

Page 1
EN
Installation guide
Installationshilfe
DE
FR
Guide d’installation
NL
De installatiegids
Page 2

Page 3

UK
Important information
Before installing your USB adapter and software, carefully read the following
information:
Installation information
> The next pages will show you how to install the Philips USB adapter on your computer.Since there are many
brands and types of computers, the photographs shown are to be seen as an example only. For specific
information on your computer, please refer to your computer manual or contact your local dealer.
> Desactivate firewall (software / hardware) before installation. Do not forget to reactivate it after the
installation.
> In the Windows 98/98SE/ME, Windows 2000 and
Windows XP operating systems, you must be logged in as a user with administration rights.
> If you have installed an old version IP Phone Center, we suggest that you uninstall it before you install your
USB adapter.
> Internet connection behind firewalls may not be supported, depending on the IP softphone capabilities.
> One softphone only must be active at a given time. To avoid any conflicts in the use of the adapter, disable
the other softphones than the one in use.
> Use of other softphone than Skype will impact installation & use of this product.
D
Wichtige Informationen
Vor der Installation des USB-Adapters und der Software bitte nachfolgende Informationen beachten:
1
Page 4

Informationen für die Installation
> Auf den nächsten Seiten können Sie lesen, wie man den Philips USB-Adapter auf dem Computer installiert.
Da es zahlreiche Computermarken und -typen gibt, sind die abgebildeten Fotos nur als Beisiel zu
betrachten. Spezielle Informationen zu Ihrem Computer finden Sie in Ihrem Computerhandbuch oder
erhalten Sie bei Ihrem Fachhändler vor Ort.
> Vor der Installation die Firewall (Software/Hardware) deaktivieren. Nach der Installation nicht vergessen
die Firewall wieder zu aktivieren.
> Bei Einsatz der Betriebssysteme Windows 2000 und Windows XP müssen Sie sich als Benutzer mit
Administratorrechten anmelden.
> Wenn Sie bereits eine ältere Version für IP-Telefonie installiert haben, empfehlen wir Ihnen diese zu
deinstallieren bevor Sie den USB-Adapter installieren.
> Internet-Verbindungen außerhalb der Firewall werden von den IP Softphone-Leistungsmerkmalen nicht
unterstützt.
> Zu einem bestimmten Zeitpunkt darf nur ein Softphone aktiv sein. Um Konflikte beim Einsatz des
Adapters zu vermeiden, deaktivieren Sie alle anderen Softphones bis auf das verwendete.
> Der Einsatz anderer Softphone-Anwendungen außer Skype beeinträchtigt die Installation und die Nutzung
des Produktes.
F
Informations importantes
Avant d’installer votre adaptateur USB et votre logiciel, lisez attentivement les
informations suivantes :
Informations d’installation
> Les pages suivantes décrivent l’installation de l’adaptateur USB sur votre ordinateur. Sachant qu’il existe
des ordinateurs de marques et de types très divers, les photos présentées ici ne constituent que des
exemples. Pour plus de détails sur votre ordinateur, consultez le manuel qui l’accompagne ou contactez
votre revendeur.
2
Page 5

> Dans les systèmes d'exploitation Windows 2000 et Windows XP, vous devez ouvrir une session en tant
qu’utilisateur possédant des droits d’administrateur.
> Désactivez les pare-feux (logiciels et matériels) avant l'installation. Pensez à les réactiver après l'installation.
> Si vous avez installé une ancienne version du service de téléphonie IP, nous vous conseillons de le
désinstaller avant d’installer votre adaptateur USB.
> Il est possible qu’une connexion internet derrière des pare-feux ne soit pas supporté, en fonction des
capacités du logiciel de téléphonie IP.
> Un seul logiciel de téléphonie doit être actif à un moment donné. Pour empêcher tout conflit dans
l’utilisation de l’adaptateur, désactivez les logiciels de téléphonie autres que celui qui est utilisé.
> L’utilisation d’un autre logiciel de téléphonie que Skype aura un impact sur l’installation et l’utilisation de
ce produit.
NL
Belangrijke informatie
Alvorens de USB-adapter en de software te installeren dient u de volgende informatie in
acht te nemen:
Informatie voor de installatie
> De volgende pagina’s laten zien hoe de wireless USB-adapter wordt geînstalleerd. Omdat er verschillende
soorten en merken computers zijn, gelden de getoonde afbeeldingen slechts ter illustratie. Voor specifieke
informatie over uw computer kijkt u in de bijbehorende handleiding of neemt u contact op met uw
leverancier.
> Bij het gebruik van de besturingssystemen Windows 2000 en Windows XP moet u zich als gebruiker met
administratorrechten aanmelden.
> Deactiveer de firewall (software/hardware) vóór de installatie. Vergeet niet na het installeren de firewall
weer te activeren.
3
Page 6

> Wanneer u reeds een oudere versie voor IP-telefonie hebt geïnstalleerd, adviseren wij u deze te
deïnstalleren voordat u de USB-adapter installeert.
> Internetverbindingen buiten de firewall om worden door de IP softphone-mogelijkheden niet ondersteund.
> Op een bepaald tijdstip mag slechts één softphone actief zijn. Om conflicten tijdens het gebruik van de
adapter te voorkomen, dient u alle andere softphones te deactiveren behalve degene die u gebruikt.
> Het gebruik van andere softphone-toepassingen behalve Skype heeft een nadelige invloed op de installatie
en het gebruik van het product.
4
Page 7
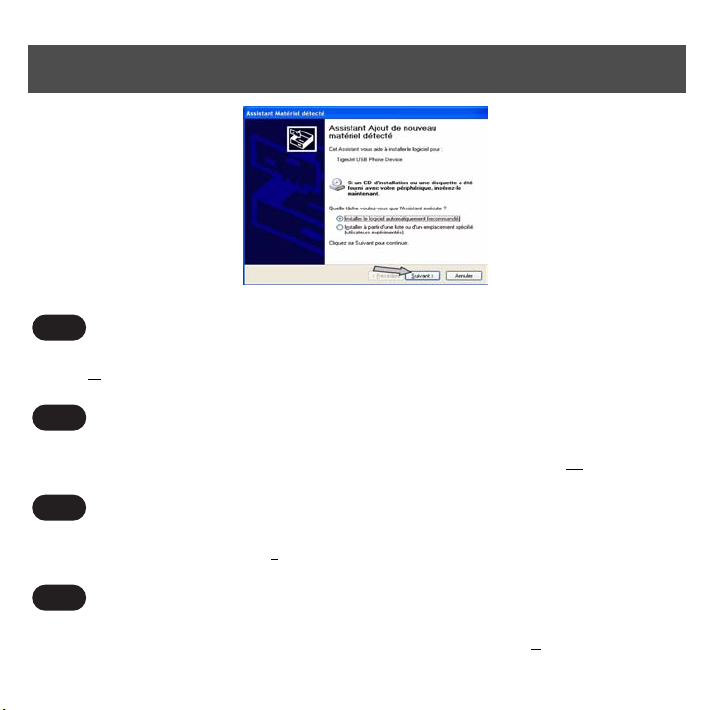
Step 1 / Schritt 1 / Etape 1 / Stap 1
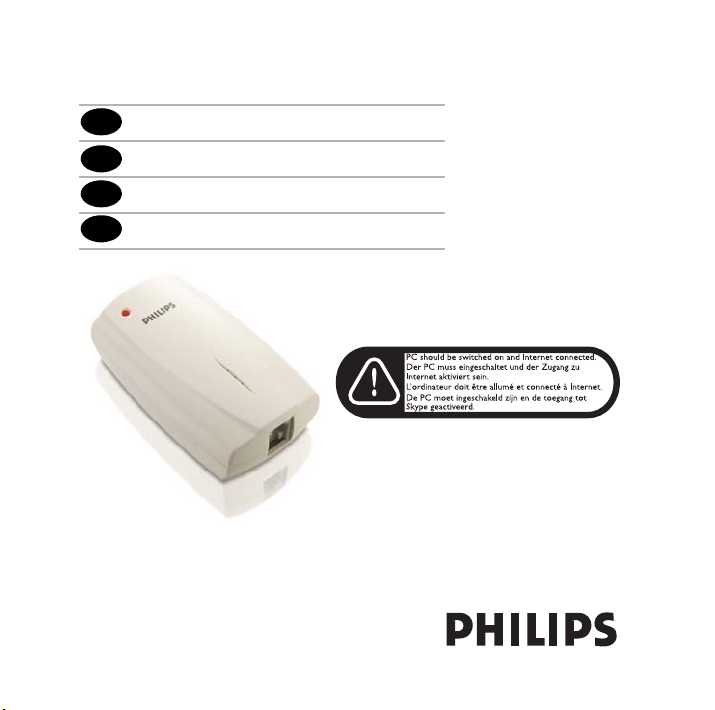
VOIP021
voice over IP telephone adapter
PHI
PC compatible
IP Phone Center SN#
XXXX0-XXXX-XXXX-XXX0
Installation CD
Version 3.00
UK
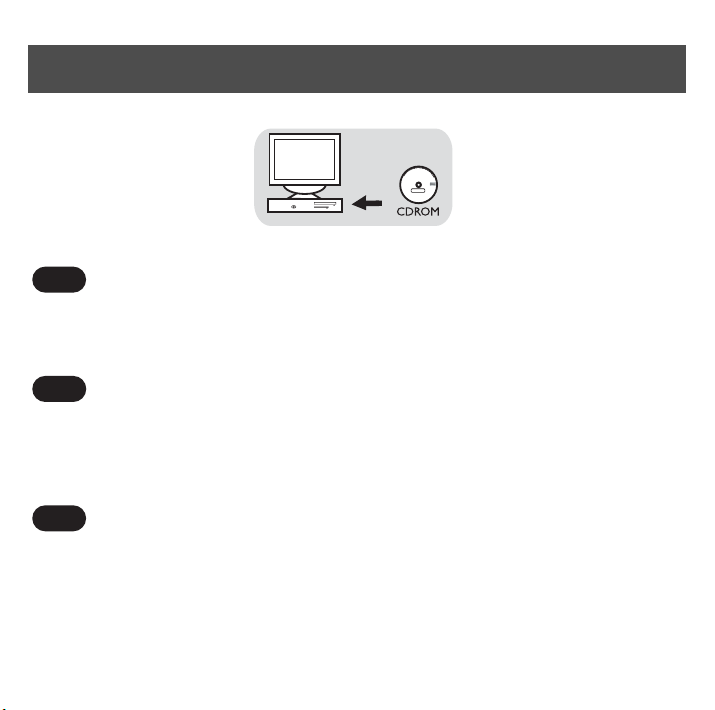
1 Place the Installation CD into the CDROM drive of your computer and close the drive.
2 Wait until the Setup program starts automatically
D
1 Legen Sie die Installations-CD in das CD-ROM-Laufwerk Ihres Computers ein und schließen Sie
die Schublade.
2 Warten Sie, bis das Setup-Programm automatisch startet.
F
1 Insé rez le CD d’i nst all ation da ns l e le cte ur de CD- ROM de votre ord ina teu r et r efe rme z le lect eur .
2 Attendez que le programme d’installation démarre automatiquement.
5
Page 8

Step 1 / Schritt 1 / Etape 1 / Stap 1
NL
1 Plaats de installatie-CD in de CD-ROM-speler van uw computer en sluit de lade.
2 Wacht tot het Setup-programma automatisch opstart.
6
Page 9

Step 2 / Schritt 2 / Etape 2 / Stap 2
What to do if the Setup program does not start automatically :
UK
1 Double-click on "My computer"
2 Double-click on the CDROM drive icon
3 Double-click on the "autorun.exe" icon.
D
Was ist zu tun, wenn das Setup-Programm nicht automatisch
startet:
1 Doppelklicken Sie auf "Arbeitsplatz"
2 Doppelklicken Sie auf das Symbol für das CD-ROM-Laufwerk
3 Doppelklicken Sie auf das Symbol "autorun.exe"
F
Si le programme d’installation ne démarre pas
automatiquement:
1 Double-cliquez sur "Poste de travail"
2 Double-cliquez sur l’icône représentant le lecteur de CD-ROM
3 Double-cliquez sur l’icône "autorun.exe".
Als het Setup-programma niet automatisch start:
NL
1 Dubbelklik op "Mijn computer"
2 Dubbelklik op het pictogram voor de CD-ROM-speler
3 Dubbelklik op het pictogram "autorun.exe"
7
Page 10
Step 3 / Schritt 3 / Etape 3 / Stap 3
UK
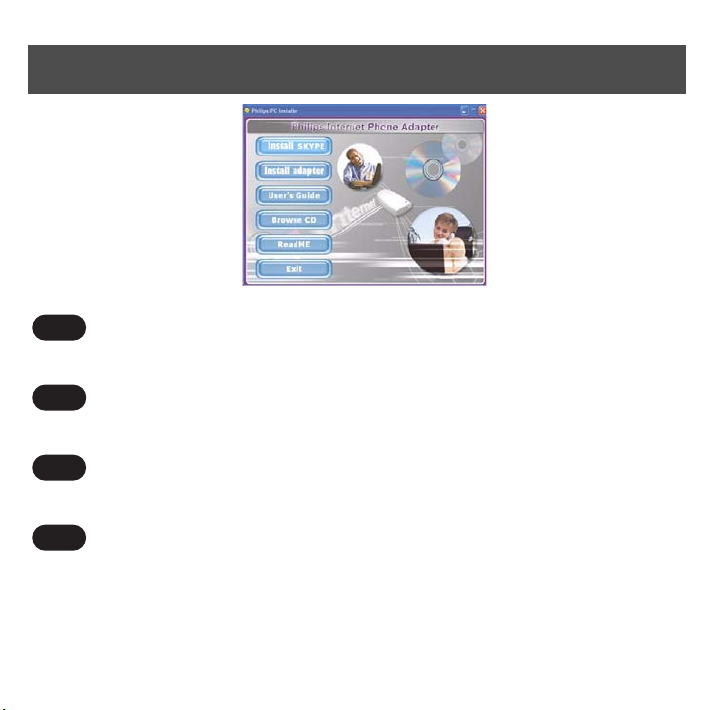
Click on "Install Skype"
D
Klicken Sie auf "Install Skype"
F
Cliquez sur "Install Skype"
NL
Klik op "Install Skype"
8
Page 11
Step 4 / Schritt 4 / Etape 4 / Stap 4
UK
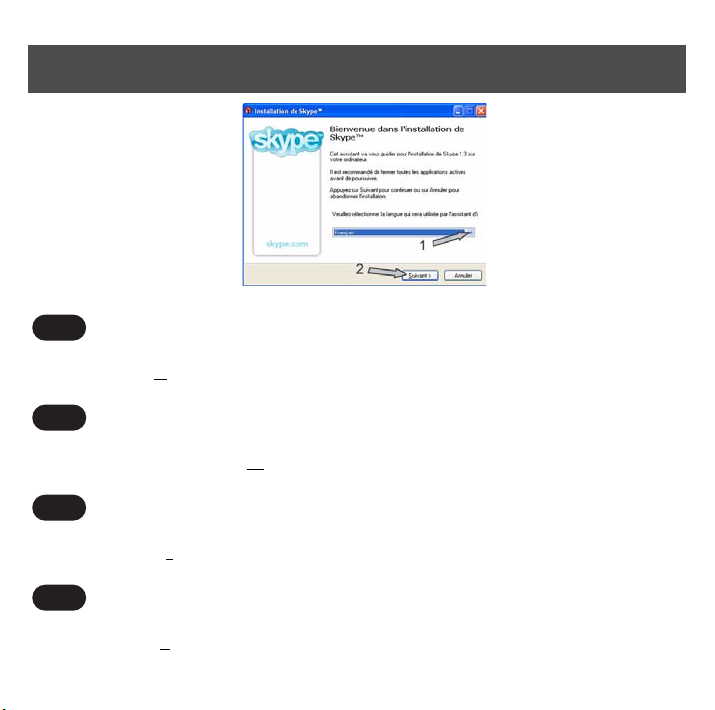
1 Choose your language
2 Then click on "N
D
1 Wählen Sie Ihre Sprache.
2 Klicken Sie anschließend auf "W
F
1 Choisissez votre langue
2 Puis cliquez sur "S
NL
1 Kies uw taal.
2 Klik daarna op "V
ext >" to continue.
uivant >" pour continuer.
olgende >" om verder te gaan.
eiter >", um fortzufahren.
9
Page 12
Step 5 / Schritt 5 / Etape 5 / Stap 5
UK
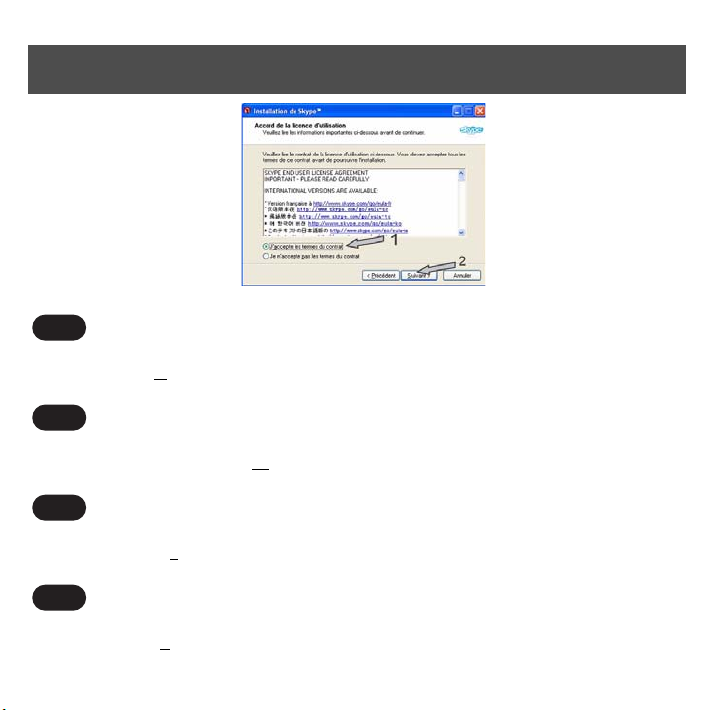
1 Tick the contract agreement box.
2 Then click on "N
D
1 Ticken der Vertrag Vereinbarung Kasten.
2 Klicken Sie anschließend auf "W
F
1 Cochez la case pour accepter les termes du contrat.
2 Puis cliquez sur "S
NL
1 Tik het vakje van de contractovereenkomst
2 Klik daarna op "V
10
ext >" to continue.
eiter >", um fortzufahren.
uivant >" pour continuer.
olgende >" om verder te gaan.
Page 13

Step 6 / Schritt 6 / Etape 6 / Stap 6
UK
1 Wait until the installation is finished.
2 Click on "F
D
1 Warten Sie, bis die Installation beendet ist.
2 Klicken Sie auf "F
F
1 Attendez la fin de l’installation.
2 Cliquez sur "T
NL
1 Wacht tot de installatie wordt beëindigd
2 Klik op "A
inish"
ertig".
erminer".
fwerking".
11
Page 14
Step 7 / Schritt 7 / Etape 7 / Stap 7
UK
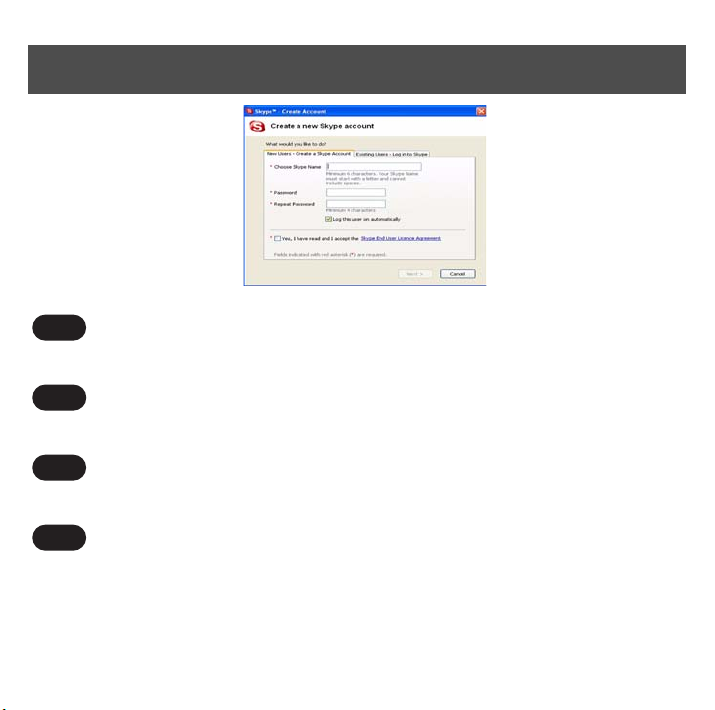
Create your Skype account.
D
Legen Sie Ihr Skype-Konto an.
F
Créez votre compte Skype.
NL
Maak uw Skype-account aan.
12
Page 15

Step 8 / Schritt 8 / Etape 8 / Stap 8
UK
1 Complete your new user profile.
2 Click on "Next >".
> Skype will send a confirmation email to the email address declared in your profile.
D
1 Tragen Sie Ihr neues Benutzerprofil ein.
2 Klicken Sie auf "Next".
> Skype sendet eine E-mail-Bestätigung an die im Profil von Ihnen angegebene E-mail-Adresse.
F
1 Remplissez votre nouveau profil d’utilisateur.
2 Cliquez sur "Next".
> Skype enverra un e-mail de confirmation à votre adresse e-mail indiquée dans votre profil.
13
Page 16

Step 8 / Schritt 8 / Etape 8 / Stap 8
NL
1 Voer uw nieuwe gebruikersprofiel in.
2 Klik op "Next".
> Skype verstuurt een e-mailbevestiging naar het e-mailadres dat u in het profiel hest aangegeven.
14
Page 17

Step 9 / Schritt 9 / Etape 9 / Stap 9
Create contacts in Skype
UK
1 Press + to add a contact.
2 Enter Pseudo Skype of your relation and follow instructions
3 Go in tab Contacts, press mouse right key and select "Assign Speed-Dial"
4 Assign a number between 0 to 99 for this new contact to directly call from your telephone
> This number will be the speed dial key of your contact
> Repeat these 4 steps for each new contact.
D
Kontakteinträge in Skype erstellen
1 Drücken Sie auf +, um einen Eintrag einzufügen.
2 Geben Sie den Skype-Namen Ihres Ansprechpartners ein und befolgen Sie die Anweisungen.
3 Positionieren Sie den Cursor auf das Register Kontakte, drücken Sie die rechte Maustaste und
wählen Sie "Assign Speed-Dial" (Kurzwahl zuweisen).
4 Weisen Sie diesem neuen Kontakt eine Nummer zwischen 0 und 99 zu, um ihn direkt über Ihr
15
Page 18

Step 9 / Schritt 9 / Etape 9 / Stap 9
Telefon anzurufen.
> Diese Nummer ist dann die Kurzwahlnummer Ihres Ansprechpartners.
> Wiederholen Sie diese 4 Schritte für jeden neuen Kontakteintrag.
F
Créer des contacts dans Skype
1 Appuyez sur + pour ajouter un contact.
2 Entrez le nom Skype de votre correspondant et suivez les instructions.
3 Allez sur l’onglet Contacts, appuyez sur la touche droite de votre souris et sélectionnez
Attribuer une numérotation abrégée.
4 Attribuez un nombre entre 0 et 99 à ce nouveau contact pour l’appeler directement à partir de
votre téléphone.
> Ce nombre sera la touche de numérotation abrégée de votre contact.
> Répétez ces 4 étapes pour chaque nouveau contact..
Contactnotities in Skype aanmaken
NL
1 Druk op + om een notitie in te voegen.
2 Voer de Skype-naam van uw contactpersoon in en volg de aanwijzingen.
3 Zet de cursor op het tabblad Contacten, druk de rechtermuistoets in en selecteer Snelkeuze
toewijzen.
4 Wijs aan dit nieuwe contact een nummer tussen 0 en 99 toe om hem rechtstreeks via uw telefoon
op te bellen.
> Dit nummer is dan het snelkeuzenummer van uw contactpersoon.
> Herhaal deze 4 stappen voor iedere nieuwe contactnotitie.
16
Page 19

Step 10 / Schritt 10 / Etape 10 / Stap 10
UK
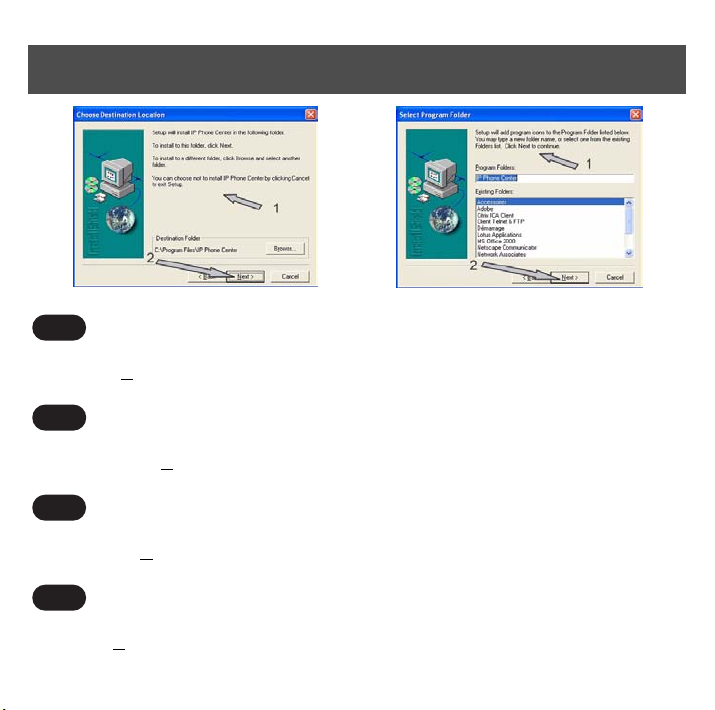
Warning: Do not connect adapter before CD-ROM installation is completed.
Click on "Install adapter".
D
Achtung: Den Adapter nicht vor dem Beenden der CD-RO%M-Installation anschließen.
Klicken Sie auf "Install adapter".
F
Attention: Ne pas connecter l’adaptateur avant que la procédure d’installation à l’aide du CD-ROM
soit terminée.
Cliquez sur "Install adapter".
NL
LET OP: Sluit de adapter niet aan,alvorens de installatie van de CD-rom is voltooid.
Klik op "Install adapter".
17
Page 20

Step 11 / Schritt 11 / Etape 11 / Stap 11
UK
Click on "Next >" to continue.
D
Klicken Sie auf "N
F
Cliquez sur "N
NL
Klik op "N
ext >".
ext >".
ext >".
18
Page 21

Step 12 / Schritt 12 / Etape 12 / Stap 12
UK
Click on "Yes" to continue.
D
Klicken Sie auf "Y
F
Cliquez sur "Y
NL
es".
es".
Klik op "Y
es".
19
Page 22
Step 13 / Schritt 13 / Etape 13 / Stap 13
UK
1 Follow instructions displayed on your screen.
2 Click on "N
D
1 Befolgen Sie die Anweisungen auf Ihrem Bildschirm.
2 Klicken Sie auf "N
F
1 Suivez les instructions affichées sur votre écran.
2 Cliquez sur "N
NL
1 Volg de aanwijzingen op uw beeldscherm.
2 Klik op "N
20
ext >" to continue the installation.
ext >", um die Installation fortzusetzen.
ext >" pour continuer l’installation.
ext >" om de installatie voort te zetten.
Page 23

Step 14 / Schritt 14 / Etape 14 / Stap 14
UK
1 Tick the "Yes, I want to restart my computer now" box.
2 Follow instructions displayed on your screen.
3 Click on "Finish".
D
1 Ticken der "Yes, I want to restart my computer now" Kasten.
2 Befolgen Sie die Anweisungen auf Ihrem Bildschirm.
3 Klicken Sie auf "Finish".
F
1 Cochez la case "Yes, I want to restart my computer now".
2 Suivez les instructions affichées sur votre écran.
3 Cliquez sur "Finish".
21
Page 24

Step 14 / Schritt 14 / Etape 14 / Stap 14
NL
1 Tik "Yes, I want to restart my computer now".
2 Volg de aanwijzingen op uw beeldscherm.
3 Klik op "Finish".
22
Page 25
Step 15 / Schritt 15 / Etape 15 / Stap 15
UK
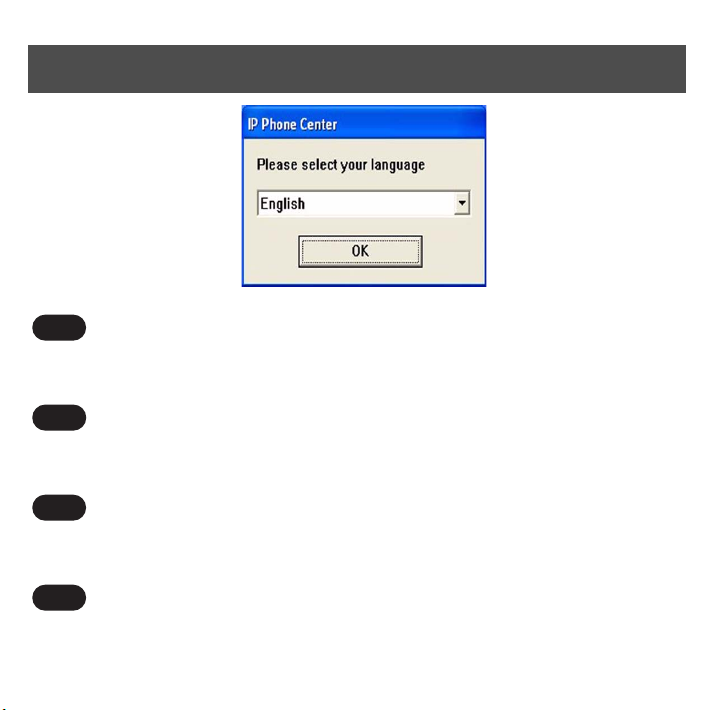
Select your language in the list and click on "OK".
This screen is optional. If it is not displayed, go to next step.
D
Wählen Sie Ihre Sprache in der Liste vor und klicken Sie an "OK".
Dieser Schirm ist wahlweise freigestellt. Ween er nicht angezeigt wird, gehen Sie, zunächst zu tretten.
F
Sélectionnez votre langue dans la liste et cliquez sur "OK".
Cet écran est facultatif. S’il ne s’affiche pas, passez à l’étape suivante.
NL
Selecteer uw taal in de lijst en klik op "OK".
Dit scherm is facultatief. Als het niet wordt getoond, ga naar volgende stap.
23
Page 26

Step 16 / Schritt 16 / Etape 16 / Stap 16
UK
1 Connect the supplied USB cable on the back of the adapter,
2 and on your PC USB port
D
1 Schließen Sie das mitgelieferte USB-Kabel auf der Rückseite des Adapters,
2 und an der USB-Buchse Ihres PCs an.
F
1 Connectez le câble USB fourni à l’arrière de l’adaptateur,
2 et sur le port USB de votre PC.
NL
1 Sluit de meegeleverde USB-kabel aan de achterzijde van de adapter,
2 aan en op de USB-poort van uw PC.
24
Page 27
Step 17 / Schritt 17 / Etape 17 / Stap 17
UK
If you removed the installation CD-ROM as requested in the window of step 14, insert it again and
click on "N
Wenn Sie die Installation CD-ROM entfernten, wie im Fenster von Schritt 15 verlangt, setzen Sie es
wieder ein, wie durch das Fenster auf Ihrem Schirm spezifiziert und klicken Sie an "W
Si vous avez retiré votre CD-ROM d’installation comme il était demandé dans la fenêtre de l’étape 14,
insérez-le de nouveau et cliquez sur "S
Als u installatiecCd-rom zoals die in het venster van stap 15 wordt gevraagd verwijderde, neem het op
opnieuw zoals gespecificeerd door het venster op het uw scherm en klik op "V
ext >".
D
eiter >".
F
uivant >".
NL
olgende >".
25
Page 28

Step 18 / Schritt 18 / Etape 18 / Stap 18
UK
Follow instructions displayed on your screen. Click on "Next >"
> Wait until the installation is finished.
Warning: If dialog boxes appear during installation informing you about a missing Windows Logo test,
click on "C
Befolgen Sie die Anweisungen auf Ihrem Bildschirm. Klicken Sie auf "W
> Warten Sie, bis die Installation beendet ist..
Achtung: Wenn während der Installation Dialogfenster bezüglich eines fehlenden Windows Logo-
Tests erscheinen, klicken Sie auf "F
Suivez les instructions affichées sur votre écran. Cliquez sur "S
> Attendez la fin de l’installation
ontinue" to continue the installation.
D
eiter >"
ortsetzen", um die Installation fortzusetzen.
F
uivant >"
26
Page 29

Step 18 / Schritt 18 / Etape 18 / Stap 18
Attention: Si des fenêtres de dialogue apparaissent pendant l’installation vous informant qu’il manque
un test de logo Windows, cliquez sur "C
NL
Volg de aanwijzingen op uw beeldscherm. Klik op "V
> Wacht tot de installatie wordt beëindigd
Let op: Wanneer er tijdens de installatie dialoogvensters m.b.t. een ontbrekende Windows logo-test
verschijnen, klikt u op "D
oorgaan" om de installatie voort te zetten.
ontinuer" pour continuer l’installation.
olgende >".
27
Page 30

Step 19 / Schritt 19 / Etape 19 / Stap 19
UK
Click on "Finish".
D
Klicken Sie auf "Ende".
F
Cliquez sur "Terminer".
NL
Klik op "Einding".
28
Page 31
Step 20 / Schritt 20 / Etape 20 / Stap 20
UK
Warning: Depending on the version of the installation CD, Step 21 could appear before Step 20.
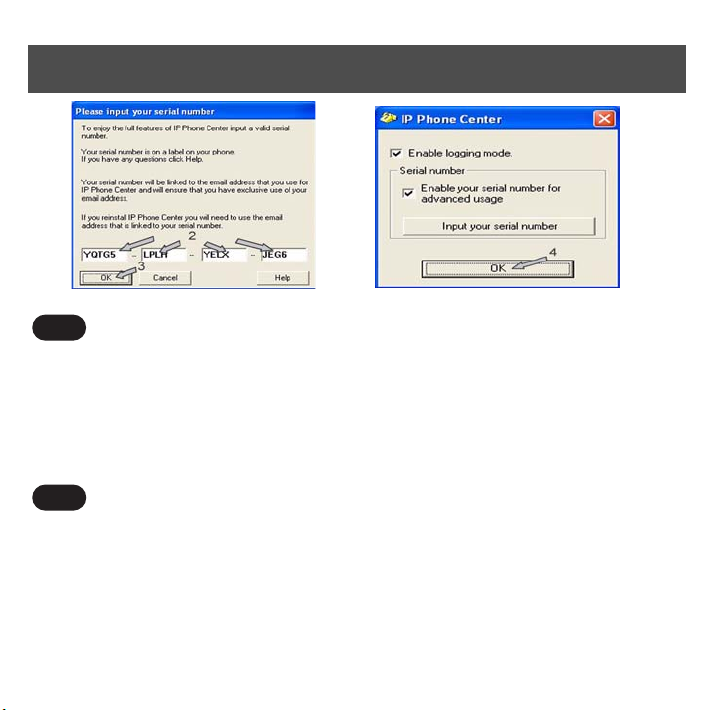
1 Find serial number printed on CD ROM sleeve.
2 Enter this number.
3 Click on "OK".
4 Click on "OK" (optional).
> You are invited to Restart the IP phone center.
D
Achtung: Abhängig von der Version der Installation CD, konnte Schritt 21 vor Schritt 20 erscheinen.
1 Geben Sie die auf der CD-Hûlle aufgedruckte Seriennummer ein.
2 Tragen Sie diese Zahl ein.
3 Klicken Sie auf "OK".
4 Klicken Sie auf "OK" (fakultativ).
> Sie werden aufgefordert einen Neustart der IP-Telefonie auszuführen.
29
Page 32

Step 20 / Schritt 20 / Etape 20 / Stap 20
F
Attention: Selon la version du DC d’installation, il se peut que l’étape 21 apparaisse avant l’étape 20.
1 Repérez le numéro de série imprimée sur la pochette du CD-ROM.
2 Entrez ce numéro.
3 Cliquez sur "OK"
4 Cliquez sur "OK" (facultatif)
> Vous êtes invité à Redémarrer le service de téléphonie IP.
NL
Let op: Afhankelijk van de versie van installatie DC, kon Stap 21 vóór Stap 20 verschijnen.
1 Voer het serienummer in dat op het CD-hoesje is afgedrukt.
2 Ga dit aantal in.
3 Klik op "OK".
4 Klik op "OK" (facultatief).
> U wordt verzocht de IP-telefonie opnieuw te starten.
30
Page 33

Step 21 / Schritt 21 / Etape 21 / Stap 21
UK
1 Click on "OK" (optional).
2 Enter your mandatory personal data.
D
1 Klicken Sie auf "OK" (fakultativ).
2 Geben Sie die erforderlichen persönlichen Daten ein.
F
1 Cliquez sur "OK" (facultatif).
2 Entrez vos données personnelles obligatoires.
NL
1 Klik op "OK" (facultatief).
2 Voer de vereiste persoonlijke gegevens in.
31
Page 34

Step 22 / Schritt 22 / Etape 22 / Stap 22
UK
1 Tick first box
2 Click on "OK".
3 Click on "OK"
D
1 Ticken erster Kasten
2 Klicken Sie auf "OK".
3 Klicken Sie auf "OK".
F
1 Cochez la première case
2 Cliquez sur "OK"
3 Cliquez sur "OK"
32
Page 35

Step 22 / Schritt 22 / Etape 22 / Stap 22
NL
1 De eerste doos van de tik
2 Klik op "OK".
3 Klik op "OK".
33
Page 36

Step 23 / Schritt 23 / Etape 23 / Stap 23
UK
1 Right click on the Skype icon of the status bar
2 Choose "Quit"
> The configuration setup is completed !
3 Double-click on Skype icon on your desktop.
D
1 Klicken Sie nach rechts auf der Skype Ikone des Statusstabes
2 Wählen Sie "Beenden".
> Die Konfiguration Einstellung ist beendet !
3 Doppleklicken Sie auf das Symbol Skype auf Ihrer Oberfläche.
F
1 Cliquez droit sur l’icône Skype de la barre de statut
2 Choisissez "Quitter Skype"
34
Page 37

Step 23 / Schritt 23 / Etape 23 / Stap 23
> La configuration du logiciel est terminée !
3 Double-cliquez sur l’icône Skype qui se trouve sur votre bureau.
NL
1 Klik net op het pictogram Skype van de statusstaaf
2 Kies "Afsluiten".
> De configuratieopstelling is voltooid !
3 Dubbelklik op het pictogram Skype op het bureaublad.
35
Page 38

Step 24 / Schritt 24 / Etape 24 / Stap 24
UK
1 Connect the supplied RJ11-RJ11 telephone line cord on your telephone
2 and on the front of the adapter
> If your telephone line cord is attached to your base station, we suggest you to change your telephone.
WARNING: Be sure that your phone is configured in Tone Dialing mode (see your phone User
manual)
D
1 Schließen Sie das mitgelieferte Telefonkabel RJ11-RJ11 an Ihrem Telefon
2 und auf der Vorderseite des Adapters an.
> Wenn das Telefonkabel Ihres Telefons fest mit der Basisstation verbunden ist, empfehlen wir Ihnen ein
anderes Telefon zu verwenden.
ACHTUNG: Stellen Sie sicher, dass das Telefon auf das Tonwahlverfahren eingestellt ist (siehe
Bedienungsanleitung des Telefons).
36
Page 39

Step 24 / Schritt 24 / Etape 24 / Stap 24
F
1 Connectez le cordon de ligne RJ11-RJ11 fourni à votre téléphone
2 et sur l’avant de l’adaptateur.
> Si vous ne pouvez pas détacher le cordon de ligne de votre base, nous vous conseillons de changer votre
téléphone.
ATTENTION: Assurez-vous que votre téléphone est configuré en mode numérotation vocale
(voir Mode d’emploi de votre téléphone).
NL
1 Sluit de meegeleverde telefoonkabel RJII-RJII op uw telefoon
2 en op de voorzijde van de adapter aan.
> Wanneer de telefoonkabel van uw telefoon vast met het basisstation is verbonden, adviseren wij u een
andere telefoon te gebruiken.
LET OP: Zorg ervoor, dat de telefoon is ingesteld op het toonkiezen (zie bedieningshandleiding van
de telefoon).
37
Page 40

Where to find installation guide upgrades of this product on the
UK
Internet ?
1 Go to the web site: www.p4c.philips.com
2 Choose your language
3 Enter the product reference
4 Select "Getting started" in Product Support section to access to the downlaodable document list.
D
Wo man Installation Führeraufsteigen dieses Produktes auf dem
Internet findet ?
1 Geben Sie die Internet-Adresse: www.p4c.philips.com
2 Wählen Sie Ihre Sprache
3 Geben Sie die Typenbezeichnung Ihres Gerätes
4 Wählen Sie "Erste Schritte" in der Rubrik Produkt-Support um zu den verfügbaren Dokumenten
zu gelangen.
38
Page 41

F
Où trouver des mises à jour du guide d’installation de ce produit
sur Internet ?
1 Allez à l’adresse Internet suivante: www.p4c.philips.com
2 Sélectionnez votre langue
3 Tapez la référence de votre produit
4 Sélectionnez "Mise en route" dans la rubrique Support Produit pour accéder à la liste des
documents téléchargeables.
Waar te om de verbeteringen van de installatiegids van dit
NL
product op Internet te vinden ?
1 U kunt deze vinden op het volgende adres: www.p4c.philips.com
2 Selecteer uw taal
3 Voer het typenummer van uw product
4 Klik vervolgens op "Eerste gebruik" in de rubriek Productondersteuning om toegang te krijgen
naar de documenten die u kunt downloaden
39
Page 42

40
Page 43

Page 44

Trademarks are the property of Koninklijke Philips Electronics N.V. or their respective owners.
Specifications are subject to change without notice.
2005 © Koninklijke Philips Electronics N.V. All rights reserved.
www.philips.com
3111 285 29501
 Loading...