

Page 1
Page 2

Neutrik , PowerCon , and EtherCon are registered trademarks of Neutrik, Inc. All other brand or product names
which may be mentioned in this manual are trademarks or registered trademarks of their respective companies or
organizations.
The information furnished in this manual is for informational use only and is subject to change without notice.
Please check www.vari-lite.com for latest version. Philips Vari-Lite assumes no responsibility or liability for any
errors or inaccuracies that may appear in this manual. All information and graphics are property of Philips VariLite, 10911 Petal Street, Dallas, Texas 75238.
Version as of: 14 November 2011
Part number: 02.9703.0010 0
VLX3 LED Wash Luminaire Service Manual
©2011, Vari-Lite, a Philips group company. All Rights Reserved.
Page 3

How To Obtain Warranty Service
A copy of the Vari-Lite Limited Warranty was included in the shipping package for this VARI❋LITE
product.
To obtain warranty service, please contact customer service at 1-877-VARI-LITE (1-877-827-4548),
+1-214-647-7880, or [email protected] and request a Return Material Authorization
(RMA) for warranty service. You will need to provide the model and serial number of the item being
returned, a description of the problem or failure and the name of the registered user or organization. If
available, you should have your sales invoice to establish the date of sale as the beginning of the
warranty period.
Once you obtain the RMA, pack the unit in a secure shipping container or in its original packing box.
Fill out the RMA form (obtained from the Vari-Lite web site www.vari-lite.com or through customer
service) and place in shipping container along with a copy of your invoice (if available). Write the
RMA number legibly on or near the shipping address label and return the unit, freight prepaid to:
Vari-Lite
10911 Petal Street
Dallas, Texas 75238 USA
Attention: Warranty Service / RMA Number
FOREWORD
As stated in the warranty, it is required that the shipment be insured and FOB our service center.
02.9703.0010 0 i
Page 4

VARI❋LITE - VLX3 LED WASH LUMINAIRE SERVICE MANUAL
Compliance Notice
FCC
This equipment has been tested and found to comply with the limits for a Class A digital device
pursuant to Part 15 of FCC Rules. These limits are designed to provide reasonable protection against
harmful interference when this equipment is operated in a commercial environment. This equipment
generates, uses, and can radiate radio frequency energy and, if not installed and used in accordance
with Vari-Lite system, service, and safety guidelines, may cause harmful interference to radio
communications. Operation of this equipment in a residential area is likely to cause harmful
interference, in which case the user will be required to correct the interference at his/her own expense.
Declaration of Conformity
We declare, under our sole responsibility, that this product complies with the relevant clauses of the
following standards and harmonized documents:
Safety
EN 60598-1:2000 Luminaire Safety Standard, General Requirements
EN 60598-2 17:1989/A2: 1991 Specification for Luminaires for Stage and Studio Lighting
EMC
EN 61000-6-4: 2001 Radiated and Conducted Emissions
W e certify that the product conforms to the protection requirements of Low Voltage Directive 2006/95/
EC and Council Directive 89/336/EEC (EMC)
ii 02.9703.0010 0
Page 5

Safety Notice
It is extremely important to read ALL safety information and instructions provided in this manual and
any accompanying documentation before installing and operating the products described herein. Heed
all cautions and warnings during installation and use of this product.
Safety symbols used throughout this manual are as follows:
GENERAL INFORMATION PERTAINING TO PROTECTION AGAINST ELECTRICAL SHOCK,
FIRE, EXPOSURE TO EXCESSIVE UV RADIATION, AND INJURY TO PERSONS CAN BE
FOUND BELOW.
WARNING:
INSTRUCTIONS FOR CONTINUED PROTECTION AGAINST FIRE
1. VARI❋LITE luminaires have been designed for use with specific light sources. The VLX3 LED
Wash Luminaire uses a special type of LED light source. Installing another type of light source
will be hazardous and void the luminaire warranty.
2. Luminaires may be mounted on any type of surface as long as mounting instructions are followed.
See instructions detailed in this manual.
3. Note distance requirement from combustible materials or illuminated objects for VARI❋LITE
luminaires.
FOREWORD
CAUTION advising of potential damage to product.
WARNING advising of potential injury or death to persons.
WARNING:
INSTRUCTIONS FOR CONTINUED PROTECTION AGAINST ELECTRICAL SHOCK
1. VARI❋LITE luminaires are designed for dry locations only. Exposure to rain or moisture may
damage luminaire.
2. Disconnect power before servicing any VARI❋LITE equipment.
3. Servicing to be performed by qualified personnel only.
02.9703.0010 0 iii
Page 6

VARI❋LITE - VLX3 LED WASH LUMINAIRE SERVICE MANUAL
WARNING:
INSTRUCTIONS FOR CONTINUED PROTECTION AGAINST EXCESSIVE EXPOSURE
TO UV RADIATION
1. Many VARI❋LITE luminaires us e a lamp that produces UV radiation. DO NOT look directly at
lamp.
2. It is hazardous to operate luminaires without lens or shield. Shields, lenses, or ultraviolet screens
shall be changed if they have become visibly damaged to such an extent that their effectiveness is
impaired. For example, by cracks or deep scratches.
WARNING:
INSTRUCTIONS FOR PROTECTION AGAINST INJURY TO PERSONS
1. Exterior surfaces of the luminaire will be hot during operation. Use appropriate safety equipment
(gloves, eye protection, etc.) when handling and adjusting hot equipment and components.
2. Luminaires will have a hot lamp when operating. Disconnect power and allow lamp to cool before
replacing.
3. Wear eye protection when relam ping.
4. Appropriate safety equipment (gloves, eye protection) should be used when handling damaged
lamps.
5. If lamp is touched with bare hands, clean lamp with denatured alcohol and wipe with lint-free
cloth before installing or powering up the luminaire.
6. The lamp shall be changed if it has become damaged or thermally deformed.
WARNING:
RF INTERFERENCE
1. This is a Class A product. In a domestic environment this product may cause radio interference, in
which case, the user may be required to take adequate measures.
iv 02.9703.0010 0
Page 7

Sicherheitshinweise
Es ist äußerst wichtig, ALLE Sicherheitsinformationen und -hinweise in diesem Handbuch und dem
beiliegenden Informationsmaterial zu lesen, bevor Sie die hierin beschriebenen Produkte installieren
bzw. bedienen. Halten Sie bei der Installation und dem Einsatz dieses Produkts alle Warnhinweise und
Vorsichtsmaßnahmen ein.
Folgende Sicherheitssymbole werden in diesem Handbuch verwendet:
VORSICHT - weist auf möglichen Produktschaden hin.
WARNUNG - weist auf mögliche Körperverletzung und Lebensbedrohung hin.
NACHSTEHEND FINDEN SIE ALLGEMEINE HINWEISE ÜBER
SICHERHEITSVORKEHRUNGEN GEGEN ELEKTROSCHOCK, FEUER, ÜBERHÖHTE UVSTRAHLUNG UND KÖRPERVERLETZUNGEN.
WARNUNG:
HINWEISE ZUM FEUERSCHUTZ
1. VARI❋LITE Beleuchtungen sind für Gebrauch mit spezifischen Lichtquellen bestimmt worden.
Die VLX3 LED Wash Luminaire Beleuchtung benutzt eine spezielle Art LED-Lichtquelle. Eine
andere Art Lichtquelle anzubringen ist gefährlich und hebt die Beleuchtunggarantie auf.
2. Scheinwerfer können auf jeder beliebigen Oberfläche montiert werden, solange Sie die
Montageanweisungen befolgen. Detaillierte Hinweise finden Sie in diesem Handbuch.
3. Beachten Sie die Einhaltung des erforderlichen Sicherheitsabstandes der VARI❋LITE Scheinwerfer von brennbarem Material oder beleuchteten Objekten.
FOREWORD
WARNUNG:
HINWEISE ZUM SCHUTZ GEGEN ELEKTROSCHOCK
1. VARI❋LITE -Scheinwerfer eignen sich ausschließlich für trockene Standorte. Regen oder
Feuchtigkeit können die Scheinwerfer beschädigen.
2. Unterbrechen Sie die Stromzufuhr, bevor Sie mit der Arbeit an VARI❋LITE -Geräten beginnen.
3. Die Geräte sollten nur von qualifiziertem Personal gewartet werden.
02.9703.0010 0 v
Page 8

VARI❋LITE - VLX3 LED WASH LUMINAIRE SERVICE MANUAL
WARNUNG:
HINWEISE ZUM SCHUTZ GEGEN ÜBERHÖHTE UV-STRAHLUNG
1. Viele VARI❋LITE -Scheinwerfer verwenden die Lampentyp, der UV-Strahlen abgibt. SCHAUEN
SIE NICHT direkt in die Lampe.
2. Es ist gefährlich, Leuchten ohne Linsen oder Blenden zu bedienen. Blenden, Linse n oder
Ultraviolettschirme müssen ausgetauscht werden, sofern deren Schutzwirkung durch sichtbare
Beschädigung (z. B. Sprünge oder Schrammen) eingeschränkt ist.
WARNUNG:
HINWEISE ZUM SCHUTZ GEGEN KÖRPERVERLETZUNGEN
1. Bei Betrieb sind die Außenflächen der Scheinwerfer heiß. Verwenden Sie bei der Bedienung von
aufgeheizter Apparatur die jeweils geeignete Sicherheitsausrüstung (Handschuhe, Augenschutz
etc.).
2. Bei Betrieb der Scheinwerfer ist die Lampe heiß. Unterbrechen Sie die Stromzufuhr und lassen Sie
die Lampe abkühlen, wenn Sie diese austauschen.
3. Tragen Sie beim Austausch der Lampen einen Augenschutz.
4. Die geeignete Sicherheitsausrüstung (Handschuhe, Augenschutz) sollte beim Umgang mit
beschädigten Lampen verwendet werden.
5. Wenn die Lampe mit bloßen Händen b erührt wird, reinigen Sie sie mit denaturiertem Alkohol und
einem flusenfreien Tuch, bevor Sie die Scheinwerfer installieren oder in Betrieb nehmen.
6. Wenn die Lampe beschädigt oder durch Hitzeeinwirkung deformiert ist, muß diese ausgetauscht
werden.
WARNUNG:
HF-INTERFERENZ
1. Es handelt sich um ein Produkt der Klasse A. In einer Wohnumgebung kann das Produkt Hochfrequenzstörungen verursachen. In diesem Fall müssen eventuell geeignete Maßnahmen getroffen
werden.
vi 02.9703.0010 0
Page 9

Notes de sécurité
Avant de procéder à l’installation des produits décrits dans ce guide et de les mettre en marche, il est
extrêmement important de lire TOUS les renseignements et TOUTES les directives de sécurité
contenues dans ce guide ainsi que toute documentation jointe. Tenir compte de tous les avertissements
et suivre toutes les précautions pendant l’installation et l’utilisation de cet appareil.
Les symboles de sécurité utilisés dans ce guide sont les suivants :
ATTENTION Ce symbole annonce que l’appareil risque d’être endommagé.
AVERTISSEMENT Ce symbole annonce qu’il y a risque d’accident grave ou même fatal.
CETTE SECTION CONTIENT DES INFORMATIONS GÉNÉRALES POUR SE PROTÉGER
CONTRE LES DÉCHARGES ÉLECTRIQUES , LES INCENDIES, L’EXPOSITION EXCESSIVE
AUX RAYONS UV ET TOUT AUTRE ACCIDENT POUVANT ENTRAÎNER DES BLESSURES.
FOREWORD
AVERTISSEMENT:
DIRECTIVES POUR SE PROTÉGER CONTRE LES INCENDIES
1. Des appareils d'éclairage de VARI❋LITE ont été conçus pour l'usage avec des sources lumineuses
spécifiques. L'appareil d'éclairage de VLX3 LED Wash Luminaire emploie un type spécial de
source lumineuse de LED. L'installation d'un autre type de source lumineuse sera dangereuse et
videra la garantie d'appareil d'éclairage.
2. Les luminaires peuvent être fixés sur tout type de surface tant que les directives de montage sont
respectées. Voir les explications détaillées dans ce guide.
3. Vérifier la distance à respecter entre les matériaux combustibles ou les objets illuminés et les
luminaires VARI❋LITE .
AVERTISSEMENT:
DIRECTIVES POUR SE PROTÉGER CONTRE LES DÉCHARGES ÉLECTRIQUES
1. Les luminaires VARI❋LITE sont conçus pour une utilisation au sec uniquement. Une exposition
à la pluie et à l’humidité risque d’endommager le luminaire.
2. Débrancher l’appareil avant de procéder à la révision de tout matériel VARI❋LITE .
3. Les révisions doivent être effectuées uniquement par des personnes qualifiées.
02.9703.0010 0 vii
Page 10

VARI❋LITE - VLX3 LED WASH LUMINAIRE SERVICE MANUAL
AVERTISSEMENT:
DIRECTIVES POUR SE PROTÉGER CONTRE UNE EXPOSITION EXCESSIVE AUX
RAYONS UV
1. Plusieurs luminaires VARI❋LITE utilisent une lampe qui produit des rayons UV. NE PAS fixer
son regard sur la lampe.
2. L’utilisation des luminaires sans lentille ou blindage pose des risques. Tous blindages, lentilles ou
écrans ultraviolet visiblement endommagés au point que leur efficacité en est affectée doivent être
remplacés, par exemple s’il y a des fissures ou de profondes rayures.
AVERTISSEMENT:
DIRECTIVES POUR SE PROTÉGER CONTRE LES ACCIDENTS POUVANT ENTRAÎNER
DES BLESSURES
1. Les surfaces externes du luminaire deviennent brûlantes quand l’appareil est en marche. Pour
manœuvrer ou ajuster des appareils brûlants et leurs composants, se protéger suffisamment (gants,
protection pour les yeux, etc.).
2. La lampe du luminaire est brûlante lorqu’il est en marche. Débrancher le courant et attendre que la
lampe ait refroidi avant de la remplacer.
3. Les lampes à arc émettent des rayons ultraviolets pouvant causer de graves brûlures sur la peau et
une inflammation des yeux. De plus, les lampes à arc fonctionnent sous haute tension à de très
hautes températures. Si la lampe se casse, les particules de la lampe cassée peuvent causer
blessures et/ou incendie en s’éparpillant.
4. Se protéger les yeux pour remplacer la lampe.
5. Utiliser des appareils de protection appropriés (gants, protection des yeux) pour manier des lampes
endommagées.
6. Si la lampe a été touchée avec des mains nues, la nettoyer avec de l’alcool dénaturé et l’essuyer
avec un chiffon non-pelucheux avant d’installer ou de brancher le luminaire.
7. Si la lampe a été endommagée ou a reçu une déformation thermique, elle doit être remplacée.
AVERTISSEMENT:
INTERFÉRENCE RF
1. Cet appareil est de Classe A. Dans un environnement domestique, cet appareil peut causer des
interférences radio, et si c’est le cas, l’utilisateur peut avoir à prendre des mesures adéquates.
viii 02.9703.0010 0
Page 11

Aviso sobre Seguridad
Es muy importante leer TODA la in formación e instrucciones sobre seguridad que se indica en es te
manual así como en los documentos adjuntos antes de instalar y operar los productos descritos. Se
debe prestar atención a todos los avisos y advertencias durante la instalación y uso de este producto.
Los símbolos de seguridad usados en este manual son los siguientes:
CUIDADO, indica posibles daños al producto.
ADVERTENCIA, indica posibles lesiones o muerte a las personas.
LA INFORMACIÓN GENERAL RELACIONADA A LA PROTECCIÓN CONTRAGOLPES DE
CORRIENTE ELÉCTRICA, INCENDIO, EXPOSICIÓN EXCESIVA A RADIACIÓN ULTRA
VIOLETA Y LESIONES A LAS PERSONAS SE PUEDE ENCONTRAR SEGUIDAMENTE:
ADVERTENCIA:
INSTRUCCIONES PARA PROTECCIÓN CONTINUA CONTRA INCENDIO
1. Los alumbrados de VARI❋LITE se han diseñado para el uso con fuentes de luz específicas. El
alumbrado de VLX3 LED Wash Luminaire utiliza un tipo especial de fuente de luz del LED. La
instalación de otro tipo de fuente de luz será peligrosa y anulará la garantía del alumbrado.
2. Las luminarias se pueden instalar en cualquier tipo de superficie siempre que se sigan las
instrucciones de instalación. Vea las instrucciones detalladas en este manual.
3. Tome nota de los requerimientos de distancia de materiales combustibles u objetos iluminados
para las luminarias VARI❋LITE .
FOREWORD
ADVERTENCIA:
INSTRUCCIONES PARA PROTECCIÓN CONTINUA CONTRA CHOQUE ELÉCTRICO
1. Las luminarias VARI❋LITE están diseñadas solamente para lugares secos. La exposición a la
lluvia o humedad pueden dañar la luminaria.
2. Desconecte la energía antes de dar servicio a cualquier equipo de VARI❋LITE .
3. El servicio debe ser realizado solamente por personal calificado .
02.9703.0010 0 ix
Page 12

VARI❋LITE - VLX3 LED WASH LUMINAIRE SERVICE MANUAL
ADVERTENCIA:
INSTRUCCIONES PARA PROTECCIÓN CONTINUA CONTRA LA EXPOSICIÓN
EXCESIVA DE RADIACIÓN ULTRA VIOLETA
1. Muchas luminarias VARI❋LITE usan un tipo de lámpara que produce radiación UV. NO mire
directamente a la lámpara.
2. Es peligroso operar luminarias sin lentes o protectores. Debe cambiar los protectores, lentes o
pantallas ultravioletas si se aprecia que han sido dañadas, y que su efectividad pudiera estar
deteriorada. Por ejemplo, si tuvieran rajaduras o raspaduras profundas.
ADVERTENCIA:
INSTRUCCIONES PARA PROTECCIÓN CONTRA LESIONES DE PERSONAS
1. Las superficies exteriores de las luminarias están calientes durante su operación. Use un equipo de
seguridad apropiado (guantes, protección para los ojos, etc.) cuando haga ajustes en el equipo y
componentes que están calientes.
2. Cuando las luminarias están en operación la lámpara estará muy caliente. Desconecte la energía y
deje que la lámpara se enfríe antes de reemplazarla.
3. Use un equipo de seguridad apropiado (guantes, protección para los ojos, etc.) cuando trabaje con
lámparas dañadas.
4. Si toca la lámpara con las manos, limpie la lámpara con alcohol desnaturalizado y con tela sin
pelusas antes de instalar o volver a conectar la luminaria.
5. Cambie la lámpara si está dañada o deformada termicamente.
ADVERTENCIA:
INTERFERENCIA RF
1. Este es un producto de Clase A. En el ambiente de la casa este producto puede ocasionar
radiointerferencia, en cuyo caso, el usuario debe tomar las medidas adecuadas.
x 02.9703.0010 0
Page 13

FOREWORD
02.9703.0010 0 xi
Page 14
VARI❋LITE - VLX3 LED WASH LUMINAIRE SERVICE MANUAL
xii 02.9703.0010 0
Page 15

Table of Contents
About This Manual...................................................................................................... 1
Additional Documentation........................................................................................... 1
Customer Service......................................................................................................... 2
Technical Bulletins and Notices................................................................................... 2
Chapter 1. Description
Features
Standard Features................................................................................................... .... .. 4
Technical Specifications .............................................................................................. 4
Components
VLX3 Wash External Components.............................................................................. 5
VLX3 Wash Luminaire Components........................................................................... 6
VLX3 Wash Luminaire Head Components................................................................. 7
VLX3 Wash Enclosure Components........................................................................... 8
Principles of Operation
VLX3 Wash Luminaire Functional Block Diagram.................................................... 9
TABLE OF CONTENTS
Chapter 2. Maintenance
Testing
Luminaire Self-Tests....................................................................... ........................... 12
Calibration Sequence................................................................................................. 12
Sensor Testing............................................................................................................ 12
Troubleshooting
Error Messages........................................................................................................... 13
Troubleshooting Guide .............................................................................................. 14
Special Care and Handling
Introduction................................................................................................................ 16
Special Cleaning and Care Instructions..................................................................... 16
General Care and Equipment Handling..................................................................... 17
Locations/Use...................................................................................................... 17
Solid State Electronics............................................................................................... 17
Electrostatic Discharge (ESD)............................................................................. 17
Printed Circuit Boards (PCBs)............................................................................ 17
Required Tools for VLX3 Wash Luminaire Service.................................................. 17
Maintenance Procedures
Moving Zoom Assembly Replacement ..................................................................... 18
Main Control Board (MCB) Replacement................................................................. 20
Low Voltage Supply (LVS)/LED Power Supply Replacement.................................. 22
Tilt Motor Assembly Replacement............................................................................ 24
Tilt Encoder Assembly Replacement......................................................................... 25
Tilt Sensor Assembly Replacement........................................................................... 26
02.9703.0010 0 14 November 2011 xiii
Page 16

VARI❋LITE - VLX3 LED WASH LUMINAIRE SERVICE MANUAL
LED Driver Assembly Replacement.......................................................................... 29
Motherboard Assembly Replacement ........................................................................ 32
Light Pipe Replacement ............................................................................................. 34
120W RGBW LED Assembly Replacement.............................................................. 36
LED Cooling Assembly Replacement........................................................................ 38
Zoom Motor Assembly Replacement......................................................................... 40
DMX PCB Assembly Replacement ........................................................................... 42
PowerCon (AC Input) Assembly Replacement.......................................................... 43
Display PCB Assembly Replacement....................................................... ..... ............ 44
Wireless DMX Interconnect PCB Replacement ........................................................ 45
Enclosure Fans Replacement...................................................................................... 46
Pan Motor Assembly Replacement............................................................................ 47
Pan Belt Replacement................................................................................................. 48
VLX3 Wash dropCal (Reinstall Factory LED Calibration)....................................... 50
Chapter 3. Illustrated Parts Breakdown
Drawing Tree
VLX3 Wash Luminaire .............................................................................................. 54
Top Assembly
VLX3 Wash Included Items Kit................................................................................. 56
VLX3 Wash Luminaire .............................................................................................. 58
VLX3 Wash Generic Assembly ................................................................................. 60
VLX3 Wash Head Cover Assembly........................................................................... 62
Head Assembly
VLX3 Wash Head Assembly...................................................................................... 63
Moving Zoom Assembly............................................................................................ 65
Tilt Cradle Assembly.................................................................................................. 67
Right Tilt Tube Assembly .......................................................................................... 69
Left Tilt Tube Assembly............................................................................................. 70
Tilt Motor Mount Assembly....................................................................................... 71
Pulley Pinion Assembly ............................................................................................. 73
Light Engine (3 Source LED) Assembly............................................................ ..... ... 74
LED Engine Cooling Assembly................................................................................. 76
LED Driver Board Assembly..................................................................................... 78
Zoom Intermediate Plate Assembly ........................................................................... 79
Enclosure Assembly
VLX3 Wash Upper Enclosure Assembly................................................................... 81
Pan Motor Assembly.................................................................................................. 86
Note: Cables are only available as complete assemblies. The information contained in
this section is for reference only.
Cable Assemblies
Chassis To Yoke Ground Cable Assembly................................................................. 89
VLX3 Wash AC Input Cable Assembly..................................................................... 90
APS Fan Cable Assembly .......................................................................................... 91
xiv 14 November 2011 02.9703.0010 0
Page 17

DMX I/O Cable Assembly......................................................................................... 92
VLX3 Wash Display Link Cable Assembly.............................................................. 93
VLX3 Wash 36VDC Supply Cable Assembly .......................................................... 94
- 12V Driver Board #1 Cable Assembly.................................................................... 95
- 12V Driver Board #2 Cable Assembly.................................................................... 96
- 12V Driver Board #3 Cable Assembly.................................................................... 97
LED Driver Grounds Cable Assembly...................................................................... 98
LED Drive Cable Assembly ...................................................................................... 99
Zoom Cable Assembly............................................................................................. 100
VLX3 Wash Tilt Cable Assembly............................................................................ 101
VLX3 Tilt Sensor Cable Assembly ......................................................................... 102
VLX3 Wash Tilt Cable Assembly............................................................................ 103
VLX3 Wash Pan Encoder Cable Assembly............................................................. 104
VLX3 AUX COMM Interface Cable Assembly ..................................................... 105
VLX3 LED Driver Grounds Cable Assembly......................................................... 106
VLX3 Yoke to Head Chassis Ground Cable Assembly........................................... 107
Appendix A. Technical Bulletins and Notices
TABLE OF CONTENTS
VLX3 Wash Technical Bulletins and Notices.......................................................... 109
02.9703.0010 0 14 November 2011 xv
Page 18

VARI❋LITE - VLX3 LED WASH LUMINAIRE SERVICE MANUAL
(This page intentionally blank.)
xvi 14 November 2011 02.9703.0010 0
Page 19
Introduction
About This Manual
This manual provides descriptions, repair procedures, and illustrated parts breakdowns for all
configurations of the VLX3 LED Wash Luminaire. The manual is intended for use by Vari-Lite
personnel and Authorized VARI❋LITE Service Centers and technicians.
WARNING: It is important to read ALL accompanying safety and installation instructions to avoid
damage to the product and potential injury to yourself or others.
This manual covers the following models:
VLX3 Wash Luminaire 20.9703.0001 Three x 120W RGBW LEDs
VLX3 Wash Luminaire, White 20.9703.0001.02 Three x 120W RGBW LEDs
INTRODUCTION : ABOUT THIS MANUAL
Model Part Number Source
Note: Performing maintenance procedures may void the product warranty. Refer to the Vari-Lite
Limited Warranty card included in the product shipping package for more information.
Additional Documentation
For complete installation and operation instructions, refer to the VLX3 Series Luminaire User’s
Manual. This manual is available in electronic (PDF) format on the Vari-Lite web site at www.vari-
lite.com in the Support (Product Downloads) section.
• VLX3 Series Luminaire User’s Manual (02.9703.0001)
For more information regarding DMX512 systems, refer to the DMX512/1990 & AMX 192 Standards
publication available from United States Institute for Theatre Technology, Inc. (USITT).
USITT
315 South Crouse Avenue, Suite 200
Syracuse, NY 13210-1844
Phone: 800-938-7488 or 315-463-6463
www.usitt.org
02.9703.0010 0 1
Page 20

VARI❋LITE - VLX3 LED WASH LUMINAIRE SERVICE MANUAL
Customer Service
Our Goal
At Vari-Lite, we are committed to providing you the highest quality in customer service. Our
comprehensive resources are available to help your business succeed and ensure you get the full
benefit of being a Vari-Lite customer. Whether your needs are telephone troubleshooting assistance,
product training or technical service, our full-time staff of experienced professionals are on-hand to
provide support.
How to Reach Us
For assistance in your area, call the dealer from which your product(s) was purchased.
or
Contact an Authorized Service Center.
or
Contact the Vari-Lite Customer Service Department, 7am - 6pm CST Monday through Friday, at the
following:
phone: 1-877-VARI-LITE (1-877-827-4548)
e-mail: [email protected]
Additional Resources
For additional resources and documentation, please visit our website at www.vari-lite.com and follow
the Support link.
Technical Bulletins and Notices
Technical bulletins concerning the latest changes to VARI❋LITE equipment are issued from the
Dallas, T exas USA office. They are documentation supplements that contain procedures for equipmen t
upgrades, retrofits, and repairs not found in the existing manuals. Operator technical bulletins are also
issued to document changes in control software. Technical bulletins are integrated into the appropriate
equipment manuals as those manuals are revised. Bulletins are categorized by assembly or
subassembly, and identified by a number such as SVX-001 (VLX Series Luminaires Technical
Bulletin number 1) or LSW-001 (Software release technical bulletin).
Technical notices are also issued from the Dallas, Texas USA office. They are non-procedural
documents that contain information regarding product support issues, current equipment problems,
software bugs, and documentation corrections. All technical notices begin with the prefix TN and are
numbered sequentially, such as TN-138 (Tech Notice number 138).
A list of current technical bulletins and notices associated with VLX Series Luminaires is found in
“VLX3 Wash Technical Bulletins and Notices” on page 109.
2 02.9703.0010 0
Page 21

CHAPTER 1.
Description
This chapter contains descriptions of luminaire features and components.
• Features
• Components
• Principles of Operation
SERVICE
02.9703.0010 0 3
Page 22
VARI❋LITE - VLX3 LED WASH LUMINAIRE SERVICE MANUAL
Features
Standard Features
All VLX3 series luminaires have the following standard features:
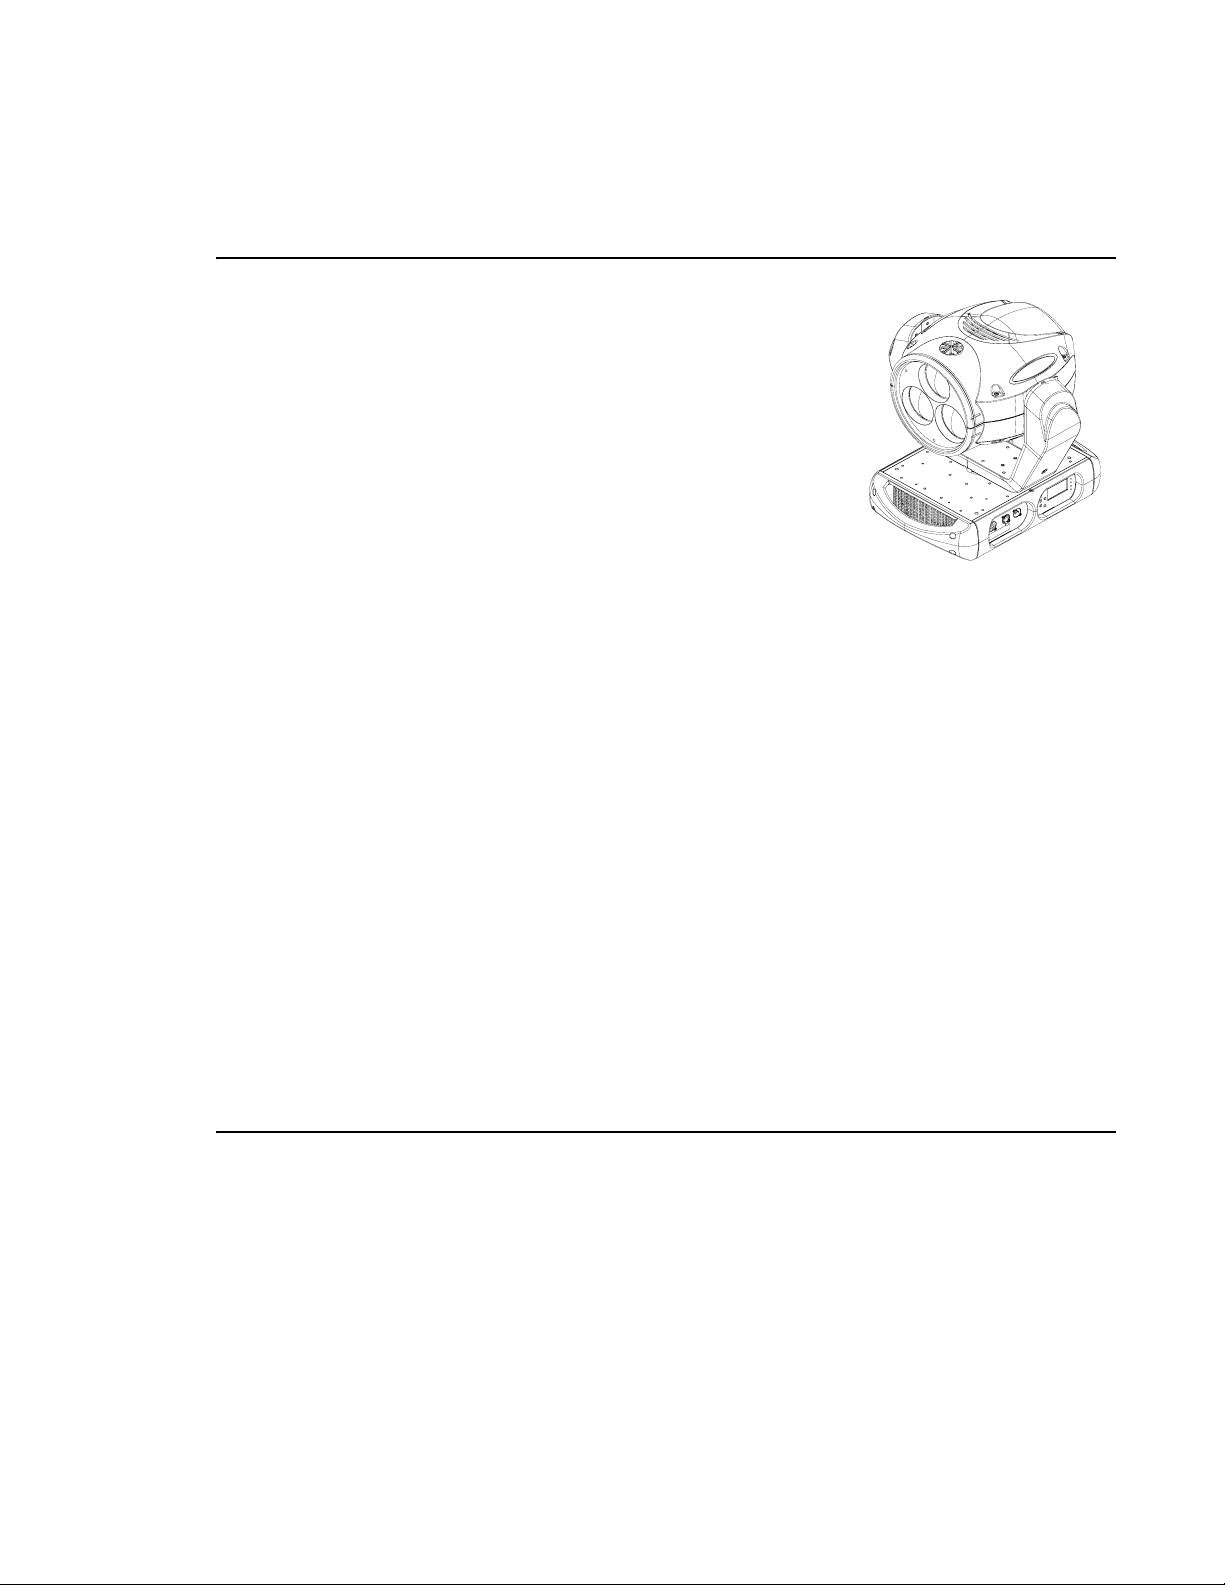
• Three, 120 Watt custom RGBW Chipsets (each chipset contains
high density red, green, blue, and white LED emitters).
• Optical zoom system with continuously variable field angle from
approximately 15° to 55°.
• Smooth, high resolution intensity and dimming control of red,
green, blue, and white LEDs.
• Color temperature (white) variable between 3000 and 9000K.
• LED manufacturer rated life in excess of 10,000 hours (at full
RGBW).
• Output exceeds 6,000 lumens (white light).
• High speed strobe operation with multiple strobe effects.
• Smooth, time-controlled continuous motion by way of a pair of three-phase stepper motor systems.
Pan range is 540°/ Tilt range is 240° both with a 0.3° resolution.
• Control by DMX512 protocol.
• Variable forced-air cooling.
• Operational Temperature of -20° to 122°F (-29° to 50°C).
• Power Requirements: Standard AC power distribution from 100-240VAC, 50/60Hz. The unit
requires up to 7A depending on the AC supply voltage.
• 23 channels DMX channels (in Map 1 mode).
• May be mounted and operated in any orientation.
• Hangs on 21.50 inch (54.6 cm) centers.
• Weight is 44 lbs. / 20 kg (luminaire only).
Technical Specifications
For detailed technical specifications, refer to VLX3 LED Wash Luminaire User’s Manual
(02.9701.0001) or the Vari-Lite web site at www.vari-lite.com.
4 02.9703.0010 0
Page 23
Components
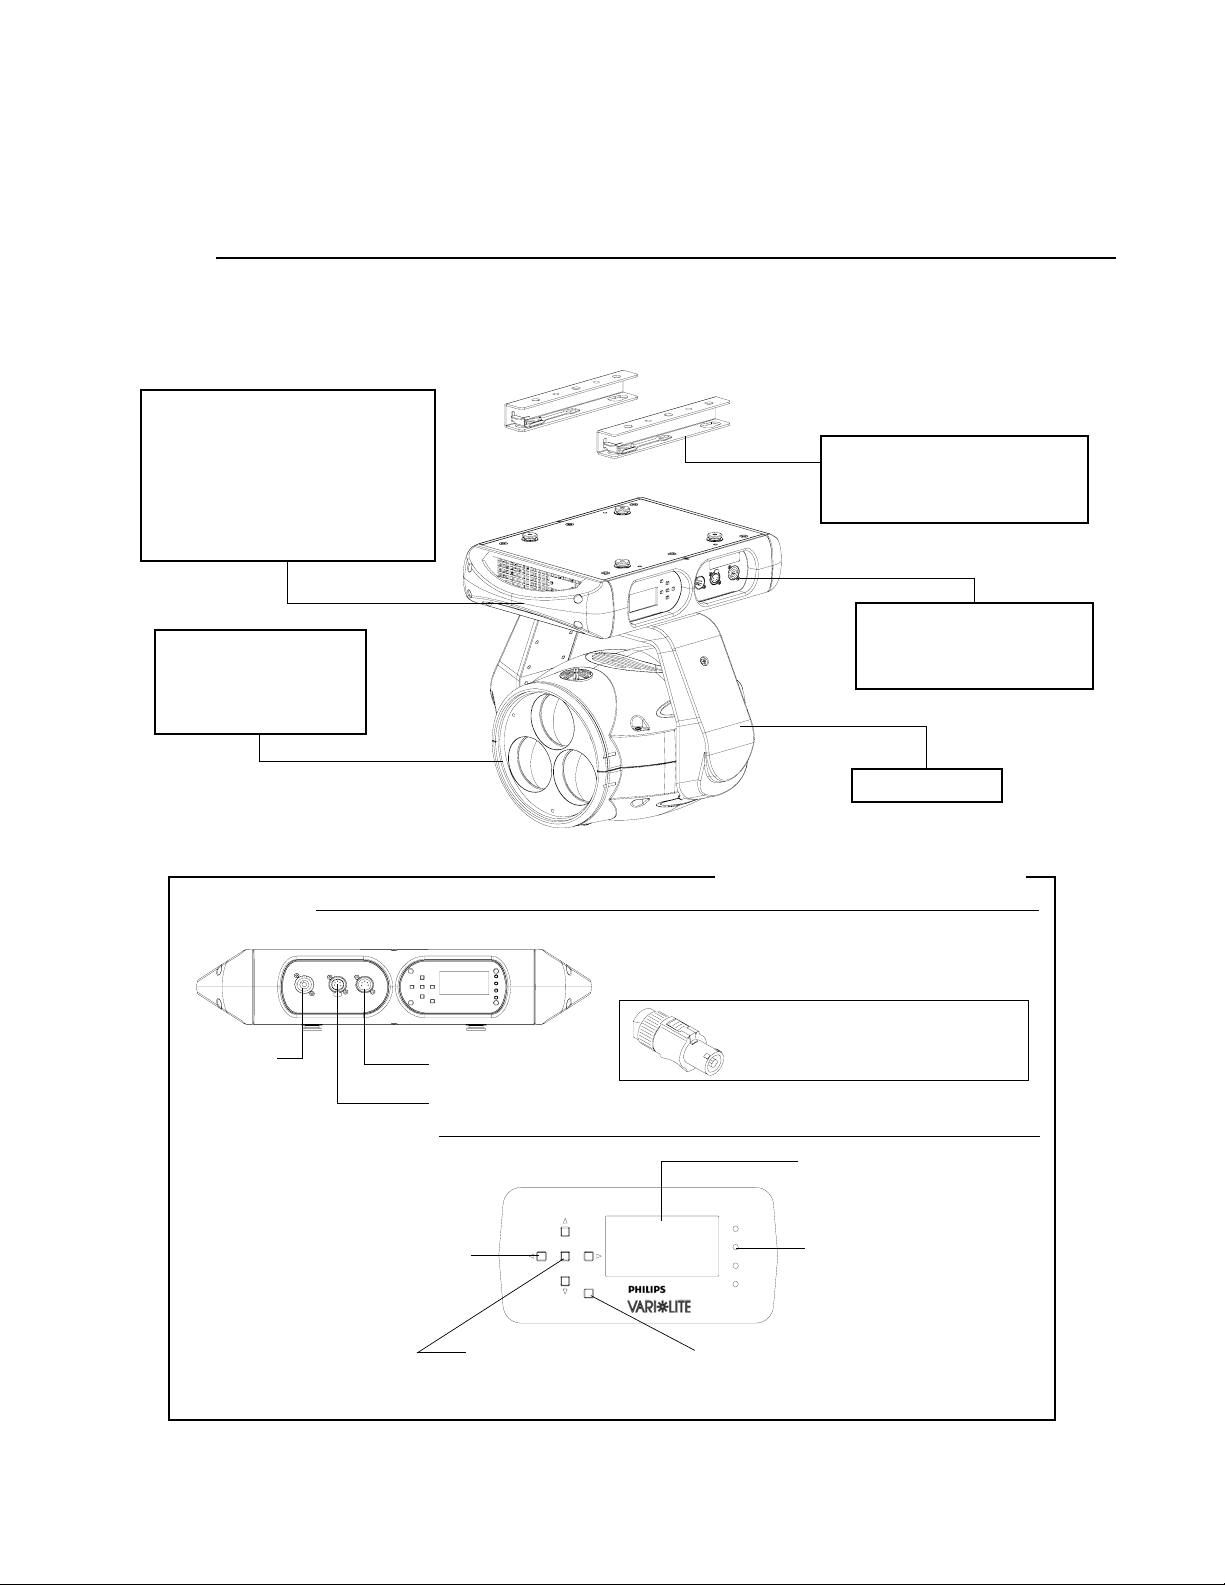
VLX3 Wash External Components
The following illustration shows the external luminaire components and controls.
Upper Enclosure Assembly
Houses power supply, pan motor,
and display board.
Menu LCD Display
Used to input manual commands,
program, test, set defaults and
access internal status information.
(see detail below)
Head Assembly
Front lens/optics, LED
driver PCBs, LEDs, and
cooling fans, tilt motor,
and MCB.
COMPONENTS : VLX3 WASH EXTERNAL COMPONENTS
Truss Hook Brackets
Attaches to enclosure base
to allow truss hook installation.
(Truss hooks sold separately)
Input Panel
Provides DMX In and Thru,
and AC Power connections.
(see detail below)
1
Input Panel
AC Input
Cable*
Menu LCD Display Panel
Arrow Keys (Left/Right/Up/Down)
To Menu Navigate Menu Options
and make Data Selections
Data In
Data Thru
Enter Button
To Select or Change a
Setting or Data Value
ENTER
Yoke Assembly
Upper Enclosure Components
*3-Pole Neutrik PowerCon Locking
Connector for AC Input Power (supplied).
User must construct power input cable.
LCD Display
Displays all Data and
Luminaire Settings
POWER
TX
RX
ERROR
ESC
Escape (ESC)
To Exit or Go to
Previous Menu Item
Status LEDs
Power State, Data T ransmit, Data
Receive, Data Error
02.9703.0010 0 5
Page 24
VARI❋LITE - VLX3 LED WASH LUMINAIRE SERVICE MANUAL
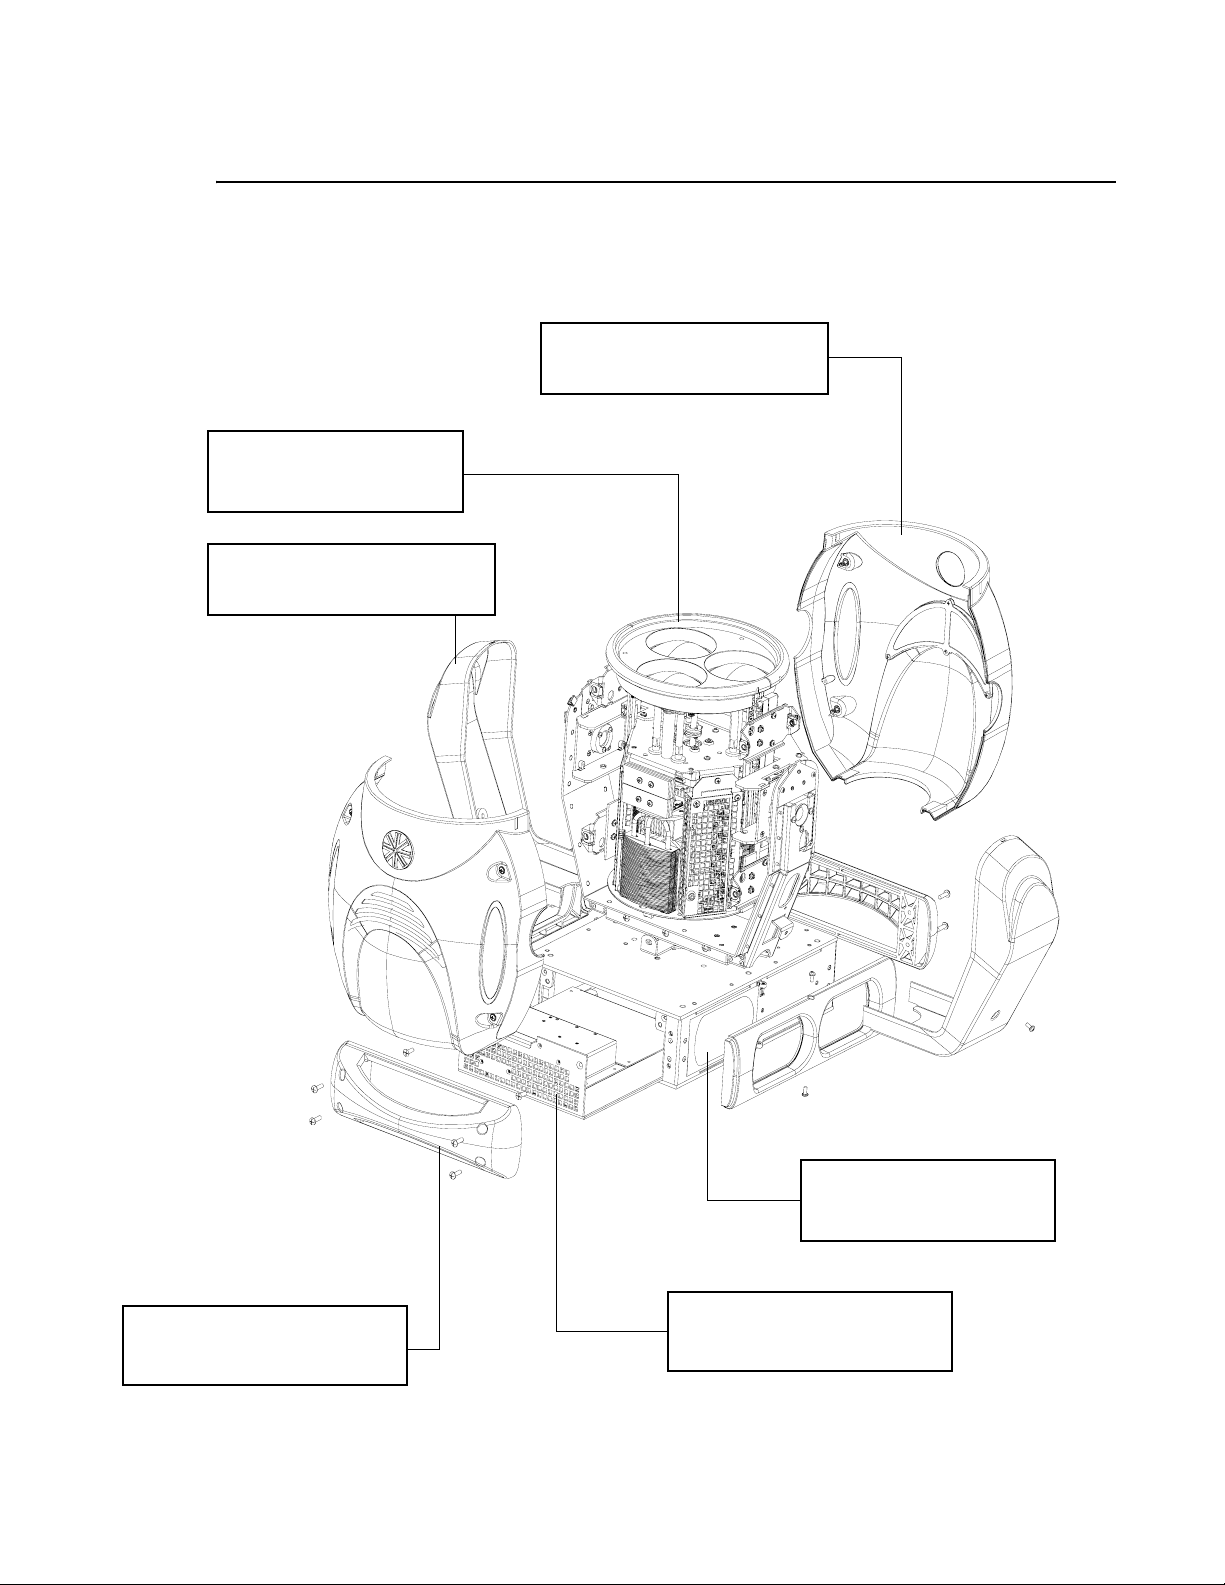
VLX3 Wash Luminaire Components
The following illustration shows the major sub-assemblies and components of the luminaire.
Luminaire Head Covers
Two covers, one on each side
of luminaire head assembly.
Head Assembly
See “VLX3 Wash Luminaire
Head Components” on page 7.
Y oke Arm Covers
Two covers, one on each side
of yoke assembly.
Enclosure Assembly
See “VLX3 Wash Enclosure
Components” on page 8.
Enclosure Covers
One on each end of enclosure
assembly, two with handles.
6 02.9703.0010 0
Power Supply Assembly
Supplies power for luminaire
operation.
Page 25

COMPONENTS : VLX3 WASH LUMINAIRE HEAD COMPONENTS
VLX3 Wash Luminaire Head Components
The following illustration shows the major sub-assemblies which are located in the luminaire head
assembly.
LEDs/LED Cooling Assembly
Houses three 120W LEDs and
LED cooling assembly.
LED Driver PCBs
One Driver PCB per LED.
1
LED Lightpipes
One lightpipe per LED. Transmits
light from LED to optics.
Zoom Assembly
Connects to motor
assembly for movement.
Zoom Motor Assembly
Connects to zoom
assembly.
Cradle Assembly
Connects head to yoke
and contains tilt motor
assembly.
Main Control Board (MCB)
Luminaire control circuit
board assembly.
Note:
Yoke and Enclosure assemblies not
shown for clarity.
02.9703.0010 0 7
Page 26
VARI❋LITE - VLX3 LED WASH LUMINAIRE SERVICE MANUAL
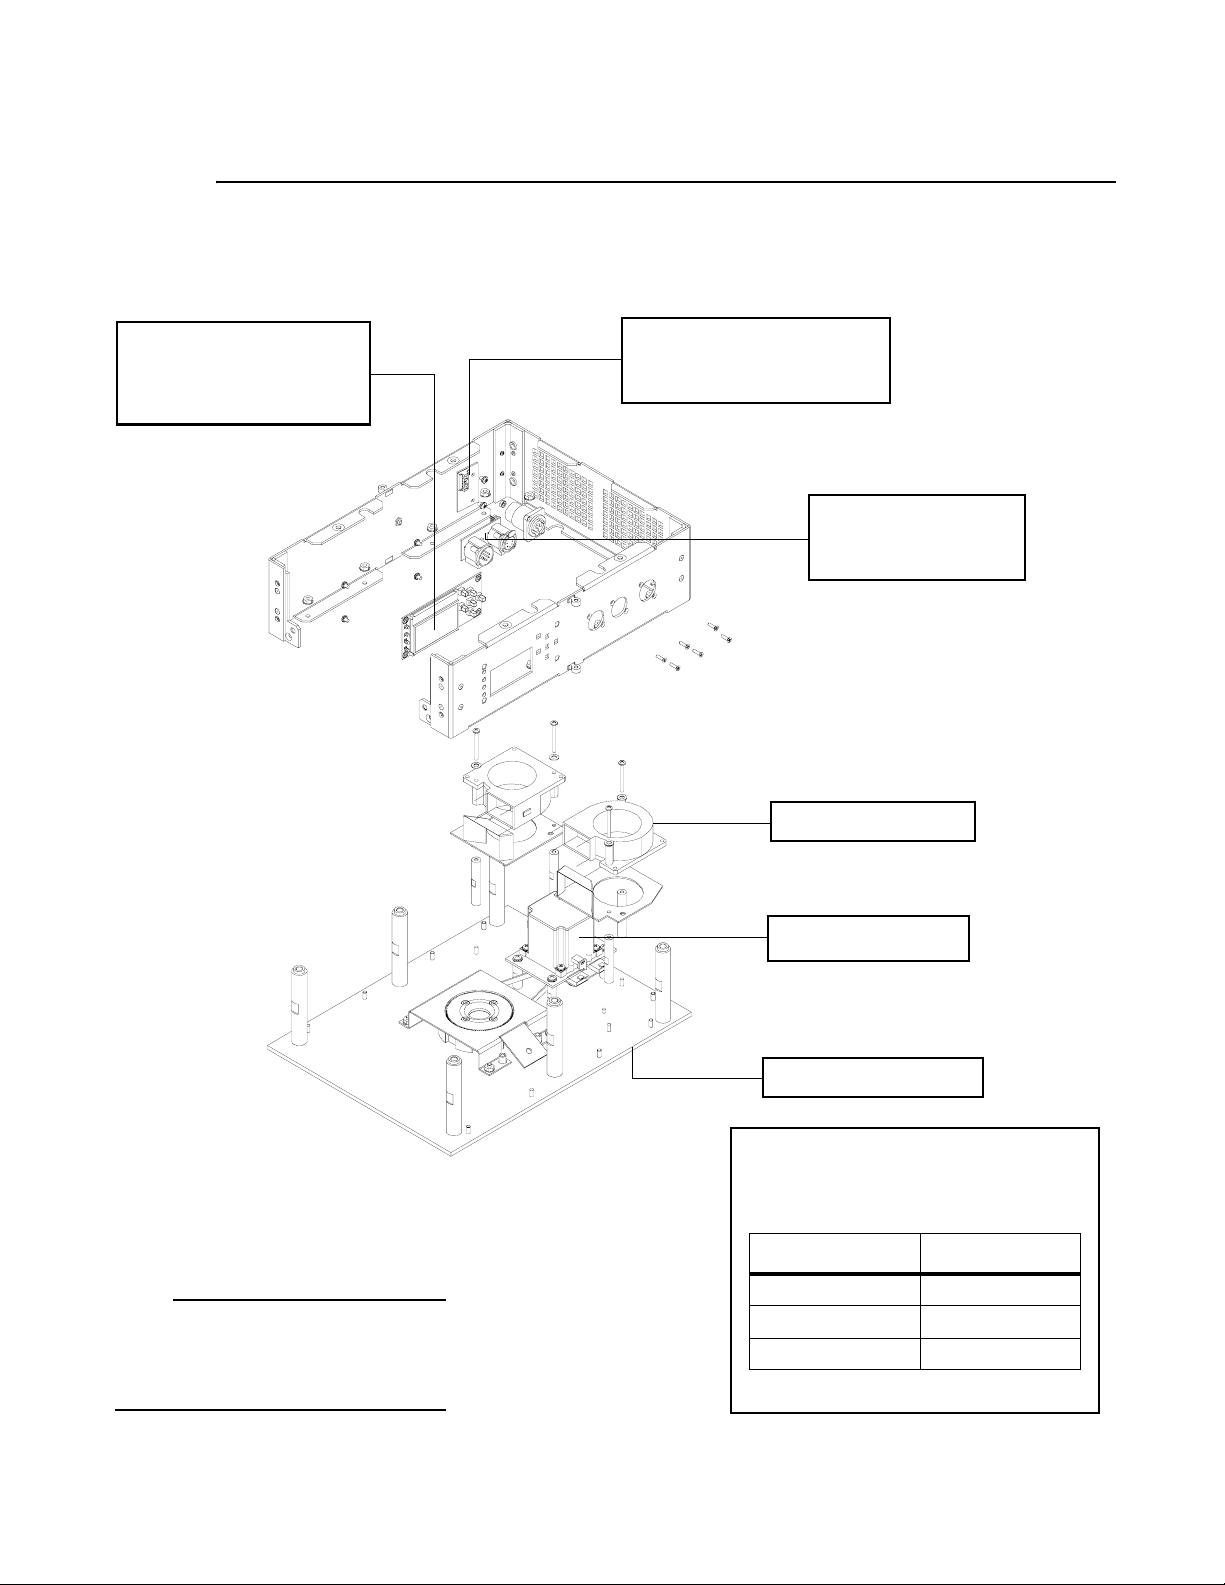
VLX3 Wash Enclosure Components
The following illustration shows the major sub-assemblies which are located in the luminaire
enclosure assembly.
LCD Display Assembly
For addressing, accessing
menu options and settings. See
page 5 for details.
Wireless DMX Interconnect
Allows connection of optional
wireless DMX module
Input Panel Assembly
Contains DMX Input
PCB and AC Input*
Fan Assemblies
Pan Motor Assembly
Enclosure Cover Plate
*AC Input
Requires standard AC power distribution
from 100-240 VAC, 50/60 Hz., up to 10A
depending on the AC supply voltage.
Wire** Connection
Note:
Other assemblies not shown for clarity.
Power supply (not shown) is part of the
generic luminaire assembly but is housed
in the enclosure assembly.
8 02.9703.0010 0
Green/Yellow AC Ground
Blue AC Neutral
Brown AC Line
** International (Harmonized) Standard
Page 27
PRINCIPLES OF OPERATION : VLX3 WASH LUMINAIRE FUNCTIONAL BLOCK DIAGRAM
Principles of Operation
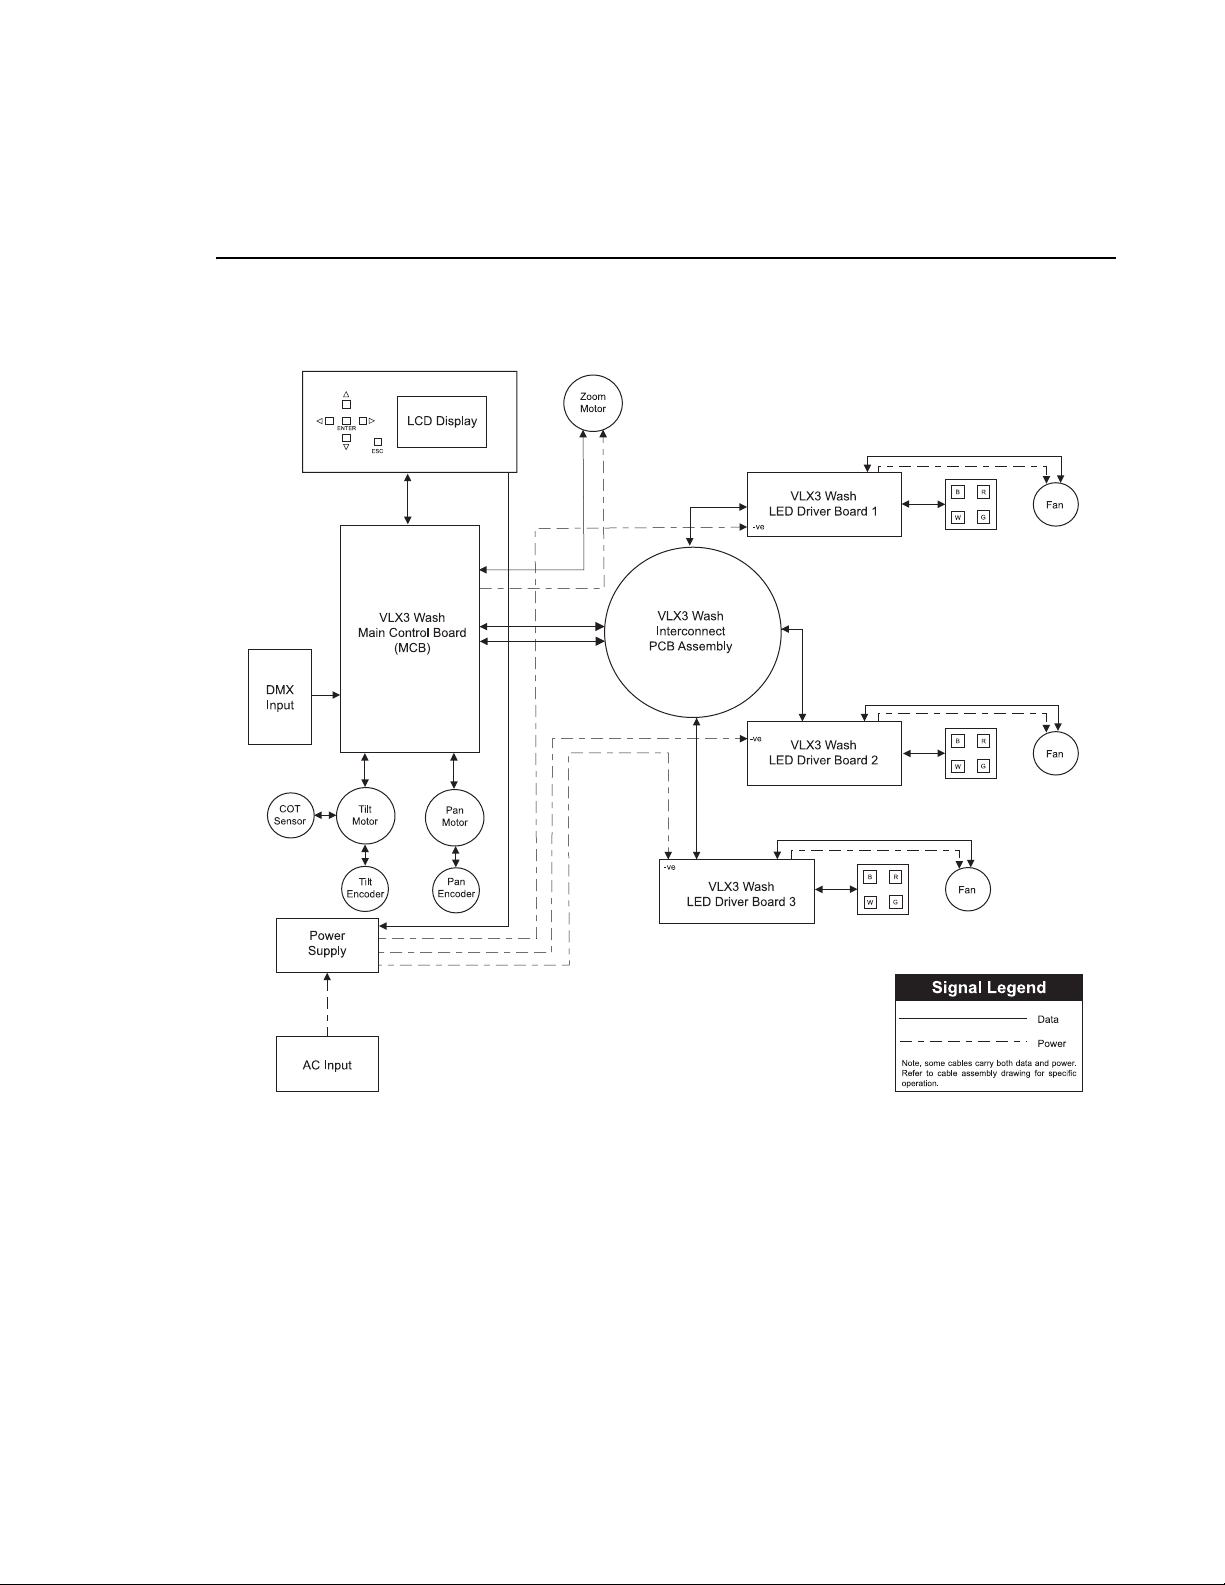
VLX3 Wash Luminaire Functional Block Diagram
1
02.9703.0010 0 9
Page 28

VARI❋LITE - VLX3 LED WASH LUMINAIRE SERVICE MANUAL
Notes
10 02.9703.0010 0
Page 29

CHAPTER 2.
Maintenance
This chapter contains test, service, and standard maintenance procedures.
• Testing
• Troubleshooting
• Special Care and Handling
• Maintenance Procedures
WARNING: All maintenance procedures are to be performed with power com-
pletely removed from the luminaire. Never remove covers while unit is in operation.
WARNING: Maintenance, repairs, and adjustments should only be performed
by a qualified, factory-trained service technician at an Authorized VARI❋LITE
Service Center.
SERVICE
02.9703.0010 0 11
Page 30

VARI❋LITE - VLX3 LED WASH LUMINAIRE SERVICE MANUAL
Testing
Luminaire Self-Tests
The luminaire is capable of running self tests by using the TEST menu functions. For detailed
instructions regarding the luminaire’s self-test function, refer to the VLX3 LED Wash Luminaire
User’s Manual (02.9703.0001).
Calibration Sequence
The following is an outline of the luminaire’s standard calibration sequence:
Phase 1
• Tilt
• LEDs Off
• LED Upload
Phase 2
•Zoom
Phase 3
•Pan
Sensor Testing
Most mechanisms within the VLX3 luminaire are equipped with either optical or magnetic sensors.
The VLX3 master control board (MCB) has labeled test points for reading DC voltages at each sensor.
Testing is best performed with a digital voltmeter for sensor readings or an Oscilloscope for pan/tilt
encoder readings. The values can be used to determine whether a circuit is opening correctly or needs
further troubleshooting.
Guidelines:
• The values will change depending on whether the sensor reading is Open or Closed.
• The values will be different depending on the type of sensor: optical or magnetic.
• As a general rule, if a change occurs from 5v to 0v or visa versa, then it is working.
• An Open reading occurs when the sensor is not aligned - tab not at sensor (typically a non-zero
DMX value).
• A Closed reading occurs when the sensor is aligned -tab in or at sensor (typically a zero DMX
value).
• Optical sensors read high when the sensor is Closed.
• Magnetic sensors read Low when the sensor is Closed.
• High value - 5 volts (typically 4.9 volts).
• Low value - 0 volts, or up to approximately 0.2 volts.
Notes regarding specific mechanisms:
• Tilt sensor reads high when the tab is in the sensor. The mechanism calibrates to the edge and its
tab covers 50% of travel. Pan and tilt encoders are best read with a scope to read the encoder ticks.
12 02.9703.0010 0
Page 31
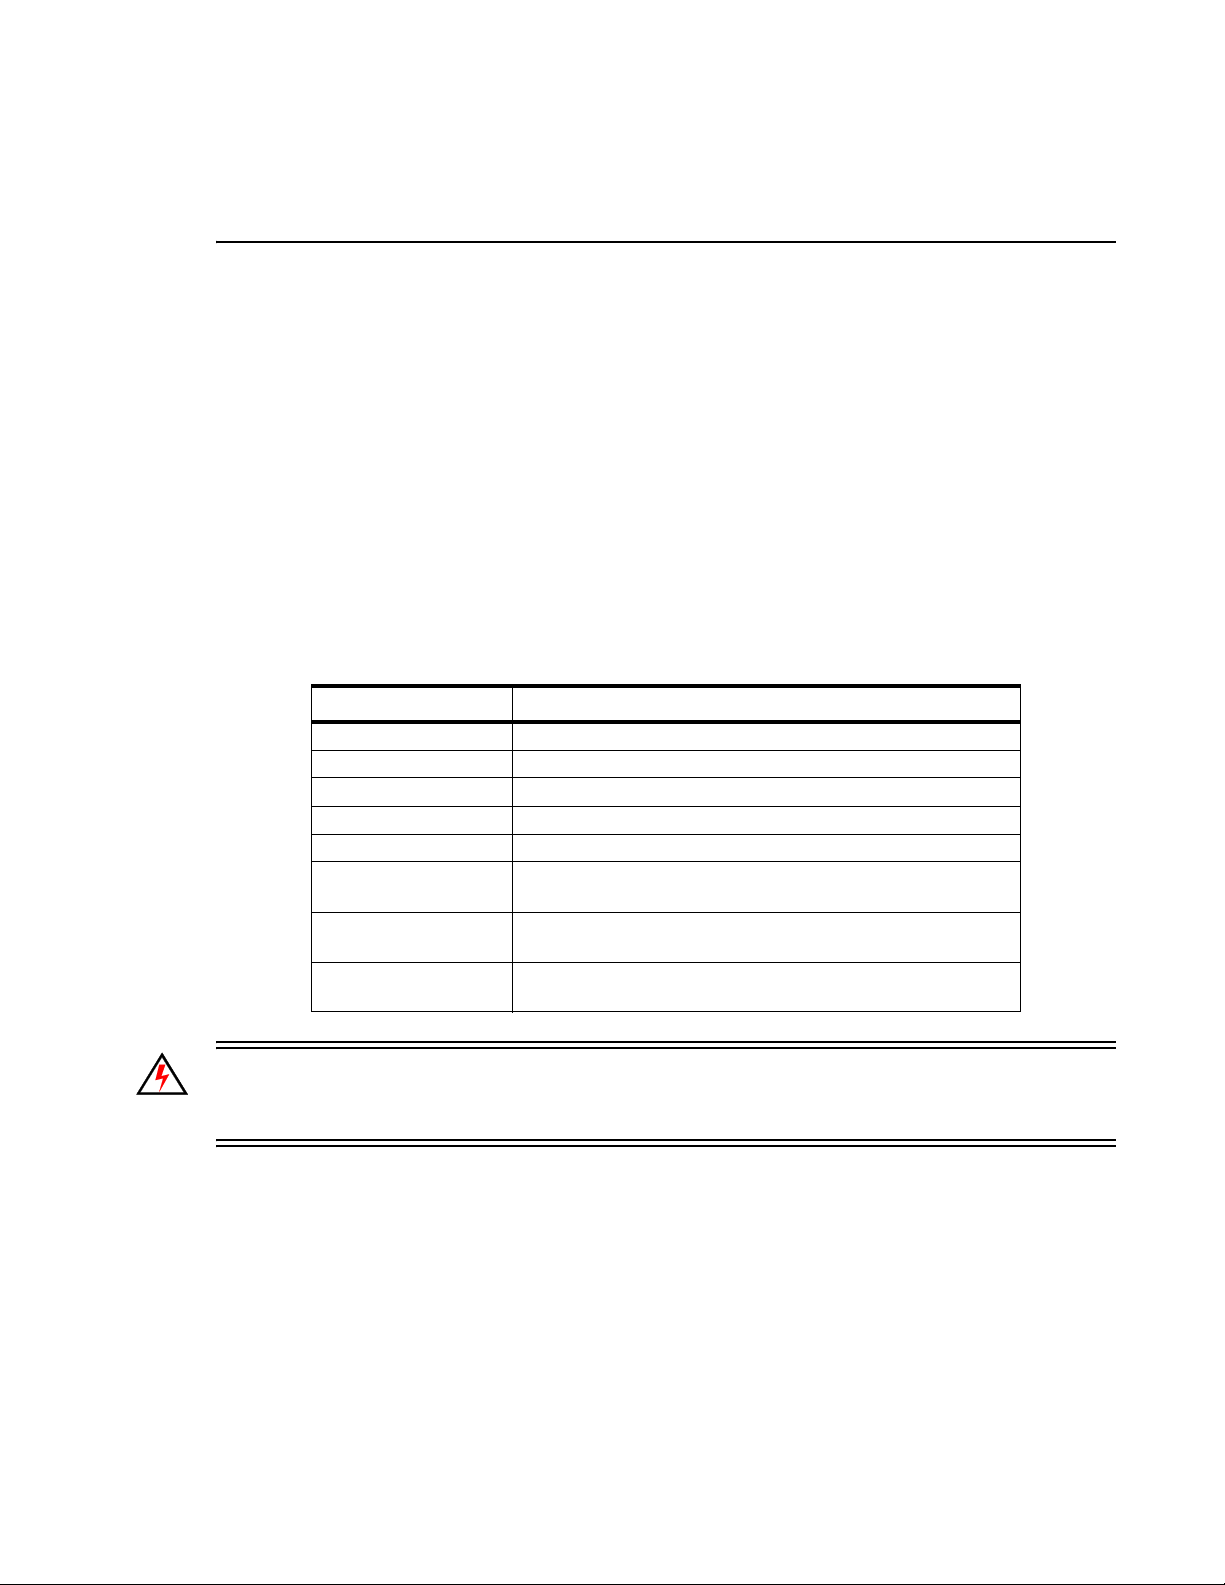
Troubleshooting
Error Messages
If a problem occurs during luminaire calibration, at the end of the calibration sequence the Menu
Display will cycle through any applicable error message(s), one at a time until the end of the list is
reached. To review the error messages again, it will be necessary to access them using the Status
function. (Refer to “Troubleshooting Guide” on page 14 for a list of possible causes and remedies
associated with the error messages.)
To access error messages:
Step 1. Press [ESC] to access the main menu screen.
Step 2. Press [Up] / [Down] arrows until Fixture appears. Press [Enter].
Step 3. Press [Up]/ [Down] arrows to access Status. Press [Enter]. (Display will now scroll
through any error messages or display OK if no errors.)
TROUBLESHOOTING : ERROR MESSAGES
2
Table 2-1: Error Messages
Display Message...
OK No errors found
No Sensor on Tilt Tilt sensor not found
Encoder Error on Tilt Tilt encoder not found
No Sensor on Zoom Zoom sensor not found
Encoder Error on Pan Pan encoder not found
No LED Com Board
Number X
No LED Upload Board
Number X
LED Error Board
Number X
No communication between LED driver board (X = driver
board number 1, 2 or 3) and MCB
No software upload to LED driver board (X = driver board
number 1, 2 or 3)
Problem exists between LED and LED driver board (X =
driver board number 1, 2 or 3)
WARNING: As with any repairs or maintenance to VARI❋LITE luminaires, service should only be
performed by a trained and qualified service technician or at an Authorized VARI❋LITE
Service
Center.
02.9703.0010 0 13
Page 32

VARI❋LITE - VLX3 LED WASH LUMINAIRE SERVICE MANUAL
Troubleshooting Guide
If a problem is suspected, try recalibrating the luminaire to prompt an error message. Refer to “Error
Messages” on page 13 for more information. The chart below provides possible causes and remedies
for each message.
Table 2-2: Troubleshooting Guide
Message Symptom Description Possible Cause and Remedy
n/a No power Luminaire does not power upCircuit not energized...
- verify circuit breaker is turned on.
Not plugged in...
- ensure A/C cable is connected to power source.
Power cable wired incorrectly...
- verify power cable and connector are wired
correctly.
n/a DMX Data Input Self tests will not run or
software download does
not work.
n/a DMX Failure No response to DMX
data.
n/a DMX Termination Erratic control of
luminaire.
n/a Single LED not operat-
ing
One LED (out of the
seven) is not producing
light or responding to control.
Detecting DMX data...
- disconnect DMX input cable.
MCB connector disconnected...
- check MCB DATA IN connection.
DMX data cable not wired correctly or has a broken
conductor...
- check DMX data cable for proper wiring.
No DMX termination or termination not correct...
- check for DMX terminator.
LED Driver PCB not Powered...
- Check Power to the driver board for that LED.
The driver board has 2 green LEDs on it. Each
LED signifies a different power supply. The outer
green LED (closest to the edge of the board)
signifies that the driver board is getting power
from the 12V supplies in the base (through the
blue wire). The inner green LED signifies that it
is getting +5V power from the round motherboard
(through the header/pin connector)
LED Driver PCB not Properly Connected...
- Check communication to the driver board for that
LED. The Driver PCB has 2 red LEDs on it. If the
LEDs are:
State 1: Always on, but alternating brightness
- board is communicating properly
State 2: Alternating on and off very quickly -
board is downloading software from Main
Control Board. This state should be replaced
by State 1 after programming.
- Check Motherboard for short to ground
14 02.9703.0010 0
Page 33

TROUBLESHOOTING : TROUBLESHOOTING GUIDE
Table 2-2: Troubleshooting Guide (Continued)
Message Symptom Description Possible Cause and Remedy
n/a LED (light) is getting
dimmer.
n/a Colors (light output) not
matching from luminaire
to luminaire
Fixture appears not to be
operating at full brightness.
Color output not matching other VLX3 wash fixtures operating at same
control settings.
Luminaire has detected an over temperature condition...
- The luminaire will reduce power to all 3 LEDs if it
senses that one LED is operating over the
specified temperature. LED temperature is read
and recorded through a thermistor imbedded in
each LED chip. The two yellow wires carry the
information (on temperature) to the LED’s
respective driver PCB.
- Check the thermistor temperatures of each LED
through the fixture’s LCD display.
If one LED is much hotter than the others...
- Check to see that the LED’s fan is running /
connected to the Driver PCB (Note, LED Driver
PCB number 5 does not have a fan) OR,
- If thermistor is not reading, replace Driver PCB
OR,
- If still no reading, replace the LED.
Calibration turned On or Off...
- Check fixture calibration setting. Make sure
calibration is set to same setting (On or Off) as
other fixtures.
- Check dimming curve setting. Make sure
dimming curve selection (Linear or Curve) is
same for all fixtures.
2
02.9703.0010 0 15
Page 34
VARI❋LITE - VLX3 LED WASH LUMINAIRE SERVICE MANUAL
Special Care and Handling
WARNING: As with any repairs or maintenance to VARI❋LITE luminaires, service should only be
performed by a trained and qualified service technician or at an Authorized VARI❋LITE
Center.
Introduction
Being a solid-state fixture, and unlike most automated arc or tungsten fixtures, the VLX3 LED Wash
Luminaire requires very little routine maintenance by the user. This section covers all the parts or
assemblies that can be removed, cleaned, and checked by the user. Any additional maintenance or
service should only be completed by an Authorized VARI❋LITE
Special Cleaning and Care Instructions
The VLX3 LED Wash Luminaire requires special care when it comes to cleaning front lens assembly.
Service
Service Center.
Note: Additional care needs to be taken with the plastic components because they are much easier to
scratch or damage than glass.
The following is a list of cleaning materials required to care for your VLX3 LED Wash Luminaire:
• Lint free lens tissue
• Lint free cotton swabs (for hard-to-reach spot cleaning)
• Lint or powder free gloves
• Reagent grade isopropyl alcohol
• A mild soap solution.
Reagent grade isopropyl alcohol is good to use on the VLX3 LED Wash Luminaire plastic optics with
anti-reflection coatings.
If the lens is still dirty after using isopropyl alcohol, for instance if fingerprints or oil is just
redistributed and not cleaned off the optic, then a mild soap and water solution can be used to gently
wash the lens. Repeat the cleaning with isopropyl alcohol to eliminate streaks and soap residue.
WARNING: Under no circumstances should ammonia-based cleaners, acetone, or other harsh
solvents be used on or near the VLX3 LED Wash Luminaire. These types of cleaners or solvents can
permanently damage the optics or housings of the fixture.
If you have any questions regarding the use or care of your VLX3 LED Wash Luminaire, please
contact Vari-Lite techn i cal support at 1.877-VARI-LITE or +1.214.647.7880.
16 02.9703.0010 0
Page 35
SPECIAL CARE AND HANDLING : GENERAL CARE AND EQUIPMENT HANDLING
2
General Care and Equipment Handling
Below are some basic tips and information on handling VARI❋LITE luminaires and their associated
components.
Locations/Use
VARI❋LITE luminaires are designed for dry locations only. Exposure to rain or moisture (including,
but not limited to, fog machines, misters, etc.) may damage luminaires.
Solid State Electronics
Electrostatic Discharge (ESD)
Electrostatic discharge (ESD) presents a significant danger to solid state electronic components
(semiconductor devices and PC board assemblies). Static electricity can build on a variety of common
objects (including people) simply by handling or moving. ESD rarely resu lts in immediate failure of a
component, but shows up later as an intermittent problem or severely reduces the life of the
component. All VARI❋LITE
protect them should be observed when servicing.
products use solid state electronics and appropriate precautions to
Printed Circuit Boards (PCBs)
All PC boards should be shipped in electrostatic shielding bags. When handling PC boards or
components, devices such as conductive mats and conductive wrist straps should be used whenever
possible. If these precautionary devices are not available, handling of PC boards and components
should be avoided.
CAUTION: Black foam (used to package solid state electronics) should never be used for packing
batteries or put in contact with PC boards which contain batteries.
Required Tools for VLX3 Wash Luminaire Service
To properly maintain and service VLX3 LED Wash Luminaires, Vari-Lite recommends that the
following tools (in addition to the tools recommended during Vari-Lite’s technical training classes) be
available to technicians:
• 90-degree Phillips head screwdriver (#2)
• Precision torque wrench capable of 80-in oz.
• Long 3/32" hex driver
02.9703.0010 0 17
Page 36
VARI❋LITE - VLX3 LED WASH LUMINAIRE SERVICE MANUAL
Maintenance Procedures
Moving Zoom Assembly R eplacement
Tools:
• #2 Phillips screwdriver
WARNING: Ensure that power is completely removed (disconnected) from luminaire before
attempting any work.
To remove moving zoom assembly:
Step 1. Remove power from luminaire and allow unit to completely cool.
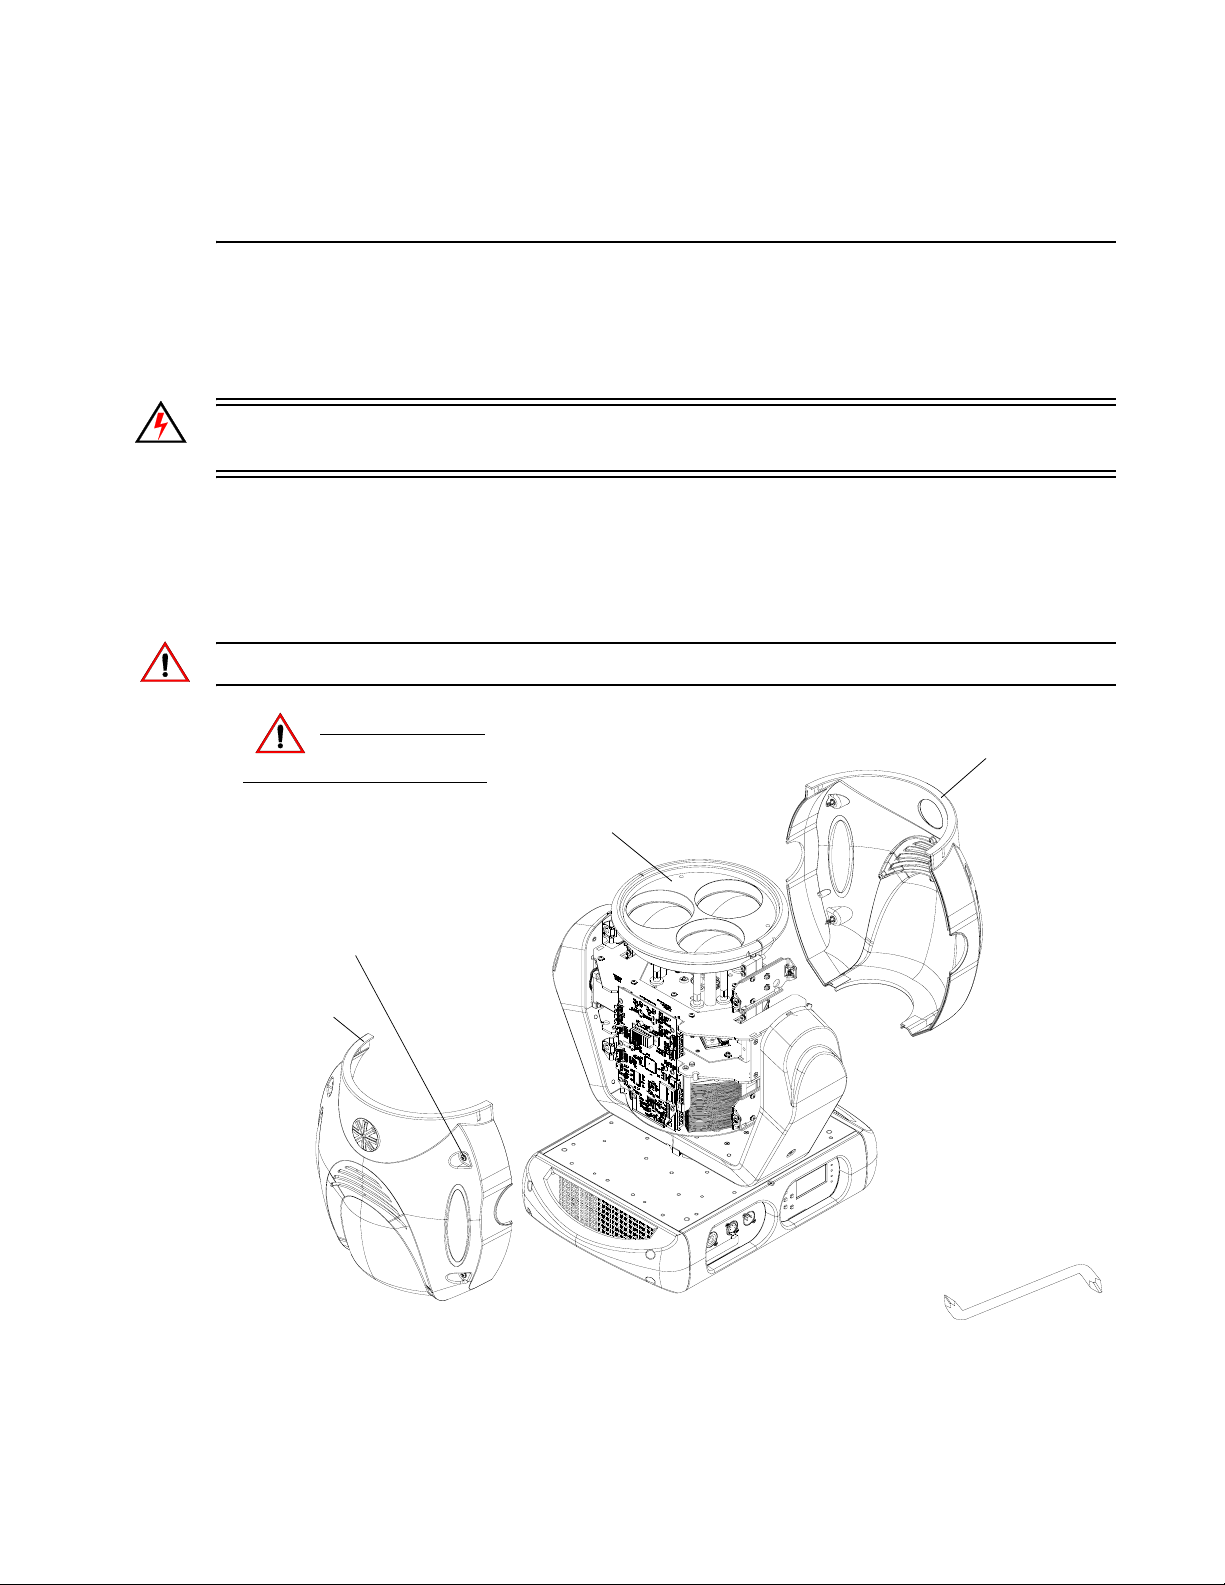
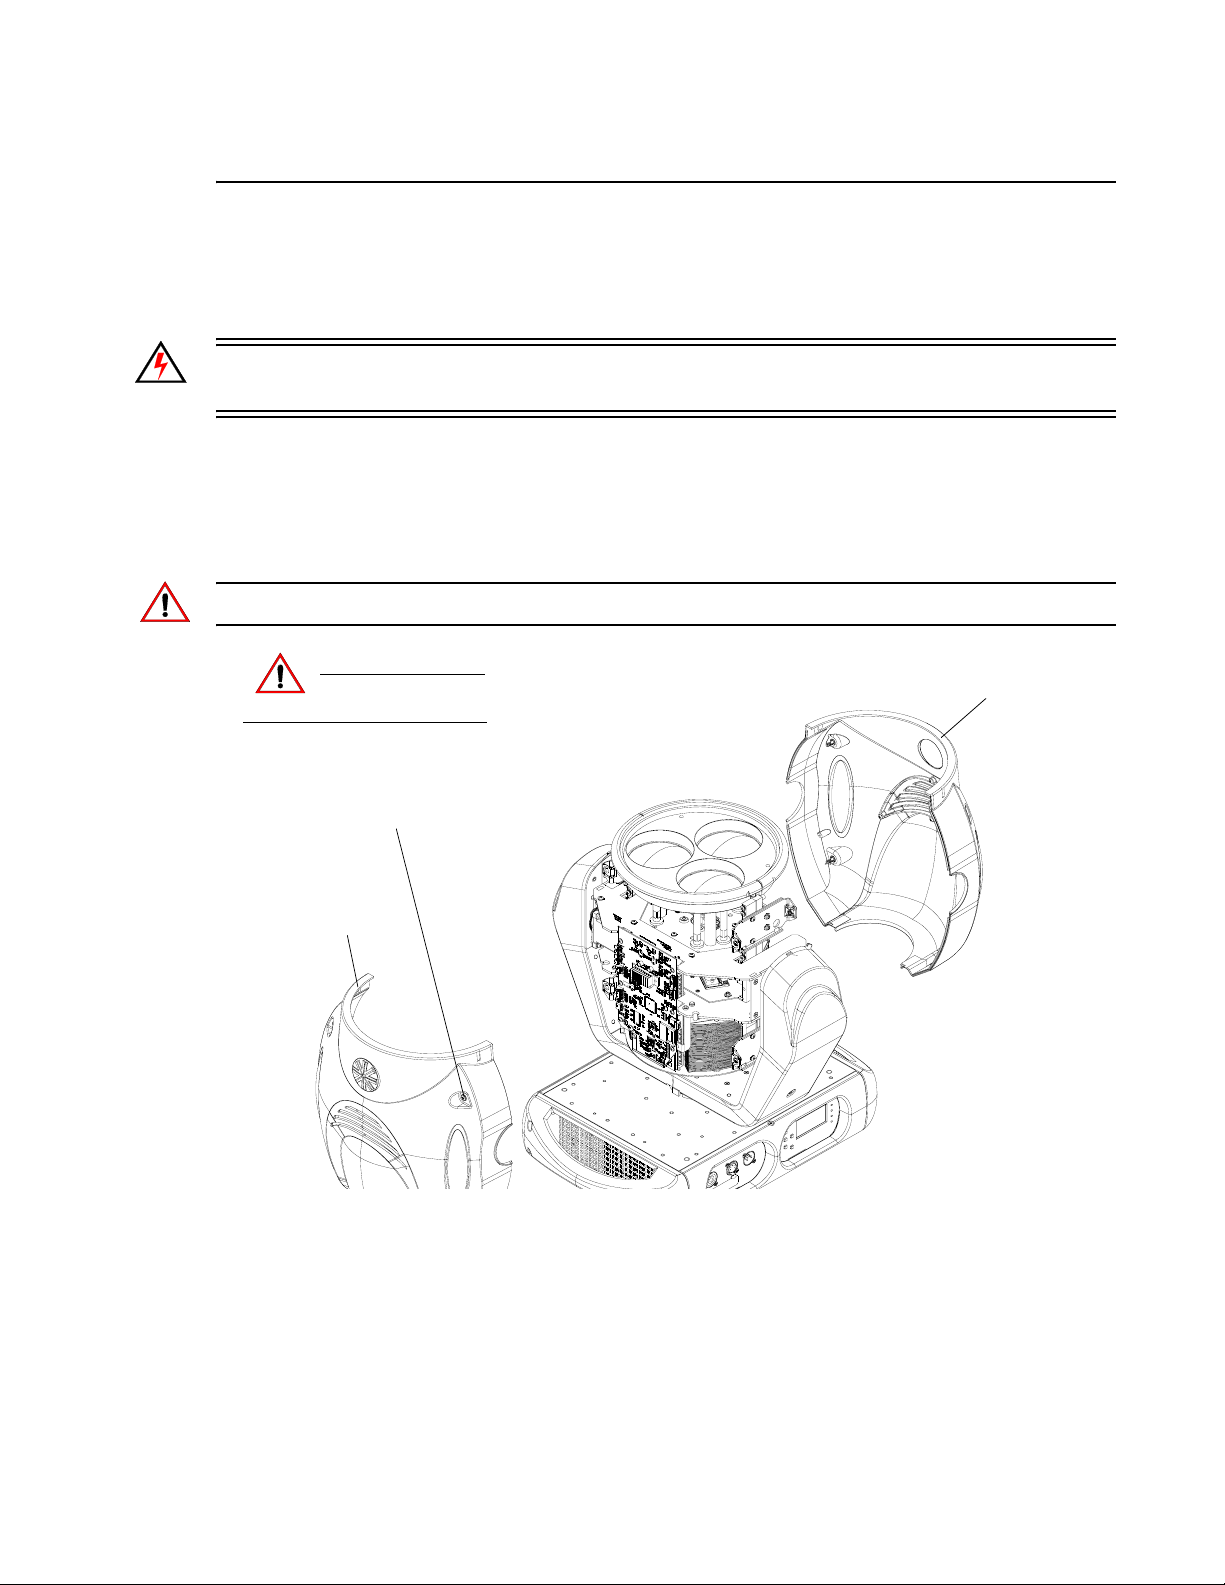
Step 2. As illustrated in Figure 2-1, remove both head covers by loosening each quarter-turn Dzus
fastener - four per cover.
Note: Each cover is secured by a safety tether. Locate clip attached to cover and unclip tether.
Remove power and
CAUTION:
Quart-Turn Dzus
Fasteners (x4)
Head Cover
allow fixture to cool.
Zoom Assembly
Head Cover
Figure 2-1: VLX3 Wash Luminaire - Removing Head Covers
18 02.9703.0010 0
Page 37
MAINTENANCE PROCEDURES : MOVING ZOOM ASSEMBLY REPLACEMENT
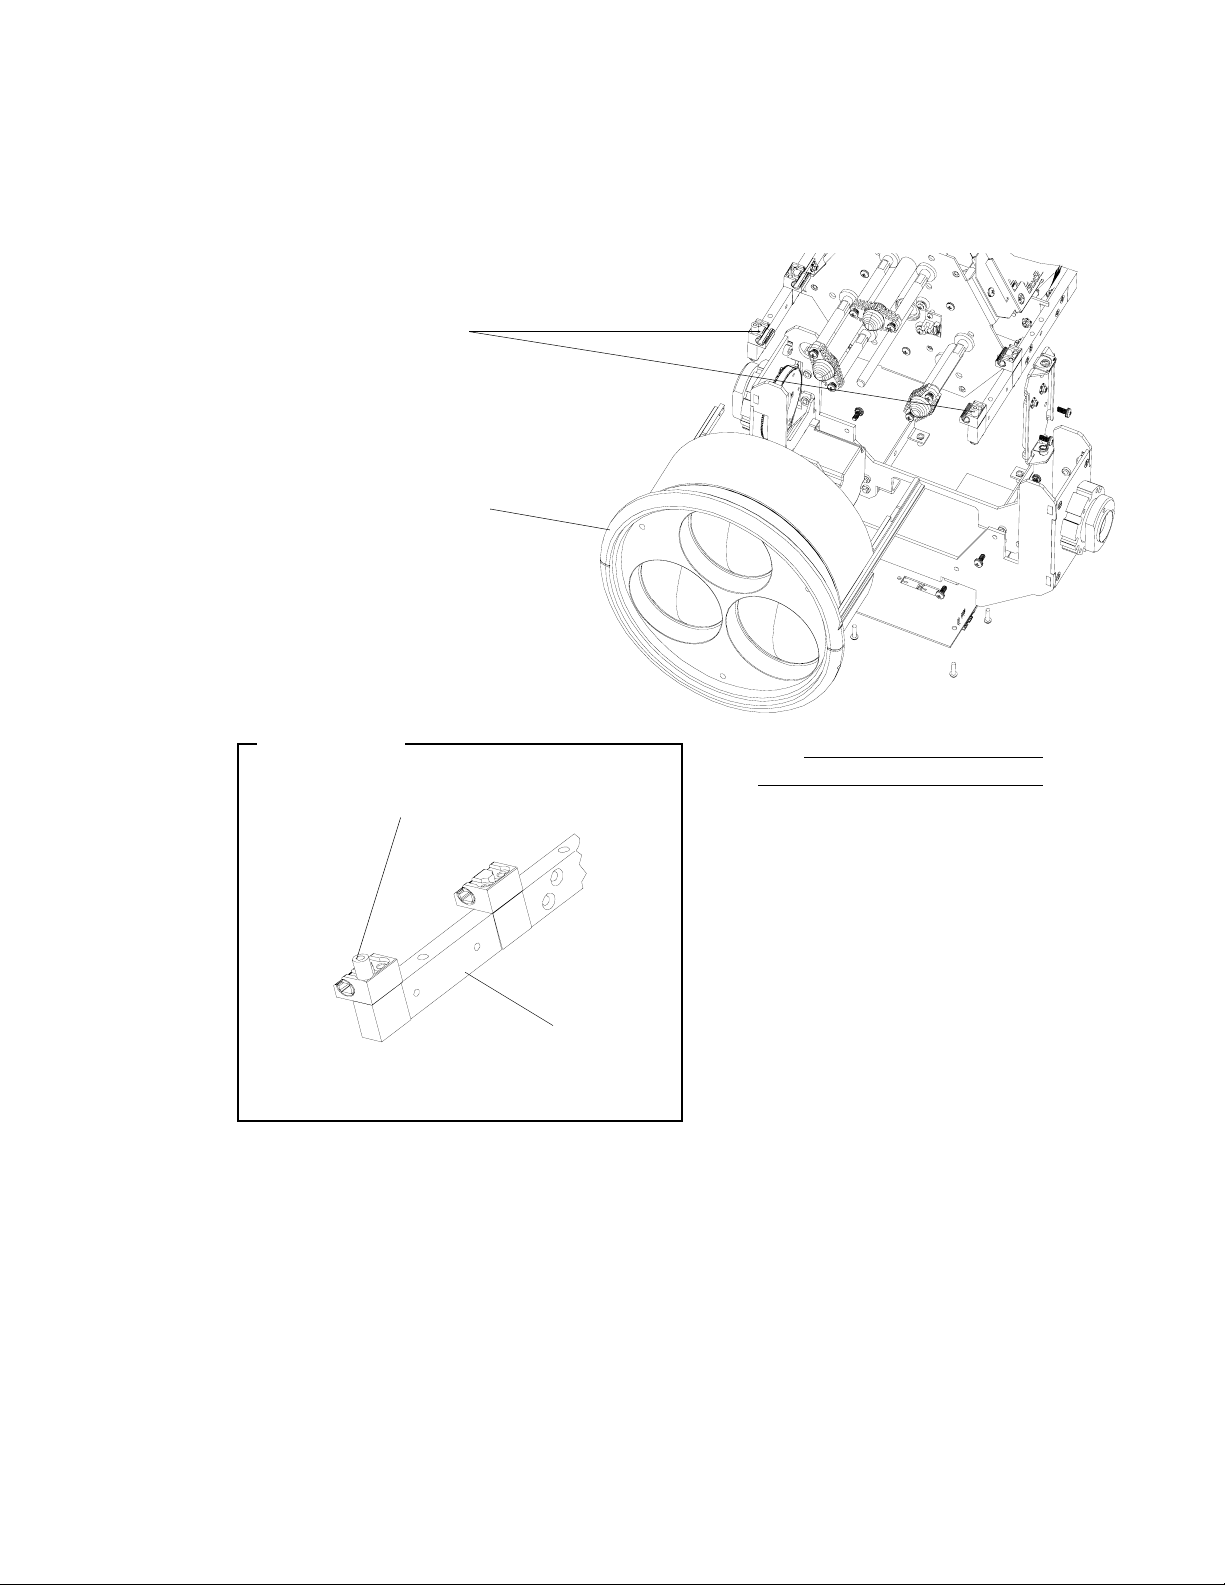
Step 3. As indicated in Figure 2-2, at each side rail, loosen (BUT, do not remove) the two M4 x
40mm screws with PVC tubing until PVC tubing can be removed and no threads stick out of
rail.
Side Rails
(see detail)
Zoom Assembly
2
Side Rail Detail
PVC Tubing
Side Rail
Figure 2-2: VLX3 Wa sh Zoom Assembly Removal
Step 4. Carefully slide Zoom Assembly off actuator motor.
Step 5. Reassemble in reverse order.
Step 6. Power luminaire and test.
Note:
Some components not shown for clarity.
02.9703.0010 0 19
Page 38
VARI❋LITE - VLX3 LED WASH LUMINAIRE SERVICE MANUAL
Main Control Board (MCB) Replacement
Tools:
• #2 Phillips screwdriver
WARNING: Ensure that power is completely removed (disconnected) from luminaire before
attempting any work.
To remove MCB assembly:
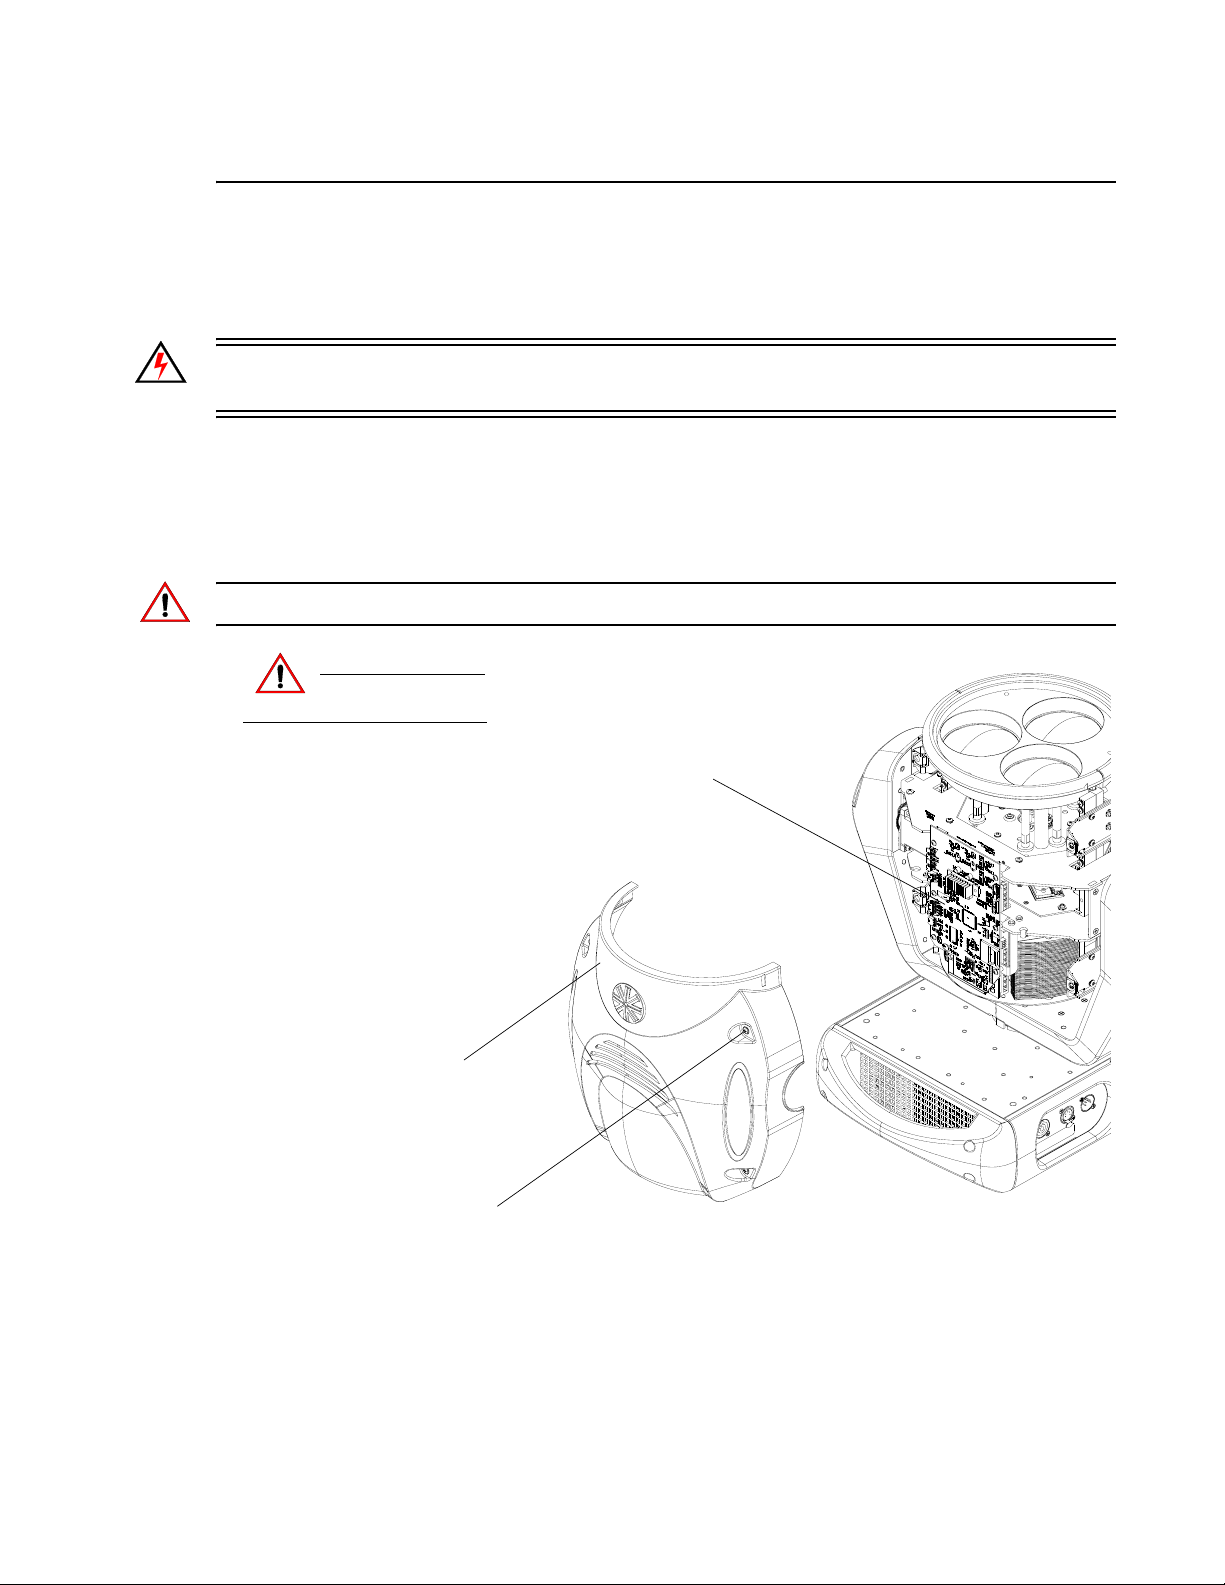
Step 1. Remove power from luminaire and allow unit to completely cool.
Step 2. As illustrated in Figure 2-3, remove MCB side head cover (side with closest to the two
lenses) by loosening the four quarter-turn Dzus fasteners.
Note: Each cover is secured by a safety tether. Locate clip attached to cover and unclip tether
CAUTION:
Remove power and
allow fixture to cool.
Head Cover
Quart-Turn Dzus
Fasteners (x4)
Main Control Board (MCB)
Figure 2-3: VLX3 Wash MCB Removal
20 02.9703.0010 0
Page 39
MAINTENANCE PROCEDURES : MAIN CONTROL BOARD (MCB) REPLACEMENT
2
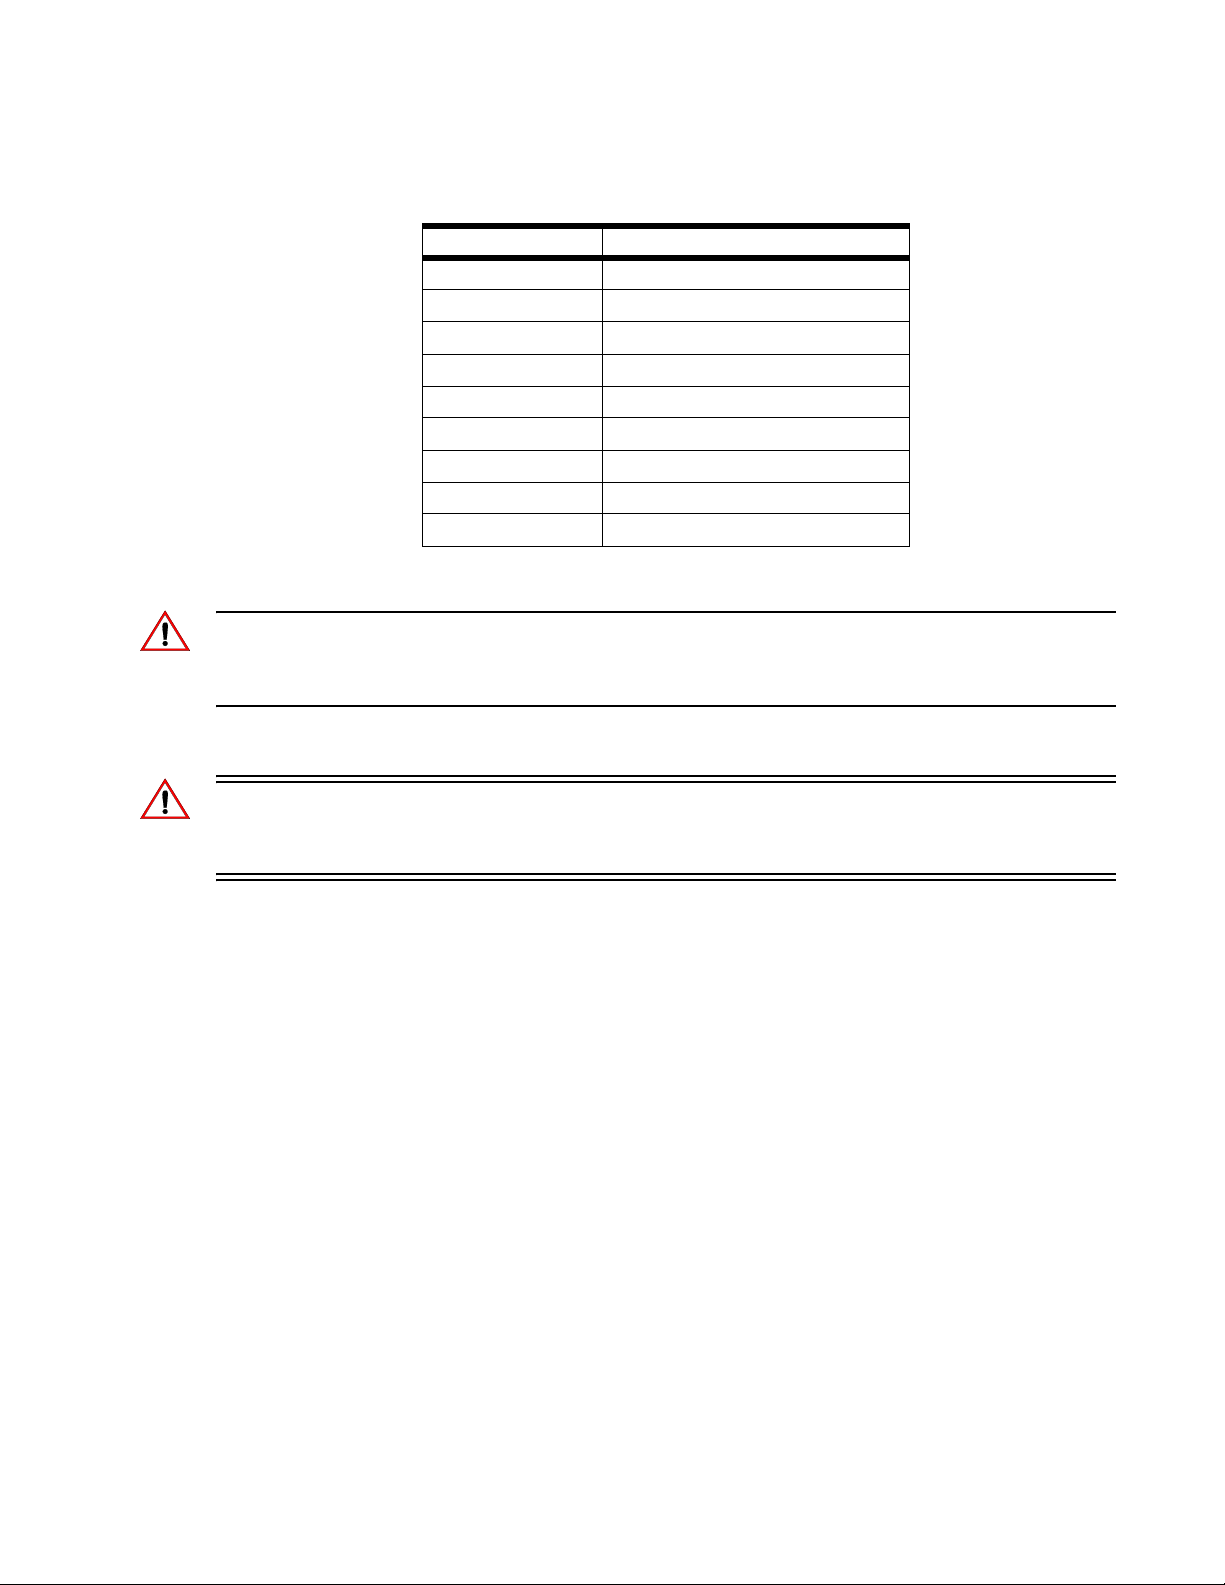
Step 3. At MCB, disconnect wiring (note all wire routing):
MCB Connector Cable Assembly
J5 36 VDC
J6 Wireless DMX
J7 DMX Comm
J8 LED Driver Comm
J9 Pan Motor*
J10 Display
J12 Zoom Motor and Sensor
J13 Pan Encoder
J14 Tilt Motor, Sensor and Encoder
Table 2-3: VLX3 Wa sh MCB Connections
CAUTION: *It is possible to reconnect Pan Motor connector (J9) in the wrong orientation. Pay
attention to the small key indicator on connector and always make sure blue wire is towards front of
fixture.
Step 4. At MCB assembly, remove assembly by removing six 6-32 x 1/2" PPZ SEMS screws
IMPORTANT! Color Calibration must be re-installed using dropCal and Vari-Lite Programming
Dongle. See “VLX3 Wash dropCal (Reinstall Factory LED Calibration)” on page 50 for more
information and procedure.
Step 5. Install replacement MCB by performing steps in reverse order.
Step 6. Power luminaire and test.
02.9703.0010 0 21
Page 40
VARI❋LITE - VLX3 LED WASH LUMINAIRE SERVICE MANUAL
Low Voltage Supply (LVS)/LED Power Supply Replacement
Tools:
• #2 Phillips screwdriver
WARNING: Ensure that power is completely removed (disconnected) from luminaire before
attempting any work.
To remove LVS / LED power supply assembly:
Step 1. Remove power from luminaire and allow unit to completely cool.
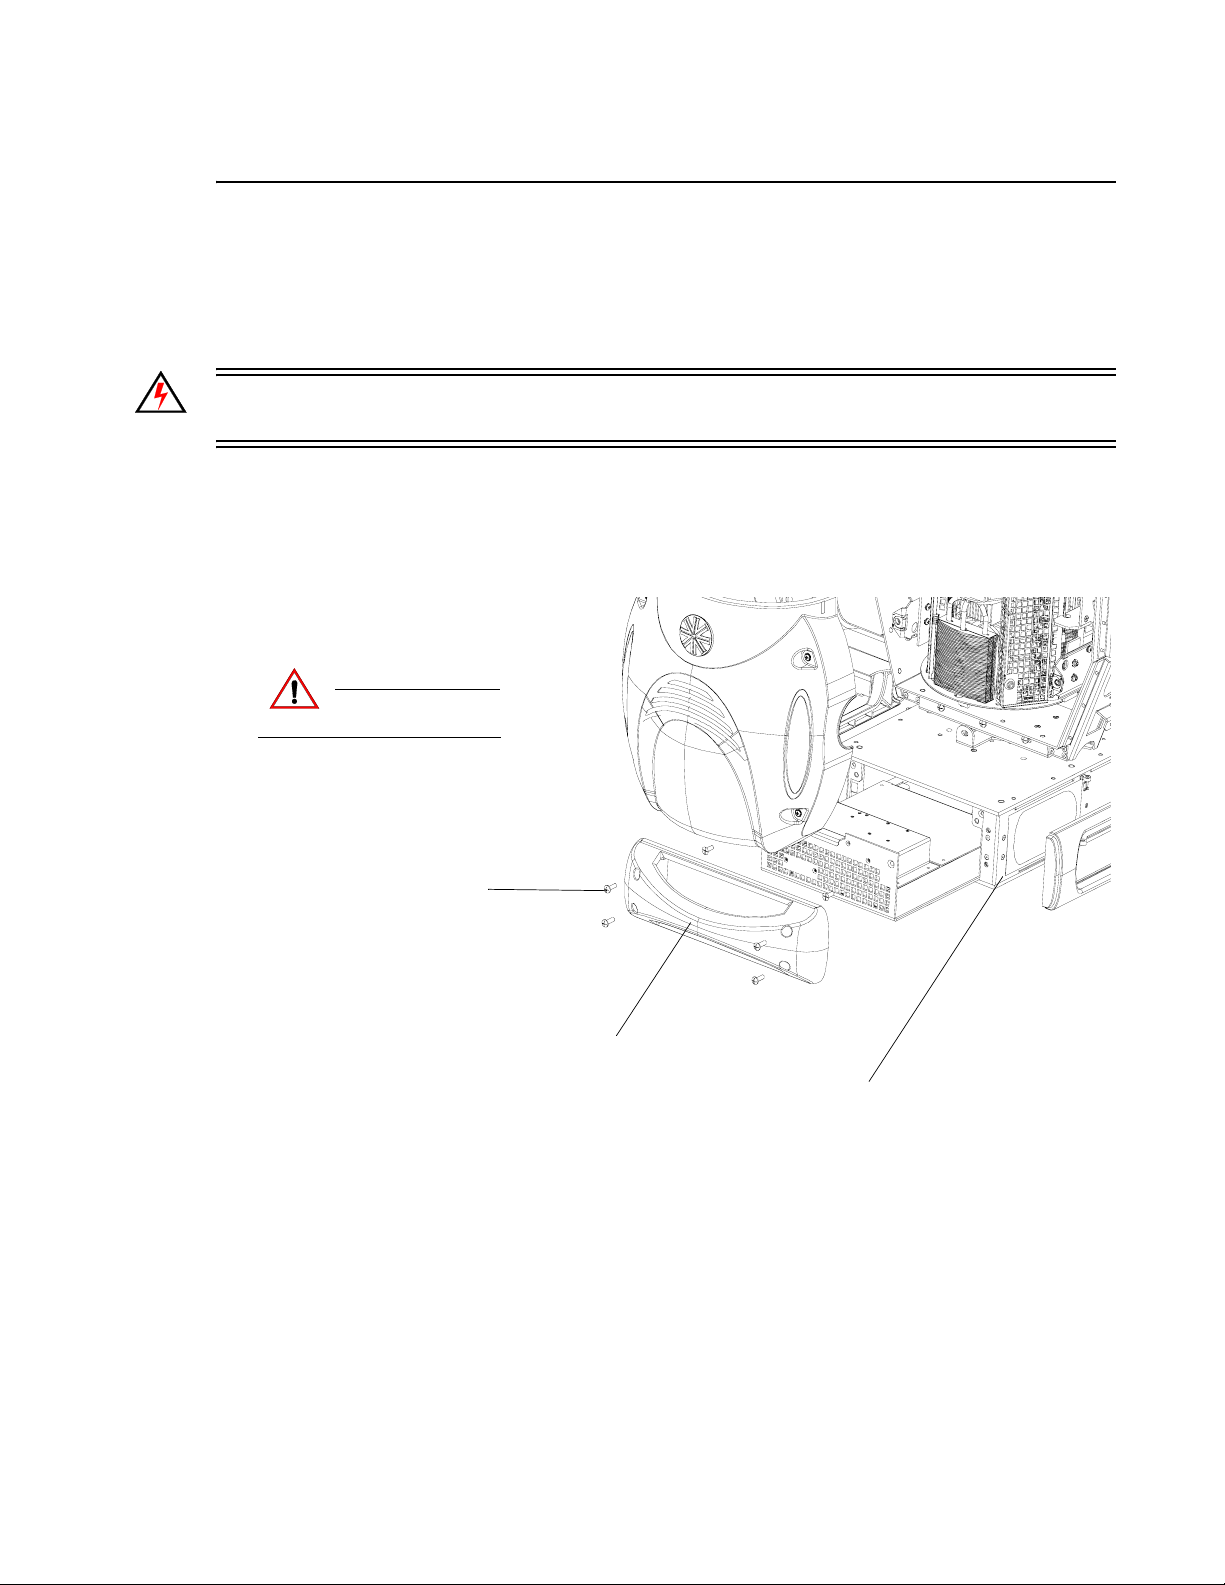
Step 2. At upper enclosure, remove display side ha ndle by removing four 1 0-32 x 5/8" PPB screws.
as shown in Figure 2-4.
Remove power and
CAUTION:
10-32 x 5/8" PPB Screws (x4)
allow fixture to cool.
Display Side Handle
Upper Enclosure
Figure 2-4: VLX3 Wash Luminaire Upper Enclosure
Step 3. Remove the inlet exhaust screen.
Step 4. Remove two 10-32 x 9/16" PFB screws securing power supply.
Step 5. Slide power supply out of enclosure. Note, the power supply is connected to wiring. Do not
pull all the way out until wiring is disconnected.
22 02.9703.0010 0
Page 41
MAINTENANCE PROCEDURES : LOW VOLTAGE SUPPLY (LVS)/LED POWER SUPPLY REPLACEMENT
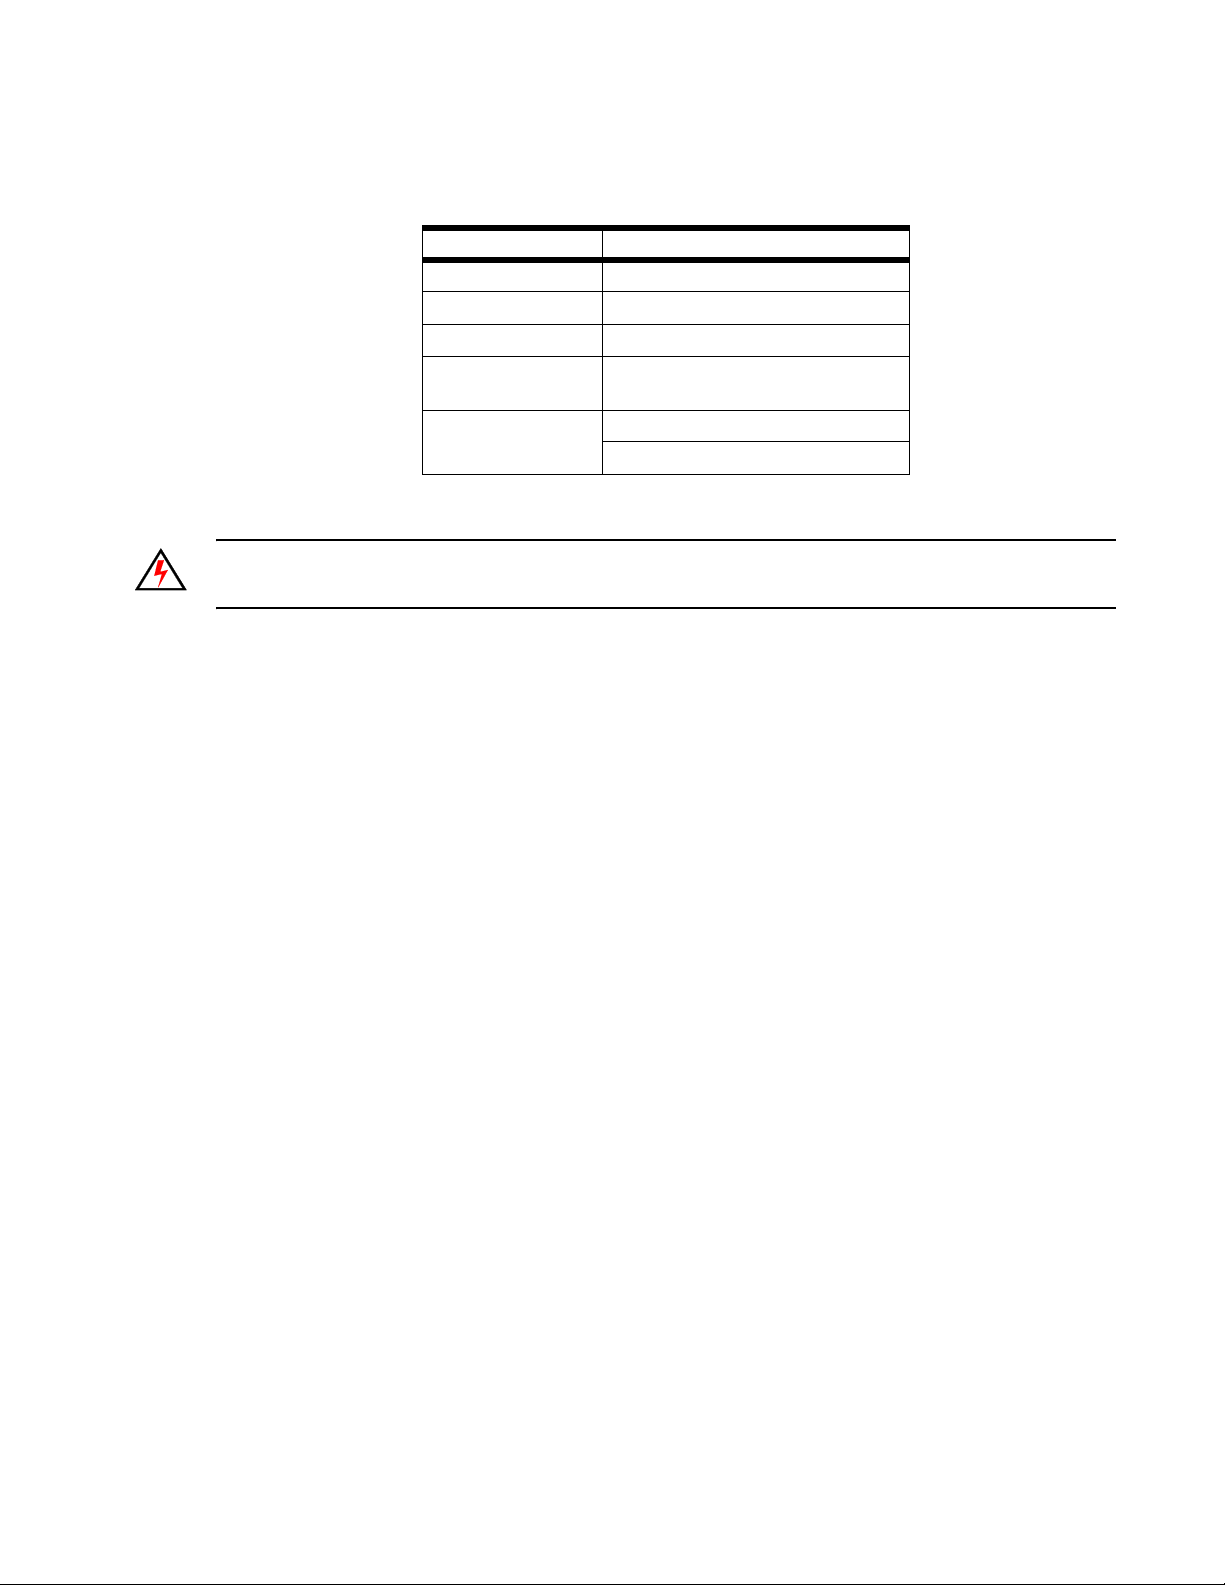
Step 6. Disconnect wiring:
Wiring Wire Descr iption
AC Line Input Black, White
Earth Ground Green / Yellow
36 VDC Output Orange, Black
Enclosure Fan Red, Black (does not matter which
wire goes where)
12 VDC Output to
LED Drivers
Step 7. Install by performing steps in reverse order.
CAUTION: When sliding power supply into upper enclosure, be sure not to pinch or damage any
wiring.
Blue - individual Negative 12 VDC
Green - Shared Positive 12 VDC
2
02.9703.0010 0 23
Page 42
VARI❋LITE - VLX3 LED WASH LUMINAIRE SERVICE MANUAL
Tilt Motor Assembly Replacement
Tools:
• #2 Phillips screwdriver
WARNING: Ensure that power is completely removed (disconnected) from luminaire before
attempting any work.
To remove tilt motor assembly:
Step 1. Remove power from luminaire and allow unit to completely cool.
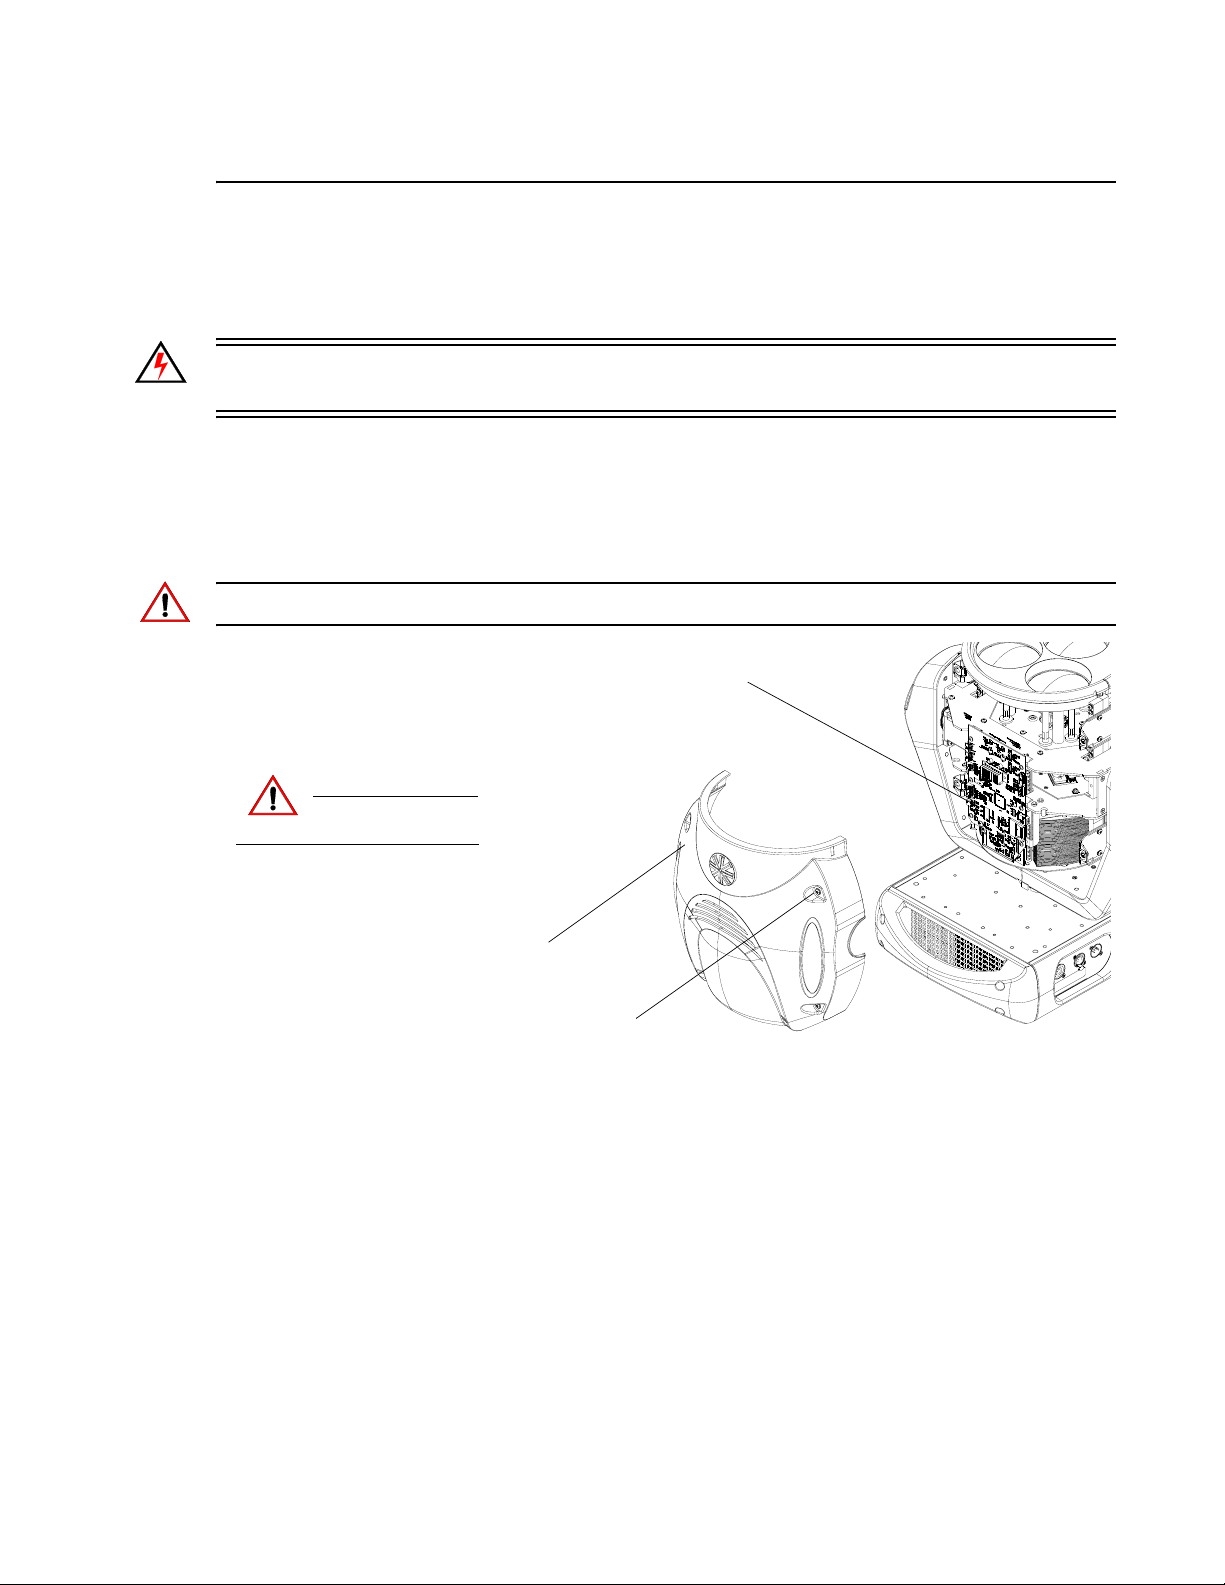
Step 2. As illustrated in Figure 2-5, remove MCB side head cover (side with closest to the two
lenses) by loosening the four quarter-turn Dzus fasteners.
Note: Each cover is secured by a safety tether. Locate clip attached to cover and unclip tether.
Main Control Board (MCB)
Remove power and
CAUTION:
allow fixture to cool.
Head Cover
Quart-Turn Dzus
Fasteners (x4)
Figure 2-5: VLX3 Wash Luminaire Head Cover Removal
Step 3. At MCB, disconnect wiring at connections J7, J13, and J14 (see Table 2-3 on page 21 for
more information).
Step 4. Disconnect motor power from tilt motor.
Step 5. Disconnect encoder wiring from encoder.
Step 6. At head cradle sides, remove four 8-32 x 3/8" PPB SEMS screws. Refer to Figure 3-3 on 68
for complete drawing.
Step 7. Carefully lift motor out of fixture, removing belt from pulley.
Step 8. Reinstall following steps in reverse order. Note, when installing replacement, before
tightening screws, pull belt tension tight.
Step 9. Power luminaire and test.
24 02.9703.0010 0
Page 43
MAINTENANCE PROCEDURES : TILT ENCODER ASSEMBLY REPLACEMENT
2
Tilt Encoder Assembly Replacement
Tools:
• #2 Phillips screwdriver
WARNING: Ensure that power is completely removed (disconnected) from luminaire before
attempting any work.
To remove tilt encoder assembly:
Step 1. Remove power from luminaire and allow unit to completely cool.
Step 2. Remove tilt motor assembly by following procedure in “Tilt Motor Assembly Replacement”
on page 24.
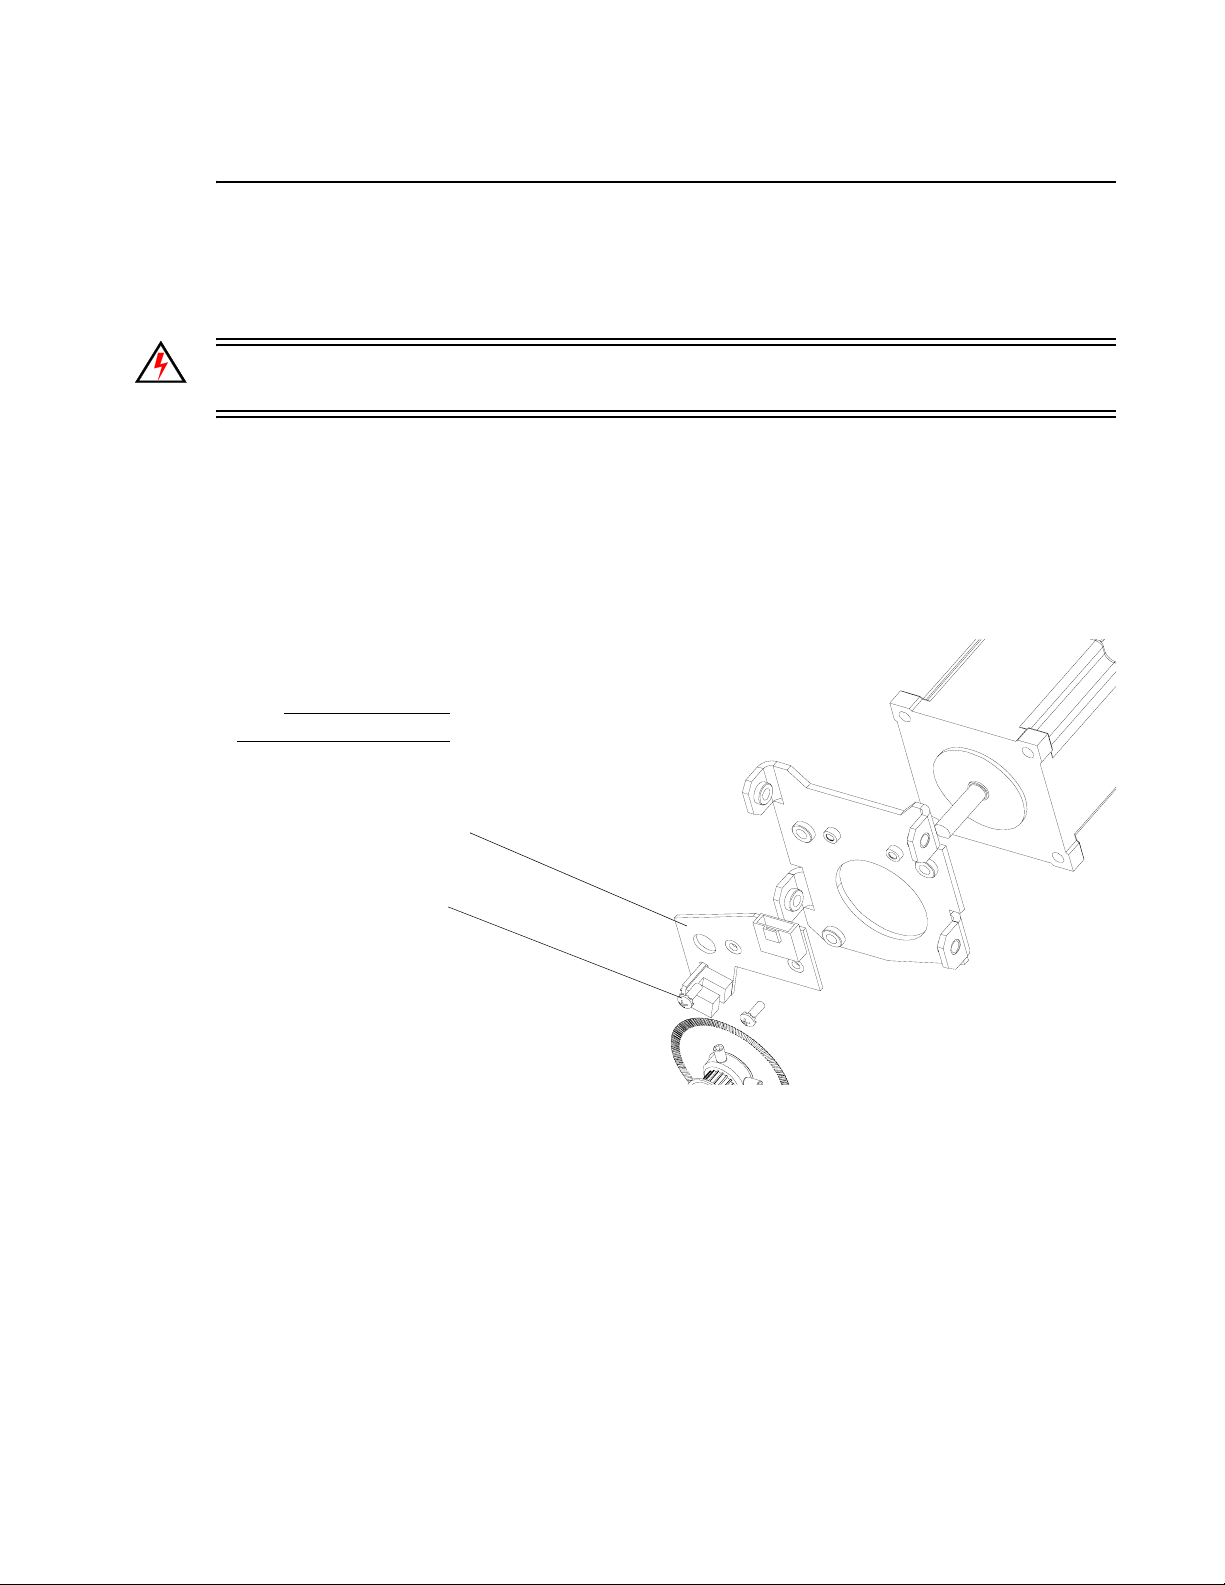
Step 3. As shown in Figure 2-6, remove two 4-40 x 5/16" PPZ SEMS screws and remove encoder.
Note:
Drawing exploded for clarity.
Tilt Encoder Assembly
4-40 x 5/16" PPZ SEMS
SEMS Screws (x2)
Figure 2-6: Tilt Motor Encoder Assembly
Step 4. Reassemble by following steps in reverse order.
Step 5. Power luminaire and test.
02.9703.0010 0 25
Page 44
VARI❋LITE - VLX3 LED WASH LUMINAIRE SERVICE MANUAL
Tilt Sensor Assembly Replacement
Tools:
• #2 Phillips screwdriver
WARNING: Ensure that power is completely removed (disconnected) from luminaire before
attempting any work.
To remove tilt sensor assembly:
Step 1. Remove power from luminaire and allow unit to completely cool.
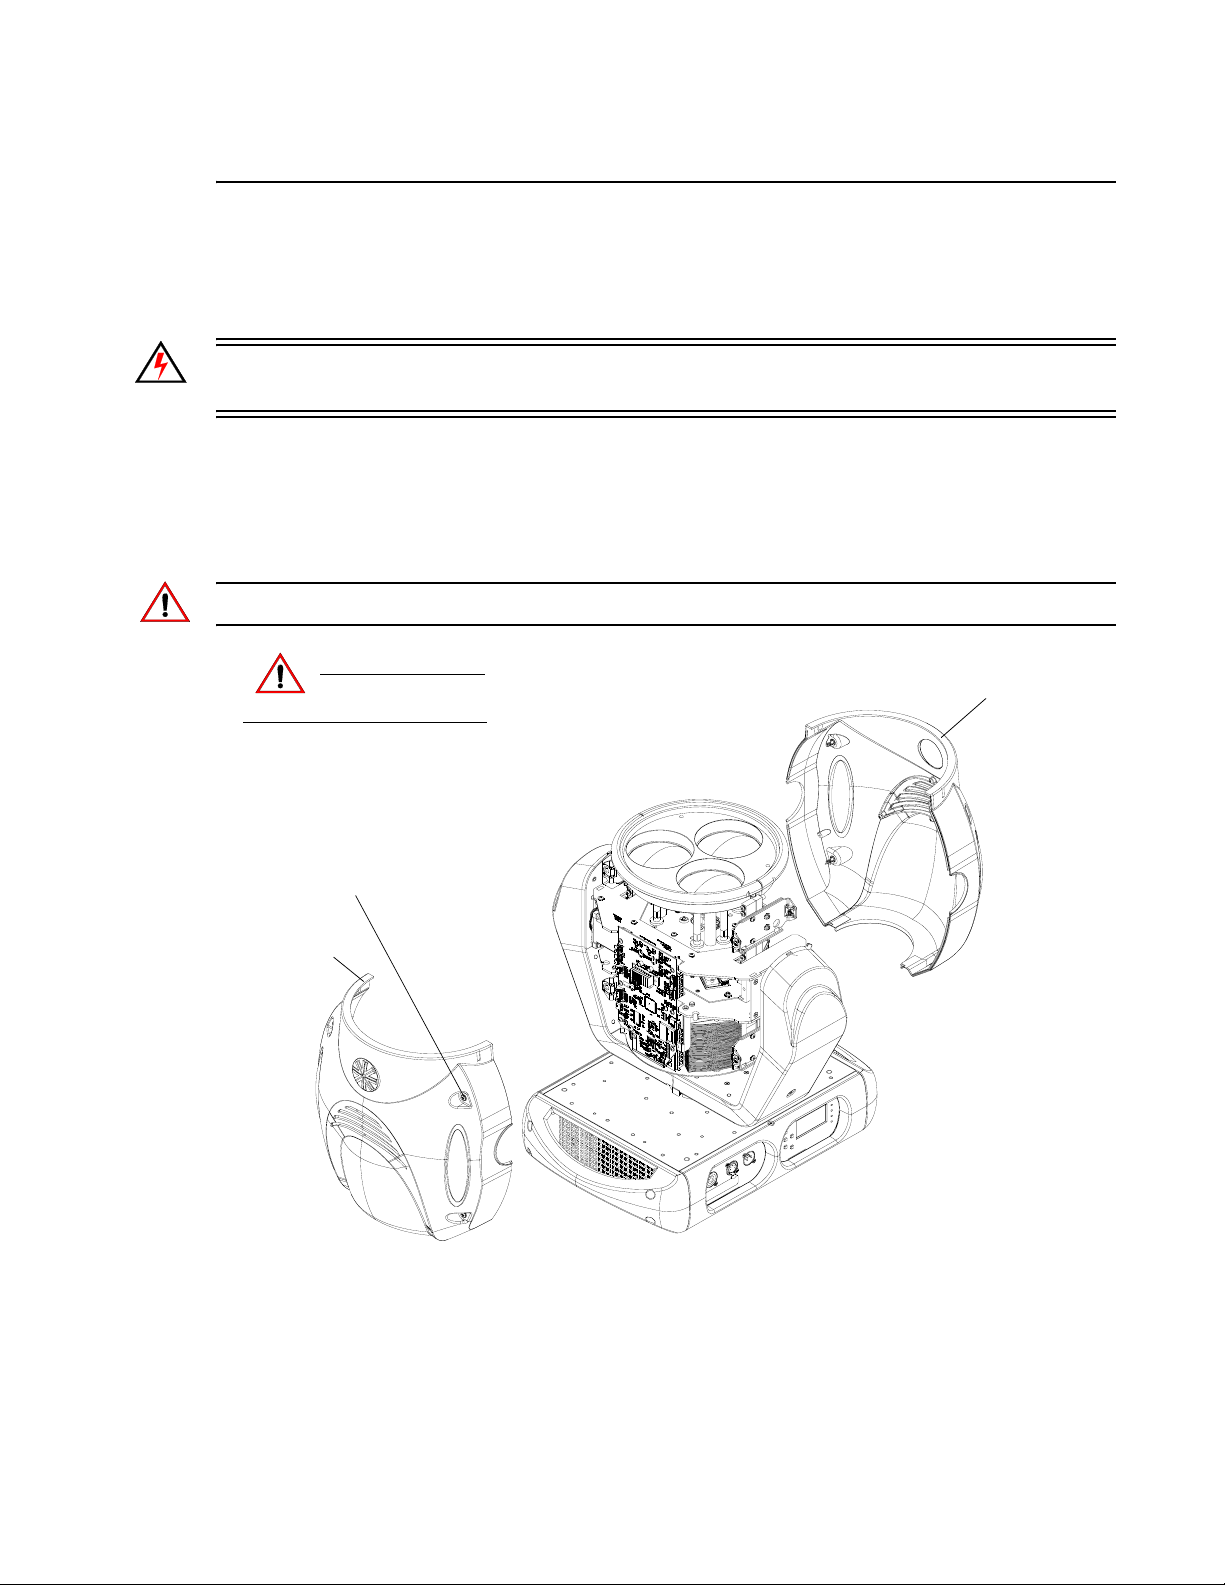
Step 2. As illustrated in Figure 2-7, remove both head covers by loosening each quarter-turn Dzus
fastener - four per cover.
Note: Each cover is secured by a safety tether. Locate clip attached to cover and unclip tether.
Remove power and
CAUTION:
Quart-Turn Dzus
Fasteners (x4)
Head Cover
allow fixture to cool.
Head Cover
Figure 2-7: VLX3 Wash Luminaire - Removing Head Covers
26 02.9703.0010 0
Page 45
MAINTENANCE PROCEDURES : TILT SENSOR ASSEMBLY REPLACEMENT
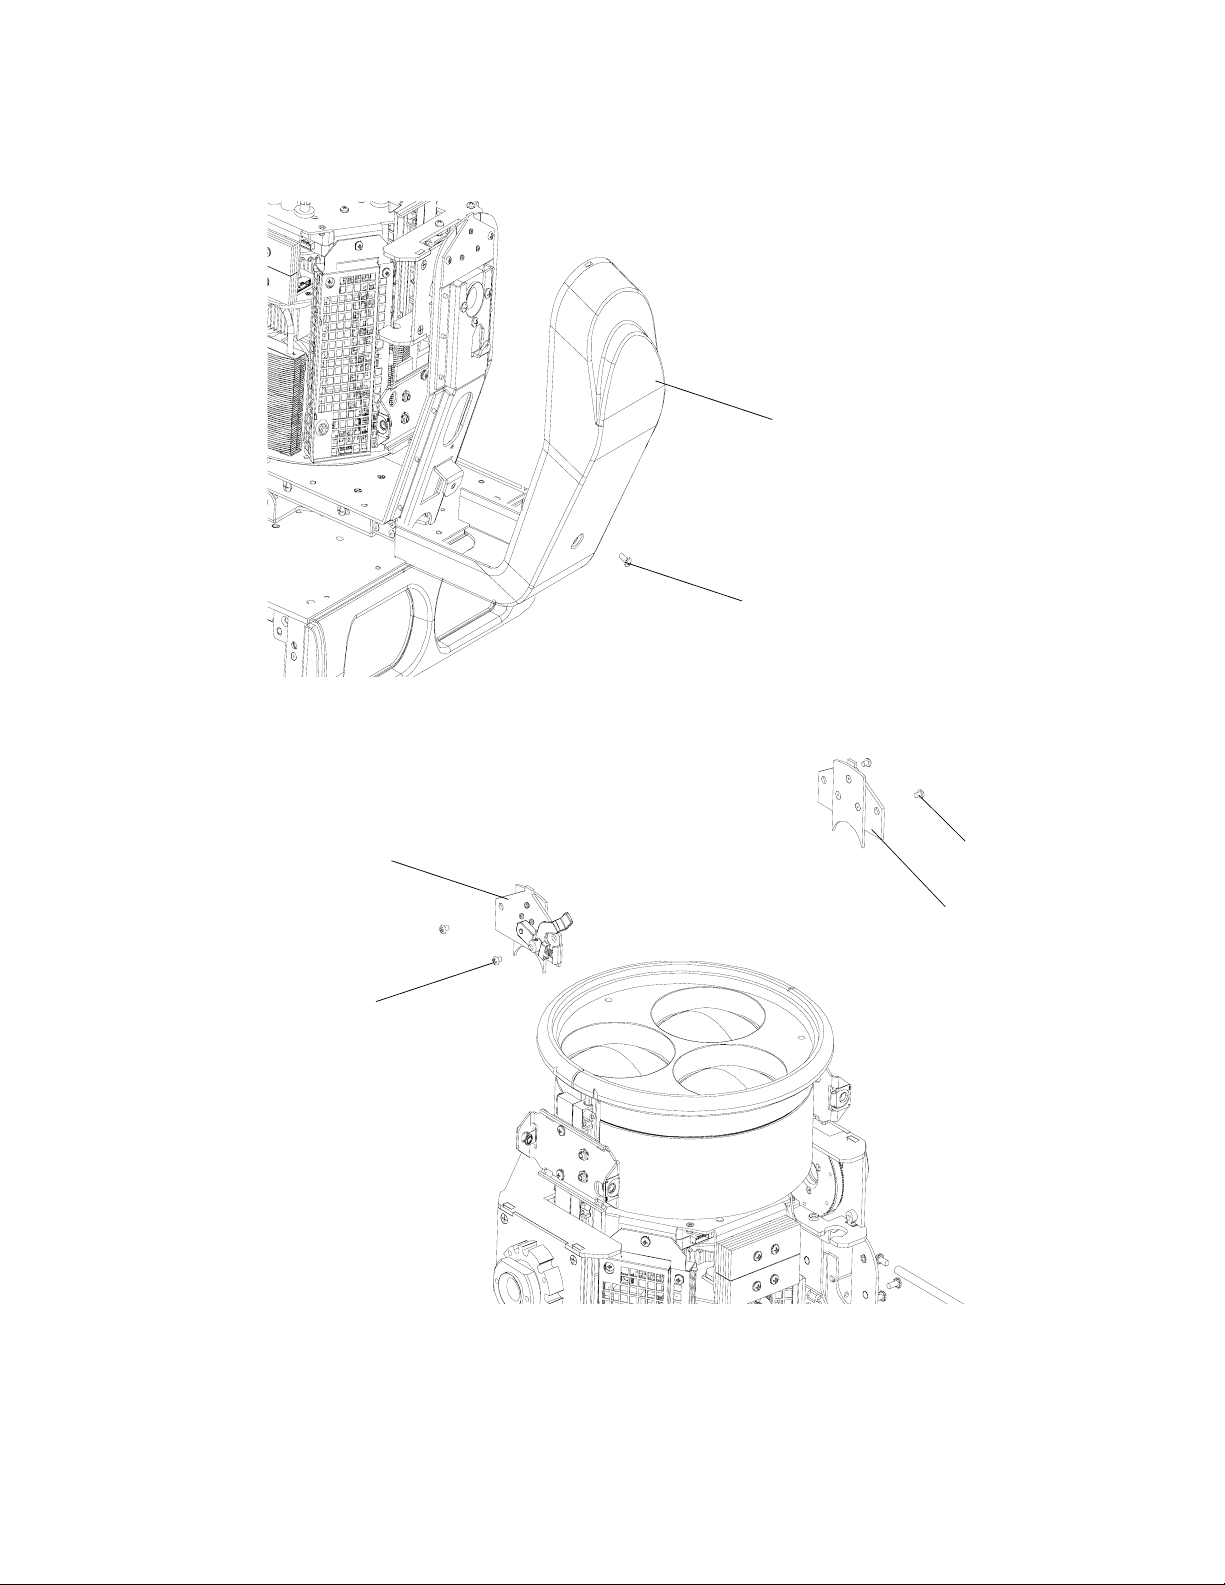
Step 3. Remove both yoke covers by removing one 8-32 x 3/8" PPB SEMS screws per cover.
Yoke Arm Cover (x2)
8-32 x 3/8" PPB SEMS Screw (x2)
2
Figure 2-8: VLX3 Wash Yoke Arm Cover Removal
Step 4. As shown in Figure 2-9, remove tilt lock by removing two 6-32 x 3/16" PPB screws.
Tilt Lock Assembly
6-32 x 3/16"
PPB Screw (x2)
6-32 x 3/16"
PPB Screw (x2)
Yoke Filler
Figure 2-9: VLX3 Wash Yoke Assembly
Step 5. Remove yoke filler by removing two 6-32 x 3/16" PPB screws as illustrated in Figure 2-9.
02.9703.0010 0 27
Page 46
VARI❋LITE - VLX3 LED WASH LUMINAIRE SERVICE MANUAL
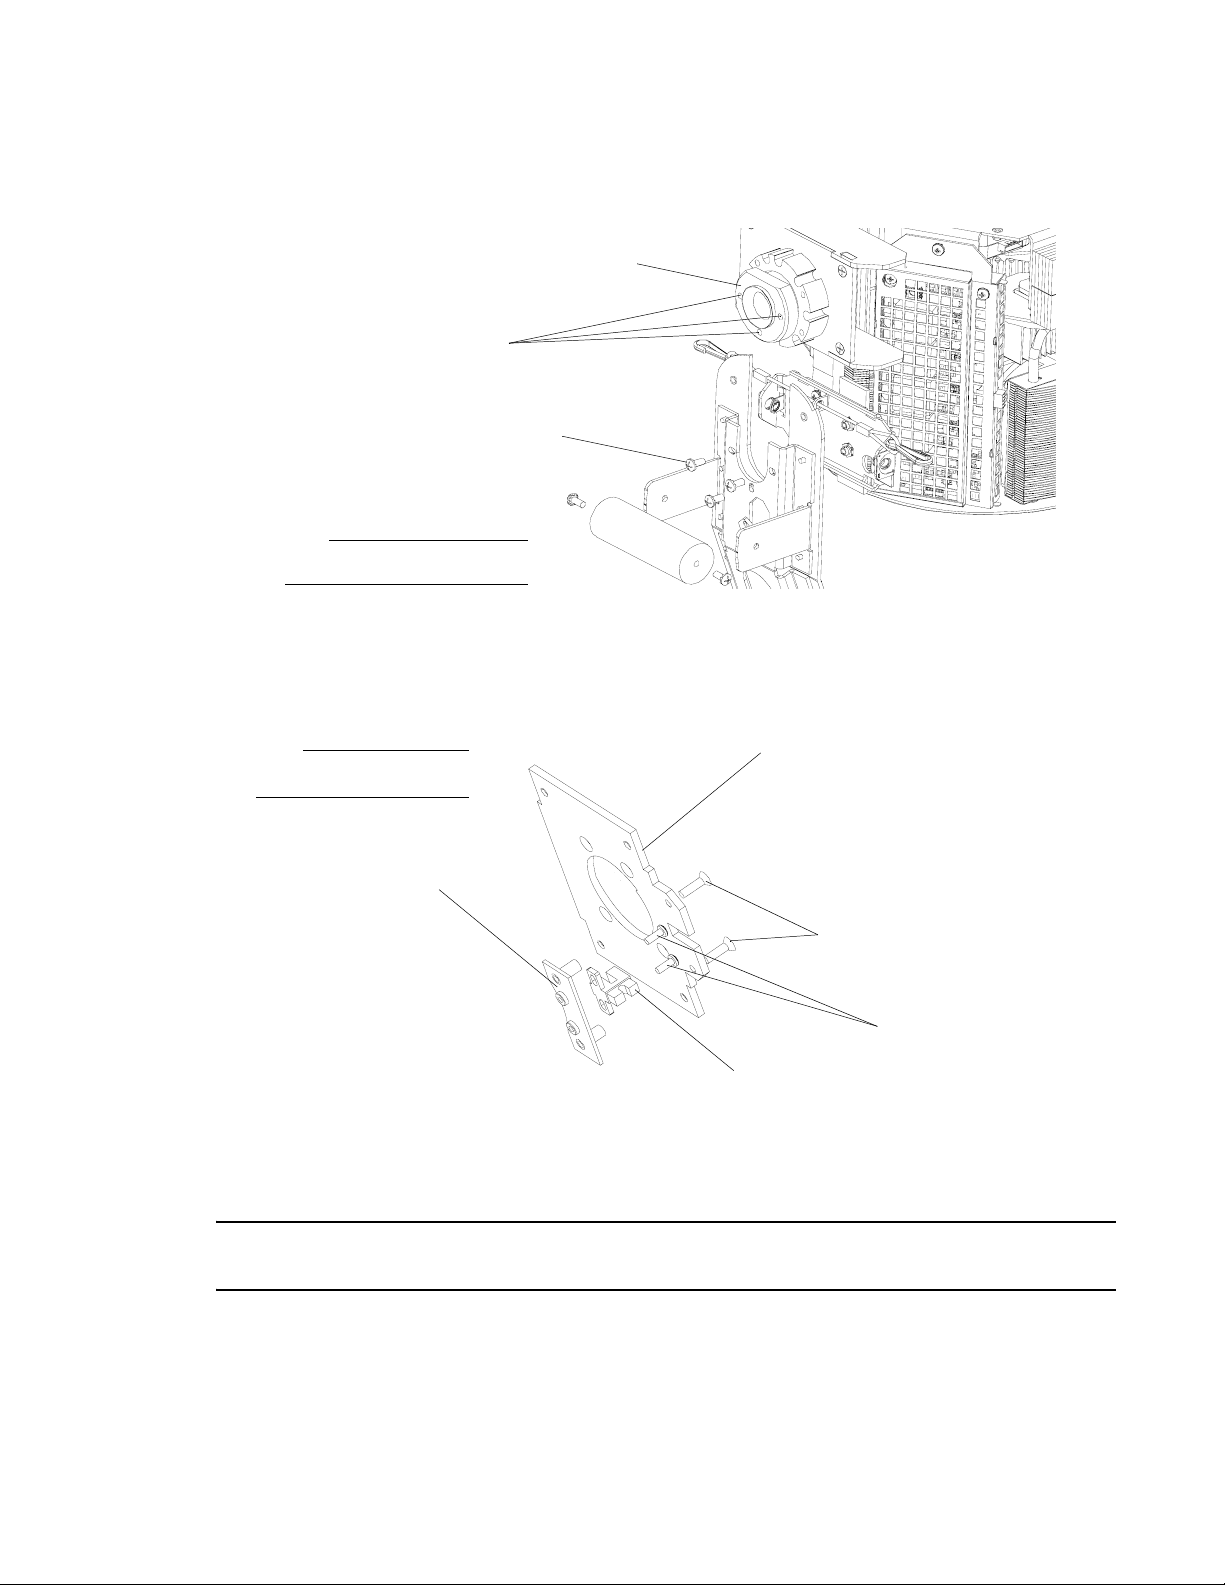
Step 6. Remove six (note, three per side) 8-32 x 3/8" PPB SEMS screws tilt sensor into yoke on
each side.
Tilt Bearing Assembly
Mounting Holes
8-32 x 3/8"
PPB SEMS (x3)
Note:
Drawing exploded for clarity. One
side shown. Same for both sides.
Step 7. Tilt head beyond stop (in both directions) so sensor mounting bracket screws are accessible
in yoke slot.
Step 8. As shown in Figure 2-10, at Right Tilt Tube Assembly, remove two 6-32 x 1/2" PFZ screws,
1 at a time by tilting head side to side.
Note:
Components removed and
drawing exploded for clarity.
Tilt Sensor Bracket
Right Tilt Tube Mount
6-32 x 1/2" PFZ
4-40 x 5/16" PFZ
Tilt Sensor
Figure 2-10: Tilt Sensor Removal
Step 9. Remove tilt sensor bracket
Step 10. Remove two 4-40 x 5/16" PPZ screws and remove sensor
Note: Before reassembly, make sure to align bearing mounting holes with yoke assembly to install six
8-32 x 3/8" PPB SEMS screws removed in Step 6.
Step 11. Reassemble by following steps in reverse order.
Step 12. Power luminaire and test.
28 02.9703.0010 0
Page 47
MAINTENANCE PROCEDURES : LED DRIVER ASSEMBLY REPLACEMENT
2
LED Driver Assembly Replacement
Tools:
• #2 Phillips screwdriver
WARNING: Ensure that power is completely removed (disconnected) from luminaire before
attempting any work.
To remove LED driver assemblies:
Step 1. Remove power from luminaire and allow unit to completely cool.
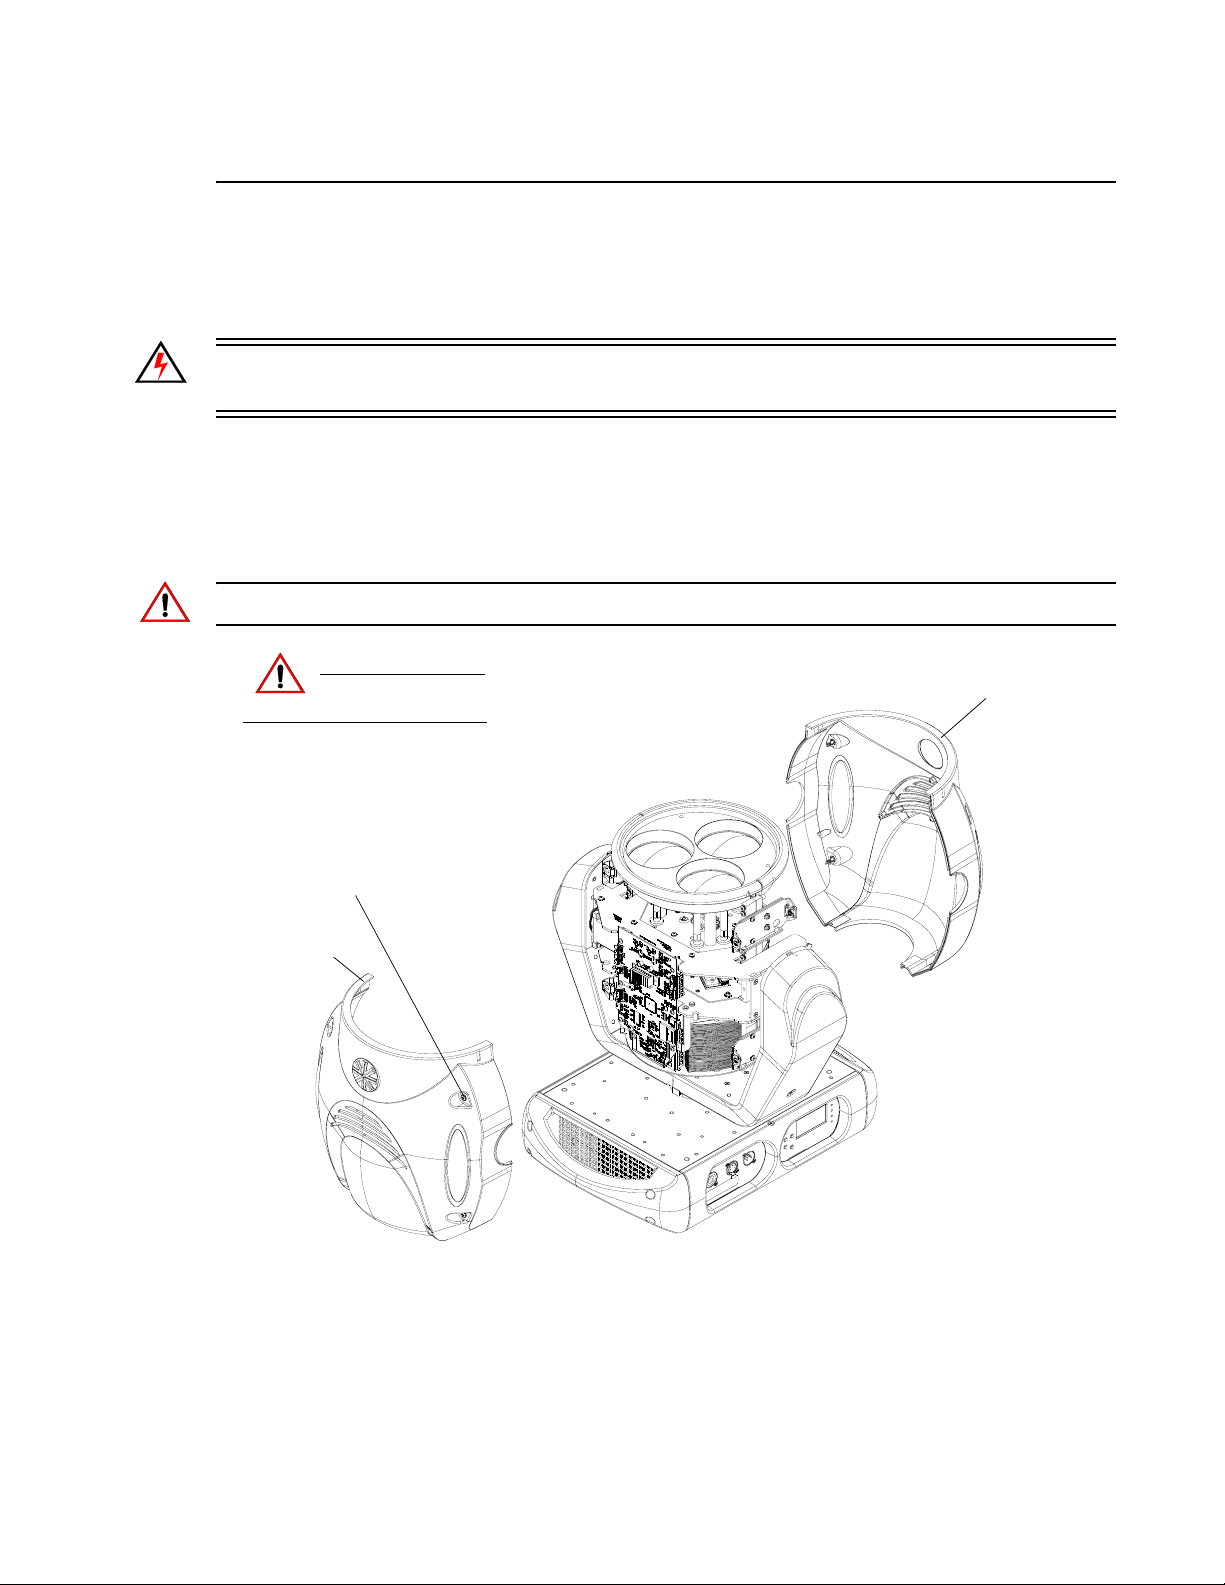
Step 2. As illustrated in Figure 2-11, remove both head covers by loosening each quarter-turn Dzus
fastener - four per cover.
Note: Each cover is secured by a safety tether. Locate clip attached to cover and unclip tether.
Remove power and
CAUTION:
Quart-Turn Dzus
Fasteners (x4)
Head Cover
allow fixture to cool.
Head Cover
Figure 2-11: VLX3 Wash Luminaire - Removing Head Covers
02.9703.0010 0 29
Page 48
VARI❋LITE - VLX3 LED WASH LUMINAIRE SERVICE MANUAL
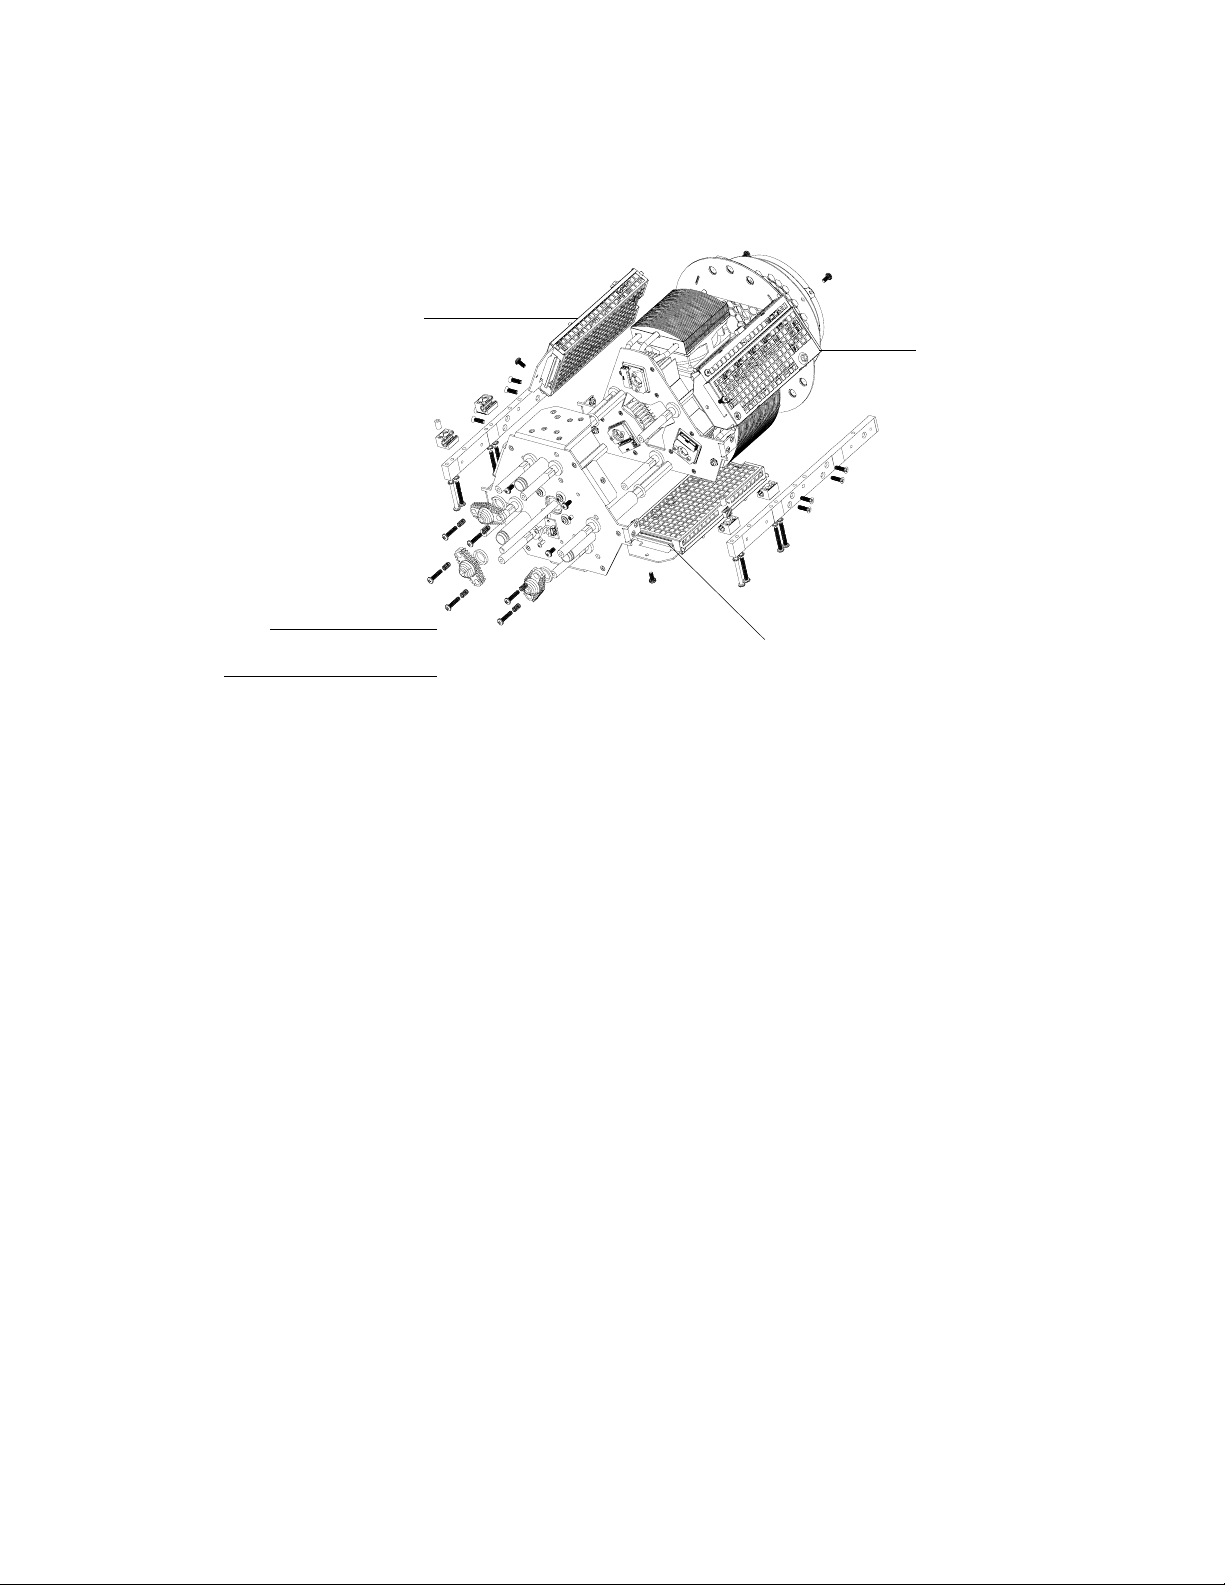
Step 3. Determine which procedure to follow - LED Driver 1, LED Driver, 2 or LED Driver 3 (or
all).
LED Driver Board
Note:
Components removed and
drawing exploded for clarity.
LED Driver Board
LED Driver Board
Figure 2-12: VLX3 Wash LED Driver Boards
Step 4. To remove LED Driver Board #1:
a. Remove MCB (see “Main Control Board (MCB) Replacement” on page 20).
b. At Driver Board, disconnect -12vdc (Blue wire). Hold standoff in place, DO NOT
remove standoff from Driver Board.
c. Remove one M4 x 10MM PPZ SEMS screw mounting driver board to +12vdc buss.
Note the green +12vdc wires attached.
d. Cut any cable ties holding wiring too LED driver board cage.
e. Carefully slide LED Driver Board from Mother Board.
f. Disconnect FAN from LED Driver Board.
g. Disconnect wiring from LED.
Step 5. To remove LED Driver Board #2:
a. At Driver Board, disconnect -12vdc (Blue wire). Hold standoff in place, DO NOT
remove standoff from Driver Board.
b. Remove one x M4 x 10MM PPZ SEMS screw mounting driver board to +12vdc buss.
c. Cut any cable ties holding wiring to LED driver board cage.
d. Carefully slide LED Driver Board from Mother Board.
e. Disconnec t FAN from LED Driver Board.
f. Disconnect wiring from LED
Step 6. To remove LED Driver Board #3:
a. At Driver Board, disconnect -12vdc (Blue wire). Hold standoff in place, DO NOT
remove standoff from Driver Board.
30 02.9703.0010 0
Page 49

MAINTENANCE PROCEDURES : LED DRIVER ASSEMBLY REPLACEMENT
b. Remove one M4 x 10MM PPZ SEMS screw mounting driver board to +12vdc buss.
Note the green ground wires attached.
c. Cut any cable ties holding wiring too LED driver board cage.
d. Carefully slide LED Driver Board from Mother Board.
e. Disconnec t FAN from LED Driver Board.
f. Disconnect wiring from LED.
Step 7. Reassemble by following steps in reverse order.
Step 8. Power luminaire and test.
2
02.9703.0010 0 31
Page 50
VARI❋LITE - VLX3 LED WASH LUMINAIRE SERVICE MANUAL
Motherboard Assembly Replacement
Tools:
• #2 Phillips screwdriver
WARNING: Ensure that power is completely removed (disconnected) from luminaire before
attempting any work.
To remove motherboard assembly:
Step 1. Remove power from luminaire and allow unit to completely cool.
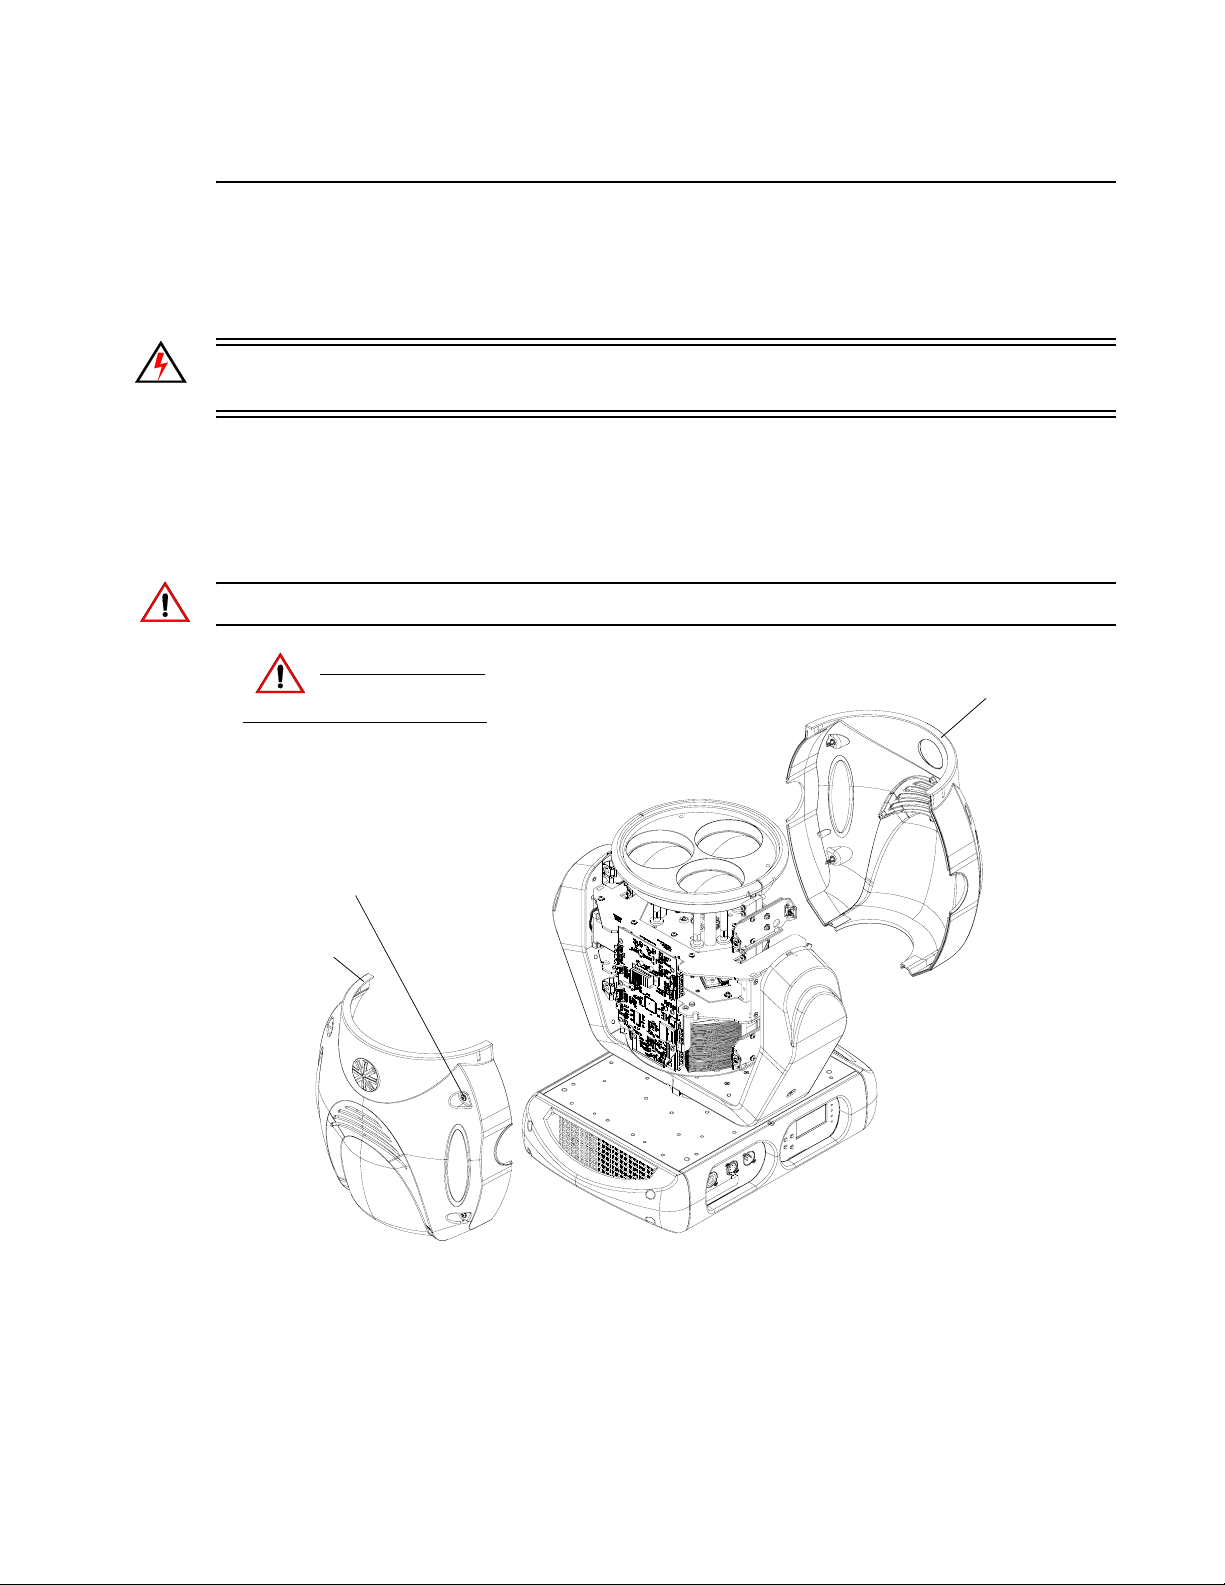
Step 2. As illustrated in Figure 2-13, remove both head covers by loosening each quarter-turn Dzus
fastener - four per cover.
Note: Each cover is secured by a safety tether. Locate clip attached to cover and unclip tether.
Remove power and
CAUTION:
Quart-Turn Dzus
Fasteners (x4)
Head Cover
allow fixture to cool.
Head Cover
Figure 2-13: VLX3 Wash Luminaire - Removing Head Covers
32 02.9703.0010 0
Page 51
MAINTENANCE PROCEDURES : MOTHERBOARD ASSEMBLY REPLACEMENT
2
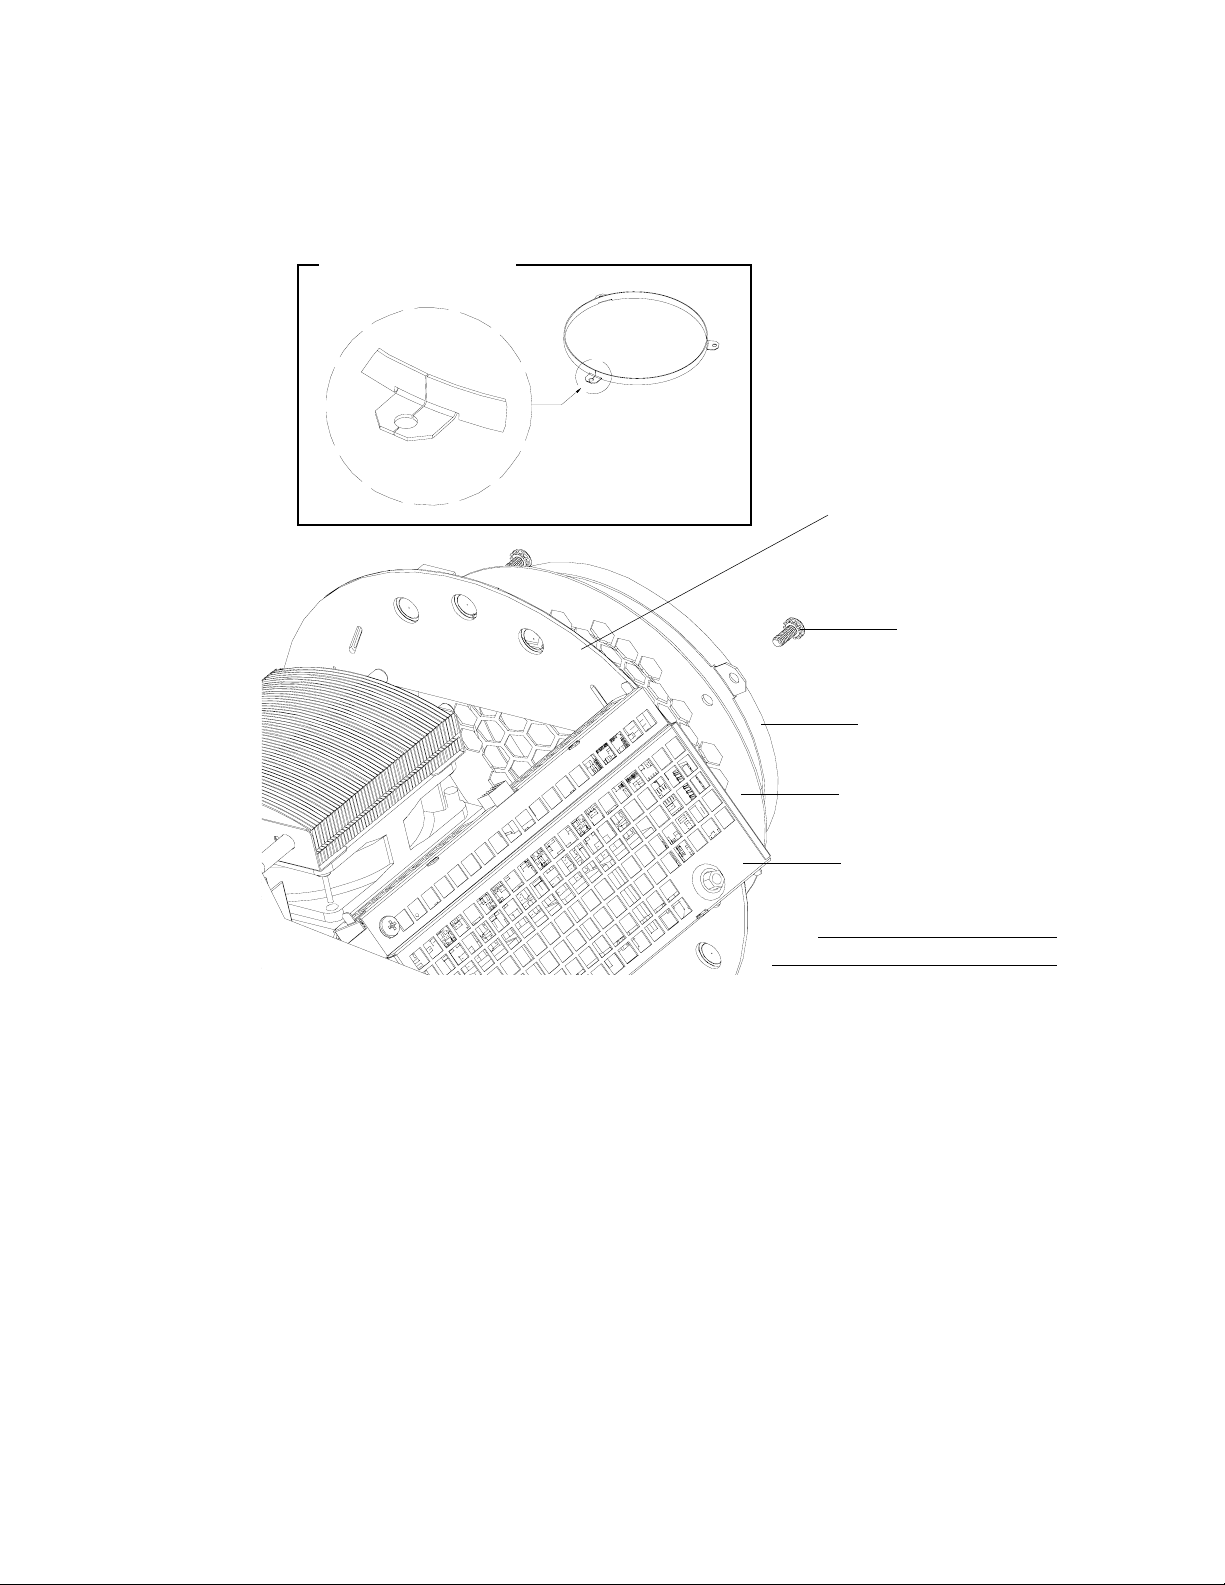
Step 3. At rear, remove three M4 x 10MM PPZ SEMS screws and remove both rear air baffle and
exhaust grill. Note, rear air baffle is split (as shown in detail in Figure 2-14).
Rear Air Baffle Detail
Baffle Split
Motherboard Assembly
M4 x 10 mm PPZ
SEMS Screws (x3)
Rear Air Baffle
Exhaust Grill
LED Driver Board
Note:
Some components not shown for clarity.
Figure 2-14: Motherboard Removal
Step 4. Disconnect wiring harness from motherboard.
Step 5. Carefully slide motherboard from LED driver board assemblies and cooling system.
Step 6. Reassemble by following steps in reverse order.
Step 7. Power luminaire and test.
02.9703.0010 0 33
Page 52
VARI❋LITE - VLX3 LED WASH LUMINAIRE SERVICE MANUAL
Light Pipe Replacement
Tools:
• #2 Phillips screwdriver
WARNING: Ensure that power is completely removed (disconnected) from luminaire before
attempting any work.
To remove light pipe assembly:
Step 1. Remove power from luminaire and allow unit to completely cool.
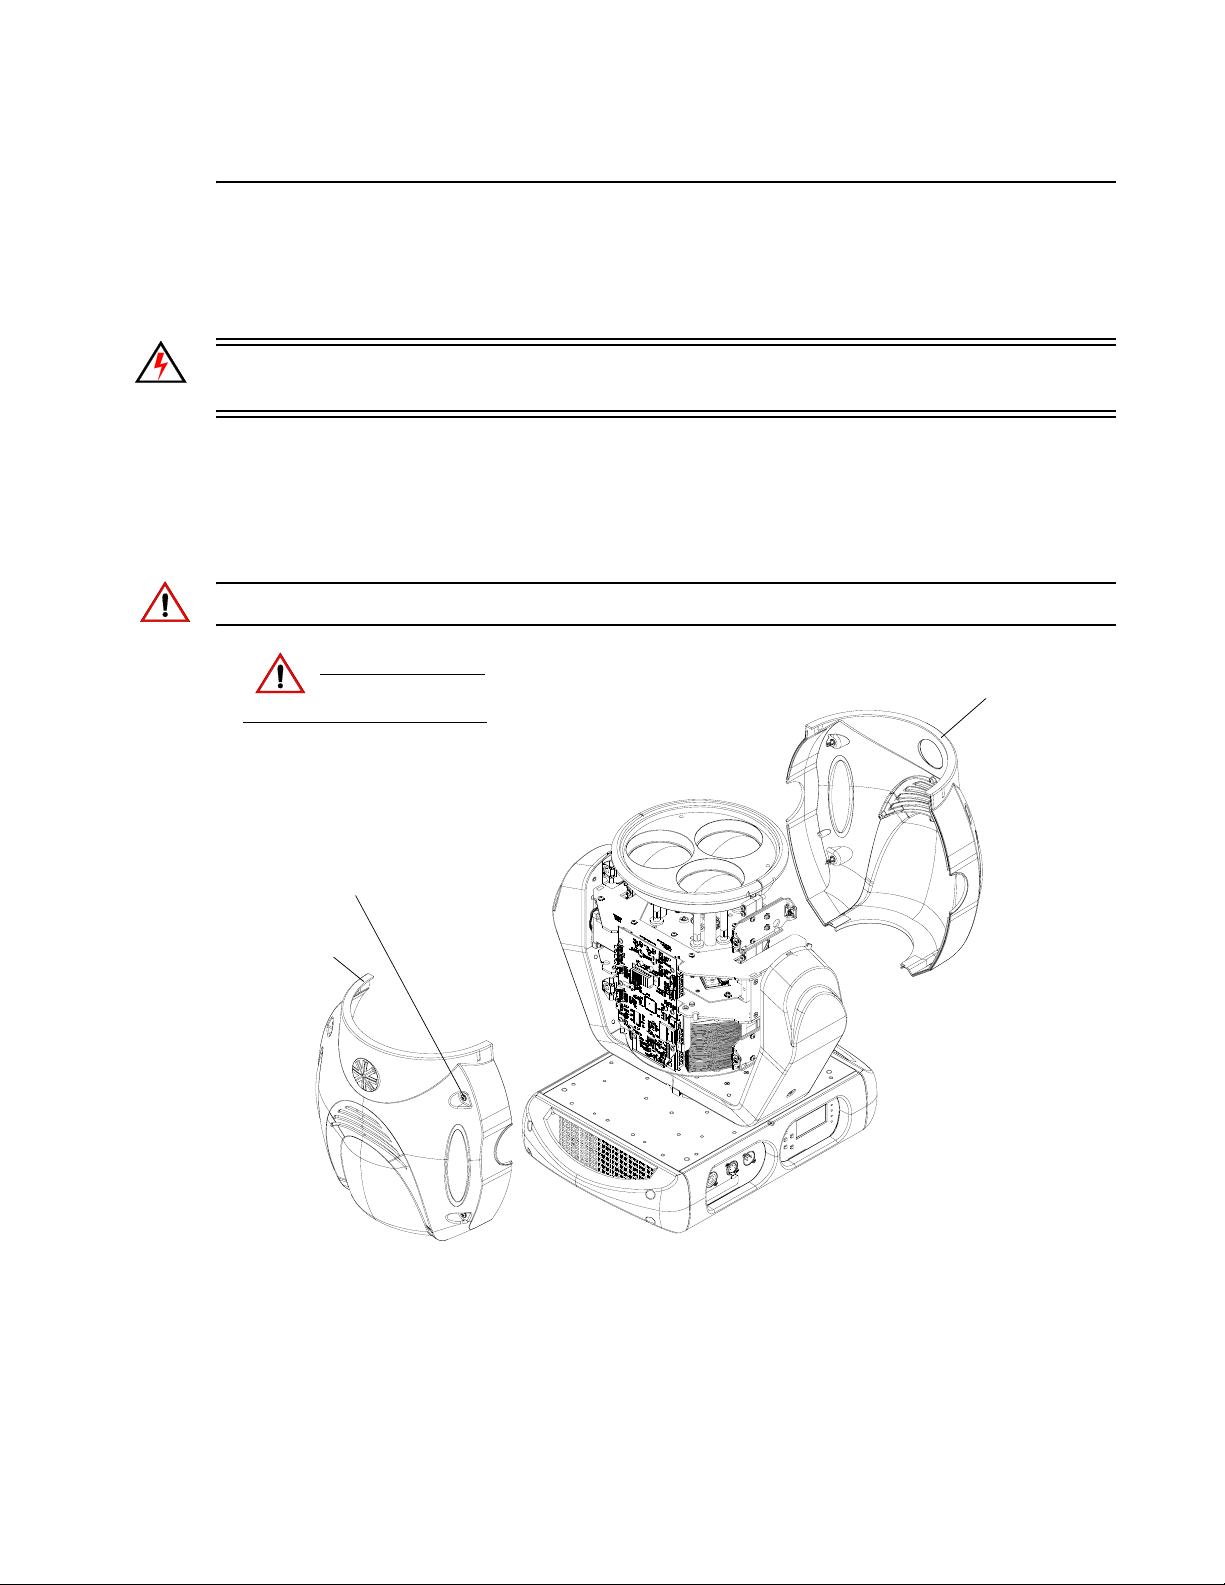
Step 2. As illustrated in Figure 2-15, remove both head covers by loosening each quarter-turn Dzus
fastener - four per cover.
Note: Each cover is secured by a safety tether. Locate clip attached to cover and unclip tether.
Remove power and
CAUTION:
Quart-Turn Dzus
Fasteners (x4)
Head Cover
allow fixture to cool.
Head Cover
Figure 2-15: VLX3 Wash Luminaire - Removing Head Covers
Step 3. Remove moving zoom assembly (refer to “Moving Zoom Assembly Replacement” on
page 18).
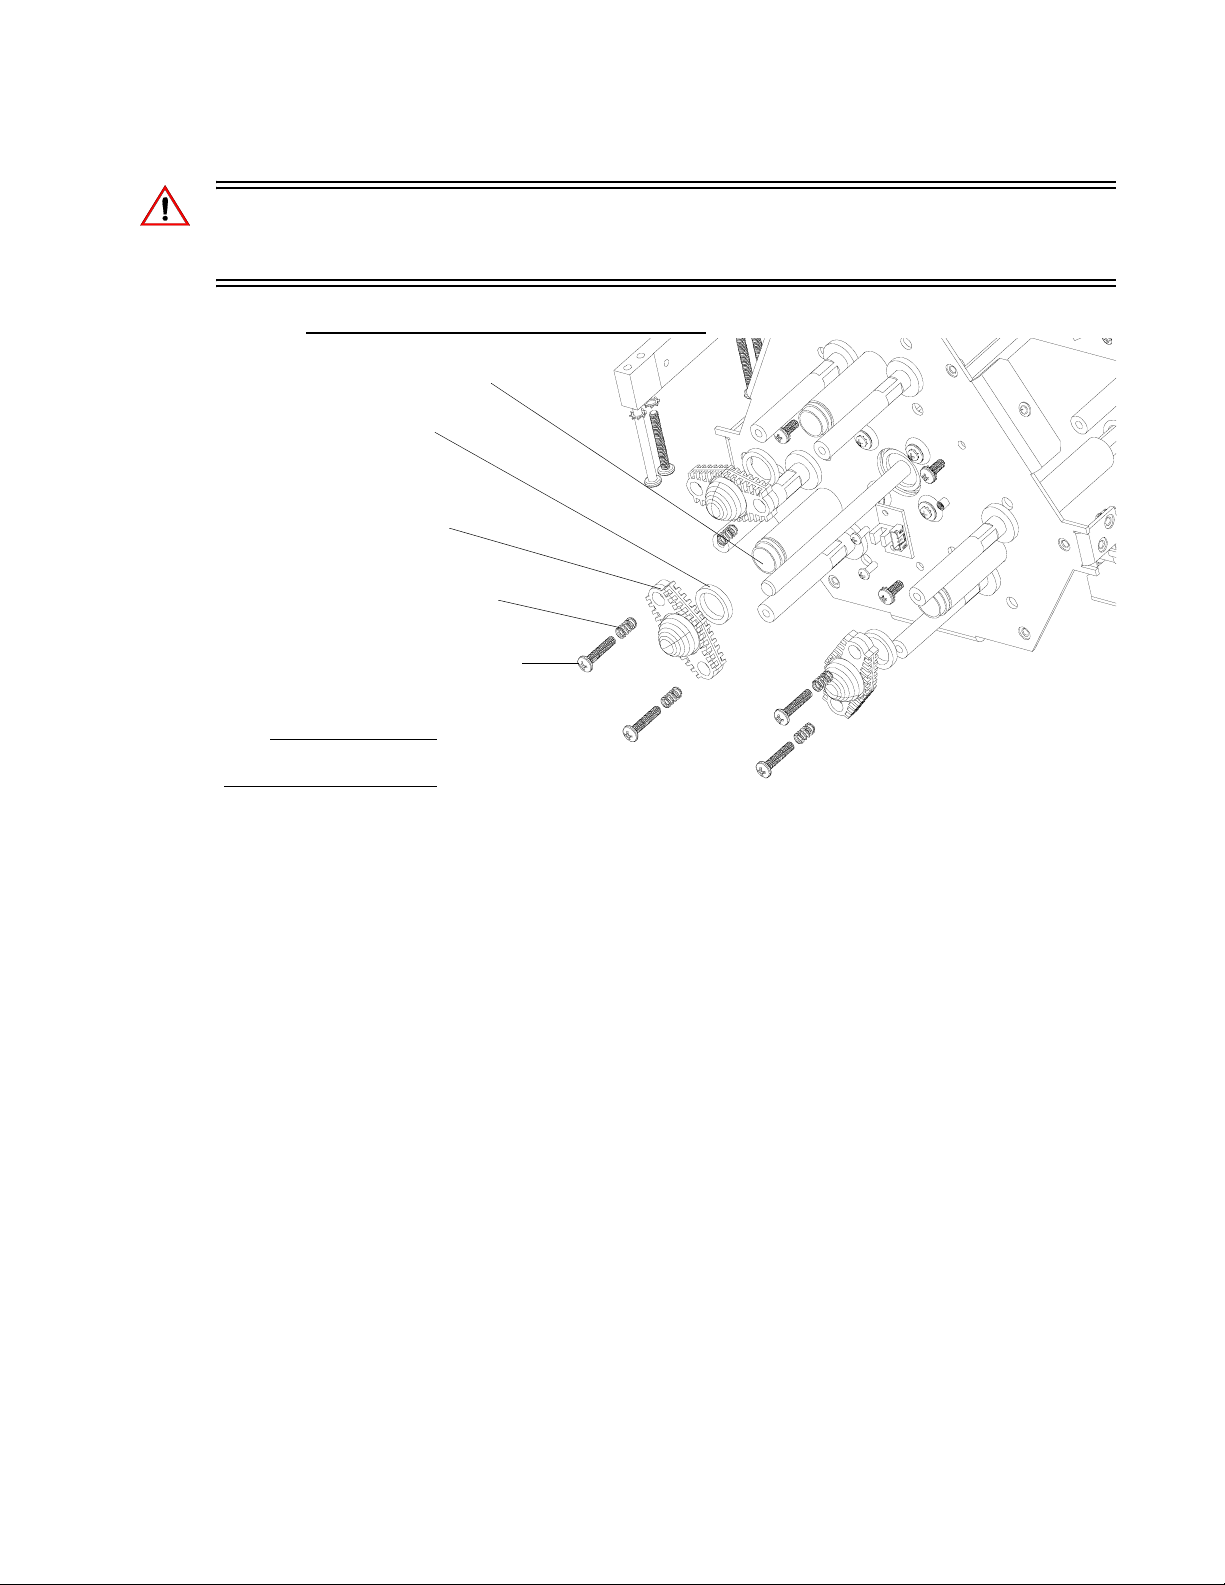
Step 4. Remove two M4 x 20MM SHC plastic screws and springs mounting Stationary Zoom Lens
Assembly and remove.
34 02.9703.0010 0
Page 53
MAINTENANCE PROCEDURES : LIGHT PIPE REPLACEMENT
WARNING: Note that light pipe must be handled with extreme care and not be damaged. All
fingerprints, grease, smudges, etc. must be removed. Any damage to light pipe and it should be
replaced with new.
2
Step 5. USING EXTREME CAUTION AND CARE
Light Pipe / Tube
Top Light Seal
Stationary Lens Assembly
Springs (x2)
M4 x 20MM SHC Plastic Screw (x2)
Note:
Components removed and
drawing exploded for clarity.
Figure 2-16: Light Pipe Removal
Step 6. When replacing, ensure that light pipe is fully seated into Z-Axis Stop at LED
Step 7. When installing Stationary Zoom Lens Assy, ensure that hex light pipe is seated correctly
into support.
, remove light pipe from tube.
Step 8. Do not completely tighten Plastic screws removed in Step 4; stationary lens assembly should
be able to move.
Step 9. Continue reassembly by performing steps in reverse order.
02.9703.0010 0 35
Page 54
VARI❋LITE - VLX3 LED WASH LUMINAIRE SERVICE MANUAL
120W RGBW LED Assembly Replacement
IMPORTANT! When replacing an LED, you must contact Vari-Lite Support and give the serial
number of the fixture and which LED position (1, 2 or 3) you are replacing so a matching LED,
performance wise, can be sent. That LED must ONLY be installed in the correct position of that light
to ensure correct performance of color calibration.
Tools:
• #2 Phillips screwdriver
• 3/32" hex driver
WARNING: Ensure that power is completely removed (disconnected) from luminaire before
attempting any work.
To remove 120W RGBW LED assembly:
Step 1. Remove power from luminaire and allow unit to completely cool.
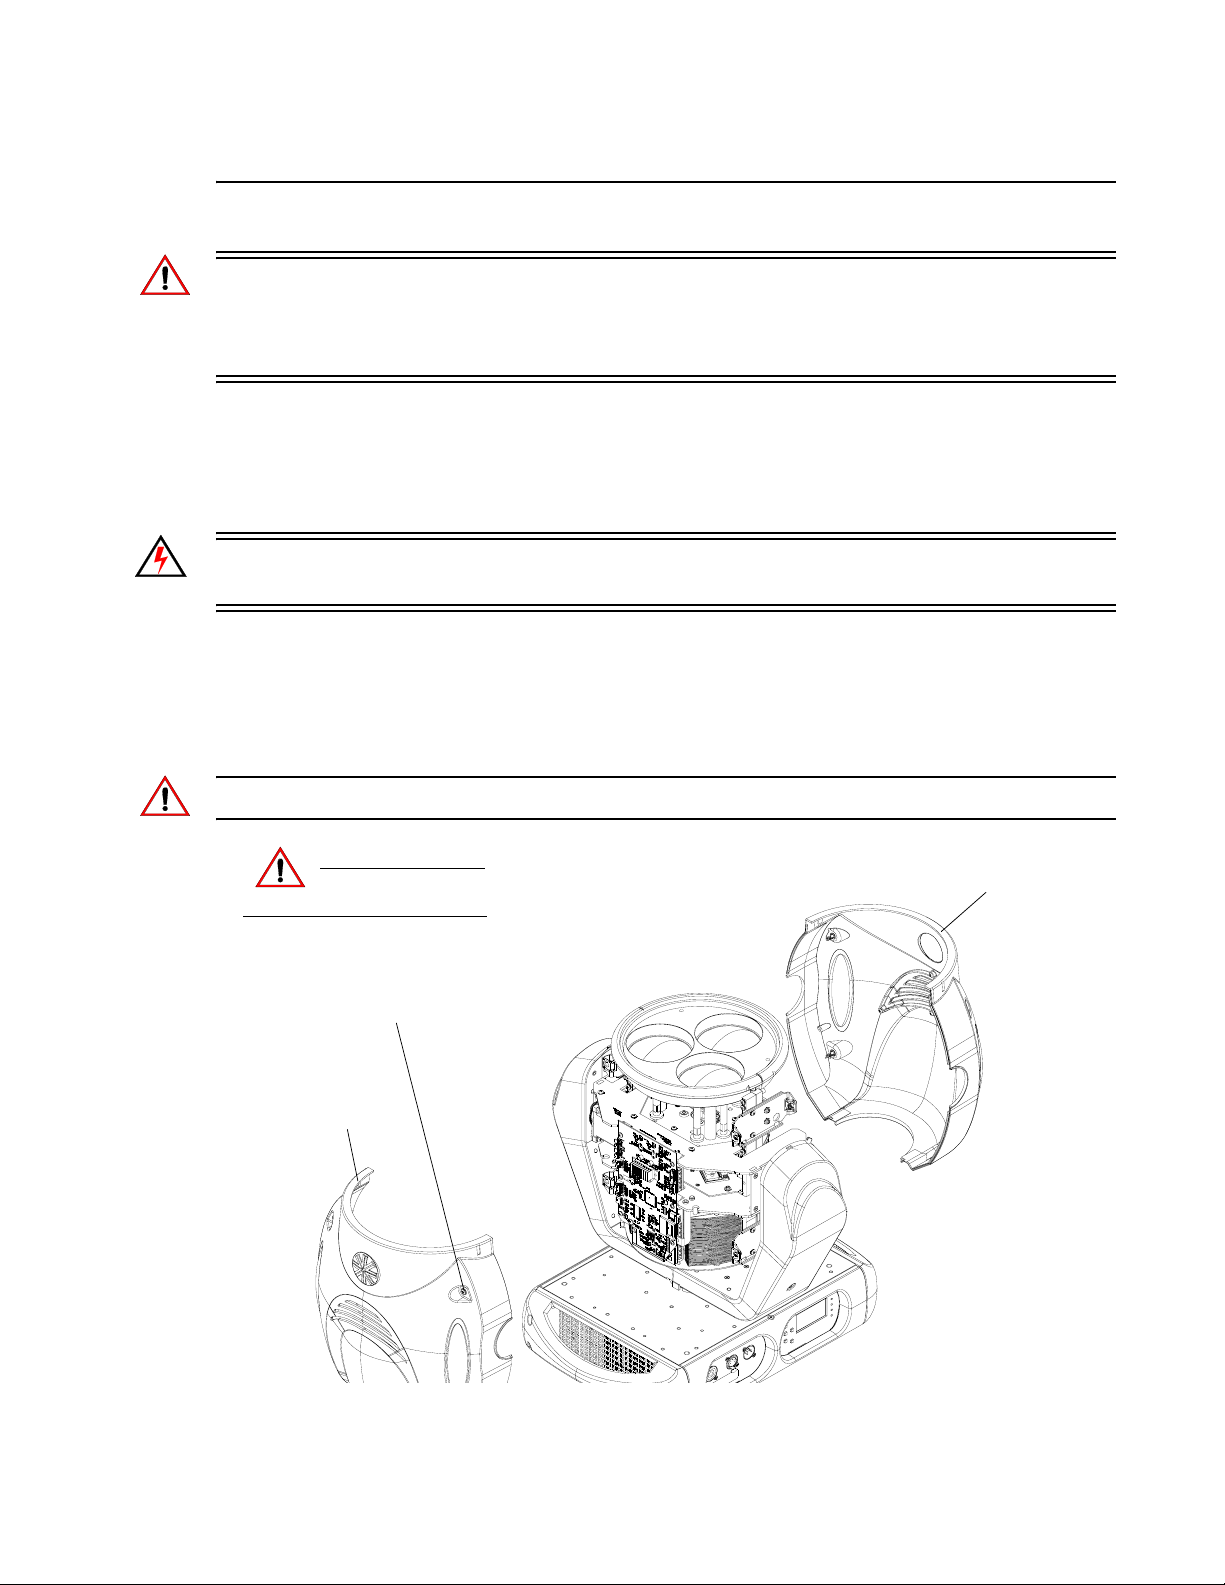
Step 2. As illustrated in Figure 2-17, remove both head covers by loosening each quarter-turn Dzus
fastener - four per cover.
Note: Each cover is secured by a safety tether. Locate clip attached to cover and unclip tether.
CAUTION:
Quart-Turn Dzus
Fasteners (x4)
Head Cover
Remove power and
allow fixture to cool.
Head Cover
Figure 2-17: VLX3 Wash Luminaire - Removing Head Covers
36 02.9703.0010 0
Page 55
MAINTENANCE PROCEDURES : 120W RGBW LED ASSEMBLY REPLACEMENT
Step 3. Remove moving zoom assembly (refer to “Moving Zoom Assembly Replacement” on
page 18).
Step 4. Remove LED Driver Board of LED to be removed and replaced. See “LED Driver
Assembly Replacement” on page 29.
WARNING: Note that light pipe must be handled with extreme care and not be damaged. All
fingerprints, grease, smudges, etc. must be removed. Any damage to light pipe and it should be
replaced with new.
Step 5. Remove Light Pipe for LED. See “Light Pipe Replacement” on page 34.
Step 6. Remove Light Pipe tube, by rolling off o-ring holding light pipe to bottom of support.
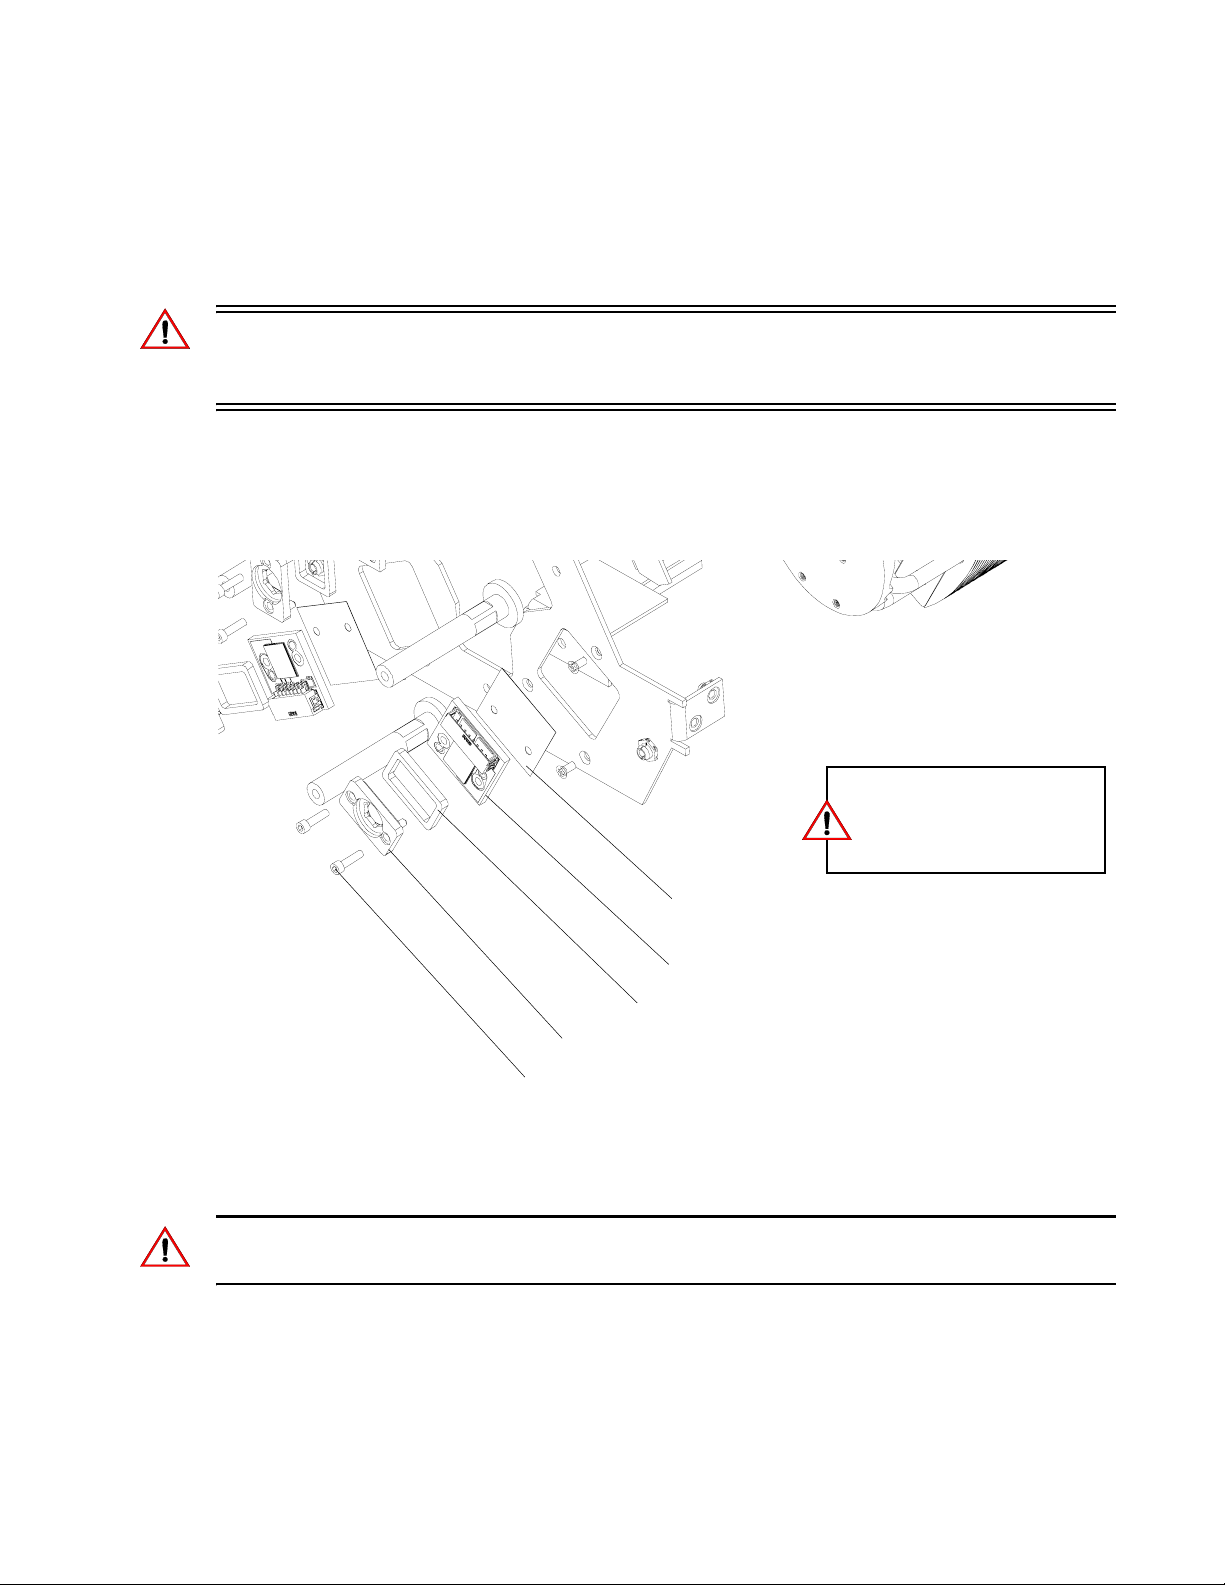
Step 7. As shown in Figure 2-18, using 3/32" hex driver, remove two 4-40 x 0.438" LG SH CAP
screws from LED die.
2
Torque Note: Torque screws
(20) to 80-in oz. using a precision torque wrench. Do not
overtighten!
Thermal Transfer Material
RGBW LED Assembly
Z-Axis Stop Seal
Hex Z-Axis Stop
4-40 x 0.438" LG SH CAP Screw (x2)
Figure 2-18: 120W RGBW LED Removal
Step 8. Remove Z-Axis stop and seal.
CAUTION: Under the LED is a thermal transfer material. If material is torn or damaged in any
manner, it must be replaced with new material.
Step 9. Reassemble by following steps in reverse order.
Step 10. Power luminaire and test.
(See Torque Note)
02.9703.0010 0 37
Page 56
VARI❋LITE - VLX3 LED WASH LUMINAIRE SERVICE MANUAL
LED Cooling Assembly Replacement
Tools:
• #2 Phillips screwdriver
• 3/32" hex driver
WARNING: Ensure that power is completely removed (disconnected) from luminaire before
attempting any work.
To remove head fan assembly:
Step 1. Remove power from luminaire and allow unit to completely cool.
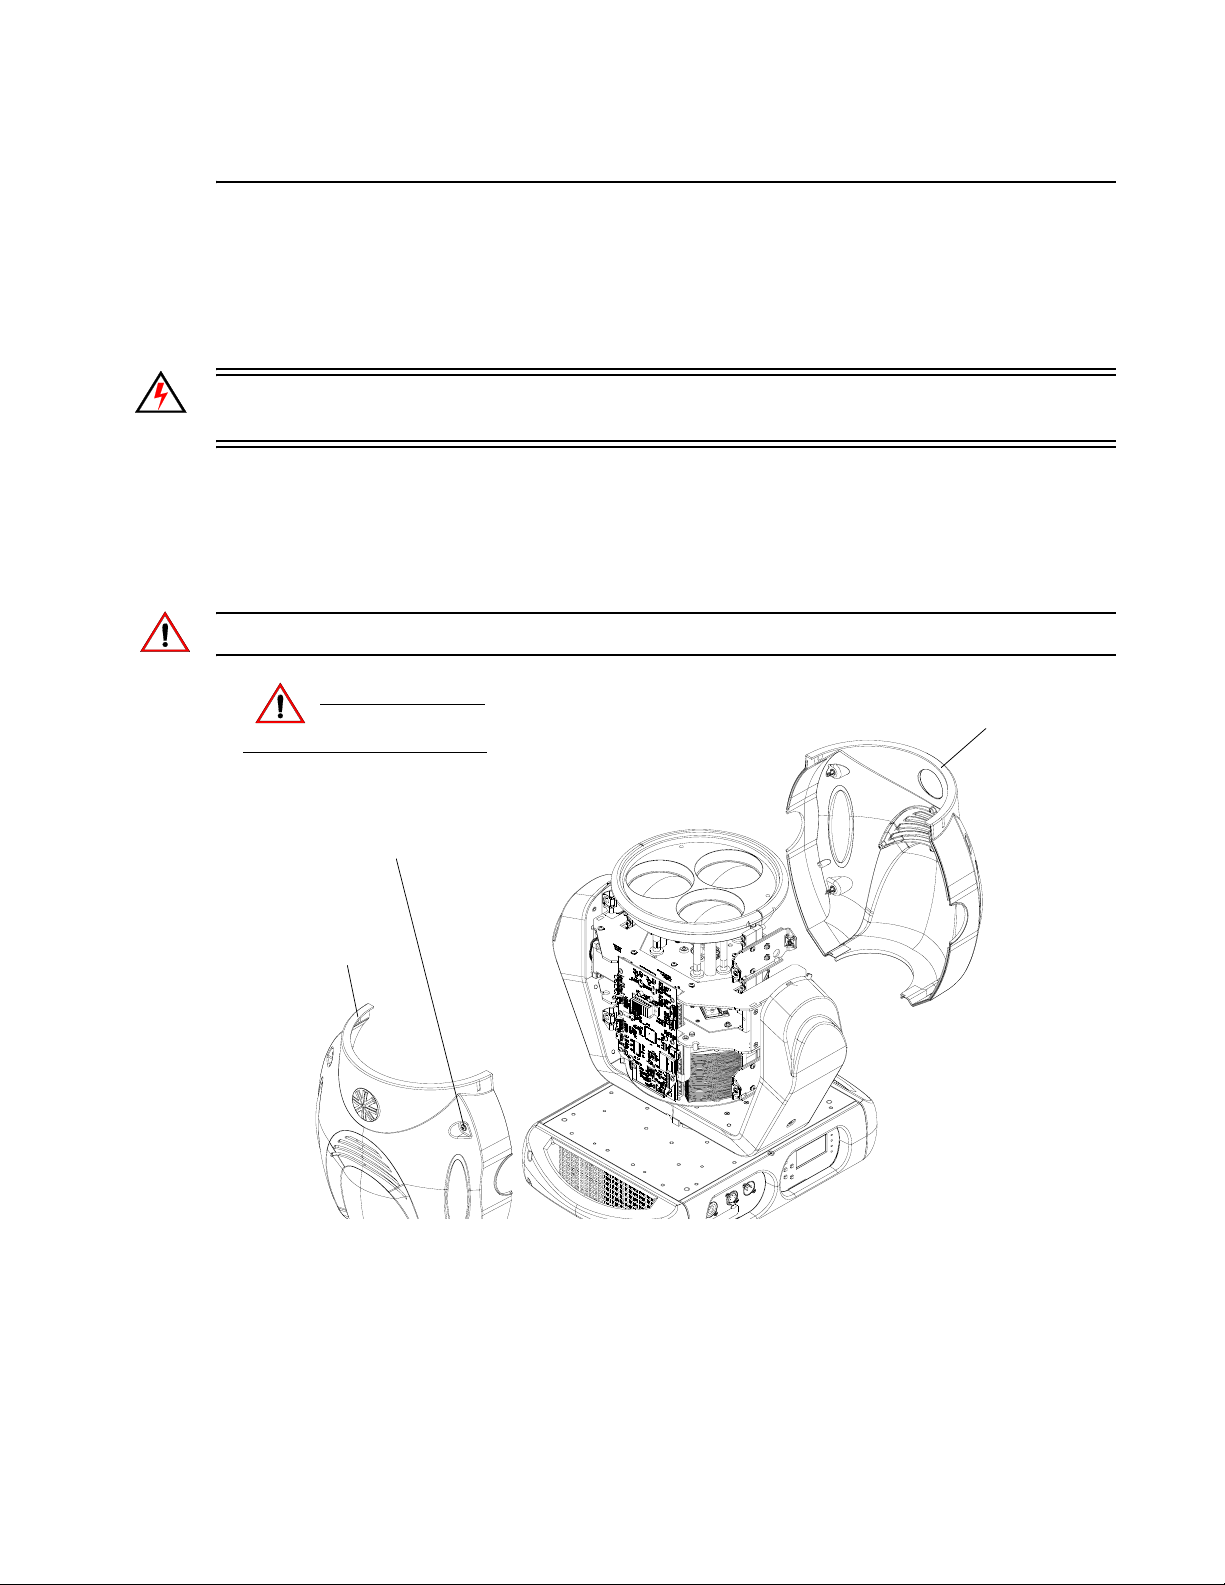
Step 2. As illustrated in Figure 2-19, remove both head covers by loosening each quarter-turn Dzus
fastener - four per cover.
Note: Each cover is secured by a safety tether. Locate clip attached to cover and unclip tether.
CAUTION:
Quart-Turn Dzus
Fasteners (x4)
Head Cover
Remove power and
allow fixture to cool.
Head Cover
Figure 2-19: VLX3 Wash Luminaire - Removing Head Covers
Step 3. Remove moving zoom assembly (refer to “Moving Zoom Assembly Replacement” on
page 18).
38 02.9703.0010 0
Page 57
MAINTENANCE PROCEDURES : LED COOLING ASSEMBLY REPLACEMENT
2
WARNING: Note that light pipe must be handled with extreme care and not be damaged. All
fingerprints, grease, smudges, etc. must be removed. Any damage to light pipe and it should be
replaced with new.
Step 4. Remove Light Pipe for LED of cooling assembly to be replaced. See “Light Pipe
Replacement” on page 34.
Step 5. Remove Light Pipe tube, by rolling off o-ring holding light pipe to bottom of support.
Step 6. Remove 120W LED of cooling system to be removed and replaced. See “120W RGBW
LED Assembly Replacement” on page 36.
Step 7. Remove mother board assembly. See “Motherboard Assembly Replacement” on page 32.
Step 8. Remove LED Driver Board of cooling system to be removed and replaced. See “LED Drive r
Assembly Replacement” on page 29.
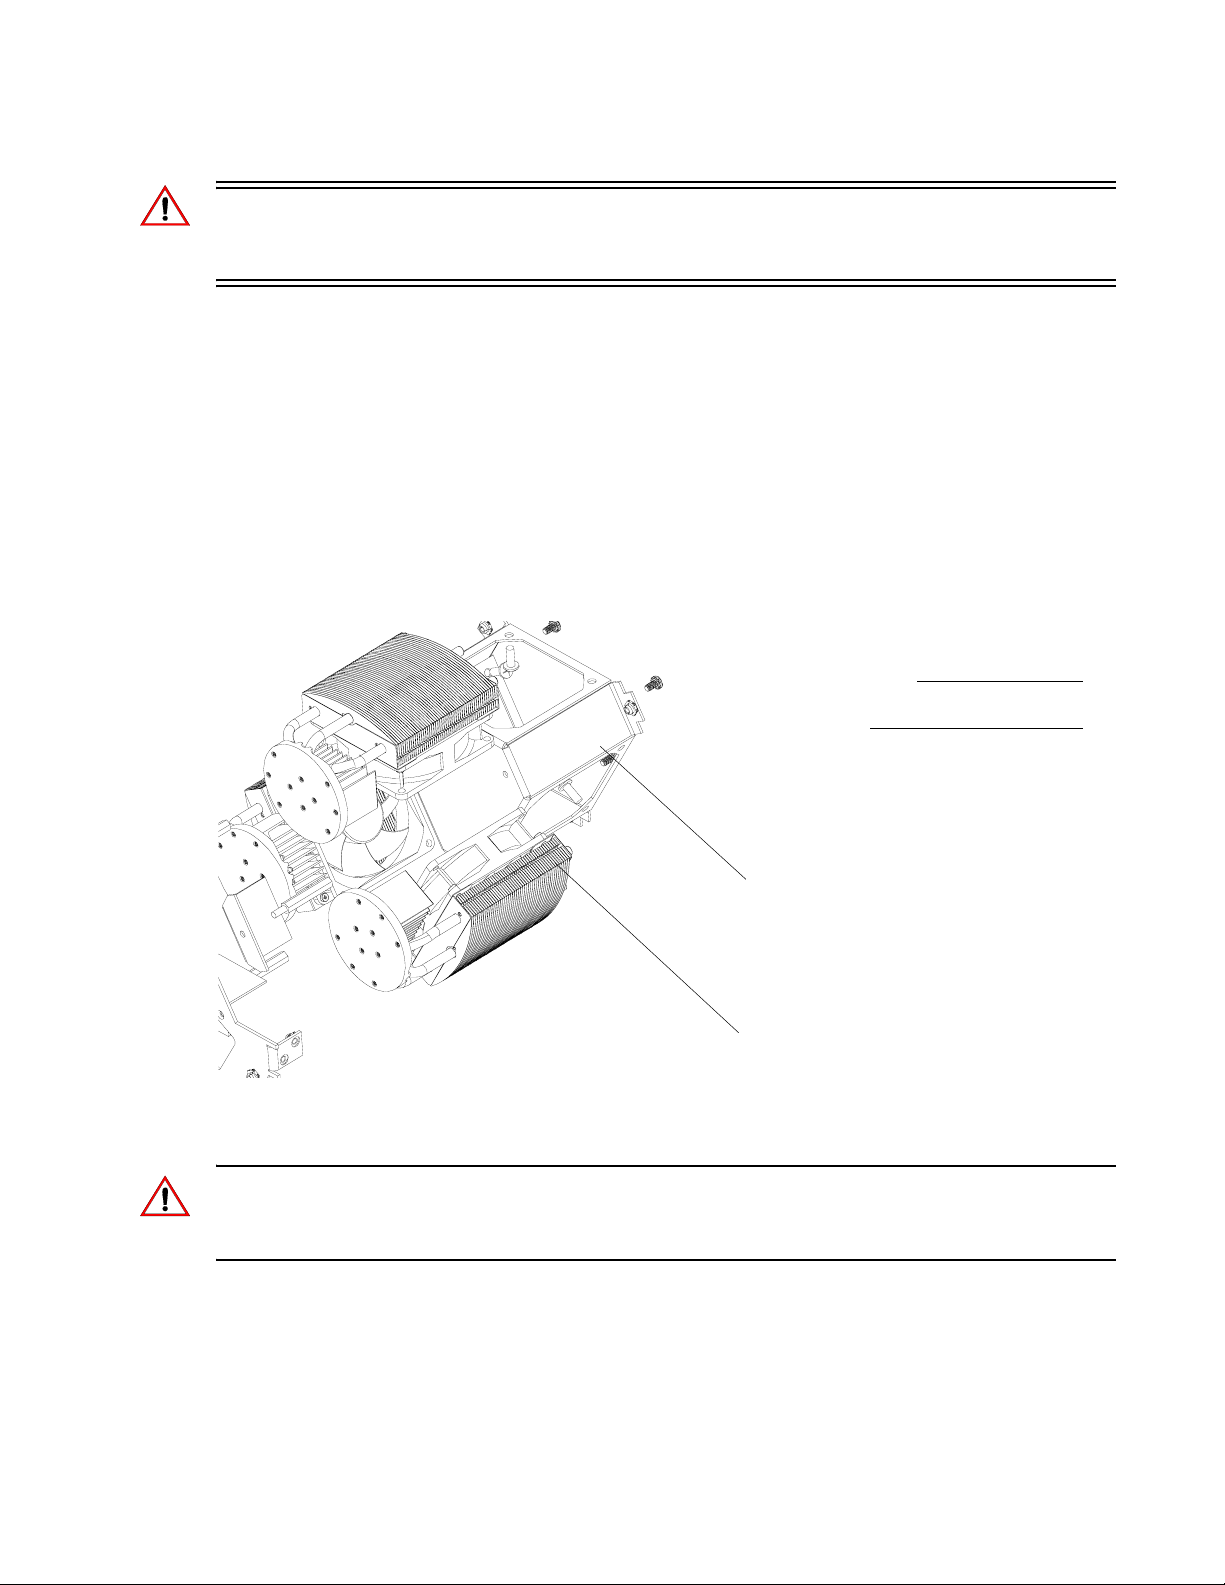
Step 9. Remove Fan Exhaust Chamber by removing six 10-32 x 1/2" PFZ screws - two from each
fan and then three M4 x 8MM screws mounting Exhaust Chamber inside.
Note:
Components removed and
drawing exploded for clarity.
Exhaust Chamber
LED Cooling Module (x3)
Figure 2-20: LED Cooling Module Assembly
Step 10. Remove LED Cooling Module by removing three 4-40 x 1/4" PFZ screws.
CAUTION: For reassembly, under the LED is a thermal transfer material. If material is torn or
damaged in any manner, it must be replaced with new material. ALSO, be sure to follow the torque
specifications as shown in Figure 2-18 on 37.
Step 11. Reassemble by following steps in reverse order.
Step 12. Power luminaire and test.
02.9703.0010 0 39
Page 58
VARI❋LITE - VLX3 LED WASH LUMINAIRE SERVICE MANUAL
Zoom Motor Assembly Replacement
Tools:
• #2 Phillips screwdriver
WARNING: Ensure that power is completely removed (disconnected) from luminaire before
attempting any work.
To remove zoom motor assembly:
Step 1. Remove power from luminaire and allow unit to completely cool.
Step 2. As illustrated in Figure 2-21, remove both head covers by loosening each quarter-turn Dzus
fastener - four per cover.
Note: Each cover is secured by a safety tether. Locate clip attached to cover and unclip tether.
CAUTION:
Quart-Turn Dzus
Fasteners (x4)
Head Cover
Remove power and
allow fixture to cool.
Head Cover
Figure 2-21: VLX3 Wash Luminaire - Removing Head Covers
Step 3. Remove moving zoom assembly (refer to “Moving Zoom Assembly Replacement” on
page 18).
Step 4. Remove mother board assembly. See “Motherboard Assembly Replacement” on page 32.
Step 5. Remove either LED Driver Board #2 or #3. See “LED Driver Assembly Replacement” on
page 29.
40 02.9703.0010 0
Page 59
MAINTENANCE PROCEDURES : ZOOM MOTOR ASSEMBLY REPLACEMENT
2
Step 6. Remove Fan Exhaust Chamber by removing six 10-32 x 1/2" PFZ screws, two from each fan
and then three M4 x 8MM screws mounting Exhaust Chamber inside.
Step 7. Remove cooler standoff and air dam.
Step 8. Remove M4 x 10MM PPZ SEMS screw and intermediate support pillar.
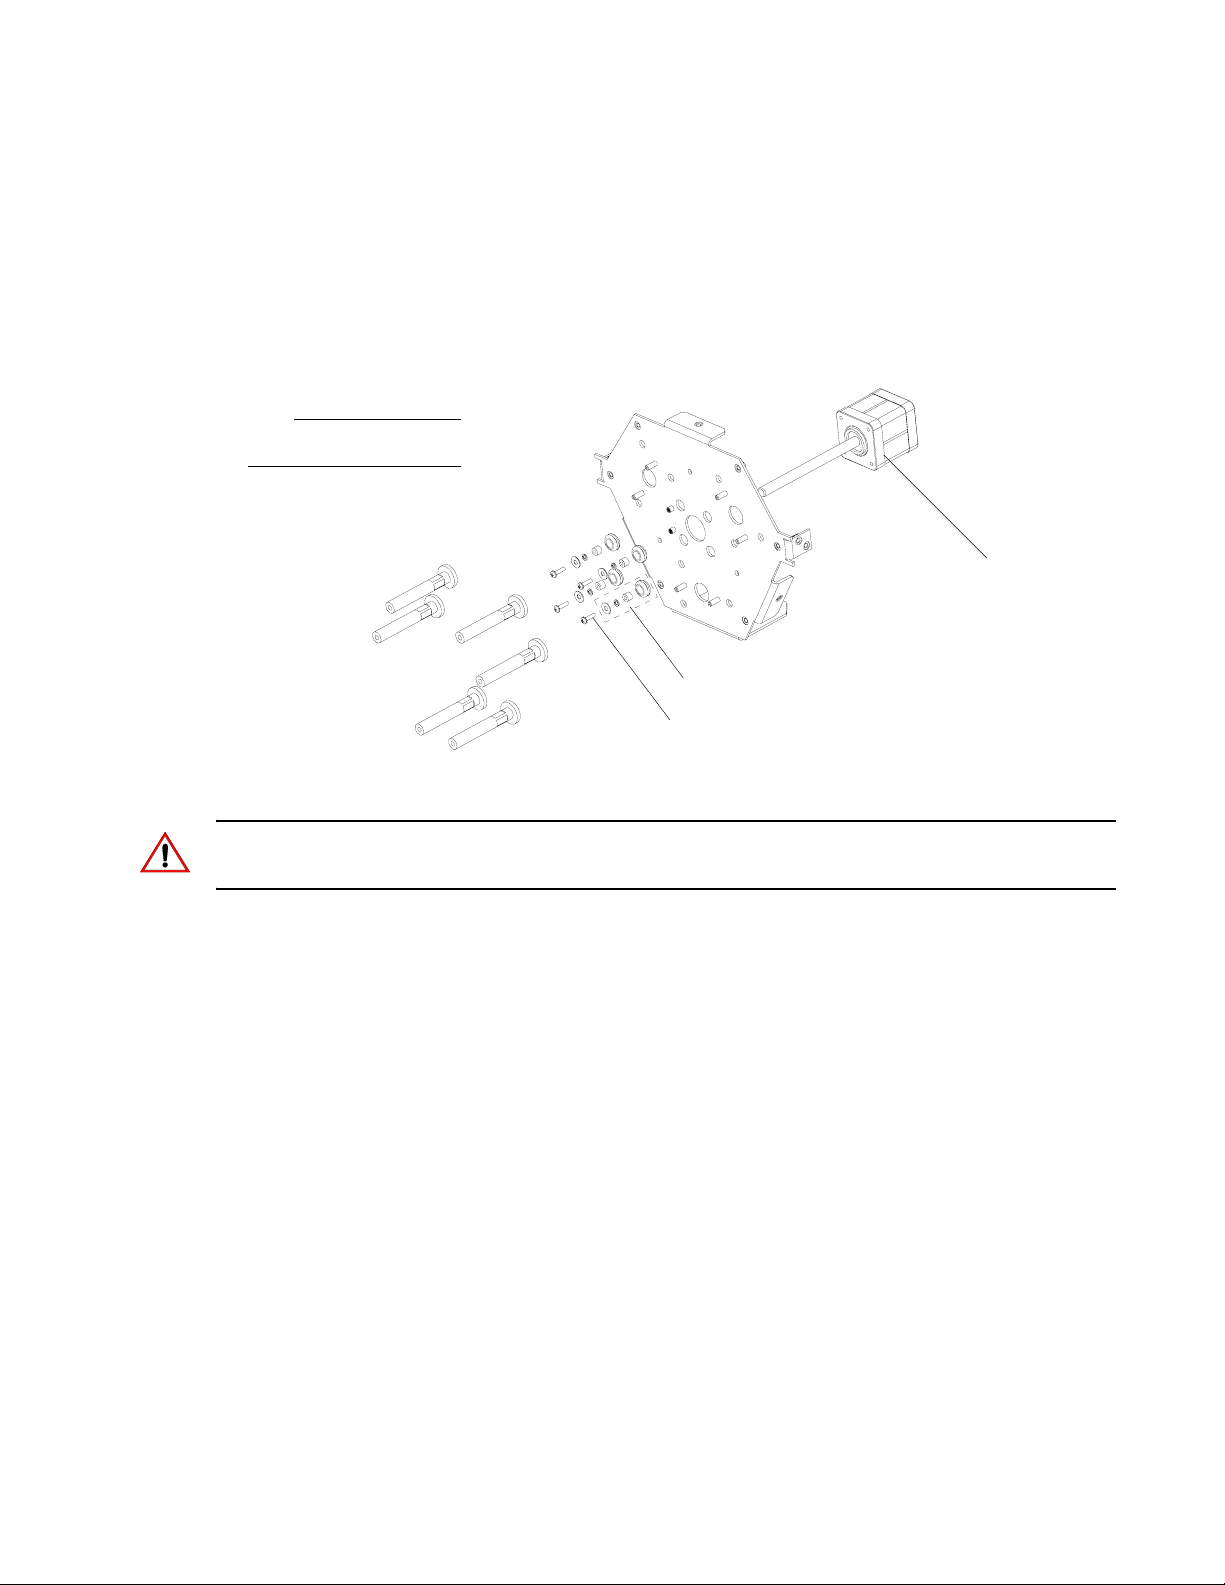
Step 9. At zoom motor, remove four 4-40 x 7/16" PPZ SEMS screws. Note the spacers inside the
grommets are loose.
Note:
Components removed and
drawing exploded for clarity.
Zoom Motor
Assembly
Note spacer, washer, grommet assembly order
4-40 x 7/16" PPZ SEMS Screws (x4)
Figure 2-22: Zoom Motor Assembly
Note: The nut for motor assembly that is included with motor is attached to Moving Zoom Assembly .
Refer to “Zoom Intermediate Plate Assembly” on page 79 for more information.
Step 10. Carefully angle motor out and through opening.
Step 11. Reassemble by following steps in reverse order.
Step 12. Power luminaire and test.
02.9703.0010 0 41
Page 60
VARI❋LITE - VLX3 LED WASH LUMINAIRE SERVICE MANUAL
DMX PCB Assembly Replacement
Tools:
• #2 Phillips screwdriver
WARNING: Ensure that power is completely removed (disconnected) from luminaire before
attempting any work.
To remove DMX PCB assembly:
Step 1. Remove power from luminaire and allow unit to completely cool.
Step 2. Remove power supply following procedure described in “Low Voltage Supply (LVS)/LED
Power Supply Replacement” chapter on page 22.
CAUTION: In next step, do not set luminaire where the lenses come in contact with the work surface.
Step 3. Carefully, rotate luminaire to access bottom of enclosure.
Step 4. Remove six 1/4-20 x 1/2" PFZ screws and remove bottom plate.
Step 5. At DMX PCB, disconnect wiring.
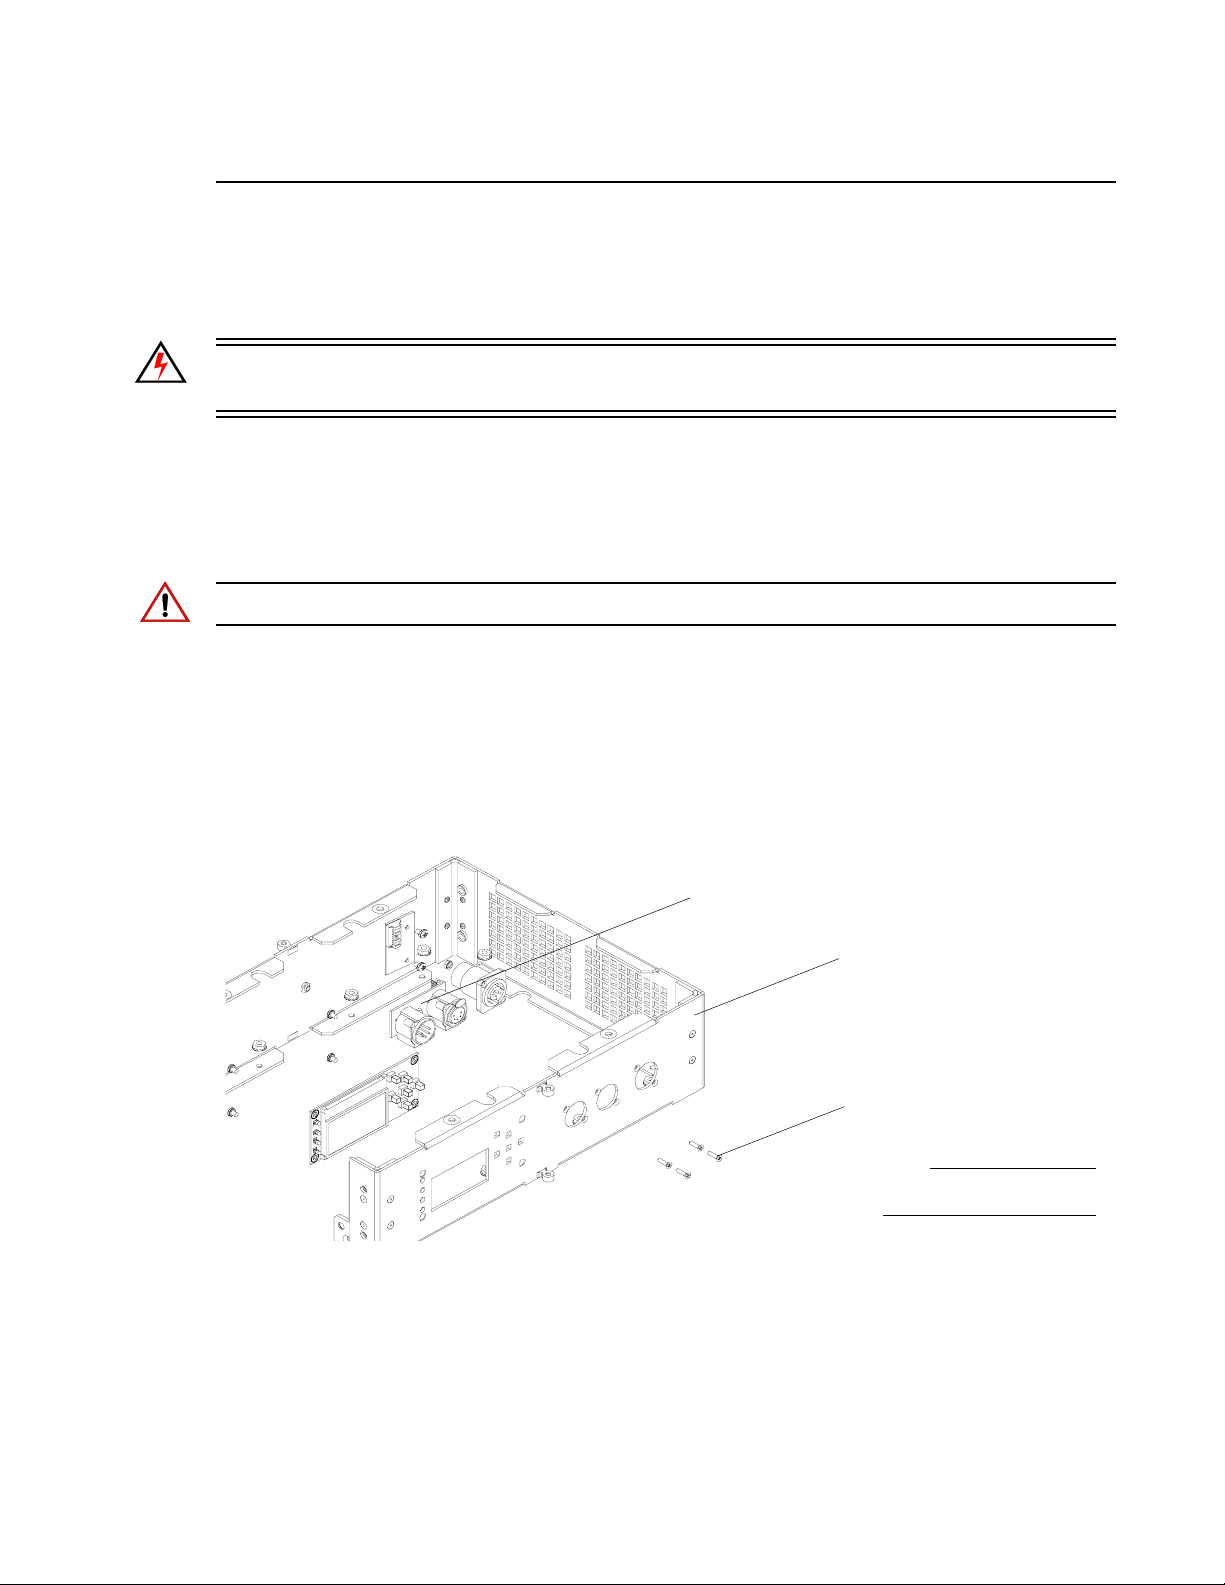
Step 6. As illustrated in Figure 2-23, at front panel, remove four 4-40 x 3/8" PFB screws and
remove DMX PCB.
DMX PCB Assembly
Enclosure Assembly
4-40 x 3/8" PFB Screws (x4)
Note:
Components removed and
drawing exploded for clarity.
Figure 2-23: DMX PCB Assembly Removal
Step 7. Reassemble following steps in reverse order.
Step 8. Power luminaire and test.
42 02.9703.0010 0
Page 61
MAINTENANCE PROCEDURES : POWERCON (AC INPUT) ASSEMBLY REPLACEMENT
2
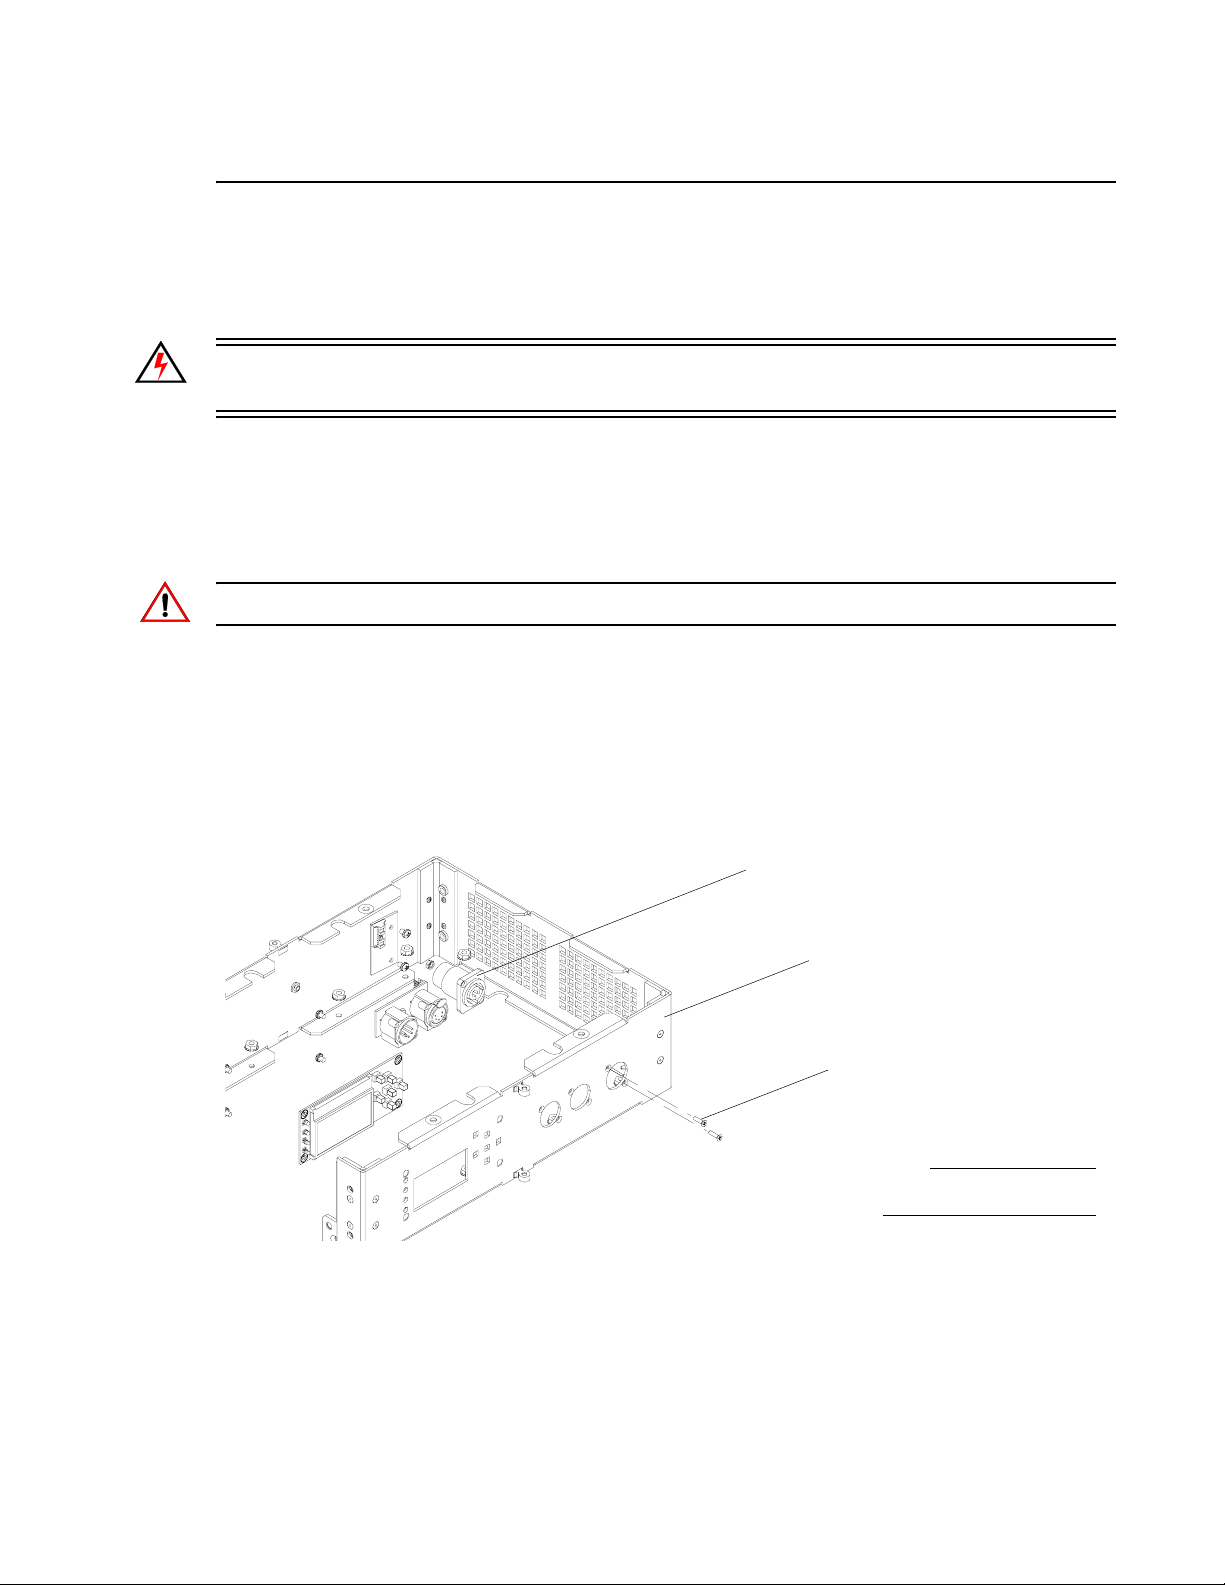
Po werCon (AC Input) Assembly Replacement
Tools:
• #2 Phillips screwdriver
WARNING: Ensure that power is completely removed (disconnected) from luminaire before
attempting any work.
To remove PowerCon (AC input) assembly:
Step 1. Remove power from luminaire and allow unit to completely cool.
Step 2. Remove power supply following procedure described in “Low Voltage Supply (LVS)/LED
Power Supply Replacement” chapter on page 22.
CAUTION: In next step, do not set luminaire where the lenses come in contact with the work surface.
Step 3. Carefully, rotate luminaire to access bottom of enclosure.
Step 4. Remove six 1/4-20 x 1/2" PFZ screws and remove bottom plate.
Step 5. At PowerCon assembly, disconnect wiring.
Step 6. As illustrated in Figure 2-24, at front panel, remove two 4-40 x 3/8" PFB screws and remove
PowerCon assembly.
PowerCon Assembly
Enclosure Assembly
4-40 x 3/8" PFB Screws (x2)
Note:
Components removed and
drawing exploded for clarity.
Figure 2-24: PowerCon Assembly Removal
Step 7. Reassemble following steps in reverse order.
Step 8. Power luminaire and test.
02.9703.0010 0 43
Page 62
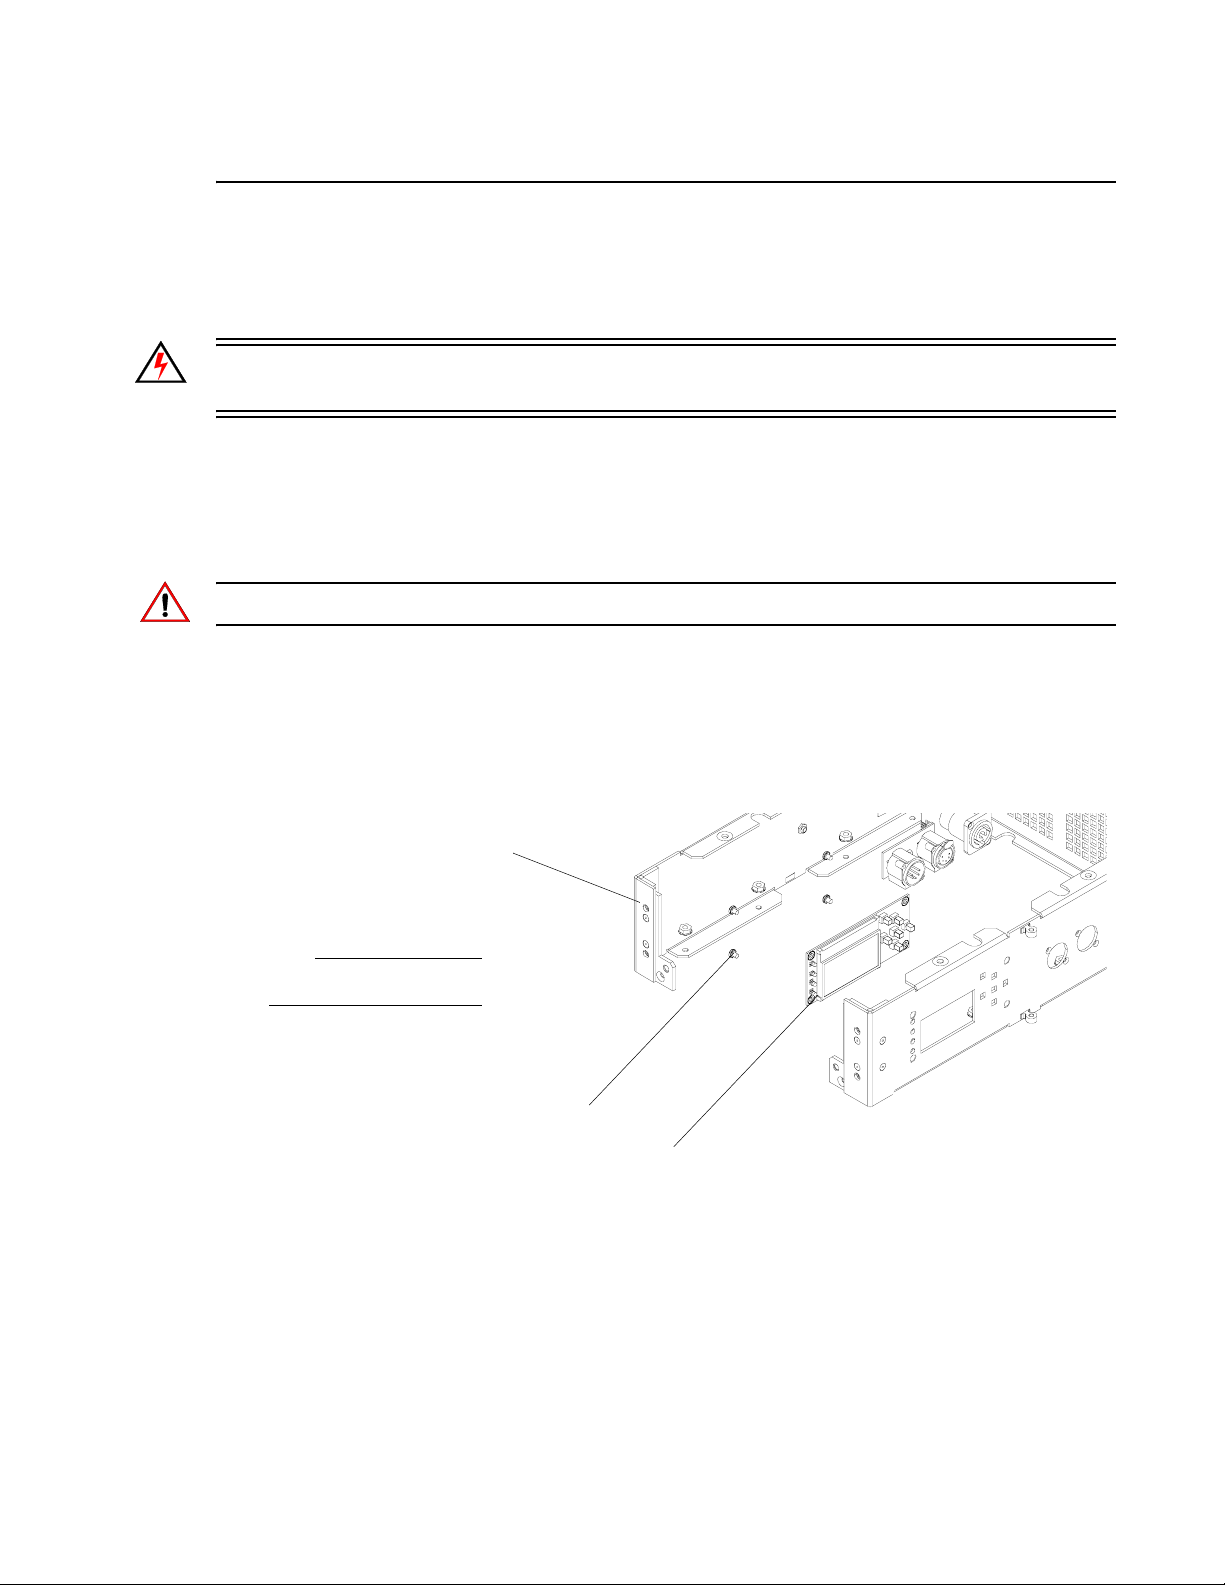
VARI❋LITE - VLX3 LED WASH LUMINAIRE SERVICE MANUAL
Display PCB Assembly Replacement
Tools:
• #2 Phillips screwdriver
WARNING: Ensure that power is completely removed (disconnected) from luminaire before
attempting any work.
To remove display PCB assembly:
Step 1. Remove power from luminaire and allow unit to completely cool.
Step 2. Remove power supply following procedure described in “Low Voltage Supply (LVS)/LED
Power Supply Replacement” chapter on page 22.
CAUTION: In next step, do not set luminaire where the lenses come in contact with the work surface.
Step 3. Carefully, rotate luminaire to access bottom of enclosure.
Step 4. Remove six 1/4-20 x 1/2" PFZ screws and remove bottom plate.
Step 5. At Display PCB assembly, disconnect wiring.
Step 6. As illustrated in Figure 2-25, at front panel, remove four 6-32 x 3/16" PPZ screws and
remove Display PCB.
Enclosure Assembly
Note:
Components removed and
drawing exploded for clarity.
6-32 x 3/16" PPZ Screws (x4)
Display PCB Assembly
Figure 2-25: Display PCB Assembly Removal
Step 7. Reassemble following steps in reverse order.
Step 8. Power luminaire and test.
44 02.9703.0010 0
Page 63
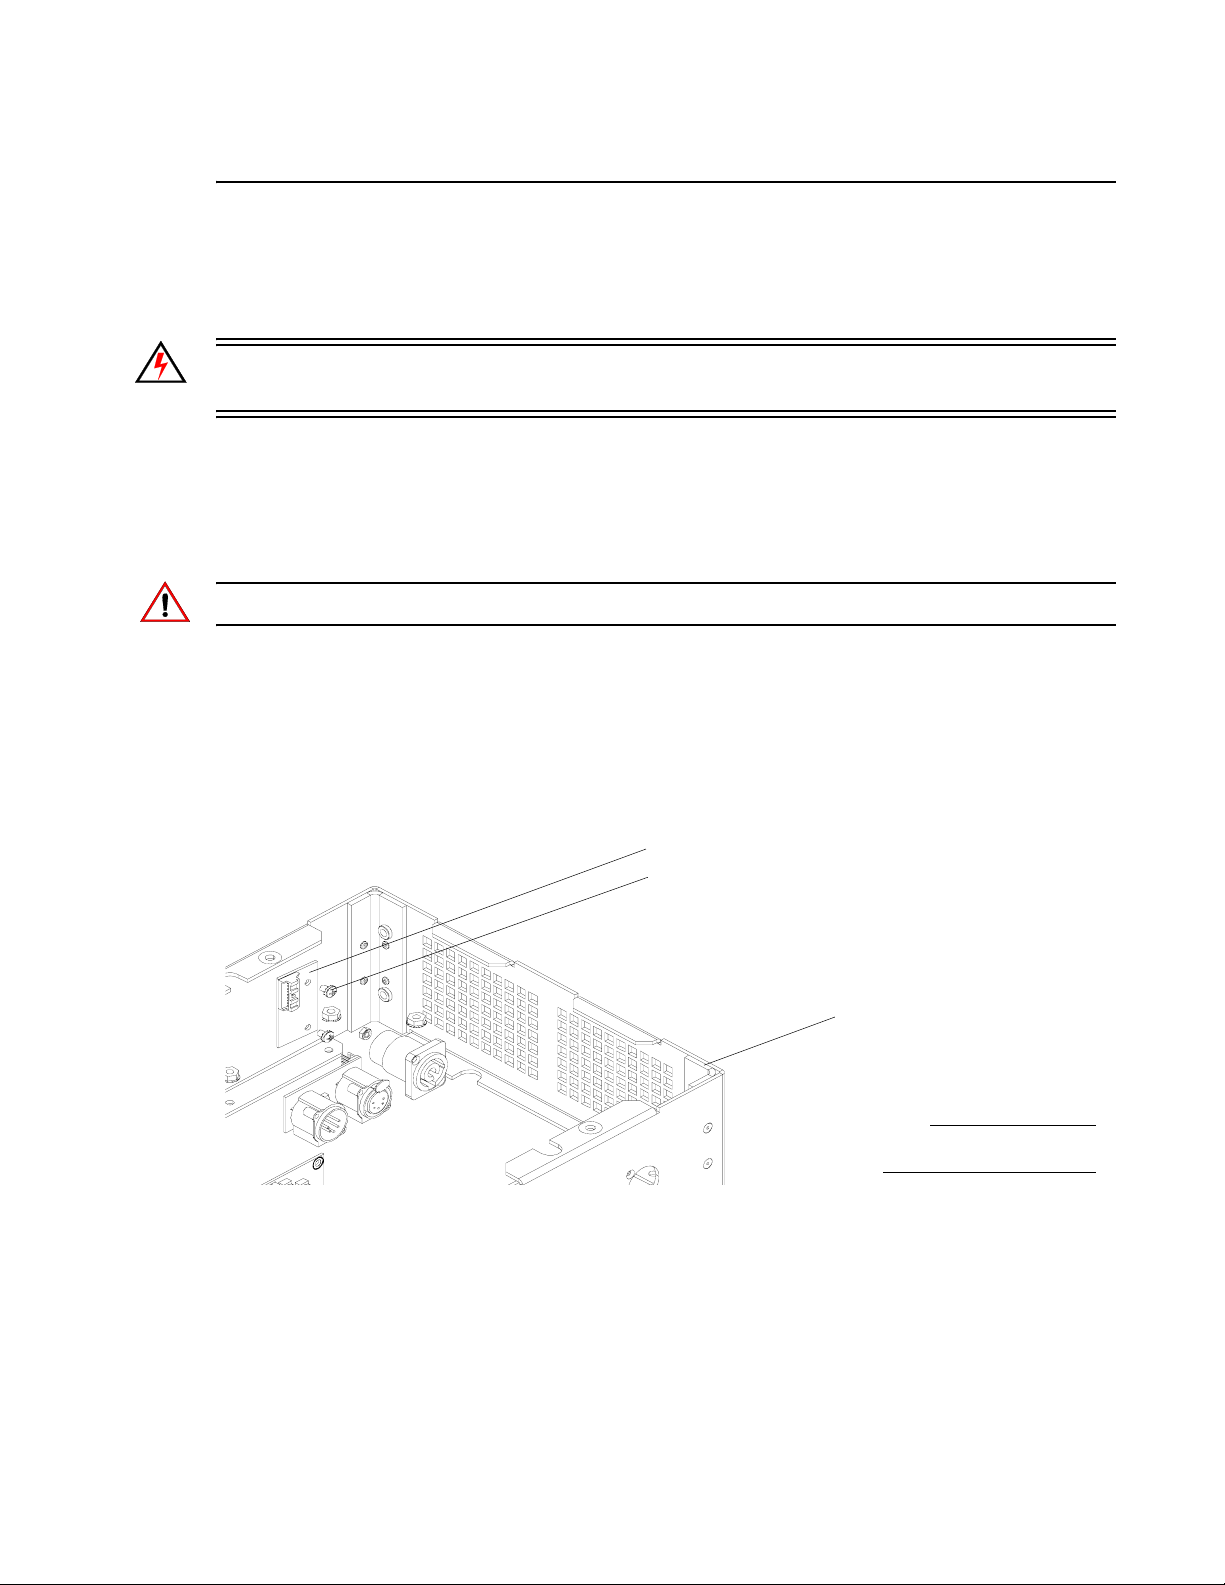
MAINTENANCE PROCEDURES : WIRELESS DMX INTERCONNECT PCB REPLACEMENT
2
Wireless DMX Interconnect PCB Replacement
Tools:
• #2 Phillips screwdriver
WARNING: Ensure that power is completely removed (disconnected) from luminaire before
attempting any work.
To remove wireless DMX interconnect PCB assembly:
Step 1. Remove power from luminaire and allow unit to completely cool.
Step 2. Remove power supply following procedure described in “Low Voltage Supply (LVS)/LED
Power Supply Replacement” chapter on page 22.
CAUTION: In next step, do not set luminaire where the lenses come in contact with the work surface.
Step 3. Carefully, rotate luminaire to access bottom of enclosure.
Step 4. Remove six 1/4-20 x 1/2" PFZ screws and remove Bottom Plate
Step 5. At wireless DMX interconnect PCB, disconnect wiring.
Step 6. As illustrated in Figure 2-26, at wireless DMX interconnect PCB, remove two 6-32 x 3/16"
PPZ screws and remove wireless DMX interconnect PCB.
Wireless DMX Interconnect PCB
6-32 x 3/16" PPZ Screws (x2)
Enclosure Assembly
Note:
Components removed and
drawing exploded for clarity.
Figure 2-26: Wireless DMX Interconnect PCB Removal
Step 7. Reassemble following steps in reverse order.
Step 8. Power luminaire and test.
02.9703.0010 0 45
Page 64
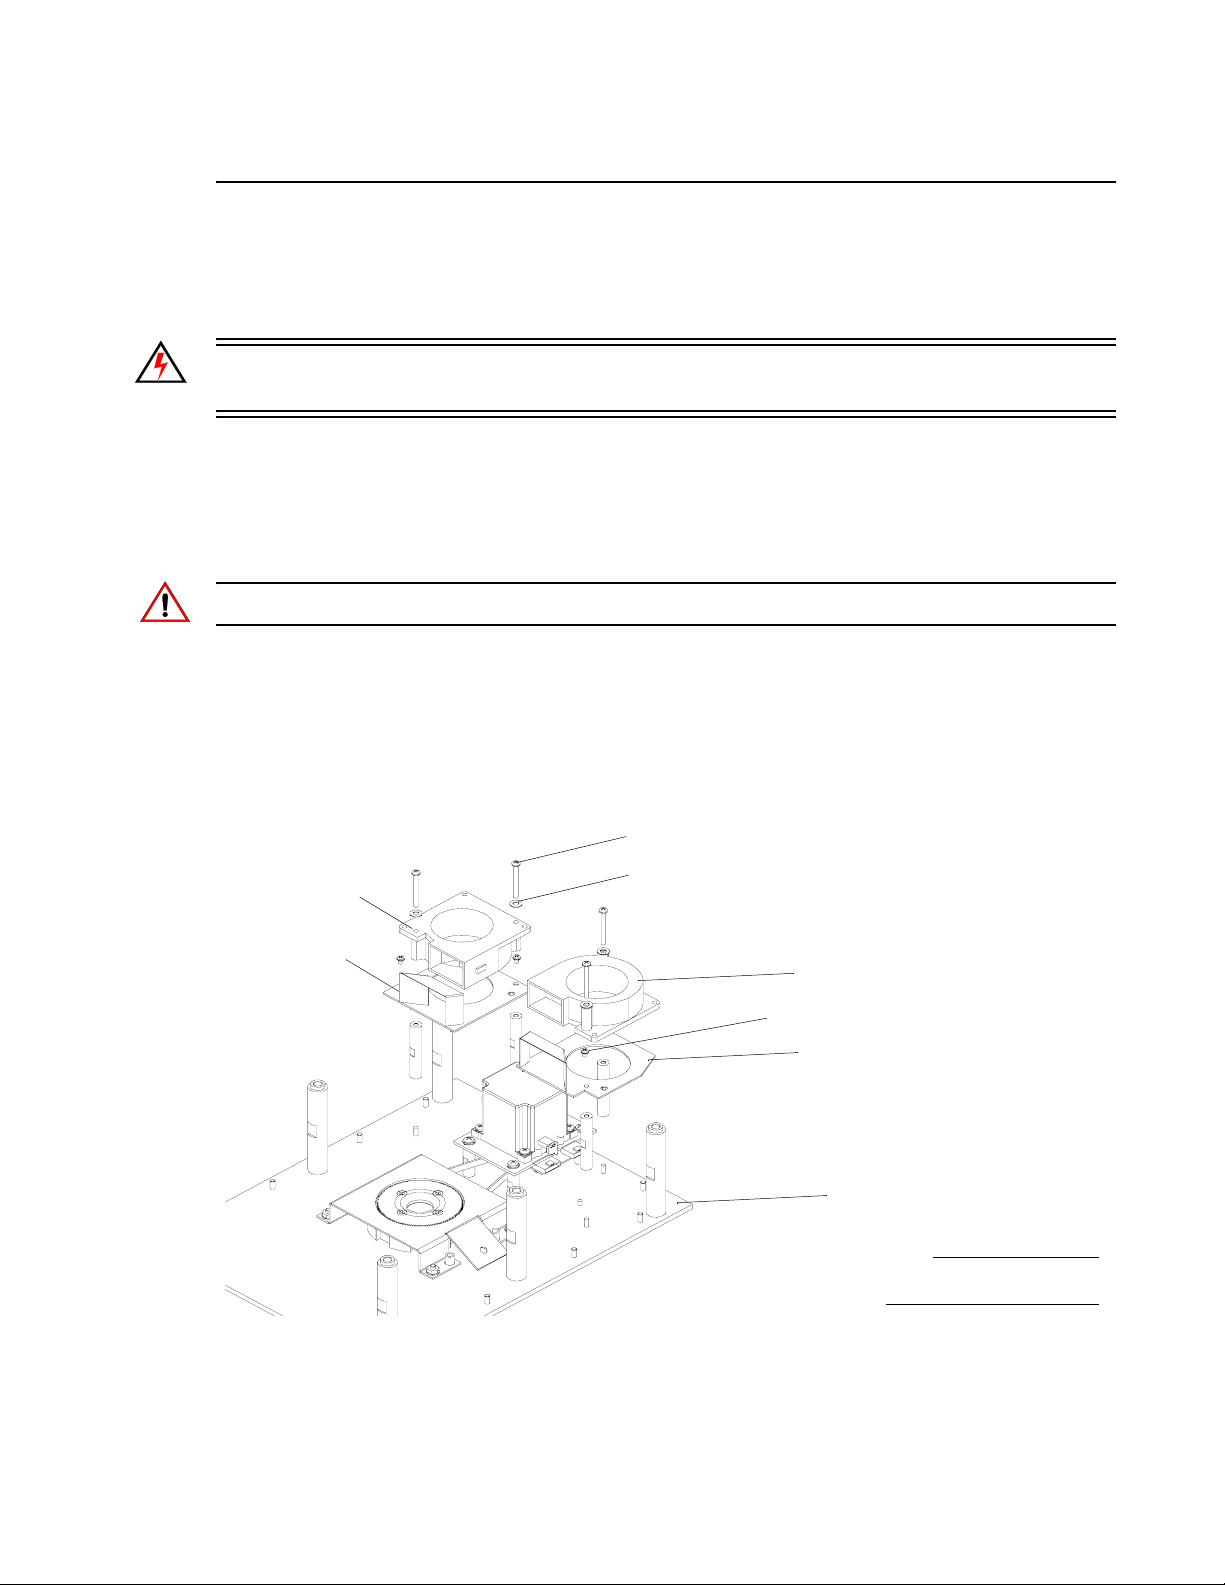
VARI❋LITE - VLX3 LED WASH LUMINAIRE SERVICE MANUAL
Enclosure Fans Replacement
Tools:
• #2 Phillips screwdriver
WARNING: Ensure that power is completely removed (disconnected) from luminaire before
attempting any work.
To remove enclosure fans:
Step 1. Remove power from luminaire and allow unit to completely cool.
Step 2. Remove power supply following procedure described in “Low Voltage Supply (LVS)/LED
Power Supply Replacement” chapter on page 22.
CAUTION: In next step, do not set luminaire where the lenses come in contact with the work surface.
Step 3. Carefully, rotate luminaire to access bottom of enclosure.
Step 4. Remove six 1/4-20 x 1/2" PFZ screws and remove bottom plate.
Step 5. Remove both fan assemblies by removing two 6-32 x 1/4" PPZ SEMS screws for each fan
assembly.
Step 6. Remove fan from mounting assembly by removing two 6-32 x 1-3/8" PPZ screws.
6-32 x 1-3/8" PPZ Screws (x2 per fan)
Fan Assembly
Fan Mounting
Assembly
#8 Flat Washer (x2 per fan)
Fan Assembly
6-32 x 1/4" PPZ Screws (x2 per fan)
Fan Mounting Assembly
Enclosure Top Plate Assembly
Note:
Components removed and
drawing exploded for clarity.
Figure 2-27: Enclosure Fans Removal
Step 7. Reassemble following steps in reverse order.
Step 8. Power luminaire and test.
46 02.9703.0010 0
Page 65
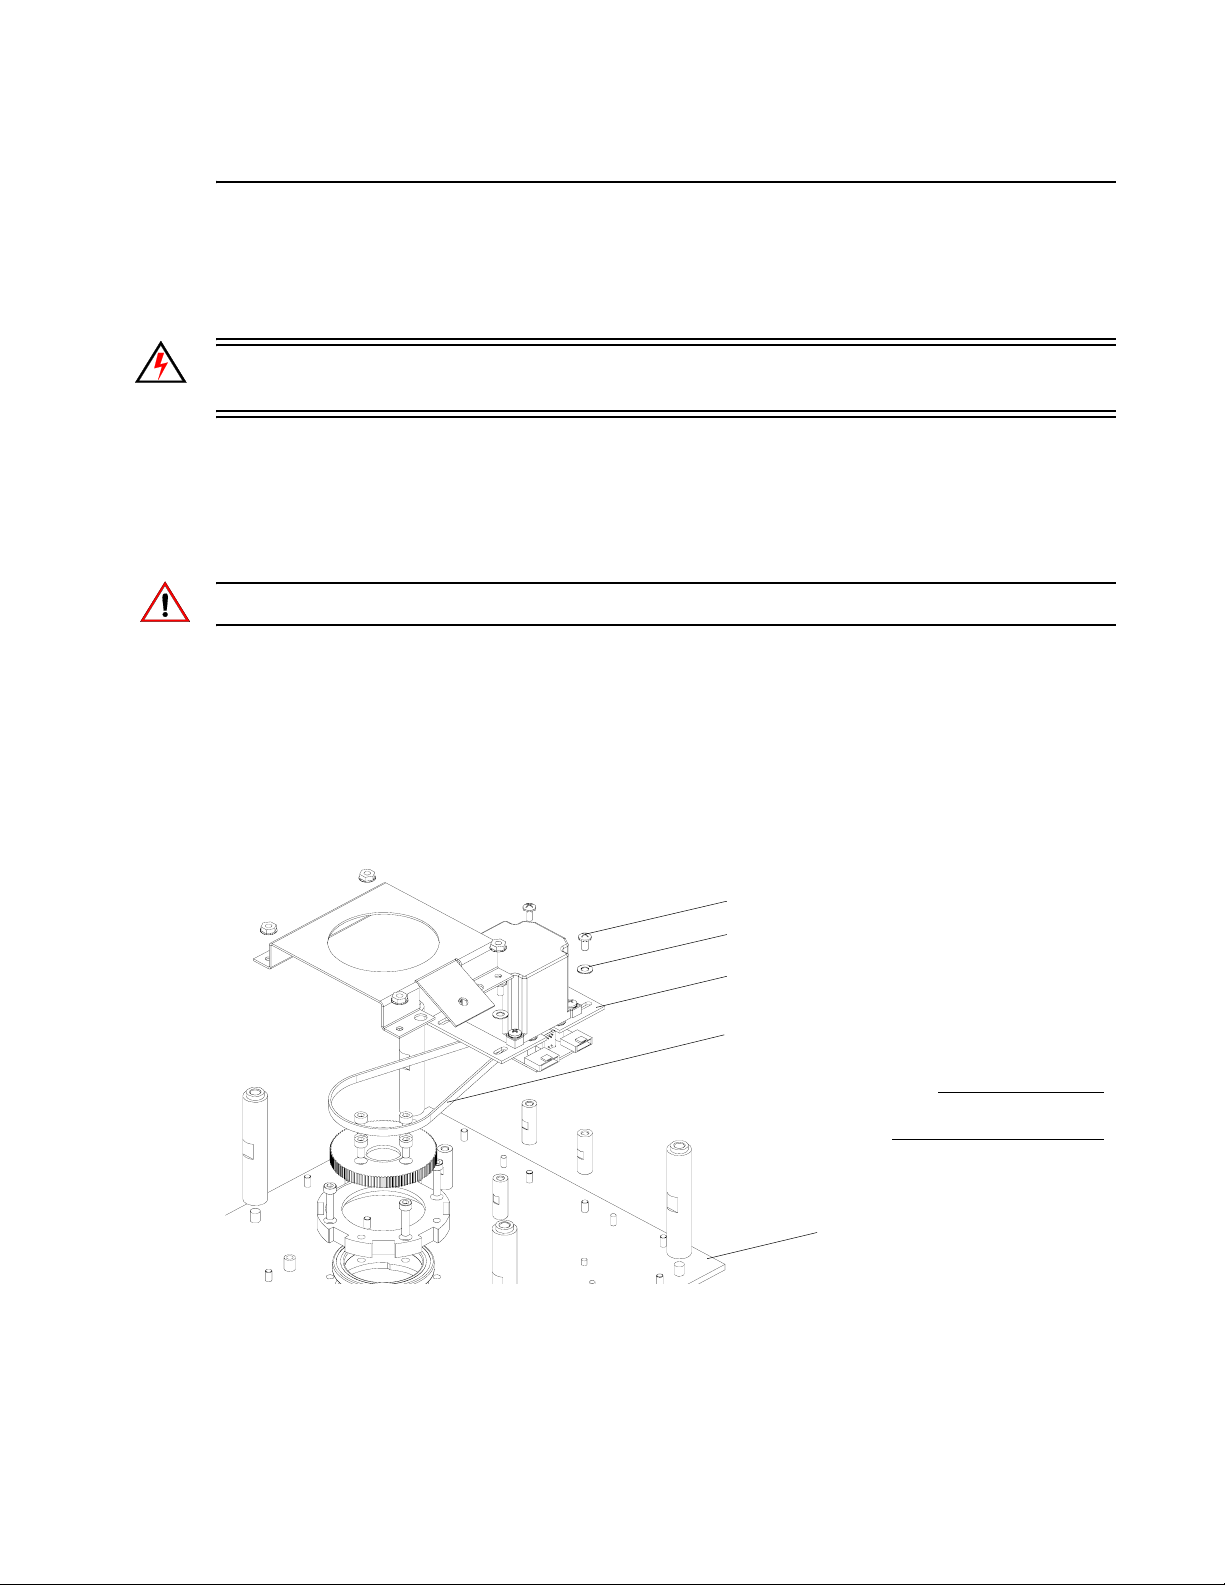
MAINTENANCE PROCEDURES : PAN MOTOR ASSEMBLY REPLACEMENT
2
Pan Motor Assembly Replacement
Tools:
• #2 Phillips screwdriver
WARNING: Ensure that power is completely removed (disconnected) from luminaire before
attempting any work.
To remove pan motor assembly:
Step 1. Remove power from luminaire and allow unit to completely cool.
Step 2. Remove power supply following procedure described in “Low Voltage Supply (LVS)/LED
Power Supply Replacement” chapter on page 22.
CAUTION: In next step, do not set luminaire where the lenses come in contact with the work surface.
Step 3. Carefully, rotate luminaire to access bottom of enclosure.
Step 4. Remove six 1/4-20 x 1/2" PFZ screws and remove bottom plate.
Step 5. Remove both fan assemblies by removing two 6-32 x 1/4" PPZ SEMS screws for each fan
assembly.
Step 6. Disconnect wiring from pan motor and pan encoder.
Step 7. As shown in Figure 2-28, remove four 8-32 x 1/4" PPB SEMS screws and flat washers
8-32 x 1/4" PPB SEMS Screws (x4)
#8 Flat Washer (x4)
Pan Motor Assembly
Pan Belt
Note:
Components removed and
drawing exploded for clarity.
Enclosure Top Plate Assembly
Figure 2-28: Pan Motor Assembly Removal
Step 8. Reassemble following steps in reverse order.
Step 9. Power luminaire and test.
02.9703.0010 0 47
Page 66
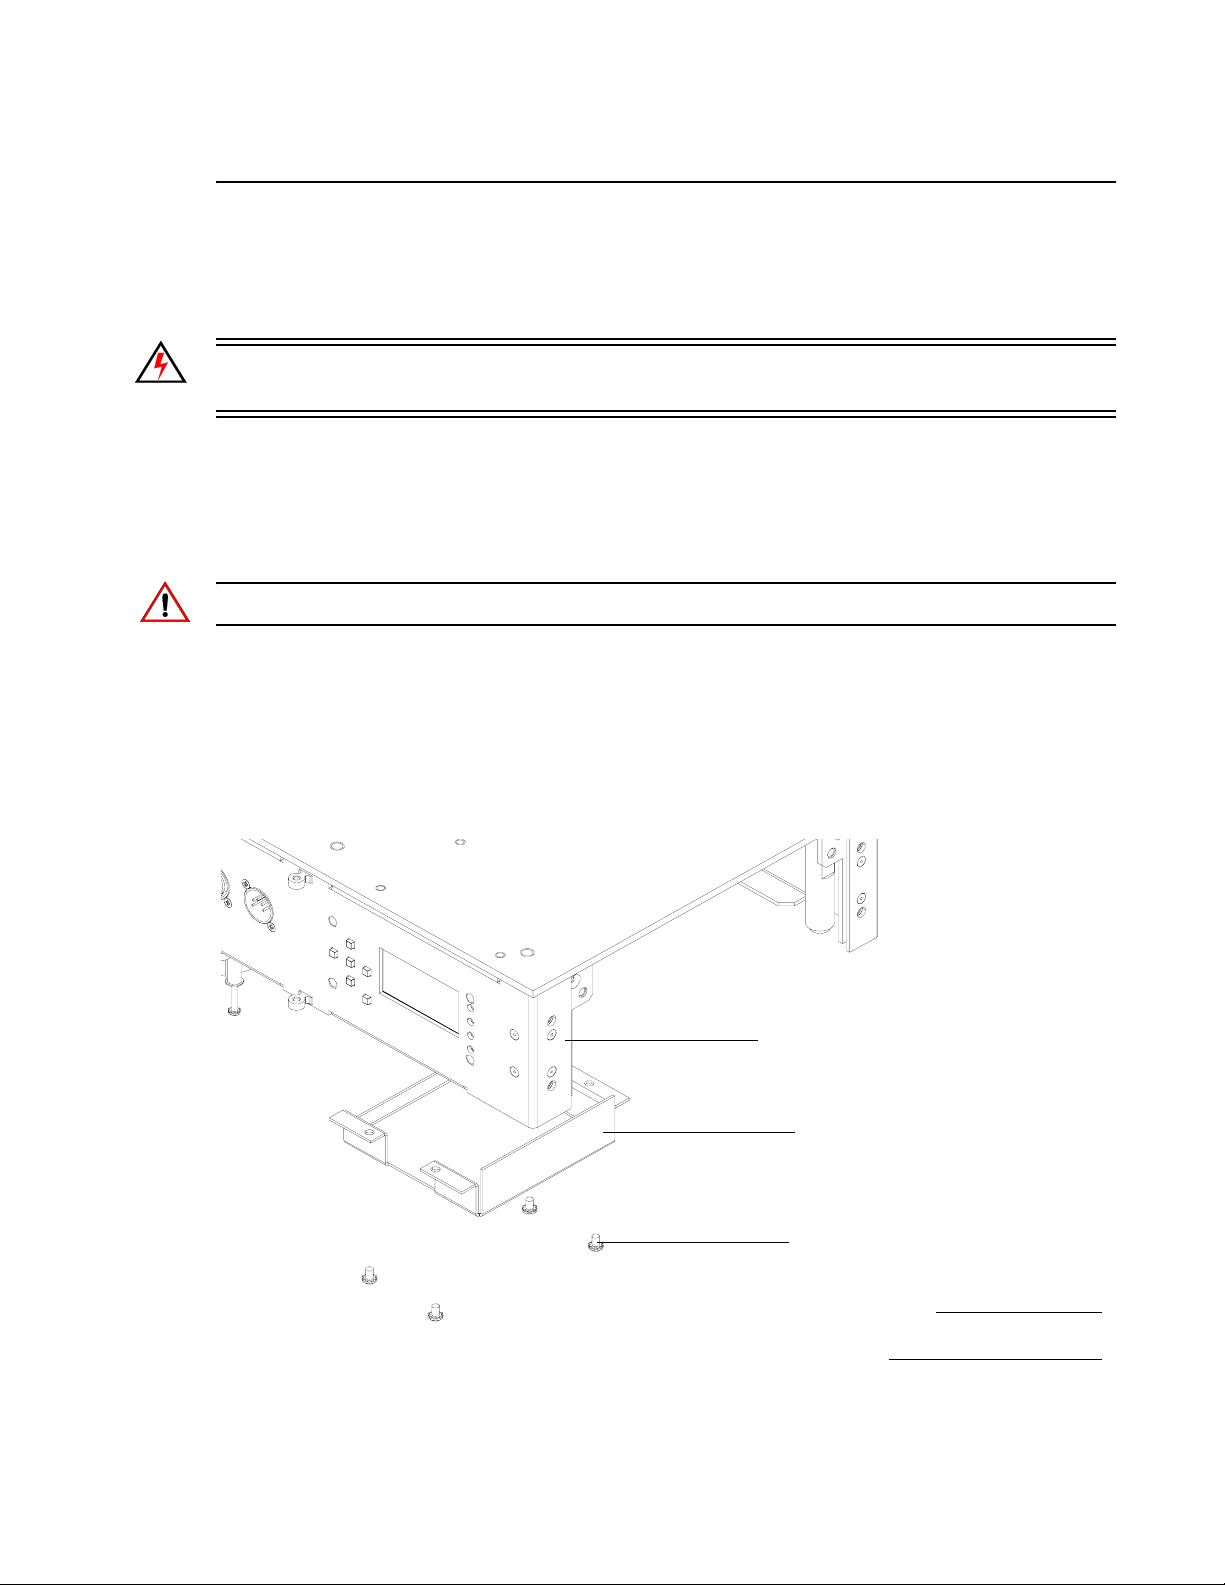
VARI❋LITE - VLX3 LED WASH LUMINAIRE SERVICE MANUAL
Pan Belt Replacement
Tools:
• #2 Phillips screwdriver
WARNING: Ensure that power is completely removed (disconnected) from luminaire before
attempting any work.
To remove pan motor assembly:
Step 1. Remove power from luminaire and allow unit to completely cool.
Step 2. Remove power supply following procedure described in “Low Voltage Supply (LVS)/LED
Power Supply Replacement” chapter on page 22.
CAUTION: In next step, do not set luminaire where the lenses come in contact with the work surface.
Step 3. Carefully, rotate luminaire to access bottom of enclosure.
Step 4. Remove six 1/4-20 x 1/2" PFZ screws and remove bottom plate.
Step 5. Remove pan motor following procedure described in “Pan Motor Assembly Replacement”
chapter on page 47.
Step 6. As shown in Figure 2-29, at wire tray, remove four 8-32 x 1/4" PPZ SEMS screws and
remove tray.
Enclosure Assembly
Wire Tray
8-32 x 1/4" PPZ
SEMS Screw (x4)
Note:
Components removed and
drawing exploded for clarity.
Figure 2-29: Wire Tray Removal
Step 7. Disconnect all wiring from inside enclosure.
48 02.9703.0010 0
Page 67
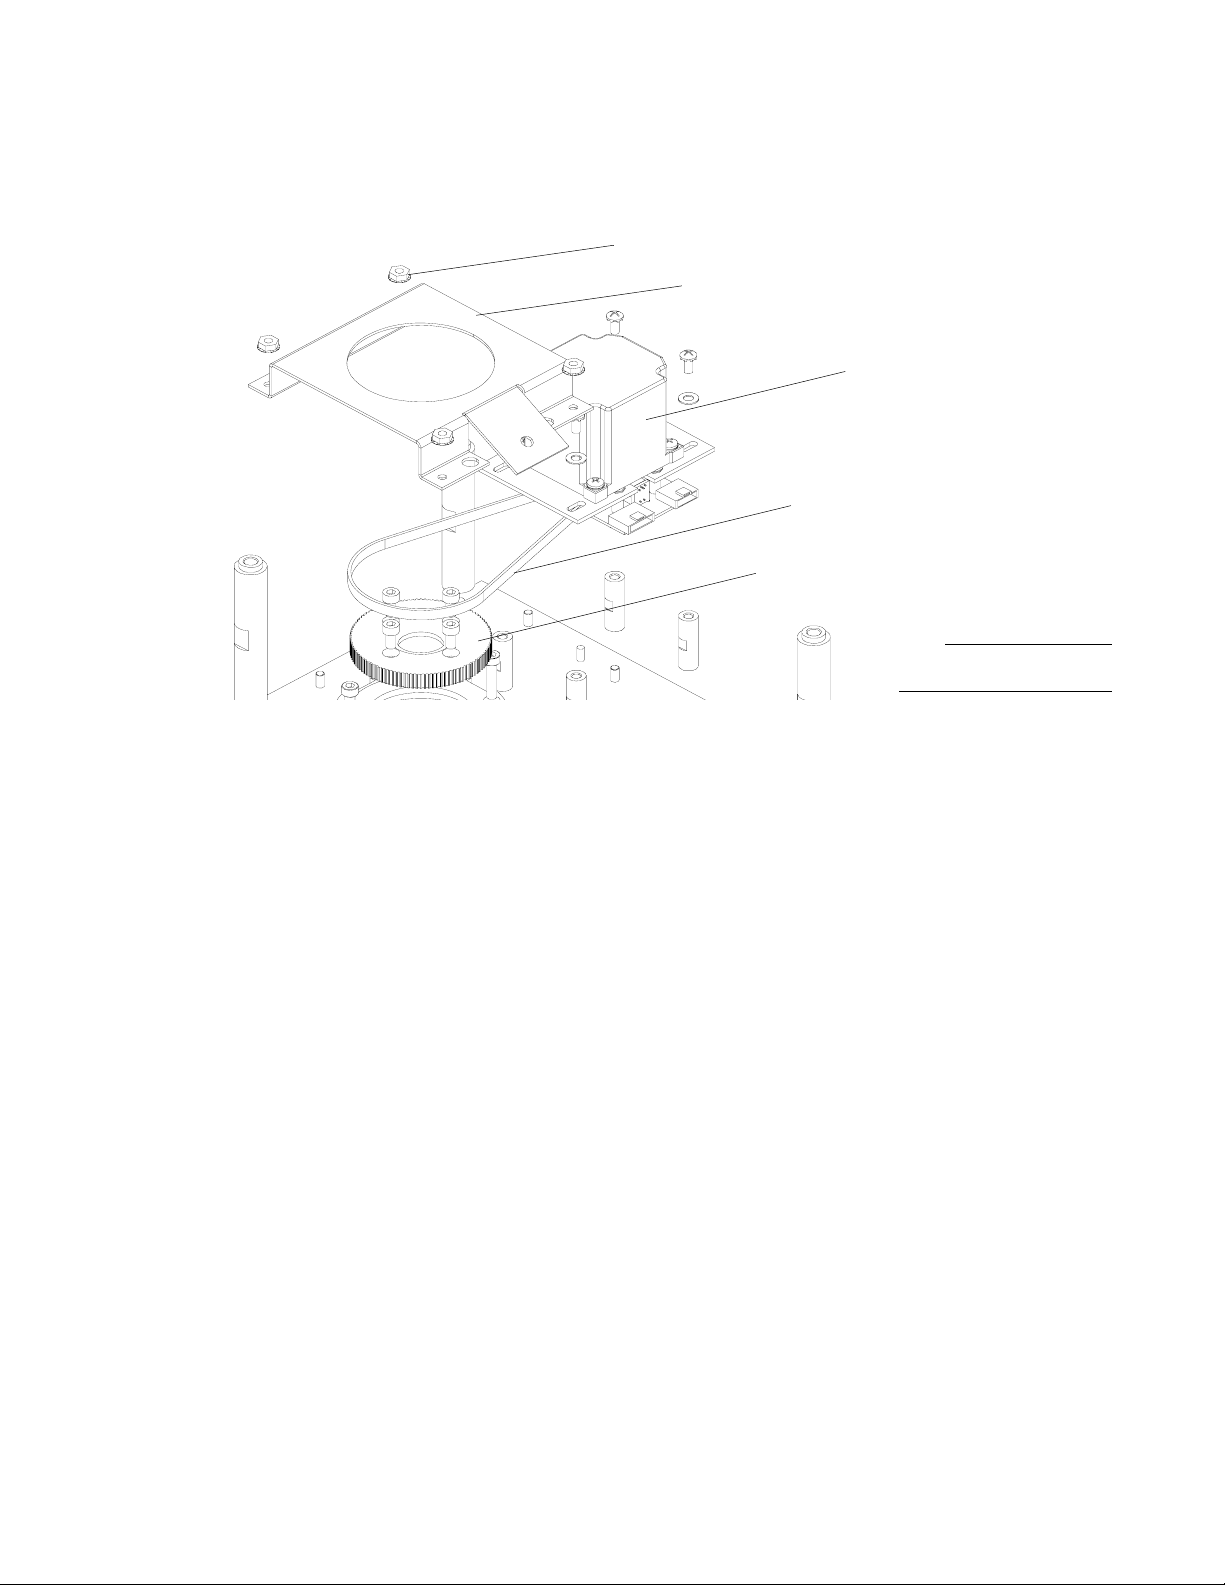
MAINTENANCE PROCEDURES : PAN BELT REPLACEMENT
Step 8. As shown in Figure 2-30, at pan pulley cover, remove four 8-32 KEPS nuts and remove
cover.
8-32 KEPS Nut (x4)
Pan Pulley Cover
Pan Motor Assembly
Pan Belt
Pan Pulley
Note:
Components removed and
drawing exploded for clarity.
2
Figure 2-30: Pan Belt Removal
Step 9. Slide belt off pulley.
Step 10. Reassemble following steps in reverse order.
Step 11. Power luminaire and test.
02.9703.0010 0 49
Page 68
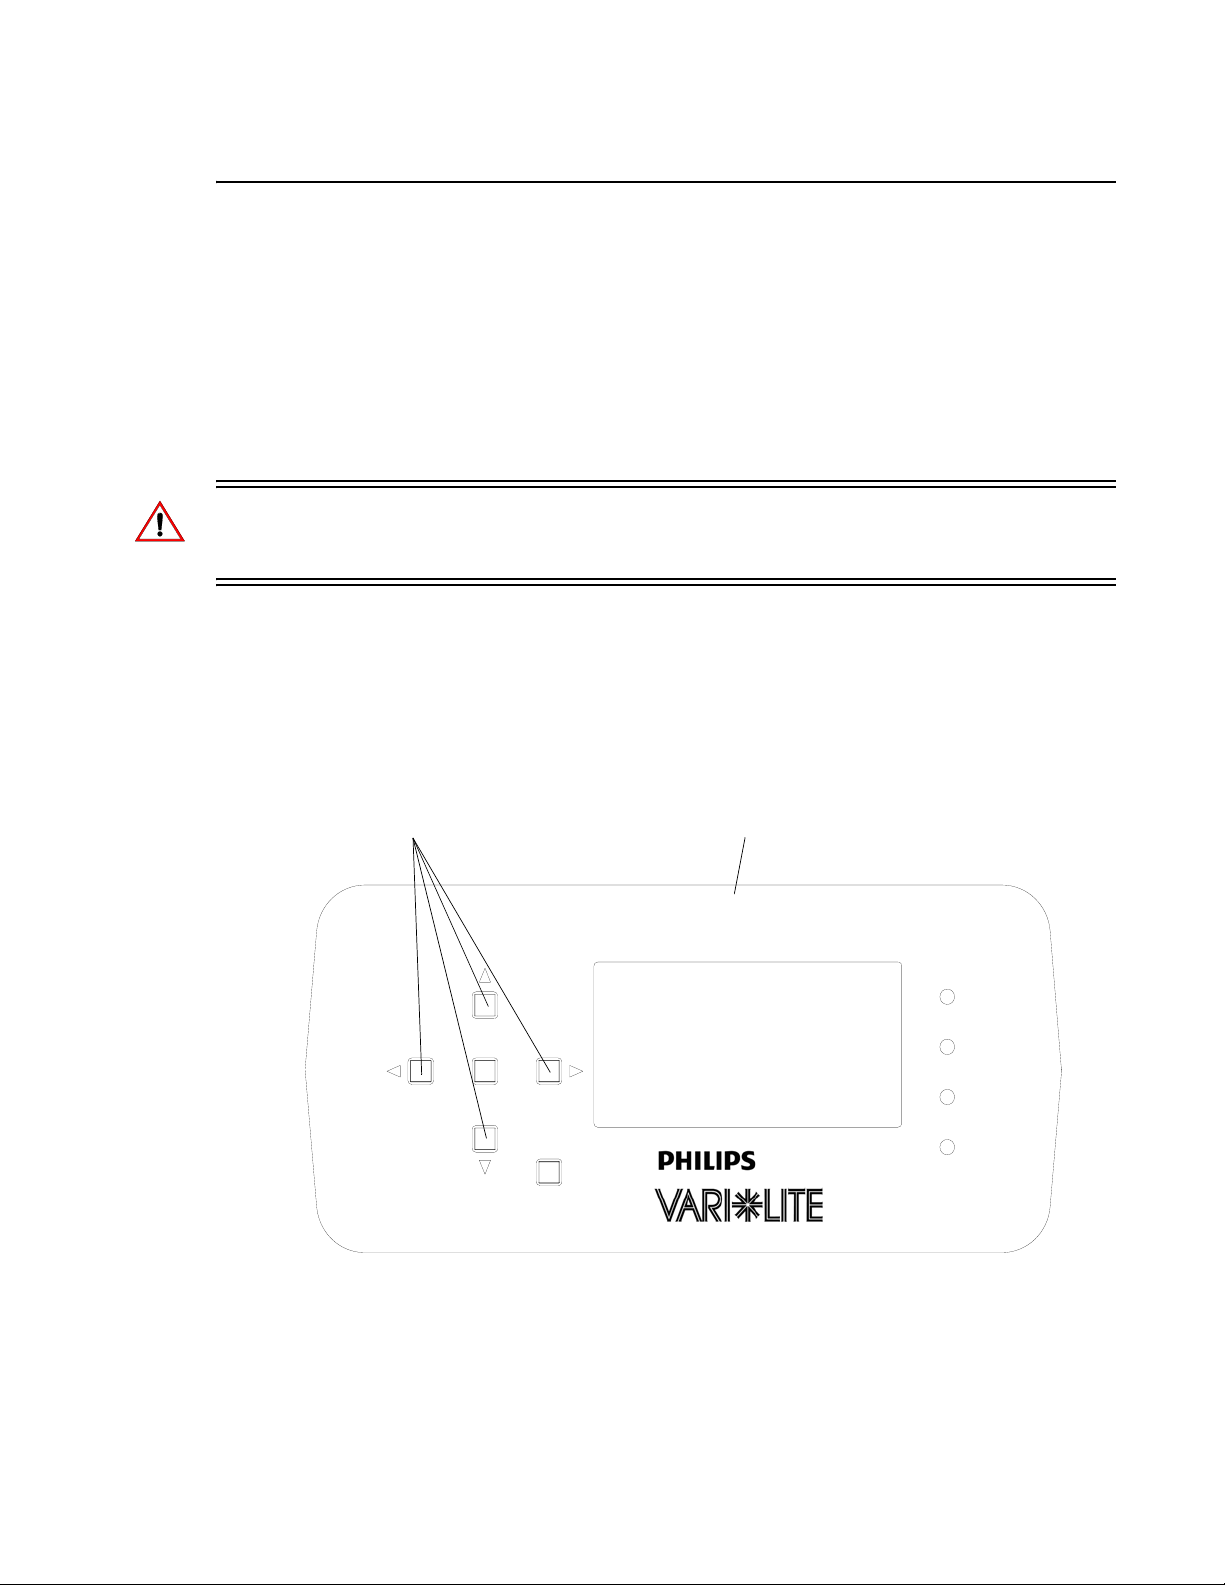
VARI❋LITE - VLX3 LED WASH LUMINAIRE SERVICE MANUAL
VLX3 Wash dropCal (Reinstall Factory LED Calibration)
Tools:
• Personal Computer (PC) Running Windows with an available USB port (user supplied).
• The dropCal software (allows installation of luminaire’s LED factory calibration). Note, this
software is only available from Vari-Lite technical support.
• Calibration .txt file (dropCal), which is specific to the serial number of the fixture. Note, this file is
only available from Vari-Lite technical support.
• Vari-Lite USB Programming Cable (Vari-Lite Part Number 28.8500.0054).
WARNING: The dropCal file is a unique calibration file and is specific to the fixture’s serial number .
Using a dropCal file from another fixture will load a different calibration scheme and will cause the
fixture to be out of calibration.
To reinstall the calibration file in a VLX3 Wash Luminaire:
Step 1. Power luminaire and allow calibration routine to run.
Step 2. Access luminaire LED calibration menu by pressing and holding all four arrow buttons (on
luminaire Menu) simultaneously until LED CAL Mode is shown on LCD display. Refer to
Figure 2-31.
Arrow Buttons
ENTER
ESC
VLX3 Wash Menu / LCD Display
LED Cal Mode
POWER
TX
RX
ERROR
Figure 2-31: VLX3 Wash Menu / LCD Display
Step 3. Press [ENTER] on menu.
Step 4. Display now reads Cal? Yes.
Step 5. Press [ENTER] on menu.
50 02.9703.0010 0
Page 69
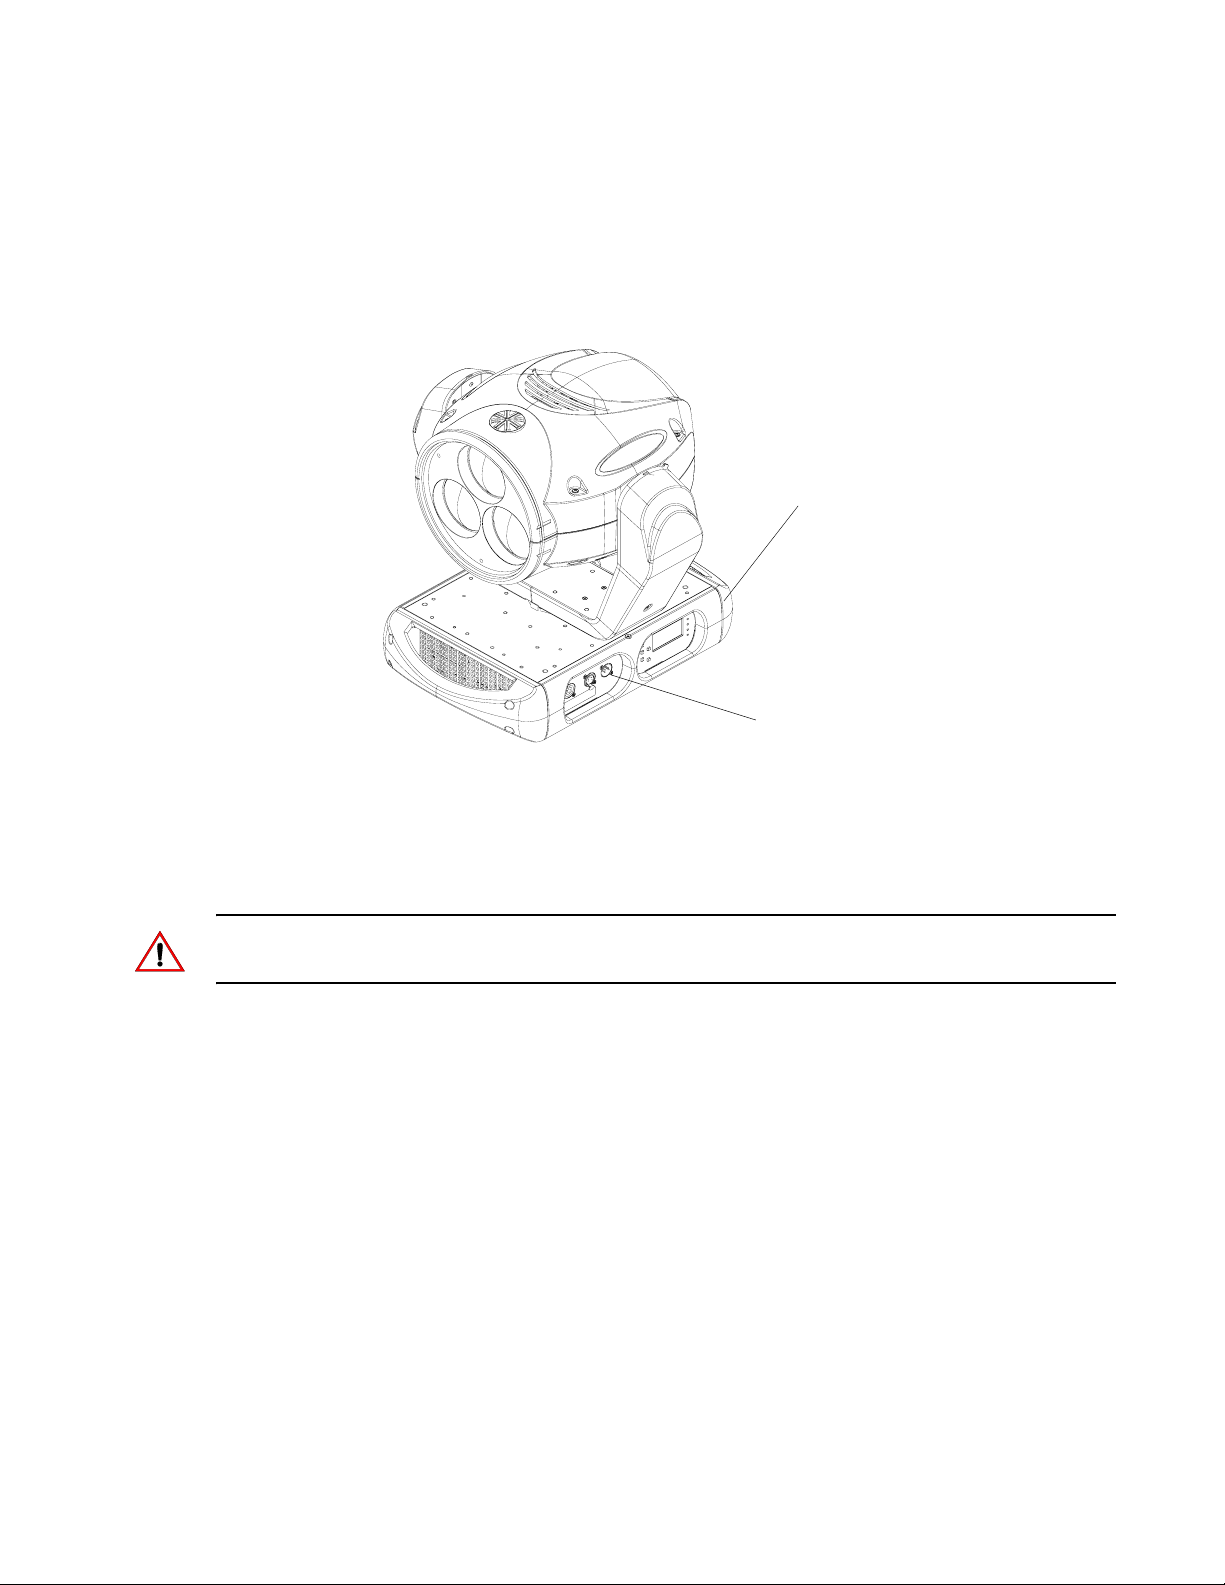
MAINTENANCE PROCEDURES : VLX3 WASH DROPCAL (REINSTALL FACTORY LED CALIBRATION)
Step 6. Display now reads Set LED Cal.
Step 7. Press [ENTER] on menu.
Step 8. Display now reads Wait for Cal.
Upper Enclosure
2
DMX / AC Input Panel
Figure 2-32: VLX3 Wash DMX / AC Input Panel
Step 9. At PC, attach USB Programming Cable to available USB port and at luminaire, using other
end of US Programming USB Cable, connect to DMX IN at DMX / AC Input Panel as
indicated in Figure 2-32.
Note: It is best to use the PC normally used to upload VARI❋LITE luminaire software since it will
already have the necessary drivers installed for the USB Programming Cable.
Step 10. Launch dropCal.exe application on PC.
- Continued on next page -
02.9703.0010 0 51
Page 70
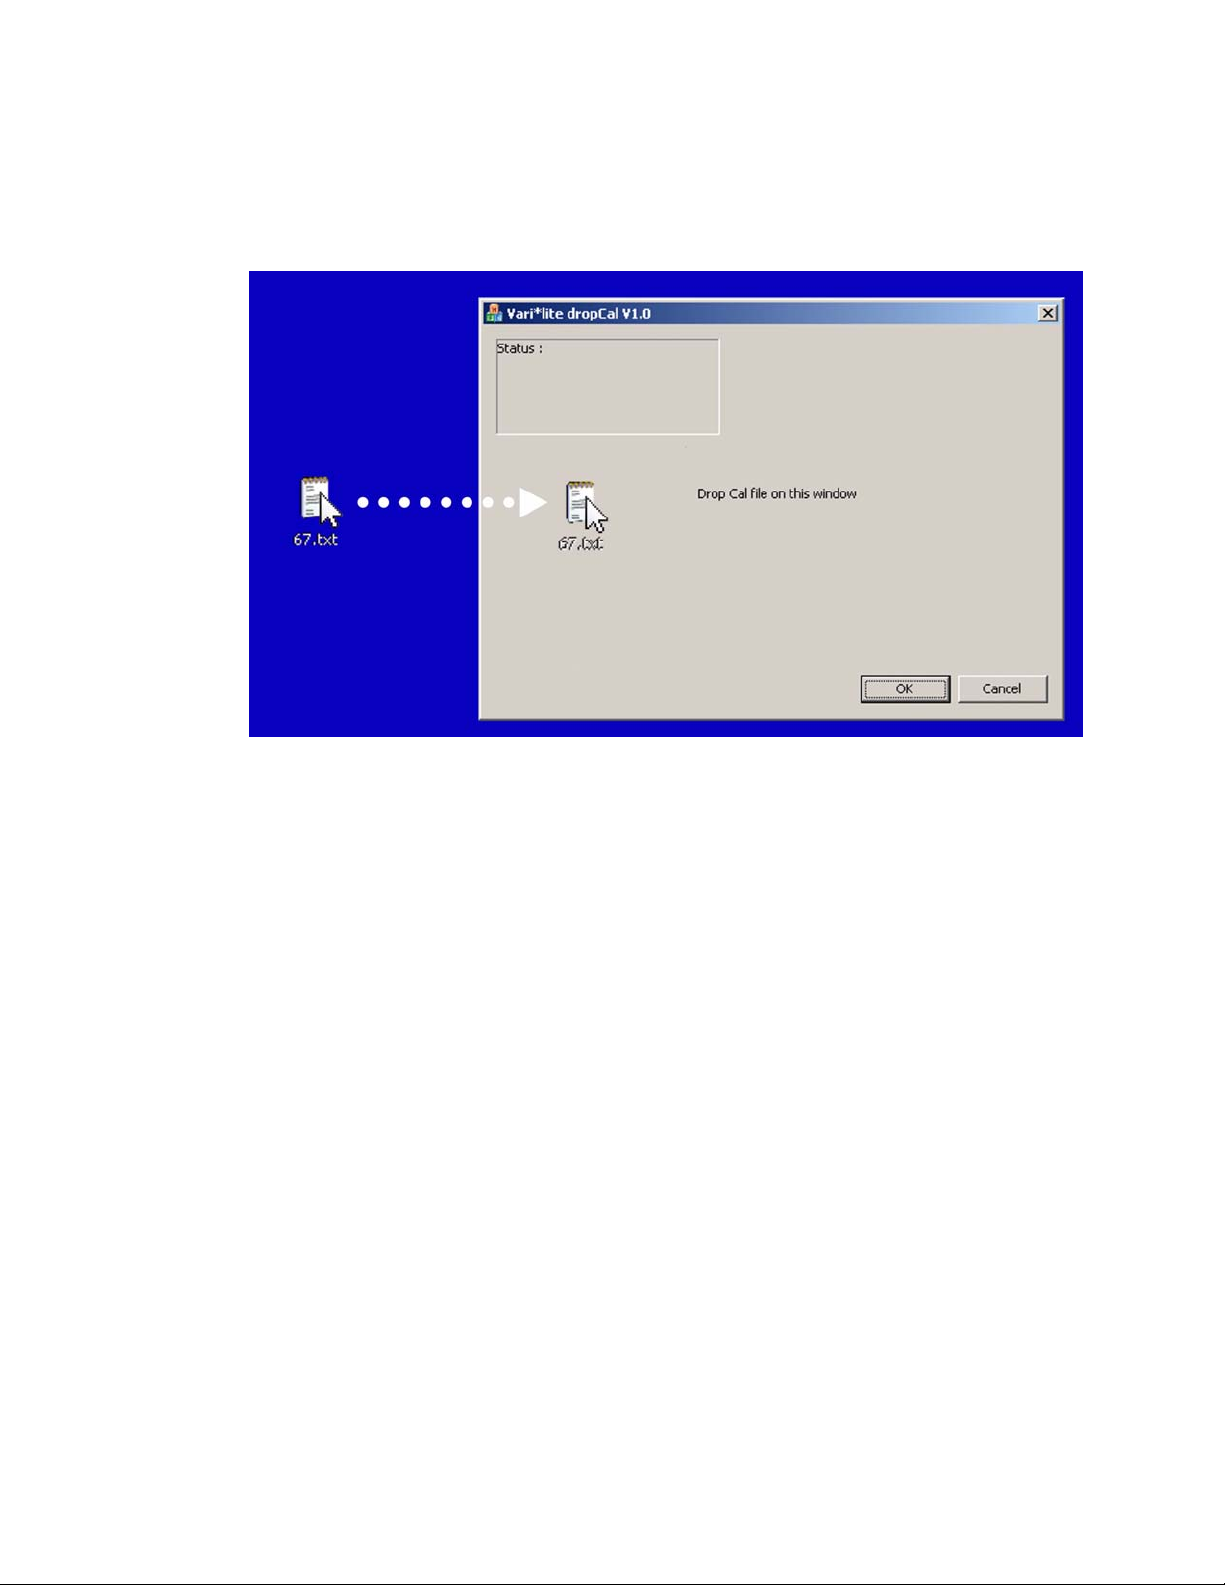
VARI❋LITE - VLX3 LED WASH LUMINAIRE SERVICE MANUAL
Step 11. Drag .txt file for specific luminaire into dropCal application window as shown in Figure 2-
33 (example, for VLX 67 [67 being the last digits of the serial number], drag file 67.txt into
application window).
Figure 2-33: dropCal Application Window
Step 12. dropCal will process file and window will read, Completed!
Step 13. LCD display on luminaire will read Cal Complete.
Step 14. Press [ENTER] on menu.
Step 15. The luminaire will run its calibration routine and unit shall be ready for use.
52 02.9703.0010 0
Page 71

CHAPTER 3.
Illustrated Parts Breakdown
This chapter contains illustrated parts breakdowns for all VLX3 LED Wash Luminaire
assemblies.
• Drawing Tree
• Top Assembly
• Head Assembly
• Enclosure Assembly
• Cable Assemblies
SERVICE
02.9703.0010 0 53
Page 72
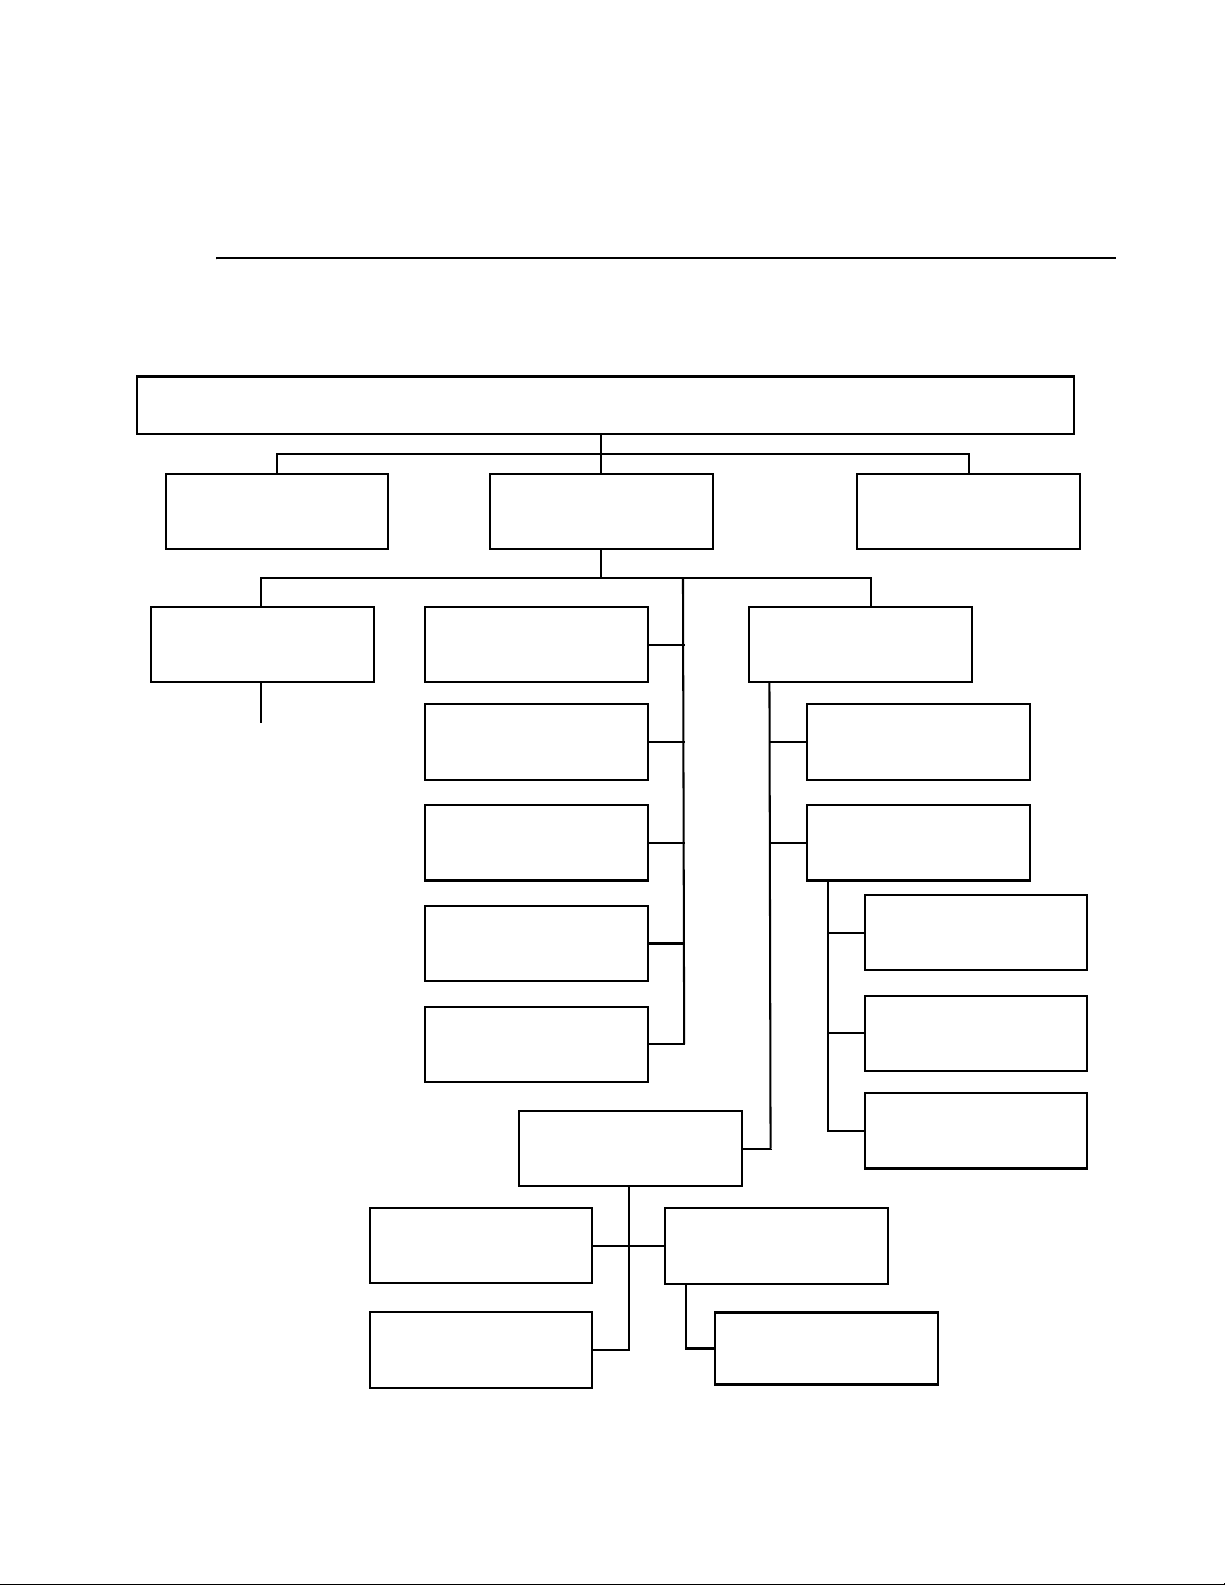
VARI❋LITE - VLX3 LED WASH LUMINAIRE SERVICE MANUAL
Drawing Tree
VLX3 Wash Luminaire
VLX3 Wash Luminaire
20.9703.0001 Rev A
VLX3 Wash Included Items Kit
28.9703.0100 Rev A
VLX3 Wash Upper Enclosure
Assembly
21.9703.0850 Rev F
continued next page
VLX3 Wash Generic Assembly
21.9703.0010 Rev B
LED Drive Cable Assembly
25.9703.0010 Rev C
Zoom Cable Assembly
25.9703.001 1 Rev A
VLX3 Wash Tilt Cable
Assembly
25.9703.0012 Rev B
VLX3 Tilt Sensor Cable
Assembly
25.9703.0013 Rev A
VLX3 Yoke to Head Chassis
Ground Cable Assembly
25.9703.0018 Rev A
VLX3 Wash Head Cover
21.9703.061 1 Rev A
VLX3 Wash Head Assembly
21.9703.0610 Rev C
Moving Zoom Assembly
21.9703.0130 Rev A
Light Engine (3 Source LED)
Assembly
21.9703.1600 Rev. C
LED Driver Board Assembly
21.9693.0652 Rev. A
Zoom Intermediate Plate
21.9703.0255 Rev. B
Assembly
Assembly
LED Engine Cooling Assembly
21.9693.0310 Rev C
Right Tilt Tube Assembly
21.9703.0661 Rev. A
Left Tilt Tube Assembly
21.9703.0662 Rev. 0
Tilt Cradle Assembly
21.9703.0650 Rev A
Tilt Motor Mount Assembly
21.9703.0660 Rev C
Pulley Pinion Assembly
21.9687.0655 Rev. A
Figure 3-1: VLX3 Wash Luminaire Subassembly Drawing Tree Part 1
54 02.9703.0010 0
Page 73
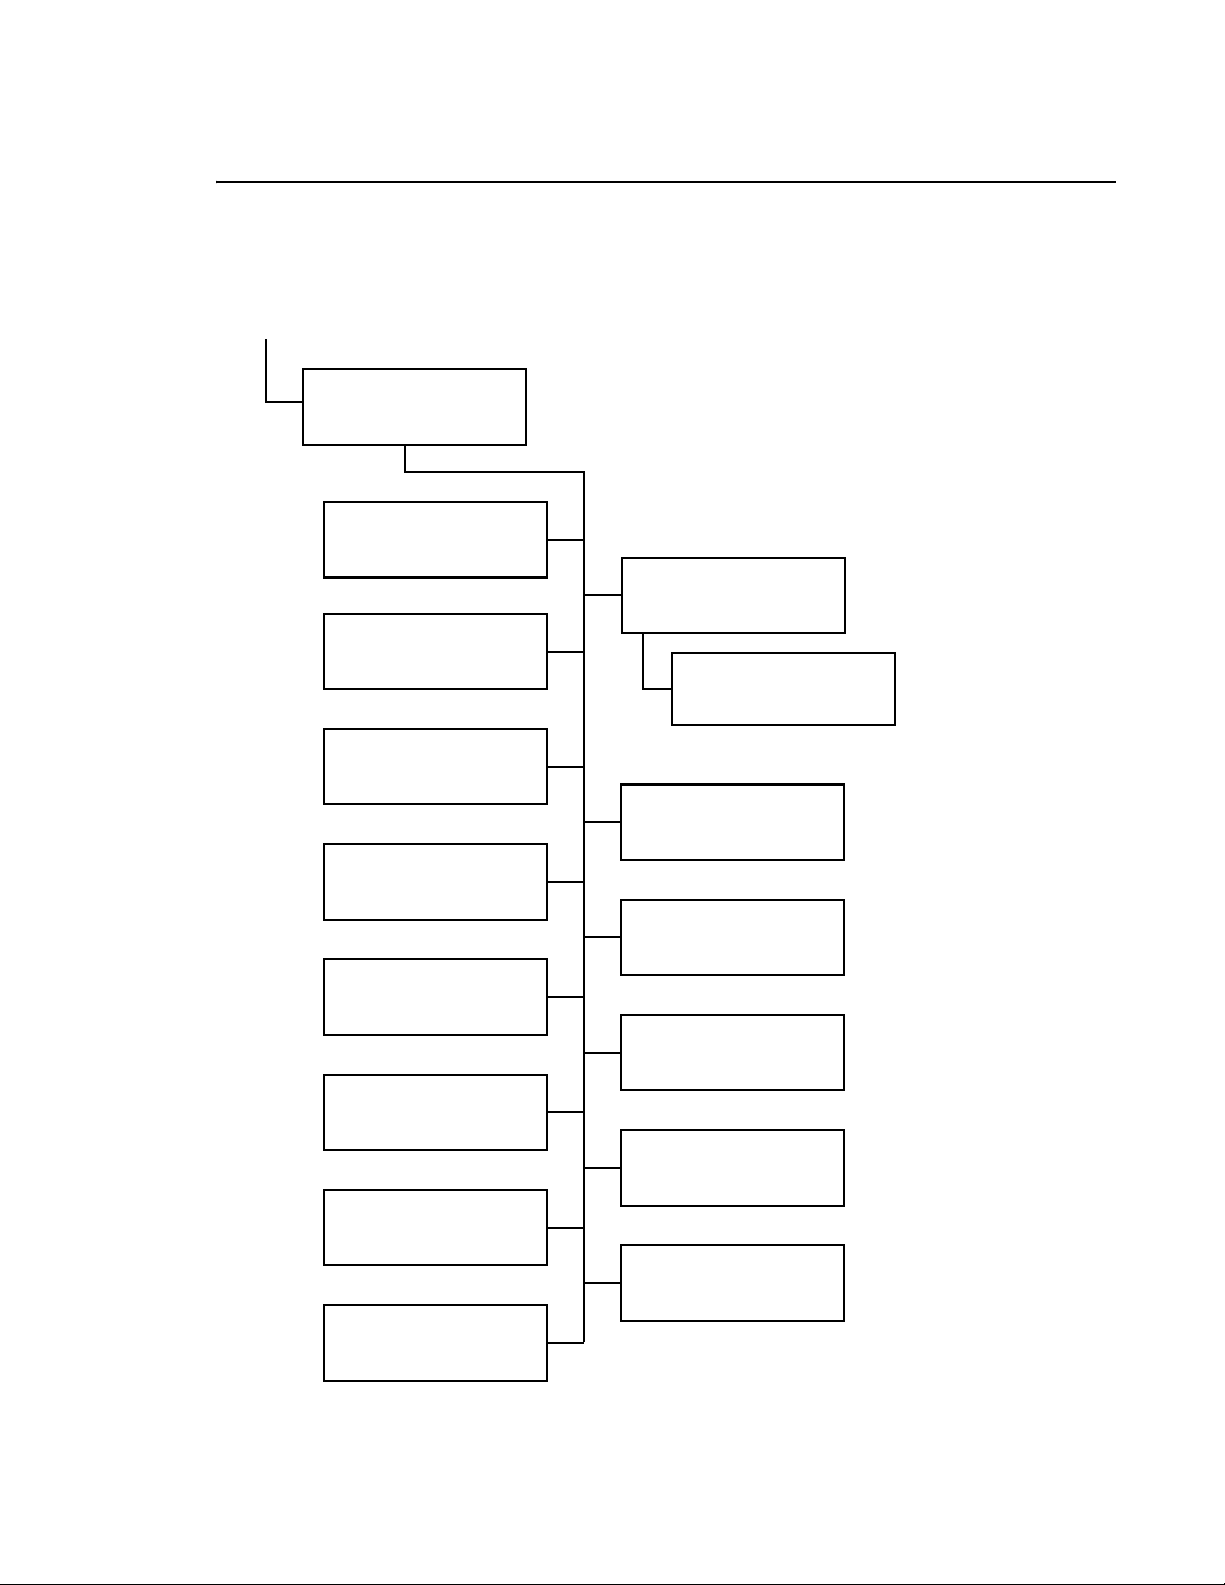
VLX3 Wash Luminaire (continued)
continued from previous page
VLX3 Wash Upper Enclosure
Assembly
21.9703.0850 Rev F
VLX3 Wash AC Input Cable
Assembly
25.9703.0001 Rev A
APS Fan Cable Assembly
25.9703.0002 Rev B
DRAWING TREE : VLX3 WASH LUMINAIRE
Pan Motor Assembly
21.9687.0860 Rev . B
Pulley Pinion Assembly
21.9687.0655 Rev . A
3
DMX I/O Cable Assembly
25.9703.0003 Rev B
VLX3 Wash Display Link Cable
Assembly
25.9703.0004 Rev B
VLX3 Wash 36VDC Supply
Cable Assembly
25.9703.0005 Rev C
- 12V Driver Board #1 Cable
Assembly
25.9703.0006 Rev A
- 12V Driver Board #2 Cable
Assembly
25.9703.0007 Rev A
- 12V Driver Board #3 Cable
Assembly
25.9703.0008 Rev A
LED Driver Grounds Cable
Assembly
25.9703.0009 Rev A
LED Drive Cable Assembly
25.9703.0014 Rev C
VLX3 Wash Pan Encoder Cable
Chassis To Yoke Ground Cable
Assembly
25.9703.0015 Rev B
VLX3 AUX COMM Interface
Cable Assembly
25.9703.0016 Rev A
Assembly
25.9661.1520 Rev D
Figure 3-2: VLX3 Wash Luminaire Subassembly Drawing Tree Part 2
02.9703.0010 0 55
Page 74

VARI❋LITE - VLX3 LED WASH LUMINAIRE SERVICE MANUAL
Top Assembly
VLX3 Wash Included Items Kit
28.9703.0100 Rev A
Refer to Figure 3-3.
No. Item Qty. UM. Description
1 02.8001.0001 1 EA PRODUCT SUPPORT SHEET, V A RI-LITE CUSTOMER SERVICE
2 02.8001.0002 1 EA VARI-LITE QUALITY ASSURANCE SHEET
3 02.8052.0001 1 EA CARD, LIMITED WARRANTY
4 02.8700.0001 1 EA CARD, PRODUCT REGISTRATION
5 02.9703.0002 1 EA UNPACK/QUICK START SHEET, VLX WASH
- 04.4037.0001 5 EA LABEL, 2.5 X .5 BARCODE (not shown)
- 04.9678.1001 2 EA LABEL, GREEN ROHS COMPLIANT (not shown)
- 04.9703.0003 2 EA LABEL, SHIPPING BOX, VLX3 WASH (not shown)
- 06.9687.0001 1 EA SHIPPING FOAM (not shown)
- 07.5044.0001 1 EA BAG, DESICCANT, SHIPPING BOX (not shown)
- 07.9703.0001 1 EA CARDBOARD SHIPPING BOX, VLX WASH (not shown)
6 08.9703.0001 1 EA CD-ROM, VLX3 WASH PRODUCT DOCUMENTATION, USER
7 22.9687.0805 2 EA FAB ASSY, BRACKET TRUSS HOOK
8 52.6541.0001 1 EA CONN., BLUE CABLE POWER INLET POWERCON
56 02.9703.0010 0
Page 75
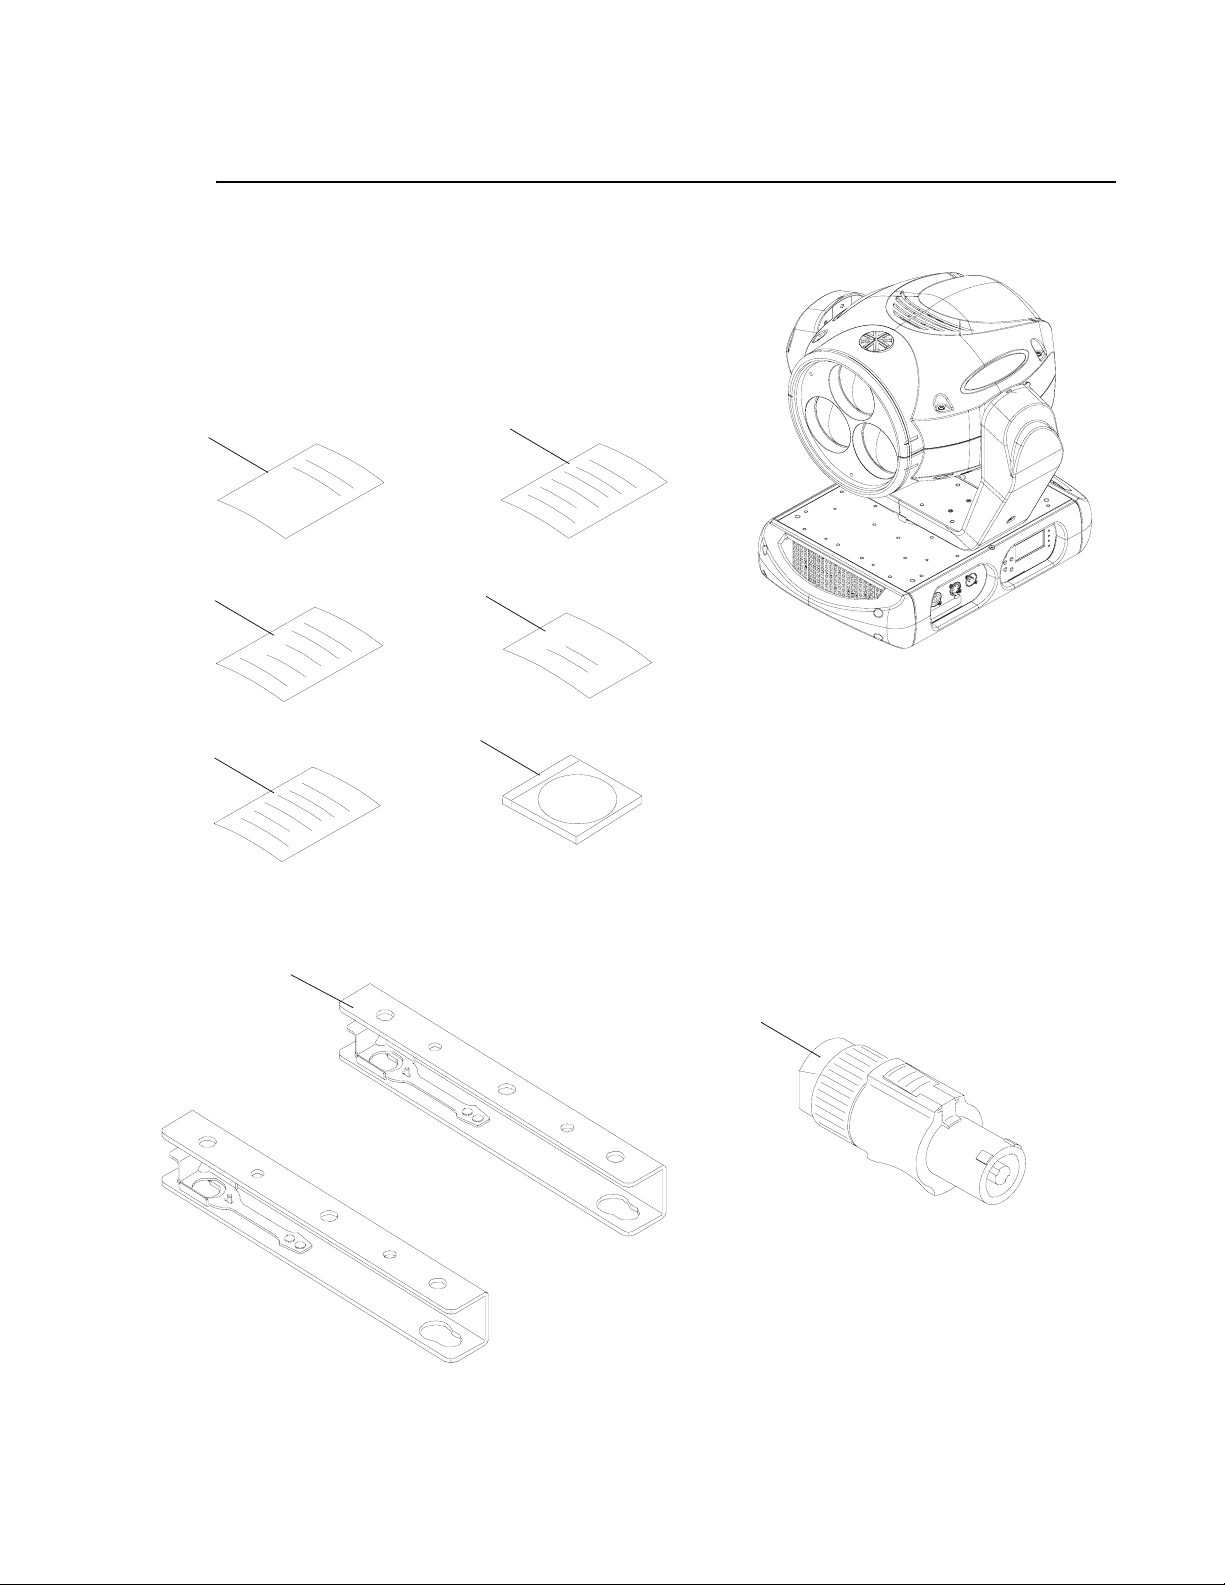
TOP ASSEMBLY : VLX3 WASH INCLUDED ITEMS KIT
VLX3 Wash Included Items Kit (continued)
3
1
3
5
7 (x2)
2
4
6
8*
*3-Pole Neutrik PowerCon Locking Connector
for AC Input Power. Power input cable must be
constructed by user.
Figure 3-3: VLX3 Wash Included Items Kit
02.9703.0010 0 57
Page 76

VARI❋LITE - VLX3 LED WASH LUMINAIRE SERVICE MANUAL
VLX3 Wash Luminaire
20.9703.0001 Rev A
Refer to Figure 3-4
No. Item Qty. UM. Description
1 10.9687.0720 2 EA YOKE COVER
2 10.9687.0850 2 EA BASE COVER, DISPLAY SIDE
3 10.9687.0852 2 EA BASE COVER, HANDLE SIDE
4 21.9703.0010 1 EA GENERIC ASSY, VLX3 WASH
5 21.9703.0611 1 EA ASSEMBLY, HEAD COVER, VLX3 WASH
- 28.9703.0100 1 EA INCLUDED ITEMS KIT, VLX3 WASH (NOT SHOWN)
6 55.6553.0008 2 EA SCREW, 10-32 X 9/16" PFB
7 53.6575.0009 6 EA SCREW, 8-32 X 3/8" LG PPB SEMS
8 53.6627.0001 8 EA SCREW, 10-32 X 5/8" PPB
9 69.9703.0570 1 EA POWER SUPPLY, 450W 12VDC, 120W 36VDC
58 02.9703.0010 0
Page 77
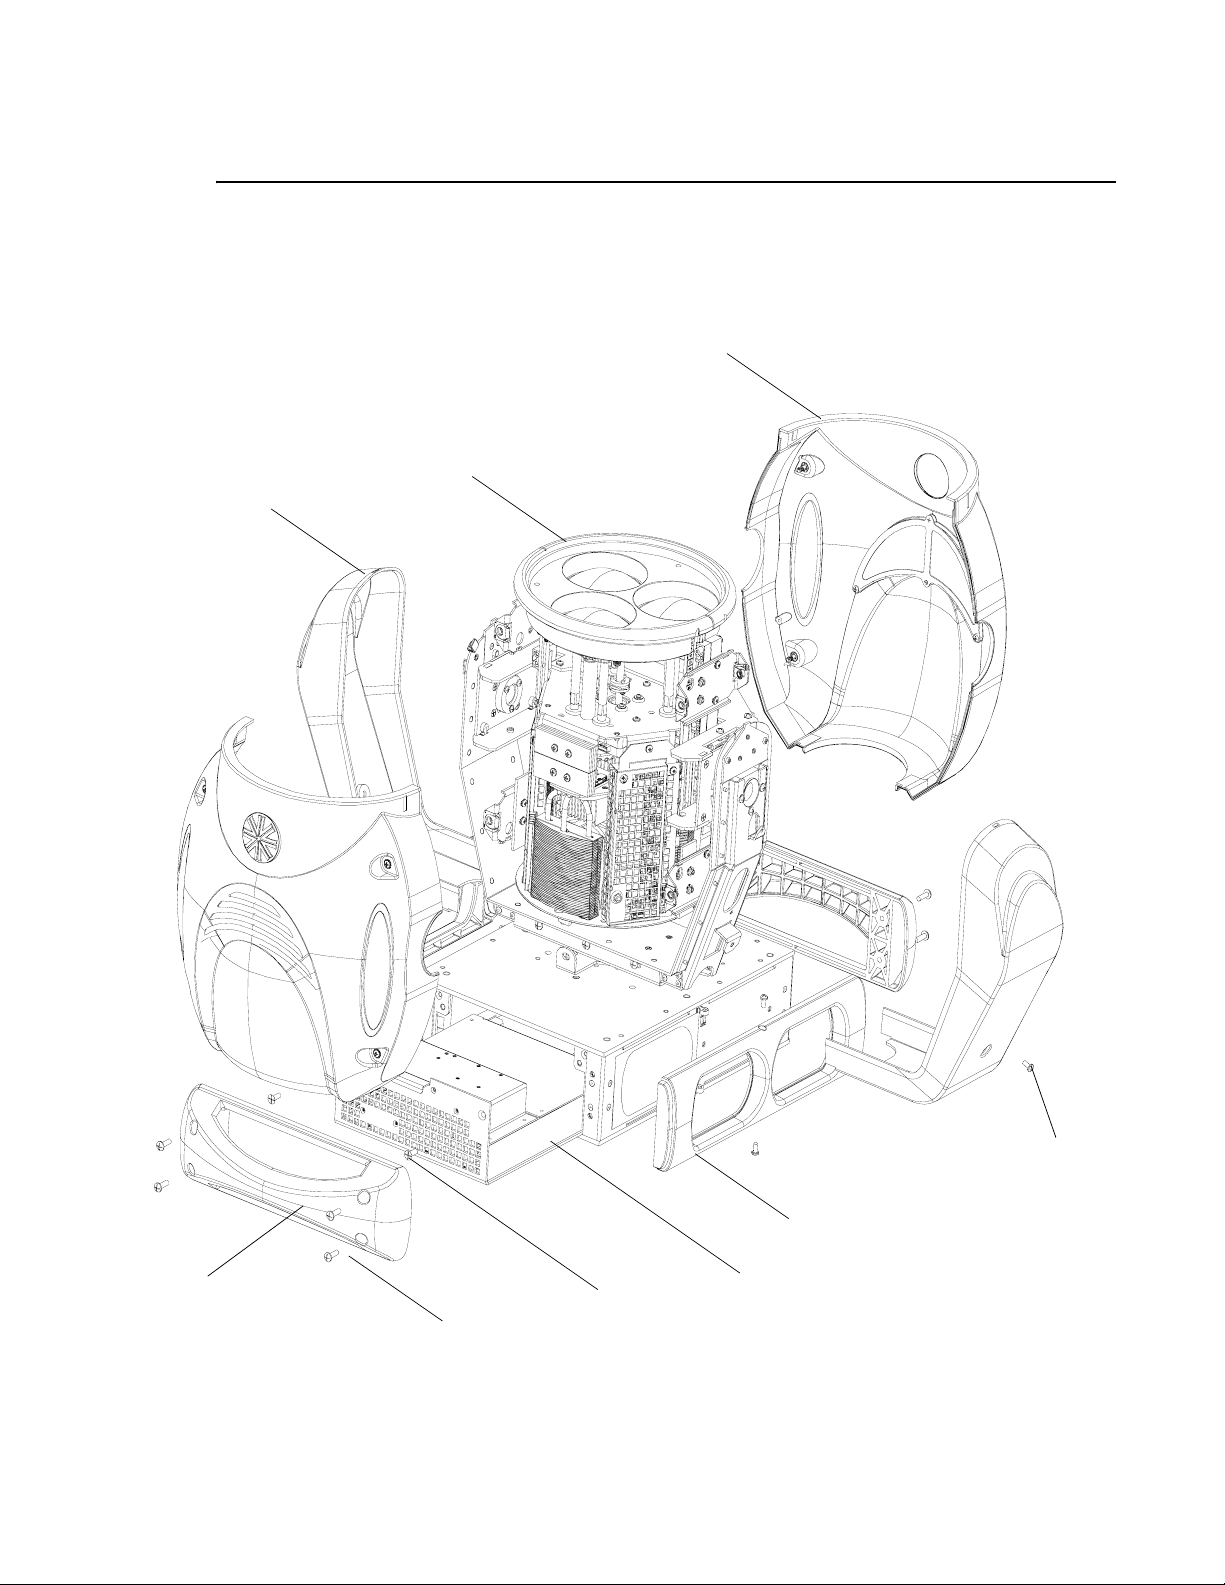
TOP ASSEMBLY : VLX3 WASH LUMINAIRE
VLX3 Wash Luminaire (continued)
5 (x2)
4
1 (x2)
3
7 (x6)
2 (x2)
3 (x2)
8 (x8)
Figure 3-4: VLX3 Wash Luminaire
02.9703.0010 0 59
6 (x2)
9
Page 78

VARI❋LITE - VLX3 LED WASH LUMINAIRE SERVICE MANUAL
VLX3 Wash Generic Assembly
21.9703.0010 Rev B
Refer to Figure 3-5
No. Item Qty. UM. Description
1 10.9703.0710 1 EA SUPPORT, YOKE TABS
2 10.9703.0711 1 EA COUNTERWEIGHT, YOKE
3 21.9687.0751 1 EA ASSY , TILT LOCK
4 21.9703.0610 1 EA HEAD ASSY, VLX3 WASH
5 21.9703.0850 1 EA ASSY, UPPER ENCLOSURE, VLX3 WASH
6 22.9687.0701 1 EA ASSY, YOKE
7 22.9687.0702 1 EA ASSY, FILLER, YOKE
- 25.9703.0010 1 EA CABLE ASSY, LED DRIVE (NOT SHOWN)
- 25.9703.0011 1 EA CABLE ASSY, ZOOM (NOT SHOWN)
- 25.9703.0012 1 EA CABLE ASSY, TILT VLX3 WASH (NOT SHOWN)
- 25.9703.0013 1 EA CABLE ASSY, TILT SENSOR, VLX3 WASH (NOT SHOWN)
- 25.9703.0018 1 EA CABLE ASSY, CHASSIS GROUND, YOKE TO HEAD (NOT SHOWN)
8 53.6543.0003 4 EA SCREW, 6-32 X 3/16" PPB
9 53.6575.0009 10 EA SCREW, 8-32 X 3/8" LG PPB SEMS
10 53.6608.0001 4 EA SCREW, 6-32 X 3/8" PFB
11 53.6682.0037 6 EA SCREW, 10-32 X 1/2" PPZ SEMS
60 02.9703.0010 0
Page 79
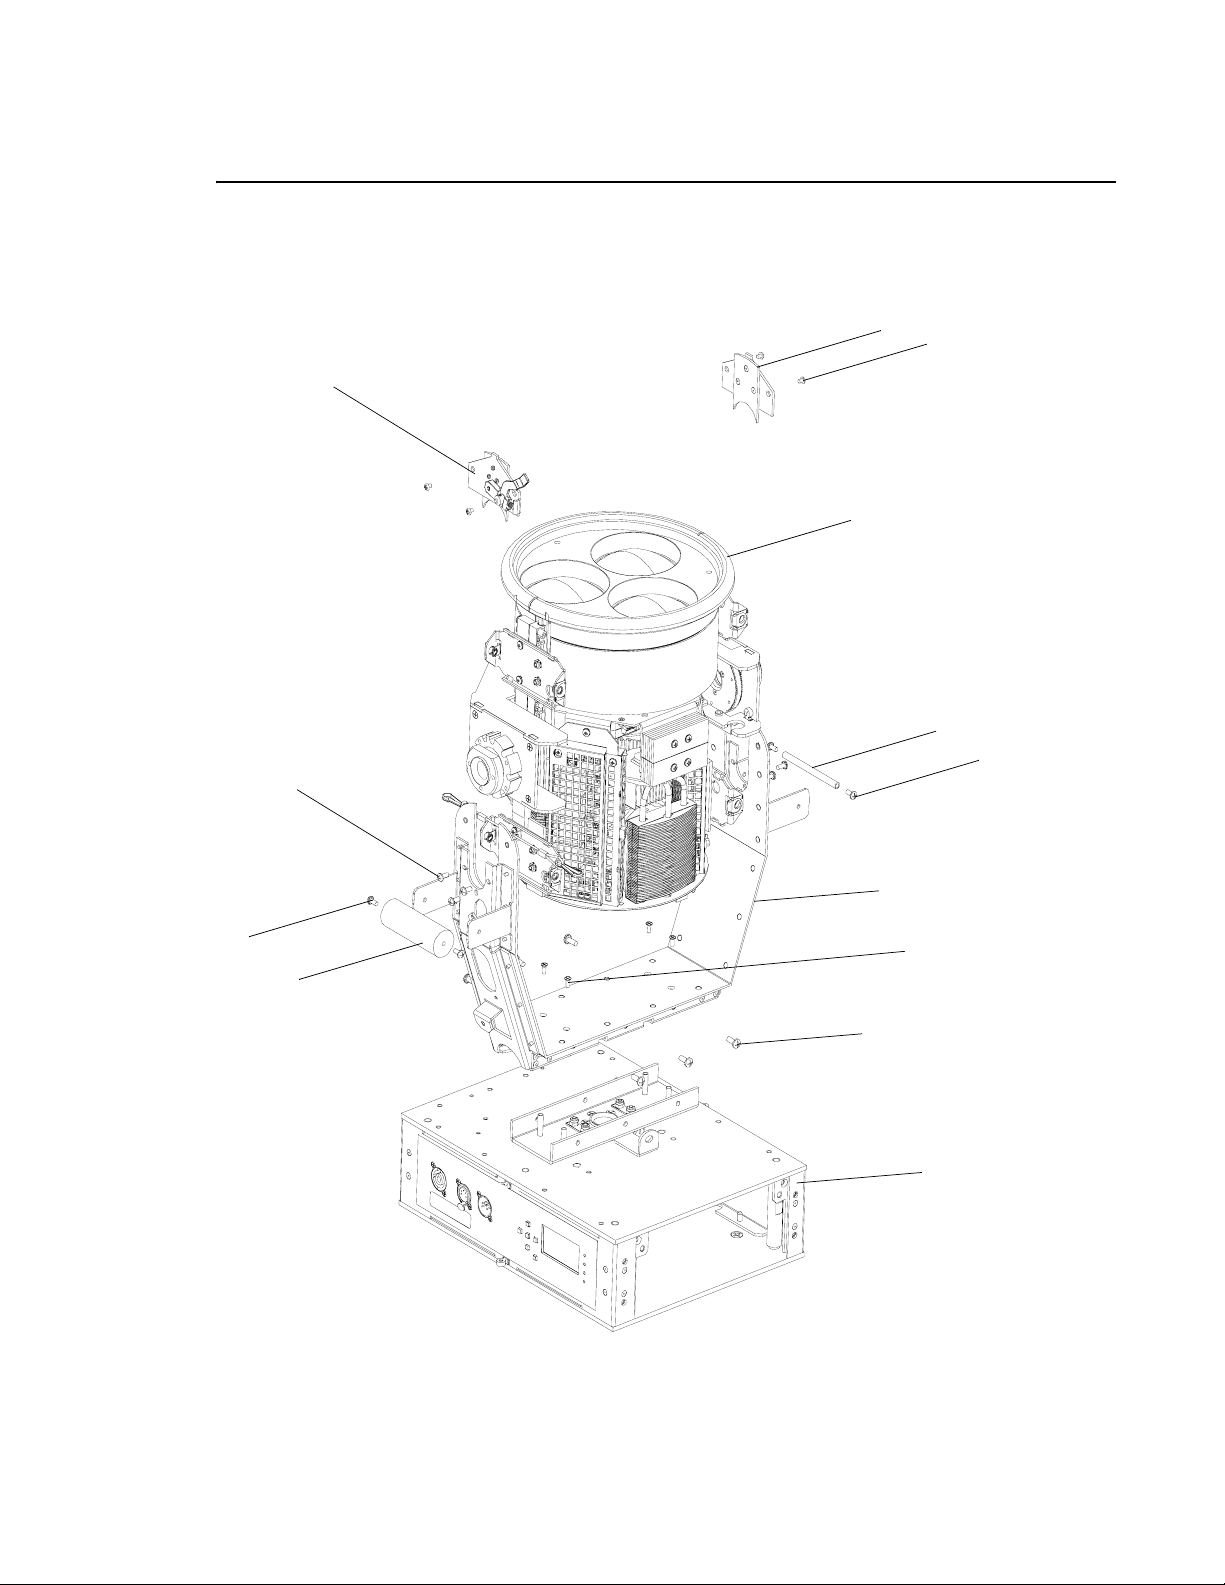
TOP ASSEMBLY : VLX3 WASH GENERIC ASSEMBLY
VLX3 Wash Generic Assembly (continued)
7
3
4
3
8 (x4)
9 (x2)
1
9 (x2)
9 (x6)
6
10 (x4)
2
11 (x6)
5
Figure 3-5: VLX3 Wash Generic Assembly
02.9703.0010 0 61
Page 80
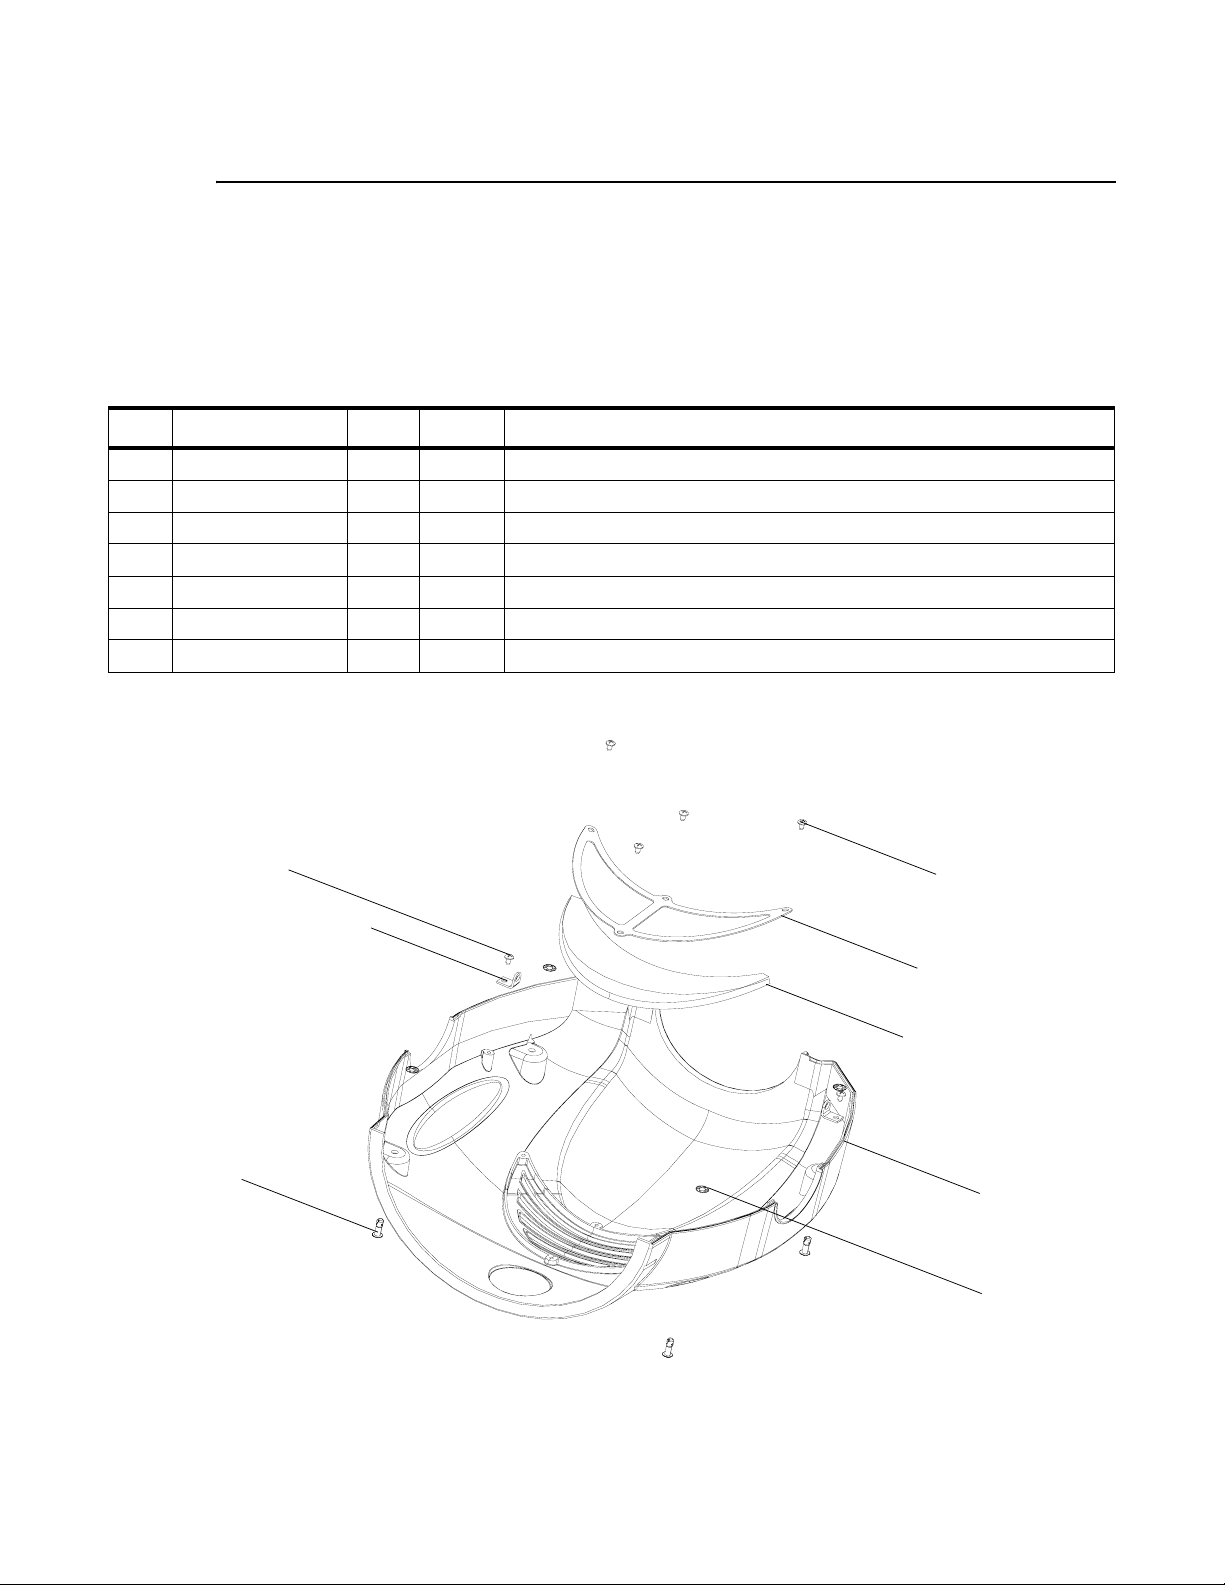
VARI❋LITE - VLX3 LED WASH LUMINAIRE SERVICE MANUAL
VLX3 Wash Head Cover Assembly
21.9703.0611 Rev A
Refer to Figure 3-6
No. Item Qty. UM. Description
1 10.9703.0612 1 EA HEAD COVER, VLX3 WASH
2 10.9703.0613 1 EA FOAM RETAINER, VLX3 WASH HEAD COVER
3 10.9703.0614 1 EA FILTER, HEAD COVER, VLX3 WASH
4 10.9678.0674 2 EA BRACKET, COVER TETHER
5 53.5655.0250 6 EA SCREW, #6 X 1/4" PPZ PLASTIC
6 55.2233.2003 4 EA DZUS RAPIER 1/4-TURN STUD RETAINER, 5 MM
7 55.2233.2005 4 EA DZUS RAPIER 1/4-TURN STUD, 5 MM, 12 MM LG
7 (x4)
5 (x2)
5 (x4)
4 (x2)
2
3
1
6 (x4)
Figure 3-6: VLX3 Wash Head Cover Assembly
62 02.9703.0010 0
Page 81

HEAD ASSEMBLY : VLX3 WASH HEAD ASSEMBLY
Head Assembly
VLX3 Wash Head Assembly
21.9703.0610 Rev C
Refer to Figure 3-1
No. Item Qty. UM. Description
1 10.9678.0658 12 EA PLATE, COUNTERWEIGHT
2 10.9678.0672 1 EA TETHER, COVER, NYLON COATED
3 10.9678.0674 1 EA BRACKET, COVER TETHER
4 21.9703.0130 1 EA ASSY, ZOOM, MOVING
5 21.9703.1600 1 EA LIGHT ENGINE ASSY, 3 SOURCE LED, VLX3 WASH
6 21.9703.0650 1EAASSY, TILT CRADLE
7 21.9703.0663 4 EA ASSY, COVER MOUNT BRACKET
(7a) 10.9703.0653 1 EA BRACKET, COVER MOUNT
(7b) 55.2233.2001 2 EA DZUS RAPIER MINI CLIP ON RET 5 MM
8 24.9703.0700 1 EA BRD ASSY, VLX3 WASH MAIN CONTROL
9 53.6576.0030 18 EA SCREW, M4 X 10 MM PPZ SEMS
10 53.6576.0032 4 EA SCREW, M4 X 30 MM PPZ
11 53.6613.0001 6 EA SCREW, 6-32 X 1/2" LG PPZ
12 55.2011.0003 2 EA SNAP, SPRING 3/16" EYE DIA
3
02.9703.0010 0 63
Page 82
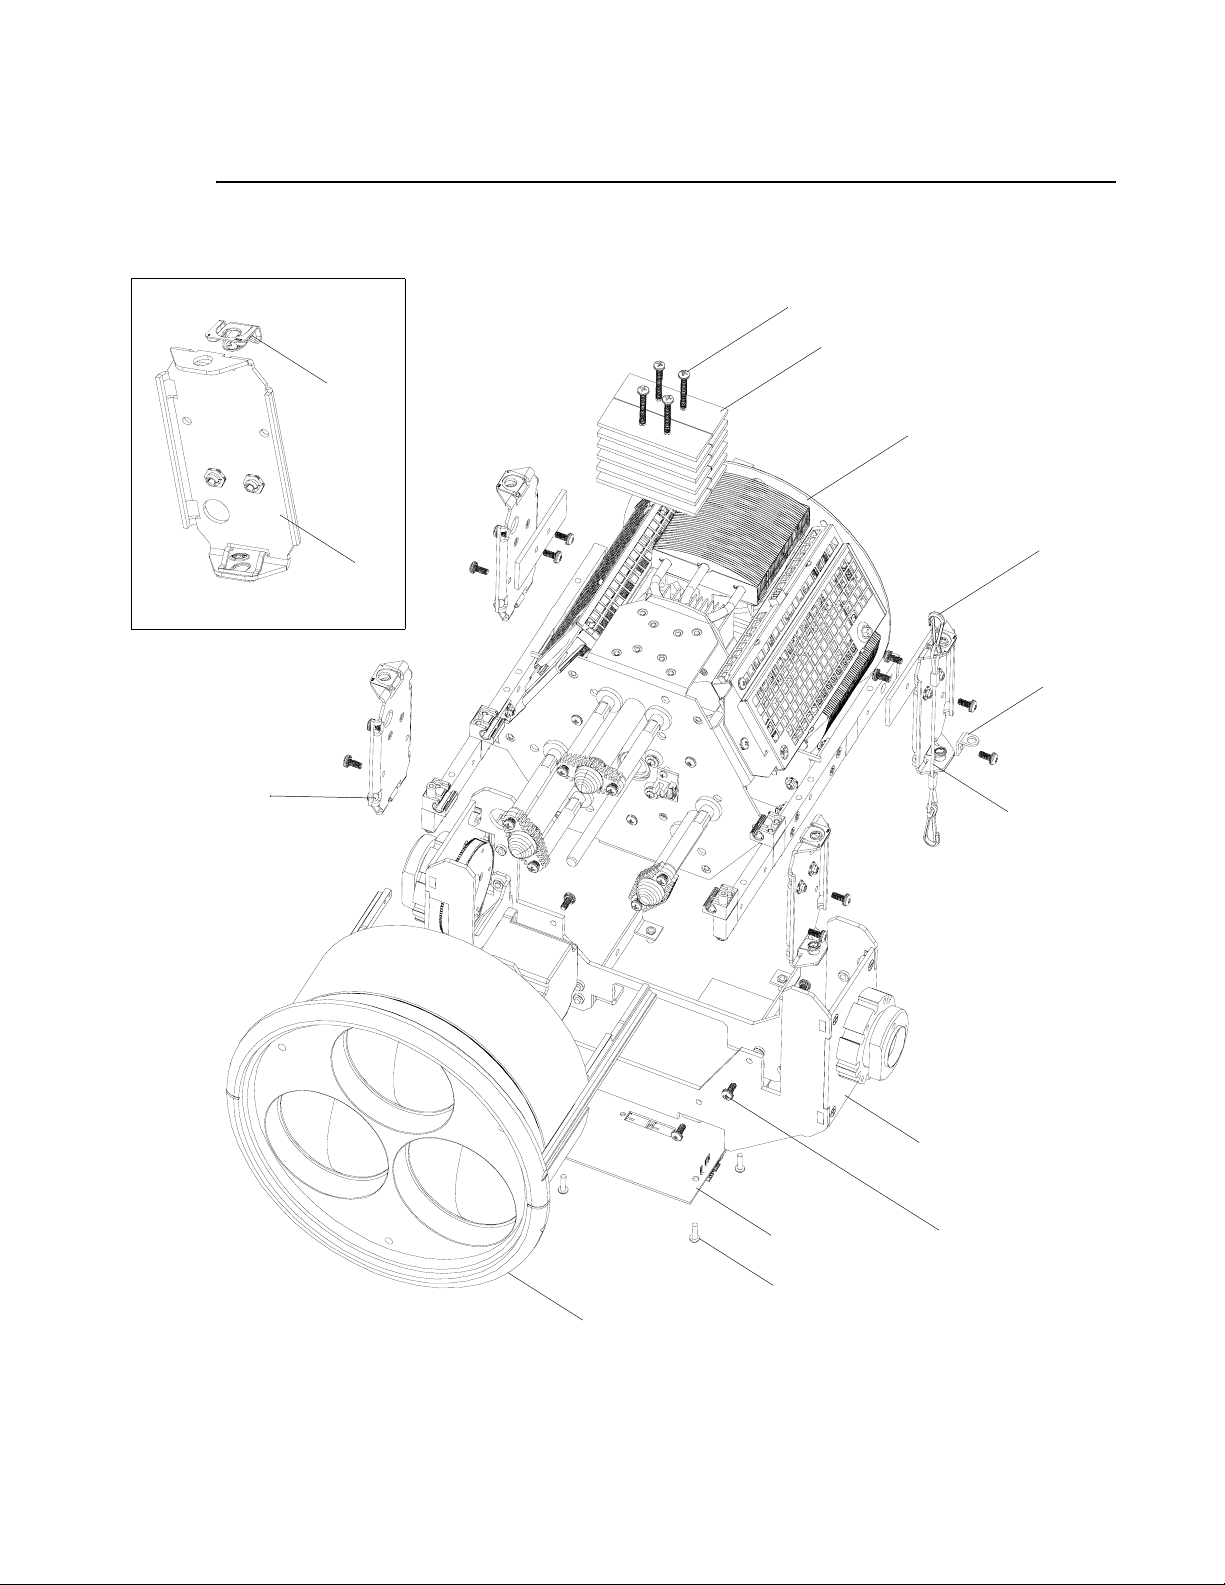
VARI❋LITE - VLX3 LED WASH LUMINAIRE SERVICE MANUAL
VLX3 Wash Head Assembly (continued)
7b (x2)
7a
10 (x4)
1 (x12)
5
12 (x2)
7 (x4)
See Detail
3
2
6
8
9 (x18)
11 (x6)
4
Figure 3-1: VLX3 Wash Head Assembly
64 02.9703.0010 0
Page 83

HEAD ASSEMBLY : MOVING ZOOM ASSEMBLY
Moving Zoom Assembly
21.9703.0130 Rev A
Refer to Figure 3-2.
No. Item Qty. UM. Description
1 10.9703.0140 1 EA LENS RING, FRONT
2 10.9703.0141 1 EA LENS RING, REAR
3 10.9693.0150 1 EA CLAMP, NUT, LINEAR MOTOR
4 10.9693.0242 2 EA BACKING PLATE, ZOOM NUT
5 10.9693.0740 1 EA LINEAR RAIL, LEFT
6 10.9693.0741 1 EA LINEAR RAIL, RIGHT
7 42.9692.0201 3 EA LENS, ASPHERIC, ARCYLIC, TEXTURED 94 MM DIA
8 NUT FOR MOTOR
ASSEMBLY
44.9695.0208
9 53.6576.0030 9 EA SCREW, M4 X 10 MM LG PPZ SEMS
10 53.6576.0037 4 EA SCREW, M4 X 8 MM LG PFB
11 53.6576.0044 3 EA SCREW, M3 X 12 MM PPZ SEMS
REF
N/A
NUT ONLY, MOTOR, LINEAR ACT, SIZE 17 105 MM (SHOWN FOR
REFERENCE / POSITIONING ONLY. PART OF THE MOTOR
ASSEMBLY - SEE 21.9703.0255 FOR ADDITIONAL INFORMATION)
3
02.9703.0010 0 65
Page 84
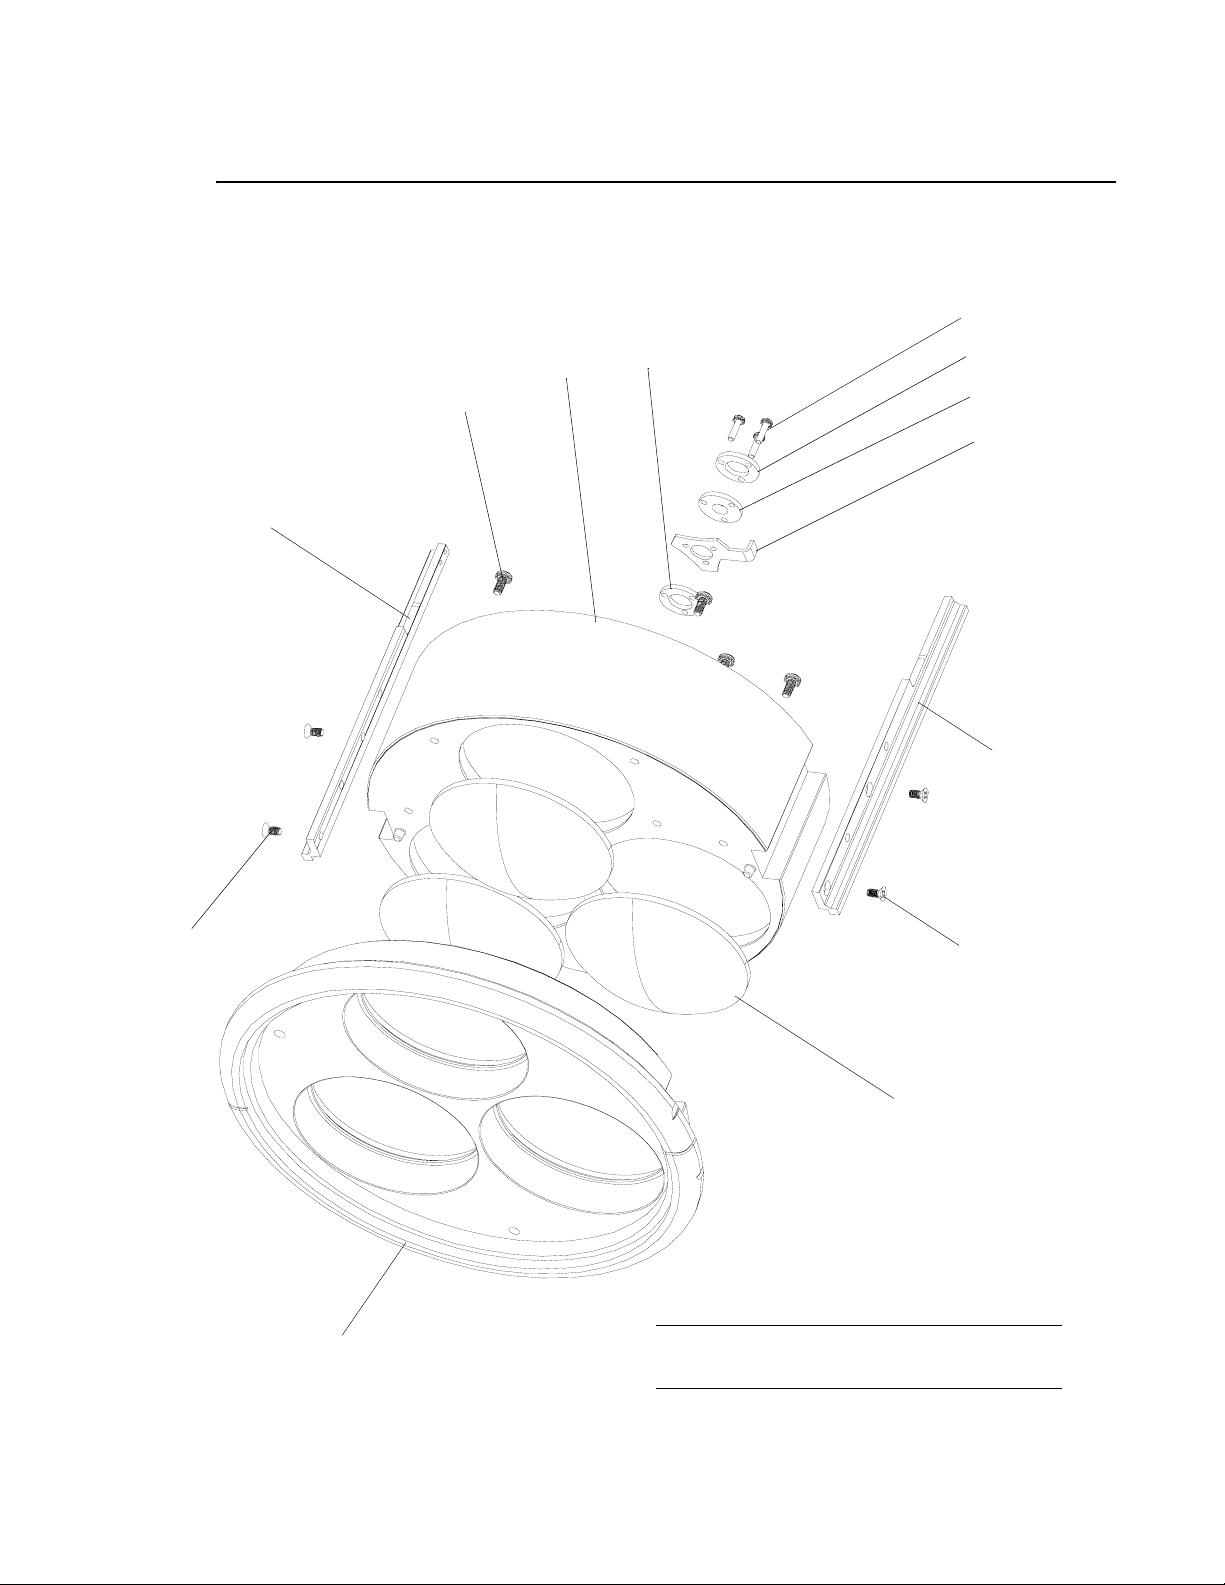
VARI❋LITE - VLX3 LED WASH LUMINAIRE SERVICE MANUAL
Moving Zoom Assembly (continued)
2
9 (x9)
6
4
11 (x3)
4
8*
See Note
3
10 (x2)
5
10 (x2)
7 (x3)
1
NOTE: *Shown for reference / positioning only.
Part of motor in assembly 21.9703.0255.
Figure 3-2: Moving Zoom Assembly
66 02.9703.0010 0
Page 85

HEAD ASSEMBLY : TILT CRADLE ASSEMBLY
Tilt Cradle Assembly
21.9703.0650 Rev A
Refer to Figure 3-3.
No. Item Qty. UM. Description
1 10.9703.0651 1 EA BULKHEAD, TILT CRADLE, FRONT
2 10.9703.0654 1 EA BULKHEAD, TILT CRADLE, REAR
3 10.9703.0671 1 EA MCB MOUNT, RIGHT
4 10.9703.0672 1 EA MCB MOUNT, LEFT
5 21.9703.0660 1 EA TILT MOTOR MOUNT ASSY
6 21.9703.0661 1 EA TILT TUBE ASSY, RIGHT
7 21.9703.0662 1 EA TILT TUBE ASSY, LEFT
8 53.6545.0003 8 EA SCREW, 8-32 X 3/8" LG PFZ
9 53.6575.0009 8 EA SCREW, 8-32 X 3/8" LG PPB SEMS
10 54.9703.0664 1 EA BELT, TIMING, 129 TOOTH, GT2, 6 MM WIDE
3
02.9703.0010 0 67
Page 86
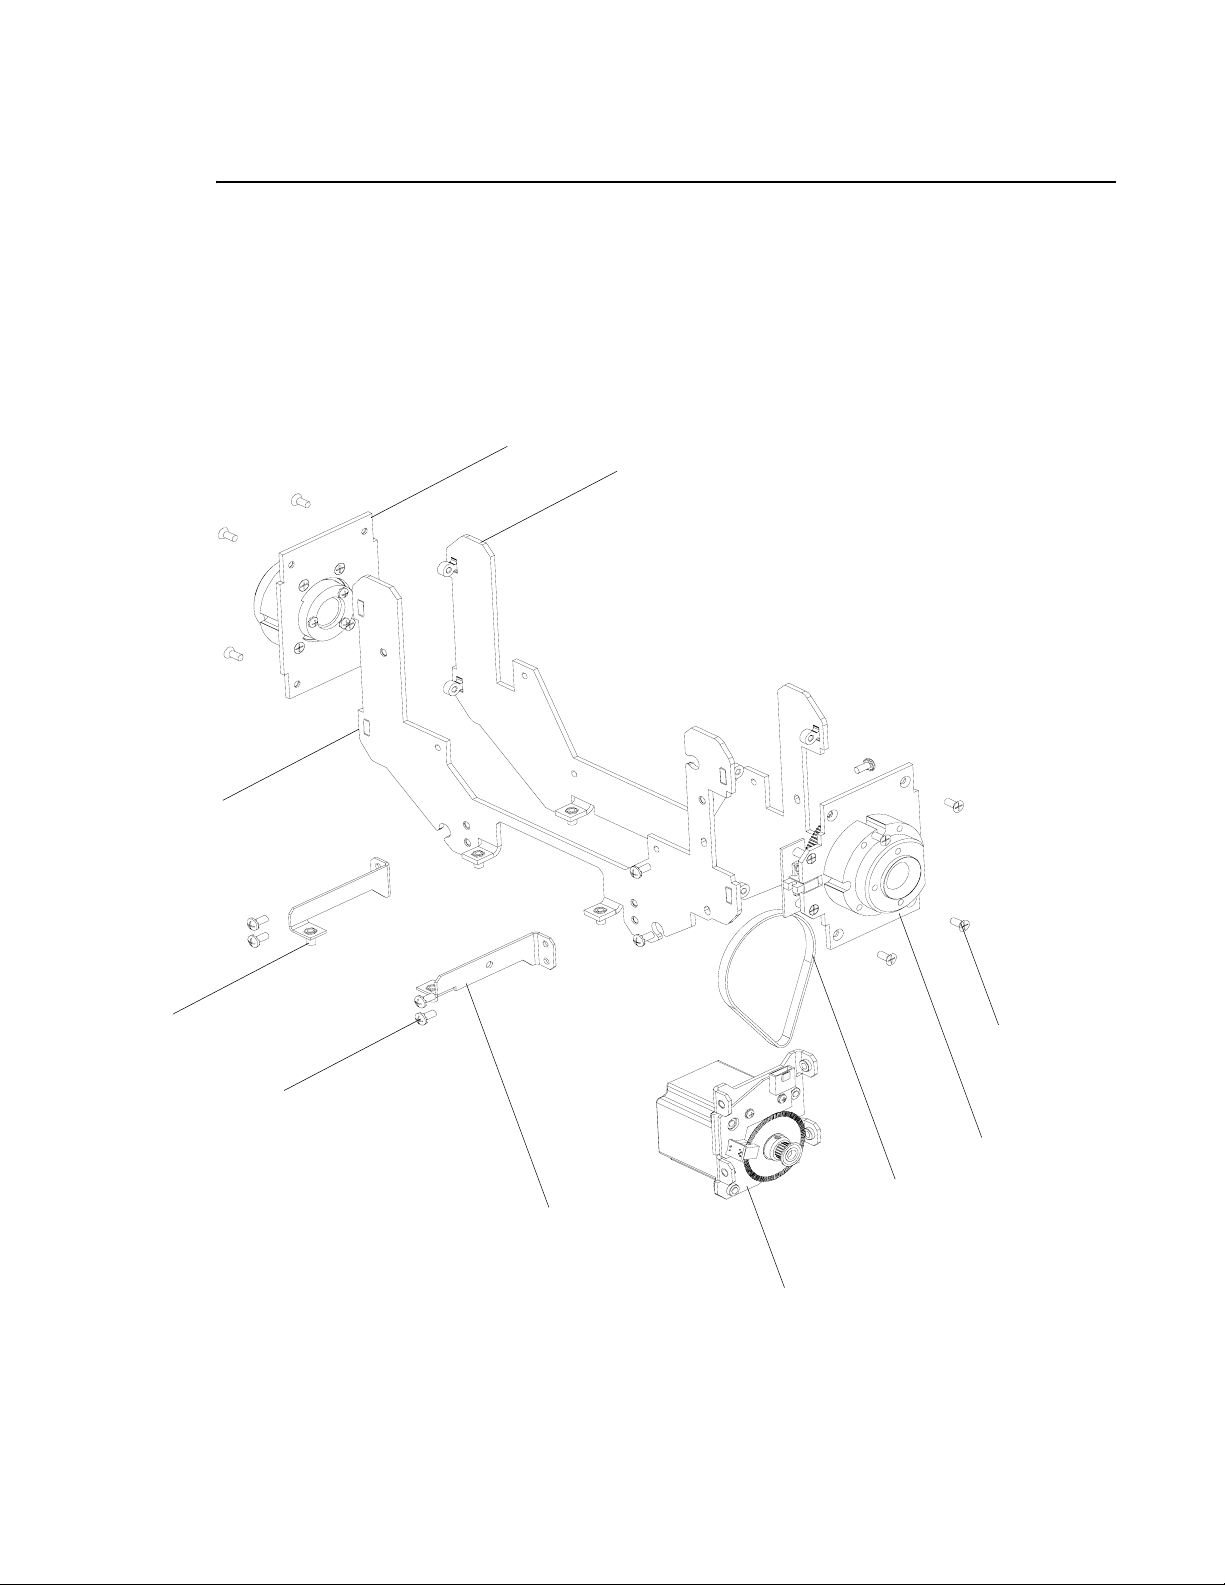
VARI❋LITE - VLX3 LED WASH LUMINAIRE SERVICE MANUAL
Tilt Cradle Assembly (continued)
7
1
2
4
9 (x8)
10
3
5
8 (x8)
6
Figure 3-3: Tilt Cradle Assembly
68 02.9703.0010 0
Page 87
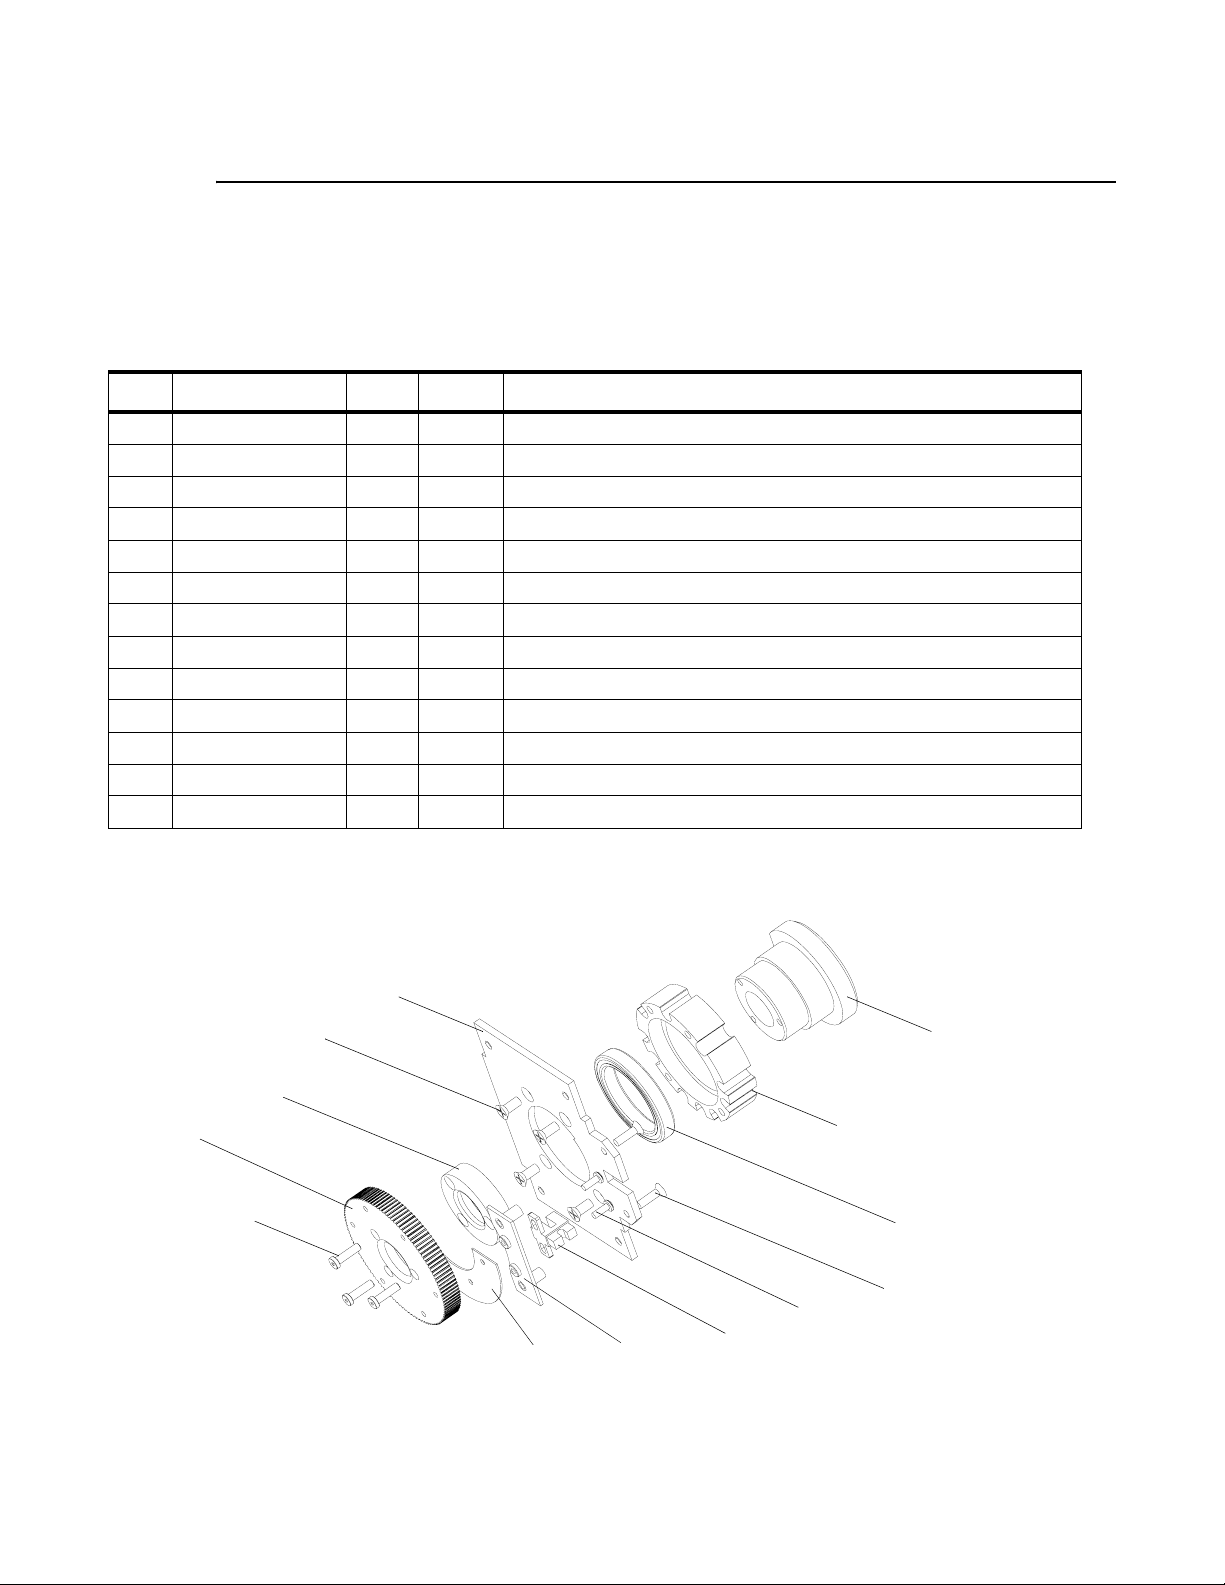
HEAD ASSEMBLY : RIGHT TILT TUBE ASSEMBLY
Right Tilt Tube Assembly
21.9703.0661 Rev. A
Refer to Figure 3-4.
No. Item Qty. UM. Description
1 10.9687.0652 1 EA BRACKET, SENSOR, TILT HOMING
2 10.9687.0658 1 EA PLATE, HOMING, TILT
3 10.9687.0659 1 EA RETAINER, TILT BEARING
4 10.9687.0660 1 EA TILT STOP
5 10.9687.0662 1 EA TILT TUBE
6 10.9703.0657 1 EA TILT TUBE MOUNT, RIGHT
7 25.9703.0013 1 EA SENSOR SWITCH, SLOTTED OPTICAL
8 53.6527.0001 3 EA SCREW, 8-32 X 1/2" LG SHC
9 53.6545.0003 4 EA SCREW, 8-32 X 3/8" PFZ
10 53.6596.0001 2 EA SCREW, 4-40 X 5/16" PPZ
11 53.6609.0500 2 EA SCREW, 6-32 X 1/2" LG PFZ
12 54.9687.0250 1 EA BEARING, BALL, 47MM OD, 35MM ID, 7MM WD
13 54.9687.0251 1 EA PULLEY, TILT, 108T-GT2P
3
6
13
8 (x3)
9 (x4)
4
3
10 (x2)
2
1
7
5
12
11 (x2)
Figure 3-4: Right Tilt Tube Assembly
02.9703.0010 0 69
Page 88
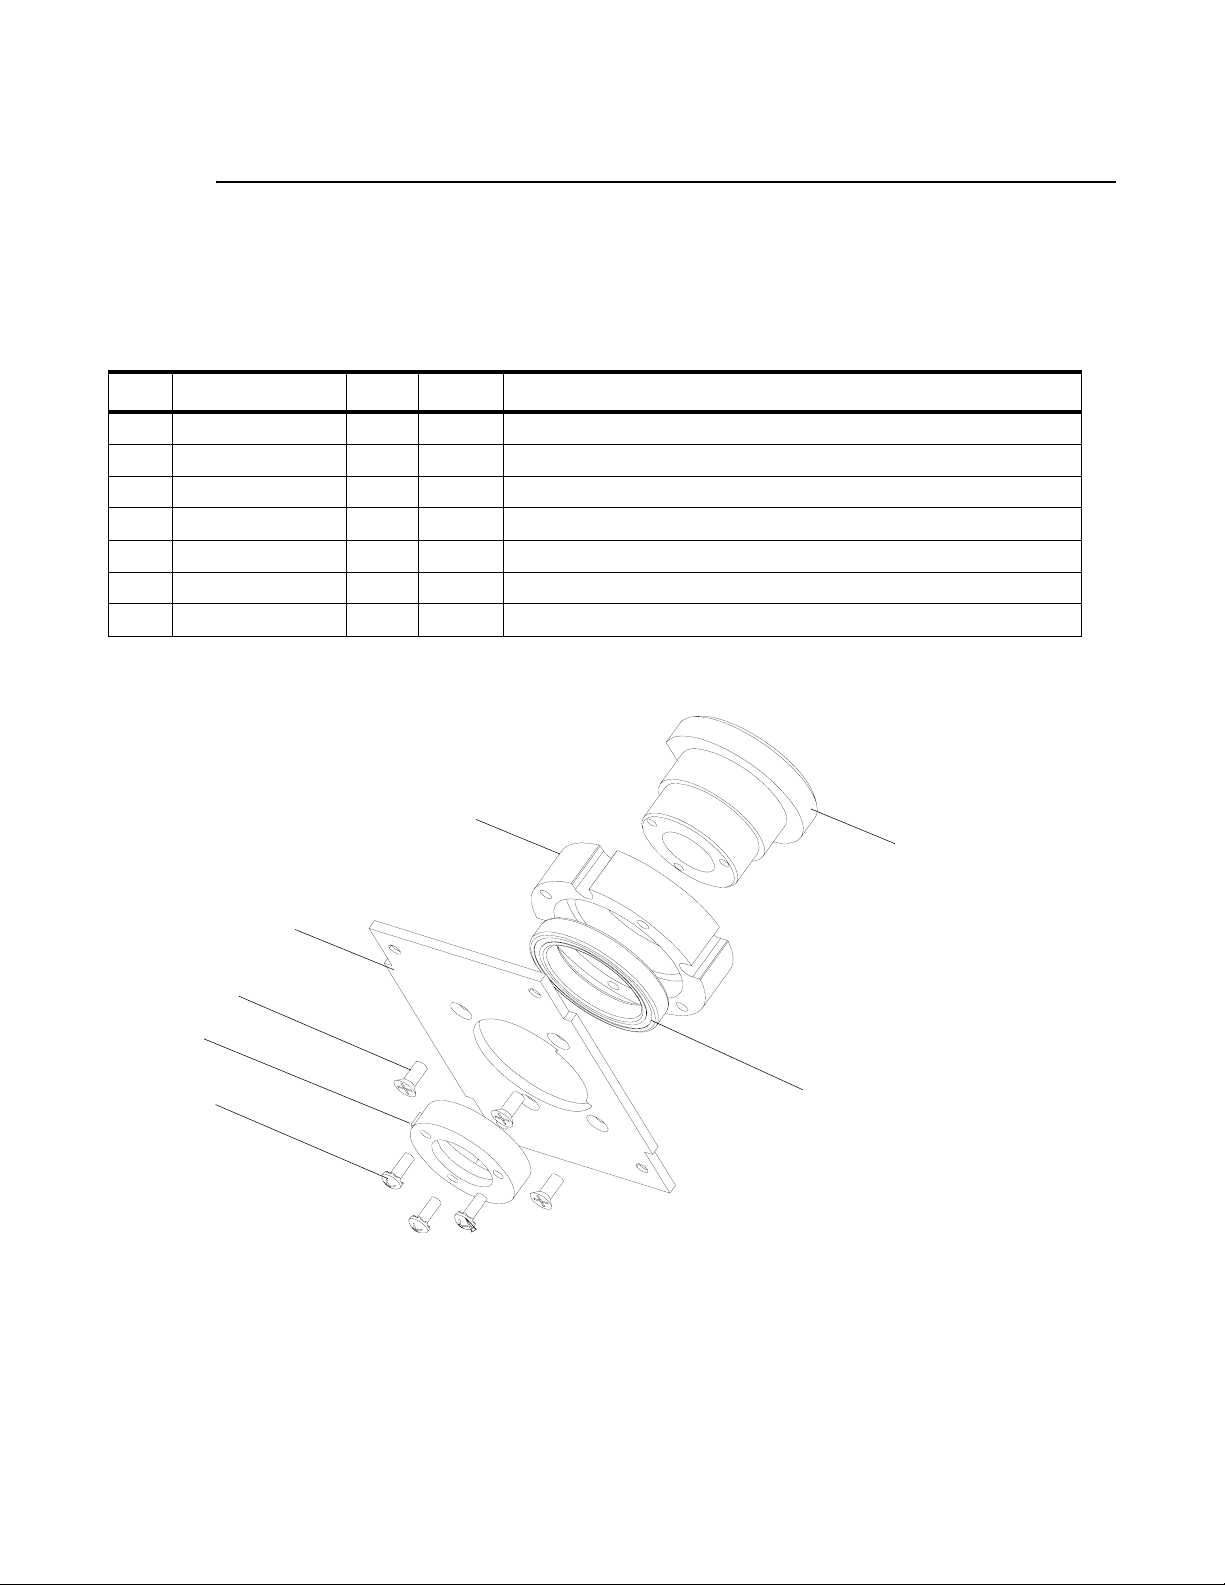
VARI❋LITE - VLX3 LED WASH LUMINAIRE SERVICE MANUAL
Left Tilt Tube Assembly
21.9703.0662 Rev. 0
Refer to Figure 3-5.
No. Item Qty. UM. Description
1 10.9687.0659 1 EA RETAINER, TILT BEARING
2 10.9687.0660 1 EA TILT STOP
3 10.9687.0662 1 EA TILT TUBE
4 10.9703.0656 1 EA TILT TUBE MOUNT, LEFT
5 53.6545.0003 4 EA SCREW, 8-32 X 3/8" PFZ
6 53.6558.0009 3 EA SCREW, 6-32 X 3/8" LG PPZ SEMS
7 54.9687.0250 1 EA BEARING, BALL, 47MM OD, 35MM ID, 7MM WD
5 (x4)
2
6 (x3)
1
3
4
7
Figure 3-5: Left Tilt Tube Assembly
70 02.9703.0010 0
Page 89

HEAD ASSEMBLY : TILT MOTOR MOUNT ASSEMBLY
Tilt Motor Mount Assembly
21.9703.0660 Rev C
Refer to Figure 3-6.
No. Item Qty. UM. Description
1 10.9703.0655 1 EA MOTOR MOUNT, TILT
2 21.9687.0655 1 EA PULLEY, PINION (INCLUDES ENCODER WHEEL AND SET SCREWS)
3 24.9703.0690 1 EA BRD ASSY, PAN/TILT ENCODER
4 44.9678.0680 1 EA MOTOR, 3 PHASE, SIZE 23 HIGH TORQUE
5 53.6575.0010 3 EA SCREW, 8-32 X 1/2" LG PPZ SEMS
6 53.6596.0002 2 EA SCREW, 4-40 X 5/16" LG PPZ SEMS
3
02.9703.0010 0 71
Page 90
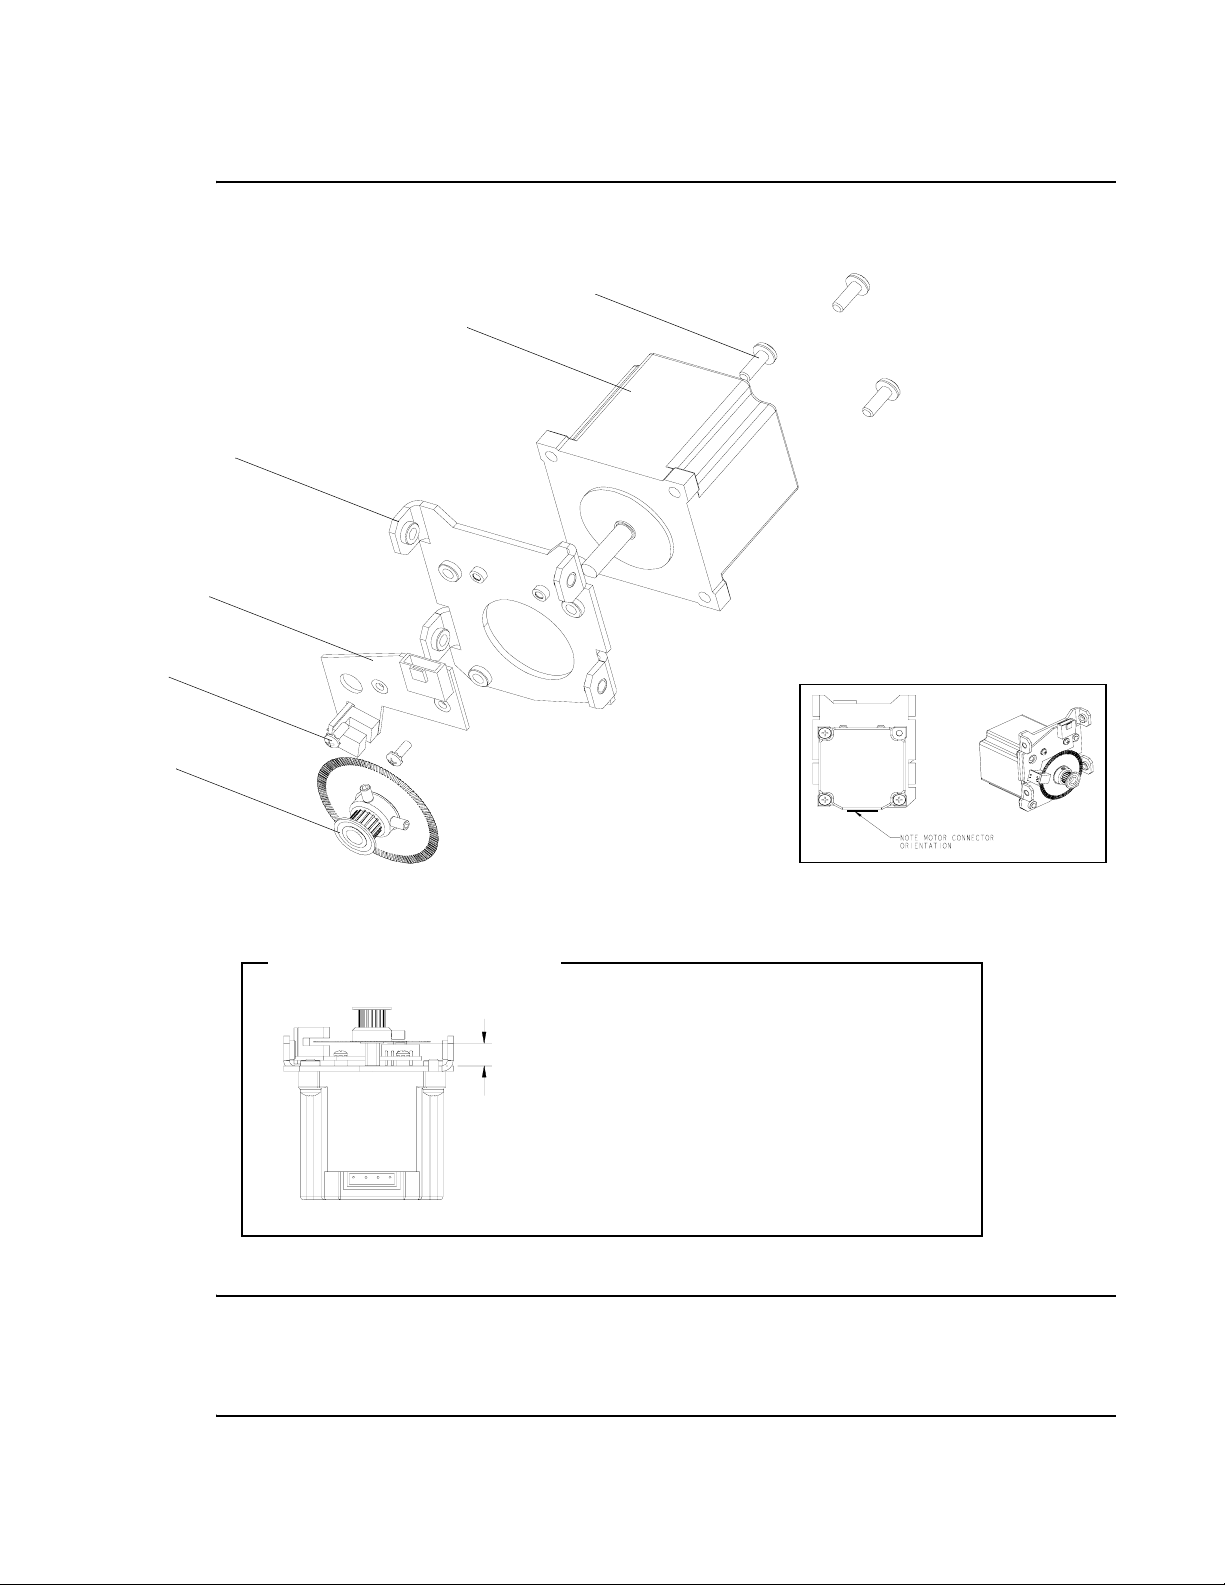
VARI❋LITE - VLX3 LED WASH LUMINAIRE SERVICE MANUAL
Tilt Motor Mount Assembly (continued)
5 (x3)
4
1
3
6 (x2)
2
Drive Pulley Detail & Installation
0.379"
Step 1. Apply one drop of Loctite 603 to motor shaft.
Step 2. Install drive pulley on motor shaft using
twisting motion to insure coverage of shaft
with loctite.
Step 3. Do not allow Loctite to drip into motor
bearing.
Step 4. Set pulley height as shown above.
Step 5. Apply Loctite 242 to pulley set screws.
Insure set screws are aligned and tightened
on flat sides of motor shaft.
Figure 3-6: Tilt Motor Mount Assembly
Note: Vari-Lite recommends that this assembly be replaced as a complete ass embly. Although you
can replace only the motor, the pulley (Item 2) is bonded to the motor shaft during assembly and
cannot be removed intact. If you order a replacement motor (Item 4), also order the pulley (Item 2).
Contact Vari-Lite Customer Service for installation information.
72 02.9703.0010 0
Page 91
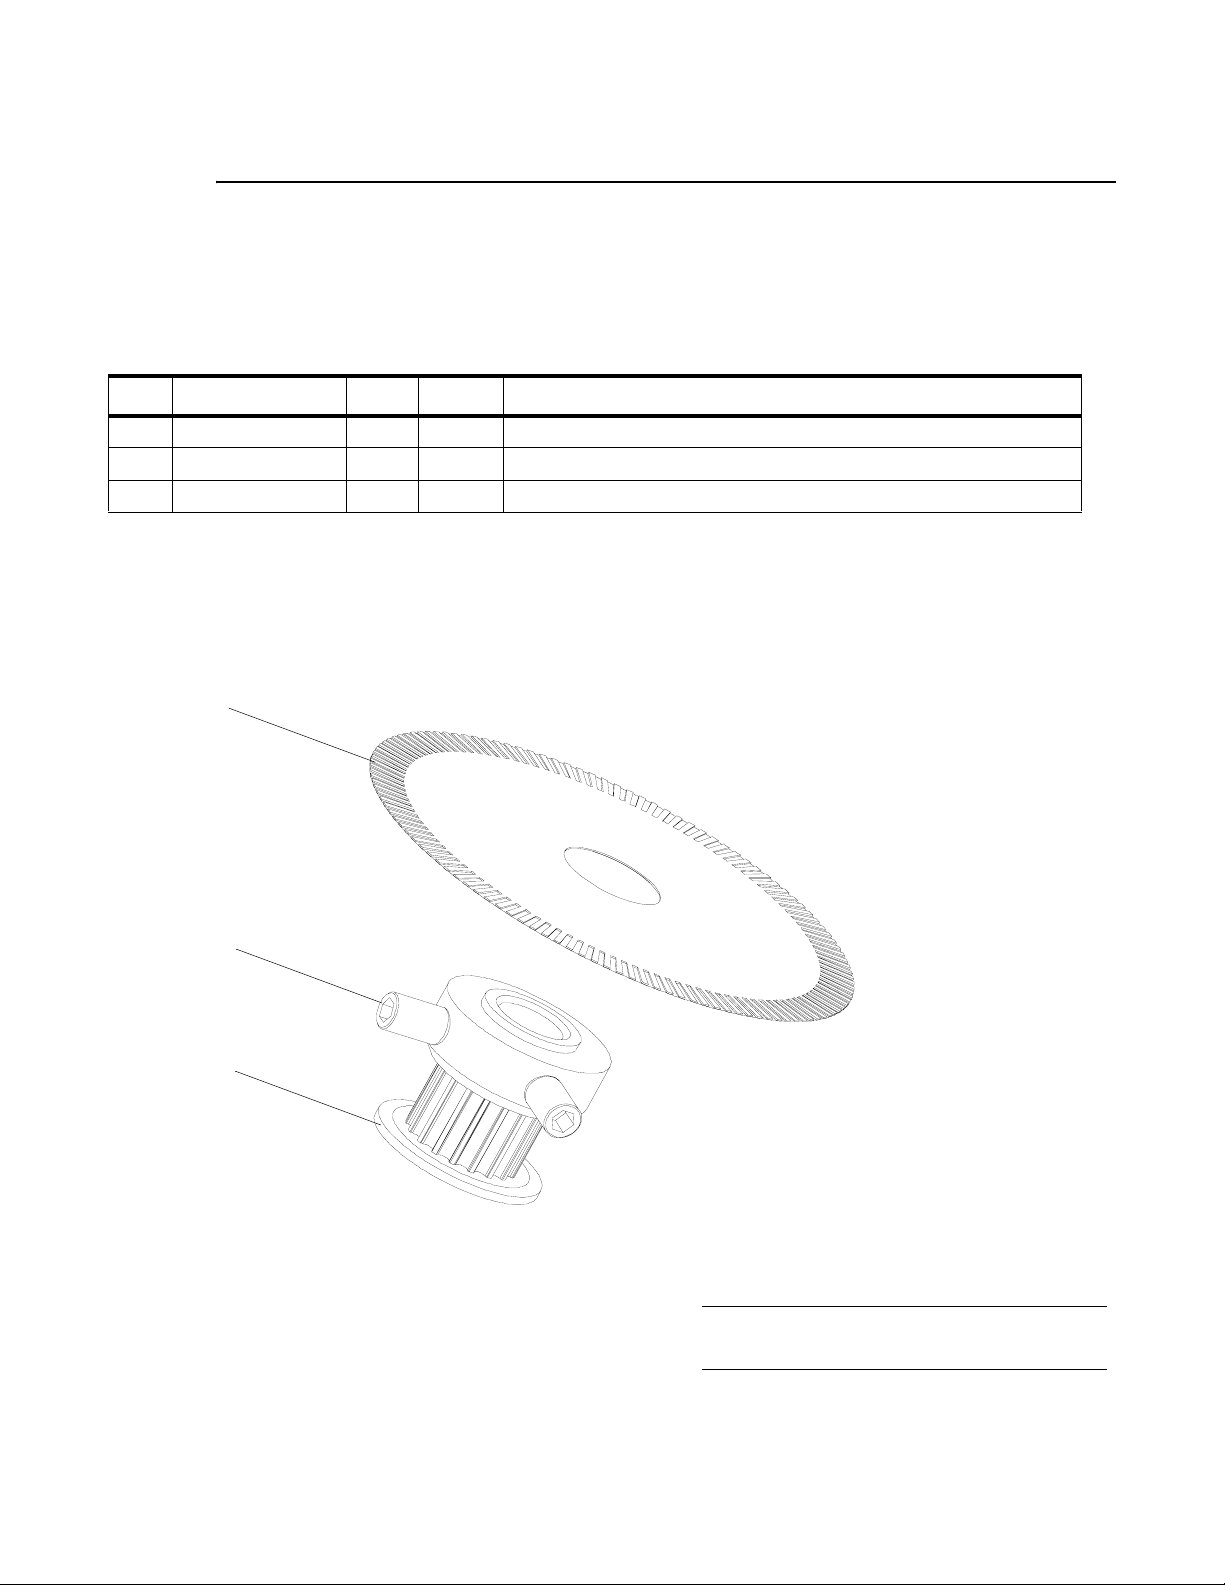
HEAD ASSEMBLY : PULLEY PINION ASSEMBLY
Pulley Pinion Assembly
21.9687.0655 Rev. A
Refer to Figure 3-7.
No. Item Qty. UM. Description
1 10.9663.8820 1 EA CODE WHEEL, 120 COUNT
2 10.9687.1655 1 EA TIMING PULLEY, 18 GROVE, GT2, 6 MM BELT
3 53.5559.0250 2 EA SCREW, SET 6-40 X 0.25" CONE POINT
3
1*
3 (x2)
2
NOTE: *On item 1, remove backing over adhesive
and stick to item 2.
Figure 3-7: Pulley Pinion Assembly
02.9703.0010 0 73
Page 92

VARI❋LITE - VLX3 LED WASH LUMINAIRE SERVICE MANUAL
Light Engine (3 Source LED) Assembly
21.9703.1600 Rev. C
Refer to Figure 3-8.
No. Item Qty. UM. Description
1 10.9690.0332 3 EA TUBE, SHIELD, LIGHT PIPE
2 10.9690.0341 3 EA SEAL, LIGHT PIPE, TOP
3 10.9693.0345 2 EA SIDE RAIL
4 10.9703.0631 1 EA GRILL, AIR EXHAUST, VLX3 WASH
5 10.9703.0670 1 EA REAR AIR BAFFLE
6 21.9693.0310 1 EA COOLING ASSEMBLY, LED ENGINE
7 21.9693.0652 3 EA LED DRIVER BOARD ASSEMBLY
8 21.9703.0255 1 EA INTERMEDIATE PLATE ASSY, ZOOM
9 22.9692.0220 3 EA LENS ASSEMBLY, ZOOM, STATIONARY
10 24.9663.1231 1 EA BRD ASSY, INDEX SENSOR
11 17.9703.0680 1 EA BRD ASSY, VLX3 WASH INTERCONNECT
12 42.9690.0128 3 EA LIGHT PIPE, HEX, GLASS
13 53.6513.0024 4 EA SCREW, M3 X 8MM LG PPZ METRIC
14 53.6576.0030 9 EA SCREW, M4 X 0.7 X 10 MM LG PPZ SEMS
15 53.6576.0031 8 EA SCREW, M4 X 0.7 X 16 MM LG PFZ
16 53.6576.0032 6 EA SCREW, M4 X 0.7 X 30 MM LG PPZ
17 53.6576.0033 2 EA SCREW, M4 X 0.7 X 40 MM LG PPZ
18 53.6576.0042 6 EA SCREW, M4 X 0.7 X 20 MM LG SHC BLK PLASTIC
19 55.1000.0009 6 EA SPRING, COMPRESSION
20 55.6520.0016 8 EA WASHER, LOCK M4 EXT TOOTH ZINC PL
21 55.6738.0004 1
22 55.6776.0011 2 EA GUIDE ASSY, LINEAR, 6 MM SQR, IGUS DRYLIN
23 55.6776.0012 2 EA GUIDE ASSY, LINEAR, 6 MM SQR ZPL, IGUS DRYLIN
24 55.7005.0014 3 EA O-RING, 9/16" ID, 3/4" OD, 3/32" THK, BUNA-N
IN
TUBING, PVC, 1/8" ID X 1/4" OD 50 DURO TRANS (USED 2 PLACES)
74 02.9703.0010 0
Page 93
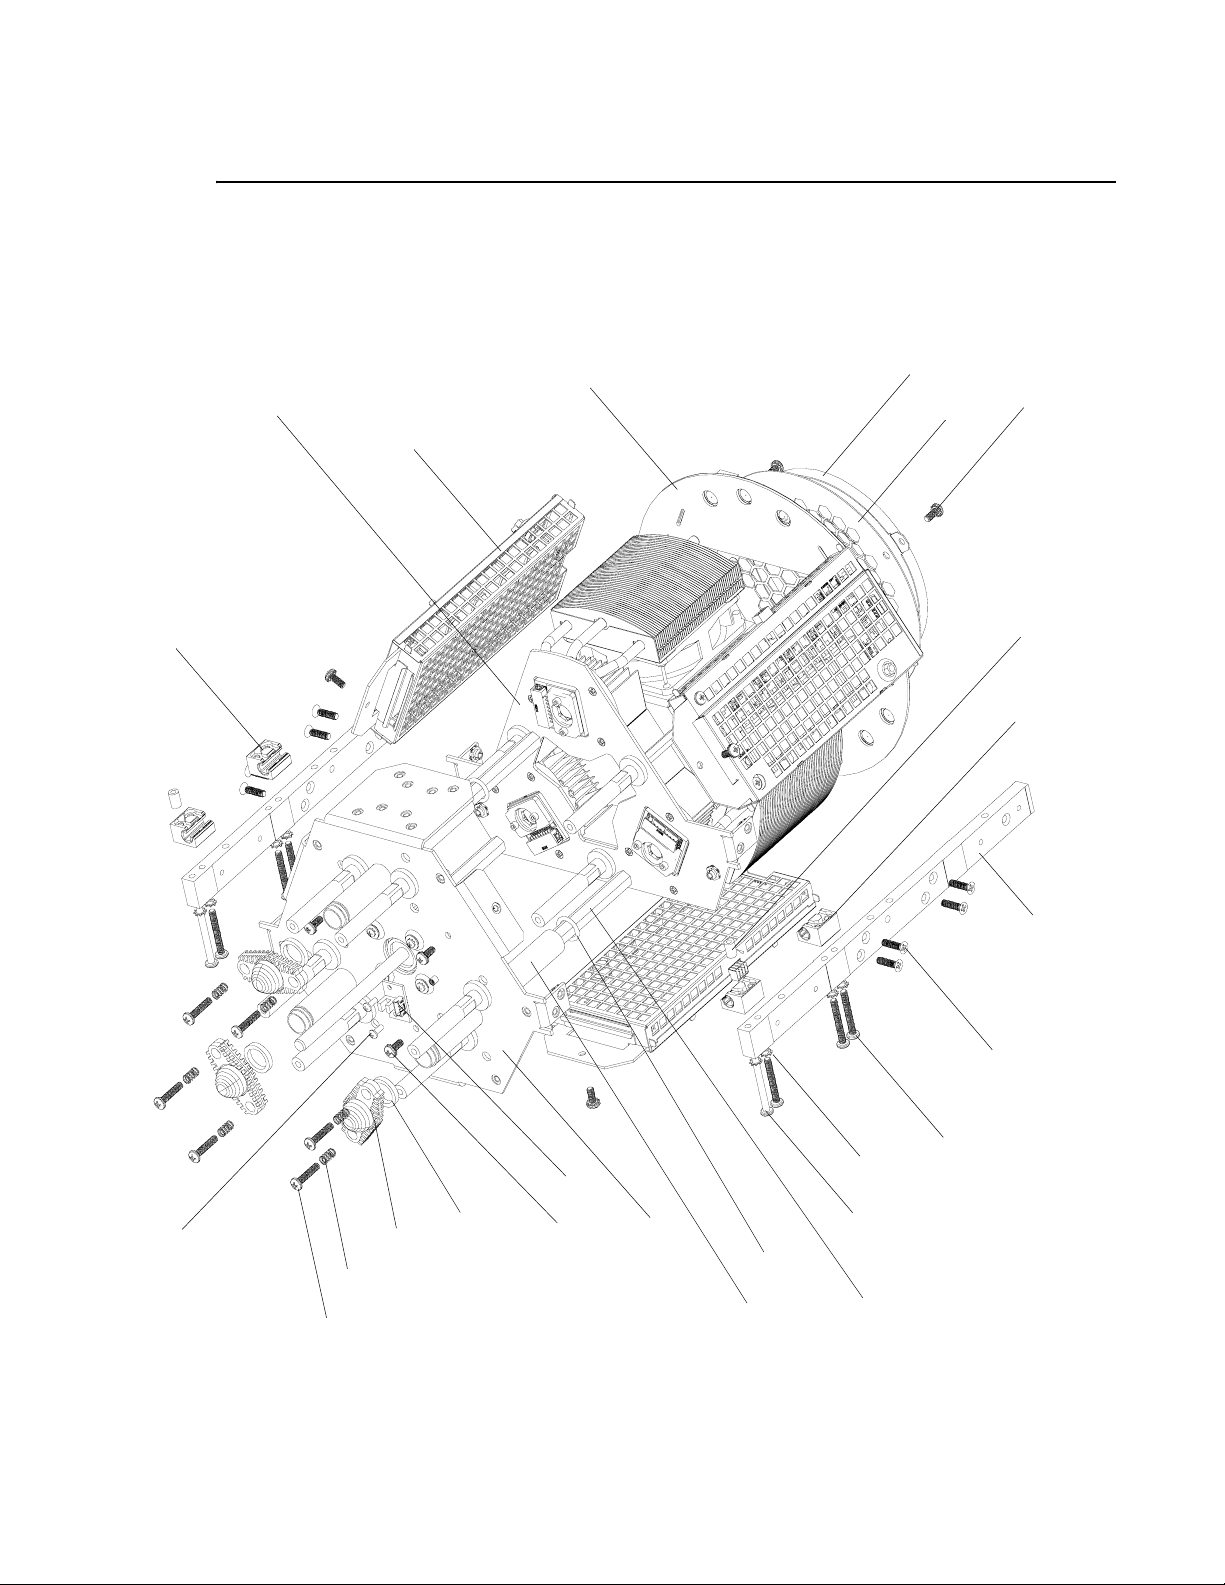
HEAD ASSEMBLY : LIGHT ENGINE (3 SOURCE LED) ASSEMBLY
Light Engine (3 Source LED) Assembly (continued)
3
22 (x2)
11
6
7 (x3)
5
4
14
21 (2 PL)
23 (x2)
3 (x2)
15 (x8)
16 (x6)
13 (x4)
19 (x6)
18 (x6)
9 (x3)
2 (x3)
10
4
8
24 (x3)
1 (x3)
20 (x8)
17 (x2)
12 (x3)
Figure 3-8: Light Engine (3 Source LED) Assembly
02.9703.0010 0 75
Page 94

VARI❋LITE - VLX3 LED WASH LUMINAIRE SERVICE MANUAL
LED Engine Cooling Assembly
21.9693.0310 Rev C
Refer to Figure 3-9.
No. Item Qty. UM. Description
1 10.9690.0333 3 EA Z-AXIS STOP, HEX
2 10.9690.1331 3 EA SEAL, Z-AXIS STOP, ULTRA SOFT
3 10.9693.0340 1 EA MOUNTING PLA T E, COOLER
4 10.9693.0341 3 EA AIR DAM
5 10.9693.0342 1 EA FAN EXHAUST CHAMBER
6 10.9693.0343 3 EA STANDOFF, COOLER
7 10.9693.0387 3 EA SUPPORT PILLAR, INTERMEDIATE PLATE, MACHINED
8 22.9692.0305 3 EA COOLER MODULE, LED, COMMON
9 51.5039.0005 3 EA THERMAL INTERFACE, LED, DIE CUT
10 53.5804.0438 6 EA SCREW, 4-40 X 0.438" LG SH CAP ZINC
11 53.6559.0001 9 EA SCREW, 4-40 X 1/4" LG PFZ
12 53.6576.0034 3 EA SCREW, M4 X 8 MM LG PPZ SEMS
13 53.6626.0001 6 EA SCREW, 10-32 X 1/2" LG PFZ
14 88.8200.0013 3 EA LED, RGBW 32 MM X 32 MM
76 02.9703.0010 0
Page 95
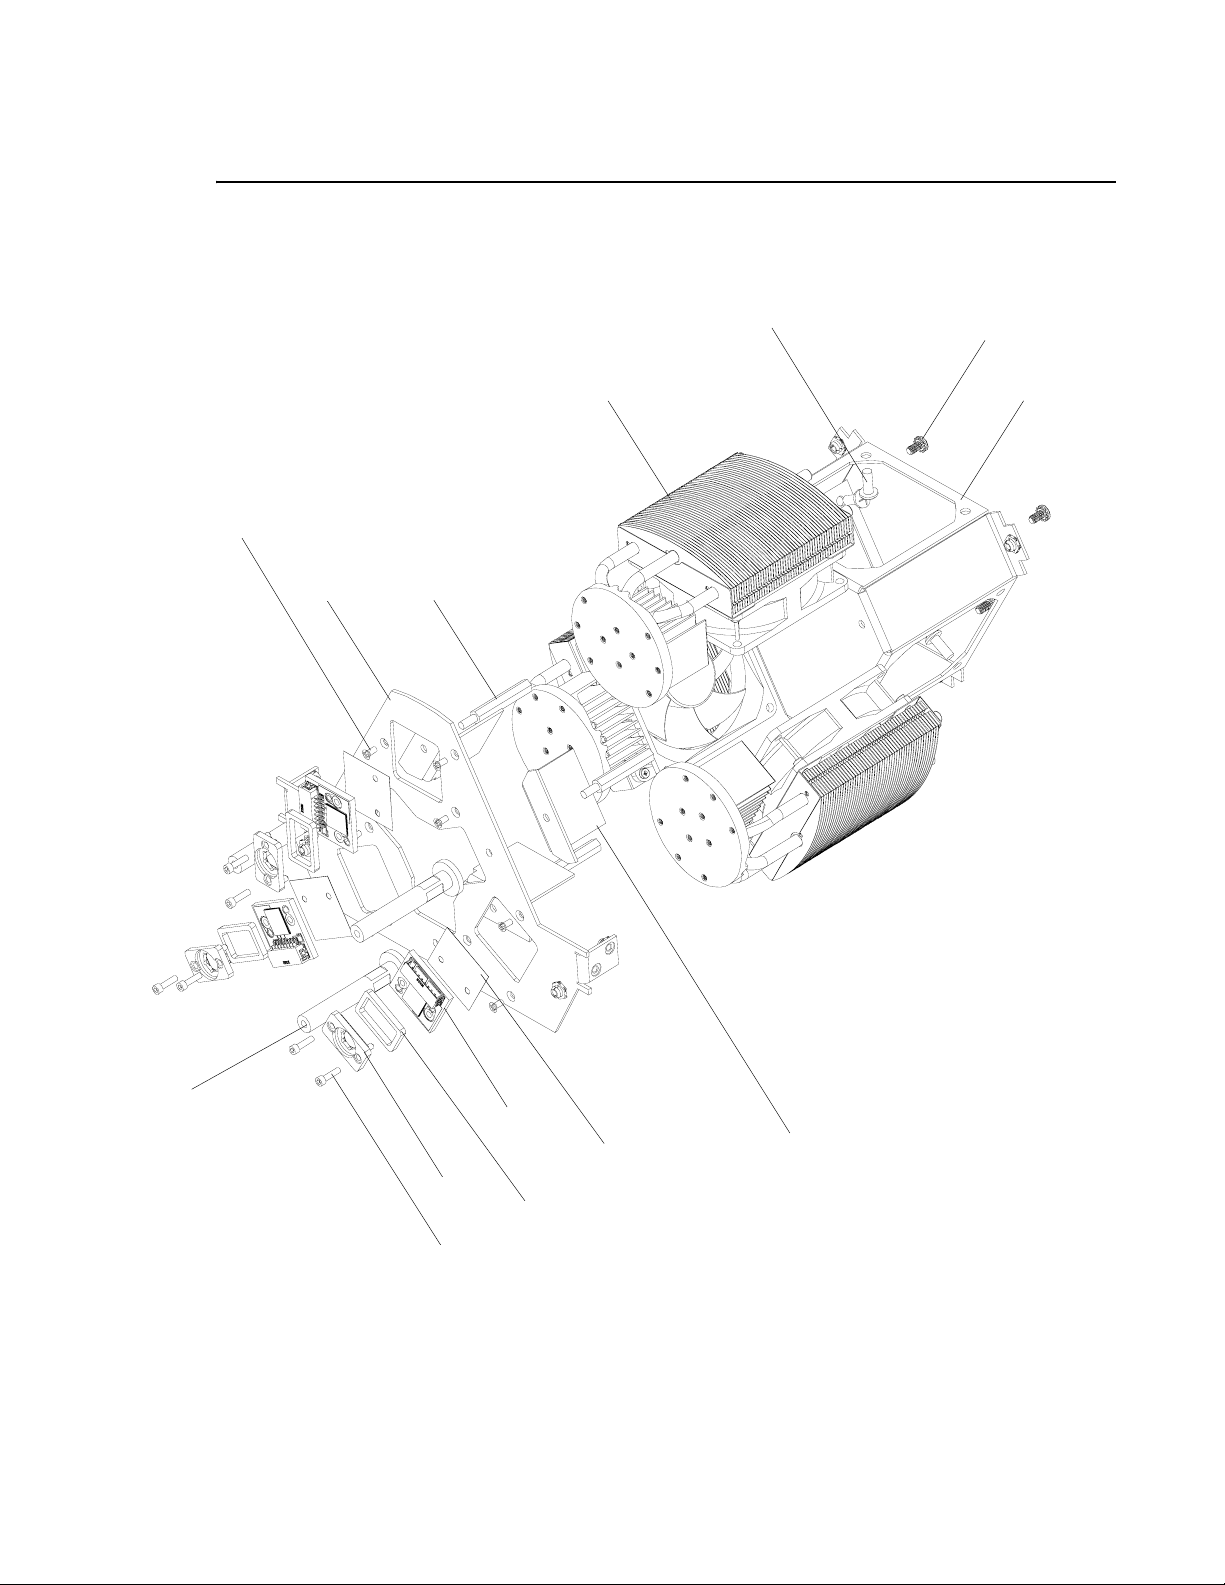
HEAD ASSEMBLY : LED ENGINE COOLING ASSEMBLY
LED Engine Cooling Assembly (continued)
3
11 (x9)
13 (x6)
8 (x3)
3
6 (x3)
12 (x3)
5
7 (x3)
14 (x3)
9 (x3)
1 (x3)
2 (x3)
10 (x6)
(See Torque Note)
Torque Note: Torque screws (20) to 80-in oz. using a precision torque wrench. Do not overtighten!
4 (x3)
Figure 3-9: LED Engine Cooling Assembly
02.9703.0010 0 77
Page 96
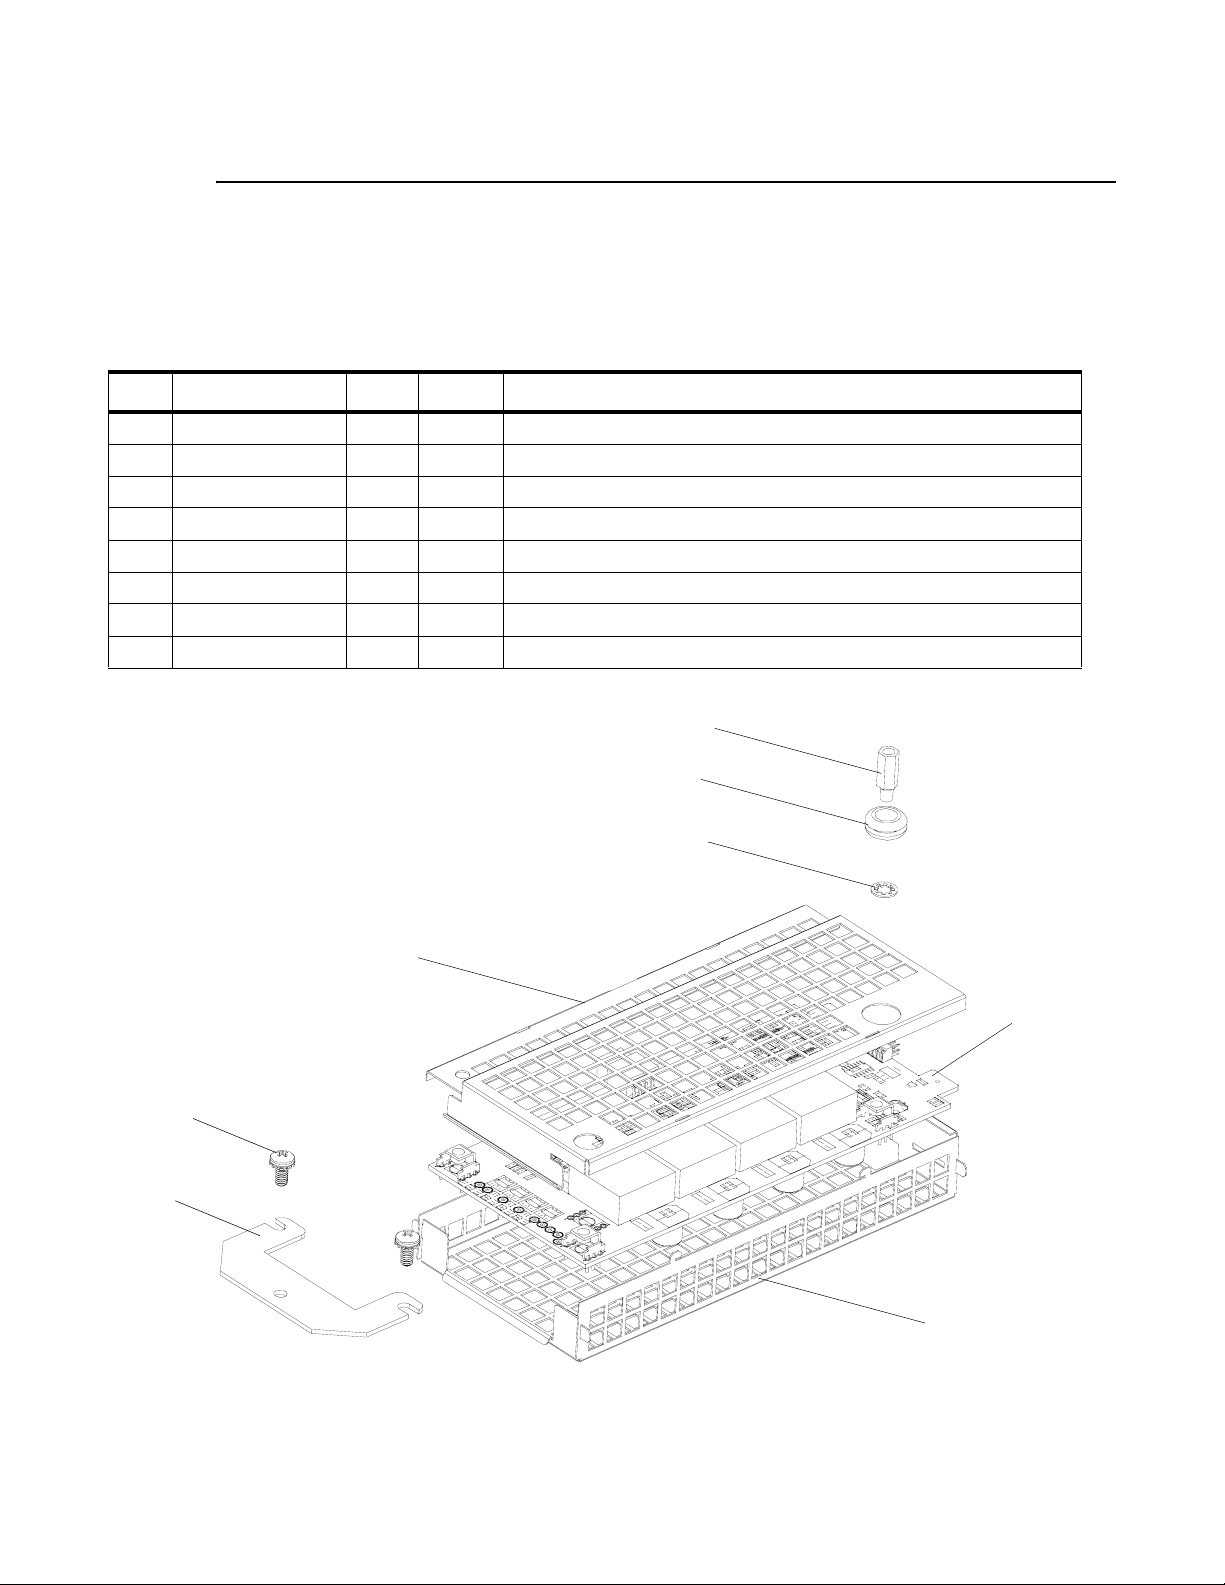
VARI❋LITE - VLX3 LED WASH LUMINAIRE SERVICE MANUAL
LED Driver Board Assembly
21.9693.0652 Rev. A
Refer to Figure 3-10.
No. Item Qty. UM. Description
1 10.9692.0237 1 EA EMI SHIELD, BODY
2 10.9692.0238 1 EA EMI SHIELD, LID
3 10.9693.0650 1 EA MOUNTING BRACKET, LED DRIVER
4 24.9690.0570 1 EA BOARD ASSY, LED DRIVER
5 53.6576.0034 2 EA SCREW, M4 X 8 MM LG PPZ SEMS
6 55.1000.0010 2 EA STANDOFF, 6 MM HEX, 4 MM MF, 12 MM LG
7 55.3303.0008 1 EA WASHER, # LOCK INT TOOTH SS
8 55.6706.0001 1 EA GROMMET, 9/32" ID, 9/16" OD, 1/4" THK
5 (x2)
3
6
8
7
2
4
1
Figure 3-10: LED Driver Board Assembly
78 02.9703.0010 0
Page 97
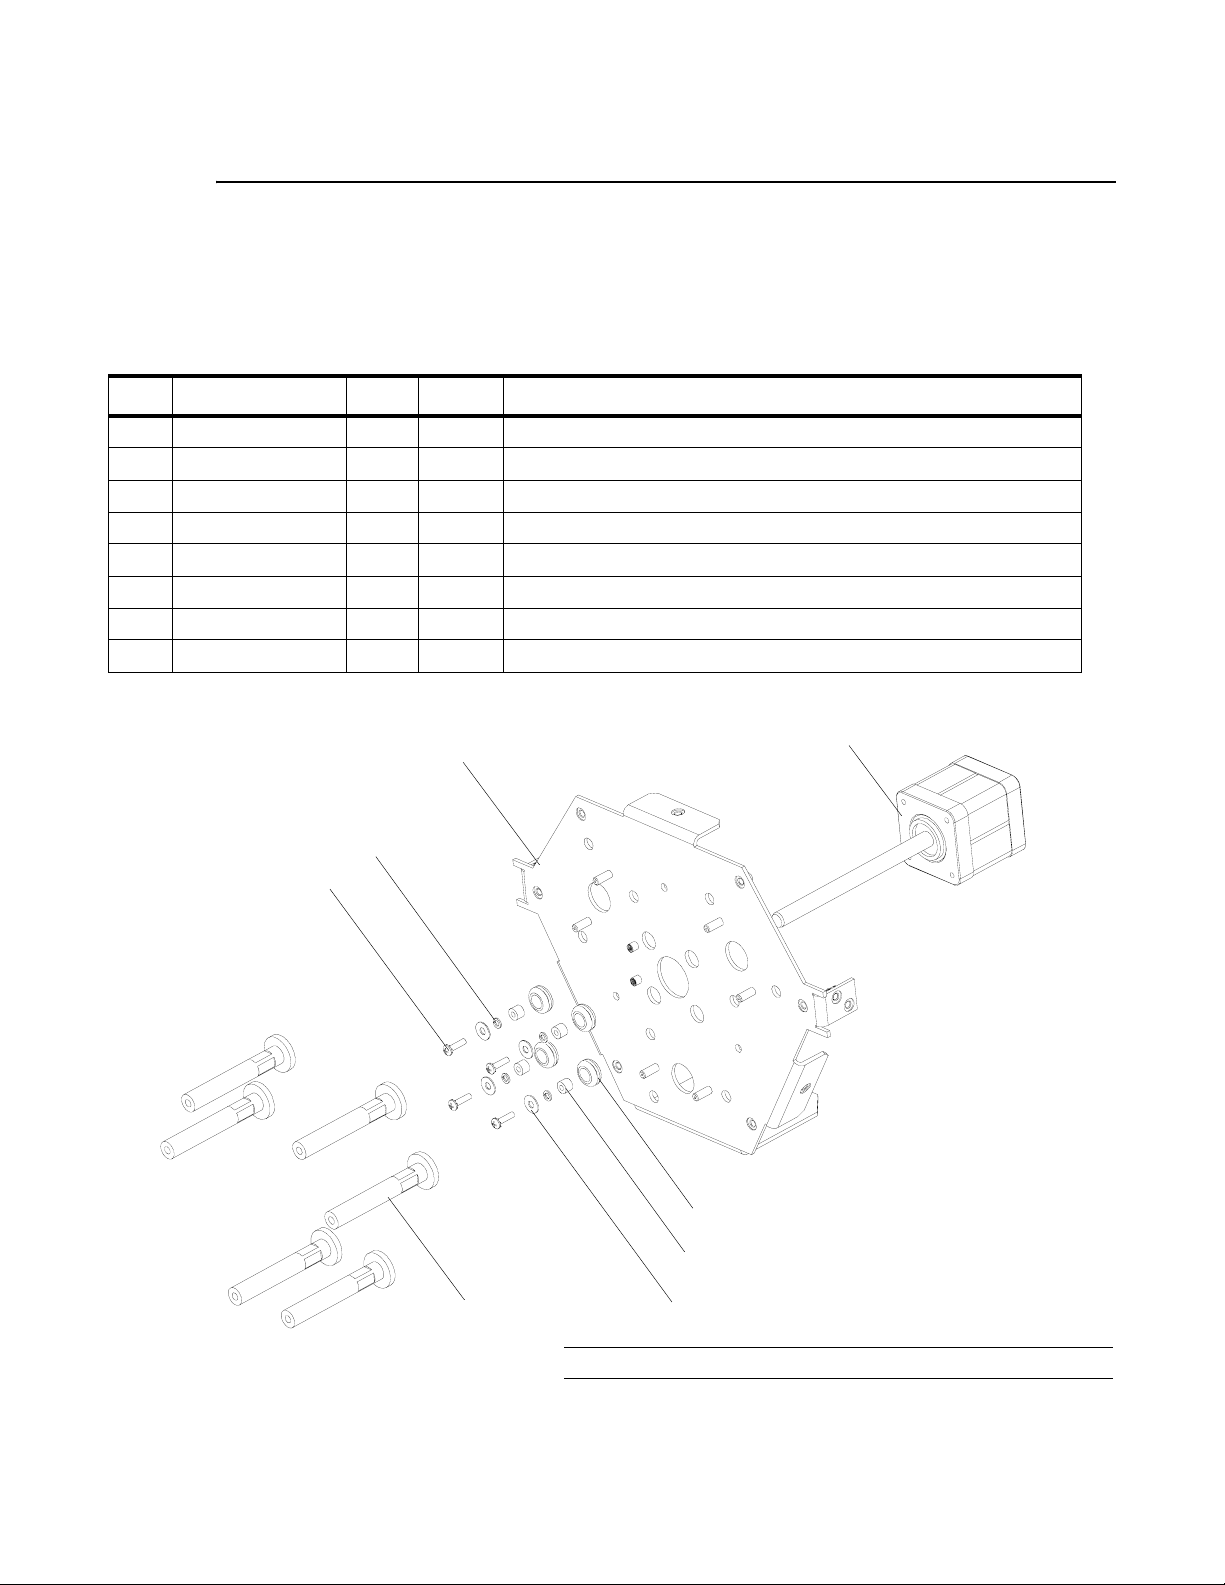
HEAD ASSEMBLY : ZOOM INTERMEDIATE PLATE ASSEMBLY
Zoom Intermediate Plate Assembly
21.9703.0255 Rev. B
Refer to Figure 3-11.
No. Item Qty. UM. Description
1 10.9693.0250 1 EA PLATE, INTERMEDIATE LENS MOUNT
2 10.9693.0387 6 EA SUPPORT PILLAR, INTERMEDIATE PLATE, MACHINED
3 44.9703.0208 1 EA MOTOR, LINEAR ACT, SIZE 17, 105 MM SHAFT
4 53.6520.0438 4 EA SCREW, 4-40 X 7/16" LG PPZ SEMS
5 55.3306.0006 4 EA WASHER, FLAT, 0.375" OD, 0.149" ID, 0.025" THK
6 55.6627.0001 4 EA WASHER, SPLIT LOCK, #4 ZINC
7 55.6659.0018 4 EA SPACER, 1/4" RND #4 THRU 1/4" LG
8 55.6706.0001 4 EA GROMMET, 9/32" ID, 9/16" OD, 1/4" THK
3
4 (x4)
1
3*
6 (x4)
8 (x4)
7 (x4)
2 (x6)
NOTE: *Nut for motor assembly is shown in assembly 21.9693.0130.
5 (x4)
Figure 3-11: Zoom Intermediate Plate Assembly
02.9703.0010 0 79
Page 98

VARI❋LITE - VLX3 LED WASH LUMINAIRE SERVICE MANUAL
Notes
80 02.9703.0010 0
Page 99

ENCLOSURE ASSEMBLY : VLX3 WASH UPPER ENCLOSURE ASSEMBLY
Enclosure Assembly
VLX3 Wash Upper Enclosure Assembly
21.9703.0850 Rev F
Refer to Figure 3-12, Figure 3-13 and Figure 3-14
No. Item Qty. UM. Description
1 04.9687.0100 1 EA OVERLAY, INPUT PANEL VL400/700
2 04.9687.0150 1 EA PRODUCT COMPLIANCE LABEL
3 10.9687.0814 1 EA ADAPTOR, YOKE
4 10.9687.0819 1 EA PLATE, BOTTOM, UPPER ENCLOSURE
5 10.9687.0820 1 EA PLATE, TOP UPPER ENCLOSURE
6 10.9687.0823 6 EA STANDOFF, UPPER ENCLOSURE
7 10.9687.0824 4 EA STANDOFF, PAN MOTOR
8 10.9687.0825 2 EA CAP,. BEARING, PAN
9 10.9687.0827 1 EA PULLEY, PAN, 108T-GT2P
10 10.9687.0828 1 EA COVER, PAN PULLEY
11 10.9687.0829 1 EA WIRE, TRAY
12 10.9687.0836 4 EA STANDOFF, BLOWER ASSY.
13 10.9687.0840 4 EA MOUNTING BUTTON
14 10.9687.0841 1 EA PAN LATCH
15 10.9687.0860 4 EA TEFLON SPACER, PAN LOCK
16 10.9687.0861 2 EA LATCH SPRING, PAN LOCK
17 21.9687.0860 1 EA ASSY, PAN MOTOR
18 22.9687.0807 1 EA ASSY, PAN TUBE
19 22.9687.0810 1 EA ASSY, PANEL, DISPLAY CONNECTOR
20 22.9687.0811 1 EA ASSY, BLOWER DEFLECTOR, RIGHT
21 22.9687.0812 1 EA ASSY, BLOWER DEFLECTOR, LEFT
22 24.9664.4895 1 EA PCB ASSY, DMX INPUT
23 24.9690.0580 1 EA BRD ASSY, VLX DISPLAY
- 25.9661.1520 1 EA CABLE ASSY, ENCLOSURE TO YOKE CHASSIS GROUND (NOT SHOWN)
24 25.9703.0001 1 EA CABLE ASSY, AC INPUT
- 25.9703.0002 1 EA CABLE ASSY, APS FAN (NOT SHOWN)
- 25.9703.0003 1 EA CABLE ASSY, DMX I/O COMM (NOT SHOWN)
- 25.9703.0004 1 EA CABLE ASSY, VLX3 DISPLAY LINK (NOT SHOWN)
3
02.9703.0010 0 81
Page 100

VARI❋LITE - VLX3 LED WASH LUMINAIRE SERVICE MANUAL
No. Item Qty. UM. Description
- 25.9703.0005 1 EA CABLE ASSY, VLX3 36V SUPPLY (NOT SHOWN)
- 25.9703.0006 1 EA CABLE ASSY, -12V DRIVER BOARD #1 (NOT SHOWN)
- 25.9703.0007 1 EA CABLE ASSY, -12V DRIVER BOARD #2 (NOT SHOWN)
- 25.9703.0008 1 EA CABLE ASSY, -12V DRIVER BOARD #3 (NOT SHOWN)
- 25.9703.0009 1 EA CABLE ASSY, LED DRIVER GROUNDS (NOT SHOWN)
- 25.9703.0014 1 EA CABLE ASSY, VLX3 PAN MOTOR (NOT SHOWN)
- 25.9703.0015 1 EA CABLE ASSY, VLX3 PAN ENCODER (NOT SHOWN)
- 25.9703.0016 1 EA CABLE ASSY, AUX COMM INTERFACE (NOT SHOWN)
25 40.9687.0005 2 EA BLOWER, FAL5F24LH
26 53.2003.0001 2 EA NUT, 4-40 KEPS ZINC PLATED
27 53.2004.0002 14 EA NUT, 8-32 KEPS ZINC PLATED
28 53.2202.0008 4 EA NUT, 8-32 HEX SS NYLON INSERT
29 53.6515.0375 4 EA SCREW, 10-32 X 3/8" SCZ-B
30 53.6515.0875 8 EA SCREW, 10-32 X 7/8" SKT CAP
31 53.6525.0188 6 EA SCREW, 6-32 X 3/16" LG PPZ
32 53.6575.0008 4 EA SCREW, 8-32 X 1/4" PPZ SEMS
33 53.6575.0009 4 EA SCREW, 8-32 X 1/4" PPB SEMS
34 53.6598.0001 6 EA SCREW, 4-40 X 3/8" PFB
35 53.6617.0005 4 EA SCREW, 6-32 X 1-3/8" LG PPZ SEMS
36 53.6624.0001 6 EA SCREW, 10-32 X 1/2" PFB
37 53.7017.0500 10 EA SCREW, 1/4-20 X 1/2" PFZ
38 54.9687.0802 0 EA BALL, 0.177" DIA STEEL
39 54.9687.0803 1 EA BEARING, 6810-2RS
40 55.3301.0008 8 EA WASHER, FLAT #8, SS
41 90-2400 8 EA BRD ASSY , VL WIRELESS INTERCONNECT
42 53.6558.0007 4 EA SCREW, 6-32 X 1/4" PPZ SEMS
82 02.9703.0010 0
 Loading...