

Philips VRKD12BL, VKRD11YL Instruction Book
Instruction Book
Important!
Return your Warranty
Card within I0 days. See
\
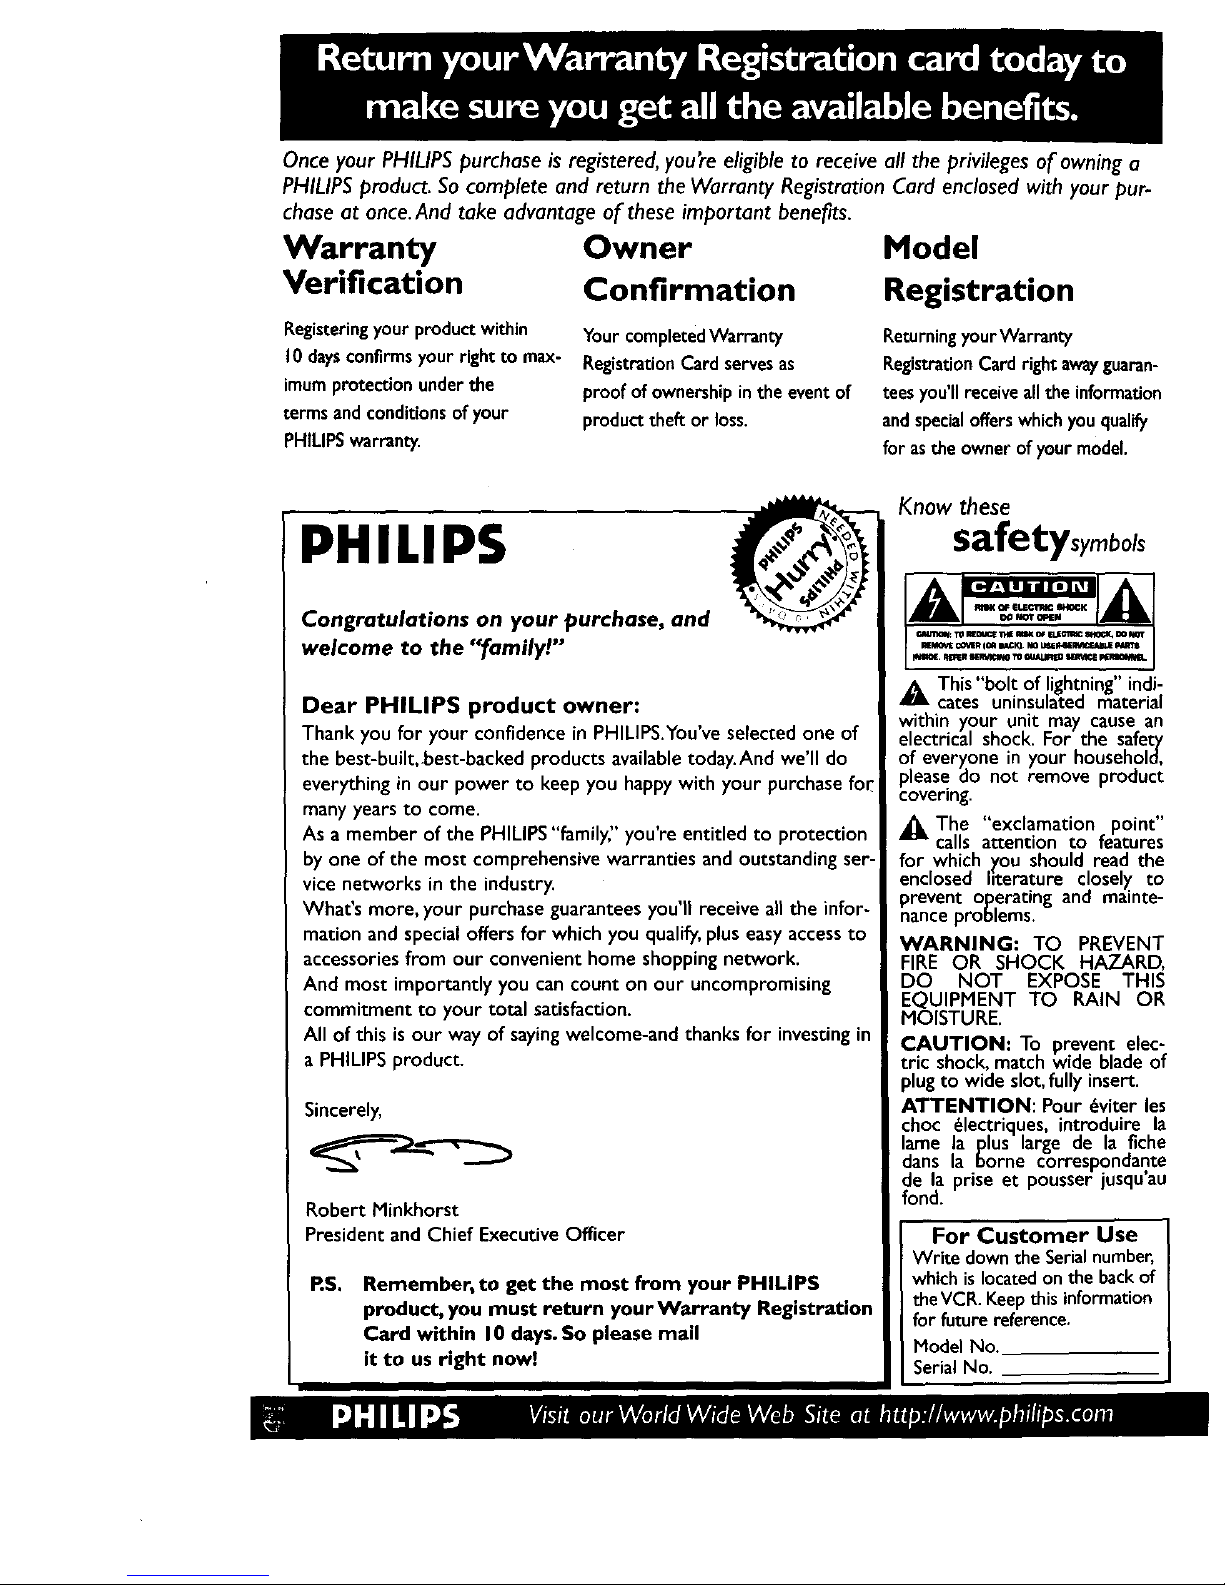
Once your PHILIPS purchase is registered, you're eligible to receive all the privileges of owning a
PHILIPS product. So complete and return the Warranty Registration Card enclosed with your pur-
chase at once. And take advantage of these important benefits.
Warranty Owner Model
Verification Confirmation Registration
Registeringyour productwithin
10daysconfirmsyourright to max-
imumprotectionunderthe
terms and conditionsofyour
PHILIPSwarranty.
Your completedWarranty
Registration Card servesas
proof of ownershipinthe eventof
product theft or loss.
ReturningyourWarranty
RegistrationCardright awayguaran-
teesyou'll receiveallthe information
andspecialofferswhichyouqualify
for asthe owner of your model.
PHILIPS
Congratulations on your purchase, and
welcome to the "_family!"
Dear PHILIPS product owner:
Thank you for your confidence in PHILIPS.You've selected one of
the best-built,best-backed products availabletoday.And we'll do
everythingin our power to keep you happywith your purchase fol
many years to come.
As a member of the PHILIPS"family," you're entitled to protection
byone of the most comprehensivewarranties and outstandingser-
vice networks in the industry.
What's more, your purchaseguaranteesyou'll receive all the infor-
mation and special offers for which you qualify,pluseasy accessto
accessoriesfrom our convenienthome shoppingnetwork.
And most importantly you can count on our uncompromising
commitment to your total satisfaction.
All of this is our way of sayingwelcome-and thanks for investingin
a PHILIPS product.
Sincerel_
Robert Minkhorst
President and Chief ExecutiveOfficer
RS.
Remember, to get the most from your PHILIPS
product, you must return your Warranty Registration
Card within 10 days.So please mail
it to us right now!
Know these
safetysymbols
_& This "bolt of lightning" indi-
cates uninsulated material
within your unit may cause an
electrical shock. For the safety
_feveryone in your household,
_leasedo not remove product
covering.
_The "exclamation point"
calls attention to features
for which _'ou should read the
enclosed I_terature closel)_ to
_revent operating and mainte-
nance problems.
WARNING: TO PREVENT
FIRE OR SHOCK HAZARD,
DO NOT EXPOSE THIS
EQUIPMENT TO RAIN OR
MOISTURE.
CAUTION: To prevent elec-
tric shock, matchwide blade of
_lugto wide slot, fully insert.
ATTENTION: Pour dviter les
choc _lectriques, introduire la
lame la plus large de la fiche
dans la borne correspondante
de la prise et pousser jusquau
fond.
For Customer Use
Write downthe Serialnumber,
which islocatedonthe backof
theVCR. Keepthis information
for future reference.
Model No.
SerialNo.
Introduction3
oog..eeg ioe.oeg otoq ooeg oooooooeo oooee ioee.oeeeo, eeeett to**Qt*ol Dmag • B,og_oooeo, IooQoeooeeeoeeot _ol,ee*oetl to_,_
Welcome to your VCR instruction book. This book shows you how to hook up your VCR,then
explains all the things the VCR can do. There's also some information for your parents or another
adult -just in case you have questions about your VCR. The instructions explain all of the VCR's
"eatures, which are listed below. You cannot hurt your VCR by trying the features!
So read on - and have fun.
Features
Alarm Clock
Automatic TV Channel Setup
Automatic Head Cleaner
Automatic PlaybackFeatures
Automatic TrackingAdjustment
Display Panel
Forward and ReverseSearching
On-Screen displaysin Englishor Spanish
One-Touch Recording (recording TV shows for 30
minutes to eight hours)
Pausinga Picture
Picture Select
Real-Time Counter
Remote Control
Repeat Play
S-VHS Quasi PlayBack (SQPB)
Timer Recording (recording aTV show when you
are not at home)
Safe_y Precautions
Warning:To prevent fire or shock, do not expose thisVCR
to rain or moisture.
Federal Communications Commission (FCC)Warning:
Any unauthorized changes or modifications to thisVCR
void the user's authority to operate it.
This VCR hasthe High Quality (HQ) system and works with Video
Home System (VHS) e_ipment. Use only video cassette tapes that
are labeled with the IVIiS!mark.The useof other tapes may harm
the picture quality and the video heads.Suchdamage may not be
covered by the warranty.
Note to the Cable "IV System Installer: This reminder is pro-
videdto call the CableTV system installer's attention to Article
820-40 of the National Electrical Code,which provides guidelines
for proper grounding - in particular, specifyingthat the cable
ground shallbe connected to the grounding system of the building,
asclose to the point of cable entry as possible.
Declaration of Conformity
Model Number: VRKDI IYL/VRKDI2BL
Trade Name: Philips
ResponsibleParty: PhilipsConsumer Electronics
P.O.Box 14810
Knoxville,TN 37914-1810
(865) 521-4316
_As an ENERGYSTAR®ParmenPhilips ConsumerElectronics
hasdetermined that this product meets the ENERGYSTAR®
guidelines for energy efficiency.ENERGYSTAR®is a U.S.reg-
istered mark.
Using products with the ENERGYSTAR®label can saveenergy.Saving
energy reduces air pollution and lowers utility bills.
Copyright 2000 Philips Consumer Electronics.All rights reserved.
Beforedoinganythingelse,write
downtheVCR'smodelandserial
numbersonpage two. Thesenum-
berswill help usassistyouif you
evercall for help.
YournewVCRand its packaging
containmaterialsthat can be recy-
cledand reused.Specializedcompa-
niescan recycleyour productto
increasethe amountof reusable
materialsand to minimizethe
amount that needsto be properly
disposed.
Yourproductusesbatteriesthat
shouldnot be thrownawaywhen
depletedbut shouldbe disposedof
assmall chemicalwaste.
Ask aboutyour community'srules
on disposalof your old product,bat-
teries,and packaging.
4 TableofContents
Setting UpYourVCR
Introduction .......................................................... 3
Table of Contents ...................................................... 4
Before Using Your VCR .................................................. S
Using the Alarm Clock .................................................. 6
Hookups Without a Cable Box/Direct Broadcast System ........................ 7
Hookups With a Cable Box/Direct Broadcast System ......................... 8-9
Hookups With a Stereo "IV .............................................. I0
Turning on Your VCR ................................................... I I
Automatic TV Channel Setup .......................................... 12-13
Setting the VCR Clock ............................................... 14-15
Choosing a Language .................................................. 16
Description of Controls
On-Screen Displays .................................................... 17
Remote Control Buttons ............................................. 18-19
VC& Display Panel ..................................................... 20
Front Panel .......................................................... 2 I
Back Panel ........................................................... 22
Basic Operations
Playing .............................................................. 23
Recording ........................................................... 24
Recording
One-Touch Recording .................................................. 25
Timer Recording ................................................... 26-30
Recording One Channel/Watching Another ................................. 3 I
Rerecording (Copying Tapes) ............................................. 32
Playing
Repeat Play .......................................................... 33
Forward and Reverse Searching/Pausing a Picture ............................. 34
Picture Select ........................................................ 35
Real-Time Counter Memory ............................................. 36
Automatic Playback Features ............................................. 37
Information You May Need
Helpful Hints ...................................................... 38-39
Limited Warranty ................................................... 40-4 I
Dictionary/Specifications ................................................ 42
Index ............................................................... 43
Accessories .......................................................... 44
BeforeUsingYourVCR5
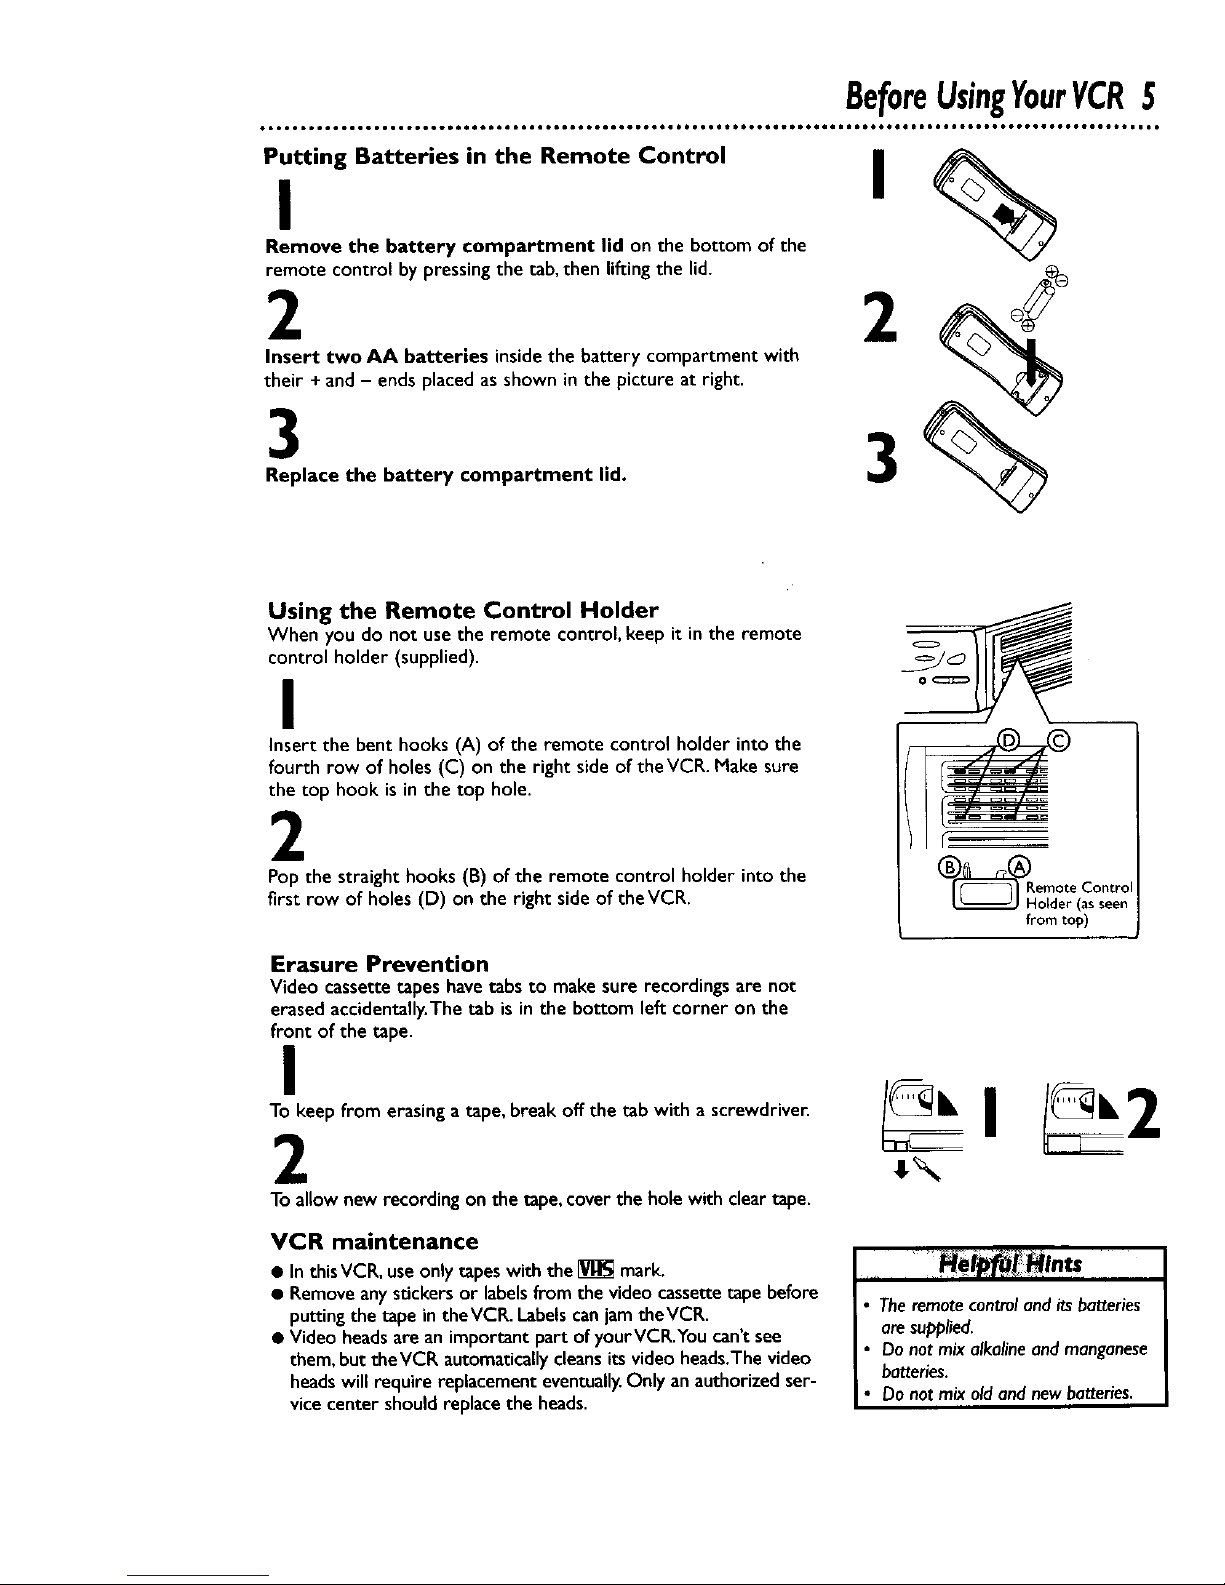
Putting Batteries in the Remote Control
I
Remove the battery compartment lid on the bottom of the
remote control by pressing the tab, then lifting the lid.
2 2
Insert two AA batteries insidethe batterycompartment with
their + and- ends placedas shown in the pictureat right.
3
Replace the battery compartment lid.
Using the Remote Control Holder
When you do not usethe remote control,keep it in the remote
control holder (supplied).
I
Insert the bent hooks (A) of the remote control holder into the
fourth row of holes (C) on the right side of the VCR.Make sure
the top hook is in the top hole.
2
Pop the straight hooks (B) of the remote control holder into the
first row of holes (D) on the right sideof theVCR.
Erasure Prevention
Video cassette tapes havetabs to make sure recordings are not
erased accidentally.Thetab is in the bottom left corner on the
front of the tape.
I
To keep from erasing atape,break off the tab with a screwdriver.
2
To allownew recording onthe tape,cover the hole with cleartape.
VCR maintenance
• In thisVCR, useonlytapeswith the _ mark.
• Removeanystickers or labelsfrom the videocassettetape before
puttingthe tape intheVCR. LabelscanjamtheVCR.
• Video headsare animportantpart of yourVCR.Youcan'tsee
them, buttheVCR automaticallycleansitsvideoheads.Thevideo
headswill require replacement eventually.Only an authorizedser-
vicecenter should replacethe heads.
• The remote control and its batteries
are supplied.
• Do not mix alkaline and manganese
batteries.
• Do not mix old and new batteries.
6 UsingtheAlarmClock
Putting Batteries in the Alarm Clock
I
I
Remove the battery compartment lid on the backof the
alarmclock,Useyour fingeror fingernailto flipdown the lid.
@
2
Insert one AA battery insidethe batterycompartment with
its+ and- endsplacedasshowninthe pictureat right.
3
Replace the battery compartment lid.
2 3
Using the Alarm Clock Holder
I
Pop_e three slotsof the alarmclock holder intothe three
holeson the left sideof the front of theVCR.The holder will
curve down, likea bowl, when placedcorrectly.
2
A velcro strip is supplied.Peeloff the tapebacking,then stick
one piece of the velcro to the front of theVCR and onepiece
to the top of the clock asshown in the picture at right.Make
surethe velcro pieceswill touch when the alarm clock is in
placein the holder.
3
Setthe alarmclock in the clock holder.
Velcroon
backof clock
Velcroon
frontofVCR
Alarm clockholder
Setting the Time and the Alarm
I
Turn the right knob to set the current time.
2
Turn the left knob to set the time for the alarm.
3
Set the OFF/ON switch to ON. At the proper time, the
alarmwill sound, The alarmwill sounduntilyoumovethe
OFF/ON switch to OFE
• SettheVCR's internalclockfor a timer recording or One-
Touch Recording.Detailsare on pages14-15.
• When you do not use the alarm,set the OFF/ON switch on
the back of the alarm clock to OFF
• The alarm will sound in the next 12-hour period.The alarm
clock does not haveAM or PM settings.
• The alarm sound is a beep.The bellson the top of the clock
are for appearanceonly. The bells will not ring.
OFFION
Switch
Alarm Knob
(on the left
asyou look
at the back
of the clock)
(on the right
asyoulook
at the back
of the clock)
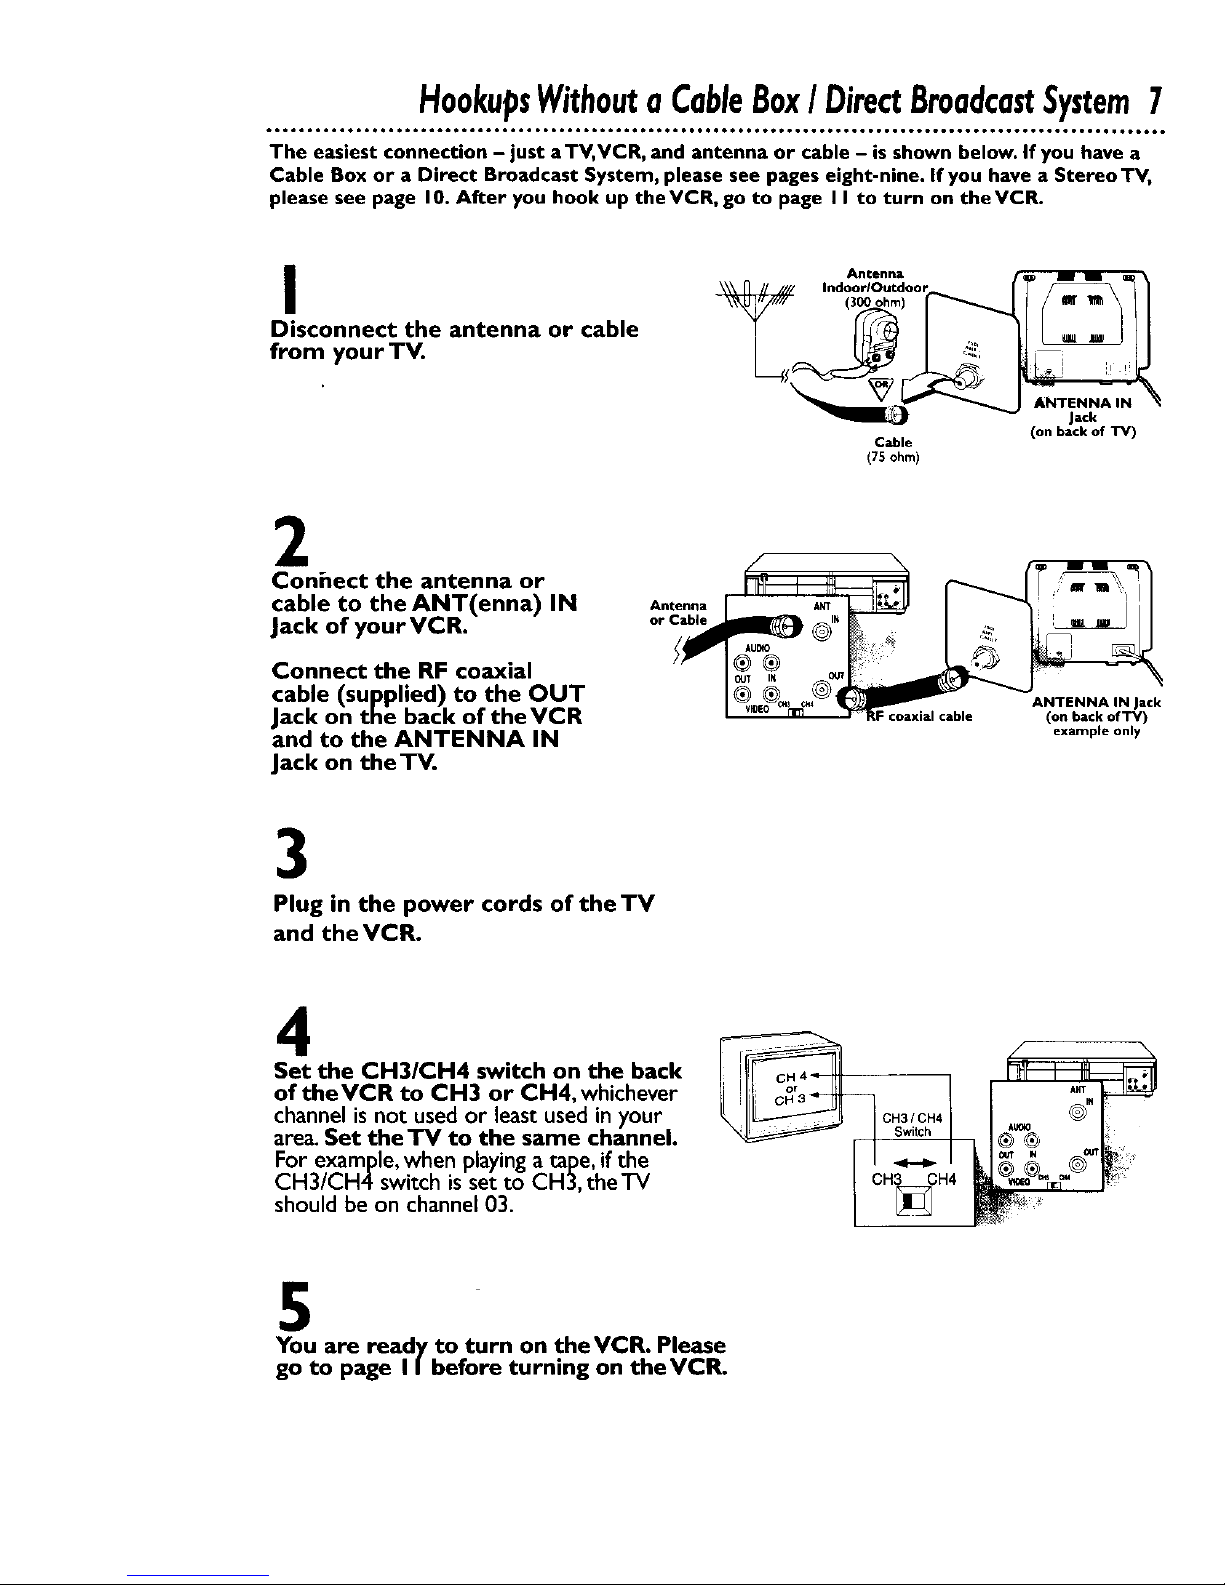
HookupsWithouta CableBox/ DirectBroadcastSystem7
tooo. *oooio*.o,. J*.oil.ooo,otooo. ttoool 1oo6o*1 J*oo* IJO_IOJO,_eOIOQQI OOOOQO IOeQQO.IIIIOI ,,O,I.,tO,,_ OIIO_ • J_,66°
The easiest connection - just aTV, VCR, and antenna or cable - is shown below. If you have a
Cable Box or a Direct Broadcast System, please see pages eight-nine. If you have a Stereo TV,
please see page 10. After you hook up theVCR, go to page I I to turn on theVCR.
I
Disconnect the antenna or cable
from your TV.
Arltenria
IndoorlOutdoor
Cable
(75 ohm)
ANTENNA IN
Jack
(on back of TV)
2
Conhect the antenna or
cable to the ANT(enna) IN
Jack of yourVCR.
Connect the RF coaxial
cable (supplied) to the OUT
Jack on the back of theVCR
and to the ANTENNA IN
Jack on theTV.
Anten113
or Cable
F coaxialcable
ANTENNA IN Jack
(on back of TV)
example only
3
Plug in the power cords of the TV
and the VCR.
4
Set the CH3/CH4 switch on the back
of theVCR to CH3 or CH4, whichever %
channel is not used or least used in your CH3/CH4 _
area. Set theTV to the same channel.
For example, when playing a tape, if the _'__ _' IT_*
CH3/CH4switch is set to CH3, theTV ! CH_CH4
should be on channel 03.
l
5
You are ready to turn on theVCR. Please
go to page I/before turning on theVCR.
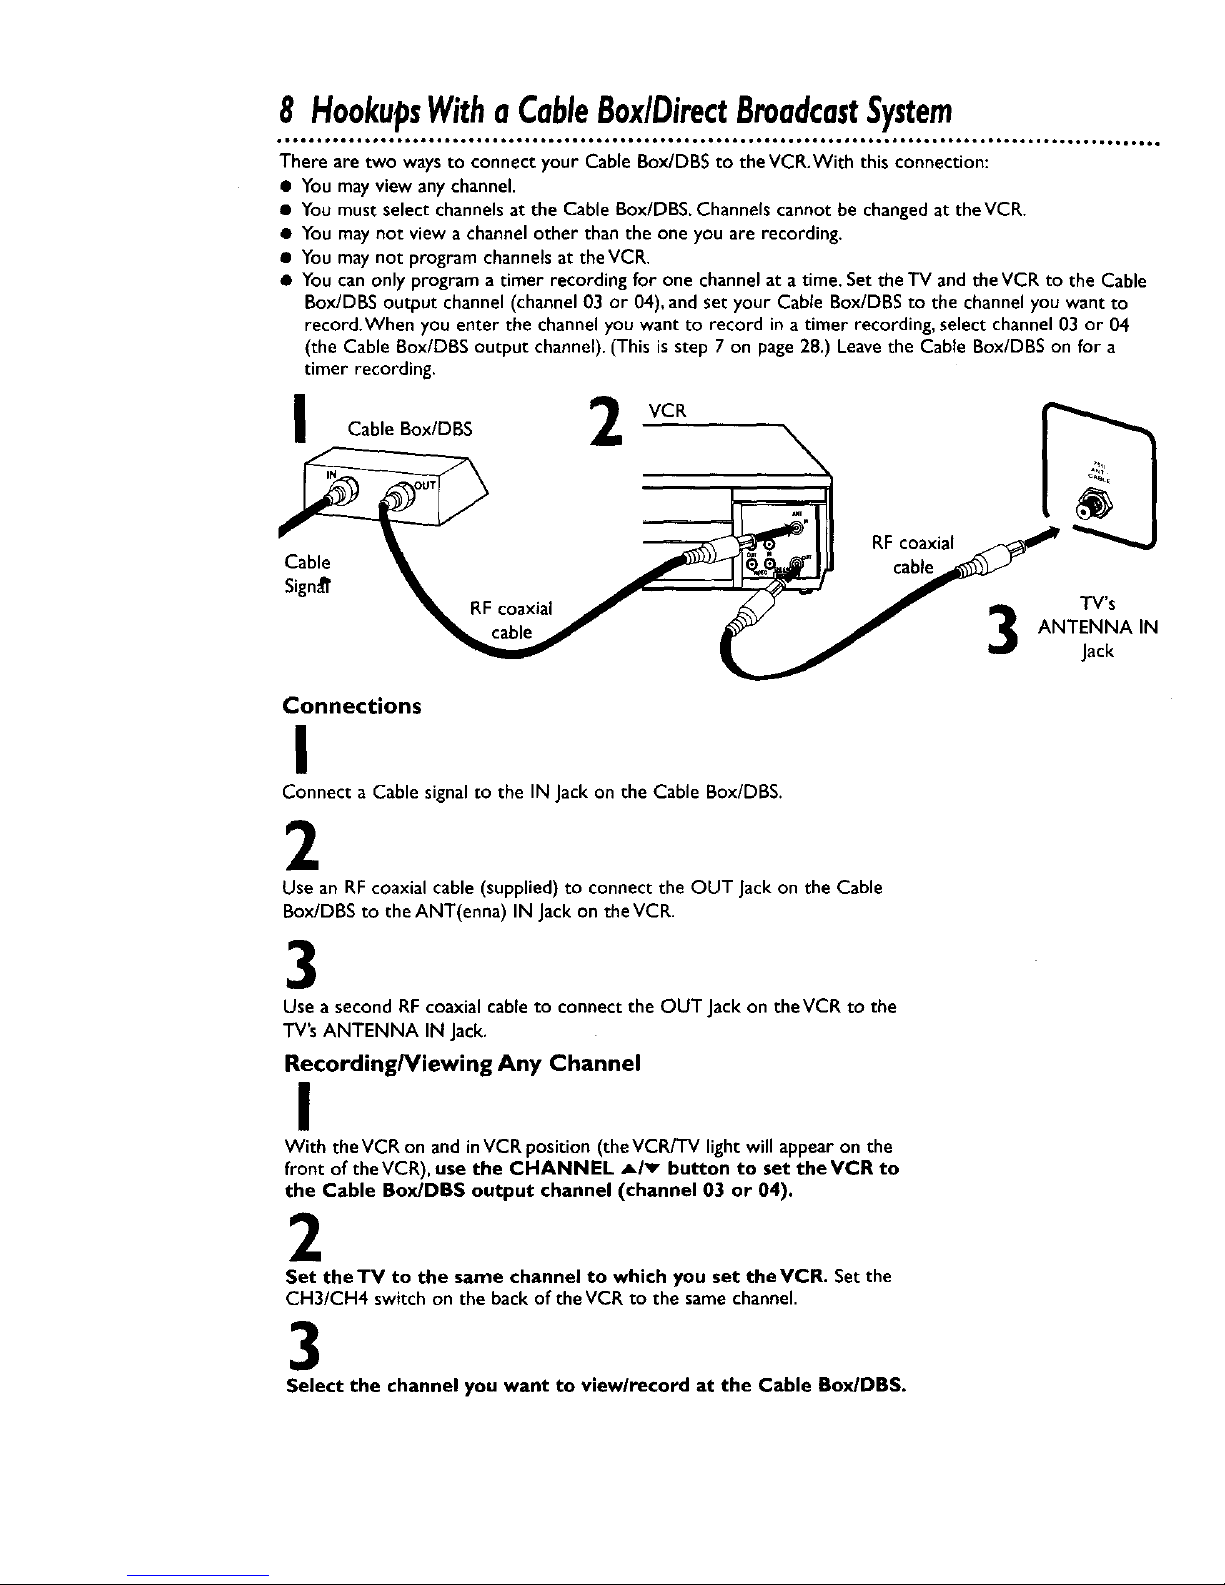
8 HookupsWithaCableBox/DirectBroadcastSystem
• ioeo, ,oetl ,oQ_ I*,••o imtt•_ • o,••_ _DtOQ_ OOOtQOOOOtQt _11• ,06•• OO0,g p_O,,g _ tO,Q• • t,,, • tt66• • _O°•_ • • 061_0• • •_mO°O,O
There are two waysto connect your Cable Box/DBS to theVCR.With this connection:
• You mayview any channel.
• You must select channelsat the Cable Box/DBS. Channels cannot be changed at theVCR.
• You maynot view a channelother than the one you are recording.
• You maynot program channelsat theVCR.
• You can only program a timer recording for one channel at a time. Set the TV and the VCR to the Cable
Box/DBS output channel (channel03 or 04), and set your Cable Box/DBS to the channel you want to
record.When you enter the channelyou want to record in a timer recording, select channel 03 or 04
(the Cable Box/DBS output channel).(This isstep 7 on page 28.) Leavethe Cable Box/DBS on for a
timer recording.
I 2
Cable Box/DBS
RF coaxial
Cable cable
Sign_ TV's
ANTENNA IN
Jack
Connections
I
Connect a Cable signalto the IN Jack on the Cable Box/DBS.
2
Use an RF coaxial cable (supplied) to connect the OUT Jack on the Cable
Box/DBS to the ANT(enna) IN Jackon theVCR.
3
Use a second RF coaxial cableto connect the OUT Jackon theVCR to the
TV's ANTENNA IN Jack.
Recording/Viewing Any Channel
I
With the VCR on and inVCR position(the VCR/TV light will appear on the
front of the VCR), use the CHANNEL _lv button to set the VCR to
the Cable Box/DBS output channel (channel 03 or 04).
2
Set theTV to the same channel to which you set theVCR. Set the
CH3/CH4 switch on the back of the VCR to the same channel.
3
Select the channel you want to view/record at the Cable Box/DBS.
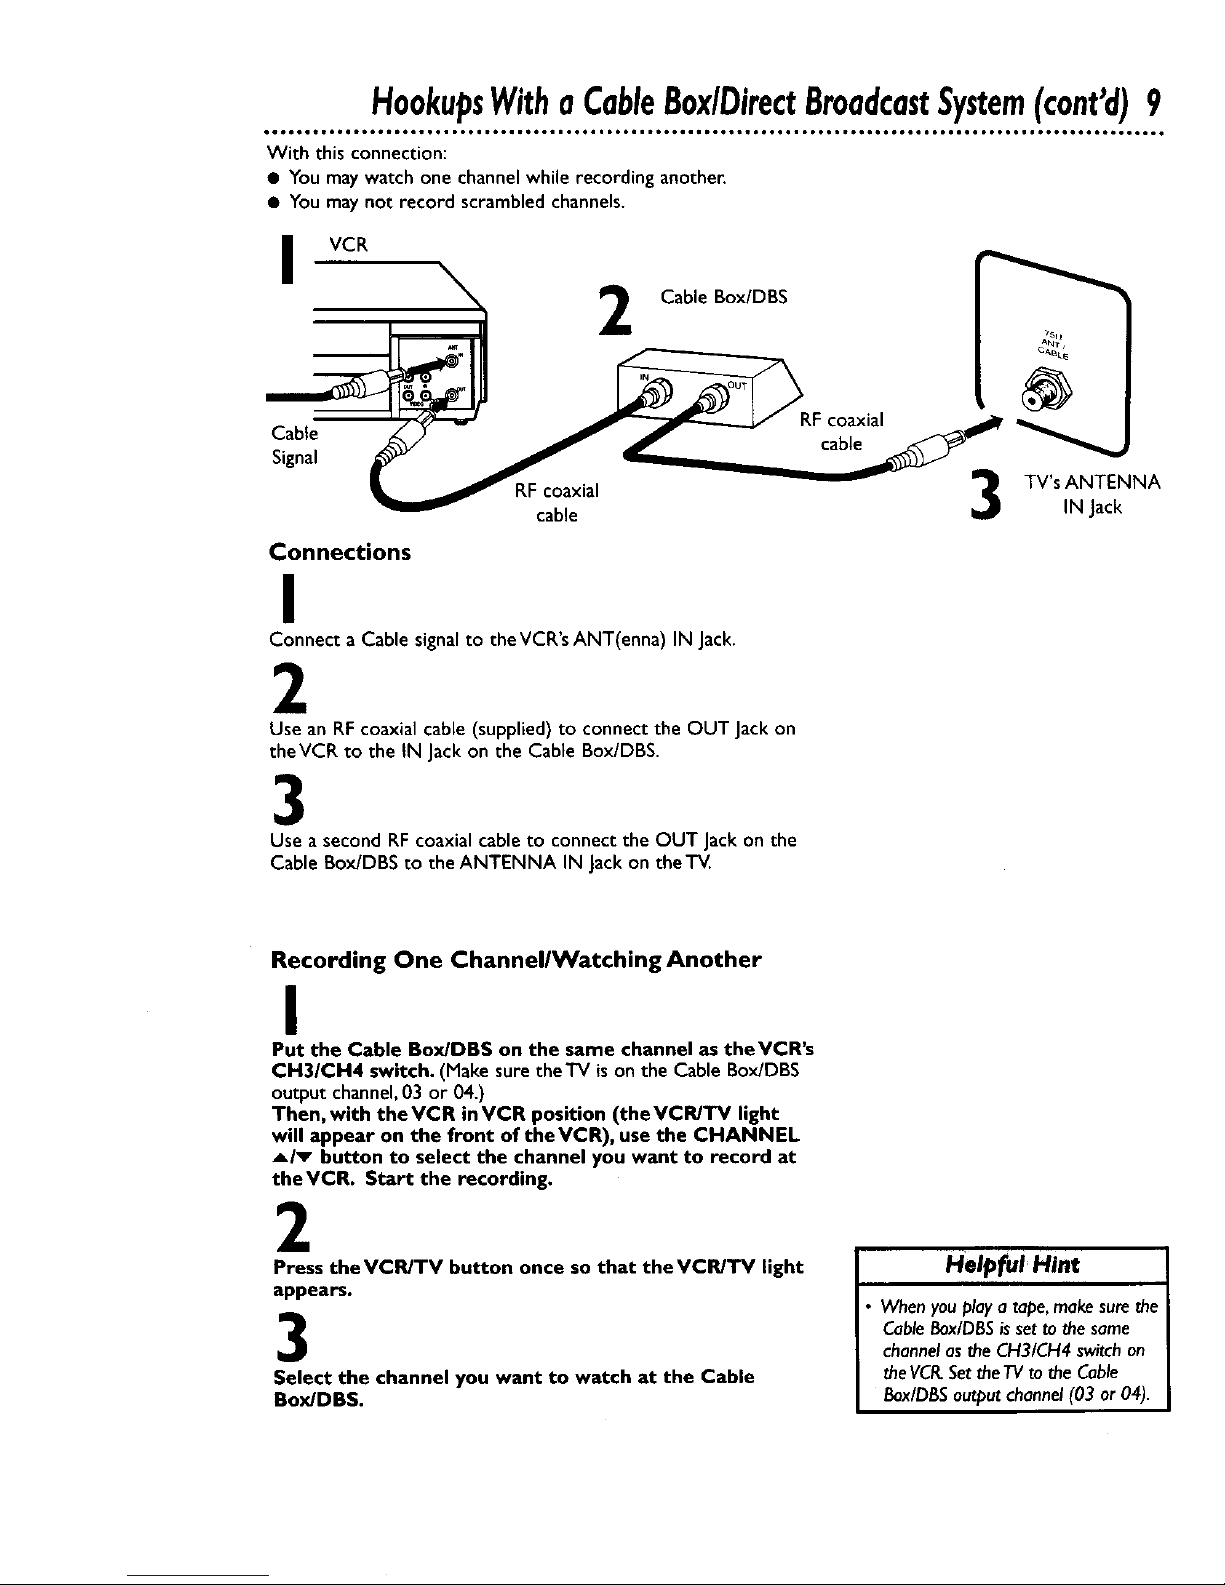
HookupsWitha CableBox/DirectBroadcastSystem(cont'd)9
Q.ooogo16el.m6o.*6a.,t o.o tt,o • i=o6 • *= • toa,lo6*ll*ool ° tD • tlm.Jotol ol Bt om ,ooooo ooo, e o,oeo, oot Qog got t Qo,,,_o,,,, o •
With this connection:
• You may watch one channel while recording another.
• You may not record scrambled channels.
VCR
Cable Box/DBS
Cable
Signal
RFcoaxial
cable
Connections
I
Connect a Cable signalto theVCR's ANT(enna) IN Jack.
2
Use an RFcoaxial cable (supplied) to connect the OUT Jackon
theVCR to the IN Jackon the Cable Box/DBS.
3
Use a second RFcoaxial cable to connect the OUT Jackon the
Cable Box/DBS to the ANTENNA IN Jackon theTM.
RFcoaxial
cable
_nj
TV's ANTENNA
IN Jack
Recording One ChannellWatching Another
I
Put the Cable Box/DBS on the same channel as theVCR's
CH3/CH4 switch. (Make sure the'iV ison the Cable Box/DBS
output channel,03 or 04.)
Then, with the VCR in VCR position (the VCR/TV light
will appear on the front of theVCR), use the CHANNEL
_/_ button to select the channel you want to record at
theVCR. Start the recording.
2
Press theVCR/TV button once so that theVCR/'rv light
appears.
3
Select the channel you want to watch at the Cable
Box/DBS.
HelpfulHint
When you play a tape, make sure the
Cable Eox/DBSis set to the same
channel as the CH3/CH4 switch on
the VCR.Set the TVto the Cable
Box/DBSoutput channel (03 or 04).
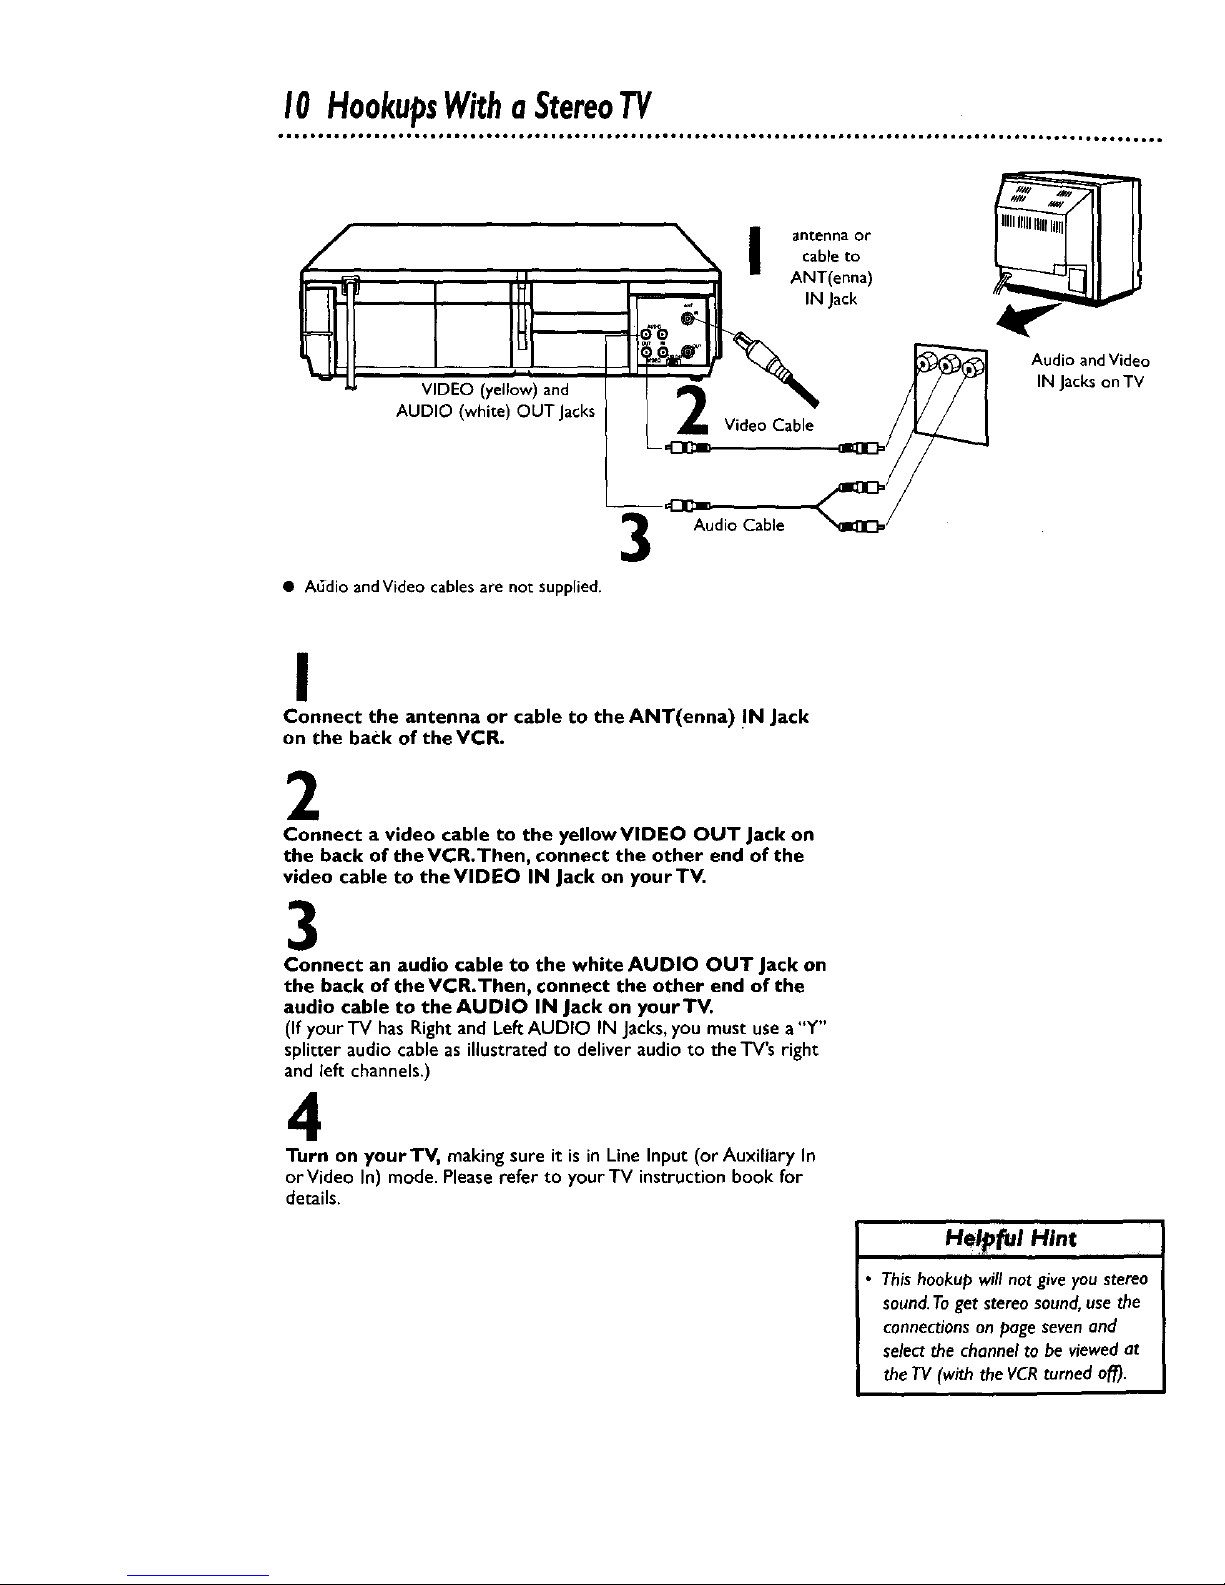
I0 HookupsWithaStereoTV
/
d I
VIDEO (yellow) and
AUDIO (white) OUT Jacks
• A_dio andVideo cables are not supplied.
n anteni_a or
cable to
ANT(enna)
IN Jack
°\
Video Cable
I
Audio Cable
Audio and Video
IN Jackson TV
I
Connect the antenna or cable to the ANT(enna) !N Jack
on the back of theVCR.
2
Connect a video cable to the yellowVIDEO OUT Jack on
the back of tbeVCR.Then, connect the other end of the
video cable to theVIDEO IN Jack on your TV.
3
Connect an audio cable to the white AUDIO OUT Jack on
the back of the VCR.Then, connect the other end of the
audio cable to the AUDIO IN Jack on your TV.
(If your TV has Right and LeftAUDIO IN Jacks,you mustusea"Y"
splitter audio cableas illustratedto deliveraudioto the TV's right
and left channels.)
4
Turn on your TV, making sure it is in Line Input (or Auxiliary In
orVideo In) mode. Please refer to your TV instruction book for
details.
u_p_l ui_€
• This hookup will not give you stereo
sound.Toget stereo sound, use the
connections on page sevenand
select the channel to be viewed at
the TV(with the VCRturned off).

• Before turning on yourVCR, make sure there are batteries in
the remote control and theVCR andTV are connected (see
pagesfive and seven-10).
• You can not set up channels if you are using a Cable Box/DBS.
• The instructions on this pageonly work when you turn on the
VCR for the first time. If there is a power failure or if theVCR is
unpluggedfor more than one minute, you may need to repeat
the instructions on this page.
I
Press the POWER button. The POWER light and the VCR/TV
light will appear on the front of theVCR.
2
Turn on the TV. Set it to the same channel as the
CH3_I_H4 switch on the back of theVCR. The display shown
below witl appear on the"iV.
LANGUAGE SELECT
I_"ENGLISH [ON]
ESPA/_OL
3
Press the PLAY button or the STOP button to select
ENGLISH or ESPAI_IOL. [ON] will appear besideyour choice.
4
Press the F.FWD button or the MENU button. AUTO SET
UP will appearonthe screen.
_ AUTOSETUP _
5
Press the MENU button, the F.FWD button, or the
REW(ind) button to begin automatic channel setup. AUTO
SETUP will flash on the screen and channel numbers will appear
in the top right corner of the screen.When channels are set up,
the TV will go to the lowest channel available.
TheVCR will memorize all availablechancels,so when you use the
CHANNEL _/_ button, you'll only scanthrough channelsthat
you receive.
Turn on the TV. Set it tochannel 3 or 4.
I
PHILIPS
_ful Hints ,
If you do not seeany messageswhen
you turn on the VCR,check your
hookups,then try again. If you still do
not see any messages,follow the
steps under "Automatic TV Channel
Setup'on page 12 and "Choosinga
Language"on page 16.
If you try to set up channels when
there isno antenna or cable connect-
ed to the VCR,channel setup will
appear to take place. Eventually,
AUTO SETUP will appear on the
screen steadily,and channel setup will
stop.Connect an antenna or cable to
the ANT(enna) IN jack of the VCR,
then press the MENU button, the
EFWD button, or the REW(ind) but-
ton again.Channel setup will begin
again.
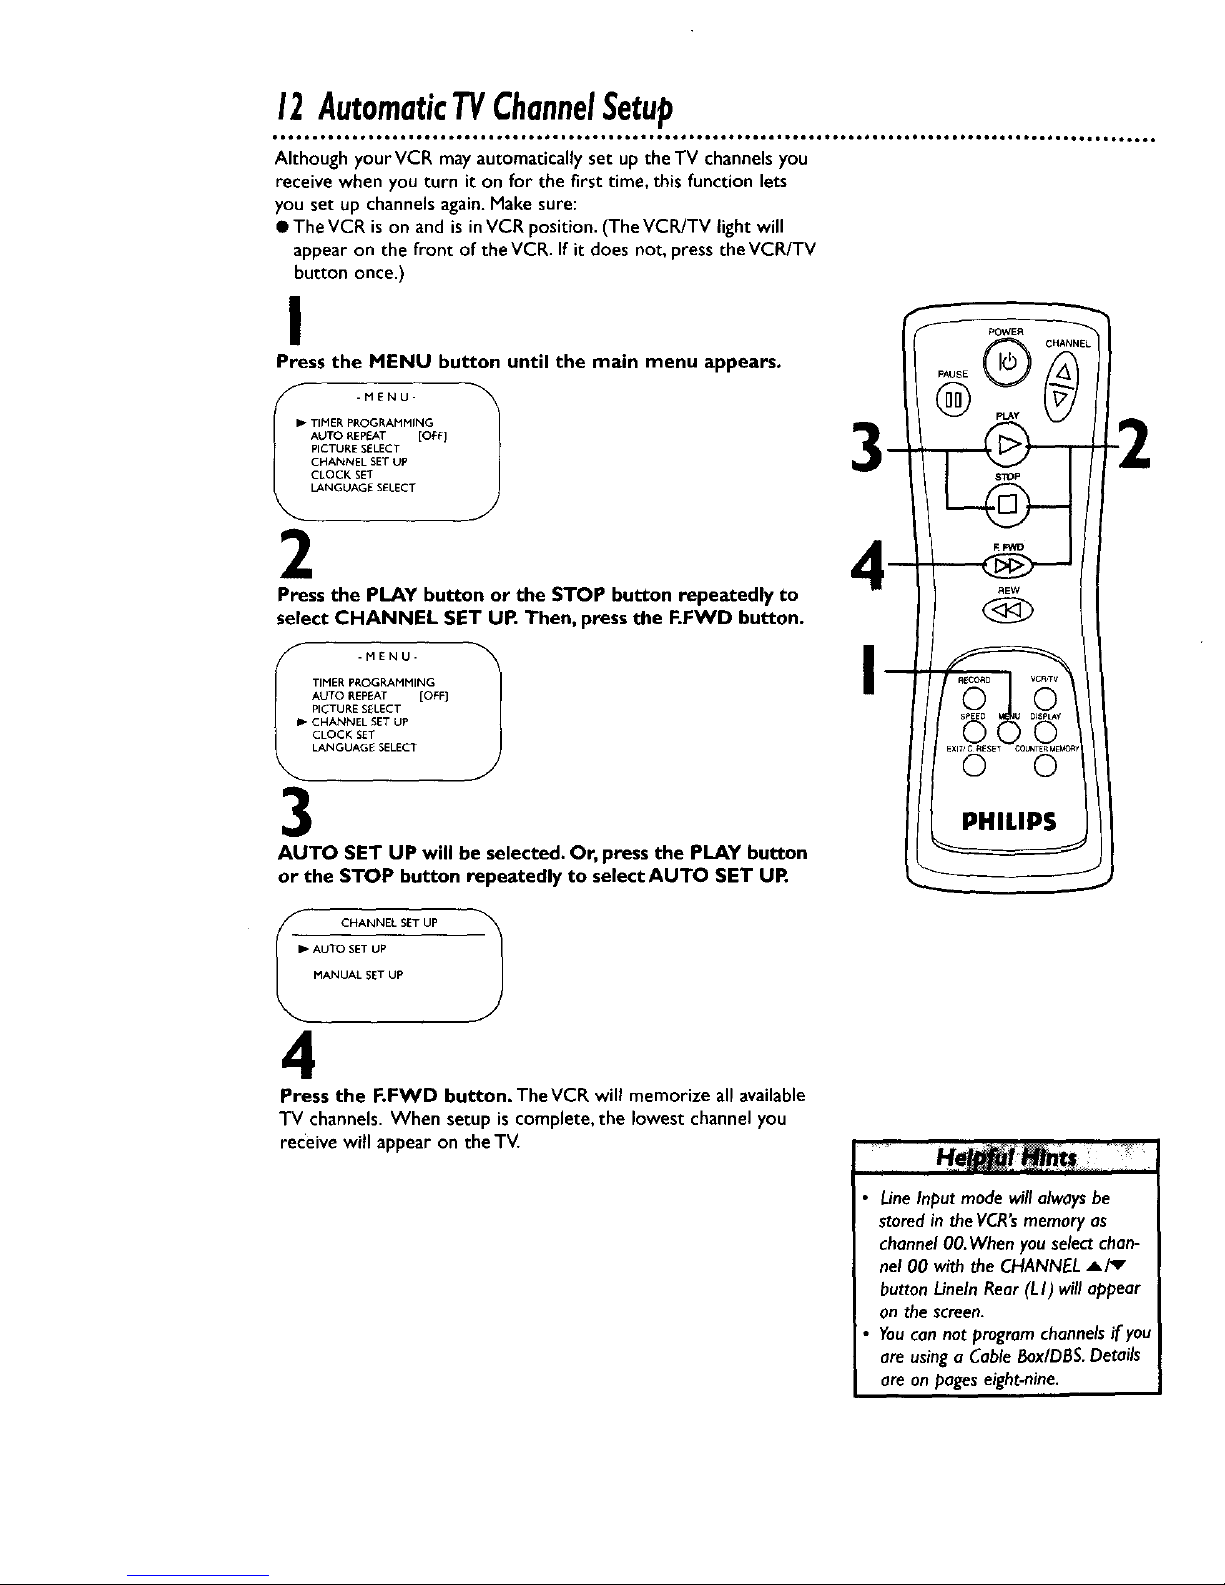
12AutomaticTVChannelSetup
oett i°to • io,,I ,o61 • oett ioo_ • •eoo I_o,*° • _t6°ml _ool ,oQt,loettiDoee,i leet,e,_o6¢*,, • tor*oQot f,"OQOO°OQ IO,¢*Q6q, O° OIOOOtOt
Although yourVCR may automatically set up the TV channels you
receive when you turn it on for the first time, this function lets
you set up channels again.Make sure:
• TheVCR is on and is inVCR position. (TheVCR/TV light will
appear on the front of the VCR. If it does not, press theVCR/TV
button once.)
I
Press the MENU button until the main menu appears.
IP TIMER PROGRAMMING
AUTO REPEAT [OEFJ
PICTURE SELECT
CHANNEL SET UP
CLOCK SET
LANGUAGE SELECT
3
2 4-
Pressthe PLAY button or the STOP button repeatedly to
select CHANNEL SET OR Then, press the F.FWD button.
S -MENU. 1
/3*MEPoAMMNG
AUTO REPEAT [OFF]
PICTURE SELECT
Ib CHANNEL SET UP
CLOCK SET
LANGUAGE SELECT
AUTO SET UP will be selected. Or, press the PLAY button
or the STOP button repeatedly to select AUTO SET UR
CHANNEL SET UP 1
P AUTO SET UP
MANUAL SET UP
4
Press the F.FWD button. TheVCR will memorize all available
TV channels. When setup is complete,the lowest channelyou
receive will appear on theTV.
Line Input mode will alwaysbe
storedin the VCR's memory as
channel 00. When you select chan-
nel O0 with the CHANNEL A/'v
button Lineln Rear (L I) will appear
on the screen.
You can not program channels if you
are using a Cable Box/DBS.Details
are on pages eight-nine.
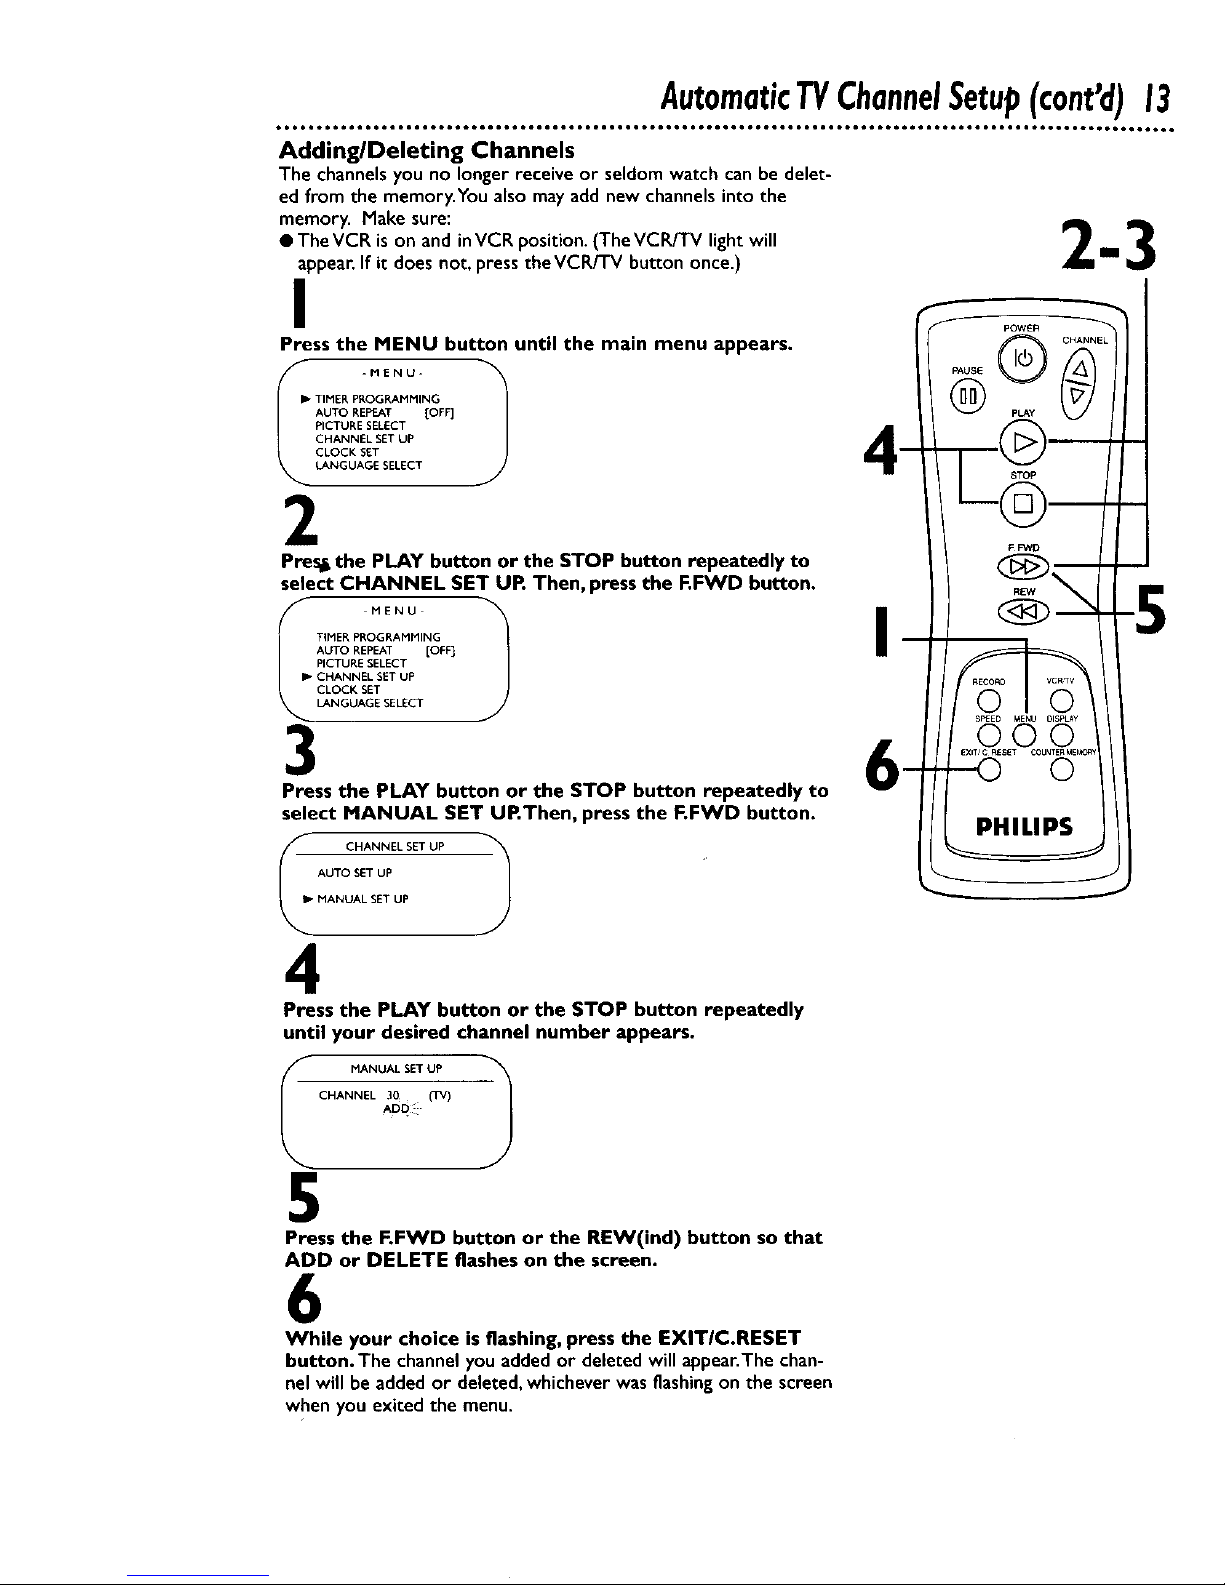
AutomaticTVChannelSetup(cont'd)13
ol,,leJoool oool toetQtot.toeeot toeeeo, _teeQOOO_OeQQO • OeeQO0 OOeQO0 O,,,_ ttett ItO60t • t060_O _tt_t • O_tO0 •Q_,,O600tOO0
Adding/Deleting Channels
The channelsyouno longer receive or seldom watch can be delet-
edfrom the memory.You alsomay add new channelsinto the
memory. Make sure: 2 3
• TheVCR ison and inVCRposition.(TheVCR/TV lightwill
appear.If it does not, presstheVCR/TV button once.) m
I
Press the MENU button until the main menu appears.
IP- TIMER P_,OGRAMMING
AUTO REPEAT [OFF]
PICTURE SELECT
CHANNEL SET UP
CLOCK SET
LANGUAGE SELECT
Pres_the PLAY button or the STOP button repeatedly to
select CHANNEL SET UP. Then, press the F.FWD button.
MENU
TIMER PROGRAMMING
AUTO REPEAT [OFF]
PICTURE SELECT
I_ CHANNEL SET UP
CLOCK SET
LANGUAGE SELECT
3
CHANNELSET UP
AUTO SET UP
MANUAL SET UP
Press the PLAY button or the STOP button repeatedly to
select MANUAL SET UP.Then, press the F.FWD button.
4
Press the PLAY button or the STOP button repeatedly
until your desired channel number appears.
MANUAL SETUP
CHANNEL 30 (TV)
ADD
5
Press the F.FWD button or the REW(ind) button so that
ADD or DELETE flashes on the screen.
6
While your choice is flashing, press the EXIT/C.RESET
button. The channelyouaddedor deleted will appear.Thechan-
nel will be addedor deleted,whicheverwas flashingon the screen
when you exited the menu.
PHILIPS
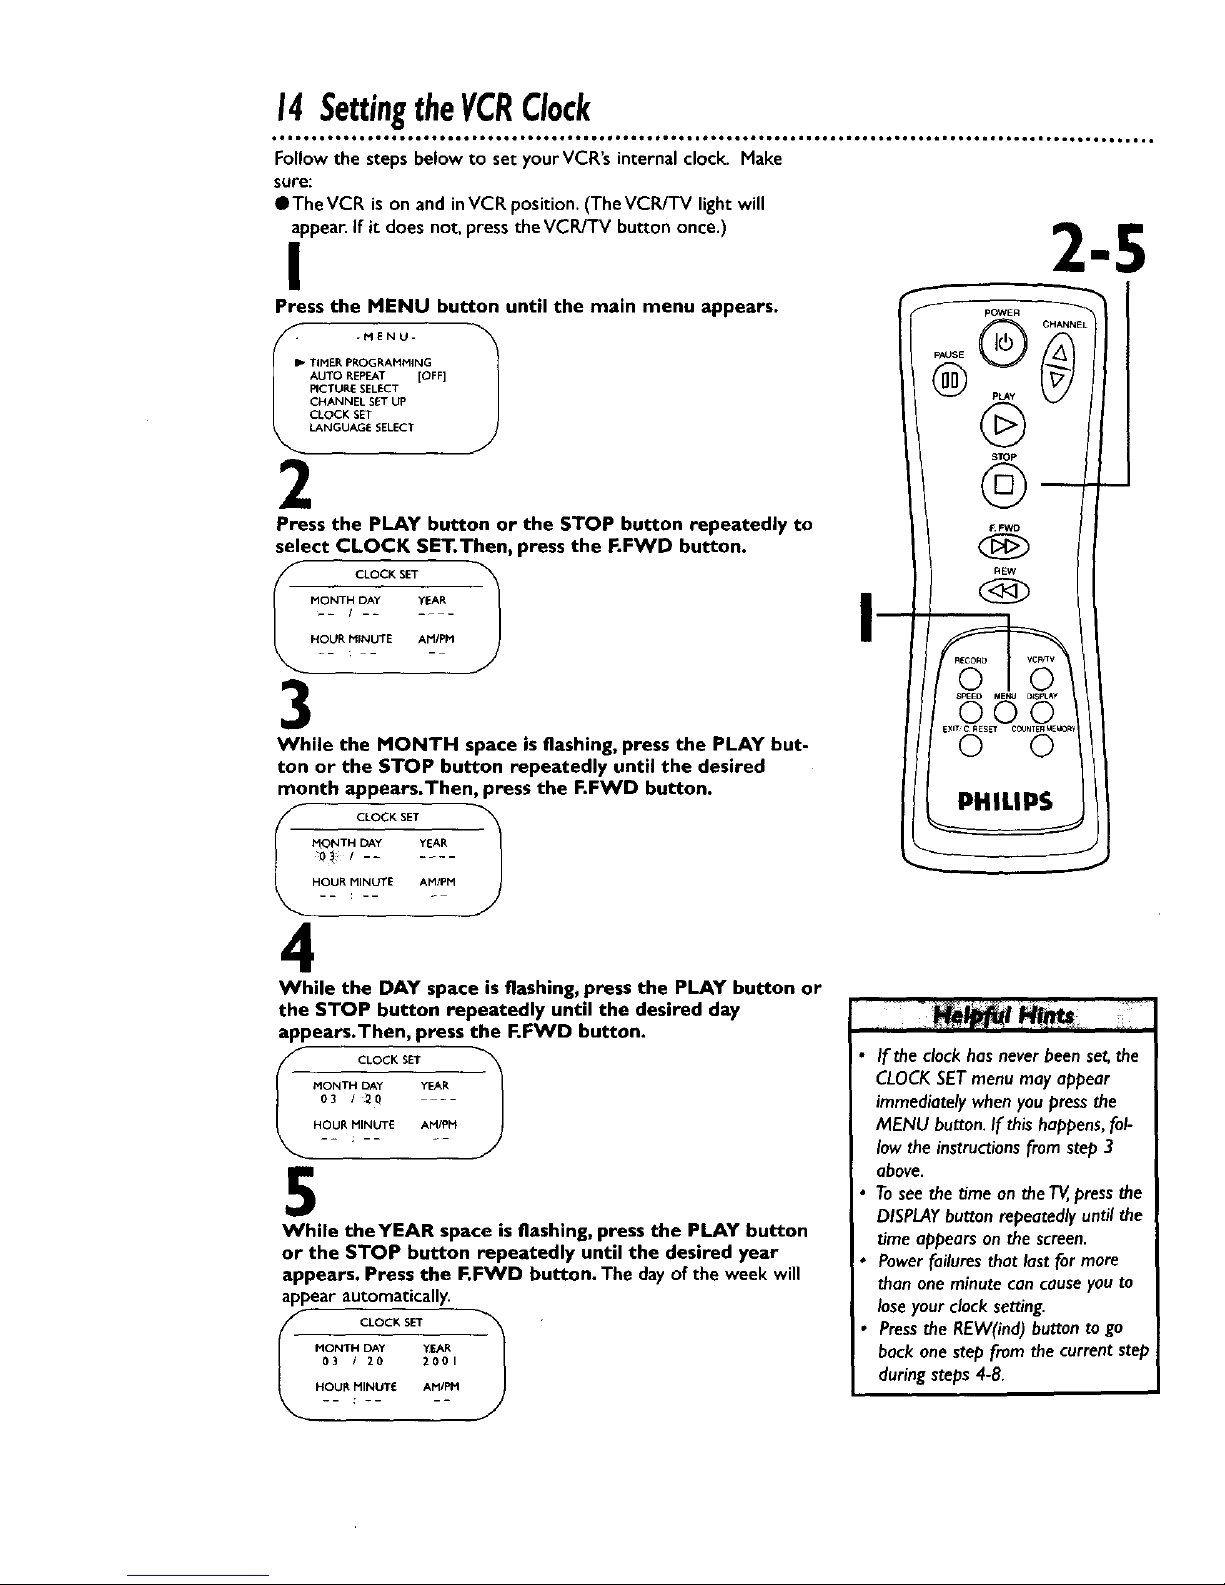
14SettingtheVCRClock
,_ i It OOQOOQO OIOe. OIOOIIIt ID,QO.t O,,Q,t lUIOOIt aeoelool e,o,oo.a,lololq OOOOIOOOO.IOO,tIIO,,I I,,O ° Oill, ° _t ° • • ll,e ° •
Follow the steps below to set yourVCR's internalclock. Hake
sure:
liThe VCR is on and inVCR position. (The VCR/TV light will
appear.If it does not, pressthe VCR/TV button once.)
I
Press the MENU button until the main menu appears.
I_ TIMEI _, PROG P,Ai"IMI N G
AUTO REPEAT [OFF]
PICTUF.E SELECT
CHANNEL SET UP
CLOCK SET
LANGUAGE SELECT
2
Press the PLAY button or the STOP button repeatedly to
select CLOCK SET.Then, press the F.FWD button.
CLOCK SET
MONTH DAY yEAR
HOUR MINUTE Ar4/PM
-- ; -
3
While the MONTH space is flashing, press the PLAY but-
ton or the STOP button repeatedly until the desired
month appears.Then, press the F.FWD button.
_ CLOCKSET _-- -- -
MONTH DAY YEAR
4
While the DAY space is flashing, press the PLAY button or
the STOP button repeatedly until the desired day
appears.Then, press the F.FWD button.
MONTH DAy YEAR
03 ! _0 ---
HOUR MINUTE AMIPM
5
While theYEAR space is flashing, press the PLAY button
or the STOP button repeatedly until the desired year
appears. Press the F.FWD button. The dayof the week will
appear automatically.
MONTH DAY "(EAR
03 / 20 2001
HOUI_ MINUTE AM/PH
pOWER
®
STOp
©-
_FWD
REW
PHILIPS
If the clock hasnever been set,the
CLOCK SET menu may appear
immediately when you press the
MENU button. If this happens, fol-
low the instructions from step 3
above.
Tosee the time on the T_,press the
DISPLAYbutton repeatedly until the
time appears on the screen.
Power failures that last for more
than one minute con causeyou to
lose your clock setting.
Pressthe REW(ind) button to go
back one step from the current step
during steps 4-8.
 Loading...