

Page 1
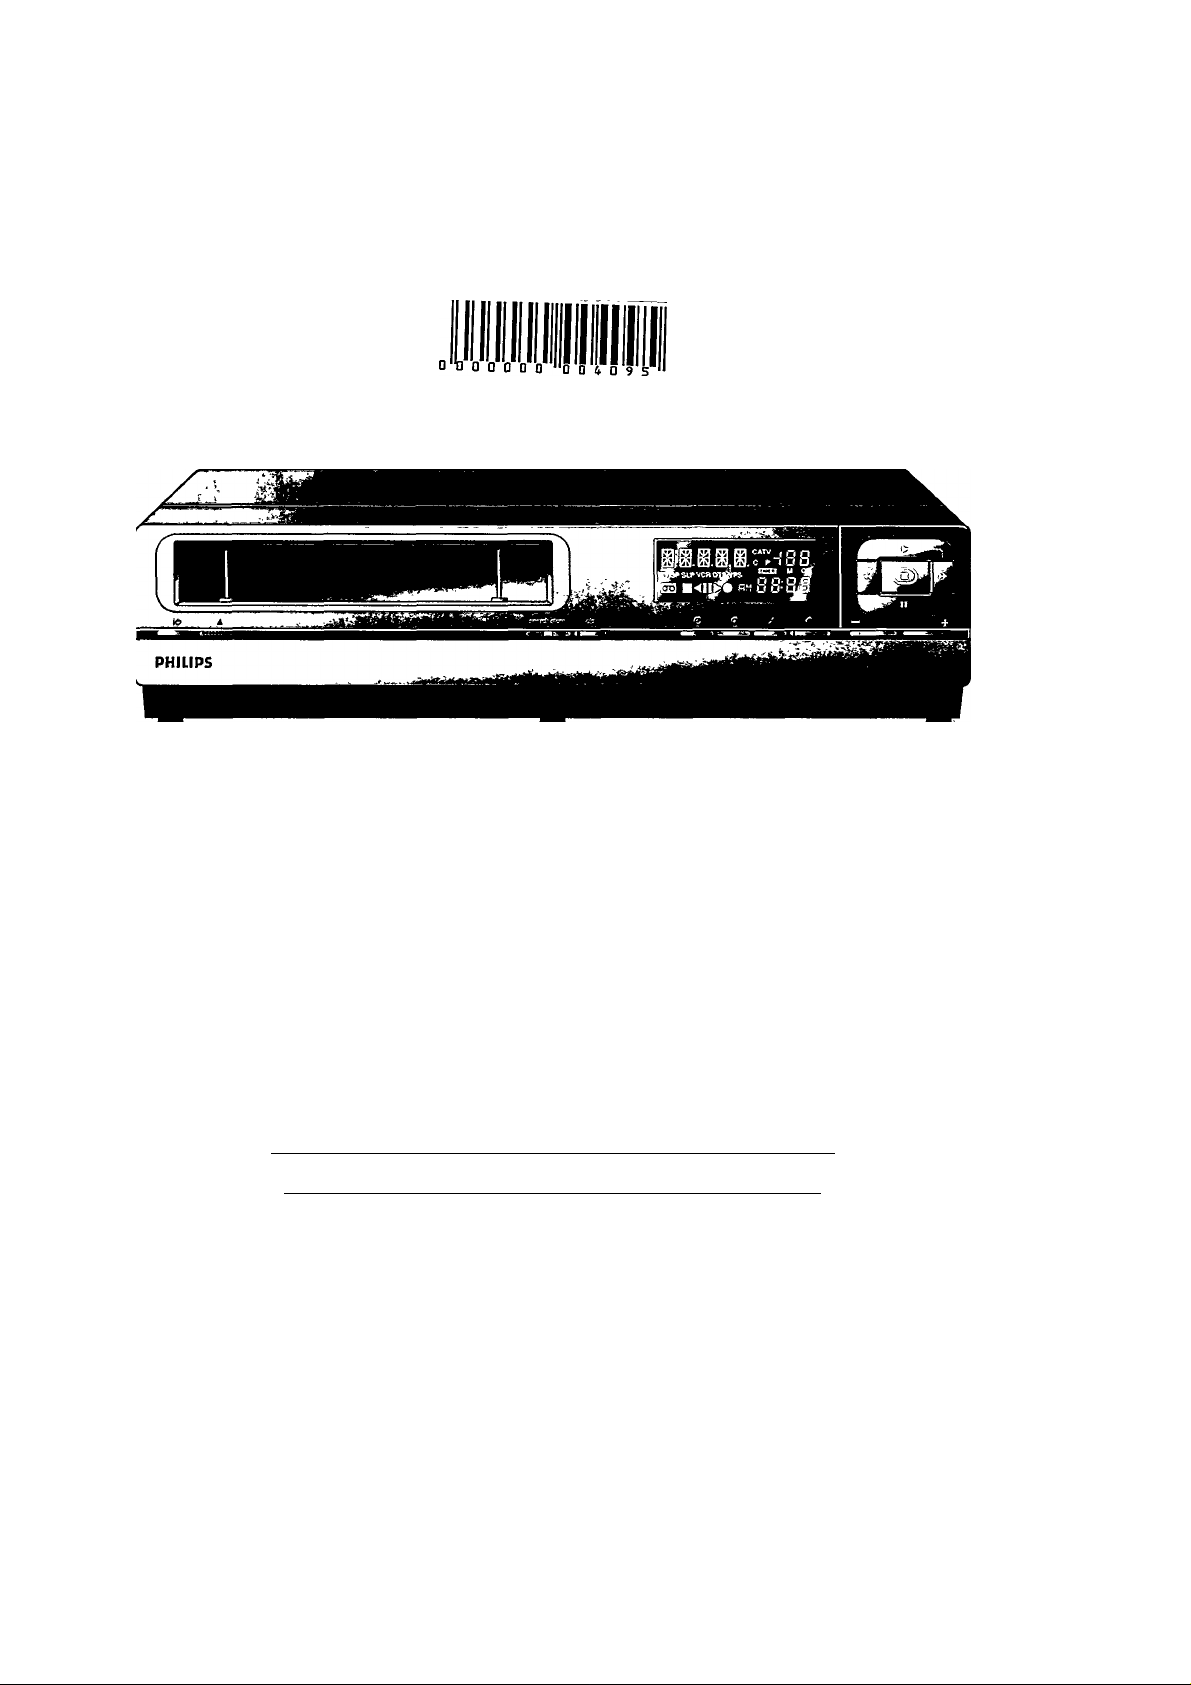
PHILIPS
CONSUMER ELECTRONICS
PHILIPS
PAL
OPERATING INSTRUCTIONS VIDEO RECORDER
BEDIENUNGSANLEITUNG VIDEO-RECORDER
MODE D’EMPLOI MAGNÉTOSCOPE
ISTRUZIONI PER L’USO VIDEOREGISTRATORE
VR6393
Page 2

Page 3
Page 4

(GB)
Operating instructions
Attention !
• Always open this flap page first.
(S)
O
CD
Bedienungsanieitung
Mode d’empoli
Istruzioni per l'uso
Achtung !
• Immer zuerst dieses Umschlagblatt öffnen.
Attention !
• Commencez toujouts par ouvrir ce rabat.
Attenzione !
• Aprire sempre prima questa pagina pieghevole.
Page 5

English
CONTENTS
Chapter 1 INTRODUCTION page 1
Use VHS cassettes of a well-known brand.
Features
2 SUMMARY OF BUTTONS, CONTROLS
AND CONNECTIONS
Safety instructions 3
3 INSTALLATION 3
Connecting the aerial 3
Tuning your TV set to the video recorder
4 REMOTE CONTROL 4
5 STORING TV STATIONS 5
6 DIRECT RECORDING 6
Loading a cassette 6
7 PLAYING A CASSETTE
8 SETTING THE CLOCK 8
9 TELETEXT-DECODER 9
10 TIMED RECORDING 11
Teletext-programming 11
Video Program System 11
One Touch Recording (OTR) 15
11 EXTRAS 16
12 OTHER RECORDING POSSIBILITIES 16
Recording from another video recorder
(copying)
13 WATCHING TV VIA THE VIDEO
RECORDER (Tuner mode)
14 CASSETTES
15 TROUBLE CHECKS
16 TECHNICAL DATA
16
17
17
18
19
INTRODUCTION
1
2
Your VHS video recorder uses advanced technology so that you
can enjoy outstanding picture and sound reproduction.
This instruction manual gives you all the information you need to
4
operate your video recorder. The time you spend reading
through this manual, and familiarizing yourself with the operation
of your video recorder will be repaid by trouble-free operation.
Some of the other advanced features of your video recorder are:
— 48 TV channel storage capacity.
— 6 timed recordings up to one month in advance, with a
possibility for every day or every week repeated recording.
— Multifunctional fluorescent Display with language selection
7
(English, German, French or Italian) and tape counter, used time
or time left indication.
— Automatic functions such as automatic tracking control,
automatic rewind, automatic switch-on when a cassette is
loaded and automatic switch to playback when the erase tab of a
cassette has been removed.
— OTR (One Touch Recording)
— All cable networks can be received with the Hyperband tuner.
— After the video recorder has been disconnected from the
mains, the clock will continue to work, and the TV stations will
remain stored on the chosen preselection numbers for one
month.
— Child lock (to stop children looking at prerecorded tapes).
— 3 video heads.
— Perfect still picture.
— Variable slow motion speed, also superslow motion.
— Recording of TXT-subtitles.
— Teletext decdrder (FLOF/FASTEXT-System)
— ‘VPT’-Videorecorder-Programming via Teletext.
— Built-in Video Program System (VPS). VPS adds flexibility to
timed recordings. It controls the video recorder so that timed
recordings will be made at the exact moment the TV programme
starts, even if the start time (and therefore also the stop time)
has been delayed or changed.
— Easy programming and operation using your LCD remote
control.
Eastern European reception (SECAM East)
1
PALSECAM
Packed with this video recorder are:
— Aerial cable
— Remote control unit
— Mains cable
This video recorder can also receive SECAM East transmissions
of East German TV broadcasting companies.
For the recorded programmes to be reproduced in colour, your
colour TV must also be equipped to receive these transmissions.
Your video recorder will switch automatically from the PAL
transmission standard to Eastern European reception and vice
versa.
Note:
Video cassettes recorded on the French SECAM colour
system can only be reproduced in black-and-white. This is a
technical limitation and not a fault in your video recorder.
1
Page 6

SUMMARY OF BUTTONS, CONTROLS AND CONNECTIONS
Getting familiar with your video recorder
The symbols below are listed in the same sequence as they appear on the video recorder.
Detailed information concerning their functions are explained in the relevant sections.
If symbols only appear on the remote control or differ from the symbols on the video recorder, they are placed between brackets in the text.
2
Symbol on video recorder
■ ■ Pause/Stop button
► ►
ii
O
II
►►
IE)
— —
+
•
X X
©
c/p (C/P)
store
search
A
1©
ir Aerial-in socket
03
30-39
(SI
Extra functions if TVAfCR selector is in position TV (only for TV sets equipped with RC5):
Symbol on remote
control
S
II Still picture button
IE)
+
(A with •)
(»❖ )
0
1©
(TV/VCR) TV/VCR selector
(WO)
RC)
(od) Tape length selector
(0-9) Digit buttons
(-/-)
(A)
(AwithOTR)
(^)
(13) Fast motion button
(Q)
(!••)
(»)
(@) Time used, time left, tape counter selector
(•«-►) Goto button
(?)
(«i»)
(S)
(X)
(•^)
(B)
(13)
((3)
((3)
(@1»)
(CD)
Meaning
Play button
Rewind button
Picture search reverse button
Wind button
Picture search fon/vard button
Down button
Up button
Record button
Reset and VPS on/off button
Timer button
Set clock button
Channel/Program (C/P) selector
Store button
Search button
Eject button
On/Standby button
Aerial-out socket
30-39 Channel control
21-pin connector socket (AV Euroconnector)
Transmit
RC Timer button
One, two orthree digit entry button (e.g. 5,15 or 105)
Child lock
Active button (press this button and • or OTR on the remote control simultaneously)
OTR button (One Touch Recording)
Play reverse button
OSD button
Slow motion button
Auto tracking button
Concealed information (only when teletext is switched on)
Stop changing pages (only when teletext is switched on)
Teletext on/off
Teletext off (temporary)
Double height (only when teletext is switched on)
Special TXT button, RED
Special TXT button, GREEN
Special TXT button, YELLOW
Special TXT button, BLUE
TXT Subcode button
TXT Index button
2 @)
(0-9) Digit buttons
(-/-)
(»)
(-1- -^)
(--^)
One, two orthree digit entry button (e.g. 5,15 or 105)
Personal preference button
Up volume TV sound
Down volume TV sound
Page 7

Safety instructions
INSTALLATION
The manufacturer cannot be held liable for damage which is
incurred by the video recorder not being used in compliance with
the guarantee conditions and the safety instructions.
• First check if your supply voltage is the same as that given on
the type plate at the rear.
• The video recorder should be allowed to acclimatise for at
least three hours after unpacking before it is connected to the
mains,
Do not use your video recorder immediately after moving it from
a cold to a warm location or vice versa, after heating a cold room
or under conditions of high humidity.
• Make sure that there is at ieast 20 cm between the video
recorder and the TV set.
• Make sure that air can circulate freely through the ventilation
openings of the video recorder.
• Do not place the video recorder close to a source of heat
(radiator, etc.).
• Do not place the video recorder near appiiances generating
strong magnetic fieids (e.g. motors, transformers).
• Do not place the video recorder on soft surfaces.
• Do not use the video recorder in dusty piaces or where it may
be subject to vibration.
• Do not poke fingers or insert objects into the cassette loading
slot, as this might cause injury (especially to children) and/or
damage the mechanism.
• Make sure that no objects or fluids pass through the
ventilation openings. If liquid is spilt into the video recorder,
disconnect the video recorder from the mains and consult a
qualified service technician.
3
Connecting the aerial
• Remove the aerial cable from your TV and plug it into T f at the
back of the video recorder.
• Take the aerial cable supplied and connect it to E) of the
video recorder and to the aerial-input socket on your TV.
Connecting to the mains
• Dangerous voltage inside. Do not open the cabinet.
Repairs must only be made by qualified service personnel.
• If you transport your video recorder, do not leave a video
cassette loaded and avoid violent shocks.
• Do not expose this video recorder to rain or moisture.
• During strong thunderstorms (stroke of lighting) we
recommend to disconnect mains and antenna.
• Insert the female plug of the mains lead into the mains socket
at the rear of the video recorder.
• Insert the other plug of the mains lead into the wall socket.
Note:
The video recorder should remain connected to the mains at all
times to make sure that timed recordings can be made and to
allow normal TV reception. '
@) 3
Page 8
Selecting the Display language
0 Press 4 to remove the cassette, if already loaded.
d) Press ►.
This will automatically switch on the video recorder.
The Display shows a language indication, for example ‘ENGL’,
‘DEUT.’, ‘FRAN.’ or ‘ITAL.’.
@ Press + or — to select the language indication of your
choice.
0 Press lO-
Tuning your TV to the video recorder signal
0
Switch on the TV.
REMOTE CONTROL
4
You can operate most of the functions of the video recorder
using the remote control unit.
Inserting the batteries
• Open the cover on the back of the remote control.
© Press 4 to remove the cassette, if already loaded.
0 Press ►.
The Display shows, for example:
ii.i
0
Select on the TV the preselection (program) number for the
video recorder.
Most modern TVs have preselection numbers for selecting TV
stations or the video recorder signal.
Refer to the Operating Instructions of your TV to determine
which preselection number you must use and how to tune it.
® Tune the TV until you see the following black and white
pattern:
This should be around UHF channel 37.
If your TV has auto search tuning:
Store this channel on the chosen preselection number (see the
TV Operating Instructions).
0 If the reception of any TV station is of a poor picture quality
(disturbed picture), use a small screwdriver to turn the 30-39
channel control on the rear of the video recorder until the
reception is good. Then search again for the black and white
pattern, as described in steps and ©.
0 Press lO once you have finished tuning.
Note:
If you now want to play back a pre-recorded cassette, see the
chapter ‘Playing a cassette’.
• Insert the batteries as indicated in the battery holder.
If you want to control video recorder functions:
• Set (TV/VCR) to position ‘VCR’.
• Aim the remote control at the video recorder and press the
required button.
If you want to control TV functions:
• Set (TV/VCR) to the position ‘TV’.
• Aim the remote control at the TV and press the required TV
function button (e.g. digit buttons (0-9) to select TV stations).
To select numbers:
Using -I- or — you can change:
— preselection numbers
— channel numbers
— a time indication.
However, instead of using + or —, you can also use the digit
buttons (0-9) on the remote control.
For numbers 0-9:
• Press the required digit button.
For numbers 10-99:
• Press (-/-) until the Display on the video recorder shows
• Press the required digit buttons.
For number 100-120 (only for channel numbers):
• Press (-/—) until the Display of the video recorder shows ‘—’.
• Press the required digit buttons.
To return to single digit entry press (-/--) again until the Display
shows
4 (g^
Page 9

STORING TV STATIONS
Special channel Select
Special channel
(Hyperband)
Select
5
— If you know the channel numbers of the TV stations you want
to store:
see the section 'Direct channel storage’.
— If you do not know the channel numbers of the TV stations
you want to store:
see the section ‘Channel search and storage’.
You can store up to 48 preferred stations.
Direct channel storage
(i) Switch on the TV.
(Don the TV select t
(D On the TV select the preselection (program) number for the
video recorder.
video recorder.
® Switch on the video recorder using 10-
• if necessary, press C/P until the Display shows ‘P’ and a
preselection number.
0 Select the desired preselection number using + or — or the
digit buttons (0-9) on the remote control.
To change the number slowly, press -t- or — repeatedly.
To change the number quickly, press and hold -f or —.
Select the same preselection numbers for the TV stations on the
video recorder as those on your TV.
0 Press STORE.
The Display shows a flashing channel number for the TV station
which is being received and the preselection number.
cm no
J 1 Ul^t-
0 Select the desired channel number using -|- or — or the digit
buttons (0-9) on the remote control.
Note:
With cable TV the following channel numbers have to be
entered for the special channels:
.... 3>-i
C “L 1
^ i 1 1 '
O i
/ 1
S1
S2 81 S22
S3 82
S4 83 S24 103
S5 84 S25 104
S6 85 S26 105
S7 86
S8 87 S28 107
S9 88
S10 89 S30 109
S11
S12 91
S13 92 S33 112
S14 93 S34 113
S15 94 S35 114
S16
S17
S18 97 S38 117
S19 98 S39 118
S20
© Press STORE again to store the TV channel on the
preselection number.
• Repeat steps © to © for all preferred channels.
Channel search and storage
0 Switch on the TV.
0 On the TV select the preselection (program) number for the
video recorder.
0
Switch on the video recorder using
preselection (program) number 1 using H- or — or the digit
buttons (0-9) on the remote control.
0
Press SEARCH.
The video recorder searches for a TV station.
The Display shows for example:
Ti (h ic
1 Uiv;_
• When a TV station is found, it appears on the TV.
The Display shows for example:
80
90 S31 110
95
96 S37 116
99
S21
S23
S27
S29
S32
S36
S40 119
S41
10
and select
_ o o
C tu
0 »
1 1
100
101
102
106
108
111
115
120
C TnQC
_i I
• If the picture quality on the TV is poor, press SEARCH again.
• If you want to cancel the search, press lO or ■.
• Through interferences in some cable TV networks, it may
hapen that the search run skips a TV channel. If this happens,
this TV channel can be selected like mentioned in chapter ‘Direct
channel storage’.
0
Select the desired preselection number using -f or — or the
digit buttons on the remote control.
To change the number slowly, press + or — repeatedly.
To change the number quickly, press and hold -I- or —.
Select the same preselection numbers for the TV stations on the
video recorder as those on your TV.
cn
o
@) 5
Page 10

© Press STORE.
® Repeat steps © to © for all the TV stations.
General notes:
— After you have stored all TV stations, you can use + or —
or the digit buttons (0-9) to select these TV stations.
— If you store a TV station on a number that has already been
used, the new station will be stored, and the old TV station will
be deleted.
DIRECT RECORDING
6
Loading a cassette and recording
© Hold the cassette with the title label facing you and the
window side up.
Push the cassette at the centre until it is pulled inside
automatically.
Have you followed the instructions in the chapters ‘Installation’
and ‘Storing TV stations’?
If so, proceed with this chapter.
You do not need to switch on the TV. However, if it is on, you can
change to another TV station on your TV without interfering with
the TV programme being recorded.
If you want to watch the TV programme to be recorded, switch
on the TV and select the preselection number for the video
recorder.
Checking or changing the tape length indication
• Press (сто) on the remote control.
A tape length indication (e.g. E30 = 30 minutes - E300 = 300
minutes) is shown on the LCD Display of the remote control.
\ \ t i 1 f
CASSBTTE
rni in
Ol. iu
If the tape length shown is not the same as the tape length of the
cassette to be loaded:
• Press -I- or — on the remote control to change the tape
length in the following sequence: E30, E60, E90, E105, E120,
E150, E180, E195, E210, E240, E300, EC30, E30, ect.
• Press ((((O) on the remote control.
If the transmission is accepted the Display of the video recorder
shows, for example:
Tone
Ml) )_
- TRANSMIT-
■'It 1 » \
c oun
!_!_ lU
Notes:
— The used time or time left display will only be correct if you
have selected a tape length which is the same as the actual
length of the cassette to be loaded.
— After you have selected the tape length, or you have loaded
a new cassette, the used time and time left display initially
shows: Then after a few seconds of tape movement the
correct times are shown on the display.
Inserting a cassette will switch on the video recorder
automatically.
Do not try to pull out the cassette during automatic loading.
© If necessary, press ►► or 44 to (re)wind the tape.
If you want to switch between the used time (u), the time
left (L)or the tape counter during the (re)windlng, recording or
playback:
• Press (l®D one or more times.
Depending on the cassette used, the actual recording time can
be about 5 minutes longer (for example 3:05 Instead of 3:00
hours with a E180 tape).
Note:
Pressing X resets the tape counter to ‘O’.
© Use -f or — or the digit buttons on the remote control to
select the TV station you want to record from.
© Press • (or the two buttons A with • on the remote control
simultaneously) when the TV programme starts.
The Display shows, for example:
QCr
11 !_ )_
Sia
The TV programme is now being recorded.
•
p 3
О on
L. UU
Notes:
— During a recording it is impossible to select another TV
station.
— If a cassette is not loaded in the video recorder when you
are trying to make a recording, the Display shows for example:
f~OC О
L.I l_l_l
P C
г IOTI
»_ IL.IL.I
6 (Gg)
Page 11

— If a protected cassette is loaded when you are trying to
make a recording, the Display shows for 5 seconds:
l I M I
LOOnr.
.1 I^U I
/ I I I I V '>
Ega
© Press ■ once to interrupt playback.
nni ll~l~
1 1 iu_u_
Esa ■
P
1 .
in
lU
1C
The cassette will be ejected.
— If the end of the tape is reached during recording, the
cassette will be ejected automatically and the video recorder
will switch itself to standby.
©To interrupt the recording, press ■ once.
• To resume recording, press • (A with •) again within 8
minutes.
This ensures a smooth join (auto-assembling).
Note:
If • (A with •) is not pressed within 8 minutes, the video
recorder automatically switches to stop. After another 8
minutes without tape movement, the video recorder
automatically switches to standby.
® To stop the recording, press ■ twice.
To eject the cassette, press A.
____
______
PLAYING A CASSETTE
© Switch on the TV.
@ On the TV select the preselection number for the video
recorder.
® Load a pre-recorded cassette.
The Display shows, for example:
c Tnn
-1 1 Ul
sni ■
D 01
P iU
n
u
7
• Press ■ twice to stop playback.
© Press A to eject the cassette.
The Display shows, for example:
i~OCC
Ul l_l_l
Note:
When the tape reaches the end during playback it automatically
rewinds to the start.
Correcting picture disturbances (auto-tracking):
• Press ►.
• Press (®).
The video recorder will automatically find the best playback
quality within a few seconds.
The sound is muted.
With very poor recordings the video recorder may not
automatically find an optimum.
• Press ►.
• Press Si.
• Then press ► when you see an acceptable playback quality.
Searching with picture for a tape position:
• Press ►.
• Press E) or ®.
The tape will (re)wind at 7 times the normal speed with picture
but without sound.
Note:
The picture may be affected by interference as it (re)winds
quickly.
This does not indicate a malfunction.
• Press ► again when the required tape position is reached.
Searching without picture for a tape position:
• Press ■.
• Press ►► or -4^.
The tape will (re)wind at high speed without picture or sound.
• Press ► when the required tape position is reached.
p E
r inn
C ILJLJ
Note:
If you load a cassette which has the erase tab removed, the
video recorder wili start piaying the cassette automaticaiiy. You
may then omit step 0.
© Press ►.
On your TV you will see the recording.
The Display shows, for example:
Entering the tape position you want to go to (GOTO)
• If necessary, press (1^) one or more times to display the used
time, the time left or the tape counter position.
• Press (•♦*♦■).
• Press (0-9) to enter the tape position (hours and minutes in
case of used time or time left) you want to go to.
• Select the function to be started from that point, for example
playK record • (A with •), stop ■ or standby lO-
The tape will (re)wind to the entered tape position and start the
chosen function from that point.
Still picture:
• Press ►.
• Press II.
Each time you press this button, the tape advances several
frames.
Note:
The video recorder will automatically switch to playback after 8
minutes of still picture to avoid tape wear.
if you notice a vertical vibration in stiii pictures:
Ü) 7
Page 12

® Take a recording which was made on this video recorder.
(D Press ►.
SETTING THE CLOCK
(D Press II.
(4) Press and hoid (®) untii the vibration disappears,
if the optimal position has been passed, press (H) again.
This adjustment for stiii pictures has only to be done once.
Important!
With hired cassettes of bad quality the still picture maybe
affected by interference; this is not caused by your video
recorder.
Variable Slow Motion:
• Press Ik
The recorded TV programme is shown in slow motion.
• If — or + is then pressed the slow motion speed can be
changed in 4 steps i.e. 1/6,1/10,1/14 and 1/18 of the normal
playback speed.
During slow motion the sound is muted.
• Press ► to return to normal playback speed.
Note:
The slow motion speed, selected using — or +, is stored until
it is changed again.
Superslow motion:
• Pressé.
• Press and hold II. This will temporarily select a slow motion
speed which is lower than the stored value, until II is released.
Fast motion:
• Press (®).
The recorded TV programme is shown in fast motion.
The sound is muted.
• Press ► again for normal playback.
Play reverse at normal speed:
• Press (4).
The recorded TV programme is shown in reverse.
The sound is muted.
• Press ► for normal playback.
8
Note:
You can also set the clock on the video recorder with © on the
video recorder. In this case only the steps @ to 0 apply.
(D Press 0 on the remote control
The Display on the remote control shows, for example:
V» » 1 »
“ TRANSMIT-“
^11 1 It''
CLOCK
YEAR
in.r
IWUU
10-00
/ ._r L_l 0 M/mj
If you want to correct the displayed data:
• Proceed with step 0.
If you don’t want to change the displayed data:
• Press X on the remote control.
The Display on the remote control shows, for example:
CLOCK
in.r nn
IWUU ou
(D Press ©.
The Display shows, for example:
k....,, tOl-UO
■CLOCK- IW lU
nn
uu
1 1
1 1
Child lock
If you want to stop children watching prerecorded tapes:
• Press (*^).
‘LOCK’ flashes on the display for a few seconds.
If ► is now pressed then ‘LOCK’ is shown on the display.
If you want to switch off the child lock:
• Press (»^) again.
• Press + or — or the digit buttons (0-9) on the remote control
to set the correct time.
To change the time slowly, press -1- or — repeatedly.
To change the time quickly, press and hold -P or —.
The clock will start again after step © is selected.
(3) Press © again.
The Display shows, for example:
CLOCK I (_r
rSAR I
in.uc
IW lu
in.no
IWUU
lO-UC
I s-J
I
0-00 I I
_l ■ (_l I I
CLOCK
-YEAR-
'II1II''
• Press -P or — or the digit buttons on the remote control to
set the correct year.
(4) Press 0 again.
The Display shows, for example:
8
Page 13

• Press + or — or the digit buttons on the remote control to
set the correct month (between 1 and 12).
(D Press © again.
The Display shows a date.
.1
lO
CLOCK 1 i_l
YEAR 1 >_l
lO
-OO 1 1
lU L. U
(_l __
1 MNTH 1 1
0 Press (ID) on the remote control.
The display shows for example:
An information line appears at the top of the TV screen:
• Press + or — or the digit buttons on the remote control to
set the correct date (between 1 and 31).
(D Press 0 once more to complete setting the clock.
The Display shows, for example:
V » I • I f ^
- TRANSM/T-
/ I I I »
CLOCK IL—I' I- I !_ (—I
YEAR I ' L_l MNTH I I
© Press ((((O) to transmit these settings to the video recorder.
If the transmission is accepted the Display of the video recorder
shows, for example:
lO-UC oo
10-00 I I
r ( me
I I / i)_
lO-UC
l!_l" l~.l
TELETEXT-DECODER (TXT)
9
With this video recorder you can receive teletext (TXT) and
record TXT-subtitle-broadcasts, even if your TV is not equipped
with TXT.
Operating TXT
0 Switch on the TV.
‘P100
The following may be indicated in this information line:
® The number of the page on the screen. If ‘Stop changing
pages’ is selected, G§ will be indicated.
® Information, for example the name of the received TV station,
the date and the time.
Also page number ‘100’ (generally the index) now appears on
the screen.
Note:
The page number always consists of three digits (e.g. 120).
0
Select the required page with the digit button (0-9) on the
remote control.
The page number selected is now visible in green on the
information line.
When the selected page number has been found, this pages
number is displayed in white.
The selected page appears on the screen.
For fast access, the red button and the blue button of the remote
control can be used to select the previous (red button = —) or
the next (blue button = -F) TXT pages.
Notes:
— There are no page numbers which start with 0 or 9. If 0 or 9
is selected as the first digit, this error is indicated by ‘P?~ ’ in
the information line.
— If you have pressed a wrong digit button, first complete a
combination of three figures and select the correct page
number again.
— If the chosen page number remains green, the page
selected is not being broadcasted at the moment
® Press X on the remote control if you want to switch off TXT
temporarily.
Press X again to return to the TXT screen.
0
If you had started a recording:
Press ■ to stop recording.
® Select on the TV the preselection number for the video
recorder.
0 If the video recorder is on, press I© to switch the video
recorder to standby.
0 Press + or — or the digit buttons (0-9) on the remote control
to select the TV station of which you want to watch the
TXT-pages.
The video recorder is in the ‘Tuner mode’ now.
Selecting another TV station:
• Press ((D) to switch off TXT.
• Press + or — or the digit buttons (0-9) on the remote control
to select another TV station.
• Press ((D) again if you want to switch on TXT on this TV
station.
Stop turning over the pages:
If a TXT page takes up more space than available on one TV
screen, automatically turning over the pages will often be used
within the same page number.
• Press (4>) on the remote control to stop turning over pages.
• Press (<^) again to cancel the stop.
@) 9
Page 14

Select one page of turning over pages:
— Press ((EE®) on the remote control.
— Enter the number of the required page.
The page number always consists of 4 digits (e.g. 0002 for page
2).
The entered digits are dispiayed at position ® of the information
line.
— Press ((EE®) to cancel this mode and return to normal TXT
mode
Note:
This function is only possible if such pages are available.
Using double type height:
• Press (-V-) for double height in the top half of the page.
• Press (-V-) for doule height in the bottom half of the page.
• Press {-r) again for normal height.
Calling up concealed information:
If a TXT page contains a question with a concealed answer:
• Press (?).
The concealed information appears on the screen.
• Press (?) again.
The concealed information disappears again.
General notes:
— If TXT is switched on, the pre-seiection or channei number
cannot be changed, without switching off TXT first
— if TXT is switched on, several other functions are also
blocked: play, picture search, fast motion, auto tracking, go to.
— TXT-subtitles may appear in the wrong coiour.
This does not indicate a malfunction of your video recorder.
TXT subtitle recording
r
---112 Polilik
- 1 G
V.V---------------
• Press the red button (F^i on the remote control to select the
previous TXT-page of the actuai group.
If the first page of the group is already selected, the last page of
the group will be displayed.
• Press the green button (F^l on the remote control to select
the next information block (indicated at position (S) in green
colour).
• Press the yellow button (F^l on the remote control to select
the next group inside the actual information block (indicated at
position ® in yellow colour).
• Press the blue button (1^1 on the remote control to select
the next TXT-page of the actual group.
If the last page of the group is already selected, the first page of
the group will be displayed.
• Press button ((T|) on the remote control to return to the initial
or programme summary page of the TXT-broadcast.
------
^
B
Using the FLOF-teletext system
Your VCR is equipped to use the additional ’FLOP’ information to
improve user comfort. All the features mentioned here are
broadcaster defined. All described functions are defined by the
broadcast stations (Please contact your dealer to find out which
teletext-broadcaster use FLOP).
If you want to record TXT subtitles:
• Select subtitles page number.
• Press • (or A and • on the remote control simultaneously).
Note:
Only TXT-subtitles may be recorded.
Pressing record while a normal TXT-page is selected cancels
the TXT picture and only the live-picture and information line is
recorded. The set remains in TXT mode.
Using the TOP-Teletext-system
Your VCR is equipped to use the additional ‘TOP’ information to
improve user comfort. (Please contact your dealer to find out
which Teletext-broadcaster uses TOP).
• Top-Teletext (TXT) is structured in several information blocks
(e.g. News, Sport, TV-programmes)
• Each block contains several groups (e.g. block ‘Sport’
contains: tennis, footbail, basebali,...)
• Each group consists of at least one page.
Operation:
An additonal line is inserted at the bottom of the TXT screen:
Each displayed teletext (TXT) page shows on its bottom row up
to 5 pieces of information, each indicating the subject of the
page which is likely to be selected next. The information is clearly
indicated in the colours red, green, yellow and blue in that order.
Operation:
— Press the coloured buttons (F^l on the remote control
corresponding to the colour of the information you want to
watch.
— When switching to TXT mode or pressing the index button
(CD), a broadcaster defined ‘initial page’ will be displayed (which
can be different from page ‘100’).
__
10
Page 15

TIMED RECORDING
10
Have you followed the Instructions in the sections ‘Installation’,
‘Storing TV stations’ and ‘Setting the clock’?
If so, proceed with this section.
You can program the video recorder to switch itself on and
record a TV programme at various times, and on various dates
up to 31 days In advance, or every day, or every week at the
same time and teletext subtitles.
Video Program System (VPS)
This video recorder is equipped with VPS.
VPS ensures that the video recorder switches on and off at the
right moment when making a timed recording, even if the
programme starts or ends eariier or later than originally
scheduled.
If your video recorder receives a TV station which transmits a
regular VPS code, ‘VPS’lights up in the Display in addition to the
preselection number.
Please, also pay attention to the text in italics concerning VPS,
when programming a timed recording.
©Press (®^).
A cursor (indication point) appears on the TV programme page.
At the information line (on top of the TXT page) it is indicated if
‘VPT-’ or ‘TEXT-PROGRAMMING’ is possible (depending on the
responsible TXT-broadcaster).
‘TEXT-PROGRAMMING’ means that not all data can be
automatically used by the videorecorder. Those data have to be
checked and correct manually.
The TV screen shows for example:
(7=
P212 0RAO£ 212 Thu 12Jan LON 1638.41
BBC 2 THURSDAY
19.51 f
1951 NEWS
20.15
2020 SHOW
2100 SPORIS
21.00
22J0
2235 MUSIC
22.45
2245 1HE MURDER HUH
23.45
2345 NEWSNIGHT
VPS
C0NHRMWITH9
• Press blue button (f^i (down) or red button (El) (up) to
move the cursor to the start time of the desired TV programme.
Note:
If all TIMER-blocks are occupied, you are requested to cancel
at least one TIMER block and the TV screen shows for
example:
CURSOR
(f
--------------------------
Programming a timed recording by teietext (‘VPT-System’)
(1) Switch on the TV.
(2) Select on the TV the preselection number of the video
recorder.
(D if the video recorder is on, press lO to switch the video
recorder to standby.
0 Press + or — or the digit buttons (0-9) on the remote control
to select the TV station of which you want to make a timed
recording.
0 Press ((D) on the remote control.
Teletext (TXT) is now switched on.
The display of the video recorder shows for example:
If you don’t want to cancel the occupied TIMER-blocks:
• Press ((D).
The previously displayed TXT page will be shown again, the TXT
programming mode is cancelled.
If you want to cancel an occupied TIMER-block and program it
again:
12 JANUARY 1989
TIMER START END DATE PROG
rr
2
3
4 8.20 9.15 5 7
5 20.15 21.00 7 1
6
Aumtstsoccupm
PRESS 9 SUTTON TO COMTWUE.
Vup CANCaWIIHX
• Press -F or — or digit button (0-9) to select the TIMER-block
you want to cancel.
• Press X on the remote control.
• Press (®^).
The TV programme page will be shown again on the TV screen,
but now including a cursor.
On the TV screen the initial page (generally the index page,
number ‘100’) appears.
Note;
TXT cannot be switched on during playback, recording or if
• Press blue button (Eli or red button (El) to select the
desired TV programme.
® Press (® ^) again.
The TV screen shows for example:
programme ‘E’ (external), timer programming or setting the
clock is selected.
23.45 2345 NEWSNIDHT
© Select the TV programme page for this TV station with the
digit buttons (0-9).
Note:
If the selected TV station has ‘TOP-’ or ‘FLOF-system’, you can
also use the coloured TXT buttons (F^) on the remote control.
START STOP DATE
1
----
22.45 23.45 19 VPS
CHECK PROGRAM NUMBER.
^ PRESS'T'-BUTTOH FOR HaP-MEKU
--
----------
20.15 21.15
18.00 18.30 19 2 VPS
17.20 19.45
20.00 22.10 17
22.45 [] 2245 THE MURDER RIM
1 CZ] CZD
15 1
27 4
PAGE
PROG VPS
2
----
13.45
VPS
VPS
VPS
DO’ATi
-1
-
-
1
If you want to change the start time, the stop time, the date or
the preselection number:
@) 11
Page 16

• Press the coloured button on the remote control which
corresponds to the colour of what you want to change on the TV
screen.
• Use + or — or the digit buttons (0-9), to change the data.
Note:
If you use the digit buttons (0-9), the date and the preselection
number have to be entered in a two-digit form, e.g. ‘01 ’ for
preselection number 1.
Following example illustrates how the automatic ‘TV station
recognition’ works:
• Preselection number ‘1 ’ is stored for ‘ZDF’
• Preselection number ‘2’ is stored for ‘ARD’
• Preselection number ‘3’ is stored for ‘BR’
• All these 3 TV stations have the same TXT-system and each
TV station shows all 3 program summaries,
• Press (?) on the remote control to get additional help
information on the screen.
VPS
VPS control will select automatically the correct VPS-time.
If you want to make a timed recording from a TV station without
VPS-code, or if you want to use a starttime which is different
from the VPS-starttime, VPS must be switched off.
If you want to switch off the VPS control for this TIMER-block:
• Press the blue button on the remote control.
‘PROG’ will flash on the TV screen.
• Press X on the remote control - VPS will disappear from the
screen.
If you want to switch on the VPS control again:
• Press X again VPS will appear on the screen.
If real start time and VPS-time are different, the starttime is
corrected automatically, when VPS control is set.
Note:
If ‘TEXT-PROGRAMMING’ has been indicated during selection
of the desired programme VPS-control may not be selected
automatically:
— If VPS-control is required, you may select it.
In this case, be sure that the start time is corrected to the
advertised VPS-time.
— The recording date, the end-time and the preselection
number have to be checked and changed if required.
(D Press (®^).
The TV screen shows a summary of all programmed
TlMER-blocks.
Note:
You can recall this TIMER summary at any time (except
record), also if TXT is not selected by pressing OSD button
(Q).
To switch off the TIMER summary, press (C3) again.
® If you want to continue programming a new block, start from
step ©.
• If you want to interrupt programming, press TXT button (ID).
• If you want to return to live TV-picture, press (ID) again.
General notes:
— During TXT, playback and wind functions are Impossible.
— If you press (D) during programming with TXT, the
videorecorder will be switched to TXT-mode without changing
any data.
• Preselection number ‘1/ZDF’ Is selected on the VCR.
• You want to program a timed recordidng from ‘2/ARD' by
VPT-programming.
Choose the desired TV programme - the VCR asks to check
the preselection number.
• Select ‘2’ for ‘ARD’ and press (® <$•) to confirm the
preselection number.
Finalize the programming sequence following steps (a) and
The preselection number ‘2’ is now assigned to the TV station
‘ARD’.
• Anytime a recording from ‘ARD’ is wanted again, the video
recorder does the selection of the preselection number ‘2’
automatically.
The same assigments are possible for all other preselection
numbers.
• If a wrong preselection number for a TV station was entered,
it can be corrected at the next programming procedure by
pressing the blue button fl—i) and correcting the preselection
number.
• These assignments are stored in the VCR unit mains power
is interrupted.
Programming a timed recording on the video recorder (without
TXT)
TXT subtitle recording
© Press ®(® <$*).
The Display shows, for example:
T I IT/CO
I I ) i/_i'
All necessary information for recordings are stored in TIMER
blocks.
Each TIMER block contains a start time, a stop time, a date and
a preselection number of a TV programme.
There are 6 TIMER blocks available, so you can program the
video recorder to record 6 TV programmes successively.
Note:
If all the TIMER blocks are programmed, the Display shows
‘FULL’, and then after a few seconds:
— During the first VPT-programming procedure, the video
recorder requests to check the preselection number to be
recorded.
12 (gg)
@ If necessary, press + or — or the digit buttons (0-9) on the
remote control to select the block you want to program.
Note:
To record TXT-subtitles use TIMER-block 6.
Page 17

Note:
If a block number Is already programmed, the Display shows,
for example:
oo oo
1
1
T 1 ITICO
1 1 / IL.K
To repeat recording every day at the same time:
• Press X one or more times until the Display shows:
1 \/
111.J
l_ 1
±11 1
oo
® Press 9 (9 again.
The Display shows, for example:
C TOOT
_j I I
lO-on
® Press + or — or the digit buttons (0-9) on the remote controi
to set the start time.
Note:
To change the time slowly press -i- or — once.
To change the time quickly, press and hold + or —.
Press X to set the start time to 20:00.
VPS
A VPS recording only works if you have entered exactly to the
minute the advertised start time (VPS time) of a TV programme.
If an additional VPS time, which differs from the advertised start
time Is Indicated in your TV magazine, this one must be entered
Instead of the advertised start time.
® Press 9 (9 again.
The Display shows, for example:
C h (T(
DD.CC
Note:
If you press X first, the start time you have just set will be
shown again and can quickly be changed into the stop time.
® Press -P or — or the digit buttons (0-9) on the remote control
to set the stop time.
• Press -P or — as many times as necessary to select the
correct date on which the first recording has to be made.
To repeat recording every week on the same day and at the
same time:
• Press X one or more times until the Display shows:
• Press -P or — as many times as necessary to select the
correct date on which the first recording has to be made.
® Press 9 (9 ^) again.
The Display shows, for example:
OUi <C
I ;'uu.
® Press -p or — or the digit buttons (0-9) on the remote control
to select the correct TV station to be recorded.
Notes:
— if TIMER-biock 6 is selected, on the display appears
‘PAGE—’.
Press 9 (9 ^) and fill in the correct TXT-subtitle page
number (3 position).
Push X if you wish to programme this TIMER-biock without
TXT-subtitle.
VPS
If 'VPS’ is shown on the Display, the VPS control has been
switched on for this block. If a TV station does not transmit a
VPS code, the VPS control has no function.
® Press ^ (^ ^) again.
The Display shows, for example:
TIQTl-
JJIl 1 l_
O f
Note:
If the Display shows another indication, e.g. for daily or weekly
recording, press X one or more times.
® Press -P or — or the digit buttons (0-9) on the remote control
again to set the recording date.
Notes:
— If today is the 16th of March and you program the date as
‘14’, the recording will be made on the 14th of April.
— For a TV programme starting at midnight (0:00), give the
date of the following day.
• Press X to switch off the VPS control for this block ('VPS'
disappears). The video recorder then uses the times you have
entered to record.
• If you want to switch on the VPS control, press X again.
® Press 9 (9 <^) once more.
For 5 seconds the Display shows, for example:
T 1 ITII7"G
1 1 / l)_/v
EHm is shown on the Display as well.
® Press 10 to switch the video recorder to standby.
ESSSIl
3
OO oo
@ 13
Page 18

Important notes:
— A timed recording will only be made if the video recorder is
in standby at the start time. If necessary press (O to select
standby.
if the timed recording starts, the timer will automatically switch
on the video recorder.
— If a cassette is not loaded in the video recorder after
programming a timed recording the Display shows ‘CASS’.
— If a protected cassette is loaded after programming a timed
recording ‘PROT flashes on the Display for 5 seconds.
The cassette will be ejected.
— Before a timed recording starts you can use the video
recorder normally.
If you continue to use the video recorder after the start time of
a timed recording, your timed recording, will not be carried out,
BDia then flashes on the Display.
You can then still start the timed recording by pressing lO
once.
iiciiia will stop flashing.
— During a timed recording, you cannot use the video
recorder. You may, however, cancel the timed recording by
pressing lO.
(i) Press (9 RC) to recall the last programmed recording
details.
The Display shows for example:
1 1 My*
• TIMER -1
'11 1 1
START
STOP
ij_
1 1
.1 ir '“/n
lu (_
. f” r~t
N » « 1 1 / V
- TRANSMIT'’
‘'ll 1 It''
(D Press the digit buttons (1-6) to select the required block
number directly or press digit button 0 to select the next free
block.
d) Press (^ RC) again.
The Display shows for example.
lO-UC
I L_ ■ IU
(4) Press (0-9) to enter the start time of the recording.
— When the tape reaches the end during a timed recording,
the cassette will be ejected automatically and the video
recorder switches itself to standby.
— If you want to re-use the previously stored information of a
TIMER block, you only have to re-program the date by pressing
+ or—.
— VPS operates from 00:00 hours of the programmed date to
04:00 hours of the following day (28 hours standby period).
If the start time of a recording is between 00:00 hours and
04:00 hours, VPS operates from 20:00 of the day preceding
the programmed date until 04:00 hours of the day following on
the programmed date (32 hours standby period).
— The video recorder can also be used during the VPS
standby period before the programmed start time.
BisBii will then flash for a few seconds. If you press iO then the
VPS standby period continues.
If TIMER-block 6 is programmed with a wrong TXT-subtitle
page number, the symbol H) appears in the upper left corner of
the recording.
Programming a timed recording on the remote control (without
TXT)
You can program timed recordings on the remote control using
RC) and the digit buttons (0-9) and then transmit the
programming details to the video recorder using ((KO).
On the Display of the remote control all the programming steps
will be shown.
The contents of all ‘TIMER’ blocks will be stored in the remote
control.
Note:
If during programming a button is not pressed within 1 minute,
you have to start the programming sequence from the
beginning again.
(D Press (9 RC) again.
Note:
if an invalid start time has been entered, e.g. 25:62, the time is
automatically reset to 00:00 and the correct start time has to be
entered again.
If the correct start time has been entered, the Display shows for
example:
2
VMER
START
vU lly
-STOP-
'll It'*
1 1 1
'~iri
■1 /1 1
1^1 . r n
1 1
M 1
.riri
© Press (0-9) to enter the stop time of the recording.
@ Press (^ RC) again.
If the correct stop time has been entered, the Display shows for
example:
START nn.nOO
L.WUU I
STOP
___________
I
OCuu
© Press (0-9) to enter the date on which the recording has to
be made.
To repeat recording every day at the same time:
• Press X on the remote control until the Display shows:
TIMER 2
START
ori.nn
1 f~~ ioAtLY-
L, U'UU
STOP
nn.no
!_ !_ ■ ^1 —1
14 (og)
• Press the digit buttons (0-9) on the remote control to select
the correct date on which the first recording has to be made.
Page 19

To repeat recording every week on the same day and at the
same time:
• Press X on the remote controi untii the Display shows:
TIMER2
START
STOP
on.nn
(_ (_l ■ L.I !_l
OO-OC
L. (_ '^1^1
1C
1
_
_
1 -imLY.
The Display of the video recorder shows:
‘TIMER’, and and a number of the selected block if the
fram transmission is accepted.
‘ERROR’ if an error occurred during the transmission, or
the transmitted data are not correct (e.g. start
time equal to stop time).
• Press the digit buttons (0-9) on the remote control to select
the correct date on which the first recording has to be made.
® Press (9 RC) again.
Note:
If an Invalid date has been entered, the date Is automatically
reset to ‘01' and the correct date has to be entered again.
If the correct date has been entered, the Display shows for
example;
2
TIM ER
STA RT
' !_(■' I(_I lU
STO P
«11 1
1C
in
L_ i_ ’ w-l W.I lU
® Press (0-9) to enter the program number of the TV station to
record from.
VPS
If ‘VPS' Is shown on the Display, the VPS control has been
switched on for this block. If a TV station does not transmit a
VPS code, the VPS control has no function.
• Press X to switch off the VPS control for this block (‘VPS’
disappears). The video recorder then uses the times you have
entered to record.
• If you want to switch on the VPS control, press X again.
® Press (9 RC) once more to complete the timer
programming.
Checking or changing TIMER block details
(?) Press 9 (9 <3*) or (9 RC) once.
d) Press + or — or (0-9) until the Display shows the required
TIMER block to be checked or changed.
d) Press ^ (9 <^) or (9 RC) again.
The Display shows the start time of the recording.
@ if you press ^ (^ •$<■) or (^ RC) repeatedly, the Display
shows the stop time, date and program number.
You can change the details as they appear pressing or — or
(0-9).
® Press ^ (9 <^) or (^ RC) once more.
If you have-used (^ RC) on the remote control:
• Press ((((O) to transmit the data, to the video recorder.
Cancelling a TIMER block
You can cancel a TIMER block of a recording already in
progress, or of a recording which has not yet started:
© Press 9 (9 <3.) or (9 RC).
@ If necessary, press -I- or — or (0-9) to select the TIMER
block to be cancelled.
@ Press X.
If you have used (^ RC) on the remote control:
• Press (IHO) to transmit the data, to the video recorder.
Note:
If an Invalid program number has been entered, e.g. 65, the
Display shows ‘E’ and the correct program number has to be
entered again.
When the programming has been completed correctly, the
Display shows for example:
TIMER 2
START
!_ U'UU 1^1
STOP
^1 '"I. n r PROS
!_ C 'Ou
- TRANSMlf-
^11 1 1 \
ir
VPS
in
lU
® Press ((((O) to send the recording details to the video
recorder.
During the transmission the symbol o))) lights up.
The Display shows, for example:
CLO CK
in.r ri“^
IWUU lU
ir
One Touch Recording (OTR)
Use OTR to record immediately for 30, 60 minutes, etc.
© Load a cassette.
® Press -1- or — to select the TV station you want to record
from.
@ Press the two buttons (A with OTR) on the remote control
simultaneously to start the recording.
The Display shows, for example:
oc>~
/'/_(_
Eu!
OTR
•
p u
nn.
i_ i_ •
The time shown is the time the recording will stop.
® Each time you press the two buttons (A with OTR)
simultaneously, the recording time is extended by 30 minutes.
If you go too far, press X to return to the current time -I- 30
minutes.
Note:
If you want to stop the OTR, press ■ or lO-
(gg) 15
Page 20

Sleep function
One Touch Recording is also useful if you want the video
recorder to finish a recording automatically, for instance when
you are going to bed.
In this case press the two buttons (A with OTR) as many times
as required to continue and finish the recording.
EXTRAS
11
If you want to improve picture quality and your TV has a 21 -pin
connector @)
OTHER RECORDING
POSSIBILITIES
12
Recording from another video recorder (copying)
Copying via the 21-pin connectors I
@ Connect the 21-pin connector on your recording video
recorder and the playback video recorder using a special cable.
Your dealer can advise you which cable to use.
• Connect the corresponding 21-pin sockets on the TV and the
video recorder using a special cable.
Consult your dealer for the correct cable.
(D Insert the pre-recorded cassette in the playback video
recorder and a cassette with intact erase tab in your recording
video recorder.
d) Press -i- or — until ‘E’ appears on your recording video
recorder or press digit button 0 on the remote control.
(‘E’ is below preselection number T.)
® Press • on your recording video recorder.
(D Press the Play button on the playback video recorder.
d) Press the Stop buttons on both video recorders to stop
copying.
Copying via the aerial sockets 1 f and (^:
16 ^i)
® Connect El on your recording video recorder to the Aerial-in
socket on the TV set as for normal installation.
d) Use another aerial cable to connect 1 f on your recording
video recorder to the Aerial-out put socket on the playback video
recorder.
d) Switch on your TV and select on it the preselection (program)
number for the recording video recorder.
Page 21

0 Insert the pre-recorded cassette in the playback video
recorder and a cassette with intact erase tab in your recording
video recorder.
CASSETTES
0 Press the Piay button on the playback video recorder.
0 Press C/P and -i- or — to select the channel number on your
recording video recorder on which the piayback video recorder
is transmitting. With most video recorders this is around UHF
channel 37 (see the Operating Instructions of the playback video
recorder).
© Press • on your recording video recorder.
0
Press the Stop buttons on both video recorders to stop
copying.
It Is forbidden to copy pre-recorded tapes if this infringes
copyright or other rights of third parties.
WATCHING TV VIA THE VIDEO
RECORDER
(TUNER MODE)
13
• Switch on the TV.
• On the TV select the preselection number for the video
recorder.
• Press lO to switch the video recorder to standby.
14
VHS cassettes can be used on one side only.
What you should do:
— Buy only high quality cassettes, cassettes of inferior quality
make your valuable video heads dirty.
Do not:
— dismantle the cassette
— touch the tape
— drop or shake the cassette.
Storing cassettes:
Always rewind the tape to the beginning before storage.
Store the cassettes:
— vertically
— at room temperature.
Keep the cassettes away from:
— dust
— extreme humidity
— bright sunlight
— loudspeakers
— electric motors
— transformers
— magnets.
Protecting recorded cassettes:
• Select the TV stations using -P or — or the digit buttons (0-9)
on the remote control.
The display shows, for example;
r 1 (ft lOO
1 i_l(M/_/C
S3
Note:
The video recorder remains in the Tuner mode.
To cancel this mode, press either ■, ►, •, or lOTimed recordings cannot be made in Tuner mode.
P li_
Ori-UC
i-U* Iwl
To prevent erasure of recordings, break off the erase tab on the
rear edge of the cassette with a screwdriver.
Removing cassette protection:
Cover the hole from which the tab was removed with adhesive
tape.
Replace any partly detached adhesive tape.
(gi) 17
Page 22

TROUBLE CHECKS
15
Disturbed or noisy picture
a Is the video recorder connected to the mains?
b Has the 30-39 channel control been adjusted?
TV station seiected on the video recorder, but no picture is
received
a Has the preselection number for the video recorder been
selected on the TV?
b Is this TV station broadcasting at the moment?
c Has the TV station been stored correctly?
No picture or sound when using a 21-pin connector cable
(Eurocable)
a Has the External input been selected on the TV?
b Has the External input been selected on the TV and on the
video recorder?
c Has the Eurocable been connected properly?
d Has the correct Eurocable been used?
Recording or playback not possible
a Has there been a mains failure or is the video recorder not
connected to the mains?
b Has the end of tape been reached?
c Is the cassette protected?
d Has a cassette been loaded?
No playback functions are possible
a Is the child lock on? (If ‘LOCK’ flashes in the Display.)
Press [oJj.
The video recorder does not respond to any button being
pressed
a Is a timed recording taking place?
b Have conflicting commands been given to the video recorder,
or has mains/aerial disturbance caused the video recorder to
stop functioning?
Disconnect video recorder from the mains for half a minute and
then reconnect.
Recording quality is poor
a Loose aerial cable?
b Has the cassette been stored correctly?
c Weak transmitter signal?
d Poor quality cassette?
e On the TV have you properly tuned the preselection number for
the video recorder?
f Is the tracking optimal?
Press (H).
Timed recording did not start
a Is the actual time later than the programmed start and stop
time?
b Have you changed the previously programmed times?
Flashing VPS indicator
The transmitter signal is being adversely affected by interference.
The aerial needs to be checked by a specialist.
General note
If the recording or playback quality decreases, the video heads
may be dirty.
Please consult your dealer for cleaning of the heads.
18 (gb)
Page 23

TECHNICAL DATA*
16
General
TV system
Mains voltage
Mains frequency
Power consumption
Wind/rewind time
Ambient temperature during operation
Humidity
Dimensions
Weight
Position for use
Number of preselections
Number of programmable blocks
Number of days in advance
Video
Input via 21-pin connector
Output via 21-pin connector
Resolution
SIgnal/noise ratio during playback
Audio
Input via 21-pin connector
Output via 21-pin connector
Signal/noise ratio
Harmonic distortion
Audio frequency response
* Data subject to change without notice.
CCIR PAUSECAM (B + G)
220 V
48 to 52 Hz
20 W typical (13 W typ. in standby)
300 sec. typical for E-180
+ 10°Cto +35°C
30% to 80% RH
420 X 350 X 89 mm (incl. feet)
6.5 kg approx.
max. 15° inclination on all sides
48 + ext.
6
1 month or every day or every week
1 Vpp +6 dB, —3 dB, 75 ohm
1 Vpp, 75 ohm
>3.1 MHz (—26dB)
typical 47 dB (CCIR recomm. 567 Part C (>44 dB))
>200 mVrms to 2Vrms, lOkOhm
500 mVrms ±3 dB, 1 kohm
>43 dB weighted (DIN 45500)
<6%
80 to 10 000 Hz within 8 dB
If the video recorder is connected to the mains, part of it is in operation. To switch off the video recorder completely, disconnect the
mains lead.
Connectors
21-pin connector
i 20 18 16 14 12 10 8 6 4 2
lllllllllll
2J_ 19 17 15 13_ 11_ 9 7 _5 3 1_
pin
pin
pin
pin
pin
pin
pin 17
pin 19
pin 20
pin 21
This product complies with the Radio Interference requirements
of the Council Directive (82/499/EC).
Audio out
Audio in
Audio out
Audio ground
Audio in
Status CVBS
Video ground
CVBS out
CVBS in
Shielding
il) 19
Page 24

NOTES
Page 25

Page 26

IDENTITY CARD
l'Ò) GERATE-
' KENNKARTE
Cf) CARTE
D'INDENTIFI*
CATION
,yrO INDENTIFI-
CATIEKAART
(Tj CARTE D’IDENTIFI-
CA2IONE
('E')TARJETA DE ,
' ^ INDENTIFICACIÒN
('p)CARTÄODE _
INDENT1FICAÇAO
«JDJC- I.D. KORT
(1T)IDENTIRKA-
-"^SJOSKORT
i'SCilDENTIFIERlNGS-
^ KORT
,ep,TUNNISTUS-
KORTTl
ДЕЛТ10
TAYTOTHTAl
This card, together with the terms of guarantee (to be provided by
your deafer), forms the full certificate of guarantee for this appliance.
Diese Karte ist, zusammen mit den Garantiebestimmungen, die Ihr
Händler Ihnen aushändigt, Ihr Garantieschein für dieses Gerät.
Associée aux conditions de garantie ( qui vous sont remises par le
revendeur), cette carte constitue le certificat de garantie de cet
appareil.
Deze kaart vormt, samen met de garantievoorwaarden (welke door
uw dealer verstrekt worden), het garantiebev/i]s voor dit apparaat.
Questa cartolina rappresenta insieme alle condizioni di garanzia (da
consegnare dal vostro nvenditore) il documento di garanzia per
questo apparecchio.
La garantía de este aparato se compone de esta tarjeta y de las
condiciones de garantía que le entregará su concesionano.
Este cartâo, em conjunto corn as condiçoes de garantía em vigor
(explicadas pe’o seu vendedor) consbtuem о cerificado de garantía
do seu aparelho.
Dette kort. udfyidt af Deres forhandler, er tilstrækkelig
garantidokurhentation for dette apparat.
Dette kort. sammen med garanlbetingelsene (som De fàr av
forhandleren) utgjor garanlbeviset for dette apparat.
Detta kort lllsammans med garanlviükoren, som Du fâr av
radiohandlaren, utgör ett fullstandigt garanlbevis for denna produkL
Tâmân laitteen takuutodistus muodostuu tàstà kortista ja
takuuehdoista (jâlleenmyyjà antaa mukaan).
H KopT&Jjx ctuTTÎ paÇi pe xou; opou; £7Д)т\а£б>; (nou Oa
npopq»)£ui)eiTe ало то костаотпра по\> OTjopdoaie Tqv
ovmxuiì). ctnoxeXoóv то я?.пред mcftonouìTiicó írj7unoeo>;
Tnç öTKJKEViji; caç
PHILIPS
3122126 0172Г
 Loading...