

Philips VELO500 User Manual

5
TT
TT
T
abab
abab
ab
le of Contentsle of Contents
le of Contentsle of Contents
le of Contents
Philips Velo™ 500 User’s Guide 5
Introduction 5
Getting help and information 5
Velo 500 hardware features 7
Caring for your Velo 500 9
Powering your Velo 500 9
The backup battery 10
The main batteries 10
Low battery indicators 11
Tips for conserving battery power 11
The AC adapter 12
Using your Velo 500 for the first time 13
The H/PC Setup Wizard 13
Windows CE basics 14
Using the stylus 14
The Windows CE taskbar 15
Software programs 16
Preinstalled programs 16
Accessories 16
Communications 17
Microsoft Pocket Office 17
Microsoft Pocket Outlook 18
Velo Applications 19
Microsoft Pocket Internet Explorer 20
Installing additional programs 20
Removing programs 21
Quick Start keys 21
Fine-tuning performance 22
The Power control panel 22
Adjusting display properties 23
Memory management 24

6
Philips Velo™ 500 User’s Manual
Connecting to a desktop computer 25
System requirements 26
Installing Windows CE Services 2.0 27
The Velo Dock 28
Establishing a partnership 29
Browsing your Velo 500 desktop 30
Synchronizing data and files 30
Backing up and restoring your Velo 500 data 31
Transferring and converting files 32
Printing files from your Velo 500 32
Connecting to a remote computer 33
Modem connection 34
Transferring files between H/PCs by infrared 34
Tips for infrared communication 35
Resetting your Velo 500 36
Expanding your Velo 500 37
DRAM Miniature Cards 37
Flash memory Miniature Cards 40
Using PC Card accessories 42
Physical specifications 44
Physical description of the Velo 500 44
Power 44
Processor and basic input/output 44
Other input/output 44
Expansion 45
Regulatory information 46
Declaration of conformity 46
FCC warning statement 46
Telephone Consumer Protection Act of 1991 47
FCC Part 68 requirements 47
Canadian IC CS-03 requirements 48
Ringer equivalence 48

7
Philips Velo™ 500 User’s Manual
IntroductionIntroduction
IntroductionIntroduction
Introduction
The Philips Velo™ 500 is a handheld PC (H/PC), a new kind of
computer that you can carry with you and use almost anywhere.
With the Microsoft® Windows® CE operating system and
programs, your Velo 500 allows you to keep track of your
appointments, take files with you, send and receive e-mail,
connect to the World Wide Web, and do much more. This Philips
Velo 500 User’s Manual helps you set up your Velo 500 for the
first time and introduces you to its important features, software,
and optional accessories.
Getting help and informaGetting help and informa
Getting help and informaGetting help and informa
Getting help and informa
tiontion
tiontion
tion
There are many sources of help and information about your
Velo 500, the Windows CE operating system and programs,
and Windows CE Services for your desktop computer:
◗ This book, the Philips Velo 500 User’s Manual.
◗ Handheld PC Companion, another manual included with
your Velo 500.
◗ Windows CE Services Help on your desktop computer.
To access Help, click Windows CE Services Help Topics
on the Help menu in the Mobile Devices window.
◗ Philips Mobile Computing Technical Support.
You can reach Philips Technical Support by phone at
888-275-8356 or find answers to common questions on the
Web at http://www.mobile.philips.com/faqs/
◗ Other Windows CE sites on the Web:
The Windows CE page on the Microsoft Corporation Web
site at http://www.microsoft.com/windowsce/
The Philips Velo 500 page on the Philips Web site at
http://www.mobile.philips.com/products/hardware/velo500/

8
Philips Velo™ 500 User’s Manual
After you’re familiar with the basic operation of your Velo 500,
you can also access the reminders and procedures on the device.
Windows CE Help and ToolTips are available anytime, so there’s
no need to carry your manual with you.
◗ To access Windows CE Help, tap Help on the Start menu
or tap
on the title bar or toolbar. When you open Help,
you’ll see topics for the application or system component
you are using. To see a list of all the Help contents, tap
Other Help.
◗ Velo 500 programs also provide shortcuts and tips for simple
operations. Keyboard shortcuts for menu commands are
listed on the menus to the right of the commands. To display
keyboard shortcuts for toolbar buttons, tap and hold the
stylus on the button until the ToolTip appears.
9
VV
VV
V
elo 500 harelo 500 har
elo 500 harelo 500 har
elo 500 har
dd
dd
d
ww
ww
w
arar
arar
ar
e feae fea
e feae fea
e fea
turtur
turtur
tur
eses
eses
es
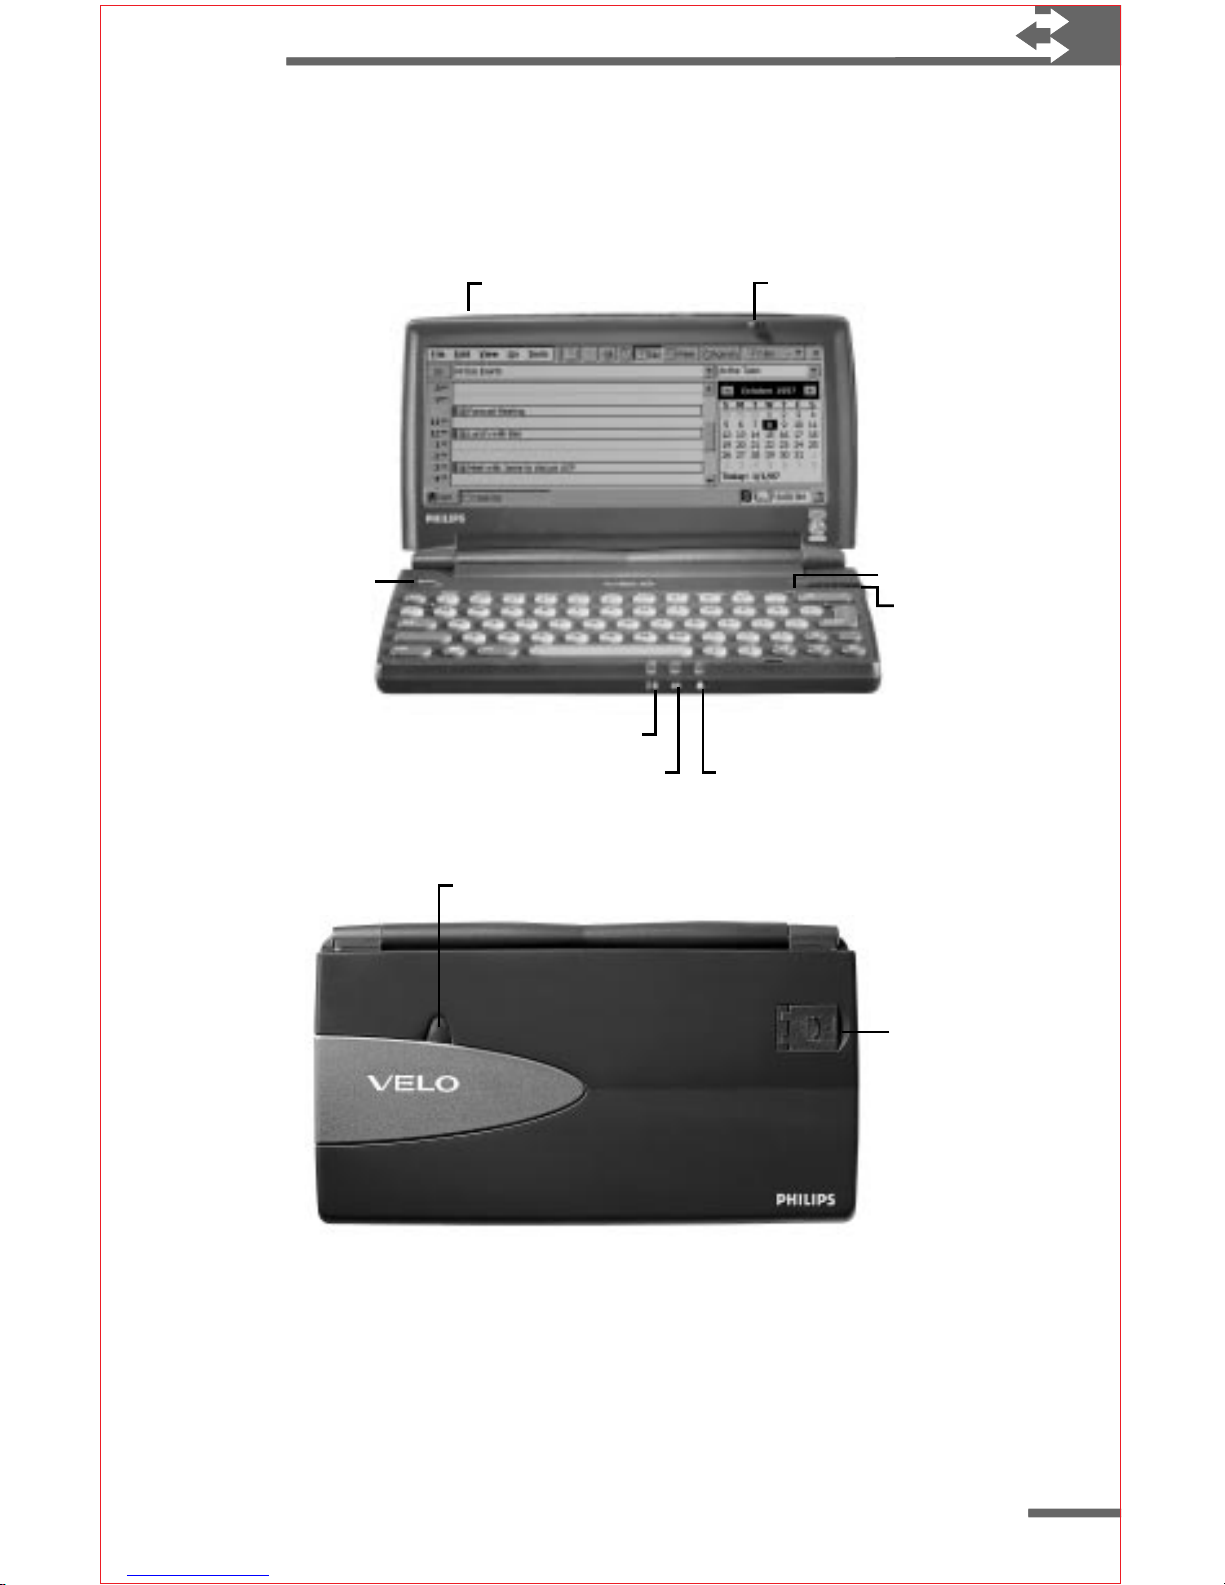
This section describes the location and function of the Velo 500
hardware features.
Stylus
Microphone
Power
button
Latch
Reset button
Recharging indicator light
Alarm indicator lightSerial connection light
FigurFigur
FigurFigur
Figur
e I:e I:
e I:e I:
e I:
VieVie
VieVie
Vie
w of w of
w of w of
w of
VV
VV
V
elo 500 with lid openelo 500 with lid open
elo 500 with lid openelo 500 with lid open
elo 500 with lid open
RJ-11
phone jack
Record button
FigurFigur
FigurFigur
Figur
e 2:e 2:
e 2:e 2:
e 2:
TT
TT
T
op vieop vie
op vieop vie
op vie
w of w of
w of w of
w of
VV
VV
V
elo 500 with lid closedelo 500 with lid closed
elo 500 with lid closedelo 500 with lid closed
elo 500 with lid closed
When you open the lid on your Velo 500, you have access to the
touch screen, keyboard, and other important controls. These
features are discussed in the sections that follow.
10
Philips Velo™ 500 User’s Manual
Press the Power button to turn your Velo 500 on and off. If you
go several minutes without working on your Velo 500, it will
preserve your work and suspend itself, shutting off automatically.
Just press the Power button to start working again, right where
you left off.
The three indicator lights on the front of the Velo 500 call your
attention to various events:
◗ The green recharging indicator light
is on while the
Philips Velo Rechargeable Battery pack is being recharged.
The light turns off when charging is complete.
◗ The red serial connection light
blinks when your Velo 500
is connected to a desktop computer running Windows CE
Services and a software connection has been established.
◗ The yellow alarm indicator light
blinks to indicate
an alarm you have set. This light stops blinking when
you tap
to close the alarm’s dialog box or when you
double-tap the alarm icon in the status area of the taskbar.
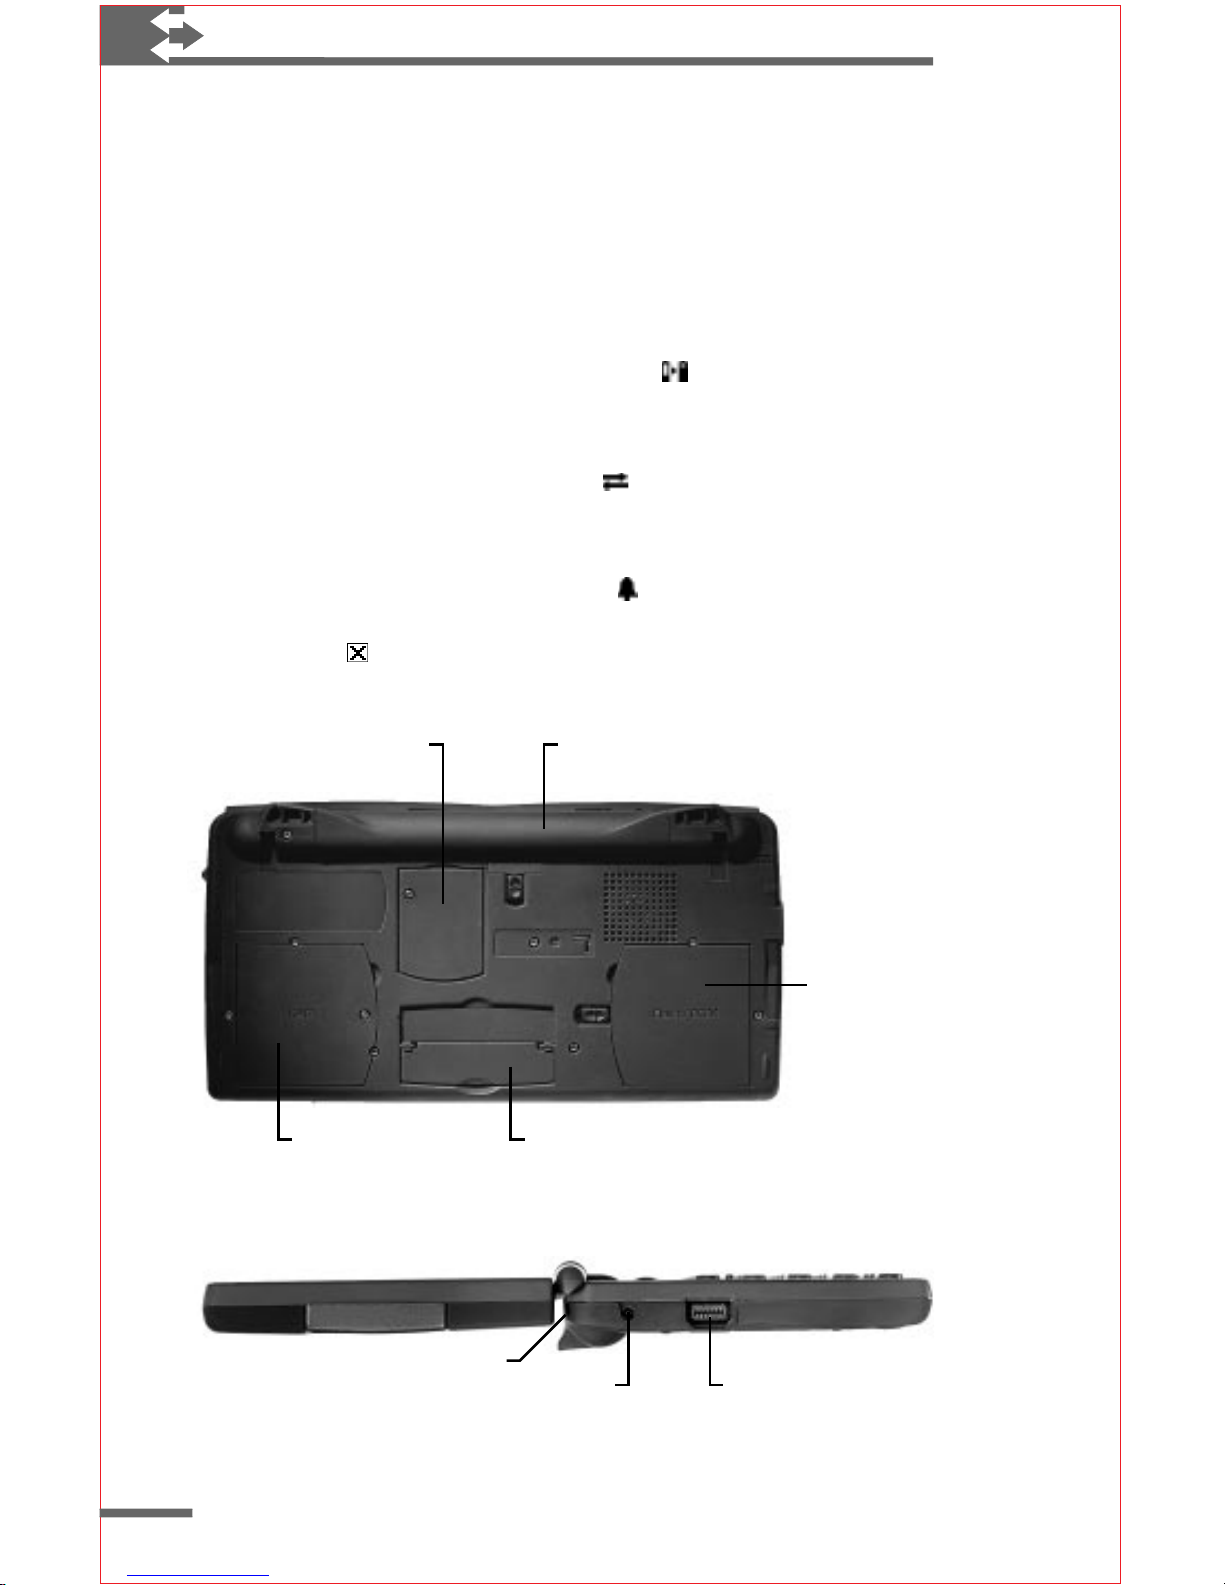
Flash/ROM
Miniature
Card slot
Backup battery
compartment
Main battery
compartment
Connector to
V-Module
DRAM Miniature
Card slot
FigurFigur
FigurFigur
Figur
e 3:e 3:
e 3:e 3:
e 3:
Bottom vie Bottom vie
Bottom vie Bottom vie
Bottom vie
w of w of
w of w of
w of
VV
VV
V
elo 500elo 500
elo 500elo 500
elo 500
Serial connectorDC jack
IR port
FigurFigur
FigurFigur
Figur
e 4:e 4:
e 4:e 4:
e 4:
Side vie Side vie
Side vie Side vie
Side vie
w of w of
w of w of
w of
VV
VV
V
elo 500 (left side)elo 500 (left side)
elo 500 (left side)elo 500 (left side)
elo 500 (left side)

11
Caring for your Velo 500
Clean the casing of your Velo 500 with a damp cloth. For more
persistent dirt, such as grease or oils, use a damp cloth and a
solution of mild detergent in water. Do not immerse your Velo
500, and always wipe off your Velo 500 with a dry cloth after
cleaning.
To clean the display, use a damp cloth or a premoistened pad
designed specifically for use on computer monitors.
Caution Be sure to turn off your Velo 500 before cleaning the
touch screen.
For extra protection, you may wish to purchase the optional
Velo 500 carrying case. For information about the availability of
carrying cases and other accessories, check the Philips Web site
(http://www.mobile.philips.com/).
PP
PP
P
oo
oo
o
ww
ww
w
ering yering y
ering yering y
ering y
our our
our our
our
VV
VV
V
elo 500elo 500
elo 500elo 500
elo 500
The Velo 500 has two kinds of batteries. The main batteries
power your Velo 500 during normal mobile use or when you
are not using an external power source. The backup battery is
a coin-sized lithium battery that protects your saved data when
the main batteries are depleted or are temporarily removed
(for example, while you replace the main batteries). The backup
battery does not provide enough power to operate your Velo 500,
but it will preserve your data for about 24 hours if no other power
source is available. If you are close to an AC power outlet, you can
connect to the power adapter that is supplied with your Velo 500.
An optional car adapter also allows you to power your Velo 500
from the DC voltage in your car. For information about the
availability of car adapters and other accessories, check the Philips
Web site (http://www.mobile.philips.com/).

12
Philips Velo™ 500 User’s Manual
The backup battery
The backup battery was installed at the factory, but must be
activated before it will protect your data.
To activate the backup battery
◗ Carefully pull the plastic tab free from the main battery
compartment, and discard it.
To replace the backup battery
1 Remove the screw from the backup battery door, and
then remove the door.
2 Remove the old backup battery.
3 Insert a CR2032 (or equivalent) lithium coin cell backup
battery. The side marked with a + (plus sign) faces up.
4 Replace the backup battery door and the screw.
The main batteries
You can use the Philips Velo Rechargeable NiMH Battery Pack
included with your Velo 500. Rechargeable AA NiCd batteries are
not recommended.
Note Battery life will vary depending on how you use your Velo 500.
To install the main batteries
1 Slide the battery door lock switch down to release the
battery door.
2 Swing the battery door open until it detaches completely.
3 Insert the Philips Velo Rechargeable Battery Pack into the
battery compartment.
A tab on the Philips Velo Rechargeable Battery Pack
indicates the date of manufacture. When you insert the
battery pack, position this tab so you can use it to pull
the battery from the compartment.
4 Replace the battery door, and slide the lock switch up to
lock the battery door.
Caution If you remove all main and backup batteries and
disconnect external power, you will lose all information in your Velo
500 and will need to restore your data from your desktop computer.
13
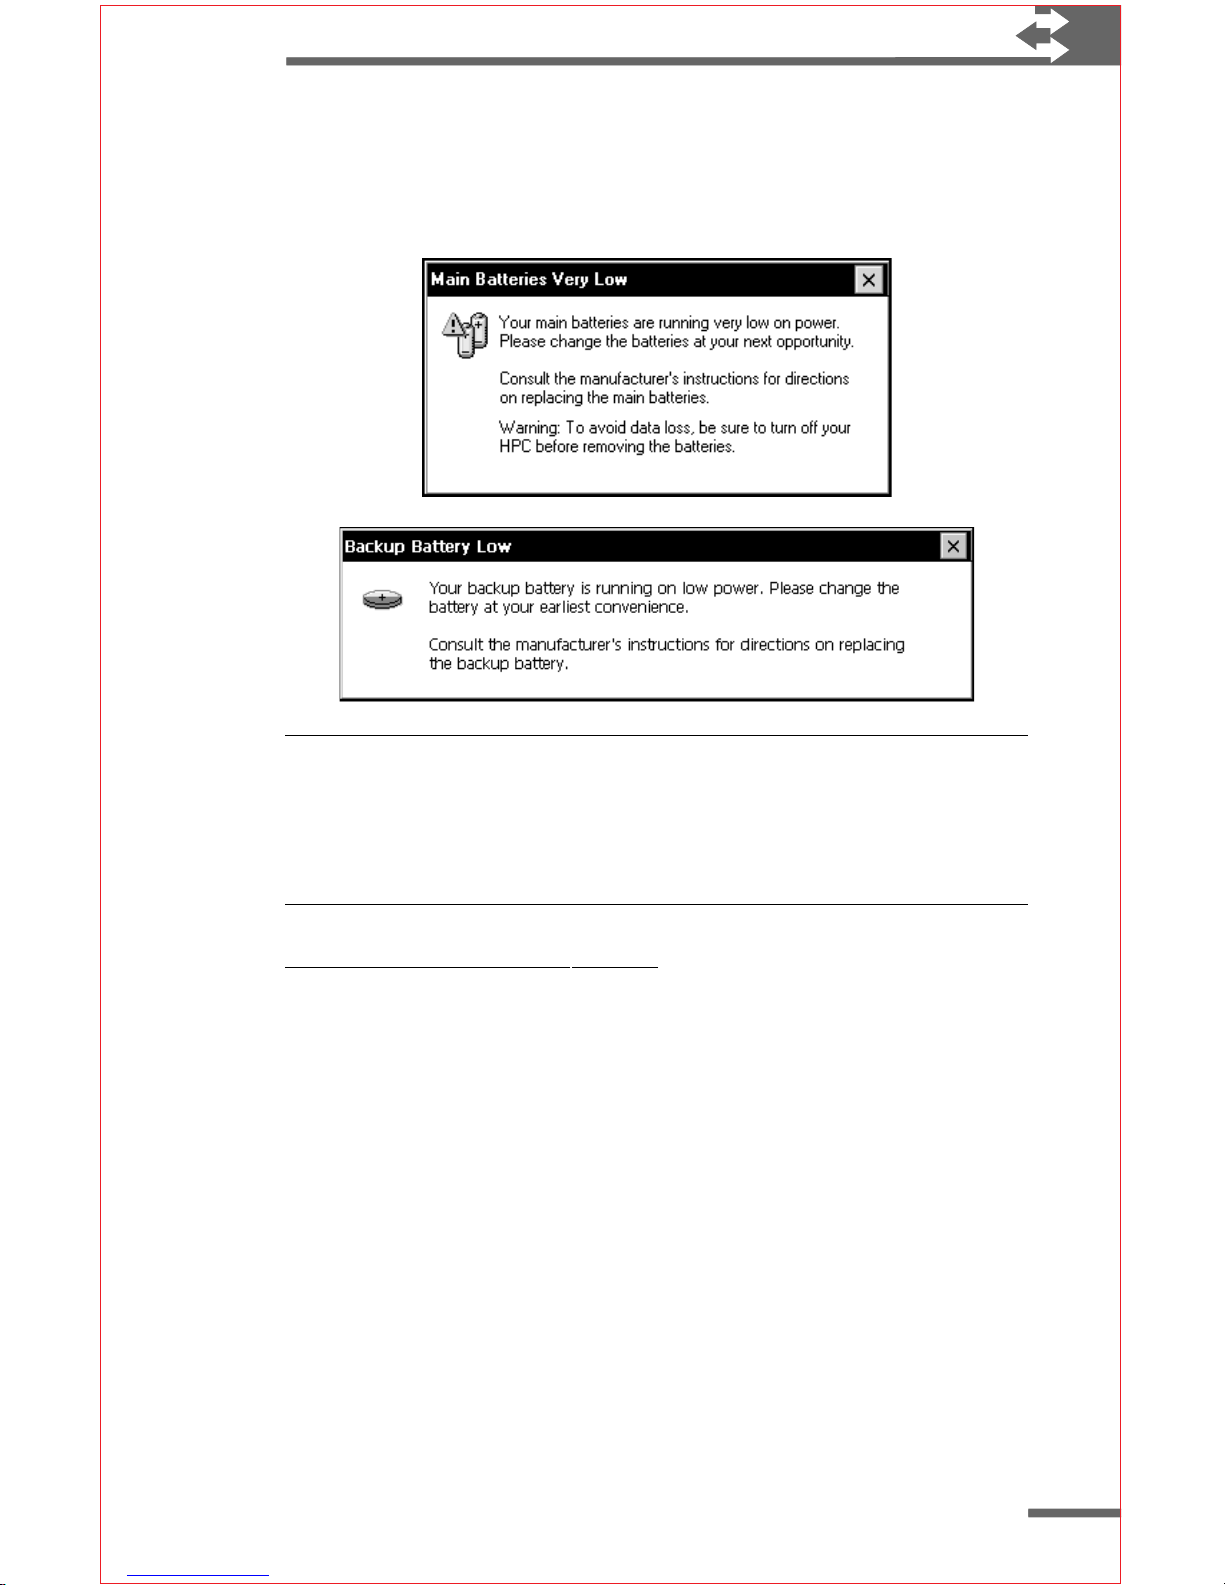
Low battery indicators
Your Velo 500 displays warning messages when batteries are low.
Take immediate action if you see these messages.
Caution To avoid data loss, do not allow the backup battery to run
down. Replace it as soon as you see a message that your backup
battery is low. Also, do not remove the backup battery unless the
main batteries are installed and are in good condition (or you are
connected to external power).
Tips for conserTips for conser
Tips for conserTips for conser
Tips for conser
ving baving ba
ving baving ba
ving ba
ttertter
ttertter
tter
y poy po
y poy po
y po
ww
ww
w
erer
erer
er
◗ Do not use battery power when using PC Card accessories.
PC Cards require considerable power to operate and can
quickly drain your Velo 500’s batteries. Always use external
power when making dial-up connections with a PC Card
modem. (The internal modem has very low power
consumption compared to PC Card modems. It is not
necessary to use external power with the internal modem.)
◗ Shorten auto-suspend time. To conserve battery power,
your Velo 500 automatically suspends operation while on
battery power after three minutes if you have not touched
the keyboard or used the stylus. To maximize battery life,
you can shorten this time. For more information, see “The
Power control panel” in “Fine-tuning performance.”
◗ When your Velo 500 is connected to your desktop computer,
make sure the Velo Dock is connected to the AC adapter.

14
Philips Velo™ 500 User’s Manual
◗ Set the backlight to turn off automatically when running on
battery power. Use the Display control panel to set Backlight
options. For more information, see “Adjusting display
properties” in “Fine-tuning performance.”
◗ Turn off sound events you do not require. Use the Volume
& Sounds control panel to set custom sound schemes. For
more information, see the Adjusting Volume and Sounds
help topic on your Velo 500.
The AC adapter
Use the AC adapter to power your Velo 500 and to recharge the
Philips Velo Rechargeable Battery Pack. You can connect the AC
adapter directly to your Velo 500 or use it to power the Velo Dock
while your Velo 500 is connected to your desktop computer. For
more information on using the Velo Dock, see “The Velo Dock” in
“Connecting to a desktop computer.”
The AC adapter included with your Velo 500 is for use with
110-V AC power only. If you travel frequently or need to
power your Velo 500 at other AC voltages, you can purchase
an optional Philips Traveling AC Adapter. For information about
the availability of AC adapters and other accessories, check the
Philips Web site (http://www.mobile.philips.com/).
Warning Use only Philips power adapters designed specifically for
use with the Velo 500; otherwise, you may damage your Velo 500.
To connect your Velo 500 to external power
1 Plug the power adapter into an AC power outlet.
2 Plug the AC adapter into the DC jack on your Velo 500.
If the Philips Velo Rechargeable Battery Pack is installed,
the batteries will be recharged while your Velo 500 is
connected to AC power.
Note When the Philips Velo Rechargeable Battery Pack is installed
for the first time, you should connect your Velo 500 to AC power and
fully charge the battery pack before you disconnect the AC adapter.
Charging should take about two-and-a-half hours. While the battery
pack is charging, the green recharging indicator light
is on. The light
turns off when charging is complete.

15
Using yUsing y
Using yUsing y
Using y
our our
our our
our
VV
VV
V
elo 500 for the first timeelo 500 for the first time
elo 500 for the first timeelo 500 for the first time
elo 500 for the first time
To start your Velo 500 for the first time
1 Slide the latch to the right and open the lid.
2 Press the Power button.
The Power button is just above the keyboard near the left
side of the Velo 500 (see Figure 1).
3 The H/PC Setup Wizard will start automatically. Follow
the instructions on the screen to set up your Velo 500.
4 If necessary, adjust the display contrast by pressing ALT+>
or ALT+< on the Velo 500 keyboard.
The H/PC Setup Wizard
The first time you use your Velo 500, the H/PC Setup Wizard will
present a brief introduction to the Windows CE operating system
and lead you through a few simple setup procedures:
◗ Calibrate the touch screen. Calibration establishes the
alignment of the background image with the touch-sensitive
portion of the screen and ensures the accuracy of your
stylus taps.
◗ Set your time zone. Select your home city. Windows CE
stores area codes, airport information, sunrise/sunset times,
and relative distances for hundreds of cities all over the
world.
◗ Set the date and time. Because Windows CE uses the date
and time to remind you of appointments as well as to
synchronize files and PIM data with your desktop computer,
it’s important to set the date and time correctly.
◗ Enter optional owner information, such as name, address
and phone number. The information you type will be
displayed whenever you turn on your Velo 500 and may
help someone return your Velo 500 to you if it’s lost.
To begin Setup
1 Install the main and backup batteries according to the
instructions earlier in this chapter.
2 Turn on your Velo 500.
3 Follow the H/PC Setup Wizard instructions on your screen.

16
Philips Velo™ 500 User’s Manual
Later, you can restart the H/PC Setup Wizard or use Control Panel
to change any of the options you set during setup.
To restart the H/PC Setup Wizard
◗ Browse to the Program Files\Accessories folder, and
double-click the Welcome icon.
WindoWindo
WindoWindo
Windo
ws CE basicsws CE basics
ws CE basicsws CE basics
ws CE basics
Microsoft Windows CE 2.0 is similar to the Microsoft Windows 95
operating system. It includes familiar components such as the
Start button and Start menu, taskbar, desktop, browser, menu
bar, toolbar, Control Panel, and shortcuts.
Using the stylus
On your Velo 500, you use the stylus in much the same way that
you use a mouse with your desktop computer. Instead of clicking
with the mouse, tap the stylus on the screen to select objects or
activate menus. You should use the supplied stylus to touch the
screen. There’s no harm in using your fingertip, but many features
require the stylus for finer pointing.
Warning Don’t use sharp objects, such as keys or pens, to touch the
screen. These objects can damage the screen.
To use the stylus
◗ Slide the stylus to the right until it is out of the slot.
To replace the stylus
◗ Slide the stylus into the slot, point first and ridges
facing up.
Double-tap programs and documents to open them, just as you
would double-click with a mouse. You can set the double-tap rate
using the Stylus control panel.
To set the double-tap rate
1 On the Start menu, point to Settings, and tap Control
Panel.
2 Double-tap the Stylus icon.
3 Tap the Double-Tap tab.

17
4 Double-tap the checkerboard to set the speed and area of
your double-tap.
5 Double-tap the clapper board to test your settings.
If you cannot select objects accurately with your stylus or if you
notice that the accuracy of the stylus has diminished over time,
you may need to record new calibration settings. You can use the
Stylus control panel to recalibrate the touch screen.
To recalibrate the touch screen
1 On the Start menu, point to Settings, and tap Control
Panel.
2 Double-tap the Stylus icon.
3 Tap the Recalibrate tab.
4 Press and briefly hold the stylus on the center of the
target each time it stops. It is important that the stylus
is the only thing touching the screen. Be careful not to
touch the screen with your fingers while calibrating.
5 Press the ENTER key to accept the settings, or press the
ESC key to cancel the settings and start over.
If you make a mistake when calibrating the touch screen or if,
over a period of time the accuracy of the touch screen diminishes,
you may not be able to navigate with the stylus. To open the
stylus calibration screen without using the stylus, simultaneously
press CTRL+ALT+=, or press ÿ+I.
The Windows CE taskbar
The Windows CE taskbar provides a quick way to switch between
programs and open documents. Each open document or running
program is shown as a button in the taskbar.
◗ To switch to a program or document, tap the taskbar button.
◗ To minimize the active program, tap the button for the active
program or document.
◗ To minimize all programs and display the desktop, tap the
desktop icon at the right edge of the taskbar.
You can set several options for the taskbar, such as whether
the taskbar remains visible in all programs (Always on top and
Auto hide) and whether the clock is displayed (Show Clock).

18
Philips Velo™ 500 User’s Manual
To set taskbar options
1 On the Start menu, point to Settings, and tap Taskbar.
2 Select the options you want.
Tip To quickly display the taskbar when it is hidden, press the ÿ key.
The status area on the right side of the taskbar may display several
icons that indicate the status of your Velo 500, such as the state
of Caps Lock, whether a connection is active, and whether the
device is connected to external power. In most cases, you can
double-tap a status icon for more information or to change
options associated with that icon.
SoftwSoftw
SoftwSoftw
Softw
arar
arar
ar
e pre pr
e pre pr
e pr
oo
oo
o
gramsgrams
gramsgrams
grams
Your Velo 500 includes many useful programs that provide all the
functionality you need as a mobile professional. You can also add
programs from other vendors.
Preinstalled programs
The programs included on your Velo 500 are described below.
Start these programs by double-tapping the desktop shortcut or
tapping the icon in the appropriate folder on the Start menu.
Detailed procedures for common tasks are available in Help.
To access Help for a specific program, start the program, and
then tap Help on the Start menu, or tap
in the toolbar.
AccessoriesAccessories
AccessoriesAccessories
Accessories
Calculator—Perform calculations by tapping on-screen buttons
or using the Velo 500 keyboard. Keep track of calculations with an
on-screen “paper tape,” or copy data and paste it into documents
and spreadsheets.
World Clock—Keep track of the current date and time, whether
you’re at home or away. You can set the clock to keep time for
your home city and for a place you’re visiting, and choose which
of these time zones to use as your system time. World Clock also
stores information on time zones, airports, dialing codes, and
distances, and even calculates sunrise and sunset for many cities
in the world.
 Loading...