

Page 1
PHILIPS
VCM8161/00T-/01T
xiaaQaa aasoo«.
PHILIPS
Page 2

English
...............
.........
1
Deutsch
Français
Nederlands
Italiano................
Espagñol
Portugués
Dansk
Svenska
Norsk
Suomi
..............
.............
.........
............
..........
.................
.............
.................
.................
.........
.......
.......
.......
.......
.......
.......
.......
.......
.......
7
15
21
27
33
39
45
51
57
63
Page 3
Page 4

Page 5

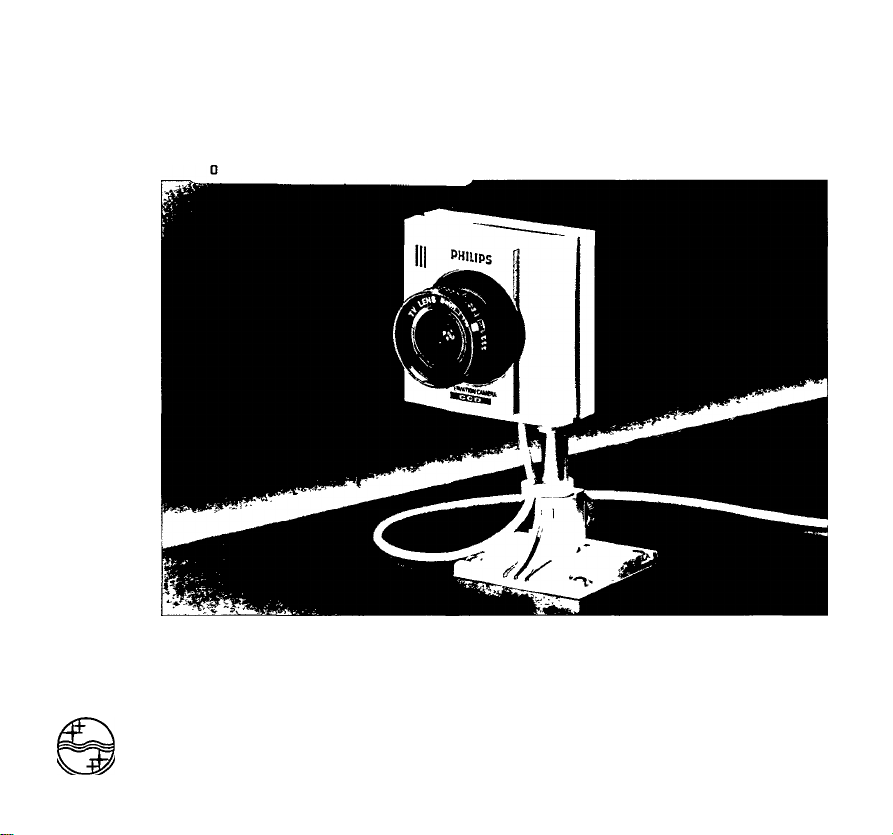
Monochrome CCD observation camera VCM8161/00T-/01T
The illustrations referred to in this manual are
printed on the insides of the two fold-out
Contents________________________
Introduction.........................................................1
Connecting the camera
The power supply............................................1
The video output
The connection cable
Changing the length of the cable
The lens................................................................2
Using a different lens
Focus adjustment
Installing the camera
The mounting bracket.........................................4
Maintenance tips.................................................5
Technical specifications.....................................6
The complete camera pack contains the
• One CCD camera
• One C/CS adapter ring
• One 8 mm, F 1.3 lens
• One adjustable mounting bracket
• One coaxial connection cable (10 metres/33ft)
• Extra plugs to extend or shorten the
connection cable
• Screws and mounting plugs
• One user manual
cover pages.
.....................................
.............................................
.........................................
......................
.........................................
...............................................
..........................................
following components;
Page
1
1
2
2
2
3
4
Introduction
Your new CCD camera is specially developed for
use with a special observation system monitor. It
features a sensitive microphone thus registering
both images and sound via the monitor.
Connecting the camera
The power supply
The power for the camera is supplied by the
monitor, via the coaxial cable. It means that the
selected camera is switched on automatically
when you switch your monitor on.
The video output
A standard coaxial connection cable (10 metres
/33 feet) is supplied with your camera. The cable
is fitted with a male, 75 Ohm coaxial plug on one
end and a male cinch plug on the other. The
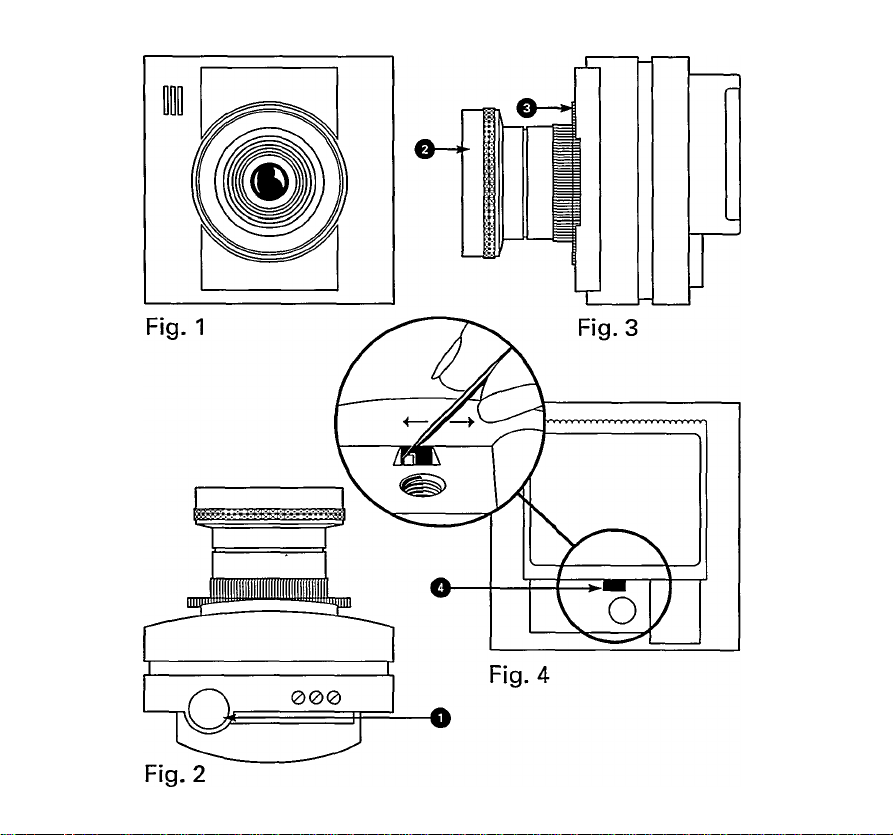
cinch plug (fig. 6) fits the connection socket of
the camera (fig. 2-1).
The default channel setting of the camera is for
channel 3. If you do not get an optimum image,
check whether the channel switch on the rear of
the monitor is set for the same channel. You can
change the channel setting of the camera too, if
necessary (e.g. when you get interference from a
strong, local TV station). You will find the switch
ENGLISH
_____________
Page 6

in a recess on the back of the camera (fig. 4-4).
You can change its setting by sliding it with the
help of a sharp pencil or toothpick.
The connection cable
The connection cable supplied with the camera
has a length of 10 metres (33 feet). If the
distance between camera and monitor happens
to be shorter or longer, you can easily make a
special cabrte, using a standard coaxial cable
(available at your dealer’s) and the extra coaxial
plugs supplied with your camera (fig. 7). You
can actually cover a distance of 100 metres (330
feet) or more, depending on the quality of the
cable you are using.
______________
Changing the length of the cable
If the distance is shorter than 10 metres (33 feet)
and the extra length bothers you, you can
shorten the cable. Measure the required length,
starting from the cinch plug (fig. 6) to make sure
that the cinch plug is included with the shorter
cable you are making. Do not make the cable
too tight but allow a little leeway. Then mount
the male coaxial plug (fig. 7) at the other end.
If the distance between camera and monitor is
larger than the length of the connection cable,
you can make an extension cable, using both
separate plugs supplied with this set (fig. 7) and
the required length of a good quality coaxial
cable (75 Ohm), available at any TV store.
If you want to bridge a longer distance, you
should use a special cable extension set with RF
booster amplifier, which will allow a distance
from camera to monitor of up to 600 metres
(1800 feet).
The lens
Your camera is equipped with a standard CS
lens mount and supplied complete with an 8
mm, F 1.3 lens with a viewing angle of 34°
horizontally and 26° vertically. The lens has a
C-mount thread and is fitted with a C/CS adapter
ring. It means that you can actually use anyone
of a wide range of both C-mount and CS-mount
lenses with either a fixed iris or manual iris.
When choosing a C-mount lens, you should use
the C/CS adapter ring. Automatic iris lenses
cannot be used.
When using a lens with manual iris adjustment,
you should, in principle, set it at its largest
aperture.
________________________
Using a different lens
The CCD sensor in the camera head is very
sensitive to dust, if you ever remove the lens
from the camera you should always point the
camera downward to minimize possible deposit
of dust. Never touch the sensor and/or use any
cleaning materials. Only use clean, dry air to
blow any particles from the surface of the
sensor. Special aerosol air-spray cans are
available at any good camera store.
You may want to use a lens with a different focal
Page 7

length and thus a different angle of view than the
8 mm F1.3 lens, supplied with your camera. You
will find useful information in the following table
and diagram to help you make the best choice.
The choice of the lens may affect the
illumination range of your camera. Consult the
table below to see which type of lens you require
for your particular application.
To ensure a good picture quality you should use
a lens with an F-value (maximum aperture) of at
least F 4, preferably better.
F-value
of lens
Illumination range (lux)
Nominal
Minimum
Maximum
0.95 18 1 13,000
1.2
1.3
1.4 39
1.6 51
1.8
2.0 80
29 1.5
34 1.7 25,000
2 28,000
2.5 36,000
64
3.5 46,000
4 57,000
2.8 156 8
The diagram in the next column will help you
select the focal length, required to cover the
object or area you want monitored; it shows the
width of the scene visible on the screen with
lenses of different focal lengths at given
distances (camera to object). You can extend
the scope of the diagram by simply multiplying
the values at both axes with "x“
21,000
100,000
12tnm
16 mm
25 mm
Example:
If the distance camera to object is 21 metres:
simply multiply the value distance camera to
object for 7 metres with 3. Next multiply the
width of the scene, reproduced on the monitor
screen by 3 also.
Focus adjustment
For optimal picture sharpness, the CS-mount
adjustment ring at the front of the camera has
been pre-adjusted in the factory to standard
CS-mount back focus distance. Re-adjustment
of the back focus distance may however be
necessary when the back focus distance for a
particular lens differs slightly from that of the
standard lens, supplied with the camera.
Set the focussing ring of the lens to infinity (this
does not apply when you have a fixed focus
lens).
• Aim the camera at an object which is at least
15 metres (45 feet) away.
_________________
Page 8

• Loosen the back focus locking ring (fig. 3-3) at
the front of the camera, by turning it
anti-clockwise.
• Turn the lens, including the CS-mount, until
the video picture is in focus.
• Tighten the back focus locking ring again (fig.
3-3), keeping the lens in place.
Warning:
Do not touch the surface of the lens . This
could damage the delicate coating on the
surface of the lens.
If the lens has to be cleaned, use special lens
cleaning tissue, available at any good camera
store.
Installing the camera_______________
it is advisable to install the camera first and
connect it to the system monitor on the spot. It
will allow you to properly aim the camera at the
area you want covered while checking the
results on the monitor (see below). When
satisfied you can place the monitor in its
permanent position.
proper area from that position.
> Fasten the mounting bracket to ceiling, wall or
any other flat and solid surface. Use the
screws and plastic mounting
plugs when fastening the mounting bracket on
a plastered surface.
( Tighten the ball joint control knob (fig 5 - 7).
. Attach the camera to the bracket by turning
the mounting socket in the back of the
camera (fig 5-5) onto the threaded end of the
mounting bracket (fig 5 - 6).
I Loosen the two knurled knobs on the
mounting bracket (fig. 5-7 and 5 - 9) and
carefully aim the camera at the object or area
you want monitored.
. Tighten both knobs again to secure the
camera in position.
Note:
The camera can also be mounted on any
camera tripod with standard 1/4" Whitworth
thread.
The mounting bracket
• Rrst determine where you want to install the
camera.
• Hold the camera in your hand at the spot
where you want to install it, while checking on
the monitor whether it does indeed cover the
______________
Page 9

Maintenance tips
Your observation camera will require a minimum
of maintenance, just observe the following rules:
Cleaning. You may clean the exterior of the
camera with a damp and lint-free cloth or
chamois.
Cleaning the lens. Use special lens cleaning
tissue (available at any good camera store) to
clean the lens, if necessary. Do NOT use any
cleaning liquids containing alcohol, spirits,
ammonia, etc.
Moisture. Direct contact with moisture should
be avoided.
Outdoor use. For outdoor applications you
should use a protective housing to shield the
camera from rain and snow.
The following accessories are optionally
available via your dealer:
• Protective camera housing (VCM1151)for
conditional outdoor use.
• A cable extension set with RF booster
amplifier (VSS2900) to cover distances from
camera to system monitor of up to 600 metres
(1800 feet)
Page 10

Technical specifications
Image pick-up device
Scanning system
Output signal
Lens mount
Lens
Illumination range
Mounting socket
Connection oable
Input voltage
Power consumption
Audio
1/3" CCD
CCIR, 625 iines,
interlaced
RF video and Audio
VHF-I switchabie
between channels
3 and 4 (external
switch)
VCM8161/00T; CCIR-B
VCM8161/01T:CCIR-i
Standard CS-mount
' with C/CS
adapter ring
8 mm, F 1.3
2 to 25,000 lux
(50 ire/-6dB)
1 to 25,000 lux
(acceptable
picture)
1/4“ Whitworth
75 Ohm coaxial cable
with cinch (RCA) and
coaxial (Euro) plug
12 V DC, supplied by
the system monitor,
via the coaxiai cable
1.3 Watt
Built-in electret
microphone
Ambient conditions:
Temperature
in operation:
in storage:
Relative humidity
in operation:
in storage:
Dimensions:
without lens
with standard lens
Weight (Incl. lens)
These specifications are subject to change
-20°Cto -F55°C
-25°Cto +70°C
20% to 90%
up to 90%
70 X 70 X 45 mm
70 X 70 X 71 mm
190 gr.
without notice.
Page 11

Page 12

F i g . 5
F i g . 6
Page 13

Page 14

Printed in the Netheriands
3122165 20333
 Loading...