

Page 1
Philips Medical Systems Customer Service Application Toolbox Manual
Customer Service
Application Toolbox
User Manual
Page1of 26
Page 2

Philips Medical Systems Customer Service Application Toolbox Manual
Document Management:
Version Date Description
1.0 10 Nov 2006 Initial Document Jagadeesh A
Author
1.1 24 Nov 2006 Reviewed and Updated for
Q1 2007 Release
Sukanta Das
Page 2 of 26
Page 3

Philips Medical Systems Customer Service Application Toolbox Manual
Table of Contents
1 Introduction............................................................................................................................... 4
1.1 Abbreviations and Terminologies .................................................................. 4
1.1.1 Abbreviations ............................................................................................................. 4
1.1.2 Terminologies ............................................................................................................ 4
1.2 Objective ................................................................................................................... 5
1.3 System Requirements ........................................................................................ 5
2 Toolbox Installation Procedure................................................................................................. 6
2.1 Introduction .............................................................................................................. 6
2.2 Uninstalling Fabric Application........................................................................ 6
2.3 Cardman USB ................................................................................................................... 7
2.3.1 Cardman USB 6020 – Version Detection and Installation......................................... 7
2.3.2 Cardman USB 6121 – Installation ............................................................................. 7
2.4 Using Customer Service Application Toolbox.......................................... 8
2.4.1 User Manual............................................................................................................... 9
2.4.2 Application Information .............................................................................................. 9
2.4.3 Install Applications ..................................................................................................... 9
2.4.3.1 Step 1: Toolbox Introduction Screen ................................................................ 10
2.4.3.2 Step 2: Scanning for the Installed Applications ................................................ 11
2.4.3.3 Step 3: Original / Incompatible Applications Display (Optional) ....................... 12
2.4.3.4 Step 4: Selection of Applications for Installation / Uninstallation) .................... 13
2.4.3.5 Step 5: Installation Sequence........................................................................... 16
2.4.3.6 Step 6: Installation In Progress Screen ............................................................ 17
2.4.3.7 Step 7: Final status Screen .............................................................................. 18
2.3.3.8 Shortcuts for Installed applications.................................................................. 19
2.4.4 Install Admin Patch .................................................................................................. 20
2.4.5 Zeppelin Compliance Test ....................................................................................... 20
3 Toolbox FAQ .......................................................................................................................... 21
Page 3 of 26
Page 4
Philips Medical Systems Customer Service Application Toolbox Manual
1 Introduction
1.1 Abbreviations and Terminologies
1.1.1 Abbreviations
CODE - Common Operating Desktop Environment
TIO - Test and Integration Office
FSE - Field Service Engineer
1.1.2 Terminologies
- Note
- Important
- Alert
Fabric Application – Unscripted Application released directly by
Business Unit to field by any means (eg. web site).
(Un)Install – Install / Uninstall
Page 4 of 26
Page 5

Philips Medical Systems Customer Service Application Toolbox Manual
1.2 Objective
The objective of this document is to list various features available in the Customer Service
Application Toolbox. This document explains process of installing application using the
Toolbox Installer CD.
1.3 System Requirements
The Toolbox has been tested on Dell D600, D610 & D620 laptops installed with Windows
XP Image released by Zeppelin. Zeppelin approved hardware and OS configurations may
be found at http://pww.zeppelin.philips.com
.
Page 5 of 26
Page 6
Philips Medical Systems Customer Service Application Toolbox Manual
2 Toolbox Installation Procedure
2.1 Introduction
The Toolbox Installer is used to install the applications. The following features are provided
by the “Customer Service Application Toolbox” installer:
1. Admin Patch: Some applications require Local Administrator rights for installation.
Since some users may not have local administrator rights, the Admin patch allows the
applications to be installed even when logged in with user rights.
2. Zepcom: This feature helps the user to check the Zeppelin compliancy of the laptop.
This also displays a report and updates a central database that helps Zeppelin to
provide better service to the end user. Please note that no personnel information is
retrieved from the database.
3. Application Installer: The primary goal of a Toolbox installer is to provide a convenient
method to manage the (un)installation of applications.
For ease of use, the applications displayed in the Toolbox Installer Screen are grouped into
the PMS – Field Service Basic Applications and Extended Application.
2.2 Uninstalling Fabric Application
To uninstall fabric application, please follow the steps below :
1. Goto Start -> Control Panel.
2. Double click on “Add Remove Programs”. Here you will find all the applications
installed.
3. Please select the application you want to un-install and click on the Remove / Change
button.
Applications that have been installed using Toolbox Installer shouldn’t be
un-installed from “Add/Remove Programs”. Please use Toolbox to un-install
these applications.
Please note the following applications are referred by different names in the Toolbox and in
Add Remove Program
Sl.
No.
01 Hardware Key driver Sentinel System Driver
02 Security Toolbox PMSSec Security Toolbox
04 IST Philips IST x.x.x.xxxx
“Cardman API” is listed in the Control Panel as “SafeGuard Smart Card
Provider”. “SafeGuard Smart Card Provider” is the latest version of “Cardman
API”.
Name as in Toolbox Name as in “Add Remove Programs”
.
Page 6 of 26
Page 7

Philips Medical Systems Customer Service Application Toolbox Manual
2.3 Cardman USB
2.3.1 Cardman USB 6020 – Version Detection and Installation
To check, the version of Cardman USB 6020 that is already installed in your machine and
to install the latest version, please perform the following steps.
Open Explorer and browse the Toolbox CD. Goto the “Cardman_USB” directory.
You will find DetectCardmanUSB.exe file.
Execute the “DetectCardmanUSB.exe” by double clicking on it and follow the
onscreen instructions to install / migrate to the new version of Cardman USB
(3.7.3.12).
2.3.2 Cardman USB 6121 – Installation
Omnikey has released new USB dongle, which is 6121. This requires a new driver, which
is available in the toolbox.
Installation preparation:
If Cardman API is installed, please un-install this using the uninst.exe (if it was
scripted by Zeppelin) or from “Add Remove Programs” (if fabric application was
installed) and restart the system.
If you are replacing your Cardman 6020 Key with Cardman 6121 Key, then
Uninstall the Cardman 6020 driver and restart the system.
Now browse the toolbox CD and goto Cardman_USB ->
Cardman_USB_6121_11032 -> wxpw2k_ze_10 directory and double click on
install.exe. This will install the 6121 driver. After this, you must restart the system.
Incase the Cardman API was un-installed (as in first step), install the latest version
of SGSCP by running the toolbox.
Insert the Dongle in the USB port and open “Safeguard SmartCard Provider” from
the “Control Panel”. Select Cardman 6121 and assign device A.
This driver is not an upgrade for 6020 version. This driver is for the new 6121 dongle.
Cardman USB 6121 and Cardman USB 6020 both can co-exist. Every time the user needs to use a
different Cardman USB, the user has to select the same from the Control Panel “Safeguard
Smartcard Provider” icon. Please refer to the FAQ section for more details.
If SGSCP is already installed, please uninstall and reinstall it. Else the dongle may not be
recognized.
Page 7 of 26
Page 8
Philips Medical Systems Customer Service Application Toolbox Manual
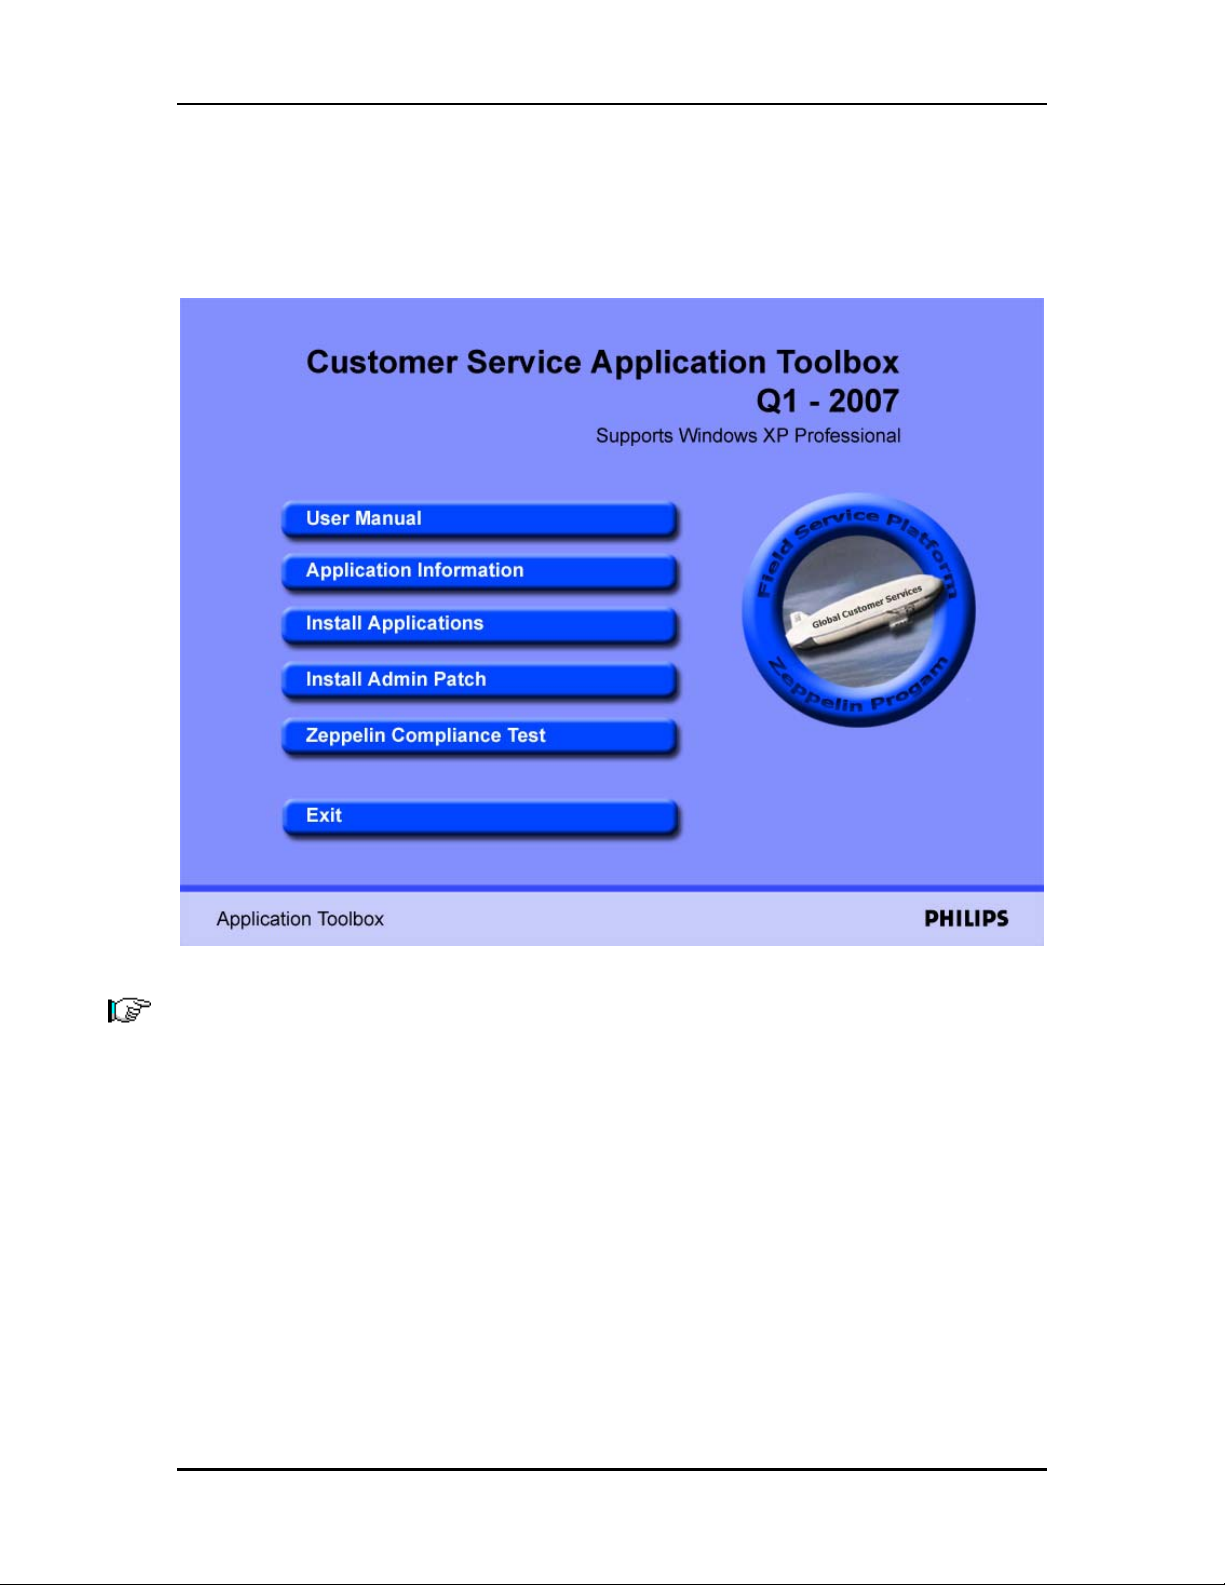
2.4 Using Customer Service Application Toolbox
To install Toolbox Applications, insert the Toolbox CD in the CD tray.
The following Toolbox Menu will be displayed.
If the menu doesn’t run automatically, browse to CD directory, and double-click on -
StartToolboxInstaller.EXE
The menu will open, showing the various options the user can select. The following are the Menu
Options :
User Manual
Application Information
Install Applications
Install Admin Patch
Zeppelin Compliance Test
Page 8 of 26
Page 9

Philips Medical Systems Customer Service Application Toolbox Manual
2.4.1 User Manual
The “User Manual” (this Document) explains about the various features available in the
Customer Service Application Toolbox.
2.4.2 Application Information
The “Application Information” opens an HTML file, which lists the applications that are
contained in the CD. Each of the application is provided with a hyperlink, which will open
the Readme file of that application.
Important Points to Note before actually running the Customer Service Application
Toolbox Installer are also displayed.
2.4.3 Install Applications
To (un)install applications click on “Install Applications”.
The Toolbox Installer involves the following steps.
Step 1 Toolbox Introduction Screen
Step 2 Scanning for the Installed Applications
Step 3 Original / Incompatible Applications Display (Optional)
Step 4 Selection of Applications for Installation / Uninstallation
Step 5 Installation Sequence
Step 6 Installation Progress Screen
Step 7 Final status Screen
If the FSE has only user rights on the laptop and the admin patch is not installed, the user
should contact the administrator to install the admin patch. For details refer section 2.3.4
If the user doesn’t have admin rights, the installer quits after displaying the following
message.
If the user has admin patch installed or the user is an administrator, the user will not be
prompted for admin patch installation. Toolbox Installer will continue loading.
Page 9 of 26
Page 10

Philips Medical Systems Customer Service Application Toolbox Manual
2.4.3.1 Step 1: Toolbox Introduction Screen
This screen will have a brief description about the Toolbox Installer.
Click ‘Next’ to proceed with the installation. The ‘Next’ button can also be pressed by
using the Shortcut Key – (Alt + N).
This screen also displays the Operating System it has detected. If the displayed
information is not correct, the user is requested to check with the local IT department.
If the detected Operating system is neither Windows 2000 nor Windows XP, the following screen
is displayed.
Page 10 of 26
Page 11

Philips Medical Systems Customer Service Application Toolbox Manual
2.4.3.2 Step 2: Scanning for the Installed Applications
The Toolbox Installer scans the machine for the installed Zeppelin Applications.
In this screen, Toolbox scans for any Fabric or Incompatible Application installed.
Fabric applications are Zeppelin Applications that are installed using its original source
or using Customer CS CD ROM.
Incompatible applications: Some applications are Operating System specific. If any of
the installed applications are not compatible with the installed OS, it is displayed in the
next screen.
The scan may take some time to complete. This is a mandatory step to proceed with the
Toolbox installer. The installer process will exit if the user chooses to cancel.
Page 11 of 26
Page 12

Philips Medical Systems Customer Service Application Toolbox Manual
2.4.3.3 Step 3: Original / Incompatible Applications Display (Optional)
The lists of Fabric and / or Incompatible applications are listed in this screen.
The user will have to first manually uninstall the Fabric applications, if he wants to install the
scripted versions from the Toolbox. However, this will not stop the user from using the toolbox for
the (Un)Installation of the other applications.
The Incompatible applications need not be remove if they are working properly. To install a
compatible version of the same application, the user should first uninstall it using Toolbox and then
run the Toolbox again and select the same application for installation.
All the Fabric applications listed above have to be uninstalled using the Windows
Add/Remove Programs or by other means. After the uninstallation, the machine has to be
Re-Scanned to confirm that the applications are uninstalled.
If there is no Fabric or Incompatible application installed then this screen is
automatically skipped.
If any application was uninstalled, Re-Scan shall be used to get the present status of the installed
Zeppelin application.
The ‘Re-Scan’ can also be called by using the Shortcut Key – (Alt + R)
Page 12 of 26
Page 13

Philips Medical Systems Customer Service Application Toolbox Manual
2.4.3.4 Step 4: Selection of Applications for Installation / Uninstallation)
This screen displays the Zeppelin Applications in this release. The users will be able to
select the applications for Installation or Uninstallation.
The following details are shown in this screen –
Application Name
Application Version
Install / Uninstall Checkboxes
Current Status
Dependency
The applications are listed under Field Service Basic Application and Extended
Application groups. To display the applications under a particular group, expand the list
by clicking on the ‘+’ icon next to the Group name. By clicking on the ‘-‘ icon next to the
Group name, the application list can be collapsed. By default only “PMS-Field Service
Basic Applications” will be expanded and “Extended applications” will be collapsed.
Earlier versions of an application, if any, can be viewed by clicking on the ‘+’ icon shown
next to the application name. This can be hidden again by clicking on the ‘-‘ icon next to
the name of the application.
InCenter Offline Viewer 3.7 included in the Toolbox need .NET Framework 2.0 (and
WindowsInstaller3.0 or above) to be installed as a prerequisite. If this application is
selected and the .NET Framework 2.0 is not already installed, the following prompt is
displayed.
Page 13 of 26
Page 14

Philips Medical Systems Customer Service Application Toolbox Manual
Selecting “Yes” will allow the Toolbox to proceed with installing .NET Framework
automatically into the local system. Otherwise, the user has to choose “No” and uncheck
the application to proceed further.
The list of detected Fabric/Incompatible applications can be re-visited by clicking the back
button.
Page 14 of 26
Page 15

Philips Medical Systems Customer Service Application Toolbox Manual
Quick Guide to understand Installed and Uninstalled applications in Toolbox Installer :
Condition
App Not Having Old
CheckBox Status
Text Display Status
Version
If scripted Application
is installed
If Fabric Application is
installed
If the Application is not
installed
App Having Old
Only Uninstall Checkbox will be enabled The application will be displayed with Green Bold
text
None of the Check boxes will be enabled The application will be displayed with Red Bold
text
Only Install Checkbox will be enabled The application will be displayed with Blue
Normal text
Version
If older version is
installed Using Scripted
App
If older version is
installed Using Fabric
App
If New Application is
installed using Scripted
App
Uninstall Checkbox for Older version is
enabled. Install Checkbox for New
application is enabled.
None of the Checkboxes for both the Old
and New Version of the Applications will be
enabled.
None of the Checkboxes for the Older
version will be enabled. Only Uninstall
Checkbox for New Application will be
Older version will be displayed with Green with
Bold Text. New application will be displayed with
Blue Normal text.
Older version will be displayed with Red and Bold
Text. New application will be displayed with Red
Normal text.
Older version will be displayed with Blue Normal
text. New Application will be displayed with
Green Bold text.
enabled.
If neither old nor new
If new Application is
installed using Fabric
Application
version is installed
None of the Checkboxes for both the Old
and New Version of the Applications will be
enabled.
None of the Checkboxes for the Older
version will be enabled. Only Install
Checkbox for New Application will be
Older version will be displayed with Blue Normal
text. New application will be displayed with Red
Bold text.
Older version will be displayed with Blue Normal
text. New Application will be displayed with Blue
Normal text.
enabled.
If Incompatible Version
is installed
Only Uninstall Checkbox will be enabled The application will be displayed with Green Bold
text
Page15 of 26
Page 16

Philips Medical Systems Customer Service Application Toolbox Manual
2.4.3.5 Step 5: Installation Sequence
This screen shows the Installation Sequence, depending on the selection that is done in
the previous step. The Installation Sequence shows the step-by-step actions that will be
executed.
This will also show any Restarts that are required. The user should close all other
applications before proceeding.
Click on the Proceed button to continue. The following message will be displayed if any of
the applications selected for installation requires a Restart.
If none of the application requires a Restart then, the above message will not be
displayed and directly the installation and uninstallation of the applications start.
After installation or un-installation, if any of the selected applications requires a Restart,
the following screen is displayed for 5-10 seconds before restarting.
Page16 of 26
Page 17

Philips Medical Systems Customer Service Application Toolbox Manual
After the restart, the following screen is displayed and Toolbox continues with the
remaining installation / un-installation. The following window is automatically closed.
2.4.3.6 Step 6: Installation In Progress Screen
This screen displays the step-by-step progress of the Installations. As the (Un)Installation
of application completes, the checkbox next to that application will be checked.
After completing all the application Installations in the selected Sequence, next screen
(Final Status Screen) will be automatically displayed.
Page 17 of 26
Page 18

Philips Medical Systems Customer Service Application Toolbox Manual
If the Installation is cancelled in between, the installer will install the current application and stop. It
does not continue installing the further applications.
After restart the Toolbox installer starts from the next application in the list.
2.4.3.7 Step 7: Final status Screen
This screen shows the status after the Installation of all the applications is completed.
If the installer has not found an application’s exe for installation, then it will skip
the installation of that application and continue with the next one. In such cases
the Status for the application will be displayed as Skipped.
If the Installation is cancelled in between, the installer will install the current
application and stop. It does not continue installing the further applications. In this
case the next application will have a status of ‘Cancelled’. The rest of the
applications in the sequence will have the Status as ‘Aborted’.
Click on Finish, the following message box will be displayed. If the user confirms the
Restart the machine will restart.
Page 18 of 26
Page 19

Philips Medical Systems Customer Service Application Toolbox Manual
2.3.3.8 Shortcuts for Installed applications
Shortcuts for installing the application will be available in Start -> Zeppelin Standard
applications -> <Business Unit> -> Application Name.
For example:
PMSSec is a Zeppelin Basic application. When this application is installed via toolbox, it
will be available at Start -> Zeppelin Standard applications -> Basic Toolbox -> PMSSec.
The application shortcuts will be available under Start -> Zeppelin Standard Applications.
Page 19 of 26
Page 20

Philips Medical Systems Customer Service Application Toolbox Manual
2.4.4 Install Admin Patch
Some of the applications need administrator rights for installation. If the user doesn’t
have admin rights, the user should contact the administrator to install the admin patch.
On installing the patch a local administrative account will be created that will be used by
the Toolbox Installer program. Now the user can log on with an account having only user
rights. The toolbox applications will be installed using the admin patch user account.
Only an administrator can install the Admin Patch.
Else the Installer displays the following message before quitting.
If the FSE is the local administrator of his laptop, the ADMIN Patch is not
required.
2.4.5 Zeppelin Compliance Test
The user can check the notebook (laptop) for Zeppelin Compliance. This can be done by
running “Zeppelin Compliance Test” from the Toolbox Menu. The tool checks the
Hardware, OS and the applications for Zeppelin Compliance. At the end it automatically
opens the report in the default browser. The report is self-explanatory.
This tool also submits the report to a central database. If the user is not
connected to the network, it displays an error message. The user is then
requested to send the Zepcom.txt file via mail to gcs.helpdesk@philips.com
.
Page 20 of 26
Page 21

Philips Medical Systems Customer Service Application Toolbox Manual
3 Toolbox FAQ
The following Frequently Asked Questions have been compiled to assist the user with
common queries faced while using the toolbox.
How do I get help if I encounter problems using the toolbox?
Please send a mail explaining in detail the problems faced while using the toolbox to:
gcs.helpdesk@philips.com
Should the Toolbox installer be installed?
Toolbox installer is the one that is going to guide you through the installation process
once you insert Toolbox CD. So there is no special installation required.
What is fabric application?
Fabric applications are Zeppelin applications that are installed using its original
source or using Customer CD.
What is Zeppelin Complies?
Following are the configurations that Zeppelin complies
Hardware
- DELL Latitude D600, D610 and D620
- The DELL Latitude C610 and DELL Latitude C810 will continue to be supported by
Zeppelin until the end of 2005.
OS
- Windows 2000 Professional (Service Pack 4)
- Windows XP Professional (Service Pack 1)
“Runtime error 339” in Zeppelin Data collection?
It seems, one of the system file is missing or not registered properly. To correct this
error, please follow the given steps.
1. Search for the file "mscomctl.ocx" in your system (Typically, the file
should be located:
In C:\WINNT\system32 folder - for Windows 2000
In C:\Windows\system32 folder - for Windows XP)
2. If you cannot find the file, please contact your local IT Department and
ask them for this file. (This is an important file for Windows OS)
3. If you can find the file in the above mentioned folder path, please
execute the following command in the "Command Prompt - C:\>" and
then try running the ZepCom.exe file again.
Regsvr32 mscomctl.ocx
Should I run IST first in admin mode?
The IST application must be run as a privileged user(i.e. from Administrator login) at
least once. The unprivileged user should select IST to run at Windows Startup:(i.e.
IST Control Panel | Tools | Options | Launch IST at Windows Startup).
What is the role of Admin Patch in Customer Service Application Toolbox?
Before the predefined software deployment is used by FSE, the Admin Patch has to
Page 21 of 26
Page 22

Philips Medical Systems Customer Service Application Toolbox Manual
be installed. This patch installs a local administrative account that will be used by the
Toolbox Installer program. A user (without admin rights) can log on with his/her own
account and install the applications. Only a user with admin rights can install the
Administrator Patch.
Is it mandatory to install the applications using install.exe and uninstall the
applications using uninst.exe?
If you are using the msi file for installation of the application then some of the features
may not get installed, which will create problems while running the applications. Also
for uninstallation, the uninst.exe must used. If you are using Windows Add/Remove
programs for uninstallation then the application may not uninstall completely. Hence
always use install.exe and uninst.exe
What is the correct way of installing scripted PMSSec application if fabric
application was installed earlier?
Steps for installing PMSSec:
1. Remove the PMSSec dongle
2. Uninstall the applications from add remove program in the following sequence:
Security Toolbox
PMSSec
Cardman API / SGSCP (SafeGuard Smart Card Provider)
Cardman USB (restart the laptop)
3. Install the downloaded applications in the following order
Cardman USB (restart the laptop)
SGSCP (SafeGuard Smart Card Provider) earlier Cardman API
PMSSec
Security Toolbox
4. Now if you still have issues, run these two commands:
Regsvr32 %windir%\system32\scardssp.dll
Scardsvr reinstall
and restart the machine.
If you still face any issues, please refer to the knowledge base (Zeppelin website
http://pww.zeppelin.philips.com
-> Support -> Knowledge Base) to get quick
resolutions.
How do I get scripted SafeGuard Smartcard Provider 4.21.1 installed properly?
Before installing the SafeGuard Smartcard Provider 4.21.1, you have to install
Cardman USB 6020. Uninstall SafeGuard Smartcard Provider 4.21.1 from the
uninst.exe(if Cardman USB is not installed), install Cardman USB 6020 v 3.7.3.12.
Restart the system and then proceed with the installation of SafeGuard Smartcard
Provider 4.21.1.
Using toolbox installer, if I reach step 3 and uninstall some Fabric Applications
do I need to Rescan?
YES. If you are already in Step 3 (Original (Fabric/ Non-Scripted) Applications
Installed) and now you are uninstalling the Fabric Application, then you need go back
to the Rescanning Step (Step2). This will again detect for the Fabric Applications
installed and displays the latest status. After the uninstallation of the Fabric
Application, if the machine is not rescanned then the latest status will not be updated
in subsequent steps.
Dell D600 / D610 laptop is not recognizing the Dongle / Smart Card.
The D600 / D610 has a built in SmartCard Reader. When installing the CardMan
API/Safeguard Smartcard Provider, it automatically takes that one as the default.
Page 22 of 26
Page 23

Philips Medical Systems Customer Service Application Toolbox Manual
Click on "Control Panel""
Select CardMan API/Safeguard Smartcard Provider
The following information will be displayed:
List of available SmartCard readers :
- O2 Micro PCMCIA Reader 0 ID A
- Omnikey CardMan 6020 0
Perform the following operations:
- Place the cursor on O2 Micro PCMCIA Reader 0 and click on Delete
- Then, place the cursor on Omnikey CardMan 6020 0 and click on Assign.
- Now assign CardMan reader ID A
All existing applications will be deleted if we use this Toolbox CD.
This is not true. Zeppelin Program is to standardize the PC platform and the
applications are scripted to install in a standard way. If non-Zeppelin standard apps
are installed in the machine, the Customer Service Application Toolbox will not allow
you to install such applications. So only after you uninstall these apps, you can install
the applications.
Error "Cannot find a Security Device" / "Non-Existing service ScarSvr" / "Can't
file scardssp" after installing new security application.
After upgrading / re-installing any of the following apps (Carman USB, SafeGuard
Smart Card Provider, PMSSec Reader, Security Toolbox), if security application is
not coming up run the following from command prompt:
Regsvr32 %windir%\system32\scardssp.dll
Scardsvr reinstall
Reboot the system.
Please Note: This is true only for Smartcard based/USB dongle and not for old
blue/grey parallel port dongle. The old parallel port dongles have HW Key # less
than 18000. The command prompt will work only for HW Key # 18000 and
above.
PMSSec 2.307 or higher
PMSSec must be started the first time as a local administrator to create
customizations to some specific files. After that, PMSSec can be used as a normal
user.
SafeGuard Smartcard Provider 4.21.1
Before installing the SafeGuard Smartcard Provider 4.21.1, you have to install
Cardman USB 6020 v3.7.3.12.
Uninstalling Hardware Key Driver.
Go to Start Menu / Settings/ ControlPanel/AddRemove Programs. This application
will be listed in the Add/Remove Programs screen as "Sentinel System Driver". To
remove this application click on remove button against "Sentinel System Driver".
Laptop restarts as soon as PMSSec is used. PMSSec is installed on a FAT32
partition.
This is a known issue. PMSSec should be installed on NTFS partition. As the CODE
Page 23 of 26
Page 24

Philips Medical Systems Customer Service Application Toolbox Manual
doesn’t support FAT32 partition, it is recommended not to have a FAT32 partition.
After uninstallation of Hardware Key Driver 5.41 (fabric application) and then
installation of "Hardware Key Driver 5.41" using the Customer Service
Application Toolbox CD, the installation did not succeed.
Root Cause of the problem is:
The uninstallation of the Fabric application Hardware Key Driver 5.41, does not
remove all the files which it has created. It leaves a folder
"C:\WinNT\System32\RNBOSENT" with a file "SETUPX86.exe".
The workaround for the problem is as follows :
On a machine on which the Fabric Application of Hardware Key Driver 5.41 is
installed :
step 1 - Uninstall the application using the Add/Remove Programs.
step 2 - Delete the folder c:\winNT\System32\RNBOSENT
step 3 - Restart the laptop.
step 4 - Install the new scripted Hardware Key Driver 5.41 using the Customer
Service Application Toolbox.
step 5 – Restart the laptop. The application should get installed properly now.
What do I do when I get the following message while running toolbox?
This happens when either of the two system Components (MSHFLXGD.OCX and
MSCOMCTL.OCX) is not registered properly. Normally MS Office registers those
files automatically. If MS Office fails to repair those files, kindly follow the below
mentioned steps.
i. Open any MS Office application (Say, MS Word) and close it
ii. Take the Zeppelin CD out of the drive and insert it. So, that Auto-run
happens
iii. Now, MS Office will automatically repair the files
If the Components are still not registered, kindly send us the error
screenshot of the problem to Gcs.helpdesk@philips.com
When I go to start the PMSSec reader it says the driver is the wrong version:"
wanted 117, found 0"?
This problem occurs when two Versions of PMSSec (both Original Version and
Scripted Version) is installed on a machine. Workaround for this problem is as
follows,
i. Goto “Add/Remove Programs”
ii. Try to find out “PMSSec Reader” entry from the “Currently installed
Page 24 of 26
Page 25

Philips Medical Systems Customer Service Application Toolbox Manual
program” list.
iii. You are expected to find two entries with the same name “PMSSec
Reader”. If you find the entries, please goto Step 4. Else (if you did
not find two entries) e-mail your problem to
Gcs.helpdesk@philips.com
iv. If you find two entries, Un-install both the applications and restart
the machine
v. After restarting, install the latest Version of PMSSec (generally
found in Zeppelin website and in latest Customer Service
Application Toolbox)
Now, try running the PMSSec.
From where can I install Admin Patch?
It is available in Zeppelin website
(http://pww.zeppelin.philips.com/zeppelin/user/Tools.asp) or also in Customer
Service Application toolbox.
Please note that, you need Administrative Privileges to run the Admin Patch.
Toolbox hangs up when login with different User ID?
For some applications (say, SafeGuard Smartcard Provider 4.21.1) Toolbox generally
requires a RESTART to proceed the installation/Un-installation. So, After Restart
Please login with the same User ID and password.
For example:
Consider yourself is running Toolbox in “XYZ” login and installing an application that
requires Restart. After restart, you are required to login with the same account (“XYZ”
login) until you get the final toolbox screen.
Incenter Offline Viewer 3.7 Required .Net Framework 2.0 and windows
Installer3.0 or above to be installed in the system.
InCenter Offline Viewer 3.7 included in the Toolbox requires .NET Framework 2.0
(and WindowsInstaller3.0 or above) to be installed as a prerequisite. If this
application is selected and the .NET Framework 2.0 is not already installed, the
following prompt is displayed.
Selecting “Yes” shall allow the Toolbox to proceed with installing .NET Framework
automatically into the local system. Otherwise, the user has to choose “No” and
uncheck these applications to proceed further.
If you are using Toolbox, it will install all the applications in C drive. Please
ensure that your C drive partition type is NTFS.
Page 25 of 26
Page 26

Philips Medical Systems Customer Service Application Toolbox Manual
For further details on toolbox and Zeppelin applications visit our FAQ section in
Zeppelin website (http://pww.zeppelin.philips.com/zeppelin/user/
->Support ->
Knowledge Base)
Last line of document
Page 26 of 26
 Loading...