

Philips TT3003/11, TT2040/32, PT925/80, TT2040 User Manual
TT2040 Bodygroom Pro
B
A
C
D
E
F
I
1
2 3 4
5 6 7
G
H
8 9 10
1
2
11 12 13
J
14 15 16
17 18 19
20 21 22
23 24 25
26 27 28
29 30 31
32

ENGLISH
2
4222.002.8051.1
Introduction
Congratulations on your purchase and welcome to
Philips! To fully benet from the support that Philips
offers, register your product at www.philips.com/
welcome.
The Philips Bodygroom offers you a safe, gentle,
quick and smooth shave for every body part below
the neckline. This complete body-grooming solution
consists of a specially designed all-in-one shaving
and trimming system which gives you the most
perfect body trim and shave. Even in the sensitive
zones. You can use it in the bath or shower, since it
is 100% waterproof.
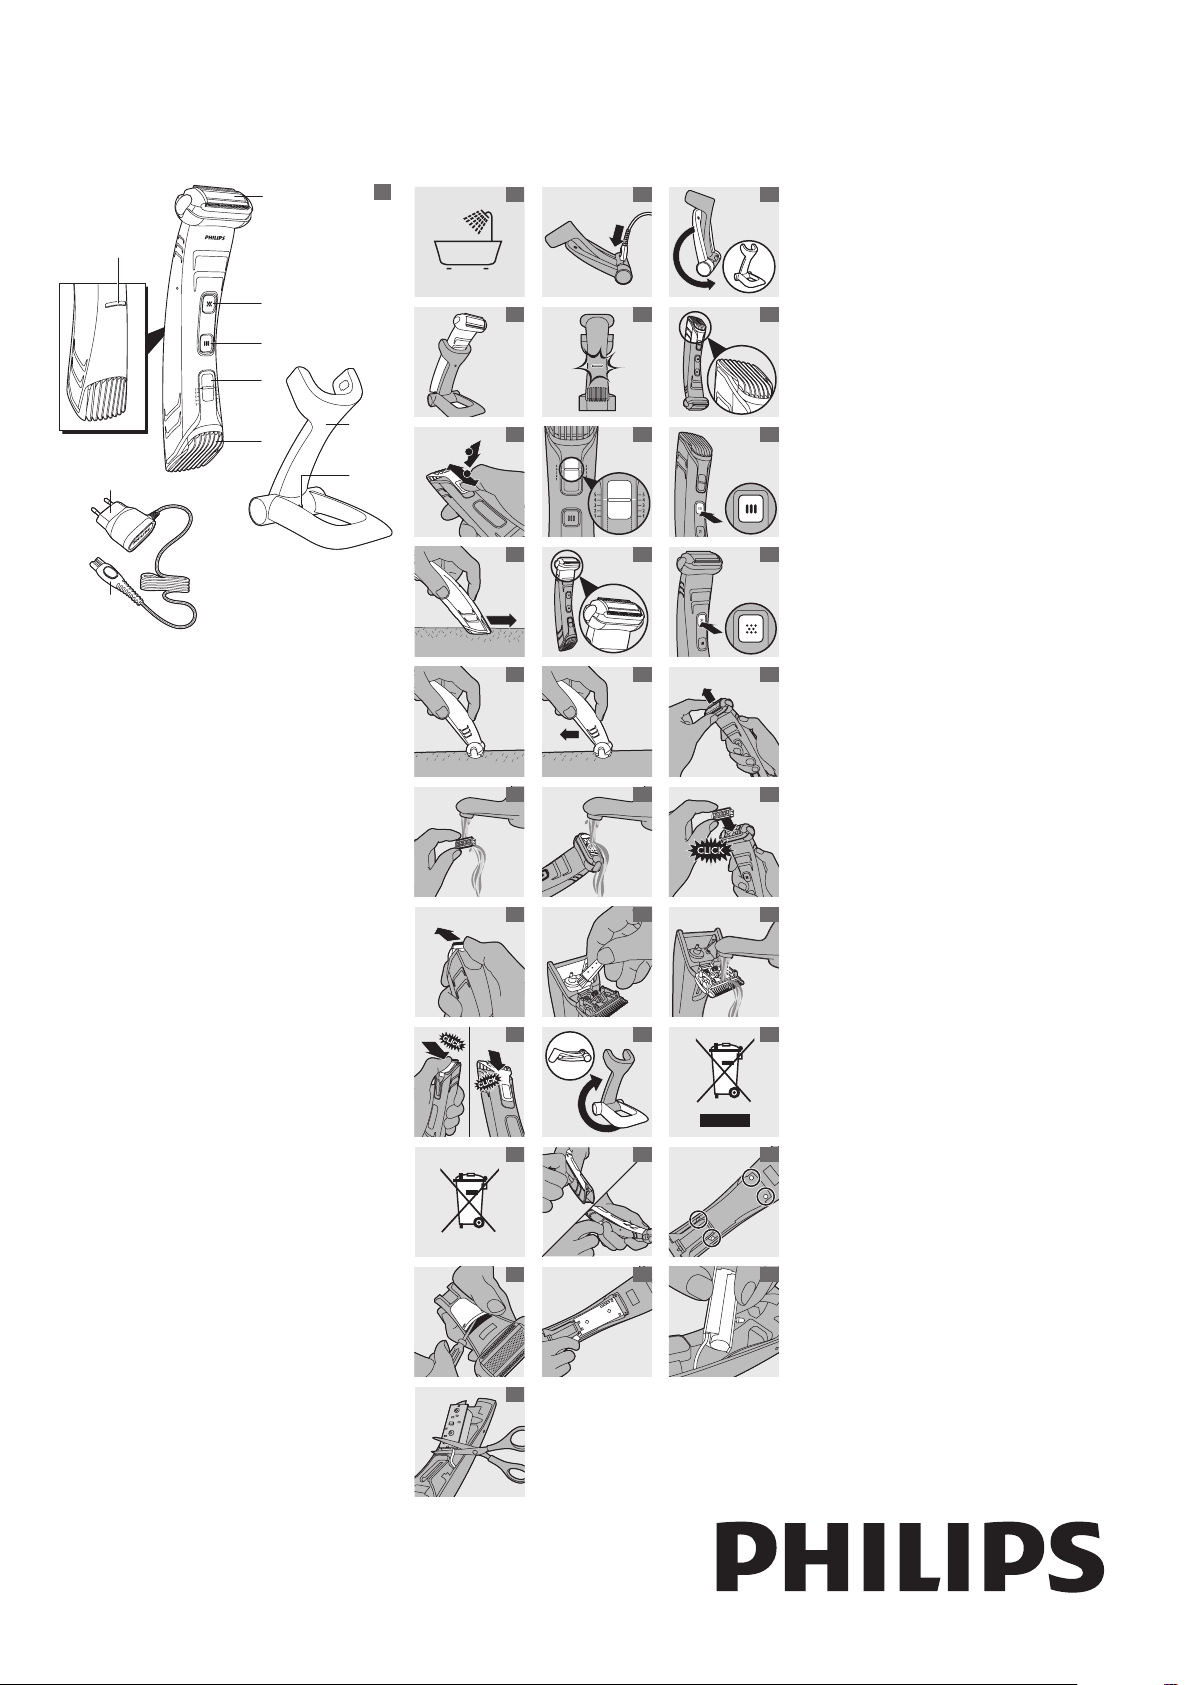
General description (Fig. 1)
A Charge indicator
B Shaving unit
C Shaving unit on/off button
D Trimming unit on/off button
E Hair length setting selector
F Trimming unit with comb
G Charger
H Socket for small plug
I Adapter
J Small plug
Note: To switch between trimming and shaving, turn
the other side of the appliance up.
Important
Read this user manual carefully before you use the
appliance and save it for future reference.
Danger
- Make sure the adapter does not get wet.
Warning
- Check if the voltage indicated on the adapter
corresponds to the local mains voltage before
you connect the appliance.
- The adapter contains a transformer. Do not cut
off the adapter to replace it with another plug,
as this causes a hazardous situation.
- This appliance is not intended for use by
persons (including children) with reduced
physical, sensory or mental capabilities, or lack
of experience and knowledge, unless they
have been given supervision or instruction
concerning use of the appliance by a person
responsible for their safety.
- This appliance is not intended for use by
children. Children should be supervised to
ensure that they do not play with the appliance.
Caution
- Use, charge and store the appliance at a
temperature between 5°C and 35°C.
- Only use the adapter and the charger supplied.
- Never immerse the charger in water nor rinse
it under the tap.
- If the appliance is subjected to a major change
in temperature, pressure or humidity, let the
appliance acclimatise for 30 minutes before you
use it.
- If the adapter or charger is damaged, always
have it replaced with one of the original type in
order to avoid a hazard.
- Do not use the appliance when the shaving
unit or the trimming comb is damaged or
broken, as this may cause injury.
- This appliance is only intended for shaving and
trimming body parts below the neckline. Do
not use it to shave or trim facial or scalp hair.
Compliance with standards
- The appliance complies with the internationally
approved IEC safety regulations and can be
safely used in the bath or shower (Fig. 2).
- This Philips appliance complies with all
standards regarding electromagnetic elds
(EMF). If handled properly and according to the
instructions in this user manual, the appliance
is safe to use based on scientic evidence
available today.
Charging
Charge the appliance for at least 10 hours before
you use it for the rst time and after a long period
of disuse.
Charging normally takes approx. 8 hours.
When the appliance is fully charged, it has an
operating time of up to 50 minutes.
When the charging light lights up orange, the
battery is running low (approx. 10 minutes of
operating time left) and you need to recharge the
appliance.
Note: The appliance can only be charged in the
charger.
1 Switch off the appliance before you charge it.
2 Insert the small plug into the charger (Fig. 3).
Note: The small plug is easiest to insert when the
charger is folded.
3 Unfold the charger (‘click’) (Fig. 4).
4 Put the adapter in the wall socket.
5 Put the appliance in the charger (Fig. 5).
, The charging light starts to ash green to
indicate that the appliance is charging (Fig. 6).
, When the battery is fully charged, the
charging light lights up green continuously.
, After approx. 30 minutes the charging light
goes out to save energy.
Optimising the lifetime of the
rechargeable battery
Discharge the rechargeable battery completely
twice a year by letting the motor run until it stops.
Then fully recharge the battery.
Using the appliance
You can use the appliance wet or dry to shave
or trim hair on all parts of the body below the
neckline. Do not use this appliance to shave or trim
facial or scalp hair.
Tip: Take your time when you rst start to shave
sensitive areas. You have to acquire practice with the
appliance. Your skin also needs some time to adjust to
the procedure.
Trimming
The trimming comb allows you to cut hair to 5
different lengths.
Start with the highest setting (5) to acquire
practice with this appliance.
Hair length setting Hair length after trimming
1 3mm
2 5mm
3 7mm
4 9mm
5 11mm
1 Hold the appliance in the trimming position,
with the trimming unit pointing upwards and
the shaving unit pointing downwards (Fig. 7).
2 Press the hair length setting selector (1)
and then move it up or down (2) to select a
setting (Fig. 8).
- The two lines next to the setting selector show
which setting you have selected (Fig. 9).
3 Press the trimming unit on/off button once to
switch on the trimming unit (Fig. 10).
4 To trim the hair, move the trimming
comb through the hair slowly (Fig. 11).
Tips
- Always make sure that the tips of the trimming
comb point in the direction in which you move
the appliance.
- Make sure that the at part of the trimming
comb is always fully in contact with the skin to
obtain an even result.
- Since all hair does not grow in the same
direction, you need to move the appliance in
different directions (upward, downward or
across).
- Trimming is easier when the skin and hair are
dry.
5 When you are nished, press the trimming
unit on/off button again to switch off the
trimming unit (Fig. 10).
Shaving
Before you use the shaving unit, always check it
for damage or wear. If the shaving unit is damaged
or worn, do not use it, as injury may occur.
Replace a damaged shaving unit before you use it
again (see chapter ‘Replacement’).
1 Hold the appliance in the shaving
position, with the shaving unit pointing
upwards and the trimming unit pointing
downwards (Fig. 12).
2 Press the shaving unit on/off button once to
switch on the shaving unit (Fig. 13).
3 Place the shaving unit on the skin (Fig. 14).
4 Move the appliance against the direction of
hair growth while you press it lightly (Fig. 15).
Tips
- Stretch your skin with your free hand to make
the hairs stand upright.
- Make sure that the shaving unit is always fully in
contact with the skin.
- If the hairs are longer than 10mm, trim them
rst to make shaving easier.
5 To switch off the shaving unit after use, press
the shaving unit on/off button again (Fig. 13).
Cleaning and maintenance
Clean the appliance after every use.
Never use compressed air, scouring pads, abrasive
cleaning agents or aggressive liquids such as
petrol or acetone to clean the appliance.
Note: The trimming unit and shaving unit do not need
any lubrication.
1 Switch off the appliance.
2 Rinse the appliance under the tap.
Cleaning the shaving unit
3 Pull the shaving unit off the
appliance. (Fig. 16)
Note: The shaving unit is very delicate. Handle it
carefully. Replace the shaving unit if it is damaged.
4 Rinse the shaving unit with lukewarm
water. (Fig. 17)
Do not clean the shaving unit with the brush, as
this may cause damage.
5 Remove hairs from the hair chamber with
the cleaning brush and/or with lukewarm
water (Fig. 18).

6 After cleaning, snap the shaving unit back
3
4222.002.8051.1
onto the appliance (‘click’) (Fig. 19).
Cleaning the trimming unit
7 Remove the trimming comb by sliding it off
the appliance.
8 Push the middle part of the trimming
unit upwards with your thumb until
it opens (Fig. 20).
9 Remove hairs from the hair chamber with
the cleaning brush and/or with lukewarm
water. (Fig. 21)
10 Rinse the trimming unit with lukewarm
water (Fig. 22).
11 After cleaning, close the trimming unit
and reattach the trimming comb. (Fig. 23)
Replacement
In case of frequent use, replace the shaving unit
(type number TT2000) every year. Replace a
damaged shaving unit immediately. To replace the
shaving unit:
1 Pull the shaving unit off the
appliance. (Fig. 16)
2 Snap the new shaving unit onto the appliance
(‘click’) (Fig. 19).
Guarantee and service
If you need service or information or if you have a
problem, please visit the Philips website at www.
philips.com or contact the Philips Consumer
Care Centre in your country (you nd its phone
number in the worldwide guarantee leaet). If
there is no Consumer Care Centre in your country,
go to your local Philips dealer.
Guarantee restrictions
The shaving unit is not covered by the terms of
the international guarantee because it is subject to
wear.
Storage
You can fold the charger for easy travelling or
storage. To fold the charger:
1 Fold the base of the charger against the
appliance holder (Fig. 24).
Environment
- Do not throw away the appliance with the
normal household waste at the end of its life,
but hand it in at an ofcial collection point for
recycling. By doing this, you help to preserve
the environment (Fig. 25).
- The built-in rechargeable battery contains
substances that may pollute the environment.
Always remove the battery before you
discard and hand in the appliance at an ofcial
collection point. Dispose of the battery at an
ofcial collection point for batteries. If you have
trouble removing the battery, you can also take
the appliance to a Philips service centre. The
staff of this centre will remove the battery for
you and will dispose of it in an environmentally
safe way. (Fig. 26)
Removing the rechargeable battery
1 Take the appliance out of the charger and let
the motor run until the battery is completely
empty.
2 Remove the front panel from the appliance
with a screwdriver (Fig. 27).
3 Undo the four screws of the cover under the
front panel with a screwdriver. (Fig. 28)
4 Use a screwdriver to break open the cover
and remove it. (Fig. 29)
, Now you see the printed-circuit board
to which the rechargeable battery is
attached (Fig. 30).
5 Lift the printed-circuit board with
rechargeable battery out of the
appliance (Fig. 31).
6 Cut the wires to separate the printed-circuit
board and the rechargeable battery from the
appliance (Fig. 32).
 Loading...