

Page 1

Owner’s Manual (use and set-up guide)
COLOR TELEVISION
AND
REMOTE CONTROL
-cn
Waming/Precautions
Hooking Up Your TV
VCR to TV Antenna Connections
Basic TV and Remote Control Operation......................3
How to Use the First Time Set-Up
On-Screen Features
"!>• Setting the TV for Cable TV Operation
❖ Adding Channels in Memory (Manually)
❖ Using the TV Volume Bar Control
❖ Using the TV Volume Limiter
❖ Using the TV Stereo Control
❖ Setting the TV Sleep Timer Control........................6
❖ How to Set the TV for Closed Captioning
❖ Using the TV Picture and Color Controls
General Information
Glossary of TV Terms
Tips if Something Isn’t Working..................................8
.................................................
....................................................
.................................
................................
.............
...............
.........................
................................
..............................
.............
..............
..................................................
1, 8
'...5
Table of Contents 1
1 Features
1 .
.................
................
... 1
NOTE: This owner's manual is used with
several different television models. Not all
2
2
features (and drawings) discussed in this
manual will necessarily match those found
with your television set. This is normal and
the TV for local channels and the correct pic
ture signal (antenna or cable).
Infrared Remote Control which works your
TV as well as all on-screen feature controls.
does not require you contacting your dealer
3
4
4
5
5
6
7
7
or requesting service.
For Customer Use
Enter (below) the Serial Number and the
Model Number of this television
(located on the rear of the TV cabinet).
Retain this information for future reference.
Model No.
Standard Broadcast (VHF/UHF) or Cable
TV (CATV) channel capability.
Stereo TV with built-in audio amplifier and
twin speaker system for receiving TV pro
grams broadcast in stereo sound.
Closed Captioning which allows the viewer to
read TV program dialogue or voice conversa
tions as on-screen text.
Automatic Programming of Channels for
quick and easy selection of favorite stations
available in your area.
Sleep-Timer which automatically turns the TV
OFF at preset times.
Index
.............................................................................
Warranty
.......................................................................
8
8
Serial No.
RetOrn your Warranty RegistMtiolI ca^
receive all the benefits you’re entitled to.
Once your PHILIPS MAGNAVOXpurchase is registered, you’re eligible to receive all
So complete and return the Warranty Registration Card enclosed with your purchase
, Warranty
Verification
Registering your product within 10 days
confirms your right to maximum protection
under the terms and conditions of your
PHILIPS MAGNAVOX warranty.
.Owner
Confirmation
Your completed Warranty
Registration Card serves as
verification of ownership in the
event of product theft or loss.
Language control allows the user to select
from three options; English, Spanish or
French. This controls the On-Screen Menu text
only. (Does not work for Closed Captioning.)
the privileges of owning a PHILIPS MAGNAVOX product,
at once. And take advantage of these important benefits.
.^Model
Registration
Returning your Warranty Registration Card
right away guarantees you’ll receive all
the information and special offers which
you qualify for as the owner of your model.
Congratulations on your purchase, and welcome to the “family!”
Dear PHILIPS MAGNAVOX product owner:
Thank you for your confidence in PHILIPS MAGNAVOX. You’ve selected one of the best-built, best-backed products
available today. And we’ll do everything in our power to keep you happy with your purchase for many years fo come.
As a member of the PHILIPS MAGNAVOX “family,” you’re entitled to protection by one of the most comprehensive warranties and out
standing service networks in the industry.
What’s more, your purchase guarantees you’ll receive all the information and special offers for which you qualify, plus easy access to
accessories from our convenient home shopping network.
And most importantly you can count on our uncompromising commitment to your total satisfaction.
All of this is our way of saying welcome-and thanks for investing in a PHILIPS MAGNAVOX product.
Sincerely,
P.S. Remember, to get the most from your PHILIPS MAGNAVOX product, you must return
Robert Minkhorst
President and Chief Executive Officer
Know these
SdifOty symbols
your Warranty Registration Card within 10 days. So please mail It to us right nowl
This “bolt of lightning” indicates uninsulated material within your unit may cause an electrical shock. For the safety
of everyone in your household, please do not remove product covering.
The “exclamation point" calls attention to features for which you should read the enclosed literature closely to pre
vent operating and maintenance problems.
PHILIPS
MAGNAVOX
3135-015-07031
Page 2
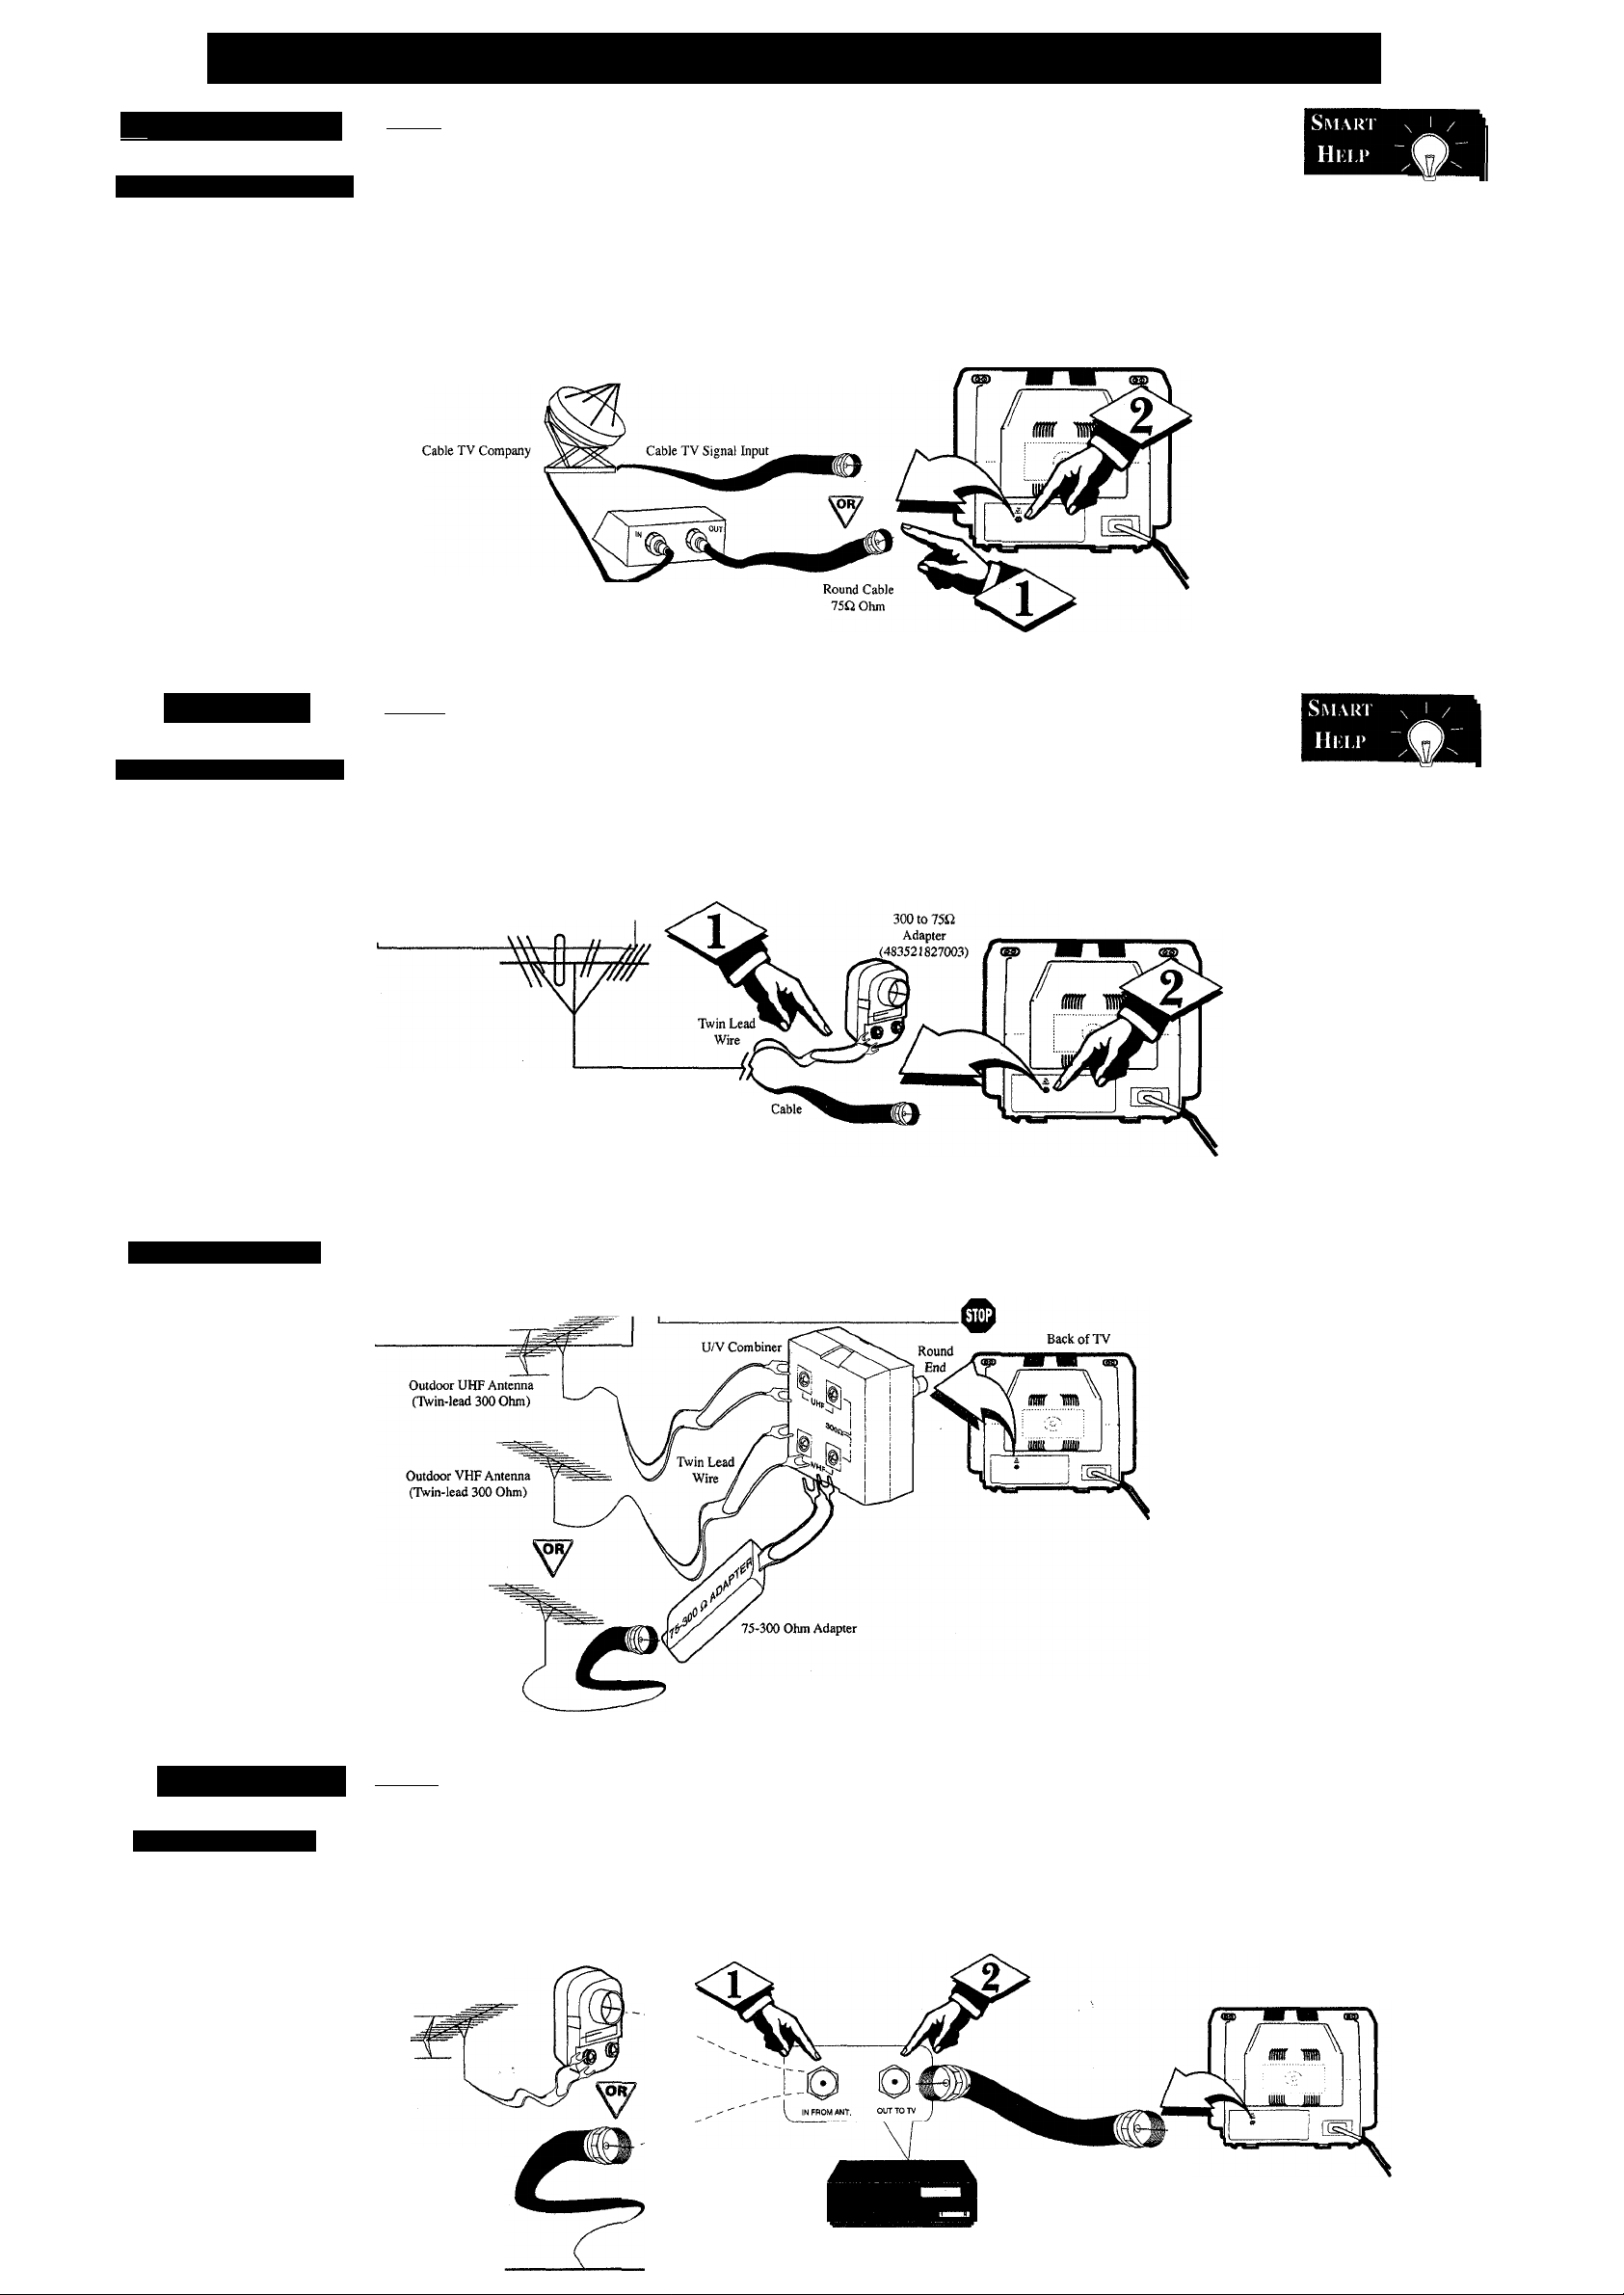
Hooking Up Your TV (Antenna/Cable TV Connections)
Wj Cable tv
Caiìu; Inj’i )/C()nm;ki i;i{
our Cable TV input
into your home may be
y
a single (75 ohm) cable, or
a Converter Box installa
tion. In either case the
connection to the TV is
very easy. Just put the
threaded end of the cable
signal to the TV's antenna
plug and screw it down
tight.
(BEeiN)—
r<i> If your Cable TV sig
nal is a single round cable (75
ohm) then you're ready to con
nect to the TV.
If you have a Cable TV
Converter Box:
Connect the Cable TV signal to
the Cable Signal IN(put) plug
on the Converter.
--------------------------------
<l>
Connect the Cable TV
cable to the ANTENNA/CABLE
plug on the TV.
If you have a Cable TV
Converter Box:
Connect the OUT(put) plug
from the Converter to the
ANTENNA/CABLE plug on the
TV. ^
Cable TV Converter
Box Connection
NOTE: The connecting cable for
the Converter is supplied from
the Cable TV Company.
Back of TV
Remember,
set the TV for the
type signal you've
just connected (see
page 3 of this SetUp Guide.)
To select only the
channel numbers on
your Cable system
see “Auto Program"
(page 3). If you use a
Cable Converter box,
set the TV to the
same channel as the
converter's CH 3/4
switch (on the rear of
the converter.)
Antenna
CoMiiiN vnoN IJHFA/MF
combination antenna
receives normal
A
broadcast channels (VHP
2-13 and UHF14-69).
Your connection is easy
since there is only one
75Q (ohm) antenna plug
on the back of your TV and that’s where the anten
na goes.
Si i-AK vn; IJIIF/VIIF
(^ome of you may have
kJtwo separate antennas.
One antenna is for VHP
channels (2-13) and the
other antenna is for UHP
channels (14-69).
Por homes with separate
UHPIVHP antennas, you
will need an optional
"combiner" before you can
connect to the TV. See the
"Smart Help" section (to
the right on this page) for
ordering details.
•CbeòinF
r<i>i
round cable (75 ohm) on the
end, then you're ready to con
nect it to the TV.
If your antenna has flat twinlead wire (300 ohm), you first
need to attach the antenna wires
to the screws on a 300 to 75
ohm adapter.
IBEQINI
the correct screws on the com
biner.
If your antenna has a
Combination VHF/UHF Antenna
(Outdoor or Indoor)
<î > ;
UHF and VHF antennas to
Attach the separate
Outdoor VHF Antenna
(Round 75 Ohm cable)
<l>
end of the antenna wire is
threaded, screw it down tight.
<P
onto the ANTENNA/CABLE plug on
the rear of the TV.
Push the round end of the
adapter (or anteima) onto the
ANTENNA/CABLE plug on
the rear of the TV. If the round
Round
75C2
Push the round end of the combiner
Back of TV
Remember,
be sure to set die
TV for the type sig
nal you've connect
ed (see page 3 of
this Set-Up Guide.)
To set the TV to
select only the
channel numbers in
your area see how
to “Program" or
"Add" channels in
memory on page 3.
To order any
optional acces.w/y
contact your dealer
or call the toll-free
accessory ordering
number (1-800-851-
8885):
• UHF/VHF
Combiner:
(SBV1133A01)
• 75-300 Ohm
Adapter:
(SBV1113A01)
• 300-75 Ohm
Adapter;
(483521827003)
VCR TO TV
Bask Conma i ion
^he basic Antenna, or
Cable TV, to VCR to
J
TV connection is shown to
the right. Por more infor
mation on other hookups
(possible when Cable
Converter!Descrambler
boxes are included) refer
to your accessory VCR
and Cable Converter
Owner's Manual for
details.
----
1BEQINI
-<P Connect your
Antenna or Cable TV signal
to the IN FROM ANT(enna)
plug on the VCR.
---------------------------------
Outdoor VHF/UHF
Antenna
Cable TV signal
Round Cable 75Û
<l>
Connect the OUT TO TV
plug on the VCR to the
ANTENNA plug on the TV
(connecting cable supplied
with the VCR.)
300 to 75Î2 Ohm
Adapter
<l>
Refer to the Owner's
Manual included with your
VCR for other possible con
nections and TV/VCR operat
ing details.
VCR
Back of TV
Round Cable
75£I Supplied with VCR
Page 3
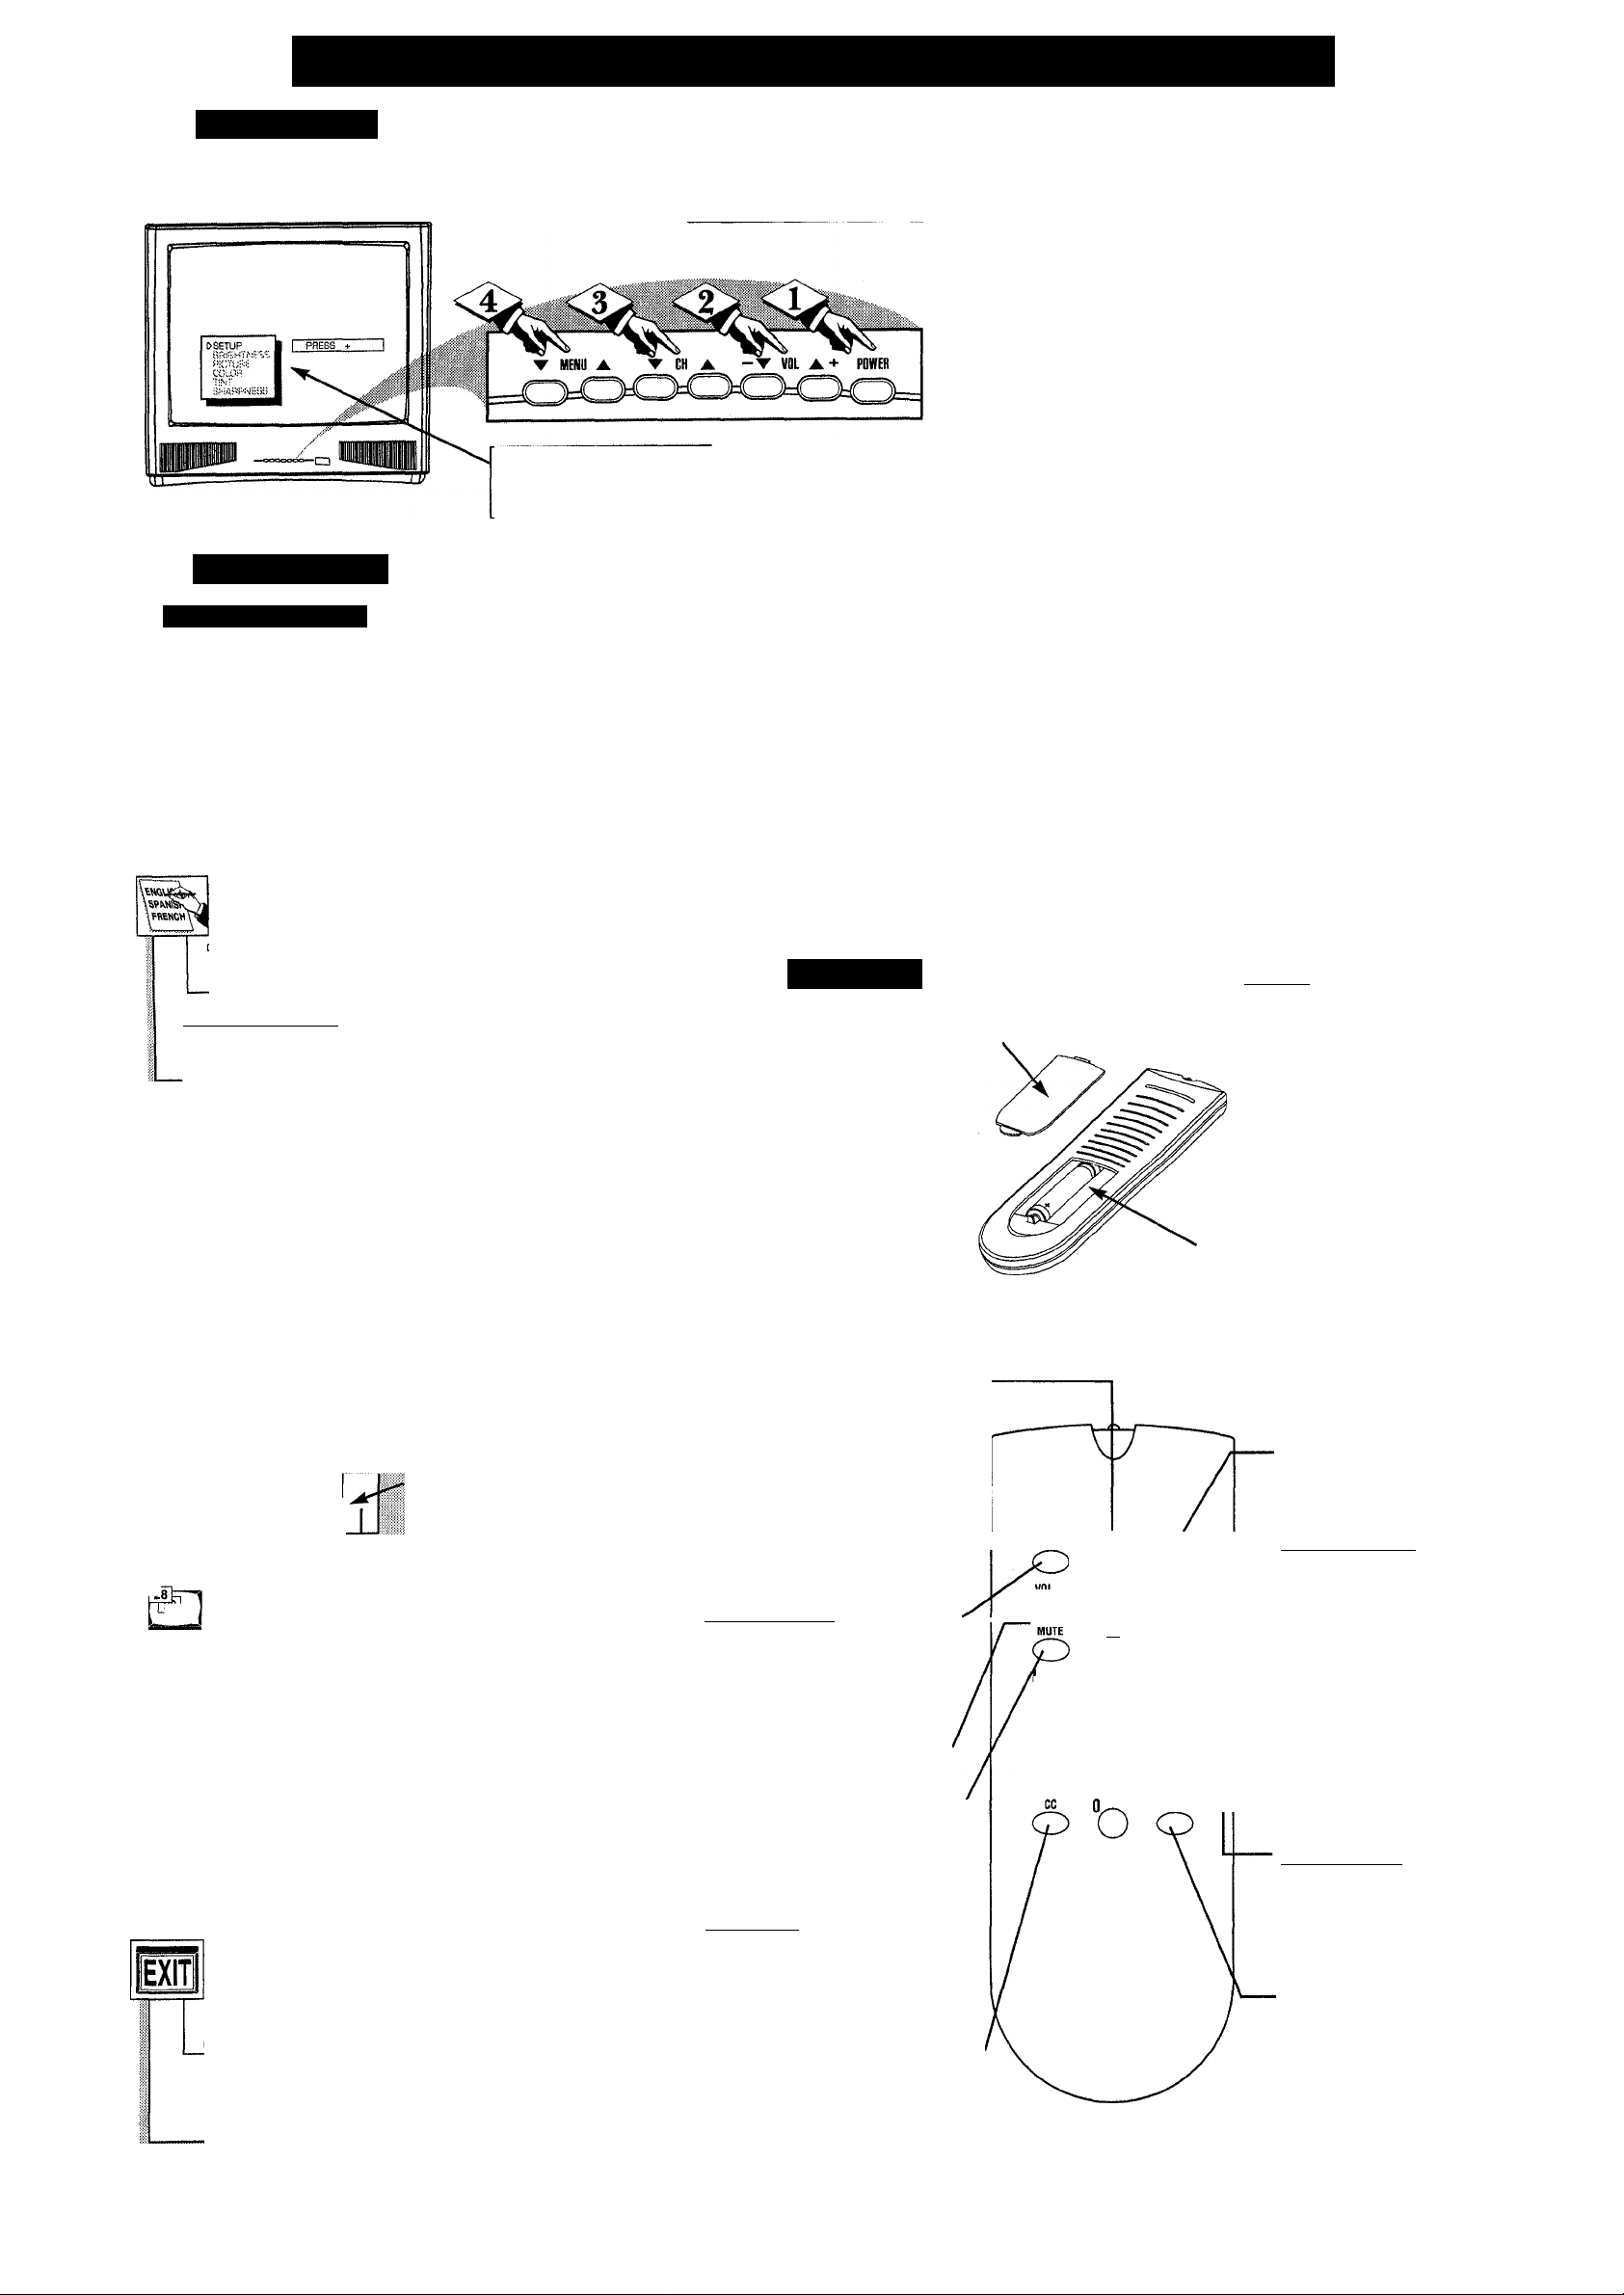
How TO Use and Setup our TV for the First Time
riU
Television
Setup Menu
Automat ic Si tttncs
irst Time Setup takes care
of some basic TV control
F
settings for you. Follow the steps
in this section to quickly add
area channel numbers into the
TV’s memory, set the Language,
and the TV for Antenna or Cable
signal.
PRESS + TO SELECT LANGUAGE
I ËNGLISh'1 I ESPAÑOLÌ I FRANÇAIS I
m
t> AUTO CABLE SELECT..
PRESS + TO DETERMINE
IF CABLE CHANGES ARE PRESENT
AUTO CABLE SEARCH
PLEASE WAIT
AUTO CABLE SEARCH
CABLE CHANNELS ARE PRESENT
OR
AUTO CABLE SEARCH
NO CABLE CHANNELS ARE PRESENT
a.
[> AUTO PROGRAMMING
PRESS + TO
AUTO PROGRAM CHANNELS
AUTOPROGRAM
SEARCHING FOR
CHANNEL 12 FOUND
AUTOPflOGRAM
SEARCH COMPLETED
PRESS + TO
EXIT
<î>
Press the POWER
button to turn the TV ON.
The SETUP on-screen control is auto
matically selected when you first plug
in your TV and press the MENU but
ton (on the TV or remote.)
Tbeoin)
r<i> Press MENU (M)
button on the remote (or
MENU A or T buttons on the
TV). An on-screen list of fea
tures appears on the TV screen.
LANGUAGE
1\'ith the Language feature
selected, press the VOI. i-t-l
hutloti to choose English,
Español (Spanish), oi Français
(.French) for the TV's on-screen
menu conirol.s.
Al TO CABLE SEI.ECT
With Auto Cable Select cho
sen. press the VOL (-b) button
to automatically determine if
cable channels are present.
-TV set to receive Cable TV
supplied channels.
TV set to receive .Antenna
.supplied channels
AUTO
PROGRA.MMINC;
Willi the Auto Programming
Nature selected, press the \’OL
(+) button to automatically
store al! available cliannels into
the TW’s nieniorv.
EXIT
Pressing the \'OL (,-b) button
witli the Exit feature selected
will return you to the main on
screen menu.
<l>
Press the VOLUME UP
(A) or DOWN (T) button to
adjust the sound level.
<l>
Press the CH (-1-) or (-)
buttons on the remote (or the
MENU A or V buttons on the
TV) to select the SETUP feature
with the on-screen arrow.
<l>
Press the VOL (-b) button to
access the SETUP on-screen
menu. Then, press the CH (-b)
or (-) buttons to scroll the
SETUP options. Next press the
VOL (-b) or (-) buttons as direct
ed to use the selected menu items.
Remote
0 load the supplied batter
T
ies into the remote:
1. Remove the battery com
partment lid on the back of
the remote.
2. Place the batteries (2AAA) in the remote. Be
sure the (-b) and (-) ends of
the batteries line up correct
ly (inside of case is
marked.)
3. Reattach the battery lid.
Channel Scan Button
Press to scan up or down through
channel numbers. (Also can be
used with the MENU button to
select on-screen controls. With the
Menu displayed, press Channel ▲
or ▼ buttons to move up or down
the list of controls.)
Status/Exit Button •
Press to see the current channel
number on the TV screen. Also
press this button to clear the TV
screen after control adjustments.
Menu Buttons
Press the M button to show on
screen controls. Press Channel (-b)
or (-) buttons to move through the
list of controls. Press the Volume
(-b) or (-) buttons to adjust the
MENU controls.
Mute Button
Press to turn the sound OFF on the
TV. Press again to return the sound
to its previous level.
CC Button ------------------------------
Press to select the Closed Captioning
mode. (CC w MUTE, CAPTION 1,
CAPTION 2, or OFF)
----------------------
-------------------------
<s>
Press the CHANNEL UP
(A) or DOWN (▼) button to
select TV channels.
Press the MENU UP (A) or
DOWN (▼) button to display
the TV’s on-screen menu. Then
press the MENU UP (A) or
DOWN (T) button to scroll
through the list of on-screen fea
tures. jflBk
----------------------------
<l>
Press the STATUS/EXIT
button on the remote to clear
the screen after an adjustment,
or scroll to the “EXIT” option
in the SETUP screen and press
the VOL (-b) button to bring
you back to the main on-screen
menu.
You can also just wait and after
a minute the MENU will drop
automatically from the screen.
Battery Lid
Battery Compartment
STATUS/EXIT CH
POWER
o
CH A/CH
o
O b b
b b 'g-
b b ’o
SLEEP
^
■|ffi
pnii^^
Remember, g
you can press
any button on the
front of the TV to
turn the TV ON.The
tuned channel num
ber will always
briefly appear when
the TV is first turned
ON (and with chan
nel changes.) You
can also press the
STATUS button (on
the remote) to see
what channel the TV
is ON.
Press the i
remote’s STATUS
button (or use
“EXIT”) to back out
of the SETUP menu.
Remember, SETUP
is a first-use, one
time operation and
will not have to be
repeated (even if the
TV is unplugged.)
-{BEGIN}-
r^i
Point the remote
control toward the remote
sensor window on the TV
when operating the TV with
the remote.
-------------------------^
Power Button
Press to turn TV ON and
OFF.
Volume (-) and t-b)
BuMons
Press to adjust the TV
sound level. When used
with the MENU button,
press to adjust the selected
on-screen (MENU) feature
controls.
A/CH Button
Press to toggle between cur
rent and previously viewed
channel.
Number Buttons
Press two number buttons
to select TV channels. For
example: to select channel
6... press "0" first; then "6".
Sleep Button
Press to set the TV to auto
matically turn itself OFF.
Page 4
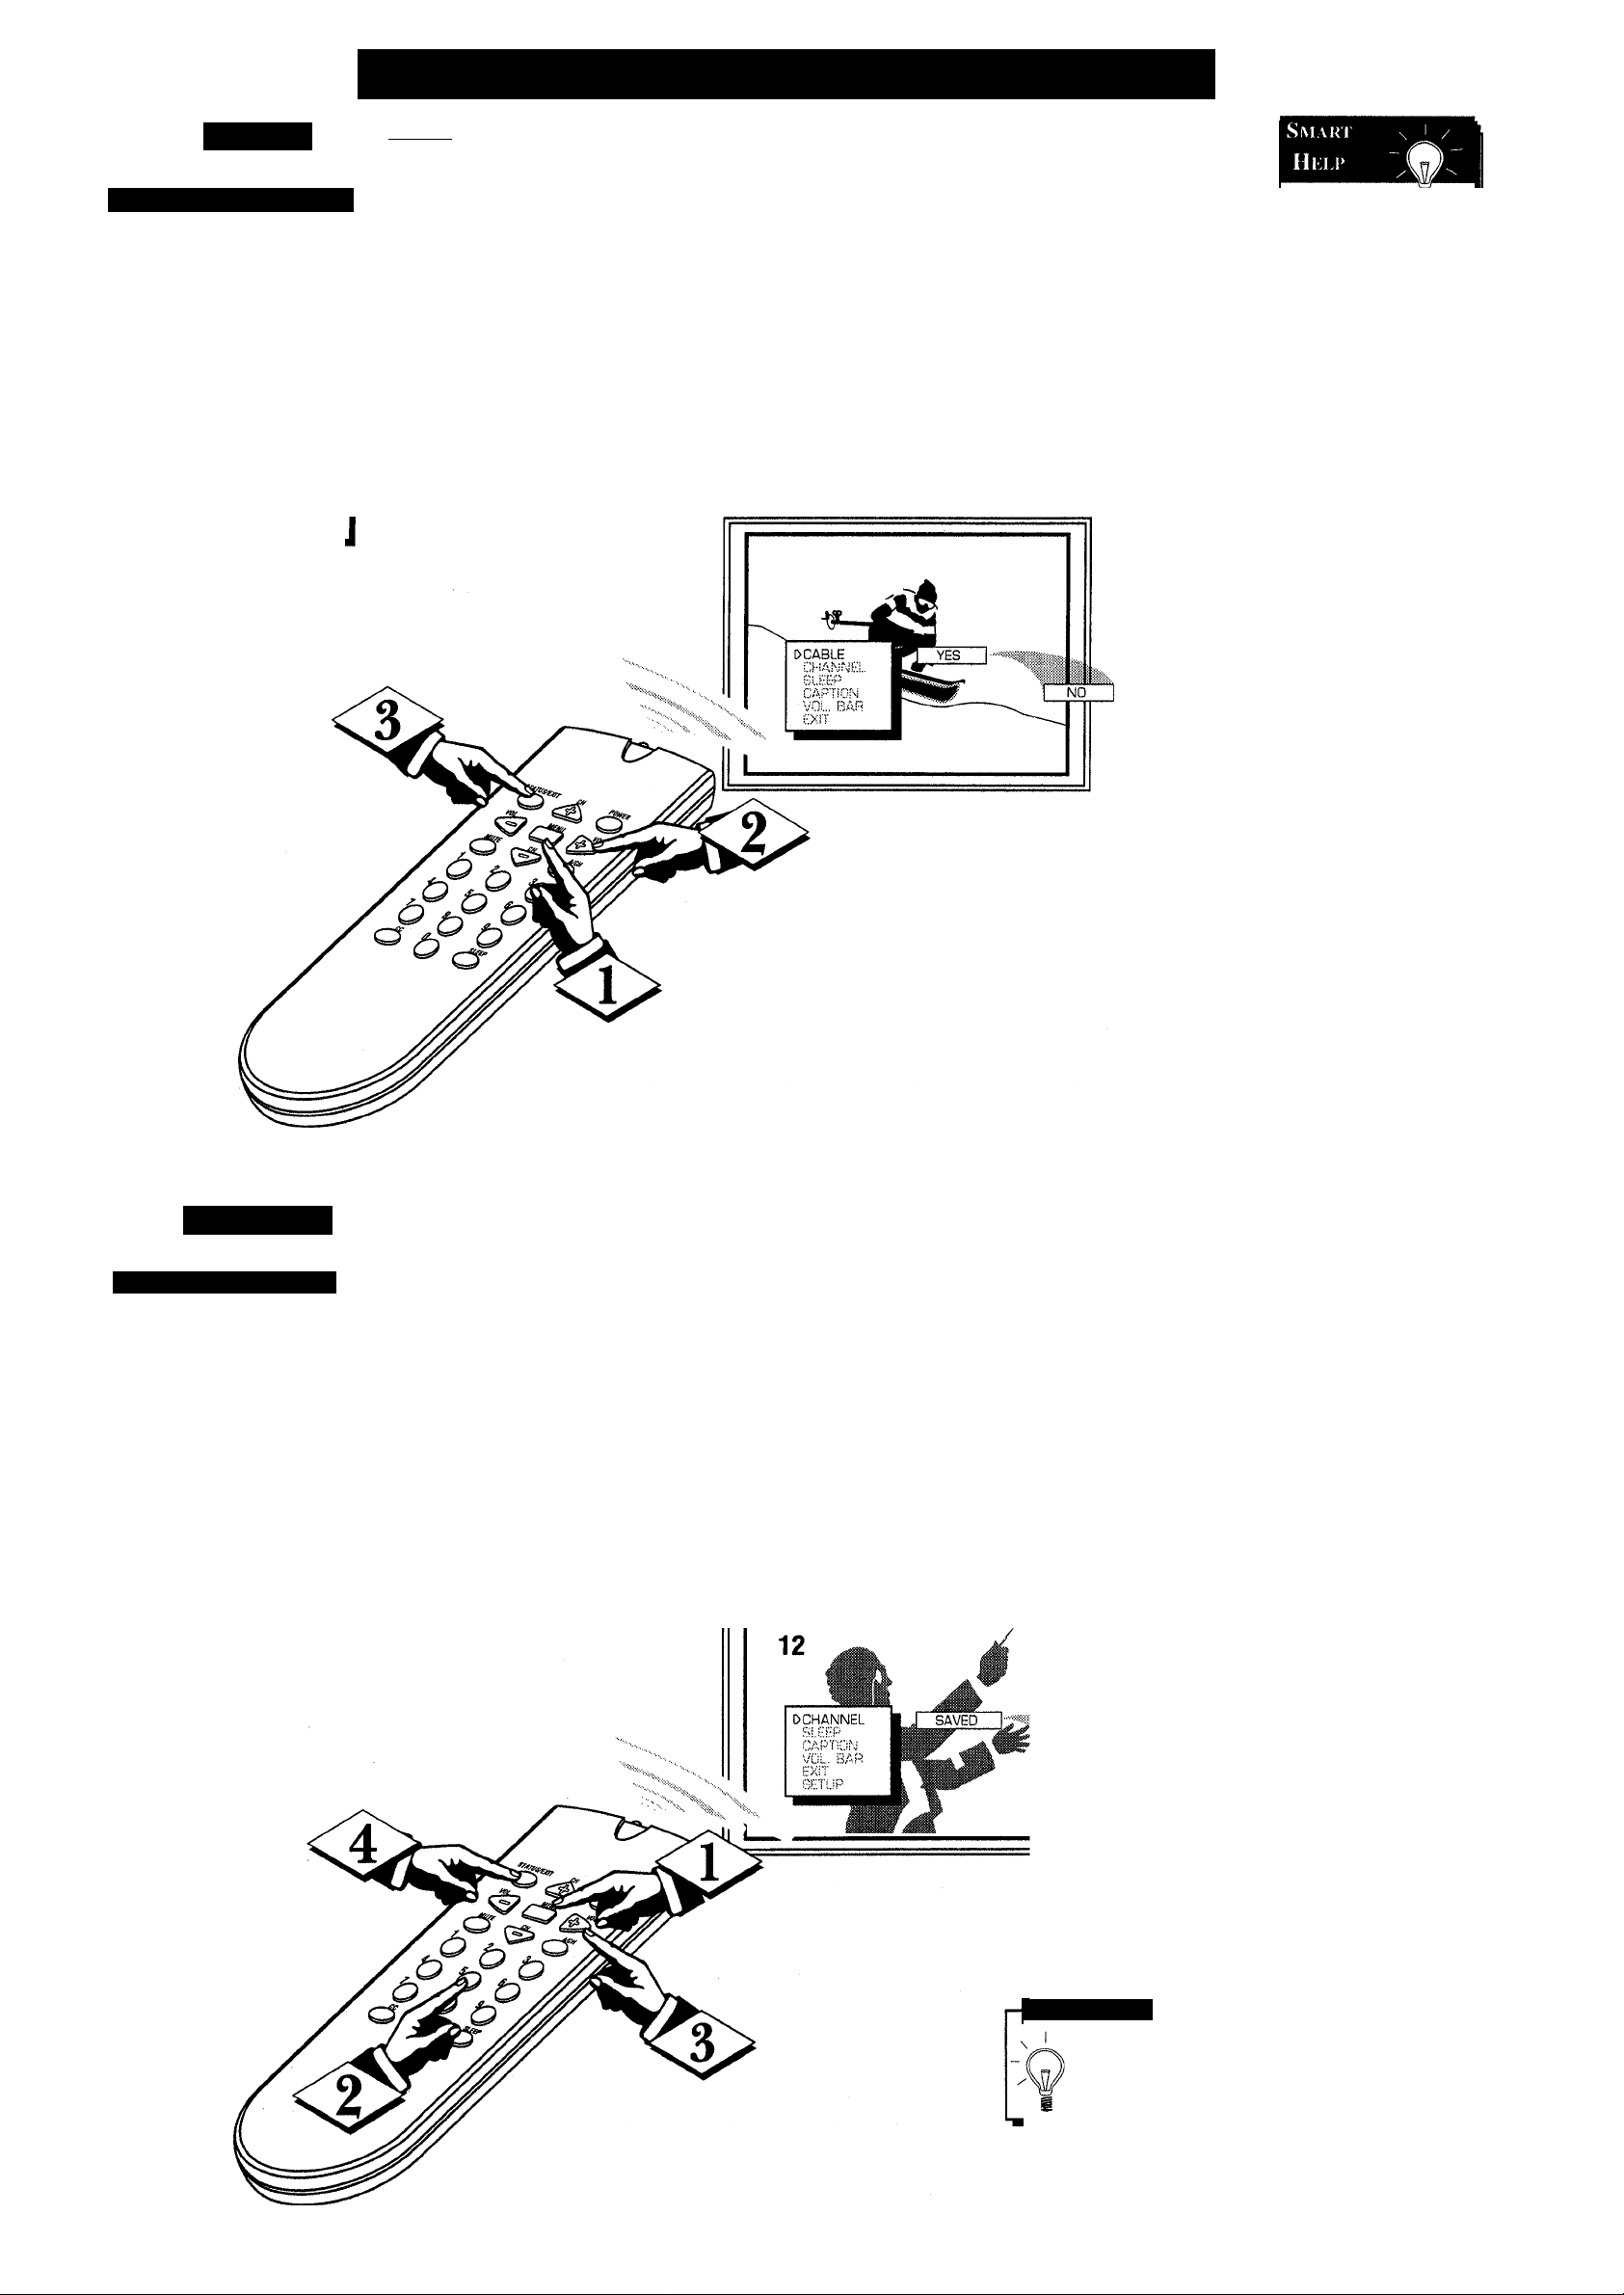
On-Screen MENU Controls (continued)
Cable
Сли1 !•: OK Antlnna Im>i i
T^OTE: If you went
1 T through First Time Setup
(page 3), this task has already
been completed for you.
You need to make sure that
the TV is set to pick up either
Cable TV stations or Antenna
signals. In other words, the
TV needs to know whether
you have connected a Cable
TV signal or a normal anten
na to its ANTENNA plug (see
page 2).
■CbeqinI—--------------------------
r4> Press the MENU (M)
button on the remote, then the
CH (+) or (-) buttons (or press
the MENU A or ▼ on the TV)
to select the word CABLE
with the TV’s on-screen Arrow.
<l>
Press the VOL (+) or (-)
buttons (on the TV or the
remote) to select either:
YES- If you have Cable
TV connected to the
TV. Channels 1-125
can be selected.
NO- If you have an Antenna
connected to the TV.
Channels 2-69 can be
selected.
<l>
Press STATUS button on
the remote control to clear the
screen.
1^
Try it out. i
Press the CHANNEL
(+) or (-) buttons and
scan the channels. CH
(+)> (-) works only
after STATUS button
is pressed to clear the
screen (or Menu times
out - about 1 minute.)
Remember, to set the
TV to select the chan
nels on your Cable
system, or in your
area, see the "Auto
Programming" steps in
the SETUP section on
page 3, and “Adding
Channels ’’ in the sec
tion below.
rQ
Add/Dki.kti: Ciiannki s
A
channels it can find (on your
Antenna or Cable TV system)
into the TV's memory.
SavelDelete channels makes
it easy for you to add other
channels, or drop unwanted
channels, from the list of
channels in the TV's memory.
Channel
uto Programming (see
page 3) adds all the
I—(ЩаШ)
r<£>
button on the remote, then the
CH (+) or (-) buttons (or the
MENU A or T on the TV) to
select the word CHANNEL
with the TV’s on-screen Arrow.
Press the MENU (M)
<l>
Press Channel Number
buttons on the remote (or CH
A or T buttons on the TV) to
select the channel you want to
SAVE (or DELETE.)
<l>
Press the VOL (-h) button
to SAVE the selected channel
number into memory.
Press VOL (-) button to
DELETE a channel from
memory.
DELETED
Press the STATUS button
to clear the screen after adding
(or deleting) all the channels
you want.
Smari Help
/ To SAVE a channel above 100, use the CH
AT buttons on the TV. The remote number
buttons only go up to channel 99.
Page 5
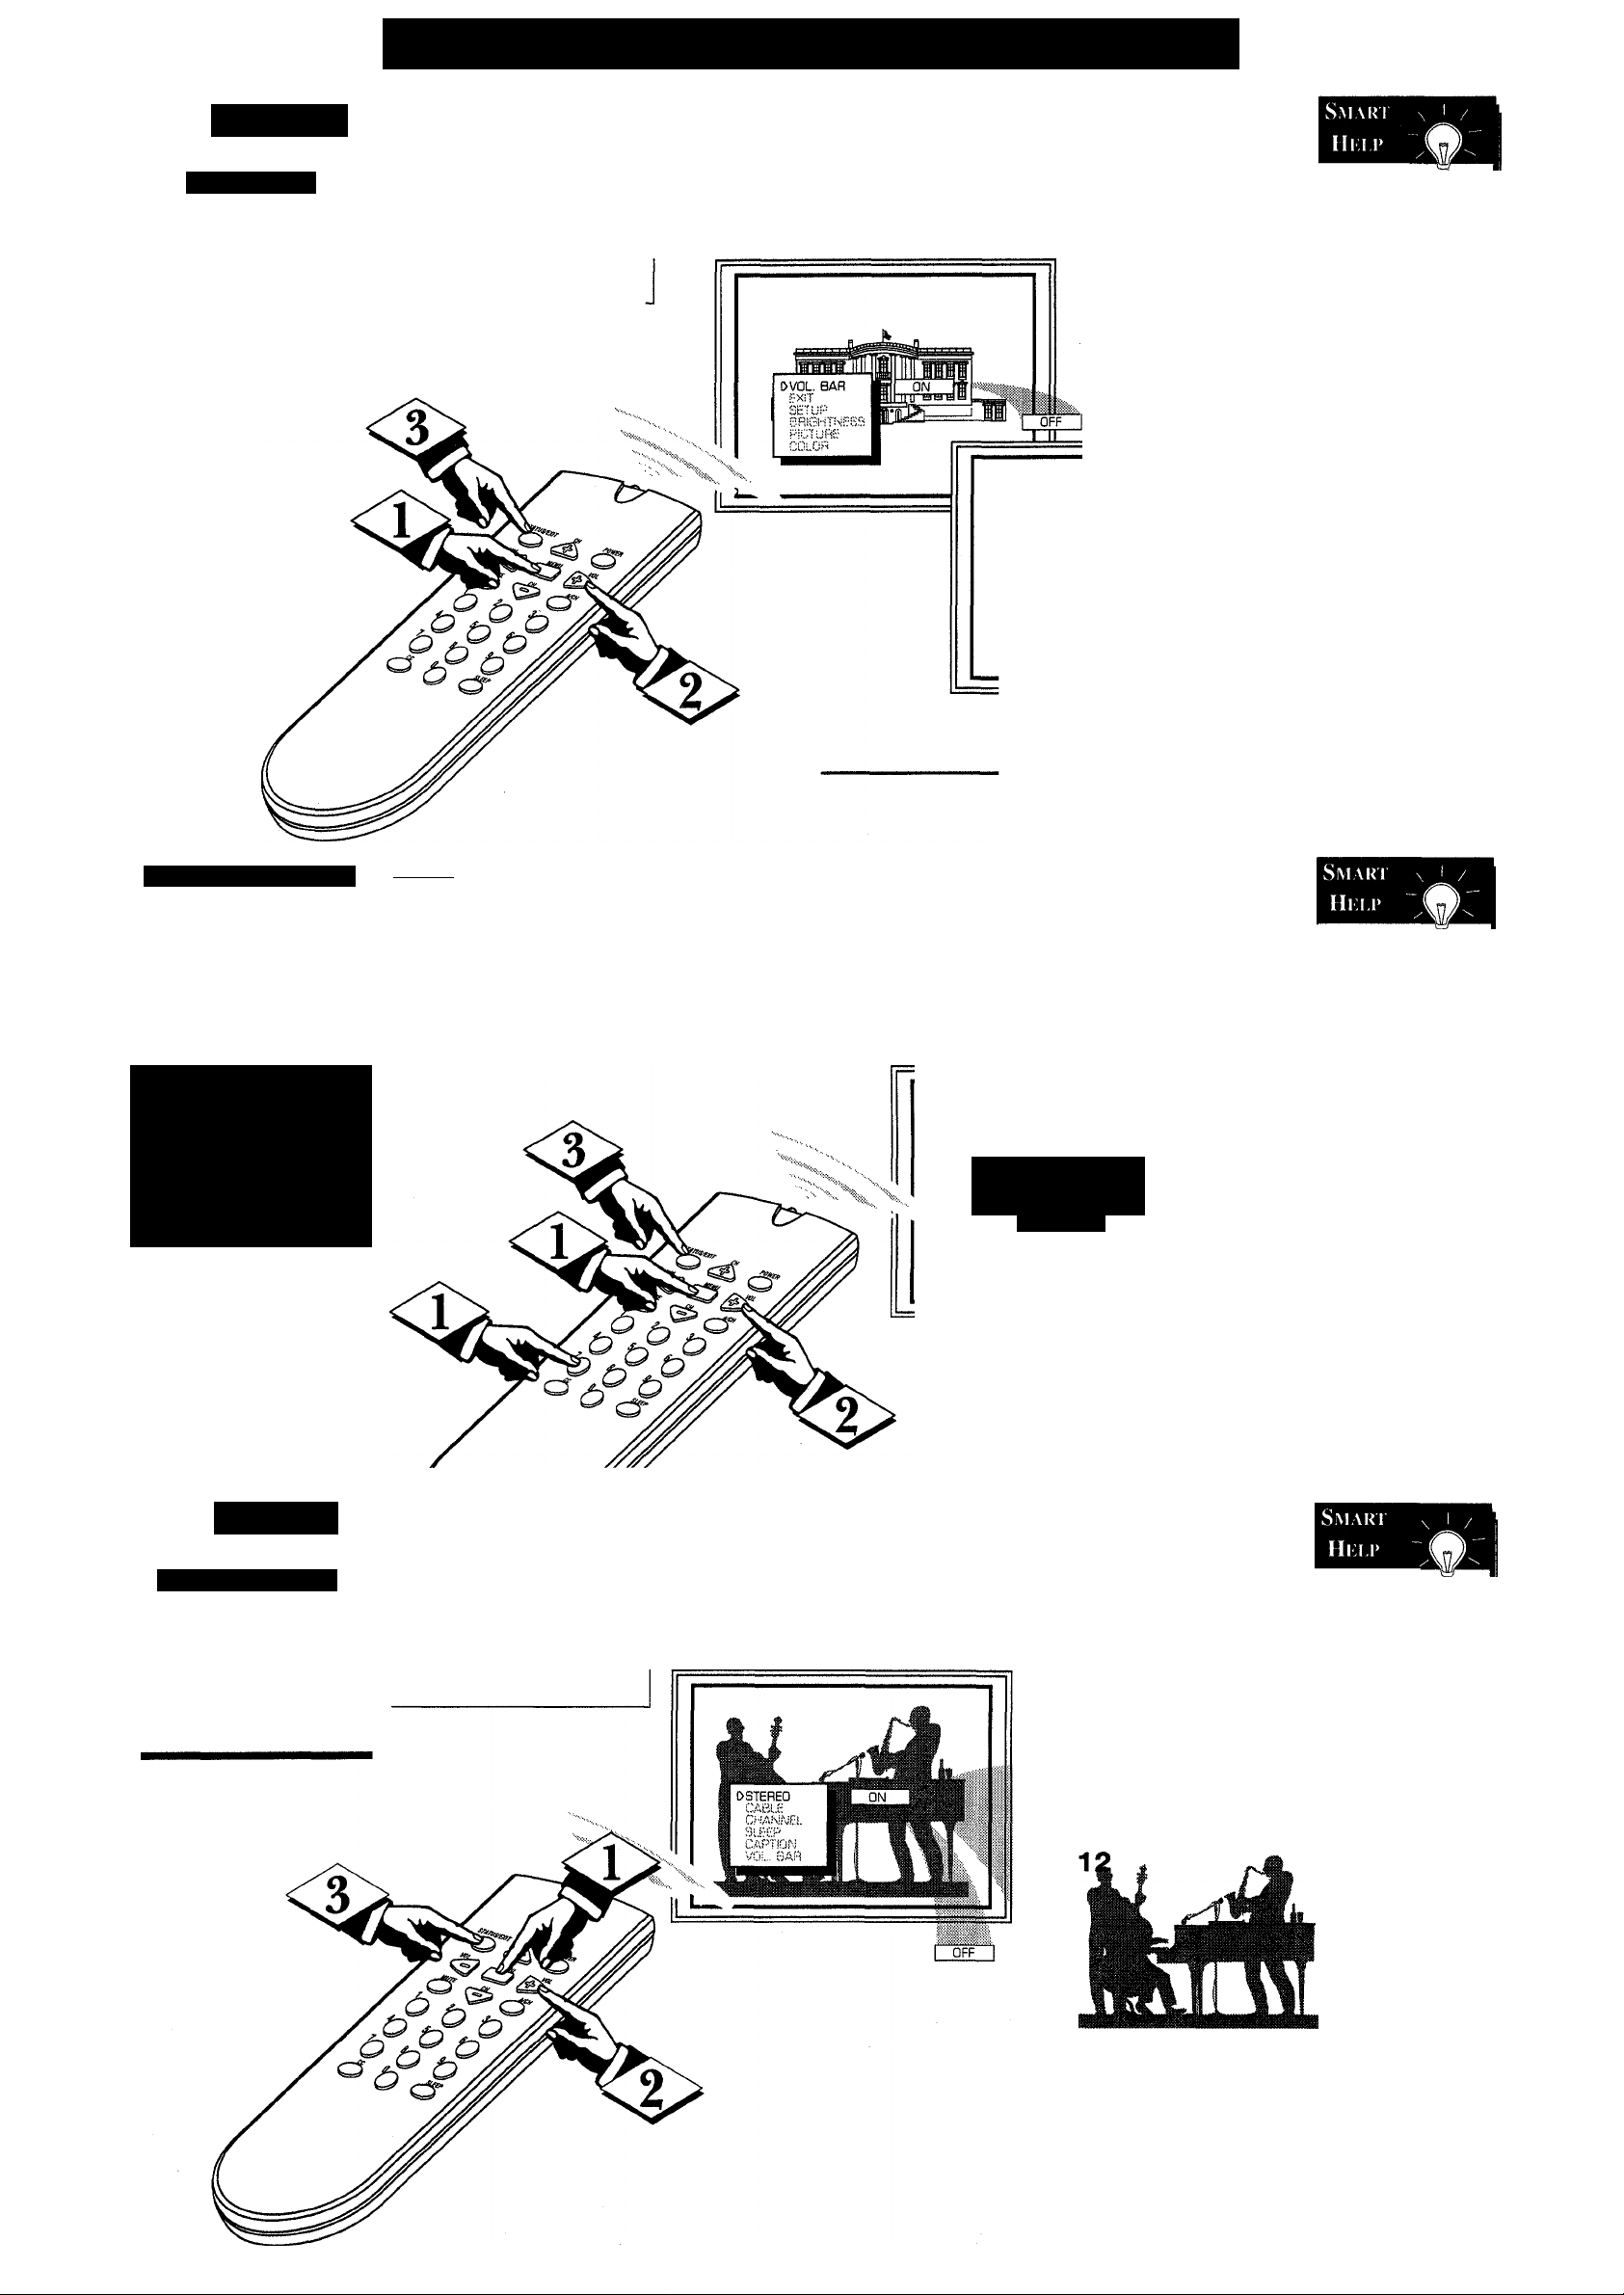
On-Screen MENU Controls (continued)
rO
T Tse the Volume Bar соп
ку trol to see the TV’s vol
ume level settings on the TV
screen. Once set the Volume
Bar will he seen each time
the VOLUME buttons (on the
TV or remote) are pressed.
Volume
VoijiMK Bar
I__tBEQINl------------------------------
r Press the MENU (M)
button on the remote, then
press the CH (+) or (-) (or
press the MENU A or ▼ but
tons on the TV) to select the
word VOL. BAR with the
TV’s on-screen Arrow.
<l>
Press the VOL (+) or (-)
buttons to turn the VOL BAR
control ON or OFF.
<l>
Press STATUS button to
clear the screen.
Sltlfe
Jiill III 111 III fill.
VOLUME
Try it out.
Press the VOL (-I-)
or (-) buttons. The
VOLUME BAR
should appear at the
bottom of the
screen.
NOTE: The TV's
volume level can
also be lowered
when the set is
turned OFF.
Limiting tiiI'. Voi.iimk
ou can limit the maximum
volume level of the TV
y
set. Once the Volume Limiter
control is set the TV sound
cannot be played louder than
the maximum preset level.
NOTE: Not all features (and
drawings) diseiissed in this
niaruial will necessarily
match those found with
your television set. This is
normal and does not require
you contacting your dealer
or requesting service.
(BEGIN)
г4>.
0, 9,1; then press MENU (M)
button on the remote or TV.
The VOL. LIMIT bar will
show on the screen.
Press numbers 0, 7, 2,
<l>
Press the VOLUME (+)
or (-) button until the VOL.
LIMIT bar is at the level you
want to be the highest possible
volume.
Press the STATUS but
ton to set the maximum vol
ume level. The screen will
clear and the TV will return to
normal channel viewing.
----------------------------
eiii pp
1 »1^1 iM
ЙМ11Ш
VOL. LIMIT
Remember,
the Volume Limit
Bar will appear to
^
return to the low end
of the register (when
the STATUS button
is pressed to set the
desired maximum
volume level - step #
3). This is nomial for
setting the Volume
Limiter. Your new
maximum volume
level has been kept
in memory.
Stereo
StkrI'O tv Solini)
our TV can receive
broadcast stereo TV pro
y
grams. The TV has both an
amplifier and twin speakers
through which the stereo
sound can be heard.
I—LBSaif&L
<3>i
Press the MENU (M)
button on the remote, then the
CHANNEL A or T buttons (or
the MENU A or T buttons on
the TV) to select the word
STEREO with the TV’s on
screen Arrow.
Ф
Press the VOLUME (+)
or (-) buttons to turn the
STEREO mode ON or off.
<l>
Press the STATUS but
ton on the remote control to
clear the screen.
Remember,
if the TV is
set to STEREO but
the current channel
is not broadcasted
in stereo, the sound
at the TV will
remain monaural.
STEREO
NOTE: The TV’s on-screen “STEREO”
indicator appears whenever the TV detects an
incoming stereo signal. Be sure the TV’s
STEREO control is also turned “ON” in order
for the stereo sound to be heard through the
TV’s twin speaker system.
Page 6
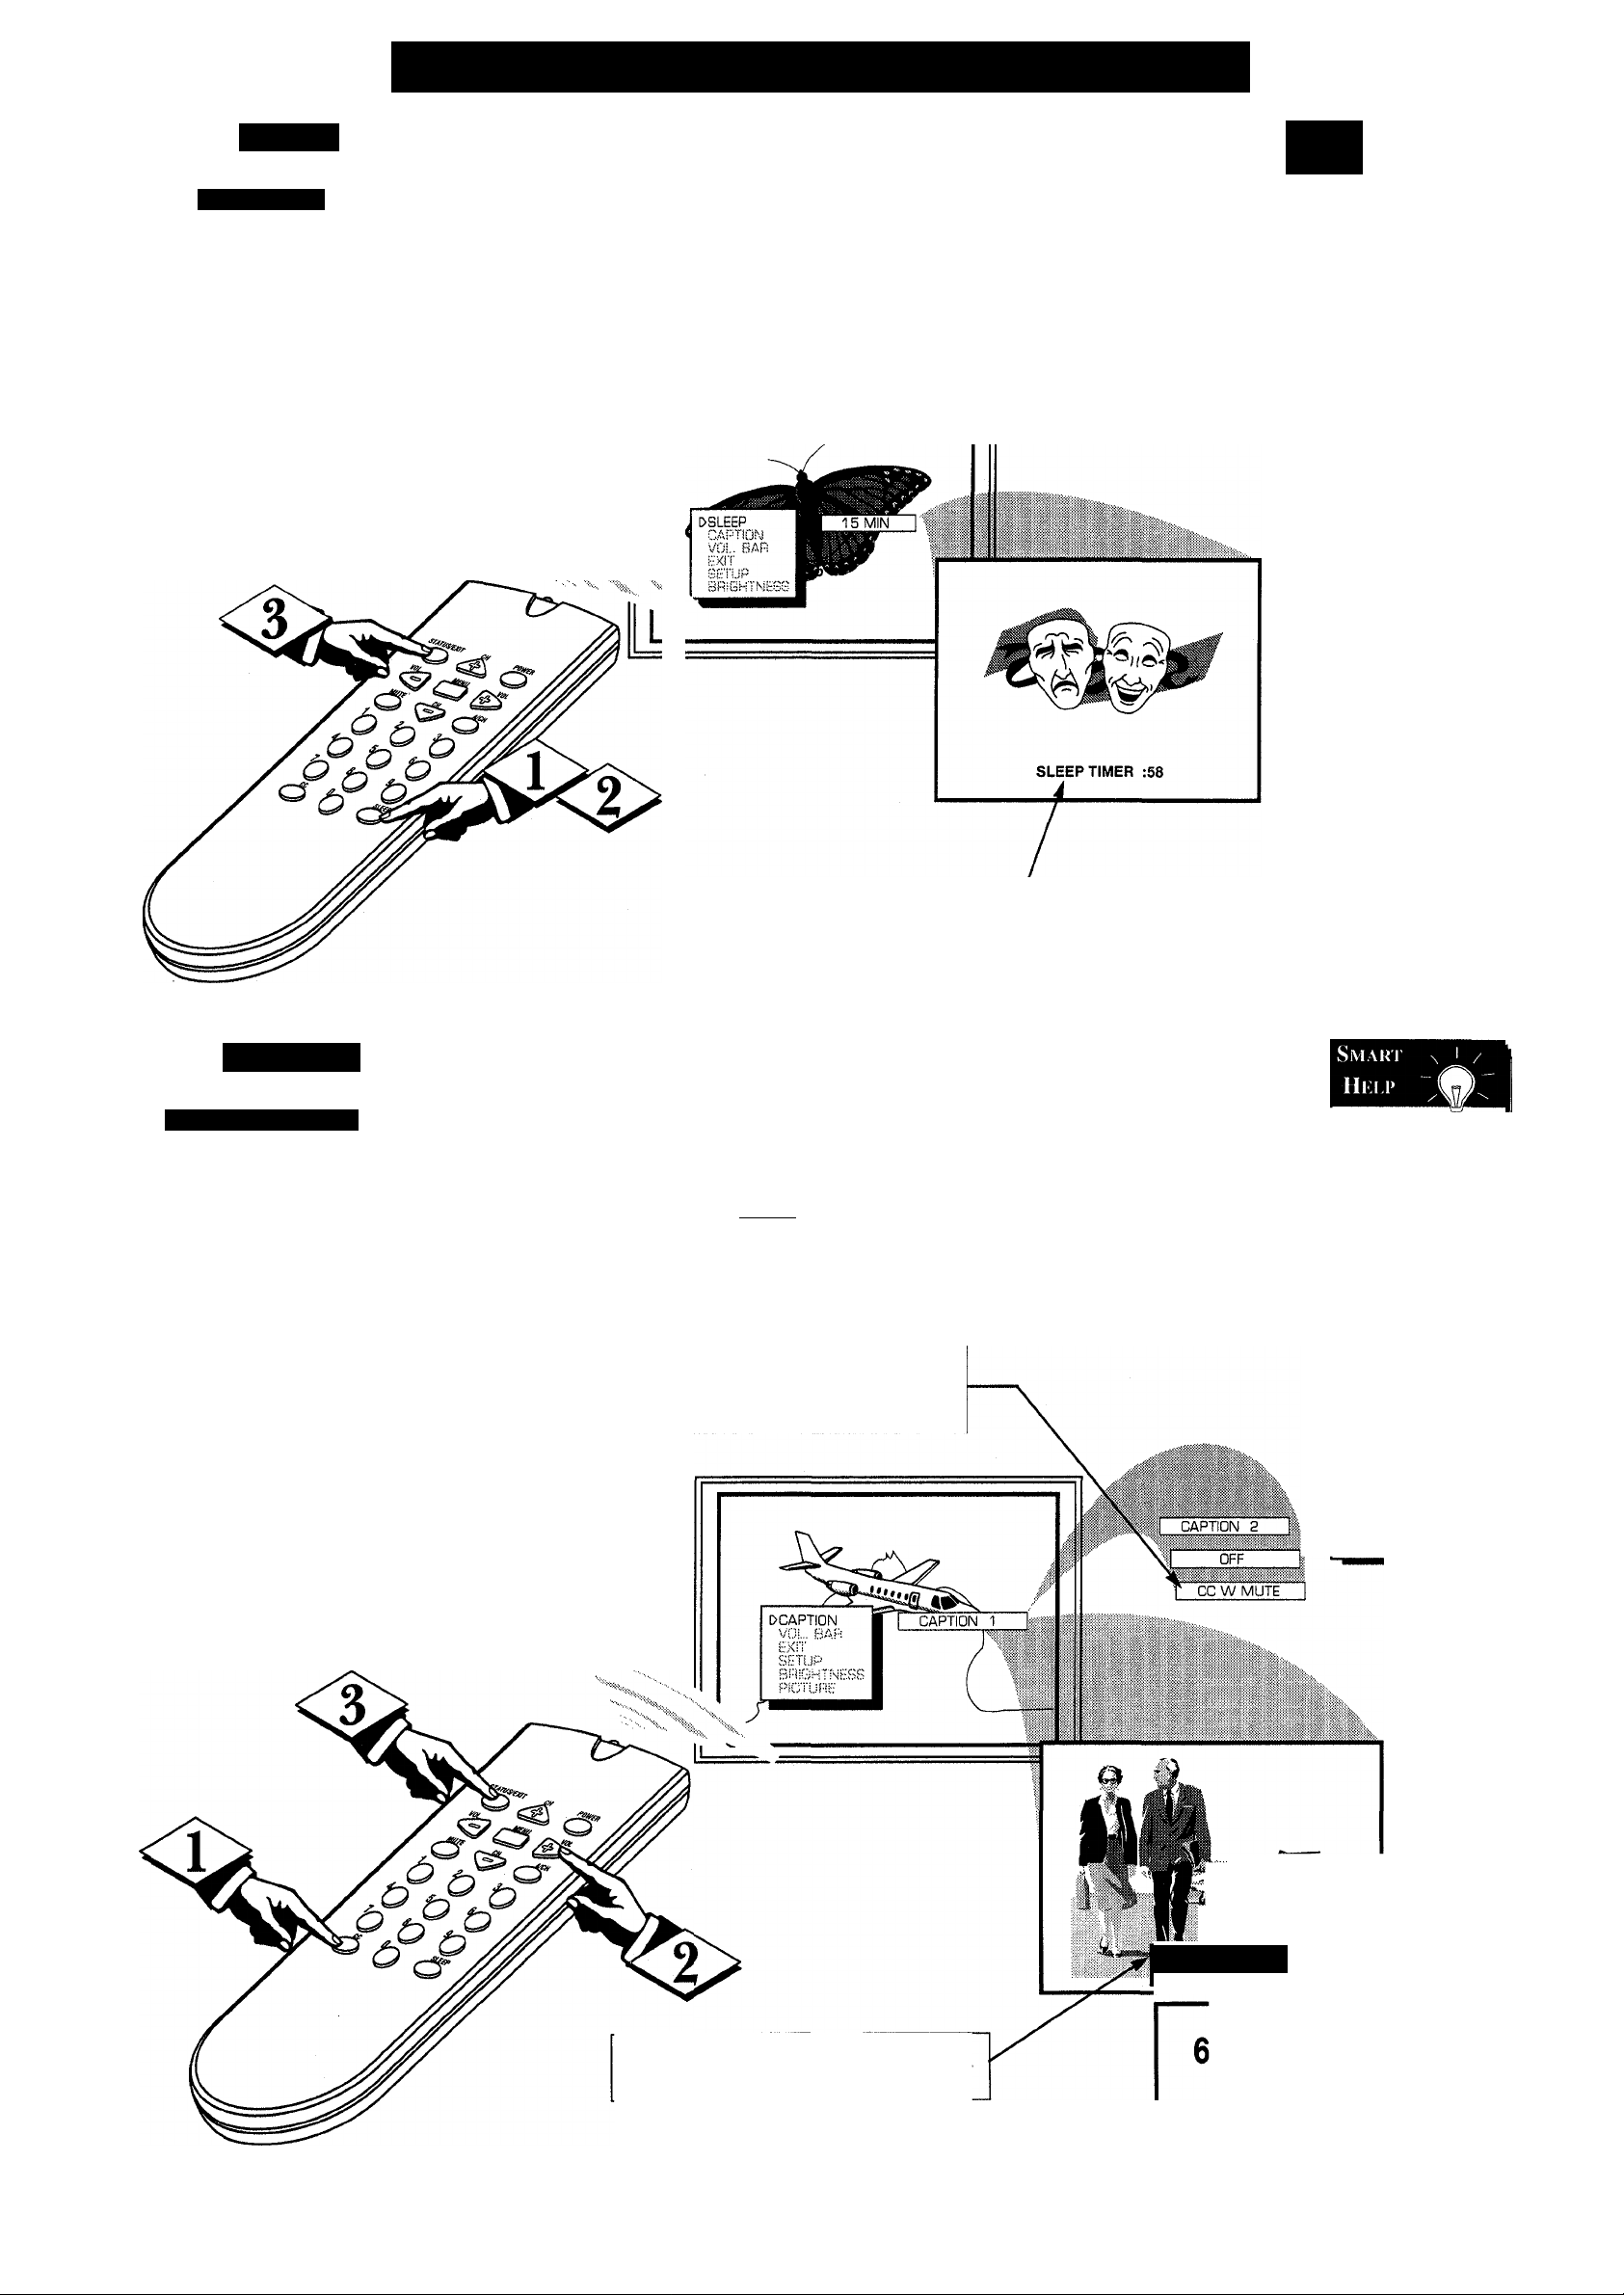
On-Screen MENU Controls (continued)
Sleep
Si.i;i:i> Timer
ave you ever fallen
asleep in front of the TV
^
only to have it wake you up
at two in the morning with a
test pattern screeching in
your ears? Well, your TV
can save you all that trouble
by automatically turning
itself off.
----------------------
Press the SLEEP but-
ton on the remote.
V
Press the MENU (M) button
on the remote, then press the
CH (+) or (-) (or press the
MENU A or T buttons on the
TV) to select the word SLEEP
with the TV’s on-screen Arrow.
Press the SLEEP button
repeatedly to pick the amount
of time (15 minutes to 2 hours
ahead) before the TV will turn
itself off.
The VOL (+) or (-) buttons can
also be used to set the amount
of time.
<l>
Press the STATUS button
to clear the screen after you
have set the time for the TV to
turn off.
An on-screen count down will
appear during the last minute
before the TV shuts itself off.
Smaki
Heli>
Remember. If
you ever want to see how
many minutes are left
before the TV shuts itself
off, press the STATUS
button on the remote.
If you want to stop a
SLEEP TIMER setting,
reset the timer back to
OFF. You could also turn
the TV off, and then back
on again, to cancel a set
ting.
_____________
Pressing any key on the
remote or TV in the last
60 seconds will cancel the
SLEEP TIMER setting.
HQ
Caption
Ci.osi.i) Captionin(;
losed Captioning allows
you to read the voice
C
content of television pro
grams on the TV screen.
Designed to help the hearing
impaired, this feature uses
on-screen "text boxes" to
show dialogue and conversa
tions while the TV program is
in progress.
Note: Broadcast stations will
often use spelling abbrevia
tions, symbols, dropouts and
other grammatical shortcuts
in order to keep pace with the
on-screen action. These type
factors vary upon the source
of the captioned text material
and do not indicate a need
for service on the part of the
TV.
dipai-
<f>-
Press CC (Closed
Caption) button on the remote
to select the word CAPTION
with the TV’s on-screen Arrow.
NOTE: The “CC W/MUTE” setting automatically switches the TV to
the Closed Caption 1 mode whenever the MUTE button (on the remote
control) is pressed. The Closed Caption 1 mode will turn OFF when the
TV sound is returned or unmuted.
<l>
Press CC (Closed
Caption) button repeatedly to
select the desired Closed
Caption (CC) mode - For
Example: CAPTION 1.
Note: Usually “CAPTION 1" is
the most used mode to view
captioned material.
During the last minute of a SLEEP TIMER setting
an on-screen count down will be displayed.
<l>
Press the STATUS but
ton after making your Caption
mode selection. The TV dis
play will clear and Captioning
material (if available on the
currently selected TV program)
will appear on the TV screen.
To cancel, set the CAPTION
feature to OFF when finished
viewing.
Remember,
not all TV
programs and prod
uct commercials are
made for broadcast
with Closed
Caption (CC) infor
mation included.
Neither are all
Closed Caption
modes (CAPTION
1 or 2) necessarily
being used by a
broadcast station
during the transmis
sion of a closed
caption program.
Refer to your area's
TV program listings
for die stations and
times of Closed
Caption shows.
CAPTION 1 or 2 mode; dialogue (and descriptions) for
the action on the captioned TV program shows on-screen,
(See Smart Help on this page.)
This symbol will appear
with channels that contain
Closed Captioning material.
JOHN: Wtiy did llicy move the
meelirK) up to this week?
MARSHA: I don'l Know, bul they
gUO»W 'iiii—
Page 7
On-Screen MENU Controls (continued)
rQ
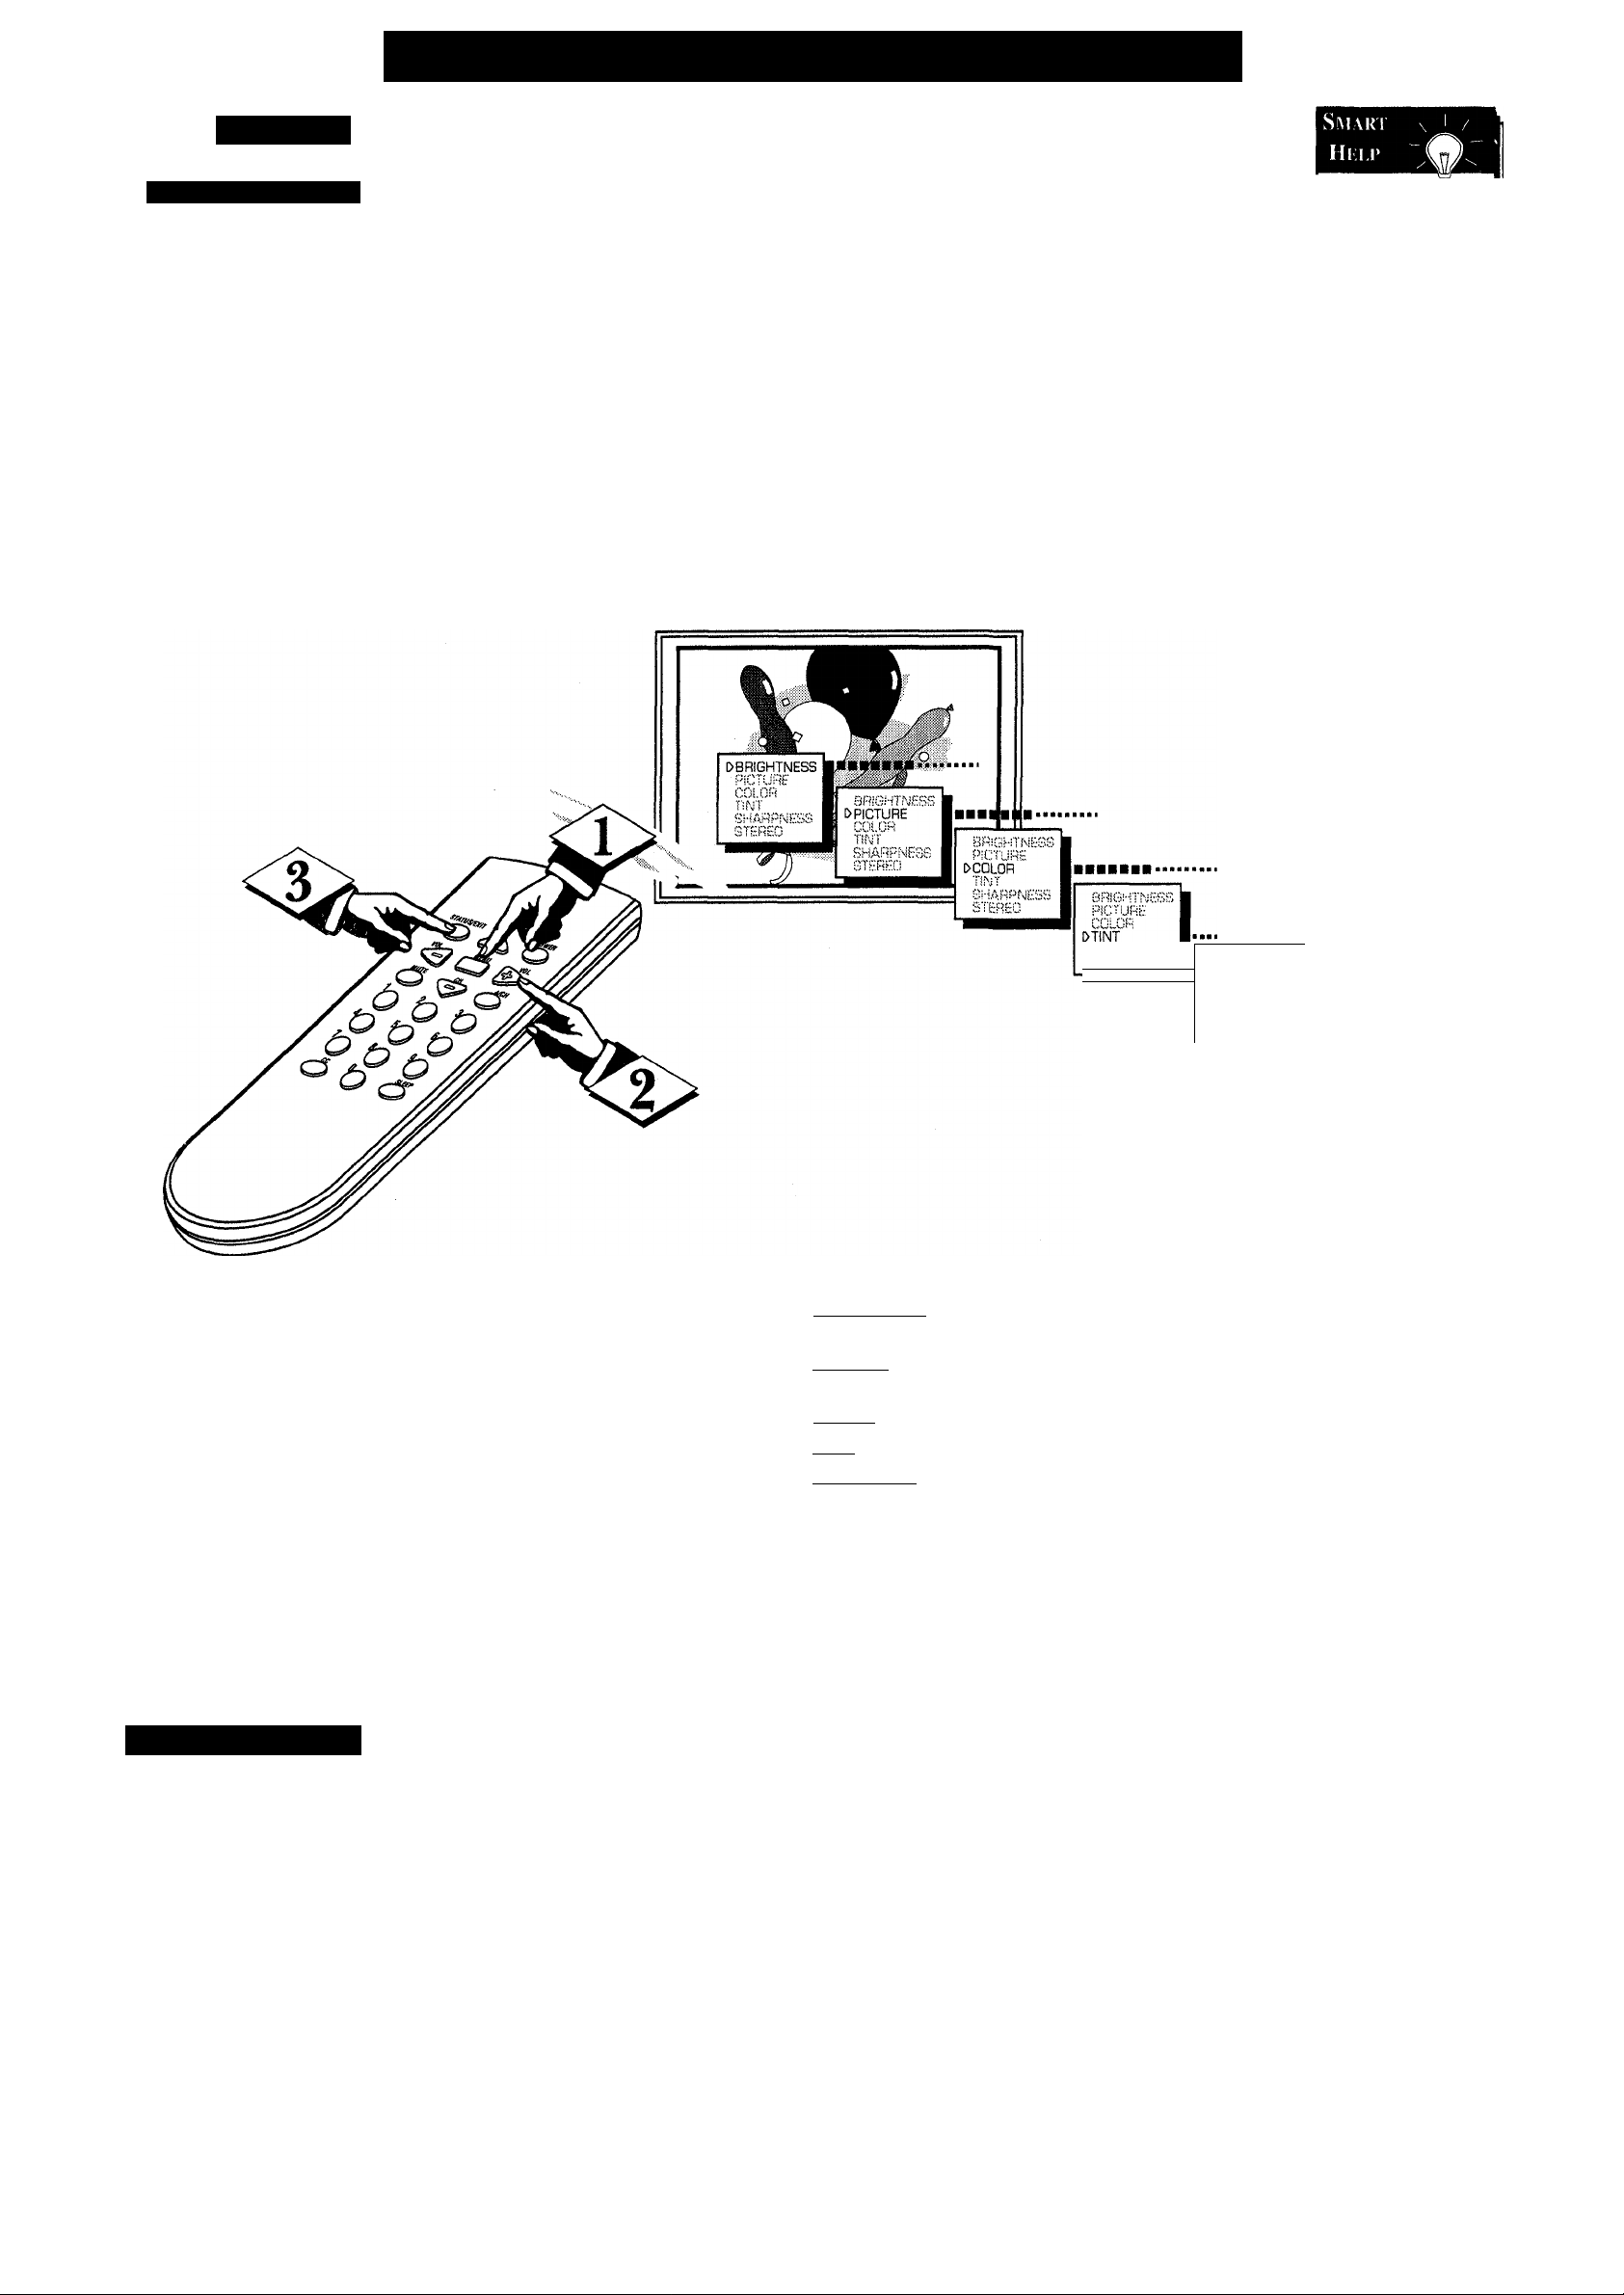
PlCniRl'. Adjusimen i s
and follow the steps shown to
the right.
Picture
adjust your TV picture
controls, select a channel
" Press the MENU (M)
button on the remote, then
press the CH (+) or (-) (or
press MENU A or ▼ buttonson the TV) until the desired
control shows on-screen.
<P
Press the VOL (-i-) and (-)
to adjust the selected picture
control.
<s>
Press STATUS button (or
EXIT Menu) to clear the screen
when picture adjustments are
completed.
----------------------------^
Remember,
with the bar scale
centered the control
settings are at normal
mid-range levels.
SHARPNESS ■
STSRSD 1
BRIGHTNESS Press VOL (-) or (+) until darkest parts of the picture are
as bright as you prefer.
PICTURE Press VOL (-) or (+) until lightest parts of the picture show
good detail.
COLOR Press VOL (-) or (+) to add or eliminate color.
TINT Press VOL (-) or (-h) to obtain natural skin tones.
SHARPNESS Press VOL (-) or (+) to improve detail in the picture.
BRIGtHYNSSS h
(:’iCTURe 1
CCLGR 1
TIImT I
OSHARPNESS 1
STEREO
Glossary
Round Cable 75£i * A single solid antenna wire normally matched with a metal
plug (F-type) end connector that screws (or pushes) directly onto a 75 Ohm input
found on the Television or VCR. (Also known as Coaxial Cable.)
Display * An on screen message or graphics that help the user operate and adjust
his Television feature controls. See On Screen Displays (OSD).
Jack Panel * Refers to the area on the back of the TV cabinet where the input
and/or output connections are located.
On Screen Displays (OSD) * Refers to the wording or messages generated by the
television (or VCR) to help the user with specific feature controls (color adjust
ment, programming, etc.).
Menu * An on-screen listing of feamre controls shown on the Television screen
that are made available for user adjustments.
Programming * The procedure of adding or deleting channel numbers into the
Television’s memory circuits. In this way the Television “remembers” only the local
ly available or desired channel numbers and skips over any unwanted channel num
bers.
Remote Sensor Window * A window or opening found on the Television control
panel through which infrared remote control command signals are received.
Status * Allows the user to quickly confirm what channel number is currently being
viewed. Status can also be used to clear the Television of on screen displays or infor
mation (rather than waiting for the displays to “time out” or automatically disappear
from the screen).
Twin Lead Wire * The more commonly used name for the two strand 300 Ohm
antenna wire used with many indoor and outdoor antenna systems. In many cases this
type of antenna wire requires an additional adapter (or balun) in order to connect to
the 75 Ohm Input terminals designed into the more recent Televisions and VCRs.
Volume Bar * When in the ON position, this feature displays an on-screen display
of the TV’s volume setting.
Page 8

m Tips
l uoi i!i.i:siio()i i\(i
lease make these simple
checks before calling for
P
service. These tips can save
you time and money since
charges for TV installation
and adjustment of customer
controls are not covered
under your warranty.
CAUTION: A video source
(such as a video game,
Compact Disc Interactive CDI, or TV information
channel) which shows a con
stant non-moving pattern on
the TV screen, can cause pic
ture tube damage. When not
in use, turn the video source
OFF. Regularly alternate the
use of such video sources
with normal TV viewing.
■C^
--------------------------------
No Power
Check the TV power cord.
Unplug the TV, wait 1
minute, then reinsert plug
into outlet and push POWER
button again.
Check to be sure outlet is not
on a wall switch.
This TV is equipped with
protective circuitry that shuts
the TV off in case of moder
ate power surges. Should
this occur turn the TV back
on by pressing the POWER
button once or twice, or
unplug (wait 10 seconds) and
then replug the power cord at
the AC outlet. This feature is
NOT designed to prevent
damage due to high power
surges such as those caused
by lightning, which is not
covered by your warranty.
General Information
<l>
No Sound
Check the VOLUME buttons.
Check the MUTE button on
the remote control.
<S>
No Picture
Check the CABLE/YES NO
control for correct position.
Check antenna connections
on the rear of the TV. Are
they properly secured to the
antenna plug on the TV?
<$>
Remote Doesn't
Work
• Check batteries. Replace
with AAA Heavy Duty (Zinc
Chloride) or Alkaline batter
ies if necessary.
• Clean the remote and the
remote sensor window on the
TV.
• Check the TV power cord.
Unplug the TV, wait 1
minute, then reinsert plug
into outlet and push POWER
button again.
-------------------------
Wrong Channel
tor no Channels
above 131
Repeat channel selection.
Add desired channel num
bers (CHANNEL control)
into TV memory.
Check CABLE/ YES NO
control for correct position.
Cleaning and Care
Unplug the TV before clean
ing.
Avoid using anything abra
sive that could scratch the
screen.
Wipe the TV screen with a
clean cloth dampened with
water.
Gently wipe cabinet surfaces
with a clean cloth or sponge
dampened with cool clear
water. Use a clean dry cloth
to dry the wiped surfaces.
Occasionally vacuum the
ventilation holes or slots in
the cabinet back.
Never use thinners, insecti
cide sprays, or other chemi
cals on or near the cabinet.
I Index
First Time Use
Glossary ........................ ....7 Programming
6
Language
2
Menu Button ................. . . . .3 RF Cable
3
Minus(-) Buttons .... . . . .3
3
Picture Adjustments ..
3
Plus(-i-) Button.............. . . ..3 Sensor Remote ....
1
COLOR TELEVISION
90 Days Free Labor
............
....3,4
...........
...........
...........
...........
...........
...........
Accessories
Add Channels
Antenna Connect ....
Autoprogram
Batteries
Cable TV Connect ...
Cable TV Control ....
...................
...............
.................
.........................
....2
....4
....2
....3
.. . .3
___
2 Display
___
4 Features
Channel Memory ...
Closed Caption
Coaxial Cable .............
Controls/TV
Controls/Remote .. .
................
.......................
.......................
m Warranty
r
One Year Free Replacement of Parts (Two Years Free Replacement on Color Picture Tube)
This product can be repaired in-home.
WHO IS COVERED?
You must have proof of purchase to receive warranty service. A sales receipt or other doc
ument showing that you purchased the product is considered proof of purchase.
WHAT IS COVERED?
Warranty coverage begins the day you buy your product. For 90 days thereafter, all parts will
be repaired or replaced free, and labor is free. From 90 days to one year from the day of
purchase, all parts will be repaired or replaced free, but you pay for all labor charges. From
one to two years from the day of purchase, you pay for the replacement or repair of all
parts except the picture tube, and for all labor charges. After two years from the day of pur
chase, you pay for the replacement or repair of all parts, and for all labor charges.
All parts. Including repaired and replaced parts, are covered only for the original warranty
period. When the warranty on the product expires, the warranty on all replaced and
repaired parts also expires.
WHAT IS EXCLUDED?
Your warranty does not cover:
• labor charges for installation or setup of the product, adjustment of customer controls on
the product, and installation or repair of antenna systems outside of the product.
• product repair and/or part replacement because of misuse, accident, unauthorized repair
or other cause not within the control of Philips Consumer Electronics Company.
• reception problems caused by signal conditions or cable or antenna systems outside the
unit.
• a product that requires modification or adaptation to enable it to operate in any country
other than the country for which it was designed, manufactured, approved and/or autho
rized, or repair of products damaged by these modifications.
• incidental or consequential damages resulting from the product. (Some states do not
allow the exclusion of incidental or consequential damages, so the above exclusion may
not apply to you. This includes, but is not limited to, prerecorded material, whether
copyrighted or not copyrighted.)
• a product used for commercial or institutional purposes.
WHERE IS SERVICE AVAILABLE?
Warranty service is available in all countries where the product is officially distributed by
Philips Consumer Electronics Company. In countries where Philips Consumer Electronics
Company does not distribute the product, the local Philips service organization will attempt
to provide service (although there may be a delay if the appropriate spare parts and technical
manual(s) are not readily available).
...............
......................
... .3 Precautions
... .3
. . . .7
Remote Control ...
Safety Notes
Service
......................
................
............
...................
..............
....1,8 SETUP........................... ....3
...........
3 Sleep Timer
...........
3 Status Button
...........
2
...........
1
...........
8 Volume Bar
...........
3
Tips for Service
VCR Connections ...
Warranty
...................
.................
..................
.......................
MAKE SURE YOU KEEP...
Please keep your sales receipt or other document showing proof of purchase. Attach it to
this owner’s manual and keep both nearby. Also keep the original box and packing material
in case you need to return your product.
BEFORE REQUESTING SERVICE...
Please check your owner’s manual before requesting service. Adjustments of the controls
discussed there may save you a service cal).
TO GET WARRANTY SERVICE IN U.S.A.,
PUERTO RICO OR U.S. VIRGIN ISLANDS...
Contact a Philips factory service center (see enclosed list) or authorized service center to
arrange repair.
(In U.S.A., Puerto Rico and U.S. Virgin Islands, all implied warranties, including implied war
ranties of merchantability and fitness for a particular purpose, are limited in duration to the
duration of this express warranty. But, because some states do not allow limitations on how
long an implied warranty may last, this limitation may not apply to you.)
TO GET WARRANTY SERVICE IN CANADA...
Please contact Philips at:
I-800-661-6162 (French Speaking)
I -800-363-7278 (English Speaking)
(In Canada, this warranty is given in lieu of all other warranties. No other warranties are
expressed or implied, including any implied warranties of merchantability or fitness for a par
ticular purpose. Philips is not liable under any circumstances for any direct, indirect, special,
incidental or consequential damages, howsoever incurred, even if notified of the possibility of
such damages.)
REMEMBER...
Please record the model and serial numbers found on the product below. Also, please fill
out and mail your warranty registration card promptly. It will be easier for us to notify you
if necessary.
MODEL#____________________________________________________________
SERIAL# ___________________________________________________________
.............
... .6
... .3
... .8
....2
. . . .5
... .8
Philips Service Company, P.O. Box 555, Jefferson City, Tennessee 37760
(423) 475-8869
 Loading...