

Page 1
O W N E R ’ S M^ N U A L
COLOR
TELEVISION
Dllll ID^
Wr I I I kl IV
IMPORTANT!
Return Your Warranty Registration Card
Within I 0 Days. See Why Inside.
r
MAGNAVOX
Page 2
Return your Warranty Registration card today to ensure you
receive all the benefits you’re entitled to.
Once your PHILIPS MAGNAVOXpurchase is registered, you’re eligible to receive all the privileges of
owning a PHILIPS MAGNAVOX product So complete and return the Warranty Registration Card
enclosed with your purchase at once. And take advantage of these Important benefits.
.Warranty i
Verification
Registering your product within
10 days cx)nliims your right to
maximum proteotbn under ihe
terms and conditions of your
PHILIPS MAGNAVOX warranty
Congratulations on your purchase,
and welcome to the “family!”
Dear PHILIPS MAGNAVOX product owner:
Thank you for your confidence in PHILIPS MAGNAVOX. YouVe selected one of the best-built, best-
backed products
available today. And we’ll do everything in our power to keep you happy with your purchase for many
years to come.
As a member of the PHILIPS MAGNAVOX “family,” you’re entitled to protection by one of the most
comprehensive warranties and outstanding service networks in the industry.
What’s more, your purchase guarantees you’ll receive all the information and special offers for which
you qualify, plus easy access to accessories from our convenient home shopping network.
And most importantly you can count on our uncompromising commitment to your total satisfaction.
All of this is our way of saying welcome-and thanks for investing in a PHILIPS MAGNAVOX product.
Sincerely,
. Owner I
Confirmation
Your completed Warranty
RegtsMon Card serves as
verfflca^on of ownership In the
event of product theft or loss.
PHILIPS
MAGNAVOX
Model
Registration
Returning your Warranty
ReglsMon Card right away guar
antees you’ll receive ail the Infor
mation and special offers which
you qualify for as tie ovwier of your
model.
Robert Minkhorst
President and Chief Executive Officer
Know these
S 3f 0ty symbols
гдгтптти71
RISK OP ELECTRIC SHOCK
A
OUmCMI: то ПЕОиСЕ THE Btsx OFElECnaC »«CK. DO ШТ
REMOVE COVER tOR SACK]. MUSEIVSEtWlCEABU РАШЕ
№ШЕ. REFER ^RVKtNG ТО ОШиШЕО SERVICE PERSOfMEL
PHILIPS
DO NOT OPEN
MAGNAVOX
A
P.S. Remember, to get the most from your PHILIPS
MAGNAVOX product, you must return your
Warranty Registration Card within 10 days. So
please mail it to us right now!
A This "bolt of lightning” indicates uninsulated material within your unit may cause an electrical
shock. For the safety of everyone in your household, please do not remove product covering.
The “exclamation poinf calls attention to features for which you should read the enclosed lit
erature closely to prevent operating and maintenance problems.
WARNING: TO PREVENT FIRE OR SHOCK HAZARD. DO NOT EXPOSE THIS EQUIPMENT
TO RAIN OR MOISTURE.
CAUTION: To prevent electric shock, match vride blade of plug to wide slot, and fully insert
ATTENTION: Pour éviter les chocs électriques, introduire la lame la plus large de la fiche dans la
borne correspondante de la prise et pousser jusqu’au fond.
Visit our World Wide Web Site at http://www.philipsmagnavox.com
Page 3
SAFETY INSTRUCTIONS - Read before operating equipment
This product was designed and manufactured to meet strict quality and
safety standards. There are, however, some installation and operation
precautions which you should be particularly aware of.
1. Read Instructions - All the safety and operating instructions should
be read before the appliance is operated.
2. Retain Instructions - The safety and operating instructions should
be retained for future reference.
3. Heed Warnings - All warnings on the appliance and in the operating
instructions should be adhered to.
4. Follow Instructions - All operating and use instructions should be
followed.
5. Water and Moisture - The appliance should not be used near water
- for example, near a bathtub, washbowl, kitchen sink, laundry tub,
in a wet basement or near a swimming pool, etc.
6. Carts and Stands - The appliance should be used only with a cart or
stand that is recommended by the manufacturer.
6A. An appliance and cart combination should be moved
■Aiip stops, excessive force, and uneven
surfaces may cause the appliance and cart combination
to overturn.
7. Wall or Ceiling Mounting * The appliance should be mounted to a
wall or ceiling only as recommended by the manufacturer.
a. Ventilation - The appliance should be situated so that its location or
position does not interfere with its proper ventilation. For example,
the appliance should not be situated on a bed, sofa, rug, or similar
surface that may block the ventilation openings; or, placed in a
built-in installation, such as a bookcase or cabinet that may impede
the flow of air through the ventilation openings.
9. Heat - The appliance should be situated away from heat sources
such as radiators, heat registers, stoves, or other appliances
{including amplifiers) that produce heat.
10. Power Sources - The appliance should be connected to a power
supply only of the type described in the operating instructions or as
marked on the appliance.
11. Power-Cord Protection - Power supply cords should be routed so
that they are not likely to be walked on or pinched by items placed
upon or against them, paying particular attention to cords and
plugs, convenience receptacles, and the point where they exit from
the appliance.
12. Cleaning - The appliance should be cleaned only as recommended
by the manufacturer.
13. Power Lines - An outdoor antenna should be located away from
power lines.
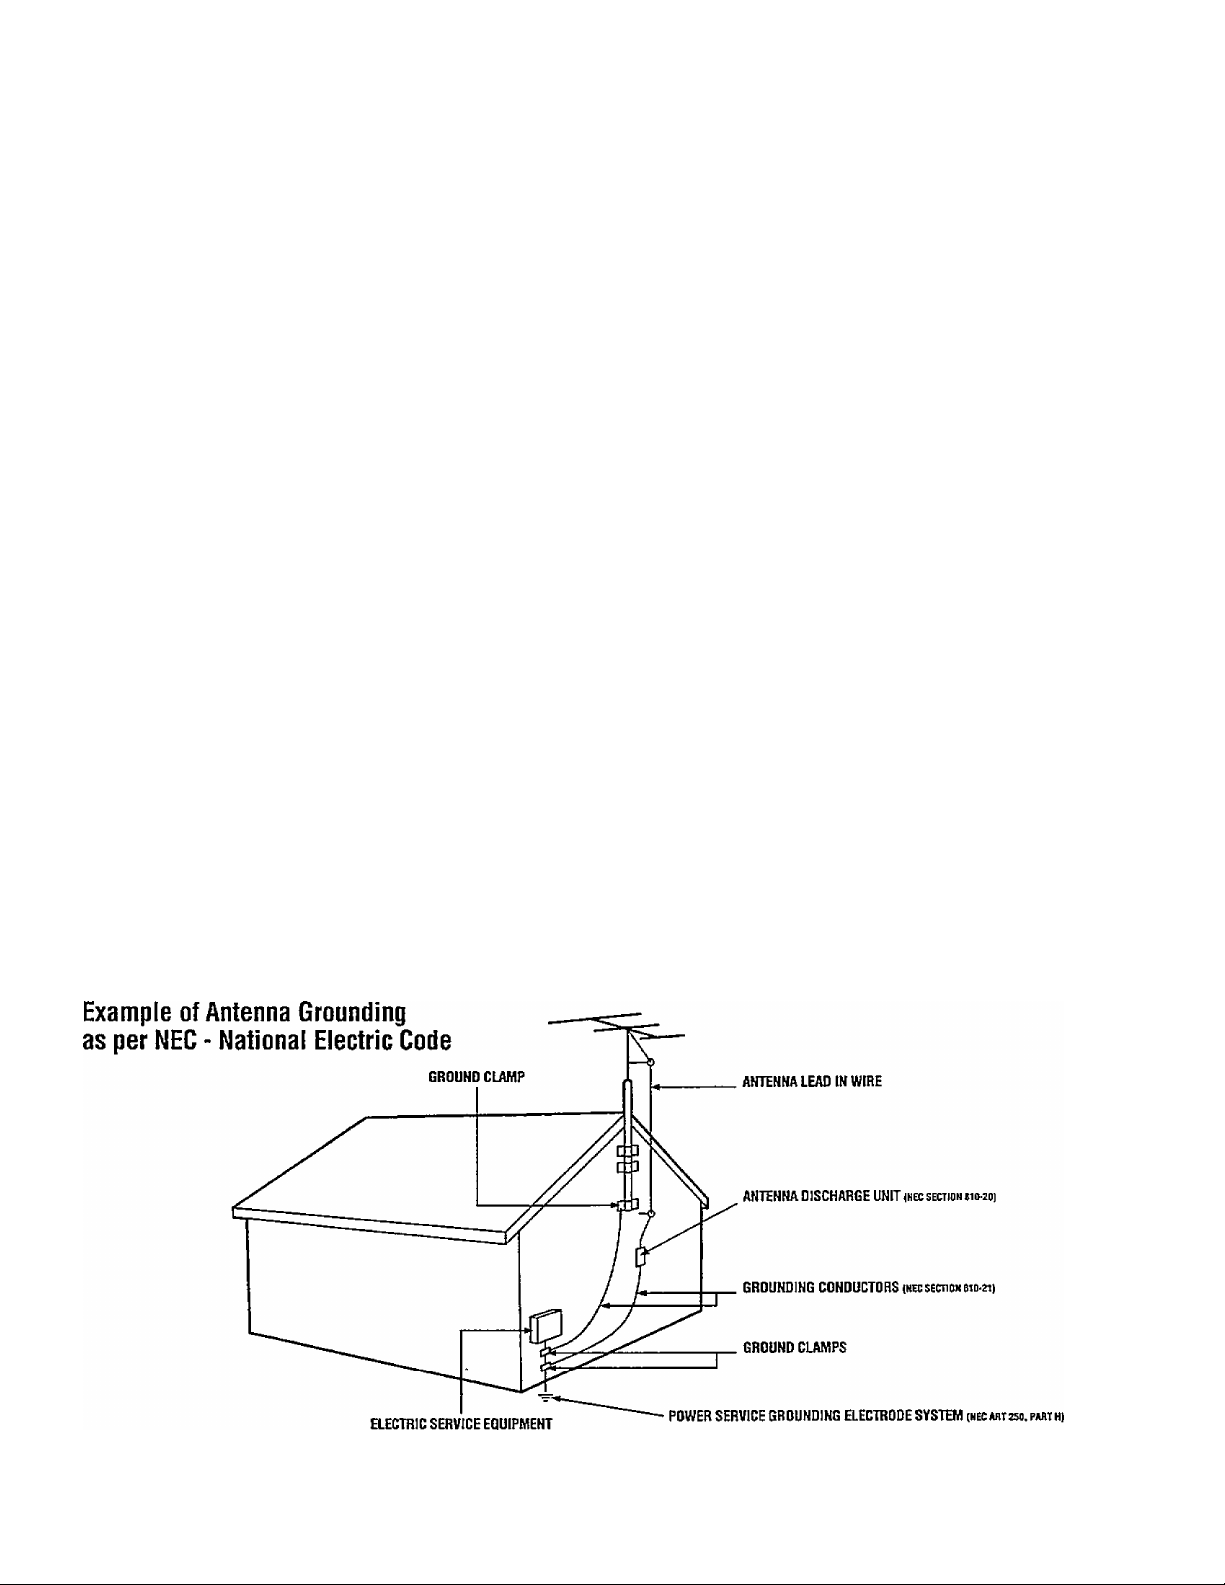
14. Outdoor Antenna Grounding - If an outside antenna is connected to
the receiver, be sure the antenna system is grounded so as to
provide some protection against voltage surges and built up static
charges.
Section 810 of the National Electric Code, ANSI/NFPA No. 70-1984,
provides information with respect to proper grounding of the mats
and supporting structure grounding of the lead-in wire to an
antenna discharge unit, size of grounding connectors, location of
antenna-discharge unit, connection to grounding electrodes and
requirements for the grounding electrode. See Fig. below.
15. Non-use Periods - The power cord of the appliance should be
unplugged from the outlet when left unused tor a long period of
time.
16. Object and Liquid Entry - Care should be taken so that objects do
not fail and liquids are not spilled into the enclosure through
openings.
17. Damage Requiring Service - The appliance should be serviced by
qualified service personnel when:
A. The power supply cord or the plug has been damaged; or
B. Objects have fallen, or liquid has been spilled into the
appliance: or
C. The appliance has been exposed to rain; or
D. The appliance does not appear to operate normally or exhibits
a marked change in performance; or
E The appliance has been dropped, or the enclosure damaged.
18. Servicing - The user should not attempt to service the appliance
beyond that described in the operating instructions. All other
servicing should be referred to qualified service personnel.
Note to the CATV system installer: This reminder is provided to call the
CATV system installer's attention to Article 820-40 of the NEC that
provides guidelines tor proper grounding and, in particular, specifies that
the cable ground shall be connected to the grounding system of the
building, as close to the point of cable entry as practical.
EXAMPLE OF ANTENNA GROUNDING AS PER NATIONAL ELECTRICAL CODE (NEC)
MAœ9S4
Page 4
Table of Contents
Introduction
Welcome/Registratioti of Yoxir TV.........................2
Safety/Precautions....................................................3
Table of Contents
Features...................................................................-4
.....................................................
A
On-Screen (MENU) Features
□
■O'Adding Channels in Memory (Automatically)...6
❖ Setting the TV for Cable TV Operation .5
Adding Channels in Memory (Manually)
■O'How to Set the TV for Closed Captioning
❖ Setting the Bass, Treble and Balance
❖ Setting the TV for Stereo/SAP Programs
❖ Using the Incredible Stereo Feature
❖ Using the TV Volume Bar Control
❖ Setting the Surf/Smart Surf Control
❖ Adjusting the TV Picture
❖ Setting the TV Sleep Timer Control
❖ Adjusting the Set Clock Control......................15
❖ Adjusting the Set Timer...................................16
❖ Setting the Timer ON/OFF
❖ Using the TV Channel Reminder
❖ Using the On-Screen Language Option
❖ Using the Audio Out Jacks (with TV Speaker
On/Off Control)...............................................19
❖ Using the TV's AudioATdeo Input Jacks ....20-21
.................................
..............................
....................
...........
.......
................9
..........
................
.................
................
................
...........
10
11
11
12
13
14
17
18
IS
® Remote Control Operation
Using the Smart Picture Control
Using the Smart Sound Control
Setting the TV Remote to Work VCRs
Setting the TV Remote to Work
Cable TV Converters
Setting the TV Remote to Work VCRs or Cable
Converters - Search Method...................................28
Using the Remote's VCR Buttons
........................................
................
.................
............
..........................
24-25
26-27
22
23
29
pi J Picture-in-Picture (PIPJ
^ Using the PIP Feature (Connections)....30-31
Using PIP with the TV Remote
Selecting the PIP Picture Source
More PIP Connections (Cable Converter)..............34
..............................
............................
32
33
General Information
Tips if Something Isn’t Working
Glossary of TV Terms............................................36
Index.......................................................................37
Factory Service Locations.................................38-39
Warranty.................................................................40
NOTE: This owner's manual is used with sev
eral different television models. Not all fea
tures (and drawings) discussed in this manual
will necessarily match those found with your
television set. This is normal and does not
require you contacting your dealer or request
ing service.
..............
35
Set-up AND Quick Use Guide
Use the simple Set-Up Guide (supplied with your TV information packet) for details on:
• Antenna Hook-ups
♦ First Time Set-Up
(Automatic Settings)
• Basic TV and Remote
7
8
Control Operation
* On-Screen Menu Use
Features
In&ared Remote Control works your TV set and a
variety of wireless remote control VCRs and Cable
Converters.
Standard broadcast (VHF/ÜHF) or Cable TV
(CATV) channel capability.
Stereo Ready TV with built-in audio amplifier and
twin speaker system for receiving TV programs
broadcast in stereo sound.
Closed Captioning allows the viewer to read TV
program dialogue or voice conversations as on
screen text.
Automatic Programming of Channels for quick
and easy selection of favorite stations available in
your area.
On-Screen Features (in either English, French, or
Spanish) show helpful messages for setting of TV
controls.
AudioA^ideo Jackpanel for direct connections with
VCRs (or other video accessories) providing quality
TV picture and sound playback.
Smart Button for the control of TV Sound and
Picture levels. Use the Smart Button on the remote to
quickly adjust Smart Sound (to keep volume levels
consistent during program changes or commercial
breaks); Smart Picture (for automatic picture adjust
ments on a variety of program sources); and Smart
Surf (for quick one button channel selection of up to
10 of your favorite channels).
Sleep-Timer automatically turns the TV OFF at pre
set times.
Clock Timer feature can turn ON the TV at any pre
set time - just like an alarm clock.
Picture-in-Picture (PEP) feature allows the user to
watch two channels at one time. It also allows the
user to swap the main viewed channel with the PIP
picture. Please note that an external tuner (such as a
VCR) is necessary for the proper operation of PIP.
Copyright © 1997 Philips Consumer Electronics Company, All rights reserved.
4
Page 5
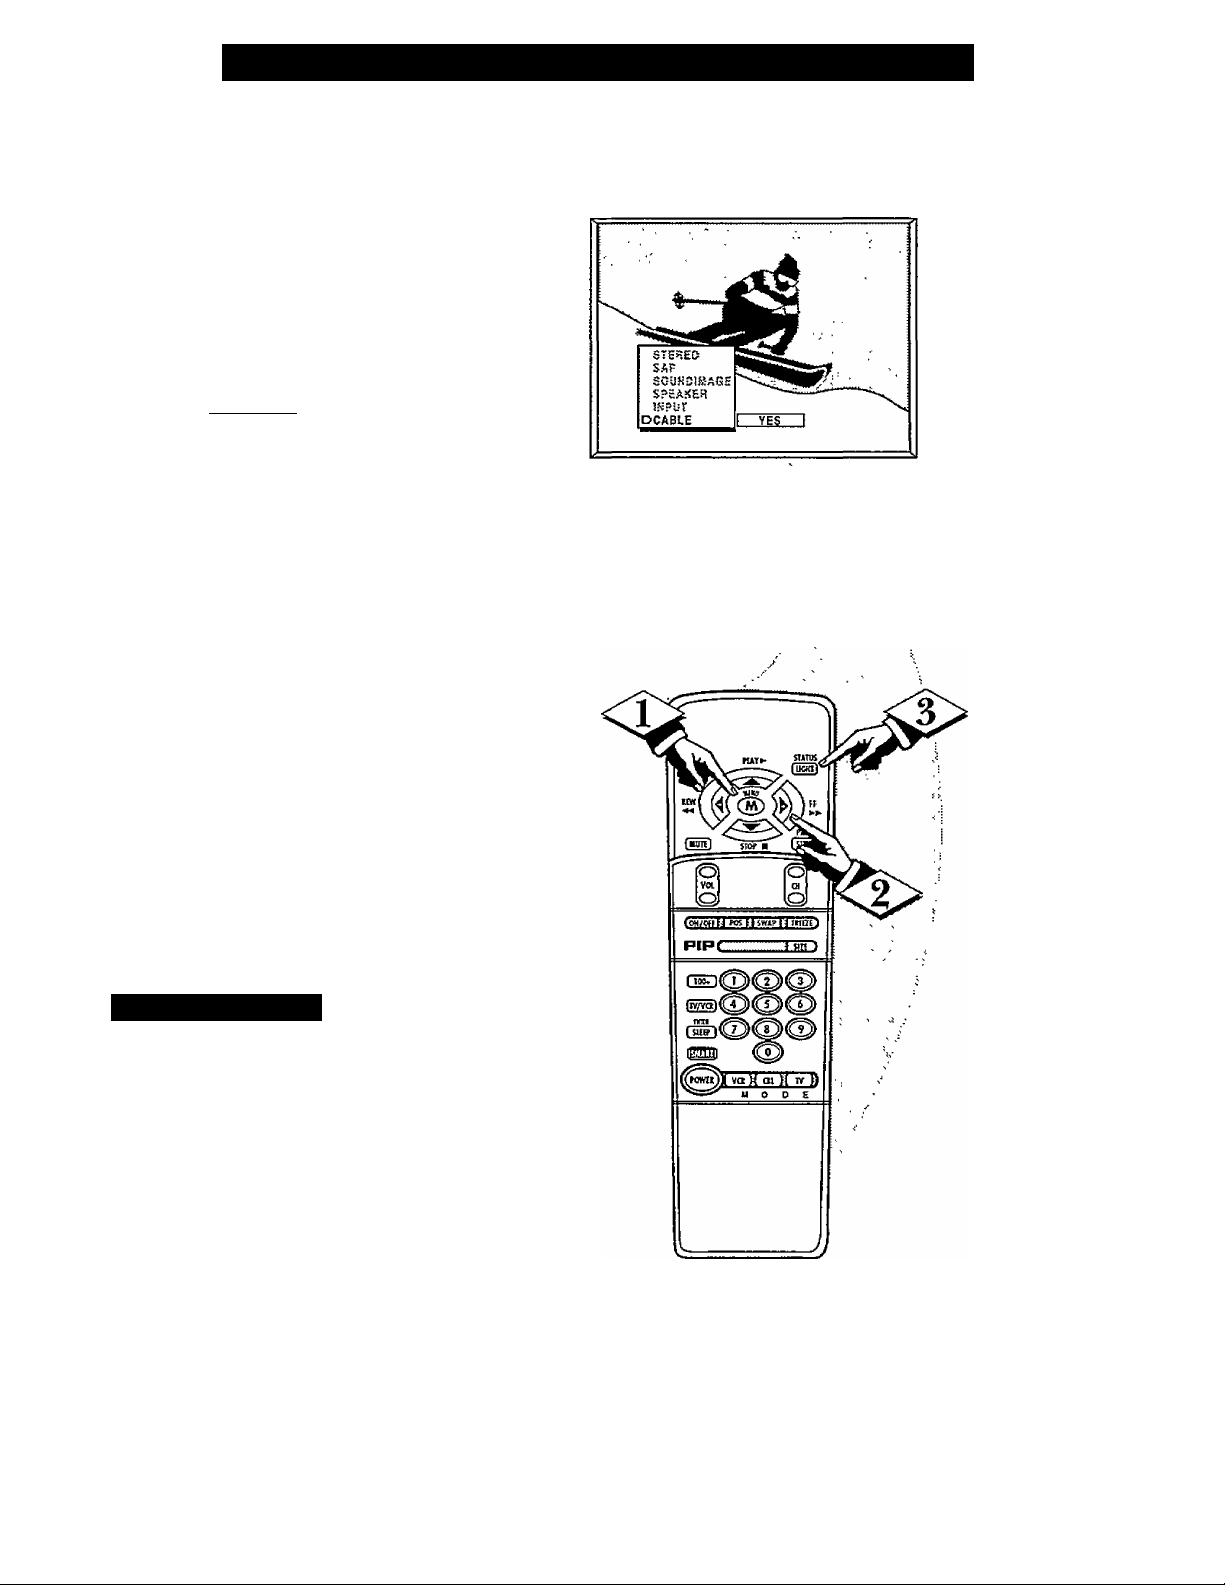
How TO Set the TV for Cable TV Operation
TkJOTE: If you went through
X T Setup (in your Quick Use
Guide), this task has already been
completed for you.
You need to make sure that the TV
is set to pick up either Cable TV
stations or Antenna signals. In
other words, the TV needs to
know whether you have connected
a Cable TV signal or a normal
antenna to its ANTENNA plug.
tBECilN)
<i>
<t>
Press the MENU (M) button
on the remote, then press the
MENU A or T buttons to select
the word CABLE with the TV’s
on-screen arrow.
Press the (+) button (on the
TV or the remote) to select either:
YES- If you DO have Cable TV
connected to the TV.
Channels 1-125 can be
selected.
NO- If you have an Antenna
connected to the TV.
Channels 2-69 can be
selected.
<|> Press STATUS to clear the
screen.
\ ' / Smart Help
Try it out. Press
m CHANNEL
and scan the channels.
Remember, the TV has been set at
the factory to select certain chan
nel numbers. See the following
page on how to set the TV to
select the channels in your area.
AT
buttons
Page 6
□
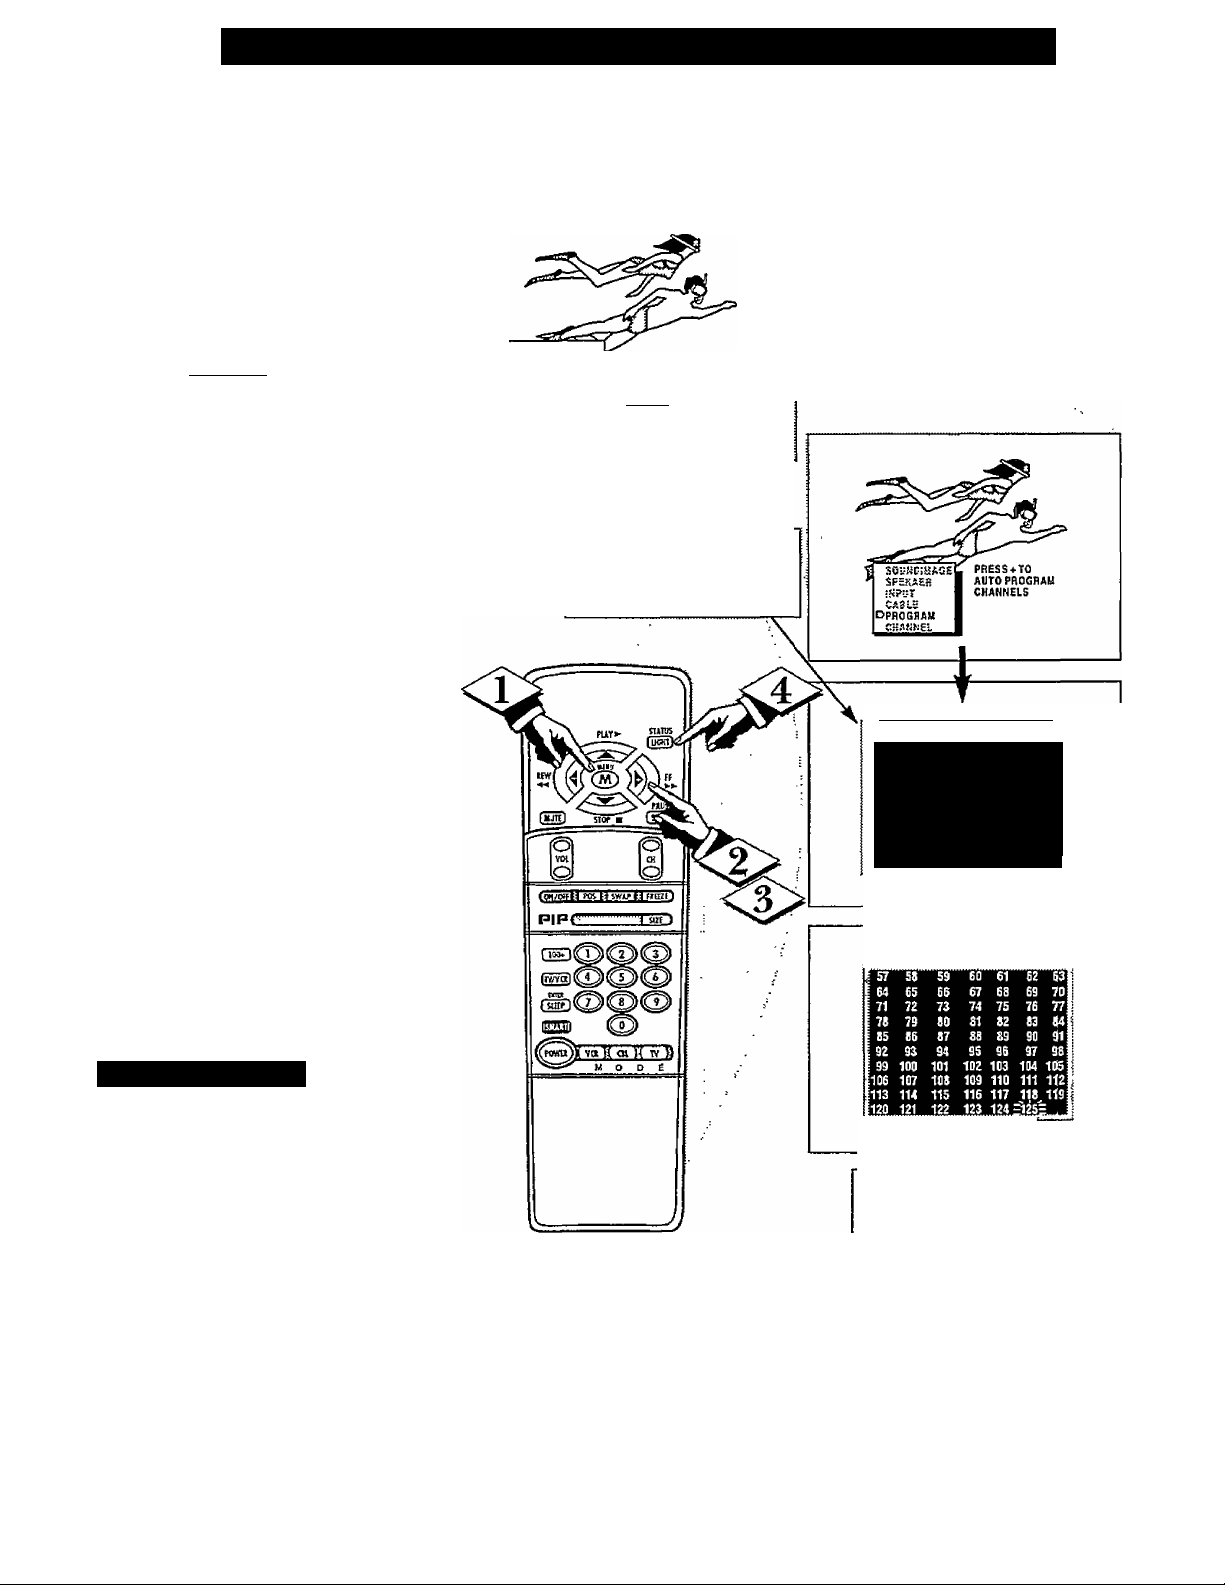
Adding Channels in Memory (Auto Programming),
'A TOTE: If you went through
L T Setup (in your Quick Use
Guide), this task has already been
completed for you.
Your TV can automatically set
itself for local area (or Cable TV)
channels. This makes it easy for
you to select only the TV stations
in your area when the CH(annel)
AT buttons are pressed.
[begin!)
<£>
Press the MENU (M) button
on the remote, then press the
MENU A or T buttons to select
the word PROGRAM with the
TV’s on-screen arrow.
SOyNPiEJACE
SPEAKER
ÌEJPUT
CABLO
DPROGRAM
CiiMML
I PRESSU
Press the (+) button (on the
TV or the remote) to PROGRAM,
<l>
Press the (■+■) button again to
start the TV search for area chan
nels.
Flashing channel numbers will
count upward on the screen as the
TV looks for channels to "ADD".
Press any button (on the TV or
remote) to stop the channel search
at any time. When the channel
search is completed the TV will
return to the last viewed channel.
Press STATUS button to clear
the screen.
\ ‘ / Smart Help
“RED” channel numbers have been
added to the TV’s memoiy.
“WHITE” channel numbCTS are not
present in the TV’s program memory.
AirrO-PROGHAMMIHG IH PROCESS
I 9 10 11 12 13 14
15 15 17 18 19 20 21
22 23 24 25 26 27 23
29 30 31 32 33 34 35
36 37 38 39 4 0 41 42
43 44 45 46 47 48 49
50 51 52 53 54 55 56
57 58 59 60 61 62 63
64 65 66 67 68 69 7
SRESgWKEfKiiiTOti“
AtrTQ.PROGRAl.lMIEJG IH PROCESS
Tiy it out. Press CHAN-
~ NEL
AT
buttons and see
which channels have been added.
Remember, if you want to drop any
unwanted channels from the TV’s
memory, see the next page on how
to "Manually" add and delete chan
nels.
Note: As the TV searches for chan
nels to "ADD" into memory the on
screen display may move (or jitter
slightly). This is normal operation
and does not indicate a need for ser
vice.
The TV screen will be blocked off
until the search for channels is
done.
Page 7
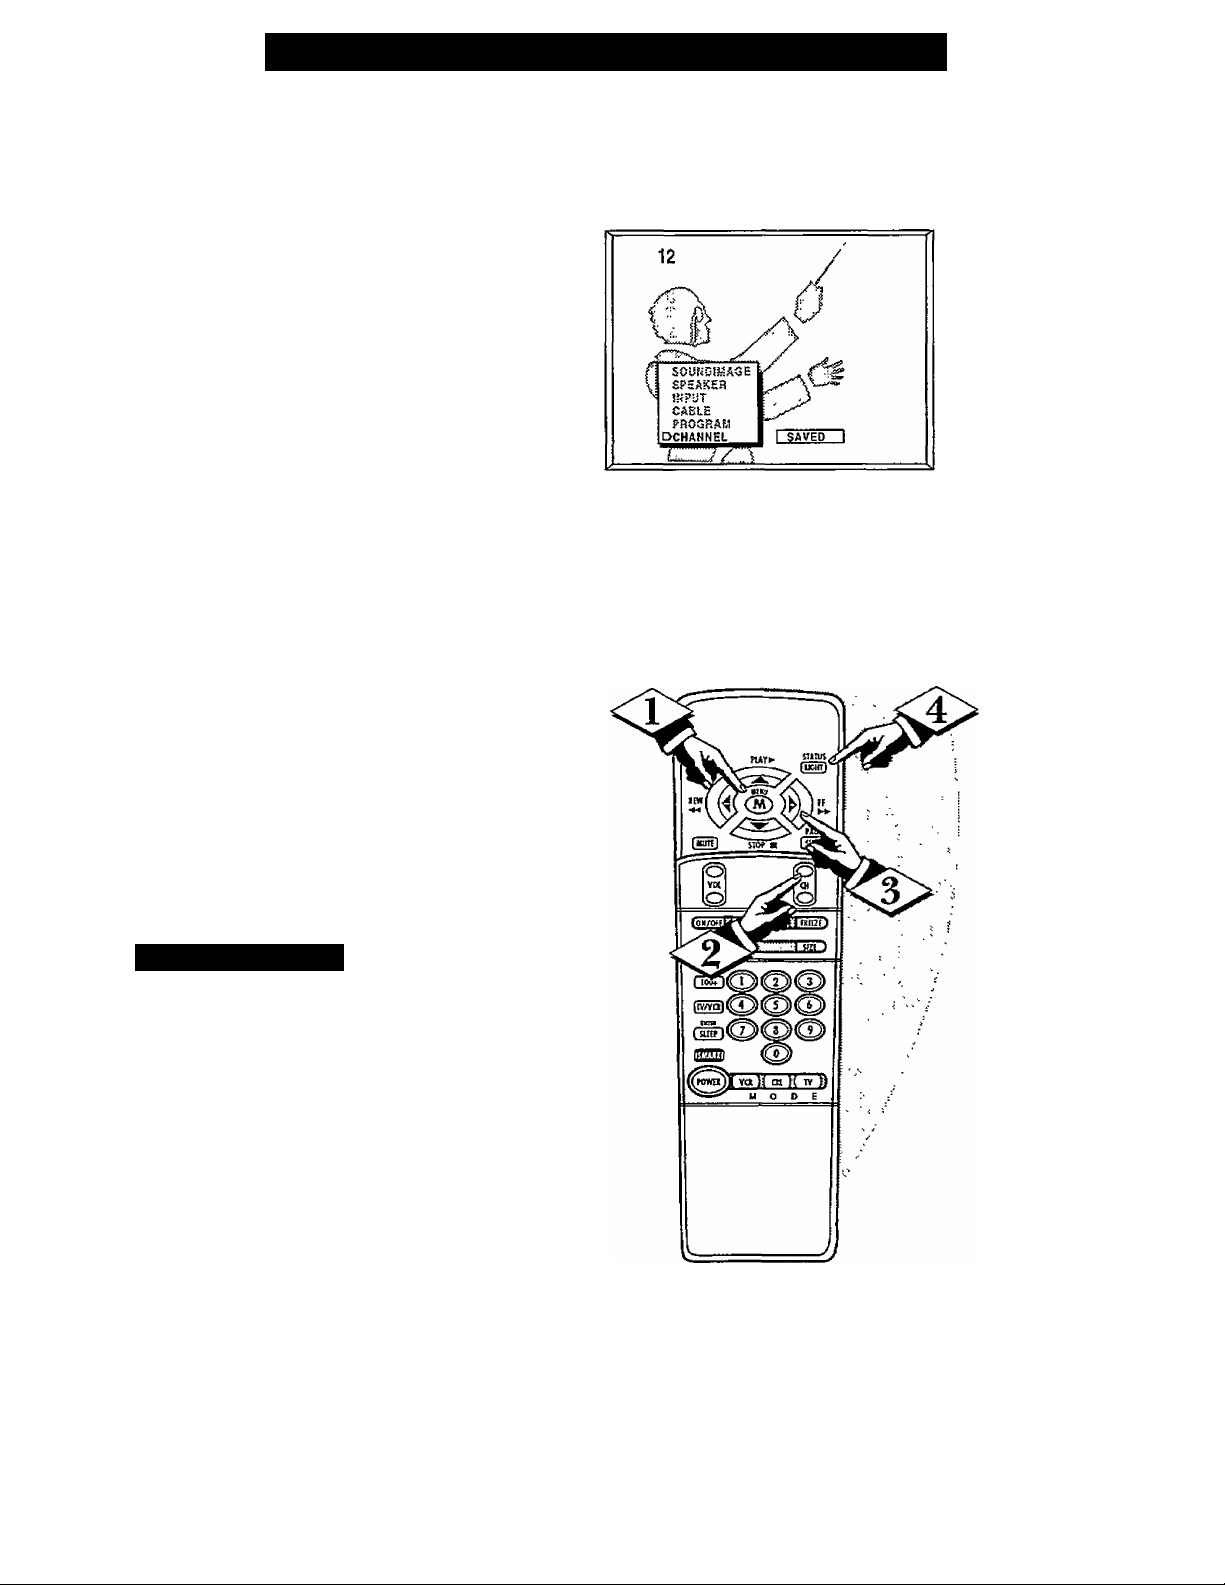
Adding Channels in Memory (Manually)
uto Programming (seepre^ijous
page) adds all the channels it
A
can find (on your Antenna or Cable
TV system) into the TV's memory,
Add/Delete Channels makes it easy
for you to add other channels, or
drop unwanted channels, from the
list of channels in the TV's memory.
(begin]
<l> Press the MENU (M) button
on the remote, then press the
MENU A or T buttons to select
the word CHANNEL with the
TV’s on-screen arrow.
□
Press the CHANNEL A or
buttons (or Channel Number but
tons on the remote) to select the
channel you want to SAVE (or
DELETE.)
^ Press the (+) button to SAVE
the selected channel number into
memory.
Press the (-) button to DELETE
a channel from memory.
Press the STATUS button to
<i>,
clear the screen after adding all
the channels you want.
X I / Smart Help
V Try it out. Press the
iCHANNELAT buttons.
The channels you SAVED should
appear. The channels you
DELETED should not appear.
Remember, you can also add the
VCR/AUX mode (see page 20)
into the TV’s channel memory.
Then by pressing the CH
buttons you can quickly select the
AudioA^ideo Input jacks on the
rear of the TV. Just “SAVE” the
VCR/AUX mode (located between
the lowest and highest channel
numbers) into the TV’s memory.
T
A T
Page 8
□
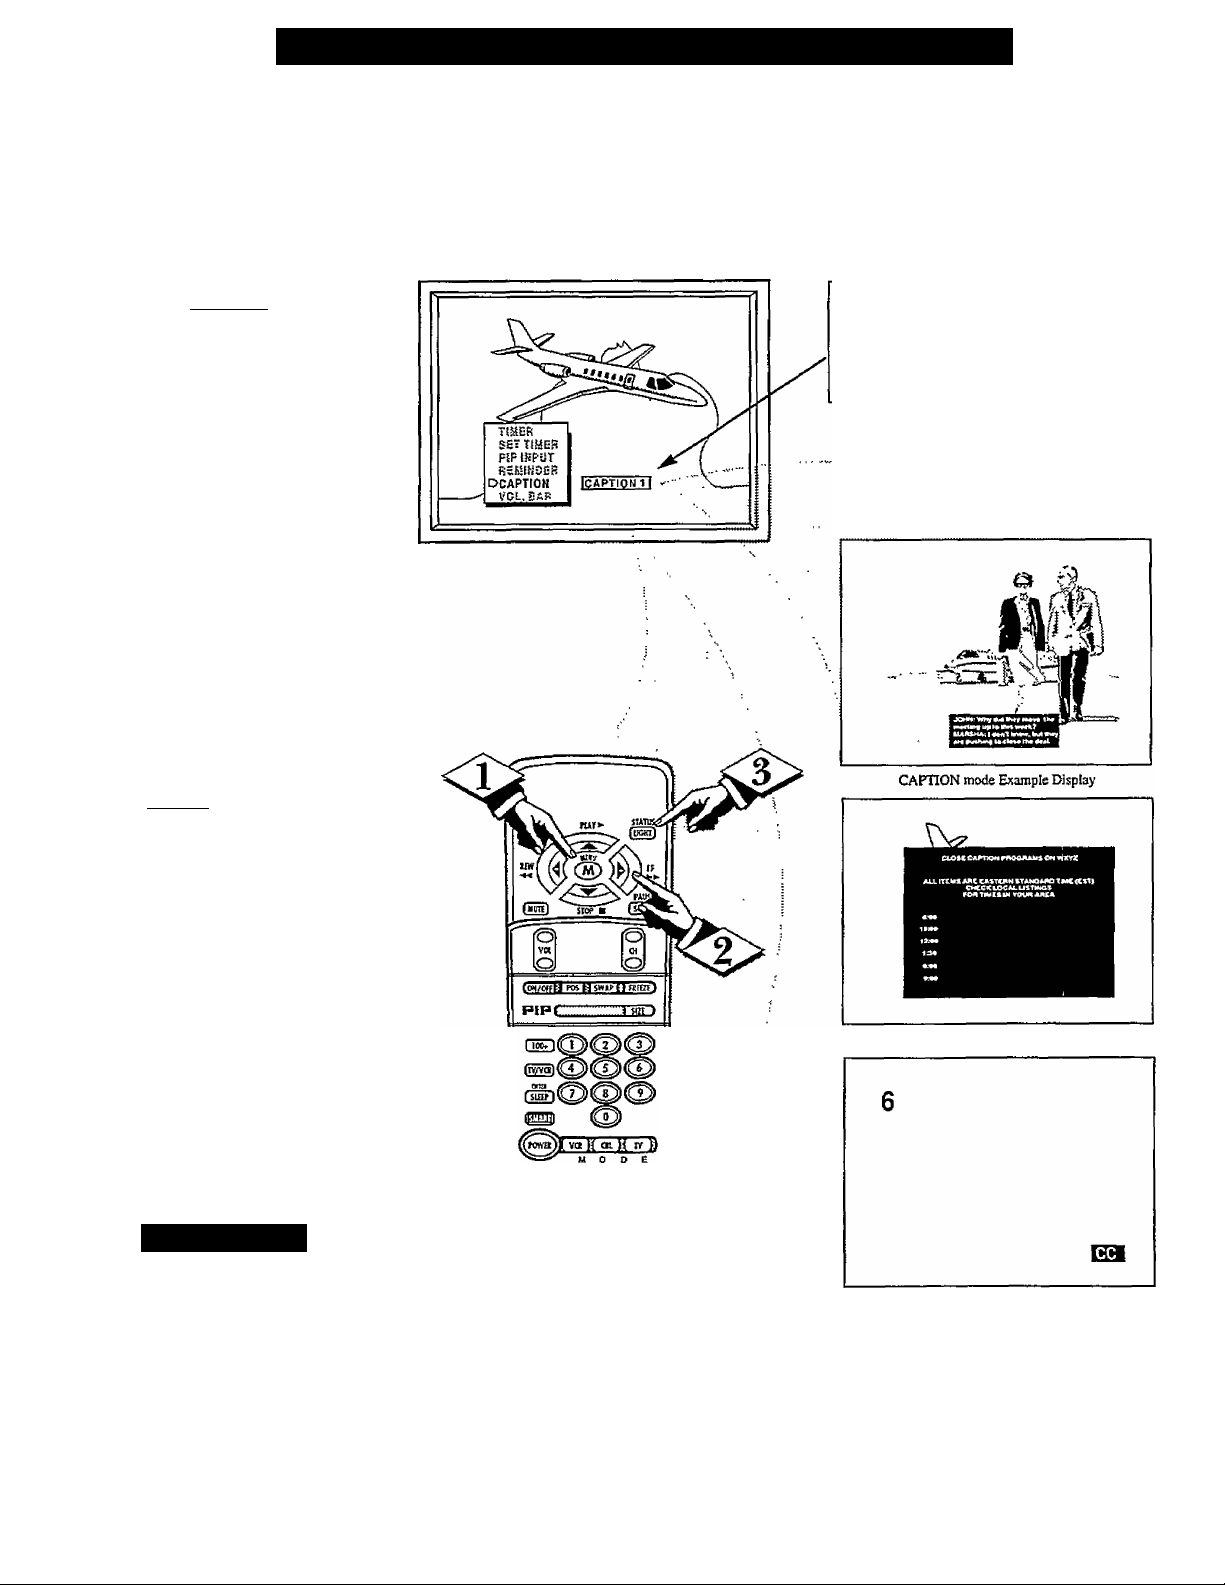
losed Captioning allows you to
read the voice content of televi
C
sion programs on the TV screen.
Designed to help the hearing
impaired this feature uses on-screen
''text boxes" to show dialogue and
conversations while the TV pro
gram is in progress.
CbeginJ
<r> Press the MENU (M) button
on the remote, then press the
MENU A or T to select the word
CAPTION with the TV’s on-screen
arrow.
Press the (+) button to select
the desired Closed Caption (CC)
mode - For Example: CAPTION 1.
CAPTION 1,2,3, or 4 mode:
dialogue (and descriptions)
for the action on the captioned
TV program shows on-screen.
(See important note on this
page.)
TEXT 1,2, 3, or 4 mode:
often used for channel guide,
schedules, or bulletin board
information for CC programs.
Note: Usually “CAPTION” 1 is the
most used mode to view captioned
material.
How TO Select the Closed Caption Feature
NOTE: Not all TV programs and product commercials are made for broadcast
with Closed Caption (CC) information included. Neither are all Closed Caption
modes (CAPTION 1-4, or TEXT 1-4)) necessarily being used by a broadcast sta
tion during the transmission of a closed caption program. Refer to your area’s TV
program listings for the stations and times of Closed Caption shows.
NOTE: TTie "CCl W/MOTE” sating automati
cally switches the TV to the Closed Caption 1
mode whenever the MUTE bunon (on the remoie
control) is pressed. The Closed Caption 1 mode
will turn OFF when the TV sound is returned or
unmuted.
Press the STATUS button after
making your Caption mode selec
tion.
The TV display will clear and
Captioning material (if available
on the currently selected TV pro
gram) will appear on the TV
screen.
To cancel, set the CAPTION fea
ture to OFF when finished viewing.
/ Smart Help
'^^r^R«nembe^raa^^^^
S tions will often use spelling
abbreviations, symbols,
dropouts and other grammatical
shortcuts in order to keep pace with
the on-screen action. These type
factors vary upon the source of the
captioned text material and do not
indicate a need for service on the
part of the TV.
TEXT mode Example Display
TV screen will be blocked from viewing
Jj
Tills symbol vail appear vath channels that
contain Closed Captioning material.
Page 9
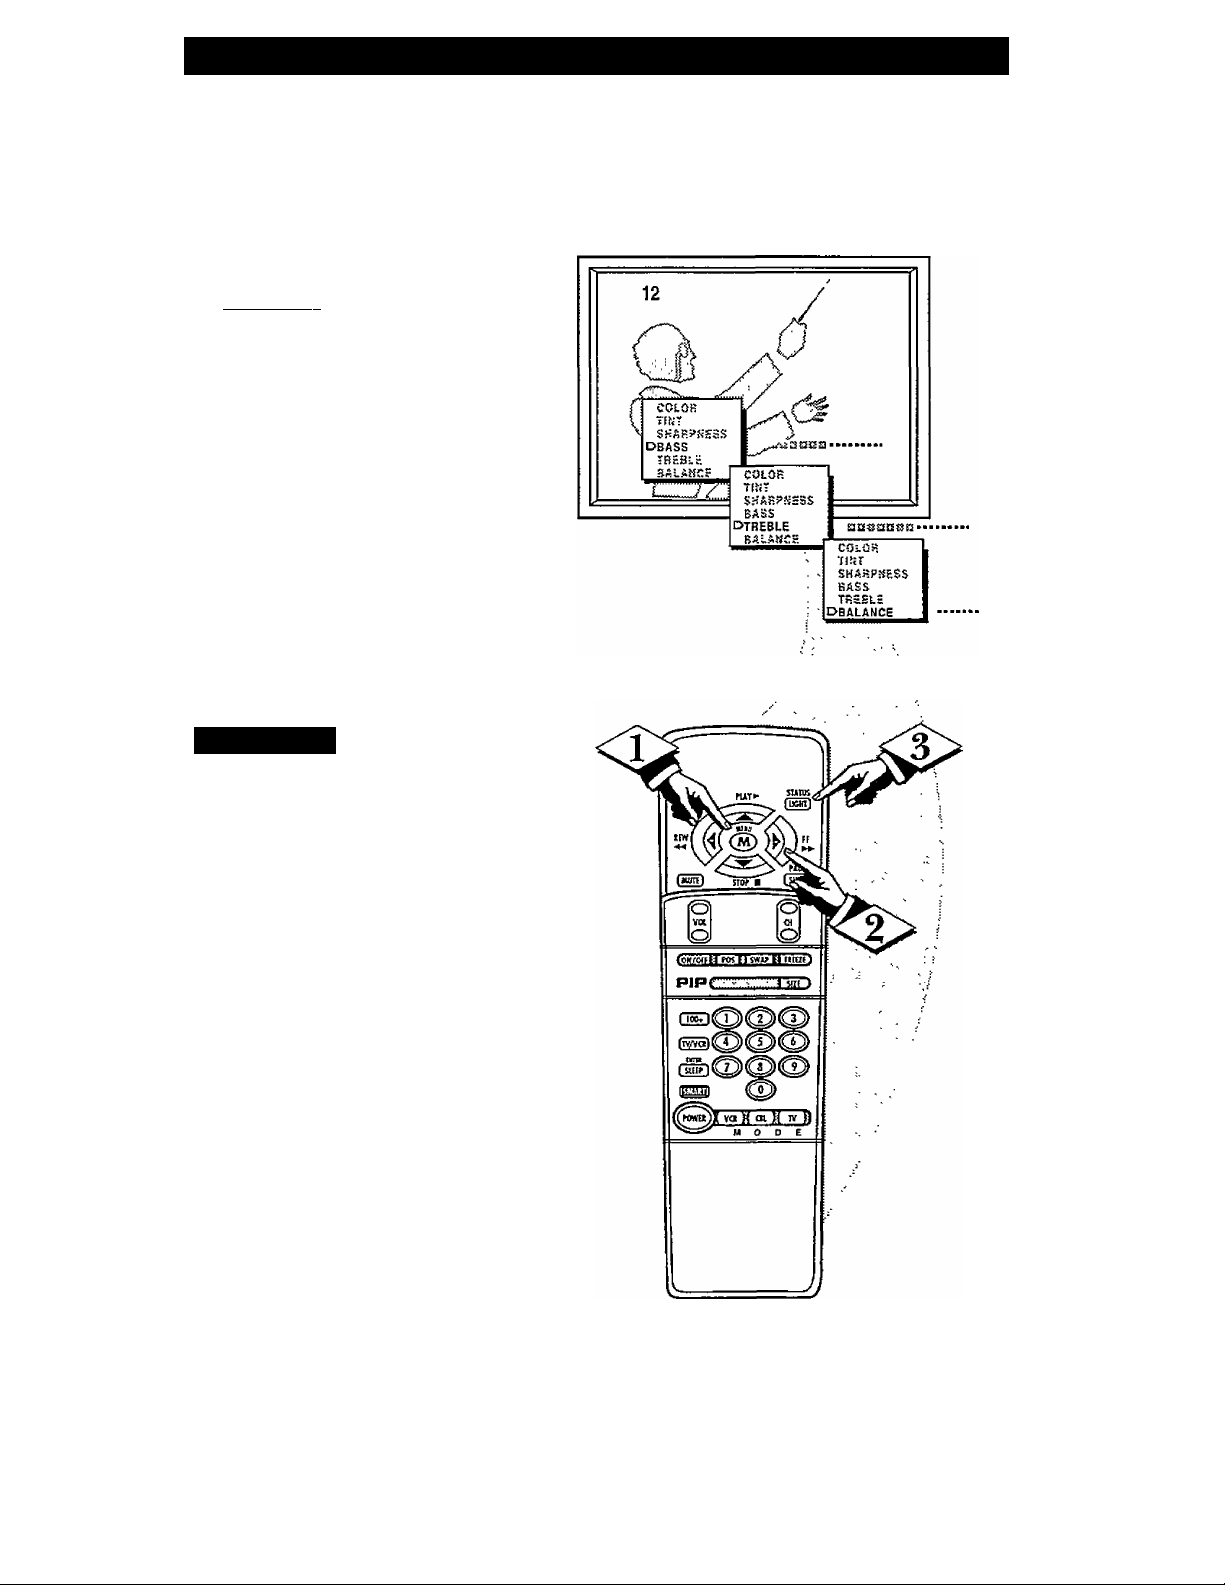
Using Bass, Treble, and Balance Sound Controls
iryesides the normal volume level
JL} controls, your TV also has
individual sound adjustment con
trols. The BASS (low frequency),
TREBLE (high frequency), and
Speaker BALANCE may all be
used to adjust the sound playback
of TV programs.
Cbe«3iim]
<X> Press the MENU (M) button
on the remote, then press the
MENU A or T buttons to select
the word BASS, TREBLE or
BALANCE with the TV’s on
screen arrow.
Press the (+) or (-) buttons to
adjust the selected sound control
to levels you prefer.
<t>
Press the STATUS button to
clear the screen when finished.
Smart Help
Remember, when the
^ bar scale is centered,
Speaker BALANCE is centered
between the TV’s Left and Right
side speakers.
Page 10
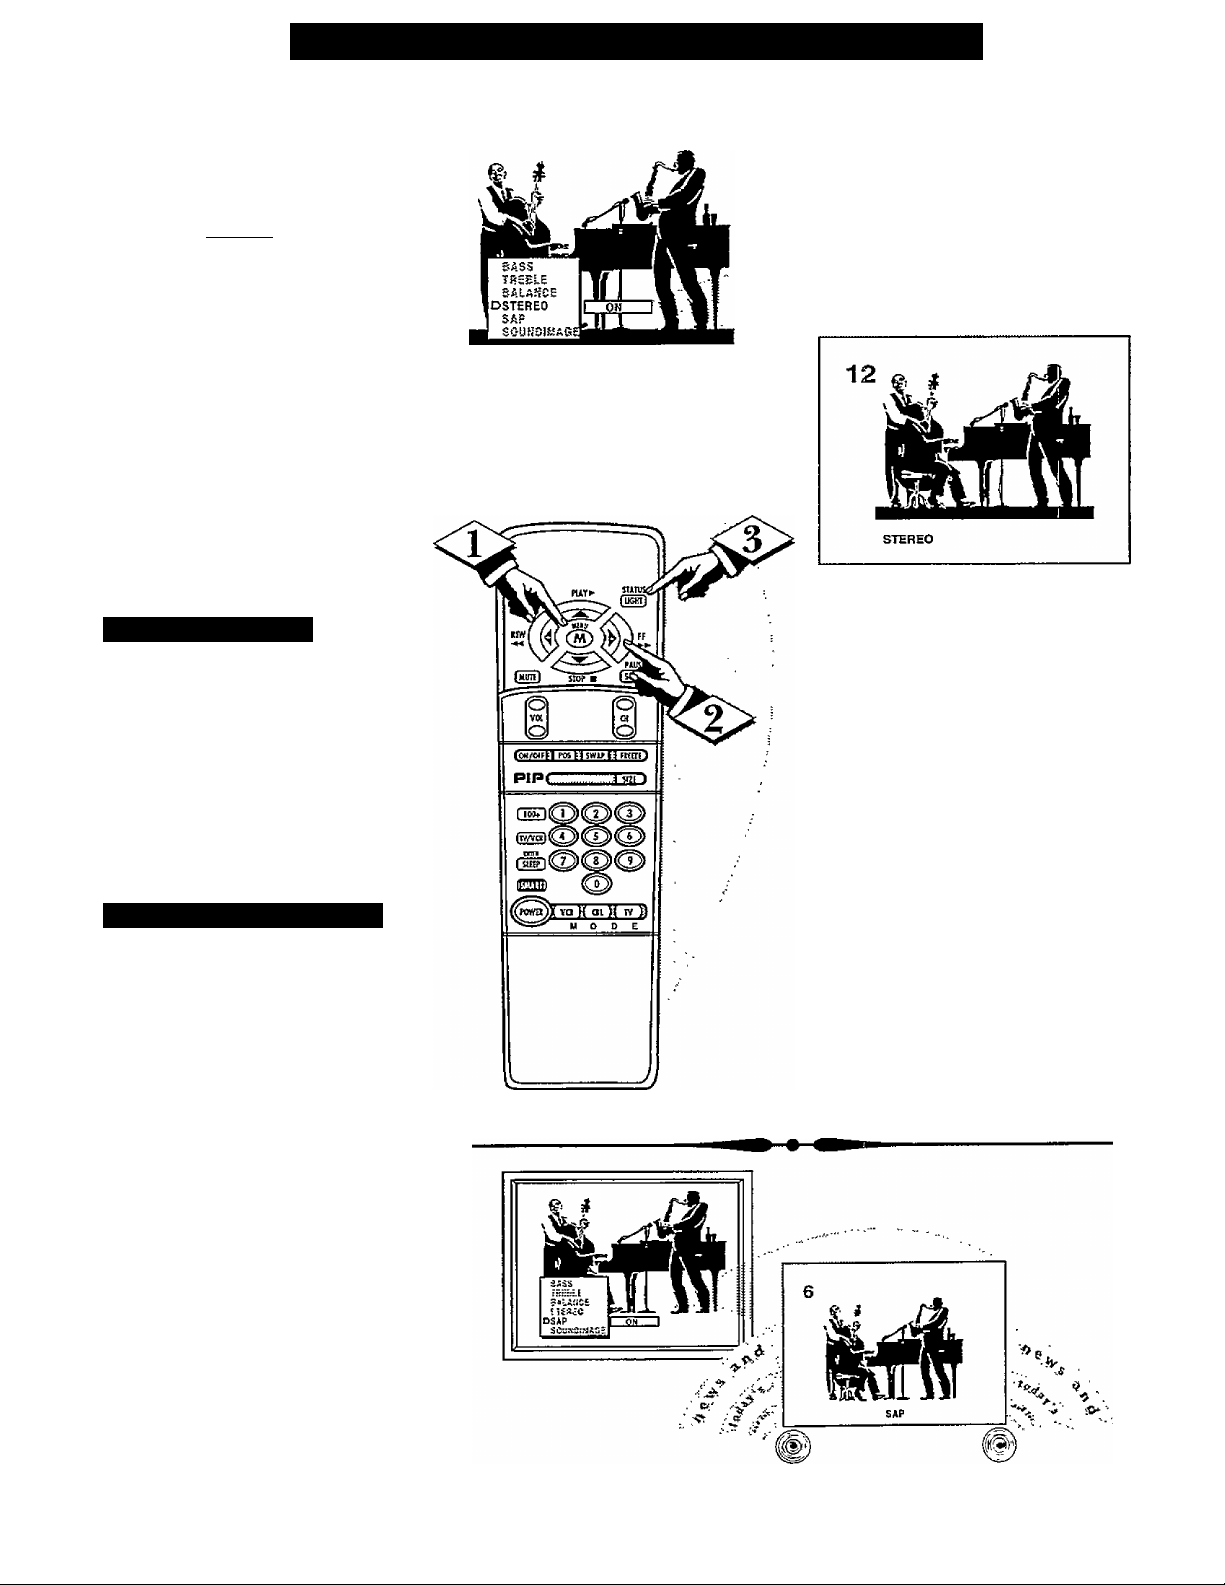
□
TV can receive broadcast
X
stereo TV programs. The TV
has both an amplifier and twin
speakers through which the stereo
sound can be heard.
CBEC3IN)
Press the MENU (M) button
<i>
on the remote, then press the
MENU A or T buttons to select
the word STEREO with the TV’s
on-screen arrow.
Press the (+) button to turn the
<l>
STEREO MODE ON.
r
Press STATUS to clear the
screen.
How TO Set the TV for Stereo Programs
\ ' / Smart Help
Remember, if stereo is
g not present on a selected
show and the TV is placed in
the STEREO mode, the sound
coming from the set will remain
monaural (mono.)
Second AvDio Program (SAP).
SAP is an additional part of the
stereo broadcast system. Sent as a
third audio channel SAP can be
heard apart from the current TV
program sound. TV stations are
free to use SAP for any number
of purposes, but many experts
believe it will be used for foreign
language translations of TV
shows (or for weather and news
bulletins.)
If a SAP signal is not present
with a selected program, the SAP
option cannot be selected. Also, if
SAP is selected on a channel
(with SAP) and you select anoth
er channel, when you return to
the original channel SAP will be
OFF (and you will have to rese
lect the SAP feature.)
10
Page 11
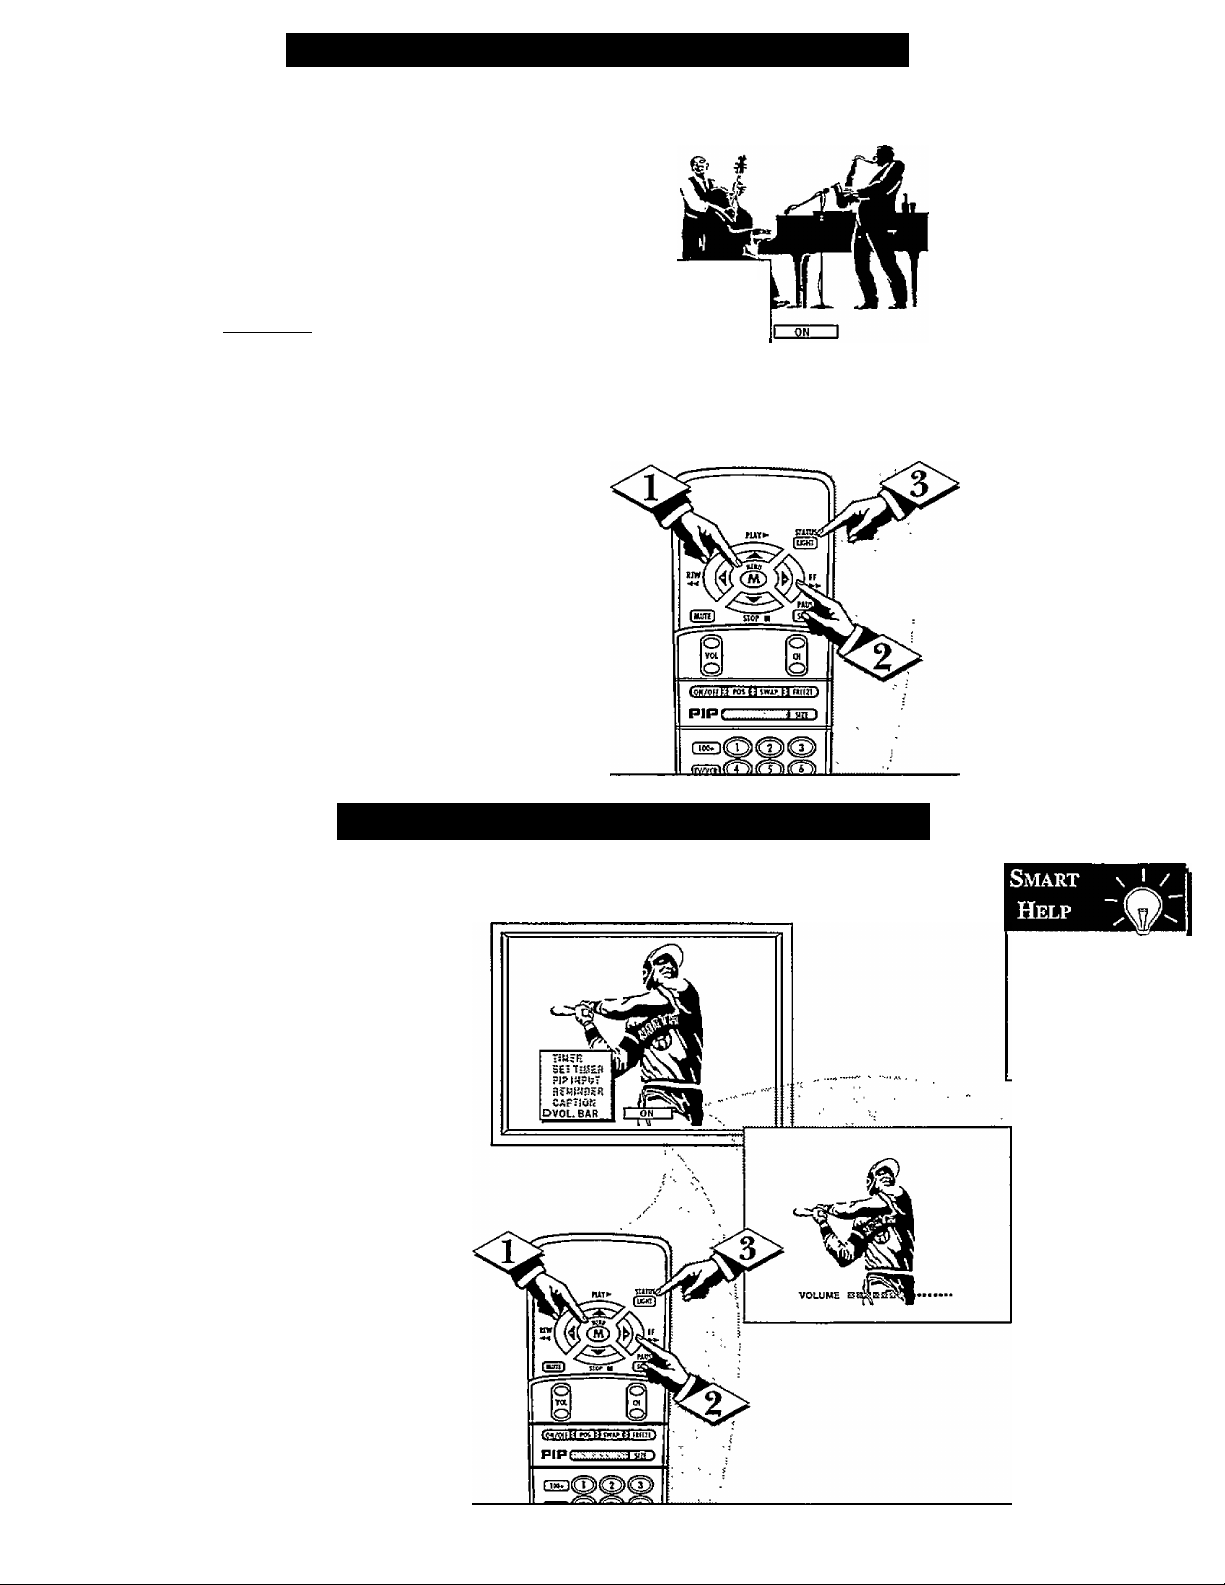
Using the Incredible Stereo Feature
^he Incredible Stereo feature
can be turned ON by using the
T
Sound Image control. Sound Image
adds greater depth and dimension
to both monaural (MONO) and
stereo TV sound. With the control
turned ON the TV's speakers can
add even wider sound separation
to normal broadcasts.
i BEGIN]
<s>
Press the MENU (M) button
on the remote, then press the
MENU
the word SOUND IMAGE with
the TV’s on-screen arrow.
A.
or T buttons to select
DASS
TEE3LS
BALANCE
STEREO
SA?
DSOUKDIMAGE
□
<l>
<4^^ Press STATUS button to clear
Press the (+) button to turn the
SOUND IMAGE control ON.
the screen.
Using the TV Volume Bar Control
jr Tse the Volume Bar control to see
Cy the TV’s volume level settings
on the TV screen. Once set the
Volume Bar will be seen each time
the VOLUME buttons (on the TV or
remote) are pressed.
CUfilE)
<1> Press the MENU (M) button on
the remote, then press the MENU A
or ▼ buttons to select the words
VOL. BAR with the TV’s on-screen
Arrow.
Try it out.
Press the VOL
buttons. The VOL
UME BAR should
appear at the bottom
of the screen.
AT
Press the (+) button to turn the
BAR control ON.
Press STATUS button to clear
the screen.
11
Page 12
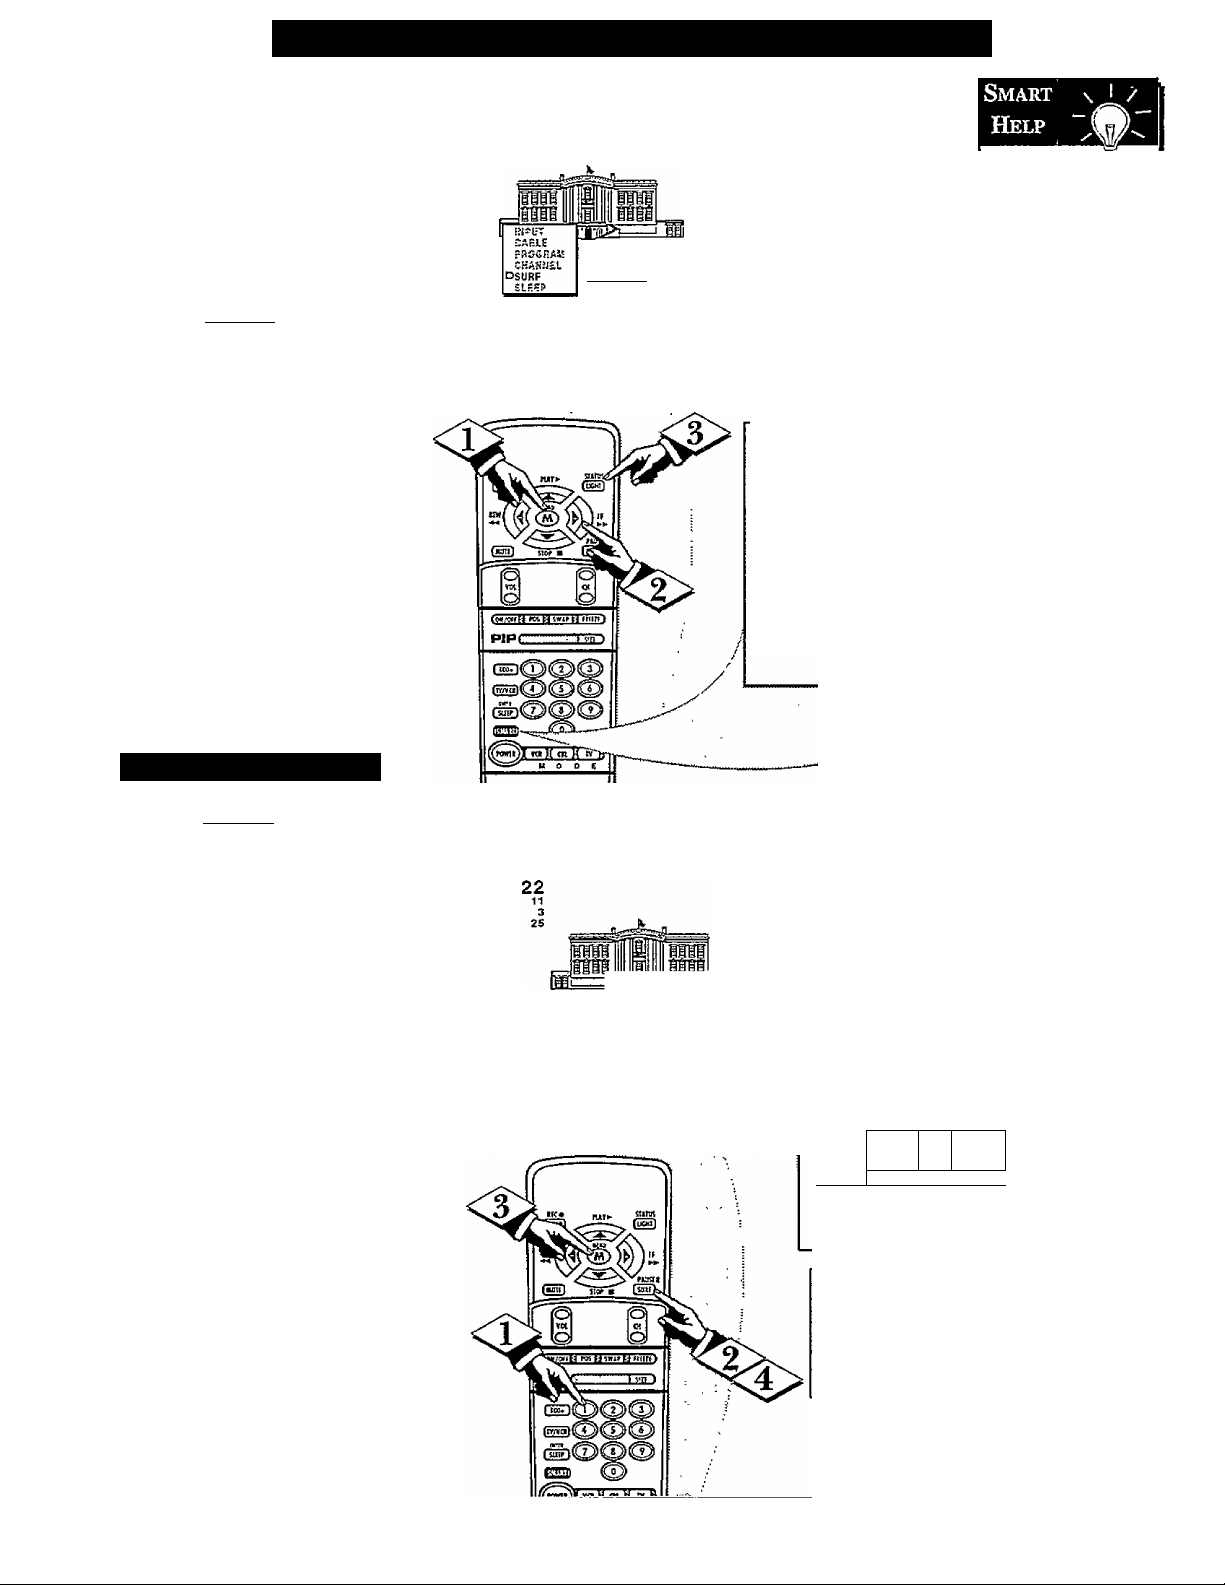
□I
Setting the Surf and Smart Surf Control
"list” or seríes of previously
viewed channels can be selected
A
with the SURF button on your
remote control. With this feature you
can easily switch between different
TV programs that currently interest
you. The Smart Suff control allows
you to set up to 10 channels in its
quick viewing “list".
[begin]
<i>
Press the MENU (M) button on
the remote, then press the MENU
or T buttons to select the word
SURF with the TV’s on-screen arrow
(or press the SMART button on the
remote).
<l>
Press the (+) button to select
either 2-Channel Surf or Smart Surf.
See explanation of Surf options with
the illustration on this page.
<f> Press STATUS button to clear
the screen.
How To Use Smart Surf
[begin]
With the Smart Surf control
<1>
ON (see above), select a desired
channel for viewing. You can use the
number buttons on the remote (or the
Channel A or T buttons).
A
\ ?CH I
2 CHANNELSURFCunenc and one previ
ous channel.
SMARTSURFCunent and up to nine
additional channels
available. Note: the
Channel Surf can be
used with fewer than
i'shY'siírfI
Below is the on-screen menu that
will appear when the SMART but
ton on the remote is pressed. Then,
by using the MENU A. or
the + or - buttons, adjustments can
be made to the SURF control.
ten channels. In this
way the number of
Surf channels can
match or fit yourpresent viewing interests.
T,
SMART
PICTURE
SOUND
QSURF
and
To Use 2- 1
Channel Surf:
With the 2-ChanneI
Surf control ON,
select the two
desired channels for
viewing with the
number buttons on
the remote control.
Press the SURF
button on the
remote to “toggle”
between the two
selected channels.
When using Smart
Surf:
A “SURF MENU
TABLE FULL”
message will appear
on-screen when the
maximum of 10
channels has been
added to the Smart
Surf list.
Press the SURF button on the
remote. (Some channel numbers may
already appear within the Surf chan
nel list.)
Press the Menu button to
“ADD” the selected channel to the
Surf list.
Select the next desired channel and
repeat steps 2 and 3. Continue until
all desired channels are on the Surf
list.
Press the SURF button on the
<S>
remote to quickly review current
action on channels contained within
the Surf list.
PRESS HEHU TO ADO
12
11
3
41'
-
----
------------i
m
n
Noie: To Delete a channel from the
Surf list just press the SURF button to
select the desired channel. Then press
the MENU button and the channel will
be immediately dropped firom the on
screen Surf list.
M.
PRESS EtEHU TO DELETE
Page 13
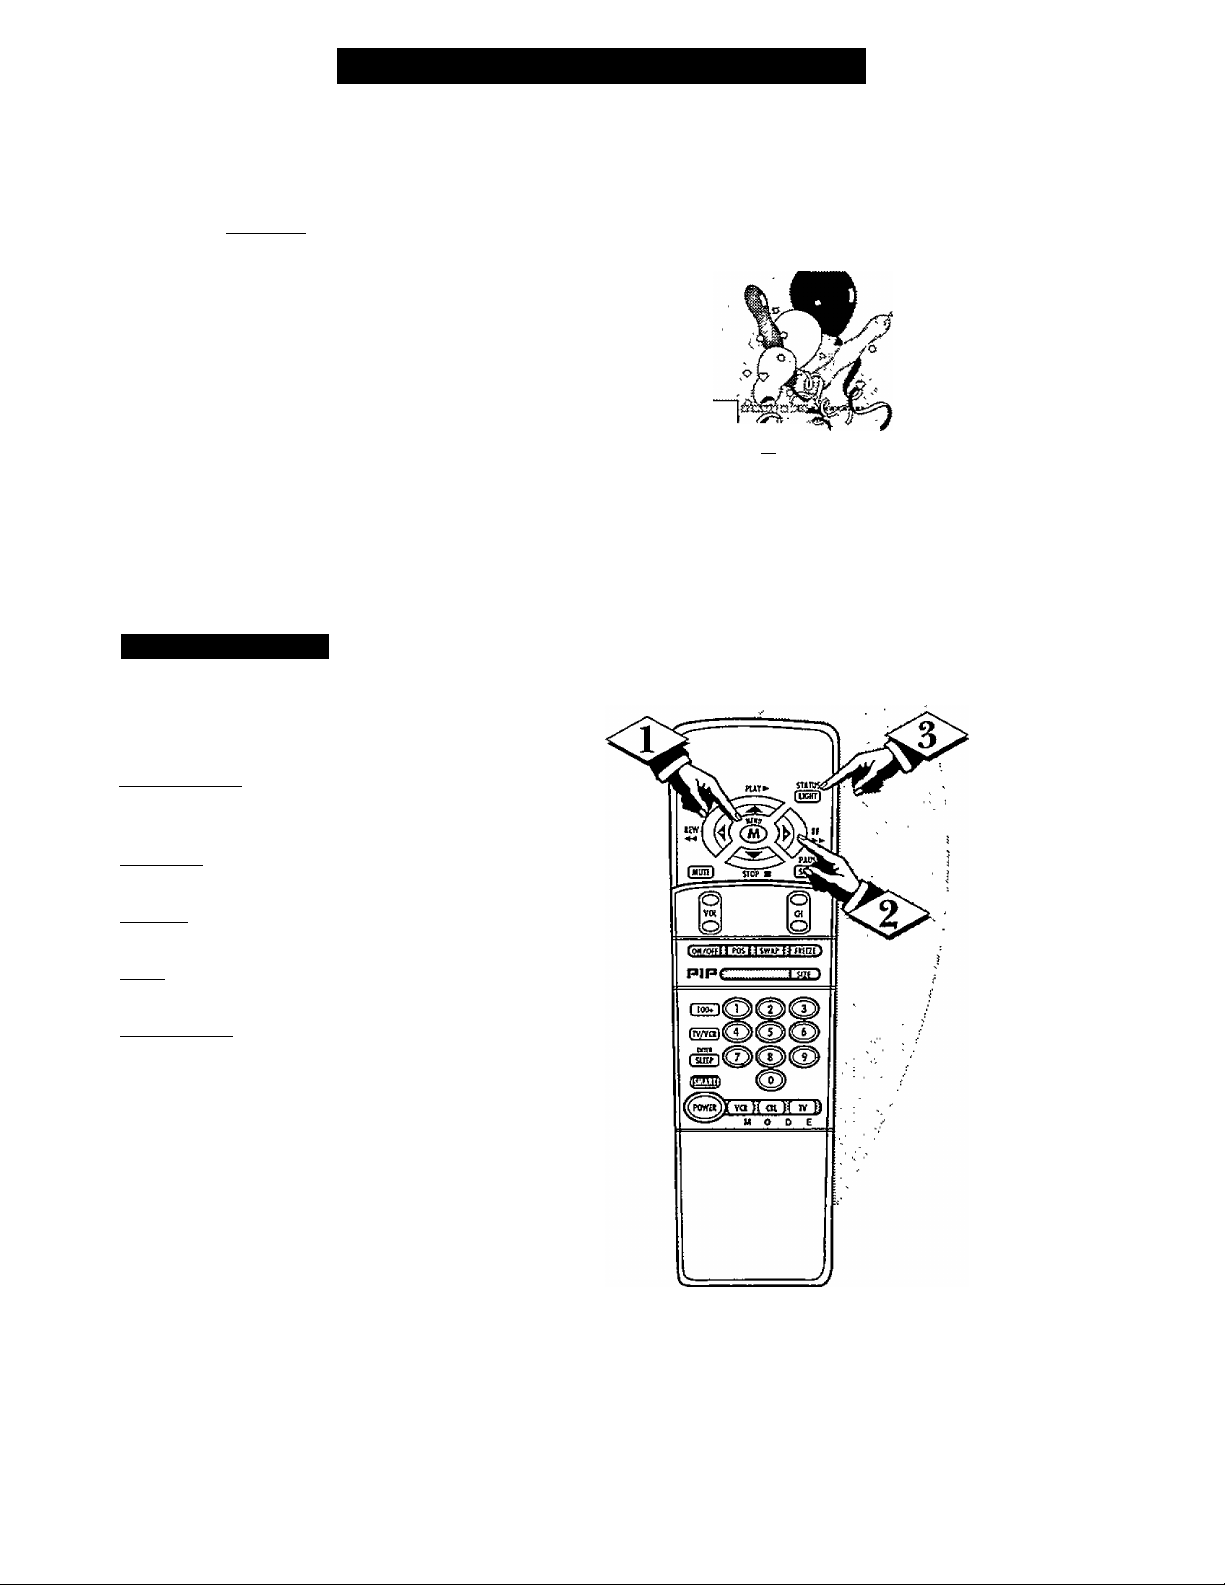
adjust your TV picture co/i-
trols, select a channel and follow
the steps shown below:
C
begin)
Press the MENU (M) button on
the remote, then press the MENU
or T buttons until the desired con
trol shows on-screen.
How TO Adjust the TV Picture
A
□
<|>
Press the (+) and (-) buttons to
adjust the selected color control.
Press the STATUS button to
clear the screen when picture adjust
ments are completed.
s I / Smart Help
V
Remember, when the bar
^ scale is centered, the control set
tings are at normal mid-range levels.
BRIGHTNESS Press (-) or (+) until
darkest parts of the picture are as bright
as you prefer.
PICTURE Press (-) or (+) until lightest
parts of the picture show good detail.
COLOR Press (-) or (+) to add or elim
inate color.
TINT Press (-) or (+) to obtain natural
skin tones,
DBRIGHTNE55
■>»äCniR£
CCi-CR
aHicHTHESst
TUJT
PICTURE I
SHAR?
SASS
5HA3Ff|DC0L0R
eatsHTEiEss
FiCTURE
UKt
SStSfiTitESS
SilAfiP
PECTURE
EÄSS
COLOR
QTINT
S»A.RPn afilGHTiiESS
BASS
...............
PICTURE
COLOR
TEXT
DSHARPNES5
BASS
an
SHARPNESS Press (-) or (+) to
improve detail in the picture.
13
Page 14
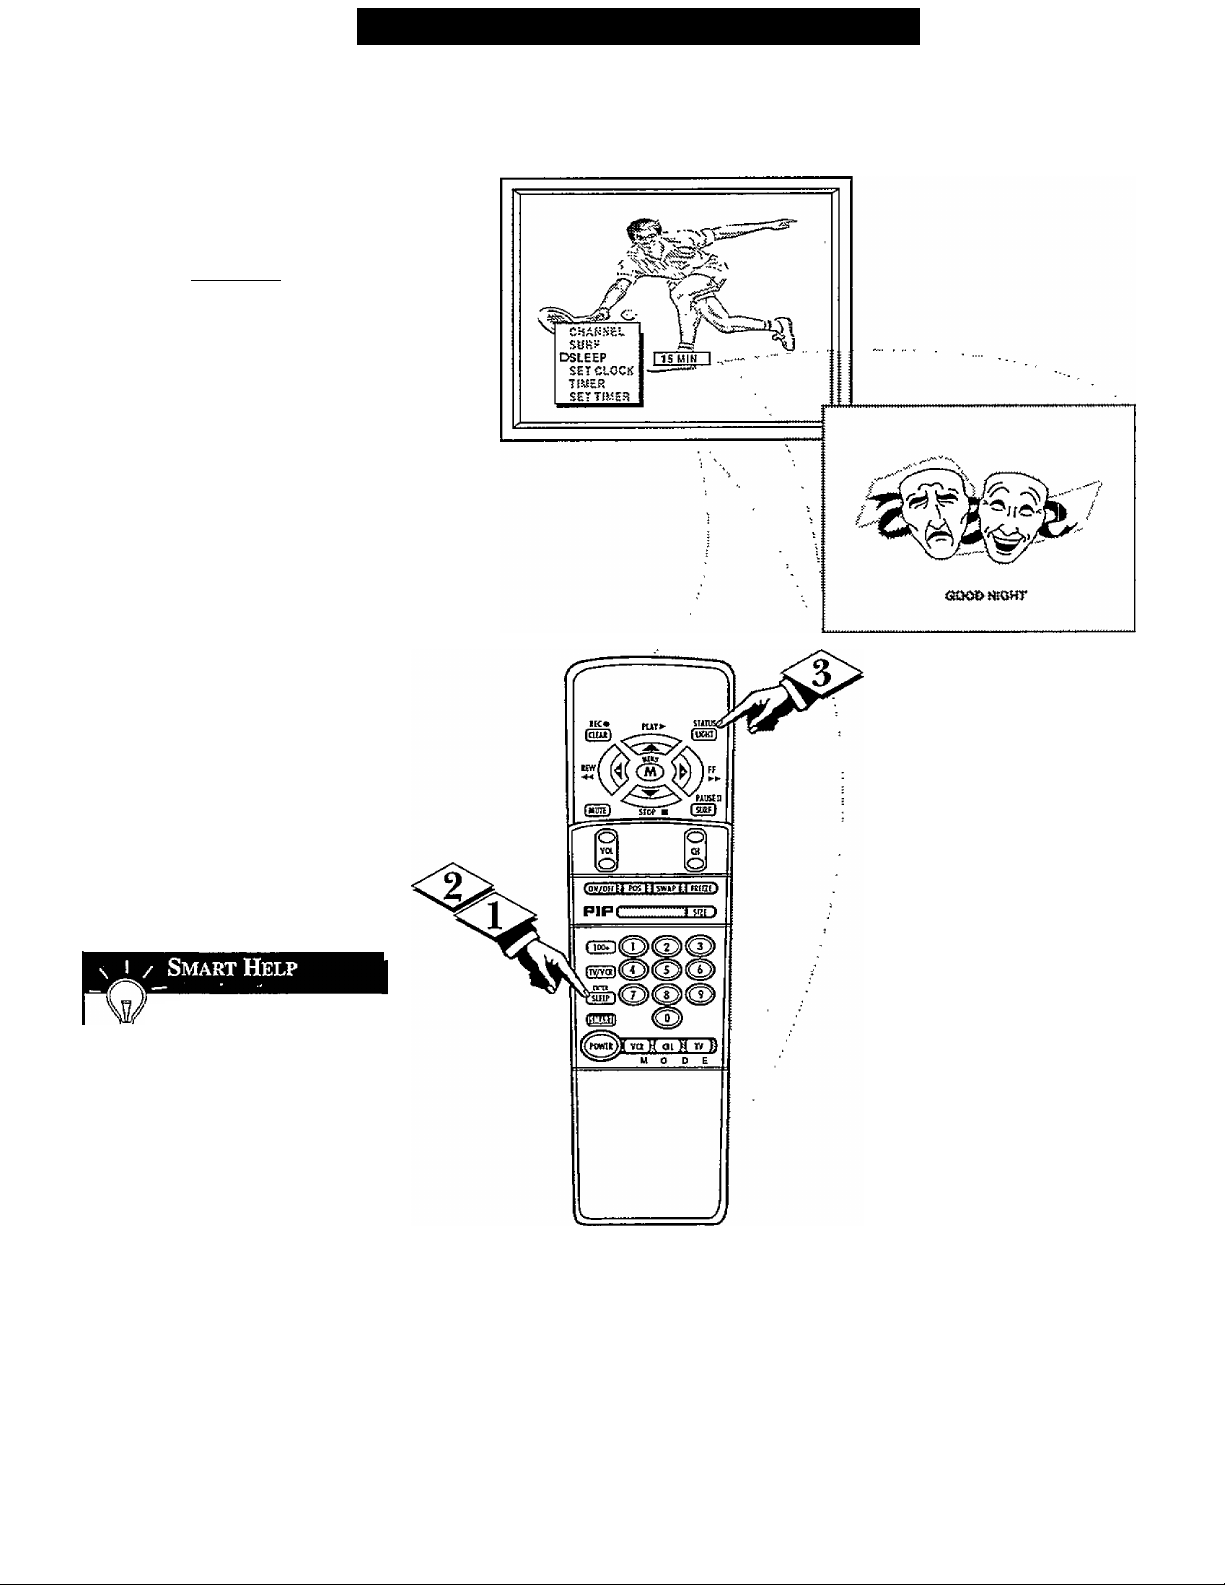
□
TTave you ever fallen asleep in
jn. front of the TV only to have
it wake you up at two in the
morning with a test pattern
screeching in your ears? Well,
your TV can save you all that
trouble by automatically turning
itself off.
[ BEGIN)
Press the SLEEP button on
the remote.
Note: You can also press the
MENU A or ▼ on the remote or
TV to select the word SLEEP
with the TV’s on-screen arrow.
Press the SLEEP button
repeatedly to pick the amount of
time (15 minutes to 2 hours
ahead) before the TV will turn
itself off.
The (+), (-) buttons can also be
used to set the amount of time.
Setting the Sleep Timer Control
<l>
Press the STATUS button to
clear the screen after you have
set the time for the TV to turn
off.
A few seconds before the TV is
to shut off a message will come
on the screen telling you GOOD
NIGHT
Remember, to see how
B many minutes are left
before the TV shuts itself off,
press the STATUS button on the
remote.
To stop a SLEEP TIMER setting,
reset the timer back to OFF.
(Turning the TV off and on, or
pressing a button during the last
minute of a timer setting, will also
cancel a setting.)
14
Page 15
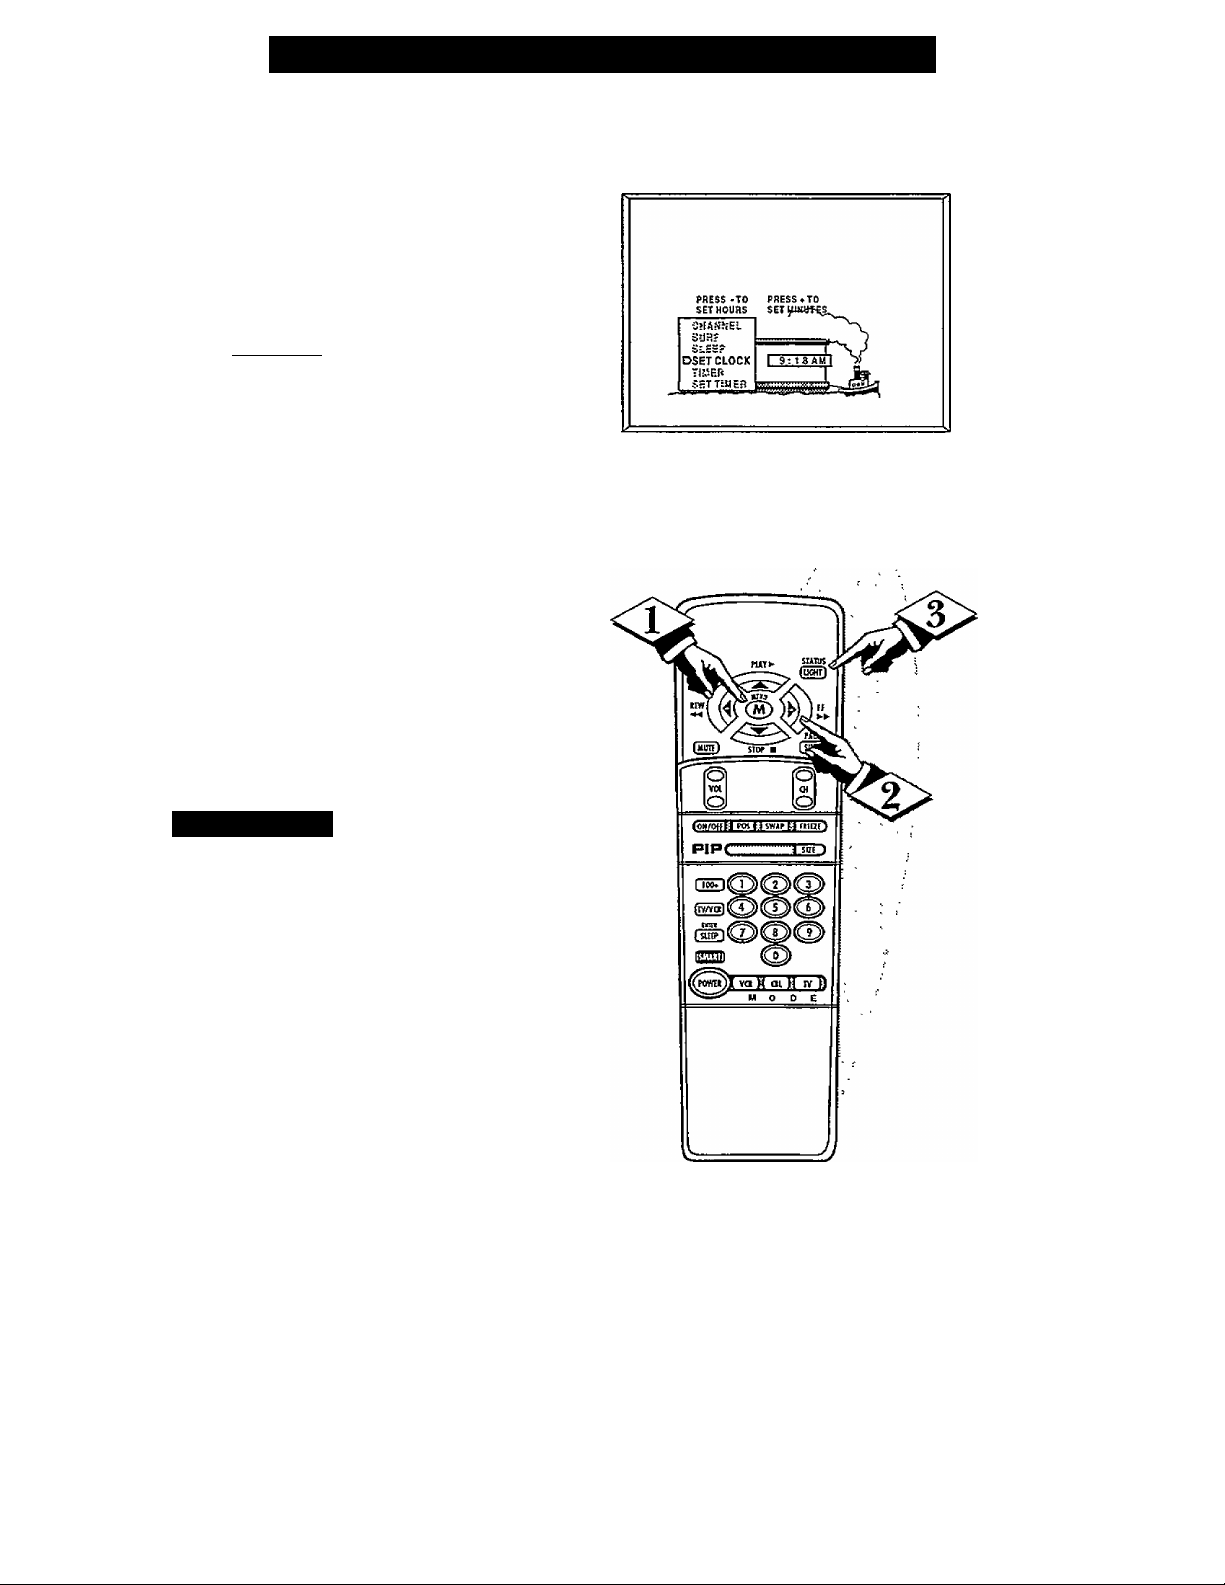
T^JOTE: If you went through First
JL y
Time Setup (page 2 of the Quick
Use Guide), this task has already
been completed for you.
Your TV comes with an on-screen
clock. During normal use the clock
shows on the screen with every chan
nel change (and when the STATUS
button is pressed.)
C
BEGIN)
Press the MENU (M) button on
<t>
the remote, then the MENU A or
buttons to select the words SET
CLOCK with the TV’s on-screen
arrow.
Press (-) button to set the hour
(and AM or PM) parts of the clock.
Press (+) button to set the minutes
part of the clock.
How TO Adjust the Set Clock Control
T
□
<^> Press STATUS button to set the
clock in operation and clear the
screen.
/ Smart Help
Remember, the remote’s
number buttons can also be
used to enter the time. Be sure to
press "O'* first for single digit hour
entries. Press the 0 or 1 number but
tons for the clock's AM or PM set
tings.
15
Page 16
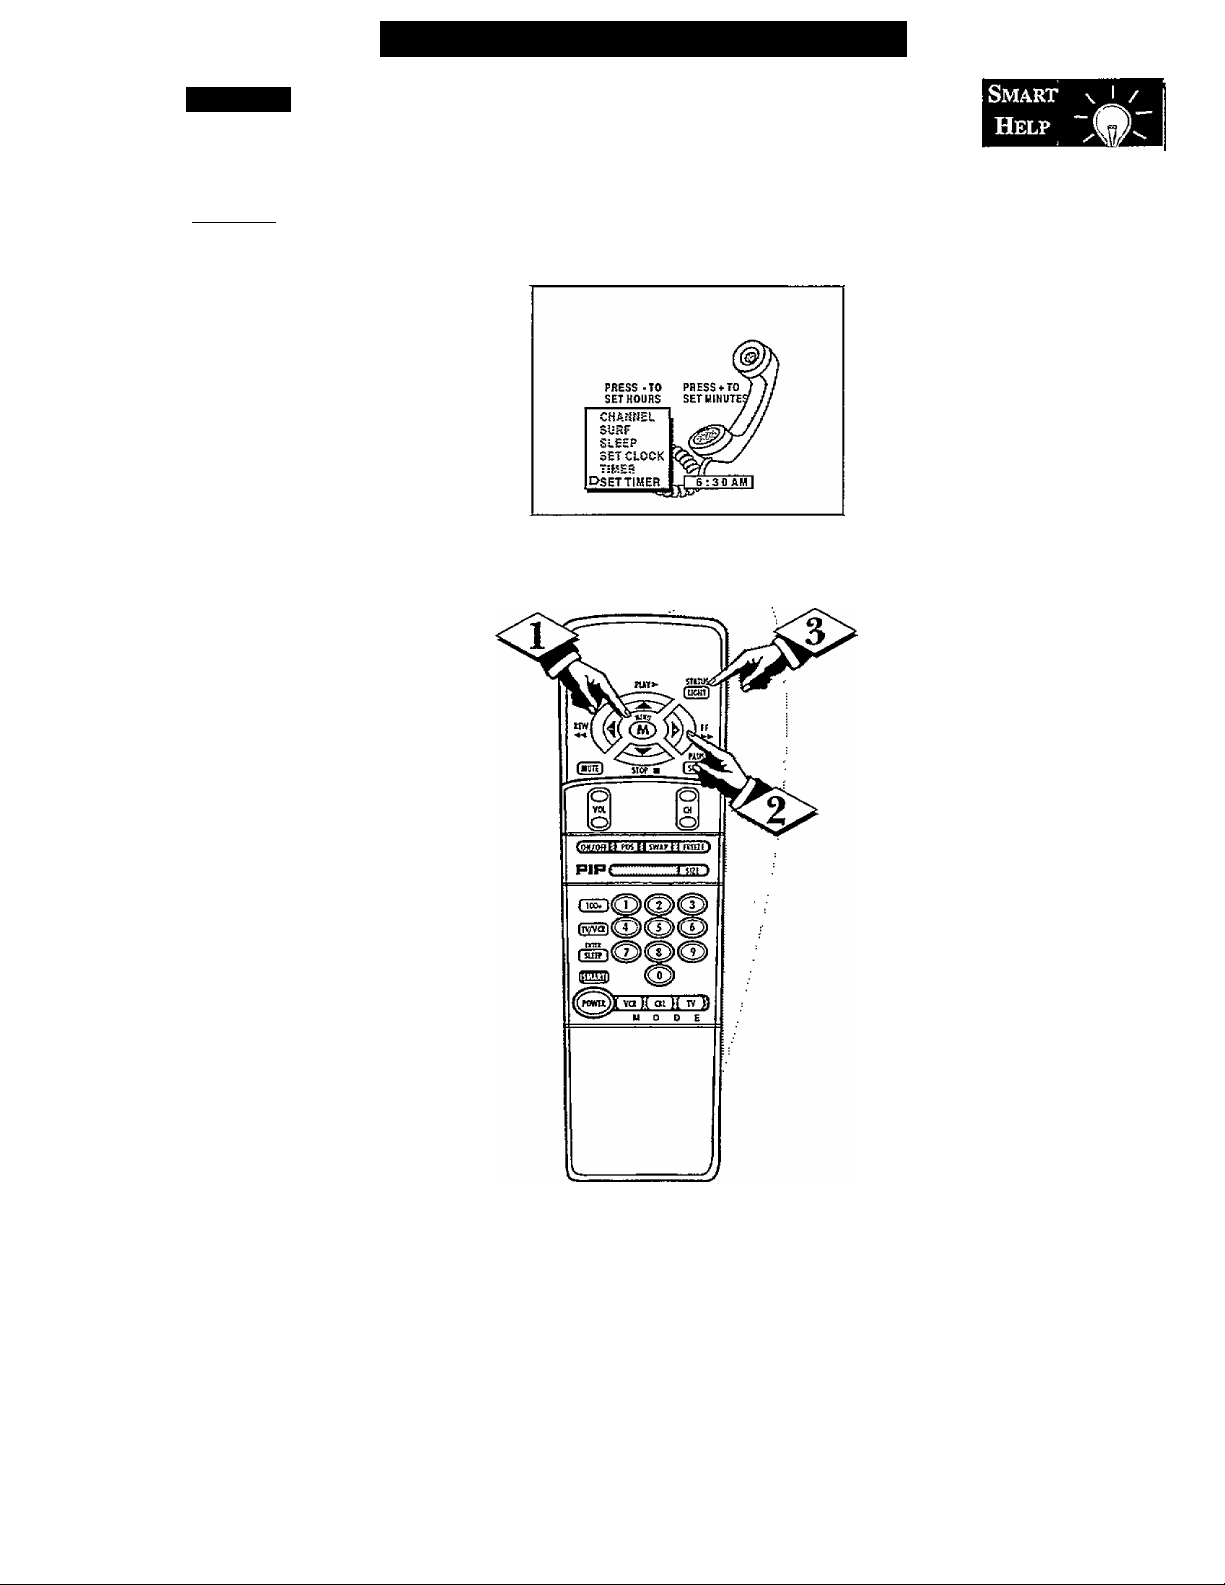
□
On Timer
'ust like an alarm clock you
can set the TV to turn itself on
7
at the same time everyday.
[BEGIN)
Press MENU (M) button on
the remote, then press the MENU
A
or T buttons to select the
words SET TIMER with the
TV’s on-screen arrow.
Press the (-) button on the
remote to set the hour you want
the TV to turn itself ON. (Also
press the (-) button for the correct
AM or PM setting).
Press the (+) button on the
remote to set the minutes part of
the timer clock.
<l>
Press the STATUS button to
set the "ON TIME" and clear the
screen.
Setting the Set Timer Control
Remember, 0
the TIMER SET
TING will not take
place unless the
TIMER Menu con
trol is also set to
"ON". (See TIMER
control section).
The remote’s num
ber buttons can also
be used to set the
clock. Be sure to
0" first for
press "
single digit hour
entries. Press the 0
or 1 number buttons
for the clock's AM
or PM settings.
16
Page 17
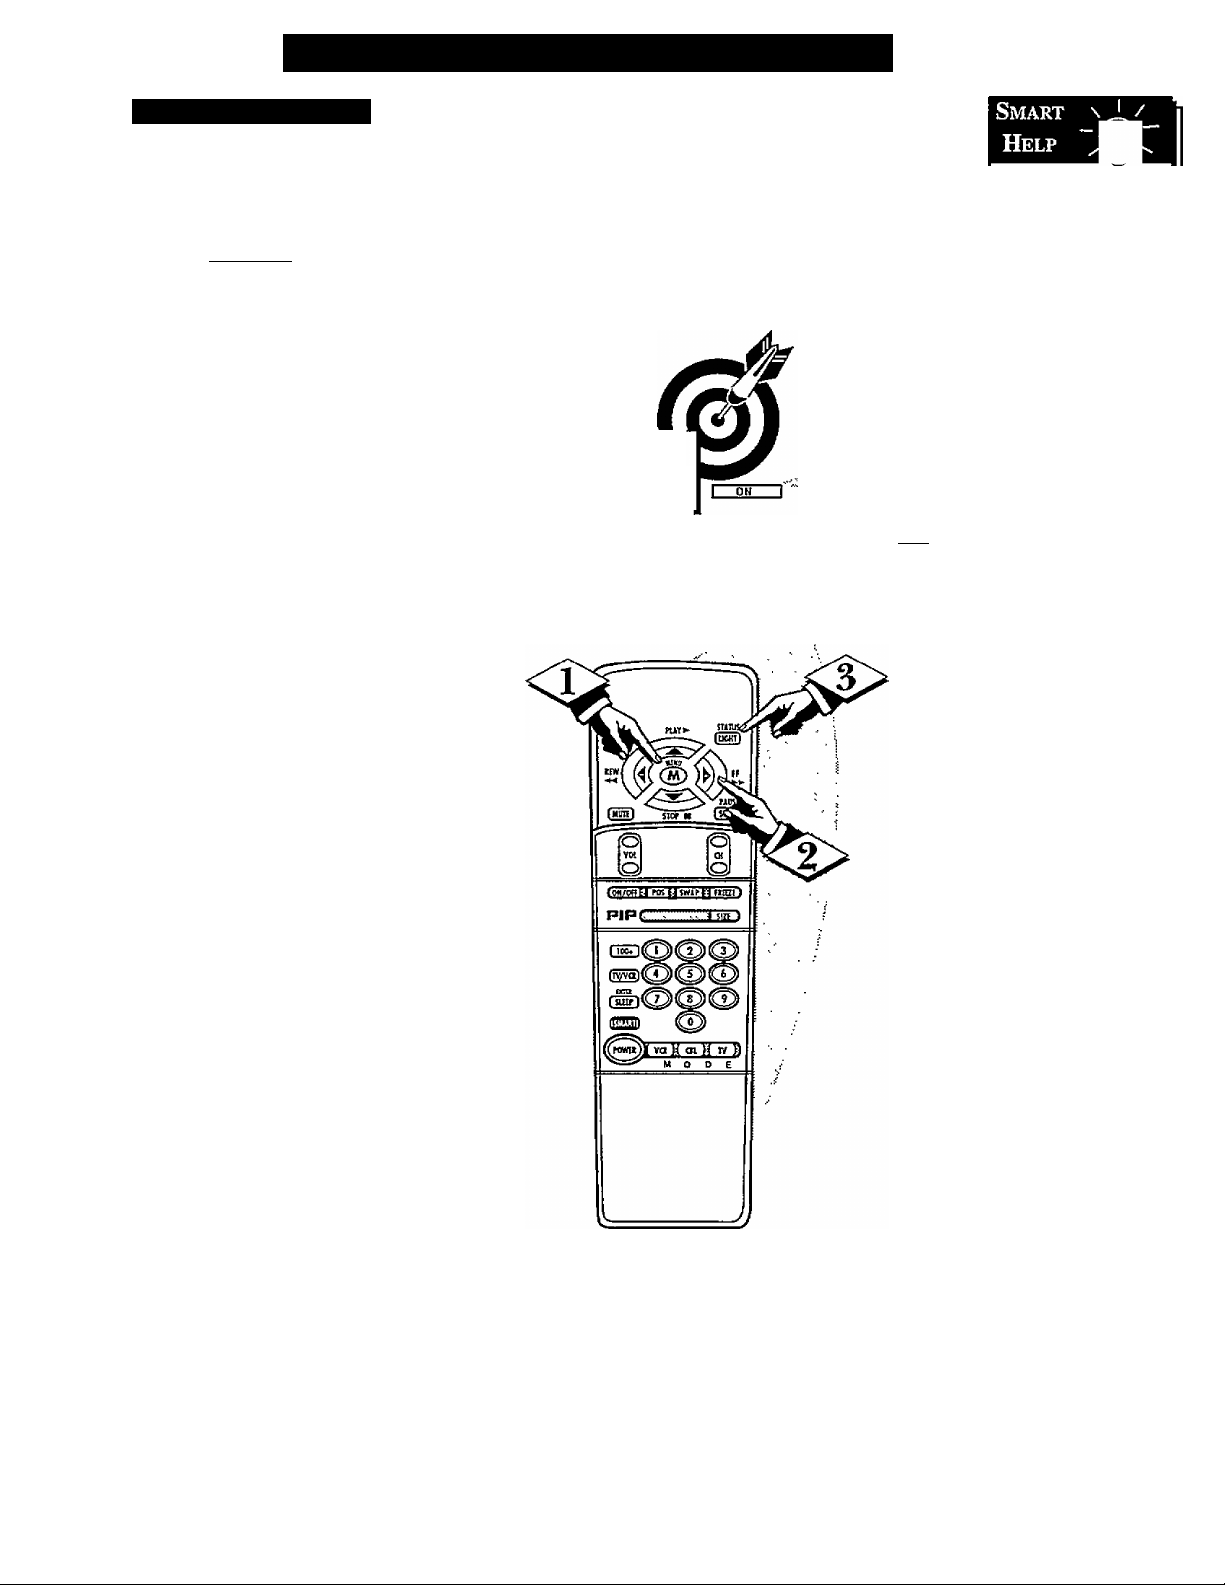
Setting the Timer ON/OFF Control
Turning Timer On/Off
□
A fteryou have set the timer to
jCxthe correct time, this feature
allows you to turn the timer ON
or OFF.
[BEGIN)
Press MENU (M) button on
the remote, then press the MENU
A
or T buttons to select the
word TIMER with the TV’s on
screen arrow.
Press the (+) button on the
remote to choose between the
ON or OFF selection.
<i>
Press the STATUS button to
save the TIMER setting and clear
the screen.
SLEEP
SET CLOCK
DTIMER
SET TtfiES
Remember ®
y
to select SET
TIMER and enter
the time you want
the TV to turn on.
i OFF I
17
Page 18
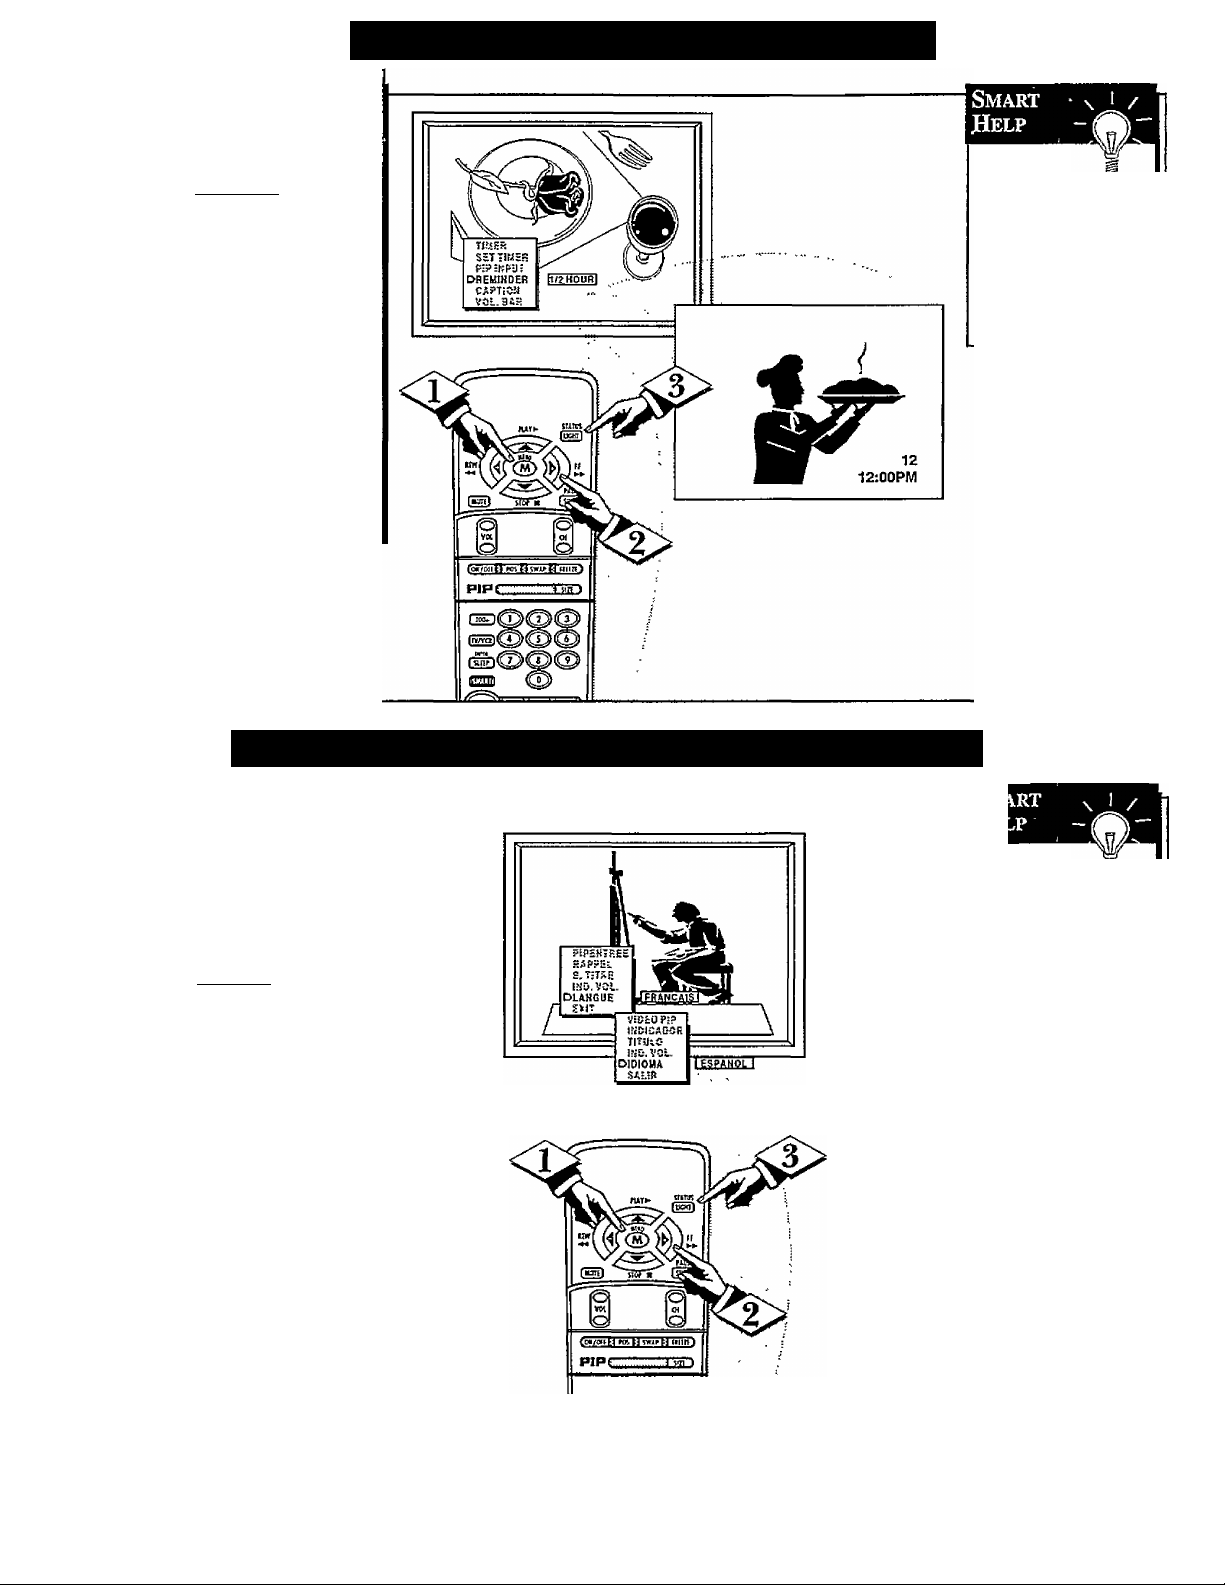
□
ith the Reminder control
ON the TV automatically
W
shows you the current time and
channel every thirty minutes.
(BEGIN)
Press the MENU (M) button
on the remote, then press the
MENU A or T buttons to select
the word REMINDER with the
TV’s on-screen arrow.
Press the (+) button to turn
REMINDER ON.
Press STATUS button to
clear the screen.
How TO Set the Channel Reminder
Remember,
if Closed ~
Captioning is ON,
neither the Channel
Reminder or the
"MUTE" sound indi
cator will show on
the TV screen.
How To UsE THE On-Screen Language Option
our French and Spanish
speaking TV owners an on
screen LANGUAGE option is pre
sent With the LANGUAGE con
trol you can set the TV’s on-screen
features to be shown in either
English, French, or Spanish text.
(BE<^N]
Press the MENU (M) button
<P
on the remote, then press the
MENU A or T buttons to select
the word LANGUAGE with the
TV’s on-screen arrow.
<l>
Press the (+) button to select
either the English, French
(FRANÇAIS), or Spanish
(ESPAÑOL) language option.
Text for the on-screen Menu will
change to the selected language.
Press STATUS to clear the
screen.
Remember, ^
If you went
through Setup (in
your Quick Use
Guide), this task has
already been complet
ed for you.
The Language control
only makes the TV's
on-screen (MENU)
items appear in
French or Spanish
text It does not
change the language
of other on-screen
text features such as
Closed Captioned
(CC) TV shows.
rr B
18
Page 19
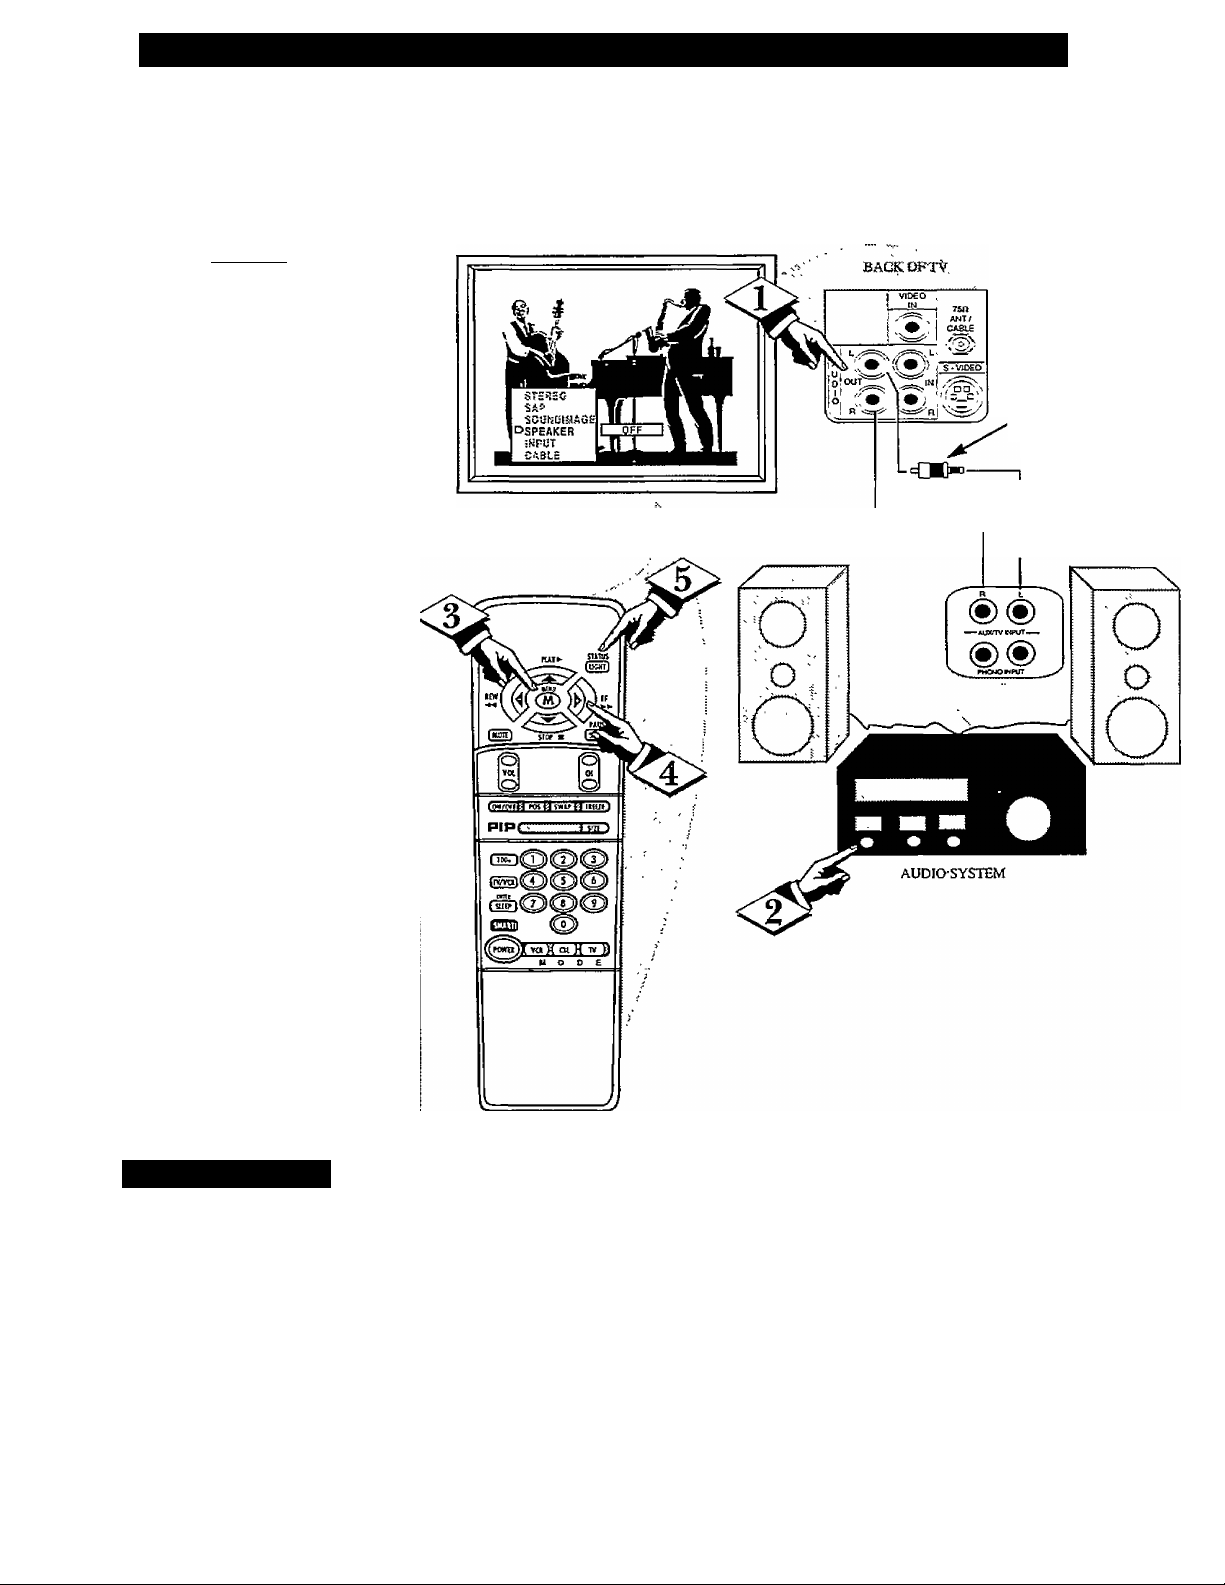
Using the TV Speaker Control and Audio Output Jacks
buld you like to hear TV pro
grams through your audio hi-
W
fi system? The TV's Audio Output
jacks and TV Speaker On/Ojf con
trol work together to offer you this
TV sound option.
Cbegin)
Connect the R(ight) and
L(eft) AUDIO OUT jacks on the
TV to the R and L Audio Input
jacks on your amplifier or sound
system.
Set the audio system's volume to
normal listening level.
□
RCA PHONO PLUG
CABLES (NOT SUPPUED)
<|> ThrntheTV and audio system
ON. You can now adjust the sound
level coming from the audio sys
tem with the Volume A or T but
tons on the TV or remote.
To hear the TV sound from
only the audio system speakers,
select the TV^s SPEAKER on
screen control.
Press the MENU (M) button on
the remote, then press the MENU
A or ▼ buttons to select the word
SPEAKER with the TV’s on
screen arrow.
Press the (+) button to turn the
<l>
TV’s internal speakers OFF.
You should now only hear TV
sound coming from the audio sys
tem speakers.
Press the STATUS button to
clear the screen.
AUDIO OUT
(REDWHITE)
N ■ / Smart Help
Remember, the audio
^ system may have to be in
AUX(iliary) mode to play sound
from the TV.
19
Page 20
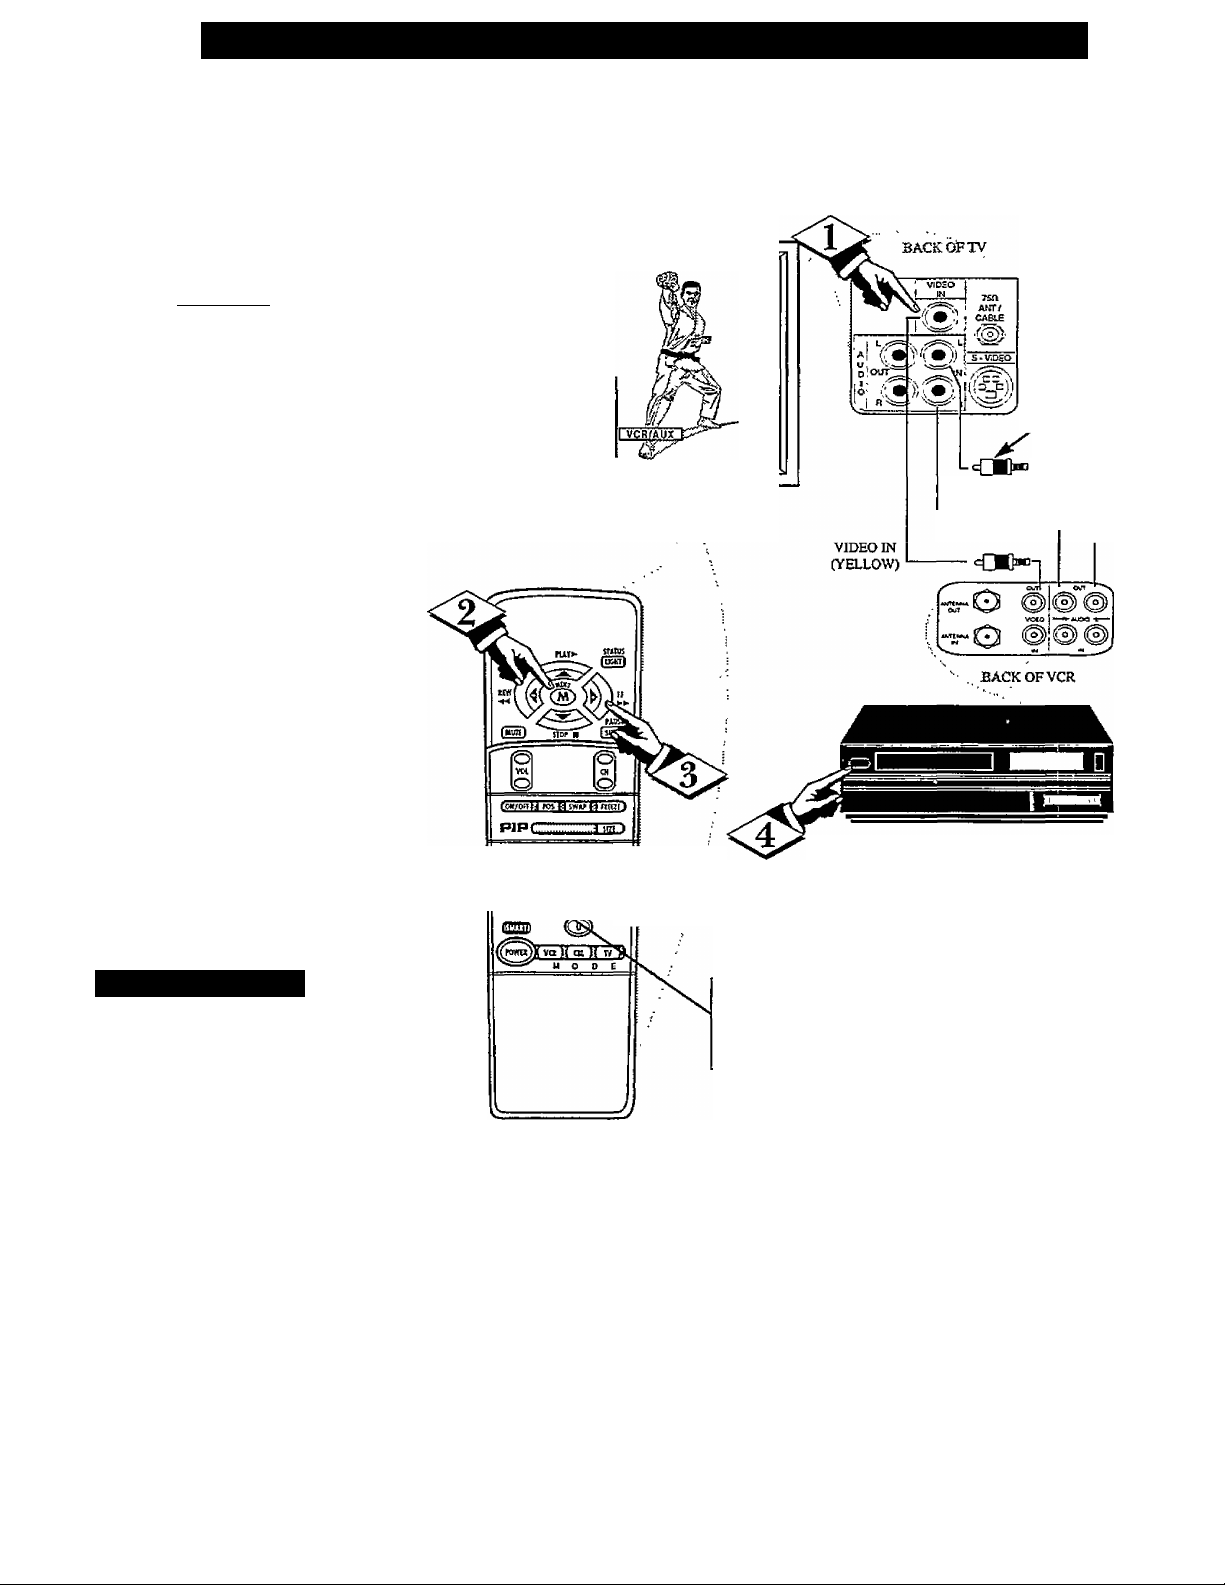
о
bu can view the playback of
VCR tapes (Video Disc
r
Players, camcorders, etc), by
using the A UDIO and VIDEO
INPUT jacks (on the rear of the
TV).
For example: to view the play
back of a VCR tape:
<l>
<l>
Connect the VIDEO and
AUDIO IN(put) jacks on the
TV to the AUDIO and VIDEO
OUT(put) jacks on the VCR.
Press the MENU (M) button
on the remote, then press the
MENU A or T buttons to select
the word INPUT with the TV^s
on-screen arrow.
Note: You can press the CHAN
NEL
“VCR/AUX” (if it has been
added to the TV’s channel mem
ory.) See page 7 for details.
How то Use the АшюА^шео Input Jacks (Contmuep)
[BECSINl
AY
buttons to select
PICTURE AND SOUND FROM PLAY
BACK OF VCR TAPE
sT=s=e
SAP
SSUiiDtHASS
SPEAKER
DlHPUT
CA3LE
RCAPHONO PLUG
CABLES (NOTSUP-
PUED)
AUDIO IN
(REDAVHITE)
—сшн—
Press the (+) button to select
the VCRyAUX(iliary) INPUTS
on the rear of the TV.
<J> Turn the VCR ON and
PLAY the VCR tape to be
viewed on the TV.
\ ' / Smart Help
Remember» when you're
” through using the PJV
INPUT jacks, return the INPUT
display screen on the TV to
ANTENNA. If you leave the TV
in the VCR/AUX INPUT mode
and there is no signal source con
nected to the jacks, you will be
seeing only a blank screen on the
TV.
NOTE: If you have a mono (sin
gle audio OUTPUT) VCR, "Y"
Connectors are available (from
your dealer or Parts Information
Center 1 8СЮ 292-6066) to con
nect to the audio inputs on the TV.
(EQUIPPED WITH VIDEO AND
VCR
AUDIO OUTPUT JACKS)
NOTE: THE ”TV/VCR" BUTTON
CAN ALSO BE USED TO PLACE
THE TV IN THE VCR/AUX MODE
(AS WELL AS SELECT CHANNELS
3 0R4.)
20
Page 21
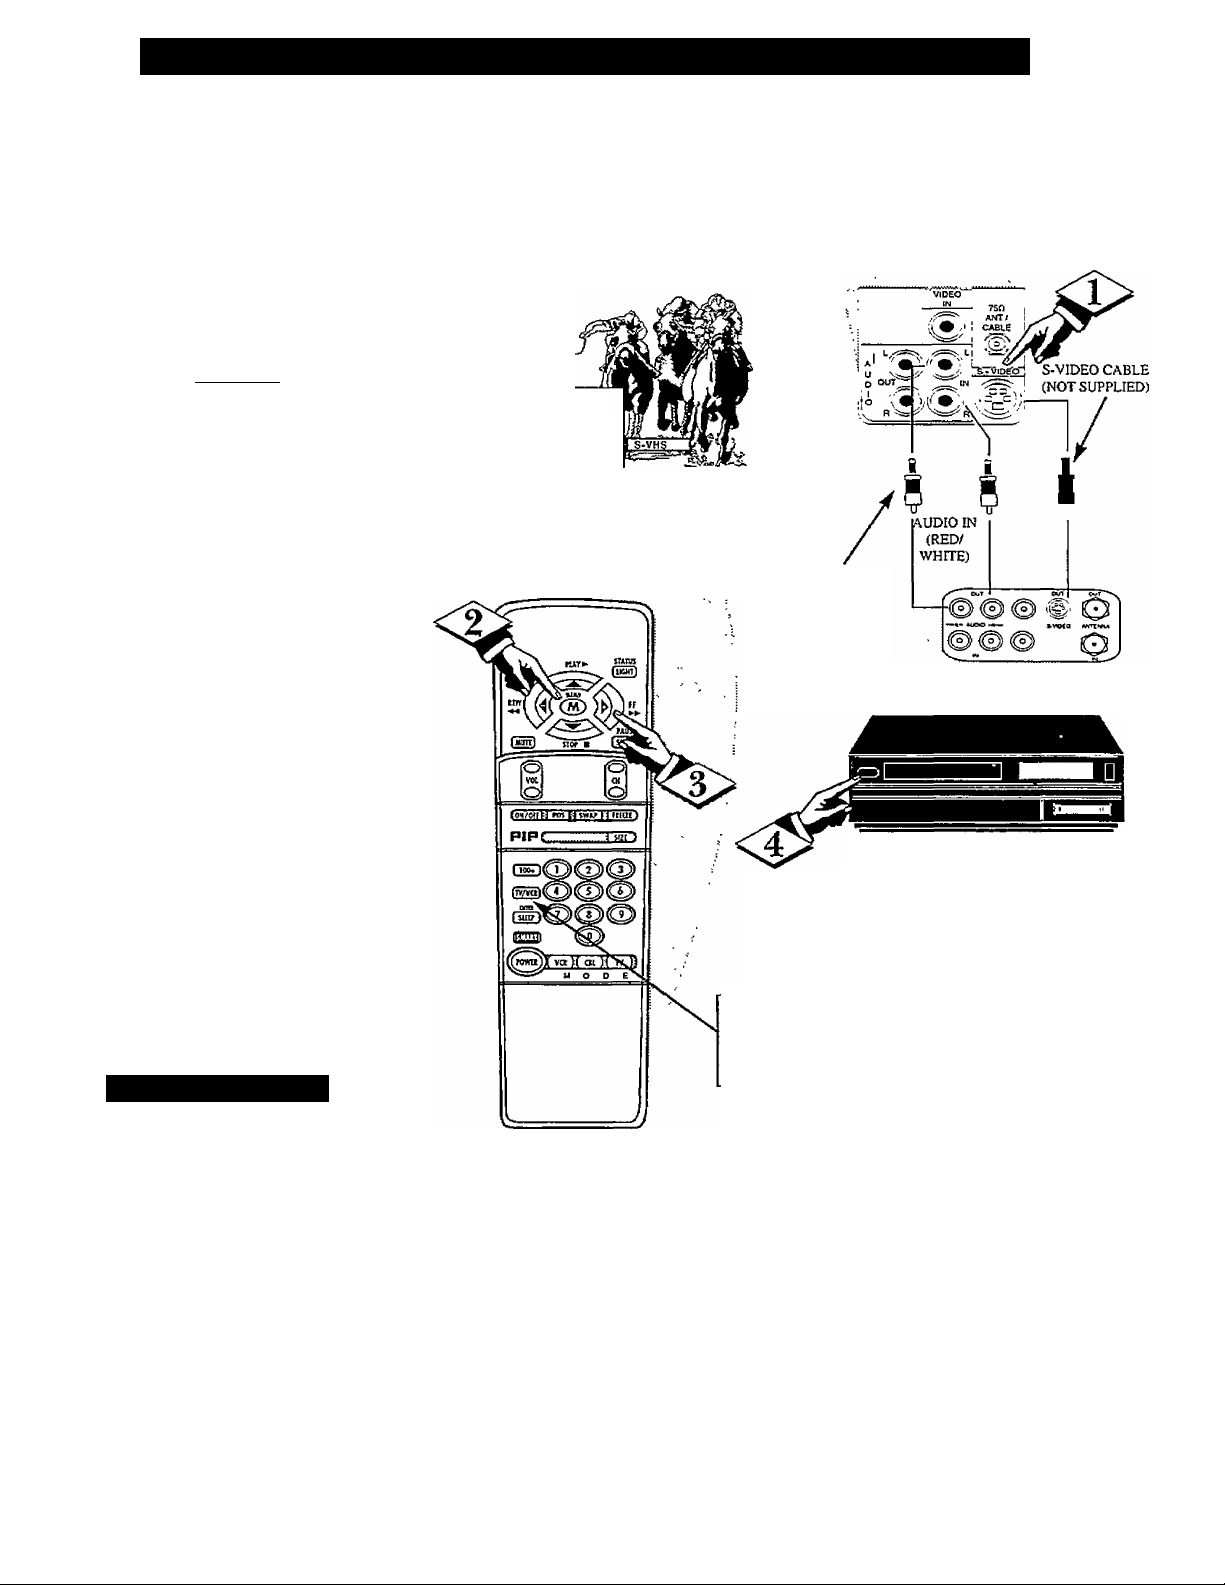
How TO Use the AoDioA^roEO Input Jacks (Contbvued)
Vie S(iiper)-Video connection
on the rear of the TV is used
7
for the playback of S-VHS VCR
tapes, Video Discs, Video Games
or Compact Disc Interactive (cd-i)
discs.
Better picture detail and clarity
is possible with the S-Video
playback as compared to the pic
ture from a normal antenna (RF)
connection.
Cbecsin]
Connect the S-VIDEO IN
<i>
Jack on the TV to the S-VHS
Out(put) jack on a S-VHS VCR.
The S-VHS connecting cable
will be supplied with the S-VHS
VCR (or Video Disc player.)
Also connect the AUDIO
IN(put) Jacks from the TV to the
AUDIO OUT jacks on the VCR.
PICTURE AND SOUND FROM PLAY
BACK OF S-VHS VCR TAPE
STESeO
SA?
SDUHSiyASi
DlHPUT
CABLE
□
BACKOFTV
RCA PHONO
PLUG CABLES
(NOT SUPPLIED)
Press the MENU (M) button
on the remote, then press the
MENU A or ▼ buttons to select
the word INPUT with the TV’s
on-screen arrow.
Press (+) button to select the
S-VHS INPUT on the rear of the
TV.
Tbrn the VCR ON and place
it in the S-VIDEO or S-VHS
mode. Insert a S-VHS cassette
tape and PLAY the VCR in a
normal manner.
\ ±/ Smart Help
w Remember, when you’re
— through using the S-VIDEO
IN(put) jack return the INPUT con
trol on ¿le TV to ANTENNA. If you
leave the TV in the S-VIDEO mode
and there is no signal source con
nected to the jack, you will be see
ing only a blank screen on the TV.
BACKQFS-VHS VCR
Example: S-VHS VCR
(EQUIPPED WITH S-VIDEO OUTPUT JACK)
(Could be used with a Video Disc Player,
Video Game Players, CD-I Players, etc.)
NOTE: THE "TVA^CR" BUTTON
CAN ALSO BE USED TO PLACE
THETV IN EITHER S-VIDEO OR
VCR/AUX MODES (AS WELL AS
SELECT CHANNELS 3 ORA)
21
Page 22
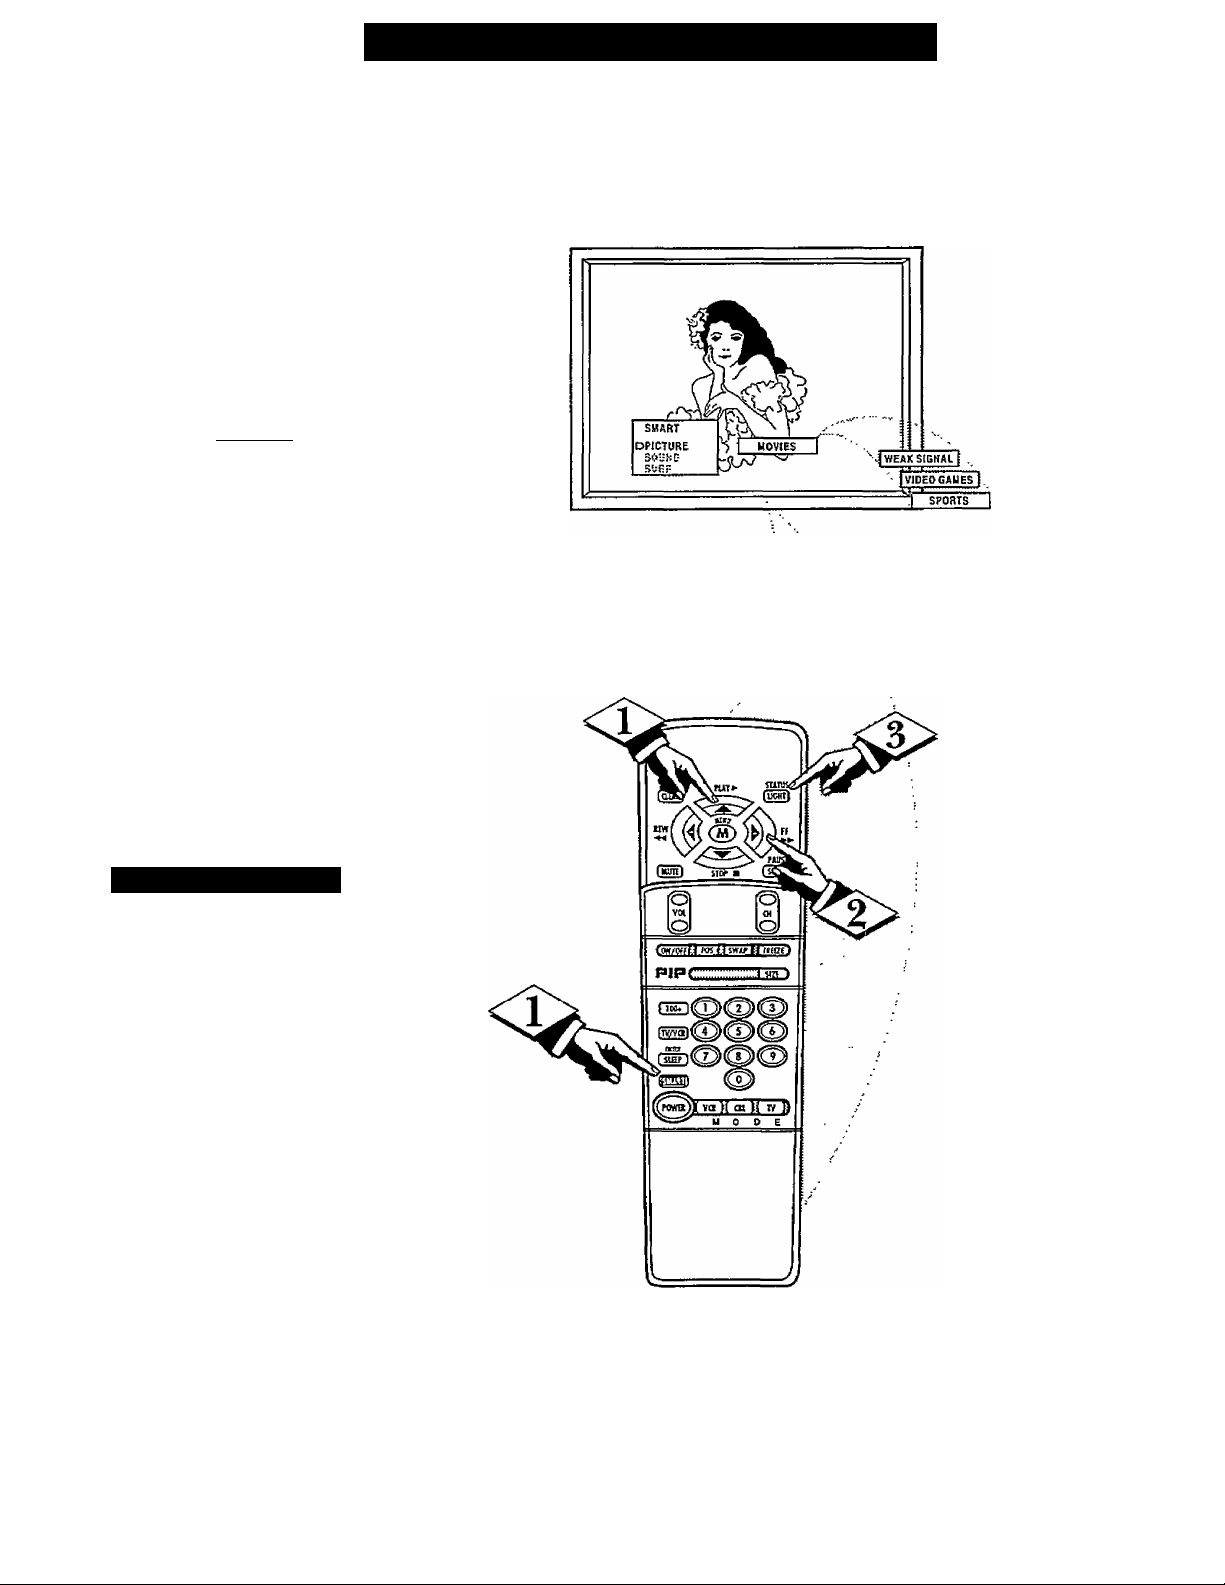
□
hether you’re watching a movie
or a video game your TV has
W
automatic video control settings
matched for your current program
source or content. The Smart Picture
feature quickly resets your TV's
video controls for a number of differ
ent types of programs and viewing
conditions you may have in your
home. Each Smart Picture setting is
preset at the factory to automatically
adjust the TV’s Picture, Color, and
Sharpness viewing control levels.
Cbeoin)
<i>
A
T
<l>
Using the Smart Picture Control
Page 23
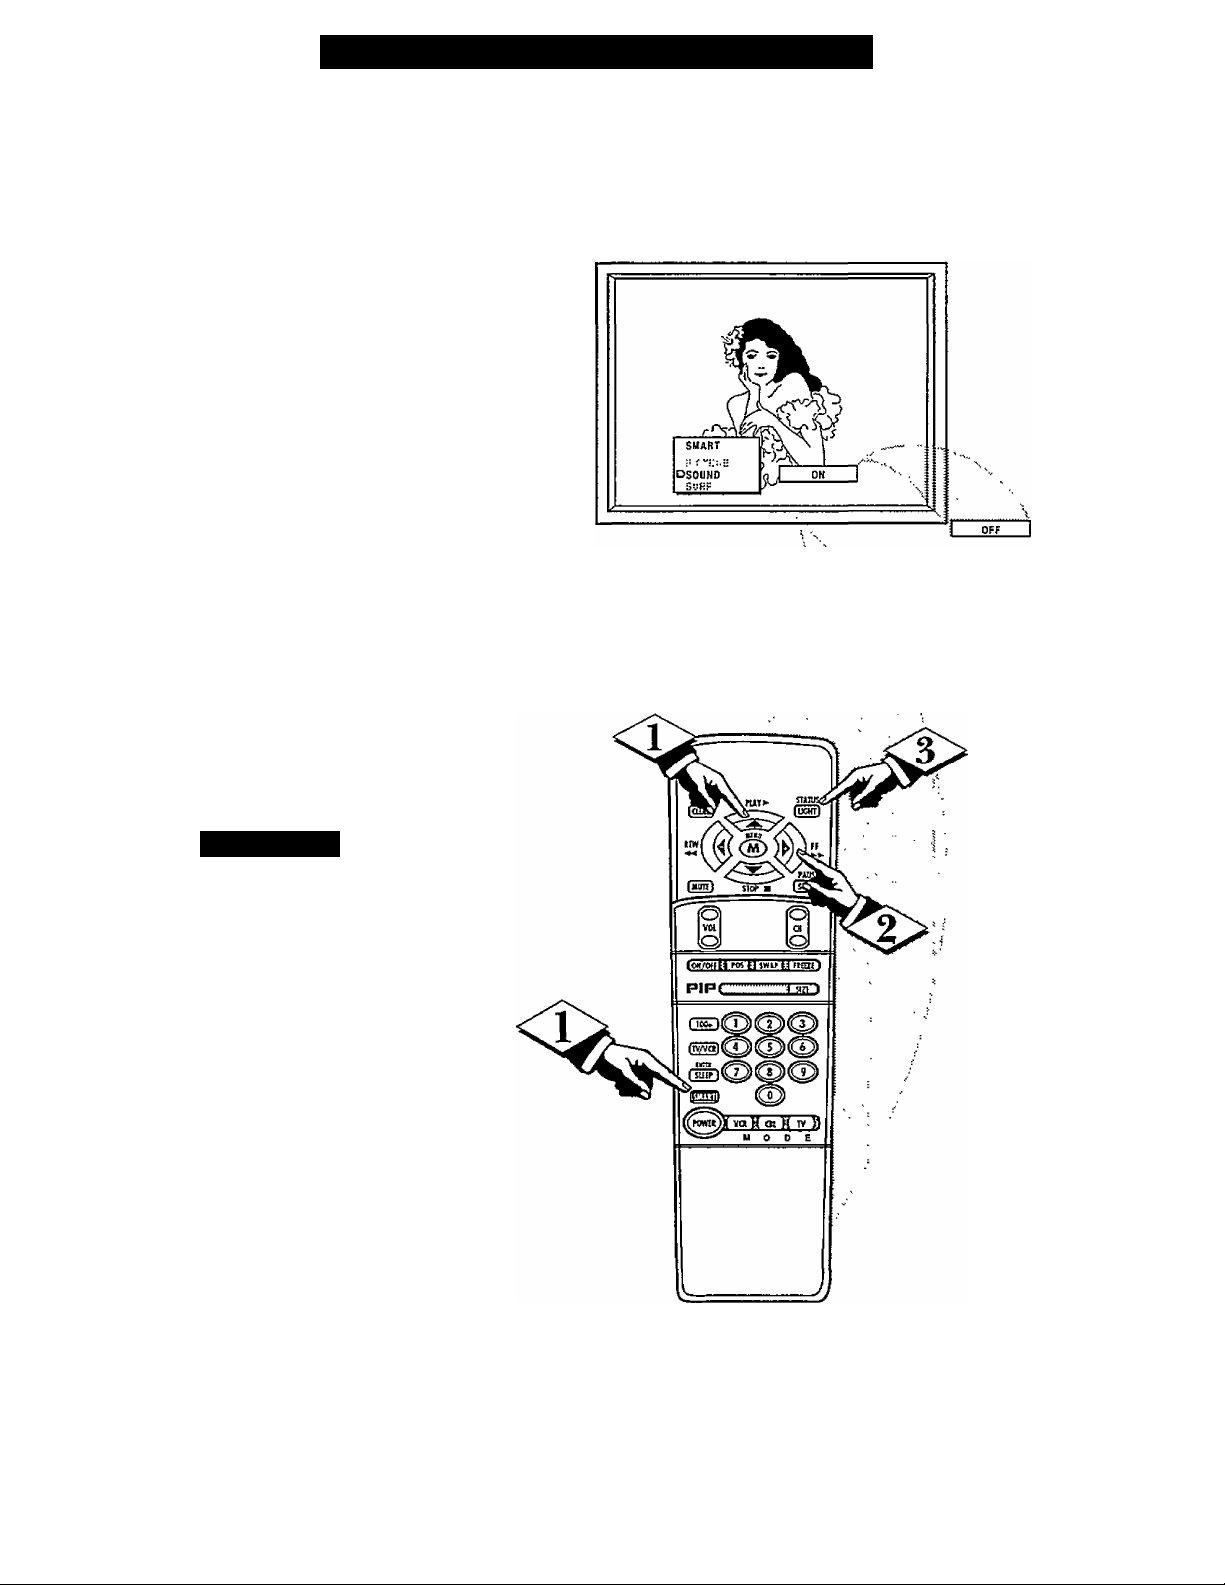
re you tired of the sound of
commercials following you
A
into the next room or all through
the house? Smart Sound allows
you to preset a desired volume
level that the TV sound will not go
above. This makes for an even,
more consistent sound by reducing
the peaks and valleys that can
occur during program chatiges or
commercial breaks.
Press the Smart button on the
remote.
Press the Menu A or T button to
select the desired Smart Menu fea
ture (highlighted with the arrow).
With the Smart Sound control
selected, press the (-}■) or (-) button
to turn the volume level control
ON or OFF
Using the Smart Sound Control
<i> Press the STATUS button to
clear the screen when completed.
Smart Help
Remember, Smart Sound
^ works only with the pro“ grams coming through the
Antenna/Cable input on the rear of
the TV (RF audio). It will not con
trol the sound levels for the
Auxiliary (VCR/AUX IN) audio
inputs.
23
Page 24
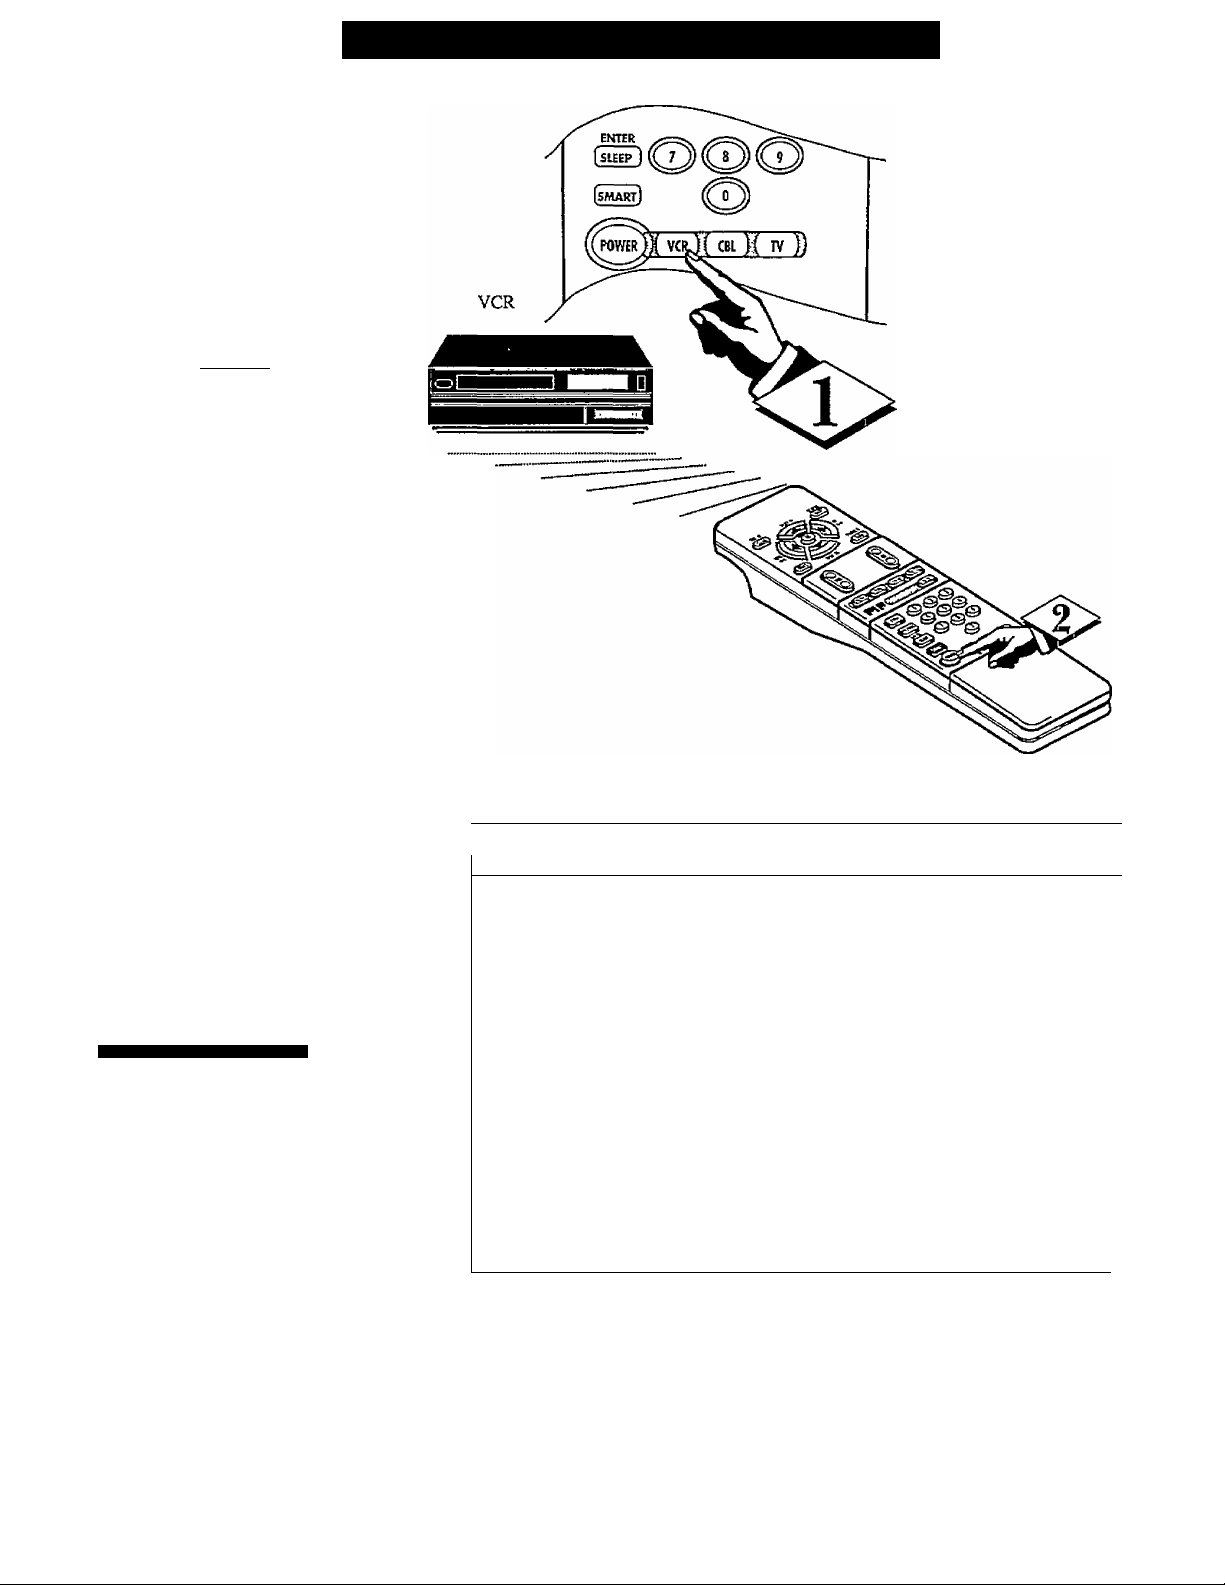
bur remote control is set to
work your TV and many
y
infrared remote (IR) control
VCRs. However, an easy one
time step may be necessary
before the remote will work your
VCR.
Try this itiitial check to see if
going on to the following section
is necessary. '
(begin)
Press the VCR System but
ton on the remote.
Point remote toward VCR
and press the POWER button.
Does the remote turn the
<l>
VCR ON?
IF YES, © and try the other
VCR buttons on the remote, if
they also work the VCR, then
the remote is ready and no fur
ther steps are needed.
If NO, continue...
Setting the Remote to Work VCRs
<i> First look up a TWO-DIGIT
remote code number for your
brand VCR before going through
the simple "1,2,3" steps (on the
following page).
continue to next page
\ ' / Smart Help
Remember, if more than
0 one number is listed, you
may have to try more than the
first two-digit code given in order
to locate your VCR's remote code.
REMOTE
BRAND
Akai
Capehart 33
Conoid 13
Curtis Mathes
Daewoo
Emerson
Fisher
Goldstar 23
Go Video
Hitachi 03,51
JVC
Magnavox
Matsushita 01,02
Mitsubishi
Multitech 27,28
l^NEC
CODE NO. BRAND
24, 25, 36 Panasonic
20, 31, 34,40 Sansui
14,47, 48
16, 17, 38, 39,50
VCR REMOTE
Philips
Philips Video CD
42
33
06, 07 Sanyo
45, 46
00, 05 Teknika
21
Samsung
Sears
Sharp 11,12
Shintom
Sony 09,10,41
Toshiba
\ddeo Concepts
Zenith
CODE NO.
01, 02, 52
00, 05
37
RCA 04, 32,42,43,44
22,30
49
13
08
35
26
18,19
29
15
----------------
i
J
24
Page 25
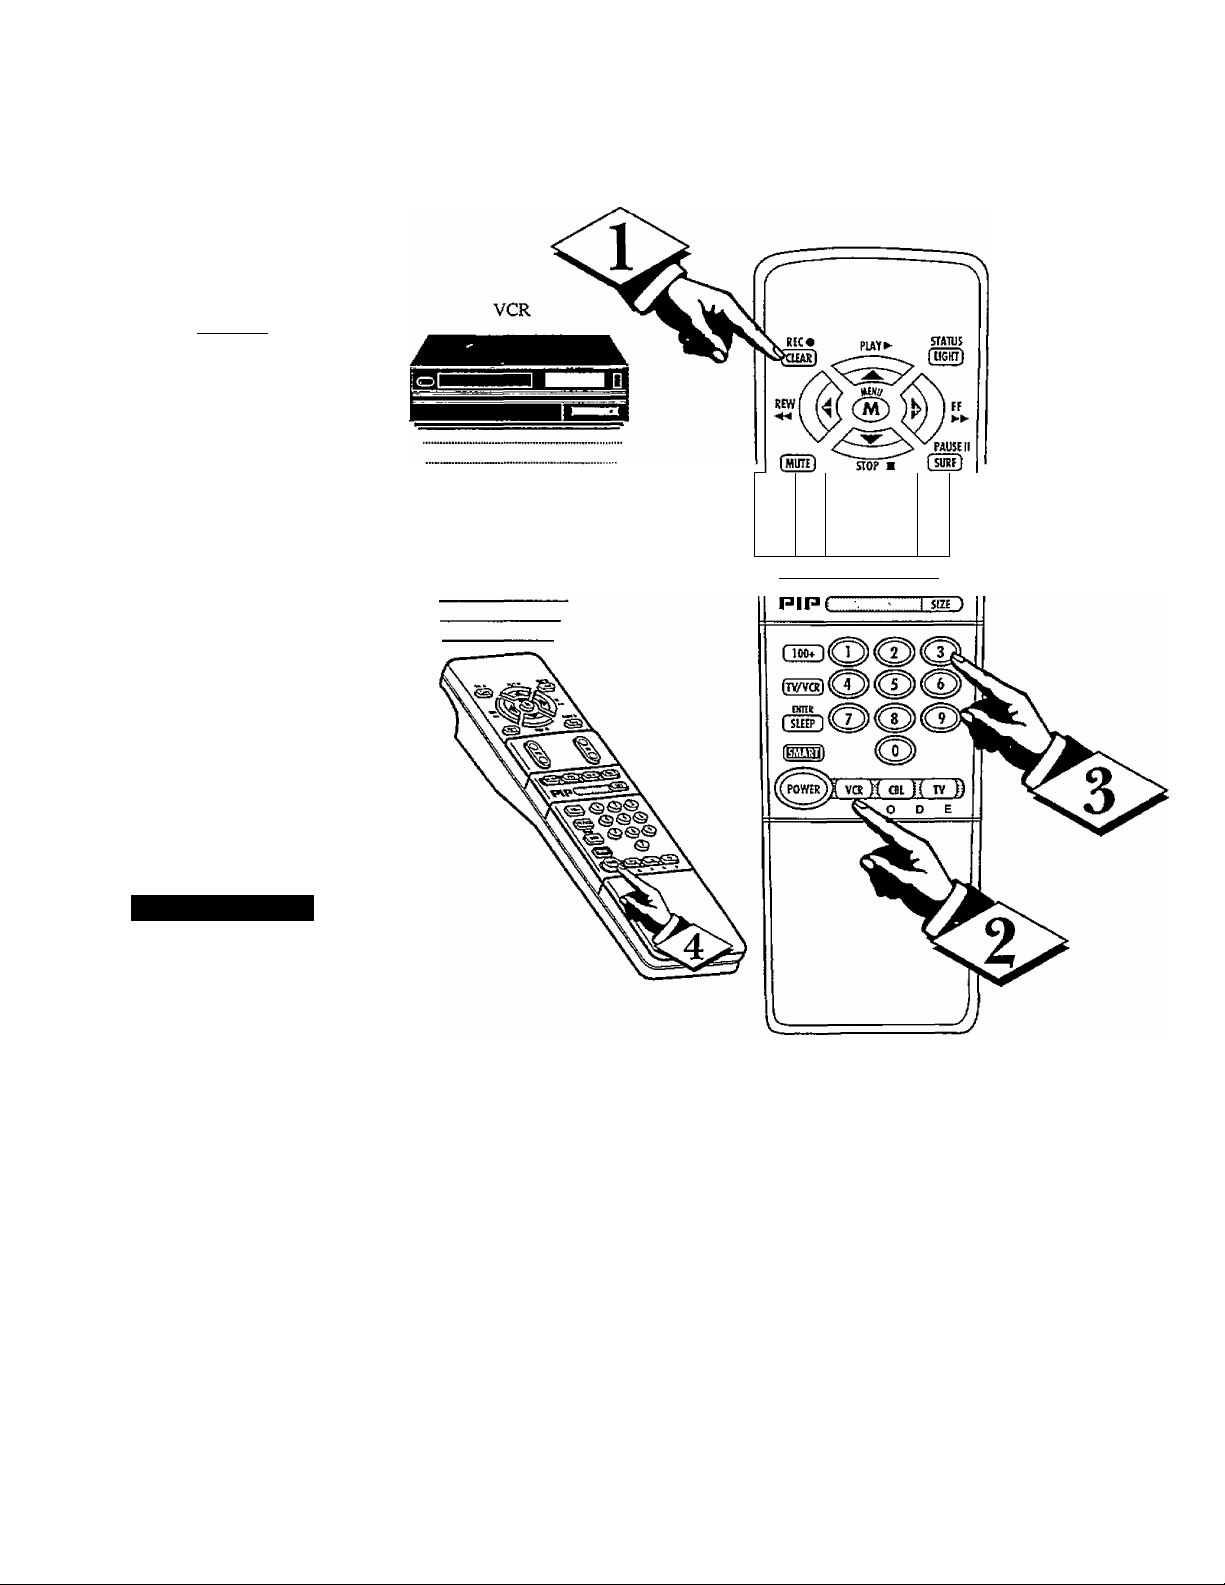
A Jow that you have looked up
1 V the two-digit Remote Code
Number for your brand of VCR
(on previous page), you are
ready to follow the four simple
steps below.
Please read through steps 1-4
before beginning.
[begin)
Press and release the REC
(RECORD) button.
Within thirty seconds after
releasing the REC button, press
and release the VCR System
button.
Within thirty seconds after
releasing the VCR System but
ton, ENTER THE TWO
DIGIT CODE NUMBER for
the desired VCR. The remote is
now ready to send commands to
the VCR.
o
VOl
o
(OH/OFf n ros t'j SWAP rSiEIE )
Pi
o
CH
Point the remote at the VCR.
Press the POWER button on the
remote to turn the VCR ON.
1 / Smart Help
Try it out. The Channel
S and VCR buttons on the
remote should now operate the
VCR.
Remember, if this doesn’t work
the first time, repeat steps using
the same remote code number.
If after a second try the remote
does not operate your VCR, and
there are more code numbers list
ed for your brand VCR, use the
next listed code number.
If after repeated attempts the code
number method does not work
your VCR, try the "VCR
SEARCH" method on page 28.
25
Page 26
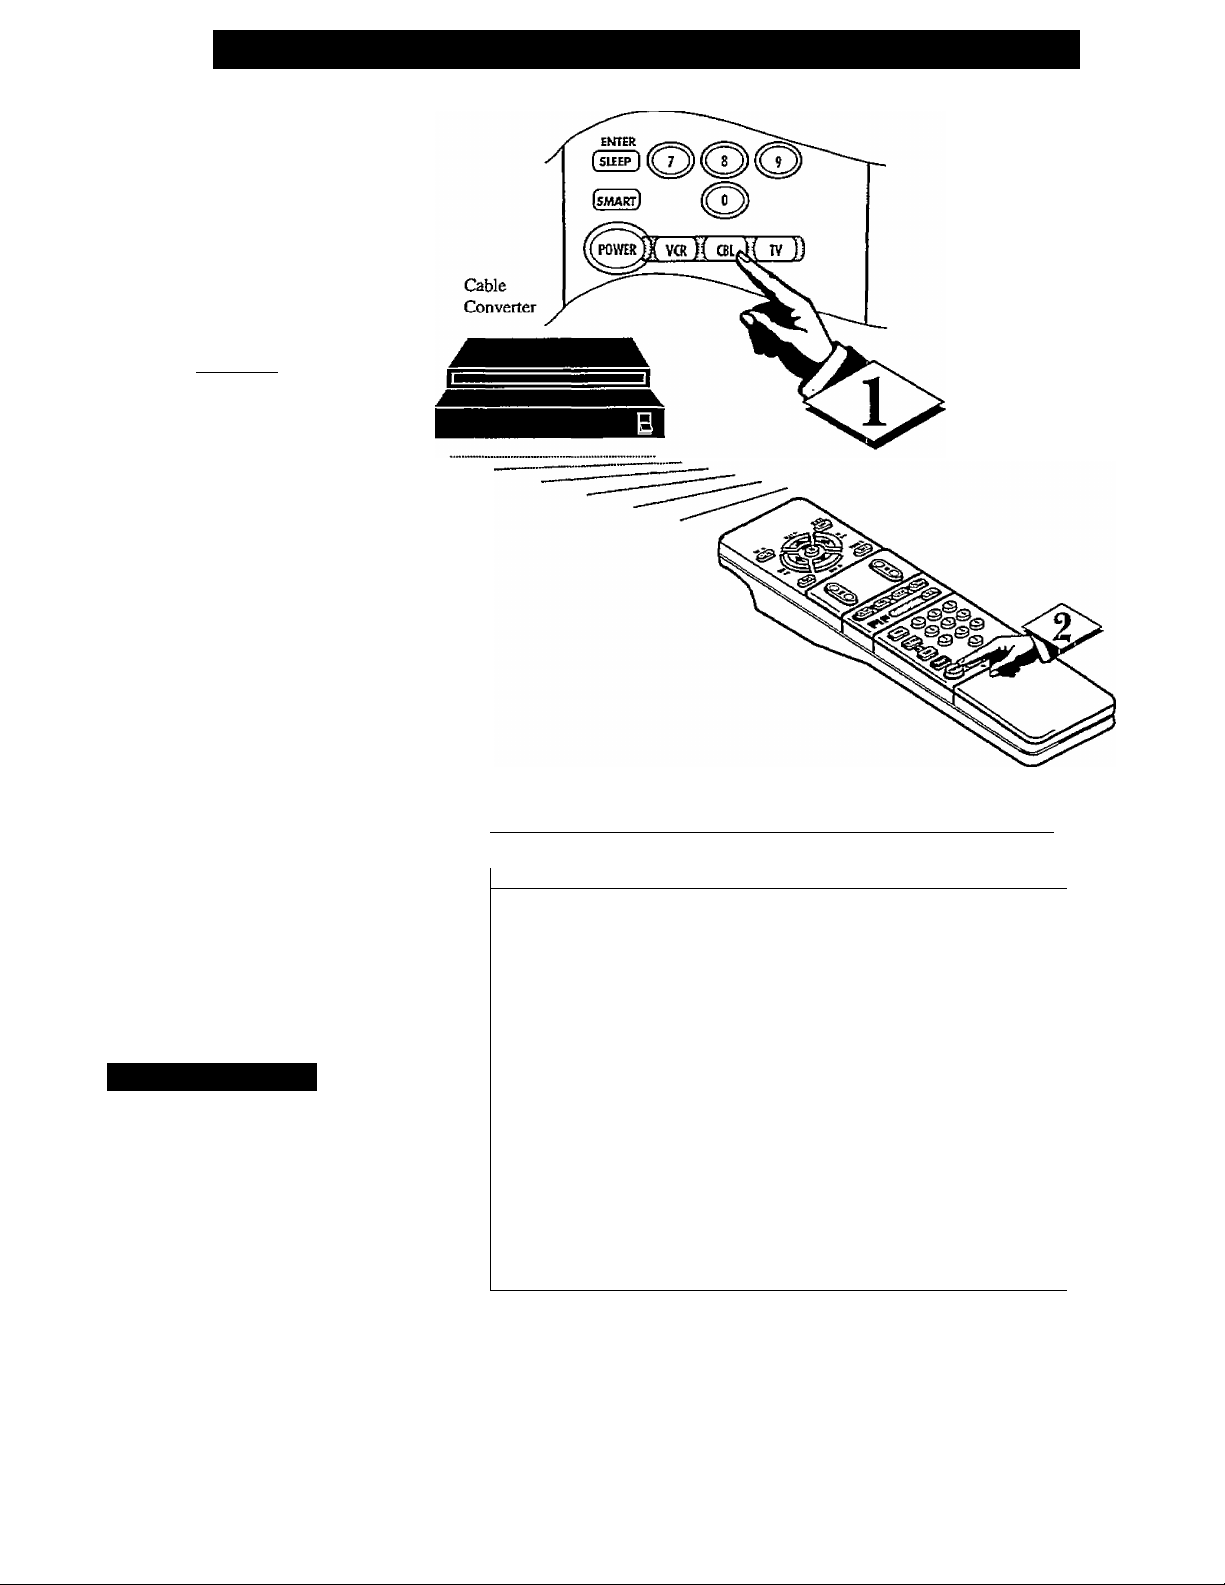
Setting the Remote to Work Cable TV Converteris
bur remote control is set to
work your TV and many
y
infrared remote (IR) control
Cable Converters. However, an
easy one-time step may be neces
sary before the remote will work
your Converter
Try this initial check to see if
going on to the following section
is necessary.
i BEGINS
Press the CBL System button
j on the remote.
Point remote toward Cable
Converter and press the POWER
button.
Does the remote turn the
Converter ON?
IF YES, Q and try the CH A
T
and CH number buttons on the
remote. If they also work the
Converter then the remote is
ready and no further steps are
needed.
If NO, continue...
<|> First look up a TWO-DIGIT
remote code number for your
brand Converter before going
through the simple "1,23" steps
(on the following page).
continue to next page
\±/ Smart Help
Remember, if more than
g one number is listed, you
may have to try more than the
first two-digit code given in order
to locate your Converter's remote
code.
/converter
BRAND
Archer
Diamond 23
Drake
Gemini
Hamlin 14, 15 Starcom
Hitachi
Jerrold 00,01,02,03,04,05,46,55
Macom
Magnavox 17,31
NSC
Oak
Panasonic
Philips 19,
Pioneer 09, 32 Video Tech 40
Regency 10, 11
REMOTE
CODE NO.
28
37
45
25
29, 38
49 Uniden Satellite
06, 27, 39
18, 35
20, 21, 24, 26
CONVERTER
BRAND
Rembrant 33
Salora
Scientific Atlanta 08, 22,47
Sheritech 34
Sylvania
Texscan 48
Tocom 12,13, 53
Toshiba
Unika
United Satellite
Universal
Video Way
Zenith 07, 41, 42
REMOTE
CODE NO.
A
52
30
16
43
44
50
54
36
51
26
Page 27
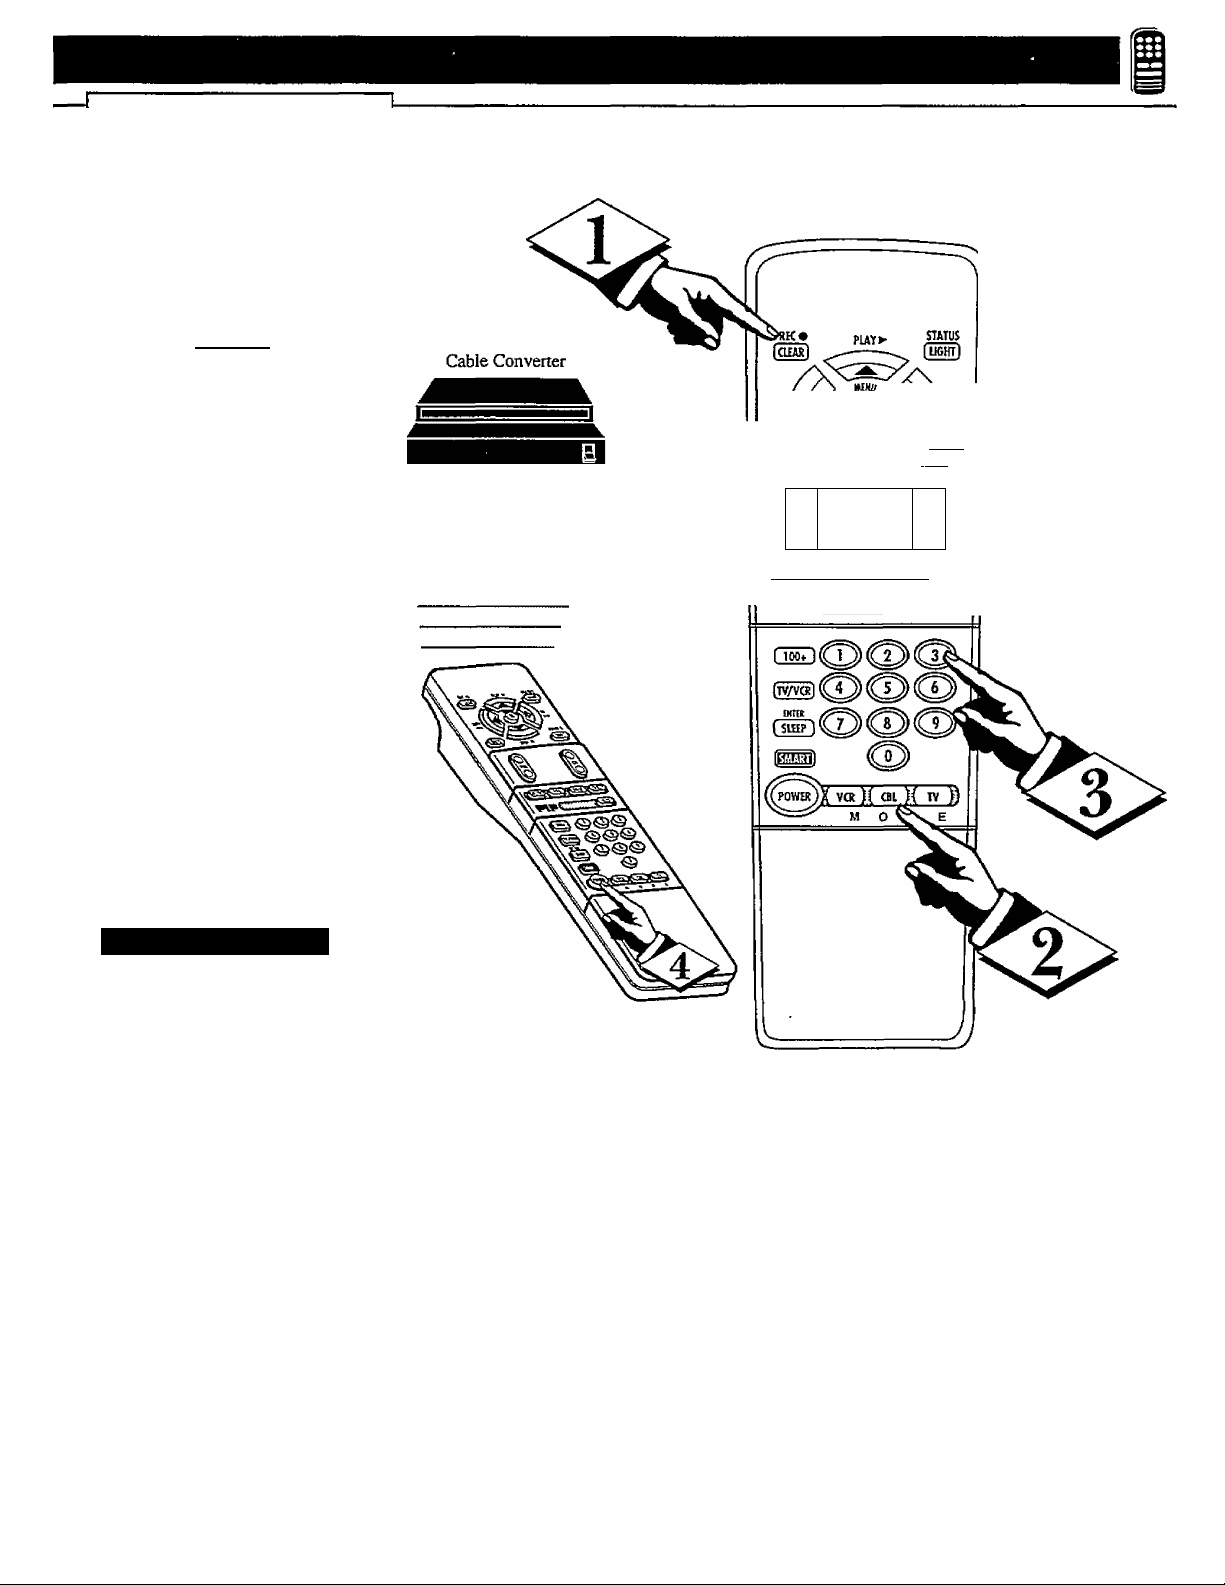
Tow that you have looked up
1 V the two-digit Remote Code
Number for your brand of Cable
Converter (on previous page),
you are ready to follow the four
simple steps below.
Please read through steps 1-4
before beginning.
rBEGIN)
Press and release the REC
j (RECORD) button.
Within thirfy seconds after
releasing the REC button, press
and release the CBL System
button.
Within thirty seconds after
releasing the CBL System but
ton, ENTER THE TWO
DIGIT CODE NUMBER for
the desired Converter. Tlie
remote is now ready to send
commands to the Converter.
S' hi.
PAUSE»
STOP
vw
o o
tOH/OFFi j POS n SWAP n Fltan )
PIPT
" . ^ ■■ j SIZE i
[surf]
o
CH
Point the remote at the
Converter. Press the POWER
button on the remote to turn the
Converter ON.
\ 1 / Smart Help -
it out. The Channel
0 and POWER buttons on the
remote should now operate the
Converter.
Remember, if this doesn’t work
the first time, repeat steps using
the same remote code number.
If after a second try the remote
does not operate your Converter,
and there are more code numbers
listed for your brand Converter,
use the next listed code number.
If after repeated attempts the code
number method does not work
your Converter, try the "CON
VERTER SEARCH" method on
page 28.
27
Page 28
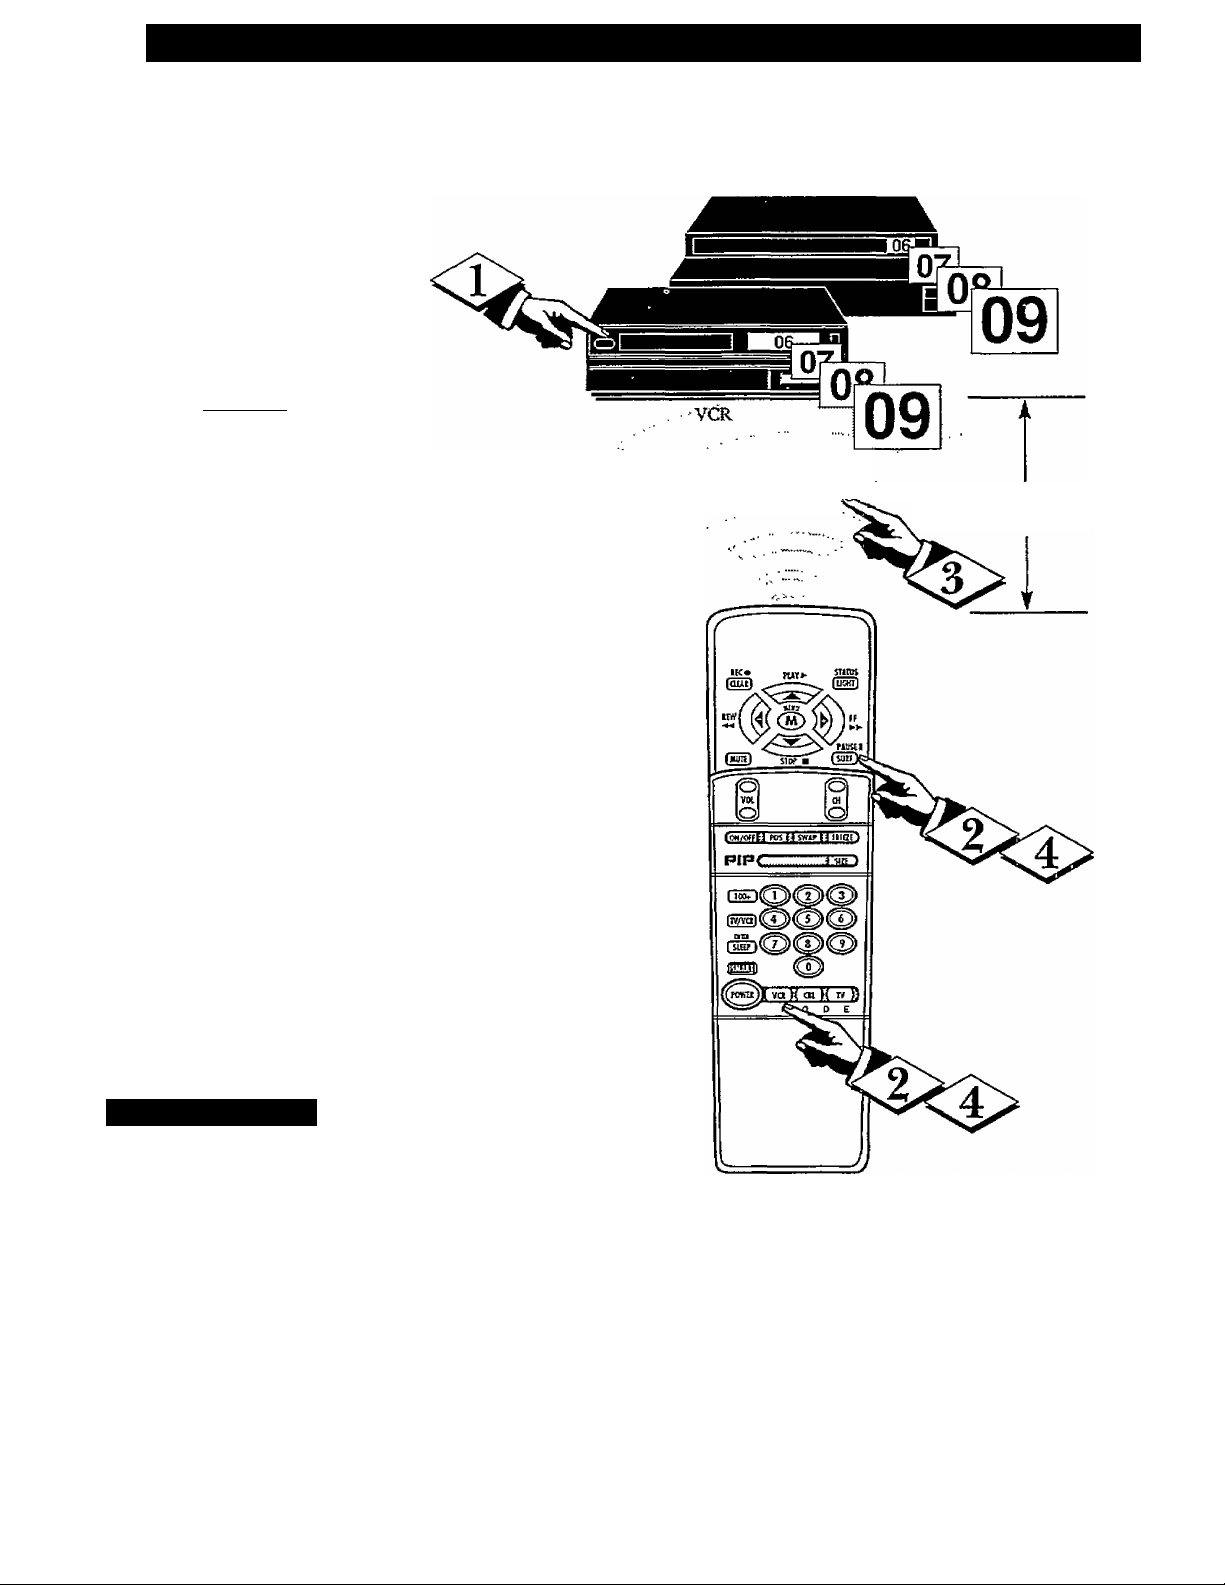
Setting Your Remote To Work VCRs, Converters ~ Semich
TV remote can be set to
JL work your VCR or Cable
Converter by what is called the
SEARCH method.
If the "REMOTE CODE" number
method shown in the previous sec
tion did not set your remote to
work your VCR or Converter, then
follow the easy steps listed below.
Please read through steps 1-4
before beginning.
[BEGIN)
Press the POWER button on
the VCR or Converter to turn the
unit ON.
Stand at least six feet away
from the front of the VCR or
Converter.
Point the remote toward the unit.
HOLD DOWN the SURF and the
desired System (VCR or CBLConverter) buttons at the same
time. KEEP HOLDING BUT
TONS DOWN.
CABLE CONVERTER
Don't let the VCR^ffirCcBiveiter
scan up tnwwlhasj ‘
tin Seaidimode)."
Six Feet
(nunimum)
Watch the Channel Indicator
on the unit.
Channel Numbers will SCAN UP
when the unit has been identified.
This may take up to two minutes.
Release the SURF and System
(VCR or CBL) buttons as soon
as channel numbers start to scan
up. The code has been identified
and the remote is ready to operate
with the VCR or Converter.
\ ' / Smart Help
Remember, a minute or
^ two can seem very long, but
the code should be located within
two minutes.
Don’t let the VCR scan up more
than five channels. If you do the
remote may pass up the right code
and another two minute search
cycle will have to be repeated.
If no channel change happens
within two minutes, repeat steps 1-
4. Should a channel change still
not occur, the remote will not
work with the desired unit.
28
Page 29
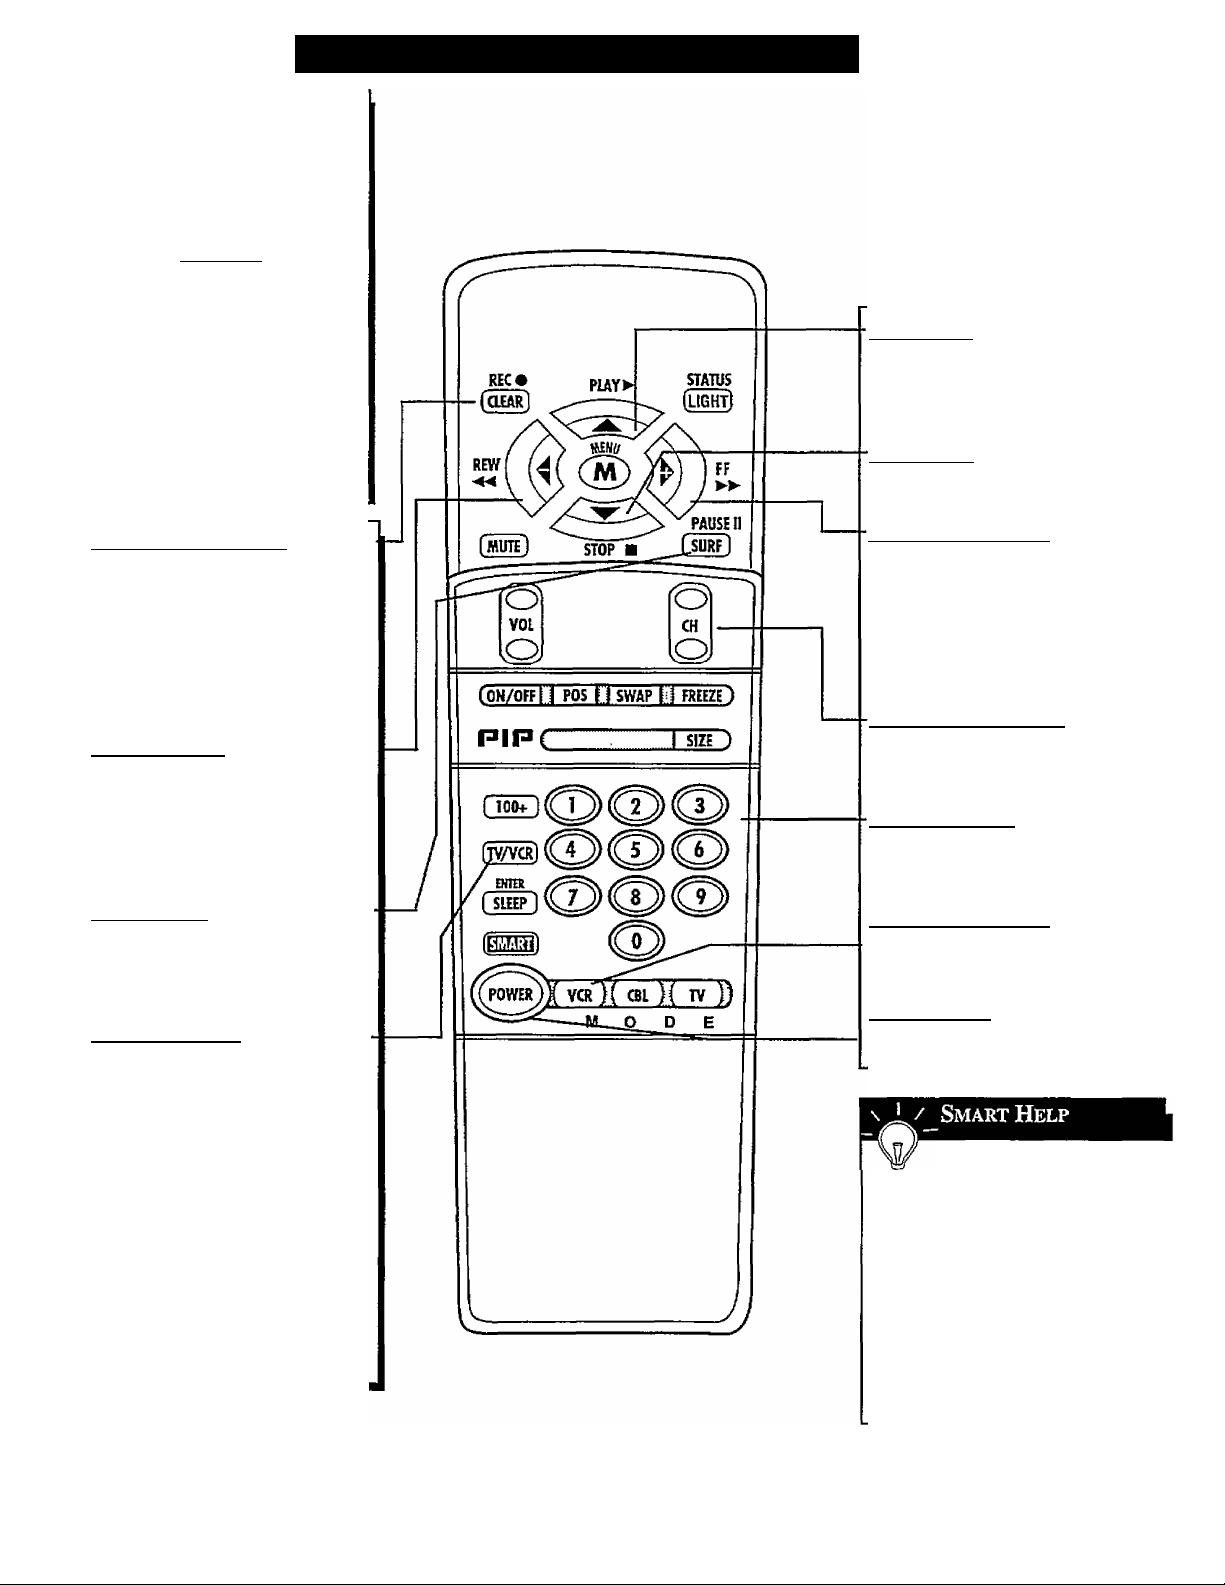
Using the Remote's VCR Buttons
hen using the TV remote
with a VCR, first make cer
W
tain it is set to control your VCR
(by the REMOTE CODE or
SEARCH method - see earlier
section).
C begin]
Press the VCR System but
ton on the remote.
Point the top of the remote
toward the front of the VCR
(remote sensor window) when
pressing buttons.
Play Button
Press to playback a tape. Hold down
after pressing the RECORD button to
start a recording.
Stop Button
Press to stop the tape.
Record (Clear) Button
Hold the RECORD button down, and
then press the PLAY button to begin
a VCR recording. The CLEAR button
can be pressed to erase incorrect data
when programming VCR functions.
The Clear button can also be pressed
to reset the VCR’s real time counter.
Rewind Button
Press to rewind tapes. For some
VCRs you may need to press STOP
button first then REWIND. In play
back mode hold button down to view
picture moving rapidly in reverse.
Pause Button
Press to temporarily stop the tape
during a playback or recording. Press
again to release Pause.
TV^VCR Button
Press to the VCR position ("VCR"
indicator on the VCR will light) to
view the playback of a tape. Press
again to place in the TV position
("VCR" indicator on the VCR will go
OFF) to view one program while
recording another program.
When used with the TV the TVA^'CR
button works as a source button.
Each press cycles the TV between
channels 3 and 4; or the VCR/AUX
Input mode. It is a quick one-button
way to select these channels and
modes (without directly entering the
TV's Menu system.)
Fast Forward Button
Press to rapidly advance the tape. For
some VCRs you may need to press
STOP first then FF. In Playback
mode hold button down to view the
picture moving rapidly in the forward
direction.
Channel Scan Buttons
Press to scan up or down through
VCR channel numbers.
Number Buttons
Press buttons for direct VCR channel
selections.
VCR System Button
Press to send remote commands to
the VCR.
Power Button
Press to turn the VCR ON and OFF.
Remember, the VCR but-
B tons on the remote will not
operate your VCR if those fea
tures are not already found on
your VCR remote control.
Note: All VCR functions (particu
larly Search, Rewind, Fast
Forward, etc.) will operate the
same as with the original VCR
remote control provided with the
VCR.
29
Page 30
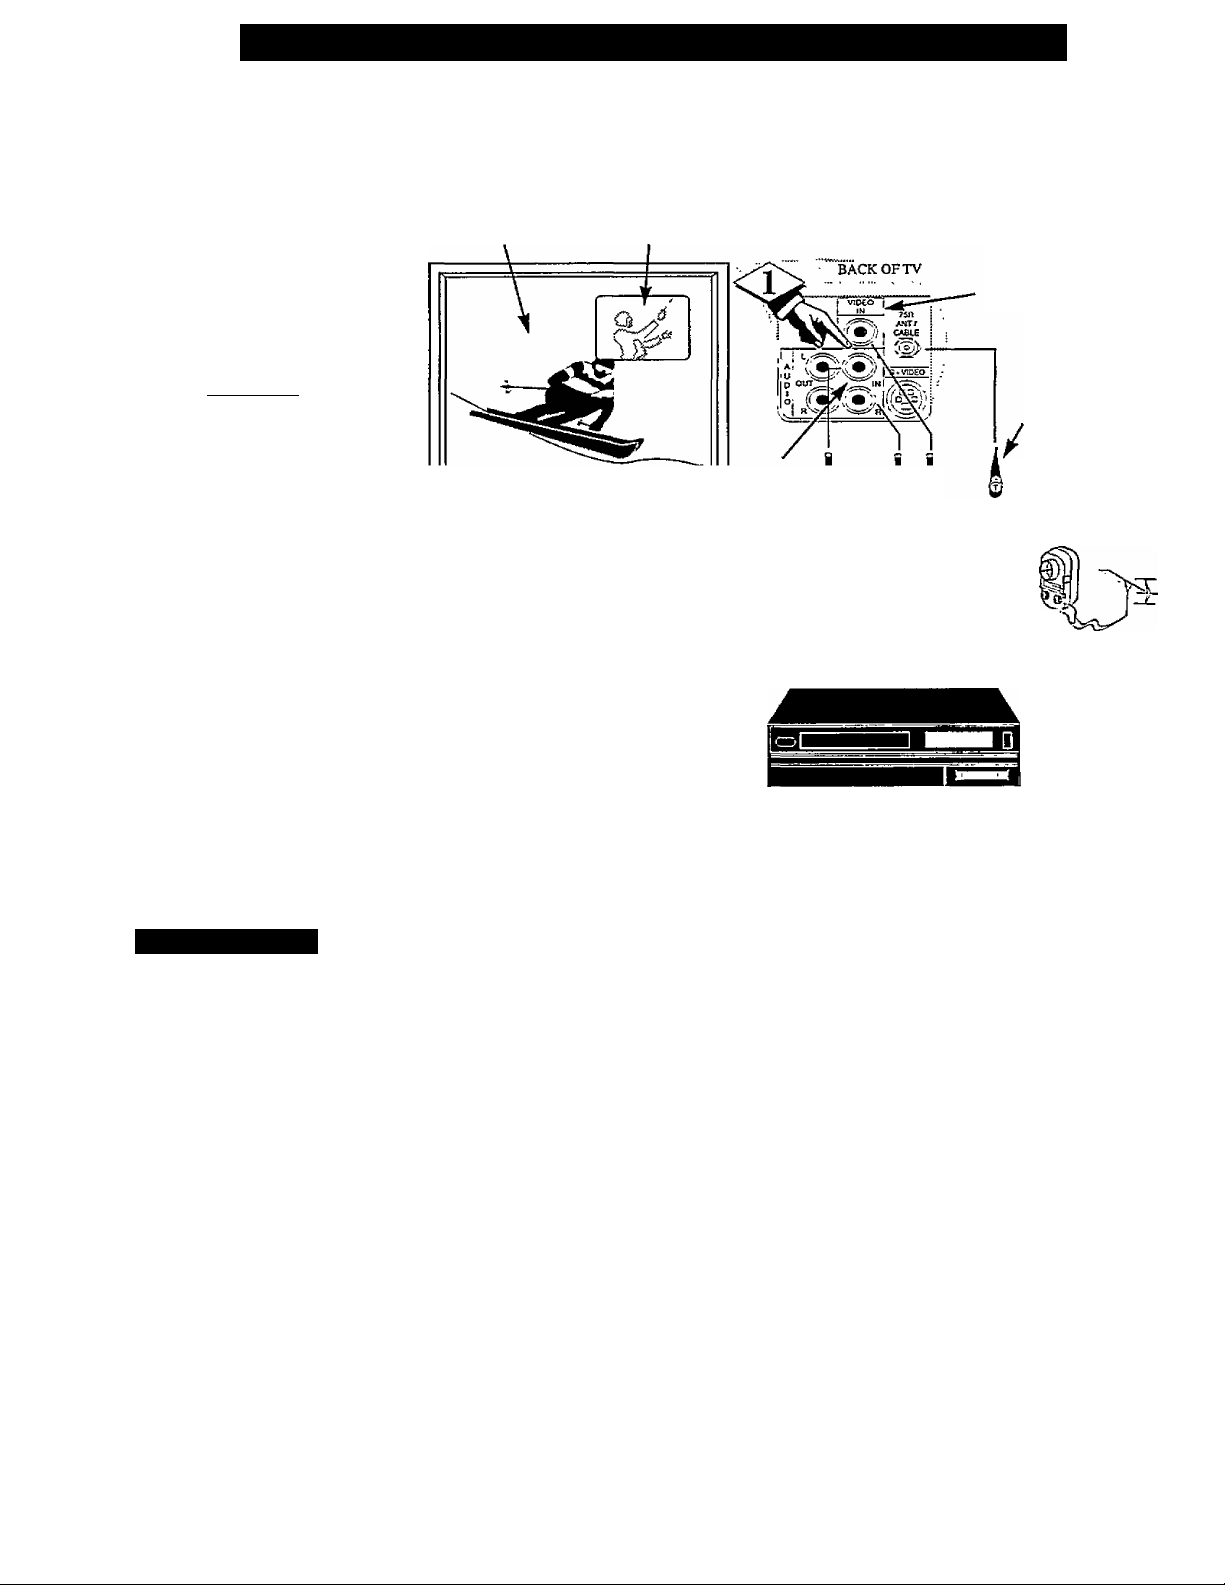
□
How TO Use the Picture-In-Picture (PIP) Feature;
icUive 1« Picture (PIP) is the
showing of two pictures on
P
the TV screen at the same time.
(One main screen picture and
one small inset picture - or PIP).
NOTE: The PIP picture must be
supplied by a VCR (or other
accessory equipped with a
VIDEO OUTPUT jack). See the
following example on how a VCR
can be used to supply a PIP pic
ture.
(BEG in')
<|> Connect the VIDEO OUT
jack on the VCR to the VIDEO
IN jack on the TV.
Also connect the AUDIO OUT
jack (Right/Left) from the VCR
to the AUDIO IN jack on the TV.
(See Reminder note below.)
Also ensure the normal antenna
connection between the VCR and
TV is in place.
Move to the next page after
the VCR to TV PIP connections
are completed.
continue to next page
MAIN PIP
SCREEN WINDOW
AUDIO IN
(RED/
WHITE)
9 99
0Ì0'© 0:| ^
(EQUIPPED WITH VIDEO AND
AUDIO OUTPUT JACKS)
VCR
VIDEO IN
(YELLOW)
RF ANTENNA
CABLE
(SUPPLIED WITH
OUTDOOR UHF/VHF
ANTENNA
CABLE TV
VCR)
SIGNAL
I / Smart Help
For other possible PIP
B connections see page for the
“More PIP Connections” section.
If you have a single (monaural)
Audio Output VCR> “Y” connec
tors are available to complete
your connection to the TV
Contact your dealer, or our Parts
Information Center (1-800-292-
6066), for details.
30
Page 31
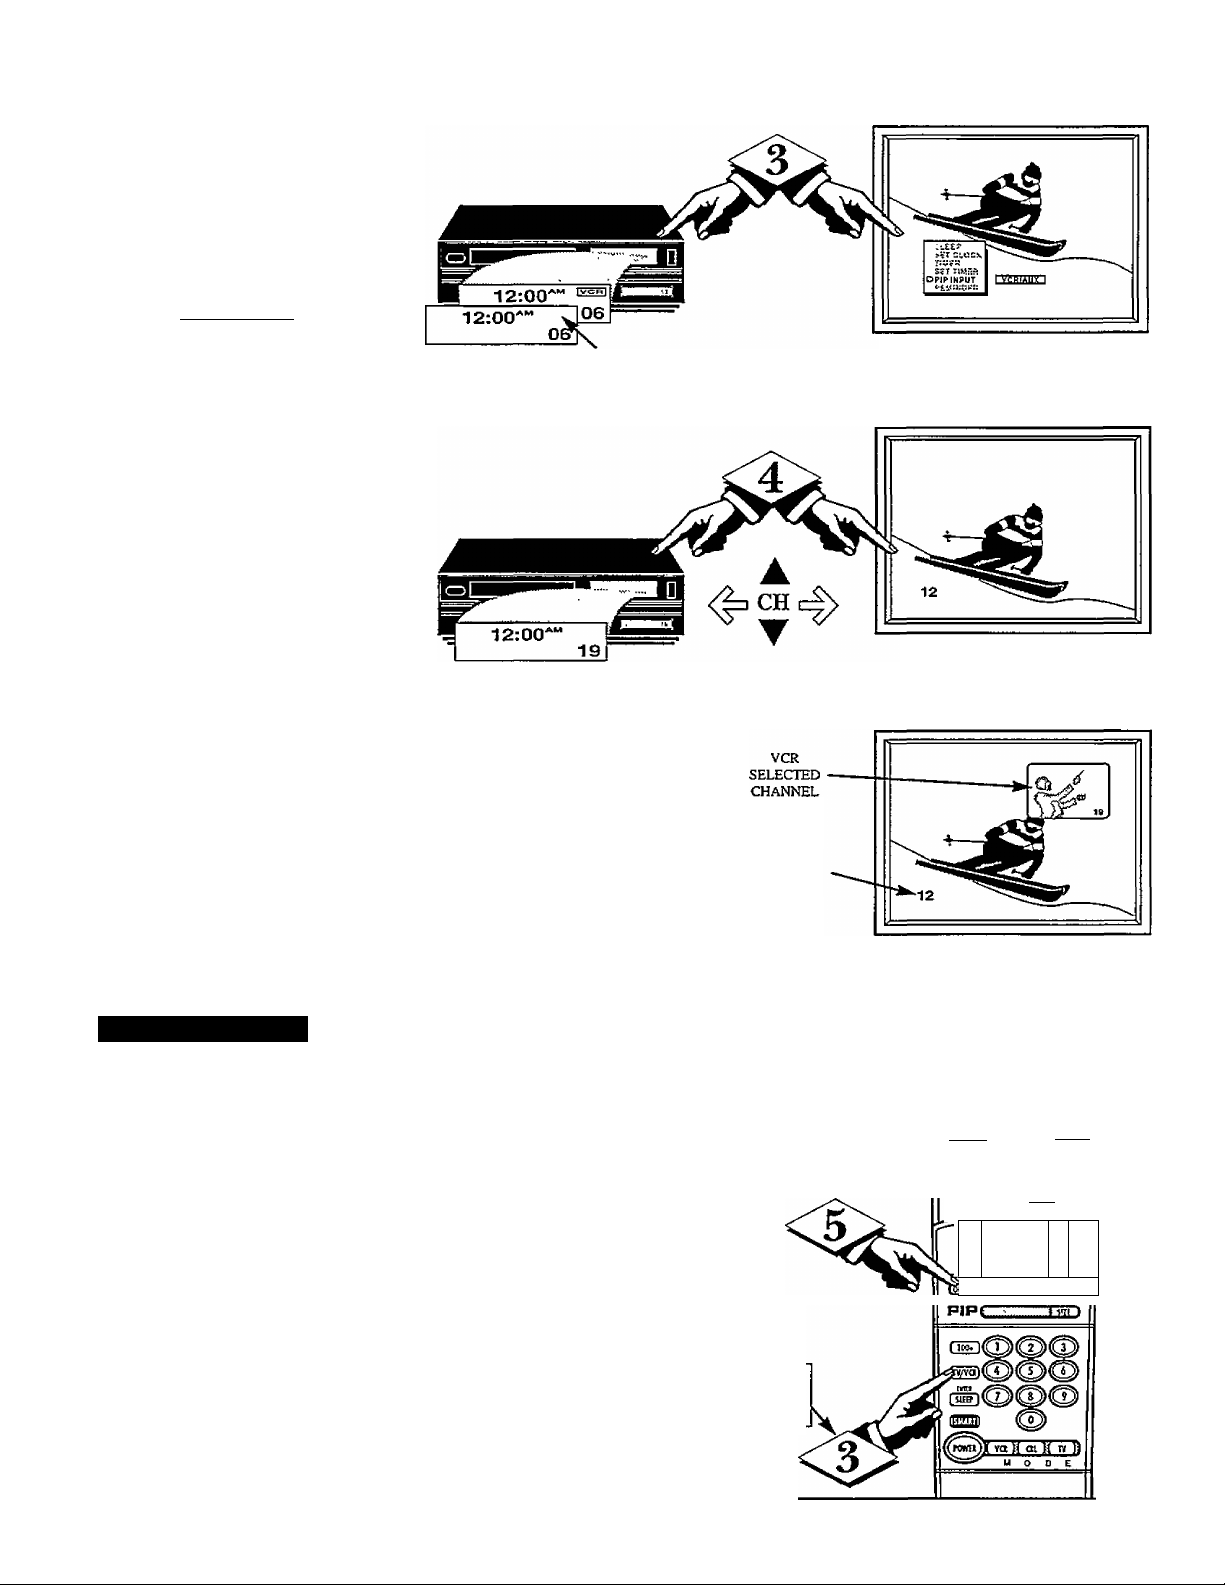
A Tow that you have completed the
1 V required connections on the pre
vious page you are ready to follow
the simple steps shown below.
<i> Turn the VCR and TV ON.
Place the VCR in the TV mode -
Use the TWCR button on the
VCR (or on the TV remote if it is set
to work your VCR - See page 24.)
Place the TV’s PIP INPUT control
to “VCR/AUX” ■
Press MENU A or ▼ on the TV
(or on the remote press M button
and then M AV buttons.)
Select the words PIP INPUT with
the TV’s on-screen Arrow. Then
press the (+) button to select
VCR/AUX.
Make sure the TV’s “INPUT’ on
screen control is set to ANTENNA.
Select the channel on the VCR to
view in the PIP window. Select the
channel on the TV to view on the
main screen.
VCR IN‘TV MODE"
(VCR Indicator Light will go out)
VCR - FOR PIP CHANNEL
PIP INPUT CONTROL SET TO "VCR/AUX"
TV - FOR MAIN SCREEN CHANNEL
Press the PIP ON/OFF button
on the remote.
The PIP window should show in one
of the comers of the TV screen.
\ > / Smart Help
Remember, if you see the
~ same picture on the main
screen and in the PIP window, you
need to be sure the TV’s PIP INPUT
control is set to “VCR/AUX.”
No sound will be heard with the PIP
picture. See the following page on
how to “SWAP” the PIP picture with
the main screen picture so that sound
can be heard.
Also, see the following page on how
to operate other PIP features with the
remote control.
TV
SELECTED
CHANNEL
Be sure to point the remote at the
front of the VCR when presang
VCR function buttons.
m«a
P
o
twin
Qi
fntul
___
llUJUl txt«Fl
i
K/OUH roi FtlOtl
31
Page 32
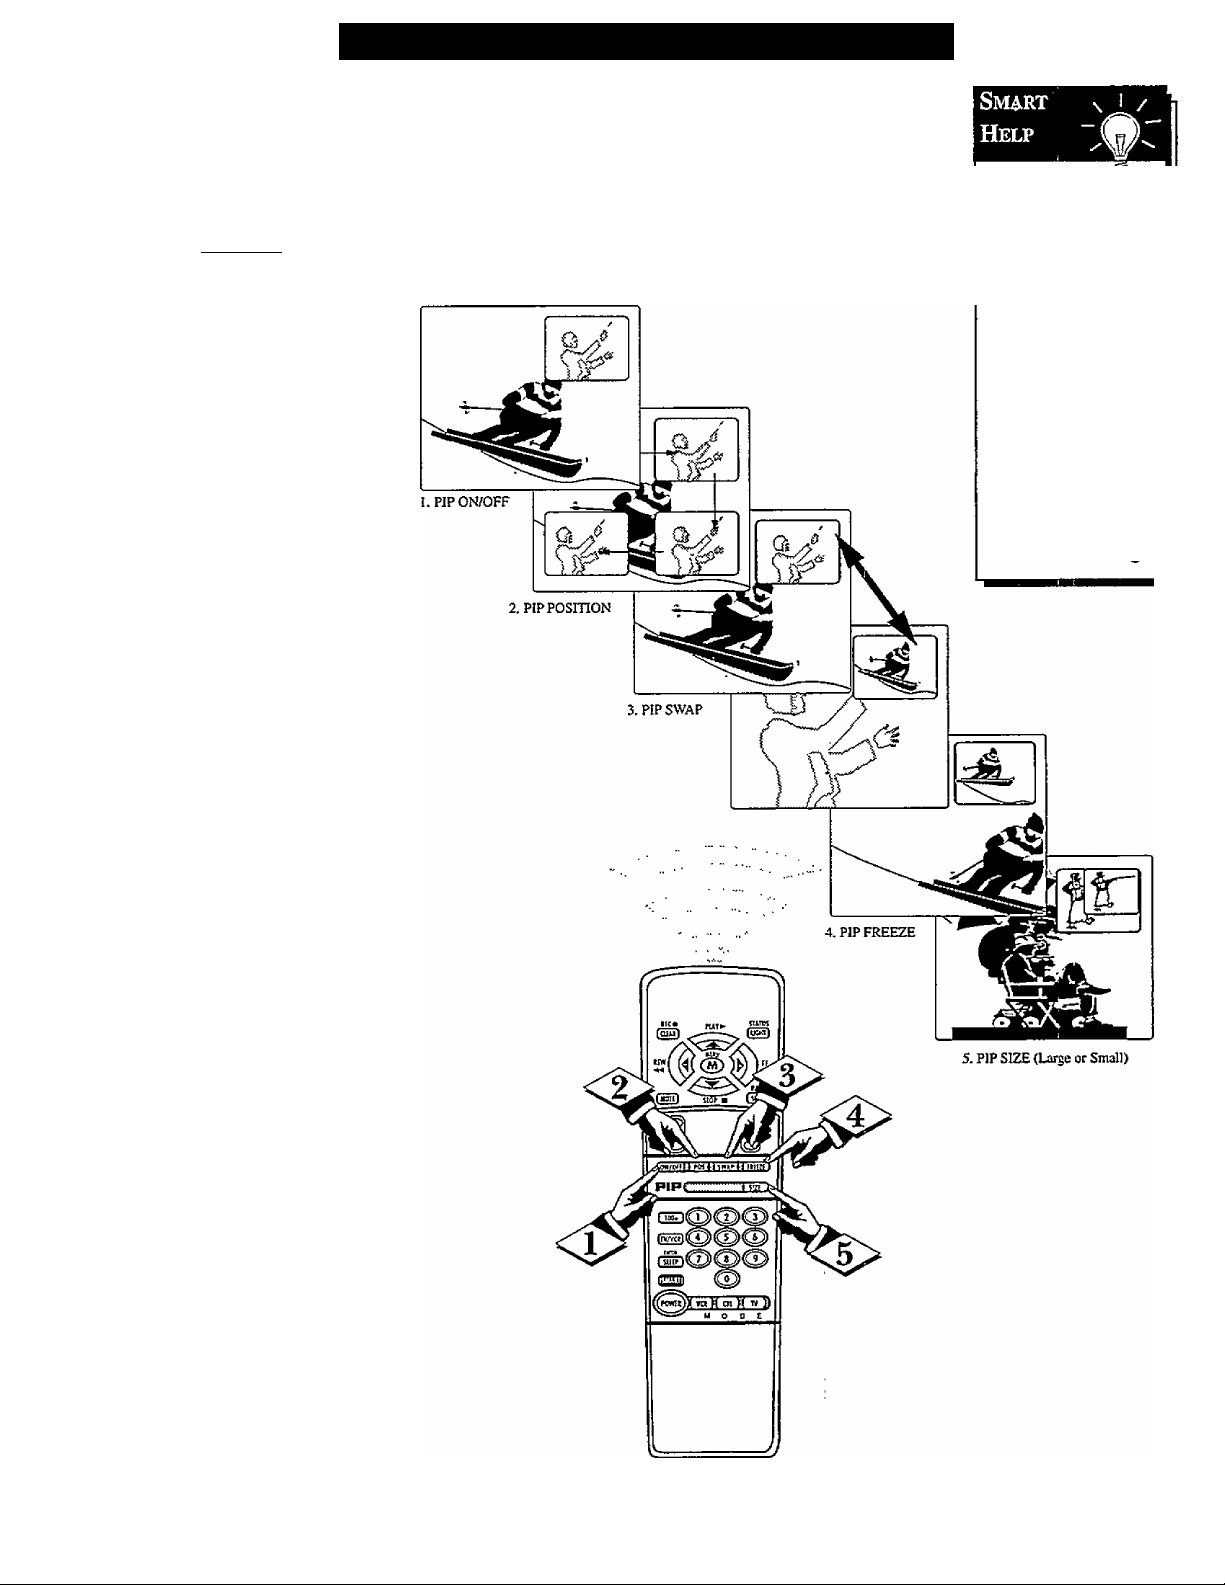
□
J^y using the PIP buttons on
the remote the PIP picture
can he moved and swapped with
the main screen. The main screen
picture can also be frozen in the
PIP window.
[BEGlNj
<t>
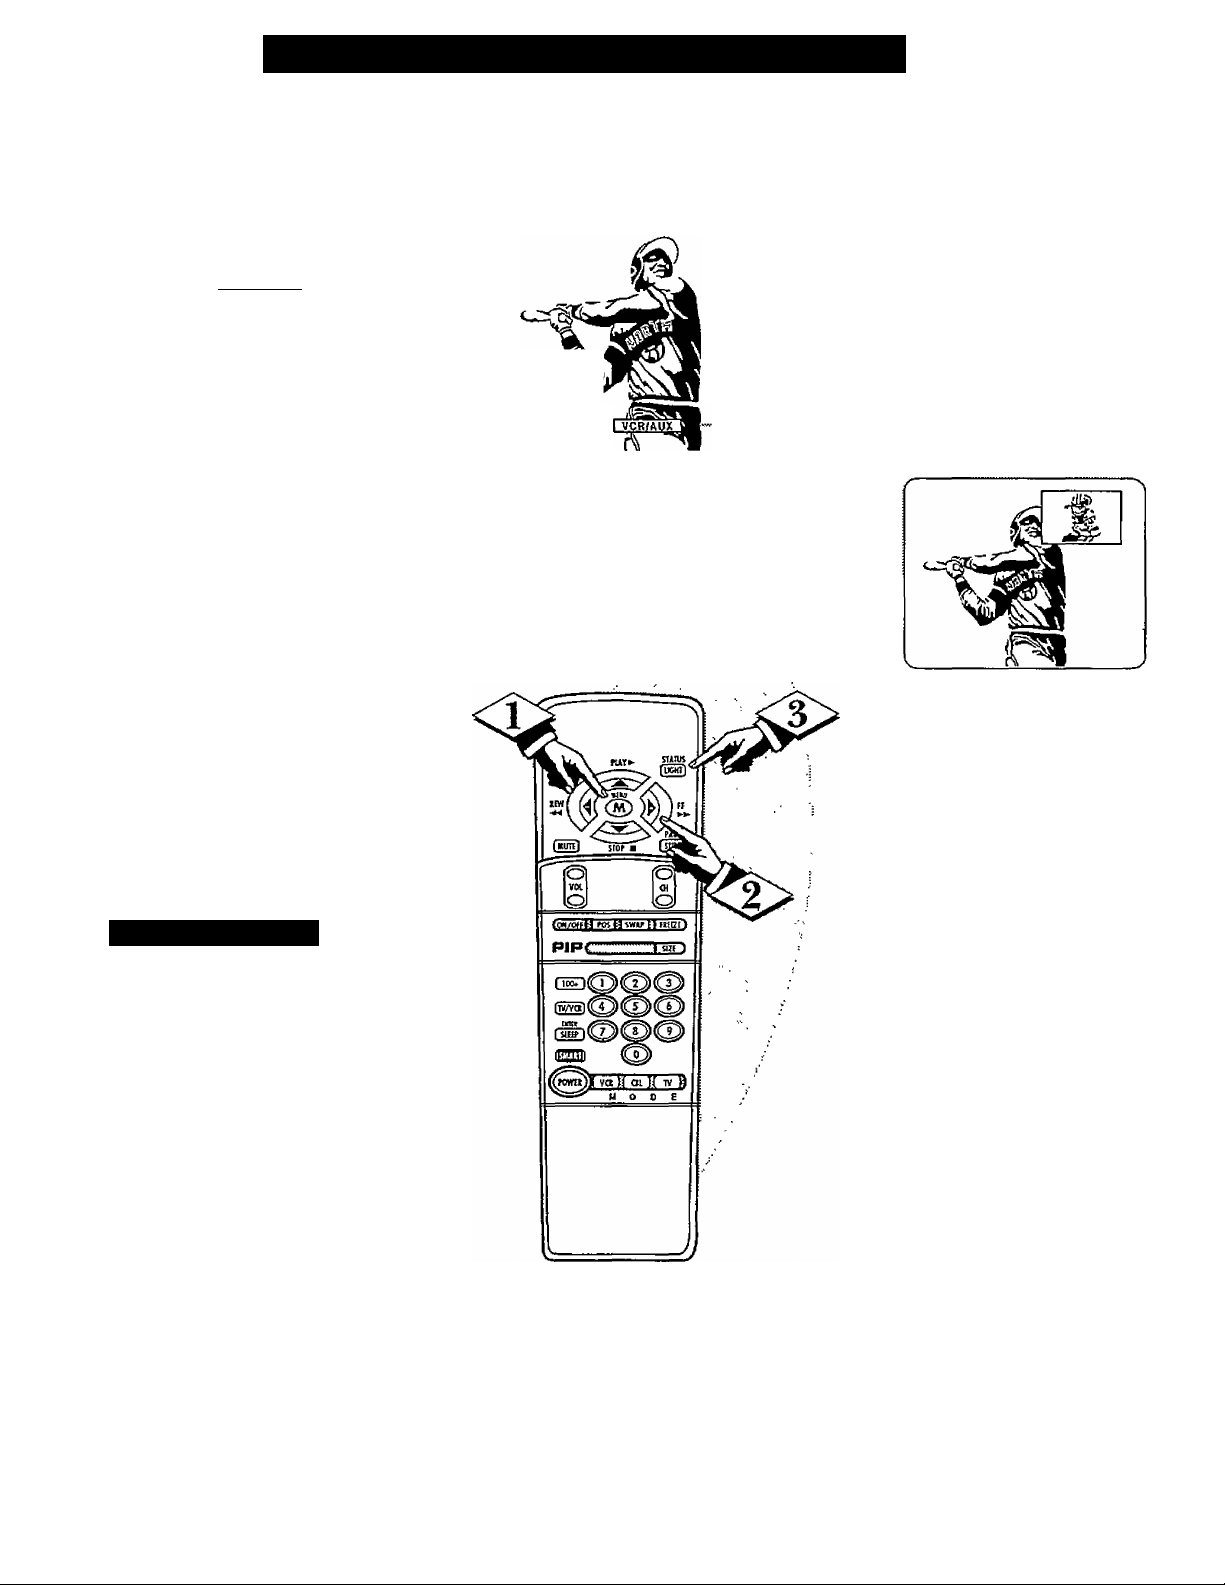
Press the PIP ON button to
show the PIP picture.
PIP appears in a comer of the TV
screen. Press the PIP ON button
again to remove PIP from the
main screen.
Using PIP with the Remote Control
Remember, if ~
the TV is showing a
“VCR/AUX” sup
plied picture on the
main screen (when
the TV and VCR are
turned OFF), a blank
screen will appear
when the TV is
turned back ON
again.
<l>
Press the PIP POSITION
button to move the PIP picture
(from corner-to-comer on the TV
screen.)
This feature allows you to move
PIP and avoid blocking off any
main screen action.
With PIP on the TV screen,
press the SWAP button to swap
the main screen picture with the
PIP picture. See “Smart Help”
note on this page.
Press FREEZE to hold the
4>
current MAIN screen picture in
the PIP window (Main picture is
still active).
If PIP is currently OFF, the PIP
window will automatically
appear.
Press FRZ repeatedly to update
the frozen PIP with current pic
tures from the main screen.
If this happens, just
press the CH(annel)
A or ▼ buttons to
select a TV station
for normal viewing.
You cannot swap a frozen PIP
picture with the TV's main
screen picture.
Press the PIP ON button to drop
the frozen PIP picture from the
screen.
<g> Press the PIP SIZE button
to change the size of the PIP win
dow shown on the screen.
Press the PIP SIZE button again
to see and compare the large and
small size PIP windows.
32
Page 33
Selecting the Picture Source for PIP
^he picture for the PIP window
can come through the TV’s
T
ANTENNA or VCR/A UX Inputs (on
the rear of the TV) The PIP INPUT
control simply tells the TV which
one of these two sources it is to
show in the PIP window.
(BEGIN)
□
<T>
Press the MENU (M) button on
the remote, then press the MENU
A
or T buttons to select the words
PIP INPUT with the TV’s on-screen
arrow.
<P
Press the (+) button to select the
source for the PIP picture:
ANTENNA-
for a picture signal coming from
the ANTENNA input on the rear
of the TV.
VCR/AUX -
for a picture signal coming from
the Video Input jack on the rear
of the TV. Used for VCR (or
other direct video accessory) con
nections.
Press the STATUS button to
clear the screen.
synp
SEtCLOCK
TIMER
SETTsMSR
DPIP tHPUT
For details on how to view separate
programs on the PIP window and main
screen, see the PIP connection section.
\ ' / Smart Help
Remember, the PIP screen
“ will be blank unless a signal is
connected to the selected source
(either ANTENNA or VCR/AUX) on
the rear of the TV.
With ANTENNA selected (as the PIP
INPUT source), the main screen and
PIP window will show the same pic
ture. The VCR/AUX inputs (on the
rear of the TV) must be used in order
to see a different channel or picture
source in the PIP window.
33
Page 34
□
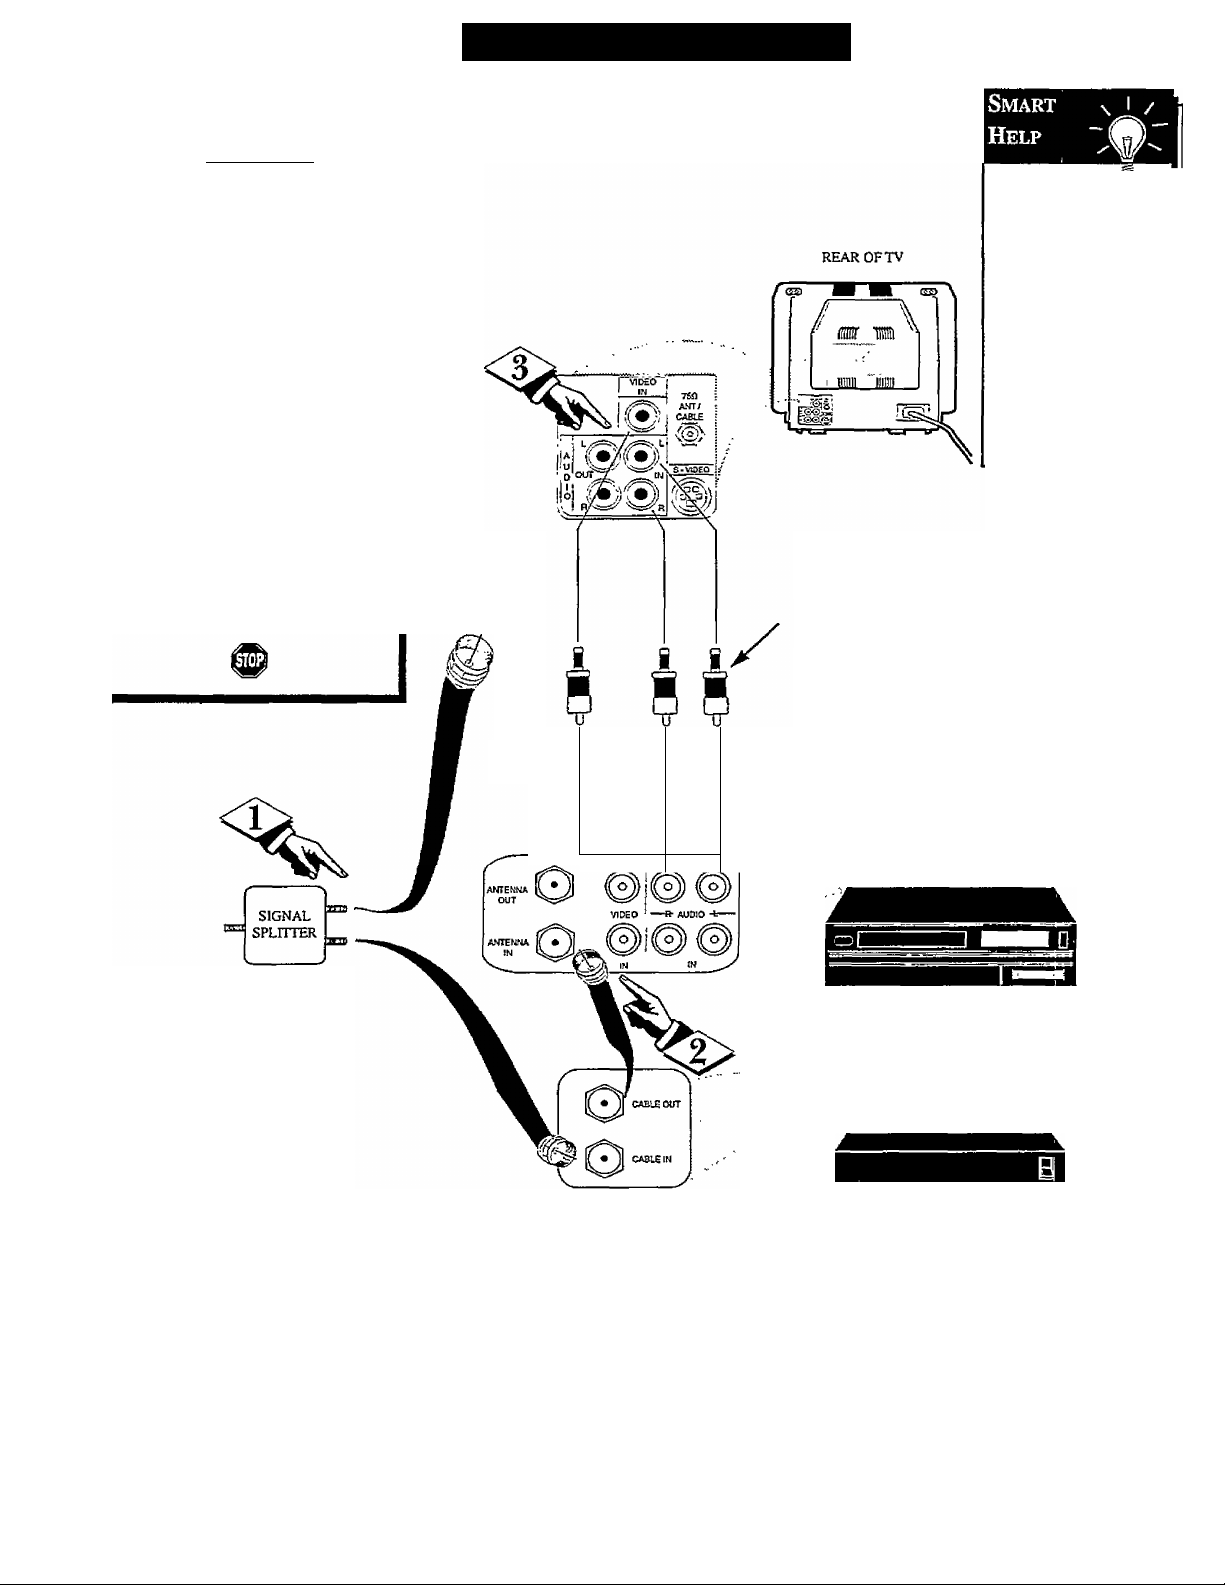
)IP hookup with Cable
Converter Box and VCR.
CbEC51N1
First use an optional signal
<S>
splitter and connect the original
cable TV signal to both the
CABLE IN on the Cable
Converter and the ANTENNA
plug on the rear of the TV,
<|> Connect the CABLE OUT
on the Cable Converter to the
ANT. IN on the VCR.
<|> Connect the VIDEO OUT
jack on the VCR to the VIDEO
IN jack on the TV.
More PIP Connections
Remember, to ~
use the Cable TV
Converter Box to
select channels for
PIP, the VCR must
be set to the same
channel as the chan
nel selection switch
on the rear of the
Cable Converter
(either channel 3 or
4).
Also connect the AUDIO OUT
(R and L) jacks from the VCR to
the AUDIO IN jacks on the TV
Contact the Parts
Infomiation Center
1-800-292-6066
to order any optional
accessories.
CONNECT TO TV
ANTENNA/CABLE
INPUT PLUG
VIDEO IN
(YELLOW)
RCAPHONO
PLUG CABLES
(NOT SUPPLIED)
AUDIO IN
(RED/WHITE)
\
OUT
VCR
34
CABLE TV CONVERTER
Page 35

Tips If Something Isn't Working
lease make these simple
checks before calling for ser
P
vice. These tips can save you
time and money since charges for
TV installation and adjustment of
customer controls are not cov
ered under your warranty.
No Power
No Picture
No Sound
CAUTION; A video source (such as a video game, Compact Disc Interactive - CDI, or
TV information channel) which shows a constant non-moving pattern on the TV screen,
can cause picture tube damage. When your TV is continuously used with such a source
the pattern of the non-moving portion of the game (CDI, etc.) could leave an image
permanently on the picture tube. When not in use, turn the video source OFF.
Regularly alternate the use of such video sources with normal TV viewing.
Check the TV power cord. Unplug the TV, wait 10 seconds, then reinsert plug into
outlet and push POWER button again.
Check to be sure outlet is not on a wall switch.
• Check antenna connections. Are they properly secured to the TV’s ANT/CABLE plug ?
• Check the CABLE/ YES NO control for correct position.
• Check INPUT control for correct position. The VCR-AUX or S-VHS position without
a signal source will result in a blank screen.
Check the VOLUME buttons.
Check the MUTE button on the remote control.
Check the SPEAKER on-screen control. OFF position will eliminate sound at the set.
If attempting auxiliary equipment hook-ups, check audio jack connections.
Check TV-VCR-CBL “System” buttons on the remote. Press the remote’s TV System
button to send commands to the TV.
Remote Does Not
Work
TV Displays Wrong
Channel or No
Channels Above 13
Cleaning and Care
• To avoid possible shock hazard be sure the TV is unplugged from the electrical outlet before cleaning.
• When cleaning the TV screen take care not to scratch or damage the screen surface (avoid wearing jewelry or using
anything abrasive). Wipe the front screen with a clean cloth dampened with water. Use even, easy, vertical strokes when
cleaning.
• Gently wipe the cabinet surfaces with a clean cloth or sponge dampened in a solution of cool clear water. Use a clean
dry cloth to dry the wiped surfaces.
• Occasionally vacuum the ventilation holes or slots in the cabinet back.
• Never use thinners, insecticide sprays, or other chemicals on or near the cabinet, as they might cause permanent marring
of the cabinet finish.
Check batteries. Replace with AA Heavy Duty (Zinc Chloride) or Alkaline batteries
if necessary.
Clean the remote and the remote sensor window on the TV.
Check the TV power cord. Unplug the TV, wait 10 seconds, then reinsert plug into
outlet and push POWER button again.
Check to be sure TV outlet is not on a wall switch.
Repeat channel selection.
Add desired channel numbers (CHANNEL control) into TV memory.
Check CABLE/ YES NO control for correct position.
This TV is equipped with protective circuitry that shuts the TV off in case of moderate
power surges. Should this occur turn the TV back on by pressing the POWER button
once or twice, or unplug (wait 10 seconds) and then replug the power cord at the AC
outlet. This feature is NOT designed to prevent damage due to high power surges such
as those caused by lightning, which is not covered by your warranty.
35
Page 36

itti
Glossary to Television Terms
Coaxial Cable * A single solid antenna wire normally matched
with a metal plug (F-type) end connector that screws (or pushes)
directly onto a 75 Ohm input found on the Television or VCR.
Closed Caption * Broadcast standard which allows you to read
the voice content of television programs on the TV screen*
Designed to help the hearing impaired this feature uses on-screen
"text boxes" to show dialogue and conversations while the TV pro
gram is in progress.
Direct AndioA^deo Inputs ^ Located on the rear of the TV these
connectors (RCA phono type plug) are used for the input of audio
and video signals. Designed for use with VCRs (or other acces
sories) in order to receive higher picture resolution and offer sound
connection options.
Identify* Method by which a remote control searches and finds an
operating code for another product (such as a VCR or Cable
Converter). Once the code has been "identified” then the TV
remote can operate and send commands to the other product.
On Screen Displays (OSD) * Refers to the wording or messages
generated by the television (or VCR) to help the user with specific
feature controls (color adjustment, programming, etc.).
Menu * An on-screen listing of feature controls shown on the
Television screen that are made available for user adjustments.
Multichannel Television Sound (MTS) * The broadcast standard
that allows for stereo sound to be transmitted with the TV picture.
Programming * The procedure of adding or deleting channel
numbers into the Television’s memory circuits. In this way the
Television “remembers” only the locally available or desired
channel numbers and skips over any unwanted channel numbers.
Remote Sensor Window * A window or opening found on the
Television control panel through which infrared remote control
command signals are received.
Setup Mode * Automatic feature control settings made by the TV.
Designed for first time set-up and use. Settings for signal connec
tions (antenna or cable TV), plus channel program memory are
held in the TV's memory (even if the set is unplugged and moved
to a new location.)
Second Audio Program (SAP) * Another or additional audio
channel provided for in the Multichannel Television Sound (MTS)
broadcast standard. The most frequently proposed use for SAP is
the simultaneous bilingual broadcast of TV program material.
Status * Allows the user to quickly confirm what channel number
is currently being viewed. Status can also be used to clear the
Television of on screen displays or information (rather than wait
ing for the displays to “time out” or automatically disappear from
the screen).
Twin Lead Wire * The more commonly used name for the two
strand 300 Ohm antenna wire used with many indoor and outdoor
antenna systems. In many cases this type of antenna wire requires
an additional adapter (or balun) in order to connect to the 75 Ohm
Input terminals designed into the more recent Televisions and
VCRs.
36
Page 37

Index
Accessories/Optional
Adapter Connector..........................................................21, *Q/U-1
Add/Delete Channels.....................................................6,7, *Q/U-2
AudioA^ideo Input Jacks
Balance Control............................................................................9
Bass Control..................................................................................9
Battery Installation
Cable TV Connections/Settings.....................................................5, *Q/U-I,2
Channel Display
Channel Memory
Channel Reminder
Clock...........................................................................................15
Closed Captioning.........................................................................8
Controls/TV........................................................................*Q/U-3
Controls/Remote........................................................22-29, *Q/U-3
Features.........................................................................................4
Glossary TV Terms
Identify VCRs with TV Remote
Identify Cable Converters with TV Remote..........................26-28
Input Control...............................................................................20
Inputs/Audio and \6deo...............................................................20
Language Option.........................................................................18
Memory/Program Channels........................................6, 7, *Q/U-2
Menu Button
Minus(-)/Plus (+) Buttons...................................................*Q/U-4
.......................................................................
.................................................
...........................................................
.............................................................
.............................................................
........................................................
......................................................................
..........
........................................................ 36
.......................................
21,34, *Q/U-1
17, *QAJ-3
6, 7, *Q/U-2
21
*Q/U-3
18
24-25, 28
*Q/U-4
Picture Controls...........................................................................13
Precautions/Safety
Programming Channels
Remote Control
Requesting Service
RF Coaxial Cable
Safety/Precautions...................................................................3, 35, *QAJ-1
Second Audio Program...............................................................10
Sensor Remote....................................................................*Q/U-3
Set Timer.....................................................................................16
Set Up/First Time Use............................................*QAJ-1, 2, 3, 4
Sleep Timer.................................................................................14
Smart Picture...............................................................................22
Smart Sound................................................................................23
Smart Surf................................................................................... 12
Status Button.......................................................................*Q/U-4
Stereo
Sound Image Control..................................................................11
Timer...........................................................................................17
Tips for Service
TV Speaker Control
VCR Buttons...............................................................................29
VCR/TV Connections
Volume Bar Control
Warranty......................................................................................40
.....................................................
...........................................
......................................................................
...........................................................
..................................................................
...................................................................................... 10
................................................................
....................................................................
......................................................
...................................................................
3,35, *Q/U-1
6, 7, ’*=Q/U-2
22-29, *Q/U-3
35, 38-40
20, 34, *Q/U-1
35, 38-40
19
20-21, 30, *Q/U-1
11
Information contained in Quick-Use (Q/U) Guide-page listed.
37
Page 38
Philips Consumer Electronics Company
Factory Service Center Locations
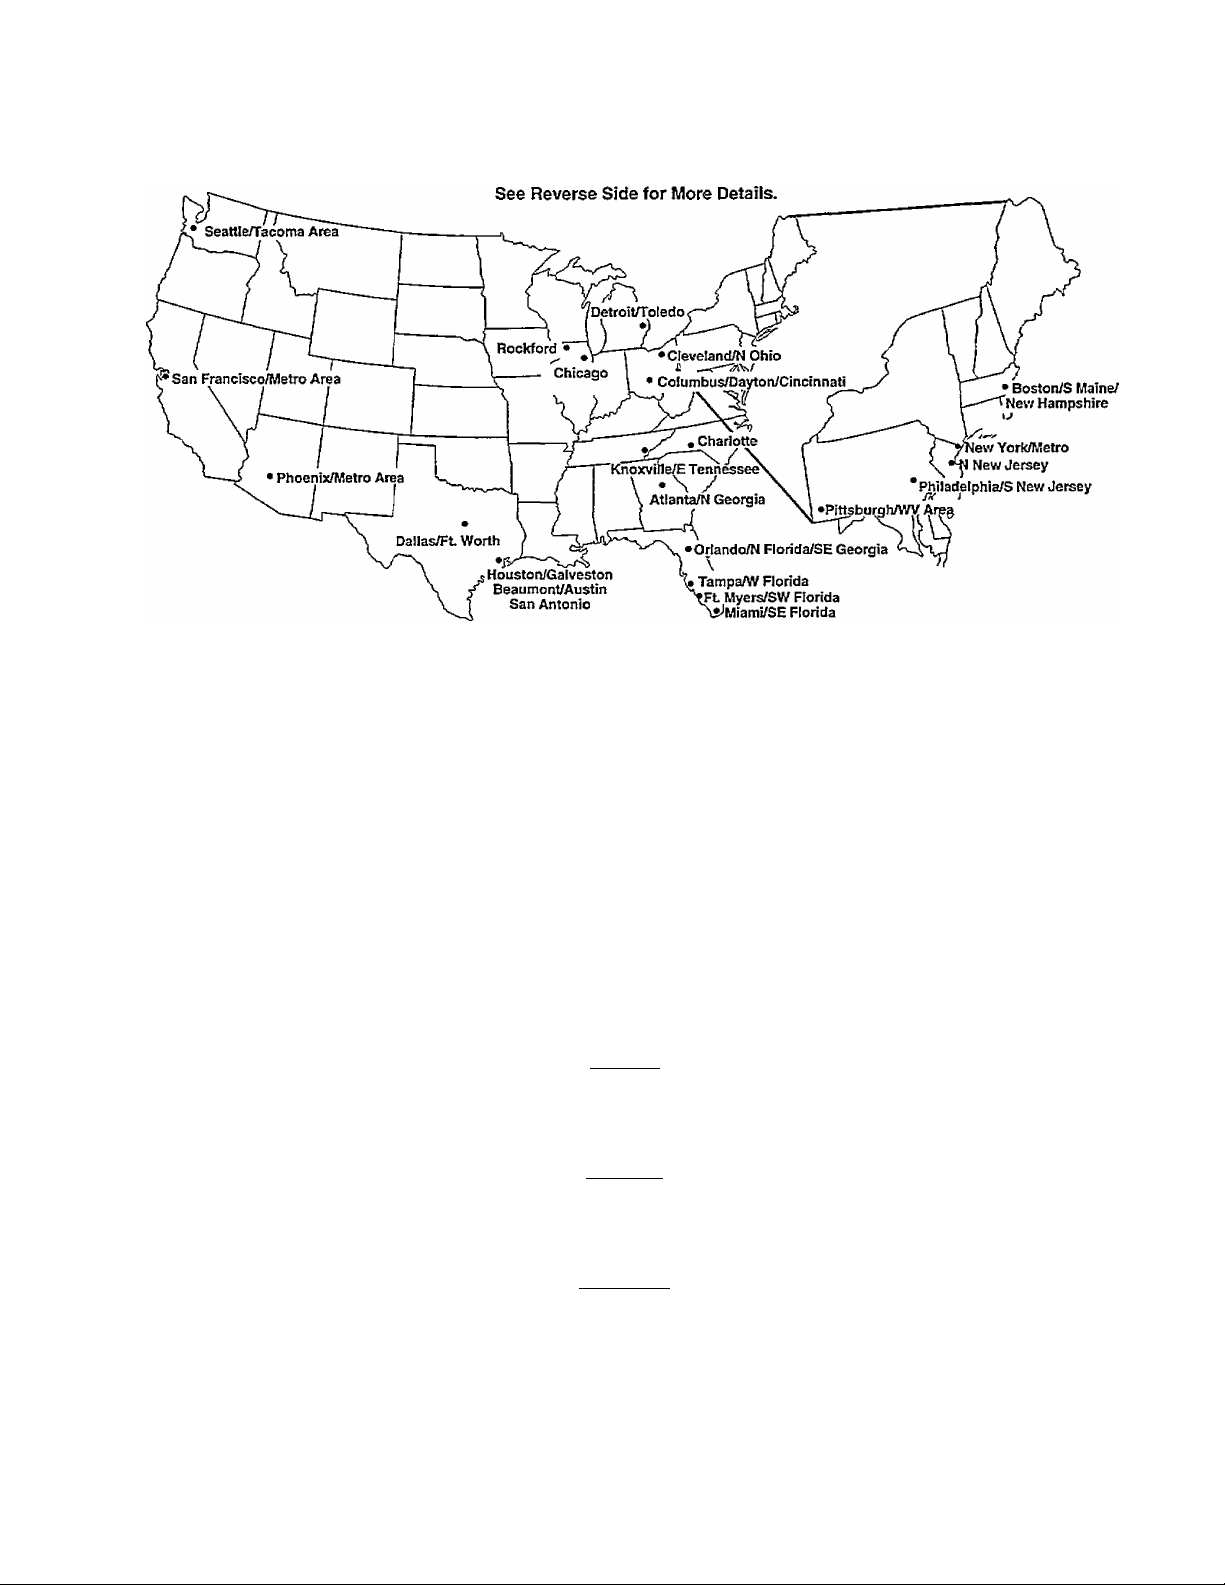
NOTE: If you reside in one of our Philips Factory Service Branch areas (see directory on back), you can contact the nearest Service Branch to
obtain efficient and expedient repair for your product. If your product is In-Warranty, you should have proof-of-purchase to ensure No Charge
Service. For Out-of-Warranty service, call the location nearest you.
NOTA; Si vous résidez dans une des régions desservies par une succurs^e de service après vente du fabricant Philips (voir liste ci-dessous),
vous pourrez contacter la branche de service après vente la plus près de chez vous pour obtenir un service après vente rapide et efficace. SI le
produit est sous garantie, il suffira de présenter une preuve d'achat pour bénéficier d'un service sans frais. Pour les produits non couverts par la
garantie, contactez le centre le plus près de chez vous.
NOTA: Si Ud. reside en una de nuestras zonas para sucursales Philips de servicio al de fábrica (ver directorio más abajo), Ud. puede comunicarse
con la sucursal de servicio más cercana para obtener una reparación oportuna y eficaz de su producto. Si su producto está todavía bajo garan
tía. Ud. debe presentar comprobante de compra para no ocasionar ningunos cargos por servicio. Para servicio después del vencimiento de la
garantía, llame al lugar más cercano de los abajo indicados.
In Canada
How you can obtain efficient and expedient carry-in, mail-in, or in-home service for your product
Please contact Philips at 1-800-661-6162 (French speaking)
1-800-363-7278 (English speaking)
Au Canada
Comment obtenir le service après-vente pour les produits apportés ou envoyés par la poste à notre centre de service ou le service à domicile
Veuillez contacter philips á: 1-800-661-6162 (Francophone)
1-800-363-7278
En el Canadá
Cómo recibir servicio efficiente para su producto, en persona, por correo o a domicilio
Favor de comunicarse con Philips al: 1-800-661-6162 (francofono)
1-800-363-7278 (anglòfono)
38
Page 39

Quality service is as close as your telephone! Simply look over the list below for the number of a Factory Service Center
NEAR YOU. Your product will receive efrcient and expedient carry-in, mail-in, or in-home service, and you will receive peace of mind,
knowing your product is being given the expert attention of Philips’ Factory Service. And, if the phone number listed for your area
IS LONG distance, CAL11-800-242-9225 for Factory Service.
COMMENT OBTENIR NOTRE SERVICE APRÈS VENTE RAPIDE ET EFFICACE SOIT PAR COURRIER, À DOMICILE, OU EN SE PRÉSENTANT À UN CENTRE DE SERVICE PHILIPS. PLUS DE 600 CENTRES
DE RÉCEPTION DE PRODUITS k RÉPARER À TRAVERS LE PAYS: CONTACTER LE CENTRE DE SERVICE AUX CONSOMMATEURS LE PLUS PROCHE POUR SAVOIR L’EMPLACEMENT DE CES DÉPÔTS
CÓMO OBTENER UN SERVICIO OPORTUNO Y EFICIENTE POR CORREO, EN CASA O EN PERSONA PARA SU PRODUCTO A TRAVÉS DE UN CENTRO PKIUPS DE SERVICIO. MAS DE 600 SITIOS POR
TODO EL PAIS PARA LA RECEPCION DE PRODUCTOS NECESITADOS DE REPARACIONES: COMUNICARSE CON EL CENTRO DE SERVICIO DE FABRICA MAS CERCANO PARA ESTOS LUGARES DENTRO
DANS UN RAYON DE 50 À 75 MILES (80 KM À120 KM) DU CENTRE DE SERVICE LOCAL.
DE UN RADIO DE SO A120 KM (50 A 73 MILLAS) DEL CENTRO DE SERVICIO LOCAL.
Atlanta-Athens-Macon-Chattanooga,
TN-North Georgia Area
200 North Cobb Parkway
Building 100, Suite 120
Marietta, GA 30062
(770) 795-0085
Boston-Southern Maine-
Southern New Hampshire Area
1 North Avenue
Burlington, MA 01803
(617) 272-4825
Charlotte-Winston Salem-
Greensboro- Chapel Hill-RaleighSpartanburg, SC Area
520-G Clanton Road
Charlotte, NC 28217
(704) 529-6330
Chicago-Gary Area
1360 W, Hamilton Parkway
itasca, IL 60143
(630) 775-0990
Cleveland-Akron-Youngstown Area
24090 Detroit Road
Westlake, OH 44145
(216) 899-2040
Columbus-Dayton-Cincinnati Area
6333 Busch Blvd.
Columbus, Ohio 43229
(614) 781-2605
Dallas-Ft. Worth Area
13375 Stemmons Freeway,
Suite 200
Dallas, Texas 75234
(214) 243-4775
DetroitAoIedo Area
25173 Dequindre
Madison Heights, Ml 48071
(810) 544-2110
Knoxville-GreenevilleTri Cities-Easl Tennessee Area
6700 D- Papermill Road
Papermill Plaza
Knoxville, TN 37919
(423) 584-6614
Ft. Myers-NaplesSouthwest Florida Area
11601 Cleveland Ave., Suite 15
Ft. Myers, FL 33907
(813) 278-4242
Houston-Galveston-Beaumont-Austin-
San Antonio Area
1110 North Post Oak Road
Suite 100
Houston. TX 77055
(713) 682-3990
Miami-Southeast Florida Area
2099 W. Atlantic Blvd.
Pompano Beach, FL 33069
(305) 978-0467
North NJ-Stalen Island-
Rockland County, NY Area
140J Commerce Way
Totowa, NJ 07512
(201) 890-7200
New York Metro Area
116 Charlotte Avenue
Hicksville, NY 11801
(516) 933-1780 Nassau County
Orlando-Jacksonville-Norlh
Florida-Southeast Georgia Area
2452 Sand Lake Road
Orlando, FL 32809
(407) 857-8998
Philadelphla/S. New Jersey Area
352 Dunks Ferry Road
Bensalem, PA 19020
(215) 638-7500
Phoenix-Scottsdale-Mesa-Tempe Area
5032 S. Ash Avenue, Ste. 101
Tempe, AZ 85282
(602) 897-7358
Pittsburgh, PA-Steuhenville, OH-
Wheeling/Morgantown, WV Area
2891 Banksville Road
Pittsburgh, PA 15216
(412) 563-8020
Rockford-Kenosha-Beloit-Madison Area
5602 N. Second
Loves Park, IL 61111
(815) 654-7343
San Francisco-Oakland-San Jose Area
3370 Montgomery Drive
Santa Clara, CA 95054
(408) 492-9013
Seattle-Tacoma/Olympia Area
1055 Andover Park East
Tukwila,WA98188
(206) 575-6288
Tampa-St.Petersburg-Sarasota Area
Center Point Business Park, Building B-1,
Suite 100
1911 U.S.Hwy.301 North
Tampa, FL 33619
(813) 621-8181
39
Page 40

LIMITED WARRANTY
COLOR TELEVISION
90 Days Free Labor
One Year Free Replacement of Parcs (Two Years Free Replacement on Color Picture Tube)
This product can be repaired in-home.
WHO IS COVERED?
You must have proof of purchase to receive warranty service. A sales
receipt or other document showing that you purchased the product is
considered proof of purchase.
WHAT IS COVERED?
Warranty coverage begins the day you buy your product. For 90 days
thereafter^ all parts will be repaired or replaced free, and labor is free.
From 90 days to one year from the day of purchase, all parts will be
repaired or replaced free, but you pay for all I^or charges. From one
to two years from the day of purchase, you pay for the replacement or
repair of all parts except the picture tube, and for all labor charges.
After two years from the day of purchase, you pay for the replacement
or repair of all parts, and for all labor charges.
All parts, including repaired and replaced parts, are covered only for
the original warranty period. When the warranty on the product
expires, the warranty on all replaced and repaired parts also expires.
WHAT IS EXCLUDED?
Your warranty does not coven
• labor charges for installation or setup of the product, adjustment of
customer controls on the product, and installation or repair of
antenna systems outside of the product.
* product repair and/or part replacement because of misuse, acci
dent, unauthorized repair or other cause not within the control of
Philips Consumer Electronics Company.
• reception problems caused by signal conditions or cable or antenna
systems outside tiie uniL
* a product that requires modification or adaptation to enable it to
operate in any country other than the country for which it was
designed, manufactured, approved and/or autiiorized, or repair of
products damaged by these modifications.
♦ incidental or consequential damages resulting from the product.
(Some states do not allow the exclusion of incidental or consequen
tial damages, so the above exclusion may not apply to you. This
includes, but is not limited to, prerecorded material, whether copy
righted or not copyrighted.)
* a product used for commercial or institutional purposes.
WHERE IS SERVICE AVAILABLE?
Warranty service is available in all countries where the product is offi
cially distributed by Philips Consumer Electronics Company. In coun
tries where Philips Consumer Electronics Company does not distribute
the product, the local Philips service organization will attempt to pro
vide service (although there may be a delay if the appropriate spare
parts ^d technical manual(s) are not readily available).
MAKE SURE YOU KEEP...
Please keep your sales receipt or other document showing proof of
purchase. Attach it to this owner’s manual and keep botii nearby.
Also keep the original box and packing material in case you need to
return your product.
BEFORE REQUESTING SERVICE...
Please check your owner’s manual before requesting service.
Adjustments of the controls discussed there may save you a service
call.
TO GET WARRANTY SERVICE IN U.S.A.,
PUERTO RICO OR U.S. VIRGIN ISLANDS...
Contact a Philips factory service center (see enclosed list) or autho
rized service center to arrange repair,
(In U.S.A, Puerto Rico and U.S. 'Wigin Islands, all implied warranties,
including implied warranties of merchantability and fitness for a partic
ular purpose, are limited in duration to the duration of this express
warranty. But, because some states do not allow limitations on how
long an implied warranty may last, this limitation may not apply to
you.)
TO GET WARRANTY SERVICE IN CANADA...
Please contact Philips at;
1-800-661-6162 (French Speaking)
1-800-363-7278 (English Speaking)
(In Cfanada, this warranty is given in lieu of all other warranties. No
other warranties are expressed or implied, including any implied war
ranties of merchantability or fitness for a particular purpose. Philips is
not liable under any circumstances for any direct, indirect, special, inci
dental or consequential damages, howsoever incurred, even if notified
of the possibility of such damages.)
REMEMBER...
Please record the model and serial numbers found on the product
below. Also, please fill out and mail your warranty registration card
promptly. It will be easier for us to notify you if necessary.
MODEL# ____________________________________________________________
SERIAL# ____________________________________________________________
1B7801 E001
Ti^ iwrrmty ypw Viw may hme iiyftts ivi»ch vaiy state/prowfi ce ta stateiprtmace.
Philips Service Company, P.O. Box SS5, Jefferson City, Tennessee 37760, (423) 475-8869
40
 Loading...