

Page 1

Instructions for use
3135 016 18341
Page 2

Return your Warranty Registration card today to ensure you
receive all the benefits you’re entitled to.
Once your PHILIPS MAGNAVOX purchase is registered, you’re eligible to receive all the privileges of
owning a PHILIPS MAGNAVOX product. So complete and return the Warranty Registration Card
enclosed with your purchase at once. And take advantage of these important benefits.
.Warranty
Verification
Registering your product within
10 days confirms your right to
maximum protection under the
terms and conditions of your
PHILIPS MAGNAVOX warranty.
Congratulations on your purchase,
and welcome tojthe “family!”
Dear PHILIPS MAGNAVOX product owner:
Thank you for your confidence in PHILIPS MAGNAVOX. You’ve selected one of the best-built, bestbacked products available today. And we’ll do everything in our power to keep you happy with your
purchase for many years to come.
As a member of the PHILIPS MAGNAVOX “family” you’re entitled to protection by one of the most
comprehensive warranties and outstanding service networks in the industry.
What’s more, your purchase guarantees you’ll receive all the information and special offers for which
you qualify, plus easy access to accessories from our convenient home shopping network.
And most importantly you can count on our uncompromising commitment to your total satisfaction.
All of this is our way of saying welcome-and thanks for investing in a PHILIPS MAGNAVOX product.
Sincerely,
. Owner I
Confirmation
Your completed Warranty
Registration Card serves as
verification of ownership in the
event of product theft or loss.
PHILIPS
MAGNAVOX
.Model
Registration
Returning your Warranty
Registration Card right away guar
antees you’ll receive all the infor
mation and special offers which
you qualify for as the owner of your
model.
Robert Minkhorst
President and Chief Executive Officer
Know these
S 3f ©ty symbols
CAUTIOIM
niiK Of fLECTTUtf IHOCK
CWnOM: TO REDUCE THE HM OF EICCTSK WOCK. (W HOT
REMOVE COVER |0R RACK]. N0 USERREAVICCAtlC RART«
WglM. REFER FCRVTCfUG TO OUAUHED SERVICE KREONNEL
PHILIPS
DO NOT OPEN
A
MAGNAVOX
RS. Remember, to gel the rnost from your PHILIPS
MAGNAVOX product, you must return your
Warranty Registration Card within 10 days. So
please mail it to us right now!
A This “bolt of lightning" indicates uninsulated material within your unit may cause an electrical
shock. For the safety of everyone in your household, please do not remove product covering.
The "exclamation point" calls attention to features for which you should read the enclosed lit
erature closely to prevent operating and maintenance problems.
WARNING:TO PREVENT FIRE OR SHOCK HAZARD, DO NOT EXPOSE THIS EQUIPMENT TO
RAIN OR MOISTURE.
CAUTION: To prevent electric shock, match wide blade of plug to wide slot, and fully insert.
ATTENTION: Pour éviter les chocs électriques, introduire la lame la plus large de la fiche dans la
borne correspondante de la prise et pousser jusqu’au fond.
Visit our World Wide Web Site at http://www.philipsmagnavox.com
Page 3

SAFETY INSTRUCTIONS - Read before operating equipment
This product was designed and manufactured to meet strict quality and
safety standards. There are, however, some installation and operation pre
cautions which you should be particularly aware of.
1.
Read Instructions - All the safety and operating instructions should
be read before the appliance is operated.
2.
Retain Instructions - The safety and operating instructions should
be retained for future reference.
3.
Heed Warnings - All warnings on the appliance and in the operating
instructions should be adhered to.
4.
Follow Instructions - All operating and use instructions should be
followed.
5.
Water and Moisture - The appliance should not be used near water
- for example, near a bathtub, washbowl, kitchen sink, laundry tub,
in a wet basement or near a swimming pool, etc.
6.
Carts and Stands - The appliance should be used only with a cart or
stand that is recommended by the manufacturer.
6A.
6B.
Tiiystabllity - All televisions must comply with recommended inter
national global safety standards for tilt and stability properties of its
cabinet design.
• Do not compromise these design standards by applying exces
• Also, do not endanger yourself, or children, by placing elec
7.
Wall or Ceiling Mounting - The appliance should be mounted to a
wall or ceiling only as recommended by the manufacturer.
8.
Ventilation - The appliance should be situated so that its location or
position does not interfere with its proper ventilation. For example,
the appliance should not be situated on a bed, sofa, rug, or similar
surface that may block the ventilation openings; or, placed in a builtin installation, such as a bookcase or cabinet that may impede the
flow of air through the ventilation openings.
9.
Heat - The appliance should be situated away from heat sources
such as radiators, heat registers, stoves, or other appliances {includ
ing amplifiers) that produce heat.
10.
Power Sources - The appliance should be connected to a power sup
ply only of the type described in the operating instructions or as
marked on the appliance.
An appliance and cart combination should be moved
with care. Quick stops, excessive force, and uneven sur
faces may cause the appliance and cart combination to
overturn.
sive pull force to the frffnt, or top, of the cabinet which could
ultimately overturn the product.
tronic equipment/toys on the top of the cabinet. Such items
could unsuspectingly fall from the top of the set and cause
product damage and/or personal injury.
11. Power-Cord Protection - Power supply cords should be routed so
that they are not likely to be walked on or pinched by items placed
upon or against them, paying particular attention to cords and plugs
convenience receptacles, and the point where they exit from thé
appliance.
12. Cleaning - The appliance should be cleaned only as recommended
by the manufacturer.
13. Power Lines - An outdoor antenna should be located away from
power lines.
14. Outdoor Antenna Grounding - If an outside antenna is connected to
the receiver, be sure the antenna system is grounded so as to pro
vide some protection against voltage surges and built up static
charges.
Section 810 of the National Electric Code, ANSI/NFPA No. 70-1984,
provides information with respect to proper grounding of the mats
and supporting structure grounding of the lead-in wire to an anten
na discharge unit, size of grounding connectors, location of antennadischarge unit, connection to grounding electrodes and require
ments for the grounding electrode. See Fig. below.
15. Non-use Periods - The power cord of the appliance should be
unplugged from the outlet when left unused for a long period of time.
16. Object and Liquid Entry - Care should be taken so that objects do not
fall and liquids are not spilled into the enclosure through openings.
17. Damage Requiring Service - The appliance should be serviced by
qualified service personnel when:
A. The power supply cord or the plug has been damaged; or
B. Objects have fallen, or liquid has been spilled into the appliance’
or
C. The appliance has been exposed to rain; or
0. The appliance does not appear to operate normally or exhibits a
marked change in performance; or
E. The appliance has been dropped, or the enclosure damaged.
18. Servicing - The user should not attempt to service the appliance
beyond that described in the operating instructions. All other servic
ing should be referred to qualified service personnel.
Note to the CATV system installer: This reminder is provided to call the
CATV system installer's attention to Article 820-40 of the NEC that pro
vides guidelines for proper grounding and, in particular, specifies that the
cable ground shall be connected to the grounding system of the building,
as close to the point of cable entry as practical.
Page 4

Tabu: of Confem s
Introduction
Welcome/Registration of Your TV...............................2
Safety/Precautions.........................................................3
Table of Contents
Features
.........................................................................
..........................................................
Onscreen MENU
Adjusting the TV Picture
□
Activating Contrast Plus (Black Stretch)
■❖ ■Activating Noise Reduction (Picture) Control ...8
■❖ Setting the TV’s Clock
❖ Activating the Timer Control
❖ Activating the Start-Up Channel
❖ Setting the TV’s Start Time Control
❖ Setting the TV for Closed Caption......................13
❖ Using the Sleep Timer Control
❖ Understanding the SmartLock™ Feature
❖ Setting the SmartLock Access Code
❖ Setting the SmartLock to Block Channels
❖ Setting the SmartLock’s Blocking Options
❖ Blocking Using the Movie Rating Feature...........19
❖ Blocking Using the TV Rating Feature
❖ Using the SmartLock Review Screen
........................................
...........................
..............
...............................
.........................
....................
............................
.......
....................
.............
.........
................
..................
10
11
12
14
16
18
20
21
4
5
6
7
9
15
17
Remote Control Operation
Using the SmartPicture™ Control
..................
28
B
Using the SmartSound’^'M (AVL) Control
Using SmartSurfTM (Alternate Channel)
Setting the Remote Control to Operate Accessory
Etevices (Code Entry)
Setting the Remote Control to operate Accessory
Devices (Search Method)...........................................33
Remote Control Direct Entry Code List
Using the Remote’s VCR Buttons
...........................................
..................
...............
.............................
nrn Picture-In-Picture (PIPÌ
■" ^ PIP Connection.................................................37
Choosing the PIP Picture Source
How to Use PIP with the TV Remote
Adjusting the PIP Tint Controls
More PIP Connections
..........................................
...............................
.......................
................................
General Information
Tips if Something Isn’t Working
Glossary of TV Terms................................................44
Index...........................................................................45
Factory Service Locations
Warranty.....................................................................48
..................
....................................
.....
30
31-32
34-35
38
41-42
43
46-47
29
36
39
40
N
4
! ❖ Setting the Balance, Treble and Bass
Controls................................................................22
❖ Setting the TV for Incredible Surround
❖ Setting the TV Volume Control
❖ Setting the TV for Stereo and SAP Programs .24
❖ Using the Input control with the AudioAideo
Input Jacks
❖ Using the Audio Video Output Jacks..................27
.....................................................
..............
..........................
22
23
25-26
Skt-i P AM) Qi i( K I SI (il idi;
Use the simple Set-Up Guide (supplied with
your TV information packet) for details on:
• Cable/Antenna
Hook-ups
Auto-Programming
of Channels
•«v,
Channel Editing
Basic TV and Remote Control Operation
Tuner Settings
External Input Naming
SmartPicture™, SmartSound"''”, SmartSurT'^, and SmartLock™ are all
registered trademarks of Philips Consumer Electronics Company.
Copyright © 2000 Philips Consumer Electronics Company. All rights reserved.
4 ■ . ■ ■ ■ .
Page 5

Fkatuuks
SmartLock™ feature allows you to block the view
ing of certain channel or external audio/video con
nections where you might not want your children
viewing inappropriate material.
Infrared Remote Control works your TV set, VCR,
and a variety of wireless remote control Cable
Converters (Satellite Receivers, DBS, etc.).
Standard broadcast (VHFAJHF) or Cable TV
(CATV) channel capability.
Stereo Ready TV with built-in audio amplifier and
twin speaker system for receiving TV programs broad
cast in stereo sound.
Closed Captioning allows the viewer to read TV pro
gram dialogue or voice conversations as onscreen text.
Automatic Programming of Channels for quick and
easy selection of favorite stations available in your
area.
Onscreen Features (in either English, French, or
Spanish) show helpfiil messages for setting of TV con
trols.
AudioA'ideo Jackpanel for direct connections with
VCRs (or other video accessories) providing quality
TV picture and sound playback.
On Timer automatically turns the TV ON at a preset
time, and channel.
Sleep-Timer automatically turns the TV OFF at preset
times.
NOTK: riiis ovMier’s niamml content is used
with several diflerent lele\ision models. Not
all leatitres (and drawings) discussed in tin’s
maiiuai will neeessarilv mateli those found
willi your tele\ isiou system. I his is normal and
does not require you contacting your dealer or
requesting scry icc.
End - o 1- L111:1) i si>( ).s \ l
Your new television and its packing contain
materials that can be recycled and reused.
Specialized companies can recycle your
product to increase the amount of reusable
materials and minimize the amounts which
need to be properly disposed.
Your product also uses batteries which
should not be thrown away when depleted,
but should be disposed of as small chemical
waste.
Please find out about the local regulations on
how to dispose of your old television, batter
ies, and packing materials whenever you
replace existing equipment.
SmartPicture™ allows you to change the picture set
tings (color, tint, contrast, etc.) for various types of pro
gramming, such as Personal, Sports, Movies, or Weak
Signals, with the push of one button.
SmartSound™ controls the sudden volume changes
during program changes and commercials. It elimi
nates the peaks and valleys in the TV’s sound and cre
ates one pleasant listening level. You also may tailor
the SmartSound setting to the type of program you are
watching (Music, Theatre, etc,).
Picture-In-Picture (PIP) allows you view to different
programs (or picture sources) on the TV screen at the
same time. PIP will also let you swap the pictures,
move the PIP picture to any of the four comers, and
even freeze the picture until you shut it off.
Page 6

□
'I ’o adjust your TV picture con-
A. trols, select a channel and follow
the steps shown below:
Press the MENU button on the
remote to display the onscreen menu.
How TO Adjust the TV Picture
Press the CURSOR UP ^ or
<l>
DOWN ■ buttons until the word
BRIGHTNESS is highlighted. (Or,
COLOR, PICTURE, SHARPNESS,
TINT, COL. TEMP, depending on
the adjustment you want to make.)
Press the CURSOR RIGHT
or the CURSOR LEFT
buttons to increase or decrease the
brightness of the picture.
Sm \ki Hi l l
BRIGHTNESS Press the
or buttons until darkest
parts of the picture are as bright as you
prefer.
COLOR Press the or buttons
to add or eliminate color.
PICTURE Press the ►► orbut
tons until lightest parts of the picture show
good detail.
SHARPNESS Press the or 4-4
buttons to improve detail in the picture.
TINT Press the or buttons to
obtain natural skin tones.
COLOR TEMP Press the or
buttons to select NORMAL, COOL, or
WARM picture preferences. (NORMAL
will keep the whites, white; COOL will
make the whites, bluish; and WARM will
make the whites, reddish.)
The onscreen menu will time out and
disappear from the screen when you
finish, or you can press the
STATUS/EXrr button to clear the
menu from the screen.
SETUP
SnnardjDck REVIEW
BRIGHTNESS am
COLOR H
RCTURE H
.................
...........................
..........................
►
►
301
30
30
Page 7

Activating the Contrasi Plus (Black Stretch) Control
^ he Contrast Plus (Black Stretch)
feature helps to “sharpen" the
7
picture quality. The black portions of
the picture become richer in dark
ness and the whites become brighter.
Press the MENU button on the
remote to display the onscreen menu.
o
<|> Press the CURSOR UP ► or
CURSOR DOWN ■ buttons until
the words CONTRAST PLUS are
highlighted,
<i> Press the CURSOR RIGHT
or CURSOR LEFT but
tons to activate or deactivate the
Contrast Plus (Black Stretch) fea
ture.
Remember: The onscreen
§ menu will disappear in a few
seconds after you have finished your
adjustment.
TINT
COL. TEMP
CONTRAST PLUS □FF
NOSE REDLCTTOSJ
VOLUME - 15
•ueep
o U
VCH ST«ni»«WT cc CLOCK
' ntoofo nmn
H'”- (T) CD ®
......t........
NORMAL
O O O
® CD (D
0
CFF
TINT
COL. TEMP
1 CONTRAST PLUS ONI
NOSE REDUCTION 0=F
VOLUME 15
.....t........
NORMAL
0
Page 8

□ I
or reasons such as poor cable
reception, the picture can some
F
times appear slightly “speckled" (or
signal noise shown in the picture). The
NOISE REDUCTION control can help
eliminate this type of interference and
improve the quality of the picture.
Press the MENU button on the
I remote to display the onscreen menu.
Press the CURSOR UP ^ or
CURSOR DOWN ■ button until the
words NOISE REDUCTION are
highlighted.
<|> Press the CURSOR RIGHT
^ or CURSOR LEFT ^ but
tons to activate or deactivate the
Noise Reduction Featu*e,
Activatin(ì the Noise Redlchon (Picture) Control
IBEQINJ
COL. TIMR NORMAL
CONTRAST PLUS
1 NOISE REDUCTION
VOLUME
BALANCE
.................
f-
ON 1
OFFI
■■ 15
... 0
COL. TEMP NORMAL
CONTRAST PLUS
NOISE REDUCTION
VOLUME mt""
BALANCE
..................
ON
ON
- 15
.... □
I"
,Sai \K l HkU’
_ Remember: The onscreen
§ menu will disappear in a few
seconds after you have finished your
adjustment.
“Noise” Reduction is a video adjust
ment feature that affects the picture
quality of the TV not the sound.
Page 9

T/b«r television comes with an
J. onscreen clock. During normal
operation the clock appears on the
screen when the STATUSIEXIT but
ton is pressed or when a channel
change occurs.
tBEQINl
<T> Press the CLOCK button on
the remote to display the onscreen
CLOCK menu.
Setting i he TV’s Ceock
!□
<i> Press the CURSOR UP ► OR
CURSOR DOWN ■ buttons until
the words SET CLOCK are high
lighted.
Enter the current time using
the NUMBERED buttons. If the
first number is a single digit first
enter a zero then the digij»(i.e.,
press “0”, then press “8”).
<J> Press the CURSOR RIGHT
^ or CURSOR LEFT but
tons to set either AM or PM time.
Note: The CLOCK onscreen menu
can also be accessed through the
main menu by pressing the MENU
button; then scrolling up/down
with the CURSOR UP ^ or
CURSOR DOWN ■ buttons until
the word CLOCK is highlighted.
Press the CURSOR RIGHT ^
button to activate the CLOCK
menu and follow the steps above to
set the time.
SET CLOCK
TIMER ACTIVE
CHANNEL
AM
ON
12
10:00 AM
TIMER ACTIVE
CHANNEL
Note: If a power failure occurs, the TV's
CLOCK will have to be reset.
ON
12
Smari Hi I i>
Remember: Be sure to
* press “0” first and then the
hour number for single digit
entries.
To clear the onscreen menu press
the STATUS/EXIT button, or wait
a few seconds after you have fin
ished your adjustment and the
menu will automatically disappear
from the screen.
If no time is set, the time will not appear
onscreen. "
Page 10
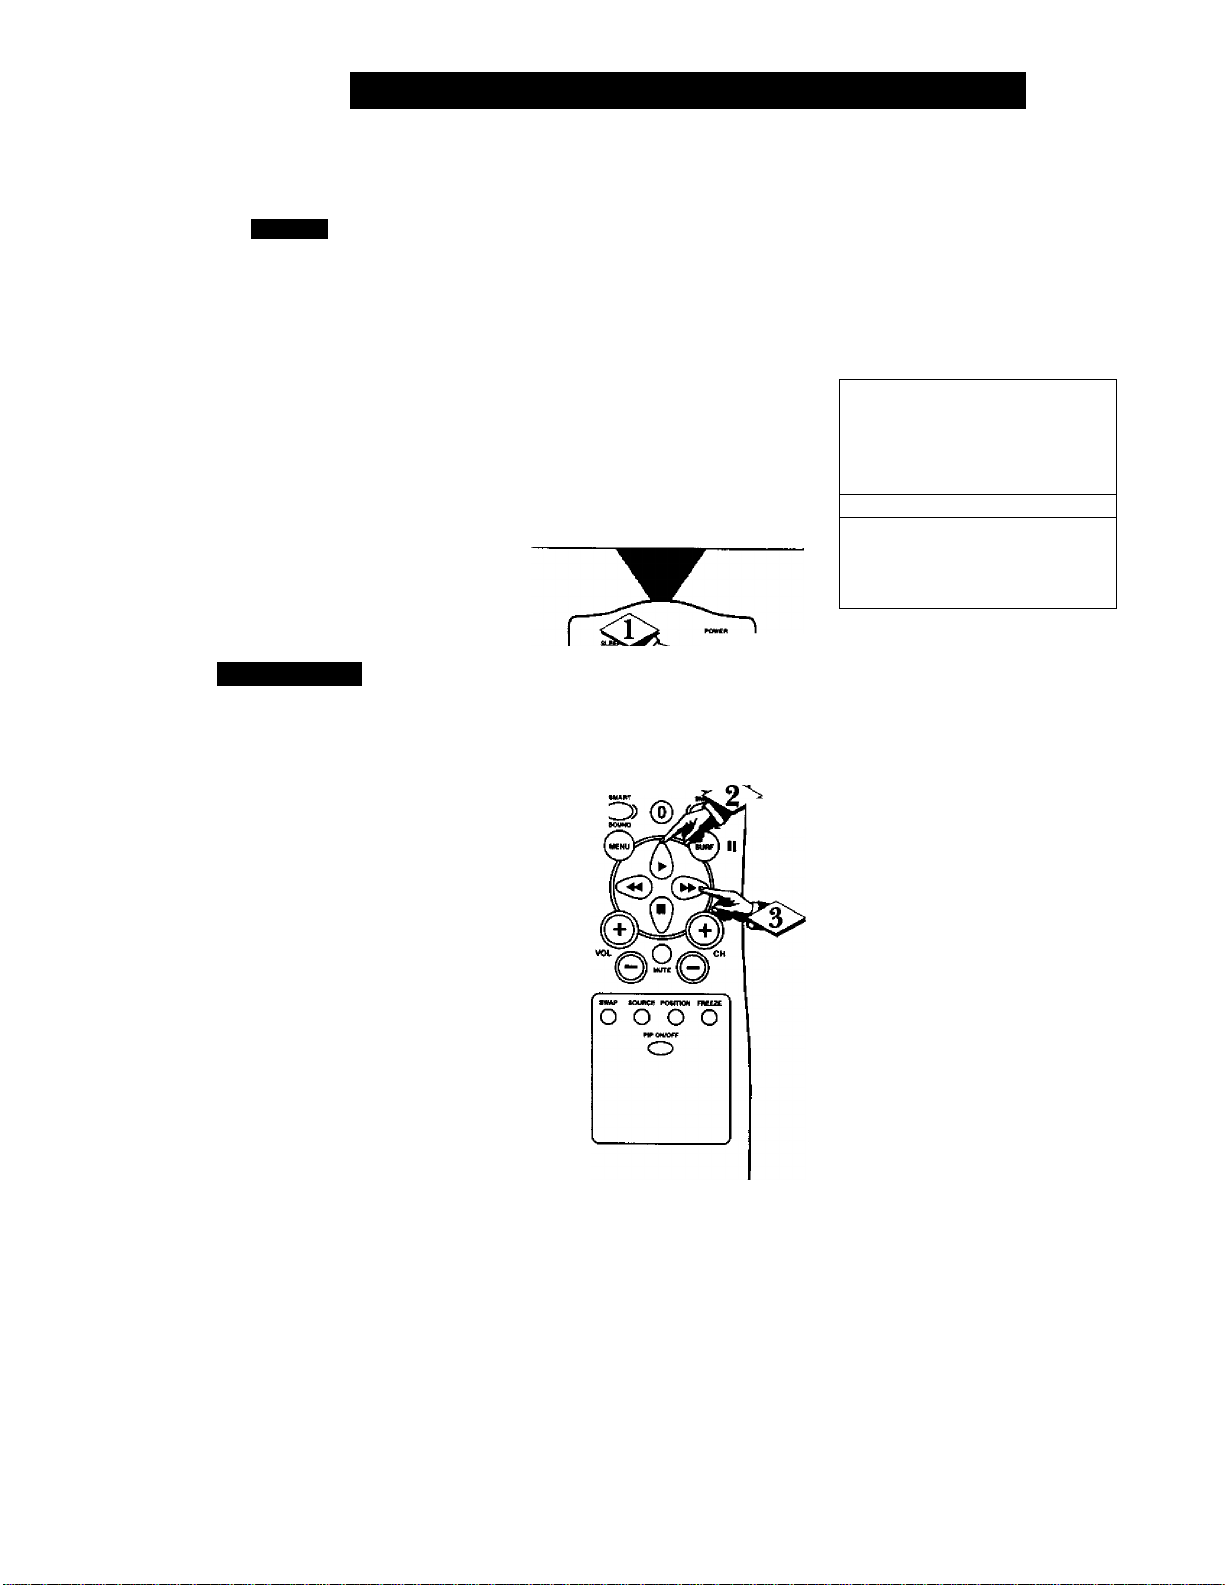
□ I
Tust like an alarm clock you can
set the TV to turn itself on at the
same time everyday.
Press the CLOCK button to
I display the Clock onscreen menu.
<|> Press the CURSOR UP ► or
CURSOR DOWN ■ button until
the words TIMER ACTIVE are
highlighted.
Press the CURSOR RIGHT
^ or CURSOR LEFT but
ton to select ON (if activating) or
OFF (if deactivating) the Timer
control.
Activatinc; thk TV’s On Timer Control
SETCLDCK 10:00 AM
mMER ACTIVE
CH/yMNEL 12
START HIVE --:--AM
OFF
SET CLOCK
TIMER ACTIVE
CHANbEL
STARTTIME
10:00 AM
ON
12
--:-AM
SmAli I Hi;m>
Remember: Be sure to set
S the clock to the current time,
then set the time you want the tele
vision to turn on using the START
TIME control as described on page
12.
The onscreen menu will time out
and disappear from the screen when
you finish, or you can press the
STATUS/EXrr button to clear the
menu from the screen.
<s> c5o o
KCOUD TVIVCR
V“ ® (D CD
Liicc
® <D CD
® CD CD
10
Page 11

Acti\atin(; the Start Up Channel
T
Jsed along with the Clock fea
tures, you can select a specific
channel that the television will tune
to when the Timer Active control is
turned ON.
Press the CLOCK button to
display the Clock onscreen menu.
Press the CURSOR UP ^ or
CURSOR DOWN ■ button until
the word CHANNEL is highlighted.
Press the number buttons to
enter the start up channel you
would like the television to start on.
SET CLOCK 10:00 AM
Tlh/ERACnVE DIM
CHANNEL
START TIME
12
■■AM
o
S the Timer Active control to
ON.
The onscreen menu will time out
and disappear from the screen when
you finish, or you can press the
STATUS/EXIT button to clear the
menu from the screen.
11
Page 12

□
T Tsed along with the Clock fea
ture, you can select a specific
time the television will turn on
when the Timer Active control is
turned ON.
Sftting the TV’s Start Up Time
<£>
<|> Press the CURSOR UP ► or
<l>
<j> Press the CURSOR RIGHT
Press the CLOCK button to
display the Clock onscreen menu.
CURSOR DOWN ■ button until
the words START TIME are high
lighted.
Enter the time to turn on the
TV using the NUMBERED but
tons. If the first number is a single
digit first enter a zero then the digit
(i.e., press “0”, then press “8”)-
or CURSOR LEFT but
tons to set either AM or PM time.
S\l \[{i Hi l r
Remember: Be sure to set
^ the Timer Active to ON.
TlMBl ACTIVE
CHANNEL
START TIME -AM
ON
12
TIMER ACTIVE
CHANNEL
STARTTIME
12
ON
12
00:30 AMI
8:30
12
If the TV is in use when the START
TIME control is about to be activated, the
screen will display a warning stating it's
going to change channels in 30 seconds.
It will appear like the screen shown below
and change to the selected start up chan
nel. Pressing any button on the remote
within this count down will cancel the
change. ■
CHAN0NG
TO CHANNEL 6
IN 30 SECONDS
Page 13

UsiNíí THE Closed Caption Control
losed Captioning (CC) allows
you to read the voice content of
C
television programs on the TV
screen. Designed to help the hear
ing impaired, this feature uses
onscreen “text boxes” to show dia
logue and conversations while the
TV program is in progress.
(■BECtINl
o
NOTE: Not all TV programs and product commercials are made for broadcast
with Closed Caption (CC) information included. Neither are all Closed Caption
modes (CC-1, or CC-2) necessarily being used by a broadcast station during the
transmission of a closed caption program. Refer to your area's TV program listings
for the stations and times of Closed Caption shows.
Press the MENU button on the
remote to display the onscreen
menu.
<|> Press the CURSOR UP ► or
CURSOR DOWN ■ button until
the word CC (Closed Caption) is
highlighted.
Press the CURSOR RIGHT
<l>
<3> NOTE: You can also set the
button to select the fSLOSED
CAPTION option you want (OFF, 1,
2, or MUTE), Dialogue (and
descriptions) for the action on the
captioned TV program will appear
onscreen.
Closed Caption by pressing the CC
button on the remote. When pressed
repeatedly the screen will display the
options: CC-OFF, CC-1, CC-2, or
CC-MUTE.
SmartLock
CLOCK
[cc
PIP
SETUP
<X> CD (3)
(1) ® CD
CD ®
►
►
OFFl
►
►
SmartLock
CLOCK
[cc
PIP
SETUP
ULUUK ■■■■
[cc
PIP
SETUP
►
►
1|
►
►
" ►
MUTEI
►
►
S\IARl Hl IT
Remember: The onscreen
§ menu will time out and disaj>-
pear from the screen when you fin
ish, or you can press the
STATUS/EXIT button to clear the
menu from the screen.
CAPTION mode
Example Display
NOTE: The CC-MUTE option
can be used to set the TV to
turn the Closed Caption mode
“ON” whenever the MUTE but
ton on the remote is pressed.
This activates the CC-1 option.
MUTE will appear smaller in
the upper center of the screen.
13
Page 14

□
TTave you ever fallen asleep in
1 L front of the TV only to have it
wake you up at two in the morning
with a test pattern screeching in
your ears? Well, your TV can save
you all that trouble by automatical
ly turning itself off.
UsiNC THE Sleep Timer Control
Press the SLEEP button on the
<i>
remote control and the SLEEP timer
will appear on the screen.
Press the SLEEP button
repeatedly to pick the amount of
time {in 15 minute increments up to
60 minutes; then 30 minute incre
ments up to 120; then 60 minute
increments up to 240) before the TV
will turn itself off.
An onscreen count down will appear
during the last minute before the TV
shuts itself off.
SMAKf Ht.i.l'
Remember: The SLEEP-
i TIMER control can also be set
within the TV’s main menu
The onscreen menu will time out
and disappear from the screen when
you finish, or you can press the
STATUS/EXrr button to clear the
menu from the screen.
12
30 MIN
12
45M!N
12
60 MIN
12
90 MIN
12
120 MIN
12
180 MIN
12
240 MIN
During the last minute of a SLEEP
timer setting, an onscreen count
down will be displayed.
Pressing any button on the remote
during this count down will cancel
the SLEEP timer setting.
14
Page 15

Understandinìì the SmartLock™ Control
'"f 'he SmartLock feature is an inte-
J grated circuit that receives arid
processes data sent by broadcasters,
or other program providers, that
contain program content advisories.
When programmed by the viewer, a
TV with SmartLock can respond to
the content advisories and block
program content that may be found
objectionable (such as offensive
language, violence, sexual situa
tions, etc.}. This is a great feature to
censor the type of viewing children
may watch.
Over the next few pages you'll
learn how to block channels and
certain rated programming. Below
Is a brief explanation of some terms
and ratings you will find in the
SmartLock feature.
SmartLock offers various
BLOCKING OPTION controls
from which to choose:
MASTER DISABLE: This is what
might be called the "master switch"
for SmartLock. When in the ON
position, ALL blocking/censoring is
turned off (or disabled). When in the
OFF position, ALL blocking based
on specifically blocked settings will
take place.
BLOCK UNRATED: ALL unrated
programs based on the Movie
Ratings or Parental (TV) Guidelines
can be blocked if this feature is set
to ON and the MASTER DISABLE
feature is set to OFF.
BLOCK NO RATINGS: ALL pro
gramming with NO content advisory
data can be blocked if this feature is
set to ON and the MASTER DIS
ABLE feature is set to OFF.
After an access code has been pro
grammed, you can block up to 5
individual channels. But more than
just blocking channels, certain
blocking options exist which will
block programming based on ratings
patterned by the Motion Pictures
Association of America and TV
broadcasters. (See description of rat
ings on this page.)
Movn: R viTNtis
(.Munos Pi( II Id Assoi I \iio\ III- Ami liii U
G: General Audience ■ All ages admitted.
Most parents would find this program
suitable for all ages. This type of pro
gramming contains little or no violence,
no strong language, and little or no sexual
dialogue or situations.
PG: Parental Guidance Suggested - This
programming contains material that parents
may find unsuitable for younger children.)
It may contain one or more of the follow
ing; Moderate violence, some sexual situa
tions, infrequent coarse language, or some
suggestive dialogue.
PG-13: Parents Strongly Cautioned - This
programming contains material that parents
may find unsuitable for children under the
age of 13. It contains one or more of the
following; violence, sexual situations,
coarse language, or suggestive dialogue.
R: Restricted -This is programming is
specifically designed for adults. Anyone
under the age of 17 should only view this
programming with an accompanying parent
or adult guardian. It contains one or more
of the following: intense violence, intense
sexual situations, strong coarse language,
or intensely suggestive dialogue.
NC-17: No one under the age of 17 will
be admitted. - This type of programming
should be viewed by adults only. It con
tains graphic violence, explicit sex, or
crude indecent language.
X: Adults Only - This type of programming
contains one or more of the following: very
graphic violence, very graphic and explicit
or indecent sexual acts, very coarse and
intensely suggestive language.
15
li
TV PaKKMM. (il llH.LINKS
( I A' ItuOAIK AMI lis)
TV-Y - (All children — This program
is designed to he appropriate for all
children.) Designed for a very young
audience, including children ages 2-6, This
type of programming is not expected to
frighten younger children.
TV-Y7 - (Directed to Older
Children - This program is designed
for children age 7 and above.) It may
be more appropriate for children who have
acquired the development skills needed to
distinguish between make-believe and reali
ty. This programming may include mild fan
tasy and comic violence (FV).
7V-G - (General Audience - Most
parents would find this program suit
able for all ages.) This type of pro
gramming contains little or no violence, no
strong language, and little or no sexual dia
logue or simations.
TV-PG - (Parental Guidance
Su^ested ~ This program contains
material that parents may find unsuit
able for younger children.) This type of pro
gramming contains one or more of the fol
lowing: Moderate violence (V), some sexual
situations (S), infiequent coarse language
(L), or some suggestive dialogue (D).
TV-14 - (Parents Strongly
Cautioned - This program contains
some material that many parents
would firul unsuitable for children under 14
years of age.) This type of programming
contains one or more of the following:
intense violence (V), intense sexual situa
tions (S), strong coarse language (L), or
intensely suggestive dialogue (D).
TV-MA - (Mature Audience Only -
This program is specfically designed
to be viewed by adults and therefore
may be unsuitable for children under 17.)
This type of programming contains one or
more of the following: graphic violence (V),
explicit sexual situations (S), or crude inde
cent language 0L<), - - ‘
Page 16
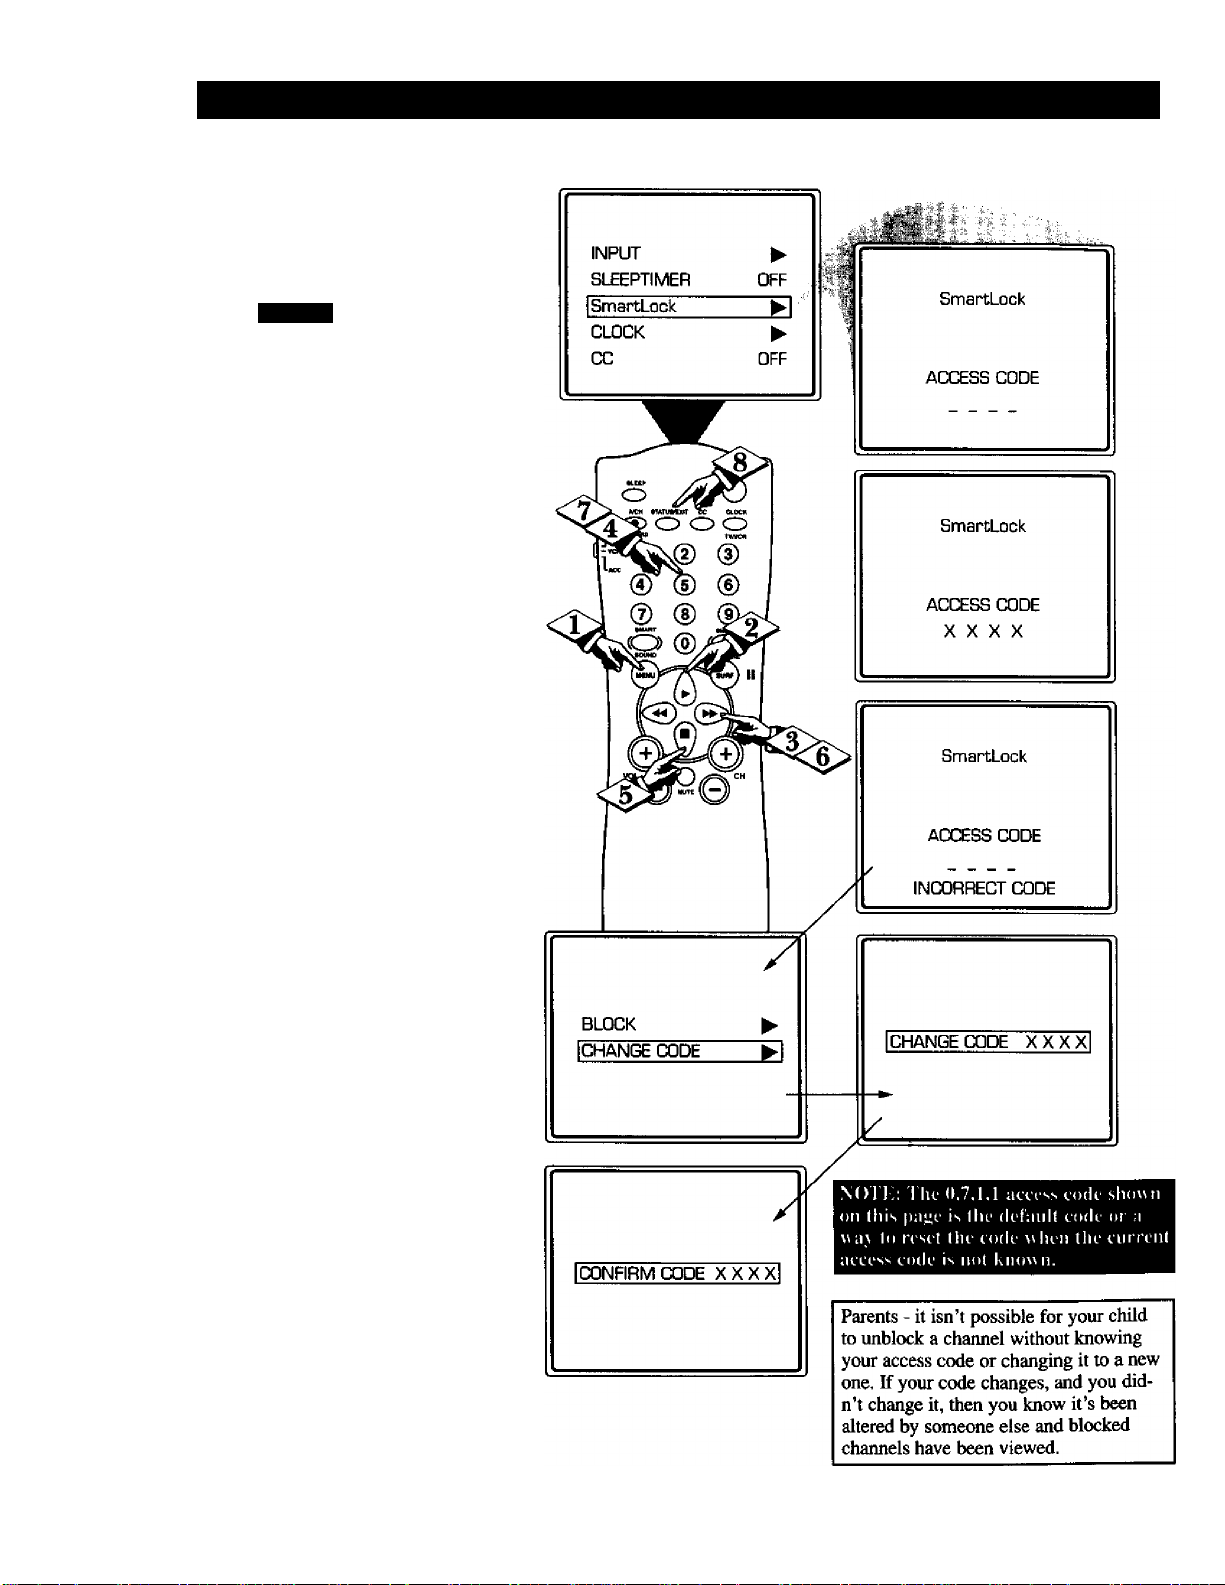
il
<î>
I menu.
<|> Press the CURSOR UP ►or
<$>
Understandinc; thi: SmartLock™ Control (Access Code)
ver the next few pages you'll
learn how to block channels
O
and get a better understanding of
the rating terms for certain pro
gramming.
First, let’s start by learning how to
set a personal access code:
Press the MENU button on the
remote to display the onscreen
CURSOR DOWN ■ buttons until
the words SmartLock are highlight
ed.
Press the CURSOR RIGHT
button to display the
SmartLock Access Code screen.
Using the NUMBERED but
tons, enter 0,7,1, lj^“XXXX”
appears on the Access Code screen
as you press the numbered buttons.
“INCORRECT CODE” will
appear on the screen, and you will
need to enter 0,7,1,1 again.
<|> Press the CURSOR DOWN ■
I button until the words CHANGE
CODE are highlighted.
<i> Press the CURSOR RIGHT
►► button to change your per
sonal Access Code.
“Next enter a “new” 4 digit
code using the NUMBERED
buttons. The screen will then ask
you to confirm the code you just
entered. Enter your new code
again. “XXXX” will appear when
you enter your new code.
<i> Press the STATUS/EXIT but
ton after the new code has been
entered to set the code in the TV’s
memory.
<1^
16'
Page 17
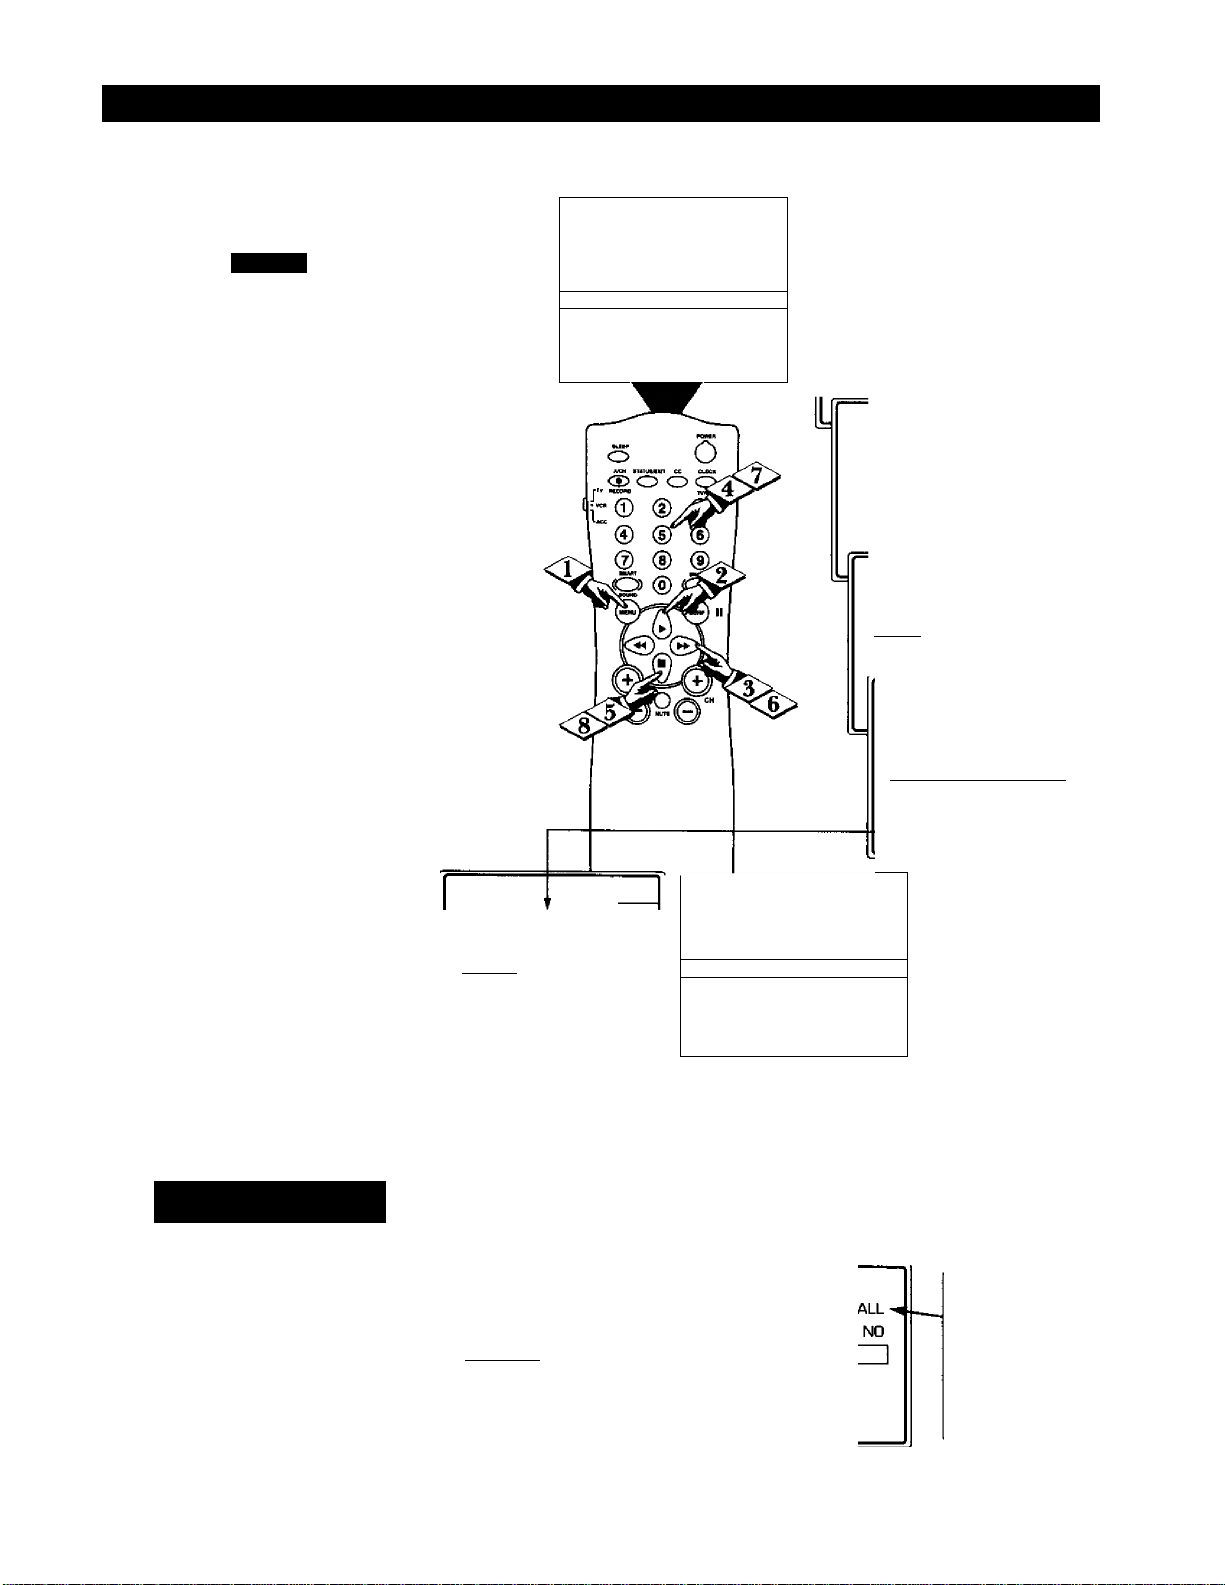
Understanding the SmartLock™ Control (Block Channel)
A fter your personal access code
/^has been set (see previous
page), you are now ready to select
the channels you want to block out
or censor.
Press the MENU button on the
I remote to show the onscreen menu.
Press the CURSOR UP ^ or
CURSOR DOWN ■ button until
the words SmartLock are highlight
ed.
<3> Press the CURSOR RIGHT
I button to display the
SmartLock Access screen.
Enter the correct access code
<S>
number. “XXXX” shows on the
Access Code display as you press
the NUMBERED buttons.
INPUT
SLEEPTIMEB
jSmartLock
CLOCK
CC OFF
OFF
►
►1
►
SmartLock
ACCESS CODE
SmartLock
ACCESS CODE
XXXX
li
Press the CURSOR JJP ^ or
DOWN ■ buttons until the word
BLOCK is highlighted. Press the
CURSOR RIGHT ^ button then
highlight CHANNELS
BLOCKED.
<i> Press the CURSOR RIGHT
►► button. Three options will be
displayed: CHANNEL, LOCK or
CLEAR ALL.
With CHANNEL highlighted,
<2>
use the NUMBERED buttons to
enter the channel number you wish
to block.
Use the CURSOR DOWN ■
button to highlight the word
LOCK, then press the CURSOR
RIGHT ^ button to select YES
(block) or NO (do not block). The
channel chosen is now blocked from
viewing.
Repeat steps 7 and 8 for any other
channels you wish to block from
viewing.
To clear blocked eliannets
follow the steps below:
(BLOCK
CHANGE 03DE
BLOCKING OPTIONS ^
(CHANNELS BLOCKED ^1
MOVIE RATINGS ^
PARENTAL GUIDEUNE ^
CHANNEL 5 BLOCKED
BY CHANNEL BLOCKING
ENTER CODE TO VIEW
(channel
LOCK
CLEAR ALL
NO
CHANNEL 5
[LOCK
CLEAR ALL
►
YES(
►
t
When a blocked channel is viewed, this is what the screen will display. To view the blocked channel, sim
ply enter the current access code. Note: Once the access code is entered ALL blocked channels will be
viewable until the TV is powered off. Once the set is turned off and then back on the previously blocked
channels will again be blocked.
Press the CURSOR DOWN ■ but
ton until the words CLEAR ALL
are highlighted, then press the
CURSOR RIGHT ^ button.
The screen will read “ALL
UNBLOCKED” for a moment. At
this point ALL the previously
blocked channels will be unblocked.
CHANNEL
LOCK
(CLEAR ALL'
17
YES
Note: When the CLEAR
5
CHANNEL
LOCK
(ALL UNBLOCKED
ALL option is selected, the
CHANNEL option will dis
play ALL,
If at this point if you change
the LOCK option to YES,
ALL channels will be blocked
from viewing.
Page 18
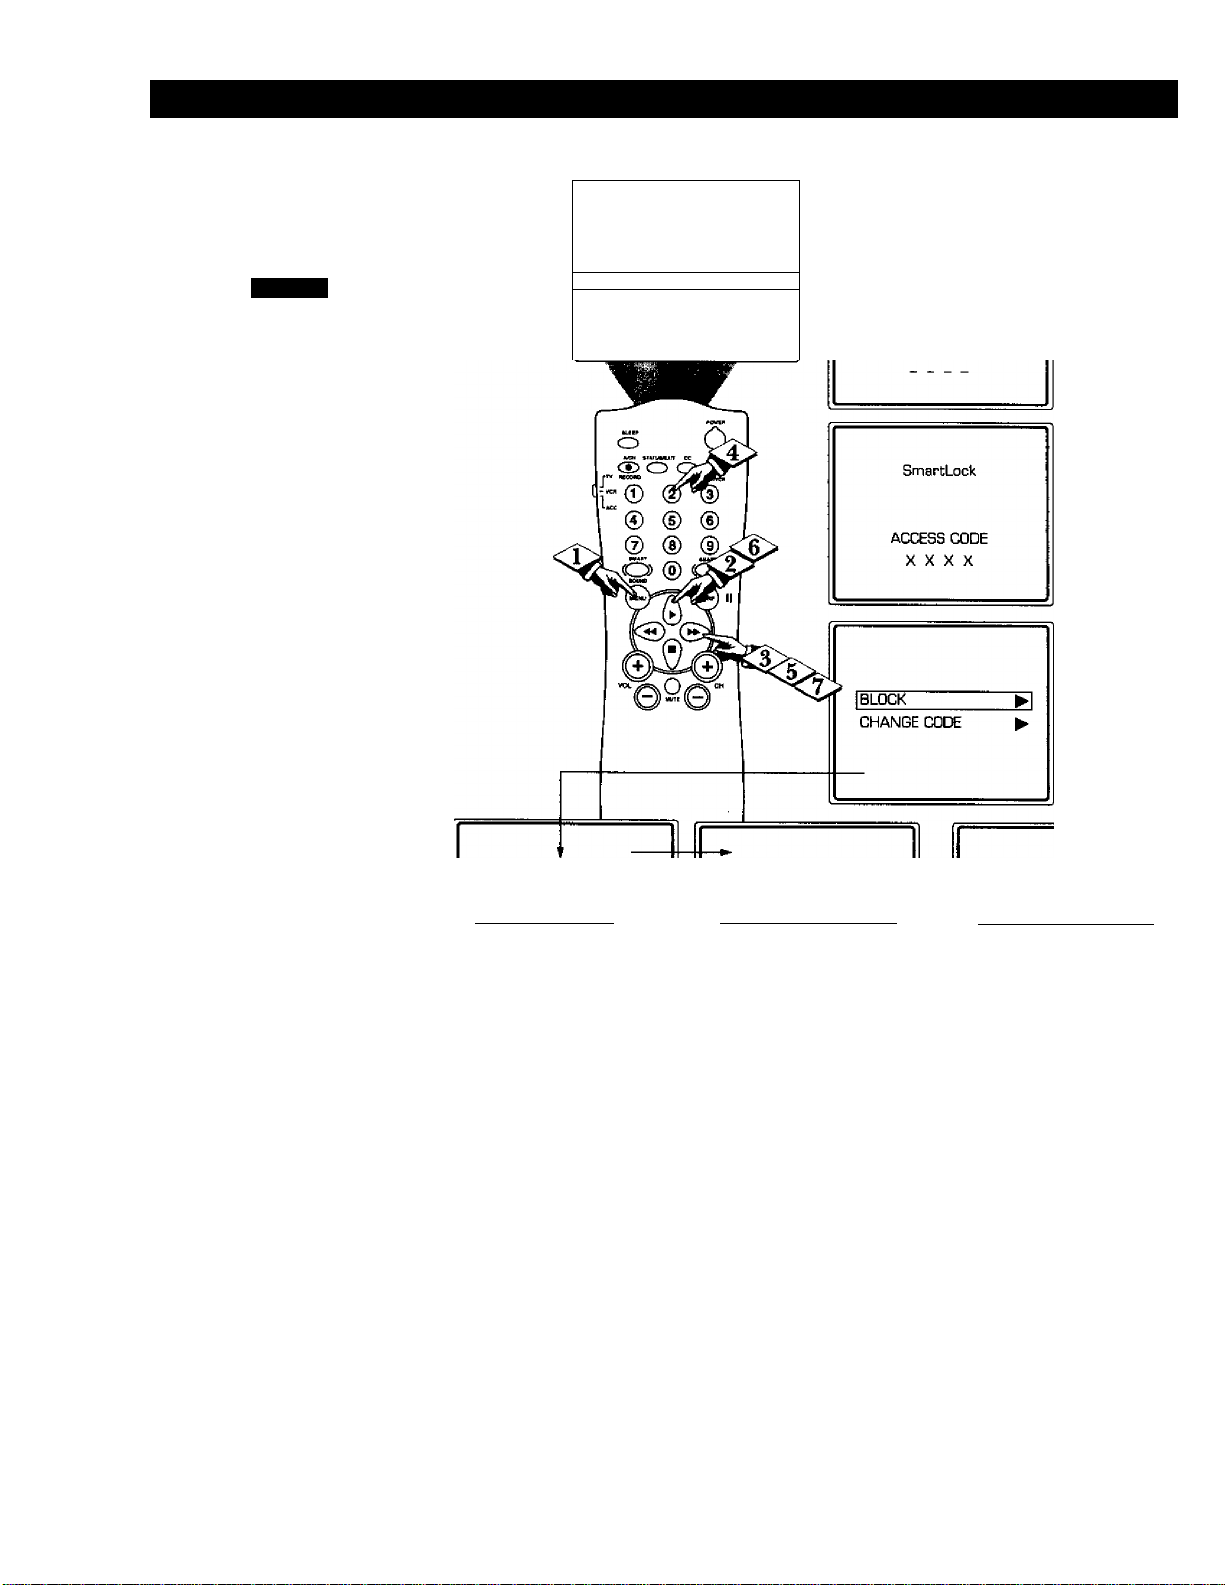
Understandinc; the SmartLock™ Control (Blocking OmoNs)
il
^martLock offers the viewer other
kJ blocking features as well. With
these Blocking Option features, the
censoring can be turned ON or
OFF.
Press the MENU button on the
remote to display the onscreen
INPUT
SLEEPTIMER
[SmartLock
CLOCK
CC OFF
OFF
►
► [
►
SmartLock
ACCESS CODE
menu.
<|> Press the CURSOR UP ► or
CURSOR DOWN ■ buttons until
the words SMART LOCK are high
lighted,
<3> Press the CURSOR RIGHT
button to display the
SmartLock Access Code screen.
<j> Using the NUMBERED but
tons on the remote, enter your per
sonal Access Code.
<i> With the word BLOCK high
lighted, Press the CURSOR
RIGHT button.
Scroll the menu using the
CURSOR UP ^ or CURSOR
DOWN ■ buttons until the words
BLOCKING OPTIONS are high
lighted.
Press the CURSOR RIGHT
<3>
I BLOCKING OPTIONS
CHANNELS BLOCKED ^
MOVIE RATINGS ^
[M/^R DISABLE ON I
BLOCX UNRATED ON
BLOCK NO RATING ON
OR
[MASTER DISABLE OFF|
BLOCK UNRATED OFF
BLOCK NO RATING OFF
button to display the
Blocking Options (MASTER
DISABLE, BLOCK UNRATED,
or BLOCK NO RATING). When
highlighted, each feature can be
turned ON or OFF using the
CURSOR RIGHT ^ or CUR
SOR LEFT buttons on the
CHANNEL 20 BLOCKED
BY CONTENT ADVISORY
CANNOT DECODE RATING
ENTER CODE TO VIEW
If Ihe BLOCK UNRATED or BLOCK NO RATINGS
controls are turned ON, all unrated programs and pro
grams containing NO content advisory data will display
the screen shown to the left. To watch the channel enter
your access code» or change the BLOCK UNRATED
and BLOCK NO RATINGS back to off.
remote.
BLOCKING OPTIONS:
MASTER DISABLE: This is what might be called the “master switch” for SmartLock. When in the ON position, ALL block-
ing/censoring is turned off (or disabled). When in the OFF position, ALL blocking based on specifically blocked settings will
take place.
BLOCK UNRATED: ALL unrated programs based on the Movie Ratings or Parental (TV) Guidelines can be blocked if this
feature is set to ON and the MASTER DISABLE feature is set to OFF.
BLOCK NO RATINGS: ALL programming with NO content advisory data can be blocked if this feature is set to ON and the
MASTER DISABLE feature is set to OFF.
18
Page 19
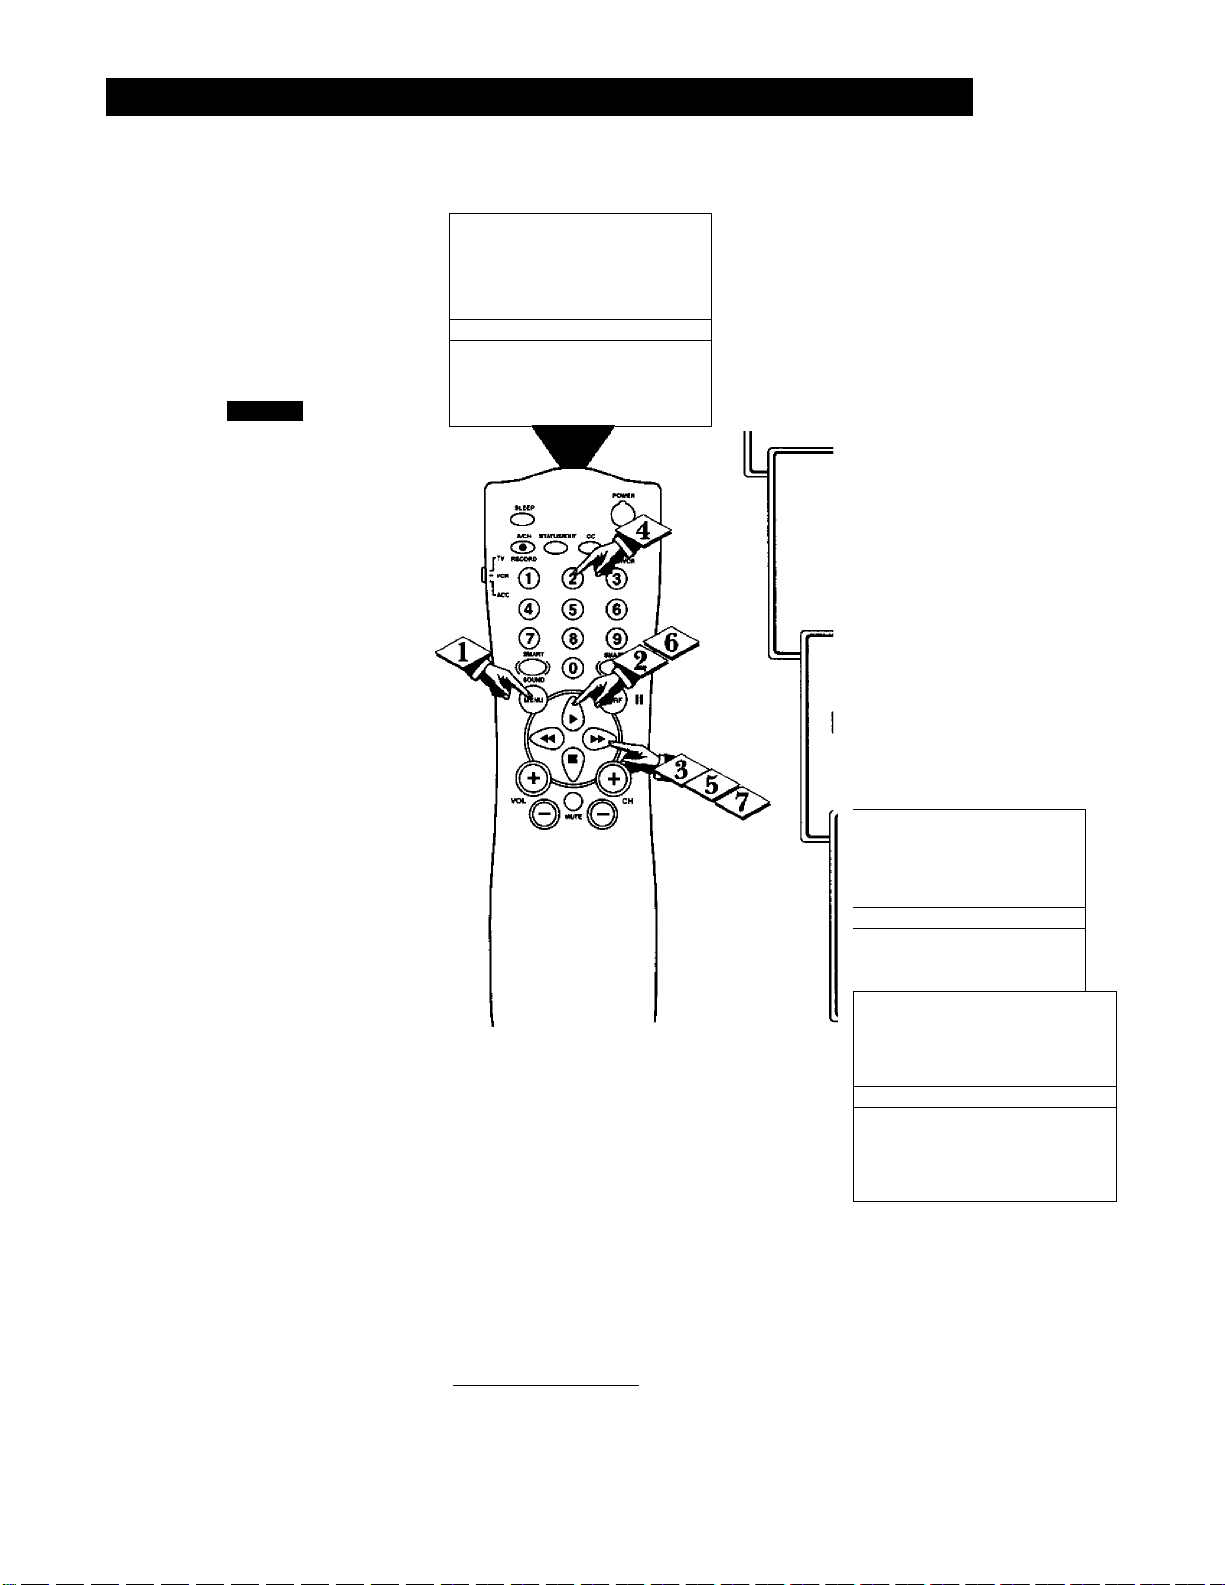
Understanding the SmartLock™ Control (Movie Ratings)
^here are two types of program
ratings within the SmartLock
T
feature. One is based on the Movie
Industry ratings while the other is
based on the TV Industry ratings.
Both can be used to block or censor
programming that has been rated in
either manner.
Let’s first look at the Movie Rating
options of SmartLock:
Press the MENU button on the
remote to display the onscreen
menu.
<|> Press the CURSOR UP ► or
CURSOR DOWN ■ buttons until
the words SMART LOCK are high
lighted.
<3> Press the CURSOR RIGHT
button to display the
SmartLock Access Code screen.
<l>
Using the NUMBERED but
tons on the remote, enter your
Personal Access Code.
T
INPUT
SLSPTIMER
ISmartLock
CLOCK
cc
OFF
►1
OFF
►
SmartLock
►
ACCESS CODE
SmartLock
ACCESS CODE
X X X X
BLOCK
CHANGE CODE
_ ___ _
ii™yi
Remember:
Selecting to
block any rating
will cause all the
higher ratings to
also be blocked
automatically.
B
i
<i> With the word BLOCK high
lighted, Press the CURSOR
RIGHT button.
Scroll the menu using the
CURSOR UP ^ or CURSOR
DOWN ■ buttons until the words
MOVIE RATINGS are highlight
ed.
<j> Press the CURSOR RIGHT
button to display the MOVIE
RATINGS (G, PG, PG-13, R,
NC17, or X).
When highlighted, all these options
can be turned ON (which will allow
blocking) or OFF (which will allow
viewing).
Use the CURSOR RIGHT ^ or
CURSOR LEFT buttons on
the remote to turn the rating option
ON or OFF.
CHANNEL 5 BLOCKED
BY CONTENT ADVISORY
MOVIE RATING R
ENTER CODE TO VIEW
Screen will display a message when programming is
blocked by the Movie Rating feature. To unblock, turn
the Movie Rating OFF, or enter your personal access
code. Entering the code will unblock ALL blocked
Movie Ratings until the TV is turn off. Then the
blocked ratings will be reset to ON.
___________________
BLOCKING OPTIONS
CHANNELS BLOCKED ►
IMOVIE RATINGS
PARBvnALGUIOEUNE
PG
PG-13
IR
NC-17
X ON
NOTE: When a rating is turned ON, all
higher ratings will automatically be turned
ON. To turn them OFF, each will have to be
set individually, (i.e.. R blocked manually,
NC-17 and X will be blocked automatically.)
►
► 1
►
OFF
OFF
ONI
ON
19
Page 20
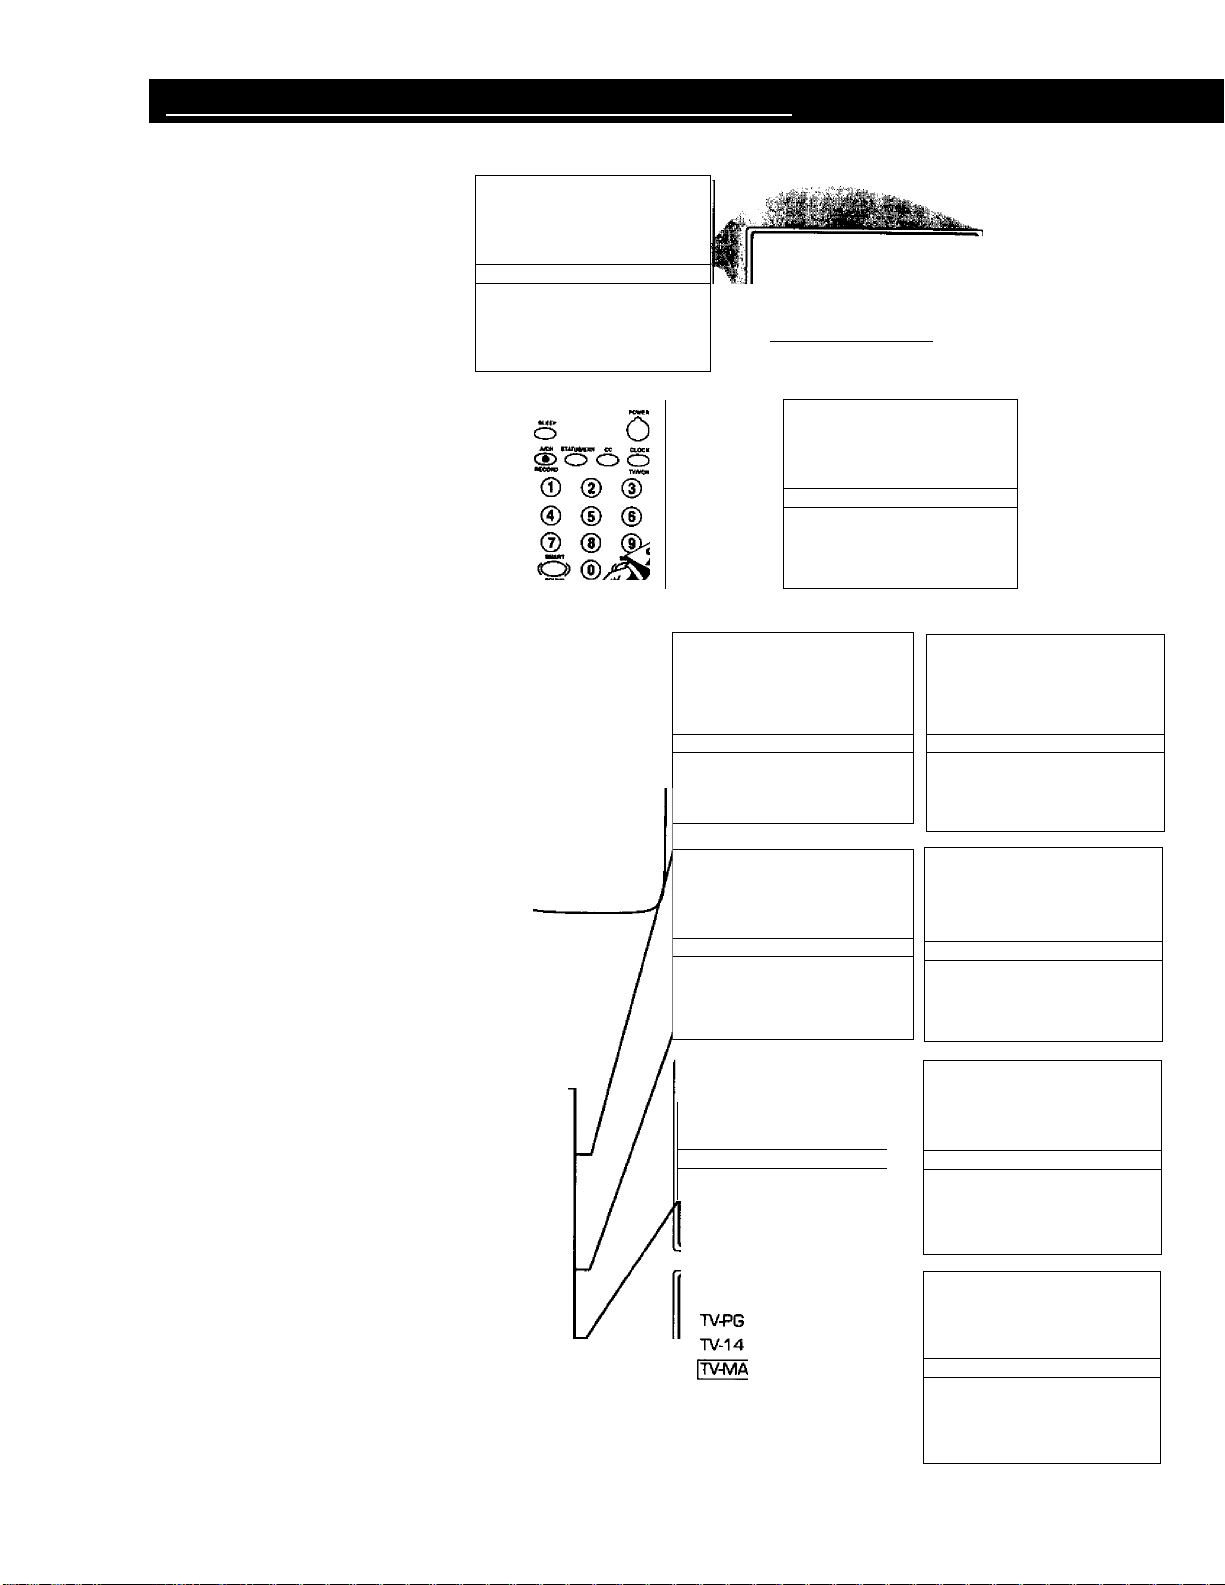
Understanding im: SviartLock™ Control (Parental Guidelines)
^ his portion of the SmartLock
features cover program ratings
7
based on the TV Industry rating
►
OFF
►
►
|yz
____________
FV
PG
0
IL
S
V
H!Pf*
Selecting to
block any rating
will cause all the
higher ratings to
also be blocked
automatically.
system. This is know as Parental
Guideline within SmartLock.
After selecting the SmartLock fea
ture and entering your personal
access code, the BLOCKICHANGE
CODE screen appears;
iBEQINl
With the word BLOCK high
<î>
li
lighted, Press the CURSOR
R]
RIGHT button.
Scroll the menu using the
<l>
CURSOR UP ^ or CURSOR
DOWN ■ buttons until the words
PARENTAL GUIDELINES are
highlighted.
Press the CURSOR RIGHT
<s>
_ . button to display the
Parental (TV) Guidelines (TV-Y,
TV-Y7, TV-G, TV-Pff; TV-14, or
TV-MA).
When highlighted, the TV-Y and
TV-G can be turned ON (which will
allow blocking) or OFF (which will
allow viewing), of these rated pro
grams.
<5> The ratings of TV-Y7, TV-PG,
TV-14, TV-MA can be customized
to block V (violence), FV (fantasy
violence), S (sexual situations), L
(coarse language), or D (suggestive
dialt^ue).
Use the CURSOR RIGHT ^ or
CURSOR LEFT buttons on
the remote to turn the rating option
ON or OFF.
1 BLOCK
CHANGE CODE
r
► 1 ^
►
TV-Y
ITV-Y7
^TVG
TV-PG
—
TV-Y7
TVG
Itv-pg
y(TV-14
f TV-MA
CHANNELS BLOCKED ►
MOVIE RATINGS ►
IPARBMTALGUIDEUNE ►!
TV-Y7
TV-G
ITV-PG
TV-14
TV-MA
TV RATING SUB MENUS:
OFF
OFF
►
►
OFF
►
►
► 1
onI
ON
ON
ON
ONl
ON
ON
TV-Y - (All children - This program is designed to be appropriate for all children.)
De$igned for a very young audience, including children ages 2-6. This type of progrsmming is not expected lo fri^ten younger children.
TV-Y7 ' (Directed lo Older Children - This program is designed for children age 7
and eüxrve.) It may be more appropriate for children who have acquired the develop
ment sldlls needed to distinguish between make-believe and reality. This program
ming may include mild fantasy and ccanic violence (FV).
TV-G - (General Audience - Most parents would find this program suitable for ail
ages.) This type of pre^ramming contains little or no violence, no strong iangiiag^
and little or no sexual dialogue or situatimis,
TV-PG - (Parental Guidance Suggested — This program contains materia! that pœr^
ents may find unsuitable for younger children.)Ttus type of programming contains one
or more of the following; some suggestive dialogue (D), inftequent coarse language
(L), some sexual situations (S), or moderate violence (V).
TV-14 - (Parents Strongly Cautioned — Tfas program contains some material that
many pareras would find unsuitable for children under 14 years of age?) Tliis type of
programming contains one or more of the following; intensely suggestive dialogue
(D), strong coarse Uutguage (L), intense sexual situations (S), or intense violence (V).
TV-MA - (Mature Audience Only - This program is ^>ecificaïiy designed to be
viewed by adults and therefore may be unsuitable for children under 17.) ITiis type of
programming contains otc or more of the following: crude indecent language (L),
explicit sexual situations (S), or graphic violence (V).
20
TVG
TVGG
ItV-14
/ TV-MA
OFF
►
► 1
►
►
►
14
D
IL
S
V
MA ON
L ON
Is
V
ON
ON
DNl
ON
ON
onI
ON
Page 21
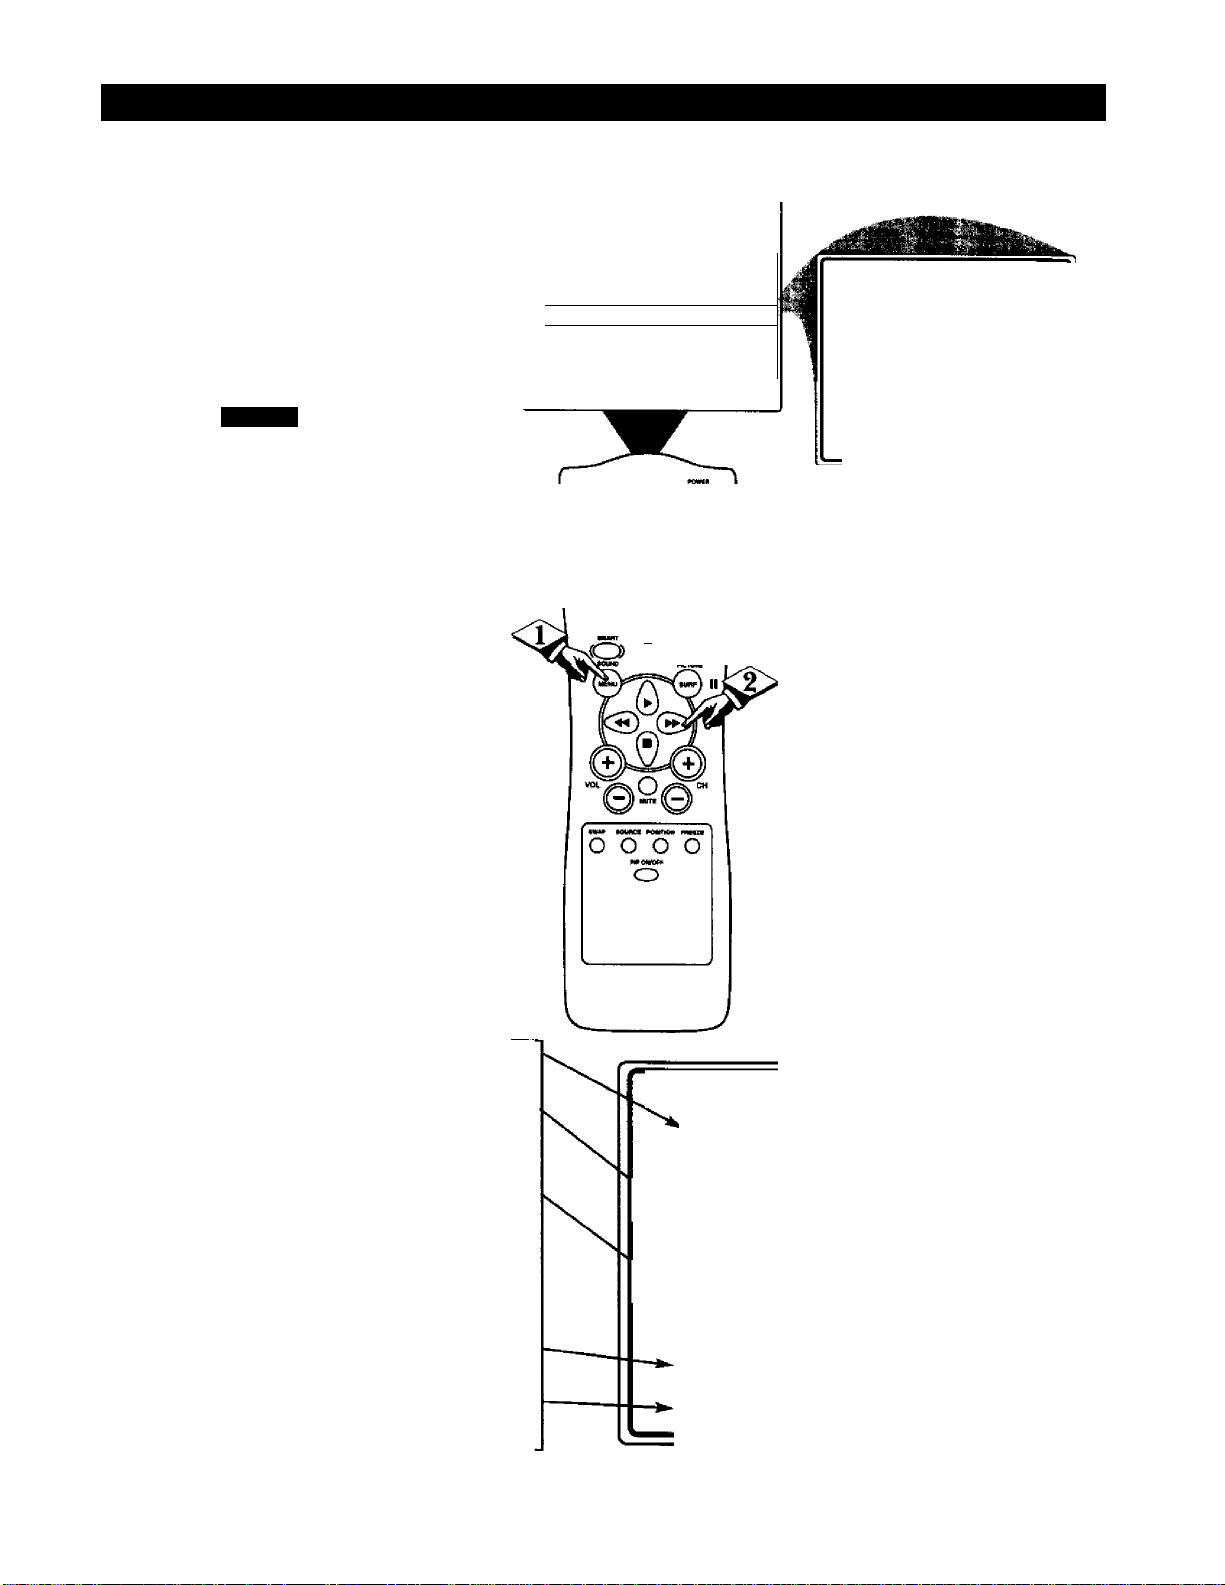
Understanding the SmartLock™ Control (Rkvikw Scrken )
\Jow that you’ve learn how to
1 V block channels or censor your
viewing using the Movie Ratings or
Parental (TV) Guidelines let's
review what you’ve done. The
SmartLock Review feature allows
you to see what has been blocked.
Whenever the Menu button is
pressed the onscreen menu will be
displayed with the SmartLock
Review highlighted.
Press the MENU button on the
<i>
remote to show the onscreen menu.
SmartLock REVIEW will be high
lighted,
<|> Press the CURSOR RIGHT
►► button and the SmartLock
Review Menu will appear.
This menu will display viJiat chan
nels have been blocked; what
Movie Ratings have been blocked;
what Parental (TV Ratings)
Guideline have been blocked. This
review screen will also display that
status of Unrated and No Rating
settings. If the Master Disable fea
ture has been turned ON, the
SmartLock Review screen will dis
play “SmartLock DISABLED.”
pp
SETUP
I SmartLock REVEW
BRIGHTINESS Wm-
ODUDR
o 0
MM nVUMM« QC MCK
C£> O O O
' ““
’ © (D C|)
* © ® ®
@ ® ®
_ taMt
® <o
30
•• 30
►
►
►1 J
CHANNELS BLOCKED
MOVE RATINGS
PARENTAL GUIDELINE
BLOCK UNRATED OFF
BLOCK NO RATING OFF
SmartLock DISABLED
SmartLock DISABLED will appear in the
SmartLock Review screen if the SmartLock
Disable feature is set to ON.
li
channels blocked • Shows all blocked channels that where set with
in the CHANNELS BLOCKED feature. Up to 5 channels may be blocked at
one time.
MOVIE RATINGS - Shows all blocked Movie Ratings that were set within
the MOVIE RATINGS feature. All or some may be blocked at one time.
Note; If a lower rating is blocked; this will automatically cause the higher
ratings to be blocked also. (i.e.. if R is set to be blocked, X will automatically
be blocked also.)
PARENTAL GUIDELINE - Shows alt blocked TV Ratings that were set
within the PARENTAL GUIDELINES feature. All or some may be blocked
at one time. Note; If a lower rating is blocked; this will automatically cause
the higher ratings to be blocked also. (i.e., if TV-14 is set to be blocked, TVMA will automatically be blocked.) Parental Guidelines also have sub ratings
for Violence (V), Fantasy Violence (FV), Sexual Situations (S), Coarse
Language <L), and Suggestive Language (D). If the main rating is turned off
but the sub rating is turned ON, the program will be blocked but the rating
will not appear within the SmartLock Review menu.
BLOCK UNRATED - Shows ON or OFF depending on the status of the
BLOCK UNRATED feature. Based on the Movie Ratings or Parental (TV)
Guidelines.
BLOCK NO RATING - Shows ON or OFF depending on the status of the
BLOCK NO RATING feature. Based on programming with NO content
advisory data.
CHANNELS BLOCKED
5 10 12 32'45
N^MOVIE RATINGS
-------R X
^PARENTAL GUIDELINE
-------14 MA
BLOCK UNRATED ON
BLOCK NO RATING ON
21
Page 22
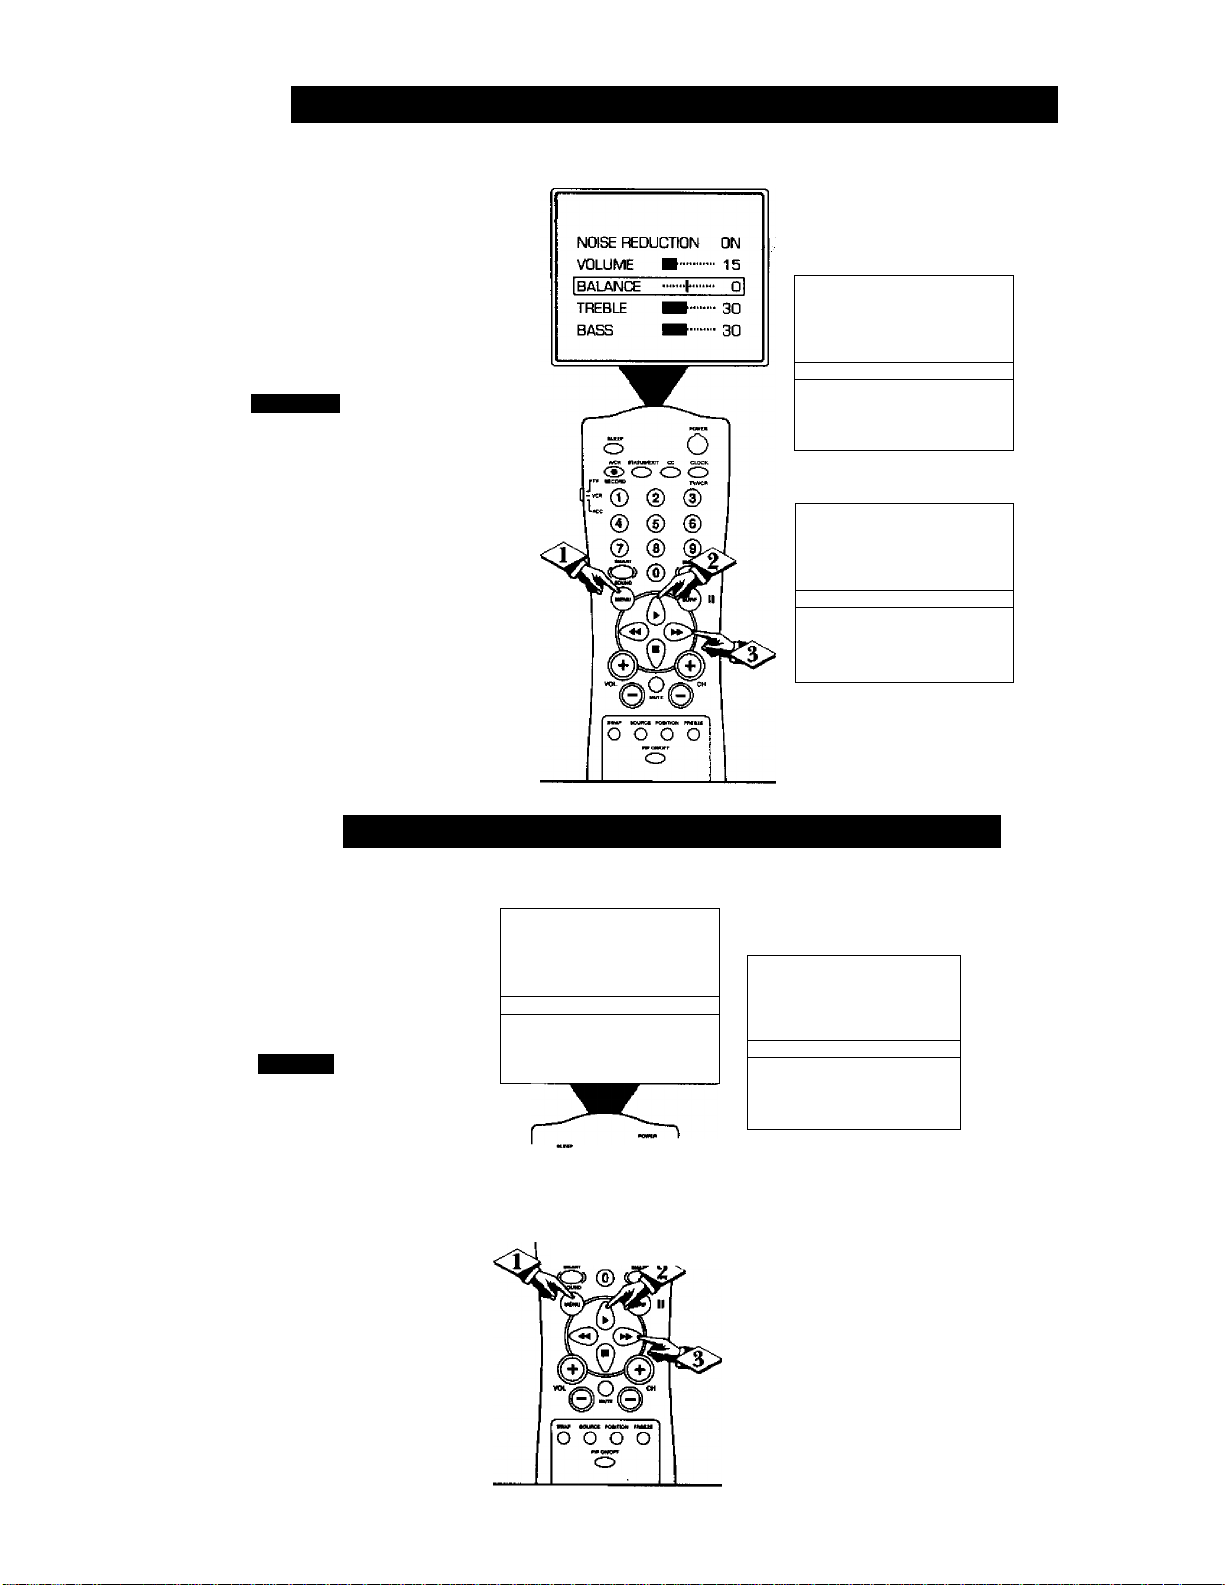
H’'))
Using the Treble, Bass and Balance Controls
jyesides the normal volume level
control, your TV also has
BALANCE. BASS and TREBLE
controls for sound adjustments. The
BALANCE control allows the listen
er to adjust the sound being heard
between the right and left TV speak
ers. The controls work just like the
BASS, TREBLE and BALANCE
controls on any hi-fi stereo audio
system.
CTTTTTi.
Press the MENU button on the
<l>
remote to show the onscreen menu.
I"
<l>
select and highlight the name of the
control you wish to change (BAL
ANCE, BASS or TREBLE).
<|> Use the CURSOITLEFT
or RIGHT buttons to adjust
the levels of each highlighted con
trol.
Press the CURSOR UP ^ or
CURSOR DOWN ■ buttons to
VOLUME
BALANCE
ITREBLE
BASS
INCREDIBLE SURR QN
.....1
H
.......
..
....
■ 15
• 0
■■ 3Q|
3D
OR
BALANCE
TREBLE
IBASS ■■ 301
INCREDIBLE SURR
SOUND
.....f....
• Q
■ 30
ON
STEREO
N"')) I
Using the Incrediiìle Sljrroi nd Featlre
^ ’ he Incredible Surround feature
X adds greater depth and dimen
sion to both monaural (MONO)
and stereo TV sound. With the con
trol turned ON the TV's speakers
can add even wider sound separa
tion to normal broadcasts.
'vjpi' Press the MENU button on the
remote to display the onscreen
menu.
<|> Press the CURSOR UP ► or
CURSOR DOWN ■ button until
the words INCREDIBLE SURR
are highlighted.
<3> Press the CURSOR RIGHT
^ or the CURSOR LEFT
buttons to turn the Incredible
Surround control ON or OFF.
TREBLE
BASS
1 INCREDIBLE SURR
SOUND
SAP
O Ö o
ij;® (D CD
® ® ®
@ ® ®.
■ 30
■ 30
OFFI
STEREO
OFF
o O
r
TREBLE • 30
BASS
IINCREDIBLE SURR ■“ONl
SOUND
SAP OFF
™
........
• 30
STEREO
“■yi
Remember: g
The onscreen
menu will time out
and disappear from
the screen when
you finish, or you
can press the STATUS/EXIT button
to clear the menu
from the screen.
22
Page 23
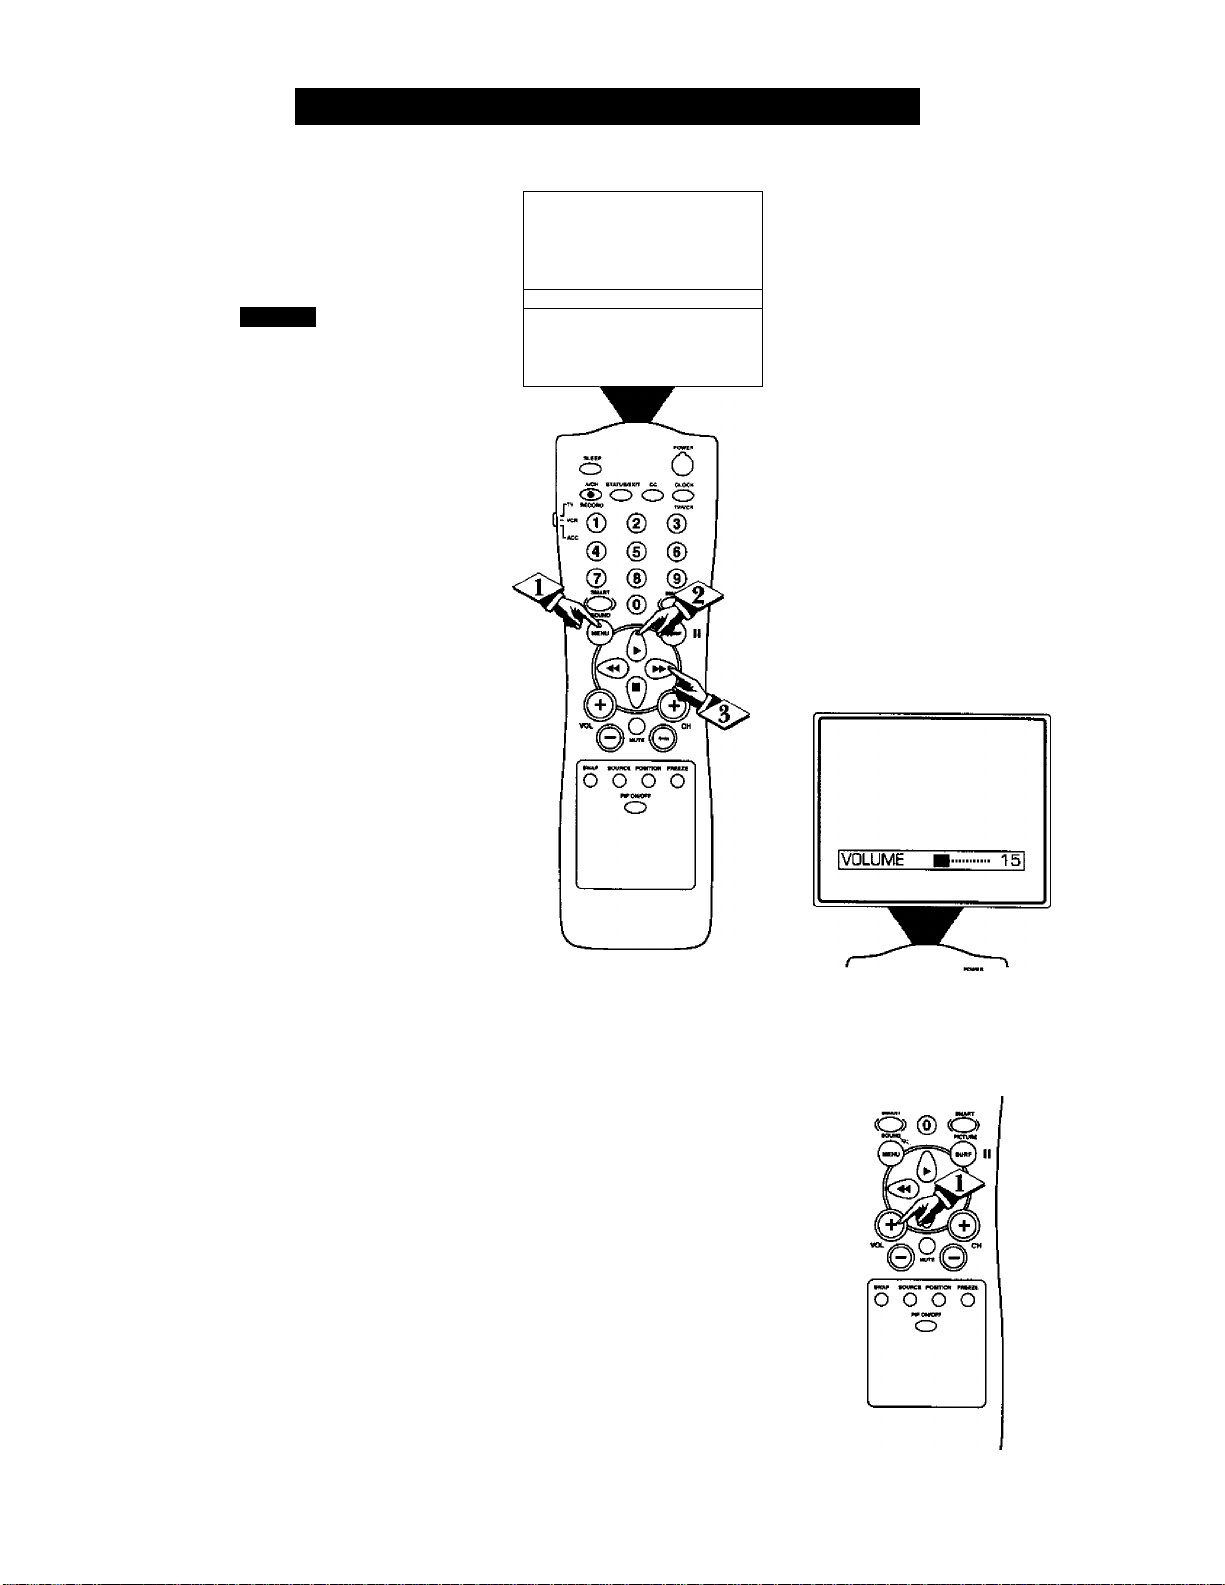
UsiN(; THE TV VoLEME Bar Control
T
Jse the Volume Bar control to see
the TV's volume level settings
on the TV screen. The Volume Bar
will be seen each time the VOLUME
buttons (on the TV or remote) are
pressed.
Press the MENU button to dis
play the onscreen menu.
CONTRAST PLUS
NOISE REDUCTION
[VOLUME
BALANCE
TREBLE
■
......t..... ■ D
■
.........
.........
o
ON
ON
■ 15!
3Q
<l>
Press the CURSOR UP ^ or
CURSOR DOWN ■ buttons until
the word VOLUME is highlighted.
<J> Press the CURSOR RIGHT
►► button to increase the TV’s vol
ume or the CURSOR LEFT
button to decrease the sound.
OR
o O
ACM MTtHUHin oe clou
® o o o
r
0 ® ®
L»«
__
® ® ®
® ® ®
Note: Pressing the VOL
(+) or (-) buttons will
also allow you to adjust
the sound level of the
TV. A Volume Bar
adjustment will appear
onscreen. Press the (+)
to increase the volume
and the (-) button to
decrease the volume.
23
Page 24
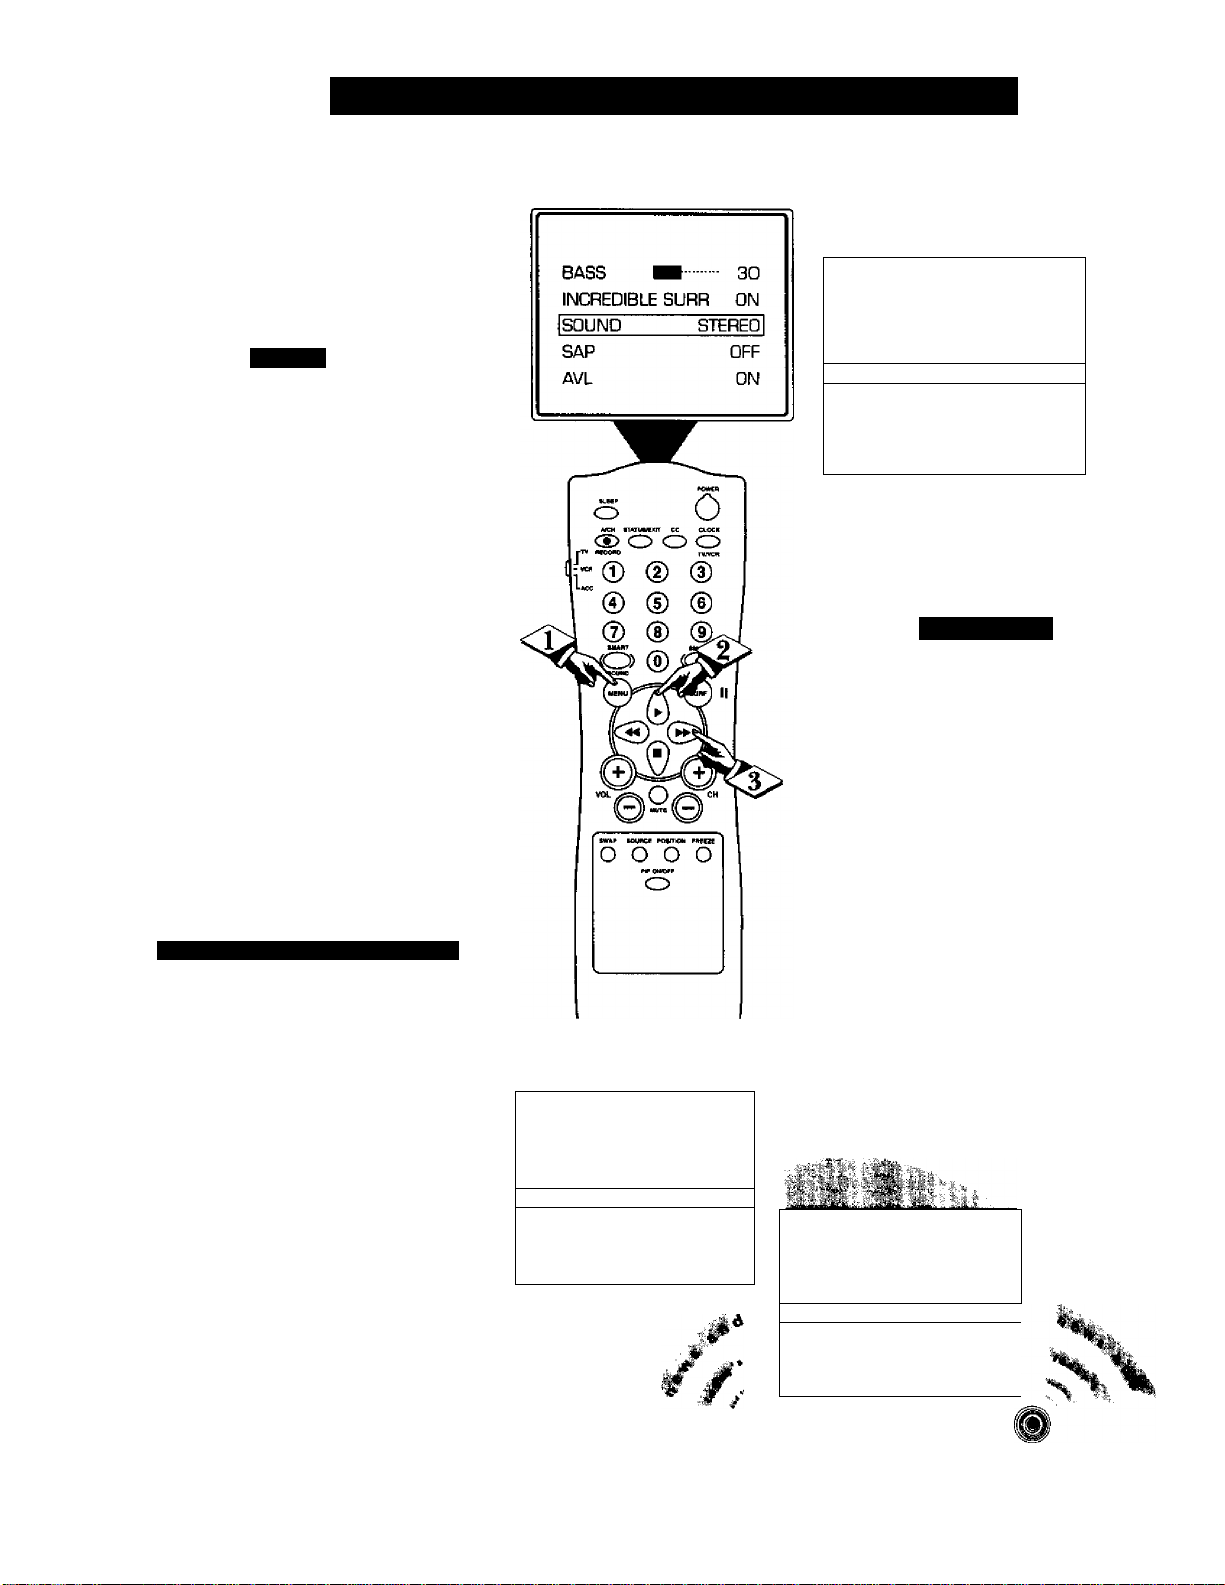
И"») I
our TV can detect a stereo sig
nal and will set itself automat
F
ically so the stereo sound can be
heard. However, there may he
occasions when you might want to
set the TV to mono. The following
steps describe how to change the
SOUND control:
<f>
<l>
<S>
Press the MENU button on
ii
the remote to show the onscreen
m
menu.
Press the CURSOR UP ^ or
CURSOR DOWN ■ button until
the word SOUND is highlighted.
Press the CURSOR RIGHT
or CURSOR LEFT
buttons to choose between
STEREO or MON».
How то Set the TV for Stereo Pro(;rams
BASS H......................
INCREDIBLE SURR ON
1 SOUND
SAP OFF
AVL ON
Smari Hl l i'
30
MONOI
With STEREO selected, the tele
vision will reproduce any stereo
broadcast signal it receives. Please
note that you can force a stereo
broadcast signal to MONO, but
you cannot force a mono broad
cast signal to stereo.
,Si roM) At i)io I'kih.uam i.S M’)
SAP is an additional part of the
stereo broadcast system. Sent as a
third audio channel SAP can be
heard apart from the current TV
program sound. TV stations are
free to use SAP for any number
of purposes, but many experts
believe it will be used for foreign
language translations of TV
shows (or for weather and news
bulletins.)
If a SAP signal is not present
with a selected program, the SAP
option cannot be selected. Also, if
SAP is selected on a channel
(with SAP) and you select anoth
er channel, when you return to
the original channel SAP will be
OFF (and you will have to rese
lect the SAP feature.) .
INCREDIBLE SURR ON
SOUND STEREO
|S№
AVL
INPUT
OFFi
ON
►
Remember: If stereo is
not present on a selected
show, the TV cannot be placed in
the STEREO mode. The sound
coming from the set will remain
monaural (mono).
INCREDIBLE SURR ON
SOUND STEREO
[sap 5n1
AVL ON
INPUT
►
24
Page 25
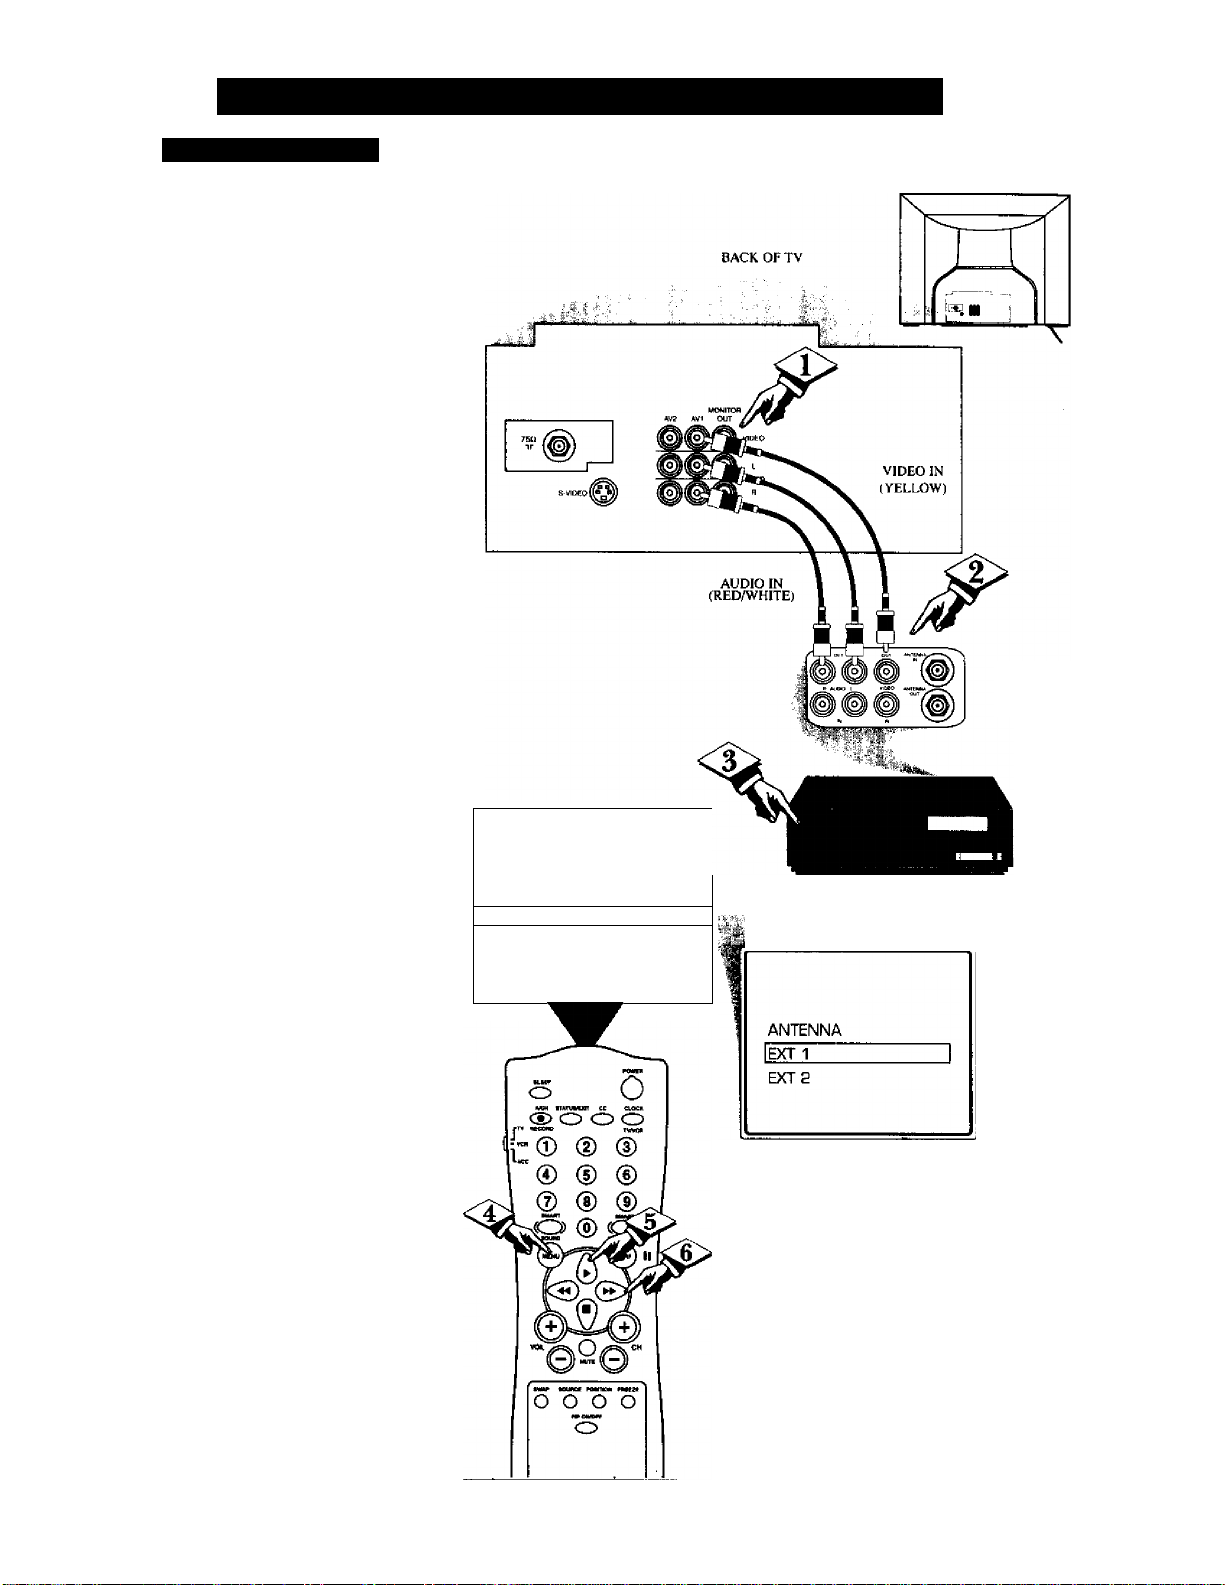
How TO Use the Input Control (A/V Inputs)
Al l)lo/\ IDLO IM‘1 I S
The TV’s AudiolVideo Input jacks
are for direct picture and sound
connections between the TV and
a VCR (or similar device) that
has AudiolVideo Output jacks.
IfiESaUU
<i>
Connect the VIDEO (yellow)
CABLE to the VIDEO AVI jack
on the back of the TV. Then con
nect the AUDIO (red and white)
CABLES to the AUDIO (left and
right) AVI jacks on the rear of
the TV.
Connect the VIDEO (yellow)
CABLE to the VIDEO OUT jack
on the back of the VCR. Then
connect the AUDIO (remand
white) CABLES to the AUDIO
(left and right) OUT jacks on the
rear of the VCR.
IH"i)
BACK OF VCR
<j> 'Dim the VCR and the TV
I ON.
Press the MENU button on
the remote to display the
onscreen menu.
<§> Press the CURSOR UP A or
CURSOR DOWN ■ buttons
until the word INPUT is high
lighted.
<l>
Press the CURSOR RIGHT
or CURSOR LEFT ^
button to display the INPUT
menu (ANTENNA, EXT 1, EXT
2). Use the CURSOR UP
A or
DOWN ■ buttons to select. If
using the AudioA'ideo AVI jacks,
select EXT 1. If using the
AudioA^ideo AV2 Jacks, select
EXT 2.
Now your ready to place a prere
corded video tape in the VCR and
press the PLAY ^ button.
SAP
AVL
1 INPUT
SLEEPTIMER OFF
SmartLock
ON
ON
► 1 ■
►
VCR
(EQUIPPED WITH
VIDEO AND AUDIO
25
Page 26
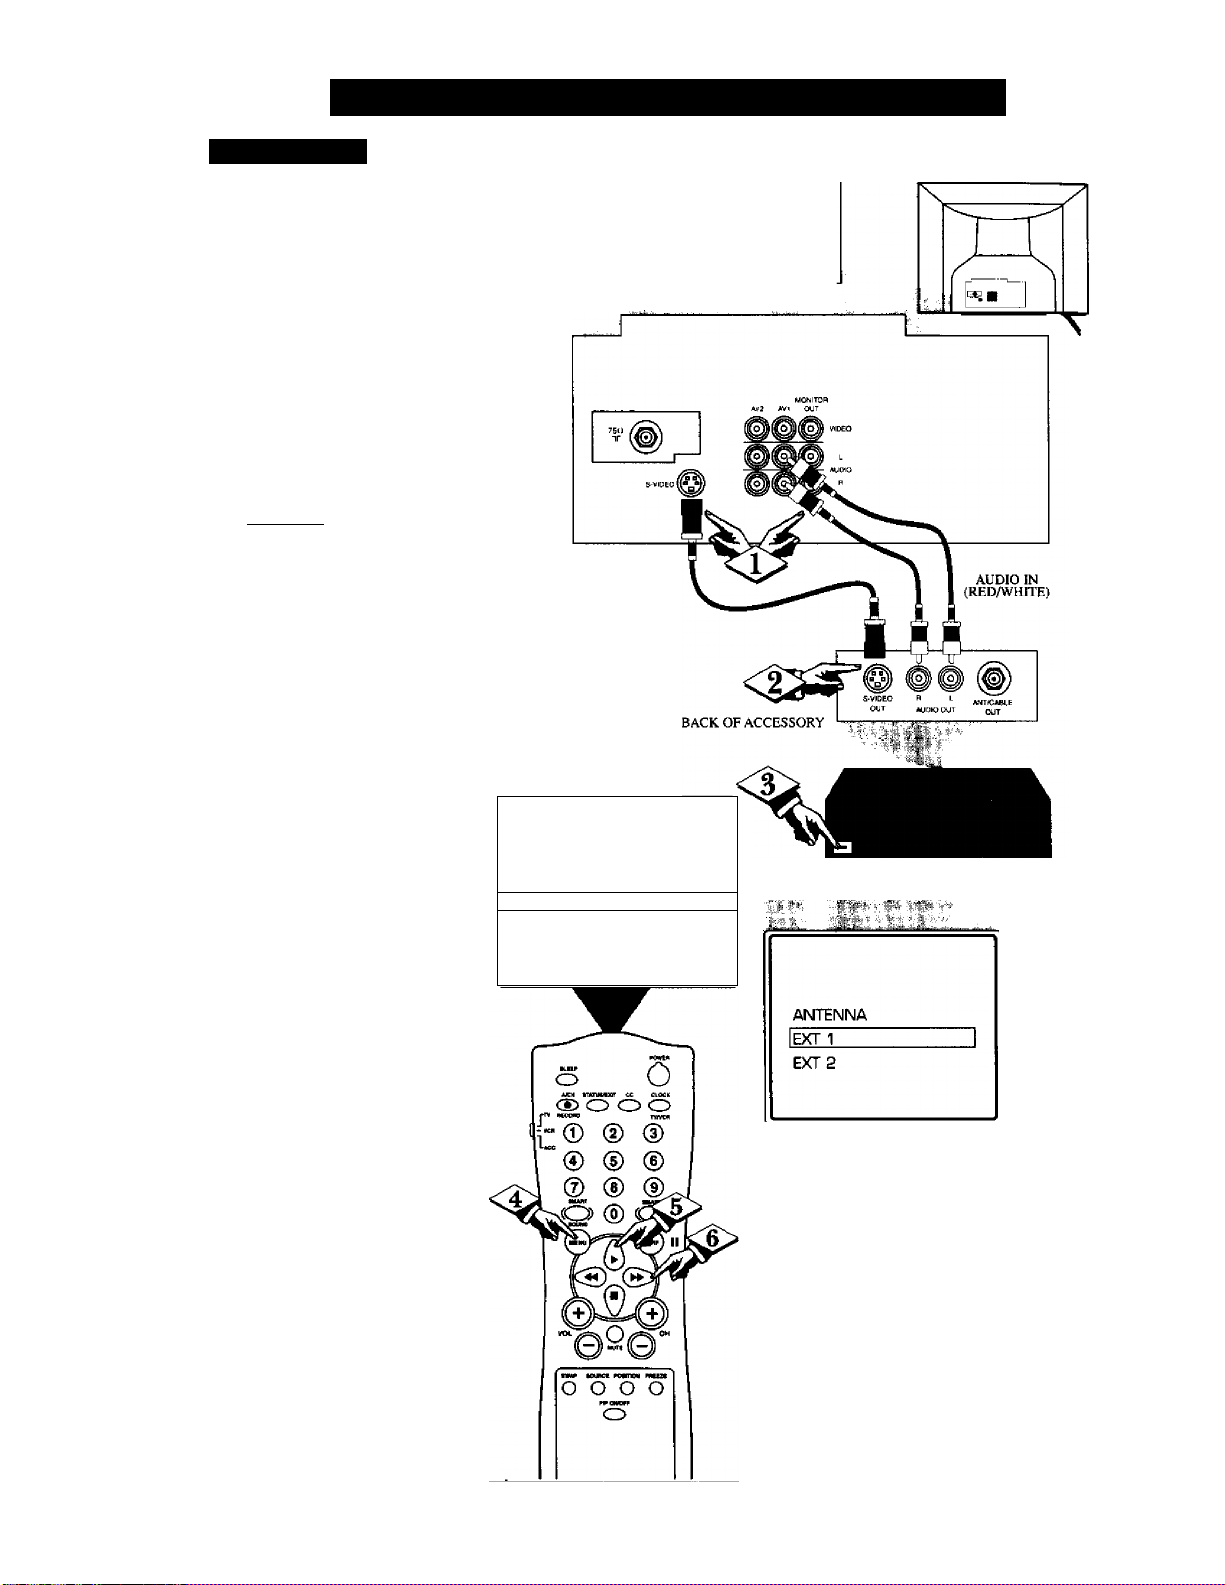
□ I
How TO Use the Audio/Video Inpet Jacks
S-Vii)i:o Im'i i
The S(uper)-Video connection on
the rear of the television can give
you better picture detail and clar
ity, for the playback ofS-VHS
VCR tapes, or Digital Video Discs
than the normal antenna picture
connections.
Note: The accessory device being
used must have a S-Video Output
to complete this connection. The
following steps show the connec
tions to the S-VIDEO and
AUDIO IN I input jacks.
CBEGINJ
<,^1^ Connect the S-VIDEO
CABLE to the S-VIDEO input
jack on the rear of the television,
then the AUDIO (red and white)
to the AUDIO AVI (l^t and right)
jacks on the rear of the TV.
<|> Connect the S-VIDEO
CABLE to the S-VIDEO output
jack on the accessory device.
Then connect the red and white
AUDIO CABLES to the AUDIO
(left and right) output jacks on the
rear of the accessory device.
Tlirn the VCR (or Digital
I Video Disc Player) ON.
<s>
Press the MENU button on
the remote to display the onscreen
menu.
NOTE: If there is an accessoty device plugged into
the S-VIDEO jack and one plugged into the VIDEO
IN-1 Jack, the video signal coming from the S-VIDEO
plug will be dominate when tuned to EXT 1 within
the INPUT control.
S-VIDEO CABLE
(NOT SUPPLIED)
SAP
AVL
1 INPUT
SLEEPTIMER OFF
SmartLock
ON
ON
►1
►
BACK OF TV
DBS, DVD, Video Game, etc.
(EQUIPPED WITH S-VIDEO AND
AUDIO OUTPUT JACKS)
<|> Press the CURSOR UP A or
CURSOR DOWN ■ buttons
until the word INPUT is highlight
ed,
<|> Press the CURSOR RIGHT
^ or CURSOR LEFT
button to display the INPUT menu
(ANTENNA, EXT 1, EXT 2). Use
the CURSOR UP ▲ or DOWN ■
buttons to select EXT 1.
Now your ready to use the accesso
ry device with the S-Video outputs.
26
Page 27
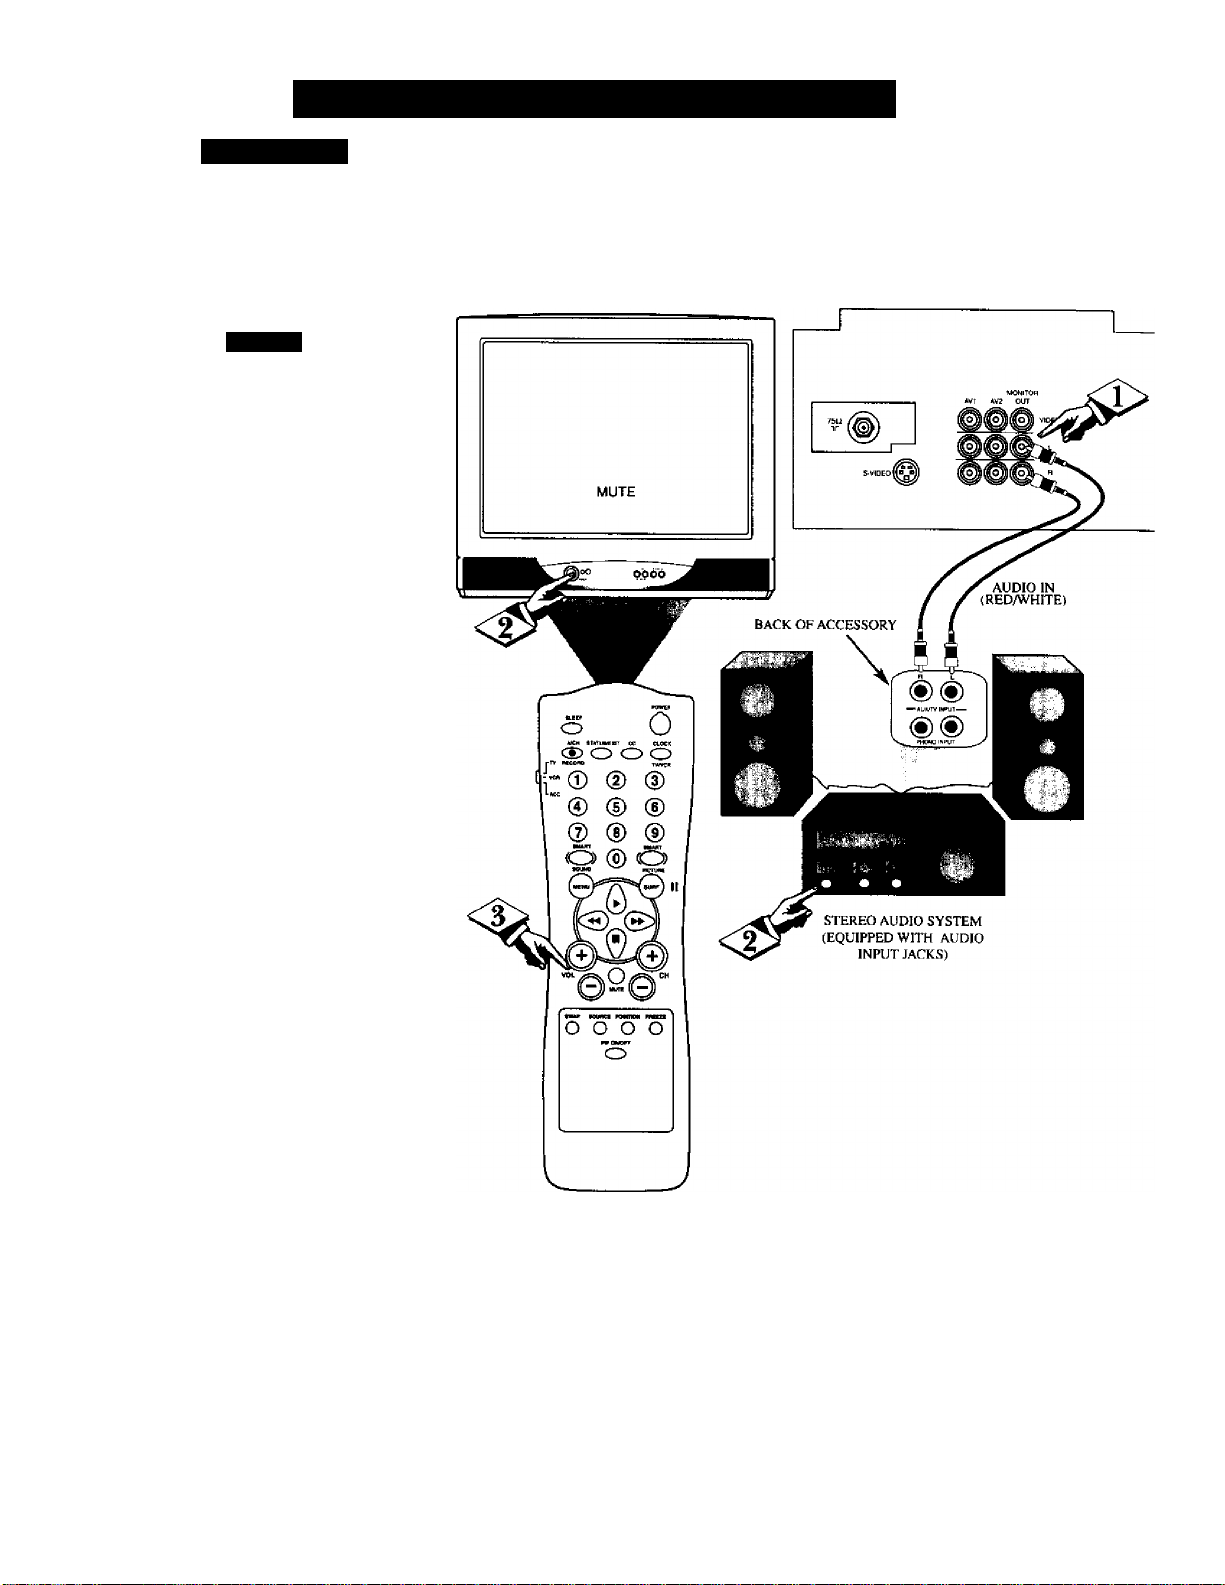
Using i m: Audk)/Vidp:o Ouput Jacks
A/V ()i Tin I S
ould you like to hear TV
programs through your
W
audio hi-fi system? The TV's
Audio output jacks can he used
to perform this TV sound option.
Connect the R(ight) and
L(eft) AUDIO MONITOR
OUT jacks on the TV to the R
and L Audio Input jacks on you
amplifier or sound system. Set
the audios system’s volume to a
normal listening level.
Tlirn the TV and the audio
system ON.
You can now adjust the sound
level coming from the audio sys
tem with the VOLUME (+) or {-)
buttons on the remote.
IK'«)
BACK OF TV
Note; The Video and Audio MONI
TOR OUT Jacks can be used as a
direct connection to a VCR for the
recording of programs to video
tapes.
27
Page 28
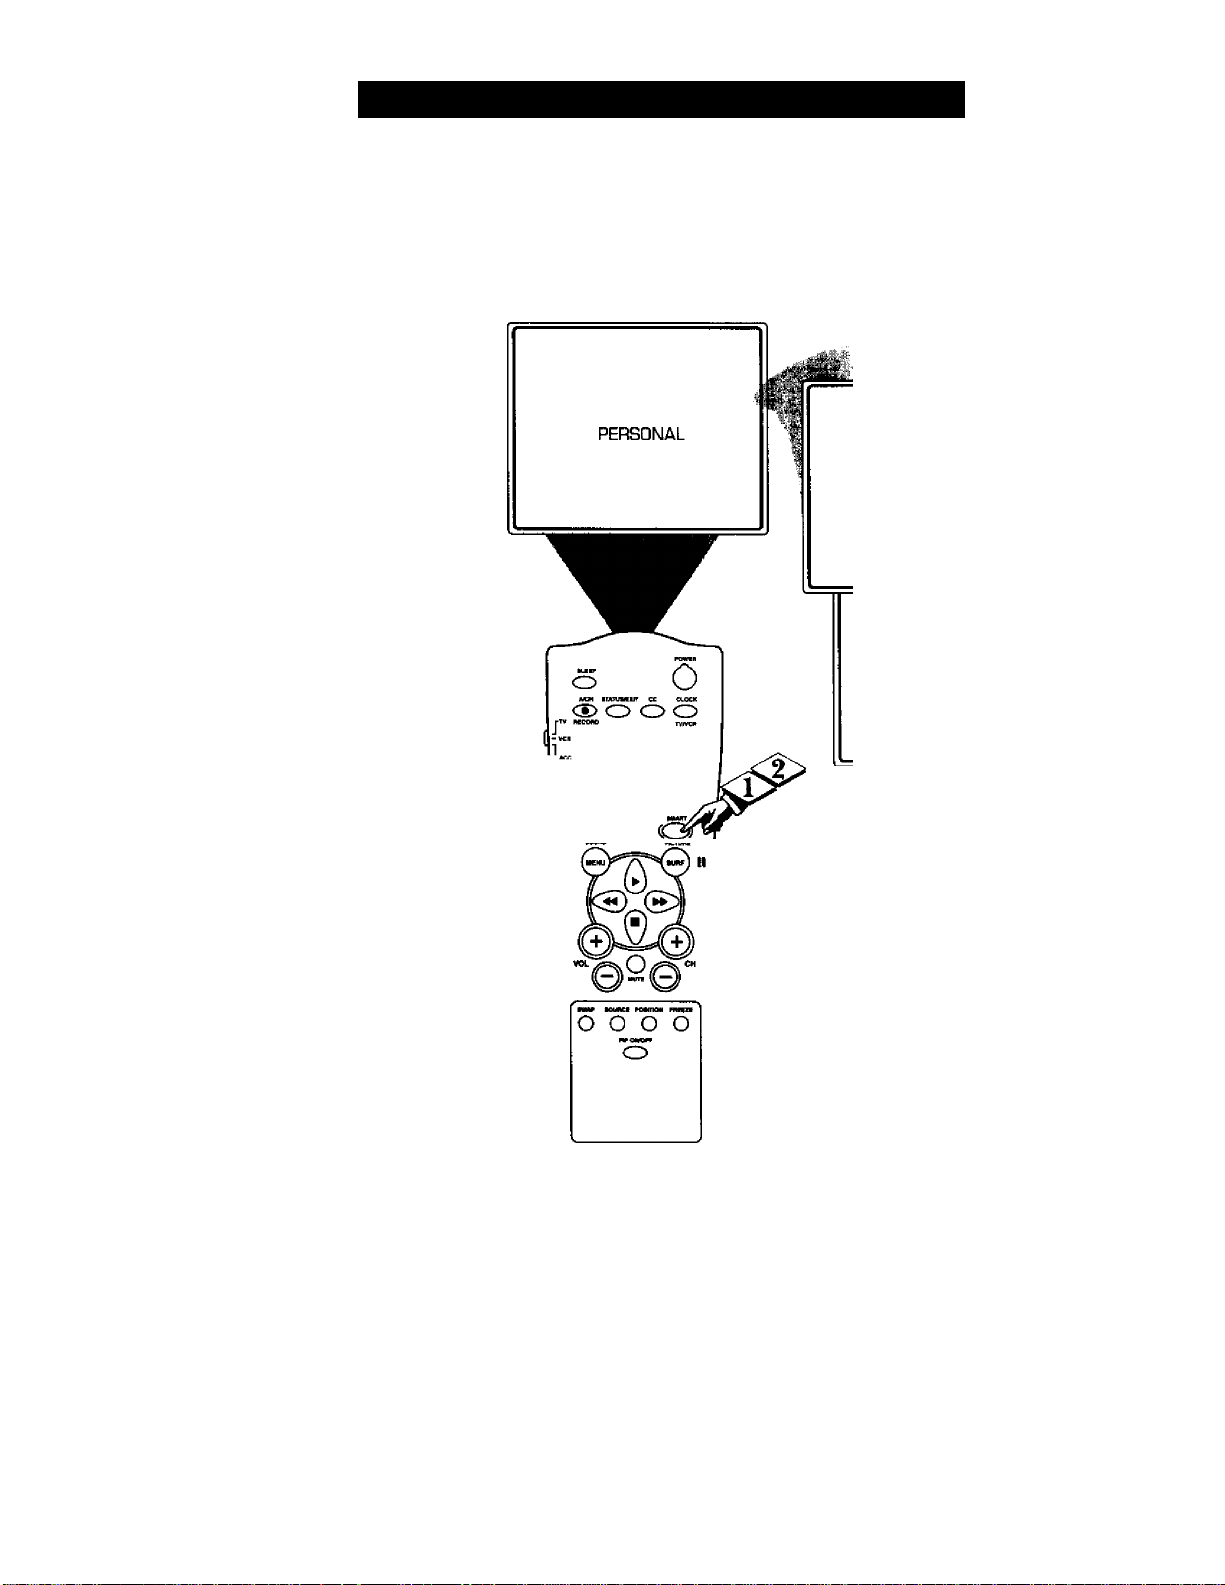
'JT^etker you’re watching a
f V movie or a video game, your
TV has automatic video control set
tings matched for your current pro
gram source or content. The
SmartPicture feature quickly resets
your TV’s video controls for a num
ber of different types of programs
and viewing conditions you may
have in your home. Each
SmartPicture setting is preset at the
factory to automatically adjust the
TV’s Brightness, Color, Picture,
Sharpness, Tint, and Color
Temperature levels.
cjbesuu
Press the SMART PICTURE
<l>
button on the remote control. The
current SmartPicture setting will
appear in the middle of fce screen.
Usinì; the SmartPictlre^^ Control
MOVES
<l> Press the SmartPicture button
repeatedly to select either PER
SONAL, MOVIES, SPORTS, or
WEAK SIGNAL picture settings.
Note: The PERSONAL setting is
the setting that you setup using the
PICTURE options within the
onscreen menu. This is the only
SmartPicture control setting that
can be changed. All other settings
are setup at the factory during the
time of production. If settings are
changed while using the Movie,
Sports, or Weak Signal selections,
the changes you make will become
the “new” Personal settings. The
Movie, Sports, and Weak Signal
settings cannot be changed.
© ® ®
® ® ®
@ ® ®
MHFT
__
<D> ®
SPORTS
WEAK SIGNAL
28
Page 29
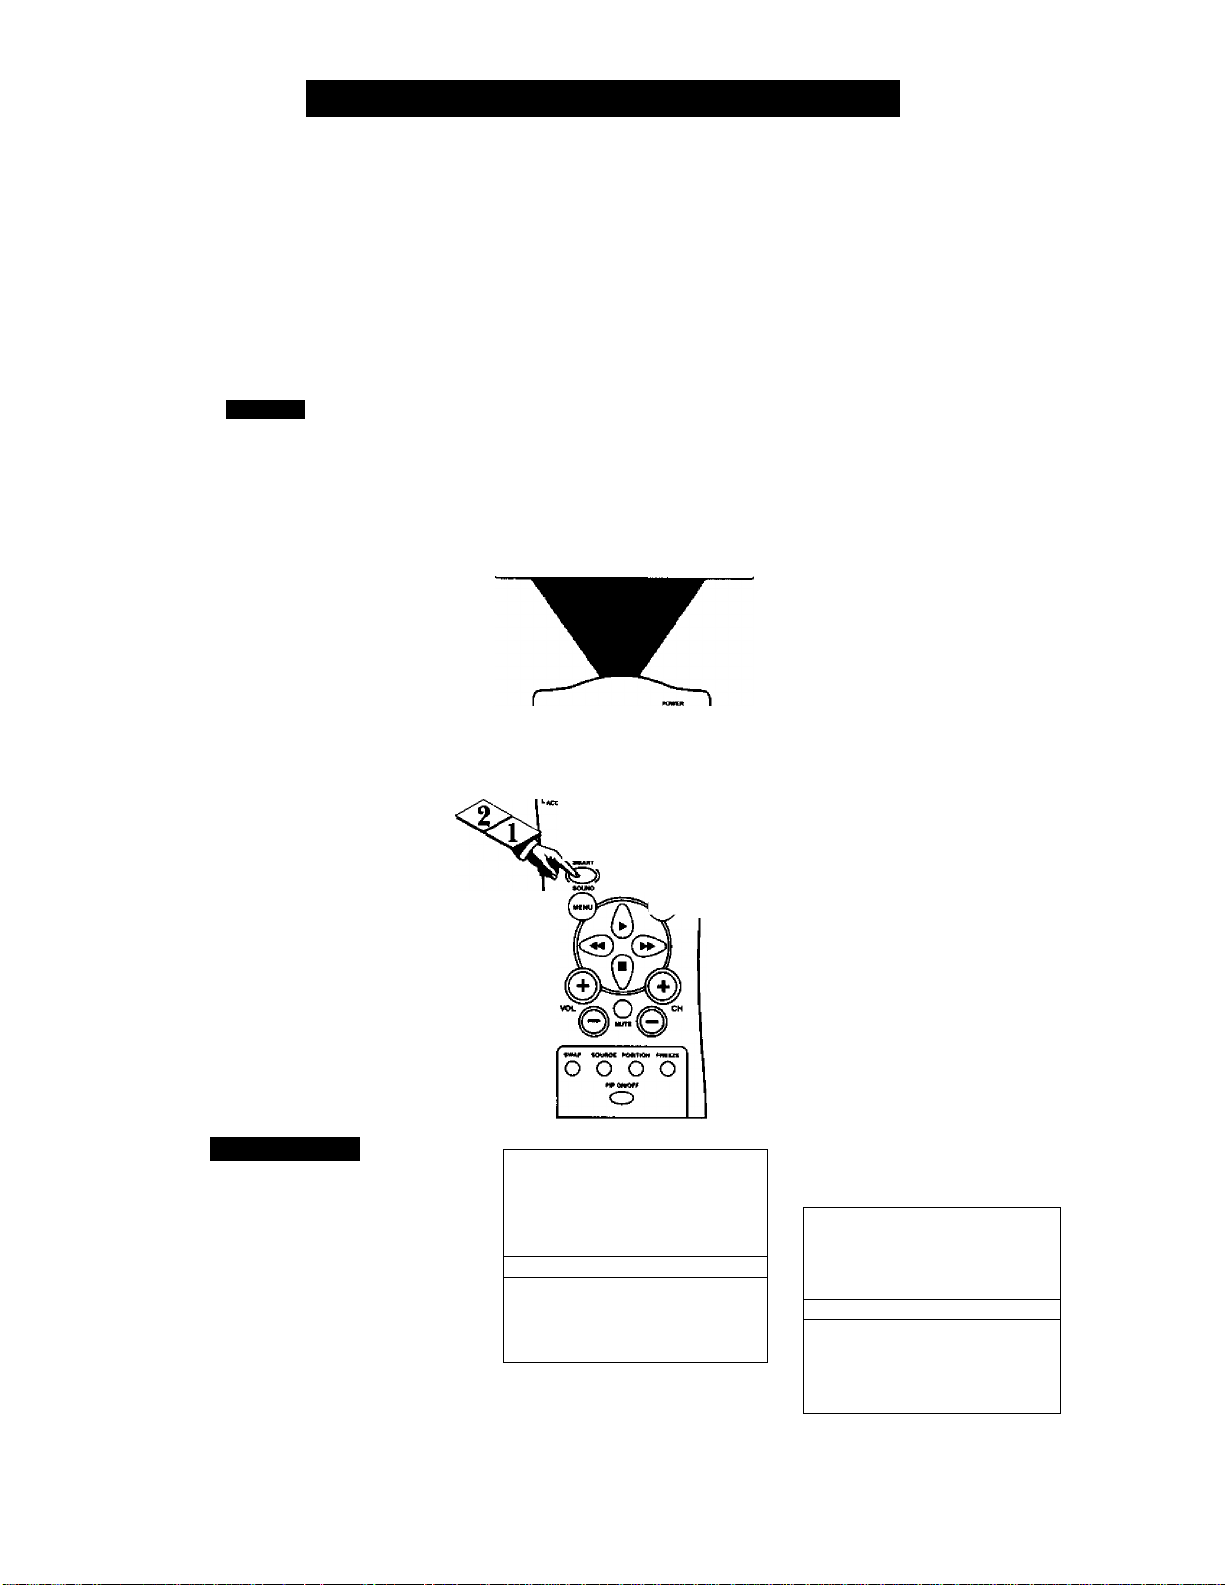
UsiN(; THK SmartSoum)™ Control
’he SmartSound feature allows
the listener to select between
T
four different factory set sound
options. Personal (which can he set
by the user). Theater (for movie
viewing), Music (for musical type
programming) and Voice (when the
program is mainly dialogue). To
select any of the options follow the
directions below.
fTT^mTi
<1> Press the SMART SOUND but
ton on the remote control. The cur
rent SmartSound setting will appear
in the middle of the screen.
<|> Press the SMART SOUND
button repeatedly to toggle
between the four settings.
Remember, only the PERSONAL
control can be changed by the view
er. This changes the settings in the
main onscreen menu’s sound con
trols. All other settings are setup at
the factory during the time of pro
duction. If settings are changed
while using the Theater, Music or
Voice selections, the changes you
make will become the “new”
Personal settings. The Theater,
Music and Voice settings cannot be
changed.
PERSONAL
ILHP
o CJ
MM tmuHin ec clock
C£) O O O
■wow -nwcn
' ® ® ®
® ® ®
@ ® ®
■w
-------
® o
MCTWt
'pfllQI
Remember, g
SmartSound works
only with the programs
coming through the 75 il
input jack on the rear of the
TV (RF audio). It will not
control the sound levels for
the External connections.
THEATER
MUSIC
VOICE
II
A\ 1. Com KOI
In most cases the volume levels com
ing from broadcast programming or
commercials are never the same.
With the AVL control turned ON,
you can have the TV level out the
sound being heard. This makes for a
more consistent sound by reducing
the peaks and valleys that occur dur
ing program changes or commercial
breaks.
SOUND
SAP
INPUT EXT 1
SLEEPTIMER OFF
29
STEREO
ON
• OFFI
NOTE: When the VOICE mode of
SmartSound is selected the AVL fea
ture will be automatically turned ON.
SOUND
SAP
[AVL ONÌ
INPUT
SLEEPTIMER OFF
STEREO
ON
EXT 1
Page 30
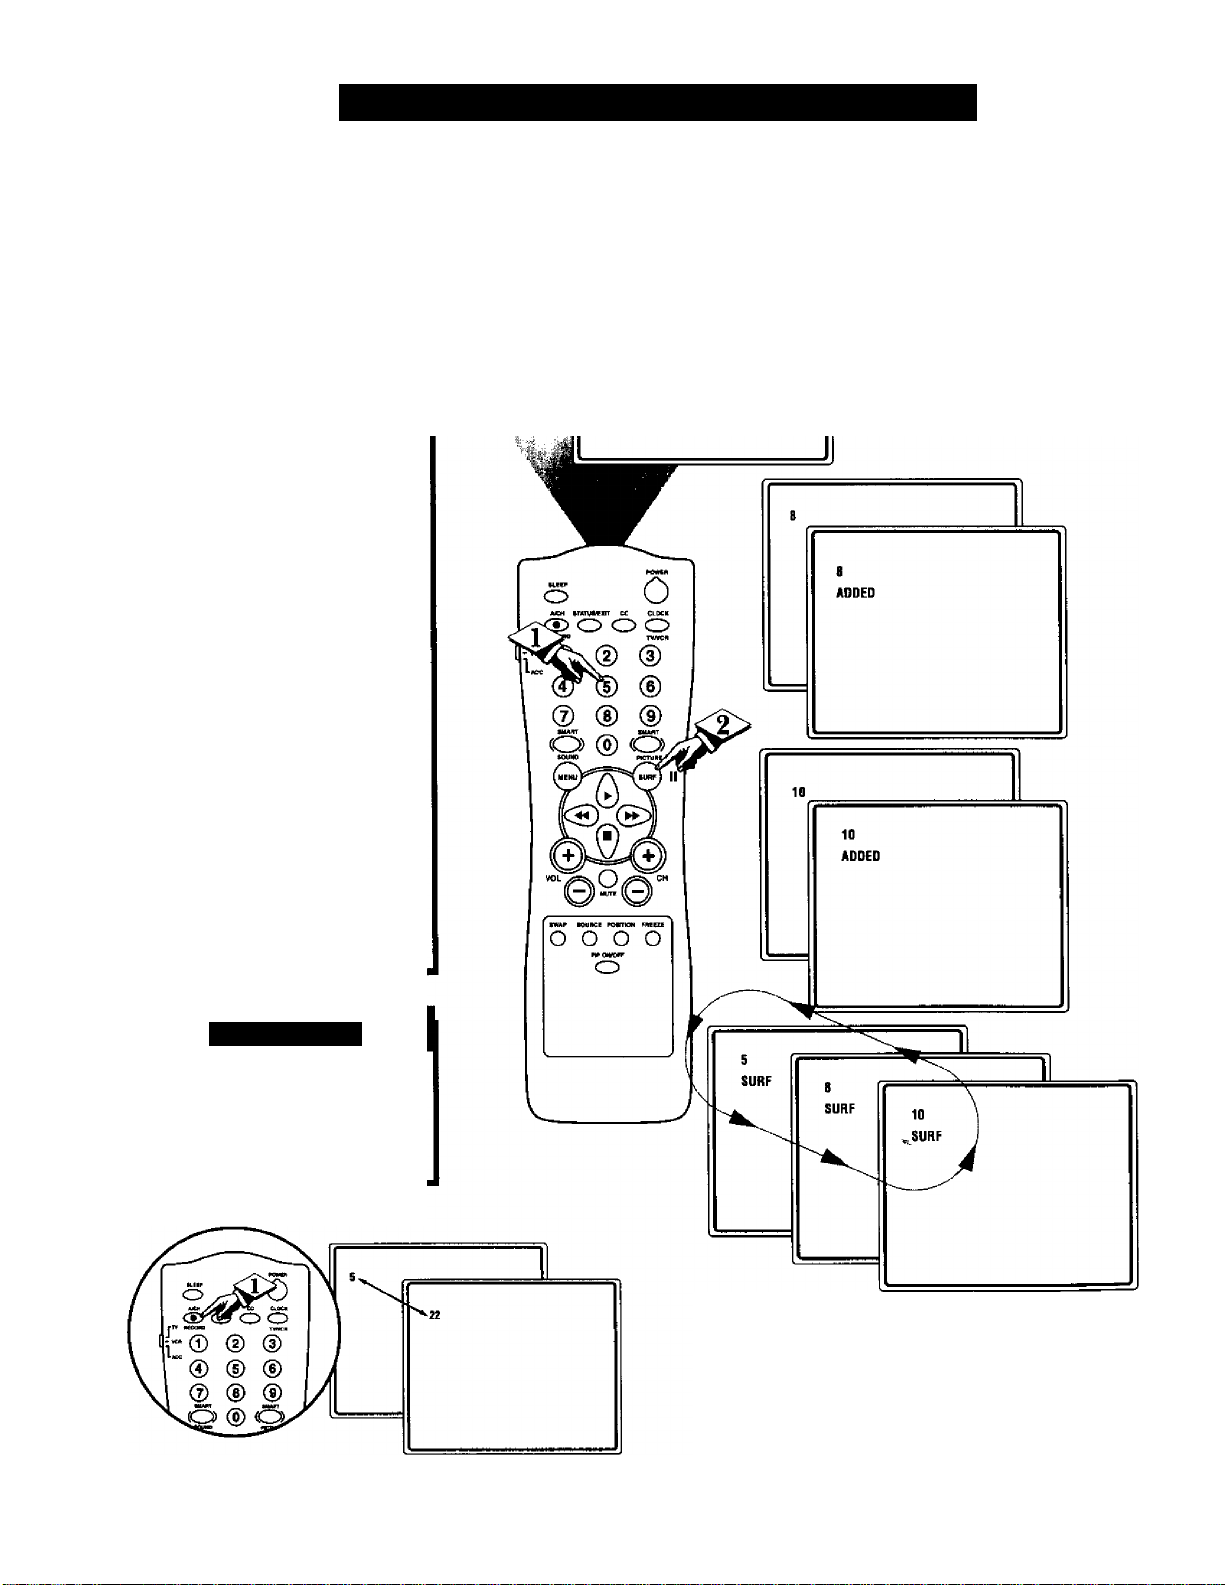
"list” or series of previously
viewed channels can he select
A
ed with the SURF button on your
remote control. With this feature
you can easily switch hetw’een dif
ferent TV programs that currently
interest you. The SmartSurf control
allows you set up to eight channels
in its quick viewing "list”.
tBEQINj
<i> Press the CHANNEL {+) or (-)
buttons (or the NUMBER buttons)
to select a channel to add to the
SURF list.
Using thk TV’s SmartSuri™ Control
5
ADDED
Ф
Press the SURF button on the
remote while the channel number is
still displayed to ADD the channel to
the SURF list.
Repeat steps 1 through 2 to add
additional channels (up to 8) to the
SURF list.
To remove a channel for the SURF
list, simply choose the channel with
the numbered buttons and press the
SURF button while the channel
number is still displayed and the
screen will read DELETED.
A/CH Hi 1 TON
Your remote also has an A/CH
(Alternate Channel) button.
Pressing this button will toggle
between the Current and one previ
ously selected channel.
30
Press the SURF button repeatedly to cycle or "loop"
through the channels saved in the SURF channel list.
Page 31

Settin(; the Remote Com roe To Work With Other Devices
our remote control is set to
work your TV and many
F
infrared remote (!R) control
VCRs, Cable Boxes, Satellite
Systems, DBS, etc. However, an
easy onetime step may be neces
sary before the remote will work
your VCR.
Try this initial check to see if
going on to the following section
is necessary.
rr^^rm
<i> Place the TVA'CR/ACC
Mode Switch in the proper posi
tion.
VCR
SLEEP
o
A/CH STATUS/EXrr CC
® o o
RECORD
“ VCR
^ACC
@
®
Point the remote control at
the device and press the POWER
button.
Does the remote turn the
device ON?
If YES, stop and try other func
tion buttons on the remote. If
they also work the device, then
the remote is ready and no fur
ther steps are needed.
If NO, continue...
Satellite Receiver
Cable Converter
SMART
o
SOUND
X X X t-srf
W
<i> First look up a THREE-DIGIT
remote control number for your
brand of Device before going
through the simple steps on the
following page.
Find your Three-Digit Code on
SmAKi Ht;[ I*
Remember, if more than
S one number is listed, you may
have to try more than the first Three
Digit code given in order to locate
your Device’s remote code.
v'Q Sl:
31
Page 32
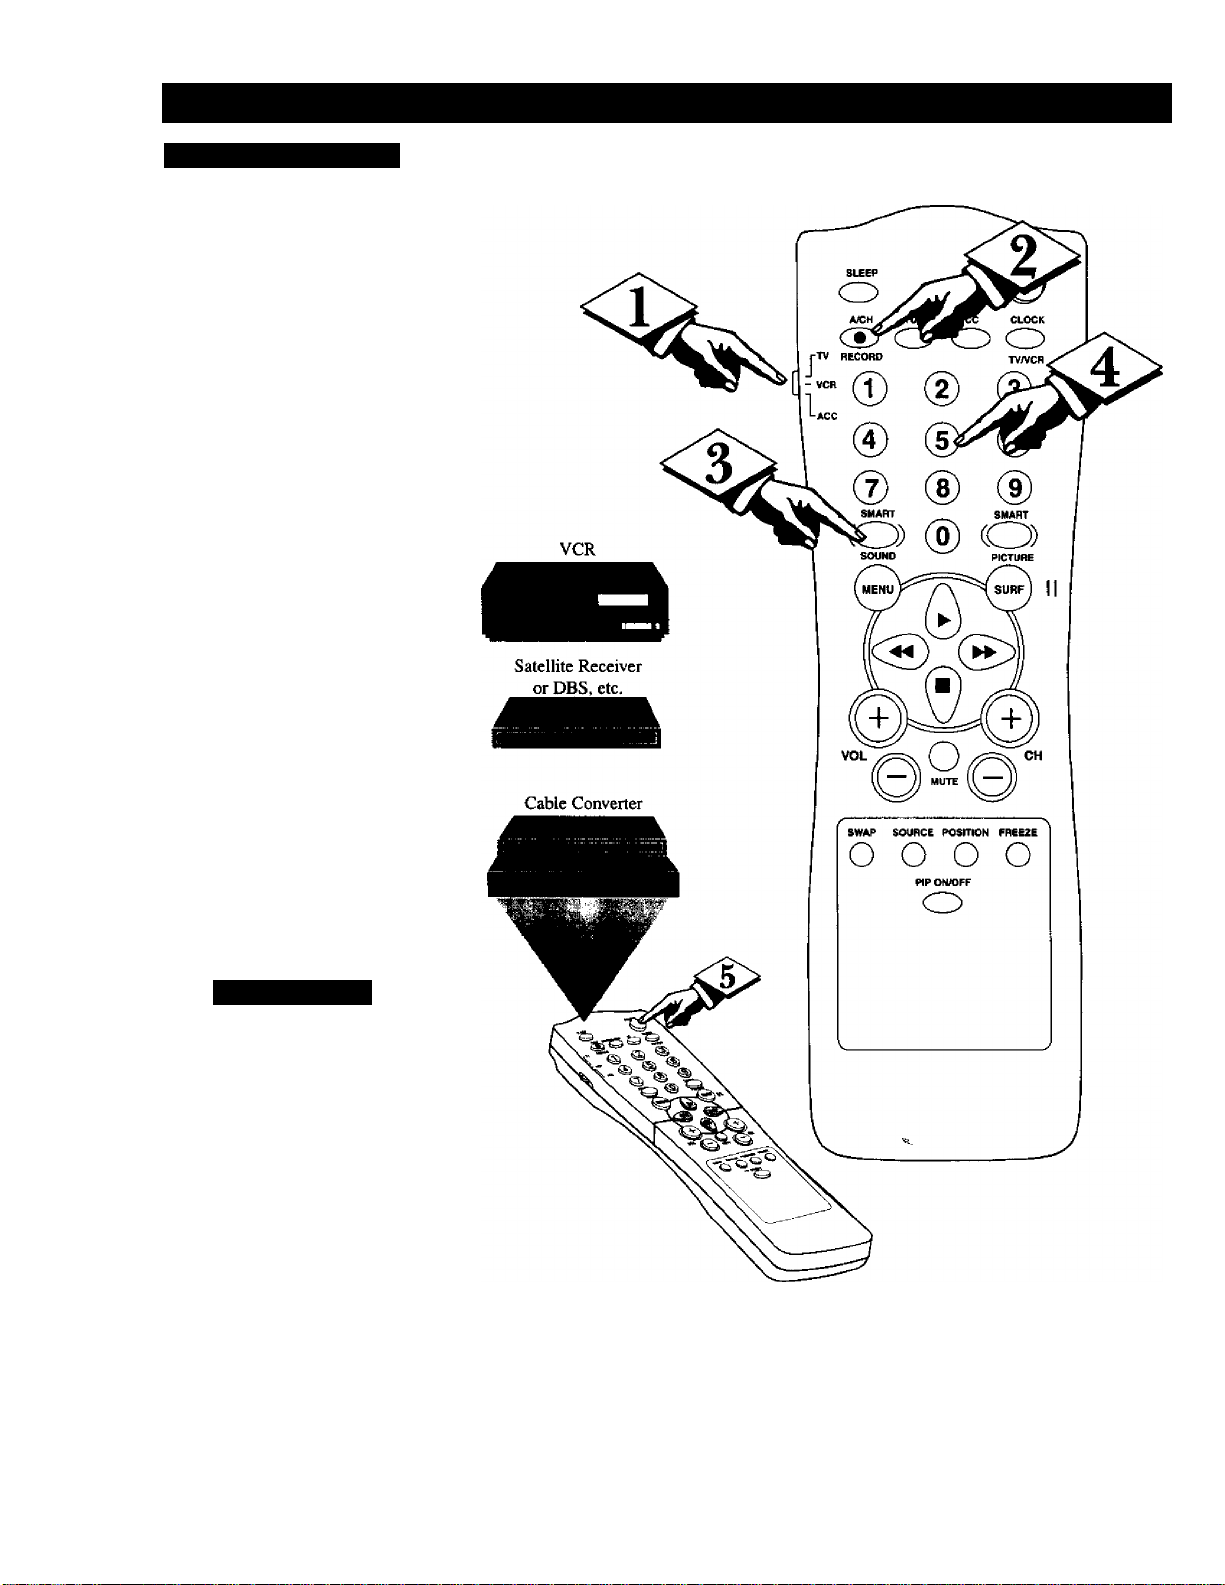
Si;n iN(i THE Remote Com roe To Work Wei h Other Devices
Direct Access Method
A Tow that you have looked up
1 V the three-digit Remote Code
Number for your brand of device,
you are ready to follow the four
simple steps below.
Please read through steps 1-4
before beginning.
<1^ Place the TV/VCR/ACC
Mode Switch in the proper posi
tion.
<|> Press the VCR RECORD
button on the remote control and
release.
Press the SmartSound button
on the remote within seconds,
then release.
<j> Enter the THREE-DIGIT
REMOTE CODE NUMBER
for your desired device. The
remote is now ready to send
commands to the unit.
<S>
Point the remote at the
Device. Press the POWER button
on the remote to turn the unit
ON.
Sm \K i Hi I I'
Remember, if this doesn’t
M work the first time, repeat steps
using the same remote code number.
After a second try and the remote
does not operate your device, see if
there is another three-digit code num
ber (pages 34-35) listed for your
device and repeat the steps above
using the new number.
If after repeated attempts the code
number method does not work you
device, try the SEARCH METHOD
on page 33.
32
Page 33
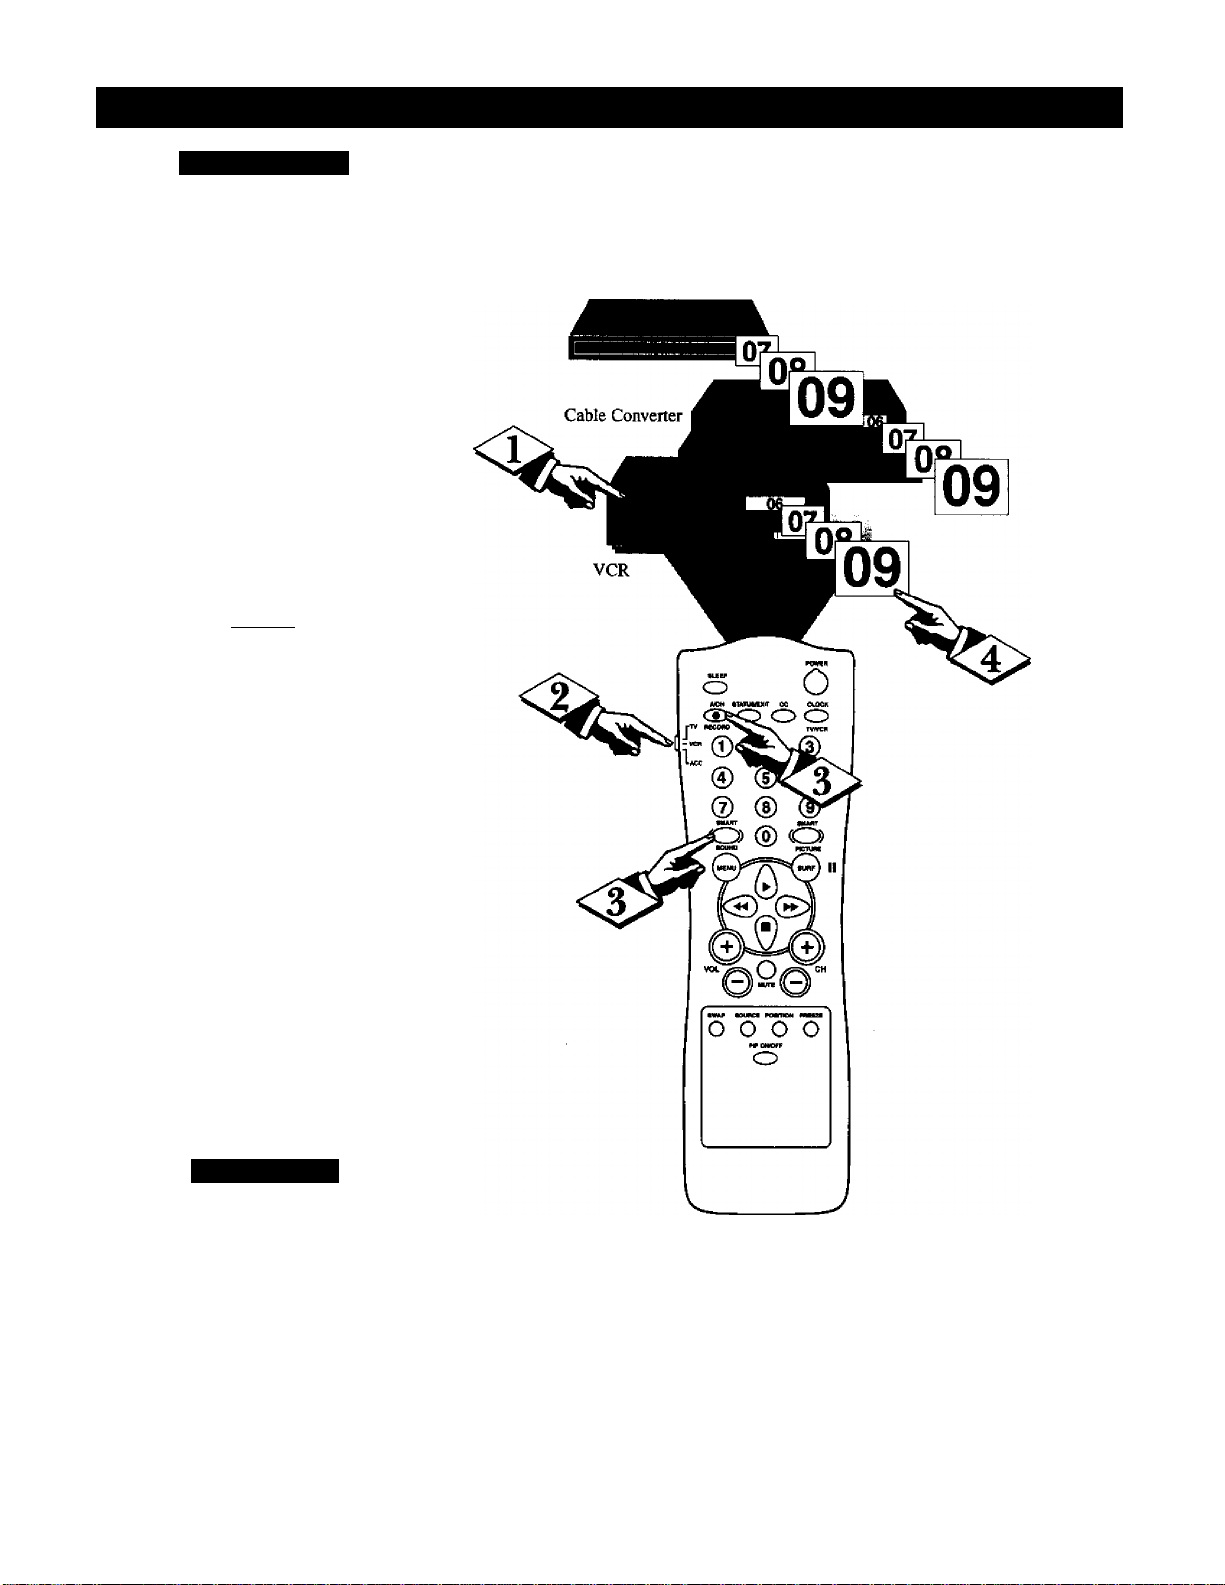
Seti IN(; THE Remote Coxtroe To Work Wei h Other Devices
Searcli Method
our TV remote can be set to
work various external devices
y
such as VCRs, Cable Boxes,
Satellite Receivers, DBS, etc. by
what is called the search method of
remote control programming. If the
“DIRECT ACCESS" code number
method (shown on the previous
page) did not set your remote to
work your accessory device, then
follow the easy steps listed below.
Note: The Search Method only
works with devices equipped with
channel display indicators or
capability.
Please read steps 1-4 before begin
ning.
IBEQINJ
< x>
Press the POWER button on
the device your are attempting to
program to turn it ON.
Satellite Receiver
<i> Place the TV/VCR/ACC
Mode Switch in the proper posi
tion.
Press the (A/CH) • RECORD
^'''^and the SMART SOUND but
tons simultaneously and hold them
down.
The device will begin to change
channels after the remote identi
fies the correct code. When the
channels start to change release the
VCR RECORD and SMART
SOUND buttons. The remote
should be ready to operate the
device.
Smaki Ilr.lT
w This method can take up to
S two minutes to perform.
Don’t let the device scan up more
than five channels. If you do the
remote may pass up the right code
and another two minute search cycle
will have to be repeated.
If no channel change happens within
two minutes, repeat steps 1-4.
Should a channel change still not
occur, the remote wUl not work the
desired device.
33
Page 34

Remote Control Direct Entry Codes
REMOTE REMOTE
VCR
Admiral ....
Adventure ..
Aiko
...............
Aiwa
.................
Akai
...............
Alba
.................
Amercian High
Amstrad .... ....................................325, 332
Asha
...............
Audiovox .,.
Baird
................
Beaumark . .
Bell & Howell
Blaupunkt . . .
Brandt
Broksonic . .
Bush
...............
CCE
.................
Calix
................
Canon
.............
Capehart . . .
Carver
..............
Citizen
Colt
..................
Combitach , ,
Craig
...............
Curtis Mathes
Cybermax .. ....................................051, 240
Daewoo . . .
Daytron . . . .
Denon
Dynatech ...
Electrophonic
Eraerex .. . .
Emerson . .. .000, 002, 036, 037, 043, 061
Ferguson . .
Fisher..............
Fuji
...............
Funai................
GE
..................
Garrard ,...
Go Video ..
Gold Star ..
Gradiente . .
Gnindig ...
HI-O
.............
Harley Davidson ............................................000
Harman/Kardon.....................................038, 075
Harwood ,.
Headquarter
Hinari .... ....................................004, 352
Hitachi....
Ingersol .,.
JVC
.................
Jensen ....
KEC...............
KT H 072
Kenwood ..
LXl..............
.............................................
.............................................
.............................................
... .000, 037, 307, 348, 352
041,049,053,061, 106,315
.............................................
..............................................
.............................................
.............................................
.............................................
.............................................
...........................................104
..........................
.............
.............
.............
..........................
___
121, 184,211,295,361 Motorola ..
.............................................
....................................072, 278 NAD..............
.............................................
.............................................
............................ ................
....................................081, 146
....................................037, 278
.............................................
.............................................
... .037, 047, 072, 240, 271 Optimus ..,
..........................
..........................
.............................................
.............................................
.............................................
.............................................
.............................................
068, 088, 121, 164,208, 209,
.211,212, 278,295, 361,479
..........................
...................
....................................033, 035
.............................................
...................
.............................................
..........................
....................................037, 038
....................................000,406 Quasar ....
...................
.............................................
....................................068, 072
.............................................
.................000, 004, 041, 042,
...................
.............................................
.008, 041, 067, 208, 384, 486
.............................................
......................................
...................
............................................037 Sanky
COPE NO. VCR CODE NO.
048
..........358
000 MEI
278 MGA
352 Magnavox . . ..........000, 035,081, 146, 181
035
240
037
107
240
003, 006, 154
187, 320, 321
352 Multitech ..
037 NEC
035 Nikko ....
020 Nikon
072
352
035, 041, 060
020, 045, 276
020
042
000 Penney .... .................035, 037, 038, 040,
037
107, 320, 321
047, 054,066, 104
035, 060, 065, 202
232, 279, 432
003,007, 195, 347
065, 105, 168, 235
037, 278
038,041,067, 384 Salora ....
035 037
000 206
Loewe
Logik
MGN Technology
MTC..............
Marta
Matsui ....
Matsushita .
Memmorex
Memorex . . ... .000,035, 037, 039, 046,
Metz
Minolta .. .
Mitsubishi . . .043,061,067, 075, 173,443
Noblex ....
Nordmende ,
Okano ....
Olympus ..
Optonica ..
Orion
Panasonic .
032
000
000
047
046
004 SEG
041 STS
Pentax ....
Philco ....
Philips . . . . ..........035,062, 081,110,403
Pilot
Pioneer....
Portland . . .
Profax ....
Profitronic .
Protec ....
Pulsar
Quarter . . .
Quartz .... ................................................046
RCA
Radio Shack
Radix.............
Randex . . .
Realistic . .
Ricoh
Runco ....
SEI
Saba
..............
...............
.................
.............
...............
.............
...............
...........
.............
..............
............
.............
.............
..............
...............
.............
...............
...........
.............................................
....................................004, 072
.............................................035
....................................043,061
.........................................
....................................000, 240
.............................................
..........................
..........................
.............................................
.047, 048, 104, 240, 266, 307
....................................003, 347
....................................042, 105 Sunkel
....................................035, 048 Sylvania .,. .000,035,043, 081, 103, 110
....................................000, 072 Symphonic .,
.............................................
..........036,040,041,067, 104
.............................................
....................................034, 253 Technics . . . . ....................................035, 162
.............................................
............................
.............................................
......................................
.................
.............................162, 432,454 Toshiba .... ..........043, 045, 066, 212, 366
.............................................
..........004, 295, 348, 352, 479
.................
............................
............................
............................
...............................................
...............................................
......................................
...............................................
...............................................
...............................................
...............................................
......................................039,051 CONVERTOR CODE Na
...............................................
...................
...................
...................
......................................
................................................037 Balcor ....
...............................................
..........
000, 035,037, 045, 047
...................
......................................
...............................................
...............................................
...............................................
................................................042 Clyde
.............................297, 320, 321
...............................................
...............................................
...................
......................................
...................
004, 348, 352
035, 162, 454
297, 320, 321
037, 048.058, 104,
035, 077,162, 225,
226, 378, 454
042, 065,105
042, 065, 105
035, 077, 162, 454
042, 060, 065, 077,
105, 106, 149,202
048, 062,066, 104 Cablatenna .
045, 051,053, 240 Contec ....
000.041.067.271 Deceat ....
004 Sanyo
240
037 Shogun
307
058
037 Teac
240
346
035, 226
062
035
037
058, 067
020
322
240
072
046
000, 037 Archer ....
037
034, 253 Cabletime , .
039
322
004 Citizen ....
004
075 Comtronics
039,048
VCR
............
Saville
.............
Scott................
Sears
...............
Sharp
...............
Shintom ....
Shoral
.............
Siemens ....
Singer
.............
Sinudyne ...
Sony
...............
.............
Sunpak . .. .
TMK
.............
Tatung
.............
.................
Teknika . . .
Telefunken .
Tansal
.............
Thomas ....
Thomson ... .............................................320
Totavision . ....................................037,240
Towada . . . . .............................................322
Unitech . . . . .............................................240
Universum . .............................................325
Vactor .............
Vactor Research
Video Concepts ...........................040, 045, 061
Videosonic . .............................................240
Wards . .000, 035, 042,047, 048,060, 062,
XR-1000 . .
Yamaha .,, .............................................038
Zenith.............
CABLE REMOTE
ABC
............
Aliegio ....
Andover ...
Antronix’'..
British Telecom..............................................105
Cable Star .
Cableview .
Century . . .
...........
Colour Voice
Comtec ,,.
Crypto vision
___
046, 047, 104, 240, 268
043,045, 121, 164,211,212
___
000, 035, 037, 042,046
___
047, 054, 066, 104, 105
....................................046, 062
.............................................072
...........
....................................051, 240
.............................................004
.............................................003
.............................................072
.............................................004
___
000,011,022, 032, 033,
.................
.............................................348
.............................................253
.............................................000
..........................
.............................................041
....................................000, 041
..........................
..........................
.............................................322
.............................................000
.............................................
....................................
..........................
...................
.................
...................
.............................................153
.............................................
.............................................022
......................................
.............................................056
.............................................056
.............................................022
...................
.............................................022
.............................................153
...............................................
...............................................
034, 035, 253, 275
.072, 081, 149,161, 212, 240
000, 033, 034, 039
001, 003, 007, 008,
011,013,014,017
161,271,377,448
.............................600
...............................423
REMOTE
CODE NO.
036, 208, 240
000, 035, 037
187, 320,321
038, 040
000, 035, 072
022, 153
...................
..............
025, 031
.....................
..........................
045
544
153
086
274
040
019
34
Page 35

Remote Control Direct Entry Codes
CABLE REMOTE
CONVERTOR CODE NO.
Eastern............................................................002, 274
Everquest
Fiimnet
Focus
France Telecom.............................................451
GC Electronics
GEC ..............................................................086
Ganard
Gemini....................................................015, 070, 242
General Instrument...............................Oil, 276, 476
Gold Star
Grundig..........................................................529
Hamlin......................................009,020,034,259
Hitachi.............................................................oil
Hytex.............................................................007
Jasco
Jerrold......................................003,011,012,014,
M.N.E. T........................................................443
MNet..............................................................443
Macon............................................................033
Magnavox
Memorex
Movie Time...................................................063
NSC
Oak
Optimus.........................................................021
Panasonic
Paragon..........................................................000
Philips . .025, 027, 031, 153, 242, 290, 334
Pioneer............................................................533, 753
Popular Mechanics
Pulsar ............................................................000
RCA
Radio Shack ..................................................015
Recoton..........................................................400
Regal.......................................................020,259
Regency.........................................................002
Rembrandt
Runco ............................................................000
SL Marx ........................................................040
Salora ............................................................382
Samsung
Satbox............................................................375
ScientiEc Atlanta ............................008,017,477
Signal .....................................................015, 040
Signature
Sprucer
Star Sight.......................................................542
Starcom
Stargate
Starquest........................................................015
Sylvania.........................................................001
TV85 .............................................................063
Tandy ............................................................258
Tele+1 ...........................................................443
Teleservice
Teleview
Texscan
Timeless
Tocom
Toshiba
Tudl................................................................286
TYisa.............................................................015
Unike..............................................................022, 153
................................................
.........................................................
.............................................................
.............................................
...........................................................
.......................................................
.............................................................
...........................................015, 024, 276, 476
....................................
.......................................................
................................................................
........................................................
........................................
........................................
.............................................................
..............................................
.......................................................
........................................................
.........................................................
..........................................................
.................................................
....................................................
.......................................................
.........................................................
.....................................................
..........................................
.........................................................
015,040
027, 032, 334
007,019
000,021, 107
011,070
015, 040
-.274
012, 013, 059
443
400
056
153
040
153
000
063, 070
400
021
040
Oil
021
003, 015
281
040
001
000
CABLE REMOTE
CONVERTOR CODE NO.
United Artists................................................007
United Cable
Universal
Videoway
Viewstar.................................................027, 063, 258
Visi Cable+ ..................................................461
Westminster
Wolsey Gaine................................................544
Zenith.....................................................000, 054, 525
21entek
m CODE NO.
Alpha Star
EchoStar
HTS...............................................................775
Hitachi...........................................................819
Hughes Network System ..............................749
Jerrold............................................................627
Magnavox
Memorex
Panasonic
Philips ....................................................722,724
Primestar
RCA ..............................................................566
Sony
Toshiba .........................................................790
Uniden...........................................................724
Satellite CODE NO.
AST...............................................................351
Akai...............................................................515
Alba........................................................352, 515, 613
Aldea
Amstrad ... .080, 252, 345, 461, 509, 689
Ankaro....................................................220, 288, 369
Anitron
Armstrong
Astra..............................................................108
Avalon
Axis
ВТ...........................................................515,668
Веко
Best................................................................369
Boca
Bush
Cambridge......................................................344, 515
Channel Master
Commlink......................................................288
Connexions ...................................................396
Conrad
Crown ...........................................................243
DDC
DNT ..............................................................396
EchoStar
Farguson
Fidelity
Finiux
Fuba................................................................369, 396
G-Bat.............................................................183
Galaxis ..........................................................286
Gooding.........................................................571
Grundig ....................................173,189,571,750
Hinari ............................................................183
................................................
...........................
......................................................
..................................................
..........................................................
.....................................................
........................................................
.............................................
.......................................................
......................................................
.......................................................
.............................................................
.............................................................
.........................................................
.....................................................
...........................................................
...............................................................
.............................................................
......................................................
.............................................................
.............................................
...........................................................
.............................................................
........................................................
............................
.........................................................
....................................................
022,056,153,191
REMOTE
722, 724
REMOTE
243,513
067, 183, 189, 336
108,397
003
250
105
400
772
775
724
701
627
639
288
183
243
396
369
189
067
362
607
362
396
252
Satellite CODE
Hirschmann..........................................397,573
Houston
........................................................
Huth
..............................................
ITT ...............................................................108
Intervision.....................................................592
JVC
......................................................
Kathrein
..............................
La Sat
...................................................
Lennox .........................................................592
Lupus
...........................................................
Luxor
...................................................
Manhatten
Maspro
Matsui......................................................... 571
Mediamarkt...................................................248
Minerva
Mintec...........................................................576
Morgan’s ...............................................243,513
Newhaus .......................................................220
Nikko.............................................................360, 713
Nokia..............................................108, 397,573
Nordmende ...................................................362
Orbitech........................................................501
Pace ...........................067, 183, 336, 455, 791
Palladium......................................................571
Palsat
Philips
Phonotrend.....................................................288, 592
Plasmatic.......................................................442
Proset
Quadral ..................................................362,628
RFT................................................................220, 288
Radix.............................................................396
SAT
SEG...............................................................369
Saba...............................................................336
Salora ...........................................................108
Satec ........................................................... 183
Schwaiger ..............................................183,504
Seemann........................................396, 578, 626
Skymaster
Sony .............................................................704
StarTrak .......................................................421
Strong
Sunstar
Tantec ...........................................................336
TechniSat ..............................................262,501
Teleka ... ^^............................................243,613
Tonna .,. r......................................................668
Triad .............................................................351
Universum
Vtech
Wisi.....................................................351, 396
QYQ CODE NO.
Kenwood.......................................................534
Mitsubishi ....................................................521
Panasonic
Philips
Pioneer
RCA
Sony
Toshiba .........................................................503
....................................................
..........................................
........................................................
............................................................
.....................................
.........................................................
.......................................................
.............................................
..........................................................
.........................................................
....................................................
............................................................
......................................................
...........................................................
.........................................................
.............................................................
.............................................................
092, 504, 622, 658
REMOTE
668
220, 243, 268
515,571
513,607
369
108,573
592
092, 336, 750
571
501
200,292,571,750
288
351,461
288, 626
421
513
571
351
REMOTE
490
539
550
522
552
35
Page 36

TI/?ie/7 using the TV remote
VV
with a VCR, first make cer
tain it is set to control your VCR
(by the REMOTE CODE or
SEARCH method).
CBEQINJ
Lsinc; thi: Rkmote’s VCR Bi ttons
<i>
Set the TV/VCR/ACC mode
switch to VCR on the remote.
1
Point the top of the remote
<l>
toward the front of the VCR
(remote sensor window) when
pressing the buttons.
RECORD BUTTON
Hold the (A/CH) • RECORD button
down to begin a VCR recording.
VCR SYSTEM SWITCH
Set in the VCR position to send
remote commands to the VCR.
PLAY BUTTONS
Press to begin playback of a
video tape.
REWIND BUTTONS
Press to rewind tapes. For some
VCR’s the STOP button may
have to be pressed first, then
REWIND. In playback mode
hold down the button to view
picture moving rapidly in
reverse.
STOPBUTTON ■
Press to stop the motion of a tape
in playback, rewind, fast forward,
etc.
JUCH STATUS/EXrr CC
■TV RECORD
VCR ^
■ACC
® ®
@ ® ®
SMART
1 O)
VOL
SWAP
SOUND
®
,o,
SOURCE POSmON FREEZE
o O O o
PIP OWOFF
O
®'
SMART
O)
TV/VCR
PiCTHflS
^ SURF 1
POWER BUTTON
Press to turn the VCR ON and
OFF.
TV/VCR BUTTON
Press while in the VCR mode (VCR
indicator on the front of the unit
will light) to view the playback of a
tape. Press again to place in the TV
position (VCR indicator light will
go off) to view one program while
recording another program.
When used in the TV mode, the
TV/VCR/CLOCK button will
access the TV's Clock menu
options.
NUMBER BUTTON
II
Press buttons for direct VCR
channel selections,
PATLSR BUTTON II
Press to temporarily stop the tape
during a playback or recording.
Press again to release Pause.
FAST FORWARD BUTTON fc»
Press to rapidly advance the tape.
For some VCR’s you may need
to press the STOP button first,
then the FAST FORWARD but
ton. In playback mode hold the
button down to view the picture
moving rapidly in the forward
direction.
S>i \ UI Hi I i>
Remember, the VCR but
S tons on the remote will not
operate your VCR if those features
are not found on your VCR remote
control.
Note: All VCR functions (particularly
Search, Rewind, Fast Forward, etc.)
will operate the same as with the orig
inal VCR remote control provided
with the VCR.
k.
_________
CHANNEL+ &-BUTTONS
Press to scan up or down through
____________
^
36
the VCR channel numbers.
Page 37
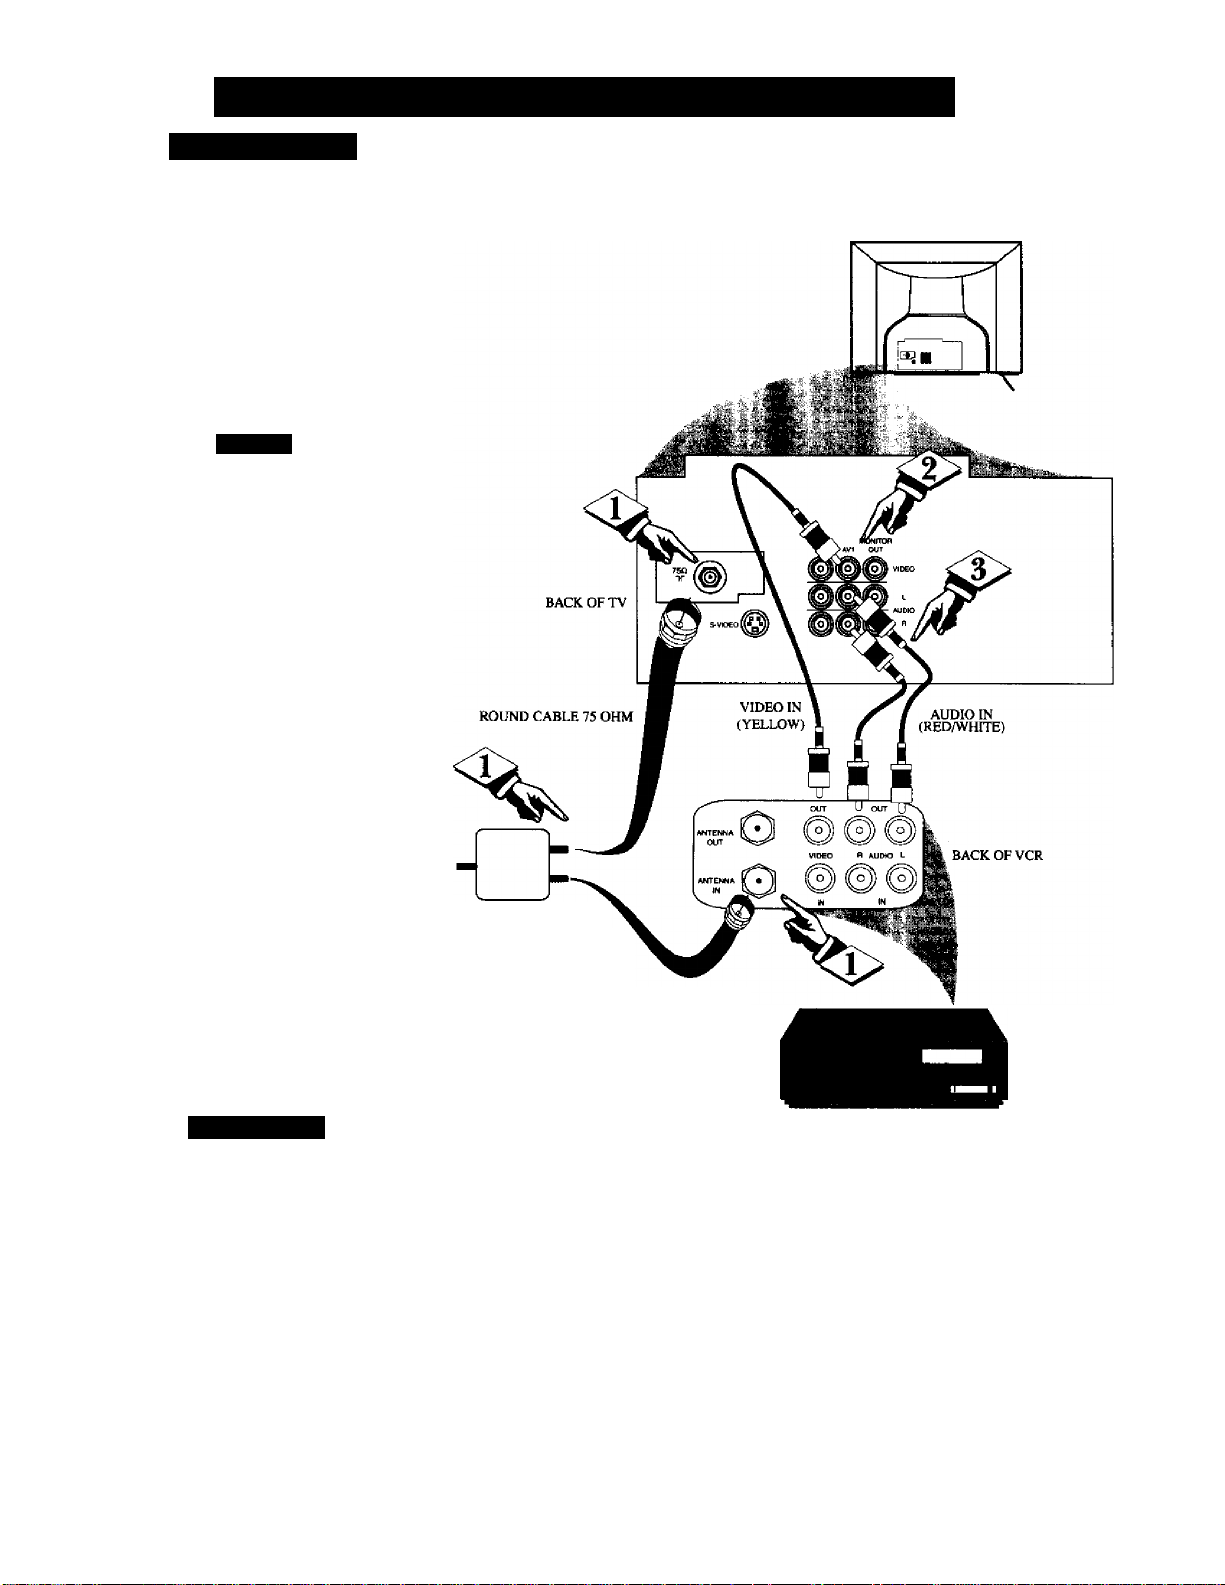
UsiNc; iHi: PIP (Picturi:-In-Pictlri:) Fkature
Hooking u|) 141*
Picture-In-Picture (PIP) is the show
ing of two pictures on the TV screen
at the same time, (One main screen
picture and one small inset picture -
or PIP).
Please Note: A VCR (or Accessory
Device) is needed to supply the PIP
signal.
The follow steps describe the basic
hookup needed to use PIP:
First use an optional signal
Ф
splitter and connect the original
cable TV signal to both the
CABm/ANT IN on the VCR and
the 75£2 input jack on the rear of the
television.
<|> Connect the VIDEO бит jack
on the VCR to the VIDEO AVI jack
on the TV.
<|> Connect the AUDIO OUT
(right and left) jacks from the
VCR to the AUDIO AVI (right and
left) jacks on the television.
Be sure to turn the VCR ON while
using the PIP features. The signal
supplied through the VCR will
appear in the PIP window once the
PIP Source has been selected.
Please refer to the next page to learn
ho to set the PIP Source control.
Sm aui III 1 i>
For other possible PIP
S connections see pages 41-42
for the "More PIP Connections”
section.
If you need any accessories or parts
to complete the described PIP con
nections, contact your dealer, or our
Parts Information Center at:
1-800-851-8885
OPTIONAL TWO-WAY SIGNAL
(single 73 ohm Input to twin 75
c^im Outputs - optional RF
Coaxial connecting cables also
required)
ROUND CABLE
75 OHM
VCR WITH AUDIOig^IDEO OUPUTS
37
Page 38
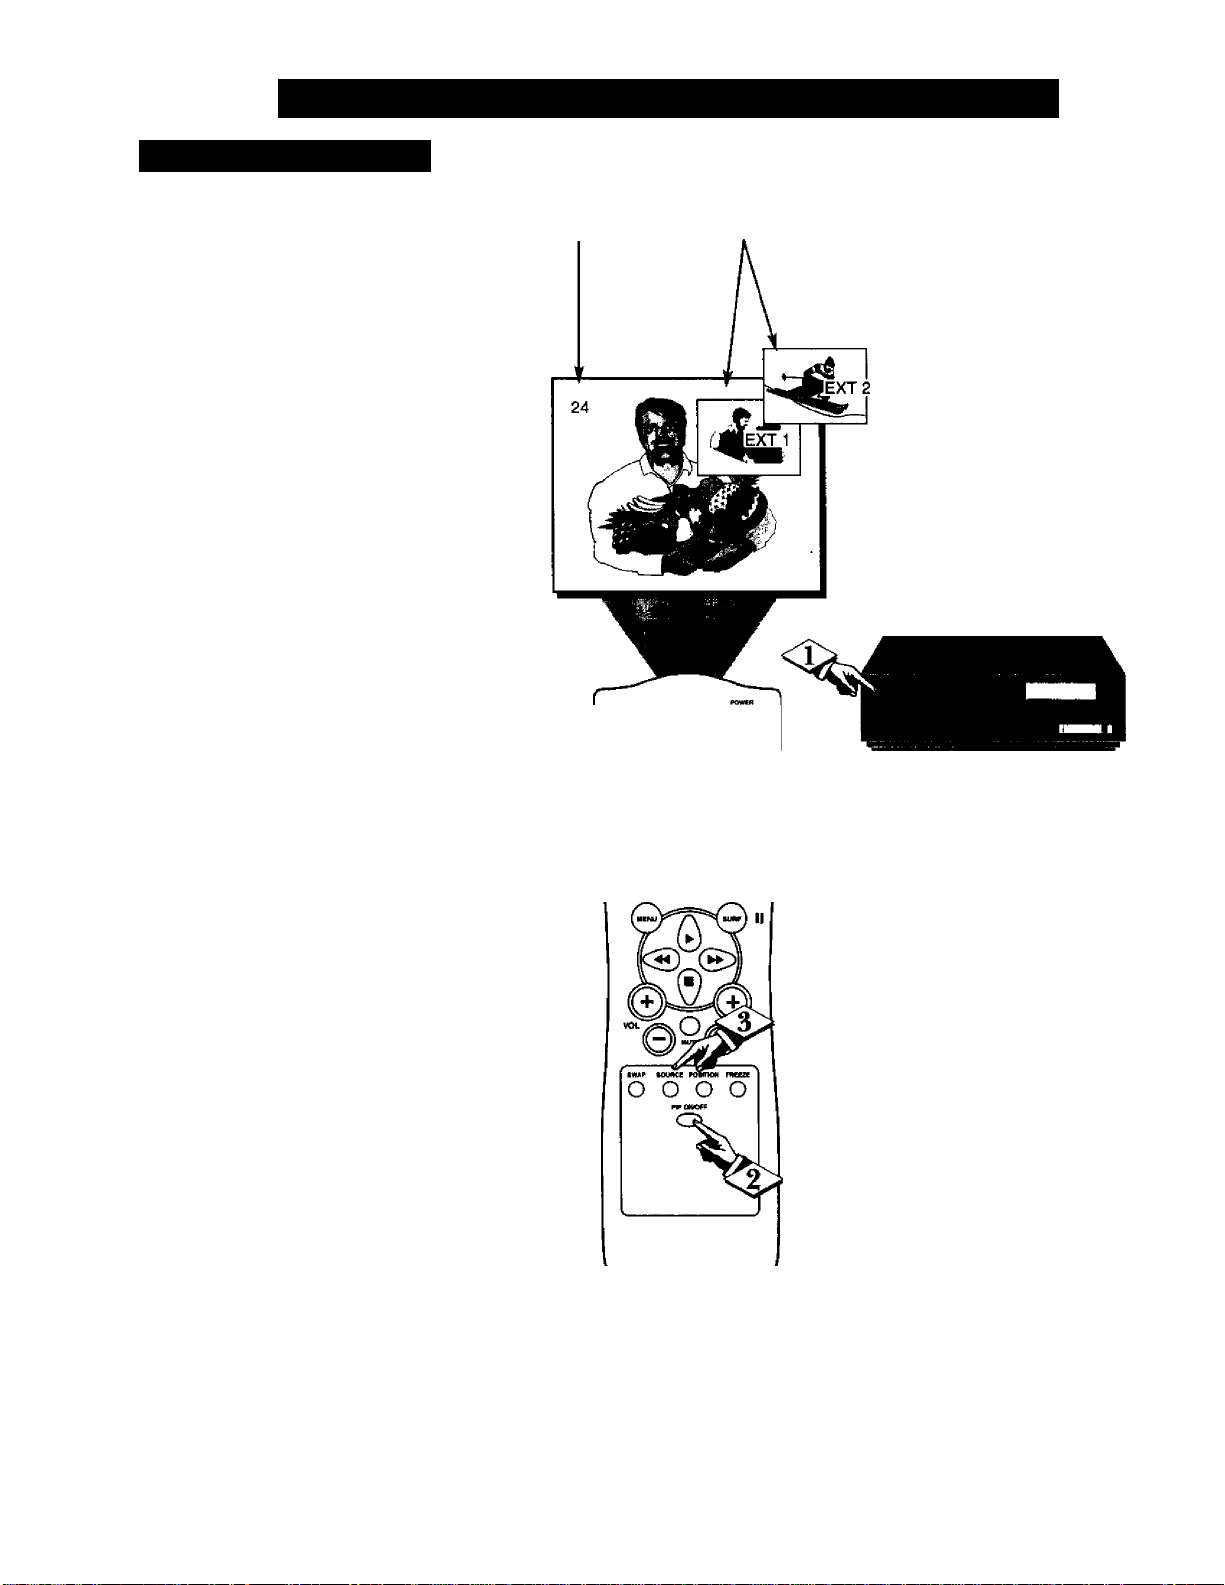
Seleci iN(i 1 HE PIP (Picture-In-Pici iJRE) Source
Ch oos ing rni: PIP S oi lu i.
The picture for the PIP window
can come through either the 75Q.
Input or any the the external
AudiolVideo Inputs (in 1, in 2 or
S-VIDEO) at the rear of the TV.
PIP Source simply tells the TV
which one of these sources it is to
show in the PIP window.
MAIN SCREEN PICTURE PIP INSET PICTURE
<t> "nirn the TV and VCR (or
other device hooked to one the
external AfW connections) ON.
<i> Press the PIP ON/OFF but
ton on the remote control. The
PIP window should appear in the
upper right hand portion of the
screen.
<t>
Press the SOURCE button
on the remote to toggle between
the different external connec
tions.
The PIP SOURCE may come
from the following:
AVI (including S-VIDEO), or
AV2: for picture signal coming
from the external AudioA'^ideo
jacks on the TV. (Must have an
external device hooked up at
these locations.)
MlttP
O (J
WCK tTMUUin CC CLOCK
<x> o o o
№»fm rvOKR
© (D (3)
® ® ®
® ® ®
«•U.BT ttURT
O) ® CO
«mjun wwiM
THE PIP SOURCE PICTURE CAN
COME FROM THE: AUDIOA'IDEO AV I
(EXT 1) (INCLUDING S-VIDEO),
OR THE AUDIO/VIDEO AV2 (INPUT
JACKS AT THE REAR OF THE TV.
VCR
(OR SIMILAR DEVICE)
38
Page 39
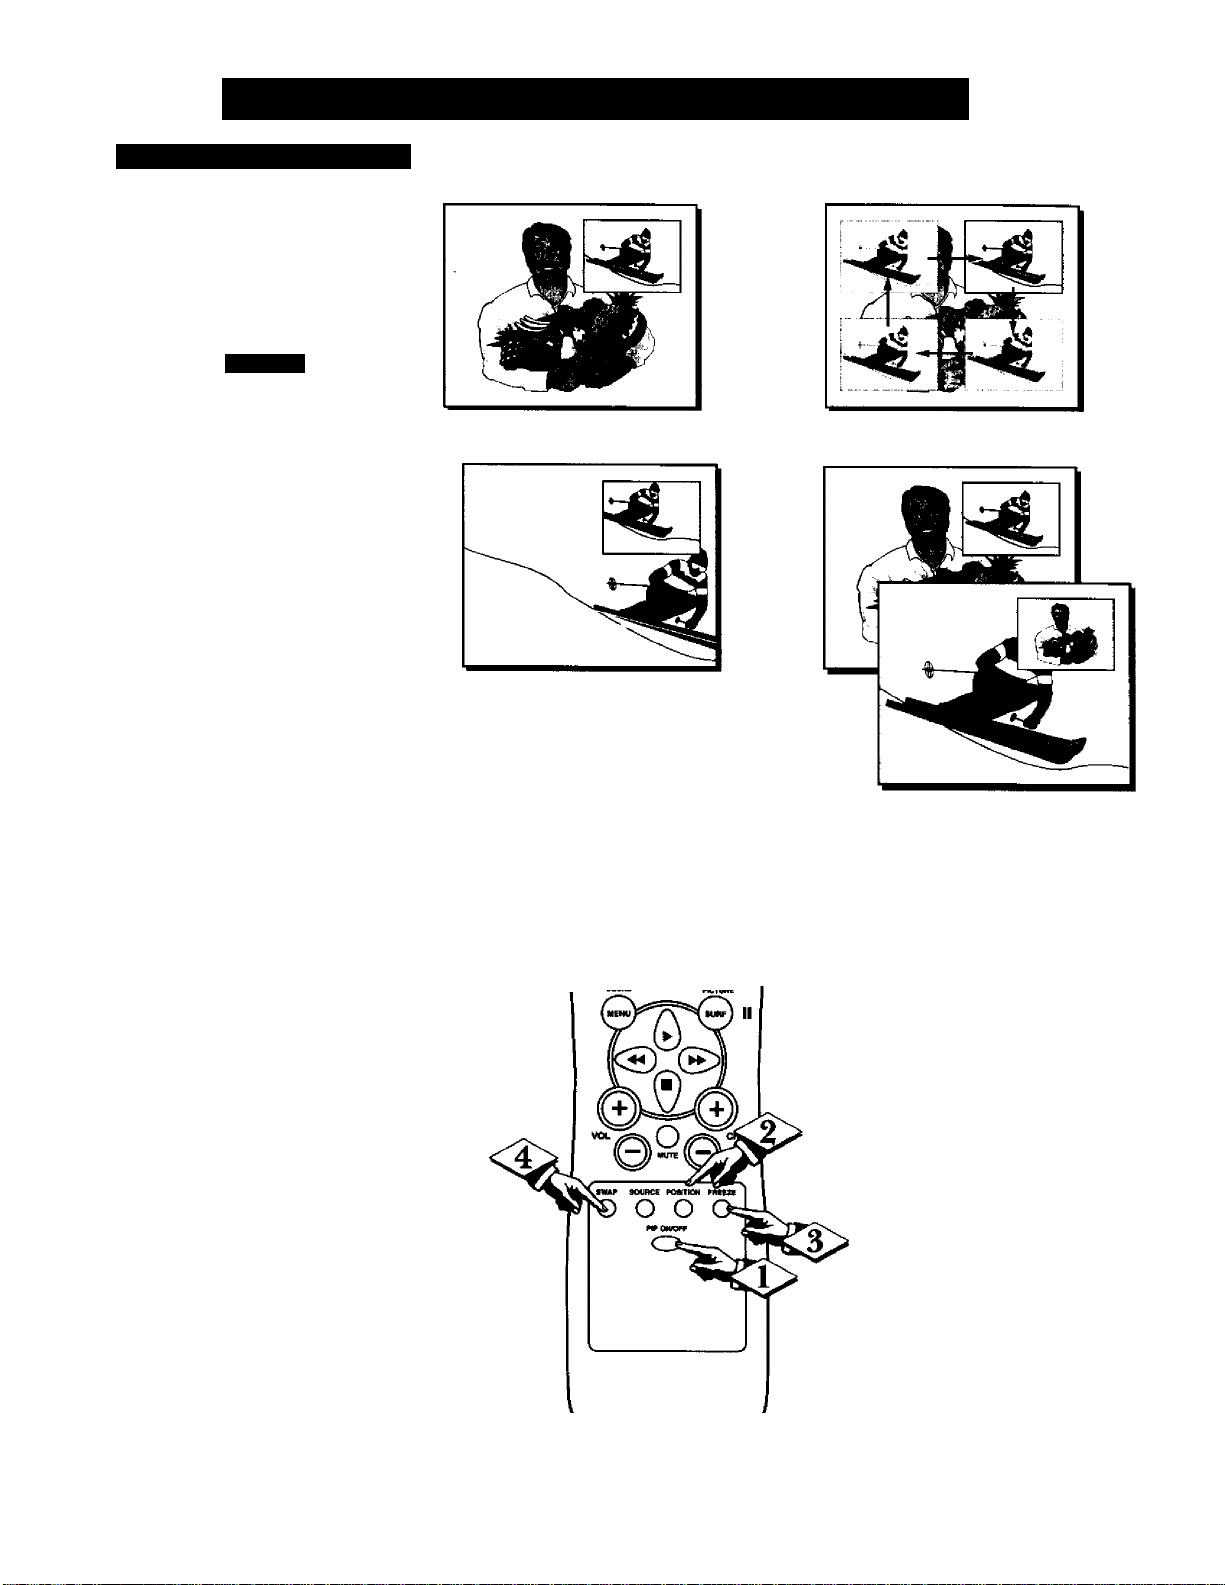
UsiNc; THE PIP (Picture-In-Picture) Feature
Rk moi i; Co ntr ol Hi t ton s
By using the PIP buttons on the
remote control the PIP picture
can be moved and swapped with
the main screen. The PIP inset
picture can also be frozen within
the PIP window.
rr^CTIT)
<i>
Press the PIP ON/OFF but
ton to show the PIP picture. PIP
appears in one of the four comers
of the screen.
Press the PIP ON/OFF button
again and the PIP picture is
reduced in size.
Pressing the PIP ON/OFF but
ton a third time will remove the
PIP picture from the screen.
1. PIP ON/OFF
2. PIP POSITION
<|> Press the POSITION button
on the remote to move the PIP
picture to any of the four comers.
<3>
<J> Press the PIP SWAP button
Press the FREEZE button on
the remote to stop the action
within the PIP window. Press the
FREEZE button again to
resume the normal viewing
action.
If the FREEZE button is pressed
while PIP is OFF, it will freeze
the picture from the main screen
in the PIP window.
to swap the main screen picture
with the PIP picture. Pressing the
PIP swap button again will return
the main picture to the screen.
^1^
3. PIP FREEZE
SLEEP
o Cj
iMM STATUMXIT CC CLOCK
<35 o O O
r
(
0 CD ®
0 0 0
0 0 0
■■■■■■■•' - lipwni
O) ® O
4. PIP SWAP
TViNCft
39
Page 40
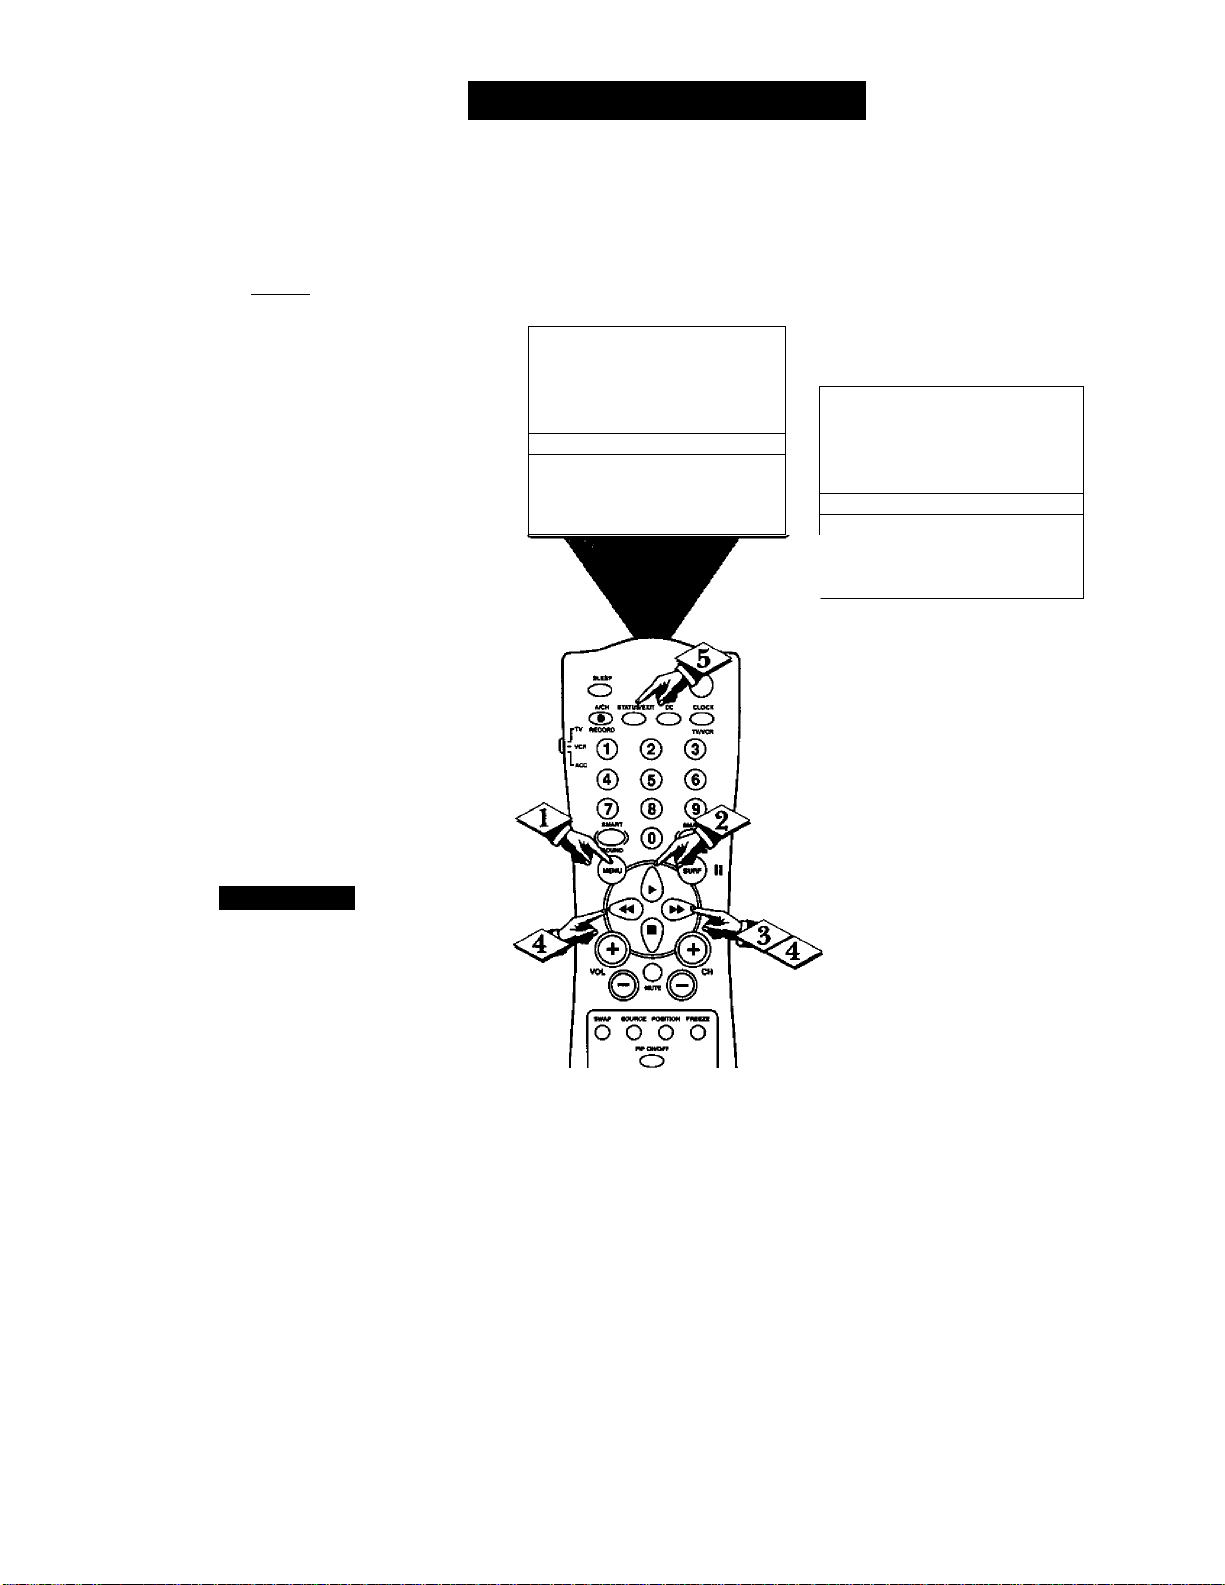
□I
'T'he Picture-In-Picture (PIP)
A. Tint control is used to make fine
tune adjustments to the tint setting
for PIP (when it is shown on the TV
screen).
Cbeqin)
Adjusting the PIP Tim
<i>
<l>
<|> Press the CURSOR RIGHT
<J> Press the CURSOR RIGHT
Press the MENU button on the
I re
remote to show the onscreen menu.
Press the CURSOR UP ^ or
the CURSOR DOWN ■ button
until the word PIP is highlighted.
button to display the PIP
TINT control.
^ or the CURSOR LEFT ^
buttons to adjust the TINT bar to
the desired levels.
<|> Press the STATUS/EXIT but
ton to clear the menu from the
screen when the adjustment is com
plete.
w
Smaki Hr.M’
CIDCX
□C
[PP
SETUP
SmartLock BEVEW
► '
OFF
► 1
►
►
friNT ^
+.. 2 1
Remember, although
i there is a separate TINT
control for PIP, the adjustment lev
els for this control depend on the
TV’s main picture. For example: If
the main picture screen is showing
a black and white picture, PIP
would also be seen in black and
white (even though the PIP picture
source is in color).
40
Page 41
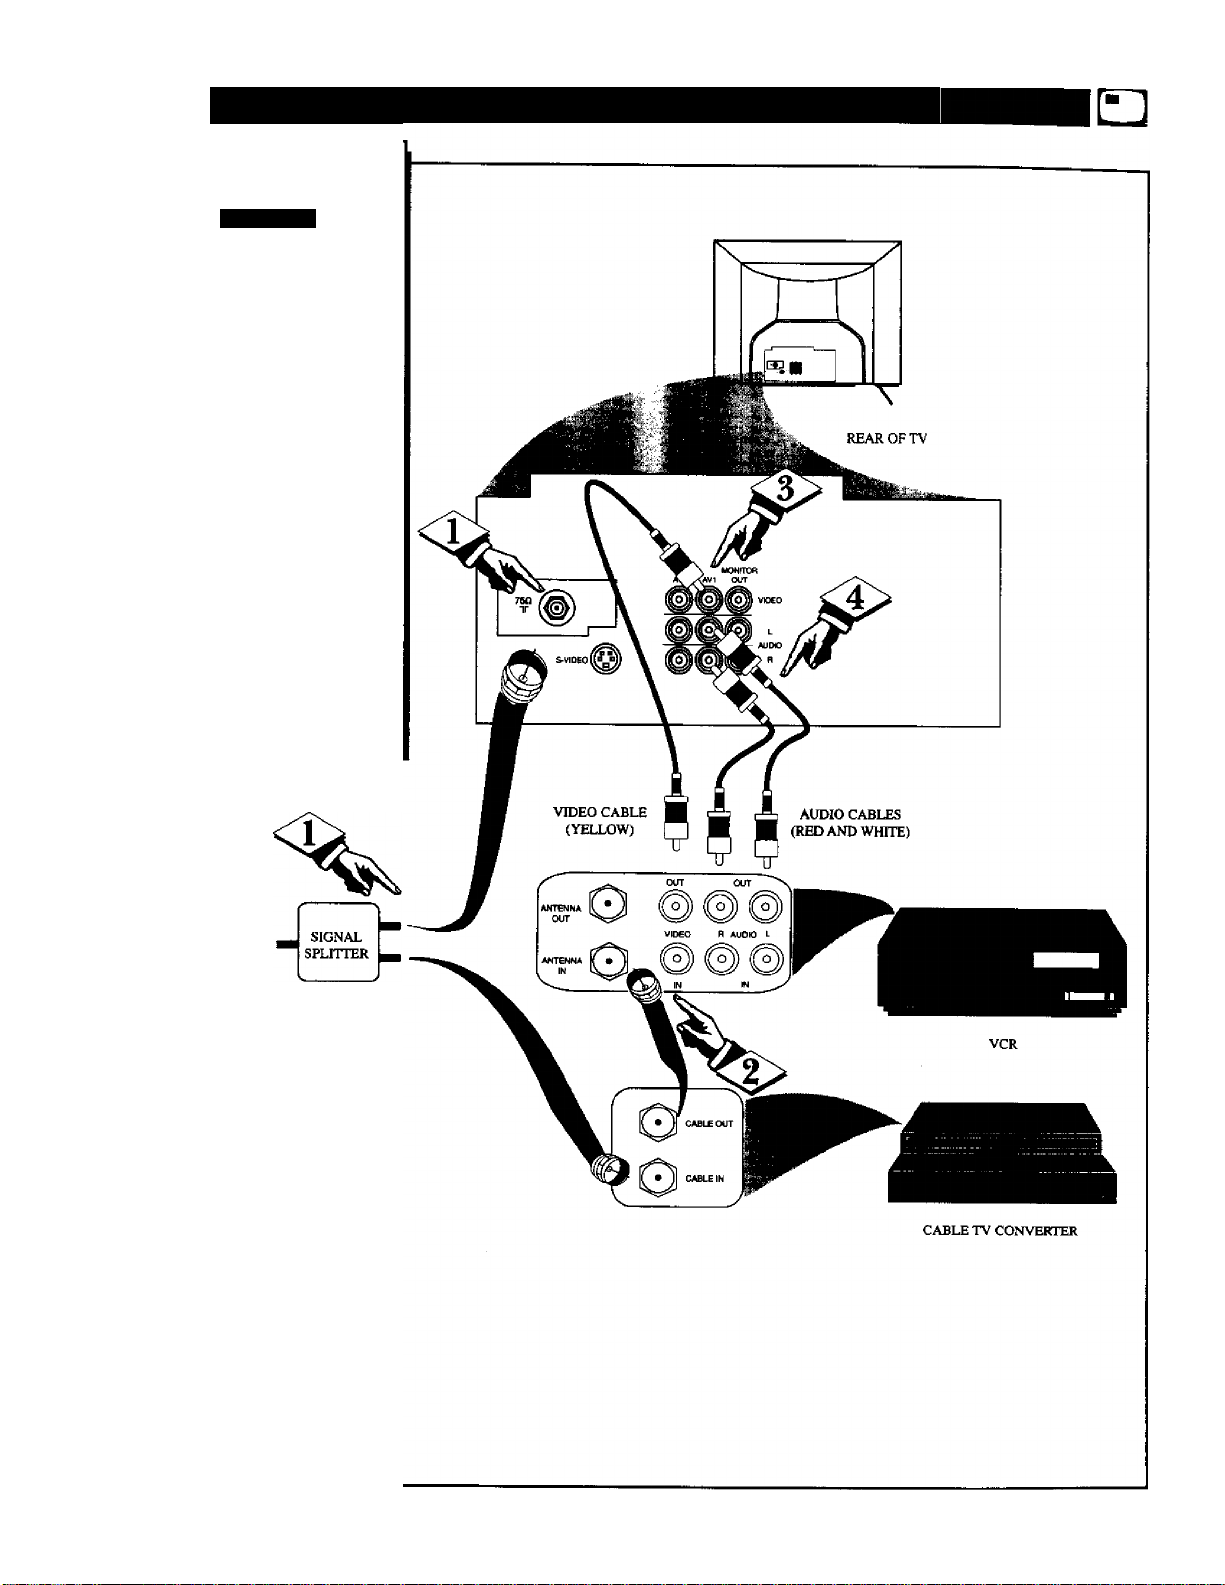
Moke PIP (Pic itjre-In-Pich re) Connections
JP hookup with a Cable Box
and VCR.
p
ГТ^ГТТТ*
First use an optional signal
Ф
splitter and connect the original
cable TV signal to both the CABLE
IN on the Cable Converter and the
75Q plug on the rear of the televi
sion.
Connect the CABLE OUT on
<3>
th(
the Converter to the ANT IN on the
V<
VCR.
Connect the VIDEO OUT jack
<l>
on
on the VCR to the \TDEO AVI jack
on
on the TV.
Connect the AUDIO OUT
Ф
(right and left) jacks from tjie VCR
to the AUDIO AVI (right and left)
jacks on the television.
Contact the Parts
Information Center
at 1-800-851-SS85
to order any optional
accessories.
41
Page 42
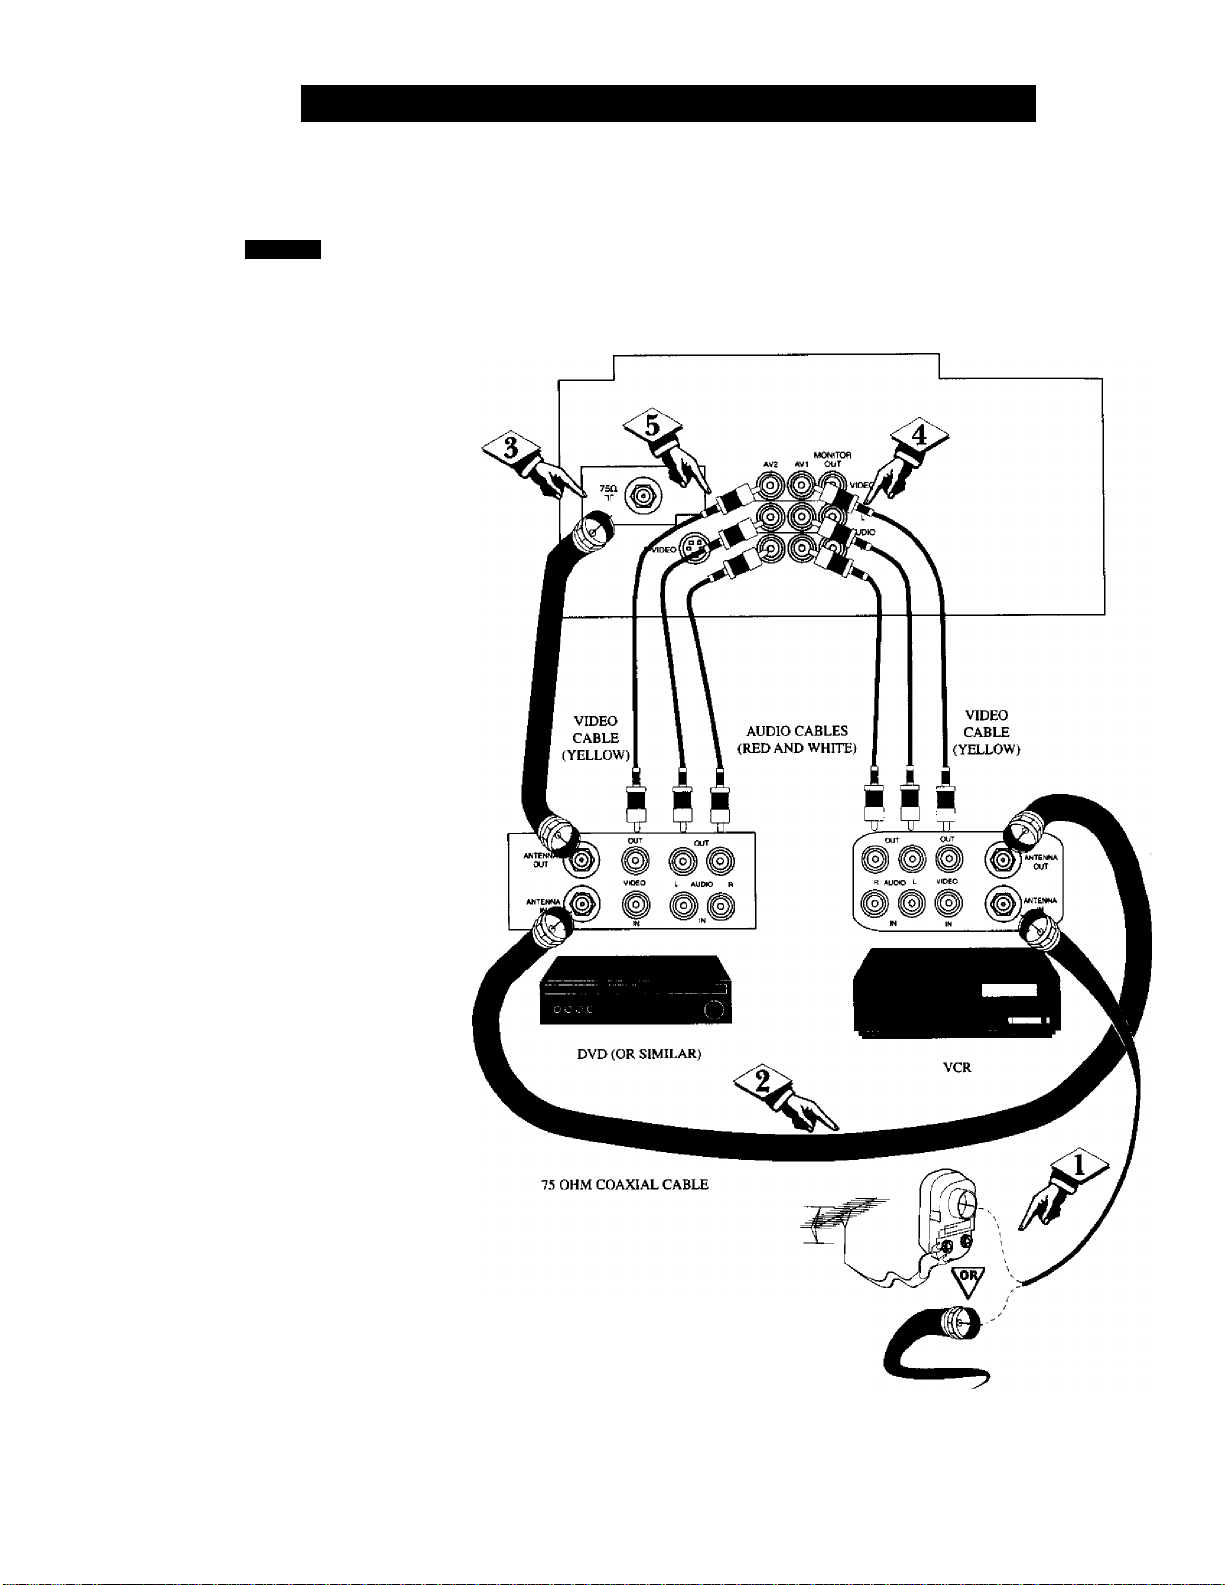
[^1
ip hookup with a VCR and a
Digital Video Disc Player (or
P
similar device).
rr^rnn
<,1^ First connect the original cable
TV signal or Antenna signal to the
ANT IN jack on the back of the
VCR.
Connect the ANT OUT jack on
the rear of the VCR to the ANT IN
jack on the rear of the Video Disc
Player.
Connect the ANT OUT Jack on
the rear of the Video Disc Player to
the 75i2 input on the rear of the iV.
Connect the yellow Video Cable
from the VIDEO OUT jack on the
VCR to the VIDEO AVI jack on the
TV. Then, connect the red and white
Audio Cables from the AUDIO OUT
jacks on the VCR to the AUDIO AVI
jacks on the rear of the TV (labeled
AUDIO L& RAVI).
More PIP (Pictlre-In-Pictlre) Connections
REAR OF TV
Connect tbe yellow Video Cable
from the VIDEO OUT jack on the
Video Disc Player to the VIDEO
AV2 jack on the TV, Then, connect
the red and white Audio Cables from
the AUDIO OUT jacks on the VCR
to the AUDIO AV2 jacks on the rear
of the TV (labeled AUDIO L & R
AV2).
Note: When selecting the PIP
SOURCE, the VCR will appear on
the EXT 1 channel, and the Video
Disc Player will appear on the EXT
2 channel.
OUTSIDE UHF/VHF
ANTENNA OR
CABLE TV SIGNAL
42
Page 43

Tips If Something Isn't Working
lease make these simple
checks before calling for ser
F
vice. These tips can save you time
and money since charges for TV
installation and adjustment of
customer controls are not covered
under your warranty.
No Power
No Picture
No Sound
CAUTION: A video source (such as a video game. Compact Disc Interactive - CDI, or
TV information channel) which shows a constant non-moving pattern on the TV screen,
can cause picture tube damage. When your TV is continuously used with such a source
the pattern of the non-moving portion of the game (CDI, etc.) could leave an image
permanently on the picture tube. When not in use, turn the video source OFF,
Regularly alternate the use of such video sources with normal TV viewing.
Check the TV power cord. Unplug the TV, wait 10 seconds, then reinsert plug into
outlet and push POWER button again.
Check that outlet is not on a wall switch. Be sure fuse is not blown on AC Power strip.
Check antenna connections. Are they properly secured to the TV's 75£2 plug?
Check the TUNER control for CABLE or ANTENNA setting.
Check Audio/Video Input jack connections if using a VCR or other external device.
Check the VOLUME buttons.
Check the MUTE button on the remote control.
Check Audio/Video Input jack connections if using a VCR or other external device.
1
Remote Does Not
Work
TV Displays Wrong
Channel or No
Check batteries. Replace with AA Heavy Duty (Zinc Chloride) or Alkaline batteries
if necessary.
Clean the remote and the remote sensor window on the TV.
Check the TV power cord. Unplug the TV, wait 10 seconds, then reinsert plug into
outlet and push POWER button again. Be sure fuse is not blown on AC Power strip if
one is being used.
Check to be sure TV outlet is not on a wall switch.
Repeat channel selection.
Add desired channel numbers (CHANNEL control) into TV memory.
Check to be sure the TUNER control is set to the CABLE option.
Channels Above 13
Cleaning and Care
• To avoid possible shock hazard be sure the TV is unplugged from the electrical outlet before cleaning,
• When cleaning the TV screen take care not to scratch or damage the screen surface (avoid wearing jewelry or using
anything abrasive). Wipe the front screen with a clean cloth dampened with water. Use even, easy, vertical strokes when
cleaning.
• Gently wipe the cabinet surfaces with a clean cloth or sponge dampened in a solution of cool clear water. Use a clean
dry cloth to dry the wiped surfaces,
• Never use thinners, insecticide sprays, or other chemicals on or near the cabinet, as they might cause permanent marring
of the cabinet finish.
43
Page 44

Glossary of Telfmsion Terms
Coaxial Cable • A single solid antenna wire normally matched
with a metal plug (F-type) end connector that screws (or pushes)
directly onto a 75 Ohm input found on the Television or VCR.
Closed Caption • Broadcast standard which allows you to read
the voice content of television programs on the TV screen.
Designed to help the hearing impaired this feature uses onscreen
"text boxes" to show dialogue and conversations while the TV
program is in progress.
Direct Audio/Video Inputs • Located on the rear of the TV these
connectors (RCA phono type plug) are used for the input of
audio and video signals. Designed for use with VCRs (or other
accessories) in order to receive higher picture resolution and
offer sound connection options.
Identify • Method by which a remote control searches and finds
an operating code for another product (such as a VCR or Cable
Converter). Once the code has been "identified" then the TV
remote can operate and send commands to the other product.
On Screen Displays (OSQ) • Refers to the wording or messages
generated by the television (or VCR) to help the user with specif
ic feature controls (color adjustment, programming, etc.).
Menu • An onscreen listing of feature controls shown on the
Television screen that are made available for user adjustments.
Multichannel Television Sound (MTS) • The broadcast stan
dard that allows for stereo sound to be transmitted with the TV
picture.
PIP (Picture In Picture) • Allows viewing of different programs
(or picture sources) on the TV screen at the same time. PIP will
also let you swap the pictures, move the PIP picture to any of the
four comers, and even freeze the picture until you shut it off.
Programming • The procedure of adding or deleting channel
numbers into the Television’s memory circuits. In this way the
Television “remembers” only the locally available or desired
channel numbers and skips over any unwanted channel num
bers.
Remote Sensor Window • A window or opening found on the
Television control panel through which infrared remote control
command signals are received.
Setup Mode • Automatic feature control settings made by the
TV. Designed for first time setup and use. Settings for signal
connections (antenna or cable TV), plus channel program
memory are held in the TV's memory (even if the set is
unplugged and moved to a new location.)
Second Audio Program (SAP) • Another or additional audio
channel provided for in the Multichannel Television Sound
(MTS) broadcast standard. The most frequently proposed use
for SAP is the simultaneous bilingual broadcast of TV program
material.
Status • Allows the user to quickly confirm what channel num
ber is currently being viewed. Status can also be used to clear
the Television of on screen displays or information (rather than
waiting for the displays to “time out” or automatically disap
pear from the screen).
Twin Lead Wire • The more commonly used name for the two
strand 300 Ohm antenna wire used with many indoor and out
door antenna systems. In many cases this type of antenna wire
requires an additional adapter (or balun) in order to connect to
the 75 Ohm Input terminals designed into the more recent
Televisions and VCRs.
44
Page 45

Accessories/Optionai
Adapter Connector..............................................................(*QAJ-1)
Add/Delete Channels
Alternate Channel
AudioA^deo Input Jacks
Audio/Video Output Jacks.............................................................27
Balance Control .............................................................................22
Bass Control...................................................................................22
Battery Installation
Cable TV Connections/Settings
Channel Memory................................................................(+Q/U-4)
Clock Set Time.................................................................................9
Closed Captioning..........................................................................13
Contrast Plus (Black Stretch) Control
ControlsA’V
.......................................................................
Controls/Remote ......................................................28-36, (*Q/U-2)
External Control..................................................................(*(yU-4.)
Features
...........................................................................................
Glossary TV Terms........................................................................44
Incredible Surround Control
Input Control..................................................................................25
Language Option ................................................................(*Q/U-3)
Memory/Program Channels................................................(+Q/U-4)
Menu Button...................................................................................36, (*QAJ-2)
Minus(-)/Plus (-I-) Buttons.............................................................36, (*Q/U-2)
Picture Controls
Picture Noise Reduction ..................................................................8
PIP Connections..................................................................
PIP Features
..................................................................................
PIP Source .....................................................................................38
PIP Tint Adjustment ......................................................................40
Precautions/Safety
........................................................
.........................................................
(*QAJ“1)
(*Q/U-4)
..........................................................................
.........................................................
............................................................
......................................
25-26
(*QAJ-2)
(*Q/U-1, 3)
............................................
(*QAJ-2)
.........................................................
...................................................'............................
37, 41-42
39
................................................................
3,43, 48
30
22
Programming Channels
Registration of your TV ...................................................................
Remote Control (Functions/Programming) ... .27-35, (*Q/U-2)
Remote Control Programming Codes List
Requesting Service...................................................................46-48
RF Coaxial Cable................................................................(*Q/U-I)
Safety/Precautions
Sensor Remote ...................................................................(*Q/U-2)
Set Up/First Time Use............................................(*Q/U-1, 2, 3,4)
Sleep Timer....................................................................................14
SmartLock Access Code Feature
SmartLock Block Channel Feature ...............................................17
SmartLock Blocking Options
7
SmartLock Blocking using the MovieA"V Ratings
SmartLock Review
SmartLock - Understanding the SmartLock Control
SmartPicture Control.....................................................................28
5
SmartSound Control .....................................................................29
SmartSurf
Sound Control (Stereo/Mono).......................................................24
Start-up Channel Control...............................................................11
Start-up Time Control....................................................................12
Status/Exit Button...............................................................(*Q/U-2)
Table of Contents ............................................................................4
Timer Control.................................................................................10
6
Tips for Service
Treble Control................................................................................22
VCR/TV Connections...................................................25, (*Q/U-1)
Volume Bar Control .....................................................................23
Warranty.........................................................................................48
* Information contained in Quick-Use (Q/U) Guide-page listed.
......................................................
.............................
.............................................................
(*Q/U-4)
34-35
3, 43, 48
..................................................
........................................................
................
19-20
.......................................................................
...................
.......................................................................................
.................................................................
43, 46-48
..
16
18
21
15
30
45
Page 46
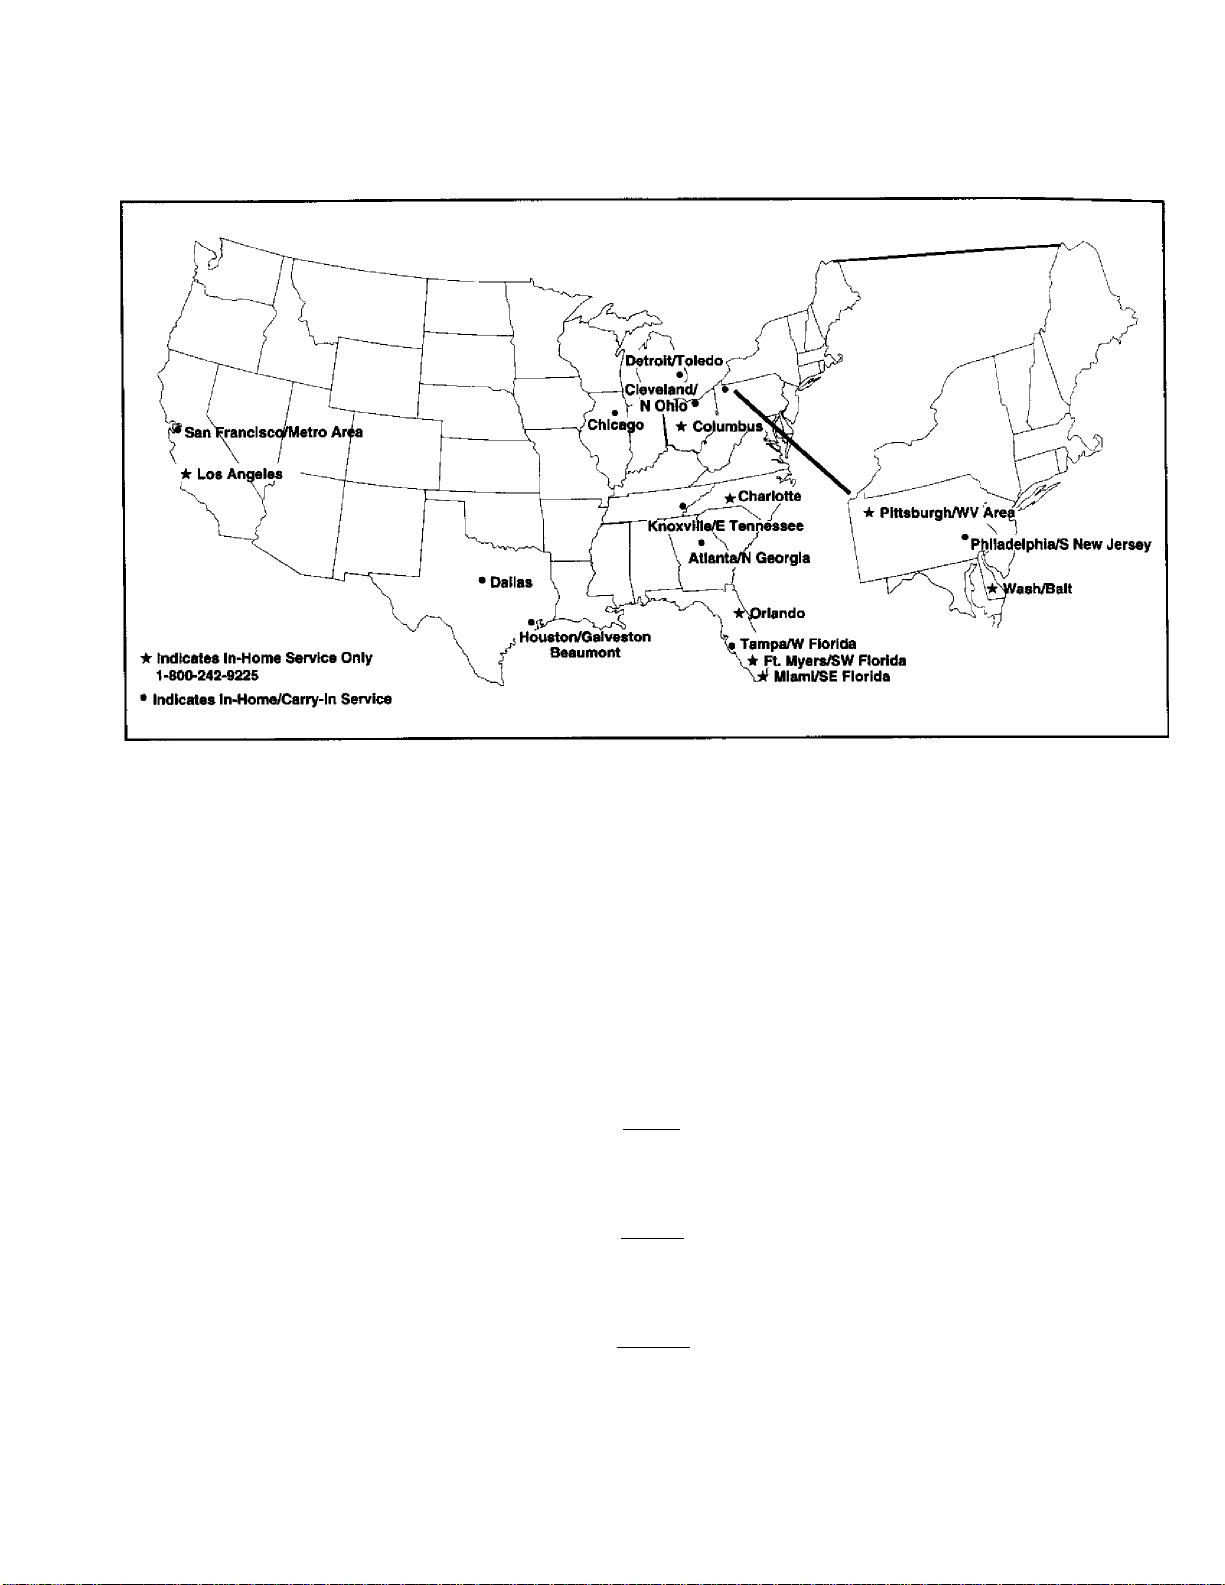
Philips Consumer Electronics Company
Factory Service Center Locations
NOTE: If you reside in one of our Philips Factory Service Branch areas (see directory on back), you can contact the nearest Service Branch to
obtain efficient and expedient repair for your product. If your product is In-Warranty, you should have proof-of-purchase to ensure No Charge
Service. For Out-of-Warranty service, call the location nearest you.
НОТА: Si vous résidez dans une des régions desservies par une succursale de service après vente du fabricant Philips (voir liste ci-dessous),
vous pourrez contacter la branche de service après vente la plus près de chez vous pour obtenir un service après vente rapide et efficace. Si le
produit est sous garantie, il suffira de présenter une preuve d'achat pour bénéficier d'un service sans frais. Pour les produits non couverts par la
garantie, contactez le centre le plus près de chez vous.
NOTA: Si Ud. reside en una de nuestras zonas para sucursales Philips de servicio al de fábrica (ver directorio más abajo), Ud. puede comunicarse
con la sucursal de servicio más cercana para obtener una reparación oportuna y eficaz de su producto. Si su producto está todavía bajo garan
tía, Ud. debe presentar comprobante de compra para no ocasionar ningunos cargos por servicio. Para servicio después del vencimiento de la
garantía, llame al lugar más cercano de los abajo indicados.
In Canada
How you can obtain efficient and expedient carry-in, mail-in, or in-home service for your product
Please contact Philips at 1 -800-661-6162 (French speaking)
1 -800-363-7278 (English speaking)
Au Canada
Comment obtenir le Service après-vente pour les produits apportés ou envoyés par la poste à notre centre de service ou le service à domicile
Veuillez contacter philips â: 1 -800-661 -6162 (Francophone)
1-800-363-7278
En el Canadé
Corno recibir servicio efficiente para su producto, en persona, por correo o a domicilio
Favor de comunicarse con Philips al: 1-800-661-6162 (francòfono)
1-800-363-7278 (anglòfono)
MAC2929 12/99
EL4482-3 Rev. ВВ
3135 015 07541
46
Page 47

QUALtTY SERVICE IS AS CLOSE AS YOUR TELEPHONE! SlMKY LOOK OVER THE LIST BELOW FOR THE NUMBER OF A FACTORY SERVICE CENTER
NEAR YOU. Your product will receive efficient and EXPEDIENT CMRY-IN, MAIL-IH, OR IN-HOME SERVICE, AND YOU WILL RECEIVE PEACE OF MIND
KNOWING YOUR PRODUCT IS BEING GIVEN THE EXPERT ATTENTION OF PHILIPS’ FACTORY SERVICE. AnD, IF THE PHONE NUMBER USrtO FOR YOUR AREA
IS LONG DISTANCE, CAL11-800-242-9225 FDR FACTORY SERVICE.
COMMENT OBTENIR NOTRE SERVICE APRÈS VENTE RAPIDE ET EFFICACE SOIT PAR COURRIER, k DOMICILE, OU EN SE PRÉSENTANT A UN CENTRE OE SERVICE PHILIPS. PLUS DE EOO CENTRES
DE RÉCEPTION DE PRODUITS A RÉPARER A TRAVERS LE PAYS: CONTACTER LE CENTRE DE SERVICE AUX CONSOMMATEURS LE PLUS PROCHE POUR SAVOIR L’EMPUCEMENT DE CES DÉPOts
CÚMO OBTENER UN SERVICIO OPORTUNO Y EFICIENTE POR CORREO, EN CASA O EN PERSONA PARA SU PRODUCTO A TRAVÉS DE UN CENTRO PHILIPS DE SERVICIO. MAS DE 600 SITIOS POR
TODO EL PAIS PARA U RECEPCION DE PRODUCTOS NECESITADOS DE REPARACIONES: COMUNICARSE CON EL CENTRO DE SERVICIO DE FABRICA MAS CERCANO PARA ESTOS LUGARES DENTRO
DANS UN RAYON DE 50 A 75 MILES (50 KM A120 KM) OU CENTRE DE SERVICE LOCAL.
DE UN RADIO DE 50 A120 KM (SO A 75 MILLAS) DEL CENTRO DE SERVICIO LOCAL.
GEORGIA
Philips Factory Service of Georgia
200 N. Cobb Pkwy., Suite 120
Marietta, GA 30062
(770) 795-0085
FLORIDA
Philips Factory Service of Florida
1911 US Highway 301 North
Tampa, FL 33619
(813) 621-8181
WESTERN U.S.A.
Philips Factory Service Wester# Region
681 East Brokaw Rd.
San Jose, CA95112
(408) 436-8566
TEXAS
Philips Factory Service of Texas
1110 N. Post Oak Rd., Suite 100
Houston, TX 77055
(713) 682-3990
CENTRAL U.S.A.
Philips Factory Service Central US
950 Keynote Circle
Brooklyn Heights, OH 44131
(216) 741-3334
MICHIGAN
Philips Factory Service of Michigan
25173 Dequindre
Madison Heights, Ml 48071
(248) 544-2110
DALLAS AREA
Philips Factory Service of Dallas
415 N. Main Street, #107
Euless, TX 76040
(713) 682-3990
ILLINOIS
Philips Factory Service of Illinois
1279 W. Hamilton Pkwy.
Itasca, IL 60143
(630) 775-0990
TENNESSEE
Philips Factory Service of East Tennessee
6700 D Papermill Rd.
Knoxville, TN 37919
(423) 584-6614
MID-ATLANTIC
Philips Factory Service Mid-Atlantic
352 Dunks Ferry Rd.
Bensalem. PA 19020
(215) 638-7500
MAC2S29
47
Page 48

LIMITED WARRANTY
COLOR TELEVISION
90 Days Free Labor
One Year Free Replacement of Parts (Two Years Free Replacement on Color Picture Tube)
This product can be repaired in-home.
WHO IS COVERED?
You must have proof of purchase to receive vsrarranty service. A sales
receipt or other document showing that you purchased the product is
considered proof of purchase.
WHAT IS COVERED? .
Warranty coverage begins the day you buy your product. For 90 doys
thereafter, all parts will be repaired or replaced free, and labor is free.
From 90 days to one year from the day of purchase, all parts will be
repaired or replaced free, but you pay for all labor charges. From one
to two years from the day of purchase, you pay for the replacement or
repair of all parts except the picture tube, and for all labor charges.
After two years from the day of purchase, you pay for the replacement
or repair of all parts, and for all labor charges.
All parts, including repaired and replaced parts, are covered only for
the original warranty period. )^hen the vrarranty on the product
expires, the warranty on all replaced and repaired parts also expires.
WHAT IS EXCLUDED?
Your warranty does not cover:
• labor charges for installation or setup of the product, adjustment of
customer controls on the product, and installation or repair of
antenna systems outside of the product.
• product repair and/or part replacement because of misuse, acci
dent, unauthorized repair or other cause not within the control of
Philips Consumer Electronics Company.
• reception problems caused by signal conditions or cable or antenna
systems outside the unit
• a product that requires modification or adaptation to enable it to
operate in any country other than the country for which it was
designed, manufactured, approved and/or authorized, or repair of
products damaged by these modifications.
• incidental or consequential damages resulting from the product.
(Some states do not allow the exclusion of Incidental or consequen
tial damages, so the above exclusion may not apply to you. This
includes, but is not limited to, prerecorded material, whether copy
righted or not copyrighted.)
• a product used for commercial or institutional purposes.
WHERE IS SERVICE AVAILABLE?
Warranty service is available in all countries where the product is offi
cially distributed by Philips Consumer Electronics Company. In coun
tries where Philips Consumer Electronics Company does not distribute
the product, the local Philips service organization will attempt to pro
vide service (although there may be a delay if the appropriate spare
parts and technical manual(s) are not readily available).
MAKE SURE YOU KEEP...
Please keep your sales receipt or other document showing proof of
purchase. Attach it to this owner’s manual and keep both nearby. Also
keep the original box and packing material in case you need to return
your product.
BEFORE REQUESTING SERVICE...
Please check your owner’s manual before requesting service.
Adjustments of the controls discussed there may save you a service
call.
TO GET WARRANTY SERVICE IN U.S.A.,
PUERTO RICO OR U.S. VIRGIN ISLANDS...
Contact a Philips factory service center (see enclosed list) or autho
rized service center to arrange repair.
(In U.SA., Puerto Rico and U.S. Virgin Islands, all implied warranties,
including implied warranties of merchantability and fitness for a particu
lar purpose, are limited in duration to the duration of this express war
ranty. But, because some states do not allow limitations on how long
an implied warranty may last, this limitation may not apply to you.)
TO GET WARRANTY SERVICE IN CANADA...
Please contact Philips at:
I-800-661-6162 (French Speaking)
1-800-363-7278 (English Speaking)
(In Canada, this warranty is given in lieu of all other warranties. No
other warranties are expressed or implied, including any implied war
ranties of merchantability or fitness for a particular purpose. Philips is
not liable under any circumstances for any direct, indirect, special, inci
dental or consequential damages, howsoever incurred, even if notified
of the possibility of such damages.)
REMEMBER...
please record the model and serial numbers found on the product
below. Also, please fill out and mail your warranty registration card
promptly. It will be easier for us go notify you if necessary.
MODEL#
SERIAL#
Printed in U.S.A.
Philips Consumer Electronics Company, P.O. Box 2976, Longview,Texas 75606, (903) 242-4800
48
 Loading...