

Philips TD6816/BM931L, TD6816/BH051P, TD6816/BH001P, TD6816/BB921K, TD6816/BB051P User Manual
...Page 1

Page 2

Safety information
The marking on the product certifies its conformity with the technical
regulations for user safety and electromagnetic disturbance which were
applicable on the date of approval in accordance with European Union
Directive No. N° 73/23/EEC, 89/336/EEC, 91/263/EEC and 93/68EEC.
Power requirements
This product requires an electrical supply of 230 volts, alternating
monophased current, excluding IT installations defined in standard
EN 60-950.
Warning:
The electrical network is classified as dangerous according to criteria in
the standard EN 60-950.
The only way to power down this product is by unplugging the power cable
from the electrical outlet. Make sure the electrical outlet is located close to
the apparatus and is always easily accessible.
It is recommended that this telephone be used as a complement to
another telephone which does not require mains power.
Safety precautions
Do not allow the handset to come into contact with water.
•
•Do not open the handset or the charger. This could expose you to
high voltages. Contact our after-sales service for all repairs.
• Do not allow the charging contacts or the battery to come into
contact with conductive materials such as keys, paper clips, rings,
bracelets, etc.
•Make sure you insert the batteries with their polarities in the correct
position.
Page 3

Contents
Introduction 2
Installing your extra handset 3
Deciding where to put the charger 3
Installing the charger on a horizontal surface 3
Mounting the charger on a wall 4
Charging your handset 5
Selecting the menu language 5
Registering your extra handset with your Onis base station 6
Changing the name of your base station 7
Using your extra handset 8
Making an outside call 8
Answering an outside call 9
Making an internal call 9
Answering an internal call 10
Using the handset loudspeaker 10
Managing the Baby Sit mode 10
Transferring calls 11
Managing a conference call 12
Locking the handset keypad 12
Using the battery saver 13
Maintenance 14
Changing the battery 14
Caring for your handset 15
Contents
5
Page 4

Introduction
Yo ur Onis extra handset comprises:
• a charger,
• a handset,
• a power cable.
• 2 standard AA/R6 rechargeable batteries.
This guide shows you how to install and use your Onis
extra handset.
Please refer to the corresponding Onis user manual for
information on:
• using the phonebook,
• using the answering machine (Onis memo and Onis Vox only),
• troubleshooting.
Note:
You should also refer to the manufacturer’s handbook
corresponding to the base station with which you are using this
handset.
Introduction6
Page 5
Installing your extra
handset
Deciding where to put the charger
• Place the charger near a main outlet supplying 220-240V at
50Hz.
• To reduce to a minimum any interference with other electronic
devices such as telephones, televisions, screens, etc. we
advise you to place your charger at least 50 cm from any other
electronic device.
• Place the charger on a flat surface as with the base station or
mount it on a wall.
• Significant obstacles such as concrete walls or metallic
supports (windows and door frames, partitions, etc.) will lessen
the communication range between the base station and the
handset.
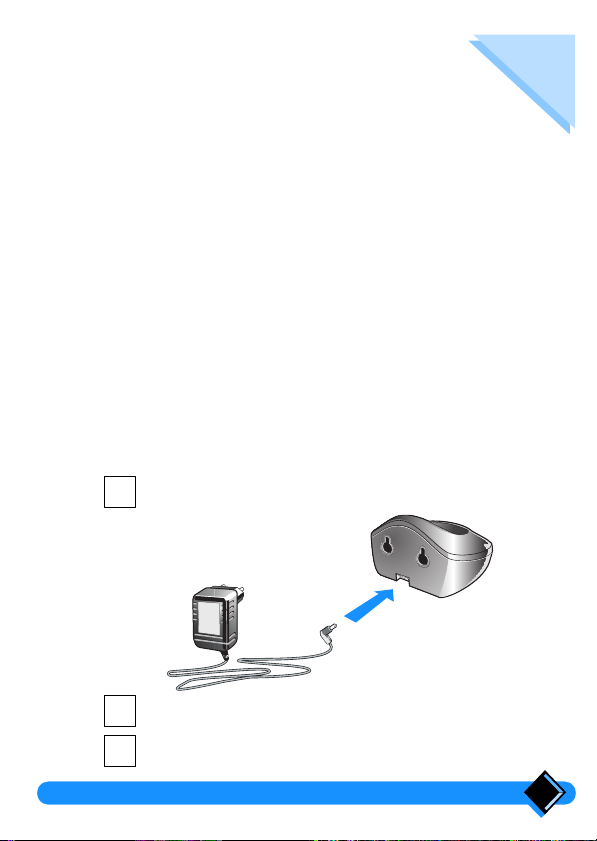
Installing the charger on a horizontal surface
1
Plug the power cable into the charger.
2
Plug the power cable into the wall socket.
3
Place the handset in the charger.
Installing your extra handset 7
Page 6
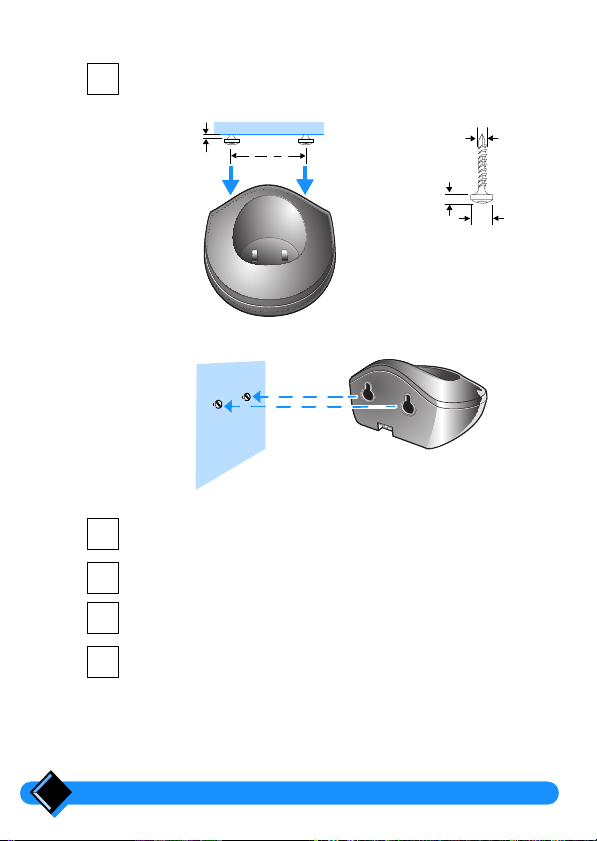
Mounting the charger on a wall
1
Fix the screws (not supplied) according to the diagram
below.
2 - 2.5 mm
46 mm
2
Plug the power cable into the charger as shown on
page 7.
3
Mount the charger on the screws.
4
Plug the power cable into the wall socket.
3 mm
1.5 - 2 mm
8 mm
5
Place the handset in the charger.
8
Installing your extra handset
Page 7

Charging your handset
Your handset is powered by 2 rechargeable AA/R6 batteries.
Before you use your handset for the first time, charge
it for at least 16 hours.
life of the battery.
To charge the handset, place it on the charger or on the base
station. The
the battery is charging.
When the
The charger must be connected to a power supply using the power
cable supplied.
b symbol will appear on the display to indicate that
b symbol disappears, your handset is fully charged.
This precaution helps to lengthen the
Tip
To ensure an optimum handset charge, replace the
handset on the charger regularly.
Selecting the menu language
1
Press R , then press - until you reach
o.
Press
MENU LANG
2
Press
o
is displayed.
.
SETUP
.
3
-
Press
Press
A beep confirms that the language has been selected.
or + to scroll through the language options.
o
to choose a language.
Installing your extra handset
9
Page 8

Registering your extra handset with your Onis base station
To register your extra handset with your base station, proceed as
follows:
1
Unplug the power cable of the base s tation, then plug it
in again.
The base station beeps to indicate that it is now in
registration mode.
It is also possible to set the base station to registration mode using a
handset that has already been registered. Instead of step 1 above,
proceed as follows:
Press R, then press + to display
1.
Press - until
2.
Enter the registration code (this is given on a sticker labelled “RC”
3.
under the base station). Press
Your handset beeps to indicate that the base station is now in
registration mode.
2
Move the handset to be registered close to the base
station and press
mode.
3
Press
+
to display
is displayed. Press o.
ADD HS
R
SETUP
.
o
on the handset to enter menu
, then press o.
SETUP
. Press o.
10
4
Press
-
until
REGISTER
is displayed, then press o.
CODE? is displayed.
5
Enter the registration code (this is given on a s ticker
labelled “RC” under the base station). Press
The handset will search for a base station that is in
registration mode.
After a few seconds, the handset beeps and
is displayed. In this case go to the next step.
If the handset cannot find a base station,
displayed, and you will need to try again.
6
Press
R
to leave menu mode.
REGISTER
FAILED will be
Installing your extra handset
o
.
Page 9

Changing the name of your base station
The default name of your base station is “PHILIPS”. You can
change this name from your extra handset as follows:
1
2
3
R
Press
o
Press
o
If the base station has a name, this will be displayed. You
can delete the existing name using the
station has no name, BASE NAME? will be displayed.
Enter the new name (max. 8 characters) using the
handset keypad.
You can enter characters by pressing the key with the
required character on it one or more times.These characters
are engraved on the handset keypad. If you wish to enter
two successive characters which are on the same key, you
need to distinguish them by pressing the
two characters. You delete a character with the + key.
For example: to enter PHILIPS you would press the
following keys.
, then press + to display
.
-
.
BASE NAME
until
is displayed, then press
SETUP
. Press
+ key. If the base
- key between the
744
PH I L I P S
4
Press
444 555 444 7-7777
-
o
. Press R to leave menu mode.
Installing your extra handset
11
Page 10

Using your extra
handset
Making an outside call
Direct dialling
1
Press the
The
tone in the handset earpiece.
2
Dial the number using the number keys.
The number called is displayed for 10 seconds after the last
key is pressed.
If the number you enter is longer than 10 digits, the display
will scroll the number to the left to show the last digits.
3
To h ang u p, p r ess
charger.
The duration of your call in minutes and seconds is
displayed for 4 seconds.
Dialling with number preparation
This way of dialling allows you to make corrections to the number
before dialling.
1
Dial the number (up to 23 digits) before pressing the
key. You can use the + key to ma ke corr ections by
cancelling the last digit entered.
If the number you enter is longer than 10 digits, the display
will scroll the number to the left to show the last digits.
If you want to see the whole number you have dialled so
far, press
longer than 10 digits.
t key on the handset.
t symbol is shown on the display and you hear the dial
t or replace the handset in the
Tip
.
o
The number will scroll to the left if it is
t
Using your extra handset12
Page 11

2
Press the
The number prepared is automatically dialled.
You can also press
activated and the number is dialled.
3
To hang up, press
charger.
The call duration is displayed for 4 seconds.
t key on the handset.
H. The handset loudspeaker is
t or replace the handset in the
Answering an outside call
When someone calls you, the base station and the extra handset
ring, the
green light on the base station flashes.
t symbol blinks on the extra handset display and the
1
Press the
The
light on the base station blinks regularly to indicate that a call
is in progress.
You can also press
activated and you can take the call.
2
To hang up, press
base station.
The call duration is displayed for 4 seconds.
t
key on the handset.
t symbol stops blinking on the handset. The green
H. The handset loudspeaker is
t or replace the handset on the
Making an internal call
When you have more than one handset, you can make internal
calls free of charge between handsets registered with the same
base station.
1
Press
e
You hear the internal dial tone and the
on the display.
2
Dial the number of the handset you want to call, or
press
3
To hang up, press
charger.
Note:
If you press * to call all handsets, and one of your handsets is in
Baby Sit mode, then this handset will take the call.
.
*
to call all your handsets.
t
or replace the handset in the
t symbol is shown
Using your extra handset
13
Page 12

Answering an internal call
When another handset calls you, your handset will ring with the
internal call melody, the
number of the handset calling you will be displayed.
1
2
t
Press
The
To hang up, press
charger.
.
t symbol is displayed.
t symbol will blink on the display and the
t
or replace the handset in the
Using the handset loudspeaker
Your extra handset is fitted with a loudspeaker as well, so that other
people with you can listen to the conversation.
1
During a call, press
The sound is amplified through the loudspeaker at the back
of the handset.
2
Adjust the volume of the loudspeaker when it is on,
+
using
3
To turn off the loudspeaker, press
or -.
H
.
H
again.
Managing the Baby Sit mode
The Baby Sit mode allows you to monitor sounds coming from
another room (e.g. the baby’s room). Because the Baby Sit mode
is a special type of inside call, it requires two handsets (of type Onis
6810 or 6816): one left in the baby’s room (Baby Sit mode handset)
and one you keep with you (Parents handset).
In order to use the Baby Sit mode, you must first set the handset to
be left in the room to be monitored (e.g. the baby’s room) in Baby
Sit mode.
Setting a handset in Baby Sit mode
14
1
Press R, then press - until
displayed. Press
o. .
BABY SIT
..
2
Press + or - to select ON. Press o.
Your handset beeps to indicate that the setting has been
changed.
3
Press
R
to exit menu mode.
Using your extra handset
is
Page 13

Note:
The handset in Baby Sit mode will not ring but can be used to make
and receive calls.
To put the handset in Baby Sit mode back into normal mode,
proceed as above. In step
to select
OFF.
2, ON will be displayed. Press + or -
Using a handset in Baby Sit mode
1
Place the handset set in Baby Sit mode, in the room you
want to monitor (e.g. the baby’s room).
2
Using the Parents handset, press
of the Baby Sit mode handset.
The Baby Sit mode handset will not ring but its microphone
will be activated to pick up surrounding sounds.
3
Turn on the loudspeaker of the Parents handset by
pressing
H
.
e
and the number
Note:
If you receive an outside call while using the Baby Sit mode,
neither the Baby Sit mode or Parents handsets will ring, but the
base station will.
Proceed with the outside call as usual and end it eventually by
pressing
To switch back to the Baby Sit mode, press
number of the Baby Sit Mode handset.
t .
e followed by the
Transferring calls
You can transfer an outside call from one handset to another
handset registered with the same base station.
1
During the call, press
The outside call is put on hold.
2
Dial the number of the handset to which you wish to
transfer the call, or press
The handset(s) called start(s) ringing.
e
.
*
to call all the handsets.
Using your extra handset
15
Page 14

3
Once the other handset answers, you can either:
e.
t
.
- Transfer the call by pressing
- Switch back and forth between the other handset and
your outside call by using
If the other handset does not reply, you can return to your
outside call by pressing
outside and inside call by pressing t.
e, or you can hang up both your
Managing a conference call
A conference call involves 3 persons in a common call.
1
While an outside call is in progress, press
another handset.
The outside call is put on hold.
2
Dial the number of the handset with which you want to
initiate a conference call, or press * to call all the
handsets.
The handset(s) called start(s) ringing.
3
Once the other handset answers, you can either :
- initiate the conference call by pressing
- switch back and for th between the other handset and
your outside call by using e.
If the other handset does not reply, you can return to your
outside call by pressing e, or you can hang up by
pressingt .
Locking the handset keypad
To prevent unwanted key presses, you may want to lock the
handset keypad. For example while you have the handset in
your pocket.
1
Press the R key and then the * key for 2 seconds.
The handset beeps to confirm the new setting and LOCKED
is displayed on the handset.
If a key is pressed, while the keypad is locked, a help
message will be displayed for 2 seconds, unless the handset
is set in off mode.
2
To unlock the handset keypad, press again * key for 2
seconds.
The handset beeps to confirm the new setting.
The handset keypad is automatically unlocked when an
incoming call is received or when you place your handset on
the base station.
e
o
to call
.
16
Using your extra handset
Page 15

Using the batter y saver
Use the battery saver if you want to use the handset away from the
base station or charger for a long period of time.
Switching on the battery saver
1
Press and hold the o key until your handset beeps.
Your handset switches to battery saver mode.
Note:
In battery saver mode, the handset will not ring. However, if
someone calls, the base station will ring.
Switching off the battery saver
• The battery saver mode will switch off as soon as you press a
key.
• The battery saver mode will also switch off as soon as you
place your handset back on the base station. Then, if
necessary, the handset will start to recharge.
Using your extra handset
17
Page 16

Maintenance
Changing the battery
Your handset is powered by 2 rechargeable AA/R6 batteries. In
case of replacement, you must use the following approved
batteries: PHILIPS R6 NC-P, Saft RC6. The manufacturer is not
liable if these recommendations are not respected.
1
Slide down and lift off the battery cover.
2
Insert the new batteries as shown.
3
Replace the battery cover.
1 2
3
NEVER USE NON RECHARGEABLE BATTERIES!
NEVER USE NON RECHARGEABLE BATTERIES!
NEVER USE NON RECHARGEABLE BATTERIES! NEVER USE NON RECHARGEABLE BATTERIES!
Maintenance18
Page 17

Warning!
.
Your handset batteries contain cadmium.
Check your local regulations for special disposal
instructions.
Caring for your handset
To clean your handset or charger, first unplug the mains cable.
Wipe with a cloth or chamois moistened slightly with soapy water,
then with a dry cloth. This will help to keep your handset looking as
good as new.
Note:
Never spray your handset or charger with cleaning products or
solvents.
Clean the charging contacts on the handset and the charger using
a dry lint-free cloth.
Maintenance
19
 Loading...