

Page 1
SH402
User manual
Register your product and get support at
www.philips.com/support
Page 2

Contents
1 Important safety instructions 2
Hearing Safety 2
General information 2
2 Your Bluetooth wireless
headphones 3
What's in the box 3
Other devices 3
Overview of your Bluetooth
wireless headphones 3
3 Get started 4
Charge your headphones 4
Pair the headphones with your
mobile phone 5
4 Use your headphones 5
Reconnect the headphones to a
Bluetooth device 5
Manage your calls and music 5
Wear your headset 6
5 Technical data 7
6 Notice 8
Declaration of conformity 8
Disposal of your old product
and battery 8
Compliance with EMF 8
Trademarks 9
7 Frequently asked questions 10
EN 1
Page 3
2 EN
Operate in a place where
temperature is between 0ºC
(32ºF) and 45ºC(113ºF) (up to
90% relative humidity).
store in a place where
temperature is between -25ºC
(-13ºF) and 55ºC(131ºF) (up to
50% relative humidity).
Page 4
2 Your
Bluetooth
wireless
headset
Quick start guide
Congratulations on your purchase, and
welcome to Philips! To fully benet
from the support that Philips oers,
register your product at
www.philips.com/welcome.
With this Philips wireless headset, you
can:
• enjoy convenient wireless
handsfree calls;
• enjoy and control wireless music;
• switch between calls and music.
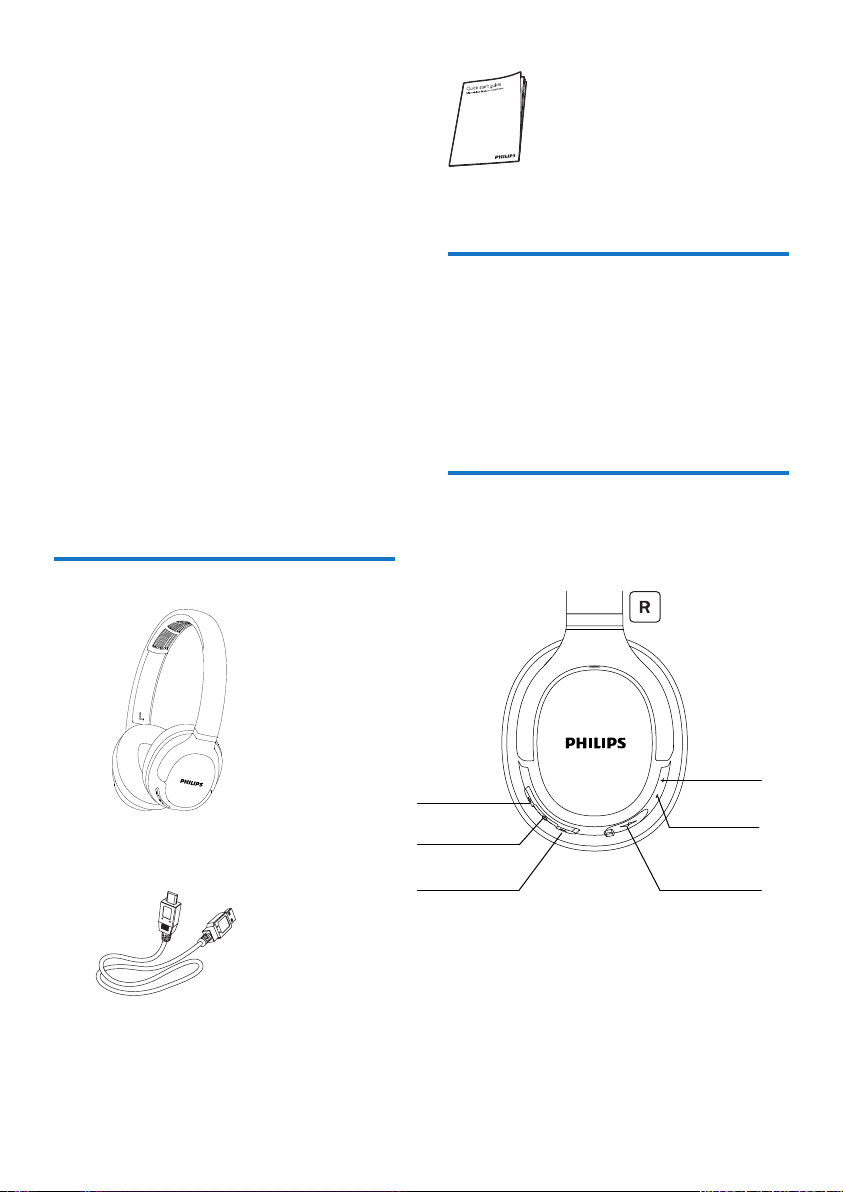
What's in the box
Philips Bluetooth wireless headphones
On-Ear (TASH402)
Other devices
A mobile phone or device (e.g.
notebook, PDA, Bluetooth adapters,
MP3 players etc) which supports
Bluetooth and is compatible to the
headset (see 'Technical data' on
page 7).
Overview of your
Bluetooth wireless
headphones
USB charging cable (for charging only)
+ Volume control button
On/o button
- Volume control button
Micro USB charging slot
LED indicator
Microphone
EN 3
Page 5

3 Get started
Charge the battery
Note
Before you use your headset for the rst
time, charge the battery for 5 hours for
optimum battery capacity and lifetime.
Use only the original USB charging cable
to avoid any damage.
Finish your call before charging the
headphones, as connecting the
headphones o.
You can operate the headphones
normally during charging.
Connect the supplied USB charging
cable to:
• the micro USB charging slot on
the headphones and;
• the charger/USB port of a
computer.
LED turns white during
charging and turns o when the
headphones is fully charged
earliest paired device is replaced by the
new one.
1 Make sure that the heaphones are
fully charged.
2 Press and hold for 2 seconds to
turn the headphones on.
3 Make sure that the mobile phone is
turned on and its Bluetooth feature
is activated.
4 Pair the headphones with the
mobile phone. For detailed
information. refer to the user
manual of your mobile phone.
The following example shows you
how to pair the headphones with your
mobile phone.
1 Activate the Bluetooth feature of
your mobile phone, select Philips
SH402.
2 Enter the headset password”0000”
(4 zeros) if prompted. For those
mobile phones featuring Bluetooth
3.0 or higher, no need to enter a
password.
Tip
Normally,a full charge takes 2 hours.
Pair the headphones with
your mobile phone
Before you use the headphones with
your mobile phone for the rst time,
pair it with a mobile phone. A successful
pairing establishes a unique encrypted
link between the headphones and
mobile phone. The headphones store
the last 8 devices in the memory. if you
try to pair more than 8 devices,the
4 EN
Philips SH402
Page 6

4 Use your
headphones
Manage your calls and
music
On/o
Connect the headphones
to a Bluetooth device
Turn on your mobile
phone/Bluetooth device.
Press and hold for 3 seconds to
turn the headphones on.
The blue light on.
The headphones are reconnected to the last connected
mobile phone/Bluetooth
device automatically. If the
headphone can not connect
to last device within 13s, enter
pairing mode.
Tip
If you turn on the mobile phone/Bluetooth
device or activate the Bluetooth feature
after turning on the headphones, you have
to reconnect the headphones and mobile
phone/Bluetooth device manually.
Note
If the headphones fails to connect to any
Bluetooth device within range in 5 minutes, it
will power o automatically to save the battery
life.
Task
Turn the
headpnones
on.
Turn the
headpnones
o.
Music control
Task
Play or pause
music
Adjust
volume.
Skip forward.
Skip
backward.
Call control
Task
Pick up/hang
up a call.
Reject an
incoming call.
Button
Button
Button Operation
Operation
Press and
hold for 2
seconds.
Press and
hold for 3
seconds.
The white
light on
and fades
out.
Operation
Press
once.
Press
once.
Press and
hold for 1
second.
Press and
hold for 1
second.
Press once.
Press and
hold for 1
second.
Redial the
last call
Double
click
EN 5
Page 7

Mute/unmute
the microphone
in a call.
Other headphones indicator status
Double
click
Wear your headset
Adjust the headband to t your head.
Headphones
status
The headphones
are connected
to a Bluetooth
device, while the
headphones in
standby mode
or while you are
listening to music
The headphones
are ready for
pairing.
The headphones
are on but not
connected to a
Bluetooth device.
Low battery level.
Battery is fully
charged.
Indicator
The blue LED
ashes for every 5
seconds.
The LED ashes
blue and white
alternately.
The LED ashes
blue and white
alternately, the
headphones will
turn o within
5 minutes.
The white LED
blinking 3 times for
every 1 minute
until it power o
automatically.
Light o.
6 EN
Page 8

5 Technical
data
Music time: 20 hours
Talk time: 20 hours
Standby time: 800 hours
Normal time for a full charge: 2
hours
Rechargeable lithium polymer
battery (200 mAh)
Bluetooth 5.0,
support (Hands-Free Prole - HFP),
Bluetooth stereo supported
(Advanced Audio Distribution
Prole - A2DP; Audio Video Remote
Control Prole - AVRCP)
Frequency range: 2.402-2.480GHz
Transmitter power: < 4dBm
Operating range: Up to 10 meters
(33 feet)
Digital echo & noise reduction for call clarity
Auto power o
Note
Specications are subject to change without
notice.
EN 7
Page 9

8 EN
Page 10

FCC Compliance Statement:
changes or modications not expressly
approved by the party responsible for
compliance could void the user’s
authority to operate the equipment.
This equipment has been tested and
found to comply with the limits for a
Class B digital device, pursuant to Part
15 of the FCC Rules. These limits are
designed to provide reasonable protection against harmful interference in a
residential installation. This equipment
generates, uses and can radiate radio
frequency energy and, if not installed
and used in accordance with the
instructions, may cause harmful interference to radio communications. However,
there is no guarantee that interference
will not occur in a particular installation.
EN 9
Page 11

If this equipment does cause harmful
interference to radio or television
reception, which can be determined by
turning the equipment o and on, the
user is encouraged to try to correct the
interference by one or more of the
following measures:
-- Reorient or relocate the receiving
antenna.
-- Increase the separation between the
equipment and receiver.
-- Connect the equipment into an outlet
on a circuit dierent from that to which
the receiver is connected.
-- Consult the dealer or an experienced
radio/TV technician for help.
ISED Compliance Statement:
This device contains licence-exempt
transmitter(s)/receiver(s) that comply
with Innovation, Science and Economic
Development Canada’s licence-exempt
RSS(s). Operation is subject to the
following two conditions:
1. This device may not cause interference.
2. This device must accept any interference, including interference that may
cause undesired operation of the
device.
RF Exposure Compliance Statement:
This equipment complies with FCC/IC
radiation exposure limits set forth for an
uncontrolled environment. This transmitter must not be co-located or
operating in conjunction with any other
antenna or transmitter. ce matériel est
conforme aux limites de dose d'exposition aux rayonnements FCC/IC énoncées pour un autre environnement.cet
émetteur ne doit pas être situées ou
opérant conjointement avec toute autre
antenne ou l'émetteur.
L’émetteur/récepteur exempt de licence
contenu dans le présent appareil est
conforme aux CNR d’Innovation,
Sciences et Développement
économique Canada applicables aux
appareils radio exempts de licence.
L’exploitation est autorisée aux deux
conditions suivantes :
1. L’appareil ne doit pas produire de
brouillage;
2. L’appareil doit accepter tout brouillage
radioélectrique subi, même si le brouillage est susceptible d’en compromettre
le fonctionnement.
10 EN
Page 12

page 4
Make sure that the LED light ashes
blue and white alternately
page 4
Make sure your mobile phone not only
supports (mono) HFP but also supports
A2DP (see “Technical data” on page 7 ).
page 7
11 EN
Page 13

UM_TASH402_00_EN_V1.0
WK1921
 Loading...