

Page 1
SRU 5150/86
Quick, Clean & Easy Setup
www.philips.com/urc
Instructions for use 4
Mode d'emploi 13
Bedienungsanleitung 22
Gebruiksaanwijzing 31
Vejledning 40
Bruksanvisning 49
Bruksanvisning 58
Käyttöohje 67
SF
NO
SV
DK
NL
DE
FR
EN
Manual_SRU5150_86 24-04-2007 15:42 Pagina 1
Page 2

Manual_SRU5150_86 24-04-2007 15:42 Pagina 2
Page 3
Manual_SRU5150_86 24-04-2007 15:42 Pagina 3
1
2
3
(
*
4
5
6
7
8
9
0
&
^
%
$
#
@
!
Page 4

Contents
1. Introduction . . . . . . . . . . . . . . . . . . . . . . . . . . . . . . . . . . . . . . . . . . . . . . . . . . . . . . . . . . . . 4
2. Setting up the remote control . . . . . . . . . . . . . . . . . . . . . . . . . . . . . . . . . . . . . . . . 4-6
3. Using the remote control . . . . . . . . . . . . . . . . . . . . . . . . . . . . . . . . . . . . . . . . . . . . 6-7
Keys and functions . . . . . . . . . . . . . . . . . . . . . . . . . . . . . . . . . . . . . . . . . . . . . . . . . . . . . . . 6-7
Extra functions . . . . . . . . . . . . . . . . . . . . . . . . . . . . . . . . . . . . . . . . . . . . . . . . . . . . . . . . . . . . 7
4. Extra possibilities . . . . . . . . . . . . . . . . . . . . . . . . . . . . . . . . . . . . . . . . . . . . . . . . . . . 8-10
Adding extra functions . . . . . . . . . . . . . . . . . . . . . . . . . . . . . . . . . . . . . . . . . . . . . . . . . . . . . 8
Delete devices. . . . . . . . . . . . . . . . . . . . . . . . . . . . . . . . . . . . . . . . . . . . . . . . . . . . . . . . . . . 8-9
Learning key functions . . . . . . . . . . . . . . . . . . . . . . . . . . . . . . . . . . . . . . . . . . . . . . . . . . . . . 9
Activating/de-activating the backlight function . . . . . . . . . . . . . . . . . . . . . . . . . . . . . . . 9-10
Restoring the original functions of the remote control . . . . . . . . . . . . . . . . . . . . . . . . . 10
5. Replacing the batteries . . . . . . . . . . . . . . . . . . . . . . . . . . . . . . . . . . . . . . . . . . . . . . . . 10
6. Support . . . . . . . . . . . . . . . . . . . . . . . . . . . . . . . . . . . . . . . . . . . . . . . . . . . . . . . . . . . . 11-12
Troubleshooting . . . . . . . . . . . . . . . . . . . . . . . . . . . . . . . . . . . . . . . . . . . . . . . . . . . . . . . 11-12
Need help? . . . . . . . . . . . . . . . . . . . . . . . . . . . . . . . . . . . . . . . . . . . . . . . . . . . . . . . . . . . . . . 12
Extra functions list . . . . . . . . . . . . . . . . . . . . . . . . . . . . . . . . . . . . . . . . . . . . . . . . . . . . . . . . 76
Information to the Consumer . . . . . . . . . . . . . . . . . . . . . . . . . . . . . . . . . . . . . . . . . . . . . . 77
1. Introduction
Congratulations on your purchase of the Philips SRU 5150 universal remote control.
The SRU 5150 is capable of operating up to 5 different devices. During setup you can
define yourself exactly which devices will be operated (see table below).
You can find information on how to prepare the SRU 5150 for use in
chapter 2 ‘Setting up the remote control’.
2. Setting up the remote control
The remote control can be set up to operate any 5 of the following devices:
Device Display indication
TV TV
Second TV TV2
VCR VCR
Second VCR VCR2
Personal Video Recorder PVR
TV-VCR combo TV-VCR
TV-DVD combo TV-DVD
DVD-VCR combo DVD-VCR
Amplifier AMPLIFIER
Home Theatre System HTS
Audio set AUDIO-SET
Tuner TUNER
Digital Media Receiver DMR
Set Top Box STB
Satellite receiver SAT
Digital Video Broadcasting Terrestrial device DVB-T
Cable decoder CABLE
CD player CD
Mini Disk MD
DVD player DVD
DVD recorder DVDR
Game console GAME
DVD recorder with Hard Disk Drive DVDR-HDD
4
English
Instructions for use
Manual_SRU5150_86 24-04-2007 15:42 Pagina 4
Page 5
Notes:
– Batteries are already installed in the remote control.
– If you wish to set up the remote control for operating your TV, you can skip step 3.
– If your device is a Philips device, you can skip step 5.
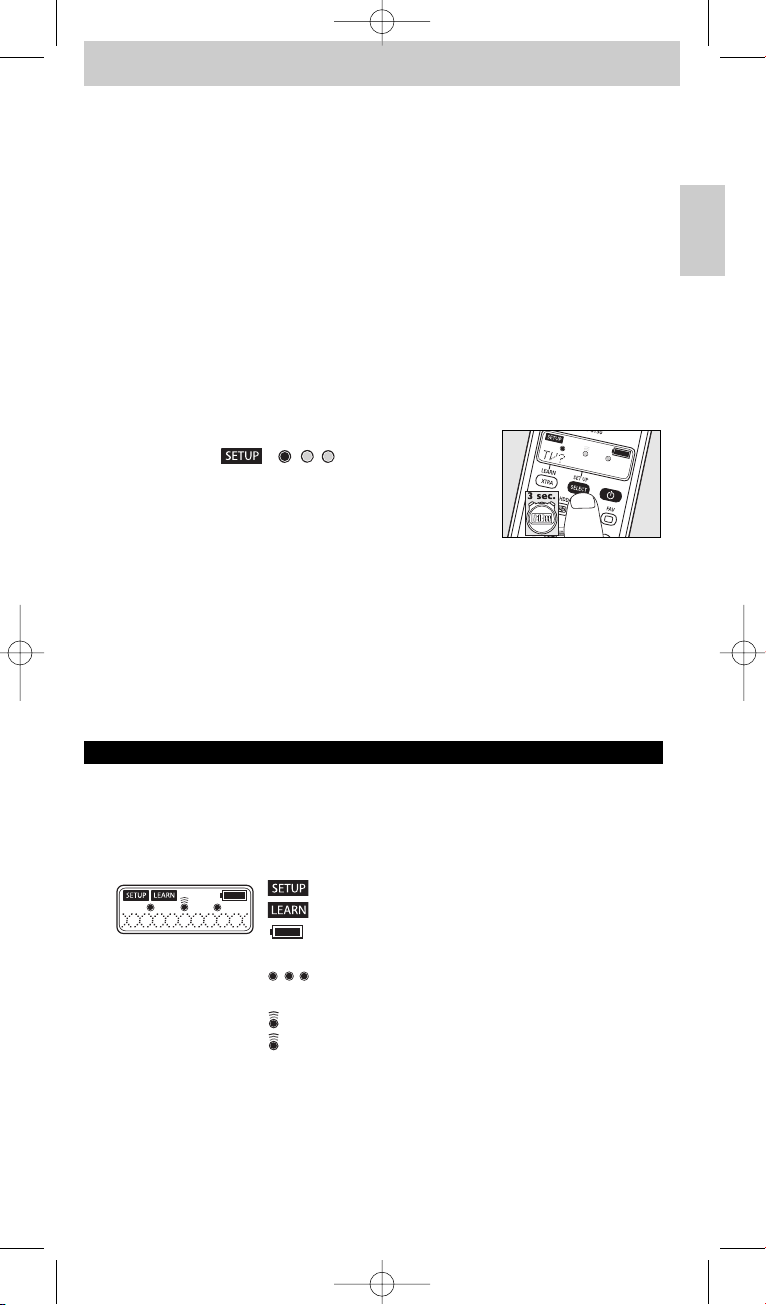
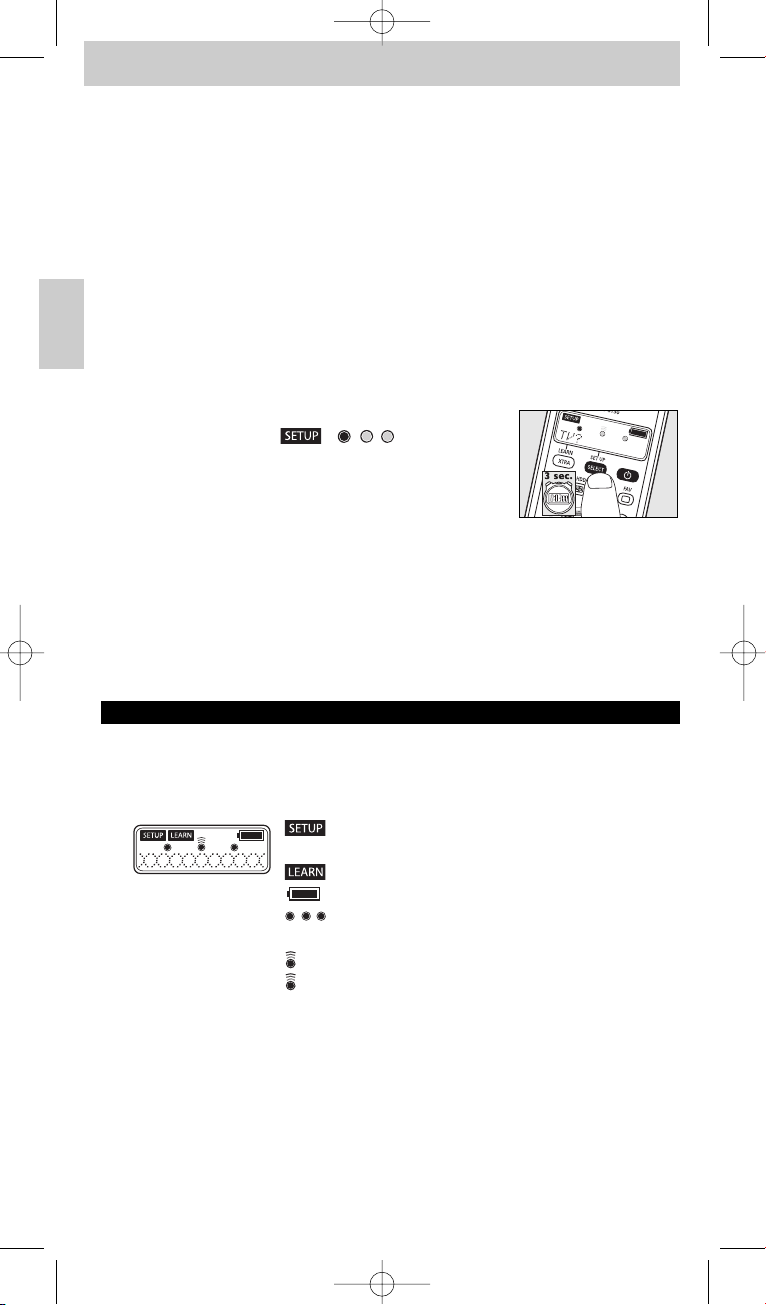
– You can exit setup mode at any time by keeping SETUP pressed for three seconds.
– Once installed, a device cannot be deleted from the device list. Only the brand name can
be changed (e.g. if you wish to operate a device type of a different brand).
To delete a device you have to clear the entire memory. For this,
see ‘Restoring the original functions of the remote control’ under 4. ‘Extra possibilities’.
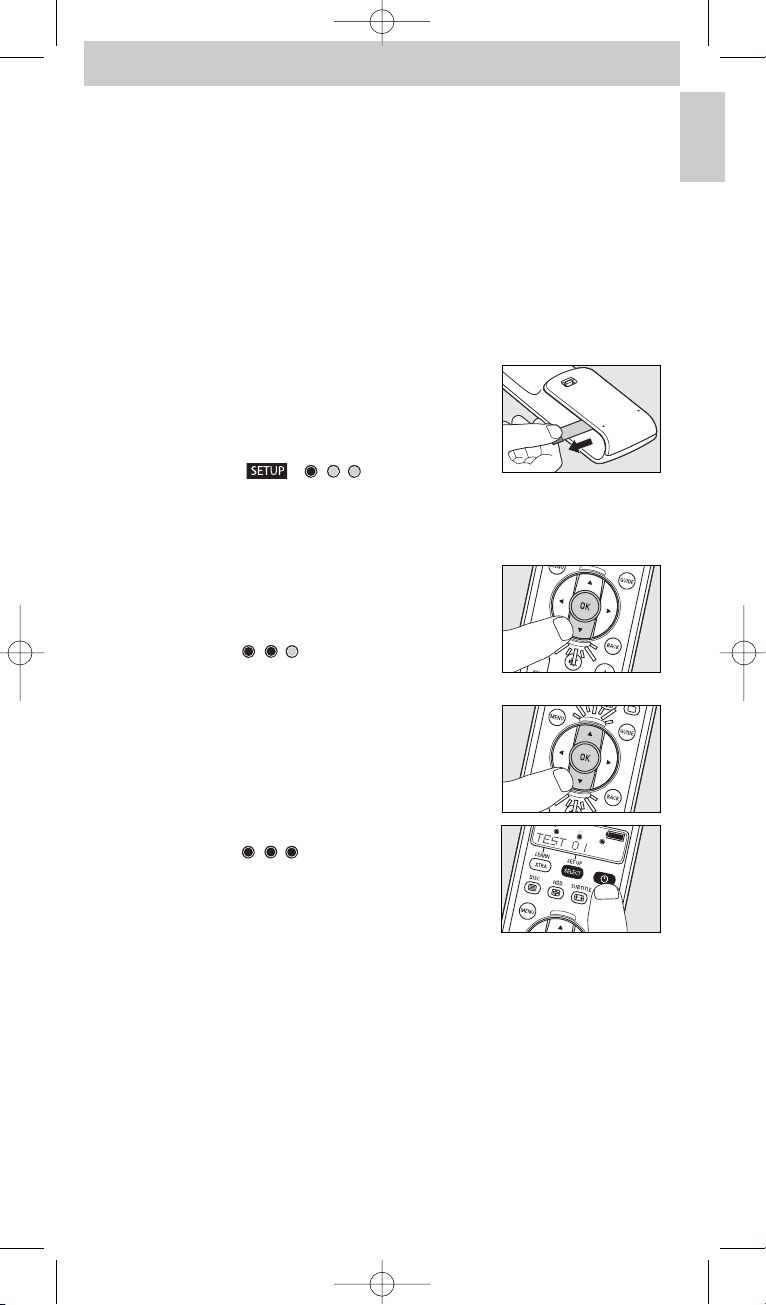
1 Switch on the device you wish to set up the remote control for. If the device is a
DVD-player/recorder or video recorder, insert a disk or tape and start playback.
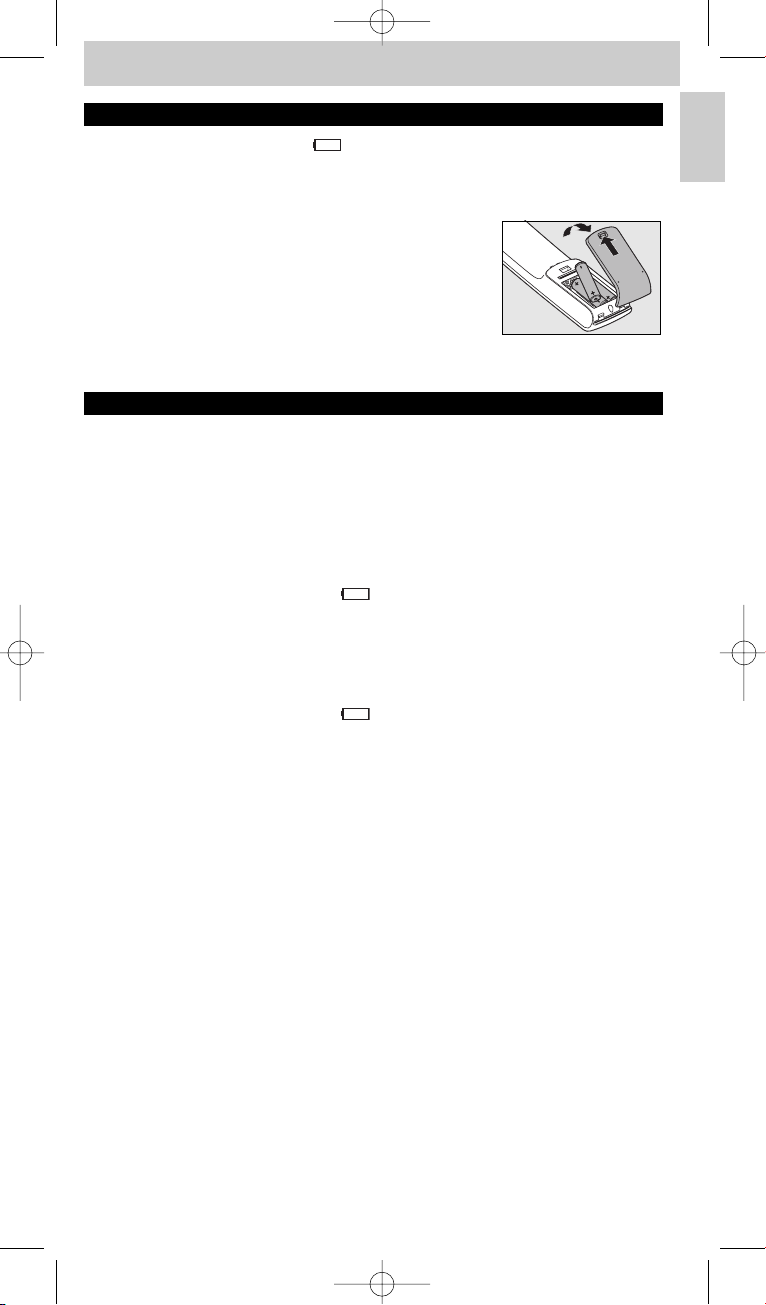
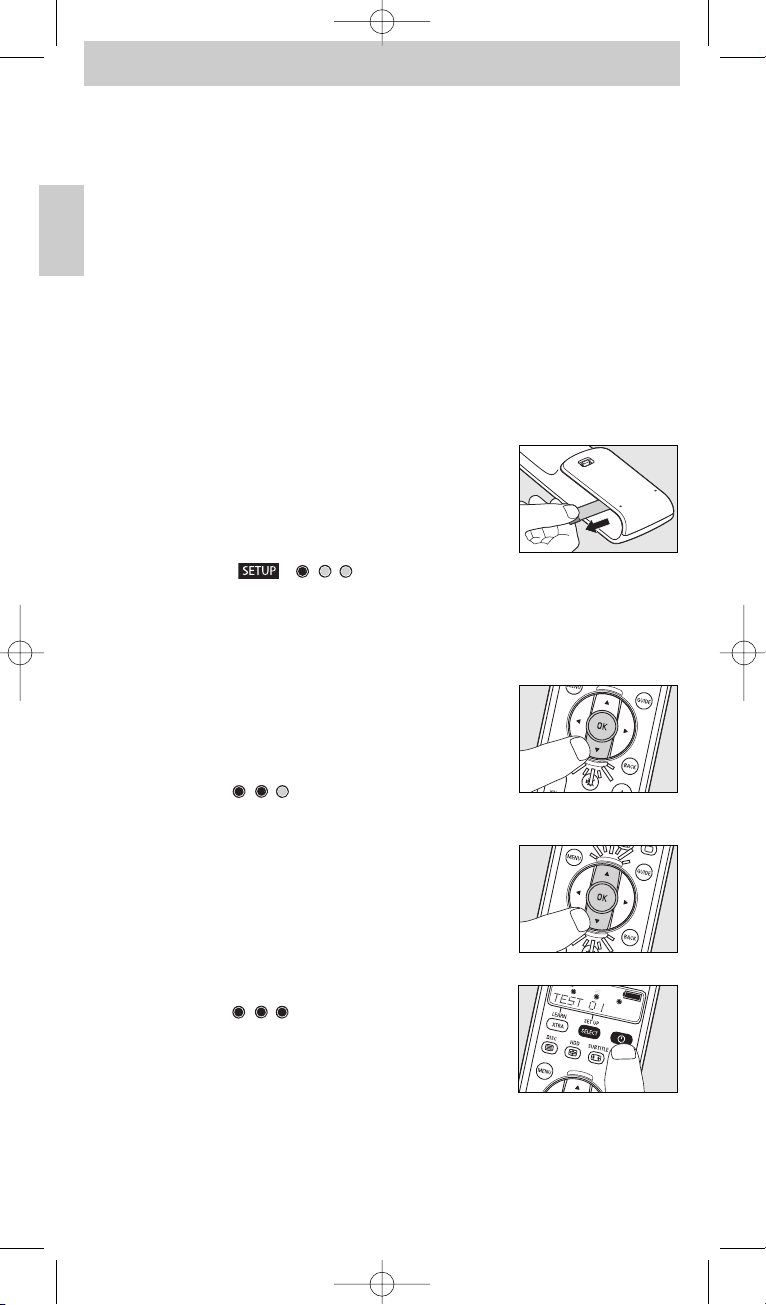
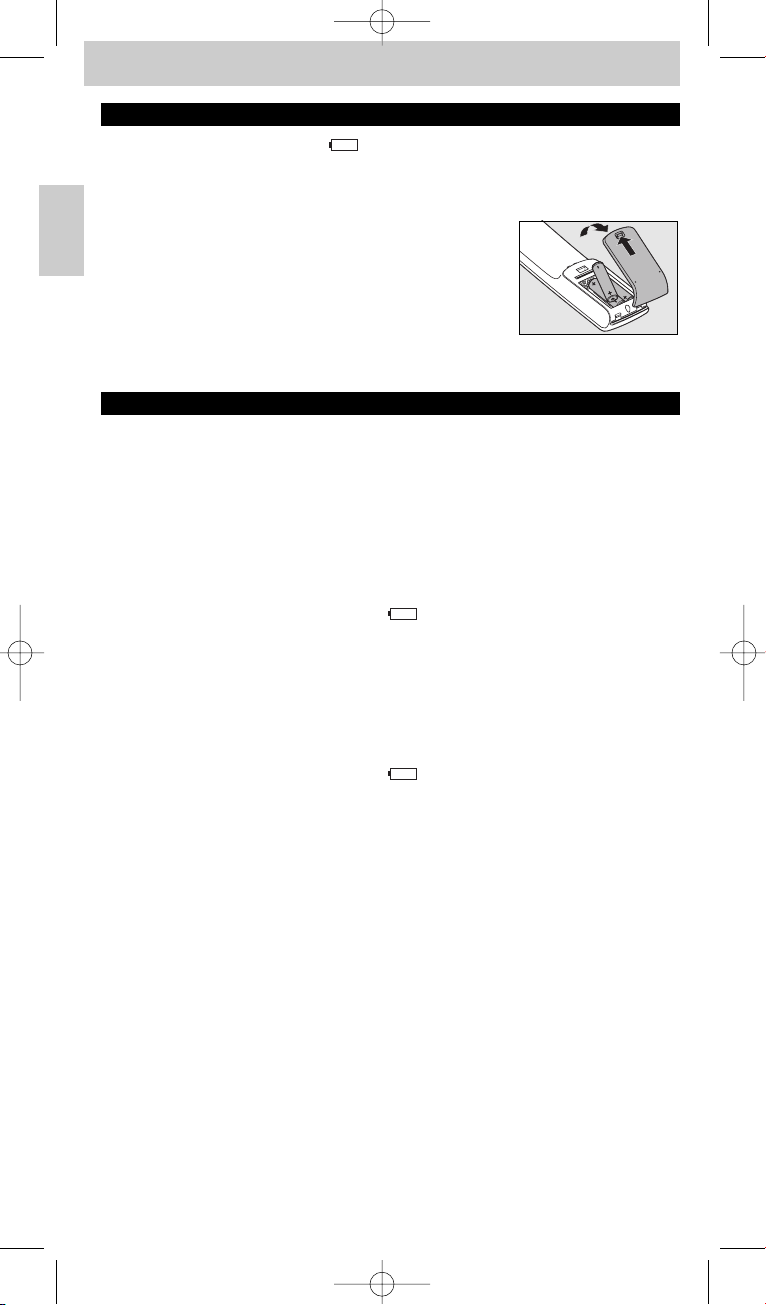
2 Pull out the protective strip from the battery
compartment to activate the batteries.
• If the strip does not come out easily, open the battery
compartment to get better access to the strip.
– The remote control will immediately enter setup mode:
- the display shows ‘ ’,‘ ’ and ’TV?’;
- the backlight turns on;
- the keys that can be used are blinking.
– The remote control is now ready to be set up for operating your TV.
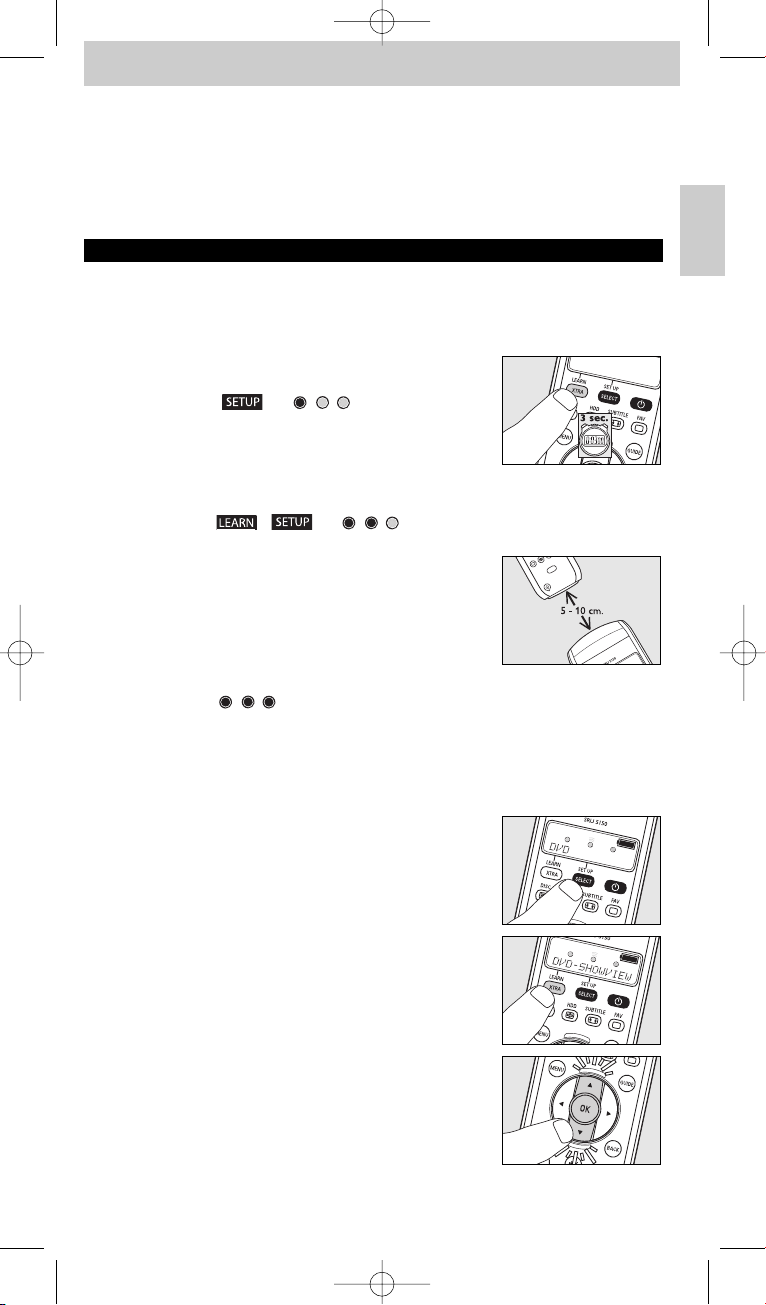
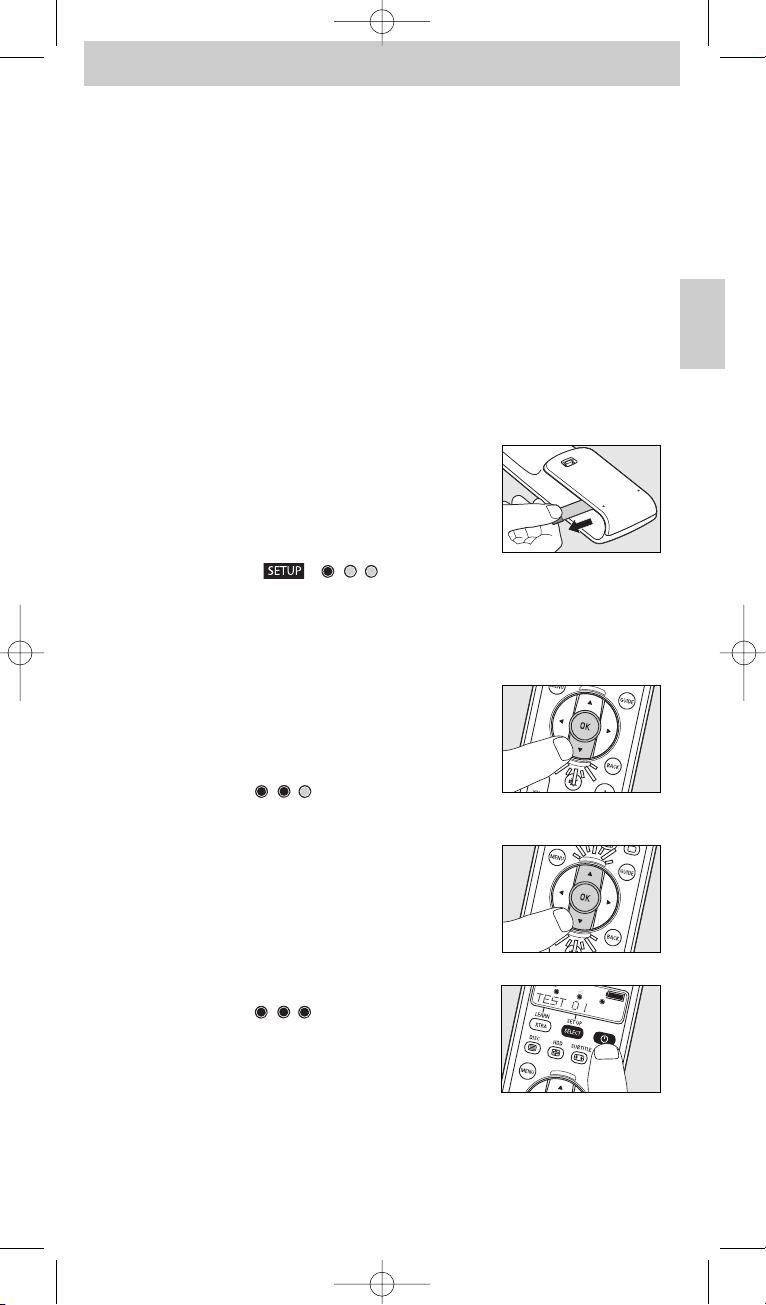
3 Use 4 to select the device you wish to set up
the remote control for (see table on previous page).
4 Confirm with OK.
– The display shows ‘ ’ and ’PHILIPS?’.
The keys that can be used are blinking.
5 Use 4 and 3 to select the brand of your device.
• If the brand of your device is not on the list, you can select
any other brand.
6 Confirm with OK.
7 Keep
yy
pressed until the device responds.
– The display shows ‘ ’.
8 Point the remote control at the device.
– The remote control now starts emitting all known ‘off
(standby)’ codes, one by one. Each time a code is sent,
this is shown on the display: ’TEST 01, 02, 03’, etc.
5
English
Instructions for use
Manual_SRU5150_86 24-04-2007 15:42 Pagina 5
Page 6
9 When the device responds, immediately release
yy
.
– The remote control has now found a code that works for your device.
’SETUP OK’ appears on the display.
– If the device does not respond and ’LIST END’ appears, no code was found for
the device. In order to operate the device with the remote control, it should learn
the original remote control functions key by key.
For this, see ‘Learning key functions’ under 4. ’Extra possibilities’.
10 Check if you can operate all device functions with the remote control.
– If this is the case, the remote control is ready to operate the device.
The backlight turns off.
• If this is not the case, continue with step 11.
• If you wish to set up the remote control for operating other devices,
continue with step 11.
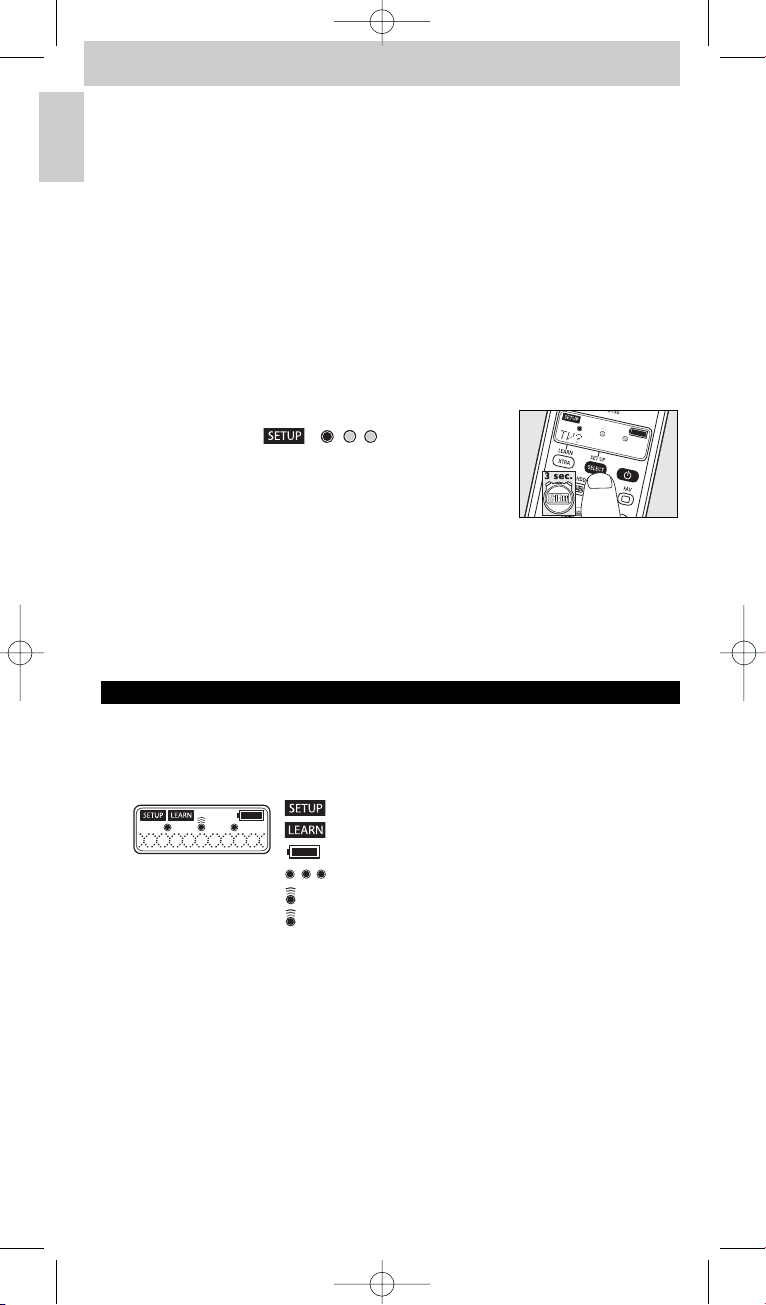
11 Keep SELECT pressed for three seconds:
– - the display shows ‘ ’,‘ ’ and ’TV?’.
- the backlight turns on.
- the keys that can be used are blinking.
– The remote control is now in setup mode.
12 Continue setup from step 3.
• If, after several times trying, a device still does not respond at all or not
properly to all key commands, the remote control cannot find a code for the
device. In order to operate the device with the remote control, it should
learn the original remote control functions key by key.
For this, see ‘Learning key functions’under 4. ’Extra possibilities’.
3. Using the remote control
Keys and functions
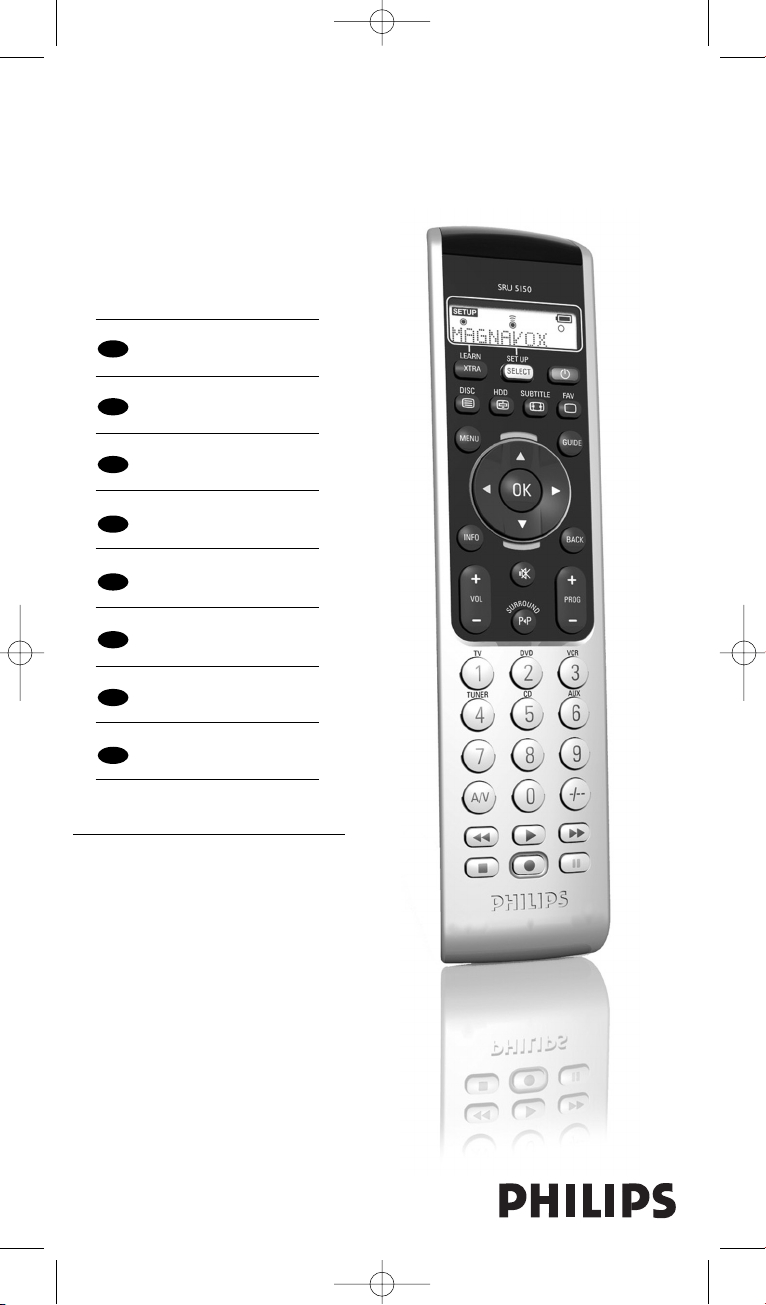
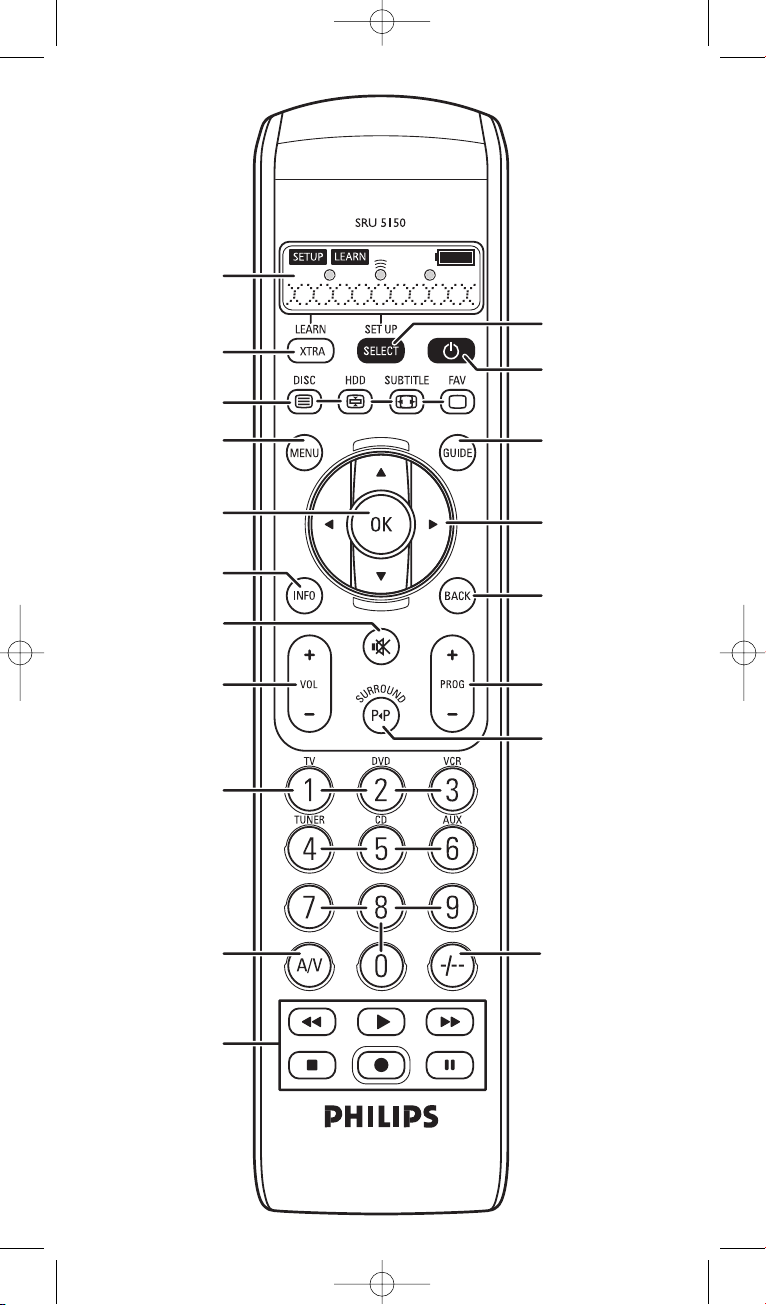
The illustration on page 3 gives an overview of all keys and their functions.
1 Display information screen. Shows current remote control status.
: remote control in setup or advanced function mode.
: remote control in learn mode.
: battery status. Blinks when battery power is low.
: light up in setup, learn, and advanced function mode.
: lights up when the remote control sends out a signal.
: lights up when the remote control receives a signal in
learn or advanced function mode.
TV: selected device.
PHILIPS: selected brand.
2 LEARN. . . . . . . . . . . . . - switches the remote control into learn mode.
XTRA . . . . . . . . . . . . . . - turns on the backlight (if enabled).
- displays extra (advanced) functions for the selected device.
6
English
Instructions for use
Manual_SRU5150_86 24-04-2007 15:42 Pagina 6
Page 7
3 / DISC . . . . . . . . . . - TV mode: teletext on/off.
- DVD mode: disc menu.
/ HDD. . . . . . . . . . . - TV mode: text hold.
- DVD-R mode: Hard Disk Drive menu.
/ SUBTITLE . . . . - TV mode: wide screen TV.
- DVD mode: subtitles.
/ FAV(ourites) . . . . - TV mode: text off.
- SAT mode: list of favourite channels.
4 MENU. . . . . . . . . . . . . . turns menu on and off.
5 OK . . . . . . . . . . . . . . . . . confirms your selection.
6 INFO. . . . . . . . . . . . . . . displays on-screen channel information.
7ss. . . . . . . . . . . . . . . . . . . mutes sound of TV.
8 - VOL +. . . . . . . . . . . . . adjusts TV volume.
9 Digit keys . . . . . . . . . . - TV mode: direct choice of channels and other functions.
- AMP mode: source selection keys (TV, DVD,VCR,TUNER,
CD,AUX).
0 AV . . . . . . . . . . . . . . . . . switches between external inputs of your equipment.
! 5 . . . . . . . . . . . . . . . . . . - TV mode: red teletext key*.
- VCR/DVD mode: rewind.
2 . . . . . . . . . . . . . . . . . . . - TV mode: index.
- VCR/DVD mode: play.
6 . . . . . . . . . . . . . . . . . . - TV mode: blue teletext key*.
- VCR/DVD mode: wind.
9 . . . . . . . . . . . . . . . . . . . - TV mode: green teletext key*.
- VCR/DVD mode: stop.
0 . . . . . . . . . . . . . . . . . . . - VCR/DVD mode: record.
; . . . . . . . . . . . . . . . . . . . - TV mode: yellow teletext key*.
- VCR/DVD mode: pause.
@ -/--. . . . . . . . . . . . . . . . . . selects between one- and two-figure channel numbers.
#22. . . . . . . . . . . . . . . . . . - selects previous programme / channel.
SURROUND . . . . . . . - selects surround modes.
$ - PROG +. . . . . . . . . . . selects previous or next channel.
% BACK . . . . . . . . . . . . . . jumps back one level in menu or turns off menu.
^ Cursor keys . . . . . . . . cursor up, down, left, right in a menu.
& GUIDE . . . . . . . . . . . . . STB mode: opens electronic TV programme guide.
*yy(Standby) . . . . . . . . . . switches TV, DVD,VCR, AMP, CD or STB on or off.
( SETUP . . . . . . . . . . . . . - switches the remote control into setup mode.
SELECT. . . . . . . . . . . . - turns on the backlight (if enabled).
- selects device modes. Only devices for which the remote
control is set up can be selected.
* Note: If you wish to use the colour keys as colour selection keys in DVDR-HDD mode,
you should learn the colour selection functions to the extra function key XTRA.
For this, see ‘Adding extra functions’ under 4. ’Extra possibilities’.
Extra functions
For each device, the remote control is set up for, extra (advanced) functions can be added
to the remote control. For this see ‘Adding extra functions’ hereafter.
For an overview of extra (advanced) functions for the various devices,
see the ‘Extra functions’ list at the back of this booklet.
7
English
Instructions for use
Manual_SRU5150_86 24-04-2007 15:42 Pagina 7
Page 8
4. Extra possibilities
Adding extra functions
Note: Only functions that are available on the original device remote controls can be added.
1 Keep XTRA pressed for 3 seconds:
– - the backlight (if enabled) turns on.
- the display shows ‘ ’ and ‘ ’.
- the keys that can be used are blinking.
2 Use 3 and 4 to select the extra function you wish to add
or change. Confirm with OK.
– The display shows ‘ ’,‘ ’ and ‘ ’ together with ‘LEARNING‘.
3 Place both remote controls on a flat surface (like a
coffee table) and aim them head-to-head with about
5 - 10 cm in between.
4 Press the function key on the original remote control
(e.g. the AMBILIGHT key on your TV remote control) or
press 1 if you wish to return to step 2.
– The display shows ‘ ’ together with e.g.‘TV-AMBILIGHT LEARN OK‘.
The extra function has been added successfully.
– If the display shows ‘ERROR‘ or ‘MEM FULL’, star t again from step 1.
Also see ‘Troubleshooting’ under 6.‘Support’.
Activating / using an extra (advanced) function
1 Use SELECT to select the desired device. E.g. DVD.
– Confirm with OK.
2 Press XTRA.
– The last selected function for the device appears on the
display. E.g. DVD-SHOWVIEW.
The keys that can be used are blinking.
3 Use 3 and 4 to select the function you wish to activate.
E.g. DVD-ZOOM. Press OK to activate the function.
4 Press XTRA again to go back to normal operation mode.
Delete devices
Example of TV:
1 Keep SETUP pressed for 3 seconds:
– the backlight (if enabled) turns on.
– the display shows ‘ ’,‘ ’ and ’TV?’
– the keys that can be used are blinking.
8
English
Instructions for use
Manual_SRU5150_86 24-04-2007 15:42 Pagina 8
Page 9
2 Use 3 and 4 to select ’DELETE TV’ at the bottom
of the list.
3 Press OK to delete the TV device mode.
– The display shows ’DEVICE DELETED’.
– The TV device mode has been deleted.
Learning key functions
If you miss certain functions from your original remote control on the SRU 5150, it can
learn these functions from the original remote control.You can store a function under any
of the available keys on the SRU 5150, except XTRA (LEARN) and SELECT (SETUP).
Any function already stored under a key will be deleted.
1 Make sure you have the original remote control at hand.
2 Use SELECT to select the desired device. E.g. DVD.
3 Place both remote controls on a flat surface (like a
coffee table) and aim them head-to-head with about
5 - 10 cm in between.
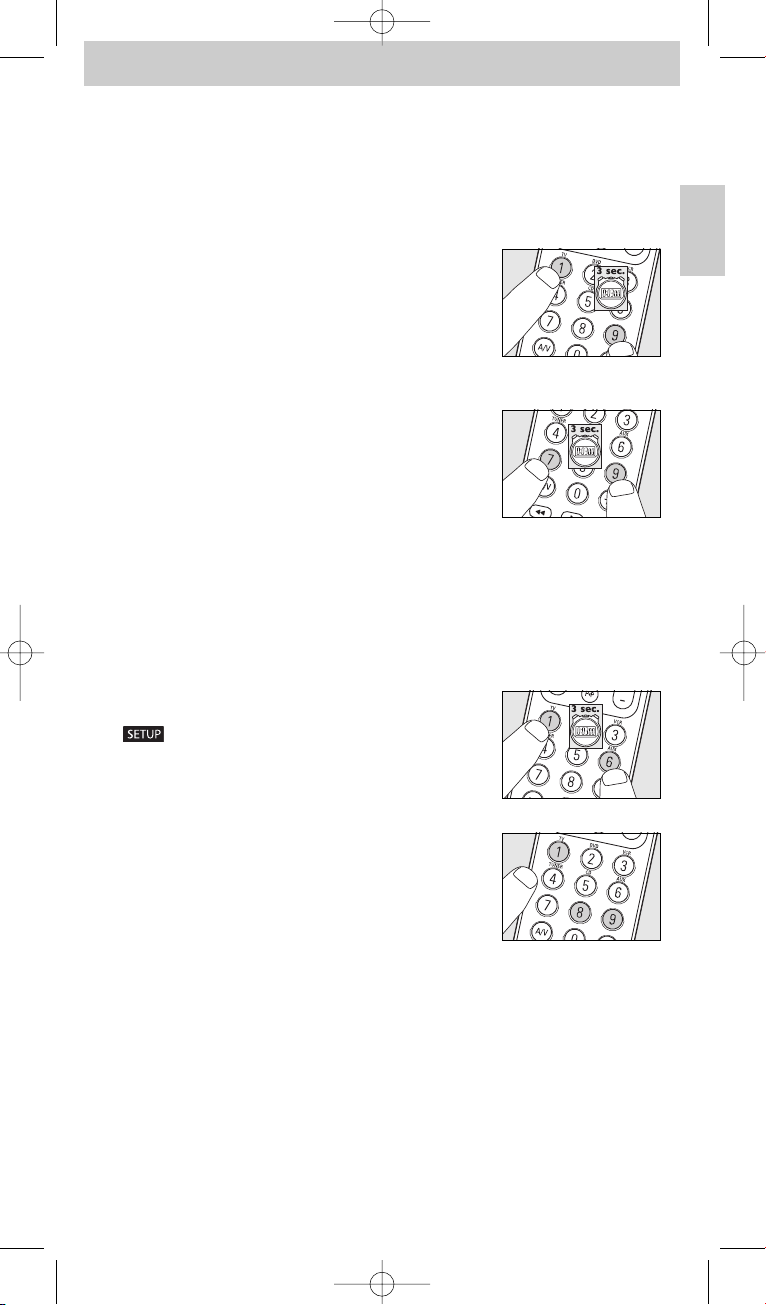
4 Keep LEARN and the key you wish to learn on the
SRU 5150 pressed simultaneously for 3 seconds,
until ‘ ’ lights up, together with ’LEARNING’.
5 Press the key you wish to copy on the original
remote control.
– lights up.The remote control is now learning the function.
– When the remote control has learned the function, the display shows ’LEARN OK’
to confirm that the signal is stored.
– If the display shows ‘ERROR‘ or ‘MEM FULL’, star t again from step 1.
Also see ‘Troubleshooting’ under 6.‘Support’.
9
English
Instructions for use
Manual_SRU5150_86 24-04-2007 15:42 Pagina 9
Page 10
Activating / de-activating the backlight function
The backlight illuminates the display so you can clearly see all display messages, even in a
dimly lit room. As the backlight consumes additional power, the battery lifetime will reduce
when the backlight is used frequently.Therefore it is possible to de-activate the backlight
function.
De-activating the backlight function
• Keep digit keys 1 and 9 pressed simultaneously for
three seconds.
– The backlight function is now de-activated and the backlight
cannot be turned on.
Activating the backlight function
• Keep digit keys 7 and 9 pressed simultaneously for
three seconds.
– The backlight function is now activated and the backlight
can be turned on.
Restoring the original functions of the remote control
In some cases it could be useful to restore the original functions of the remote control.
E.g. if the remote control memory is full while you wish to set it up for a specific device or
learn an extra key function to it.The remote control will then be reset to the default
factory settings and all user settings will be deleted.
1 Keep digit keys 1 and 6 pressed simultaneously for
three seconds.
– ‘ ’ lights up.
The remote control is now in setup mode.
2 Press digit keys 9, 8 and 1, in that order.
– ‘981 - WAIT’ appears on the display.
All original functions have now been restored and
any extra functions have been deleted.
10
English
Instructions for use
Manual_SRU5150_86 24-04-2007 15:42 Pagina 10
Page 11
5. Replacing the batteries
When the battery status indicator ( ) on the display starts blinking, battery power is
low and you should replace the batteries. All user settings will be retained when the old
batteries are removed.
1 Press the cover inward, slide it in the direction of the
arrow and remove the cover.
2 Insert 3 AAA/R03 batteries noting the + and -
configuration inside the battery compar tment.
3 Place the cover back and click it firmly into place.
6. Support
Troubleshooting
• Problem
– Possible cause / solution
• The device you want to operate does not respond at all when a key is pressed.
– Point the remote control at the device and make sure that there are no obstructions
between the remote control and the device.
– Make sure the function you wish to operate is available on the device.
– Check if the battery status indicator ()on the display blinks (low battery power).
If this is the case, insert new batteries.
• The device you want to operate does not respond properly when a key is pressed.
– Maybe the wrong code is programmed for the device during setup.
Try setting up the remote again. If the device still does not respond, call our helpline.
– Check if the battery status indicator ()on the display blinks (low battery power).
If this is the case, insert new batteries.
• The teletext keys do not work.
– Find out whether your TV is equipped with teletext.
• You have difficulties operating all of the functions on your device.
– Maybe the remote control has to be adapted to the model of the device.
Call our helpline for details.
• ERROR appears on the display while adding an extra (advanced) function or when
trying to learn a key.
– No signal from the original remote control is received for 20 seconds and the SRU 5150
stopped the adding / learning process. Start again from step 1.
– An SRU 5150 key is pressed before a signal is detected and the SRU 5150 stopped the
adding/learning process. Start again from step 1.
– The function you try to add is not available on the original remote control.
– Make sure the original remote control is working properly.
– Make sure the remote controls are properly aligned.
– The IR signal of your original device is out of range.The SRU 5150 can only learn IR signals
with a carrier signal of 30-60kHz.
11
English
Instructions for use
Manual_SRU5150_86 24-04-2007 15:42 Pagina 11
Page 12
• MEM FULL appears on the display while adding an extra (advanced) function or
when trying to learn a key.
– No more functions can be added for the selected device or the SRU 5150 memory is full.
Restore all the original functions of your remote control in order to create memory space.
For this, see ‘Restoring the original functions of your remote control’ under 4.
‘Extra possibilities’.All user settings will then be deleted.
• The remote control does not enter setup mode after pressing SELECT.
– Check if the battery status indicator ()on the display blinks (low battery power).
If this is the case, insert new batteries.
• Only 5 devices can be selected during setup.
– The maximum number of devices (5) for the SRU 5150 is already set up.
Other device types cannot be selected unless you clear the entire memory. For this,
see ‘Restoring the original functions of the remote control’ under 4. ‘Extra possibilities’.
All user settings will then be deleted.
Need help?
If you have any questions about the SRU 5150, you can always contact us.
You will find our contact details after the extra functions list at the back of this manual.
Read this manual carefully before you make a call.You can solve most of the problems
yourself. When you call our helpline, make sure the device is at hand so that our operators
can help you determine whether your remote control is working properly.
The model number of your Philips universal remote control is SRU 5150/86.
Date of purchase: ......../ ......../ ........
(day/month/year)
12
English
Instructions for use
Manual_SRU5150_86 24-04-2007 15:42 Pagina 12
Page 13
Table des matières
1. Introduction . . . . . . . . . . . . . . . . . . . . . . . . . . . . . . . . . . . . . . . . . . . . . . . . . . . . . . . . . . . 13
2. Configuration de la télécommande . . . . . . . . . . . . . . . . . . . . . . . . . . . . . . . . 13-15
3. Utilisation de la télécommande . . . . . . . . . . . . . . . . . . . . . . . . . . . . . . . . . . . . 15-17
Touches et fonctions . . . . . . . . . . . . . . . . . . . . . . . . . . . . . . . . . . . . . . . . . . . . . . . . . . . 15-16
Fonctions supplémentaires . . . . . . . . . . . . . . . . . . . . . . . . . . . . . . . . . . . . . . . . . . . . . . . . 17
4. Possibilités supplémentaires . . . . . . . . . . . . . . . . . . . . . . . . . . . . . . . . . . . . . . . . 17-19
Ajout de fonctions supplémentaires . . . . . . . . . . . . . . . . . . . . . . . . . . . . . . . . . . . . . . . . . 17
Supprimer les appareils . . . . . . . . . . . . . . . . . . . . . . . . . . . . . . . . . . . . . . . . . . . . . . . . . . . . 18
Apprentissage des fonctions de touche . . . . . . . . . . . . . . . . . . . . . . . . . . . . . . . . . . . . . . 18
Activation/désactivation de la fonction de rétroéclairage . . . . . . . . . . . . . . . . . . . . . . . . 19
Restauration des fonctions d’origine de la télécommande . . . . . . . . . . . . . . . . . . . . . . 19
5. Remplacement des piles . . . . . . . . . . . . . . . . . . . . . . . . . . . . . . . . . . . . . . . . . . . . . . 19
6. Assistance . . . . . . . . . . . . . . . . . . . . . . . . . . . . . . . . . . . . . . . . . . . . . . . . . . . . . . . . . . 20-21
Dépannage . . . . . . . . . . . . . . . . . . . . . . . . . . . . . . . . . . . . . . . . . . . . . . . . . . . . . . . . . . . 20-21
Besoin d’aide ? . . . . . . . . . . . . . . . . . . . . . . . . . . . . . . . . . . . . . . . . . . . . . . . . . . . . . . . . . . . 21
Liste des fonctions supplémentaires . . . . . . . . . . . . . . . . . . . . . . . . . . . . . . . . . . . . . . . . . 76
Informations pour les consommateurs . . . . . . . . . . . . . . . . . . . . . . . . . . . . . . . . . . . . . . 77
1. Introduction
Félicitations pour votre achat d’une télécommande universelle Philips SRU 5150.
La SRU 5150 est capable de commander 5 appareils différents. Durant la configuration,
vous pourrez définir vous-même exactement quels appareils seront commandés
(voir tableau ci-dessous).Vous trouverez des informations sur la préparation de la SRU
5150 dans le chapitre 2 ‘Installation de la télécommande’.
2. Configuration de la télécommande
La télécommande peut être configurée pour commander n’importe lequel des 5 appareils
suivants :
Appareil Indication écran
TV TV
Deuxième TV TV2
Magnétoscope VCR
Deuxième magnétoscope VCR2
Magnétoscope numérique PVR
Combiné TV-magnétoscope TV-VCR
Combiné TV-DVD TV-DVD
Combiné DVD-magnétoscope DVD-VCR
Amplificateur AMPLIFIER
Système de cinéma maison HTS
Appareil audio AUDIO-SET
Tuner TUNER
Passerelle multimédia DMR
Décodeur STB
Récepteur satellite SAT
Appareil terrestre de radiodiffusion vidéonumérique DVB-T
Décodeur câble CABLE
Lecteur de CD CD
Mini disque MD
Lecteur de DVD DVD
Enregistreur de DVD DVDR
Console de jeu GAME
Enregistreur de DVD avec disque dur DVDR-HDD
13
Français
Mode d'emploi
Manual_SRU5150_86 24-04-2007 15:42 Pagina 13
Page 14
Remarques :
– Les piles sont déjà installées dans la télécommande.
– Si vous souhaitez configurer la télécommande pour commander votre téléviseur,
vous pouvez ignorer l’étape 3.
– Si votre appareil est un appareil Philips, vous pouvez ignorer l’étape 5.
– Pour quitter le mode de configuration à tout moment, tenez la touche SETUP enfoncée
pendant trois secondes.
– Une fois installé, un appareil ne pourra pas être supprimé de la liste des appareils.
Seul le nom de la marque peut être modifié (ex. pour commander un type d’appareil
d’une marque différente). Pour supprimer un appareil, vous devrez effacer toute la
mémoire. Pour cela, voir ‘Restauration des fonctions d’origine de la télécommande’ sous
4. ‘Possibilités supplémentaires’.
1 Allumez l’appareil pour lequel vous souhaitez configurer la télécommande. Si l’appareil
est un lecteur/enregistreur de DVD ou un magnétoscope numérique, insérez un
disque ou une bande et lancez la lecture.
2 Pour activer les piles, retirez la bande
protectrice du compartiment des piles.
• Si la bande ne s’enlève pas facilement, ouvrez le
compartiment des piles pour mieux accéder à la bande.
– La télécommande entrera alors immédiatement en mode
de configuration :
- l’écran affiche ‘ ’, ‘ ’ et ’TV?’;
- le rétroéclairage s’allume;
- les touches pouvant être utilisées clignotent.
– La télécommande est maintenant prête à être configurée pour commander votre
téléviseur.
3 Utilisez 4 pour sélectionner l’appareil pour lequel
vous souhaitez configurer la télécommande (voir tableau
page précédente).
4 Confirmez avec OK.
– L’écran affiche ‘ ’ et ’PHILIPS?’.
Les touches pouvant être utilisées clignotent.
5 Utilisez 4 et 3 pour sélectionner la marque de
votre appareil.
• Si la marque de votre appareil n’est pas dans la liste, vous
pourrez sélectionner n’importe quelle autre marque.
6 Confirmez avec OK.
7 Tenez
yy
enfoncé jusqu’à ce que l’appareil réagisse.
– L’écran affiche ‘ ’.
8 Orientez la télécommande vers l’appareil.
– À présent, la télécommande commence à émettre tous les
codes ‘off (veille)’ connus, un après l’autre.
Chaque fois qu’un code est envoyé, l’écran l’affiche : ’TEST 01, 02, 03’, etc.
14
Français
Mode d’emploi
Manual_SRU5150_86 24-04-2007 15:42 Pagina 14
Page 15
9 Quand l’appareil réagit, relâchez immédiatement
yy
.
– La télécommande vient de trouver un code correspondant à votre appareil.
’SETUP OK’ s’affiche à l’écran.
– Si l’appareil ne réagit pas et si ’LIST END’ s’affiche, aucun code n’a été trouvé pour
l’appareil. Pour commander l’appareil avec la télécommande, elle devra apprendre les
fonctions de la télécommande d’origine, touche après touche. Pour cela, voir
‘Apprentissage des fonctions de touche’ sous 4.‘Possibilités supplémentaires’.
10 Vérifiez si vous pouvez commander toutes les fonctions de l’appareil avec la
télécommande.
– Dans ce cas-là, la télécommande est prête à commander l’appareil.
Le rétroéclairage s’éteint.
• Si ce n’est pas le cas, passez à l’étape 11.
• Si vous souhaitez configurer la télécommande pour commander d’autres appareils,
passez à l’étape 11.
11 Tenez SELECT enfoncé trois secondes :
– - l’écran affiche ‘ ’, ‘ ’ et ’TV?’.
- le rétroéclairage s’allume.
- les touches pouvant être utilisées clignotent.
– La télécommande est maintenant en mode de
configuration.
12 Continuez la configuration à partir de l’étape 3.
• Si, après plusieurs essais, un appareil ne réagit pas du tout ou réagit
incorrectement à toutes les commandes de touche, c’est que la
télécommande ne trouve pas de code pour cet appareil. Pour commander
l’appareil avec la télécommande, elle devra apprendre les fonctions de la
télécommande d’origine, touche après touche. Pour cela, voir ‘Apprentissage
des fonctions de touche’ sous 4.‘Possibilités supplémentaires’.
3. Utilisation de la télécommande
Touches et fonctions
L’illustration de la page 3 donne une présentation de toutes les touches et de leurs
fonctions.
1 Affichage écran d’information. Indique l’état actuel de la télécommande.
: télécommande en mode de configuration ou avancé.
: télécommande en mode d’apprentissage.
: état des piles. Clignote quand les piles deviennent
faibles.
: s’allume en mode de configuration, d’apprentissage
ou avancé.
: s’allume quand la télécommande envoie un signal.
: s’allume quand la télécommande reçoit un signal en mode
d’apprentissage ou avancé.
TV : appareil sélectionné.
PHILIPS : marque sélectionnée.
2 LEARN. . . . . . . . . . . . . - met la télécommande en mode d’apprentissage.
XTRA . . . . . . . . . . . . . . - allume le rétroéclairage (si activé).
- affiche des fonctions (avancées) supplémentaires pour
l’appareil sélectionné.
15
Français
Mode d'emploi
Manual_SRU5150_86 24-04-2007 15:42 Pagina 15
Page 16
3 / DISC . . . . . . . . . . - mode TV : marche/arrêt télétexte.
- mode DVD : menu du disque.
/ HDD. . . . . . . . . . . - mode TV : attente texte.
- mode DVD-R : menu du disque dur.
/ SUBTITLE . . . . - mode TV : téléviseur écran large.
- mode DVD : sous-titres.
/ FAV(oris) . . . . . . . - mode TV : arrêt texte.
- mode SAT : liste des chaînes favorites.
4 MENU. . . . . . . . . . . . . . active et désactive le menu.
5 OK . . . . . . . . . . . . . . . . . confirme votre sélection.
6 INFO. . . . . . . . . . . . . . . affiche à l’écran des informations sur les chaînes.
7ss. . . . . . . . . . . . . . . . . . . met le téléviseur en sourdine.
8 - VOL +. . . . . . . . . . . . . règle le volume du téléviseur.
9 Touches
numériques . . . . . . . . - mode TV : choix direct de chaînes et d’autres fonctions.
- mode AMP : touches de sélection de source (TV, DVD,VCR,
TUNER, CD, AUX).
0 AV . . . . . . . . . . . . . . . . . alterne entre les entrées externes de votre équipement.
! 5 . . . . . . . . . . . . . . . . . . - mode TV : touche rouge télétexte*.
- mode VCR/DVD : retour arrière.
2 . . . . . . . . . . . . . . . . . . . - mode TV : index.
- mode VCR/DVD : lecture.
6 . . . . . . . . . . . . . . . . . . - mode TV : touche bleue télétexte*.
- mode VCR/DVD : avance rapide.
9 . . . . . . . . . . . . . . . . . . . - mode TV : touche verte télétexte*.
- mode VCR/DVD : arrêt.
0 . . . . . . . . . . . . . . . . . . . - mode VCR/DVD : enregistrement.
; . . . . . . . . . . . . . . . . . . . - mode TV : touche jaune télétexte*.
- mode VCR/DVD : pause.
@ -/--. . . . . . . . . . . . . . . . . . alterne entre les numéros de chaîne à un ou deux chiffres.
#22. . . . . . . . . . . . . . . . . . - sélectionne la chaîne/l’émission précédente.
SURROUND . . . . . . . - sélectionne les modes surround.
$ - PROG +. . . . . . . . . . . sélectionne la chaîne précédente/suivante.
% BACK . . . . . . . . . . . . . . remonte d’un niveau dans le menu ou désactive le menu.
^ Touches curseur . . . . déplace le curseur vers le haut, le bas, la gauche, la droite dans
un menu.
& GUIDE . . . . . . . . . . . . . mode STB : ouvre le guide électronique des émissions de
télévision.
*yy(Veille) . . . . . . . . . . . . active ou éteint le téléviseur, le lecteur/enregistreur de DVD,
le magnétoscope, l’amplificateur, le lecteur de CD ou le
décodeur.
( SETUP . . . . . . . . . . . . . - met la télécommande en mode de configuration.
SELECT. . . . . . . . . . . . - allume le rétroéclairage (si activé).
- sélectionne les modes de l’appareil. Seuls les appareils pour
lesquels la télécommande a été configurée peuvent être
sélectionnés.
* Remarque : Si vous voulez utiliser les touches de couleur comme touches de sélection de
couleur en mode DVDR-HDD, vous devrez enseigner les fonctions de sélection de
couleurs à la touche de fonction supplémentaire XTRA. Pour cela, voir
‘Ajout de fonctions supplémentaires’ sous 4.‘Possibilités supplémentaires’.
16
Français
Mode d’emploi
Manual_SRU5150_86 24-04-2007 15:42 Pagina 16
Page 17
Fonctions supplémentaires
Pour chaque appareil pour lequel la télécommande a été configurée, des fonctions
supplémentaires (avancées) peuvent être ajoutées à la télécommande.
Pour cela, voir ‘Ajout de fonctions supplémentaires’ ci-après.
Pour voir une présentation des fonctions supplémentaires (avancées) des divers appareils,
voir la liste des ‘Fonctions supplémentaires’ au verso de cette notice.
4. Possibilités supplémentaires
Ajout de fonctions supplémentaires
Remarque : Seules les fonctions disponibles pour la télécommande d’origine peuvent être
ajoutées.
1 Tenez XTRA enfoncé 3 secondes :
– - le rétroéclairage s’allume (si activé).
- l'écran affiche ‘ ’ et ‘ ’.
- les touches pouvant être utilisées clignotent.
– La télécommande est maintenant en mode avancé.
2 Utilisez 3 et 4 pour sélectionner la fonction supplémentaire que vous voulez ajouter
ou modifier. Confirmez avec OK.
– L'écran affiche ‘ ’, ‘ ’ et ‘ ’ avec ‘LEARNING‘.
3 Placez les deux télécommandes sur une surface
plane (telle qu’une table basse) et placez la tête de l’une à
environ 5 à 10 cm de la tête de l’autre.
4 Appuyez sur la touche de la fonction de la télécommande
d’origine (ex. la touche AMBILIGHT de la télécommande de
votre téléviseur) ou appuyez sur 1 si vous souhaitez retourner à l’étape 2.
– L'écran affiche ‘ ’ avec par ex.‘TV-AMBILIGHT LEARN OK‘.
L’ajout de la fonction supplémentaire a réussi.
– Si l’écran affiche ‘ERROR‘ ou ‘MEM FULL’, recommencez à l’étape 1.
Voir également ‘Dépannage’ sous 6.‘Assistance’.
Activation / utilisation d’une fonction supplémentaire (avancée)
1 Utilisez SELECT pour sélectionner l’appareil voulu, ex. DVD.
– Confirmez avec OK.
2 Appuyez sur XTRA.
– La dernière fonction sélectionnée pour cet appareil s’affiche
à l’écran, ex. DVD-SHOWVIEW.
Les touches pouvant être utilisées clignotent.
3 Utilisez 3 et 4 pour sélectionner la fonction que vous
voulez activer. Ex. DVD-ZOOM.
Appuyez sur OK pour activer la fonction.
4 Appuyez à nouveau sur XTRA pour revenir au mode de
fonctionnement normal.
17
Français
Mode d'emploi
Manual_SRU5150_86 24-04-2007 15:42 Pagina 17
Page 18

Supprimer les appareils
Exemple de téléviseur :
1 Maintenez la touche SETUP enfoncée pendant
3 secondes :
– Le rétroéclairage (s'il est activé) s'allume.
– ‘ ’, ‘ ’ et ’TV?’apparaissent sur l'afficheur.
– Les touches pouvant être utilisées clignotent.
2 Utilisez les flèches vers le haut 3 ou vers le bas 4 pour
sélectionner ’DELETE TV’ (Supprimer téléviseur) en bas
de la liste.
3 Appuyez sur OK pour supprimer le mode périphérique
‘téléviseur’.
– Le message ’DEVICE DELETED’ (Appareil supprimé)
apparaît sur l'afficheur..
– The TV device mode has been deleted.
Apprentissage des fonctions de touche
S’il vous manque sur la SRU 5150 certaines fonctions de votre télécommande d’origine,
elle peut les apprendre à partir de la télécommande d’origine.Vous pouvez enregistrer une
fonction sous n’importe quelle touche disponible de la SRU 5150, sauf XTRA (LEARN) et
SELECT (SETUP).Toute fonction déjà attribuée à la touche choisie sera alors supprimée.
1 Veillez à avoir la télécommande d’origine à portée de main.
2 Utilisez SELECT pour sélectionner l’appareil voulu, ex. DVD.
3 Placez les deux télécommandes sur une surface
plane (telle qu’une table basse) et placez la tête de l’une
à environ 5 à 10 cm de la tête de l’autre.
4 Tenez LEARN et la touche que vous voulez modifier sur
la SRU 5150 enfoncés simultanément 3 secondes, jusqu'à ce
que ‘ ’ s'allume avec ’LEARNING’.
5 Sur la télécommande d’origine, appuyez sur la touche que
vous voulez copier.
– s’allume. La télécommande apprend maintenant la fonction.
– Quand la télécommande a appris la fonction, ’LEARN OK’ s'affiche à l'écran pour
confirmer l'enregistrement du signal.
– Si l’écran affiche ‘ERROR‘ ou ‘MEM FULL’, recommencez à l’étape 1.
Voir également ‘Dépannage’ sous 6.‘Assistance’.
18
Français
Mode d’emploi
Manual_SRU5150_86 24-04-2007 15:42 Pagina 18
Page 19
Activation/désactivation de la fonction de rétroéclairage
Le rétroéclairage éclaire l’affichage pour que vous puissiez lire facilement tous les messages
affichés, même dans une pièce sombre. Étant donné que le rétroéclairage consomme
davantage d’électricité, la durée des piles sera réduite si vous l’utilisez fréquemment.
Il est donc possible de désactiver la fonction de rétroéclairage.
Désactivation de la fonction de rétroéclairage
• Tenez les touches numériques 1 et 9 appuyées
simultanément trois secondes.
– La fonction de rétroéclairage est maintenant désactivée :
le rétroéclairage ne peut pas fonctionner.
Activation de la fonction de rétroéclairage
• Tenez les touches numériques 7 et 9 appuyées
simultanément trois secondes.
– La fonction de rétroéclairage est maintenant activée :
le rétroéclairage peut fonctionner.
Restauration des fonctions d’origine de la télécommande
Dans certains cas, il peut être utile de restaurer les fonctions d’origine de la
télécommande. Ex. si la mémoire de la télécommande est pleine alors que vous voulez la
configurer pour un appareil spécifique ou enregistrer une nouvelle fonction. Les paramètres
par défaut de la télécommande seront alors restaurés et tous les paramètres de l’utilisateur
seront supprimés.
1 Tenez les touches numériques 1 et 6 appuyées
simultanément trois secondes.
– ‘ ‘ s’allume.
La télécommande est maintenant en mode de
configuration.
2 Appuyez sur les touches numériques 9, 8 et 1, dans
cet ordre.
– ‘981 - WAIT’ s’affiche à l’écran.
Toutes les fonctions d’origine sont alors restaurées
et toutes les fonctions supplémentaires sont supprimées.
19
Français
Mode d'emploi
Manual_SRU5150_86 24-04-2007 15:42 Pagina 19
Page 20
5. Remplacement des piles
Quand l’indicateur d’état des piles ( ) de l’écran commence à clignoter, la puissance
des piles est faible : vous devez les remplacer.Tous les paramètres de l’utilisateur seront
conservés pendant le remplacement des piles.
1 Appuyez sur le couvercle vers l’intérieur, faites-le glisser
dans la direction de la flèche et retirez le couvercle.
2 Insérez 3 piles AAA/R03 en respectant la configuration
+ et – indiquée à l’intérieur du compartiment.
3 Remettez le couvercle en place et emboîtez-le.
6. Assistance
Dépannage
• Problème
– Cause possible / solution
• L’appareil que vous voulez commander ne réagit pas quand vous appuyez sur une
touche.
– Orientez la télécommande vers l’appareil et veillez à ce qu’il n’y ait pas d’obstacles entre la
télécommande et l’appareil.
– Vérifiez que la fonction que vous voulez commander existe sur l’appareil.
– Vérifiez si l’indicateur d’état des batteries ()clignote sur l’écran (piles faibles).
Si c’est le cas, insérez de nouvelles piles.
• L’appareil que vous voulez commander ne réagit pas normalement quand vous
appuyez sur une touche.
– Il se peut que le code programmé pour l’appareil durant la configuration soit incorrect.
Essayez de reconfigurer la télécommande. Si l’appareil ne réagit toujours pas, appelez notre
service d’assistance.
– Vérifiez si l’indicateur d’état des batteries ()clignote sur l’écran (piles faibles).
Si c’est le cas, insérez de nouvelles piles.
• Les touches de télétexte ne fonctionnent pas.
– Vérifiez que votre téléviseur est équipé du télétexte.
• Vous avez des difficultés à commander toutes les fonctions de votre appareil.
– Vous devez peut-être adapter la télécommande au modèle de votre appareil.
Pour en savoir plus, appelez notre service d’assistance.
• ERROR s’affiche à l’écran pendant que vous ajoutez une fonction supplémentaire
(avancée) ou que vous essayez de programmer une touche.
– Aucun signal n’est parvenu de la télécommande d’origine pendant 20 secondes et
la SRU 5150 a cessé le processus d’ajout/d’apprentissage. Recommencez à l’étape 1.
– Une touche de la SRU 5150 a été enfoncée avant la détection d’un signal et la SRU 5150
a cessé le processus d’ajout/d’apprentissage. Recommencez à l’étape 1.
– La fonction que vous essayez d’ajouter n’existe pas sur la télécommande d’origine.
– Assurez-vous que la télécommande fonctionne correctement.
– Assurez-vous que les télécommandes sont correctement alignées.
– Le signal infrarouge de votre appareil d’origine est hors de portée. La SRU 5150 ne peut
apprendre les signaux infrarouges que d’une portée de 30-60 kHz.
20
Français
Mode d’emploi
Manual_SRU5150_86 24-04-2007 15:42 Pagina 20
Page 21
• MEM FULL s’affiche à l’écran pendant que vous ajoutez une fonction
supplémentaire (avancée) ou que vous essayez de programmer une touche.
– Aucune autre fonction ne peut être ajoutée pour l’appareil sélectionné ou la mémoire de la
SRU 5150 est pleine. Restaurez toutes les fonctions d’origine de votre télécommande pour
libérer de l’espace mémoire. Pour cela, voir ‘Restauration des fonctions d’origine de la
télécommande’ sous 4.‘Possibilités supplémentaires’.
Tous les paramètres de l’utilisateur seront supprimés.
• La télécommande n’entre pas en mode de configuration quand vous appuyez sur
SELECT.
– Vérifiez si l’indicateur d’état des batteries ()clignote sur l’écran (piles faibles).
Si c’est le cas, insérez de nouvelles piles.
• Seulement 5 appareils peuvent être sélectionnés durant la configuration.
– Le nombre maximum d’appareils (5) pour la SRU 5150 est déjà configuré.
Aucun autre type d’appareil ne pourra être sélectionné tant que vous n’aurez pas effacé la
totalité de la mémoire. Pour cela, voir ‘Restauration des fonctions d’origine de la
télécommande’ sous 4.‘Possibilités supplémentaires’.
Tous les paramètres de l’utilisateur seront supprimés.
Besoin d’aide ?
Si vous avez des questions sur la SRU 5150, vous pouvez toujours nous contacter.
Vous trouverez nos coordonnées après la liste des fonctions supplémentaires, au dos de ce
manuel.
Avant d’appeler, lisez ce manuel soigneusement.Vous pouvez résoudre la plupart des
problèmes vous-même. Lorsque vous appelez le service d’assistance, ayez l’appareil à
portée de main pour que nos agents puissent déterminer si votre télécommande
fonctionne correctement.
Le numéro de modèle de votre télécommande universelle Philips est SRU5150/86.
Date d’achat : ......../ ......../ ........
(jour/mois/année)
21
Français
Mode d'emploi
Manual_SRU5150_86 24-04-2007 15:42 Pagina 21
Page 22
Inhaltsverzeichnis
1. Einleitung . . . . . . . . . . . . . . . . . . . . . . . . . . . . . . . . . . . . . . . . . . . . . . . . . . . . . . . . . . . . . 22
2. Einrichten der Fernbedienung . . . . . . . . . . . . . . . . . . . . . . . . . . . . . . . . . . . . . . 22-24
3. Benutzung der Fernbedienung . . . . . . . . . . . . . . . . . . . . . . . . . . . . . . . . . . . . . 24-25
Tasten und Funktionen . . . . . . . . . . . . . . . . . . . . . . . . . . . . . . . . . . . . . . . . . . . . . . . . . 24-25
Zusätzliche Funktionen . . . . . . . . . . . . . . . . . . . . . . . . . . . . . . . . . . . . . . . . . . . . . . . . . . . . 25
4. Zusätzliche Möglichkeiten . . . . . . . . . . . . . . . . . . . . . . . . . . . . . . . . . . . . . . . . . . 26-28
Zusätzliche Funktionen hinzufügen . . . . . . . . . . . . . . . . . . . . . . . . . . . . . . . . . . . . . . . . . . 26
Geräte löschen . . . . . . . . . . . . . . . . . . . . . . . . . . . . . . . . . . . . . . . . . . . . . . . . . . . . . . . . . . . 27
Tastenfunktionen lernen . . . . . . . . . . . . . . . . . . . . . . . . . . . . . . . . . . . . . . . . . . . . . . . . . . . 27
Die Hintergrundbeleuchtungsfunktion aktivieren/deaktivieren. . . . . . . . . . . . . . . . . . . . 28
Ursprüngliche Fernbedienungsfunktionen wiederherstellen . . . . . . . . . . . . . . . . . . . . . 28
5. Batteriewechsel . . . . . . . . . . . . . . . . . . . . . . . . . . . . . . . . . . . . . . . . . . . . . . . . . . . . . . . 28
6. Unterstützung . . . . . . . . . . . . . . . . . . . . . . . . . . . . . . . . . . . . . . . . . . . . . . . . . . . . . 29-30
Fehlersuche . . . . . . . . . . . . . . . . . . . . . . . . . . . . . . . . . . . . . . . . . . . . . . . . . . . . . . . . . . 29-30
Brauchen Sie Hilfe? . . . . . . . . . . . . . . . . . . . . . . . . . . . . . . . . . . . . . . . . . . . . . . . . . . . . . . . 30
Liste zusätzlicher Funktionen . . . . . . . . . . . . . . . . . . . . . . . . . . . . . . . . . . . . . . . . . . . . . . . 76
Verbraucherinformationen . . . . . . . . . . . . . . . . . . . . . . . . . . . . . . . . . . . . . . . . . . . . . . . . . 78
1. Einleitung
Wir gratulieren Ihnen zum Kauf der universellen Fernbedienung SRU 5150 von Philips.
Die SRU 5150 kann bis zu 5 verschiedene Geräte bedienen. Während der Einrichtung
können Sie exakt definieren, welche Geräte bedient werden (siehe nachstehende Tabelle).
Informationen zur Vorbereitung der SRU 5150 auf den Gebrauch finden Sie in dem
Kapitel 2 ‘Einrichten der Fernbedienung’.
2. Einrichten der Fernbedienung
Die Fernbedienung kann für die Bedienung von 5 beliebigen der folgenden Geräte
eingerichtet werden:
Gerät Display-Anzeige
Fernsehgerät TV
Zweites Fernsehgerät TV2
Videorecorder VCR
Zweiter Videorecorder VCR2
Persönlicher Videorecorder PVR
TV-VCR-Kombination TV-VCR
TV-DVD-Kombination TV-DVD
DVD-VCR-Kombination DVD-VCR
Verstärker AMPLIFIER
Home Theatre-System HTS
Audiogerät AUDIO-SET
Tuner TUNER
Digitaler Medienempfänger DMR
Set-Top-Box STB
Satellitenempfänger SAT
Digital Video Broadcasting Terrestr ial-Gerät DVB-T
Kabeldecoder CABLE
CD-Spieler CD
Mini Disk MD
DVD-Spieler DVD
DVD-Recorder DVDR
Game-Konsole GAME
DVD-Recorder mit Festplattenlaufwerk DVDR-HDD
22
Deutsch
Bedienungsanleitung
Manual_SRU5150_86 24-04-2007 15:42 Pagina 22
Page 23
Hinweise:
– Batterien sind bereits in der Fernbedienung installiert.
– Wenn Sie die Fernbedienung für die Bedienung Ihres Fernsehgerätes einrichten wollen,
können Sie Schritt 3 überspringen.
– Wenn Ihr Gerät ein Philips-Gerät ist, können Sie Schritt 5 überspringen.
– Sie können den Einrichtmodus jederzeit beenden, indem Sie SETUP drei Sekunden lang
gedrückt halten.
– Nach erfolgter Installation kann ein Gerät nicht aus der Geräteliste gelöscht werden.
Nur der Markenname kann geändert werden (z. B. wenn Sie einen Gerätetyp einer
anderen Marke bedienen möchten). Zum Löschen eines Gerätes müssen Sie den
gesamten Speicher löschen. Diesbezüglich siehe ‘Ursprüngliche Fernbedienungsfunktionen
wiederherstellen’ unter 4.‘Zusätzliche Möglichkeiten’.
1 Schalten Sie das Gerät ein, für das Sie die Fernbedienung einrichten wollen.Wenn das
Gerät ein DVD-Spieler/Recorder oder Videorecorder ist, legen Sie eine Disk oder ein
Band ein und beginnen Sie mit der Wiedergabe.
2 Ziehen Sie den Schutzstreifen aus dem Batteriefach
heraus, um die Batterien zu aktivieren.
• Wenn der Streifen nicht einfach herauskommt, öffnen Sie
das Batteriefach, um den Streifen besser zugänglich zu
machen.
– Die Fernbedienung geht sofort zum Einrichtmodus über:
- im Display erscheint ‘ ’,‘ ’ und ’TV?’;
- die Hintergrundbeleuchtung wird eingeschaltet;
- die Tasten, die benutzt werden können, blinken.
– Die Fernbedienung ist jetzt bereit, für die Bedienung Ihres Fernsehgerätes eingerichtet
zu werden.
3 Benutzen Sie 4 zur Auswahl des Gerätes, für welches Sie
die Fernbedienung einrichten wollen (siehe Tabelle auf
vorheriger Seite).
4 Bestätigen Sie dies mit OK.
– Im Display erscheint ‘ ’ und ’PHILIPS?’.
Die Tasten, die benutzt werden können, blinken.
5 Benutzen Sie 4 und 3 zur Auswahl der Marke Ihres
Gerätes.
• Wenn die Marke Ihres Gerätes nicht in der Liste steht,
können Sie eine beliebige andere Marke auswählen.
6 Bestätigen Sie dies mit OK.
7 Halten Sie
yy
gedrückt, bis das Gerät anspricht.
– Im Display erscheint ‘ ’.
8 Richten Sie die Fernbedienung auf das Gerät.
– Die Fernbedienung beginnt jetzt, alle bekannten
‘Aus (Standby)’ Codes, einen nach dem anderen,
auszugeben. Jedes Mal, wenn ein Code gesendet wird, wird dies im Display gezeigt:
’TEST 01, 02, 03’ usw.
23
Deutsch
Bedienungsanleitung
Manual_SRU5150_86 24-04-2007 15:42 Pagina 23
Page 24
9 Wenn das Gerät anspricht, lassen Sie
yy
sofort los.
– Die Fernbedienung hat jetzt einen Code gefunden, der bei Ihrem Gerät funktioniert.
’SETUP OK’ erscheint im Display.
– Wenn die Gerät nicht anspricht und ’LIST END’ erscheint, wurde kein Code für
das Gerät gefunden. Zur Bedienung des Gerätes mit der Fernbedienung muss es die
ursprünglichen Fernbedienungsfunktionen Taste für Taste lernen. Diesbezüglich siehe
‘Tastenfunktionen lernen’ unter 4. ’Zusätzliche Möglichkeiten’.
10 Prüfen Sie, ob Sie alle Gerätefunktionen mit der Fernbedienung ausführen können.
– Wenn dies der Fall ist, dann ist die Fernbedienung zur Bedienung des Gerätes bereit.
Die Hintergrundbeleuchtung wird abgeschaltet.
• Wenn dies nicht der Fall ist, fahren Sie mit Schritt 11 fort.
• Wenn Sie die Fernbedienung für die Bedienung anderer Geräte einrichten wollen,
fahren Sie mit Schritt 11 for t.
11 Halten Sie SELECT drei Sekunden lang gedrückt:
– - im Display erscheint ‘ ’,‘ ’ und ’TV?’.
- die Hintergrundbeleuchtung wird eingeschaltet.
- die Tasten, die benutzt werden können, blinken.
– Die Fernbedienung befindet sich jetzt im Einrichtmodus.
12 Setzen Sie die Einrichtung ab Schritt 3 for t.
• Wenn, nach mehreren Versuchen, ein Gerät nach wie vor überhaupt nicht
anspricht oder nicht auf alle Tastenbefehle richtig anspricht, kann die
Fernbedienung einen Code für das Gerät nicht finden. Zur Bedienung des
Gerätes mit der Fernbedienung muss es die ursprünglichen
Fernbedienungsfunktionen Taste für Taste lernen. Diesbezüglich siehe
‘Tastenfunktionen lernen’ unter 4. ’Zusätzliche Möglichkeiten’.
3. Benutzung der Fernbedienung
Tasten und Funktionen
Die Abbildung auf Seite 3 vermittelt einen Überblick über alle Tasten und ihre Funktionen.
1 Display-Infobildschirm. Zeigt den aktuellen Fernbedienungsstatus.
: Fernbedienung im Einricht- oder erweiterten
Funktionsmodus.
: Fernbedienung im Lernmodus.
: Batteriestatus. Blinkt bei schwacher Batterieleistung.
: leuchten im Einricht-, Lern- und erweiterten
Funktionsmodus auf.
: leuchtet auf, wenn die Fernbedienung ein Signal abschickt.
: leuchtet auf, wenn die Fernbedienung ein Signal im Lern-
oder erweiterten Funktionsmodus empängt.
TV: gewähltes Gerät.
PHILIPS: gewählte Marke.
2 LEARN. . . . . . . . . . . . . - schaltet die Fernbedienung in den Lernmodus.
XTRA . . . . . . . . . . . . . . - schaltet die Hintergrundbeleuchtung ein (falls aktiviert).
- zeigt zusätzliche (erweiterte) Funktionen für das gewählte
Gerät an.
24
Deutsch
Bedienungsanleitung
Manual_SRU5150_86 24-04-2007 15:42 Pagina 24
Page 25

3 / DISC . . . . . . . . . . - TV-Modus:Videotext ein/aus.
- DVD-Modus: Disk-Menü.
/ HDD. . . . . . . . . . . - TV-Modus:Text halten.
- DVD-R-Modus: Festplattenlaufwerk-Menü.
/ SUBTITLE . . . . - TV-Modus: Breitbildschirm-Fernsehen.
- DVD-Modus: Unter titel.
/ FAV . . . . . . . . . . . . - TV-Modus:Text aus.
- SAT-Modus: Liste der Lieblingskanäle.
4 MENU. . . . . . . . . . . . . . Ein- und Ausschalten des Menüs.
5 OK . . . . . . . . . . . . . . . . . Bestätigung der Auswahl.
6 INFO. . . . . . . . . . . . . . . Anzeige von Kanalinformationen auf dem Bildschirm.
7ss. . . . . . . . . . . . . . . . . . . Stummschalten des TV-Sounds.
8 - VOL +. . . . . . . . . . . . . Einstellen der Fernsehlautstärke.
9 Zifferntasten . . . . . . . - TV-Modus: Direktwahl von Kanälen und anderen Funktionen.
- AMP-Modus: Quellenwahltasten (TV, DVD,VCR,TUNER,
CD,AUX).
0 AV . . . . . . . . . . . . . . . . . Umschalten zwischen externen Eingängen der Ausrüstung.
! 5 . . . . . . . . . . . . . . . . . . - TV-Modus: rote Videotext-Taste*.
- VCR/DVD-Modus: Rückspulen.
2 . . . . . . . . . . . . . . . . . . . - TV-Modus: Index.
- VCR/DVD-Modus: Wiedergabe.
6 . . . . . . . . . . . . . . . . . . - TV-Modus: blaue Videotext-Taste*.
- VCR/DVD-Modus:Vorspulen.
9 . . . . . . . . . . . . . . . . . . . - TV-Modus: grüne Videotext-Taste*.
- VCR/DVD-Modus: Stop.
0 . . . . . . . . . . . . . . . . . . . - VCR/DVD-Modus: Aufnahme.
; . . . . . . . . . . . . . . . . . . . - TV-Modus: gelbe Videotext-Taste*.
- VCR/DVD-Modus: Pause.
@ -/--. . . . . . . . . . . . . . . . . . Auswahl zwischen ein- und zweistelligen Kanalnummern.
#22. . . . . . . . . . . . . . . . . . - Auswahl des vorherigen Programms / Kanals.
SURROUND . . . . . . . - Auswahl von Surround-Modi.
$ - PROG +. . . . . . . . . . . Auswahl des vorherigen oder nächsten Kanals.
% BACK . . . . . . . . . . . . . . Rücksprung um eine Menüebene oder Abschalten des Menüs.
^ Cursor-Tasten . . . . . . Cursor nach oben, unten, links, rechts in einem Menü.
& GUIDE . . . . . . . . . . . . . STB-Modus: Öffnen des elektronischen
Fernsehprogrammführers.
*yy(Standby) . . . . . . . . . . Ein- oder Ausschalten von TV, DVD,VCR, AMP, CD oder STB.
( SETUP . . . . . . . . . . . . . - Schalten der Fernbedienung in den Einrichtmodus.
SELECT. . . . . . . . . . . . - Einschalten der Hintergrundbeleuchtung (falls aktiviert).
- Auswahl von Gerätemodi. Es können nur Geräte, für welche
die Fernbedienung eingerichtet ist, gewählt werden.
* Hinweis:Wenn Sie die Farbtasten als Farbauswahltasten im DVDR-HDD-Modus benutzen
möchten, sollten Sie die Farbauswahlfunktionen in der Zusatzfunktionstaste XTRA
einlernen. Diesbezüglich siehe ‘Zusätzliche Funktionen hinzufügen’ unter
4. ’Zusätzliche Möglichkeiten’.
Zusätzliche Funktionen
Bei jedem Gerät, für das die Fernbedienung eingerichtet ist, können zusätzliche (erweiterte)
Funktionen zur Fernbedienung hinzugefügt werden. Diesbezüglich siehe ‘Zusätzliche
Funktionen hinzufügen’ (nachstehend).
Für einen Überblick über zusätzliche (erweiterte) Funktionen für die verschiedenen Geräte
siehe die ‘Zusätzliche Funktionen’-Liste hinten in dieser Schrift.
25
Deutsch
Bedienungsanleitung
Manual_SRU5150_86 24-04-2007 15:42 Pagina 25
Page 26

4. Zusätzliche Möglichkeiten
Zusätzliche Funktionen hinzufügen
Hinweis: Es können nur Funktionen, die auf den Fernbedienungen des ursprünglichen Gerätes
zur Verfügung stehen, hinzugefügt werden.
1 Halten Sie XTRA 3 Sekunden lang gedrückt:
– - die Hintergrundbeleuchtung (falls aktiviert) wird
eingeschaltet.
- im Display erscheint ‘ ’ und ‘ ’.
- die Tasten, die benutzt werden können, blinken.
– Die Fernbedienung befindet sich jetzt im erweiterten
Funktionsmodus.
2 Benutzen Sie 3 und 4 zur Auswahl der zusätzlichen Funktion, die Sie hinzufügen oder
ändern wollen. Bestätigen Sie dies mit OK.
– Im Display erscheint ‘ ’,‘ ’ und ‘ ’ zusammen mit ‘LEARNING‘.
3 Positionieren Sie beide Fernbedienungen auf einer
flachen Oberfläche (wie einem Kaffeetisch) und richten Sie
sie Kopf an Kopf aus, mit etwa 5-10 cm dazwischen.
4 Drücken Sie die Funktionstaste auf der ursprünglichen
Fernbedienung (z. B. die AMBILIGHT Taste auf Ihrer
TV-Fernbedienung) oder drücken Sie 1 wenn Sie zu Schritt 2 zurückkehren wollen.
– Im Display erscheint ‘ ’ zusammen mit z. B. ‘TV-AMBILIGHT LEARN OK‘.
Die zusätzliche Funktion wurde erfolgreich hinzugefügt.
– Wenn im Display ‘ERROR‘ oder ‘MEM FULL’ erscheint, beginnen Sie erneut mit
Schritt 1. Siehe auch ‘Fehlersuche’ unter 6.‘Unterstützung’.
Eine zusätzliche (erweiterte) Funktion aktivieren/benutzen
1 Benutzen Sie SELECT zur Auswahl des gewünschten
Gerätes. Z. B. DVD.
– Bestätigen Sie dies mit OK.
2 Drücken Sie XTRA.
– Die letzte gewählte Funktion für das Gerät erscheint im
Display. Z. B. DVD-SHOWVIEW.
Die Tasten, die benutzt werden können, blinken.
3 Benutzen Sie 3 und 4 zur Auswahl der Funktion,
die Sie aktivieren wollen. Z. B. DVD-ZOOM.
Drücken Sie OK zum Aktivieren der Funktion.
4 Drücken Sie XTRA erneut, um zur normalen Betriebsart
zurückzukehren.
26
Deutsch
Bedienungsanleitung
Manual_SRU5150_86 24-04-2007 15:42 Pagina 26
Page 27

Geräte löschen
Beispiel für TV:
1 Halten Sie die Taste SETUP 3 Sekunden lang gedrückt:
– Die Hintergrundbeleuchtung (sofern aktivier t) schaltet sich
ein.
– Auf dem Display wird ‘ ’,‘ ’ und ’TV?’
angezeigt.
– Die Tasten, die verwendet werden können, blinken.
2 Wählen Sie mit der Pfeiltaste nach oben 3 abzw. nach
unten 4 die Option ’DELETE TV’ (TV löschen) unten in
der Liste aus.
3 Drücken Sie OK, um den TV-Gerätemodus zu löschen.
– Auf dem Display wird die Meldung ’DEVICE DELETED’
(Gerät gelöscht) angezeigt..
– Der TV-Gerätemodus wurde gelöscht.
Tastenfunktionen lernen
Wenn Ihnen bestimmte Funktionen von Ihrer ursprünglichen Fernbedienung auf der
SRU 5150 fehlen, kann sie diese Funktionen von der ursprünglichen Fernbedienung lernen.
Sie können eine Funktion unter beliebigen der verfübaren Tasten auf der SRU 5150
speichern, mit Ausnahme von XTRA (LEARN) und SELECT (SETUP).
Jede bereits unter einer Taste gespeicherte Funktion wird gelöscht.
1 Vergewissern Sie sich, dass Sie die ursprüngliche Fernbedienung zur Hand haben.
2 Benutzen Sie SELECT zur Auswahl des gewünschten
Gerätes. Z. B. DVD.
3 Positionieren Sie beide Fernbedienungen auf einer
flachen Oberfläche (wie einem Kaffeetisch) und richten Sie
sie Kopf an Kopf aus, mit etwa 5-10 cm dazwischen.
4 Halten Sie LEARN und die Taste, die Sie auf der SRU 5150
lernen wollen, gleichzeitig 3 Sekunden lang gedrückt,
bis ‘ ’ aufleuchtet zusammen mit ’LEARNING’.
5 Drücken Sie die Taste, die Sie auf der ursprünglichen
Fernbedienung kopieren wollen.
– leuchtet auf. Die Fernbedienung lernt jetzt die Funktion.
– Wenn die Fernbedienung die Funktion gelernt hat, erscheint ’LEARN OK’ im Display
um zu bestätigen, dass das Signal gespeichert ist.
– Wenn im Display ‘ERROR‘ oder ‘MEM FULL’ erscheint, beginnen Sie erneut mit
Schritt 1. Siehe auch ‘Fehlersuche’ unter 6.‘Unterstützung’.
27
Deutsch
Bedienungsanleitung
Manual_SRU5150_86 24-04-2007 15:42 Pagina 27
Page 28

Die Hintergrundbeleuchtungsfunktion aktivieren/deaktivieren
Die Hintergrundbeleuchtung beleuchtet das Display, damit Sie alle Displaymeldungen selbst
in einem schwach beleuchteten Raum deutlich sehen können. Da die
Hintergrundbeleuchtung zusätzlichen Strom verbraucht, wird die Batteriestandzeit bei
häufiger Benutzung der Hintergrundbeleuchtung verkürzt. Deshalb ist es möglich, die
Hintergrundbeleuchtungsfunktion zu deaktivieren.
Die Hintergrundbeleuchtungsfunktion deaktivieren
• Halten Sie Zifferntasten 1 und 9 gleichzeitig drei Sekunden
lang gedrückt.
– Die Hintergrundbeleuchtungsfunktion ist jetzt deaktivier t,
und die Hintergrundbeleuchtung kann nicht eingeschaltet
werden.
Die Hintergrundbeleuchtungsfunktion aktivieren
• Halten Sie Zifferntasten 7 und 9 gleichzeitig drei Sekunden
lang gedrückt.
– Die Hintergrundbeleuchtungsfunktion ist jetzt aktivier t, und
die Hintergrundbeleuchtung kann eingeschaltet werden.
Ursprüngliche Fernbedienungsfunktionen wiederherstellen
In einigen Fällen könnte es sich als nützlich erweisen, die ursprünglichen Funktionen der
Fernbedienung wiederherzustellen, z. B. wenn der Fernbedienungsspeicher voll ist, während
Sie sie für ein spezifisches Gerät einrichten oder eine für sie zusätzliche Tastenfunktion
lernen wollen. Die Fernbedienung wird dann auf die werksseitig vorgegebenen
Einstellungen rückgesetzt, und alle Benutzereinstellungen werden gelöscht.
1 Halten Sie Zifferntasten 1 und 6 gleichzeitig drei Sekunden
lang gedrückt.
– ‘ ’ leuchtet auf.
Die Fernbedienung befindet sich jetzt im Einrichtmodus.
2 Drücken Sie Zifferntasten 9, 8 und 1, in dieser Reihenfolge.
– ‘981 - WAIT’ erscheint im Display.
Alle ursprünglichen Funktionen sind jetzt wiederhergestellt,
und jegliche zusätzlichen Funktionen wurden gelöscht.
28
Deutsch
Bedienungsanleitung
Manual_SRU5150_86 24-04-2007 15:42 Pagina 28
Page 29

5. Batteriewechsel
Wenn die Batteriestatusanzeige ( ) im Display zu blinken beginnt, ist die
Batterieleistung schwach und sollten Sie die Batterien wechseln. Alle Benutzereinstellungen
bleiben erhalten, wenn die alten Batterien herausgenommen werden.
1 Drücken Sie die Abdeckung nach innen, schieben Sie sie in
Pfeilrichtung und nehmen Sie die Abdeckung ab.
2 Legen Sie sie 3 AAA/R03-Batterien ein und beachten Sie
dabei die Konfiguration + und – im Batteriefach.
3 Setzen Sie die Abdeckung wieder auf und lassen Sie sie fest
einrasten.
6. Unterstützung
Fehlersuche
• Problem
– Mögliche Ursache/Lösung
• Das Gerät, das Sie bedienen wollen, spricht beim Drücken einer Taste überhaupt
nicht an.
– Richten Sie die Fernbedienung auf das Gerät und vergewissern Sie sich,
dass sich keine Hindernisse zwischen Fernbedienung und Gerät befinden.
– Vergewissern Sie sich, dass die Funktion, die Sie ausführen wollen, auf dem Gerät zur
Verfügung steht.
– Überprüfen Sie, ob die Batteriestatusanzeige ()im Display blinkt
(schwache Batterieleistung).Wenn dies der Fall ist, legen Sie neue Batterien ein.
• Das Gerät, das Sie bedienen wollen, spricht beim Drücken einer Taste nicht
richtig an.
– Eventuell wurde beim Einrichten der falsche Code für das Gerät programmiert.
Versuchen Sie erneut, die Fernbedienung einzurichten.Wenn das Gerät nach wie vor nicht
anspricht, rufen Sie unsere Helpline an.
– Überprüfen Sie, ob die Batteriestatusanzeige ()im Display blinkt
(schwache Batterieleistung).Wenn dies der Fall ist, legen Sie neue Batterien ein.
• Die Videotext-Tasten funktionieren nicht.
– Stellen Sie fest, ob Ihr Fernsehgerät mit Videotext ausgerüstet ist.
• Sie haben Schwierigkeiten beim Bedienen aller Funktionen auf Ihrem Gerät.
– Eventuell muss die Fernbedienung dem Gerätemodell angepasst werden.
Für nähere Angaben rufen Sie unsere Helpline an.
29
Deutsch
Bedienungsanleitung
Manual_SRU5150_86 24-04-2007 15:42 Pagina 29
Page 30

• ERROR erscheint im Display beim Hinzufügen einer zusätzlichen (erweiterten)
Funktion oder beim Versuch, eine Taste zu erlernen.
– 20 Sekunden lang wird kein Signal von der ursprünglichen Fernbedienung empfangen, und
die SRU 5150 stoppte den Hinzufüge-/Lernvorgang. Beginnen Sie erneut mit Schritt 1.
– Eine SRU 5150-Taste wird gedrückt, bevor ein Signal festgestellt wird, und die SRU 5150
stoppte den Hinzufüge-/Lernvorgang. Beginnen Sie erneut mit Schritt 1.
– Die Funktion, die Sie hinzuzufügen versuchen, steht auf der ursprünglichen Fernbedienung
nicht zur Verfügung.
– Vergewissern Sie sich, dass die ursprüngliche Fernbedienung richtig funktioniert.
– Vergewissern Sie sich, dass die Fernbedienungen richtig ausgerichtet sind.
– Das IR-Signal Ihres ursprünglichen Gerätes ist außer Reichweite.
Die SRU 5150 kann IR-Signale nur mit einem Trägersignal von 30-60 kHz lernen.
• MEM FULL erscheint im Display beim Hinzufügen einer zusätzlichen (erweiterten)
Funktion oder beim Versuch, eine Taste zu erlernen.
– Es können keine weiteren Funktionen für das gewählte Gerät hinzugefügt werden, oder der
SRU 5150-Speicher ist voll. Stellen Sie alle ursprünglichen Funktionen Ihrer Fernbedienung
wieder her, um Speicherplatz zu schaffen. Diesbezüglich siehe ‘Ursprüngliche
Fernbedienungsfunktionen wiederherstellen’ unter 4.‘Zusätzliche Möglichkeiten’.
Alle Benutzereinstellungen werden dann gelöscht.
• Die Fernbedienung geht nach Drücken von SELECT nicht zum Einrichtmodus über.
– Überprüfen Sie, ob die Batteriestatusanzeige ()im Display blinkt
(schwache Batterieleistung).Wenn dies der Fall ist, legen Sie neue Batterien ein.
• Nur 5 Geräte können während der Einrichtung gewählt werden.
– Die maximale Anzahl Geräte (5) für die SRU 5150 ist bereits festgelegt.
Ander Gerätetypen können nicht gewählt werden, es sei denn, Sie löschen den gesamten
Speicher. Diesbezüglich siehe ‘Ursprüngliche Fernbedienungsfunktionen wiederherstellen’
unter 4. ‘Zusätzliche Möglichkeiten’. Alle Benutzereinstellungen werden dann gelöscht.
Brauchen Sie Hilfe?
Wenn Sie Fragen zur SRU 5150 haben, können Sie sich stets an uns wenden. Sie finden
unsere Kontaktangaben nach der Liste zusätzlicher Funktionen hinten in dieser Anleitung.
Lesen Sie diese Anleitung vor dem Anrufen aufmerksam durch. Die meisten Probleme
können Sie selbst lösen.Wenn Sie unsere Helpline anrufen, müssen Sie das Gerät zur Hand
haben, so dass Sie mit Hilfe unserer Mitarbeiter bestimmen können, ob Ihre Fernbedienung
richtig funktioniert.
Die Modellnummer Ihrer Philips Universalfernbedienung lautet SRU 5150/86.
Kaufdatum: ......../ ......../ ........
(Tag/Monat/Jahr)
30
Deutsch
Bedienungsanleitung
Manual_SRU5150_86 24-04-2007 15:42 Pagina 30
Page 31

Inhoudsopgave
1. Inleiding . . . . . . . . . . . . . . . . . . . . . . . . . . . . . . . . . . . . . . . . . . . . . . . . . . . . . . . . . . . . . . . 31
2. Instellen van de afstandsbediening . . . . . . . . . . . . . . . . . . . . . . . . . . . . . . . . . 31-33
3. Gebruik van de afstandsbediening . . . . . . . . . . . . . . . . . . . . . . . . . . . . . . . . . . 33-34
Toetsen en functies . . . . . . . . . . . . . . . . . . . . . . . . . . . . . . . . . . . . . . . . . . . . . . . . . . . . 33-34
Extra functies . . . . . . . . . . . . . . . . . . . . . . . . . . . . . . . . . . . . . . . . . . . . . . . . . . . . . . . . . . . . 34
4. Extra mogelijkheden . . . . . . . . . . . . . . . . . . . . . . . . . . . . . . . . . . . . . . . . . . . . . . . 35-37
Toevoegen van extra functies . . . . . . . . . . . . . . . . . . . . . . . . . . . . . . . . . . . . . . . . . . . . . . 35
Apparaten verwijderen . . . . . . . . . . . . . . . . . . . . . . . . . . . . . . . . . . . . . . . . . . . . . . . . . . . . 36
Aanleren van toetsfuncties . . . . . . . . . . . . . . . . . . . . . . . . . . . . . . . . . . . . . . . . . . . . . . . . 36
Inschakelen/uitschakelen van de achtergrondverlichting . . . . . . . . . . . . . . . . . . . . . . . . 37
Herstellen van de oorspronkelijke functies van de afstandsbediening . . . . . . . . . . . . . 37
5. Vervangen van de batterijen . . . . . . . . . . . . . . . . . . . . . . . . . . . . . . . . . . . . . . . . . . 37
6. Ondersteuning . . . . . . . . . . . . . . . . . . . . . . . . . . . . . . . . . . . . . . . . . . . . . . . . . . . . . 38-39
Verhelpen van storingen . . . . . . . . . . . . . . . . . . . . . . . . . . . . . . . . . . . . . . . . . . . . . . . 38-39
Hulp nodig? . . . . . . . . . . . . . . . . . . . . . . . . . . . . . . . . . . . . . . . . . . . . . . . . . . . . . . . . . . . . . 39
Lijst met extra functies . . . . . . . . . . . . . . . . . . . . . . . . . . . . . . . . . . . . . . . . . . . . . . . . . . . . 76
Informatie voor de gebruiker . . . . . . . . . . . . . . . . . . . . . . . . . . . . . . . . . . . . . . . . . . . . . . 78
1. Inleiding
Gefeliciteerd met de aanschaf van de Philips SRU 5150 universele afstandsbediening.
De SRU 5150 kan tot 5 verschillende apparaten bedienen.Tijdens het instellen kunt u zelf
exact aangeven welke apparaten u gaat bedienen (zie onderstaande tabel).
Informatie over het gebruiksklaar maken van de SRU 5150 vindt u in hoofdstuk 2
‘Instellen van de afstandsbediening’.
2. Instellen van de afstandsbediening
De afstandsbediening kan ingesteld worden voor het bedienen van elke gewenste 5 van de
volgende apparaten:
Apparaat Display-indicatie
Tv TV
Tweede tv TV2
Videorecorder VCR
Tweede videorecorder VCR2
Personal Video Recorder PVR
Tv/vcr-combi TV-VCR
Tv/dvd-combi TV-DVD
Dvd/vcr-combi DVD-VCR
Versterker AMPLIFIER
Home Theatre-systeem HTS
Audio-installatie AUDIO-SET
Tuner TUNER
Digitale media-receiver DMR
Settop-box STB
Satellietontvanger SAT
DVB-T-apparaat
(Digital Video Broadcasting – Terrestrial) DVB-T
Kabeldecoder CABLE
Cd-speler CD
Minidisk MD
Dvd-speler DVD
Dvd-recorder DVDR
Spelcomputer GAME
Dvd-recorder met harddisk DVDR-HDD
31
Nederlands
Gebruiksaanwijzing
Manual_SRU5150_86 24-04-2007 15:42 Pagina 31
Page 32

Opmerkingen:
– Er zitten reeds batterijen in de afstandsbediening.
– Als u de afstandsbediening wil instellen voor het bedienen van uw tv, dan kunt u stap 3
overslaan.
– Als uw apparaat een Philips-apparaat is, dan kunt u stap 5 overslaan.
– U kunt het instellen op elk moment beëindigen door SETUP gedurende drie seconden
ingedrukt te houden.
– Als een apparaat eenmaal ingesteld is, kan het niet meer van de lijst met apparaten
gewist worden.Alleen de merknaam kan gewijzigd worden (bijvoorbeeld als u een bepaald
type apparaat van een ander merk wil bedienen). Om een apparaat te wissen, moet u
het hele geheugen leegmaken. Zie hier voor ‘Herstellen van de oorspronkelijke functies van
de afstandsbediening’ onder 4.‘Extra mogelijkheden’.
1 Zet het apparaat, waarvoor u de afstandsbediening wilt instellen, aan.Als het apparaat
een dvd-speler/recorder of videorecorder is, plaats dan een disk of cassette in het
apparaat en start het afspelen.
2 Trek de beschermstrip uit het batterijvak
om de batterijen gebruiksklaar te maken.
• Als de strip niet makkelijk meekomt, open dan het
batterijvak om beter bij de strip te kunnen.
– De afstandsbediening gaat nu onmiddellijk in de stand
‘Instellen’.
- in het display verschijnt ‘ ’, ‘ ’ en ’TV?’;
- de achtergrondverlichting gaat aan;
- de toetsen die gebruikt kunnen worden, knipperen.
– De afstandsbediening is nu klaar om ingesteld te worden voor het bedienen van
uw tv.
3 Gebruik 4 om het apparaat te kiezen waarvoor u de
afstandsbediening wilt instellen (zie de tabel op de vorige
pagina).
4 Bevestig met OK.
– In het display verschijnt ‘ ’ en ’PHILIPS?’.
De toetsen die gebruikt kunnen worden, knipperen.
5 Gebruik 4 en 3 om het merk van uw apparaat te kiezen.
• Als het merk van uw apparaat niet in de lijst voorkomt, dan
kunt u een willekeurig ander merk kiezen.
6 Bevestig met OK.
7 Houd
yy
ingedrukt tot het apparaat reageert.
– In het display verschijnt ‘ ’.
8 Richt de afstandsbediening naar het apparaat.
– De afstandsbediening begint nu alle gekende ‘uit (stand-by)’-
signalen één voor één te versturen. Bij elke verzonden code
verschijnt het volgende in het display: ’TEST 01, 02, 03’, enzovoort.
32
Nederlands
Gebruiksaanwijzing
Manual_SRU5150_86 24-04-2007 15:42 Pagina 32
Page 33

9 Wanneer het apparaat reageert, laat
yy
dan onmiddellijk los.
– De afstandsbediening heeft nu een code gevonden die werkt voor uw apparaat.
In het display verschijnt ’SETUP OK’.
– Als het apparaat niet reageert en ’LIST END’ verschijnt, dan is er geen code
gevonden voor het apparaat. Om het apparaat met de afstandsbediening te kunnen
bedienen, moeten de functies van de originele afstandsbediening één voor één
aangeleerd worden. Zie hiervoor ‘Aanleren van toetsfuncties’ onder
4. ’Extra mogelijkheden’.
10 Controleer of u alle apparaatfuncties kunt bedienen met de afstandsbediening.
– Als dit lukt, dan is de afstandsbediening klaar om het apparaat te bedienen.
De achtergrondverlichting gaat uit.
• Lukt dit niet, ga dan verder met stap 11.
• Als u de afstandsbediening wilt instellen voor het bedienen van andere apparaten,
ga dan verder met stap 11.
11 Houd SELECT gedurende drie seconden ingedrukt:
– - in het display verschijnt ‘ ’, ‘ ’ en ’TV?’.
- de achtergrondverlichting gaat aan.
- de toetsen die gebruikt kunnen worden, knipperen.
– De afstandsbediening staat nu in de stand ‘Instellen’.
12 Ga verder met het instellen vanaf stap 3.
• Als een apparaat, na verschillende pogingen,nog steeds helemaal niet of niet
op de juiste manier op alle toetsen reageert, dan kan de afstandsbediening
geen code vinden voor het apparaat. Om het apparaat met de
afstandsbediening te kunnen bedienen, moeten de functies van de originele
afstandsbediening één voor één aangeleerd worden. Zie hiervoor
‘Aanleren van toetsfuncties’ onder 4. ’Extra mogelijkheden’.
3. Gebruik van de afstandsbediening
Toetsen en functies
Op de afbeelding op pagina 3 ziet u een overzicht van alle toetsen en de bijbehorende
functies.
1 Display informatiescherm. Geeft de huidige status van de
afstandsbediening weer.
: de afstandsbediening staat in de stand ‘Instellen’ of
‘Geavanceerde functies’.
: de afstandsbediening is bezig met aanleren.
: batterijstatus. Knippert als de batterijen bijna leeg zijn.
: branden bij instellen, aanleren of geavanceerde
functies.
: brandt als de afstandsbediening een signaal verstuurt.
: brandt als de afstandsbediening een signaal ontvangt bij het
aanleren of bij geavanceerde functies.
TV: het gekozen apparaat.
PHILIPS: het gekozen merk.
2 LEARN. . . . . . . . . . . . . - de afstandsbediening in de aanleerstand schakelen.
XTRA . . . . . . . . . . . . . . - aanzetten van de achtergrondverlichting (indien
ingeschakeld).
- weergeven van extra (geavanceerde) functies voor het
gekozen apparaat.
33
Nederlands
Gebruiksaanwijzing
Manual_SRU5150_86 24-04-2007 15:42 Pagina 33
Page 34

3 / DISC . . . . . . . . . . - TV-mode: teletekst aan/uit.
- DVD-mode: diskmenu.
/ HDD. . . . . . . . . . . - TV-mode: tekst vasthouden.
- DVD-R-mode: Harddiskmenu.
/ SUBTITLE . . . . - TV-mode: breedbeeld-tv.
- DVD-mode: onder titeling.
/ FAV(orieten) . . . . - TV-mode: tekst uit.
- SAT-mode: lijst met favoriete kanalen.
4 MENU. . . . . . . . . . . . . . openen en afsluiten van het menu.
5 OK . . . . . . . . . . . . . . . . . bevestigen van uw keuze.
6 INFO. . . . . . . . . . . . . . . weergeven van zenderinformatie op het scherm.
7ss. . . . . . . . . . . . . . . . . . . uitschakelen van het geluid van de tv.
8 - VOL +. . . . . . . . . . . . . instellen van het tv-volume.
9 Cijfertoetsen . . . . . . . - TV-mode: directe keuze van een kanaal of andere functie.
- AMP-mode: bronkeuzetoetsen (TV, DVD,VCR,TUNER, CD,
AUX).
0 AV . . . . . . . . . . . . . . . . . schakelen tussen de externe ingangen van uw apparaat.
! 5 . . . . . . . . . . . . . . . . . . - TV-mode: rode teleteksttoets*.
- VCR/DVD-mode: terugspoelen.
2 . . . . . . . . . . . . . . . . . . . - TV-mode: index.
- VCR/DVD-mode: afspelen.
6 . . . . . . . . . . . . . . . . . . - TV-mode: blauwe teleteksttoets*.
- VCR/DVD-mode: doorspoelen.
9 . . . . . . . . . . . . . . . . . . . - TV-mode: groene teleteksttoets*.
- VCR/DVD-mode: stoppen.
0 . . . . . . . . . . . . . . . . . . . - VCR/DVD-mode: opnemen.
; . . . . . . . . . . . . . . . . . . . - TV-mode: gele teleteksttoets*.
- VCR/DVD-mode: pauze.
@ -/--. . . . . . . . . . . . . . . . . . kiezen tussen één- en tweecijferige zendernummers.
#22. . . . . . . . . . . . . . . . . . - kiezen van een vorig kanaal / programma.
SURROUND . . . . . . . - kiezen van de surround-modes.
$ - PROG +. . . . . . . . . . . kiezen van de vorige of volgende zender.
% BACK . . . . . . . . . . . . . . één niveau terugkeren binnen het menu of afsluiten van het
menu.
^ Cursortoetsen. . . . . . cursor omhoog, omlaag, naar links, naar rechts in een menu.
& GUIDE . . . . . . . . . . . . . STB-mode: openen van de elektronische tv-programmagids.
*yy(Stand-by) . . . . . . . . . in- of uitschakelen van TV, DVD, VCR, AMP, CD of STB.
( SETUP . . . . . . . . . . . . . - de afstandsbediening in de stand ‘Instellen’ schakelen.
SELECT. . . . . . . . . . . . - aanzetten van de achtergrondverlichting
(indien ingeschakeld).
- kiezen van een apparaat. U kunt alleen die apparaten kiezen,
waarvoor de afstandsbediening ingesteld is.
* Opmerking: Als u de gekleurde toetsen wilt gebruiken als kleurkeuzetoetsen in DVDR-HDD-
mode, dan moet u de kleurkeuzefuncties aanleren aan de XTRA-functietoetsen.
Zie hiervoor ‘Aanleren van toetsfuncties’ onder 4. ’Extra mogelijkheden’.
Extra functies
Aan de afstandsbediening kunnen voor elk apparaat, waarvoor de afstandsbediening
ingesteld is, extra (geavanceerde) functies toegevoegd worden.
Zie hiervoor het hierna volgende ‘Toevoegen van extra functies’.
Voor een overzicht van de extra (geavanceerde) functies voor de verschillende apparaten,
zie de lijst ‘Extra functies’ achterin dit boekje.
34
Nederlands
Gebruiksaanwijzing
Manual_SRU5150_86 24-04-2007 15:42 Pagina 34
Page 35

4. Extra mogelijkheden
Toevoegen van extra functies
Opmerking: Er kunnen alleen functies toegevoegd worden die ook aanwezig zijn op de originele
afstandsbedieningen van de apparaten.
1 Houd XTRA gedurende 3 seconden ingedrukt:
– - de achtergrondverlichting (mits ingeschakeld) gaat aan.
- in het display verschijnt ‘ ’ en ‘ ’.
- de toetsen die gebruikt kunnen worden, knipperen.
– De afstandsbediening staat nu in de stand
‘Geavanceerde functies’.
2 Gebruik 3 en 4 om de extra functie te kiezen die u wil toevoegen of wijzigen.
Bevestig met OK.
– In het display verschijnt ‘ ’, ‘ ’ en ‘ ’ samen met ‘LEARNING‘.
3 Plaats beide afstandsbedieningen op een vlakke
ondergrond (bijvoorbeeld op de salontafel) en richt ze met
de bovenkanten naar elkaar met ongeveer 5 tot 10 cm
afstand ertussen.
4 Druk op de functietoets op de originele afstandsbediening
(bijvoorbeeld op de toets AMBILIGHT op de afstandsbediening van uw tv) of
druk op 1 indien u terug wilt keren naar de vorige stap 2.
– In het display verschijnt ‘ ’ samen met bijv. ‘TV-AMBILIGHT LEARN OK‘.
De extra functie is met succes toegevoegd.
– Als in het display ‘ERROR‘ of ‘MEM FULL’ verschijnt, begin dan opnieuw vanaf
stap 1. Zie ook ‘Verhelpen van storingen’ onder 6.‘Ondersteuning’.
Activeren / gebruiken van een extra (geavanceerde) functie
1 Gebruik SELECT om het gewenste apparaat te kiezen.
Bijvoorbeeld DVD.
– Bevestig met OK.
2 Druk op XTRA.
– De laatst gekozen functie voor het apparaat verschijnt in
het display. Bijvoorbeeld DVD-SHOWVIEW.
De toetsen die gebruikt kunnen worden, knipperen.
3 Gebruik 3 en 4 om de functie te kiezen die u wilt
activeren. Bijvoorbeeld DVD-ZOOM.
Druk op OK om de functie te activeren.
4 Druk nogmaals op XTRA om terug te keren naar de
normale bedieningsstand.
35
Nederlands
Gebruiksaanwijzing
Manual_SRU5150_86 24-04-2007 15:42 Pagina 35
Page 36

Apparaten verwijderen
Voorbeeld van TV:
1 Houd SETUP gedurende 3 seconden ingedrukt:
– de achtergrondverlichting wordt (indien mogelijk)
ingeschakeld.
– op het display wordt ‘ ’,‘ ’ en ’TV?’
weergegeven.
– de toetsen die u kunt gebruiken, knipperen.
2 Gebruik 'omhoog' 3 of 'omlaag' 4 om ’DELETE TV’
(TV afsluiten) onder in de lijst te selecteren.
3 Druk op OK om de TV-modus te beëindigen.
– Op het display wordt ’DEVICE DELETED’ (Apparaat
afgesloten) weergegeven.
– De TV-modus is afgesloten.
Aanleren van toetsfuncties
Als u bepaalde functies van uw originele afstandsbediening mist op de SRU 5150,
dan kan deze de betreffende functies aanleren van de originele afstandsbediening.
U kunt een functie onder elk van de beschikbare toetsen van de SRU 5150 opslaan,
behalve onder XTRA (LEARN) en SELECT (SETUP).
Elke functie die reeds onder een toets opgeslagen was, wordt gewist.
1 Zorg ervoor dat u de originele afstandsbediening bij de hand heeft.
2 Gebruik SELECT om het gewenste apparaat te kiezen.
Bijvoorbeeld DVD.
3 Plaats beide afstandsbedieningen op een vlakke
ondergrond (bijvoorbeeld op de salontafel) en richt ze met
de bovenkanten naar elkaar met ongeveer 5 tot 10 cm
afstand ertussen.
4 Houd LEARN en de toets waaraan u wil aanleren op de
SRU 5150 tegelijk gedurende 3 seconden ingedrukt,
tot ‘ ’ begint te branden samen met ’LEARNING’.
5 Druk op de toets die u wil kopiëren van de originele afstandsbediening.
– begint te branden. De afstandsbediening is de functie nu aan het aanleren.
– Wanneer de afstandsbediening de functie aangeleerd heeft, dan verschijnt in het
display ’LEARN OK’ om te bevestigen dat het signaal opgeslagen is.
– Als in het display ‘ERROR‘ of ‘MEM FULL’ verschijnt, begin dan opnieuw vanaf
stap 1. Zie ook ‘Verhelpen van storingen’ onder 6.‘Ondersteuning’.
36
Nederlands
Gebruiksaanwijzing
Manual_SRU5150_86 24-04-2007 15:42 Pagina 36
Page 37

Inschakelen / uitschakelen van de achtergrondverlichting
De achtergrondverlichting verlicht het display zodat u alle display-indicaties duidelijk kunt
zien, zelfs in een minder goed verlichte kamer.Aangezien de achtergrondverlichting extra
energie verbruikt, gaan de batterijen minder lang mee als de achtergrondverlichting vaak
gebruikt wordt. Daarom is er de mogelijkheid om de achtergrondverlichtingsfunctie uit te
schakelen.
Uitschakelen van de achtergrondverlichtingsfunctie
• Houd de cijfertoetsen 1 en 9 tegelijk gedurende 3 seconden
ingedrukt.
– De achtergrondverlichtingsfunctie is nu uitgeschakeld en de
achtergrondverlichting kan niet aangezet worden.
Inschakelen van de achtergrondverlichtingsfunctie
• Houd de cijfertoetsen 7 en 9 tegelijk gedurende 3 seconden
ingedrukt.
– De achtergrondverlichtingsfunctie is nu ingeschakeld en de
achtergrondverlichting kan aangezet worden.
Herstellen van de oorspronkelijke functies van de
afstandsbediening
In bepaalde gevallen kan het nuttig zijn de originele functies van de afstandsbediening te
herstellen. Bijvoorbeeld als het geheugen van de afstandsbediening vol is terwijl u deze wilt
instellen voor een bepaald apparaat of een extra toetsfunctie wilt aanleren.
De fabrieksinstellingen van de afstandsbediening worden dan hersteld en alle eigen
instellingen worden gewist.
1 Houd de cijfertoetsen 1 en 6 tegelijk gedurende 3 seconden
ingedrukt.
– ‘ ’ begint te branden.
De afstandsbediening staat nu in de stand ‘Instellen’.
2 Druk in de juiste volgorde op de cijfertoetsen 9, 8 en 1.
– ‘In het display verschijnt 981 - WAIT’.
Alle oorspronkelijke functies zijn nu hersteld en
alle toegevoegde functies zijn gewist.
37
Nederlands
Gebruiksaanwijzing
Manual_SRU5150_86 24-04-2007 15:42 Pagina 37
Page 38

5. Vervangen van de batterijen
Als de batterijstatusindicator ( ) in het display begint te knipperen, dan zijn de
batterijen bijna leeg en moeten ze vervangen worden. Alle eigen instellingen blijven
bewaard wanneer de oude batterijen uitgehaald worden.
1 Druk het klepje naar binnen, schuif het in de richting
van de pijl en neem het klepje uit.
2 Plaats 3 AAA/R03-batterijen in het batterijvak en let hierbij
op de aanduidingen + en – binnenin het batterijvak.
3 Plaats het klepje terug en klik het op zijn plaats.
6. Ondersteuning
Verhelpen van storingen
• Probleem
– Mogelijke oorzaak / Oplossing
• Het apparaat dat u wilt bedienen reageert helemaal niet als een toets ingedrukt
wordt.
– Richt de afstandsbediening naar het apparaat en zorg ervoor dat er niets in de weg staat
tussen de afstandsbediening en het apparaat.
– Controleer of de functie die u wilt bedienen aanwezig is op het apparaat.
– Controleer of de batterijstatusindicator ()in het display knippert
(batterijen bijna leeg). Zo ja, plaats dan nieuwe batterijen.
• Het apparaat dat u wilt bedienen reageert niet op de juiste manier als een toets
ingedrukt wordt.
– Misschien is er tijdens het instellen een foute code geprogrammeerd voor het apparaat.
Probeer de afstandsbediening nogmaals in te stellen.
Reageert het apparaat nog steeds niet, bel dan onze helpdesk.
– Controleer of de batterijstatusindicator ()in het display knippert
(batterijen bijna leeg). Zo ja, plaats dan nieuwe batterijen.
• De teleteksttoetsen werken niet.
– Controleer of uw tv wel teletekst heeft.
• U kunt niet alle functies van uw apparaat bedienen.
– De afstandsbediening moet misschien aangepast worden voor het model van uw apparaat.
Bel onze helpdesk voor meer details.
• ERROR verschijnt in het display terwijl een extra (geavanceerde) functie
toegevoegd wordt of wanneer u probeert een toets aan te leren.
– Er werd 20 seconden lang geen signaal ontvangen van de originele afstandsbediening en
de SRU 5150 heeft het toevoegen / aanleren beëindigd. Begin opnieuw vanaf stap 1.
– Er werd een toets van de SRU 5150 ingedrukt voor een signaal ontvangen werd en de
SRU 5150 heeft het toevoegen / aanleren beëindigd. Begin opnieuw vanaf stap 1.
– De functie die u probeert toe te voegen is niet beschikbaar op de originele
afstandsbediening.
– Controleer of de originele afstandsbediening correct werkt.
– Zorg ervoor dat de afstandsbedieningen recht tegenover elkaar liggen.
– Het infraroodsignaal van de originele afstandsbediening is buiten bereik.
De SRU 5150 kan enkel infraroodsignalen aanleren met een draaggolf van 30-60kHz.
38
Nederlands
Gebruiksaanwijzing
Manual_SRU5150_86 24-04-2007 15:42 Pagina 38
Page 39

• MEM FULL verschijnt in het display terwijl een extra (geavanceerde) functie
toegevoegd wordt of wanneer u probeert een toets aan te leren.
– Er kunnen geen functies meer toegevoegd worden voor het gekozen apparaat of het
geheugen van de SRU 5150 is vol. Herstel alle oorspronkelijke functies van uw
afstandsbediening om ruimte te maken in het geheugen. Zie hiervoor ‘Herstellen van de
oorspronkelijke functies van de afstandsbediening’ onder 4.‘Extra mogelijkheden’.
Alle eigen instellingen worden dan gewist.
• De afstandsbediening gaat niet in de stand ‘Instellen’ na het indrukken van SELECT.
– Controleer of de batterijstatusindicator ()in het display knippert
(batterijen bijna leeg). Zo ja, plaats dan nieuwe batterijen.
• Tijdens het instellen kunnen maar 5 apparaten gekozen worden.
– Het maximumaantal apparaten (5) voor de SRU 5150 is reeds ingesteld.
Er kunnen geen andere apparaattypes gekozen worden behalve als u het hele geheugen
leegmaakt. Zie hiervoor ‘Herstellen van de oorspronkelijke functies van de
afstandsbediening’ onder 4.‘Extra mogelijkheden’.
Alle eigen instellingen worden dan gewist.
Hulp nodig?
Mocht u vragen hebben over de SRU 5150, dan kunt u altijd contact opnemen met ons.
U vindt onze gegevens aan het einde van de lijst met extra functies achterin deze
gebruiksaanwijzing.
Leest u deze gebruiksaanwijzing aandachtig voor u opbelt. De meest problemen kunt u zelf
oplossen. Als u onze hulplijn belt, zorg er dan voor dat het apparaat in de buurt staat zodat
nagegaan kan worden of uw afstandsbediening op de juiste manier werkt.
Het typenummer van uw Philips universele afstandsbediening is SRU 5150/86.
Aankoopdatum: ......../ ......../ ........
(dag/maand/jaar)
39
Nederlands
Gebruiksaanwijzing
Manual_SRU5150_86 24-04-2007 15:42 Pagina 39
Page 40

Indholdsfortegnelse
1. Indledning . . . . . . . . . . . . . . . . . . . . . . . . . . . . . . . . . . . . . . . . . . . . . . . . . . . . . . . . . . . . . 40
2. Indstilling af fjernbetjeningen . . . . . . . . . . . . . . . . . . . . . . . . . . . . . . . . . . . . . . . 40-42
3. Brug af fjernbetjeningen . . . . . . . . . . . . . . . . . . . . . . . . . . . . . . . . . . . . . . . . . . . . 42-43
Taster og funktioner . . . . . . . . . . . . . . . . . . . . . . . . . . . . . . . . . . . . . . . . . . . . . . . . . . . 42-43
Ekstra funktioner . . . . . . . . . . . . . . . . . . . . . . . . . . . . . . . . . . . . . . . . . . . . . . . . . . . . . . . . . 43
4. Ekstra muligheder . . . . . . . . . . . . . . . . . . . . . . . . . . . . . . . . . . . . . . . . . . . . . . . . . 44-46
Tilføjelse af ekstra funktioner . . . . . . . . . . . . . . . . . . . . . . . . . . . . . . . . . . . . . . . . . . . . . . . 44
Slet enheder . . . . . . . . . . . . . . . . . . . . . . . . . . . . . . . . . . . . . . . . . . . . . . . . . . . . . . . . . . 44-45
Indlæring af tastfunktioner . . . . . . . . . . . . . . . . . . . . . . . . . . . . . . . . . . . . . . . . . . . . . . . . . . 45
Aktivering/deaktivering af baggrundslysfunktionen. . . . . . . . . . . . . . . . . . . . . . . . . . . . . . 46
Aktivering af fjernbetjeningens oprindelige funktioner . . . . . . . . . . . . . . . . . . . . . . . . . . 46
5. Udskiftning af batterierne . . . . . . . . . . . . . . . . . . . . . . . . . . . . . . . . . . . . . . . . . . . . . 46
6. Service . . . . . . . . . . . . . . . . . . . . . . . . . . . . . . . . . . . . . . . . . . . . . . . . . . . . . . . . . . . . . 47-48
Problemløsning . . . . . . . . . . . . . . . . . . . . . . . . . . . . . . . . . . . . . . . . . . . . . . . . . . . . . . . 47-48
Har du brug for hjælp? . . . . . . . . . . . . . . . . . . . . . . . . . . . . . . . . . . . . . . . . . . . . . . . . . . . . 48
Liste over ekstra funktioner . . . . . . . . . . . . . . . . . . . . . . . . . . . . . . . . . . . . . . . . . . . . . . . . 76
Information til kunden . . . . . . . . . . . . . . . . . . . . . . . . . . . . . . . . . . . . . . . . . . . . . . . . . . . . 78
1. Indledning
Til lykke med erhvervelsen af Philips universalfjernbetjening SRU 5150.
SRU 5150 kan betjene op til 5 forskellige apparater. Under indstillingen kan du selv definere
nøjagtigt, hvilke apparater der skal betjenes (se nedenstående tabel).
Oplysninger om klargøring af SRU 5150 til brug finder du i afsnittet 2
‘Indstilling af fjernbetjeningen’.
2. Indstilling af fjernbetjeningen
Fjernbetjeningen kan indstilles til at betjene 5 af de følgende apparater:
Apparat Visning på displayet
TV-apparat TV
Andet TV-appar at TV2
Videobåndoptager VCR
Anden videobåndoptager VCR2
Personlig videobåndoptager PVR
TV-video-kombinationer TV-VCR
TV-DVD-kombinationer TV-DVD
DVD-video-kombinationer DVD-VCR
Forstærker AMPLIFIER
Hjemmebiografsystem HTS
Audioapparat AUDIO-SET
Radio TUNER
Digital mediemodtager DMR
Dekoder STB
Satellitmodtager SAT
Digitalt jordbaseret fjernsyn
(Digital Video Broadcasting Terrestr ial) DVB-T
Kabeldekoder CABLE
CD-afspiller CD
Mini Disk MD
DVD-afspiller DVD
DVD-optager DVDR
Spillekonsol GAME
DVD-optager med harddiskdrev DVDR-HDD
40
Dansk
Vejledning
Manual_SRU5150_86 24-04-2007 15:42 Pagina 40
Page 41

Bemærk:
– Der er allerede sat batterier i fjernbetjeningen.
– Hvis du ønsker at indstille fjernbetjeningen til at betjene dit TV-apparat, kan du springe
over trin 3.
– Hvis dit apparat er et Philips apparat, kan du springe over trin 5.
– Indstillingsfunktionen kan afsluttes på et hvilket som helst tidspunkt ved at holde SETUP
(INDSTILLING) trykket ned i 3 sekunder.
– Når et apparat først er installeret, kan det ikke slettes fra listen over apparater.
Kun navnet på mærket kan ændres (f.eks. hvis du ønsker at betjene en type apparat
af et andet mærke). For at slette et apparat skal hele hukommelsen slettes.
Se ‘Aktivering af fjernbetjeningens oprindelige funktioner’ under 4.‘Ekstra muligheder’.
1 Tænd for det apparat, du ønsker at indstille fjernbetjeningen til.
Hvis det drejer sig om en DVD-afspiller/optager eller videobåndoptager,
skal du indsætte en disk eller et bånd i apparatet og begynde afspilningen.
2 Træk den beskyttende strimmel ud af batterirummet
for at aktivere batterierne.
• Hvis det er svært at trække strimlen ud, skal batterirummet
åbnes for at gøre det lettere at få fat i strimlen.
– Fjernbetjeningen vil omgående komme i indstillingsfunktion:
- displayet viser ‘ ’, ‘ ’ og ’TV?’;
- baggrundslyset tændes;
- de taster, som kan anvendes, blinker.
– Fjernbetjeningen er nu klar til at blive indstillet til at betjene dit tv-apparat.
3 Brug 4 for at vælge det apparat, du ønsker at indstille
fjernbetjeningen til (se tabellen på forrige side).
4 Bekræft med OK.
– Displayet viser ‘ ’ og ’PHILIPS?’.
De taster, som kan anvendes, blinker.
5 Brug 4 og 3 for at vælge mærket på dit apparat.
• Hvis mærket på dit apparat står ikke på listen, kan du vælge
et andet mærke.
6 Bekræft med OK.
7 Hold
yy
trykket ned, indtil apparatet reagerer.
– Displayet viser ‘ ’.
8 Peg på apparatet med fjernbetjeningen.
– Fjernbetjeningen begynder nu at sende alle kendte
‘fra (standby)’-koder, en ad gangen. Hver gang en kode
sendes, vises dette på displayet: ’TEST 01, 02, 03’, osv.
41
Dansk
Vejledning
Manual_SRU5150_86 24-04-2007 15:42 Pagina 41
Page 42

9 Når apparatet reagerer, slippes
yy
omgående.
– Fjernbetjeningen har nu fundet en kode, der virker med dit apparat.
’SETUP OK’ vises på displayet.
– Hvis apparatet ikke reagerer og ’LIST END’ vises, er der ikke fundet en kode til
apparatet. Hvis fjernbetjeningen skal kunne betjene apparatet, skal den lære den
oprindelige fjernbetjenings funktioner, en tast ad gangen. Se ‘Indlæring af tastfunktioner’
under 4.‘Ekstra muligheder’.
10 Kontrollér, om du kan betjene alle apparatets funktioner med fjernbetjeningen.
– Hvis du kan det, er fjernbetjeningen klar til at betjene apparatet.
Baggrundslyset slukkes.
• Hvis du ikke kan det, skal du fortsætte med trin 11.
• Hvis du ønsker at indstille fjernbetjeningen til at betjene andre apparater, skal du
fortsætte med trin 11.
11 Hold SELECT trykket ned i 3 sekunder:
– - displayet viser ‘ ’, ‘ ’ og ’TV?’.
- baggrundslyset tændes.
- de taster, som kan anvendes, blinker.
– Fjernbetjeningen er nu i indstillingsfunktion.
12 Fortsæt indstillingen fra trin 3.
• Hvis et apparat efter flere forsøg stadig ikke reagerer eller ikke reagerer
korrekt på alle tastkommandoer,kan fjernbetjeningen ikke finde en kode til
apparatet. Hvis fjernbetjeningen skal kunne betjene apparatet, skal den lære
den oprindelige fjernbetjenings funktioner, en tast ad gangen.
Se ‘Indlæring af tastfunktioner’ under 4. ’Ekstra muligheder’.
3. Brug af fjernbetjeningen
Taster og funktioner
Illustrationen på side 3 giver en oversigt over alle taster og deres funktioner.
1 Display informationsskærm.Viser fjernbetjeningens nuværende status.
: fjernbetjening i indstillingsfunktion eller avanceret
funktion.
: fjernbetjening i indlæringsfunktion.
: batteristatus. blinker, når batteristrømmen næsten er
brugt op
: lyser i indstillings-, indlærings- og avanceret funktion.
: lyser, når fjernbetjeningen sender et signal.
: lyser, når fjernbetjeningen modtager et signal i indlærings-
eller avanceret funktion.
TV: valgt apparat.
PHILIPS: valgt mærke.
2 LEARN. . . . . . . . . . . . . - skifter fjernbetjeningen til indlæringsfunktion.
XTRA . . . . . . . . . . . . . . - tænder for baggrundslyset (hvis aktiveret).
- viser ekstra (avancerede) funktioner for det valgte apparat.
42
Dansk
Vejledning
Manual_SRU5150_86 24-04-2007 15:42 Pagina 42
Page 43

3 / DISC . . . . . . . . . . - TV-funktion: tekst-tv til/fra.
- DVD-funktion: diskmenu.
/ HDD. . . . . . . . . . . - TV-funktion: tekst hold.
- DVD-R-funktion: menu for harddiskdrev.
/ SUBTITLE . . . . - TV-funktion: bred skærm TV.
- DVD-funktion: under tekst.
/ FAV(oritter) . . . . - TV-funktion: tekst fra
- SAT-funktion: liste over favoritkanaler.
4 MENU. . . . . . . . . . . . . . slår menu til eller fra.
5 OK . . . . . . . . . . . . . . . . . bekræfter dit valg.
6 INFO. . . . . . . . . . . . . . . viser kanalinformation på TV-skærmen.
7ss. . . . . . . . . . . . . . . . . . . slår lyden fra på TV-apparatet.
8 - VOL +. . . . . . . . . . . . . regulerer lydstyrken på TV-apparatet.
9 Taltaster . . . . . . . . . . . - TV-funktion: til direkte valg af kanaler og andre funktioner.
- AMP-funktion: kildevalgstaster
(TV, DVD,VCR,TUNER, CD, AUX).
0 AV . . . . . . . . . . . . . . . . . skifter mellem eksterne udgange på dit udstyr.
! 5 . . . . . . . . . . . . . . . . . . - TV-funktion: rød tekst-tv tast*.
- VCR/DVD-funktion: tilbagespoling.
2 . . . . . . . . . . . . . . . . . . . - TV-funktion: Indeks.
- VCR/DVD-funktion: afspil.
6 . . . . . . . . . . . . . . . . . . - TV-funktion: blå tekst-tv tast*.
- VCR/DVD-funktion: fremspoling.
9 . . . . . . . . . . . . . . . . . . . - TV-funktion: grøn tekst-tv tast*.
- VCR/DVD-funktion: stop.
0 . . . . . . . . . . . . . . . . . . . - VCR/DVD-funktion: optag.
; . . . . . . . . . . . . . . . . . . . - TV-funktion: gul tekst-tv tast*.
- VCR/DVD-funktion: pause.
@ -/--. . . . . . . . . . . . . . . . . . vælger mellem 1- og 2-cifrede kanalnumre.
#22. . . . . . . . . . . . . . . . . . - vælger forrige kanal /program.
SURROUND . . . . . . . - vælger surround-funktioner.
$ - PROG +. . . . . . . . . . . vælger forrige eller næste kanal.
% BACK . . . . . . . . . . . . . . går ét niveau tilbage i menuen eller slår menuen fra.
^ Markørtaster . . . . . . . markør op, ned, til venstre, til højre i en menu.
& GUIDE . . . . . . . . . . . . . STB-funktion: åbner den elektroniske TV-programguide.
*yy(Standby) . . . . . . . . . . slår TV, DVD,VCR, AMP, CD eller STB til eller fra.
( SETUP . . . . . . . . . . . . . - sætter fjernbetjeningen i indstillingsfunktion.
SELECT. . . . . . . . . . . . - tænder for baggrundslyset (hvis aktiveret).
- vælger apparatets funktioner. Kun apparater, som er indstillet
i fjernbetjeningen, kan vælges.
* Bemærk: Hvis du ønsker at anvende farvetaster som farvevalgstaster i DVDR-HDD-funktion,
skal du indlære farvevalgsfunktionerne under den ekstra funktionstast XTRA.
Se ‘Tilføjelse af ekstra funktioner’ under 4.‘Ekstra muligheder’.
Ekstra funktioner
For hvert apparat, som er indstillet i fjernbetjeningen, kan der føjes ekstra (avancerede)
funktioner til fjernbetjeningen. Se ‘Tilføjelse af ekstra funktioner’ herefter.
En oversigt over ekstra (avancerede) funktioner for de forskellige apparater findes i listen
over ‘Ekstra funktioner’ bagest i denne vejledning.
43
Dansk
Vejledning
Manual_SRU5150_86 24-04-2007 15:42 Pagina 43
Page 44

4. Ekstra muligheder
Tilføjelse af ekstra funktioner
Bemærk: Kun funktioner, der er tilgængelige på den oprindelige fjernbetjening, kan tilføjes.
1 Hold XTRA trykket ned i 3 sekunder:
– - baggrundslyset (hvis aktiveret) tændes.
- displayet viser ‘ ’ og ‘ ’.
- de taster, som kan anvendes, blinker.
– Fjernbetjeningen er nu i avanceret funktion.
2 Brug 3 og 4 for at vælge den ekstra funktion, du ønsker at tilføje eller ændre.
Bekræft med OK.
– Displayet viser ‘ ’, ‘ ’ og ‘ ’ sammen med ‘LEARNING‘.
3 Læg begge fjernbetjeninger på en flad overflade
(f.eks. et sofabord), så den ende af fjernbetjeningerne, der
normalt peger mod dine apparater, nu peger mod hinanden.
Afstanden mellem dem skal være ca. 5 – 10 cm.
4 Tryk på funktionstasten på den oprindelige fjernbetjening
(f.eks. AMBILIGHT-tasten på din TV-fjernbetjening) eller tryk på 1,
hvis du ønsker at gå tilbage til trin 2.
– Displayet viser ‘ ’ sammen med f.eks.‘TV-AMBILIGHT LEARN OK‘.
Det lykkedes at tilføje den ekstra funktion.
– Hvis displayet viser ‘ERROR‘ eller ‘MEM FULL’, så begynd igen fra trin 1.
Se også 'Problemløsning' under 6. 'Kundeservice'.
Aktivering / brug af en ekstra (avanceret) funktion
1 Brug SELECT for at vælge det ønskede apparat, f.eks. DVD.
– Bekræft med OK.
2 Tryk på XTRA.
– Den sidst valgte funktion for apparatet vises på displayet,
f.eks. DVD-SHOWVIEW.
De taster, som kan anvendes, blinker.
3 Brug 3 og 4 for at vælge den funktion, du ønsker at
aktivere, f.eks. DVD-ZOOM.
Tryk på OK for at aktivere funktionen.
4 Tryk på XTRA igen for at gå tilbage til normal funktion.
Slet enheder
Eksempel for TV:
1 Tryk knappen SETUP ind i 3 sekunder:
– baggrundsbelysningen tænder (hvis denne er aktiveret).
– displayet viser ‘ ’, ‘ ’ og ’TV?’
– de taster, der kan anvendes, blinker.
44
Dansk
Vejledning
Manual_SRU5150_86 24-04-2007 15:42 Pagina 44
Page 45

2 Brug 3 eller 4 til at vælge ’DELETE TV’ i bunden
af listen.
3 Tryk på OK for at slette TV-enhedstilstand.
– Displayet viser ’DEVICE DELETED’.
– TV-enhedstilstand er slettet.
Indlæring af tastfunktioner
Hvis du mangler visse funktioner fra din originale fjernbetjening på SRU 5150’en, kan disse
funktioner kopieres fra den originale fjernbetjening. Du kan gemme en funktion under
enhver af de tilgængelige taster på SRU 5150’en, undtagen XTRA (LEARN) og SELECT
(SETUP). Enhver funktion, der allerede er gemt under en tast, vil blive slettet.
1 Sørg for at have den originale fjernbetjening i nærheden.
2 Brug SELECT for at vælge det ønskede apparat, f.eks. DVD.
3 Læg begge fjernbetjeninger på en flad overflade
(f.eks. et sofabord), så den ende af fjernbetjeningerne, der
normalt peger mod dine apparater, nu peger mod hinanden.
Afstanden mellem dem skal være ca. 5 – 10 cm.
4 Hold LEARN og den tast, som du ønsker at kopiere til
SRU 5150 trykket ned samtidigt i 3 sekunder,
indtil ‘ ’ lyser sammen med ’LEARNING’.
5 Tryk på den tast, du ønsker at kopiere fra den originale
fjernbetjening.
– lyser. Fjernbetjeningen lærer nu funktionen.
– Når fjernbetjeningen har lært funktionen, vises ’LEARN OK’ på displayet for at
bekræfte, at signalet er gemt.
– Hvis displayet viser ‘ERROR‘ eller ‘MEM FULL’, så begynd igen fra trin 1.
Se også 'Problemløsning' under 6. 'Kundeservice'.
45
Dansk
Vejledning
Manual_SRU5150_86 24-04-2007 15:42 Pagina 45
Page 46

Aktivering/deaktivering af baggrundslysfunktionen.
Baggrundslyset tændes på displayet, så du tydeligt kan se alle displaymeddelelser, selv i
mørke. Da baggrundslyset bruger ekstra strøm, reduceres batteriernes levetid, hvis
baggrundslyset anvendes meget. Derfor er det muligt at deaktivere baggrundslysfunktionen.
Deaktivering af baggrundslysfunktionen
• Hold taltasterne 1 og 9 trykket ned samtidigt i
3 sekunder.
– Baggrundslysfunktionen er nu deaktiveret, og baggrundslyset
kan ikke tændes.
Aktivering af baggrundslysfunktionen
• Hold taltasterne 7 og 9 trykket ned samtidigt i
3 sekunder.
– Baggrundslysfunktionen er nu aktiveret og baggrundslyset
kan tændes.
Aktivering af fjernbetjeningens oprindelige funktioner
I visse tilfælde kan det være nyttigt at aktivere fjernbetjeningens oprindelige funktioner igen,
f.eks. hvis fjernbetjeningens hukommelse er fuld, mens du ønsker at indstille et særligt
apparat eller kopiere en ekstra tastfunktion til fjernbetjeningen. Fjernbetjeningen vil så blive
nulstillet til de standard fabriksindstillinger og alle brugerindstillinger vil blive slettet.
1 Hold taltasterne 1 og 6 trykket ned samtidigt i
3 sekunder.
– ‘ ’ lyser. Fjernbetjeningen er nu i indstillingsfunktion.
2 Tryk på taltasterne 9, 8 og 1 i den angivne rækkefølge.
– ‘981 - WAIT’ vises på displayet.
Alle oprindelige funktioner er nu aktiveret på ny og
eventuelle ekstra funktioner er blevet slettet.
46
Dansk
Vejledning
Manual_SRU5150_86 24-04-2007 15:42 Pagina 46
Page 47

5. Udskiftning af batterierne
Når batteriindikatoren ( ) på displayet blinker, er batteristrømmen næsten brugt op og
batterierne skal udskiftes. Alle brugerindstillinger vil blive bibeholdt, når de gamle batterier
fjernes.
1 Tryk dækslet indad, skub det i retning af pilen og
fjern dækslet.
2 Sæt 3 stk. AAA/R03 batterier i, og vær opmærksom
på + og - mærkerne inde i batterirummet.
3 Skub dækslet tilbage, til det klikker godt på plads.
6. Service
Problemløsning
• Problem
– Mulig årsag / løsning
• Det apparat, du vil betjene, reagerer slet ikke, når du trykker på en tast.
– Peg på apparatet med fjernbetjeningen og sørg for, at der ikke er nogen forhindringer
mellem fjernbetjeningen og apparatet.
– Sørg for, at den funktion, du ønsker at betjene, er tilgængelig på apparatet.
– Kontrollér, om batteriindikatoren ()på displayet blinker
(batteristrømmen er næsten brugt op). Hvis den gør det, skal der sættes nye batterier i.
• Det apparat, du vil betjene, reagerer ikke korrekt, når du trykker på en tast.
– Måske er den forkerte kode blevet programmeret for apparatet under indstillingen.
Prøv at indstille fjernbetjeningen igen.
Hvis apparatet stadig ikke reagerer, så ring til vores hjælpetelefon.
– Kontrollér, om batteriindikatoren ()på displayet blinker
(batteristrømmen er næsten brugt op). Hvis den gør det, skal der sættes nye batterier i.
• Tekst-tv tasterne virker ikke.
– Undersøg, om dit TV-apparat er udstyret med tekst-tv.
• Du har problemer med at betjene alle funktionerne på dit apparat.
– Fjernbetjeningen skal måske tilpasses til netop din modeltype.
Ring til vores hjælpetelefon for at få nærmere oplysninger.
• ERROR vises på displayet, når en ekstra (avanceret) funktion tilføjes eller når der
gøres forsøg på at kopiere en tast.
– Der er ikke modtaget noget signal fra den oprindelige fjernbetjening i 20 sekunder og
SRU 5150’en har standset tilføjelses-/indlæringsprocessen. Begynd igen fra trin 1.
– Der er trykket på en tast på SRU 5150’en, før et signal registreres, og SRU 5150’en har
standset tilføjelses-/indlæringsprocessen. Begynd igen fra trin 1.
– Den funktion, du forsøger at tilføje, findes ikke på den oprindelige fjernbetjening.
– Kontrollér, om den oprindelige fjernbetjening, virker korrekt.
– Sørg for, at fjernbetjeningerne er rettet ind korrekt med hinanden.
– IR-signalet på den oprindelige fjernbetjening er uden for rækkevidde. SRU 5150’en kan kun
kopiere IR-signaler med et bæresignal på 30-60kHz.
47
Dansk
Vejledning
Manual_SRU5150_86 24-04-2007 15:42 Pagina 47
Page 48

• MEM FULL vises på displayet, mens en ekstra (avanceret) funktion tilføjes eller når
der gøres forsøg på at kopiere en tast.
– Der kan ikke føjes flere funktioner til det valgte apparat, eller der er ikke mere plads i
SRU 5150’ens hukommelse. Aktivér fjernbetjeningens oprindelige funktioner for at få mere
plads i hukommelsen. Se ‘Aktivering af fjernbetjeningens oprindelige funktioner’ under
4. ‘Ekstra muligheder’. Alle brugerindstillinger vil så blive slettet.
• Fjernbetjeningen kommer ikke i indstillingsfunktion,når der trykkes på SELECT.
– Kontrollér, om batteriindikatoren ()på displayet blinker (batteristrømmen er næsten
brugt op). Hvis den gør det, skal der sættes nye batterier i.
• Kun 5 apparater kan vælges under indstillingen.
– Det maksimale antal apparater (5) for SRU 5150’en er allerede indstillet.
Det er ikke muligt at vælge andre typer apparat, medmindre du sletter hele hukommelsen.
Se ‘Aktivering af fjernbetjeningens oprindelige funktioner’ under 4.‘Ekstra muligheder’.
Alle brugerindstillinger vil så blive slettet.
Har du brug for hjælp?
Hvis du har nogen spørgsmål om SRU 5150’en, så kan du altid kontakte os. Du kan finde
vore kontaktoplysninger efter listen over ekstra funktioner bagest i denne vejledning.
Inden du ringer, skal du læse denne vejledning omhyggeligt igennem. Du vil sikkert kunne
løse de fleste problemer selv. Når du ringer til vores hjælpetelefon, bedes du stille/sætte dig
foran udstyret, så vores personale kan hjælpe dig med at kontrollere, om din fjernbetjening
fungerer rigtigt.
Modelnummeret på din Philips universalfjernbetjening er SRU 5150/86.
Købsdato: ......../ ......../ ........
(dag/måned/år)
48
Dansk
Vejledning
Manual_SRU5150_86 24-04-2007 15:42 Pagina 48
Page 49

Innehåll
1. Inledning . . . . . . . . . . . . . . . . . . . . . . . . . . . . . . . . . . . . . . . . . . . . . . . . . . . . . . . . . . . . . . 49
2. Ställa in fjärrkontrollen . . . . . . . . . . . . . . . . . . . . . . . . . . . . . . . . . . . . . . . . . . . . . 49-51
3. Använda fjärrkontrollen . . . . . . . . . . . . . . . . . . . . . . . . . . . . . . . . . . . . . . . . . . . . 51-52
Knappar och funktioner . . . . . . . . . . . . . . . . . . . . . . . . . . . . . . . . . . . . . . . . . . . . . . . . 51-52
Extrafunktioner . . . . . . . . . . . . . . . . . . . . . . . . . . . . . . . . . . . . . . . . . . . . . . . . . . . . . . . . . . 52
4. Extra möjligheter . . . . . . . . . . . . . . . . . . . . . . . . . . . . . . . . . . . . . . . . . . . . . . . . . . 53-55
Lägga till extrafunktioner . . . . . . . . . . . . . . . . . . . . . . . . . . . . . . . . . . . . . . . . . . . . . . . . . . . 53
Ta bort enheter . . . . . . . . . . . . . . . . . . . . . . . . . . . . . . . . . . . . . . . . . . . . . . . . . . . . . . . 53-54
Lära fjärrkontrollen knappfunktioner . . . . . . . . . . . . . . . . . . . . . . . . . . . . . . . . . . . . . . . . . 54
Aktivera / inaktivera bakgrundsbelysningsfunktionen. . . . . . . . . . . . . . . . . . . . . . . . . . . . 55
Återställa alla de ursprungliga funktionerna på fjärrkontrollen . . . . . . . . . . . . . . . . . . . 55
5. Byta batterierna . . . . . . . . . . . . . . . . . . . . . . . . . . . . . . . . . . . . . . . . . . . . . . . . . . . . . . 55
6. Support . . . . . . . . . . . . . . . . . . . . . . . . . . . . . . . . . . . . . . . . . . . . . . . . . . . . . . . . . . . . 56-57
Felsökning . . . . . . . . . . . . . . . . . . . . . . . . . . . . . . . . . . . . . . . . . . . . . . . . . . . . . . . . . . . . 56-57
Behöver du hjälp? . . . . . . . . . . . . . . . . . . . . . . . . . . . . . . . . . . . . . . . . . . . . . . . . . . . . . . . . 57
Lista över extrafunktioner . . . . . . . . . . . . . . . . . . . . . . . . . . . . . . . . . . . . . . . . . . . . . . . . . 76
Information till konsumenten . . . . . . . . . . . . . . . . . . . . . . . . . . . . . . . . . . . . . . . . . . . . . . 79
1. Inledning
Gratulerar till ditt inköp av fjärrkontrollen Philips SRU 5150. SRU 5150 kan styra upp till
5 olika enheter. Du kan själv ange under inställningen precis vilka enheter som du vill ska
styras (se tabellen nedan). Du hittar information om hur du gör i ordning din SRU 5150 för
användning i kapitel 2 ‘Ställa in fjärrkontrollen’.
2. Ställa in fjärrkontrollen
Fjärrkontrollen kan ställas in så att den styr 5 av följande enheter:
Enhet I rutan
TV TV
En andra TV TV2
VCR VCR
Second VCR VCR2
Personlig videoinspelare PVR
Kombinerad TV-VCR TV-VCR
Kombinerad TV-DVD TV-DVD
Kombinerad DVD-VCR DVD-VCR
Förstärkare AMPLIFIER
Hembio HTS
Audioenhet AUDIO-SET
Radio TUNER
Digital mediamottagare DMR
Digitalbox STB
Satellitmottagare SAT
Markbunden DVB-enhet DVB-T
Kabeldekoder CABLE
CD-spelare CD
Minidisk MD
DVD-spelare DVD
DVD-inspelare DVDR
Spelkonsol GAME
DVD-inspelare med hårddiskenhet DVDR-HDD
49
Svenska
Bruksanvisning
Manual_SRU5150_86 24-04-2007 15:42 Pagina 49
Page 50

Observera:
– Det ligger redan batterier i fjärrkontrollen.
– Om du vill ställa in fjärkontrollen för att styra din TV kan du hoppa över steg 3.
– Om enheten är en Philips kan du hoppa över steg 5.
– Du kan när som helst gå ur inställningsläget genom att hålla ner SETUP i tre sekunder.
– När en enhet väl är installerad kan den inte tas bort från enhetslistan. Du kan bara ändra
märket (t.ex. om du vill styra samma enhetstyp men av ett annat märke).
Om du absolut vill radera en enhet måste du tömma hela minnet. Hur du gör det kan du
läsa om i ‘Återställa fjärrkontrollens ursprungliga inställningar’ under 4.‘Extra möjligheter’.
1 Koppla på den enhet som du vill ställa in fjärrkontrollen för.
Om det är en DVD-spelare/inspelare eller VCR, lägger du i en skiva respektive en
kassett och startar avspelningen.
2 Dra ut skyddsremsan ur batterifacket
för att aktivera batterierna.
• Om det inte går lätt att dra ut remsan kan du öppna
batterifacket så att du kommer åt remsan bättre.
– Då går fjärrkontrollen omedelbart in i inställningsläge:
- i rutan visas ‘ ’,‘ ’ och ’TV?’,
- bakgrundsbelysningen tänds,
- och de knappar som kan användas blinkar.
– Fjärrkontrollen är nu klar att ställas in för att styra din TV.
3 Använd 4 för att välja den enhet du till ställa in
fjärrkontrollen för (se tabell på föregående sida).
4 Bekräfta med OK.
– I rutan visas ‘ ’ och ’PHILIPS?’.
De knappar som kan användas blinkar.
5 Använd 4 och 3 för att välja din enhets märke.
• Om märket inte finns med i listan kan du välja ett annat
märke.
6 Bekräfta med OK.
7 Håll ner
yy
tills enheten svarar.
– I rutan visas ‘ ’.
8 Rikta fjärrkontrollen mot enheten.
– Fjärrkontrollen börjar nu sända alla koderna för ‘Stäng av
(standby)’ efter varandra.Varje gång en kod sänds,
visas följande i displayen: ’TEST 01, 02, 03’, etc.
50
Svenska
Bruksanvisning
Manual_SRU5150_86 24-04-2007 15:42 Pagina 50
Page 51

9 När enheten svarar släpper du omedelbart upp knappen
yy
.
– Fjärrkontrollen har nu hittat en kod som fungerar för din enhet.
’SETUP OK’ visas i displayen.
– Om enheten inte reagerar och ’LIST END’ visas, kunde ingen kod hittas för
enheten. För att styra enheten med fjärrkontrollen måste du då lära den funktionerna
från de ursprungliga fjärrkontrollen knapp för knapp. Hur du gör då kan du läsa i
‘Lära fjärrkontrollen knappfunktioner’ under 4. ‘Extra möjligheter’.
10 Kontrollera att du kan styra alla enhetens funktioner med fjärrkontrollen.
– Om du kan det är fjärrkontrollen klar att styra enheten.
Bakgrundsbelysningen stängs av.
• Om du inte kan det fortsätter du med steg 11.
• Om du vill ställa in fjärrkontrollen för att styra andra enheter fortsätter du med
steg 11.
11 Håll ner SELECT i tre sekunder:
– - i rutan visas ‘ ’,‘ ’ och ’TV?’,
- bakgrundsbelysningen tänds,
- och de knappar som kan användas blinkar.
– Fjärrkontrollen är nu i inställningsläge.
12 Fortsätt inställningen från steg 3.
• Om enheten inte svarar alls eller inte på rätt sätt på knappnedtryckningarna
trots att du försökt flera gånger, kan fjärrkontrollen inte hitta någon kod för
enheten. För att styra enheten med fjärrkontrollen måste du då lära den
funktionerna från de ursprungliga fjärrkontrollen knapp för knapp.
Hur du gör då kan du läsa i ‘Lära fjärrkontrollen knappfunktioner’ under
4.‘Extra möjligheter’.
3. Använda fjärrkontrollen
Knappar och funktioner
I illustrationen på sid. 3 ges en översikt över alla knapparna och deras funktioner.
1 Display Informationsskärm. visar fjärrkontrollens aktuella status.
: fjärrkontrollen i inställningsläge eller avancerat
funktionsläge.
: fjärrkontrollen i inlärningsläge.
: batteristatus. blinkar vid låg batteriladdning.
: lyser i inställningsläge, inlärningsläge och avancerat läge.
: lyser när fjärrkontrollen sänder ut en signal.
: lyser när fjärrkontrollen tar emot en signal i inlärningsläge
eller i avancerat funktionsläge.
TV: vald enhet.
PHILIPS: valt märke.
2 LEARN. . . . . . . . . . . . . - ställer fjärrkontrollen i inlärningsläge.
XTRA . . . . . . . . . . . . . . - tänder bakgrundsbelysningen (om den är aktiverad).
- visar extra (avancerade) funktioner för den valda enheten.
51
Svenska
Bruksanvisning
Manual_SRU5150_86 24-04-2007 15:42 Pagina 51
Page 52

3 / DISC . . . . . . . . . . - TV-läge: teletext på/av.
- DVD-läge: diskmeny.
/ HDD. . . . . . . . . . . - TV-läge: håll kvar texten.
- DVD-R-läge: meny för hårddisksenhet.
/ SUBTITLE . . . . - TV-läge: bredskärm
- DVD-läge: textremsa.
/ FAV(orit) . . . . . . . - TV-läge: text bort.
- SAT-läge: lista över favoritkanaler.
4 MENU. . . . . . . . . . . . . . kopplar på och av menyn.
5 OK . . . . . . . . . . . . . . . . . bekräftar valet.
6 INFO. . . . . . . . . . . . . . . visar information om kanalen på skärmen.
7ss. . . . . . . . . . . . . . . . . . . stänger av TV-ljudet.
8 - VOL +. . . . . . . . . . . . . justerar TV-volymen.
9 Nummerknappar. . . - TV-läge: direktval av kanal eller andra funktioner.
- AMP-läge: knappar för val av källa (TV, DVD,VCR,TUNER,
CD,AUX).
0 AV . . . . . . . . . . . . . . . . . växlar mellan de externa ingångarna på din utrustning.
! 5 . . . . . . . . . . . . . . . . . . TV-läge: röd text-TV-knapp*.
VCR/DVD-läge: spola tillbaka.
2 . . . . . . . . . . . . . . . . . . . TV-läge: förteckning.
VCR/DVD-läge: spela.
6 . . . . . . . . . . . . . . . . . . TV-läge: blå text-TV-knapp*.
VCR/DVD-läge: spola framåt.
9 . . . . . . . . . . . . . . . . . . . TV-läge: - grön text-TV-knapp*.
VCR/DVD-läge: stopp.
0 . . . . . . . . . . . . . . . . . . . - VCR/DVD-läge: spela in.
; . . . . . . . . . . . . . . . . . . . TV-läge: gul text-TV-knapp*.
VCR/DVD-läge: paus.
@ -/--. . . . . . . . . . . . . . . . . . växlar mellan en- och tvåsiffriga kanalnummer.
#22. . . . . . . . . . . . . . . . . . - väljer en tidigare kanal / program.
SURROUND . . . . . . . - väljer surroundlägen.
$ - PROG +. . . . . . . . . . . väljer föregående eller nästa kanal.
% BACK . . . . . . . . . . . . . . hoppar tillbaka en nivå i menyn eller stänger av menyn.
^ Markörknappar. . . . . markör upp, ner, vänster, höger i en meny.
& GUIDE . . . . . . . . . . . . . STB-läge: öppnar en elektronisk TV-programtablå.
*yy(Standby) . . . . . . . . . . kopplar på eller av TV, DVD,VCR, AMP, CD eller STB.
( SETUP . . . . . . . . . . . . . - ställer fjärrkontrollen i inställningsläge.
SELECT. . . . . . . . . . . . - tänder bakgrundsbelysningen (om den är aktiverad).
- väljer enhetslägen. Du kan bara välja enheter som
fjärrkontroller har ställts in för.
* Observera: Om du vill använda färgknapparna som färgvalsknappar i DVDR-HDD mode,
måste du lära in färgvalsfunktionerna i extrafunktionsknappen XTRA .
Hur du gör då kan du läsa i ‘Lägga till extrafunktioner’ under 4.‘Extra möjligheter’.
Extrafunktioner
Du kan lägga till extra (avancerade) funktioner på fjärrkontrollen för de olika enheterna
som den är inställd för. Hur du gör då kan läsa under ‘Lägga till extrafunktioner’ nedan.
För en översikt över de extra (avancerade) funktionerna för de olika enheterna, se listan
‘Extrafunktioner’ längst bak i detta häfte.
52
Svenska
Bruksanvisning
Manual_SRU5150_86 24-04-2007 15:42 Pagina 52
Page 53

4. Extra möjligheter
Lägga till extrafunktioner
Observera: Du kan bara lägga till funktioner som fanns på den ursprungliga fjärrkontrollen
för enheten.
1 Håll ner XTRA i tre sekunder:
– - tänder bakgrundsbelysningen (om den är aktiverad).
- i rutan visas ‘ ’ och ‘ ’.
- de knappar som kan användas blinkar.
– Fjärrkontrollen är nu i avancerat funktionsläge.
2 Använd 3 och 4 för att välja den extrafunktion du vill lägga till eller ändra.
Bekräfta med OK.
– I rutan visas ‘ ’, ‘ ’ och ‘ ’ tillsammans med ‘LEARNING‘.
3 Lägg de båda fjärrkontrollerna på en plan yta (t.ex. ett
soffbord) och rikta dem mot varandra med ca 5 - 10 cm
mellan dem.
4 Tryck på funktionsknappen på den ursprungliga
fjärrkontrollen (t.ex. knappen AMBILIGHT på
fjärrkontrollen) eller tryck på 1 om du vill gå tillbaka till steg 2.
– I rutan visas ‘ ’ tillsammans med t.ex.‘TV-AMBILIGHT LEARN OK‘.
Extrafunktionen har lagts till med framgång.
– Om rutan visar ‘ERROR‘ eller ‘MEM FULL’, börjar du om från steg 1.
Se även "Felsökning" 6.‘Support’.
Aktivering / använda en extra (avancerad) funktion
1 Använd SELECT för att välja önskad enhet, t.ex. DVD.
– Bekräfta med OK.
2 Tryck på XTRA.
– Den senast valda funktionen för den enheten visas i rutan,
t.ex. DVD-SHOWVIEW.
De knappar som kan användas blinkar.
3 Använd 3 och 4 för att välja den funktion som du vill
aktivera, t.ex. DVD-ZOOM.
Tryck på OK för att aktivera funktionen.
4 Tryck på XTRA igen för att gå tillbaka till normalt
användningsläge.
Ta bort enheter
Exempel på TV:
1 Håll SETUP intryckt i 3 sekunder:
– bakgrundsbelysningen tänds (om den är aktiverad).
– ‘ ’, ‘ ’ och ’TV?’ visas i teckenfönstret.
– knapparna som kan användas blinkar.
53
Svenska
Bruksanvisning
Manual_SRU5150_86 24-04-2007 15:42 Pagina 53
Page 54

2 Använd upp- 3 eller ned-knappen 4 till att välja
’DELETE TV’ längst ned i listan.
3 Tryck på OK om du vill ta bort TV-enhetsläget.
–’DEVICE DELETED’ visas i teckenfönstret.
– TV-enhetsläget har tagits bor t.
Lära fjärrkontrollen knappfunktioner
Om du saknar vissa funktioner från din ursprungliga fjärrkontroll på SRU 5150, kan den lära
sig dessa funktioner från den ursprungliga fjärrkontrollen. Du kan lagra en funktion under
vilken som helst av de tillgängliga knapparna på SRU 5150, utom XTRA (LEARN) och
SELECT (SETUP). Om en funktion redan finns lagrad på den knappen raderas den
funktionen.
1 Se till att du har den ursprungliga fjärrkontrollen till hands.
2 Använd SELECT för att välja önskad enhet, t.ex. DVD.
3 Lägg de båda fjärrkontrollerna på en plan yta (t.ex. ett
soffbord) och rikta dem mot varandra med ca 5 - 10 cm
mellan dem.
4 Håll ner LEARN och den knapp på SRU 5150 som du vill
lära samtidigt i 3 sekunder, tills ‘ ’ tänds tillsammans
med ’LEARNING’.
5 Tryck på den knapp du vill kopiera på den ursprungliga
fjärrkontrollen.
– lyser. Fjärrkontrollen lär sig nu funktionen.
– När fjärrkontrollen har lärt sig funktionen, visas ’LEARN OK’ i displayen för att
bekräfta att signalen har lagrats.
– Om rutan visar ‘ERROR‘ eller ‘MEM FULL’, börjar du om från steg 1.
Se även "Felsökning" 6.‘Support’.
54
Svenska
Bruksanvisning
Manual_SRU5150_86 24-04-2007 15:42 Pagina 54
Page 55

Aktivera / inaktivera bakgrundsbelysningsfunktionen
Bakgrundsbelysningen tänds så att du kan se alla meddelandena klart i displayen även i ett
svagt upplyst rum. Bakgrundsbelysningen drar ström, så batteriet håller inte så länge om
bakgrundsbelysningen används ofta. Bakgrundsbelysningsfunktionen kan därför inaktiveras.
Inaktivera bakgrundsbelysningsfunktionen
• Håll ner nummerknapparna 1 och 9 samtidigt i
tre sekunder.
– Bakgrundsbelysningen är nu inaktiverad och kan inte tändas.
Aktivera bakgrundsbelysningsfunktionen
• Håll ner nummerknapparna 7 och 9 samtidigt i
tre sekunder.
– Bakgrundsbelysningen är nu aktiverad och kan tändas.
Återställa alla de ursprungliga funktionerna på fjärrkontrollen
I vissa fall är det praktiskt att kunna återställa fjärrkontrollens ursprungliga funktioner, t.ex.
om minnet i fjärrkontrollen är fullt och du vill ställa in en viss enhet eller lära fjärrkontrollen
en extra knapp. Fjärrkontrollen ställs då tillbaka till fabriksinställningarna och alla
användarinställningarna tas bort.
1 Håll ner nummerknapparna 1 och 6 samtidigt i
tre sekunder.
– ‘ ’ lyser.
Fjärrkontrollen är nu i inställningsläge.
2 Tryck på nummerknapparna 9, 8 och 1, i den ordningen.
– ‘981 - WAIT’ visas i displayen.
Alla de ursprungliga funktionerna har nu återställts
och eventuella extra funktioner har tagits bort.
55
Svenska
Bruksanvisning
Manual_SRU5150_86 24-04-2007 15:42 Pagina 55
Page 56

5. Byta batterierna
När batteristatusindikatorn ( ) på displayen börjar blinka är batteriladdningen låg, och då
bör batterierna bytas. Alla användarinställningarna behålls när de gamla batterierna tas ur.
1 Tryck in locket, skjut det i pilens riktning
och ta ut locket.
2 Lägg i tre R03-batterier av AAA-storlek. Se till att de
kommer rätt enligt markeringarna för + och - i
batterifacket.
3 Skjut tillbaka locket och knäpp fast det stadigt.
6. Support
Felsökning
• Problem
– Möjlig orsak / lösning
• Enheten du vill styra reagerar inte alls när du trycker på en knapp.
– Rikta fjärrkontrollen mot enheten och se till att det inte finns några hinder i vägen mellan
den och enheten.
– Kontrollera att funktionen du vill styra finns på enheten.
– Se efter om batteriindikatorn ()på displayen blinkar (låg batteriladdning).
Om den gör det sätter du i nya batterier.
• Enheten du vill styra reagerar inte på rätt sätt när du trycker på en knapp.
– Du kanske har programmerat in fel kod för enheten under inställningen.
Försök med att ställa in fjärrkontrollen igen. Om enheten fortfarande inte reagerar kan du
ringa vår helpline.
– Se efter om batteriindikatorn ()på displayen blinkar (låg batteriladdning).
Om den gör det sätter du i nya batterier.
• Text-TV fungerar inte.
– Ta reda på om din teve är utrustad med Text-TV.
• Du har svårigheter med att styra alla funktionerna på din enhet.
– Fjärrkontrollen kanske måste anpassas till enhetens modell.
Ring vår helpline och fråga.
• ERROR visas i displayen när du lägger till en extra (avancerad) funktion eller när du
försöker lära fjärrkontrollen en ny knapp.
– Det kom ingen signal från den ursprungliga fjärrkontrollen på 20 sekunder,
så SRU 5150 avbröt inställningen/inlärningen. Börja om från steg 1.
– En knapp på SRU 5150 trycktes ner innan en signal avkändes,
så SRU 5150 avbröt inställningen/inlärningen. Börja om från steg 1.
– Funktionen du försöker lägga till finns inte på den ursprungliga fjärrkontrollen.
– Kontrollera att den ursprungliga fjärrkontrollen fungerar rätt.
– Se till att de båda fjärrkontrollerna ligger rätt.
– IR-signalen för den ursprungliga enheten ligger utanför omfånget.
SRU 5150 kan bara lära sig IR-signaler med en bärarfrekvens på 30-60kHz.
56
Svenska
Bruksanvisning
Manual_SRU5150_86 24-04-2007 15:42 Pagina 56
Page 57

• MEM FULL visas i displayen när du lägger till en extra (avancerad) funktion eller
när du försöker lära fjärrkontrollen en ny knapp.
– Det går inte att lägga in fler funktioner för den valda enheten, eller minnet i SRU 5150 är
fullt. Återställ alla de ursprungliga funktionerna på din fjärrkontroll om du vill frigöra mer
minne. Hur du gör det kan du läsa om i ‘Återställa fjärrkontrollens ursprungliga inställningar’
under 4. ‘Extra möjligheter’. Då tas alla användarinställningar bort.
• Fjärrkontrollen går inte in i inställningsläge med knappen SELECT.
– Se efter om batteriindikatorn ()på displayen blinkar (låg batteriladdning).
Om den gör det sätter du i nya batterier.
• Du kan bara välja 5 enheter under inställningen.
– Maxantalet enheter (5) för SRU 5150 är redan inställda. Det går inte att välja andra
enhetstyper om inte hela minnet raderas. Hur du gör det kan du läsa om i
‘Återställa fjärrkontrollens ursprungliga inställningar’ under 4.‘Extra möjligheter’.
Då tas alla användarinställningar bort.
Behöver du hjälp?
Om du har några frågor om SRU 5150-enheten kan du alltid kontakta oss.
Du hittar kontaktuppgifter efter listan över extrafunktioner längst bak i denna handbok.
Läs handboken noga innan du ringer. De flesta problem kan du lösa själv. När du ringer vår
helpline ska du ha enheten inom räckhåll, så att våra operatören kan avgöra om din
fjärrkontroll fungerar ordentligt.
Modellnumret för din Philips universalfjärrkontroll är SRU 5150/86.
Inköpsdatum: ......../ ......../ ........
(dag/månad/år)
57
Svenska
Bruksanvisning
Manual_SRU5150_86 24-04-2007 15:42 Pagina 57
Page 58

Innhold
1. Innledning . . . . . . . . . . . . . . . . . . . . . . . . . . . . . . . . . . . . . . . . . . . . . . . . . . . . . . . . . . . . . 58
2. Stille inn fjernkontrollen . . . . . . . . . . . . . . . . . . . . . . . . . . . . . . . . . . . . . . . . . . . 58-60
3. Bruke fjernkontrollen . . . . . . . . . . . . . . . . . . . . . . . . . . . . . . . . . . . . . . . . . . . . . . 60-61
Knapper og funksjoner . . . . . . . . . . . . . . . . . . . . . . . . . . . . . . . . . . . . . . . . . . . . . . . . . 60-61
Ekstra funksjoner . . . . . . . . . . . . . . . . . . . . . . . . . . . . . . . . . . . . . . . . . . . . . . . . . . . . . . . . . 61
4. Ekstra muligheter . . . . . . . . . . . . . . . . . . . . . . . . . . . . . . . . . . . . . . . . . . . . . . . . . . 62-64
Legge til ekstra funksjoner. . . . . . . . . . . . . . . . . . . . . . . . . . . . . . . . . . . . . . . . . . . . . . . . . . 62
Slett enheter . . . . . . . . . . . . . . . . . . . . . . . . . . . . . . . . . . . . . . . . . . . . . . . . . . . . . . . . . . 62-63
Lære viktige funksjoner . . . . . . . . . . . . . . . . . . . . . . . . . . . . . . . . . . . . . . . . . . . . . . . . . . . . 63
Aktivere/deaktivere bakgrunnsbelysning . . . . . . . . . . . . . . . . . . . . . . . . . . . . . . . . . . . . . . 64
Gjenopprette de opprinnelige innstillingene av fjernkontrollen . . . . . . . . . . . . . . . . . . 64
5. Skifte batteri . . . . . . . . . . . . . . . . . . . . . . . . . . . . . . . . . . . . . . . . . . . . . . . . . . . . . . . . . . 64
6. Brukerstøtte . . . . . . . . . . . . . . . . . . . . . . . . . . . . . . . . . . . . . . . . . . . . . . . . . . . . . . . 65-66
Feilsøking . . . . . . . . . . . . . . . . . . . . . . . . . . . . . . . . . . . . . . . . . . . . . . . . . . . . . . . . . . . . 65-66
Trenger du hjelp? . . . . . . . . . . . . . . . . . . . . . . . . . . . . . . . . . . . . . . . . . . . . . . . . . . . . . . . . . 66
Liste over ekstra funksjoner . . . . . . . . . . . . . . . . . . . . . . . . . . . . . . . . . . . . . . . . . . . . . . . . 76
Information for brukeren . . . . . . . . . . . . . . . . . . . . . . . . . . . . . . . . . . . . . . . . . . . . . . . . . . 79
1. Innledning
Gratulerer med valget av en Philips SRU 5150 universal fjernkontroll.
SRU 5150 kan brukes til å betjene inntil 5 forskjellige enheter. Under innstillingen kan du
selv bestemme hvilke enheter som skal betjenes (se tabellen nedenfor).
Du finner du opplysninger om hvordan SRU 5150 skal klargjøres for bruk i kapittel
2 ‘Installere fjernkontrollen’.
2. Stille inn fjernkontrollen
Fjernkontrollen vil kunne betjene inntil 5 av disse enhetene:
Enhet Indikasjon på display
TV TV
TV nr. 2 TV2
VCR (videospiller) VCR
Videospiller nr. 2 VCR2
Personlig video-opptaker (PVR) PVR
TV-VCR kombinasjon TV-VCR
TV-DVD kombinasjon TV-DVD
DVD-VCR kombinasjon DVD-VCR
Forsterker AMPLIFIER
Hjemmekino HTS
Audio-sett AUDIO-SET
Tuner TUNER
Digital mediamottaker DMR
Digitalboks STB
Satellittmottaker SAT
Digital videokringkasting Landbasert enhet
(DVB-T) DVB-T
Kabeldekoder CABLE
CD-spiller CD
Minidisk MD
DVD-spiller DVD
DVD-opptaker DVDR
Spillkonsoll GAME
DVD-opptaker med harddisk DVDR-HDD
58
Norge
Bruksanvisning
Manual_SRU5150_86 24-04-2007 15:42 Pagina 58
Page 59

Anmerkninger:
– Det er allerede batterier i fjernkontrollen.
– Hvis du vil innstille fjernkontrollen til å betjene TV-apparatet, kan du hoppe over trinn 3.
– Hvis det er en Philips-enhet, kan du hoppe over trinn 5.
– Du kan gå ut av innstillingsmodus når du vil ved å trykke på SETUP i tre sekunder.
– Når den er blitt installert, kan ikke enheten slettes fra listen over enheter. Det er bare
merkenavnet som kan endres (for eksempel hvis du ønsker å betjene en enhet av et
annet merke). Vil du slette en enhet, må du slette hele minnet. I så fall, se ‘Gjenopprette
de opprinnelige innstillingene av fjernkontrollen’ under 4.‘Ekstra muligheter’.
1 Slå på enheten du vil innstille fjernkontrollen for. Hvis enheten er en DVD-spiller/-
opptaker eller videospiller, sett inn en plate eller et bånd og start avspillingen.
2 Trekk ut vernestrimmelen fra batteri
rommet for å aktivere batteriene.
• Hvis det ikke er lett å trekke strimmelen ut, åpne
batterirommet slik at du får tak i den.
– Fjernkontrollen vil straks gå inn i innstillingsmodus:
- displayet viser ‘ ’, ‘ ’ og ’TV?’;
- bakgrunnsbelysningen slås på;
- knappene som kan brukes, blinker.
– Fjernkontrollen er nå klar til å innstilles for å betjene TV-apparatet ditt.
3 Velg 4 for å velge enheten du vil innstille
fjernkontrollen for (se tabellen på foregående side).
4 Bekreft med OK.
– Displayet viser ‘ ’ og ’PHILIPS?’.
Knappene som kan brukes, blinker.
5 Velg 4 og 3 for å velge merket på utstyrsenheten.
• Hvis merket på enheten ikke finnes på listen, kan du velge
et annet merke.
6 Bekreft med OK.
7 Hold
yy
trykket til enheten reagerer.
– Displayet viser ‘ ’.
8 Rett fjernkontrollen mot enheten.
– Nå begynner fjernkontrollen å avgi alle kjente ‘av- (standby)’
koder, en etter en. Hver gang det sendes en kode,
vises den på displayet: ’TEST 01, 02, 03’, osv.
59
Norge
Bruksanvisning
Manual_SRU5150_86 24-04-2007 15:42 Pagina 59
Page 60

9 Når enheten reagerer, må du straks slippe
yy
.
– Fjernkontrollen har nå funnet en kode som virker på enheten.
’SETUP OK’ vises på displayet.
– Hvis enheten ikke reagerer og ’LIST END’ vises, ble det ikke funnet noen kode for
enheten. For å kunne betjene enheten med fjernkontrollen, må den lære de
opprinnelige fjernkontrollfunksjonene knapp for knapp.
Se i så fall ‘Lære viktige funksjoner’ under 4. ’Ekstra muligheter’.
10 Sjekk om du kan betjene alle funksjonene på enheten med fjernkontrollen.
– I så fall er fjernkontrollen klar til å betjene enheten. Bakgrunnsbelysningen slås av.
• Hvis det ikke er tilfelle, fortsett med trinn 11.
• Hvis du vil innstille fjernkontrollen til å betjene andre utstyrsenheter, fortsett med
trinn 11.
11 Hold SELECT trykket i tre sekunder:
– - displayet viser ‘ ’, ‘ ’ og ’TV?’.
- bakgrunnsbelysningen slås på.
- knappene som kan brukes, blinker.
– Fjernkontrollen er nå i innstillingsmodus:
12 Fortsett innstillingen fra trinn 3.
• Hvis, etter flere forsøk, en enehet ikke reagerer i det hele tatt,eller ikke
reagerer på alle knappekommandoene, betyr det at fjernkontrollen ikke
finner noen kode for enheten. For å kunne betjene enheten med
fjernkontrollen, må den lære de opprinnelige fjernkontrollfunksjonene knapp
for knapp. Se i så fall ‘Lære viktige funksjoner’ under 4. ’Ekstra muligheter’.
3. Bruke fjernkontrollen
Knapper og funksjoner
Illustrasjonen på side 3 gir en oversikt over alle knapper og deres funksjoner.
1 Display informasjonsskjerm.Viser gjeldende status for fjernkontrollen.
: Fjernkontrollen i innstillingsmodus eller modus for
avanserte funksjoner.
: fjernkontrollen i læremodus.
: batteristatus blinker hvis batteriet nesten er utladet.
: lyser i innstillings- og læremodus, samt modus for
avanserte funksjoner.
: lyser når det kommer signaler fra fjernkontrollen
: lyser når fjernkontrollen mottar et signal i læremodus eller
modus for avanserte funksjoner.
TV: valgt enhet
PHILIPS: valgt merke.
2 LEARN. . . . . . . . . . . . . - slår fjernkontrollen over på læremodus.
XTRA . . . . . . . . . . . . . . - slår på bakgrunnsbelysningen (hvis aktivert).
- viser ekstra (avanserte) funksjoner for enheten som ble valgt.
60
Norge
Bruksanvisning
Manual_SRU5150_86 24-04-2007 15:42 Pagina 60
Page 61

3 / DISC . . . . . . . . . . - TV modus: tekst-TV av/på.
- DVD-modus: disc menu (platemeny).
/ HDD. . . . . . . . . . . - TV-modus: tekst hold.
- DVD-R-modus: Harddisk-meny.
/ SUBTITLE . . . . - TV-modus: bredskjerm TV.
- DVD-modus: filmtekster.
/ FAV(oritter) . . . . - TV-modus: tekst av.
- SAT-modus: oversikt over favorittkanaler
4 MENU. . . . . . . . . . . . . . slår menyen av og på.
5 OK . . . . . . . . . . . . . . . . . bekrefter valget.
6 INFO. . . . . . . . . . . . . . . viser kanalinformasjon på skjermen.
7ss. . . . . . . . . . . . . . . . . . . TV-lyd av.
8 - VOL +. . . . . . . . . . . . . justerer TV-volumet.
9 Sifferknapper. . . . . . . - TV-modus: direkte valg av kanaler og andre funksjoner.
- AMP-modus (forsterker): Knapper for valg av kilde (TV, DVD,
VCR,TUNER, CD, AUX).
0 AV . . . . . . . . . . . . . . . . . veksler mellom eksterne innganger på utstyret ditt..
! 5 . . . . . . . . . . . . . . . . . . - TV-modus: rød tekst-TV-knapp*.
- VCR/DVD-modus: spol tilbake.
2 . . . . . . . . . . . . . . . . . . . - TV-modus: oversikt.
- VCR/DVD-modus: spill av.
6 . . . . . . . . . . . . . . . . . . - TV-modus: blå tekst-TV-knapp*.
- VCR/DVD-modus: spol frem.
9 . . . . . . . . . . . . . . . . . . . - TV-modus: grønn tekst-TV-knapp*.
- VCR/DVD-modus: stopp.
0 . . . . . . . . . . . . . . . . . . . - VCR/DVD-modus: opptak.
; . . . . . . . . . . . . . . . . . . . - TV-modus: gul tekst-TV-knapp*.
- VCR/DVD-modus: pause.
@ -/--. . . . . . . . . . . . . . . . . . velger mellom én- og to-sifrete kanalnumre.
#22. . . . . . . . . . . . . . . . . . - velger tidligere kanal / program.
SURROUND . . . . . . . - velger surroundmoduser.
$ - PROG +. . . . . . . . . . . velger en tidligere eller neste kanal.
% BACK . . . . . . . . . . . . . . hopper tilbake ett nivå i menyen eller slår av menyen.
^ Markørknapper. . . . . markør opp, ned, venstre, høyre i en meny.
& GUIDE . . . . . . . . . . . . . STB-modus: åpner elektronisk TV-programoversikt.
*yy(Standby) . . . . . . . . . . slår TV, DVD,VCR, AMP, CD eller STB av og på.
( SETUP . . . . . . . . . . . . . - slår fjernkontrollen over på innstillingsmodus.
SELECT. . . . . . . . . . . . - slår på bakgrunnsbelysningen (hvis aktivert).
- velger enhetsmoduser. Du kan bare velge enheter som
fjernkontrollen er innstilt for.
* Merk: Hvis du ikke vil bruke fargetastene som fargevalgtaster i DVDR-HDD-modus,
bør du lære fargevalgfunksjonene til den ekstra funksjonsknappen XTRA.
Se i så fall ‘Legge til ekstra funksjoner’ under 4. ’Ekstra muligheter’.
Ekstra funksjoner
Det er mulig å legge til ekstra (avanserte) funksjoner for hver enhet fjernkontrollen er
innstilt for. Se i så fall ‘Legge til ekstra funksjoner’ i neste kapittel.
For en oversikt over ekstra (avanserte) funksjoner for ulike enheter,
se listen under ‘Ekstra funksjoner’ bak i heftet.
61
Norge
Bruksanvisning
Manual_SRU5150_86 24-04-2007 15:42 Pagina 61
Page 62

4. Ekstra muligheter
Legge til ekstra funksjoner
Merk: Det er bare mulig å legge til de funksjonene som finnes på den opprinnelige
fjernkontrollen.
1 Hold XTRA trykket i 3 sekunder:
– - bakgrunnsbelysningen (hvis aktivert) slås på.
- displayet viser ‘ ’ og ‘ ’.
- knappene som kan brukes, blinker.
– Fjernkontrollen er nå i avansert funksjonsmodus:
2 Bruk 3 og 4 for å velge tilleggsfunksjone du vil legge til eller endre. Bekreft med OK.
– Displayet viser ‘ ’, ‘ ’ og ‘ ’ sammen med ‘LEARNING‘.
3 Legg begge fjernkontrollene på et flatt underlag
(som f.eks. et salongbord) og rett dem inn hode-mot-hode
med ca. 5 - 10 cm mellom dem.
4 Trykk på funksjonsknappen på den gamle fjernkontrollen
(f.eks. AMBILIGHT-knappen på fjernkontrollen for
TV-apparatet) eller trykk på 1 hvis du vil gå tilbake til trinn 2.
– Displayet viser ‘ ’ sammen med f.eks.‘TV-AMBILIGHT LEARN OK‘.
Du lykkes i å legge til en ekstra funksjon.
– Hvis displayet viser ‘ERROR‘ eller ‘MEM FULL’, begynn på nytt fra trinn 1.
Se også ‘Problemløsing’ under 6.‘Brukerstøtte’.
Aktivere / bruke en ekstra (avansert) funksjon
1 Bruk SELECT når du vil velge en enhet. F.eks. DVD.
– Bekreft med OK.
2 Trykk på XTRA.
– Funksjonen som ble valgt sist for enheten, vises på displayet.
F.eks. DVD-SHOWVIEW.
Knappene som kan brukes, blinker.
3 Bruk 3 og 4 for å velge funksjonen du ønsker å aktivere.
F.eks. DVD-ZOOM.Trykk på OK for å aktivere funksjonen.
4 Trykk på XTRA igjen for å gå tilbake til normal driftsmodus.
Slett enheter
Eksempel på TV:
1 Trykk på SETUP i 3 sekunder:
– baklyset (hvis det er aktivert) slås på.
– skjermen vise ‘ ’,‘ ’ og ’TV?’
– tastene som kan brukes, begynner å blinke.
62
Norge
Bruksanvisning
Manual_SRU5150_86 24-04-2007 15:42 Pagina 62
Page 63

2 Bruk up (opp) 3 eller down (ned) 4 for å velge
’DELETE TV’ nederst i listen.
3 Trykk på OK for å slette TV-enhetsmodusen.
– Skjermen viser ’DEVICE DELETED’.
– TV-enhetsmodusen er slettet.
Lære viktige funksjoner
Hvis det finnes funksjoner på den opprinnelige fjernkontrollen som du ikke har på
SRU 5150, kan den lære disse funksjonene fra den gamle fjernkontrollen.
Du kan lagre en funksjon under en av de tilgjengelige knappene på SRU 5150, bor tsett fra
XTRA (LEARN) og SELECT (SETUP).
Hvis det allerede er lagret en funksjon under en knapp, vil den bli slettet.
1 Sørg for å ha den opprinnelige fjernkontrollen for hånden.
2 Bruk SELECT når du vil velge en enhet. F.eks. DVD.
3 Legg begge fjernkontrollene på et flatt underlag
(som f.eks. et salongbord) og rett dem inn hode-mot-hode
med ca. 5 - 10 cm mellom dem.
4 Hold LEARN og knappen du ønsker å lære på SRU 5150
trykket samtidig i 3 sekunder, til ‘ ’ lyser sammen med
’LEARNING’.
5 Trykk på knappen du vil kopiere på den opprinnelige
fjernkontrollen.
– lyser. Fjernkontrollen lærer nå funksjonen.
– Når fjernkontrollen har lært funksjonen, kommer ’LEARN OK’ til syne på displayet
for å bekrefte at signalet ble lagret.
– Hvis displayet viser ‘ERROR‘ eller ‘MEM FULL’, begynn på nytt fra trinn 1.
Se også ‘Problemløsing’ under 6.‘Brukerstøtte’.
63
Norge
Bruksanvisning
Manual_SRU5150_86 24-04-2007 15:42 Pagina 63
Page 64

Aktivere/deaktivere bakgrunnsbelysning
Bakgrunnsbelysningen belyser displayet slik at du lettere kan se alle displaymeldingene, selv
om rommet er halvmørkt. Ettersom bakgrunnsbelysning bruker strøm, vil batteriets levetid
bli forkortet hvis bakgrunnsbelysning brukes ofte. Av den grunn er det mulig å deaktivere
funksjonen for bakgrunnsbelysning.
Deaktivere bakgrunnsbelysning
• Hold siffertastene 1 og 9 trykket samtidig i 3 sekunder.
– Funksjonen for bakgrunnsbelysning er nå deaktivert og
bakgrunnsbelysning kan ikke slås på.
Aktivere bakgrunnsbelysning
• Hold siffertastene 7 og 9 trykket samtidig i 3 sekunder.
– Funksjonen for bakgrunnsbelysning er nå aktivert og
bakgrunnsbelysning kan slås på.
Gjenopprette de opprinnelige innstillingene av
fjernkontrollen
Av og til kan det være nyttig å gjenopprette de opprinnelige innstillingene av fjernkontrollen
F.eks. hvis minnet til fjernkontrollen er fullt, og du vil innstille den for en bestemt enhet eller
lære den ekstra knappefunksjon. Fjernkontrollen vil da bli tilbakestilt til fabrikkens
standardinnstillinger og alle brukerinnstillinger vil bli slettet.
1 Hold siffertastene 1 og 6 trykket samtidig i 3 sekunder.
– ‘ ’ lyser.
Fjernkontrollen er nå i innstillingsmodus.
2 Trykk på siffer tastene 9, 8 og 1, i denne rekkefølgen.
– ‘981 - WAIT’ vises på displayet.
Alle opprinnelige funksjoner er nå gjenopprettet og
eventuelle tilleggsfunksjoner er slettetd.
64
Norge
Bruksanvisning
Manual_SRU5150_86 24-04-2007 15:42 Pagina 64
Page 65

5. Skifte batterier
Når statusindikator for batteri ( ) på displayet begynner å blinke, betyr det at
batteriene nesten er utladet og må skiftes ut. Alle brukerinnstillinger blir beholdt når de
gamle batteries tas ut.
1 Trykk dekselet inn, skyv det i retning med
pilen og ta det av.
2 Legg i 3 AAA/R03 batterier og ta hensyn til + and -
merkene i batterirommet.
3 Sett på dekselet igjen og klikk det godt på plass.
6. Brukerstøtte
Feilsøking
• Problem
– Mulig årsak / løsning:
• Enheten du vil styre reagerer ikke i det hele tatt når du trykker på en knapp.
– Pek på enheten med fjernkontrollen og forsikre deg om at det ikke er noen hindring
mellom fjernkontrollen og enheten.
– Sjekk at funksjonen du ønsker å benytte er tilgjengelig på enheten.
– Sjekk om statusindikator for batteri ()på displayet begynner å blinke
(batteriene nesten utladet). Hvis det er tilfelle, legg i nye batterier.
• Enheten du vil styre reagerer ikke som den skal når du trykker på en knapp.
– Kanskje feil kode ble programmert for enheten under innstillingen.
Prøv å stille inn fjernkontrollen igjen.
Hvis enheten fremdeles ikke reagerer, ring hjelpelinjen (brukerstøtten) vår.
– Sjekk om statusindikator for batteri ()på displayet begynner å blinke
(batteriene nesten utladet). Hvis det er tilfelle, legg i nye batterier.
• Tekst-TV-knappene virker ikke.
– Finn ut om TV-apparatet er utstyrt med Tekst-TV.
• Du har problemer med å få alle funksjonene på enheten din til å virke.
– Kanskje fjernkontrollen må tilpasses den enhetsmodellen du har.
Ring hjelpelinjen (brukerstøtten) vår for å få vite mer.
• ERROR kommer til syne på displayet mens du legger til en ekstra (avansert)
funksjon eller når du prøver å lære en knapp.
– Det blir ikke mottatt noe signal fra den opprinnelige fjernkontrollen på 20 sekunder og
SRU 5150 stoppet å legge til / læreprosessen. Begynn på nytt fra trinn 1.
– En SRU 5150 knapp blir trykket før det blir registrert et signal og SRU 5150 stoppet å
legge til / læreprosessen. Begynn på nytt fra trinn 1.
– Funksjonen du prøver å legge til er ikke tilgjengelig på din opprinnelige fjernkontroll.
– Sjekk at den opprinnelige fjernkontrollen virker som den skal.
– Sjekk at fjernkontrollen peker rett mot hverandre.
– IR-signalet fra den opprinnelige fjernkontrollen er utenfor rekkevidde.
SRU 5150 kan bare lære IR-signaler med et bæresignal på 30-60kHz.
65
Norge
Bruksanvisning
Manual_SRU5150_86 24-04-2007 15:42 Pagina 65
Page 66

• MEM FULL kommer til syne på displayet mens du legger til en ekstra (avansert)
funksjon eller når du prøver å lære en knapp.
– Det er ikke mulig å legge til flere funksjoner for den utvalgte enheten eller minnet til
SRU 5150 er fullt. Gjenopprett alle de opprinnelige funksjonene på fjernkontrollen for å
lage plass i minnet. Les om ‘Gjenopprette de opprinnelige innstillingene av fjernkontrollen’
under 4. ‘Ekstra muligheter’. Alle brukerinnstillinger vil da bli slettet.
• Fjernkontrollen går ikke inn i innstillingsmodus når du trykker på SELECT.
– Sjekk om statusindikator for batteri ()på displayet begynner å blinke
(batteriene nesten utladet). Hvis det er tilfelle, legg i nye batterier.
• Bare 5 enheter kan velges under innstillingen.
– Maksimum antall enheter (5) for SRU 5150 er allerede innstilt.
Du kan ikke velge andre typer enheter uten først å tømme hele minnet.
I så fall, se ‘Gjenopprette de opprinnelige innstillingene av fjernkontrollen’ under
4. ‘Ekstra muligheter’. Alle brukerinnstillinger vil da bli slettet.
Trenger du hjelp?
Du må gjerne kontakte oss hvis du har spørsmål som gjelder SRU 5150-kontrollen.
Du finner kontaktinformasjon etter listen over tilleggsfunksjoner bakerst i bruksanvisningen.
Les bruksanvisningen nøye før du ringer. Du kan løse de fleste problemene selv. Når du
ringer hjelpelinjen (brukerstøtten) vår, må du passe på å ha enheten ved siden av deg slik
at operatørene våre kan hjelpe deg å avgjøre om fjernkontrollen virker som den skal.
Modellnummeret på din Philips universal fjernkontroll er SRU 5150/86.
Kjøpedato: ......../ ......../ ........
(dag/måned/år)
66
Norge
Bruksanvisning
Manual_SRU5150_86 24-04-2007 15:42 Pagina 66
Page 67

Sisältö
1. Johdanto . . . . . . . . . . . . . . . . . . . . . . . . . . . . . . . . . . . . . . . . . . . . . . . . . . . . . . . . . . . . . . 67
2. Kauko-ohjaimen asetus . . . . . . . . . . . . . . . . . . . . . . . . . . . . . . . . . . . . . . . . . . . . . 67-69
3. Kauko-ohjaimen käyttö . . . . . . . . . . . . . . . . . . . . . . . . . . . . . . . . . . . . . . . . . . . . 69-70
Näppäimet ja toiminnot . . . . . . . . . . . . . . . . . . . . . . . . . . . . . . . . . . . . . . . . . . . . . . . . 69-70
Lisätoiminnot . . . . . . . . . . . . . . . . . . . . . . . . . . . . . . . . . . . . . . . . . . . . . . . . . . . . . . . . . . . . 70
4. Lisämahdollisuuksia . . . . . . . . . . . . . . . . . . . . . . . . . . . . . . . . . . . . . . . . . . . . . . . . 71-73
Lisätoimintojen lisääminen. . . . . . . . . . . . . . . . . . . . . . . . . . . . . . . . . . . . . . . . . . . . . . . . . . 71
Poista laitteet. . . . . . . . . . . . . . . . . . . . . . . . . . . . . . . . . . . . . . . . . . . . . . . . . . . . . . . . . . 71-72
Opintonäppäintoiminnot. . . . . . . . . . . . . . . . . . . . . . . . . . . . . . . . . . . . . . . . . . . . . . . . . . . 72
Taustavalotoiminnon kytkentä/katkaisu . . . . . . . . . . . . . . . . . . . . . . . . . . . . . . . . . . . . . . . 73
Kauko-ohjaimen alkuperäisten toimintojen säilytys . . . . . . . . . . . . . . . . . . . . . . . . . . . . . 73
5. Paristojen vaihto . . . . . . . . . . . . . . . . . . . . . . . . . . . . . . . . . . . . . . . . . . . . . . . . . . . . . . 73
6. Tuki . . . . . . . . . . . . . . . . . . . . . . . . . . . . . . . . . . . . . . . . . . . . . . . . . . . . . . . . . . . . . . . . 74-75
Vianhaku . . . . . . . . . . . . . . . . . . . . . . . . . . . . . . . . . . . . . . . . . . . . . . . . . . . . . . . . . . . . . 74-75
Tarvitsetko apua? . . . . . . . . . . . . . . . . . . . . . . . . . . . . . . . . . . . . . . . . . . . . . . . . . . . . . . . . . 75
Lisätoimintolista . . . . . . . . . . . . . . . . . . . . . . . . . . . . . . . . . . . . . . . . . . . . . . . . . . . . . . . . . . 76
Tietoja kuluttajalle . . . . . . . . . . . . . . . . . . . . . . . . . . . . . . . . . . . . . . . . . . . . . . . . . . . . . . . . 79
1. Johdanto
Onnittelumme Philips SRU 5150 -kauko-ohjaimen hankinnastasi.
SRU 5150 pystyy käyttämään yhteensä viittä eri laitetta. Asetuksen aikana pystyt
määrittelemään tarkkaan, mitä laitteita tullaan käyttämään (katso alla esitettyä taulukkoa).
Pystyt saamaan informaatiota SRU 5150:n valmistelusta käyttöä varten luvusta
2 ‘Kauko-ohjaimen asetus’.
2. Kauko-ohjaimen asetus
Kauko-ohjain voidaan asettaa seuraavana mainittujen viiden laitteen käyttöä varten:
Näytön esitys
TV TV
Toinen TV TV2
VCR VCR
Toinen videonauhuri VCR2
Henkilökohtainen videonauhuri PVR
TV-VCR combo TV-VCR
TV-DVD combo TV-DVD
DVD-VCR combo DVD-VCR
Vahvistin AMPLIFIER
Home Theatre System HTS
Audio set AUDIO-SET
Viritin TUNER
Digitaalinen media-vastaanotin DMR
Set Top Box STB
Satelliittivastaanotin SAT
Digital Video Broadcasting Terrestr ial -laite DVB-T
Kaapelikooderi CABLE
CD-soitin CD
Mini Disk MD
DVD-soitin DVD
DVD-nauhiri DVDR
Pelikonsoli GAME
Kovalevyasemalla varustettu DVD DVDR-HDD
67
Suomi
Käyttöohje
Manual_SRU5150_86 24-04-2007 15:42 Pagina 67
Page 68

Huomautuksia:
– Paristot on jo asennettu kauko-ohjaimeen.
– Jos haluat asettaa kauko-ohjaimen TV:n käyttöä varten, voit hypätä vaiheen 3 yli.
– Jos laite on Philips-laite, voit hypätä vaiheen 5 yli.
– Voit poistaa asetustilan aina halutessasi pitämällä asetuspainiketta SETUP painettuna
kolme sekuntia.
– Kun laite on asennettu, sitä ei voida pyyhkiä pois laitelistasta. Ainoastaan brändin nimi on
muutettavissa (esim. jos haluat käyttää eri brändin laitetyyppiä).
Laitteen pyyhkimiseksi yli on tyhjennettävä koko muisti.Tietojen saamiseksi tästä katso
kappaletta ‘Kauko-ohjaimen alkuperäisten toimintojen säilyttäminen’ luvussa
4. ‘Lisämahdollisuuksia’.
1 Kytke laite, jonka haluat asettaa kauko-ohjainta varten. Jos laite on DVD-soitin/nauhuri,
asenna levy tai kasetti ja käynnistä toisto.
2 Irrota paristolokeron suojaliuska paristojen
aktivoimiseksi.
• Jos liuska on vaikea irrottaa, avaa paristolokero saadaksesi
paremman otteen liuskasta.
– Kauko-ohjain asettuu välittömästi asetustilaan:
- näytössä näkyy ‘ ’, ‘ ’ ja ’TV?’;
- taustavalo syttyy;
- käytettävissä olevan näppäimet vilkkuvat.
– Kauko-ohjain on nyt valmis TV:n käytön asettamiseksi.
3 Käytä 4 valitaksesi laitteen, jota varten haluat asettaa
kauko-ohjaimen (katso edellisellä sivulla esitettyä taulukkoa).
4 Vahvista painamalla OK.
– Näyttöön ilmestyy ‘ ’ ja ’PHILIPS?’.
Käytettävissä olevat näppäimet vilkkuvat.
5 Käytä 4 ja 3 laitteesi brändin valitsemiseksi.
• Jos laitteesi brändi ei ole listalla, voit valita jonkun muista
brändeistä.
6 Vahvista painamalla OK.
7 Pidä
yy
painettuna kunnes laite reagoi.
– Näytössä näkyy ‘ ’.
8 Suuntaa kauko-ohjain laitetta kohti.
– Kauko-ohjain alkaa nyt lähettää kaikkia tunnettuja ‘pois päältä
(valmiustila)’ -koodeja yhden toisensa jälkeen. Joka kerran
kun koodi lähetetään, se näkyy näytössä: ’TEST 01, 02, 03’jne.
68
Suomi
Käyttöohje
Manual_SRU5150_86 24-04-2007 15:42 Pagina 68
Page 69

9 Kun laite reagoi, vapauta välittömästi
yy
.
– Kauko-ohjain on nyt löytänyt koodin, joka toimii laitteellasi.
’SETUP OK’ ilmestyy näyttöön.
– Jos laite ei reagoi ja ’LIST END’ ilmestyy näyttöön, laitetta varten ei löytynyt
koodia. Laitteen käyttämiseksi kauko-ohjaimella sen on opittava alkuperäiset
kauko-ohjaintoiminnot näppäin näppäimeltä.Tietojen saamiseksi tästä katso kappaletta
‘Näppäintoimintojen oppiminen’ luvussa 4. ’Lisämahdollisuuksia’.
10 Tarkista, pystytkö käyttämään kaikkia laitteen toimintoja kauko-ohjaimella.
– Jos näin on, kauko-ohjain on valmis käyttämään laitetta.Taustavalo sammuu.
• Jos näin ei ole, jatka vaiheesta 11.
• Jos haluat asettaa kauko-ohjaimen käyttämään muita laitteita, jatka vaiheesta 11.
11 Pidä SELECT painettuna kolme sekuntia:
– - näytössä näkyy ‘ ’, ‘ ’ ja ’TV?’.
- taustavalo syttyy.
- käytettävissä olevat näppäimet vilkkuvat.
– Kauko-ohjain on nyt asetustilassa.
12 Jatka asetusta vaiheesta 3.
• Jos laite ei useamman yrityksen jälkeen reagoi lainkaan tai asianmukaisesti
kaikkiin näppäinkomentoihin, kauko-ohjain ei pysty löytämään koodia
laitetta varten. Laitteen käyttämiseksi kauko-ohjaimella sen on opittava
alkuperäiset kauko-ohjaintoiminnot näppäin näppäimeltä.
Tietojen saamiseksi tästä katso kappaletta ‘Näppäintoimintojen oppiminen’
luvussa 4. ’Lisämahdollisuuksia’.
3. Kauko-ohjaimen käyttö
Näppäimet ja toiminnot
Sivun 3 kuva antaa yleiskatsauksen kaikista näppäimistä ja niiden toiminnoista.
1 Ota esille informaationäyttö. Esittää senhetkisen kauko-ohjaimen tilan.
: kauko-ohjain asetustilassa tai erityistoimintotilassa.
: kauko-ohjain oppimistilassa.
: paristotila.Vilkkuu pariston tehon tyhjentyessä.
: syttyy asetus-, oppimis- ja erityistoimintotilassa.
: syttyy kun kauko-ohjain lähettää signaalin.
: syttyy kun kauko-ohjain vastaanottaa signaalin oppimis- tai
erityistoimintotilassa.
TV: valittu laite.
PHILIPS: valittu brändi.
2 LEARN. . . . . . . . . . . . . - kytkee kauko-ohjaimen oppimistilaan.
XTRA . . . . . . . . . . . . . . - kytkee taustavalon (jos tarjolla).
- esittää lisätoimintoja (erityistoimintoja) valittua laitetta varten.
69
Suomi
Käyttöohje
Manual_SRU5150_86 24-04-2007 15:42 Pagina 69
Page 70

3 / DISC . . . . . . . . . . . . . - TV-tila: teksti-TV päällä/pois päältä.
- DVD-tila: levyvalikko.
/ HDD . . . . . . . . . . . . . - TV-tila: tekstin pito.
- DVD-R-tila: kovalevyaseman valikko.
/ SUBTITLE . . . . . . - TV-tila: laajakaista-TV.
- DVD-tila: tekstitys.
/ FAV . . . . . . . . . . . . . . - TV-tila: teksti pois päältä.
- SAT-tila: lemmikkikanavien lista.
4 MENU . . . . . . . . . . . . . . . . kytkee valikon päälle ja pois päältä.
5 OK . . . . . . . . . . . . . . . . . . . vahvistaa valintasi.
6 INFO . . . . . . . . . . . . . . . . . esittää näyttökanavan informaatiota.
7ss. . . . . . . . . . . . . . . . . . . . . vaimentaa TV:n äänen.
8 - VOL + . . . . . . . . . . . . . . . säätää TV:n äänenvoimakkuuden.
9 Numeronäppäimet . . . - TV-tila: suora kanavien ja muiden toimintojen valinta.
- AMP-tila: lähteen valintanäppäimet (TV, DVD,VCR,
TUNER, CD, AUX).
0 AV . . . . . . . . . . . . . . . . . . . . kytkee laitteen ulkopuolisten tulojen välillä.
! 5. . . . . . . . . . . . . . . . . . . . . - TV-tila: punaiset teksti-TV-näppäimet*.
- VCR/DVD-tila: takaisinkelaa.
2 . . . . . . . . . . . . . . . . . . . . . - TV-tila: indeksi.
- VCR/DVD-tila: toista.
6. . . . . . . . . . . . . . . . . . . . . - TV-tila: sininen TV-tekstinäppäin*.
- VCR/DVD-tila: kelaa.
9 . . . . . . . . . . . . . . . . . . . . . - TV-tila: vihreä teksti-TV-näppäin*.
- VCR/DVD-tila: pysäytä.
0 . . . . . . . . . . . . . . . . . . . . . - VCR/DVD-tila: nauhoita.
; . . . . . . . . . . . . . . . . . . . . . . - TV-tila: keltainen teksti-TV-näppäin*.
- VCR/DVD-tila: keskeytä.
@ -/-- . . . . . . . . . . . . . . . . . . . . valitsee yksi- ja kaksinumeroisia kanavien numeroita.
#22. . . . . . . . . . . . . . . . . . . . - valitsee edellisen ohjelman / kanavan.
SURROUND . . . . . . . . . - valitsee surround-tilat.
$ - PROG + . . . . . . . . . . . . . valitsee edellisen tai seuraavan kanavan.
% BACK . . . . . . . . . . . . . . . . hyppää yhden tason valikosta tai kytkee valikon pois päältä.
^ Kohdistinnäppäimet . . kohdistin ylös, alas, vasemmalle, oikealle valikoimassa.
& GUIDE . . . . . . . . . . . . . . . STB-tila: avaa elektronisen TV-ohjelmaopas.
*yy(Valmiustila). . . . . . . . . . kytkee TV:n, DVD:n, videonauhurin,AMP:n, CD:n tai
STB:n päälle tai pois päältä.
( SETUP . . . . . . . . . . . . . . . - kytkee kauko-ohjaimen asetustilaan.
SELECT . . . . . . . . . . . . . . - kytkee taustavalon päälle (jos tarjolla).
- valitsee laitetilat.Valittavana ovat vain sellaiset laitteet, joita
varten kauko-ohjain on asetettu.
* Huomautus: Haluttaessa käyttää värinäppäimiä värin valintanäppäiminä DVDR-HDD-tilassa,
on opittava värinvalintatoiminnot lisätoimintonäppäimeen XTRA.
Tietojen saamiseksi tästä katso kappaletta ‘Lisätoimintojen lisääminen’ luvussa
4. ’Lisämahdollisuuksia’.
Lisätoimintoja
Kutakin kauko-ohjaimella asetettua laitetta varten kauko-ohjaimeen voidaan lisätä
lisätoimintoja (erityistoimintoja).Tietojen saamiseksi tästä katso tätä seuraavaa kappaletta
‘Lisätoimintojen lisääminen’.
Yleiskatsauksen saamiseksi lisätoiminnoista (erityistoiminnoista) eri laitteita varten
katso tämän esitteen takaosassa esitettyä ‘Lisätoiminnot’-listaa.
70
Suomi
Käyttöohje
Manual_SRU5150_86 24-04-2007 15:42 Pagina 70
Page 71

4. Lisämahdollisuuksia
Lisätoimintojen lisääminen
Huomautus: On mahdollista lisätä vain toimintoja, jotka ovat tarjolla alkuperäisen laitteen kauko-
ohjaimissa.
1 Pidä XTRA painettuna kolme sekuntia:
– - taustavalo (jos tarjolla) syttyy päälle.
- näyttöön ilmestyy ‘ ’ ja ‘ ’.
- käytettävissä olevat näppäimet vilkkuvat.
– Kauko-ohjain on nyt erityistoimintotilassa.
2 Käytä 3 ja 4 lisätoiminnon valitsemiseksi lisäys tai muutos haluttaessa.
Vahvista painamalla OK.
– Näyttöön ilmestyy ‘ ’, ‘ ’ ja ‘ ’ sekä ‘LEARNING‘.
3 Aseta molemmat kauko-ohjaimet tasaiselle pinnalle
(esimerkiksi kahvipöydälle) ja kohdista ne toisiaan vastaan
päästä päähän niin, että väliin jää noin 5 - 10 cm.
4 Paina alkuperäisen kauko-ohjaimen toimintonäppäintä
(esim.TV:n kauko-ohjaimen AMBILIGHT-näppäintä) tai
paina 1 jos haluat palata vaiheeseen 2.
– Näyttöön ilmestyy ‘ ’ sekä esim. ‘TV-AMBILIGHT LEARN OK‘.
Lisätoiminnon lisääminen on onnistunut.
– Jos näyttöön ilmestyy ‘ERROR‘ tai ‘MEM FULL’, aloita uudelleen vaiheesta 1.
Katso myös ‘Vianhaku’ osassa 6.‘Tuki’.
Lisätoiminnon (erityistoiminnon) aktivointi / käyttö
1 Käytä SELECT halutun laitteen valitsemiseksi. Esim. DVD.
– Vahvista painamalla OK.
2 Paina XTRA.
– Laitetta varten viimeksi valittu toiminto ilmestyy näyttöön.
Esim. DVD-SHOWVIEW.
Käytettävissä olevat näppäimet alkavat vilkkua.
3 Käytä 3 ja 4 aktivoitavaksi haluamasi toiminnon
valitsemiseksi. Esim. DVD-ZOOM.
Paina OK toiminnon aktivoimiseksi.
4 Paina XTRA uudelleen normaaliin toimintatilaan
palaamiseksi.
Poista laitteet
TV-esimerkki:
1 Paina SETUP (Asetukset) painiketta kolmen sekunnin ajan:
– Taustavalo (jos käytössä) syttyy.
– Näytössä näkyy ‘ ’, ‘ ’ ja ’TV?’
– Käytettävissä olevat painikkeet vilkkuvat.
71
Suomi
Käyttöohje
Manual_SRU5150_86 24-04-2007 15:42 Pagina 71
Page 72

2 Siirry luettelon alareunassa olevaan ’DELETE TV’
(Poista TV) -kohtaan ylä- tai alanuolella.
3 Poista TV-laitteen toimintatila painamalla OK-painiketta.
– Näytössä näkyy teksti ’DEVICE DELETED’ (Laite
poistettu).
– TV-laitteen toimintatila on poistettu.
Toimintojen oppiminen
Jos alkuperäisestä kauko-ohjaimestasi SRU 5150:llä puuttuu tiettyjä toimintoja, se pystyy
oppimaan nämä toiminnot alkuperäisestä kauko-ohjaimesta.Voit tallentaa toiminnon
SRU 5150:n mihin tahansa tarjolla oleviin näppäimiin paitsi XTRA (LEARN) ja SELECT
(SETUP). Näppäimeen aikaisemmin tallennettu toiminto pyyhkiytyy yli.
1 Varmista, että käsillä on alkuperäinen kauko-ohjain.
2 Käytä SELECT halutun laitteen valitsemiseksi. Esim. DVD.
3 Aseta molemmat kauko-ohjaimet tasaiselle pinnalle
(esimerkiksi kahvipöydälle) ja kohdista ne toisiaan vastaan
päästä päähän niin, että väliin jää noin 5 - 10 cm.
4 Pidä LEARN ja painike, jonka haluat opittavaksi SRU 5150
-kauko-ohjaimella, painettuna samanaikaisesti 3 sekuntia,
kunnes ‘ ’ sekä ’LEARNING’ syttyvät päälle.
5 Paina näppäintä, jonka haluat kopioida alkuperäisellä
kauko-ohjaimella.
– syttyy päälle. Kauko-ohjain oppii nyt toiminnon.
– Kun kauko-ohjain on oppinut toiminnon, näyttöön ilmestyy ’LEARN OK’
vahvistamaan, että signaali on tallennettu.
– Jos näyttöön ilmestyy ‘ERROR‘ tai ‘MEM FULL’, aloita uudelleen vaiheesta 1.
Katso myös ‘Vianhaku’ osassa 6.‘Tuki’.
72
Suomi
Käyttöohje
Manual_SRU5150_86 24-04-2007 15:42 Pagina 72
Page 73

Taustavalotoiminnon aktivointi / katkaiseminen
Taustavalo valaisee näytön, joten pystyt näkemään selvästi kaikki näytön viestit heikostikin
valaistussa huoneessa. Koska taustavalo kuluttaa virtaa, pariston kestoaika lyhenee
taustavaloa usein käytettäessä.Tämän vuoksi on mahdollista katkaista taustavalotoiminto
pois päätä.
Taustavalotoiminnon katkaiseminen
• Pidä numeronäppäimiä 1 ja 9 painettuna samanaikaisesti
kolme sekuntia.
– Taustavalotoiminto on nyt katkaistu pois päältä eikä
taustavaloa voida kytkeä päälle.
Taustavalotoiminnon aktivointi
• Pidä numeronäppäimet 7 ja 9 painettuna samanaikaisesti
kolme sekuntia.
– Taustavalotoiminto on nyt aktivoitu ja taustavalo voidaan
kytkeä päälle.
Kauko-ohjaimen alkuperäisten toimintojen tallennus
Joissakin tapauksissa voi olla hyödyllistä tallentaa kauko-ohjaimen alkuperäiset toiminnot.
Esim. jos muisti on täynnä, kun haluat asettaa sen tiettyä laitetta varten tai oppia sitä varten
lisänäppäintoiminnon. Kauko-ohjain voidaan sen jälkeen nollata tehtaalla asetettuihin
oletusasetuksiin ja kaikki käyttöasetukset pyyhitään yli.
1 Pidä numeronäppäimet 1 ja 6 painettuna samanaikaisesti
kolme sekuntia.
– ‘ ’ syttyy päälle. Kauko-ohjain on nyt asetustilassa.
2 Paina numeronäppäimiä 9, 8 ja 1, tässä järjestyksessä.
– ‘981 - WAIT’ ilmestyy näyttöön.
Kaikki alkuperäiset toiminnon on nyt tallennettu ja
kaikki lisätoiminnot on pyyhitty yli.
73
Suomi
Käyttöohje
Manual_SRU5150_86 24-04-2007 15:42 Pagina 73
Page 74

5. Paristojen vaihto
Kun paristotilan osoitin ( ) näytössä alkaa vilkkua, pariston teho on vähissä ja paristot
on vaihdettava. Kaikki käyttöasetukset pysyvät tallella, kun vanhat paristot poistetaan.
1 Paina kantta sisään, liu’uta sitä nuolen
suuntaan ja poista kansi.
2 Asenna 3 AAA/R03 paristoa painaen mieleen
paristolokeron merkkien + ja - paikat.
3 Aseta kansi takaisin ja näpsäytä se kunnolla paikalleen.
6. Tuki
Vianhaku
• Ongelma
– Mahdollinen syy / ratkaisu
• Käytettäväksesi haluamasi laite ei reagoi lainkaan näppäintä painettaessa.
– Suuntaa kauko-ohjain laitetta kohti ja varmista, että kauko-ohjaimen ja laitteen välillä ei
ole esteitä.
– Varmista, että toiminto, jota haluat käyttää, on tarjolla laitteessa.
– Tarkista, vilkkuuko pariston tilan osoitin ()näytössä (pariston teho vähissä).
Jos on näin, asenna uudet paristot.
• Käytettäväksi haluamasi laite ei reagoi näppäintä painettaessa.
– Asetuksen aikana on ehkä ohjelmoitu väärä koodi laitetta varten.Yritä asettaa laite
uudelleen. Jos laite ei edelleenkään reagoi, ota yhteyttä helpline-neuvontaamme.
– Tarkista, vilkkuuko pariston tilan osoitin ()näytössä (pariston virta vähissä).
Jos on näin, asenna uudet paristot.
• Teksti-TV-näppäimet eivät toimi.
– Ota selville, onko TV:si varustettu teksti-TV:llä.
• Koet vaikeuksia kaikkien laitteen toimintojen käytössä.
– Kauko-ohjaimesi on ehkä muunnettava laitemalliin sopivaksi.
Ota yhteyttä helpline-neuvontaamme yksityiskohtaisten tietojen saamiseksi.
• ERROR ilmestyy näyttöön lisättäessä lisätoiminto (erityistoiminto) tai yritettäessä
oppia uusi näppäin.
– Alkuperäisestä kauko-ohjaimesta ei ole saatu signaalia 20 sekuntiin ja SRU 5150 pysäytti
lisäys / oppimisprosessin. Aloita uudelleen vaiheesta 1.
– SRU 5150-näppäintä on painettu ennen signaalin tunnistamista ja SRU 5150 pysäytti
lisäys/opintoprosessin. Aloita uudelleen vaiheesta 1.
– Toiminto, jonka haluat lisätä, ei ole tarjolla alkuperäisessä kauko-ohjaimessa.
– Varmista, että alkuperäinen kauko-ohjain toimii oikein.
– Varmista, että kauko-ohjaimet on suunnattu oikein.
– Alkuperäisen laitteesi IR-signaali on signaalialueen ulkopuolella. SRU 5150 pystyy oppimaan
IR-signaaleja vain kantosignaalin ollessa 30-60kHz.
74
Suomi
Käyttöohje
Manual_SRU5150_86 24-04-2007 15:42 Pagina 74
Page 75

• MEM FULL ilmestyy näyttöön lisätoiminto (erityistoiminto) lisättäessä tai
näppäimen oppimista yritettäessä.
– Valittuun laitteeseen ei voida enää lisätä toimintoja tai SRU 5150:n muisti on täynnä.
Tallenna kaikki alkuperäisen kauko-ohjaimesi alkuperäiset toiminnot muistitilan luomiseksi.
Tietojen saamiseksi tästä katso kappaletta ‘Kauko-ohjaimesi alkuperäisten toimintojen
tallennus’ luvussa 4.‘Lisämahdollisuuksia’.
Kaikki käyttöasetukset tullaan tällöin pyyhkimään pois.
• Kauko-ohjain ei asetu asetustilaan, kun on painettu SELECT.
– Tarkista, vilkkuuko pariston tilan osoitin ()näytössä (pariston teho vähissä).
Jos on näin, asenna uudet paristot.
• Asetuksen aikana voidaan valita vain viisi laitetta.
– SRU 5150:lle tarjolla olevien laitteiden maksimimäärä (5) on jo asetettu.
Muita laitetyyppejä ei voida valita paitsi jos tyhjennetään koko muisti.Tietojen saamiseksi
tästä katso kappaletta ‘Kauko-ohjaimen alkuperäisten toimintojen tallennus’ luvussa
4. ‘Lisämahdollisuuksia’. Kaikki käyttöasetukset tullaan tällöin pyyhkimään pois.
Tarvitsetko apua?
Jos esitettävänäsi on SRU 5150:ta koskevia kysymyksiä, pystyt aina ottamaan yheyttä meihin.
Yhteystietomme löytyvät lisätoimintojen jälkeen tämän manuaalin takaosasta.
Lue tämä manuaali tarkkaan ennen yhteyden ottamista. Pystyt itse ratkaisemaan useimmat
ongelmat. Ottaessasi yhteyttä helpline-neuvontaamme varmista, että kyseinen laite on käsillä
niin että operaattorimme pystyvät auttamaan määriteltäessä, toimiiko kauko-ohjaimesi
oikein.
Philips-kauko-ohjaimesi mallin numero on SRU 5150/86.
Ostopäivä: ......../ ......../ ........
(päivä/kuukausi/vuosi)
75
Suomi
Käyttöohje
Manual_SRU5150_86 24-04-2007 15:42 Pagina 75
Page 76

Extra functions
76
Device Extra functions
TV, second TV Ambi Mode, Ambilight, PIP, Pixelplus,
Sleep,Text Mix
VCR, second VCR, Personal Video Recorder Showview, SP/LP
TV-VCR combo, TV-DVD combo, TV-VCR,TV-DVD, DVD,VCR
DVD-VCR combo
Amplifier, Home Theater System, AM, CD input, DSP mode, DVD input,
Audio set,Tuner FM, Surround mode
Digital Media Receiver Repeat
Set Top Box, Satellite receiver, Help, Interactive, List, Option, Pause,
Digital Video Broadcasting Terrestr ial device , Play, Ser vices, Sound, Stop
Cable decoder
CD player, Mini Disk Program, Repeat
DVD player, DVD recorder, Game console, Help, Interactive, List, Option, Pause,
DVD recorder with Hard Disk Drive Play, Services, Sound, Stop
Manual_SRU5150_86 24-04-2007 15:42 Pagina 76
Page 77

77
Note your codes!Note your codes! Helpline
Information to the Consumer
Disposal of your old product
Your product is designed and manufactured with high quality materials and components, which
can be recycled and reused.
When this crossed-out wheeled bin symbol is attached to a product
it means the product is covered by the European Directive 2002/96/EC.
Please inform yourself about the local separate collection system for electrical and
electronic products.
Please act according to your local rules and do not dispose of your old products with your
normal household waste.The correct disposal of your old product will help prevent potential
negative consequences for the environment and human health.
Informations pour le consommateur
Mise au rebut des produits en fin de vie
Ce produit a été conçu et fabriqué avec des matériaux et composants recyclables de haute
qualité.
Le symbole d'une poubelle barrée apposé sur un produit signifie
que ce dernier répond aux exigences de la directive européenne 2002/96/EC.
Informez-vous auprès des instances locales sur le système de collecte des produits
électriques et électroniques en fin de vie.
Conformez-vous à la législation en vigueur et ne jetez pas vos produits avec les déchets
ménagers. Seule une mise au rebut adéquate des produits peut empêcher la contamination de
l'environnement et ses effets nocifs sur la santé.
FR
EN
Country Phone number Tariff
Australia 1300 363 391 Local tariff
België/ Belgique/ Belgien 070 253 011 € 0,17
Danmark 35258758 Local tariff
France 08 9165 0007 € 0,23
Deutschland 0180 5 007 533 € 0,12
España 902 889 343 € 0,15
ŒÏÏ¿da 00800 3122 1219 Local tariff
Ireland 01 6011158 Local tariff
Italia 199 404 043 € 0.25
Luxembourg 40 6661 5645 Local tariff
Nederland 0900 0400 062 € 0,20
New Zealand 0800 625 224 Local tariff
Norge 22 70 82 58 Local tariff
Österreich 0820 901116 Local tariff
Portugal 2 1359 1441 Local tariff
Suisse/ die Schweiz/ Svizzera 044 212 0045 Local tariff
Suomi 09 2294 8258 Local tariff
Sverige 08 7505196 Local tariff
United Kingdom 0906 1010 018 £ 0.15
Manual_SRU5150_86 24-04-2007 15:42 Pagina 77
Page 78

Kundeninformationen
Entsorgung Ihres alten Geräts
Ihr Gerät wurde unter Verwendung hochwertiger Materialien und Komponenten entwickelt und
hergestellt, die recycelt und wieder verwendet werden können.
Befindet sich dieses Symbol (durchgestrichene Abfalltonne auf
Rädern) auf dem Gerät, bedeutet dies, dass für dieses Gerät die Europäischen
Richtlinie 2002/96/EG gilt.
Informieren Sie sich über die geltenden Bestimmungen zur getrennten Sammlung
von Elektro- und Elektronik-Altgeräten in Ihrem Land.
Richten Sie sich bitte nach den geltenden Bestimmungen in Ihrem Land, und entsorgen Sie
Altgeräte nicht über Ihren Haushaltsabfall. Durch die korrekte Entsorgung Ihrer Altgeräte
werden Umwelt und Menschen vor möglichen negativen Folgen geschützt.
Informatie voor de consument
Verwijdering van uw oude product
Uw product is vervaardigd van kwalitatief hoogwaardige materialen en onderdelen, welke
gerecycled en opnieuw gebruikt kunnen worden.
Als u op uw product een doorstreepte afvalcontainer op wieltjes
ziet, betekent dit dat het product valt onder de EU-richtlijn 2002/96/EC.
Win inlichtingen in over de manier waarop elektrische en elektronische producten
in uw regio gescheiden worden ingezameld.
Neem bij de verwijdering van oude producten de lokale wetgeving in acht en plaats deze
producten niet bij het gewone huishoudelijke afval.Als u oude producten correct verwijdert
voorkomt u negatieve gevolgen voor het milieu en de volksgezondheid.
Information til kunden
Bortskaffelse af dit gamle produkt
Dit produkt er konstrueret med og produceret af materialer og komponenter af høj kvalitet,
som kan genbruges.
Når dette markerede affaldsbøttesymbol er placeret på et produkt
betyder det, at produktet er omfattet af det europæiske direktiv 2002/96/EC
Hold dig orienteret om systemet for særskilt indsamling af elektriske og
elektroniske produkter i dit lokalområde.
Overhold gældende regler, og bortskaf ikke dine gamle produkter sammen med dit almindelige
husholdningsaffald. Korrekt bortskaffelse af dine gamle produkter er med til at skåne miljøet og
vores
DK
NL
DE
78
Manual_SRU5150_86 24-04-2007 15:42 Pagina 78
Page 79

79
Information till konsumenten
Kassering av din gamla produkt
Produkten är utvecklad och tillverkad av högkvalitativa material och komponenter som kan
både återvinnas och återanvändas.
När den här symbolen med en överkryssad papperskorg visas på
produkten innebär det att produkten omfattas av det europeiska direktivet
2002/96/EG
Ta reda på var du kan hitta närmaste återvinningsstation för elektriska och
elektroniska produkter.
Följ de lokala reglerna och släng inte dina gamla produkter i det vanliga hushållsavfallet.
Genom att kassera dina gamla produkter på rätt sätt kan du bidra till att minska eventuella
negativa effekter på miljö och hälsa.
Informasjon til forbrukerne
Avhending av gamle produkter
Produktet er utformet og produsert i materialer og komponenter av høy kvalitet, som kan
resirkuleres og brukes på nytt.
Når denne søppelbøtten med kryss på følger med et produkt, betyr
det at produktet dekkes av det europeiske direktivet 2002/96/EU
Finn ut hvor du kan levere inn elektriske og elektroniske produkter til gjenvinning
i ditt lokalmiljø.
Overhold lokale regler, og ikke kast gamle produkter sammen med husholdningsavfallet. Riktig
avhending av de gamle produktene dine vil hjelpe til med å forhindre potensielle negative
konsekvenser for miljøet og menneskers helse.
Tiedote kuluttajille
Vanhan tuotteen hävittäminen
Tuotteesi on suunniteltu ja valmistettu laadukkaista materiaaleista ja komponenteista, jotka
voidaan kierrättää ja käyttää uudelleen.
Tuotteeseen kiinnitetty yliviivatun roskakorin kuva tarkoittaa, että
tuote kuuluu Euroopan parlamentin ja neuvoston direktiivin 2002/96/EC
soveltamisalaan.
Ota selvää sähkölaitteille ja elektronisille laitteille tarkoitetusta
kierrätysjärjestelmästä alueellasi.
Noudata paikallisia sääntöjä äläkä hävitä vanhoja tuotteita tavallisen talousjätteen mukana.
Vanhojen tuotteiden hävittäminen oikealla tavalla auttaa vähentämään ympäristölle ja ihmisille
mahdollisesti koituvia haittavaikutuksia.
SF
NO
SV
Manual_SRU5150_86 24-04-2007 15:42 Pagina 79
Page 80

Guarantee
certificate
Certificat de
garantie
Garantiebewijs
Záruční list
Garantieschein
Certificado de
garantía
Certificato di
garanzia
Karta gwarancyjna
Certificado de
garantia
Garantibevis
Takuutodistus
Гаpантия
Type:
Serial nr.:
Date of purchase - Date d’achat - Koopdatum - Kaufdatum -
Fecha de compra - Data di acquisto - Data da compra - Inköpsdat -
Køpedatum - Kjøpedato - Ostopäivä - a a -
Datum nákupu - Data zakupu - Дата пpиобpетения
_________________20_____
year
année
jaar
Jahr
año
rok
warranty
garantie
garantie
Garantie
garantía
gwarancyjna
anno
ano
år
vuosi
год
garanzia
garantia
garanti
takuu
гаpантия
Dealer’s name, address and signature
Nom, adresse et signature du revendeur
Naam, adres en handtekening v.d. verkoper
Name,Anschrift und Unterschrift des Händlers
Nombre, dirección y firma del distribuidor
Nome, indirizzo e firma del fornitore
Nome, endereço e assinatura da loja
Återförsäljarens namn, adress och namnteckning
Forhandlerens navn,adresse og underskrift
Myyjän nimi, osoite ja allekirjoitus
Jméno prodejce, adresa a podpis
Nazwa, adres punktu sprzedaży i podpis sprzedawcy
Jméno prodejce, adresa a podpis
Oa, d a a‹ . ‹
3128 145 2170.1 N’MW/RM/RD/1707
11
Manual_SRU5150_86 24-04-2007 15:42 Pagina 80
 Loading...