

Page 1
Register your product
and get support at
www.philips.com/welcome
Prestigo SRT9320
EN User Manual
Page 2
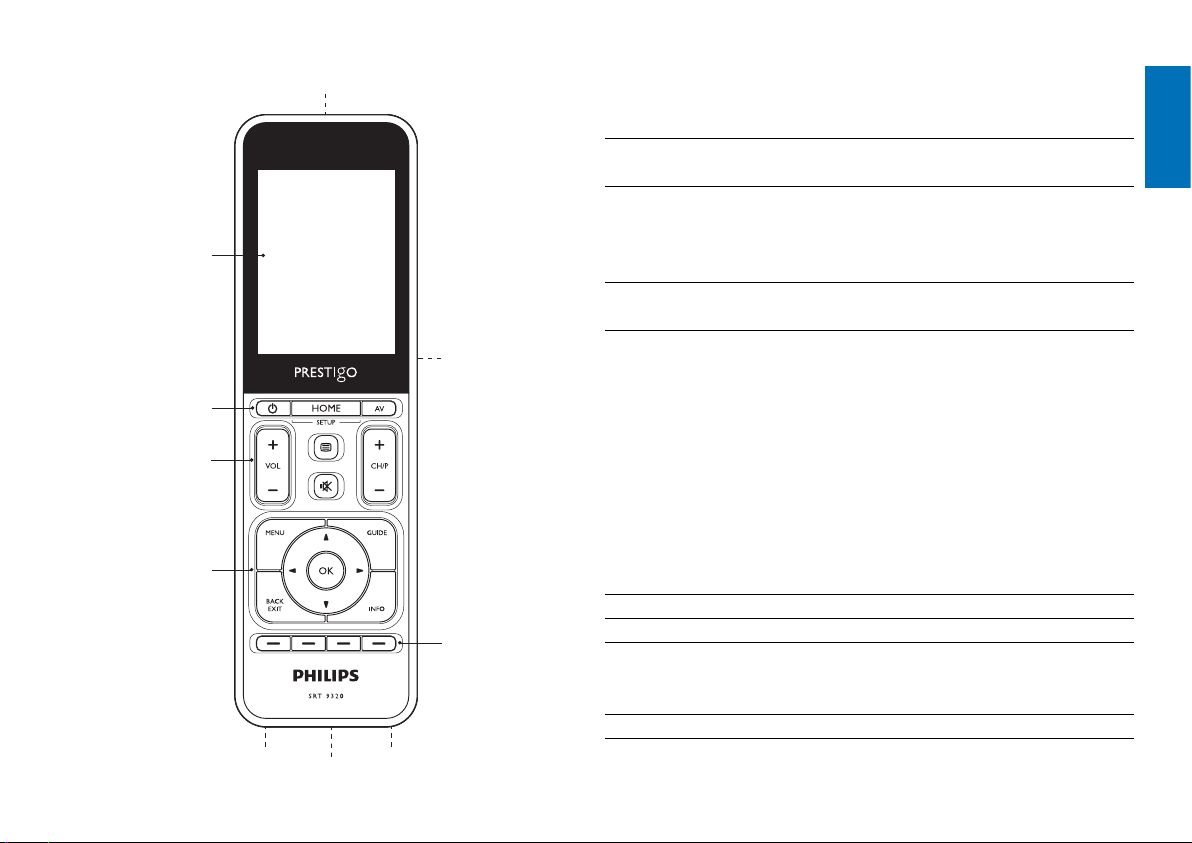
IR transmitter
(Top of Prestigo)
Table of contents
Display /
touchscreen
- Power button
- Home / Setup button
- AV button
- Volume + / - button
- Teletext button
(Europe / Australia)
Previous channel button (USA)
- Mute button
- Channel /
Program + / – button
- Menu button
- Back / Exit button
- Cursor buttons
- OK button
- Guide button
- Info button
Power supply jack
USB port
(Bottom of Prestigo)
IR receiver
On / Off switch
(Rear of Prestigo)
Color buttons
1 Your Prestigo 3
1.1 What’s in the box? 3
2 Getting started 3-6
2.1 Charging the battery 3-4
2.2 Setting up the remote control 4-5
2.3 Exit Setup mode 6
3 Using the remote control - Basic operation 6-7
3.1 Selecting devices 6-7
4 Extra possibilities - Advanced setup 7-20
4.1 Entering Setup mode 7
4.2 Setting up devices 8-9
4.3 Setting up activities 9-12
4.4 Selecting activities (use mode) 12-13
4.5 Setting up favorites 13-15
4.6 Selecting favorites (use mode) 15
4.7 Reconfi guring buttons 15-18
4.8 Reconfi guring the Power / AV buttons 18-19
4.9 Adjusting system settings 19
4.10 Installing Philips PrestigoSync software 19-20
5 Frequently asked questions 20-22
6 Technical specifi cations 22
7 Service and support 22-24
7.1 Need help? 22
7.2 Information to the consumer 23-24
Equipment list 25
English
Table of contents
2EN
Page 3

1 Your Prestigo
After setting up the Philips Prestigo universal remote control you can
operate up to 20 different devices with it, use up to 20 activities and select
a total of 100 favorites.
Favorites are your favorite TV and radio channels that you can select and
watch / listen with a single button press.
Activities give you one-touch access to your home entertainment system.
During setup you can select yourself the devices you wish to operate with
the remote control (see table under chapter 2.2 ‘Setting up the remote
control’). The on-screen instructions on the remote control display help you
to easily set up and operate the remote control.
If, however, you require extra information, please consult this user manual.
It is provided to help you set up and use the remote control.
1.1 What’s in the box
Please verify that the packaging contains the following items:
• Prestigo SRT9320 universal remote control
• User manual
• Quick Start Guide
• Customer Demonstration sheet
• Charging cable
• USB cable
• CD ROM containing Philips PrestigoSync software and user manual
• Power plug Europe + Power plug UK
Or:
• Power plug Australia
2 Getting started
English
Your Prestigo
To fully benefit from the support that Philips offers, register your product at
www.philips.com/welcome
• At ‘www.philips.com/welcome’, select ‘Register my product’ and follow
the on-screen instructions for registration.
How to use this manual
When you click with the cursor on a sentence in theTable of contents you
automatically go to the right page / chapter.
When you click on a page number, reference chapter or internetsite in the
text you go there.
Clicking on the blue language tab in the right top corner brings you back to
the Table of contents.
2.1 Charging the battery
The remote control comes pre-installed with a rechargeable battery.
When using the remote control for the first time, make sure the battery is
fully charged. Do not disconnect the remote control from the power supply
until the battery is fully charged (
and can take place with the remote control turned on or off.
With the remote control turned on you can follow the charging process on
the remote control display.
). Charging may take up to 3 hours
3EN
Page 4
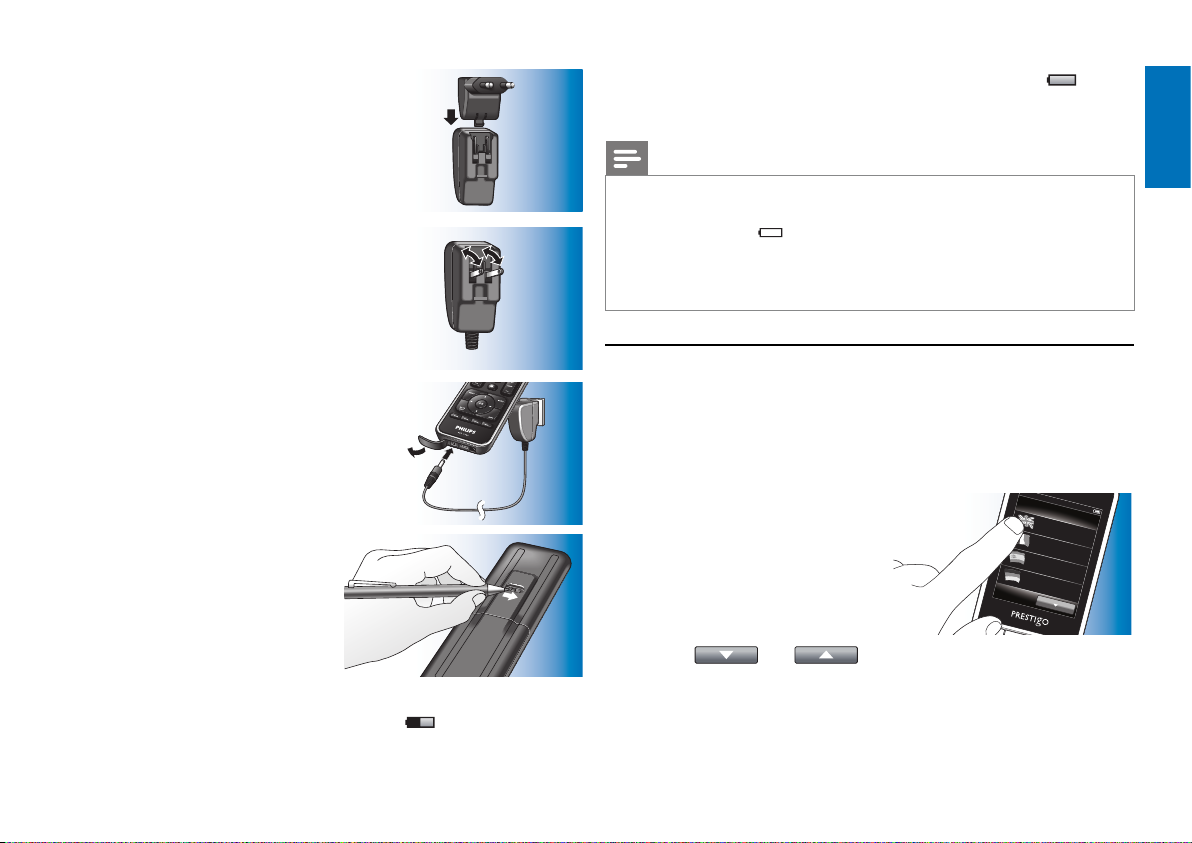
1 Select the adapter plug for your
country and slide it over the power
plug of the charging cable.
OR:
Fold out the contact blades.
2 Insert the power plug into a wall
outlet.
3 Turn the protective cap, covering the
connectors, to the left.
4 Insert the plug at the other end of
the charging cable into the remote
control power supply jack.
5 If desired, set the On / Off switch
to the right (On).
The On / Off switch is located at the
rear of the remote control.
Use a pen or small screwdriver to
set the switch.
• The Philips Startup screen appears, followed by the Language
Selection screen. The progress animation (
corner of the screen indicates the charging status.
) in the top right
• When the battery is fully charged the battery full icon (
appears at the top right corner of the screen.
Notes
• Operation time of a fully charged battery is approximately 1 month but also
depends on the intensity of usage. When the battery is almost empty the
battery low icon (
Recharge the battery as described above.
• When the battery cannot be recharged anymore it needs to be replaced.
For this, refer to chapter 7.2.2 ‘Replacing the battery’.
2.2 Setting up the remote control
) flashes in the top right corner of the screen.
Make sure the remote control is fully charged and turned on (for this refer
to chapter 2.1 ‘Charging the battery’).
Avoid turning off the remote control with the On / Off switch at the rear
for this will shorten batter y life time.
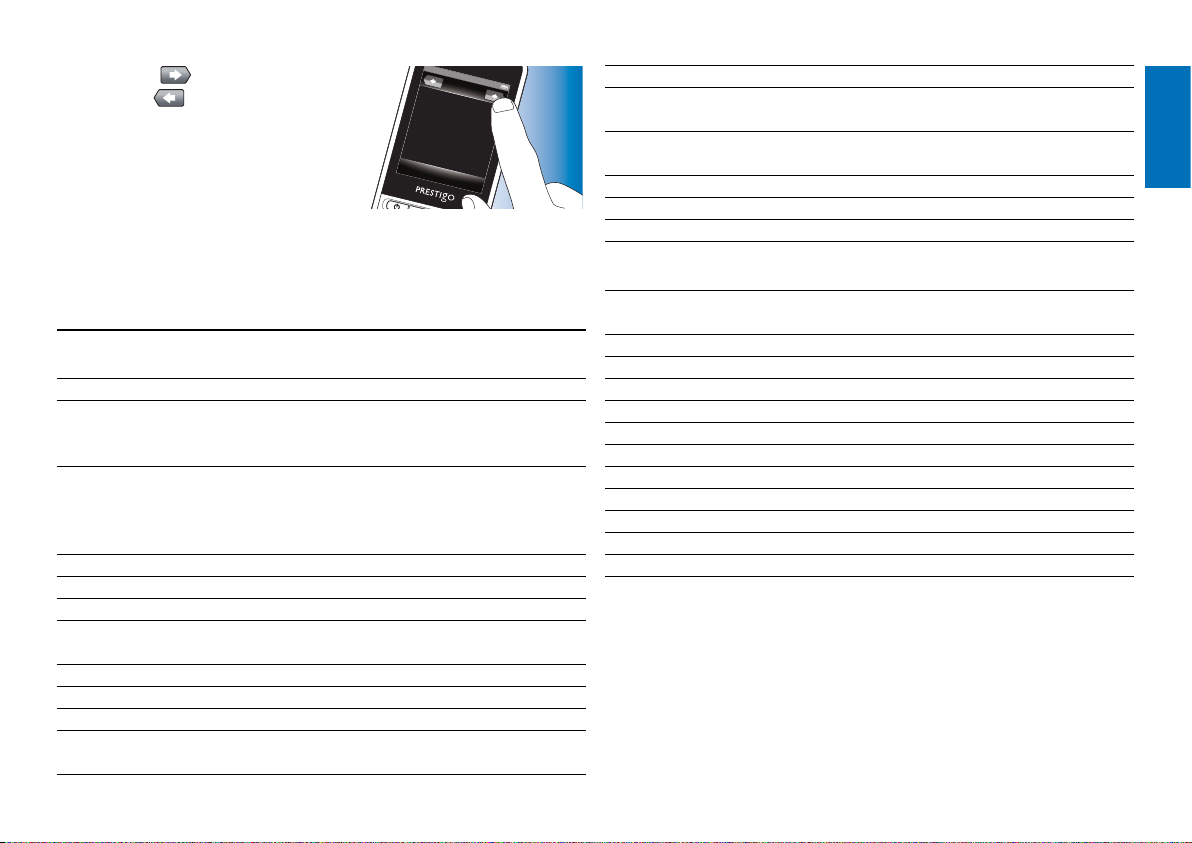
1 Select your preferred language by
touching the language (flag) in the
Language Selection screen.
• Use the
and buttons, at the bottom of the screen,
Setup
English
Français
Español
Deutsch
to scroll through the list of available languages.
• A welcome message appears.
)
English
Getting started
4EN
Page 5
2 Touch the button to continue
With the button you go back
to the Language Selection screen.
Setup
Welcome to the Prestigo setup
guide. The next steps will help you
add devices to your SRT9320.
3 Follow the on-screen instructions to set up the remote control for all
devices you wish to operate, using the remote control.
• You can set up the remote control for any of the devices listed below,
with a maximum of 20 devices.
Device name Description
TV Traditional TV, fl at screen TV and projection TV
Set-Top Box Cable box, satellite receiver, Digital Video
Broadcasting Terrestrial device (DVB-T), IPTV,
TNT (FR), Freeview (UK)
Set-Top Box Recorder Cable box, satellite receiver, Digital Video
Broadcasting Terrestrial device (DVB-T), IPTV,
TNT (FR), Freeview (UK) with recording
capabilities (Hard Disk Drive)
DVD Player DVD player
Blu-Ray Player Blu-Ray player
DVD Recorder DVD Recorder
Hard Disk Recorder DVD / Hard Disk Drive combination, PVR,
(+HDD)DVR
VCR Video cassette player and recorder
PC Personal Computer, Windows Media Center
Game Console Game Console
MP3 Player Dock MP3 player docking station and audio-video
accessories (Switches, Apple TV, etc.)
Digital Media Receiver Digital Media Receiver, Media Adapter, Squeezebox
Receiver AV Receiver, Amplifi er + Tuner combination, sound
processor
Home Theatre System Home Theatre System, Home Entertainment
System
Audio System Audio System, AudioSet, Hifi system
Amplifi er Amplifi er, Preamplifi er, Active Speaker System
Radio tuner Radio Tuner, Digital Audio Broadcasting (DAB)
CD player CD player and recorder, Super Audio CD player
(SACD)
Tape Audio cassette tape player and recorder, DAT,
DCC
Minidisc Minidisc player and recorder
TV / DVD Combo TV with integrated DVD
TV / VCR Combo TV with integrated VCR
TV / VCR / DVD Combo TV with integrated VCR and DVD
DVD / VCR Combo DVD / VCR combination
Projector Video projector
Video CD / Laser Disc Video Compact Disc, Laser Disc, Karaoke
HD-DVD player High-Defi nition DVD player
Phono Turntable
TiVo Digital Video Recorder*
Satellite Radio Satellite Radio Receiver*
* USA only
English
Getting started
5EN
Page 6
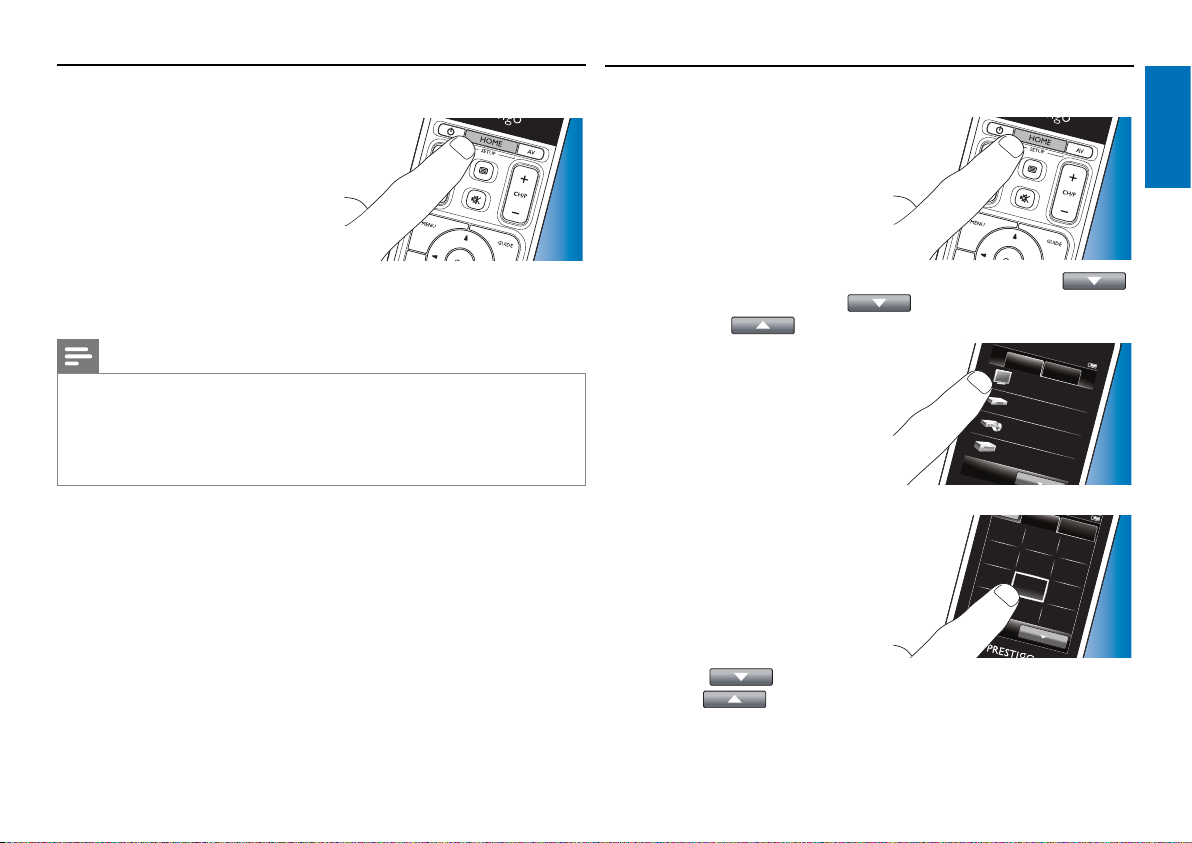
2.3 Exit Setup mode
3.1 Selecting devices
1 To exit the initial Setup at any time,
press the HOME button.
• The message ‘Do you want to
save your settings and exit setup’
appears.
2 Touch the ‘Yes’ button to exit.
• If you accidentally press the HOME
button during initial Setup, you can enter Setup mode again by touching
the ‘No’ button. Also refer to chapter 4.1 ‘Entering Setup mode’.
Notes
• In order to be able to use the remote control, it should be set up for at least
one device.
• Devices for which the remote control is set during this initial set up can be
deleted, renamed, rearranged or replaced afterwards.
For this, refer to chapter 4.2 ‘Setting up devices’.
3 Using the remote control
- Basic operation
After initial setup you can use the remote control to operate your devices.
For operation the appropriate hard buttons on the remote control can be
used as well as the touchscreen buttons that are displayed when a device
is selected.
1 Press the HOME button.
• The Home screen appears.
The ‘Devices’ tab is highlighted
and the devices for which the
remote control is set up are
displayed. For adding devices,
refer to chapter 4.2. ‘Setting up
devices’. When more pages with devices are available the
button appears. Touch the
With the
button you go back to the previous page.
button to go to the next page.
2 Select the desired device by
touching the corresponding button.
Receiver
• A keypad with buttons for
operating the selected device
appears.
• Touch the
button to go to the next keypad.
With the button you go back to the previous keypad.
1
4
7
Devices
Set-top Box
DVD
English
Home
Activities
TV
Keypad
Favorites
2
3
5
6
8
9
0
enter
Using the remote control
6EN
Page 7
3 You can now operate the selected device by using the touchscreen
buttons (keypad) and the appropriate hard buttons on the remote
control.
• Touch the
• To set up the remote control for other (more) devices, refer to
chapter 4.2.1 ‘Adding devices’.
Note
If a device does not respond properly to a button command you can have the
remote control search for the button function or learn the function from the
original remote control. For this refer to chapter 4.7.4.1 ‘Searching the database’
and / or chapter 4.7.4.2 ‘Learning button functions’.
button to go back to the list of available devices.
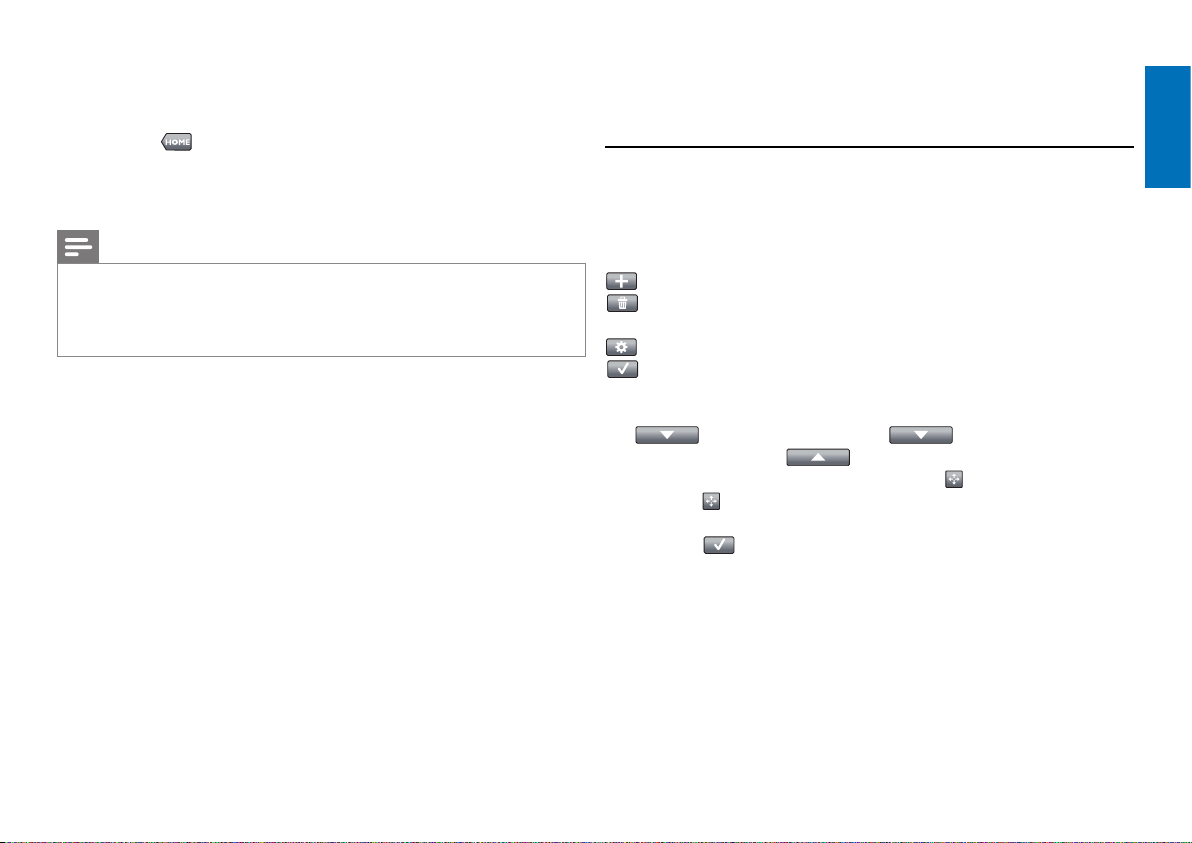
4 Extra possibilities
- Advanced setup
4.1 Entering Setup mode
When in normal operation mode, pressing the HOME button for 3 seconds
will display a toolbar. This toolbar enables you to configure the current
screen and contains the following tools:
(add): adds items (devices, activities, etc.) to the current screen.
(delete): deletes items (devices, activities, etc.) from the current
screen.
(edit): renames and reconfigures items (devices, activities, etc.).
(done): confirms settings and returns to normal operation mode.
• When more items are available than can be displayed on the screen, the
button appears. Touch the button to go to the next
list of items. With the
• When an item is selected on the screen, the
Press the
to a different position on the screen.
• Press the
button and use the arrows that appear to move the item
button to exit Setup mode at any time.
button you go back to the previous list.
button appears.
English
Extra possibilities
7EN
Page 8
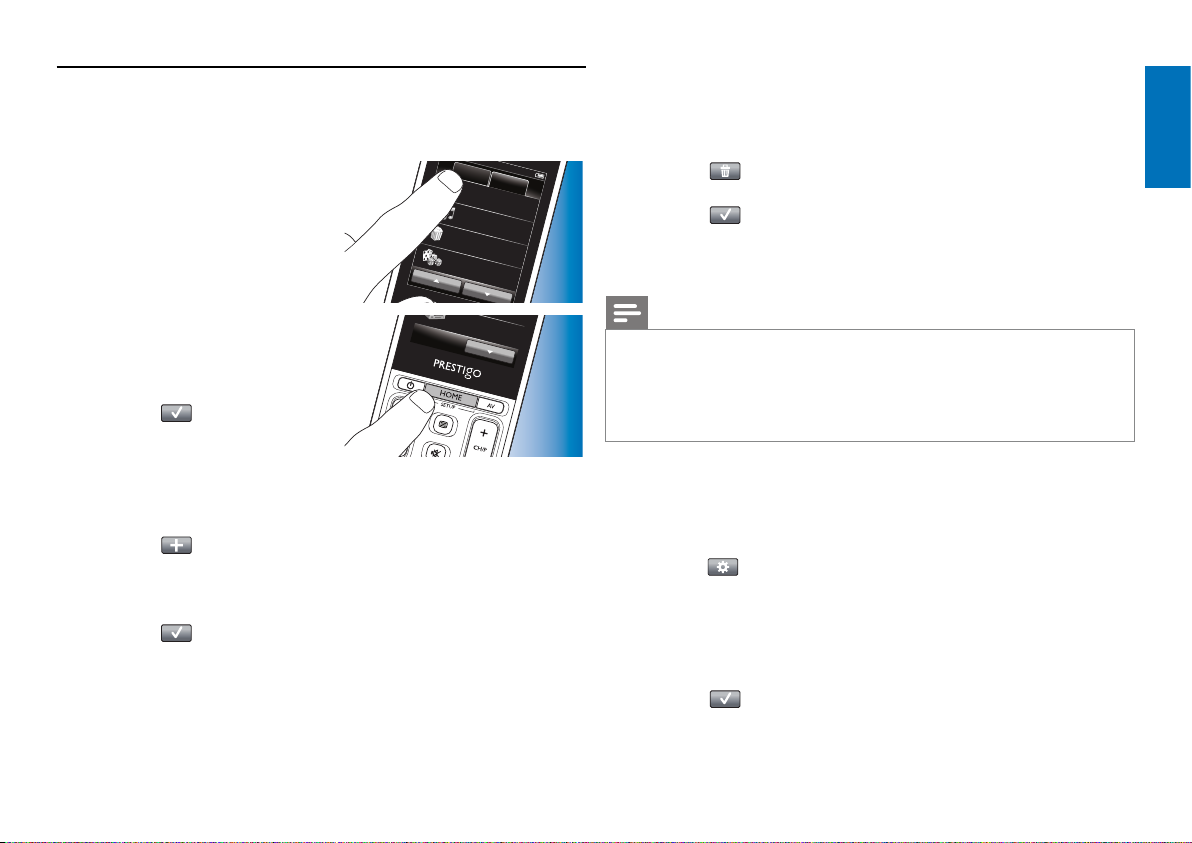
4.2 Setting up devices
H
4.2.2 Deleting devices
When entering setup mode from the devices home screen, you can add,
delete, rename and rearrange devices.
1 In the Home screen, touch
the ‘Devices’ tab.
• The devices for which the
remote control is set up are
displayed on
Devices
Watch TV
Listen to music
Watch a movie
Play a game
ome
Activities
the screen.
2 Keep the HOME button pressed for
Receiver
3 seconds.
3 Use the buttons in the toolbar to
add, delete and edit devices.
4 Touch the button in the toolbar
when finished.
4.2.1 Adding devices
1 Touch the button in the toolbar.
• The Add device screen appears.
2 Select the new device you wish to set up the remote control for (add)
and follow the on-screen instructions.
3 Touch the button in the toolbar when finished.
• The Home screen appears. The remote control is now set up to
operate the newly added device.
1 In the list of devices, select the device you wish to delete.
• The Delete device screen appears.
2 Touch the button in the toolbar.
3 Touch the ‘Yes’ button to confirm.
4 Touch the button in the toolbar when finished.
• The Home screen appears.
The device is now deleted from the remote control memory.
Note
Buttons of the deleted device that are used elsewhere, e.g. in an activity or the
volume buttons will be deleted as well. Check the activities you installed and
reinstall them if necessary. For this refer to chapter 4.3 ‘Setting up activities’.
Check the volume buttons for your devices and reinstall them if necessary.
For this refer to chapter 4.2.4 ‘Copy volume buttons from another device’.
4.2.3 Renaming devices
1 In the list of devices, select the device you wish to rename.
2 Touch the button in the toolbar.
• The Edit device screen appears.
3 Touch the ‘Rename’ button.
4 Use the keyboard to enter the new name.
5 Touch the ‘OK’ button when finished.
• The Setup screen appears.
6 Touch the button in the toolbar.
• The Home screen appears.
The device is now stored under the new name.
English
Extra possibilities
8EN
Page 9

4.2.4 Copy volume buttons from another device
When adding devices, the remote control copies the volume settings as
follows:
• If a device has its own volume buttons in the remote control database,
these volume buttons will be used.
• If a device has no volume buttons in the remote control database,
the volume buttons of another device will be used automatically.
You can change which volume buttons are used, for instance if you wish to
use the volume buttons of the Amplifier to control the volume of the
DVD player.
4.2.5 Rearranging devices
1 In the list of devices, select the device you wish to rearrange.
2 Touch the button in the toolbar.
3 Use the arrows to move the device to the preferred position.
4 Touch the button in the toolbar when finished.
• The Home screen appears.
4.3 Setting up activities
Activities enable you to turn a number of devices on and off with a single
button press while all buttons needed for operating the devices immediately
become available.
English
Extra possibilities
1 In the list of devices, select the device you wish to copy the volume to.
2 Touch the button in the toolbar.
• The Edit device screen appears.
3 Touch the ‘Copy volume buttons’ button.
• The Copy volume screen appears.
4 Follow the on-screen instructions.
5 Touch the button in the toolbar when finished.
• The Home screen appears. The volume settings are now copied.
Notes
• When changing the volume settings, the default volume settings of the
remote control will be overwritten.
• Previously installed volume settings will be overwritten.
• Volume settings will be deleted when the volume source device is deleted.
• In ‘Add device’ mode, punched through volume buttons will not be available
for testing.
For example: touching the ‘Watch DVD’ activity can automatically turn on
your TV, DVD player and Home Theater System, select the correct AV
inputs on your TV and Home Theater System and displays the buttons that
can be used for operating these devices. Only the buttons that you typically
use when watching a DVD will be shown.
Start / Stop Activity macro
After selecting all desired devices for the activity, you can set up a start and
stop macro for the activity. In the start macro you define a series of button
presses that turn on your devices and select the correct input(s) when you
activate the activity. In the stop macro you define a series of button presses
that turn off your devices when you deactivate the activity.
Note that a short delay is required between each button command that is
sent, otherwise your devices might not respond properly.
9EN
Page 10

If you do not set up start / stop macros, all devices have to be turned on /
off manually one after another. This can be easily done by pressing the ‘On’
and ‘Off’ buttons in the Power screen that appears after selecting the activity.
• Touch the ‘Yes’ button when you are asked if you wish to set up macros
and follow the on-screen instructions.
Example Start Activity macro for ‘Watch DVD’:
1 Turn on TV.
- Standard delay of 0.25 seconds is automatically inserted.
2 Turn on DVD.
3 User-defined delay of 10 seconds to wait for the TV to turn on.
4 Select input 1 on TV.
Example Stop Activity macro for ‘Watch DVD’:
1 Turn off TV.
- Standard delay of 0.25 seconds is automatically inserted.
2 Turn off DVD.
Tips and tricks for setting up Macros
A/V input selection
On most remote controls A/V input selection is done by cycling through the
available input sources, using the A/V button and then selecting the desired
source (cyclic input selection).
Some remote controls, however, are equipped with physical buttons
(TV, DVD, etc.) that directly select a particular input source (discrete input
selection).
In order to make your macros more reliable use discrete input selection
where possible.
It might occur that input names used by the remote control differ from the
names used on your device (e.g. ‘Input 1’ could be ‘HDMI’, ‘Input 2’ could be
‘RGB’, etc.). Try all input commands and check whether your device reacts.
Maybe the original remote control does not have discrete commands, but
nevertheless the Prestigo suppor ts them.
Command sequences
Before you set up a macro, it is useful to try out the sequence of commands
you intend to program, using the original remote control.
You may encounter issues that can help you optimize the macro.
E.g. for most TVs the sequence 0 and 1 in a macro will perform better than
1 only. Other TVs might need -/-- 1 2 iso 1 2, etc.
Button press duration
For some devices it may be necessary to extend the duration of an IR
command (button press) for these devices need a long button press on the
original remote control in order to perform certain functions.
E.g. some Panasonic TVs only turn on after a long press on the Power (B)
button and some Philips DVD players only eject a disc after a long press on
the Stop button.
Delay time
Sometimes delay times between IR commands (button presses) are needed,
for the receiving device needs some time to react.
E.g. after turning on your TV, it may take a couple of seconds before you are
able to change inputs. Also when setting up favorites delays may be needed
since the receiving device(s) need(s) some time to react (for this refer to
chapter 4.5 ‘Setting up favorites’).
You can easlily try this out by pressing 1 and 2 very fast after each other on
the original remote control. If your TV switches to channel 12, no delay time
is needed. If your TV switches to channel 1 a delay time is needed.
English
Extra possibilities
10EN
Page 11

Testing
Wat
It is advised to test an activity macro twice, before actually using it.
If, in the second test, the macro behaves different than in the first test,
you may have included cyclic codes for A/V input selection or you did not
include enough delay times. In this case, adapt the cyclic codes to discrete
codes and / or include more (or longer) delay times.
1 In the Home screen, touch the
‘Activities’ tab.
• The available activities (if already
added) are displayed on the
screen.
2 Keep the HOME button pressed for
3 seconds.
Devices
Watch TV
Listen to music
Watch a movie
Play a game
Play a game
Home
Activities
ch a movie
• The Setup toolbar appears.
You can now add, delete, rename
and rearrange activities.
• Press the
button to exit Setup
mode at any time.
4.3.1 Adding activities
1 Touch the button in the toolbar.
• The Add activity screen appears.
2 Select an activity and follow the on-screen instructions.
• Touch the ‘Help’ button if you need extra information.
3 Touch the button in the toolbar when finished.
• The last used Activities screen appears.
The activity is now stored in the remote control memory.
4.3.2 Deleting activities
1 Select an activity and follow the on-screen instructions.
2 Touch the button in the toolbar.
• The Delete activity screen appears.
3 Touch the ‘Yes’ button to confirm.
• The Setup Activities screen appears.
4 Touch the button in the toolbar when finished.
• The last used Activities screen appears.
The activity is now deleted from the remote control memory.
4.3.3 Renaming activities
1 In the list of activities, select the activity you wish to rename.
2 Touch the button in the toolbar.
• The Edit activity screen appears.
3 Touch the ‘Rename’ button.
4 Use the keyboard to enter the new name.
5 Touch the ‘OK’ button when finished.
• The Setup screen appears.
6 Touch the button in the toolbar.
• The last used Activities screen appears.
The activity is now stored under the new name.
4.3.4 Editing Start / Stop Activity Macros
1 In the list of activities, select the activity for which you wish to edit the
macro(s).
2 Touch the button in the toolbar.
• The Edit Activity screen appears.
3 Touch the ‘Edit activity star t macro’ or the ‘Edit activity stop macro’
button.
• The Edit macro screen appears.
English
Extra possibilities
11EN
Page 12

4 Use the and buttons in the toolbar to add / delete macro
buttons. Use the
button press duration. This may be necessary to turn on devices that
require a long button press (for example some Panasonic TVs). In this
case you need to extend the duration of the button press that powers
on this device.
button in the toolbar to adapt delay times and
5 Follow the on-screen instructions.
• Select a button and touch the
macro.
button to rearrange the items in the
6 Touch the button in the toolbar when finished.
• The last used Activities screen appears.
The new settings for the macro(s) are now stored.
4.3.5 Rearranging activities
1 In the list of activities, touch the activity you wish to rearrange.
2 Touch the button.
3 Use the arrows to move the activity to the preferred position.
4 Touch the button in the toolbar when finished.
• The last used Activities screen appears.
4.4 Selecting activities
Start an activity
1 Make sure you have left Setup mode (the toolbar should not be visible).
2 Start an activity by touching its
button on the screen.
• Use the keypad(s) and appropriate
hard buttons on the remote control
to operate the activity devices.
• Touch the
the next keypad. With the
button you go back to the previous keypad.
button to go to
Devices
Watch TV
Listen to music
Watch a movie
Play a game
Home
Activities
• If a ‘Start Activity’ macro has been set up for the activity, the macro
will be executed when selecting the activity in the Home screen.
All activity devices will be turned on automatically and the required
inputs will be selected. For this refer to chapter 4.3 ‘Start / Stop
Activity macro’.
If a device did not turn on, touch the ‘On’ button under the device
name in the screen.
Stop an activity (with Activity Macro)
1 Press the Power (B) button.
• The Power screen appears.
The activity devices are displayed.
2 Touch the ‘Activity off ’ button or
Power
press the Power (B) button again
to stop the activity and turn off all
activity devices.
TV On
DVD On
Radio O
Stop an activity (without Activity Macro)
1 Press the Power (B) button.
• The Power screen appears.
The activity devices are displayed.
English
Extra possibilities
12EN
Page 13

2 Touch the Off buttons to turn off
ter
the devices.
4.5 Setting up favorites
Favorites are your favorite TV and radio channels that you can select and
watch / listen with a single button press.
1 In the Home screen, select a device or activity.
2 Touch the ‘Favorites’ tab.
• The available favorite channels
(if already added) are shown on
the display.
3 Keep the HOME button pressed
for 3 seconds.
• The Setup toolbar appears.
You can now add, delete,
rearrange and rename favorites.
• Press the
mode at any time.
button to exit Setup
Watch TV
Keypad
2
5
8
0
RTL
Favorites
3
6
9
en
Discovery Channel
1
4
7
4.5.1 Adding favorites
1 Touch the button in the toolbar.
2 Use the keyboard to enter the name of the favorite channel you wish to
add and touch the ‘OK’ button.
• The remote control now checks if the favorite channel name and
icon are available in the internal database.
3 Follow the on-screen instructions to select the channel name and assign
button presses to it.
• Touch the ‘Help’ button if you need extra information.
4 Touch the button in the toolbar when finished.
• The last used Favorites screen appears.
The channel is now added to the remote control memory.
4.5.2 Deleting favorites
1 In the list of favorites, select the favorite channel you wish to delete.
2 Touch the button in the toolbar.
• The Delete favorite screen appears.
3 Touch the ‘Yes’ button to confirm.
• The Setup screen appears.
4 Touch the button in the toolbar when finished.
• The last used Favorites screen appears.
The channel is now deleted from the remote control memory.
4.5.3 Renaming favorites
1 In the list of favorites, select the favorite channel you wish to rename.
2 Touch the button in the toolbar.
• The Edit favorite screen appears.
3 Touch the ‘Rename’ button.
4 Use the keyboard to enter the new name.
English
Extra possibilities
13EN
Page 14

5 Touch the ‘OK’ button when finished.
• The Setup screen appears.
6 Touch the button in the toolbar.
• The last used Favorites screen appears.
The favorite is now stored under the new name.
4.5.4 Changing the channel icon
1 In the list of favorites, select the favorite channel for which you wish to
change the icon.
2 Touch the button in the toolbar.
• The Edit favorite screen appears.
3 Touch the ‘Change channel icon’ button.
• The Setup Favorites screen appears.
4 Select the desired icon.
5 Touch the ‘OK’ button when finished.
• The Setup screen appears.
6 Touch the button in the toolbar.
• The last used Favorites screen appears.
The favorite channel is now stored with the new icon.
4.5.5 Editing a channel macro
1 In the list of favorites, navigate to the page which contains the favorite
for which you wish to change the channel number.
2 Keep the HOME button pressed for 3 seconds to enter Setup mode.
3 Select the favorite you wish to edit.
4 Touch the button in the toolbar.
• The Edit favorite screen appears.
5 Touch the ‘Edit channel macro’ button.
• The Edit macro screen appears.
• The ‘action’ list for this channel is displayed.
6 Use the button in the toolbar to delete the old digits.
7 Use the button in the toolbar to enter the new digits.
Follow the on-screen instructions.
8 Touch the button in the toolbar when finished.
• The Setup screen appears.The new macro is now stored and will
be sent out when selecting the favorite channel.
4.5.5.2 Optimizing the channel macro performance
You can tweak the channel macro for optimal performance by fine-tuning
the delay times and button press duration to allow faster channel switching.
Delay time and button press duration depend on the reaction time of the
device.
English
Extra possibilities
4.5.5.1 Changing the channel number
When a favorite channel is selected, the remote control sends outs a macro
to select the channel number. E.g. for channel 25 the remote control sends
out macro ‘2 - delay time - 5’. The delay time is the time after which the
next digit in the macro is sent.
If, for whatever reason, the cable company changes the channel position
(e.g. new position 127), you have to enter the new macro manually into the
remote control memory. E.g. ‘1 - delay time - 2 - delay time - 7’.
1 In the list of favorites, navigate to the page which contains the favorite
for which you wish to optimize macro performance.
2 Keep the HOME button pressed for 3 seconds to enter Setup mode.
3 Select the favorite you wish to edit.
4 Touch the button in the toolbar.
• The Edit favorite screen appears.
5 Touch the ‘Edit channel macro’ button.
• The Edit macro screen appears.
6 Touch the button in the toolbar.
14EN
Page 15

7 Use the ‘+’ and ‘–’ buttons to adjust delay times and channel press
duration. Follow the on-screen instructions.
8 Touch the button in the toolbar when finished.
• The Setup screen appears.The new delay times and / or button
press duration are now stored.
4.5.6 Rearranging favorites
1 In the list of favorites, touch the favorite channel you wish to rearrange.
2 Touch the button.
3 Use the arrows move the favoritel to the preferred position.
4 Touch the button when finished.
• The last used Favorites screen appears.
4.7 Reconfi guring buttons
The remote control is equipped with the most used functions for operating
your devices. However, if you miss certain functions from your original
remote control, you can add these functions via the Setup menu. In this
menu you can also delete, rename and rearrange button functions and
repair buttons that do not function properly.
• When a device is selected and its
keypad is displayed, keep the HOME
button pressed for 3 seconds.
• The Setup toolbar appears.
You can now add, delete, rename
and repair buttons.
Discovery Channel
RTL
English
Extra possibilities
4.6 Selecting favorites
1 Make sure you have left setup mode (the toolbar should not be visible).
2 In the list of favorites, touch the
favorite TV or radio channel you wish
to watch / listen to.
• The remote control sends out a signal and the TV / tuner / receiver
switches to the selected channel.
• Touch the
favorites.
and buttons to scroll through your
Watch TV
Keypad
CNN
MTV
Discovery Channel
RTL
Favorites
4.7.1 Adding buttons
1 Touch the button in the toolbar.
• A Functions List appears on the screen.
2 Touch the button function you wish to add.
3 Follow the on-screen instructions for testing the button.
4 Touch the ‘Yes’ button if the new button functions properly.
• The tool bar appears.
5 Touch the button in the toolbar when finished.
• The last used Setup screen appears.
The button is now added to the keypad.
15EN
Page 16

4.7.2 Editing activity buttons
Buttons within an activity can be edited afterwards.
For activities, refer to chapter 4.3 ‘Setting up activities’.
For deleting, rearranging, renaming, fixing and learning buttons,
refer to the relevant chapters in 4.7 ‘Reconfiguring buttons’.
For adding buttons to your activity pages:
1 When an activity is active and a keypad is displayed,
press the HOME button for 3 seconds.
• The Add button screen appears.
2 Touch the button in the toolbar.
3 Select the device from which you wish to add a button to the keypad.
Follow the on-screen instructions.
4 Touch the button in the toolbar when finished.
• The Setup screen appears.
The button is now added to the remote control memory.
4.7.2.1 Deleting buttons
1 In the Setup screen, select the button you wish to delete.
2 Touch the button in the toolbar.
3 Touch the ‘Yes’ button to confirm.
• The Setup toolbar appears.
4 Touch the button in the toolbar when finished.
• The Setup screen appears.
The button is now deleted from the remote control memory.
4.7.3 Renaming buttons
1 In the Setup screen, select the button you wish to rename.
2 Touch the button in the toolbar.
• The Edit button screen appears.
3 Touch the ‘Rename’ button.
4 Use the keyboard to enter the new name.
5 Touch the ‘OK’ button when finished.
• The Setup screen appears.
6 Touch the button in the toolbar when finished.
• The last used Setup screen appears.
The button is now stored under the new name.
4.7.4 Repair a button
If a device does not respond properly to a button command you can have
the remote control search for the button function in its database or learn
the function from the original remote control.
Note that buttons in an activity belong to a certain device. If a button is
repaired within an activity, it will also be repaired in the corresponding
device and vice versa.
4.7.4.1 Searching the database
1 Make sure the receiving device is able to respond. E.g. when you try to
fix the Play button for your DVD player, make sure to insert a DVD in
the DVD player otherwise the Play button is not able to function.
2 Touch the button in the toolbar.
• The Edit button screen appears.
3 Press / touch the (hard) button that does not work.
4 Touch the button in the toolbar.
5 Select ‘Repair this button’.
6 Select ‘Search’ in the screen that appears and follow the on-screen
instructions.
7 Touch the button in the toolbar when finished.
• The last used Setup screen appears. The button is now fixed.
English
Extra possibilities
16EN
Page 17

4.7.4.2 Learning button functions
25 - 50 mm
When a button could not be found in the remote control database you can
learn the remote control the function from the original remote control.
Note
Any function already stored under a button will be will be overwritten by the
new function.
Tips on learning button functions
• Some functions of some types of remote control might not be learned.
• Keep at least 1 metre (3.3 feet) away from incandescent or low-energy
lights when learning.
• Note that the IR receiver, used for learning button functions, is located
at the bottom of the remote control.
• You can store a function under any of the available buttons, except
under:
- the HOME button in the Devices screens:
- the HOME, POWER (B) and AV buttons in the Activities screens;
- any button in the Home screens.
1 Place both remote controls on a flat surface (like a coffee table)
and aim them in such way that the IR transmitter (at the top) of the
original remote control points at the IR receiver (at the bottom) of the
SRT9320.
2 Touch the button in the toolbar.
• The Edit button screen appears.
3 Press / touch the (hard) button that you wish to learn a new function.
4 Touch the button.
5 Select ‘Repair this button’.
6 Select ‘Learn’ in the screen that appears and follow the on-screen
instructions.
7 Touch the button when finished.
• The last used Setup screen appears.
The button has now successfully learned the new function.
If learning fails:
• Try keeping the button pressed for a longer or shorter period of time.
• Adjust the distance between the two remote controls (closer or further
away).
• If problems reoccur with the same button, check if the original remote
control is transmitting and operates the target device.
English
Extra possibilities
Keep about 25 - 50 mm in between the remote controls.
You may need to adjust the height of one of the remote controls to
achieve this.
17EN
Page 18

4.7.5 Rearranging buttons
DV
1 Select the button you wish to rearrange.
2 Touch the button.
3 Use the arrows to move the favorite to the preferred position.
4 Touch the button when finished.
• The last used Setup screen appears.
4.8 Reconfi guring the Power / AV buttons
In the Power / AV menu you can change the buttons that will be used for
turning on / off devices and the buttons that are used for input selection in
an activity without going back to the Home screen first.
Power
Enables you to turn devices on and off without going back to the Home
screen first. E.g. when you select an activity and one or more devices do
not turn on automatically, you can turn on the device(s) by pressing the
corresponding ‘On’ button(s) in the Power screen. When a device of a
previously selected activity does not turn off automatically when a new
activity is selected, you can turn off the device by pressing the corresponding
‘Off’ button in the Power screen.
1 Select an activity.
2 Press the Power (B) button.
• The Power screen appears.
3 Keep the HOME button pressed
for 3 seconds.
• The Setup screen appears.
D On
DVD O
4 Select the On or Off button you
wish to change.
5 Follow the on-screen instructions.
6 Touch the button in the toolbar
when finished.
• The Power screen appears. The new button is now added.
A/V
Enables you to select A/V inputs without going back to the Home screen
first. E.g. when you select an activity and one or more A/V inputs are
not automatically selected, you can select the input(s) by pressing the
corresponding A/V button(s) in the A/V screen.
1 Select an activity.
2 Press the AV button.
• The AV inputs screen appears.
3 Keep the HOME button pressed
for 3 seconds.
• The Setup screen appears.
Receiver AV
4 Select the AV button you wish to
change.
5 Follow the on-screen instructions.
English
Extra possibilities
18EN
Page 19

6 Touch the button in the toolbar when finished.
x
• The Power screen appears. The new button is now added.
4.9 Adjusting system settings
In the System settings menu you can adjust a number of default remote
control settings to suit your own personal preferences.
1 In the Home screen, touch
the ‘Devices’ tab.
• The available devices are shown
on the display.
2 Keep the HOME button pressed
for 3 seconds.
Home
Devices
Watch TV
Listen to music
DVD
Receiver
Activities
• The Setup screen appears.
3 Touch ‘My Prestigo’.
• The System Settings screen
appears.
- Language: selects English, French, Spanish,
German, Dutch, Portuguese, Italian or
Russian language.
- Brightness: sets the brightness of the display.
- Backlight time-out: sets the time for the display illumination to
turn off.
- Key backlight On / Off: turnes button backlighting On / Off.
- Full reset: restores the default factory settings. The
remote control needs to be installed again.
- Sound settings: sets the volume of the ‘click’ sound of the
buttons.
5 Follow the instructions in the corresponding System settings screen.
6 When finished, touch the button in the toolbar to go back to the
System Settings screen.
• Press the
button to exit Setup mode at any time.
4.10 Installing the Philips PrestigoSync software
If you wish to customize the channel icon library or upgrade the remote
control firmware, you can install the Philips PrestigoSync software on your
PC. When the application is started, it will infrom you when firmware
updates, new channel icons, etc. for your remote control are available.
The Philips PrestigoSync software is available on the CD-ROM supplied or
can be downloaded at www.philips.com/support
For this, refer to chapter 7 ‘Service and support’.
English
Extra possibilities
4 Touch the item for which you wish to adapt the settings.
Settings for the following items can be adjusted:
19EN
Page 20

1 Place the installation CD-ROM supplied in your PC’s/laptop’s CD-ROM/
DVD drive.
• The PrestigoSync Install Wizard
screen appears. If the screen
does not appear automatically,
open ‘My computer’ double click
on the CD-ROM, then double
click the ‘Setup.exe’ icon.
2 Click the ‘Next’ button and follow the on-screen instructions for
installing the PrestigoSync software.
4.10.1 Synchronizing data between the remote control and
your PC
1 Make sure both PC and remote control are turned on.
2 Connect the USB cable supplied
between the USB port of the
remote control and a USB port of
the PC.
• The PrestigoSync application will
now be launched automatically.
3 You can now modify the icon library
and synchronize back to the remote control by pressing the ‘Sync’
button.
• For more detailed information and support, refer to the PrestigoSync
user manual that can be found under ‘PrestigoSync Help’ or by pressing
F1 on your PC keyboard.
5 Frequently asked questions
In this chapter you find answers to the most frequently asked questions
about your universal remote control.
Setup
I cannot enter ‘Setup’ mode.
Battery level too low.
• Recharge the battery. For this refer to chapter 2.1 ‘Charging the battery’.
Battery lifetime came to an end (batter y cannot be recharged anymore).
• Replace the battery. For this refer to chapter 7.2.2 ‘Replacing the battery’.
How do I set up the remote control for combo devices (TV / VCR,
TV / DVD, DVD / VCR, etc)?
Some combo devices require you to set up two different source selection
buttons to control both parts of the combo device. For example, if you have
a TV / DVD combo, you might need to set up the remote control for both
TV and DVD to operate your TV / DVD combo.
In the Activity menu you can create an activity enabling you to operate both
combo devices. for this, refer to chapter 4.3 ‘Setting up activities’.
How do I set up the remote control for my Home Theater System?
You may have to set up the remote control for all devices in your Home
Theater System separately.
In the Activity menu you can create an activity enabling you to operate all
devices in the system. for this, refer to chapter 4.3 ‘Setting up activities’.
English
Frequently asked questions
20EN
Page 21

I cannot find the brand of my device.
You selected the wrong device name.
• Refer to the device name overview in chapter 2.2 ‘Setting up the
remote control’ to select the correct device name.
The brand of your device is not available in the remote control database.
• Copy the button functions from the original remote control.
For this, refer to chapter 4.7.4.2 ‘Learning button functions’.
Or:
• Download the new remote control firmware. For this, refer to chapter
4.10 ‘Installing the Philips PrestigoSync software’.
Operation
The remote control does not wake up anymore.
Battery level too low.
• Recharge the battery. For this refer to chapter 2.1 ‘Charging the battery’.
Battery lifetime came to an end (batter y cannot be recharged anymore).
• Replace the battery. For this refer to chapter 7.2.2 ‘Replacing the
battery’.
The device I want to operate does not respond at all / does not respond
to all of the button commands.
• Check if the buttons you press are available on the original remote
control of the device. If buttons are missing, they can be added.
For this, refer to chapter 4.7 ‘Reconfiguring buttons’ or chapter
4.7.1‘Adding buttons’.
Wrong device selected in the Home screen.
• Make sure the device you wish to operate is selected in the Home
screen. For this refer to chapter 3.1 ‘Selecting devices’.
Battery level too low.
• Recharge the battery. For this refer to chapter 2.1 ‘Charging the battery’.
When operating the device, point the remote control at the device and
make sure that there are no obstructions between the remote control
and the device.
Battery lifetime came to an end (batter y cannot be recharged anymore).
• Replace the battery. For this refer to chapter 7.2.2 ‘Replacing the
battery’.
Not all button functions are available in the remote control database.
• Try copying button functions from the original remote control.
For this, refer to chapter 4.7.4.2 ‘Learning button functions’.
Wrong IR code selected during setup.
• Set up the remote control again for the device.
Always test if the device responds, before leaving setup mode (
).
The volume and mute buttons are not working properly.
When setting up the remote control for a device (adding a device), the
remote control automatically copies the volume and mute buttons as
follows:
• If a device has its own volume buttons in the remote control library,
these volume buttons will be used.
• If a device has no volume buttons in the remote control library, the
volume buttons of another device will be used automatically.
• Try copying the volume and mute buttons from another device. For this,
refer to chapter 4.2.4 ‘Copy volume buttons from another device’.
The Teletext buttons do not work (Europe and Australia only).
• Find out whether your TV is equipped with Teletext.
• Try fixing the Teletext buttons. for this refer to chapter 4.7.4 ‘Repair a
button’.
English
Frequently asked questions
21EN
Page 22

One or more devices do not turn on / off automatically when I activate /
deactivate an activity.
Maybe the ‘On or Off’ signal was interrupted when the macro command
was sent.
• Select the device and press the Power (B) button.
Or:
• Touch the appropriate Power (B) button in the Power screen.
For this refer to chapter 4.8 ‘Reconfiguring the Power / AV buttons’.
6 Technical specifications
Power adapter: ...................................... 100 - 240VAC / 50-60Hz power adapter
5VDC, 2A output
7 Service and support
English
Maybe the ‘Select Input’ signal was interrupted when the macro command
was sent.
• Press the A/V button and select the device.
Or:
• Touch the appropriate AV button in the A/V screen.
For this refer to chapter 4.8 ‘Reconfiguring the Power / AV buttons’.
If the problem occurs frequently, try adding delays to the Star t Activity
macro. For this, refer to chapter 4.3 ‘Setting up activities’.
My touch screen often activates the wrong button
• The touch screen has to be calibrated. For this call our helpdesk.
Batteries
Will my settings be deleted when I replace the battery?
No. All user settings will be stored in the flash memory of the remote
control.
7.1 Need help?
First of all, read this user manual carefully.
When you have additional questions about setup, usage, spare parts,
warranty, etc. of the SRT9320, see www.philips.com/support
1 At ‘www.philips.com/support’, select your country / language.
2 Enter ‘SRT9320’ after ‘Model number or keyword’ and click ‘Search’.
3 Click ‘SRT9320’ under ‘Your results’.
• Under ‘Product support’ you will find information on setup and
usage.
• Under ‘Service’ you will find information on spare parts and
warranty.
Before calling our helpline, please first fill out the the equipment list at the
end of this user manual. Make sure to have the list and the SRT9320 at hand
when you call, so that our operators can help you determine whether the
SRT9320 is working properly.
You will find our contact details at the back of the Quick Start Guide
supplied.
The model number of your Philips universal remote control is SRT9320.
22EN
Service and support
Page 23

7.2 Information to the consumer
7.2.1 Disposal of your old product (Europe only)
Your product is designed and manufactured with high quality materials and
components, which can be recycled and reused.
When this crossed-out wheeled bin symbol is attached
to a product it means the product is covered by the
European Directive 2002/96/EC.
Please inform yourself about the local separate collection
system for electrical and electronic products.
Please act according to your local rules and do not dispose of your old
products with your normal household waste. The correct disposal of your
old product will help prevent potential negative consequences for the
environment and human health.
7.2.2 Replacing the battery
Battery safety instructions
1 Lithium polymer batteries have a soft aluminium foil package, therefore:
• Do not strike the batteries with any sharp edged par ts.
• Make sure the worktable is clean so that no sharp particles can
damage the foil.
• Do not bend or fold battery tabs, battery body or sealing edges.
2 Never dispose the cells in fire. This may cause the cells to explode.
3 Do not spill liquids such as water or coffee on the cells.
4 To prevent damage, use a tool to remove the batteries and do not pull
the wires.
To replace the battery:
1 Set the On / Off switch to the left (Off).
The On / Off switch is located at the rear of the remote control.
Use a pen or small screwdriver to
set the switch.
English
Service and support
When the battery cannot be recharged anymore it needs to be replaced.
A new battery (soft pack) can be ordered at www.philips.com/support
For this refer to chapter 7.1 ‘Need help?’
Warning
Replace the batteries only with batteries of the same type, otherwise the
warranty is no longer valid and hazardous situations could occur.
2 Remove the battery cover.
3 Disconnect and remove the old
battery as indicated.
23EN
Page 24

4 Insert and connect the new
battery as indicated.
Note
Your product contains a built-in rechargable battery covered by the European
Directive 2006/66/EC. To safeguard the functionality and safety of your product,
always bring your product to an official collection point or service centre where a
professional can remove / replace the battery.
Please inform yourself about the local rules on separate collection of batteries
because the correct disposal will help prevent negative consequences for the
environmental and human health.
Please do not dispose of your batteries with your normal household waste.
FCC Compliancy (USA, Canada only)
This device complies with Part 15 of the FCC Rules. Operation is subject to
the following two conditions:
• This device may not cause harmful interference.
• This device must accept any interference received, including interference
that may cause undesired operation.
Caution (USA, Canada only)
Notice for Canada / Remarque pour le Canada
This class B digital apparatus complies with Canadian ICES-003.
Cet appareil numérique de la Classe B est conforme à la norme NMB-003
du Canada.
English
Service and support
User changes or modifications not expressly approved by the party responsible
for compliance could void the user’s authority to operate the equipment.
24EN
Page 25

Equipment list
TV
Brand
Model number
Model number of original remote control
Set-Top Box (Satellite, Antenna, or Cable Receiver / Recorder)
Brand
Model number
Model number of original remote control
Receiver / Home Theater System
Brand
Model number
Model number of original remote control
DVD Player / Blu-Ray player
Brand
Model number
Model number of original remote control
Game Console
Brand
Model number
Model number of original remote control
Other equipment
Brand
Model number
Model number of original remote control
English
Equipment list
PC
Brand
Operating System
Service Pack number
25EN
Page 26

© 2008 Koninklijke Philips Electronics N.V.
All rights reserved. Reproduction in whole or in part is prohibited without the prior written consent of the copyright owner. The information presented in this document
does not form part of any quotation or contract, is believed to be accurate and reliable and may be changed without notice. No liability will be accepted by the publisher
for any consequence of its use. Publication there of does not convey nor imply any license under patent- or other industrial or intellectual property rights.
November 2008
www.philips.com N’MW/RR/RD/4908
 Loading...