

Page 1
PhotoFrame
Get started
Play
Setup
1
2
3
SPF5008
SPF5208
SPF5010
SPF5210
SPF7008
SPF7208
SPF7010
SPF7210
EN
Quick start guide
Page 2
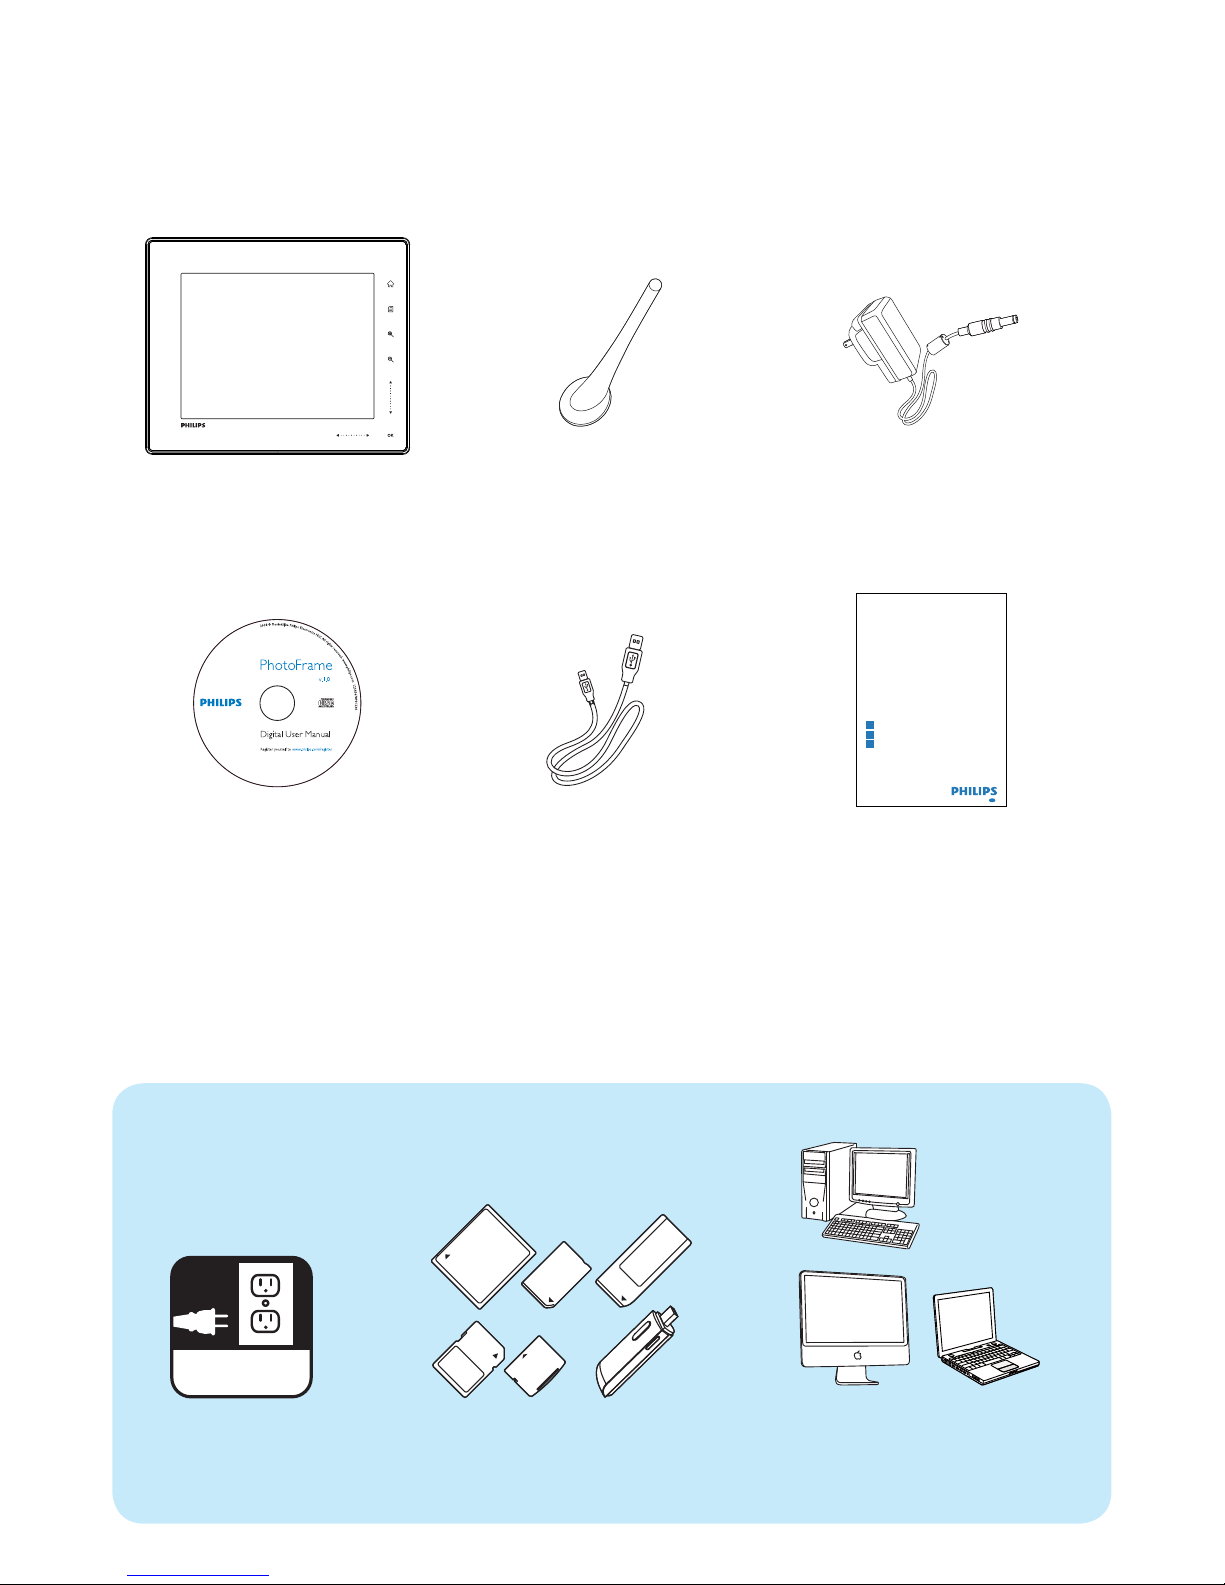
What you also need
What’s in the box
Philips Digital PhotoFrame
AC power socket
AC-DC power adaptor
AC
Memory card / USB
Stand
Computer
CD-ROM, including
• Digital User Manual
• (SPF7008/SPF7208/
SPF7010/SPF7210) Philips
PhotoFrame Manager
(Software and User
Manual)
USB cable
(not supplied to
SPF5010/SPF5210)
Quick Start Guide
1
2
3
Quick start guide
SPH8008
SPF2107
SPF2107
SPA2007
SPA2007
Connect
Install
Enjoy
Eng
PhotoFrame
Page 3
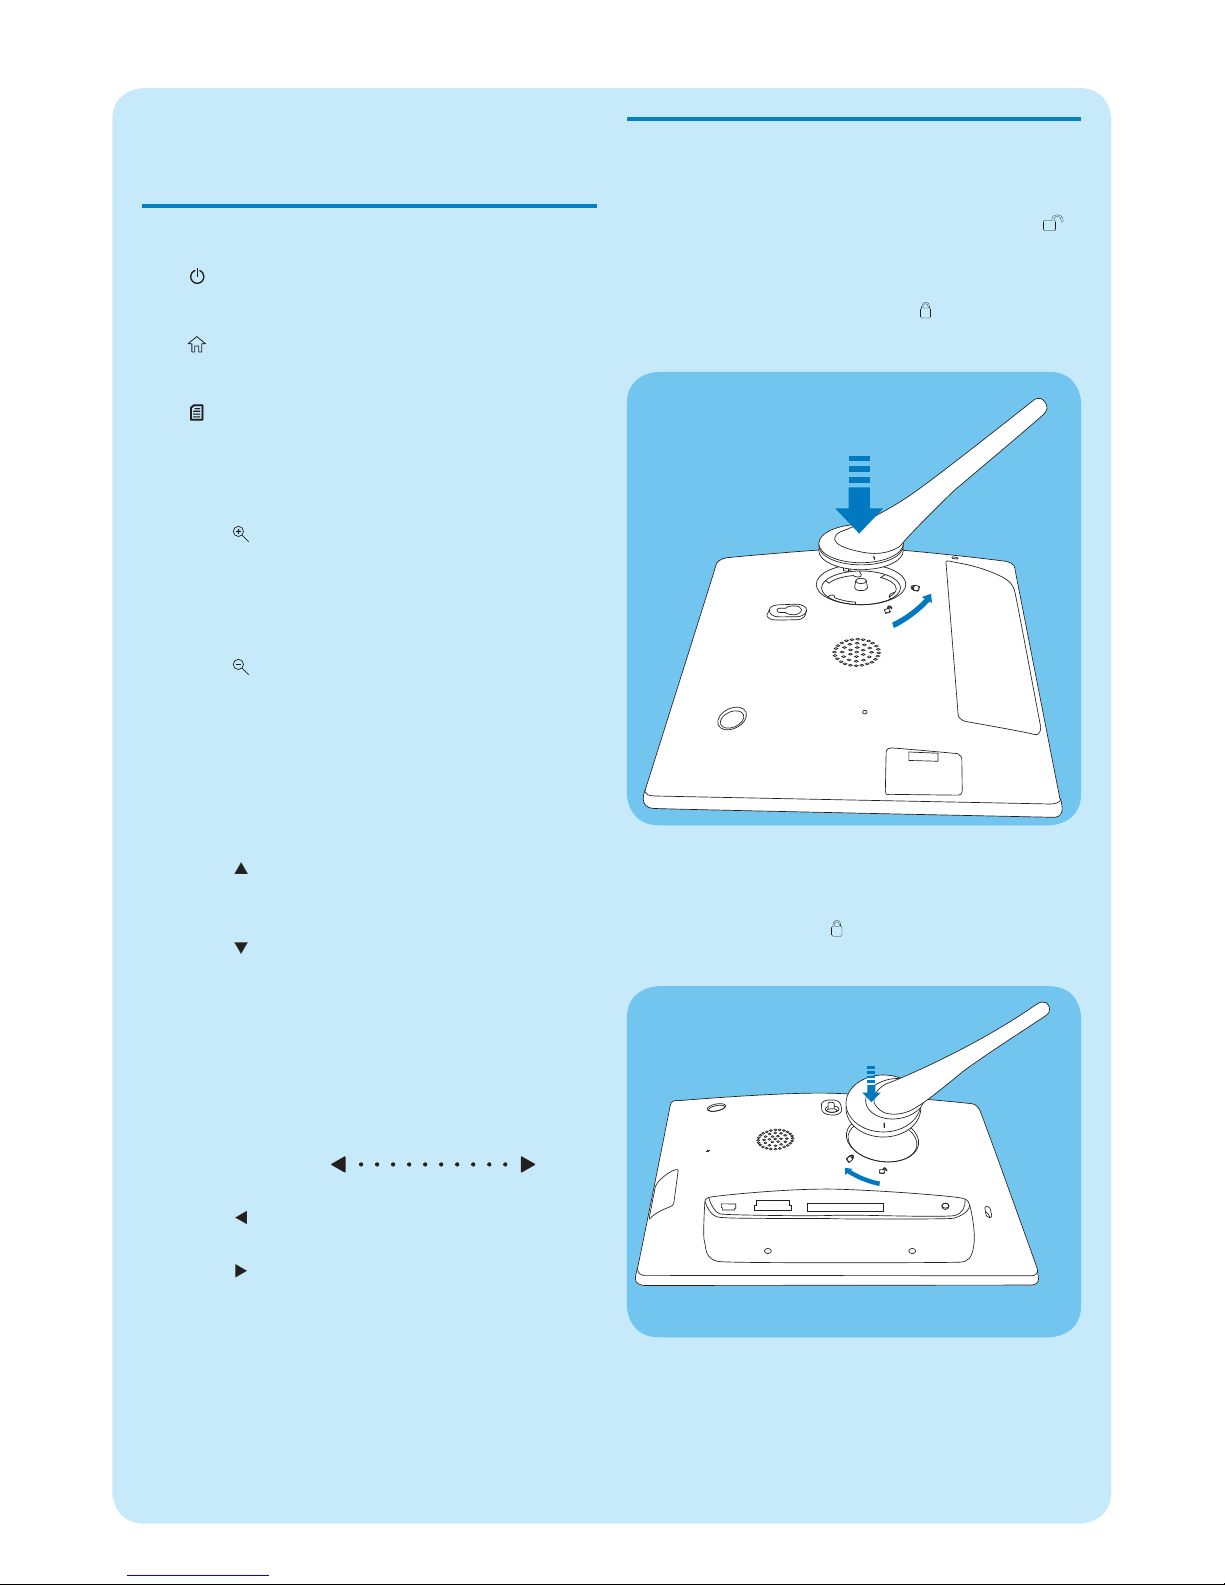
Install the stand
1 Insert the stand into the PhotoFrame.
2 Position the indication on the stand to the
position.
3 ( SPF5008/SPF5208 ) Turn the stand anti-
clockwise 45 degrees to the position and
lock it to the PhotoFrame fi rmly.
( • SPF5010/SPF5210/SPF7008/SPF7208/
SPF7010/SPF7210 ) Turn the stand clockwise
45 degrees to the position and lock it to the
PhotoFrame fi rmly.
1 Get started
Control buttons
a
Turn on/off the PhotoFrame•
b
Access the home screen•
c
Access the quick menu•
Access option menu•
d Zoom in/out
•
Zoom in an image
Switch modes: Album mode → thumbnail
mode → slideshow mode → zoom in 2
times → zoom in 4 times
•
Zoom out an image
Switch modes: Album mode ← thumbnail
mode ← slideshow mode ← zoom out 2
times ← zoom out 4 times
e Up/down slider
Scroll up/down at high speed
•
Select the upper item
Increase the volume
•
Select the item below
Decrease the volume
f OK
Display slideshow
•
Play/Pause slideshow/video•
Confi rm a selection•
g Left/right slider
Scroll left/right at high speed
•
Select the left item
•
Select the right item
Page 4
For other times when the on screen language is
selected :
1 Press and hold for more than 1 second.
The home screen is displayed. »
To turn off the PhotoFrame, press and hold
•
for about 2 seconds.
Transfer photos/music or video
fi les from an SD card
Caution
Do not remove a storage device from the PhotoFrame •
when fi les are transferring from or to the storage
device.
For details on other applicable storage device, refer to
the User Manual of your PhotoFrame in the supplied
CD-ROM.
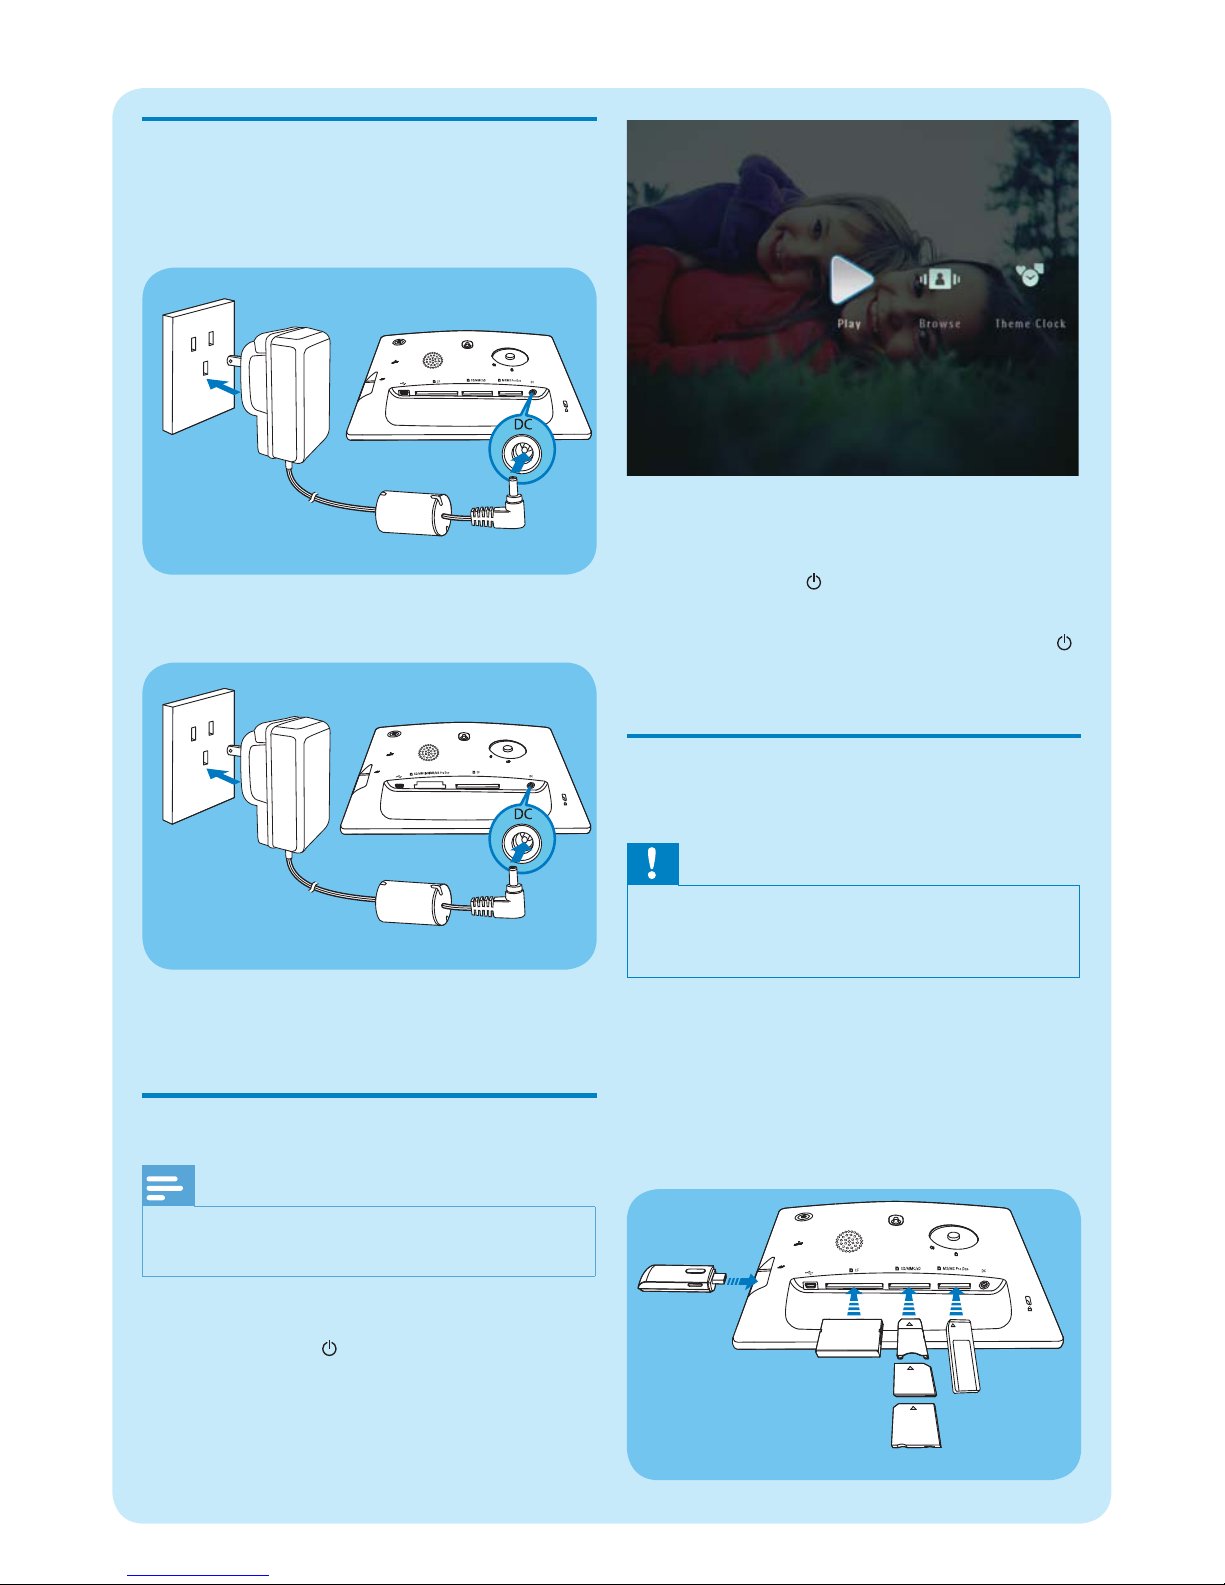
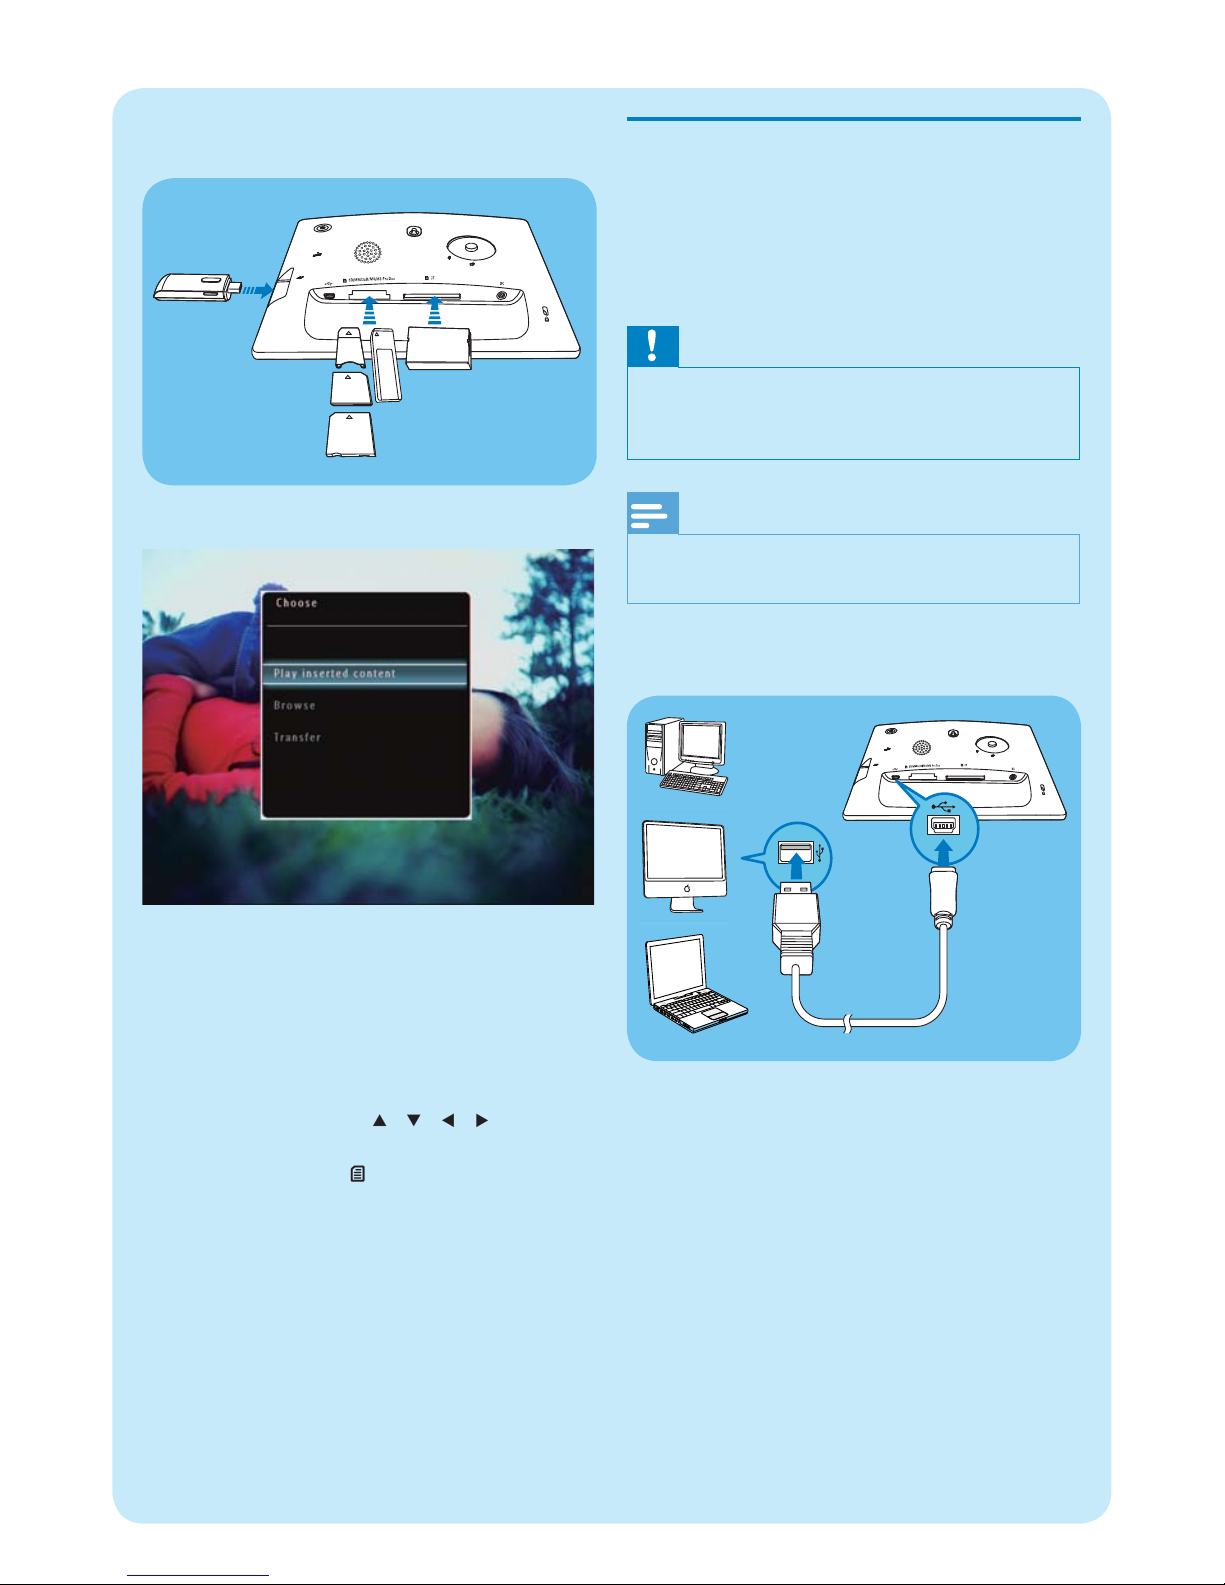
1 Insert an SD card or other storage device into
the PhotoFrame fi rmly.
SPF5008/SPF5208•
Connect power
1 Connect the supplied power cord to the DC
socket of the PhotoFrame.
• SPF5008/SPF5208
• SPF5010/SFP5210/SPF7008/SPF7208/
SPF7010/SPF7210
2 Connect the power cord to a power supply
socket.
Turn on/off the PhotoFrame
Note
You can only turn off the PhotoFrame after all copy •
and save actions are complete.
For the fi rst time use :
1 Press and hold for more than 1 second.
The language selection menu is displayed. »
2 Select a language, and then tap OK to confi rm.
The home screen is displayed. »
a
b
a
b
Page 5
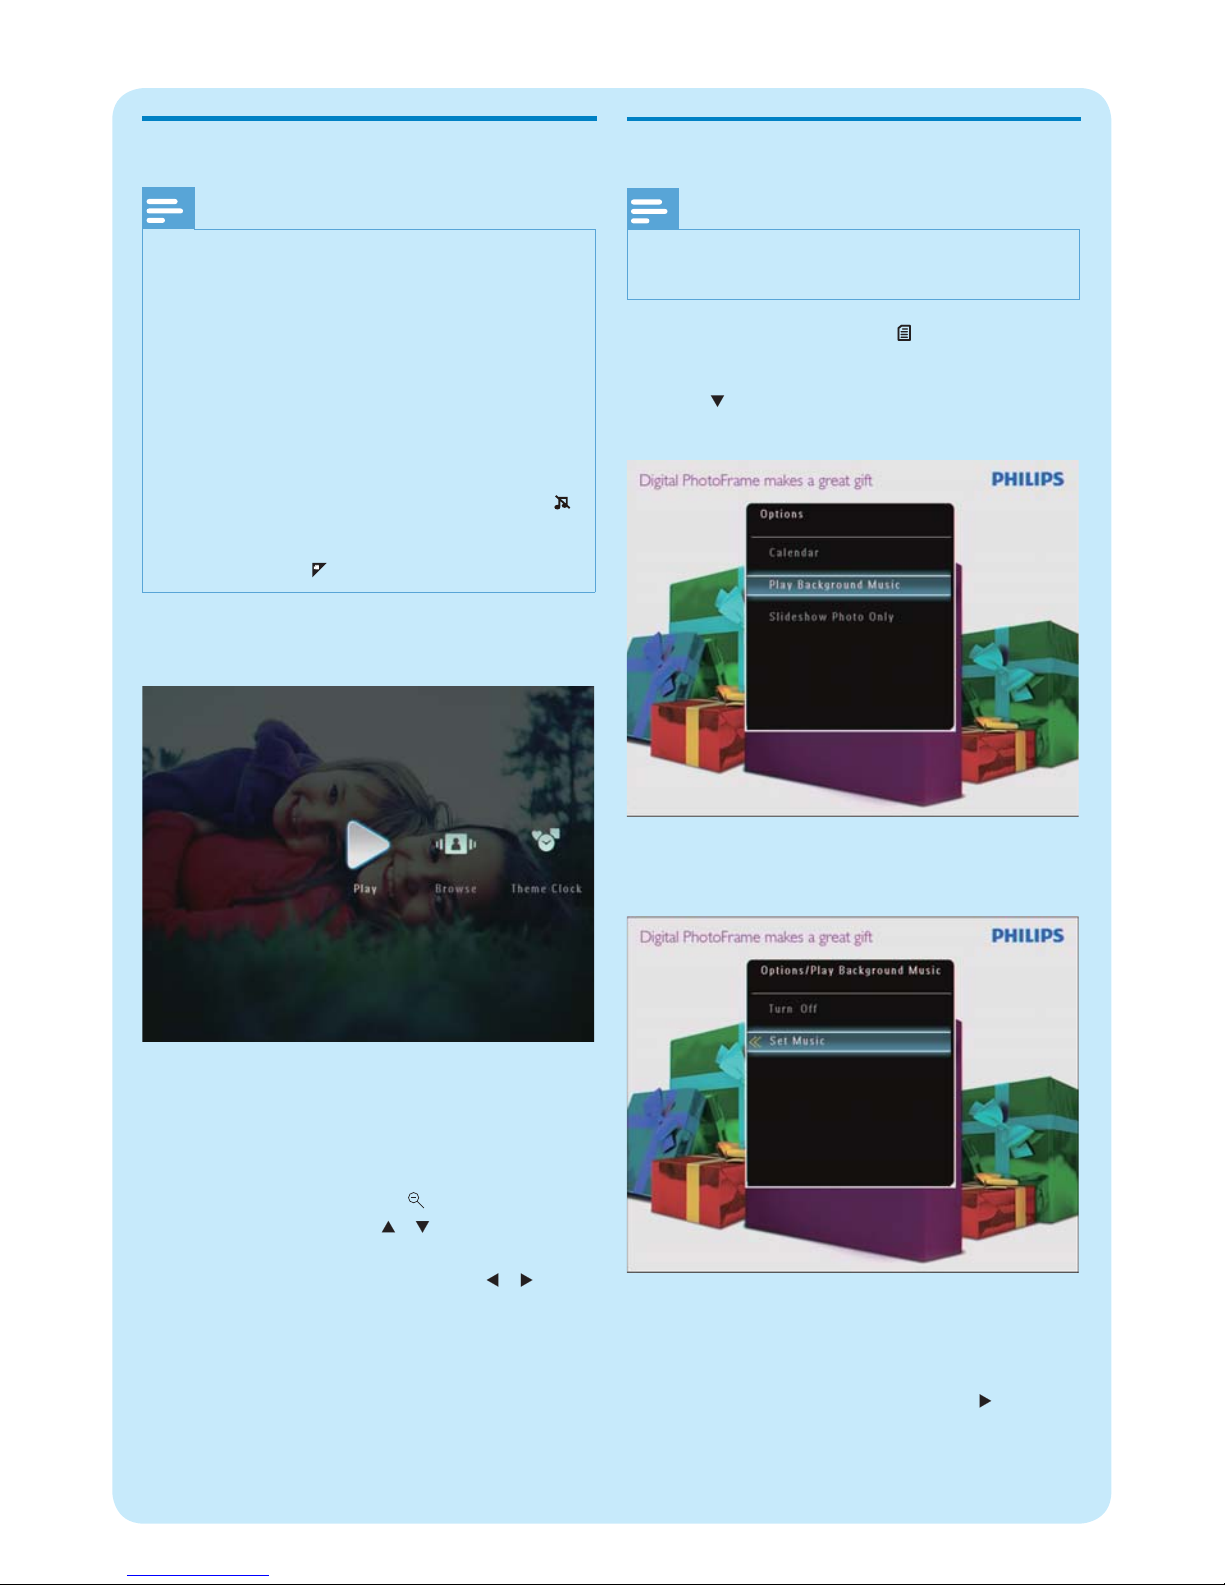
Transfer by Philips PhotoFrame
Manager (SPF7008/SPF7208/
SPF7010/SPF7210)
Recommended way for SPF7008/SPF7208/
SPF7010/SPF7210.
Caution
Do not disconnect the PhotoFrame from the PC when •
fi les are transferring between the PhotoFrame and
the PC.
Note
Ensure that Philips PhotoFrame Manager is installed •
on your PC.
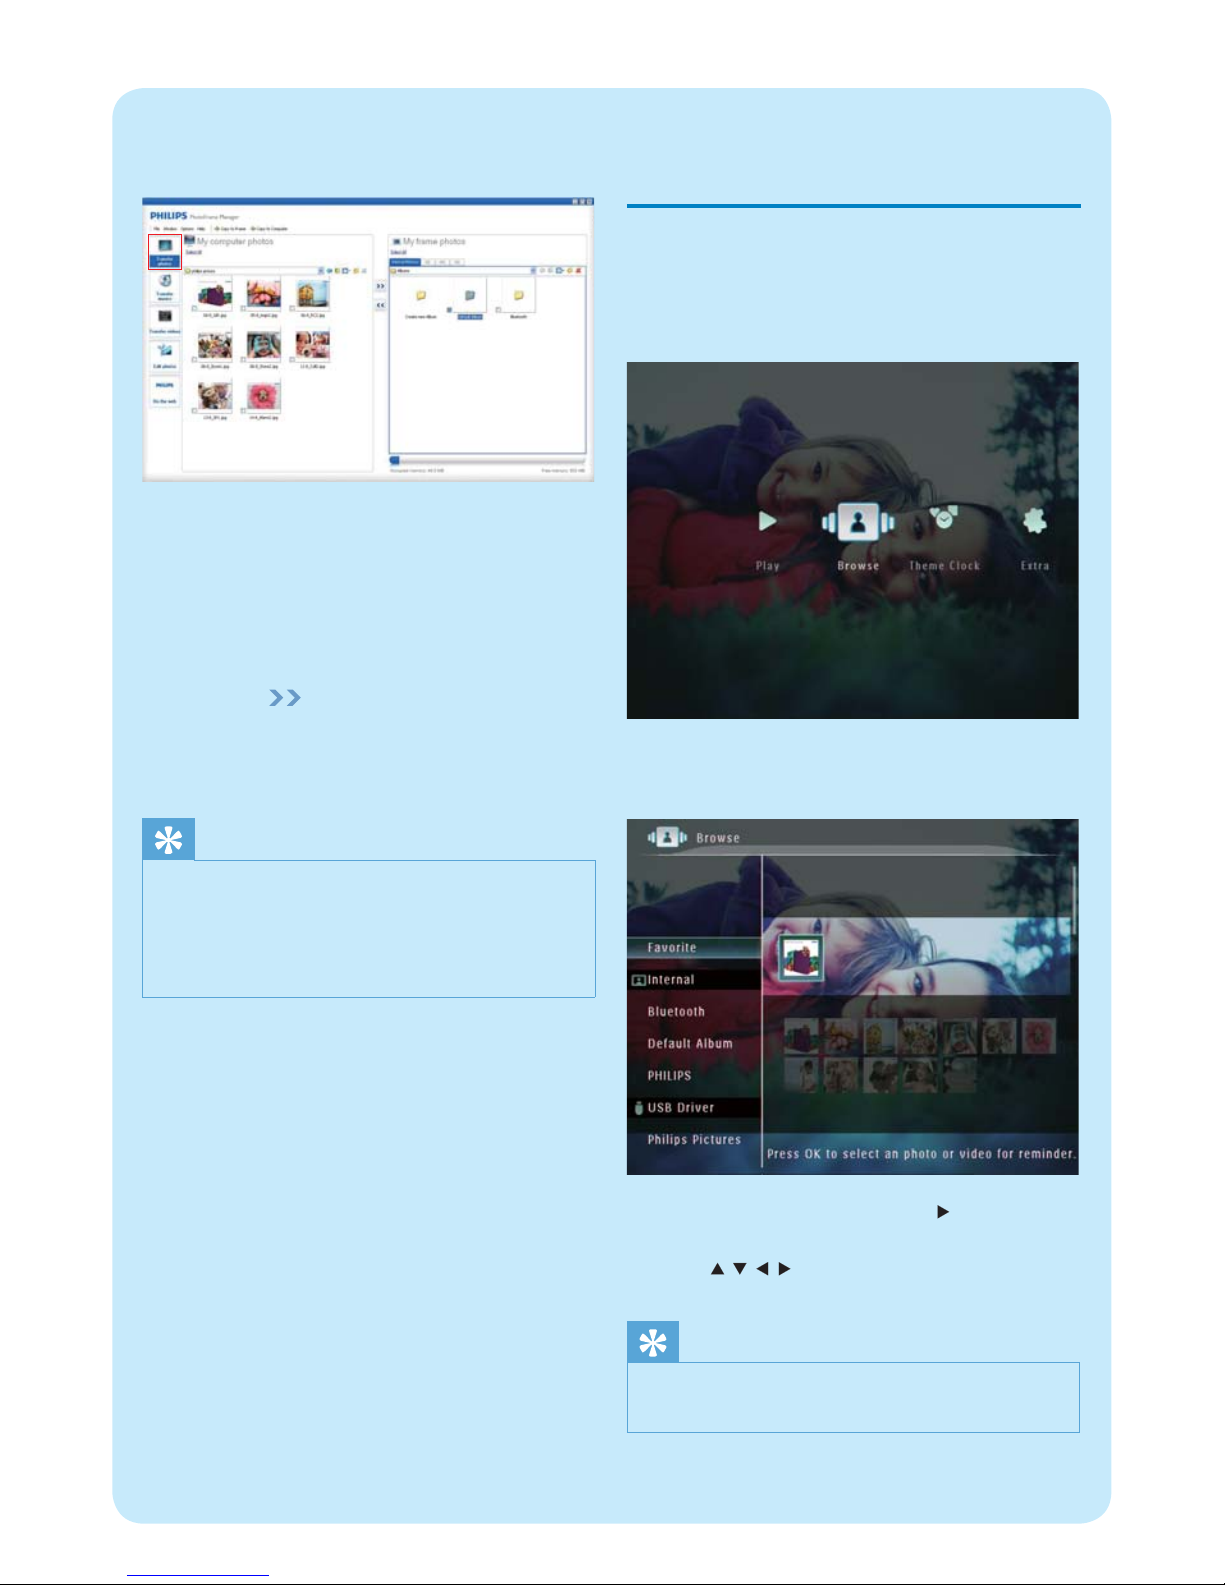
1 Connect the supplied USB cable to the
PhotoFrame and to a PC.
Philips PhotoFrame Manager star ts »
automatically.
SPF5010/SPF5210/SPF7008/SPF7208/•
SPF7010/SPF7210
An option menu is displayed.•
2 Select [Transfer] , and then tap OK to confi rm.
A confi rmation message is displayed. »
3 To select all photos or video/music fi les, select
[Yes] and then tap OK to confi rm.
To select some of photos or video/•
music fi les, select [No] and then tap OK
to confi rm. Tap / / / and OK
to select photos or video/music fi les,
and then tap to continue the transfer
operation.
4 Select a destination album on the PhotoFrame,
and then tap OK to confi rm.
Photos/video fi les are transferred to the »
PhotoFrame.
To remove a storage device, pull it out from
•
the PhotoFrame.
Page 6
2 Select [Transfer Photos] / [Tranfer Music] /
[Transfer Video].
3 Under [My frame photos] / [My frame music] /
[My frame videos], select a destination album/
folder.
4 Under [My computer photos] / [My computer
music] / [My computer videos], select photos
or video/music fi les.
5 Click the icon to start transfer.
6 After all transfer actions are complete,
disconnect the USB cable from the PC and the
PhotoFrame.
Tip
If Philips PhotoFrame Manager does not start •
automatically, you can double click its icon on the
desktop of your PC to start it.
You can also drag and drop photos from the
•
PhotoFrame to a PC .
2 Play
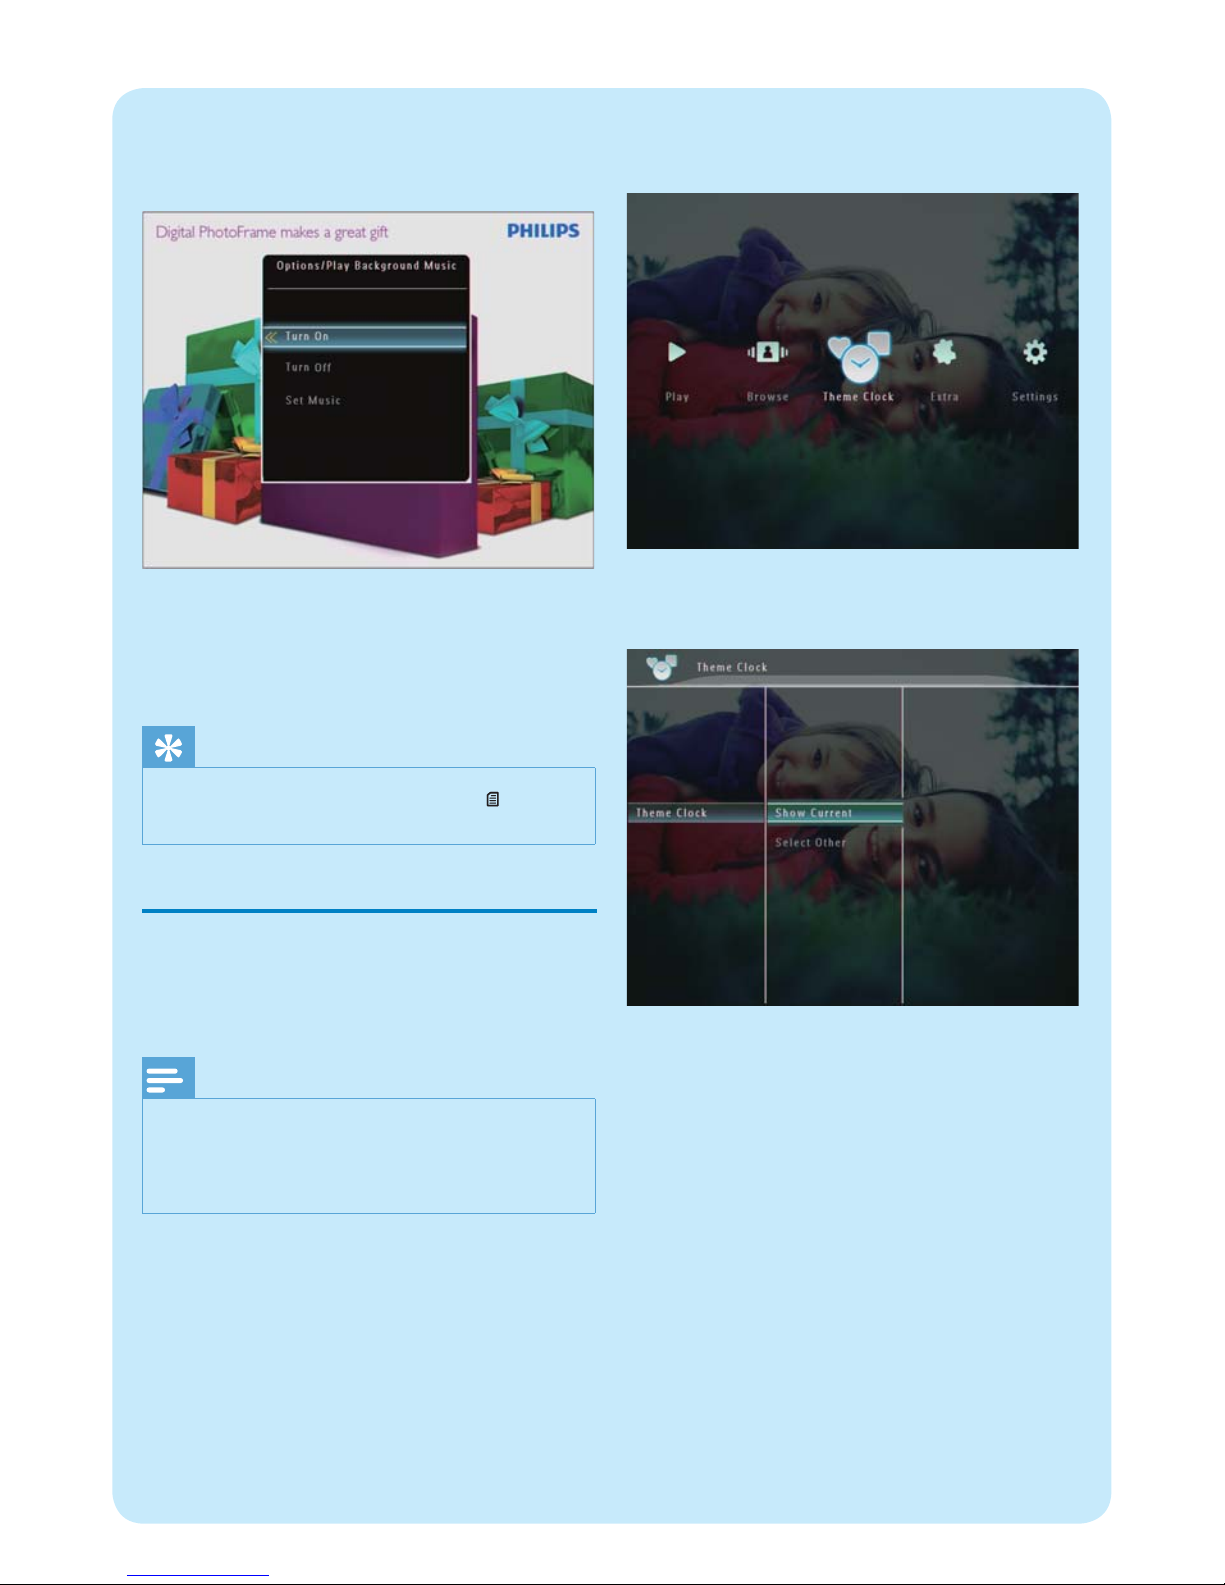
Browse photos/video fi les in
album mode
1 In the home screen, select [Browse] and then
tap OK to confi rm.
Photos/video fi les are displayed in album »
mode.
2 Select an album, and then tap to access the
album.
3 Tap / / / to browse photos/video fi les in
the album.
Tip
If you select an album and then tap • OK , photos/video
fi les in the selected album are displayed in slideshow.
Page 7
Play photos/video fi les
Note
With the PhotoFrame, you can play JPEG/progressive •
JPEG photos and most video clips of a digital still
camera in M-JPEG (*.avi/*.mov), MPEG-1 (*.mpg),
MPEG-4 (*.avi/*.mov/*.mp4), H.263 (*.avi/*.mov)
format. Some video clips might have compatibility
issues when played on your PhotoFrame. Before
playing, ensure that these video clips are compatible
with your PhotoFrame.
Some video clips in a format which is not compatible
•
well with your PhotoFrame, like *.3gp/*.3g2 and some
others, may be played with no audio output. When a
video clip is played with no audio output, the icon
is
displayed on the screen.
In album/thumbnail/fi lmstrip mode, a video fi le is
•
displayed with the icon on the left top corner.
1 In the home screen, select [Play] and then tap
OK to confi rm.
Photos/video fi les are displayed in slideshow »
mode.
During play :
To view the album in which the slideshow
•
image/video is saved, tap twice.
To adjust volume, tap • /
To pause/resume play, tap • OK .
To play the previous/nex t fi le, tap • / .
Play background music
Note
Only MP3 (MPEG Audio Layer III) music fi les can be •
played on the PhotoFrame.
1 During photo display, tap .
An option menu is displayed. »
2 Tap repeatedly to select [Play Background
Music] , and then tap OK to confi rm.
3 Select [Set Music] , and then tap OK to
confi rm.
4 Select a folder.
5 To play all music fi les in the folder, tap OK to
confi rm.
To play a single music fi le, tap • to access
the folder, select a music fi le, and then
tap OK to confi rm.
Page 8
If you have set music before :
In • [Play Background Music] menu, select
[Turn On] and then tap OK to confi rm.
Selected music fi les are played.•
To stop music play :
In • [Play Background Music] menu, select
[Turn Off] and then tap OK to confi rm.
Tip
After a music fi le is selected, you can tap • to access
the option menu to copy/delete it.
Display a theme clock (SPF5008/
SPF5208/SPF7008/SPF7208/
SPF7010/SPF7210)
Note
Ensure that you have installed a theme clock in your •
PhotoFrame.
You can also download latest theme clocks from www.
•
philips.com/suppor t, in the coming future.
1 In the home screen, select [Theme Clock] and
then tap OK to confi rm.
2 Select [Show Current] , and then tap OK to
confi rm.
To select and install another theme clock :
1 Download a theme clock and save it in an SD
card before you install it.
2 Insert the SD card into the PhotoFrame.
3 In [Theme Clock] menu, select [Select Other]
and then tap OK to confi rm.
4 Select a theme clock, and then tap OK to
confi rm.
After the theme clock is installed, it is »
displayed automatically.
Page 9
3 Setup
Bluetooth (SPF7008/SPF7208/
SPF7010/SPF7210)
Note
Bluetooth connectivity is available only on SPF7008/ •
SPF7208/SPF7010/SPF7210.
Set up Bluetooth connection
With the PhotoFrame, you can set up Bluetooth
connection with a device like a mobile phone. Once a
device is recognized, it is automatically accepted when
it tries to connect with the PhotoFrame.
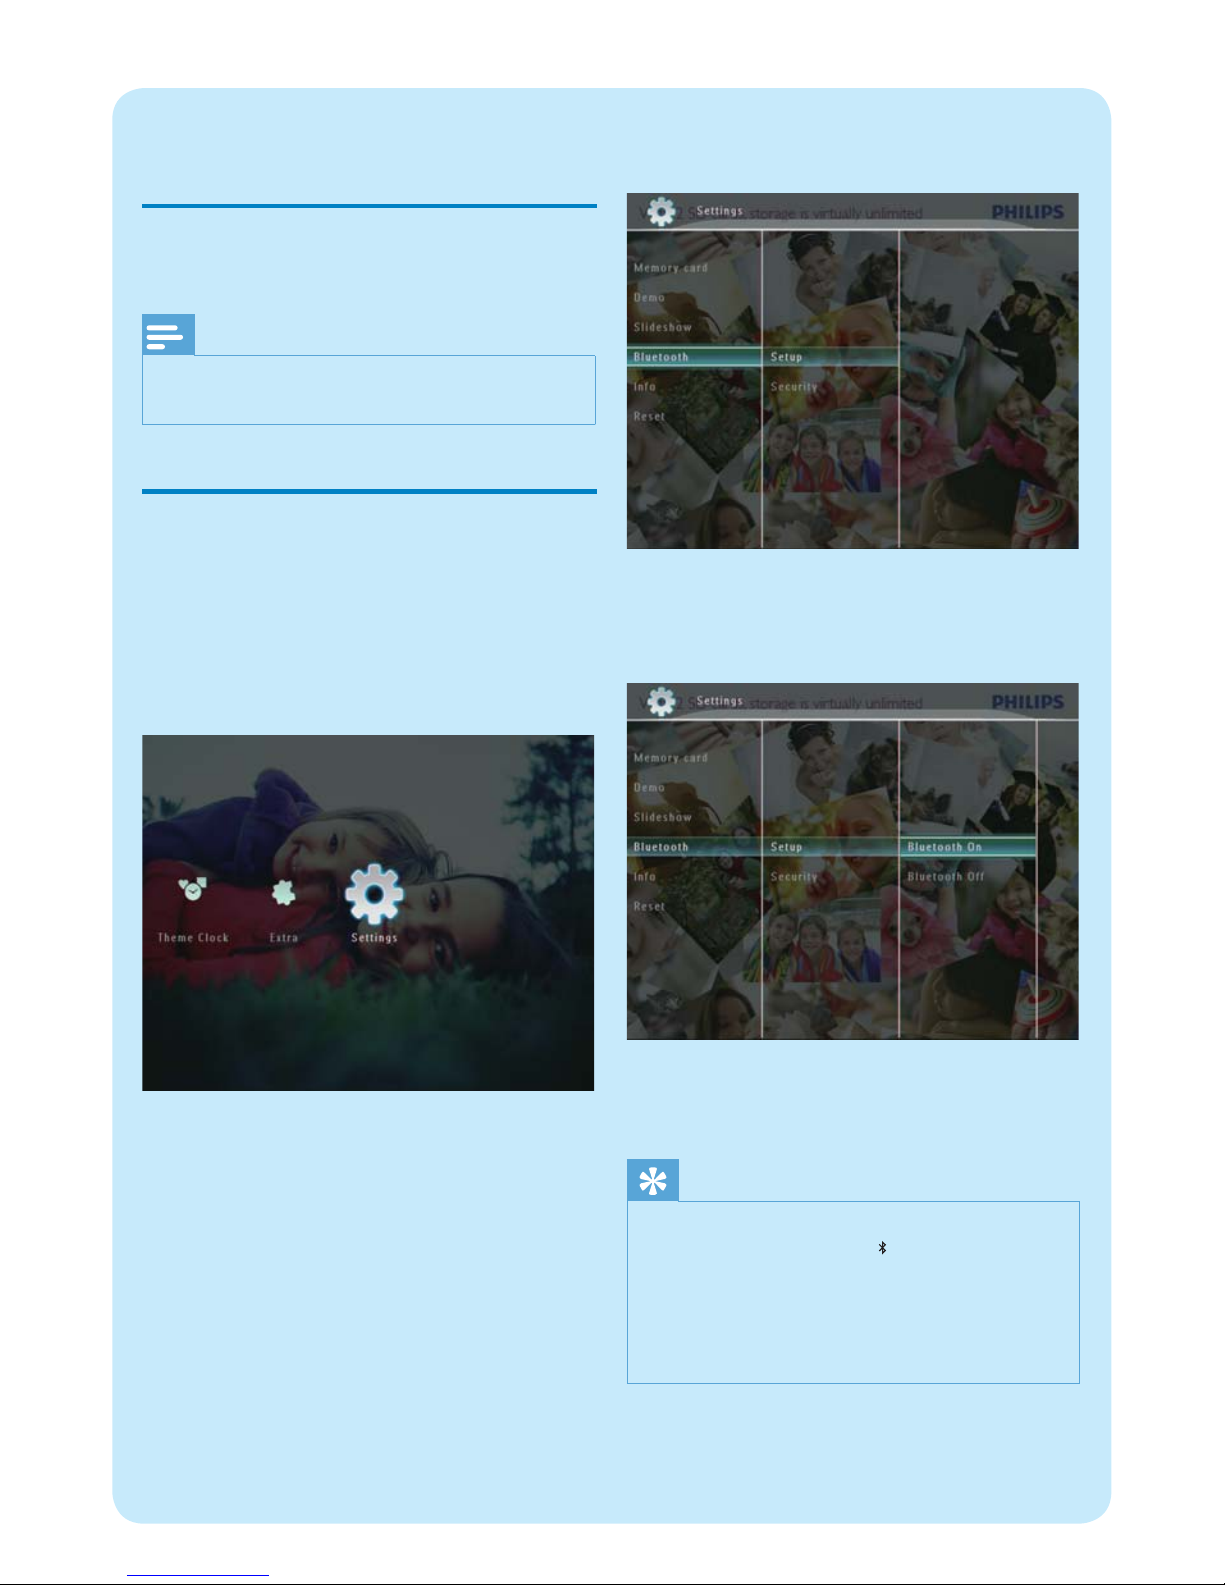
1 In the home screen, select [Settings] and then
tap OK to confi rm.
2 Select [Bluetooth] , and then tap OK to
confi rm.
3 Select [Setup] , and then tap OK to confi rm.
4 Select [Bluetooth On] , and then tap OK to
confi rm.
To set off • Bluetooth connection, select
[Bluetooth Off] and then tap OK to
confi rm.
Tip
If • Bluetooth connection on your PhotoFrame is
enabled, the Bluetooth icon
is displayed on the topright corner of the screen.
Photos obtained via
• Bluetooth connection are saved
in the Bluetooth album. You can access or manage the
Bluetooth album the same way you access or manage
other albums on the PhotoFrame.
Page 10
Set Bluetooth pin code
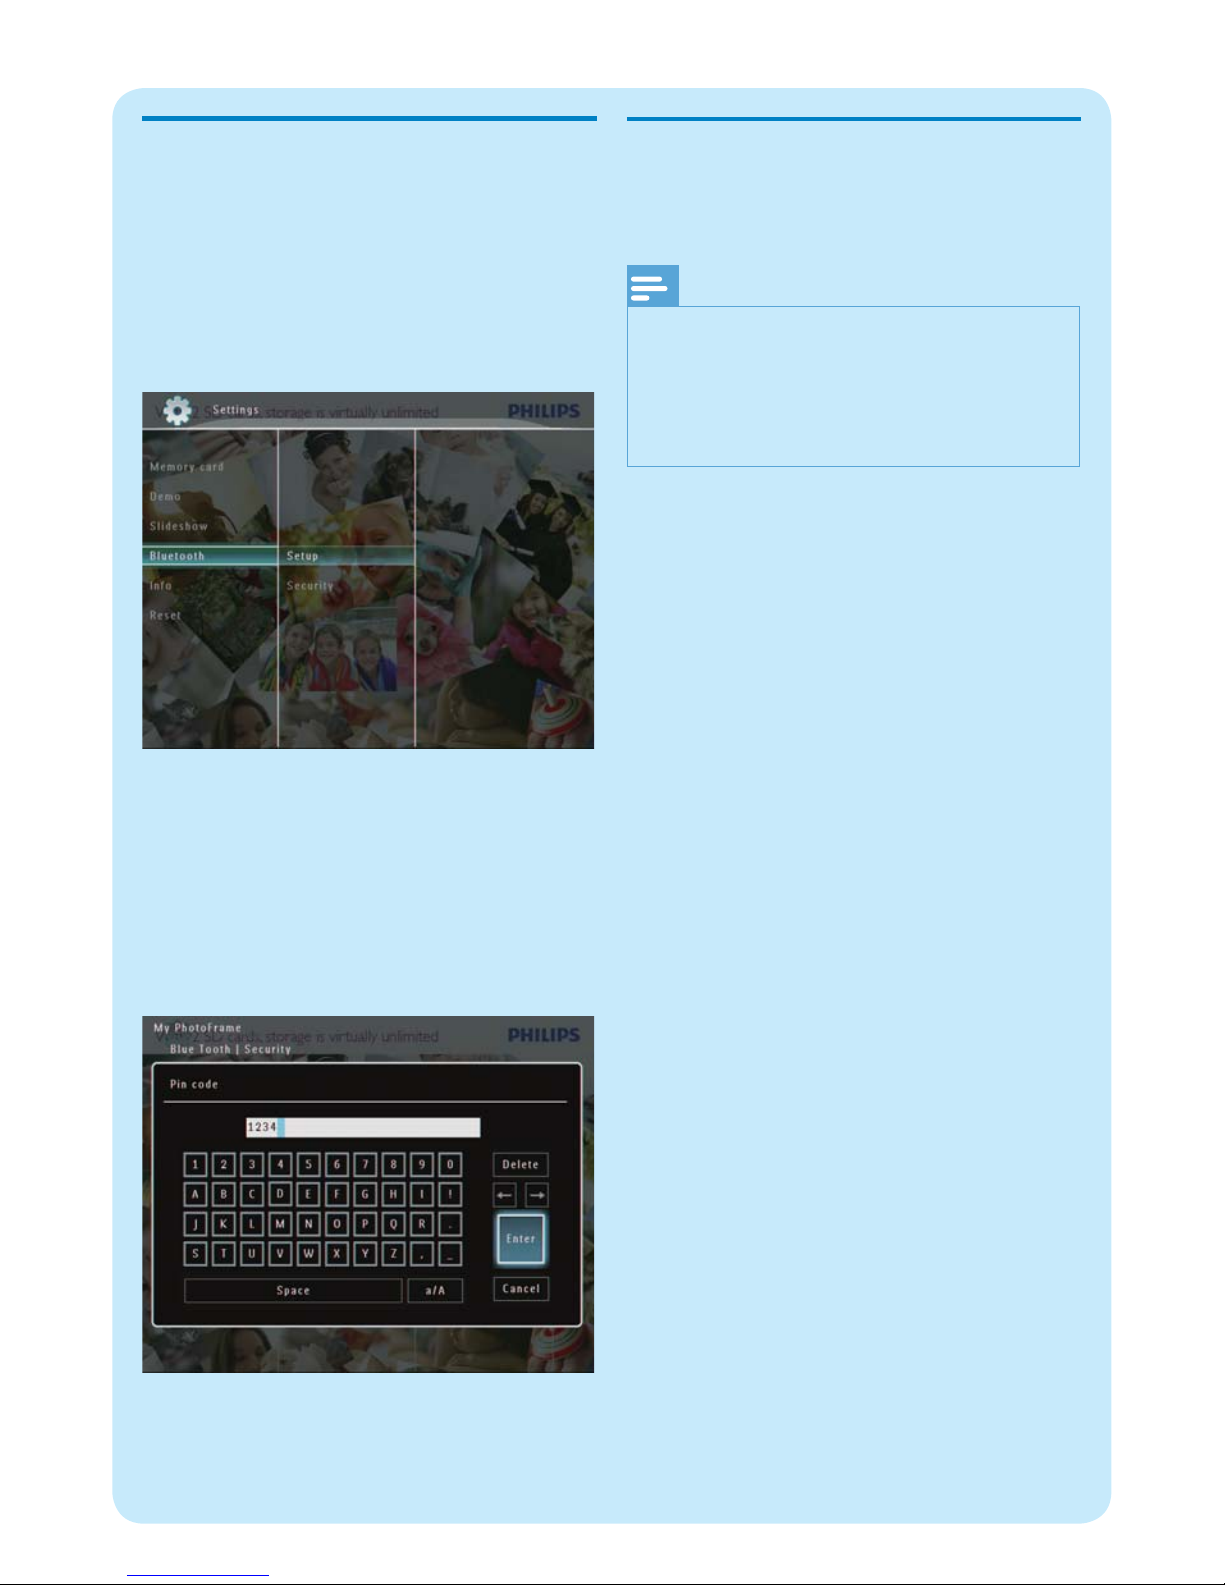
To keep security, you can set a pin code (from 1 to
16 digits) on the PhotoFrame. The default pin code
is 0000.
1 In the home screen, select [Settings] and then
tap OK to confi rm.
2 Select [Bluetooth] , and then tap OK to
confi rm.
3 Select [Security] , and then tap OK to confi rm.
4 Select [Pin Code] , and then tap OK to
confi rm.
A key pad is displayed. »
5 Select a number, and then tap OK to confi rm.
6 Repeat Step 5 until the pin code is complete.
7 Select [Enter] , and then tap OK to confi rm.
8 To set the pin code on, select [Pin Code On]
and then tap OK to confi rm.
To set the pin code off, select
• [Pin Code
Off] and then tap OK to confi rm.
Send photos via Bluetooth
connection by your mobile
phone
Note
Ensure that • Bluetooth connection on your mobile
phone is enabled.
Ensure that
• Bluetooth connection on your
PhotoFrame is enabled.
Detailed operation procedure may vary based on
•
different mobile phones.
On your mobile phone:
1 Select photos to be sent to the PhotoFrame.
2 Select [Send] > [Bluetooth], and then confi rm
the selection.
Your Philips PhotoFrame is searched. »
3 If a pin code is required, enter the pin code
(0000 by default ) of the PhotoFrame.
4 Select [Send], and then confi rm the selection.
Selected photos are sent to and saved in »
the Bluetooth album on the PhotoFrame.
Page 11

Welcome to Philips!
Register your product and get support at
www.philips.com/welcome
Is the LCD screen touch-enabled?
The LCD screen is not touch-enabled. After
you turn on the PhotoFrame, you can use the
touch boarder on the front panel to control the
PhotoFrame.
Can I use the PhotoFrame to delete photos on a
memory card?
Yes, it supports operations to delete photos on
external devices such as a memory card. Ensure that
you enable the delete function on a memory card
available on the PhotoFrame.
Why does my PhotoFrame not show some of my
photos?
The PhotoFrame plays only JPEG photos
•
(maximum: 8000 x 6000 pixel resolution) and
progressive JPEG photos (maximum: 1024 x
768 pixel resolution).
Ensure that these photos are not damaged.•
Why does my PhotoFrame not show some of my
video fi les?
The PhotoFrame plays most video clips of a •
digital still camera in M-JPEG (*.avi/*.mov),
MPEG-1 (*.mpg), MPEG-4 (*.avi/*.mov/*.mp4),
H.263 (*.avi/*.mov) format. Some video clips
might have compatibility issues when played
on your PhotoFrame. Before playing, ensure
that these video clips are compatible with your
PhotoFrame.
Ensure that the size of the video fi les are •
applicable to your PhotoFrame (For details,
see “Product information” in the User Manual).
Ensure that the video fi les are not damaged.•
Why cannot my PhotoFrame show video fi les even I
could see them in [Browse] mode, and I played them
before?
Ensure that [Slideshow Photo Only] is not enabled.
To play video in slideshow mode:
1. In slideshow mode, tap .
2. In the displayed option menu, select [Slideshow
Photo Only] .
3. In the displayed message, select [No] and then
tap OK to confi rm.
Now you can play these video fi les in slideshow.
Frequently asked questions
Why does my PhotoFrame not show some of my
music fi les?
The PhotoFrame only suppor ts MP3 (MPEG Audio
Layer III) music fi les. Ensure that these MP3 (MPEG
Audio Layer III) music fi les are not damaged.
Why does the PhotoFrame not go into auto-off
status after I set it?
Ensure that you set the current time, auto-
•
off time, and auto-on time correctly. The
PhotoFrame automatically turns off its display
exactly at the auto-off time. If the time has
already passed for the day, it starts to enter
auto-off status at the specifi ed time from the
next day.
Ensure that you adjust brightness sensor •
correctly. If the auto-on level is too close to
the auto-off level, this function cannot take
effect.
Can I use the PhotoFrame during its display auto-off
periods?
Yes.
When the PhotoFrame is in standby (sleep) mode,
you can press to wake up the PhotoFrame.
The PhotoFrame is ON but the PhotoFrame does
not respond anymore. What can I do?
Ensure that the PhotoFrame is turned on. Then, use
a pin to trigger the RESET button located on the
back to restore the system.
Page 12

© Royal Philips Electronics N.V. 2009
All rights reserved.
Specifi cations are subject to change without notice.
Trademarks are the property of Koninklijke Philips
Electronics N.V. or their respective owners.
QSG_V2.1 Printed in China
 Loading...