

Page 1

Register your product and get support at
www.philips.com/welcome
PhotoFrame
English
© 2010 Koninklijke Philips Electronics N.V.
All rights reserved.
Specifi cations are subject to change without notice.
Trademarks are the proper ty of Koninklijke Philips
Electronics N.V. or their respective owners.
EN Quick start guide
DE Schnellstartanleitung
ES Guía de confi guración rápida
FR Guide de mise en route
IT Guida di avvio rapido
NL Snelstartgids
RU Краткое руководство
SPF4308
SPF4328
SPF4508
SPF4528
Know these buttons
Control Buttons Functions
MENU - Press to enter/exit a menu
OK (Joystick) - Press to play, pause, or resume slideshow
- Press to turn on the PhotoFrame
- Press and hold to turn off the PhotoFrame
- Press to switch mode: slideshow/clock/calendar
- Press to go back step by step
- Press and hold to access the home screen
- Press to confi rm a selection
- Move up/down/right/left to select the upper/lower/right/left
option
Know these keypad icons
/ ABC
aA Switch between upper and lower case
Input in English
Input in suppor ted European languages
Input in Simplifi ed Chinese
Input in Russian
Switch to select symbols, punctuations, alphabet or numbers
Enter a blank space
Enter a line break
Transfer/Play media via a storage device
Media type supported:
Photo (JPEG)•
Video clip (SPF4508/SPF4528)•
Background music (SPF4508/SPF4528)•
Storage device supported:
Secure Digital (SD)•
Secure Digital High Capacity (SDHC)•
Multimedia Card (MMC)•
Memor y Stick (MS)•
Memory Stick Pro (MS Pro)•
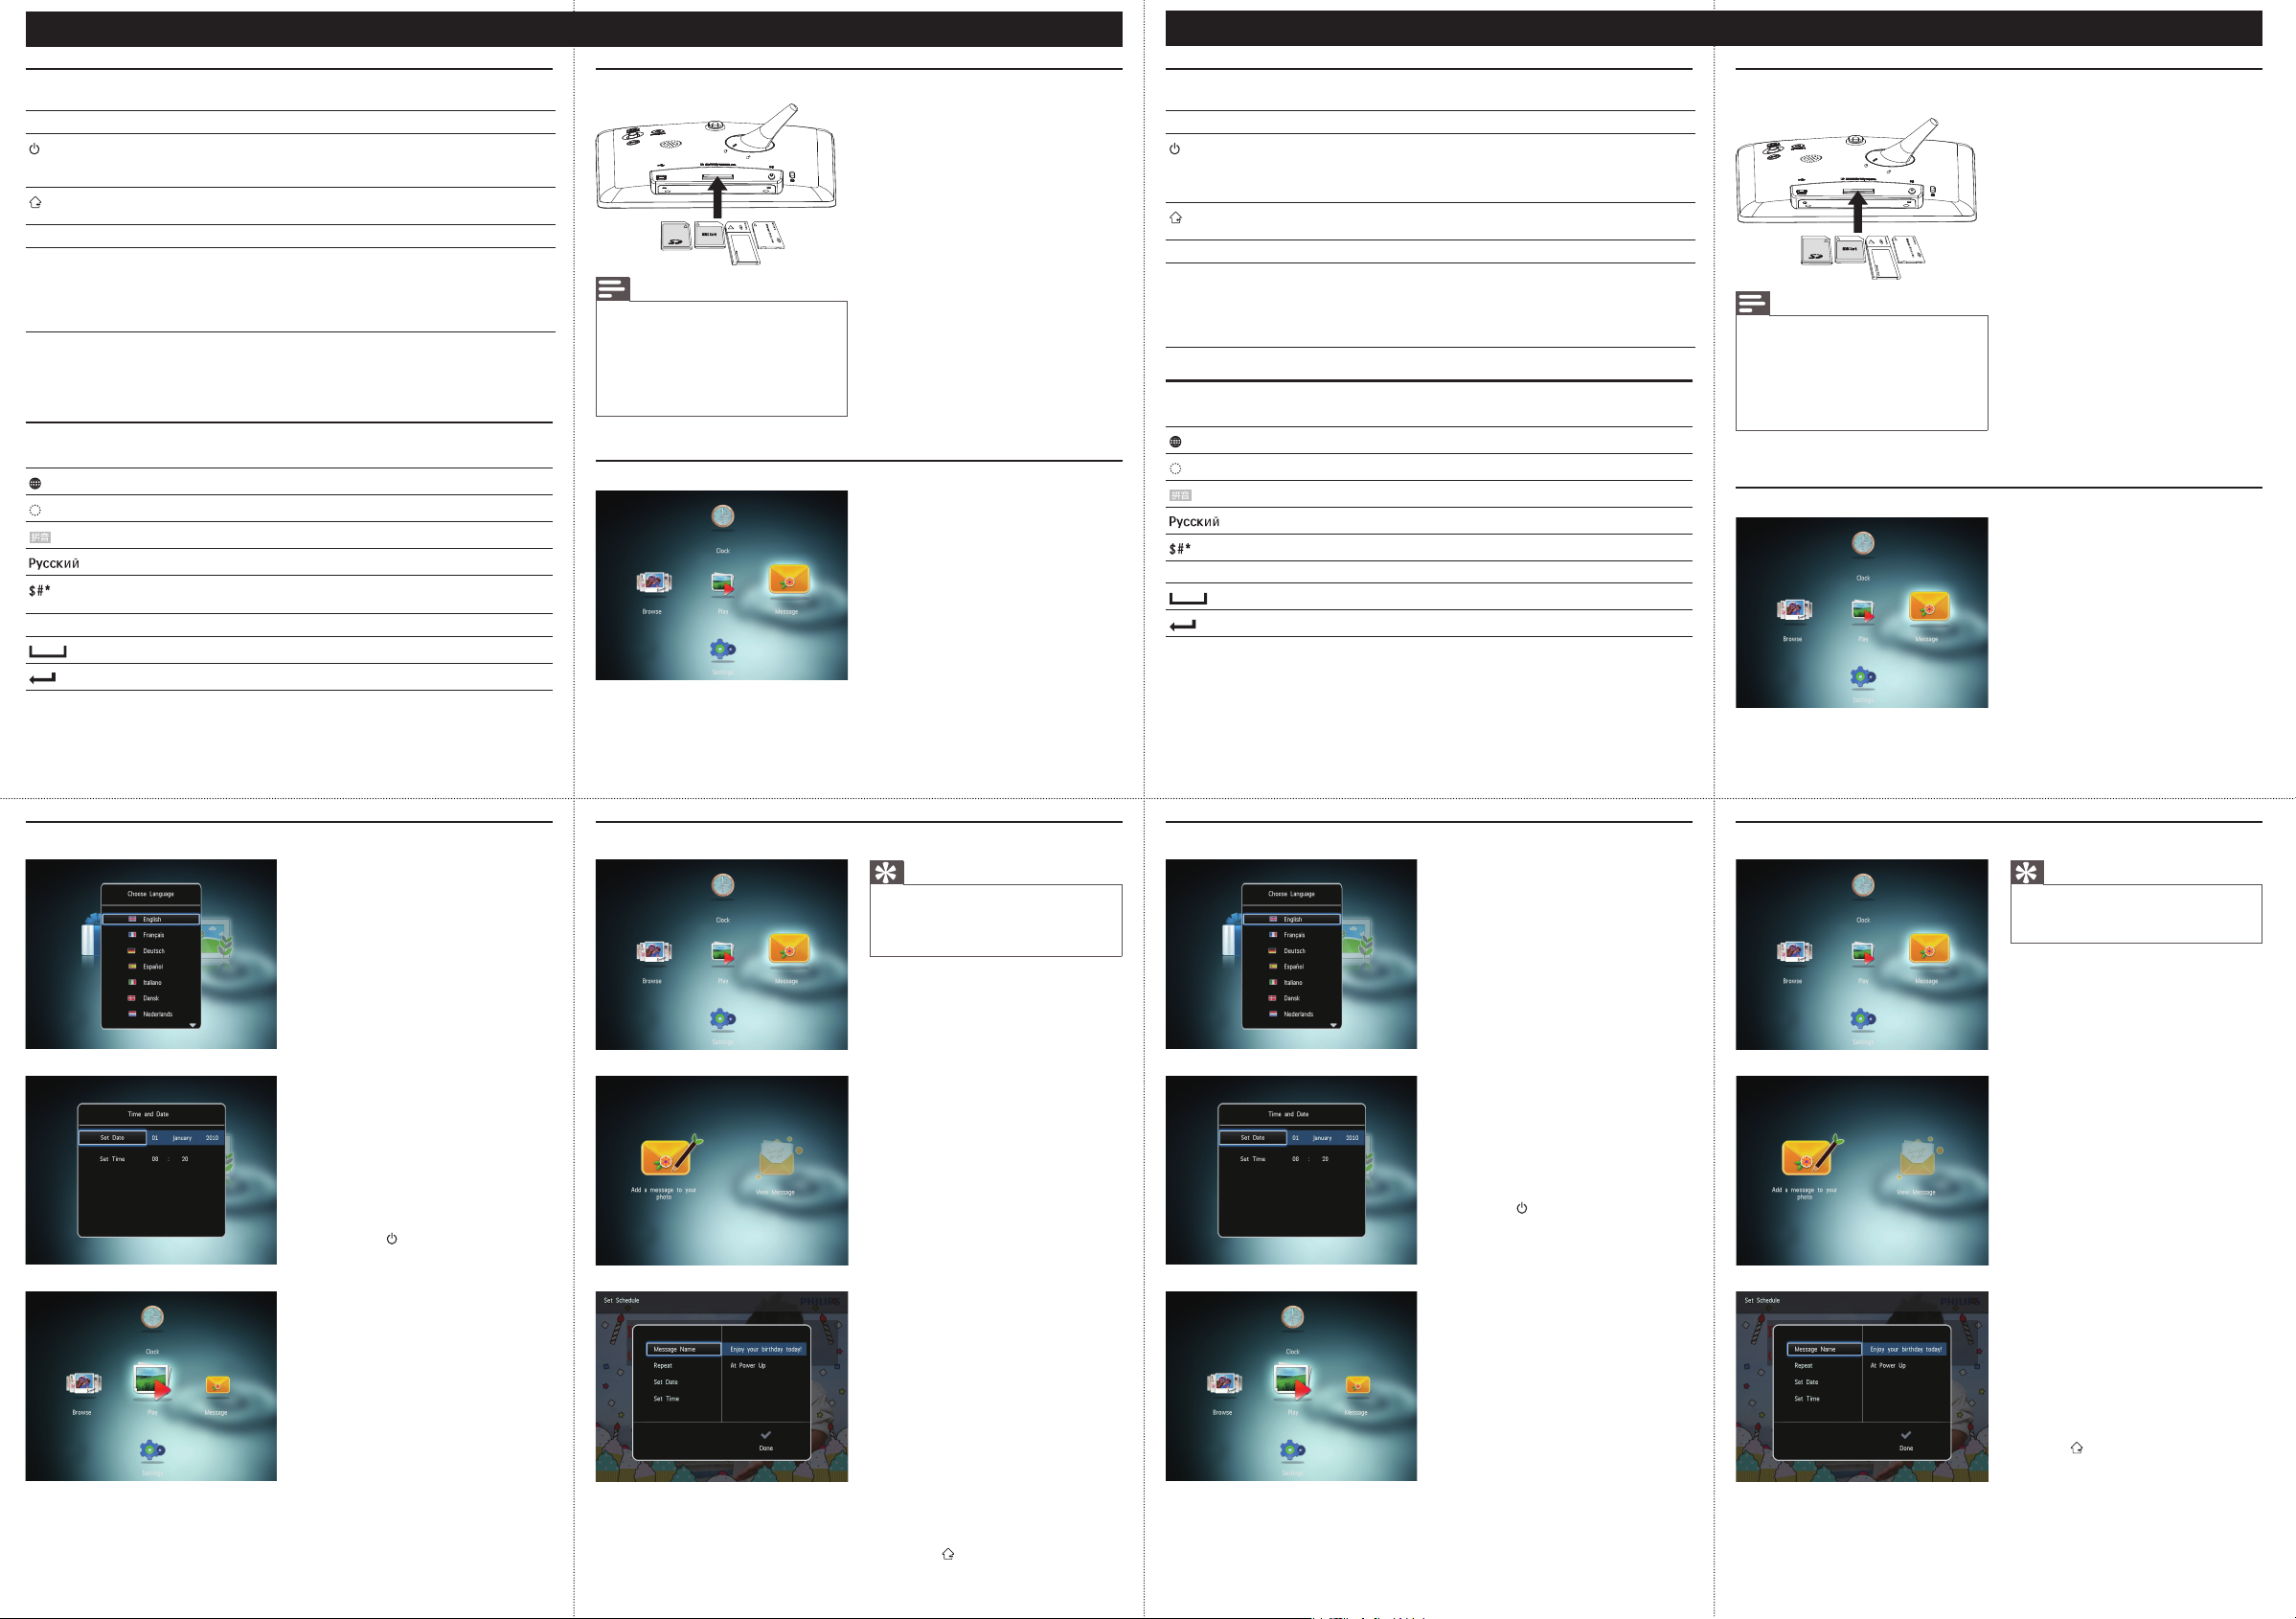
Insert a storage device into the PhotoFrame.
Note
Videos and music are available only on •
SPF4508/SPF4528. For details on the
supported media formats, see the digital
User Manual in the supplied CD-ROM.
1
2 Select an option, and then press OK .
3 Follow the on screen instructions to:
•
View a created message
View a pop-up message :
If you have a pop-up message, the
PhotoFrame prompts that you have a gift.
Then, press OK to view the message.
View a message via the home screen :
1 In the home screen, select [Message] and
then press OK .
2 Select [View Message] , and then press OK .
3 Move the joystick right/left to select a message,
and then press OK to view the message.
An option menu is displayed. »
Play media on the storage device
Browse media on the storage device•
Copy media on the storage device to •
PhotoFrame
V2.0 Printed in China
Register your product and get support at
www.philips.com/welcome
Quick Start Guide
PhotoFrame
Startup
1 Connect the power cord to the DC socket
of the PhotoFrame and then to a power
supply socket.
A few seconds later, the PhotoFrame »
turns on automatically.
2 Move the joystick up/down to select a
language, and then press OK .
3 Move the joystick up/down/right/left to set
time and date, and then press OK .
4 To start PhotoFrame, select [Start
PhotoFrame] and then press OK .
5 To start slideshow, select [Play] and then
press OK .
To pause slideshow, press
• OK .
• OK again.
To resume slideshow, press
• .
To turn off the PhotoFrame, hold
Create a message
Tip
If there is no message created before, at power up •
select [Personalize Frame] to add a message to
your photo or to view a message.
1 In the home screen, select [Message] and
then press OK .
2 Select [Add a message to your photo] , and
then press OK .
3 Move the joystick right or left to select a
message template, and then press OK .
(SPF4508/SPF4528) Add music to the •
message.
•
Edit the text of the message or change
photo of the message.
•
Set the real time and date if applicable.
Select [Done] .
4
The screen prompts you to schedule the »
message.
5 Schedule the message.
• [Message Name] : Enter the name
• [Repeat] : Select a repeat frequency
• [Set Date] : Set the date or day
• [Set Time] : Set the time
6 After you schedule the message, select
[Done] and then press OK .
• To view the available messages , select [View
Message] .
• To go back to the home screen , hold .
Page 2
Deutsch
Español
Tastenfunktionen
Steuerungstasten Funktionen
MENU - Drücken, um ein Menü aufzurufen oder zu verlassen
OK (Joystick) - Drücken, um Wiedergabe zu starten, anzuhalten oder Diashow
- Drücken, um den PhotoFrame einzuschalten
- Gedrückt halten, um den PhotoFrame auszuschalten
- Drücken, um den Modus zu wechseln: Diashow, Uhr, Kalender
- Drücken, um Schritt für Schritt zurückzugehen
- Gedrückt halten, um zum Startbildschirm zu wechseln
fortzusetzen
- Drücken, um eine Auswahl zu bestätigen
- Nach oben/unten/rechts/links bewegen, um die obere/untere/
rechte/linke Option auszuwählen
Wichtige Tastensymbole
/ ABC
aA Wechseln zwischen Klein- und Großbuchstaben
Eingabe auf Englisch
Eingabe in einer unterstützten europäischen Sprache
Eingabe in vereinfachtem Chinesisch
Eingabe auf Russisch
Wechseln zwischen Symbolen, Zeichensetzung, Alphabet oder
Ziffern
Einfügen eines Leerzeichens
Einfügen eines Zeilenumbruchs
Übertragung/Wiedergabe von Medien über ein Speichergerät
Unterstützte Medientypen :
Foto (JPEG)•
Videos (SPF4508/SPF4528)•
Hintergrundmusik (SPF4508/SPF4528)•
Unterstützte Speichergeräte:
Secure Digital (SD)•
Secure Digital High Capacity (SDHC)•
Multimedia Card (MMC)•
Memor y Stick (MS)•
Memory Stick Pro (MS Pro)•
1 Verbinden Sie ein Speichergerät mit dem
PhotoFrame.
Hinweis
Videos und Musik sind nur auf den •
Modellen SPF4508/SPF4528 verfügbar.
Weitere Informationen zu den
unterstützten Medientypen fi nden Sie
im digitalen Benutzerhandbuch auf der
mitgelieferten CD-ROM.
Es wird ein Optionsmenü angezeigt. »
2 Wählen Sie eine Option aus, und drücken
Sie die Taste OK .
3 Folgen Sie den Bildschirmanweisungen, um
Folgendes durchzuführen:
•
Wiedergeben von Medien auf dem
Speichergerät
Durchsuchen von Medien auf dem •
Speichergerät
Kopieren von Medien vom Speichergerät •
auf den PhotoFrame
Anzeigen einer erstellten Nachricht
Anzeigen einer Nachricht :
Wenn Sie eine Nachricht haben, zeigt der
PhotoFrame an, dass Sie ein Geschenk
erhalten haben. Drücken Sie dann zum
Lesen der Nachricht OK .
Anzeigen einer Nachricht über den
Startbildschirm :
1 Wählen Sie auf dem Startbildschirm
[Nachricht] , und drücken Sie anschließend
OK .
2 Wählen Sie [Nachricht anzeigen] , und
drücken Sie dann die Taste OK .
3 Bewegen Sie den Joystick nach rechts/
links, um eine Nachricht auszuwählen, und
drücken Sie dann OK , um die Nachricht
anzuzeigen.
Información sobre estos botones
Botones de control Funciones
MENU - Púlselo para acceder al menú o salir del mismo
OK (mando) - Púlselo para reproducir, poner en pausa o reanudar la
- Púlselo para encender el PhotoFrame
- Manténgalo pulsado para apagar el PhotoFrame
- Púlselo para cambiar de modo: presentación de diapositivas/reloj/
calendario
- Púlselo para volver atrás paso a paso
- Manténgalo pulsado para acceder a la pantalla de inicio
presentación de diapositivas
- Púlselo para confi rmar la selección
- Muévalo hacia arriba/abajo/derecha/izquierda para seleccionar la
opción superior/inferior/derecha/izquierda
Información sobre los iconos del teclado
/ ABC
aA Cambiar entre mayúsculas y minúsculas
Entrada en inglés
Entrada en idiomas europeos compatibles
Entrada en chino simplifi cado
Entrada en ruso
Seleccionar símbolos, puntuación, alfabeto o números
Introducir un espacio en blanco
Introducir un salto de línea
Transferencia/Reproducción de archivos multimedia mediante un
dispositivo de almacenamiento
Tipos de archivos compatibles :
•
Fotos (JPEG)
Clip de vídeo (SPF4508/SPF4528)•
Música de fondo (SPF4508/SPF4528)•
Dispositivo de almacenamiento compatible:
•
Secure Digital (SD)
Secure Digital High Capacity (SDHC)•
Multimedia Card (MMC)•
Memor y Stick (MS)•
Memory Stick Pro (MS Pro)•
1 Inserte un dispositivo de almacenamiento en
Nota
Los vídeos y la música sólo están •
disponibles en SPF4508/SPF4528. Para
obtener más información sobre los
formatos de archivos compatibles, consulte
el manual de usuario digital del CD-ROM
suministrado.
el PhotoFrame.
Aparece un menú de opciones. »
2 Seleccione una opción y pulse OK .
3 Siga las instrucciones que aparecen en
pantalla para:
•
Reproducir los archivos del dispositivo de
almacenamiento
•
Explorar los archivos del dispositivo de
almacenamiento
•
Copiar los archivos del dispositivo de
almacenamiento al PhotoFrame
Visualización de un mensaje creado
Visualización de un mensaje emergente:
Si tiene un mensaje emergente, el
PhotoFrame le avisa de que tiene un
regalo. Pulse OK a continuación para ver
el contenido del mensaje.
Visualización de un mensaje a través de
la pantalla de inicio :
1 En la pantalla de inicio, seleccione [Mensaje]
y pulse OK .
2 Seleccione [Ver mensaje] y pulse OK .
3 Mueva el mando hacia la derecha/
izquierda para seleccionar un mensaje y, a
continuación, pulse OK para ver el mensaje.
Start
1 Verbinden Sie das Netzkabel mit der
DC -Buchse des PhotoFrame und mit einer
Steckdose.
Nach einigen Sekunden schaltet sich der »
PhotoFrame automatisch ein.
2 Bewegen Sie den Joystick nach oben/unten,
um eine Sprache auszuwählen, und drücken
Sie dann OK .
3 Bewegen Sie den Joystick nach oben/
unten/rechts/links, um Uhrzeit und Datum
einzustellen, und drücken Sie anschließend OK .
4 Um den PhotoFrame zu starten, wählen Sie
[PhotoFrame starten] aus, und drücken Sie
anschließend OK .
5 Um eine Diashow zu starten, wählen
Sie [Wiedergabe] aus, und drücken Sie
anschließend OK .
•
Um die Diashow anzuhalten, drücken Sie
auf OK .
•
Um die Diashow for tzusetzen, drücken
Sie erneut auf OK .
•
Um den PhotoFrame auszuschalten,
halten Sie gedrückt.
Erstellen einer Nachricht
Tipp
Wenn zuvor noch keine Nachricht erstellt wurde, •
wählen Sie beim Einschalten [Rahmen personalis.] ,
um Ihrem Foto eine Nachricht hinzuzufügen oder
eine Nachricht anzuzeigen.
1 Wählen Sie auf dem Startbildschirm
[Nachricht] , und drücken Sie anschließend
OK .
2 Wählen Sie [Nachricht zu Ihrem Foto
hinzufügen] , und drücken Sie dann die
Taste OK .
3 Bewegen Sie den Joystick nach rechts
oder links, um eine Nachrichtenvorlage
auszuwählen, und drücken Sie dann OK .
•
(SPF4508/SPF4528) Wählen Sie Musik für
die Nachricht aus.
•
Bearbeiten Sie den Text, oder ändern Sie
das zur Nachricht gehörenden Foto.
•
Stellen Sie ggf. die richtige Uhrzeit und
das richtige Datum ein.
4 Wählen Sie [Fertig] .
Sie werden aufgeforder t, einen Zeitplan »
für die Nachricht zu erstellen.
5 Erstellen Sie einen Zeitplan für die Nachricht.
• [Name der Nachricht] : Geben Sie den
Namen ein
• [Wiederholen] : Wählen Sie eine
Wiederholungsfrequenz aus
• [Datum einstellen] : Stellen Sie Datum
oder Tag ein
• [Zeit einstellen] : Stellen Sie die Uhrzeit ein
6 Nachdem Sie einen Zeitplan für die
Nachricht erstellt haben, wählen Sie [Fertig]
aus, und drücken Sie OK .
• Um die verfügbaren Nachrichten
anzuzeigen , wählen Sie [Nachricht
anzeigen] .
•
Um zum Startbildschirm zurückzukehren ,
halten Sie gedrückt.
Inicio
1 Conecte el cable de alimentación a la toma
DC del PhotoFrame y a una toma de la
fuente de alimentación.
Unos segundos después, el PhotoFrame »
se enciende automáticamente.
2 Mueva el mando hacia arriba/abajo para
seleccionar un idioma y, a continuación, pulse
OK .
3 Mueva el mando hacia arriba/abajo/derecha/
izquierda para ajustar la fecha y la hora y, a
continuación, pulse OK .
4 Para iniciar el PhotoFrame, seleccione
[Iniciar PhotoFrame] y pulse OK .
5 Para comenzar la presentación de
diapositivas, seleccione [Reproducir] y pulse
OK .
• OK .
Para hacer una pausa, pulse
• OK
Para reanudar la secuencia, pulse
de nuevo.
•
Para apagar el PhotoFrame mantenga
pulsado .
Creación de un mensaje
Consejo
Si no hay ningún mensaje creado anteriormente, •
seleccione [Marco personalizable] al iniciar para
añadir un mensaje a la foto o ver un mensaje.
1 En la pantalla de inicio, seleccione [Mensaje]
y pulse OK .
2 Seleccione [Añadir un mensaje a su foto] y
pulse OK .
3 Mueva el mando a la izquierda o a la
derecha para seleccionar una plantilla de
mensaje y pulse OK .
•
(SPF4508/SPF4528) Añada música al
mensaje.
•
Edite el texto del mensaje o cambie la
foto del mensaje.
•
Ajuste la hora y fecha real si es necesario.
4 Seleccione [Hecho] .
La pantalla le solicitará que programe el »
mensaje.
5 Programe el mensaje.
• [Nombre del mensaje] : introduzca el
nombre
• [Repetir] : selecciona una frecuencia
repetida
• [Confi gurar fecha] : ajusta la fecha o el día
• [Confi gurar hora] : ajusta la hora
6 Después de programar el mensaje,
seleccione [Hecho] y pulse OK .
• Para ver los mensajes disponibles ,
seleccione [Ver mensaje] .
• Para volver a la pantalla de inicio , mantenga
.
pulsado
Page 3

Français
Italiano
Boutons les plus utiles
Boutons de commande Fonctions
MENU - Appuyez sur ce bouton pour accéder à/quitter un menu
OK (Bouton directionnel) - Appuyez sur ce bouton pour lire, suspendre ou reprendre la
- Appuyez sur ce bouton pour mettre le PhotoFrame sous tension
- Mainteniez ce bouton enfoncé pour mettre le PhotoFrame hors
tension
- Appuyez sur ce bouton pour basculer d’un mode à l’autre :
diaporama/horloge/calendrier
- Appuyez sur ce bouton pour revenir aux écrans précédents
- Maintenez ce bouton enfoncé pour accéder à l’écran d’accueil
lecture du diaporama
- Appuyez sur ce bouton pour confi rmer une sélection
- Appuyez sur le haut/le bas/la droite/la gauche du bouton
directionnel pour sélectionner l’option en haut/en bas/à droite/à
gauche
Boutons les plus utiles du pavé numérique
/ ABC
aA Basculer entre majuscules et minuscules
Saisie en anglais
Saisie dans les langues européennes prises en charge
Saisie en chinois simplifi é
Saisie en russe
Basculer entre les symboles, la ponctuation, les lettres ou les
chiffres
Saisir un espace
Retourner à la ligne
Transfert/lecture de fi chiers multimédias via un périphérique de
stockage
Remarque
Le transfert et la lecture de vidéos et de •
musiques ne sont possibles qu’avec les
modèles SPF4508 et SPF4528. Pour plus
d’informations sur les formats multimédias
pris en charge, reportez-vous au manuel
d’utilisation électronique que vous
trouverez sur le CD-ROM fourni.
Type de support pris en charge :
Photo (JPEG)•
Clip vidéo (SPF4508/SPF4528)•
Musique de fond (SPF4508/SPF4528)•
Périphériques de stockage pris en charge :
Secure Digital (SD)•
Secure Digital High Capacity (SDHC)•
Multimedia Card (MMC)•
Memor y Stick (MS)•
Memory Stick Pro (MS Pro)•
1 Insérez un périphérique de stockage dans le
PhotoFrame.
Un menu d’options s’affi che. »
2 Sélectionnez une option, puis appuyez sur OK .
3 Suivez les instructions affi chées à l’écran pour :
•
Lire les fi chiers multimédias sur le
périphérique de stockage
•
Parcourir les fi chiers multimédias stockés
sur le périphérique de stockage
•
Copier les fi chiers multimédias du
périphérique de stockage sur le PhotoFrame
Affi chage d’un message créé
Affi cher un message contextuel :
Lorsqu’un message contextuel est disponible,
le PhotoFrame vous indique que vous avez
reçu un cadeau. Appuyez alors sur OK pour
affi cher le contenu du message.
Affi cher un message via l’écran d’accueil :
1 Dans l’écran d’accueil, sélectionnez
[Message] , puis appuyez sur OK .
2 Sélectionnez [Affi cher le message] , puis
appuyez sur OK .
3 Appuyez sur la droite/la gauche du bouton
directionnel pour sélectionner un message,
puis appuyez sur OK pour affi cher le message.
Pulsanti e relativa funzione
Pulsanti di comando Funzioni
MENU - Premere questo pulsante per entrare/uscire da un menu
OK (joystick) - Premere questo pulsante per riprodurre, sospendere o riavviare
- Premere per accendere PhotoFrame
- Tenere premuto per spegnere PhotoFrame
- Premere questo pulsante per cambiare modalità: presentazione/
orologio/calendario
- Premere questo pulsante per tornare indietro un passo alla volta
- Tenere premuto questo pulsante per accedere alla schermata
principale
la presentazione
- Premere questo pulsante per confermare una selezione
- Spostare in alto/in basso/a sinistra/a destra per selezionare
l’opzione in alto/in basso/a sinistra/a destra
Icone del tastierino
/ ABC
aA Passaggio da lettere maiuscole a minuscole
Immissione in inglese
Immissione in lingue europee suppor tate
Immissione in cinese semplifi cato
Immissione in russo
Interruttore per selezionare simboli, punteggiatura, lettere o
numeri
Immettere uno spazio
Immettere un’interruzione di riga
Trasferimento/riproduzione di fi le multimediali tramite un
dispositivo di archiviazione
Nota
Video e musica sono disponibili solo •
su SPF4508/SPF4528. Per ulteriori
informazioni sui formati multimediali
supportati, vedere il Manuale dell’utente
in formato elettronico nel CD-ROM in
dotazione.
Formati multimediali supportati :
Foto (JPEG)•
Video clip (SPF4508/SPF4528)•
Musica di sottofondo (SPF4508/SPF4528)•
Dispositivi di archiviazione supportati:
Secure Digital (SD)•
Secure Digital High Capacity (SDHC)•
Multimedia Card (MMC)•
Memor y Stick (MS)•
Memory Stick Pro (MS Pro)•
1
Inserire un dispositivo di archiviazione
all’interno di PhotoFrame.
Viene visualizzato un menu delle opzioni. »
2 Selezionare un’opzione, quindi premere OK .
3 Seguire le istruzioni sullo schermo per :
•
Riprodurre fi le multimediali sul dispositivo
di archiviazione
•
Cercare fi le multimediali sul dispositivo di
archiviazione
•
Copiare fi le multimediali dal dispositivo di
archiviazione in PhotoFrame
Per visualizzare un messaggio creato
Per visualizzare un messaggio pop-up :
Se compare un messaggio pop-up,
PhotoFrame avverte della ricezione di
un regalo. Premere OK per visualizzare il
contenuto del messaggio.
Per visualizzare un messaggio dalla
schermata principale :
1 Nella schermata principale, selezionare
[Messaggio] e premere OK .
2 Selezionare [Visualizza messaggio] , quindi
premere OK .
3 Spostare il joystick a sinistra/a destra per
selezionare un messaggio, quindi premere
OK per visualizzare il messaggio.
Démarrage
1 Branchez le cordon d’alimentation à la prise
DC du PhotoFrame, puis à la prise secteur.
Le PhotoFrame s’allume automatiquement »
après quelques secondes.
2 Appuyez sur le haut ou le bas du bouton
directionnel pour sélectionner une langue,
puis appuyez sur OK .
3 Appuyez sur le haut/le bas/la droite/la
gauche du bouton directionnel pour défi nir
l’heure et la date, puis appuyez sur OK .
4 Pour démarrer le PhotoFrame, sélectionnez
[Démarrer PhotoFrame] , puis appuyez sur OK .
5 Pour lancer un diaporama, sélectionnez
[Lecture] , puis appuyez sur OK .
•
Pour suspendre le diaporama, appuyez
sur OK .
•
Pour reprendre le diaporama, appuyez de
nouveau sur OK .
•
Pour éteindre le PhotoFrame, maintenez
le bouton enfoncé.
Création d’un message
Conseil
Si aucun message n’a été créé auparavant, •
sélectionnez [Personnaliser cadre] au démarrage
pour ajouter un message à votre photo ou affi cher
un message.
1 Dans l’écran d’accueil, sélectionnez
[Message] , puis appuyez sur OK .
2 Sélectionnez [Ajouter un message à votre
photo] , puis appuyez sur OK .
3 Déplacez la touche de commande vers la
droite ou vers la gauche pour sélectionner un
modèle de message, puis appuyez sur OK .
•
(SPF4508/SPF4528) Ajoutez une musique
à votre message.
•
Modifi ez le texte ou la photo du
message.
•
Réglez l’heure et la date exactes le cas
échéant.
4 Sélectionnez [Terminé] .
Vous êtes invité(e) à programmer le »
message.
5 Programmer le message.
• [Nom du message] : permet de saisir
le nom
• [Répéter] : permet de sélectionner une
fréquence de répétition
• [Défi nir date] : permet de régler la date
ou le jour
• [Défi nir heure] : permet de régler l’heure
6 Une fois le message programmé, sélectionnez
[Terminé] , puis appuyez sur OK .
• Pour voir les messages disponibles ,
sélectionnez [Affi cher le message] .
• Pour revenir à l’écran d’accueil , maintenez
enfoncé
.
Avvio
1 Collegare il cavo di alimentazione alla presa
DC di PhotoFrame e alla presa di corrente.
Dopo alcuni secondi, PhotoFrame si »
accende automaticamente.
2 Spostare il joystick in alto/in basso per
selezionare una lingua, quindi premere OK .
3 Spostare il joystick in alto/in basso/a sinistra/a
destra per impostare la data e l’ora, quindi
premere OK .
4 Per avviare PhotoFrame, selezionare [Avvia
PhotoFrame] quindi premere OK .
5 Per avviare la presentazione, selezionare
[Riproduci] quindi premere OK .
Per mettere in pausa la presentazione,
•
premere OK .
•
Per riprendere la presentazione, premere
nuovamente OK .
•
Per spegnere PhotoFrame, tenere
premuto .
Creazione di un messaggio
Suggerimento
Se non vi sono messaggi creati precedentemente, •
all’accensione selezionare [Personalizza cornice]
per aggiungere un messaggio alla foto o per
visualizzare un messaggio.
1 Nella schermata principale, selezionare
[Messaggio] e premere OK .
2 Selezionare [Aggiungi un messaggio alla tua
foto] , quindi premere OK .
3 Spostare il joystick a sinistra/a destra per
selezionare un modello di messaggio, quindi
premere OK .
•
(SPF4508/SPF4528) Aggiungere musica
al messaggio.
•
Modifi care il testo del messaggio o
cambiare la foto del messaggio.
•
Impostare la data e l’ora reale, se
applicabile.
4 Selezionare [Fine] .
Sulla schermata compare la richiesta di »
programmare il messaggio.
5 Programmare il messaggio.
• [Nome messaggio] : consente di
immettere il nome
• [Ripeti] : consente di selezionare una
frequenza di ripetizione
• [Imposta data] : consente di impostare la
data o il giorno
• [Imposta ora] : consente di impostare
l’ora
6 Una volta programmato il messaggio,
selezionare [Fine] e premere OK .
• Per visualizzare i messaggi disponibili ,
selezionare [Visualizza messaggio] .
• Per tornare alla schermata principale ,
tenere premuto
.
Page 4

Nederlands Русский
Weet wat deze knoppen betekenen
Bedieningsknoppen Functies
MENU - Druk op deze knop om een menu te openen/sluiten
OK (Joystick) - Druk op deze knop om de diapresentatie te star ten, te
- Druk op deze knop om het PhotoFrame in te schakelen
- Houd deze knop ingedrukt om het PhotoFrame uit te schakelen
- Druk op deze knop om tussen modi te schakelen: diapresentatie/
klok/kalender
- Druk op deze knop om stapsgewijs terug te gaan
- Houd deze knop ingedrukt om het beginscherm te openen
onderbreken of te hervatten
- Druk op deze knop om uw keuze te bevestigen
- Beweeg deze knop omhoog/omlaag/naar links/naar rechts om de
optie naar boven/beneden/links/rechts te selecteren
Weet wat pictogrammen op het toetsenblok betekenen
/ ABC
aA Wisselen tussen hoofdletters en kleine letters
Tekst in Engels invoeren
Tekst in een van de ondersteunde Europese talen invoeren
Tekst in Vereenvoudigd Chinees invoeren
Tekst in Russisch invoeren
Overschakelen naar een venster waarin u symbolen, leestekens,
letters of cijfers kunt selecteren
Een spatie invoeren
Een regeleinde invoeren
Media overbrengen/afspelen via een opslagapparaat
Ondersteund mediatype:
Foto (JPEG)•
Videoclip (SPF4508/SPF4528)•
Achtergrondmuziek (SPF4508/SPF4528)•
Ondersteund opslagapparaat:
Secure Digital (SD)•
Secure Digital High Capacity (SDHC)•
Multimedia Card (MMC)•
Memor y Stick (MS)•
Memory Stick Pro (MS Pro)•
Plaats een opslagmedium in het PhotoFrame.
Opmerking
Video’s en muziek zijn alleen beschikbaar •
op de SPF4508/SPF4528. Informatie over
de ondersteunde media-indelingen vindt u
in de digitale gebruikershandleiding op de
meegeleverde CD-ROM.
1
Er wordt een optiemenu weergegeven. »
2 Selecteer een optie en druk vervolgens op OK .
3 Volg de instructies op het scherm voor het
volgende:
•
Media op het opslagapparaat weergeven
Bladeren door media die zijn opgeslagen •
op het opslagapparaat
•
Media die op het opslagapparaat zijn
opgeslagen naar het PhotoFrame kopiëren
Een door u gemaakt bericht bekijken
Een pop-upbericht bekijken :
Als u een pop-upbericht hebt ontvangen,
verschijnt er op het PhotoFrame
een bericht dat u een geschenk hebt
ontvangen. Druk op OK om het bericht
weer te geven.
Een bericht bekijken op het
beginscherm :
1 Op het beginscherm selecteert u [Bericht]
en drukt u op OK .
2 Selecteer [Bericht weergeven] en druk
vervolgens op OK .
3 Beweeg de joystick naar rechts/links om een
bericht te selecteren en druk vervolgens op
OK om het bericht te bekijken.
Основные кнопки
Кнопки управления Функции
MENU - Нажмите для входа в меню и выхода из него.
OK (джойстик) - Нажмите для запуска, приостановки или возобновления
- Нажмите, чтобы включить фоторамку.
- Нажмите и удерживайте, чтобы выключить фоторамку.
- Нажмите для выбора режима: слайд-шоу, часы или календарь.
- Нажимайте для пошагового перехода назад.
- Нажмите и удерживайте для перехода на основной экран.
воспроизведения слайд-шоу
- Нажмите для подтверждения выбора.
- Перемещение вверх/вниз/вправо/влево для выбора
параметра
вверх/вниз/вправо/влево.
Описание значков клавиатуры
/ ABC
aA Переключение между верхним и нижним регистрами
Ввод на английском
Ввод на поддерживаемых европейских языках
Ввод на упрощенном китайском
Ввод на русском
Переключение между меню символов, знаков пунктуации,
букв и цифр
Ввод пробела
Разрыв строки
Перенос/воспроизведение медиафайлов с помощью устройства
хранения
Примечание
Видео и музыка доступны только на •
моделях SPF4508/SPF4528. Подробную
информацию о поддерживаемых
медиаформатах см. в электронной
версии руководства пользователя на
диске CD-ROM.
Поддерживаемые форматы:
•
Фото (JPEG)
Видео (SPF4508/SPF4528)•
Фоновая музыка (SPF4508/SPF4528)•
Поддерживаемые носители:
Карта Secure Digital (SD)•
Карта Secure Digital High Capacity (SDHC)•
Карта MMC (Multimedia Card)•
Карта Memor y Stick (MS)•
Карта Memory Stick Pro (MS Pro)•
1 Подключите запоминающее устройство к
фоторамке.
Отобразится меню функций. »
2 Выберите параметр, затем нажмите OK .
3 Следуйте инструкциям на экране, чтобы
выполнить следующие действия.
•
Воспроизведение медиафайлов на
запоминающем устройстве
•
Обзор медиафайлов на запоминающем
устройстве
•
Копирование медиафайлов с
запоминающего устройства на фоторамку
Просмотр созданного сообщения
Просмотр всплывающих сообщений
Если есть всплывающее сообщение, на
экране фоторамки появляется надпись о
том, что вас ждет сообщение-сюрприз.
Нажмите OK для просмотра сообщения.
Просмотр сообщения в меню
основного экрана
1 На основном экране выберите
[Сообщения] и нажмите OK .
2 Выберите [Просмотреть сообщение] ,
затем нажмите OK .
3 Для выбора сообщения передвигайтесь с
помощью джойстика вправо/влево, а затем
нажмите OK для просмотра сообщения.
Opstarten
1 Sluit het netsnoer aan op de DC -aansluiting
van het PhotoFrame en vervolgens op een
stopcontact.
Na enkele seconden schakelt het »
PhotoFrame automatisch in.
2 Beweeg de joystick omhoog/omlaag om een
taal te selecteren en druk vervolgens op
OK .
3 Beweeg de joystick omhoog/omlaag/naar
rechts/naar links om de tijd en datum in te
stellen en druk vervolgens op OK .
4 Om het PhotoFrame te starten, selecteert u
[PhotoFrame starten] en drukt u op OK .
5 Om een diapresentatie te starten, selecteert
u [Afspelen] en drukt u op OK .
• OK om de diapresentatie te
Druk op
pauzeren.
• OK om de diapresentatie te
Druk op
hervatten.
• ingedrukt om het PhotoFrame
Houd
uit te schakelen.
Een bericht maken
Tip
Als u nog niet eerder een bericht hebt gemaakt, •
drukt u bij het inschakelen op
[Lijst personaliseren] om een bericht aan uw foto
toe te voegen of een bericht te bekijken.
1 Op het beginscherm selecteert u [Bericht]
en drukt u op OK .
2 Selecteer [Voeg een bericht aan uw foto
toe] en druk vervolgens op OK .
3 Beweeg de joystick naar rechts of links om
een berichtsjabloon te selecteren en druk
vervolgens op OK .
•
(SPF4508/SPF4528) Voeg muziek toe aan
het bericht.
•
Bewerk de tekst in het bericht of
verander de bijbehorende foto.
•
Stel de actuele tijd en datum in
(indien van toepassing).
4 Selecteer [Gereed] .
U wordt gevraagd een tijd en datum »
voor het bericht in te voeren.
5 Een tijd en datum invoeren voor het bericht.
• [Naam bericht] : voer de naam in
• [Herhalen] : selecteer een
herhalingsfrequentie
• [Datum instellen] : stel de datum of
dag in
• [Tijd instellen] : stel de tijd in
6 Selecteer [Gereed] en druk op OK als u het
bericht hebt gepland.
• Om de beschikbare berichten te bekijken ,
selecteert u [Bericht weergeven] .
• Om terug te gaan naar het beginscherm ,
houdt u
ingedrukt.
Начало работы
1 Подключите шнур питания к разъему
DC на фоторамке и к разъему источника
питания.
Через несколько секунд фоторамка »
включится автоматически.
2 Для выбора языка перемещайтесь вверх/
вниз по меню с помощью джойстика,
затем нажмите OK .
3 Для настройки времени и даты
перемещайтесь вверх/вниз /вправо/влево
по меню с помощью джойстика, затем
нажмите OK .
4 Для включения фоторамки выберите
[Запуск PhotoFrame] , а затем нажмите
OK .
5 Для воспроизведения слайд-шоу
выберите [Воспроизведение] , а затем
нажмите OK .
•
Для приостановки воспроизведения
слайд-шоу нажмите кнопку OK .
•
Для возобновления воспроизведения
слайд-шоу еще раз нажмите кнопку
OK .
•
Чтобы выключить фоторамку, нажмите
и удерживайте .
Создание сообщения
Совет
Если еще не было создано ни одного •
сообщения, в меню создания сообщений
выберите [Настройка фоторамки] , чтобы
добавить комментарий к фотографии или
просмотреть сообщение.
1 На основном экране выберите
[Сообщения] и нажмите OK .
2 Выберите [Добавить подпись к фото] ,
затем нажмите OK .
3 Для выбора шаблона сообщения
передвигайтесь вправо или влево при
помощи джойстика, затем нажмите OK .
•
(SPF4508/SPF4528) Добавление музыки
в сообщение.
•
Редактируйте текст сообщения
или измените фотографию,
сопровождающую сообщение.
•
При необходимости установите
фактическое время и дату.
4 Выберите [Готово] .
На экране появится предложение »
создать расписание ввести
информацию о сообщении.
5 Введение информации о сообщении.
• [Название сообщения] : ввод названия
• [Повтор] : выбор частоты повторений
• [Установить дату] : установка даты
или дня
• [Установить время] : установка
времени
6 После установки времени для сообщения
выберите [Готово] , а затем нажмите OK .
• Для просмотра доступных сообщений
выберите [Просмотреть сообщение] .
• Для возврата к основному экрану
нажмите и удерживайте
.
 Loading...