


Philips Digital PhotoFrame
Copyright
No part of this publication may be reproduced, transmitted,
transcribed, stored in a retrieval system or translated into
any language or computer language, in any form or by any
means, electronic, mechanical, magnetic, optical, chemical,
manual or otherwise, without the prior written permission of
the company.
Disclaimer
The company makes no representations or warranties,
either expressed or implied, with respect to the contents
hereof and specifically disclaims any warranties,
merchantability or fitness for any particular purpose. Further,
the company reserves the right to revise this publication and
to make changes from time to time in the contents hereof
without obligation to notify any person of such revision or
changes.
Safety Instructions
Before operating the PhotoFrame, carefully read and follow the
instructions below. Retain this User Manual for future reference.
• Read the safety and operating instructions carefully before
using the product. All warnings on the product and in the
operating instructions should be observed.
• Do not place this product under direct sunlight or near heat
sources, such as in a closed car under sunlight or near a stove.
The outer casing of this product may become deformed and
the sophisticated sensors inside may become damaged due
to excessive heat.
• Do not use this product near water, in the rain or allow any
liquid to get inside this product. Water and moisture may cause
short-circuit to the electronic components and lead to
malfunctions.
Copyright
EN-i

Philips Digital PhotoFrame
• Do not use this product near strong electromagnetic sources,
such as a microwave oven. The electromagnetic interference
may cause this product to malfunction.
• Do not drop or apply shock/vibration to this product. Strong
impacts may damage the components inside.
• Do not insert objects other than compatible memory cards
into the memory card slots of this product. The metal
contacts inside the slot can easily become damaged by
foreign objects.
• Do not use an unknown power adapter other than the one
supplied with the PhotoFrame. Connecting this product to
an unknown power adapter is very dangerous and may lead
to fire or explosion.
• Do not cut, bend, modify, place heavy objects, or step on
the power adapter cord. Otherwise the external insulation
may be damaged and result in short-circuit or fire.
• If there are strange odors or heat emitting from this product
or any signs of malfunction, disconnect the PhotoFrame from
the power immediately and contact your dealer for inspection
or service.
• Use a smooth, soft cloth to clean the surface of the screen.
Do not use liquid cleaners or glass cleaners.
• Do not attempt to disassemble or modify this product. There
are no user serviceable parts inside this product, and any
unauthorized modifications will void the warranty.
• Although the LCD panel is made with high-precision
technology and has effective pixels of 99.99% or more, black
dots or bright points of light (red, blue or green) may appear
constantly on the LCD panel. This is a structural property of
the LCD panel and is not a malfunction.
EN-ii
Safety Instructions

Philips Digital PhotoFrame
Table of contents
Key features……………………………………………………..
What’s in the box……………………………………………….
Overview………………………………………………………….
Right view………………………………………………….....
Rear view ………………………………………………….....
Operating the PhotoFrame…………………………………...
Using the control buttons……………………………………
Using the remote control (8" and 10" models only)
Getting started ………………………………………………….
Step 1:Using the adjustable back stand …………………..
Step 2: Connecting to power………………………………..
Step 3: First usage…………………………………………...
Step 4:Basic setup…………………………………………....
Selecting a language……………………………………...
Setting the date and time…………………………………
Step 5: Copying photos to internal memory………………
Step 6: Connecting the PhotoFrame to a computer …….
Step 7: Replacing the paper mat………………..…………
Using the main menu ………………… …………………......
Managing photos …………………… ……………………......
Manually copying photos to the internal memory ………..
Tagging photos to an album…………………………………
Removing photos from an album…………………………
Managing photos by using the TIMELINE album………
Creating a new album ………………………………………
Modifying an album…………………………………………
Deleting an album……………………………………………
Using other options in the PHOTO ALBUMS menu……...
Deleting photos……………………………… ……………...
……….…….….................................
1
2
3
3
4
5
6
7
9
10
10
11
11
11
11
12
13
14
16
17
17
19
21
22
23
24
24
24
24
Table of contents
EN-iii

Philips Digital PhotoFrame
Rotating photos………………………………… …………….....
Applying photo effects……………………………………….......
Viewing photos…………………………………………...............
Running a slideshow by using the TIMELINE album ….........
Using Smart Energy Saver™……………………………….......
Using CLOCK (EZ Access button)………………………….....
Selecting a clock skin…………………………………………....
Switching between Clock view and Slideshow view……… ...
Using SCRAPBOOK……………………………………………...
Using SETTINGS………………………………………………....
Date and Time page………………………………………….....
General Settings page……………………………………….....
Information page………………………………………………...
Frequently asked questions …………………………………...
Regulation and compliance………………………………….....
Recycling………………………………………………...................
Appendix ………………………………………………………......
Specifications………………………………………………….....
25
25
25
27
28
29
29
30
30
31
32
33
34
34
35
36
37
37
EN-iv
Table of contents

Philips Digital PhotoFrame
Dear Customer:
Thank you for bringing our Philips Digital PhotoFrame into
your home. Now you will be able to view your growing digital
picture library in stunning clarity and share great memories
with friends and family.
To get the most out of your new Philips product, please
read through this entire User Manual before use.
Key features
This PhotoFrame is equipped with the following features:
&lear and bright display.
Enables you to display photos that are stored on the
internal memory, a memory card or a USB flash drive.
Allows you to select a preferred power-saving option for
the PhotoFrame using the Smart Energy Saver™ feature.
Allows you to use albums to manage and sort your
photos easily.
Allows you to display photos in slideshow using various
kinds of templates available in S&5APB22K.
Multi-language 2n-Screen Display 2SD menus.
&lock and &alendar functions.
Key features
EN-1

Philips Digital PhotoFrame
What’s in the box
Carefully open the packing box and ensure that
you have the following items.
1. Digital PhotoFrame x 1
2. AC power adapter x 1
3. Remote control x 1
(8" and 10" models only)
4. Quick Start Guide x 1
5. User Manual x 1
6. Registration Card x 1
7. Warranty Card x 1
8. Hook and loop tape for remote control x 1
User Manual
1
5 6 7
Registration Card
2
Warranty Card
3 4
Hook and loop tape
• Actual product appearance may vary from the illustrations
shown in this User Manual.
• Available accessories may vary depending on the area where
you purchased the PhotoFrame.
• The remote control is not included in the 7" models.
EN-2
8
What’s in the box
Philips Digital PhotoFrame
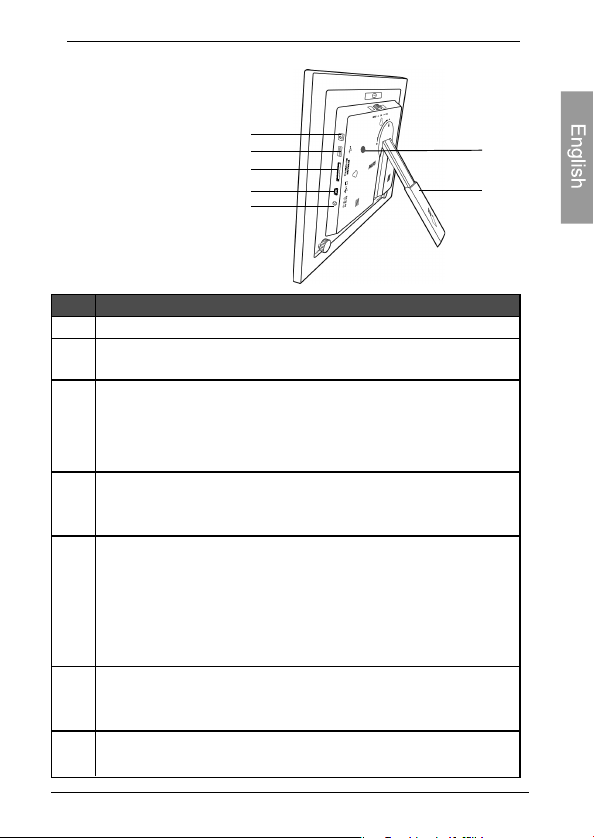
Overview
Right view
2
3
5
4
6
Description
No.
Adjustable back stand
1
Power button
2
Press the Power button to turn on/off the PhotoFrame.
USB port
3
Allows for a USB flash drive.
Play back photos stored on the inserted drive
Copy photos from the inserted drive to the PhotoFrame.
Mini USB port
4
Allows you to connect the PhotoFrame to a computer to
manage the files on the internal memory of the PhotoFrame.
Memory card slot
5
Allows for an SD™/SDHC™, MultiMediaCard™ (MMC),
Memory Stick™ (MS), Memory Stick PRO™ (MS PRO),
Memory Stick Duo™ (MS Duo) memory card.
Play back photos stored on the inserted card
Copy photos from the inserted card to the PhotoFrame.
Power jack
6
Connect one end of the AC power adapter into the power
jack and the other end into a power outlet.
Recommended Remote control storage
7
Use the hook and loop tape included to store your remote control
7
1
Right View
EN-3
Philips Digital PhotoFrame
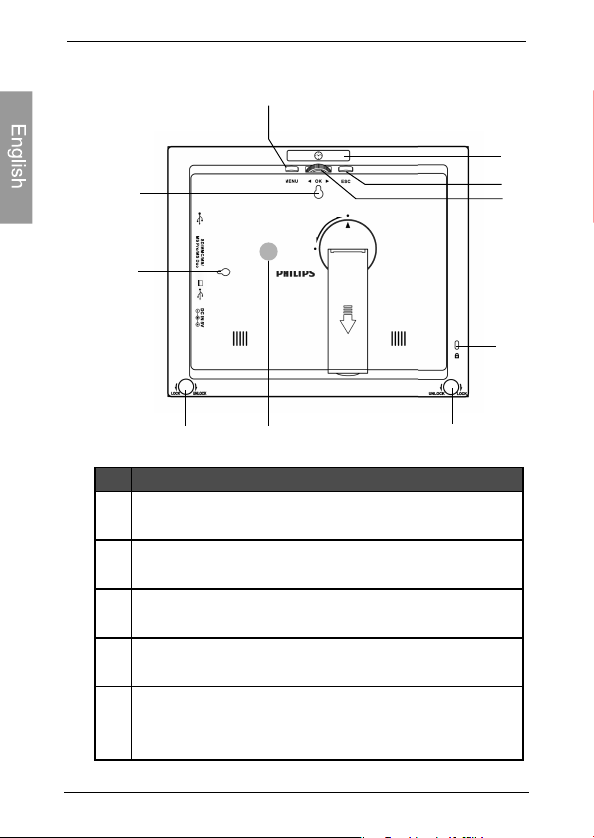
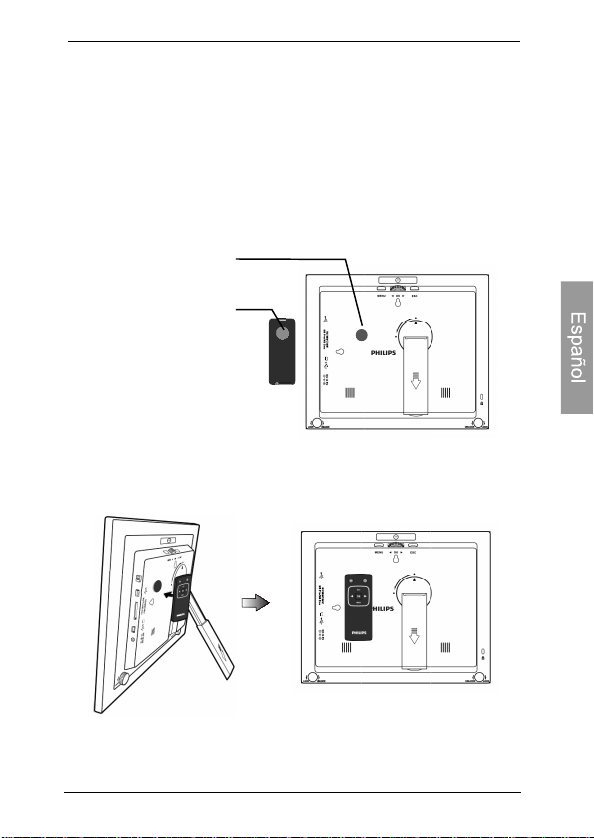
Rear view
7
8
1
2
3
4
5
EN-4
9
Description
No.
1
MENU button
See "Using the control buttons" on page 6 for details.
2
EZ Access button
See "Using the control buttons" on page 6 for details.
3
ESC button (ESCAPE button)
See "Using the control buttons" on page 6 for details.
4
Scroll wheel/OK button
See "Using the control buttons" on page 6 for details.
5
Kensington® security slot
You can attach an anti-theft Kensington® lock and cable
to this slot to help prevent possible theft.
66
Rear View
Philips Digital PhotoFrame
Description
No.
6
EZ Lock System
You can use the EZ Lock Screws to lock or unlock the
wooden frame.
Wall mount hole (for landscape wall mounting)
7
Allows you to hang the PhotoFrame horizontally on a wall.
Wall mount hole (for portrait wall mounting)
8
Allows you to hang the PhotoFrame vertically on a wall.
Recommended Remote control storage
9
Use the hook and loop tape included to store your remote control.
Operating the PhotoFrame
You can use the control buttons on the back or the supplied
remote control to operate the photo frame
• In this user manual, instructions or examples provided are based
upon operation with the remote control. To know how to use the
control buttons, refer to "Using the control buttons" on page 6 for
details.
• The remote control is supplied with the 8" and 10" models only.
Operating the PhotoFrame
EN-5
Philips Digital PhotoFrame
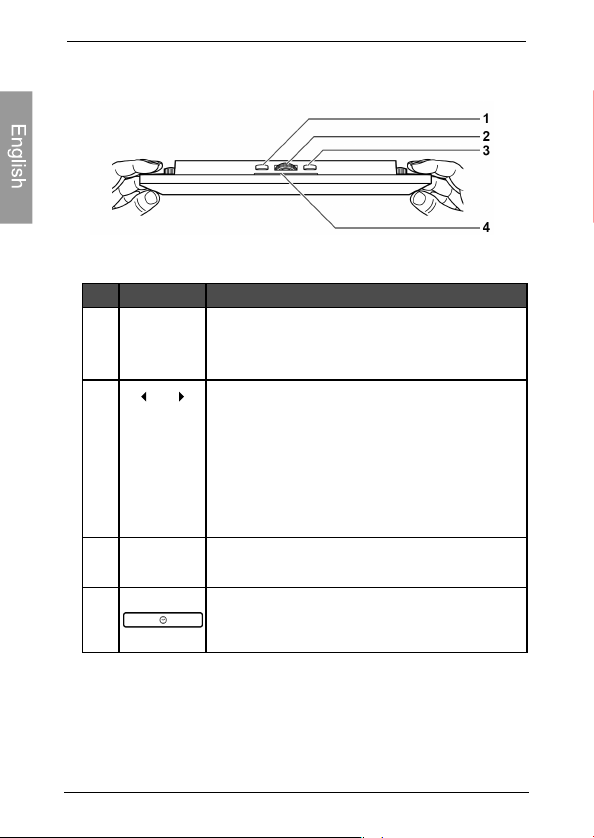
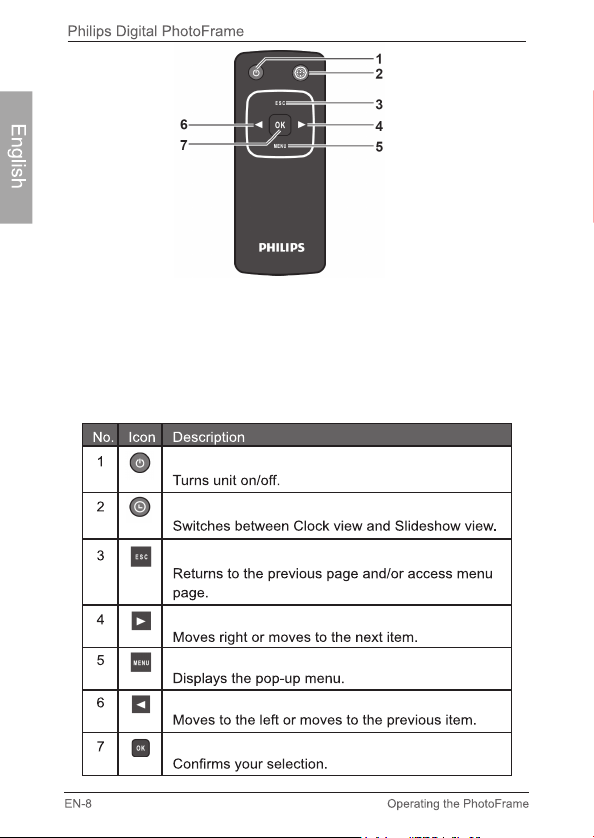
Using the control buttons
EN-6
No.
1
2
3
4
Icon
ESC
OK
MENU
Description
ESC button (ESCAPE button)
Cancels current operation and/or returns to
the previous page
Scroll wheel/ OK button
• Press this button to enter or confirm your
operation/selection.
• Scroll this button to the left to select the
previous item.
• Scroll this button to the right to select the
next item.
MENU button
Displays the pop-up menu.
EZ Access button
Switches between Clock view and Slideshow
view
Operating the PhotoFrame
Philips Digital PhotoFrame
Using the remote control (8" and 10"
models only)
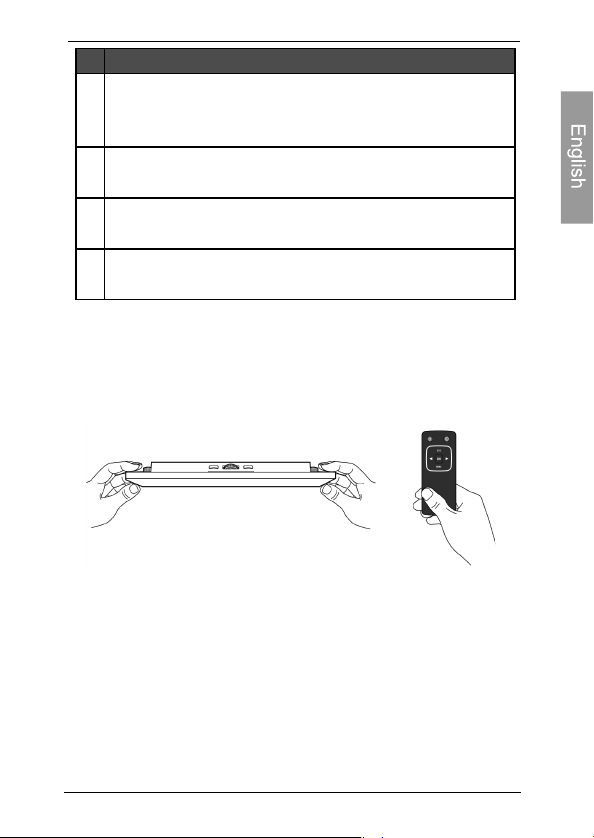
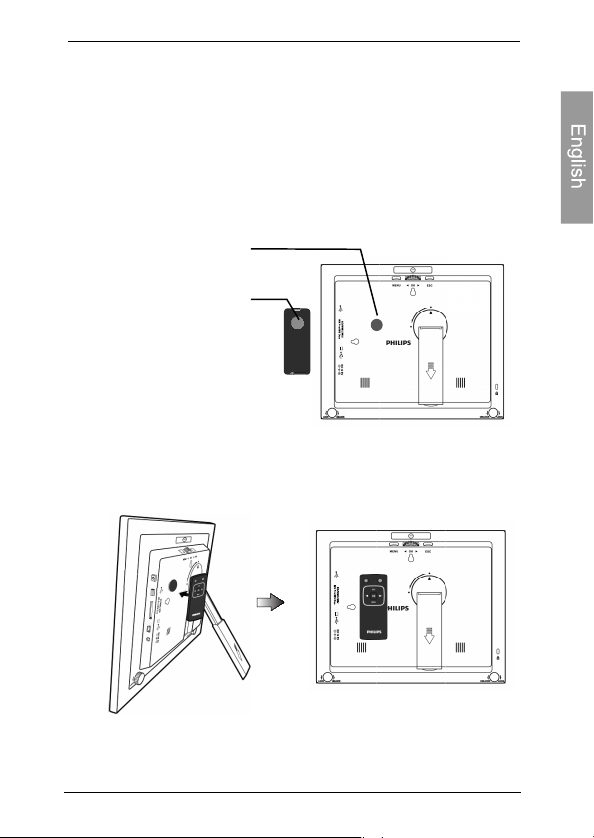
Place the hook and loop tape on back of the PhotoFrame for
remote storage
hook and loop tape1
hook and loop tape2
Operating the PhotoFrame
EN-7
• Please remove the plastic strip under the battery before using the
remote control for the first time.
• The remote control is supplied with the 8" and 10" models only.
• Use only the specified battery type.
• The batteries are highly flammable, keep away from excessive heat
or moisture.
ON/OFF
EZ Access button
ESC (Escape)
RIGHT
MENU
LEFT
“OK”

Philips Digital PhotoFrame
Getting started
Step 1: Using the adjustable back stand
1. Gently pop out the back stand as shown below.
2. To place the PhotoFrame horizontally or vertically, you can rotate
the back stand by aligning the triangle mark with the rounded
points (1 or 2).
Getting started
EN-9
Philips Digital PhotoFrame
3. Pull out the back stand and adjust accordingly to the preferred
viewing angle.
• It is recommended to place the PhotoFrame horizontally, because
this direction provides the best viewing and operating experience.
• By using the wall mount holes, you can hang the PhotoFrame
horizontally or vertically on the wall.
Step 2: Connecting to power
1. Place the PhotoFrame on a flat surface.
2. Connect the power adapter as below (1), and press the Power
button to turn on the PhotoFrame (2)
• Power systems and plug types may vary depending on your country/region.
• To turn off the PhotoFrame, press the Power button.
EN-10
Getting started
Philips Digital PhotoFrame
Step 3: First usage
To help you get the most out of your PhotoFrame, we installed a
video tutorial that automatically starts playing when you first turn
on your unit. To cancel the looping video and start playing your
own photos, press any of the buttons on the back. Follow the
five-step process to familiarize yourself with how the control
buttons work. This simple process is automatically disabled
after the first use. You can turn on the tutorial by going into
SETTINGS.
Step 4: Basic setup
Select a language and set the date and time during the first use
of the PhotoFrame.
Selecting a language
1. In the main menu, press or to select SETTINGS ,
and then press "OK"
2. Press The General Settings page appears.
3. Press "OK", press to go to Language, and then press "OK" again.
4. Press or to select a language you wish to use, and
then press "OK"
5. Press "ESC" to exit
Setting the date and time
1. In the main menu, press or to select SETTINGS ,
and then press "OK". The Date and Time page appears.
Getting started
EN-11

Philips Digital PhotoFrame
2. Press“OK” to highlight the Year field, press or to select
a year, and then press“OK” to confirm the setting
3. Press to move to move to the Month field, press“OK” to
highlight the Month field, press or to select a month,
and the press "OK" to confirm the setting.
4. Repeat Step 3 for the remaining fields, including Date, Hour,
Minute, Mode, On Screen Clock, Current Time Zone and
Second Time Zone.
5. Press “ESC” to exit
When inserting a memory card or a USB flash drive, you will be
asked to copy all photos to the internal memory.
If “Smart Copy” is set to “Resize” under “General Settings”, photos will be
resized to the screen resolution when copied to the internal memory to
optimize the storage capacity. Please keep a copy of the original photos on
your memory card or USB flash drive.
"Smart Copy" is designed
To copy all photos contained on the inserted memory card (or
USB flash drive), select the check mark and press “OK”.
To view photos without copying them to the PhotoFrame,
select the cross mark and press “OK”. The PhotoFrame
will start playing back the photos automatically from the
inserted memory card or USB flash drive.
EN-12
Getting started

Philips Digital PhotoFrame
• Do not remove the memory card/USB flash drive before the copy
process is completed.
• If the files you wish to copy from the memory card/USB flash drive
already exists on the internal memory of the PhotoFrame, the files
will be overwritten when you select to proceed.
Compatible memory card formats :
1
Memory card format
SD/SDHC
MultiMediaCard(MMC)
Memory Stick(MS)
Mcmory Stick PRO(MS PRO)
Memory Stick Duo(MS Duo)
USB flash drive
• Maximum capacity specification listed above are subject to change
without prior notice
Maximum capacity
32GB
1GB
4GB
2GB
2GB
16GB
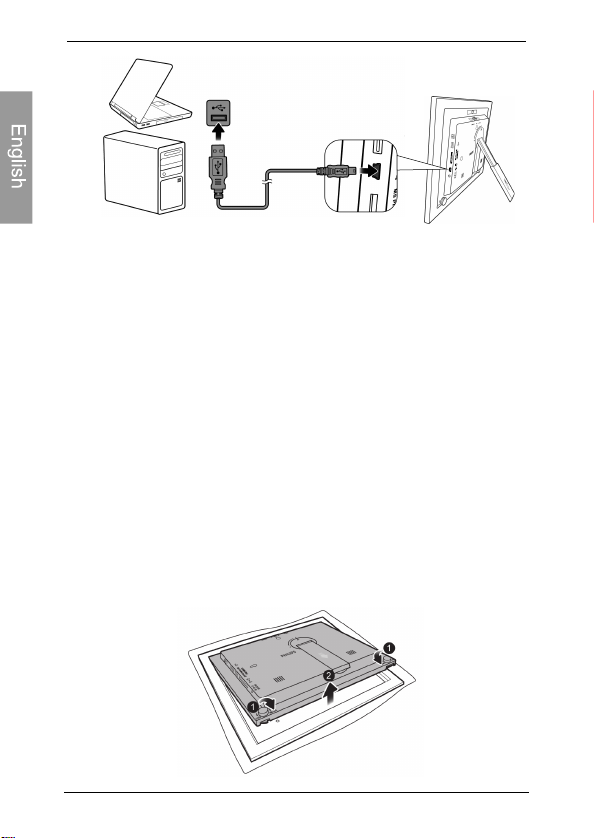
Step 6: Connecting the PhotoFrame
to a computer
You can connect the PhotoFrame to a computer using a mini USB
cable (to be purchased separately) to easily manage the files on
the internal memory of the PhotoFrame.
1. Start the computer and turn on the PhotoFrame.
2. Connect the smaller end of the USB cable to the mini USB port
of the PhotoFrame.
3. Connect the other end of the USB cable to a USB port on the
computer, making sure the connectors are fully inserted.
4. Once connected, the PhotoFrame will enter PC transfer mode
automatically.
5. When the computer has detected the PhotoFrame, the
PhotoFrame will appear in “My Computer” as “removable disk”.
6. Now you can freely transfer the files on the PhotoFrame as you
would on other disk drive.
EN-13Getting started
Philips Digital PhotoFrame
• You can copy photos from the computer to the PhotoFrame, and
vice versa.
• The files on the memory cards and USB flash drive cannot be
viewed/edited via USB connection.
Step 7: Replacing the paper mat
Your PhotoFrame may come with one or more bonus paper mats
depending on your purchased model. You can replace the existing
paper mat with the one supplied (if available). Follow the
instructions below to replace the supplied paper mat.
1. On a flat table, place the PhotoFrame facing down on top of a
soft towel. Be careful not to scratch the unit.
2. Twist the EZ Lock Screws on the back of the PhotoFrame to
the “UNLOCK” position, then carefully lift up the core unit from
the wood frame.
EN-14
Getting started
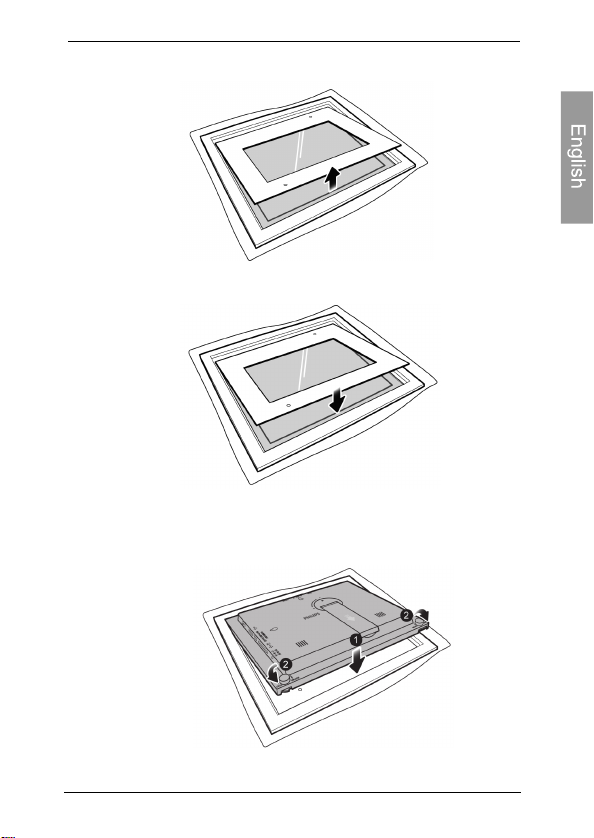
Philips Digital PhotoFrame
3. Remove the existing paper mat.
4. Install the supplied bonus paper mat.
5. Install the PhotoFrame to the wooden frame, and secure the
PhotoFrame by tightening the EZ Lock Screws to the “LOCK”
position.
EN-15Getting started

Philips Digital PhotoFrame
Using the main menu
From the main menu, you can scroll to select the desired option,
and then press “OK”. To exit back to the main menu, press
"ESC".
Description
No.
Smart Energy Saver™
1
Allows you to select a power-saving option for the
PhotoFrame. See "Using Smart Energy Saver™" on
page 28 for details.
Clock
2
Allows you to set your favorite clock skins. See "Using
CLOCK (EZ Access button)" on page 29 for details.
SCRAPBOOK
3
Allows you to display photos in slideshow with various
preloaded templates. See "Using SCRAPBOOK on
page 30 for details.
EN-16
Using the main menu

Philips Digital PhotoFrame
DescriptionNo.
SLIDESHOW
4
Allows you to display photos in slideshow. See "Viewing
photos" on page 25 for details.
PHOTO ALBUMS
5
Allows you to manage your photos and sort them by
using different albums. See "Managing photos" on page
17 for details.
SETTINGS
6
Allows you to configure the settings of the
PhotoFrame. See "Using SETTINGS" on page 31
for details.
Managing photos
You can use the PHOTO ALBUMS menu to manage photos
on the internal memory, memory card or USB flash drive.
Manually copying photos to the internal
memory
In addition to the automatic “Smart Copy” feature , you can
manually copy photos from external storage devices to the
internal memory and tag photos to an album.
The example below demonstrates how to copy photos from a
memory card to the internal memory and tag photos into an
album.
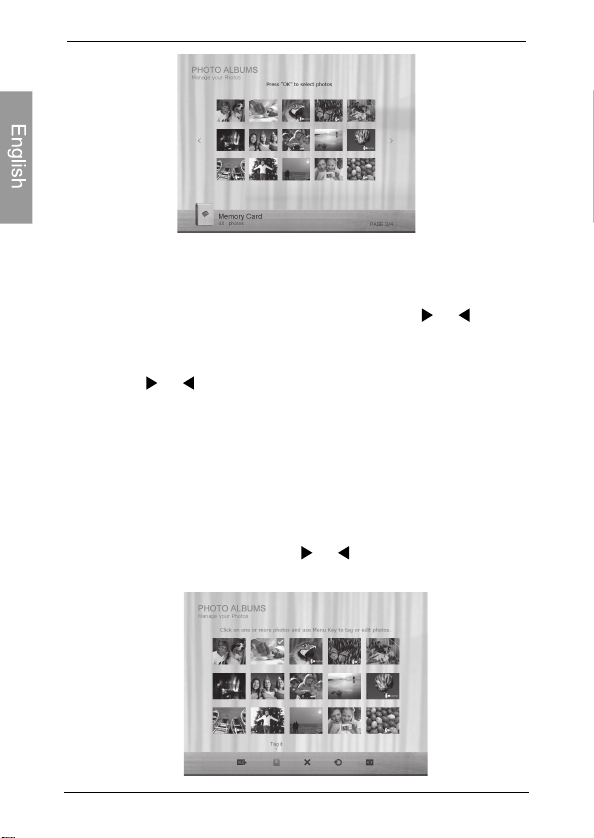
1. Insert a compatible memory card to the memory card slot.
2. In the main menu, press or to select PHOTO
ALBUMS, and then press “OK”
3. Select Memory Card, and then press “OK”, The screen
shows the photos contained on your memory card
Managing photos
EN-17

Philips Digital PhotoFrame
4. If there is more than one page, you can press or to go
to the previous or next page to browse photos. (If not, skip this
step.)
5. Press “OK” to enable the selection mark
6. Press or to move to the photo you wish to select, and
then press “OK” to confirm the selection. The selected photo
will have a selection mark
Repeat Step 6 to select more photos as desired.
If you wish to select all the photos shown on the current page, select
"Select All" in the pop-up menu and press “OK”.Then continue with Step 7.
7. Press “Menu”
8. From the pop-up menu, press or to select Tag It, and
then press “OK”
EN-18
Managing photos

Philips Digital PhotoFrame
9. Select a default target album to copy and sort the photos into
this specified album.
Tagging photos to an album
1. In the main menu, press or to select PHOTO
ALBUMS, and then press “OK”.
The screen shows:
• The file source, including USB, Memory Card and
Internal Memory.
• The default albums on the internal memory, including
TIMELINE, Pre-install, Uncategorized, Family,
Friend and Vacation.
• The “USB” and “Memory Card” file sources will only appear when a USB
flash drive and a memory card have been inserted to the PhotoFrame.
• For details about the “TIMELINE” album, see "Managing
photos by using the TIMELINE album" on page 22.
2. Press or to select
the Internal Memory
also select USB or
the source of your photos,
album, and then press “OK”. (You
Memory Card, if available.)
such as
can
Managing photos
EN-19
Philips Digital PhotoFrame
The screen shows all the photos that are available on the internal
memory.
3. If there are more than one page, you can press or to go to
the previous or next page to browse photos (If not, skip this step.)
4. Press “OK” to enable the selection mark
5. Press or to move to the photo you wish to select, and then
press “OK” to confirm the selection. The selected photo will have
a selection mark.
Repeat Step 6 to select more photos as desired.
6. Press “MENU”
If you wish to select all the photos shown on the current page, select
All” in the pop-up menu and press "OK". Then proceed to Step 7.
“Select
7. From the pop-up menu, press or to select Tag It, and then
press “OK”
EN-20
Managing photos

Philips Digital PhotoFrame
8. Select the destination album for the photos to be stored
Removing photos from an album
1. In the PHOTO ALBUMS menu, press or to select
an album from which you want to remove the photos,
and then press “OK”. The screen shows the photos in the
album.
2. Press “OK” to enable the selection mark
3. Press or to move to the photo you wish to select, and
then press “OK” to confirm the selection.
The selected photo will have a selection mark.
Repeat Step 3 to select more photos as desired.
4. Press “MENU”.
If you wish to select all the photos shown on the current page, select
“Select All” in the pop-up menu and press“OK”. Then proceed to
Step 5.
5.From the pop-up menu, press or to select
Uncategorized, and then press “OK”.
The photos will be removed from the album, but will not be
deleted from the internal memory.
Managing photos
EN-21
Philips Digital PhotoFrame
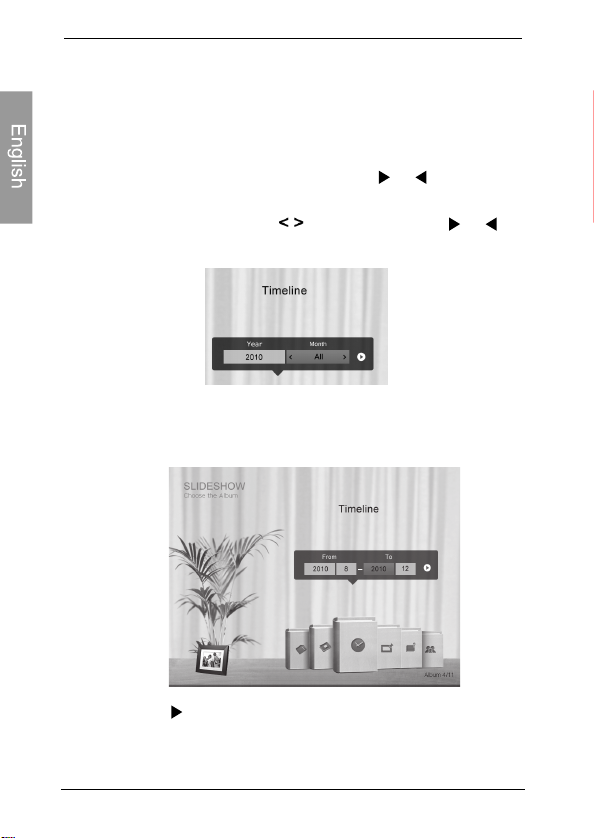
Managing photos by using the TIMELINE
album
In PHOTO ALBUMS, you can use the TIMELINE album to
search for photos on the internal memory according to the time
span specified.
1. In the PHOTO ALBUMS menu, press or to select
TIMELINE, and then press “OK”
2. Press “OK”. When the marks appear, press or to
adjust the settings in the Year field, and then press again.
In this step, you can also search for photos taken in a specific
period of time under the TIMELINE album by pressing MENU
and selecting the time frame.
3. Press to move to the Month field, and repeat Step 2 to
adjust the settings.
EN-22
Managing photos
Philips Digital PhotoFrame
4. Press to move to , and then press “OK” to start
playback.
The photos taken in the time span you specified above will
appear on the screen.
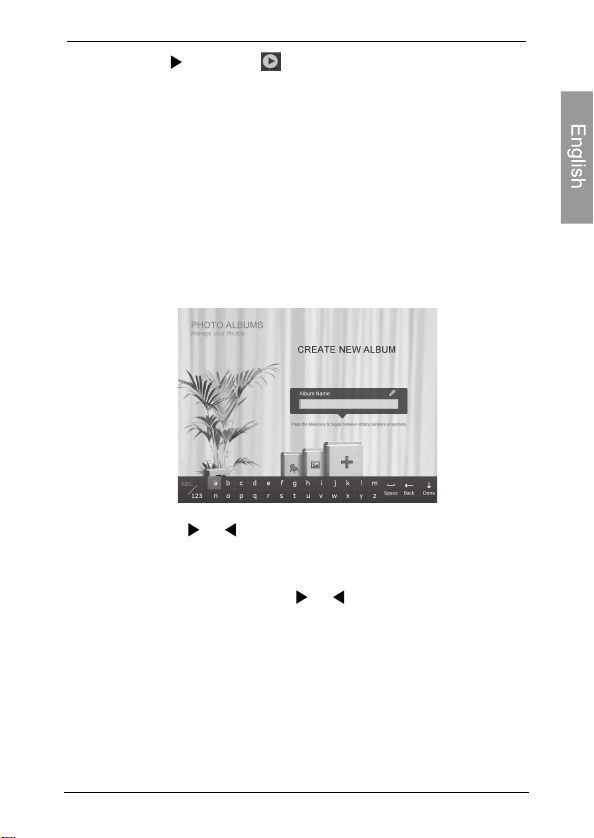
Creating a new album
1. In the PHOTO ALBUMS menu, press “OK” to select “+”,
and then press “OK” to create album.
2. In the Album Name field that appears, use the on-screen
keyboard to enter a desired name.
Press or to select a letter, and then press “OK”
to enter the letter.
Press MENU to toggle between letters and numbers.
To add a space, press or to move to Space, and
then press “OK”.
3. Now the new album is created.
The PhotoFrame allows you to create up to 12 custom albums.
Managing photos
EN-23

Philips Digital PhotoFrame
Modifying an album
1. In the PHOTO ALBUMS menu, press or to select
an album for which you wish to modify the album name,
and then press MENU .
2. Select , and then press “OK”
3. In the Album Name field that appears, use the on-screen
keyboard to enter a desired name.
4. Once you have finished editing the album name, press
ESC to exit.
Modify Name
Deleting an album
1. In the PHOTO ALBUMS menu, press or to select an
album that you wish to delete, then press MENU.
2. Select Delete Album, and then press “OK”.
Default albums including TIMELINE, Pre-install,
Family, Friends and Vacation cannot be deleted.
Uncategorized,
Using other options in the PHOTO
ALBUMS menu
Deleting photos
1. In the PHOTO ALBUMS menu, press or to select an
album, and then press “OK”.
2. Press “OK” to enable the selection mark
3. Press or to move to the photo you wish to select, and
then press “OK” to confirm the selection.
The selected photo will have a selection mark.
Repeat Step 3 to select more photos as desired.
EN-24
Managing photos
Philips Digital PhotoFrame
4. Press MENU.
If you wish to select all the photos shown on the current page, select
“Select All” in the pop-up menu and
Step 5.
5. From the pop-up menu, press or to select Delete,
and then press “OK”.
“OK”. Then proceed to
press
Rotating photos
From the pop-up menu, press or to select Rotate, and then
press “OK”. The photo will be rotated 90 degrees clockwise.
Repeat Step above if you wish to rotate the photo into other
angles.
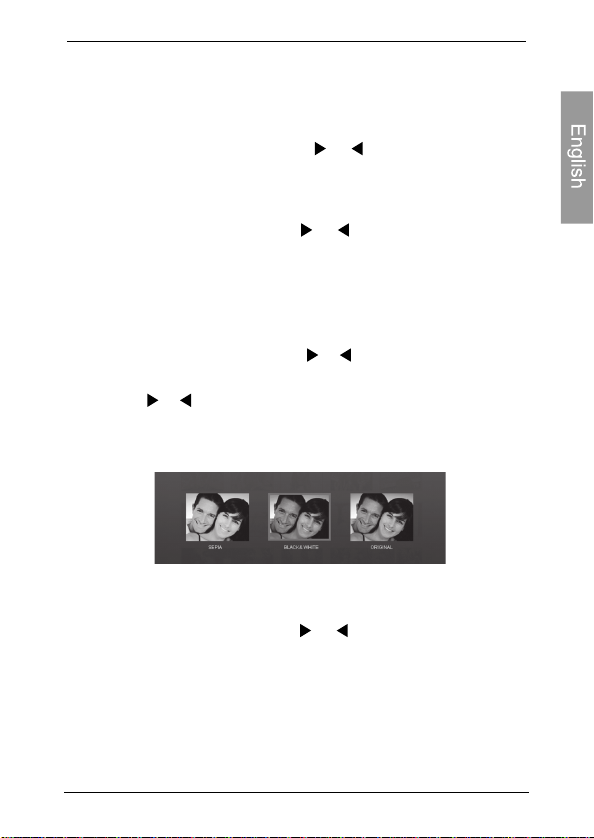
Applying photo effects
From the pop-up menu, press or to select Photo Effects,
and then press “OK”.
Press or to select the effect you wish to apply to the
selected photo, including SEPIA, ORIGINAL and BLACK
& WHITE, and then press “OK”.
Viewing photos
1. In the main menu, press or to select SLIDESHOW,
and then press “OK”
The “USB” and “Memory Card” albums only appear when a USB flash
drive and a memory card have been inserted to the PhotoFrame.
Viewing photos
EN-25

Philips Digital PhotoFrame
2. Press or to select the album that contains the photos
you wish to display in slideshow, and then press “OK”
If you wish to pause the slideshow, press “OK”
3. To configure slideshow settings, press MENU to display
the pop-up menu. You can adjust the settings below.
Transition Effect: selects the transition effect you wish to
apply to the slideshow.
Slideshow Interval: selects the slideshow interval between
photos.
EN-26
Viewing photos

Philips Digital PhotoFrame
Play mode: selects sequent or random order of the playback.
The default transition effect “Pan & Zoom” does not allow
customized
Brightness: selects the level of screen brightness.
Contrast: selects the level of contrast.
Saturation: selects the level of saturation.
interval settings.
Running a slideshow by using the
TIMELINE album
1. In the SLIDESHOW menu, press or to select
TIMELINE, and then press “OK”.
2. In the pop-up screen, specify a time span to include
the photos you wish to display in slideshow.
In this step, you can also search for photos taken in a
specific period of time under the TIMELINE album by
pressing MENU and selecting the time frame.
Viewing photos
EN-27

Philips Digital PhotoFrame
3. Select , and then press “OK” to start playback.
The TIMELINE feature only applies to photos stored on the
internal memory. Please copy any photos on the USB drive or
memory card to the internal memory if you wish to access this feature.
Using Smart Energy Saver™
The Smart Energy Saver™ menu provides various pre-
defined power-saving options.
1. In the main menu, press or to select Smart Energy
Saver™, and then press “OK”.
2. Press or to select a desired option, and confirm
with “OK”.
For details about the power-saving options, refer to the table
below.
DescriptionOptions
Turns off Smart Energy Saver™ . Off
EN-28
Auto 50%
Saves 50% on backlight power consumption
during nighttime and automatically resumes
normal power consumption during daytime.
Using Smart Energy Saver™

Philips Digital PhotoFrame
DescriptionOptions
Puts the PhotoFrame into sleep mode during
Auto 100%
Save 20%
Save 50%
Customized
Nighttime is defined as hours from 9:00 p.m. to 7:00 a.m..
Daytime is defined as hours from 7:00 a.m. to 9:00 p.m..
Using Smart Energy Saver does not affect the photo quality.
nighttime and automatically resume normal
backlight power consumption during daytime.
Always saves 20% on backlight power consumption.
Always saves 50% on backlight power consumption.
Personalize Smart Energy Saver hours to your
preference.
Using CLOCK (EZ Access button)
Selecting a clock skin
The PhotoFrame provides various preloaded clock and
calendar skins. To set a default clock skin to be displayed
in Clock view, follow the steps below.
1. In the main menu, press or to select CLOCK, and then
press “OK”.
2. Press or to select a desired skin.
Using CLOCK (EZ Access button)
EN-29

Philips Digital PhotoFrame
3. Press MENU and select Default.
4. Press “OK” to set the selected clock skins as default. The
default clock skin will be displayed when ( or )
is pressed
Switching between Clock view and
Slideshow view
You can press to toggle between Clock view and
Slideshow view.
When switching from Clock view to Slideshow view, the Photo
Frame starts the slideshow that was running previously.
If the last slideshow was playing from memory card or USB
and is no longer available, the PhotoFrame will start a
slideshow from the Internal Memory.
Using SCRAPBOOK
Philips SCRAPBOOK feature provides a brand new
user experience in enjoying photo slideshows.
1. In the main menu, press or to select SCRAPBOOK,
and then press “OK”.
2. Press or to select a template, and then press “OK”.
EN-30
Using SCRAPBOOK

Philips Digital PhotoFrame
3.Select an album that contains the photos you wish to display
in slideshow, and then press “OK”.
The PhotoFrame will start to display the photos in slideshow
using the selected template.
Using SETTINGS
The SETTINGS menu allows you to configure the settings of
the PhotoFrame.
1. In the main menu, press or to select SETTI , and
then press "OK".
The Date and Time page appears.
2. Press or to toggle among Date and Time, General
Settings and Information pages.
NG S
Using SETTINGS
EN-31

Philips Digital PhotoFrame
3. Press “OK” to enter a page, and the first option in that page
will be high lighted.
4. Press “OK” again. When the marks appear in the field,
press or to adjust the settings.
5. Press “OK” to exit.
Date and Time page
Item
Date
Time
Mode
On Screen
Clock
Current Time
Zone
Second Time
Zone
Option
-
-
-
On
Off
-
-
General Settings Page
EN-32
Description
Allows you to set the date.
Allows you to set the time.
Allows you to select a time
format (12-hour clock or 24hour clock).
On screen display of the digit
clock during slideshow mode.
Allows you to select the time
zone that matches your current
geographic location.
Allows you to set a second time
zone additionally.
Using SETTINGS

Philips Digital PhotoFrame
Philips Digital PhotoFrame
Item Option
Brightness
Smart Copy
Determines how photos are copied from the
Description
1
2
Allows you to select the level
3
of screen brightness.
4
5
external storage devices to the internal
memory when using the Smart Copy feature.
Resize
Resizes the photos to save memory
space.
Original
Smart
Cropping
Full-screen
Original
English
Language
Spanish
French
Yes Returns all the settings back to
Reset
No system default.
Yes Upgrades the firmware of the
FW Upgrade
No PhotoFrame.
Product Intro
On
Off
Keeps the original file size.
Selects to display photos in original
size or full screen.
Sets up the On-Screen Display
(OSD) language.
The start-up video tutorial for major
features and functions.
Information Page
Item Option
Firmware Version Shows the current firmware version.
-
Total Memory
-
Free Memory
-
Description
Shows the total capacity of the
internal memory.
Shows the remaining capacity of
the internal memory.
Using SETTINGS
EN-33

Philips Digital PhotoFrame
Frequently asked questions
What memory card formats are compatible with the PhotoFrame?
SD/SDHC, MMC, MS, MS PRO and MS Duo are compatible
with the PhotoFrame.
Why do some photos load faster than others?
Higher resolution photos load slower. Using a lower resolution
when taking photos will speed up loading time. Smart Copy™
can be used to resize selected images to decrease loading time.
How does auto rotation work?
The PhotoFrame will display in a landscape mode if placed on
its long side (as shown on your product box). To display your
photos in a portrait mode, rotate the PhotoFrame on it right side.
Why are my photos appearing upside down?
The PhotoFrame is placed upside down. Please rotate the frame.
What types of image files can I view on my PhotoFrame?
The PhotoFrame supports playback of JPEG, BMP images.
Can I connect my PhotoFrame directly to my computer?
You can connect the PhotoFrame directly to your computer via
a mini USB cable.
Will the tagged photos be reset if I pull out the SD card?
No. The Digital PhotoFrame (DPF) will write information into
the MetaData of tagged photos. So the DPF will remember
the photo's album categorization the next time the SD card is
re-inserted to the unit.
The frame slows down significantly on certain photos. What can I do?
This is mainly due to extra processing time needed to decode
very large size high resolution files. The DPF's Smart Copy
(Resize by default) feature will automatically resize the file based
on the unit's screen resolution and will significantly reduce the
size of the photo and eliminate this issue. However, please
EN-34
Frequently asked questions

Philips Digital PhotoFrame
Philips Digital PhotoFrame
always keep a copy of the original photos on the computer.
The frame froze and will not respond, what can I do?
If the frame freezes, it is easy to restart by unplugging from
power, then press power button again.
Why isn't the TIMELINE feature accessible for photos on
my USB drive?
The TIMELINE feature only applies to photos stored on the
internal memory Please copy any photos on the USB drive
to the internal memory if you wish to access this feature.
Why can't I tag my photos in my SD card to any albums?
Please check that your SD card is not locked because the
DPF will need to be able write information onto the files in
order to tag to Album.
This equipment has been tested and found to comply with the limits for a
Class B digital device, pursuant to Part 15 of the FCC Rules. These
limits are designed to provide reasonable protection against harmful inter
ference in a residential installation. This equipment generates, uses,and
can radiate radio frequency energy and, if not installed and used in accor
dance with the instructions, may causeharmful interference to radio
communications. However, there is no guarantee that interference will
not occur in a particular installation. If this equipment does cause
harmfulinterference to radio or television reception, which can be
determined by turning the equipment off and on, the user is encouraged
to try to correct the interference by one or more of the following measures:
Regulation and compliance
EN-35

Philips Digital PhotoFrame
Reorient or relocate the receiving antenna.
Increase the separation between the equipment and receiver.
Connect the equipment into an outlet on a circuit different from that to
which the receiver is connected.
Consult the dealer or an experienced radio/TV technician for help.
Warning: Any changes or modification not expressly approved
by the party responsible for compliance could void the user's
authority to operate the equipment.
This device complies with Part 15 of the FCC Rules. Operation
is subject to the following two conditions: (1) This device may
not cause harmful interference, and (2) This device must
accept any interference received, including interference that
may cause undesired operation.
Recycling
To minimize harm to the environment, the batteries supplied with the
PhotoFrame do not contain mercury or nickelcadmium. If possible,
when disposing of batteries, use recycling means available in your area.
The PhotoFrame uses materials that can be recycled. To minimize the
amount of waste in the environment, check your area for companies
that will recover used televisions for dismantling and collection of
reusable materials, or contact your dealer for recycling tips.
Please dispose of the carton and packing material through the proper waste
disposal management in your area.
* Visit www.recycle.philips.com for more information.
GiiNii International
7060, Koll Center Parkway,
Suite 340 Pleasanton, CA 94566
1-877-784-0999
EN-36
Regulation and compliance

Philips Digital PhotoFrame
Appendix
Specifications
Specifications are subject to change without prior notice
Model
Screen Size 7" 8" 10"
Backlight type LED LED LED
Aspect ratio 16:9 4:3 4:3/16:9
Panel interface Digital Digital Digital
Screen resolution 800x480 800x600 800x600/1024x600
Built-in internal
memory(for data
storage)
Supported memory
card formats
Supported image
format
USB port Mini USB, USB
USB 1.1/2.0
compliant
Memory card slots 5-in-1 card slot 5-in-1 card slot 5-in-1 card slot
Input power AC100-240V AC100-240V AC100-240V
Output power DC 5V, 1A DC 5V, 1A DC 5V, 2A
Automatic photo
rotation (with built-in
sensor)
Back stand Foldable Foldable Foldable
Language support English, French
Plug & Play
Compatibility
Remote control
Paper Mat
Bonus Mat
7"
128MB 128MB 128MB
SD/SDHC, MMC,
MS, MS PRO,
MS Duo
JPEG, BMP JPEG, BMP JPEG, BMP
host
Yes Ye s Ye s
Yes Ye s Ye s
Yes Ye s Ye sClock
and Spanish
Windows7/XP
/Vista/2000/
MacOS X
No
Yes
No No No
8"
SD/SDHC, MMC,
MS, MS PRO,
MS Duo
Mini USB, USB
host
English, French
and Spanish
Windows7/XP
/Vista/2000/
MacOS X
Yes
Yes Yes
10"
SD/SDHC, MMC,
MS, MS PRO,
MS Duo
Mini USB, USB
host
English, French
and Spanish
Windows7/XP
/Vista/2000/
MacOS X
Yes
Appendix
EN-37

Philips Digital PhotoFrame
<Memo>
EN-38
Appendix

PhotoFrame digital Philips
Copyright
1inguna parte de esta publicación puede ser reproducida,
transmitida, transcripta, almacenada en un sistema de
recuperación o traducida a ningún idioma o lenguaMe informático
de ninguna forma ni con ningún método, ya sea éste electrónico,
mecánico, magnético, óptico, químico, manual o cualquier otro,
sin el consentimiento previo por escrito de la empresa.
Limitación de responsabilidad
La empresa no otorga garantía alguna, de manera explícita o
implícita, con respecto al contenido de este documento y
renuncia expresamente a cualquier garantía, comerciabilidad o
adecuación para un propósito en particular. Además, la empresa
se reserva el derecho de revisar esta publicación y realizar
modificaciones periódicamente en el contenido de este
documento sin la obligación de notificar a nadie sobre dichos
cambios o revisiones.
Instrucciones de seguridad
Antes de utilizar el PhotoFrame, lea detenidamente y siga las
instrucciones que aparecen a continuación.
Conserve este manual del usuario para consulta futura.
Antes de utilizar el producto, lea detenidamente las
instrucciones de seguridad y funcionamiento. Se deberán
tener en cuenta todas las instrucciones que aparecen en el
producto y en las instrucciones de funcionamiento.
1o coloque este producto baMo la luz solar directa o cerca de
fuentes de calor, por eMemplo en un automóvil cerrado ubicado
al sol o en una ubicación cercana a una estufa. La cubierta
exterior del producto podría deformarse y los sofisticados
sensores internos podrían sufrir daños causados por el calor
excesivo.
1o utilice este producto cerca del agua o baMo la lluvia ni permita
que ingresen líquidos al mismo. El agua y la humedad podrían
causar cortocircuitos de los componentes electrónicos y provocar
un funcionamiento defectuoso.
Copyright
Español
ES-i

PhotoFrame digital Philips
• No utilice este producto cerca de fuentes electromagnéticas
potentes, tales como un horno a microondas. La interferencia
electromagnética podría causar un funcionamiento defectuoso
de este producto.
• No deje caer el producto ni lo someta a impactos/vibraciones.
Los impactos fuertes podrían dañar los componentes internos.
• No inserte en las ranuras para tarjetas de memoria de este
Español
producto objetos que no sean las tarjetas de memoria
compatibles. Los objetos extraños podrían dañar fácilmente
los contactos metálicos ubicados en el interior de las ranuras.
• No utilice un adaptador de alimentación desconocido o que no
sea el que se suministra con el PhotoFrame. La conexión del
producto a un adaptador de alimentación desconocido es
sumamente peligrosa y podría causar un incendio o explosión.
• No corte, doble, modifique, coloque objetos pesados encima
ni pise el cable del adaptador de alimentación. De lo contrario,
podría dañarse el aislamiento externo y ello derivar en un
cortocircuito o incendio.
• Si existieran olores extraños o calor provenientes de este
producto u otro signo de funcionamiento defectuoso, desconecte
de inmediato el PhotoFrame de la alimentación y póngase en
contacto con el distribuidor para su inspección o servicio técnico.
• Utilice un paño suave para limpiar la superficie de la pantalla.
No utilice limpiadores líquidos o limpiadores para vidrios.
• Si ingresara al producto una sustancia extraña o agua,
apáguelo de inmediato y desconecte el adaptador de
alimentación. Luego, extraiga la sustancia extraña o el agua y
envíe el producto al centro de servicio técnico más cercano.
• No intente desarmar ni modificar el producto. No existen
piezas dentro del producto que el usuario pueda reparar, y
cualquier modificación no autorizada anulará la garantía.
• A pesar de que el panel LCD está fabricado con tecnología de
alta precisión y posee un 99,99% o más de píxeles efectivos,
es posible que aparezcan de manera constante en el panel
LCD puntos de luz negros o brillantes (rojos, azules o verdes).
Ésta es una característica estructural del panel LCD y no
representa un funcionamiento defectuoso.
ES-ii
Instrucciones de seguridad

PhotoFrame digital Philips
Tabla de contenido
Características principales………………………………........
Elementos incluidos en la caja………………………………..
Generalidades………………………………………………........
Vista derecha…………………………………………………...
Vista posterior ………………………………………………….
Funcionamiento del PhotoFrame…………………………….
Utilización de los botones de control……………………......
Utilización del control remoto (8" y 10" modelos sólo)
Comienzo …………………………………................................
Paso 1: Utilización del pedestal trasero ajustable ………..
Paso 2: Conexión de la alimentación eléctrica…………….
Paso 3: Primer uso………………………………..................
Paso 4: Configuración básica……………………………......
Selección de un idioma………………………...................
Configuración de la fecha y hora………………………….
Paso 5: Copiado de fotografías a la memoria interna…….
Paso 6: Conexión del PhotoFrame a una computadora….
Paso 7: Reemplazo de la esterilla de papel .……..............
Utilización del menú principal …………………...…….........
Gestión de las fotografías …………………… ………………
Copiado manual de fotografías a la memoria interna…….
Rotulación de fotografías en un álbum.…………………….
Remoción de fotografías de un álbum……………………
Gestión de las fotografías utilizando el album
CRONOGRAMA …..........................................................
Creación de un nuevo álbum…………………………………
Modificación de un álbum……………………………...........
Eliminación de un álbum……………………………………..
1
2
3
3
4
5
6
7
9
10
10
11
11
11
11
12
13
14
16
17
17
19
21
22
23
24
24
Tabla de contenido
ES-iii

PhotoFrame digital Philips
Utilización de otras opciones en el menú ÁLBUM DE
FOTOGRAFÍAS………………………………..........................
Eliminación de fotografías…………………….........................
Rotación de fotografías ……………………............................
Aplicación de efectos fotográficos……………………………..
Visualización de fotografías……………………………………
Español
Ejecución de una presentación de diapositivas utilizando
el álbum CRONOGRAMA…..................................................
Utilización del Economizador inteligente de energía™…...
Utilización de RELOJ (botón de acceso a EZ)…..................
Selección de un tema del reloj …………...............................
Conmutación entre Vista de reloj y Vista de presentación….
Utilización del ÁLBUM DE RECORTES……………………....
Utilización de CONFIGURACIÓN………………………………
Página de Fecha y hora………………………………………...
Página Configuración general………………………………….
Página de información………………………………………….
Preguntas frecuentes…………………………………..............
Regulación y cumplimiento…………………………………....
Reciclaje…………………………………..................................
Apéndice………………………………………………………......
Especificaciones.……………………………………….............
24
24
25
25
25
27
28
29
29
30
30
31
32
33
34
34
35
36
37
37
ES-iv
Tabla de contenido

PhotoFrame digital Philips
Estimado cliente:
Gracias por adquirir nuestro PhotoFrame digital Philips para
su hogar. Este producto le permitirá visualizar su biblioteca de
imágenes digitales en crecimiento con una calidad asombrosa,
y además compartir estupendos recuerdos con amigos y
familiares.
Para aprovechar al máximo su nuevo producto Philips, lea
detenidamente todo este manual del usuario antes de utilizarlo.
Características principales
El PhotoFrame digital posee las siguientes características:
Pantalla nítida y brillante.
Le permite exhibir fotografías que estén almacenadas en la
memoria interna, una tarjeta de memoria o una unidad flash
USB.
Le permite seleccionar una opción de ahorro de energía
preferida para el PhotoFrame utilizando la función
Economizador inteligente de energía™.
Le permite utilizar álbumes para administrar y ordenar sus
fotografías con facilidad.
Le permite exhibir fotografías en forma de presentación de
diapositivas utilizando diversos tipos de plantillas disponibles
en el ÈLBU0 'E 5EC25TES.
Incluye menús de información en pantalla 2S', por sus
siglas en inglés en varios idiomas.
Funciones de reloj y calendario.
Español
Características principales
ES-1

PhotoFrame digital Philips
Elementos incluidos en la caja
Abra con cuidado la caja y asegúrese de que contenga los
siguientes elementos:
1. PhotoFrame digital x 1
2. Adaptador de alimentación de CA x 1
Español
3. Control remoto x 1 (8" y 10" modelos sólo)
4. Guía de inicio rápido x 1
5. Manual del usuario x 1
6. Tarjeta de registro x 1
7. Tarjeta de garantía x 1
8. Control remote hook and loop tape x 1
User Menue
1
5 6 7
Registration Card
2
3 4
La apariencia real del producto puede variar de aquella que
aparece en las ilustraciones de este manual del usuario.
Los accesorios disponi les podr an variar en unci n de la
re i n en la que se adquiera el oto rame.
El control remoto no est incluido en los modelo
ES-2
Elementos incluidos en la caja
8
s 7”.

PhotoFrame digital Philips
Generalidades
Vista derecha
2
3
7
5
4
6
Descripción
No.
Pedestal trasero ajustable
1
Botón de encendido
2
Para encender/apagar el PhotoFrame presione el Botón de encendido.
Puerto USB
3
Permite insertar una unidad flash USB.
• Reproducir las fotografías almacenadas en la unidad insertada
• Copiar fotografías desde la unidad insertada hacia el PhotoFrame.
4
Puerto mini USB
Le permite conectar el PhotoFrame a una computadora para administrar
los archivos presentes en la memoria interna del mismo.
Ranura para tarjetas de memoria
5
Permite tarjetas de memoria SD™/SDHC™, MultiMediaCard™ (MMC),
Memory Stick™ (MS), Memory Stick PRO™ (MS PRO), Memory Stick
Duo™ (MS Duo)
• Reproducir las fotografías almacenadas en la tarjeta
insertada.
• Copiar fotografías desde la tarjeta insertada hacia el PhotoFrame.
6
Conector hembra de alimentación eléctrica
Conecte un extremo del adaptador de alimentación CA al conector de
alimentación y enchufe el otro extremo a un tomacorriente.
7
Recomenda el control remoto de almacenaje
Utilice el hook and loop tape que incluiye para guardar el mando a
distancia.
1
Español
Vista derecha
ES-3

PhotoFrame digital Philips
Vista posterior
Español
7
8
1
2
3
4
5
ES-4
9
DescripciónNo.
1
Botón MENÚ
Para obtener más información, consulte "Utilización de los
botones de control" en página 6.
2
Botón de acceso a EZ
Para obtener más información, consulte "Utilización de los
botones de control" en página 6.
3
Botón ESC (botón ESCAPE)
Para obtener más información, consulte "Utilización de los
botones de control" en página 6.
Botón Rueda de desplazamiento / OK
4
Para obtener más información, consulte "Utilización de los
botones de control" en página 6.
5
Ranura de seguridad Kensington®
Puede colocar en esta ranura un cable con un candado
antirrobo Kensington® para evitar posibles robos.
66
Vista posterior

PhotoFrame digital Philips
No.
Descripción
6
Sistema de candado EZ
Se pueden utilizar los tornillos del candado EZ para bloquear o
desbloquear el marco de madera.
Orificio para montaje en pared (para montaje apaisado en pared)
7
Le permite colgar el PhotoFrame horizontalmente en una pared.
Orificio para montaje en pared (para montaje vertical en pared)
8
Le permite colgar el PhotoFrame verticalmente en una pared.
Recomenda el control remoto de almacenaje.
9
Utilice el hook and loop tape que incluiye para guardar el mando a
distancia.
Funcionamiento del PhotoFrame
Para operar el PhotoFrame se puede utilizar los botones de
control ubicados en la parte posterior o en el control remoto
suministrado.
• En este manual del usuario, las instrucciones o ejemplos
proporcionados se basan en la utilización del control remoto.
Para obtener más información sobre cómo utilizar los botones
de control, consulte "Utilización de los botones de control" en
página 6.
Español
• El control remoto sólo se suministra con los modelos
Funcionamiento del PhotoFrame
8" y 10 ".
ES-5

PhotoFrame digital Philips
Utilización de los botones de control
Español
ES-6
No.
1
2
3
4
Icon
ESC
OK
MENU
Descripción
Botón ESC (botón ESCAPE)
Cancela la operación en curso y/o regresa
a la página anterior.
Botón Rueda de desplazamiento / OK
• Presione este botón para ingresar o
confirmar su operación/selección
• Desplace este botón hacia la izquierda
para seleccionar el elemento anterior
• Desplace este botón hacia la derecha
para seleccionar el elemento siguiente
pour sélectionner l'élément suivant.
Botón MENÚ
Exhibe el menú emergente.
Botón de acceso a EZ
Conmuta entre Vista de reloj y Vista de
presentación.
Utilización de los botones de control
PhotoFrame digital Philips
Utilización del control remoto
(8" y 10" modelos sólo)
Coloque el hook and loop tape en la parte posterior del
PhotoFrame del control remoto de almacenaje,por favor.
hook and loop tape1
hook and loop tape2
Utilización del control remoto
ES-7

8” y 10”.

PhotoFrame digital Philips
Comienzo
Paso 1: Utilización del pedestal
trasero ajustable
1. Retire suavemente el pedestal trasero tal como se muestra
a continuación.
2. Para colocar el PhotoFrame horizontal o verticalmente, se
puede girar el pedestal trasero alineando la marca
triangular con los puntos redondeados (1 o 2).
Español
Comienzo
ES-9

PhotoFrame digital Philips
3. Retire el pedestal trasero y ajuste de acuerdo con el ángulo de
visión preferido.
Español
Se recomienda colocar el PhotoFrame de forma horizontal, debido a
•
que esta orientación proporciona la mejor experiencia de
• Utlizando los agujeros para montaje en pared, usted puede colgar el
PhotoFrame horizontal o verticalmente en la pared.
Paso 2: Conexión de la alimentación
Eléctrica
1. Coloque el PhotoFrame sobre una superficie plana.
2. Conecte el adaptador de alimentación eléctrica tal como se
ndica a continuación (1), y presione el Botón de encendido
para activar el PhotoFrame (2).
•
Los sistemas de alimentación eléctrica y los tipos de enchufe pueden variar de
acuerdo con su país/región.
• Para apagar el PhotoFrame, presione el Botón de encendido.
ES-10
Comienzo

PhotoFrame digital Philips
Paso 3: Primer uso
Para ayudarle a aprovechar al máximo su PhotoFrame,
instalamos un tutorial de video que se comienza a reproducir
automáticamente cuando usted enciende su aparato por primera
vez. Para cancelar el video repetitivo y comenzar a reproducir sus
propias fotografías, presione alguno de los botones de la parte
trasera. Siga el proceso de cinco pasos para familiarizarse con la
manera en que funcionan los botones de control. Este sencillo
proceso queda automáticamente deshabilitado luego del primer
uso. Usted puede activar el tutorial yendo a CONFIGURACIÓN
Paso 4: Configuración básica
Seleccione un idioma y configure la fecha y la hora durante el
primer uso del PhotoFrame.e.
Selección de un idioma
1. En el menú principal, presione o para seleccionar
CONFIGURACIÓN , y luego presione “OK” .
2. Presione Aparecerá la página Configuración general.
3. Presione “OK”, Presione para pasar a Idioma, y luego
presione “OK” de nuevo.
4. Presione o para seleccionar un idioma que
deseeutilizar, y luego presione “OK” .
5. Presione “ESC” para salir.
Configuración de la fecha y hora
1. En el menú principal, Presione o para seleccionar
CONFIGURACIÓN , y luego presione “OK”.
Comienzo
Español
ES-11

PhotoFrame digital Philips
Aparecerá la página Fecha y hora.
2. Presione”OK” para resaltar el campo Año,, Presione or
para seleccionar un año, y luego presione “OK” para confirmar
la configuración.Appuyez sur “OK”pour mettre en surbrillance
le champ.
3. Presione para pasar al campo Mes Presione“OK” para
Español
resaltarlo,Presione o para seleccionar un mes, y luego
presione “OK” para confirmar la configuración
4. Repita el Paso 3 para los campos restantes, entre ellos
Fecha, Hora, Minuto, Modo, El reloj de la pantalla Zona horaria
actual y Segunda zona horaria.
5. Presione “ESC” para salir.
Paso 5: Copiado de fotografías a la memoria
interna
Cuando inserte una tarjeta de memoria o una unidad flash USB,
se le pedirá que copie todas las fotografías a la memoria interna.
Si “Copiado inteligente” se configura a “Redimensionar” en
“Configuración general”, las fotografías serán redimensionadas a la
definición de pantalla cuando sean copiadas a la memoria interna para
optimizar la capacidad de almacenamiento. Mantenga una copia de las
fotografías originales en su tarjeta de memoria o unidad flash USB.
Para copiar todas las fotografías almacenadas en la tarjeta de
memoria (o en la unidad flash USB), seleccione la marca de
verificación y Presione “OK” para continuar
Para ver las fotografías sin copiarlas al PhotoFrame,
seleccione la marca en forma de cruz y presione “OK”. El
PhotoFrame comenzará la reproducción automática de las
ES-12
Comienzo

PhotoFrame digital Philips
fotografías almacenadas en la tarjeta de memoria o unidad
flash USB insertadas.
•No extraiga la tarjeta de memoria o la unidad flash USB antes de
que finalice el proceso de copiado.
• Si los archivos que se desea copiar desde la tarjeta de memoria o
unidad flash USB ya existen en la memoria interna del PhotoFrame,
serán sobrescritos cuando se seleccione para continuar.
Formatos de tarjetas de memoria compatibles:
1
Formatos de tarjeta de memoria
SD/SDHC
Tarjeta MultimediaCard (MMC)
Memory Stick (MS)
Memory Stick PRO (MS PRO)
Memory Stick Duo (MS Duo)
Unidad flash USB
• Les spécifications de capacités maximumsénumérées ci-dessussont sujettes à
changement sans préavis.
Capacidad máxima
32GB
1GB
4GB
2GB
2GB
16GB
Peso 6: Conexión del PhotoFrame a una
computadora
Se puede conectar el PhotoFrame a una computadora con un
cable mini USB (a ser adquirido por separado) para administrar
de manera sencilla los archivos en la memoria interna del
PhotoFrame.
1. Inicie la computadora y encienda el PhotoFrame.
2. Conecte el extremo más pequeño del cable USB al puerto
mini USB del PhotoFrame.
3. Conecte el otro extremo del cable USB a un puerto USB de la
computadora, asegurándose de que los conectores estén
debidamente insertados.
4. Una vez conectado, el PhotoFrame ingresará automáticamente
al modo de transferencia a la PC.
5. Cuando la computadora haya detectado el PhotoFrame, éste
aparecerá en “Mi PC” como “Disco extraíble”.
Comienzo
ES-13
Español

PhotoFrame digital Philips
6. Ahora usted puede transferir libremente los archivos del
PhotoFrame tal como lo haría en otra unidad de disco.
Español
• Vous pouvez copier des photos depuis votre ordinateur vers le
PhotoFrame et vice versa.
• Les fichiers enregistrés sur les cartes mémoire et la clé USB ne peuvent
être vus ni modifiés via la connexion USB.
Paso 7: Reemplazo de la esterilla de papel
Su PhotoFrame puede venir con una o más esterillas de papel de
regalo según sea el modelo adquirido. Se puede reemplazar la
esterilla de papel existente con otra suministrada (si estuviera
disponible). Para reemplazar la esterilla de papel suministrada
siga las instrucciones listadas a continuación.
1. En una mesa plana, coloque el PhotoFrame apuntando hacia
abajo sobre un paño suave. Tenga cuidado de no rayar el
equipo.
2. Gire los tornillos del candado EZ ubicados en la parte trasera
del PhotoFrame hacia la posición “DESBLOQUEAR”, y luego
levantecuidadosamente el aparato desde el armazón de
madera.
ES-14
Comienzo

PhotoFrame digital Philips
3. Retire la esterilla de papel existente.
4. Instale la esterilla de papel de regalo suministrada.
5. Instale el PhotoFrame en el marco de madera, y fíjelo
apretando los tornillos del candado EZ hacia la posición
“BLOQUEO”..
Español
Comienzo
ES-15

PhotoFrame digital Philips
Utilización del menú principal
Cuando se enciende el PhotoFrame, aparece el siguiente menú
principal. Se puede presionar o para seleccionar el menú
deseado, y luego presionar”OK” para ingresar al menú
seleccionado.
Español
DescripciónNo.
Economizador inteligente de energía™
1
Vous permet de sélectionner une option d'économie d'énergie pour le
PhotoFrame. Voir «Utilisation de la fonction Smart Energy Saver™»
à la page 28pour plus de détails.
RELOJ
2
Le permite configurar sus temas del reloj favoritos.
Para obtener más información, consulte "Utilización de
RELOJ (botón de acceso a EZ)" en página 29.
ÁLBUM DE RECORTES
3
Le permite exhibir fotografías en el modo Presentación de
diapositivas con varias plantillas precargadas. Para obtener más
información, consulte "Utilización del ÁLBUM DE RECORTES"
en página 30.
ES-16
Utilización del menú principal

PhotoFrame digital Philips
DescripciónNo.
4
PRESENTACIÓN DE DIAPOSITIVAS
Le permite exhibir las fotografías en el modo de presentación
de diapositivas. Para obtener más información, consulte
"Visualización de otografías" en página 25.
5
ÁLBUM DE FOTOGRAFÍAS
Le permite administrar sus fotografías y ordenarlas
utilizando diversos álbumes. Para obtener más información,
consulte "Gestión de las fotografías" en página 17.
CONFIGURACIÓN
6
Le permite configurar los parámetros del PhotoFrame. Para
obtener más información, consulte "Utilización de
CONFIGURACIÓN" en página 31.
Gestión de las fotografías
Se puede utilizar el menú ÁLBUMES DE FOTOS para
administrar fotografías ubicadas en la memoria interna, la t
arjeta de memoria o la unidad flash USB.
Copiado manual de fotografías a la
memoria interna
Además de la función automática “Copiado inteligente”,
se puede copiar fotografías manualmente desde dispositivos
externos de almacenamiento a la memoria interna y rotular
fotografías en un álbum. El siguiente ejemplo demuestra cómo
copiar fotografías desde una tarjeta de memoria a la memoria
interna y rotular fotografías en un álbum.
1. Inserte una tarjeta de memoria compatible en la ranura para
tarjetas de memoria.
2. En el menú principal, presione o para seleccionar
ÁLBUMES DE FOTOS y luego presione “OK”
Español
Gestión de las fotografías
ES-17

PhotoFrame digital Philips
3. Seleccione Tarjeta de memoria y luego presione “OK”, La
pantalla muestra las fotografías contenidas en su tarjeta de
memoria.
Español
4. Si hubiera más de una página, puede presionar o para
pasar a la página anterior o siguiente para revisar fotografías.
(De lo contrario, omita este paso.)
5. Presione “OK” para habilitar la marca de selección.
6. Presione o par pasar a la fotografía que desea seleccionar, y
luego Presione “OK” para confirmar la selección. La fotografía
seleccionada tendrá una marca de selección azul.
Repita el paso 6 para seleccionar más fotografías tal como se desee. Si desea
seleccionar todas las fotografías mostradas en la página actual, seleccione “
Seleccionar todas” en el menú emergente y presione “OK”. y luego continúe con
el Paso 7.
7. Presione “Menu”
8. En el menú emergente, Presione o para seleccionar
Rotularla, y luegoPresione “OK”
ES-18
Gestión de las fotografías

PhotoFrame digital Philips
9. Seleccione un álbum predeterminado deseado para copiar
las fotografías a ese álbum especificado y luego ordenarlas.
Rotulación de fotografías en un Album
1. En el menú principal, presione o t para seleccionar
ÁLBUMES DE FOTOS y luego presione “OK”.
La pantalla mostrará:
• los archivos fuente, que incluyen los de la tarjeta USB,
la Tarjeta de memoria y la Memoria interna.
• los álbumes predeterminados en la memoria interna,
entre ellos CRONOGRAMA, Biblioteca
preinstalada, No categorizado, Familia, Amigos y
Vacaciones.
• Los archivos fuente “USB” y “Tarjeta de memoria” sólo aparecerán
cuando hayan sido insertadas en el PhotoFrame una unidad flash
USB y una tarjeta de memoria.
• Para obtener detalles sobre el álbum “CRONOGRAMA”, consulte
"Gestión de las fotografías utilizando el álbum CRONOGRAMA" en
página 30.
2. Presione o para seleccionar la fuente de sus fotografías,
tal como el álbum Memoria interna, y luego presione “OK”.
(Usted también puede seleccionar USB o Tarjeta de memoria,
si estuvieran disponibles.)
Gestión de las fotografías
Español
ES-19

PhotoFrame digital Philips
Español
La pantalla muestra todas las fotografías que se encuentran
disponibles en la memoria interna..
3. Si hubiera más de una página, puede presionar o para pasar
a la página anterior o siguiente para revisar fotografías. (De lo
contrario, omita este paso.)
4. Presione“OK” para habilitar la marca de selección, que se
exhibirá en anaranjado.
5. Presione o para pasar a la fotografía que desea seleccionar,
y luego presione “OK” para confirmar la selección. La fotografía
seleccionada tendrá una marca de selección azul.
Repita el paso 5 para seleccionar más fotografías tal como se desee
6. Presione “MENU”
Si desea seleccionar todas las fotografías mostradas en la página actual,
seleccione “Seleccionar todas” en el menú emergente y presione”OK”. Luego
continúe al paso 7.
7. En el menú emergente, Presione o para seleccionar
Rotularla, y luego presione “OK”
ES-20
Gestión de las fotografías

PhotoFrame digital Philips
8. Seleccione el álbum de destino para almacenar las fotos.
Remoción de fotografías de un álbum
1. En el menú ÁLBUMES DE FOTOS, Presione o para
seleccionar un álbum en el cual desea eliminar las
fotografías, y luego presione “OK”. La pantalla mostrará
las fotografías presentes en el álbum
2. Presione“OK” para habilitar la marca de selección.
3. Presione o para pasar a la fotografía que desea
seleccionar, y luego presione “OK” para confirmar la
selección.
Repita el paso 3 para seleccionar más fotografías tal como se desee.
4. Presione “MENU”.
Si desea seleccionar todas las fotografías mostradas en la página
actual, seleccione “Seleccionar todas” en el menú emergente y
presione “OK”. Luego continúe al paso 5.
5En el menú emergente, presione o para seleccionar
No categorizado, y luego presione “OK”
Las fotografías serán removidas del álbum, pero no serán
eliminadas de la memoria interna.
Español
Gestión de las fotografías
ES-21

PhotoFrame digital Philips
Gestión de las fotografías utilizando el
álbum CRONOGRAMA
En ÁLBUMES DE FOTOS, usted puede utilizar el álbum
CRONOGRAMA para buscar fotografías en la memoria interna
de acuerdo con el intervalo de tiempo especificado.
Español
1. En el menú ÁLBUMES DE FOTOS, presione o para
seleccionar CRONOGRAMA y luego presione “OK”
2. Presione “OK”. Cuando aparezcan las marcas < >, presione
or para ajustar los parámetros del campo Año, y luego
oprima “OK” de nuevo
En este paso usted puede también buscar fotografías tomadas
en un período específico de tiempo en el álbum
CRONOGRAMA presionando MENU y seleccionando el intervalo
3. Presione para pasar al campo Mes, y repita el Paso 2
para ajustar los parámetros..
ES-22
Gestión de las fotografías

PhotoFrame digital Philips
4. Presione para pasar a , y luego presione “OK” para
comenzar a reproducir.
Aparecerán en la pantalla las fotografías tomadas en el
intervalo de tiempo que fue especificado más arriba.
Creating a new album
1. En el menú FOTOS ÁLBUMES, pulse o selecciona "
+", y luego presione "OK" para crear el álbum.
2. En el campo Nombre del álbum que aparece, utilice el
teclado en pantalla para ingresar el nombre deseado.
Presione o para seleccionar una letra, y luego
presione “OK” para ingresar la letra..
Para alternar entre letras y números presione “MENU”
Para añadir un espacio, presione o para
pasar a Espacio y luego presione “OK”.
ione “OK”
3. Ahora el nuevo álbum está creado
El PhotoFrame le permite crear hasta 12 álbumes personalizados
Español
Gestión de las fotografías
ES-23

PhotoFrame digital Philips
Modificación de un álbum
1. En el menú ÁLBUMES DE FOTOS, presione o para
seleccionar un álbum del cual desea modificar su nombre, y
luego presione MENU .
Español
2. Seleccione Editar nombre y luego presione “OK”.
3. En el campo Nombre del álbum que aparece, utilice el
teclado en pantalla para ingresar el nombre deseado..
4. Una vez que haya terminado de editar el nombre del álbum,
Presione” ESC” para salir.
Eliminación de un álbum
1. En el menú ÁLBUMES DE FOTOS, presione o para
seleccionar un álbum que desee eliminar, y luego presione
“MENU”.
2. Seleccione Eliminar álbum y luego presione “OK”.
Los álbumes predeterminados, entre ellos CRONOGRAMA, Biblioteca
preinstalada, No categorizado, Familia, Amigos y Vacaciones, no pueden
ser eliminados.
Se utilice otras opciones en el menú de
los álbumes de fotos
Suppression de photos
1. En el menú de los álbumes de fotos, presione o
seleccione un álbum, y luego presione "OK".
2. Presione "OK" para activar la marca de selección, que
muestra en el color naranja.
3. Presione o mueva la foto que quiere seleccionar y,
a continuación. Presione "OK" para confirmar la selección.
La foto selecciona a una marca de selección.
Repita el paso 3 para seleccionar más fotos como desee.
ES-24
Gestión de las fotografías

PhotoFrame digital Philips
4. Presione MENÚ
Si quiere seleccionar todas las fotos que se muestran en la página actual,
seleccione "select all" en el menú pop-up y Presione "OK". A continuar,
vaya al paso 5.
5. Desde el menú pop-up, presione o selecciona eliminar.A
continuar, presione "OK".
Se gira las fotos
Desde el menú pop-up, presione o girar, y luego presione
"OK". La foto se gira 90 grados hacia la derecha.
Repita el paso anterior, si quiere girar la foto en otros ángulos.
Se aplica los efectos a las fotos
Desde el menú pop-up,presione o para selecciona los
efectos a las fotos. A continuar, presione "OK".
Presione o para seleccionar el efecto que quiere aplicar a
la foto seleccionada. Incluye SEPIA, ORIGINAL EN BLANCO Y
NEGRO. A continuar, presione "OK".
Español
Visualización de fotografías
1. En el menú principal, presione o t para seleccionar
PRESENTACIÓN DE DIAPOSITIVAS y luego presione
“OK”
Los álbumes “USB” y “Tarjeta de memoria” sólo aparecerán cuando
hayan sido insertadas en el PhotoFrame una unidad flash USB y una
tarjeta de memoria.
Visualización de fotografías
ES-25

PhotoFrame digital Philips
2. Presione o para seleccionar el álbum que contiene
las fotografías que desea exhibir en la presentación de
diapositivas, y luego presione “OK”
Español
Si desea pausar la presentación de diapositivas, presione
“OK”
3. Para configurar los parámetros de la presentación de
diapositivas, presione “MENU” para exhibir el menú
emergente. Usted puede ajustar los siguientes parámetros.
Efecto de transición: selecciona el efecto de la transición que
se desea aplicar a la presentación de diapositivas.
Intervalo de la presentación de diapositivas: selecciona el
intervalo de tiempo que transcurre entre cada fotografía.
ES-26
Visualización de fotografías

PhotoFrame digital Philips
Modo de reproducción: selecciona el subsiguiente o al azar
de la reproducción..
El efecto de transición predeterminado “Panear y ampliar” no permite
configuraciones de intervalos personalizadas.
Brillo: selecciona el nivel de brillo de la pantalla.
Contraste: selecciona el nivel de contraste.
Saturation: sélectionne le niveau de saturation.
Ejecución de una presentación de
diapositivas utilizando el álbum
CRONOGRAMA
1. En el menú PRESENTACIÓN DE DIAPOSITIVAS, Presione
or para seleccionar CRONOGRAMA y luego presione “OK”.
2. En la pantalla emergente, especifique un intervalo de tiempo
que incluya las fotografías que desea exhibir en la presentación
de diapositivas.
En este paso usted puede también buscar fotografías tomadas
en un período específico de tiempo en el álbum CRONOGRAMA
presionando “ MENU” y seleccionando el intervalo.
Español
Visualización de fotografías
ES-27

PhotoFrame digital Philips
3. Seleccione , y luego presione “OK” para iniciar la.
la característica de TIMELINE solamente se aplica a las fotos internas.
Copie cualquier foto en la unidad USB o tarjeta de memoria por favor, si
quiere acceder a esta función.
Utilización del Economizador
Español
inteligente de energía
El menú del del Economizador inteligente de energía™
suministra varias opciones predefinidas de ahorro de energía
1. En el menú principal, presione o para seleccionar
Economizador inteligente de energía™, y luego presione
“OK”.
2. Presione o para seleccionar una opción deseada, y
confirme con “OK”.
Para obtener detalles sobre las opciones de ahorro de energía,
consulte la tabla siguiente.
DescripciónOpción
Désactive la fonction Smart Energy Saver™. Apagado
Automático
50%
Ahorra el 50% de consumo de energía durante la
noche y reanuda automáticamente el consumo
normal de energía durante el día.
ES-28
Utilización del Economizador inteligente de energía

PhotoFrame digital Philips
DescriptionOptions
Automático
100%
Ahorrar 20%
Ahorrar 50%
Establece
El horario nocturno se define como el intervalo comprendido entre
las : p.m. y las : a.m.
El horario diurno se define como el intervalo comprendido entre las
: a.m. y las : p.m.
La utilización del Planificador automático del economizador
inteligente de energía no afecta la calidad de las fotografías.
Pone el PhotoFrame en el modo de reposo durante la
noche y reanuda automáticamente el consumo normal
de energía durante el día.
Economiza siempre un 20% de consumo deenergía..
Economiza siempre un 50% de consumo deenergía..
Personaliza a ahorrar las horas de energía fina que
están de acuerdo con sus preferencias.
Utilización de RELOJ (botón de
acceso a EZ)
Selección de un tema del reloj
El PhotoFrame suministra varias opciones de temas del reloj y
calendario precargadas. Para establecer un tema del reloj
predeterminado a ser exhibido en la vista Reloj, siga los pasos
detallados a continuación.
1. En el menú principal, presione o ara seleccionar
RELOJ Y CALENDARIO y luego presione “OK”.
2. Presione o para seleccionar un tema deseado
Español
Utilización de RELOJ (botón de acceso a EZ)
ES-29

PhotoFrame digital Philips
3. Presione MENUy seleccione Predeterminado.
4. Presione “OK” tpara establecer como predeterminado el tema
del reloj seleccionado.. Cuando se presione ( o )
se exhibirá el tema de reloj predeterminado
Conmutación entre Vista de reloj y Vista
Español
de presentación
Se puede presionar para alternar entre la vista Reloj y
la vista Presentación de diapositivas.
Cuando se pasa de Vista reloj a Vista de presentación, el PhotoFrame
inicia la presentación de diapositivas que fue ejecutada previamente.
Si la última presentación de diapositivas fue ejecutada desde la
tarjeta de memoria o la unidad USB y ya no está disponible, el
PhotoFrame comenzará una presentación de diapositivas desde la
memoria interna.
Utilización del ÁLBUM DE
RECORTES
La función ÁLBUM DE RECORTES de Philips brinda una
experiencia de usuario totalmente nueva de disfrute de
presentaciones de diapositivas.
1. En el menú principal, presione o para seleccionar
ÁLBUM DE RECORTES y luego presione “OK”.
2. Presione o para alternar entre las páginas Fecha y
hora, Configuración general e Información.
ES-30
Utilización del ÁLBUM DE RECORTES

PhotoFrame digital Philips
3. Seleccione un álbum que contenga las fotografías que desea
exhibir en la presentación de diapositivas, y luego presione
“OK”.
El PhotoFrame comenzará a exhibir las fotografías en el modo
Presentación de diapositivas utilizando la plantilla
seleccionada
Utilización de CONFIGURACIÓN
El menú CONFIGURACIÓN le permite configurar los
parámetros del PhotoFrame.
1. In the main menu, Presione or to select SETTINGS,
and then Presione. The Date and Time page appears.
2. Presione o para alternar entre las páginas Fecha y
hora, Configuración general e Información.
Español
Utilización de CONFIGURACIÓN
ES-31

PhotoFrame digital Philips
3. Presione el botón "OK" para acceder a un menú, y la primera
esta opción del menú se iluminará.
4. Presione “OK” de nuevo. Cuando aparezcan en el campo las
marcas < >, Presione o para ajustar los parámetros.
5. Presione “OK” para salir.
Español
Página de Fecha y hora
Elemento Opción
Fecha
Hora
Modo
El reloj de la
pantalla
Zona horaria
actual
Segunda
zona horaria
ES-32
-
-
-
Activé
Désactivé
-
-
Descripción
Le permite configurar la fecha.
Le permite configurar la hora.
Le permite seleccionar un formato
de hora (reloj de 12 horas o de 24
horas).
En la pantalla visualize el reloj
del dígito durante utiliza el modo
de presentación .
Le permite seleccionar la zona
horaria que coincida con la de su
ubicación geográfica actual.
Le permite configurar adicionalmente
una segundazona horaria.
Utilización de CONFIGURACIÓN

PhotoFrame digital Philips
Página Configuración general
Elemento Opción
1
Brillo
Copiado
inteligente
2
3
4
5
Determina cómo son copiadas las fotografías
desde los dispositivos externos de
almacenamiento a la memoria interna cuando
se utiliza la función Copiado inteligente.
Redimensionar
Descripción
Le permite seleccionar el nivel
de brillo de la pantalla.
Redimensiona las fotografíaspara ahorrar
espacio de memoria.
Español
Normal
Rognage
intelligent
Langue
Réinitialiser
Mise à niveau
FW
Introduction
au produit
Pantalla completa
Original
Inglés
Español
Francés
Sí
No
Sí
No
Encendido
Désactivé
Menu Information
Elemento Opción
Versión
Memoria total
Memoria libre
Utilización de CONFIGURACIÓN
Mantiene el tamaño de archivo original.
Permite seleccionar si las fotografías se
exhibirán en su tamaño original o en
pantalla completa.
Permite configurar el idioma del menú de
información enpantalla (OSD).
Retorna todos los parámetros a los valores
predeterminados del sistema.
Actualiza el firmware del PhotoFrame.
El tutorial de video inicial sobre las
principales características y funciones.
Descripción
Muestra la versión de firmware actual.
-
Muestra la capacidad total de la memoria
-
interna.
Muestra la capacidad remanente de la
-
memoria interna.
ES-33

PhotoFrame digital Philips
Preguntas frecuentes
Qué formatos de tarjeta de memoria son compatibles con el PhotoFrame?
Son compatibles con el PhotoFrame los formatos de tarjetas
de memoria SD/SDHC, MMC, MS, MS PRO y MS Duo
Por qué algunas fotografías se cargan más rápido queotras?
Las fotografías con mayor resolución se cargan más
lentamente. Si se utiliza una resolución más baja al tomar las
Español
fotografías, se reducirá el tiempo de carga. Copiado
inteligente™ puede ser utilizado para redimensionar las
imágenes seleccionadas a fin de reducir el tiempo de la carga.
Cómo funciona la rotación automática?
Le PhotoFrame affichera les photos en mode paysage
(à l'italienne) s'il est posé à l'horizontale (tel qu'illustré sur la
boîtedu produit). Pour afficher vos photos en mode portrait (à
la française), tournez le PhotoFrame sur son coté droit.
Por qué mis fotografías aparecen al revés?
El PhotoFrame está colocado al revés. Gire el armazón.
Qué tipos de archivo de imagen puedo visualizar en miPhotoFrame?
El PhotoFrame admite la reproducción de imágenes JPEG,
BMP..
Puedo conectar mi PhotoFrame directamente a micomputadora?
Usted puede conectar el PhotoFrame directamente a su
computadora a través de un cable mini USB..
Serán reinicializadas las fotografías rotuladas si extraigo
la tarjeta SD?
No El PhotoFrame Digital (PFD) escribirá información a los
metadatos de las fotografías rotuladas. De modo que el PFD
recordará la categorización en álbum de las fotografías la
próxima vez que la tarjeta SD sea reinsertada en el aparato.
En ciertas fotografías el PhotoFrame se vuelve significativamente más
lento. ¿Qué puedo hacer?
adicional requerido para decodificar archivos de alta definición
de tamaño muy grande. La función de recortado inteligente del
PFD (Redimensionar de manera predeterminada)
redimensionará automáticamente el archivo basada en la
definición de pantalla del aparato y reducirá
ES-34
Preguntas frecuentes

PhotoFrame digital Philips
considerablemente el tamaño de la fotografía, lo que eliminará
este problema. Sin embargo, mantenga siempre en la
computadora una copia de las fotografías originales.
El cuadro se congeló y no responde; ¿qué puedo hacer?
Si el cuadro se congelara, es sencillo reiniciar el portarretratos
desenchufándolo del tomacorriente y luego presionando de
nuevo el botón de encendido.
le débranchant de l'alimentation électrique, puis en appuyant
à nouveau sur le bouton d'alimentation.
¿Por qué razón no está accesible la función CRONOGRAMA para las
fotografías presentes en mi unidad USB?
La función CRONOGRAMA sólo rige para las fotografías
almacenadas en la tarjeta de memoria del lector de tarjetas. Si
desea acceder a esta función, copie todas las fotografías
presentes en la unidad USB a la tarjeta de memoria insertada.
¿Por qué no puedo rotular las fotografías de mi tarjeta SD
en ningún álbum?
Verifique que su tarjeta SD no esté bloqueada, porque para
rotular un álbum el PFD deberá poder escribir la información
a los archivos.
Regulación y Cumplimiento
Comisión Federal de Comunicaciones (FCC)
Este aparato ha sido probado y se ha comprobado que cumple con los
límites establecidos para los dispositivos digitales Clase B, según la
sección 15 de las normas de la FCC. Estos límites se han establecido
para ofrecer una protección razonable contra interferencias cuando el
aparato funciona en un entorno residencial. Este aparato genera, utiliza
y puede irradiar energía de radiofrecuencia y, si no se instala y utiliza
de acuerdo con las instrucciones, puede ocasionar interferencias en
las comunicaciones por radio. Sin embargo, no existe garantía alguna
de que no se produzcan interferencias en una instalación específica.
Si este aparato produce interferencias en la recepción de radio o
televisión, lo que se puede determinar apagando y encendiendo el
aparato, se recomienda al usuario que intente corregir la interferencia
realizando una o varias de las siguientes acciones::
Preguntas frecuentes
Español
ES-35

PhotoFrame digital Philips
cambie la orientación o ubicación de la antena receptora.
aumente la separación entre el aparato y el receptor..
conecte el aparato a una fuente de alimentación que esté en
un circuito distinto de aquél donde está conectado el receptor.
consulte con el distribuidor o con un técnico especializado en
radio/TV para obtener más sugerencias.
De alerta: Cualquier cambio o modificación no aprobados
Español
expresamente por la parte responsible de la compatibilidad puede
anular el derecho del usuario a utilizar el aparato.
Este dispositivo cumple con la Parte 15 de las Normas de la FCC.
La operación está sujeta a las siguientes dos condiciones: (1)
Este dispositivo no puede causar interferencias perjudiciales y (2)
Este dispositivo debe aceptar cualquier interferencia recibida,
incluyendo interferencias que puedan causar un funcionamiento
no deseado.
GiiNii International
7060, Koll Center Parkway,
Suite 340 Pleasanton, CA 94566
1-877-784-0999
Reciclaje
Para minimizar los daños al medio ambiente, las pilas suministradas
con este PhotoFrame no contienen mercurio ni níquel-cadmio. De ser
posible, al desechar las pilas utilice los medios de reciclaje disponibles
en su región.
El PhotoFrame utiliza materiales que pueden reciclarse. Para minimizar
la cantidad de desechos en el medio ambiente, compruebe si existen
en su área empresas que recolecten televisores usados para el
desarmado y recopilación de los materiales reutilizables o póngase en
contacto con su vendedor para obtener información sobre el reciclaje.
Deseche el cartón y los materiales de embalaje a través de la gestión
correcta de desecho de residuos de su área.
* Visit www.recycle.philips.com for more information.
ES-36
Regulación y Cumplimiento

PhotoFrame digital Philips
Apéndice
Especificaciones
Las especificaciones están sujetas a cambios sin aviso previo.
Modelo
Tamaño de la pantalla
Tipo de iluminación de fondo
Relación de aspecto
Panel de interfaz
Definición de pantalla
Memoria interna integrada
(para el almacenamiento
de datos)
Formatos de tarjeta de
Memoria admitidos
Formatos de archivo de
Imagen admitidos
Puerto USB
Compatible con USB 1.1/2.0
Ranuras para tarjetas de
memoria
Alimentación eléctrica de
entrada
Potencia de salida
Rotación automática de fotos
(Con sensor de inclinación)
Reloj/Calendario
Pedestal trasero
Idiomas admitidos
Compatibilidad plug &play
Control remoto
Esterilla de papel
Esterilla de regalo
7"
7"
LED
16:9
Digital
800x480
128MB
SD/SDHC,
MMC, MS, MS
PRO, MS Duo
JPEG, BMP
Mini USB, Servid
or USB
sí
Ranura para tarjetas
de memoria 5 en 1
AC100-240V
DC 5V, 1A
sí
sí
plegable
Inglés, francés y
español
Windows7/XP
/Vista/2000/
MacOS X
No
sí
No
8"
8"
LED
4:3
Digital
800x600 800x600/1024x600
128MB 128MB
SD/SDHC,
MMC, MS, MS
PRO, MS Duo
JPEG, BMP JPEG, BMP
Mini USB, Servid
or USB
sí sí
Ranura para tarjetas
de memoria 5 en 1
AC100-240V AC100-240V
DC 5V, 1A DC 5V, 2A
sí sí
sí sí
plegable plegable
Inglés, francés y
español
Windows7/XP
/Vista/2000/
MacOS X
sí
sí sí
No No
10"
10"
LED
4:3/16:9
Digital
SD/SDHC,
MMC, MS, MS
PRO, MS Duo
Mini USB, Servid
or USB
Ranura para tarjetas
de memoria 5 en 1
Inglés, francés y
español
Windows7/XP
/Vista/2000/
MacOS X
sí
Español
Apéndice
ES-37

FR-i

Cadre photo numérique PhotoFrame
N'utilisez pas cet appareil près de fortes sources
électromagnétiques, comme un four à micro-ondes.
/'interférence électromagnétique peut causer un mauvais
fonctionnement de cet appareil.
N'échappez pas ou ne faites pas subir de chocs ou de
vibrations à cet appareil. /es impacts forts peuvent
endommager les composants intérieurs de ce produit
N'insérez pas d'obMets autres que les cartes mémoires
compatibles dans les logements de carte mémoire de cet
appareil. /es surfaces de contact métalliques à l'intérieur des
logements peuvent facilement être endommagées par des
corps étrangers
N'utilisez pas d'adaptateur de courant autre que celui fourni
avec le PhotoFrame. /e branchement de cet appareil à tout
autre adaptateur de courant est très dangereux et peut
provoquer un incendie ou une explosion.
evitez de couper, plier ou modifier le cordon et ne placez pas
d'obMets lourds ou ne marchez pas sur le cordon de l'adaptateur
de courant. /'isolation externe pourrait être endommagée, ce
qui risquerait d'entravner un court-circuit ou un incendie.
6i vous sentez que l'appareil émet une odeur étrange, de la
chaleur, ou que celui-ci présente des signes de mauvais
fonctionnement, débranchez immédiatement le PhotoFrame
de son alimentation électrique et communiquez avec votre
revendeur pour une inspection ou de l'assistance.
8tilisez un chiffon lisse et doux pour nettoyer la surface de
l'écran.N'utilisez pas de nettoyants liquides ou de nettoyants
pour vitres.
Ne tentez pas de démonter ou modifier cet appareil. /'intérieur
de cet appareil ne comprend aucune pièce dont l'entretien peut
être effectué par l'utilisateur et toute modification non autorisée
annulera la garantie.
0ême si l'écran à cristaux liquides est fabriqué grkce à une
technologie de haute précision et est composé de pixels
efficaces à , ou plus, des points noirs ou des points
brilliants de lumière rouge, bleu ou vert peuvent apparavtre
fréquemment sur l'écran à cristaux liquides. Ce phénomène tient
à une propriété structurale des écrans à cristaux liquides et ne
représente pas un mauvais fonctionnement.
Consignes de sécurité
FR-ii


Cadre photo numérique PhotoFrame
Changement de l'orientation d'une photo……………………..
Ajouter des effets photo………………………………………....
Affichage des photos…………………………………………....
Lancer un diaporama avec l'album TIMELINE …..................
Utilisation de la fonction Smart Energy Saver™……………
Utilisation du menu HORLOGE (bouton EZ Access)………
Sélection d'une apparence d'affichage de l'horloge………….
Basculement entre les modes horloge et diaporama……… .
Utilisation de l'ALBUM PERSONNALISÉ……………………..
Utilisation du menu RÉGLAGES……………………………….
Menu Date et heure…………………………………………......
Menu Réglages généraux………………………………………
Menu Information………………………………………………...
Foire aux questions…………………………………..................
Réglementation et conformité………………………………….
Recyclage…………………………………………………………...
Annexe………………………………………………………..........
Spécifications techniques ………………………………………
25
25
25
27
28
29
29
30
30
31
32
33
34
34
35
36
37
37
Table des matières
FR-iv

Cadre photo numérique PhotoFrame
Cher client:
Merci d'avoir intégré le cadre photo numérique PhotoFrame à
votre espace intérieur. Vous serez maintenant capable
d'afficher votre photothèque numérique avec une clarté
sensationnelle et de partager des souvenirs formidables
avec vos amis et votre famille.
Pour retirer le maximum de votre nouvel appareil Philips,
veuillez lire le présent mode d'emploi en entier avant
utilisation.
Caractéristiques principales
Ce cadre photo numérique PhotoFrame présente les
caractéristiques suivantes:
Affichage clair et brillant.
Vous permet d'afficher des photos stockées dans une
mémoire interne, sur une carte mémoire ou une clé USB.
Vous offre un choix d'options d'économie d'énergie grâce
à la fonction Smart Energy Saver™ (gestion d'énergie
intelligente)
Vous permet de gérer et classer facilement vos photos par
albums.
Vous permet d'afficher des photos en diaporamas selon
différents modèles disponibles dans le menu ALBUM
PERSONNALISÉ.
Menus d'affichage à l'écran (OSD) multilingues.
Fonctions d'horloge et de calendrier.
FR-1
Caractéristiques principales
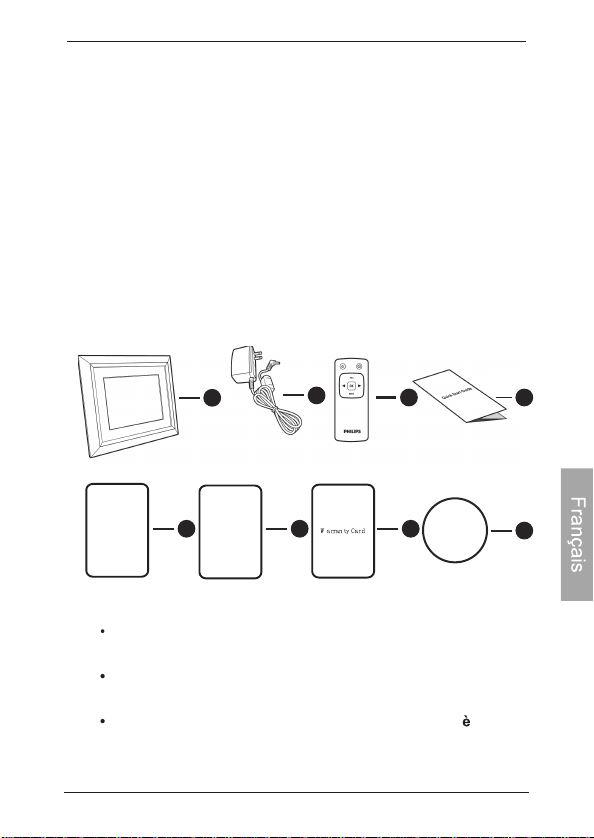
Cadre photo numérique PhotoFrame
Contenu de l'emballage
Ouvrez soigneusement l'emballage et assurez-vous d'avoir les
articles suivants:
1. Cadre photo numérique PhotoFrame x 1
2. Adaptateur de courant CA x 1
3. Télécommande x 1 (8” et 10” modèles seulement)
4. Guide de démarrage rapide x 1
5. Mode d'emploi x 1
6. Carte d'enregistrement x 1
7. Carte de garantie x 1
8. Hook and loop tape pour la télécommande x 1
User Manual
1
5 6 7
Registration Card
2
3 4
Hook and loop tape
L'apparence réelle de l'appareil peut différer des
illustrations trouvées dans le présent mode d'emploi.
Les accessoires disponibles peuvent varier selon la région
où vous avez acheté le cadre photo.
La télécommande n'est pas fournie avec les mod les 7”.
Contenu de l'emballage
8
FR-2

Cadre photo numérique PhotoFrame
Vue d'ensemble
Vue de droite
2
3
5
4
6
Description
Nº
Pied ajustable
1
Bouton d'alimentation
2
Appuyez sur le bouton d'alimentation pour allumer/éteindre le PhotoFrame.
Port USB
3
Permet l'insertion d'un périphérique de stockage USB.
Affichez les photos enregistrées sur le périphérique de stockage inséré.
Copiez des photos à partir d'un périphérique de stockage vers le
PhotoFrame .
4
Mini port USB
Vous permet de connecter le PhotoFrame à un ordinateur pour
gérer les fichiers dans la mémoire interne du PhotoFrame.
5
Logements pour cartes mémoire
Le PhotoFrame prend en charge les cartes de stockage suivantes:
SD™/SDHC™, MultiMediaCard™ (MMC), Memory Stick™ (MS),
Memory Stick PRO™ (MS PRO), Memory Stick Duo™ (MS Duo)
et xD-Picture Card™ (xD).
Affichez les photos enregistrées sur la carte mémoire insérée.
Copiez des photos à partir d'une carte mémoire vers le PhotoFrame .
6
Prise d'alimentation
Branchez une extrémité de l'adaptateur de courant CA dans la
prise d'alimentation
du PhotoFrame et l'autre extrémité dans une prise de courant murale.
7
Stockage de télécommande recommandé
Vous permet de connecter le PhotoFrame à un ordinateur pour
gérer les fichiers dans la mémoire interne du PhotoFrame.
7
1
FR-3
Vue de droite

Cadre photo numérique PhotoFrame
Vue arrière
1
7
8
2
3
4
5
1
2
3
4
5
Vue arrière
9
DescriptionNº.
Bouton MENU
Voir «Utilisation des boutons de commande» à la page 6 pour plus
de détails.
Bouton EZ Access
Voir «Utilisation des boutons de commande» à la page 6
pour plus de détails.
Bouton ESC ( Bouton ÉSCHAP )
Voir «Utilisation des boutons de commande» à la page 6
pour plus de détails.
Roulette de défilement / bouton OK
Voir «Utilisation des boutons de commande» à la page 6
pour plus de détails.
Emplacement pour verrou antivol Kensington®
Vous pouvez fixez un verrou et un câble antivols Kensington®
à cet ancrage afin d'aider à protéger votre PhotoFrame contre
le vol.
66
FR-4

Cadre photo numérique PhotoFrame
Nº.
Description
6
Système de verrouillage EZ Lock
Vous pouvez vous servir des vis de blocage EZ pour verrouiller ou
déverrouiller le cadre en bois.
7
Trou de suspension pour fixation murale à l'italienne
(mode paysage)
Vous permet de suspendre le PhotoFrame horizontalement à un mur.
Trou de suspension pour fixation murale à la française (mode
8
portrait)
Vous permet de suspendre le PhotoFrame verticalement à un mur.
Stockage de télécommande recommandé
9
Utilisez le Hook and loop tape inclus pour sauver votre télécommande
Fonctionnement du PhotoFrame
Vous pouvez contrôler le PhotoFrame à l'aide des boutons de
commande se trouvant à l'arrière du cadre, ou encore en vous
servant de la télécommande fournie avec l'appareil.
Dans le présent mode d'emploi, les consignes ou les exemples
fournis sont basés sur l'utilisation de latélécommande. Pour
savoir comment utiliser les boutons de commande, reportez vous à la section «Utilisation des boutons de commande» à la
page 6 pour en savoir plus.
La télécommande est fournie uniquement avec les modèles
8" et 10".
FR-5
Fonctionnement du PhotoFrame

Cadre photo numérique PhotoFrame
En utilisant les boutons de
commande
Icône
Nº.
ESC
OK
MENU
Fonctionnement du PhotoFrame
Description
Bouton ESC ( Bouton ESCAPE)
Annule l'opération en cours et/ou retourne à
l'écran précédent.
Roulette de défilement / bouton OK
Appuyez sur ce bouton pour entrer ou
confirmer une opération/sélection.
Faites tourner la roulette vers la gauche
pour sélectionner l'élément précédent.
Faites tourner la roulette vers la droite
pour sélectionner l'élément suivant.
Bouton MENU
Fait apparaître le menu contextuel.
Bouton EZ Access
Permet de basculer entre les modes horloge
et diaporama.
FR-6

Cadre photo numérique PhotoFrame
Utilisation de la télécommande
(8" et 10" modèles seulement)
Placez le Hook and loop tape en arrière du PhotoFrame pour
le stockage à distance
Hook and loop tape 1
Hook and loop tape 2
F -7
R
Fonctionnement du PhotoFrame

8” et 10”.

Cadre photo numérique PhotoFrame
Démarrage du PhotoFrame
Étape 1: Utilisation du pied arrière réglable
1. Éjectez doucement le pied arrière tel qu'illustré ci-dessous.
2. Pour placer le PhotoFrame à l'horizontale ou à la verticale,
vous pouvez faire pivoter le pied arrière en alignant la flèche
sur les points (1 ou 2).
FR-9
Démarrage du PhotoFrame

Cadre photo numérique PhotoFrame
3. Tirez le pied arrière et réglez-le en fonction de l'angle de vue
que vous préférez..
Il est recommandé de placer le cadre photo à l'horizontale, car cette
orientation offre une meilleure vue tout en facilitant le contrôle du
PhotoFrame
Vous pouvez suspendre le PhotoFrame horizontalement ou
verticalement à un mur en vous servant des trous de suspension.
Étape 2: Branchement de l'alimentation
1. Placez le PhotoFrame sur une surface plane.
2. Branchez l'adaptateur de courant tel qu'illustré ci-dessous (1),
puis appuyez sur le bouton d'alimentation pour allumer le
PhotoFrame (2).
Les systèmes d'alimentation et les types de fiche peuvent varier selon votre pays
ou région.
Pour éteindre le PhotoFrame, appuyez à nouveau sur le bouton
d'alimentation.
Démarrage du PhotoFrame
FR-10

Cadre photo numérique PhotoFrame
Étape 3: Première utilisation
Afin de vous aider à tirer le maximum de votre PhotoFrame, nous
avons enregistré un tutoriel vidéo qui se lance automatiquement
la première fois que vous allumer l'appareil. Pour interrompre la
lecture en boucle de la vidéo et commencer à afficher vos
propres photos, appuyez sur l'un des boutons situés à l'arrière
ducadre. Suivez la procédure en cinq étapes pour vous
familiariser avec le fonctionnement des boutons de commande.
L'affichage de cette procédure sera automatiquement désactivé
après la première utilisation du PhotoFrame. Vous pouvez activer
l'affichage du tutoriel en accédant au menu RÉGLAGES.
Étape 4: Configuration de base
Sélectionnez la langue d'affichage et réglez la date et l'heure lors
de votre première utilisation du PhotoFrame.
Sélection de la langue d'affichage
1. Dans le menu principal, appuyez sur ou sur pour
sélectionner RÉGLAGES , puis appuyez sur “OK”
2. Appuyez sur Le menu Réglages généraux apparaît.
3. Appuyez sur “OK”puis sur pour accéder à l'option Langue,
puis appuyez à nouveau sur “OK”..
4. Appuyez sur ou sur pour sélectionner la langue
d'affichage que vous désirez, puis appuyez sur “OK”
5. Appuyez sur ESC pour quitter.
Réglage de la date et de l'heure
1. Dans le menu principal, appuyez sur ou sur pour
sélectionner RÉGLAGES , puis appuyez sur “OK”.
Le menu Date et heure apparaît.
FR-11
Démarrage du PhotoFrame

Cadre photo numérique PhotoFrame
2. Appuyez sur “OK”pour mettre en surbrillance le champ
Année, appuyez sur ou pour sélectionner l'année,
puis appuyez sur “OK ” pour confirmer le réglage
3. Appuyez sur pour déplacer le champ de sélection jusqu'au
champ Mois, appuyez sur OK pour mettre en surbrillance le
champ Mois, appuyez sur ou pour sélectionner un mois,
puis appuyez sur OK pour confirmer le réglage.
4. Répétez l'étape 3 pour les autres champs: Date, Heure,
Minutes, Mode, Fuseau horaire actuel et Fuseau horaire
secondaire.
5. Appuyez sur “ESC” pour quitter
Étape 5: Copier des photos vers la mémoire
interne
Lorsque vous insérez une carte mémoire ou une clé USB dans
le PhotoFrame, il vous sera demandé si vous souhaitez copier
toutes les photos vers la mémoire interne.
Si l'option « Copie intelligente » (Smart Copy) sous « Réglages généraux »
est réglée sur « Redimensionner », les photos seront automatiquement
redimensionnées en fonction de la résolution d'écran lorsque copiées
vers la mémoire interne, et ce afin d'optimiser la capacité de stockage de
cette dernière. Veuillez vous assurer de conserver des copies des photos
originales sur votre carte mémoire ou votre clé USB.
Pour copier toutes les photos enregistrées sur la carte mémoire
insérée (ou la clé USB), sélectionnez la coche , puis appuyez
sur “OK” pour confirmer.
Pour afficher des photos sans les copier vers la mémoire interne
du PhotoFrame, sélectionnez la croix , puis appuyez sur “OK”
Le PhotoFrame commencera automatiquement à afficher les
Démarrage du PhotoFrame
FR-12
 Loading...