

Philips SM6685/00 user manual [uk]


EN USER MANUAL
CS UŽIVATELSKÁ PŘIRUČKA
CNR UPUTSTVO ZA KORISNIKE
DA BRUGERVEJLEDNING
DE BENUTZERHANDBUCH
ET KASUTUSJUHEND
ES MANUAL DEL USUARIO
FR MODE D’EMPLOI
HR KORISNIČKI PRIRUČNIK
IT MANUALE UTENTE
LV LIETOT JA ROKASGR MATA
LT NAUDOTOJO VADOVAS
HU FELHASZNÁLÓI KÉZIKÖNYV
NL GEBRUIKSAANWIJZING
NO BRUKERHÅNDBOK
PL INSTRUKCJA OBSŁUGI
PT MANUAL DO UTILIZADOR
RO MANUAL DE UTILIZARE
SQ MANUALI I PËRDORIMIT
SL UPORABNIŠKI PRIROČNIK
SK NÁVOD NA POUŽITIE
SR УПУТСТВО ЗА КОРИШЋЕЊЕ
FI KAYTTÖOPAS
SV ANVÄNDARHANDBOK
EL ΕΓΧΕΙΡΊΔΙΟ ΧΡΉΣΗΣ
BG РЪКОВОДСТВО ЗА ПОТРЕБИТЕЛЯ
MK КОРИСНИЧКО УПАТСТВО
RU РУКОВОДСТВО ПОЛЬЗОВАТЕЛЯ
UK ПОСІБНИК КОРИСТУВАЧА
KK ПАЙДАЛАНУШЫ НҰСҚАУЛЫҒЫ
Le respect du Café
Уважение к кофе
WWW.SAECO.COM/CARE

A
A2A1
A3
A10
A9
A7
A8
A5
A6
A25 A26 A27
A24A23A22A21
A11
A4
A14
A17
A12
A13
A5
A16
A18
A20
A19
A15

C
B
GranAroma Deluxe: SM6685, SM6682, SM6680
Espresso
Cappuccino
Americano
Co ee
Select your drink
Drinks
P
r
o
leSett
Sett
i
ng
sStatusS
ho
p
B1
B2
B3 B4 B5 B6 B8B7
A18A16A21 A26A7 A8 A22A14A1 A10A5A20 A19 A17 A23

English 6
Čeština 26
Crnogorski 46
Dansk 67
Deutsch 87
Eesti 110
Español 130
Français 152
Hrvatski 174
Italiano 195
Latviešu 217
Lietuviškai 238
Magyar 258
Nederlands 279
Norsk 301
Polski 321
Português 343
Română 365
Shqip 386
Slovenščina 408
Slovensky 429
Srpski 450
Suomi 471
Svenska 491
Ελληνικά
511
Български 533
Македонски 556
Русский 579
Українська 603
Қазақша
625

6
English
Contents
Machine overview (Fig. A) ____________________________________________________________________________ 6
Introduction __________________________________________________________________________________________ 7
Adjusting machine settings __________________________________________________________________________ 11
AquaClean water filter _______________________________________________________________________________ 12
Removing and inserting the brew group ____________________________________________________________ 13
Cleaning and maintenance __________________________________________________________________________ 13
Descaling procedure _________________________________________________________________________________ 16
Error codes ___________________________________________________________________________________________ 17
Ordering accessories _________________________________________________________________________________ 18
Software updates ____________________________________________________________________________________ 19
Troubleshooting ______________________________________________________________________________________ 19
Technical specifications______________________________________________________________________________ 24
Declaration of Conformity____________________________________________________________________________ 25
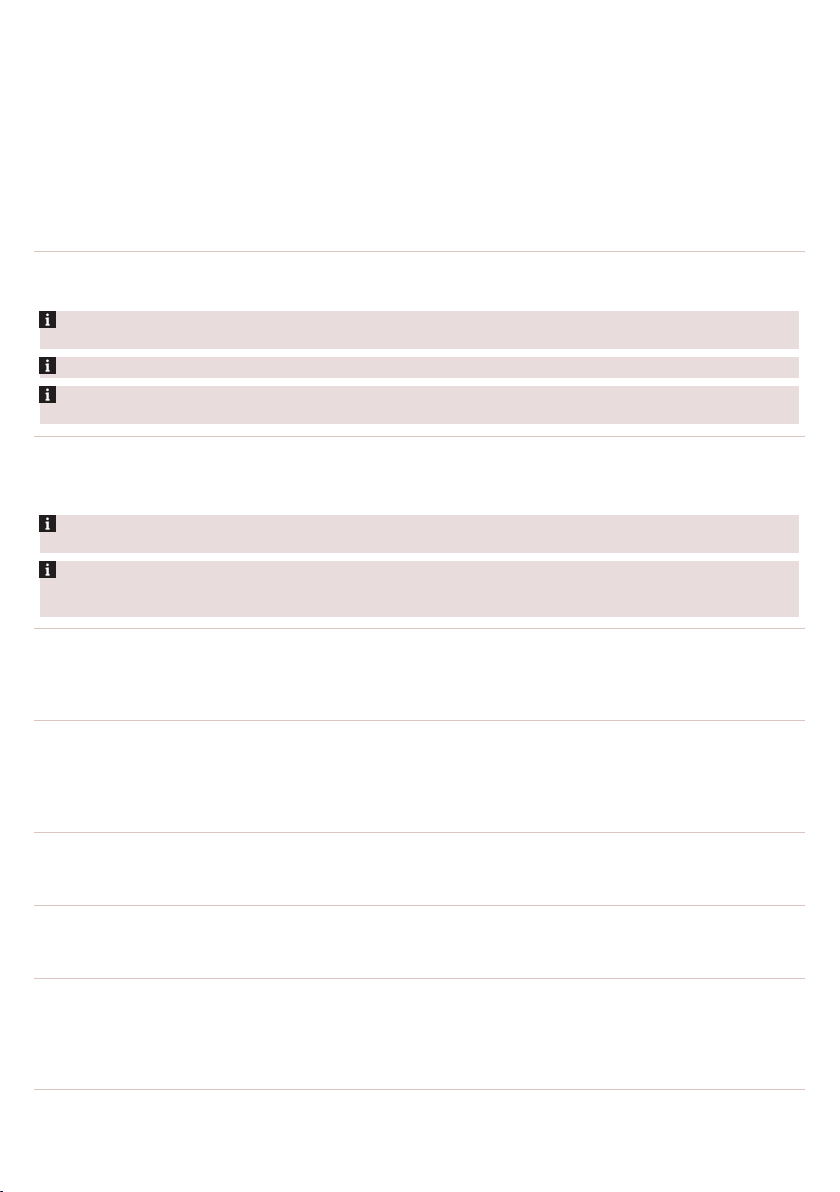
Machine overview (Fig. A)
A1 Lid of bean hopper
A2 Lid of pre-ground coffee compartment
A3 Control panel
A4 Socket for cord
A5 Drip tray
A6 Drip tray release grip
A7 HygieSteam container
A8 HygieSteam cover with milk tube holder
A9 Height-adjustable coffee and milk
dispensing spout
A10 Internal cappuccinatore
A11 Power cord with plug
A12 Grind setting knob (to learn more, visit
www.saeco.com/care)
A13 Bean hopper
A14 Brew group (to learn more, visit
www.saeco.com/care)
A15 Service door
A16 Water tank
A17 Coffee grounds container
A18 Front panel of coffee grounds container
A19 Drip tray cover
A20 'Drip tray full' indicator
Accessories
A21 Milk container
A22 Milk tube
A23 Cleaning brush
A24 Grease tube
A25 AquaClean filter
A26 Measuring spoon
A27 Water hardness test strip
Control panel
Refer to figure B for an overview of all icons. Below you can find the descriptions.
B1 On/off icon
B2 Drinks
B3 Drinks menu
B4 Personal profiles
B5 Machine settings
B6 Status menu
B7 Shop
B8 Start/stop icon

English
Introduction
Congratulations on your purchase of a Saeco full-automatic coffee machine! To fully benefit from the
online support that Saeco offers, you can use the control panel to register your machine via the builtin Wi-Fi connection, or go to www.saeco.com/MyCoffeeMachine and register your product there.
Read the separate safety booklet carefully before you use the machine for the first time and save it for
future reference.
Your Saeco full-automatic coffee machine allows you to connect with your Wi-Fi network to enhance
your coffee experience.
By connecting your machine to your Wi-Fi network, you will be able to:
-
enjoy regular software updates to enhance your user experience
-
make use of the shop functionality, if available in your country
-
you can link your machine to your Amazon account for accessory replenishment, if this option is
available in your country
-
connect to your Alexa home device to make use of voice control, if available in your country
Note: This machine has been tested with coffee. Although it has been carefully cleaned, there may be
some coffee residues left. We guarantee, however, that the machine is absolutely new.
Switching on the machine
Tap the 'on' icon and follow the step-by-step instructions on the control panel.
7
Connecting to Wi-Fi
Connect your coffee machine to a 2.4 GHz 802.11 b/g/n home Wi-Fi network.
Connecting your coffee machine to your home Wi-Fi network, provides you with an enhanced user
experience.
Make sure that the coffee machine and the Wi-Fi router are within range of each other.
Follow the steps below to connect your coffee machine to your Wi-Fi network.
1 Tap the Settings icon and swipe from left to right to find the Wi-Fi icon.
2 Tap the Wi-Fi icon.
3 Follow the steps on the screen to connect your machine to your Wi-Fi network.
You are now ready to start your connected experience.
The machine will perform the automatic rinsing cycle when it is switched on and off via voice
control and when the machine has been inactive for a while and switches off. Please make sure that
the environment of the machine is safe.

8
English
Special functions
Special function Purpose
With CoffeeMaestro you can personalize your coffee by selecting a pre-set
taste profile (Delicato, Intenso, Forte) for your beverage instead of changing
the settings yourself.
HygieSteam function automatically cleans the milk system, removing
microorganisms: use it after brewing cappuccino or other milk-based drinks.
Our durable grinder is made from 100% ceramic to be exceptionally hard and
precise. It can be adjusted to your taste with 12-step levels.
The Maintenance Dashboard gives you a helpful overview and notifies you
with status information on things like that the AquaClean is running low.
Brewing drinks
General steps
To brew a drink, you need to follow a few simple steps.
1 Fill the water tank with tap water and fill the bean hopper with beans.
2 Place one or two cups under the height-adjustable dispensing spout. Slide the dispensing spout
up or down to adjust the height to the size of the cup or glass you are using.
3 Tap the Drinks icon to enter the 'Drinks' menu. Swipe from left to right to select your drink by
tapping on it.
-
Tap the '2x' icon if you want to brew two cups. The machine automatically carries out two
grinding cycles in sequence of the selected drinks.
The '2x' icon is not available for all drinks.

English
4 After selecting a drink you can adjust the settings to your preference by swiping the adjustable bars
up and down.
5 Press the start/stop icon to start brewing the selected drink.
Do not use caramelized or flavored coffee beans.
Support on drink parameters
To get additional information about a specific drink parameter, press and hold an item for 3 seconds.
Brewing milk-based drinks
To brew milk-based drinks, you need to follow a few simple steps.
9
1 Fill the water tank with tap water and fill the bean hopper with beans.
2 Unscrew the lid of the milk container and fill the milk container with milk.
Always use milk coming directly from the fridge for optimal results.
3 Connect the flexible milk tube to the cappuccinatore.
4 Place the metal milk tube in the container.
5 Tap the Drinks icon, scroll and select the milk-based drink icon of your choice.
6 You can adjust the settings to your preference by swiping the adjustable bars up and down.
7 Press the start/stop icon at any time to start brewing the selected drink.
-
For specific drinks, the machine first dispenses milk and then coffee. For a number of other
drinks this is the other way around, the machine will first dispense coffee and then milk.
-
To stop dispensing milk before the machine has dispensed the preset amount, press the
start/stop icon.
-
To stop dispensing the complete drink (milk and coffee) before the machine is finished, press
and hold the start/stop icon.
Directly after dispensing the milk, the 'HygieSteam Shot' is performed. The machine shoots steam
through the internal milk system to rinse it quickly.The metal part of the milk tube may become hot. To
avoid the risk of burns, let it cool down first.
Tip: You can also use a regular milk carton to brew your milk-based drinks. Place the metal milk tube
directly into the milk carton.

10
English
Brewing coffee with pre-ground coffee
To brew coffee with pre-ground coffee, you need to follow a few simple steps.
1 Open the lid of the pre-ground coffee compartment and pour one measuring spoon of pre-ground
coffee into it. Then close the lid.
2 Tap the Drinks icon, scroll from left to right and select your drink.
3 Tap the pre-ground coffee icon.
4 You can adjust the settings to your preference by swiping the adjustable bars up and down.
5 Press the start/stop icon to start brewing the selected drink.
If you select pre-ground coffee, you cannot adjust the coffee strength or brew more than one drink
at the same time.
Dispensing hot water
1 Make sure that the internal cappuccinatore is correctly attached to the machine (Fig. 1).
2 Place a cup under the spout.
3 Tap 'Hot Water' (Fig. 2).
4 Slide the adjustable bars up and down to adjust the hot water quantity or temperature to your
preference (Fig. 3).
5 Press the start/stop icon.
6 To stop dispensing hot water before the machine is finished, press the start/stop icon again.
Personalization
The machine allows you to adjust the settings of a drink to your own preference and to store the
adjusted drink in a personal profile. You can choose your own icon and your own profile name.
Speed up with CoffeeMaestro
Your machine offers the possibility to select taste profiles instead of adjusting all settings separately
with the CoffeeMaestro function. You can choose between Delicato, Intenso and Forte. To select a
CoffeeMaestro taste profile:
1 Tap the drink icon of your choice (Fig. 4).
2 Tap the CoffeeMaestro icon repeatedly (Fig. 5).
-
The main settings of the drink are now adjusted accordingly.
3 Press the start/stop icon to start brewing the drink.
Personalize your drink with the CoffeeEqualizer Touch function
After selecting a drink, the CoffeeEqualizer Touch function is activated automatically, allowing you to
adjust the drink settings. Long press on each of the items on the display to activate the help function
and receive further information.

English
With the CoffeeEqualizer Touch function you can adjust the following settings:
1 Aroma strength
2 Coffee quantity
3 Milk quantity
4 Water quantity
Note: It depends on the drink you choose which settings you can adjust.
5 Drink temperature
6 Foam amount
7 You can also decide to prepare 1 or 2 cups
8 The order of first dispensing coffee or milk
Save your favorite drinks in a profile
The machine allows you to adjust the settings of a drink to your own preference and to store the
adjusted drink in a personal profile. You can select a profile and store a recipe using the profiles.
You can create a profile and add a drink using the profile icon.
1 Tap the profile icon on the main menu (Fig. 6).
2 Tap the Plus icon (Fig. 7).
3 Type your name and select your favorite icon.
4 You are ready to add a drink. Tap the drink icon of your choice.
5 Personalize the drink via the CoffeeEqualizer Touch or the CoffeeMaestro function.
6 Tap on the 'Safe to profile' icon to store it in your personal profile (Fig. 8).
Extra shot (ExtraShot)
Your machine offers you the possibility to add an extra shot of Ristretto to your coffee and milk drinks,
for example if you want to have a stronger coffee.
1 Place a cup under the spout.
2 Tap one of the one-touch drinks icons to select a drink (Fig. 4).
3 Slide the adjustable bar up to set the strength to the top level and select the ExtraShot function
(Fig. 9).
4 Then press the start/stop icon to start brewing the drink.
5 To stop dispensing the drink before the machine has finished, press the start/stop icon again.
When you have selected the ExtraShot function, you can only brew one coffee at the time.
The extra shot function is not available for all drinks.
11
Adjusting machine settings
You can adjust most machine settings by tapping the Settings icon and follow the steps on the
screen.
For online support (frequently asked questions, movies etc.), scan the QR code on the cover of this
booklet or visit www.saeco.com/care
Setting the water hardness
We advise you to adjust the water hardness setting to the water hardness level in your region for
optimal performance and a longer lifetime of the machine. This also prevents you from having to
descale the machine too often. The default water hardness setting is 4: hard water.
Use the water hardness test strip supplied in the box to determine the water
hardness in your region:
1 Immerse the water hardness test strip in tap water or hold it under the tap for 1 second (Fig. 10).
2 Wait 1 minute. The number of squares on the test strip that turn red indicate the water hardness
(Fig. 11).

12
English
Set the machine to the correct water hardness:
1 Tap the Settings icon and scroll from left to right to select 'Water hardness'.
2 Select the water hardness level. The number of red squares selected on the display should be the
same as the number of red squares on the test strip (Fig. 12).
3 When you have set the correct water hardness, tap the confirmation icon to confirm.
Adjusting the grind setting
You can change the coffee strength with the grind setting knob inside the bean container. The lower
the grind setting, the finer the coffee beans are ground and the stronger the coffee becomes. There
are 12 different grind settings you can choose from.
The machine has been set up to get the best taste out of your coffee beans. Therefore we advise you
not to adjust the grind setting until you have brewed 100-150 cups (approx. 1 month of use).
You need to brew 2 to 3 drinks before you can taste the full difference.
Do not turn the grind setting knob more than one notch at a time to prevent damage to the grinder.
1 Tap the Settings icon in the main menu.
2 Tap on ¨Grinder¨.
3 Watch the how to video.
Restoring factory settings
The machine offers you the possibility to restore the factory settings at any moment.
1 Tap the Settings icon.
2 Scroll from left to right to select 'Factory settings'. Confirm by tapping the confirmation icon.
-
The settings are now restored.
The following factory settings are restored to default: water hardness, standby time, display
brightness, sound, front illumination, profiles, measure/units, home screen settings, Wi-Fi credentials,
software update preferences, Saeco credentials, Amazon credentials.
AquaClean water filter
Your machine is AquaClean enabled. You can place the AquaClean water filter in the water tank to
preserve the taste of your coffee. It also diminishes the need for descaling by reducing limescale
build-up in your machine. You can purchase an AquaClean water filter from your local or online
retailer or from authorized service centers.
AquaClean filter status indication
The status of the AquaClean filter is always visible in the 'Status' menu as a percentage.
-
If the status of the AquaClean filter is 10% or less, the screen shows a message for 2 seconds each
time you switch on the machine. This message advises you to buy a new filter.
-
If the status of the filter is 0%, the machine asks you to replace the AquaClean filter every time you
switch on the machine.
Activating the AquaClean water filter (5 min.)
The machine does not automatically detect that a filter has been placed in the water tank.
Therefore you need to activate each new AquaClean water filter that you install in the 'Status' menu.
When the machine stops showing the filter activation message, you can still activate an AquaClean
water filter, but you will need to descale the machine first.

English
Your machine has to be completely limescale-free before you start using the AquaClean water
filter.
Before activating the AquaClean water filter, it has to be prepared by soaking it in water as described
below. If you don't do this, air might be drawn into the machine instead of water, which makes a lot of
noise and prevents the machine from being able to brew coffee.
1 Tap the 'Status' icon and scroll from left to right to select 'AquaClean'.
2 Tap the confirmation icon again when the activation screen appears. Follow the instructions on
the screen.
Replacing the AquaClean water filter (5 min.)
After 95 liters of water have flowed through the filter, the filter will cease to work. The AquaClean
status indicator drops to 0% to remind you to replace the filter. If you do not replace the AquaClean
water filter in time, you can still replace the filter but you first need to descale the machine.
When the AquaClean status indicator drops to 0% or when the machine reminds you to replace the
AquaClean filter:
1 take out the old AquaClean water filter.
2 install a new filter and activate it as described in chapter 'Activating the AquaClean water filter (5
min.)'.
Replace the AquaClean water filter at least every 3 months, even if the machine does not yet
indicate that replacement is required.
Removing and inserting the brew group
Go to the 'Status' menu on the screen and select 'Brew group clean' or visit www.saeco.com/care for
detailed video instructions on how to remove, insert and clean the brew group.
13
Removing the brew group from the machine
1 Remove the water tank and open the service door (Fig. 13).
2 Press the PUSH handle (Fig. 14) and pull at the grip of the brew group to remove it from the
machine (Fig. 15).
When you remove the brew group from the machine, make sure to empty the drip tray and the
coffee grounds container.
Reinserting the brew group
Before you slide the brew group back into the machine, make sure it is in the correct position.
1 Check if the brew group is in the correct position. The arrow on the yellow cylinder on the side of
the brew group has to be aligned with the black arrow and N (Fig. 16).
-
If they are not aligned, push down the lever until it is in contact with the base of the brew group
(Fig. 17).
2 Slide the brew group back into the machine along the guiding rails on the sides (Fig. 18) until it
locks into position with a click (Fig. 19). Do not press the PUSH button.
3 Close the service door and place back the water tank.
Cleaning and maintenance
Your machine will advise you when to perform cleaning and maintenance.
14
English
Regular cleaning and maintenance keeps your machine in top condition and ensures good-tasting
coffee for a long time with a steady coffee flow.
Consult the table below for a detailed description of when and how to clean all detachable parts of
the machine. You can find more detailed information and video instructions on www.saeco.com/care.
See figure C for an overview of which parts can be cleaned in the dishwasher.
Item When to clean How to find in the control panel/
What to do
AquaClean filter When the machine asks you or
The machine does not automatically detect that a filter has been placed in the water tank.
Therefore you need to activate each new AquaClean filter that you install in the 'Status' menu.
Your machine has to be completely limescale-free before you start using the AquaClean filter.
Replace the AquaClean filter at least every 3 months, even if the machine does not yet indicate
that replacement is required.
Brew group Weekly STATUS -> PERFORMANCE ->BREW
When you remove the brew group from the machine, make sure to empty the drip tray and the
coffee grounds container.
Before you slide the brew group back into the machine, make sure it is in the correct position.The
arrow on the yellow cylinder on the side of the brew group has to be aligned with the black arrow
and N (Fig. 16).
Milk system/internal
cappuccinatore
every three months.
Monthly STATUS -> PERFORMANCE ->COFFEE OIL
After every day of use STATUS -> HYGIESTEAM. Follow the steps
STATUS->CLEANING->AQUACLEAN. Follow
the steps to activate the AquaClean filter.
GROUP CLEAN. Follow the steps to remove
and clean the brew group.
REMOVAL. Follow the steps of the selfcleaning process to automatically remove
coffee oil residues from the brew group.
of the self-cleaning process to clean the milk
system. Wipe the outside of the metal milk
tube with a damp cloth before placing it into
the milk tube holder.
Weekly Remove and disassemble the internal
Monthly STATUS -> HYGIESTEAM -> DEEP MILK
Milk container Weekly Disassemble the milk container (Fig. 20) and
cappuccinatore. Rinse all parts under the tap
with some washing-up liquid.
CLEAN. Follow the steps of the self-cleaning
process to clean the milk system.
push out the ball using the pin of the milk
tube (Fig. 21). Clean all parts of the milk
container under the tap or in the
dishwasher.

English
Item When to clean How to find in the control panel/
What to do
15
HygieSteam
container (milk tube
holder)
Pre-ground coffee
compartment
Coffee grounds
container
Drip tray Empty the drip tray daily or as
Lubrication of the
brew group
Weekly or when the machine
reminds you
Check the pre-ground coffee
compartment weekly to see if it
is clogged
Empty the coffee grounds
container when prompted by
the machine. Clean it weekly
soon as the red 'drip tray full'
indicator pops up through the
drip tray (Fig. 25). Clean the drip
tray weekly
Every 2 months Lubricate the brew group with the by-
Remove the HygieSteam container from the
machine (Fig. 22) and remove the
HygieSteam cover (Fig. 23). Clean the
HygieSteam container and cover under the
tap or in the dishwasher. Let the container
and cover air-dry and place them back into
the machine.
Unplug the machine and remove the brew
group. Open the lid of the pre-ground coffee
compartment and insert the spoon handle
into it. Move the handle up and down until
the clogged ground coffee falls down (Fig.
24). Go to www.saeco.com/care for detailed
video instructions.
Remove the coffee grounds container while
the machine is switched on. Clean it under
the tap with some washing-up liquid or in
the dishwasher.
Note: The front panel of the coffee grounds
container is not dishwasher proof.
Remove the drip tray (Fig. 26) and clean it
under the tap with some washing-up liquid
or in the dishwasher.
packed grease (see 'Lubricating the brew
group'). Go to www.saeco.com/care for
detailed video instructions.
Water tank Weekly Rinse the water tank under the tap.
Machine front Weekly Clean with a non-abrasive cloth.
Descaling of the
machine
When the machine asks you to
descale
STATUS -> DESCALING. Follow the steps to
descale the machine. When descaling is
needed, the machine asks you to descale it,
press the OK icon to start and follow the
steps.
Cleaning the brew group
Regular cleaning of the brew group prevents coffee residues from clogging up the internal circuits. Go
to the 'Status' menu on the screen and select 'Brew group clean' or visit www.saeco.com/care for
support videos on how to remove, insert and clean the brew group.
Cleaning the brew group under the tap
1 Tap the 'Status' icon and scroll to select 'Brew group clean'.

16
English
2 Tap the confirmation icon to confirm and then follow the instructions on the screen.
Cleaning the brew group with the coffee oil remover tablets
Only use Philips coffee oil remover tablets.
1 Tap the 'Status' icon and scroll to select 'Brew group clean'.
2 Tap the confirmation icon to confirm and then follow the instructions on the screen.
Lubricating the brew group
To improve your machine's performance, we suggest that you lubricate the brew group every 2
months, to ensure that the moving parts continue to move smoothly.
1 Apply a thin layer of grease on the piston (grey part) of the brew group (Fig. 27).
2 Apply a thin layer of grease around the shaft (grey part) in the bottom of the brew group (Fig. 28).
3 Apply a thin layer of grease to the guiding rails on both sides (Fig. 29).
Cleaning programs for the internal cappuccinatore
The machines tells you when to clean the internal cappuccinatore.
The machine has three programs to clean the internal cappuccinatore:
-
'HygieSteam Shot': during the preparation of a milk-based drink, the machine automatically shoots
steam through the internal cappuccinatore to rinse it quickly.
-
'HygieSteam': the machine thoroughly cleans the internal milk system with steam. Make sure that
the HygieSteam container is correctly assembled (Fig. 30) and attached to the machine (Fig. 31).
Place the milk tube in the milk tube holder (Fig. 32) and follow the instructions on the screen.
-
'Deep Milk Clean': Perform the 'Deep Milk Clean' procedure with the Philips milk circuit cleaner for a
thorough cleaning of the internal milk system.
Cleaning the internal cappuccinatore under the tap
1 Open the door of the internal cappuccinatore (Fig. 33).
2 Remove the internal cappuccinatore by pulling it down (Fig. 34).
3 Disassemble the internal cappuccinatore by pulling the bottom part off the top part (Fig. 35).
4 Disassemble all parts (Fig. 36) and clean them under the tap.
5 Reassemble the internal cappuccinatore.
6 To place back the internal cappuccinatore, put it in upright position and make sure the holes are
aligned with the two tubes on the machine. Then move the internal cappuccinatore upwards until it
locks into place (Fig. 1).
7 Close the door.
Visit www.saeco.com/care for detailed video instructions.
Descaling procedure
Please use Philips descaler only. Under no circumstances should you use a descaler based on sulfuric
acid, hydrochloric acid, sulfamic or acetic acid (vinegar) as this may damage the water circuit in your
machine and will not dissolve the limescale properly. Not using the Philips descaler will void your
warranty. Failure to descale the appliance will also void your warranty. You can buy Philips descaler
from your local or online retailer or from authorized service centers.
1 When the machine asks you to descale it, tap the confirmation icon to start. To start descaling
without being prompted by the machine, tap the 'Status' icon and select 'Descale'.

English
2 Remove the drip tray, the coffee grounds container and the HygieSteam container (Fig. 22), empty
them and put them back into place.
3 Remove the water tank and empty it. Then remove the AquaClean filter.
4 Pour the whole bottle of Philips descaler into the water tank and then fill it with water up to the
CALC CLEAN level (Fig. 37). Then place the water tank back into the machine.
5 Place a large container (1.5 l) under the coffee dispensing spout.
6 Make sure that the HygieSteam container is correctly assembled (Fig. 30) and attached to the
machine (Fig. 31). Place the milk tube in the milk tube holder.
7 Follow the instructions on the screen to start the descaling procedure. The descaling procedure
lasts approx. 30 minutes and consists of a descaling cycle and a rinsing cycle.
8 Once the descaling cycle is finished, you need to rinse the water tank and water circuit. Follow the
instructions on the screen.
9 Place a new AquaClean filter in the water tank and activate it (see 'Activating the AquaClean water
filter (5 min.)').
Tip: Using the AquaClean filter reduces the need for descaling!
What to do if the descaling procedure is interrupted
You can exit the descaling procedure by pressing the on/off icon on the control panel. If the descaling
procedure is interrupted before it is completely finished, some descaling liquid may remain in the
water tank or the water circuit. In that case, do the following:
1 Empty and rinse the water tank thoroughly.
2 Fill the water tank with fresh water up to the CALC CLEAN level indication and switch the machine
back on. The machine will heat up and perform an automatic rinsing cycle.
3 Before brewing any drinks, perform a manual rinsing cycle. To perform a manual rinsing cycle, first
dispense half a water tank of hot water and then brew 2 cups of pre-ground coffee without adding
ground coffee.
Note: If the descaling procedure was not completed, the machine will require another descaling
procedure as soon as possible.
17
Error codes
Below you find a list of the error codes showing problems that you can solve yourself. Video
instructions are available on www.saeco.com/care. If another error code appears, please contact the
Consumer Care Center in your country. For contact details, see the warranty leaflet.
Error
code
01 The coffee funnel is
03 The brew group is dirty
Problem Possible solution
clogged.
or not well-greased.
Switch off the machine and unplug it. Remove the brew group.
Then open the lid of the pre-ground coffee compartment and
insert the spoon handle. Move the handle up and down until
the clogged ground coffee falls down. Visit
www.saeco.com/care for detailed video instructions.
Switch off the machine. Rinse the brew group with fresh water,
let it air-dry and then lubricate it (see 'Lubricating the brew
group'). Consult chapter 'Cleaning the brew group' or visit
www.saeco.com/care for detailed video instructions. Then
switch the machine on again.

18
English
Error
Problem Possible solution
code
04 The brew group is not
05 There is air in the water
11 The machine needs to
14 The machine is
19 The machine is not
positioned correctly.
circuit.
The AquaClean filter
was not prepared
properly before
installation or it is
clogged.
adjust to room
temperature
overheated.
connected to the wall
socket properly.
Switch off the machine. Remove the brew group and reinsert it.
Make sure that the brew group is in the correct position before
you insert it. Consult chapter 'Handling the brew group' or visit
www.saeco.com/care for detailed video instructions. Then
switch the machine on again.
Restart the machine by switching it off and on again. If this
works, dispense 2-3 cups of hot water. Descale the machine if
you have not done so for a longer period of time.
Remove the AquaClean filter and try to brew a coffee again. If
this works, make sure that the AquaClean filter is prepared
properly before you place it back (see 'Activating the
AquaClean water filter (5 min.)'). Put the AquaClean filter back
into the water tank. If this still does not work, the filter might be
clogged and needs to be replaced.
Allow some time for the machine to adjust from
transport/outdoor temperature to room temperature. Switch
off the machine for 30 minutes and switch it on again. If this
does not work, contact the Consumer Care Center in your
country. For contact details, see the warranty leaflet.
Switch off the machine and switch it back on after 30 minutes.
Make sure that the small plug of the power cord is properly
connected to the socket on the back of the machine.
Ordering accessories
To clean and descale the machine, only use Philips maintenance products. These products can be
purchased by enabling Amazon Smart Reorders, from your local or online retailer or from authorized
service centers.
To be able to use Amazon Smart Reorders, you first need to activate this service on Amazon. Then
follow the steps on the screen of your machine to connect your Amazon account to your Saeco
account. After you have completed these steps, you can use the Amazon Smart Reorder service.
In the 'Shop' menu on the control panel of the machine you can view the availability of Philips
maintenance products and accessories at local retailers.
To find a full list of spare parts online, enter the type number of your machine. You can find the type
number on the inside of the service door.
Maintenance products and type numbers:
-
Descaling solution CA6700
-
AquaClean filter CA6903
-
Brew group grease HD5061
-
Coffee oil remover tablets CA6704
-
Milk circuit cleaner CA6705
-
Maintenance kit CA6707

English
19
Software updates
Updating is essential to safeguard your privacy and proper functioning of your coffee machine. You
can set whether you want to update your machine manually or whether you want it to be done
automatically.
When you have selected automatic updates, make sure that the machine is also plugged in at night
and Wi-Fi is enabled, so that the machine can receive the software updates overnight.
Updates are made available when there are software improvements, new features for the machine
and to prevent a possible security issue.
Mandatory firmware updates are started automatically when the coffee machine is in stand-by
mode. During a firmware update the coffee machine cannot be used.
Troubleshooting
This chapter summarizes the most common problems you could encounter with the machine. Support
videos and a complete list of frequently asked questions are available on www.saeco.com/care. If you
are unable to solve the problem, contact the Consumer Care Center in your country. For contact
details, see the warranty leaflet.
Problem Cause Solution
There are some coffee
residues inside my new
coffee machine.
The machine is in DEMO
mode.
The drip tray fills up
quickly / there is always
some water in the drip
tray.
The 'empty coffee
grounds container' icon
remains on.
The machine prompts to
empty the coffee
grounds container even
though the container is
not full.
This machine has been tested
with coffee.
You pressed the standby icon
for more than 8 seconds.
This is normal. The machine
uses water to rinse the internal
circuit and brew group. Some
water flows through the internal
system directly into the drip
tray.
You emptied the coffee grounds
container while the machine
was unplugged from the wall
socket, or you placed it back too
fast.
The machine did not reset the
counter the last time you
emptied the coffee grounds
container.
Although it has been carefully cleaned,
there may be some coffee residues left.
However, the machine is absolutely
new.
Switch the machine on and off by
unplugging the power cord and then
plugging it in again.
Empty the drip tray daily or as soon as
the red 'drip tray full' indicator pops up
through the drip tray cover. Tip: place a
cup under the dispensing spout to
collect rinsing water that comes out of
it.
Remove the coffee grounds container,
wait at least 5 seconds and then insert it
again.
Always wait approx. 5 seconds when
you place back the coffee grounds
container. In this way, the coffee pucks
counter will be reset to zero and the
number of coffee pucks is counted
correctly.

20
English
Problem Cause Solution
The coffee grounds
container is too full and
the 'empty coffee
grounds container' icon
did not appear on the
display.
I cannot remove the
brew group.
I cannot insert the brew
group.
You removed the drip tray
without emptying the coffee
grounds container.
The brew group is not in the
correct position.
The brew group is not in the
correct position.
When you remove the drip tray, also
empty the coffee grounds container
even if it contains only a few coffee
pucks. This ensures that the coffee
pucks counter is reset to zero and that
the number of coffee pucks is counted
correctly.
Reset the machine in the following way:
close the service door and place back
the water tank. Switch the machine off
and back on again and wait for the
lights in the drink icons to come on. Try
to remove the brew group again. See
chapter 'Removing and inserting the
brew group' for step-by-step
instructions.
Reset the machine in the following way:
close the service door and place back
the water tank. Leave the brew group
out. Switch off the machine and unplug
it. Wait for 30 seconds and then plug
the machine back in, switch it on and
wait for the lights in the drink icons to
come on. Then put the brew group in
the correct position and reinsert it into
the machine. See chapter 'Removing
and inserting the brew group' for stepby-step instructions.
The coffee is watery. The brew group is dirty or needs
The coffee is not hot
enough.
to be lubricated.
The machine is performing its
self-adjustment procedure. This
procedure is started
automatically when you use the
machine for the first time, when
you change to another type of
coffee beans or after a long
period of non-use.
The grinder is set to a too
coarse setting.
The temperature is set too low. Set the temperature to the maximum
A cold cup reduces the
temperature of the drink.
Remove the brew group, rinse it under
the tap and leave it to dry. Then
lubricate the moving parts (see
'Lubricating the brew group').
Brew 5 cups of coffee initially to allow
the machine to complete its selfadjustment procedure.
Set the grinder to a finer (lower) setting.
Brew 2 to 3 drinks to be able to taste
the full difference.
setting (Fig. 38).
Preheat the cups by rinsing them with
hot water.

Problem Cause Solution
English
21
Adding milk reduces the
Coffee does not come
out or coffee comes out
slowly.
The brew group is dirty. Remove the brew group and rinse it
The coffee dispensing spout is
temperature of the drink.
The AquaClean water filter was
not prepared properly for
installation.
The AquaClean water filter is
clogged.
The grinder is set to a too fine
setting.
dirty.
Regardless of whether you add hot or
cold milk, adding milk always reduces
the temperature of the coffee. Preheat
the cups by rinsing them with hot water.
Remove the AquaClean filter and
dispense some hot water. If this works,
the AquaClean filter was not installed
properly. Reinstall and activate the
AquaClean filter and follow all steps in
chapter 'AquaClean water filter'.
After a long period of non-use, you
need to prepare the AquaClean water
filter for use again and dispense 2-3
cups of hot water.
Replace the AquaClean water filter
every 3 months. A filter that is older
than 3 months can become clogged.
Set the grinder to a coarser (higher)
setting. Note that this will impact the
coffee taste.
under the tap (see 'Cleaning the brew
group under the tap').
Clean the coffee dispensing spout and
its holes with a pipe cleaner or needle.
The pre-ground coffee
compartment is clogged
The machine circuit is blocked
by limescale.
The milk does not froth. The internal cappuccinatore is
dirty or not inserted correctly.
The type of milk used is not
suitable for frothing.
The milk is splashing. The milk you use is not cold
enough.
Switch off the machine and remove the
brew group. Open the lid of the preground coffee compartment and insert
the spoon handle into it. Move the
handle up and down until the clogged
ground coffee falls down (Fig. 24).
Descale the machine with Philips
descaler (see 'Descaling procedure').
Always descale when the machine
prompts you.
Clean the internal cappuccinatore and
make sure that you position and insert it
correctly (see 'Cleaning the internal
cappuccinatore under the tap').
Different types of milk result in different
amounts of froth and different froth
qualities.
Make sure you use cold milk coming
directly from the fridge.

22
English
Problem Cause Solution
The flexible milk tube is not
connected properly.
The cappuccinatore and milk
tubes are not clean.
The milk tubes are clogged. Always store the milk container without
Open the door of the coffee dispensing
spout (Fig. 33) and check if the flexible
milk tube is fully connected to the
cappuccinatore (Fig. 39). Note that the
cappuccinatore and milk tubes may be
hot. Let the cappuccinatore and the
tubes cool down before you touch
them.
Remove and disassemble the internal
cappuccinatore (see 'Cleaning the
internal cappuccinatore under the tap').
Rinse all parts under the tap. For
thorough cleaning, use Philips milk
circuit cleaner and perform the Deep
Milk Clean procedure via the 'Status'
and 'Hygiesteam' menu. Note that if the
parts have been cleaned in the
dishwasher, they may have become
clogged by food particles or detergent
residues. A visual check that they are
not obstructed is also recommended.
We advise you to perform the
HygieSteam program every day: 1) Press
'Status' on the control panel. 2) Select
'HygieSteam'. 3) Then confirm all steps
on the display.
the milk tubes in the refrigerator.
Leftover milk could accumulate inside
the milk tubes and block the flow of
milk through the tubes. Rinse the milk
tubes before storage.
The machine seems to
be leaking.
The machine uses water to rinse
the internal circuit and brew
group. This water flows through
the internal system directly into
the drip tray. This is normal.
The drip tray is too full and has
overflowed which makes it look
like the machine is leaking.
The water tank is not fully
inserted, some water is leaking
out of the water tank and air is
drawn into the machine.
The brew group is dirty/clogged. Rinse the brew group.
Empty the drip tray every day or as
soon as the 'drip tray full' indicator pops
up through the drip tray cover. Tip:
Place a cup under the dispensing spout
to collect rinsing water and reduce the
amount of water in the drip tray.
Empty the drip tray every day or as
soon as the 'drip tray full' indicator pops
up through the drip tray cover.
Make sure the water tank is in the
correct position: remove it and reinsert
it into the machine as far as possible.

Problem Cause Solution
English
23
I cannot activate the
AquaClean water filter
and the machine asks
for descaling.
The new water filter
does not fit.
The machine is making a
loud noise.
The machine is not placed on a
horizontal surface.
The filter has not been installed
or replaced in time after the
screen showed the AquaClean
reminder. This means your
machine is not completely free
of limescale anymore.
You are trying to install another
filter than the AquaClean water
filter.
The rubber ring on the
AquaClean water filter is not in
place.
It is normal that your machine
makes some noise during use.
The AquaClean water filter was
not prepared properly and air is
now drawn into the machine.
The water tank is not fully
inserted and air is drawn into
the machine.
Place the machine on a horizontal
surface so that the drip tray does not
overflow and the 'drip tray full' indicator
works properly.
Descale your machine first and then
install the AquaClean water filter.
Only the AquaClean water filter fits into
the machine.
Place back the rubber ring on the
AquaClean water filter.
If the machine starts to make a different
kind of noise, clean the brew group and
lubricate it (see 'Lubricating the brew
group').
Remove the AquaClean water filter from
the water tank and prepare it for use
properly before you place it back. See
chapter 'AquaClean water filter' for
step-by-step instructions.
Make sure the water tank is in the
correct position: remove it and reinsert
it by pushing it into the machine as far
as possible.
When I try to connect
the machine to Wi-Fi for
the first time, the
machine cannot connect
to the Wi-Fi network.
The machine is not able
to find the home Wi-Fi
network.
Your Wi-Fi name and password
are not correct.
The coffee machine and the WiFi router are not within range of
each other.
The Wi-Fi router is not working
properly.
The machine is not within range
of the router.
Check your Wi-Fi name and password.
Ensure that the coffee machine and the
Wi-Fi router are within range of each
other.or use a Wi-Fi repeater.
Please make sure that the Wi-Fi router
is working properly and is connected to
the internet.
Make sure the machine is within range
of the router. You can also use a Wi-Fi
signal repeater.

24
English
Problem Cause Solution
I cannot use Alexa and
Amazon Smart Reorders
yet.
The Wi-Fi connectivity of
the machine used to
work but is not working
anymore.
The router your coffee machine
is trying to connect to is 5GHz
dual-band and your coffee
machine is not trying to connect
to a 2.4GHz network.
You have not yet connected to
your Amazon to your Saeco
account.
Your Wi-Fi name and/or
password has changed.
The Wi-Fi password has
changed.
Your Wi-Fi router is not working
properly.
The Wi-Fi connectivity can be
interrupted by electromagnetic
or other interferences.
5GHz networks are not
supported.Temporarily switch off the
5GHz band in your router and try to
pair your coffee machine again to
another band of the same router
(2.4GHz). Switch on your 5GHz band
again after successful pairing
Please follow the instructions on the
control panel of the machine to connect
your Amazon account to your Saeco
account to be able to use Alexa voice
control and Amazon Smart Reorders.
Note: To be able to use these features
you need to have an Alexa app or an
Alexa device and you need to enable
the Smart Reorders service on Amazon.
Follow the instructions of section
'Connecting to Wi-Fi' and choose the
network with the new Wi-Fi name to
connect to.
Follow the instructions of section
'Connecting to Wi-Fi' and enter the new
Wi-Fi password.
Check the router and make sure it is
working.
Keep the appliance away from other
electronic devices that may cause
interferences.
None of the solutions
mentioned above work.
Switch off the machine and unplug it,
then plug the machine back in and
switch it on to recheck the Wi-Fi
connection.
Technical specifications
The manufacturer reserves the right to improve the technical specifications of the product. All the
preset quantities are approximate.
Description Value
Size (w x h x d) 262 x 383 x 448 mm
Weight 8.3 - 8.8 kg
Power cord length 1200 mm
Water tank 1.8 liters
Bean hopper capacity 300 g

English
Coffee grounds container capacity 12 pucks
Milk container capacity 600 ml
Height-adjustable spout height 87 - 147 mm
Nominal voltage - Power rating - Power supply See data label on inside of service door
Wi-Fi frequency band 2.4 GHz 802.11 b/g/n
Declaration of Conformity
Hereby, DAP B.V. declares that the fully automatic espresso machines SM6685, SM6682 and SM6680
are in compliance with Directive 2014/53/EU.
The full text of the EU declaration of conformity is available at the following internet address:
https://www.saeco.com.
The fully automatic espresso machines SM6685, SM6682 and SM6680 are equipped with a Wi-Fi
module, 2.4GHz 802.11 b/g/n (channels 1..11). Maximum transmitting power <100mW(20dBm).
25

26
Čeština
Obsah
Přehled přístroje (obr.A) _____________________________________________________________________________ 26
Úvod __________________________________________________________________________________________________ 27
Úprava nastavení přístroje ___________________________________________________________________________ 31
Vodní filtr AquaClean ________________________________________________________________________________ 32
Vyjmutí avložení varné sestavy______________________________________________________________________ 33
Čištění aúdržba ______________________________________________________________________________________ 34
Postup odstranění vodního kamene ________________________________________________________________ 37
Chybové kódy ________________________________________________________________________________________ 38
Objednávání příslušenství____________________________________________________________________________ 39
Aktualizace softwaru _________________________________________________________________________________ 39
Řešení problémů _____________________________________________________________________________________ 39
Technické specifikace ________________________________________________________________________________ 45
Prohlášení oshodě___________________________________________________________________________________ 45
Přehled přístroje (obr. A)
A1 Víko násypky na kávová zrna
A2 Víko přihrádky na mletou kávu
A3 Ovládací panel
A4 Zásuvka pro kabel
A5 Odkapávací tácek
A6 Rukojeť uvolnění odkapávacího tácku
A7 HygieSteam Nádoba
A8 Kryt HygieSteam sdržákem trubičky na
mléko
A9 Výškově nastavitelná hubice dávkování kávy
a mléka
A10 Vnitřní napěňovač mléka
A11 Napájecí kabel se zástrčkou
A12 Knoflík nastavení mletí (více informací
najdete na stránce www.saeco.com/care)
A13 Násypka na kávová zrna
A14 Varná sestava (více informací najdete na
stránce www.saeco.com/care)
A15 Obslužná dvířka
A16 Nádržka na vodu
A17 Nádoba na kávovou sedlinu
A18 Přední panel nádoby na kávovou sedlinu
A19 Kryt odkapávacího tácku
A20 Indikátor „Plný odkapávací tácek“
Příslušenství
A21 Nádržka na mléko
A22 Trubička na mléko
A23 Čisticí kartáček
A24 Tuba splastickým mazivem
A25 Filtr AquaClean
A26 Odměrka
A27 Testovací proužek ke zjišťování tvrdosti
vody
Ovládací panel
Přehled všech symbolů naleznete na obrázkuB. Níže jsou uvedeny popisy.
B1 On/off icon (Ikona Zapnuto/Vypnuto)
B2 Drinks (Nápoje)
B3 Drinks menu (Nabídka nápojů)
B4 Personal profiles (Osobní profily)
B5 Machine settings (Nastavení přístroje)
B6 Status menu (Stavová nabídka)
B7 Obchod
B8 Start/stop icon (Ikona
Spuštění/Zastavení)

Čeština
Úvod
Gratulujeme vám kzakoupení plně automatického kávovaru Saeco! Chcete-li plně využívat výhod
online podpory nabízené společností Saeco, můžete pomocí ovládacího panelu provést registraci
přístroje přes vestavěné Wi-Fi připojení, případně můžete navštívit web
www.saeco.com/MyCoffeeMachine asvůj produkt zaregistrovat tam.
Před prvním použitím kávovaru si pečlivě přečtěte samostatnou brožuru sbezpečnostními
informacemi a uschovejte ji pro budoucí použití.
Plně automatický kávovar Saeco nabízí prostřednictvím připojení kWi-Fi síti rozšířené možnosti.
Přístroj připojený kWi-Fi síti nabízí uživateli tyto funkce:
-
stahování pravidelných aktualizací softwaru pro vylepšení uživatelského prostředí,
-
možnost využití funkce obchodu, pokud je ve vaší zemi kdispozici,
-
propojení přístroje súčtem Amazon za účelem nákupu příslušenství, pokud je služba ve vaší zemi
kdispozici,
-
připojení kdomácímu zařízení Alexa avyužití hlasového ovládání (pokud je ve vaší zemi
kdispozici).
Poznámka: Tento přístroj byl zkoušen spoužitím kávy. Ikdyž byl pečlivě vyčištěn, mohly vněm zůstat
zbytky kávy. Zaručujeme však, že přístroj je zcela nový.
Zapnutí přístroje
Klepněte na ikonu „Zapnout“ apostupujte podle pokynů na ovládacím panelu.
27
Připojení kWi-Fi síti
Připojte svůj kávovar kdomácí Wi-Fi síti 2,4 GHz 802.11 b/g/n.
Připojení vašeho kávovaru kdomácí Wi-Fi síti vám poskytne lepší uživatelský zážitek.
Ujistěte se, že kávovar a směrovač Wi-Fi jsou ve vzájemném dosahu.
Pomocí níže uvedených kroků připojte kávovar kWi-Fi síti.
1 Klepnutím na ikonu Nastavení a přejetím zleva doprava najděte ikonu Wi-Fi.
2 Klepněte na ikonu Wi-Fi.
3 Podle pokynů na obrazovce připojte svůj přístroj kWi-Fi síti.
Nyní jste připraveni využívat všechny užitečné funkce.
Přístroj provede automatický cyklus proplachování při zapnutí avypnutí pomocí hlasového
ovládání ataké vpřípadě, že byl déle nečinný avypnul se. Ujistěte se, že je prostředí přístroje
bezpečné.

28
Čeština
Speciální funkce
Speciální funkce Účel
Chcete-li si sCoffeeMaestro přizpůsobit kávu přesně podle sebe, vyberte si
jeden zchuťových profilů (Delicato, Intenso, Forte). Samotné nastavení
nápoje tak nemusíte nijak měnit.
Funkce HygieSteam se automaticky postará očištění systému na mléko
aodstraní mikroorganismy: tuto funkci používejte po přípravě cappuccina
nebo jiných nápojů obsahujících mléko.
Náš odolný mlýnek je vyroben ze 100% keramiky, aby byl výjimečně tvrdý a
přesný. Díky 12 stupňovému nastavení si ho můžete přizpůsobit podle vlastní
chuti.
Řídicí panel údržby vám poskytuje užitečný přehled o přístroji a upozorňuje
vás například na končící životnost filtru AquaClean.
Vaření nápojů
Obecný postup
Chcete-li připravit nápoj, postupujte podle několika jednoduchých kroků.
1 Naplňte nádržku na vodu vodou zkohoutku anásypku na kávová zrna naplňte kávovými zrny.
2 Pod výškově nastavitelnou dávkovací hubici umístěte jeden nebo dva šálky. Výšku hubice lze podle
velikosti šálku nebo sklenice nastavit posunutím dávkovací hubice nahoru nebo dolů.
3 Přejděte do nabídky nápojů klepnutím na ikonu nápojů . Přejíždějte zleva doprava a klepnutím
vyberte požadovaný nápoj.
-
Pokud chcete připravit dva šálky, klepněte na ikonu „2ד. Přístroj automaticky provede dva cykly
mletí vpořadí vybraných nápojů.
Ikona „2ד není kdispozici pro všechny nápoje.

Čeština
4 Po výběru nápoje můžete posouváním nastavitelných sloupků nahoru a dolů upravit nastavení
podle svých preferencí.
5 Přípravu vybraného nápoje poté spusťte stisknutím ikony spuštění/zastavení .
Nopoužívejte karamelizovaná nebo jinak ochucená kávová zrna.
Podpora týkající se parametrů nápojů
Chcete-li získat další informace okonkrétním parametru nápoje, stiskněte apodržte danou položku
po dobu 3sekund.
Příprava nápojů obsahujících mléko
Chcete-li vařit nápoje obsahující mléko, postupujte podle několika jednoduchých kroků.
29
1 Naplňte nádržku na vodu vodou zkohoutku anásypku na kávová zrna naplňte kávovými zrny.
2 Odšroubujte víko nádržky na mléko anaplňte ji mlékem.
Abyste dosáhli co nejlepšího výsledku, vždy používejte vychlazené mléko.
3 Připojte pružnou trubičku na mléko knapěňovači mléka.
4 Vložte kovovou trubičku na mléko do nádržky.
5 Klepněte na ikonu nápojů , posuňte se vnabídce a vyberte ikonu nápoje smlékem podle
vlastního výběru.
6 Nastavení můžete upravit podle svých preferencí posunutím nastavitelných sloupků nahoru a dolů.
7 Stisknutím ikony spuštění/zastavení můžete kdykoli začít připravovat vybraný nápoj.
-
Uněkterých nápojů začne přístroj vypouštět nejprve mléko a až potom kávu. Ujiných nápojů je
pořadí obrácené – přístroj vypouští nejprve kávu a až potom mléko.
-
Stisknutím ikony spuštění/zastavení můžete dávkování mléka ukončit ještě předtím, než
přístroj nadávkuje nastavené množství mléka.
-
Přípravu celého nápoje (mléka akávy) můžete předčasně ukončit podržením ikony
spuštění/zastavení .
Bezprostředně po dokončení dávkování mléka proběhne čistící program „HygieSteam Shot“. Přístroj
vhání do vnitřního systému na mléko páru, aby ho rychle opláchl. Kovová část trubičky na mléko proto
může být horká. Abyste se vyhnuli riziku popálení, nechte ji nejprve vychladnout.
Tip: Kpřípravě nápojů obsahujících mléko můžete také použít běžné krabicové mléko. Vložte kovovou
trubičku na mléko přímo do krabicového mléka.

30
Čeština
Vařeníkávy zmleté kávy
Chcete-li vařit kávu zmleté kávy, postupujte podle několika jednoduchých kroků.
1 Otevřete víko přihrádky na mletou kávu a vsypte do ní jednu odměrku mleté kávy. Poté víko
zavřete.
2 Klepněte na ikonu nápojů , posuňte se zleva doprava a vyberte svůj nápoj.
3 Klepněte na ikonu mleté kávy .
4 Nastavení můžete upravit podle svých preferencí posunutím nastavitelných sloupků nahoru a dolů.
5 Přípravu vybraného nápoje poté spusťte stisknutím ikony spuštění/zastavení .
Pokud vyberete mletou kávu, nebude možné nastavit sílu kávy nebo uvařit více šálků najednou.
Dávkování horké vody
1 Ujistěte se, že je vnitřní napěňovač mléka správně připojen kpřístroji (obr. 1).
2 Postavte pod výstup šálek.
3 Klepněte na položku „Horká voda“ (obr. 2).
4 Posunutím nastavitelných sloupků nahoru adolů můžete podle potřeby (obr. 3) upravit množství
horké vody nebo její teplotu.
5 Stiskněte ikonu Spuštění/Zastavení .
6 Dávkování horké vody můžete předčasně ukončit opětovným stisknutím ikony Spuštění/Zastavení
.
Přizpůsobení
Přístroj umožňuje měnit nastavení nápojů podle vlastních preferencí apoté přizpůsobené nápoje
ukládat do osobních profilů. Můžete si vybrat vlastní ikonu a vlastní název profilu.
Zrychlete přípravu pomocí funkce CoffeeMaestro
Kromě nastavování jednotlivých nastavení nabízí váš přístroj možnost výběru chuťových profilů
pomocí funkce CoffeeMaestro. Můžete si vybrat možnosti Delicato, Intenso a Forte. Pro výběr
chuťového profilu CoffeeMaestro:
1 Klepněte na ikonu vašeho vybraného (obr. 4) nápoje.
2 Opakovaně (obr. 5) klepněte na ikonu CoffeeMaestro.
-
Hlavní nastavení nápoje se upraví odpovídajícím způsobem.
3 Spusťte přípravu nápoje klepnutím na ikonu spuštění/zastavení .
Přizpůsobte si svůj nápoj pomocí funkce CoffeeEqualizer Touch
Po výběru nápoje se automaticky aktivuje funkce CoffeeEqualizer Touch, která vám umožní upravit
nastavení nápoje. Dlouhým stisknutím každé položky na displeji aktivujete funkci nápovědy a získáte
další informace.
 Loading...