

Page 1

SE445
EN Telephone Answering Machine
w Warning
Use only rechargeable batteries.
Charge the handset for 24 hours before use.
Register your product and get support at
www.philips.com/welcome
Page 2

Page 3

1
Table of content s
Table of contents
1 Important 4
1.1 Power requirements 4
1.2 Conformity 4
1.3 Using GAP standard compliance 4
1.4 Recycling and disposal 5
1.5 Electric, Magnetic and Electromagnetic
Fields (“EMF”) 5
2 Your SE445 Digital Cordless
Telephone 6
2.1 What’s in the box? 6
2.2 What you will also need 6
2.3 Overview of the handset 7
2.4 Handset display 8
2.5 Overview of the base 9
2.6 Menu navigation 9
3 Getting started 10
3.1 Position the base 10
3.2 Connect the base 10
3.3 Install and charge the handset
batteries 11
3.4 Using multipacks 11
4 Using your SE445 12
4.1 Calls 12
4.1.1 Make a call 12
4.1.2 Pre-dial 12
4.1.3 Dial one touch numbers 1 to 9 12
4.1.4 Call from the phonebook 12
4.1.5 Call waiting 12
4.1.6 Call from the call log 12
4.1.7 Answer a call 12
4.1.8 Adjust volume 12
4.1.9 Mute 13
4.1.10 End a call 13
4.1.11 Switch handset on/off 13
4.2 Call a second external number 13
4.3 Intercom 13
4.3.1 Call another handset 13
4.3.2 Transfer an external call to another
handset 13
4.3.3 Switch between an internal and external
call 13
4.3.4 Three-party conference call 14
4.4 Voicemail 14
4.4.1 Dial your network voicemail service 14
5 Phonebook 14
5.1 View and dial phonebook entries 14
5.2 Store an entry 14
5.3 Entering names 15
5.4 Character map 15
5.5 Enter a pause 15
5.6 View an entry 15
5.7 Edit an entry 15
5.8 Delete an entry 16
5.9 Delete all entries 16
5.10 Copy phonebook to another handset 16
5.10.1 One touch keys 16
5.10.2 Dial a one touch number 16
5.10.3 Store a phonebook entry as aone touch
number 16
5.10.4 Delete a one touch number 16
6 Caller ID and Call log 17
6.1 Call log 17
6.1.1 View the call log 17
6.1.2 Dial from the call log 17
6.1.3 Save a number from the call log to the
phonebook 17
6.1.4 Delete a call log entry 18
6.1.5 Delete entire call log 18
6.2 Redial 18
6.2.1 Redial the last number 18
6.2.2 View and dial a number in the redial
list 18
6.2.3 Copy a redial number to the
phonebook 18
6.2.4 Delete a redial list entry 18
6.2.5 Delete entire redial list 18
Page 4

2
Table of content s
7 Clock & Alarm 19
7.1 Set date and time 19
7.2 Set alarm 19
7.3 Set alarm melody 19
8 Personal settings 20
8.1 Handset tones 20
8.1.1 Ring volume 20
8.1.2 Ring melody 20
8.1.3 Group melody 20
8.1.4 Key tones on/off 20
8.1.5 First ring 20
8.2 Handset name 20
8.3 Auto pick up 21
8.4 Auto hang up 21
8.5 Display language 21
8.6 Babysit mode on/off 21
8.7 Babysit 21
8.8 Backlight on/off 21
8.9 Keypad lock 21
9 Advanced settings 22
9.1 Recall time 22
9.2 Dial mode 22
9.2.1 Temporarily switch from Pulse to
Tone dialling 22
9.3 Call barring 22
9.3.1 Switch call barring on/off 22
9.3.2 Set a number to be barred 22
9.4 Baby call 22
9.4.1 Switch baby call on/off 23
9.4.2 Set the baby call number 23
9.4.3 Dial a baby number 23
9.5 Registration 23
9.6 Register a handset 23
9.7 Select a base 23
9.8 Unregister a handset 24
9.9 PIN 24
9.10 Reset 24
9.11 Default settings 24
9.12 Auto prefix 24
9.13 Country 25
9.14 Intrusion 25
10 Network Services 25
10.1 Call forward for all calls 25
10.1.1 Set call forward number 25
10.1.2 Activate/Deactivate call forward for
all calls 25
10.2 Call forward when busy 25
10.2.1 Set call forward number 25
10.2.2 Activate/Deactivate call forward when
busy 26
10.3 Call forward when unanswered 26
10.3.1 Set call forward number 26
10.3.2 Activate/Deactivate call forward when
unanswered 26
10.4 Voice mail 26
10.5 Info service 26
10.6 Call return 26
10.7 Cancel Callback 26
10.8 Withhold number 27
10.8.1 Set up withhold ID 27
10.8.2 Activate/Deactivate withhold ID 27
11 Using yourAnswering machine 27
11.1 SE445 Base Answer Machine Control
Keys 27
11.2 Switch on/off 27
11.3 Play messages 28
11.4 Delete all messages 28
11.5 Record a memo 28
11.6 Outgoing messages 28
11.6.1 Answer & Record 28
11.6.2 Answer Only 28
11.6.3 Set answer mode 28
11.6.4 Record, play or delete your
ownoutgoing message 29
11.7 Answering machine settings 29
11.7.1 Ring delay 29
11.8 Remote access 29
11.8.1 Remote Access activated/deactivated 29
11.9 Call screening 30
11.9.1 Switch handset call screening on/off 30
11.9.2 Switch base station call screening
on/off 30
11.10 Access answering machine menu via
the Call log 30
11.11 Memory full 30
Page 5

3
Table of content s
12 Maintenance and replacement 31
12.1 Cleaning 31
12.2 How to replace the batteries 31
13 Technical data 32
Battery life and range 32
Low battery warning 32
Battery type 32
Out of range warning 32
14 Frequently asked questions 33
Charging 33
Calls 33
Caller Line Identification (CLI) service does
not work 33
Phonebook 33
Display 33
Registration 33
Interference 33
Answering machine 34
15 Index 35
Page 6

4
ImportantImportant
1 Important
Take time to read this user manual before
you use your telephone. It contains important
information and notes regarding operating
your telephone.
1.1 Power requirements
• This product requires an electrical supply
of 220–240 volts, alternating monophased
power, excluding IT installations defined in
standard EN 60-950. In case of power
failure, the communication can be lost.
• The electrical network is classified as
hazardous according to criteria in the
standard EN 60-950. The only way to power
down this product is to unplug the power
supply unit from the electrical outlet.
Ensure the electrical outlet is located close to
the apparatus and is always easily accessible.
• The voltage on the network is classified
as TNV-3 (Telecommunication Network
Voltages), as defined in the standard
EN 60-950.
w Warning
• This equipment is not designed to make
emergency calls in the event of a power
failure. An alternative has to be made available
to allow emergency calls.
• High voltage. Never open the product or
attempt any repair.
• Keep the product away from liquid.
• Never use any battery type other than the
one supplied. There is a risk of explosion if the
batteries are replaced by an incorrect type.
• When the phone is ringing avoid holding
the earpiece too close to your ear as it may
damage your hearing.
• Do not use the product in places where there
are explosive hazards.
• Do not let small metal objects come into
contact with the product. This can deteriorate
audio quality and damage the product.
• Handsfree activation could suddenly increase
the volume in the earpiece to a very high level:
make sure the handset is not too close to
your ear.
• Refer also to the Cautions in chapters and
subchapter sections.
1.2 Conformity
Hereby, Philips Consumer Electronics, declares
that this SE445x is in compliance with the
essential requirements and other relevant
provisions of Directive 1999/5/EC.
The declaration of conformity is available at:
www.p4c.philips.com.
This product can only be connected to the
analogue telephone networks of the countries
mentioned on the packaging.
1.3 Using GAP standard compliance
The GAP standard guarantees that all DECT
GAP handsets and base stations comply with
a minimum operating standard irrespective of
their make.Your handset and base station are
GAP compliant, which means the minimum
guaranteed functions are: register a handset,
take the line, receive a call and dial.
The advanced features may not be available
if you use another handset than a SE440/445
with your base station. To register and use
your SE440/445 handset with a GAP standard
base station of a different make, first follow
the procedure described in the manufacturer’s
instructions, then follow the procedure
described on page 23.
To register a handset of another make to
the SE440/445 base station, place the base
station into registration mode, then follow the
procedure in the manufacturer’s instructions.
Page 7

5
1.4 Recycling and disposal
Disposal instructions for old products
The WEEE directive (Waste Electrical and
Electronic Equipment; 2002/96/EC) has been put
in place to ensure that products are recycled
using best available treatment, recovery and
recycling techniques to ensure human health and
high environmental protection.
Your product is designed and manufactured with
high quality materials and components, which
can be recycled and reused. Do not dispose of
your old product in your general household
waste bin.
Inform yourself about the local
separate collection system for
electrical and electronic products
marked by this symbol:
Use one of the following disposal options:
1 Dispose of the complete product (including its
cables, plugs and accessories) in the designated
WEEE collection facilities.
2 If you purchase a replacement product, hand
your complete old product back to the retailer.
He should accept it as required by the WEEE
directive.
Disposal instructions for batteries
Batteries should not be disposed of with
general household waste.
Packaging information
Philips has marked the packaging with standard
symbols designed to promote the recycling and
appropriate disposal of your eventual waste.
A financial contribution has been paid
to the associated national recovery and
recycling system.
The labelled packaging material is
recyclable.
Important
1.5 Electric, Magnetic and Electromagnetic Fields (“EMF”)
• Philips Royal Electronics manufactures and
sells many consumer oriented products which
usually, as with any electronic apparatus,
have the ability to emit and receive electro
magnetic signals.
• One of Philips’ leading Business Principles
is to take all necessary health and safety
precautions for our products, to comply with
all applicable legal requirements and to stay
well within the EMF standards applicable at
the time of producing the products.
• Philips is committed to develop, produce and
market products that cause no adverse health
effects.
• Philips confirms that if its products are
handled properly for their intended use, they
are safe to use according to scientific evidence
available today.
• Philips plays an active role in the development
of international EMF and safety standards,
enabling Philips to anticipate further
developments in standardization for early
integration in its products.
Page 8

6
Your SE445 Digital Cord less Tele phone
SE445 base
SE445 handset Power adaptor Battery door Line cord* 2x AAA
rechargeable
batteries
User manual Quick start guide Warranty information
2 Your SE445 Digital Cordless Telephone
Congratulations on your purchase and welcome to Philips!
To fully benefit from the support that Philips offers, register your product at
www.philips.com/welcome.
2.1 What’s in the box?
2.2 What you will also need
• For the call log to function, subscribe to your network’s Caller Line Identification service.
• For voicemail to function, subscribe to your network’s voicemail service.
n Note
* The line adaptor may not be attached to the line cord. If this is the case, please connect the line cord
to the line adaptor before plugging it into the line socket.
w Warning
Always use the cables and batteries supplied.
Page 9

7
Your SE445 Digital Cord less Tele phone
1
3
4
5
13
7
8
9
6
14
12
11
10
2
2.3 Overview of the handset
1 Earpiece
2 LED
The event LED on your handset blinks when
there is a new message recorded on your
telephone answering machine. If you have
subscribed to Caller Line Identification, the
event LED also blinks when there is a new call
or a new voice mail message.
3 Display
See page 8 for an overview of the display icons.
4 Menu key
Enter the main menu. Select the option displayed
on screen. Confirm menu option –
OK is displayed on screen.
5 Call log / Scroll Up / Volume up
Open the calls log.
Scroll up through lists and settings.
Increase the earpiece volume during a call.
6 Talk / Recall
Make or answer a call.
Use recall (R) functions.
7 Keypad
Press to dial number in during a call
or in predial.
Press and hold a key 1- 9 for one touch dialling
of pre-set numbers.
8 * / Keypad lock
Press and hold to lock/unlock the keypad.
During a call, press and hold to switch from
pulse dialling to tone dialling.
Dial a star.
9 Loudspeaker key
Activate and deactivate the loudspeaker during
a call.
w Warning
Handsfree activation can suddenly increase the
volume in the earpiece to a very high level. Make
sure the handset is not too close to your ear.
10 Intercom (at least 2 handsets needed)
In standby mode, use to make an internal call.
During a call, use to transfer an external call to
another handset.
11 # / Ringer off / Pause
Press and hold to switch handset ringer on or off.
When dialling or storing a number, press and hold to
enter a pause (P).
Dial a #.
Page 10

8
Your SE445 Digital Cord less Tele phone
2 3
1
4
12 End / Exit / Switch handset on/off
End a call.
When in a menu, go back to standby mode.
Press and hold to switch handset off (when in
standby) or on.
13 Phonebook / Scroll Down / Volume down
Open the phonebook.
Scroll down through lists and menus.
Decrease the earpiece volume.
14 Redial / Scroll right / Clear / Mute
Open the redial list. Scroll to the right.
Delete characters on screen when entering
names and numbers. Mute / unmute the
microphone during a call.
Go back to previous menu level –
BACK displayed on screen.
2.4 Handset display
1 Status icons
f
Battery status
P On when the line is in use.
Flashes when there is an incoming call.
E Flashes when you have new voicemail
messages.
Off when you have no voicemail messages.
L On when you have missed calls and new
number(s) in the call log.
b
Phonebook is open.
C The alarm clock has been set.
S Handsfree mode.
M Handset ringer is off.
T Answering machine On. Off when answering
machine is off. Flashes when you have new
messages. Flashes fast when the memory
is full.
N Steady when the handset is registered and
within range of the base.
Flashes when the handset is out of range or
searching for base.
2 OK displayed
Press the m key to select and validate a setting
3 A displayed
Press u or d to scroll through the options
in a menu, to open the phonebook or call list
when in standby.
4
BACK
displayed
Press > to go back to the previous menu
option, to cancel an action or to delete
a character.
Page 11

9
Your SE445 Digital Cord less Tele phone
1
7
2
3
6
5
4
8
2.5 Overview of the base
1 LED Status Action
00 On. No messages
02 (flashing) 2 new messages.
02 (not flashing) 2 saved messages.
off Answering
machine off
- - (flashing slowly) Memory full
05 (during playback) Playing message
number 5.
P (flashing) During playback of
outgoing message
AA (flashing) During remote
access.
00-09 Shows level when adjusting playback
volume.
2 Delete
3 Answering machine On/Off
4 Speaker volume up/down
5 Skip forward
6 Skip back
7 Play/Stop
8 Paging key
8 Paging
Paging is a useful way of finding lost handsets.
1
Press p on the base.
All handsets ring.
2
Press p again to cancel the paging call or
press any key on the handset to stop the
paging call.
2.6 Menu navigation
The basic steps of navigating through the menu
and on-screen options.
1
From the standby screen, press m.
The main menu is opened.
2
Use the u or d keys to scroll through
the menu.
3
Soft key options OK and BACK are
displayed. Press m to select OK and open
a sub-menu or validate an option.
Press r to select BACK and go back to
previous menu level, correct a character or
cancel an action.
4
Press e to return to standby.
Standby mode
If you do not press any button on the handset
for 15 seconds the display will automatically
return to standby. It will also return to standby
when the handset is placed on the base
or charger.
Page 12

10
Get ting sta rted
3 Getting started
3.1 Position the base
Place the base within reach of the telephone line
and electricity sockets.
t Tip
The position in which you place the base can
have an effect on the range and performance of
your product. Avoid placing the base too close
to large metal objects such as filing cabinets,
radiators or electrical appliances. This can impair
the range and sound quality. Buildings with
thick internal and external walls may impair
transmission of signals to and from the base.
3.2 Connect the base
w Warning
• Make sure you connect the power adaptor
and telephone line cord correctly as incorrect
connection could damage the product.
• Always use the telephone line cord supplied
with the unit. Otherwise you may not get a
dial tone.
n Note
In some countries the line adaptor may not
be attached to the line cord. If this is the case,
please connect the line cord to the line adaptor
before plugging it into the line socket.
1
Plug the line cord and the power cable into
the sockets at the back of the base.
2
Plug the other ends of the line cord and
power cable into the telephone socket and
mains power socket.
Page 13
11
Get ting sta rted
3.3 Install and charge the handset
batteries
w Warning
• The handset must be charged for at least 24
hours before using it for the first time.
• Never use any battery type other than the
one supplied. There is a risk of explosion if the
batteries are replaced by an incorrect type.
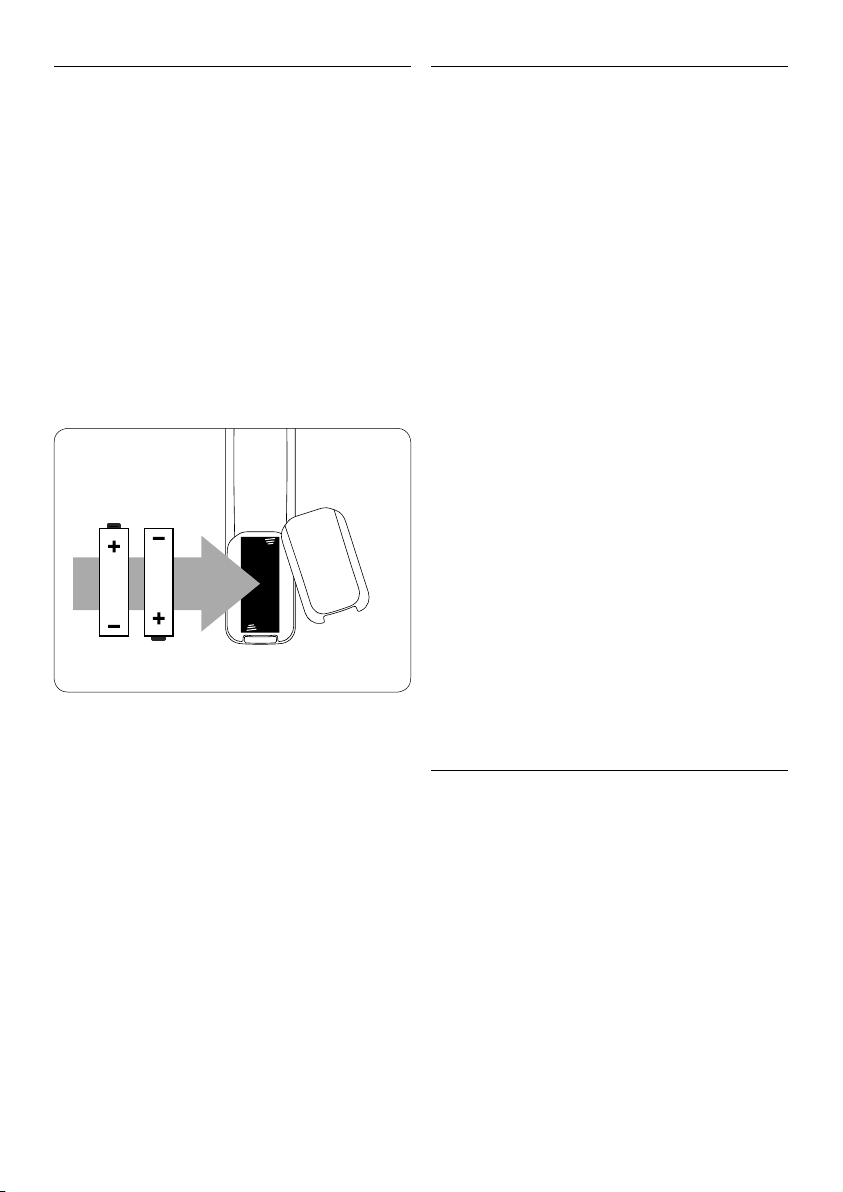
Your SE445 is supplied with two
rechargeable batteries.
1
Slide off the battery door (if fitted).
2
Insert the batteries as indicated and slide the
door back on.
3
Place the handset face up on the base
to charge.
A beep confirms the handset is placed correctly
and charging will begin.
4
When there is enough power in the
batteries, the handset will automatically
register with the base.
The standby screen is displayed. Or if the display
shows
WE L C O M E:
you must select the country.
If you need to select your country
•
WE L C O M E
is displayed and scrolls in
different languages.
• Press m. The country name is shown
on the display.
Scroll u or d to select your country and
press m.
CO N F I R M?
is displayed.
• Press OK to confirm.
This will set the default settings for the
country you choose.
n Note
• If you receive a call before the country is set,
you can take the call. When the call is ended
the display returns to country setting mode.
Caller Identification will not work until the
country has been selected.
• If you make a mistake when choosing your
country, please refer to ‘Country’
on page 25.
5
Leave the handset until the batteries are fully
charged (at least 24 hours).
The handset batteries are fully charged when
the charging animation stops and the f
(battery charged) icon is displayed.
w Warning
If you insert alkaline batteries instead of
the NiMH batteries
WA R N I NG BA TT
will
appear on the display. Replace imediately
with batteries supplied.
3.4 Using multipacks
If you have purchased a multipack you will have
additional handsets, chargers, power adaptors
and AAA rechargeable batteries.
1
Plug the chargers into a power socket.
2
Install the batteries supplied into the
other handsets.
3
Place the handsets on the chargers to fully
charge the batteries for at least 24 hours.
Page 14

12
Using your SE 445
4 Using your SE445
4.1 Calls
4.1.1 Make a call
1
Press r.
2
Dial the telephone number.
4.1.2 Pre-dial
1
Enter the phone number (maximum 24
digits). If you make a mistake press >.
2
Press r to dial the phone number entered.
4.1.3 Dial one touch numbers 1 to 9
1
Press and hold a key from 1 to 9 until
the number is displayed and dialled.
If no number is stored, you hear a beep.
4.1.4 Call from the phonebook
1
Press d.
The first entry in the phonebook is displayed.
2
Scroll u or d to the entry you want.
3
Press r to dial the number.
t Tip
Instead of scrolling to browse the phonebook
entries, press the numeric key corresponding to
the first letter of the entry you wish to locate.
For example, pressing 2 will show the entries
starting with A. Pressing 2 again will show the
entries starting with B, etc...
4.1.5 Call waiting
If you have subscribed to Call Waiting service,
the earpiece will emit a beep tone to inform
you that there is a second incoming call. The
number or name of the second caller will also be
displayed if you have subscribed to Caller Line
Identification service (CLI). Please contact your
network provider for more information on this
service. To answer the second call, press r.
4.1.6 Call from the call log
n Note
You need to subscribe to your network’s Caller
Line Identification service to be able to see the
caller’s number in the call log. See ‘Call log’ on
page 17 for more details.
1
Press
u
to enter
CALL LOG
menu. You have
the options to access
CALL LIST
or
ANSW
MACHIN E
. Press m to enter
CALL LIST
.
The first entry in the call list is displayed.
2
Scroll u or d to the entry you want.
3
Press r to dial the number.
4.1.7 Answer a call
1
When the phone rings and P flashes in the
display, press r or press v to answer
the call via the loudspeaker.
w Warning
When the phone is ringing, avoid holding the
earpiece too close to your ear as it may damage
your hearing. Handsfree activation can suddenly
increase the volume in the earpiece to a very
high level. Make sure the handset is not too
close to your ear.
n Note
If you have subscribed to your Network’s
Caller Identity service and assigned a VIP Group
to the caller’s number, the caller’s details are
displayed before the phone starts ringing (see
‘Store an entry’ on page 14 and ‘Group melody’
on page 20). You can set your phone to give the
default ringtone as soon as the call is received
then once the caller’s identity is displayed, the
assigned ringtone will start. See ‘First ring’, page 20.
t Tip
If Auto Pick up mode (see page 21) is on, simply
lift up the handset from its base to answer the
call. The default setting is off, in which case you
will need to press r to answer a call.
n Note
An incoming call has priority over other events.
Whenever there is an incoming call, other
operations in progress such as phone settings,
menu navigation, etc. will be ended.
4.1.8 Adjust volume
1
During a call, press u or d to adjust
the earpiece or loudspeaker volume.
The level is shown in the handset display.
Page 15

13
Using your SE 445
4.1.9 Mute
Mute the microphone so that you can talk to
someone else in the room without your caller
hearing you.
1
During a call, press
>
.
The microphone is muted.
2
Press > again to turn the microphone
back on.
4.1.10 End a call
1
Press e.
After you hang up, the duration of your call is
displayed for 5 seconds.
n Note
If auto hang-up is on (see page 21) simply
replace the handset on the base to end the call.
The default setting is ON.
4.1.11 Switch handset on/off
1
Press and hold e until the handset
switches off.
2
Press and hold e again to switch the
handset back on.
4.2 Call a second external number
Put an external caller on hold to make a second
external call. You can then switch between both
callers or hold a 3-way conference call.
1
During your call, press m. Scroll d to
IN I T 2 N D C A L L
.
2
Press m.
Display shows
CA L L I NG R
3
Enter the second number.
4
When your second caller answers, press
m
to open the option menu:
CO N F E R ENC E
– press m to initiate a 3-way
with an external caller and internal caller.
SW I T C H C A L LS
– press m to switch
between the two callers.
5
Press e to hang up.
4.3 Intercom
This feature is only available when there are
at least 2 registered handsets. It allows you to
make internal calls, transfer external calls from
one handset to another and use the conference
option.
4.3.1 Call another handset
1
Press c.
• If you have two handsets, the other handset is
called automatically.
• If more than two handsets are registered
to the base, their numbers are displayed,
e.g.
2 3 4 5*
. Enter the number of the handset
you want to call or press * to ring all
handsets.
2
Press e to hang up.
n Note
If the handset does not belong to SE440/445
range, this function may not be available.
4.3.2 Transfer an external call to
another handset
1
During an external call, press c.
Your caller is put on hold.
2
Enter the number of the handset you want to
call or press * to ring all handsets.
If there are only two handsets, the other handset
is called automatically.
3
When the other handset answers, announce
the caller then press e to transfer the call.
If the other handset does not answer, press
c
to talk to your caller again.
4.3.3 Switch between an internal and
external call
1
During an external call, press c.
Your caller is put on hold.
2
Enter the number of the handset you want to
call or press * to ring all handsets.
If there are only two handsets, the other handset
is called automatically.
Page 16

14
Using your SE 445
3
When the other handset answers you can
speak privately to your internal caller.
4
Press c to switch between both callers.
5
Press e to hang up.
4.3.4 Three-party conference call
1
During an external call, press c.
Your caller is put on hold.
2
Enter the number of the handset you want to
call or press * to ring all handsets.
If there are only two handsets, the other handset
is called automatically.
3
When the other handset answers, announce
the call then press and hold c to connect
both calls. If the other handset does not
answer, press c to talk to your caller again.
4
Press e to hang up.
4.4 Voicemail
If you have subscribed to your network’s
voicemail service (if available), your SE445
displays E when you have a new message.
Depending on your country and network
services, the voicemail number may be
pre-stored in your handset for one touch dialling
using the
1
button.
n Note
The voicemail number is pre-stored only if the
country where the phone was purchased offers a
voicemail service. If the voicemail number is not
pre-stored you can add a number, or overwrite the
existing stored number. See page 16.
4.4.1 Dial your network voicemail
service
1
Press and hold 1.
The number is displayed and dialed. Follow the voice
prompts to play, save and delete your messages.
Or
If E is displayed in a call list, press
r
to
dial the network voicemail number.
n Note
You can turn off the E icon. When viewing the
Calls log, press and hold 5.
5 Phonebook
The SE445 handset phonebook can store up to
100 names and numbers.
n Note
Numbers can be up to 24 digits long and names
up to 12 characters long. Entries are stored in
alphabetical order.
5.1 View and dial phonebook entries
1
Press d. Display shows the first entry.
2
Scroll u or d to the entry you want.
Or
To search alphabetically, press d then
press the key with the first letter of the
name, e.g. if the name begins with N, press
6
twice. The display shows the first entry
beginning with N. If required, press u or d
to scroll to the exact entry.
3
Press
r
to dial the entry displayed.
5.2 Store an entry
1
Press m.
PH O N E B OOK
is displayed.
2
Press m.
NE W EN T R Y
is displayed.
3
Press m.
EN T E R N A M E
is displayed.
4
Enter a name and press m.
5
Enter a number. Press m to save. Press
u
or d to select
NO GRO U P, G R O UP A,
B
or C and press m to confirm.
6
Press e to return to standby.
n Note
You can assign individual contacts to specific
groups of your choice. For example, Group A
contains phone numbers of all your co-workers.
You can also assign a specific ring melody to
that group (see ‘Group Melody’ on page 20).
You can benefit from this feature only if you have
subscribed to Caller Line Identification service
from your network provider. If it is the case,
every time someone from that group calls you,
you will hear the designated ringtone for that
group.
Page 17

15
Using your SE 445
n Note
Cancel storing an entry by pressing r at any
time during the process.
5.3 Entering names
Use the alphanumeric keypad to enter names in
the phonebook.
For instance to enter the name Paul
P
Press 7 once
A
Press
2
once
U
Press 8 twice
L
Press
5
three times
To enter a space press
1
Press
>
to delete a character or press and
hold
>
to delete all characters.
5.4 Character map
Use the keypad to enter names and characters.
1
Space
1 - < > *
2
A B C 2
3
D E F 3
4
G H I 4
5
J K L 5
6
M N O 6
7
P Q R S 7
8
T U V 8 ?
9
W X Y Z 9
0
0 - / \ # +
5.5 Enter a pause
If your SE445 is connected to a switchboard,
you may need to enter a pause in a stored
number. This gives the switchboard time to get
an outside line. A Pause is normally stored after
the switchboard access code (e.g. 9)
1
When storing a number, press and hold
#
until the display shows P. You can then
continue storing the phone number.
5.6 View an entry
In standby:
1
Press d.
2
Enter the first letter of the name to search
alphabetically then scroll u or d to the
exact entry. The name is displayed.
3
Press > to display the number. If there are
more than 12 digits, press > again to see
the rest of the number.
4
Press e to return to standby.
During a call:
1
Press m twice to open the
phonebook menu.
2
Enter the first letter of the name you want
then scroll u or d if necessary to
the exact name. Press > to display the
number. If there are more than 12 digits,
press > again to see the rest of the
number.
3
Press e to cancel the phonebook display.
4
Press e again to end the call.
5.7 Edit an entry
1 Press
d
.
2 Scroll
u
or d to the entry you want to
edit and press m.
ED I T E N T R Y
is dsplayed.
Press m again.
3 Edit the name and press
m
to confirm.
Use > to delete characters.
4 Press
m
and edit the number.
5 Press
m
to confirm.
6 Scroll
u
or d to select NO
GR O U P
,
GR O U P A, B
or C and press m to confirm.
7
Press e to return to standby.
Page 18

16
Using your SE 445
5.8 Delete an entry
1
Press d.
2
Scroll to the entry you want to delete and
press m.
3
Scroll d to
DE L E T E E N T RY
and press m.
4
Display shows
CO N F I R M?
. Press m.
5
Press e to return to standby.
5.9 Delete all entries
1
Press m twice.
2
Scroll d to
DE L E T E A L L
and press m.
3
Display shows
CO N F I R M?
. Press m.
4
Press e to return to standby.
5.10 Copy phonebook to another handset
1
Press
m twice.
2
Scroll d to
PB TRA N S F E R
and press m.
3
Scroll u or
d
to
the number of the
handset you want the phonebook copied to.
Press m.
4
Press m on the receiving handset to
accept the transfer from the emitting
handset.
Display shows
TR A N S FER ...
on the emitting
handset.
Display shows
WA I T I NG...
on the receiving
handset.
5
Press
e
to return to standby.
n Note
If an entry with the same name and number is
already stored in the receiving handset, it will
not be copied across.
5.10.1 One touch keys
The keys 1 to 9 enable one touch dialling
of entries stored in the phonebook.
n Note
Keys 1 and 2 may have numbers prestored
- usually giving access to Voicemail and
Information services offered by your network,
but this depends on your country and network.
You can change pre-stored entries to your own
preferred numbers.
5.10.2 Dial a one touch number
1
Press and hold a number key 1 to 9.
The number is displayed and dialled.
2
Press e to cancel the dialling and return
to standby.
5.10.3 Store a phonebook entry as a
one touch number
1
Press m twice.
2
Scroll d to
DI R E C T M E M
and press m.
3
Press u or
d
to select
KE Y 1 - 9
and press m. The current entry, if any, is
displayed.
4
Press m again to open the options menu.
5
Press m to
AD D
an entry from the
phonebook.
6
Scroll u or d to the entry you want.
Press m to confirm or e to return to
standby.
5.10.4 Delete a one touch number
1
Press m twice then scroll u or d to
DI R E C T M E M
and press m.
2
Scroll u or d to select
KE Y 1- 9
.
3
Press m to display the current entry.
Press m again to open the options menu.
4
Scroll d to
DE L E T E
and press
m
5
Display shows
CO N F I R M?
. Press m.
6
Press e to return to standby.
Page 19

17
Using your SE 445
6 Caller ID and Call log
If you have subscribed to Caller Line
Identification (CLI), and provided the identity
of the caller is not withheld, the number of the
caller will be displayed together with the date
and time of the call (if provided by the network).
n Note
• If the caller’s number is stored in your
phonebook along with a name, the name will
also be displayed.
• If the telephone number is not available
for incoming calls, the handset will
display
UN K N O W N
.
• Information about incoming calls will vary
by country and network operator. Some
operators may charge a subscription for their
Caller Line Identification service.
6.1 Call log
The call log contains details of missed and
received call. Details include the date and time
of the call. Entries are displayed in chronological
order with the most recent call at the top of
the list.
n Note
• When the call log is full, a new call replaces
the oldest in the list.
• The received and missed calls log holds details
of up to 50 calls.
• If you receive more than one call from the
same number, only the most recent call is kept
in the call log.
When you have missed calls (incoming calls
that you haven’t answered) the L icon will be
displayed in the display on all handsets registered
to the base.
If one handset is used to view the calls log, the
icon on the other handsets continue to flash
(Multipack user only).
6.1.1 View the call log
1
Press u to enter
CALL LOG
option menu,
then press m to enter
CA L L L I S T
–
The most recent number - or name if stored in
the phonebook - is displayed. New calls are
marked with L icon flashing.
2
Scroll u or d through the calls log.
At the end of the log, you will hear a beep.
Press > to see the number. If the number
has more than 12 digits, press > to see
the rest of the number.
3
Press e to return to standby.
n Note
The L icon stops flashing once all new calls
have been viewed.
6.1.2 Dial from the call log
1
Press u to enter the
CA L L L O G
option
menu, then press m to enter
CA L L L I S T
.
2
Scroll u or
d
to the entry you want.
3
Press
r
or
v
to dial.
6.1.3 Save a number from the call log to
the phonebook
1
Press u. Press m.
2
Scroll u or d to the number you want.
3
Press m.
SA V E N U M B E R
is displayed.
4
Press m.
EN T E R N A M E
is displayed. Use the
keypad to enter the name.
5
Press m then the number is displayed, the
user can then edit the number if required
and must press m to save the number
(even if has not been edited).
6
Press
u
or
d
to select
NO GRO U P,
GR O U P A, B
or C and press m to confirm.
7
Press m to confirm.
8
Press e to return to standby.
Page 20

18
Using your SE 445
6.1.4 Delete a call log entry
1
Press u then m. The most recent call
is displayed.
2
Scroll u or d to the number you want.
3
Press m then scroll d to
DE L E T E
and
press m.
4
Display shows
CO N F I R M?
. Press m to
confirm.
5
Press e to return to standby.
6.1.5 Delete entire call log
1
Press u then m. The most recent call
is displayed.
2
Scroll d to
DE L E T E A L L
and press m.
3
Display shows
CO N F I R M?
. Press m to
confirm. Press e to return to standby.
6.2 Redial
The SE445 lets you redial any of the last 10
numbers called. Numbers can be up to 24
digits long.
6.2.1 Redial the last number
1
Press >. The last number dialled is displayed.
If the number has more than 12 digits, the
display shows B and the cursor blinks.
Press > to display the rest. If the number
is stored in the Phonebook, the name is
displayed as well.
2
Press r to dial.
6.2.2 View and dial a number in the
redial list
1
Press >. The last number dialled is
displayed. If required, scroll u or d to
display the number you want.
2
Press r to dial the number.
6.2.3 Copy a redial number to the
phonebook
1
Press > and scroll u or d to the
entry you want.
2
Press m.
3
Display shows
SA V E N U M B E R
. Press m.
4
Enter the name and press m.
5
Edit the number if required and press m.
6
Press
u
or
d
to select
NO GRO U P,
GR O U P A, B
or C and press m to confirm.
7
Press e to return to standby.
6.2.4 Delete a redial list entry
1
Press >. Scroll u or d to display the
number you want.
2
Press m and scroll d to
DE L E T E
then
press m.
3
Display shows
CO N F I R M?
. Press m to
confirm, then e to return to standby.
6.2.5 Delete entire redial list
1
Press > then press m.
2
Scroll d to
DE L E T E A L L
and press m.
3
Display shows
CO N F I R M?
. Press m to
confirm. Press e to return to standby.
Page 21

19
Using your SE 445
7 Clock & Alarm
If you subscribe to your network’s Caller
Identification service, the time on your SE445
may be set automatically each time you receive
a call, depending on your network provider.
You can also set or adjust the time using the
Clock & Alarm menu.
7.1 Set date and time
1
Press m and scroll d to
CL O C K / A L ARM
.
Press m. Display shows
DA TE & T I M E
, then
press
m
.
2
Enter the date using the format
DD - M M
e.g.
04 / 08
for 4th August.
3
Press m and enter the time using the 24
hour format
HH – M M
, e.g.
14:45
for 2.45pm.
4
Press m to confirm.
5
Press e to return to standby.
n Note
The date and time is retained during a power
failure or when the batteries are discharged.
7.2 Set alarm
1
Press m, scroll d to
CL O C K / A L ARM
and
press m.
2
Scroll d to
SE T AL A R M
and press m.
3
Scroll u or d to
OF F, ON ONC E
or
ON DAI LY
and press m.
4
If you select
ON ONC E
or
ON DAI LY
, enter the
time using the 24 hour format
HH - M M
e.g
14:45
for 2:45pm and press m.
5
Press e to return to standby. When the
alarm goes off, press any key to stop the ring.
n Note
• Once the alarm is set to on, the C icon is
displayed.
• The alarm will ring at the medium level.
AL A R M
ON
and the C will flash on the display.
7.3 Set alarm melody
There are three alarm ringtones.
1
Press m and scroll d to
CL O C K / A L ARM
.
Press m.
2
Scroll d to
AL A R M T O N E
and press m.
Melodies are played.
3
Scroll u or d and press m.
Page 22

20
Personal settings
8 Personal settings
8.1 Handset tones
w Warning
When the phone is ringing, avoid holding the
earpiece too close to your ear as it may damage
your hearing.
8.1.1 Ring volume
Choose from: Ringer Off, Low, Medium, High,
Boost and Progressive (increasing ring volume).
n Note
The default setting is High.
1
Press m, scroll d to
PE R S O NAL S ET
and
press m.
2
HA N D S ET T O NE
is displayed. Press m.
3
RI N G V O L U M E
is displayed. Press m.
4
Scroll u or d to adjust the ringer
volume level.
5
Press m to save the settings.
6
Press e to return to standby.
8.1.2 Ring melody
Choose from 10 ringer melodies.
1
Press m, scroll d to
PE R S O NAL S ET
and
press m.
2
HA N D S ET T O NE
is displayed. Press m and
scroll d to
RI N G M E L O D Y
. Press m.
3
Press u or d to select the ringtone.
A sample of the ringtone is played.
4
Press m to confirm.
5
Press e to return to standby.
8.1.3 Group melody
To benefit from this feature, you must subscribe
to the Caller Line ldentification service.This
menu enables you to select and set the melodies
to be played when there is an external incoming
call from a contact whose name is stored in
your phonebook and is part of a group. You can
associate 1 ring melody to each group.There
are three phonebook groups (Group A, B, C)
available for you to organize your contacts. Each
group can be assigned a unique melody.
1
Press m, scroll d to
PE R S O NAL S ET
and
press m.
2
HA N D S ET T O NE
is displayed. Press m and
scroll d to
GR O U P M E L O DY
. Press m.
3
Scroll u or d to select:
GR O U P A, B
or
C
, then press m.
4
Press u or
d
to select the ringtone
you want for the group and press m.
5
Press e to return to standby.
8.1.4 Key tones on/off
When you press a key on the handset you hear
a beep. You can switch these beeps on or off.
1
Press m, scroll d to
PE R S O NAL S ET
and
press m.
2
HA N D S ET T O NE
is displayed. Press m and
scroll d to
KE Y TO N E
. Press m.
3
Scroll u or d to select ON or
OF F
.
4
Press m to confirm.
5
Press e to return to standby.
8.1.5 First ring
Your SE445 will automatically detect the Caller
identification (Subscription dependent). Your
phone will not ring until this information is
displayed. If you wish to hear the ring before the
caller identification is displayed you can manually
set FIRST RING to ON.
1
Press m, scroll d to
PE R S O NAL S ET
and
press m.
2
HA N D S ET T O NE
is displayed. Press m and
scroll d to
FI R S T R I N G
. Press m.
3
Scroll u or d to select ON or
OF F
.
4
Press m to confirm.
5
Press e to return to standby.
8.2 Handset name
Personalise your handset, with a name or
location for example Peter or Bedroom.
Maximum 10 characters.
Page 23

21
Personal settings
1
Press m, scroll d to
PE R S O NAL S ET
and
press m.
2
Scroll d to
HA N D S ET N A ME
and press m.
The current name is displayed.
3
Press > to delete the current name.
4
Enter the name you want – maximum 10
characters and press m to save.
5
Press e to return to standby.
8.3 Auto pick up
With Auto pick up switched on, you can answer
a call just by lifting the handset off the base or
charger. If switched off, you will have to press
r
to answer a call. The default setting is Off.
1
Press m, scroll d to
PE R S O NAL S ET
and
press m.
2
Scroll d to
AU T O P I C K U P
. Press m.
3
Scroll u or d to select ON or
OF F
.
4
Press m to confirm.
5
Press e to return to standby.
8.4 Auto hang up
With Auto hang up switched on, you can end a
call just by replacing the handset on the base or
charger. If switched off, you have to press e to
hang up. The default setting is On.
1
Press m, scroll d to
PE R S O NAL S ET
and
press m.
2
Scroll d to
AU T O H A N G U P
. Press m.
3
Scroll u or d to select ON or
OF F
.
4
Press m to confirm.
5
Press e to return to standby.
8.5 Display language
You can change the display language.
1
Press m, scroll d to
PE R S O NAL S ET
and
press m.
2
Scroll d to
LA N G U AGE
. Press m.
3
Scroll u or d to select the language
you want.
4
Press m to confirm.
5
Press e to return to standby.
8.6 Babysit mode on/off
Leave one handset in a room and use another
handset to hear sounds in that room.
1
Press m, scroll d to
PE R S O NAL S ET
and
press m.
2
Scroll d to
BA B Y S IT M O DE
. Press m.
3
Press u or
d
to select ON or
OF F
.
4
Press m to confirm.
When switched On, you can leave this handset
in the room you wish to monitor. Only the
microphone is on. Anyone in the room cannot
hear you.
8.7 Babysit
1
Switch a handset’s babysit mode setting On
and place that handset in the room.
2
At a second handset, press c and enter
the number of the handset you are using as
a room monitor. You can now hear sounds
coming from the room.
t Tip
To stop room monitoring at any time, press
e
8.8 Backlight on/off
1
Press m, scroll d to
PE R S O NAL S ET
and
press m.
2
Scroll d to
BA C K L IGH T
. Press m.
3
Press u or
d
to select ON or
OF F
.
4
Press m to confirm.
8.9 Keypad lock
Prevent accidental dialling while carrying the
handset by locking the keypad.
1
Press and hold *.
The display shows
KE Y S L O C K E D
.
2
To unlock the handset, press and hold *
again.
n Note
While the keypad is locked, you can answer
incoming calls as normal.
Page 24

22
Advanced se ttings
9 Advanced settings
This setting is useful to access certain network
and PABX/switchboard services.
9.1 Recall time
The default SE445 recall time is suitable for your
country and network operator. It is unlikely that
you should need to change this setting unless
advised to do so.
1
Press m, scroll d to
AD V A N CED S ET
and
press m.
2
RE C A L L T I M E
is displayed. Press m.
3
Press u or d to select the setting you
want:
SH O R T, ME D I U M, LO N G
.
4
Press m to confirm.
5
Press
e
to return to standby.
n Note
The use of your SE445 cannot be guaranteed on
all PABX.
9.2 Dial mode
The default SE445 dialling mode is suitable for
your country and network operator. It is unlikely
that you should need to change this setting
unless advised to do so.
1
Press m, scroll d to
AD V A N CED S ET
and
press m.
2
Scroll d to
DI A L M O D E
. Press m.
3
Press u or d to select
TO N E
or
PU L S E
.
4
Press m to confirm.
5
Press e to return to standby.
9.2.1 Temporarily switch from Pulse to
Tone dialling
1
Press and hold *.
The dial mode will change from Pulse to Tone
for the duration of the call.
9.3 Call barring
Prevent certain numbers from being dialled from
your SE445. Store up to four specific numbers,
each up to 4 digits – for example, international
or local prefixes.
Bypass call barring by switching the setting Off
or On.
n Note
If you switch Call barring on,
BA R R MO D E ON
will
be displayed on your screen in standby mode.
9.3.1 Switch call barring on/off
1
Press m, scroll d to
AD V A N CED S ET
and
press m.
2
Scroll d to
CA L L B A R R I NG
. Press m.
3
Enter the master PIN (default setting 0000)
and press m.
4
MO D E
is displayed. Press m.
5
Press u or
d
to select ON or
OF F
.
Press m to confirm.
6
Press e to return to standby. You can now
set the number (See below).
9.3.2 Set a number to be barred
1
Press m, scroll d to
AD V A N CED S ET
and
press m.
2
Scroll d to
CA L L B A R R I NG
. Press m.
3
Enter the master PIN (default setting 0000)
and press m.
4
Scroll d to
NU M B E R
. Press m.
5
If necessary, scroll u or d to the next
available slot.
6
Press m and enter the number or prefix
you want to bar. Press m to confirm.
7
Press e to return to standby.
9.4 Baby call
When activated, this feature allows you to dial
a number by pressing any key on your handset
(except e). This feature is very useful for
access to emergency services.
Page 25

23
Advanced se ttings
9.4.1 Switch baby call on/off
1
Press m, scroll d to
AD V A N CED S ET
and
press m.
2
Scroll d to
BA B Y C A L L
. Press m.
3
Enter the master PIN (default setting 0000)
and press m.
4
MO D E
is displayed. Press m then press u
or d to select ON or
OF F
. Press m
to confirm.
5
Press e to return to standby.
n Note
If you switch Baby call on,
BA B Y CA L L ON
will be
displayed on your screen in standby mode.
To switch Baby call off again:
1
Press e.
2
OF F?
is displayed. Press m to confirm.
9.4.2 Set the baby call number
1
Press m, scroll d to
AD V A N CED S ET
and
press m.
2
Scroll d to
BA B Y C A L L
. Press m.
3
Enter the master PIN (Default setting 0000)
and press menu.
4
Scroll d to
NU M B E R
. Press m.
5
Enter the number. Press m to confirm
6
Press e to return to standby.
9.4.3 Dial a baby number
1
When a baby call number has been stored
and the baby call setting switched on, press
any key (apart from e), to dial a number.
n Note
When baby call is switched on, you can still
answer any incoming call as normal.
9.5 Registration
Up to 5 handsets can be registered to one base
station. Additional handsets must be registered
to the base before you can use them.
• The instructions described below apply
specifically to your Philips SE445 handset.
If you wish to register another manufacturer’s
handset, the instructions may vary. In this
case, please refer to the manufacturer of the
additional handset.
• The Master PIN is required before you can
register or unregister handsets. The default
PIN is
00 0 0
.
9.6 Register a handset
At the base:
1
Press and hold the p button on the
base station for at least 3 seconds. The base
station emits a beep when it is ready to accept
registration. You have 90 seconds in which to
register a handset.
At the handset:
1
Press m and scroll d to
AD V A N CED S ET
and press m.
2
Scroll d to
RE G I S TRA T ION
and press
m
.
3
If necessary, scroll u or d to display
RE G I S T. B A SE
and press m.
BA S E 1 2 3 4
is displayed and the registered
base number is flashing.
Enter the number of the base on which you
wish to register your handset.
If you have only 1 base station, press 1.
If you have 2 base stations, press 1 or 2,
etc.
4
When the display shows
PI N - - --
, enter the
base PIN.
When the handset registers with the base, it is
assigned a handset number.
9.7 Select a base
You can register your SE445 handset with up
to 4 bases. Once registered, you can switch
between bases, for example, bases at home and
at work.
1
Press m and scroll d to
AD V A N CED S ET
and press m.
2
Scroll d to
RE G I S TRA T ION
and press
m
.
3
SE L E C T BA S E
is displayed. Press m.
Page 26

24
Advanced se ttings
The available bases are displayed with the
current base number flashing.
4
Enter the number of the base you want
– 1,2,3 or 4 and press m.
When the base is found you hear a beep. If not
found, the display shows
UN R E G I STE R E D
.
9.8 Unregister a handset
1
Press m and scroll d to
AD V A N CED S ET
and press m.
2
Scroll d to
UN R E G I STE R
and press
m
.
3
Enter the 4 digit master PIN and press m.
Display shows the registered handset numbers.
4
Scroll u or d to select the handset
you want to delete and press m.
U N REG I S T E RED
is displayed on the handset
screen.
9.9 PIN
The 4-digit master PIN is used when registering
or unregistering a handset and when changing
some settings on your SE445. The default setting
is 0000. You can change this PIN for more
security.
1
Press m, scroll d to
AD V A N CED S ET
and
press m.
2
Scroll d to
PI N
. Press m.
3
Enter the current 4 digit master PIN and
press m. (Default setting 0000).
4
Enter the new PIN and press m.
n Note
Make a note of your PIN. If you forget your PIN
you will need to reset your product.
9.10 Reset
This will reset your SE445 to its default settings.
n Note
Entries stored in the phonebook and new
answering machine messages are retained.
After reset, depending on your country, the
welcome mode setting may be shown on the
handset display.
1
Press m, scroll d to
AD V A N CED S ET
and
press m.
2
Scroll d to
RE S E T U N I T
. Press m.
3
CO N F I R M?
is displayed. Press m.
9.11 Default settings
Handset name PHILIPS
Key tone On
Auto pick up Off
Auto hang up On
Ringer melody Ring 1
Ringer volume Medium
Earpiece volume 3
Phonebook Unchanged
Call log Empty
Redial list Empty
Master PIN 0000
Keypad lock Off
Clock 00:00
Alarm Off
Dial mode Tone
Answer Machine On
Answer Mode Answer & Record
Outgoing message Pre-defined
Ring delay 6
Remote Access On
Handset screening Off
Base screening On
9.12 Auto prefix
You can set the SE445 to detect a dialling number
and replace it with another number. The number
to be detected can be up to 5 digits long. It can
be replaced with a number up to 10 digits.
1
Press m, scroll d to
AD V A N CED S ET
and
press m.
2
Scroll d to
PR E F I X
. Press m.
3
DE T E C T DI G I T
is displayed. Press m.
4
Enter the number you want to be detected
and press m.
5
Scroll to
PR E F I X NU M
. and press m.
6
Enter the number you want it replaced
with and press m.
7
Press e to return to standby.
Page 27

25
Network Ser vices
9.13 Country
If you move to another country you can set
your phone to be compatible with the network
settings of that country.
n Note
If you make a mistake during welcome mode
country selection, you can also reset your
country.
Depending on your country, this option may be
displayed as
NO T AV A I L
or you country may not
be displayed.
1
Press m, scroll d to
AD V A N CED S ET
and
press m.
2
Scroll d to
SE L. CO U N T R Y
. Press m.
3
Enter the 4-digit master PIN and press m.
4
Scroll u or d to display the required
country.
5
Press m to confirm.
9.14 Intrusion
When an external call is taking place, another
handset registered to the base can join in,
making the call a 3-way conference, just by
pressing r.
To enable this, Intrusion must be switched On.
1
Press m, scroll d to
AD V A N CED S ET
and
press m.
2
Scroll d to
IN T R U SIO N
. Press m.
3
Scroll u or d to ON or
OF F
.
4
Press m to confirm.
10 Network Services
Your SE445 gives you easy access to a range of
network services.
10.1 Call forward for all calls
Set your phone to forward all incoming calls to
another number.
10.1.1 Set call forward number
1
Press m and scroll d to
NE T. SE R V I C E
and press m.
2
CA L L F O R W A RD
is displayed. Press m.
3
Scroll u or d to
SE T T I NGS
to set the
number you wish to transfer the calls to and
press m.
4
Press e to return to standby.
10.1.2 Activate/Deactivate call forward
for all calls
1
Press m and scroll d to
NE T. SE R V I C E
and press m.
2
CA L L F O R W A RD
is displayed. Press m.
3
Scroll u or d to
AC T I V AT E D
or
DE A C T IVA T ED
and press
m
.
4
Press e to return to standby.
10.2 Call forward when busy
Set your phone to forward incoming calls to
another number only if your line is busy.
10.2.1 Set call forward number
1
Press m and scroll d to
NE T. SE R V I C E
and press m.
2
Scroll d to
CA L L F W D B U SY
and press m.
3
Scroll u or d to
SE T T I NGS
to set the
number you wish to transfer the calls to and
press m.
4
Press e to return to standby.
Page 28

26
Network Ser vices
10.2.2 Activate/Deactivate call forward
when busy
1
Press m and scroll d to
NE T. SE R V I C E
and press m.
2
Scroll d to
CA L L F W D B U SY
and press m.
3
Scroll u or d to
AC T I V AT E D
or
DE A C T IVA T ED
and press
m
.
4
Press e to return to standby.
10.3 Call forward when unanswered
Set your phone to forward incoming calls to
another number only if your line does not
answer.
10.3.1 Set call forward number
1
Press m and scroll d to
NE T. SE R V I C E
and press m.
2
Scroll d to
CA L L F W D U A NS
and press m.
3
Scroll u or d to
SE T T I NGS
to set the
number you wish to transfer the calls to and
press m.
4
Press e to return to standby.
10.3.2 Activate/Deactivate call forward
when unanswered
1
Press m and scroll d to
NE T. SE R V I C E
and press m.
2
Scroll d to
CA L L F W D U A NS
and press m.
3
Scroll u or d to
AC T I V AT E D
or
DE A C T IVA T ED
and press
m
.
4
Press e to return to standby.
10.4 Voice mail
Switch your network’s answering service on
or off.
1
Press m and scroll d to
NE T. SE R V I C E
and press m.
2
Scroll d to
VOICE MAIL 1
or
VOICE MAIL 2
and press m.
3
Scroll u or d to
CA L L
and press m
to call the voice mail number, or scroll to
SE T T I NGS
to set a voice mail number and
press m.
4
Press e to return to standby.
10.5 Info service
Dial your network’s directory enquiries service.
1
Press m and scroll d to
NE T. SE R V I C E
and press m.
2
Scroll d to
IN F O S E R V I CE
and press m.
3
Scroll u or d to
CA L L
and press m
to call the service number, or scroll to
SE T T I NGS
to set a service number and press
m
.
4
Press e to return to standby.
10.6 Call return
Dials your network to find out who
called you last.
1
Press m and scroll d to
NE T. SE R V I C E
and press m.
2
Scroll d to
CA L L R E T U R N
and press m.
3
Scroll u or d to
CA L L
and press m
to call the number or scroll to
SE T T I NGS
to
set a call return number and press m.
4
Press e to return to standby.
10.7 Cancel Callback
Dials the service number for your country to
deactivate the call back service.
1
Press m and scroll d to
NE T. SE R V I C E
and press m.
2
Scroll d to
CANCEL CALLBK
and press m.
3
Scroll u or d to
CA L L
and press m to
dial the service number that will deactivate
the call back service, or scroll to
SE T T I NGS
to set or modify the cancel callback service
number and press m.
4
Press e to return to standby.
Page 29

27
Using your Answer ing machine
10.8 Withhold number
Set your phone to withhold your number
from being sent out every time you dial. If the
receiving phone uses Caller Identification, your
number will appear as
WI T H H E LD
on the display.
Alternatively, this feature allows the prefix code
to be added automatically to the dialling number
once set.
10.8.1 Set up withhold ID
1
Press m and scroll d to
NE T. SE R V I C E
and press m.
2
Scroll d to
WI T H H O LD I D
and press m.
3
Scroll u or d to
SE T T I NGS
to set the
prefix code for withholding ID and press
m
.
4
Press e to return to standby.
10.8.2 Activate/Deactivate withhold ID
1
Press m and scroll d to
NE T. SE R V I C E
and press m.
2
Scroll d to
WI T H H O LD I D
and press m.
3
Scroll u or d to
AC T I V AT E D
or
DE A C T IVA T ED
and press m.
4
Press e to return to standby.
11 Using your
Answering machine
Your SE445 answering machine records
unanswered calls when it is activated. It can
store up to 59 messages within the maximum
recording time of 15 minutes. Each message can
be up to 3 minutes long. Your personal outgoing
messages can be up to 1 minute long.
11.1 SE445 Base Answer Machine Control Keys
o
Press to turn the
answering machine on/off
P
Play new messages
Press and hold to play all stored
messages
Press to stop playback
R
Skip to the next message during
message playback
L
Replay current message
Press twice to skip back to previous
message
x
Delete current message during message
playback
Long press to delete all messages when
TAM is in standby mode.
+
Increase speaker volume during
message playback
-
Decrease speaker volume during
message playback.
11.2 Switch on/off
1
Press m scroll
u
or d to
ANSW
MACHINE
and press m .
2
Scroll d to
AN S W O N / O FF
and press m.
3
Scroll
u
or d to display
ON or O F F
.
4
Press m to confirm.
5
Press e to return to standby.
Page 30

28
Using your Answer ing machine
11.3 Play messages
1
Press m and scroll u or d to
AN S W
MA C H I NE
and press m.
PL A Y
is displayed.
2
Press m to play new messages.
The display shows the number of new messages.
If there are no new messages, all stored
messages are played.
3
Press > to display the callers
identification. Press > again to see the
date and time of the call.
n Note
If you have not subscribed to the Caller Line
Identification this option is not available.
This also applies for memo recordings.
4
During playback press m to display a
list of options. Use the u and d
keys to change the options:
•
RE P E AT
– press m to repeat
current message
•
NE X T M E S S A GE
– press m to play
next message
•
PR E V M E S S A GE
– press m to play previous
message
•
DE L E T E
– press m to delete the current
message.
•
SA V E N U M B E R
– press m to store the
number, if available, in the phonebook.
n Note
If you have not subscribed to the Caller Line
Identification this option is not available.
5
Press e to stop playback
and return to standby.
11.4 Delete all messages
1
Press m scroll to d
AN S W M A C H I NE
and
press m.
2
Scroll d to
DE L E T E A L L
and press m.
3
Display shows
CO N F I R M?
. Press m to
confirm.
11.5 Record a memo
You can record a memo which is stored on your
answering machine and played back like a normal
message.
1
Press m scroll
u
or d to
AN S W
MA C H I NE
and press m.
2
Scroll d to
RE C O R D M E M O
and press
m
.
Display shows
RE C O R DIN G
.
3
Speak your message. Press m to
end recording.
11.6 Outgoing messages
This is the message your callers hear on the
answering machine. There are two pre-recorded
outgoing messages, or you can record your own.
11.6.1 Answer & Record
The caller can leave a message. The pre-recorded
message is “This is an answering machine, please
leave your message after the tone.”
11.6.2 Answer Only
The caller can listen to your announcement
but cannot leave a message. The pre-recorded
message is “This is an answering machine, please
call back later”.
11.6.3 Set answer mode
Set your machine to Answer & Record or
Answer Only.
1
Press m scroll
u
or d to
AN S W
MA C H I NE
and press m.
2
Scroll d to
AN S W E R M O D E
and press m.
The current answer mode is displayed.
3
Scroll
u
or d to select
AN S W E R & R E C
or
AN S W E R O N LY
and press m.
4
Scroll
u
or d to display the message
type you want:
PE R S O NAL I S E D
to set your
own recorded message or
PR E D E FIN E D
for
the pre-recorded message.
5
Press
m
to confirm.
Page 31

29
Using your Answer ing machine
If you select
PE R S O NAL I Z E D
, see following
paragraph.
11.6.4 Record, play or delete your own
outgoing message
Answer & Record invites your callers to leave
a message. Answer Only lets callers hear your
announcement but they cannot leave a message.
1
Press m scroll to
AN S W M A C H I NE
and press
m
.
2
Scroll u to
AN S W E R M O D E
and press m.
3
Scroll
u
or d to select
AN S W E R & R E C
or
AN S W E R O N LY
and press m. Use the
u
or d key to select
PE R S O NAL I S E D
then press m.
4
PL A Y
is displayed. Press m.
Current message is played back.
• Scroll d to select
RE C O R D M E S S
- press
m
. Display shows
RE C O R DIN G
and a beep
is emitted. Speak your message. Press m
to end recording.
•
DE L E T E
- press m. The pre-recorded
message will be automatically reinstated.
5
Press m to confirm.
11.7 Answering machine settings
11.7.1 Ring delay
Select the number of rings before your
answering machine picks up the call. Choose
from 2 – 9 rings or Toll Saver.
n Note
If Toll Saver is selected, then:
• If you have new messages your phone
answers after 2 rings.
• If there are no new messages it will answer
after 6 rings. So you have the option to hang
up, saving the time and cost of a call.
• If the memory is full, it will answer after 10
rings in Answer Only mode.
1
Press m scroll
u
or d to
AN S W
MA C H I NE
and press m.
2
Scroll d to
AN S W S E T T I NGS
and press
m
.
3
RI N G D E L A Y
is displayed. Press m.
4
Scroll
u
or d to select the number of
rings – 2-9 or
TO L L S A V E R
.
5
Press
m
to confirm.
11.8 Remote access
Remote access allows you to operate your
answering machine and listen to your messages
by calling your SE445 from another phone.
The default setting is activated.
1
Call your SE445. When you hear your
outgoing message, press #.
2
Enter your 4 digit PIN. The default code is
00 0 0
. You hear a confirmation beep.
n Note
Change this code for increased security, see
‘PIN’ on page 24.
3
After entering your PIN as stated above,
use the keypad to operate your SE445
answering machine:
Play messages 2
Play previous message 1
Play next message 3
Delete message playing 6
Switch answer machine on 7
Stop playback 8
Switch answer machine off 9
11.8.1 Remote Access activated/deactivated
1
Press m, scroll d to
AN S W M A C H I NE
and
press m.
2
Scroll d to
ANSW SETTINGS
and press m.
3
Scroll d to
RE M O T E A C C
and press m.
4
Scroll
u
or d to select
AC T I V AT E D
or
DE A C T IVA T ED
.
5
Press m to confirm.
Page 32

30
Using your Answer ing machine
11.9 Call screening
Use your handset or base speaker to hear a
caller leaving a message. You can then choose
to ignore the caller or pick up the call.
The default settings are:
• Handset call screening: Off
• Base call screening: On.
At the handset:
1
If you want to interrupt and take the call
press r or
v
At the base:
1
When a caller is leaving a message, press +
or - to adjust the volume to listen to your
caller.
2
To interrupt and take the call on the handset,
press r or v.
11.9.1 Switch handset call screening
on/off
1
Press m, scroll
u
or d to
AN S W
MA C H I NE
and press m.
2
Scroll d to
ANSW SETTINGS
and press m.
3
Scroll to
HS SCR E E N I NG
and press m.
4
Scroll
u
or d to select ON or
OF F
.
5
Press m to confirm.
11.9.2 Switch base station call screening
on/off
1
Press m, scroll d to
AN S W M A C H I NE
and
press m.
2
Scroll d to
ANSW SETTINGS
and press m.
3
Scroll d to
BS SCR E E N I NG
and
press m.
4
Press
u
or d to select ON or
OF F
.
5
Press
m
to confirm.
11.10 Access answering machine menu via the Call log
When the T is flashing to indicate new
messages you can see caller details via
u
or
press d again to go to
AN S W MA C H I NE
to play
new messages.
1
Press u,
CA L L L I S T
is displayed.
2
Press d,
AN S W MA C H I NE
is displayed.
3
Press m,
PL A Y
is displayed.
4
Press m, the handset will start the new
message playback. Once all messages are
played, the handset will return to standby.
During message playback, press e anytime
to return to standby.
11.11 Memory full
The memory is full if there is less than 15
seconds of recording time left or if the
maximum total of 59 messages has
been reached.
When the memory becomes full:
• The display will show --.
• T flashes quickly on the handset display.
• The machine will automatically switch to
Answer Only mode.
If the memory becomes full while a caller is
leaving a message, they will hear a beep and the
call is ended.
Page 33
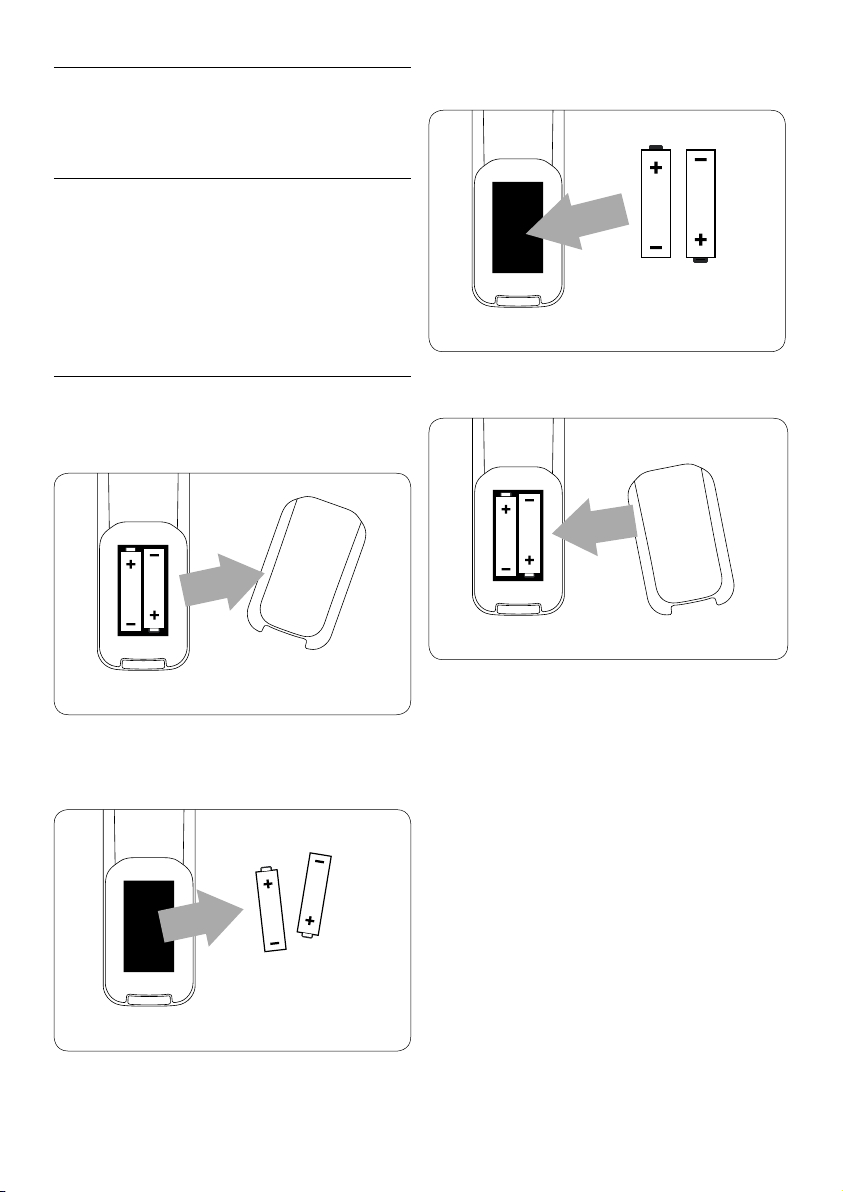
31
Maintenance and r eplacement
12 Maintenance and
replacement
12.1 Cleaning
• Simply clean the handset and base with a
damp (not wet) cloth, or an anti-static wipe.
• Never use household polish as this will
damage the product.
• Never use a dry cloth as this may cause a
static shock.
12.2 How to replace the batteries
w Warning
Always use AAA rechargeable batteries.
1
Slide off the battery cover.
2
Remove the old batteries.
3
Place the new batteries in the handset.
4
Replace the battery cover.
Page 34

32
Technica l dat a
13 Technical data
Battery life and range
Talk time and stand-by time
When the battery is fully charged, the talk time
of your SE445 is approximately 12 hours and the
stand-by time is approximately 150 hours.
Low battery warning
The battery level is shown in the top left of the
handset display.
When the battery level becomes low, you hear
a beep once every minute (during a call) and
the e icon flashes. If the battery level becomes
exceedingly low, the phone automatically
switches off shortly after the alert.
The approximate power levels of your battery
are:
f Fully charged.
g Partially charged.
e Running low.
Battery type
The batteries that are used on your SE445 are
AAA NiMh 550mAh.
Out of range warning
In ideal conditions the range of the phone is up
to 50 metres indoors and 300 metres outdoors.
When you are getting close to being out of
range during a call, the handset gives a
warning beep.
If the handset moves outside this range, the
handset gives and error beep, the call is lost and
some other functions will not be available. You
will hear an error beep if you try to use them,
provided the error beep is switched on.
When you come back in range of the base, the
handset gives another beep.
n Note
For the error beep to work, it must be
switched on.
Page 35

33
Frequently as ked qu est ions
14 Frequently asked questions
www.philips.com/support
Charging
The f icon is not blinking when the
handset is placed on the base
• Bad battery contact – move the handset
slightly
• Dirty contact – Clean the battery contact
with a cloth moistened with alcohol
• Battery is full – no need to charge
Calls
No dialling tone
• No power – check the connections. Reset the
phone: unplug and plug back in the mains
• Batteries are empty – charge the batteries for
at least 24 hours
• You are too far from the base – move closer
to the base
• Wrong line cable – use the line cable provided
• Line adaptor (when needed) is not connected
to the line cord – connect the line adaptor
(when needed) to the line cord
Poor audio quality
The base is too close to electrical appliances,
reinforced concrete walls or metal doorframes
– move the base at least one metre away from
any electrical appliances
The N icon is blinking
• Handset is not registered to the base
– register the handset to the base
• You are too far from the base – move closer
to the base
No ring tone
The ring tone is deactivated.
Increase the volume.
Caller Line Identification (CLI) service
does not work
Check your subscription with your network
operator
Phonebook
A phonebook entry cannot be stored
The phonebook is full. Delete an entry to free
memory
Display
No display
• Try recharging or replacing the batteries.
• Try disconnecting and connecting the base
power supply.
• If 7 segment display is not lit up, then try
disconnecting and connecting the base
power supply.
Registration
Unable to register another handset
Maximum number of 5 handsets has been
reached.
The display shows
SE A R C HIN G
. You must
unregister a handset in order to register a new
one.
Interference
Noise interference on your radio or
television
Your base or charger may be too close. Move it
as far away as possible.
Page 36

34
Frequently as ked qu est ions
Answering machine
Answering machine does not record
messages
• Switch the answering machine on.
• The memory may be full. If so, you will need
to delete some messages.
• Answer mode may be set to Answer Only.
Change the mode to Answer & Record.
Cannot access messages remotely
• Remote access may be switched off.
• If wrong PIN is entered a beep is played. You
can enter the PIN once again.
Cannot record outgoing message
• The memory may be full. If so, you will need
to delete some messages.
Answering machine stops automatically
• The memory may be full. If so, you will need
to delete some messages.
• The maximum message length is 3 minutes.
Page 37

35
Index
15 Index
A
Access the redial list 18
Add entry to phonebook 14
Adjust earpiece volume 12
Alarm clock 19
Answer a call 12
Auto hang up 21
Auto pick up 21
Auto prefix 24
B
Babysitter call 22
Base station overview 9
Box contents 6
C
Call barring 22
Call from the phonebook 12
Call a number from the call log 12
Call another handset 13
Call network voicemail 14
Caller identification 17
Call screening 30
Change country setting 25
Change handset ringtone 20
Change one touch phone numbers 16
Change ringer volume 20
Change master PIN 24
Charge batteries 11
Conference call 14
Connect the base 10
Controlling answering machine messages 27
D
Default settings 24
Delete a call log entry 18
Delete a one touch number 16
Delete a phonebook entry 16
Delete all phonebook entries 16
Delete an entry in the call log 18
Delete answering machine messages 27
at the base 27
by remote access 29
Delete a redial list number 18
Display icons and symbols 8
E
Earpiece volume 12
Edit a phonebook entry 15
End a call 13
Enter a name in the phonebook 15
F
First ring 20
H
Handset keys 7
Handset name 20
Handset overview 7
Handset registration 23
Identify your caller 17
Install batteries 11
L
Lock the keypad 21
M
Make a call 12
Menu navigation 9
Master reset 24
N
Navigate the menu 9
New messages 28
O
One touch keys 16
Outgoing messages 28
P
Page a handset 9
Pause in a stored number 15
Play answering machine messages 27
at the base 27
at the handset 28
by remote access 29
Pre-dial a call 12
Put a caller on hold to answer a second caller 13
Page 38

36
Section
R
Recall time 22
Record a memo 28
Recording memory full 30
Record outgoing message 29
Recycle your phone 5
Register a handset to a base 23
Remote access 29
Reset 24
S
Safety information 4
Save a call log number to the phonebook 17
Save a redial number to the phonebook 18
Secrecy 13
Set alarm 19
Set date and time 19
Set ring delay 29
Set alarm melody 19
Set country 25
Set display language 21
Set handset melody 20
Set first ring 20
Set dialling mode 22
Set prefix detect and replacement dialling 24
Set recall (flash) mode 22
Store a one touch number 16
Switch answering machine on and off 27
at the base 27
at the handset 27
by remote access 29
Switch between internal and external calls 13
Switch handset on/off 13
Switch key beeps on/off 20
T
Transfer an external call to another handset 13
U
Unregister a handset 24
V
View phonebook entries 15
View a call log 17
Index
Page 39

Copyright © 2007 Koninklijke Philips Electronics N.V. All rights reserved.
Trademarks are the property of Koninklijke Philips Electronics N.V. or their respective owners.
Specifications are subject to change without notice.
Document order number: 3111 285 38681 (E N)
Printed in China
 Loading...