

Page 1
User Manual
Register your product and get support at
www.philips.com/welcome
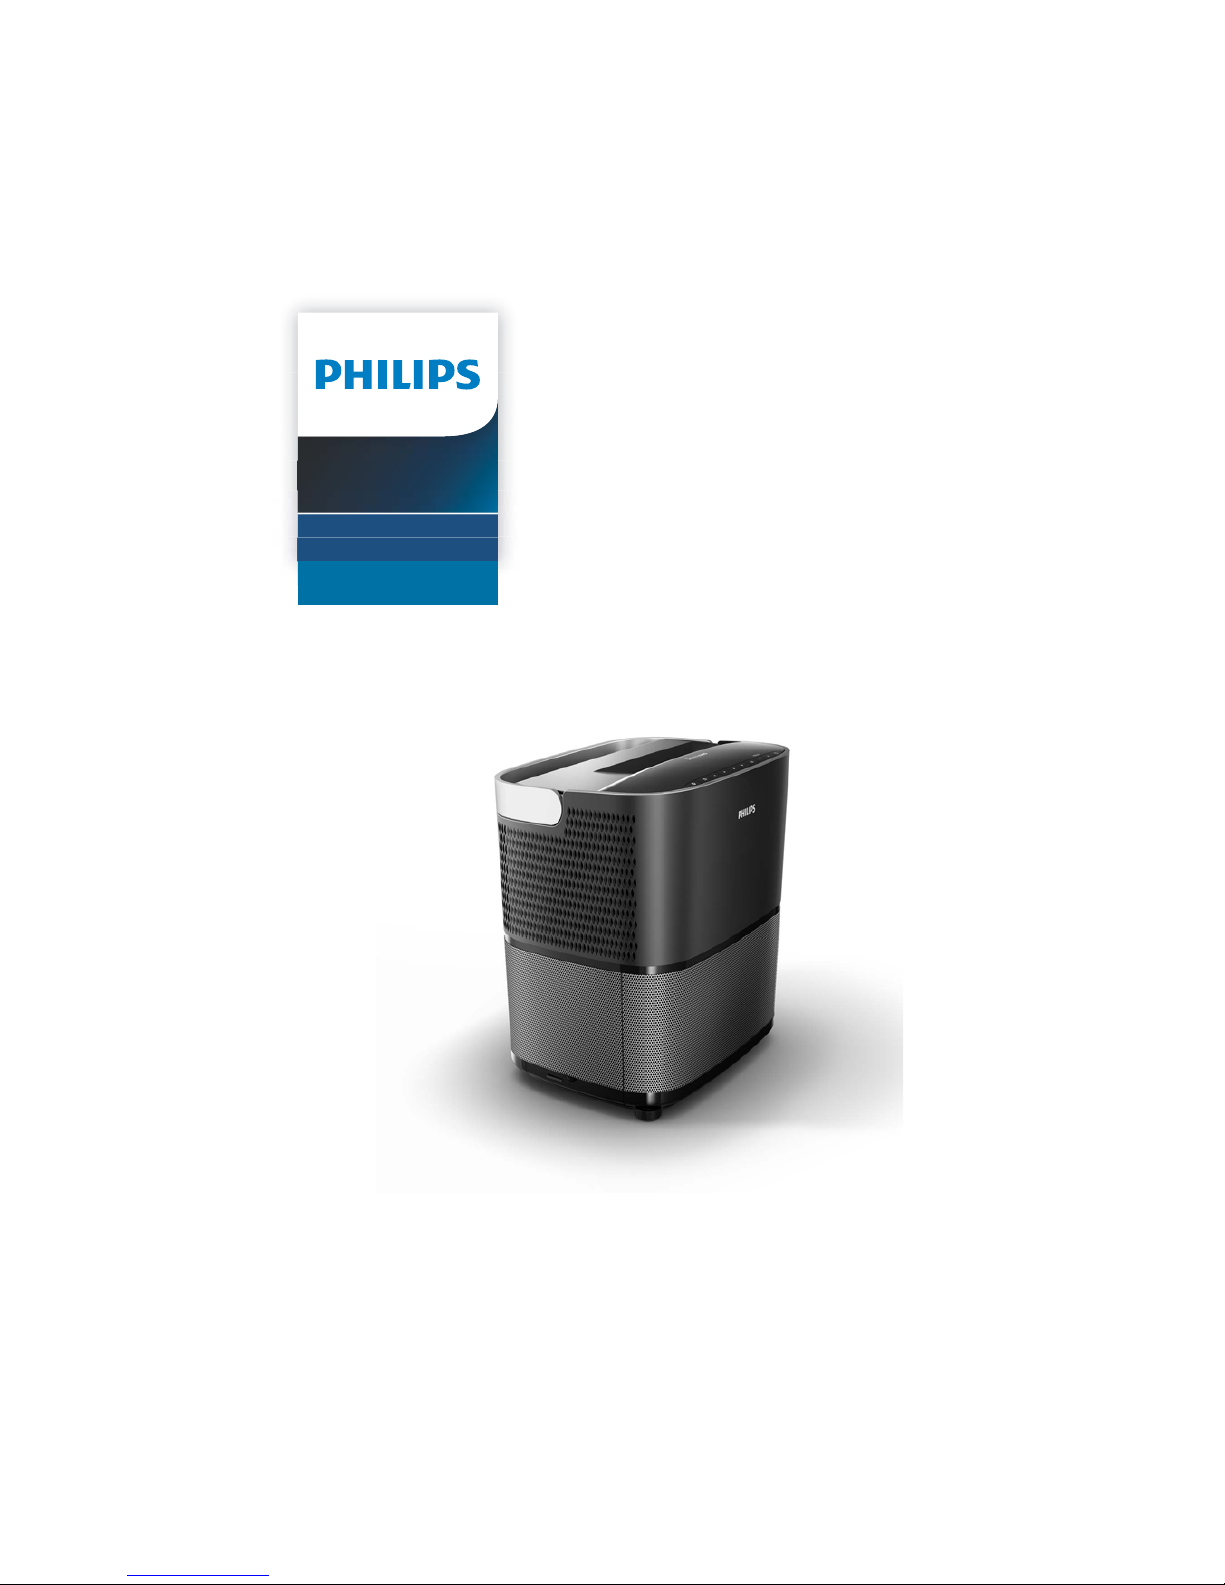
Full HD projector
HDP2510
Screeneo
Page 2

Table on Contents
Overview ........................................................3
Dear customer ............................................................3
About this user manual ............................................ 3
What's in the box ....................................................... 3
Product highlights ...................................................... 3
1 General safety information .................. 4
Setting up the device ................................................ 4
Repairs ..........................................................................4
Power supply ..............................................................5
3D glasses use .............................................................5
Dolby digital .................................................................5
2 Overview ...................................................6
Top view .......................................................................6
Side view .......................................................................6
Rear view ...................................................................... 7
Remote control ...........................................................8
Browsing the user interface ....................................9
Option menu and Short cut menu .......................9
Overview of the main menu functions .............. 10
3 Initial operation ..................................... 11
Setting up the device ............................................... 11
Connecting power supply ...................................... 11
Installing or changing the batteries of the
IR remote control ......................................................12
Using the remote control .......................................12
3D glasses (optional) ...............................................12
Initial installation ...................................................... 14
4 Connect to the playback device ........ 16
Connecting to devices with HDMI output ........ 16
Connecting to a computer (VGA) ....................... 16
Connecting a screen using the automatic
Trigger input ...............................................................17
Connecting using an audio/video (CVBS)
adapter cable .............................................................17
Connecting to external devices via
digital cable ................................................................17
Connecting to a home cinema amplifier .......... 18
Connecting to headphones .................................. 18
5 Bluetooth speaker ............................... 20
Activating Bluetooth speaker .............................. 20
Pair mode .................................................................. 20
6 Media playback (optional) ................. 21
Navigation for media playback .............................21
Activating media player .........................................22
Movie playback ........................................................22
Photo playback (optional) ....................................23
Music playback (optional) ................................... 24
7 Settings ................................................... 25
Overview of the menu functions ........................25
Reset functions ......................................................... 27
8 Service .....................................................29
Cleaning ......................................................................29
Replacing the lamp .................................................29
Troubleshooting ........................................................31
9 Appendix ................................................ 33
Technical data ..........................................................33
Accessories ................................................................33
Page 3
3
Overview
Dear customer
Thank you for purchasing our projector.
We hope you enjoy your device and its many
fun
ctions!
About this user manual
With the quick start guide that is supplied with
your device, you can start using your device
quickly and easily. Detailed descriptions can be
found in the following sections of this user
manual.
Read the entire user manual carefully. Follow
all s
afety instructions in order to ensure proper
operation of your device. The manufacturer
accepts no liability if these instructions are not
followed.
This user manual describes several versions of
th
e product. An infrared remote control (IR) is
provided.
Symbols used
Troubleshooting
This symbol designates tips that will
help you to use your device more effectively and easily.
Damage to the device or loss of data!
This symbol gives warning of damage to
the device and possible loss of data.
This damage can result from improper
handling.
Danger to persons!
This symbol gives warning of danger to
persons. Physical injury or damage can
result from improper handling.
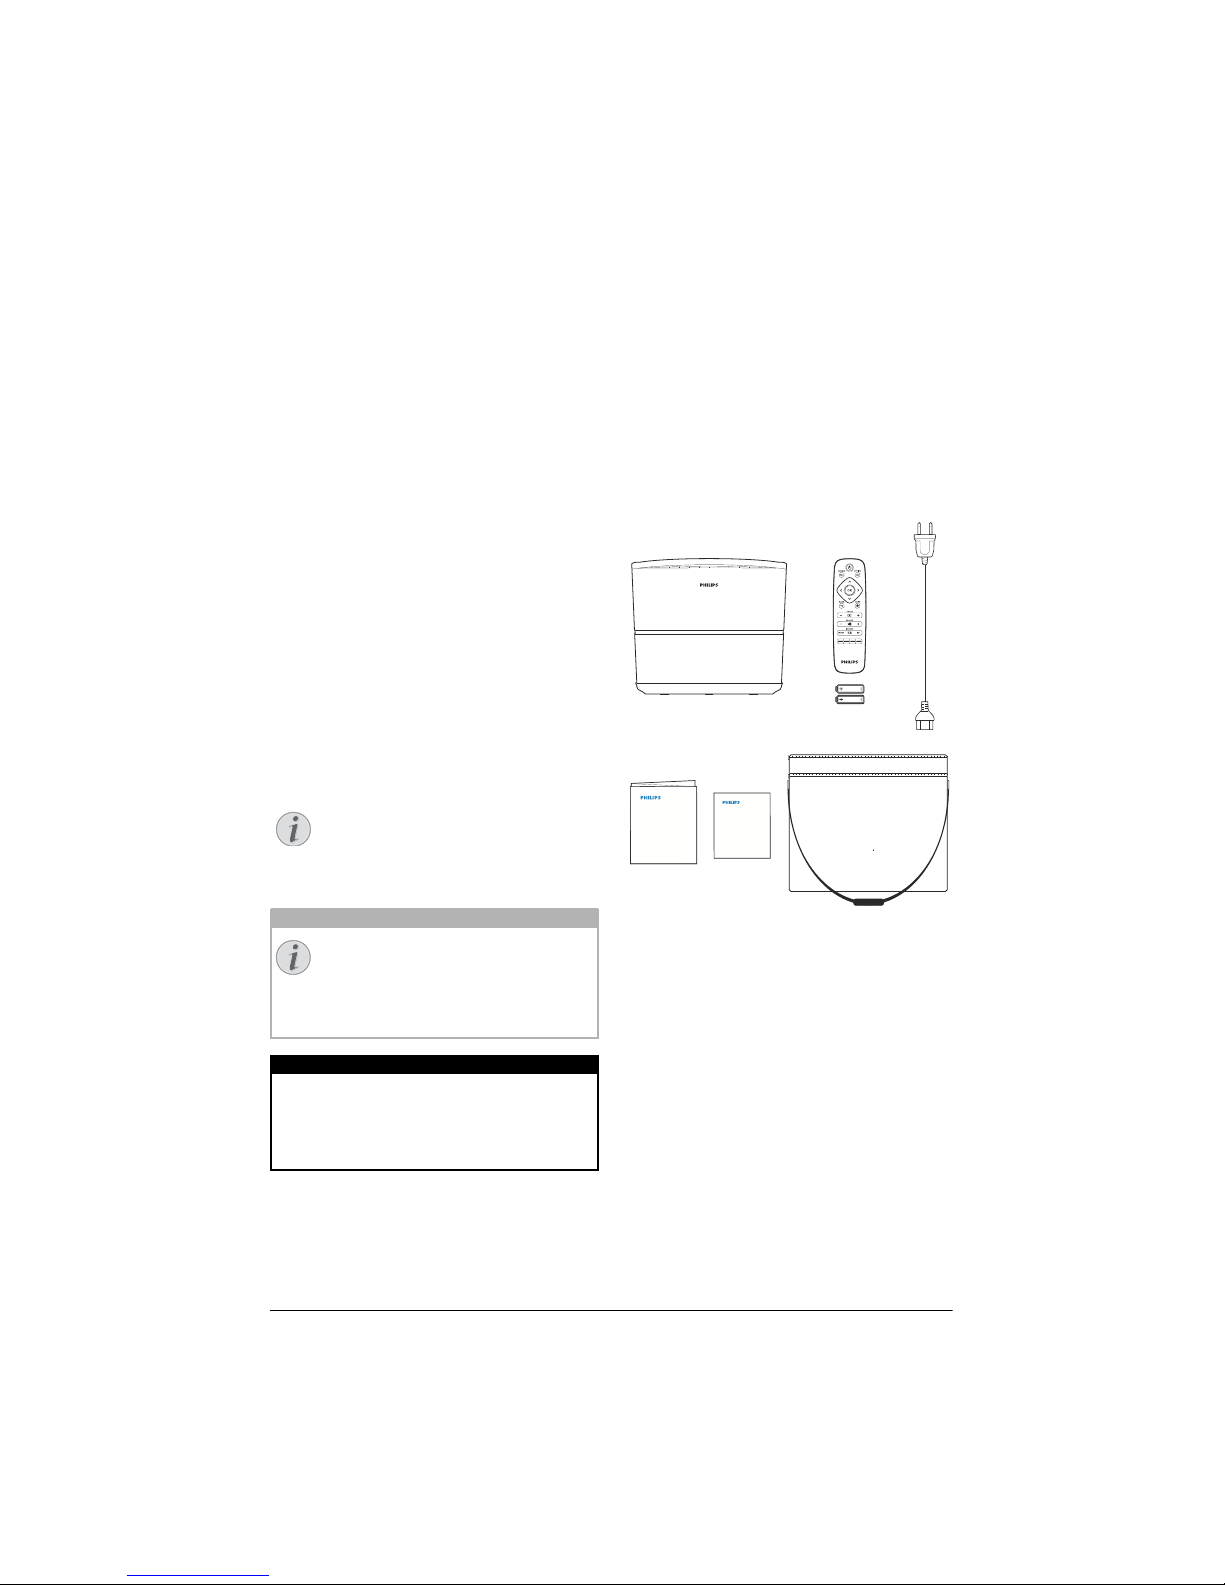
What's in the box
1 – Projector
2 –
Remote control (with two AAA battery)
3 – A/C po
wer cable
4 – Q
uick start guide
5 – W
arranty card
6 – C
arry bag (depending on model)
Quick Start
Guide
a
b
c
d
e
f
Product highlights
Wide-ranging connections
Your device is full HD compatible. With a HDMI
cable you can connect the projector to a Blueray player, set-top box or gaming console (see
Connect to the playback device, page 16).
Brilliant image
The luminAce engine ensurers a brilliant and
crisp
image with 2000 colour lumens and natu-
ral colours.
Excellent sound
The integrated Dolby Digital 2.1 sound system
e
nsures a full and rich sound.
Notice
CAUTION!
DANGER!
Page 4
4 Philips · HDP2510
1 General safety information
Do not make any changes or settings that are
not described in this user manual. Physical
injury or damage to the device or loss of data
can result from improper handling. Take note of
all warning and safety notes indicated.
Setting up the device
The device is for indoor use only. The device
should be placed securely on a stable, flat surface. Position all cables in such a way that no
on
e will stumble on them, thus avoiding possible injuries to persons or damage to the device
itse
lf.
Do not plug in the device in moist rooms. Never
touch the mains cable or the mains connection
with wet hands.
Never operate the projector immediately after
movin
g it from a cold location to a hot location.
When the device is exposed to such a change in
temperature, moisture may condense on the
crucial internal parts.
The device must have sufficient ventilation and
may
not be covered. Do not put your device in
closed cabinets or boxes.
Do not place the device on soft surfaces such
a
s tablecloths or carpets and do not cover the
ventilation slits. Otherwise the device could
overheat or catch fire.
Protect the device against direct sunlight, heat,
l
arge temperature fluctuations and moisture.
Do not place the device in the vicinity of heaters
or air conditioners. Observe the information on
temperature and humidity in the technical data
(see Technical da
ta, page 33).
Do not allow liquids to enter into the device.
Switch
off the device and disconnect it from the
mains supply if liquids or foreign substances
end up inside the device. Have the unit
inspected by a technical service centre.
Always handle the device with care. Avoid
t
ouching the lens. Never place heavy or sharp
objects on the device or the power cable.
If the device gets too hot or emits smoke, shut it
down immediately and unplug the power cable.
Arrange for your device to be investigated by a
technical service centre. To prevent the spread
of fire, open flames should be kept away from
the device.
Under the following conditions, a layer of moisture can appear inside the device which can
le
ad to malfunctions:
• if
the device is moved from a cold to a
warm area;
• after a cold room is heated;
• w
hen this device is placed in a damp
room.
Proceed as follows to avoid any moisture buildup:
1 Se
al this device in a plastic bag before
moving it to another room, in order for it to
adapt to room conditions.
2 Wait on
e to two hours before you take the
device out of the plastic bag.
The device should not be used in a very dusty
e
nvironment. Dust particles and other foreign
objects may damage the unit.
Do not expose the device to extreme vibrations. It
may damage the internal components.
Do not allow children to handle the device
without supervision. The packing materials
should be kept out of the hands of children.
Repairs
Do not repair the device yourself. Improper
maintenance can result in injuries or damage to
the device. Your device must be repaired by an
authorised service centre.
Find details of authorised service centres on
th
e warranty card.
Do not remove the type label from your device;
th
is would void the warranty.
Page 5
General safety information 5
Power supply
Before turning on your device, check that the
outlet that you are going to plug it into conforms to the indications shown on the information plate (voltage, current, power network frequency) located on your de
vice. This device
shall be connected to a single phase power
network. The device shall not be installed on
bare ground.
Only use the power cable that is supplied with
y
our device. Your device is delivered with a
grounded power cable. It is imperative to connect a grounded connector to a grounded outlet connected to the building earthing.
The socket outlet shall be installed near the
d
evice and shall be easily accessible.
To remove all electrical power from the device,
di
sconnect the power cable from the electrical
outlet. Only in case of danger, the power cable
is the disconnect device for this projector.
Always use the POWER button to
power off the projector. This is manda
tory for the UHP lamp to respect the
n
ecessary cooling time!
Turn off the device and unplug from the power
ou
tlet before cleaning the surface. Use a soft,
lint-free cloth. Never use liquid, gaseous or easily flammable cleansers (sprays, abrasives, polishes, alcohol). Do not allow any moisture to
reach
the interior of the device.
Risk of eye irritation!
This device is equipped with a long-life
UHP lamp, which emit very bright light.
Do not look directly into the projector
lens during operation. This could cause
eye irritation or damage.
3D glasses use
For the use of 3D glasses at home for watching
TV mind:
• i
t is contraindicated for children less than
six years old;
• for
children from six years old to adulthood, should be limited to the vision for a
maximum time
equal to the duration of a
film show;
• the same time limit is
also recommended
for adults;
• must
be restricted to watching only 3D
content
• how to make a p
roper and regular cleaning and disinfection in the case of any particular eventualities-ocular infections,
i
nfestations of the head, mixed use, etc.
where disinfection of the glasses is not
possible as it may damage the functionality of the 3D glasses must be communicated to the consumer that in presence of
t
hese eventualities-infections is contraindicated the use of 3D glasses for the person concerned until the disappearance of
t
he above circumstances;
• 3
D glasses must be kept out of children if
there is the presence of small moving
parts ingestible;
3D glasses are to be used together with the
in
struments of vision correction in case the
consumer is the bearer of lenses (eyeglasses or
contact lenses).
You should stop watching 3D in the
event of the occurrence of eye prob
lems or discomfort, and in the event of
a pe
rsistence of the same, consult a
doctor.
Dolby digital
Manufactured under license from Dolby Laboratories. Dolby and the double-D symbol are
tr
ademarks of Dolby Laboratories.
CAUTION!
DANGER!
CAUTION!
Page 6
6 Philips · HDP2510
2Overview
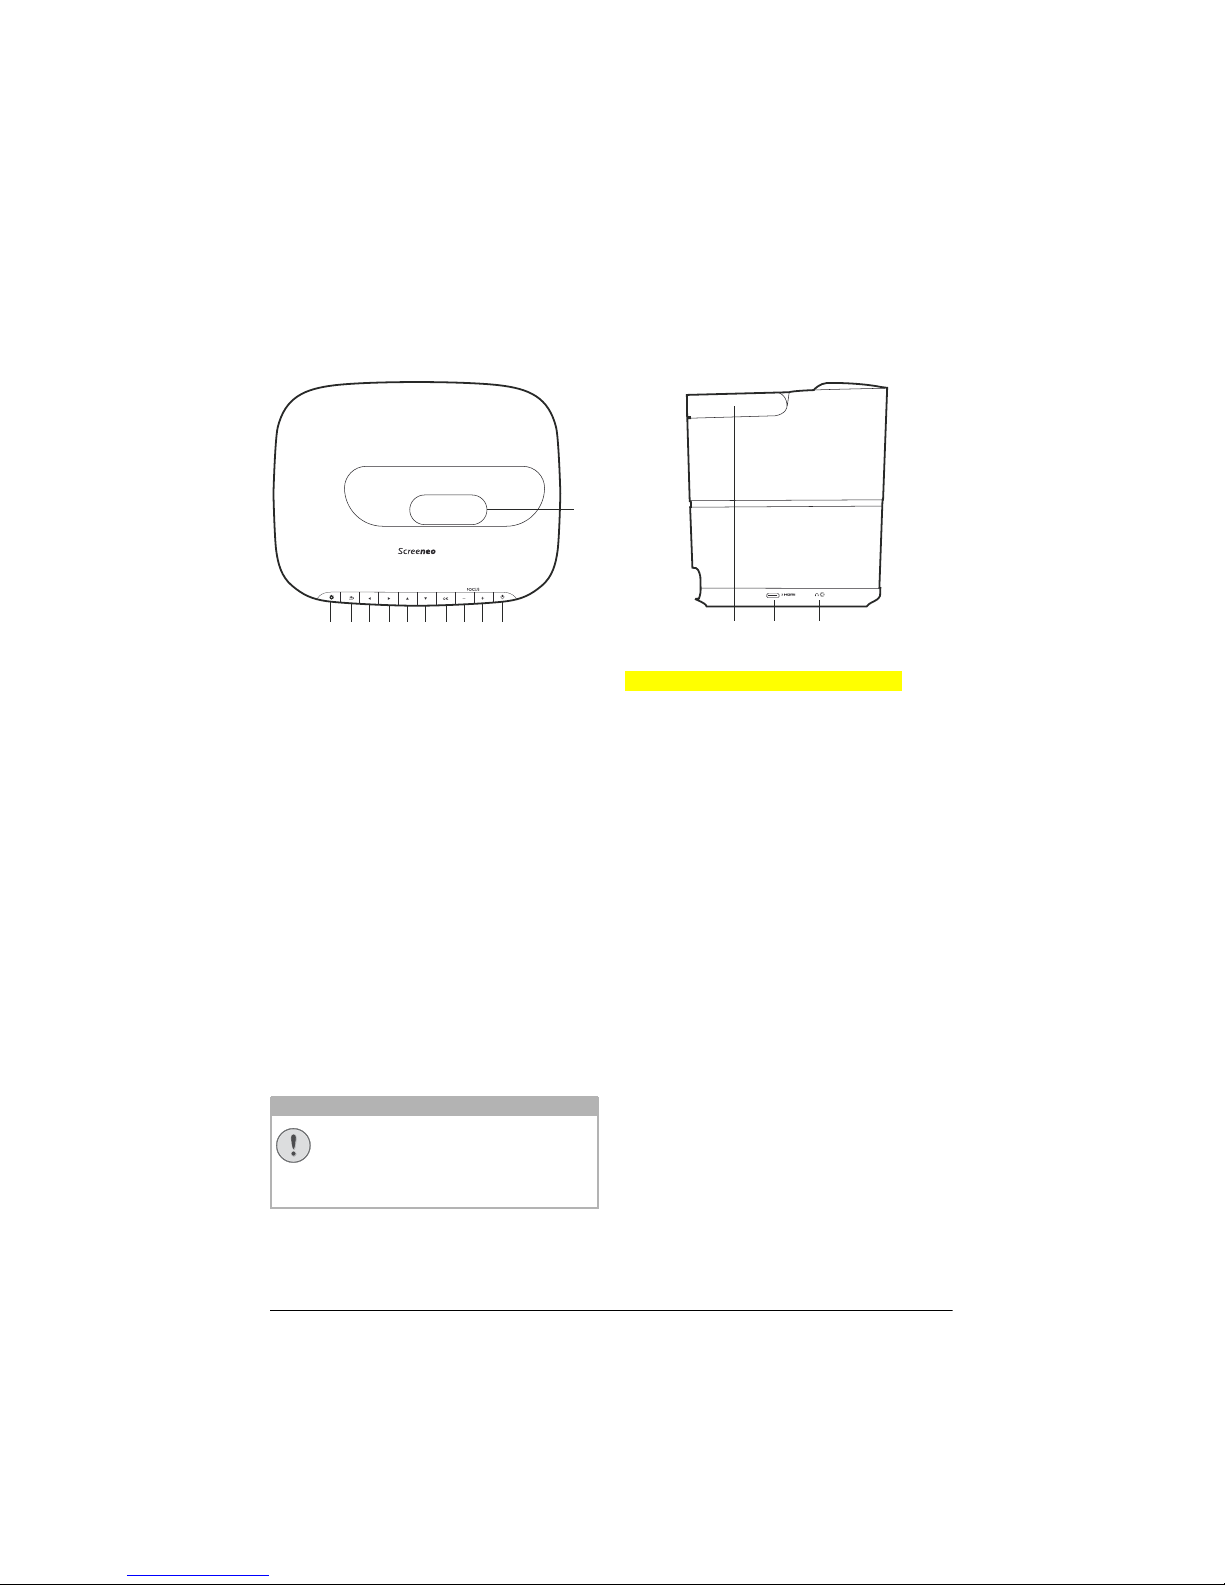
Top view
adcghijf
e
b
k
Always use the POWER button to
power off the projector. This is manda
tory for the UHP lamp to respect the
n
ecessary cooling time!
1 e / OPTI
ON
Opens the Option menu.
2 BACK / ¿
Goes one level back in menu / cancels a
function.
3–6 Navigation keys – //À/Á
Navigate in menu / modify settings, confirms
selection.
7 OK
Goes one level down in menu / confirms selection.
8–9 FOCUS -/+
Adjusts the focus for image sharpness
.
B / POWER
Short press: Powers on the projector.
Double press: Powers off the projector.
Long press (three seconds): Starts Pairing
mode.
Long press (ten seconds): Resets the projector.
Lens
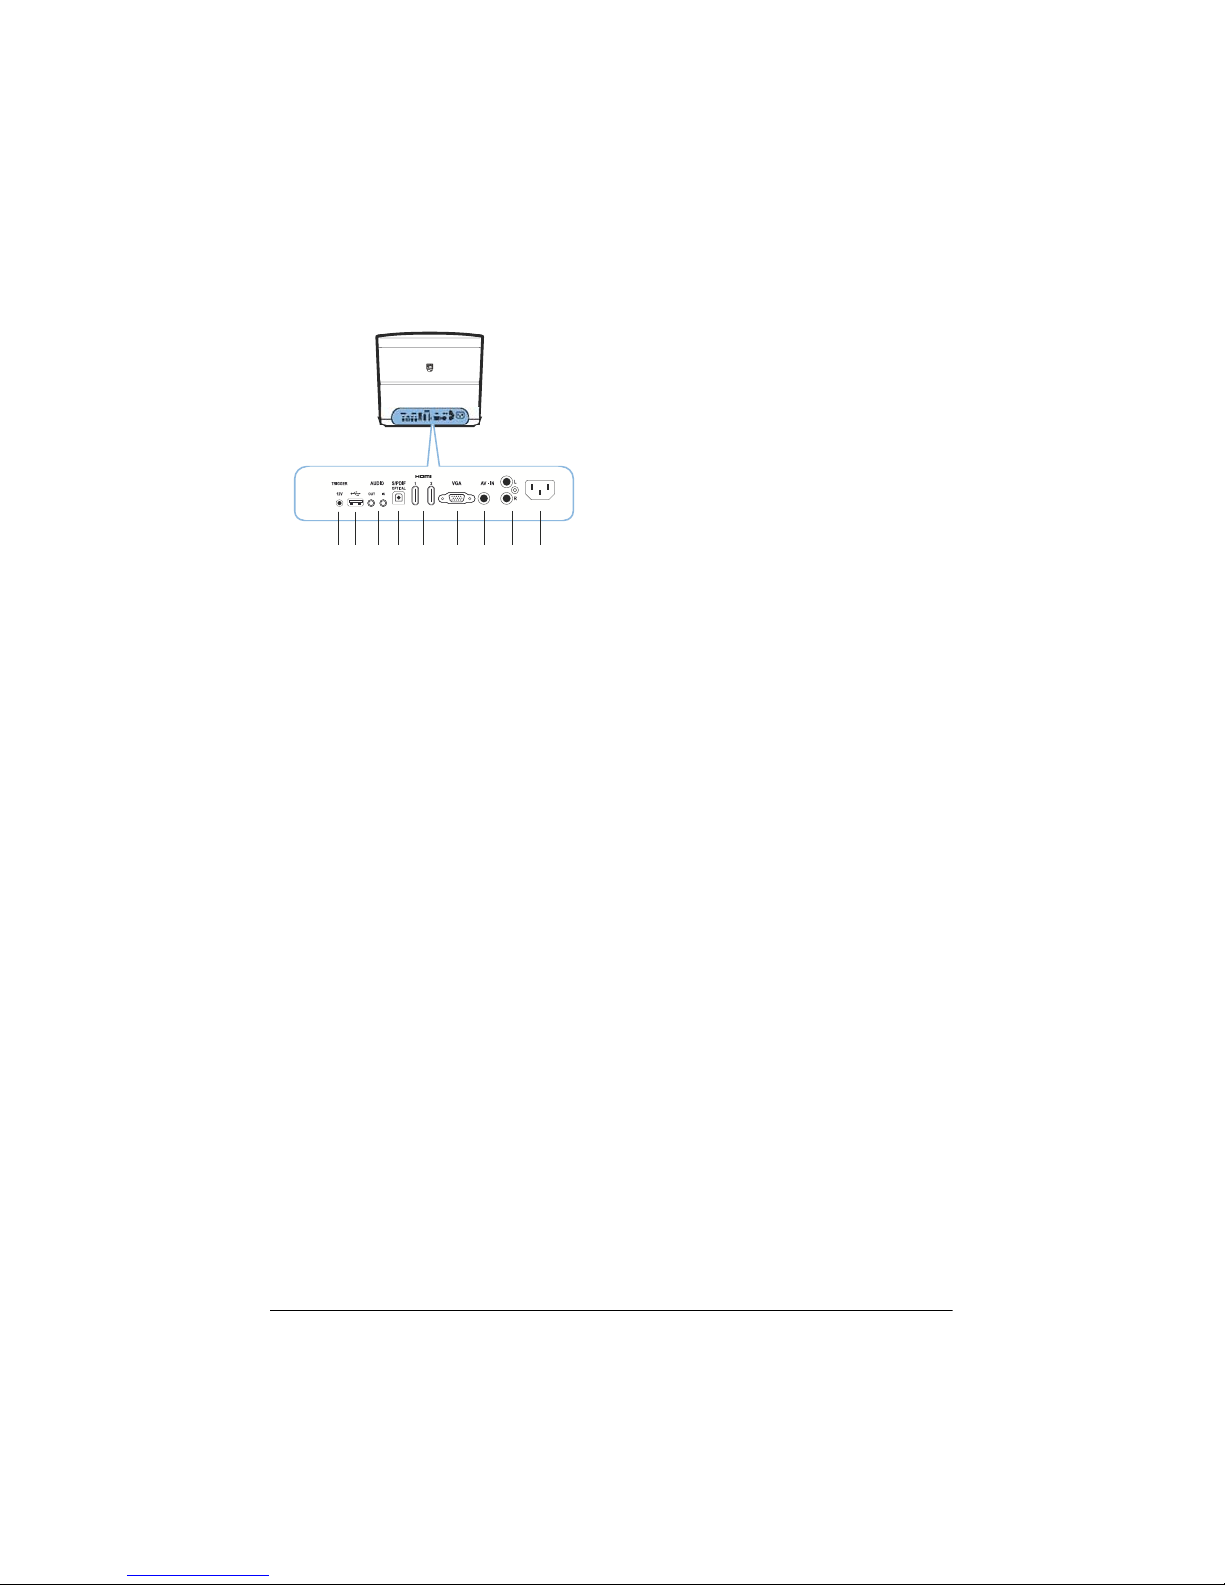
Side view
ab 3
1 Tragegriff (ausklappbar) Carry handle
2
HDMI port for a playback device.
3
Ï
– Audio output
Headphone connection or connection for
external speakers.
CAUTION!
Page 7
Overview 7
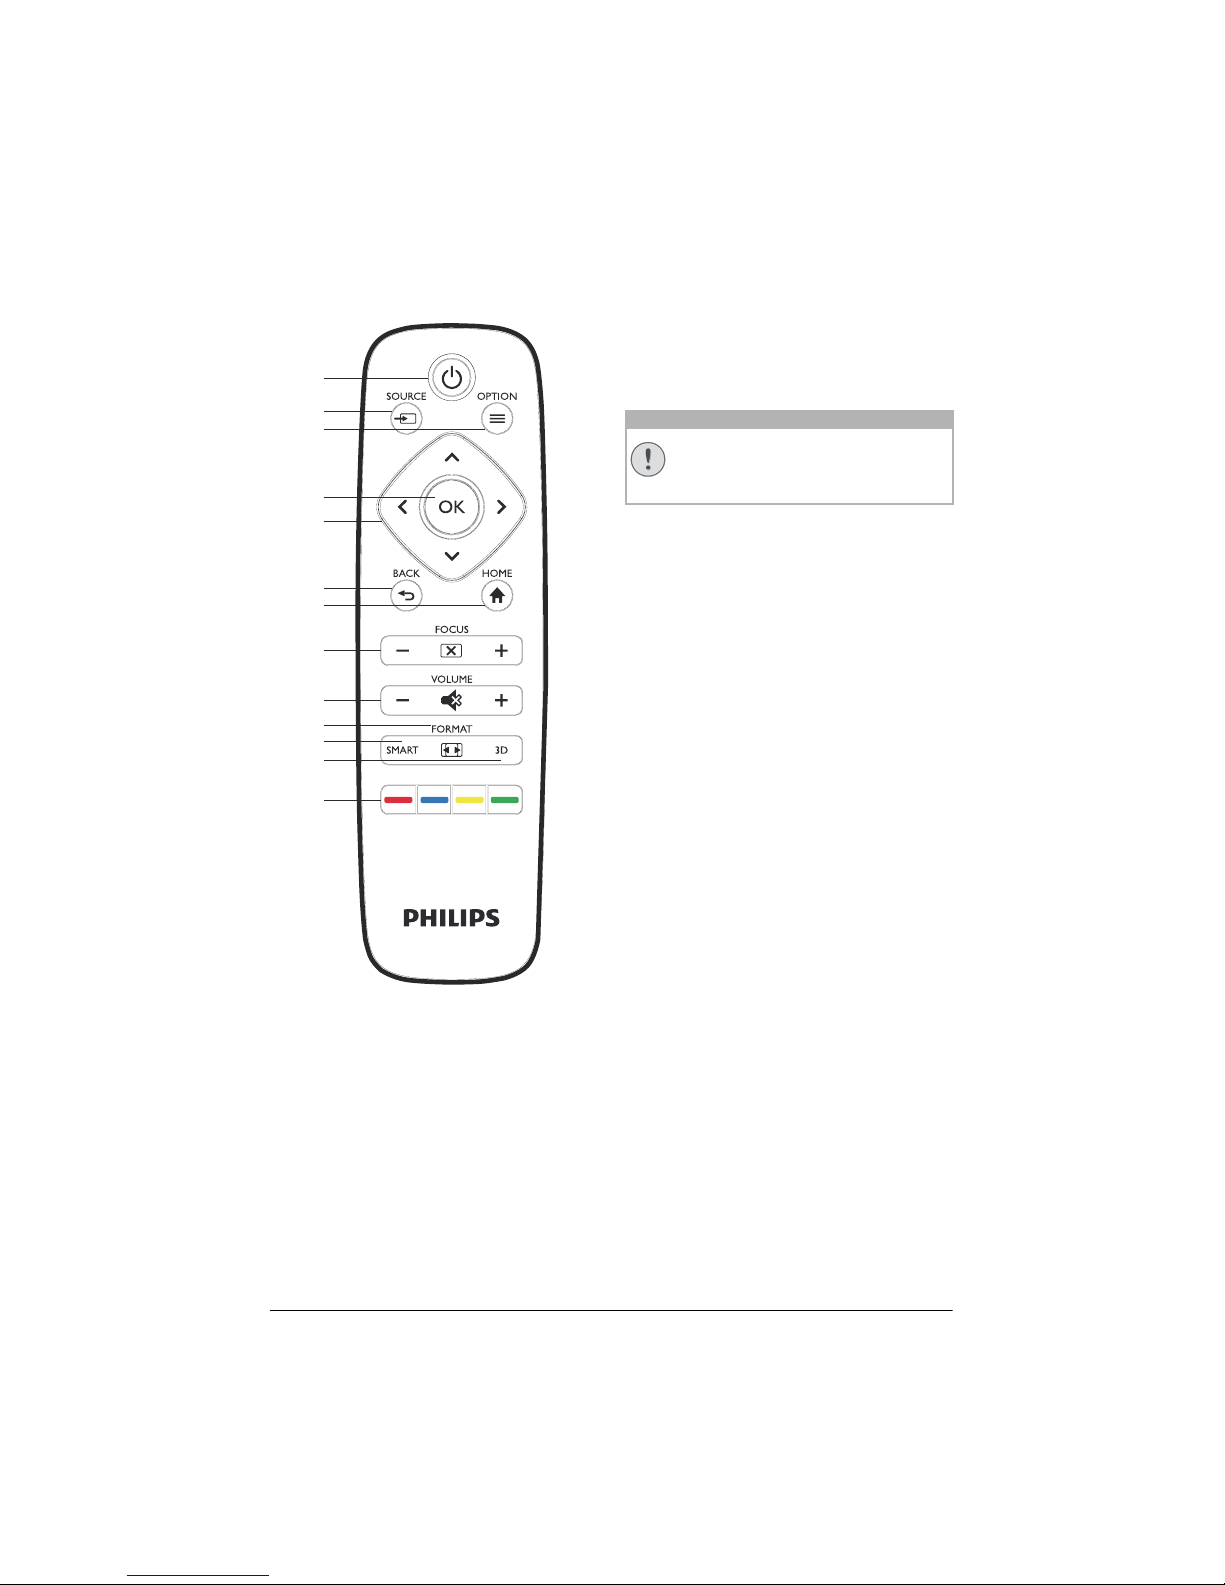
Rear view
adcghif
e
b
1 TRIG OUT
Remote screen connection.
2 ý
USB port for firmware update.
3 AUDIO
AUDIO OUT: Connection for external
speakers.
AUDIO IN: Connection for external audio
devices – only with VGA input.
4
SPDIF OPTICAL
Digital audio connector.
5 HDMI 1 and 2
HDMI port for a playback device.
6 VGA
Personal computer input.
7 AV-IN
RCA plug for composite video.
8 AUDIO
Analogue audio connector.
9 Power supply socket
Page 8
8 Philips · HDP2510
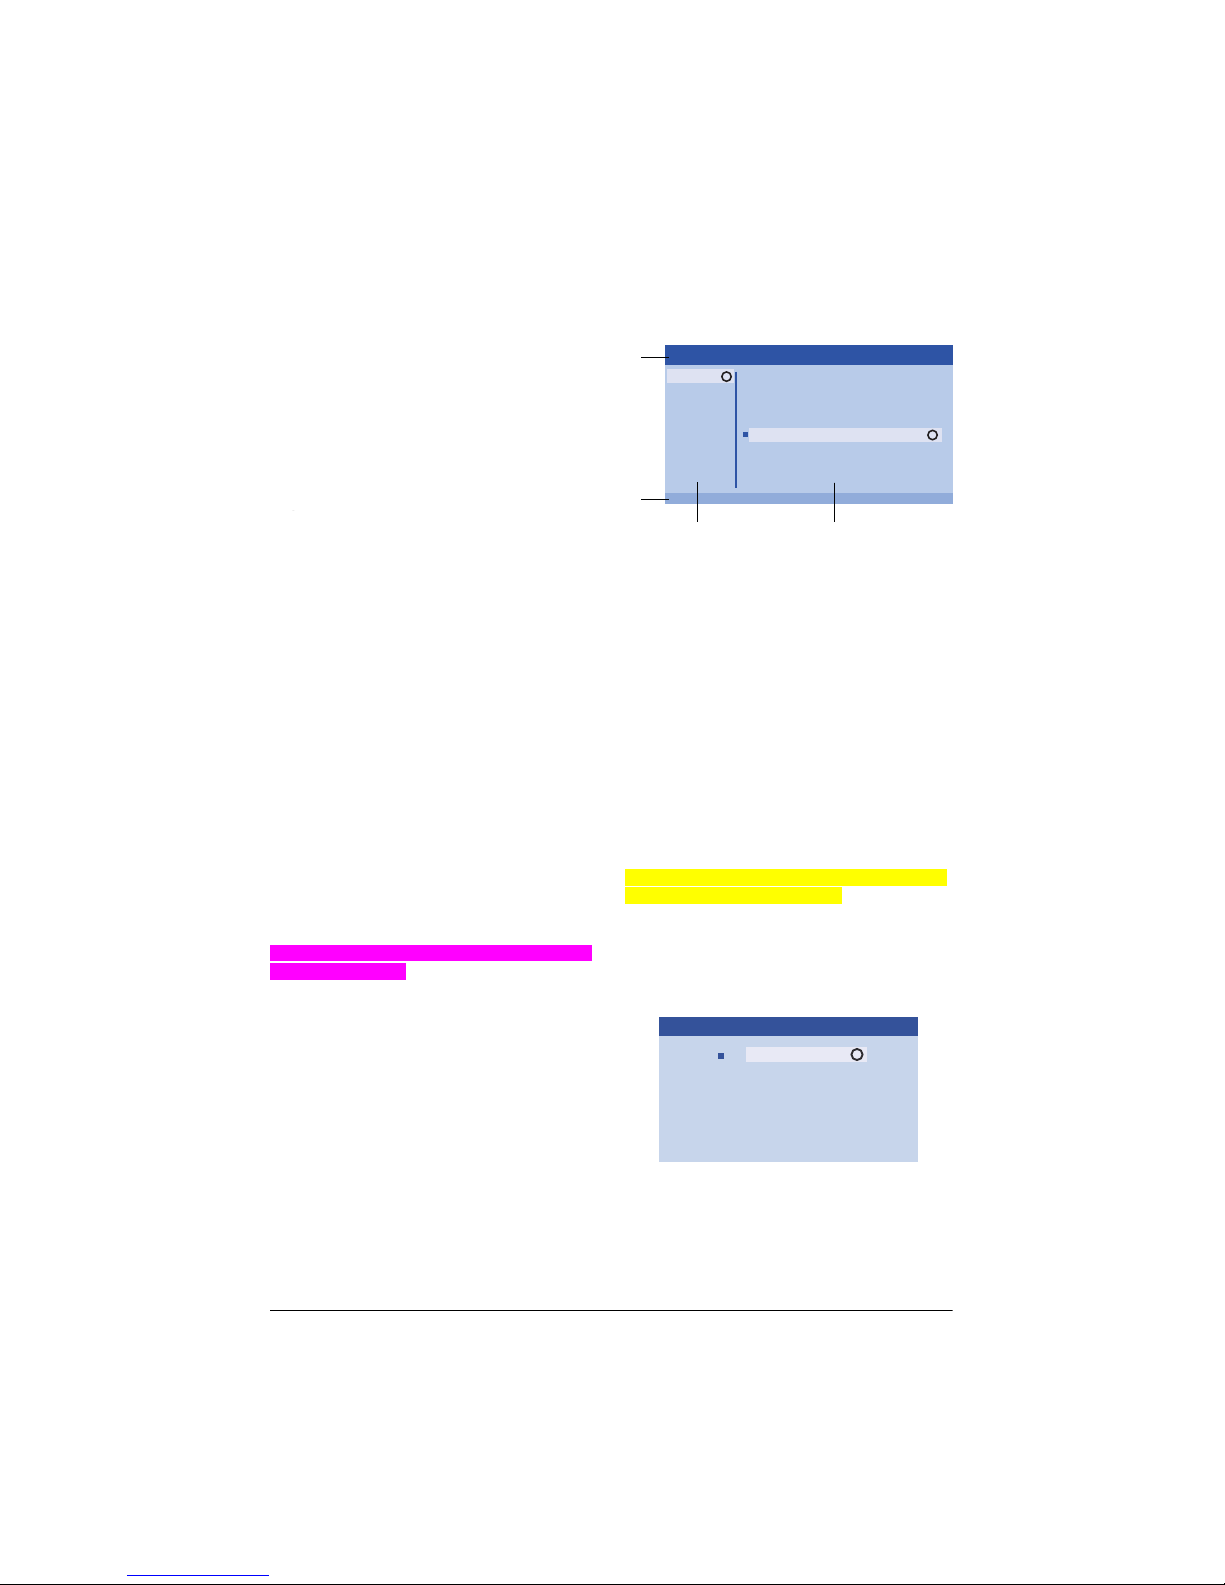
Remote control
a
d
c
g
h
i
j
÷
…
f
e
b
Fahren Sie das Gerät stets ordnungsgemäß herunter, um Schäden an der
UH
P-Lampe zu vermeiden.
1 B / POWER
Short press: Powers on the projector.
Double press: Powers off the projector.
Long press (three seconds): Starts Pairing
mode.
Long press (ten seconds): Resets the projector.
2 SOURCE
Opens the Source short cut menu.
3 OPTION / e
Opens the Option menu.
4 OK
Goes one level down in menu / confirms selection.
5 Navigation keys – //À/Á
Navigate in menu / modify settings / confirms selection.
6 BACK / ¿
Goes one level back in menu / cancels a
function.
7 HOME
Opens the Option menu.
8 FOCUS
Adjusts the focus for image sharpness
.
9 VOLUME
Adjusts the volume level (decreases/increases and mutes the sound).
FORMAT
Changes the aspect ratio.
SMART
Displays the Smart settings menu.
÷ 3D
Displays the 3D menu.
… Colour keys
Changes on-screen options.
CAUTION!
Page 9
Overview 9
Browsing the user interface
Navigation for menu
1 Navigation can be done by navigation keys
(,, À,Á, OK and ¿) on the panel
control of your device or on the remote
control.
2 Th
e chosen setting is always highlighted with
a bar and the font is changed to black.
Im Folgenden wird die Navigation mit
der Infrarot-Fernbedienung (IR) beschrieben. Below the navigation with the
infra
red remote control is decribed.
Navigation by keys:
• /
– Scrolls trough the menu level up
and down.
• À/Á –
Modify settings / confirms selec-
tion (depending on which menu)
•OK – Confirms selection / goes one level
down.
In the final level, acce
pts a setting and
goes back to the last sub menu (depending on which menu).
• ¿ – G
oes one level up.
The ¿ k
ey aborts a setting or exits the
menu (depending on which menu).
Option menu and Short cut
menu
Settings can be done in the Option menu or in
the Short cut menu.
Option menu
1 Select the Option menu using the OPTION
button.
OK
OK
OK
Source
Image
3D
Sound
System
Information
HDMI1
HDMI2
HDMI3
VGA
AV-In
Bluetooth speaker
Source settings
a
d
c
b
HDMI1
1 Top bar
Displays the currently selected setting with
detailed description.
2 Status bar
After changing the Source the currently selected status is displayed in the status bar.
3 Main menu
Select the desired setting with / and
confirm with OK.
4 Sub menu
Additional settings can be done. Select the
desired setting with //À/Á and confirm with OK.
Short cut menu
Für die Schnellauswahl stehen Ihnen folgende
Kurzwa
hl Menüs zur Verfügung: Source, Smart
Settings, Format and 3D.
The Short cut window always opens in the right
corner.
1 S
elect the Short cut menu using the related
button (for example SOURCE button).
HDMI 1
HDMI 2
HDMI 3
VGA
AV-IN
Blutetooth speaker
OK
Source
Notice
Page 10

10 Philips · HDP2510
Overview of the main menu
functions
Source
Displays the available sources.
Image
Displays the image setting related functions.
3D
Displays all settable 3D functions.
Sound
Displays the sound functions.
System
Displays the content of all system related
functions.
Information
Displays an overview of the status and version of the device.
Page 11
Initial operation 11
3Initial operation
Setting up the device
Before installing your device, make sure that
the projector is turned off and the power cable
is unplugged from the power outlet.
Remove protection foil before operation!
Do not place any objects in front of the
lens!
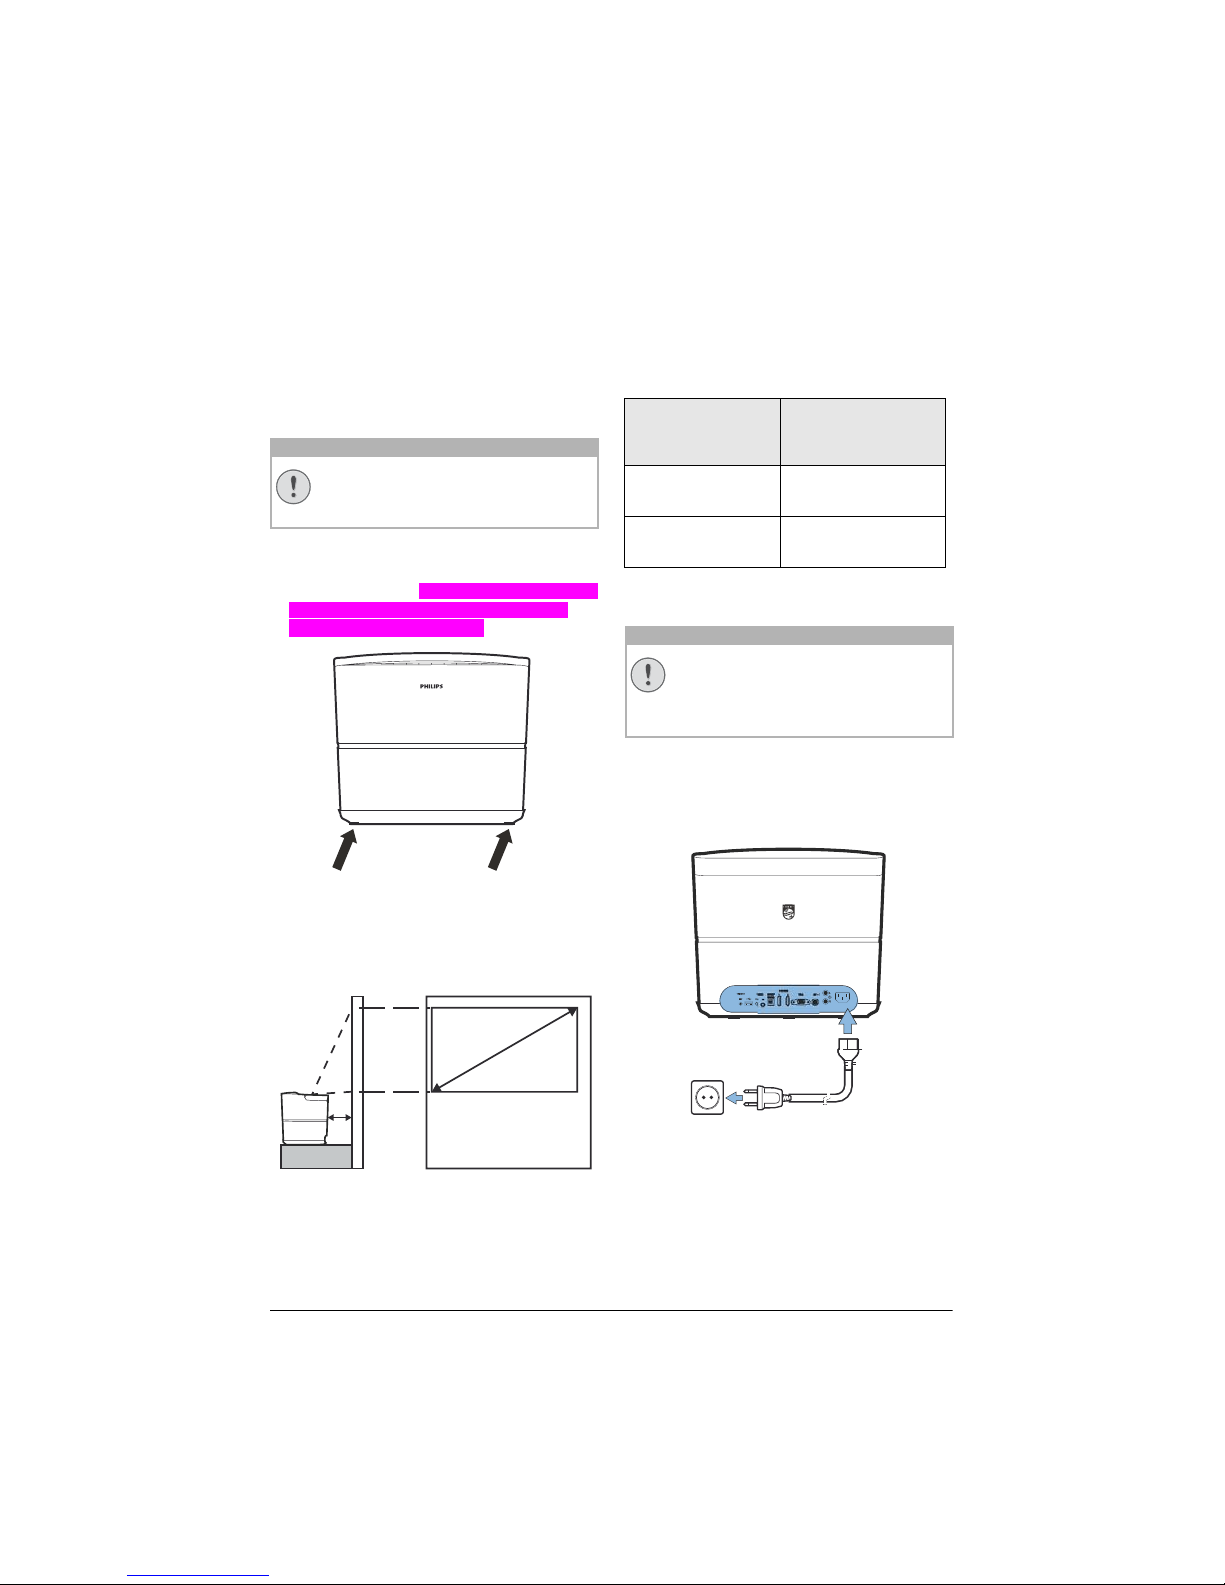
1 You can position the device so that it stands
flat on a table with the rear side in front of the
projection surface. Zusätzlich können Sie das
Bild mit den Standfüßen optimal auf die
Projektionsfläche ausrichten
.
The device compensates for the distortion from
the slanted projection (pincushion distortion).
Check that the projection surface is appropriated to the projector. The distance between the
p
rojector and the screen determines the actual
size of the image.
a
b
To change the size of the screen, just move the
projector towards or away from the wall.
The size of the screen (b) is comprised between
0.1 and 0.42 meter depending on the projection
distance (a), as described in the following table.
Diagonal size (b)
(mm
)
[inch]
Projection distance
(a)
(mm)
1270
[50]
108
3048
[120]
420
Connecting power supply
Always use the POWER button to
power off the projector. This is manda
tory for the UHP lamp to respect the
n
ecessary cooling time!
1 C
onnect the power cable into the socket on
the rear side of your device (1).
2 Pl
ug the power cable to outlet on the wall
(2).
b
a
CAUTION!
CAUTION!
Page 12
12 Philips · HDP2510
Installing or changing the
batteries of the IR remote
control
Risk of explosion with incorrect type of
batteries!
Only use the AAA type battery.
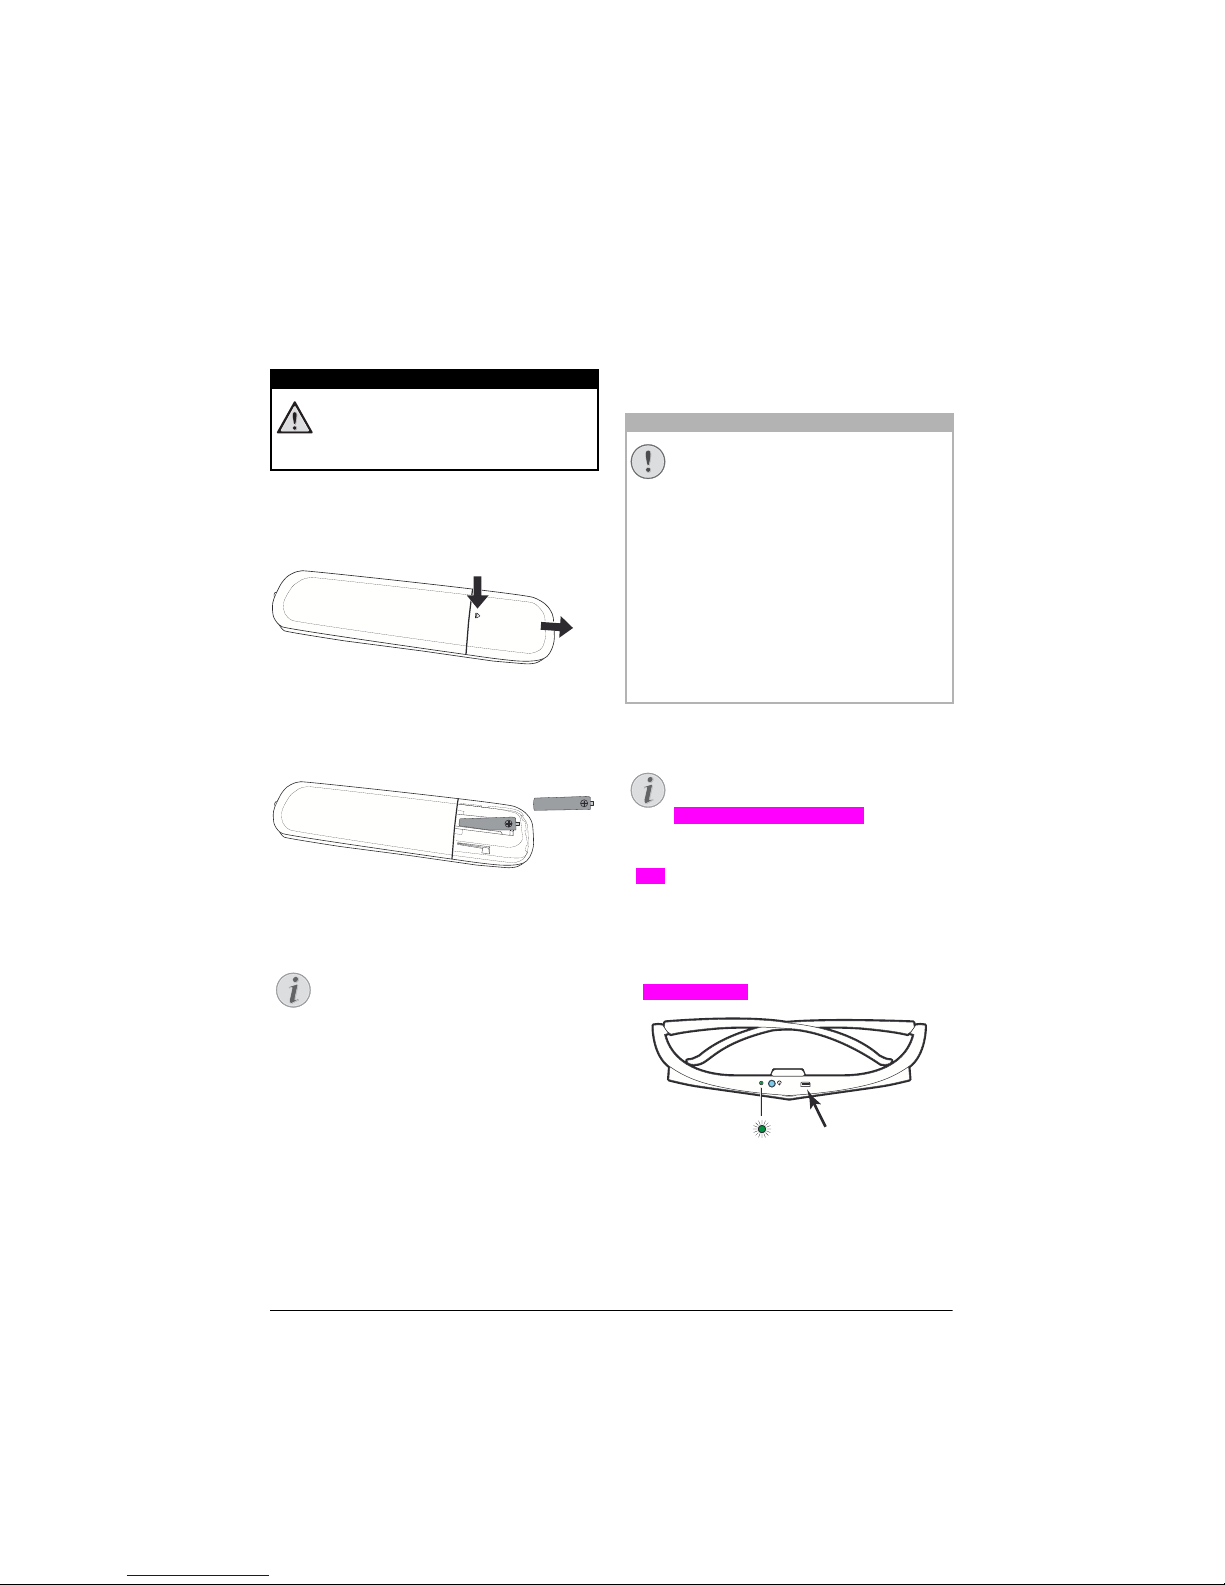
1 To acces
s the battery, press to unlock the
locking mechanism (1) and slide out the
battery compartment (2).
b
a
2 Insert the new batteries into the battery com-
partment with the positive and negative
pole
s as shown. Make sure the polarities
(+ and -) are aligned correctly.
3 Push the battery compartment back into the
remote control until the locking mechanism
engages.
Normally the batteries will last for
around one year. If the remote control
stops working, replace the batteries. If
the device is not used for a long time,
take out the batteries. This will prevent
leakage and possible damage to the
remote control.
The used batteries should be disposed
of according to the recycling regulations of your country.
Using the remote control
The remote control can be used within an angle
of 22.5 degrees and up to 10 meters from the
device. When using the remote control, no
obstacle should be placed between the remote
control and remote sensor.
3D glasses (optional)
You can purchase Screeneo 3D glasses
on the website Philips:
www.philips.com/screeneo
The 3D glasses are equipped with a battery,
whi
ch has to be charged before first use. Charg-
ing takes several hours and is compl
ete when
the LED on the glasses is on green.
When the LED turns red, do a new charge.
1 Take
an USB mini cable, connect the USB
mini on the 3D glasses and the another plug
on an USB port of the device.
DANGER!
Notice
CAUTION!
• The improper use of batteries can
lead to overheating, explosion, risk
of fire and injury. Leaking batteries
can possibly damage the remote
control.
• Never expose the remote control
to direct sunlight.
• Avoid deforming, dismantling or
charging the batteries.
• Avoid exposure to open fire and
water.
• Replace empty batteries immediately.
• Remove the battery from the
remote control if not in use for long
periods of time.
Notice
Page 13
Initial operation 13
Activate 3D glasses
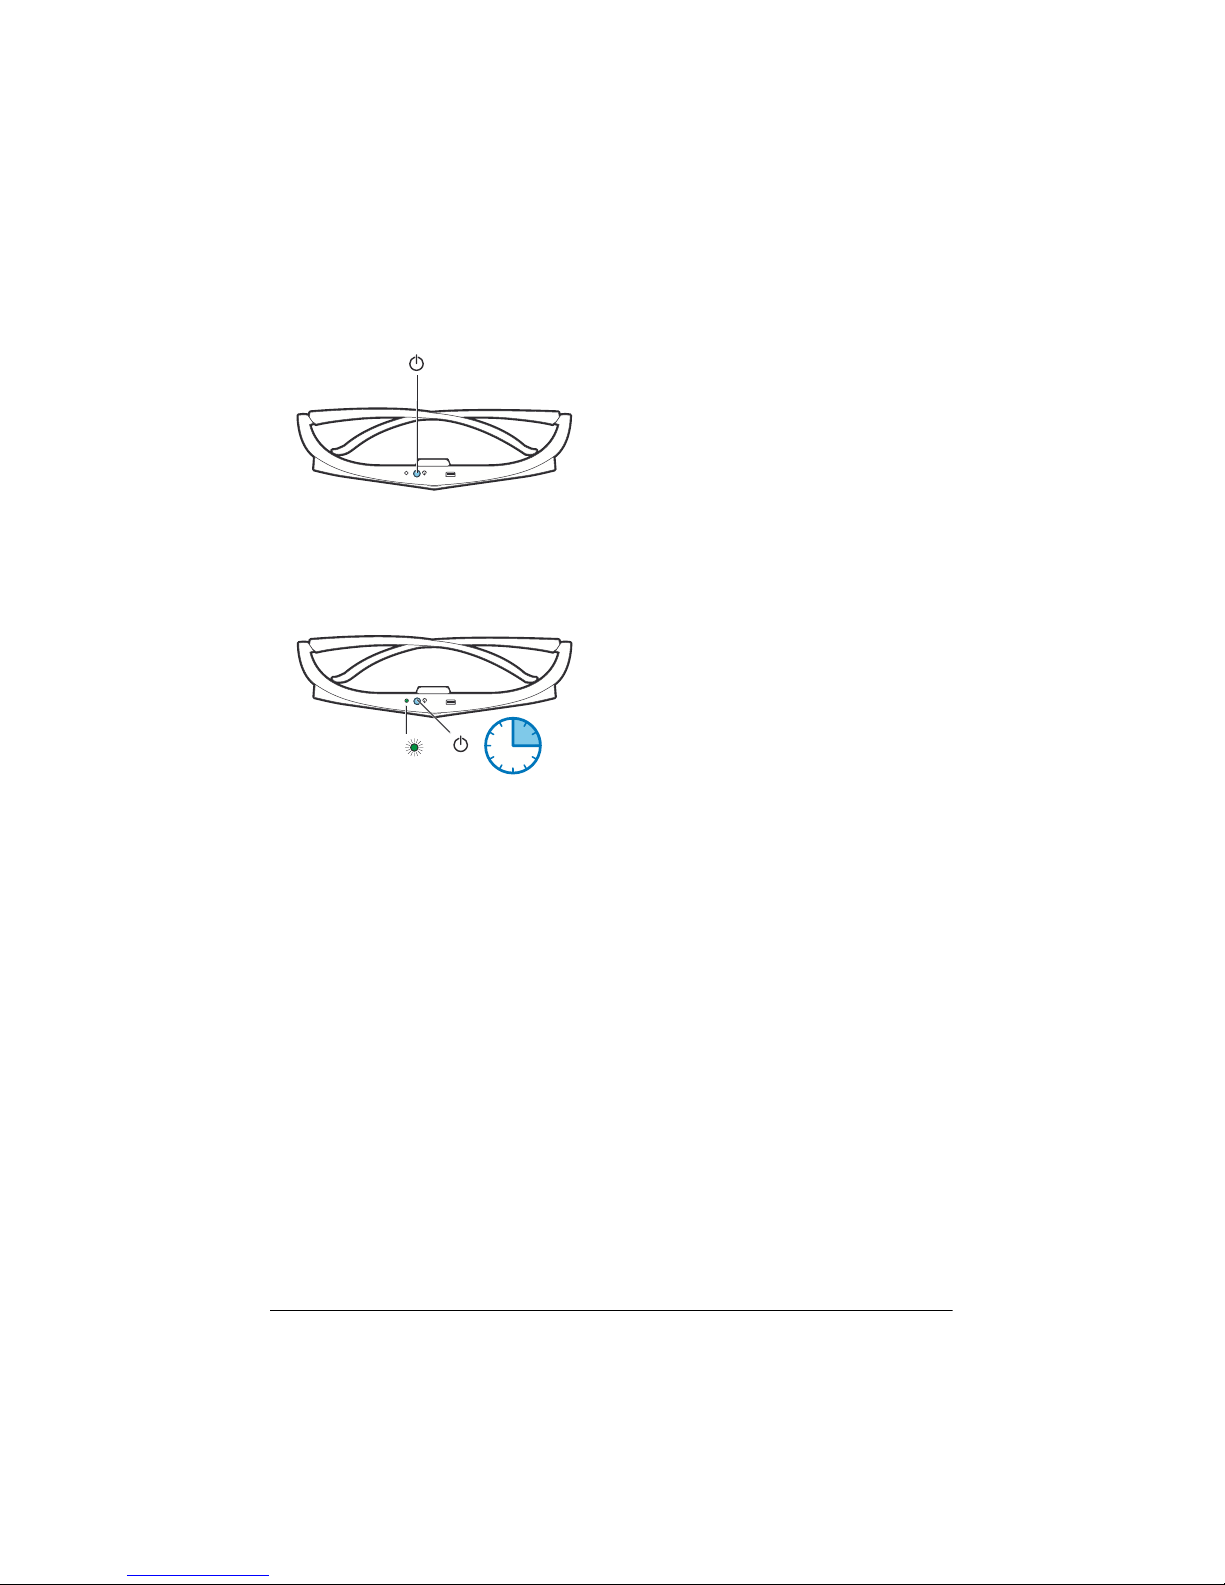
1 Press the ON / OFF button on the top of the
glasses.
2 On the remote control, press the 3D button.
3 Th
e 3D menu appears, select your choice and
press OK.
4 Pres
s the ON/OFF button for one second and
a half on the top of the glasses.
1.5 SEC
3x
The LED flashes green three times and
be
comes fixed. Your glasses are ready.
Page 14
14 Philips · HDP2510
Initial installation
1 Turn the device with the rear side towards a
suitable projection surface or wall. Note that
the distance to the projection surface must
be a minimum of 0.1 meter and a maximum of
0.42 meter (see Setting up the device,
page 4). Make sure the projector is in a secure
position.
Das Ein- und Ausschalten des Gerätes
nimmt einige Zeit in Anspruch, da die
UHP Lampe Betriebstemperatur erre
ichen muss. Die volle Helligkeit ist nach
e
inigen Minuten erreicht.
Turning on the projector
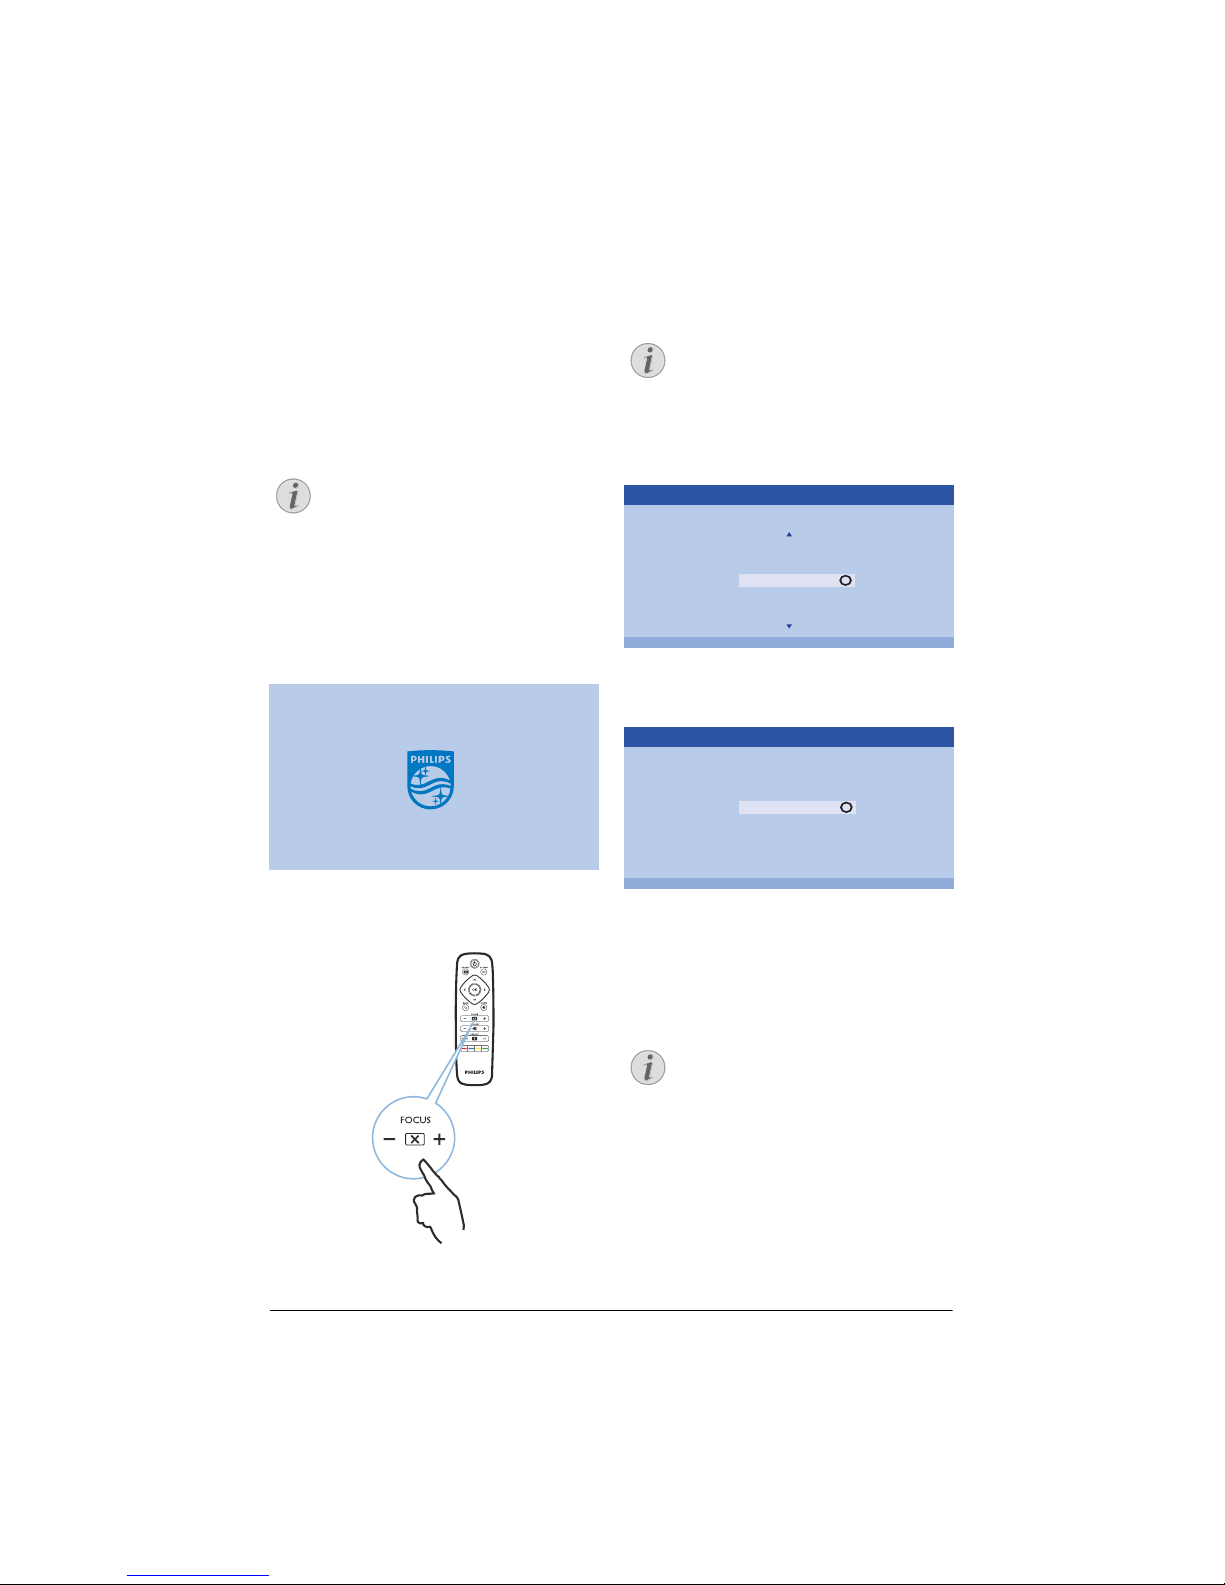
1 To turn on the projector, press once the
B button on the panel control of the device
or
on the remote control.
2 Use the FOCUS buttons (+/-) to adjust the
image sharpness.
3 The first time you turn on the device, you
need to set the following settings.
During the first installation, use OK key
to validate your choice and continue to
the next step, and the ¿ key to return
on the previous step.
4 Us
e the keys / to select the language
and confirm with OK.
Please choose your Language
Český
Dansk
Deutsch
English
Español
Francais
Italiano
OK
Language
5 Use the keys / to select the location and
confirm with OK.
Please choose the location where your Screeneo
should be placed
Shop
Home
OK
Location
Home: For normal use.
Shop: W
hen you choose this option, the pro-
jector starts in shop mo
de. In this mode
default setting are made and can’t be
changed.
The shop mode can be activated or
deactivated on the Option menu
(see
Shop Mode Switches the shop mode
On and Off., page 27).
Notice
Notice
Notice
Page 15

Initial operation 15
Turning off the projector
1 To turn off the projector, press twice the
B button on the panel control of the device
or
on the remote control.
2 A mes
sage displays asking if you really want
to turn off the device. Confirm with the
B button or stop shutting down with any
ot
her key.
For shutting down the system please click
again the Power button B
Or any other key to stop shutting down the
system
Shut down system
Setting up the language
The device has already been installed. In order
to change the menu language, proceed as follows:
1 Pres
s the OPTION button and use / to
select System.
2 Confirm with .
3 Use
/ to select Language/ Language.
4 Confirm with .
5 Use
/ to select your desired language.
6 Confirm with .
7 Exit with ¿.
Page 16
16 Philips · HDP2510
4 Connect to the playback device
If no input source is found or connected
a message appears: NO SIGNAL
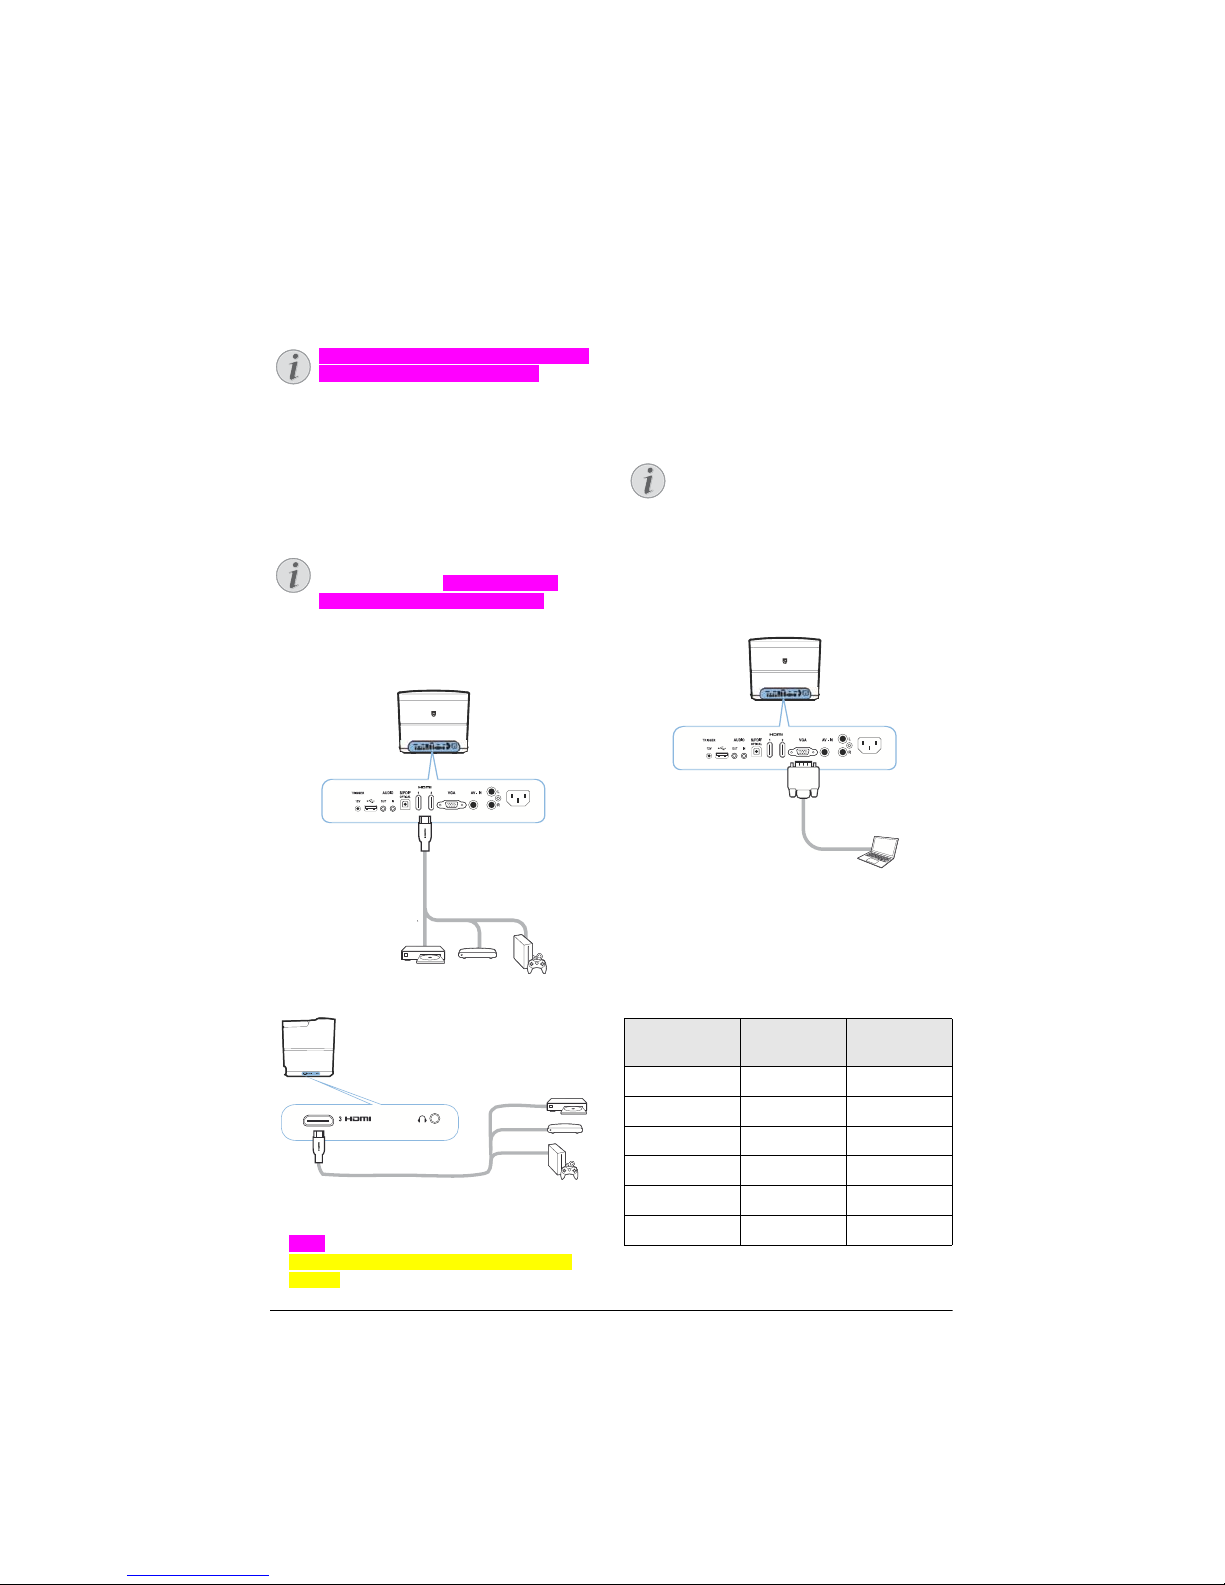
Connecting to devices with
HDMI output
Use a HDMI cable to connect the projector to a
Blu-ray player, set-top box or gaming console.
Use any of the HDMI sockets to connect
the projector to a playback device
when a 3D signal is broadcasted.
1 C
onnect the cable to one of the projector's
HDMI sockets on the rear or side of the
device.
2 Connect the HDMI plug to the HDMI socket of
the playback device.
3 From the Option menu, select HD
MI 1,2 or 3
depending on the external device is connected.
Connecting to a computer
(VGA)
Use a VGA cable to connect the projector to a
computer, laptop or other devices.
Many laptops do not activate the external video output automatically when
you con
nect a second display such as a
projector. Check your laptop's user
manual to find out how to activate the
external video output.
1 C
onnect the VGA cable to the projector' s VGA
socket.
2 Connect the VGA plug to the VGA socket of
the computer.
3 Adjust the computer's resolution to the cor-
rect setting and switch the VGA signal to an
e
xternal monitor. The following resolutions
are supported:
Resolution Image refresh
rate
VGA 640 x 480 60 Hz
SVGA 800 x 600 60 Hz
XGA 1024 x 768 60 Hz
WXGA 1280 x 768 60 Hz
HD 1280 x 720 60 Hz
FULL HD 1920 x 1080 60 Hz
Notice
Notice
Notice
Page 17
Screen Resolution
The projector supports the following
resolutions: VGA/SVGA/WXGA, HD and
FULL HD. For best results, please check
the best resolution.
Connect to the playback device 17
4 From the Option menu, select VGA.
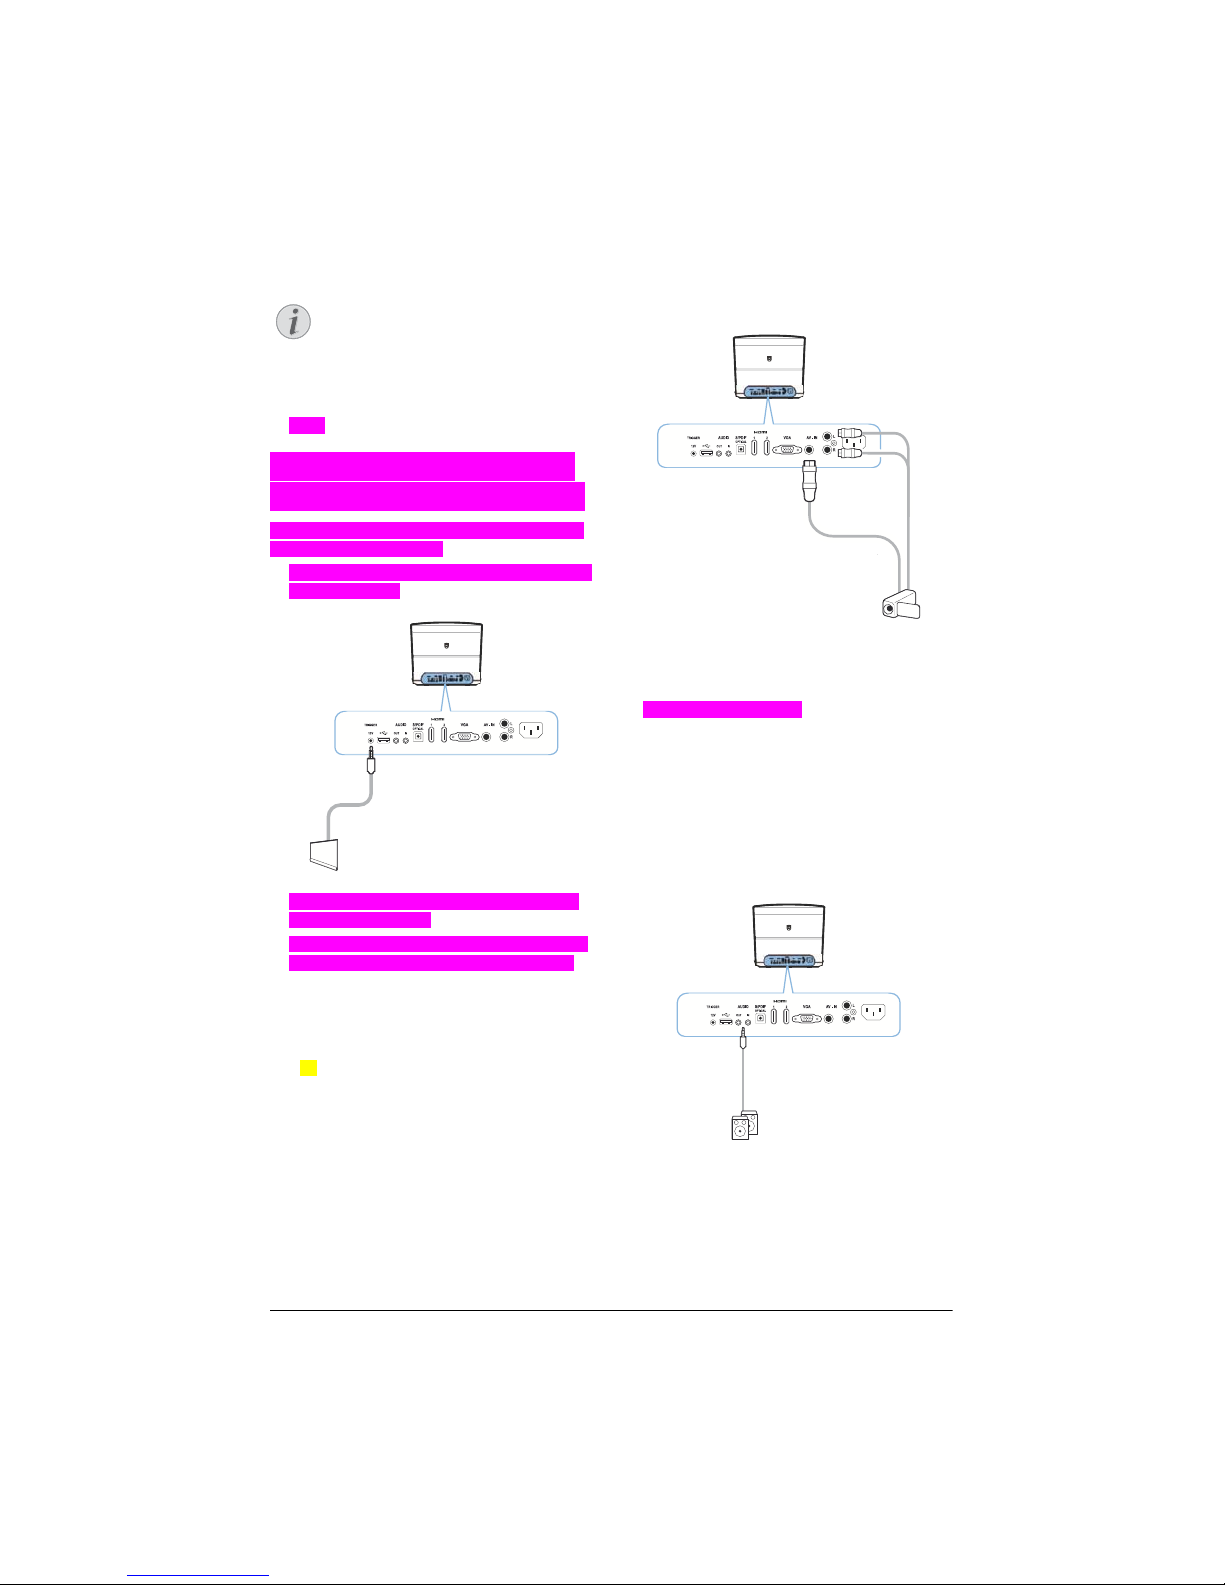
Connecting a screen using
the automatic Trigger input
Use a Trigger cable (Klinkenkabel) to connect
the projector to a screen.
1 Connect the Trigger cable to the projector's
TRIGGER socket.
2 Connect the other end of the cable to the
socket of the screen.
3 Th
e screen automatically moves down and
up when the projector is turned on or off.
Connecting using an audio/
video (CVBS) adapter cable
Use an audio/video adapter cable (A/V cable)
to connect a camcorder or digital camera. The
jacks for these devices are yellow (video), red
(audio right) and white (audio left).
1 Connect the A/V adapter to the projector's
- socket.
2 Connect the video device's audio/video
sockets to the A/V cable using a conventional
composite video (RCA) cable.
3 From th
e Option menu, select AV-IN.
Connecting to external
devices via digital cable
Use a digital cable to connect the projector to
external audio devices.
1 C
onnect the digital cable to the projector's
AUDIO socket.
AUDIO OUT: Con
nection for external
speakers.
AUDIO IN: Con
nection for external audio
devices
– only with VGA input.
2 Connect the other end of the cable to the
socket of you external audio device.
Notice
Page 18
18 Philips · HDP2510
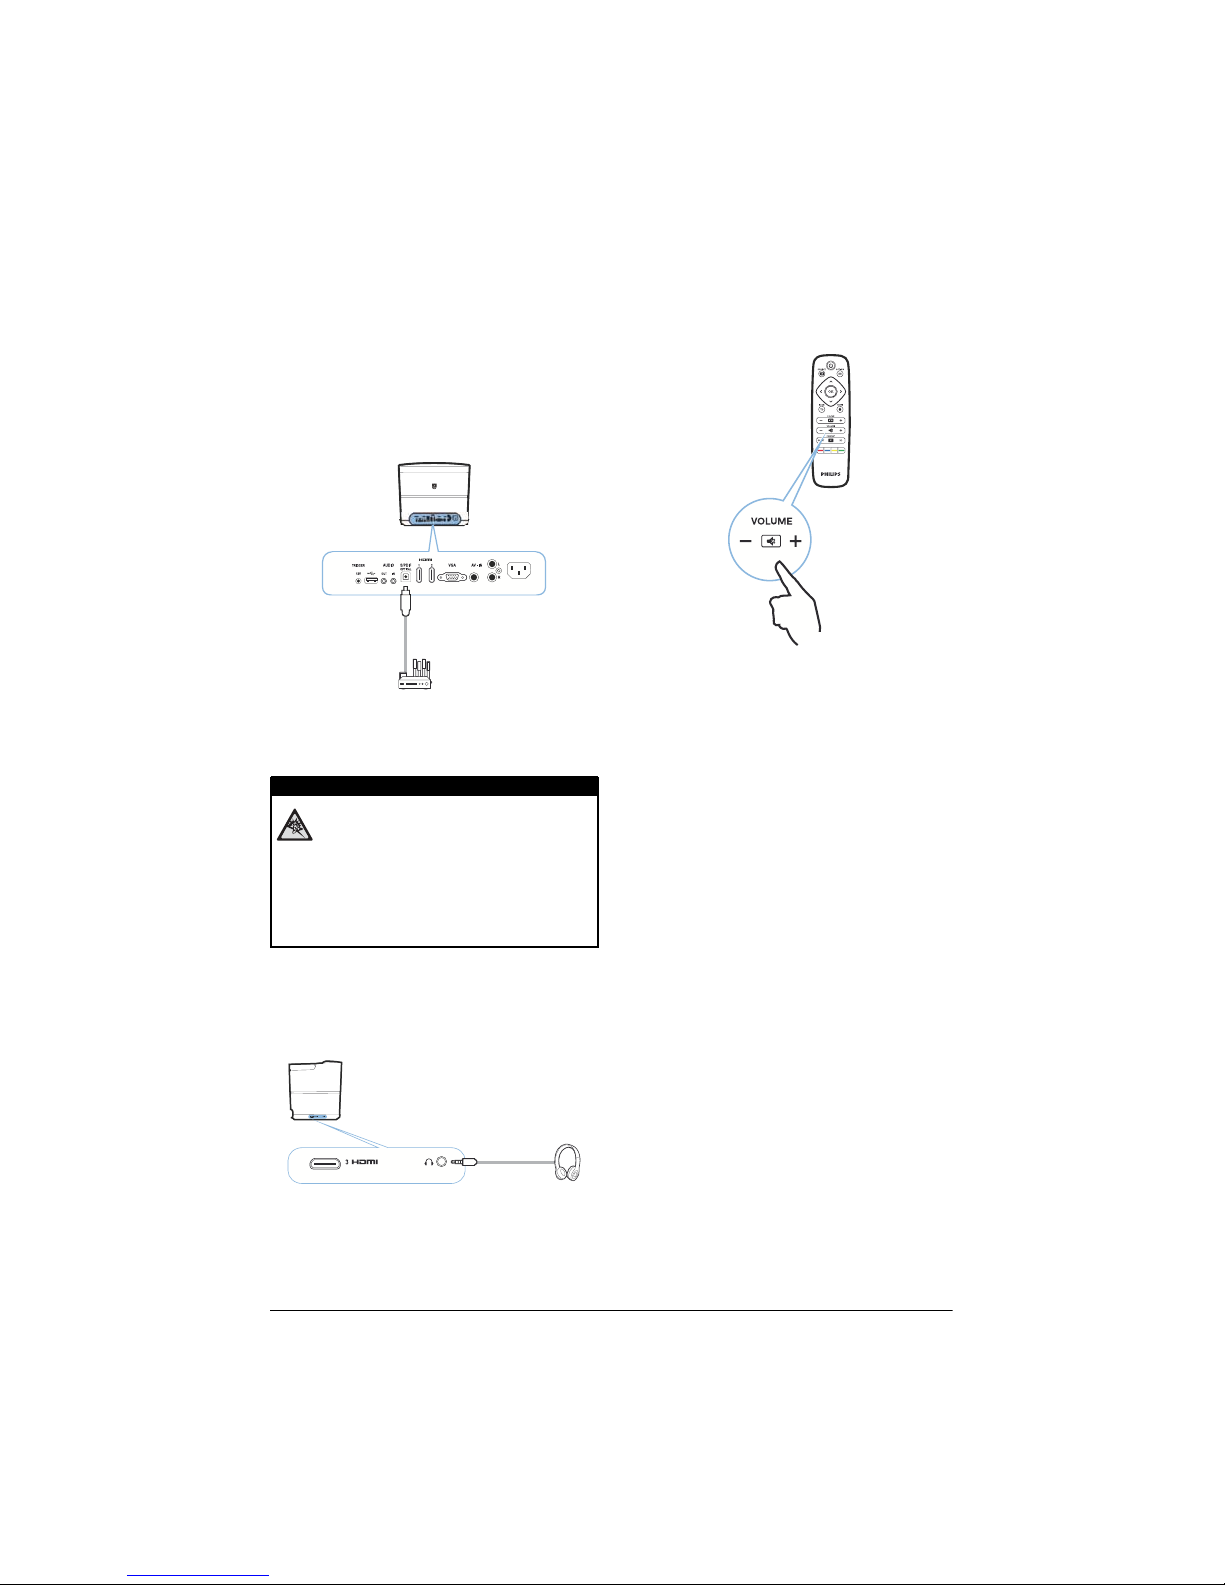
Connecting to a home
cinema amplifier
Use a S/PDIF optical cable to connect the DIGITAL AUDIO output on the projector to the input
of you
r home cinema amplifier.
For example, to show digital channels in DTS or
DOLBY DI
GITAL quality sound.
Connecting to headphones
Danger of hearing damage!
Do not use the device over a longer
time at high volume – especially when
using headphones. This could lead to
the risks of hearing damage. Before
connecting the headphones, turn down
the volume on the device.
1 Conn
ect the headphones to the headphone
slot on the side of the device. The device
speakers deactivate automatically when the
headphones are connected.
2 After connecting the headphones, increase
the volume to a comfortable level using the
VOLUME buttons (+/-).
DANGER!
Page 19
Connect to the playback device 19
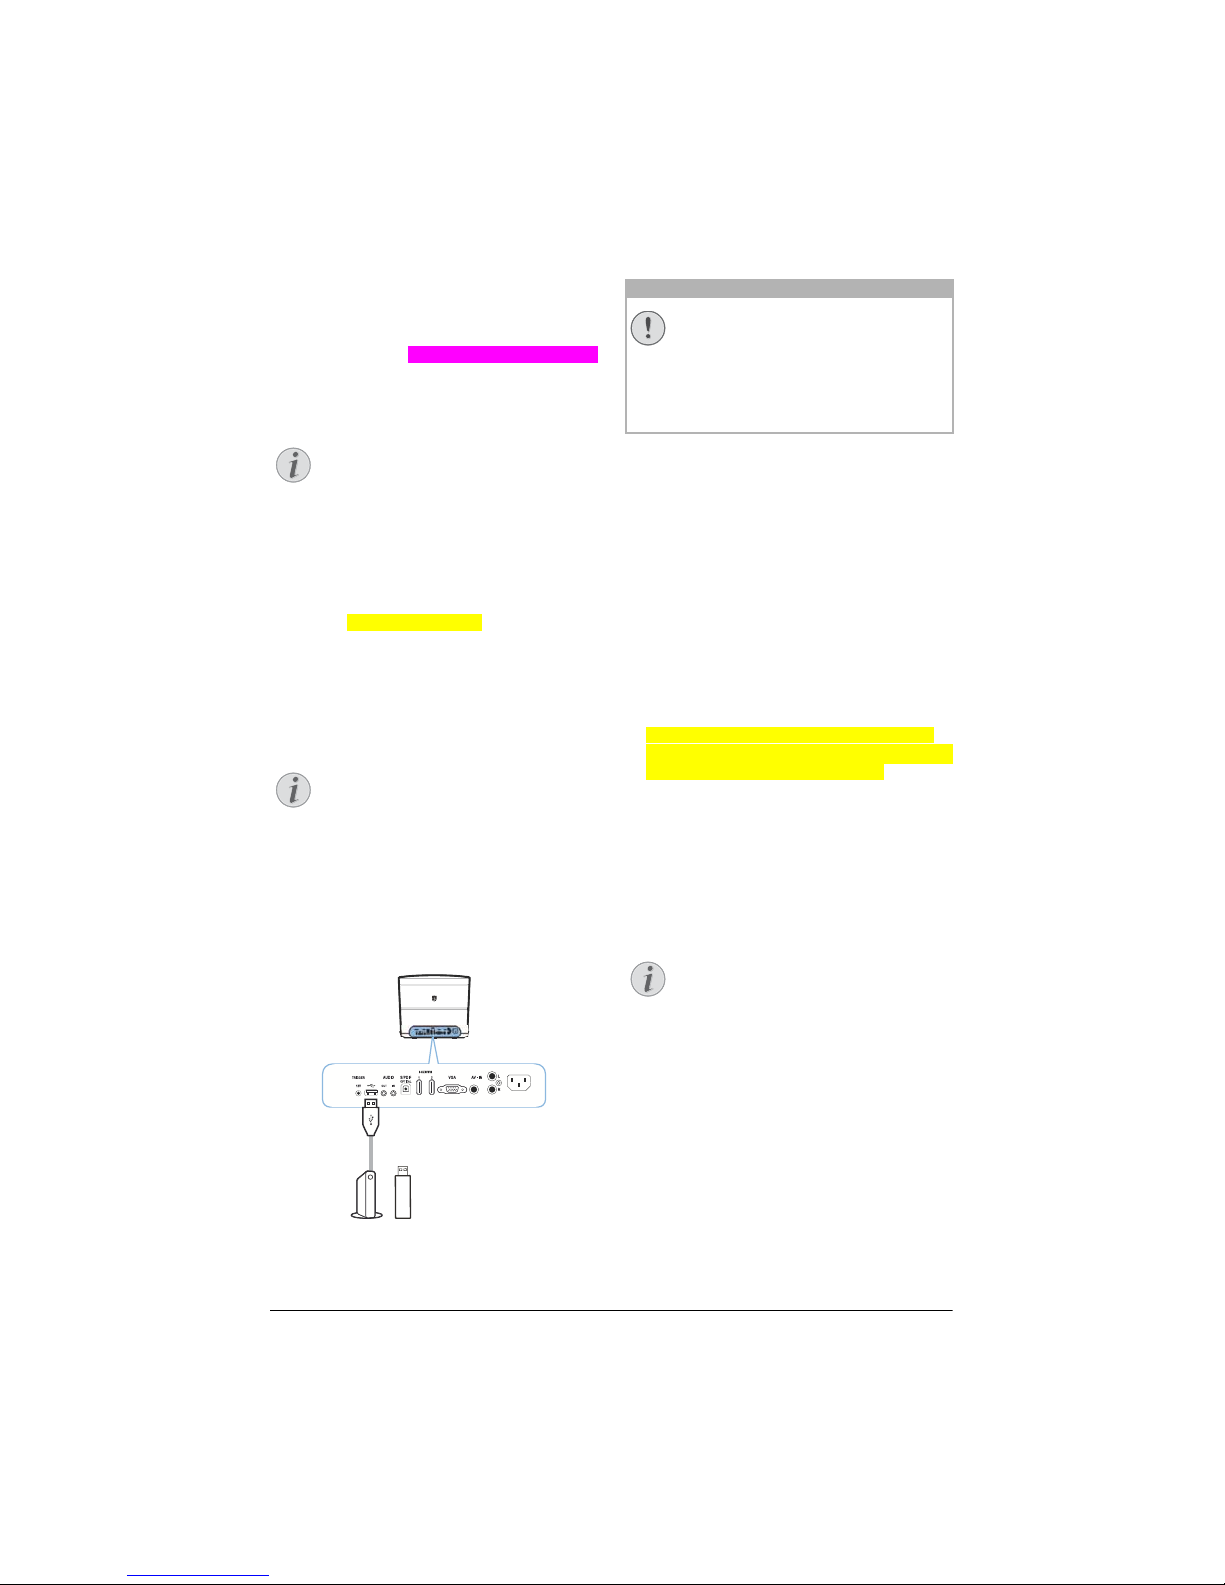
Update firmware with USB
storage medium
You can find the Screeneo firmware version on
the website Philips: www.philips.com/screeneo
1 Y
ou must download the file on USB storage
medium in order to update your projector.
Do not turn off the device during the
update process!
Download from website
1 Launch an Internet browser, in the address
bar, type the address: www.philips.com/
screeneo
2 Se
lect your country and your language.
3 Cli
ck on View All 6 Products to select your
model: HDP2510
4 T
he Screeneo HDP2510 projector screen
appears. In the new screen, research Support
and click on Software & drivers.
5 I
n the Software & drivers screen select your
language and click Download file.
The file on the website is a zip file. It has
to be unpacked and put on the root
folder of the USB stick.
On the projector
1 Check that the device is connected to power
supply.
2 Conn
ect the USB storage medium to the pro-
jector's USB sock
et.
Never pull out the digital media while
the device is accessing it. This could
cause data to be damaged or lost.
Turn the device off in order to make
sure that the device does not access
the USB storage medium.
3 To turn on the projector, press once the
B button on the panel cont
rol of the device
or on the remote control.
4 Pr
ess the OPTION button and use / to
select System.
5 Confirm with OK.
6 Us
e / to select Firmware update.
7 Confirm with OK.
A message displays asking if you want to
update the new fi
rmware. Confirm with OK
(YES).
If no firmware was found on the USB stick or
if no USB stick is plugged in a message
appears.
Möchten Sie die Firmware nicht updaten,
verlassen Sie das Menü indem Sie mit À/Á
NO wählen und mit OK bestätigen.
8 A
message displays informing you that the
installation process will take some minutes
and that the projector will reboot during
installation. Confirm with OK.
9 T
he device turns off and on again. After a
short time the Language selection screen
appears. The firmware update is now completed.
If an error occurs during the firmware
update process retry the procedure or
contact your dealer.
Notice
Notice
CAUTION!
Notice
Page 20
20 Philips · HDP2510
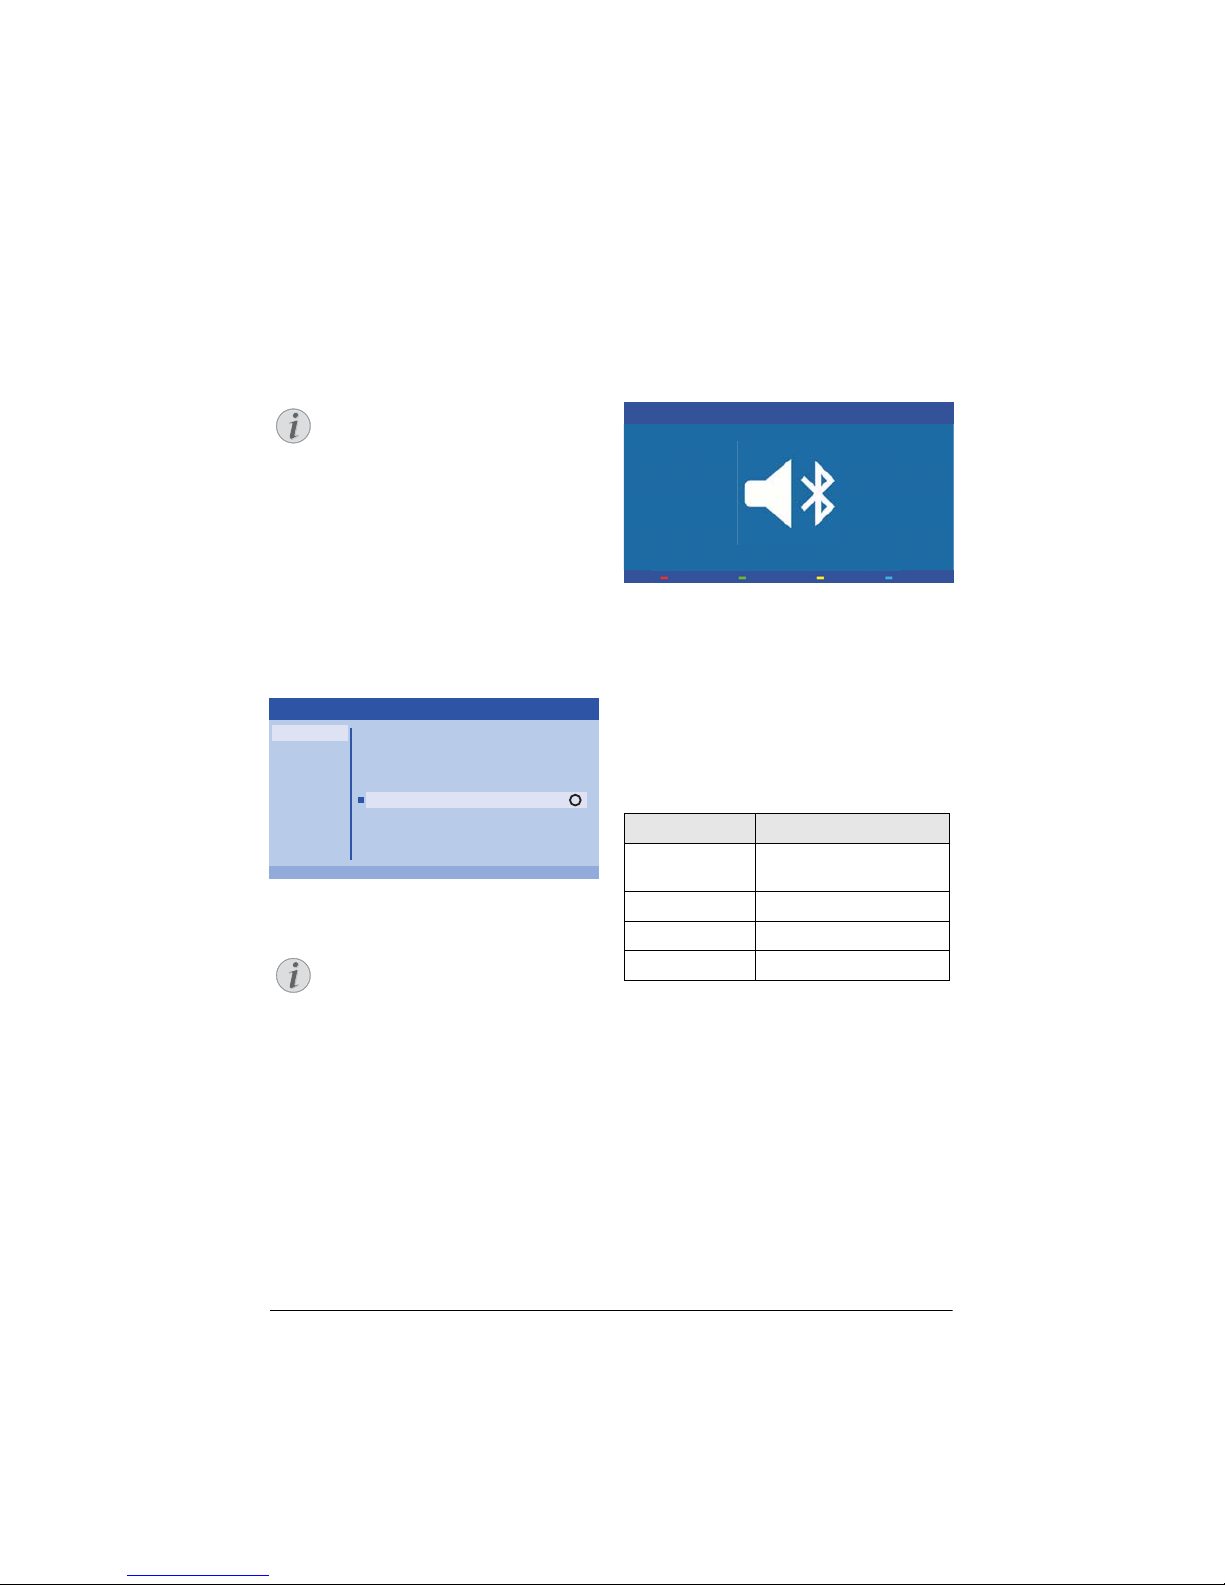
5 Bluetooth speaker
The projector can be used as Bluetooth
speaker. In this mode, you can play music from
smart phones, tablets or other devices.
In this m ode i t is not poss ible t o do a nything else than playing music.
The projector can only connect to, and
pl
ay audio from one device at a time.
Activating Bluetooth
speaker
1 Press the OPTION button and use / to
select System.
2 Confirm with .
3 Use
/ to select Bluetooth speaker.
4 Confirm with .
OK
OK
Source
Image
3D
Sound
System
Information
HDMI1
HDMI2
HDMI3
VGA
AV-In
Bluetooth speaker
Source settings
5 Press the RED key to Power on the speaker.
Shortcut menu
1 Press the SOURCE button and use
/ to se
lect Bluetooth speaker.
2 Co
nfirm with .
3 Pr
ess the key to Power on the
speaker.
The projector is now visible for the near external Bluetooth devices.
Pair mode
1 After activating the Bluetooth connection the
pair mode can be started.
Power O
Waiting for pairing (60/60)
1 Press GREEN key to start the pair mode. The
timer counts down from 60 seconds.
2 Sel
ect on your external device the Screeneo
projector.
Wurde die Verbindung unterbrochen,
drücken Sie auf die rote Taste, um die
Verbindung wieder herzustellen.
Navigation by colour keys
Keys Action
Red key Starts and stops the con-
nection.
Green key Makes a pause.
Yellow ke
y Plays the previous music.
Blue key Plays the next music
Notice
Notice
Notice
Page 21
Media playback (optional) 21
6 Media playback (optional)
Read the informations on the best settings for optimal use of your device
(see Settings, page 25).
Navigation for media
playback
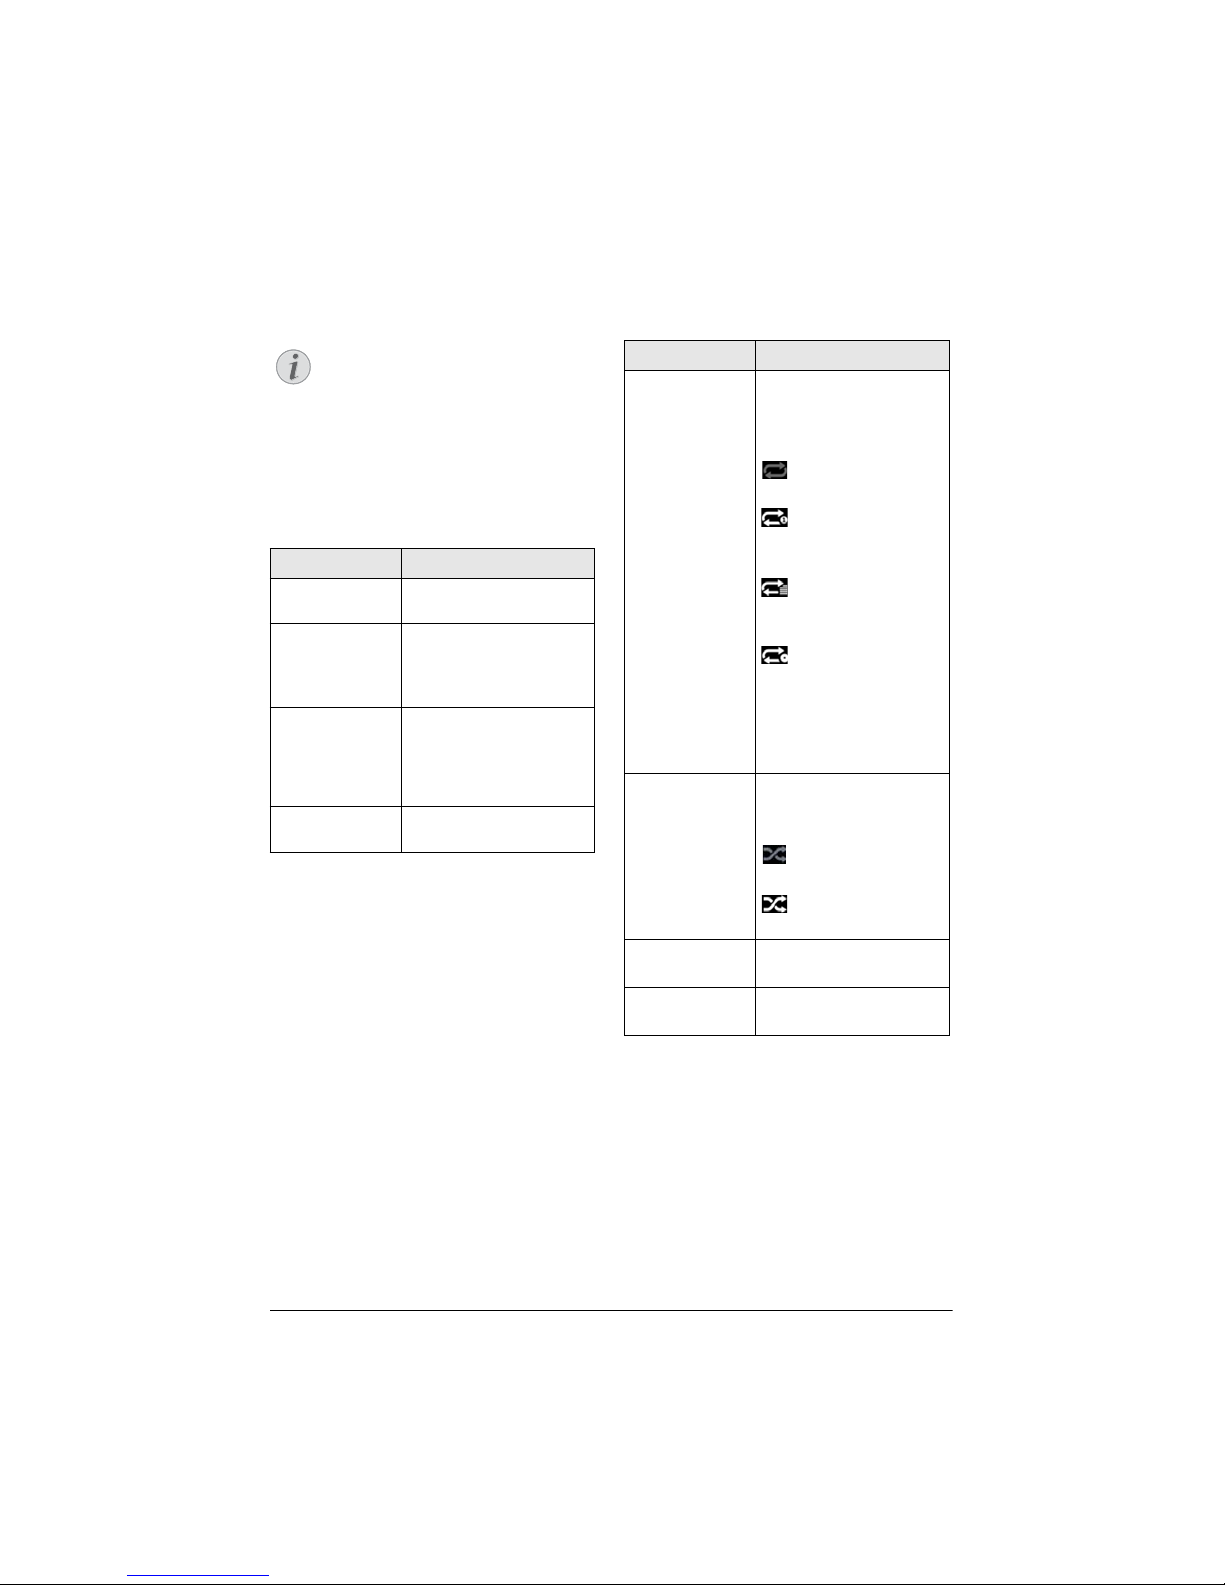
Navigation can be done by navigation keys
(,, À,Á), OK, ¿, u and colour keys on
the remote control.
Keys
Action
or Selects folders or files in
the displayed list.
Á or Goes one level down in
the directory.
Starts the selected media
file.
À or ¿ Goes one level up in the
directory.
Additionally you can also
use the BACK button on
the screen.
u Exits to media player main
screen.
Navigation by colour keys
Keys Action
Red key Music and movie player:
A
llows to set the repeat
mode: off, song, direc-
tory, all
: Play mode deacti-
vated (greyed).
: Plays only the
selected music or movie
in loo
p.
: Plays all musics or
movies in the selected
dire
ctory in loop.
: Plays all musics or
movies in the media in
loo
p.
Photo viewer:
Allows to set the slide
sp
eed: off, 3 sec, 5 sec,
10 sec
Green key Music player:
Allows to set the shuffle
m
ode: on, off
: Shuffle mode deactivated (greyed).
: Shuffle mode activated.
Yellow ke
y Music player:
Fast forward for music.
Blue key Music player:
Fast backward for music.
Notice
Page 22
22 Philips · HDP2510
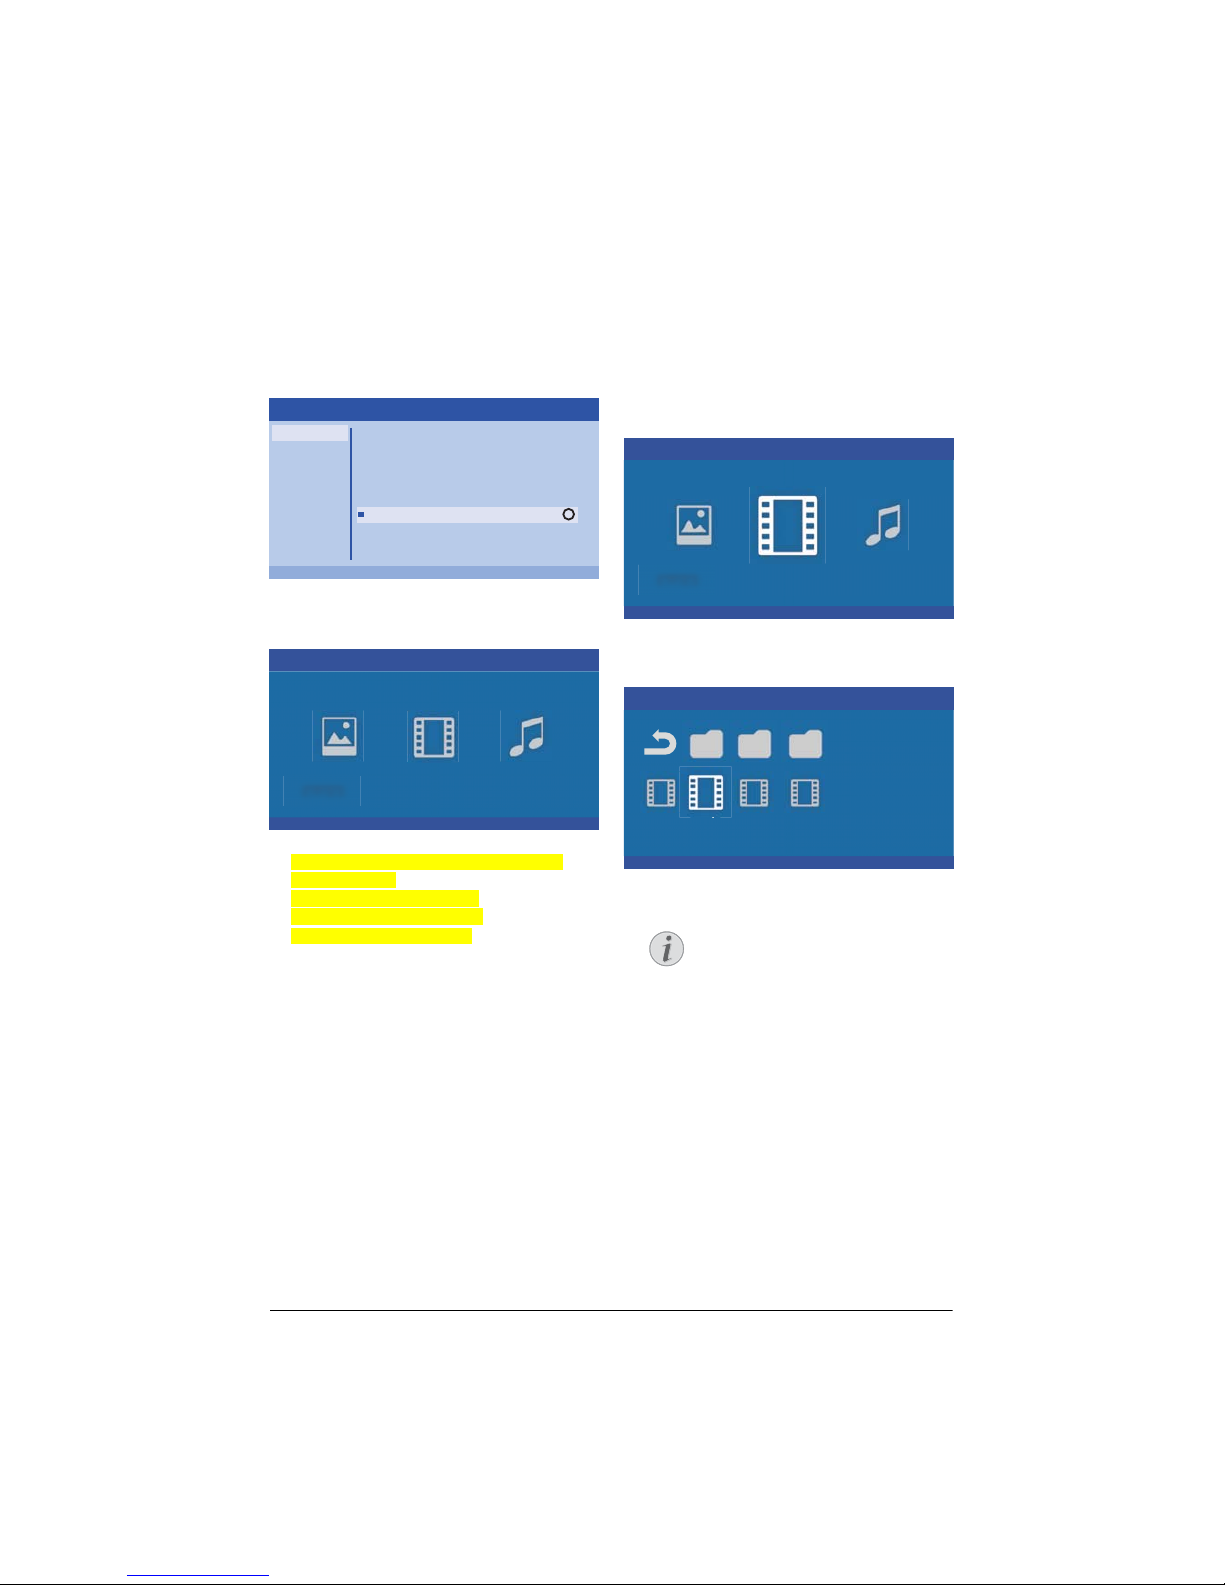
Activating media player
1 Press the OPTION button and use / to
select Source.
2 Confirm with .
3 Use
/ to select Media player.
OK
Source
Image
3D
Sound
System
Information
HDMI1
HDMI2
HDMI3
VGA
AV-In
Bluetooth speaker
Media Player
OK
Source settings
4 Confirm with .
5 The media pla
yer main screen appears.
Media Player
Photo Movie Music
You can choose between the following
media players:
Photo: For showing photos
Movie: For watching movies
Music: For listening music.
6 Use
À/Á to select the desired media player.
7 Confirm with .
The chosen icon is highlighted in white and it
is bigger than the unselected icon.
Movie playback
Supported file formats
Supported file formats are *.avi, *.mov, *.mp4,
*.mkv, *.flv, *.ts, *.m2ts, *.3gp.
1 To display the movies content, select Movie
using the keys À/Á.
Media Player
Photo Movie Music
1 Use À/Á or / to select the movie file
that you wish to play.
Movie
USB/Movie1 1/1
Movie MovieMovie
Only those movies that are compatible with the projector will be displayed.
2 Pr
ess or Á to start playback. The status
bar is shown. If no key is pressed it disappears after three seconds.
3 Pr
ess ¿ to end the playback and return to
the overview.
4 Wh
en you press ¿ again or u, you will
return to the media player main screen.
Notice
Page 23
Media playback (optional) 23
5 Press OK on the remote control to show the
status bar again. The movie pauses.
Fast forward/backward (2x, 4x, 8x
with each click) using :/;. Press
or Á to return to normal speed.
Press or Á t
o continue play-
back.
Navigation by colour keys
Keys Action
Red key Allows to set the repeat
mo
de: off, song, direc-
tory, all
: Play mode deacti-
vated (greyed).
: Plays only the
selected music or movie
i
n loop.
: Plays all musics or
movies in the selected
d
irectory in loop.
: Plays all musics or
movies in the media in
loop
.
During playback you can adjust the volume
us
ing the VOLUME buttons (+/-). Press
or
repeatedly to shut off the volume com-
pletely.
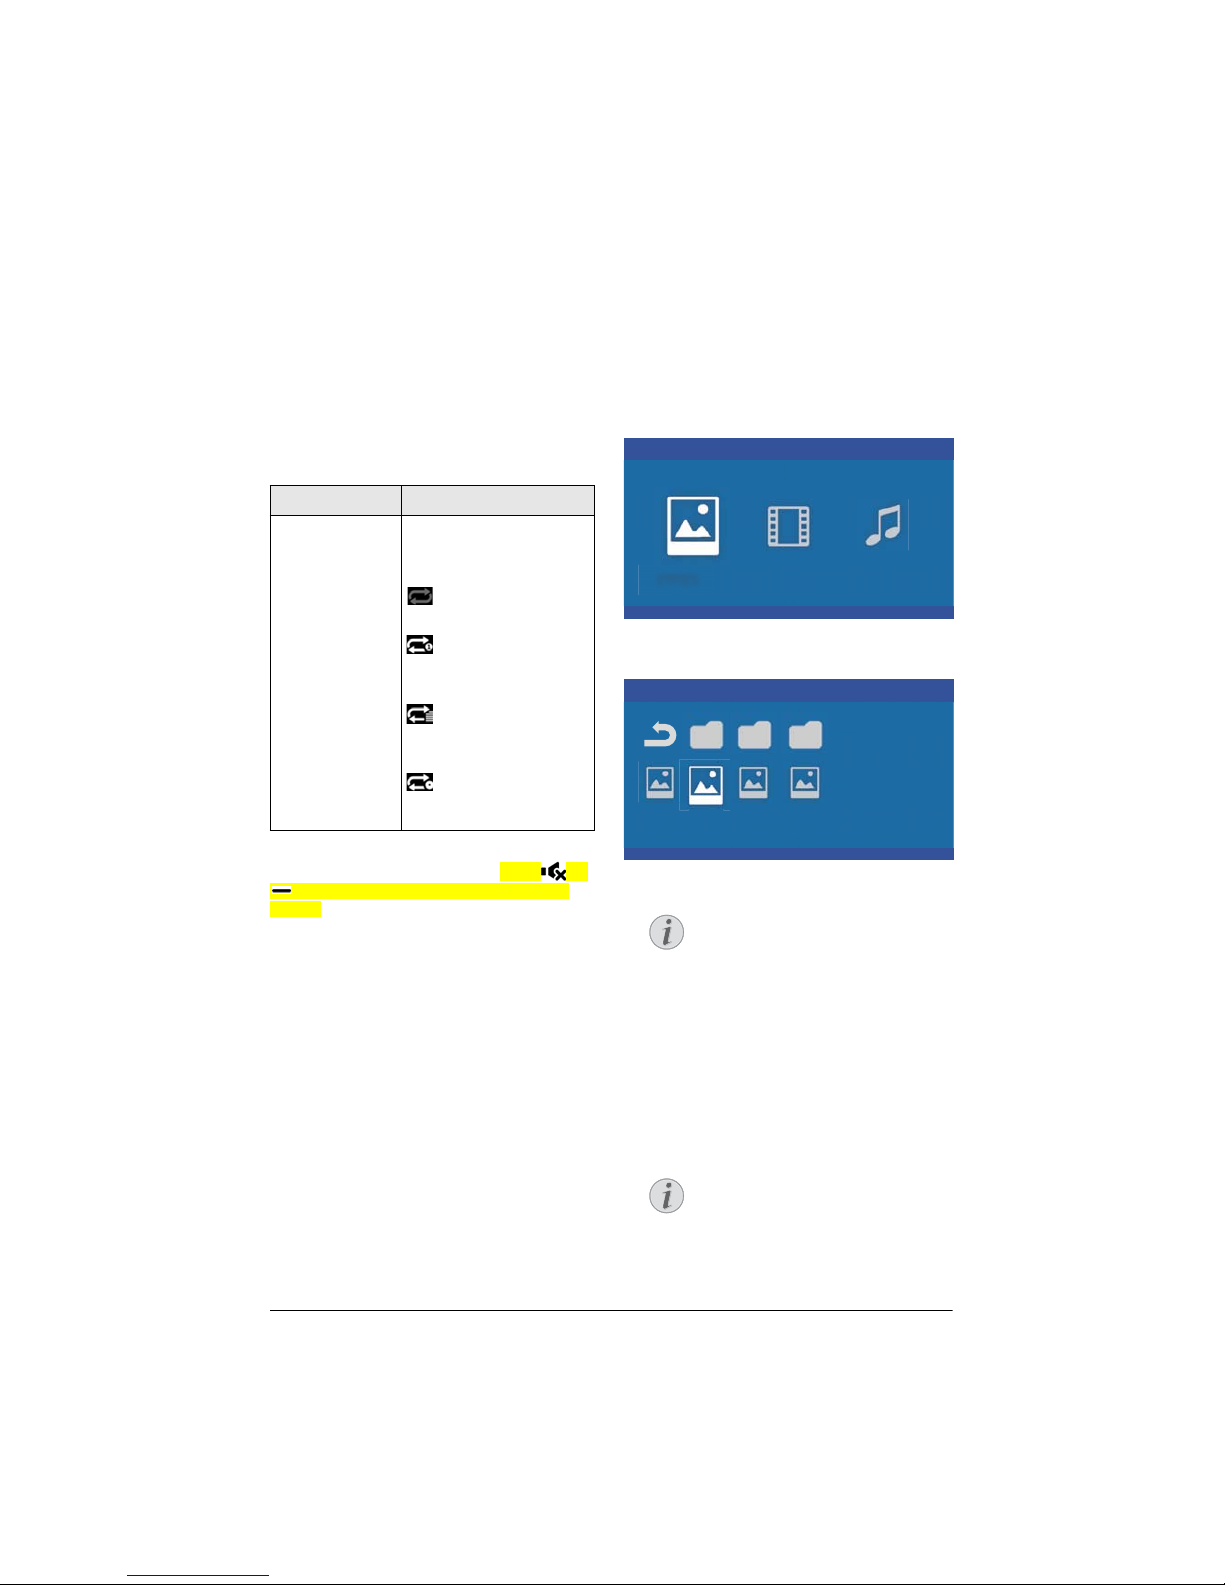
Photo playback (optional)
Supported file formats
Supported file formats are JPEG, BMP, PNG and
GIF.
1 To display the photos content, select Photo
using the keys À/Á.
Media Player
Photo Movie Music
1 Use / to select the photo file that you
wish to play.
Picture
USB/Picture2 1/1
Picture PicturePicture
Only those photos that are compatible with the projector will be displayed.
2 Th
e list of photos are displayed on the screen
as an overview. On the left side of the screen
the image is shown as a pre-image.
3 Us
e À/Á or / to select the image that
you want to start the slide show with. The
image is shown as a preview in the left window.
4 Pr
ess OK to start the slide show.
The slide show can be paused with
OK.
Press À/Á t
o choose an option:
with each click on OK turn the picture
90°
Notice
Notice
Notice
Page 24
24 Philips · HDP2510
5 When you press u, you will return to the
media player main screen.
Navigation by colour keys
Keys Action
Red key Allows to set the slide
sp
eed: off, 3 sec, 5 sec,
10 sec
Music playback (optional)
The projector can be used as Bluetooth
speaker. In this mode, you can play music from
smart phones, tablets or other devices (see
Bluetooth speaker, page 20).
Supported file formats
Supported file formats are MP3 and WAV.
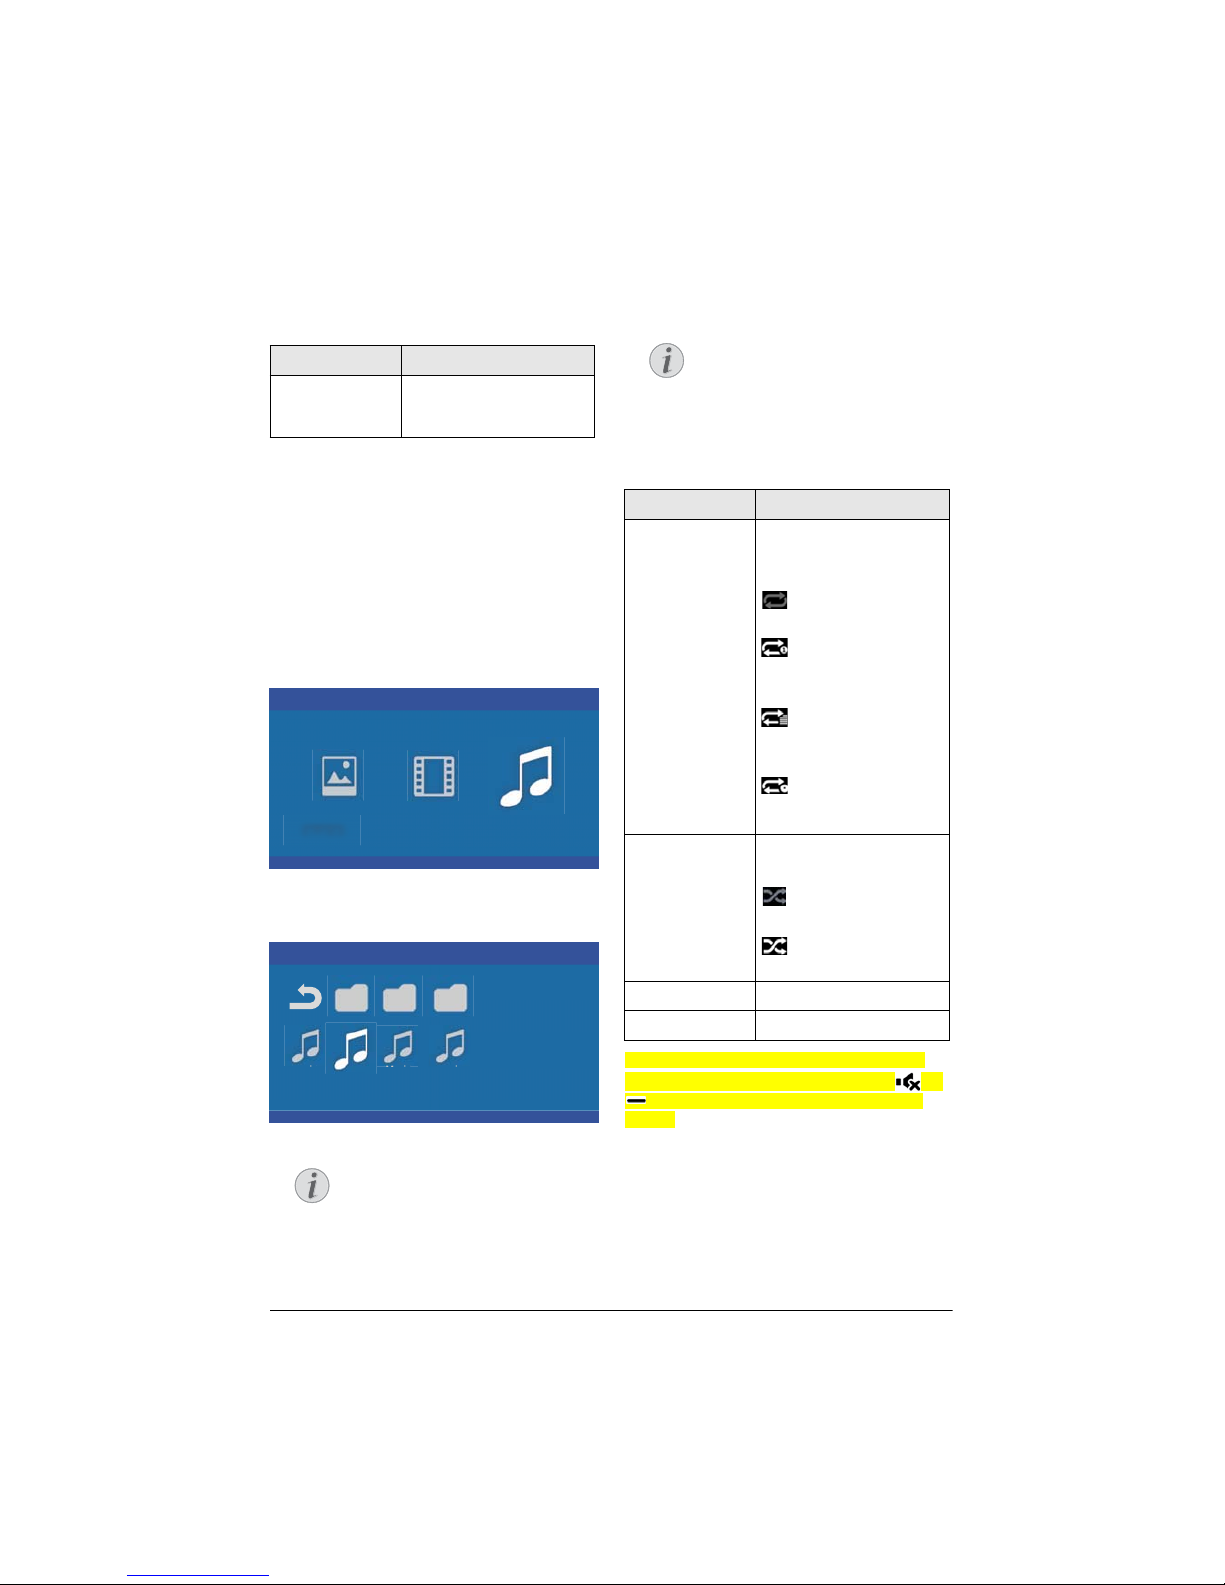
1 To disp
lay the photos content, select Music
using the keys À/Á.
Media Player
Photo Movie Music
1 Use / to select the music file that you
wish to play.
Music
USB/Music2 1/1
Music MusicMusic
Only those music that are compatible with the projector will be displayed.
2 Press OK to start the playback. The title or
information is shown for two seconds.
The playback can be paused with
OK. To stop the music press BACK
button.
3 When you press u, you will return to the
media player main screen.
Navigation by colour keys
Keys Action
Red key Allows to set the repeat
mode: off, song, directory, all
: Play mode deacti-
vated (greyed).
: Plays only the
selected music or movie
in loo
p.
: Plays all musics or
movies in the selected
dire
ctory in loop.
: Plays all musics or
movies in the media in
loo
p.
Green key Allows to set the shuffle
m
ode: on, off
: Shuffle mode deactivated (greyed).
: Shuffle mode activated.
Yellow ke
y Fast forward for music.
Blue key Fast backward for music.
During playback you can adjust the volume
us
ing the VOLUME buttons (+/-). Press
or
repeatedly to shut off the volume com-
pletely.
Notice
Notice
Page 25
Settings 25
7 Settings
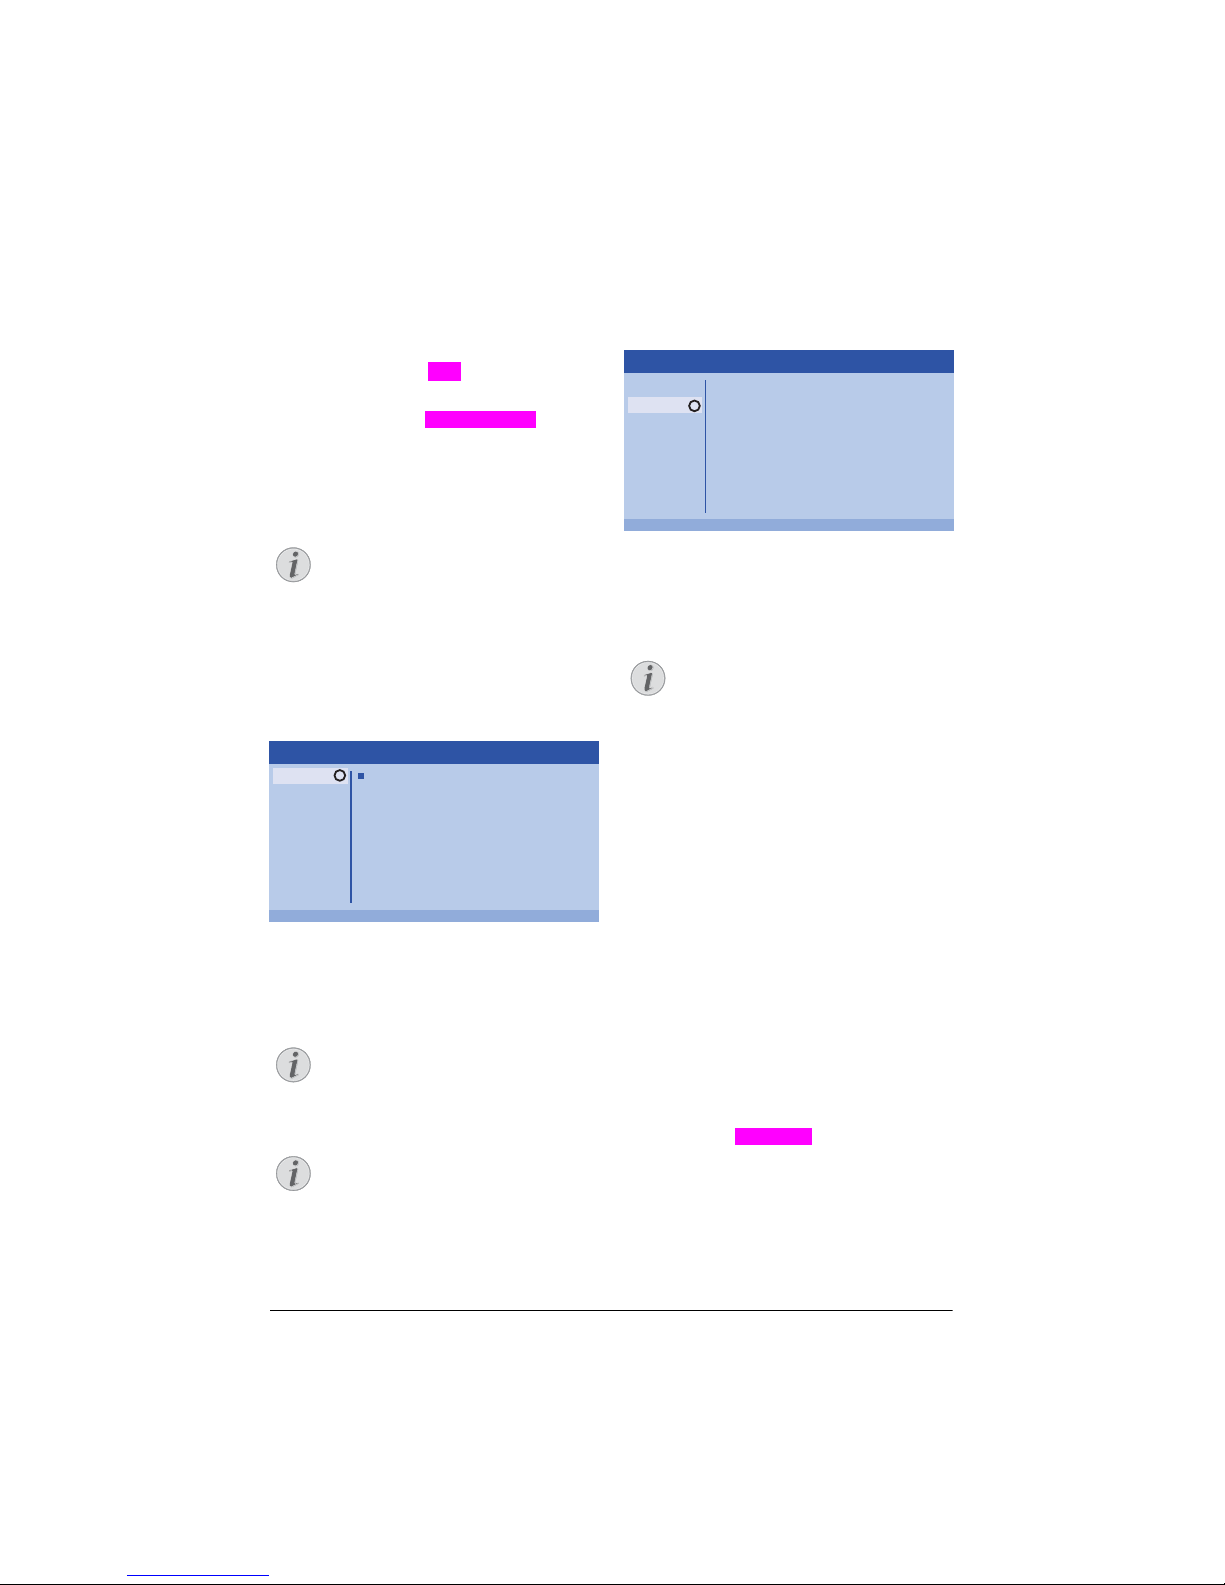
1 Select the Option menu using the OPTION
button.
2 Use
/ to select from the main settings.
3 Confirm with OK.
4 Mo
dify the settings in the sub menu using
À/Á.
5 Confirm the settings with OK (if requested).
6 Th
e ¿ key takes you one step up in the
menu.
Select the Short cut menu using the
related button (for example or
button (see (see Option
menu and Short cut menu, page 9).
Overview of the menu
functions
Source settings
OK
Source
Image
3D
Sound
System
Information
HDMI1
HDMI2
HDMI3
VGA
AV-In
Bluetooth speaker
Source settings
Source
The projector supports the following sources: HDMI1,2,3, VGA, AV-IN, Bluetooth Speak-
er, Media Player (optional).
Image settings
Source
Image
3D
Sound
System
Information
OK
Smart settings
Format
Brightness
Contrast
Saturation
Sharpness
Lamp power mode
Flow motion
Wall colour correction
Advanced colour settings
Standard
Original
50
50
50
16
Standard
On
OFF
Image settings
Smart Settings
Selects predefined settings for brightness /
contrast / colour saturation: Bright, Stand-
ard, Cinema, Game, Presentation or User.
Format
Adjusts the screen format:
Original, 4:3, 16:9, Full screen.
Brightness
Adjusts the brightness: 0 – 100.
Contrast
Adjusts the contrast: 0 – 100.
Saturation
Adjusts the saturation: 0 – 100.
Sharpness
Adjusts the sharpness: 0 – 100.
Lamp power mode
Modifies the lamp power mode:
Daylight – for bright environment.
Primetime – for twilight.
Cinema – for very dark rooms and smaller
screen sizes.
Flow motion
Switches the MEMC (Motion estimation/motion compensation) for motion interpolation
On and Off.
Notice
Notice
Depending on which Source you have
selected the settings in the sub menu
may change.
Notice
If no source is found or connected a
message appears: NO SIGNAL
Notice
The default setting depends on the
choice of Shop mode or Home mode
(see Initial installation, page 14).
The default settings of all related settings (except Wall colour correction
and White point) are changed accordingly.
Page 26
26 Philips · HDP2510
Wall colour correction
Colour correction of the projected image to
adjust to coloured projection surface.
Advanced colour settings
Adjust detailed colour corrections.
Colour temperature – set to Warm to
enhance hotter colours such as red, set to
Cool to make picture bluish or set to Natural.
Dynamic contrast – adjusts the contrast to
keep it at the best level according to the
brightness of the screen.
Gamma – adjusts the gamma correction
according to the type of the projected
image: Gamma 2P2/2P4/2P4, Linear,
Enhanced, MaxBright, Enphoto, Photo,
Gamma 1,2,3.
Black level – set the black and white level to
Full range (RGB), Limit range (YCbCr and
RGB) or to Auto.
Manual White Point – manually adjusts the
white point calibration according to your
needs: Colour, Offset, Gain.
Manual colours RGB CMY – manually
adjusts colours in RGB CMY mode according
to your needs: Colour, Hue, Saturation,
Brightness.
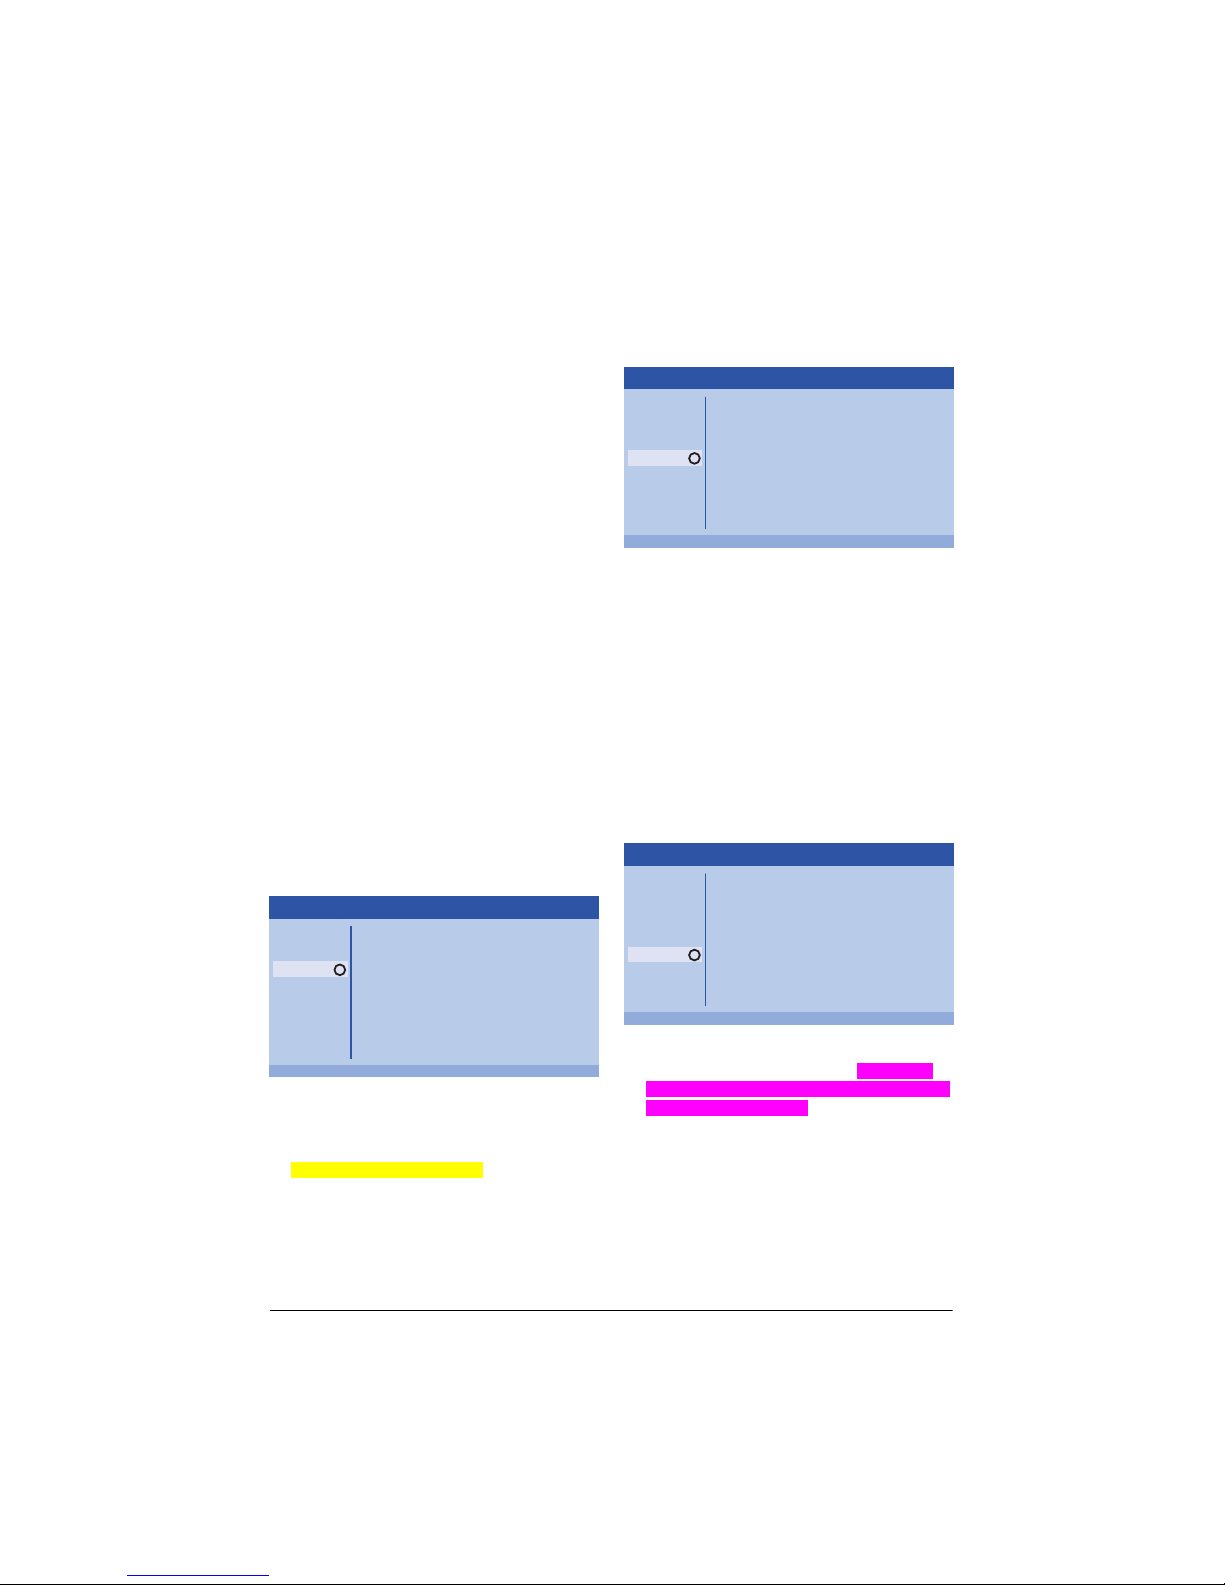
3D settings
OK
Source
Image
3D
Sound
System
Information
2D/3D
L/R Swap
2D
O
3D settings
3D
Sets the picture modes with 2D/3D options.
L/R Swap
Changes the screen display.
Sound settings
OK
Source
Image
3D
Sound
System
Information
Volume
Deep bass
Wide sound
Equalizer
Speaker
6
On
On
Normal
On
Sound settings
Volume
Adjusts the volume: 0 – 20.
Deep bass
Switches the deep bass On and Off.
Wide sound
Switches the wide sound On and Off.
Equalizer
Selects the equalizer mode:
Normal, Pop, Rock, Jazz, Classic, Voice.
Speaker
Switches the speaker On and Off
System settings
OK
Source
Image
3D
Sound
System
Information
Key stone
Projection mode
Sleep mode
Screen saver
Auto power down
Reset lamp timer
Language/language
Shop mode
Firmware update
0
Front
O
1 min
On
English
O
O
System settings
Keystone
Minimizes the Keystone effect (trapezförmige Verzerrung des Bildes bei der Aufwärtsprojektion) (-32 – +32).
Projection mode
Adjusts the projection mode.
Front – normal projection; the device is
located in front of the projection surface/
screen.
Rear – rear projection; the device is located
behind the projection surface; the image is
reflected horizontally.
Page 27
The default setting is depending on the
choice of Shop mode or Home mode
(see Initial installation, page 14).
Do not reset the lamp timer if the lamp
has not been replaced as this could
cause damage
(see Resetting the lamp
timer, page 30).
Settings 27
Front Ceiling – the device is hanging from
the ceiling in an upside-down position; the
image is rotated by 180 degrees.
Rear ceiling – the device is located behind
the projection surface, hanging from the ceiling in an upside-down position; the image is
rotated by 180 degrees and reflected horizontally.
Sleep mode
Adjusts the time until the projector should go
into sleep mode and powers off after ten
seconds if user doesn’t stop it. The followings options are available: Off, 30 min.,
45 min., 60 min., 120 min.
Screen saver
Adjusts the time until the system should
power down the lamp if no source is connected to system. The followings options are
available: Off, 1 min. 2 min., 5 min., 10 min.,
30 min.
Auto power down (APD)
Switches the auto power down On and Off.
When the function is switched on, the projector should go into off mode after three
hours.
If a video is displayed, the APD should take
place three hours after last user action,
meaning that a pop-up will appear after 2:58
for two minutes, indicating that the device
will go into off mode.
Reset lamp timer
Resets the lamp timer of the system.
Language/language
Selects the desired language.
Shop Mode
Switches the shop mode On and Off.
In this mode, Screeneo is continuously dis-
played on the screen and system powers on
after power is available. System is set to shop
mode conditions and settings are set back to
default settings after a certain period of time.
Firmware update
Updates firmware (see Update firmware
with USB storage medium, page 19).
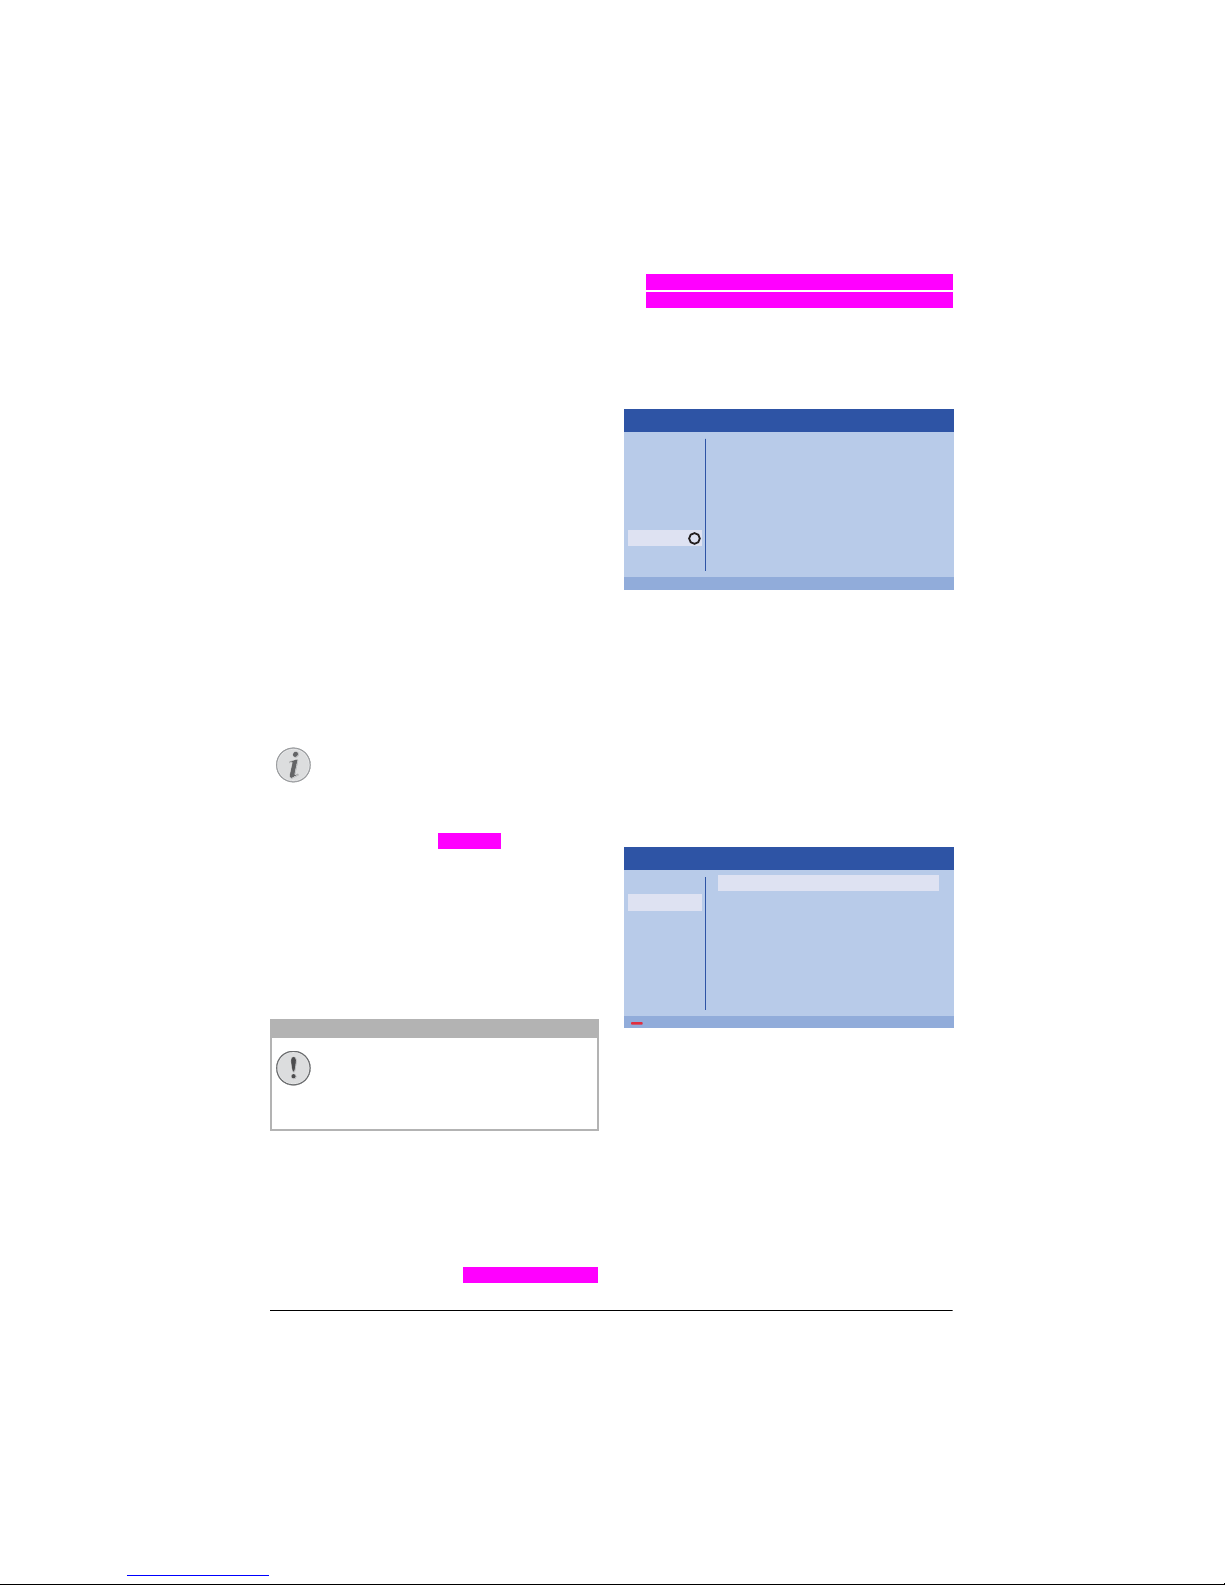
Information
OK
Source
Image
3D
Sound
System
Information
Source
Smart settings
3D settings
Equivalent lamp hour
Resolution
Firmware version
Engine version
MCU version
Model
HDMI1
Standard
2D
0 h
1920 x 1080
V1.0
V1.111
V1.11111
HDP2510
System settings
Information
Displays an overview of the status and version of the device.
Reset functions
You can select between two different reset
functions:
Reset image settings
This function is resetting the current chosen
Smart settings back
to default mode.
Reset current image settings
Source
Image
3D
Sound
System
Information
Smart settings
Format
Brightness
Contrast
Saturation
Sharpness
Lamp power mode
Flow motion
Wall colour correction
Advanced colour settings
Standard
Original
50
50
50
16
Standard
On
OFF
Image settings
1 Press the OPTION button and use / to
select Image.
2 Confirm with OK.
3 Us
e / to select Smart settings.
4 I
n the status bar appears Reset current
image settings.
5 Us
e À/Á to select Standard*.
6 Confirm with
the RED button.
Notice
CAUTION!
Page 28

28 Philips · HDP2510
7 A message displays asking if you want to
reset smart mode to default. Confirm with OK
(YES).
Möchten Sie die Smart settings nicht reseti
eren, verlassen Sie das Menü indem Sie mit
À/Á NO wählen und mit OK bestätigen.
Reset all settings
This function is resetting the complete System
s
ettings back to default mode – starting with the
initial installation again.
Reset all settings
OK
Source
Image
3D
Sound
System
Information
Key stone
Projection mode
Sleep mode
Screen saver
Auto power down
Reset lamp timer
Language/language
Shop mode
Firmware update
0
Front
O
1 min
On
English
O
O
System settings
1 Press the OPTION button and use / to
select System.
2 Confirm with OK.
3 Use
/ to select Keystone.
4 In
the status bar appears Rest all settings.
5 Confirm with
the RED button.
6 A messa
ge displays asking if you want to
reset all settings to default. Confirm with OK
(YES).
Möchten Sie die Einstellungen nicht reseti
eren, verlassen Sie das Menü indem Sie mit
À/Á NO wählen und mit OK bestätigen.
7 Th
e device turns off and on again. After a
short time the Language selection screen
appears. The resetting process is now completed.
Page 29
Service 29
8 Service
Cleaning
Instructions for cleaning!
Use a soft, lint-free cloth. Never use liquid or easily flammable cleansers
(s
prays, abrasives, polishes, alcohol,
etc.). Do not allow any moisture to
reach the interior of the device. Do not
spray the device with any cleaning fluids.
Wipe over the surfaces gently. Be careful that you do not scratch the surfaces.
Cleaning the lens
Use a brush or lens cleaning paper for cleaning
the lens of the projector.
Do not use any liquid cleaning agents!
Do not use any liquid cleaning agents
for cleaning the lens, to avoid damaging
the coating film on the lens.
Replacing the lamp
The UHP lamp lasts up to 10,000 hours. UHP
lamps are maturing during their life time, so a
loss in brightness is a normal aging process. We
recommend to change the UHP lamp after
4,500 – 10,000 hours depending which lamp
mode is used. You can check the elapsed lamp
time in the UI menu Information – lamp hour.
The lamp is a consumable item and can be
ordered by X-GEM service hotline or on the
Philips homepage.
Do not operate the lamp beyond the
rated lamp life. Excessive operation of
lamps could cause a lamp to break on
rare occasions.
Instructions for cleaning!
The lamp becomes extremely hot during operation. Allow the device to cool
fo
r approximately 45 minutes prior to
removing the lamp.
Turn off the projector and disconnect the device
from the power outlet.
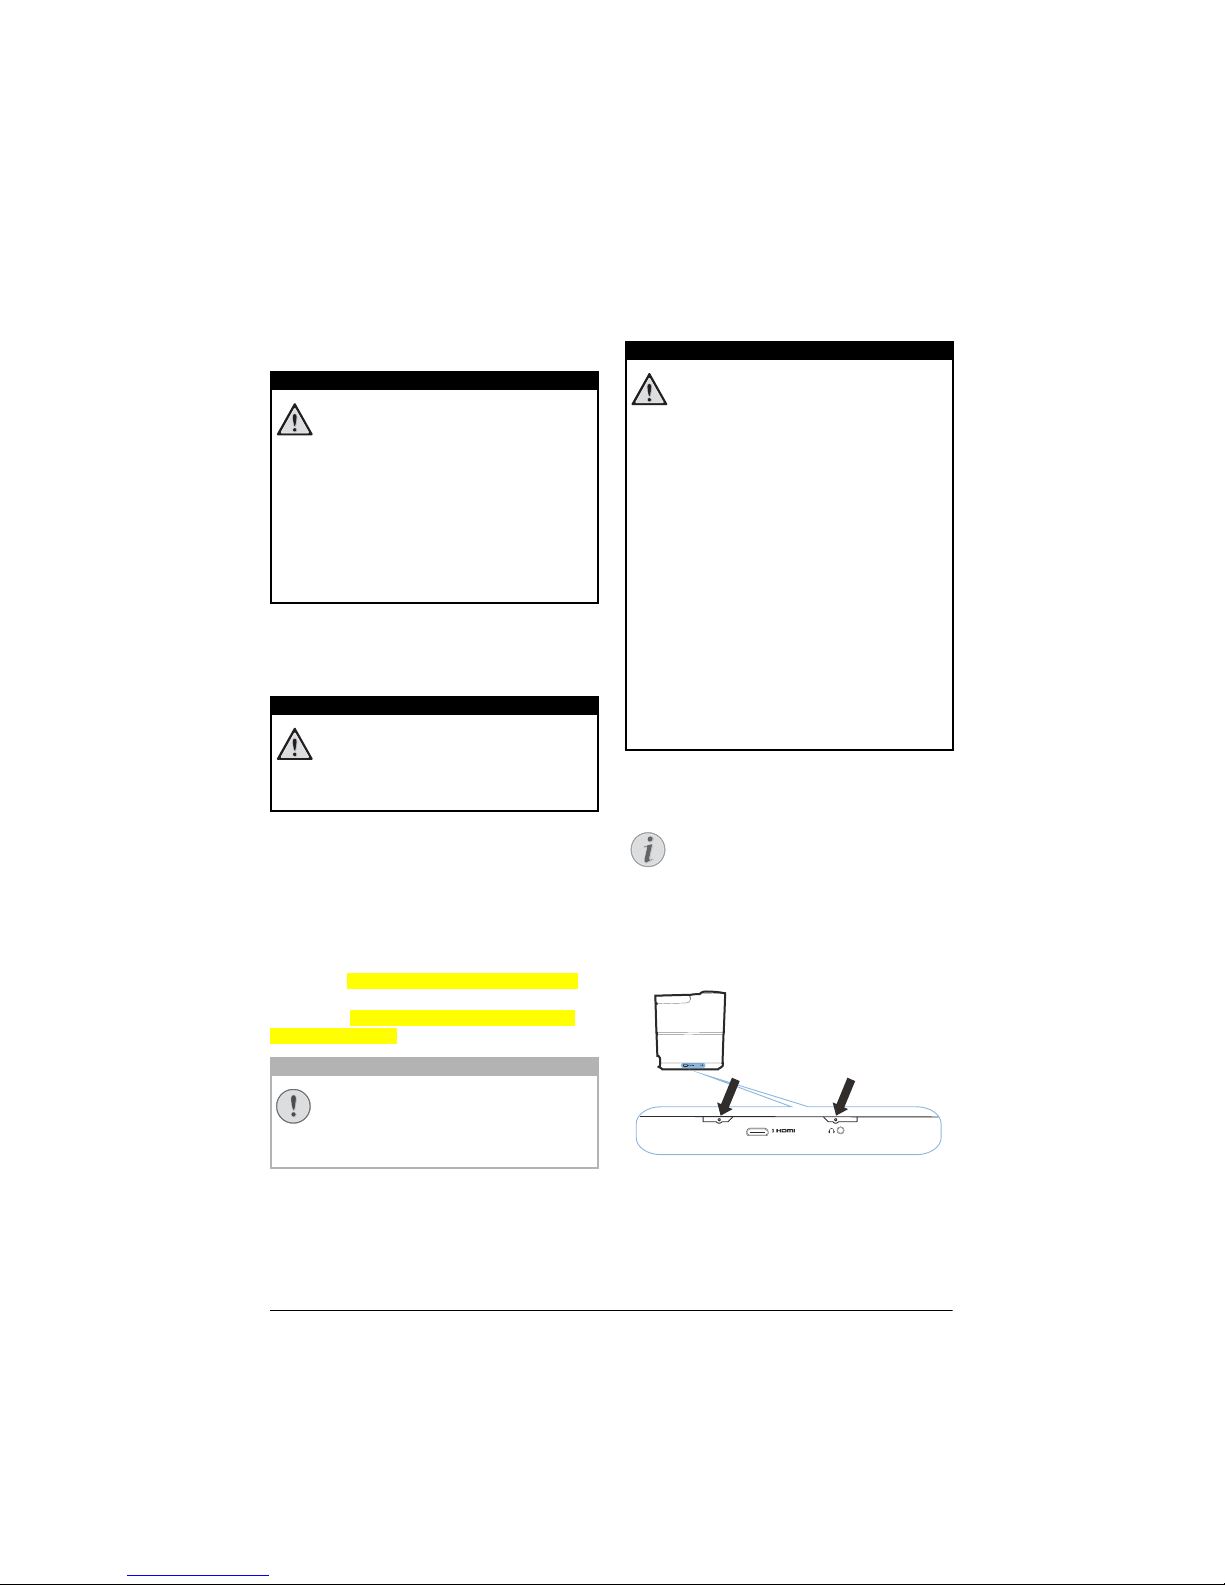
1 Loos
en the two screws that secure the lamp
cover on the side of the projector until the
lamp cover loosens.
2 Remove the lamp cover from the projector.
DANGER!
DANGER!
CAUTION!
DANGER!
• To reduce the risk of electrical
shock, always turn the projector off
and disconnect the power cable
before changing the lamp.
• To reduce the risk of severe burns,
allow the projector to cool for at
least 45 minutes before replacing
the lamp.
• To reduce the risk of injuries to fingers and damage to internal components, use caution when removing lamp glass that has shattered
into sharp pieces.
• To reduce the risk of injuries to fingers and/or compromising image
quality by touching the lens, do not
touch the empty lamp compartment when the lamp is removed.
• This lamp contains mercury. Consult your local hazardous waste
regulations to dispose of this lamp
in a proper manner.
Notice
Page 30
30 Philips · HDP2510
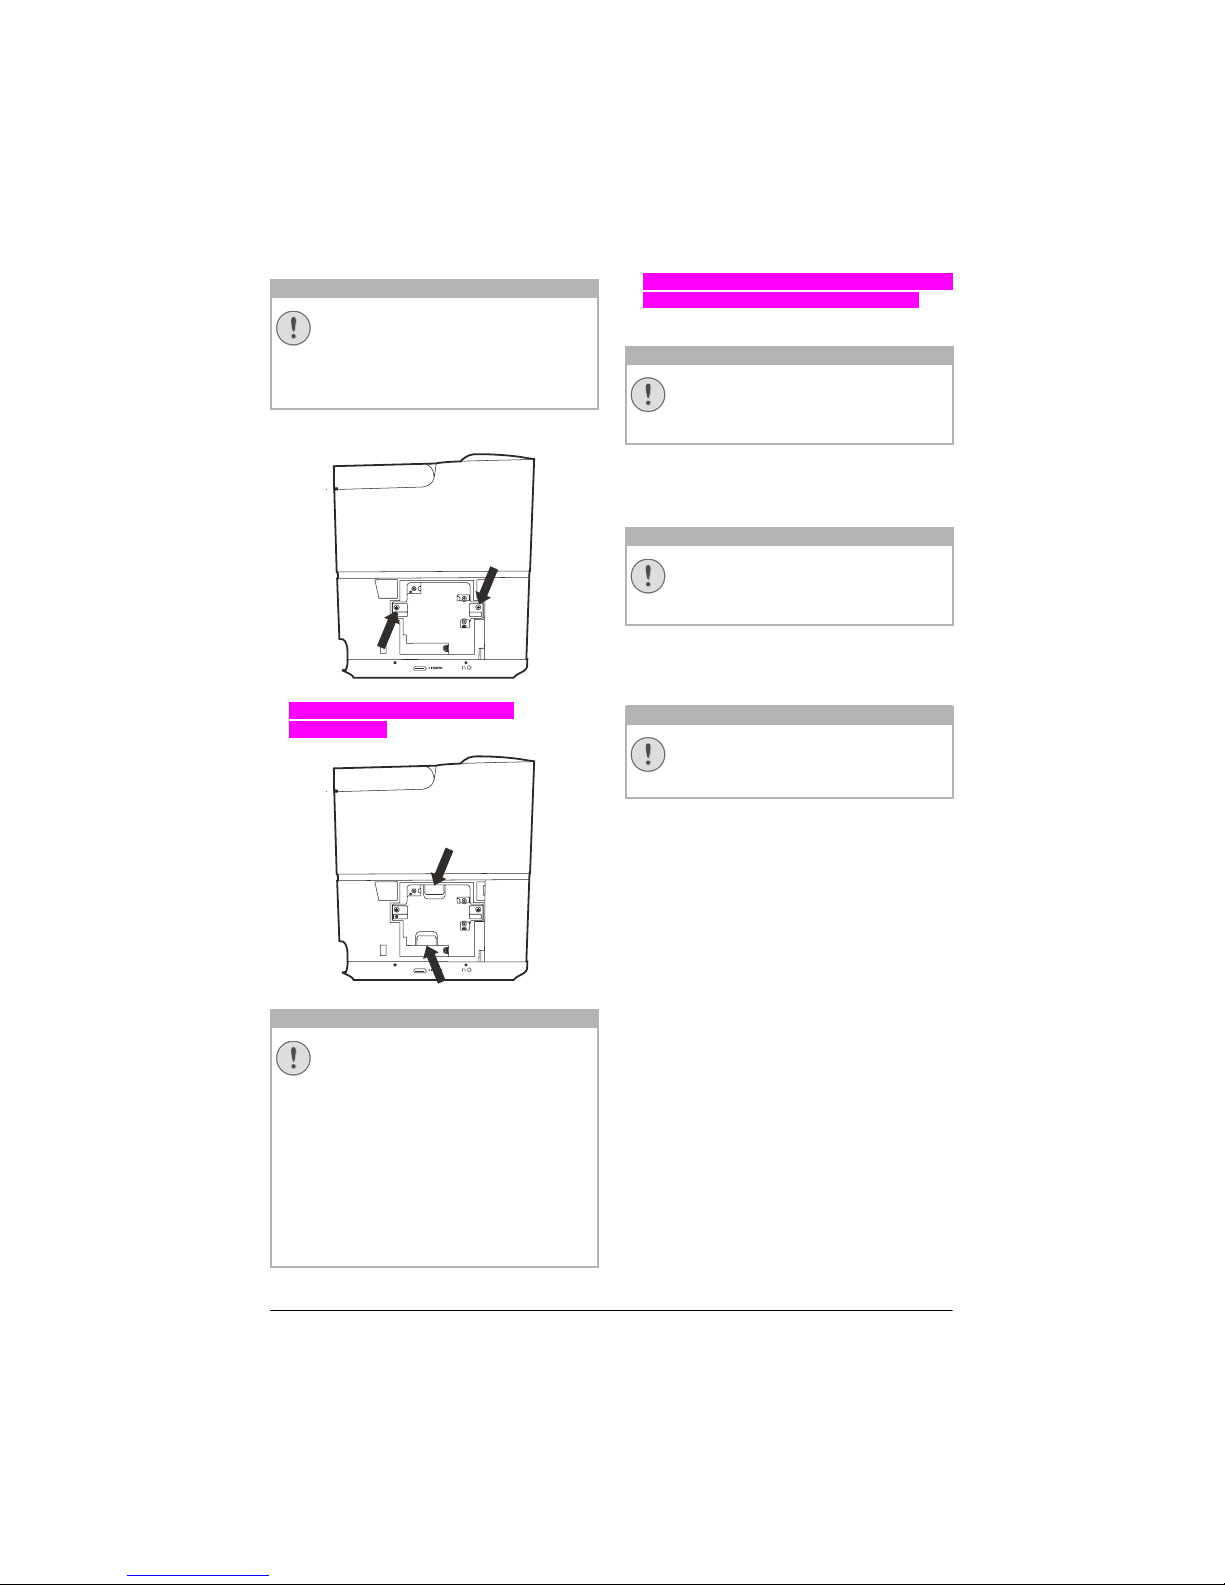
1 Loosen the two screws that secure the lamp.
1 Pull out the lamp an den beiden
Aussparungen
.
2 Gentlly insert the new lamp.If it does´t fit eas-
ily, make sure it´s facing the correct way.
3 T
ighten the two screws that secure the lamp.
4 Replace the lamp cover on the projector.
5 T
ighten the two screws that secure the lamp
cover.
6 Plug the power cable to outlet.
Resetting the lamp timer
Do not reset the lamp timer if the lamp
has not been replaced as this could
cause damage.
1 To turn on the projector, press once the B
button on the panel control of the device or
on the remote control.
2 Pr
ess the OPTION button and use / to
select System.
3 Confirm with OK.
4 Us
e / to select Reset lamp timer.
5 Confirm with OK.
6 A
message displays asking if you want to
reset the lamp timer. Confirm with OK. The
lamp time will be reset to "0".
CAUTION!
• Do not turn the power on while the
lamp cover is removed.
• Do not insert your fingers between
the lamp and the projector.
• The sharp edges inside the projector may cause injuries.
CAUTION!
• Pulling it too quickly may cause the
lamp to break and scatter broken
glass in the projector.
• Do not place the lamp in locations
where water might splash on it,
children can reach it, or near flammable materials.
• Do not insert your hands into the
projector after the lamp is
removed.
• If you touch the optical components inside, it could cause colour
unevenness and distortion of the
projected images.
CAUTION!
• Loose screw may cause a bad connection, which could result malfunction.
• Do not over tighten the screws.
CAUTION!
• Loose screw may cause a bad connection, which could result malfunction.
• Do not over tighten the screw.
CAUTION!
Page 31
Service 31
Troubleshooting
Power cycling
If a problem occurs that cannot be corrected
with the instructions in this user manual, follow
the steps given here.
1 Turn the device off by pressing twice the B
button.
2 Wait at least ten seconds.
3 Turn the device on by pressing once the B
button.
4 If the problem repeats, please contact our
technical customer service or your retailer.
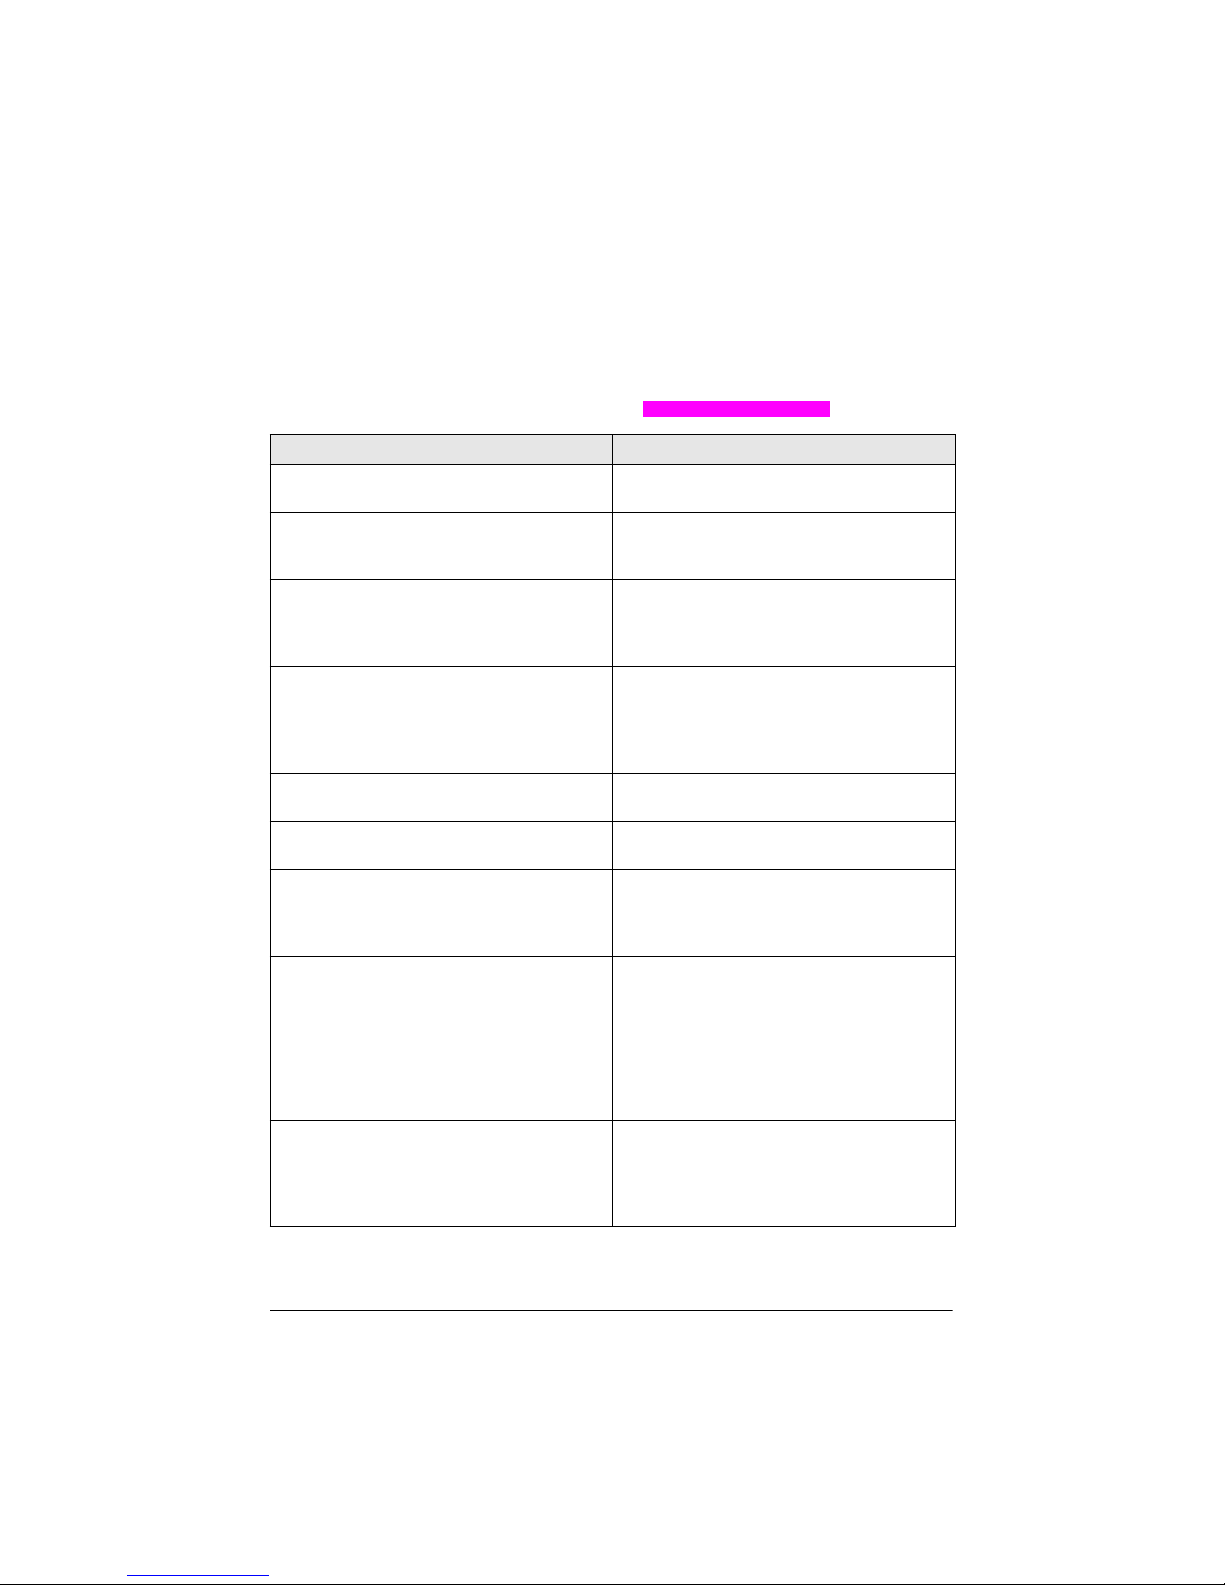
Problems Solutions
The projector cannot be turned on • Disconnect and connect the power supply
cable and try to turn it on again.
The projector cannot be turned off
• Push the B button longer than ten seconds.
If it does not work, disconnect the power
supply cable.
No sound • Check that the speaker is activated (see
Sound settings, page 26).
• Adjust the volume using the VOLUME buttons
(-/+).
No sound from the external connected device • Check the cables to the external device.
• Check that the sound is activated on the
external device.
• Only the original cables from the device manufacturer may function.
No sound from external HDMI output device • Set the audio setting to Multichannel (Raw
data) & Stereo (PCM).
No sound when you connect your computer via
HDMI cable
• Check that the sound is activated on the
computer.
Video display problem when the source is a 3D
signal from a Blu-ray player
• Check that the 3D mode is activated on the
projector (see 3D settings, page 26)
• If the Blu-ray player is connected to the projector via HDMI, use any of the HDMI sockets.
Only the initial screen appears and not the image
from the external device
• Check if the cables are connected to the right
sockets.
• Check that the external device is turned on
• Check if the video output of the external
device is turned on.
• Check that the HDMI source selected on the
user interface corresponds to HDMI connector where the external device is connected.
Only the initial screen appears and not the image
from the connected computer
• Check that the VGA-output of the computer
is turned on.
• Check if the resolution of the computer is set
to 1920*1080 (for VGA-connection) or 1080P
(for HDMI-connection).
Page 32
32 Philips · HDP2510
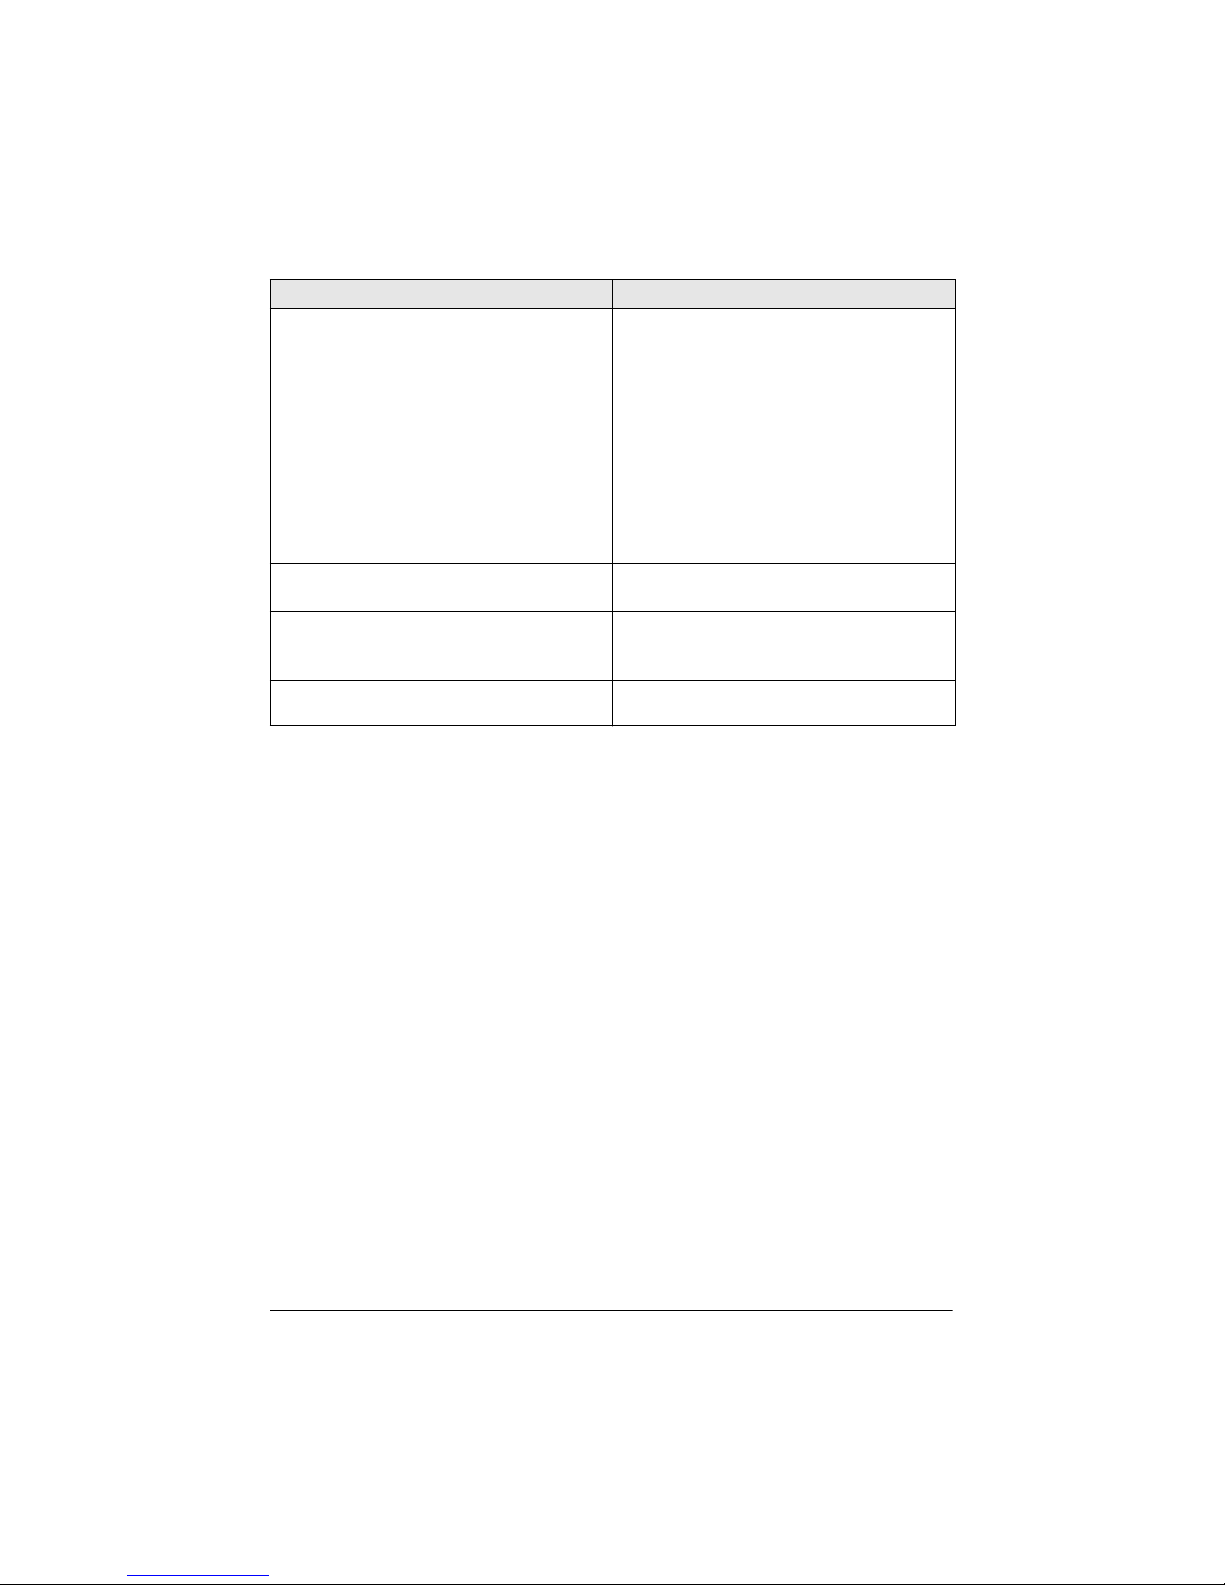
The device turns itself off • When the device is running for a long period
of time, the surface becomes hot and a warn
ing symbol appears on the projection (see
Initial operation, page 11). The device automatically turns off when it gets too hot. After
the device has cooled down, you can continue playback.
• Check that the power cable is connected correctly.
• Check the sleep mode status in the setting
menu. When the sleep mode is activated, the
device turn off after the programmed duration.
Bad image or colour quality when connecting
with HDMI
• Use the supplied HDMI cable. Third-party
cables may cause signal distortions.
The device cannot read the USB stick • The device does not support the exFAT file
system.
• Format the USB key in FAT format, then use it.
The projector does not react to remote control
commands
• Check the batteries of the remote control.
Problems Solutions
Page 33

Appendix 33
9 Appendix
Technical data
Technology / optical
Display technology ........ Single 0.65” DarkChip3
1080p DLP® Technology by Texas Instruments
Light source ............ Philips UHP Image life lamp
Lamp type .................................................... 250 watt
UHP light source ............lasts over ˜10000 hours
Colour wheel segment .....6 segment (RGBRGB)
Contrast ratio ..........................................200 000: 1
Brightness .............................. 2000 colour lumens
Displayable colours .............................. 1.07 billions
Resolution ....................................1920 x 1080 pixel
Throw ratio .......................................................... 0.21:1
Screen size ..................................................50”–120”
Screen distance from device backside
............................................................... 10–42 cm
Keystone correction ............................................. yes
Aspect ratio ............................................ 4:3 and 16:9
Projection modes ........................ front, rear, front
............................................ ceiling, rear, ceilling
Wall colour correction .........................................yes
Focus adjustment ......................................electrical
Frame rate.........................................................720 Hz
3D technology ........................... converts 2D in 3D,
...................................... supports all 3D modes
Image lag time .................................................. 50 ms
Image response time .................................. < 0.1 ms
Noise level...................... 32 dB(A) daylight mode/
....................................<25 dB(A) cinema mode
Supported formats/ resolutions
PAL (50Hz)/SECAM (50Hz)/NTSC (60Hz)/
........................ 480i/p/576i/p/720p/1080i/p
Sound
Built-in speakers ................................2+subwoofer
Output power .................................................... 26 W
Sound System ................................Dolby Digital 2.1
Connection
Bluetooth ........stream music from smart-phone
..............or tablet to Screeneo via Bluetooth
................................................... aptX® Standard
Connectivity ... 2x back HDMI, 1 side HDMI, VGA,
................ composite, 1x back standard USB,
.............................headphone out side, Audio
........................in & out, AV in, S/PDIF optical,
.............................................................. trigger out
Power source
Power consumption ...operation: 190 to 300 W
................................................ power off: <0.5 W
Power supply .........power adapter 90 V–264 V,
.................................... 47–63Hz for EU and UK
Logistic data
Packaging dimensions ......... packed (W x D x H):
.......................................... 408 x 340 x 385 mm
....................................... unpacked (W x D x H):
................................... 315.5 x 248.8 x 281.9 mm
Weight ...............................................packed: 10.5 kg
..................................................unpacked: 8.3 kg
Temperature range ................operation: 5–35° C
Storage packed .........................................-10–60°C
Storage unpacked .......................................0–45° C
Relative humidity ............. operation: 15–85% RH
..............................storage packed: 5–93% RH
....................... storage unpacked: 15–85% RH
Standard package includes ....................HDP2510
..................................................... remote control
.................................................. quick start guide
.......................................................... power cable
.....................................................2 x AAA battery
...........................................................carrying bag
........................................................warranty card
Accessories
Following accessories are available for your
device:
PVideo-(CVBS) cable......... PPA1320 / 253526178
3D GlassesPPA5610 / 253569764
For HDP1650 an HDP1650TV models:
RF remote control ............ PPA5650 / 253588194
Lamp
All data are provided for reference purposes
only. X-GEM SAS reserves the right to make any
changes without prior notice.
Page 34

34 Philips · HDP2510
The CE marking certifies that the product meets
the main requirements of the European Parliament and Council directives
1999/5/CE, 2006/
95/CE, 2004/108/CE and 2009/125/CE on
information technology equipment, regarding
safety and health of users and regarding electromagnetic interference.
The declaration of complian
ce can be con-
sulted on the site www.screeneo
.philips.com.
Preservation of the environment as part of a
s
ustainable development plan is an essential
concern of X-GEM SAS. The desire of X-GEM
SAS is to operate systems observing the environment. The desire of X-GEM SAS is to operate systems observing the environment and
cons
equently it has decided to integrate environmental performances in the life cycle of this
prod
ucts, from manufacturing to commissioning use and elimination.
This device complies with Part 15 of the FCC
Rules. Operation is subject to the following two
conditions:
1 Thi
s device may not cause harmful
interference, and
2 Thi
s device must accept any interference
received, including interference that may
cause undesired operation.
Notice: Th
is device has been tested and found
to comply with the limits for a Class B digital
device, pursuant to part 15 of the FCC Rules.
These limits are designed to provide reasonable protection against harmful interference in a
re
sidential installation. This device generates,
uses and can radiate radio frequency energy
and, if not installed and used in accordance
with the instructions, may cause harmful interference to radio communications.
However, there is no guarantee that interference will not occur in a particular installation. If
this device does cause harmful interference to
radio or television reception, which can be
determined by turning the device off and on,
the user is encouraged to try to correct the
interference by one or more of the following
measures:
• Reorient or relocate the receiving
antenna.
• Increase the separation between the
device and receiver.
• Conn
ect the device into an outlet on a circuit different from that to which the
receiver is conn
ected.
• C
onsult the dealer or an experienced
radio/TV technician for help.
Caution:
Any changes or modifications not
expressly approved by the party responsible
for compliance could void the user's authority
to operate this device.
RF Exposure: A di
stance of 20 centimetres shall
be maintained between the antenna and users,
and the transmitter may not be co-located with
any other transmitter or antenna.
Canada Regulatory Compliance: Th
is device
complies with RSS-210 of the Industry Canada
Rules. Operation is subject to the following two
conditions:
1 Th
is device may not cause interference and
2 This
device must accept any interference,
including interference that may cause undesired operation of the device.
IC Radiation Exposure Statement: Th
is device
complies with IC radiation exposure limits set
forth for an uncontrolled environment.
Avis d’Industrie Canada:
Cet appareil est conforme à la norme CNR-210
d
es règlements d’Industrie Canada. Son fonctionnement est sujet aux deux conditions suivantes:
1) Cet appareil ne doit pas provoquer d’interférences et
2) Cet appareil doit accept
er toutes les interférences, y compris celles pouvant entraîner son
dy
sfonctionnement.
Avis d’Industrie Canada sur l’exposition aux
Rayo
nnements: Cet appareil est conforme aux
li
mites d’exposition aux rayonnements d’Industrie Canada pour un environnement non
con
trôlé.
Page 35
Appendix 35
Packaging: The presence of the logo (green
dot) means that a contribution is paid to an
approved national organisation to improve
package recovery and recycling infrastructures.
Please respect the sorting rules set up locally
for this kind of waste.
Batteries: I
f your product contains batteries,
they must be disposed of at an appropriate
collection point.
Product: The crossed-out waste bin stuck on
the product means that the product belongs to
the family of electrical and electronic equipment. In this respect, the European regulations
as
k you to dispose of it selectively;
• At sales points in the event of the purchase of similar equipment
• At
the collection points made available to
you locally (drop-off centre, selective collection, etc.).
In this way you can participate in the re-use
a
nd upgrading of Electrical and Electronic
Equipment Waste, which can have an effect on
the environment and human health.
The paper and cardboard packaging used
can
be disposed of as recyclable paper. Have the
plastic wrapping recycled or dispose of it in the
non-recyclable waste, depending on the
requirements in your country.
Trademarks: Th
e mentioned references in this
manual are trademarks of the respective companies. The lack of the trademarks É an
d Ë
does not justify the assumption that these dedicated terminologies are free trademarks. Other
pr
oduct names used herein are for identification purposes only and may be trademarks of
th
eir respective owners. X-GEM SAS disclaims
any and all rights in those marks.
Neither X-GEM SAS nor its affiliates shall be liable to the purchaser of this product or third
parties for damages, losses, costs, or expenses
incurred by the purchaser or third parties as a
result of accident, misuse, or abuse of this
product or unauthorized modifications, repairs,
or alterations to this product, or failure to
strictly comply with X-GEM SAS operating and
maintenance instructions.
X-GEM SAS shall not be liable for any damages
or problems arising from the use of any options
or any consumable materials other than those
designated as original X-GEM SAS / PHILIPS
products or X-GEM SAS / PHILIPS approved
products.
X-GEM SAS shall not be held liable for any
d
amage resulting from electromagnetic interference that occurs from the use of any interface cables other than those designated as XG
EM SAS / PHILIPS products.
All rights reserved. No part of this publication
may
be reproduced, stored in a retrieval system
or transmitted in any form or by any means,
electronic, mechanical, photocopying, recording, or otherwise, without the prior written permission of X-GEM SAS. The information contained herein is designed only for use with this
prod
uct. X-GEM SAS is not responsible for any
use of this information as applied to other
devices.
This user manual is a document that does not
re
present a contract.
Errors, printing errors and changes are reserved.
Copyright È 2016
X-GEM SAS
Page 36

HDP2510
EN
VERSION A
PHILIPS and the PHILIPS’ Shield Emblem are registered trademarks of Koninklijke
Philips N.V. used under license.
This product was brought to the market by X-GEM SAS, further referred to in this
document as X-GEM SAS, and is the manufacturer of the product.
2016 È X-GEM SAS.
All rights reserved.
Headquarters:
X-GEM SAS
9 rue de la Négresse
64200 Biarritz – FRANCE
Tel: +33 (0)5 59 41 53 10
www.xgem.com
 Loading...