

Philips SCD860 Important Information Manual
Register your product and get support at
Enregistrez votre produit et protez de l’assistance Philips
www.philips.com/welcome
4
www.philips.com/avent
Philips Consumer Lifestyle BV
Tussendiepen 4, 9206 AD Drachten, Netherlands
Trademarks owned by the Philips Group.
©2019 Koninklijke Philips N.V. All rights reserved
1 2 3 5
6
10 11 12 13
14
7 8 9
4213.328.0013.2

ENGLISH
Know these safety symbols
- This “bolt of lightning” indicates uninsulated material within your unit
may cause an electrical shock. For the safety of everyone in your
household, please do not remove product covering. (Fig. 1)
- The exclamation mark calls attention to features that require you to
read the enclosed user information closely to prevent operating and
maintenance problems. (Fig. 2)
Warning: To reduce the risk of re or electric shock, this apparatus should
not be exposed to rain or moisture and objects lled with liquids, such as
vases, should not be placed on this apparatus.
IMPORTANT SAFETY INSTRUCTIONS
1 Read these instructions.
2 Keep these instructions.
3 Heed all warnings.
4 Follow all instructions.
5 Do not use this apparatus near water.
6 Do not use the product while you are in a bathtub, shower or pool.
Immersion of the product in water could cause an electrical shock.
7 Clean only with dry cloth.
8 Do not block any ventilation openings. Install in accordance with
the manufacturer’s instructions.
9 Do not install near any heat sources such as radiators, heat registers,
stoves or other apparatus (including ampliers) that produce heat.
10 Protect the power cord from being walked on or pinched particularly
at plugs, convenience receptacles, and the point where they exit from
the apparatus.
11 Only use attachments/accessories specied by the manufacturer.
12 Use this appliance only for its intended use as described in this manual.
13 Unplug this product from the wall outlet before cleaning. Do not use
liquid cleaners or aerosol cleaners.
14 Unplug this apparatus during lightning or when unused for long periods
of time.
15 Unplug the product immediately and do not use it if the adapter,
the cord or the product itself is damaged.
16 Refer all servicing to qualied ser vice personnel. Servicing is required
when the apparatus has been damaged in any way, such as powersupply cord or plug is damaged, liquid has been spilled or objects have
fallen into the apparatus, the apparatus has been exposed to rain or
moisture, does not operate normally, or has been dropped. Please check
the power cord periodically to prevent potential damages, such as
worn or cut cord. For assistance, visit our website www.philips.com/
support or contact the Philips Consumer Care Center in your country.
You nd its contact details in the worldwide guarantee leaet.
17 Keep screws and small items out of the reach of the baby.
18 All the required markings are located on the bottom of the apparatus
and on the adapter.
- WARNING: STRANGULATION HAZARD. Children have
STRANGLED in cords. Keep this cord out of the reach of
children (more than 3.5 feet (1 meter) away). Do not remove
the tag (Fig. 3).
Caution
Caution: Prevent risk of explosion, electric shock, short circuit,
or leakage
- The apparatus shall not be exposed to dripping or splashing and no
objects lled with liquids, such as vases, shall be placed on the apparatus.
- To prevent electric shock, do not open the housing of the product.
- Where the power plug is used as the disconnect device, the disconnect
device shall remain readily operable.
- The adapter contains a transformer. Do not cut off the adapter to
replace it with another plug, as this causes a hazardous situation.
- Use the supplied adapter to connect the apparatus to the power outlet.
- If the adapter is damaged, always have it replaced with one of the
original type in order to avoid a hazard.
- For the adapter type, please refer to chapter ‘Replacement’ for details.
Adult supervision
- This baby monitor is intended as an aid. It is not a substitute for
responsible and proper adult supervision and should not be used as such.
- Never place the baby monitor inside or directly over the baby bed or playpen.
- To prevent overheating, do not cover the baby monitor with a towel,
blanket or any other items.
- For their safety, do not allow children to touch and play with the baby
monitor, the adapter and the accessories. THIS IS NOT A TOY.
Introduction
Congratulations on your purchase and welcome to Philips Avent! To benet
fully from the support that Philips Avent offers, register your product at
www.philips.com/welcome.
This short manual contains important information about your uGrow baby
monitor and offers brief instructions on how to set up the baby monitor
and the app. For more detailed information and the complete user manual,
please visit www.philips.com/ugrow.
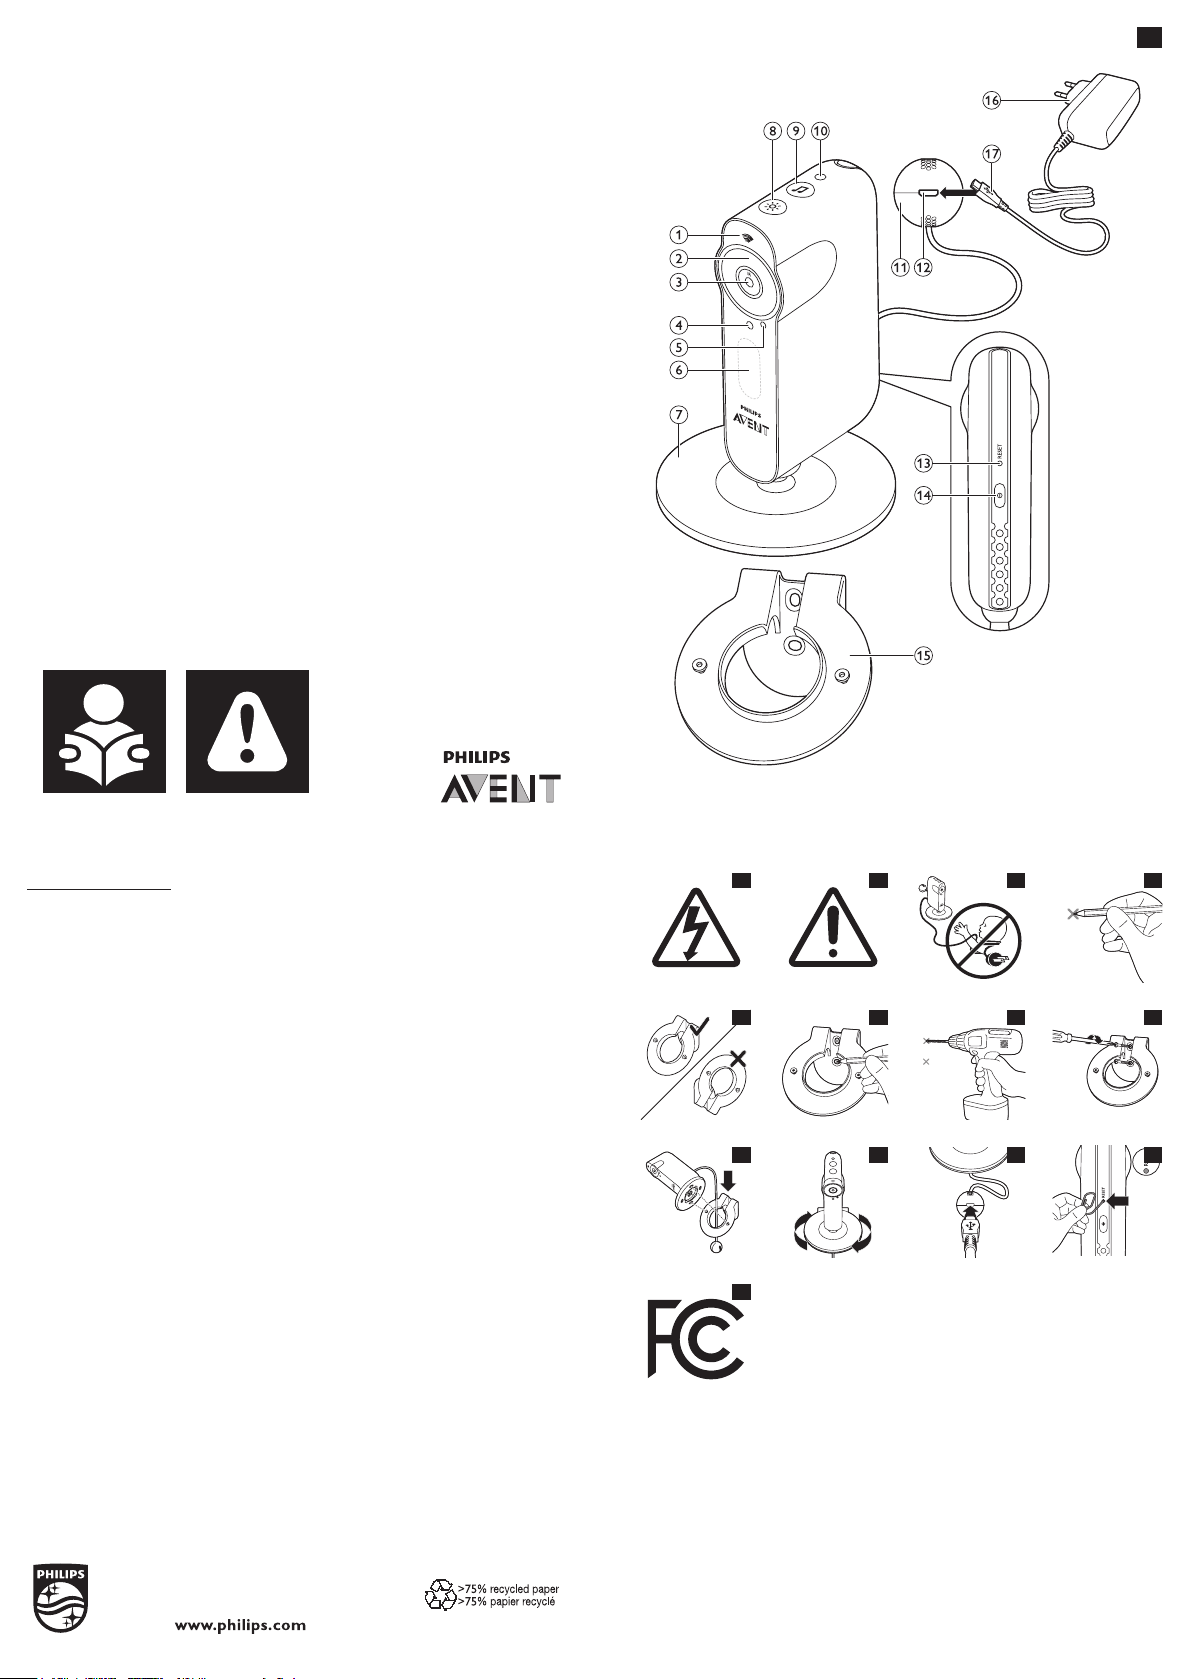
Product overview (Fig. 4)
1 WiFi status light
2 Infrared lights
3 Baby monitor lens
4 Microphone
5 Viewing indicator
6 Nightlight
7 Foot
8 Nightlight button
9 Lullaby play/pause button
10 Light sensor
11 Temperature and humidity sensor unit
12 Appliance plug socket
13 Reset button
14 On/off button
15 Wall mounting bracket
16 Adapter
17 Appliance plug
First-time setup
Before you start the set-up procedure, make sure:
- You have wireless Internet access (2.4 GHz WiFi).
- You are close enough to the WiFi router to have a good WiFi signal.
- If you use a WiFi repeater, make sure that your router and your WiFi
repeater have the same SSID and that you use the same password for
the router and the repeater.
- You have the password of your WiFi network at hand. Always connect the
baby monitor to a secure network (see chapter ‘Security and privacy’ in
the user manual available online at www.philips.com/ugrow).
- Make sure that your smart device runs on iOS 7 or higher, or Android
4.1 or higher.
1 Download the Philips Avent uGrow Smart Monitor app from the
App Store or Google Play. Use keywords ‘uGrow smart monitor’
or ‘Philips smart monitor’ to nd the app.
2 Launch the app.
3 Follow the set-up instructions in the app.
Mounting the baby monitor on the wall
The baby monitor comes with a wall mounting bracket. Before you mount
the baby monitor on the wall, make sure there is a good WiFi signal at the
point where you want to mount the baby monitor. Follow the instructions
below to fasten the wall mounting bracket to the wall and to attach the
baby monitor onto the wall mounting bracket.
1 Use a pencil to put a cross on the wall at the place where you want to
mount the baby monitor. (Fig. 5)
2 Hold the wall mounting bracket to the wall. Make sure that one of the
holes is right over the cross that you put on the wall at step 1.
Note: Make sure that the ring of the wall mounting bracket slants downward
when you hold it to the wall. If the ring of the wall mounting bracket slants
upward, turn the wall mounting bracket the other way around so that it is in
the correct position (Fig. 6).
3 Use a pencil to mark the other screw hole on the wall (Fig. 7).
4 Drill 2 holes in the wall at the marks (Fig. 8).
5 Use 2 screws to fasten the wall mounting bracket to the wall. Tighten
the screws with a screwdriver (Fig. 9).
6 Pass the humidity and temperature sensor unit through the hole in the
wall mounting bracket. Then align the slots in the foot of the baby monitor
with the projections on the ring. Fit the groove in the foot of the baby
monitor onto the raised edge on the inside of the ring (Fig. 10).
7 Turn the foot of the baby monitor clockwise to position the baby monitor
(Fig. 11).
8 Insert the appliance plug into the appliance plug socket in the
temperature and humidity sensor unit and insert the adapter into
a power outlet. Now your baby monitor is ready for use (Fig. 12).

WiFi status light signals
1 Off
- The baby monitor is off
2 Orange
- Flashes fast: the baby monitor is starting up.
- Flashes slowly: the baby monitor is upgrading its rmware. Do not turn
the baby monitor off during the rmware upgrade.
Note: The WiFi status light might turn off shortly during the rmware upgrade.
- Solid: the camera of the baby monitor is ready to read the WiFi QR
code generated by your smartphone or tablet.
3 Green
- Flashes slowly: the WiFi QR code has been read successfully.
- Solid: the baby monitor is connected to the WiFi network.
4 Red
- Flashes slowly: the WiFi password entered is wrong.
- Solid red: the baby monitor fails to connect to the WiFi network.
Resetting the baby monitor
The baby monitor has a reset button on the back. When you press this
button the baby monitor is reset to its factory default settings.
Note: Always reset the baby monitor by pressing the reset button and delete
your account before you transfer the baby monitor to someone else. This is
necessary to protect your privacy.
How to reset to factory default settings
1 While the baby monitor is on, press the reset button on the back
of the baby monitor with a paperclip or another pointed object.
It is recommended to do this when the baby monitor is connected
to your WiFi network (Fig. 13).
2 Keep the reset button pressed until the baby monitor beeps.
What to do after a reset to factory default settings
After the baby monitor has been reset, you need to reconnect it to
the WiFi network. If you invited other people to access the baby monitor,
you need to invite them again.
Cleaning and maintenance
- Do not immerse the baby monitor in water, and do not clean it under
running water.
- Do not use cleaning spray or liquid cleaners.
- Unplug the baby monitor if it is connected to a power outlet.
- Clean the baby monitor with a damp cloth.
- Clean the adapter with a dry cloth.
- This baby monitor has no other user serviceable parts.
Frequently asked questions
For more frequently asked questions, check the relevant section in the app.
Question Answer
Where can I
nd the user
manual?
I have problems
making my baby
monitor read
the QR code
on my smart
device. What
can I do?
You can nd the user manual online at www.philips.com/
ugrow. The user manual is also available inside the app.
Tap on ‘Support’ in the left tray to open the user manual.
Make sure that you hold the WiFi QR code at approx.
8 inch (20cm) distance from the lens. Try moving the
smart device slightly up or down or left or right to ensure
the WiFi QR code is directly in front of the baby monitor.
You can also tr y moving the smart device closer to or
further away from the baby monitor lens to allow proper
focusing. Make sure that there is enough light in the room,
but avoid too bright light. When the baby monitor has
read the WiFi QR code, it beeps to conrm.
Perhaps you did not remove the protective foil from
the baby monitor lens. Remove the foil.
Perhaps part of your hand covers the WiFi QR code.
Hold your device in such a way that your hand does
not cover the WiFi QR code.
I cannot
download and
install the app.
What can I do?
Please check if any of the following factors prevent a
smooth download. Is your WiFi signal stable and strong
enough? Does your smart device run on iOS 7 or higher,
or Android 4.1 or higher? Do you have enough space left
on your smart device to save the app? Did you enter the
correct password for the App Store or Google Play?
Disposal
This product may contain lead and mercury. Disposal of these materials
may be regulated due to environmental considerations. For disposal or
recycling information, please contact your local authorities or visit
www.recycle.philips.com.
Storage precautions
- Do not expose the baby unit and parent unit to extreme cold or heat
or to direct sunlight.
- Do not put the baby unit and the parent unit close to a heating source.
Replacement
- If you need to replace the adapter, please refer to the user manual
and contact the Philips Customer Care Center.
- Supplied AC/DC Adapter. Input: 100-240V AC. Model No.:
S005AJU0500100. Output: 5 V DC, 1000 mA, (US plug).
- To buy accessories or spare parts, visit our online shop at
www.shop.philips.com/service. You can also contact the Philips
Consumer Care Center in your country (see the worldwide guarantee
leaet for contact details). If there is no Consumer Care Center available
in your country, go to your Philips dealer or a Philips service center.
Compliance information
- This device complies with Part 15 of the FCC Rules and Industr y
Canada License-exempt RSS standard. Operation is subject to the
following two conditions: (1) this device may not cause harmful
interference, and (2) this device must accept any interference received,
including interference that may cause undesired operation (Fig. 14).
Radio interference
This equipment has been tested and found to comply with the limits for a
Class B digital device, pursuant to Part 15 of the FCC Rules and ICES-003 of
Industry Canada. These limits are designed to provide reasonable protection
against harmful interference in a residential installation. This equipment
generates, uses and can radiate radio frequency energy and, if not installed
and used in accordance with the instructions, may cause harmful interference
to radio communications. However, there is no guarantee that interference
will not occur in a particular installation. If this equipment does cause harmful
interference to radio or television reception, which can be determined by
turning the equipment off and on, the user is encouraged to try to correct
the interference by one or more of the following measures:
- Reorient or relocate the receiving antenna.
- Increase the separation between the equipment and receiver.
- Connect the equipment to an outlet on a circuit different from that to
which the receiver is connected.
- Consult the dealer or an experienced radio/TV technician for help.
RF Radiation Exposure Statement
This equipment complies with FCC RF radiation exposure limits set forth
for an uncontrolled environment. This equipment should be installed
and operated with a minimum distance of 7 3/4 inches / 20 centimeters
between the radiator and your body. For handheld/body-worn operation,
this equipment has been tested and meets the FCC RF/Industry Canada RF
exposure guideline when used with the belt clip supplied with this product.
This transmitter must not be co-located or operating in conjunction with
any other antenna or transmitter. Use of other accessories may not ensure
compliance with FCC RF/Industry Canada RF exposure guidelines.
This equipment also complies with Industry Canada RSS-102 with respect
to Canada’s Health Code 6 for Exposure of Humans to RF Fields.
Do not attempt to repair or modify this equipment.
Any repairs or alterations made by the user to the equipment may void the
warranty and compliance of the equipment. Changes or modications made
to this equipment not expressly approved by Philips Avent may void the
FCC authorization to operate this equipment. For assistance visit our website
www.philips.com/avent or contact the Philips Consumer Care Center in
your country. You nd contact details in the worldwide guarantee leaet.
Electromagnetic elds (EMF) This Philips Avent appliance complies with all
applicable standards and regulations regarding exposure to electromagnetic elds.
Specifications
General
AC power adapter:
- Rated input 100-240 V
- Rated frequency 50-60 Hz
- Rated output - adapter
5V DC , 1 A
Connectivity: WiFi 802.11 b/g/n, 2.4 GHz
Apps
General
- Operating system iOS 7 or higher (excluding iPhone 4 or
lower), or Android 4.1 or higher
For the latest information on device
compatibility, please visit www.philips.com/
ugrow.
Lens
Focus mode Fixed
Focus range 2.3 - 16.5 ft (0.7 - 5 meters)
Aperture F2.8
Digital zoom 2x
Night mode IR LED, 13 ft (4 metres)
Sensors
Temperature sensor 32°F -104°F (0°C - 40°C)
Humidity sensor 10% - 80% RH
Video
Resolution up to 720p (HD)
Video format H.264
ESPAÑOL
Atención a estos símbolos de seguridad
- Este símbolo indica que el material no aislante del interior de la unidad
puede provocar una descarga eléctrica. Por seguridad, no quite la
cubierta del producto. (g. 1)
- El signo de exclamación indica características importantes que requieren
que lea atentamente la información adjunta para evitar problemas de
funcionamiento y mantenimiento. (g. 2)
Advertencia: Para reducir el riesgo de incendio o descarga eléctrica,
el aparato no debe exponerse a la lluvia ni a la humedad ni se deben
colocar sobre este objetos que contengan líquidos.
INSTRUCCIONES IMPORTANTES DE SEGURIDAD
1 Lea estas instrucciones.
2 Conserve estas instrucciones.
3 Preste atención a todas las advertencias.
4 Siga todas las instrucciones.
5 No utilice este aparato cerca de agua.
6 No utilice el producto mientras se encuentre en la bañera, la ducha o la
piscina. Si el producto entra en contacto con el agua se puede producir
una descarga eléctrica.
7 Límpielo sólo con un paño seco.
8 No bloquee ninguna abertura de ventilación. Realice la instalación según
las instrucciones del fabricante.
9 No lo instale cerca de ninguna fuente de calor, como radiadores,
rejillas de aire caliente, estufas u otros aparatos (incluidos amplicadores)
que generen calor.
10 Evite que el cable de alimentación se pise o se doble especialmente
en las clavijas, las tomas de corriente y el punto de salida del aparato.
11 Utilice únicamente los accesorios especicados por el fabricante.
12 Utilice este aparato sólo para el uso al que está destinado tal y como
se describe en este manual.
13 Desenchufe el aparato de la toma de corriente de la pared antes de
limpiarlo. No utilice limpiadores líquidos ni aerosoles.
14 Desenchufe el aparato durante las tormentas eléctricas o cuando no
lo utilice durante un periodo largo de tiempo.
15 Desenchufe el producto inmediatamente y no lo utilice si el adaptador,
el cable o el propio producto están dañados.
16 Derive todas las reparaciones al personal cualicado del servicio técnico.
Se necesita servicio cuando el aparato se daña de algún modo; por
ejemplo, si el cable de alimentación o la clavija están dañados, se ha
derramado líquido o han caído elementos dentro del aparato, el aparato
ha estado expuesto a lluvia o humedad, no funciona con normalidad o
se ha caído. Compruebe el cable de alimentación periódicamente para
evitar posibles daños, como que el cable esté desgastado o roto. Si desea
obtener ayuda, visite nuestro sitio web www.philips.com/support o
póngase en contacto con el servicio de atención al cliente de Philips de su
país. Encontrará los datos de contacto en el folleto de la garantía mundial.
17 Mantenga los tornillos y objetos pequeños fuera del alcance del bebé.
18 Todas las marcas obligatorias se encuentran en la parte inferior del
aparato y en el adaptador.
- ADVERTENCIA: PELIGRO DE ESTRANGULACIÓN.
Los niños se pueden ESTRANGULAR con los cables.
Mantenga este cable fuera del alcance de los niños
(más de 1 metro). No quite esta etiqueta (g. 3).
Precaución
Precaución: Evite el riesgo de explosión, descarga eléctrica,
cortocircuito o fugas
- No exponga el aparato a goteos ni salpicaduras, tampoco coloque
sobre el aparato objetos que contengan líquidos, como jarrones.
- Para evitar descargas eléctricas, no abra la carcasa del producto.
- Cuando el enchufe de alimentación se usa como dispositivo de
desconexión, el dispositivo de desconexión debe estar siempre disponible.
- El adaptador incorpora un transformador. No corte el adaptador para
sustituirlo por otra clavija, ya que podría provocar situaciones de peligro.
- Utilice el adaptador suministrado para conectar el aparato a la toma
de corriente.
- Si el adaptador está dañado, sustitúyalo siempre por otro del modelo
original para evitar situaciones de peligro.
- Para obtener más información sobre el tipo de adaptador,
consulte el capítulo “Sustitución”.
Supervisión adulta
- El objetivo de este vigilabebés es servir de ayuda. En ningún caso
sustituye la supervisión responsable y adecuada por parte de un adulto,
y no debe utilizarse como tal.
- Nunca coloque el vigilabebés dentro de la cuna o del parque del bebé
ni por encima de estos.
- Para evitar que se sobrecaliente, no cubra el vigilabebés con una toalla,
manta o cualquier otro objeto.
- Para su seguridad, no permita que los niños toquen el vigilabebés,
el adaptador y los accesorios ni que tampoco jueguen con ellos.
NO ES UN JUGUETE.
Introducción
Enhorabuena por la compra de este producto y bienvenido a Philips Avent.
Para sacar el mayor partido de la asistencia que Philips Avent le ofrece,
registre su producto en www.philips.com/welcome.
Este breve manual contiene información importante sobre el vigilabebés
uGrow y ofrece unas breves instrucciones sobre cómo congurar el
vigilabebés y la aplicación. Para obtener información más detallada y el
manual de usuario completo, visite www.philips.com/ugrow.
Descripción del producto (fig. 4)
1 Piloto de estado Wi-Fi
2 Luces infrarrojas
3 Lente del vigilabebés
4 Micrófono
5 Indicador de visualización
6 Luz nocturna
7 Pie
8 Botón de luz nocturna
9 Botón de reproducción y pausa de nanas
10 Sensor de luz
11 Unidad de sensor de humedad y temperatura
12 Toma para la clavija del aparato
13 Botón de reinicio
14 Botón de encendido/apagado
15 Soporte de montaje en pared
16 Adaptador de corriente
17 Clavija del aparato
Configuración inicial
Antes de comenzar el procedimiento de conguración, asegúrese de que:
- Tiene acceso a Internet de forma inalámbrica (conexión Wi-Fi de 2,4 GHz).
- Está lo sucientemente cerca del router Wi-Fi para obtener una buena
señal Wi-Fi.
- Si utiliza un repetidor Wi-Fi, asegúrese de que el router y el repetidor
Wi-Fi tengan el mismo SSID y de que utiliza la misma contraseña para
ambos dispositivos.
- Tiene la contraseña de la red Wi-Fi a mano. Conecte siempre el
vigilabebés a una red segura (consulte el capítulo “Seguridad y
privacidad” del manual de usuario disponible en línea en
www.philips.com/ugrow).
- Asegúrese de que el dispositivo inteligente funciona con iOS 7
o posterior o con Android 4.1 o posterior.
 Loading...