

Page 1
SCD588
User manual 4
Mode d’emploi 23
Instrucciones de manejo 42
ES
FR
EN
Page 2
3
+
+
+
+
+
+
1
2
3
4
8
7
6
9
10
5
+
+
+
+
+
+
1
2
8
3
7
6
5
4
9
10
+
+
+
+
+
+
11
12
16
A. Baby unit
B. Parent unit
13
14
15
11
Page 3

EN
4
Philips is dedicated to producing caring, reliable products to give parents the reassurance they
need.You can trust this Philips baby monitor to provide round-the-clock support by ensuring you
can always hear your baby clearly without any distracting noise.Your SCD588 uses DECT
technology which guarantees zero interference from other wireless appliances and a clear signal
between the parent unit and baby unit.
Philips Baby Care, taking care together
SIMPORTANT SAFETY
INSTRUCTIONS
This baby monitor is intended as an aid. It is not a substitute for responsible and proper adult
supervision and should not be used as such.
Some of the following information may not apply to your particular product; however, when using
baby monitor equipment, basic safety precautions should always be followed to reduce the risk of
fire, electric shock and injury to persons, including the following:
1 Read this user manual carefully before using the product and keep it for future reference.
2 Follow all warnings and instructions marked on the product.
3 Use this product for its intended household use as described in this manual. Do not use
attachments not recommended by Philips Electronics North America Corporation.
4 Unplug this product from the wall outlet before cleaning. Do not use liquid cleaners or
aerosol cleaners. Use a damp cloth for cleaning.
5 Products should not be used while you are in a bathtub, shower or pool. Immersion of the
product in water could cause an electrical shock.
6 Slots and openings in the cabinet back or bottom are provided for ventilation, to protect it
from overheating.These openings should not be blocked or covered.The openings should
never be blocked by placing the product on the bed, sofa, rug, or other similar surface.This
product should not be placed in a built-in installation unless proper ventilation is provided.
7 This product should be operated only from the type of power source indicated on the type
plate of the adapters (A-11, B13). If you are not sure of the type of power supply to your
home, consult your dealer or local power company.
8 Do not allow anything to rest on the power cord. Do not locate this product where the
cord will be abused by persons walking on it.
9 Do not overload wall outlets and extension cords as this can result in the risk of fire or electric shock.
10 Never push objects of any kind into this product through cabinet slots as they may touch
dangerous voltage points or short out parts that could result in a risk of fire or electric
shock. Never spill liquid of any kind on the product.
11 To reduce the risk of electric shock, do not disassemble this product, but take it to a qualified
service personnel when service or repair work is required. Opening or removing covers
(except battery compartment covers) may expose you to dangerous voltage or other risks.
Incorrect reassembly can cause electric shock when the appliance is subsequently used.
12 Do not expose the product to extreme temperatures such as areas near a hot radiator or
stove or in a hot car.
13 Do not place lighted candles, cigarettes, cigars, etc., on the product.
Welcome
Page 4

EN
14 Unplug this product from the wall outlet and refer servicing to qualified service personnel
under the following conditions:
A.When the power supply cord or plug is damaged or frayed.
B. If the product has been exposed to rain or water.
C. If the product does not operate normally by following the operating instructions.
D. If the product’s cabinet has been damaged.
E. If the product exhibits a distinct change in performance.
15 Do not place this product on an unstable cart, stand or table.The product may fall, causing
serious damage to the product.
16 Make sure the baby unit and adapter cable are always out of reach of the baby
(at least 1 meter / 3 feet away).
17 Never place the baby unit inside the baby’s bed or playpen.
18 Never cover the baby monitor (with a towel, blanket, etc.).
If your product utilizes batteries,the following additional precautions should be
observed:
1 Use only the type and size of the battery(ies) specified in the user manual.
2 Do not dispose of the battery(ies) in fire.They may explode. Check with local regulations for
possible special disposal instructions.
3 Exercise care in handling battery(ies) in order not to short out the battery(ies) with
conducting materials such as rings, bracelets and keys. Overcharging, short circuiting, reverse
charging, mutilation, or incineration of the cells and the batteries must be avoided to prevent
one or more of the following occurrences:release of toxic. materials, release of hydrogen
and/or oxygen gas, rise in surface temperature.
4 Do not attempt to recharge the battery(ies) provided with or identified for use with this
product that are not intended to be charged.The battery(ies) may leak corrosive electrolyte
or explode.
5 Do not attempt to rejuvenate the battery(ies) provided with or identified for use with this
product by heating them. Sudden release of the battery(ies) electrolyte may occur causing
burns or irritation to eyes or skin.
6 If and when necessary, these cells or batteries must be replaced with identical new ones from
the same manufacturer. If a cell or a battery to be replaced is connected with other cells or
batteries in series, it is recommended that the other cells or batteries be replaced with new
ones at the same time.
7 Reverse polarity installation of the cell or the battery(ies) in the end product must be
avoided. Reverse insertion of battery(ies) can cause charging, and that may result in leakage
or explosion.
8 Remove battery(ies) from this product if storing over 30 days because the battery(ies) could
leak and damage the product.
9 Discard ‘dead’ battery(ies) as soon as possible since ‘dead’ batteries are more likely to leak in
a product. If a cell or a battery has leaked or vented, it should be replaced immediately using
protective gloves
10 Do not store this product, or the battery(ies) provided with or identified for use with this
product, in high-temperature areas. Batteries that are stored in a freezer or refrigerator for the
purpose of extending shelf life should be protected from condensation during storage and
defrosting. Batteries should be stabilized at room temperature prior to use after cold storage.
Welcome
5
Page 5

11 If your product use rechargeable battery(ies), charge the battery(ies) only in accordance with
the instructions and limitation specified in the user manual.
12 Risk of explosion if batteries are replaced by an incorrect type. For the parent unit,always
use rechargeable batteries.
SAVE THESE INSTRUCTIONS
S CAUTION: Unplug power cord before replacing batteries.
S Use only the adapters supplied with this baby monitor. Incorrect adapter polarity or
voltage can seriously damage the baby monitor.
Adapters for baby unit and charger:
Input: 120 VAC 60 Hz
Output: 9 VDC 300 mA
S CAUTION: THERE IS A RISK OF EXPLOSION IF THE BATTERIES ARE
REPLACED BY AN INCORRECT TYPE. DISPOSE OF USED BATTERIES
ACCORDING TO THE INSTRUCTIONS.
Use 1.5V AA size alkaline batteries only for baby unit (batteries not supplied).
Use 1.2V AAA size Ni-MH rechargeable batteries only for parent unit (batteries supplied).
EN
6
Welcome
Page 6

EN
7
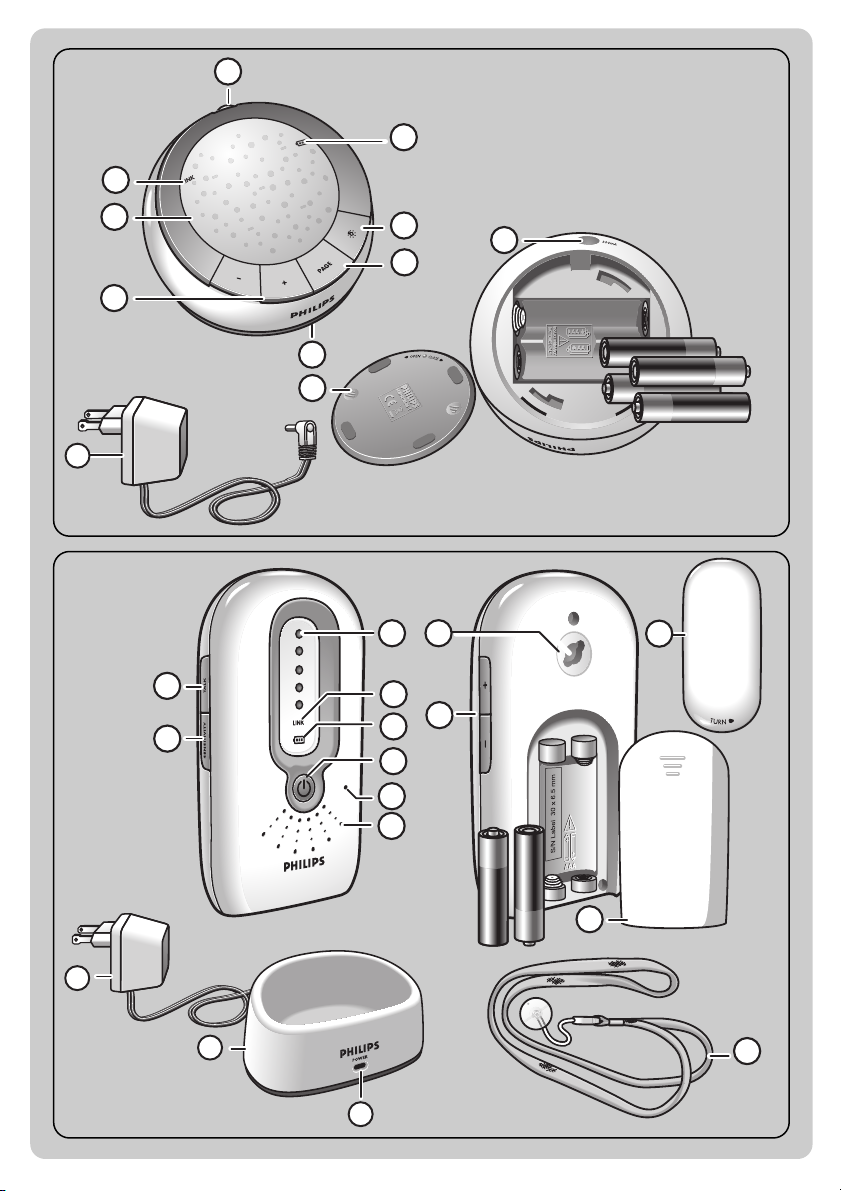
A. Baby unit
A-1 On/Off button (y)
A-2 LINK light
A-3 Night light
A-4 Volume – / + buttons
A-5 Microphone
A-6 PAGE button
A-7 Night light button ( )
A-8 Battery check light ( )
A-9 Battery compartment cover
A-10 DC 9V / 300mA power supply jack
A-11 AC power adapter
B. Parent unit
B-1 TALK button
B-2 SENSITIVITY button
B-3 Loudspeaker
B-4 Microphone
B-5 On/Off button (y)
B-6 Battery check light ( )
B-7 LINK light
B-8 Sound-level lights
B-9 Volume – / + buttons
B-10 Recess for the belt clip
B-11 Battery compartment cover
B-12 Belt clip
B-13 AC power adapter
B-14 Charging base
B-15 POWER light
B-16 Neck strap
C.What else you need
Both units can be battery operated.
For battery-operated use you will need:
– 4 x 1.5V AA Alkaline batteries for baby unit (not supplied).
– 2 x 1.2V AAA Ni-MH rechargeable batteries for parent unit
(supplied).
Legend of functions
Page 7

3 Illustrations
4 Welcome
4 Important safety instructions
7 Legend of functions
7 Baby unit
7 Parent unit
7 What else you need
8 Contents
9 Preparing your baby monitor
9 Baby unit
10 Parent unit
11 Using your baby monitor
12 Other features
12 Adjusting loudspeaker volume
13 Talking to your baby
13 Adjusting microphone sensitivity
14 Monitoring baby silently
14 Switching night light on / off
15 Connecting / disconnecting belt clip and neck strap
15 Paging parent unit
16 Troubleshooting
18 Frequently asked questions
19 Important information
19 Technical specifications
19 Maintenance
20 Environmental information
20 Factory initialization mode
21 Compliance information
21 Radio Interference
21 FCC RF Radiation Exposure Statement
22 Assistance
22 Warranty
EN
Contents
8
Page 8
EN
9
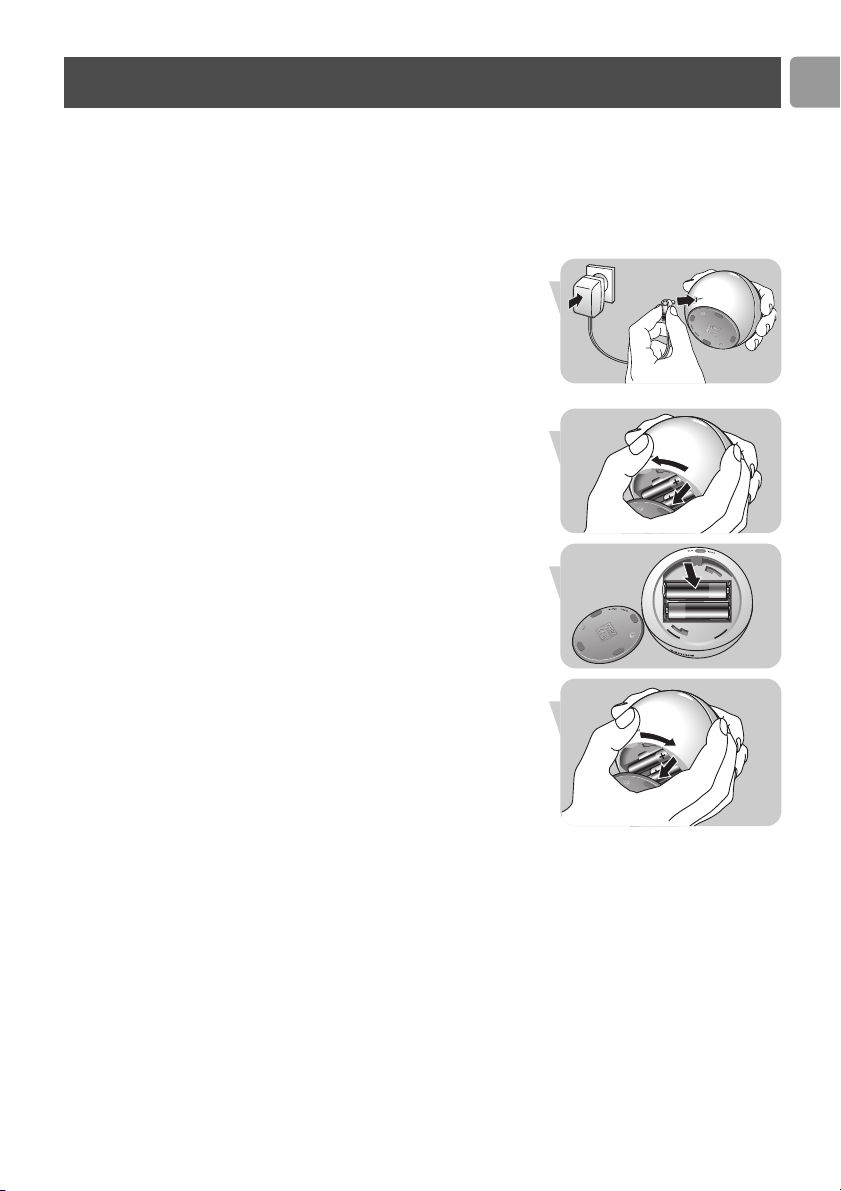
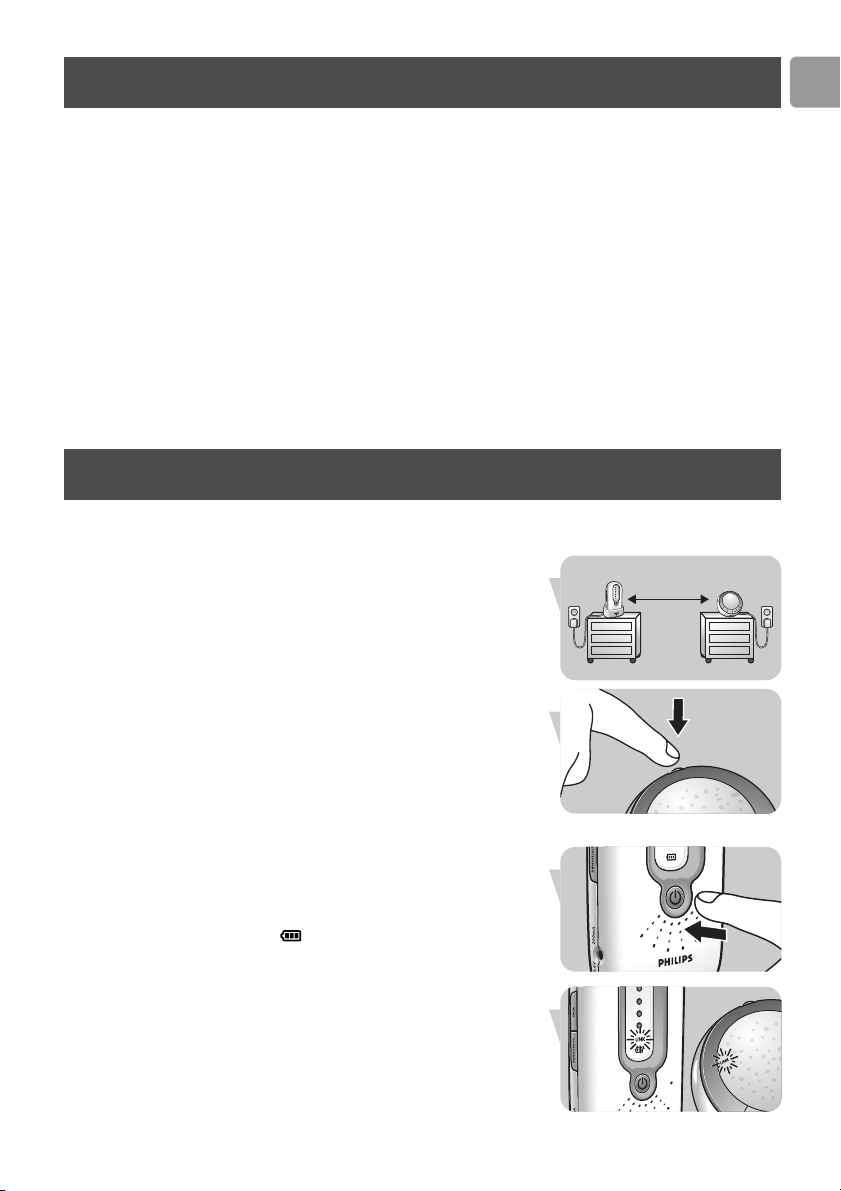
Baby unit
You can use the baby unit corded or battery operated. Even if
you are going to use the unit corded, we advise you to insert
batteries.This guarantees automatic back-up in case of power
supply failure.
Operation using AC power adapter
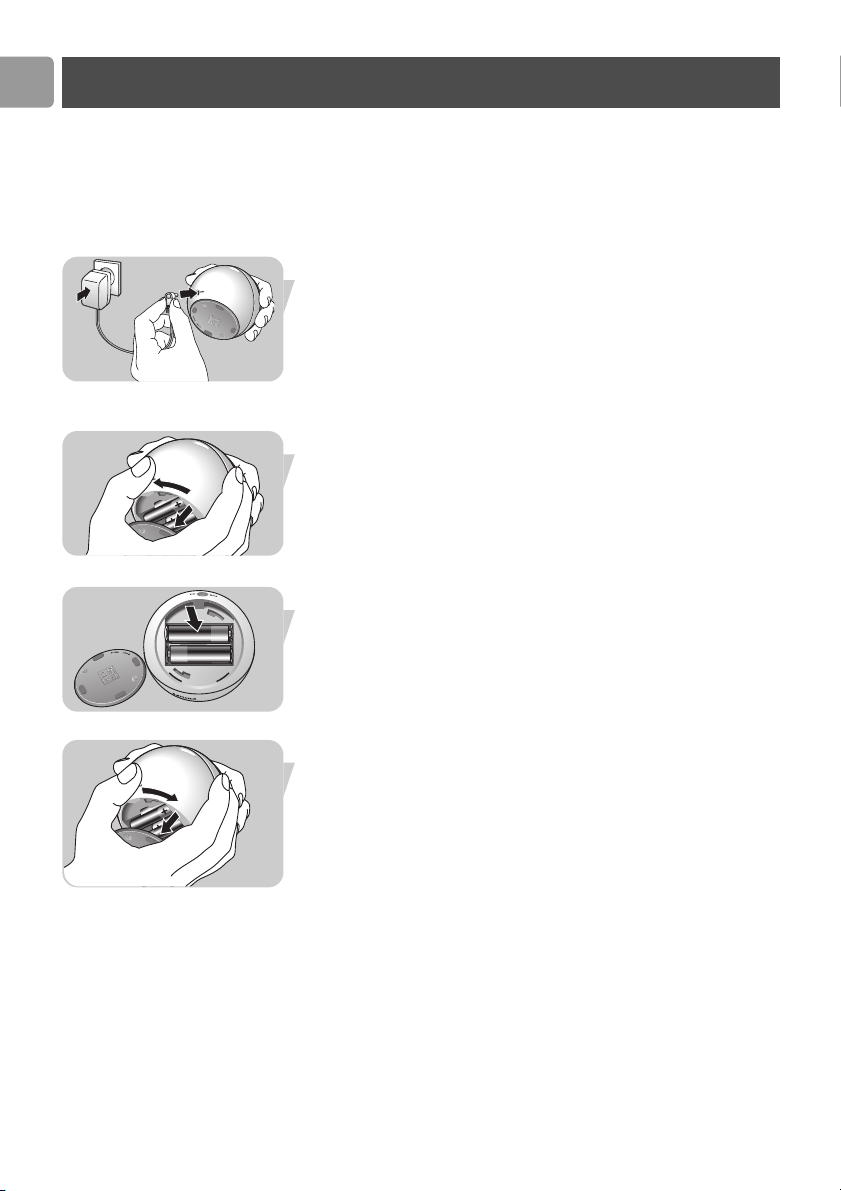
1 Connect the power adapter cord (A-11) to the power supply
jack (DC 9V / 300mA - A-10) of the baby unit.
2 Connect the AC power adapter (A-11) to a wall outlet.
➜ The baby unit is now ready for cord operated use!
Battery operated use
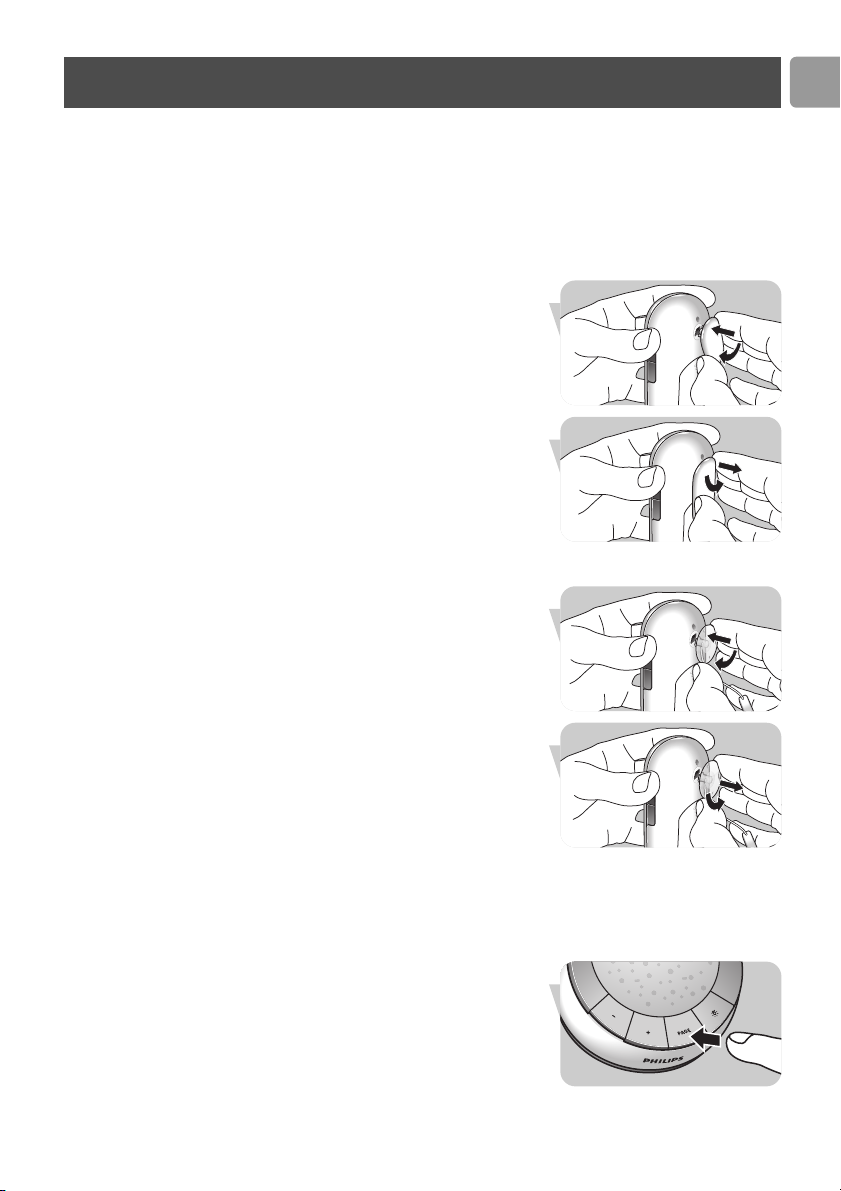
1 Open the battery compartment by turning the cover (A-9) to
the left (C OPEN), using the palm of your hand.Take the
cover off.
2 Insert four 1.5V AA batteries, noting the + and –
configuration inside the battery compartment (batteries are
not supplied; we recommend Philips Alkaline batteries).
3 Put the battery compartment cover (A-9) back in place.
Close the compartment by turning the cover (A-9) to the
right (CLOSE B), using the palm of your hand.
➜ The baby unit is now ready for battery operated use!
Preparing your baby monitor
+
+
+
+
+
+
+
+
Page 9
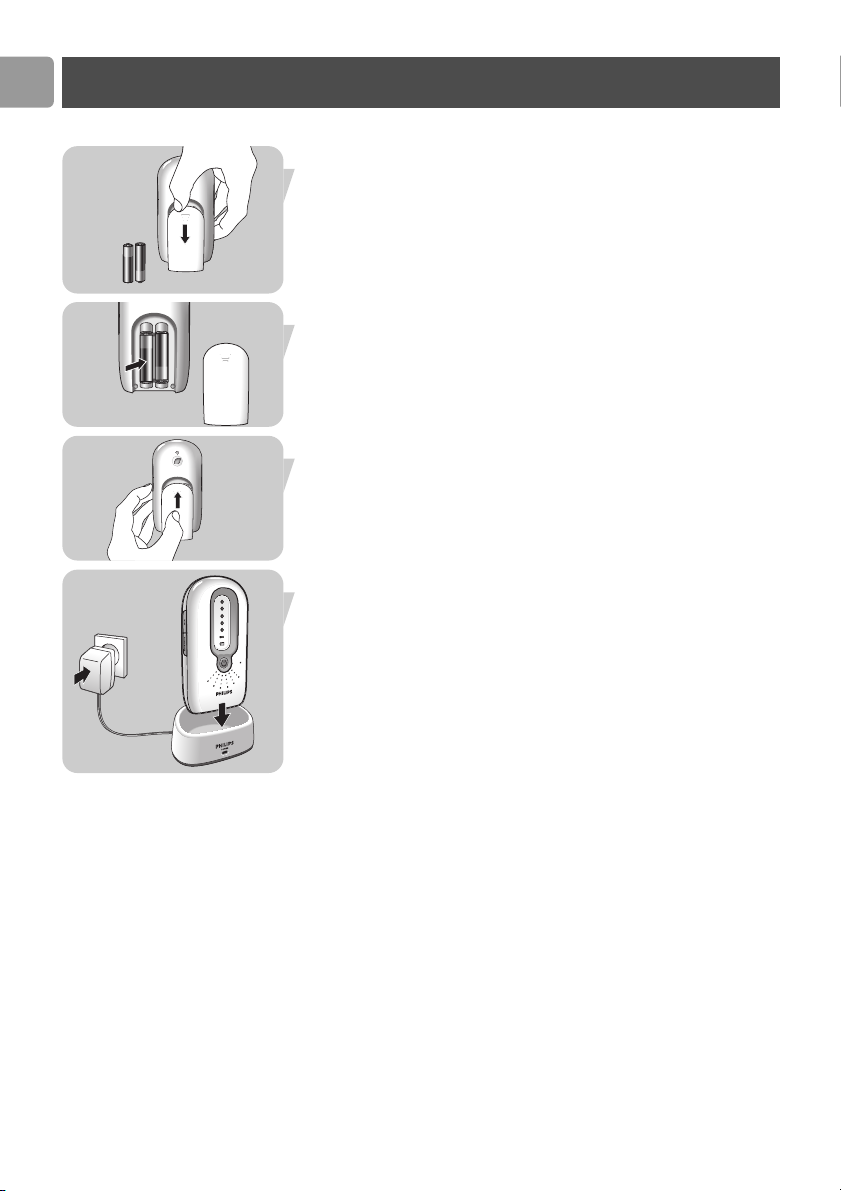
Parent unit
1 Open the battery compartment by sliding the cover (B-11)
downwards.
2 Insert the two 1.2V AAA size Ni-MH rechargeable batteries
(supplied), noting the + and – configuration inside the battery
compartment.
3 Put the battery compartment cover (B-11) back in place.
Close the compartment by sliding the cover (B-11) upward
until it clicks in position.
4 Connect the AC power adapter (B-13) of the charging base
(B-14) to a wall outlet.
5 Place the parent unit in the charging base (B-14).
> The POWER light (B-15) lights up red.
6 Leave the parent unit in the charging base until the batteries
are fully charged (at least 16 hours).
> The POWER light (B-15) will stay red, even when batteries
are fully charged.
> When the batteries are fully charged, the parent unit can be
taken out of the charging base and used cordlessly for at
least 8 hours.
Notes:
– Operation time will be 8 hours based on the assumption that
the baby unit will be transmitting 25% of the time and is in
standby mode for the rest of the time (baby does not any
make sound).
– When the parent unit batteries are charged for the first time,
operating time will be less than 8 hours.The batteries will use
their maximum capacity after at least four times charging and
discharging.
EN
Preparing your baby monitor
10
+
+
+
+
+
+
+
+
+
+
Page 10
EN
– Charging will take longer than 16 hours when the parent unit
is switched on during charging.To shorten the charging time,
the parent unit should be switched off.
➜ The parent unit is now ready for use!
General notes:
– When the units are switched off, in case of battery operated
use, the batteries still discharge slowly.
– When the batteries are almost empty, the battery check light
of the parent unit (B-6) starts blinking red; the battery check
light of the baby unit (A-8) lights up red continuously.
Place the parent unit in the charging base (B-14) to recharge
the batteries and/or replace the batteries in the baby unit.
Preparing your baby monitor
11
Using your baby monitor
Use this baby monitor for its intended household use as
described in this manual.
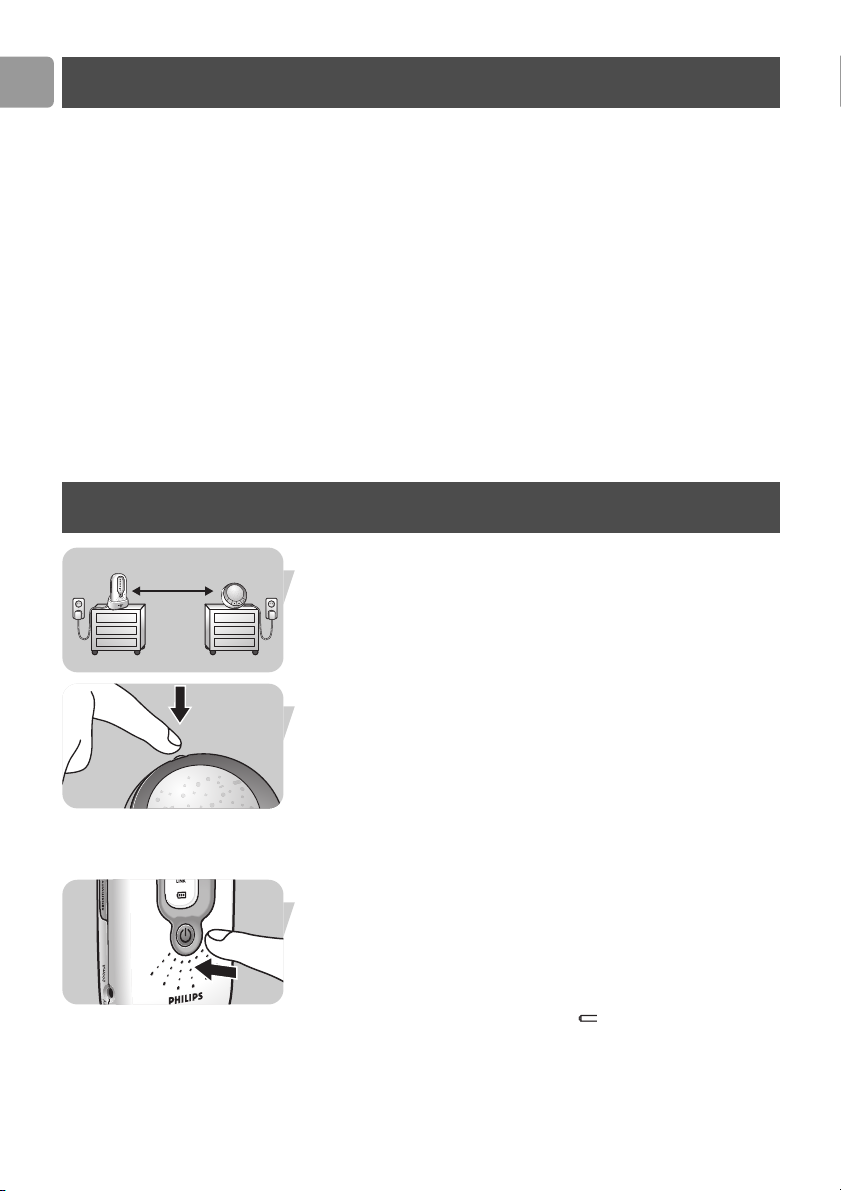
1 Place both units in the same room to test the connection.
Make sure the baby unit is at least 1 meter / 3 feet away from
the parent unit.
2 Press and hold the On/Off (y) button (A-1) on the baby unit
for 2 seconds.
> The night light (A-3) lights up briefly.
> The LINK light (A-2) lights up red briefly then starts
blinking green as it seeks connection with the parent unit.
If, after 30 seconds, no link is established, "Not Linked" will
appear on the display and the LINK light starts blinking red
as it seeks connection with the parent unit.
3 Press and hold the On/Off button (y) (B-5) on the parent
unit for 2 seconds.
> The sound level lights (B-8) light up orange briefly.
> The battery check light ( - B-6) lights up red briefly.
> The LINK light (B-7) lights up red briefly then starts
blinking green as it seeks connection with the baby unit.
> The LINK lights (A-2, B-7) on both units blink green until
connection has been established.This will take up to
approximately 30 seconds. Both LINK lights (A-2, B-7) will
then light green continously.
> If, after 30 seconds, no link is establshed both LINK lights
(A-2, B-7) will light up red and the parent unit will emit a
beep from time to time.
> 1m / 3 ft
Page 11
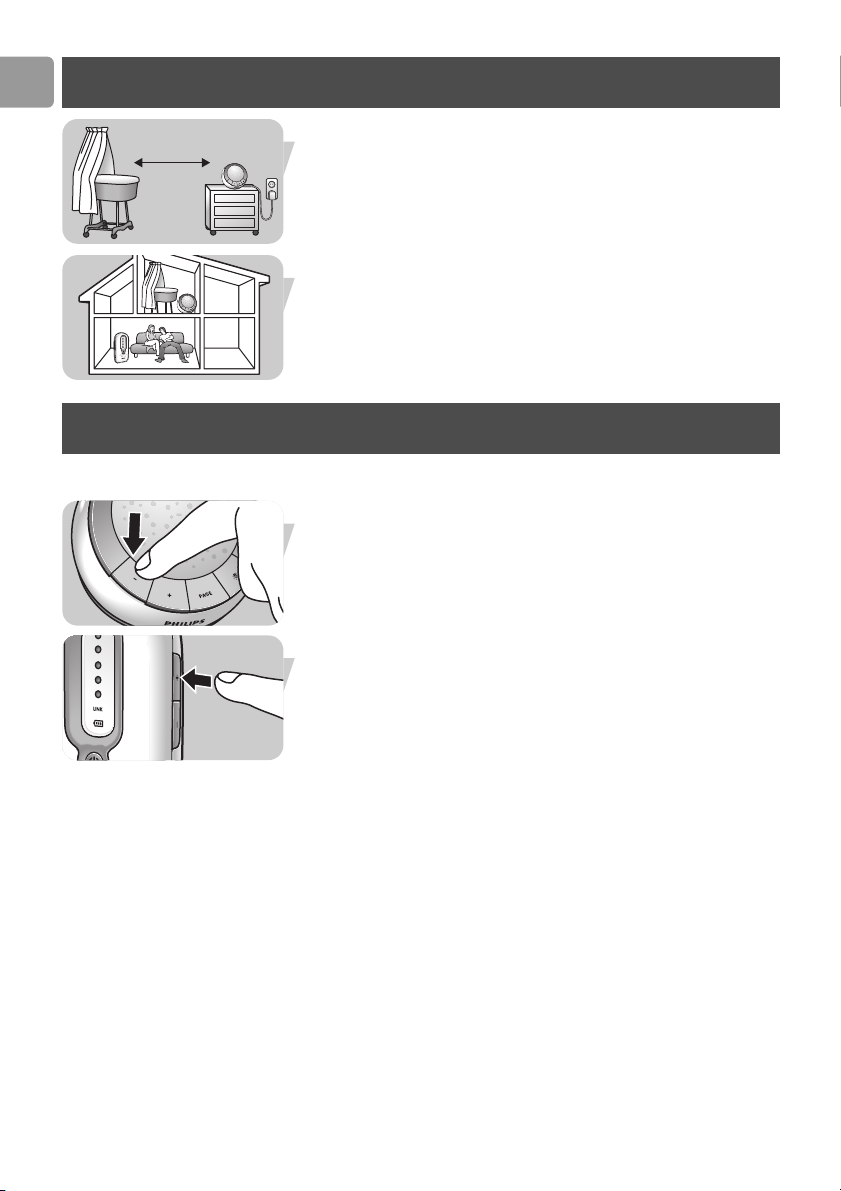
4 Position the baby unit at least 1 meter / 3 feet away from
your baby.
5 Position the parent unit at the desired place within the
operating range of the baby unit but at least 1 meter / 3 feet
away from the baby unit. For more information on the
operating range see ‘Technical specifications’.
➜ You can now monitor your baby!
EN
12
Using your baby monitor
> 1m / 3 ft
Other features
Adjusting loudspeaker volume
• Briefly press the volume + and – buttons (A-4) on the baby
unit repeatedly until the desired loudspeaker volume for the
baby unit has been reached.
• Briefly press the volume + and – buttons (B-9) on the parent
unit repeatedly until the desired loudspeaker volume for the
parent unit has been reached.
Notes:
– If you press the Volume + and – buttons (A-4, B-9) too long,
the volume will not be adjusted.
– If the volume is set to a high level, the units consume more
power.
Page 12
EN
13
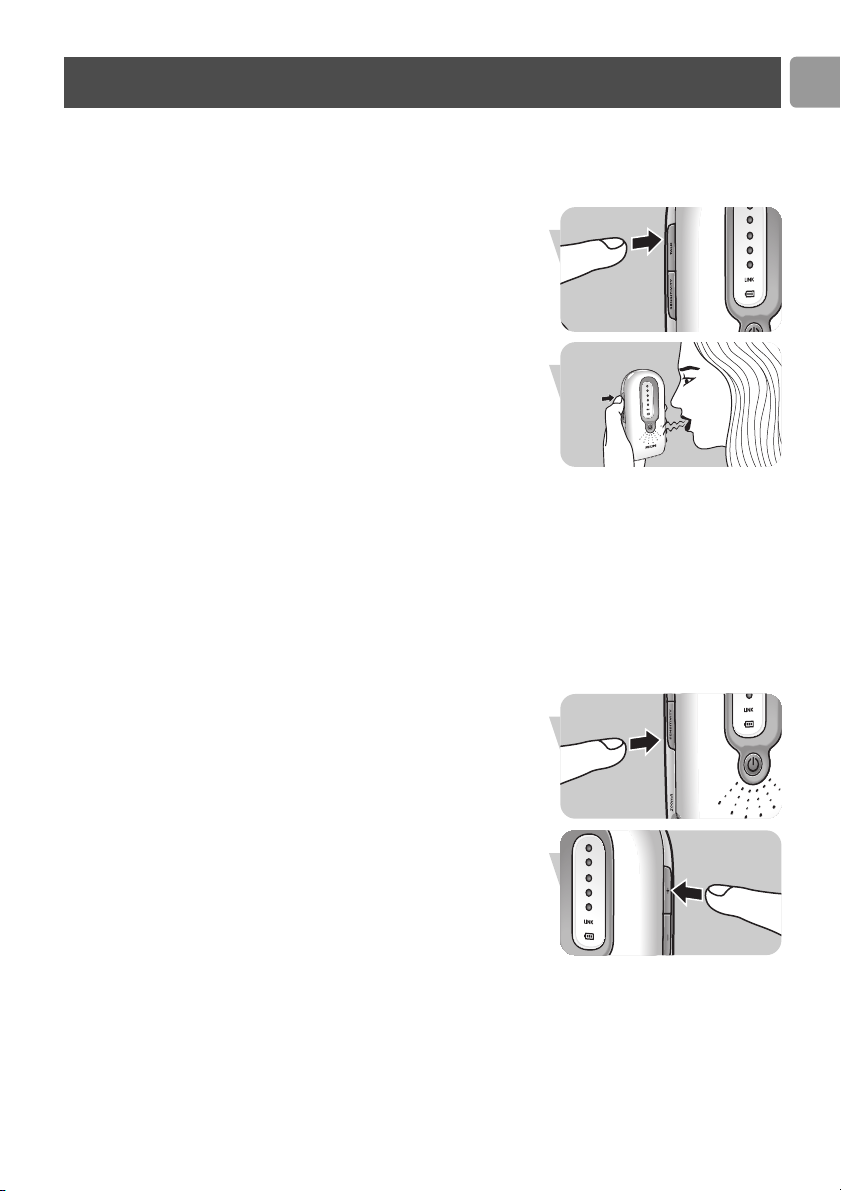
Talking to your baby
While using the TALK button (B-1) on the parent unit you can
talk to your baby (e.g to comfort your baby).
• Press and hold the TALK button (B-1) and talk clearly into
the microphone (B-4).
• Release TALK button (B-1) when finished talking.
Note:When the TALK button (B-1) is pressed, you can no
longer hear your baby.
Adjusting microphone sensitivity
You can set the sound sensitivity of the baby unit, to the desired
level.When set to the maximum sensitivity level all sounds
(including your baby’s breathing, when loud enough) can be
heard on the parent unit.You can only change the microphone
sensitivity if the connection between the baby unit and the
parent unit is established (when LINK lights (A-2, B-7) light
continuously green).
1 Briefly press the SENSITIVITY button (B-2) on the parent
unit.
> The sound-level lights (B-8) give visual feedback on the
current sensitivity level for approximately 2 seconds.
2 Briefly press the Volume + and – buttons (B-9) on the parent
unit repeatedly until the desired microphone sensitivity for
the baby unit has been reached.
Note: If you press the SENSITIVITY button (B-2) and/or the
Volume + and – buttons (B-9) too long, the microphone
sensitivity will not be adjusted.
Other features
Page 13
> The sound-level lights (B-8) give visual feedback on the new
setting for approximately 2 seconds:
- 1 light (1 x orange) = minimum level / lowest sensitivity;
- all lights (5 x orange) = maximum level (continuous
transmission) / highest sensitivity.
Note:When the sensitivity level of the baby unit is set to a high
level, the unit will consume more power because it is in
continuous transmission mode.
Monitoring baby silently
• Briefly press the Volume – button (B-9) on the parent unit
repeatedly until the volume is switched off completely.
> All sound-level lights (B-8) will now be off.
> When no sound is detected all sound-level lights (B-8) will
be off.
> When a sound is detected the sound-level lights (B-8) light
up orange.
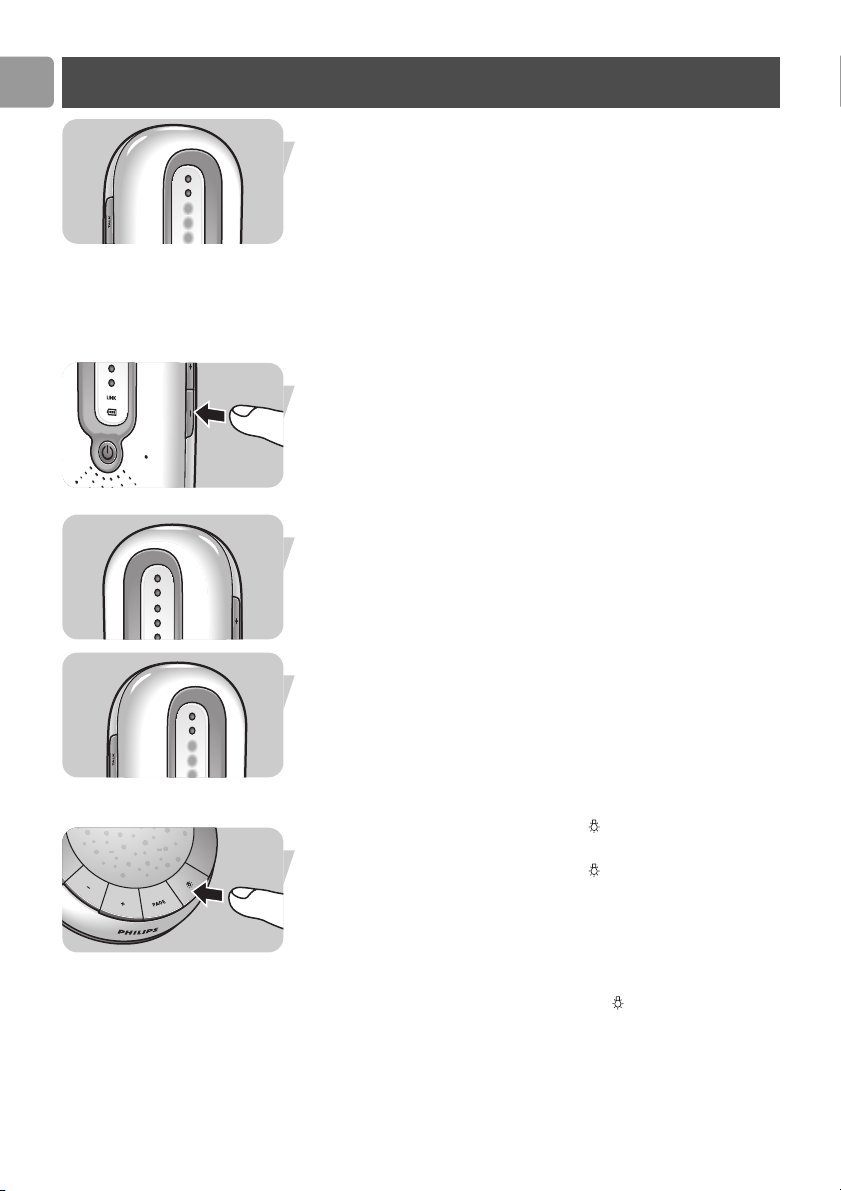
Switching night light on/off
1 Briefly press the night light button ( ) (A-7) on the baby unit
to switch on the night light (A-3).
2 Briefly press the night light button ( ) (A-7) again to switch
off the night light (A-3).
> The night light dims and gradually switches off.
• Switch off the night light when operating the baby unit on
batteries.This saves power!
Note: If you press the night light button ( ) (A-7) too long, the
night light (A-3) will not switch on/off.
EN
Other features
14
Page 14
EN
Other features
15
Connecting / disconnecting belt clip and
neck strap
If the parent unit is operated using batteries, you can carry it in
and around your house, allowing you freedom of movement
while still monitoring your baby.
Connect
• Insert the little spindle on the rear of the belt clip into the
recess (B-10) on the rear of the parent unit.Twist the belt
clip to the left until it clicks in position.
Disconnect
• Twist the belt clip to the right (TURN B) and take it off.
Connecting the neck strap
• Insert the little spindle at the end of the neck strap into the
recess (B-10) on the rear of the parent unit.
Twist the spindle to the left until it clicks in position.
Disconnecting the neck strap
• Twist the spindle to the right (TURN B) and remove it.
Paging parent unit
When the parent unit is misplaced and the volume is switched
off, you can use the PAGE button (A-6) on the baby unit to
locate the parent unit.
1 Briefly press the PAGE button (A-6) on the baby unit.
> A paging alert will sound on the parent unit.
2 To stop the paging alert, briefly press the page button (A-6)
again or any button on the parent unit.
Note: If you press the PAGE button (A-6) too long, the paging
alert will not sound.
Page 15

Problem Possible cause Solution
LINK light (A-2, B-7) Parent unit:
does not light at all. Power adapter (B-13) Connect power adapter (B-13)
not plugged in. to parent unit.
Connect power adapter (B-13)
to wall outlet.
Unit not turned on. Press and hold On/Off button (y)
(B-5) for two seconds.
Batteries are low. Recharge batteries (B-11).
Batteries are empty. Replace batteries (B-11).
Baby unit:
Power adapter (A-11) Connect power adapter (A-11) to
not plugged in. baby unit.
Connect power adapter (A-11) to
wall outlet.
Batteries incorrectly Insert batteries correctly.
inserted.
Unit not turned on. Press and hold On/Off button (y)
(A-1) for two seconds.
Batteries are low. Replace batteries (A-9).
LINK light (A2, B-7) Units out of range. Decrease distance between units
flashing red/alarm (see ‘Technical specifications).
beeping on parent unit.
Baby unit batteries are low. Replace batteries (A-9.).
Parent unit batteries are low. Recharge batteries (B-11).
Parent unit batteries are Replace batteries (B-11).
empty.
Units cannot establish Try solving the problem by using
connection, even when the factory initialization mode.
close to each other. See chapter ‘Factory initialization
mode’
No power on one of the Press On/Off button (A-1, B-5)
units. for two seconds.
Troubleshooting
EN
16
Troubleshooting
Page 16

EN
17
Problem Possible cause Solution
High pitched noise. Units are too close to Move parent unit away
each other. from baby unit (at least
1 meter / 3 feet).
Volume on parent unit Decrease volume (B-9) on
set too high. parent unit.
No sound/ Volume on parent unit is Increase volume on parent unit
baby’s crying cannot set too low or switched off. (B-9).
be heard.
Microphone sensitivity level Adjust microphone sensitivity
set too low on parent unit. level (B-2) on parent unit.
to a higher level.
Units are out of range Move parent unit closer to baby
unit.
Parent unit reacts Ambient sounds trigger Move baby unit closer to
too fast to other transmission. baby (keep minimal distance of
ambient sounds. 1 meter / 3 feet).
Microphone sensitivity Decrease microphone sensitivity
set too high. level (B-2) on parent unit.
Parent unit reacts slowly/ Microphone sensitivity is Increase microphone sensitivity
late to baby's crying. set too low. level (B-2) on parent unit and/or
move baby unit closer to baby
(keep minimal distance of 1 meter
/ 3 feet).
Battery check light ( ) Batteries are low or almost Replace batteries (A-9, B-11).
is lit. empty.
Baby unit battery power Microphone sensitivity is set Set microphone sensitivity to a
diminishes rapidly. too high. Unit consumes lower level (B-2).
more power.
Volume setting too high. Set volume to a lower level (A-4).
Charging time of parent Parent unit switched on during Switch off parent unit (B-5).
unit batteries exceeds charging.
16 hours.
Troubleshooting
Page 17

Answer
The specified range is only valid outdoors in open air. Inside
your house the workable range is limited by the amount and
type of walls and/or ceilings in between. Inside the house the
operating range will be up to 50 meters / 150 feet.
You are probably approaching the outer limits of the practical
range.Try a different location or decrease the distance slightly.
Please note that it takes about 30 seconds each time before a
new link between the units is established.
When batteries are installed in the both units, the units will
automatically switch over to battery use in case of power
supply failure.
The 60 (for NA FCC / IC) channels guarantee no interference
from other equipment.
Except for the On/Off buttons and TALK button (A-1, B-5), only
press the buttons briefly.
When the parent unit batteries are charged for the first time,
operating time will be less than 8 hours.The batteries will use
their maximum capacity after at least four times charging and
discharging.
Maybe the volume setting is too high.When the volume is set
to a high level, the unit consumes more power. Set the volume
to a lower level (B-9).
Maybe the microphone sensitivity setting is too high.When the
sensitivity is set to a high level, the units consumes more power.
Set the sensitivity to a lower level (B-2).
EN
Frequently asked questions
18
Question
The technical specifications
show an operating range of
300 meters / 900 feet
outdoors. How come my baby
monitor manages much less
than that?
The link is lost every now and
then, sound interruptions etc.
What happens during a power
supply failure?
Is my DECT baby monitor
secure from eavesdropping and
interference?
Some buttons do not seem to
work when I press them.
What do I do wrong?
Operating time of the parent
unit batteries is supposed to
be at least 8 hours. How come
the battery operating time of
my parent unit is less?
Page 18

EN
Important information
19
Technical specifications
– 1 x AC power adapter DC 9V / 300mA for baby unit
(supplied)
– 1 x charging base DC 9V / 300mA for parent unit (supplied)
– 4 x AA 1.5V Alkaline batteries for baby unit (not supplied)
– 2 x AAA 1.2V Ni-MH rechargeable batteries for parent unit
(supplied)
Up to 300 meters / 900 feet in ideal conditions.Walls, doors,
etc will affect range. Indoors the range is up to 50 meters /
150 feet.
Dry materials Material thickness Loss of range
Wood, plaster, < 30cm / 12˝ 0 - 10%
plaster cardboard,
glass (without metal
or wires, no lead)
Brick, plywood < 30cm / 12˝ 5 - 35%
Reinforced concrete < 30cm / 12˝ 30 - 100%
Metal grids, bars < 1cm / 0.4˝ 90 - 100%
Metal,Aluminium < 1cm / 0.4˝ 100%
sheets
+ 32°F – + 104°F
Digital Enhanced Cordless Telecommunication (DECT)
The DECT standard makes use of advanced digital radio
techniques to achieve efficient use of the radio spectrum. It
delivers high speech quality and security and low power
technology. It makes it possible to hear your baby at a range of
up to 300 meters / 900 feet in open air.
Maintenance
• Clean the baby monitor with a damp cloth.
• Dispose of used batteries in an environmentally friendly
manner.
• When batteries are inserted in case of mains operated use,
check the batteries every six months on possible leakage.
• If the batteries are left in the unit when it is powered from
the mains, check them for leakage every six months.
Power supply
Operating range
Operating temperature
Standard
Page 19

Environmental information
Disposal of your old product
Your product is designed and manufactured with high quality
materials and components, which can be recycled and reused.
Please inform yourself about the local separate collection
system for electrical and electronic products.
Please act according to your local rules and do not dispose of
your old products with your normal household waste.The
correct disposal of your old product will help prevent potential
negative consequences for the environment and human health.
Factory initialization mode
In this mode both units can be reset to the default factory
settings. Factory initialization can be used if problems occur
which can not be solved by following the suggestions in the
chapter ‘Troubleshooting’. Resetting must be done separately for
each unit.
1 Press and hold the On/Off (y) button (A-1, B-5) for
2 seconds to switch on the units.
2 When the LINK lights (A-2, B-7) on the units light up,
immediately press and hold the volume – button
(A-4, B-9) for 1 second.
> The units have now been reset to the default factory
settings.
Default factory settings
Parent unit
– Loudspeaker volume: 1
– Microphone sensitivity: 3
Baby unit
– Loudspeaker volume: 3
– Night light: off
EN
20
Important information
Page 20

EN
Important information
21
Compliance information
The FCC ID number is located on the cabinet bottom of Parent Unit and in battery
compartment of Baby Unit.
The term ‘IC:’ before the certification number signifies that Industry Canada technical
specifications were met.This certification means that the equipment meets certain radio
communications and operational requirements.
This device complies with Part 15 of the FCC Rules and ICES-003 of Industry Canada. Operation
is subject to the following two conditions: (1) this device may not cause harmful interference, and
(2) this device must accept any interference received, including interference that may cause
undesired operation.This device complies also with RSS-213 of Industry Canada.
Radio Interference
This equipment has been tested and found to comply with the limits for a Class B digital device,
pursuant to Part 15 of the FCC Rules and applicable Industry Canada specifications.These limits
are designed to provide reasonable protection against harmful interference in a residential
installation.This equipment generates, uses and can radiate radio frequency energy and, if not
installed and used in accordance with the instructions, may cause harmful interference to radio
communications. However, there is no guarantee that interference will not occur in a particular
installation. If this equipment does cause harmful interference to radio or television reception,
which can be determined by turning the equipment off and on, the user is encouraged to try to
correct the interference by one or more of the following measures:
• Reorient or relocate the receiving antenna.
• Increase the separation between the equipment and receiver.
• Connect the equipment into an outlet on a circuit different from that to which the receiver is
connected.
RF Radiation Exposure Statement
This equipment complies with FCC RF radiation exposure limits set forth for an uncontrolled
environment.This equipment should be installed and operated with a minimum distance of 20
centimeters between the radiator and your body. For hand held operation, this equipment has
been tested and meets the FCC RF exposure guidelines. Use of other accessories may not
ensure compliance with FCC RF exposure guidelines. For body worn operation, this product has
been tested and meets the FCC RF exposure guideline when used with the belt clip or neck
strap supplied with this product. User must maintain a separation distance of 3mm between the
back of the unit and the body to ensure compliance. Use of other accessories may not ensure
compliance with FCC RF exposure guidelines.This transmitter must not be co-located or
operating in conjunction with any other antenna or transmitter.This equipment complies als with
Industry Canada RSS-102 with respect to Canada’s Health Code 6 for Exposure of Humans to
RF Fields.
Do not attempt to repair or modify this equipment
Any repairs or alterations made by the user to the equipment may cause the equipment void in
product warranty and compliance. Refer servicing to authorized or designated service centers.
Page 21

EN
22
Assistance
Warranty
For assistance, call toll free:
1-800-243-7884
Or visit our website:
www.philips.com
Information is available 24 hours a day,7 days a week.
FULL TWO YEAR WARRANTY
Philips Electronics North America Corporation warrants each new Philips Babycare Product against
defects in materials or workmanship for a period of two years from the date of purchase, and
agrees to repair or replace any defective product without charge.
IMPORTANT: This warranty does not cover damage resulting from accident, misuse or abuse,
lack of reasonable care, the affixing of any attachment not provided with the product or loss of
parts or subjecting the product to any but the specified voltage.* Use of unauthorized replacement
parts will void this warranty.
PHILIPS ELECTRONICS NORTH AMERICA CORPORATION WILL NOT PAY FOR
WARRANTY SERVICE PERFORMED BY A NON-AUTHORIZED REPAIR SERVICE
AND WILL NOT REIMBURSE THE CONSUMER FOR DAMAGE RESULTING FROM
WARRANTY SERVICE PERFORMED BY A NON-AUTHORIZED REPAIR SERVICE.
NO RESPONSIBILITY IS ASSUMED FOR ANY SPECIAL, INCIDENTAL OR
CONSEQUENTIAL DAMAGES.
In order to obtain warranty service, simply ship the product postage prepaid to the Philips Norelco
Service Location (information available online at www.philips.com or at 1-800-243-7884). It is
suggested that for your protection you return shipments of product by insured mail, insurance
prepaid. Damage occurring during shipment is not covered by this warranty.
NOTE: No other warranty, written or oral, is authorized by Philips Electronics North America
Corporation.
This warranty gives you specific legal rights, and you may also have other rights which vary from
state to state. Some states do not allow the exclusion or limitation of incidental or consequential
damages, so the above exclusion and limitations may not apply to you.
* Read enclosed instructions carefully.
Manufactured for:
Philips Domestic Appliances and Personal Care Company
A Division of Philips Electronics North America Corporation
1010 Washington Blvd., Stamford, CT 06912-0015
This symbol on the product’s nameplate means it is
listed by Underwriters’ Laboratories, Inc.
PHILIPS is a Registered Trademark of Koninklijke Philips Electronics N.V.
©2006 Philips Electronics North America Corporation. All Rights Reserved.
Page 22

FR
23
Philips se consacre à la fabrication de produits de puériculture fiables pour donner aux parents la
tranquillité d’esprit dont ils ont besoin.Vous pouvez faire confiance à votre babyphone Philips : il vous
aidera 24 h sur 24 en vous permettant d’entendre votre bébé constamment et clairement, sans bruit
gênant.Votre SCD588 utilise la technologie DECT, qui garantit un niveau zéro d’interférences
provenant d’autres appareils sans fil, ainsi qu’un signal clair entre l’unité parent et l’unité bébé.
Protection pour bébés Philips, protéger ensemble
SCONSIGNES DE SÉCURITÉ
IMPORTANTES
Ce moniteur est conçu pour vous aider à surveiller votre bébé. Il ne peut remplacer la
surveillance responsable et adéquate par un adulte et ne devrait jamais être utilisé à cette fin.
Certains des renseignements suivants pourraient ne pas s’appliquer au produit que vous avez
acheté. Cependant, lors de l’utilisation d’un moniteur pour bébé, vous devriez respecter des
mesures de sécurité de base afin de réduire le risque de feu, d’électrocution et de blessures,
incluant les mesures de sécurité suivantes :
1 Avant d’utiliser le produit, lisez ce mode d’emploi attentivement et conservez-le pour
référence future.
2 Respectez toutes les mises en garde et consignes indiqués sur le produit.
3 Utilisez cet appareil uniquement pour l’usage domestique auquel il est destiné, tel que décrit dans
le présent manuel. N’utilisez pas d’accessoires non recommandés par Philips Electronics North
America Corporation.
4 Débranchez ce produit de la prise murale avant d’en faire le nettoyage. N’utilisez pas de
nettoyants liquides ou en aérosol. Utilisez un chiffon humide pour nettoyer le produit.
5 N’utilisez pas le produit lorsque vous êtes dans un bain, une douche ou une piscine.
L’immersion de ce produit dans l’eau pourrait produire une électrocution.
6 Le boîtier comporte des fentes et des ouvertures d’aération situées à l’arrière et dans le bas.
Ces ouvertures empêchent que le boîtier ne surchauffe et ne devraient pas être obstruées ni
couvertes. Faites attention de ne pas obstruer les ouvertures lorsque vous placez le produit
sur un lit, sofa, tapis ou autre surface similaire. Prévoyez une aération appropriée si vous
installez ce produit dans une unité murale ou un cabinet fermé.
7 Seul le type d’alimentation indiqué sur les étiquettes des adaptateurs (A-11, B13) devrait être
utilisé pour faire fonctionner ce produit. En cas d’incertitude quant au voltage de votre
maison, contactez votre distributeur ou votre fournisseur d’électricité.
8 Ne déposez rien sur le cordon d’alimentation. Installez le produit dans un endroit où
personne ne peut marcher sur le cordon d’alimentation et ainsi l’endommager.
9 Ne surchargez pas les prises murales ni les rallonges électriques puisque ceci constitue un
risque d’incendie ou d’électrocution.
10
N’insérez jamais d’objets dans ce produit à travers les fentes du boîtier car ils pourraient entrer
en contact avec des points de tension dangereux ou court-circuiter des pièces, ce qui
constituerait un risque d’incendie ou d’électrocution. Ne versez jamais de liquide sur ce produit
Accueil
Accueil
Page 23

FR
24
11
Afin de diminuer les risques d’électrocution, ne démontez pas ce produit : apportez-le plutôt à un
centre de service qualifié lorsqu’une maintenance ou une réparation est nécessaire. En ouvrant
les couvercles ou en les enlevant (sauf le couvercle du compartiment des piles), vous pourriez
vous exposer à des risques d’électrocution ou à d’autres dangers. Un remontag» incorrect du
produit pourrait causer une électrocution lors de l’utilisation subséquente de l’appareil..
12 N’exposez pas le produit à des températures extrêmes comme celles qu’on trouve près d’un
calorifère chaud ou d’un four chaud, ou dans une auto chaude.
13 Ne placez pas de chandelles allumées, ni de cigarettes ou cigares allumés,etc., sur le produit.
14 Si l’une des situations ci-après survient, cesser d’utiliser l’appareil, débranchez-le et renvoyez-le à
un centre de service Philips pour vérification et réparation :
A. Lorsque le cordon d’alimentation ou la fiche sont endommagés ou usés.
B. Si le produit a été exposé à la pluie ou à l’eau.
C. Si le produit ne fonctionne pas normalement même en suivant les directives du mode d’emploi.
D. Si le boîtier du produit a été endommagé.
E. Si vous remarquez un changement appréciable de la performance du produit.
15 Ne placez pas ce produit sur un chariot, support ou table instable. Le produit pourrait
tomber et être sérieusement endommagé.
16 Assurez-vous que l’unité bébé et le cordon de l’adaptateur soient toujours hors de portée du
bébé (à au moins 1 mètre / 3 pieds de distance).
17 Ne placez jamais l’unité bébé dans le lit du bébé ni dans son parc pour bébés.
18 Ne recouvrez jamais le moniteur pour bébé (avec une serviette, une couverture, etc.).
Si votre produit fonctionne avec des piles, les précautions supplémentaires suivantes
doivent être respectées :
1 Utilisez uniquement le type et le format de piles spécifiés dans le mode d’emploi.
2 Ne jetez pas les piles dans le feu. La cellule pourrait exploser.Vérifiez les lois locales relatives
à la mise au rebut des piles.
3 Procédez soigneusement en manipulant les piles pour ne pas les court-circuiter en les mettant en
contact avec des objets conducteurs tels que les bagues, les bracelets et les clés. Il faut éviter de
surcharger, court-circuiter, endommager ou incinérer les piles pour prévenir une ou plusieurs des
situations suivantes: libération de substances toxiques, de gaz d'hydrogène ou d'oxygène, élévation
de la température à la surface.
4 N’essayez pas de recharger les piles fournies ou identifiées pour cet appareil si elles ne sont pas
rechargeables. Les piles pourraient libérer de l’électrolyte corrosif ou exploser.
5 N’essayez pas de régénérer les piles fournies ou identifiées pour cet appareil en les chauffant. Les
piles pourraient libérer soudainement de l’électrolyte et causer des brûlures ou de l’irritation aux
yeux ou à la peau.
6 Au besoin, les piles doivent être remplacées par des piles identiques du même fabricant. Si une pile
est reliée en série avec d’autres piles et doit être remplacée, il est recommandé de remplacer
toutes les piles en même temps.
7 Veillez à installer les piles en respectant la polarité indiquée. Une insertion inversée des piles peut
causer un chargement résultant en une fuite ou une explosion.
8 Enlevez les piles du produit si vous arrêtez de vous en servir pour plus de 30 jours car les piles
pourraient fuire et endommager le produit.
9 Jetez les piles mortes aussitôt que possibles car elles sont susceptibles de fuire dans l’appareil. Si une
pile fuit ou est endommagée, remplacez-la immédiatement en portant des gants de protection contre
les produits chimiques.
Page 24

FR
10 Ne rangez pas ce produit ni les piles fournies ou identifiées pour celui-ci dans des endroits à
température élevée. Si vous conservez les piles dans un congélateur ou un réfrigérateur afin
d’en augmenter la durée de vie, mettez-les à l’abri de la condensation pendant leur
entreposage et leur décongélation. Les piles entreposées au froid doivent être ramenées à la
température de la pièce avant de les utiliser.
11 Si votre produit fonctionne avec des piles rechargeables, rechargez-les seulement selon les
directives et restrictions spécifiées dans le mode d’emploi.
12 Il y a risque d’explosion si les piles sont remplacées par des piles de type incorrect. Pour
l’unité parent, utilisez toujours des piles rechargeables.
CONSERVEZ CES CONSIGNES.
S AVERTISSEMENT: Débranchez le cordon d’alimentation avant de remplacer les piles.
S Utilisez uniquement l’adaptateur livré avec le moniteur pour bébé.L’utilisation d’un
adaptateur doté d’une polarité ou d’une tension incorrecte pourrait endommager
gravement l’appareil.
Adaptateurs de l’unité bébé et du chargeur :
Entrée : 120 V CA 60 Hz
Sortie : 9 V CC 300 mA
S AVERTISSEMENT: IL Y A RISQUE D’EXPLOSION SI LES PILES SONT
REMPLACÉES PAR DES PILES DE TYPE INCORRECT. LES PILES USÉES
DOIVENT ÊTRE DÉPOSÉES AU RECYCLAGE CONFORMÉMENT AUX
DIRECTIVES.
Utilisez uniquement des piles alcalines 1,5 V de type AA pour l’unité bébé (non fournies).
Utilisez uniquement des piles rechargeables 1,2 V de type AAA Ni-MH pour l’unité parent
(piles fournies).
25
Page 25

FR
26
A. Unité bébé
A-1 Bouton marche/arrêt (y)
A-2 Indicateur de liaison LINK
A-3 Veilleuse
A-4 Boutons de volume - / +
A-5 Micro
A-6 Bouton de contact PAGE
A-7 Bouton de veilleuse ( )
A-8 Indicateur de niveau des piles ( )
A-9 Couvercle du compartiment des piles
A-10 Jack d’alimentation 9 V/300 mA cc
A-11 Adaptateur
B. Unité parent
B-1 Bouton de communication TALK
B-2 Bouton de sensibilité SENSITIVITY
B-3 Haut-parleur
B-4 Micro
B-5 Bouton marche/arrêt (y)
B-6 Indicateur de niveau des piles ( )
B-7 Indicateur de liaison LINK
B-8 Indicateurs de volume sonore
B-9 Boutons de volume - / +
B-10 Logement de la pince de ceinture
B-11 Couvercle du compartiment des piles
B-12 Pince de ceinture
B-13 Adaptateur
B-14 Chargeur
B-15 Indicateur d’alimentation POWER
B-16 Lanière
C.Autres éléments nécessaires
Les deux unités peuvent fonctionner sur adapteur ou sur piles.
Pour une utilisation sur piles, vous aurez besoin de :
– 4 piles alcalines 1,5 V de type AA pour l’unité bébé
(non fournies)
– 2 piles rechargeables 1,2 V de type AAA Ni-MH pour l’unité
parent (fournies)
Légende des fonctions
Page 26

FR
3 Illustrations
23 Accueil
23 Consignes de sécurité importantes
26 Légende des fonctions
26 Unité bébé
26 Unité parent
26 Autres éléments nécessaires
27 Sommaire
28 Préparation de votre babyphone
28 Unité bébé
29 Unité parent
30 Utilisation de votre babyphone
31 Autres fonctions
31 Réglage du volume du haut-parleur
32 Parler à votre bébé
32 Réglage de la sensibilité du micro
33 Surveillance silencieuse de votre bébé
33 Activation/désactivation de la veilleuse
34 Ajout/retrait de la pince de ceinture et de la lanière
34 Contacter l’unité parent
35 Dépannage
37 Questions fréquemment posées
38 Informations importantes
38 Spécifications techniques
38 Entretien
39 Informations concernant l’environnement
39 Mode initialisation usine
40 Renseignements sur la conformité
40 Interférence radio
40 Déclaration de la FCC relative à l’exposition aux
radiations RF
41 Assistance
41 Garantie
Préparation de votre babyphone
Sommaire
27
Page 27
FR
28
système de relais automatique en cas de panne de courant.
Alimentation par l’adaptateur
1 Connectez le cordon de l’adaptateur (A-11) au jack
d’alimentation (9 V / 300 mA cc (A-10)) de l’unité bébé.
2 Connectez l’adaptateur (A-11) à une prise murale.
➜ L’unité bébé peut maintenant fonctionner avec
l’adaptateur!
Utilisation sur piles
1 Ouvrez le compartiment des piles en faisant tourner le
couvercle (A-9) vers la gauche (C OPEN), avec la paume de
la main. Retirez le couvercle.
2 Insérez les quatre piles 1,5 V AA en respectant la
configuration + et – indiquée à l’intérieur du compartiment
(piles non fournies ; piles alcalines Philips recommandées).
3 Replacez le couvercle du compartiment des piles (A-9).
Refermez le compartiment des piles en faisant tourner le
couvercle (A-9) vers la droite (CLOSE B), avec la paume de
la main.
➜ L’unité bébé peut maintenant être utilisée sur piles !
Unité bébé
L’unité bébé peuvent fonctionner sur adapteur ou sur piles. L’insertion de piles procure un
+
+
+
+
+
+
+
+
Page 28

FR
Préparation de votre babyphone
Unité parent
1 Ouvrez le compartiment des piles en faisant glisser le
couvercle vers le bas (B-11).
2
Insérez les deux piles rechargeables 1,2 V de type AAA Ni-MH
(fournies), en respectant configuration + et – indiquée à
l’intérieur du compartiment.
3 Replacez le couvercle du compartiment des piles (B-11).
Fermez le compartiment en faisant glisser le couvercle (B-11)
vers le haut jusqu’à ce qu’il s’enclenche.
4 Connectez l’adaptateur (B-13) du chargeur (B-14) à une prise
murale.
5 Placez l’unité parent dans le chargeur (B-14).
> L’indicateur POWER (B-15) deviendra rouge fixe.
6 Laissez l’unité parent dans le chargeur jusqu’à ce que les piles
soient entièrement chargées (au moins 16 heures).
> L’indicateur POWER (B-15) restera rouge fixe, même
lorsque les piles sont entièrement chargées.
> Lorsque les piles sont entièrement chargées, l’unité parent
peut être enlevée du chargeur et utilisée en mode sans fil
pendant au moins 8 heures.
Remarques :
– La durée de fonctionnement sera de 8 heures si l’unité bébé
est en mode de transmission 25 % du temps et est en mode
de veille le restant du temps (le bébé ne fait aucun son).
– Après avoir chargé les piles de l’unité parent pour la première
fois, la durée de fonctionnement sera de moins de 8 heures.
Les piles atteindront leur capacité maximale après avoir été
chargées et déchargées au moins quatre fois.
29
+
+
+
+
+
+
+
+
+
+
Page 29
FR
30
– Le temps de chargement excédera 16 heures si l’unité parent
est allumée pendant le chargement. Pour diminuer le temps
de chargement, l’unité parent devrait être éteinte.
➜ L’unité parent est maintenant prête à être utilisée !
Remarques générales :
– Quand les unités sont éteintes, si elles fonctionnent sur piles,
les piles continueront à se décharger lentement.
– Quand les piles seront presque déchargées, l’indicateur de
niveau des piles de l’unité parent (B-6) deviendra rouge
clignotant, tandis que l’indicateur de niveau des piles de l’unité
bébé (A-8) deviendra rouge fixe.
Placez l’unité parent dans le chargeur (B-14) pour recharger
les piles et/ou remplacez les piles dans l’unité bébé.
Préparation de votre babyphone
Utilisez cet appareil uniquement pour l’usage
domestique auquel il est destiné, tel que décrit dans le
présent manuel.
1 Placez les deux unités dans la même pièce pour tester la
connexion. Placez l’unité bébé à au moins 1 mètre de distance
de l’unité parent.
2 Tenez enfoncé le bouton marche/arrêt (y) (A-1) de l’unité
bébé pendant 2 secondes.
> La veilleuse (A-3) s’allumera brièvement.
> L’indicateur de liaison LINK (A-2) s’allume brièvement en
rouge puis clignote en vert durant la tentative de liaison
avec l’unité parent. Si la liaison n’est pas établie après 30
secondes, le message «Not Linked» (aucune liaison)
apparaît et le témoin LINK clignote en rouge.
3 Tenez enfoncé le bouton marche/arrêt (y) (B-5) de l’unité
parent pendant 2 secondes.
> Les indicateurs de volume (B-8) deviendront brièvement
oranges.
> L’indicateur de niveau des piles ( - B-6) deviendra
brièvement rouge.
> L’indicateur de liaison LINK (B-7) deviendra brièvement
rouge puis deviendra vert clignotant, indiquant la recherche
de connexion avec l’unité bébé.
Utilisation de votre babyphone
> 1m / 3 ft
Page 30

FR
> L’indicateur de liaison LINK (A-2, B-7) de chaque unité
deviendra vert clignotant quand la connexion sera établie.
Cela prendra environ 30 secondes. Les deux voyants LINK
(A-2, B-7) deviendront alors vert fixe.
> Si, au bout de 30 secondes, aucune connexion n’a été
établie, les deux indicateurs LINK (A-2, B-7) deviendront
rouges et l’unité parent émettra un bip de temps à temps.
4 Placez l’unité bébé à au moins 1 mètre de distance de votre
bébé.
5 Placez l’unité parent à l’endroit de votre choix, à portée de
l’unité bébé, mais à au moins 1 mètre de l’unité bébé.
Pour en savoir plus sur la portée, reportez-vous à
‘Spécifications techniques’.
➜ Vous pouvez maintenant surveiller votre bébé !
Utilisation de votre babyphone
Autres fonctions
> 1m / 3 ft
31
Réglage du volume du haut-parleur
• Appuyez à plusieurs reprises brièvement sur les boutons de
volume + et – (A-4) de l’unité bébé jusqu’à ce que le volume
désiré du haut-parleur de l’unité bébé soit atteint.
• Appuyez à plusieurs reprises brièvement sur les boutons de
volume + et – (B-10) de l’unité parent jusqu’à ce que le
volume désiré du haut-parleur de l’unité parent soit atteint.
Remarques :
– Si vous appuyez trop longtemps sur les boutons de volume
+ et - (A-4, B-9), le volume ne sera pas réglé.
– Lorsque le volume est réglé à un niveau élevé, les unités
augmentent leur consommation d’énergie.
Page 31

FR
32
Parler à votre bébé
En utilisant le bouton de communication TALK (B-1) de l’unité
parent, vous pouvez parler à votre bébé (par exemple pour le
rassurer).
• Tenez enfoncé le bouton TALK (B-1) et parlez clairement
dans le micro (B-4).
• Relâchez le bouton TALK (B-1) quand vous avez fini de parler.
Remarque : Pendant que vous appuyez sur le bouton TALK (B-1),
vous ne pouvez pas entendre votre bébé.
Réglage de la sensibilité du micro
Vous pouvez régler la sensibilité de son de l’unité bébé au
niveau de votre choix. Si vous choisissez le niveau de sensibilité
maximum, tous les sons (y compris la respiration de votre bébé,
si elle est assez sonore) vous parviendront par l'unité parent.
Vous ne pouvez modifier la sensibilité du micro que si la
connexion entre l’unité bébé et l’unité parent est établie
(quand les indicateurs LINK (A-2, B-7) sont vert fixe).
1 Appuyez brièvement sur le bouton SENSITIVITY (B-2) de
l’unité parent.
> Les indicateurs de niveau de son (B-8) indiquent de façon
visuelle le niveau de sensibilité choisi pendant environ
2 secondes.
2 Appuyez à plusieurs reprises brièvement sur les boutons de
volume + et – (B-9) de l’unité parent jusqu’à ce que la
sensibilité du micro de l’unité parent soit atteinte.
Remarque : Si vous appuyez trop longtemps sur le bouton
SENSITIVITY (B-2) et/ou sur les boutons de volume +
et - (B-9), la sensibilité du micro ne sera pas réglée.
Autres fonctions
Page 32

FR
> Les indicateurs de niveau de son (B-8) indiquent de façon
visuelle le nouveau réglage pendant environ 2 secondes :
- 1 indicateur (1 orange) =
niveau minimum/faible sensibilité ;
- tous les indicateurs (5 oranges) = niveau maximum
(émission continue) / sensibilité la plus haute.
Remarque : lorsque la sensibilité de l’unité bébé est réglée à un
niveau élevé,l’unité augmente sa consommation
d’énergie car elle est en mode de transmission
continuel.
Surveillance silencieuse de votre bébé
• Appuyez 1a plusieurs reprises brièvement sur le bouton de
volume - (B-9) de l'unité parent jusqu'à ce que le volume soit
totalement coupé.
> Tous les indicateurs de niveau sonore (B-8) sont alors
éteints.
> Quand aucun son n’est détecté, tous les indicateurs de
niveau sonore (B-8) sont éteints.
> Quand un son est détecté, les indicateurs de niveau sonore
(B-8) deviennent oranges.
Activation/désactivation de la veilleuse
1 Appuyez brièvement sur le bouton de veilleuse ( ) (A-7) de
l’unité bébé pour activer la veilleuse (A-3).
2 Appuyez à nouveau brièvement sur le bouton de veilleuse
( ) (A-7) de l’unité bébé pour désactiver la veilleuse (A-3).
> La veilleuse s’assombrit progressivement avant de
s’éteindre.
• Quand vous utilisez l’unité bébé sur piles, éteignez la
veilleuse.Vous économiserez les piles !
Remarque : Si vous appuyez trop longtemps sur le bouton de
veilleuse ( ) (A-7), la veilleuse (A-3) ne
s’activera/se désactivera pas.
Autres fonctions
33
Page 33

FR
34
Ajout / retrait de la pince de ceinture
et de la lanière
Si l’unité parent fonctionne sur piles, vous pouvez
l’emporter dans la maison et autour, vous permettant de
vous déplacer tout en surveillant votre bébé.
Ajout de la pince
• Insérez la petite broche située à l’arrière de la pince de
ceinture (B-10) au dos de l’unité parent. Faites tourner la
pince vers la gauche jusqu’à ce qu’elle s’enclenche.
Retrait de la pince
• Faites tourner la pince vers la droite (TURNB) et
retirez-la.
Ajout de la lanière
• Insérez la petite broche située à l'extrémité de la lanière
dans la cavité (B-10) au dos de l'unité parent.
Faites tourner la petite broche vers la gauche jusqu’à ce
qu’elle s’enclenche.
Retrait de la lanière
• Faites tourner la petite broche vers la droite (TURN B)
et retirez-la.
Contacter l’unité parent
Si l’unité parent est égarée et que le volume est éteint, vous
pouvez utiliser le bouton de contact PAGE (A-6) de l’unité
bébé pour retrouver l’unité parent.
1 Appuyez brièvement sur le bouton PAGE (A-6) de l’unité
bébé.
> Une alerte de contact sera émise par l’unité parent.
2 Pour arrêter l’alerte de contact, appuyez à nouveau sur le
bouton PAGE (A-6) ou sur un des boutons de l’unité
parent.
Remarque : Si vous appuyez trop longtemps sur le bouton
PAGE (A-6), l’alerte de contact ne fonctionnera
pas.
Autres fonctions
Page 34

FR
Problème Cause possible Solution
Indicateur LINK (A-2, B-7) Unité parent :
ne s’allume pas du tout. Adaptateur (B-13) non branché. Connectez l’adaptateur (B-13) à
l’unité parent.
Connectez l’adaptateur (B-13) à
une prise murale.
L’unité n’est pas allumée. Tenez enfoncé le bouton marche/
arrêt (y) (B-5) pendant 2 secondes.
Les piles sont faibles. Rechargez les piles (B-11).
Les piles sont déchargées. Remplacez les piles (B-11).
Unité bébé :
Adaptateur (A-11) non branché. Connectez l’adaptateur (A-11) à
l’unité bébé.
Connectez l’adaptateur (A-11) à
une prise murale.
Piles mal insérées. Insérez les piles correctement.
L’unité n’est pas allumée. Tenez enfoncé le bouton marche/
arrêt (y) (A-1) pendant 2 secondes.
Les piles sont faibles. Remplacez les piles (A-9).
Indicateur LINK (A-2, B-7) Les unités sont hors de portée Diminuez la distance entre les
rouge clignotant/alarme l’une de l’autre. unités (voir « Spécifications
sur l’unité parent. techniques »).
Les piles de l’unité bébé Remplacez les piles (A-11.).
sont faibles.
Les piles de l’unité parent Rechargez les piles (B-11).
sont faibles
Les piles de l’unité parent Remplacez les piles (B-11).
sont déchargées.
Impossible d’établir la connexion, Essayez d’utiliser le mode
même quand les unités sont initialisation usine.Voir chapitre
proches l’une de l’autre. ‘Mode initialisation usine’
Pas d’alimentation sur l’une Appuyez sur le bouton marche/
des unités. arrêt (A-1, B-5) pendant
2 secondes.
Dépannage
35
Page 35

FR
36
Problème Cause possible Solution
Son aigu. Les appareils sont trop Eloignez l’unité parent de l’unité
près l’un de l’autre. bébé (au moins d’1 mètre).
Le volume de l’unité parent Diminuez le volume (B-9) de
est trop élevé.l’unité parent.
Aucun son/ Le volume de l’unité parent est Diminuez le volume de l’unité
les pleurs du bébé ne réglé trop bas ou éteint. parent (B-9).
s’entendent pas.
La sensibilité du micro est Augmentez la sensibilité du micro
trop basse sur l’unité parent. (B-2) de l’unité parent.
Les unités sont hors de portée Rapprochez l’unité parent de
l’unité bébé.
L’unité parent réagit Les bruits ambiants Rapprochez l’unité bébé du bébé
trop vite aux autres déclenchent l’émission. (respectez la distance minimale de
bruits ambiants. 1 mètre).
La sensibilité du micro Diminuez la sensibilité du micro
est trop élevée. (B-2) sur l’unité parent.
L’unité parent réagit La sensibilité du micro est Augmentez la sensibilité du micro
lentement/trop tard aux trop basse. (B-2) sur l’unité parent et/ou
pleurs du bébé. rapprochez l’unité bébé du bébé
(respectez la distance minimale de
1 mètre).
L’indicateur de niveau Les piles sont faibles ou presque Remplacez les piles (A-9,B-11).
des piles ( ) est allumé.déchargées.
Les piles de l’unité bébé La sensibilité du micro est Diminuez la sensibilité du micro.
s’affaiblissent rapidement. trop élevée.L’unité augmente sa
consommation d’énergie.
Le volume est réglé à un Diminuez le volume (A-4).
niveau trop élevé.
Le temps de chargement L’unité parent a été allumée Éteignez l’unité parent (B-5).
des piles de l’unité parent pendant le chargement.
excède 16 heures.
Dépannage
Page 36

FR
Questions fréquemment posées
Question
Les spécifications techniques
indiquent une portée de
300 mètres à l’extérieur.
Pourquoi la portée de mon
babyphone est-elle bien
inférieure?
La liaison est coupée de temps
en temps, le son est
interrompu, etc.
Que se passe-t-il en cas de
panne de courant ?
Mon babyphone DECT est-il
protégé contre les écoutes
indiscrètes et les interférences ?
Certains boutons ne semblent
pas fonctionner lorsque
j’appuie dessus. Comment
corriger cela ?
La durée de fonctionnement
de l’unité parent est sensée
être d’au moins 8 heures.
Pourquoi la durée de
fonctionnement des piles de
mon unité parent est-elle
moindre?
37
Réponse
La portée indiquée n’est valable à hors de la maison qu’à l’air
libre.A l’intérieur de la maison, la portée effective est limitée
par la quantité et le type de murs/plafonds qui séparent les
unités.A l’intérieur de la maison, la portée va jusqu’à 50 mètres.
Vous approchez sans doute des limites de la portée du signal.
Essayez un endroit différent ou réduisez légèrement la distance.
Attendez environ 30 secondes chaque fois qu’une nouvelle
liaison est établie entre les deux unités.
Quand des piles sont installées dans les deux unités, elles
passeront automatiquement au fonctionnement sur piles en cas
de panne de courant.
Les 60 canaux (NA FCC / IC) garantissent que l’appareil ne sera
pas affecté par les interférences produites par tout autre
équipement.
A l’exception des boutons marche/arrêt et bouton de
communication TALK (A-1, B-5), appuyez brièvement sur les
boutons.
Lorsque les piles de l’unité parent sont chargées pour la première
fois, la durée de fonctionnement sera de moins de 8 heures.
Les piles atteindront leur capacité maximale après avoir été
chargées et déchargées au moins quatre fois.
Il se peut que le volume soit réglé à un niveau trop élevé. Lorsque
le volume est réglé à un niveau élevé, les unités augmentent leur
consommation d’énergie. Diminuez le volume (B-9).
Il se peut que la sensibilité du micro soit trop élevée. Lorsque la
sensibilité est réglée à un niveau élevé, les unités augmentent
leur consommation d’énergie. Diminuez la sensibilité (B-2).
Page 37

Alimentation
Portée de fonctionnement
Température de
fonctionnement
Norme
FR
Informations importantes
38
Spécifications techniques
– 1 adaptateur 9 V / 300 mA cc pour l’unité bébé (fourni)
– 1 chargeur 9 V / 300mA CC pour l’unité parent (fourni)
– 4 piles alcalines 1,5 V de type AA pour l’unité bébé (non
fournies)
– 2 piles rechargeables 1,2 V de type AAA Ni-MH pour l’unité
parent (fournies)
Jusqu’à 300 mètres dans des conditions idéales. Les murs,
portes, etc., réduisent la portée.A l’intérieur, la portée peut aller
jusqu’à 50 mètres.
Matériaux secs Epaisseur des Perte de
matériaux portée
Bois, plâtre, carton, verre < 30 cm 0 - 10%
(pas de métal ni de fils
électriques, pas de plomb)
Briques, contreplaqué < 30 cm 5 - 35%
Béton armé < 30 cm 30 - 100%
Grilles/barres métalliques < 1 cm 90 - 100%
Feuilles de métal, d’aluminium < 1 cm 100%
+32°F - +104°F
DECT (Digital Enhanced Cordless Telecommunication)
La norme DECT utilise des techniques radio numériques de
pointe pour utiliser efficacement le spectre des radiofréquences.
Elle permet d’obtenir une haute qualité de voix et une
technologie économique en énergie. En outre, elle vous permet
d’entre votre bébé à une portée allant jusqu’à
300 mètres à l’air libre.
Entretien
• Nettoyez le babyphone à l’aide d’un tissu humide.
• Jetez les piles utilisées en respectant l’environnement.
• Si l'appareil fonctionne sur adapteur, vérifiez tous les six mois
que les piles ne fuient pas.
Page 38

FR
39
Informations concernant l’environnement
Mise au rebut des produits en fin de vie
Ce produit a été conçu et fabriqué avec des matériaux et
composants recyclables de haute qualité.
Informez-vous auprès des instances locales sur le système de
collecte des produits électriques et électroniques en fin de vie.
Conformez-vous à la législation en vigueur et ne jetez pas vos
produits avec les déchets ménagers. Seule une mise au rebut
adéquate des produits peut empêcher la contamination de
l'environnement et ses effets nocifs sur la santé.
Mode initialisation usine
Ce mode permet de restaurer les réglages usine par défaut des
deux unités. L’initialisation usine peut être utilisée si des
problèmes ne peuvent pas être résolus en appliquant les
suggestions du chapitre ‘Dépannage’. La restauration doit être
effectuée séparément pour chaque unité.
1 Tenez enfoncé le bouton marche/arrêt (y) (A-1, B-5) pendant
2 secondes pour allumer les unités.
2 Quand l’indicateur LINK (A-2, B-7) de chaque unité s’allume,
appuyez immédiatement sur le bouton volume -
(A-4, B-9) et tenez-le enfoncé pendant 1 seconde.
> Les réglages par défaut des unités ont alors été restaurés.
Réglages usine par défaut
Unité parent
– Volume du haut-parleur : 1
– Sensibilité du micro : 3
Unité bébé
– Volume du haut-parleur : 3
– Veilleuse : désactivée
Informations importantes
Page 39

Le numéro d’identification FCC est situé en-dessous du boîtier de l’unité parent ainsi que dans le
compartiment des piles de l’unité bébé.
Le sigle «IC» placé devant le numéro de certification indique que le produit est conforme aux
spécifications techniques d’Industrie Canada. Cette certification signifie que l’équipement respecte
certaines exigences relativement à son fonctionnement ainsi qu’aux communications radio.
Renseignements sur la conformité
Cet appareil est conforme à la partie 15 des règlements de la FCC ainsi qu’à la norme NMB-003
d’Industrie Canada. Son fonctionnement est sujet aux deux conditions suivantes : (1) cet appareil
ne doit pas produire d’interférence nuisible, et (2) cet appareil doit pouvoir accepter toute
interférence externe, incluant celles susceptibles de perturber son bon fonctionnement. Cet
appareil est aussi conforme à la norme CNR-213 d’Industrie Canada.
Interférence radio
Cet équipement a été testé et déclaré conforme aux limites des appareils numériques de catégorie
B, en vertu des dispositions de l’article 15 des règlements de la FCC et des spécifications
applicables d’Industrie Canada. Ces limites ont été établies pour offrir une protection raisonnable
contre l’interférence nuisible dans un environnement résidentiel. Cet équipement génère, utilise et
peut émettre des radiofréquences. S’il n’est pas installé ni utilisé conformément aux instructions du
fabricant, il peut générer de l’interférence nuisible aux communications radio. Toutefois, il n’est pas
garanti qu’il n’y aura pas d’interférence dans un environnement donné. Si cet équipement cause de
l’interférence affectant la réception radiophonique ou télévisuelle, ce qui peut être déterminé en
éteignant puis en rallumant l’équipement, nous vous conseillons de corriger la situation en prenant
une ou plusieurs des mesures suivantes :
• Réorientez ou déplacez l’antenne du récepteur.
• Increase the separation between the equipment and receiver.
• Augmentez la distance entre l’équipement et le récepteur.
• Branchez l’équipement dans une prise murale reliée à un circuit autre que celui où est branché le
récepteur.
Déclaration de la FCC relative à l’exposition aux radiations
Cet équipement est conforme aux limites d’exposition aux radiations RF établies par la FCC pour
un environnement non contrôlé.Cet équipement doit être installé et utilisé en maintenant une
distance minimum de 20 centimètres entre vous et l’émetteur. Cet équipement a été testé quant à
son utilisation manuelle et déclaré conforme aux directives de la FCC sur l’exposition RF.
L’utilisation de tout autre accessoire pourrait ne pas être conforme aux directives de la FCC sur
l’exposition RF. Ce produit a été testé pour s’assurer que l’utilisateur puisse le porter et déclaré
conforme aux directives de la FCC sur l’exposition RF lorsqu’il est utilisé avec la pince de ceinture
ou la lanière fournis avec ce produit. L’utilisateur doit maintenir une distance de 3 mm entre son
corps et l’arrière de l’unité afin d’être conforme aux directives. L’utilisation de tout autre accessoire
pourrait ne pas être conforme aux directives de la FCC sur l’exposition RF. Ce transmetteur ne
doit pas être placé ou utilisé avec une autre antenne ou un autre transmetteur. Cet équipement est
aussi conforme à la norme CNR-102 d’Industrie Canada relative au Code de sécurité 6 de Santé
Canada sur les limites d’exposition humaine aux champs de radiofréquences.
N’essayez pas de réparer ou de modifier cet équipement
Toute réparation ou modification faite à l’équipement par l’utilisateur pourrait entraîner
l’annulation de la garantie du produit et faire en sorte que le produit ne soit plus conforme.
Confiez l’entretien de cet équipement à un centre de service autorisé.
FR
Informations importantes
40
Page 40

FR
41
Pour obtenir de l’assistance, composez sans frais le:
1 800 243-7884
ou visitez le site:
www.philips.com
Le service d’assistance est offert 24 heures sur 24, 7 jours sur 7.
Assistance
GARANTIE COMPLÈTE DE DEUX ANS
Ce produit est garanti par Philips Electronics North America Corporation contre les défauts de
matière et de main-d’œuvre pour une période de deux ans à compter de la date d’achat, et
pourra être réparé ou remplacé sans frais durant cette période.
IMPORTANT : Cette garantie ne couvre pas les dommages causés par un accident, un usage
abusif, un manque d’entretien, l’ajout d’accessoires non fournis avec le produit, la perte de pièces
ou l’alimentation de l’appareil avec une tension électrique autre que celle spécifiée.* L’installation
de pièces de remplacement non conformes annulera cette garantie.
PHILIPS ELECTRONICS NORTH AMERICA CORPORATION N’ASSUMERA PAS
LES FRAIS POUR DES RÉPARATIONS EFFECTUÉES PAR UN CENTRE DE
SERVICE NON AUTORISÉ ET NE REMBOURSERA PAS AU CLIENT LE COÛT
DES DOMMAGES RÉSULTANT DE RÉPARATIONS EFFECTUÉES PAR UN
CENTRE DE SERVICE NON AUTORISÉ.
PHILIPS ELECTRONICS NORTH AMERICA CORPORATION NE PEUT ÊTRE
TENUE RESPONSABLE DES DOMMAGES SPÉCIAUX,ACCESSOIRES OU
INDIRECTS.
Pour obtenir des services en vertu de la garantie, expédiez l’appareil port payé au centre de
service Philips Norelco de votre région (visitez le site www.philips.com ou composez le 1 800
243-7884). Pour votre protection, nous vous recommandons d’assurer votre envoi. Les
dommages subis durant le transport ne sont pas couverts par cette garantie.
REMARQUE : Philips Electronics North America Corporation n’accorde aucune autre garantie
verbale ou écrite.
La présente garantie vous confère des droits spécifiques et vous pourriez disposer d’autres
droits qui peuvent varier selon les juridictions. Dans certains pays, la loi ne permet pas la
limitation ou l’exclusion de la garantie pour les dommages-intérêts ou les dommages indirects.
Par conséquent, les limitations ou exclusions susmentionnées ne s’appliquent pas nécessairement
à vous.
*Veuillez lire attentivement les directives fournies.
Fabriqué pour :
Philips Domestic Appliances and Personal Care Company
Une division de Philips Electronics North America Corporation
1010 Washington Blvd., Stamford, CT 06912-0015
Ce symbole figurant sur la plaque signalétique de l’appareil signifie que celui-ci est
approuvé par le Underwriters Laboratories, Inc.
Philips est une marque déposée de Koninklijke Philips Electronics N.V.
© Philips Electronics North America Corporation, 2006.Tous droits réservés.
Garantie
Page 41

ES
42
Philips está dedicada a producir productos fiables de cuidado de los niños para dar a sus padres
la tranquilidad que necesitan. Puede confiar en que este vigilabebés Philips le proporcionará
soporte continuo al asegurar que usted siempre oiga claramente a su bebé sin ningún ruido que
lo distraiga. Su SCD589 utiliza tecnología DECT,que le garantiza que no recibirá ninguna
interferencia de otros aparatos inalámbricos y que tendrá una señal clara entre la unidad de los
padres y la unidad del bebé.
Philips Baby Care, taking care together
S
INSTRUCCIONES DE
SEGURIDAD IMPORTANTES
El objetivo de este vigilabebés es que funcione como una ayuda. No es un sustituto de la
supervisión responsable y adecuada de un adulto y no debe utilizarse como tal.
Alguna de la siguiente información puede no aplicarse en su producto particular; sin embargo, al
utiliza el equipo vigilabebés se deben seguir las precauciones de seguridad básicas para disminuir
el riesgo de incendio, descarga eléctrica y daños a personas, incluyendo lo siguiente:
1 Lea con atención este manual del usuario antes de usar el producto y guárdelo para poder
consultarlo en el futuro.
2 Siga todas las advertencias e instrucciones marcadas en el producto.
3 Utilice este producto para uso doméstico tal y como se describe en este manual. No utilice
accesorios no recomendados por Philips Electronics North America Corporation.
4 Desenchufe este producto del tomacorriente en la pared antes de limpiar. No utilice líquidos
limpiadores o aerosoles de limpieza. Utilice un paño húmedo para realizar la limpieza.
5 No debe usar los productos mientras se encuentra en la bañera, ducha o piscina.Al sumergir
el producto en el agua puede provocar una descarga eléctrica.
6 Las ranuras y aberturas en la parte inferior o trasera del gabinete son para la ventilación a fin
de proteger el producto del sobrecalentamiento. No se deben bloquear ni tapar estas
aberturas. Estas aberturas nunca se deben bloquear colocando el producto sobre la cama,
sofa, alfombra u otra superficie similar. Este producto no debe colocarse en un lugar cerrado
a menos que se le proporcione la ventilación adecuada.
7
Este producto debe utilizarse únicamente con el tipo de fuente de alimentación indicado en la
placa de especificaciones de los adaptadores (A-11, B13). Si no está seguro del tipo de suministro
de energía de su hogar, consulte con su distribuidor o con la empresa de energía local.
8 No permita que nada se apoye sobre el cable de corriente. No ubique este producto donde
el cable pueda ser dañado por personas que caminen sobre el mismo.
9 No sobrecargue los tomacorrientes de la pared y los cables de extensión porque esto puede
provocar el riesgo de incendio o descarga eléctrica.
10 No coloque objetos de ningún tipo dentro del producto a través de las ranuras del gabinete
ya que se pueden tocar puntos peligrosos de voltaje o poner en cortocircuito partes que
pueden causar el riesgo de incendio o descarga eléctrica. No derrame líquido de ningún tipo
sobre el producto.
11 Para disminuir el riesgo de descarga eléctrica,no desarme este producto, y lléveselo a un personal
de servicio de mantenimiento calificado cuando se requiere un trabajo de mantenimiento o
reparación. Las aberturas o las tapas desmontables (excepto las tapas del compartimiento de las
pilas) pueden exponerlo a un voltaje peligroso o a otros riesgos. Si se utiliza el aparato luego de
un rearmado incorrecto posiblemente cause una descarga eléctrica.
Bienvenido
Page 42

ES
12 No exponga el producto a temperaturas extremas como áreas cerca de un calefactor o
estufa o en un automóvil caliente.
13 No apoye velas encendidas, cigarrillos, cigarros, etc., sobre el producto.
14
Desenchufe el producto de la toma de alimentación, deje de utilizarlo y llévelo al servicio técnico
autorizado de Philips para su examen y reparación en los casos siguientes:
A. Cuando el cable o enchufe de suministro de energía está dañado o pelado.
B. Si el producto ha estado expuesto a la lluvia o al agua.
C. Si el producto no funciona normalmente de acuerdo a las siguientes instrucciones de uso.
D. Si se ha dañado el gabinete del producto.
E. Si el producto muestra un cambio notable en su funcionamiento.
15 No coloque este producto en un carro, soporte o mesa no estable. El producto puede
caerse, y dañarse de manera severa.
16 Asegúrese que la unidad del bebé y el cable adaptador estén siempre lejos del alcance del
bebé. (por lo menos a 1 metro / 3 pies de distancia).
17 Nunca coloque la unidad del bebé dentro de la cama del bebé o del corralito.
18 Nunca cubra el vigilabebés (con una toalla, sábana, etc.)
Si su producto utiliza pilas, se deben tener en cuenta las siguientes precauciones
adicionales:
1 Utilice sólo el tipo y tamaño de pila(s) especificado en el manual del usuario.
2 No deseche las pilas en el fuego. Pueden explotar. Consulte las normas de su región para
conocer sobre las posibles instrucciones especiales de desecho.
3 Manipule con cuidado las pilas para que no se pongan en cortocircuito con materiales conductivos
como anillos, brazaletes y llaves. Evite sobrecargas, cortocircuitos, cargas inversas, mutilación o
incineración de las pilas (de botón y otras) para evitar que se produzcan uno o más de los
siguientes incidentes: liberación de materiales tóxicos, liberación de gas hidrógeno y oxígeno,
aumento de la temperatura de la superficie.
4 No trate de recargar las pilas que se suministran o que se identifican para el uso de este producto
que no son recargables. Las pilas pueden poseer fugas de electrolito corrosivo o explotar.
5 No trate de rejuvenecer las pilas que se suministran o que se identifican para el uso de este
producto calentándolas. Puede ocurrir una liberación repentina del electrolito de las pilas,
causando quemaduras o irritación en los ojos o en la piel.
6 Si es necesario, sustituya estas pilas (de botón u otras) por otras idénticas del mismo fabricante. Si
alguna de las pilas (de botón u otras) que ha de sustituirse está conectada a otras pilas en serie, se
recomienda sustituir al mismo tiempo las demás pilas por otras nuevas.
7 No instale las pilas (de botón u otras) con la polaridad invertida. La colocación de manera inversa
de las pilas puede causar una carga y esto puede tener como resultado una pérdida o una
explosión.
8 Quite las pilas del producto si lo va a guardar por más de 30 días porque las pilas pueden tener
una fuga y dañar el producto.
9 Deseche las pilas ‘descargadas’ tan pronto como sea posible ya que es más probable que estas pilas
‘descargadas’ tengan una fuga en el producto. Si una pila (de botón u otras) tiene fugas o escapes,
debe sustituirse inmediatamente utilizando para ello guantes de protección.
Bienvenido
43
Page 43

10 No almacene este producto o las pilas que se suministran o que se identifican para el uso de este
producto en zonas de alta temperaturas. Las pilas que se guardan en un congelador o heladera
para extender su duración deben protegerse de la condensación durante el guardado y la
descongelación. Luego del almacenamento en el frío, las pilas deben estabilizarse a la temperatura
del cuarto antes de utilizarlas.
11 Si su producto utiliza pilas recargables,cargue las pilas sólo de acuerdo a las instrucciones y
limitaciones especificadas en el manual del usuario.
12 Existe un riesgo de explosión si las pilas se cambian por un tipo incorrecto. Para la unidad de
padres, siempre utilice pilas recargables.
GUARDE ESTAS INSTRUCCIONES
SPRECAUCIÓN: Desenchufe el cable de alimentación antes de cambiar las pilas.
SUtilice sólo los adaptadores de corriente suministrados con este vigilabebés. El adaptador
de polaridad o voltaje incorrecto puede dañar seriamente el vigilabebés.
Adaptadores para la unidad del bebé y para la base de carga:
Entrada: 120 VCA 60 Hz
Salida: 9 VCC 300 mA
S PRECAUCIÓN: EXISTE RIESGO DE EXPLOSIÓN SI LAS PILAS SE
CAMBIAN POR UN TIPO INCORRECTO. DESECHE LAS PILAS USADAS
SEGÚN LAS INSTRUCCIONES.
Utilice pilas alcalinas AA de 1,5 V sólo para la unidad del bebé (no se suministran).
Utilice pilas AAA Ni-MH recargables de 1,2 V sólo para la unidad de padres (se suministran
pilas).
ES
Bienvenido
44
Page 44

ES
45
A. Unidad del bebé
A-1 Botón de encendido/apagado (y)
A-2 Luz LINK
A-3 Luz nocturna
A-4 Botones de volumen – / +
A-5 Micrófono
A-6 Botón PAGE
A-7 Botón de luz nocturna ( )
A-8 Luz de comprobación de pila ( )
A-9 Tapa del compartimiento de pilas
A-10 Enchufe de alimentación de CC 9V / 300mA
A-11 Adaptador de alimentación de CA
B. Unidad de padres
B-1 Botón de comunicación TALK
B-2 Botón de sensibilidad SENSITIVITY
B-3 Altavoz
B-4 Micrófono
B-5 Botón de encendido/apagado (y)
B-6 Luz de comprobación de pila ( )
B-7 Luz de conexión LINK
B-8 Luces de nivel de sonido
B-9 Botones de volumen – / +
B-10 Muestra para el clip para el cinturón
B-11 Tapa del compartimiento de pilas
B-12 Clip para el cinturón
B-13 Adaptador de alimentación de CA
B-14 Base de carga
B-15 Luz indicadora de corriente POWER
B-16 Correa para el cuello
C. Otras cosas que necesita
Ambas unidades pueden funcionar con pilas.
Para funcionamiento con pilas, necesitará:
– 4 pilas alcalinas AA de 1,5 V para la unidad del bebé
(no incluidas).
– 2 pilas AAA de 1,2 V Ni-MH recargables para la unidad de
padres (suministradas)
Descripción de las funciones
Page 45

3 Ilustraciones
42 Bienvenido
42 Instrucciones de seguridad importantes
45 Descripción de las funciones
45 Unidad del bebé
45 Unidad de padres
45 Otras cosas que necesita
46 Contenido
47 Preparación del vigilabebés para utilizarlo
47 Unidad del bebé
48 Unidad de padres
49 Utilización del vigilabebés
50 Otras funciones
50 Ajuste del volumen del altavoz
51 Cómo hablarle a su bebé
51 Ajuste de la sensibilidad del micrófono
52 Vigilancia silenciosa del bebé
52 Encendido/apagado de la luz nocturna
53 Enganche/desenganche del clip para el cinturón y la
correa para el cuello
53 Cómo llamar a la unidad de padres
54 Resolución de problemas
56 Preguntas frecuentes
57 Información importante
57 Especificaciones técnicas
57 Mantenimiento
58 Información medioambiental
58 Modo de inicialización de fábrica
59 Información sobre el cumplimiento
59 Interferencia de radio
59 Disposiciones sobre exposición a la radiación RF
de la FCC
60 Ayuda
60 Garantía
ES
Contenidos
46
Page 46
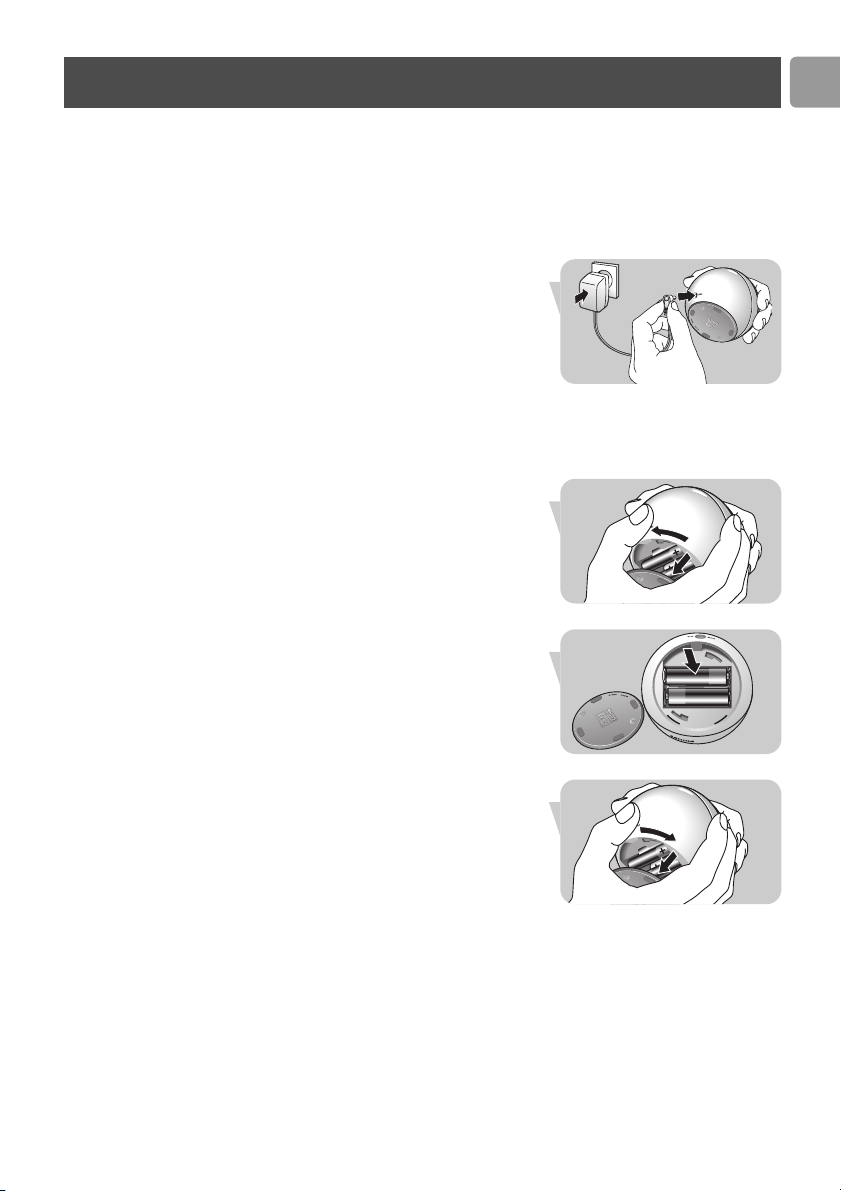
ES
47
Unidad del bebé
La unidad del bebé puede funcionar con corriente eléctrica o
con pilas. Cuando las pilas están colocadas, tiene energía de
respaldo automática en caso de un corte de corriente.
Uso con cable
1 Conecte el cable del adaptador de corriente (A-11) al
enchufe de alimentación (CC 9V / 300mA - A-10) del
vigilabebés.
2 Conecte el adaptador de CA (A-11) a un tomacorriente de
pared.
➜ ¡La unidad de bebés ya está lista para utilizarla con
cable.!
Funcionamiento con pilas
1 Abra el compartimiento de las pilas girando la tapa (A-9)
hacia la izquierda (C OPEN), utilizando la palma de la mano.
Retire la tapa.
2 Coloque cuatro pilas AA de 1.5 V, observando la configuración
+ y – en el interior del compartimiento de las pilas (las pilas
no se suministran; recomendamos pilas alcalinas Philips).
3 Vuelva colocar la tapa del compartimiento de pilas (A-9).
Cierre el compartimiento de las pilas girando la tapa (A-9)
hacia la derecha (CLOSE B),utilizando la palma de la mano.
➜ ¡La unidad del bebé ahora está preparada para
funcionamiento con pilas!
Preparación del vigilabebés para utilizarlo
+
+
+
+
+
+
+
+
Page 47

Unidad de los padres
1 Abra el compartimiento de las pilas deslizando la tapa (B-11)
hacia abajo.
2 Coloque dos pilas AAA NiMH recargables de 1,2 V
(suministradas) observando la configuración + y - dentro del
compartimiento de las pilas.
3 Vuelva a colocar la tapa del compartimiento de pilas (B-11).
Cierre el compartimiento deslizando la tapa (B-11) hacia
arriba hasta que se ajuste en su sitio.
4 Conecte el adaptador de CA (B-13) de la base de carga
(B-14) a un tomacorriente de pared.
5 Coloque la unidad de padres en la base de carga (B-14).
> La luz POWER (B-15) se enciende de color rojo.
6 Deje la unidad de los padres en la base de carga hasta que las
pilas estén completamente cargadas (por lo menos 16 horas).
> La luz POWER (B-15) permanece de color rojo aunque las
pilas estén completamente cargadas.
> Cuando las pilas están totalmente cargadas, la unidad de
padres se puede quitar de la base de carga y usarse de
manera inalámbrica durante al menos 8 horas.
Notas:
– El tiempo de funcionamiento será de 8 horas cuando la
unidad del bebé está transmitiendo el 25% del tiempo y se
encuentra en modo de espera el resto del tiempo (el bebé no
produce ningún sonido).
– Cuando las pilas de la unidad de padres se cargan por
primera vez, el tiempo de funcionamiento será de menos de
8 horas. Las pilas utilizarán su capacidad máxima luego de por
lo menos cuatro veces de cargarlas y descargarlas.
ES
48
Preparación del vigilabebés para utilizarlo
+
+
+
+
+
+
+
+
+
+
Page 48

ES
– La carga llevará más de 16 horas cuando la unidad de padres
está activada durante la carga. Para reducir el tiempo de
carga, la unidad de padres debe estar apagada.
➜ ¡Ahora la unidad de los padres está preparada para
utilizarse!
Notas generales:
– Cuando las unidades están desactivadas, en caso de que
funcionen con pilas, éstas se gastarán lentamente.
– Cuando las pilas están casi agotadas, la luz de comprobación de
las pilas de la unidad de los padres (B-6) empieza a parpadear de
color rojo; la luz de comprobación de las pilas de la unidad del
bebé (A-8) aparece encendida continuamente de color rojo.
– Coloque la unidad de padres en la base de carga (B-14) para
recargar las pilas y/o cambia las pilas en la unidad del bebé.
Preparación del vigilabebés para utilizarlo
Utilice este vigilabebés para uso doméstico tal y como
se describe en este manual.
1 Coloque ambas unidades en la misma sala para comprobar la
conexión.Asegúrese de que la unidad del bebé esté por
menos a 1 metro de distancia de la unidad de los padres.
2 Mantenga apretado el botón de encendido/apagado(y) (A-1)
de la unidad del bebé durante 2 segundos.
> La luz nocturna (A-3) se enciende brevemente.
> La luz de conexión LINK (A-2) parpadea en rojo brevemente
y, después, empieza a parpadear en verde mientras intenta
establecer la conexión con la unidad de padres. Si transcurridos 30 segundos no se establece la conexión, aparecerá en la
pantalla el mensaje "Not Linked" (No hay conexión entre las
unidades) y la luz LINK comenzará a parpadear en rojo mientras
intenta establecer la conexión con la unidad de padres..
3 Mantenga apretado el botón de encendido/apagado (y) (B-5)
de la unidad de padres durante 2 segundos.
> Las luces de nivel de sonido (B-8) se encienden brevemente
de color naranja.
> La luz de comprobación de la pila ( - B-6) se enciende
brevemente de color rojo.
> La luz LINK (B-7) se enciende brevemente de color rojo y
después empieza a parpadear de color verde, buscando la
conexión con la unidad del bebé.
Utilización del vigilabebés
49
> 1m / 3 ft
Page 49

> Las luces LINK (A-2, B-7) de ambas unidades parpadean de
color verde hasta que la conexión ha sido establecida. Esto
llevará aproximadamente 30 segundos. Seguidamente ambas
luces LINK (A-2, B-7) estarán encendidas continuamente de
color verde.
> Si después de 30 segundos no se ha establecido una
conexión, ambas luces LINK (A-2, B-7) se encenderán de
color rojo y la unidad de los padres emitirá un pitido
ocasionalmente.
4 Coloque la unidad del bebé por lo menos a 1 metro de
distancia del bebé.
5 Coloque la unidad de los padres en el lugar deseado dentro
del alcance de la unidad del bebé pero por lo menos a 1
metro de distancia de la misma. Para obtener más
información sobre el alcance consulte ‘Especificaciones
técnicas’.
➜ ¡Ahora puede vigilar a su bebé!
ES
50
Utilización del vigilabebés
Otras funciones
Ajuste del volumen del altavoz
• Presione brevemente los botones + y – (A-4) de la unidad
del bebé hasta que se alcance el volumen de altavoz deseado
para la unidad del bebé.
• Presione brevemente los botones + y – (B-9) de la unidad de
padres hasta que se alcance el volumen de altavoz deseado
para la unidad de padres.
Notas:
– Si mantiene apretados los botones de volumen + y –
(A-4, B-9) durante demasiado tiempo, el volumen no se
ajustará.
– Cuando el volumen se ajusta a un nivel alto, las unidades
consumen más energía.
> 1m / 3 ft
Page 50

ES
Otras funciones
51
Cómo hablarle a su bebé
Utilizando el botón de comunicación TALK (B-1) de la unidad
de los padres puede hablar con su bebé (por ejemplo, para
tranquilizarlo).
• Mantenga apretado el botón TALK (B-1) y hable claramente
en el micrófono (B-4).
• Cuando termine de hablar deje de pulsar el botón TALK (B-1).
Nota: Mientras el botón TALK (B-1) está apretado, no se puede
oír al bebé.
Ajuste de la sensibilidad del micrófono
Puede ajustar la sensibilidad del sonido de la unidad del bebé al
nivel deseado. Cuando está puesta al nivel de sensibilidad
máximo, en la unidad de los padres pueden oírse todos los
sonidos (incluso la respiración del bebé, cuando es
suficientemente ruidosa) Sólo puede cambiar la sensibilidad del
micrófono si la conexión entre la unidad del bebé y la unidad de
padres está establecida (cuando las luces LINK (A-2, B-7) están
encendidas de color verde sin parpadear).
1 Presione brevemente el botón SENSITIVITY (B-2) de la
unidad de los padres.
> Las luces de nivel de sonido (B-8) proporcionan
retroinformación visual sobre el nivel de sensibilidad actual
durante aproximadamente 2 segundos.
2 Presione breve y repetidamente los botones de volumen + y
– (B-9) de la unidad de padres hasta que se alcance la
sensibilidad del micrófono deseada para la unidad del bebé
Nota: Si mantiene apretado el botón SENSITIVITY y/o los
botones de volumen + y – (B-9) durante demasiado
tiempo, la sensibilidad del micrófono no se ajustará.
Page 51

> Las luces de nivel de sonido (B-8) proporcionan
retroinformación visual sobre el nuevo ajuste durante
aproximadamente 2 segundos.
- 1 luz (1 de color naranja) =
nivel mínimo/sensibilidad mínima;
- Todas las luces (5 de color naranja) =
nivel máximo (transmisión continua)/sensibilidad máxima.
Nota:
Cuando el nivel de sensibilidad de la unidad del bebé se
ajusta en un nivel alto, la unidad consumirá más energía
porque se encuentra en un modo de transmisión continua.
Vigilancia silenciosa del bebé
• Presione breve y repetidamente el botón de volumen (B-9) de
la unidad de padres hasta que el volumen esté completamente
desactivado
> Ahora todas las luces de nivel de sonido (B-9) estarán
apagadas.
> Cuando no se detecta sonido todas las luces de nivel de
sonido (B-8) estarán apagadas.
> Cuando se detecta sonido las luces de nivel de sonido (B-8)
se encienden de color naranja.
Encendido/apagado de la luz nocturna
1 Presione brevemente el botón de luz nocturna ( ) (A-7) de
la unidad del bebé para encender la luz nocturna (A-3).
2 Presione brevemente el botón de luz nocturna ( ) (A-7) de
nuevo para apagar la luz nocturna (A-3).
> La luz nocturna se atenúa gradualmente hasta que se apaga.
• Apague la luz nocturna cuando la unidad del bebé funcione
con pilas. ¡Esto ahorra energía!
Nota: Si mantiene apretado el botón de luz nocturna ( ) (A-7)
durante demasiado tiempo, la luz nocturna (A-3) no se
enciende/apaga.
ES
52
Otras funciones
Page 52

ES
Otras funciones
53
Enganche/desenganche del clip para el
cinturón y la correa para el cuello
Si la unidad de los padres funciona con pilas, puede llevarla por
toda la casa, lo que le da libertad de movimiento mientras vigila
a su bebé.
Enganche
• Inserte el pequeño huso situado en la parte trasera del clip
para el cinturón en la muesca (B-10) de la parte trasera de la
unidad de los padres. Gire el clip para el cinturón hacia la
izquierda hasta que se ajuste en posición.
Desenganche
• Gire el clip para el cinturón hacia la derecha (TURN B) y
retírelo.
Enganche de la correa para el cuello
• Inserte el pequeño husillo situado en el extremo de la correa
para el cuello en la muesca (B-10) de la parte trasera de la
unidad de padres. Gire el husillo hacia la izquierda hasta que
se ajuste en posición.
Desenganche de la correa para el cuello
• Gire el husillo hacia la derecha (TURN B) y retírelo.
Cómo localizar la unidad de padres
Cuando no se sabe dónde se ha dejado la unidad de los padres
y el volumen está desactivado, puede utiliza el botón de
localización PAGE (A-6) de la unidad del bebé para localizar la
unidad de los padres.
1
P
resione brevemente el botón PAGE (A-6) de la unidad del bebé.
> En la unidad de padres sonará una alerta de localización.
2 Para detener la alerta de localización, presione brevemente el
botón page (A-6) de nuevo o cualquier botón de la unidad de
padres.
Nota: Si mantiene apretado el botón PAGE (A-6) demasiado
tiempo, la alerta de localización no sonará.
Page 53

Problema Posible causa Solución
La luz LINK (A-2, B-7) Unidad de padres: Conecte el adaptador de corriente
no se enciende en El adaptador de corriente (B-13) a la unidad de padres.
absoluto. (B-13) no está enchufado. Conecte el adaptador de corriente
(B-13) al tomacorriente de pared.
La unidad no se activa. Mantenga apretado el botón de
encendido/apagado (y) (B-5)
durante dos segundos.
Las pilas están gastadas. Recargue las pilas (B-11).
Las pilas están vacías. Cambie las pilas (B-11).
Unidad del bebé:
El adaptador de corriente Conecte el adaptador de corriente
(A-11) no está enchufado (A-11) a la unidad del bebé.
Conecte el adaptador de corriente
(A-11) al tomacorriente de pared.
Las pilas están colocadas Coloque las pilas correctamente.
incorrectamente.
La unidad no se activa. Mantenga apretado el botón de
encendido/apagado (y) (A-1)
durante dos segundos.
Las pilas están casi agotadas. Cambie las pilas (A-9).
La luz LINK (A2, B-7) Las unidades están fuera de su Reduzca la distancia entre las
parpadea de color rojo/ alcance mutuo. unidades (consulte
la alarma emite pitidos ‘Especificaciones técnicas).
en la unidad de padres.
Las pilas de la unidad del bebé Cambie las pilas (A-11).
están agotadas.
Las pilas de la unidad de padres Recargue las pilas (B-11).
están agotadas.
Las pilas de la unidad de padres Cambie las pilas (B-11).
están vacías.
Las unidades no pueden establecer Intente resolver el problema
una conexión, incluso cuando utilizando el modo de inicialización
están cerca la una de la otra. de fábrica. Consulte el capítulo
‘Modo de inicialización de fábrica’
Una de las unidades no está Mantenga apretado el botón de
activada. encendido/apagado (A-1, B-5s)
durante dos segundos.
ES
54
Resolución de problemasESResolución de problemas
Page 54

55
Problema Posible causa Solución
Ruido muy agudo. Las unidades están demasiado Aparte la unidad de padres de la
cerca la una de la otra. unidad del bebé (por lo menos
1 metro).
El volumen de la unidad de Reduzca el volumen (B-9) de la
padres es demasiado alto. unidad de padres.
No se oye ningún sonido/ El volumen de la unidad de Aumente el volumen de la unidad
llanto del bebé. padres es demasiado bajo o de padres (B-9).
está desactivado.
El nivel de sensibilidad del Aumente el nivel de sensibilidad
micrófono es demasiado bajo en del micrófono (B-2) de la unidad
la unidad de padres. de padres.
Las unidades están fuera de su Acerque la unidad de padres a la
alcance mutuo. unidad del bebé.
La unidad de padres Los sonidos ambientales activan Acerque la unidad del bebé al
reacciona demasiado la transmisión. bebé (mantenga una distancia
rápidamente a otros mínima de 1 metro).
sonidos ambientales.
El nivel de sensibilidad del Reduzca el nivel de sensibilidad del
micrófono es demasiado alto. micrófono (B-2) en el menú de la
unidad de padres.
La unidad de padres El nivel de sensibilidad del Aumente el nivel de sensibilidad
reacciona lentamente/ micrófono es demasiado bajo. del micrófono (B-2) en el menú de
tarde al llanto del bebé. la unidad de padres y/o acerque la
unidad del bebé al bebé (mantenga
una distancia mínima de 1 metro).
Luz de comprobación Las pilas están casi agotadas. Cambie las pilas (A-9, B-11).
de pila ( )
Energía de la pila Configuración de la sensibilidad Establezca la sensibilidad del
de la unidad del bebé del micrófono está demasiado micrófono a nivel más bajo (B2).
disminuye rápidamente. alto.
El volumen establecido Ajuste el volumen en en nivel
está demasiado alto. más bajo (A-4).
Tiempo de carga de las Unidad de padres activada Desactivada la unidad de padres
pilas de la unidad de durante la carga. (B-6).
padres exceden 16 horas.
Page 55

Pregunta
Las especificaciones técnicas
muestran un alcance eficaz de
300 metros en el exterior.
¿Cómo es que mi vigilabebés
alcanza mucho menos que esto?
La conexión se pierde
ocasionalmente, hay
interrupciones de sonido, etc.
¿Qué ocurre durante un corte
de corriente eléctrica?
¿Está protegido mi vigilabebés
contra escucha indebida e
interferencias?
Parece que algunos botones
no funcionan cuando los pulso.
¿Qué hago incorrectamente?
El tiempo de funcionamiento
de las pilas de la unidad de
padres se supone que es de
por lo menos 8 horas.
¿Cómo puede ser que el
tiempo de funcionamiento de
las pilas de mi unidad de
padres es menor?
ES
56
Preguntas frecuentes
Respuesta
El alcance especificado solamente es válido al aire libre.
En el interior de la casa el alcance eficaz está limitado por el
número y tipo de paredes y/o techos que la señal tiene que
atravesar. En el interior de la casa el alcance eficaz será de hasta
50 metros.
Quizás se esté acercando a los límites del alcance eficaz. Pruebe
en un lugar diferente o reduzca ligeramente la distancia. Debe
observar que lleva alrededor de 30 segundos establecer una
nueva conexión entre las unidades.
Cuando hay pilas instaladas en ambas unidades, éstas pasan
automáticamente al funcionamiento con pilas en caso de corte
de corriente eléctrica.
Los 60 canales (para NA FCC/IC) garantizan que no haya
interferencia desde otros equipos.
Excepto por los botones de encendido/apagado y botón de
comunicación TALK (A-1, B-5), solamente presione los botones
brevemente.
Cuando las pilas de la unidad de padres se cargan por primera
vez, el tiempo de funcionamiento será de menos de 8 horas. Las
pilas utilizarán su capacidad máxima luego de por lo menos
cuatro veces de cargarlas y descargarlas.
Tal vez el volumen establecido sea demasiado alto. Cuando el
volumen se ajusta a un nivel alto,las unidades consumen más
energía.Ajuste el volumen en un nivel más bajo (B-9).
Tal vez la sensibilidad del micrófono sea demasiado alta. Cuando
la sensibilidad se ajusta a un nivel alto, las unidades consumen
más energía.Ajuste la sensibilidad en un nivel más bajo (B-2).
Page 56

ES
Fuente de alimentación
Alcance
Temperatura operativa
Especificaciones técnicas
Información importante
57
Preguntas frecuentes
– 1 adaptador de CA CC 9V / 300MA para la unidad del
bebé (suministrado)
– 1 base de carga de CC 9V / 300 mA para la unidad de
padres (suministrada)
– 4 pilas alcalinas AA de 1,5 V para la unidad del bebé
(no suministradas).
– 2 pilas AAA de 1,2 V Ni-MH recargables para la unidad de
padres (suministradas).
Hasta 300 metros en condiciones ideales. Las paredes,
puertas, etc. afectarán el alcance. Dentro de la casa el
alcance es de hasta 50 metros.
Materiales secos Espesor del Pérdida de
material alcance
Madera, yeso cartón, < 30 cm / 12’ 0 - 10%
cartón, vidrio (sin metal
o alambres, no cable)
Ladrillo, madera < 30 cm / 12’ 5 -35%
contrachapada
Hormigón reforzado < 30 cm / 12’ 30 -100%
Rejas, barras metálicas < 1cm / 0,4’ 90 -100%
Chapas de aluminio,
metálicas < 1cm / 0,4’ 100%
+32°F - +104°F
Digital Enhanced Cordless Telecommunication (DECT)
(Telecomunicaciones inalámbricas mejoradas digitales)
El estándar DECT utiliza técnicas de radio digital avanzadas
para conseguir el uso eficiente del espectro de radio.
Proporciona alta calidad de voz y seguridad y tecnología que
usa poca energía. Le permite oír a su bebé a una distancia
de hasta 300 metros al aire libre.
Mantenimiento
•Limpie el vigilabebés con un paño húmedo.
• Deseche las pilas usadas de una forma inocua para el
medio ambiente.
• Cuando hay pilas colocadas al utilizarse el funcionamiento
con corriente eléctrica, revise las pilas cada seis meses
por si hay alguna fuga.
• Cuando hay pilas colocadas al utilizarse el funcionamiento
con corriente eléctrica, revise las pilas cada seis meses
por si hay alguna fuga.
Page 57

Información medioambiental
Desecho del producto antiguo
El producto se ha diseñado y fabricado con materiales y
componentes de alta calidad, que se pueden reciclar y volver a
utiliza.
Obtenga información sobre la recogida selectiva local de
productos eléctricos y electrónicos.
Cumpla con la normativa local y no deseche los productos
antiguos con los desechos domésticos. El desecho correcto del
producto antiguo ayudará a evitar consecuencias negativas para
el medioambiente y la salud humana.
Modo de inicialización de fábrica
En este modo, ambas unidades pueden restaurarse a los ajustes
por defecto de fábrica. Puede utilizarse la inicialización de
fábrica si surgen problemas que no pueden solucionarse
siguiendo las sugerencias del capítulo ‘Resolución de
problemas’. La restauración debe realizarse por separado para
cada unidad.
1 Mantenga apretado el botón de encendido/apagado (y)
(A-1, B-5) durante 2 segundos para activar las unidades.
2
Cuando las luces LINK (A-2, B-7) de las unidades se encienden,
presione inmediatamente y mantenga apretado el
botón de volumen – (A-4, B-9) durante 1 segundo.
> Ahora las unidades han sido restauradas a los ajustes por
efecto de fábrica.
Ajustes por defecto de fábrica
Unidad de padres
– Volumen del altavoz: 1
– Sensibilidad de micrófono: 3
Unidad del bebé
– Volumen del altavoz: 3
– Luz nocturna: apagada
ES
58
Información importante
Page 58

ES
Información importante
59
El número de identificación de FCC se encuentra debajo del gabinete de la unidad de padres y en
el compartimiento de la unidad del bebé.
El término ‘IC:’ antes del número de certificación significa que se cumplen las especificaciones
técnicas de la industria de Canadá. Esta certificación significa que el equipo cumple ciertos
requerimientos de comunicación de radio y operacionales.
Información sobre el cumplimiento
Este dispositivo cumple con la Parte 15 de las normas de FCC y ICESS-003 de Industry Canada
(Industria de Canadá). El funcionamiento está sujeto a las dos condiciones siguientes: (1) este
dispositivo no puede causar interferencias perjudiciales, y (2) este dispositivo debe aceptar
cualquier interferencia recibida, inclusive las que puedan causar un funcionamiento no deseado.
Este dispositivo cumple también con la norma RSS-213 de Industria de Canadá.
Interferencia de radio
Este equipo ha sido probado y se encontró que obedece a los límites para un dispositivo digital
de Clase B, conforme a la Parte 15 de las normas de FCC y correspondiente a las especificaciones de Industria de Canadá. Estos límites están diseñados para brindar una protección razonable
contra las interferencias perjudiciales en una instalación residencial. Este equipo genera, utiliza y
puede irradiar energía de frecuencia de radio. Si no se instala y se usa de acuerdo con las
instrucciones, puede provocar interferencias perjudiciales a las comunicaciones de radio.Sin
embargo, no hay garantías que aseguren que las interferencias no ocurrirán en una instalación en
particular. Si este equipo no causa interferencias perjudiciales en la recepción de televisión o
radio, que puede determinarse al encender o apagar el equipo, se recomienda al usuario tratar de
corregir estas interferencias por una o más de las siguientes medidas:
• Reorientar o reubicar la antena receptora.
• Aumentar la separación entre el equipo y el receptor.
• Conectar el equipo en un tomacorriente de un circuito diferente al que está conectado el receptor.
Disposiciones sobre exposición a la radiación RF
Este equipo cumple con los límites de la exposición a la radiación RF de la FCC establecidos para
un ambiente no controlado. Este equipo se debe instalar y utiliza con una distancia mínima de
20 centímetros entre el radiador y su cuerpo. Para el uso portátil, este equipo se ha probado y
cumple con las normas de exposición de la FCC RF. El uso de otros accesorios no asegura el
cumplimiento de las normas de exposición RF de la FCC. Para el funcionamiento portátil sobre
el cuerpo, se ha probado y cumple con las reglas de exposición al utilizarse con el clip para el
cinturón o el cordón para el cuello que se suministra con el producto.El usuario debe mantener
una distancia de separación de 3 mm entre la parte trasera de la unidad y el cuerpo para
asegurar el cumplimiento. El uso de otros accesorios no asegura el cumplimiento de las normas
de exposición RF de la FCC. Este transmisor no se debe colocar o hacer funcionar en conjunto
con cualquier otra antena o transmisor. Este equipo cumple también con las normas de Industria
de Canadá RSS-102 en relación con el Código 6 de salud de Canadá para la exposición humana a
campos de radiofrecuencia.
No intente reparar o modificar este equipo
Cualquier reparación o alteración realizada por el usuario en el equipo puede causar que el
equipo anule la garantía y el cumplimiento del producto. Busque servicio de mantenimiento en
centros autorizados o designados.
Page 59

ES
60
Ayuda
Para obtener ayuda,llame al teléfono gratuito:
1-800-243-7884 (EE.UU.)
O visite nuestro sitio Web:
www.philips.com
La información está disponible 24 horas al día, los 7 días de la semana.
Garantía
DOS AÑOS DE GARANTÍA
Philips Electronics North America Corporation garantiza cada nuevo producto Philips Babycare
frente a defectos de materiales o fabricación durante un período de dos años a partir de la fecha
de compra y se compromete a reparar o sustituir sin cargo cualquier producto defectuoso.
IMPORTANTE: esta garantía no cubre los daños resultantes de accidentes, mal uso o abuso,
falta razonable de mantenimiento, el uso de accesorios no suministrados con el producto, la
pérdida de piezas o el uso del aparato con un voltaje distinto al especificado*. El uso de piezas de
repuesto no autorizadas anulará esta garantía.
PHILIPS ELECTRONICS NORTH AMERICA CORPORATION NO PAGARÁ
SERVICIOS DE GARANTÍA LLEVADOS A CABO POR SERVICIOS DE
REPARACIÓN NO AUTORIZADOS,Y NO REEMBOLSARÁ AL CONSUMIDOR
POR DETERIOROS RESULTANTES DEL SERVICIO DE GARANTÍA LLEVADO A
CABO POR SERVICIOS DE REPARACIÓN NO AUTORIZADOS.
NO SE ASUME LA RESPONSABILIDAD POR NINGÚN DAÑO ESPECIAL,
INCIDENTAL O CONSECUENCIAL.
Para disfrutar del servicio de garantía, sólo tiene que enviar el producto en un sobre franqueado
al servicio técnico autorizado de Philips Norelco (información disponible en línea en
www.philips.com o a través del número 1-800-243-7884). Por seguridad, recomendamos realizar
la devolución de productos por correo certificado y asegurado. La garantía no cubre los daños
producidos durante el envío.
NOTA: Ninguna otra garantía, ya sea escrita u oral, está autorizada por Philips Electronics North
America Corporation.
Esta garantía le otorga derechos específicos y además puede tener otros derechos que varían
entre estados.Algunos estados no permiten la exclusión o limitación de los daños fortuitos o
resultantes, por lo que la exclusión y limitaciones anteriores no se aplicarían en este caso.
* Lea atentamente las instrucciones que se incluyen.
Fabricado para:
Philips Domestic Appliances and Personal Care Company
A Division of Philips Electronics North America Corporation
1010 Washington Blvd., Stamford, CT 06912-0015, EE.UU.
Este símbolo colocado en la placa de características del producto significa que está
registrado por Underwriters Laboratories, Inc.
PHILIPS es una marca registrada de Koninklijke Philips Electronics N.V.
©2006 Philips Electronics North America Corporation. Reservados todos los derechos.
Page 60

Specifications are subject to change without notice.
Trademarks are the property of Koninklijke Philips Electronics N.V. or their respective owners.
2006 © Koninklijke Philips Electronics N.V. All rights reserved.
www.philips.com
0682
www.philips.com
This document is printed on chlorine free produced paper
Data subject to change without notice
4222 002 65101 Printed in China NMW/RR/RD/0606
 Loading...