

Page 1

SCD560
User manual
Page 2

Page 3

1
Page 4

Page 5

ENGLISH 6
ESPAÑOL 11
FRANÇAIS (CANADA) 17
PORTUGUÊS DO BRASIL 23
SCD560
Page 6

6
ENGLISH
Introduction
Go to www.philips.com/welcome to register your product and to read the detailed user manual.
Overview (Fig. 1)
1 Signal strength indicator
2 Mute symbol
3 Battery status indicator
4 Navigation arrow
5 Microphone sensitivity indicator
6 Lullaby symbol
7 Nightlight symbol
8 Timer symbol
9 Temperature symbol
Preparing for use
IMPORTANT: Read the safety instructions carefully before you use the baby monitor
and keep them for future reference.
Baby unit
We advise you to use the baby unit on electrical power. To guarantee automatic power backup in
case of a power failure, you can insert four 1.5V AA alkaline batteries (not included).
Do not use rechargeable batteries. The baby unit does not have a charging function and
rechargeable batteries discharge slowly when they are not in use.
Parent unit
The parent unit runs on two rechargeable batteries that are supplied with the baby monitor.
Charge the parent unit before you use it for the rst time and when the batteries are low.
Please note that you have to charge the parent unit for the full 10 hours to have a
cordless operating time of 18 hours.
Note: When you start using the baby monitor, it takes four charge and discharge cycles before the
rechargeable batteries reach their full capacity.
Using the baby monitor
Positioning the baby monitor
Keep the baby unit out of the reach of the baby. Never place the baby unit inside or mount it on
the baby’s bed or playpen.
- Because the cord of the baby unit presents a potential strangulation hazard, make sure that the
baby unit and its cord are at least 1 meter/3.5 feet away from your baby.
- To prevent a high-pitched sound from one or both units, make sure the parent unit is at least
1 meter/3.5 feet away from the baby unit.
Linking parent unit and baby unit
1 Press and hold the 3 button on the baby unit for 2 seconds until the power light goes on.
2 Press and hold the 3 button on the parent unit for 2 seconds until the display lights up.
, The ‘link’ light on the parent unit starts ashing red and the message ‘LINKING’ appears on
the display.
, When the parent unit and baby unit are linked, the ‘link’ light turns solid green. The signal
strength indicator and the message ‘LINKED’ appear on the display.
Page 7

ENGLISH 7
, If no connection is established, the message ‘NOT LINKED’ is displayed and the parent unit
starts to beep.
What to do if no link is established
- If the parent unit is out of range, place it closer to the baby unit.
- If the baby or parent unit is too close to another DECT appliance (e.g. a cordless phone),
switch off this appliance or move the unit away from this appliance.
- If the baby unit is switched off, switch it on.
Operating range
- The operating range is 330 meters/1000 feet outdoors and up to 50 meters/150 feet indoors.
- The operating range of the baby monitor varies depending on the surroundings and factors that
cause interference. Wet and moist materials cause so much interference that the range loss is up
to 100%. For interference from dry materials, see table below
Dry materials Material thickness Loss of range
Wood, plaster, cardboard, glass
(without metal, wires or lead)
Brick, plywood < 30cm (12in) 5-35%
Reinforced concrete < 30cm (12in) 30-100%
Metal grilles or bars < 1cm (0.4in) 90-100%
Metal or aluminum sheets < 1cm (0.4in) 100%
Functions and feedback on the baby unit
Nightlight
The nightlight produces a soft glow that comforts your baby.
1 Press the Q button on the baby unit to switch on the nightlight.
2 Press the Q button again to switch off the nightlight.
Lullaby function
1 Press the K button on the baby unit to play the last selected lullaby. (Fig. 2)
, The selected lullaby repeats for 15 minutes.
2 Press the
3 To adjust the sound level of the lullaby, press the volume + or the volume – button on the
baby unit (Fig. 4).
Note: You can only set the loudspeaker volume on the baby unit when a lullaby is playing. If you set the volume
for the lullaby higher, the sound will also be louder when you use the talk function on the parent unit.
4 To stop lullaby playing, press the K button on the baby unit.
Paging the parent unit
If you have lost the parent unit, you can use the FIND button on the baby unit to locate the parent
unit. This function only works when the parent unit is switched on.
1 Press FIND on the baby unit and the parent unit produces a paging alert tone (Fig. 5).
2 To stop the paging alert tone, press FIND on the baby unit again or press any button on the
parent unit. The paging alert tone stops automatically after 2 minutes.
button to select another lullaby from the list. (Fig. 3)
< 30cm (12in) 0-10%
Page 8

ENGLISH8
Battery status light
1 The battery status light is solid green when the baby unit runs on battery power and the
batteries contain enough energy.
2 The battery status light ashes red quickly when the batteries run low while the baby unit is
running on battery power.
- Replace the batteries when they run low.
Functions and feedback on the parent unit
Volume
The volume can be set if the menu is not active. There are seven volume levels and a ‘volume off’ setting.
Setting the volume level
1 Press the + button or the - button once.
, The current volume level appears on the display.
2 Press the + button to increase the volume or press the - button to decrease the volume.
, If no button is pressed for more than 2 seconds, the volume level indication disappears and
the volume setting is saved.
Volume off
Below the lowest volume setting, there is a ‘volume off’ setting.
1 Press the + button or the - button once.
, The current volume level appears on the display.
2 Press and hold the - button for more than 2 seconds to set the volume to off.
, The message ‘MUTE’ and the mute symbol appear on the display (Fig. 6).
Note: If the volume is off, only the sound level lights show that the baby produces sounds.
Talk function
1 If you want to comfort your baby, press TALK on the parent unit and talk clearly into the
microphone on the front from a distance of 15-30cm (0.5-1ft) (Fig. 7).
Note: If you have set the volume for the lullaby higher on the baby unit, the sound will also be louder
when you use the talk function on the parent unit.
, The ‘link’ light starts ashing green and the message ‘TALK’ appears on the display.
2 Release TALK when you have nished talking.
Battery status indications
The battery charge status is indicated on the display by the battery status indicator and by text messages.
Battery low
When the rechargeable batteries are low, ‘BATTERY LOW’ appears on the display, the battery status
indicator is empty and ashes, and the parent unit beeps. The remaining operating time is at least
30 minutes.
Battery empty
1 If the rechargeable batteries are almost empty, the battery status light ashes red
quickly (Fig. 8).
2 If you do not connect the parent unit to an electrical outlet, it switches off.
Page 9
ENGLISH 9
Menu of the parent unit
Navigating the menu
Note: Some menu functions only work when the baby unit and the parent unit are linked.
1 Press the MENU button to open the menu. and to make the rst menu option appear (Fig. 9).
2 Use the + button to go to the next option or the - button to go to the previous option. The
arrow on the display indicates the direction you can navigate (Fig. 10).
3 Press the OK button to conrm your selection (Fig. 11).
Note: Press the MENU button if you want to leave the menu without making any changes. If there is no
input in the menu for more than 20 seconds, the menu closes automatically.
Sensitivity
This option in the parent unit menu allows you to set the microphone sensitivity of the baby unit.
The microphone sensitivity determines what noise level the baby unit picks up e.g. you will want to
hear when your baby cries, but you may be less interested in its babbling.
1 Select ‘Sensitivity’ in the menu with the + and - buttons and press OK to conrm.
2 Use the + and - buttons to increase or decrease the microphone sensitivity. The number of
lled segments shows the sensitivity level selected. Press OK to conrm the setting.
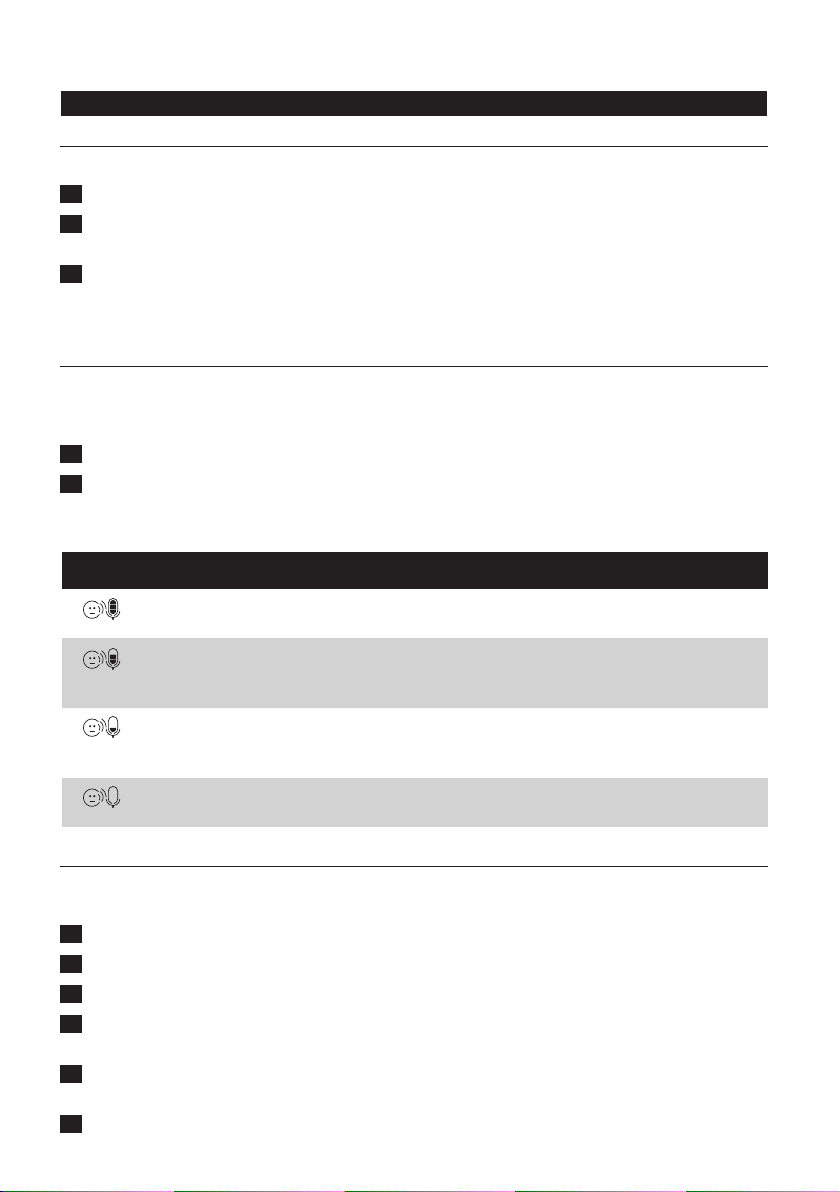
Sensitivity levels and indications
Icon Sensitivity Description
highest Hear everything from your baby. The speaker of the
high Hear all sounds from soft babbling and louder. If your
medium Hear sounds from soft cries and louder. If your baby
low The speaker of the parent unit only goes on if the baby
Feed timer
You can set the feed timer to alert you that it is time to feed your baby. The timer can be set from
1 minute to 23 hours and 59 minutes.
1 To open the feed timer submenu, select ‘Feed Timer’ in the menu. Press OK to conrm.
2 Select ‘Set Timer’ in the feed timer submenu. Press OK to start setting the timer.
3 Set the hour and the minutes press OK to conrm.
4 To start the feed timer, select ‘xx:xx Start’ in the feed timer submenu. Press OK to conrm.
The timer symbol appears on the display and the timer starts counting down (Fig. 12).
5 When the timer has reached 00:00, the feed timer alert goes off, the timer symbol starts
ashing on the display and the message ‘TIMER END’ scrolls across the display (Fig. 13).
6 To stop the timer, select ‘Stop & Reset’ in the feed timer submenu and press OK to conrm.
parent unit is continuously on.
baby does not make any sound, the speaker of the parent
unit is off.
makes softer sounds, the speaker of the parent unit does
not go on.
makes loud sounds, for instance because it is crying.
Page 10

ENGLISH10
Setting feed timer repeat
1 To make the feed timer go off after the same set time, select ‘Repeat’ in the feed timer
submenu after you have set the timer. Press OK to conrm.
2 Choose ‘Repeat ON’ or ‘Repeat OFF’ and press OK to conrm.
3 If ‘Repeat ON’ is set, the feed timer starts counting down again after you stop the alert.
Temperature
A baby sleeps comfortably at a temperature between 16°C/61°F and 20°C/68°F. You can set a
minimum and a maximum temperature range and a temperature alert.
1 To open the temperature submenu, select ‘Temperature’ in the menu. Press OK to conrm.
2 Select ‘Temp Range’ in the temperature submenu and press OK to conrm.
3 Use the + and - buttons to set the minimum temperature range between 10°C/50°F and
19°C/66°F and the maximum temperature range between 22°C/72°F and 37°C/99°F.
Press OK to conrm.
4 Select ‘Alert’ in the temperature submenu. Press OK to conrm.
5 Select ‘Alert ON’ or ‘Alert OFF’. Press OK to conrm.
6 Select ‘Temp Scale’ in the temperature submenu. Press OK to conrm.
7 Select ‘Celsius’ or ‘Fahrenheit’ and press OK to conrm.
, The temperature in the set scale appears on the display.
, If the temperature is outside the set range, the temperature alert symbol on the display
ashes and the message ‘TOO HOT’ or ‘TOO COLD’ appears on the display. If you set the
alert to on, the parent unit also beeps (Fig. 14).
Clock
The default setting for the clock is hidden. You can choose to show the clock and set the clock time
in the menu of the parent unit.
1 Select ‘Clock’ in the menu with the + and - buttons. Press OK to conrm.
2 Select ‘Show Time’ and press OK to conrm.
3 Select ‘Set Time’ and press OK to conrm.
4 Set the hour and the minutes and press OK to conrm.
, The clock time alternates with other indications in the message eld of the display.
Language
You can use this menu option to change the language setting.
1 Select ‘Language’ in the menu with the + and - buttons. Press OK to conrm.
2 Use the + and - buttons to select your language and press OK to conrm.
Guarantee and support
If you need information or support, please visit the Philips website at
www.philips.com/support or read the separate worldwide guarantee leaet.
Page 11

ESPAÑOL
Introducción
Visite www.philips.com/welcome para registrar su producto y leer el manual de usuario detallado.
Vista general (g. 1)
1 Indicador de intensidad de la señal
2 Símbolo de silenciamiento
3 Indicador del estado de la pila
4 Flecha de navegación
5 Indicador de sensibilidad del micrófono
6 Símbolo de nana
7 Símbolo de luz de compañía
8 Símbolo de temporizador
9 Símbolo de temperatura
Preparación para su uso
IMPORTANTE: Lea las instrucciones de seguridad con atención antes de utilizar el
vigilabebés y consérvelas por si necesita consultarlas en el futuro.
Unidad del bebé
Le aconsejamos que utilice la unidad del bebé conectada a la red eléctrica. Para garantizar una
alimentación de reserva automática en caso de fallo de la red eléctrica, puede insertar cuatro pilas
alcalinas AA de 1,5 V (no incluidas). No utilice pilas recargables. La unidad del bebé no dispone de
función de carga y las pilas recargables se agotan lentamente si no se utilizan.
Unidad de padres
La unidad de padres funciona con dos pilas recargables que se suministran con el vigilabebés.
Cargue la unidad de padres antes de utilizarla por primera vez o cuando las pilas se estén agotando.
Tenga en cuenta que debe cargar la unidad de padres durante 10 horas completas
para que ofrezca un tiempo de funcionamiento sin cable de 18 horas.
Nota: Cuando empiece a utilizar el vigilabebés, las pilas recargables tardan cuatro ciclos de carga y
descarga en alcanzar su capacidad total.
11
Uso del vigilabebés
Colocación del vigilabebés
Mantenga siempre la unidad del bebé fuera del alcance del bebé. Nunca coloque ni monte la
unidad del bebé en el interior de la cuna o del parque.
- El cable de la unidad del bebé presenta posibles riesgos de estrangulación, por lo que debe
asegurarse de que la unidad del bebé y su cable están al menos a 1 metro (3,5 pies) del bebé.
- Para evitar que el sonido de una o ambas unidades sea muy agudo, asegúrese de que la unidad
de padres está al menos a 1 metro (3,5 pies) de la unidad del bebé.
Conexión de la unidad de padres y la unidad del bebé
1 Mantenga pulsado el botón 3 de la unidad del bebé durante 2 segundos hasta que el piloto
de encendido se ilumine.
2 Mantenga pulsado el botón 3 de la unidad de padres durante 2 segundos hasta que se
ilumine la pantalla.
, El piloto “LINK” de la unidad de padres empieza a parpadear en rojo y aparece el mensaje
“LINKING” (Conectando) en la pantalla.
Page 12

ESPAÑOL12
, Cuando la unidad de padres y la unidad del bebé están conectadas, el piloto “LINK”
se ilumina en verde de forma permanente. El indicador de intensidad de la señal y el mensaje
“LINKED” (Conectadas) aparecen en la pantalla.
, Si no se establece la conexión, se muestra el mensaje “NOT LINKED” (No conectada)
y la unidad de padres empieza a pitar.
Qué hacer si no se establece la conexión
- Si la unidad de padres está fuera de alcance, acérquela a la unidad del bebé.
- Si la unidad del bebé o la unidad de padres está demasiado cerca de otro aparato DECT
(por ejemplo, un teléfono inalámbrico), apague el aparato o aleje la unidad del mismo.
- Si la unidad del bebé está apagada, enciéndala.
Alcance de funcionamiento
- El alcance de funcionamiento es de 330 metros (1000 pies) en exteriores y de hasta 50 metros
(150 pies) en interiores.
- El alcance de funcionamiento del vigilabebés varía en función del entorno y factores que
provocan interferencias. La humedad y los materiales húmedos pueden provocar tantas
interferencias que el alcance se puede reducir hasta un 100%. Para conocer las interferencias
que provocan los materiales secos, consulte la tabla que aparece más abajo
Materiales secos Grosor del material Pérdida de alcance
Madera, yeso, cartón, cristal (sin
metal, cables o plomo)
Ladrillo, madera contrachapada < 30 cm 5 - 35%
Hormigón armado < 30 cm 30 - 100%
Rejillas o barras metálicas < 1 cm 90 - 100%
Láminas de metal o aluminio < 1 cm 100%
Funciones y reacciones de la unidad del bebé
Luz de compañía
La luz de compañía produce un resplandor suave que tranquiliza al bebé.
1 Pulse el botón Q de la unidad del bebé para encender la luz de compañía.
2 Vuelva a pulsar el botón Q para apagar la luz de compañía.
Función de nanas
1 Pulse el botón K en la unidad del bebé para reproducir la última nana seleccionada. (g. 2)
, La nana seleccionada se repite durante 15 minutos.
2 Pulse el botón
3 Para ajustar el nivel de sonido de la nana, pulse el botón para subir o bajar el volumen en la
unidad del bebé (g. 4).
Nota: Solo se puede ajustar el volumen del altavoz en la unidad del bebé cuando esté sonando una
nana. Si aumenta el volumen de la nana, el sonido también será más alto cuando utilice la función de
intercomunicador de la unidad de padres.
4 Para detener la reproducción de la nana, pulse el botón K de la unidad del bebé.
para seleccionar otra nana de la lista. (g. 3)
< 30 cm 0 - 10%
Page 13

ESPAÑOL 13
Localización de la unidad de padres
Si ha perdido la unidad de padres, puede utilizar el botón FIND de la unidad del bebé para
encontrarla. Esta función solo funciona cuando la unidad de padres está encendida.
1 Pulse FIND en la unidad del bebé y la unidad de padres producirá un tono de alerta de
localización (g. 5).
2 Para detener el tono de alerta de localización, pulse FIND de nuevo en la unidad del bebé o
pulse cualquier botón de la unidad de padres. El tono de alerta de localización se detiene
automáticamente después de 2 minutos.
Piloto de estado de las pilas
1 El piloto de estado de las pilas se ilumina en verde de forma permanente cuando la unidad
del bebé funciona con las pilas y estas contienen suciente energía.
2 El piloto de estado de las pilas parpadea en rojo rápidamente cuando las pilas se están
agotando si la unidad del bebé funciona con pilas.
- Sustituya las pilas cuando se estén agotando.
Funciones y reacciones de la unidad de padres
Volumen
El volumen se puede ajustar si el menú no está activo. Hay siete niveles de volumen y un ajuste de
volumen desactivado.
Ajuste del nivel de volumen
1 Pulse el botón + o - una vez.
, El nivel de volumen actual aparece en la pantalla.
2 Pulse el botón + para aumentar el volumen o - para bajarlo.
, Si no pulsa ningún botón durante más de 2 segundos, la indicación de nivel de volumen
desaparece y el ajuste de volumen se guarda.
Volumen desactivado
Por debajo del ajuste de volumen más bajo, hay un ajuste de volumen desactivado.
1 Pulse el botón + o - una vez.
, El nivel de volumen actual aparece en la pantalla.
2 Mantenga pulsado el botón - durante más de 2 segundos para desactivar el volumen.
, El mensaje “MUTE” (Silencio) y el símbolo de silenciamiento aparecen en la pantalla (g. 6).
Nota: Si el volumen está desactivado, solo los pilotos de nivel de sonido muestran que el bebé está
produciendo sonidos.
Función TALK (Intercomunicador)
1 Si desea tranquilizar al bebé, pulse TALK en la unidad de padres y hable con claridad hacia el
micrófono de la parte delantera desde una distancia de 15-30 cm (0,5-1 pie) (g. 7).
Nota: Si ha aumentado el volumen de la nana en la unidad del bebé, el sonido también será más alto
cuando utilice la función de intercomunicador de la unidad de padres.
, El piloto “LINK” comienza a parpadear en verde y el mensaje “TALK” (Intercomunicador)
aparece en la pantalla.
2 Suelte TALK cuando termine de hablar.
Page 14

ESPAÑOL14
Indicaciones de estado de las pilas
El estado de carga de las pilas se indica en la pantalla mediante el indicador de estado de las pilas y
los mensajes de texto.
Batería baja
Cuando las pilas recargables se están agotando, aparece “BATTERY LOW” (Pilas bajas) en la pantalla,
el indicador de estado de las pilas aparece vacío y parpadea, y la unidad de padres emite un pitido.
El tiempo de funcionamiento restante es de al menos 30 minutos.
Batería descargada
1 Si las pilas recargables están casi agotadas, el piloto de estado de las pilas parpadea en rojo
rápidamente (g. 8).
2 Si no conecta la unidad de padres a una toma de corriente, se apagará.
Menú de la unidad de padres
Navegación por el menú
Nota: Algunas funciones del menú solo funcionan cuando la unidad del bebé y la unidad de padres están
conectadas.
1 Pulse el botón MENU para abrir el menú y que aparezca la primera opción del mismo (g. 9).
2 Utilice el botón + para acceder a la opción siguiente o el botón - para acceder a la opción
anterior. La echa de la pantalla indica en qué dirección puede navegar (g. 10).
3 Pulse el botón OK para conrmar su selección (g. 11).
Nota: Pulse el botón MENU si desea salir del menú sin realizar cambios. Si no realiza ninguna acción en
el menú durante más de 20 segundos, este se cierra automáticamente.
Sensibilidad
Esta opción del menú de la unidad de padres le permite ajustar la sensibilidad del micrófono de la unidad
del bebé. La sensibilidad del micrófono determina el nivel de ruido que detecta la unidad del bebé.
Por ejemplo, puede que quiera oír al bebé cuando llore, pero esté menos interesado en oír los balbuceos.
1 Seleccione “Sensitivity” (Sensibilidad) en el menú con los botones + y -. Pulse OK para
conrmar.
Utilice los botones + y - para aumentar o reducir la sensibilidad del micrófono. El número de
2
segmentos rellenos muestra el nivel de sensibilidad seleccionado. Pulse OK para conrmar el ajuste.
Niveles e indicaciones de sensibilidad
Icono Sensibilidad Descripción
más alto Puede oír todos los sonidos del bebé. El altavoz de la
alta Puede oír todos los sonidos más altos que un balbuceo
medio; mediano Puede oír los sonidos más altos que un llanto suave. Si el
baja El altavoz de la unidad de padres se activa si el bebé
unidad de padres está activado de forma continua.
suave. Si el bebé no emite ningún sonido, el altavoz de la
unidad de padres se desactiva.
bebé emite sonidos más suaves, el altavoz de la unidad de
padres no se activa.
emite sonidos altos, por ejemplo cuando llora.
Page 15

ESPAÑOL 15
Temporizador de alimentación
Puede ajustar el temporizador de alimentación para recibir una alerta cuando sea hora de dar de comer
al bebé. El temporizador se puede ajustar con un tiempo de entre 1 minuto y 23 horas y 59 minutos.
1 Para abrir el submenú del temporizador de alimentación, seleccione “Feed Timer”
(Temporizador de alimentación) en el menú. Pulse OK para conrmar.
2 Seleccione “Set Timer” (Ajustar temporizador) en el submenú del temporizador de
alimentación. Pulse OK para iniciar el ajuste del temporizador.
3 Ajuste la hora y los minutos, y pulse OK para conrmar.
4 Para iniciar el temporizador de alimentación, seleccione “xx:xx Start” (xx:xx Iniciar) en el
submenú del mismo. Pulse OK para conrmar. El símbolo del temporizador aparece en la
pantalla y este inicia la cuenta atrás (g. 12).
5 Cuando el temporizador llega a 00:00, se activa la alerta del temporizador de alimentación,
el símbolo del temporizador empieza a parpadear en la pantalla y el mensaje “TIMER END”
(Fin del temporizador) se desplaza por la pantalla (g. 13).
6 Para detener el temporizador, seleccione “Stop & Reset” (Detener y restablecer) en el
submenú del temporizador de alimentación y pulse OK para conrmar.
Ajuste de la repetición del temporizador de alimentación
1 Para hacer que el temporizador de alimentación se active después del mismo tiempo
establecido, seleccione “Repeat” (Repetir) en el submenú del temporizador de alimentación
después de ajustarlo. Pulse OK para conrmar.
2 Seleccione “Repeat ON” (Repetición activada) o “Repeat OFF” (Repetición desactivada)
y pulse OK para conrmar.
3 Si establece “Repeat ON” (Repetición activada), el temporizador de alimentación inicia la
cuenta atrás de nuevo después de detener la alerta.
Temperatura
Los bebés duermen cómodamente a una temperatura de entre 16 °C (61 °F) y 20 °C (68 °F).
Puede establecer un intervalo de temperatura mínimo y máximo, y una alerta de temperatura.
1 Para abrir el submenú de temperatura, seleccione “Temperature” (Temperatura) en el menú.
Pulse OK para conrmar.
2 Seleccione “Temp Range” (Intervalo de temperatura) en el submenú de temperatura y pulse
OK para conrmar.
3 Utilice los botones + y - para establecer el intervalo de temperatura mínimo entre 10 °C
(50 °F) y 19 °C (66 °F) y el intervalo de temperatura máximo entre 22 °C (72 °F) y 37 °C
(99 °F). Pulse OK para conrmar.
4 Seleccione “Alert” (Alerta) en el submenú de temperatura. Pulse OK para conrmar.
5 Seleccione “Alert ON” (Alerta activada) o “Alert OFF” (Alerta desactivada). Pulse OK para
conrmar.
6 Seleccione “Temp Scale” (Escala de temperatura) en el submenú de temperatura. Pulse OK
para conrmar.
Page 16

ESPAÑOL16
7 Seleccione “Celsius” o “Fahrenheit” y pulse OK para conrmar.
, La temperatura aparece en la pantalla en la escala establecida.
, Si la temperatura está fuera del intervalo establecido, el símbolo de alerta de temperatura de la
pantalla parpadea y el mensaje “TOO HOT” (Demasiado calor) o “TOO COLD”
(Demasiado frío) aparece en la pantalla. Si activa la alerta, la unidad de padres también pita (g. 14).
Reloj
El ajuste predeterminado del reloj es oculto. Puede mostrar el reloj y ajustar la hora del mismo en
el menú de la unidad de padres.
1 Seleccione “Clock” (Reloj) en el menú con los botones + y -. Pulse OK para conrmar.
2 Seleccione “Show Time” (Mostrar hora) y pulse OK para conrmar.
3 Seleccione “Set time” (Ajustar hora) y pulse OK para conrmar.
4 Ajuste la hora y los minutos, y pulse OK para conrmar.
, La hora del reloj se alterna con el resto de indicaciones en el campo de mensajes de la pantalla.
Idioma
Puede utilizar esta opción del menú para cambiar el ajuste de idioma.
1 Seleccione “Language” (Idioma) en el menú con los botones + y -. Pulse OK para conrmar.
2 Utilice los botones + y - para seleccionar su idioma, y pulse OK para conrmar.
Garantía y asistencia
Si necesita asistencia o información, visite el sitio Web de Philips en www.philips.com/support
o lea el folleto de garantía mundial independiente.
Page 17

FRANÇAIS (CANADA)
Introduction
Visitez le site www.philips.com/welcome pour enregistrer votre produit et consulter le manuel
d’utilisation détaillé.
Aperçu (g. 1)
1 Indicateur de puissance du signal
2 Symbole de coupure du son
3 Témoin de l’état de la batterie
4 Flèche de navigation
5 Indicateur de sensibilité du microphone
6 Symbole de berceuse
7 Symbole de veilleuse
8 Symbole de minuterie
9 Symbole température
Avant l’utilisation
IMPORTANT : Lisez attentivement les consignes de sécurité avant d’utiliser
l’écoute-bébé et conservez-les pour toute consultation ultérieure.
Unité bébé
Il est conseillé de brancher l’unité bébé sur une prise de courant. Vous pouvez également utiliser quatre
piles alcalines AA 1,5 V (non fournies) an de garantir une alimentation de secours automatique en cas
de coupure de courant. N’utilisez pas de piles rechargeables. L’unité bébé ne possède pas de fonction
de recharge et les piles rechargeables se déchargent lentement lorsqu’elles ne sont pas utilisées.
Unité parent
L’unité parent fonctionne avec deux piles rechargeables fournies avec l’écoute-bébé. Chargez l’unité
parent avant la première utilisation ou lorsque le niveau des piles est faible.
Veuillez noter qu’un temps de charge de 10 heures est nécessaire pour obtenir une
durée de fonctionnement sans l de 18 heures.
Remarque : Lorsque vous commencez à vous servir de l’écoute-bébé, notez que la batterie rechargeable
n’atteint sa pleine capacité qu’après quatre cycles de charge et décharge.
17
Utilisation de l’écoute-bébé
Emplacement de l’écoute-bébé
Gardez l’unité bébé hors de la portée du bébé. Ne la placez jamais dans le lit ou le parc du bébé
et ne la xez jamais sur ces meubles.
- Les cordons de l’unité bébé présentent des risques d’étranglement. Veillez à maintenir l’unité
bébé et les cordons hors de la portée de votre bébé (à plus d’un mètre de distance).
- An d’éviter que les unités ne produisent un son aigu, assurez-vous que l’unité parent se situe à
plus d’un mètre (3,5 pieds) de l’unité bébé.
Liaison entre l’unité parent et l’unité bébé
1 Maintenez enfoncé le bouton 3 de l’unité bébé durant 2 secondes jusqu’à ce que le voyant
d’alimentation s’allume.
2 Maintenez enfoncé le bouton 3 de l’unité parent durant 2 secondes jusqu’à ce que l’écran
s’allume.
Page 18

FRANÇAIS (CANADA)18
, Le voyant «Link» de l’unité parent se met à clignoter en rouge, et un message de liaison
(«LINKING») s’afche.
, Lorsque l’unité parent et l’unité bébé sont connectées, le voyant LINK passe au vert.
L’indicateur de puissance du signal et le message «LINKED» (Liaison) apparaissent sur l’écran.
, Si aucune liaison n’est établie, le message «NOT LINKED» s’afche et l’unité parent émet un
signal sonore.
Que faire si la liaison ne peut pas être établie?
- Si l’unité parent est hors de portée, placez-la plus près de l’unité bébé.
- Si l’une des unités (parent ou bébé) est trop près d’un autre appareil DECT (par exemple, un
téléphone sans l), éteignez cet appareil ou éloignez l’unité.
- Si l’unité bébé est éteinte, rallumez-la.
Portée de transmission
- La portée de transmission est de 330 mètres (1 000 pieds) à l’extérieur et de 50 mètres
(150 pieds) à l’intérieur.
- La portée de transmission de l’écoute-bébé varie selon l’environnement et les facteurs
d’interférence. Si des matériaux humides ou mouillés font obstacle à la transmission du signal,
la perte de portée peut atteindre 100 %. Si des matériaux secs font obstacle à la transmission
du signal, reportez-vous au tableau suivant :
Matériaux secs Épaisseur Diminution de portée
Bois, plâtre, carton, verre (sans métal,
ls ni plomb)
Brique, contre-plaqué < 30 cm (12”) 5-35 %
Béton armé < 30 cm (12”) 30-100 %
Grilles ou barres de métal < 1 cm (0,4”) 90-100 %
Feuilles de métal ou d’aluminium < 1 cm (0,4”) 100 %
Fonctions et rétroaction sur l’unité bébé
Veilleuse
La veilleuse produit une lumière douce qui apaise votre bébé.
1 Appuyez sur le bouton Q de l’unité bébé pour allumer la veilleuse.
2 Appuyez de nouveau sur le bouton Q pour éteindre la veilleuse.
Fonction Berceuse
Appuyez sur le bouton K de l’unité bébé pour diffuser la dernière berceuse sélectionnée. (g. 2)
1
, La berceuse sélectionnée est répétée pendant 15 minutes.
2 Appuyez sur le bouton
3 Pour ajuster le volume sonore de la berceuse, appuyez sur les boutons Volume + ou
Volume - sur l’unité bébé (g. 4).
Remarque : Vous pouvez uniquement régler le volume du haut-parleur sur l’unité bébé lorsqu’une
berceuse est en cours de lecture. Si vous augmentez le volume de la berceuse, le son de l’interphone sera
également plus fort sur l’unité parent.
4 Pour arrêter la berceuse, appuyez sur le bouton K de l’unité bébé.
pour sélectionner une autre berceuse dans la liste. (g. 3)
< 30 cm (12”) 0-10 %
Page 19

FRANÇAIS (CANADA) 19
Localisation de l’unité parent
Si vous avez égaré l’unité parent, vous pouvez utiliser le bouton FIND de l’unité bébé pour la
localiser. Cette option ne fonctionne que si l’unité parent est allumée.
1 Appuyez sur FIND sur l’unité bébé pour que l’unité parent émette un signal sonore (g. 5).
2 Pour arrêter le signal sonore, appuyez de nouveau sur le bouton FIND ou sur n’importe
quelle touche de l’unité parent. Le signal sonore s’éteindra automatiquement après 2 minutes.
Voyant d’état de la pile
1 Le voyant d’état de la pile passe au vert lorsque l’unité bébé fonctionne avec les piles et que
ces dernières contiennent sufsamment d’énergie.
2 Le voyant d’état de la pile clignote en rouge lorsque les piles sont sur le point d’être
épuisées, si l’unité bébé fonctionne avec les piles.
- Remplacez les piles lorsqu’elles sont sur le point d’être épuisées.
Fonctions et rétroaction sur l’unité bébé
Volume
Le volume peut être réglé lorsque le menu n’est pas actif. Il y a sept niveaux de volume sonore et
un paramètre «volume désactivé».
Réglage du volume
1 Appuyez sur le bouton + ou le bouton - une fois.
, Le niveau de volume actuel s’afche sur l’écran.
2 Appuyez sur le bouton + pour augmenter le volume ou sur le bouton - pour le diminuer.
, Si vous n’appuyez sur aucun bouton pendant plus de 2 secondes, l’indication de volume
sonore disparaît et le paramètre de volume est enregistré.
Volume désactivé
Pour baisser le son en-deçà du volume minimum, utilisez le paramètre «volume désactivé».
1 Appuyez sur le bouton + ou le bouton - une fois.
, Le niveau de volume actuel s’afche sur l’écran.
2 Appuyez sur le bouton - et maintenez-le enfoncé pendant plus de 2 secondes pour couper le
son.
, Le message «MUTE» (Sourdine) et le symbole de sourdine apparaissent sur l’écran (g. 6).
Remarque : Lorsque le volume est coupé, seuls les voyants de niveau sonore montrent que le bébé émet
des sons.
Interphone
1 Si vous voulez rassurer votre bébé, appuyez sur le bouton TALK de l’unité parent et parlez
distinctement dans le microphone situé à l’avant, à 15-30 cm de distance (g. 7).
Remarque : Si vous avez augmenté le volume de la berceuse sur l’unité bébé, le son de la fonction
d’interphone de l’unité parent sera lui-aussi plus fort.
, Le voyant LINK se met à clignoter en vert et le message «TALK» (Parler) apparaît sur l’écran.
2 Relâchez le bouton TALK lorsque vous avez ni de parler.
Indications du niveau des piles
L’état du niveau des piles est indiqué sur l’écran grâce à un témoin lumineux et à des messages textuels.
Page 20

FRANÇAIS (CANADA)20
Batterie faible
Lorsque le niveau des piles rechargeables est bas, l’indication «BATTERY LOW» s’afche sur l’écran,
le voyant de batterie vide clignote et l’unité parent émet un signal sonore. L’autonomie restante est
alors d’au moins 30 minutes.
Pile vide
1 Lorsque les piles rechargeables sont presque vides, le voyant de l’état de la pile clignote en
rouge rapidement (g. 8).
2 L’unité parent s’éteindra si vous ne la raccordez pas à une prise électrique.
Menu de l’unité parent
Navigation dans le menu
Remarque : Certaines fonctions du menu ne sont accessibles que lorsque les unités parent et bébé sont
connectées.
1 Appuyez sur le bouton MENU pour ouvrir le menu et pour voir la première option de menu
apparaître à l’écran (g. 9).
2 Utilisez la touche + pour passer à l’option suivante ou sur la touche - pour retourner à
l’option précédente. La èche à l’écran indique dans quel sens vous pouvez parcourir le
menu (g. 10).
3 Appuyez sur le bouton OK pour conrmer votre sélection (g. 11).
Remarque : Appuyez sur le bouton MENU si vous voulez quitter le menu sans faire aucun changement.
Si vous n’appuyez sur aucun bouton pendant plus de 20 secondes, le menu se ferme automatiquement.
Sensibilité
Cette option du menu de l’unité parent permet de régler la sensibilité du microphone de l’unité
bébé. La sensibilité du microphone détermine le niveau de bruit détecté par l’unité bébé, par
exemple, vous pouvez choisir d’entendre les pleurs mais pas les babillages.
1 Sélectionnez «Sensitivity» (Sensibilité) dans le menu avec les boutons + et -, puis appuyez sur
OK pour conrmer.
2 Utilisez les boutons + et - pour augmenter ou réduire la sensibilité du microphone. Le
nombre de segments indique le degré de sensibilité choisi. Appuyez sur OK pour conrmer.
Indicateurs et niveaux de sensibilité
Icône Sensibilité Description
la plus élevée Vous entendrez tous les sons provenant de votre bébé.
élevée Vous entendrez les babillages et les sons plus forts.
moyenne Vous entendrez les pleurs faibles et les sons plus forts.
faible Le haut-parleur de l’unité parent ne se déclenche que si
Le haut-parleur de l’unité parent est activé en
permanence.
Si votre bébé n’émet aucun son, le haut-parleur de l’unité
parent est désactivé.
Si votre bébé émet des sons plus faibles, le haut-parleur
de l’unité parent ne se déclenche pas.
le bébé émet des sons forts, par exemple lorsqu’il pleure.
Page 21

FRANÇAIS (CANADA) 21
Minuterie de repas
Vous pouvez régler la minuterie de repas pour qu’elle se déclenche lorsqu’il est l’heure de nourrir
votre bébé. Le réglage de la minuterie va de 1 minute à 23 heures et 59 minutes.
1 Pour ouvrir le sous-menu de minuterie de repas, sélectionnez «Feed Timer» dans le menu,
puis appuyez sur OK pour conrmer.
2 Sélectionnez «Set Timer» (Régler la minuterie) dans le sous-menu. Appuyez sur OK pour
commencer à régler la minuterie.
3 Réglez les heures et les minutes, et appuyez sur OK pour conrmer.
4 Pour le début de la minuterie de repas, sélectionnez «xx:xx Start» dans le sous-menu de la
minuterie de repas. Le symbole de minuterie s’afche et le minuteur commence le compte à
rebours (g. 12).
5 Lorsque la minuterie atteint 00:00, l’alerte de repas se déclenche, le symbole de la minuterie
se met à clignoter sur l’écran et le message «TIMER END» (Fin de la minuterie) déle sur
l’écran (g. 13).
6 Pour arrêter la minuterie, sélectionnez «Stop & Reset» (Arrêt et réinitialisation) dans le
sous-menu de la minuterie de repas et appuyez sur OK pour conrmer.
Répétition de la minuterie de repas
1 Pour que le minuteur de repas se déclenche à intervalles réguliers, sélectionnez «Repeat»
(Répéter) dans le sous-menu après avoir régler la minuterie de repas. Appuyez sur OK pour
conrmer.
2 Sélectionnez «Repeat ON» (Répétition activée) ou «Repeat OFF» (Répétition désactivée)
et appuyez sur OK pour conrmer.
3 Si «Repeat ON» est sélectionné, le minuteur reprendra le compte à rebours après que vous
ayez stoppé l’alarme.
Température
Un bébé dort confortablement dans une pièce dont la température est comprise entre 16 °C
(61 °F) et 20 °C (68 °F). Vous pouvez établir une plage de températures minimale et maximale,
ainsi qu’une alerte de température.
1 Sélectionnez l’option «Temperature» (température) dans le menu pour ouvrir le sous-menu
correspondant, et appuyez sur OK pour conrmer.
2 Sélectionnez «Temp Range» (Plage de températures) dans le sous-menu et appuyez sur OK
pour conrmer.
3 Utilisez les boutons + et - pour régler la température minimale entre 10 °C (50 °F) et 19 °C
(66 °F) et la température maximale entre 22 °C (72 °F) et 37 °C (99 °F). Appuyez sur OK
pour conrmer.
4 Sélectionnez «Alert» (Alerte) dans le sous-menu de température, puis appuyez sur OK pour
conrmer.
5 Sélectionnez «Alert ON» ou «Alert OFF», puis appuyez sur OK pour conrmer.
6 Sélectionnez «Temp Scale» (Échelle de température) dans le sous-menu et appuyez sur OK
pour conrmer.
Page 22

FRANÇAIS (CANADA)22
7 Sélectionnez «Celsius» ou «Fahrenheit» et appuyez sur OK pour conrmer.
, La température s’afche dans l’échelle de température sélectionnée.
, Si la température de la pièce est en dehors de la plage établie, le symbole d’alerte de
température s’afchera avec le texte «TOO HOT» (trop chaud) ou «TOO COLD» (trop
froid). Si vous avez activé l’alerte, l’unité parent émettra également un signal sonore (g. 14).
Horloge
L’horloge est masquée par défaut. Vous pouvez choisir d’afcher l’horloge et la régler dans le menu
de l’unité parent.
1 Sélectionnez «Clock» (Horloge) dans le menu à l’aide des boutons + et -, puis appuyez sur
OK pour conrmer.
2 Sélectionnez «Show Time» (Afcher l’heure) et appuyez sur OK pour conrmer.
3 Sélectionnez «Set Time» (Réglage de l’heure) et appuyez sur OK pour conrmer.
4 Réglez les heures et les minutes, et appuyez sur OK pour conrmer.
, L’heure de l’horloge s’afche en alternance avec les autres indications dans le champ de
message de l’écran.
Langue
Vous pouvez utiliser cette option pour changer les paramètres de langue.
1 Sélectionnez «Language» (Langue) dans le menu à l’aide des boutons + et -, puis appuyez sur
OK pour conrmer.
2 Utilisez les boutons + et - pour sélectionner votre langue et appuyez sur OK pour conrmer.
Assistance et garantie
Pour obtenir des renseignements supplémentaires, rendez-vous sur le site Philips
www.philips.com/support ou lisez le feuillet de garantie internationale.
Page 23

PORTUGUÊS DO BRASIL
Introdução
Acesse www.philips.com/welcome para registrar seu produto e consultar o manual do usuário.
Visão geral (g. 1)
1 Indicador de intensidade do sinal
2 Símbolo de silencioso
3 Indicador de status da bateria
4 Seta de navegação
5 Indicador de sensibilidade do microfone
6 Símbolo de canção de ninar
7 Símbolo de luz noturna
8 Símbolo do timer
9 Símbolo de temperatura
Preparação para o uso
IMPORTANTE: antes de utilizar a babá eletrônica, leia cuidadosamente as
instruções de segurança e guarde-as para consultas futuras.
Unidade do bebê
É aconselhável usar a unidade do bebê com energia elétrica. Para garantir o backup automático em
caso de queda de energia, você pode usar quatro pilhas alcalinas AA de 1,5 V (não inclusas).
Não use pilhas recarregáveis. A unidade do bebê não possui uma função de carregamento e as
pilhas recarregáveis descarregam lentamente quando não estão em uso.
Unidade dos pais
A unidade dos pais funciona com duas baterias recarregáveis que vêm junto com a babá eletrônica
sem o. Carregue a unidade dos pais antes do primeiro uso e quando as baterias estiverem fracas.
É necessário carregar a unidade dos pais por 10 horas completas para que o produto
funcione por 18 horas.
Nota: Ao iniciar o uso da babá eletrônica sem o, são necessários quatro ciclos de carga e descarga
antes de as baterias recarregáveis alcançarem sua capacidade máxima.
23
Uso da babá eletrônica
Posicionamento da babá eletrônica
Mantenha a unidade do bebê para fora do alcance do bebê. Nunca coloque a unidade do bebê
dentro do berço ou do cercado e nem instale-a nesses móveis.
- Como o cabo da unidade do bebê apresenta perigo potencial de estrangulamento, certique-se de
que a unidade do bebê e o respectivo cabo quem a pelo menos 1 metro de distância do bebê.
- Para impedir um som agudo em uma ou em ambas as unidades, cer tique-se de que a unidade
dos pais que a pelo menos 1 metro de distância da unidade do bebê.
Page 24

PORTUGUÊS DO BRASIL24
Como conectar a unidade dos pais à unidade do bebê
1 Mantenha pressionado o 3 botão na unidade do bebê por dois segundos até acender a luz
indicadora de energia.
2 Mantenha pressionado o 3 botão na unidade dos pais por dois segundos até acender o visor.
, A luz “link” começa a piscar em vermelho na unidade dos pais e a mensagem “Conectando”
aparece no visor.
, Quando a unidade dos pais e a unidade do bebê são conectadas, luz “link” acende em verde
constante. O indicador de intensidade do sinal e a mensagem “LINKED” (Conectadas)
aparecem no visor.
, Se nenhuma conexão for estabelecida, a mensagem “Não conectado” é exibida no visor e a
unidade dos pais começa a bipar.
O que fazer se nenhuma conexão for estabelecida
- Se a unidade dos pais estiver fora de alcance, coloque-a mais próximo à unidade do bebê.
- Se a unidade do bebê ou dos pais estiver muito próxima a outros aparelhos DECT,
- como telefone sem o, troque-a de lugar.
- Se a unidade do bebê estiver desligada, ligue-a.
Faixa operacional
- A faixa operacional é de 330 metros ao ar livre e de até 50 metros em ambientes fechados.
- A faixa operacional da babá eletrônica varia conforme o ambiente e os fatores que causam
interferência. Materiais molhados e úmidos causam tanta interferência que a perda de alcance é de
até 100%. Para obter informações sobre interferência de materiais secos, consulte tabela abaixo
Materiais secos Espessura do material Perda de alcance
Madeira, gesso, papelão, vidro
(sem metal, os ou chumbo)
Tijolo, madeira compensada < 30 cm 5 a 35%
Concreto reforçado < 30 cm 30 a 100%
Grades ou barras de metal < 1 cm 90 a 100%
Folhas de metal ou alumínio < 1 cm 100%
Funções e comentários sobre a unidade do bebê
Luz noturna
A luz noturna produz um brilho suave que acalma o bebê.
1 Pressione o Q botão na unidade do bebê para ligar a luz noturna.
2 Pressione o Q botão novamente para desligar a luz noturna.
Função de canção de ninar
1 Pressione oK botão na unidade do bebê para reproduzir a última canção de ninar
selecionada. (g. 2)
, A canção de ninar selecionada é repetida por 15 minutos.
2 Pressione o
3 Para ajustar o nível de som da canção de ninar, pressione o botão de volume + ou o volume
– na unidade do bebê (g. 4).
botão para selecionar outra canção de ninar da lista. (g. 3)
< 30 cm 0 a 10%
Page 25

PORTUGUÊS DO BRASIL 25
Nota: O volume do alto-falante só pode ser congurado na unidade do bebê enquanto uma canção de
ninar é reproduzida. Se você aumentar o volume, o som também sairá mais alto ao usar a função de
comunicação na unidade dos pais.
4 Para interromper a reprodução da canção de ninar, pressione o K botão na unidade do bebê.
Localização da unidade dos pais
Caso perca a unidade dos pais, você pode usar a função Encontrar na unidade do bebê para
localizá-la. Essa função só funciona se a unidade dos pais estiver ligada.
1 Pressione o botão ENCONTRAR na unidade do bebê e um tom de alerta de localização
será reproduzido na unidade dos pais (g. 5).
2 Se desejar desligar o tom de alerta, pressione novamente o botão Encontrar na unidade do
bebê, ou qualquer botão na unidade dos pais. O tom de alerta para automaticamente após
dois minutos.
Luz de estado das pilhas
1 A luz de estado das pilhas ca acesa em verde quando a unidade do bebê funciona a pilha e
as pilhas têm energia suciente.
2 A luz de estado das pilhas pisca rapidamente em vermelho quando as pilhas cam fracas
enquanto a unidade do bebê está funcionando a pilha.
- Substitua as pilhas quando elas descarregarem.
Funções e comentários sobre a unidade dos pais
Volume
O volume pode ser denido se o menu não estiver ativo. Há sete níveis de volume e uma
conguração de “volume desligado” denida.
Denição do nível do volume
1 Pressione uma vez o botão + ou o botão -.
, O nível de volume atual aparece no visor.
2 Pressione o botão + para aumentar o volume ou o botão - para diminuí-lo.
, Se nenhum botão for pressionado por mais de 2 segundos, o indicador do nível de volume
desaparece e a conguração do volume é salva.
Volume desligado
Abaixo da conguração mais baixa de volume, há uma ‘conguração de “volume desligado”.
1 Pressione uma vez o botão + ou o botão -.
, O nível de volume atual aparece no visor.
2 Mantenha pressionado o botão - por mais de 2 segundos para denir o volume como
desligado.
, A mensagem “MUTE” (Sem som) e o símbolo de interrupção de som aparecem no visor (g. 6).
Nota: Se o volume estiver desligado, somente as luzes do nível de som indicarão que o bebê está
emitindo sons.
Page 26

PORTUGUÊS DO BRASIL26
Função de comunicação
1 Se desejar conversar com seu bebê para confortá-lo, pressione o botão COMUNICAÇÃO
na unidade dos pais e fale claramente no microfone frontal a uma distância de 15 a 30 cm
(0.5-1ft) (g. 7).
Nota: Se o volume da canção de ninar foi congurado como alto na unidade do bebê, o som também
sairá mais alto ao usar a opção comunicação na unidade dos pais.
, A luz “link” começa a piscar em verde e a mensagem “TALK” (Comunicação) aparece no visor.
2 Solte o botão Comunicação quando terminar de falar.
Indicações de estado das pilhas
O estado de carga das pilhas é indicado no visor pelo indicador de estado das pilhas e por
mensagens de texto.
Bateria fraca
Quando as baterias recarregáveis estiverem acabando, a mensagem “Bateria fraca” é exibida no
visor, o indicador de status da bateria ca vazio e começa a piscar. A unidade dos pais emite sons de
bipe. O tempo de operação restante é de 30 minutos.
Bateria descarregada
1 Se as pilhas recarregáveis estiverem quase vazias, a luz de estado das pilhas pisca rapidamente
em vermelho (g. 8).
2 Se a unidade dos pais não for conectada a uma tomada elétrica, ela desligará.
Menu da unidade dos pais
Navegação no menu
Nota: Algumas funções do menu funcionam somente quando a unidade do bebê e a unidade dos pais
estão conectadas.
1 Pressione o botão Menu para abrir a primeira opção (g. 9).
2 Use o botão + para a próxima opção ou o botão - para a opção anterior. A seta no visor
indica a direção que você pode navegar (g. 10).
3 Pressione o botão OK para conrmar a seleção (g. 11).
Nota: Pressione o botão MENU se você quiser sair do menu sem fazer alterações. Se não houver
nenhuma entrada no menu por mais de 20 segundos, o menu fecha automaticamente.
Sensibilidade
No menu da unidade dos pais, esta opção permite que seja feita a conguração da sensibilidade do
microfone na unidade do bebê. Essa ferramenta determina o nível do barulho que a unidade do
bebê pode reproduzir, por exemplo, você vai querer ouvir quando seu bebê chorar, o que é mais
importante do que ouvi-lo balbuciar.
1 Selecione “Sensitivity” (Sensibilidade) no menu usando os botões + e - e pressione OK para
conrmar.
2 Use os botões + e - para aumentar ou diminuir a sensibilidade do microfone. O número de
segmentos preenchidos mostra o nível de sensibilidade selecionado. Pressione o botão Ok
para conrmar a conguração.
Page 27

Níveis e indicações de sensibilidade
Ícone Sensibilidade Descrição
PORTUGUÊS DO BRASIL 27
Mais alta Ouça todos os ruídos do bebê. O alto-falante da unidade
alta Ouça todos os sons, do balbuciar mais baixo ao mais alto.
médio Ouça sons desde choro suave ao mais alto. Se o bebê
baixa O alto-falante da unidade dos pais só será ligado se o
Timer de alimentação
Você pode denir o timer de alimentação para alertá-lo que é hora de alimentar o bebê. O timer
pode ser denido de 1 minuto a 23 horas e 59 minutos.
1 Para abrir o submenu do timer de alimentação, selecione a opção “Timer de alimentação”
no menu. Pressione o botão Ok para conrmar.
2 Selecione a opção “Denir timer” no submenu do timer de alimentação. Pressione Ok para
iniciar a sua conguração.
3 Dena a hora e os minutos e pressione Ok para conrmar.
4 Para iniciar o timer de alimentação, selecione Iniciar ‘xx:xx no submenu. Pressione Ok para
conrmar. O símbolo do timer será exibido no visor e começará a contagem
regressiva (g. 12).
5 Quando o timer alcançar 00:00, o alerta do timer de alimentação dispara, o símbolo de timer
começa a piscar no visor e a mensagem “TIMER END” (Término de timer) é exibido no
visor (g. 13).
6 Se quiser parar o timer, selecione “Parar e reiniciar” no submenu do timer de alimentação e
pressione Ok para conrmar.
Conguração para repetir o timer de alimentação
1 Para desligar o timer de alimentação após o mesmo tempo denido, selecione “Repetir”
no submenu após a conguração do timer. Pressione Ok para conrmar.
2 Escolha “Repeat ON” (Repetição ligada) ou “Repeat OFF” (Repetição desligada) e pressione
OK para conrmar.
3 Se a opção “Repetição ligada” foi habilitada, o timer de alimentação começará a contagem
regressiva novamente após o alerta ser desligado.
dos pais ca ligado ininterruptamente.
Se o bebê não emitir nenhum som, signica que o
alto-falante da unidade dos pais está desligado.
emitir sons mais baixos, o alto-falante da unidade dos pais
não será ligado.
bebê emitir sons altos, por exemplo, se estiver chorando.
Page 28

PORTUGUÊS DO BRASIL28
Temperatura
Um bebê dorme confortavelmente em uma temperatura entre 16° C/61°F e 20° C/68° F. Você pode
congurar um intervalo de temperatura ambiente mínima e máxima e um aler ta de temperatura.
1 Para abrir o submenu de temperatura, selecione “Temperatura” no menu. Pressione Ok para
conrmar.
2 Selecione “Intervalo de temperatura” no submenu de e pressione Ok para conrmar.
3 Use os botões + e - para denir o intervalo de temperatura ambiente mínimo entre
10° C/50°F e 19° C/66°F e o máximo entre 22° C/72°F e 37° C/99° F. Pressione Ok para
conrmar.
4 Selecione a opção “Alerta” no submenu de temperatura. Pressione Ok para conrmar.
5 Selecione a opção “Alerta ligado” ou “Alerta desligado”. Pressione Ok para conrmar.
6 Selecione a opção “Intervalo de temperatura” no submenu e pressione Ok para conrmar.
7 Selecione “Celsius” ou “Fahrenheit” e pressione OK para conrmar.
, A temperatura na escala denida é exibida no visor.
, Se a temperatura estiver fora do intervalo denido, o símbolo de alerta de temperatura
piscará no visor e a mensagem “Muito quente” ou “Muito frio” será exibida. Se o alerta foi
habilitado, a unidade dos pais também bipará (g. 14).
Relógio
A conguração padrão para o relógio ca oculta. Você pode escolher exibir o relógio e ajustar a
hora do relógio no menu da unidade dos pais.
1 Selecione a opção “Relógio” no menu com os botões + e -. Pressione Ok para conrmar.
2 Selecione a opção “Exibir tempo” e pressione OK para conrmar.
3 Selecione a opção “Denir tempo” e pressione OK para conrmar.
4 Dena a hora e os minutos e pressione Ok para conrmar.
, A hora do relógio é alternada com outras indicações no campo de mensagens do visor.
Idioma
Você pode utilizar esta opção de menu para alterar a denição do idioma.
1 Selecione a opção “Idioma” no menu com os botões + e -. Pressione Ok para conrmar.
2 Utilize os botões + e - para selecionar seu idioma e pressione OK para conrmar.
Garantia e suporte
Caso você pfrecise de informações ou suporte, acesse o site da Philips em
www.philips.com/support ou leia o folheto de garantia mundial à parte.
Page 29

SCD560
Menu
< Sensitivity >
< Feed Timer > xx:xx Start >
< Set Timer >
< Repeat Repeat ON >
< Temperature >
Temp Range > Minimum x Maximum y
< Temp Alert Alert ON >
< Temp Scale
< Set Clock >
Show/Hide > Show Clock >
< Set Time
< Language English >
< Русский
< =
> =
Press OK =
Hr 00:00 00:30 Min
< Repeat OFF
< Alert OFF
Celsius >
< Fahrenheit
< Hide Clock
Hr 00:00 00:00 Min
Page 30

SCD560
Menu
< Sensibilité >
< Minut. ux > xx:xx Dém. >
< Déf minut >
< Répéter Répét. act >
< Température >
Plage temp. > Minimum x Maximum y
< Alerte tmp Alerte ACT >
< Echelle tp.
< Régl. horl. >
Aff./Masqu. > Aff. Heure >
< Régl. Heure
< Langue English >
< Русский
< =
> =
Appuyer OK =
Hr 00:00 00:30 Min
< Répét. des
< Alerte DÉS
Celsius >
< Fahrenheit
< Masq. heure
Hr 00:00 00:00 Min
Page 31

SCD560
Menu
< Sensibilidad >
< Temporizador
alimentación >
xx:xx inicio >
< Ajuste
temporizador >
< Repetir Repetir el >
< Temperatura >
Rango de temp. > xx mínimo yy máximo
< Alerta de temp. ACT alerta >
< Escala de temp
< Ajuste del
reloj >
Mostrar/
Ocultar >
< Ajustar hora
< Idioma English >
< Русский
Hr 00:00 00:30 Min
< Repetición
desactivada
< DES alerta
Centigrados >
< Fahrenheit
Mostrar hora >
< Ocultar hora
Hr 00:00 00:00 Min
< =
> =
Pulse OK =
Page 32

Page 33

Page 34

2 3 4 5
6 7 8 9
10 11 12 13
14
Page 35

Page 36

4222.100.0531.1
 Loading...