

Page 1
EN User manual 3
SCD570
ES Manual del usuario 21
FR-CA Manuel d’utilisation 40
PT-BR Manual do Usuário 60
Page 2
Page 3

Table of contents
1 Introduction 3
8 Neck strap 17
9 Cleaning and maintenance 17
ENGLISH
10 Storage 18
2 Product overview 3
3 Preparing for use 4
3.1 Baby unit 4
3.2 Parent unit 5
4 Using the baby monitor 6
4.1 Positioning the baby monitor 6
4.2 Linking parent unit and baby unit 7
5 Functions and feedback on the
baby unit 8
5.1 Nightlight 8
5.2 Lullaby function 8
5.3 Paging the parent unit 9
5.4 Battery status light 10
6 Functions and feedback on the
parent unit 10
6.1 Volume 10
6.2 Talk function 11
6.3 Battery status indications 11
6.4 Signal strength indicator 13
6.5 Reset 13
7 Menu of the parent unit 14
7.1 Navigating the menu 14
7.2 Sensitivity 14
7.3 Feed timer 15
7.4 Temperature 16
7.5 Clock 16
7.6 Language 17
11 Ordering accessories 18
12 Guarantee and support 18
13 Frequently asked questions 18
1 Introduction
Congratulations on your purchase and welcome
to Philips AVENT! To fully benet from the
support that Philips AVENT offers, register your
product at www.philips.com/welcome.
Philips AVENT is dedicated to producing
caring, reliable products that give parents the
reassurance they need. This Philips AVENT baby
monitor provides round-the-clock support
by ensuring you can always hear your baby
clearly without any distracting noise. The DECT
technology guarantees zero interference and a
crystal clear sound between the baby unit and the
parent unit.
The temperature sensor enables you to monitor
the temperature in your baby’s room, and offers
you personalized settings to help keep your baby’s
room comfortable.
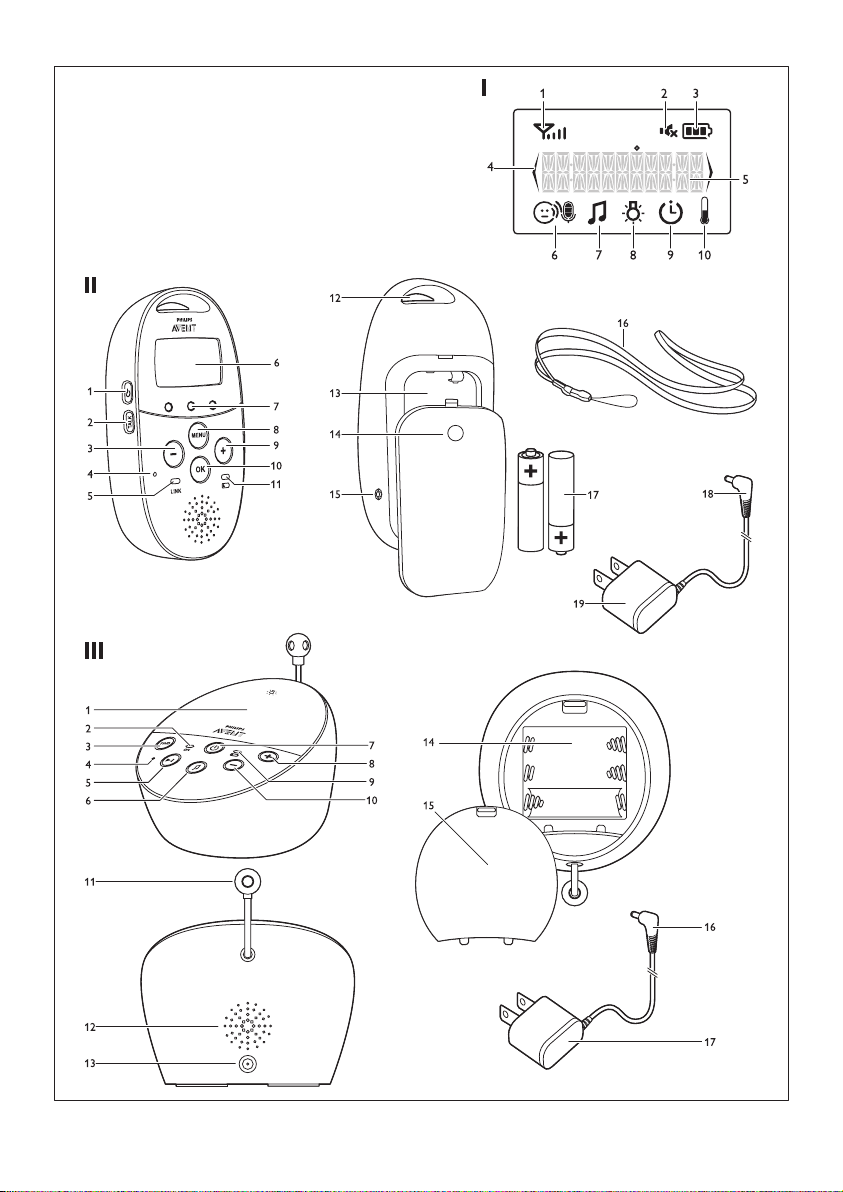
2 Product overview
• I Display
1 Signal strength indicator
2 Mute symbol
3 Battery status indicator
4 Navigation arrow
5 Message eld
6 Microphone sensitivity indicator
7 Lullaby symbol
8 Nightlight symbol
9 Timer symbol
10 Temperature symbol
3
Page 4
• II Parent unit
1 On/off button
2 TALK button
3 - button
4 Microphone
5 ’link’ light
6 Display
7 Sound level lights
8 MENU button
9 + button
10 Battery status light
11 OK button
12 Handgrip/attachment hole for neck strap
13 Compartment for rechargeable batteries
14 Lid of compartment for rechargeable
batteries
15 Socket for small plug of adapter
16 Neck strap
17 Rechargeable batteries
18 Small plug of adapter
19 Adapter
• III Baby unit
1 Nightlight and nightlight on/off button
2 Power-on light
3 FIND button
4 Microphone
5 Next lullaby button
6 Lullaby play/stop button
7 On/off button
8 Volume + button
9 Battery status light
10 Volume - button
11 Temperature sensor
12 Loudspeaker
13 Socket for small plug of adapter
14 Compartment for non-rechargeable
batteries
15 Lid of compartment for non-rechargeable
batteries
16 Small plug of adapter
17 Adapter
3 Preparing for use
IMPORTANT: Read the safety instructions
carefully before you use the baby monitor
and keep them for future reference.
3.1 Baby unit
Use the baby unit on electric power. To guarantee
automatic power backup in case of a power
failure, we advise you to insert non-rechargeable
batteries.
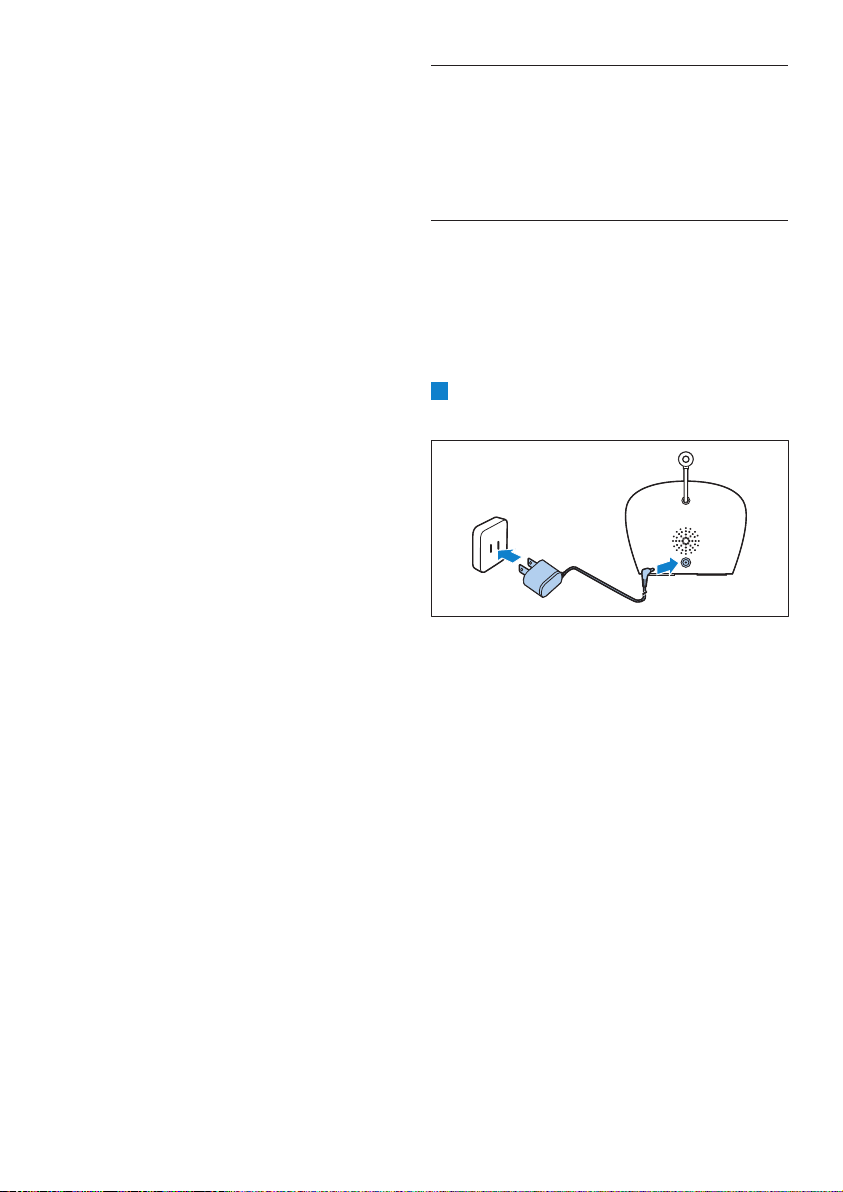
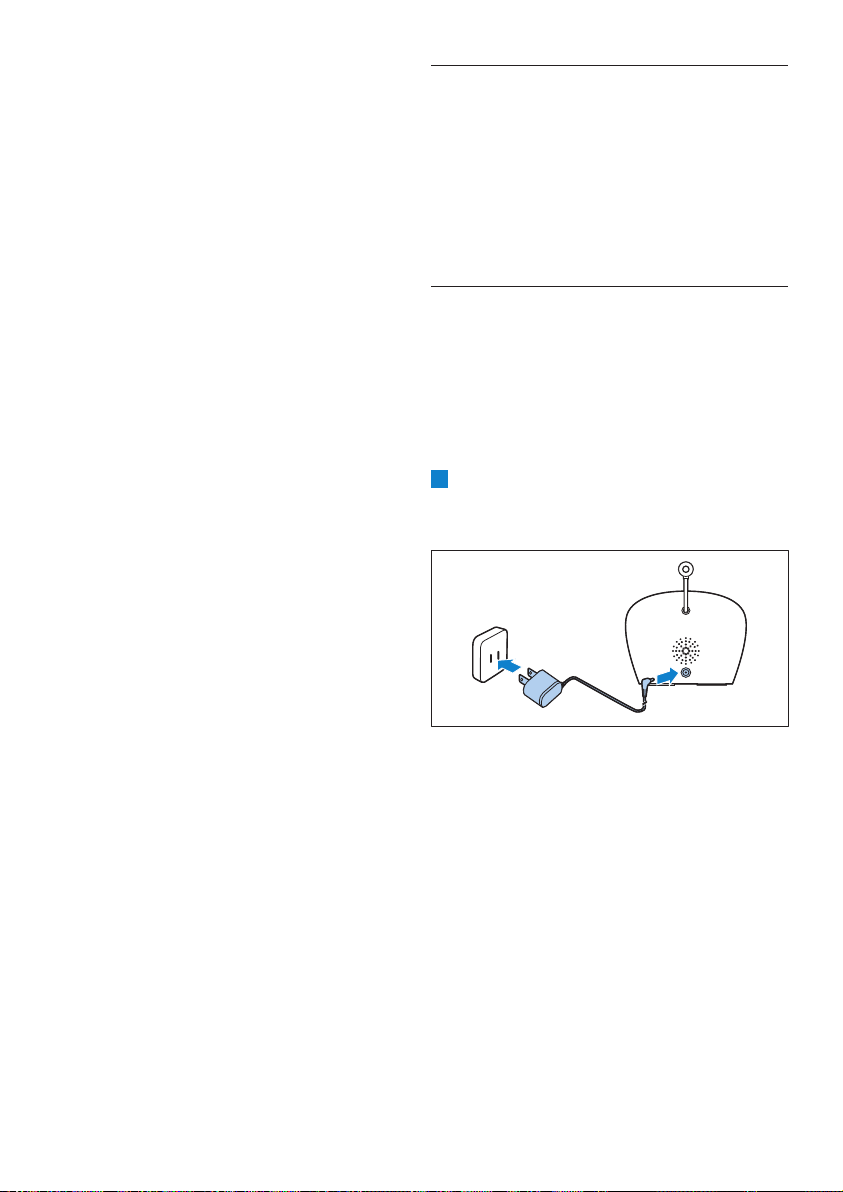
3.1.1 Operation on electric power
1 Put the adapter in an electric outlet and insert
the small appliance plug into the baby unit.
3.1.2 Placing the non-rechargeable batteries
If there is a power failure, the baby unit can
run on four 1.5V R6 AA alkaline batteries (not
included).
Do not use rechargeable batteries. The baby
unit does not have a charging function and
rechargeable batteries discharge slowly when they
are not in use.
B
Warning:
Unplug the baby unit and make sure your hands
and the unit are dry when you insert nonrechargeable batteries.
D
Note:
We advise you to use the baby unit on electric
power, as the baby unit has a limited operating
time when you use it on non-rechargeable alkaline
batteries. The operating time on non-rechargeable
batteries is 24 hours.
4
Page 5
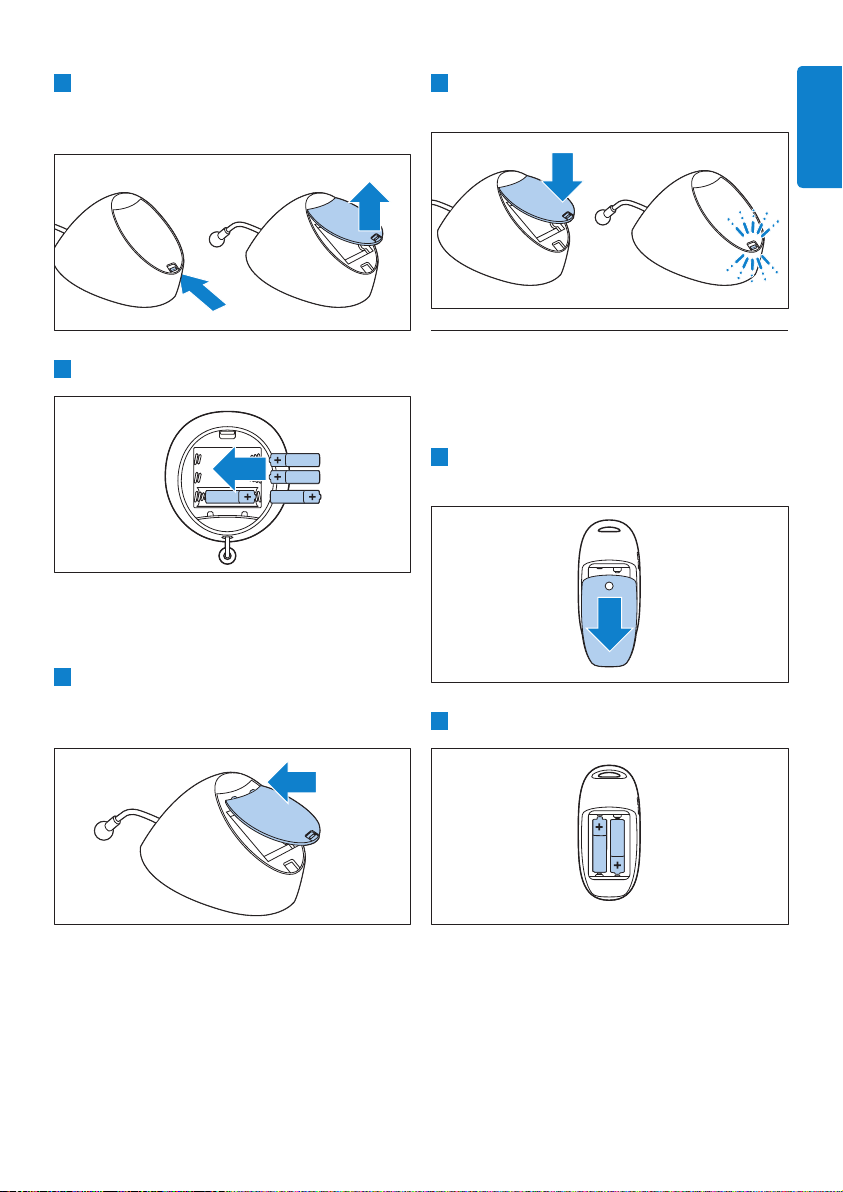
1 Push the lock to release the lid of the
compartment for non-rechargeable batteries
and remove the lid.
2 Inser t four non-rechargeable batteries.
D
Note:
Make sure the + and - poles point in the right
direction.
3 To reattach the lid, rst insert the lugs into the
openings in the rim of the compartment for
non-rechargeable batteries.
4 Then push down the lid until the lock closes
with a click.
ENGLISH
3.2 Parent unit
The parent unit runs on two rechargeable
batteries that are supplied with the baby monitor.
3.2.1 Inserting the rechargeable batteries
1 Slide the lid of the compar tment for the
rechargeable batteries off the parent unit.
2 Inser t the rechargeable batteries.
D
Note:
Make sure the + and - poles of the batteries
point in the right direction.
5
Page 6

3 Slide the lid of the compar tment for the
rechargeable batteries back onto the parent
unit. Push the lid home until it locks into place
with a click.
3.2.2 Charging the parent unit
Charge the parent unit before you use it for the
rst time or when the parent unit indicates that
the batteries are low.
Important: You have to charge the parent
unit for the full 10 hours to have a cordless
operating time of 18 hours.
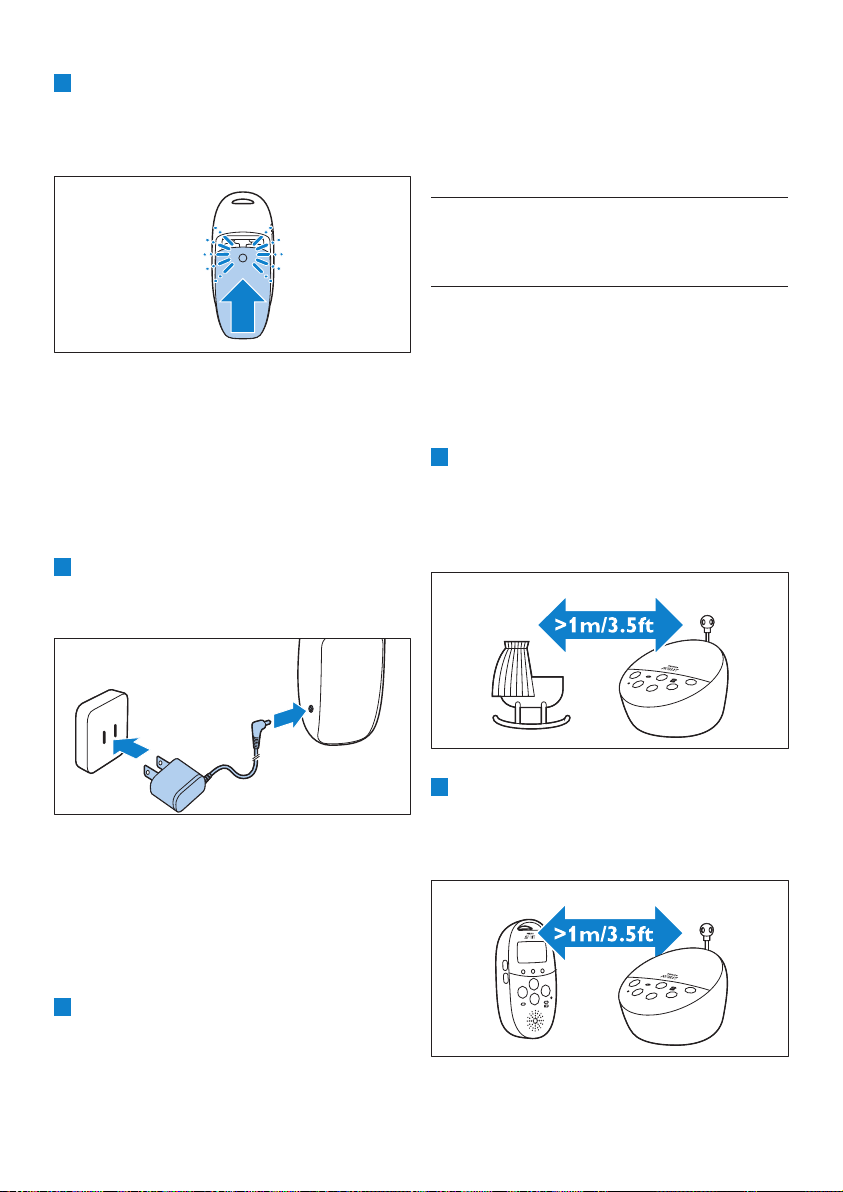
1 Put the adapter in an electric outlet and
insert the small appliance plug into the parent
unit.
D Note:
When you start using the baby monitor, it takes
four charge and discharge cycles before the
rechargeable batteries reach their full capacity.
4 Using the baby
monitor
4.1 Positioning the baby
monitor
B Warning:
Keep the baby unit out of the reach of the baby.
Never place the baby unit inside or mount it on
the baby’s bed or playpen.
1 Because the cord of the baby unit presents
a potential strangulation hazard, make sure
that the baby unit and its cord are at least
1 meter/3.5 feet away from your baby.
• The display goes on and the battery status
indications show that the parent unit is
charging. For battery status indications,
see ‘Battery charge indications’ in chapter
‘Functions and feedback on the parent unit’.
2 Leave the parent unit connected to the
electric outlet until the rechargeable batteries
are fully charged.
6
2 To prevent a high-pitched sound from one
or both units, make sure the parent unit is at
least 1 meter/3.5 feet away from the baby unit.
Page 7
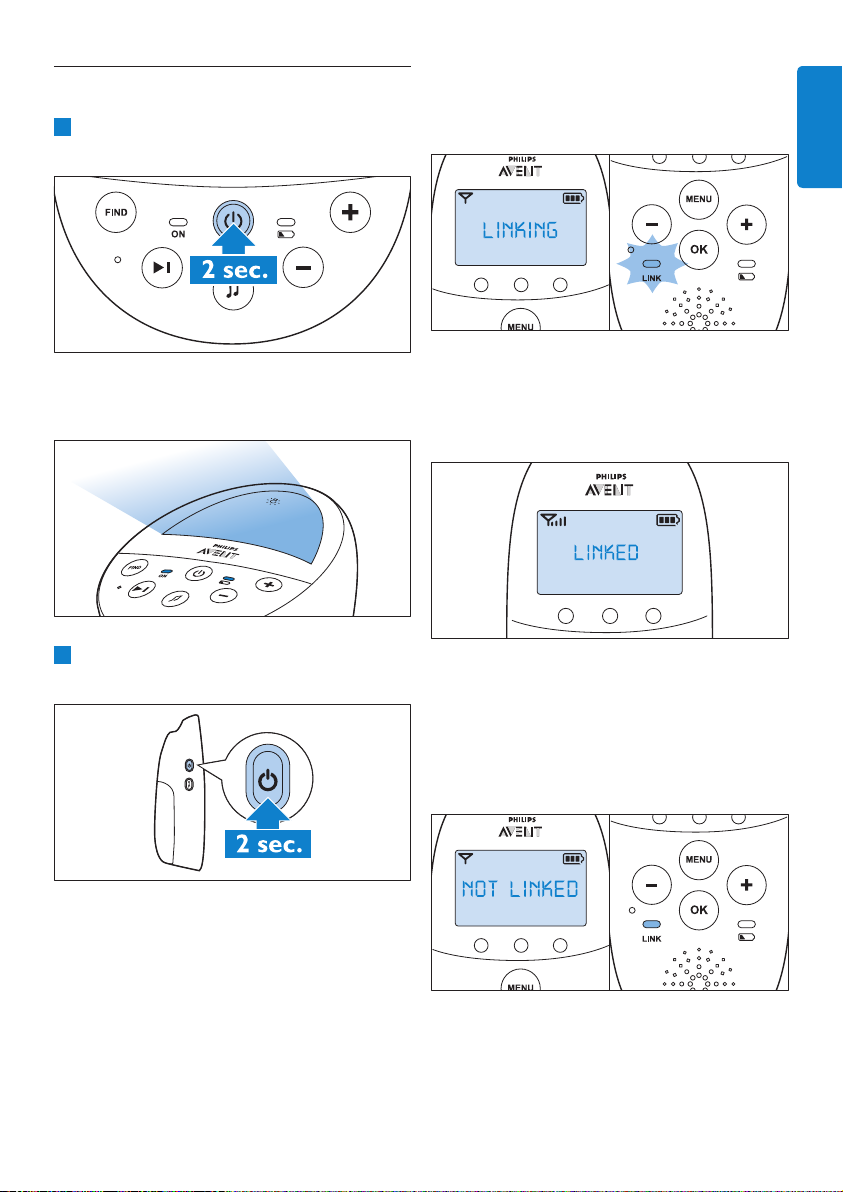
4.2 Linking parent unit and
baby unit
1 Press and hold the on/off button 3 on the
baby unit for 2 seconds.
• The nightlight, the battery status light and
the power-on light go on briey.
2 Press and hold the on/off button 3 on the
parent unit for 2 seconds.
• The ‘link’ light on the parent unit starts
ashing red and the message ‘LINKING’
appears on the display.
ENGLISH
• When the parent unit and baby unit are
linked, the ‘link’ light turns solid green. The
signal strength indicator and the message
‘LINKED’ appear on the display.
• If no connection is established within
10 seconds, the message ‘NOT LINKED’
on the display alternates with ‘LINKING’.
If still no connection is established after
30 seconds, the parent unit starts to beep
and only the message ‘NOT LINKED’ is shown.
• The display goes on and briey displays all
indicators and symbols. Then the indicators
and symbols fade out and the battery status
indicator appears.
D
Note:
When you switch on the parent unit for
the rst time or after a reset, you have
to select your preferred display language
(see ‘Language’ in chapter ‘Menu of the
parent unit’).
7
Page 8
What to do if no link is established
• The parent unit may be out of range
of the baby unit. Place the parent unit
closer to the baby unit, but not closer
than 1 meter/3.5 feet.
• The baby unit or the parent unit may
lose connection because it is too
close to another DECT appliance
(e.g. a cordless phone). Switch off this
DECT appliance or place the unit
further away from this appliance.
• The baby unit may be switched off.
Switch on the baby unit.
4.2.1 Operating range
• The operating range is 330 meters/
1000 feet outdoors and up to 50 meters/
150 feet indoors.
• The operating range of the baby monitor
varies depending on the surroundings and
factors that cause interference. Wet and moist
materials cause so much interference that
the range loss is up to 100%. For interference
from dry materials, see table below
Dry materials Material
thickness
Wood, plaster,
cardboard, glass
(without metal, wires
or lead)
Brick, plywood < 30cm
Reinforced concrete < 30cm
Metal grilles or bars < 1cm (0.4in)90-100%
Metal or aluminum
sheets
< 30cm
(12in)
(12in)
(12in)
< 1cm (0.4in)100%
Loss of
range
0-10%
5-35%
30-100%
5 Functions and
feedback on the
baby unit
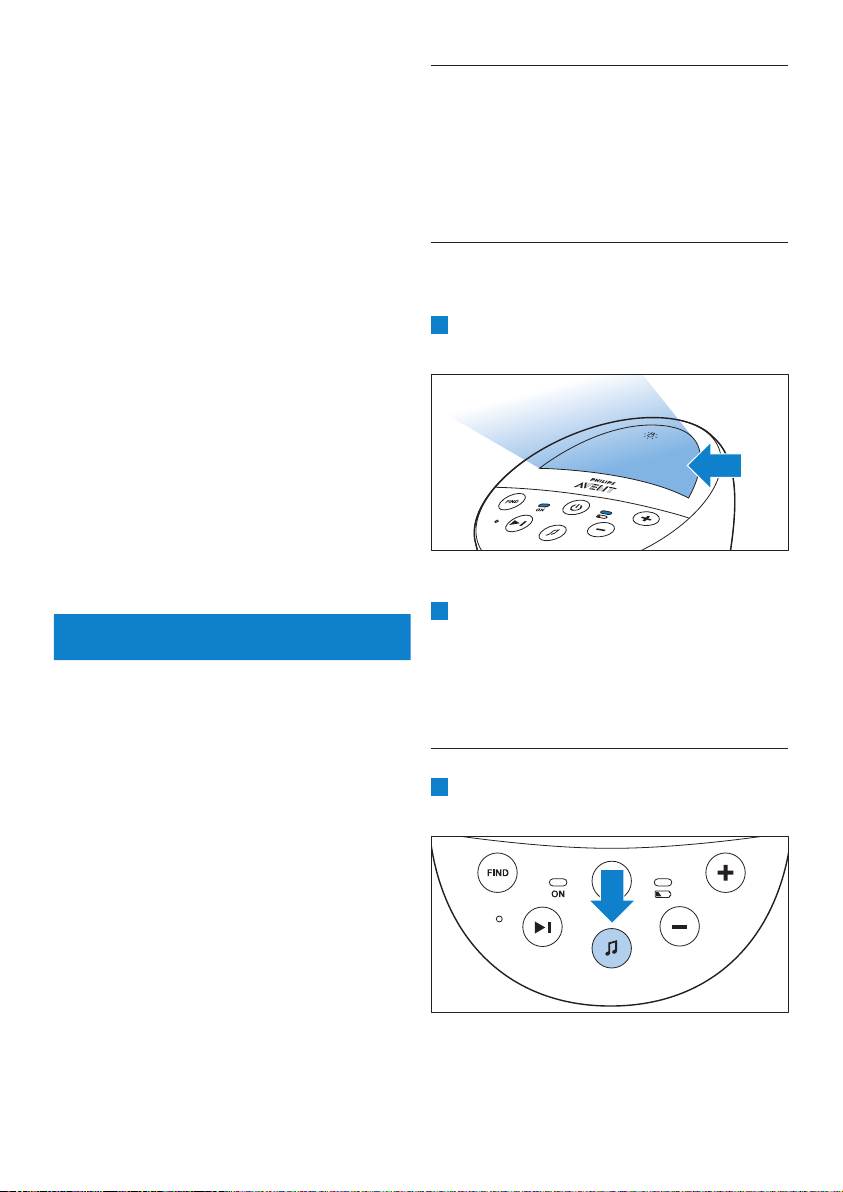
5.1 Nightlight
The nightlight produces a soft glow that comforts
your baby.
1 Press the nightlight on/off button on the baby
unit to switch on the nightlight.
• Q appears on the display of the parent unit.
2 Press the nightlight on/off button again to
switch off the nightlight.
• The nightlight dims gradually before it goes
out completely.
• Q disappears from the display of the parent
unit.
5.2 Lullaby function
1 Press the lullaby play/stop button K on the
baby unit to play the last selected lullaby.
• The selected lullaby repeats for 15 minutes.
• If no lullaby was selected before, lullaby
1 is played.
8
Page 9
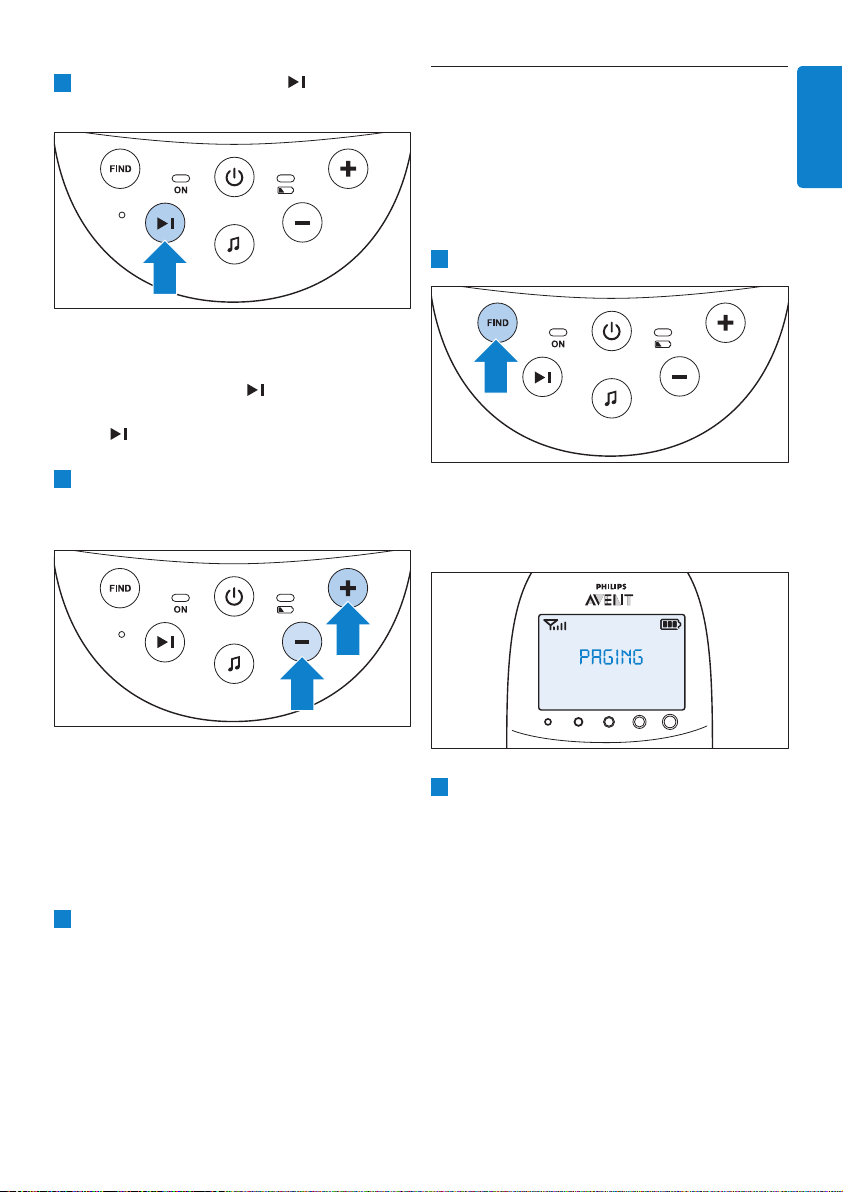
2 Press the next lullaby button to select
another lullaby from the list.
• If no lullaby is playing, the last selected
lullaby starts playing when you press the
next lullaby button
• When you press the next lullaby button
while a lullaby is playing, the next
lullaby starts playing.
3 To adjust the sound level of the lullaby, press
the volume + or the volume - button on the
baby unit.
5.3 Paging the parent unit
If you have lost the parent unit, you can use the
FIND button on the baby unit to locate the
parent unit.
D
Note:
The paging function only works when the parent
unit is switched on.
1 Press the FIND button on the baby unit.
• The message ‘PAGING’ appears on the
display of the parent unit and the parent
unit produces a paging alert tone.
ENGLISH
D
Note:
You can only set the loudspeaker volume on
the baby unit when a lullaby is playing. If you
have set the volume for the lullaby higher on
the baby unit, the sound will also be louder
when you use the talk function on the
parent unit.
4 To stop lullaby playing, press the lullaby play/
stop button K on the baby unit.
2 To stop the paging alert tone, press the FIND
button on the baby unit again or press any
button on the parent unit.
D
Note:
The paging alert tone stops automatically after
2 minutes.
9
Page 10
5.4 Battery status light
1 The batter y status light is solid green when
the baby unit runs on battery power and the
batteries contain enough energy.
2 The batter y status light ashes red quickly
when the batteries run low while the baby
unit is running on battery power.
6 Functions and
feedback on the
parent unit
6.1 Volume
The volume can be set if the menu is not active.
There are seven volume levels and a ‘volume off ’
setting.
6.1.1 Setting the volume level
1 Press the + button or the - button once.
• The current volume level appears on the
display.
2 Press the + button to increase the volume or
press the - button to decrease the volume.
• The parent unit beeps at every volume step
• At maximum volume, the parent unit gives
two beeps.
• Replace the batteries when they run low.
• If the batteries run out of power while the
baby unit is running on battery power, the
baby unit switches off and the parent unit
loses connection with the baby unit.
D
Note:
We advise you to use the baby unit on electric
power, as the baby unit has a limited operating
time when you use it on non-rechargeable alkaline
batteries. The operating time on non-rechargeable
batteries is 24 hours.
10
• If no button is pressed for more than
2 seconds, the volume level indication
disappears and the volume setting is saved.
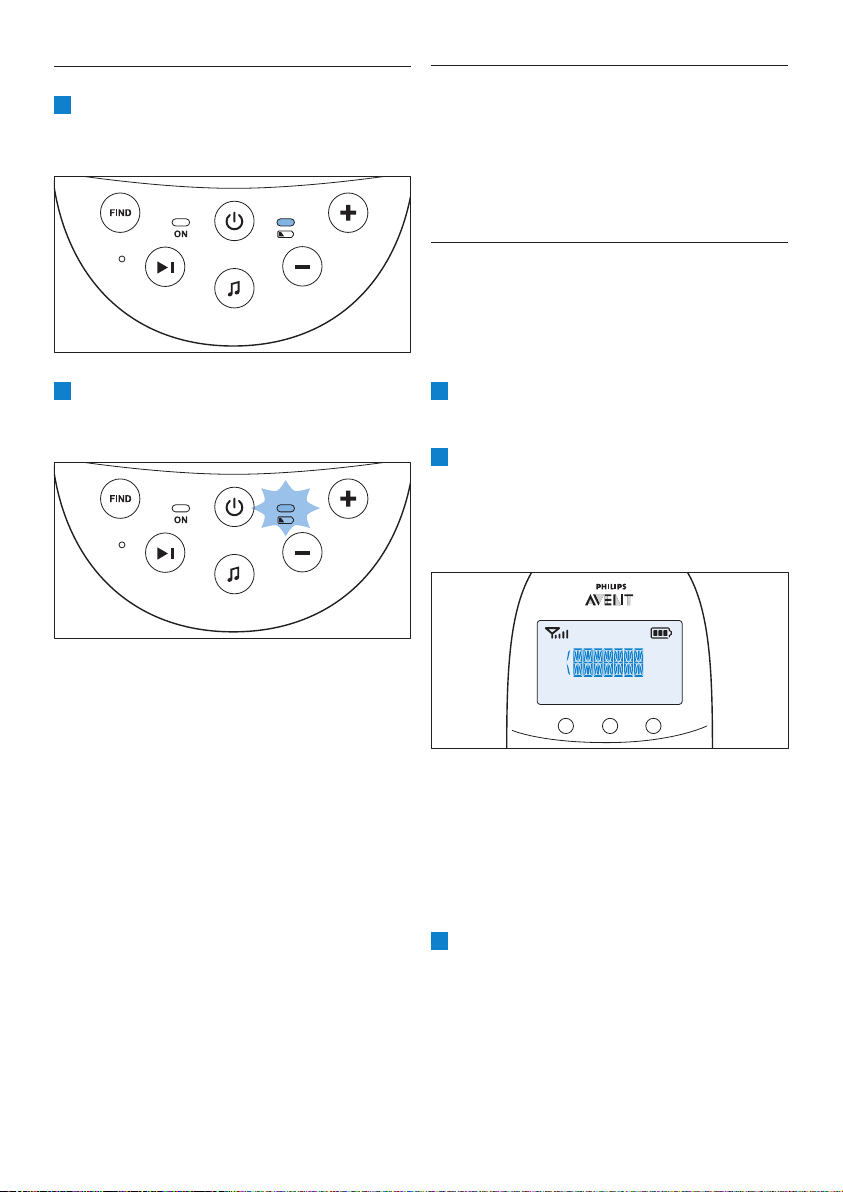
6.1.2 Volume off
Below the lowest volume setting, there is a
‘volume off’ setting.
1 Press the + button or the - button once.
• The current volume level appears on the
display.
Page 11
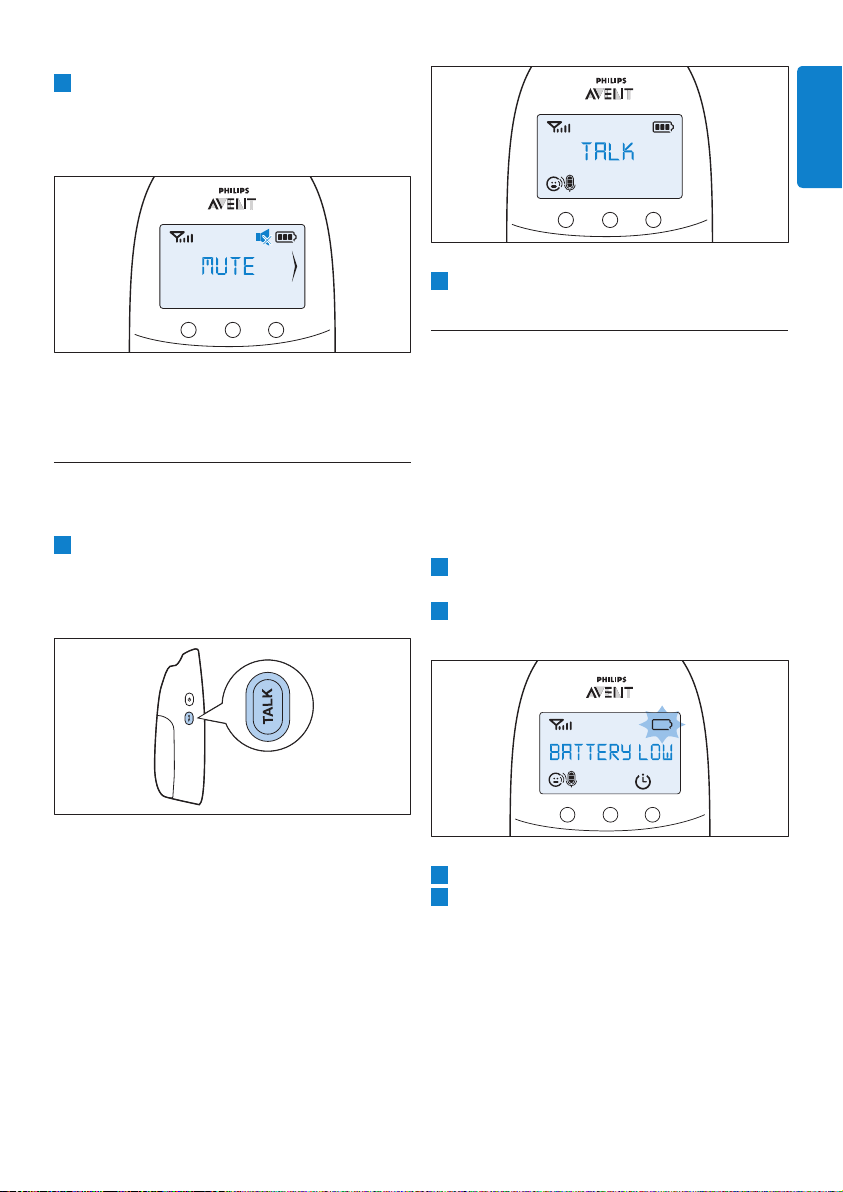
2 Press and hold the - button for more than
2 seconds to set the volume to off.
• The message ‘MUTE’ and the mute symbol
appear on the display.
D
Note:
If the volume is off, only the sound level
lights show that the baby produces sounds.
6.2 Talk function
You can use the TALK button on the parent unit
to talk to your baby (e.g. to comfort your baby).
1 Press and hold the TALK button and talk
clearly into the microphone on the front of
the parent unit from a distance of 15-30cm
(0.5-1ft).
ENGLISH
2 Release the TALK button when you have
nished talking.
6.3 Battery status indications
The battery charge status is indicated on the
display by the battery status indicator and by text
messages.
6.3.1 Battery low
When the rechargeable batteries are low, the
remaining operating time is at least 30 minutes if
the baby monitor works in normal mode at the
highest settings.
1 The batter y status indicator on the display is
empty and ashes.
2 The message ‘BATTERY LOW’ appears on the
display.
D
Note:
If you have set the volume for the lullaby
higher on the baby unit, the sound will also be
louder when you use the talk function on the
parent unit.
• The ‘link’ light starts ashing green and the
message ‘TALK’ appears on the display.
3 The batter y status light ashes red slowly.
4 The parent unit beeps every 10 seconds in
the rst 3 minutes. Then it continues to beep
every minute.
11
Page 12
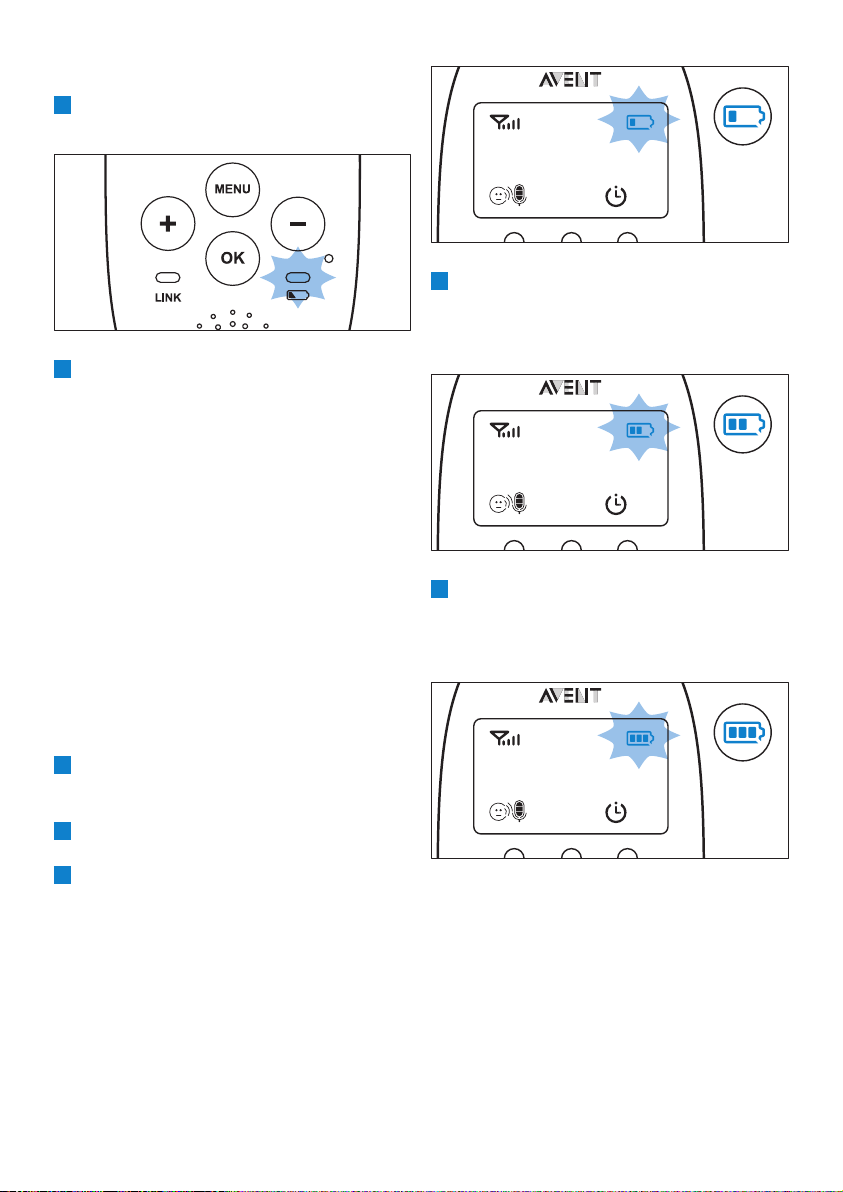
6.3.2 Battery empty
1 If the rechargeable batteries are almost empty,
the battery status light ashes red quickly.
2 If you do not connect the parent unit to
an electric outlet, the following happens in
succession:
1 The link with the baby unit is lost.
2 The display goes out.
3 The parent unit switches off.
D
Note:
If you switch on the parent unit when its
rechargeable batteries are almost empty, the
display goes on. The message ‘BATTERY LOW’
appears on the display for 2 seconds before the
parent unit switches off.
6.3.3 Charging
Insert the small plug in the parent unit and put the
adapter in an electric outlet. When the parent unit
charges, the following happens in succession:
1 The display goes on for 4 seconds and the
text ‘CHARGING’ appears on the screen for
2 seconds.
2 The batter y status light is solid green when
the parent unit is connected to electric power.
3 The rst segment in the battery status
indicator starts ashing to indicate that the
rechargeable batteries are charging.
4 The second segment in the batter y status
indicator starts ashing when the rechargeable
batteries are charged to more than 30% of
their capacity.
5 The third segment in the batter y status
indicator starts ashing when the rechargeable
batteries are charged to more than 50% of
their capacity.
12
Page 13
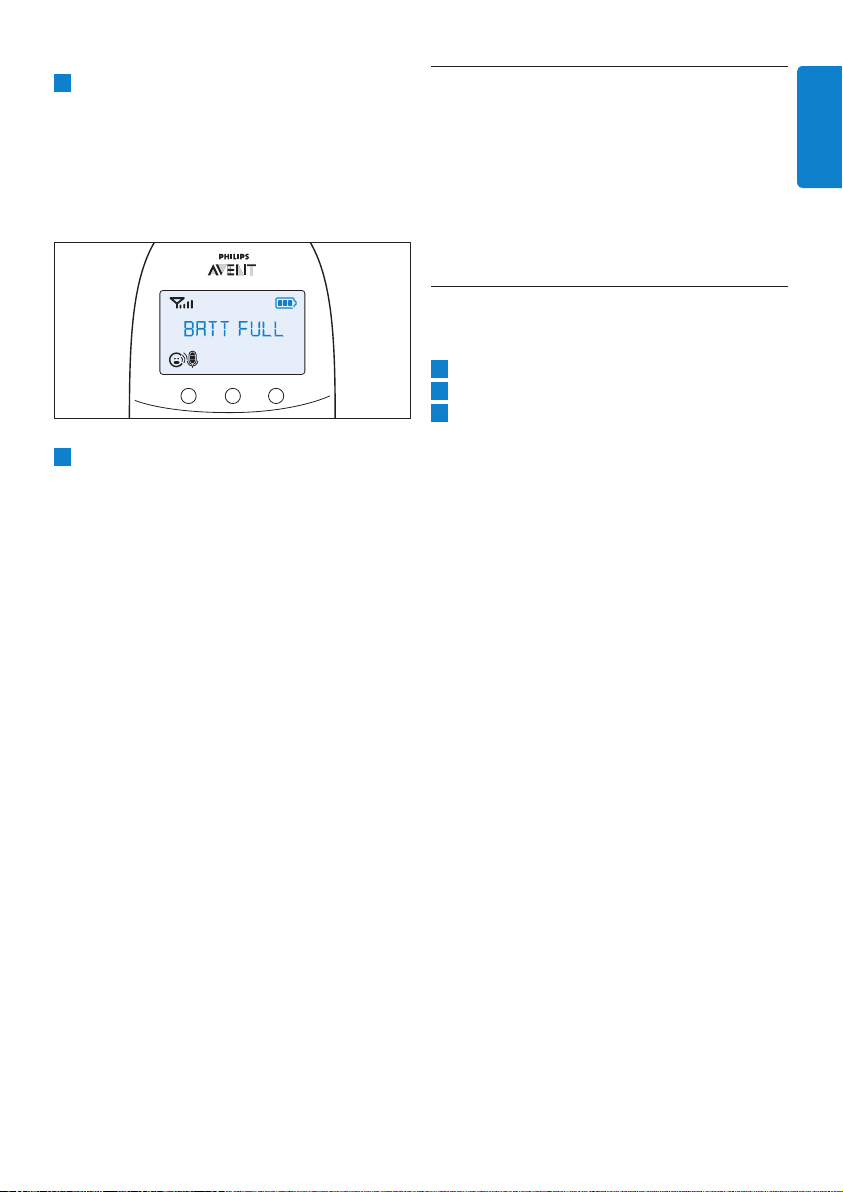
6 When the rechargeable batteries are full, the
following happens:
• The third segment in the battery status
indicator stops ashing.
• The display goes on for 4 seconds and
the message ‘BATT FULL’ appears on the
display.
7 Disconnect the parent unit from the electric
outlet to use it without cord.
• The battery status light is off when the
parent unit is used cordlessly on battery
power.
D
Note:
You can charge the parent unit when it is switched
off. In that case the battery status indicator is solid
green, but it gives no indication when the batteries
are fully charged.
D
Note:
If the rechargeable batteries run low very quickly,
they have reached the end of their life and you
have to replace them. To order new rechargeable
batteries, see chapter ‘Ordering accessories’.
6.4 Signal strength indicator
• If the signal strength indicator has 4 bars, the
connection between the baby unit and the
parent unit is excellent.
• If the signal strength indicator has 1 bar or
no bar at all, the transmission signal from the
baby unit is very weak or not available. Take
the parent unit closer to the baby unit to get
a better signal.
6.5 Reset
This function allows you to reset the parent unit
and the baby unit to the factory default settings.
1 Switch off the unit.
2 Press and hold the - button.
3 Switch on the unit again while holding
the - button.
6.5.1 Default settings
Parent unit
• Language: English
• Loudspeaker volume: 3
• Microphone sensitivity: 3
• Temperature alert: off
• ‘Temperature low’ alert: 14°C (57°F)
• ’Temperature high’ alert: 35°C (95°F)
• Temperature scale: Fahrenheit
• Feed timer: 02:00
• Feed timer: Stop
• Clock: hidden
Baby unit
• Loudspeaker volume: 4
• Nightlight: off
• Lullaby: off (lullaby 1 selected)
ENGLISH
13
Page 14
7 Menu of the parent
unit
All functions described in the following sections
can be operated through the menu of the parent
unit.
7.1 Navigating the menu
D Note:
Some menu functions only work when the baby
unit and the parent unit are linked.
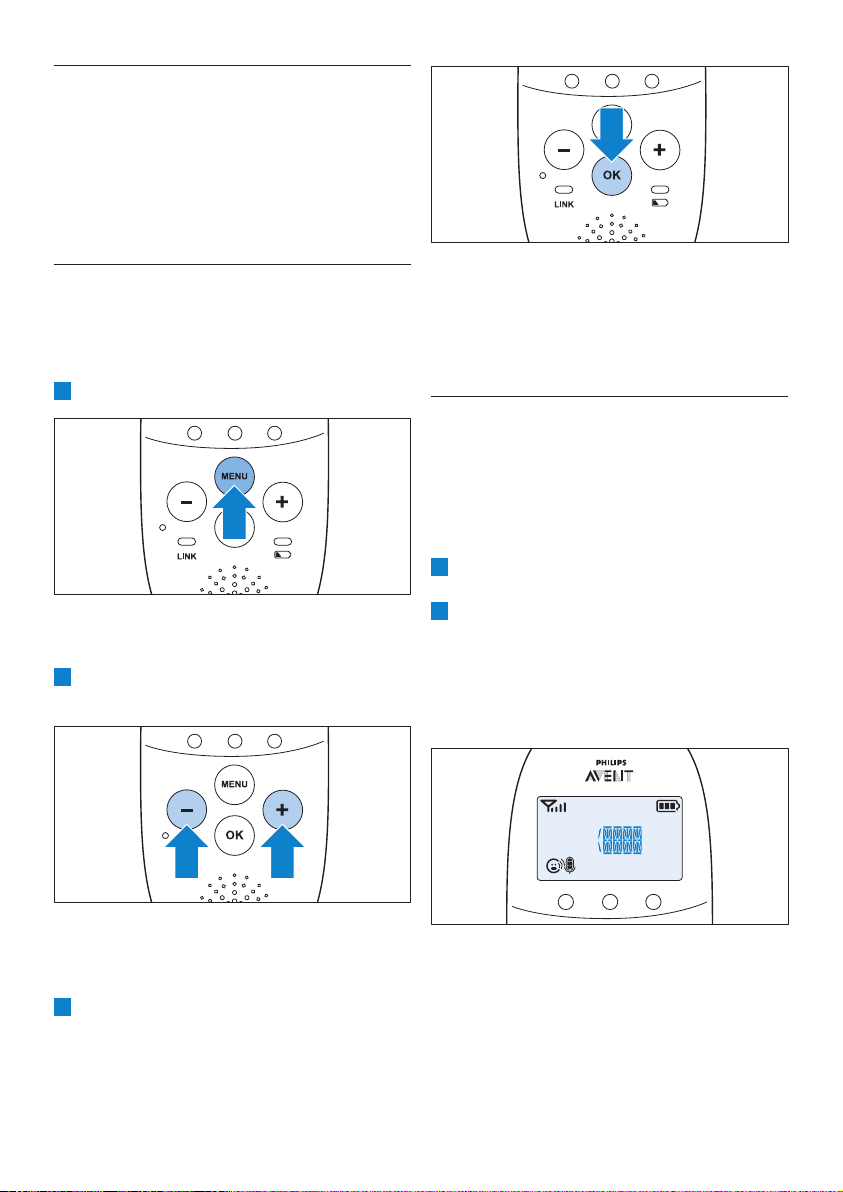
1 Press the MENU button to open the menu.
• The rst menu option appears on the
display.
2 Use the + button to go to the next option or
the - button to go to the previous option.
D Note:
Press the MENU button if you want to leave the
menu without making any changes. If there is no
input in the menu for more than 20 seconds, the
menu closes automatically.
7.2 Sensitivity
This option in the parent unit menu allows you to
set the microphone sensitivity on the baby unit.
The microphone sensitivity determines what noise
level the baby unit picks up, e.g. you will want to
hear when your baby cries, but you may be less
interested in its babbling.
1 Select ‘Sensitivity’ in the menu with the + and
- buttons and press OK to conrm.
2 Use the + and - buttons to increase or
decrease the microphone sensitivity. The
sensitivity indication on the display has four
segments.
• If all four segments are lled, the sensitivity
is at its highest level.
D
Note:
The arrow on the display indicates in which
direction you can navigate.
3 Press the OK button to conrm your
selection.
14
• If all segments are empty, the sensitivity is
at its lowest.
Page 15
3 Press OK to conrm the setting.
7.2.1 Sensitivity levels and indications
5 Select ‘xx:xx Start’ with the + and - buttons.
Press OK to conrm.
• The timer symbol appears on the display.
ENGLISH
Icon Sensitivity Description
highest Hear everything from your
baby. The speaker of the parent
unit is continuously on.
high Hear all sounds from soft
babbling and louder. If your
baby does not make any
sound, the speaker of the
parent unit is off.
medium Hear sounds from soft cries
and louder. If your baby makes
softer sounds, the speaker of
the parent unit does not go on.
low The speaker of the parent unit
only goes on if the baby makes
loud sounds, for instance
because it is crying.
7.3 Feed timer
You can set the feed timer to alert you that it is
time to feed your baby. The timer can be set from
1 minute to 23 hours and 59 minutes.
7.3.1 Setting and using the feed timer
1 Select ‘Feed Timer’ in the menu with the +
and - buttons and press OK to conrm.
2 Select ‘Set Timer’ with the + and - buttons.
Press OK start setting the timer.
• The hour indication starts ashing on the
display.
3 Set the hour and press OK to conrm.
• The minutes indication starts ashing on the
display.
4 Set the minutes and press OK to conrm.
• The timer starts counting down.
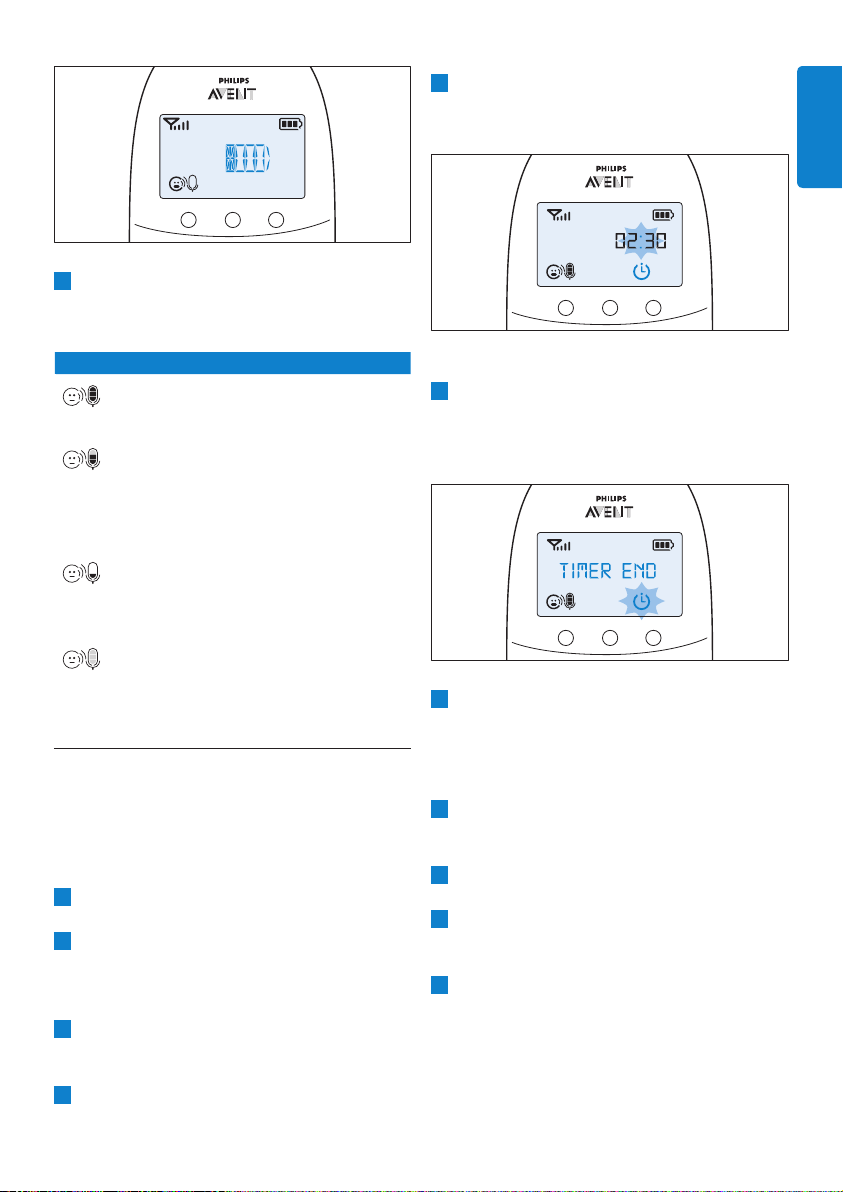
6 When the timer has reached 00:00, the feed
timer alert goes off, the timer symbol starts
ashing on the display and the message
‘TIMER END’ scrolls across the display.
7 Press any key to stop the alert. If you do not
stop the alert, it stops automatically after
2 minutes.
7.3.2 Repeat the feed timer
1 After step 5 in ‘Setting and using the feed
timer’, select ‘Repeat’ with the + and - buttons.
Press OK to conrm.
2 Choose ‘Repeat ON’ or ‘Repeat OFF’ and
press OK to conrm.
3 Select ‘xx:xx Start’ with the + and - buttons
and press OK to activate the feed timer
repeat function.
4 When you press any key to stop the feed
timer alert or if the alert stops automatically
after 2 minutes, the feed timer starts counting
down again.
15
Page 16

7.3.3 Stopping the timer
1 Press the menu button and select ‘Feed Timer’.
2 Use the + and - buttons to select ‘Stop’ and
press OK to conrm.
7.4 Temperature
A baby sleeps comfortably at a temperature
between 16°C/61°F and 20°C/68°F. You can set
a minimum and a maximum temperature range
and an alert to warn you that the temperature is
outside the set range.
1 Select ‘Temperature’ in the menu with the +
and - buttons and press OK to conrm.
2 Select ‘Temp Range’ with the + and - buttons
and press OK to conrm.
• The minimum temperature indication starts
ashing on the display.
3 Use the + and - buttons to set the minimum
temperature range between 10°C/50°F and
19°C/66°F. Press OK to conrm.
• The maximum temperature indication starts
ashing on the display.
4 Use the + and - buttons to set the
maximum temperature range between
22°C/72°F and 37°C/99°F. Press OK to
conrm.
5 Select ‘Alert’ with the + and - buttons. Press
OK to conrm and to start setting the
temperature alert.
• The message ‘Alert’ appears on the display.
6 Select ‘Alert ON’ or ‘Alert OFF’. Press OK to
conrm.
• If you choose ‘Alert On’, the temperature
alert symbol appears on the display.
7 Select ‘Temp Scale’ with the + and - buttons.
Press OK to conrm and to start setting the
temperature scale.
8 Select ‘Celsius’ or ‘Fahrenheit’ and press OK to
conrm.
• The temperature in the set scale appears
on the display.
• If the temperature is outside the set range,
the temperature alert symbol on the display
ashes and the message ‘TOO HOT’ or ‘TOO
COLD’ appears on the display. If you set the
alert to on, the parent unit also beeps.
7.5 Clock
The default setting for the clock is hidden. You can
choose to show the clock and set the clock time
in the menu of the parent unit.
1 Select ‘Clock’ in the menu with the + and -
buttons and press OK to conrm.
2 Use the + or - button to select ‘Show Time’
and press OK to conrm.
3 Select ‘Set Time’ with the + and - buttons.
Press OK to conrm and to start setting the
clock.
• The hour indication starts ashing on the
display.
4 Set the hour and press OK to conrm.
• The minutes indication starts ashing on the
display.
5 Set the minutes and press OK to conrm.
• The clock time alternates with other
indications in the message eld of the
display.
16
Page 17
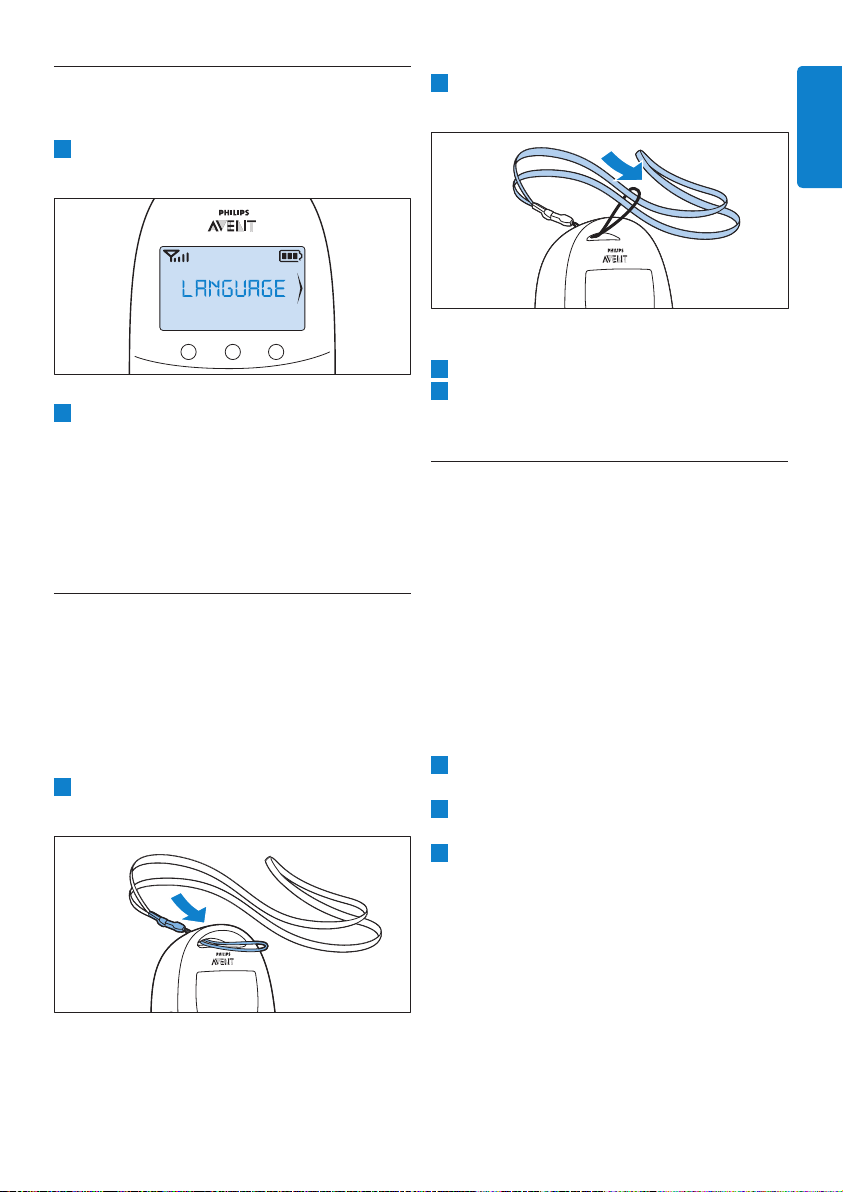
7.6 Language
You can use this menu option to change the
language setting.
1 Select ‘Language’ in the menu with the + and -
buttons and press OK to conrm.
2 Use the + and - buttons to select your
language and press OK to conrm.
D
Note:
This option automatically appears on the
display when you switch on the parent unit
for the rst time and after a reset.
8 Neck strap
A convenient neck strap is supplied with the baby
monitor. It allows you to carry the parent unit
around with you.
8.0.1 Connecting the neck strap
1 Inser t the end loop of the neck strap through
the opening at the top of the parent unit.
2 Thread the neck strap through the end loop
and pull the neck strap tight.
8.0.2 Disconnecting the neck strap
1 Pass the neck strap though the end loop.
2 Pull the end loop out of the opening at the
top of the parent unit.
9 Cleaning and
maintenance
B Warning:
Do not immerse the parent unit and the baby
unit in water and do not clean them with
running water.
B
Warning:
Do not use cleaning spray or liquid cleaners.
1 Unplug the baby unit if it is running on electric
power.
2 Clean the parent unit and the baby unit with a
dry cloth.
3 Clean the adapters with a dry cloth.
ENGLISH
17
Page 18

10 Storage
If you are not going to use the baby monitor for
some time, do the following:
• Remove the non-rechargeable batteries from
the baby unit.
• Remove the rechargeable batteries from the
parent unit.
• Store the parent unit, the baby unit and the
adapters in a cool and dry place.
11 Ordering accessories
To buy accessories or spare parts, visit
www.shop.philips.com/service or go to your
Philips dealer. You can also contact the Philips
Consumer Care Centre in your country (see the
worldwide guarantee leaet for contact details).
12 Guarantee and
support
If you need information or support, please visit the
Philips website at www.philips.com/support
or read the separate worldwide guarantee leaet.
Why don’t the power-on light of the baby unit
and the ‘link’ light of the parent unit come on
when I press the on/off buttons of the units?
• Perhaps the rechargeable batteries of the
parent unit are empty and the parent unit is
not plugged in. Connect the parent unit to an
electric outlet. Then press the on/off button to
establish connection with the baby unit.
• Perhaps the baby unit is running on battery
power and its non-rechargeable batteries are
empty. Replace the non-rechargeable batteries
or connect the baby unit to an electric outlet.
Then press the on/off button to establish
connection with the parent unit.
• If the ‘link’ light on the parent unit still does not
start ashing red, use the reset function to reset
the units to their default settings.
Why does the ‘link’ light on the parent unit ash
red continuously and why is the message ‘NOT
LINKED’ or ‘LINKING’ shown on the display?
• The baby unit and the parent unit are out
of range of each other. Move the parent unit
closer to the baby unit.
• The baby unit may be switched off. Switch on
the baby unit.
Why does the battery status light on the baby
unit ash red?
• The non-rechargeable batteries of the baby unit
are running low. Replace the non-rechargeable
batteries or connect the baby unit to an electric
outlet.
13 Frequently asked
questions
This chapter lists the questions most frequently
asked about the appliance. If you cannot nd the
answer to your question, visit www.philips.com/
AVENT for more frequently asked questions
or contact the Consumer Care Center in your
country.
18
Why does the parent unit beep?
• If the parent unit beeps while the ‘link’ light
ashes red continuously and the message ‘NOT
LINKED’ or ‘LINKING’ is shown on the display,
the connection with the baby unit is lost. Move
the parent unit closer to the baby unit or switch
the baby unit on, if it was off.
• If the parent unit beeps and the battery symbol
on the display is empty, the rechargeable
batteries of the parent unit are running low.
Recharge the batteries.
Page 19

• If you have set the room temperature range
and the temperature alert, the parent unit
beeps when the temperature drops below
the set minimum temperature range or when
the temperature rises above the set maximum
temperature range.
• The baby unit may be switched off. Switch on
the baby unit.
Why does the appliance produce a high-pitched
noise?
• The units may be too close to each other. Make
sure the parent unit and the baby unit are at
least 1 meter/3.5 feet away from each other.
• The volume of the parent unit may be too high.
Decrease the volume of the parent unit.
Why don’t I hear a sound/Why can’t I hear
my baby cry?
• The volume of the parent unit may be too low
or may be switched off. Increase the volume of
the parent unit.
• The microphone sensitivity level of the baby
unit may be too low. Set the microphone
sensitivity level to a higher level in the menu of
the parent unit.
• The baby unit and the parent unit may be out
of range of each other. Reduce the distance
between the units.
Why does the parent unit react too quickly to
other sounds?
• The baby unit also picks up other sounds than
those of your baby. Move the baby unit closer
to the baby (but observe the minimum distance
of 1 meter/3.5 feet).
• The microphone sensitivity level of the baby
unit may be too high. Decrease the microphone
sensitivity level in the menu of the parent unit.
Why does the parent unit react slowly to the
baby’s crying?
• The microphone sensitivity level of the baby
unit may be too low. Increase the microphone
sensitivity level of the baby unit in the menu of
the parent unit.
Why do the non-rechargeable batteries of the
baby unit run low quickly?
• The microphone sensitivity level of the baby
unit may be too high, which causes the baby
unit to transmit more often. Decrease the
microphone sensitivity level in the menu of the
parent unit.
• The volume on the baby unit may be too high,
which causes the baby unit to consume a lot of
energy. Decrease the volume of the baby unit.
• You may have set a maximum temperature
range that is lower than the actual room
temperature or a minimum temperature range
that is higher than the actual room temperature.
The baby unit continues to send data to the
parent unit and therefore uses more power.This
causes the non-rechargeable batteries of the
baby unit to run low quickly.
• Perhaps you switched on the nightlight. If you
want to use the nightlight, we advise you to run
the baby unit on electric power.
Why does the charging time of the parent unit
exceed 10 hours?
• The parent unit may be switched on during
charging. Switch off the parent unit during
charging.
The specied operating range of the baby
monitor is 330 meters/1000 feet. Why does my
baby monitor manage a much smaller distance
than that?
• The specied range is only valid outdoors in
open air. Inside your house, the operating range
is limited by the number and type of walls and/
or ceilings in between. Inside the house, the
operating range is up to 50 meters/150 feet.
Why is the connection lost every now and then?
Why are there sound interruptions?
• The baby unit and the parent unit are probably
close to the outer limits of the operating
range. Try a different location or decrease the
distance between the units. Please note that
it takes about 30 seconds each time before a
connection between the units is established.
ENGLISH
19
Page 20

• You may have placed the unit next to a
transmitter or other DECT appliance, such as
a DECT telephone or other 1.8GHz/1.9GHz
baby monitor. Move the unit away from the
other appliances until the connection is reestablished.
What happens during a power failure?
• If the parent unit is sufciently charged,
it continues to operate during a power failure.
If there are batteries in the baby unit, it also
continues to operate during a power failure.
Is my baby monitor secure from eavesdropping
and interference?
• The DECT technology of this baby monitor
guarantees no interference from other
equipment and no eavesdropping.
The operating time of the parent unit is
supposed to be up to 18 hours. Why is
the operating time of my parent unit shorter?
• When the parent unit has been charged for
the rst time, the operating time is less than 18
hours. The rechargeable batteries only reach
their full capacity after you have charged and
discharged them at least four times.
• The volume of the parent unit may be too high,
which causes the parent unit to consume a lot
of energy. Decrease the volume of the parent
unit
• The microphone sensitivity level of the baby
unit may be too high, which causes the parent
unit to consume a lot of energy. Decrease the
microphone sensitivity level in the menu of the
parent unit.
Why does it take some time for the battery
status indicator to appear on the display when I
start charging the parent unit while it is off?
• This is normal. The parent unit needs a few
seconds to wake up when you connect it to an
electric outlet while it is switched off. When it is
connected, the parent unit rst needs to detect
that it is charging and it has to measure the
battery charge level before the battery status
indicator can be displayed.
Why do the rechargeable batteries of the parent
unit run low quickly?
• The rechargeable batteries have reached the
end of their life. You have to replace them. To
replace the rechargeable batteries, see chapter
‘Ordering accessories’.
20
Page 21

Contenido
11 Solicitud de accesorios 36
12 Garantía y asistencia 36
1 Introducción 21
2 Descripción del producto 21
3 Preparación para su uso 22
3.1 Unidad del bebé 22
3.2 Unidad de padres 23
4 Uso del vigilabebés 24
4.1 Colocación del vigilabebés 24
4.2 Conexión de la unidad de padres
y la unidad del bebé 25
5 Funciones y reacciones de
la unidad del bebé 26
5.1 Luz de compañía 26
5.2 Función de nanas 27
5.3 Localización de la unidad de padres 27
5.4 Piloto de estado de las pilas 28
6 Funciones y reacciones de
la unidad de padres 28
6.1 Volumen 28
6.2 Función TALK (Intercomunicador) 29
6.3 Indicaciones de estado de las pilas 29
6.4 Indicador de intensidad de la señal 31
6.5 Reinicio 31
7 Menú de la unidad de padres 32
7.1 Navegación por el menú 32
7.2 Sensibilidad 32
7.3 Temporizador de alimentación 33
7.4 Temperatura 33
7.5 Reloj 34
7.6 Idioma 35
8 Cinta para el cuello 35
9 Limpieza y mantenimiento 36
10 Almacenamiento 36
13 Preguntas más frecuentes 37
1 Introducción
ESPAÑOL
Enhorabuena por la compra de este producto y
bienvenido a Philips AVENT. Para sacar el mayor
partido de la asistencia que Philips AVENT le
ofrece, registre su producto en www.philips.com/
welcome.
Philips AVENT se dedica a la fabricación de
productos ables para el cuidado del bebé, que
proporcionen a los padres la tranquilidad que
necesitan. Este vigilabebés de Philips AVENT
permite vigilar al bebé de forma continua y
oírle con claridad sin ruidos que intereran. La
tecnología DECT garantiza cero interferencias
y un sonido nítido entre la unidad del bebé y la
unidad de padres.
El sensor de temperatura le permite controlar la
temperatura de la habitación del bebé y le ofrece
unos ajustes personalizados que le ayudan a
mantener un clima confortable en ésta.
2 Descripción del
producto
• I Pantalla
1 Indicador de intensidad de la señal
2 Símbolo de silenciamiento
3 Indicador del estado de la pila
4 Flecha de navegación
5 Campo de mensajes
6 Indicador de sensibilidad del micrófono
7 Símbolo de nana
8 Símbolo de luz de compañía
9 Símbolo de temporizador
10 Símbolo de temperatura
21
Page 22
• II Unidad de padres
1 Botón de encendido/apagado
2 Botón TALK (Intercomunicador)
3 Botón 4 Micrófono
5 Piloto “LINK”
6 Pantalla
7 Pilotos de nivel de sonido
8 Botón MENU (Menú)
9 Botón +
10 Piloto de estado de las pilas
11 Botón OK (Aceptar)
12 Empuñadura/oricio de colocación del
cordón para el cuello
13 Compartimento para pilas recargables
14 Tapa del compartimento para pilas
recargables
15 Toma para la clavija pequeña del
adaptador
16 Cinta para el cuello
17 Pilas recargables
18 Clavija pequeña del adaptador
19 Adaptador de corriente
• III Unidad del bebé
1 Luz de compañía y botón de encendido/
apagado de la luz de compañía
2 Piloto de encendido
3 Botón FIND
4 Micrófono
5 Botón de siguiente nana
6 Botón de reproducción/parada de nana
7 Botón de encendido/apagado
8 Botón de aumento del volumen
9 Piloto de estado de las pilas
10 Botón de reducción del volumen
11 Sensor de temperatura
12 Altavoz
13 Toma para la clavija pequeña del
adaptador
14 Compartimento para pilas no recargables
15 Tapa del compartimento para pilas no
recargables
16 Clavija pequeña del adaptador
17 Adaptador de corriente
3 Preparación para
su uso
IMPORTANTE: Lea las instrucciones de
seguridad con atención antes de utilizar
el vigilabebés y consérvelas por si necesita
consultarlas en el futuro.
3.1 Unidad del bebé
Utilice la unidad del bebé conectándola a la red
eléctrica. Para garantizar una alimentación de
reserva automática en caso de fallo de la red
eléctrica, le aconsejamos que introduzca pilas no
recargables.
3.1.1 Funcionamiento con energía eléctrica
1 Coloque el adaptador en una toma de
corriente e inserte la clavija pequeña del
mismo en la unidad del bebé.
3.1.2 Colocación de las pilas no recargables
En caso de fallo de la red eléctrica, la unidad del
bebé puede funcionar con cuatro pilas alcalinas
AA de 1,5 V R6 (no incluidas).
No utilice pilas recargables. La unidad del bebé no
dispone de función de carga y las pilas recargables
se agotan lentamente si no se utilizan.
B
Advertencia:
Desenchufe la unidad del bebé y, cuando vaya a
poner las pilas no recargables, asegúrese de que
sus manos y la unidad estén secas.
22
Page 23

D Nota:
Le aconsejamos que utilice la unidad del bebé
conectada a la red, ya que cuando se utiliza con
pilas alcalinas no recargables tiene un tiempo
de funcionamiento limitado. El tiempo de
funcionamiento de las pilas no recargables es de
24 horas.
1 Pulse el bloqueo para liberar la tapa del
compartimento de las pilas no recargables y
quite la tapa.
2 Inser te cuatro pilas no recargables.
4 A continuación, presione la tapa hacia abajo
hasta que el bloqueo se cierre con un clic.
ESPAÑOL
3.2 Unidad de padres
La unidad de padres funciona con dos pilas
recargables que se suministran con el vigilabebés.
3.2.1 Inserción de las pilas recargables
1 Deslice la tapa del compar timento de las pilas
recargables para extraerla de la unidad de
padres.
D
Nota:
Asegúrese de que los polos + y - estén en la
posición correcta.
3 Para volver a colocar la tapa, inserte primero
las protuberancias en las aberturas del borde
del compartimento de las pilas no recargables.
2 Inser te las pilas recargables.
D
Nota:
Asegúrese de que los polos + y - de las pilas
estén en la posición correcta.
23
Page 24
3 Deslice la tapa del compar timento de las pilas
recargables de nuevo en la unidad de padres.
Presione la tapa hasta que encaje en su lugar
con un clic.
3.2.2 Carga de la unidad de padres
Cargue la unidad de padres antes de utilizarla por
primera vez o cuando esta indique que las pilas se
están agotando.
Importante: Debe cargar la unidad de
padres durante 10 horas completas para
que ofrezca un tiempo de funcionamiento
sin cable de 18 horas.
1 Coloque el adaptador en una toma de
corriente e inserte la clavija pequeña del
mismo en la unidad de padres.
D Nota:
Cuando empiece a utilizar el vigilabebés, las
pilas recargables tardan cuatro ciclos de carga y
descarga en alcanzar su capacidad total.
4 Uso del vigilabebés
4.1 Colocación del vigilabebés
B Advertencia:
Mantenga siempre la unidad del bebé fuera del
alcance del bebé. Nunca coloque ni monte la
unidad del bebé en el interior de la cuna o del
parque.
1 El cable de la unidad del bebé presenta
posibles riesgos de estrangulación, por lo que
debe asegurarse de que la unidad del bebé y
su cable están al menos a 1 metro (3,5 pies)
del bebé.
• La pantalla se enciende y las indicaciones de
estado de las pilas muestran que la unidad
de padres se está cargando. Para conocer
las indicaciones de estado de las pilas,
consulte “Indicaciones de carga de las pilas”
en el capítulo “Funciones y reacciones de la
unidad de padres”.
2 Deje la unidad de padres conectada a la toma
de corriente hasta que las pilas recargables
estén completamente cargadas.
24
2 Para evitar que el sonido de una o ambas
unidades sea muy agudo, asegúrese de que
la unidad de padres está al menos a 1 metro
(3,5 pies) de la unidad del bebé.
Page 25

4.2 Conexión de la unidad de
padres y la unidad del bebé
1 Mantenga pulsado el botón de encendido/
apagado 3 de la unidad del bebé durante 2
segundos.
• La luz de compañía, el piloto de estado de
las pilas y el piloto de encendido se iluminan
brevemente.
D Nota:
Al encender la unidad de padres por
primera vez o después de restablecerla,
debe seleccionar el idioma de visualización
que preera (consulte “Idioma” en el
capítulo “Menú de la unidad de padres”).
• El piloto “LINK” de la unidad de padres
empieza a parpadear en rojo y aparece
el mensaje “LINKING” (Conectando) en la
pantalla.
• Cuando la unidad de padres y la unidad
del bebé están conectadas, el piloto “LINK”
se ilumina en verde de forma permanente.
El indicador de intensidad de la señal y el
mensaje “LINKED” (Conectadas) aparecen
en la pantalla.
ESPAÑOL
2 Mantenga pulsado el botón de encendido/
apagado 3 de la unidad de padres durante
2 segundos.
• La pantalla se enciende y muestra
brevemente todos los indicadores y símbolos.
A continuación, los indicadores y los símbolos
se apagan, y aparece el indicador de estado
de las pilas.
• Si no se establece la conexión antes de
10 segundos, el mensaje “NOT LINKED”
(No conectada) de la pantalla se alterna
con el mensaje “LINKING” (Conectando).
Si sigue sin establecerse la conexión
después de 30 segundos, la unidad de
padres empieza a pitar y solo se muestra el
mensaje “NOT LINKED” (No conectada).
25
Page 26

Qué hacer si no se establece la
conexión
• Puede que la unidad de padres esté
fuera del alcance de la unidad del
bebé. Acerque la unidad de padres
a la unidad del bebé, aunque no a
menos de 1 metro (3,5 pies).
• La unidad del bebé o la unidad de
padres puede perder la conexión
porque está demasiado cerca de
otro aparato DECT (por ejemplo,
un teléfono inalámbrico). Apague el
aparato DECT o aleje la unidad del
aparato.
• Es posible que la unidad del bebé esté
apagada. Enciéndala.
4.2.1 Alcance de funcionamiento
• El alcance de funcionamiento es de
330 metros (1000 pies) en exteriores y de
hasta 50 metros (150 pies) en interiores.
• El alcance de funcionamiento del vigilabebés
varía en función del entorno y factores que
provocan interferencias. La humedad y los
materiales húmedos pueden provocar tantas
interferencias que el alcance se puede reducir
hasta un 100%. Para conocer las interferencias
que provocan los materiales secos, consulte la
tabla que aparece más abajo
Materiales secos Grosor del
material
Madera, yeso, cartón,
cristal (sin metal, cables
o plomo)
Ladrillo, madera
contrachapada
Hormigón armado < 30 cm 30 - 100%
Rejillas o barras
metálicas
Láminas de metal o
aluminio
< 30 cm 0 - 10%
< 30 cm 5 - 35%
< 1 cm 90 - 100%
< 1 cm 100%
Pérdida de
alcance
5 Funciones y
reacciones de la
unidad del bebé
5.1 Luz de compañía
La luz de compañía produce un resplandor suave
que tranquiliza al bebé.
1 Pulse el botón de encendido/apagado de la
luz de compañía de la unidad del bebé para
encender la luz de compañía.
• Q aparece en la pantalla de la unidad de
padres.
2 Vuelva a pulsar el botón de encendido/
apagado de la luz de compañía para apagarla.
• La luz de compañía se atenúa
gradualmente antes de apagarse por
completo.
• Q desaparece de la pantalla de la unidad
de padres.
26
Page 27

5.2 Función de nanas
1 Pulse el botón de reproducción/parada de
nanas K en la unidad del bebé para reproducir
la última nana seleccionada.
• La nana seleccionada se repite durante
15 minutos.
• Si no se ha seleccionado ninguna nana
antes, se reproduce la nana 1.
2 Pulse el botón de siguiente nana para
seleccionar otra nana de la lista.
D Nota:
Solo se puede ajustar el volumen del altavoz
en la unidad del bebé cuando esté sonando
una nana. Si ha aumentado el volumen de la
nana en la unidad del bebé, el sonido también
será más alto cuando utilice la función de
intercomunicador de la unidad de padres.
4 Para detener la reproducción de la nana,
pulse el botón de reproducción/parada de
nanas K de la unidad del bebé.
5.3 Localización de la unidad
de padres
Si ha perdido la unidad de padres, puede utilizar
el botón FIND de la unidad del bebé para
encontrarla.
D
Nota:
La función de localización sólo está disponible si la
unidad de padres está encendida.
1 Pulse el botón FIND de la unidad del bebé.
ESPAÑOL
• Si no se está reproduciendo ninguna
nana, la última nana seleccionada empieza
a reproducirse al pulsar el botón de
siguiente nana
.
• Si pulsa el botón de siguiente nana
mientras se reproduce una nana, la
siguiente nana empieza a reproducirse.
3 Para ajustar el nivel de sonido de la nana,
pulse el botón para subir o bajar el volumen
en la unidad del bebé.
• El mensaje “PAGING” (Localizando) aparece
en la pantalla de la unidad de padres y esta
produce un tono de alerta de localización.
27
Page 28

2 Para detener el tono de alerta de localización,
pulse el botón FIND de nuevo en la unidad
del bebé o pulse cualquier botón de la unidad
de padres.
D
Nota:
El tono de alerta de localización se detiene
automáticamente después de 2 minutos.
5.4 Piloto de estado de las pilas
1 El piloto de estado de las pilas se ilumina
en verde de forma permanente cuando la
unidad del bebé funciona con las pilas y estas
contienen suciente energía.
2 El piloto de estado de las pilas parpadea en
rojo rápidamente cuando las pilas se están
agotando si la unidad del bebé funciona con
pilas.
D Nota:
Le aconsejamos que utilice la unidad del bebé
conectada a la red, ya que cuando se utiliza con
pilas alcalinas no recargables tiene un tiempo
de funcionamiento limitado. El tiempo de
funcionamiento de las pilas no recargables es de
24 horas.
6 Funciones y
reacciones de la
unidad de padres
6.1 Volumen
El volumen se puede ajustar si el menú no está
activo. Hay siete niveles de volumen y un ajuste de
volumen desactivado.
6.1.1 Ajuste del nivel de volumen
1 Pulse el botón + o - una vez.
• El nivel de volumen actual aparece en la
pantalla.
2 Pulse el botón + para aumentar el volumen
o - para bajarlo.
• La unidad de padres emite un pitido al
cambiar cada nivel.
• En el volumen máximo, la unidad de padres
emite dos pitidos.
• Sustituya las pilas cuando se estén
agotando.
• Si las pilas se agotan cuando la unidad
del bebé está funcionando con pilas, esta
se apaga y la unidad de padres pierde la
conexión con la unidad del bebé.
28
• Si no pulsa ningún botón durante más
de 2 segundos, la indicación de nivel de
volumen desaparece y el ajuste de volumen
se guarda.
Page 29

6.1.2 Volumen desactivado
Por debajo del ajuste de volumen más bajo, hay
un ajuste de volumen desactivado.
1 Pulse el botón + o - una vez.
• El nivel de volumen actual aparece en la
pantalla.
2 Mantenga pulsado el botón - durante más de
2 segundos para desactivar el volumen.
• El mensaje “MUTE” (Silencio) y el símbolo
de silenciamiento aparecen en la pantalla.
D
Nota:
Si el volumen está desactivado, solo los
pilotos de nivel de sonido muestran que
el bebé está produciendo sonidos.
6.2 Función TALK
(Intercomunicador)
Puede utilizar el botón TALK (Intercomunicador)
de la unidad de padres para hablar al bebé (por
ejemplo, para tranquilizarle).
1 Mantenga pulsado el botón TALK y hable
con claridad hacia el micrófono de la parte
delantera de la unidad de padres desde una
distancia de 15-30 cm (0,5-1 pie).
D Nota:
Si ha aumentado el volumen de la nana
en la unidad del bebé, el sonido también
será más alto cuando utilice la función de
intercomunicador de la unidad de padres.
• El piloto “LINK” comienza a parpadear
en verde y el mensaje “TALK”
(Intercomunicador) aparece en la pantalla.
ESPAÑOL
2 Cuando haya terminado de hablar, suelte el
botón TALK (Intercomunicador).
6.3 Indicaciones de estado de
las pilas
El estado de carga de las pilas se indica en la
pantalla mediante el indicador de estado de las
pilas y los mensajes de texto.
6.3.1 Batería baja
Si las pilas recargables se están agotando, el
tiempo de funcionamiento restante es de al
menos 30 minutos si el vigilabebés funciona en el
modo normal con los ajustes más altos.
1 El indicador de estado de las pilas de la
pantalla está vacío y parpadea.
2 El mensaje “BATTERY LOW” (Pilas bajas)
aparece en la pantalla.
29
Page 30

3 El piloto de estado de las pilas parpadea en
rojo lentamente.
4 La unidad de padres pita cada 10 segundos
durante los primeros 3 minutos. A
continuación, sigue pitando cada minuto.
6.3.2 Batería descargada
1 Si las pilas recargables están casi agotadas, el
piloto de estado de las pilas parpadea en rojo
rápidamente.
2 Si no conecta la unidad de padres a una toma
de corriente, ocurre lo siguiente en orden:
1 Se pierde la conexión con la unidad del
bebé.
2 La pantalla se apaga.
3 La unidad de padres se apaga.
3 El primer segmento del indicador de estado
de las pilas empieza a parpadear para indicar
que las pilas recargables se están cargando.
4 El segundo segmento del indicador de estado
de las pilas empieza a parpadear cuando las
pilas recargables están cargadas a más de un
30% de su capacidad.
D
Nota:
Si enciende la unidad de padres cuando las pilas
recargables están casi agotadas, la pantalla se
enciende. El mensaje “BATTERY LOW” (Pilas
bajas) aparece en la pantalla durante 2 segundos
antes de que la unidad de padres se apague.
6.3.3 Carga
Inserte la clavija pequeña en la unidad de padres
y conecte el adaptador a una toma de corriente.
Al cargar la unidad de padres, ocurre lo siguiente
en orden:
1 La pantalla se enciende durante 4 segundos y
el texto “CHARGING” (Cargando) aparece
en la pantalla durante 2 segundos.
2 El piloto de estado de las pilas se ilumina en
verde de forma permanente al conectar la
unidad de padres a la corriente.
30
5 El tercer segmento del indicador de estado de
las pilas empieza a parpadear cuando las pilas
recargables están cargadas a más de un 50%
de su capacidad.
Page 31

6 Cuando las pilas recargables están llenas,
ocurre lo siguiente:
• El tercer segmento del indicador de
estado de las pilas deja de parpadear.
• La pantalla se enciende durante
4 segundos y el mensaje “BATT FULL”
(Pilas llenas) aparece en la pantalla.
7 Desconecte la unidad de padres de la toma
de corriente para utilizarla sin cable.
• El piloto de estado de la batería se apaga
si la unidad de padres se utiliza sin cable
con pilas.
D
Nota:
Puede cargar la unidad de padres cuando está
apagada. Es ese caso, el indicador de estado de las
pilas se ilumina en verde de forma permanente,
pero no ofrece ninguna indicación cuando las pilas
están totalmente cargadas.
D
Nota:
Si las pilas recargables se agotan con mucha
rapidez, han llegado al nal de su vida útil y debe
sustituirlas. Para solicitar nuevas pilas recargables,
consulte el capítulo “Solicitud de accesorios”.
6.4 Indicador de intensidad de
la señal
• Si el indicador de intensidad de la señal tiene
4 barras, la conexión entre la unidad del bebé
y la unidad de padres es excelente.
• Si el indicador de intensidad de la señal tiene
1 barra o ninguna, la señal de transmisión de
la unidad del bebé es muy débil o no está
disponible. Acerque la unidad de padres a la
unidad del bebé para mejorar la señal.
6.5 Reinicio
Esta función le permite restablecer la unidad
de padres y la unidad del bebé a los ajustes
predeterminados de fábrica.
1 Apague la unidad.
2 Mantenga pulsado el botón -.
3 Encienda de nuevo la unidad mientras
mantiene pulsado el botón -.
6.5.1 Ajustes predeterminados
Unidad de padres
• Idioma: español
• Volumen de altavoz: 3
• Sensibilidad del micrófono: 3
• Alerta de temperatura: desactivada
• Alerta de “Temperatura baja”: 14 °C (57 °F)
• Alerta de “Temperatura alta”: 35 °C (95 °F)
• Escala de la temperatura: Fahrenheit
• Temporizador de alimentación: 02:00
• Temporizador de alimentación: detenido
• Reloj: oculto
Unidad del bebé
• Volumen de altavoz: 4
• Luz de compañía: apagada
• Nana: desactivada (nana 1 seleccionada)
ESPAÑOL
31
Page 32

7 Menú de la unidad
de padres
Todas las funciones descritas en las secciones
siguientes se pueden utilizar a través del menú de
la unidad de padres.
7.1 Navegación por el menú
3
Pulse el botón OK para conrmar su selección.
D Nota:
Algunas funciones del menú solo funcionan
cuando la unidad del bebé y la unidad de padres
están conectadas.
1 Pulse el botón MENU (Menú) para abrir el
menú.
• La primera opción de menú aparece en la
pantalla.
2 Utilice el botón + para acceder a la opción
siguiente o el botón - para acceder a la
opción anterior.
D Nota:
Pulse el botón MENU si desea salir del menú sin
realizar cambios. Si no realiza ninguna acción en el
menú durante más de 20 segundos, este se cierra
automáticamente.
7.2 Sensibilidad
Esta opción del menú de la unidad de padres le
permite ajustar la sensibilidad del micrófono de
la unidad del bebé. La sensibilidad del micrófono
determina el nivel de ruido que detecta la unidad
del bebé. Por ejemplo, puede que quiera oír al
bebé cuando llore, pero esté menos interesado
en oír los balbuceos.
1 Seleccione “Sensitivity” (Sensibilidad) en el
menú con los botones + y -. Pulse OK para
conrmar.
2 Utilice los botones + y - para aumentar
o reducir la sensibilidad del micrófono. El
indicador de sensibilidad de la pantalla tiene
cuatro segmentos.
• Si los cuatro segmentos están llenos, la
sensibilidad está en su nivel máximo.
D
Nota:
La echa de la pantalla indica en qué dirección
puede navegar.
32
Page 33

• Si todos los segmentos están vacíos, la
sensibilidad está en su nivel mínimo.
3 Pulse OK para conrmar el ajuste.
7.2.1 Niveles e indicaciones de sensibilidad
Icono Sensibilidad Descripción
más alto Puede oír todos los sonidos
del bebé. El altavoz de
la unidad de padres está
activado de forma continua.
alta Puede oír todos los sonidos
más altos que un balbuceo
suave. Si el bebé no emite
ningún sonido, el altavoz
de la unidad de padres se
desactiva.
medio;
mediano
Puede oír los sonidos más
altos que un llanto suave.
Si el bebé emite sonidos
más suaves, el altavoz de
la unidad de padres no se
activa.
baja El altavoz de la unidad de
padres se activa si el bebé
emite sonidos altos, por
ejemplo cuando llora.
7.3 Temporizador de
alimentación
Puede ajustar el temporizador de alimentación
para recibir una alerta cuando sea hora de dar de
comer al bebé. El temporizador se puede ajustar
con un tiempo de entre 1 minuto y 23 horas y
59 minutos.
7.3.1 Ajuste y uso del temporizador de
alimentación
1 Seleccione “Feed Timer” (Temporizador de
alimentación) en el menú con los botones + y
-. Pulse OK para conrmar.
2 Seleccione “Set Timer” (Ajustar temporizador)
con los botones + y -. Pulse OK para iniciar el
ajuste del temporizador.
• La indicación de hora empieza a parpadear
en la pantalla.
3 Ajuste la hora y pulse OK para conrmar.
• La indicación de minutos empieza a
parpadear en la pantalla.
4 Ajuste los minutos y pulse OK para conrmar.
5 Seleccione “xx:xx Start” (xx:xx Iniciar) con los
botones + y -. Pulse OK para conrmar.
• El símbolo de temporizador aparece en la
pantalla.
• El temporizador comienza la cuenta atrás.
ESPAÑOL
33
Page 34

6 Cuando el temporizador llega a 00:00,
se activa la alerta del temporizador de
alimentación, el símbolo del temporizador
empieza a parpadear en la pantalla y el
mensaje “TIMER END” (Fin del temporizador)
se desplaza por la pantalla.
7 Pulse cualquier botón para detener la alerta.
Si no detiene la alerta, esta se detiene
automáticamente después de 2 minutos.
7.3.2 Repetición del temporizador de
alimentación
1 Después del paso 5 de “Ajuste y uso del
temporizador de alimentación”, seleccione
“Repeat” (Repetir) con los botones + y -.
Pulse OK para conrmar.
2 Seleccione “Repeat ON” (Repetición activada)
o “Repeat OFF” (Repetición desactivada) y
pulse OK para conrmar.
3 Seleccione “xx:xx Start” (xx:xx Iniciar) con
los botones + y -. Pulse OK para activar la
función de repetición del temporizador de
alimentación.
4 Al pulsar cualquier botón para detener la
alerta del temporizador de alimentación
o si la alerta se detiene automáticamente
después de 2 minutos, el temporizador de
alimentación inicia de nuevo la cuenta atrás.
7.3.3 Detención del temporizador
1 Pulse el botón MENU y seleccione “Feed
Timer” (Temporizador de alimentación).
2 Utilice los botones + y - para seleccionar
“Stop” (Detener) y pulse OK para conrmar.
7.4 Temperatura
Los bebés duermen cómodamente a una
temperatura de entre 16 °C (61 °F) y 20 °C
(68 °F). Puede establecer un intervalo de
temperatura mínimo y máximo y una alerta para
avisarle de que la temperatura se encuentra fuera
del intervalo establecido.
1 Seleccione “Temperature” (Temperatura) en
el menú con los botones + y -. Pulse OK para
conrmar.
2 Seleccione “Temp Range” (Intervalo de
temperatura) con los botones + y -. Pulse OK
para conrmar.
• La indicación de temperatura mínima
empieza a parpadear en la pantalla.
3 Utilice los botones + y - para establecer
el intervalo de temperatura mínimo entre
10 °C (50 °F) y 19 °C (66 °F). Pulse OK para
conrmar.
• La indicación de temperatura máxima
empieza a parpadear en la pantalla.
4 Utilice los botones + y - para establecer
el intervalo de temperatura máximo entre
22 °C (72 °F) y 37 °C (99 °F). Pulse OK para
conrmar.
5 Seleccione “Alert” (Alerta) con los botones +
y -. Pulse OK para conrmar e iniciar el ajuste
de la alerta de temperatura.
• El mensaje “Alert” (Alerta) aparece en la
pantalla.
6 Seleccione “Alert ON” (Alerta activada) o
“Alert OFF” (Alerta desactivada). Pulse OK
para conrmar.
• Si selecciona “Alert On” (Alerta activada),
el símbolo de la alerta de temperatura
aparece en la pantalla.
7 Seleccione “Temp Scale” (Escala de
temperatura) con los botones + y -. Pulse OK
para conrmar e iniciar el ajuste de la escala
de temperatura.
8 Seleccione “Celsius” o “Fahrenheit” y pulse OK
para conrmar.
• La temperatura aparece en la pantalla en la
escala establecida.
34
Page 35

7.6 Idioma
Puede utilizar esta opción del menú para cambiar
el ajuste de idioma.
1 Seleccione “Language” (Idioma) en el menú
con los botones + y -. Pulse OK para
conrmar.
• Si la temperatura está fuera del intervalo
establecido, el símbolo de alerta de
temperatura de la pantalla parpadea y el
mensaje “TOO HOT” (Demasiado calor) o
“TOO COLD” (Demasiado frío) aparece en
la pantalla. Si activa la alerta, la unidad de
padres también pita.
7.5 Reloj
El ajuste predeterminado del reloj es oculto.
Puede mostrar el reloj y ajustar la hora del mismo
en el menú de la unidad de padres.
1 Seleccione “Clock” (Reloj) en el menú con los
botones + y -. Pulse OK para conrmar.
2 Utilice el botón + o - para seleccionar “Show
Time” (Mostrar hora) y pulse OK para
conrmar.
3 Seleccione “Set time” (Ajustar hora) con los
botones + y -. Pulse OK para conrmar e
iniciar el ajuste del reloj.
• La indicación de hora empieza a parpadear
en la pantalla.
4 Ajuste la hora y pulse OK para conrmar.
• La indicación de minutos empieza a
parpadear en la pantalla.
5 Ajuste los minutos y pulse OK para conrmar.
• La hora del reloj se alterna con el resto de
indicaciones en el campo de mensajes de la
pantalla.
2 Utilice los botones + y - para seleccionar su
idioma, y pulse OK para conrmar.
D
Nota:
Esta opción aparece automáticamente en la
pantalla al encender la unidad de padres por
primera vez y después de restablecerla.
8 Cinta para el cuello
El vigilabebés incluye una cómoda cinta para el
cuello, que le permite llevar la unidad de padres
con usted.
8.0.1 Cómo poner la cinta para el cuello
1 Inser te el extremo en forma de arandela de la
cinta para el cuello a través de la abertura de
la parte superior de la unidad de padres.
ESPAÑOL
35
Page 36

2 Introduzca la cinta para el cuello a través del
extremo en forma de arandela y tire de la
cinta para apretarla.
8.0.2 Cómo quitar la cinta para el cuello
1 Pase la cinta para el cuello a través del
extremo en forma de arandela.
2 Extraiga el extremo en forma de arandela de
la abertura de la parte superior de la unidad
de padres.
9 Limpieza y
mantenimiento
10 Almacenamiento
Si no va a utilizar el vigilabebés durante un tiempo,
haga lo siguiente:
• Quite las pilas no recargables de la unidad
del bebé.
• Quite las pilas recargables de la unidad de
padres.
• Guarde la unidad de padres, la unidad del
bebé y los adaptadores en un lugar fresco y
seco.
11 Solicitud de
accesorios
Para comprar accesorios o piezas de repuesto,
visite www.shop.philips.com/service o
acuda a su distribuidor de Philips. También puede
ponerse en contacto con el Servicio de Atención
al Cliente de Philips en su país (consulte el folleto
de garantía mundial para encontrar los datos de
contacto).
B Advertencia:
No sumerja la unidad de padres ni la del bebé en
agua ni las lave bajo el grifo.
B
Advertencia:
No utilice aerosoles ni líquidos de limpieza.
1 Desenchufe la unidad del bebé si está
funcionando con energía eléctrica.
2 Limpie la unidad de padres y la unidad del
bebé con un paño seco.
3 Limpie los adaptadores con un paño seco.
36
12 Garantía y asistencia
Si necesita asistencia o información, visite el sitio
Web de Philips en www.philips.com/support
o lea el folleto de garantía mundial independiente.
Page 37

13 Preguntas más
frecuentes
En este capítulo se exponen las preguntas más
frecuentes sobre el aparato. Si no encuentra
la respuesta a su pregunta, visite www.philips.
com/AVENT para consultar las preguntas más
frecuentes o póngase en contacto con el Servicio
de Atención al Cliente de su país.
¿Por qué no se iluminan el piloto de encendido
de la unidad del bebé y el piloto “LINK” de la
unidad de padres cuando pulso los botones de
encendido/apagado?
• Es posible que se hayan agotado las pilas
recargables de la unidad de padres y la unidad
no esté enchufada. Conecte la unidad de padres
a una toma de corriente. Luego, pulse el botón
de encendido/apagado para establecer la
conexión con la unidad del bebé.
• Puede que la unidad del bebé esté funcionando
con pilas y sus pilas no recargables estén
agotadas. Sustituya las pilas no recargables o
conecte la unidad del bebé a una toma de
corriente. Luego, pulse el botón de encendido/
apagado para establecer la conexión con la
unidad de padres.
• Si aun así el piloto “LINK” de la unidad de
padres no comienza a parpadear en rojo,
utilice la función de reinicio para restablecer los
ajustes predeterminados en ambas unidades.
¿Por qué parpadea el piloto “LINK” de la
unidad de padres en rojo de forma continua
y se muestra el mansaje “NOT LINKED” (No
conectada) o “LINKING” (Conectando) en la
pantalla?
• La unidad del bebé y la unidad de padres están
fuera del alcance de funcionamiento. Acerque la
unidad de padres a la del bebé.
• Es posible que la unidad del bebé esté apagada.
Enciéndala.
¿Por qué parpadea en rojo el piloto de estado de
las pilas de la unidad del bebé?
• Las pilas no recargables de la unidad del
bebé se están agotando. Cambie las pilas no
recargables o enchufe la unidad del bebé a una
toma de corriente.
¿Por qué la unidad de padres emite un pitido?
• Si la unidad de padres pita mientras el piloto
“LINK” parpadea en rojo continuamente y el
mensaje “NOT LINKED” (No conectada) o
“LINKING” (Conectando) se muestra en la
pantalla, la conexión con la unidad del bebé se
ha perdido. Acerque la unidad de padres a la
unidad del bebé o encienda la unidad del bebé
si estaba apagada.
• Si la unidad de padres emite un pitido y el
símbolo de la pila en la pantalla está vacío, las
pilas recargables de la unidad de padres se
están agotando. Recargue las pilas.
• Si ha establecido el intervalo de temperatura
de la habitación y la alerta de temperatura,
la unidad de padres emite un pitido si la
temperatura desciende por debajo del intervalo
de temperatura mínimo establecido o si la
temperatura supera el intervalo de temperatura
máximo establecido.
• Es posible que la unidad del bebé esté apagada.
Enciéndala.
¿Por qué emite el aparato un sonido agudo?
• Es posible que las unidades estén demasiado
cerca la una de la otra. Compruebe que
la separación entre la unidad de padres y
la unidad del bebé es superior a 1 metro
(3,5 pies).
• Es posible que el volumen de la unidad de
padres sea demasiado alto. Baje el volumen de
la unidad de padres.
ESPAÑOL
37
Page 38

¿Por qué no se oye ningún sonido? ¿Por qué no
se oye llorar al bebé?
• Es posible que el volumen de la unidad de
padres sea demasiado bajo o esté desactivado.
Suba el volumen de la unidad de padres.
• Es posible que el nivel de sensibilidad del
micrófono de la unidad del bebé sea demasiado
bajo. Ajuste el nivel de sensibilidad del
micrófono a un nivel más alto en el menú de la
unidad de padres.
• Es posible que la unidad del bebé y la
unidad de padres estén fuera del alcance de
funcionamiento. Reduzca la distancia entre las
unidades.
¿Por qué la unidad de padres reacciona tan
rápidamente a otros sonidos?
• La unidad del bebé recoge también otros
sonidos aparte de los del bebé. Aproxime la
unidad del bebé al bebé (pero manteniendo
una distancia mínima de 1 metro (3,5 pies)).
• Es posible que el nivel de sensibilidad del
micrófono de la unidad del bebé sea demasiado
alto. Reduzca el nivel de sensibilidad del
micrófono en el menú de la unidad de padres.
¿Por qué se agotan tan rápidamente las pilas no
recargables de la unidad del bebé?
• Es posible que el nivel de sensibilidad del
micrófono de la unidad del bebé sea demasiado
alto y esto hace que la unidad del bebé
transmita más frecuentemente. Reduzca el nivel
de sensibilidad del micrófono en el menú de la
unidad de padres.
• Es posible que el volumen de la unidad del
bebé sea demasiado alto, y esto hace que la
unidad del bebé consuma mucha más energía.
Baje el volumen de la unidad del bebé.
• Puede que haya establecido un intervalo de
temperatura máximo inferior a la temperatura
real de la habitación, o un intervalo de
temperatura mínimo superior a la temperatura
real de la habitación. La unidad del bebé
continúa enviando información a la unidad
de padres y, por lo tanto, utiliza más energía.
Por este motivo, las pilas no recargables de la
unidad del bebé se agotan rápidamente.
• Puede que haya encendido la luz de compañía.
Si desea utilizar la luz de compañía, le
recomendamos que utilice la unidad del bebé
enchufada a la red.
¿Por qué la unidad de padres reacciona tan
lentamente al llanto del bebé?
• Es posible que el nivel de sensibilidad del
micrófono de la unidad del bebé sea demasiado
bajo. Aumente el nivel de sensibilidad del
micrófono de la unidad del bebé en el menú de
la unidad de padres.
38
¿Por qué la unidad de padres tarda más de
10 horas en cargarse?
• Es posible que la unidad de padres esté
encendida durante el proceso de carga.
Apáguela durante el proceso de carga.
El alcance de funcionamiento especicado para
el vigilabebés es de 330 metros. ¿Por qué el
alcance de mi vigilabebés es mucho menor?
• El alcance especicado es válido sólo en
exteriores y al aire libre. En interiores, el alcance
de funcionamiento está limitado por el número
y tipo de paredes y/o techos que se encuentren
entre las dos unidades. En interiores, el alcance
puede ser de hasta 50 metros.
Page 39

¿Por qué se pierde la conexión de vez en
cuando? ¿Por qué hay interrupciones de sonido?
• Es posible que la unidad del bebé y la unidad
de padres estén fuera de los límites del alcance
de funcionamiento. Pruebe en una ubicación
diferente o reduzca la distancia entre las
unidades. Tenga en cuenta que cada conexión
entre las unidades tarda 30 segundos en
establecerse.
• Puede que haya colocado la unidad junto a un
transmisor u otro aparato DECT, por ejemplo,
un teléfono DECT u otro vigilabebés que emita
a una frecuencia de 1,8 GHz/1,9 GHz. Separe
la unidad de los demás aparatos hasta que se
restablezca la conexión.
¿Qué sucede si hay un corte en el suministro
eléctrico?
• Si la unidad de padres tiene carga suciente,
continuará funcionando si se produce un corte
del suministro eléctrico. Si la unidad del bebé
tiene pilas y se produce un corte del suministro
eléctrico, la unidad seguirá funcionando.
¿Está protegido el vigilabebés contra escuchas e
interferencias?
• La tecnología DECT de este vigilabebés
garantiza la eliminación de escuchas e
interferencias de otros equipos.
¿Por qué el indicador de estado de las pilas
tarda tanto en aparecer en la pantalla cuando
empiezo a cargar la unidad de padres mientras
está apagada?
• Esto es normal. La unidad de padres necesita
unos segundos para activarse al conectarla a
una toma de corriente mientras está apagada.
Al conectarla, la unidad de padres necesita
primero detectar que se está cargando y debe
medir el nivel de carga de las pilas antes de
mostrar el indicador de estado de las mismas.
¿Por qué se agotan tan rápidamente las pilas
recargables de la unidad de padres?
• Las pilas recargables han llegado al nal de su
vida útil. Debe sustituirlas. Para sustituir las pilas
recargables, consulte el capítulo “Solicitud de
accesorios”.
ESPAÑOL
Se supone que el tiempo de funcionamiento de
la unidad de padres es de al menos 18 horas.
¿Por qué el de mi unidad de padres es menor?
• Al cargar por primera vez la unidad de padres,
el tiempo de funcionamiento será inferior a
18 horas. Las pilas recargables sólo alcanzan su
capacidad máxima después de haberlas cargado
y descargado al menos cuatro veces.
• Es posible que el volumen de la unidad de
padres sea demasiado alto y esto hace que la
unidad de padres consuma mucha energía. Baje
el volumen de la unidad de padres.
• Es posible que el nivel de sensibilidad del
micrófono de la unidad del bebé sea demasiado
alto, y esto hace que la unidad de padres
consuma mucha energía. Reduzca el nivel de
sensibilidad del micrófono en el menú de la
unidad de padres.
39
Page 40

Table des matières
11 Commande d’accessoires 56
12 Assistance et garantie 56
1 Introduction 40
2 Aperçu du produit 40
3 Avant l’utilisation 41
3.1 Unité bébé 41
3.2 Unité parent 42
4 Utilisation de l’écoute-bébé 43
4.1 Emplacement de l’écoute-bébé 43
4.2 Liaison entre l’unité parent et l’unité
bébé 44
5 Fonctions et rétroaction sur
l’unité bébé 45
5.1 Veilleuse 45
5.2 Fonction Berceuse 46
5.3 Localisation de l’unité parent 46
5.4 Voyant d’état de la pile 47
6 Fonctions et rétroaction sur
l’unité bébé 47
6.1 Volume 47
6.2 Interphone 48
6.3 Indications du niveau des piles 49
6.4 Indicateur de puissance du signal 50
6.5 Réinitialiser 50
7 Menu de l’unité parent 51
7.1 Navigation dans le menu 51
7.2 Sensibilité 51
7.3 Minuterie de repas 53
7.4 Température 54
7.5 Horloge 54
7.6 Langue 55
8 Sangle 55
9 Nettoyage et entretien 56
10 Entreposage 56
13 Foire aux questions 56
1 Introduction
Félicitations pour votre achat et bienvenue dans
l’univers Philips AVENT! Pour proter pleinement
de l’assistance Philips AVENT, enregistrez votre
produit sur le site www.philips.com/welcome.
Philips AVENT s’engage à fabriquer des produits
pour bébé ables an de fournir aux parents
toute l’assurance dont ils ont besoin. Cet écoutebébé Philips AVENT permet une surveillance
24 heures sur 24 an que vous puissiez toujours
entendre clairement votre enfant, sans bruits
parasites. La technologie DECT garantit une
absence totale d’interférences et un son clair
entre les unités parent et bébé.
Le capteur de température vous permet de
surveiller la température dans la chambre de bébé
et grâce aux réglages personnalisés qu’offre cet
appareil vous pouvez maintenir en tout temps une
atmosphère agréable pour votre poupon.
2 Aperçu du produit
• I Écran
1 Indicateur de puissance du signal
2 Symbole de coupure du son
3 Témoin de l’état de la batterie
4 Flèche de navigation
5 Champ de message
6 Indicateur de sensibilité du microphone
7 Symbole de berceuse
8 Symbole de veilleuse
9 Symbole de minuterie
10 Symbole température
40
Page 41

• II Unité Parent
1 Bouton marche/arrêt
2 Bouton TALK
3 Bouton 4 Microphone
5 Voyant LINK
6 Écran
7 Témoins de niveau sonore
8 Bouton MENU
9 Bouton +
10 Voyant d’état de la pile
11 Bouton OK
12 Poignée/attache pour la sangle
13 Compartiment des piles rechargeables
14 Couvercle du compartiment des piles
rechargeables
15 Prise pour la petite che de l’adaptateur
16 Sangle
17 Piles rechargeables
18 Petite che de l’adaptateur
19 Adaptateur
• III Unité Bébé
1 Bouton de veilleuse et de marche/arrêt de
la veilleuse
2 Voyant de marche
3 Bouton FIND (Trouver)
4 Microphone
5 Bouton Berceuse suivante
6 Bouton de lecture/d’arrêt de berceuse
7 Bouton marche/arrêt
8 Bouton volume +
9 Voyant d’état de la pile
10 Bouton volume -
11 Capteur de température
12 Haut-parleur
13 Prise pour la petite che de l’adaptateur
14 Compartiment des piles non
rechargeables
15 Couvercle du compartiment des piles non
rechargeables
16 Petite che de l’adaptateur
17 Adaptateur
3 Avant l’utilisation
IMPORTANT : Lisez attentivement les
consignes de sécurité avant d’utiliser
l’écoute-bébé et conservez-les pour toute
consultation ultérieure.
3.1 Unité bébé
Branchez l’unité bébé sur secteur. An d’assurer la
bonne alimentation de l’appareil dans le cas d’une
coupure de courant, nous vous recommandons
d’insérer des piles non rechargeables.
3.1.1 Fonctionnement sur secteur
1 Raccordez l’adaptateur à une prise électrique
puis insérez la petite che dans l’unité bébé.
3.1.2 Insertion des piles non rechargeables
En cas de coupure de courant, l’unité bébé peut
fonctionner grâce à quatre piles alcalines de type
R6 AA de 1,5 V (non fournies).
N’utilisez pas de piles rechargeables. L’unité bébé
ne possède pas de fonction de recharge et les
piles rechargeables se déchargent lentement
lorsqu’elles ne sont pas utilisées.
B
Avertissement :
Débranchez l’unité bébé et veillez à avoir les
mains sèches et à bien sécher l’appareil avant
d’insérer les piles non rechargeables.
D
Remarque :
Nous vous recommandons de brancher l’unité
bébé sur secteur car sa durée de fonctionnement
est limitée lorsqu’elle utilise des piles alcalines non
rechargeables. L’autonomie avec des piles non
rechargeables est de 24 heures.
CA FRANÇAIS
41
Page 42

1 Poussez le système de blocage pour enlever
le couvercle du compartiment des piles non
rechargeables puis retirez le couvercle.
4 Poussez ensuite le couvercle vers le bas
jusqu’à entendre le déclic indiquant la
fermeture.
2 Insérez quatre piles non rechargeables.
D
Remarque :
Veillez à respecter la polarité (+ et -).
3 Pour replacer le couvercle, insérez les crans
dans les fentes sur le bord du compartiment à
piles.
3.2 Unité parent
L’unité parent fonctionne avec deux piles
rechargeables fournies avec l’écoute-bébé.
3.2.1 Insertion des piles rechargeables
1 Retirez le couvercle du compartiment à piles
de l’unité parent en le faisant glisser.
2 Insérez les piles.
42
Page 43

D Remarque :
Veillez à respecter la polarité des piles.
3 Remettez le couvercle du compartiment à
piles en place sur l’unité parent en le faisant
glisser jusqu’à ce qu’il s’enclenche (vous
entendrez un déclic).
D Remarque :
Lorsque vous commencez à vous servir de
l’écoute-bébé, notez que la batterie rechargeable
n’atteint sa pleine capacité qu’après quatre cycles
de charge et décharge.
4 Utilisation de
l’écoute-bébé
4.1 Emplacement de l’écoutebébé
3.2.2 Chargement de l’unité parent
Chargez l’unité parent avant la première utilisation
ou lorsque le témoin de l’unité parent indique que
le niveau des piles est faible.
Important : Veuillez noter qu’un temps de
charge de 10 heures est nécessaire pour
obtenir une durée de fonctionnement sans
l de 18 heures.
1 Raccordez l’adaptateur à une prise électrique
puis insérez la petite che dans l’unité parent.
• L’écran s’allume et l’indicateur de l’état de
la pile montre que l’unité parent est en
train de charger. Pour plus d’informations
sur l’indicateur de l’état de la pile, veuillez
consulter la section «Indications de l’état
de la pile», dans la rubrique «Fonctions et
rétroaction sur l’unité parent».
2 Laissez l’unité parent branchée jusqu’à ce que
les piles rechargeables soient entièrement
chargées.
B Avertissement :
Gardez l’unité bébé hors de la portée du bébé.
Ne la placez jamais dans le lit ou le parc du bébé
et ne la xez jamais sur ces meubles.
1 Les cordons de l’unité bébé présentent des
risques d’étranglement. Veillez à maintenir
l’unité bébé et les cordons hors de la portée
de votre bébé (à plus d’un mètre de distance).
2 An d’éviter que les unités ne produisent un
son aigu, assurez-vous que l’unité parent se
situe à plus d’un mètre (3,5 pieds) de l’unité
bébé.
CA FRANÇAIS
43
Page 44

4.2 Liaison entre l’unité parent
et l’unité bébé
1 Maintenez enfoncé le bouton marche/arrêt 3
de l’unité bébé pendant 2 secondes.
• Les voyants de veilleuse, d’état de la pile et
de mise sous tension s’allument brièvement.
2 Maintenez enfoncé le bouton marche/arrêt 3
de l’unité parent pendant 2 secondes.
D Remarque :
Lorsque vous allumez l’unité parent
pour la première fois ou après une
réinitialisation, vous devez sélectionner
la langue d’afchage par défaut (voir la
section «Langues» de la rubrique «Menu
de l’unité parent»).
• Le voyant «Link» de l’unité parent se met à
clignoter en rouge, et un message de liaison
(«LINKING») s’afche.
• Lorsque l’unité parent et l’unité bébé sont
connectées, le voyant LINK passe au vert.
L’indicateur de puissance du signal et le
message «LINKED» (Liaison) apparaissent
sur l’écran.
• L’écran s’allume et afche brièvement tous
les indicateurs et symboles. Les indicateurs
et les symboles disparaissent ensuite, et le
témoin de l’état de la pile apparaît.
44
• Si la liaison n’est pas établie au bout de
10 secondes, les messages «NOT LINKED»
(Aucune liaison) et «LINKING» (Liaison
en cours) apparaissent en alternance.
Si aucune liaison n’est établie après
30 secondes, l’unité parent commence à
émettre un signal sonore et seul le message
«NOT LINKED» (Aucune liaison) s’afche.
Page 45

Que faire si la liaison ne peut pas
être établie?
• L’unité parent se situe peut-être
hors de portée de l’unité bébé.
Placez l’unité parent plus près de
l’unité bébé, tout en respectant la
distance minimale recommandée
(1 m/3,5 pieds).
• L’unité bébé ou l’unité parent peuvent
se déconnecter lorsqu’elles sont trop
proches d’un autre appareil DECT
(par exemple un téléphone sans l).
Éteignez cet appareil DECT ou placez
l’unité plus loin de cet appareil.
• L’unité bébé pourrait s’être éteinte. Si
tel est le cas, rallumez-la.
4.2.1 Portée de transmission
• La portée de transmission est de 330 mètres
(1 000 pieds) à l’extérieur et de 50 mètres
(150 pieds) à l’intérieur.
• La portée de transmission de l’écoute-bébé
varie selon l’environnement et les facteurs
d’interférence. Si des matériaux humides
ou mouillés font obstacle à la transmission
du signal, la perte de portée peut atteindre
100 %. Si des matériaux secs font obstacle
à la transmission du signal, reportez-vous au
tableau suivant :
Matériaux secs Épaisseur Diminution
de portée
Bois, plâtre, carton,
verre (sans métal, ls ni
plomb)
Brique, contre-plaqué < 30 cm
Béton armé < 30 cm
Grilles ou barres de
métal
Feuilles de métal ou
d’aluminium
< 30 cm
(12”)
(12”)
(12”)
< 1 cm
(0,4”)
< 1 cm
(0,4”)
0-10 %
5-35 %
30-100 %
90-100 %
100 %
5 Fonctions et
rétroaction sur
l’unité bébé
5.1 Veilleuse
La veilleuse produit une lumière douce qui apaise
votre bébé.
1 Appuyez sur le bouton marche/arrêt de
la veilleuse de l’unité bébé pour allumer la
veilleuse.
CA FRANÇAIS
• Qapparaît sur l’afcheur de l’unité parent.
2 Appuyez de nouveau sur le bouton marche/
arrêt de la veilleuse pour éteindre cette
fonction.
• La lumière de la veilleuse baisse
graduellement avant de s’éteindre
complètement.
• Qdisparaît de l’afcheur de l’unité parent.
45
Page 46

5.2 Fonction Berceuse
1 Appuyez sur le bouton lecture/arrêt de la
berceuse de l’unité bébé K pour diffuser la
dernière berceuse sélectionnée.
• La berceuse sélectionnée est répétée
pendant 15 minutes.
• Si aucune berceuse n’a été sélectionnée
précédemment, la berceuse numéro 1 est
diffusée.
2 Appuyez sur le bouton Berceuse suivante
pour sélectionner une autre berceuse dans
la liste.
3 Pour ajuster le volume sonore de la berceuse,
appuyez sur les boutons Volume + ou
Volume – sur l’unité bébé.
D
Remarque :
Vous pouvez uniquement régler le volume
du haut-parleur sur l’unité bébé lorsqu’une
berceuse est en cours de lecture. Si vous
augmentez le volume de la berceuse sur
l’unité bébé, le son de l’interphone sera
également plus fort sur l’unité parent.
4 Pour arrêter la berceuse, appuyez sur le
bouton de lecture/arrêt de la berceuse K de
l’unité bébé.
5.3 Localisation de l’unité
parent
Si vous avez égaré l’unité parent, vous pouvez
utiliser le bouton FIND (Trouver) de l’unité bébé
pour la localiser.
• Si aucune berceuse n’est diffusée
présentement, la dernière berceuse
sélectionnée est diffusée lorsque vous
appuyez sur le bouton Berceuse suivante
.
• Lorsque vous appuyez sur le bouton
Berceuse suivante
lorsqu’une berceuse
est diffusée, la berceuse suivante démarre.
46
D
Remarque :
La fonction de localisation ne fonctionne que si
l’unité parent est allumée.
1 Appuyez sur le bouton FIND (Trouver) de
l’unité bébé.
Page 47

• Le message «PAGING» (Localisation) apparaît
sur l’écran de l’unité parent et cette dernière
émet un signal sonore de localisation.
2 Pour arrêter le signal sonore, appuyez de
nouveau sur le bouton FIND (Trouver) de
l’unité bébé ou sur n’importe quel bouton de
l’unité parent.
• Remplacez les piles lorsqu’elles sont sur le
point d’être épuisées.
• Si l’unité bébé fonctionne avec les piles et
que ces dernières s’épuisent, l’unité bébé
s’éteint et la liaison entre l’unité parent et
l’unité bébé est interrompue.
D
Remarque :
Nous vous recommandons de brancher l’unité
bébé sur secteur car sa durée de fonctionnement
est limitée lorsqu’elle utilise des piles alcalines non
rechargeables. L’autonomie avec des piles non
rechargeables est de 24 heures.
6 Fonctions et
CA FRANÇAIS
D
Remarque :
Le signal sonore de localisation s’interrompt
automatiquement après 2 minutes.
5.4 Voyant d’état de la pile
1 Le voyant d’état de la pile passe au vert
lorsque l’unité bébé fonctionne avec les
piles et que ces dernières contiennent
sufsamment d’énergie.
2
Le voyant d’état de la pile clignote en rouge
lorsque les piles sont sur le point d’être
épuisées, si l’unité bébé fonctionne avec les piles.
rétroaction sur
l’unité bébé
6.1 Volume
Le volume peut être réglé lorsque le menu n’est
pas actif. Il y a sept niveaux de volume sonore et
un paramètre «volume désactivé».
6.1.1 Réglage du volume
1
Appuyez sur le bouton + ou le bouton - une fois.
• Le niveau de volume actuel s’afche sur l’écran.
2 Appuyez sur le bouton + pour augmenter le
volume ou sur le bouton - pour le diminuer.
• L’unité parent émet un son à chaque niveau
de volume.
• Au volume maximum, l’unité parent émet
deux sons.
47
Page 48

• Si vous n’appuyez sur aucun bouton
pendant plus de 2 secondes, l’indication de
volume sonore disparaît et le paramètre de
volume est enregistré.
6.1.2 Volume désactivé
Pour baisser le son en-deçà du volume minimum,
utilisez le paramètre «volume désactivé».
1 Appuyez sur le bouton + ou le bouton - une
fois.
• Le niveau de volume actuel s’afche sur
l’écran.
2 Appuyez sur le bouton - et maintenez-le
enfoncé pendant plus de 2 secondes pour
couper le son.
• Le message «MUTE» (Sourdine) et le
symbole de sourdine apparaissent sur
l’écran.
6.2 Interphone
Utilisez le bouton TALK de l’unité parent pour
parler à votre bébé (pour le rassurer, par
exemple).
1 Appuyez sur le bouton TALK (Parler) et
maintenez-le enfoncé, puis parlez clairement
dans le microphone situé à l’avant de
l’unité parent, à une distance de 15-30 cm
(0,5/1 pied).
D
Remarque :
Si vous avez augmenté le volume de la
berceuse sur l’unité bébé, le son de la fonction
d’interphone de l’unité parent sera lui-aussi
plus fort.
• Le voyant LINK se met à clignoter en vert
et le message «TALK» (Parler) apparaît sur
l’écran.
D
Remarque :
Lorsque le volume est coupé, seuls les
voyants de niveau sonore montrent que le
bébé émet des sons.
48
2 Relâchez le bouton TALK lorsque vous avez
ni de parler.
Page 49

6.3 Indications du niveau
des piles
L’état du niveau des piles est indiqué sur l’écran
grâce à un témoin lumineux et à des messages
textuels.
6.3.1 Batterie faible
Lorsque les piles rechargeables sont presque
épuisées, le temps de fonctionnement de l’appareil
est d’au moins 30 minutes si l’écoute-bébé
fonctionne en mode normal et sur des réglages
maximaux.
1 Le témoin de l’état de la pile sur l’écran est
vide et clignote.
2 Le message «BATTERY LOW» (Pile faible)
apparaît sur l’écran.
3 Le voyant de l’état de la pile clignote en rouge
lentement.
4 L’unité parent émet un son toutes les
10 secondes pendant les 3 premières minutes,
puis toutes les minutes passé ce délai.
2 Si vous ne branchez pas l’unité parent à une
prise électrique :
1 La liaison avec l’unité bébé s’interrompt.
2 L’écran s’éteint.
3 L’unité parent s’éteint.
D
Remarque :
Si vous allumez l’unité parent lorsque ses piles
rechargeables sont presque vides, l’écran s’allume.
Le message «BATTERY LOW» (Pile faible)
apparaît sur l’écran pendant 2 secondes avant que
l’unité parent ne s’éteigne.
6.3.3 Charge en cours
Insérez la petite che dans l’unité parent et
branchez l’adaptateur sur une prise secteur.
Lorsque l’unité parent charge, vous observerez
successivement que :
1 L’écran s’allume pendant 4 secondes et le
texte «CHARGING» (En charge) apparaît
pendant 2 secondes.
2 L’indicateur vert d’état de la batterie s’allume
lorsque l’unité parent est branchée.
3 Le premier segment du témoin de l’état de
la pile commence à clignoter an d’indiquer
que les piles rechargeables sont en train de se
recharger.
CA FRANÇAIS
6.3.2 Pile vide
1 Lorsque les piles rechargeables sont presque
vides, le voyant de l’état de la pile clignote en
rouge rapidement.
49
Page 50

4 Le deuxième segment du témoin de charge
commence à clignoter lorsque les piles
rechargeables sont chargées à plus de 30 %
de leur capacité.
5 Le troisième segment du témoin de charge
commence à clignoter lorsque les piles
rechargeables sont chargées à plus de 50 %
de leur capacité.
6 Lorsque les piles rechargeables sont
rechargées :
• Le troisième segment du témoin de l’état
de la pile arrête de clignoter.
• L’écran s’allume pendant 4 secondes, et le
message «BATT FULL» (Batterie chargée)
apparaît sur l’écran.
7 Débranchez l’unité parent pour pouvoir
l’utiliser sans l.
• Le témoin de charge reste éteint pendant
que l’unité parent fonctionne sans l.
D
Remarque :
Vous pouvez charger l’unité parent lorsque
celle-ci est éteinte. Dans ce cas, le témoin de
charge s’allume en vert et n’indique pas l’état
d’avancement de la charge.
D
Remarque :
Si les piles rechargeables se déchargent très
rapidement, elles sont sans doute arrivées en n
de vie utile. Il convient donc de les remplacer.
Pour commander de nouvelles piles rechargeables,
consultez le chapitre «Commande d’accessoires».
6.4 Indicateur de puissance du
signal
• Si l’indicateur de puissance du signal afche
quatre barres, la connexion entre l’unité bébé
et l’unité parent est excellente.
• Si l’indicateur de puissance du signal afche
une barre ou moins, le signal de transmission
provenant de l’unité bébé est très faible, ou
n’est pas disponible. Rapprochez l’unité parent
de l’unité bébé pour obtenir un meilleur signal.
6.5 Réinitialiser
Cette fonction vous permet de rétablir les
réglages par défaut des unités parent et bébé.
1 Éteignez l’unité.
2 Appuyez sur le bouton - et maintenez-le
enfoncé.
3 Rallumez l’unité tout en maintenant le
bouton - enfoncé.
50
Page 51

6.5.1 Réglages par défaut
Unité parent
• Langue : Anglais
• Volume : 3
• Sensibilité du microphone : 3
• Alerte de température : désactivée
• Alerte «Temperature Low» (température
basse) : 14 °C (57 °F)
• Alerte «Temperature High» (température
élevée) : 35 °C (95 °F)
• Échelle de température : Fahrenheit
• Minuterie de repas : 02:00
• Minuterie de repas : arrêt
• Horloge : masquée
Unité bébé
• Volume du haut-parleur : 4
• Veilleuse : éteinte
• Berceuse : désactivée (berceuse numéro 1
sélectionnée)
7 Menu de l’unité
parent
Toutes les fonctions décrites dans les sections
suivantes peuvent être utilisées à partir du menu
de l’unité parent.
7.1 Navigation dans le menu
D Remarque :
Certaines fonctions du menu ne sont accessibles
que lorsque les unités parent et bébé sont
connectées.
1 Appuyez sur le bouton MENU pour ouvrir le
menu.
2 Appuyez sur le bouton + pour accéder à
l’option suivante, ou sur le bouton - pour
accéder à l’option précédente.
D
Remarque :
La èche sur l’écran indique dans quelle
direction vous pouvez naviguer.
3 Appuyez sur le bouton OK pour conrmer
votre sélection.
D
Remarque :
Appuyez sur le bouton MENU si vous voulez
quitter le menu sans faire aucun changement. Si
vous n’appuyez sur aucun bouton pendant plus de
20 secondes, le menu se ferme automatiquement.
7.2 Sensibilité
Cette option du menu de l’unité parent permet
de régler la sensibilité du microphone sur l’unité
bébé. La sensibilité du microphone détermine
le niveau de bruit détecté par l’unité bébé, par
exemple, vous pouvez choisir d’entendre les
pleurs mais pas les babillages.
1 Sélectionnez «Sensitivity» (Sensibilité) dans le
menu avec les boutons + et -, puis appuyez
sur OK pour conrmer.
CA FRANÇAIS
•
La première option de menu apparaît à l’écran.
51
Page 52

2 Utilisez les boutons + et - pour augmenter
ou diminuer la sensibilité du microphone.
L’indicateur de sensibilité sur l’écran comporte
quatre segments.
• Si les quatre segments sont remplis, la
sensibilité est à son niveau maximum.
• Si tous les segments sont vides, la sensibilité
est à son niveau minimum.
7.2.1 Indicateurs et niveaux de sensibilité
Icône Sensibilité Description
la plus
élevée
Vous entendrez tous les sons
provenant de votre bébé. Le
haut-parleur de l’unité parent
est activé en permanence.
élevée Vous entendrez les babillages
et les sons plus forts. Si votre
bébé n’émet aucun son, le
haut-parleur de l’unité parent
est désactivé.
moyenne Vous entendrez les pleurs
faibles et les sons plus forts.
Si votre bébé émet des sons
plus faibles, le haut-parleur
de l’unité parent ne se
déclenche pas.
faible Le haut-parleur de l’unité
parent ne se déclenche que
si le bébé émet des sons
forts, par exemple lorsqu’il
pleure.
3 Appuyez sur OK pour conrmer le réglage.
52
Page 53

7.3 Minuterie de repas
Vous pouvez régler la minuterie de repas pour
qu’elle se déclenche lorsqu’il est l’heure de nourrir
votre bébé. Le réglage de la minuterie va de
1 minute à 23 heures et 59 minutes.
7.3.1 Réglage et utilisation de la minuterie
de repas
1 Sélectionnez «Feed Timer» (Minuterie de
repas) dans le menu avec les boutons + et -,
puis appuyez sur OK pour conrmer.
2 Sélectionnez «Set Timer» (Réglage minuterie)
avec les boutons + et -. Appuyez sur OK pour
commencer à régler la minuterie.
• L’indicateur d’heures se met à clignoter sur
l’écran.
3 Réglez les heures et appuyez sur OK pour
conrmer.
• L’indicateur des minutes se met à clignoter
sur l’écran.
4 Réglez les minutes et appuyez sur OK pour
conrmer.
5 Sélectionnez «xx:xx Star t » (xx:xx Début)
avec les boutons + et -. Appuyez sur OK pour
conrmer.
• Le symbole de la minuterie apparaît sur
l’écran.
• La minuterie se met en marche.
6 Lorsque la minuterie atteint 00:00, l’alerte de
repas se déclenche, le symbole de la minuterie
se met à clignoter sur l’écran et le message
«TIMER END» (Fin de la minuterie) déle sur
l’écran.
7 Appuyez sur n’importe quelle touche pour
arrêter l’alerte. Si vous n’arrêtez pas l’alerte,
celle-ci s’interrompra automatiquement au
bout de 2 minutes.
7.3.2 Répétition de la minuterie de repas
1 Après l’étape 5 de la section «Réglage
et utilisation de la minuterie de repas»,
sélectionnez «Repeat» (Répéter) avec
les boutons + et -. Appuyez sur OK pour
conrmer.
2 Sélectionnez «Repeat ON» (Répétition
activée) ou «Repeat OFF» (Répétition
désactivée) et appuyez sur OK pour
conrmer.
3 Sélectionnez «xx:xx Star t » (xx:xx Début)
avec les boutons + et -, puis appuyez sur OK
pour activer la fonction de répétition de la
minuterie de repas.
4 Lorsque vous appuyez sur n’importe quelle
touche pour arrêter l’alerte de la minuterie
de repas ou lorsque l’alerte s’interrompt
au bout de 2 minutes, la minuterie de repas
s’enclenche à nouveau.
CA FRANÇAIS
53
Page 54

7.3.3 Arrêt de la minuterie
1 Appuyez sur le bouton Menu et sélectionnez
«Feed Timer» (Minuterie de repas).
2 Utilisez les boutons + et - pour sélectionner
«Stop» (Arrêt) et appuyez sur OK pour
conrmer.
7.4 Température
Un bébé dort confortablement dans une pièce
dont la température est comprise entre 16 °C
(61 °F) et 20 °C (68 °F). Vous pouvez établir une
plage de températures minimale et maximale, ainsi
qu’une alerte de température.
1 Sélectionnez «Temperature» (Température)
dans le menu avec les boutons + et -, puis
appuyez sur OK pour conrmer.
2 Sélectionnez «Temp Range» (Plage de
température) avec les boutons + et -, puis
appuyez sur OK pour conrmer.
• L’indicateur de température minimale se
met à clignoter sur l’écran.
3 Utilisez les boutons + et - pour attribuer
une température minimale comprise entre
10 °C/50 °F et 19 °C/66 °F. Appuyez sur OK
pour conrmer.
• L’indicateur de température maximale se
met à clignoter sur l’écran.
4 Utilisez les boutons + et - pour attribuer
une température maximale comprise entre
22 °C/72 °F et 37 °C/99 °F. Appuyez sur OK
pour conrmer.
5 Sélectionnez «Aler t» (Aler te) avec les
boutons + et -. Appuyez sur OK pour
conrmer et commencer à régler l’alerte de
température.
• Le message «Alert» (Alerte) apparaît à
l’écran.
6 Sélectionnez «Aler t ON» ou «Aler t OFF»,
puis appuyez sur OK pour conrmer.
• Si vous sélectionnez «Alert On», le symbole
d’alerte de température apparaît à l’écran.
7 Sélectionnez «Temp Scale» (Échelle de
température) avec les boutons + et -.
Appuyez sur OK pour conrmer et dénir
l’échelle de température.
8 Sélectionnez «Celsius» ou «Fahrenheit» et
appuyez sur OK pour conrmer.
• La température s’afche dans l’échelle de
température sélectionnée.
• Si la température de la pièce est en dehors
de la plage établie, le symbole d’alerte de
température s’afchera avec le texte «TOO
HOT» (trop chaud) ou «TOO COLD» (trop
froid). Si vous avez activé l’alerte, l’unité
parent émettra également un signal sonore.
7.5 Horloge
L’horloge est masquée par défaut. Vous pouvez
choisir d’afcher l’horloge et la régler dans le
menu de l’unité parent.
1 Sélectionnez «Clock» (Horloge) dans le menu
avec les boutons + et -, puis appuyez sur OK
pour conrmer.
2 Utilisez les boutons + et - pour sélectionner
«Show Time» (Afcher l’heure) et appuyez
sur OK pour conrmer.
3 Sélectionnez «Set Time» (Régler l’heure) avec
les boutons + et -. Appuyez sur OK pour
conrmer et commencer à régler l’horloge.
• L’indicateur d’heures se met à clignoter sur
l’écran.
54
Page 55

4 Réglez les heures et appuyez sur OK pour
conrmer.
• L’indicateur des minutes se met à clignoter
sur l’écran.
5 Réglez les minutes et appuyez sur OK pour
conrmer.
• L’heure de l’horloge s’afche en alternance
avec les autres indications dans le champ de
message de l’écran.
7.6 Langue
Vous pouvez utiliser cette option pour changer les
paramètres de langue.
1 Sélectionnez «Language» (Langue) dans le
menu avec les boutons + et -, puis appuyez
sur OK pour conrmer.
2 Utilisez les boutons + et - pour sélectionner
votre langue et appuyez sur OK pour
conrmer.
8 Sangle
Une sangle pratique est fournie avec l’écoutebébé. Elle vous permet d’emporter l’unité parent
partout avec vous.
8.0.1 Installation de la sangle
1 Insérez l’extrémité de la boucle de la sangle
dans l’ouverture située en haut de l’unité
parent.
CA FRANÇAIS
2 Enlez la sangle dans l’extrémité de la boucle
et tirez fermement sur la sangle.
D
Remarque :
Cette option s’afche automatiquement
sur l’écran lorsque vous allumez l’unité
parent pour la première fois et après une
réinitialisation.
8.0.2 Retrait de la sangle
1 Faites passer la sangle dans l’extrémité de la
boucle.
2 Glissez la sangle hors de l’ouverture située en
haut de l’unité parent.
55
Page 56

9 Nettoyage et
11 Commande
entretien
B Avertissement :
Ne plongez jamais l’unité parent ou l’unité bébé
dans l’eau et ne les passez pas sous le robinet
pour les nettoyer.
B
Avertissement :
N’utilisez pas de détergents liquides ou en
vaporisateur.
1 Débranchez l’unité bébé de la prise de
courant.
2 Nettoyez les unités parents et bébé à l’aide
d’un chiffon sec.
3 Nettoyez les adaptateurs avec un chiffon sec.
10 Entreposage
Lorsque vous n’utilisez pas l’écoute-bébé pendant
une période prolongée, effectuez les actions
suivantes :
• Retirez les piles non rechargeables de l’unité
bébé.
• Retirez les piles rechargeables de l’unité
parent.
• Rangez l’unité parent, l’unité bébé et les
adaptateurs dans un endroit frais et sec.
d’accessoires
Pour acheter des accessoires ou des pièces de
rechange, rendez-vous sur www.shop.philips.com/
service ou chez votre détaillant Philips. Vous
pouvez également communiquer avec le service
à la clientèle Philips de votre pays (consultez le
feuillet de garantie internationale pour obtenir
les coordonnées).
12 Assistance et
garantie
Pour obtenir des renseignements supplémentaires,
rendez-vous sur le site Philips www.philips.com/
support ou lisez le feuillet de garantie
internationale.
13 Foire aux questions
Cette section contient la liste des questions les
plus fréquentes au sujet de cet appareil. Si vous ne
trouvez pas la réponse à votre question ici, visitez
le site www.philips.com/AVENT pour consultez
d’autres questions fréquentes ou communiquez
avec le service à la clientèle de votre pays.
Pourquoi le voyant d’alimentation de l’unité
bébé et le voyant LINK de l’unité parent ne
s’allument-ils pas lorsque j’appuie sur les
boutons marche/arrêt de ces unités?
• Les piles de l’unité parent sont peut-être
déchargées et l’unité parent n’est pas branchée
sur le secteur. Branchez l’unité parent dans la
prise électrique puis appuyez sur le bouton
marche/arrêt pour établir la connexion avec
l’unité bébé.
56
Page 57

• L’unité bébé n’est peut-être pas branchée sur
le secteur et les piles non-rechargeables sont
vides. Remplacez les piles non-rechargeables ou
branchez l’unité bébé dans la prise électrique.
Puis appuyez sur le bouton marche/arrêt pour
établir la connexion avec l’unité parent.
• Si le voyant LINK de l’unité parent ne clignote
toujours pas, rétablissez les réglages par défaut
des deux unités à l’aide de la fonction de
réinitialisation.
Pourquoi le voyant LINK de l’unité parent
clignote-t-il en rouge et pourquoi les messages
«NOT LINKED» (Aucune liaison) ou
«LINKING» (Liaison en cours) apparaissent-il
sur l’écran?
• L’unité bébé est hors de portée de l’unité
parent. Rapprochez l’unité parent de l’unité
bébé.
• L’unité bébé pourrait s’être éteinte. Si tel est le
cas, rallumez-la.
Pourquoi le voyant de l’état de la pile de l’unité
bébé clignote-t-il en rouge?
• Les piles non-rechargeables de l’unité bébé sont
faibles. Changez-les ou branchez l’unité bébé
sur une prise de courant.
• Si vous avez déni une plage de température
et que l’alerte de température est activée,
l’unité parent émet un signal sonore lorsque la
température est inférieure au niveau minimum
déni, ou lorsqu’elle est supérieure au niveau
maximum déni.
• L’unité bébé pourrait s’être éteinte. Si tel est le
cas, rallumez-la.
Pourquoi l’appareil émet-il un son aigu?
• Les unités sont peut-être trop rapprochées.
Assurez-vous que l’unité parent et l’unité bébé
sont situées à au moins 1 mètre (3,5 pieds)
l’une de l’autre.
• Le volume de l’unité parent est peut-être trop
élevé. Baissez-le.
CA FRANÇAIS
Pourquoi est-ce que je n’entends pas de sons ou
mon bébé lorsqu’il pleure?
• Le volume de l’unité parent est peut-être trop
bas ou éteint. Augmentez-le.
• Le niveau de sensibilité du microphone de
l’unité bébé est peut-être trop bas. Augmentez
la sensibilité du microphone dans le menu de
l’unité parent.
• L’unité bébé et l’unité parent sont peut-être
trop éloignées. Rapprochez les deux unités.
Pourquoi l’unité parent émet-elle des bips?
• Si l’unité parent émet un signal sonore, alors
que le voyant LINK clignote en rouge et que
le message «NOT LINKED» (Aucune liaison)
ou «LINKING» (Liaison en cours) apparaît
sur l’écran, la liaison avec l’unité bébé est
interrompue. Rapprochez l’unité parent de
l’unité bébé, ou allumez l’unité bébé si elle
était éteinte.
• Si l’unité parent émet un signal sonore et que le
symbole de la pile est vide sur l’écran, ceci indique
que les piles rechargeables de l’unité parent sont
presque épuisées. Rechargez les piles.
Pourquoi l’unité parent émet-elle d’autres bruits
que les sons émis par mon bébé?
• L’unité bébé capte tous les sons dans la pièce
où elle est installée, et pas uniquement ceux du
bébé. Rapprochez l’unité bébé de votre enfant,
en laissant au moins 1 mètre (3,5 pieds) de
séparation.
• Le niveau de sensibilité du microphone de
l’unité bébé est peut-être trop élevé. Diminuez
la sensibilité du microphone dans le menu de
l’unité parent.
57
Page 58

Pourquoi l’unité parent réagit-elle lentement aux
pleurs du bébé?
• Le niveau de sensibilité du microphone
de l’unité bébé est peut-être trop faible.
Augmentez la sensibilité du microphone de
l’unité bébé dans le menu de l’unité parent.
Pourquoi les piles non rechargeables de l’unité
bébé s’épuisent-elles rapidement?
• Le niveau de sensibilité du microphone de
l’unité bébé est peut-être trop élevé, ce qui
force l’unité bébé à transmettre plus souvent.
Diminuez la sensibilité du microphone dans le
menu de l’unité parent.
• Le volume de l’unité bébé est peut-être trop
élevé, ce qui augmente la consommation
d’énergie. Réduisez le volume de l’unité bébé.
• Vous avez peut-être déni une plage de
température maximale inférieure à la
température habituelle de la pièce ou une
plage de température minimale supérieure à
la température habituelle de la pièce. L’unité
bébé envoie en permanence des informations
à l’unité parent ce qui, par conséquent,
consomme davantage d’énergie et épuise
rapidement les piles non rechargeables de
l’unité bébé.
• Vous avez peut-être allumé la veilleuse. Si vous
souhaitez utiliser la veilleuse, il est conseillé de
brancher l’unité bébé sur une prise de courant.
Pourquoi la durée de charge de l’unité parent
dépasse-t-elle 10 heures?
• L’unité parent est peut-être restée allumée
pendant la charge. Éteignez-la pendant la
charge.
La portée nominale du moniteur est de
330 mètres (1 000 pieds). Pourquoi mon
moniteur ne fonctionne-t-il qu’à une distance
bien plus courte ?
• La portée indiquée n’est valable qu’en plein air,
à l’extérieur. Dans une maison, cette portée est
limitée par le nombre et le type de murs et/
ou de plafonds faisant obstacle. À l’intérieur, la
portée ne dépasse pas 50 mètres.
Pourquoi la liaison est-elle coupée de temps à
autre et les sons sont-ils interrompus?
• L’unité parent et l’unité bébé sont
probablement à la limite de la portée de
fonctionnement. Placez les unités ailleurs
ou rapprochez-les. Notez qu’il faut environ
30 secondes pour établir une liaison entre les
deux unités.
• Vous avez peut-être placé l’unité à proximité
d’un émetteur-récepteur ou d’un autre appareil
DECT, tel qu’un téléphone DECT ou un autre
écoute-bébé de 1,8/1,9 GHz. Éloignez l’unité
des autres appareils jusqu’à ce que la liaison soit
rétablie.
Que se passe-t-il durant une panne d’électricité?
• Si l’unité parent est sufsamment chargée, elle
continue de fonctionner lors d’une panne de
courant. Si l’unité bébé est équipée de piles, elle
continue également à fonctionner pendant une
panne de courant.
Est-ce que l’écoute-bébé est protégé contre
l’écoute indiscrète et les interférences?
• La technologie DECT de l’écoute-bébé élimine
les interférences et empêche d’autres appareils
radio de capter son signal.
La durée de fonctionnement de l’unité parent
est normalement d’au moins 18 heures.
Pourquoi celle de mon unité parent est-elle plus
courte?
• Après la première charge, l’unité parent a une
autonomie inférieure à 18 heures. Les piles
n’atteignent leur pleine capacité qu’au bout de
quatre cycles de charge et décharge.
• Le volume de l’unité parent est peut-être
trop élevé, ce qui augmente la consommation
d’énergie. Réduisez le volume de l’unité parent.
• Le niveau de sensibilité du microphone de
l’unité bébé est peut-être trop élevé, ce qui
augmente la consommation d’énergie de l’unité
parent. Réduisez le niveau de sensibilité du
microphone dans le menu de l’unité parent.
58
Page 59

Pourquoi le témoin de l’état de la pile met-il
autant de temps avant de s’afcher sur l’écran
lorsque je commence à recharger l’unité parent
éteinte?
• Ceci est normal. L’unité parent met quelques
secondes à sortir du mode veille lorsque vous
la branchez à une prise électrique. Une fois
branchée, l’unité parent doit d’abord détecter
qu’elle est en charge, puis elle doit mesurer le
niveau de charge des piles avant de pouvoir
afcher le témoin du niveau des piles.
Pourquoi les piles rechargeables de l’unité parent
s’épuisent-elles rapidement?
• Les piles rechargeables sont arrivées en n
de vie utile. Il convient de les remplacer. Pour
remplacer les piles rechargeables, consultez le
chapitre «Commande d’accessoires».
CA FRANÇAIS
59
Page 60

Sumário
11 Compra de acessórios 75
12 Garantia e suporte 75
1 Introdução 60
2 Visão geral do produto 60
3 Preparação para o uso 61
3.1 Unidade do bebê 61
3.2 Unidade dos pais 62
4 Uso da babá eletrônica 63
4.1 Posicionamento da babá eletrônica 63
4.2 Como conectar a unidade dos pais
à unidade do bebê 64
5 Funções e comentários sobre
a unidade do bebê 65
5.1 Luz noturna 65
5.2 Função de canção de ninar 66
5.3 Sinal sonoro para localização da
unidade dos pais 66
5.4 Luz de status da bateria 67
6 Funções e comentários sobre
a unidade dos pais 67
6.1 Volume 67
6.2 Função Conversar 68
6.3 Indicações de status da bateria 68
6.4 Indicador de intensidade do sinal 70
6.5 Reinicializar 70
13 Perguntas frequentes 76
1 Introdução
Parabéns pela sua compra e bem-vindo à Philips
AVENT! Para aproveitar ao máximo o suporte
oferecido pela Philips AVENT, registre o produto
em www.philips.com/welcome.
A Philips AVENT se dedica à criação de
produtos conáveis que proporcionem aos
pais a tranquilidade de que precisam. Esta babá
eletrônica Philips AVENT fornece monitoramento
24 horas, garantindo que você sempre ouvirá
claramente seu bebê, sem que nenhum ruído
desnecessário seja captado. A tecnologia
DECT garante interferência zero e um sinal
extremamente nítido entre a unidade do bebê e
a dos pais.
Com o sensor de temperatura, você pode
monitorar a temperatura do quar to do bebê e
fazer congurações personalizadas para manter o
quarto agradável.
2 Visão geral do
7 Menu da unidade dos pais 71
7.1 Navegação no menu 71
7.2 Sensibilidade 71
7.3 Timer de alimentação 72
7.4 Temperatura 73
7.5 Relógio 74
7.6 Idioma 74
8 Alça para o pescoço 74
9 Limpeza e manutenção 75
10 Armazenamento 75
60
produto
• I Visor
1 Indicador de intensidade do sinal
2 Símbolo de silencioso
3 Indicador de status da bateria
4 Seta de navegação
5 Campo de mensagem
6 Indicador de sensibilidade do microfone
7 Símbolo de canção de ninar
8 Símbolo de luz noturna
9 Símbolo do timer
10 Símbolo de temperatura
Page 61

• II Unidade dos pais
1 Botão liga/desliga
2 Botão TALK
3 Botão 4 Microfone
5 Luz “link”
6 Tela
7 Luzes do nível do som
8 Botão MENU
9 Botão +
10 Luz de status da bateria
11 Botão OK
12 Furo da alça/acessório para o pescoço
13 Compartimento de pilhas recarregáveis
14 Tampa do compartimento de pilhas
recarregáveis
15 Tomada para conector pequeno
do adaptador
16 Alça para o pescoço
17 Baterias recarregáveis
18 Conector pequeno do adaptador
19 Adaptador
• III Unidade do bebê
1 Botão de luz noturna e liga/desliga luz
noturna
2 Luz indicadora de energia
3 Botão FIND (Localizar)
4 Microfone
5 Botão Próxima canção de ninar
6 Botão reproduzir/parar canção de ninar
7 Botão liga/desliga
8 Botão + volume
9 Luz de status da bateria
10 Volume - botão
11 Sensor de temperatura
12 Alto-falante
13 Tomada para conector pequeno do
adaptador
14 Compartimento de pilhas não
recarregáveis
15 Tampa do compartimento de pilhas
não recarregáveis
16 Conector pequeno do adaptador
17 Adaptador
3 Preparação para
o uso
IMPORTANTE: antes de utilizar a babá
eletrônica, leia cuidadosamente as
instruções de segurança e guarde-as para
consultas futuras.
3.1 Unidade do bebê
Utilize a unidade do bebê com energia elétrica.
Para garantir backup automático de energia em
caso de queda de energia, recomendamos inserir
pilhas não recarregáveis.
3.1.1 Operação com energia elétrica
1 Coloque o adaptador em uma tomada
elétrica e insira o plugue pequeno do
aparelho na unidade do bebê.
3.1.2 Colocando as baterias não
recarregáveis
Se houver queda falha de energia, a unidade do
bebê poderá funcionar com quatro pilhas alcalinas
de AA R6 de 1,5 V (não incluídas).
Não use pilhas recarregáveis. A unidade do bebê
não possui uma função de carregamento e as
pilhas recarregáveis descarregam lentamente
quando não estão em uso.
B
Aviso:
Desconecte a unidade do bebê e certique-se
de que suas mãos e a unidade estejam secas
quando inserir pilhas não recarregáveis.
BR PORTUGUÊS
61
Page 62

D Nota:
Recomendamos o uso da babá eletrônica com
energia elétrica, pois a unidade do bebê tem
tempo de operação limitado quando usada com
pilhas alcalinas não rerregáveis. O tempo de
operação com pilhas não recarregáveis é de 24
horas.
1 Empurre a trava para liberar a tampa do
compartimento de pilhas não recarregáveis e
remova-a.
2 Insira quatro baterias não recarregáveis.
4 Pressione a tampa para baixo até ouvir um
clique, sinalizando que está travada.
3.2 Unidade dos pais
A unidade dos pais funciona com duas pilhas
recarregáveis fornecidas com a babá eletrônica.
3.2.1 Inserção das pilhas recarregáveis
1 Deslize a tampa do compartimento de pilhas
recarregáveis removendo-a da unidade dos
pais.
D
Nota:
verique se os polos + e - apontam na
direção certa.
3 Para encaixar a tampa novamente, primeiro
insira as saliências nas aberturas da borda do
compartimento para pilhas não recarregáveis.
62
2 Insira as pilhas recarregáveis.
D
Nota:
verique se os pólos + e - das pilhas apontam
na direção correta.
Page 63

3 Deslize a tampa do compartimento de pilhas
recarregáveis recolocando-a na unidade dos
pais. Encaixe a tampa no lugar até ouvir um
clique.
2 Deixe a unidade dos pais conectada
à rede elétrica até as baterias
recarregáveis carregarem totalmente.
D
Nota:
Ao iniciar o uso da babá eletrônica sem o,
são necessários quatro ciclos de carga e
descarga antes de as baterias recarregáveis
alcançarem sua capacidade máxima.
4 Uso da babá
3.2.2 Carregamento da unidade dos pais
Carregue a unidade dos pais antes de usá-la pela
primeira vez ou quando a unidade indicar que as
pilhas estão fracas.
Importante: é necessário carregar a
unidade dos pais por 10 horas completas
para que o produto funcione sem o por
18 horas.
1 Coloque o adaptador em uma tomada
elétrica e insira o plugue pequeno do
aparelho na unidade dos pais.
• O visor é ligado e as indicações de estado
das pilhas mostram que a unidade dos pais
está carregando. Para obter indicações de
estado das pilhas, consulte “Indicações de
carga das pilhas” no capítulo “Funções e
comentários sobre a unidade dos pais”.
eletrônica
4.1 Posicionamento da babá
eletrônica
B Aviso:
Mantenha a unidade do bebê para fora do
alcance do bebê. Nunca coloque a unidade do
bebê dentro do berço ou do cercado e nem
instale-a nesses móveis.
1 Como o cabo da unidade do bebê apresenta
perigo potencial de estrangulamento,
certique-se de que a unidade do bebê e o
respectivo cabo quem a pelo menos
1 metro de distância do bebê.
BR PORTUGUÊS
63
Page 64

2 Para impedir um som agudo em uma ou em
ambas as unidades, certique-se de que a
unidade dos pais que a pelo menos 1 metro
de distância da unidade do bebê.
4.2 Como conectar a unidade
dos pais à unidade do bebê
1 Mantenha o botão liga/desliga 3 na unidade
do bebê pressionado por 2 segundos.
2 Mantenha o botão liga/desliga 3 na unidade
dos pais pressionado por 2 segundos.
• O visor acende e exibe brevemente todos
os indicadores e símbolos. Em seguida, os
indicadores e símbolos desvanecem e o
indicador de estado das pilhas é exibido.
D
Nota:
Quando você liga a unidade dos pais pela
primeira vez ou após uma reinicialização,
é preciso selecionar o idioma de exibição
de sua preferência (consulte “Idioma”, no
capítulo “Menu da unidade dos pais”).
• A luz “link” começa a piscar em vermelho
na unidade dos pais e a mensagem
“Conectando” aparece no visor.
• A luz noturna, a luz de estado das pilhas
e a luz indicadora de energia se acendem
brevemente.
64
• Quando a unidade dos pais e a unidade do
bebê são conectadas, luz “link” acende em
verde constante. O indicador de intensidade
do sinal e a mensagem “LINKED”
(Conectadas) aparecem no visor.
Page 65

• Se nenhuma conexão for estabelecida
dentro de 10 segundos, a mensagem
“NOT LINKED” (Sem conexão) no visor
alterna para “LINKING” (Conectando).
Se ainda assim nenhuma conexão for
estabelecida após 30 segundos, a unidade
dos pais começa a emitir bipes e apenas a
mensagem “NOT LINKED” (Sem conexão)
é mostrada.
4.2.1 Faixa operacional
• A faixa operacional é de 330 metros ao ar livre
e de até 50 metros em ambientes fechados.
• A faixa operacional da babá eletrônica varia
conforme o ambiente e os fatores que
causam interferência. Materiais molhados
e úmidos causam tanta interferência que a
perda de alcance é de até 100%. Para obter
informações sobre interferência de materiais
secos, consulte tabela abaixo
Materiais secos Espessura do
material
Madeira, gesso, papelão,
vidro (sem metal, os ou
chumbo)
Tijolo, madeira
compensada
Concreto reforçado < 30 cm 30 a 100%
Grades ou barras de
metal
Folhas de metal ou
alumínio
< 30 cm 0 a 10%
< 30 cm 5 a 35%
< 1 cm 90 a 100%
< 1 cm 100%
Perda de
alcance
5 Funções e
BR PORTUGUÊS
O que fazer se nenhuma conexão
for estabelecida
• A unidade dos pais pode estar fora
do alcance da unidade do bebê.
Aproxime a unidade dos da unidade
do bebê, mantendo uma distância
mínima de 1 metro.
• A unidade do bebê ou a unidade dos
pais pode perder a conexão por estar
próxima demais de outro aparelho
DECT (por exemplo, um telefone
sem o). Desligue este aparelho
DECT ou coloque a unidade mais
afastada do aparelho.
• A unidade do bebê pode estar
desligada. Ligue-a.
comentários sobre a
unidade do bebê
5.1 Luz noturna
A luz noturna produz um brilho suave que acalma
o bebê.
1 Pressione o botão de luz noturna na unidade
do bebê para ativar essa função.
65
Page 66

• Q aparece na tela da unidade dos pais.
2 Pressione o botão de luz noturna
novamente para desativar essa função.
• A luz noturna diminui gradativamente antes
de apagar completamente.
• Q desaparece da tela da unidade dos pais.
5.2 Função de canção de ninar
1 Pressione o botão reproduzir/parar canção de
ninar K na unidade do bebê para reproduzir a
última canção de ninar selecionada.
• A canção de ninar selecionada é repetida
por 15 minutos.
• Se nenhuma canção de ninar foi
selecionada antes, a canção de ninar 1 será
reproduzida.
2 Pressione o próximo botão de canções de
ninar
para selecionar outra canção de ninar
da lista.
• Quando você pressiona o próximo botão
de canções de ninar
enquanto uma
canção de ninar é reproduzida, a próxima
canção de ninar começa reproduzir.
3 Para ajustar o nível do som da canção de
ninar, pressione o botão de volume + ou – na
unidade do bebê.
D
Nota:
O volume do alto-falante só pode ser
congurado na unidade do bebê enquanto
uma canção de ninar é reproduzida. Se você
aumentar o volume, o som também sairá
mais alto ao usar a função de comunicação na
unidade dos pais.
4 Para interromper a reprodução, pressione
novamente o botão reproduzir/parar canção
de ninar K na unidade do bebê.
5.3 Sinal sonoro para
localização da unidade dos
pais
Se você não souber onde está a unidade dos pais,
poderá usar o botão FIND (Localizar) na unidade
do bebê para localizá-la.
• Se nenhuma canção de ninar for
reproduzida, a última canção de ninar
selecionada será reproduzida quando
você pressionar o próximo botão de
canções de ninar
66
.
D
Nota:
a função de localização só funciona quando a
unidade dos pais está ligada.
1 Pressione o botão FIND (Localizar) na
unidade do bebê.
Page 67

• A mensagem “PAGING” (Sinal sonoro para
localização) aparece no visor da unidade
dos pais e a unidade emite um sinal sonoro
para localização.
2 Para interromper o sinal sonoro para
localização, pressione novamente o botão
FIND (Localizar) na unidade do bebê ou
qualquer botão na unidade dos pais.
• Substitua as pilhas quando elas
descarregarem.
• Se as pilhas forem descarregadas
enquanto a unidade do bebê estiver
funcionando a pilha, a unidade do bebê
desliga e a unidade dos pais perde
conexão com a unidade do bebê.
D
Nota:
Recomendamos o uso da babá eletrônica com
energia elétrica, pois a unidade do bebê tem tempo
de operação limitado quando usada com pilhas
alcalinas não rerregáveis. O tempo de operação
com pilhas não recarregáveis é de 24 horas.
6 Funções e
D
Nota:
O sinal sonoro para localização para
automaticamente após 2 minutos.
5.4 Luz de status da bateria
1 A luz de status da bateria ca acesa em verde
quando a unidade do bebê funciona a bateria
e ela tem energia suciente.
2 A luz de status da bateria pisca rapidamente
em vermelho quando as baterias cam fracas,
e a unidade do bebê está funcionando a bateria
comentários sobre a
unidade dos pais
BR PORTUGUÊS
6.1 Volume
O volume pode ser denido se o menu não
estiver ativo. Há sete níveis de volume e uma
conguração de “volume desligado” denida.
6.1.1 Denição do nível do volume
1 Pressione uma vez o botão + ou o botão -.
• O nível de volume atual aparece no visor.
2 Pressione o botão + para aumentar o volume
ou o botão - para diminuí-lo.
• A unidade dos pais emite um bipe a cada
etapa de volume
• No volume máximo, a unidade dos pais
emite dois bipes.
.
67
Page 68

• Se nenhum botão for pressionado por
mais de 2 segundos, o indicador de nível
de volume desaparece e a conguração do
volume é salva.
6.1.2 Volume desligado
Abaixo da conguração mais baixa de volume, há
uma conguração de volume desligado.
1 Pressione uma vez o botão + ou o botão -.
• O nível de volume atual aparece no visor.
2 Mantenha pressionado o botão - por mais
de 2 segundos para denir o volume como
desligado.
• A mensagem “MUTE” (Sem som) e o símbolo
de interrupção de som aparecem no visor
D
Nota:
.
Se o volume estiver desligado, somente
as luzes do nível de som indicarão que o
bebê está emitindo sons.
6.2 Função Conversar
Você pode usar o botão TALK (Comunicação)
na unidade dos pais para falar com o bebê (para
acalmá-lo, por exemplo).
1 Mantenha pressionado o botão TALK
(Comunicação) e fale claramente no
microfone frontal da unidade dos pais a uma
distância de 15 a 30 cm.
D Nota:
Se o volume da canção de ninar foi
congurado como alto na unidade do bebê, o
som também sairá mais alto ao usar a opção
comunicação na unidade dos pais.
• A luz “link” começa a piscar em verde e a
mensagem “TALK” (Comunicação) aparece
no visor.
2 Solte o botão TALK (Comunicação) quando
terminar de falar.
6.3 Indicações de status da
bateria
O status de carga da bateria é indicado no
visor pelo indicador de estado das pilhas e por
mensagens de texto.
6.3.1 Bateria fraca
Quando as baterias recarregáveis estiverem
baixas, o tempo operacional restante é de pelo
menos 30 minutos se a babá eletrônica funcionar
em modo normal com as denições mais altas.
1 O indicador de estado das pilhas no visor está
em brando e pisca de forma intermitente.
2 A mensagem “BATTERY LOW” (Pilha fraca)
aparece no visor.
68
Page 69

3 A luz de estado das pilhas pisca em vermelho
lentamente.
4 A unidade dos pais emite um bipe cada 10
segundos nos primeiros 3 minutos. Depois
continua a bipar uma vez por minuto.
6.3.2 Bateria descarregada
1 Se as baterias recarregáveis estiverem quase
vazias, a luz de status da bateria piscará
rapidamente em vermelho.
2 Se você não ligar a unidade dos pais a uma
tomada elétrica, ocorrerá o seguinte:
1 A conexão com a unidade do bebê é
perdida.
2 O visor apaga.
3 A unidade dos pais desliga.
3 O primeiro segmento no indicador de estado
das pilhas começa a piscar indicando que as
pilhas recarregáveis estão sendo carregadas.
4 O segundo segmento no indicador do status
da bateria começa a piscar quando as baterias
recarregáveis estiverem carregadas a mais de
30% de sua capacidade.
BR PORTUGUÊS
D
Nota:
Se você ligar a unidade dos pais quando as
baterias recarregáveis estiverem quase vazias, o
visor será ligado. A mensagem “BATTERY LOW”
(Pilha fraca) aparece no visor por 2 segundos
antes de a unidade dos pais desligar.
6.3.3 Carregamento
Insira o plugue pequeno na unidade dos pais e
coloque o adaptador em uma tomada elétrica.
Quando a unidade dos pais carregar, ocorrerá o
seguinte:
1 O visor liga por 4 segundos e o texto
“CHARGING” (Carregando) aparece na tela
por 2 segundos.
2 A luz de status da bateria acenderá em verde
contínuo quando a unidade dos pais for ligada
à energia elétrica.
5 O terceiro segmento no indicador do status
da bateria começa a piscar quando as baterias
recarregáveis estiverem carregadas a mais de
50% de sua capacidade.
69
Page 70

6 Quando as pilhas recarregáveis estiverem
totalmente carregadas, ocorrerá o seguinte:
• O terceiro segmento no indicador de
estado das pilhas para de piscar.
• O visor liga por 4 segundos e a
mensagem “BATT FULL” (Bateria
carregada) aparece no visor.
7 Desconecte a unidade dos pais da tomada
elétrica para utilizá-lo sem o o.
• A luz de status da bateria desliga quando
a unidade dos pais é utilizada sem os
com funcionamento à bateria.
6.4 Indicador de intensidade do
sinal
• Se o indicador de intensidade do sinal tiver
4 barras, isso indica que a conexão entre
a unidade do bebê e a unidade dos pais é
excelente.
• Se o indicador de intensidade do sinal não
exibir nenhuma barra ou mostrar apenas uma
barra, isso indica que o sinal de transmissão
da unidade do bebê está muito fraco ou não
está disponível. Aproxime a unidade dos pais
da unidade do bebê para receber um sinal
mais forte.
6.5 Reinicializar
Esta função permite que você restaure a unidade
dos pais e a unidade do bebê às congurações
padrão de fábrica.
1 Desligue a unidade.
2 Mantenha pressionado o botão -.
3 Ligue a novamente unidade mantendo o
botão - pressionado.
D
Nota:
Você pode carregar a unidade dos pais quando
ela estiver desligada. Nesse caso, o indicador de
status da bateria acende em verde contínuo, mas
não dá nenhuma indicação quando as baterias
estiverem completamente carregadas.
D
Nota:
Se as baterias recarregáveis descarregam
rapidamente, elas alcançaram o m da vida útil
e você deve substituí-las. Para comprar novas
baterias recarregáveis, consulte o capítulo
“Encomendar acessórios”.
70
6.5.1 Congurações padrão
Unidade dos pais
• Idioma: inglês
• Volume do alto-falante: 3
• Sensibilidade do microfone: 3
• Alerta de temperatura: desligado
• Alerta de “Temperature low” (Baixa
temperatura): 14 °C
• Alerta de “Temperature high” (Alta
temperatura): 35 °C
• Escala de temperatura: Fahrenheit
• Timer de alimentação: 02:00
• Timer de alimentação: interrompido
• Relógio: oculto
Unidade do bebê
• Volume do alto-falante: 4
• Luz noturna: desligada
• Canção de ninar: desligado (Canção de ninar
1 selecionada)
Page 71

7 Menu da unidade
dos pais
Todas as funções descritas nas seguintes seções
podem ser operadas pelo menu da unidade
dos pais.
7.1 Navegação no menu
D Nota:
Algumas funções do menu funcionam somente
quando a unidade do bebê e a unidade dos pais
estão conectadas.
1 Pressione o botão MENU para abrir o menu.
• A primeira opção do menu aparece na tela.
2 Utilize o botão + para passar à próxima
opção ou o botão - para ir até a opção
anterior.
3 Pressione o botão OK para conrmar a
seleção.
D
Nota:
Pressione o botão MENU se você quiser sair
do menu sem fazer alterações. Se não houver
nenhuma entrada no menu por mais de 20
segundos, o menu fecha automaticamente.
7.2 Sensibilidade
No menu da unidade dos pais, essa opção
permite denir a sensibilidade do microfone na
unidade do bebê. Essa ferramenta determina o
nível de ruído que a unidade do bebê captará. Por
exemplo, ouvir seu bebê chorar pode ser mais
importante do que ouvi-lo balbuciar.
1 Selecione “Sensitivity” (Sensibilidade) no menu
usando os botões + e - e pressione OK para
conrmar.
2 Utilize os botões + e - para aumentar ou
diminuir a sensibilidade do microfone. A
indicação de sensibilidade no visor tem quatro
segmentos.
• Se todos quatro segmentos estiverem
preenchidos, signica que a sensibilidade
está no nível mais alto.
BR PORTUGUÊS
D
Nota:
A seta no visor indica em qual direção você
pode navegar.
71
Page 72

• Se todos os segmentos estiverem em branco,
a sensibilidade está no nível mais baixo.
3 Pressione OK para conrmar a conguração.
7.2.1 Níveis e indicações de sensibilidade
Ícone Sensibilidade Descrição
Mais alta Ouça todos os ruídos do
bebê. O alto-falante da
unidade dos pais ca ligado
ininterruptamente.
alta Ouça todos os sons,
do balbuciar mais baixo
ao mais alto. Se o bebê
não emitir nenhum som,
signica que o alto-falante
da unidade dos pais está
desligado.
médio Ouça sons desde choro
suave ao mais alto. Se o
bebê emitir sons mais
baixos, o alto-falante da
unidade dos pais não será
ligado.
baixa O alto-falante da unidade
dos pais só será ligado se
o bebê emitir sons altos,
por exemplo, se estiver
chorando.
7.3 Timer de alimentação
Você pode denir o timer de alimentação para
alertá-lo que é hora de alimentar o bebê. O timer
pode ser denido de 1 minuto a 23 horas e 59
minutos.
7.3.1 Conguração e uso do timer de
alimentação
1 Usando os botões + e -, selecione “Feed
Timer” (Timer de alimentação) no menu e
pressione OK para conrmar.
2 Usando os botões + e -, selecione “Set Timer”
(Denir timer). Pressione OK para iniciar a
conguração do temporizador.
• A indicação de horas começa a piscar no
visor.
3 Dena a hora e pressione OK conrmar.
• A indicação de minutos começa a piscar no
visor.
4 Dena os minutos e pressione OK conrmar.
5 Usando os botões + e -, selecione “xx:xx
Start” (Início às xx:xx). Pressione OK para
conrmar.
• O símbolo de timer aparece no visor.
• O timer começa a contagem regressiva.
72
Page 73

6 Quando o timer alcançar 00:00, o alerta do
timer de alimentação dispara, o símbolo de
timer começa a piscar no visor e a mensagem
“TIMER END” (Término de timer) é exibido
no visor.
7 Pressione qualquer tecla para interromper o
alerta. Se você não interromper o alerta, ele
para automaticamente após 2 minutos.
7.3.2 Repita o timer de alimentação
1 Após a etapa 5 em “Conguração e uso do
timer de alimentação”, selecione “Repeat”
(Repetir) usando os botões + e -. Pressione
OK para conrmar.
2 Escolha “Repeat ON” (Repetição ligada)
ou “Repeat OFF” (Repetição desligada) e
pressione OK para conrmar.
3 Usando os botões + e -, selecione “xx:xx
Start” (Início às xx:xx) e pressione OK para
ativar a função de repetição do timer de
alimentação.
4 Quando você pressiona qualquer tecla para
interromper o alerta do timer de alimentação
ou se o alerta para automaticamente após
2 minutos, o timer de alimentação começa a
contagem regressiva novamente.
7.3.3 Interrupção do timer
1 Pressione o botão do menu e selecione “Feed
Timer” (Timer de alimentação).
2 Utilize os botões + e - para selecionar “Stop”
(Parar) e pressione OK para conrmar.
7.4 Temperatura
Um bebê dorme confortavelmente numa
temperatura entre 16 °C e 20 °C. Você pode
denir um intervalo de temperatura mínima
e máxima e um alerta para avisá-lo que a
temperatura está fora dos limites estabelecidos.
1 Selecione “Temperature” (Temperatura) no
menu usando os botões + e - e pressione OK
para conrmar.
2 Usando os botões + e -, selecione “Temp
Range” (Intervalo de temperatura) e
pressione OK para conrmar.
• A indicação de temperatura mínima começa
a piscar no visor.
3 Utilize os botões + e - para denir o intervalo
de temperatura mínima entre 10 °C e 19 °C.
Pressione OK conrmar.
• A indicação de temperatura máxima
começa a piscar no visor.
4 Utilize os botões + e - para denir o intervalo
de temperatura máxima entre 22 ° e 37 °C.
Pressione OK para conrmar.
5 Use os botões + e - para selecionar “Alert”
(Alerta). Pressione OK para conrmar e
inicie a conguração das opções de alerta de
temperatura.
• A mensagem “Alert” (Alerta) aparece no
display.
6 Selecione a opção “Alerta ligado” ou “Alerta
desligado”. Pressione Ok para conrmar.
• Caso você escolha “Alert On” (Alerta
ligado), o símbolo do alerta de temperatura
aparecerá no visor.
7 Use os botões + e - para selecionar “Temp
Scale” (Escala de temperatura). Pressione OK
para conrmar e inicie a conguração das
opções de alerta de temperatura.
BR PORTUGUÊS
73
Page 74

8 Selecione “Celsius” ou “Fahrenheit” e
pressione OK para conrmar.
• A temperatura na escala denida é exibida
no visor.
• Se a temperatura estiver fora do intervalo
denido, o símbolo de alerta de temperatura
piscará no visor e a mensagem “Muito
quente” ou “Muito frio” será exibida. Se
o alerta foi habilitado, a unidade dos pais
também bipará.
• A indicação de minutos começa a piscar no
visor.
5 Dena os minutos e pressione OK conrmar.
• A hora do relógio é alternada com outras
indicações no campo de mensagens do visor.
7.6 Idioma
Você pode utilizar esta opção de menu para
alterar a denição do idioma.
1 Selecione “Language” (Idioma) no menu
usando os botões + e -, e pressione OK para
conrmar.
2 Utilize os botões + e - para selecionar seu
idioma e pressione OK para conrmar.
D
Nota:
Esta opção aparece automaticamente no
visor quando você liga a unidade dos pais pela
primeira vez e após uma reinicialização.
7.5 Relógio
A conguração padrão para o relógio ca oculta.
Você pode escolher exibir o relógio e ajustar a
hora do relógio no menu da unidade dos pais.
1 Selecione “Clock” (Relógio) no menu usando
os botões + e -, e pressione OK para
conrmar.
2 Utilize o botão + ou - para selecionar “Show
Time” (Exibir hora) e pressione OK para
conrmar.
3 Usando os botões + e -, selecione “Set time”
(Ajustar hora). Pressione OK para conrmar e
começar a ajustar o relógio.
• A indicação de horas começa a piscar no
visor.
4 Dena a hora e pressione OK conrmar.
74
8 Alça para o pescoço
Uma prática alça para o pescoço é fornecida
com a babá eletrônica. Ela permite que você
transporte a unidade dos pais enquanto se
locomove.
8.0.1 Conectar a alça para o pescoço
1 Insira a ponta do laço da alça para o pescoço
na abertura na parte superior da unidade
dos pais.
Page 75

2 Passe a alça para o pescoço pela ponta
do laço e puxe a alça para o pescoço
rmemente.
8.0.2 Desconectar a alça para o pescoço
1 Passe a alça para o pescoço pela ponta do
laço.
2 Puxe a ponta do laço para fora da abertura
na parte superior da unidade dos pais.
10 Armazenamento
Se você não for usar a babá eletrônica durante
algum tempo, faça o seguinte:
• Remova as pilhas não recarregáveis da
unidade do bebê.
• Remova as pilhas recarregáveis da unidade
dos pais.
• Armazene a unidade dos pais, a unidade do
bebê e os adaptadores em local fresco e seco.
11 Compra de
acessórios
Para comprar acessórios ou peças avulsas, acesse
www.shop.philips.com/service ou dirija-se
até um revendedor Philips. Você também pode
entrar em contato com a Central de Atendimento
ao Cliente Philips em seu país (veja o folheto
de garantia mundial para obter os detalhes de
contato).
BR PORTUGUÊS
9 Limpeza e
manutenção
B Aviso:
Não mergulhe a unidade dos pais ou do bebê na
água nem as lave em água corrente.
B
Aviso:
Não use spray para limpeza nem produtos para
limpeza líquidos.
1 Desligue a unidade do bebê caso esteja ligado
à energia elétrica.
2 Limpe a unidade dos pais e a do bebê usando
um pano seco.
3 Limpe os adaptadores com um pano seco.
12 Garantia e suporte
Caso você pfrecise de informações ou suporte,
acesse o site da Philips em www.philips.com/
support ou leia o folheto de garantia mundial
à parte.
75
Page 76

13 Perguntas
frequentes
Este capítulo lista as perguntas mais frequentes
sobre o aparelho. Se você não conseguir localizar
a resposta para a sua pergunta, visite o site www.
philips.com/AVENT para ver mais perguntas
frequentes ou entre em contato com a Central de
Atendimento ao Cliente em seu país.
Por que a luz indicadora de energia da unidade
do bebê e a luz “link” da unidade dos pais não
acendem quando pressiono os botões liga/
desliga das unidades?
• Talvez as baterias recarregáveis da unidade dos
pais estejam vazias e a unidade dos pais não
está conectada à tomada. Ligue a unidade dos
pais a uma tomada elétrica. Depois, pressione
o botão liga/desliga para estabelecer conexão
com a unidade do bebê.
• Talvez a unidade do bebê esteja em modo
de funcionamento a bateria e suas baterias
não recarregáveis estejam vazias. Substitua as
baterias não recarregáveis ou ligue a unidade
do bebê a uma tomada elétrica. Depois,
pressione o botão liga/desliga para estabelecer
conexão com a unidade dos pais.
• Se a luz ‘link’ na unidade dos pais ainda não
começar a piscar em vermelho, utilize a função
de reinicialização para restaurar as unidades às
respectivas congurações padrão.
Por que a luz “link” na unidade dos pais ca
piscando em vermelho de forma contínua e
por que a mensagem “NOT LINKED” (Sem
conexão) ou “LINKING” (Conectando) aparece
no visor?
• A unidade do bebê e a dos pais estão fora do
alcance uma da outra. Aproxime a unidade dos
pais da unidade do bebê.
• A unidade do bebê pode estar desligada.
Ligue-a.
Por que a luz de estado das pilhas na unidade do
bebê pisca na cor vermelha?
As baterias não recarregáveis da unidade do bebê
estão fracas. Troque-as ou conecte a unidade do
bebê à rede elétrica.
Por que a unidade dos pais emite um bipe?
• Se a unidade dos pais emitir um bipe enquanto
a luz “link” pisca de forma contínua na cor
vermelha e a mensagem “NOT LINKED” (Sem
conexão) ou “LINKING” (Conectando) aparece
no visor, signica que a conexão com a unidade
do bebê foi perdida. Aproxime a unidade dos
pais da unidade do bebê ou ligue a unidade do
bebê, caso esteja desligada.
• Caso a unidade dos pais emita um bipe e o
símbolo de pilha na tela esteja vazio, as pilhas
recarregáveis da unidade dos pais estão com
pouca carga. Recarregue-as.
• Se você ajustou o intervalo de temperatura do
ambiente e o alerta de temperatura, a unidade
dos pais emitirá um bipe quando a temperatura
car abaixo do intervalo mínimo denido ou
quando a temperatura atingir um nível acima
do intervalo máximo denido.
• A unidade do bebê pode estar desligada.
Ligue-a.
Por que o aparelho emite um ruído agudo?
• As unidades podem estar muito próximas uma
da outra. Certique-se de manter pelo menos
1 metro de distância entre elas.
• O volume da unidade dos pais pode estar
muito alto. Diminua-o.
Por que não ouço nenhum som ou não ouço
o bebê chorando?
• A unidade dos pais pode estar com um volume
muito baixo ou desligado. Aumente o volume.
• O nível de sensibilidade do microfone da
unidade do bebê talvez esteja muito baixo.
Ajuste o nível de sensibilidade do microfone no
menu da unidade dos pais.
• A unidade do bebê e a dos pais talvez estejam
foram do alcance uma da outra. Reduza a
distância entre elas.
76
Page 77

Por que a unidade dos pais reproduz
rapidamente outros sons?
• A unidade do bebê também capta outros sons
além dos emitidos pelo bebê. Aproxime-a do
bebê, mantendo a distância mínima de 1 metro.
• O nível de sensibilidade do microfone da
unidade do bebê talvez esteja muito alto.
Diminua-o no menu da unidade dos pais.
Por que a unidade dos pais demora a reproduzir
o choro do bebê?
• O nível de sensibilidade do microfone da
unidade do bebê talvez esteja muito baixo.
Aumente-o no menu da unidade dos pais.
Por que as baterias não recarregáveis da unidade
do bebê descarregam rapidamente?
• O nível de sensibilidade do microfone da
unidade do bebê talvez esteja muito alto,
fazendo com que ela faça transmissões com
maior frequência. Diminua-o no menu da
unidade dos pais.
• O volume da unidade do bebê talvez esteja
muito alto, fazendo com que ela consuma muita
energia. Diminua o volume.
• Você pode ter ajustado um intervalo de
temperatura ambiente máxima inferior à
temperatura ambiente real ou um intervalo
de temperatura ambiente mínima superior à
temperatura ambiente real. A unidade do bebê
continua enviando dados à unidade dos pais e,
portanto, usa mais energia. Isso faz com que as
pilhas não recarregáveis da unidade do bebê
descarreguem rapidamente.
• Talvez você tenha ligado a luz noturna. Se
desejar usá-la, recomendamos conectar a
unidade do bebê à rede elétrica.
Por que o tempo de carregamento da unidade
dos pais ultrapassa 10 horas?
• A unidade dos pais talvez esteja ligada
durante o carregamento. Desligue-a durante o
carregamento.
A faixa operacional especicada para a babá
eletrônica é de 330 metros. Por que a babá
eletrônica só funciona em uma distância bem
menor do que essa?
• A faixa especicada é válida apenas em
ambientes externos, em locais abertos. Dentro
de casa, a faixa operacional é limitada pela
quantidade e pelo tipo de parede e/ou teto
entre as unidades. Dentro de casa, a faixa
operacional é de até 50 metros.
Por que a conexão cai de vez em quando? Por
que há falhas no som?
• A unidade do bebê e a dos pais provavelmente
estão atingindo os limites máximos da faixa
operacional. Experimente usá-las em outro local
ou diminua a distância entre elas. Observe que
são necessários cerca de 30 segundos para que
a conexão entre as unidades seja estabelecida.
• Você pode ter colocado a unidade ao lado de
um transmissor ou aparelho DECT, como um
telefone DECT ou outra babá eletrônica na
faixa de 1,8 GHz/1,9 GHz. Afaste a unidade
dos outros aparelhos até que a conexão seja
restabelecida.
O que acontece em caso de falta de energia?
• Se a unidade dos pais tiver carga suciente,
ela continuará funcionando durante a falha de
energia. Se houver pilhas na unidade do bebê,
ela também continuará funcionando.
A babá eletrônica é segura em termos de
privacidade e interferência?
• A tecnologia DECT desta babá eletrônica
garante que não ocorrerá interferência
de outros equipamentos nem invasão de
privacidade.
BR PORTUGUÊS
77
Page 78

Espera-se que o tempo operacional da unidade
dos pais seja de pelo menos 18 horas. Por que a
unidade dos pais está apresentando um tempo
operacional menor?
• Quando a unidade dos pais é carregada pela
primeira vez, o tempo operacional é inferior a
18 horas. As pilhas recarregáveis só atingem sua
capacidade máxima após serem carregadas e
descarregadas pelo menos quatro vezes.
• O volume da unidade dos pais talvez esteja
muito alto, fazendo com que ela consuma muita
energia. Diminua o volume.
• O nível de sensibilidade do microfone da
unidade do bebê talvez esteja muito alto,
fazendo com que a unidade dos pais consuma
muita energia. Diminua o nível de sensibilidade
do microfone no menu da unidade dos pais.
Porque leva algum tempo para o indicador de
estado das pilhas aparecer no visor quando
começo a carregar a unidade dos pais enquanto
está desligada?
• Isso é normal. A unidade dos pais necessita de
alguns segundos para ativar após ser conectada
a uma tomada elétrica quando está desligada.
Quando é conectada, a unidade dos pais
precisa primeiro detectar que está carregando
e medir o nível de carga da bateria antes de
exibir o indicador de status da bateria.
Por que as baterias recarregáveis da unidade dos
pais descarregam rapidamente?
• As baterias recarregáveis alcançaram o m da
vida útil. Você deve substituí-las. Para substituir
as baterias recarregáveis, consulte o capítulo
“Encomendar acessórios”.
78
Page 79

BR PORTUGUÊS
79
Page 80

© 2013 Koninklijke Philips Electronics N.V.
All rights reserved.
Document order number: 4222.100.0495.1
 Loading...