

Page 1

SCD520
Page 2

2
Page 3

3
1
2
5
3
12
4
6
13
14
15
1
8
7
2
3
4
5
6
9
11
10
9
8
18
7
16
17
10
15
11
22
21
12
13
14
2
20
19
17
16
1
2
3
4
5
Page 4

4
Page 5

ENGLISH 6
ESPAÑOL 26
FRANÇAIS (CANADA) 48
SCD520
Page 6

6
ENGLISH
IMPORTANT
SAFETY
INSTRUCTIONS
Some of the following information may not apply to your particular
product; however, when using baby monitor equipment, basic safety
precautions should always be followed to reduce the risk of fi re, electric
shock and injury to persons, including the following:
1 Read these instructions.
2 Keep these instructions.
3 Heed all warnings.
4 Follow all instructions.
5 Do not use this apparatus near water.
6 Clean only with dry cloth.
7 Do not block any ventilation openings. Install in accordance with the
manufacturer’s instructions.
8 Do not install near any heat sources such as radiators, heat registers,
stoves or other apparatus (including amplifi ers) that produce heat.
9 Do not defeat the safety purpose of the polarized or grounding-type
plug. A polarized plug has two blades with one wider than the other.
A grounding-type plug has two blades and a third grounding prong.
The wide blade or the third prong are provided for your safety. If the
provided plug does not fi t into your outlet, consult an electrician for
replacement of the obsolete outlet.
10 Protect the power cord from being walked on or pinched particularly
at plugs, convenience receptacles, and the point where they exit from
the apparatus.
11 Only use attachments/accessories specifi ed by the manufacturer.
12 Unplug this appliance during lightning storms or when not used for
long periods of time.
13 Refer all servicing to qualifi ed service personnel. Servicing is required
when the apparatus has been damaged in any way, such as power-
supply cord or plug is damaged, liquid has been spilled or objects have
fallen into the apparatus, the apparatus has been exposed to rain or
moisture, does not operate normally, or has been dropped.
14 This baby monitor is intended as an aid. It is not a substitute for
responsible and proper adult supervision and should not be used as
such.
15 Use this appliance only for its intended use as described in this manual.
16 Unplug this product from the wall outlet before cleaning. Do not use
liquid cleaners or aerosol cleaners.
17 Products should not be used while you are in a bathtub, shower or
pool. Immersion of the product in water could cause an electrical
shock.
18 This product should be operated only from the type of power source
indicated on the type plate of the adapters (A15,B9). If you are not
sure of the type of power supply to your home, consult your dealer or
local power company.
Page 7

ENGLISH 7
19 Do not overload wall outlets and extension cords as this can result in
the risk of fi re or electric shock.
20 Never push objects of any kind into this product through casing slots as
they may touch dangerous voltage points or short out parts that could
result in a risk of fi re or electric shock. Never spill liquid of any kind on
the product.
21 To reduce the risk of electric shock, do not disassemble this product,
but call 1-800-54-AVENT (1-800-542-8368) for assistance. Opening or
removing covers (except battery compartment lids) may expose you
to dangerous voltage or other risks. Incorrect reassembly can cause
electric shock when the appliance is subsequently used.
22 To prevent strangulation with power cord, never place monitor within
reach of child. Do not use with extension cords.
If your product utilizes batteries, the following additional
precautions should be observed:
1 Use only the type and size of batteries specifi ed in the user manual.
2 Do not dispose of batteries in fi re. They may explode. Check with local
regulations for possible special disposal instructions.
3 Exercise care in handling batteries in order not to short out the
batteries with conducting materials such as rings, bracelets and
keys. Overcharging, short circuiting, reverse charging, mutilation, or
incineration of batteries must be avoided to prevent one or more
of the following occurrences: release of toxic materials, release of
hydrogen and/or oxygen gas, rise in surface temperature.
4 Do not attempt to recharge batteries provided with or identifi ed
for use with this product that are not intended to be charged. The
batteries may leak corrosive electrolyte or explode.
5 Do not attempt to rejuvenate the batteries provided with or identifi ed
for use with this product by heating them. Sudden release of battery
electrolyte may occur, causing burns or irritation to eyes or skin.
6 If and when necessary, the batteries must be replaced with identical
new ones from the same manufacturer. If a battery to be replaced
is connected with other batteries in series, it is recommended that
the other batteries be replaced with new ones at the same time.
7 Reverse polarity installation of the batteries in the end product must
be avoided. Reverse insertion of batteries can cause charging, and that
may result in leakage or explosion.
8 Remove batteries from this product if you store the product over 30
days because the batteries could leak and damage the product.
9 Discard ‘dead’ batteries as soon as possible since ‘dead’ batteries are
more likely to leak in a product. If a battery has leaked or vented, it
should be replaced immediately using protective gloves.
10 Do not store this product, or the batteries provided with or identifi ed
for use with this product, in high-temperature areas. Batteries that
are stored in a freezer or refrigerator for the purpose of extending
shelf life should be protected from condensation during storage and
defrosting. Batteries should be stabilized at room temperature prior to
use after cold storage.
11 If your product uses rechargeable batteries, charge the batteries only
in accordance with the instructions and limitations specifi ed in the user
manual.
Page 8
ENGLISH8
12 There is a risk of explosion if batteries are replaced with an
incorrect type. For the parent unit, always use the SCD520 NiMH
rechargeable battery pack as supplied with the appliance.
SAVE THESE
INSTRUCTIONS
CAUTION: THE SYMBOL SHOWN IN FIGURE 1 MEANS
-
THAT THERE IS A RISK OF EXPLOSION OF THE
BATTERIES AND/OR OF SERIOUS DAMAGE TO THE
BABY MONITOR IF THE BATTERIES OR THE ADAPTER
ARE REPLACED WITH AN INCORRECT TYPE.
Adapters for baby unit and charger :
Input: 120 VAC 60 Hz
-
Output: 7.5 VDC 400 mA
-
Adapter no. UD075040B
The socket-outlet shall be installed near the equipment and shall be easily
accessible.
For the baby unit, only use 1.5V AA alkaline batteries (batteries not
supplied).
For the parent unit, only use the SCD520 NiMH rechargeable battery pack
as supplied with the appliance.
Dispose of used batteries according to the instructions.
Compliance information
The FCC ID number is located on the casing bottom of the parent unit
and in the battery compar tment of the baby unit.
The term ‘IC’ before the certifi cation number signifi es that Industry
Canada technical specifi cations were met.This certifi cation means that
the equipment meets certain radio communications and operational
requirements. This device complies with Part 15 of the FCC Rules and
ICES-003 of Industry Canada. Operation is subject to the following two
conditions: (1) this device may not cause harmful interference, and (2) this
device must accept any interference received, including interference that
may cause undesired operation.This device complies also with RSS-213 of
Industry Canada.
Radio interference
This equipment has been tested and found to comply with the limits
for a Class B digital device, pursuant to Part 15 of the FCC Rules and
applicable Industry Canada specifi cations. These limits are designed to
provide reasonable protection against harmful interference in a residential
installation. This equipment generates, uses and can radiate radio frequency
energy and, if not installed and used in accordance with the instructions,
may cause harmful interference to radio communications. However, there
is no guarantee that interference will not occur in a particular installation.
If this equipment does cause harmful interference to radio or television
reception, which can be determined by turning the equipment off and on,
Page 9

ENGLISH 9
the user is encouraged to try to correct the interference by one or more
of the following measures:
-
Reorient or relocate the receiving antenna.
-
Increase the separation between the equipment and receiver.
-
Connect the equipment to an outlet on a circuit different from that to
which the receiver is connected.
RF Radiation Exposure Statement
This equipment complies with FCC RF radiation exposure limits set for th
for an uncontrolled environment. This equipment should be installed and
operated with a minimum distance of 20 centimeters between the radiator
and your body. For handheld operation, this equipment has been tested
and meets the FCC RF exposure guidelines. For body-worn operation,
this product has been tested and meets the FCC RF exposure guideline
when used with the belt clip or neck strap supplied with this product. This
transmitter must not be co-located or operating in conjunction with any
other antenna or transmitter. This equipment also complies with Industry
Canada RSS-102 with respect to Canada’s Health Code 6 for Exposure of
Humans to RF Fields.
Do not attempt to repair or modify this equipment
Any repairs or alterations made by the user to the equipment may
void the warranty and compliance of the equipment. Refer servicing to
authorized or designated service centers.
Introduction
Congratulations on your purchase and welcome to Philips AVENT! To fully
benefi t from the support that Philips AVENT offers, register your product
at www.philips.com/welcome.
Philips AVENT is dedicated to producing caring, reliable products
that give parents the reassurance they need. This Philips AVENT baby
monitor provides round-the-clock support by ensuring you can always
hear your baby clearly without any distracting noise. The DECT technology
guarantees zero interference from other wireless appliances and a crystal
clear signal between the baby unit and the parent unit. The temperature
sensor enables you to monitor the temperature in your baby’s room,
and offers you personalized settings to help keep your baby’s room
comfortable.
General description (Fig. 2)
A Parent unit
1 On/off button 3
2 Slot for belt clip
3 TALK button
4 MENU button
5 LINK light
6 Microphone
7 Loudspeaker
8 Menu and volume +/– buttons
9 OK button
10 Display
11 Sound level lights
12 Belt clip
Page 10

ENGLISH10
13 Adapter
14 Small appliance plug
15 Socket for small appliance plug
16 Charger
17 Charging light
18 Compartment for rechargeable battery pack
19 Neck strap
20 Lid of compartment for rechargeable battery pack
21 Rechargeable battery pack (included)
22 Opening for neck strap
B Baby unit
1 On/off button 3
2 PAGE button
3 Play/stop button E
4 Lullaby button K
5 Battery light T
6 Nightlight button Q
7 Power-on light
8 Volume +/– buttons
9 Microphone
10 Adapter
11 Large appliance plug
12 Loudspeaker
13 Temperature sensor
14 Socket for large appliance plug
15 Compartment for non-rechargeable batteries
16 Lid of compartment for non-rechargeable batteries
17 Non-rechargeable batteries (not included)
C Display
1 Ñ ° = room temperature indication
2 R = sound alert
3 K = lullaby
4 T = battery symbol
5 Q = nightlight
For other display indications and volume/sensitivity levels, see chapters
‘Features’ and ‘Menu options’.
Important
,
Read the user manual carefully before you use the appliance and save
it for future reference.
,
This baby monitor is intended as an aid. It is not a substitute for
responsible and proper adult supervision and should not be used as
such.
,
This monitor is not intended to be used as a medical monitor and its
use should not replace adult supervision.
,
Check if the voltage indicated on the adapter corresponds to the
local electrical voltage before you connect the appliance.
,
Use and store the appliance at a temperature between 50°F (10°C)
and 104°F (40°C).
,
This appliance is suitable for electrical outlet voltages of 120V.
Page 11
ENGLISH 11
Do not expose the baby monitor to extreme cold or heat or to
,
direct sunlight.
Make sure the baby unit and power cord are always out of reach of
,
the baby (at least 3 feet / 1 meter away).
Never place the baby unit inside the baby’s bed or playpen.
,
Never cover the baby monitor with a towel or blanket.
,
Never immerse any part of the baby monitor in water or any other
,
liquid.
Never use the baby monitor in moist places or close to water.
,
Except for the battery compartment, do not open the housing of the
,
baby unit and parent unit in order to prevent electric shock.
Only use the adapters supplied.
,
The adapters contain a transformer. Do not cut off the adapters
,
to replace them with other plugs, as this will cause a hazardous
situation.
If one of the adapters is damaged, always have it replace with one of
,
the original type in order to avoid a hazard.
If you place the parent unit next to a transmitter or other DECT
,
appliance (e.g. a DECT telephone), the connection with the baby unit
may be lost.
The temperature sensor only measures the temperature in the
,
baby’s room. It cannot be used to control or adjust the temperature
in the baby’s room.
The power outlet should be located near the appliance and easily
,
accessible.
Preparing for use
Baby unit
You can use the baby unit corded or on non-rechargeable batteries. Even
if you are going to use the unit corded, we advise you to insert the nonrechargeable batteries. This guarantees automatic back-up in case of power
failure.
Corded operation
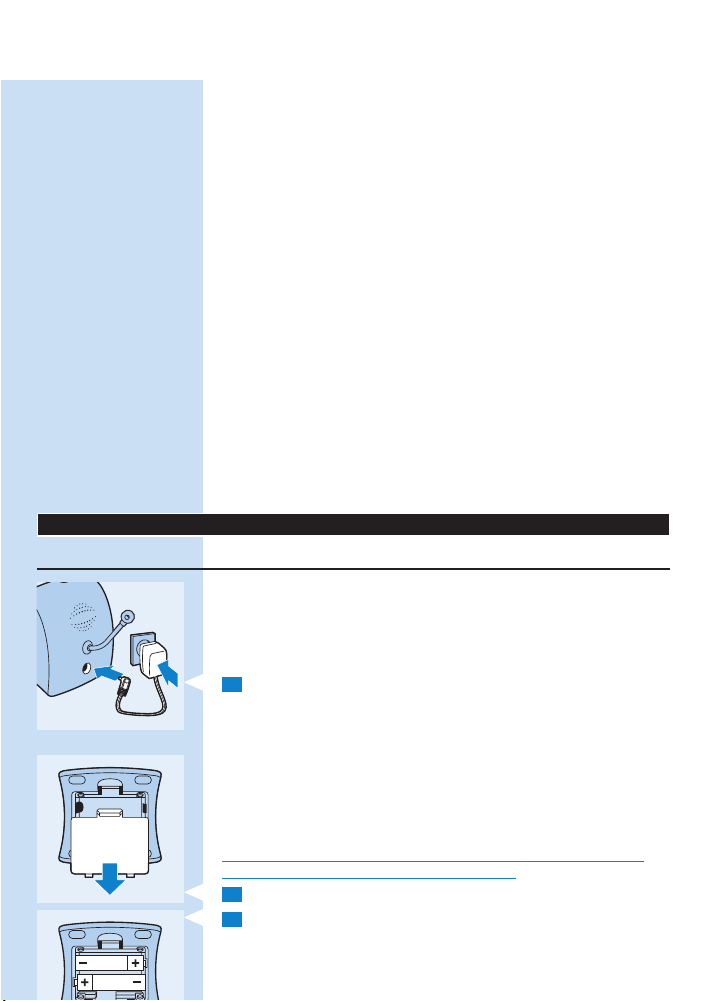
1 Put the large appliance plug in the baby unit and put the adapter in a
wall socket.
The power-on light goes on.
,
Battery operation (non-rechargeable batteries)
The baby unit runs on four 1.5V R6 AA batteries (not included). We
recommend you to use Philips LR6 PowerLife batteries or an equivalent
type.
Do not use rechargeable batteries, as the baby unit does not have a
charging function.
Unplug the baby unit and make sure your hands and the unit are dry
when you insert the non-rechargeable batteries.
1 Remove the lid of the compartment for non-rechargeable batteries.
2 Insert four non-rechargeable batteries.
Note: Make sure the + and - poles point in the right direction.
Page 12
ENGLISH12
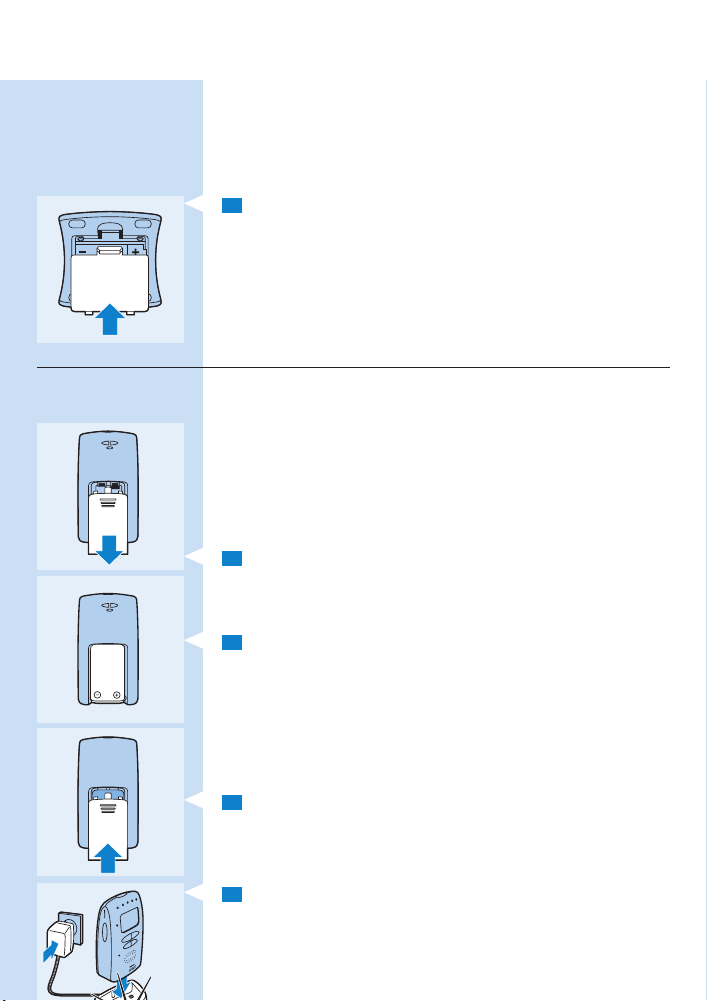
3 Reattach the lid.
Note: When the batteries are low, the battery light on the baby unit fl ashes red.
Parent unit
Battery operation (rechargeable battery pack)
The parent unit comes with a SCD520 NiMH rechargeable battery pack.
Charge the parent unit before you use it for the fi rst time or when
the parent unit indicates that the battery pack is low (the empty
battery symbol fl ashes on the display and the parent unit beeps). The
parent unit starts indicating that the batter y pack is low 30 minutes before
the battery pack is completely empty.
Note: If the battery pack is completely empty, the parent unit automatically
switches off and loses contact with the baby unit.
1 Remove the lid of the compartment for the rechargeable battery
pack.
2 Insert the rechargeable battery pack.
Note: Make sure the + and - poles of the battery pack point in the right
direction.
3 Reattach the lid.
4 Insert the small appliance plug into the charger, put the adapter in
a wall socket and place the parent unit in the charger.
The charging light on the charger goes on.
,
The display shows a charging battery symbol to indicate that the
,
parent unit is charging.
Page 13
ENGLISH 13
5 Leave the parent unit in the charger until the battery pack is fully
charged.
,
During charging, the charging light on the charger lights
up continuously.
,
When the battery pack is fully charged, the display of the parent unit
shows a full battery symbol T .
-
When you charge the parent unit for the fi rst time or after a long
period of disuse, switch it off and let it charge continuously for at least
10 hours.
Charging normally takes 8 hours, but it takes longer when the parent
-
unit is switched on while charging. To keep the charging time as short
as possible, switch off the parent unit during charging.
When the battery pack is fully charged, the parent unit can be used
-
cordlessly for at least 24 hours.
Note: When the parent unit is charged for the fi rst time, the operating time
is less than 24 hours. The battery pack only reaches its full capacity after you
have charged and discharged it four times.
Note: When the parent unit is not connected to a power outlet or even when
the parent unit is switched off, the battery pack gradually discharges.
Using the appliance
Use the baby monitor for its intended household use as described in this
manual.
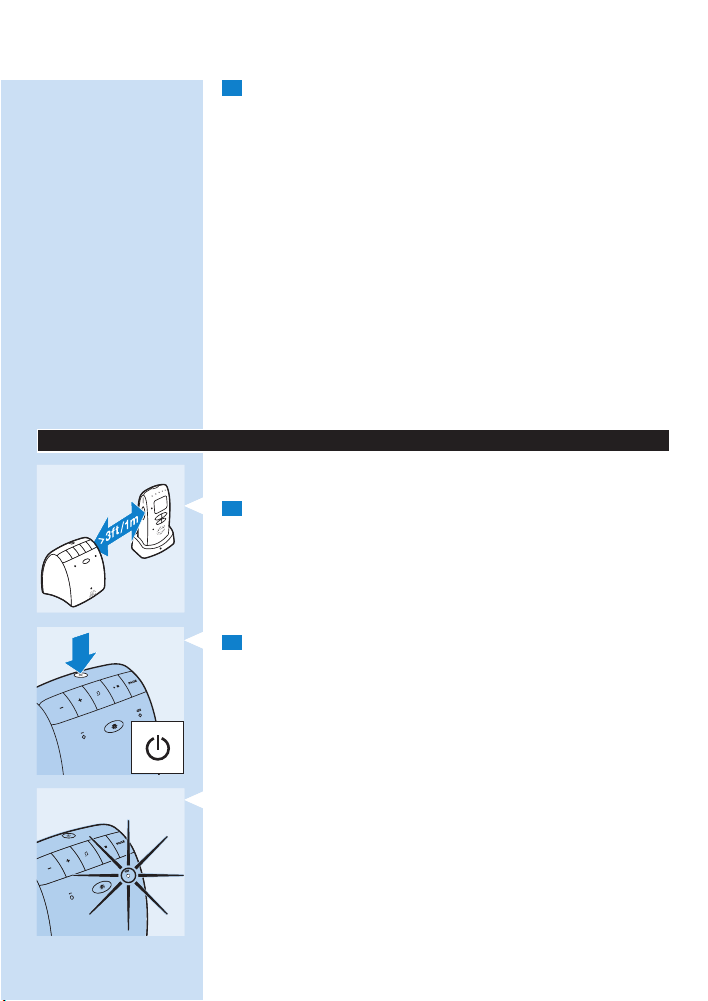
1 Place the parent unit and the baby unit in the same room to test the
connection.
Make sure the baby unit is at least 3 feet/1 meter away from the parent
unit.
2 Press and hold the on/off button 3 on the baby unit until the green
power-on light goes on.
Note: The power-on light always lights up green, even when there is no
connection with the parent unit.
The nightlight lights up briefl y and then goes out again.
,
The battery light T lights up briefl y and then goes out again.
,
Page 14

ENGLISH14
3 Press and hold the on/off button 3 on the parent unit until the
sound level lights light up briefl y.
The display goes on and the battery symbol appears on the display.
,
The LINK light fl ashes red and the message ‘Searching’ appears on
,
the display.
The LINK light on the parent unit turns green and lights up
,
continuously when a connection has been established between
the baby unit and parent unit. The message ‘Linked’ appears on the
display.
After 2 seconds the message ‘Linked’ disappears and the temperature
,
value is shown on the display.
Page 15

,
If no connection is established, the LINK light on the parent
unit stops fl ashing and lights up red. The parent unit beeps from time
to time and the message ‘Not Linked’ appears on the display.
Positioning the baby monitor
1 Place the baby unit at least 3 feet/1 meter away from your baby.
2 Place the parent unit within the operating range of the baby unit.
Make sure it is at least 3 feet/1 meter away from the baby unit to
avoid acoustic feedback.
For more information on the operating range, see section ‘Operating range’
below.
Operating range
The operating range of the baby monitor is 330 meters/1000 feet in open
air. Depending on the surroundings and other disturbing factors, this range
may be smaller. Indoors the operating range is up to 50 meters/150 feet.
Dry materials Material thickness Loss of range
Wood, plaster, cardboard, glass
(without metal, wires or lead)
Brick, plywood < 30cm/12in 5-35%
Reinforced concrete < 30cm/12in 30-100%
Metal grilles or bars < 1cm /0.4in 90-100%
Metal or aluminum sheets < 1cm/0.4in 100%
< 30cm/12in 0-10%
For wet and moist materials, the range loss may be up to 100%.
Features
The following features are described in chapter ‘Menu options’, as they can
only be operated in the menu of the parent unit:
Adjusting microphone sensitivity
-
Sound alert on/off
-
ENGLISH 15
Page 16
ENGLISH16
Setting room temperature range (minimum and maximum
-
temperature)
Temperature alert on/off
-
Adjusting loudspeaker volume
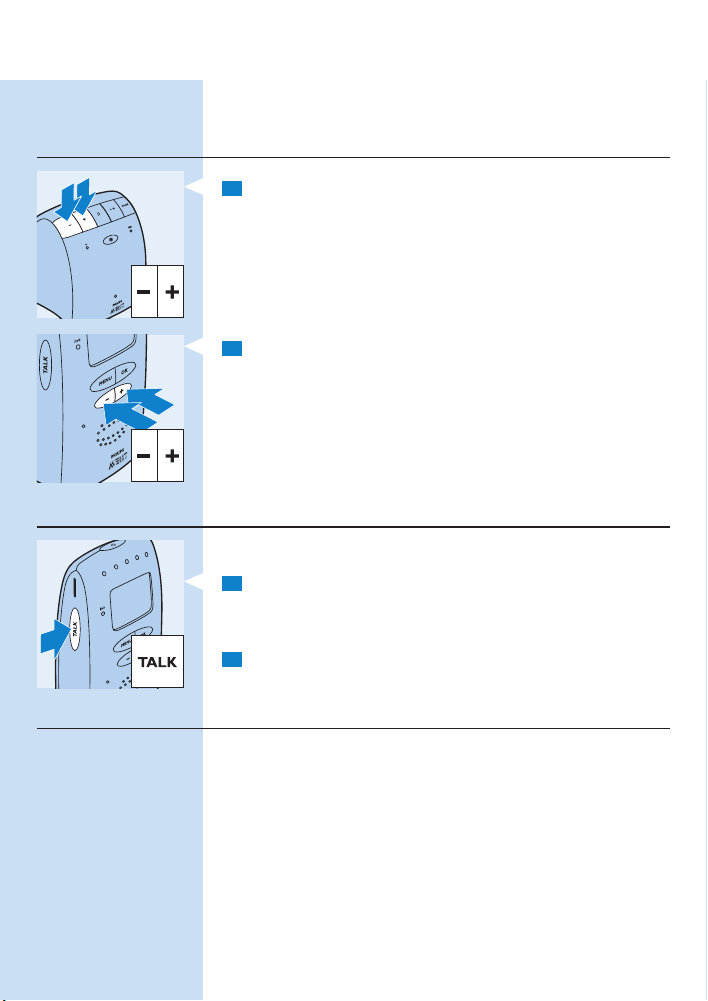
1 Press the volume + or – button on the baby unit until the desired
loudspeaker volume for the baby unit has been reached.
Note: You can only set the loudspeaker volume on the baby unit when a lullaby
is playing.
2 Press the volume + or – button on the parent unit until the desired
loudspeaker volume for the parent unit has been reached.
The display gives visual feedback on the volume settings of the
,
parent unit:
j = volume switched off/silent baby monitoring
-
k = minimum volume
-
l = maximum volume
-
Note: If the volume is set to a high level, the units consume more power.
Talk function
You can use the TALK button on the parent unit to talk to your baby (e.g.
to comfort your baby).
1 Press and hold the TALK button and talk clearly into the microphone
from a distance of 15-30cm/6-12in.
The green LINK light starts fl ashing and the message ‘Talk’ appears
,
on the display.
2 Release the TALK button when you have fi nished talking.
Sound level lights
The parent unit continuously monitors the sound level in your baby´s room
and the sound level lights let you know if there is any activity. If your baby
cries, you see the sound level lights light up on the parent unit.
As long as the baby unit does not detect a sound, all sound level lights
-
on the parent unit are out.
When the baby unit picks up a sound, one or more sound level lights
-
on the parent unit go on. The number of lights that go on is related to
the loudness of the sound picked up by the baby unit.
Page 17

ENGLISH 17
Nightlight
1 Press the nightlight button Q on the baby unit to switch on the
nightlight.
,
Q appears on the display of the parent unit.
2 Press the nightlight button Q again to switch off the nightlight.
,
The nightlight dims gradually before it goes out completely.
,
Q disappears from the display of the parent unit.
Tip: Switch off the nightlight when you operate the baby unit on the nonrechargeable batteries. This saves power.
Paging the parent unit
If you have misplaced the parent unit and its volume is switched off, you
can use the PAGE button on the baby unit to locate the parent unit.
Note: The paging function only works when the parent unit is switched on.
1 Press the PAGE button on the baby unit.
,
The message ‘Paging’ appears on the display of the parent unit.
,
The parent unit produces a paging alert tone.
2 To stop the paging alert tone, press the PAGE button again or press
any button on the parent unit.
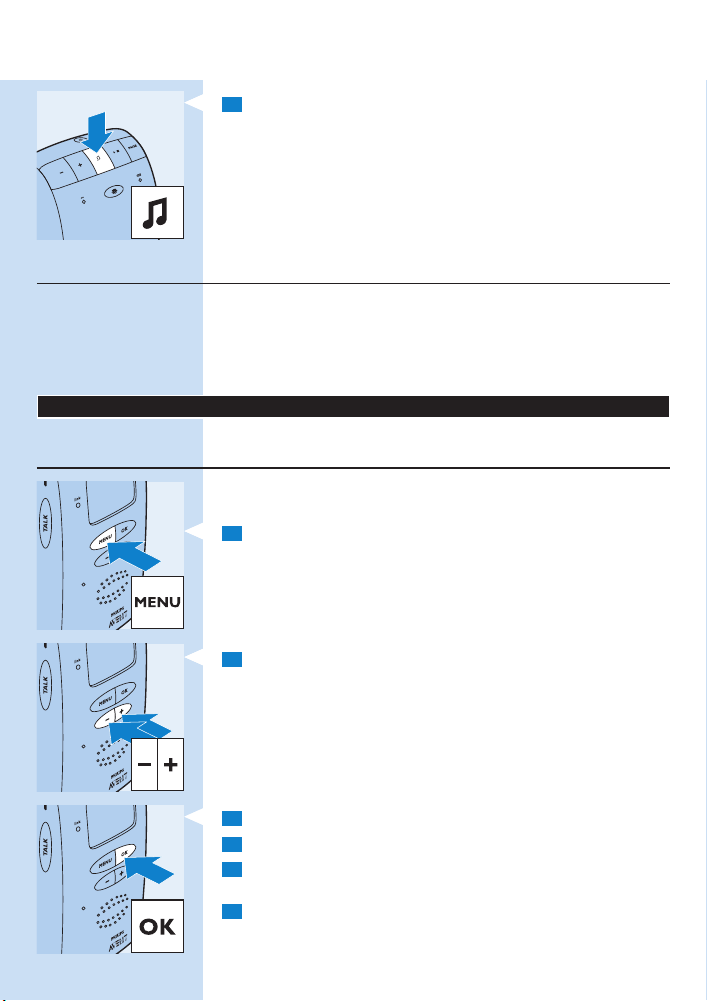
Lullaby function
1 Press the play/stop button E on the baby unit to play the currently
selected lullaby.
,
The lullaby starts to play and repeats continuously.
2 To stop the lullaby, press the play/stop button E on the baby unit
again.
Page 18
ENGLISH18
3 To select another lullaby when a lullaby is playing:
-
Press the lullaby button K on the baby unit.
-
Wait 2 seconds for the next lullaby to start.
-
If you want another lullaby, press the lullaby button K on the baby unit
again.
Out of range alert
When the parent unit is out of range of the baby unit, the parent unit
beeps from time to time and the message ‘Not linked’ appears on the
display. The LINK light on the parent unit fl ashes red.
Note: The message ‘Not Linked’ also appears on the display of the parent unit
when the baby unit is switched off.
Menu options
The following functions are operated in the menu of the parent unit.
Menu operation - general explanation
Note: Menu functions can only be operated when a connection has been
established between the baby unit and the parent unit.
1 Press the MENU button to open the menu.
The fi rst menu option appears on the display.
,
2 Use the – and + buttons to select the desired menu option.
Note: The arrow indicates in which direction you can navigate.
3 Press the OK button to confi rm.
4 Use the + and - buttons to select the desired setting.
5 Press the OK button to confi rm.
The new setting fl ashes twice and then disappears from the display.
,
6 Press the MENU button again to exit the menu.
Page 19

ENGLISH 19
Adjusting microphone sensitivity
You can set the microphone sensitivity of the baby unit to the desired
level. You can only change the microphone sensitivity when a connection
between the baby unit and the parent unit has been established, i.e. when
the LINK light on the parent unit lights up green continuously.
1 Select ‘Sensitivity’ with the + and - buttons.
2 Press the OK button to confi rm.
3 Select the desired microphone sensitivity level for the baby unit
with the + and - buttons.
k = minimum sensitivity level
,
l = maximum sensitivity level
,
4 Press the OK button to confi rm.
The message ‘Saved’ appears on the display.
,
Note: When the microphone sensitivity of the baby unit is set to a high level, it
picks up more sounds and therefore transmits more often. As a result, the units
consume more power.
Sound alert on/off
This feature allows you to monitor your baby silently. It enables you to
switch off the volume on your parent unit and still be alerted if your baby
cries.
If the sound aler t is switched on, the parent unit beeps as soon as the
fourth sound level light lights up blue while the volume is switched off. In
addition, the backlight of the parent unit display goes on and the sound
alert symbol ( R ) fl ashes on the display.
1 Select ‘Sound Alert’ with the + and - buttons.
2 Press the OK button to confi rm.
3 If the alert is off, the display shows ‘On?’. Press the OK button to
switch on the alert. If the alert is on, the display shows ‘Off?’. Press
the OK button to switch off the alert.
If you have set the sound alert to ‘on’, the sound alert symbol ( R )
,
appears on the display of the parent unit.
Setting room temperature range
A baby will sleep comfortably in a room heated to a temperature between
61°F and 68°F. This is important, since a baby cannot regulate its body
temperature as well as an adult. A baby needs more time to adjust to
temperature changes.
If you do not set a temperature range, the baby monitor alerts you when
the temperature in your baby’s room drops below 57°F or rises above
86°F. In this case, the backlight of the parent unit display goes on and
‘High’ or ‘Low’ appears on the display. To change the default minimum and
maximum temperature, follow the instructions below.
Note: The temperature of the baby’s room is shown on the display of the
parent unit when they are linked.
1 Select ‘Temperature’ with the + and - buttons.
2 Press the OK button to confi rm.
Page 20
ENGLISH20
3 Select ‘Range’ with the + and - buttons.
4 Press the OK button to confi rm.
5 Set the desired minimum temperature with the + and - buttons.
6 Press the OK button to confi rm.
7 Set the desired maximum temperature with the + and - buttons.
8 Press the OK button to confi rm.
,
The message ‘Saved’ appears on the display.
Note: If the temperature in the baby’s room drops below or exceeds the set
temperature range, the display of the parent unit is on continuously. This causes
the unit to consume more power.
Temperature alert on/off
Note: If the temperature alert is activated too often, reduce the set minimum
temperature and/or increase the set maximum temperature (see ‘Setting room
temperature range’).
If the temperature aler t is switched on, the parent unit beeps if the actual
room temperature exceeds the set maximum temperature or drops below
the set minimum temperature. In addition, the backlight of the parent unit
display goes on and ‘High’ or ‘Low’ appears on the display. If no minimum
and maximum temperatures have been set, the temperature alert is given
when the room temperature drops below 57°F or rises above 86°F.
1 Select ‘Temperature’ with the + and - buttons.
2 Press the OK button to confi rm.
3 Select ‘Alert’ with the + and - buttons.
4 Press the OK button to confi rm.
5 If the alert is off, the display shows ‘On?’. Press the OK button to
switch on the alert. If the alert is on, the display shows ‘Off?’. Press
the OK button to switch off the alert.
Reset function
This function in the menu of the parent unit allows you to reset both the
parent unit and the baby unit to the default settings at the same time. You
can use this function if problems occur that you cannot solve by following
the suggestions in chapter ‘Frequently asked questions’.
1 Select ‘Reset’ with the + and - buttons.
2 Press the OK button to confi rm.
,
The message ‘Confi rm?’ appears on the display of the parent unit.
3 Press the OK button to confi rm.
The parent unit switches off and then switches on again.
,
,
The units have now both been reset to the default factory settings.
Default settings
Parent unit
Loudspeaker volume: 1
-
Microphone sensitivity: 3
-
Sound alert: off
-
Page 21
ENGLISH 21
Temperature alert: off
-
‘Temperature low’ alert: 57°F
-
‘Temperature high’ alert: 86°F
Baby unit
Loudspeaker volume: 3
-
Nightlight: off
-
-
Lullaby: 1
Accessories
Belt clip and neck strap
If the battery pack of the parent unit is suffi ciently charged, you can take
the unit with you inside and outside the house if you attach the unit to
your belt or waistband with the belt clip or if you hang it around your neck
with the neck strap. This allows you to monitor your baby while you are
moving around.
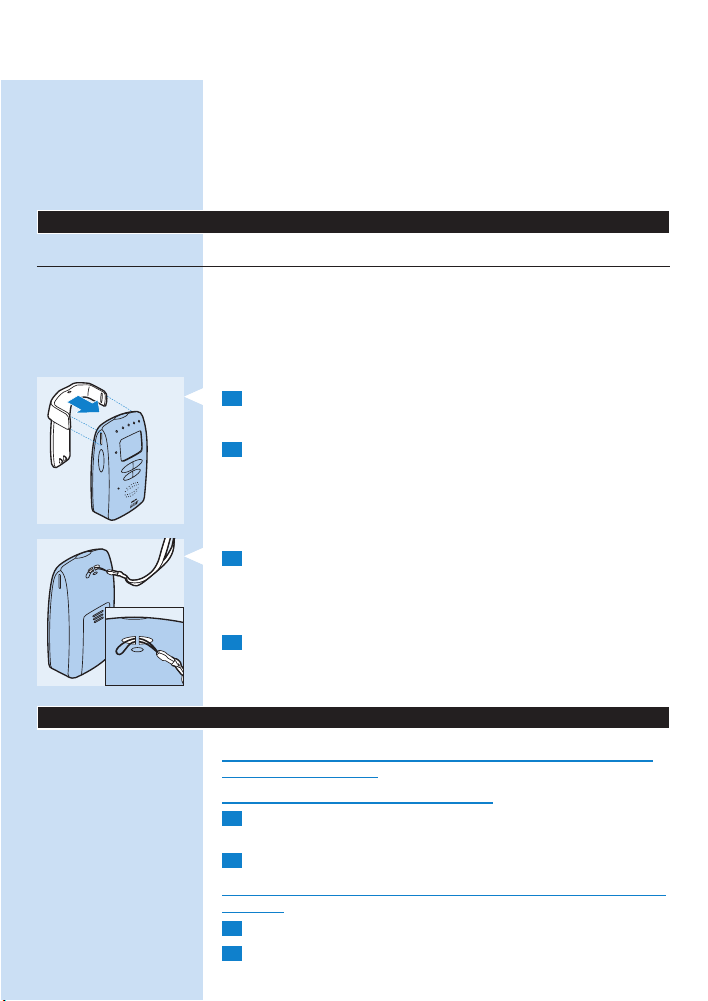
Connecting the belt clip
1 Snap the belt clip onto the parent unit.
Disconnecting the belt clip
1 Pull the belt clip off the parent unit.
Connecting the neck strap
1 Insert the end loop of the neck strap through the hole behind the
strap post. Thread the neck strap through the end loop and pull the
neck strap tight.
Disconnecting the neck strap
1 Pass the neck strap though the end loop and pull the end loop out of
the hole behind the strap post.
Cleaning and maintenance
Do not immerse the parent unit or the baby unit in water and do not
clean them under the tap.
Do not use cleaning spray or liquid cleaners.
1 Unplug the baby unit if it is connected to an electrical outlet and take
the parent unit out of the charger.
2 Clean the parent unit and the baby unit with a damp cloth.
Make sure the parent unit is dry before you put it back into the pluggedin charger.
3 Clean the charger with a dry cloth.
4 Clean the adapters with a dry cloth.
Page 22

ENGLISH22
This appliance has no other user-serviceable parts. For assistance call 1800-54-AVENT (1-800-542-8368).
Storage
When you are not going to use the baby monitor for some time,
-
remove the non-rechargeable batteries from the baby unit and the
rechargeable battery pack from the parent unit. Store the parent unit,
the baby unit, the charger of the parent unit and the adapters in a cool
and dry place.
Do not wrap cord around the monitor when storing. Store cord in a
-
safe location where it will not be cut or damaged.
Replacement
Baby unit
Batteries
Only replace the non-rechargeable batteries of the baby unit with four
non-rechargeable 1.5V R6 AA batteries.
Note: We recommend you to use Philips non-rechargeable batteries or an
equivalent type.
Adapter
Only replace the adapter of the baby unit with an adapter of the original
type. For assistance call 1-800-54-AVENT (1-800-542-8368) or visit our
website: www.philips.com/AVENT.
Parent unit
Batteries
Only replace the SCD520 NiMH rechargeable battery pack of the parent
unit with a pack of the original type. For assistance, call 1-800-54-AVENT
(1-800-542-8368) or visit our website: www.philips.com/AVENT.
Adapter
Only replace the adapter of the parent unit charger with an adapter of the
original type.For assistance call 1-800-54-AVENT (1-800-542-8368) or visit
our website: www.philips.com/AVENT.
Assistance
For assistance call 1-800-54-AVENT (1-800-542-8368) or visit our website:
www.philips.com/AVENT.
Environment
Dispose of batteries properly. Do not incinerate. Batteries may
-
explode if overheated. Do not wrap in metal or aluminum foil. Wrap in
newspaper before discarding.
It is suggested that you contact your local town or city to determine
-
proper battery redemption site(s) in your area.
Page 23

ENGLISH 23
Warranty
FULL TWO YEAR WARRANTY
Philips Electronics Nor th America Corporation (USA) and Philips
Electronics Ltd (CANADA) warrant each new Philips AVENT product,
model SCD520/00, against defects in materials or workmanship for a
period of two years from the date of purchase, and agrees to repair or
replace any defective product without charge. IMPORTANT: This warranty
does not cover damage resulting from accident, misuse or abuse, lack
of reasonable care, or the affi xing of any attachment not provided with
the product. NO RESPONSIBILITY IS ASSUMED FOR ANY SPECIAL,
INCIDENTAL OR CONSEQUENTIAL DAMAGES. In order to obtain
warranty service, simply call toll-free 1-800-54-AVENT.
Frequently asked questions
This chapter lists the questions most frequently asked about the appliance.
If you cannot fi nd the answer to your question, call 1-800-54-AVENT (1-
Question Answer
Why don’t both the poweron light of the baby unit and
the LINK light of the parent
unit come on when I press
the on/off buttons of the
units?
Perhaps the non-rechargeable batteries of the baby unit are empty and
The baby unit and the parent unit may be out of range of each other.
If the LINK light on the parent unit still does not start to fl ash, use the
Why does the LINK light on
the parent unit light up red
continuously and why is the
message ‘Not Linked’ shown
on the display?
The baby unit may be switched off. Switch on the baby unit.
Why does the battery light
on the baby unit fl ash red?
800-542-8368) for assistance.
Perhaps the battery pack of the parent unit are empty and the parent
unit is not in the plugged-in charger. Inser t the small appliance plug into
the charger, put the adapter of the charger in a wall socket and place
the parent unit in the charger. Then press the on/off button to establish
connection with the baby unit.
the baby unit is not connected to an electrical outlet. Replace the nonrechargeable batteries or connect the baby unit to an electrical outlet.
Then press the on/off button to establish connection with the parent
unit.
Move the parent unit closer to the baby unit, but not closer than 3 feet/1
meter.
reset function to reset the units to their default settings.
The baby unit and the parent unit are out of range of each other. Move
the parent unit closer to the baby unit.
The non-rechargeable batteries of the baby unit are running low. Replace
the non-rechargeable batteries or connect the baby unit to an electrical
outlet (see chapter ‘Preparing for use’).
Page 24

ENGLISH24
Question Answer
Why does the parent unit
beep?
If the parent unit beeps and the battery symbol on the display is
If you have switched off the volume while the sound alert is on, the
If you have set the room temperature range on the parent unit and the
The baby unit may be switched off. Switch on the baby unit.
Why does the appliance
produce a high-pitched
noise?
The volume of the parent unit may be set too high. Decrease the volume
Why don’t I hear a sound/
Why can’t I hear my baby
cry?
The microphone sensitivity level of the baby unit may be set too low.
The baby unit and the parent unit may be out of range of each other.
Why does the parent unit
react too quickly to other
sounds?
The microphone sensitivity level of the baby unit may be set too high.
Why does the parent unit
react slowly to the baby’s
crying?
Why do the nonrechargeable batteries of the
baby unit run low quickly?
The volume on the baby unit may be set too high, which causes the baby
If the parent unit beeps while the LINK light lights up red continuously
and the message ‘Not Linked’ is shown on the display, the connection
with the baby unit is lost. Move the parent unit closer to the baby unit.
empty, the rechargeable battery pack of the parent unit is running low.
Recharge the battery pack.
parent unit beeps whenever the fourth sound level light lights up
because the baby unit has picked up a sound.
temperature alert is on, the parent unit beeps when the temperature
drops below the set level or below 57°F or when the temperature rises
above the set level or above 86°F.
The units may be too close to each other. Make sure the parent unit and
the baby unit are at least 3 feet/1 meter away from each other.
of the parent unit.
The volume of the parent unit may be set too low or may be switched
off. Increase the volume of the parent unit.
Set the microphone sensitivity level to a higher level in the menu of the
parent unit.
Reduce the distance between the units.
The baby unit also picks up other sounds than those of your baby. Move
the baby unit closer to the baby (but observe the minimum distance of 3
feet/1 meter).
Decrease the microphone sensitivity level in the menu of the parent unit.
The microphone sensitivity level of the baby unit may be set too low.
Increase the microphone sensitivity level in the menu of the parent unit.
The microphone sensitivity level of the baby unit may be set too high,
which causes the baby unit to transmit more often. Decrease the
microphone sensitivity level in the menu of the parent unit.
unit to consume a lot of energy. Decrease the volume of the baby unit.
Page 25

ENGLISH 25
Question Answer
You may have set a maximum room temperature that is lower than the
Perhaps you have switched on the nightlight. If you want to use the
Why does the charging time
of the parent unit exceed 8
hours?
The specifi ed operating
range of the baby monitor
is 330 meters/1000 feet.
Why does my baby monitor
manage a much smaller
distance than that?
Why is the connection lost
every now and then?
Why are there sound
interruptions?
What happens during a
power failure?
Is my baby monitor secure
from eavesdropping and
interference?
The operating time of the
parent unit is supposed to
be at least 24 hours. Why
is the operating time of my
parent unit shorter?
The volume of the parent unit may be set too high, which causes the
The microphone sensitivity level of the baby unit may be set too high,
Why doesn’t the battery
symbol appear on the
display of the parent unit
when I start to recharge the
parent unit?
actual room temperature or a minimum room temperature that is higher
than the actual room temperature. The baby unit continues to send data
to the parent unit and therefore uses more power.This causes the nonrechargeable batteries of the baby unit to run low quickly.
nightlight, we advise you to run the baby unit on electrical power.
The parent unit may be switched on during charging. Switch off the
parent unit during charging.
The specifi ed range is only valid outdoors in open air. Inside your house,
the operating range is limited by the number and type of walls and/or
ceilings in between. Inside the house, the operating range is up to 50
meters/150 feet.
The baby unit and the parent unit are probably close to the outer limits
of the operating range. Try a different location or decrease the distance
between the units. Please note that it takes about 30 seconds each time
before a connection between the units is established.
If the parent unit is suffi ciently charged, it continues to operate during a
power failure, both inside and outside the charger. If there are batteries in
the baby unit, it also continues to operate during a power failure.
The DECT technology of this baby monitor guarantees no interference
from other equipment and no eavesdropping.
When the parent unit has been charged for the fi rst time, the operating
time is less than 24 hours. The rechargeable battery pack only reaches its
full capacity after you have charged and discharged it at least four times.
parent unit to consume a lot of energy. Decrease the volume of the
parent unit
which causes the parent unit to consume a lot of energy. Decrease the
microphone sensitivity level in the menu of the parent unit.
It may take a few minutes before the battery symbol appears on the
display of the parent unit when you charge the parent for the fi rst time
or after a long period of disuse.
Page 26

26
ESPAÑOL
INSTRUCCIONES
IMPORTANTES DE
SEGURIDAD
Puede que par te de la información que aparece a continuación no se
aplique a su producto. Sin embargo, al utilizar un equipo vigilabebés, se
deben tomar siempre medidas de seguridad básicas para reducir el riesgo
de incendio, descarga eléctrica y lesiones, incluidas las siguientes medidas:
1 Lea estas instrucciones.
2 Conserve estas instrucciones.
3 Preste atención a todas las advertencias.
4 Siga todas las instrucciones.
5 No utilice este aparato cerca de agua.
6 Límpielo sólo con un paño seco.
7 No bloquee ninguna abertura de ventilación. Realice la instalación
según las instrucciones del fabricante.
8 No lo instale cerca de ninguna fuente de calor, como radiadores, rejillas
de aire caliente, estufas u otros aparatos (incluidos amplifi cadores) que
generen calor.
9 No modifi que el sistema de seguridad de la clavija polarizada o de
conexión a tierra. Una clavija polarizada tiene dos hojas, una es más
ancha que la otra. Una clavija de conexión a tierra tiene dos hojas
y una tercera punta de conexión a tierra. La hoja ancha o la tercera
punta se proporcionan para su seguridad. Si la clavija proporcionada
no entra en la toma, consulte a un electricista para la sustitución de la
toma de corriente antigua.
10 Evite que el cable de alimentación se pise o se doble especialmente en
las clavijas, las tomas de corriente y el punto de salida del aparato.
11 Utilice únicamente los accesorios especifi cados por el fabricante.
12 Desenchufe el aparato durante tormentas eléctricas o cuando no se
use durante períodos de tiempo prolongados.
13 Consulte todas las reparaciones a personal cualifi cado. Se necesita
servicio cuando el aparato se daña de cualquier modo, por ejemplo,
si el cable de alimentación o la clavija están dañados, se ha derramado
líquido o han caído elementos dentro del aparato, el aparato ha estado
expuesto a lluvia o humedad, no funciona con normalidad o se ha
caído.
14 El objetivo de este vigilabebés es servir de ayuda. En ningún caso
sustituye la supervisión responsable y adecuada por parte de un adulto,
y no debe utilizarse como tal.
15 Utilice este aparato sólo para el uso al que está destinado tal y como
se describe en este manual.
16 Desenchufe el aparato de la toma de corriente de la pared antes de
limpiarlo. No utilice limpiadores líquidos ni aerosoles.
17 Los aparatos no deben ser utilizados en bañeras, duchas o piscinas. Si el
aparato entra en contacto con el agua se puede producir una descarga
eléctrica.
Page 27

ESPAÑOL 27
18 Este producto debe conectarse únicamente a una fuente de
alimentación del tipo que se indica en la placa de modelo de los
adaptadores (A15,B9). Si no está seguro del tipo de fuente de
alimentación de su casa, póngase en contacto con su distribuidor o con
la empresa de suministro local.
19 No sobrecargue las tomas de corriente y los cables alargadores, ya que
esto supondría un riesgo de incendio o descarga eléctrica.
20 No introduzca objetos de ningún tipo a través de las ranuras de la
carcasa del aparato, ya que podrían entrar en contacto con puntos de
voltaje peligrosos o provocar cortocircuitos, con riesgo de incendio
o descarga eléctrica. No derrame líquido de ningún tipo sobre el
producto.
21 Para reducir el riesgo de descarga eléctrica, no desmonte el
aparato, llame al 1-800-54-AVENT (1-800-542-8368) para obtener
asistencia técnica. Al abrir o retirar las cubiertas (excepto la tapa del
compartimento de las pilas) se puede exponer a un voltaje peligroso u
otro tipo de riesgo. Un montaje incorrecto puede provocar descargas
eléctricas cuando el aparato vuelva a utilizarse.
22 Para evitar la estrangulación con el cable de alimentación, nunca
coloque el monitor al alcance de los niños. No utilice cables
alargadores.
Si su aparato funciona con pilas, deberá tener en cuenta las
siguientes medidas de seguridad adicionales:
1 Utilice sólo el tipo y tamaño de pilas especifi cado en el manual de
usuario.
2 No arroje las pilas al fuego, ya que pueden explotar. Consulte la
normativa local para obtener información adicional sobre cómo
deshacerse de las pilas.
3 Tenga cuidado al manipular las pilas para no provocar un cortocircuito
en las mismas mediante materiales conductores como, por ejemplo,
anillos, pulseras o llaves. Se debe evitar sobrecargar las pilas,
cortocircuitarlas, cargarlas al revés, romperlas o quemarlas, con el
fi n de evitar que se produzca alguna de las siguientes situaciones:
liberación de materiales tóxicos, liberación de hidrógeno o de oxígeno,
aumento de la temperatura superfi cial.
4 No intente recargar las pilas suministradas con el aparato o
recomendadas para su uso con el mismo si éstas no son recargables.
Las pilas pueden liberar electrolitos corrosivos o explotar.
5 No intente calentar las pilas suministradas con el aparato o
recomendadas con el fi n de alargar su vida útil. Podría producirse una
fuga repentina de electrolitos, causando quemaduras o irritaciones en
los ojos y en la piel.
6 Cuando sea necesario, las pilas deberán ser sustituidas por otras
idénticas del mismo fabricante. Si hay que sustituir una pila que esté
conectada con otras pilas en serie, se recomienda sustituir todas por
pilas nuevas al mismo tiempo.
7 Se debe evitar instalar las pilas con la polaridad invertida, ya que ello
podría cargarlas y derivar en fugas o explosiones.
8 Quite las pilas del producto si no va a utilizarlo durante más de 30 días,
ya que podrían producirse fugas y dañar el aparato.
9 Deshágase de las pilas gastadas lo antes posible, ya que es más
probable que éstas tengan fugas dentro del aparato. Si una pila tiene
Page 28

ESPAÑOL28
fugas o está rajada, debe ser sustituida inmediatamente utilizando
guantes protectores.
10 No guarde el aparato o las pilas suministradas o recomendadas en
zonas expuestas a altas temperaturas. Si almacena las pilas en una
nevera o congelador con el fi n de alargar su vida útil, debe protegerlas
de la condensación durante el almacenamiento y la descongelación. Las
pilas deben estar a temperatura ambiente antes de utilizarlas tras un
almacenamiento en frío.
11 Si su aparato funciona con pilas recargables, cárguelas siempre según lo
indicado en las instrucciones y limitaciones especifi cadas en el manual
de usuario.
12 Existe riesgo de explosión si las pilas se sustituyen por otras de tipo
incorrecto. Utilice siempre la batería recargable SCD520 NiMH en la
unidad de padres como la suministrada con el aparato.
CONSERVE ESTAS
INSTRUCCIONES
ADVERTENCIA: EL SÍMBOLO QUE SE MUESTRA EN
-
LA FIGURA 1 SIGNIFICA QUE EXISTE RIESGO DE
EXPLOSIÓN DE LAS PILAS O DE DAÑO GRAVE AL
VIGILABEBÉS SI LAS PILAS O EL ADAPTADOR SE
SUSTITUYEN POR OTROS DE TIPO INCORRECTO.
Adaptadores para la unidad del bebé y el cargador.
Entrada: 120 V CA 60 Hz
-
Salida: 7,5 VCC 400 mA
-
Adaptador nº UD075040B
La toma se deberá instalar junto al equipo y será fácilmente accesible.
Utilice únicamente pilas alcalinas AA de 1,5 V en la unidad del bebé (pilas
no incluidas).
Utilice únicamente la batería recargable SCD520 NiMH para la unidad de
padres como la suministrada con el aparato.
Deseche las pilas usadas según las instrucciones.
Información sobre cumplimiento de normas
El número de identifi cación FCC está situado en la parte inferior de la
carcasa de la unidad de padres y en el compartimento de las pilas de la
unidad del bebé.
Las siglas “IC” que aparecen delante del número de certifi cación indican
que el producto cumple las especifi caciones técnicas del Ministerio de
Industria de Canadá. Esta certifi cación signifi ca que el equipo cumple
ciertos requisitos de comunicación por radio y de funcionamiento. Este
dispositivo cumple el apartado 15 de las normas de la FCC (Comisión
nacional de comunicaciones de EE. UU.) y la normativa ICES-003 del
Ministerio de Industria de Canadá. Su funcionamiento está sujeto a las dos
siguientes condiciones: (1) este dispositivo no debe producir interferencias
dañinas, y (2) este dispositivo debe aceptar todas las interferencias
que reciba, incluso aquellas que puedan provocar un funcionamiento
inadecuado. Este dispositivo también cumple la norma RSS-213 del
Ministerio de Industria de Canadá.
Page 29

ESPAÑOL 29
Interferencias de radio
Este equipo ha sido sometido a pruebas y cumple los límites establecidos
para los dispositivos digitales Clase B, de acuerdo con el apartado 15
de las normas de la FCC y las especifi caciones aplicables del Ministerio
de Industria de Canadá. Estos límites han sido diseñados para evitar
interferencias dañinas en instalaciones residenciales. Este equipo genera,
usa y puede irradiar energía de radio frecuencia y, si no se instala según
las instrucciones, puede provocar interferencias que perjudiquen a las
comunicaciones de radio. Sin embargo, no hay garantía de que esas
interferencias no se vayan a producir en una instalación particular. Si este
equipo provoca interferencias que perjudiquen la recepción de radio o
televisión, las cuales se pueden detectar encendiendo y apagando el equipo,
el usuario debe intentar corregir la interferencia mediante uno o más de
los siguientes procedimientos:
-
Cambie la orientación o la posición de la antena receptora.
-
Aumente la separación entre el equipo y el receptor.
-
Enchufe el equipo a una toma en un circuito distinto al que esté
conectado el receptor.
Informe de exposición a radiación de radiofrecuencia
Este equipo cumple los límites de exposición a radiación de la FCC
establecidos para un entorno no controlado. Este equipo se debe instalar
y utilizar a una distancia mínima de 20 centímetros entre la fuente de
radiación y su cuerpo. Este dispositivo ha sido sometido a pruebas para
poder utilizarlo en la mano y cumple la normativa de exposición a la
radiación de la FCC. Este dispositivo ha sido sometido a pruebas para
poder utilizarlo sujeto al cuerpo y cumple la normativa de exposición a la
radiación de la FCC cuando se utiliza con la pinza para el cinturón o con la
cinta para el cuello suministradas con este producto. Este transmisor no se
debe colocar ni debe funcionar junto a cualquier otra antena o transmisor.
Este dispositivo también cumple la normativa canadiense RSS-102 respecto
al Código sanitario canadiense 6 de exposición de humanos a campos de
radiofrecuencia.
No intente reparar o modifi car este equipo
Las reparaciones o alteraciones hechas por el usuario pueden anular la
garantía y la conformidad del equipo. Diríjase a los centros de servicio
autorizados o designados.
Introducción
Enhorabuena por la compra de este producto y bienvenido a Philips
AVENT. Para sacar el mayor partido de la asistencia que Philips AVENT le
ofrece, registre su producto en www.philips.com/welcome.
Philips AVENT se dedica a la fabricación de productos fi ables para el
cuidado del bebé, que proporcionan a los padres la tranquilidad que
necesitan. Este vigilabebés de Philips AVENT permite vigilar al bebé
de forma continua y oírle con claridad sin ruidos que interfi eran. La
tecnología DECT garantiza la eliminación de interferencias de otros
dispositivos inalámbricos, y una señal nítida entre la unidad del bebé
y la unidad de padres. El sensor de temperatura le permite controlar
la temperatura de la habitación del bebé y le ofrece unos ajustes
personalizados que le ayudan a mantener un clima confortable en ésta.
Page 30

ESPAÑOL30
Descripción general (fi g. 2)
A Unidad de padres
1 Botón de encendido/apagado 3
2 Ranura para la pinza para cinturón
3 Botón del intercomunicador (TALK)
4 Botón MENU
5 Piloto de conexión (LINK)
6 Micrófono
7 Altavoz
8 Botones de menú y volumen +/–
9 Botón OK
10 Pantalla
11 Pilotos de nivel de sonido
12 Pinza para cinturón
13 Adaptador
14 Clavija para el cargador de la unidad de padres
15 Toma para la clavija del aparato pequeño
16 Cargador
17 Piloto de carga
18 Compartimento de la batería recargable
19 Cinta para el cuello
20 Tapa del compartimento de la batería
21 Batería recargable (incluida)
22 Orifi cio para la cinta para el cuello
B Unidad del bebé
1 Botón de encendido/apagado 3
2 Botón de localización (PAGE)
3 Botón de reproducción/parada E
4 Botón de nana K
5 Piloto de las pilas T
6 Botón de luz de compañía Q
7 Piloto de encendido
8 Botones de volumen +/–
9 Micrófono
10 Adaptador
11 Clavija para la unidad del bebé
12 Altavoz
13 Sensor de temperatura
14 Toma para la clavija para la unidad del bebé
15 Compartimento para pilas no recargables
16 Tapa del compartimento para pilas no recargables
17 Pilas no recargables (no incluidas)
C Pantalla
1 Ñ ° = indicador de temperatura de la habitación
2 R = alerta sonora
3 K = nana
4 T = símbolo de la pila
5 Q = luz de compañía
Para ver otras indicaciones de la pantalla sobre los niveles de volumen y
sensibilidad, consulte los capítulos “Características” y “Opciones del menú”.
Page 31

ESPAÑOL 31
Importante
,
Antes de usar el aparato, lea atentamente el manual del usuario y
consérvelo por si necesitara consultarlo en el futuro.
,
El objetivo de este vigilabebés es servir de ayuda. En ningún caso
sustituye la supervisión responsable y adecuada por parte de un
adulto, y no debe utilizarse como tal.
,
Este monitor no se ha diseñado para utilizarse como monitor para
uso médico y su uso no debe sustituir la supervisión de un adulto.
,
Antes de enchufar el aparato, compruebe si el voltaje indicado en el
adaptador se corresponde con el voltaje eléctrico local.
,
Utilice y guarde el aparato a una temperatura de entre 10 °C y
40 °C.
,
Este aparato es adecuado para voltajes de toma de corriente de
120 V.
,
No exponga el vigilabebés a temperaturas extremadamente bajas o
altas ni al contacto directo con la luz del sol.
,
Mantenga siempre la unidad del bebé y el cable de alimentación fuera
del alcance del bebé (a 1 metro de distancia como mínimo).
,
No coloque nunca la unidad del bebé en el interior de la cuna o el
parque.
,
No cubra nunca el vigilabebés con una toalla o manta.
,
No sumerja nunca ninguna parte del vigilabebés en agua u otros
líquidos.
,
No utilice nunca el vigilabebés en lugares húmedos o cerca del agua.
,
No abra nunca la carcasa de la unidad del bebé o de la unidad de
padres (excepto el compartimento de las pilas), con el fi n de evitar
descargas eléctricas.
,
Utilice sólo los adaptadores que se suministran.
,
Los adaptadores contienen un transformador. No corte los
adaptadores para sustituirlos por otras clavijas, ya que podrían
producirse situaciones de peligro.
Si se daña alguno de los adaptadores, sustitúyalo siempre por uno del
,
modelo original para evitar situaciones de peligro.
Si coloca la unidad de padres junto a un transmisor u otro aparato
,
DECT (por ejemplo, un teléfono DECT), se puede perder la
conexión con la unidad del bebé.
El sensor de temperatura sólo mide la temperatura de la habitación
,
del bebé. No se puede utilizar para controlar ni ajustar la
temperatura de la habitación.
La toma de corriente debe estar cerca del aparato y ser fácilmente
,
accesible.
Preparación para su uso
Unidad del bebé
Puede utilizar la unidad del bebé con cable o con pilas no recargables.
Recomendamos que utilice pilas no recargables aunque vaya a utilizar
la unidad con cable. De esta manera se garantiza una alimentación de
reserva que se activa automáticamente en caso de producirse un corte del
suministro eléctrico.
Page 32

ESPAÑOL32
Funcionamiento con cable
1 Enchufe la clavija para la unidad del bebé a ésta, y conecte el
adaptador a la red.
,
El piloto de encendido se ilumina.
Funcionamiento a pilas (pilas no recargables)
La unidad del bebé funciona con cuatro pilas R6 AA de 1,5 V (no incluidas).
Recomendamos usar pilas Philips LR6 PowerLife o similares.
No utilice pilas recargables, ya que la unidad del bebé no tiene una función
de carga.
Desenchufe la unidad del bebé y, cuando vaya a poner las pilas no
recargables, asegúrese de que sus manos y la unidad estén secas.
1 Quite la tapa del compartimento para pilas no recargables.
2 Inserte cuatro pilas no recargables.
Nota: Asegúrese de que los polos + y - estén en la posición correcta.
3 Vuelva a colocar la tapa.
Nota: Cuando las pilas se estén agotando, el piloto de las pilas de la unidad del
bebé parpadeará en rojo.
Unidad de padres
Funcionamiento a pilas (batería recargable)
La unidad de padres viene con una batería recargable SCD520 NiMH.
Cargue la unidad de padres antes de utilizarla por primera vez o cuando
ésta indique que el nivel de la batería es bajo (el símbolo de batería vacía
parpadea en la pantalla y la unidad de padres emite un pitido). La unidad
de padres comienza a indicar que el nivel de la batería es bajo 30 minutos
antes de que ésta esté completamente descargada.
Nota: Si la batería está completamente descargada, la unidad de padres se
apaga automáticamente y pierde el contacto con la unidad del bebé.
Page 33

ESPAÑOL 33
1 Quite la tapa del compartimento de la batería recargable.
2 Inserte la batería recargable.
Nota: Asegúrese de que los polos + y - de la batería estén en la posición
correcta.
3 Vuelva a colocar la tapa.
4 Inserte la clavija para el cargador de la unidad de padres en el
cargador, enchufe el adaptador a la toma de corriente y coloque la
unidad de padres en el cargador.
,
El piloto de carga del cargador se enciende.
,
La pantalla muestra el símbolo de la pila cargándose para indicar que
la unidad de padres se está cargando.
5 Deje la unidad de padres en el cargador hasta que la batería esté
completamente cargada.
,
Durante la carga, el piloto del cargador permanece encendido de
forma continua.
,
Cuando la batería esté completamente cargada, en la pantalla de la
unidad de padres aparecerá el símbolo de la pila llena T .
Cuando cargue la unidad de padres por primera vez o después de no
-
haberla utilizado durante mucho tiempo, apáguela y cárguela al menos
durante 10 horas seguidas.
El aparato normalmente tarda 8 horas en cargarse, pero puede tardar
-
más si la unidad de padres está encendida durante la carga. Para que el
tiempo de carga sea lo más breve posible, apague la unidad de padres
durante la carga.
Cuando la batería esté completamente cargada, la unidad de padres se
-
puede utilizar sin cable durante al menos 24 horas.
Page 34

ESPAÑOL34
Nota: Al cargar por primera vez la unidad de padres, el tiempo de
funcionamiento será inferior a 24 horas. La batería sólo alcanza su capacidad
máxima después de haberla cargado y descargado cuatro veces.
Nota: Cuando la unidad de padres no está conectada a una toma de corriente
o incluso cuando está apagada, la batería se va descargando gradualmente.
Uso del aparato
Use este vigilabebés para uso doméstico tal y como se describe en este
manual.
1 Coloque la unidad de padres y la unidad del bebé en la misma
habitación para probar la conexión.
Coloque la unidad del bebé a una distancia de al menos 1 metro de la
unidad de padres.
2 Mantenga pulsado el botón de encendido/apagado 3 de la unidad del
bebé hasta que el piloto verde de encendido se ilumine.
Nota: El piloto de encendido siempre se ilumina en verde, aunque no haya
conexión con la unidad de padres.
La luz de compañía se enciende brevemente y se apaga de nuevo.
,
El piloto de las pilas T se enciende brevemente y se apaga de nuevo.
,
3 Mantenga pulsado el botón de encendido/apagado 3 de la unidad
de padres hasta que los pilotos de nivel de sonido se enciendan
brevemente.
Page 35

ESPAÑOL 35
,
La pantalla se ilumina y aparece el símbolo de la pila.
,
El piloto LINK parpadea en rojo y el mensaje ‘Buscando’ aparece en
la pantalla.
,
El piloto LINK de la unidad de padres cambia a color verde y se
queda encendido de forma continua cuando se ha establecido una
conexión entre la unidad del bebé y la unidad de padres. El mensaje
‘Conectado’ aparece en la pantalla.
,
Después de 2 segundos, el mensaje ‘Conectado’ desaparece y el valor
de temperatura aparece en la pantalla.
,
Si no se ha establecido conexión, el piloto LINK de la unidad de
padres deja de parpadear y se ilumina en rojo. La unidad de padres
emite un pitido cada cierto tiempo y el mensaje ‘Sin conexión’
aparece en la pantalla.
Page 36

ESPAÑOL36
Colocación del vigilabebés
1 Coloque la unidad del bebé como mínimo a 1 metro de distancia del
bebé.
2 Coloque la unidad de padres dentro del alcance de funcionamiento
de la unidad del bebé. Compruebe que se encuentra a más
de 1 metro de distancia de la unidad del bebé para evitar la
retroalimentación acústica.
Si desea obtener más información sobre el alcance de funcionamiento,
consulte la sección “Alcance de funcionamiento”.
Alcance de funcionamiento
El alcance de funcionamiento del vigilabebés es de 330 metros al aire libre.
En función del entorno y de otros factores de interferencia, este alcance
puede ser menor. En interiores, el alcance de funcionamiento es de hasta
50 metros.
Materiales secos Grosor del material Pérdida de alcance
Madera, yeso, cartón, cristal (sin
metal, cables o plomo)
Ladrillo, madera contrachapada < 30 cm 5 - 35%
Hormigón armado < 30 cm 30 - 100%
Rejillas o barras metálicas < 1 cm 90 - 100%
Láminas de metal o aluminio < 1 cm 100%
< 30 cm 0 - 10%
En el caso de materiales húmedos, la pérdida de alcance puede ser de
hasta el 100%.
Características
Las siguientes características se describen en el capítulo “Opciones del
menú”, ya que sólo se pueden seleccionar en el menú de la unidad de
padres:
Ajuste de la sensibilidad del micrófono
-
Activación/desactivación de la alerta sonora
-
Ajuste del rango de temperaturas de la habitación (temperatura
-
máxima y mínima)
Activación/desactivación de la alerta de temperatura
-
Page 37

ESPAÑOL 37
Ajuste del volumen del altavoz
1 Pulse los botones de volumen + o – de la unidad del bebé hasta
alcanzar el nivel deseado.
Nota: Sólo se puede ajustar el volumen del altavoz en la unidad del bebé
cuando esté sonando una nana.
2 Pulse los botones de volumen + o – de la unidad de padres hasta
alcanzar el nivel deseado.
,
La pantalla proporciona información visual sobre los ajustes de
volumen de la unidad de padres:
j = volumen desactivado/vigilancia silenciosa del bebé
-
k = volumen mínimo
-
l = volumen máximo
-
Nota: Si el ajuste de volumen es muy alto, las unidades consumen más energía.
Función de intercomunicador
Puede utilizar el botón TALK de la unidad de padres para hablar al bebé
(por ejemplo, para tranquilizarle).
1 Mantenga pulsado el botón TALK y hable por el micrófono con
claridad a una distancia de 15-30 cm.
El piloto verde LINK comienza a parpadear y el mensaje
,
‘Intercomunicador’ aparece en la pantalla.
2 Cuando haya terminado de hablar, suelte el botón TALK.
Pilotos de nivel de sonido
La unidad de padres controla permanentemente el nivel de sonido de
la habitación del bebé y los pilotos de nivel de sonido le indican si hay
alguna actividad. Si el bebé llora, verá que los pilotos de nivel de sonido se
iluminan en la unidad de padres.
Mientras la unidad del bebé no detecte ningún sonido, todos los pilotos
-
de nivel de sonido de la unidad de padres permanecerán apagados.
Cuando la unidad del bebé recoge un sonido, se encienden uno o
-
varios pilotos de nivel de sonido en la unidad de padres. El número de
pilotos que se encienden depende del volumen del sonido recogido
por la unidad del bebé.
Page 38

ESPAÑOL38
Luz de compañía
1 Pulse el botón de luz de compañía Q de la unidad del bebé para
encender la luz de compañía.
,
Q aparece en la pantalla de la unidad de padres.
2 Vuelva a pulsar el botón de luz de compañía Q para apagarla.
La luz de compañía se atenúa gradualmente antes de apagarse por
,
completo.
Q desaparece de la pantalla de la unidad de padres.
,
Consejo: Cuando utilice la unidad del bebé con pilas no recargables, apague la
luz de compañía. De esta manera ahorrará energía.
Localización de la unidad de padres
Si no sabe dónde ha dejado la unidad de padres y tiene el volumen
apagado, puede utilizar el botón PAGE (localización) de la unidad del bebé
para localizarla.
Nota: La función de localización sólo está disponible si la unidad de padres
está encendida.
1 Pulse el botón PAGE de la unidad del bebé.
El mensaje ‘Localización’ aparece en la pantalla de la unidad de
,
padres.
La unidad de padres emite un tono de aviso de localización.
,
2 Para detener el tono de aviso de localización, vuelva a pulsar el
botón PAGE o pulse cualquier botón de la unidad de padres.
Función de nanas
1 Pulse el botón de reproducción/parada E en la unidad del bebé
para reproducir la nana que esté seleccionada en ese momento.
La nana comienza a reproducirse y se repite continuamente.
,
2 Para detener la nana, pulse de nuevo el botón de reproducción/
parada E de la unidad del bebé.
Page 39

ESPAÑOL 39
3 Para seleccionar otra nana cuando ya se está reproduciendo una:
-
Pulse el botón de nana K en la unidad del bebé.
-
Espere 2 segundos hasta que comience la siguiente nana.
-
Si desea otra nana, vuelva a pulsar el botón de nana K en la unidad del
bebé.
Alerta de fuera de alcance
Cuando la unidad de padres está fuera del alcance de la unidad del bebé,
la unidad de padres emite un pitido cada cierto tiempo y el mensaje ‘Sin
conexión’ aparece en la pantalla. El piloto LINK de la unidad de padres
parpadea en rojo.
Nota: El mensaje ‘Sin conexión’ también aparece en la pantalla de la unidad de
padres cuando la unidad del bebé está apagada.
Opciones del menú
Se pueden utilizar las siguientes funciones en el menú de la unidad de
padres.
Funcionamiento del menú: descripción general
Nota: Las funciones del menú sólo se pueden utilizar si se ha establecido la
conexión entre la unidad del bebé y la unidad de padres.
1 Pulse el botón MENU para abrir el menú.
La primera opción de menú aparece en la pantalla.
,
2 Utilice los botones - y + para seleccionar la opción del menú
deseada.
Nota: La fl echa indica la dirección en la que puede desplazarse.
Page 40

ESPAÑOL40
3 Pulse el botón OK para confi rmar.
4 Utilice los botones + y - para seleccionar la opción que desee.
5 Pulse el botón OK para confi rmar.
,
La nueva opción parpadea dos veces y luego desaparece de la
pantalla.
6 Pulse el botón MENU de nuevo para salir del menú.
Ajuste de la sensibilidad del micrófono
Puede ajustar la sensibilidad del micrófono de la unidad del bebé al nivel
deseado. Sólo puede cambiar la sensibilidad si hay conexión entre la unidad
del bebé y la unidad de padres, es decir, cuando el piloto LINK de la unidad
de padres se enciende en verde de manera continua.
1 Seleccione ‘Sensibilidad’ con los botones + y -.
2 Pulse el botón OK para confi rmar.
3 Seleccione el nivel de sensibilidad del micrófono deseado de la
unidad del bebé con los botones + y -.
,
k = nivel de sensibilidad mínimo
,
l = nivel de sensibilidad máximo
4 Pulse el botón OK para confi rmar.
,
El mensaje ‘Guardado’ aparece en la pantalla.
Nota: Cuando el nivel de sensibilidad del micrófono de la unidad del bebé es
alto, recoge más sonidos y, por tanto, transmite más frecuentemente. Como
resultado, las unidades consumen más energía.
Activación/desactivación de la alerta sonora
Esta función le permite vigilar el bebé silenciosamente. Por tanto, podrá
desactivar el volumen en la unidad de padres y, aun así, seguir aler ta si el
bebé llora.
Si la aler ta sonora está activada, la unidad de padres emite un pitido en
cuanto el cuarto piloto de nivel de sonido se ilumina en color azul mientras
el volumen está desactivado. Además, la pantalla de la unidad de padres se
ilumina y el símbolo de alerta sonora ( R ) parpadea en la pantalla.
1 Seleccione ‘Alerta sonora’ con los botones + y -.
2 Pulse el botón OK para confi rmar.
3 Si la alerta está desactivada, la pantalla muestra ‘¿Activar?’. Pulse
el botón OK para activar la alerta. Si ésta está activada, aparece
‘¿Desactivar?’ en la pantalla. Pulse el botón OK para desactivar la
alerta.
Si ha activado la alerta sonora, el símbolo de alerta sonora ( R )
,
aparece en la pantalla de la unidad de padres.
Ajuste del rango de temperaturas de la habitación
Un bebé dormirá cómodamente en una habitación con una temperatura
de entre 16 °C y 20 °C. Esto es muy importante, ya que un bebé no
Page 41

ESPAÑOL 41
puede regular su temperatura corporal como un adulto. Un bebé necesita
más tiempo para adaptarse a los cambios de temperatura.
Si no ajusta un rango de temperaturas, el vigilabebés le avisa cuando la
temperatura de la habitación del bebé está por debajo de los 14 °C o
supera los 30 °C. En ese caso, la retroiluminación de la pantalla de la
unidad de padres se activa y el mensaje ‘Alta’ o ‘Baja’ aparece en la pantalla.
Para cambiar la temperatura máxima y mínima predeterminada, siga las
instrucciones que se muestran más abajo.
Nota: La temperatura de la habitación del bebé aparece en la pantalla de la
unidad de padres cuando está conectada con la unidad del bebé.
1 Seleccione ‘Temperatura’ con los botones + y -.
2 Pulse el botón OK para confi rmar.
3 Seleccione ‘Rango’ con los botones + y -.
4 Pulse el botón OK para confi rmar.
5 Establezca la temperatura mínima deseada con los botones + y -.
6 Pulse el botón OK para confi rmar.
7 Establezca la temperatura máxima deseada con los botones + y -.
8 Pulse el botón OK para confi rmar.
El mensaje ‘Guardado’ aparece en la pantalla.
,
Nota: Si la temperatura de la habitación del bebé supera o cae por debajo
del rango de temperaturas establecido, la pantalla de la unidad de padres se
ilumina de forma permanente. Esto hace que la unidad consuma más energía.
Activación/desactivación de la alerta de temperatura
Nota: Si la alerta de temperatura avisa con demasiada frecuencia, reduzca
la temperatura mínima establecida y/o aumente la temperatura máxima
establecida (consulte “Ajuste del rango de temperaturas de la habitación”).
Si la aler ta de temperatura está activada, la unidad de padres emite un
pitido si la temperatura real de la habitación supera la temperatura máxima
establecida o cae por debajo de la temperatura mínima establecida.
Además, la retroiluminación de la pantalla de la unidad de padres se activa
y en la pantalla aparece ‘Alta’ o ‘Baja’. Si no se ha establecido ninguna
temperatura máxima ni mínima, la alerta de temperatura se activa cuando
la temperatura de la habitación desciende por debajo de los 14 °C o
supera los 30 °C.
1 Seleccione ‘Temperatura’ con los botones + y -.
2 Pulse el botón OK para confi rmar.
3 Seleccione ‘Alerta’ con los botones + y -.
4 Pulse el botón OK para confi rmar.
5 Si la alerta está desactivada, la pantalla muestra ‘¿Activar?’. Pulse
el botón OK para activar la alerta. Si ésta está activada, aparece
‘¿Desactivar?’ en la pantalla. Pulse el botón OK para desactivar la
alerta.
Page 42

ESPAÑOL42
Función de reinicio
Esta función del menú de la unidad de padres le permite restablecer los
ajustes predeterminados tanto en la unidad de padres como en la unidad
del bebé al mismo tiempo. Puede utilizar esta función si se produce algún
problema que no puede solucionar siguiendo las sugerencias que aparecen
en el capítulo “Preguntas más frecuentes”.
1 Seleccione ‘Reiniciar’ con los botones + y -.
2 Pulse el botón OK para confi rmar.
El mensaje ‘¿Confi rmar?’ aparece en la pantalla de la unidad de
,
padres.
3 Pulse el botón OK para confi rmar.
La unidad de padres se apaga y se vuelve a encender.
,
Ahora se han restablecido los ajustes predeterminados de fábrica en
,
ambas unidades.
Ajustes predeterminados
Unidad de padres
Volumen del altavoz: 1
-
Sensibilidad del micrófono: 3
-
Alerta sonora: desactivada
-
Alerta de temperatura: desactivada
-
Alerta de ‘Temperatura baja’: 14 °C
-
Alerta de ‘Temperatura alta’: 30 °C
Unidad del bebé
Volumen de altavoz: 3
-
Luz de compañía: apagada
-
Nana: 1
-
Accesorios
Pinza para cinturón y cinta para el cuello
Si la batería de la unidad de padres tiene carga sufi ciente, podrá llevar la
unidad consigo dentro y fuera de la casa fi jándosela al cinturón con la pinza
o colgándosela al cuello con la cinta. Así podrá vigilar al bebé mientras se
desplaza de un lado a otro.
Cómo poner la pinza para cinturón
1 Encaje la pinza para cinturón en la unidad de padres.
Cómo quitar la pinza para cinturón
1 Tire de la pinza para sacarla de la unidad de padres.
Cómo poner la cinta para el cuello
Page 43

ESPAÑOL 43
1 Introduzca la presilla de la cinta para el cuello a través del orifi cio
situado en la parte de atrás de la unidad de padres. Pase la cinta por
la presilla y tire de ella para ajustarla.
Cómo quitar la cinta para el cuello
1 Pase la cinta por la presilla y saque ésta del orifi cio situado en la
parte de atrás de la unidad de padres.
Limpieza y mantenimiento
No sumerja la unidad de padres ni la del bebé en agua ni las lave bajo el
grifo.
No utilice aerosoles ni líquidos de limpieza.
1 Desenchufe la unidad del bebé si está conectada a una toma de
corriente eléctrica y quite la unidad de padres del cargador.
2 Limpie la unidad de padres y la unidad del bebé con un paño húmedo.
Asegúrese de que la unidad de padres esté seca antes de volver a
colocarla en el cargador enchufado.
3 Limpie el cargador con un paño seco.
4 Limpie los adaptadores con un paño seco.
Este aparato no tiene más piezas que pueda reparar el usuario. Si desea
obtener ayuda, llame al 1-800-54-AVENT (1-800-542-8368).
Almacenamiento
Si no va a utilizar el vigilabebés durante un periodo de tiempo
-
prolongado, quite las pilas no recargables de la unidad del bebé y
la batería recargable de la unidad de padres. Guarde la unidad de
padres, la unidad del bebé, el cargador de la unidad de padres y los
adaptadores en un lugar fresco y seco.
Al guardar el vigilabebés no enrolle el cable alrededor del mismo.
-
Guarde el cable en un lugar seguro donde no se pueda cortar o dañar.
Sustitución
Unidad del bebé
Pilas
Sustituya las pilas no recargables de la unidad del bebé únicamente por
cuatro pilas no recargables R6 AA de 1,5 V.
Nota: Recomendamos usar pilas no recargables Philips o de un tipo similar.
Adaptador
Sustituya el adaptador de la unidad del bebé únicamente por otro del
modelo original. Si desea obtener ayuda, llame al 1-800-54-AVENT (1-800542-8368) o visite nuestro sitio Web: www.philips.com/AVENT.
Page 44

ESPAÑOL44
Unidad de padres
Pilas
Sustituya la batería recargable SCD520 NiMH de la unidad de padres sólo
por otra del modelo original. Si desea obtener ayuda, llame al 1-80054-AVENT (1-800-542-8368) o visite nuestro sitio Web: www.philips.
com/AVENT.
Adaptador
Sustituya el adaptador del cargador de la unidad de padres únicamente
por otro del modelo original. Si desea obtener ayuda, llame al 1-80054-AVENT (1-800-542-8368) o visite nuestro sitio Web: www.philips.
com/AVENT.
Ayuda
Si desea obtener ayuda, llame al 1-800-54-AVENT (1-800-542-8368) o
visite nuestro sitio Web: www.philips.com/AVENT.
Medio ambiente
Deshágase de las pilas de manera adecuada. No las incinere. Las pilas
-
podrían explotar si se calientan en exceso. No las envuelva en papel
de aluminio o metal. Envuélvalas en papel de periódico antes de
deshacerse de ellas.
Le sugerimos que se informe acerca de los puntos de recogida de pilas
-
de su ciudad.
Garantía
GARANTÍA COMPLETA DE DOS AÑOS
Philips Electronics Nor th America Corporation (EE.UU.) y Philips
Electronics Ltd (Canadá) garantizan cada nuevo producto Philips AVENT,
modelo SCD520/00 frente a defectos de materiales o de fabricación
durante un período de dos años desde la fecha de compra, y se
compromete a reparar o sustituir sin cargo cualquier producto defectuoso.
IMPORTANTE: Esta garantía no cubre los daños resultantes de accidentes,
del uso inapropiado o de abusos, la falta razonable de mantenimiento, el
uso de accesorios no suministrados con el producto. NO SE ASUME LA
RESPONSABILIDAD POR NINGÚN DAÑO ESPECIAL, ACCIDENTAL O
RESULTANTE. Para disfrutar del servicio de garantía, sólo tiene que llamar
gratuitamente al 1-800-54-AVENT.
Preguntas más frecuentes
En este capítulo se exponen las preguntas más frecuentes sobre el aparato.
Si no encuentra la respuesta a su pregunta, llame al 1-800-54-AVENT (1800-542-8368) para obtener asistencia técnica.
Page 45

ESPAÑOL 45
Pregunta Respuesta
¿Por qué no se ilumina
el piloto de encendido
de la unidad del bebé
y el piloto LINK de la
unidad de padres cuando
pulso los botones de
encendido/apagado?
Es posible que las pilas no recargables de la unidad del bebé estén
Puede que la unidad del bebé y la unidad de padres estén fuera del alcance
Si aun así el piloto LINK de la unidad de padres no comienza a parpadear,
¿Por qué el piloto LINK
de la unidad de padres
se ilumina en rojo
continuamente y aparece
el mensaje ‘Sin conexión’
en la pantalla?
Es posible que la unidad del bebé esté apagada. Enciéndala.
¿Por qué el piloto de la
batería de la unidad del
bebé parpadea en rojo?
¿Por qué la unidad de
padres emite un pitido?
Si la unidad de padres emite un pitido y el símbolo de batería de la pantalla
Si ha desactivado el volumen mientras la alerta sonora está activada, la
Si ha establecido el rango de temperaturas de la habitación en la unidad de
Es posible que la unidad del bebé esté apagada. Enciéndala.
Es posible que se haya agotado la batería de la unidad de padres y no
haya colocado la unidad en el cargador enchufado. Inserte la clavija para
el cargador de la unidad de padres en el cargador, enchufe el adaptador
del cargador a una toma de corriente y coloque la unidad de padres en el
cargador. Luego pulse el botón de encendido/apagado para establecer la
conexión con la unidad del bebé.
descargadas y la unidad no esté conectada a una toma de corriente
eléctrica. Cambie las pilas no recargables o enchufe la unidad del bebé a una
toma de corriente eléctrica. Luego pulse el botón de encendido/apagado
para establecer la conexión con la unidad de padres.
de funcionamiento. Acerque la unidad de padres a la unidad del bebé, pero
no a menos de 1 metro.
utilice la función de reinicio para restablecer los ajustes predeterminados en
ambas unidades.
La unidad del bebé y la unidad de padres están fuera del alcance de
funcionamiento. Acerque la unidad de padres a la del bebé.
Las pilas no recargables de la unidad del bebé se están agotando. Cambie las
pilas no recargables o enchufe la unidad del bebé a una toma de corriente
eléctrica (consulte el capítulo “Preparación para su uso”).
Si la unidad de padres emite un pitido mientras el piloto LINK permanece
encendido en rojo y el mensaje ‘Sin conexión’ aparece en la pantalla, esto
indica que se ha perdido la conexión con la unidad del bebé. Acerque la
unidad de padres a la unidad del bebé.
está vacío, la batería recargable de la unidad de padres se está agotando.
Recargue la batería.
unidad de padres emite un pitido en cuanto el cuarto piloto de nivel de
sonido se ilumina, ya que la unidad del bebé ha recogido un sonido.
padres y la alerta de temperatura está activada, la unidad de padres emite
un pitido si la temperatura desciende por debajo del nivel establecido o
por debajo de 14 °C, o bien si la temperatura supera el nivel establecido o
aumenta a más de 30 °C.
Page 46

ESPAÑOL46
Pregunta Respuesta
¿Por qué emite el aparato
un sonido agudo?
Es posible que el ajuste de volumen de la unidad de padres sea demasiado
¿Por qué no se oye
ningún sonido? ¿Por qué
no se oye llorar al bebé?
Es posible que el nivel de sensibilidad del micrófono de la unidad del bebé
Es posible que la unidad del bebé y la unidad de padres estén fuera del
¿Por qué la unidad de
padres reacciona tan
rápidamente a otros
sonidos?
Es posible que el nivel de sensibilidad del micrófono de la unidad del bebé
¿Por qué la unidad de
padres reacciona tan
lentamente al llanto del
bebé?
¿Por qué se agotan tan
rápidamente las pilas no
recargables de la unidad
del bebé?
Es posible que el ajuste de volumen de la unidad del bebé sea demasiado
Puede que haya establecido una temperatura máxima de la habitación
Puede que haya encendido la luz de compañía. Si desea utilizar la luz de
¿Por qué la unidad de
padres tarda más de
8 horas en cargarse?
Es posible que las unidades estén demasiado cerca la una de la otra.
Asegúrese de que la separación entre la unidad de padres y la unidad del
bebé es superior a 1 metro.
alto. Baje el volumen de la unidad de padres.
Es posible que el nivel de volumen de la unidad de padres sea demasiado
bajo o que esté apagado. Suba el volumen de la unidad de padres.
esté demasiado bajo. Ajuste el nivel de sensibilidad del micrófono a un nivel
más alto desde el menú de la unidad de padres.
alcance de funcionamiento. Reduzca la distancia entre las unidades.
La unidad del bebé recoge también otros sonidos apar te de los del bebé.
Aproxime la unidad del bebé al bebé (pero manteniendo una distancia
mínima de 1 metro).
esté demasiado alto. Reduzca el nivel de sensibilidad del micrófono desde el
menú de la unidad de padres.
Es posible que el nivel de sensibilidad del micrófono de la unidad del bebé
esté demasiado bajo. Aumente el nivel de sensibilidad del micrófono desde
el menú de la unidad de padres.
Es posible que el ajuste del nivel de sensibilidad del micrófono de la unidad
del bebé sea demasiado alto y esto hace que la unidad del bebé transmita
más frecuentemente. Reduzca el nivel de sensibilidad del micrófono desde el
menú de la unidad de padres.
alto, y esto hace que la unidad del bebé consuma mucha más energía. Baje el
volumen de la unidad del bebé.
que sea inferior a la temperatura real de la misma, o una temperatura
mínima que sea superior a la temperatura real. La unidad del bebé continúa
enviando información a la unidad de padres y, por lo tanto, utiliza más
energía. Por este motivo, las pilas no recargables de la unidad del bebé se
agotan rápidamente.
compañía, le recomendamos que utilice la unidad del bebé enchufada a la
alimentación eléctrica.
Es posible que la unidad de padres esté encendida durante el proceso de
carga. Apáguela durante el proceso de carga.
Page 47

ESPAÑOL 47
Pregunta Respuesta
El alcance de
funcionamiento
especifi cado para
el vigilabebés es de
330 metros. ¿Por qué el
alcance de mi vigilabebés
es mucho menor?
¿Por qué se pierde
la conexión de vez
en cuando? ¿Por qué
hay interrupciones de
sonido?
¿Qué sucede si hay un
corte en el suministro
eléctrico?
¿Está protegido el
vigilabebés contra
escuchas e interferencias?
Se supone que el tiempo
de funcionamiento de la
unidad de padres es de
24 horas. ¿Por qué el de
mi unidad de padres es
menor?
Es posible que el ajuste de volumen de la unidad de padres sea demasiado
Es posible que el ajuste del nivel de sensibilidad del micrófono de la unidad
¿Por qué no aparece el
símbolo de la pila en la
pantalla de la unidad de
padres cuando empiezo
a recargarla?
El alcance especifi cado es válido sólo en exteriores y al aire libre. En
interiores, el alcance de funcionamiento está limitado por el número y
tipo de paredes y/o techos que se encuentren entre las dos unidades. En
interiores, el alcance puede ser de hasta 50 metros.
Es posible que la unidad del bebé y la unidad de padres estén fuera de los
límites del alcance de funcionamiento. Pruebe en una ubicación diferente o
reduzca la distancia entre las unidades. Tenga en cuenta que cada conexión
entre las unidades tarda 30 segundos en establecerse.
Si la unidad de padres tiene carga sufi ciente, continúa funcionando durante
un corte del suministro eléctrico, tanto en el cargador como fuera de él. Si
la unidad del bebé tiene pilas y se produce un corte del suministro eléctrico,
la unidad seguirá funcionando.
La tecnología DECT de este vigilabebés garantiza la eliminación de escuchas
e interferencias de otros equipos.
Al cargar por primera vez la unidad de padres, el tiempo de funcionamiento
será inferior a 24 horas. La batería recargable sólo alcanza su capacidad total
después de haberla cargado y descargado al menos cuatro veces.
alto y esto hace que la unidad de padres consuma mucha energía. Baje el
volumen de la unidad de padres.
del bebé sea demasiado alto, y esto hace que la unidad de padres consuma
mucha energía. Reduzca el nivel de sensibilidad del micrófono desde el
menú de la unidad de padres.
Es posible que el símbolo de la pila tarde varios minutos en aparecer en la
pantalla de la unidad de padres cuando la cargue por primera vez o tras un
largo periodo sin usarla.
Page 48

48
FRANÇAIS (CANADA)
INSTRUCTIONS
DE SÉCURITÉ
IMPORTANTES
Il se peut que, parmi les informations qui suivent, certaines ne s’appliquent
pas à votre produit; cependant, lorsqu’on utilise un moniteur pour bébé,
il est important de respecter des mesures de sécurité élémentaires pour
réduire les risques d’incendie, d’électrocution et de blessure :
1 Lisez ces instructions.
2 Conservez ces instructions.
3 Tenez compte de tous les avertissements.
4 Suivez toutes les instructions.
5 N’utilisez pas cet appareil près de l’eau.
6 Nettoyez l’appareil avec un linge humide seulement.
7 N’obstruez aucune prise de ventilation. Installez l’appareil en
conformité avec les instructions du fabricant.
8 Ne pas installez l’appareil près d’une source de chaleur comme un
radiateur, un four ou un autre appareil (incluant les amplifi cateurs) qui
produit de la chaleur.
9 Ne passez pas outre les instructions de sécurité concernant la fi che
polarisée ou la fi che de mise à la terre. Une fi che polarisée comporte
deux lames, dont une est plus grosse que l’autre. Une fi che de mise
à la terre possède deux lames et un contact à la terre. La lame plus
grosse ou le contact à la terre sont fournis pour votre sécurité. Si la
plus grosse lame ou le contact ne peuvent être insérés dans la prise,
consultez un électricien pour qu’il remplace votre prise désuète.
10 Protégez le cordon d’alimentation de façon qu’on ne puisse marcher
dessus ou le coincer quelque part; vérifi ez particulièrement les fi ches,
les prises et la sortie du fi l dans l’appareil.
11 Utilisez seulement les accessoires spécifi és par le fabricant.
12 Débranchez cet appareil pendant les orages avec éclairs ou s’il n’est
pas utilisé pendant de longue période.
13 Toute réparation devrait être faite par un technicien qualifi é. Une
réparation est nécessaire quand l’appareil a été endommagé, par
exemple, quand le cordon ou la fi che ont été endommagés, quand un
objet a été introduit dans l’appareil ou quand l’appareil a été mouillé,
exposé à la pluie ou à l’humidité, qu’il ne fonctionne pas correctement
ou qu’il ait été échappé.
14 Ce moniteur pour bébé est conçu pour vous aider à surveiller votre
bébé. Il n’est pas destiné à remplacer la surveillance responsable et
adéquate par un adulte et ne devrait jamais être utilisé à cette fi n.
15 Cet appareil ne doit être utilisé que pour l’usage décrit dans ce mode
d’emploi.
16 Débranchez ce produit de la prise murale avant de le nettoyer. Ne pas
utiliser de nettoyant en liquide ou en aérosol.
Page 49

FRANÇAIS (CANADA) 49
17 Il ne faut pas utiliser ce produit lorsque vous êtes dans la baignoire, la
douche ou la piscine. L’immersion du produit dans l’eau présente un
risque d’électrocution.
18 Ce produit ne doit être branché qu’au type de source d’alimentation
indiqué sur la plaque signalétique des adaptateurs (A15, B9). Si vous ne
connaissez pas le type de courant électrique que vous avez à la maison,
consultez la compagnie d’électricité.
19 Pour éviter les risques d’incendie et d’électrocution, ne surchargez pas
les prises murales ni les rallonges électriques.
20 N’introduisez pas d’objets d’aucune sorte dans ce produit par les
orifi ces du boîtier : ils pourraient toucher des points électriques
dangereux ou court-circuiter des pièces, ce qui pourrait entraîner un
risque d’incendie ou d’électrocution. Ne versez jamais de liquide sur le
produit.
21 Pour réduire les risques de choc électrique, ne démontez pas le
produit. Appelez plutôt le 1 800 54-AVENT (1 800 -542-8368) pour
de l’aide. L’ouver ture du produit et l’enlèvement des pièces du boîtier
(à l’exception du couvercle du compartiment des piles) pourrait vous
exposer à une tension dangereuse ou à un autre danger. Un remontage
inadéquat pourrait entraîner un choc électrique lors de l’utilisation
subséquente de l’appareil.
22 Pour éviter les risques d’étranglement de l’enfant avec le cordon
d’alimentation, placer le moniteur hors de sa portée. Ne pas utiliser de
rallonge.
Si votre produit fonctionne avec des piles, il faut observer les
précautions supplémentaires suivantes :
1 Utilisez uniquement des piles du type et de la taille indiqués dans le
présent mode d’emploi.
2 Ne jetez pas les piles dans le feu, car elles risquent d’exploser. Vérifi ez
la réglementation locale pour connaître la façon de mettre au rebut les
piles.
3 Quand vous manipulez les piles, faites attention de ne pas les court-
circuiter avec des objets faits de matériaux conducteurs comme des
anneaux, des bracelets et des clés. Il ne faut pas surcharger, court-
circuiter, charger les piles en polarité inversée, ouvrir ni brûler les piles
pour éviter les problèmes suivants : libération de substances toxiques,
émanation de gaz oxygène ou hydrogène, élévation de la température
de surface.
4 N’essayez pas de recharger les piles fournies avec le produit ou
identifi ées pour l’usage avec celui-ci, si ce ne sont pas des piles
rechargeables : elles risqueraient de répandre un électrolyte corrosif,
voire d’exploser.
5 Ne tentez pas de redonner vie aux piles fournies avec le produit ou
identifi ées pour l’usage avec celui-ci en les réchauffant : l’électrolyte
risquerait de s’en échapper brusquement, causant des brûlures ou une
irritation aux yeux ou à la peau.
6 Au besoin, il faut remplacer les piles par des piles neuves identiques
du même fabricant. Si une pile à remplacer est connectée en série à
d’autres piles, on recommande de remplacer en même temps toutes
les piles de la série.
Page 50

FRANÇAIS (CANADA)50
7 Il faut éviter d’installer les piles en polarité inversée dans le produit :
cela risquerait de provoquer la charge et d’entraîner une fuite des piles,
voire une explosion.
8 Si vous entreposez le produit pendant plus de 30 jours retirez-en les
piles, car elles risqueraient de fuir et d’endommager le produit.
9 Retirez les piles épuisées dès que possible car elles risquent de fuir
dans le produit. Si une pile a fui ou s’il y a fuite de liquide ou de gaz, il
faut la remplacer immédiatement au moyen de gants de protection.
10 N’entreposez pas le produit, ni les piles fournies avec le produit ou
identifi ées pour l’usage avec celui-ci, dans un endroit à température
élevée. Les piles entreposées au congélateur ou au réfrigérateur, dans
le but d’en prolonger la vie, doivent être protégées de la condensation
pendant l’entreposage et la décongélation. Après l’entreposage au froid,
il faut stabiliser les piles à la température ambiante avant de les utiliser.
11 Si vous utilisez des piles rechargeables dans le produit, chargez-les
conformément aux directives et restrictions mentionnées dans le mode
d’emploi.
12 Il existe un risque d’explosion si les piles sont remplacées par une pile
d’un type inadéquat. Pour l’unité parents, utilisez toujours un bloc-pile
SCD520 NiMH rechargeable comme celui fourni avec l’appareil.
CONSERVEZ CES
INSTRUCTIONS
AVERTISSEMENT: LE SYMBOLE ILLUSTRÉ DANS LA
-
FIGURE 1 SIGNIFIE QU’IL N’Y A AUCUN RISQUE
D’EXPLOSION DES PILES OU DE DOMMAGE
IMPORTANT AU MONITEUR POUR BÉBÉ SI LES PILES
OU L’ADAPTATEUR SONT REMPLACÉS PAR UN TYPE
DE PILES INADÉQUAT.
Adaptateurs pour unité bébé et chargeur :
Entrée : 120 V CA 60 Hz
-
Sortie : 7,5 CCV 400 mA
-
No d’adaptateur : UD075040B
La prise doit être proche de l’équipement et facilement accessible.
Dans l’unité bébé, utilisez uniquement des piles alcalines AA de 1,5 V (piles
non comprises).
Pour l’unité parent, utilisez seulement un bloc-pile SCD520 NiMH
rechargeable comme celui fourni avec l’appareil.
Mettez les piles au rebut conformément aux instructions.
Conformité aux normes
Le numéro d’identifi cation de la FCC se trouve sous le boîtier de l’unité
parents et dans le compartiment des piles de l’unité bébé.
Le terme « IC » avant le numéro d’homologation signifi e que les normes
d’Industrie Canada ont été respectées. Cette homologation signifi e
que le matériel est conforme à certaines normes d’exploitation et de
radiocommunication. Cet appareil est conforme aux dispositions de la
partie 15 du règlement de la FCC et à la norme NMB-003 d’Industrie
Canada. Son utilisation est soumise aux deux conditions suivantes : (1)
Page 51

FRANÇAIS (CANADA) 51
cet appareil ne doit pas causer d’interférence préjudiciable, et (2) cet
appareil doit accepter toute interférence reçue, y compris une interférence
pouvant causer un fonctionnement indésirable. Cet appareil est également
conforme à la norme RSS-213 d’Industrie Canada.
Interférence radio
L’appareil a été testé et trouvé conforme aux limites d’un appareil
numérique de catégorie B, en vertu de la partie 15 des règlements de la
FCC et des spécifi cations pertinentes d’Industrie Canada. Ces limites sont
conçues pour fournir une protection raisonnable contre l’interférence
préjudiciable dans une installation résidentielle. L’appareil génère, utilise et
peut émettre de l’énergie radiofréquence et, s’il n’est pas installé et utilisé
conformément aux directives, peut causer de l’interférence préjudiciable
aux radiocommunications. Rien ne garantit cependant que dans une
installation en particulier, il n’y ait pas d’interférence. Si l’appareil crée
effectivement de l’interférence préjudiciable à la réception de programmes
de radio ou de télévision, ce qu’on peut déterminer en éteignant et en
allumant l’appareil, on recommande à l’utilisateur d’essayer de corriger
l’interférence au moyen des mesures suivantes :
Réorientez ou déplacez l’antenne de réception.
-
Augmentez la distance entre l’équipement et le récepteur.
-
Branchez l’équipement à une prise d’un circuit autre que celui auquel le
-
récepteur est branché.
Énoncé d’exposition aux rayonnements radioélectriques
Cet appareil est conforme aux limites d’exposition aux rayonnements
radioélectriques de la FCC pour un environnement non contrôlé. Cet
équipement doit être installé et utilisé à une distance minimale de
20 centimètres entre le radiateur et votre corps. En mode portatif, cet
équipement a été testé et est conforme aux directives d’exposition
aux rayonnements radioélectriques. Si vous portez l’appareil sur vous,
ce produit a été testé et est conforme aux directives d’exposition aux
rayonnements radioélectriques de la FCC pour un appareil porté à l’aide
de la pince pour ceinture et la courroie de cou fournis avec l’appareil. Ce
transmetteur ne doit pas être installé au même endroit ou utilisé avec
toute autre antenne ou transmetteur. Cet équipement est également
conforme à la règle RSS-102 d’Industrie Canada en ce qui concerne
l’exposition des humains à un environnement avec rayonnements
radioélectriques du code de Santé Canada.
N’essayez jamais de réparer ou de modifi er l’appareil vous-
même.
Toute réparation ou modifi cation apportée à l’appareil par l’utilisateur
risque d’annuler la garantie et la conformité de l’appareil aux normes
indiquées. Confi ez tout entretien à un centre de service autorisé ou
désigné.
Introduction
Félicitations pour votre achat et bienvenue dans l’univers Philips AVENT !
Pour profi ter pleinement de l’assistance Philips AVENT, enregistrez votre
produit sur le site www.philips.com/welcome.
Philips AVENT s’engage à fabriquer des produits pour bébé fi ables afi n
de fournir aux parents toute l’assurance dont ils ont besoin. Ce moniteur
pour bébé Philips AVENT permet une surveillance 24 heures sur 24 afi n
Page 52

FRANÇAIS (CANADA)52
que vous puissiez toujours entendre clairement votre enfant, sans bruits
parasites. La technologie DECT garantit une absence totale d’interférences
d’autres appareils sans fi l et un signal clair entre les unités parents et
bébé. Le capteur de température et d’humidité vous permet de surveiller
les conditions ambiantes de la chambre de votre bébé ; ses paramètres
personnalisés vous permettent de maintenir une atmosphère agréable et
saine dans la chambre de votre bébé.
Description générale (fi g. 2)
A Unité parent
1 Bouton marche/arrêt 3
2 Fente pour ceinture
3 Bouton TALK
4 Bouton MENU
5 Voyant LINK
6 Microphone
7 Haut-parleur
8 Boutons de menu et de volume +/–
9 Bouton OK
10 Écran
11 Témoins de niveau sonore
12 Pince de ceinture
13 Adaptateur
14 Petite fi che de l’appareil
15 Prise pour la petite fi che de l’appareil
16 Chargeur
17 Témoin de charge
18 Compartiment du bloc-pile rechargeable
19 Courroie de cou
20 Couvercle du compartiment du bloc-pile rechargeable
21 Bloc-pile rechargeable (inclus)
22 Ouverture pour lanière
B Unité bébé
1 Bouton marche/arrêt 3
2 Bouton PAGE
3 Bouton lecture/arrêt E
4 Bouton de berceuse K
5 Voyant de charge T
6 Bouton de veilleuse Q
7 Témoin lumineux de marche
8 Boutons de volume +/–
9 Microphone
10 Adaptateur
11 Grande fi che de l’appareil
12 Haut-parleur
13 Capteur de température
14 Prise pour la grande fi che de l’appareil
15 Compartiment des piles non rechargeables
16 Couvercle du compartiment des piles non rechargeables
17 Piles non rechargeables (non incluses)
Page 53

FRANÇAIS (CANADA) 53
C Écran
1 Ñ °= température de la pièce
2 R = alerte sonore
3 K = berceuse
4 T = symbole de pile
5 Q = veilleuse
Pour toute autre indication sur l’écran et sur le volume/sensibilité, consultez
le chapitre Caractéristiques et Options de menu.
Important
,
Lisez attentivement le mode d’emploi avant d’utiliser l’appareil et
conservez-le pour un usage ultérieur.
,
Ce moniteur pour bébé est conçu pour vous aider à surveiller votre
bébé. Il n’est pas destiné à remplacer la surveillance responsable et
adéquate par un adulte et ne devrait jamais être utilisé à cette fi n.
,
Ce moniteur n’est pas conçu à des fi ns médicales ou pour remplacer
la surveillance par un adulte.
,
Avant de brancher l’appareil, vérifi ez si la tension indiquée sur
l’adaptateur correspond à celle de la prise de courant de l’endroit où
vous vous trouvez.
,
Utilisez et conservez l’appareil à une température entre 50 °F et
104 °F.
,
Cet appareil est conçu pour une tension électrique de 120 V.
,
N’exposez pas le moniteur pour bébé aux températures extrêmes ni
au soleil.
,
Placez toujours l’unité bébé et son cordon d’alimentation hors de
portée du bébé, soit à une distance d’au moins 1 mètre (3 pieds).
,
Ne placez jamais l’unité bébé dans le lit ou le parc du bébé.
,
Ne recouvrez jamais le moniteur pour bébé avec une serviette ou
une couverture.
,
Ne l’exposez jamais à des liquides.
,
Ne l’utilisez jamais dans les endroits humides ou près de l’eau.
,
À l’exception des compartiments à piles, n’ouvrez pas les boîtiers des
unités bébé et parents, ceci afi n d’éviter tout risque d’électrocution.
,
Utilisez uniquement les adaptateurs livrés avec l’appareil.
,
Ces adaptateurs contiennent un transformateur. Pour éviter les
risques d’incendie, ne coupez pas les adaptateurs pour remplacer la
fi che.
,
Si l’un des adaptateurs est endommagé, faites-le remplacer par un
modèle du même type pour éviter les accidents.
,
Si vous placez l’unité parents à proximité d’un émetteur-récepteur
ou d’un autre appareil DECT (par exemple, un téléphone DECT), la
liaison avec l’unité bébé risque de se perdre.
,
Le capteur de température a pour unique fonction de mesurer la
température dans la chambre de bébé. Il ne peut pas servir à réguler
la température de la pièce.
,
La prise de courant devrait être située près de l’appareil et elle
devrait être facile d’accès.
Page 54

FRANÇAIS (CANADA)54
Avant l’utilisation
Unité bébé
L’unité bébé peut être raccordée à une prise de courant ou alimentée par
des piles non rechargeables. Même si vous avez l’intention de la raccorder
à une prise de courant, nous vous conseillons d’insérer des piles non
rechargeables. Cette précaution vous permet de garantir une sauvegarde
automatique en cas de coupure de courant.
Fonctionnement avec cordon
1 Insérez la grande fi che dans l’unité bébé et branchez l’adaptateur sur
une prise murale.
,
Le voyant d’alimentation rouge s’allume.
Fonctionnement à piles (piles non rechargeables)
L’unité bébé fonctionne avec quatre piles AA 1,5 V R6 (non fournies). Il est
fortement recommandé d’utiliser des piles Philips LR6 PowerLife.
N’utilisez pas de piles rechargeables. L’unité bébé ne possède pas de
fonction de recharge.
Débranchez l’unité bébé et veillez à avoir les mains sèches et à bien
sécher l’appareil avant d’insérer les piles non rechargeables.
1 Enlevez le couvercle du compartiment des piles non rechargeables.
2 Insérez quatre piles non rechargeables.
Remarque : Veillez à respecter la polarité (+ et -).
3 Remettez le couvercle en place.
Remarque : Lorsque les piles sont faibles, le voyant de charge clignote en rouge
sur l’unité bébé.
Unité parent
Alimentation par piles (bloc-pile rechargeable)
L’unité parents est fournie avec un bloc-pile SCD520 NiMH rechargeable.
Page 55

FRANÇAIS (CANADA) 55
Chargez l’unité parents avant la première utilisation ou lorsque l’unité
parents indique un état de pile faible (le symbole de pile vide clignote
sur l’affi cheur et l’unité parents émet un signal sonore). L’unité parents
commence à indiquer que le bloc-pile est faible 30 minutes avant la
décharge complète.
Remarque : Si le bloc-pile rechargeable se déchargeait complètement, l’unité
parents s’éteindrait automatiquement et perdrait le contact avec l’unité bébé.
1 Enlevez le couvercle du compartiment du bloc-pile rechargeable.
2 Insérez le bloc-pile rechargeable.
Remarque : Veillez à respecter la polarité de la pile.
3 Remettez le couvercle en place.
4 Insérez la petite fi che dans le chargeur, branchez l’adaptateur sur une
prise de courant murale et placez l’unité parents sur le chargeur.
,
Le voyant de charge du chargeur s’allume.
,
Un symbole de pile en charge apparaît sur l’affi cheur de l’unité
parents.
5 Laissez l’unité parents sur le chargeur jusqu’à ce que le bloc-pile soit
entièrement chargé.
,
En cours de charge, le voyant de charge du chargeur reste
constamment allumé.
,
Lorsque le bloc-pile est entièrement chargé, le symbole de pile
pleine T apparaît sur l’affi cheur de l’unité parents.
Pour la première charge ou au bout d’une période prolongée sans
-
utilisation, éteignez l’unité parents et laissez-la se charger au moins
10 heures d’affi lée.
Page 56

FRANÇAIS (CANADA)56
Une charge normale prend 8 heures, mais elle peut durer plus
-
longtemps si l’unité parents est allumée au cours de la charge. Pour
réduire la durée de charge, éteignez l’unité parents.
-
Avec une pleine charge de batterie, l’unité parents peut être utilisée
sans fi l pendant au moins 24 heures.
Remarque : Après une première charge, l’unité parents a une autonomie
inférieure à 24 heures. Le bloc-pile n’atteint sa pleine capacité qu’au bout de 4
cycles de charge et décharge.
Remarque : Quand l’unité parents n’est pas branchée à une prise de courant
ou même quand l’unité est éteinte, le bloc-pile se déchargera.
Utilisation de l’appareil
Utilisez le moniteur pour bébé que pour l’utilisation prévue à la maison,
comme il est décrit dans ce mode d’emploi.
1 Placez l’unité parents et l’unité bébé dans la même pièce pour tester
la liaison radio.
Placez l’unité bébé à au moins 1 mètre de l’unité parent.
2 Maintenez enfoncé le bouton marche/arrêt 3 de l’unité bébé jusqu’à
ce que le voyant vert d’alimentation s’allume.
Remarque : Le voyant d’alimentation est toujours vert, même en l’absence
d’une liaison avec l’unité parents.
La veilleuse s’allume brièvement, puis s’éteint de nouveau.
,
Le voyant de charge T s’allume brièvement, puis s’éteint de nouveau.
,
3 Maintenez enfoncé le bouton marche/arrêt 3 de l’unité parents
jusqu’à ce que les voyants du niveau sonore s’allument brièvement.
Page 57

FRANÇAIS (CANADA) 57
L’a ffi cheur s’allume et le symbole de pile apparaît sur l’affi cheur.
,
Le voyant LINK clignote en rouge et le message « Searching »
,
(Recherche) apparaît sur l’affi cheur.
Lorsque la liaison est établie entre les unités bébé et parents, le
,
voyant LINK de l’unité parents reste allumé en vert. Le message
« Linked » (Reliée) apparaît sur l’affi cheur.
Au bout de 2 secondes, le message « Linked » (liaison) disparaît et
,
l’affi cheur indique la température.
Si aucune liaison n’est établie, le voyant LINK de l’unité parents cesse
,
de clignoter et s’allume en rouge. L’unité parents émet un signal
sonore intermittent et le message « Not Linked » (aucune liaison)
apparaît sur l’affi cheur.
Page 58

FRANÇAIS (CANADA)58
Emplacement du moniteur pour bébé
1 Placez l’unité bébé à au moins 1 mètre du bébé.
2 Placez l’unité parents à portée de l’unité bébé. Veillez à maintenir une
distance minimale d’un mètre (3 pieds) entre les deux unités afi n
d’éviter un retour acoustique.
Pour un complément d’informations sur la portée, voir la section
« Portée » ci-dessous.
Portée de transmission
La por tée de transmission du moniteur pour bébé est de 300 mètres à
l’extérieur et peut varier en fonction des conditions et des obstacles. À
l’intérieur, la por tée maximale est de 50 mètres.
Matériaux secs Épaisseur Diminution de portée
Bois, plâtre, carton, verre (sans métal,
fi ls ni plomb)
Brique, contreplaqué < 30 cm 5-35 %
Béton armé < 30 cm 30-100 %
Grilles ou barres de métal < 1 cm 90-100 %
Feuilles de métal ou d’aluminium < 1 cm 100 %
< 30 cm 0-10 %
Si les matériaux sont humides ou mouillés, la perte de por tée peut
atteindre 100 %.
Caractéristiques
Les fonctionnalités suivantes sont décrites au chapitre « Options de
menu ». Elles ne peuvent être activées qu’à partir du menu de l’unité
parents :
-
Réglage de la sensibilité du microphone
Activation/désactivation de l’alerte sonore
-
Réglage de la plage de température (températures minimale et
-
maximale de la pièce)
Activation/désactivation de l’alerte de température
-
Page 59

FRANÇAIS (CANADA) 59
Réglage du volume
1 Appuyez brièvement sur les boutons + et – de l’unité bébé jusqu’à
obtention du volume souhaité pour l’unité bébé.
Remarque : Vous pouvez uniquement régler le volume du haut-parleur sur
l’unité bébé lorsqu’une berceuse est en cours de lecture.
2 Appuyez brièvement sur le bouton + et – de l’unité parents jusqu’à
obtention du volume souhaité pour l’unité parents.
,
L’ affi cheur indique les réglages de volume de l’unité parents :
j = volume désactivé/moniteur en mode silencieux
-
k = volume minimum
-
l = volume maximum
-
Remarque : Plus le volume est élevé, plus les appareils consomment d’énergie.
Interphone
Utilisez le bouton TALK de l’unité parents pour parler à votre bébé (pour
le rassurer, par exemple).
1 Maintenez enfoncé le bouton TALK et parlez distinctement dans le
micro à 15-30 cm de distance.
Le voyant LINK clignote en vert et le message « Talk » (Parler)
,
apparaît sur l’affi cheur.
2 Relâchez le bouton TALK lorsque vous avez fi ni de parler.
Témoins de niveau sonore
L’unité parents surveille en permanence le niveau sonore de la pièce où
se trouve l’enfant afi n de signaler toute activité. Quand bébé pleure, les
voyants de l’unité parents indiquent le niveau sonore.
Tant que l’unité bébé ne détecte pas de son, tous les voyants de niveau
-
sonore de l’unité parents sont éteints.
Lorsque l’unité bébé détecte un son, un ou plusieurs des voyants de
-
niveau sonore de l’unité parents s’allument. Le nombre de voyants
allumés est proportionnel au bruit capté par l’unité bébé.
Page 60

FRANÇAIS (CANADA)60
Veilleuse
1 Appuyez sur le bouton de la veilleuse Q de l’unité bébé pour allumer
la veilleuse.
,
Q apparaît sur l’affi cheur de l’unité parents.
2 Appuyez de nouveau sur le bouton de la veilleuse Q pour éteindre la
veilleuse.
La lumière de la veilleuse baisse graduellement avant de s’éteindre
,
complètement.
Q disparaît de l’affi cheur de l’unité parents.
,
Conseil : Éteignez la veilleuse lorsque l’unité bébé fonctionne sur piles non
rechargeables afi n d’économiser de l’énergie.
Localisation de l’unité parent
Si vous égarez l’unité parents et que son volume est éteint, utilisez le
bouton de localisation, sur l’unité bébé, pour la retrouver.
Remarque : La fonction de localisation ne fonctionne que si l’unité parents est
allumée.
1 Appuyez sur le bouton PAGE de l’unité bébé.
Le message « Paging » (localisation) apparaît sur l’affi cheur de l’unité
,
parents.
L’unité parents émet un signal sonore.
,
2 Pour arrêter le signal sonore, appuyez de nouveau sur le bouton
PAGE ou sur n’importe quel bouton de l’unité parents.
Fonction Berceuse
1 Appuyez sur le bouton lecture/arrêt E de l’unité bébé pour faire
jouer la berceuse sélectionnée.
La berceuse commence et est jouée en continu.
,
2 Pour arrêter la berceuse, appuyez de nouveau sur le bouton lecture/
arrêt E de l’unité bébé.
Page 61

FRANÇAIS (CANADA) 61
3 Pour sélectionner une berceuse alors qu’une autre est en cours de
lecture, procédez comme suit :
-
Appuyez sur le bouton de berceuse K de l’unité bébé.
-
La prochaine berceuse commence 2 secondes après.
Si vous souhaitez sélectionner une autre berceuse, appuyez à nouveau
-
sur le bouton de berceuse K de l’unité bébé.
Alarme hors de portée
Lorsque l’unité parents est hors de portée de l’unité bébé, l’unité parents
émet un signal sonore intermittent et le message « Not Linked » (aucune
liaison) apparaît sur l’affi cheur. Le voyant LINK de l’unité parents clignote
alors en rouge.
Remarque : Le message « Not linked » (aucune liaison) apparaît également sur
l’affi cheur de l’unité parents lorsque l’unité bébé est éteinte.
Options de menu
Les fonctions suivantes peuvent être activées dans le menu de l’unité
parents.
Fonctionnement du menu - explication générale
Remarque : Les fonctions du menu peuvent être activées uniquement
lorsqu’une liaison a été établie entre l’unité bébé et l’unité parents.
1 Appuyez sur le bouton MENU pour ouvrir le menu.
La première option de menu apparaît sur l’affi cheur.
,
2 Sélectionnez l’option de menu souhaitée à l’aide des boutons – et +.
Remarque : La fl èche indique dans quel sens vous pouvez vous déplacer.
3 Appuyez sur le bouton OK pour confi rmer.
4 Sélectionnez le réglage souhaité à l’aide des boutons + et -.
5 Appuyez sur le bouton OK pour confi rmer.
Le nouveau paramètre clignote deux fois et disparaît de l’affi cheur.
,
6 Appuyez de nouveau sur le bouton MENU pour quitter le menu.
Page 62

FRANÇAIS (CANADA)62
Réglage de la sensibilité du microphone
Vous pouvez régler la sensibilité du microphone de l’unité bébé sur le
niveau qui vous convient. La modifi cation de la sensibilité du microphone
n’est possible que lorsqu’une connexion est établie entre l’unité parents et
l’unité bébé, c’est-à-dire lorsque le voyant LINK de l’unité parents s’allume
en vert de manière continue.
1 Sélectionnez « Sensitivity » (Sensibilité) à l’aide des boutons + et -.
2 Appuyez sur le bouton OK pour confi rmer.
3 Sélectionnez la sensibilité de microphone souhaitée pour l’unité bébé
à l’aide des boutons + et -.
,
k = sensibilité minimale
,
l = sensibilité maximale
4 Appuyez sur le bouton OK pour confi rmer.
,
Le message « Saved » (Enregistré) apparaît sur l’affi cheur.
Remarque : Lorsque la sensibilité du microphone de l’unité bébé est réglée
sur un niveau élevé, l’unité détecte plus de sons. Elle en transmet donc plus
souvent et consomme dès lors plus d’énergie.
Activation/désactivation de l’alerte sonore
Cette fonction vous permet de surveiller votre bébé en mode silencieux.
Vous pouvez ainsi désactiver le son sur l’unité parents et être néanmoins
averti si votre enfant pleure.
Quand l’aler te sonore est activée, l’unité parents émet un signal sonore dès
que le quatrième voyant de niveau sonore s’allume en bleu alors que le
son est désactivé. En outre, le rétroéclairage de l’unité parents s’allume et le
symbole de l’alerte sonore ( R ) clignote sur l’affi cheur.
1 Sélectionnez « Sound Alert » (Alerte sonore) à l’aide des boutons +
et -.
2 Appuyez sur le bouton OK pour confi rmer.
3 Si l’alerte est désactivée, « On? » (Activée ?) apparaît sur l’affi cheur.
Appuyez sur le bouton OK pour activer l’alerte. Si l’alerte est
activée, « Off? » (Désactivée ?) apparaît sur l’affi cheur. Appuyez sur le
bouton OK pour désactiver l’alerte.
,
Si vous avez sélectionné « On » (Activée), le symbole de l’alerte
sonore ( R ) apparaît sur l’affi cheur de l’unité parents.
Réglage de la plage de température
Bébé doit dormir confor tablement dans une pièce dont la température
est comprise entre 16 °C et 20 °C. En effet, un nourrisson ne peut réguler
sa température corporelle aussi bien qu’un adulte. Il a besoin de plus de
temps pour s’adapter aux fl uctuations thermiques.
Si vous ne défi nissez pas une plage de température, le moniteur pour bébé
vous avertit lorsque la température de la chambre de bébé est inférieure
à 14 °C ou supérieure à 30 °C. Dans ce cas, le rétroéclairage de l’affi cheur
de l’unité parents s’allume et la mention « Low » (Basse) ou « High »
(Élevée) apparaît sur l’affi cheur. Suivez les instructions ci-dessous pour
changer les températures minimale et maximale par défaut.
Page 63

FRANÇAIS (CANADA) 63
Remarque : La température de la chambre de bébé est indiquée sur l’affi cheur
de l’unité parents lorsque les deux unités sont en liaison.
1 Sélectionnez « Temperature » (Température) à l’aide des boutons +
et -.
2 Appuyez sur le bouton OK pour confi rmer.
3 Sélectionnez « Range » (Plage) à l’aide des boutons + et -.
4 Appuyez sur le bouton OK pour confi rmer.
5 Réglez la température minimale voulue à l’aide des boutons + et -.
6 Appuyez sur le bouton OK pour confi rmer.
7 Réglez la température maximale voulue à l’aide des boutons + et -.
8 Appuyez sur le bouton OK pour confi rmer.
Le message « Saved » (Enregistré) apparaît sur l’affi cheur.
,
Remarque : Lorsque la température de la chambre de bébé dépasse la limite
inférieure ou supérieure, l’affi cheur de l’unité parents reste constamment
allumé et l’unité consomme davantage.
Activation/désactivation de l’alerte de température
Remarque : Si l’alerte de température s’active trop souvent, diminuez la
température minimale ou augmentez la température maximale (consultez «
Réglage de la plage de température »).
Si l’aler te de température est activée, l’unité parents émet un signal sonore
lorsque la température de la pièce dépasse les valeurs maximum et
minimum défi nies. De plus, le rétroéclairage de l’affi cheur de l’unité parents
s’allume et la mention « Low » (Basse) ou « High » (Élevée) apparaît sur
l’affi cheur. Si aucune valeur maximum ou minimum n’a été défi nie, l’alerte
de température se déclenche lorsque la température de la pièce est
inférieure à 14 °C ou supérieure à 30 °C.
1 Sélectionnez « Temperature » (Température) à l’aide des boutons +
et -.
2 Appuyez sur le bouton OK pour confi rmer.
3 Sélectionnez « Alert » (Alerte) à l’aide des boutons + et -.
4 Appuyez sur le bouton OK pour confi rmer.
5 Si l’alerte est désactivée, « On? » (Activée ?) apparaît sur l’affi cheur.
Appuyez sur le bouton OK pour activer l’alerte. Si l’alerte est
activée, « Off? » (Désactivée ?) apparaît sur l’affi cheur. Appuyez sur le
bouton OK pour désactiver l’alerte.
Fonction de réinitialisation
Cette fonction du menu de l’unité parents vous permet de rétablir les
réglages par défaut des unités parents et bébé en même temps. Vous
pouvez utiliser cette fonction si les conseils de la « Foire aux questions »
ne permettent pas de résoudre un problème.
1 Sélectionnez « Reset » (Réinitialiser) à l’aide des boutons + et -.
2 Appuyez sur le bouton OK pour confi rmer.
Page 64

FRANÇAIS (CANADA)64
,
Le message « Confi rm? » (Confi rmer ?) apparaît sur l’affi cheur de
l’unité parents.
3 Appuyez sur le bouton OK pour confi rmer.
,
L’unité parents s’éteint, puis se rallume.
,
Les réglages par défaut des unités sont désormais rétablis.
Réglages par défaut
Unité parent
Volume : 1
-
Sensibilité du microphone : 3
-
-
Alerte sonore : désactivée
-
Alerte de température : désactivée
-
Alerte «Temperature low» (température basse) : 57°F
-
Alerte « Temperature high » (température élevée) : 86°F
Unité bébé
-
Volume : 3
-
Veilleuse : éteinte
-
Berceuse : 1
Accessoires
Pince de ceinture et courroie
Si le bloc-pile de l’unité parents est suffi samment chargé, vous pouvez vous
déplacer chez vous ou à l’extérieur avec l’unité fi xée à la ceinture ou à
la taille à l’aide de la pince de ceinture. Vous pouvez également le porter
autour du cou grâce à la courroie de cou et surveiller ainsi bébé tout en
vaquant à vos occupations.
Installation de la pince de ceinture
1 Fixez la pince de ceinture à l’unité parents.
Retrait de la pince de ceinture
1 Détachez la pince de ceinture de l’unité parents.
Installation de la courroie
1 Insérez l’extrémité de la boucle de la courroie de cou dans l’orifi ce
situé au dos de l’unité. Enfi lez la courroie de cou dans l’extrémité de
la boucle et tirez fermement sur la lanière.
Retrait de la courroie
1 Faites passer la courroie de cou dans l’extrémité de la boucle et
glissez la courroie de cou de l’orifi ce situé au dos de l’unité.
Nettoyage et entretien
Ne plongez jamais l’unité parents ou l’unité bébé dans l’eau et ne les
passez pas sous le robinet pour les nettoyer.
N’utilisez pas de détergents liquides ou en vaporisateur.
1 Débranchez l’unité bébé de la prise de courant et enlevez l’unité
parents du chargeur.
2 Nettoyez les unités parents et bébé à l’aide d’un chiffon humide.
Page 65

FRANÇAIS (CANADA) 65
Assurez-vous que l’unité parents est sèche avant de la replacer sur le
chargeur branché au préalable.
3 Nettoyez le chargeur avec un chiffon sec.
4 Nettoyez les adaptateurs avec un chiffon sec.
Les éléments de cet appareil ne peuvent être démontés. Pour obtenir de
l’aide, appelez le 1 800 54-AVENT (1 800 542-8368).
Rangement
Lorsque vous n’utilisez pas le moniteur pendant une période
-
prolongée, retirez les piles non rechargeables de l’unité bébé et le
bloc-pile rechargeable de l’unité parents. Rangez l’unité parents, l’unité
bébé, le chargeur de l’unité parents et les adaptateurs dans un endroit
frais et sec.
Pour ranger le moniteur, n’enroulez pas le cordon d’alimentation autour
-
de l’appareil. Rangez-le dans un endroit sûr, où il ne pourra pas être
coupé ou endommagé.
Remplacement
Unité bébé
Piles
Remplacez exclusivement les piles non rechargeables de l’unité bébé par
quatre piles non rechargeables AA R6 de 1,5 V.
Remarque : Nous vous recommandons d’utiliser des piles non rechargeables
Philips ou des piles de type équivalent.
Adaptateur
Remplacez seulement l’adaptateur de l’unité bébé par un adaptateur de
même type. Pour de l’aide, appelez le 1 800 54-AVENT (1 800 542-8368)
ou visitez notre site Web : www.philips.com/AVENT.
Unité parent
Piles
Remplacez seulement l’adaptateur SCD520 NiMH de l’unité parents par
un adaptateur de même type. Pour de l’aide, appelez le 1 800 54-AVENT
(1 800 542-8368) ou visitez notre site Web : www.philips.com/AVENT.
Adaptateur
Remplacez seulement l’adaptateur de l’unité bébé par un adaptateur de
même type. Pour de l’aide, appelez le 1 800 54-AVENT (1 800 542-8368)
ou visitez notre site Web : www.philips.com/AVENT.
Aide
Pour obtenir de l’aide, appelez le 1 800 54-AVENT (1 800 542-8368) ou
visitez notre site Web : www.philips.com/AVENT.
Page 66

FRANÇAIS (CANADA)66
Environnement
Mettez les piles au rebut conformément aux normes en vigueur. Ne
-
les mettez pas dans un incinérateur; si elles sont surchauffées, elles
pourraient exploser. Ne les enveloppez pas dans du papier métallique
ou d’aluminium, mais plutôt dans du papier journal avant de les mettre
au rebut.
-
Nous vous suggérons de communiquer avec les responsables de votre
ville pour connaître le ou les sites où vous pouvez laisser vos piles.
Garantie
GARANTIE COMPLÈTE DE DEUX ANS
Philips Electronics Nor th America Corporation (É.-U.) et Philips Electronics
Ltd (CANADA) garantissent chaque nouveau produit Philips AVENT,
modèle SCD520/00, contre les défauts de matériaux et de fabrication
pour une période de deux ans à partir de la date d’achat et acceptent de
réparer ou de remplacer sans frais tout produit défectueux. IMPORTANT:
Cette garantie ne couvre pas les dommages causés par un accident, une
mauvaise utilisation ou un usage abusif, un manque d’entretien ou un
ajout d’accessoires non fournis avec le produit. PHILIPS NE POURRA
EN AUCUN CAS ÊTRE TENUE RESPONSABLE DE DOMMAGES
SPÉCIFIQUES, ACCESSOIRES OU CORRÉLATIFS. Pour obtenir du service
dans le cadre de la garantie, appelez simplement le numéro sans frais
suivant : 1 800 54-AVENT.
Foire aux questions
Cette section énumère les questions les plus fréquentes au sujet de cet
appareil. Si vous ne trouvez pas la réponse à votre question ici, composez
Question Réponse
Pourquoi le voyant
d’alimentation de l’unité
bébé et le voyant LINK de
l’unité parents s’allumentils lorsque j’appuie sur les
boutons marche/arrêt de ces
unités ?
Les piles non rechargeables de l’unité bébé sont peut-être épuisées et
L’unité bébé est peut-être hors de portée de l’unité parents. Rapprochez
le 1 800 54-AVENT (1 800 542-8368) pour obtenir de l’aide.
Le bloc-pile rechargeable de l’unité parents est peut-être déchargé et
l’unité parents ne se trouve pas sur le chargeur. Insérez la petite fi che de
l’appareil dans le chargeur, branchez l’adaptateur du chargeur sur la prise
de courant murale, puis placez l’unité parents sur le chargeur. Appuyez
ensuite sur le bouton marche/arrêt pour établir une liaison avec l’unité
bébé.
l’unité bébé n’est pas branchée à une prise de courant. Remplacez les
piles non rechargeables ou branchez l’unité bébé dans la prise électrique.
Puis appuyez sur le bouton marche/arrêt pour établir la connexion avec
l’unité parents.
l’unité parents de l’unité bébé, en respectant une distance minimum d’un
mètre.
Page 67

FRANÇAIS (CANADA) 67
Question Réponse
Si le voyant LINK de l’unité parents ne clignote toujours pas, rétablissez
Pourquoi le voyant LINK
de l’unité parents reste-t-il
allumé en rouge et pourquoi
le message « Not Linked »
(aucune liaison) apparaît-il
sur l’affi cheur ?
L’unité bébé est éteinte. Allumez l’unité bébé.
Pourquoi le voyant de pile
de l’unité bébé clignote-t-il
en rouge ?
Pourquoi l’unité parents
émet-elle un signal sonore ?
Si l’unité parents émet un signal sonore et que le symbole de la pile est
Si vous avez désactivé le volume mais que l’alerte sonore est activée,
Si vous avez défi ni la température de la pièce sur l’unité parents et que
L’unité bébé est éteinte. Allumez l’unité bébé.
Pourquoi l’appareil émet-il
un son aigu ?
Le volume de l’unité parents est peut-être trop élevé. Baissez le volume
Pourquoi est-ce que je
n’entends pas mon bébé
lorsqu’il pleure ?
Le niveau de sensibilité du microphone de l’unité bébé est peut-être
L’unité bébé et l’unité parents sont peut-être trop éloignées. Rapprochez
les réglages par défaut des deux unités à l’aide de la fonction de
réinitialisation.
L’unité bébé est hors de portée de l’unité parents. Rapprochez l’unité
parents de l’unité bébé.
Les piles non rechargeables de l’unité bébé sont faibles. Changez-les ou
branchez l’unité bébé sur une prise de courant (voir le chapitre « Avant
utilisation »).
Si l’unité parents émet un signal sonore, alors que le voyant LINK reste
allumé en rouge et que le message « Not Linked » (aucune liaison)
apparaît sur l’affi cheur, la liaison avec l’unité bébé est perdue. Rapprochez
l’unité parents de l’unité bébé.
vide sur l’affi cheur, le bloc-pile rechargeable de l’unité parents est faible.
Rechargez la pile.
l’unité parents émet un signal sonore dès que le quatrième voyant de
niveau sonore s’allume en raison de la détection d’un bruit par l’unité
bébé.
l’alerte de température est activée, l’unité parents émet un signal sonore
lorsque la température est inférieure au niveau minimum défi ni ou à
14 °C, ou lorsqu’elle est supérieure au niveau maximum défi ni ou à
30 °C.
Les unités sont peut-être trop rapprochées. Assurez-vous que l’unité
parents et l’unité bébé sont à au moins 1 mètre l’une de l’autre.
de l’unité parent.
Le volume de l’unité parents est peut-être trop bas ou éteint. Augmentez
le volume de l’unité parent.
trop bas. Augmentez la sensibilité du microphone dans le menu de l’unité
parents.
les deux unités.
Page 68

FRANÇAIS (CANADA)68
Question Réponse
Pourquoi l’unité parents
émet-elle d’autres bruits
que les sons émis par mon
bébé ?
Le niveau de sensibilité du microphone de l’unité bébé est peut-être
Pourquoi l’unité parents
réagit-elle lentement aux
pleurs du bébé ?
Pourquoi les piles non
rechargeables de l’unité bébé
s’épuisent-elles rapidement ?
Le volume de l’unité bébé est peut-être trop élevé, ce qui augmente la
Vous avez peut-être défi ni une température maximum inférieure à
Vous avez peut-être allumé la veilleuse. Si vous souhaitez utiliser la
Pourquoi la durée de charge
de l’unité parents dépasse-telle les 8 heures ?
La por tée nominale du
moniteur est de 330 mètres
(1 000 pieds). Pourquoi mon
moniteur ne fonctionne-t-il
qu’à une distance bien plus
courte ?
Pourquoi la liaison estelle coupée de temps à
autre et que les sons sont
interrompus ?
Que se passera-t-il durant
une panne d’électricité ?
Est-ce que le moniteur pour
bébé est protégé contre
l’écoute indiscrète et les
interférences ?
L’unité bébé capte tous les sons dans la pièce où elle est installée, et pas
uniquement ceux du bébé. Rapprochez l’unité bébé du bébé, en laissant
au moins 1 mètre entre les deux.
trop élevé. Diminuez la sensibilité du microphone dans le menu de l’unité
parents.
Le niveau de sensibilité du microphone de l’unité bébé est peut-être
trop faible. Diminuez la sensibilité du microphone dans le menu de l’unité
parents.
Le niveau de sensibilité du microphone de l’unité bébé est peut-être
trop élevé, ce qui amène l’unité bébé à transmettre plus souvent.
Diminuez la sensibilité du microphone dans le menu de l’unité parents.
consommation d’énergie. Réduisez le volume de l’unité bébé.
la température habituelle de la pièce ou une température minimum
supérieure à la température habituelle de la pièce. L’unité bébé continue
d’envoyer des informations à l’unité parents ce qui, par conséquent,
consomme davantage d’énergie et épuisent rapidement les piles non
rechargeables de l’unité bébé.
veilleuse, il est conseillé de brancher l’unité bébé sur une prise de
courant.
L’unité parents est peut-être restée allumée pendant la charge. Éteignezla pendant la charge.
La por tée indiquée n’est valable qu’en plein air, à l’extérieur. Dans une
maison, cette portée est limitée par le nombre et le type de murs et/ou
de plafonds faisant obstacle. À l’intérieur, la portée ne dépasse pas
50 mètres.
L’unité parents et l’unité bébé sont probablement à la limite de la portée
de fonctionnement. Placez les unités ailleurs ou rapprochez-les. Notez
qu’il faut environ 30 secondes pour établir une liaison entre les deux
unités.
Si l’unité parents est suffi samment chargée, elle continue à fonctionner
lors d’une coupure de courant, qu’elle soit sur le chargeur ou non. Si
l’unité bébé est équipée de piles, elle continue également à fonctionner
pendant une coupure de courant.
La technologie DECT du moniteur pour bébé élimine les interférences
et empêche d’autres appareils radio de capter son signal.
Page 69

Question Réponse
La durée de fonctionnement
de l’unité parents est
nominalement d’au moins
24 heures. Pourquoi celle de
mon unité parents est-elle
plus courte ?
Le volume de l’unité bébé est peut-être trop élevé, ce qui augmente la
Le niveau de sensibilité du microphone de l’unité bébé est peut-être
Le symbole de pile
n’apparaît pas sur l’affi cheur
de l’unité parents lorsque je
mets cette dernière sur le
chargeur. Comment cela se
fait-il ?
Après la première charge, l’unité parents a une autonomie inférieure
à 24 heures. Les piles n’atteignent leur pleine capacité qu’au bout de
4 cycles de charge et décharge.
consommation d’énergie. Réduisez le volume de l’unité bébé.
trop élevé, ce qui augmente la consommation d’énergie. Réduisez le
niveau de sensibilité du microphone de l’unité parents.
Il est possible que le symbole de pile n’apparaisse qu’après quelques
minutes sur l’affi cheur de l’unité parents lorsque vous chargez celle-ci
pour la première fois ou après une longue période d’inutilisation.
69FRANÇAIS (CANADA)7071
Page 70

Page 71

Page 72

72
Page 73

73
Page 74

In US manufactured for Philips Consumer Lifestyle,
a division of Philips Electronics North America
Corporation. 1600 Summer Street, 5 Fl., Stamford,
CT 06905-5125
In Canada imported for Philips Electronics Ltd,
281 Hillmount Road, Markham, ON L6C2S3
Call TOLL-FREE 1.800.54.AVENT
En EE.UU. fabricado para Philips Consumer Lifestyle,
una división de Philips Electronics North America
Corporation. 1600 Summer Street, 5 Fl., Stamford,
CT 06905-5125
En Canadá importado para Philips Electronics Ltd,
281 Hillmount Road, Markham, ON L6C2S3
Llame gratuítamente: 1.800.54.AVENT
Aux États-Unis fabriqué pour : Mode de Vie/
Consommateurs Philips, une division de Philips
Electronics North America Corporation, 1600
Summer Street, 5 Fl., Stamford, CT 06905-5125.
Au Canada importé pour Philips Électronique Ltée,
281 Hillmount Road, Markham, ON L6C2S3
Appelez SANS FRAIS: 1.800.54.AVENT
0682
/AVENT
100% papel reciclado
4222.002.7190.1
 Loading...