

Philips SA126/05, SA125/00 User Manual [es]

Digital Audio Player
SA 125
SA 126
DAT A I/O
DAT A I/O
4.5V DC
H
O
L
D
DISPLAY
M
O
D
E/E
Q
VOLUME
D
E
LETE
B
O
O
K
M
A
R
K
NO
YES
DISPLAY
M
O
D
E
/E
Q
VOLUME
D
ELETE
B
O
O
K
M
A
R
K
NO
YES
4.5
V
D
C
H
O
L
D
XP SA 125/00 E1 19-07-2000 10:11 Pagina 1

2
INDEX
Windows is a registered trademark of Microsoft Corporation.
Pentium is a registered trademark of Intel Corporation.
RealJukebox is a registered trademark of RealNetworks
Corporation. Audible and AudibleReady are registered
trademarks of Audible, Inc. All rights reserved. All trade names
referenced are the service mark, trademark or registered
trademarks of their respective manufacturers.
In the U.K. and certain other countries, the copying of material
protected by copyright may require the permission of copyright
holders.
i Italia
DICHIARAZIONE DI CONFORMITA’
Si dichiara che l’apparecchio SA 125 e SA 126,
Philips risponde alle prescrizioni dell’art. 2 comma 1 del D. M.
28 Agosto 1995 n. 548.
Philips Consumer Electronics
Philips, Glaslaan 2,
5616 JB Eindhoven, The Netherlands
English ................................................................... 4
Français ............................................................. 21
Español ............................................................... 38
Deutsch .............................................................. 55
Nederlands ...................................................72
Italiano ................................................................ 89
English
Français
Español
Deutsch
Nederlands
Italiano
XP SA 125/00 E1 19-07-2000 10:11 Pagina 2
3
123 4
CARD EJECT
%
^
3
2x AAA
4
.5
V
D
C
D
A
T
A
I
/
O
H
O
L
D
D
IS
P
L
A
Y
M
O
D
E
/E
Q
V
O
L
U
M
E
D
ELE
TE
B
O
O
K
M
A
R
K
N
O
Y
E
S
21 3 4
6
7
8
9
5
0
!
@
#
$
Fig. 1
Fig. 2
Fig. 1
XP SA 125/00 E1 19-07-2000 10:11 Pagina 3

4
English
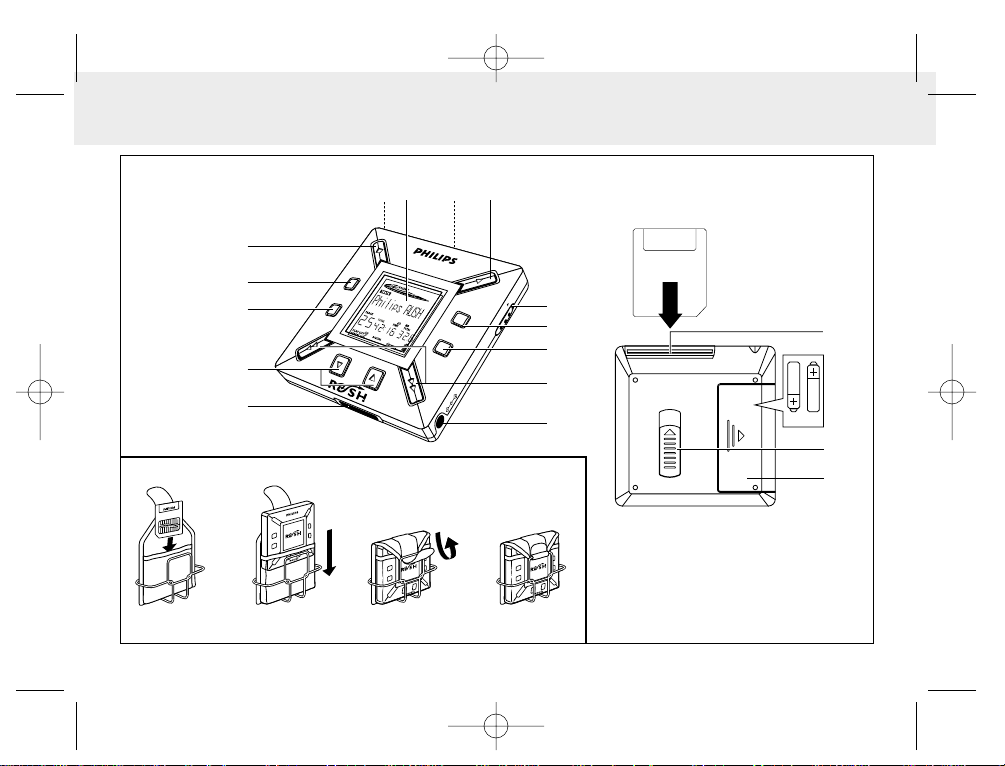
(Please refer to Fig. 1 on page 3)
1 p – 3.5 mm stereo headphone socket.
2 Display screen – shows status of the set and basic file
details. E.g.
Mb – memory space;
kHz – sampling frequency of original recording;
kbps– compression rate of file.
3 CARD INSERT – insert the SmartMedia card here.
4 YES 2 – switches the set on, starts and pauses playback.
5 HOLD 2 – locks function keys to prevent keys from being
pressed accidentally.
6 DISPLAY – selects file details e.g. name of song, artist,
album, track numbers, and elapsed playing
time.
7 MODE/EQ
– selects shuffle and repeat options,
including repeat or random order playback.
– EQ(ualizer): select from four sound modes:
Normal/ Jazz/ Rock/ Classic.
8 5, 6 – skips to beginning of a current/previous/next
track or file;
– searches backward/ forward within a track or file.
9 4.5V DC – connection for AC/DC adapter as an option to
using battery power.
0 DATA I/O – connect the supplied USB or parallel cable
here and to the USB or parallel port of your
computer.
! VOLUME 4, 3 – adjusts the volume.
@ DELETE – deletes current tracks/ erases SmartMedia card/
clears all bookmarks.
# BOOKMARK – sets up to a maximum of ten bookmarks
within the SmartMedia card.
$ NO 9 – switches the set off, or stops playback.
% CARD EJECT – push up switch to eject the SmartMedia
card.
^ Battery compartment – for two AAA, R03 or UM4
batteries.
CONTROLS AND CONNECTIONS
XP SA 125/00 E1 19-07-2000 10:11 Pagina 4

English
5
SUPPLIED ACCESSORIES
Make sure all items listed are in the package purchased. If any
item is missing, please contact your dealer.
• one USB cable
• one parallel cable
• one AC/DC adapter (not included for SA 126 models)
• one SmartMedia card with ID logo
• one protective rubber seal for the DATA I/O socket
• one SmartMedia card holder with label and chrome stickers
• one RUSH installation CD-ROM
• one set of in-ear headphones
• one carrying pouch
• two AAA, R03 or UM4 alkaline batteries
IMPORTANT SPECIFICATIONS
RUSH is a solid-state, portable, digital audio player. It can:
• play MP3 format files that you can download from the
Internet;
• playback digitized and compressed CD tracks, tape tracks,
audio books, newspapers, sound effects, etc., that are
encoded into MP3 format using RealJukebox.
Because the set is fully electronic with no moving parts and
lasers, you can play music while you are moving without
missing the quality.
COMPUTER SYSTEM REQUIREMENTS
• USB port with Windows 98 and for parallel port with
Windows 95 and ECP/EPP mode
• Internet Explorer 3.01 or above, Netscape 4.0 or above and
Internet access
• Intel®Pentium®200 MHz
• 64MB internal memory (recommended)
• Free on the personal computer: 15 MB for the software, plus
1 MB for every minute of music you store on the pc
• CD-ROM drive
• 16 bit sound card
• 256 colour video card
TAKE CARE WHEN USING HEADPHONES
Hearing Safety: Listen at a moderate volume. Using
headphones at high volume can impair your hearing.
Traffic Safety:Do not use headphones while driving or
cycling as you may cause an accident.
COPYRIGHT INFORMATION
Unauthorized duplication and distribution of Internet/
CD recordings violate copyright law and international treaties.
You should use the MP3 software only for personal purposes.
GENERAL INFORMATION
XP SA 125/00 E1 19-07-2000 10:11 Pagina 5

6
English
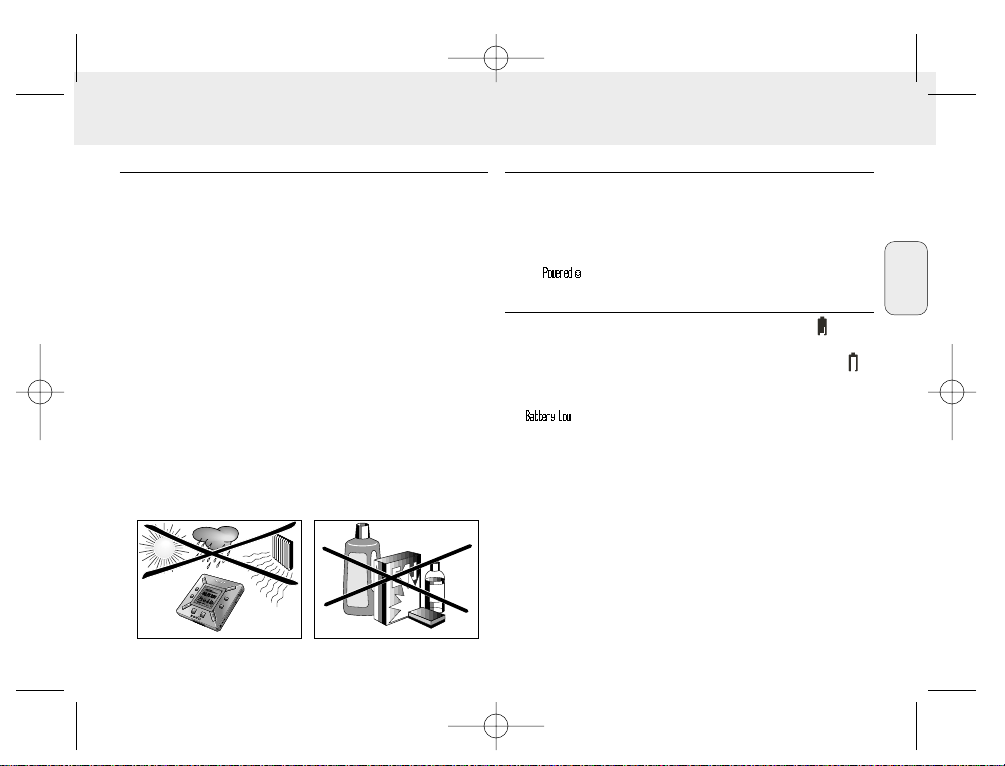
GENERAL MAINTENANCE
• To avoid damage or malfunction:
– Do not expose the set, batteries, or SmartMedia cards to
strong magnetic fields, humidity, rain, sand, or excessive
heat caused by heating equipment or direct sunlight.
– Do not drop the set or allow objects to fall on the set.
• Do not allow the set to contact water. Wipe the surface of
the set dry if wet. Water entering the set may cause major
damage.
• To clean the set, use a soft, slightly dampened chamois
leather. Do not use any cleaning agents containing alcohol,
ammonia, benzene, or abrasives as these may harm the set.
BATTERIES
1 Open the battery compartment and insert two batteries
(preferably alkaline) type AAA, R03 or UM4 as indicated by
the + and – symbols inside the battery compartment.
2 Close the battery compartment door.
™ appears on the display.
INDICATION OF EMPTY BATTERIES
The number of blocks inside the battery symbol indicates
the power level.
• When the power level is almost empty, the symbol starts
to flash. Replace the batteries or change to AC power.
• appears on the display if you ignore the flashing.
The set will switch off automatically.
Important!
• Remove the batteries if they are exhausted or if the set is
not to be used for more than two weeks.
• Batteries contain chemical substances, so they should be
disposed of properly.
• This set does not have an on board function for
rechargeable batteries.
POWER SUPPLY
XP SA 125/00 E1 19-07-2000 10:11 Pagina 6
N
O
N
O
B
OOKMARK
BOOKMARK
Y
Y
E
E
S
S
D
E
D
L
E
E
L
T
E
E
T
E
D
D
I
S
IS
D
D
P
P
L
L
L
L
A
A
Y
Y
O
O
H
H
M
M
O
O
D
D
E
E
/
/
E
E
Q
Q
VOLUME
VOLUME
D
D
A
A
T
T
A
A
I/
I
/
C
O
C
O
D
D
V
V
.5
.5
4
4
English
7
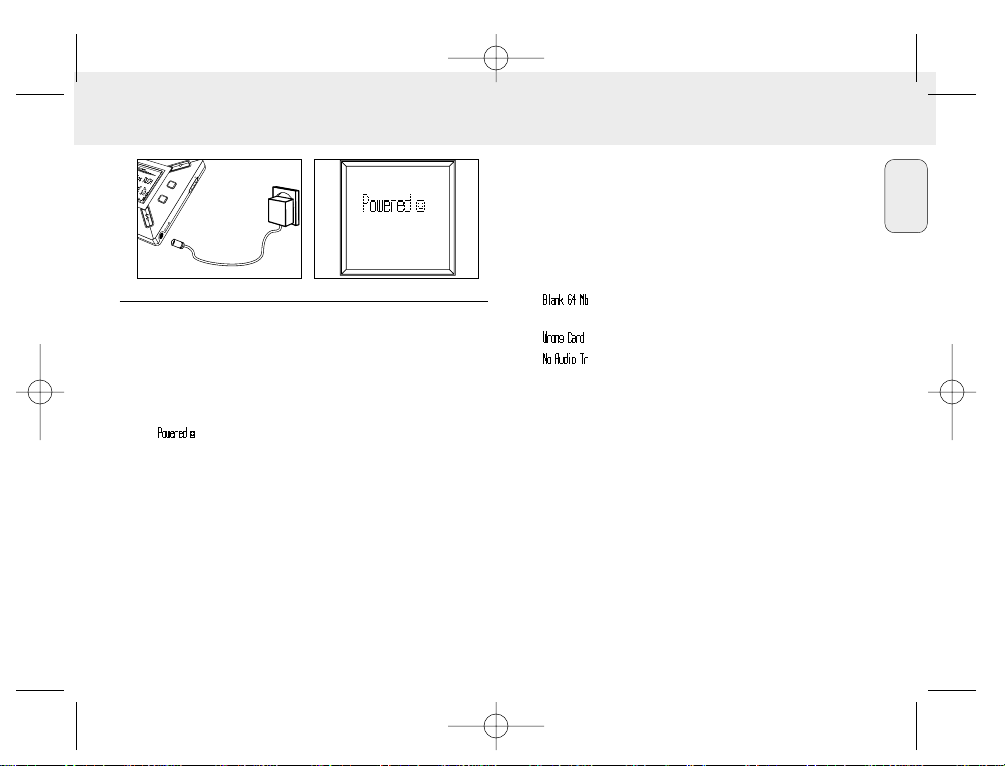
AC/DC ADAPTER (not included for SA 126 models)
1 Make sure the local voltage corresponds to the 4.5 V
adapter's voltage. The 1.3 mm centre pin (in the 4.5V DC
socket on the set) must connect to the positive pole + of
the supplied adapter with 3.5 mm socket.
2 Connect the adapter to the set's 4.5V DC socket and a wall
socket.
™ message may appear briefly on the display.
3 Always disconnect the adapter from the AC wall socket if
you are not using it.
(See Fig. 1 on page 3)
You can store up to 120 minutes of music on the card, erasing
and overwriting as you want.
Make sure the set is off before inserting or removing the card.
• Insert a SmartMedia card into CARD INSERT with the
clipped corner of the card aligned as shown on the set.
Display shows:
™ – if your card is blank
™ card details if card already contains files.
™ – if format is incompatible with the set.
™ – the track is not an audio track or your card is
blank.
• Ejecting: Slide the CARD EJECT switch up and remove the
card.
USING YOUR SMARTMEDIA CARD
XP SA 125/00 E1 19-07-2000 10:11 Pagina 7
Y
E
S
D
I
S
D
P
L
L
A
Y
O
H
M
O
D
E
/
E
Q
DC
V
5
.
4

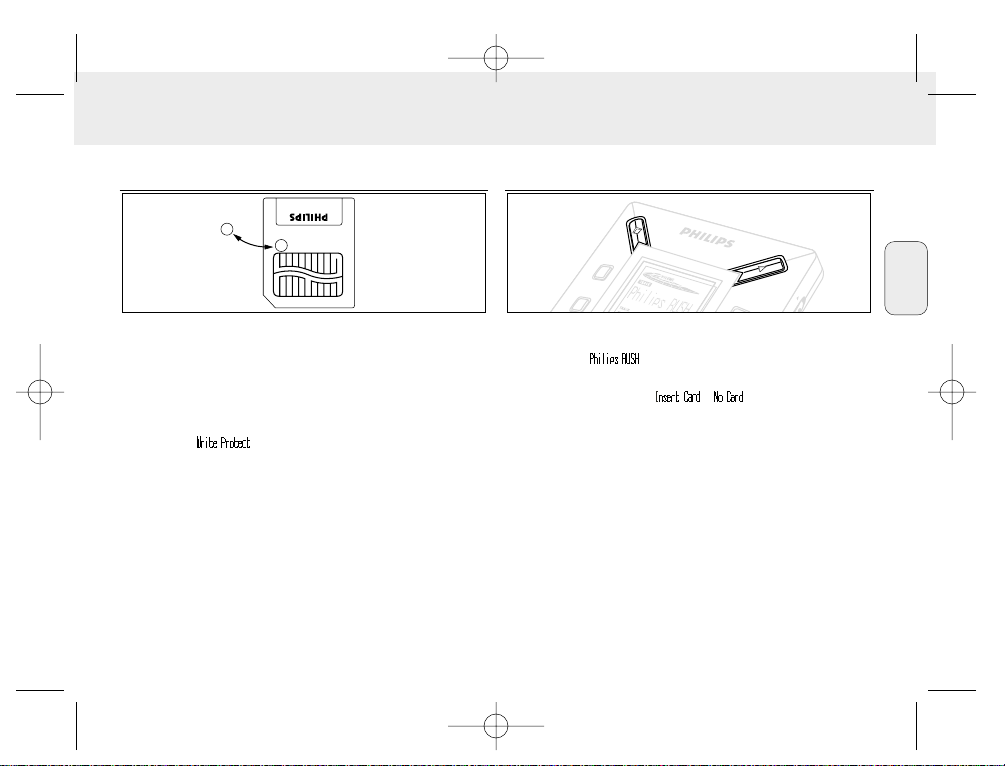
PREVENTING CARD ERASURE AND OVERWRITING
• To prevent accidental erasure or overwriting of your card,
place a chrome sticker over the circle on the front of the card.
• Remove the chrome sticker to erase or overwrite your card.
• appears on the display if you have forgotten to
remove the chrome sticker and try to delete tracks or erase
your card.
Notes:
– Use 32MB or 64MB SmartMedia cards with the
ID32MB or ID64MB logo only, or use Philips 32MB
Blue SmartMedia cards only.
– For further information, please visit our web site:
www.rush.philips.com.
– Do not use SmartMedia cards from a digital camera or
computer for your set.
– After a SmartMedia card has been formatted for MP3 files,
the card will not be recognized by your PC or digital camera.
SWITCHING ON/OFF, PLAYING AND PAUSING
AUDIO FILES
1 Press YES 2 to switch on the set.
™ appears on the display before playback starts.
™ If no card is inserted: ( ) appears.
2 Press YES 2 briefly to pause playback. To resume playback,
press YES 2 again.
3 Press NO 9 twice to switch off the set.
Power-saving standby mode
The set automatically switches off if no keys are pressed
within 15 seconds of when playback is stopped, the end of a
file is reached, or pause is activated.
L
D
D
IS
P
L
A
Y
D
E
L
E
T
E
BO
O
K
M
A
R
K
N
O
Y
E
S
8
English
XP SA 125/00 E1 19-07-2000 10:11 Pagina 8

English
9
Adjusting volume and sound
1 Press and hold VOLUME 4, 3 to decrease or increase the
volume.
™ The volume bar changes on the display to show the
volume.
2 Press and hold MODE /EQ for two seconds to see the
equalizer options: Normal/ Jazz/ Rock/ or Classic.
3 When the display shows one of the equalizer options, press
MODE /EQ briefly and repeatedly to select your option.
Locking functions with HOLD
HOLD prevents the front panel keys from being pressed
accidentally.
1 Push the HOLD 2 switch to the right as indicated to lock
the keys.
™ Display shows when activated, and the front
panel keys will not function.
2 To deactivate, push the HOLD2 switch to the left.
• If you forget to unlock HOLD and attempt to switch the set
on/off, the display shows the message: . You must
deactivate HOLD first.
H
O
L
D
D
IS
P
L
A
Y
MODE/EQ
VOLUME
D
E
L
E
T
E
B
O
O
KM
ARK
Y
E
S
XP SA 125/00 E1 19-07-2000 10:11 Pagina 9
M
ODE/EQ
VOLUME
D
A
T
A
I
/
O
C
D
V
.5
4

10
English
Display
1 Press DISPLAY repeatedly to see various types of
information about the items stored on the SmartMedia card:
TRACK song title
ARTIST name, if entered, or 'No Artist Info'
ALBUM title, if entered, or 'No Album Info'
CARD title, if entered, or 'No Card Info'
FILE name
Track Time
Remained Time - remaining playing time of current track
Total Time - total playing time of file
Option? - the card's technical details –
Free Memory, Total Memory, Sampling Frq.
(Frequency) and Compression rate.
2 Press YES 2 to confirm the type of detail.
3 If you want to see the details under Option?
• Press YES 2 again, while the display shows Option?
• Press DISPLAY briefly and repeatedly until you see your
option.
Selecting a different track
• Press 5 or 6 once or repeatedly until the desired track
number appears in the display.
Fast searching within a track
• Press and hold 5 or 6. Watch the track time to find the
desired point in the track and release 5 or 6.
4
.5
V
D
C
D
A
T
A
I
/
O
M
ODE/EQ
VOLUME
XP SA 125/00 E1 19-07-2000 10:11 Pagina 10
N
O
BO
O
K
M
A
R
K
D
E
L
E
T
E
Y
E
S
D
IS
D
P
L
L
A
Y
O
H

English
11
Different play modes: REPEAT and SHUFFLE
1 To select your play mode before or during playback, press
MODE /EQ briefly and repeatedly to scroll through the
options.
REPEAT 1 – repeats current track continuously.
REPEAT ALL
– repeats all tracks stored in the selected mode
continuously.
SHUFFLE – plays tracks in random order.
2 To return to normal playback, press MODE/EQ repeatedly
until the various SHUFFLE/ REPEAT modes are no longer
displayed.
USING BOOKMARK TO FIND YOUR FAVOURITE
PASSAGES
BOOKMARK allows you to start playback instantly from
selected points within a file/track. You can set up to
10 bookmarks.
1 To set the bookmark at the desired passage, press and hold
BOOKMARK for more than two seconds.
™ Display shows .
2 Repeat step 1 to set other bookmarks.
3 To select a bookmark, press BOOKMARK repeatedly.
™ Display shows the bookmark number, 1-10, and playback
starts immediately from this point.
Deleting tracks, bookmarks, and card
DELETE allows you to clear:
• all bookmarks.
• a selected track.
• an entire SmartMedia card.
H
O
L
D
D
IS
P
L
A
Y
MODE/EQ
D
E
L
E
T
E
BO
O
KM
A
RK
N
O
Y
E
S
D
S
XP SA 125/00 E1 19-07-2000 10:11 Pagina 11
D
E
L
E
T
E
VOLUME
M
ODE/EQ
D
IS
D
P
L
A
Y
L
O
H

12
English
When clearing tracks or the entire card, use DELETE
sparingly unless you are absolutely sure you no longer want
the existing contents!
1 During playback, press YES 2 to pause playback.
2 Press DELETE repeatedly to see the options.
™ Display shows in sequence , and
• If you have selected Erase Card, the display shows an
extra message: . To continue to delete the entire
card, press YES 2.
3 To cancel DELETE, press NO9.
4 To delete an item, press YES 2.
™ Display shows or and
then:
,
or .
Note: If you set more than ten bookmarks, this will overwrite
your original set of bookmarks.
USING THE CARRYING POUCH
(See Fig. 2 on page 3)
Disconnect headphones before using the pouch.
1 Store your extra SmartMedia card(s) in the pocket.
2 Insert the set into the pouch with the display screen facing
the plastic square.
3 Insert the strap through the plastic square and pull strap to
adjust securely.
4 Adjust elastic cords to ensure all keys are accessible.
Detachable key ring
Push back the hinge of the key ring, then hook onto a belt,
ring, etc.
Belt strap
If your belt is a suitable width, thread the belt through the
strap at the back of the pouch.
H
O
L
D
D
IS
P
L
A
Y
D
E
L
E
T
E
B
O
O
K
M
A
R
K
N
O
Y
E
S
XP SA 125/00 E1 19-07-2000 10:11 Pagina 12

English
13
CONNECTING RUSH TO YOUR COMPUTER
Depending on your PC, you can choose one of 2 ways to
connect RUSH to your computer.
• Port option (see Fig. 3)
Follow steps 1-4 below.
• USB port option (see Fig. 4)
Follow step 3, but connect the supplied USB cable to the
computer’s USB port and the set.
1 Make sure your computer and the set are switched off.
2 If a printer cable is connected to the parallel port on your
computer, disconnect the printer cable.
3 Connect the supplied parallel cable/USB cable to the
computer's respective port. Remove the protective rubber
seal from the DATA I/O socket on the set, then insert the
other end of the cable to DATA I/O.
• IMPORTANT:
– To avoid damage to the set, check the other end of the
cable is the right way up, with the side marked TOP
facing up, before you insert this cable end to DATA I/O.
– Always replace the protective rubber seal when not
connecting RUSH to your computer. Keep the seal in the
carrying pouch or a safe place when removed from the
DATA I/O socket.
4 Turn on the set first, then turn on your computer.
4.5V
D
C
D
A
T
A
I
/
O
HO
L
D
D
IS
PLA
Y
MODE/EQ
V
OLU
M
E
DELETE
B
O
O
K
M
A
R
K
NO
Y
E
S
TOP
C
O
K
M
Fig. 3
Fig. 4
XP SA 125/00 E1 19-07-2000 10:11 Pagina 13
4.5V D
TOP
E
O
/
I
A
LUM
T
O
A
V
D
DELETE
O
B
14
English
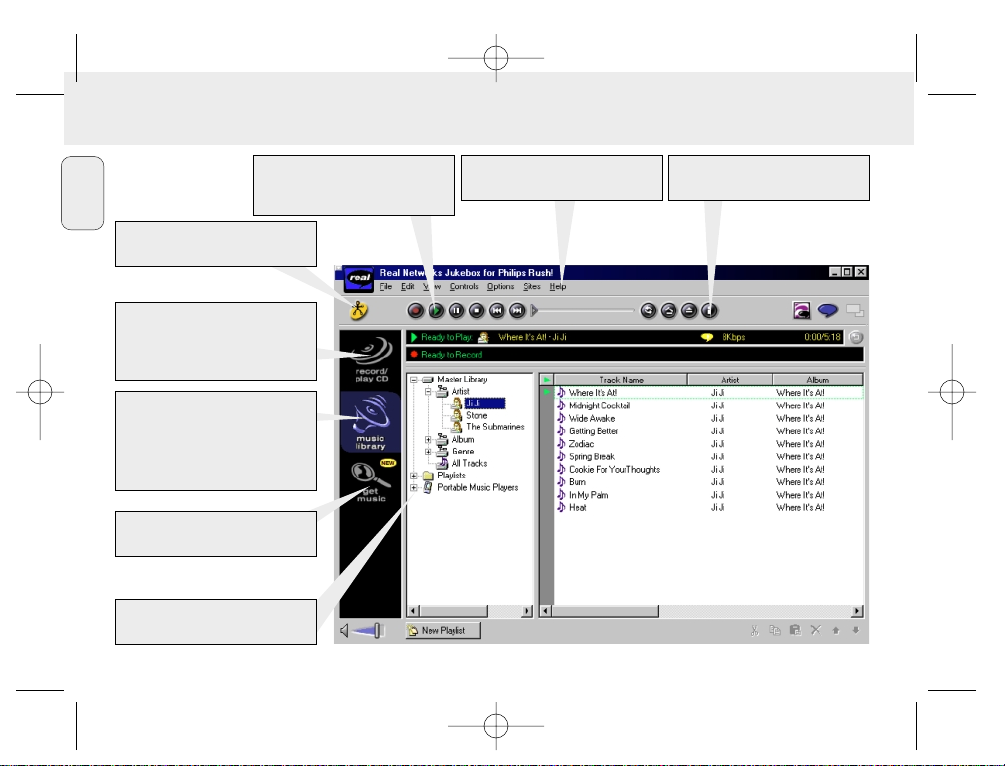
REALJUKEBOX
Create and save Playlists for any
occasion. Sort and manage thousands
of songs and hundreds of CDs by
genre, artist, album, song title
and more.
Put your CD collection on your PC.
Record CDs at high speed
(up to seven times faster than
playback speed).
Automatically downloads CD track,
artist and album information.
Quickly and easily download and
install new plug-ins and updates.
Find and download music from the
Web, including MP3 songs.
Drag and drop music from
RealJukebox to RUSH!
Instantly access to
Philips SmartConnect website.
Plays the broadest range of digital
music. Listen to music while you
record.
XP SA 125/00 E1 19-07-2000 10:11 Pagina 14

English
INSTALLING REALJUKEBOX ONTO YOUR COMPUTER
IMPORTANT
Read all the RealJukebox instructions before installing.
• Use the Help menu for more information.
RealJukebox
Install the RealJukebox software to manage your playlist
selection on your personal computer. RealJukebox allows you to:
• Record from /play CDs: Records CDs at high speed onto
your computer's hard drive and downloads the songs to
Rush for super compact portable playback.
• Set up a music library: Automatically indexes songs by
artist, album, genre, etc.
• get music: Download free songs from the Internet.
IMPORTANT
If you are using the parallel port, RealJukebox is designed to
work in ECP (Printer Port) mode. Make sure your computer
supports ECP mode before starting the installation by following
step 1. Then to install RealJukebox, continue to steps 2-3.
• USB users: go directly to steps 2-3 to install RealJukebox.
1 Select My Computer, then click through the following items:
My Computer ™ Control panel ™ System ™
Device Manager ™ Ports.
• Make sure ECP is available at Ports.
2 Insert the RealJukebox CD into your CD-ROM drive.
™ The programme setup screen will appear on your
monitor.
3 Follow Install RealJukebox screen directions to install
the RealJukebox software.
• Click Yes on the screen to restart your computer when
prompted. The software is now installed.
IF YOU ARE NOT IN ECP MODE:
• Restart your computer.
• Refer to your computer instruction manual, or contact the
dealer to enter BIOS set-up.
• Select ECP as the parallel port mode.
IF YOUR COMPUTER DOES NOT SUPPORT ECP MODE:
• Refer to your computer instruction manual, or contact the
dealer to select EPP or Bi-directional mode.
Tips on using RealJukebox:
• Log onto the Internet while using RealJukebox to use all the
features.
• Complete the Online Tutorial before using and recording
files.
15
XP SA 125/00 E1 19-07-2000 10:11 Pagina 15

16
English
INFORMATION ON RECORDING AND ENCODING
• From the main menu, select Options, then click through:
Preferences ™ Recording Options.
– For best recording results, select Use Error Correction,
then click OK.
• RUSH plays files encoded with the popular MP3,
RealAudio, Wave Audio and Secure Files Setting formats.
Select Encoding Options to select your recording format
and quality level:
– MP3 Audio is MPEG layer 3 Audio. Compression levels
available are: 96, 64, and 56 Kbps stereo, using the supplied
RealJukebox software. If you upgrade your software,
Philips RUSH can play music up to 224 Kbps. This has the
best sound quality, but uses the most disk space.
– RealAudio is RealNetworks' audio format. This format
saves your music as RealAudio (.rmx) secure or RealAudio
unsecured (.rmj) files. Compression levels available are:
96, 64, and 44 stereo, and 32 Kbps mono. Among these,
96 Kbps has the best sound quality, but uses the most disk
space.
– Wave Audio is unencoded music that is not compressed.
This format has the best quality sound but uses the largest
file size, as much as 650MB per CD.
– Secure Files Setting: has two further options. Secure
Files On, where files recorded with security on can only be
played on the personal computer on which they were
recorded. Secure Files Off allows the recorded files to be
played on more than one computer.
Making MP3 files from a CD
1 Double-click to select RealJukebox from your computer.
2 Insert an audio CD into the CD-ROM drive.
™ Monitor display shows CD track details.
3 Select the track you want to record in MP3.
4 From Controls in the toolbar, click Record.
™
Monitor display shows recording status. When recording is
complete, the track will be stored in the Music Library.
Sending files to RUSH from your computer
1 Before connecting RUSH to your computer, insert batteries
or connect the set to AC power. (See Connecting Rush to
your computer.) Press YES 2 to switch on Rush.
2 Double-click to select RealJukebox from your computer.
XP SA 125/00 E1 19-07-2000 10:11 Pagina 16

English
17
3 Click through the following items under
Portable Players/ Storage:
Philips RUSH ™ External Flash Card.
4 To transfer your MP3 files to RUSH,
drag your selected file from your Music Library and drop
into External Flash Card.
5 Click the Begin Transfer button, at the bottom of the
screen, to copy your your selected tracks to your RUSH
SmartMedia card.
™ Monitor display shows transfer status.
Organizing the library
You can organize the Master Libraryinto three groupings:
Artist, Album or Genre.
Enter the Master Library from the Options menu: (Options)
™ Preferences ™ Music Library ™ Master Library.
Creating a Playlist
Create a playlist for playback on your computer or to download
to RUSH.
1 Click New Playlist at the bottom of the screen.
2 Type in a name for your playlist.
3 Click to select the music you want to record.
4 Drag and drop the desired songs to your playlist.
Downloading from the Internet
1 With access to Internet on your computer, click get music.
™ RealJukebox connects you to the Internet.
2 Select your music and download it to your library and
playlist.
MP3 web sites
You can find MP3 news, and download MP3 files from Internet
sites. Below are examples:
Web site . . . . . . . . . address
Philips Consumer Electronics
. . . . . . . . . . . http://www.smartconnect.philips.com/audio
Emusic . . . . . . . . . . . . http://www.emusic.com
Audible Inc. . . . . . . . . http://www.audible.com
AudioExplosion, Inc.. . http://www.audioexplosion.com
AudioHighway.com. . . http://www.audiohighway.com
Big Heavy World . . . . http://www.bigheavyworld.com
MP3.com. . . . . . . . . . http://www.mp3.com
SINC Recordings . . . . http://www.sincrecordings.com
Songs.com. . . . . . . . . http://www.songs.com
XP SA 125/00 E1 19-07-2000 10:11 Pagina 17

18
English
If a fault occurs, first check the points listed below before taking the set for repair.
If you are unable to remedy a problem by following these hints, consult your dealer or service centre.
WARNING: Do not open the set as there is a risk of electric shock! Under no circumstances should you try to
repair the set yourself, as this will invalidate the guarantee.
TROUBLESHOOTING
PROBLEM
– POSSIBLE CAUSE
• REMEDY
No display/ sound
– Batteries weak/ incorrectly inserted.
• Correctly insert fresh batteries.
– Loose AC adapter connection/ mains supply switched off
• Check adapter and wall socket connection. Switch on mains
supply at wall socket.
– YES2 not pressed long enough.
• Press YES 2 until display turns on.
– Headphones not properly connected.
• Insert headphone plug into socket completely.
No power to external drive
– Connections loose/mains supply not switched on/
computer not turned on.
• Make sure all connections are secure. Switch on the power
at the wall socket. Turn on the computer.
No reaction to controls and/or display shows
– HOLD activated.
• Switch off HOLD.
– Electrostatic discharge.
• Remove batteries and replace after several seconds.
Sound skips during playback on RUSH
– MP3 file made at compression level exceeding 224Kbps
• Use a lower compression level to record CD tracks into
MP3 format
XP SA 125/00 E1 19-07-2000 10:11 Pagina 18

English
19
SmartMedia card does not insert/ play
– Card inserted incorrectly.
• Insert according to illustration (See Fig. 1 on page 3.).
– Incompatible format.
• Use MP3 format.
– Card damaged.
• Replace card.
– Incompatible card from a digital camera /another MP3 player.
• Use 32MB or 64MB SmartMedia cards with the ID32MB or
ID64MB logo only, or use Philips 32MB Blue SmartMedia
cards only.
USB does not connect/ function
– An unsuitable USB cable has been used.
• Use the supplied USB cable only.
– Cable connections incorrect or not secure.
• Check all connections are correct and well inserted
between RUSH and your computer.
– USB driver not installed.
• Check you have installed the USB driver provided from the
RUSH installation CD-ROM.
– Wrong Windows version.
• Your computer must be equipped with Windows 98.
– USB not enabled.
• Check the BIOS set-up: USB has to be enabled.
Unable to download MP3 file
– Batteries low and/ or connection between the set and
computer loose.
• Check battery status and USB or parallel cable connection.
– (For parallel port users only) Parallel port not in ECP mode.
• See chapter: INSTALLING REALJUKEBOX ONTO YOUR
COMPUTER.
Set skips/repeats files
– SHUFFLE or REPEAT mode is active.
• Press MODE/EQ to switch off SHUFFLE / REPEAT.
Long delay between songs
– Alternating between MP3, RealAudio or Wave formats.
• Group songs by format, then transfer files to RUSH.
TROUBLESHOOTING
XP SA 125/00 E1 19-07-2000 10:11 Pagina 19

Amplifier system
Audio out . . . . . . . . . . . . . . . . . . . . . . . . . . . . . . . . . . 2 x 5mW
S/N ratio. . . . . . . . . . . . . . . . . . . . . . . . . . . . . . . . . . . . . >60dB
Frequency response . . . . . . . . . . . . . . . . . . . . . . . 30Hz - 16KHz
Connections
I/O Interface . . . . . . . . . . . . . . . . . . 26-pin mini connector, USB
DC socket . . . . . . . . . . . . . . . . . . . . . . . 3.5 mm, 4.5V centre '+'
Mains Supply
Batteries . . . . . . . . . . . . . . . . . . . . . . . . . 2 x AAA, R03 or UM4
External supply. . . . . . . . . . . . . . . . . . . . . . . . . . . . . . . 4.5V DC
General
Dimension . . . . . . . . . 70.5 mm (w) x 70.5 mm (h) x 17.7 mm (d)
Weight . . . . . . . . . . . . . . . . . . . . . . . . . 65 g (without batteries)
This product complies with the radio interference
requirements of the European Union.
20
TECHNICAL DATA
English
Environmental information
We have reduced the packaging to its minimum and made it easy to separate into two materials: cardboard (box) and
polyethylene (bags).
Your set consists of materials which can be recycled if disassembled by a specialized company. Please observe
the local regulations to dispose of packing materials, exhausted batteries and old equipment.
XP SA 125/00 E1 19-07-2000 10:11 Pagina 20

21
Français
(Voir fig. 1 page 3)
1 p – prise 3,5 mm. pour écouteurs stéréo.
2 Ecran – indique le statut de l’équipement et des
informations de base sur les fichiers. Exemple:
Mb – capacité de mémoire;
kHz – fréquence d’échantillonnage de l’enregistrement
original;
kbps– taux de compression du fichier.
3 CARD INSERT – insérez la carte SmartMedia ici.
4 YES 2 – permet de mettre l’équipement en service, de
démarrer et d’arrêter le fonctionnement.
5 HOLD 2 – bloque les touches de fonction pour éviter de
les utiliser de façon inopinée.
6 DISPLAY – sélectionne les détails du fichier, par exemple
le titre du morceau, le nom de l’artiste,
l’album, les références de piste et le temps
écoulé.
7 MODE/EQ
– sélectionne les options Shuffle- et Repeat, y
compris la répétition et la reproduction dans un
ordre quelconque.
– EQ(ualizer): sélectionne entre les réglages de son:
Normal/ Jazz/ Rock/ Classic.
8 5, 6 – saute au début d’une piste ou d’un fichier en
cours/ précédent/ suivant;
– cherche en avant/en arrière dans une même piste
ou un même fichier.
9 4.5V DC – pour raccordement d’un adaptateur secteur en
tant qu’alternative pour l’alimentation piles.
0 DATA I/O – pour câble USB ou parallèle compris à la
livraison et pour la porte parallèle de votre
ordinateur.
! VOLUME 4, 3 – règle le volume.
@ DELETE – enlève les pistes en cours/efface la carte
SmartMedia élimine tous les repères.
# BOOKMARK – permet de régler au maximum dix repères
sur la carte SmartMedia.
$ NO 9 – met l’équipement hors service ou arrête la
reproduction.
% CARD EJECT – bouton-poussoir servant à éjecter la carte
SmartMedia.
^ Compartiment de piles – pour deux piles du type
AAA, R03 ou UM4.
TOUCHES ET CONNEXIONS
XP SA 125/00 E1 19-07-2000 10:11 Pagina 21

ACCESSOIRES COMPRIS A LA LIVRAISON
Vérifiez si tous les accessoires mentionnés sur cette liste se
trouvent bien dans l’emballage de l’équipement que vous
venez d’acheter. Au cas où un élément ne s’y trouverait pas,
contactez votre fournisseur.
• un câble USB
• un câble parallèle
• un adaptateur secteur (AC/DC) (non fourni avec les modèles SA 126)
• une carte SmartMedia avec le logo ID
• un caoutchouc de protection pour la prise DATA I/O
• un porte-cartes SmartMedia avec étiquette et autocollants
chromés
• un CD-ROM d’installation pour RUSH
• un jeu d’écouteurs
• une sacoche
• deux piles alcalines, type AAA, R03 ou UM4
DONNEES IMPORTANTES
Le RUSH est un lecteur audio solide, portable et numérique.
Il peut servir à:
• reproduire les fichiers en format MP3 que vous avez
téléchargé d’Internet;
• reproduire des morceaux numérisés et comprimés de CD ou
de cassette ainsi que des fichiers audio, d’effets sonores,
etc. codés en format MP3 à l’aide RealJukebox.
Comme cet équipement est entièrement électronique et
fonctionne sans éléments mobiles ni lasers,
vous pouvez faire jouer votre musique tout en étant en
mouvement sans qu’il y ait perte de qualité.
CONDITIONS DU SYSTEME POUR ORDINATEUR
• La porte USB avec Windows 98 et pour une porte parallèle
avec Windows 95 et ECP/EPP
• Internet Explorer 3.01 ou supérieur, Netscape 4.0 ou
supérieur et accès à Internet
• Intel®Pentium®200 MHz
• Mémoire interne 64MB (recommandée)
• Disponible sur votre PC: 15 MB pour le logiciel, plus 1 MB pour
chaque minute de musique que vous sauvegardez sur votre PC.
• Un lecteur de CD-ROM
• Une carte son 16-bits
• Une carte vidéo 256 couleurs
ECOUTEUR MIS: NE PERDEZ PAS LA TETE
Protégez votre ouïe: Ne mettez pas le volume trop fort pour
éviter d’endommager en permanence votre ouïe.
Sécurité dans le trafic: Ne mettez pas votre écouteur
lorsque vous êtes au volant ou que vos faites de la bicyclette.
Ceci peut causer des accidents.
INFORMATIONS SUR LES DROITS D’AUTEUR
Le copiage et la distribution sans autorisation d’enregistrement
Internet/CD est illégal car soumis aux conventions
internationales sur les droits d’auteur. Le logiciel MP3 peut
uniquement être utilisé pour des applications individualisées.
22
INFORMATIONS D’ORDRE GENERAL
Français
XP SA 125/00 E1 19-07-2000 10:11 Pagina 22
ENTRETIEN GENERAL
• Pour prévenir l’endommagement et le mauvais
fonctionnement:
– Protégez l’équipement, les piles et les cartes SmartMedia
contre les champs magnétiques trop puissants, l’humidité,
la pluie, le sable ou les températures extrêmement hautes,
telles que les équipements de chauffage ou l’exposition en
plein soleil.
– Ne pas laisser tomber l’équipement et évitez de faire
tomber les objets lourds sur celui-ci.
• Veillez à ce que l’équipement ne vienne pas contact avec
l’eau. Essuyez la surface de l équipement si humide. Du
liquide à l’intérieur de l’équipement pourrait gravement
l’abîmer.
• Nettoyez l’équipement avec un chiffon légèrement
humidifié. Ne pas utiliser de produits de nettoyage
comprenant de l’alcool, de l’ammoniaque ou un détergent,
car ces éléments peuvent endommager cet équipement.
PILES
1 Ouvrez le compartiment de piles et introduisez deux piles du
type AAA, R03 ou UM4 (de préférence alcaline), en
observant les positions symbolisées + et – à l’intérieur de
ce compartiment.
2 Refermez le compartiment de piles.
™ apparaît à l’écran.
SIGNAL INDIQUANT L’ETAT DES PILES (USEES)
Le nombre de petits blocs dans le symbole des piles
indique la capacité de celles-ci.
• Dans le cas où les piles sont presque vides, le symbole
se met à clignoter. Remplacez les piles ou passez à
l’alimentation secteur.
• apparaît à l’écran si vous ne réagissez pas au
signal clignotant. L’équipement est alors automatiquement
mis hors service.
Important!
• Déposez les piles dès que leur capacité est insuffisante ou
que vous n’avez pas l’intention d’utiliser l’équipement
pendant une période supérieure à deux semaines.
• Les piles contiennent des produits chimiques et elles
doivent par la suite être remises à un endroit répondant aux
lois sur l’environnement.
• Avec cet équipement, il n’est pas possible de recharger des
piles rechargeables.
23
ALIMENTATION SECTEUR
Français
XP SA 125/00 E1 19-07-2000 10:11 Pagina 23
N
O
N
O
BOOKMARK
BOOKMARK
Y
Y
E
E
S
S
D
E
D
L
E
E
L
T
E
E
T
E
D
D
I
S
IS
D
D
P
P
L
L
L
L
A
A
Y
Y
O
O
H
H
M
M
O
O
D
D
E
E
/
E
/
E
Q
Q
VOLUME
VOLUME
D
D
A
A
T
T
A
A
I
I/
/
C
O
C
O
D
D
V
V
5
5
.
.
4
4

AC/DC ADAPTATEUR SECTEUR
(non fourni avec les modèles SA 126)
1 La tension secteur de l’adaptateur 4,5-volt doit
correspondre à la tension secteur locale. La fiche centrale
de 1,3 mm. (au niveau de la douille 4.5V DC de
l’équipement) doit être connectée au pôle positif + de
l’adaptateur fourni avec fiche 3,5 mm.
2 Connectez l’adaptateur à la douille 4.5V DC de l’équipement
et branchez la fiche dans la prise secteur.
™ L’écran indiquera brièvement .
3 Débranchez la fiche de l’adaptateur de la prise secteur en
cas de non-utilisation.
(Voir fig. 1 page 3)
Vous pouvez mémoriser 120 minutes de musique au total sur la
carte et si vous le désirez effacer ou enregistrer en
écrasement.
Veillez à ce que l’équipement soit hors service lorsque vous
introduisez ou retirez la carte.
• Introduisez une carte SmartMedia dans l’ouverture
CARD INSERT avec la section oblique de la carte comme
indiqué sur l’équipement. L’affichage indique:
™ – si votre carte est vide.
™ les informations disponibles sur la carte s’il y a déjà des
fichiers enregistrés dessus.
™ – si le format n’est pas compatible avec
l’équipement.
™ – si l’enregistrement n’est pas un
enregistrement audio ou si votre carte est
vide.
• Retrait: Coulissez la touche CARD EJECT vers le haut et
retirez la carte.
24
EMPLOI DE LA CARTE SMARTMEDIA
Français
XP SA 125/00 E1 19-07-2000 10:11 Pagina 24
Y
E
S
D
I
S
D
P
L
L
A
Y
O
H
M
O
D
E
/
E
Q
C
D
V
.5
4
25
Français
PROTECTION DE LA CARTE CONTRE L’EFFACEMENT ET
L’ENREGISTREMENT EN ECRASEMENT
• Pour éviter l’effacement ou l’écrasement inopiné sur votre
carte, vous pouvez coller une étiquette chromée au-delà de la
section arrondie à l’avant de la carte.
• Enlevez cet autocollant dès que vous désirez effacer ou
enregistrer en écrasement.
• Si vous oubliez d’enlever l’autocollant en question et que
vous essayez malgré tout d’effacer des morceaux de
musique, apparaît à l’affichage.
Remarques:
– Utilisez uniquement des cartes SmartMedia de 32 ou
64 MB avec le logo ID32MB ou ID64MB, ou utilisez
uniquement des cartes Blue SmartMedia de 32 MB
de Philips.
– Pour davantage de renseignements, visitez notre site
Web: www.rush.philips.com.
– N’utilisez pas de cartes SmartMedia destinées aux caméras
numériques ni aux ordinateurs.
– Au cas où une carte SmartMedia a été formatée pour les
fichiers MP3, la carte n’est pas reconnue par votre
ordinateur ni par votre caméra numérique.
MISE EN/HORS SERVICE, REPRODUCTION ET
INTERRUPTION TEMPORAIRE DE FICHIERS AUDIO
1 Appuyez sur YES 2 pour mettre l’équipement en service.
™ Avant que la reproduction ne démarre, l’affichage
indique .
™ Au cas où il n’y aurait pas de carte dans I’équipement,
l’affichage indique ( ).
2 Appuyez brièvement sur YES 2 pour interrompre la
reproduction momentanément. Appuyez à nouveau sur
YES 2 pour poursuivre la reproduction.
3 Appuyez deux fois sur NO 9 pour mettre l’équipement hors
service.
Position veille économique
L’équipement est mis automatiquement hors service dans le
cas où aucune touche n’est sollicitée pendant 15 secondes
après la fin de la reproduction, la fin d’un fichier ou
l’interruption momentanée.
L
D
D
IS
P
L
A
Y
D
E
L
E
T
E
BO
O
K
M
A
R
K
N
O
Y
E
S
XP SA 125/00 E1 19-07-2000 10:11 Pagina 25

Réglage du volume et du son
1 Tenez enfoncé VOLUME 4, 3 pour augmenter ou baisser
le volume.
™ La barre volume dans l ‘affichage change selon le
volume.
2 Tenez MODE /EQ enfoncé pendant deux secondes pour
contrôler le réglage de l’égaliseur: Normal/ Jazz/ Rock/
ou Classic.
3 Appuyez brièvement et de façon répétée sur MODE /EQ
pour sélectionner le réglage souhaité au moment où un
réglage d’égaliseur apparaît à l’affichage.
Blocage des fonctions avec HOLD
La fonction HOLD prévient l’emploi inopiné des touches.
1 Faites glisser HOLD 2 vers la droite comme illustré pour
bloquer les touches.
™ Si la fonction est en service, apparaît dans
l’affichage et les touches avant ne réagissent plus.
2 Pour repasser en position de service, glissez HOLD 2 vers
la gauche.
• Si vous avez oublié de mettre la fonction HOLD hors service
et que vous essayez de mettre en/hors service
l’équipement, apparaît à l’affichage. Il vous faut
dans ce cas d’abord mettre la fonction HOLD hors service.
H
O
L
D
D
IS
P
L
A
Y
MODE/EQ
VOLUME
D
E
L
E
T
E
BO
O
K
M
A
R
K
Y
E
S
26
Français
XP SA 125/00 E1 19-07-2000 10:12 Pagina 26
MODE/EQ
VOLUME
D
A
T
A
I
/
O
C
D
V
.5
4

Affichage
1 Appuyez de façon répétée sur DISPLAY pour voir les
différentes sortes d’information mémorisées sur la carte
SmartMedia:
TRACK titre du morceau
ARTIST nom de l’artiste, si introduit ou 'No Artist Info'
ALBUM titre de l’album, si introduit, ou 'No Album Info'
CARD titre de la carte, si introduite, ou 'No Card Info'
FILE nom du fichier
Track Time
Remained Time - durée restante du morceau en cours
Total Time - durée totale du fichier
Option? - spécifications techniques de la carte –
Free Memory, Total Memory, Sampling Frq.
(Frequency) et Compression rate.
2 Appuyez sur YES 2 pour confirmer ces informations.
3 Pour illustrer les informations sous Option?
• Avec Option? à l’affichage, appuyez une nouvelle fois sur
YES 2.
• Appuyez brièvement et de façon répétée sur DISPLAY pour
faire apparaître les informations souhaitées.
Sélection d’un autre morceau
• Appuyez une ou plusieurs fois sur 5 ou 6 pour faire
apparaître le morceau souhaité à l’affichage.
Recherche rapide dans un morceau
• Tenez appuyé 5 ou 6. Observez la durée de reproduction
pour rechercher le moment souhaité dans ce morceau et
relâchez ensuite 5 ou 6.
4
.5
V
D
C
D
A
T
A
I
/
O
MO
DE/EQ
VOLUME
27
Français
XP SA 125/00 E1 19-07-2000 10:12 Pagina 27
N
O
BO
O
KM
A
R
K
D
E
L
E
T
E
D
Y
E
S
IS
D
P
L
L
A
Y
O
H

Différents types de reproduction: REPEAT et SHUFFLE
1 Pour sélectionner avant ou pendant la reproduction le type
de reproduction, appuyez brièvement et de façon répétée
sur MODE /EQ pour voir les différentes possibilités.
REPEAT 1 – le morceau en cours est répété à chaque fois.
REPEAT ALL
– tous les morceaux sauvegardés sont
constamment répétés.
SHUFFLE – les morceaux sont reproduits dans un ordre
quelconque.
2 Si vous désirez poursuivre la reproduction de façon normale,
appuyez de façon répétée sur MODE/EQ jusqu’à ce
qu’aucune autre possibilité SHUFFLE/ REPEAT ne soit
affichée.
RECHERCHE D’UN PASSAGE PREFERE A L’AIDE DU
REPERE BOOKMARK
Avec la fonction BOOKMARK, vous pouvez démarrer la
reproduction directement à partir d’un moment spécifique dans
un fichier/ morceau. Vous disposez de 10 bookmarks au total.
1 Tenez BOOKMARK enfoncé pendant plus de deux
secondes pour introduire un bookmark au passage souhaité.
™ apparaît à l’affichage.
2 Répétez le point 1 si vous désirez introduire davantage de
bookmarks.
3 Pour sélectionner un bookmark, appuyez de façon répétée
sur BOOKMARK.
™ A l’affichage la référence bookmark 1 à 10 apparaît et la
reproduction démarre immédiatement à partir de ce point.
Effacement de morceaux, bookmarks et cartes
Avec DELETE, il vous est possible d’effacer:
• tous les bookmarks.
• un morceau spécifique.
• une carte SmartMedia dans sa totalité.
H
O
L
D
D
IS
P
L
A
Y
MODE/EQ
D
E
L
E
T
E
BO
O
KM
A
R
K
N
O
Y
E
S
D
S
28
Français
XP SA 125/00 E1 19-07-2000 10:12 Pagina 28
D
E
L
E
T
E
VOLUME
M
ODE/EQ
D
IS
P
L
A
D
L
Y
O
H

Soyez toujours prudent pour effacer des morceaux ou une
carte totale avec a fonction DELETE, à moins que vous ne
soyez certain de ne plus avoir besoin de ces données!
1 Pendant la reproduction, appuyez sur YES 2 pour
interrompre momentanément cette reproduction.
2 Appuyez de façon répétée sur DELETE pour voir les
diverses possibilités.
™ A l’affichage, vous verrez successivement ,
et
• Si vous optez pour Erase Card, une mention complémentaire
est affichée. Appuyez sur YES 2 si vous désirez
poursuivre l’effacement de la carte dans sa totalité.
3 Appuyez sur NO 9 si vous désirez interrompre DELETE.
4 Pour effacer les possibilités, appuyez sur YES 2.
™ Un ou apparaissent à
l’affichage et ensuite:
,
ou .
Remarque: Dès que vous avez introduit plus de dix
bookmarks, les bookmarks originaux seront
écrasés.
EMPLOI DE LA SACOCHE
(Voir fig. 2 page 3)
Débranchez l’écouteur de l’équipement avant de le disposer
dans la sacoche.
1 Il est possible de ranger une ou plusieurs cartes
SmartMedia dans la sacoche.
2 Introduisez l’équipement dans la sacoche avec l’affichage
orienté vers le carré en plastique.
3 Introduisez la languette à travers le carré plastique et tirez
dessus.
4 Disposez les élastiques de telle sorte que vous puisiez bien
accéder à toutes les touches.
Anneau de clé
Ouvrez l’anneau de clé et l’accrocher à votre ceinture, un autre
anneau, etc.
Fixation de ceinture
Si votre ceinture n’est pas suffisamment large, il vous est
possible de la faire passer par la boucle à l’arrière de la
sacoche.
H
O
L
D
D
IS
P
L
A
Y
D
E
L
E
T
E
B
O
O
K
M
A
R
K
N
O
Y
E
S
29
Français
XP SA 125/00 E1 19-07-2000 10:12 Pagina 29

CONNEXION DU RUSH SUR VOTRE PC
Selon votre modèle de PC, vous avez le choix entre 2 manières
pour connecter le RUSH sur votre PC.
• Option de la porte (voir fig. 3)
Passez aux points 1 à 4 ci-dessous.
• USB port option (see Fig. 4)
Passez au point 3, mais connectez le câble USB fourni à la
porte USB de votre PC et l’équipement.
1 Veillez à ce que votre PC et l’équipement soient hors service.
2 Si un câble d’imprimante est raccordé à la porte parallèle
de votre PC, le débrancher.
3 Connectez le câble parallèle/USB fourni à la porte
respective de votre PC.Déposez le caoutchouc de protection
de ma douille DATA I/O de l‘équipement et branchez l’autre
fiche de câble sur DATA I/O.
• IMPORTANT:
– Pour éviter d'endommager l'équipement, contrôlez
d'abord si l’autre fiche de câble est bien positionnée
(avec la section TOP orientée vers le haut) avant de
procéder au raccordement du câble sur DATA I/O.
– Remettez toujours le caoutchouc de protection en cas de
non-utilisation du RUSH sur votre PC. Conservez bien
cette protection dans la sacoche ou en un endroit sûr.
4 Mettez l’équipement en service et ensuite votre PC.
4.5V
DC
D
A
T
A
I
/
O
HO
LD
D
IS
PLA
Y
MODE/EQ
VO
LU
M
E
DELETE
B
O
O
K
M
A
R
K
NO
Y
E
S
TOP
O
K
M
30
Français
Fig. 3
Fig. 4
XP SA 125/00 E1 19-07-2000 10:12 Pagina 30
4.5V
D
TOP
E
O
/
M
I
A
LU
T
A
VO
D
DELETE
O
B
 Loading...