

Philips SA10717, SA107 User Manual

Digital Audio Player
SA 107
DAT A I/O
DAT A I/O
4.5V DC
H
O
L
D
DISPLAY
M
O
D
E/E
Q
VOLUME
D
E
LETE
B
O
O
K
M
A
R
K
NO
YES
DISPLAY
M
O
D
E
/E
Q
VOLUME
D
ELETE
B
O
O
K
M
A
R
K
NO
YES
4.5
V
D
C
H
O
L
D
Toll Free Help Line
Ligne d'assistance en service libre
Linea de ayuda telefónica sin cargo
1-800-531-0039
XP SA 107/17 11-07-2000 11:11 Pagina 1
2
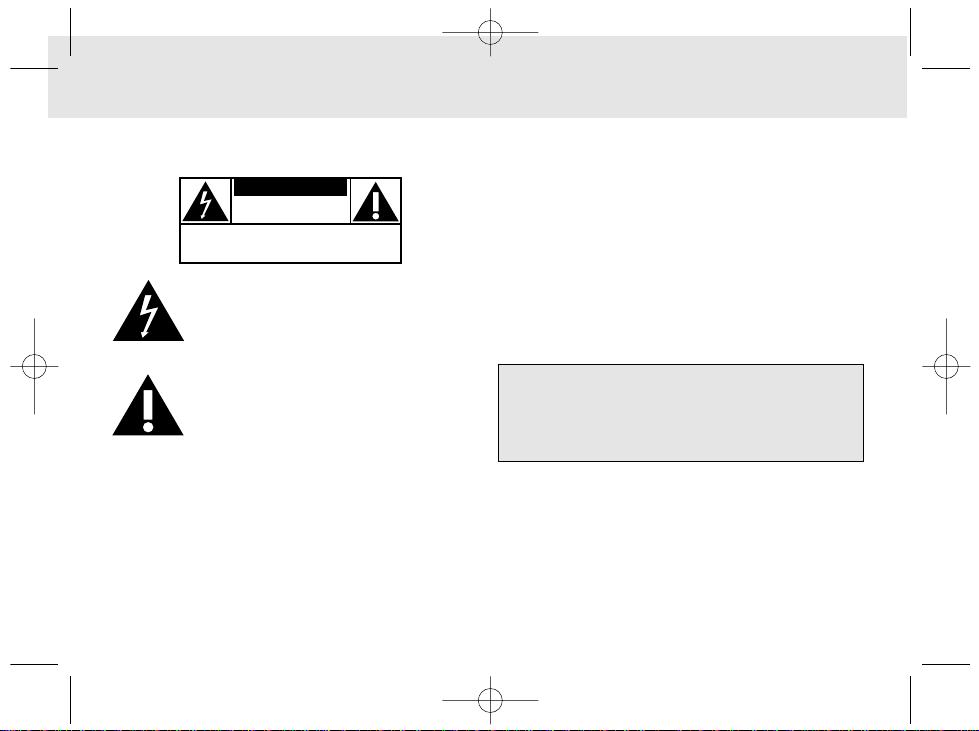
Know these ssaaffeettyy symbols
CAUTION
RISK OF ELECTRIC SHOCK
DO NOT OPEN
CAUTION: TO REDUCE THE RISK OF ELECTRIC SHOCK, DO NOT
REMOVE COVER (OR BACK). NO USER-SERVICEABLE PARTS
INSIDE. REFER SERVICING TO QUALIFIED SERVICE PERSONNEL.
This “bolt of lightning” indicates uninsulated
material within your unit may cause an
electrical shock.For the safety of everyone in
your household,please do not remove
product covering.
The “exclamation point” calls attention to
features for which you should read the
enclosed literature closely to prevent operating
and maintenance problems.
WARNING: TO PREVENT FIRE OR SHOCK
HAZARD,DO NOT EXPOSE THIS EQUIPMENT TO
RAIN OR MOISTURE.
CAUTION:To prevent electric shock,match wide
blade of plug to wide slot,and fully insert.
SAFETY INFORMATION
For details on warranty registration, product information,
instructions for use or frequently asked questions,
please visit our web site:
www.rush.philips.com
for additional information and purchases.
Use 32 or 64 MB SmartMedia cards with the ID32MB or
ID64MB logo only, or use Philips 32 MB Blue
SmartMedia cards only.
The serial number is located inside the battery compartment,
and the model number is on the back of the set.
The set complies with the Federal Communications Commission-Rules,
Part 15. Operation is subject to the following two conditions:
1. This device may not cause harmful interference, and
2. This device must accept any interference received, including
interference that may cause undesired operation.
Windows is a registered trademark of Microsoft Corporation.
Pentium is a registered trademark of Intel Corporation.
RealJukebox is a registered trademark of RealNetworks
Corporation. Audible and AudibleReady are registered
trademarks of Audible, Inc. All rights reserved. All trade names
referenced are the service mark, trademark or registered
trademarks of their respective manufacturers.
XP SA 107/17 11-07-2000 11:11 Pagina 2

3
123 4
CARD EJECT
%
^
3
2x AAA
4
.5
V
D
C
D
A
T
A
I
/
O
H
O
L
D
D
IS
P
L
A
Y
M
O
D
E
/E
Q
V
O
L
U
M
E
D
ELE
TE
B
O
O
K
M
A
R
K
N
O
Y
E
S
21 3 4
6
7
8
9
5
0
!
@
#
$
Fig. 1
Fig. 2
XP SA 107/17 11-07-2000 11:11 Pagina 3
This product was designed and manufactured to meet strict quality and
safety standards. There are, however, some installation and operation
precautions which you should be particularly aware of.
1. Read these instructions – All the safety and operating
instructions should be read before the appliance is operated.
2. Keep these instructions – The safety and operating instructions
should be retained for future reference.
3. Heed all warnings – All warnings on the appliance and in the
operating instructions should be adhered to.
4. Follow all instructions – All operating and use instructions
should be followed.
5. Do not use this apparatus near water – for example, near a
bathtub, washbowl, kitchen sink, laundry tub, in a wet basement or
near a swimming pool, etc.
6. Clean only with a damp cloth – The appliance should be cleaned
only as recommended by the manufacturer.
7. Install in accordance with the manufacturers instructions. Do
not block any of the ventilation openings – For example, the
appliance should not be situated on a bed, sofa, rug, or similar
surface or placed in a built-in installation, such as a bookcase or
cabinet that may impede the flow of air through the ventilation
openings.
8. Do not install near any heat sources such as radiators, heat
registers, stoves, or other apparatus (including amplifiers) that
produce heat.
9. Only use attachments/accessories specified by the
manufacturer.
10. Use only with a cart, stand, tripod, bracket, or table
specified by the manufacturer, or sold with the
apparatus. When a cart is used, use caution when
moving the cart/apparatus combination to avoid injury
from tip-over.
11. Refer all servicing to qualified service personnel. Servicing is
required when the apparatus has been damaged in any way, such as
power-supply cord or plug is damaged, liquid has been spilled or
objects have fallen into the apparatus, the apparatus has been
exposed to rain or moisture, does not operate normally, or has been
dropped.
EL 4562-E004: 99/3
4
IMPORTANT SAFETY INSTRUCTIONS – Read before operating equipment
CANADA
English: This digital apparatus does not exceed the Class B limits for
noise emissions from digital apparatus as set out in the Radio
Interference Regulations of the Canadian Department of
Communications.
XP SA 107/17 11-07-2000 11:11 Pagina 4

5
Français
Español
English
INDEX
CONTENTS
Safety, Information
................................................................ 2 + 4
Controls and connections
...................................................... 3 + 6
General Information
..................................................................... 7
Maintenance, Power Supply
.................................................... 8-9
Using your SmartMedia card
................................................. 9-10
Switching RUSH on/off
............................................................. 10
Adjusting volume, sound and HOLD
.......................................... 11
Display, Playing tracks
............................................................... 12
Play modes, BOOKMARK
........................................................... 13
DELETE feature
..................................................................... 13-14
Carrying pouch
........................................................................... 14
Connecting RUSH to your computer
.......................................... 15
RUSH installation CD-ROM
.................................................. 16-19
In-Car Connection
...................................................................... 20
Troubleshooting
.................................................................... 21-22
Technical data
............................................................................ 23
Limited Warranty
.................................................................. 24-25
INDEX
Sécurite, Informations
.......................................................... 26-27
Touches et connexions
........................................................ 3 + 28
Informations d’ordre general
..................................................... 29
Entretien, Alimentation secteur
........................................... 30-31
Emploi de la carte smartmedia
............................................ 31-32
Mis en/hors service RUSH
........................................................ 32
Réglage du volume, du son et HOLD
........................................ 33
Affichage, Reproduire des morceaux
........................................ 34
Types de reproduction, BOOKMARK
......................................... 35
DELETE touche
...................................................................... 35-36
Sacoche
...................................................................................... 36
Connexion du RUSH sur votre PC
.............................................. 37
RUSH installation CD-ROM
.................................................. 38-41
Raccordement en voiture
........................................................... 42
Depistage des anomalies
..................................................... 43-44
Specifications technniques
....................................................... 45
Garantie Limitée
................................................................... 46-47
ÍNDICE
Seguridad, Información
........................................................ 48-49
Controles y conexiones
....................................................... 3 + 50
Información general
................................................................... 51
Mantenimiento, Suministro de corriente
............................. 52-53
Como utilizar su tarjeta smartmedia
.................................... 54-55
Encendido y apagado RUSH
..................................................... 55
Ajuste del volumen, sonido y HOLD
.......................................... 56
Pantalla, Reproduce las piezas musicales
................................ 57
Modos de reproducción, BOOKMARK
....................................... 58
DELETE control
..................................................................... 58-59
Bolsa de transporte
................................................................... 59
Conexión de RUSH a su ordenador
........................................... 60
RUSH instalación CD-ROM
.................................................. 61-63
Conexión para el automóvil
....................................................... 64
Resolución de problemas
..................................................... 65-66
Datos técnicos
........................................................................... 67
Garantia Limitada
................................................................. 68-69
XP SA 107/17 11-07-2000 11:11 Pagina 5

6
English
(Please refer to Fig. 1 on page 3)
1 p – 3.5 mm stereo headphone jack.
2 Display screen – shows status of the set and basic file
details. E.g.
Mb – memory space;
kHz – sampling frequency of original recording;
kbps– compression rate of file.
3 CARD INSERT – insert the SmartMedia card here.
4 YES 2 – switches the set on, starts and pauses playback.
5 HOLD 2 – locks function keys to prevent keys from being
pressed accidentally.
6 DISPLAY – selects file details e.g. name of song, artist,
album, track numbers, and elapsed playing
time.
7 MODE/EQ
– selects shuffle and repeat options,
including repeat or random order playback.
– EQ(ualizer): select from four sound modes:
Normal/ Jazz/ Rock/ Classic.
8 5, 6 – skips to beginning of a current/previous/next
track or file;
– searches backward/ forward within a track or file.
9 4.5V DC – connect supplied AC/DC adapter as an option to
using battery power.
0 DATA I/O – connect the supplied USB or parallel cable
here and to the USB or parallel port of your
computer.
! VOLUME 4, 3 – adjusts the volume.
@ DELETE – deletes current tracks/ erases SmartMedia card/
clears all bookmarks.
# BOOKMARK – sets up to a maximum of ten bookmarks
within the SmartMedia card.
$ NO 9 – switches the set off, or stops playback.
% CARD EJECT – push up switch to eject the SmartMedia
card.
^ Battery compartment – for two AAA batteries.
CONTROLS AND CONNECTIONS
Environmental information
We have reduced the packaging to its minimum and made it easy to separate into two materials: cardboard (box) and
polyethylene (bags).
Your set consists of materials which can be recycled if disassembled by a specialized company. Please observe
the local regulations to dispose of packing materials, dead batteries and old equipment.
XP SA 107/17 11-07-2000 11:11 Pagina 6

English
7
SUPPLIED ACCESSORIES
Make sure all items listed are in the package purchased. If any
item is missing, please contact your dealer.
• one car kit
• one USB cable
• one parallel cable
• one AC/DC adapter
• one SmartMedia card with ID logo
• one protective rubber seal for the DATA I/O jack
• one SmartMedia card holder with label and chrome stickers
• one RUSH installation CD-ROM
• one set of in-ear headphones
• one carrying pouch
• two AAA, R03 or UM4 alkaline batteries
IMPORTANT SPECIFICATIONS
RUSH is a solid-state, portable, digital audio player. It can:
• play MP3 format files that you can download from the
internet;
• playback digitized and compressed CD tracks, tape tracks,
audio books, newspapers, sound effects, etc., that are
encoded into MP3 format using RealJukebox.
Because the set is fully electronic with no moving parts and
lasers, you can play music while you are moving without
missing the quality.
COMPUTER SYSTEM REQUIREMENTS
• USB port with Windows 98 and for parallel port with
Windows 95 and ECP/EPP mode
• Internet Explorer 3.01 or above, Netscape 4.0 or above and
Internet access
• Intel®Pentium®200 MHz
• 64MB internal memory (recommended)
• Free on the personal computer: 15MB for the software, plus
1 MB for every minute of music you store on the pc
• CD-ROM drive
• 16 bit sound card
• 256 color video card
TAKE CARE WHEN USING HEADPHONES
Hearing Safety: Listen at a moderate volume. Using
headphones at high volume can impair your hearing.
Traffic Safety:Do not use headphones while driving or
cycling as you may cause an accident.
COPYRIGHT INFORMATION
Unauthorized duplication and distribution of Internet/
CD recordings violate copyright law and international treaties.
You should use the MP3 software only for personal purposes.
GENERAL INFORMATION
XP SA 107/17 11-07-2000 11:11 Pagina 7
English
8
GENERAL MAINTENANCE
• To avoid damage or malfunction:
– Do not expose the set, batteries, or SmartMedia cards to
strong magnetic fields, humidity, rain, sand, or excessive
heat caused by heating equipment or direct sunlight.
– Do not drop the set or allow objects to fall on the set.
• Do not allow the set to contact water. Wipe the surface of
the set dry if wet. Water entering the set may cause major
damage.
• To clean the set, use a soft, slightly dampened chamois
leather. Do not use any cleaning agents containing alcohol,
ammonia, benzene, or abrasives as these may harm the set.
BATTERIES
1 Open the battery compartment and insert two batteries
(preferably alkaline) type AAA as indicated by the + and –
symbols inside the battery compartment.
2 Close the battery compartment door.
™ appears on the display.
INDICATION OF EMPTY BATTERIES
The number of blocks inside the battery symbol indicates
the power level.
• When the power level is almost empty, the symbol starts
to flash. Replace the batteries or change to AC power.
• appears on the display if you ignore the flashing.
The set will switch off automatically.
Important!
• Remove the batteries if they are dead or if the set is not to
be used for more than two weeks.
• Batteries contain chemical substances, so they should be
disposed of properly.
• This set does not have an on board function for
rechargeable batteries.
POWER SUPPLY
XP SA 107/17 11-07-2000 11:11 Pagina 8
N
O
N
O
B
OOKMARK
BOOKMARK
Y
Y
E
E
S
S
D
E
D
L
E
E
L
T
E
E
T
E
D
D
I
S
IS
D
D
P
P
L
L
L
L
A
A
Y
Y
O
O
H
H
M
M
O
O
D
D
E
E
/
/
E
E
Q
Q
VOLUME
VOLUME
D
D
A
A
T
T
A
A
I/
I
/
C
O
C
O
D
D
V
V
.5
.5
4
4

English
9
AC/DC ADAPTER
1 Make sure the local voltage corresponds to the 4.5 V
adapter's voltage. The 1.3 mm center pin (in the 4.5V DC
jack on the set) must connect to the positive pole + of the
supplied adapter with 3.5 mm jack.
2 Connect the adapter to the set's 4.5V DC jack and a wall
power outlet.
™ message may appear briefly on the display.
3 Always disconnect the adapter from the AC wall power
outlet if you are not using it.
(See Fig. 1 on page 3)
You can store up to 120 minutes of music on the card, erasing
and overwriting as you want.
Make sure the set is off before inserting or removing the card.
• Insert a SmartMedia card into CARD INSERT with the
clipped corner of the card aligned as shown on the set.
Display shows:
™ – if your card is blank.
™ card details if card already contains files.
™ – if format is incompatible with the set.
™ – the track is not an audio track or your card is
blank.
• Ejecting: Slide the CARD EJECT switch up and remove the
card.
USING YOUR SMARTMEDIA CARD
XP SA 107/17 11-07-2000 11:11 Pagina 9
Y
E
S
D
I
S
D
P
L
L
A
Y
O
H
M
O
D
E
/
E
Q
DC
V
5
.
4

PREVENTING CARD ERASURE AND OVERWRITING
• To prevent accidental erasure or overwriting of your card,
place a chrome sticker over the circle on the front of the card.
• Remove the chrome sticker to erase or overwrite your card.
• appears on the display if you have forgotten to
remove the chrome sticker and try to delete tracks or erase
your card.
Notes:
– Use only 32 or 64 MB Smartmedia cards with the
ID32MB or ID64MB logo only, or use Philips 32 MB
Blue SmartMedia cards only.
– For further information, please visit our web site:
www.rush.philips.com.
– Do not use SmartMedia cards from a digital camera or
computer for your set.
– After a SmartMedia card has been formatted for MP3 files,
the card will not be recognized by your PC or digital camera.
SWITCHING ON/OFF, PLAYING AND PAUSING
AUDIO FILES
1 Press YES 2 to switch on the set.
™ appears on the display before playback starts.
™ If no card is inserted: ( ) appears.
2 Press YES 2 briefly to pause playback. To resume playback,
press YES 2 again.
3 Press NO 9 twice to switch off the set.
Power-saving standby mode
The set automatically switches off if no keys are pressed
within 15 seconds of when playback is stopped, the end of a
file is reached, or pause is activated.
L
D
D
IS
P
L
A
Y
D
E
L
E
T
E
BO
O
K
M
A
R
K
N
O
Y
E
S
10
English
XP SA 107/17 11-07-2000 11:11 Pagina 10

English
11
Adjusting volume and sound
1 Press and hold VOLUME 4, 3 to decrease or increase the
volume.
™ The volume bar changes on the display to show the
volume.
2 Press and hold MODE /EQ for two seconds to see the
equalizer options: Normal/ Jazz/ Rock/ or Classic.
3 When the display shows one of the equalizer options, press
MODE /EQ briefly and repeatedly to select your option.
Locking functions with HOLD
HOLD prevents the front panel keys from being pressed
accidentally.
1 Push the HOLD 2 switch to the right as indicated to lock
the keys.
™ Display shows when activated, and the front
panel keys will not function.
2 To deactivate, push the HOLD2 switch to the left.
• If you forget to unlock HOLD and attempt to switch the set
on/off, the display shows the message: . You must
deactivate HOLD first.
H
O
L
D
D
IS
P
L
A
Y
MODE/EQ
VOLUME
D
E
L
E
T
E
B
O
O
KM
ARK
Y
E
S
XP SA 107/17 11-07-2000 11:11 Pagina 11
M
ODE/EQ
VOLUME
D
A
T
A
I
/
O
C
D
V
.5
4

English
12
Display
1 Press DISPLAY repeatedly to see various types of
information about the items stored on the SmartMedia card:
TRACK song title
ARTIST name, if entered, or 'No Artist Info'
ALBUM title, if entered, or 'No Album Info'
CARD title, if entered, or 'No Card Info'
FILE name
Track Time
Remained Time - remaining playing time of current track
Total Time - total playing time of file
Option? - the card's technical details –
Free Memory, Total Memory, Sampling Frq.
(Frequency) and Compression rate.
2 Press YES 2 to confirm the type of detail.
3 If you want to see the details under Option?
• Press YES 2 again, while the display shows Option?
• Press DISPLAY briefly and repeatedly until you see your
option.
Selecting a different track
• Press 5 or 6 once or repeatedly until the desired track
number appears in the display.
Fast searching within a track
• Press and hold 5 or 6. Watch the track time to find the
desired point in the track and release 5 or 6.
4
.5
V
D
C
D
A
T
A
I
/
O
M
ODE/EQ
VOLUME
XP SA 107/17 11-07-2000 11:11 Pagina 12
N
O
BO
O
K
M
A
R
K
D
E
L
E
T
E
D
IS
Y
E
S
D
P
L
L
A
Y
O
H
English
13
Different play modes: REPEAT and SHUFFLE
1 To select your play mode before or during playback, press
MODE /EQ briefly and repeatedly to scroll through the
options.
REPEAT 1 – repeats current track continuously.
REPEAT ALL
– repeats all tracks stored in the selected mode
continuously.
SHUFFLE – plays tracks in random order.
2 To return to normal playback, press MODE/EQrepeatedly
until the various SHUFFLE/ REPEAT modes are no longer
displayed.
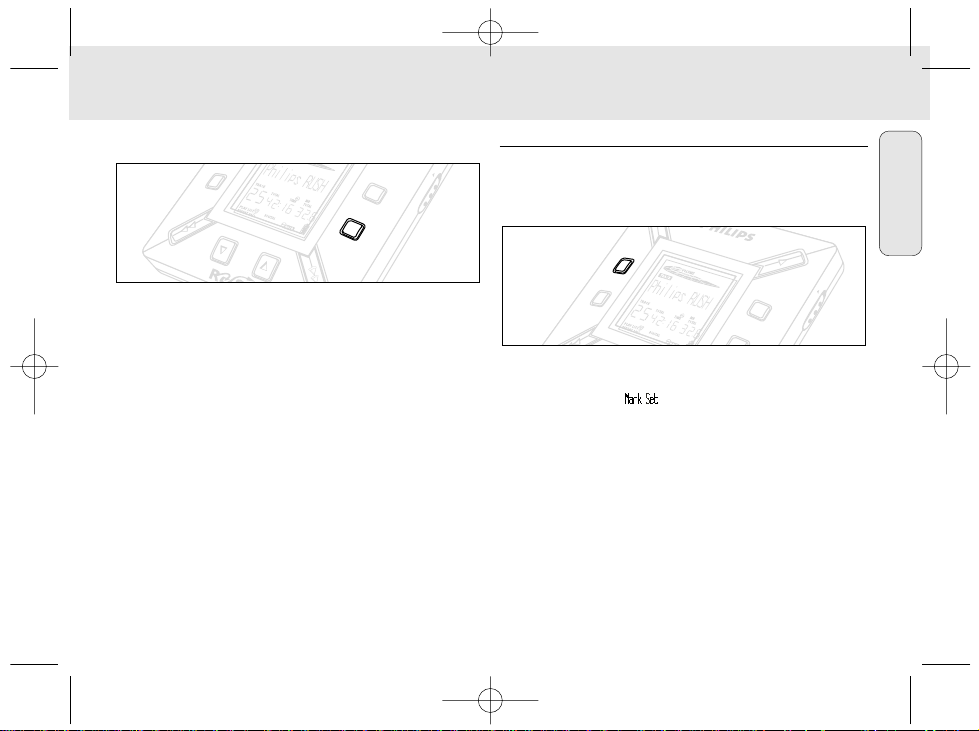
USING BOOKMARK TO FIND YOUR FAVORITE PASSAGES
BOOKMARK allows you to start playback instantly from
selected points within a file/track. You can set up to 10
bookmarks.
1 To set the bookmark at the desired passage, press and hold
BOOKMARK for more than two seconds.
™ Display shows .
2 Repeat step 1 to set other bookmarks.
3 To select a bookmark, press BOOKMARK repeatedly.
™ Display shows the bookmark number, 1-10, and playback
starts immediately from this point.
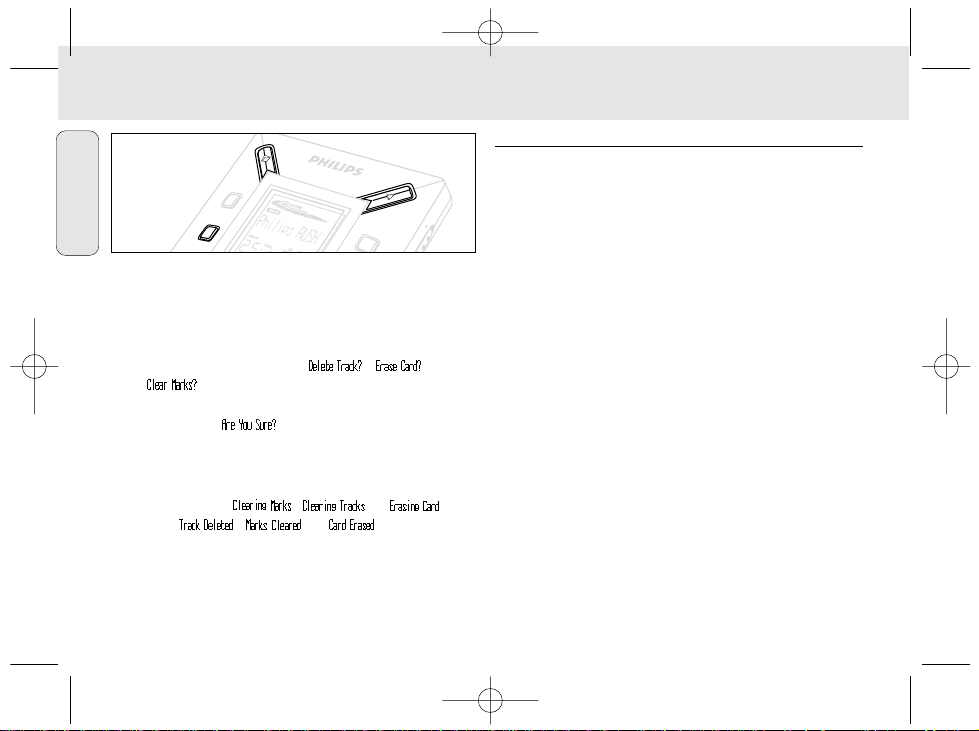
Deleting tracks, bookmarks, and card
DELETE allows you to clear:
• all bookmarks.
• a selected track.
• an entire SmartMedia card.
H
O
L
D
D
IS
P
L
A
Y
MODE/EQ
D
E
L
E
T
E
B
O
O
K
M
A
RK
N
O
Y
E
S
D
S
XP SA 107/17 11-07-2000 11:11 Pagina 13
D
E
L
E
T
E
VOLUME
M
ODE/EQ
D
IS
P
D
L
L
A
Y
O
H
English
14
When clearing tracks or the entire card, use DELETE
sparingly unless you are absolutely sure you no longer want
the existing contents!
1 During playback, press YES 2 to pause playback.
2 Press DELETE repeatedly to see the options.
™ Display shows in sequence , and
• If you have selected Erase Card, the display shows an
extra message: . To continue to delete the entire
card, press YES 2.
3 To cancel DELETE, press NO9.
4 To delete an item, press YES 2.
™ Display shows or and
then:
,
or .
Note: If you set more than ten bookmarks, this will overwrite
your original set of bookmarks.
USING THE CARRYING POUCH
(See Fig. 2 on page 3)
Disconnect headphones before using the pouch.
1 Store your extra SmartMedia card(s) in the pocket.
2 Insert the set into the pouch with the display screen facing
the plastic square.
3 Insert the strap through the plastic square and pull strap to
adjust securely.
4 Adjust elastic cords to ensure all keys are accessible.
Detachable key ring
Push back the hinge of the key ring, then hook onto a belt,
ring, etc.
Belt strap
If your belt is a suitable width, thread the belt through the
strap at the back of the pouch.
H
O
L
D
D
IS
P
L
A
Y
D
E
L
E
T
E
B
O
O
K
M
A
R
K
N
O
Y
E
S
XP SA 107/17 11-07-2000 11:11 Pagina 14

English
15
CONNECTING RUSH TO YOUR COMPUTER
Depending on your PC, you can choose one of 2 ways to
connect RUSH to your computer.
• Parallel port option (see Fig. 3)
Follow steps 1-4 below.
• USB port option (see Fig. 4)
Follow step 3, but connect the port/USB cable to the
computer’s USB port and the set.
1 Make sure your computer and the set are switched off.
2 If a printer cable is connected to the parallel port on your
computer, disconnect the printer cable.
3 Connect the supplied parallel cable to the computer's
respective port. Remove the protective rubber seal from the
DATA I/O jack on the set, then insert the other end of the
cable to DATA I/O.
• IMPORTANT:
– To avoid damage to the set, check the other end of the
cable is the right way up, with the side marked TOP
facing up, before you insert this cable end to DATA I/O.
– Always replace the protective rubber seal when not
connecting RUSH to your computer. Keep the seal in the
carrying pouch or a safe place when removed from the
DATA I/O jack.
4 Turn on the set first, then turn on your computer.
4.5V
D
C
D
A
T
A
I
/
O
HO
L
D
D
IS
PLA
Y
MODE/EQ
V
OLU
M
E
DELETE
B
O
O
K
M
A
R
K
NO
Y
E
S
TOP
C
O
K
M
Fig. 3
Fig. 4
XP SA 107/17 11-07-2000 11:11 Pagina 15
4.5V D
TOP
E
O
/
I
A
LUM
T
O
A
V
D
DELETE
O
B
English
16
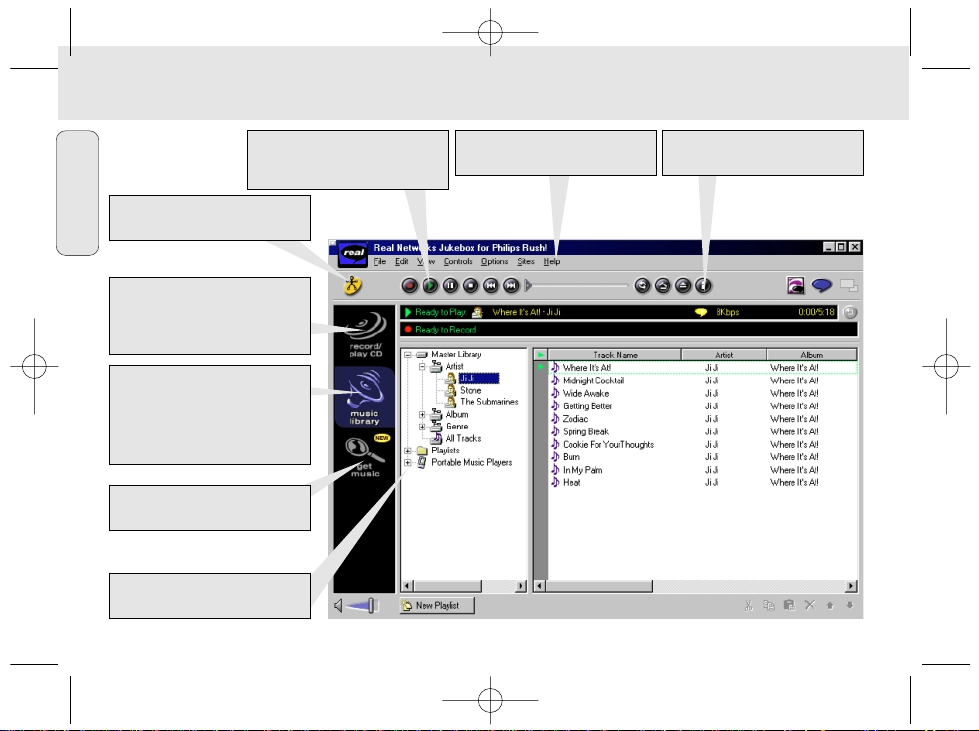
REALJUKEBOX
Create and save Playlists for any
occasion. Sort and manage thousands
of songs and hundreds of CDs by
genre, artist, album, song title
and more.
Put your CD collection on your PC.
Record CDs at high speed
(up to seven times faster than
playback speed).
Automatically downloads CD track,
artist and album information.
Quickly and easily download and
install new plug-ins and updates.
Find and download music from the
Web, including MP3 songs.
Drag and drop music from
RealJukebox to RUSH!
Instantly access to
Philips SmartConnect website.
Plays the broadest range of digital
music. Listen to music while you
record.
XP SA 107/17 11-07-2000 11:11 Pagina 16

English
INSTALLING REALJUKEBOX ONTO YOUR COMPUTER
IMPORTANT
Read all the RealJukebox instructions before installing.
• Use the Help menu for more information.
RealJukebox
Install the RealJukebox software to manage your playlist
selection on your personal computer. RealJukebox allows you to:
• Record from /play CDs: Records CDs at high speed onto
your computer's hard drive and downloads the songs to
Rush for super compact portable playback.
• Set up a music library: Automatically indexes songs by
artist, album, genre, etc.
• get music: Download free songs from the Internet.
IMPORTANT
If you are using the parallel port, RealJukebox is designed to
work in ECP (Printer Port) mode. Make sure your computer
supports ECP mode before starting the installation by following
step 1. Then to install RealJukebox, continue to steps 2-3.
• USB users: go directly to steps 2-3 to install RealJukebox.
1 Select My Computer, then click through the following items:
My Computer ™ Control panel ™ System ™
Device Manager ™ Ports.
• Make sure ECP is available at Ports.
2 Insert the RealJukebox CD into your CD-ROM drive.
™ The program setup screen will appear on your monitor.
3 Follow Install RealJukebox screen directions to install
the RealJukebox software.
• Click Yes on the screen to restart your computer when
prompted. The software is now installed.
IF YOU ARE NOT IN ECP MODE:
• Restart your computer.
• Refer to your computer instruction manual, or contact the
dealer to enter BIOS set-up.
• Select ECP as the parallel port mode.
IF YOUR COMPUTER DOES NOT SUPPORT ECP MODE:
• Refer to your computer instruction manual, or contact the
dealer to select EPP or Bi-directional mode.
Tips on using RealJukebox:
• Log onto the Internet while using RealJukebox to use all the
features.
• Complete the Online Tutorial before using and recording
files.
17
XP SA 107/17 11-07-2000 11:11 Pagina 17

English
18
INFORMATION ON RECORDING AND ENCODING
• From the main menu, select Options, then click through:
Preferences ™ Recording Options.
– For best recording results, select Use Error Correction,
then click OK.
• RUSH plays files encoded with the popular MP3,
RealAudio, Wave Audio and Secure Files Setting formats.
Select Encoding Options to select your recording format
and quality level:
– MP3 Audio is MPEG layer 3 Audio. Compression levels
available are: 96, 64, and 56 Kbps stereo, using the supplied
RealJukebox software. If you upgrade your software,
Philips RUSH can play music up to 224 Kbps. This has the
best sound quality, but uses the most disk space.
– RealAudio is RealNetworks' audio format. This format
saves your music as RealAudio (.rmx) secure or RealAudio
unsecured (.rmj) files. Compression levels available are:
96, 64, and 44 stereo, and 32 Kbps mono. Among these,
96 Kbps has the best sound quality, but uses the most disk
space.
– Wave Audio is unencoded music that is not compressed.
This format has the best quality sound but uses the largest
file size, as much as 650MB per CD.
– Secure Files Setting: has two further options. Secure
Files On, where files recorded with security on can only be
played on the personal computer on which they were
recorded. Secure Files Off allows the recorded files to be
played on more than one computer.
Making MP3 files from a CD
1 Double-click to select RealJukebox from your computer.
2 Insert an audio CD into the CD-ROM drive.
™ Monitor display shows CD track details.
3 Select the track you want to record in MP3.
4 From Controls in the toolbar, click Record.
™
Monitor display shows recording status. When recording is
complete, the track will be stored in the Music Library.
Sending files to RUSH from your computer
1 Before connecting RUSH to your computer, insert batteries
or connect the set to AC power. (See Connecting Rush to
your computer.) Press YES 2 to switch on Rush.
2 Double-click to select RealJukebox from your computer.
XP SA 107/17 11-07-2000 11:11 Pagina 18

English
19
3 Click through the following items under
Portable Players/ Storage:
Philips RUSH ™ External Flash Card.
4 To transfer your MP3 files to RUSH,
drag your selected file from your Music Library and drop
into External Flash Card.
5 Click the Begin Transfer button, at the bottom of the
screen, to copy your your selected tracks to your RUSH
SmartMedia card.
™ Monitor display shows transfer status.
Organizing the library
You can organize the Master Libraryinto three groupings:
Artist, Album or Genre.
Enter the Master Library from the Options menu: (Options)
™ Preferences ™ Music Library ™ Master Library.
Creating a Playlist
Create a playlist for playback on your computer or to download
to RUSH.
1 Click New Playlist at the bottom of the screen.
2 Type in a name for your playlist.
3 Click to select the music you want to record.
4 Drag and drop the desired songs to your playlist.
Downloading from the Internet
1 With access to Internet on your computer, click get music.
™ RealJukebox connects you to the Internet.
2 Select your music and download it to your library and
playlist.
MP3 web sites
You can find MP3 news, and download MP3 files from Internet
sites. Below are examples:
Web site . . . . . . . . . address
Philips Consumer Electronics
. . . . . . . . . . . http://www.smartconnect.philips.com/audio
Emusic . . . . . . . . . . . . http://www.emusic.com
Audible Inc. . . . . . . . . http://www.audible.com
AudioExplosion, Inc.. . http://www.audioexplosion.com
AudioHighway.com. . . http://www.audiohighway.com
Big Heavy World . . . . http://www.bigheavyworld.com
MP3.com. . . . . . . . . . http://www.mp3.com
SINC Recordings . . . . http://www.sincrecordings.com
Songs.com. . . . . . . . . http://www.songs.com
XP SA 107/17 11-07-2000 11:11 Pagina 19
IN-CAR USE (CONNECTIONS SUPPLIED OR OPTIONALLY
AVAILABLE)
Only use the supplied car voltage converter (4.5 V, DC, positive
pole to the center pin) and the car adapter cassette. Any other
product may damage the set.
1 Put the RUSH on a horizontal, vibration-free and stable
surface. Make sure it is a safe place, where the player is
not a danger or obstacle to the driver and passengers.
2 Connect the DC plug of the voltage converter to the 4.5V DC
jack of the RUSH.
3 Insert the voltage converter into the cigarette lighter jack. If
necessary, clean the cigarette lighter jack to obtain a good
electrical contact (only for a 12 V car battery, negative
grounding).
4 Turn down the volume and connect the adapter cassette
plug to the p jack of RUSH.
5 Carefully insert the adapter cassette into the car radio’s
cassette compartment.
6 Make sure the cord does not hinder your driving.
7 Start the RUSH, set VOL to 8 bar and adjust the sound with
the car radio controls.
• Always remove the voltage converter from the cigarette
lighter jack when the RUSH is not in use.
Notes:
– Avoid excessive heat from the car heating or from direct
sunlight (e.g. in a parked car in the summer).
– If your car radio has a LINE IN jack, use the LINE IN jack for
the car radio connection instead of the adapter cassette.
Connect the signal lead to this LINE IN jack and the p jack
of the RUSH.
D
I
G
I
T
A
L
D
I
G
I
T
A
L
D
I
G
I
T
A
L
p
4.5 V DC
4
.
5
V
D
C
D
A
T
A
I
/O
H
O
LD
D
IS
P
L
A
Y
M
O
D
E
/
E
Q
V
O
L
U
M
E
D
E
L
E
T
E
B
O
O
K
M
A
R
K
N
O
YES
20
IN-CAR CONNECTION
English
XP SA 107/17 11-07-2000 11:11 Pagina 20

English
21
If a fault occurs, first check the points listed below before taking the set for repair.
If you are unable to remedy a problem by following these hints, consult your dealer or service center.
WARNING: Do not open the set as there is a risk of electric shock! Under no circumstances should you try to
repair the set yourself, as this will invalidate the warranty.
TROUBLESHOOTING
PROBLEM
– POSSIBLE CAUSE
• REMEDY
No display/ sound
– Batteries weak/ incorrectly inserted.
• Correctly insert fresh batteries.
– Loose AC adapter connection/ power supply switched off
• Check adapter and power outlet connection. Switch on
power supply at wall outlet.
– YES 2 not pressed long enough.
• Press YES 2 until display turns on.
– Headphones not properly connected.
• Insert headphone plug into jack completely.
In car use
– Wrong playback direction of the cassette player’s
autoreverse feature.
• Change the autoreverse direction.
No power to external drive
– Connections loose/power supply not switched on/
computer not turned on.
• Make sure all connections are secure. Switch on the power
at the wall outlet. Turn on the computer.
In car use
– Cigarette lighter is not powered when ignition is off.
• Switch on ignition or insert batteries.
– Cigarette lighter jack is dirty.
• Clean the cigarette lighter jack.
No reaction to controls and/or display shows
– HOLD activated.
• Switch off HOLD.
– Electrostatic discharge.
• Remove batteries and replace after several seconds.
XP SA 107/17 11-07-2000 11:11 Pagina 21
 Loading...