

Page 1
S9733
BC
www.philips.com/support/ifu
Page 2
Page 3
1
2
3
4
5
6
7
8
9
10
12
11
13
14
15
16
Page 4

empty page before TOC
Page 5

English 6
Español 33
Page 6

English
6
IMPORTANT SAFETY INSTRUCTIONS
When using an electric product, basic
precautions should always be followed,
including the following:
Read all instructions before using this
product.
DANGER
To reduce the risk of electric shock:
-
Do not reach for a corded product that has
fallen into water. Unplug immediately.
-
The power plug and the accessories
connected to it are not for immersion or for
use in shower.
-
Do not use an extension cord with this
product.
-
Always unplug this product from the
electrical outlet immediately after
(re)charging.
-
Unplug and remove power cord from the
product before cleaning.
-
The batteries used in this product may
present a fire or chemical burn hazard if
mistreated. Do not disassemble, heat above
100°C (212°F) or incinerate.
English
Page 7

WARNING
To reduce the risk of burns, fire, electric
shock, or injury to persons:
-
Close supervision is required when this
product is used by, on, or near children, or
persons with limited physical, sensory, or
mental capabilities or invalids.
-
Use this product for its intended household
use as described in this manual. Do not use
attachments not recommended by Philips
North America LLC.
-
Never operate this product if it has a
damaged power cord or charging plug, if it
is not working properly, if it has been
dropped or damaged, or dropped into
water while plugged in. For assistance call
1-800-243-3050.
-
Keep the product, cord and charging plug
and any attachments away from heated
surfaces.
-
Never drop or insert any object into any
opening.
-
Do not use the adapter in or near a power
outlet that contains an electric air freshener
to prevent damage to the adapter.
-
Do not charge, clean or plug in product
outdoors or operate where aerosol (spray)
products are being used or where oxygen is
being administered.
English
7
Page 8

English
8
-
Always check cutters and combs before
using the product. Do not use the product if
cutters or combs are damaged, as injury
may occur.
-
Always attach plug to product first, then to
outlet. Be certain plug is inserted firmly into
shaver up to mark indicated on plug. To
disconnect, turn shaver off then remove
power cord from outlet.
-
Keep the power cord dry at all times. Do not
handle with wet hands.
-
Never put the product in direct sunlight or
store at a temperature above 140°F (60°C).
-
To prevent possible damage to the power
cord, do not wrap power cord around the
product.
-
Do not attempt to open the product to
remove or replace the built-in rechargeable
battery.
-
Only use the power cord and other
accessories supplied with the product.
SAVE THESE INSTRUCTIONS
IMPORTANT: The power plug contains a
transformer. Do not cut off the power plug to
replace it with another plug as this will cause a
hazardous condition.
Contents
IMPORTANT SAFETY INSTRUCTIONS___ 6
Page 9

SAVE THESE INSTRUCTIONS____________ 8
General description (Fig. 1)_______________ 9
Introduction______________________________ 10
The display_______________________________ 10
Charging__________________________________ 13
Using the product________________________ 15
Travel lock________________________________ 20
Cleaning and maintenance______________ 21
Replacement_____________________________ 27
Storage___________________________________ 28
Accessories_______________________________ 29
Assistance________________________________ 29
Disposal__________________________________ 29
Full Two-Year Warranty__________________ 30
45-DAY MONEY-BACK GUARANTEE____ 31
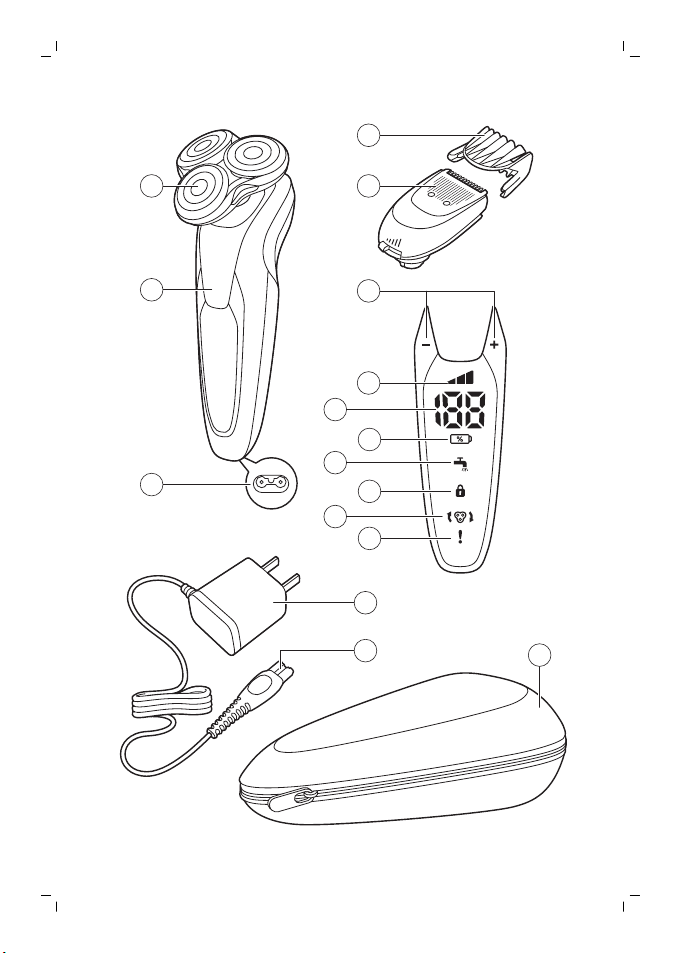
General description (Fig. 1)
1 Shaving unit with hair chamber
2 On/off button
3 Socket for small plug
4 SmartClick beard styler attachment
5 Comb for SmartClick beard styler
attachment
6 + and - buttons for personal comfort
settings
7 Personal comfort settings bar
8 Battery charge percentage
9 Battery symbol
10 Cleaning reminder
11 Travel lock symbol
12 Replacement reminder
13 Notification symbol
14 Power plug
English
9
Page 10
English
10
15 Small plug
16 Travel pouch
Introduction
Congratulations on your purchase and
welcome to Philips Norelco!
To fully benefit from the support that Philips
Norelco offers, register your product at
www.norelco.com/register.
The display
Note: Before you use the shaver for the first
time, remove the protective foil from the
display.
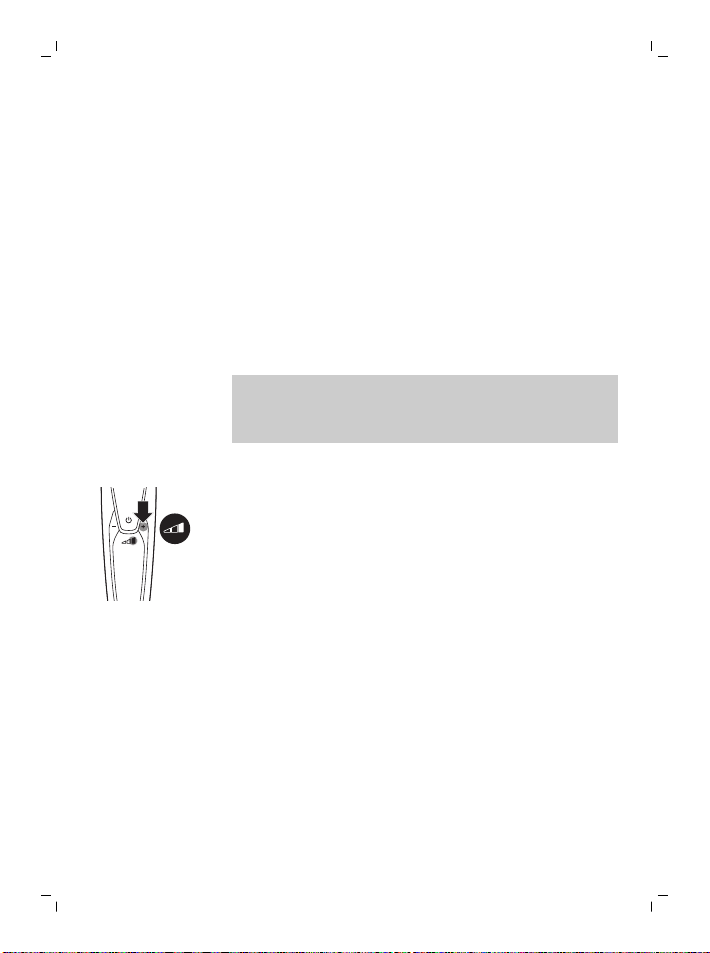
Personal comfort settings
The shaver has a feature that allows you to
personalize your settings. Depending on your
personal shaving needs, choose between
three settings, from low to high: slow: for an
even more skin-friendly shave, medium: for a
standard thorough shave, and fast: for a highpowered shave. When you press the button on
the left or right of the display, the segment of
the personal comfort settings bar that lights up
shows the currently selected setting. To select
a lower or higher setting, press the button on
the left or right of the display.
Page 11
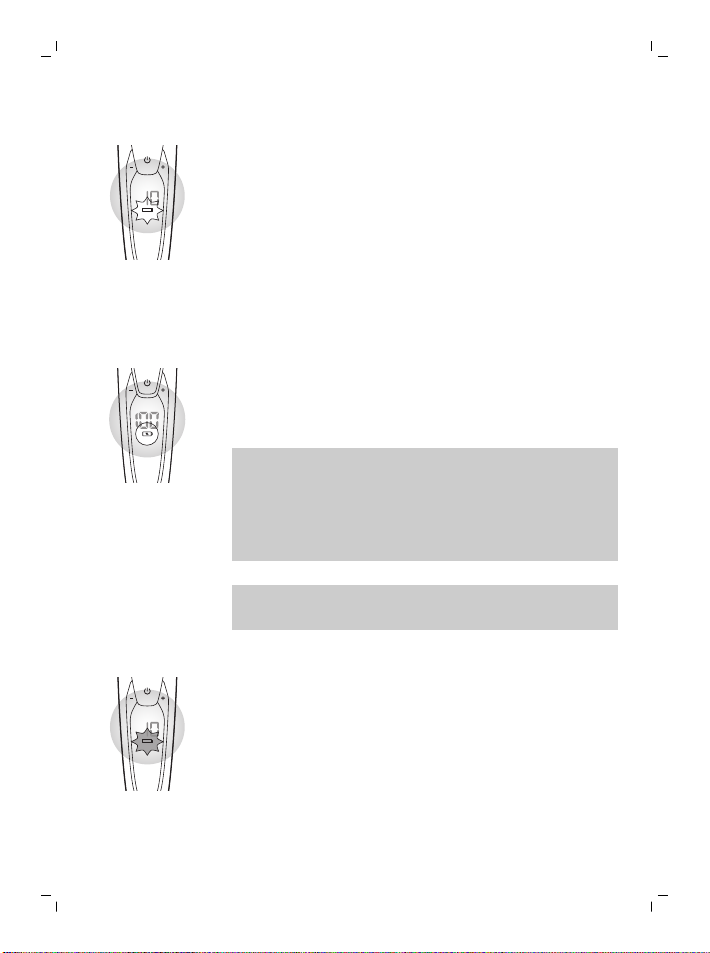
Charging
When the shaver is charging, the battery
charge percentage and the battery symbol
flash white.
The battery charge is indicated by the battery
charge percentage shown on the display.
Quick charge: When the battery symbol starts
to flash quickly, the shaver contains enough
charge for one shave.
Battery fully charged
When the battery is fully charged, the battery
charge percentage lights up white
continuously.
Note: This product can only be used without
cord. When you press the on/off button during
or after charging, you hear a sound to indicate
that the shaver is still connected to the wall
socket.
Note: When the battery is full, the display
switches off automatically after 30 minutes.
Battery low
When the battery is almost empty, the battery
charge indicator flashes orange and the shaver
beeps.
English
11
Page 12

English
12
Remaining battery charge
The remaining battery charge is indicated by
the battery charge percentage shown on the
display.
Cleaning reminder
Clean the shaver after every use for optimal
performance (see 'Cleaning and maintenance').
When you switch off the shaver, the cleaning
reminder flashes to remind you to clean the
shaver.
Travel lock
You can lock the shaver when you are going to
travel. The travel lock prevents the shaver from
being switched on by accident.
Replacement reminder
For maximum shaving performance, we advise
you to replace the shaving heads every year
(see 'Replacement'). The shaver is equipped
with a replacement reminder which reminds
you to replace the shaving heads. The shaving
unit symbol lights up white continuously, the
arrows flash white and the shaver beeps to
indicate that you have to replace the shaving
heads.
Note: After replacing the shaving heads, you
can reset the replacement reminder by
pressing the on/off button for 7 seconds. If you
Page 13

do not reset the replacement reminder, the
shaver resets automatically after 9 shaves.
Notification symbol
Overheating
If the shaver overheats during charging, the
notification symbol flashes orange. When this
happens, the shaver switches off
automatically. Charging continues once the
temperature of the shaver has decreased to
the normal level.
Blocked shaving heads
If the shaving heads are blocked, the
notification symbol lights up orange
continuously. The replacement reminder and
the cleaning reminder flash white alternately
and you hear a sound. In this case, the motor
cannot run because the shaving heads are
soiled or damaged.
If the shaving heads are soiled, you have to
clean them. If the shaving heads are damaged,
you have to replace them.
Charging
-
Charging, recharging, or using the product
at temperatures below 40°F (4.5°C) or
higher than 95°F (35°C) adversely affects
the lifespan of the battery.
-
Do not charge the shaver in a pouch or
travel case.
-
The power plug transforms 100-240V AC to
less than 24V DC.
English
13
Page 14
1
2
English
14
Charge the shaver before you use it for the first
time and when the display indicates that the
battery is almost empty. The battery charge is
indicated by the lights of the battery charge
indicator on the display.
When you connect the shaver to the wall
socket, you hear a sound.
Charging takes approx. 1 hour. A fully charged
shaver has a shaving timeof up to 60 minutes.
Note: You cannot use the product while it is
charging.
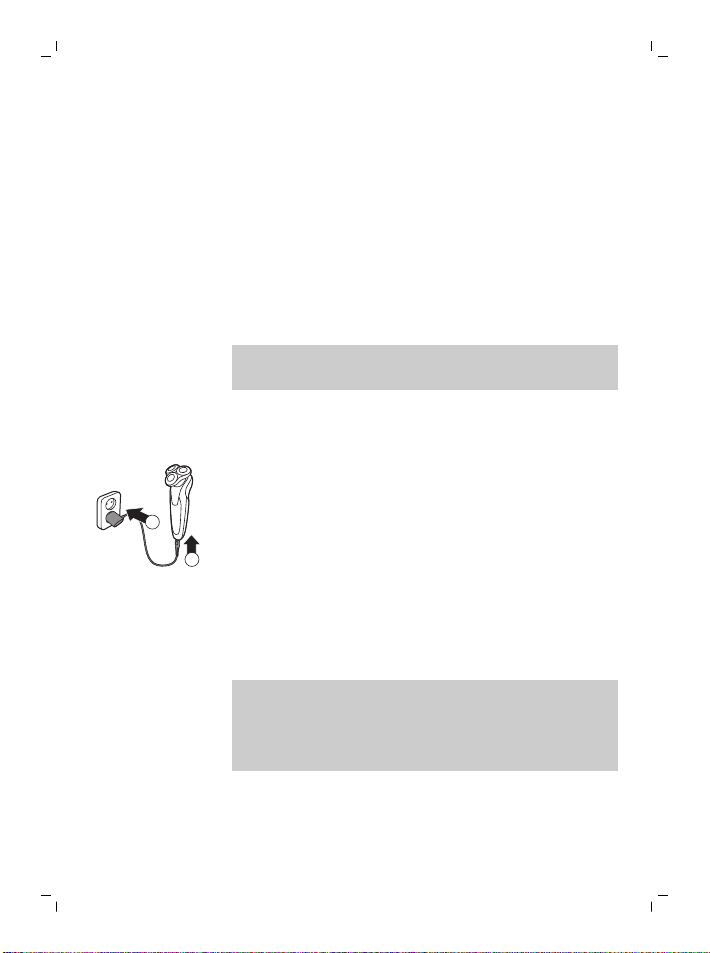
Charging with the power cord
1 Make sure the shaver is switched off.
2 Put the small plug in the shaver and
connect the power plug to any 100V to
240V AC outlet. Use only the power cord
provided.
The display of the shaver indicates that the
shaver is charging.
3 After charging, remove the power plug from
the wall outlet and pull the small plug out of
the shaver.
Note: An adapter plug may be necessary for
cord usage in some foreign countries. Use an
attachment plug adapter of the proper
configuration for power outlet.
Page 15

Using the product
Always check the shaver and all accessories
before use. Do not use the shaver or any
accessory if it is damaged, as this may cause
injury. Always replace a damaged part with
one of the original type.
This symbol indicates that the shaver can be
used in the bath or shower.
-
Use this shaver for its intended household
use as described in this manual.
-
For hygienic reasons, the shaver should
only be used by one person.
-
Trimming is easier when the skin and hair
are dry.
Note: This shaver is waterproof. It is suitable
for use in the bath or shower and for cleaning
under the tap. For safety reasons, the shaver
can therefore only be used without charging
cord.
Put it to the test
-
21 Day Trial and Conversion Process. It is a
fact that your skin and beard need time to
adjust to a new grooming system.
-
Use your new shaver exclusively for 3 weeks
to fully enjoy the closeness of a Philips
Norelco shave.
English
15
Page 16
English
16
-
At first you may not get as close a shave as
you expect, or your face may even become
slightly irritated. This is normal since your
beard and skin will need time to adjust.
Invest 3 weeks and you'll soon experience
the full joy of your new shaver.
-
Stick with it! If you alternate shaving
methods during the adjustment period, it
may make it more difficult to adapt to the
Philips Norelco shaving system.
-
If you are still not convinced after 21 days,
Philips Norelco will refund you the full
purchase price as long as the request is
received within 45 days of purchase.
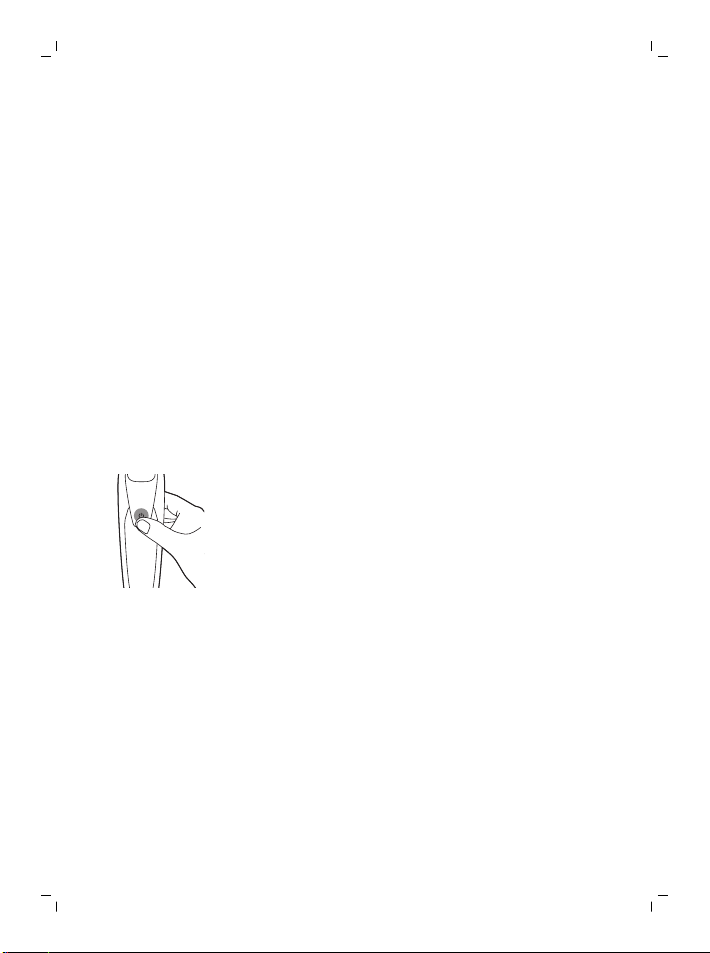
Switching the product on and off
1 To switch on the shaver, press the on/off
button once.
The display lights up for a few seconds.
2 To switch off the shaver, press the on/off
button once.
The display lights up for a few seconds and
shows the remaining battery charge.
Shaving
Shaving tips
-
Selectyour personal comfort settings (see
‘The display’).
-
For the best results on skin comfort, pre-
trim your beard if you have not shaved for 3
days or longer.
Dry shaving
1 Switch the shaver on.
Page 17

English
2 Stretch your skin with your free hand so
blades can lift and cut whiskers. Gently
press shaver to skin so the floating heads
can follow the contours of your face.
Note: Do not press too hard. Too much
pressure can pinch the skin into the combs.
3 Switch off and clean the shaver after each
use.
The display lights up for a few seconds to
show the battery status.
Wet shaving
For a more comfortable shave, you can also
use this shaver on a wet face with shaving
foam or shaving gel.
1 Apply some water to your skin.
2 Apply shaving foam or shaving gel to your
skin.
17
3 Rinse the shaving unit under the tap to
ensure that the shaving unit glides smoothly
over your skin.
4 Switch the shaver on.
Page 18
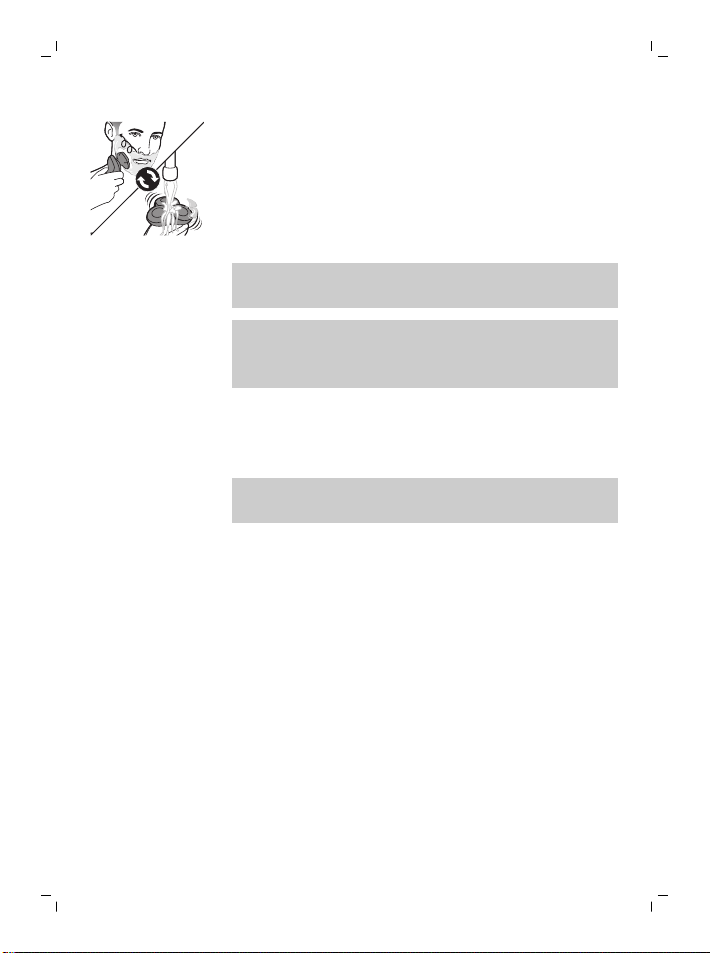
English
18
5 Move the shaving heads over your skin in
circular movements to catch all hairs
growing in different directions. Make sure
each shaving head is fully in contact with
the skin. Exert gentle pressure for a close,
comfortable shave.
Note: Do not press too hard, this can cause
skin irritation.
Note: Rinse the shaving unit regularly to
ensure that it continues to glide smoothly
over your skin.
6 Dry your face.
7 Switch off the shaver and clean it after each
use.
Note: Make sure that you rinse all foam or
shaving gel off the shaver.
Using click-on attachments
Using the beard styler attachment with comb
You can use the beard styler attachment with
the comb attached to style your beard at one
fixed setting, but also at different length
settings. You can also use it to pre-trim any
long hairs before shaving for a more
comfortable shave.
The length settings on the beard styler
attachment correspond to the remaining hair
length after cutting and range from 1 to 5mm
(3/64 - 3/16in).
Page 19
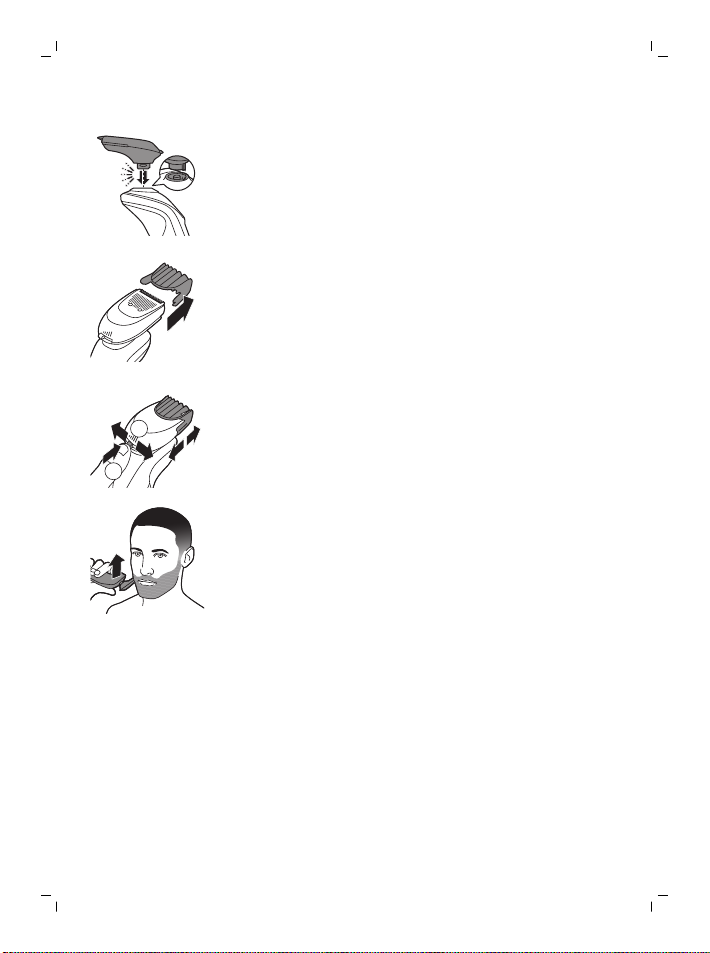
2
1
English
1 Attach the attachment to the product
('click').
2 Slide the comb straight into the guiding
grooves on both sides of the beard styler
attachment (‘click’).
3 Press the length selector and then push it
to the left or right to select the desired hair
length setting.
4 Switch on the product.
5 Move the product upwards while you exert
gentle pressure. Make sure the front of the
comb is in full contact with the skin.
6 Clean the attachment after use.
Using the beard styler attachment without comb
You can use the beard styler attachment
without the comb to contour your beard,
moustache, sideburns or neckline to a length
of 0.5mm (1/32 in).
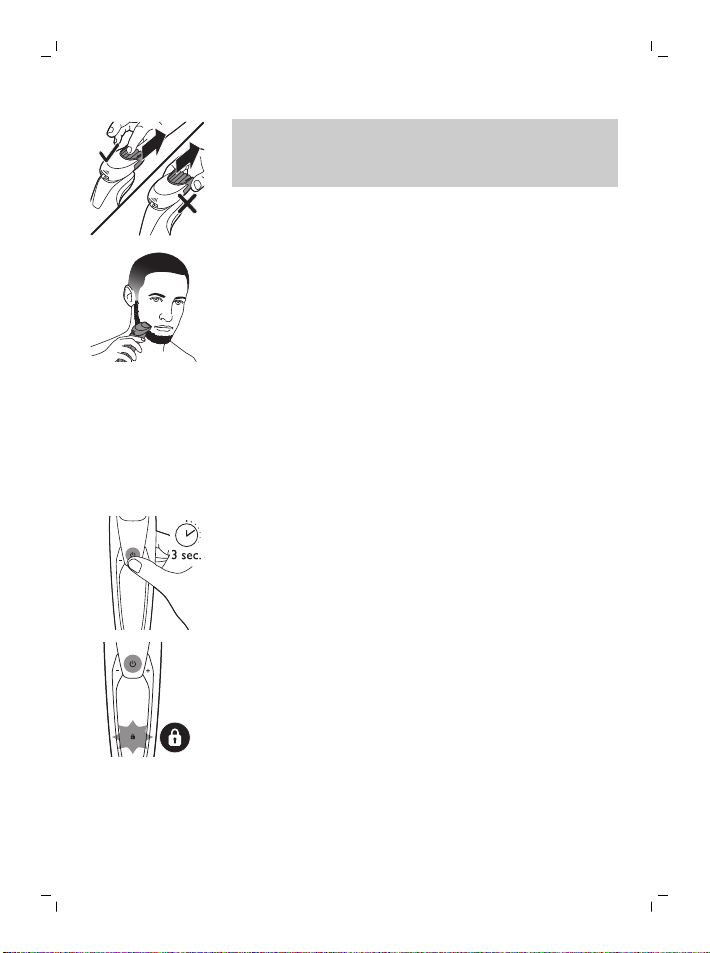
1 Pull the comb off the beard styler
attachment.
19
Page 20
English
20
Note: Grab the comb in the center to pull it
off the beard styler attachment. Do not pull
at the sides of the comb.
2 Switch on the product.
3 Hold the beard styler attachment
perpendicular to the skin and move the
product downwards while you exert gentle
pressure.
4 Clean the attachment after use.
Travel lock
You can lock the shaver when you are going to
travel to prevent it from turning on
accidentally.
Activating the travel lock
1 Press the on/off button for 3 seconds to
enter the travel lock mode.
While you activate the travel lock, the travel
lock symbol lights up white continuously.
When the travel lock is activated, the
appliance produces a sound and the travel
lock symbol flashes.
Deactivating the travel lock
1 Press the on/off button for 3 seconds.
Page 21
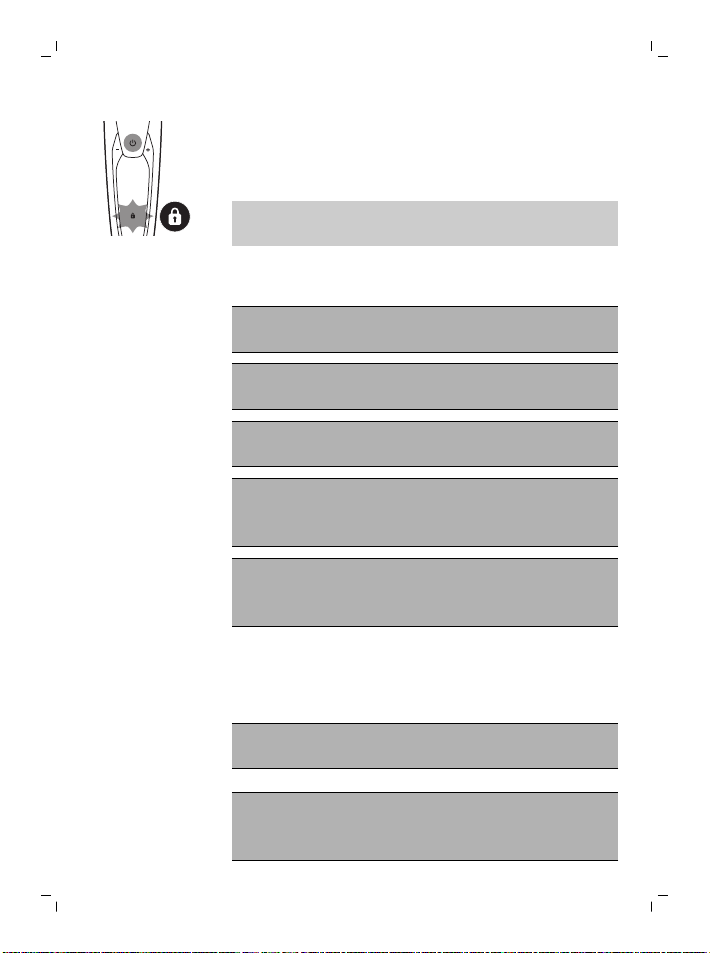
The travel lock symbol flashes and then
lights up continuously. The appliance is now
ready for use again.
Note: You can also deactivate the travel lock
by connecting the appliance to the wall socket.
Cleaning and maintenance
Regular cleaning guarantees better
shaving results.
Never clean, remove or replace the shaving
unit while the shaver is switched on.
Do not apply pressure to shaving head
combs.
Do not touch shaving heads with hard
objects as this may dent or damage the
precision-made slotted combs.
Do not use abrasives, scourers or
aggressive liquids such as gasoline or
acetone to clean the shaver.
Cleaning the shaver under the tap
Clean the shaver after every shave for optimal
performance.
English
21
Always check if the water is too hot, to
prevent burning your hands.
Never dry the shaving unit with a towel or
tissue, as this may damage the shaving
heads.
Page 22

22
English
While rinsing shaving heads, water may drip
out of the base of shaver. This is a normal
occurrence.
1 Switch the product on.
2 Rinse the shaving unit under a warm tap.
3 Switch off the product. Pull the shaving
head holder off the bottom part of the
shaving unit.
4 Rinse the hair chamber under the tap.
5 Rinse the shaving head holder under a
warm tap.
6 Carefully shake off excess water and let the
shaving head holder air-dry completely.
7 Attach the shaving head holder to the
bottom part of the shaving unit (‘click’).
Page 23

Thorough cleaning
We advise you to clean the shaving heads
thoroughly once a month or when the shaver
does not shave as well as it used to.
Note: The shaving heads are locked by a blue
or an orange retaining ring.
Follow the correct instructions.
1 Turn off the shaver.
2 Pull the shaving head holder off the bottom
3 Rinse the hair chamber and shaving head
part of the shaving unit.
holder under the tap.
English
23
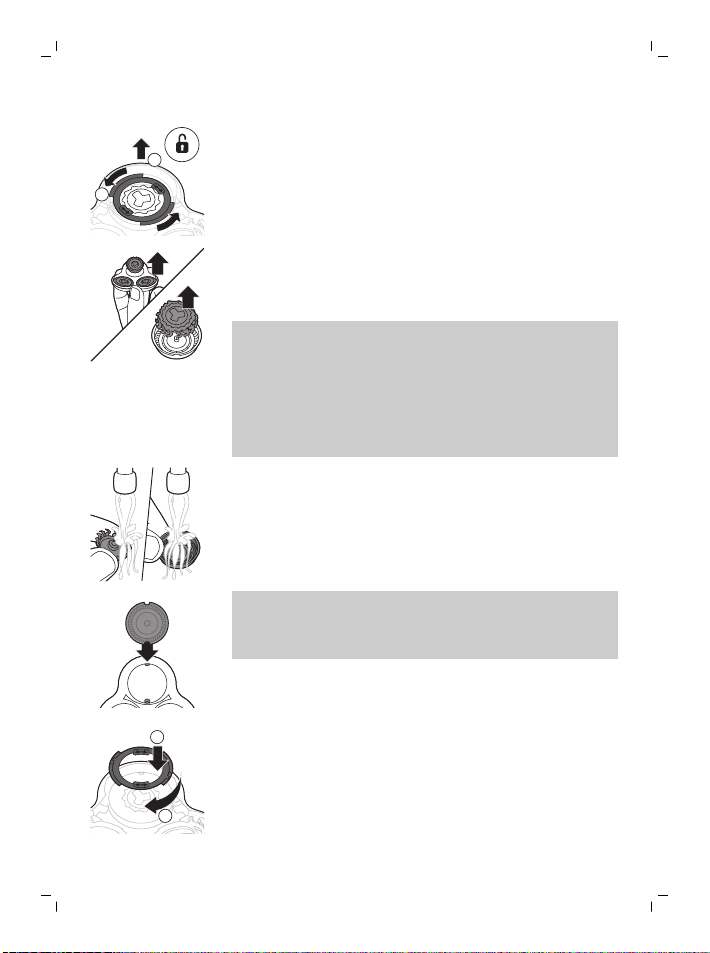
4 Turn the retaining ring counterclockwise
and lift it off the shaving head.
Page 24
1
2
1
2
24
English
Repeat this process for the other retaining
rings. Place them aside in a safe place.
5 Remove the shaving heads from the
shaving head holder. Each shaving head
consists of a cutter and guard.
Note: Do not clean more than one cutter
and guard at a time, since they are all
matching sets. If you accidentally put a
cutter in the wrong shaving guard, it may
take several weeks before optimal shaving
performance is restored.
6 Clean the cutter and guard under the tap.
7 Shake off excess water.
8 Put the cutter back into the guard.
9 Place the shaving heads in the shaving
head holder.
Note: Make sure the notches on both sides
of the shaving heads fit exactly onto the
projections in the shaving head holder.
10 Reattach the retaining rings.
-
Blue retaining ring: Place the retaining ring
on the shaving head and turn it clockwise to
reattach the retaining ring.
Page 25

Align the arrows on the retaining ring with
1
2
the projections in the shaving head holder.
Turn the ring clockwise until it clicks to
indicate that the ring is fixed.
-
Orange retaining ring: Place the retaining
ring on the shaving head and turn it
clockwise to reattach the retaining ring.
Repeat this process for the other retaining
rings.
Each retaining ring has two recesses that fit
exactly into the projections of the shaving
head holder. Turn the ring clockwise until
your hear a click to indicate that the ring is
fixed.
Hold the shaving head holder in your hand
when you reinsert the shaving heads and
reattach the retaining rings. Do not place
the shaving head holder on a surface when
you do this, as this may cause damage.
11 Attach the shaving head holder to the
bottom part of the shaving unit (‘click’).
Cleaning the click-on attachments
English
25
Never dry trimmer or beard styler attachments
with a towel or tissue, as this may damage the
trimming teeth.
The accessories supplied may vary for
different products. The box shows the
Page 26

26
English
accessories that have been supplied with your
product.
Cleaning the beard styler attachment
Clean the beard styler attachment after each
use.
1 Pull the comb off the beard styler
attachment.
Note: Grab the comb in the center to pull it
off the beard styler attachment . Do not pull
at the sides of the comb.
2 Rinse cut hairs off the cutting unit with
lukewarm water.
3 Rinse cut hairs off the comb.
4 Remove the cutting unit from the beard
styler attachment. By pushing the cutting
unit off the beard styler attachment, you
can remove any hairs that have
accumulated inside the beard styler. You
can also rinse the bottom of the cutting
unit.
5 Rinse cut hairs out of the beard styler
attachment.
6 Carefully shake off excess water and leave
the comb, cutting unit and beard styler
attachment to air-dry before you use them
again.
Page 27

1
2
7 When the cutting unit is dry, attach it to the
beard styler attachment.
8 When the comb is dry, attach it to the beard
styler attachment.
9 For optimal performance, lubricate the
teeth of the attachment with a drop of
mineral oil every six months.
Replacement
Replacing the shaving heads
For maximum shaving performance, replace
the shaving heads once a year. Replace
damaged shaving heads immediately.
Always replace the shaving heads with original
Philips Norelco shaving heads (see
'Accessories').
Replacement reminder
The replacement reminder indicates that the
shaving heads need to be replaced.The
shaving unit symbol and arrows light up when
you switch off the product.
1 To replace the shaving heads, remove the
shaving heads from the shaving head
holder one by one. See chapter Thorough
Cleaning for the instructions on how to
remove the retaining rings and shaving
heads.
English
27
Page 28

English
28
Storage
Note: The shaving heads are locked by a
blue or an orange retaining ring. Follow the
correct instructions.
2 To reset the replacement reminder, press
and hold the on/off button for approx. 7
seconds. Wait until you hear two beeps.
This product has no other user-serviceable
parts. For assistance call 1-800-243-3050.
Store the shaver in the travel case.
Note: Always let the shaver dry completely
before you store it in the travel case.
-
Be sure the product is turned off. Remove
cord from outlet and the product before
storing it in a safe, dry location where it will
not be crushed, banged, or subject to
damage.
-
Do not wrap cord around the product when
storing.
-
Store cord and other accessories in a safe
location where these will not be cut or
damaged.
-
Do not place or store the product where it
can fall or be pulled into a tub or sink, water
or other liquid while plugged in.
Page 29

Accessories
Assistance
Disposal
English
Replacement parts and accessories may be
purchased at a store near you or on our
website www.philips.com/store.
The following accessories are available:
-
SH90 Philips Norelco shaving heads
-
JC302 Philips Norelco SmartClean cleaning
cartridge, 2-Pack
-
JC303 Philips Norelco SmartClean cleaning
cartridge, 3-Pack
-
RQ111 Philips Norelco SmartClick beard
styler
-
RQ585 Philips Norelco SmartClick cleansing
brush
For assistance, visit our website:
www.philips.com/support or call toll free
1-800-243-3050.
Online information is available 24 hours a day,
7 days a week.
-
This product contains a rechargeable
lithium-ion battery which must be disposed
of properly.
-
Contact your local town or city officials for
battery disposal information. You can also
call 1-800-822-8837 or visit
www.call2recycle.org for battery drop-off
locations.
29
Page 30

English
30
-
For assistance, visit our website
www.philips.com/support or call
1-800-243-3050 toll free.
-
Your product is designed and manufactured
with high quality materials and
components, which can be recycled and
reused. For recycling information, please
contact your local waste management
facilities or visit www.recycle.philips.com
Full Two-Year Warranty
Philips North America LLC warrants this new
product (except cutters and combs) against
defects in materials or workmanship for a
period of two years from the date of purchase,
and agrees to repair or replace any defective
product without charge.
IMPORTANT: This warranty does not cover
damage resulting from accident, misuse or
abuse, lack of reasonable care, the affixing of
any attachment not provided with the product
or loss of parts or subjecting the product to
any but the specified voltage or batteries.*
NO RESPONSIBILITY IS ASSUMED FOR ANY
SPECIAL, INCIDENTAL OR CONSEQUENTIAL
DAMAGES.
In order to obtain warranty service, simply go
to www.philips.com/support for assistance. It
is suggested that for your protection you
return shipments of product by insured mail,
insurance prepaid. Damage occurring during
shipment is not covered by this warranty.
Page 31

NOTE: No other warranty, written or oral, is
authorized by Philips North America LLC.
This warranty gives you specific legal rights,
and you may also have other rights which vary
from state to state. Some states do not allow
the exclusion or limitation of incidental or
consequential damages, so the above
exclusion and limitations may not apply to
you.
*Read enclosed instructions carefully.
45-DAY MONEY-BACK GUARANTEE
To enjoy the closest and most comfortable
shave from your new Philips Norelco Men’s
Shaver, the shaver should be used exclusively
for 3 weeks. This allows your hair and skin
enough time to adapt to the Philips Norelco
Shaving System. If, after that period of time,
you are not fully satisfied with your Philips
Norelco Men’s Shaver, send the product back
along with dated sales receipt and we’ll refund
you the full purchase price.
The product must be shipped prepaid by
insured mail, insurance prepaid, have the
original sales receipt, indicating purchase
price and date of purchase, and the moneyback guarantee return authorization form
enclosed.
We cannot be responsible for lost mail.
The product must be postmarked no later than
45 days after the date of purchase. Philips
English
31
Page 32

32
English
reserves the right to verify the purchase price
of the product and limit refunds not to exceed
suggested retail price.
To obtain money-back guarantee return
authorization form, call 1-800-243-3050 for
assistance.
Delivery of refund check will occur 6–8 weeks
after receipt of returned product.
Page 33

INSTRUCCIONES IMPORTANTES DE SEGURIDAD
Cuando utilice un producto eléctrico, siempre
debe seguir las precauciones básicas,
incluidas las siguientes:
Lea todas las instrucciones antes de usar este
producto.
PELIGRO
Para reducir el riesgo de descarga eléctrica:
-
No intente recoger un producto con cable
que haya caído al agua. Desenchúfelo
inmediatamente.
-
El enchufe de alimentación y los accesorios
conectados a este no deben sumergirse ni
usarse en la ducha.
-
No utilice este producto con un cable de
extensión.
-
Siempre desenchufe este producto del
tomacorriente eléctrico inmediatamente
después de cargarlo.
-
Desenchufe y desconecte el cable de
alimentación del producto antes de
limpiarlo.
Español
33
Español
Page 34

Español
34
-
Las baterías que se emplean en este
producto pueden representar un riesgo de
incendio o de quemadura química si no se
manipulan correctamente. No desarme,
incinere ni permita que la temperatura de
las baterías supere los 100°C (212°F).
ADVERTENCIA
Para reducir el riesgo de quemaduras,
incendio, descarga eléctrica o lesiones:
-
El uso de este dispositivo debe estar bajo
estricta supervisión cuando esté operado
por niños, por personas con capacidades
mentales, sensoriales o físicas limitas o por
personas con discapacidades, o cuando se
emplee en o cerca de estos.
-
Use este producto para su uso previsto en
el hogar, según se describe en este manual.
No use accesorios que no estén
recomendados por la Corporación Philips
North America LLC.
-
Nunca emplee este producto si el cable
eléctrico o el enchufe de carga están
dañados, si no funciona correctamente, si
se cayó, si está dañado o si se sumergió en
agua mientras estaba conectado a la
alimentación eléctrica. Para solicitar
asistencia, comuníquese
al1-800-243-3050.
-
Mantenga el producto, el cable y el enchufe
de carga y cualquier accesorio lejos de
superficies calientes.
Page 35

Español
-
No deje caer ni introduzca ningún objeto en
ninguna abertura.
-
No utilice el adaptador dentro o cerca de
una salida de corriente que contenga un
aromatizador eléctrico para prevenir daño
al adaptador.
-
No cargue, limpie o conecte el producto a la
intemperie ni lo use donde se estén usando
productos de aerosol (atomizador) o donde
se esté administrando oxígeno.
-
Siempre revise las cuchillas y los peines
antes de usar el producto. No use el
producto si las cuchillas o los peines están
dañados, ya que puede producirse una
lesión.
-
Siempre conecte la clavija al producto
primero y, luego, al tomacorriente.
Asegúrese de que el enchufe esté insertado
firmemente en la afeitadora hasta la marca
indicada en el enchufe. Para desconectar,
apague la afeitadora y luego desconecte el
cable de alimentación de la toma de
corriente.
-
Mantenga el cable de alimentación siempre
seco. No lo use con las manos mojadas.
-
Nunca exponga el producto a la luz directa
del sol ni lo guarde en lugares con
temperaturas superiores a los 60°C
(140°F).
-
Para prevenir posibles daños al cable, no lo
enrede alrededor del producto.
35
Page 36

Español
36
-
No intente abrir el producto para retirar o
reemplazar la batería recargable integrada.
-
Utilice únicamente el cable de alimentación
y los accesorios suministrados con el
producto
CONSERVE ESTAS INSTRUCCIONES
¡IMPORTANTE!: El enchufe eléctrico contiene
un transformador. No corte el enchufe
eléctrico para reemplazarlo con otro ya que
esto puede producir una condición de peligro.
Contenido
INSTRUCCIONES IMPORTANTES DE
SEGURIDAD
CONSERVE ESTAS INSTRUCCIONES____ 36
Descripción general (Fig. 1)_______________ 37
Introducción______________________________ 37
La pantalla_______________________________ 38
Carga_____________________________________ 41
Uso del producto_________________________ 43
Bloqueo para viajes______________________ 48
Limpieza y mantenimiento______________ 49
Sustitución_______________________________ 56
Almacenamiento_________________________ 57
Accesorios________________________________ 58
Asistencia_________________________________ 59
Desecho__________________________________ 59
Garantía Total de Dos Años_____________ 59
_ 33
Page 37

Español
37
GARANTÍA DE DEVOLUCIÓN DE SU DI
NERO POR 45DÍAS
Descripción general (Fig. 1)
1 Unidad de afeitado con cámara de
acumulación de vello
2 Botón de encendido/apagado
3 Toma para clavija pequeña
4 Accesorio de recortadora de barba
SmartClick
5 Peine para el accesorio de recortadora de
barba SmartClick
6 + y - botones para los ajustes de comfort
personal
7 Barra de ajustes de comfort personal
8 Porcentaje de carga de la batería
9 Símbolo de la batería
10 Recordatorio de limpieza
11 Sistema de bloqueo de viaje
12 Recordatorio de reemplazo
13 Símbolo de notificación
14 Conector eléctrico
15 Enchufe pequeño
16 Bolso para viajes
Introducción
¡Felicitaciones por su compra y bienvenido a
PhilipsNorelco!
Para beneficiarse completamente del soporte
que ofrece PhilipsNorelco, registre el
producto en www.norelco.com/register.
_ 61
Page 38

Español
38
La pantalla
Nota: Quite cualquier adhesivo o lámina
protectora de la pantalla antes de usar la
afeitadora.
Ajustes de comfort personalizados
La afeitadora tiene una característica que le
permite personalizar sus ajustes. Según sus
necesidades de afeitado personales, elija de
entre tres ajustes, de bajo a alto: bajo: para un
afeitado suave en la piel, medio: para un
afeitado general estándar y rápido: para un
afeitado de alto poder. Cuando presiona el
botón que se encuentra a la derecha o a la
izquierda de la pantalla, el segmento de la
barra de ajustes de comfort personalizados
que se enciende muestra el ajuste
seleccionado actualmente. Para seleccionar
un ajuste más bajo o más alto, presione el
botón a la izquierda o derecha de la pantalla.
Carga
Cuando la afeitadora se está cargando, el
porcentaje de carga de la batería y el símbolo
de batería se iluminan en blanco
continuamente.
La carga de la batería se indica por el
porcentaje mostrado en la pantalla.
Carga rápida: Cuando el símbolo de la batería
comienza a destellar rápidamente, la
afeitadora tiene suficiente carga para un
afeitado.
Page 39

Batería completamente cargada
Cuando la batería está totalmente cargada, el
porcentaje de carga de batería se ilumina en
blanco continuamente.
Nota: Este producto solo se puede utilizar sin
cable. Cuando presiona el botón de
encendido/apagado durante o después de la
carga, se escucha un sonido que indicar que la
afeitadora aún está conectada al enchufe de
pared.
Nota: Cuando la batería está cargada por
completo, la pantalla cambia a apagado
automáticamente después de 30 minutos.
Batería baja
Cuando la batería está casi agotada, la luz
inferior del indicador de carga de la batería
destella en color naranja y la afeitadora emite
un sonido.
Carga de batería disponible
El porcentaje de carga de la batería que se
muestra en la pantalla indica la capacidad de
carga disponible en la batería.
Español
39
Page 40

Español
40
Recordatorio de limpieza
Limpie la afeitadora después de cada uso para
un óptimo rendimiento (see 'Limpieza y
mantenimiento'). Cuando apaga la afeitadora,
el recordatorio de limpieza destella para
recordarle limpiarla.
Bloqueo para viajes
Puede bloquear la afeitadora cuando viaje. El
bloqueo de viaje previene que la afeitadora se
encienda por accidente.
Recordatorio de reemplazo
Para un rendimiento de afeitado óptimo, le
aconsejamos que reemplace los cabezales de
afeitado cada año (see 'Sustitución'). La
afeitadora está equipada con un recordatorio
de reemplazo que le recuerda reemplazar los
cabezales de afeitado. El símbolo de la unidad
de afeitado se ilumina en blanco
continuamente, las flechas destellan en
blanco y la afeitadora emite un sonido para
indicar que tiene que reemplazar los
cabezales de la afeitadora.
Nota: Después de reemplazar los cabezales de
afeitado, necesita restablecer el recordatorio
de reemplazo presionando el botón
encendido/apagado durante 7 segundos.
Page 41
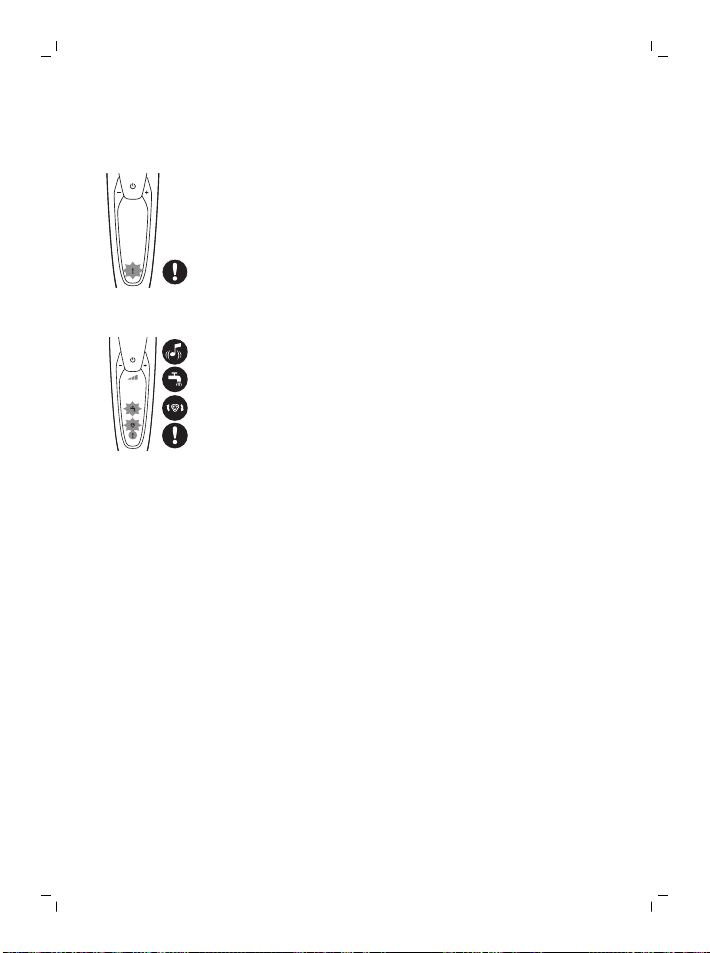
Símbolo de notificación
Sobrecalentamiento
Si la afeitadora se sobrecalienta durante la
carga, el signo de notificación destella en
naranja. Cuando esto sucede, la afeitadora se
apaga automáticamente. La carga continúa
una vez que la temperatura de la afeitadora
baja al nivel normal.
Cabezales de afeitado bloqueado
Si los cabezales de afeitado están
bloqueados, el signo de notificación se
enciende en naranja continuamente. El
recordatorio de reemplazo y el de limpieza
destellan en blanco de manera alterna y se
escucha un sonido. En este caso, el motor no
puede funcionar porque los cabezales de
afeitado están sucios o dañados.
Si los cabezales de la afeitadora están sucios,
tiene que limpiarlos.. Si los cabezales de la
afeitadora están dañados, tiene que
reemplazarlos.
Carga
-
La carga, recarga o el uso del producto a
temperaturas por debajo de los 40°F
(4.5°C) o superiores a los de 95°F (35°C)
afecta la vida útil de la batería.
-
No ponga a cargar la afeitadora si se
encuentra dentro de una funda o estuche
de viaje.
-
El conector de alimentación transforma la
CA de 100-240 V a menos de 24 V de CC.
Español
41
Page 42

1
2
Español
42
Cargue la afeitadora antes de usarla por
primera vez y cuando la pantalla indique que
la batería está casi agotada.El porcentaje de
carga de la batería se indica por las luces del
indicador de carga.
Cuando conecte la afeitadora al enchufe de
pared, escuchará un sonido.
La carga toma, aproximadamente, 1hora. Una
afeitadora completamente cargada otorgaun
tiempo de afeitado de hasta 60 minutos.
Nota: No puede usar el producto mientras se
carga.
Carga con el cable de alimentación
1 Asegúrese de que la afeitadora esté
apagada.
2 Coloque la clavija pequeña en la afeitadora
y conecte el enchufe eléctrico en cualquier
enchufe de pared de 100 V a 240 V AC. Use
solo el cable eléctrico provisto.
La pantalla de la afeitadora indica que la
afeitadora se está cargando.
3 Después de realizar la carga, retire el
enchufe del tomacorriente y retire la clavija
pequeña de la afeitadora.
Nota: Es posible que se requiera un enchufe
adaptador para el uso del cable en algunos
países extranjeros. Use un enchufe adaptador
compatible con la configuración del
tomacorriente.
Page 43

Uso del producto
Siempre revise el producto y todos los
accesorios antes de usarlo. No use el
producto ni ningún accesorio si está
dañado, ya que esto puede causar alguna
lesión. Siempre reemplace una pieza
dañada con una del tipo original.
Siempre revise la afeitadora y todos los
accesorios antes de usarla. No use la
afeitadora ni ningún accesorio si está
dañado, ya que esto puede causar alguna
lesión. Siempre reemplace una pieza dañada
con una del tipo original.
Este símbolo indica que la afeitadora puede
utilizarse en el baño o en la ducha.
-
Utilice esta afeitadora para el uso
doméstico que se describe en este manual.
-
Por motivos de higiene, la afeitadora debe
emplearse únicamente por una persona.
-
El recorte es más fácil cuando la piel y el
vello están secos.
Español
43
Nota: Esta afeitadora es resistente al agua. Es
apropiada para su uso en el baño o la ducha y
puede lavarse en la llave. Por motivos de
seguridad, por lo tanto la afeitadora debe
emplearse únicamente sin cable.
Page 44

Español
44
Póngala a prueba
-
Prueba de 21 días y proceso de adaptación.
Es un hecho que la piel y la barba tardan
algún tiempo en acostumbrarse al nuevo
sistema de arreglo personal.
-
Utilice su nueva afeitadora únicamente 3
semanas para disfrutar completamente de
un afeitado Philips Norelco al ras.
-
Es posible que al principio no obtenga la
afeitada al ras que espera e incluso es
posible que su rostro se irrite levemente.
Esto es normal, ya que la barba y la piel
necesitan tiempo para ajustarse. Invierta 3
semanas y pronto podrá disfrutar al
máximo de su nueva afeitadora.
-
Sea perseverante. Si alterna entre métodos
de afeitado durante el período de
adaptación, será más difícil acostumbrarse
al sistema de afeitado de Philips Norelco.
-
Si después de 21 días todavía no está
satisfecho con los resultados, Philips
Norelco le reembolsará el precio total de la
compra, siempre que la solicitud de
reembolso se reciba dentro de los 45 días
posteriores a la compra.
Encendido y apagado del producto
1 Para encender la afeitadora, pulse el botón
de encendido/apagado una vez.
La pantalla se ilumina durante algunos
segundos.
2 Para apagar la afeitadora, pulse el botón de
encendido/apagado una vez.
Page 45

Afeitado
Español
La pantalla se ilumina durante algunos
segundos para mostrar el estado de la
batería disponible.
Consejos de afeitado
-
Seleccionesus ajustes de comfort
personalizados (ver 'La pantalla').
-
Para obtener los mejores resultados de
confort sobre la piel, recorte su barba si no
se ha afeitado durante 3 días o más.
Afeitado seco
1 Encienda la afeitadora.
2 Estire bien la piel con su mano libre de
manera que las navajas puedan elevar y
cortar lo barba. Presione suavemente la
afeitadora sobre la piel para que los
cabezales sigan el contorno de la cara.
Nota: No presione demasiado fuerte.
Demasiada presión puede pellizcar la piel
con los peines.
3 Desconecte y limpie la afeitadora después
de cada uso.
La pantalla se ilumina durante algunos
segundos para mostrar el estado de la
batería.
Afeitado húmedo
Para una afeitada más confortable, también
puede utilizar la afeitadora sobre el rostro
húmedo con espuma o gel de afeitar.
45
Page 46

46
Español
1 Humedezca la piel.
2 Aplique espuma o gel de afeitar sobre la
piel.
3 Enjuague la unidad de afeitado con el agua
de la llave para garantizar que se deslice
suavemente sobre su piel.
4 Encienda la afeitadora.
5 Mueva los cabezales de afeitado sobre la
piel con movimientos circulares para llegar
a todos los vellos en las diferentes
direcciones de crecimiento. Asegúrese de
que cada unidad de afeitado esté siempre
en contacto total con la piel. Ejerza una
suave presión para una afeitada al ras y
cómoda.
Nota: No presione demasiado fuerte, esto
puede producir irritación en la piel.
Nota: Enjuague la unidad de afeitado con
regularidad para garantizar que se siga
deslizando suavemente sobre la piel.
6 Seque su cara.
Page 47

7 Desconecte y limpie la afeitadora después
de cada uso.
Nota: Asegúrese de enjuagar todos los restos
de espuma o gel de afeitar de la afeitadora.
Uso de los accesorios de ajuste de clic
Uso del accesorio de recortadora de barba con peine
Puede usar la recortadora de barba y el peine
incluido para arreglar su barba en cualquier
ajuste fijo y a diferentes ajustes de duración.
También puede usarla para cortar cualquier
vello largo antes de afeitarse para una
afeitada más agradable.
Los ajustes de longitud de la recortadora de
barba corresponden al largo del vello restante
después de cortar y varían de 3/64 pulg.– 3/16
pulg. (1-5 mm).
1 Ajuste el accesorio en el producto ("clic").
Español
47
2 Deslice el peine directo dentro de las
ranuras guía en ambos lados del accesorio
de la recortadora de barba ("clic").
Page 48

2
1
48
Español
3 Presione el selector de longitud y luego
empújelo hacia la izquierda o derecha para
seleccionar el largo del vello deseado.
4 Encienda el producto.
5 Mueva el producto hacia arriba mientras
ejerce una presión suave. Asegúrese de que
la parte frontal del peine esté siempre en
contacto total con la piel.
6 Limpie el accesorio después de su uso.
Uso del accesorio de recortadora de barba sin peine
Puede usar el accesorio de recortadora de
barba sin el peine para contornear la barba,
bigote, patillas o línea del cuello a una
longitud de 1/32 pulg./0.5 mm.
1 Saque el peine de la recortadora de barba.
Nota: Tome el peine por el centro para
sacarlo del accesorio de recortadora de
barba. No jale de los lados del peine.
2 Encienda el producto.
3 Sostenga el accesorio de recortadora de
barba perpendicular a la piel y mueva el
producto hacia abajo mientras aplica una
presión suave.
4 Limpie el accesorio después de su uso.
Bloqueo para viajes
Puede bloquear la afeitadora cuando viaja
para evitar que se encienda accidentalmente.
Page 49

Activación del sistema de bloqueo
1 Pulse el botón de encendido/apagado
durante 3 segundos para ingresar el modo
de bloqueo de viaje.
Cuando activa el bloqueo de viaje el
símbolo de bloqueo de viaje se ilumina en
blanco continuamente. Cuando se activa el
bloqueo de viaje, el aparato emite un
sonido y el símbolo de bloqueo de viaje
destella.
Desactivación del bloqueo de viaje
1 Pulse el botón de encendido/apagado
durante 3 segundos.
El símbolo de bloqueo de viaje destella y
luego se ilumina constantemente. El
aparato ya está listo para usarse de nuevo.
Nota: También puede desactivar el bloqueo
de viaje conectando el aparato al enchufe de
pared.
Español
49
Limpieza y mantenimiento
-
Una limpieza frecuente garantiza los
mejores resultados de afeitado.
-
Nunca limpie, retire ni reemplace la unidad
de afeitado con el motor en
funcionamiento.
-
No aplique presión a los peines del cabezal
de afeitado.
Page 50

Español
50
-
No toque los cabezales de afeitado con
objetos duros, debido a que podría
deformar o dañar los peines que cuentan
con ranuras de precisión.
-
No utilice agentes abrasivos ni líquidos
agresivos como la gasolina o la acetona
para limpiar la afeitadora.
Tenga cuidado con el agua caliente. Revise
siempre si el agua no está muy caliente, para
evitar quemarse las manos.
Nunca seque ni limpie la unidad de afeitado
con una toalla o un papel desechable, ya que
esto puede dañar los cabezales de afeitado.
Al enjuagar los cabezales de afeitado, es
posible que salga agua por la base de la
afeitadora. Esto es algo normal.
Limpieza de la afeitadora bajo la llave de agua.
Limpie la afeitadora después de cada uso para
un óptimo rendimiento.
Revise siempre si el agua no está muy
caliente, para evitar quemarse las manos.
Nunca seque ni limpie la unidad de afeitado
con una toalla o un papel desechable, ya que
esto puede dañar los cabezales de afeitado.
Page 51

Español
Al enjuagar los cabezales de afeitado, es
posible que salga agua por la base de la
afeitadora. Esto es algo normal.
1 Encienda el producto.
2 Enjuague la unidad de afeitado con agua
caliente de la llave.
3 Apague el producto. Saque el soporte del
cabezal de afeitado desde la parte inferior
de la unidad de afeitado.
4 Enjuague el vello de la cámara de
acumulación bajo la llave.
5 Enjuague el sostenedor del cabezal de
afeitado con agua caliente de la llave.
6 Elimine cuidadosamente el exceso de agua
y deje que el soporte del cabezal de
afeitado se seque al aire completamente.
7 Coloque el soporte del cabezal de afeitado
en la parte inferior de la unidad de afeitado
("clic").
51
Page 52

Español
52
Limpieza a fondo
Le aconsejamos que limpie los cabezales de
afeitado a fondo una vez al mes o cuando la
afeitadora ya no afeite tan bien como antes.
Nota: Los cabezales de afeitado están
asegurados por un anillo de retención azul o
naranja.
Siga las instrucciones correctas.
1 Apague la afeitadora.
2 Saque el soporte del cabezal de afeitado
3 Enjuague la unidad de afeitado y el sostén
desde la parte inferior de la unidad de
afeitado.
del cabezal de afeitado en el grifo.
4 Gire el anillo de retención a la izquierda y
retírelos del cabezal de la afeitadora.
Page 53

1
2
1
2
Español
53
Repita este proceso con los otros anillos de
retención. Colóquelos aparte en un lugar
seguro.
5 Quite los cabezales de afeitado del soporte
del cabezal de afeitado. Cada cabezal de
afeitado consiste de un cortador y un
protector.
Nota: No limpie más de un cortador y
protector a la vez, ya que todos son pares.
Si accidentalmente coloca una cuchilla en
el protector de afeitado equivocado,
tardará varias semanas en volver a lograr un
desempeño óptimo del afeitado.
6 Limpie el cortador y el protector en el grifo.
7 Sacuda el exceso de agua.
8 Vuelva a poner el cortador en el protector.
9 Coloque los cabezales de afeitado nuevos
en el soporte del cabezal de afeitado.
Nota: Asegúrese de que las muescas de
ambos lados de los cabezales de afeitado
encajen exactamente en los salientes del
sostenedor del cabezal de afeitado.
10 Vuelva a poner los anillos de retención.
-
Anillo de retención azul: Coloque el anillo
de retención en el cabezal de afeitado y
gírelo hacia la derecha para volver a colocar
el anillo de retención.
Page 54

1
2
Español
54
Alinee las flechas del anillo de retención
con los salientes en el soporte del cabezal
de afeitado. Gire el anillo a la derecha hasta
que haga clic para indicar que el anillo está
fijo.
-
Anillo de retención naranja: Coloque el
anillo de retención en el cabezal de
afeitado y gírelo hacia la derecha para
volver a colocar el anillo de retención.
Repita este proceso con los otros anillos de
retención.
Cada anillo de retención tiene dos ranuras
que ajustan perfecto en los salientes del
soporte del cabezal de afeitado. Gire el
anillo a la derecha hasta que escuche un
clic para indicar que el anillo está fijo.
Tome el sostenedor del cabezal de afeitado
en su mano cuando vuelva a insertar los
cabezales de afeitado y vuelva ajustar los
anillos de retención. No coloque el soporte
del cabezal de afeitado sobre una
superficie cuando haga esto, ya que se
pueden dañar los cabezales de afeitado.
11 Coloque el soporte del cabezal de afeitado
en la parte inferior de la unidad de afeitado
("clic").
Limpieza de los accesorios de ajuste de clic
Nunca seque la cortadora o los accesorios de
la recortadora de barba con una toalla o paño,
Page 55

Español
ya que esto puede dañar el dentado de la
cortadora.
Los accesorios provistos pueden variar según
el producto. La caja muestra los accesorios
que han sido provistos con su producto.
Limpieza del accesorio de recortadora de barba
Limpie el accesorio de recortadora de barba
después de cada uso.
1 Saque el peine del accesorio de
recortadora de barba.
Nota: Tome el peine por el centro para
sacarlo de la recortadora de barba. No jale
de los lados del peine.
2 Enjuague el vello cortado de la unidad con
agua tibia.
3 Enjuague el vello cortado del peine.
4 Quite la unidad de cortado del accesorio de
recortadora de barba. Al sacar la unidad de
corte del accesorio de recortadora de barba
al empujarla puede quitar cualquier vello
acumulado dentro del mismo. También
puede enjuagar la parte inferior de la
unidad de corte.
55
Page 56

1
2
Español
56
5 Enjuague los vellos cortados del accesorio
de recortadora de barba.
6 Elimine cuidadosamente el exceso de agua
y deje que el peine, la unidad de corte y el
accesorio de recortadora de barba se
sequen al aire antes de volver a usarlos.
7 Cuando la unidad de corte esté seca
póngala en el accesorio de recortadora de
barba.
8 Cuando el peine esté seco póngalo en el
accesorio de recortadora de barba.
9 Para obtener un rendimiento óptimo,
lubrique los dientes del accesorio con una
gota de aceite mineral cada 6 meses.
Sustitución
Reemplazo de los cabezales de afeitado
Para un rendimiento de afeitado óptimo, le
aconsejamos que reemplace los cabezales de
afeitado cada año. Reemplace los cabezales
de afeitado dañados inmediatamente.
Siempre reemplace los cabezales de afeitado
con cabezales originales de Philips Norelco
(see 'Accesorios').
Recordatorio de reemplazo
Page 57

Español
El recordatorio de reemplazo indica que los
cabezales de afeitado tienen que ser
reemplazados. El símbolo de la unidad de
afeitado y las flechas se iluminan cuando
apaga el producto.
1 Para reemplazar los cabezales de afeitado,
retírelos del sostenedor uno por uno.
Consulte el capítulo Limpieza a fondo para
ver las instrucciones sobre cómo remover
los anillos de retención y los cabezales de
afeitado.
Nota: Los cabezales de afeitado están
asegurados por un anillo de retención azul
o naranja. Siga las instrucciones correctas.
2 Para restablecer el recordatorio de
reemplazo, mantenga pulsado el botón de
encendido/apagado por aproximadamente
7 segundos. Espere hasta que escuche dos
sonidos.
Este producto no contiene otras piezas que
requieran mantenimiento. Para solicitar
asistencia, comuníquese al 1-800-243-3050.
57
Almacenamiento
Guarde la afeitadora en el estuche de viaje.
Nota: Siempre deje secar la afeitadora
completamente antes de guardarla en el
estuche de viaje.
Page 58

Español
58
Accesorios
-
Asegúrese de que el producto esté
apagado. Retire el cable del enchufe y del
producto antes de guardarlo. Guarde el
producto en un lugar seguro y seco donde
no pueda aplastarse, golpearse o dañarse.
-
No enrolle el cable alrededor del producto
para guardarlo.
-
Guarde el cable y otros accesorios en un
lugar seguro donde no sufran cortes ni
daños.
-
No coloque ni guarde el producto en un
lugar desde donde pueda, de algún modo,
caerse a una bañera, lavabo o dentro de
cualquier recipiente que contenga agua o
líquido.
Puede adquirir los accesorios y partes de
reemplazo en la tienda más cercana a su
domicilio o a través de nuestro sitio web
www.philips.com/store.
Están disponibles los siguientes accesorios:
-
Cabezales de afeitado Philips Norelco SH90
-
Modelo JC302: cartucho de limpieza
SmartClean de Philips Norelco
-
Cartucho de limpieza SmartClean, Paquete
de 3 JC303 de Phiips Norelco
-
Recortadora de barba SmartClick de Philips
Norelco RQ111
-
Cepillo de limpieza SmartClick de Philips
Norelco RQ585
Page 59

Asistencia
Desecho
Español
Para asistencia, visite nuestro sitio web:
www.philips.com/support o llame al número
gratuito1-800-243-3050.
La información en línea está disponible las
24horas, los siete días de la semana.
-
Este producto posee una batería recargable
de litio-ión que debe desecharse
apropiadamente.
-
Contacte a sus funcionarios locales o de la
ciudad para mayor información acerca del
manejo final de la batería. También puede
llamar al 1-800-822-8837 o visitar
www.call2recycle.org para las ubicaciones
donde se pueden desechar las baterías.
-
Para obtener ayuda visite nuestro sitio web
www.philips.com/support o llame
gratuitamente al número 1-800-243-3050.
-
Su producto está diseñado y fabricado con
materiales y componentes de alta calidad,
que pueden ser reciclados y reusados. Para
obtener información sobre reciclado,
comuníquese con las oficinas locales de
manejo de desechos o visite www.recycle.
philips.com
59
Garantía Total de Dos Años
PhilipsNorthAmericaLLC garantiza este
producto nuevo (excepto cuchillas y peines)
contra defectos en los materiales o en la mano
Page 60

60
Español
de obra por un período de dos años desde la
fecha de compra y acepta reparar o
reemplazar cualquier producto defectuoso sin
cargo.
IMPORTANTE: Esta garantía no cubre ningún
daño que surja como resultado de un
accidente, de un uso indebido o abuso, de la
falta de cuidado razonable, del uso de
cualquier accesorio no provisto con el
producto ni la pérdida de piezas, así como
tampoco ningún daño derivado del uso del
producto con una tensión o con baterías que
no sean las establecidas.*
NINGUNA RESPONSABILIDAD ES ASUMIDA
POR CUALQUIER DAÑO, INCIDENTAL O
RESULTANTE.
Para obtener el servicio de garantía,
simplemente vaya a
www.philips.com/support para obtener
asistencia. Para su protección, se sugiere que
el envío de las devoluciones del producto se
realice por correo certificado, con seguro
prepago. Cualquier daño que ocurra durante
el envío no será cubierto por esta garantía.
NOTA: PhilipsNorthAmerica LLC. no extiende
ninguna otra garantía, ni escrita ni oral.
Esta garantía le proporciona derechos legales
específicos; asimismo, es posible que goce de
otros derechos que pueden variar de estado a
estado. En algunos estados no se permite la
exclusión o la limitación de los daños fortuitos
o resultantes, de modo que es posible que las
Page 61

Español
limitaciones o exclusiones arriba mencionadas
no se apliquen a su caso.
*Lea las instrucciones adjuntas atentamente.
GARANTÍA DE DEVOLUCIÓN DE SU DINERO POR 45 DÍAS
Para disfrutar de una afeitada cómoda y al ras
con su nueva afeitadora para hombres Philips
Norelco, la afeitadora se debe usar
únicamente por 3 semanas. Esto permite que
su cabello y su piel tengan tiempo suficiente
para adaptarse al Sistema de afeitado Philips
Norelco. Si, después de ese periodo de
tiempo, no está satisfecho con los resultados
de su afeitadora para hombre Philips Norelco,
puede devolver el producto con su recibo de
compra fechado y le reembolsaremos el
importe que pagó.
El producto debe enviarse por correo
certificado pago, con seguro prepago, junto
con el recibo original de compra, donde se
indique el precio y la fecha de compra, así
como el formulario de autorización para la
garantía de devolución de dinero.
No asumimos ninguna responsabilidad por
los paquetes perdidos.
El paquete del producto debe contar con
matasellos que no supere los 45días a partir
de la fecha de compra. Philips se reserva el
derecho a verificar el precio de compra del
61
Page 62

62
Español
producto y limita los reembolsos al precio de
venta minorista sugerido.
Para obtener el formulario de autorización
para la garantía de devolución del dinero,
llame al 1-800-243-3050 para obtener
asistencia.
La entrega del cheque de reembolso ocurrirá
de 6 a 8 semanas después de la recepción del
producto devuelto.
Page 63

Empty page before back cover
Page 64

Manufactured for:
Philips Personal Health
a division of Philips North America LLC
P.O. Box 10313, Stamford, CT 06904 USA
This symbol on the product’s nameplate means it is listed by
Underwriters’ Laboratories, Inc.
Norelco and Tripleheader are registered trademarks of Philips
North America LLC.
PHILIPS and Philips shield are registered trademarks of Koninklijke
Philips N.V.
©2018 Philips North America LLC. All rights reserved.
Fabricado por:
Philips Personal Health
una división de Philips North America LLC
P.O. Box 10313, Stamford, CT 06904
Este símbolo en la placa del nombre del producto indica que
está registrado en Underwriters' Laboratories, Inc.
Norelco y Tripleheader son marcas comerciales registradas de
Philips North America LLC.
PHILIPS es una marca registrada de Koninklijke Philips N.V.
©2018 Philips North America LLC. Todos los derechos reservados.
3000.015.7940.1
 Loading...