

Page 1

Always there to help you
Question?
Contact
Philips
Register your product and get support at
www.philips.com/welcome
S8A
User manual
Page 2

Page 3

Contents
1 Important safety instructions 3
2 Your phone 5
What is in the box 5
Overview of the phone 6
Overview of the base station 6
Answer a second call 19
Answer a second call with the landline
or mobile line 19
Switch between two calls 19
Switch between two calls on the
landline and mobile line 19
Make a conference call with the
external callers 19
Make a conference call on the landline
and mobile line 20
3 Main menu icons 8
4 Display icons 9
5 Get started 10
Connect the base station 10
Install the handset 10
Congure your phone (country
dependent) 11
Change the remote access PIN/passcode 12
Charge the handset 12
Check the battery level 12
What is standby mode? 12
Check the signal strength 13
6 Bluetooth 14
Pair S8A with your mobile phones 14
Synchronize the phonebook 14
Manage the mobile phones list 15
Change the PIN/passcode 15
Recover the PIN/passcode 15
Rename your device 16
7 Calls 17
Make a call 17
Answer a call 18
End a call 18
Adjust the earpiece/speaker volume 18
Mute the microphone 18
Turn the speaker on or off 18
Make a second call 18
Make a second call with the landline/
mobile line 19
8 Intercom and conference calls 21
Make a call to another handset 21
Transfer a call 21
Make a conference call 21
9 Text and numbers 23
Enter text and numbers 23
Switch between uppercase and
lowercase 23
10 Phonebook 24
Access the phonebook directories 24
Direct access memory 24
View the phonebook 24
Download the phonebook from the
mobile phone 24
Search a record 24
Call from the phonebook 25
Access the phonebook during a call 25
Add a record 25
Edit a record 25
Set the personalized melody 25
Set the speed dial keys 25
Delete a record 26
Delete all records 26
Add a contact to the exception list 26
11 Call log 27
Call list type 27
View the call records 27
Save a call record to the phonebook 27
Return a call 27
Delete a call record 28
1EN
Page 4

Delete all call records 28
Restore default settings 44
12 Redial list 29
View the redial records 29
Redial a call 29
Save a redial record to the phonebook 29
Delete a redial record 29
Delete all redial records 29
13 Phone settings 30
Sound settings 30
Alarm clock 31
Set the date and time 32
ECO mode 32
Name the handset 32
Set the display language 32
Display settings 32
Line settings 33
14 Baby monitor 34
Activate/Deactivate the baby unit 34
Send an alert 34
Set the baby cry level 35
15 Telephone answering machine 36
Turn the answering machine on or off 36
Set the answering machine language 36
Set the answer mode 36
Announcements 36
Incoming messages (ICM) 37
17 Technical data 45
18 Notice 46
Declaration of conformity 46
Use GAP standard compliance 46
Compliance with EMF 46
Disposal of your old product and
batteries 46
19 Trademarks 48
20 Frequently asked questions 49
21 Appendix 51
Text and number input tables 51
22 Index 52
16 Services 40
Auto conference 40
Call barring 40
Call list type 40
Auto prex 41
Network type 41
Select the recall duration 41
Dial mode 41
First ring 42
Auto clock 42
Register additional handsets 42
Unregister handsets 43
Call services 43
2 EN
Page 5

1 Important safety
instructions
Power requirements
• This product requires an electrical supply
of 100-240 volts AC. In case of power
failure, the communication can be lost.
• The voltage on the network is classied
as TNV-3 (Telecommunication Network
Voltages), as dened in the standard EN
60950.
Warning
• The Electrical network is classied as hazardous. The
only way to power down the charger is to unplug the
power supply from the electrical outlet. Ensure that the
electrical outlet is always easily accessible.
To avoid damage or malfunction
Caution
• Use only the power supply listed in the user
instructions.
• Use only the batteries listed in the user instructions.
• Risk of explosion if battery is replaced by an incorrect
type.
• Dispose of used batteries according to the instructions.
• Always use the cables provided with the product.
• Do not allow the charging contacts or the battery to
come into contact with metal objects.
• Do not let small metal objects come into contact with
the product. This can deteriorate audio quality and
damage the product.
• Metallic objects may be retained if placed near or on
the handset receiver.
• Do not use the product in places where there are
explosive hazards.
• Do not open the handset, base station or charger as
you could be exposed to high voltages.
• For pluggable equipment, the socket-outlet shall
be installed near the equipment and shall be easily
accessible.
• Handsfree activation could suddenly increase the
volume in the earpiece to a very high level: make sure
the handset is not too close to your ear.
• This equipment is not designed to make emergency
calls when the power fails. An alternative has to be
made available to allow emergency calls.
• Do not allow the product to come into contact with
liquids.
• Do not use any cleaning agents containing alcohol,
ammonia, benzene, or abrasives as these may harm
the set.
• Do not expose the phone to excessive heat caused by
heating equipment or direct sunlight.
• Do not drop your phone or allow objects to fall on
your phone.
• Active mobile phones in the vicinity may cause
interference.
When using the phone as a baby monitor
Caution
• Children should be supervised to ensure that they do
not play with the appliance.
• Make sure the baby unit and the cord are always out of
reach of the baby (at least 1 metre/3 feet away).
• Keep the parent unit at least 1.5 metres/5 feet away
from the baby unit to prevent acoustic feedback.
• Never place the baby unit inside the baby’s bed or
playpen.
• Never cover the parent unit and the baby unit with
anything (e.g. a towel or blanket). Always make sure the
cooling vents of the baby unit are free.
• Take every precaution to make sure that your baby can
sleep safely .
• This appliance is not intended for use by persons
(including children) with reduced physical, sensory
or mental capabilities, or lack of experience and
knowledge, unless they have been given super vision or
instruction concerning use of the appliance by a person
responsible for their safety.
• If you place the parent unit next to a transmitter or
other DECT appliance (e.g. a DECT telephone or
wireless router for the internet), the connection with
the baby unit may be lost. Move the baby monitor
further away from the other wireless appliances until
the connection is restored.
• This baby monitor is intended as an aid. It is not a
substitute for responsible and proper adult supervision
and should not be used as such.
3EN
Page 6

About operating and storage temperatures
• Operate in a place where temperature is
always between 0°C to +40°C (up to 90%
relative humidity).
• Store in a place where temperature is
always between -20°C and +45°C (up to
95% relative humidity).
• Battery life may be shorter in low
temperature conditions.
4 EN
Page 7

2 Your phone
Congratulations on your purchase and welcome
to Philips! The Philips S8A provides the superior
sound quality of HQ-Sound and the ultimate
convenience of MobileLink. It allows you to
make and receive all calls - landline and mobile on your home phone and easily download your
mobile's phonebook.
To fully benet from the support that Philips
offers, register your product at www.philips.
com/welcome.
What is in the box
Base station
Power adapter**
Line cord*
Guarantee
User manual
Handset**
Charger**
4XLFNVWDUWJXLGH
Quick start guide
Note
• * In some countries, you have to connect the line
adapter to the line cord, then plug the line cord to the
telephone socket.
Note
• ** In multi-handset packs, there are additional handsets,
chargers and power adapters.
5EN
Page 8
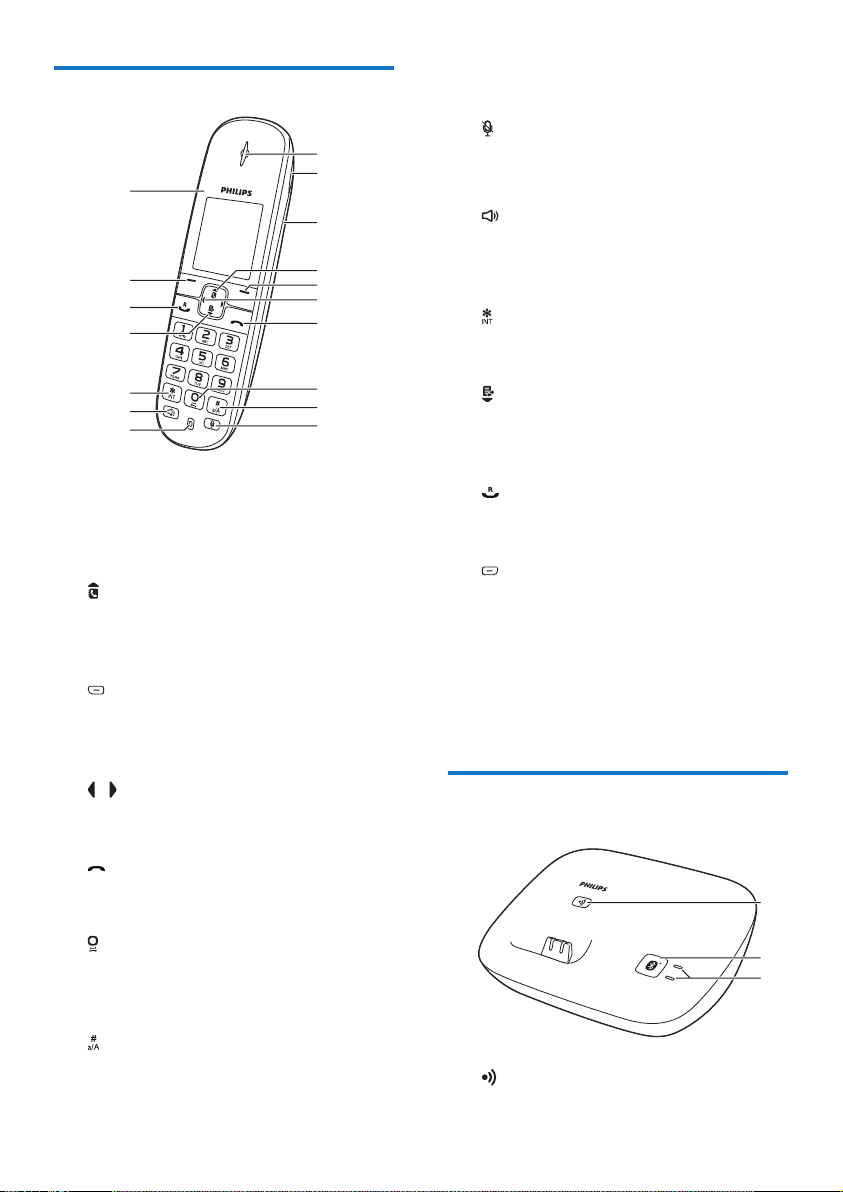
Overview of the phone
q
p
o
n
m
l
k
a Earpiece
b Loudspeaker
c Battery door
d
• Scroll up on the menu.
• Increase the earpiece/speaker volume.
• Access the phonebook.
e
• Delete text or digits.
• Cancel operation.
• Enter the redial list
f /
Move the cursor to the left or right in
editing mode.
g
• End the call.
• Exit the menu/operation.
h
• Press to enter a space during text
editing.
• Press and hold to lock the keypad.
i
• Make a predial call.
• Press and hold to enter a pause.
• Switch to upper/lower case during
editing.
j
a
b
c
d
e
f
g
h
i
j
Mute or unmute the microphone.
k Microphone
l
• Turn the speaker phone is on/off.
• Make and receive calls through the
speaker.
m
Press and hold to make an intercom call
(for multi handset version only).
n
• Scroll down on the menu.
• Decrease the earpiece/speaker volume.
• Access the call log.
o
• Make and receive calls.
• Recall key
p
• Access the main menu.
• Conrm selection.
• Enter the options menu.
• Select the function displayed on the
handset screen directly above the key.
q LED light
Overview of the base station
a
b
c
a
6 EN
Page 9

• Find handsets.
• Enter registration mode.
b
Press and hold to start pairing the landline
phone with your mobile phone with
Bluetooth.
c Bluetooth LEDs
Off: no mobile phone is available.
On: there is mobile phone available for
Bluetooth connection.
Flashing: the mobile phone is in use with
Bluetooth connection.
7EN
Page 10
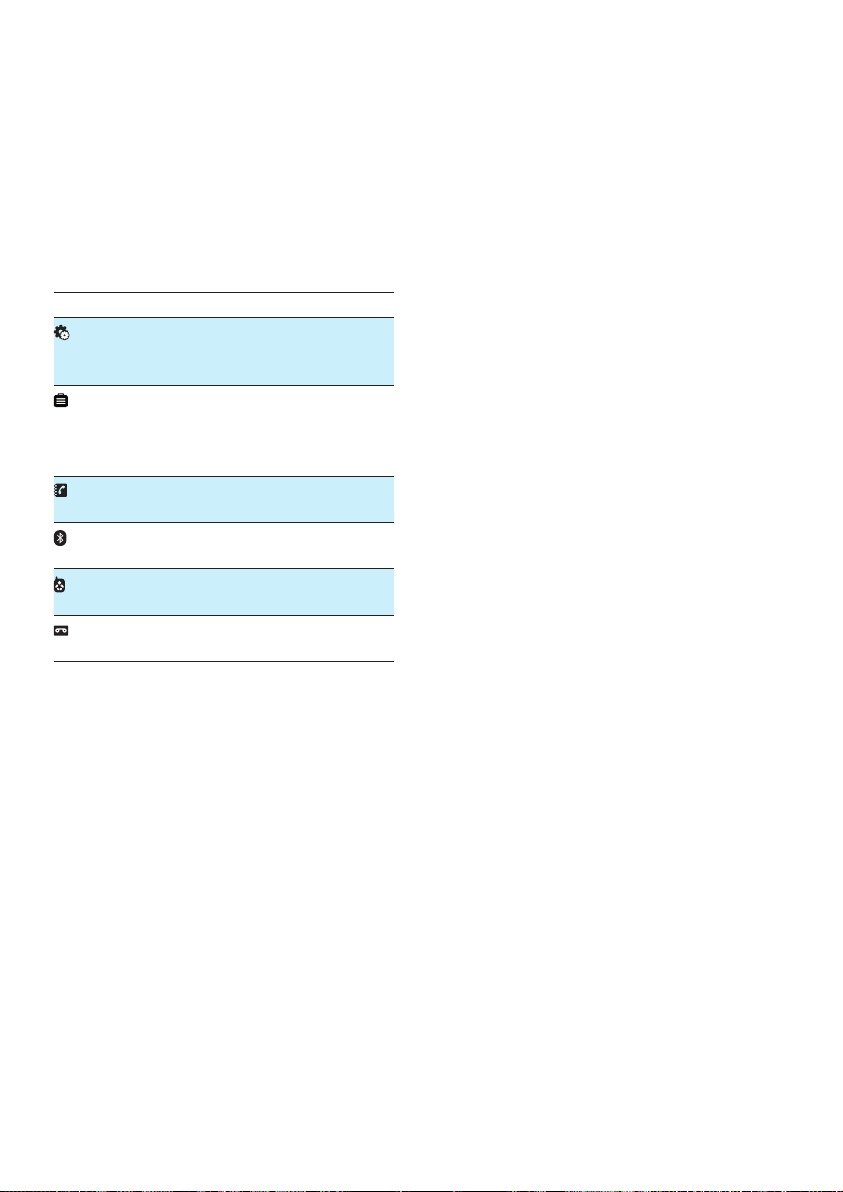
3 Main menu
icons
The following is an overview of the menu
options that are available in your S8A. For
detailed explanation of the menu options, see
the corresponding sections in this user manual.
Icon Descriptions
[Phone setup] - Set the date and time,
sounds, ECO mode, phone name and
display language.
[Services] - Set the auto conference,
auto prex, network type, recall time,
auto clock, call services etc. The services
are network and country dependent.
[Phonebook] - Add, edit, manage
phonebook entries etc.
[Bluetooth] - Pair the mobile phones,
download the mobile's phonebook.
[Baby monitor] - Set the alert to other
handsets and the baby cry level.
[Answer machine] - Setup, listen to,
delete phone messages, etc.
8 EN
Page 11
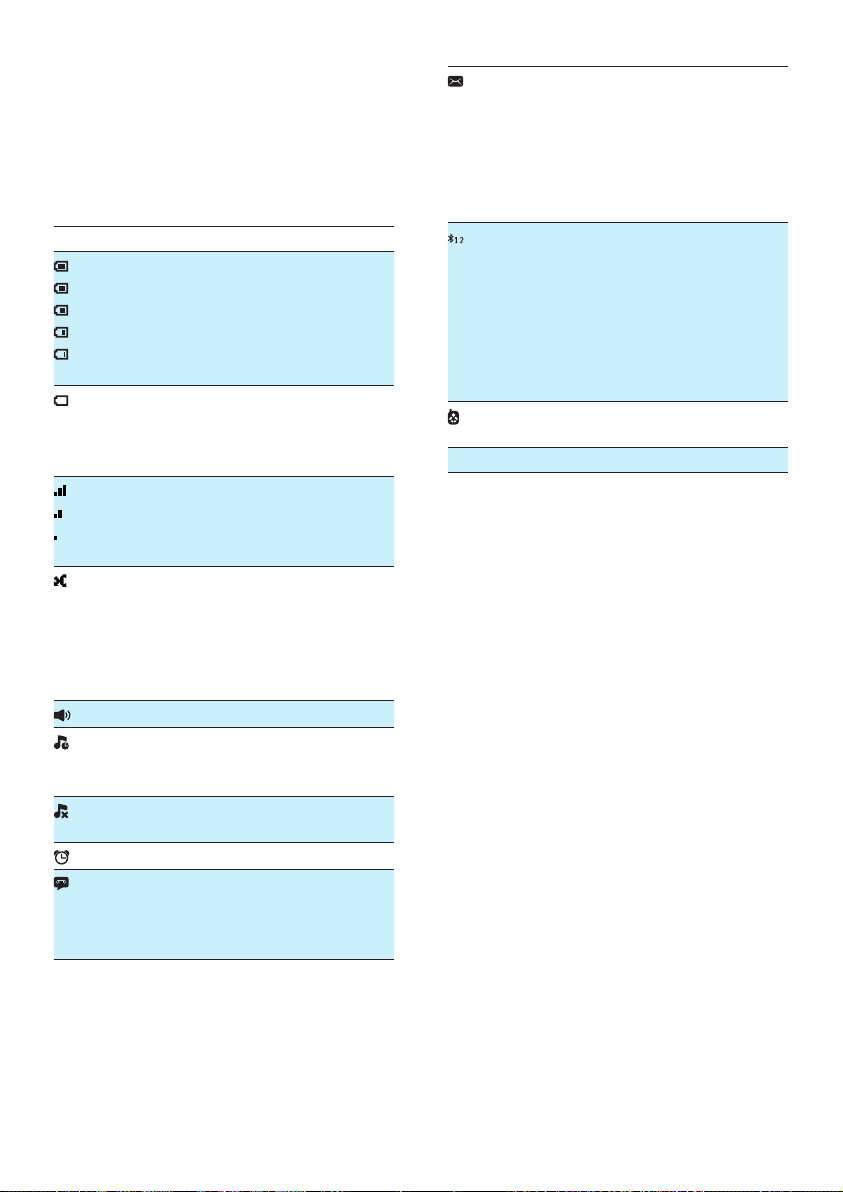
4 Display icons
In standby mode, the icons shown on the main
screen tell you what features are available on
your handset.
Icon Descriptions
When the handset is off the base
station/charger, the bars indicate the
battery level (from full to low).
When the handset is on the base
station/charger, the bars keep scrolling
until charging is complete.
The empty battery icon ashes and you
hear an alert tone.
The battery is low and needs
recharging.
The number of bars indicates the
connection status between the handset
and base station. The more bars are
shown, the better the signal strength is.
It is red on the standby screen when
there is a new missed call.
It is red in the incoming call list when
there is an unread missed call.
It is green in the incoming call list when
there is a read missed call.
The speaker is on.
It is displayed when the silent mode is
activated or during the preset time for
the silent mode.
It is displayed when the ringer is off or
when the silent mode is activated.
The alarm is activated.
Answering machine: it ashes when
there is a new message. It displays when
the telephone answering machine is
turned on.
It ashes when there is a new voice
message.
It remains steadily on when the voice
messages are already viewed in the call
log.
The icon is not shown when there is no
voice message.
The Bluetooth function is activated.
Number '1' indicates mobile 1 while
'2' indicates mobile 2 in the active list
of bluetooth device. Gray color means
the device is added in the active list but
is out of range or not available. Blank
color means the corresponding active
list has no device added.
It is displayed when the baby unit is set
up.
ECO The ECO mode is activated.
9EN
Page 12
5 Get started
Caution
• Make sure that you have read the safety instructions in
the 'Important safety instructions' section before you
connect and install your handset.
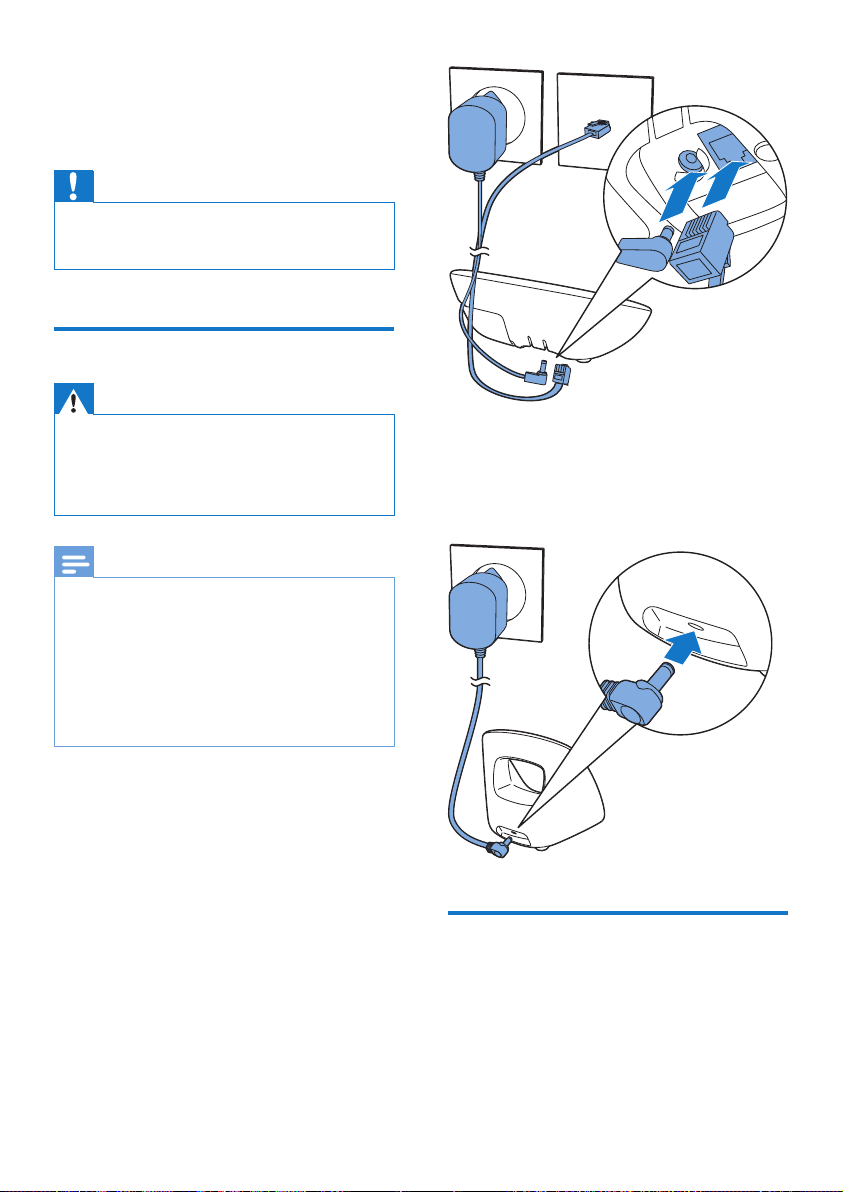
Connect the base station
Warning
• Risk of product damage! Make sure that the power
supply voltage corresponds to the voltage printed on
the back or underside of the phone.
• Use only the supplied power adapter to charge the
batteries.
Note
• If you subscribe to the digital subscriber line (DSL)
high speed internet service through your telephone
line, ensure you install a DSL lter between the
telephone line cord and the power socket. The lter
prevents noise and caller ID problems caused by DSL
interference. For further information on DSL lters,
contact your DSL service provider.
• The type plate is located on the bottom of the base
station.
1 Connect each end of the power adapter
to:
• the DC input jack at the bottom of the
base station;
• the power socket on the wall.
2 Connect each end of the line cord to:
• the telephone socket at the bottom of
the base station;
• the telephone socket on the wall.
3 Connect each end of the power adapter
to (for multi handset versions only):
• the DC input jack at the back of the
extra handset charger.
• the power socket on the wall.
Install the handset
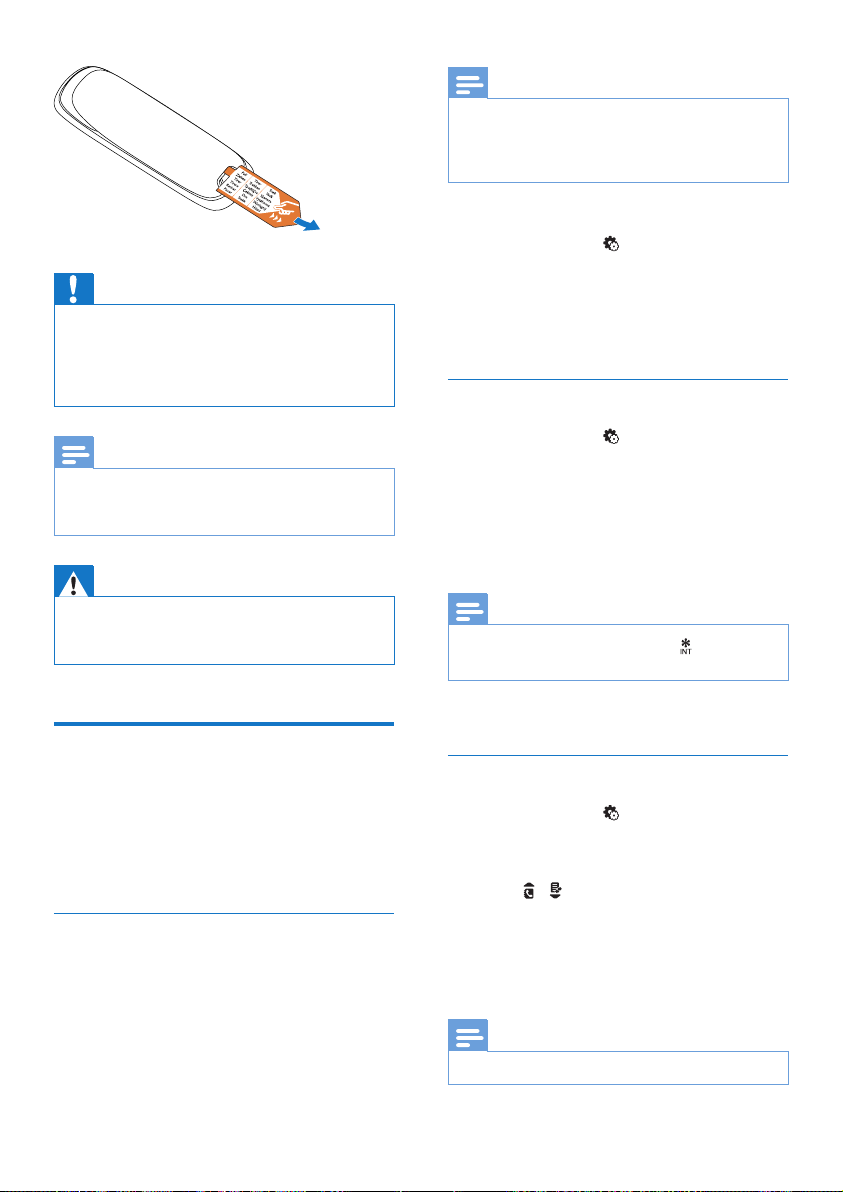
The batteries are pre-installed in the handset.
Pull the battery tape off from the battery door
before charging.
10 EN
Page 13
Note
• The country/language setting option is country
dependent. If no welcome message is displayed, it
means the country/language setting is preset for your
country. Then you can set the date and time.
Caution
• Risk of explosion! Keep batteries away from heat,
sunshine or re. Never discard batteries in re.
• Use only the supplied batteries.
• Risk of decreased battery life! Never mix different
brands or types of batteries.
Note
• Charge the batteries for 8 hours before rst use.
• If the handset becomes warm when the batteries are
charging, it is normal.
Warning
• Check the battery polarity when inser ting in the
battery compar tment. Incorrect polarity may damage
the product.
Congure your phone
(country dependent)
To re-set the language, see the following steps.
1 Select [Menu] > > [Language], then
press [OK] to conrm.
2 Select a language, then press [OK] to
conrm.
» The setting is saved.
Set the date and time
1 Select [Menu] > > [Date & time], then
press [OK] to conrm.
2 Select [Set date]/[Set time], then press
[OK] to conrm.
3 Press the numeric buttons to enter the
date and time.
Note
• If the time is in 12-hour format, press to select [am]
or [pm] (Country dependent).
4 Press [OK] to conrm.
Set the date and time format
1 When using your phone for the rst time,
you see a welcome message.
2 Press [OK].
Set the country/language
Select your country/language, then press [OK]
to conrm.
» The country/language setting is saved.
1 Select [Menu] > > [Date & time], then
press [OK] to conrm.
2 Select [Date format] or [Time format].
3 Press / to select [DD-MM-YYYY] or
[MM-DD-YYYY] as the date display, and
[12 Hours] or [24 Hours] as the time
display. Then press [OK] to conrm.
» The setting is saved.
Note
• The date and time format setting is country dependent.
11EN
Page 14

Change the remote access PIN/passcode
Note
• The default answering machine remote access PIN/
passcode is 0000 and it is important to change it to
ensure the security.
1 Select [Menu] > > [Remote access] >
[Change PIN], then press [OK] to conrm.
2 Enter the old PIN/passcode, then press
[OK] to conrm.
3 Enter the new PIN/passcode, then press
[OK] to conrm.
4 Enter the new PIN/passcode again, then
press [OK] to conrm.
» The setting is saved.
Charge the handset
Place the handset on the base station to
charge the handset. When the handset is
placed correctly on the base station, you hear
a docking tone (see 'Set the docking tone' on
page 31).
» The handset starts charging.
Note
• Charge the batteries for 8 hours before rst use.
• If the handset becomes warm when the batteries are
being charged, it is normal.
• Over time, capacity of batteries decreases. This is a
normal battery behavior.
Your phone is now ready to use.
Check the battery level
The battery icon displays the current battery
level.
When the handset is off the base
station/charger, the bars indicate
the battery level (from full to low).
When the handset is on the base
station/charger, the bars ash until
charging is complete.
The empty battery icon ashes.
The battery is low and needs
recharging.
If you are on the phone, you hear warning
tones when the batteries are almost empty.
The handset turns off when the batteries are
completely empty.
What is standby mode?
Your phone is in standby mode when it is idle.
When the handset is off the charging cradle,
the standby screen displays the date and time.
When the handset is on the charging cradle,
the standby screen displays the time as a screen
saver.
12 EN
Page 15

Check the signal strength
The number of bars indicates
the connection status between
the handset and base station. The
more bars are shown, the better
the connection is.
• Make sure the handset is connected to the
base station before you make or receive
calls and carry out the functions and
features.
• If you hear warning tones when you are
on the phone, the handset is almost out
of battery or the handset is out of range.
Charge the battery or move the handset
close to the base station.
13EN
Page 16

6 Bluetooth
S8A supports Bluetooth wireless technology.
You can connect it to a mobile phone which
is Bluetooth compatible. Then you can make
and receive calls and download the phonebook
from your mobile phone with the S8A handset.
Note
• Make sure that the mobile phone with which you
establish a connection supports the Bluetooth function.
• The Bluetooth connection is subject to interference
from obstructions such as walls or other electronic
devices.
Pair S8A with your mobile phones
Make sure the Bluetooth function of the mobile
phones is activated and in searching status. Then
you can do the pairing in this way:
1 Select [Menu] > > [Find Me].
2 Place the mobile phone close to the base
station, then press [OK] to conrm.
» The mobile phone name is displayed
on the screen.
3 On the mobile phone, select S8A and
connect.
4 Enter the PIN/passcode on the mobile
phone, if necessary.
Note
• When the Bluetooth device list is full, remove some
mobile phone names before pairing can start.
• If the name of S8A exists in your mobile phone, you
have to remove it from your mobile phone. Then you
can do the pairing again.
• When pairing is successful, you can add the new mobile
phone name to the active list. Remove some mobile
phone names if the active list is full. See 'Manage the
mobile phones list' in this chapter for information.
Synchronize the phonebook
Download the phonebook from the mobile phones
1 Make sure that the mobile phone is already
connected to S8A with Bluetooth.
2 Select [Menu] > > [Mobile setting].
3 Select a mobile phone, then press [OK] to
conrm.
4 Select [Phonebook] to download the
phonebook, then press [OK] to conrm.
» The phonebook from the mobile
phone is updated on the base station.
Note
• After the update is complete, the new phonebook
overwrites the old one.
• If there is an incoming call when phonebook update is
in progress, the update is suspended and resumes after
the call ends.
Tip
• The default PIN/passcode is 0000.
» When S8A and the mobile phone are
paired,
screen.
14 EN
or is displayed on the
Set the mobile's phonebook to privacy mode
You can set whether the mobile's phonebook is
available for viewing.
1 Select [Menu] > > [Mobile setting].
2 Select a mobile phone, then press [OK] to
conrm.
Page 17

3 Select [Privacy mode], then press [OK] to
conrm.
4 You can select among these 3 options:
• [Off] : no PIN/passcode is required to
access the mobile's phonebook which
is always available for viewing.
• [Auto range] : no PIN/passcode
is required to access the mobile's
phonebook which is available for
viewing only when the mobile phone is
within the Bluetooth range.
• [PIN] : follow the on-screen instruction
to activate or change the PIN/
passcode.
» The selected mobile phone is
connected to/disconnect from
Bluetooth.
Delete a device/Delete all devices on the list
1 Select [Menu] > > [Device list], then
press [OK] to conrm.
» The mobile phones list is displayed.
2 Select a mobile phone, press [Option].
3 Select [Delete]/[Delete all], then press
[OK] to conrm.
Manage the mobile phones list
You can manage your mobile phones list in this
way:
1 Select [Menu] > > [Device list], then
press [OK] to conrm.
» The mobile phones list is displayed.
2 Select a mobile phone, press [Option].
3 Select [Connect]/[Disconnect]/[Delete]/[
Delete all], then press [OK] to conrm.
Note
• You can see [Disconnect] in the option list only when
the mobile phone is connected; and [Connect] only
when the mobile phone is disconnected.
Connect/Disconnect the mobile phone
1 Select [Menu] > > [Device list], the
press [OK] to conrm.
» The mobile phones list is displayed.
2 Select a mobile phone, press [Option].
3 Select [Connect]/[Disconnect], then press
[OK] to conrm.
Note
• If you select to delete all mobile phones on the list,
a conrmation message is displayed. Press [OK] to
conrm.
Change the PIN/passcode
1 Select [Menu] > > [Change PIN], then
press [OK] to conrm.
2 Press [Clear] to remove the current PIN/
passcode to conrm.
3 Enter the new PIN/passcode, then press
[OK] to conrm.
» The new PIN/passcode is saved.
Recover the PIN/passcode
If you forget the PIN/passcode, refer to the
following instructions:
1 Access [Menu] > > [Device list], then
press [OK] to conrm.
2 Select a mobile phone, then press
[Option].
3 Select [Delete], then press [OK] to
conrm.
15EN
Page 18

» The mobile phone is removed from
the device list.
4 Pair S8A with the mobile phone again (see
'Pair S8A with your mobile phones' on
page 14).
5 Access [Menu] > > [Mobile setting],
press [OK] to conrm.
6 Select [Privacy mode], then press [OK] to
conrm.
7 Select [PIN], then follow the on-screen
instruction to activate or change the PIN/
passcode.
Rename your device
The name of your phone is S8A by default. You
can rename it in this way:
1 Select [Menu] > > [Rename Me], then
press [OK] to conrm.
2 Edit the name, then press [Save] to
conrm.
16 EN
Page 19
7 Calls
Note
• When the power fails, the phone cannot access
emergency services.
Tip
• If you select [Auto] on the handset, the idle line is
pre-selected for an outgoing call, with [Home] as the
highest priority, then [Mobile 1] and [Mobile 2]. If
you select [Manual], select an icon among these three
options.
Tip
• Check the signal strength before you make a call or
when you are in a call (see 'Check the signal strength'
on page 13).
Make a call
You can make a call in these ways:
• Normal call
• Predial call
• Call through the speed dial key
You can also make a call from the redial list (see
'Redial a call' on page 29), phonebook list (see
'Call from the phonebook' on page 25) and call
log (see 'Return a call' on page 27).
Normal call
1 Press or .
2 Dial the phone number.
» The number is dialed out.
» The duration of your current call is
displayed.
Note
• Make sure that the line settings are set to [Home]
for the landline. For information, see chapter 'Phone
settings', section 'Line settings'.
Predial call
1 Dial the phone number
• To erase a digit, press [Clear].
• To enter a pause, press and hold .
2 Press / to select the landline or mobile
line ( / / ) from which you want to
make an outgoing call.
3 Press or to dial out the call.
Note
• Make sure that the Line settings are set to [Home] for
the landline or [Mobile 1]/[Mobile 2] for mobile line.
For information, see chapter 'Phone settings', section
'Line settings'.
Tip
• If you select [Auto] on the handset, the idle line is
pre-selected for an outgoing call, with [Home] as the
highest priority, then [Mobile 1] and [Mobile 2]. If
you select [Manual], select an icon among these three
options.
Call through the speed dial key
You can assign and save the number of your
contact to a key (see 'Set the speed dial keys'
on page 25). Then you can press and hold
on the key in standby mode to dial the saved
phone number automatically.
17EN
Page 20
Note
• The call timer displays the talk time of your current call.
• If you hear warning tones, the phone is almost out of
battery or out of range. Charge the battery or move
the phone close to the base station.
• Press ; or
• Place the handset to the base station
or charging cradle.
Adjust the earpiece/speaker volume
Answer a call
When there is an incoming call from the
landline or mobile line, you can select from the
following options:
• press or to answer the call.
• select [Divert] to send incoming call to the
answering machine.
• select [Silent] to turn off the ringer of the
current incoming call.
When there are incoming calls from the
landline and mobile line at the same time, press
/ on the handset to select a call, then, press
or to answer the call.
Warning
• When the handset rings or when the handsfree is
activated, keep the handset away from your ear to
avoid ear damage.
Note
• If you have subscribed for a caller ID service with
the service provider, you will see the caller number
displayed on the handset. If the number is saved in the
phonebook, the name will be displayed.
Press / on the handset to adjust the
volume during a call.
» The earpiece/speaker volume is
adjusted and the phone is back to the
call screen.
Mute the microphone
1 Press during a call.
» The handset displays [Mute on].
» The caller cannot hear you, but you
can still hear his voice.
2 Press again to unmute the microphone.
» You can now communicate with the
caller.
Turn the speaker on or off
Press .
Make a second call
Tip
• When there is a missed call, a notication message is
displayed.
End a call
You can end a call in these ways:
18 EN
Note
• This service is network dependent.
1 Press during a call.
» The rst call is put on hold.
2 Dial the second number.
» The number displayed on the screen is
dialed out.
Page 21
Make a second call with the landline/mobile line
When you are in a call with the landline/mobile
line, you can also make a second call through
the other line (mobile line/landline).
1 Press [Option], then select to switch to
the line which you want to make a second
call .
» The rst call is on hold.
2 To switch or exit the calls from the landline
and/or mobile line, select from [Option]
menu.
Answer a second call
Note
• This service is network dependent.
When there is a periodical beep to notify you
of an incoming call, you can answer the call in
these ways:
1 Press and to answer the call.
» The rst call is put on hold, and you
are now connected to the second call.
2 Press and to end the current call and
answer the rst call.
Switch between two calls
You can switch your calls in these ways:
• Press and ; or
• Press [Option] and select [Switch calls],
then press [OK] again to conrm.
» The current call is put on hold, and you
are now connected to the other call.
Switch between two calls on the landline and mobile line
You can switch the calls between the landline
and mobile line.
1 Make an outgoing call with the land line.
2 When there is an incoming call from the
mobile line, press [Option], then select a
mobile phone to answer the call.
» The call from the landline is on hold.
3 To switch or exit the calls from the landline
and/or mobile line, select from [Option]
menu.
Note
• For some mobile phones, when you pick up the call
from the mobile phone, the Bluetooth is disconnected.
For further information, check with the mobile phone
dealer.
Answer a second call with the landline or mobile line
When you are in a call with the landline/mobile
line, you can also answer a second call through
the other line (mobile line/landline).
1 Press [Option], then select to switch to
the line which you answer a second call .
» The rst call is on hold.
2 To switch or exit the calls from the landline
and/or mobile line, select from [Option]
menu.
Make a conference call with the external callers
Note
• This service is network dependent. Check with the
service provider for additional charges.
When you are connected to two calls, you can
make a conference call in these ways:
• Press , then ; or
19EN
Page 22

• Press [Option], select [Conference] and
then press [OK] again to conrm.
» The two calls are combined and a
conference call is established.
Make a conference call on the landline and mobile line
You can make a two-line conference call
through the landline and mobile line.
1 Make an outgoing call with the landline.
2 When there is an incoming from the
mobile line, press [Option] , then select a
mobile phone to answer the call.
» The call from the landline is on hold.
3 Press [Option] to access the menu.
4 Select [2 lines conf.] to star t a conference
call with the landline and mobile line.
5 To switch or exit the calls from the landline
and/or mobile line, select from [Option]
menu.
20 EN
Page 23
8 Intercom and
conference calls
An intercom call is a call to another handset
that shares the same base station. A conference
call involves a conversation between you,
another handset user and the outside callers.
» Wait for the other side to answer your
call.
Switch between calls
Press [Extern] to switch between the outside
call and the intercom call.
Transfer a call
Make a call to another handset
Note
• If the base station only has 2 registered handsets, press
and hold
to make a call to another handset.
1 Press and hold .
» The handsets available for intercom are
displayed.
2 Select a handset number, then press [OK]
to conrm.
» The selected handset rings.
3 Press on the selected handset.
» The intercom is established.
4 Press [Cancel] or to cancel or end the
intercom call.
Note
• If the selected handset is busy, [Busy] is displayed on
the handset screen.
Note
• If the base station only has 2 registered handsets, press
and hold
to transfer a call to another handset.
1 Press and hold during a call.
» The handsets available for intercom are
displayed.
2 Select a handset number, then press [OK]
to conrm.
» The selected handset rings.
3 Press when the other side answers your
call.
» The call is now transferred to the
selected handset.
Make a conference call
A 3-way conference call is between you,
another handset user and the outside callers. It
requires two handsets to share the same base
station.
During an external call
While you are on the phone
You can go from one handset to another during
a call:
1 Press and hold .
» The current caller is put on hold.
2 Select a handset number, then press [OK]
to conrm.
1 Press and hold to initiate an internal call.
» The external caller is put on hold.
» For multi-handset versions, The
handsets available for intercom are
displayed. Then go to step 2.
» For two-handset versions, the other
handset rings. Then go to step 3.
21EN
Page 24
2 Select or enter a handset number, then
press [OK] to conrm.
» The selected handset rings.
3 Press on the selected handset.
» The intercom is established.
4 Press [Conf].
» You are now in a 3-way conference
call with an external call and a selected
handset.
5 Press to end the conference call.
Note
• Press to join an ongoing conference with another
handset if [Services] > [Conference] is set to [Auto].
During the conference call
• Press [Int.] to put the external call on hold
and go back to the internal call.
» The external call is put on hold.
• Press [Conf] to establish the conference
call again.
Note
• If a handset hangs up during the conference call, the
other handset remains connected to the external call.
22 EN
Page 25
9 Text and
numbers
You can enter text and numbers for handset
name, phonebook records, and other menu
items.
Enter text and numbers
1 Press once or several times on the
alphanumeric key to enter the selected
character.
2 Press [Clear] to delete the character. Press
/ to move the cursor left and right.
3 Press to add a space.
Note
• For information on key mapping of characters and
numbers, see the chapter 'Appendix'.
Switch between uppercase and lowercase
By default, the rst letter of each word in a
sentence is uppercase and the rest is lowercase.
Press
to switch between the uppercase and
lowercase letters.
23EN
Page 26
10 Phonebook
View the phonebook
This phone has a phonebook that stores up to
500 records. Each record can have a name up
to 32 characters long and a number up to 32
digits long.
You can access the phonebook from the
handset. The base station can maintain multiple
phonebook directories and can transfer the
phonebook from two mobile phones. You can
access any phonebook entry and use that entry
to make a call on the landline or either of the
two mobile phones.
Access the phonebook directories
1 Press or select [Menu] > > [OK] to
on the handset to access the phonebook
directories.
2 Select to view a phonebook directory.
Note
• To view the mobile's phonebook, make sure that
the mobile phone is already connected to S8A with
Bluetooth.
Note
• You can view the phonebook on one handset only
each time.
1 Press or select [Menu] > > [OK] to
access the phonebook list.
2 Press / to scroll through the
phonebook entries.
Download the phonebook from the mobile phone
Tip
• For information, see the chapter 'Bluetooth', section
'Synchronize the phonebook'.
Search a record
You can search the phonebook records in these
ways:
• Scroll the contact list.
• Enter the rst character of the contact.
Direct access memory
There are 2 direct access memories (keys
and ). Depending on your country, keys
and are preset to the voice mail number and
information service number of your service
provider respectively. When you press and hold
on the key in standby mode , the saved phone
number is dialed automatically.
24 EN
Scroll the contact list
1 Press or select [Menu] > > [OK] to
access the phonebook list.
2 Press / to scroll through the
phonebook list.
Enter the rst character of a contact
1 Press or select [Menu] > > [OK] to
access the phonebook list.
2 Press the alphanumerical key that matches
the character.
Page 27
» The rst record that starts with this
character is displayed.
Call from the phonebook
1 Press or select [Menu] > > [OK] to
access the phonebook directories.
2 Select to view a phonebook directory.
3 Select a contact in the phonebook list.
4 Press / to make the call.
Access the phonebook during a call
1 Press [Option] and select [Phonebook].
2 Press [OK] to conrm.
3 Select a contact, press [Option], then press
[View] to view the number.
Add a record
1 Press or select [Menu] > to access
the phonebook list.
2 Select [Option] > [Add new], then press
[OK] to conrm.
3 Enter the name, then press [OK] to
conrm.
4 Enter the number, then press [Save] to
conrm
» Your new record is saved.
Tip
• Press and hold to insert a pause.
• Press to switch between the uppercase and
lowercase letters.
• Press [Clear] to delete the character. Press / to
move the cursor left and right.
Edit a record
1 Press or select [Menu] > > [Option]
> [Edit], then press [OK] to conrm.
2 Edit the name, then press [OK] to conrm.
3 Edit the number, then press [Save] to
conrm.
» The record is saved.
Set the personalized melody
You can personalize the melody played when
someone in the phonebook calls you.
Note
• Make sure you have subscribed to caller identication
before you use this feature.
1 Press or select [Menu] > , then press
[OK] to conrm.
2 Select a contact, then press [Option] >
[Select melody], press [OK] to conrm.
» The melody is set.
Note
• If your phonebook memory is full, the handset displays
a notication message. Delete some records to add
new ones.
• The phonebook overwrites the old number with the
new number.
Set the speed dial keys
You can assign and save the number of your
contact to a key. Then you can press and hold
on the key in standby mode to dial the saved
phone number automatically.
25EN
Page 28

1 Press or select [Menu] > , then press
[OK] to conrm.
2 Select a contact, then press [Option] >
[Speed dial], then press [OK] to conrm.
3 Press / to select and assign the contact
to an available location, then press [OK] to
conrm.
» The speed dial key is set.
Delete a record
1 Press or select [Menu] > .
2 Select a contact, then select [Option] >
[Delete]. Press [OK] to conrm.
» The handset displays a conrmation
request.
3 Select [OK] to conrm.
» The record is deleted.
Delete all records
1 Press or select [Menu] > .
2 Select a contact, then select [Option] >
[Delete all].
3 Press [OK] to conrm.
» The handset displays a conrmation
request.
4 Press [OK] to conrm.
» All records are deleted.
2 Select a contact, then select [Option] >
[Set exception].
3 Press [On] to conrm.
» The setting is saved.
Tip
• For further information on how to set the silent mode
and exclude the contacts from silent mode, see the
chapter 'Phone settings', section 'Silent mode'.
Add a contact to the exception list
You can select a contact to the exception
list. When the contact who is added into
the exception list calls you, the phone rings
immediately even though you activate the silent
mode.
1 Press or select [Menu] > .
26 EN
Page 29
11 Call log
2 Select an option, then press [OK] to
conrm.
The call log stores the call history of all missed
or received calls. The incoming call history
includes the name and number of the caller, call
time, and date. This feature is available if you
have registered to the caller ID service with
your service provider.
Your phone can store up to 50 call records. The
call log icon on the handset ashes to remind
you of any unanswered calls. If the caller allows
the display of his identity, you can view his
name or number. The call records are displayed
in chronological order with the most recent
received call at the top of the list.
Note
• Make sure that the number in the call list is valid before
you can call back directly from the call list.
The following icon shown on the screen
informs you if you have missed calls.
• It is red on the standby screen
when there is a new missed call.
• It is red in the incoming call list
when there is an unread missed
call.
• It is green in the incoming call
list when there is a read missed
call.
Call list type
View the call records
1 Press .
» The incoming call log is displayed.
2 Select [Incoming calls].
3 Select a record, then select [Option]
> [View] > [OK] to view the available
information.
Note
• You can only view the call records from the landline.
Save a call record to the phonebook
1 Press .
» The incoming call log is displayed.
2 Select [Incoming calls].
3 Select a record, then press [Option].
4 Select [Save number], then press [OK] to
conrm.
5 Enter and edit the name, then press [OK]
to conrm.
6 Enter and edit the number, then press
[Save] to conrm.
» The record is saved.
You can set if you can see all calls or missed
calls from the call log.
Select the call list type
1 Select [Menu] > > [Call list type], then
press [OK] to conrm.
Return a call
1 Press .
» The incoming call log is displayed.
2 Select [Incoming calls].
3 Select a record on the list.
27EN
Page 30

4 Press to make the call.
Delete a call record
1 Press .
» The incoming call log is displayed.
2 Select [Incoming calls].
3 Select a record, then press [Option] to
conrm.
4 Select [Delete], then press [OK] to
conrm
» The handset displays a conrmation
requests.
5 Press [OK] to conrm.
» The record is deleted.
Delete all call records
1 Press .
» The incoming call log is displayed.
2 Select [Incoming calls].
3 Select a record, then press [Option].
4 Select [Delete all], then press [OK] to
conrm.
» The handset displays a conrmation
request.
5 Press [OK] to conrm.
» All records are deleted.
28 EN
Page 31
12 Redial list
Delete a redial record
The redial list stores the call history of dialed
calls. It includes the names and/or numbers you
have called. This phone can store up to 20 redial
records.
View the redial records
Press [Redial].
» The dialed calls list is displayed.
Note
• You can only view the redial list from the landline.
Redial a call
1 Press [Redial].
2 Select the record you want to call. Press
.
» The number is dialed out.
1 Press [Redial] to enter the list of dialed
calls.
2 Select a record, then press [Option] to
conrm.
3 Select [Delete], then press [OK] to
conrm.
» The handset displays a conrmation
request.
4 Press [OK] to conrm.
» The record is deleted.
Delete all redial records
1 Press [Redial] to enter the list of dialed
calls.
2 Select [Option] > [Delete all], then press
[OK] to conrm.
» The handset displays a conrmation
request.
3 Press [OK] to conrm.
» All records are deleted.
Save a redial record to the phonebook
1 Press [Redial] to enter the list of dialed
calls.
2 Select a record, then press [Option] to
conrm.
3 Select [Save number], then press [OK] to
conrm.
4 Enter and edit the name, then press [OK]
to conrm.
5 Enter and edit the number, then press
[Save] to conrm.
» The record is saved.
29EN
Page 32
13 Phone settings
You can customize the settings to make it your
own phone.
Sound settings
Set the handset's ringtone volume
You can select among 5 ringtone volume levels,
[Progressive] or [Off].
1 Select [Menu] > > [Sounds] > [Ring
volume], then press [OK] to conrm.
2 Select a volume level, then press [OK] to
conrm.
» The setting is saved.
Set the handset's ringtone
You can select from 15 ringtones.
1 Select [Menu] > > [Sounds] > [Ring
Tone], then press [OK] to conrm.
2 Select the landline phone or a mobile
phone.
3 Select a ringtone, then press [OK] to
conrm.
» The setting is saved.
Silent mode
You can set your phone to silent mode and
enable it for a specic duration when you do
not want to be disturbed. When the silent
mode is turned on, your phone does not ring
or send any alerts or sound.
Note
1 Select [Menu] > > [Silent mode], then
press [OK] to conrm.
2 Select [On]/[Off], then press [OK] to
conrm.
» The setting is saved.
3 Select [Start & end], then press [OK] to
conrm.
4 Set the time, then press [OK] to conrm.
» The setting is saved.
Note
• When the silent mode is set to [On], is displayed.
is displayed during the preset time for the silent
mode.
Exclude the contacts from silent mode
You can select the length of ring delay and
set the contacts to be excluded from the
phonebook. Ring delay is the number of rings
that will be muted before the rings become
audible on the phone.
1 Select [Menu] > > [Sounds] > [Silent
mode], then press [OK] to conrm.
2 Select [Exception].
3 Select [On] to activate, or [Off] to
deactivate the silent mode, then press
[OK] to conrm.
4 Select [Ring delay], then select an option.
5 press [OK] to conrm.
» The setting is saved.
Note
• If [Exception] is set to [On] and [Ring delay] option
is selected, the handset rings only after length of ring
delay selected is reached.
• Make sure that the contact under the [Set exception]
option of the phonebook menu is set to [On] before
you can exclude this contact from the silent mode.
• When you press to nd your handset, or when you
activate the alarm, your phone still sends alert even
when the silent mode is activated.
30 EN
Page 33
Set the key tone
Key tone is the sound made when you press a
key on the handset.
1 Select [Menu] > > [Sounds] > [Key
tone], then press [OK] to conrm.
2 Select [On]/[Off], then press [OK] to
conrm.
» The setting is saved.
Set the docking tone
Docking tone is the sound made when you
place the handset on the base station or
charger.
1 Select [Menu] > > [Sounds] >
[Docking tone], then press [OK] to
conrm.
2 Select [On]/[Off], then press [OK] to
conrm.
» The setting is saved.
Set the sound prole
You can set the sound in the earpiece or
handsfree mode among 3 different proles.
1 Select [Menu] > > [Sounds] >
[MySound], then press [OK] to conrm.
2 Select a prole, then press [OK] to
conrm.
» The setting is saved.
Access the sound prole during a call
Press [Sounds] for once or several times to
change the sound prole during a call.
Alarm clock
Your phone has a built-in alarm clock. Check the
information below to set your alarm clock.
Set the alarm
1 Select [Menu] > > [Alarm], then press
[OK] to conrm.
2 Select [On]/[Off], then press [OK] to
conrm.
3 Select [Alarm time], then press [OK] to
conrm.
4 Enter an alarm time, then press [OK] to
conrm.
5 Select [Repetition], then press [OK] to
conrm.
6 Select an alarm occurrence, then press
[OK] to conrm.
7 Select [Alarm tone], then press [OK].
8 Select a tone from options, then press
[OK] to conrm.
» The alarm is set and is displayed on
the screen.
Tip
• Press to switch between [am]/[pm] (Country
dependent).
Turn off the alarm
Before the alarm rings
Select [Menu] >
press [OK] to conrm.
» The setting is saved.
When the alarm rings
• Press[Off] to turn off the alarm.
• Press [Snooze](or any key except [Off] )
to snooze.
» The alarm rings again after 5 minutes.
After you snooze it for 3 times, the
snooze function is off.
> [Alarm] > [Off], then
31EN
Page 34
Set the date and time
Set the display language
For further information, see chapter 'Get
started', sections 'Set the date and time' and
'Set the date and time format'.
ECO mode
The ECO mode reduces the transmission
power of the handset and base station when
you are on a call or when the phone is in
standby mode.
1 Select [Menu] > > [Eco mode], then
press [OK] to conrm.
2 Select [On]/[Off], and press [OK] to
conrm.
» The setting is saved.
» ECO is displayed in standby mode.
Note
• When ECO is set to [On], the connection range
between the handset and the base station can be
reduced.
Name the handset
The name of the handset can be up to 32
characters. It is displayed on the handset screen
in standby mode.
1 Select [Menu] > > [Phone name], then
press [OK] to conrm.
2 Enter or edit the name. To erase a
character, select [Clear].
3 Press [Save] to conrm.
» The setting is saved.
Note
• This feature only applies to models with multiple-
language support.
• Languages available vary from country to country.
1 Select [Menu] > > [Language], then
press [OK] to conrm.
2 Select a language, then press [OK] to
conrm.
» The setting is saved.
Display settings
You can change the display of the phone during
standby mode.
Set the brightness
You can set the brightness of the handset
screen to different levels.
Select [Menu] >
[OK] to conrm.
> [Display], then press
1 Select [Brightness], then press [OK] to
conrm.
2 Select an option, then press [OK] to
conrm.
Set the clock display
You can set the clock to digital or analog display.
Select [Menu] >
[OK] to conrm.
> [Display], then press
1 Select [Clock], then press [OK] to
conrm.
2 Select an option, then press [OK] to
conrm.
Set the backlight of the LCD screen
You can set the backlight of the LCD screen
and keypad ashing on or off when the phone
rings.
1 Select [Menu] > > [Display] > [Visual
alert], then press [OK] to conrm.
32 EN
Page 35
2 Select [Flashing on]/[Flashing off], then
press [OK] to conrm.
» The setting is saved.
Line settings
You can select to access the landline or mobile
line.
1 Select [Menu] > [Line settings], then
press [OK] to conrm.
2 Select a new setting, then press [OK] to
conrm.
» The setting is saved.
Tip
• If you select [Auto] on the handset, the idle line is
pre-selected for an outgoing call, with [Home] as the
highest priority. Then [Mobile 1] and [Mobile 2]. If
you select [Manual], select an icon among these three
options.
33EN
Page 36
14 Baby monitor
Send an alert
Your phone supports the baby monitor function
which sends an alert if the sound level exceeds
the set limit.
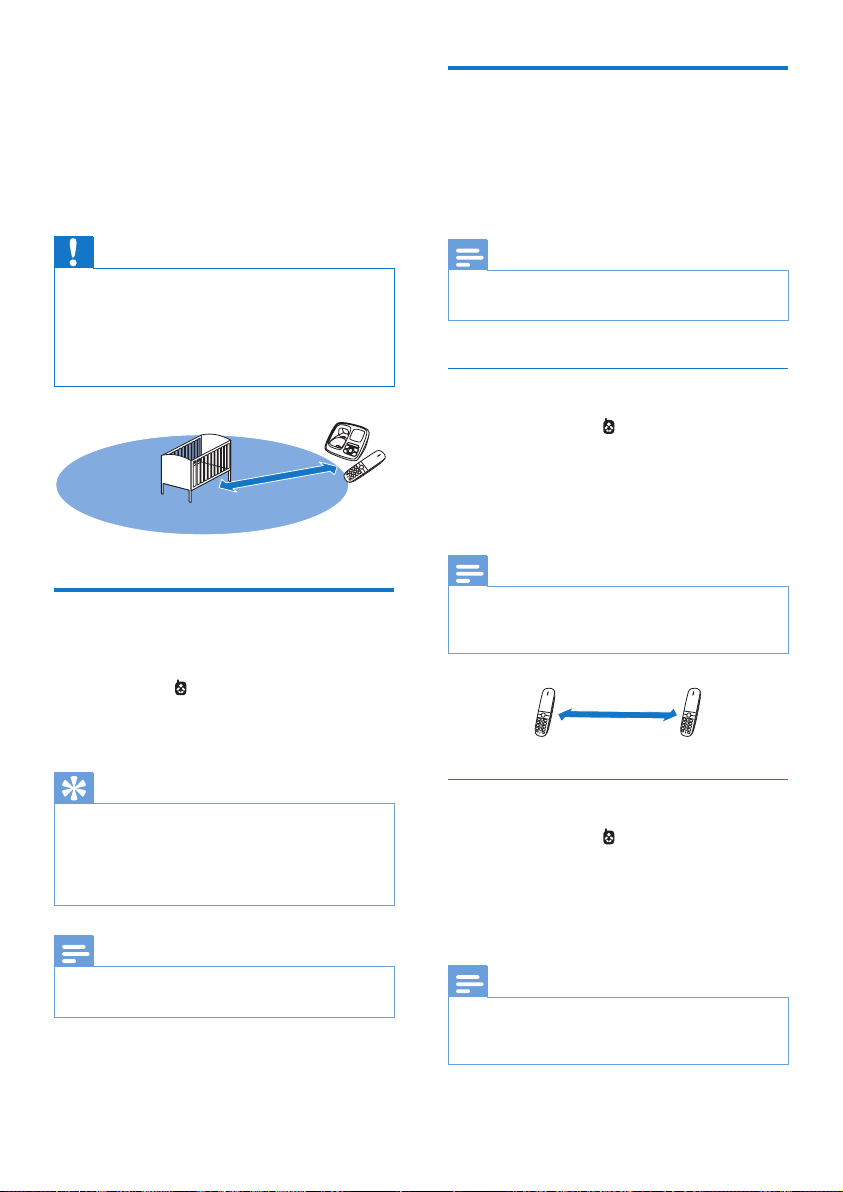
Caution
• Make sure that you do not leave the handset that has
the active monitor in the baby room.
• Make sure the baby unit and the cord are always out of
reach of the baby.
• Place the baby unit at least 1 meter/3 feet but not
more than 2 meters/6 feet away from the baby.
1-2m
Activate/Deactivate the baby unit
Select [Menu] > > [Activate], then press
[OK] to conrm.
» The baby unit is activated.
You can send an alert to other handsets within
the home or an external line. External line can
be a cell phone or another xed line outside
the house.
Note
• Make sure that any prex digits and/or country code
are included when you send an alert.
Send to other handsets
1 Select [Menu] > > [Send alert to] >
[Connected line], then press [OK] to
conrm.
2 Select the handset number, then press
[OK] to conrm.
Note
• Make sure that the distance between the baby unit and
the parent unit is at least 1.5 meter away from each
other to prevent the howling effect.
1.5m
Tip
• If you have not set the parent unit, a notication
message appears. Then you are asked to select to
where you send the alert: external lines or other
handset number. For information, see the next section.
• To exit from the baby monitor menu, press [Off].
Note
• When the baby monitor mode is activated, the baby
handset does not ring on incoming calls.
34 EN
Send to an external line
1 Select [Menu] > > [Send alert to]
> [External line], then press [OK] to
conrm.
2 Enter a telephone number, then press
[Save] to conrm.
Note
• You can still send an aler t to the external line even
though it is in the barred list (see 'Add new number to
the barred list' on page 40).
Page 37

Send to a contact from the phonebook
1 Select [Menu] > > [Send alert to]
> [Select number], then press [OK] to
conrm.
2 Select a contact from the phonebook, then
press [Save] to conrm.
Set the baby cry level
1 Select [Menu] > > [Baby cry level], then
press [OK] to conrm.
2 Select a new setting, then press [OK] to
conrm.
» The setting is saved.
35EN
Page 38
15 Telephone
Set the answer mode
answering
machine
Your phone includes a telephone answering
machine that records unanswered calls when it
is on. By default, the answering machine is set to
the [Answer & rec.] mode. You can also access
the answering machine remotely and change
the settings through the answering machine
menu on the handset.
Turn the answering machine on or off
1 Select [Menu] > > [Answer mode],
then press [OK] to conrm.
2 Select [Answer only]/[Answer &
rec.]/[Off], then press [OK] to conrm.
» The setting is saved.
Set the answering machine language
Note
• This feature only applies to models with multiple-
language support.
The answering machine language is the language
for the announcements.
1 Select [Menu] > > [Voice language],
then press [OK] to conrm.
2 Select a language, then press [OK] to
conrm.
» The setting is saved.
You can set the answering machine and
select if the callers can leave messages. Select
[Answer & rec.] if you allow the callers to leave
messages. Select [Answer only] if you forbid
the callers to leave messages.
1 Select [Menu] > > [Answer mode],
then press [OK] to conrm.
2 Select an answer mode, then press [OK]
to conrm.
» The setting is saved.
Note
• If the memory is full, the answering machine switches to
[Answer only] mode automatically.
Announcements
The announcement is the message your caller
hears when the answering machine picks up
the call. The answering machine has 2 default
announcements: the [Answer & rec.] mode
and [Answer only] mode.
Record an announcement
The maximum length of the announcement you
can record is 3 minutes. The newly recorded
announcement automatically replaces the old
one.
1 Select [Menu] > > [Announcement],
then press [OK] to conrm.
2 Select [Answer & rec.] or [Answer only],
then press [OK] to conrm.
3 Select [Record new], then press [OK] to
conrm.
4 Recording starts after the beep.
5 Press [OK] to stop recording or the
recording stops after 3 minutes.
36 EN
Page 39
» You can listen to the newly recorded
announcement on the handset.
machine and the handset displays a notication
message.
Note
• Make sure that you speak close to the microphone
when you record an announcement.
Listen to the announcement
1 Select [Menu] > > [Announcement],
then press [OK] to conrm.
2 Select [Answer & rec.] or [Answer only],
then press [OK] to conrm.
3 Select [Play], then press [OK] to conrm.
» You can listen to the current
announcement.
Note
• You can no longer listen to the announcement when
you pick up an incoming call.
Restore the default announcement
1 Select [Menu] > > [Announcement],
then press [OK] to conrm.
2 Select [Answer & rec.] or [Answer only],
then press [OK] to conrm.
3 Select [Use default], then press [OK] to
conrm.
» The handset displays a conrmation
request.
4 Press [OK] to conrm.
» The default announcement is restored.
Note
• If you pick up the phone when the caller leaves a
message, the recording stops and you can talk to the
caller directly.
Note
• If the memory is full, the answering machine switches
to [Answer only] automatically. Delete old messages to
receive new ones.
Listen to the incoming messages
You can listen to the incoming messages in the
sequence they are recorded.
Select [Menu] >
to conrm.
» New messages start playing. Old
messages start playing if there is no
new message.
• Press [Back] to stop listening.
• Press [Option] to enter the options menu.
• Press / to increase/decrease the
volume.
> [Play], then press [OK]
Delete an incoming message
1 When you listen to the message, press
[Option] to enter the options menu.
2 Select [Delete], then press [OK] to
conrm.
» The current message is deleted.
Delete all old incoming messages
Incoming messages (ICM)
Each message can be up to 3 minutes long.
When you receive new messages, the new
message indicator ashes on the answering
1 Select [Menu] > > [Delete all], then
press [OK] to conrm.
» The handset displays a conrmation
request.
2 Press [OK] to conrm.
37EN
Page 40
» All old messages are permanently
deleted.
Note
• You can only delete the read messages. No deleted
messages can be recovered.
Tip
• When you access the answering machine remotely,
you are recommended to set the ring delay to[Toll
saver] mode. This is a cost effective way to manage
your messages. When there are new messages, the
answering machine picks up the call after 3 rings; When
there is no messages, it picks up the call after 5 rings.
Call screening
You can hear the caller while he is leaving a
message. Press
to answer the call.
Set the sound quality of the message
You can adjust the sound quality of the
messages received from the answering machine.
1 Select [Menu] > > [Msg quality], then
press [OK] to conrm.
2 Select the new setting, then press [OK] to
conrm.
» The setting is saved.
Note
• The sound quality can only be adjusted before
recording starts.
Set the ring delay
You can set the number of times the phone
rings before the call goes to the answering
machine..
1 Select [Menu] > > [Ring delay], then
press [OK] to conrm.
2 Select a new setting, then press [OK] to
conrm.
» The setting is saved.
Note
• Make sure that the answering machine is switched on
before this feature can be applied.
Remote access
You can operate your answering machine when
you are away from home. Simply make a call to
your phone with a touch tone phone and enter
your 4-digit PIN/passcode.
Note
• The remote access PIN/passcode is the same as your
system PIN/passcode. The preset PIN/passcode is 0000.
Change the PIN/passcode
1 Select [Menu] > > [Remote access] >
[Change PIN], then press [OK] to conrm.
2 Enter the old PIN/passcode, then press
[OK] to conrm.
3 Enter the new PIN/passcode, then press
[OK] to conrm.
4 Enter the new PIN/passcode again, then
press [OK] to conrm.
» The setting is saved.
Activate/deactivate the remote access
You can allow or block remote access to the
answering machine.
1 Select [Menu] > > [Remote access],
then press [OK] to conrm.
2 Select [Activate] / [Deactivate], then press
[OK] to conrm.
» The setting is saved.
Access the answering machine remotely
1 Make a call to your home number with a
touch tone phone.
2 Enter # when you hear the announcement.
3 Enter your PIN/passcode.
38 EN
Page 41
» You now have access to your
answering machine, and you can listen
to the new messages.
Note
• You have 2 chances to enter the correct PIN/passcode
before your phone hangs up.
4 Press a key to carry out a function. See the
Remote access commands table below for
a list of available functions.
Note
• When there is no message, the phone hangs up
automatically if no key is pressed for 8 seconds.
Remote access commands
Key Function
1 Repeat the current or listen to the
previous message.
2 Listen to messages.
3 Skip to the next message.
6 Delete the current message.
7 Switch the answering machine on.
(not available when you listen to the
messages).
8 Stop listening to the message.
9 Switch the answering machine off.
(not available when you listen to the
messages).
39EN
Page 42
16 Services
The phone supports a number of features that
help you handle and manage the calls.
Auto conference
To join an external call with another handset,
press
.
Activate/Deactivate auto conference
1 Select [Menu] > > [Conference], then
press [OK] to conrm.
2 Select [Auto]/[Off], then press [OK] to
conrm.
» The setting is saved.
Add new number to the barred list
1 Select [Menu] > > [Call barring] >
[Barring number], then press [OK] to
conrm.
2 Enter the PIN/passcode. The default PIN
is 0000.
3 Select a number from the list, then press
[OK] to conrm.
4 Edit the number, then press [OK] to
conrm.
» The setting is saved.
Note
• The number in the barred list can still be sent as an
external line for a baby call.
Change the PIN/passcode
Call barring
You can create four sets of numbers with four
digits at maximum for each set of numbers.
When you make a call that starts with one of
these four sets of numbers, the outgoing call is
then barred.
Select the barring mode
1 Select [Menu] > > [Call barring]
> [Barring mode] then press [OK] to
conrm.
2 Enter the PIN/passcode. The default PIN/
passcode is 0000.
3 Select [On]/[Off], then press [OK] to
conrm.
» The setting is saved.
40 EN
1 Select [Menu] > > [Call barring] >
[Change PIN], then press [OK] to conrm.
2 Enter the old PIN/passcode, then press
[OK] to conrm.
3 Enter the new PIN/passcode, then press
[OK] to conrm.
4 Enter the new PIN/passcode again, then
press [OK] to conrm.
» The setting is saved.
Note
• If you forget the PIN/passcode, you have to reset your
phone (see 'Restore default settings' on page 44).
Call list type
You can set if you can see all calls or missed
calls from the call log.
Page 43
Select the call list type
1 Select [Menu] > > [Call list type], then
press [OK] to conrm.
2 Select an option, then press [OK] to
conrm.
Auto prex
This feature checks and formats your outgoing
call number before it is dialed out. The prex
number can replace the detect number you
set in the menu. For example, you set 604 as
the detect number and 1250 as the prex.
When you have dialed out a number such as
6043338888, your phone changes the number
to 12503338888 when it dials out.
Note
• The maximum length of a detect number is 5 digits. The
maximum length of an auto prex number is 10 digits.
Set auto prex
1 Select [Menu] > > [Auto prex], then
press [OK] to conrm.
2 Enter the detect number, then press [OK]
to conrm.
3 Enter the prex number, then press [OK]
to conrm.
» The setting is saved.
Note
• This is a country dependent feature.
• To enter a pause, press and hold .
• If the prex number is set and the detect number is left
empty, the prex number is added to all outgoing calls.
• The feature is unavailable if the dialed number starts
with * and #.
Network type
Note
• This is a country dependent feature. It only applies to
models with network type support.
1 Select [Menu] > > [Network type],
then press [OK].
2 Select a network type, then press [OK].
» The setting is saved.
Select the recall duration
Make sure that the recall time is set correctly
before you can answer a second call. In normal
case, the phone is already preset for the recall
duration. You can select among 3 options:
[Short], [Medium] and [Long]. The number of
available options varies with different countries.
For details, consult your service provider.
1 Select [Menu] > > [Recall time], then
press [OK] to conrm.
2 Select an option, then press [OK] to
conrm.
» The setting is saved.
Dial mode
Note
• This feature is country dependent and only applies to
models that support both tone and pulse dial.
Dial mode is the telephone signal used in your
country. The phone suppor ts tone (DTMF) and
pulse (rotary) dial. Consult the service provider
for detailed information.
1 Select [Menu] > > [Dial mode], then
press [OK] to conrm.
2 Select an option, then press [OK] to
conrm.
41EN
Page 44
» The setting is saved.
» The setting is saved. .
First ring
If you have subscribed to the caller ID service
with your service provider, your phone can
cancel the rst ring before the caller ID is
displayed on the screen. After the phone is
reset, it can detect automatically if there is a
caller subscription and start to cancel the rst
ring. You can change this setting to suit your
preference. This feature only applies to models
with rst ring suppor t.
Turn the rst ring on/off
1 Select [Menu] > > [First ring], then
press [OK] to conrm.
2 Select [On]/[Off], press [OK] to conrm.
» The setting is saved.
Note
• To reset the rst ring status, go to the reset menu (see
'Restore default settings' on page 44).
Auto clock
Register additional handsets
You can register additional handsets to the base
station. The base station can register up to 5
handsets.
Auto registration
Extra handsets of the same model can be auto-
registered. Place the unregistered handset on
the base station.
» The handset detects the base station
and registers automatically.
» Registration is complete in less
than two minutes. The base station
automatically assigns a handset number
to the handset.
Manual registration/Pairing
If auto registration fails or if you register a
handset of a different model, register your
handset manually to the base station.
1 Select [Menu] > > [Register], then
press [OK] to conrm.
2 Press and hold on the base station for
5 seconds.
Note
• This service is network dependent.
• Make sure you have subscribed to the caller ID service
before you use this feature.
It synchronizes the date and time on your
phone with the public switched telephone
network (PSTN) automatically. For the date to
be synchronized, make sure the current year is
set.
1 Select [Menu] > > [Auto clock], then
press [OK] to conrm.
2 Select [On]/[Off] . Press [OK].
42 EN
Note
• For models with an answering machine, you hear a
conrmation beep.
3 Enter the system PIN/passcode. Press
[Clear] to make corrections.
4 Press [OK] to conrm the PIN/passcode.
» Registration is complete in less than 2
minutes. The base automatically assigns
a handset number to the handset.
Page 45
Note
• If the PIN/passcode is incorrect or no base is found
within a certain period, your handset displays a
notication message. Repeat the above procedure if
registration fails.
• The preset PIN/passcode is 0000. No change can be
made on it.
Unregister handsets
1 If two handsets share the same base
station, you can unregister a handset with
another handset.
2 Select [Menu] > > [Unregister], then
press [OK] to conrm.
3 Select the handset number to be
unregistered.
4 Press [OK] to conrm.
» The handset is unregistered.
Tip
• The handset number displays beside the handset name
in standby mode.
Call services
The call services are network and country
dependent. They apply to models with call
services suppor t. Contact your service provider
for more information.
Note
• For the call services to work proper ly, make sure that
the activation and/or deactivation codes are correctly
entered.
Call forward
You can divert your calls to another phone
number. You can select among 3 options:
• [Call forward]: divert all incoming calls to
another number.
• [Call fwd busy]: divert calls when the line
is busy.
• [Call fwd unans]: divert calls when no one
answers.
Activate/Deactivate call forward
1 Select [Menu] > > [Call Services] >
[Call forward]/[Call fwd busy]/[Call fwd
unans]
2 Select [Activate]/[Deactivate], then press
[OK] to conrm.
3 Enter the telephone number.
» The setting is saved .
Edit the activation/deactivation code
You can edit the prex and sufx to the call
forward codes.
1 Select [Menu] > > [Call Services] >
[Call forward]/[Call fwd busy]/[Call fwd
unans], then press [OK] to conrm.
2 Select [Change code], then press [OK].
3 Then you can either
• Select [Activation] > [Prex]/[Sufx],
then press [OK] to conrm; or
• Select [Deactivation], then press [OK]
to conrm.
4 Enter or edit the code, then press [OK] to
conrm.
» The setting is saved.
Call return
You can check the most recent unanswered call.
Call the return service centre
Select [Menu] >
return] > [Call], then press [OK] to conrm.
» Your call is made to the service center.
Edit the call return service centre number
> [Call Services] > [Call
43EN
Page 46

1 Select [Menu] > > [Call Services] >
[Call return] > [Settings], then press [OK]
to conrm.
2 Enter or edit the number, then press [OK]
to conrm.
» The setting is saved.
Call back service
The call back service noties you when a party
you have tried to call becomes available. You
can cancel this service from the menu after you
have activated it from the service provider.
Cancel the call back service
Select [Menu] >
call bk] > [Call], then press [OK] to conrm.
» A call is made to the service centre to
cancel the call back option.
Edit the cancel call back service number
> [Call Services] > [Cancel
1 Select [Menu] > > [Call Services] >
[Cancel call bk] > [Settings], then press
[OK] to conrm.
2 Enter or edit the number, then press [OK]
to conrm.
» The setting is saved.
Restore default settings
You can reset your phone settings to the
original factory settings.
1 Select [Menu] > > [Reset], then press
[OK] to conrm.
» The handset displays a conrmation
request.
2 Press [OK] to conrm.
» All settings are reset.
Hide your identity
You can hide your identity from the caller.
Activate ID withheld
Select [Menu] >
my ID] > [Activate], then press [OK] to
conrm.
» When you make a call to your contact,
your ID is withheld.
Edit the ID withheld code
> [Call Services] > [Hide
1 Select [Menu] > > [Call Services] >
[Hide my ID] > [Settings], then press
[OK] to conrm.
2 Enter or edit the number, then press [OK]
to conrm.
» The setting is saved.
44 EN
Page 47

17 Technical data
General specication and features
• Maximum talk time: 20 hours
• Maximum standby time: 250 hours
• Range indoor: 50 meters
• Range outdoor: 300 meters
• Bluetooth range indoor: 10 meters
• Phonebook list with 500 entries
• Redial list with 20 entries
• Call log with 50 entries
• Answering machine with up to 45 minutes
recording time
• Caller identication standard support: FSK,
DTMF
Connectivity
Bluetooth: link up to two devices for voice link
and phonebook download
Battery
• Philips: 2 x AAA Ni-MH 1.2V 600 mAh
rechargeable batteries
Power adapter
Base and charger
• Philips, SSW-2095EU-1, input: 100-240Vac,
50-60Hz 0.2A, output: 5V 600mA
• Philips, S003PV0500060, input:100-240Vac,
50-60Hz 0.2A, output 5V 600mA
Power consumption
• Power consumption at standby mode:
around 0.65W
Note
• It only applies when the screen saver is turned off (see
'Display settings' on page 32).
Weight and dimensions
• Handset: 130 grams
• 161 x 47.5 x 26.5 mm (H x W x D)
• Base: 135 grams
• 138 x 103 x 56 mm (H x W x D)
• Charger: 42.7 grams
• 106.4 x 80.2 x 55.3 mm (H x W x D)
45EN
Page 48

18 Notice
Declaration of conformity
Hereby Philips Consumer Lifestyle, declares
that the S8A is in compliance with the essential
requirements and other relevant provisions
of Directive 1999/5/EC. You can nd the
Declaration of Conformity on www.p4c.philips.
com.
This product has been designed, tested and
manufactured according the European R&TTE
directive 1999/5/EC.
Use GAP standard compliance
general have the ability to emit and receive
electromagnetic signals.
One of Philips’ leading Business Principles is to
take all necessary health and safety measures
for our products, to comply with all applicable
legal requirements and to stay well within
the EMF standards applicable at the time of
producing the products.
Philips is committed to develop, produce and
market products that cause no adverse health
effects. Philips conrms that if its products are
handled properly for their intended use, they
are safe to use according to scientic evidence
available today.
Philips plays an active role in the development
of international EMF and safety standards,
enabling Philips to anticipate further
developments in standardization for early
integration in its products.
The GAP standard guarantees that all DECT™
GAP handsets and base stations comply with
a minimum operating standard irrespective of
their make. The handset and base station are
GAP compliant, which means they guarantee
the minimum functions: register a handset,
take the line, make a call and receive a call. The
advanced features may not be available if you
use them with other makes. To register and use
this handset with a GAP compliant base station
of different make, rst follow the procedure
described in the manufacturer's instructions,
then follow the procedure described in this
manual for registering a handset. To register a
handset from different make to the base station,
put the base station in registration mode, then
follow the procedure described in the handset
manufacturer's instructions.
Compliance with EMF
Koninklijke Philips Electronics N.V. manufactures
and sells many products targeted at consumers,
which, like any electronic apparatus, in
Disposal of your old product and batteries
Your product is designed and manufactured
with high quality materials and components,
which can be recycled and reused.
When this crossed-out wheeled bin symbol is
attached to a product it means that the product
is covered by the European Directive 2002/96/
EC. Please inform yourself about the local
separate collection system for electrical and
electronic products.
Please act according to your local rules and
do not dispose of your old products with your
normal household waste.
Correct disposal of your old product helps to
prevent potential negative consequences for the
environment and human health.
46 EN
Page 49

Your product contains batteries covered by the
European Directive 2006/66/EC, which cannot
be disposed with normal household waste.
Please inform yourself about the local rules
on separate collection of batteries because
correct disposal helps to prevent negative
consequences for the environmental and
human health.
When this logo is attached to a product, it
means a nancial contribution has been paid to
the associated national recovery and recycling
system.
Environmental information
All unnecessary packaging has been omitted.
We have tried to make the packaging easy to
separate into three materials: cardboard (box),
polystyrene foam (buffer) and polyethylene
(bags, protective foam sheet.)
Your system consists of materials which can
be recycled and reused if disassembled by
a specialized company. Please observe the
local regulations regarding the disposal of
packaging materials, exhausted batteries and old
equipment.
47EN
Page 50

19 Trademarks
Trademarks are the property of Koninklijke
Philips Electronics N.V. or their respective
owners. The Bluetooth word mark and logos
are owned by the Bluetooth SIG, Inc. and
any use of such marks by Koninklijke Philips
Electronics N.V. is under license.
48 EN
Page 51
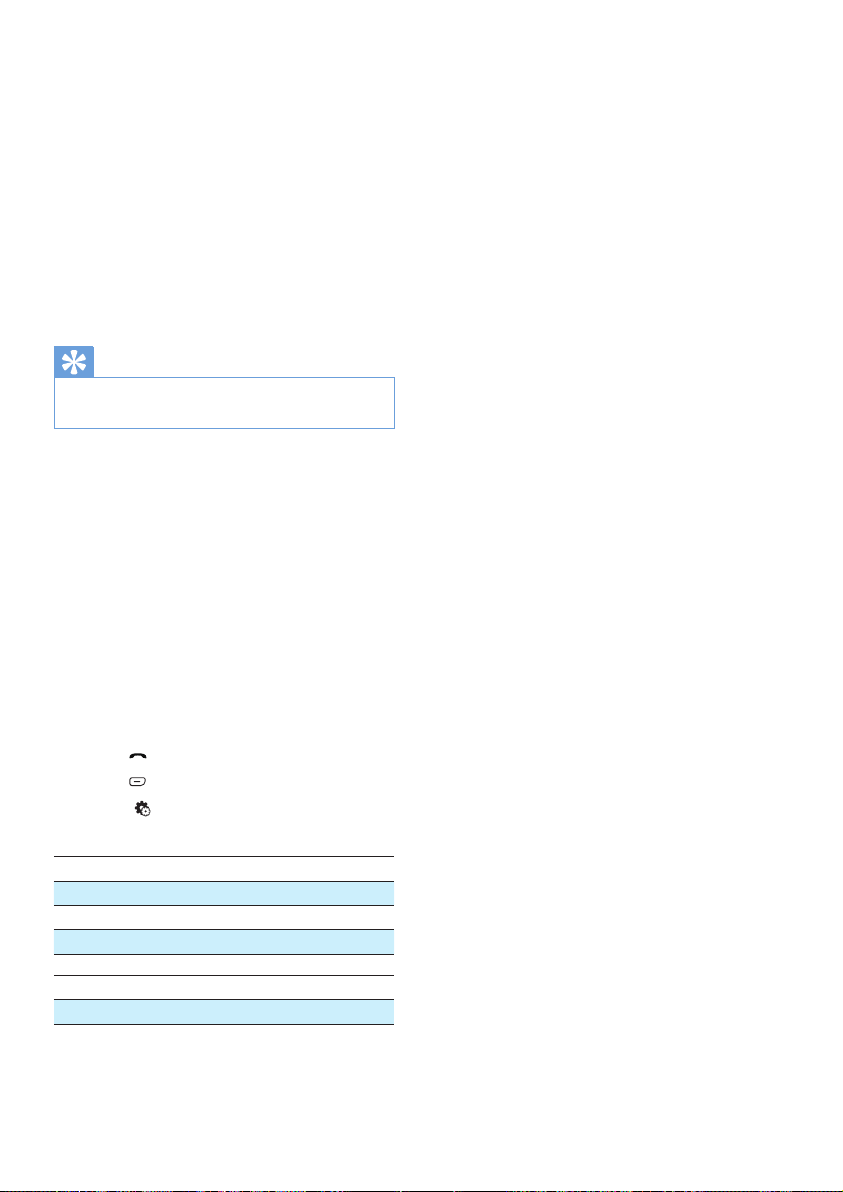
20 Frequently
asked questions
No signal bar is displayed on the screen.
• The handset is out of range. Move it closer
to the base station.
• If the handset displays [Unregister], put
the handset on the base until the signal bar
appears.
Tip
• For further information, see 'Register additional
handsets' on the Services section.
My handset is in searching status, what do I
do?
• Make sure that the base station has power
supply.
• Register the handset to the base station.
• Move the handset closer to the base
station.
If I fail to pair (register) the additional
handsets to the base station, what do I do?
Your base memory is full. Unregister the unused
handsets and try again.
I have chosen a wrong language which I cannot
read, what do I do?
1 Press to go back to the standby screen.
2 Press to access the main menu screen.
3 Select , then you see one of the
following texts appear on the screen:
Lingua
Langue
Idioma
Taal
Sprache
Langue
4 Select it to access the language options.
5 Select your own language.
No dialing tone
• Check your phone connections.
• The handset is out of range. Move it closer
to the base station.
No docking tone
• The handset is not placed properly on the
base station/charger.
• The charging contacts are dirty. Disconnect
the power supply rst and clean the
contacts with a damp cloth.
I cannot change the settings of my voice mail,
what do I do?
The voice mail service is managed by your
service provider but not the phone itself.
Contact your service provider to change the
settings.
The handset on the charger does not charge.
• Make sure the batteries are inserted
correctly.
• Make sure the handset is placed properly
on the charger. The battery icon animates
when charging.
• Make sure the docking tone setting is
turned on. When the handset is placed
correctly on the charger, you can hear a
docking tone.
• The charging contacts are dirty. Disconnect
the power supply rst and clean the
contacts with a damp cloth.
• Batteries are defective. Purchase new ones
with the same specications.
No display
• Make sure the batteries are charged.
• Make sure there is power and the phone is
connected.
Bad audio (crackles, echo, etc.)
• The handset is nearly out of range. Move it
closer to the base station.
• The phone receives interference from the
nearby electrical appliances. Move the base
station away from them.
• The phone is at a location with thick walls.
Move the base away from them.
The handset does not ring.
Make sure the handset ringtone is turned on.
The caller ID does not display.
49EN
Page 52

• The service is not activated. Check with
your service provider.
• The caller's information is withheld or
unavailable.
Note
• If the above solutions do not help, disconnect the
power supply from both the handset and base station.
Try again after 1 minute.
50 EN
Page 53

21 Appendix
Text and number input tables
Key Upper case characters (for English/
French/ German/ Italian/Turkish/
Portuguese/Spanish/Dutch/Danish/
Finnish/Norwegian/ Swedish/Romanian/
Polish/Czech/Hungarian/Slovakian/
Slovenian/Croatian/Lithuanian/Estonian/
Latvian/Bulgarian)
0 Space . 0 , / : ; " ' ! ¡ ? ¿ * + - % \^ ~|
1 1 @ _ # = < > ( ) & € £ $ ¥ [ ] { } ¤ § ...
2 A B C 2 À Â Æ Á Ã Ä Å Ą Ā Ç Č
3 D E F 3 È É Ê Ë Ė Ę Ē Δ Φ
4 G H I 4 Ğ Í Ï Į Ī İ Γ
5 J K L 5 Λ
6 M N O 6 Ñ Ó Ô Õ Ö
7 P Q R S 7 Ş Š Π Θ Σ
8 T U V 8 Ù Ú Ü Ū Ų
9 W X Y Z 9 Ø Ω Ξ Ψ Ž
Key Lower case characters (for English/
French/ German/ Italian/Turkish/
Portuguese/Spanish/Dutch/Danish/
Finnish/Norwegian/Swedish)
0 Space . 0 , / : ; " ' ! ¡ ? ¿ * + - % \ ^ ~ |
1 1 @ _ # = < > ( ) & € £ $ ¥ [ ] { } ¤ §
…
2 a b c 2 à â æ á ã ä å ą ā ç č
d e f 3 è é ê ë ė ę ē Δ Φ
3
4 g h i 4 ğ í ì ï į ī ı Γ
5 j k l 5 Λ
6 m n o 6 ñ ó ô õ ö ò
7 p q r s 7 β ş š Π Θ Σ
8 t u v 8 ù ú ü ū ų μ
9 w x y z 9 ø Ω Ξ Ψ ž
2 A B Г 2 A B C Æ Ä Å Ç
3 Δ Ε Ζ 3 D E F É
4 Η Θ Ι 4 G H I
5 Κ Λ Μ 5 J K L
6 Ν Ξ Ο 6 M N O Ñ Ö
7 Π Ρ Σ 7 P Q R S
8 Τ Υ Φ 8 T U V Ü
9 Χ Ψ Ω 9 W X Y Z Ø
Key Lower case characters (for Greek)
0 Space . 0 , / : ; " ' ! ¡ ? ¿ * + - % \ ^ ~ |
1 1 @ _ # = < > ( ) & € £ $ ¥ [ ] { } ¤ §
…
2 α β γ 2 a b c à æ ä å
3 δ ε ζ 3 d e f è é
4 η θ ι 4 g h i ì
5 κ λ μ 5 j k l Λ
6 ν ξ ο 6 m n o ñ ö ò
7 π ρ σ ς 7 p q r s ß
8 τ υ φ 8 t u v ù ü
9 χ ψ ω 9 w x y z ø
Key Upper case characters (for Greek)
0 Space . 0 , / : ; " ' ! ¡ ? ¿ * + - % \^ ~|
1 1 @ _ # = < > ( ) & € £ $ ¥ [ ] { } ¤ § ...
51EN
Page 54

22 Index
A
additional handsets 42
adjust the volume 18
alarm 31
announcements 36
answer a call 18
answering machine 36
answering machine language 36
auto clock 42
auto conference 40
auto prex 41
B
baby monitor 34
base station
installation 10
overview 6
battery 10
Bluetooth 14
C
call back service 44
call barring 40
call forward service 43
call log 27
call return 43
call screening 38
caller ID 18
calling 17
charging 12
conference call 19
contacts 24
D
default settings 44
delete messages 37
dial mode 41
display icons 9
display settings 32
disposal 46
E
ECO mode 32
exception list, silent mode 26
F
nd handsets 6
rst ring 42
G
GAP 46
H
hide own call 44
I
incoming message 37
intercom 21
internal call 21
L
language setting
answering machine 36
handset 11
listen to messages 37
M
main menu icons 8
missed calls 27
mute 18
N
name the handset 32
network type 41
O
on or off 36
52 EN
Page 55

P
personalized melody 25
phone settings 30
phonebook 27
PIN
answering machine 38
Bluetooth 15
calling barring 40
registration 42
power adapter 45
R
recall time 41
redial 29
register/unregister 42
remote access to the answering machine 38
ring delay 38
ringtone 30
S
safety 3
save a call record 27
set date 42
set time 42
signal strength 13
silent mode 26
sounds
docking 31
keytone 31
sound prole 31
speaker phone 18
standby mode 12
T
text entry 23
transfer call 21
troubleshooting/FAQ 49
two calls/call on hold 19
53EN
Page 56

0168
Specifications are subject to change without notice
© 2012 Koninklijke Philips Electronics N.V.
All rights reserved.
 Loading...