


S8950
www.philips.com/support/ifu

1
12
13
14
15
11
3
4
5
9
10
8
7
6
2
19
20
21
22
16
17 18

empty page before TOC

English 6
Français (Canada) 36

English
6
Introduction
Congratulations on your purchase and welcome to
Philips! To fully benefit from the support that
Philips offers, register your product at
www.philips.com/welcome.
General description
1 Comb for beard styler attachment
2 Click-on beard styler attachment
3 Click-on shaving unit
4 Handle
5 Socket for small plug
6 Battery charge indicator with 3 lights
7 Unplug for use symbol
8 Travel lock symbol
9 Replacement reminder
10 Cleaning reminder
11 SmartClean system
12 Cap of SmartClean system
13 On/off button
14 Replacement symbol
15 Rinsing symbol
16 Drying symbol
17 Ready symbol
18 Battery symbol
19 Cleaning cartridge for SmartClean system
20 Supply unit
21 Small plug
22 Pouch
The accessories supplied may vary for different
products. The box shows the accessories that have
been supplied with your product.
Important safety information
Read this important information carefully before
you use the appliance and its accessories and save
English

Danger
Warning
Caution
English
it for future reference. The accessories supplied
may vary for different products.
- Keep the supply unit dry.
- To charge the battery, only use the detachable
supply unit (HQ8505) provided with the
appliance.
- The supply unit contains a transformer. Do not
cut off the supply unit to replace it with another
plug, as this causes a hazardous situation.
- Children shall not play with the appliance.
Cleaning and user maintenance shall not be
made by children without supervision.
- Always unplug the shaver before you clean it
under the tap.
- Always check the appliance before you use it.
Do not use the appliance if it is damaged, as
this may cause injury. Always replace a
damaged part with one of the original type.
- Do not open the appliance to replace the
rechargeable battery.
- Never immerse the cleaning system or the
charging stand in water and do not rinse it
under the tap.
- Never use water hotter than 60°C to rinse the
shaver.
- Only use this appliance for its intended purpose
as shown in the user manual.
7

English
8
- For hygienic reasons, the appliance should only
be used by one person.
- Never use compressed air, scouring pads,
abrasive cleaning agents or aggressive liquids
such as petrol or acetone to clean the
appliance.
- If your shaver comes with a cleaning system,
always use the original Philips cleaning fluid
(cartridge or bottle, depending on the type of
cleaning system).
- Always place the cleaning system on a stable,
level and horizontal surface to prevent leakage.
- If your cleaning system uses a cleaning
cartridge, always make sure the cartridge
compartment is closed before you use the
cleaning system to clean or charge the shaver.
- When the cleaning system is ready for use, do
not move it to prevent leakage of cleaning fluid.
- Water may drip from the socket at the bottom
of the shaver when you rinse it. This is normal
and not dangerous because all electronics are
enclosed in a sealed power unit inside the
shaver.
- Do not use the supply unit in or near wall
sockets that contain an electric air freshener to
prevent irreparable damage to the supply unit.
Electromagnetic fields (EMF)
This Philips appliance complies with all applicable
standards and regulations regarding exposure to
electromagnetic fields.

General
- This shaver is waterproof. It is suitable for use in
the bath or shower and for cleaning under the
tap. For safety reasons, the shaver can
therefore only be used without cord.
- The supply unit is suitable for mains voltages
ranging from 100 to 240 volts.
- The supply unit transforms 100-240 volts to a
safe low voltage of less than 24 volts.
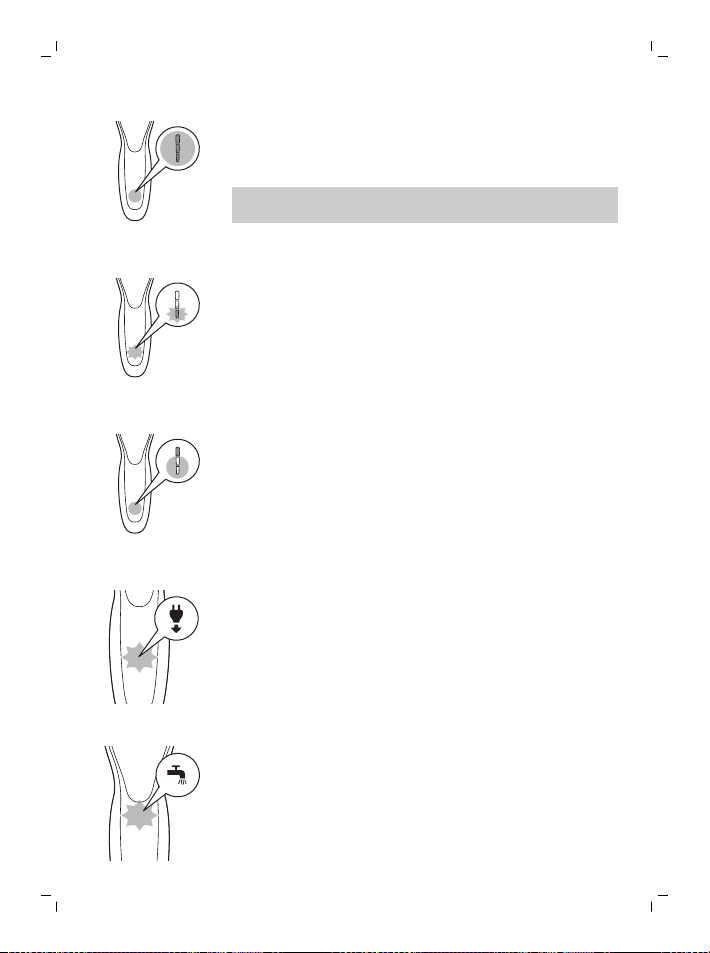
The display
Battery charge indicator
Note: If you press the on/off button during
charging, the 'unplug for use' symbol flashes white
to remind you that you have to disconnect the
appliance from the wall socket.
Quick charge: When the battery is empty and you
connect the appliance to the wall socket, the lights
of the battery charge indicator light up one after
the other repeatedly. When the appliance contains
enough energy for one shave, the bottom light of
the battery charge indicator starts flashing slowly.
While the appliance continues to charge, first the
bottom light of the battery charge indicator flashes
and then lights up continuously. Then the second
light flashes and then lights up continuously, and
so on until the appliance is fully charged.
English
9
Battery fully charged
Note: When the battery is full, the display switches
off automatically after 30 minutes.
Note: This appliance can only be used without
cord.
English
10
When the battery is fully charged, all lights of the
the battery charge indicator light up white
continuously.
Note: When the battery is full, the display switches
off automatically after 30 minutes.
Battery low
When the battery is almost empty, the bottom light
of the battery charge indicator flashes orange.
Remaining battery charge
The remaining battery charge is shown by the
lights of the battery charge indicator that light up
continuously.
’Unplug for use’ reminder
The appliance is equipped with an ‘unplug for use’
reminder. The ‘unplug for use’ symbol flashes to
remind you that you have to disconnect the
appliance from the supply unit before you can
switch it on.
Cleaning reminder
Clean the shaver after every shave for optimal
performance. When you switch off the appliance,
the cleaning reminder flashes to remind you to
clean the appliance.
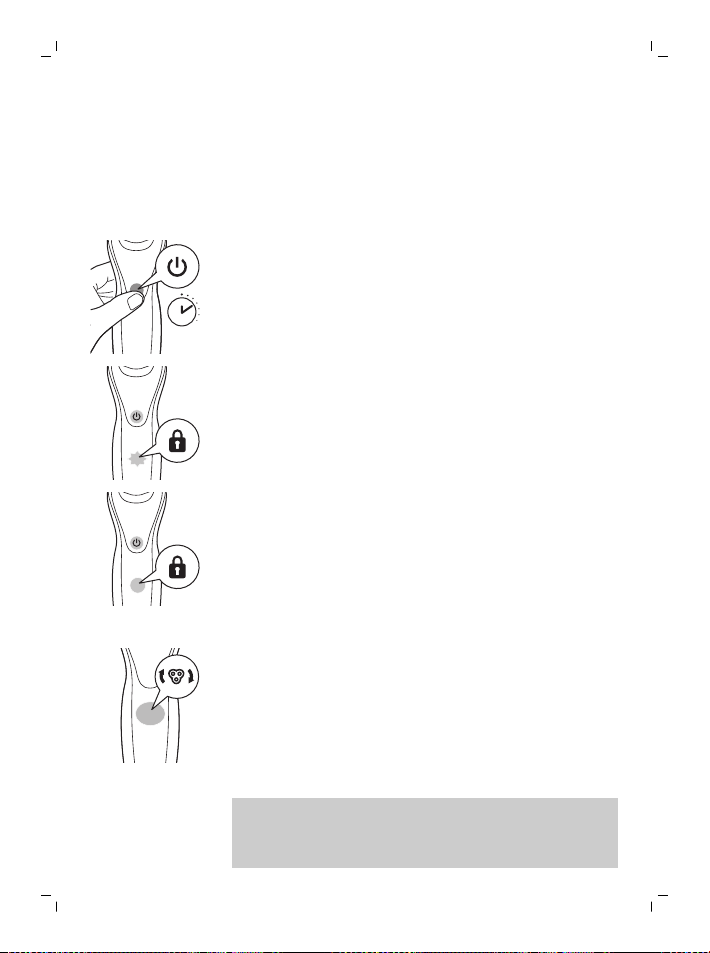
Travel lock
3 sec.
You can lock the appliance when you are going to
travel. The travel lock prevents the appliance from
being switched on by accident.
Activating the travel lock
1 Press the on/off button for 3 seconds to enter
the travel lock mode.
While you activate the travel lock, the travel lock
symbol lights up continuously. When the travel
lock is activated, the travel lock symbol flashes.
Deactivating the travel lock
1 Press the on/off button for 3 seconds.
The travel lock symbol flashes and then lights
up continuously. The appliance is now ready for
use again.
Replacing shaving heads
For maximum shaving performance, we advise you
to replace the shaving heads every year. The
appliance is equipped with a replacement
reminder which reminds you to replace the
shaving heads. The shaving unit symbol lights up
and the arrows flash to indicate that you have to
replace the shaving heads.
Note: After replacing the shaving heads, you can
reset the replacement reminder by pressing the
on/off button for 7 seconds. If you do not reset the
English
11
1
2
English
12
replacement reminder, the shaver resets
automatically after 9 shaves.
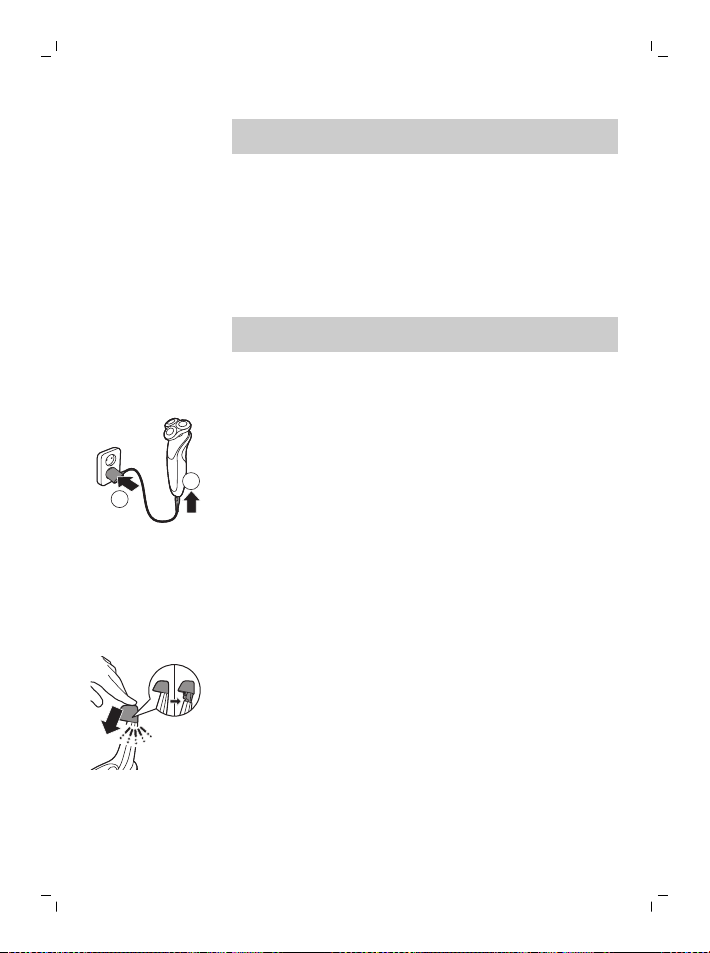
Charging
Charge the shaver before you use it for the first
time and when the display indicates that the
battery is almost empty.
Charging takes approx. 1 hour. A fully charged
shaver has a shaving timeof up to 50 minutes.
Note: You cannot use the appliance while it is
charging.
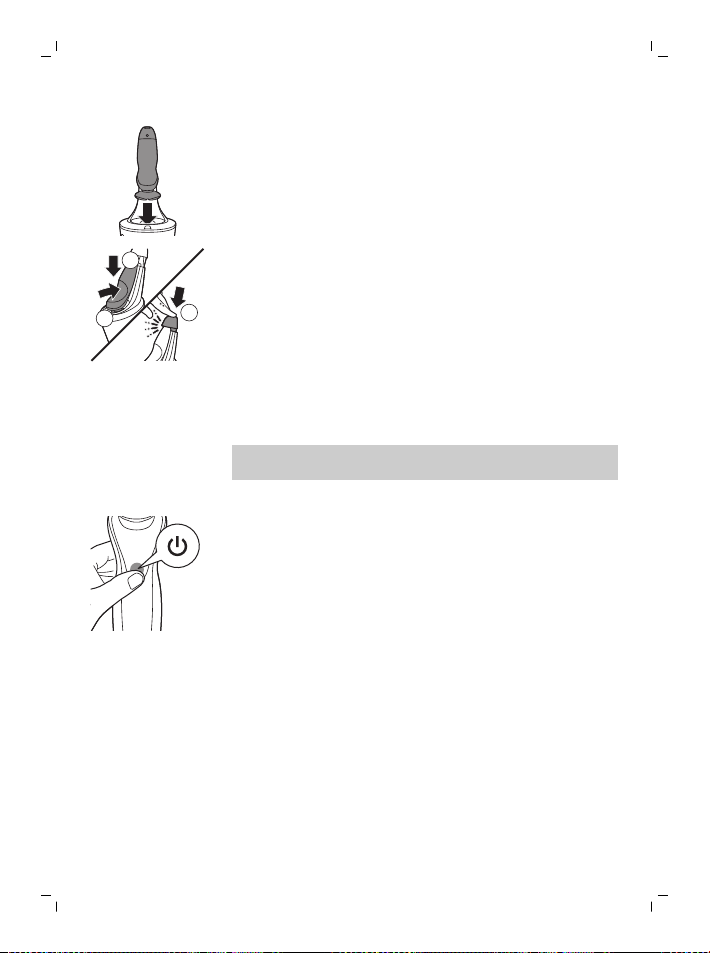
Charging with the supply unit
1 Make sure the appliance is switched off.
2 Put the small plug in the appliance and put the
supply unit in the wall socket.
3 After charging, remove the supply unit from the
wall socket and pull the small plug out of the
appliance.
Charging in the SmartClean system (specific types only)
1 Put the small plug in the back of the
SmartClean system.
2 Put the supply unit in the wall socket.
3 Press the top cap to be able to place the shaver
in the holder ('click').
4 Hold the shaver upside down above the holder.
1
2
3
Make sure the front of the shaver points
towards the SmartClean system holder.
5 Place the shaver in the holder, tilt the shaver
backwards and press down the top cap to
connect the shaver (‘click’).
The battery symbol starts to flash to indicate
that the appliance is charging. When the battery
is fully charged, the battery symbol lights up
continuously.
Using the appliance
Note: This appliance can only be used without
cord.
Switching the appliance on and off
1 To switch on the appliance, press the on/off
button once.
2 To switch off the appliance, press the on/off
button once.
Battery charge indicator with 3 lights: The display
lights up for a few seconds to show the remaining
battery status.
Shaving
Skin adaptation period
Your first shaves may not bring you the result you
expect and your skin may even become slightly
irritated. This is normal. Your skin and beard need
time to adapt to any new shaving system. To allow
your skin to adapt to this new appliance, we advise
you to shave regularly (at least 3 times a week) and
English
13
14
English
exclusively with this appliance for a period of 3
weeks.
Shaving tips
- For the best results on skin comfort, pre-trim
your beard if you have not shaved for 3 days or
longer.
- Move the shaving heads over your skin in
circular movements.
Dry shaving
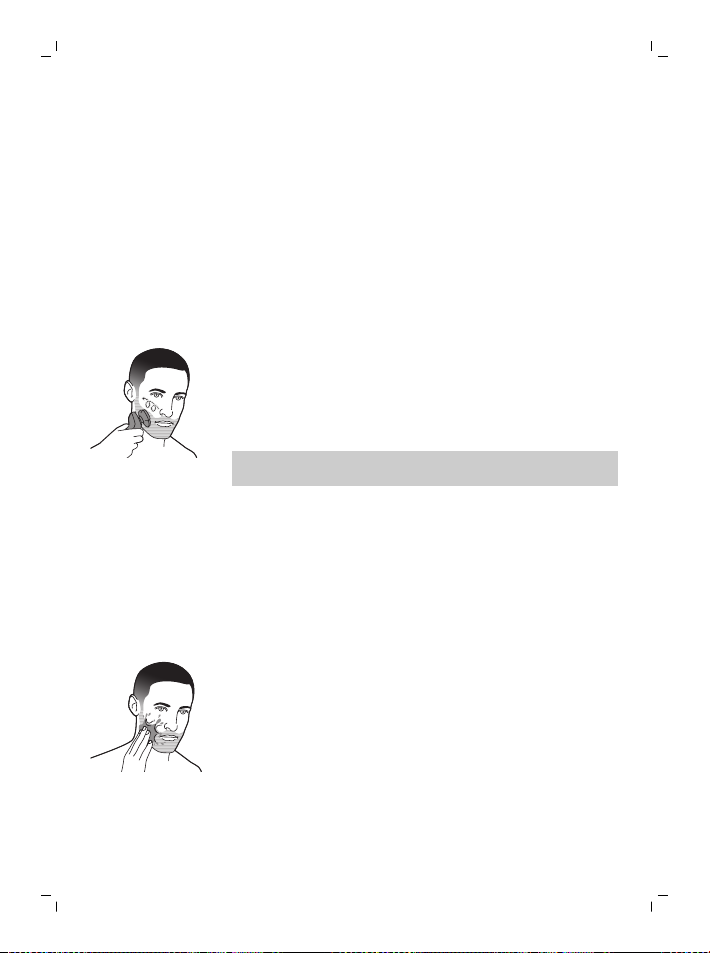
1 Switch on the appliance.
2 Move the shaving heads over your skin in
circular movements to catch all hairs growing in
different directions. Make sure each shaving
head is fully in contact with the skin. Exert
gentle pressure for a close, comfortable shave.
Note: Do not press too hard, as this can cause
skin irritation.
3 Clean the appliance after use.
Wet shaving
For a more comfortable shave, you can also use
this appliance on a wet face with shaving foam or
shaving gel.
To shave with shaving foam or shaving gel, follow
the steps below:
1 Apply some water to your skin.
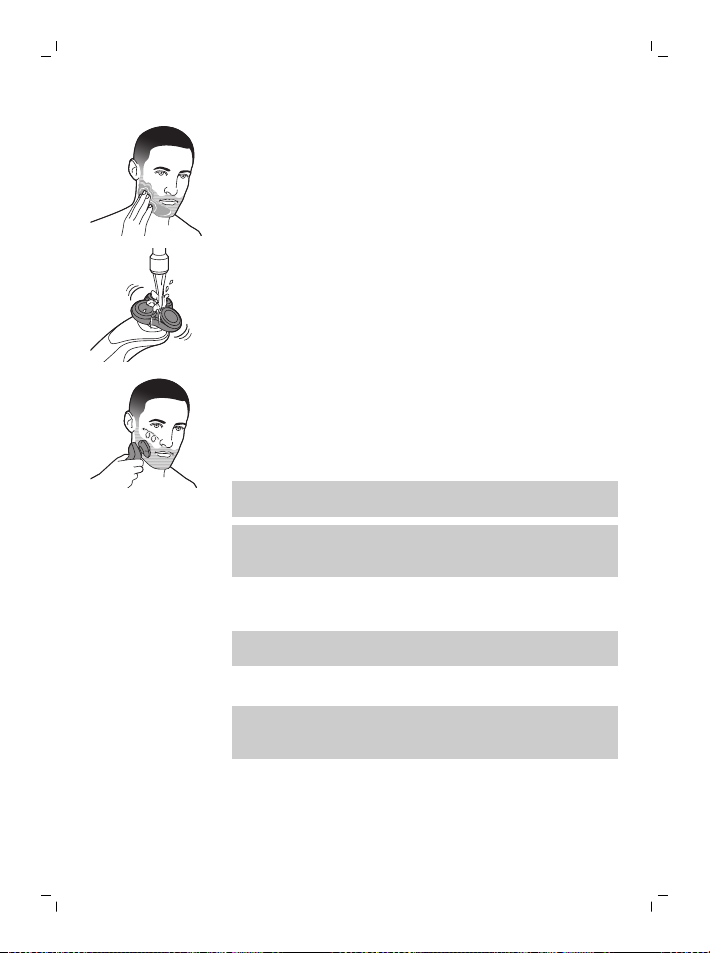
2 Apply shaving foam or shaving gel to your skin.
3 Rinse the shaving unit under the tap to ensure
that the shaving unit glides smoothly over your
skin.
4 Switch on the appliance.
5 Move the shaving heads over your skin in
circular movements to catch all hairs growing in
different directions. Make sure each shaving
head is fully in contact with the skin. Exert
gentle pressure for a close, comfortable shave.
Note: Do not press too hard, this can cause skin
irritation.
Note: Rinse the shaving unit regularly to ensure
that it continues to glide smoothly over your
skin.
6 Dry your face.
7 Clean the appliance after use.
Note: Make sure you rinse all foam or shaving gel
off the appliance.
Using the click-on attachments
Note: The accessories supplied may vary for
different products. The box shows the accessories
that have been supplied with your product.
Removing or attaching the click-on attachments
1 Make sure the appliance is switched off.
English
15

16
English
2 Pull the attachment straight off the appliance.
Note: Do not twist the attachment while you
pull it off the appliance.
3 Insert the lug of the attachment into the slot in
the top of the appliance. Then press down the
attachment to attach it to the appliance (‘click’).
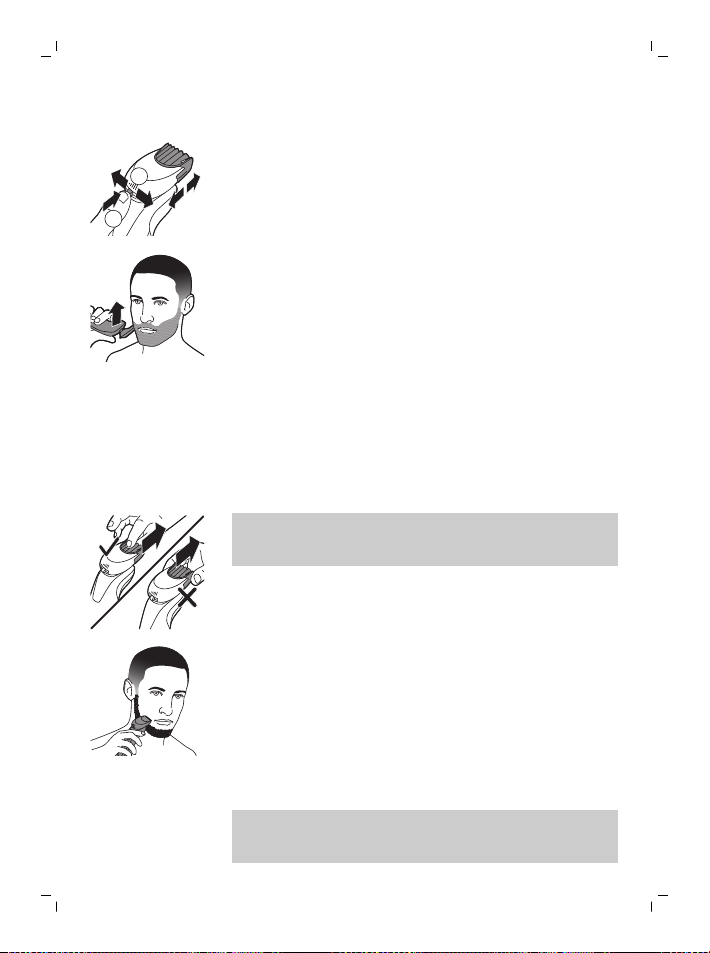
Using the beard styler attachment with comb
You can use the beard styler attachment with the
comb attached to style your beard at one fixed
setting, but also at different length settings. You
can also use it to pre-trim any long hairs before
shaving for a more comfortable shave.
The length settings on the beard styler attachment
correspond to the remaining hair length after
cutting and range from 1 to 5mm (3/64 - 3/16in).
1 Attach the attachment to the appliance ('click').
2 Slide the comb straight into the guiding grooves
on both sides of the beard styler attachment
(‘click’).
2
1
English
3 Press the length selector and then push it to
the left or right to select the desired hair length
setting.
4 Switch on the appliance.
5 Move the appliance upwards while you exert
gentle pressure. Make sure the front of the
comb is in full contact with the skin.
6 Clean the attachment after use (see 'Cleaning
and maintenance').
Using the beard styler attachment without comb
You can use the beard styler attachment without
the comb to contour your beard, moustache,
sideburns or neckline to a length of 0.5mm (1/32
in).
1 Pull the comb off the beard styler attachment.
Note: Grab the comb in the center to pull it off
the beard styler attachment. Do not pull at the
sides of the comb.
2 Switch on the appliance.
3 Hold the beard styler attachment perpendicular
to the skin and move the appliance downwards
while you exert gentle pressure.
4 Clean the attachment after use (see 'Cleaning
and maintenance').
17
Cleaning and maintenance
Note: The accessories supplied may vary for
different products. The box shows the accessories
that have been supplied with your product.

1
2
English
18
Cleaning the shaver in the SmartClean system
SmartClean Plus has two phases: a cleaning phase
and a drying phase
Preparing the SmartClean system for use
Caution: Do not tilt the SmartClean system to
prevent leakage.
Note: Hold the SmartClean system while you
prepare it for use.
Note: If you clean the shaver in the SmartClean
system once a week, the SmartClean cartridge
lasts approximately three months.
1 Put the small plug in the back of the
SmartClean system.
2 Put the supply unit in the wall socket.
3 While holding the SmartClean system with one
hand, press the button on the side of the
SmartClean system and lift the top part of the
SmartClean system.
4 Pull the seal off the cleaning cartridge.
5 Place the cleaning cartridge in the SmartClean
system.

1
2
3
English
19
6 While holding the SmartClean system with one
hand, gently push the top part of the
SmartClean system back down (‘click’).
Using the SmartClean system
Caution: Always shake excess water off the
shaver before you place it in the SmartClean
system.
1 Press the top cap to be able to place the shaver
in the holder ('click').
2 Hold the shaver upside down above the holder.
Make sure the front of the shaver points
towards the SmartClean system holder.
3 Place the shaver in the holder (1), tilt the shaver
backwards (2) and press down the top cap to
connect the shaver ('click') (3).
The battery symbol starts to flash, which
indicates that the shaver is charging.

20
English
4 Press the on/off button on the SmartClean
system to start the cleaning program.
During the rinsing phase, the rinsing symbol
flashes. When the rinsing phase is done (after
approx. 10 minutes), the rinsing symbol lights up
continuously.
After the rinsing phase, the drying phase starts
automatically. During this phase, the drying symbol
flashes. When the drying phase is done (after
approx. 4 hours), the drying symbol lights up
continuously.
When the cleaning program is done, the ready
symbol lights up continuously.
30 minutes after the cleaning program and
charging are done, the SmartClean system
switches off automatically.
The battery symbol lights up continuously to
indicate that the shaver is fully charged. Charging
takes approx. 1 hour.
Note: If you press the on/off button of the
SmartClean system during the cleaning program,
the program stops. In this case, the cleaning or
drying symbol goes out.
Note: If you disconnect the SmartClean system
from its power source, the cleaning program stops.
Replacing the cartridge of the SmartClean system
Replace the cleaning cartridge when the
replacement symbol flashes orange or when you
are no longer satisfied with the cleaning result. If
you clean the shaver in the SmartClean system
once a week, the SmartClean cartridge lasts
approximately three months.

1
2
English
1 While holding the SmartClean system with one
hand, press the button on the side of the
SmartClean system and lift the top part of the
SmartClean system.
2 Remove the cleaning cartridge from the
SmartClean system and pour out any remaining
cleaning fluid.
You can safely pour the cleaning fluid down the
sink.
3 Discard the empty cleaning cartridge.
4 Unpack the new cleaning cartridge and pull off
the seal.
5 Place the cleaning cartridge in the SmartClean
system.
6 While holding the SmartClean system with one
hand, gently push the top part of the
SmartClean system back down (‘click’).
21
Cleaning the shaver under the tap
Clean the shaver after every shave for optimal
performance.
Be careful with hot water. Always check if the
water is not too hot, to prevent burning your
hands.
Never dry the shaving unit with a towel or tissue,
as this may damage the shaving heads.
 Loading...