

Page 1
Application Note
Philips Consumer Lifestyle
Project
Bluetooth Infrared (Lenovo Upsell) Remote Installation
Guide
BLC Category Peripherals & Control
Version 0.5
Author Lim Hong Chiang
Date 24 October 2008
Change record:
Version Date Status Change
0.1 14 April 2008 Preliminary -
0.2 15 July 2008 Preliminary
0.3 28 July 2008 Preliminary
0.4 29 July 2008 Preliminary
0.5 24 October 2008 Preliminary
Note:
The Bluetooth Infrared Remote Control bundled with PC / notebook product as an ITE
peripheral and accessories device only.
The Bluetooth Infrared Remote Control with the incoming call alert function is controlled
by PC / notebook application software only.
-
-
-
-
www.philips.com
Page 2

Page: 2/18
FCC Statement
FCC Part 15.19
This device complies with Part 15 of the FCC Rules. Operation is subject to the following
two conditions: (1) this device maynot cause harmful interference and (2) this device
must accept any interference received, including interference that may cause undesired
operation.
NOTE: This equipment has been tested and found to comply with the limits for a Class B
digital device, pursuant to Part 15 of the FCC Rules. These limits are designed to provide
reasonable protection against harmful interference in a residential installation. This
equipment generates, uses and can radiate radio frequency energy and, if not installed and
used in accordance with the instructions, may cause harmful interference to radio
communications. However, there is no guarantee that interference will not occur in a
particular installation. If this equipment does cause harmful interference to radio or
television reception, which can be determined by turning the equipment off and on, the
user is encouraged to try to correct the interference by one or more of the following
measures:
-- Reorient or relocate the receiving antenna.
-- Increase the separation between the equipment and receiver.
-- Connect the equipment into an outlet on a circuit different from that to which the
receiver is connected.
-- Consult the dealer or an experienced radio/TV technician for help.
Any changes or modifications not expressly approved by the party responsible for
compliance could void the user’s authority to operate the equipment.
No special accessory is required to enable the equipment to comply with the emission
limits.
Page 3
Page: 3/18
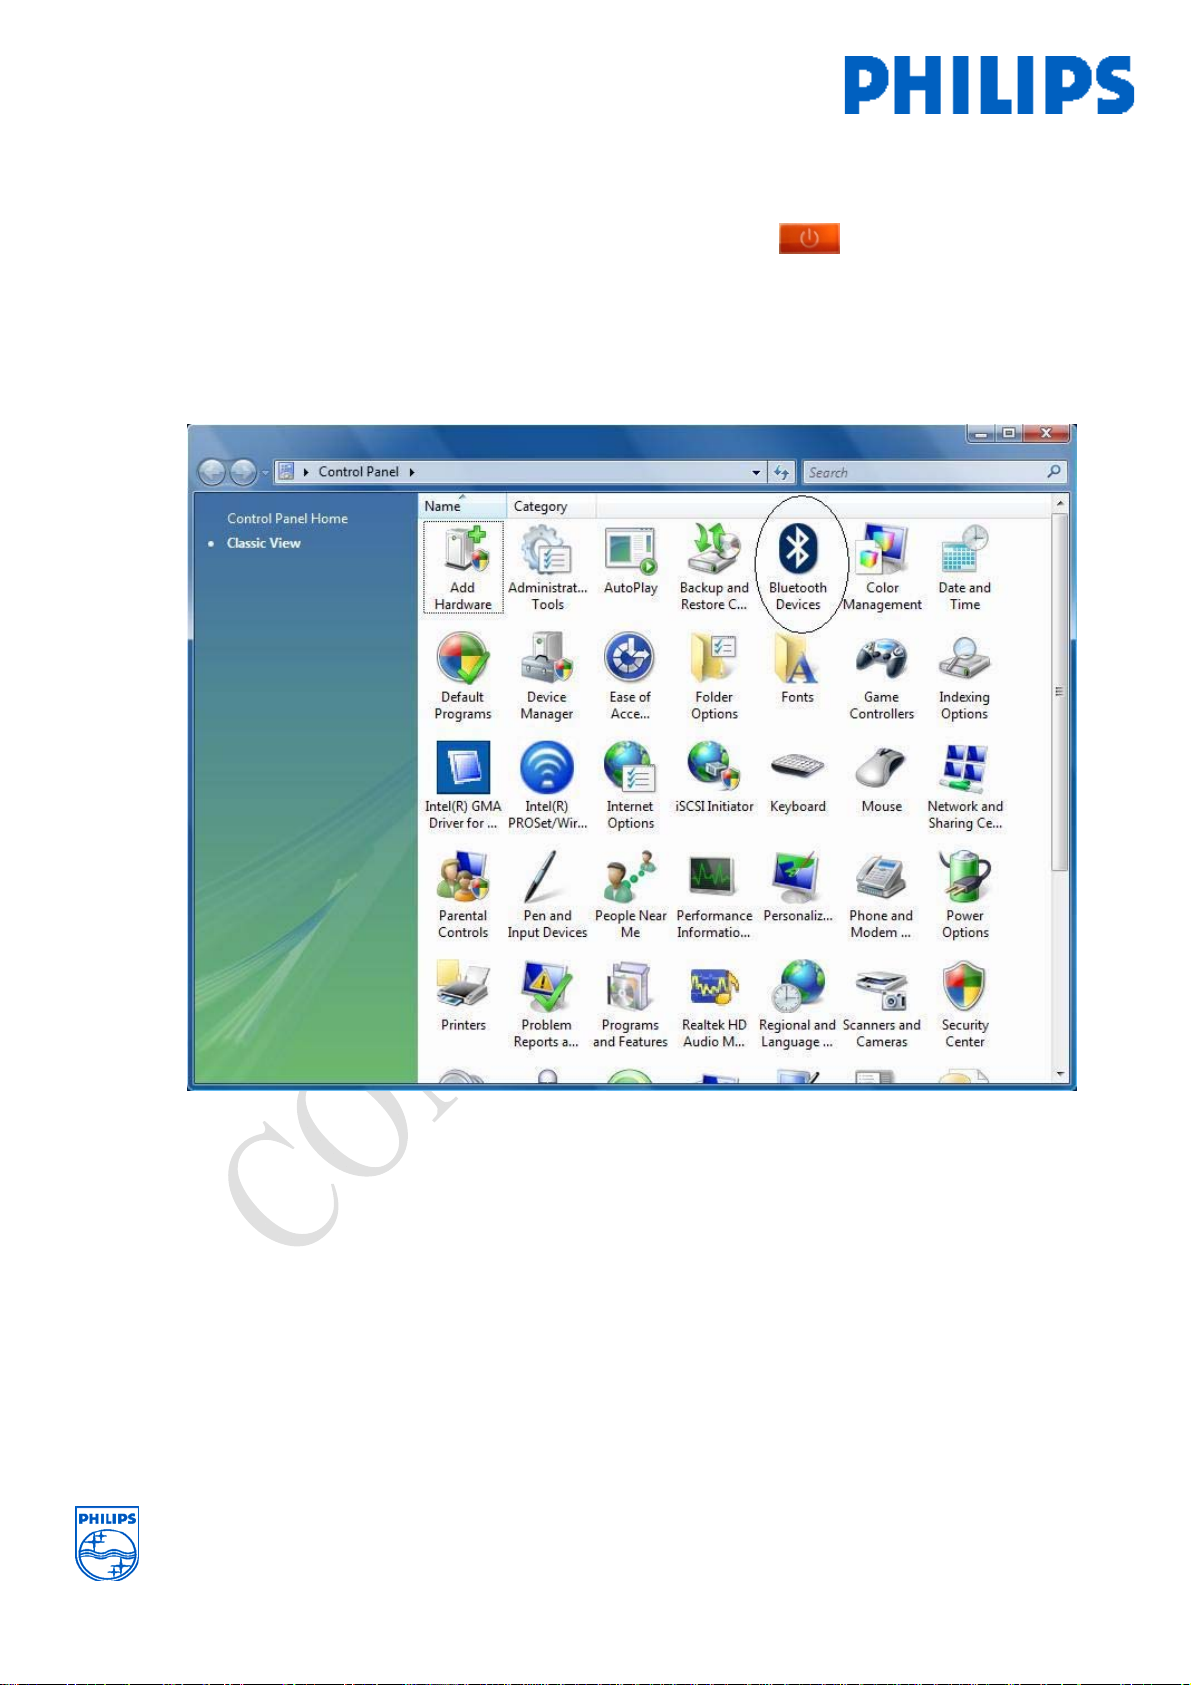
Remember to charge the remote for 2 hrs or you can proceed the following setup with the
USB power source connected. Notice the amber light blinks which indicate charging
is in progress. Once battery charge is full, red LED will remain On until the USB power
source is removed.
Go to Vista control panel, select the Bluetooth Devices for first initial Bluetooth RF pairing
& setup.
Page 4
Page: 4/18
Press & hold the Bluetooth side button for 8 second to initiate Bluetooth RF pairing.
Blue LED will turn-on . Remote is prepared to negotiate Bluetooth pairing (make it
recoverable) with Lenovo Laptop. If no successful pairing for more than 180 seconds , the
Blue LED will turn off . Re-paring process need to be re-do again.
In the Vista Bluetooth setup , check √ “ My device is set up and ready to be found “.
Press Next for the associating process.
Page 5
Page: 5/18
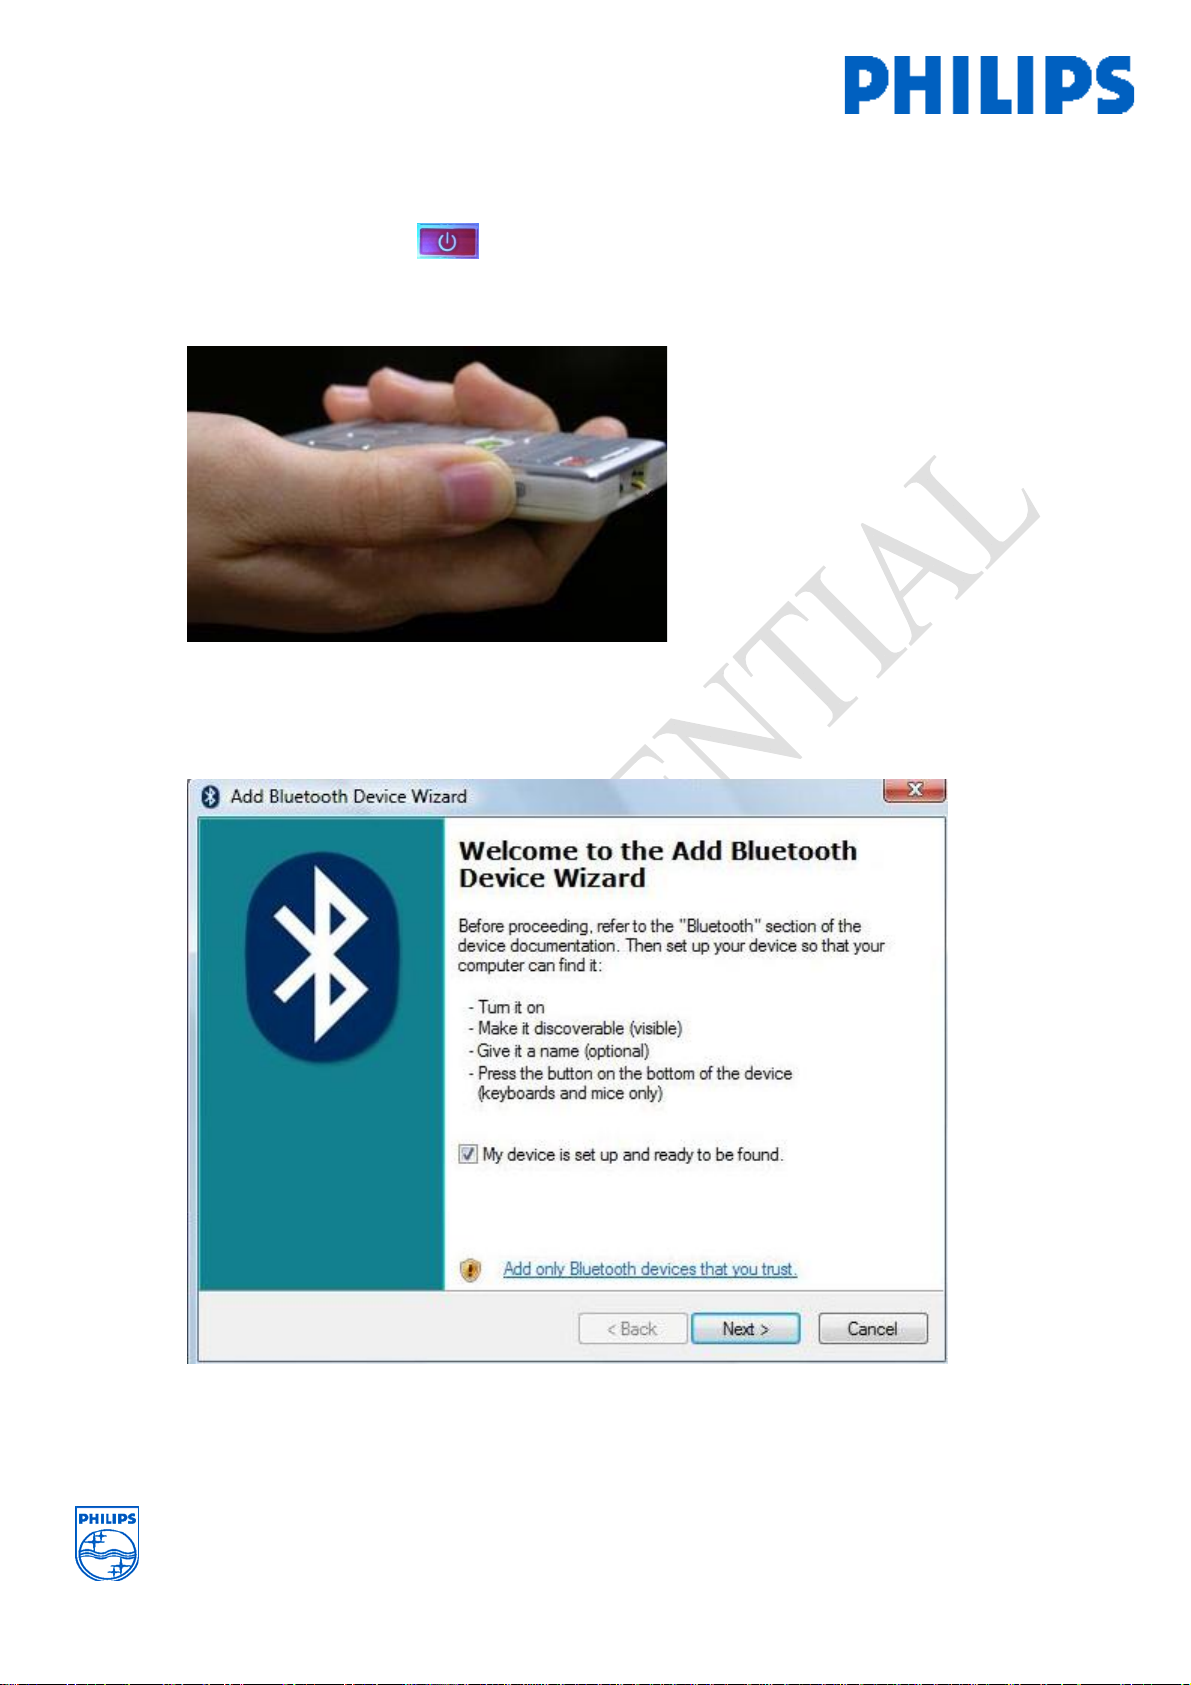
Once Vista Bluetooth application discovered the remote , RC22928 icon will appear in Add
Bluetooth Device Wizard . Click on the icon and press ‘Next >’ to proceed pass-code
entry .
Page 6
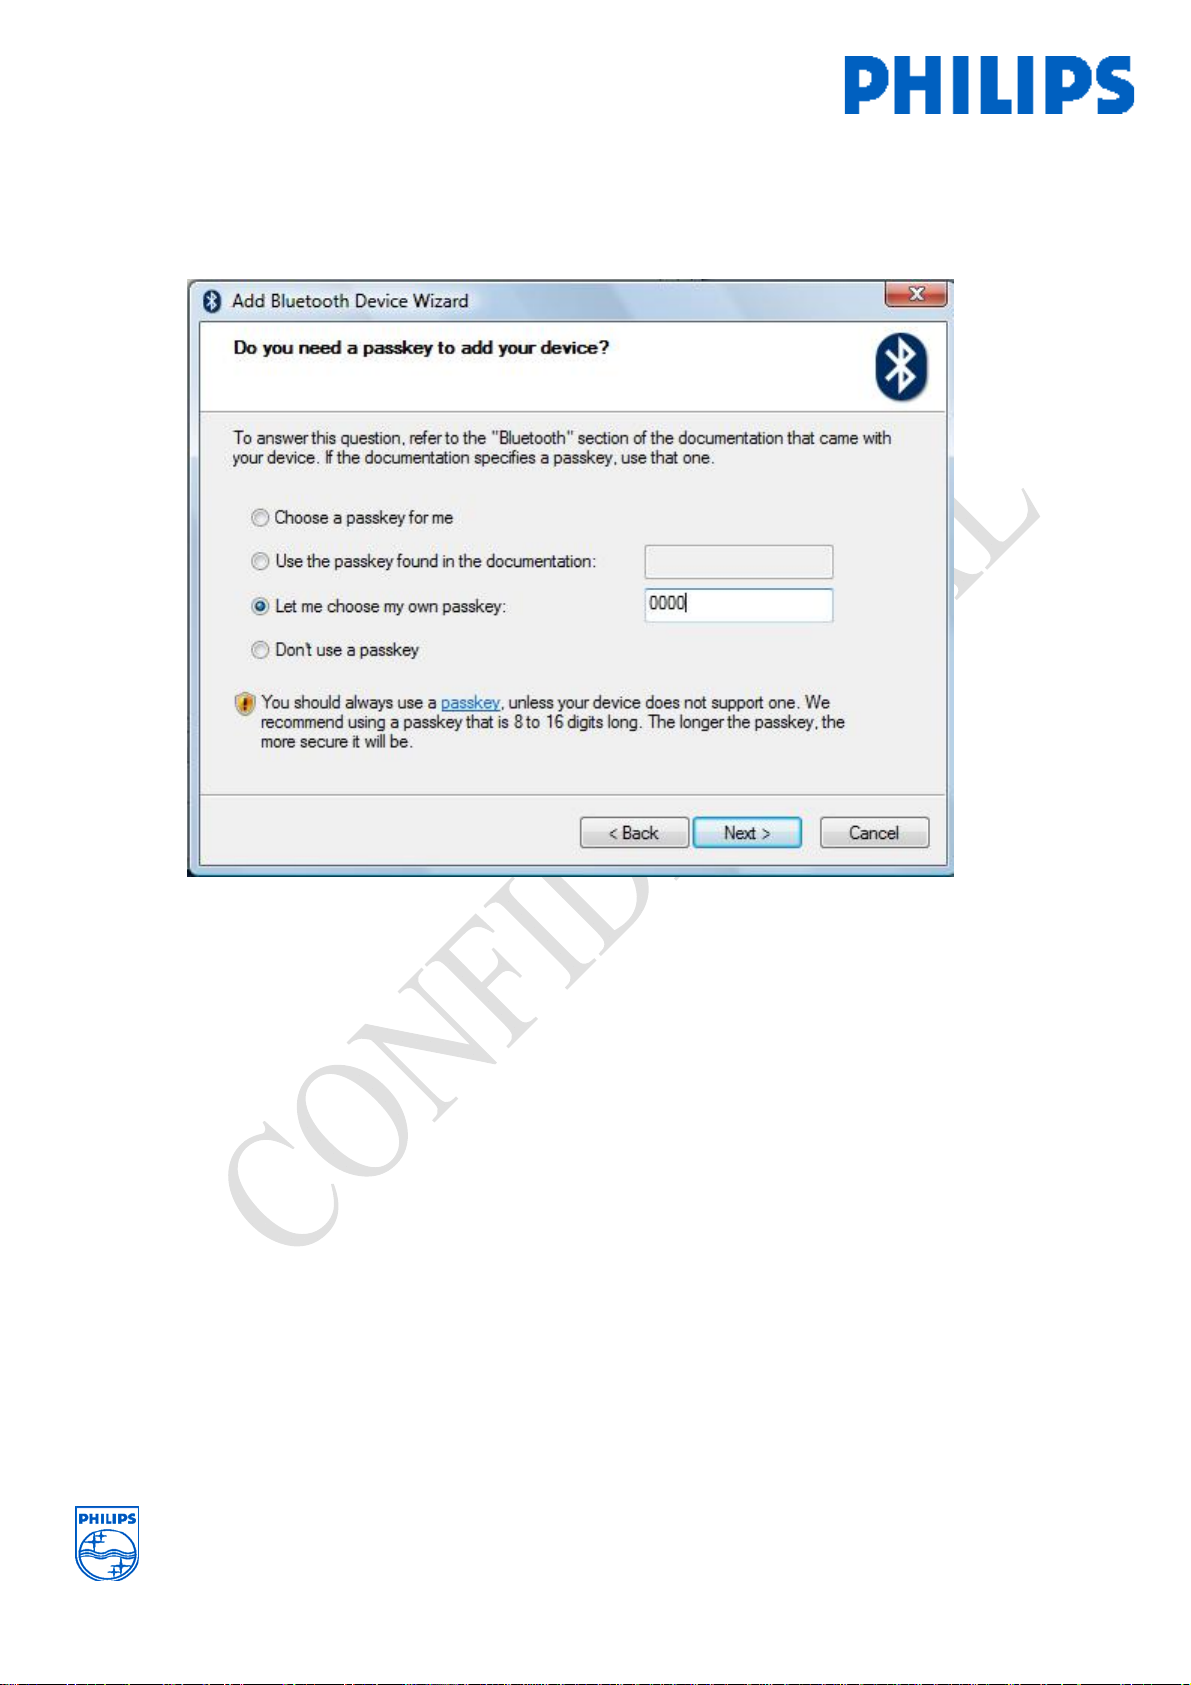
Page: 6/18
In the Bluetooth Wizard application enter the pass-key “ 0000” . Once entered the passkey ,
Bluetooth pairing process is undergoing.
Page 7

Page: 7/18
As the remote is connected , you are able to see the RC22928 icon Bluetooth device in the
wizard . Double click the Icon to get the remote to connect with the Laptop via Bluetooth.
Once successfully paired , connected & HID peripherals enumerated , you should see the
‘Connected’ massage underneath the icons a shown.
Page 8

Go to the RC22928’s Properties , Check √ all the services as shown.
Page: 8/18
Page 9

Page: 9/18
Page 10

Page: 10/18
If all the necessary steps have been successfully done. You should be able use the remote as
a 3D mouse Pointer by pressing the mouse side button key as shown below:
Page 11

Page: 11/18
To use the remote as an audio gateway , some steps are still needed . Go to control panel
again to select the Sound icon to configure sound path output to Bluetooth devices
Page 12

Select the Speakers to Bluetooth Hands-free Audio
Page: 12/18
Select the audio input to Headset Microphone
By now, you should be able to play a media audio content and the audio can be heard from
the remote’s earpiece. Do a mic recording by speaking into the remote , playback can be
heard from the remote earpiece.
Page 13

APPENDIX A
Bluetooth side button state diagram :
Page: 13/18
Page 14

Page: 14/18
APPENDIX B
LEDs SEQUENCE
Function
Code
LED_Fn1 Off On Blue LED stays on for 180 secs
Red
LED
Blue
LED
LED blinking pattern description Function
BT pairing mode
throughout pairing duration
, relate to FB_01
LED_Fn2 Off Blink Blue LED blink once every 3 secs BT On (inactive or
without connection)
LED_Fn3 Off Blink Blue LED blink twice every 3 secs
BT Active (Mouse,
VOIP, game in use)
Paired & connected
*LED_Fn4 Blink Off Red LED double blinks once every
VoIP incoming call
1 sec
LED_Fn5 Blink - Red Blink once together every 3
Battery critically low
seconds with 3 beeps for 8 cycles.
Repeat cycle over 3 minute until
battery low threshold is reach.
LED_Fn6 Blink Off Single Red led blink every 1 sec Battery charging
LED_Fn7 ON Red LED turn ON Battery fully charged
LED_Fn8 Off Blink
once,
Blue LED blinks once follow by a
beep , then blink continuous
Enable BT
, relate to FB_03
then off
LED_Fn9 Off Blink
twice,
Blue LED blinks twice follow by a
low beep , then off
Disable BT
, relate to FB_02
then off
• the timing can be adjusted according after the 1st prototype sample to give
the optimal display results.
Table 6.2
Page 15

Page: 15/18
Bluetooth Side Button sequence
Function
Key code Duration Description
Code
FB_01
Press and Hold
side button
8sec Enter Bluetooth Pairing
Blue LED turn ON , refer LED_Fn 1
Provided BT previous state is OFF
FB_02
Press and Hold
side button
3sec Disable Bluetooth
Blue LED double blink then OFF
,refer LES_Fn9
FB_03
Press and Hold
side button
3sec Enable Bluetooth
Blue LED Blink once then OFF
, refer LED Fn8
FB_04 Press & hold ,
Mouse Left & right
key together
15sec Hard reset of the remote .
Red LED and Blue LED both
ON and OFF for 2 sec.
Function
Operate Time Function Description
code
FM_01 Press & Hold Immediate Operating 3D mouse with finger
on the mouse button
FM_02 Double Press and release Within 1
sec.
FM_03 Single press and release Within 1
sec.
Free your finger to operate 3D
mouse ( default state)
Disable mouse but ready for
next use
Page 16

Function of each keypad
Page: 16/18
Key Function
Enable / Disable Mouse Function.
Enable / Disable Bluetooth Function.
Bluetooth: Mouse key. Left Click
Bluetooth: Mouse key. Right Click
Infrared key: Power Key. Turn on / off the
target devices.
Infrared key: REC Key. Recording the show /
music into CD / DVD.
Infrared key: Pause Key. Pausing the show /
music.
Infrared key: Stop Key. Stopping the show /
music.
Page 17

Page: 17/18
Key Function
Infrared key: Backward Key. Backward the
Infrared key: Play Key. Playing the show /
show / music.
music.
Infrared key: Forward Key. Forward the show
/ music.
Infrared key: Previous / First Key. Playing the
previous or the first show / music.
Infrared key: Next / Last Key. Playing the
next or last show / music.
Infrared key: Back Key. Playing back
previous show / music.
Infrared key: More Key. Display the
information of the show / music.
Infrared key: Media Player Key. Launch the
Microsoft Media Center.
Infrared key: Cursor Left Key. Move the
cursor to the left side.
Infrared key: Cursor Up Key. Move up the
cursor.
Infrared key: Cursor Right Key. Move the
cursor to the right side.
Infrared key: OK Key. Confirm or enter the
selection.
Infrared key: Cursor Down Key. Move down
the cursor.
Infrared key: Volume Up Key. Increase the
volume.
Infrared key: Volume Down Key. Decrease
the volume.
Page 18

Page: 18/18
Key Function
Infrared key: Mute Key. Mute the sound /
music.
Infrared key: Channel Up Key. Switch to
Infrared key: Channel Down Key. Switch to
higher channel by 1 channel.
lower channel by 1 channel.
Infrared key: REC TV Key. Recording the TV
show.
Infrared key: GUIDE Key. Display the “Help”
menu to guide the user.
Infrared key: LIVE TV Key. Switch to TV
mode.
Infrared key: DVD Key. Switch to DVD
mode.
 Loading...