

Page 1
QP6520, QP6510
Page 2
Page 3
15
14
13
1
QP6520
QP6510
QP6520 QP6520
2
7
8
11
4
3
5
6
9
10
12
Page 4

empty page before TOC
Page 5

English 6
Dansk 25
Deutsch 43
Español 65
Français 84
Italiano 104
Nederlands 124
Norsk 143
Português 160
Suomi 179
Svenska 197
Türkçe 215
Ελληνικα 233
Page 6

English
6
Introduction
Congratulations on your purchase and welcome to
Philips! To fully benefit from the support that
Philips offers, register your product at
www.philips.com/welcome.
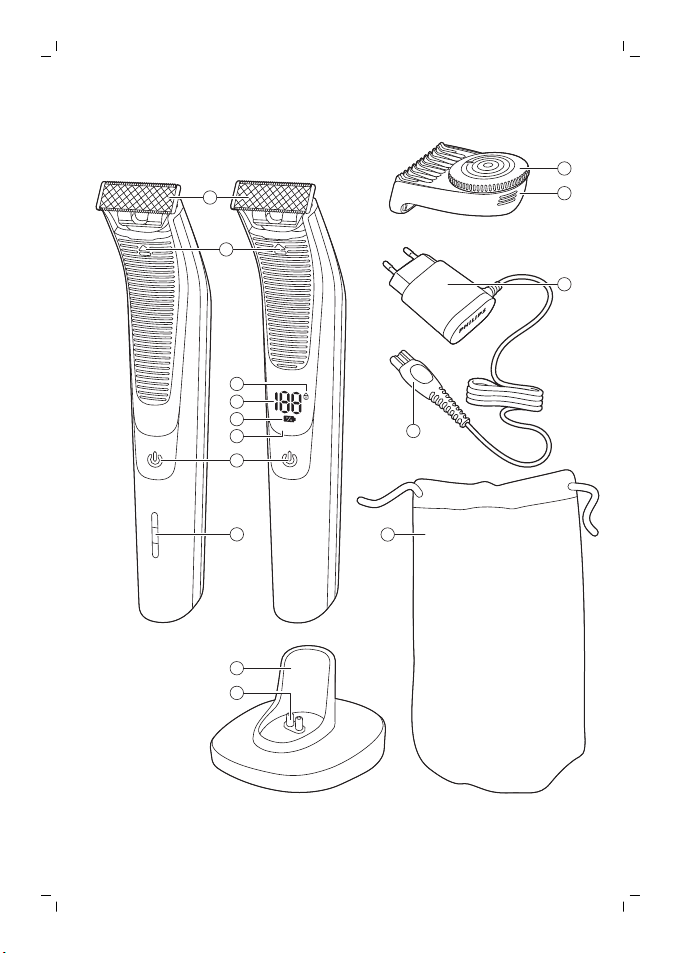
General description (Fig.1)
1 Blade
2 Blade release slide
3 Travel lock (QP6520 only)
4 Battery status percentage (QP6520 only)
5 Charge symbol (QP6520 only)
6 Display (QP6520 only)
7 On/off button
8 Battery status indicator (QP6510 only)
9 Charging stand (QP6520 only)
10 Small plug of the charging stand (QP6520 only)
11 Pouch (QP6520 only)
12 Small plug
13 Supply unit (adapter, type HQ8505)
14 Precision trimming comb
15 Hair length setting wheel
Important safety information
Read this important information carefully before
you use the appliance and its accessories and
save it for future reference. The accessories
supplied may vary for different products.
Danger
-
Keep the supply unit dry.
English
Page 7

Warning
English
-
The supply unit contains a
transformer. Do not cut off the
supply unit to replace it with
another plug, as this causes a
hazardous situation.
-
Only charge the appliance with
the supply unit provided.
-
This appliance can be used by
children aged from 8 years and
above and persons with
reduced physical, sensory or
mental capabilities or lack of
experience and knowledge if
they have been given
supervision or instruction
concerning use of the
appliance in a safe way and
understand the hazards
involved. Children shall not play
with the appliance. Cleaning
and user maintenance shall not
be made by children without
supervision.
7
Page 8
English
8
Caution
-
Always unplug the appliance
before you clean it under the
tap.
-
Always check the appliance
before you use it. Do not use
the appliance if it is damaged,
as this may cause injury. Always
replace a damaged part with
one of the original type.
-
Do not open the appliance to
replace the rechargeable
battery.
-
Never immerse the charging
stand in water and do not rinse
it under the tap.
-
Never use water hotter than
80°C to rinse the appliance.
-
Only use this appliance for its
intended purpose as shown in
the user manual.
Page 9

-
For hygienic reasons, the
appliance should only be used
by one person.
-
Never use compressed air,
scouring pads, abrasive
cleaning agents or aggressive
liquids such as petrol or
acetone to clean the appliance.
-
Do not use the supply unit in or
near wall sockets that contain
or have contained an electric air
freshener to prevent irreparable
damage to the supply unit.
Electromagnetic fields (EMF)
-
This Philips appliance complies with all
applicable standards and regulations regarding
exposure to electromagnetic fields.
General
-
This appliance is waterproof. It is suitable for
use in the bath or shower and for cleaning
under the tap. For safety reasons, the appliance
can therefore only be used without cord.
-
The appliance is suitable for mains voltages
ranging from 100 to 240 volts.
-
The supply unit transforms 100-240 volts to a
safe low voltage of less than 24 volts.
English
9
Page 10
English
10
Charging
Note: This appliance can only be used without
cord.
QP6520, QP6510: Charging takes approx. 1 hour. A
fully charged appliance has an operating time of
up to 90 minutes (QP6520) or 60 minutes
(QP6510).
Charge the appliance before you use it for the first
time and when the charge symbol indicates that
the battery is almost empty.
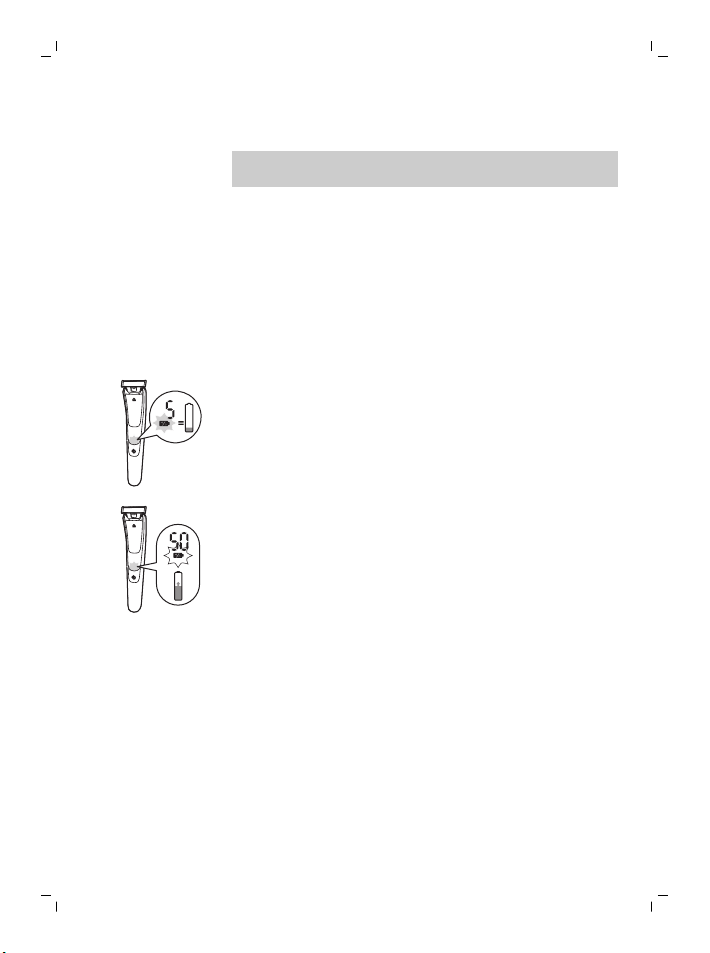
Battery status indicator QP6520
-
When the charge symbol flashes orange, the
battery is almost empty. The remaining battery
capacity is indicated by the battery status
percentage shown on the display.
-
To indicate that the appliance is charging, the
charge symbol flashes white.
-
Quick charge: after approx. 5 minutes charging,
the appliance contains enough energy for 5
minutes using. During quick charge the charge
symbol flashes white quickly until quick charge
is finished.
-
The battery is fully charged when the battery
status percentage shown on the display is 100%
and the charge symbol lights up continuously.
-
Approx. 30 minutes after the battery is fully
charged or when you disconnect the appliance
from the mains, the display switches off
automatically.
Page 11

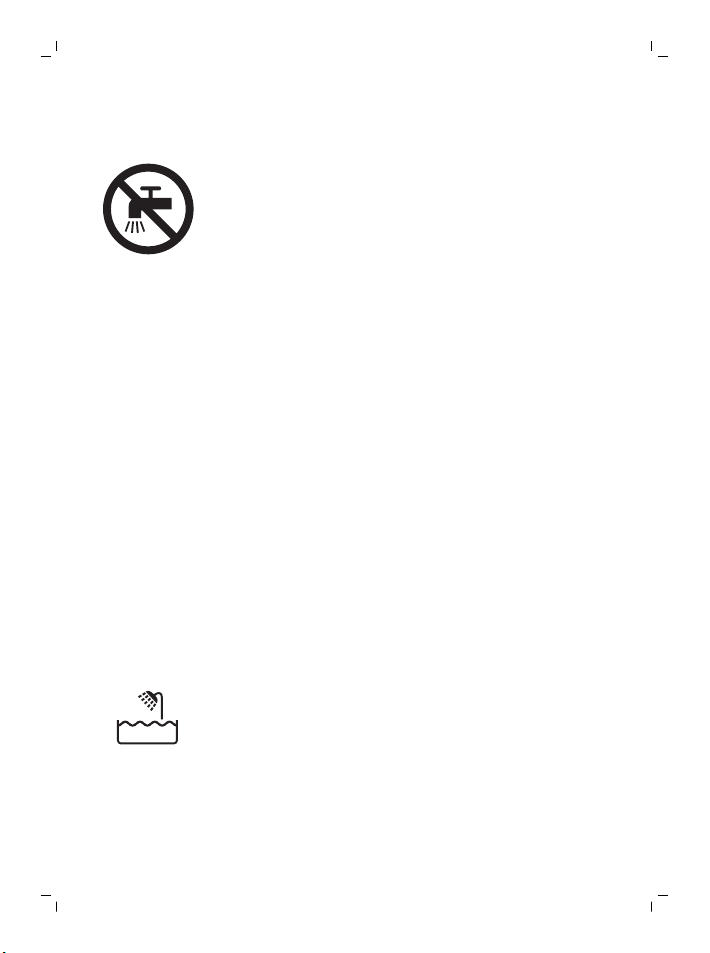
Battery status indicator QP6510
-
When the battery status indicator light flashes
orange, the battery is almost empty.
-
To indicate that the appliance is charging, first
the bottom light flashes white and then lights
up white continuously. Then the second light
flashes and then lights up continuously, and so
on until the appliance is fully charged.
-
Quick charge: after approx. 5 minutes charging,
the appliance contains enough energy for 5
minutes using. During quick charge the lights of
the battery status indicator will light up
continuously one after another and then all
switch off. This will repeat itself until quick
charge is finished.
-
The battery is fully charged when all lights of
the battery status indicator light up
continuously.
-
Approx. 30 minutes after the battery is fully
charged or when you disconnect the appliance
from the mains, the lights of the battery status
indicator switch off automatically.
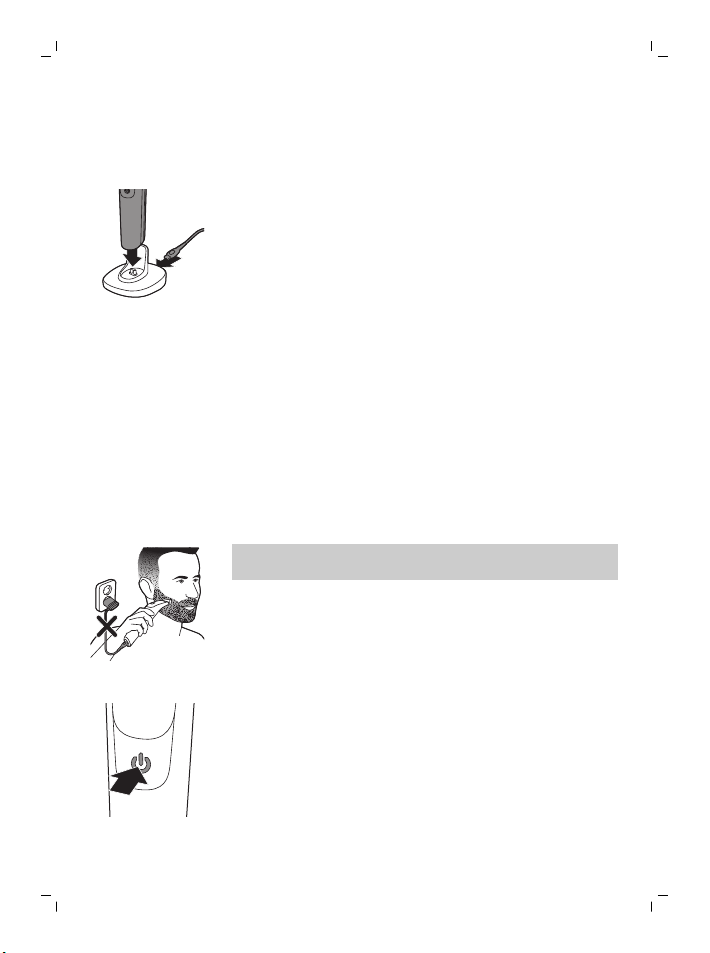
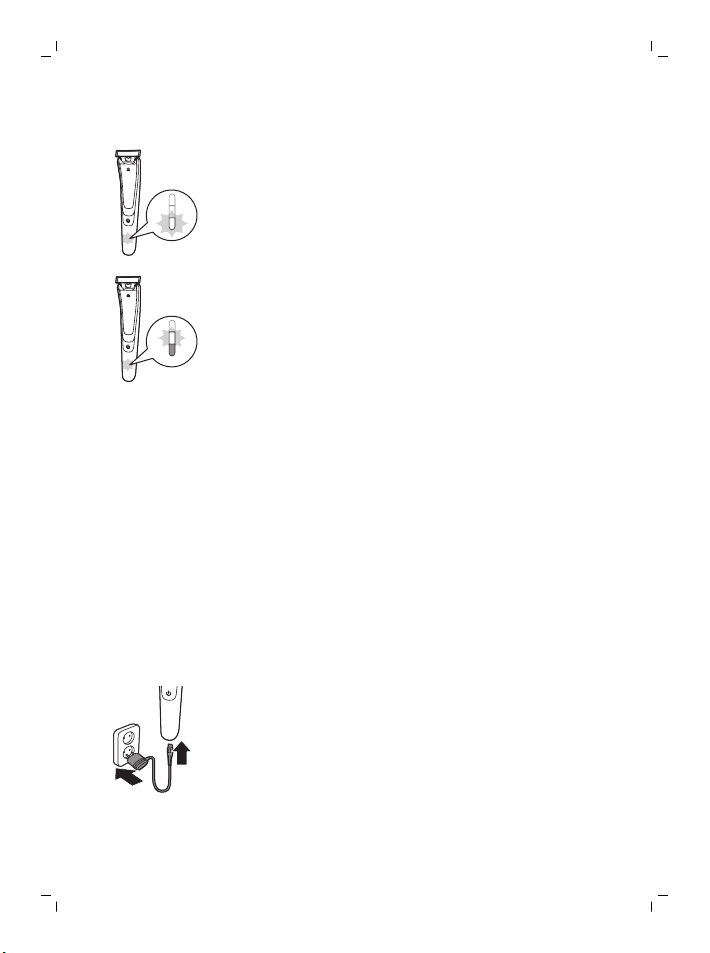
Charging with the adapter
1 Insert the small plug into the appliance and put
the adapter in the wall socket.
2 After charging, remove the adapter from the
wall socket and pull the small plug out of the
appliance.
English
11
Page 12
English
12
Charging in the charging stand (QP6520 only)
1 Insert the small plug into the charging stand
and put the adapter in the wall socket.
2 Put the appliance in the charging stand.
3 After charging, remove the adapter from the
wall socket and pull the small plug out of the
charging stand.
Using the appliance
You can use the appliance to trim, edge or shave
facial hair (beard, moustache and sideburns).
Shave for a smooth result, trim to obtain a certain
length and edge to create perfect edges and sharp
lines. This appliance is not intended for shaving,
edging or trimming hairs on lower body parts or
scalp hair. Take your time when you first start to
use the appliance. You have to acquire practice
with the appliance.
Note: This appliance can only be used without
cord.
Switching the appliance on and off
1 To switch on the appliance, press the on/off
button once.
2 To switch off the appliance, press the on/off
button once.
Page 13
Shaving
English
Warning: Before you use the appliance,
always check the blade for damage or
wear. If the blade is damaged or worn, do
not use the appliance, as injury may occur.
Replace a damaged blade before you use
the appliance (see chapter ‘Replacement’).
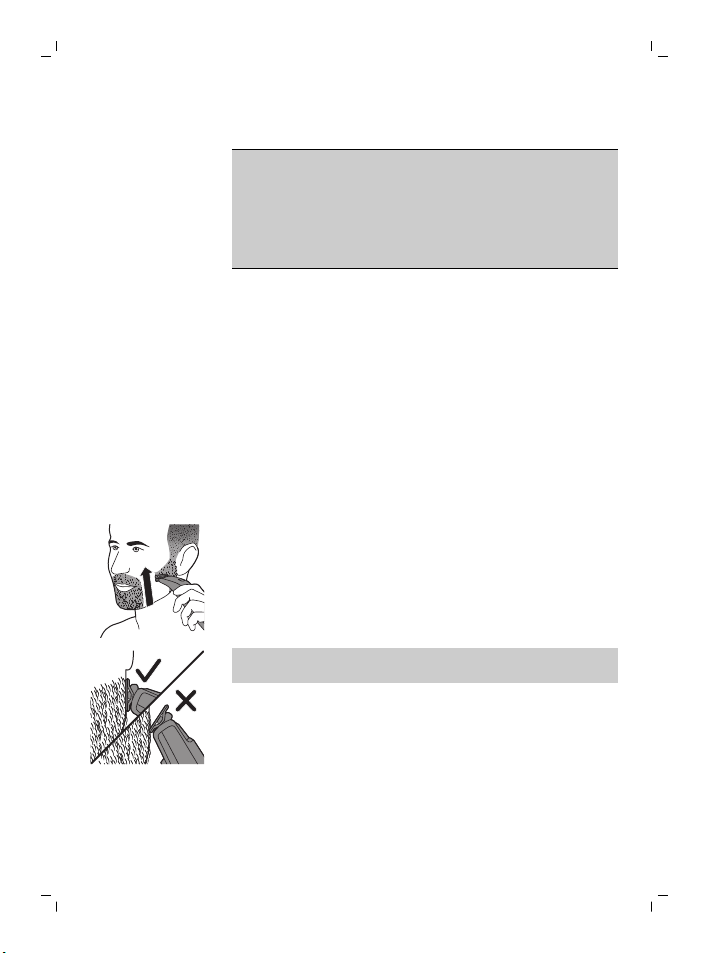
Shaving tips and tricks
-
Make sure that the blade is in full contact with
the skin by placing it flat on the skin.
-
For the best result, move the appliance against
the grain.
-
Make long strokes while you press lightly.
-
You can use the appliance dry or wet with gel
or foam, even in the shower.
-
Shaving a clean beard and face gives the best
results.
1 Switch on the appliance.
2 Place the blade on the skin and move the
appliance up or against the grain in long strokes
while you press it lightly.
Note: Make sure you hold the surface of the
blade flat against your skin.
3 Switch off and clean the appliance after every
use (see ‘Cleaning and maintenance’).
13
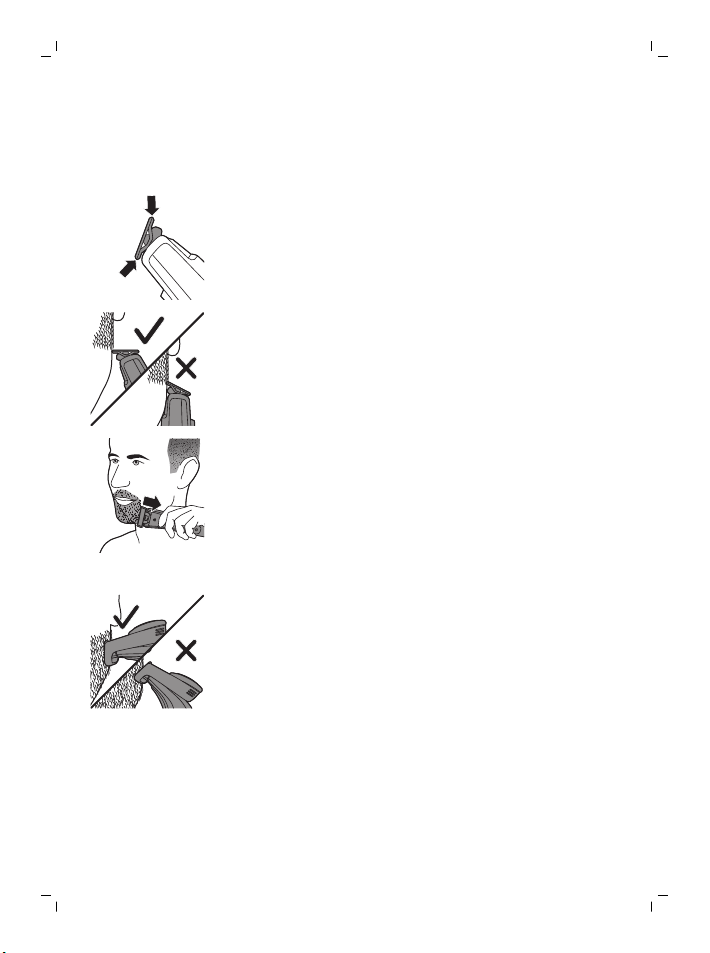
Edging
You can also use both edges of the blade to create
sharp lines and perfect edges. Hold the appliance
in such a way that the blade is perpendicular to
Page 14
English
14
the skin and one of its edges touches the skin. This
allows more precise detailing of sideburns and the
area around the mouth and nose.
1 To use the blade for creating sharp edges and
lines, use either edge of the blade.
2 Switch on the appliance.
3 Place the edge of the blade perpendicular onto
the skin.
-
Make straight strokes while applying gentle
pressure.
4 Switch off and clean the appliance after every
use (see ‘Cleaning and maintenance’).
Trimming with comb
Tips
-
Always trim in the direction of the teeth of the
precision trimming comb making sure the flat
part of the comb is in full contact with the skin
for an even trimming result.
-
Since hair grows in different directions, you
need to hold the appliance in different
positions as well. However, always make sure
that you move the appliance upwards against
the grain.
-
Trimming is easier when the skin and hair are
dry.
Page 15
1 2
English
15
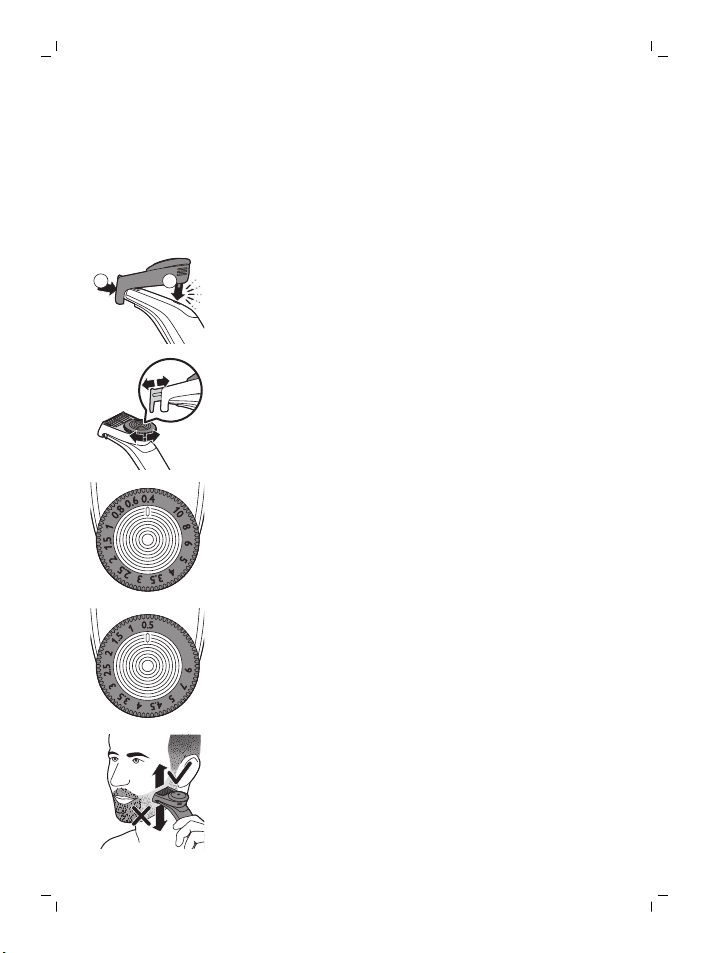
The precision trimming comb allows you to trim
hair to different lengths. Start at the highest setting
to acquire practice with this appliance. The settings
on the wheel correspond to the hair lengths in
millimeters.
1 Place the front part of the comb onto the blade
and push the projection at the back of the
comb into the appliance (‘click’).
2 Turn the hair length setting wheel to select the
desired hair length setting.
The settings on the wheel correspond to the
hair lengths in millimeters.
-
QP6520
-
QP6510
3 Switch on the appliance.
4 Place the comb onto the skin and move the
appliance upwards slowly, against the grain.
5 Switch off and clean the appliance after every
use (see ‘Cleaning and maintenance’).
Page 16

1
2
1
2
English
16
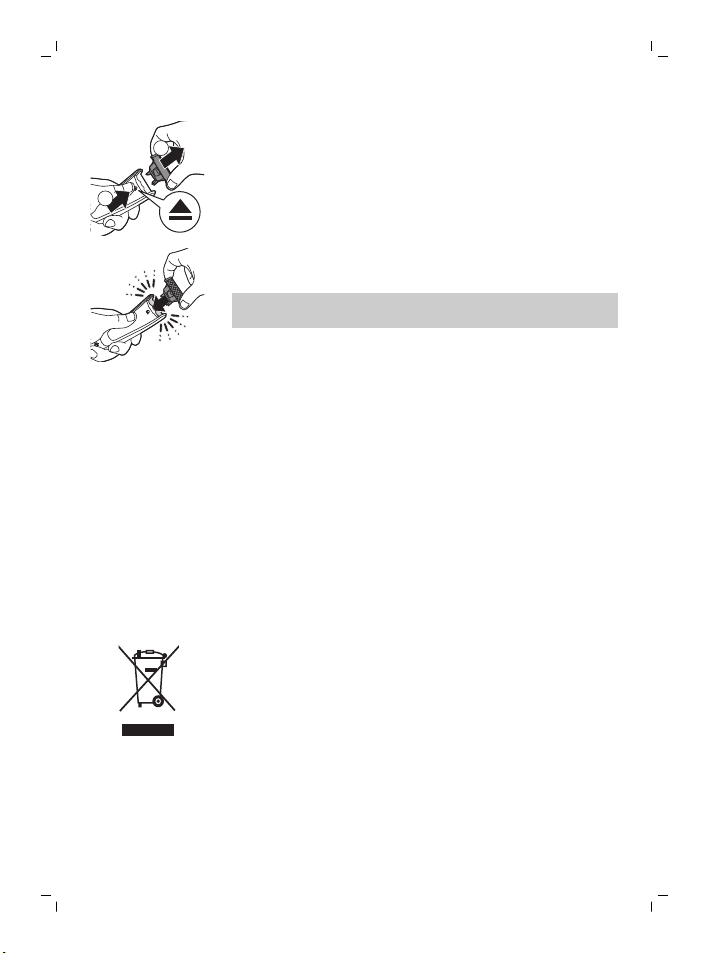
6 To remove the comb, pull its back part off the
appliance and then slide it off the blade.
Cleaning and maintenance
Clean the appliance after every use.
Caution: Never use compressed air, scouring
pads, abrasive cleaning agents or aggressive
liquids such as petrol or acetone to clean the
appliance.
Caution: Do not tap the appliance against a
surface to remove water from it, as this may
cause damage. Replace the blade if it is
damaged.
Cleaning the appliance
1 Remove the comb from the blade. Always turn
the appliance off before putting on or taking off
the comb.
2 If a lot of hairs have accumulated on the comb,
first blow them off.
Page 17

Storage
1 2
English
3 If a lot of hairs have accumulated on the
appliance, first blow them off.
4 Then switch on the appliance and rinse the
blade with lukewarm water.
Caution: Do not dry the blade with a towel or a
tissue as this may cause damage.
5 Then rinse the comb with lukewarm water.
6 Let the appliance and comb dry.
Note: The blade is fragile. Handle it carefully.
Replace the blade if it is damaged.
Note: We advise you to let the appliance and its
attachments dry before you store them for the
next use.
1 Always attach the precision trimming comb on
the blade to protect the blade from damage
during travelling or storage.
17
Travel lock (QP6520 only)
You can lock the appliance when you are going to
travel. The travel lock prevents the appliance from
being switched on by accident.
Activating the travel lock
Page 18

3 sec.
English
18
1 Press the on/off button for 3 seconds.
-
While you activate the travel lock, the travel
lock symbol lights up and the digital display
counts down.
-
When the travel lock is activated, the travel lock
symbol flashes.
Deactivating the travel lock
1 Press the on/off button for 3 seconds.
-
While you deactivate the travel lock, the display
counts down. Then the travel lock symbol lights
up and switches off.
-
The appliance is now ready for use again.
Replacement
Replacing the blade
For optimal cutting and gliding performance of the
blade, we advise you to replace the blade every 4
months or when it no longer provides the shaving
or trimming results you expect. The advice of
replacing every 4 months is based on two full
shaves a week. Depending on your usage behavior
the exact lifetime of the blade could be longer or
shorter. Similar to what you would experience with
a manual blade, the blade becomes blunt over
time, which results in increased hair pulling and
reduced cutting performance.
Page 19
2
1
1 Push the blade release slide upwards carefully,
and hold the blade on its sides to remove the
blade and prevent it from flying away.
2 Hold the new blade on its sides and press it
onto the handle (‘click’).
Note: When you hear a click the new blade is
placed correctly and ready for use.
Ordering accessories
To buy accessories or spare parts, visit
www.shop.philips.com/service or go to your
Philips dealer. You can also contact the Philips
Consumer Care Centre in your country (see the
worldwide guarantee leaflet for contact details).
The following parts are available:
-
QP210 Blade 1-pack
-
QP220 Blade 2-pack
Recycling
-
This symbol means that this product shall not
be disposed of with normal household waste
(2012/19/EU).
English
19
Page 20
English
20
-
This symbol means that this product contains a
built-in rechargeable battery which shall not be
disposed of with normal household waste
(2006/66/EC). We strongly advise you to take
your product to an official collection point or a
Philips service centre to have a professional
remove the rechargeable battery.
-
Follow your country’s rules for the separate
collection of electrical and electronic products
and rechargeable batteries. Correct disposal
helps prevent negative consequences for the
environment and human health.
Removing the rechargeable battery
Caution: Only remove the rechargeable battery
when you discard the appliance. Make sure the
battery is completely empty when you remove it.
Note: We strongly advise you to have a
professional remove the rechargeable battery.
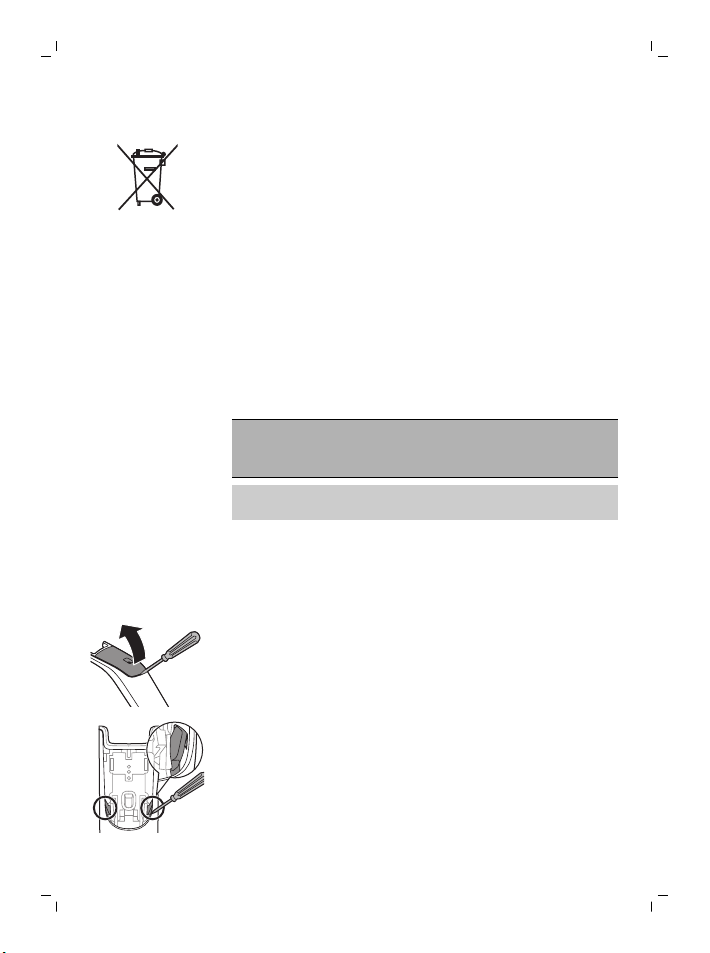
1 Disconnect the appliance from the mains and
let the appliance run until the motor stops.
2 Remove the blade from the appliance.
3 Insert a screwdriver under the back panel and
remove the panel.
4 Break the snap connections on both sides with
the screwdriver.
Page 21
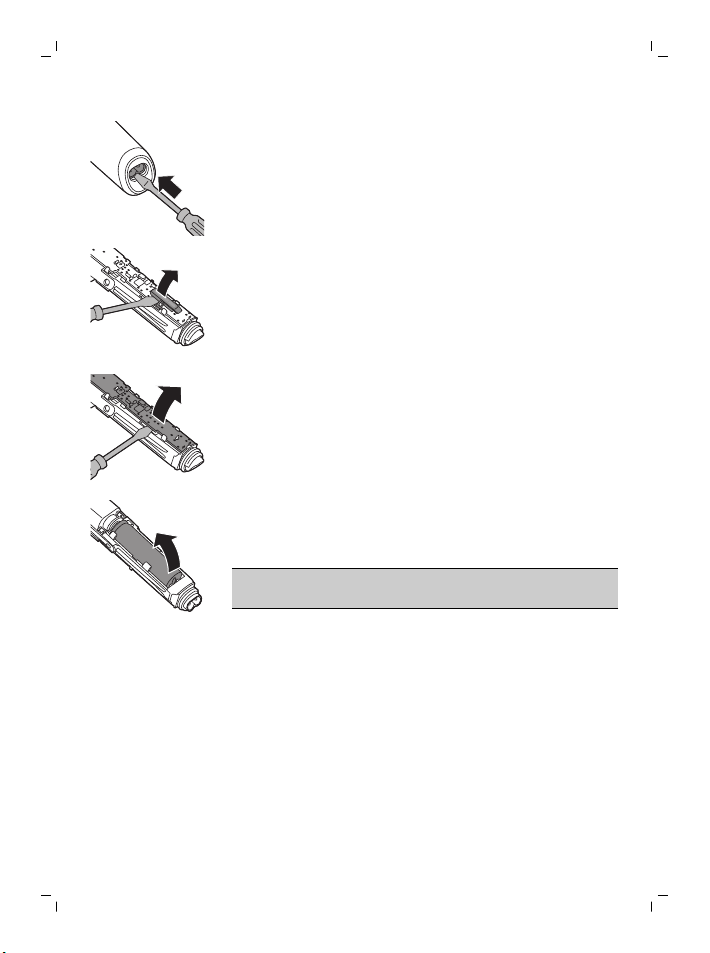
5 Push out the inner body by pushing the
screwdriver into the bottom of the handle.
-
Now you see the printed circuit board.
6 QP6510: remove the cover of the printed circuit
board with the screwdriver.
7 Remove the printed circuit board from the inner
body with the screwdriver.
8 Lift the battery out of the inner body with the
screwdriver. The battery is connected with
double-sided tape.
Warning: Be careful, the battery strips are
very sharp.
Guarantee and support
If you need information or support, please visit
www.philips.com/support or read the separate
worldwide guarantee leaflet.
English
21
Guarantee restrictions
The blade is not covered by the terms of the
international guarantee because it is subject to
wear.
Page 22
English
22
Troubleshooting
This chapter summarizes the most common
problems you could encounter with the appliance.
If you are unable to solve the problem with the
information below, visit www.philips.com/support
for a list of frequently asked questions or contact
the Consumer Care Center in your country.
Problem Possible cause Solution
I cannot switch
on the appliance
when it is
connected to the
mains.
The appliance
does not work
anymore.
You cannot use the
appliance when it
is charging. You
can only use the
appliance without
cord.
The rechargeable
battery is empty.
The blade is
blocked by dirt.
Disconnect the appliance
from the mains before use.
Charge the appliance (see
chapter ‘Charging’). During
charging, the battery
charge indicator flashes
white. If the battery charge
indicator does not flash,
check whether there is a
power failure or if the wall
socket is live. If there is no
power failure and the wall
socket is live but the
battery charge indicator
still does not flash, take the
appliance to your dealer or
a Philips service center.
Switch on the appliance
and rinse the blade under
the tap with warm water.
Hold the blade in a cup
with warm water (60°C and
not hotter) for approx. 30
seconds.
Page 23
Problem Possible cause Solution
English
23
The appliance
does not cut hairs
anymore.
The appliance
makes a strange
noise.
The appliance
does not function
optimally
anymore.
Travel lock is
activated.
The blade is placed
on the handle
incorrectly.
The blade is
damaged or worn.
The blade is
damaged or worn.
The blade is placed
on the handle
incorrectly.
The blade is
blocked by dirt.
The blade is
blocked by dirt.
Press the on/off button for
3 seconds to deactivate
travel lock.While you
deactivate the travel lock,
the display counts down.
Then the travel lock
symbol lights up and
switches off.The appliance
is now ready for use again.
Push the blade onto the
appliance until you hear a
click.
Replace the blade with a
new one. See chapter
‘Replacement’.
Replace the blade with a
new one. See chapter
‘Replacement’.
Remove and reattach the
blade. Push it onto the
appliance until you hear a
click.
Remove the blade and
clean the blade
thoroughly.
Remove the blade and
clean the blade
thoroughly.
The blade is
subject to wear and
therefore its
performance
decreases over
time.
Replace the blade with a
new one. See chapter
‘Replacement’.
Page 24

English
24
Problem Possible cause Solution
The blade is a
delicate part of the
appliance and can
easily be damaged.
If the blade is
damaged, it may
not function
optimally anymore.
Replace the blade with a
new one. See chapter
‘Replacement’.
Page 25

Introduktion
Tillykke med dit køb, og velkommen til Philips! For
at få fuldt udbytte af den support, Philips tilbyder,
skal du registrere dit produkt på
www.philips.com/welcome.
Generel beskrivelse (fig. 1)
1 Knivenhed
2 Udløser til knivenhed
3 Rejselås (kun QP6520)
4 Batteristatusindikator (kun QP6520)
5 Opladningssymbol (kun QP6520)
6 Display (kun QP6520)
7 On/off-knap
8 Batteristatusindikator (kun QP6510)
9 Opladeenhed (kun QP6520)
10 Lille stik på opladeenheden (kun QP6520)
11 Etui (kun QP6520)
12 Lille stik
13 Strømforsyningsenhed (adapter, HQ8505 type)
14 Præcisionstrimmekam
15 Hjul til indstilling af hårlængde
Vigtige sikkerhedsoplysninger
Læs disse vigtige oplysninger omhyggeligt
igennem, inden apparatet og tilbehøret tages i
brug, og gem dem til eventuel senere brug. Det
medfølgende tilbehør kan variere for forskellige
produkter.
Dansk
25
Dansk
Page 26

Dansk
26
Fare
Advarsel
-
Hold forsyningsenheden tør.
-
Strømforsyningsenheden indeholder en
transformator. Klip ikke
strømforsyningsenheden af og udskift den med
et andet stik, da dette vil føre til farlige
situationer.
-
Brug kun den medfølgende
strømforsyningsenhed ved opladning af
apparatet.
-
Dette apparat må bruges af børn fra 8 år og
opefter og personer med reducerede fysiske,
sensoriske eller mentale evner eller manglende
erfaring og viden, hvis de er blevet instrueret i
sikker brug af apparatet og forstår de
medfølgende risici. Lad ikke børn lege med
apparatet. Rengøring og vedligeholdelse må
ikke foretages af børn uden opsyn.
-
Tag altid stikket ud af apparatet, inden det
skylles under vandhanen.
-
Kontroller altid apparatet, inden du anvender
det. Anvend ikke apparatet, hvis det er
beskadiget, da dette kan forårsage
personskade. Udskift altid en beskadiget del
med en tilsvarende original type.
-
Apparatet må ikke åbnes i forbindelse med
udskiftning af det genopladelige batteri.
Page 27
Forsigtig
-
Opladeren må aldrig kommes ned i vand eller
skylles under vandhanen.
-
Rens aldrig apparatet med vand, der er varmere
end 80°C.
-
Brug kun apparatet til det tilsigtede formål som
vist i brugervejledningen.
-
Af hygiejniske grunde bør apparatet kun
anvendes af en og samme person.
-
Brug aldrig trykluft, skuresvampe eller skrappe
rengøringsmidler, som f.eks. benzin, acetone
eller lignende, til rengøring af apparatet.
-
Brug ikke strømforsyningsenheden i eller i
nærheden af stikkontakter, som indeholder eller
har indeholdt en elektrisk luftfrisker, for at
forhindre uoprettelig beskadigelse af
strømforsyningsenheden.
Elektromagnetiske felter (EMF)
-
Dette Philips-apparat overholder alle
branchens gældende standarder og regler
angående eksponering for elektromagnetiske
felter.
Generelt
-
Dette apparat er vandtæt. Apparatet er
velegnet til brug i badet eller under bruseren og
kan rengøres under vandhanen. Af
sikkerhedsmæssige årsager kan apparatet kun
betjenes trådløst.
-
Apparatet kan tilsluttes netspændinger mellem
100 og 240 V.
Dansk
27
Page 28

Dansk
28
-
Strømforsyningsenheden omformer 100-240
Volt til en lav sikkerhedsspænding under 24
Volt.
Opladning
Bemærk: Dette apparat kan kun bruges uden
ledning.
QP6520, QP6510: En fuld opladning tager ca. 1
time. En fuld opladning giver mulighed for op til 90
minutters (QP6520) eller 60 minutters (QP6510)
brug af apparatet.
Oplad apparatet, før du bruger det første gang, og
når opladningssymbolet viser, at batteriet næsten
er tomt.
Batteristatusindikator QP6520
-
Når opladningssymbolet blinker orange, er
batteriet næsten tomt. Den resterende
batterikapacitet angives ved, at batteristatus i
procent vises på displayet.
-
Opladningssymbolet blinker hvidt for at vise, at
apparatet oplades.
-
Lynopladning: efter ca. 5 minutters opladning,
er apparatet tilstrækkeligt opladet til 5 minutters
brug. Under lynopladning blinker
opladningssymbolet hurtigt hvidt, indtil
lynopladningen er fuldført.
-
Batteriet er fuldt opladet, når den batteristatus i
procent, der vises på displayet, er 100 %, og
opladningssymbolet lyser konstant.
-
Ca. 30 minutter efter at batteriet er fuldt
opladet, eller når du kobler apparatet fra
stikkontakten, slukkes displayet automatisk.
Page 29
Batteristatusindikator QP6510
-
Når batteristatusindikatoren blinker orange, er
batteriet næsten tomt.
-
For at angive, at apparatet oplades, blinker den
nederste indikator først hvidt og lyser derefter
hvidt konstant. Derefter blinker den anden
lysdiode og lyser derefter konstant og så videre,
indtil apparatet er fuldt opladet.
-
Lynopladning: efter ca. 5 minutters opladning,
er apparatet tilstrækkeligt opladet til 5 minutters
brug. Under lynopladning lyser
batteristatusindikatorens lys konstant det ene
efter det andet og slukker derefter alle sammen.
Dette gentages, indtil lynopladningen er
fuldført.
-
Batteriet er fuldt opladet, når alle lysdioderne i
batteristatusindikatoren lyser konstant.
-
Ca. 30 minutter efter at batteriet er fuldt
opladet, eller når du kobler apparatet fra
stikkontakten, slukkes batteristatusindikatorens
lys automatisk.
Opladning med adapter
1 Sæt det lille stik i apparatet, og sæt adapteren i
stikkontakten.
2 Efter opladning skal du tage adapteren ud af
stikkontakten og tage det lille stik ud af
apparatet.
Dansk
29
Page 30

Dansk
30
Opladning i opladeenheden (kun QP6520)
1 Sæt det lille stik i opladeenheden, og sæt
adapteren i en stikkontakt.
2 Placer apparatet i opladeren.
3 Efter opladning skal du tage adapteren ud af
stikkontakten og tage det lille stik ud af
opladeenheden.
Sådan bruges apparatet
Du kan bruge apparatet til at trimme, rette kanter
på eller barbere ansigtshår (skæg, overskæg og
bakkenbarter). Barber for at opnå et glat resultat,
trim for at opnå en bestemt længde, og ret kanter
for at skabe perfekte kanter og skarpe linjer. Dette
apparat er ikke beregnet til barbering, kantretning
eller trimning af hår på de nedre kropsdele eller
hovedhår. Tag dig god tid, når du begynder at
bruge apparatet første gang. Du skal vænne dig
lidt til at bruge apparatet.
Bemærk: Dette apparat kan kun bruges uden
ledning.
Sådan tændes og slukkes apparatet
1 Apparatet tændes ved at trykke én gang på
on/off-knappen.
2 Apparatet slukkes ved at trykke én gang på
on/off-knappen.
Page 31

Barbering
Dansk
Advarsel: Inden du bruger apparatet, skal
du altid kontrollere, om knivenheden er
beskadiget eller slidt. Hvis knivenheden er
beskadiget eller slidt, må du ikke bruge
apparatet, da du kan risikere at komme til
skade. Udskift en beskadiget knivenhed,
inden du bruger apparatet (se afsnittet
"Udskiftning").
Barberingstips og tricks
-
Sørg for, at knivenheden er i fuld kontakt med
huden ved at anbringe den fladt på huden.
-
Bevæg apparatet mod hårene for at opnå det
bedste resultat.
-
Brug lange strøg, mens du trykker let.
-
Du kan bruge apparatet på et tørt eller vådt
ansigt med sæbe eller skum, også under
bruseren.
-
Resultatet bliver bedst, hvis skægget og ansigtet
er rent.
1 Tænd for apparatet.
2 Anbring knivenheden på huden, og før
apparatet op eller mod hårene med lange strøg,
mens du trykker let.
31
Bemærk: Sørg for at holde knivenhedens
overflade fladt mod huden.
3 Sluk for apparatet, og rengør apparatet før hver
brug (se "Rengøring og vedligeholdelse").
Page 32

Dansk
32
Kantretning
Du kan også bruge begge knivenhedens kanter til
at skabe skarpe linjer og perfekte kanter. Hold
apparatet i en sådan vinkel, at knivenheden er
vinkelret på huden, og en af dens kanter berører
huden. Dette gør det muligt at tilrette bakkenbarter
og området omkring munden og næsen mere
præcist.
1 Du kan bruge en af knivenhedens kanter til at
skabe skarpe kanter og linjer.
2 Tænd for apparatet.
3 Placer knivenhedens kant vinkelret på huden.
-
Brug lige strøg, mens du trykker let.
4 Sluk for apparatet, og rengør apparatet før hver
brug (se "Rengøring og vedligeholdelse").
Trimning med kam
Gode råd
-
Trim altid i retning med tænderne på
præcisionstrimmekammen, og sørg for, at den
flade del af kammen altid er i fuld kontakt med
huden for at opnå et ensartet trimningsresultat.
Page 33

1 2
Dansk
-
Da hår vokser i forskellige retninger, skal du
også holde apparatet i forskellige positioner. Du
skal imidlertid altid bevæge apparatet opad
imod hårets vækstretning.
-
Trimningen er nemmest på tør hud og hår.
Præcisionstrimmekammen giver dig mulighed for
at trimme hår i forskellige længder. Begynd med
den højeste indstilling for at vænne dig til at bruge
apparatet. Indstillingerne på hjulet svarer til
hårlængden i millimeter.
1 Placer den forreste del af kammen på kniven,
og skub fremspringet på kammens bageste del
ind i apparatet ("klik").
2 Drej hjulet til indstilling af hårlængde for at
vælge den ønskede hårlængdeindstilling.
Indstillingerne på hjulet svarer til hårlængden i
millimeter.
-
QP6520
33
-
QP6510
3 Tænd for apparatet.
Page 34

1
2
1
2
Dansk
34
4 Placer kammen på huden, og før apparatet
langsomt opad imod hårenes vækstretning.
5 Sluk for apparatet, og rengør apparatet før hver
brug (se "Rengøring og vedligeholdelse").
6 Du kan tage kammen af ved at trække dens
bageste del af apparatet og derefter fjerne den
fra knivenheden.
Rengøring og vedligeholdelse
Rengør altid apparatet efter brug.
Forsigtig: Brug aldrig trykluft, skuresvampe eller
skrappe rengøringsmidler, som f.eks. benzin,
acetone eller lignende, til rengøring af apparatet.
Forsigtig: Bank ikke apparatet mod en overflade
for at fjerne vand fra det, da det kan beskadige
apparatet. Udskift knivenheden, hvis den er
beskadiget.
Rengøring af apparatet
1 Fjern kammen fra knivenheden. Sluk altid for
apparatet, inden du monterer eller afmonterer
kammen.
Page 35

Opbevaring
1 2
Dansk
2 Hvis der har samlet sig en masse hår på
kammen, skal du først blæse dem af.
3 Hvis der har samlet sig en masse hår på
apparatet, skal du først blæse dem af.
4 Tænd derefter for apparatet, og skyl
knivenheden med lunkent vand.
Forsigtig:iTør ikke knivenheden med et
håndklæde eller køkkenrulle, da dette kan
beskadige apparatet.
5 Skyl derefter kammen med lunkent vand.
6 Lad apparatet og kammen tørre.
Bemærk: Knivenheden er sart. Behandl den
forsigtigt. Udskift knivenheden, hvis den er
beskadiget.
Bemærk: Vi anbefaler, at du lader apparatet og
tilbehørsdelene tørre, før du opbevarer dem til
næste brug.
1 Sæt altid præcisionstrimmekammen på
knivenheden for at beskytte den mod
beskadigelse på rejser eller under opbevaring.
35
Page 36

3 sec.
Dansk
36
Rejselås (kun QP6520)
Du kan låse apparatet, når du skal ud at rejse.
Rejselåsen forhindrer, at apparatet tændes
utilsigtet.
Aktivering af rejselåsen
1 Tryk på tænd/sluk-knappen i 3 sekunder.
-
Mens du aktiverer rejselåsen, lyser
rejselåssymbolet, og der tælles ned på det
digitale display
-
Når rejselåsen er aktiveret, blinker
rejselåssymbolet.
Deaktivering af rejselåsen
1 Tryk på tænd/sluk-knappen i 3 sekunder.
-
Mens du deaktiverer rejselåsen, tælles der ned
på det digitale display. Derefter tænder og
slukker rejselåssymbolet.
-
Herefter er apparatet igen klar til brug.
Udskiftning
Udskiftning af knivenheden
For at knivenheden skal skære og glide perfekt
anbefaler vi, at du udskifter knivenheden hver
fjerde måned, eller når den ikke længere giver de
barberings- og trimningsresultater, du forventer.
Rådet om at udskifte knivenheden hver fjerde
måned er baseret på to fulde barberinger om
ugen. Afhængigt af dine brugsvaner kan
Page 37

knivenhedens levetid være længere eller kortere
2
1
end det angivne. På samme måde som et
almindeligt barberblad bliver knivenheden sløv
med tiden, hvilket medfører at den hiver mere i
hårene skærer dårligere.
1 Skub udløseren til knivenheden forsigtigt opad,
og hold på siderne af knivenheden for at tage
knivenheden af og forhindre den i at flyve væk.
2 Hold på siderne af den nye knivenhed, og tryk
den på håndtaget ("klik").
Bemærk: Når du hører et klik, sidder den nye
knivenhed korrekt og er klar til brug.
Bestilling af tilbehør
Du kan købe tilbehør og reservedele på
www.shop.philips.com/service eller hos din
Philips-forhandler. Du kan også kontakte det
lokale Philips-kundecenter (du kan finde
kontaktoplysninger i folderen "World-Wide
Guarantee").
Der findes følgende dele:
-
QP210-knivenhed, pakke med 1
-
QP220-knivenhed, pakke med 2
Dansk
37
Page 38

Dansk
38
Genanvendelse
-
Dette symbol betyder, at dette produkt ikke må
bortskaffes sammen med almindeligt
husholdningsaffald (2012/19/EU).
-
Dette symbol betyder, at dette produkt
indeholder et indbygget genopladeligt batteri,
som ikke må bortskaffes sammen med
almindeligt husholdningsaffald (2006/66/EF).
Vi anbefaler på det kraftigste, at du afleverer
produktet på et officielt indsamlingssted eller
hos en Philips-forhandler, hvor du kan få en
fagmand til at tage det genopladelige batteri
ud.
-
Følg den nationale lovgivning om særskilt
indsamling af elektriske og elektroniske
produkter og genopladelige batterier. Korrekt
bortskaffelse er med til at forhindre negativ
påvirkning af miljøet og menneskers helbred.
Udtagning af det genopladelige batteri
Forsigtig: Det genopladelige batteri må kun tages
ud af apparatet, når det skal bortskaffes. Sørg
for, at batteriet er fuldstændig tomt, når du tager
det ud.
Bemærk: Vi anbefaler på det kraftigste, at du får en
fagmand til at tage det genopladelige batteri ud.
1 Tag stikket ud af stikkontakten, og lad apparatet
køre, indtil motoren stopper af sig selv.
2 Fjern knivenheden fra apparatet.
Page 39

Dansk
3 Sæt en skruetrækker ind under bagpanelet, og
fjern panelet.
4 Knæk "snap-on"-tappene på begge sider med
en skruetrækker.
5 Skub den indvendige del ud ved at skubbe
skruetrækkeren ind i bunden af håndtaget.
-
Du kan nu se printpladen.
6 QP6510: fjern dækslet fra printpladen med
skruetrækkeren.
7 Fjern printpladen fra den indvendige del ved
hjælp af skruetrækkeren.
39
Page 40

Dansk
40
8 Løft batteriet ud af den indvendige del med
skruetrækkeren. Batteriet er tilsluttet med
dobbeltsidet tape.
Advarsel: Pas på - strimlerne på batteriet er
meget skarpe.
Reklamationsret og support
Hvis du har brug for hjælp eller support, bedes du
besøge www.philips.com/support eller læse i den
separate folder "World-Wide Guarantee".
Gældende forbehold i reklamationsretten
Knivenheden er ikke omfattet af den internationale
garanti, da den udsættes for slitage.
Fejlfinding
Dette afsnit opsummerer de mest almindelige
problemer, der kan forekomme ved brug af
enheden. Har du brug for yderligere hjælp og
vejledning, så besøg www.philips.com/support for
at få en liste med ofte stillede spørgsmål, eller
kontakt dit lokale Philips Kundecenter.
Problem Mulig årsag Løsning
Du kan ikke
tænde
apparatet,
mens det er
tilsluttet en
stikkontakt.
Du kan ikke bruge
apparatet, mens
det oplader. Du kan
kun bruge
apparatet uden
ledning.
Tag stikket ud af
stikkontakten, før
apparatet bruges.
Page 41

Problem Mulig årsag Løsning
Dansk
41
Apparatet
fungerer ikke
mere.
Det genopladelige
batteri er afladet.
Knivenheden er
blokeret af snavs.
Rejselåsen er
aktiveret.
Oplad apparatet (se
afsnittet "Opladning").
Under opladning blinker
batteriopladningsindikato
ren hvidt. Hvis
batteriopladningsindikato
ren ikke blinker, skal du
kontrollere, om der er
strømsvigt, eller om der er
noget galt med
stikkontakten. Hvis der ikke
er strømsvigt, og der ikke er
noget galt med
stikkontakten, men
batteriopladningsindikato
ren stadig ikke blinker, skal
du tage apparatet med til
din forhandler eller et
Philips-servicecenter.
Tænd for apparatet, og
skyl knivenheden under
vandhanen med varmt
vand.
Hold knivenheden nede i
en kop med varmt vand
(højst 60 °C) i ca. 30
sekunder.
Hvis du vil deaktivere
rejselåsen, skal du holde
on/off-knappen nede i 3
sekunder. Mens du
deaktiverer rejselåsen,
tælles der ned på det
digitale display. Derefter
tænder og slukker
rejselåssymbolet.
Apparatet er nu igen klar til
brug.
Page 42

Dansk
42
Problem Mulig årsag Løsning
Apparatet klipper
ikke hår mere.
Apparatet siger
en mærkelig lyd.
Apparatet
fungerer ikke
optimalt mere.
Knivenheden
sidder forkert på
håndtaget.
Knivenheden er
beskadiget eller
slidt.
Knivenheden er
beskadiget eller
slidt.
Knivenheden
sidder forkert på
håndtaget.
Knivenheden er
blokeret af snavs.
Knivenheden er
blokeret af snavs.
Knivenheden bliver
slidt, og dens
ydeevne forringes
med tiden.
Knivenheden er en
sart del af
apparatet og kan
nemt blive
beskadiget. Hvis
knivenheden
beskadiges,
fungerer den
muligvis ikke
optimalt længere.
Skub knivenheden på
apparatet, indtil du hører et
klik.
Udskift knivenheden med
en ny. Se afsnittet
"Udskiftning".
Udskift knivenheden med
en ny. Se afsnittet
"Udskiftning".
Tag knivenheden af, og
sæt den på igen. Skub den
på apparatet, indtil du
hører et klik.
Tag knivenheden af, og
rengør den grundigt.
Tag knivenheden af, og
rengør den grundigt.
Udskift knivenheden med
en ny. Se afsnittet
"Udskiftning".
Udskift knivenheden med
en ny. Se afsnittet
"Udskiftning".
Page 43

Einführung
Herzlichen Glückwunsch zu Ihrem Kauf und
willkommen bei Philips! Um die Unterstützung von
Philips optimal nutzen zu können, sollten Sie Ihr
Produkt unter www.philips.com/welcome
registrieren.
Übersicht (Abb. 1)
1 Scherblatt
2 Entriegelungsschieber für Scherblatt
3 Reisesicherung (nur QP6520)
4 Akkustands-Prozentwert (nur QP6520)
5 Ladesymbol (nur QP6520)
6 Display (nur QP6520)
7 Ein-/Ausschalter
8 Akkustands-Anzeige (nur QP6510)
9 Ladestation (nur QP6520)
10 Kleiner Stecker der Ladestation (nur QP6520)
11 Tasche (nur QP6520)
12 Gerätestecker
13 Netzteil (Adapter, Typ HQ8505)
14 Präzisionskammaufsatz
15 Schnittlängen-Einstellungsrad
Wichtige Sicherheitsinformationen
Lesen Sie diese wichtigen Informationen vor dem
Gebrauch des Geräts und des Zubehörs
aufmerksam durch, und bewahren Sie sie für eine
spätere Verwendung auf. Das mitgelieferte
Zubehör kann für verschiedene Produkte variieren.
Deutsch
43
Deutsch
Page 44

Deutsch
44
Gefahr
Warnung
-
Halten Sie das Netzteil trocken.
-
Das Netzteil enthält einen
Transformator. Schneiden Sie
das Netzteil keinesfalls auf, um
einen anderen Stecker
anzubringen, weil dies eine
gefährliche Situation
verursachen könnte.
-
Laden Sie das Gerät nur unter
Verwendung des im
Lieferumfang enthaltenen
Netzteils auf.
Page 45

Deutsch
-
Dieses Gerät kann von Kindern
ab 8 Jahren und Personen mit
verringerten physischen,
sensorischen oder psychischen
Fähigkeiten oder Mangel an
Erfahrung und Kenntnis
verwendet werden, wenn sie
bei der Verwendung
beaufsichtigt werden oder
Anleitung zum sicheren
Gebrauch des Geräts erhalten
und die Gefahren verstanden
haben. Kinder dürfen nicht mit
dem Gerät spielen. Die
Reinigung und Pflege des
Geräts darf von Kindern nicht
ohne Aufsicht durchgeführt
werden.
-
Ziehen Sie stets das Netzteil
aus der Steckdose, bevor Sie
das Gerät unter fließendem
Wasser reinigen.
45
Page 46

Deutsch
46
Achtung
-
Überprüfen Sie das Gerät vor
jedem Gebrauch. Um
Verletzungen zu vermeiden,
benutzen Sie das Gerät nicht,
wenn es beschädigt ist.
Ersetzen Sie ein beschädigtes
Teil nur durch Originalteile.
-
Öffnen Sie das Gerät nicht, um
den Akku zu ersetzen.
-
Tauchen Sie die Ladestation
niemals in Wasser. Spülen Sie
sie auch nicht unter fließendem
Wasser ab.
-
Das Wasser zur Reinigung des
Geräts darf nicht heißer als
80 °C sein.
-
Verwenden Sie dieses Gerät nur
für den vorgesehenen Zweck
wie in der Bedienungsanleitung
angegeben.
Page 47

-
Aus hygienischen Gründen
sollte das Gerät nur von einer
Person verwendet werden.
-
Benutzen Sie zum Reinigen des
Geräts keine Druckluft,
Scheuerschwämme und -mittel
oder aggressive Flüssigkeiten
wie Benzin oder Azeton.
-
Verwenden Sie das Netzteil
nicht in oder in der Nähe von
Wandsteckdosen, die einen
elektrischen Lufterfrischer
enthalten oder enthalten
haben, um irreparable Schäden
am Netzteil zu vermeiden.
Elektromagnetische Felder
-
Dieses Philips-Gerät erfüllt alle einschlägigen
Normen und Vorschriften zur Exposition
gegenüber elektromagnetischen Feldern.
Deutsch
47
Allgemeines
-
Dieses Gerät ist wasserdicht. Es ist für die
Verwendung im Bad oder unter der Dusche
geeignet ist und kann mit Leitungswasser
gereinigt werden. Aus Sicherheitsgründen kann
dieses Gerät daher nur kabellos verwendet
werden.
Page 48

Deutsch
48
-
Er ist für Stromspannungen zwischen 100 und
240 Volt konzipiert.
-
Das Netzteil wandelt Netzspannungen von 100
bis 240 Volt in eine sichere Betriebsspannung
von unter 24 Volt um.
Laden
Hinweis: Dieses Gerät kann nur ohne Kabel
verwendet werden.
QP6520, QP6510: Der Ladevorgang dauert ca.
1 Stunde. Ein vollständig geladenes Gerät kann bis
zu 90 Minuten (QP6520) oder 60 Minuten
(QP6510) schnurlos betrieben werden.
Laden Sie das Gerät vor dem ersten Gebrauch auf
und wenn das Akkuladestands-Symbol anzeigt,
dass der Akku fast leer ist.
Akkustands-Anzeige QP6520
-
Wenn der Akku fast leer ist, blinkt die
Akkuladestands-Anzeige orange. Die
verbleibende Akkukapazität wird durch den
Akkustand in Prozent auf dem Display
angezeigt.
-
Die Ladeanzeige blinkt weiß und zeigt dadurch
an, dass das Gerät aufgeladen wird.
-
Schnellaufladung: Nachdem das Gerät für ca.
5 Minuten aufgeladen wurde, reicht die
Akkukapazität für 5 Minuten Nutzung. Während
der Schnellaufladung blinkt das Ladesymbol
schnell in Weiß, bis die Schnellaufladung
beendet ist.
Page 49

-
Der Akku ist voll aufgeladen, wenn der im
Display angezeigte Akkustands-Prozentwert
100 % beträgt und das Ladesymbol dauerhaft
leuchtet.
-
Rund 30 Minuten, nachdem der Akku
vollständig aufgeladen ist, oder wenn Sie das
Gerät vom Netz trennen, schaltet sich das
Display automatisch aus.
Akkustandsanzeige QP6510
-
Die Akkuladestands-Anzeige blinkt orange,
wenn der Akku fast leer ist.
-
Um anzuzeigen, dass das Gerät aufgeladen
wird, blinkt die untere Anzeige zuerst weiß und
leuchtet dann dauerhaft weiß. Anschließend
blinkt die zweite Anzeige und leuchtet dann
dauerhaft. Das wiederholt sich, bis das Gerät
vollständig aufgeladen ist.
-
Schnellaufladung: Nachdem das Gerät für ca.
5 Minuten aufgeladen wurde, reicht die
Akkukapazität für 5 Minuten Nutzung. Während
der Schnellaufladung leuchten die Anzeigen an
der Akkustands-Anzeige abwechselnd
dauerhaft und schalten sich dann alle aus. Das
wiederholt sich, bis die Schnellaufladung
beendet ist.
-
Der Akku ist vollständig aufgeladen, wenn alle
Anzeigen der Akkuladestands-Anzeige
dauerhaft leuchten.
Deutsch
49
Page 50

Deutsch
50
-
Rund 30 Minuten, nachdem der Akku
vollständig aufgeladen ist, oder wenn Sie das
Gerät vom Netz trennen, schaltet sich die
Anzeigen der Akkustands-Anzeige automatisch
aus.
Mit dem Ladegerät aufladen
1 Führen Sie den Gerätestecker in das Gerät, und
stecken Sie den Adapter in eine Steckdose.
2 Trennen Sie den Adapter nach dem
Ladevorgang von der Steckdose und den
kleinen Gerätestecker vom Gerät.
Aufladen in der Ladestation (nur QP6520)
1 Stecken Sie den Gerätestecker in die
Ladeschale und den Adapter in eine Steckdose.
2 Stellen Sie das Gerät in die Ladestation.
3 Trennen Sie den Adapter nach dem
Ladevorgang von der Steckdose und den
kleinen Gerätestecker von der Ladestation.
Das Gerät benutzen
Verwenden Sie das Gerät ausschließlich zum
Trimmen, Konturieren oder Rasieren von
Gesichtshaar (Bart, Schnurrbart und Koteletten).
Um ein weiches Ergebnis zu erzielen, rasieren Sie.
Zum Erreichen einer bestimmten Länge trimmen
Sie. Für perfekte Kanten und scharfe Linien
konturieren Sie. Dieses Gerät ist nicht zum
Rasieren, Konturieren oder Trimmen von Haaren
an unteren Körperteilen oder auf dem Kopf
vorgesehen. Nehmen Sie sich beim ersten
Page 51

Gebrauch des Geräts Zeit. Sie müssen Übung mit
dem Gerät bekommen.
Hinweis: Dieses Gerät kann nur ohne Kabel
verwendet werden.
Das Gerät ein- und ausschalten
1 Um das Gerät einzuschalten, drücken Sie
einmal den Ein-/Ausschalter.
2 Um das Gerät auszuschalten, drücken Sie
einmal den Ein-/Ausschalter.
Rasieren
Warnhinweis: Überprüfen Sie das
Scherblatt vor Gebrauch des Geräts immer
auf Schäden oder Abnutzung. Wenn das
Scherblatt beschädigt oder abgenutzt ist,
verwenden Sie das Gerät nicht, um
Verletzungen zu vermeiden. Ersetzen Sie
ein beschädigtes Scherblatt immer vor
Gebrauch des Geräts (siehe Kapitel
„Ersatzteile“).
Tipps und Tricks zum Rasieren
-
Achten Sie darauf, dass das Scherblatt
vollständig in Kontakt mit der Haut ist, indem
Sie es flach auflegen.
-
Führen Sie das Gerät entgegen der
Haarwuchsrichtung, um beste Ergebnisse zu
erzielen.
-
Streichen Sie in langen Bahnen und drücken Sie
dabei leicht.
Deutsch
51
Page 52

Deutsch
52
Konturieren
-
Sie können das Gerät auch unter der Dusche
oder auf einem angefeuchteten Gesicht mit
Rasierschaum oder -gel verwenden.
-
Die beste Rasur erzielen Sie bei sauberer Haut
und einem sauberen Bart.
1 Schalten Sie das Gerät ein.
2 Setzen Sie die Schereinheit auf die Haut und
bewegen Sie das Gerät unter leichtem Druck in
langen Zügen nach oben oder gegen die
Haarwuchsrichtung.
Hinweis: Achten Sie darauf, dass Sie die
Oberfläche des Scherblatts flach an Ihre Haut
halten.
3 Schalten Sie das Gerät nach jedem Gebrauch
aus und reinigen Sie es (siehe Kapitel
„Reinigung und Wartung“).
Die beiden Kanten des Scherblatts lassen sich
auch nutzen, um scharfe Linien und perfekte
Kanten zu erhalten. Halten Sie das Gerät so, dass
sich das Scherblatt in einem Winkel zur Haut
befindet und eine der Ecken die Haut berührt. So
lassen sich Koteletten und die Gegend um Mund
und Nase genauer herausarbeiten.
1 Um scharfe Linien und perfekte Kanten zu
erhalten, lassen sich beide Kanten des
Scherblatts nutzen.
2 Schalten Sie das Gerät ein.
Page 53

3 Halten Sie die Ecke des Scherblatts in einem
Winkel an die Haut.
-
Führen Sie gerade Züge unter leichtem Druck
aus.
4 Schalten Sie das Gerät nach jedem Gebrauch
aus und reinigen Sie es (siehe Kapitel
„Reinigung und Wartung“).
Mit Kammaufsatz schneiden
Tipps
-
Trimmen Sie immer in Richtung der Zähne des
Präzisions-Trimmkamms und achten Sie für ein
glattes Trimming-Ergebnis darauf, dass der
flache Teil des Kamms flach auf der Haut
aufliegt.
-
Da Haare in unterschiedliche Richtungen
wachsen, müssen Sie das Gerät auch in
unterschiedlichen Positionen halten. Achten Sie
aber immer darauf, dass Sie das Gerät nach
oben entgegen der Haarwuchsrichtung
bewegen.
-
Das Schneiden von Körperhaar ist bei trockener
Haut und trockenem Haar am einfachsten.
Mit dem Präzisions-Trimmingkamm können Sie
das Haar auf verschiedene Längen trimmen.
Beginnen Sie mit der maximalen Schnittlänge, um
sich mit dem Gerät vertraut zu machen. Die
Einstellungen auf dem Rad entsprechen der
Haarlänge in Millimetern.
Deutsch
53
Page 54

1 2
54
Deutsch
1 Schieben Sie das Vorderteil des Kamms auf das
Scherblatt und drücken Sie den Vorsprung an
der Rückseite des Kamms auf das Gerät, bis es
klickt.
2 Drehen Sie das Haarlängen-Einstellungsrad, um
die gewünschte Haarlängeneinstellung
auszuwählen.
Die Einstellungen auf dem Rad entsprechen der
Haarlänge in Millimetern.
-
QP6520
-
QP6510
3 Schalten Sie das Gerät ein.
4 Setzen Sie den Kammaufsatz auf die Haut und
führen Sie das Gerät langsam nach oben,
entgegen der Haarwuchsrichtung.
5 Schalten Sie das Gerät nach jedem Gebrauch
aus und reinigen Sie es (siehe Kapitel
„Reinigung und Wartung“).
Page 55

1
2
6 Um den Kammaufsatz zu entfernen, halten Sie
1
2
ihn auf beiden Seiten und ziehen Sie ihn vom
Scherblatt ab.
Reinigung und Pflege
Reinigen Sie das Gerät nach jedem Gebrauch.
Achtung: Benutzen Sie zum Reinigen des Geräts
keine Druckluft, Scheuerschwämme und -mittel
oder aggressive Flüssigkeiten wie Benzin oder
Azeton.
Achtung: Klopfen Sie nicht mit dem Gerät gegen
eine Oberfläche, um Wasser zu entfernen, da das
Gerät dadurch beschädigt werden könnte.
Ersetzen Sie das Scherblatt, wenn es beschädigt
ist.
Das Gerät reinigen
1 Nehmen Sie den Kammaufsatz vom Scherblatt
ab. E_Schalten Sie das Gerät immer aus, bevor
Sie Kämme aufstecken oder abnehmen.
Deutsch
55
2 Wenn sich viele Haare auf dem Kammaufsatz
angesammelt haben, pusten Sie sie erst weg.
Page 56

1 2
Deutsch
56
Lagerräume
3 Wenn sich viele Haare auf dem Gerät
angesammelt haben, pusten Sie sie erst weg.
4 Schalten Sie das Gerät dann ein und spülen Sie
das Scherblatt mit lauwarmem Wasser.
Achtung:Trocknen Sie das Scherblatt nicht mit
einem Handtuch oder Taschentuch ab, da dies
das Scherblatt beschädigen kann.
5 Spülen Sie dann den Kammaufsatz mit
lauwarmem Wasser.
6 Lassen Sie das Gerät und den Kammaufsatz
trocknen.
Hinweis: Das Scherblatt ist zerbrechlich. Seien Sie
im Umgang mit ihm vorsichtig. Ersetzen Sie das
Scherblatt, wenn das beschädigt ist.
Hinweis: Vergewissern Sie sich, dass das Gerät und
die zugehörigen Aufsätze trocken sind, bevor Sie
sie für den nächsten Einsatz verstauen.
1 Setzen Sie den Präzisionstrimmer zum
Aufstecken immer auf das Scherblatt auf, damit
das Scherblatt auf Reisen oder bei
Nichtgebrauch geschützt ist.
Reisesicherung (nur QP6520)
Sie können das Gerät sichern, bevor Sie auf Reisen
gehen. Die Reisesperre verhindert, dass das Gerät
versehentlich eingeschaltet wird.
Page 57

Die Reisesicherung aktivieren
3 sec.
1 Halten Sie den Ein-/Ausschalter 3 Sekunden
lang gedrückt.
-
Während Sie die Reisesicherung aktivieren,
beginnt das Reisesicherungs-Symbol zu
leuchten und das Digitaldisplay zählt herunter.
-
Wenn die Reisesicherung aktiviert ist, blinkt das
Reisesicherungs-Symbol.
Die Reisesicherung deaktivieren
1 Halten Sie den Ein-/Ausschalter 3 Sekunden
lang gedrückt.
-
Während Sie die Reisesicherung deaktivieren,
zählt das Display herunter. Dann beginnt das
Reisesicherungs-Symbol zu leuchten und
schaltet sich ab.
-
Das Gerät ist nun wieder einsatzbereit.
Austausch
Austausch des Scherblatts
Für optimale Schneide- und Gleitleistung des
Scherblatts empfehlen wir, es alle 4 Monate
auszuwechseln, oder wenn nicht mehr die
erwarteten Rasur- oder Trimming-Ergebnisse
erzielt werden. Der Rat, die Einheit alle 4 Monate
auszuwechseln, gilt bei zwei Vollrasuren pro
Woche. Je nach Nutzung ist die Lebensdauer des
Scherblatts eventuell länger oder kürzer. Ähnlich
wie bei einem Handrasierer wird das Scherblatt mit
Deutsch
57
Page 58

2
1
Deutsch
58
der Zeit stumpf. Dadurch werden mehr Haare
ausgerissen und die Schneideleistung sinkt.
1 Zum Entfernen des Scherblatts drücken Sie den
Entriegelungsschieber vorsichtig nach oben und
halten Sie das Scherblatt an den Seiten fest,
damit es nicht wegfliegt.
2 Halten Sie das neue Scherblatt seitlich fest und
drücken Sie es auf den Halter, sodass es klickt.
Hinweis: Wenn Sie einen Klick hören, ist das neue
Scherblatt korrekt eingesetzt und einsatzbereit.
Bestellen von Zubehör
Um Zubehör oder Ersatzteile zu kaufen, gehen Sie
auf www.shop.philips.com/service, oder suchen
Sie Ihren Philips Händler auf. Sie können sich auch
an ein Philips Service-Center in Ihrem Land
wenden. Die Kontaktdaten finden Sie in der
internationalen Garantieschrift.
Die folgenden Teile sind erhältlich:
-
QP210 Scherblatt 1 Stück
-
QP220 Scherblatt 2 Stück
Recycling
-
Dieses Symbol bedeutet, dass das Produkt
nicht mit dem normalen Hausmüll entsorgt
werden kann (2012/19/EU).
Page 59

-
Dieses Symbol bedeutet, dass das Produkt
einen Akku enthält, der nicht mit dem normalen
Hausmüll entsorgt werden darf (2006/66/EG).
Wir empfehlen dringend, das Produkt bei einer
offiziellen Sammelstelle oder einem Philips
Service-Center abzugeben, um den Akku
fachgerecht ausbauen zu lassen.
-
Beachten Sie die örtlichen Vorschriften zur
getrennten Entsorgung von elektrischen und
elektronischen Produkten, Akkus und Batterien.
Die ordnungsgemäße Entsorgung dient dem
Schutz von Umwelt und Gesundheit.
Den Akku entfernen
Achtung: Bauen Sie den wiederaufladbaren Akku
nur zur Entsorgung des Geräts aus. Vergewissern
Sie sich, dass der Akku ganz leer ist, bevor Sie ihn
ausbauen.
Hinweis: Wir empfehlen Ihnen, den Akku von
einem Fachmann entfernen zu lassen.
1 Trennen Sie das Gerät vom Stromnetz, und
lassen Sie es so lange laufen, bis es zum
Stillstand kommt.
2 Nehmen Sie das Scherblatt vom Gerät ab.
3 Gehen Sie mit einem Schraubenzieher unter die
hintere Abdeckung, und nehmen Sie die
Abdeckung ab.
Deutsch
59
Page 60

60
Deutsch
4 Brechen Sie die Schnappverbindungen an
beiden Seiten mit dem Schraubendreher.
5 Schieben Sie den inneren Rahmen heraus,
indem Sie den Schraubendreher in den unteren
Teil des Halters drücken.
-
Jetzt sehen Sie die gedruckte Platine.
6 QP6510: Entfernen Sie die Abdeckung der
gedruckten Platine mit dem Schraubendreher.
7 Entfernen Sie die gedruckte Platine mit dem
Schraubendreher aus dem inneren Rahmen.
8 Heben Sie den Akku mit dem Schraubendreher
aus dem inneren Rahmen. Der Akku ist mit
doppelseitigem Klebeband angeschlossen.
Warnhinweis: Vorsicht: Die Schienen am
Akku sind sehr scharf!
Garantie und Support
Wenn Sie Hilfe oder Informationen benötigen,
besuchen Sie bitte www.philips.com/support,
oder lesen Sie die internationale Garantieschrift.
Page 61

Garantieeinschränkungen
Die Schereinheit unterliegt nicht den Bedingungen
der internationalen Garantie, da sie einem
normalen Verschleiß ausgesetzt ist.
Fehlerbehebung
In diesem Kapitel sind die häufigsten Probleme
aufgeführt, die beim Gebrauch des Geräts
auftreten können. Sollten Sie ein Problem mithilfe
der nachstehenden Informationen nicht beheben
können, besuchen Sie unsere Website unter
www.philips.com/support, und schauen Sie in der
Liste „Häufig gestellte Fragen“ nach, oder wenden
Sie sich an das Philips Service-Center in Ihrem
Land.
Problem Mögliche
Ursache
Die Lösung
Deutsch
61
Ich kann das
Gerät nicht
einschalten,
wenn es ans Netz
angeschlossen ist.
Sie können das
Gerät nicht
verwenden,
während es
aufgeladen wird.
Das Gerät kann nur
ohne Kabel
verwendet werden.
Trennen Sie das Gerät von
der Stromversorgung,
bevor Sie es nutzen.
Page 62

62
Deutsch
Problem Mögliche
Ursache
Das Gerät
funktioniert nicht
mehr.
Der Akku ist leer. Laden Sie das Gerät auf
Das Scherblatt ist
verstopft.
Die Lösung
(siehe Kapitel „Laden“).
Während des Aufladens
blinkt die AkkuladestandsAnzeige weiß. Wenn die
Akkuladestands-Anzeige
nicht blinkt, ist
möglicherweise der Strom
ausgefallen oder die
Steckdose ist defekt. Falls
der Strom nicht
ausgefallen ist und die
Steckdose funktioniert, die
Akkuladestands-Anzeige
aber immer noch nicht
blinkt, bringen Sie das
Gerät zum Händler oder
einem Philips
Kundendienst.
Schalten Sie das Gerät ein
und spülen Sie das
Scherblatt unter dem
Wasserhahn mit warmem
Wasser ab.
Halten Sie das Scherblatt
für ca. 30 Sekunden in eine
Tasse mit warmem Wasser
(maximal 60 °C).
Page 63

Deutsch
63
Problem Mögliche
Ursache
Reisesicherung ist
aktiviert.
Das Gerät
schneidet keine
Haare mehr.
Das Gerät erzeugt
ein seltsames
Geräusch.
Das Scherblatt
steckt falsch auf
dem Halter.
Das Scherblatt ist
beschädigt oder
abgenutzt.
Das Scherblatt ist
beschädigt oder
abgenutzt.
Das Scherblatt
steckt falsch auf
dem Halter.
Das Scherblatt ist
verstopft.
Die Lösung
Halten Sie den Ein/Ausschalter drei
Sekunden lang gedrückt,
um die Reisesicherung zu
deaktivieren. Während Sie
die Reisesicherung
deaktivieren, zählt das
Display herunter. Dann
leuchtet das
Reisesicherungs-Symbol
kurz auf. Das Gerät ist jetzt
wieder einsatzbereit.
Drücken Sie das Scherblatt
auf das Gerät, bis es klickt.
Ersetzen Sie das Scherblatt
durch ein neues. Siehe
Kapitel „Ersatzteile“.
Ersetzen Sie das Scherblatt
durch ein neues. Siehe
Kapitel „Ersatzteile“.
Entfernen Sie das
Scherblatt und stecken Sie
es neu auf. Drücken Sie es
auf das Gerät, bis es klickt.
Entfernen Sie das
Scherblatt und reinigen Sie
es gründlich.
Das Gerät
arbeitet nicht
mehr optimal.
Das Scherblatt ist
verstopft.
Entfernen Sie das
Scherblatt und reinigen Sie
es gründlich.
Page 64

64
Deutsch
Problem Mögliche
Ursache
Das Scherblatt wird
mit der Zeit
abgenutzt,
wodurch sich seine
Leistung verringert.
Das Scherblatt ist
ein zerbrechliches
Teil des Geräts und
kann leicht
beschädigt werden.
Wenn das
Scherblatt
beschädigt ist,
arbeitet es
möglicherweise
nicht mehr optimal.
Die Lösung
Ersetzen Sie das Scherblatt
durch ein neues. Siehe
Kapitel „Ersatzteile“.
Ersetzen Sie das Scherblatt
durch ein neues. Siehe
Kapitel „Ersatzteile“.
Page 65

Español
Introducción
Enhorabuena por la adquisición de este producto,
y bienvenido a Philips Para sacar el mayor partido
a la asistencia que Philips le ofrece, registre el
producto en www.philips.com/welcome.
Descripción general (Fig. 1)
1 Cuchilla
2 Botón de liberación de la cuchilla
3 Bloqueo para viajes (solo modelo QP6520)
4 Porcentaje de estado de la batería (solo
modelo QP6520)
5 Símbolo de carga (solo modelo QP6520)
6 Pantalla (solo modelo QP6520)
7 Botón de encendido/apagado
8 Indicador de estado de la batería (solo modelo
QP6510)
9 Soporte de carga (solo modelo QP6520)
10 Clavija pequeña del soporte de carga (solo
modelo QP6520)
11 Funda (solo modelo QP6520)
12 Clavija pequeña
13 Unidad de alimentación (adaptador, tipo
HQ8505)
14 Peine-guía de precisión
15 Rueda de posiciones de longitud de barba
Información de seguridad importante
Antes de utilizar el aparato y sus accesorios, lea
atentamente esta información importante y
consérvela por si necesitara consultarla en un
futuro. Los accesorios suministrados pueden variar
según los diferentes productos.
65
Español
Page 66

Español
66
Peligro
Advertencia
-
Mantenga seca la fuente de alimentación.
-
La fuente de alimentación contiene un
transformador. No corte la fuente de
alimentación para sustituirla por otra clavija, ya
que podría provocar situaciones de peligro.
-
Cargue el aparato únicamente con la fuente de
alimentación suministrada.
-
Este aparato puede ser usado por niños a partir
de 8 años y por personas con su capacidad
física, psíquica o sensorial reducida y por
quienes no tengan los conocimientos y la
experiencia necesarios, si han sido
supervisados o instruidos acerca del uso del
aparato de forma segura y siempre que sepan
los riesgos que conlleva su uso. No permita que
los niños jueguen con el aparato. Los niños no
deben limpiar el aparato ni realizar tareas de
mantenimiento sin supervisión.
-
Desenchufe siempre el aparato antes de
limpiarlo bajo el grifo.
-
Compruebe siempre el aparato antes de
utilizarlo. No utilice el aparato si está dañado,
ya que podría ocasionar lesiones. Sustituya las
piezas dañadas por repuestos originales.
-
No abra el aparato para cambiar la batería
recargable.
Page 67

Precaución
-
No sumerja nunca el soporte de carga en agua
ni lo enjuague bajo el grifo.
-
Nunca enjuague el aparato con agua a una
temperatura superior a 80 °C.
-
Utilice este aparato solo para el uso al que está
destinado como se indica en el manual de
usuario.
-
Por razones de higiene, el aparato debería ser
usado únicamente por una persona.
-
No utilice nunca aire comprimido, estropajos,
agentes de limpieza abrasivos ni líquidos
agresivos, como gasolina o acetona, para
limpiar el aparato.
-
No utilice la fuente de alimentación cerca o en
tomas de corriente en las que esté o haya
estado enchufado un ambientador eléctrico
para evitar daños irreparables.
Campos electromagnéticos (CEM)
-
Este Philips cumple los estándares y las
normativas aplicables sobre exposición a
campos electromagnéticos.
General
-
Este aparato es resistente al agua. Puede
utilizarse en la bañera o en la ducha y puede
limpiarse bajo el agua del grifo. Así pues, por
motivos de seguridad, el aparato solo puede
utilizarse sin cable.
-
Este aparato es adecuado para voltajes de red
de 100 a 240 voltios.
Español
67
Page 68

Español
68
-
La fuente de alimentación transforma la
corriente de 100 - 240 voltios en un bajo voltaje
de seguridad inferior a 24 voltios.
Carga
Nota: Este aparato solo puede utilizarse sin cable.
QP6520, QP6510: La afeitadora tarda
aproximadamente una hora en cargarse. Un
aparato completamente cargado tiene un tiempo
de funcionamiento sin cable de hasta 90 minutos
(QP6520) o 60 minutos (QP6510).
Cargue el aparato antes de utilizarlo por primera
vez y cuando el símbolo de carga de la batería
indique que la batería está casi vacía.
Indicador de estado de la batería QP6520
-
Cuando el símbolo de carga parpadea en
naranja, la batería está casi descargada. El
porcentaje de carga de la batería que se
muestra en la pantalla indica la carga
disponible en la batería.
-
Para indicar que el aparato se está cargando, el
símbolo de carga parpadea en blanco.
-
Carga rápida: Tras un tiempo de carga de 5
minutos aproximadamente, el aparato dispone
de energía suficiente durante 5 minutos.
Durante la carga rápida el símbolo de carga
parpadea en blanco rápidamente hasta que la
carga rápida ha finalizado.
-
La batería está completamente cargada cuando
el porcentaje de estado de la batería que se
muestra en la pantalla sea del 100 % y el
símbolo de carga se ilumine continuamente.
Page 69

-
Aproximadamente 30 minutos después de que
la batería se cargue por completo o se
desconecte el aparato de la toma de corriente,
la pantalla se apaga automáticamente.
Indicador de estado de la batería QP6510
-
Cuando el indicador de carga de la batería
parpadea en naranja, la batería está casi
descargada.
-
Para indicar que el aparato está cargando,
primero el piloto inferior parpadea en blanco y
luego se ilumina continuamente. A
continuación, el segundo piloto parpadea y se
ilumina de forma continua, y así sucesivamente
hasta que el aparato está cargado por
completo.
-
Carga rápida: Tras un tiempo de carga de 5
minutos aproximadamente, el aparato dispone
de energía suficiente durante 5 minutos.
Durante la carga rápida, los pilotos del
indicador de estado de la batería se iluminan
continuamente, uno tras otro, hasta que se
apagan. Esto se repetirá hasta que la carga
haya finalizado.
-
La batería está totalmente cargada cuando
todos los pilotos del indicador de estado de la
batería se iluminan de forma continua.
-
Aproximadamente 30 minutos después de que
la batería se cargue por completo o se
desconecte el aparato de la toma de corriente,
los pilotos del indicador de estado de la batería
se apagan automáticamente.
Español
69
Page 70

Español
70
Carga con el adaptador
1 Inserte la clavija pequeña en el aparato y
enchufe el adaptador a la toma de corriente.
2 Después de la carga, desenchufe el adaptador
de la toma de corriente y la clavija pequeña del
aparato.
Carga en el soporte de carga (solo modelo QP6520)
1 Inserte la clavija pequeña en el soporte de
carga y enchufe el adaptador a la toma de
corriente.
2 Coloque el aparato en el soporte de carga.
3 Después de la carga, desenchufe el adaptador
de la toma de corriente y saque la clavija
pequeña del soporte de carga.
Uso del aparato
Puede utilizar el aparato para recortar, perfilar o
afeitar el vello facial (barba, bigote y patillas).
Afeite para un resultado suave, recorte para
obtener una longitud determinada y perfile para
crear las formas que desee. Este aparato no ha
sido diseñado para afeitar, perfilar ni recortar las
partes inferiores del cuerpo ni el pelo de la cabeza.
Tómese su tiempo cuando utilice por primera vez
el aparato. Debe adquirir práctica con el aparato.
Nota: Este aparato solo puede utilizarse sin cable.
Page 71

Encendido y apagado del aparato
1 Para encender el aparato, pulse el botón de
encendido/apagado una vez.
2 Para apagar el aparato, pulse el botón de
encendido/apagado una vez.
Afeitado
Advertencia: Antes de usar el aparato,
compruebe siempre que la cuchilla no esté
dañada o deteriorada. Si la cuchilla está
dañada o deteriorada, no utilice el aparato,
ya que podría ocasionar lesiones. Sustituya
la cuchilla dañada antes de usar el aparato
(consulte el capítulo "Sustitución").
Consejos y trucos de afeitado
-
Asegúrese de que la cuchilla esté siempre en
contacto con la piel colocándola de forma
plana sobre la piel.
-
Para obtener los mejores resultados, mueva el
aparato a contrapelo.
-
Realice pasadas largas presionando
ligeramente.
-
También puede usar el aparato en seco o en
húmedo, con gel o con espuma, incluso en la
ducha.
-
Aféitese con la cara limpia y seca para obtener
los mejores resultados.
1 Encienda el aparato.
Español
71
Page 72

Español
72
Perfilado
2 Coloque la cuchilla sobre la piel y mueva el
aparato hacia arriba o a contrapelo, en pasadas
largas, ejerciendo una ligera presión.
Nota: Asegúrese de mantener la superficie de la
cuchilla completamente en contacto con la piel.
3 Apague el aparato y límpielo después de cada
uso (consulte el capítulo "Limpieza y
mantenimiento").
Puede usar los bordes de la cuchilla para dibujar
líneas y bordes perfectos. Incline el aparato de
forma que la cuchilla quede perpendicular a la
piel, con solo uno de sus bordes tocándola. Esto
permite obtener una mayor precisión en las
patillas y en la zona alrededor de la boca y la
nariz.
1 Para crear formas y líneas definidas, utilice
cualquiera de los bordes de la cuchilla.
2 Encienda el aparato.
3 Coloque el borde de la cuchilla en un ángulo
perpendicular a la piel.
Page 73

-
1 2
Realice pasadas rectas ejerciendo una ligera
presión.
4 Apague el aparato y límpielo después de cada
uso (consulte el capítulo "Limpieza y
mantenimiento").
Cómo recortar con el peine-guía
Consejos
-
Recorte siempre en la dirección de los dientes
del peine-guía de precisión asegurándose de
que la parte plana del peine-guía esté
completamente en contacto con la piel para
conseguir un corte uniforme.
-
Debido a que el cabello crece en distintas
direcciones, también hay que inclinar el aparato
en diferentes posiciones. No obstante,
asegúrese siempre de que mueve el aparato
hacia arriba y a contrapelo.
-
Es más fácil recortar cuando el vello y la piel
están secos.
El peine-guía de precisión le permite recortar el
vello con longitudes diferentes. Comience con la
posición más alta para adquirir práctica con el
aparato. Los ajustes de la rueda corresponden a la
longitud del vello en milímetros.
1 Coloque la parte delantera del peine-guía en la
cuchilla y empuje el saliente hacia la parte
posterior del peine-guía en el aparato (oirá un
clic).
Español
73
Page 74

1
2
74
Español
2 Gire la rueda de posición de longitud para
seleccionar la posición de longitud que desee.
Los ajustes de la rueda corresponden a la
longitud del vello en milímetros.
-
QP6520
-
QP6510
3 Encienda el aparato.
4 Coloque el peine-guía sobre la piel y mueva el
aparato hacia arriba lentamente, a contrapelo.
5 Apague el aparato y límpielo después de cada
uso (consulte el capítulo "Limpieza y
mantenimiento").
6 Para retirar el peine-guía, deslice su parte
trasera del aparato y sepárela de la cuchilla.
Limpieza y mantenimiento
Limpie el aparato después de cada uso.
Precaución: No utilice nunca aire comprimido,
estropajos, agentes de limpieza abrasivos ni
Page 75

líquidos agresivos, como gasolina o acetona,
1
2
para limpiar el aparato.
Precaución: No golpee el aparato contra una
superficie para eliminar el exceso de agua, ya
que podría dañarlo. Sustituya la cuchilla si está
dañada.
Limpieza del aparato
1 Quite el peine-guía de la cuchilla. Apague
siempre el aparato antes de colocar o retirar el
peine-guía.
2 Si se ha acumulado mucho pelo en el peine-
guía, sople para eliminarlo.
3 Si se ha acumulado mucho pelo en el aparato,
sople para eliminarlo.
Español
75
4 Encienda el aparato y enjuague la cuchilla con
agua tibia.
Precaución:No seque la cuchilla con una toalla
o pañuelo, ya que se podrían estropear.
Page 76

1 2
3 sec.
Español
76
5 Enjuague el peine-guía con agua tibia.
6 Mantenga el aparato y el peine-guía siempre
secos.
Nota: La cuchilla es frágil. Manipúlela con cuidado.
Sustituya la cuchilla si está dañada.
Almacenamiento
Nota: Le recomendamos secar el aparato y los
accesorios antes de guardarlos hasta el próximo
uso.
1 Coloque siempre el peine-guía de precisión en
la cuchilla para protegerla de cualquier daño
durante un viaje o al guardarla.
Bloqueo para viajes (solo modelo QP6520)
Cuando viaje, puede bloquear el aparato. El
bloqueo para viajes evita que el aparato se
encienda accidentalmente.
Activación del bloqueo para viajes
1 Pulse el botón de encendido/apagado durante
3 segundos.
-
Al activar el bloqueo para viajes, el símbolo del
bloqueo para viajes se ilumina y la pantalla
digital muestra la cuenta atrás.
-
Cuando el bloqueo para viajes está activado, el
símbolo de bloqueo para viajes parpadea.
Page 77

Desactivación del bloqueo para viajes
2
1
1 Pulse el botón de encendido/apagado durante
3 segundos.
-
Mientras desactiva el bloqueo para viaje, la
pantalla muestra la cuenta atrás. El símbolo del
bloqueo para viajes se ilumina y se apaga.
-
Ahora el aparato está listo para usar de nuevo.
Sustitución
Sustitución de la cuchilla
Para obtener un rendimiento óptimo de la cuchilla
en el corte y el deslizamiento, le recomendamos
que sustituya la cuchilla cada 4 meses o cuando
ya no proporcione los resultados de afeitado o
recorte que espera. La recomendación de sustituir
la cuchilla cada 4 meses contempla dos afeitados
completos a la semana. En función de su uso, la
vida útil de la cuchilla puede ser mayor o menor.
Igual que ocurre con una cuchilla manual, la
cuchilla se vuelve roma con el tiempo y puede dar
como resultado una mayor tirantez del vello y un
rendimiento de corte reducido.
1 Deslice el botón de liberación de la cuchilla
hacia arriba y sujete la cuchilla por ambos lados
para retirarla y evitar que se pierda.
Español
77
Page 78

Español
78
2 Sujete la nueva cuchilla por ambos lados e
insértela en el aparato (oirá un clic).
Nota: Cuando oiga un clic, significa que la nueva
cuchilla se ha colocado correctamente y está lista
para usarse.
Solicitud de accesorios
Para comprar accesorios o piezas de repuesto,
visite www.shop.philips.com/service o acuda a su
distribuidor de Philips. También puede ponerse en
contacto con el Servicio de Atención al Cliente de
Philips en su país (consulte los datos de contacto
en el folleto de la garantía mundial).
Las siguientes piezas de repuesto están
disponibles:
-
1 pack de cuchillas para QP210
-
2 packs de cuchillas para QP220
Reciclaje
-
Este símbolo significa que este producto no
debe desecharse con la basura normal del
hogar (2012/19/UE).
-
Este símbolo significa que este producto
contiene una batería recargable integrada, que
no debe desecharse con los residuos
domésticos normales (2006/66/EC).
Recomendamos encarecidamente que se lleve
la batería a un punto de recogida oficial o a un
centro de asistencia de Philips, para desecharla
de forma profesional.
Page 79

-
Siga la normativa de su país para la recogida
selectiva de productos eléctricos y electrónicos
y de baterías recargables. El desechado
correcto ayuda a evitar consecuencias
negativas para el medio ambiente y la salud
humana.
Cómo extraer la batería recargable
Precaución: No quite la batería recargable hasta
que deseche el aparato. Asegúrese de que la
batería esté completamente descargada cuando
la quite.
Nota: Le recomendamos encarecidamente que
acuda a un profesional para que extraiga la batería
recargable.
1 Desenchufe el aparato de la red y deje que
funcione hasta que el motor se pare.
2 Extraiga la cuchilla del aparato.
3 Introduzca un destornillador debajo del panel
posterior y quite el panel.
4 Rompa las conexiones internas de ambos lados
con el destornillador.
Español
79
Page 80

Español
80
5 Retire el cuerpo interior presionando con el
destornillador hacia el fondo del mango.
-
En ese momento verá la placa de circuito
impreso.
6 QP6510: Quite la cubierta de la placa del
circuito impreso con el destornillador.
7 Saque la placa del circuito impreso del cuerpo
interior con el destornillador.
8 Saque la batería del cuerpo interior con el
destornillador. La batería está conectada con
cinta de doble cara.
Advertencia: Tenga cuidado con las tiras de
la batería, ya que están muy afiladas.
Garantía y asistencia
Si necesita asistencia o información, visite
www.philips.com/support o lea el folleto de
garantía mundial independiente.
Restricciones de la garantía
La cuchilla no está cubierta por las condiciones de
la garantía internacional debido a que está sujeta
a desgaste.
Page 81

Resolución de problemas
En este capítulo se resumen los problemas más
comunes que pueden surgir al usar el aparato. Si
no puede resolver el problema con la siguiente
información, visite www.philips.com/support para
ver las preguntas más frecuentes o póngase en
contacto con el servicio de atención al cliente de
su país.
Problema Posible causa Solución
Español
81
No puedo
encender el
aparato cuando
está conectado a
la red eléctrica.
El aparato ya no
funciona.
No puede usar el
aparato mientras
se carga. El aparato
solo puede
utilizarse sin cable.
La batería
recargable está
descargada.
La cuchilla está
atascada por la
acumulación de
residuos.
Desenchufe el aparato de
la red antes de usarlo.
Cargue el aparato
(consulte el capítulo
"Carga"). Durante la carga,
el indicador de carga de la
batería parpadea en
blanco. Si el indicador de
carga de la batería no
parpadea, compruebe si
ha habido un corte en el
suministro eléctrico o si la
toma de corriente está
activa. Si no ha habido
ningún corte en el
suministro de energía y la
toma de corriente está
activa, pero el indicador de
carga de la batería sigue
sin parpadear, lleve el
aparato a su distribuidor o
a un centro de servicio
Philips.
Encienda el aparato y
enjuague la cuchilla bajo el
grifo con agua tibia.
Page 82

Español
82
Problema Posible causa Solución
Coloque la cuchilla en un
recipiente con agua tibia
(no más de 60 °C) durante
aproximadamente
30 segundos.
El aparato ya no
corta el vello.
El aparato hace
un ruido extraño.
El bloqueo para
viajes está
activado.
La cuchilla no se ha
colocado
correctamente.
La cuchilla está
dañada o
deteriorada.
La cuchilla está
dañada o
deteriorada.
La cuchilla no se ha
colocado
correctamente.
La cuchilla está
atascada por la
acumulación de
residuos.
Mantenga pulsado el
botón de
encendido/apagado
durante 3 segundos para
desactivar el bloqueo.
Mientras desactiva el
bloqueo, la pantalla
mostrará la cuenta atrás. A
continuación, el símbolo
del bloqueo para viajes se
ilumina y se apaga. El
aparato está listo para
usarse.
Presione la cuchilla e
insértela en el aparato
hasta que oiga un clic.
Sustituya la cuchilla por
otra nueva. Consulte el
capítulo "Sustitución".
Sustituya la cuchilla por
otra nueva. Consulte el
capítulo "Sustitución".
Quite y vuelva a colocar la
cuchilla. Presione la
cuchilla e insértela en el
aparato hasta que oiga un
clic.
Quite la cuchilla y límpiela
bien.
Page 83

Problema Posible causa Solución
Español
83
El aparato ya no
funciona
correctamente.
La cuchilla está
atascada por la
acumulación de
residuos.
La cuchilla se va
desgastando, por
lo que el
rendimiento va en
descenso con el
paso del tiempo.
La cuchilla es una
pieza delicada del
aparato y puede
dañarse con
facilidad. Si la
cuchilla se daña,
puede que no
vuelva a funcionar
correctamente.
Quite la cuchilla y límpiela
bien.
Sustituya la cuchilla por
otra nueva. Consulte el
capítulo "Sustitución".
Sustituya la cuchilla por
otra nueva. Consulte el
capítulo "Sustitución".
Page 84

Français
84
Introduction
Félicitations pour votre achat et bienvenue dans
l'univers Philips ! Pour profiter pleinement de
l'assistance offerte par Philips, enregistrez votre
produit à l'adresse suivante :
www.philips.com/welcome.
Description générale (Fig. 1)
1 Lame
2 Bouton coulissant de déverrouillage de la lame
3 Verrouillage (QP6520 uniquement)
4 Pourcentage de l'état de la batterie (QP6520
uniquement)
5 Symbole de charge (QP6520 uniquement)
6 Afficheur (QP6520 uniquement)
7 Bouton marche/arrêt
8 Témoin d'état de la batterie (QP6510
uniquement)
9 Base de recharge (QP6520 uniquement)
10 Petite fiche de la base de recharge (QP6520
uniquement)
11 Housse (QP6520 uniquement)
12 Petite fiche
13 Bloc d’alimentation électrique (adaptateur, type
HQ8505)
14 Sabot de tonte de précision
15 Molette de réglage de la longueur de coupe
Informations de sécurité importantes
Lisez attentivement ces informations importantes
avant d'utiliser l'appareil et ses accessoires et
conservez-les pour un usage ultérieur. Les
accessoires fournis peuvent varier selon les
différents produits.
Français
Page 85

Danger
-
Avertissement
-
-
-
-
-
Français
Gardez le bloc d’alimentation au sec.
Le bloc d’alimentation contient un
transformateur. N’essayez pas de remplacer le
bloc d’alimentation par une autre fiche afin
d’éviter tout accident.
Chargez toujours l’appareil à l’aide du bloc
d’alimentation fourni.
Cet appareil peut être utilisé par des enfants
âgés de 8 ans ou plus, des personnes dont les
capacités physiques, sensorielles ou
intellectuelles sont réduites ou des personnes
manquant d'expérience et de connaissances, à
condition que ces enfants ou personnes soient
sous surveillance ou qu'ils aient reçu des
instructions quant à l'utilisation sécurisée de
l'appareil et qu'ils aient pris connaissance des
dangers encourus. Les enfants ne doivent pas
jouer avec l'appareil. Le nettoyage et l'entretien
ne doivent pas être effectués par des enfants
sans surveillance.
Débranchez toujours l'appareil avant de le
nettoyer sous l'eau du robinet.
Vérifiez toujours l'appareil avant utilisation. Afin
d'éviter tout accident, n'utilisez pas l'appareil s'il
est endommagé. Remplacez toujours une pièce
endommagée par une pièce du même type.
85
Page 86

Français
86
-
N'ouvrez pas l'appareil pour remplacer la pile
rechargeable.
Attention
-
Ne plongez jamais la base de recharge dans
l'eau et ne la rincez pas sous le robinet.
-
N'utilisez jamais une eau dont la température
est supérieure à 80 °C pour rincer l'appareil.
-
N'utilisez pas cet appareil à d'autres fins que
celles pour lesquelles il a été conçu (voir le
mode d'emploi).
-
Pour des raisons d'hygiène, l'appareil doit être
utilisé par une seule personne.
-
N'utilisez jamais d'air comprimé, de tampons à
récurer, de produits abrasifs ou de détergents
agressifs tels que de l'essence ou de l'acétone
pour nettoyer l'appareil.
-
N’utilisez pas le bloc d’alimentation dans ou à
proximité de prises murales qui contiennent ou
ont contenu un assainisseur d’air électrique,
afin d’éviter que le bloc d’alimentation ne
subisse des dommages irréversibles.
Champs électromagnétiques (CEM)
-
Cet Philips appareil est conforme à toutes les
normes et à tous les règlements applicables
relatifs à l'exposition aux champs
électromagnétiques.
Page 87

Informations d'ordre général
-
Cet appareil est étanche. Il peut être utilisé dans
la baignoire et sous la douche, et peut être
nettoyé sous l'eau du robinet. Pour des raisons
de sécurité, l'appareil est uniquement prévu
pour une utilisation sans fil.
-
L'appareil est conçu pour une tension secteur
comprise entre 100 V et 240 V.
-
Le bloc d’alimentation transforme la tension de
100-240 V en une tension de sécurité de moins
de 24 V.
Charge
Remarque : Cet appareil est uniquement conçu
pour une utilisation sans fil.
QP6520, QP6510 : La charge dure environ 1 heure.
Une fois chargé, l’appareil offre une autonomie
d’environ 90 minutes (QP6520) ou 60 minutes
(QP6510).
Mettez l'appareil en charge avant de l'utiliser pour
la première fois et lorsque le symbole de charge
de la batterie indique que celle-ci est presque
déchargée.
Témoin d'état de la batterie QP6520
-
Lorsque le symbole de charge clignote en
orange, la batterie est presque vide. Le niveau
de charge de la batterie est indiqué par le
pourcentage de l'état de la batterie qui figure
sur l'afficheur.
Français
87
Page 88

Français
88
-
Le symbole de charge clignote en blanc pour
indiquer que l’appareil se charge.
-
Charge rapide : après environ 5 minutes de
charge, l'appareil est suffisamment chargé pour
une utilisation de 5 minutes. Pendant une
charge rapide, le symbole clignote rapidement
en blanc jusqu'à la fin de la charge.
-
La batterie est entièrement chargée lorsque le
pourcentage de l'état de la batterie sur
l'afficheur atteint 100 % et le symbole de charge
s'allume de manière continue.
-
Environ 30 minutes après que la batterie est
entièrement chargée, ou lorsque vous
déconnectez l'appareil du secteur, l'afficheur
s'éteint automatiquement.
Témoin d'état de la batterie QP6510
-
Lorsque le témoin d'état de la batterie clignote
en orange, la batterie est presque vide.
-
Pour indiquer que l'appareil est en cours de
charge, le voyant inférieur se met tout d'abord à
clignoter en blanc, puis reste allumé en blanc.
Ensuite, le second voyant clignote, puis reste
allumé, et ainsi de suite jusqu'à ce que
l'appareil soit complètement chargé.
Page 89

Français
-
Charge rapide : après environ 5 minutes de
charge, l'appareil est suffisamment chargé pour
une utilisation de 5 minutes. Pendant la charge
rapide, les voyants du témoin d'état de la
batterie s’allument l'un après l'autre sans
interruption puis d'éteignent tous ensemble.
Cette procédure se répètera jusqu'à la fin de la
charge rapide.
-
La batterie est entièrement chargée lorsque
tous les voyants du témoin d'état de la batterie
s'allument de manière continue.
-
Environ 30 minutes après que la batterie est
entièrement chargée, ou lorsque vous
déconnectez l'appareil du secteur, la lumière de
l'indicateur d'état de la batterie s'éteint
automatiquement.
Charge avec l'adaptateur
1 Insérez la petite fiche dans l'appareil et
l'adaptateur secteur dans la prise secteur.
2 Une fois la charge terminée, débranchez
l'adaptateur de la prise murale, puis retirez la
petite fiche de l'appareil.
Charge à l'aide de la base de recharge (QP6520 uniquement)
1 Insérez la petite fiche dans la base de charge et
branchez l'adaptateur sur la prise secteur.
2 Placez l'appareil sur le socle de charge.
3 Une fois la charge terminée, débranchez
l'adaptateur de la prise murale, puis retirez la
petite prise du socle de charge.
89
Page 90

Français
90
Utilisation de l'appareil
Vous pouvez utiliser l'appareil pour tondre,
égaliser ou raser les poils du visage (barbe,
moustache et pattes). Rasez pour un résultat
optimal, tondez pour obtenir une certaine
longueur et égalisez pour créer des bords parfaits
et des lignes nettes. Cet appareil n'a pas été conçu
pour raser, égaliser ou tondre les poils des parties
inférieures du corps ou pour tondre les cheveux.
Prenez votre temps lorsque vous utilisez la
tondeuse pour la première fois. Vous devez vous
familiariser avec l'appareil.
Remarque : Cet appareil est uniquement conçu
pour une utilisation sans fil.
Mise en marche et arrêt de l'appareil
1 Pour allumer l'appareil, appuyez sur le bouton
marche/arrêt.
2 Pour éteindre l'appareil, appuyez sur le bouton
marche/arrêt.
Se raser
Avertissement : Avant d'utiliser l'appareil,
vérifiez toujours que la lame n'est pas
endommagée ou usée Si la lame est
endommagée ou usée, évitez d'utiliser
l'appareil, car il peut causer une blessure.
Avant d'utiliser l'appareil, veillez à
remplacer toute lame endommagée (voir le
chapitre « Remplacement »).
Page 91

Français
Conseils et astuces de rasage
-
Assurez-vous que la lame est totalement en
contact avec la peau en la posant à plat sur la
peau.
-
Pour un résultat optimal, placez l'appareil dans
le sens inverse de la pousse des poils.
-
Effectuez de longs mouvements en exerçant
une légère pression.
-
Vous pouvez utiliser l'appareil sur peau sèche
ou humidifiée avec du gel ou de la mousse, y
compris sous la douche.
-
Vous obtiendrez de meilleurs résultats de
rasage sur une barbe et un visage propres.
1 Allumez l'appareil.
2 Placez la lame sur la peau et déplacez
l'appareil sur ou dans le sens inverse de la
pousse des poils par des mouvements longs
tout en exerçant une faible pression.
Remarque : Veillez à maintenir la surface de la
lame à plat contre votre peau.
3 Éteignez et nettoyez l'appareil après chaque
utilisation (voir le chapitre « Nettoyage et
maintenance »).
91
Tailler
Vous pouvez également utiliser les deux bords de
la lame pour créer des lignes nettes et des bords
parfaits. Maintenez l'appareil de manière à ce que
la lame soit perpendiculaire à la peau et qu'un de
ses côtés touche la peau. Cela permet de créer
plus de détails sur les pattes et dans la zone
autour de la bouche et du nez.
Page 92

Français
92
1 Pour utiliser la lame pour créer des bords et des
lignes nettes, utilisez chaque bord de la lame.
2 Allumez l'appareil.
3 Placez le bord de la lame perpendiculairement
à la peau.
-
Effectuez des mouvements légers en exerçant
une légère pression.
4 Éteignez et nettoyez l'appareil après chaque
utilisation (voir le chapitre « Nettoyage et
maintenance »).
Tonte avec le sabot
Conseils
-
Tondez toujours dans le sens des dents du
sabot de la tondeuse de précision, en vous
assurant que la partie plate du sabot reste
toujours bien en contact avec la peau, pour
obtenir une coupe régulière.
-
Dans la mesure où les cheveux ne poussent
pas tous dans le même sens, vous devez tenir
l'appareil dans différentes positions. Veillez
néanmoins toujours à déplacer l'appareil vers le
haut, dans le sens inverse de la pousse des
poils.
-
Vous obtiendrez de meilleurs résultats si vous
utilisez la tondeuse sur une peau ou des poils
secs.
Page 93

1 2
Français
Le sabot de coupe de précision offre différentes
hauteurs de coupe. Commencez par sélectionner
le réglage maximum pour vous faire la main. Les
paramètres sur la roulette correspondent aux
longueurs de poils en millimètres.
1 Placez la partie avant du sabot sur la lame et
poussez la projection à l'arrière du sabot dans
l'appareil (clic).
2 Faites tourner la roulette de réglage pour
sélectionner la hauteur de coupe désirée.
Les paramètres sur la roulette correspondent
aux longueurs de poils en millimètres.
-
QP6520
-
QP6510
3 Allumez l'appareil.
93
4 Posez le sabot sur la peau et déplacez
lentement l'appareil vers le haut, dans le sens
inverse de la pousse des poils.
5 Éteignez et nettoyez l'appareil après chaque
utilisation (voir le chapitre « Nettoyage et
maintenance »).
Page 94

1
2
1
2
Français
94
6 Pour retirer le sabot, retirez sa partie arrière de
l'appareil puis faites-le glisser hors de la lame.
Nettoyage et entretien
Nettoyez l'appareil après chaque utilisation.
Attention : N'utilisez jamais d'air comprimé, de
tampons à récurer, de produits abrasifs ou de
détergents agressifs tels que de l'essence ou de
l'acétone pour nettoyer l'appareil.
Attention : Ne tapotez pas l'appareil contre une
surface pour en retirer l'eau, car il risque d'être
endommagé. Remplacez la lame si elle est
endommagée.
Nettoyage de l'appareil
1 Retirez le sabot de la lame. Éteignez toujours
l'appareil avant de placer ou retirer le sabot.
2 Si beaucoup de poils se sont accumulés sur le
sabot, retirez-les d'abord en soufflant dessus.
Page 95

Rangement
1 2
Français
3 Si beaucoup de poils se sont accumulés sur
l'appareil, retirez-les d'abord en soufflant
dessus.
4 Allumez ensuite l'appareil et rincez la lame avec
de l'eau tiède.
Attention :iNe séchez pas la lame avec une
serviette ou un mouchoir afin d'éviter de
l'endommager.
5 Rincez ensuite le sabot à l'eau tiède.
6 Laissez sécher l'appareil et le sabot.
Remarque : La lame est fragile. Manipulez-la
soigneusement. Remplacez la lame si elle est
endommagée.
Remarque : Nous vous conseillons de laisser
l'appareil et ses accessoires sécher avant de les
mettre de côté pour la prochaine utilisation.
1 Veillez à toujours fixer le sabot de coupe de
précision sur la lame, afin de protéger celle-ci
contre tout risque d'endommagement pendant
vos déplacements ou son rangement.
95
Verrouillage (QP6520 uniquement)
Vous pouvez verrouiller l'appareil si vous partez en
voyage. Le verrouillage empêche l'appareil de se
mettre en marche accidentellement.
Activation du verrouillage
Page 96

3 sec.
Français
96
1 Maintenez enfoncé le bouton marche/arrêt
pendant 3 secondes.
-
Lorsque vous activez le verrouillage, le symbole
de verrouillage s'allume et l'afficheur
numérique indique le décompte.
-
Une fois que le verrouillage est activé, le
symbole de verrouillage clignote.
Désactivation du verrouillage
1 Maintenez enfoncé le bouton marche/arrêt
pendant 3 secondes.
-
Lorsque vous désactivez le verrouillage,
l'afficheur commence le décompte. Ensuite, le
symbole du système de verrouillage clignote
puis s'éteint.
-
L'appareil est à présent prêt à l'emploi.
Remplacement
Remplacement de la lame
Pour une coupe et un rasage optimaux de la lame,
nous vous conseillons de remplacer la lame tous
les 4 mois ou lorsqu'elle ne fournit plus les
résultats de rasage ou de taille escomptés. Le
conseil du remplacement tous les 4 mois est basé
sur deux rasages complets par semaine. Selon vos
habitudes d'utilisation, la durée de vie exacte de la
lame peut être plus longue ou plus courte. Comme
pour une lame manuelle, la lame s'émousse avec
le temps, résultant en une traction accrue sur les
poils et des performances de coupe réduites.
Page 97

2
1
1 Appuyez avec attention sur le bouton
coulissant de déverrouillage de la lame et
saisissez la lame sur ses deux côtés pour retirer
la lame et m'empêcher de s'échapper.
2 Saisissez la nouvelle lame sur les côtés et fixez-
la sur la poignée (vous devez entendre un clic).
Remarque : Lorsque vous entendez un clic, la
nouvelle lame est placée correctement et prête à
l'emploi.
Commande d'accessoires
Pour acheter des accessoires ou des pièces de
rechange, consultez le site Web
www.shop.philips.com/service ou rendez-vous
chez votre revendeur Philips. Vous pouvez
également communiquer avec le Service
Consommateurs Philips de votre pays (consultez
le dépliant de garantie internationale pour obtenir
les coordonnées).
Les pièces suivantes sont disponibles :
-
Lame QP210 1 boîte
-
Lame QP220 2 boîtes
Français
97
Recyclage
-
Ce symbole signifie que ce produit ne doit pas
être jetées avec les déchets ménagèrs
(2012/19/EU).
Page 98

Français
98
-
Ce symbole signifie que ce produit contient une
batterie rechargeable intégrée, qui ne doit pas
être jetées avec les déchets ménagers
(2006/66/CE). Nous vous recommandons
vivement de déposer votre produit dans un
point de collecte agréé ou un centre de service
après-vente Philips pour faire retirer la batterie
rechargeable par des professionnels.
-
Respectez les réglementations de votre pays
concernant la collecte séparée des appareils
électriques et électroniques et des piles
rechargeables. La mise au rebut appropriée des
piles permet de protéger l'environnement et la
santé.
Retrait de la pile rechargeable
Attention : Ne retirez la pile rechargeable que
lorsque vous mettez l'appareil au rebut. Veillez à
ce que la pile soit totalement déchargée avant de
la retirer.
Remarque : Nous vous conseillons vivement de
faire retirer la batterie rechargeable par un
professionnel.
1 Débranchez l'appareil de la prise secteur et
laissez-le fonctionner jusqu'à l'arrêt complet du
moteur.
2 Retirez la lame de l'appareil.
3 Insérez un tournevis sous le panneau arrière et
enlevez le panneau.
Page 99

Français
4 Libérez les fermoirs sur les deux côtés à l'aide
du tournevis.
5 Faites sortir la partie interne en poussant le
tournevis en bas du manche.
-
Vous voyez à présent un circuit imprimé.
6 QP6510: retirez le cache du circuit imprimé avec
le tournevis.
7 Retirez le cache du circuit imprimé de la partie
interne avec le tournevis.
8 Sortez la batterie du boîtier interne à l'aide du
tournevis. La batterie est attachée avec un
ruban double face.
Avertissement : Soyez prudent car les
languettes de la batterie sont coupantes.
99
Garantie et assistance
Si vous avez besoin d'aide ou d’informations
supplémentaires, consultez le site
Page 100

Français
100
www.philips.com/support ou lisez le dépliant
séparé sur la garantie internationale.
Restrictions de garantie
Étant susceptible de s'user, la lame n'est pas
couverte par la garantie internationale.
Dépannage
Cette rubrique récapitule les problèmes les plus
courants que vous pouvez rencontrer avec
l'appareil. Si vous ne parvenez pas à résoudre un
problème à l'aide des renseignements ci-dessous,
rendez-vous sur le site www.philips.com/support
et consultez la liste des questions fréquemment
posées ou contactez le
Service Consommateurs Philips de votre pays.
Problème Cause possible Solution
Je ne peux pas
allumer l'appareil
lorsqu'il est
raccordé au
secteur.
Vous ne pouvez
pas utiliser
l'appareil lorsqu'il
est en charge. Vous
pouvez
uniquement utiliser
l'appareil sans fil.
Débranchez l'appareil de
la prise secteur avant de
l'utiliser.
 Loading...