

Philips QC5530 User Manual
Register your product and get support at
www.philips.com/welcome
QC5530
4222.002.8255.3
2 3 4
ENGLISH
Introduction
Congratulations on your purchase and welcome to
Philips! To fully benet from the support that Philips
5 6 7
offers, register your product at www.philips.com/
welcome.
Your new Philips hair clipper with new ergonomic
design and 180° adjustable cutting element allows
you to clip your own hair easily. You can move
the clipper over all areas of your head as easily as
running your ngers through your hair. To enjoy
8 9 10
MM
3
5
7
9
11
13
15
using the hair clipper, we advise you to read the
following information.
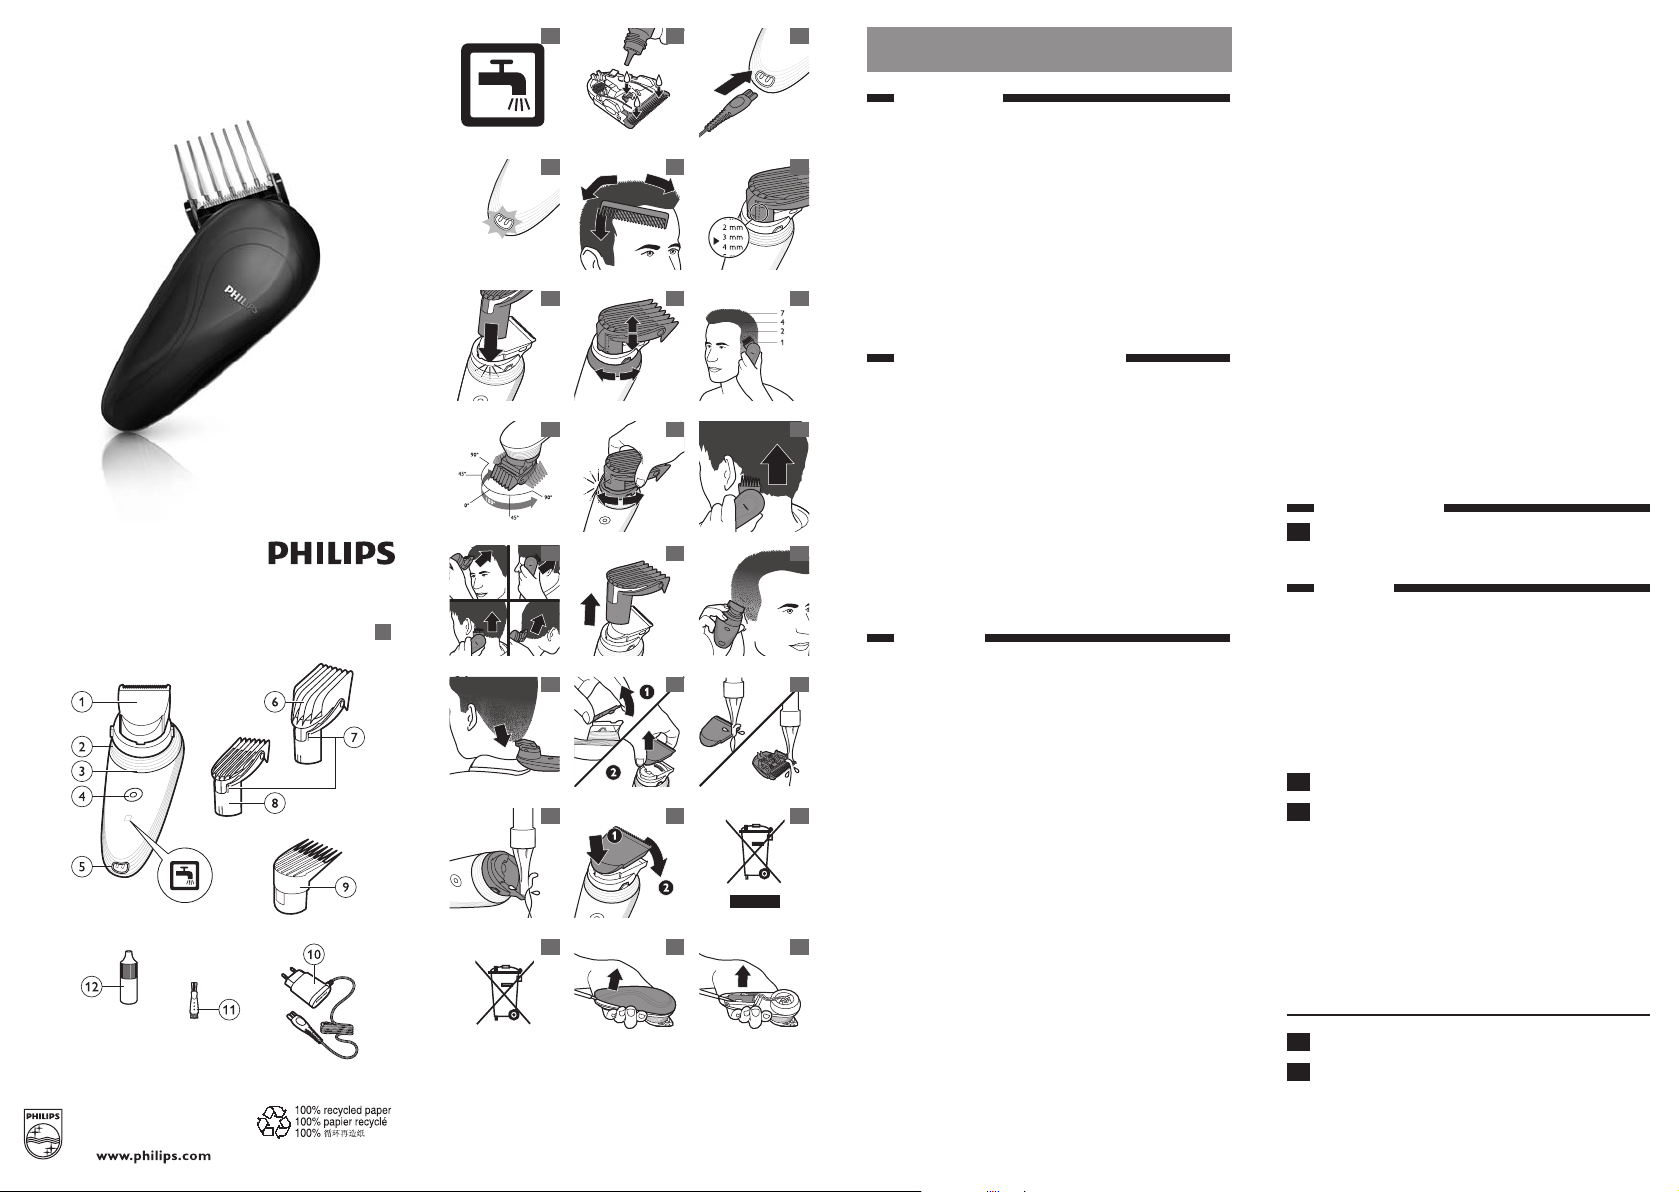
General description (Fig. 1)
1 Cutting element
2 Swivel head
11 12 13
3 Length setting adjustment ring
4 On/off button
5 Charging light
6 Large comb attachment
7 Length setting indicator
8 Small comb attachment
14 15 16
9 Precision comb attachment
10 Adapter
11 Cleaning brush
12 Oil
1
Important
Read this user manual carefully before you use the
17 18 19
appliance and save it for future reference.
Danger
- Make sure the adapter does not get wet.
Warning
- The adapter contains a transformer. Do not cut
20 21 22
off the adapter to replace it with another plug,
as this causes a hazardous situation.
- This appliance is not intended for use by
persons (including children) with reduced
physical, sensory or mental capabilities, or lack
of experience and knowledge, unless they
have been given supervision or instruction
23 24 25
concerning use of the appliance by a person
responsible for their safety.
- Children should be supervised to ensure that
they do not play with the appliance.
Caution
- Do not use the appliance in the bath or in the
shower.
- Use, charge and store the appliance at a
temperature between 5°C and 35°C.
- Only use the adapter supplied to charge the
appliance.
- If the adapter is damaged, always have it
replaced with one of the original type in order
to avoid a hazard.
- Do not use the appliance when the cutting
element or one of the comb attachments is
damaged or broken, as this may cause injury.
- This appliance is only intended for clipping
head hair. Do not use it for any other purpose.
- If the appliance is subjected to a major change
in temperature, pressure or humidity, let the
appliance acclimatise for 30 minutes before
you use it.
Compliance with standards
- The appliance complies with the internationally
approved IEC safety regulations and can be
safely cleaned under the tap (Fig. 2).
- This Philips appliance complies with all
standards regarding electromagnetic elds
(EMF). If handled properly and according to the
instructions in this user manual, the appliance
is safe to use based on scientic evidence
available today.
Before first use
1 Lubricate the cutting element with 3 drops of
the included oil (Fig. 3).
Charging
Charge the appliance for at least 1 hour before
you use it for the rst time or after a long period
of disuse.
When the appliance is fully charged, it has a
cordless clipping time of up to 1 hour.
When the charging light ashes orange, the battery
is running low (approx. 7 minutes of operating time
left) and you need to recharge the appliance.
1 Make sure the appliance is switched off.
2 Insert the appliance plug into the appliance
and insert the adapter into the wall
socket (Fig. 4).
, The charging light starts to ash white to
indicate that the appliance is charging (Fig. 5).
, When the battery is fully charged, the
charging light lights up white continuously.
, After approx. 30 minutes the charging light
goes out to save energy.
Corded clipping
1 Switch off the appliance.
2 Connect the appliance to the mains and wait
a few seconds before you switch it on.
Note: If the battery is completely empty, wait a few
minutes before you switch on the appliance.
Using the appliance
Make sure your hair is clean and dry. Do not use
the appliance on freshly washed hair.
Preparing for hair clipping
1 Comb your hair with a styling comb in the
direction of hair growth (Fig. 6).
Clipping with comb attachment
1 Select the comb attachment you want to use.
Use the precision comb attachment, the small or
the large comb attachment, depending on the
desired hair length.
Note: The hair length settings are indicated on the
comb attachment. (Fig. 7)
Barber settings on comb
Precision comb
attachment
Setting Resulting hair
length (inches)
Resulting hair
length (mm)
1 3/64 1
2 1/16 1.5
3 5/64 2
4 3/32 2.5
5 1/8 3
Small comb
attachment
Setting Resulting hair
length (inches)
Resulting hair
length (mm)
1 1/8 3
2 3/16 5
3 9/32 7
4 3/8 9
5 7/16 11
6 1/2 13
7 5/8 15
Large comb
attachment
Setting Resulting hair
length (inches)
Resulting hair
length (mm)
1 11/16 18
2 13/16 20
3 14/16 22
4 15/16 24
5 1 26
6 1 2/16 28
7 1 3/16 30
2 Attach the comb attachment to the swivel
head (‘click’) (Fig. 8).
Make sure that the comb attachment locks into
position properly.
3 Turn the length setting adjustment ring
to set the comb attachment to the
desired setting (Fig. 9).
, The arrowhead on the appliance indicates
which setting you have selected.
Tip: Use different settings to create a natural and
smooth transition between the various hair lengths
from your neckline to the top of your head (Fig. 10).
Do not turn the length setting adjustment ring
beyond the highest setting.
4 Turn the swivel head to the position that is
most comfortable for your arm when you
clip the different parts of your head.
Using the swivel head
- From its starting position of 0° (pointing
forwards), you can turn the swivel head 45°
or 90° to the left or right. This enables you to
adjust the position of the cutting element to
the part of your head that you are clipping.
This makes it much easier to clip your own
hair (Fig. 11).
- To set the cutting element to the desired
position, turn the swivel head (‘click’) (Fig. 12).
Note: Always adjust the position of the cutting
element by turning the swivel head. Do not turn the
swivel head by holding the cutting element or the
comb attachment.
Note: Do not turn the swivel head more than 90° to
the left or right.
- The swivel head allows you to hold and
use the appliance like a styling comb (Fig. 13).
5 Press the on/off button to switch on the
appliance.
6 Move the clipper through the hair slowly.
7 Regularly remove cut hair from the comb
attachment.
If a lot of hair has accumulated in the comb
attachment, remove the comb attachment from
the appliance and blow and/or shake the hair out
of it. When you remove the comb attachment, the
selected setting does not change.
Tips
- We advise you to start clipping at the highest
setting of the large comb attachment and to
reduce the setting gradually.
- To clip most effectively, move the appliance
against the hair growth direction.
- Since all hair does not grow in the same
direction, you need to move the appliance in
different directions (upwards, downwards and
across) (Fig. 14).
- Make sure that the at part of the comb
attachment is always fully in contact with the
scalp to obtain an even result.
- Write down the settings you use to create
a certain hairstyle as a reminder for future
clipping sessions.
Contouring without comb attachment
You can use the appliance without comb
attachment to clip your hair very close to the skin
(1mm) or to contour the neckline and the area
around the ears.
Be careful when you clip without comb
attachment because the cutting element removes
every hair it touches.
1 Pull the comb attachment off the swivel
head (Fig. 15).
Never pull at the exible top of the comb
attachment. Always pull at the bottom part.
2 Comb the hair ends over the ears before you
start to contour the hairline.
3 Press the on/off button to switch on the
appliance.
4 When you shape the contours around the
ears, tilt the appliance in such a way that only
one edge of the cutting element touches the
hair ends (Fig. 16).
5 To contour the neckline and the sideburns,
turn the appliance and make downward
strokes (Fig. 17).
Note: Move the appliance slowly and smoothly. Just
follow the natural hairline.
6 Adjust the position of the swivel head to
make contouring easier.
Cleaning and maintenance
Clean the appliance every time you have used it by
rinsing it under the tap or with the cleaning brush
supplied.
The appliance does not need any lubrication.
Never use compressed air, scouring pads, abrasive
cleaning agents or aggressive liquids such as
petrol, acetone or ethereal oils to clean the
appliance.
Be careful that the cutting element does not fall
on the oor.
Cleaning the cutting element and comb
attachments
1 Switch off the appliance and disconnect it
from the mains.
2 Remove the comb attachment (Fig. 15).
3 Rinse the comb attachment under the tap or
clean it with the cleaning brush supplied.
4 Place your thumb on the center of the
cutting element and your index nger on the
teeth of the cutting element (1). Lift your
index nger so the cutting element releases
from the swivel head (2) (Fig. 18).
5 Rinse the cutting element under the tap
or clean them with the cleaning brush
supplied (Fig. 19).
6 Rinse the inside of the appliance under
the tap or clean it with the cleaning brush
supplied (Fig. 20).
7 Insert the lug of the cutting element into the
slot and push the cutting element back onto
the swivel head (‘click’) (Fig. 21).
Lubrication
1 Lubricate the cutting element with 3 drops of
the included oil every 3 months.
Storage
1 Switch off the appliance and disconnect it
from the mains.
2 Store the appliance in a dry and safe place.

Replacement
Only replace a worn or damaged cutting element
with an original Philips cutting element, available
from authorised Philips service centres.
Environment
- Do not throw away the appliance with the
normal household waste at the end of its life,
but hand it in at an ofcial collection point for
recycling. By doing this, you help to preserve
the environment (Fig. 22).
- The built-in rechargeable battery contains
substances that may pollute the environment.
Always remove the battery before you
discard and hand in the appliance at an ofcial
collection point. Dispose of the battery at an
ofcial collection point for batteries. If you have
trouble removing the battery, you can also take
the appliance to a Philips service centre. The
staff of this centre removes the battery for you
and disposes of them in an environmentally
safe way (Fig. 23).
Removing the rechargeable battery
Only remove the rechargeable battery when you
discard the appliance. Make sure the battery is
completely empty when you remove it.
Do not connect the appliance to the mains again
after you have removed the rechargeable battery.
1 Disconnect the appliance from the mains and
let the appliance run until the motor stops.
2 Remove the upper housing part of the
appliance (Fig. 24).
3 Open the inner body with a screwdriver.
4 Use a screwdriver to remove the
rechargeable battery from the
appliance (Fig. 25).
5 Cut the wires with a pair of household
scissors.
Guarantee and service
If you need service or information or if you have
a problem, please visit the Philips website at
www.philips.com or contact the Philips
Consumer Care Centre in your country. You nd
its phone number in the worldwide guarantee
leaet. If there is no Consumer Care Centre in
your country, go to your local Philips dealer.
Troubleshooting
This chapter summarises the most common
problems you could encounter with the appliance.
If you are unable to solve the problem with the
information below, visit www.philips.com/
support for a list of frequently asked questions
or contact the Consumer Care Centre in your
country.
Problem Solution
The appliance
does not
work when I
switch it on.
Charge the appliance (see
chapter ‘Charging’). Make
sure that the appliance plug
is inserted properly into the
appliance and the adapter is
connected properly to the
wall socket. The charging light
ashes white to indicate that the
appliance is charging.
You can also use the appliance
when it is connected to the
mains.
I do not
know how
to attach
To attach the comb attachments,
simply slide them into the slot in
the appliance.
the comb
attachments
to the
appliance.
I do not
know how to
change the
hair length
settings of
the comb
attachments.
You can change the hair
length settings of the comb
attachments with the length
setting adjustment ring on the
appliance. Turn the ring to set
the comb attachment to the
desired setting. See chapter
‘Using the appliance’, section
‘Clipping with comb attachment’
The adapter
fell into water.
The adapter is waterproof. You
only have to dry it thoroughly
with a towel and then you can
use it again.
One of
the comb
attachments
is damaged
or worn.
Do not use the comb
attachment anymore. Replace it
with an attachment or comb of
the original type. You can obtain
a replacement comb attachment
from your local Philips dealer or
you can visit www.philips.com/
shop. For more information you
can contact the Consumer Care
Centre.
FRANÇAIS
Introduction
Félicitations pour votre achat et bienvenue dans
l’univers Philips ! Pour proter pleinement de
l’assistance Philips, enregistrez votre produit sur
le site à l’adresse suivante : www.philips.com/
welcome.
Votre nouvelle tondeuse Philips au design
ergonomique et à tête pivotante à 180° vous
permet de vous couper les cheveux en toute
simplicité. Vous pouvez la déplacer sur toutes
les zones de la tête, comme si vous passiez vos
doigts dans vos cheveux. Avant de l’utiliser, nous
vous conseillons de consulter les informations
ci-dessous.
Description générale (fig. 1)
1 Bloc tondeuse
2 Tête pivotante
3 Anneau de réglage de la hauteur de coupe
4 Bouton marche/arrêt
5 Voyant de charge
6 Grand sabot
7 Indicateur de la hauteur de coupe
8 Petit sabot
9 Sabot de précision (accessoire)
10 Adaptateur secteur
11 Brossette de nettoyage
12 Huile
Important
Lisez attentivement ce mode d’emploi avant
d’utiliser l’appareil et conservez-le pour un usage
ultérieur.
Danger
- Veillez à ce que l’adaptateur ne soit pas en
contact avec de l’eau.
Avertissement
- L’adaptateur contient un transformateur.
N’essayez pas de remplacer la che de
l’adaptateur pour éviter tout accident.
- Cet appareil n’est pas destiné à être utilisé
par des personnes (notamment des enfants)
dont les capacités physiques, sensorielles
ou intellectuelles sont réduites, ou par des
personnes manquant d’expérience ou de
connaissances, à moins que celles-ci ne soient
sous surveillance ou qu’elles n’aient reçu des
instructions quant à l’utilisation de l’appareil par
une personne responsable de leur sécurité.
- Veillez à ce que les enfants ne puissent pas
jouer avec l’appareil.
Attention
- N’utilisez jamais l’appareil dans le bain ni sous
la douche.
- Utilisez, rechargez et conservez l’appareil à une
température comprise entre 5 °C et 35 °C.
- Utilisez exclusivement l’adaptateur fourni pour
charger l’appareil.
- Si l’adaptateur secteur est endommagé, il doit
toujours être remplacé par un adaptateur
secteur de même type pour éviter tout
accident.
- An d’éviter tout accident, n’utilisez pas
l’appareil si le bloc tondeuse ou si l’un des
sabots est endommagé ou cassé.
- Cet appareil a été conçu uniquement pour
tondre les cheveux. Ne l’utilisez jamais à
d’autres ns.
- Si l’appareil devait être soumis à une forte
variation de température, de pression ou
d’humidité, laissez-le s’acclimater pendant
30 minutes avant de l’utiliser.
Conformité aux normes
- Ce rasoir est conforme aux normes
internationales IEC et peut être nettoyé à l’eau
en toute sécurité (g. 2).
- Cet appareil Philips est conforme à
toutes les normes relatives aux champs
électromagnétiques (CEM). Il répond aux
règles de sécurité établies sur la base des
connaissances scientiques actuelles s’il est
manipulé correctement et conformément aux
instructions de ce mode d’emploi.
Avant la première utilisation
1 Lubriez le bloc tondeuse avec 3 gouttes de
l’huile fournie (g. 3).
Charge
Chargez l’appareil pendant au moins 1 heure avant
la première utilisation ou après une longue période
de non-utilisation.
Une fois chargé, l’appareil dispose d’une autonomie
sans l de 1 heure environ.
Lorsque le voyant de charge clignote en orange, la
batterie est presque déchargée (environ 7 minutes
d’autonomie restantes). Il faut alors recharger
l’appareil.
1 Assurez-vous que l’appareil est éteint.
2 Insérez la che de l’adaptateur dans l’appareil,
puis branchez l’adaptateur sur la prise
secteur (g. 4).
, Le voyant de charge se met à clignoter en
blanc pour indiquer que l’appareil est en
cours de charge (g. 5).
 Loading...