

Page 1
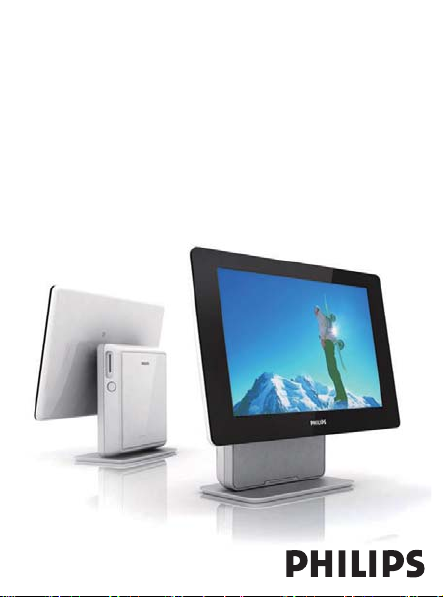
Portable TV
Register your product and get support at
www.philips.com/welcome
User Manual
PVD1075
Page 2

1
2 4 3 1
5
6
7
8
12
9
10
11
12
Page 3
2
3
2
6
7
9
0
@
$
^
¡
1
4
5
8
!
#
%
&
*
(
)
™
Page 4

English
Contents
1 General information
1.1 What is digital TV?
1.2 Safety
1.2.1 General
1.2.2 Care of the screen
1.3 Unpacking
1.4 Zero Bright Dot
2 Overview of television
keys and connectors
2.1 Main unit controls
2.2 Left of the TV
2.3 Right of the TV
2.4 Rear of the TV
3 Getting started
3.1 Stand installation
3.2 Connecting to antenna for
either home antenna or
auxiliary antenna
3.3 Charging the TV set
3.4 Switching on the TV
3.5 Using the Remote Control
3.6 Remote Control functions
3.7 First time installation
4 Further TV functions
4.1 Manual Channel Search
4.2 Set Time Zone
4.3 Adjust Parental Control
4.4 On Screen Program
Information
TM
Electronic Program Guide (EPG)
4.5
4.6 Channel List
4.7 Manage your channel
4.8 Other TV functions
5 Multimedia Player
5.1 Photo Album
5.1.1 Preview / Slide Show
5.1.2 Slide Show with Music
5.1.3 Rotate and Zoom of Photos
5.1.4 Photo Album setup
5.2 Music
5.3 Video Clips
6 Connection
6.1 Headphone
6.2 Audio/Video input
6.3 USB and SD card
7 SETUP menu overview
8 Wall mounting
9 Troubleshooting
10 Technical data
The Windows Media and
Windows logo are registered
trademarks of Micorsoft
Corporation in the United
States and/or other countires.
Page 5

1 General information
Congratulations on your purchase and welcome to Philips!
To fully benefi t from the support that Philips offers, register
your product at www.philips.com/welcome.
1.1 What is digital TV?
Digital Television offers a far wider choice of TV viewing, free from the
interference that you may experience on analogue TV. It promises to
transform television viewing into a whole new experience. There is a
greater selection of widescreen programming. Many of your favorite
programmes are in widescreen on the digital channels - something the
analogue TV cannot do properly.
There is new whole experience of interactivity on digital TV. By using
your remote control, you can access all kinds of information like the
digital text which is much clearer than the old teletext system. It gives
you the added enjoyment of related information running alongside
the programme you are watching. You can also access an Electronic
Programme Guide that provides you with a quick and easy way to view a
complete list of digital programmes as you would in a newspaper or TV
magazine.
1.2 Safety
Warning: The connections do not have to be made before hanging
but the cables must be inserted into connectors of the TV.
1.2.1 General
1
Place or hang the TV wherever you want but make sure that air can
circulate freely through the ventilation slots.
Do not install the TV in a confi ned space such as a book case or a
2
similar unit.
To prevent any unsafe situations, no naked fl ame sources such as
3
lighted candles should be placed in the vicinity of the TV set. Avoid
heat, direct sunlight and exposure to rain or water.
Page 6
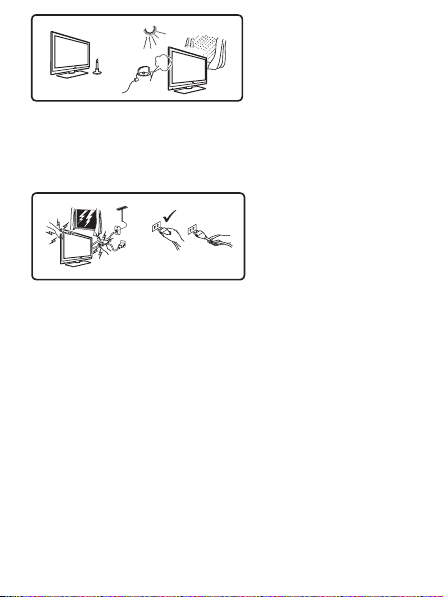
X
4
As a safety precaution, do not touch any part of the TV, power lead
or aerial lead during lightning storms.
5
Pull the power lead by the plug. Do not pull on the power lead. Do
not use a poor fi tting mains socket. Insert the plug fully into the mains.
If it is loose, it may cause arching and result in fi re.
X
X
X
X
6
Take care not to connect too many equipment to the same mains
socket as it may cause overloading resulting in fi re or electric shock.
7
Avoid placing a vase or vases fi lled with water on top or near the
TV. Water spilled into the set could result in electric shock. Do not
operate set if water is spilled into the set. Unplug the power cord
from the mains immediately and have the set checked by a qualifi ed
serviceman.
8
Installation of the TV set on the wall should be carried out by a
qualifi ed serviceman. Improper and incorrect installation may render
the set unsafe.
1.2.2 Care of the screen
1
Do not remove the protective sheet until you have completed the
stand/wall mounting and connections. Please handle with care.
Do not use too wet a cloth which is dripping with water. Do not use
2
acetone, toluene or alcohol to clean the TV. As a safety precaution,
unplug the power cord from the mains when cleaning the set.
Page 7
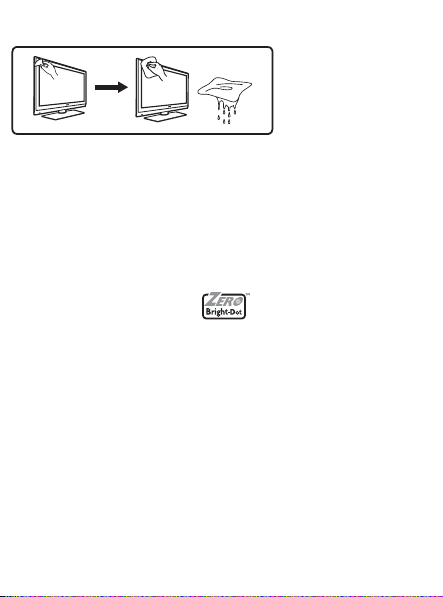
Note
Use only the soft cloth provided to clean the glossy front of the TV.
X
3
Do not touch, push or rub or strike the screen with anything hard as
this may scratch, mar or damage the screen permanently.
1.3 Unpacking
First check and identify the contents of your package, as listed below:
TV set • Remote control
•
AV cable • TV set stand
•
Power adaptor • User manual
•
Auxiliary antenna
•
1.4 Zero Bright Dot
Enjoy highest-quality images that are free from annoying blank spots on
the LCD screen. LCD displays commonly have imperfections, termed as
'bright dots' by the LCD industry. A limited number of bright dots were
once considered an inevitable side effect of LCD mass production. With
Philips' strict quality control procedures used in our Portable DVD
Players, our LCD displays are produced with zero tolerance for bright
dots. Select Portable DVD Players come with Philips Zero Bright Dot
Policy to guarantee optimal screen quality.
Warranty service varies from region to region. Contact your local Philips
representative for more detailed information.
TM
TM
Page 8

2 Overview of television keys and connectors
2.1 Main unit controls (see fi gure 1)
1
POWER
consumption, you need to remove the mains cord from the mains
socket.)
2
VOLUME
3
MENU 9: to display or exit menus.
4
CHANNEL
: to switch the TV on and off. (Note: For zero power
2;
: to increase or decrease the volume.
1 2
: to select channels.
4 3
2.2 Left of the TV (see fi gure 1)
: Jack for the external USB mass storage devices.
5
AV IN: Audio/Video input.
6
;
: Headphone jack.
7
DC IN 9V: Power supply socket.
8
2.3 Right of the TV (see fi gure 1)
9
SD: SD card slot.
10
75 Ω antenna: to connect antenna.
2.4 Rear of the TV (see fi gure 1)
11
RESET: to reset the TV.
12
Hooking hole: to mount the TV on the wall.
Page 9

3 Getting started
3.1 Stand installation
Use the stand to place the TV set on a fl at surface. To install the stand,
align the catches on the stand base with the slots at the bottom of the
set, as shown in the fi gure below. Then fi t the stand into the slots and
turn anticlockwise until you hear a "click" sound.
1
2
When you install the TV on the wall (refer to the Wall Mounting
Note:
section), please release the stand. To release the stand, lift up the latch and
turn the stand clockwise.
3.2 Connecting to antenna for either home
antenna or auxiliary antenna
Insert the aerial plug fi rmly into the 75 Ω aerial socket on the right side
of the TV and in the wall antenna socket.
3.3 Charging the TV set
Plug in the AC/DC adaptor.
Page 10
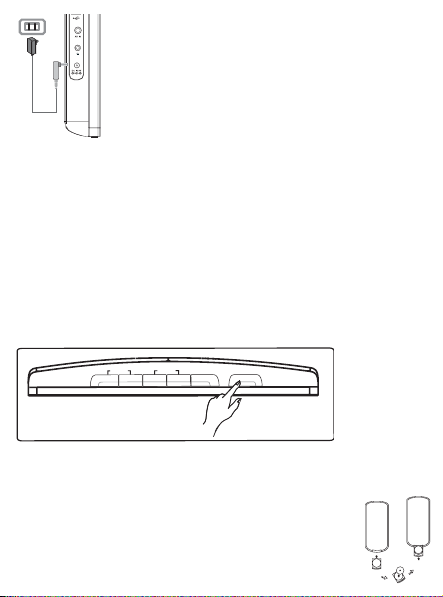
VOLUME CHANNEL MENU POWER
1 2 3 4 9 2;
•
The RED LED indicates that charging is in progress.
When the set is not in use, it will take about 6 hours to fully charge it.
However, when in use, it will take more than 8 hours to fully charge it.*
•
The RED LED will turn off when the set is fully charged. When the
low battery icon appears on the screen, please charge the set.
* Rechargeable batteries have a limited number of charge cycles and may
eventually need to be replaced. Battery life and number of charge cycles
vary by use and settings.
3.4 Switching on the TV
To switch on the TV, press and hold the POWER key on the top of the
set and the GREEN indictor also comes on.
Notes:
1. For the fi rst time to power on the set, use the AC power adaptor.
2. In case of failure to power on the set with built-in batteries, use the AC
power adaptor to charge batteries.
3.5 Using the Remote Control
1
Open the battery compartment. Remove the protective
plastic tab (fi rst time users only).
Page 11

2
Insert 1 x lithium 3V battery, type CR2025, then close the
compartment.
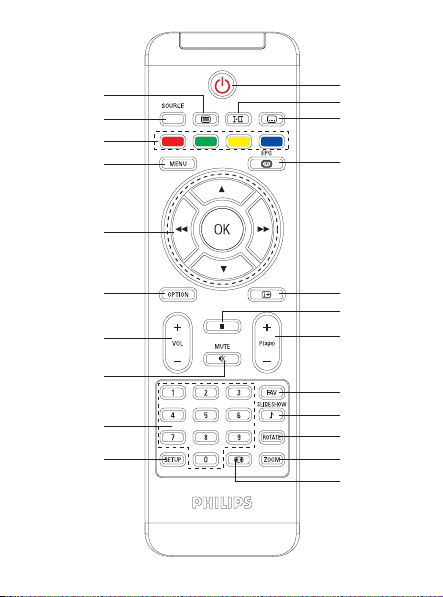
3.6 Remote Control functions (see fi gure 2)
2
1
: Power On/Off the TV set
2
SOURCE: Switch between TV > Radio > USB > SD > AV-in
3
TELETEXT
4
AUDIO : Audio language selection
5
SUBTITLE
6
Color keys: Coloured areas are displayed at the bottom of the
screen. The 4 coloured keys are used to access the items or
corresponding pages. The coloured areas fl ash when the item or the
page is not yet available.
7
MENU: Press briefl y to return to previous menu page. Press and
hold about 2 seconds to return to the top menu page.
8
EPG: Activate Electronic Program Guide
9
Navigation keys:
OK Confi rm a selection or start/interrupt playback
/ 4 Up/down navigation key
3
/ )K Left/right navigation key or previous/next track or fast search
J(
backward/forward
OPTION: Access additional functions
10
INFORMATION
11
12
+ Vol -: Volume control
13
: Press once to stop playback of digital fi les
9
14
MUTE: Mute the volume
15
+P(age)-: Change TV channels or Teletext pages
16
0-9: Numerical keys
17
FAV: Activate favorite TV/Radio channel mode
18
SLIDESHOW/MUSIC: Activate digital photo slide show with music
back ground
19
ROTATE: Rotate digital photos
: Activate Teletext
: Subtitle languages selection
: List program information
Page 12

20
ZOOM: Zoom in digital photos
21
SETUP: Enter setup menu
22
ASPECT RATIO
: to adjust the screen of 16:9 or 4:3
3.7 First time installation
Setup DTV channels
During fi rst time installation, you are prompted to select your country.
To confi rm selection, press OK.
1
> After selecting your country, you are prompted to Auto Channel Search.
To start auto search, press OK.
2
> Auto channel search starts.
When Auto channel search is complete, the screen displays the total
3
number of TV and Radio channels found.
Select OK to view programs of the fi rst found channel.
Page 13

4 Further TV functions
4.1 Manual Channel Search
1 Press SETUP > DTTV > Country to select your country.
2 Press SETUP > DTTV > Manual search.
3 Select Channel number.
To confi rm a channel, press OK.
4.2 Set Time Zone
Select whether the local time offset with regard to Greenwich mean time
is to be set automatically, or if you want to specify it yourself.
Page 14

To set local time, press SETUP, select DTTV > Time settings.
•
Time format
Set your time format to 12-hour or 24-hour.
•
Time zone
Select the entry GMT +01:00 for Germany and Central Europe (time
difference with regard to the Greenwich mean time).
•
Daylight saving
Set the menu item summer time to off if it is not summer time at the
moment. You can also select the setting automatic. In case of this setting,
the receiver obtains the information regarding summer time from the
currently selected channel.
4.3 Adjust Parental Control
To adjust Parent control setting, press SETUP, select DTTV >
Parental.
Parental options are only selectable when password
mode is deactivated.
4.4 On Screen Program Information
To view information of current program, press the INFORMATION
key.
1
: TV program
: Radio program
2
Next program’s information
3
Program number
4
Program name
5
Local time
6
Signal strength indicator. More the bars stronger the signals.
7
Program information icons
: Program contains different audio languages. You can press the
Page 15

AUDIO or OPTION key on the remote to access this function.
3
1
2
4 5
6
7
: Program contains subtitles. You can press the SUBTITLE or
OPTION key on the remote to access this function.
: Program contains Teletext. You can press the TELETEXT key on
the remote to select Teletext function.
3
4.5 Electronic Program Guide (EPG)
The EPG offers you an overview of all programmes to be broadcasted in
the next week on the current channel. The information presented for the
selected event are: Start time, Title, Short description.
Not all channels offer an extensive EPG.
•
Many broadcasting services broadcast the current day
•
programme but do not offer detailed descriptions.
There are broadcasting services that do not offer any EPG
•
information.
Select the desired channel.
1
Press EPG to call up the electronic programme guide.
2
The following functions are offered to you by the EPG:
A press on 3 / 4 allows you to consult all event pages for the days, a
•
press on 4 when last event of the list is highlighted displays the next
page.
Page 16

4.6 Channel List
To view available channel in your TV set:
1
Press OK.
2
Press 3 / 4 to select a channel.
3
To change channel, press OK.
4
To exit Channel list, press OPTION.
4.7 Manage your channel
1
Press SETUP. Go to DTTV.
2
Select Manage Channel.
Page 17

Lock: The feature allows you to lock channels to prevent your children
from watching certain channels.
Hide: This feature allows you to hide the program from channel selection
list.
Favorite: This feature allows you to skip programmes that you do not
watch often and only keep your favourite channels.
4.8 Other TV functions
Remote
button
SOURCE Switch between input source (TV, Radio, USB, SD
TELETEXT
Color keys They will be mainly used in the Teletext page to
AUDIO
Function
Card, AV-in).
If the current channel has Teletext available,
shown in the program INFO screen. You can access
the function by pressing TELETEXT. The program
may request using color key to access or control the
viewing feature. Please follow indication from the
Teletext screen.
control the viewing. It will be various from different TV
teletext program design.
If the current channel has audio available,
shown in the program INFO screen. Press AUDIO to
activate the subtitle audio.
will be
will be
Page 18

Remote
button
SUBTITLE
Function
If the current channel has subtitle available,
shown in the program INFO screen. Press SUBTITE
to activate the subtitle.
To adjust the screen of 16:9 or 4:3
will be
5 Multimedia Player
The set can let you display pictures, video clips and music fi les stored
on a USB device or a SD memory card. The multimedia application is
invoked from the main menu.
Menu To
TV Watch the TV programs
Radio-DTTV Listen to the DTTV radio programs
Picture View your Photo Album
Music Play your digital music tracks
Video Watch the video clips
Folder view Browse the content of USB drive / SD card
Settings Customize the settings of the set
•
The following inputs are
➜
USB: Only FAT/DOS-formatted memory device are supported.
➜
SD card except SDHC cards
accepted.
Page 19

The following fi le formats can be reproduced.
•
➜
Picture: JPEG
➜
Video clips: MEPG1/2/4. DivX 4,5
➜
Music fi le: MP3 and WMA
Note: Philips can not be held responsible if your USB
or SD card are not supported or recognized by this set.
Tip: If your USB device does not fi t into the USB
connector at the side, use an USB extension cable to connect the
USB device to the USB port. Ask your dealer for more information.
Transferring and recording of data from the DTTV
to the USB port or SD card is not possible.
5.1 Photo Album
5.1.1 Preview / Slide Show
After you insert the USB drive or SD card, press MENU to go to
•
home page.
Select Picture from the home page. Then select you source of USB
•
or SD card.
All the picture fi les will be sorted out. You can then use navigation key
•
to highlight the picture from the left side area.
Page 20

Press OK to start the slide show.
•
Press STOP to return to photo thumb nail browser screen.
•
5.1.2 Slide Show with Music
To add music during slide show, press on the remote when you
•
start slideshow, you can browse the music fi le location.
Tip: Your music fi le must be store in the same device
as your picture fi le.
Then the set will continue to run the slideshow with your favorite
•
music.
Press STOP to return to Photo Album thumb nail browser screen.
•
5.1.3 Rotate and Zoom of Photos
During the slideshow playback, you can press the OPTION key from
the remote. It will pop up a function window.
Page 21

You can select to rotate or zoom the picture.
5.1.4 Photo Album setup
Press SETUP and go to PHOTO. The following functions are available.
Thumbnail: Select the display matrix.
Sort by: Sort the fi le ranking criteria.
Slideshow: Slideshow Sequence: Select sequential or random.
Time per Slide: Select the time interval between each slide.
Transition: Select the effect of the photos appear in the screen.
5.2 Music
After you insert the USB drive or SD card, press MENU to go to
•
home page.
Select Music from the home page. Then select you source of USB or
•
SD card.
•
All the music fi les will be sorted out. You can then use navigation key
to highlight the music from the left side area.
•
Press OK to playback the music fi les.
•
Press STOP when you end the listening.
Music with Slideshow
To start the slide show during music playback, press
•
remote when you start music playback, you can browse the photo fi le
location.
on the
Page 22

Tip: Your photo file must be stored in the same
device as your music fi le.
Then the set will continue to run the slideshow with your favorite
•
music
Press STOP to return to music browser screen.
•
Music setup
Press SETUP and go to MUSIC. The following functions are available.
Repeat: Select repeat playback mode
Shuffl e: Turn shuffl e on or off
Sort by: Sort the fi le ranking criteria.
Equalizer: Set desired sound effect.
5.3 Video Clips
Preview
•
After you insert the USB drive or SD card, press MENU to go to
home page.
•
Select Video from the home page. Then select you source of USB or
SD card.
•
All the video fi les will be sorted out. You can then use navigation key
to highlight the video from the left side area.
•
Press OK to playback the video.
•
Press STOP to return to Video thumb nail browser screen.
Page 23

Video Clip setup
Press SETUP and go to VIDEO. The following functions are available.
Thumbnail: Select the display matrix.
Repeat: Select the repeat playback mode.
Sort by : Sort the fi le ranking criteria.
DivX (VOD): Get the DivX (Video-On-Demand) code.
DivX Subtitles: Select the preference subtitle language if there is any
subtitle language in your video clips.
6 Connection
6.1 Headphone
Connect the headphone to the headphone jack on the left side of the
player.
6.2 Audio/Video input (e.g. Digital Camcorder)
2
1
Page 24

6.3 USB and SD card
You can play video/audio/picture fi les stored in USB drive or SD card by
inserting it into the SD card slot.
\ |
7 SETUP menu overview
Level 1 Level 2 Remark
General Languages Change OSD language
Power saving Set Power Saving mode ON/OFF
Set password Change password (default: 1369)
Factory settings Restore factory settings
Display Adjust the LCD color, brightness,
contrast, etc.
Equalizer Adjust the speaker performance
Page 25

Level 1 Level 2 Remark
DTTV Auto search Perform auto TV program scan
Picture Thumbnail grid Set the thumbnail picture display
Music Repeat Set repeat mode
Video Thumbnail grid Set the thumbnail picture display
Manual search Perform manual TV program scan
Manage channels Set channel lock and favorite
Country Set your country of location
Time settings Set time format, time zone and
Parental (DVB-T) Select the preferred rating to lock
Sort by Set the fi le sorting preference
Slideshow Set slide show preference
Shuffl e Set shuffl e mode
Sort by Set fi le sorting preference
Repeat Set repeat mode
Sort by Set fi le sorting preference
DivX (VOD) Get the DivX (video-on-demand)
DivX Subtitles Set preference subtitle languages:
channel list
summer time
the channel
matrix
matrix
code
Czech, Danish, Dutch, English,
Finnish, French, German, Greek,
Hebrew, Hungarian, Icelandic,
Italian, Norwegian, Polish,
Portuguese, Russian, Spanish,
Swedish, Turkish.
Page 26

8 Wall mounting
There are 2 screw hooking holes to hang up the set. Please follow the
steps below:
1
Choose a spot near an electrical outlet and an antenna jack.
2
Use the screw position plate to position the screw.
3
Fix the provided screws into the wall and make sure it is fi xed fi rmly
into the wall.
Detach all the connection cable from the set.
4
Release the bottom stand from the product.
5
Hook the set on the wall.
6
Wall
Attach all the connection, like power and antenna, etc.
7
Page 27

9 Troubleshooting
If it appears that the TV is faulty, fi rst consult this checklist. It may be that
something has been overlooked.
WARNING Under no circumstances should you
try to repair the set yourself as this will invalidate the guarantee.
If a fault occurs, fi rst check the points listed, before taking the set
for repair. If you are unable to solve a problem by following these
hints, consult your dealer or service centre.
Symptom Remedy
No power Check if both plugs of the mains cord are
Distorted picture Sometimes a small amount of picture distortion
No sound Check audio connections. If using a HiFi
The player does
not respond to the
remote control
Player does not
respond to all
operating commands
during playback
Loss of current TV
programs when
travelling to another
country
•
properly connected.
Check if there is power at the AC outlet by
•
plugging in another appliance.
•
may appear. This is not a malfunction.
•
amplifi er, try another sound source.
Aim the remote control directly at the sensor
•
on the front of the player. Avoid all obstacles
that may interfere with the signal path. Inspect
or replace the batteries.
Operations are not permitted in TV mode.•
1) Press SETUP > DTTV > Country to select
your country.
2) Select Auto search.
Page 28

Symptom Remedy
Cannot detect USB
plug-in
Cannot switch to AVin or no signal
Switch between
TV/USB/AV-in
Player feels warm When the player is in use for a long period of
Display goes dimmer
when AC is unplugged
No radio reception The unit is designed to receive digital signals
Unplug the USB device and plug in again. The
•
time taken for detection may vary with the
capacity of your USB device.
The TV does not support Hard Disk storage
•
or Media Transfer Protocol (MTP) format.
Unplug the AV-in connection and plug in again.
•
Check the connection from the AV output
•
device, such as digital camera, video recorder,
etc.
Use the provided AV cable for connection.
•
TV mode is the default source after power on.
•
Plugging in USB will activate USB mode.
•
Deactivate it by unplugging the connection.
Do not plug in USB & AV-in at the same time.
•
Plug in one type connection at a time only.
Unplug the connection before you plug in
•
another connection.
•
time, the surface will be heated. This is normal.
The unit is saving power to ensure longer
•
playtime with battery. It is normal.
Adjust the brightness in the SETUP menu.
•
•
only, and it does not support analog radio such
as FM or AM.
Page 29

Symptom Remedy
Cannot charge the
player
No/weak signal
displayed on the
screen
Cannot play MP4
video
Unsmooth playback
of DivX video
Check if both plugs of the mains cord are
•
properly connected.
Check if there is power at the AC outlet by
•
plugging in another appliance.
Check if car adaptor is connected
•
appropriately.
Only use 12V car charger (for small car) and
•
do not use 24V car charger (for truck)
The environment temperature should be
•
between 0°C and 35°C. To protect the
electronic insides, the player will stop charging
when too cold or too hot.
DVB-T signal is too weak or out of DVB-T
•
signal covering area.
Make sure you are in an area with suffi cient
•
coverage.
Receiving DVB-T signal in a driving car may
•
cause signal problems.
There are too many types of MP4 videos
•
format. The play can only support MP4 format
in *.avi and *.divx fi le.
Please make sure you generate the DivX video
•
with DivX Mobile confi guration. For detail of DivX
mobile confi guration, pleases refer to section 1.4
or visit DivX web side www. divx. com.
10 Technical data
TV system DVB-T
USB 1.1
Card SD memory card
Speaker 2 x 2W (RMS)
Dimensions 27.5 x 24 x 10 cm
11 x 9.4 x 4 inches
Page 30

Weight 1.2 kg /2.6 Ib
Power supply DC 9V 1.8A
Power consumption ≤ 20W
Operating temperature range
0 - 45°C (32 - 122°F)
PHILIPS reserves the right to make design and specifi cation
changes for product improvement without prior notice.
Modifi cations not authorized by the manufacturer may void
users authority to operate this device.
All rights reserved.
Your product is designed and manufactured with high quality
materials and components, which can be recycled and reused.
When this crossed-out wheeled bin symbol is attached to
a product it means the product is covered by the European
Please inform yourself about the local separate collection system for
electrical and electronic products.
Please act according to your local rules and do not dispose of your old
products with your normal household waste. The correct disposal of
your old product will help prevent potential negative consequences for
the environment and human health.
Directive 2002/96/EC.
Page 31

Meet Philips at the Internet
http://www.philips.com
PVD1075
Printed in China WK07-38
 Loading...