

Page 1

user manual
manuel d’utilisation | benutzerhandbuch | manual del usuario
gebruikershandleiding | manuale per l'utente | manual do usuário
användar-handbok
Page 2

We hope you enjoy your Philips ShoqBox
Please visit www.philips.com/support
and enter your model number to view:
· FAQ, Frequently Asked Questions
· Latest user manuals
· Latest computer software downloads
· Firmware upgrade files
Register
Since it is possible for you to upgrade your product,
we recommend that you register your product on
www.philips.com/register so we can inform you as
soon as new free upgrades become available.
The typeplate is located on the back of the connections cover. Open connections cover to see.
1
Page 3
Quick start
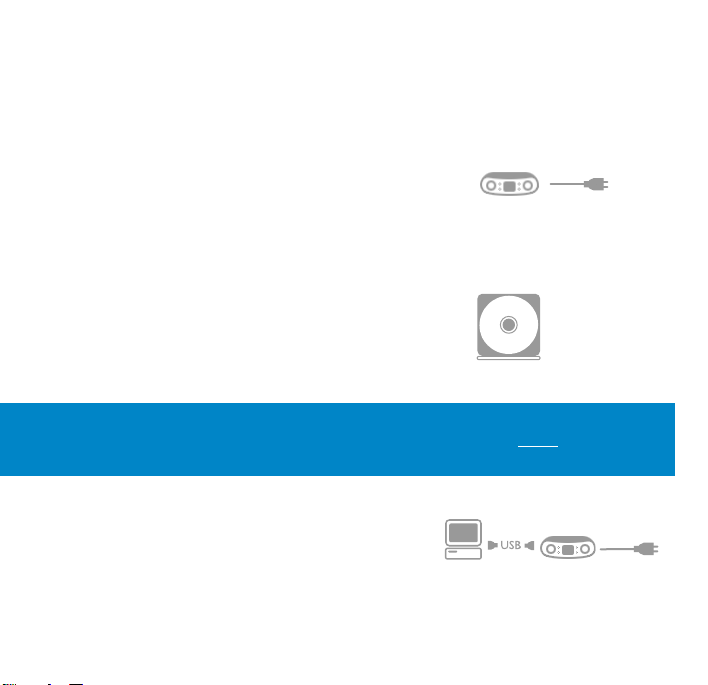
1 Charge
Open the connections cover at the back of your ShoqBox.
Connect the included multi-voltage adaptor / charger into the
jack marked 5V DC, and then plug the multi-voltage
adaptor / charger into a standard AC outlet.
Charge 1 hour for fast charge or 4 hours for 100% batter y power.
(Battery life may vary according to use.)
2 Install music software
Insert the included CD into your PC's CD-ROM drive.
Follow screen instructions to complete installation.
ATTENTION! WINDOWS 98SE USERS:
To avoid installation problems, DO NOT CONNECT ShoqBox to the PC until AFTER
installation completes.
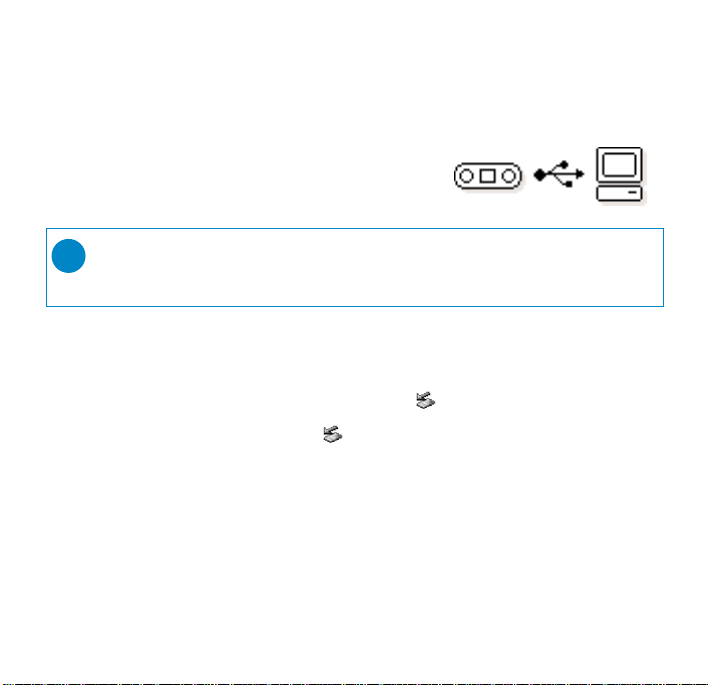
3 Connect
Connect your ShoqBox to your PC using the included
USB cable, with ShoqBox powered by included adapter.
The USB connection screen will automatically appear.
2
Page 4
4 Organize and Transfer Music
Launch your music software from Windows desktop or
Start menu. Organize your music. Transfer files from
your PC to your ShoqBox.
➯
TIP
Detailed information is given in selected music software’s Help.
5 Unplug /Eject
Exit your music software.
Disconnect ShoqBox safely from your PC by clicking on the
task bar to avoid file error.
(WINDOWS 98SE users: there is no icon.
Simply disconnect ShoqBox after file transfer completes.)
6 Immerse in your music everywhere you go
Press and hold 2; to switch on ShoqBox.
Use scroll controls to browse and press 2; to enjoy music!
3
Page 5
MENU
SOURCE
USB
RESET
LINE IN
5V DC
USB
RESET
LINE IN
5V DC
1
2
3
1010 1111
7
8
9
6
5
4
1212
y
4
Page 6

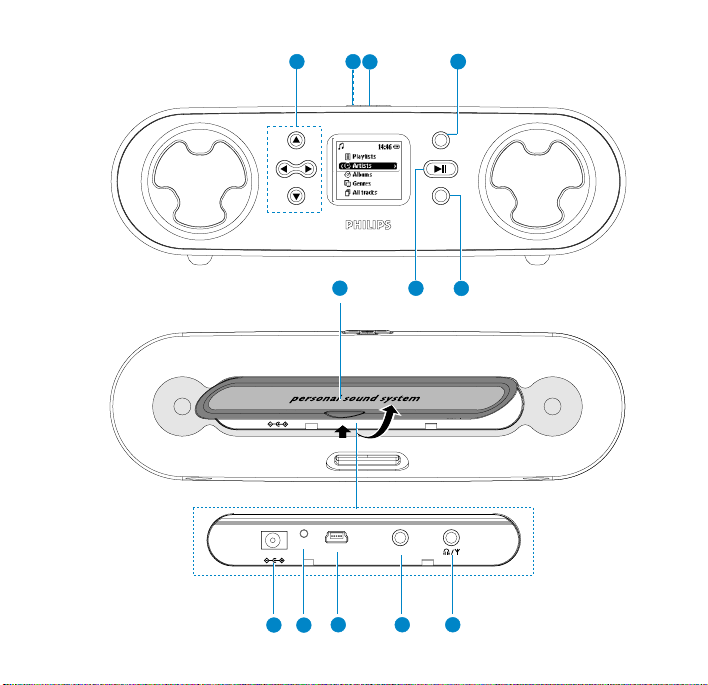
Overview of controls and connections
1 Navigation
3
Up / previous / fast search backwards
4
Down / next / fast search forwards
1
Left / return to previous menu or library levels
2
Right / confirm a menu setting
2 + / – Increases / decreases volume
3 DBB Enables or disables Dynamic Bass Boost to enhance bass tones
4 MENU For menu options
5 2; y On / off ; plays / pauses music; plays / stores a radio station
6 SOURCE Returns to root menu / displays playscreen or library options
7 Connections cover
8 5V DC Charger /adapter connection for power supply
9 Reset opening Press here to reset if the device “hangs” or “freezes”
0 USB USB cable connector
! LINE IN 3.5mm socket for audio cable: connects to LINE OUT
of auxiliary equipment
@ p
/
b 3.5mm jack for headphones (not included) or for
FM antenna (included)- if listening via speakers
5
Page 7

Included Accessories
1 x multi-voltage 5V AC/DC power adapter/charger
1 x CD-ROM with user manual, drivers, FAQ, music management softwares
1 x USB cable
1 x audio cable
1 x travel case
1 x pigtail FM antenna
1 x Quick Start
Switching your ShoqBox on / off
Power on: Press 2; for 2 seconds.
Power off: Press 2; again for 2 seconds or more.
➔ PHILIPS splash screen appears briefly.
Indication of power level
Low battery warning: appears when battery power is very low.
Please use the 5V adapter to recharge/ operate your ShoqBox, otherwise
ShoqBox enters the power shutdown mode within a minute.
Battery one-third full
Battery two-thirds full
Battery full
appears when charging batter y
appears when operating on adapter fully charged
6
Page 8
Auto power down
Your ShoqBox automatically switches off:
- if the set is left idle for a while (you can adjust the Auto Shutdown period, see Settings).
- if sleep timer is activated and the end of the timer period is reached.
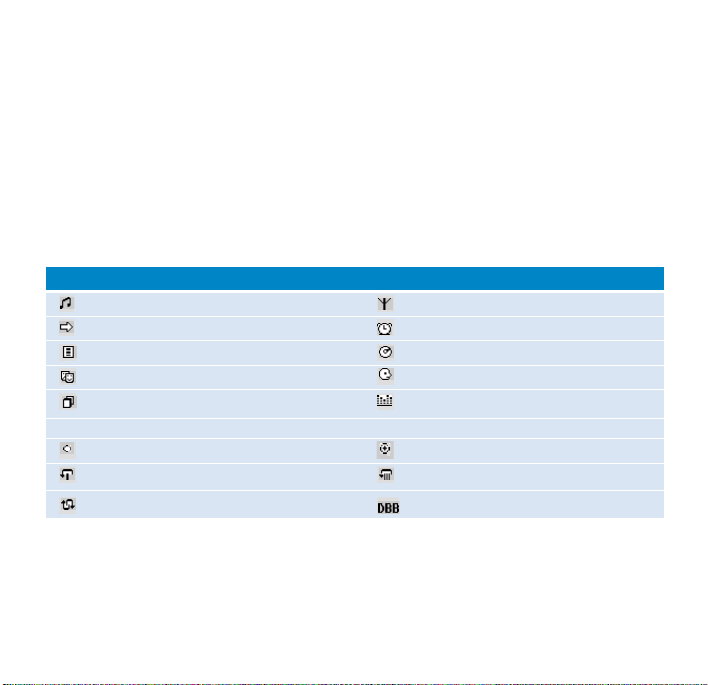
Understanding ShoqBox display
ShoqBox has an intuitive display to show various information:
Music mode Tuner mode
Line-in mode Alarm clock
Playlists Albums
Genres Ar tists
All tracks Equalizer
< Previous menu / library level available > Next menu / library level available
Option available for selection Option selected
Repeat 1 Repeat all
Shuffle
- Your ShoqBox shows a brief animation when an activity takes more than 2 seconds to perform.
- When you adjust volume, a brief volume adjustment screen is shown.
Dynamic Bass Boost selected
7
Page 9

Using ShoqBox controls
Troubleshooting Controls to press
Reset ShoqBox Press RESET OPENING with a small object for 2 seconds
Restore shoqbox Factory Settings Press MENU; scroll to Settings > Restore settings
Basic Operation Controls to press
Switch ShoqBox on / off Press and hold 2;
Select Music / Tuner / Line-in Press SOURCE to highlight and select
Enter/ exit the menu display Press MENU
Scrolling and browsing
Go to different levels of menu Press 2 for next and 1 for previous
Play music Highlight selection and press 2;
Pause music playback Press 2; during playback
Change volume Press VOLUME + / –
Fast forward in a track Press and hold
Rewind in a track Press and hold
Play next or previous track Press down 4for next and 3for previous
Tuning Press MENU to select ManualTuning or AutoTune
Play radio / preset a station Highlight selection and wait for 2 seconds
8
and select Yes.
3,4
, 1, 2 for up, down, left, right
4
3
in Radio mode
Page 10
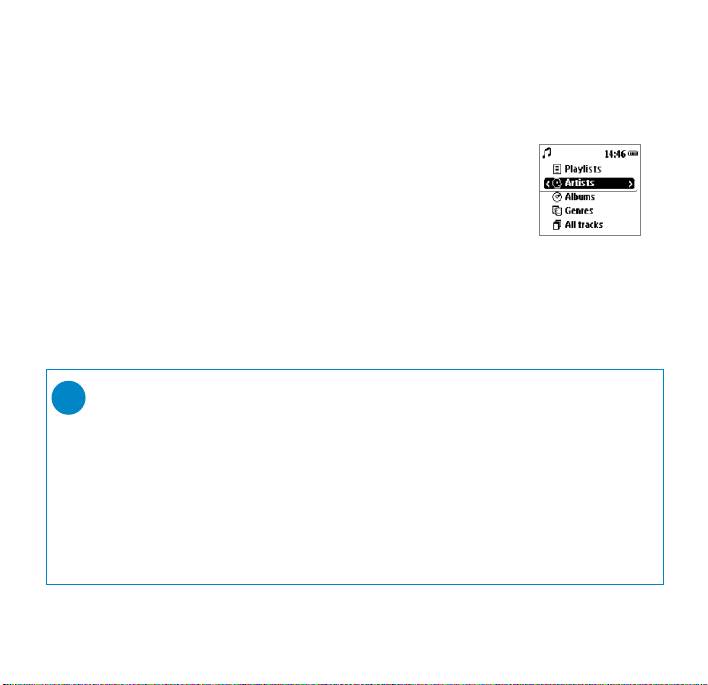
Music mode: playback
Once you have downloaded MP3/ WMA tracks from your computer
to the ShoqBox, you can access your music in 5 different ways on the
ShoqBox.
1 Press SOURCE and select MUSIC to enter the music mode.
2 Press
3 Press 2; to play or pause your selection.
3
to scroll up or 4to scroll down for your option.
Press 2 for next or 1 for previous levels of library.
➯
TIP
0 Please install the included software(s) and read the instructions.
0 During playback of Albums, tracks are sorted according to track number
sequence. Any tracks assigned with the same number will then be further
sorted alphabetically.
0 Select More Track Info in Settings ➔ [>] key shortcut. You can then press
2 from the playscreen to display track information e.g. track title, artist name,
codec (MP3 or WMA), bitrate, duration of track, album, genre.
9
Page 11

FM Radio mode
Insert the included pigtail antenna into the p / b jack, if you are listening via
the built-in speakers. Extend and position the antenna to improve reception.
Press SOURCE and select Radio to enter the radio mode.
Any recorded music playback will stop as you enter the radio mode.
Automatic tuning
1 Press MENU and select AutoTune to automatically select
the 10 strongest radio stations.
2 Press
Manual tuning
3
to scroll up or 4to scroll down for your preset.
TIP
➯
0 Available stations are stored as presets in order of decreasing signal strength.
0 AutoTune will overwrite all previously stored stations.
1 Press
3
to scroll up or 4to scroll down for your preset.
2 Press MENU and select ManualTuning.
Press and hold 4or 3to scan for the next / previous available station.
Press 4or 3to fine tune (tune step by step).
Press 2 to save your preset.
3 Press
10
3
to scroll up or 4to scroll down for your preset.
Let the cursor stay on your selection to play a preset station.
Page 12

Line-in Mode: for playback of external sources
You can use your ShoqBox to act as a powerful mini speaker.
1 Connect the included audio cable between LINE IN on ShoqBox to the
LINE OUT /p connection on your auxiliary equipment.
2 On ShoqBox, press SOURCE and select Line-in to enter the Line in mode.
3 Operate the controls on your auxiliary equipment to playback.
4 Adjust the volume on both ShoqBox and your device.
11
Page 13

Customizing settings
1 Press MENU for menu options. Press
for your option. Press 2 for next or 1 for previous levels of menu.
3
to scroll up or 4to scroll down
2 Press 2 to confirm your selection by checking .
3 Press MENU or 1 to exit the menu display.
Options for each setting are shown on ShoqBox's display.
Advanced settings and actions
Shuffle/Repeat Plays music tracks randomly (
Sleep timer Set the timer period to switch off
Equalizer Adjusts sound settings: Rock, HipHop, Jazz, Dance, Funk, Off.
Alarm clock Sets alarm clock (12-hour and 24-hour)
Settings Browse submenu options to fur ther customize your settings
[>] key shortcut
Display Adjusts Backlight options (5/10/30 seconds /Off ), Contrast level (1-6)
Auto shutdown Sets time for switching off
Time & Day Sets day and time allows AM/PM display in standby mode
Language Sets display language options
Information Display
Restore settings Restore Factory Settings
12
MUSIC mode
after 15, 30 or 60 minutes. (Default: off)
Adjusts 2key actions during playback
(30 seconds; 2 /5/10 minutes)
ShoqBox
firmware version.
device information. e.g. Device name, free memory space,
) and / or repeatedly (
Shuffle
ShoqBox
ShoqBox
automatically to save battery power
Repeat
) in
Page 14

About the clock and alarm features
The time is displayed using the 12-hour and 24-hour clock. 12-hour clock is the default option
During the alarm call, the current ShoqBox mode (e.g. music / radio / Line-in) will be interrupted.
The alarm will sound for 10 minutes in your selected alarm source mode and then enter the
"snooze" mode. The "snooze" alarm remains active and repeats the call at 10-minute
intervals, until you choose to cancel the alarm.
➯
TIP
0 For best results, we recommend you use the included adapter / charger to
operate ShoqBox. AC power will ensure adequate and steady power.
0 You will need to set both the clock time and date first, before you can
set the alarm options.
Setting day & time
1 In any mode, enter the menu: Settings ➔ Day and Time ➔ ....
2 Highlight the menu option you want to adjust.
3 Press 3 / 4 to adjust the day / hours / minutes.
13
Page 15

Setting the alarm
1 Enter the menu: Alarm Clock ➔ ....
2 Use the 3 / 4 , 1 / 2 controls to browse, scroll through, highlight and
select the submenu options
3 Press 3 / 4 to adjust the day / hours / minutes.
Submenu options
Alarm clock On / Off
Alarm time Adjusts the hours and minutes
Alarm Occurence Sets alarm activation according to sound once (default) / at the same
Alarm Source Selects alarm source from Music, Tuner or Buzzer.
➯
TIP
You can select your favourite song or radio as wake-up sound. In order to do so,
FIRST CHECK:
0 you have disconnected the headphones.
0 Radio: you have tuned properly to a station
0 Radio / Music: the volume has not been turned down too low!
0 Artist / Album: the next artist / album stored is selected if it has been deleted
from your ShoqBox. Buzzer option is the default alarm source if no artists and
albums are available on your ShoqBox.
14
time every 24 hours / weekdays only / once a week.
Page 16

Stopping the alarm
There are 2 ways to stop the alarm call:
"Snooze" (Repeat alarm)
0 During the 10-minute alarm call, press any button (on the top / front panels).
➔ Display shows: Cancel Alarm .
ShoqBox enters the "snooze" mode which repeats your alarm call every 10 minutes.
Disable "Snooze"
0 In the "snooze" mode, press any button again before the alarm call repeats.
➔ "Snooze” is disabled.
The alarm will sound again only according to the Alarm Occurrence setting.
➯
TIP
If you do not press any buttons to stop the alarm, ShoqBox by default enters the
"snooze" (repeat alarm) mode after 10 minutes.
15
Page 17

Using shoqbox as an external storage device
ShoqBox can be used as an external storage device for storage and transfer of any data files.
Note that music files transferred from the PC to ShoqBox via Windows Explorer will not
be able to play on shoqbox. Please always use included music software for music transfer.
1 Connect your ShoqBox to your PC using the included USB cable, with ShoqBox pow-
ered by included AC adapter. The USB connection screen will automatically appear.
2 On your PC, the ShoqBox is detected as a drive "Removable Disk" under "My
Computer" in Windows Explorer.
➯
TIP
0 During USB connection, we recommend that you always use the included power
adapter to avoid loss of data.
0 Always remove USB connection safely (see Step 5, page 3).
IMPORTANT!
PLEASE ENSURE THAT YOU RETAIN THE ORIGINAL FILES TRANSFERRED TO ShoqBox. PHILIPS IS
NOT RESPONSIBLE FOR ANY LOSS OF CONTENT IF THE PRODUCT BECOMES DAMAGED
OR THE MEMORY NOT READABLE.
16
Page 18

Troubleshooting
If a fault occurs, first check the points listed in the following pages. For fur ther help and other
troubleshooting tips, please also check out ShoqBox FAQ at www.philips.com/support.
If you are unable to find a solution by following these hints, consult your dealer or
service center.
WARNING:
Do not open the set as there is a risk of electric shock! Under no circumstances should you
try to repair the set yourself, as this will invalidate the warranty.
Q. My ShoqBox does not respond.
Should your ShoqBox "hang" or continues to display the busy icon indefinitely, use a pencil or
similar object to press the reset pinhole at the back of the set . File contents e.g. your songs
or downloaded files on your ShoqBox are not affected when resetting in this way.
Q. I can't play my music tracks.
ShoqBox can only play MP3 / WMA files transferred using the included software. ShoqBox
will not be able to play audio files that are not of these formats.
Q. ShoqBox switches off by itself.
This is a built-in safety measure to protect the unit from overheating, possibly caused by
overuse at too high volume, incorrect power voltage. Check voltage and use only the
included adapter/charger. Play at a sensible volume. Allow shoqBox to cool down before
using again. Alternatively, check the shutown menu setting. Change if necessary.
Q. My ShoqBox has short playback time.
Make sure ShoqBox battery is fully charged when you begin playback. Over time, the internal rechargeable battery will become weaker. It is replaceable. Please contact your nearest
Philips Service Center for a batter y replacement.
Q. No DBB during FM radio playback.
ShoqBox supports DBB only during music playback, but not during radio playback.
17
Page 19

Q. Poor fm reception.
Weak signal. Adjust the headphone cable or antenna. Battery weak. Switch over to
AC power.
Q. My ShoqBox shows this [file error] icon.
You have a file error: system files may be missing or there is a format error on
ShoqBox.To remedy, please connect ShoqBox to your PC with the included USB cable and
to the main power supply with the included adapter. Start Device Manager .
Q. How do I know which firmware version I have?
On your ShoqBox, you can check your firmware version from the menu options.
Scroll for MENU ➔ Settings ➔ Information to display FW vers:.
Q. How do I know how much free space I have?
On your ShoqBox, you can check your ShoqBox free space from the menu options.
Scroll for MENU ➔ Settings ➔ Information to display Free:.
Q.The alarm does not function
Clock date and time incorrect.
Check you have correctly set both the clock and alarm settings.
Alarm source/ occurrence not selected.
Check you have activated all the necessary alarm settings.
Battery power low. Use the AC adapter/charger to operate ShoqBox.
18
Page 20

Copyright information
0 Unauthorized duplication and distribution of Internet/CD recordings violate
copyright law and international treaties. You should use ShoqBox and the included
software for personal use only.
0 In the U.K and cer tain countries, the copying of material protected by
copyright may require the permission of the copyright holders.
Environmental information
All redundant packaging has been omitted. We have done our utmost to make the packaging
easily separable into four materials: cardboard, polystyrene foam, PET and polyethylene.
Your set consists of materials which can be recycled if disassembled by a specialized company.
Please observe the local regulations regarding the disposal of packaging, exhausted batteries
and old equipment.
Disposal of your old product
Your product is designed and manufactured with high quality materials and components, which
can be recycled and reused.
When this crossed-out wheeled bin symbol is attached to a product it means the
product is covered by the European Directive 2002/96/EC
Please inform yourself about the local separate collection system for electrical and
electronic products.
Please act according to your local rules and do not dispose of your old products with
your normal household waste. The correct disposal of your old product will help
prevent potential negative consequences for the environment and human health.
19
Page 21

Safety and maintenance
To get the most from your product, please also refer to the Safety &
Warranty booklet included with this device for important safety instructions.
About operating and storage temperatures
0 Operate ShoqBox in a place where the temperature is always between 0 and 35º C
(32 to 95º F).
0 Store ShoqBox in a place where the temperature is always between -20 and 45º C
(-4 to 113º F).
0 Battery life of ShoqBox may shorten in low temperature conditions.
0 Do not expose to excessive heat caused by heating equipment or direct sunlight.
0 When you are using ShoqBox, connecting it to your PC or charging the battery, it is
normal for ShoqBox to become warm.
Avoiding damage or malfunction
0 Backup your files. Please ensure that you retain the original files that you have down
loaded to ShoqBox. Philips is not responsible for any loss of content if the product
becomes damaged or not readable / legible.
0 Manage (transfer, delete, etc.) your files only through included music software
to avoid problems!
0 Do not drop ShoqBox or allow objects to fall on ShoqBox.
0 Do not allow ShoqBox to be submersed in water. Do not expose connection jacks
to water as water entering the set may cause major damage.
0 Clean ShoqBox with a slightly damp cloth. Don't use any cleaning agents containing
alcohol, ammonia, benzene or abrasives as these may harm the finishing on ShoqBox.
0 Active mobile phones in the vicinity may cause interference to the device.
20
Page 22

Using the power adapter / charger
0 Use only the AY3197/05 power adapter that came with ShoqBox. Adapters for other
electronic devices may look similar, but they may damage ShoqBox.
0 The only way to shut off power completely to your power adapter/charger is to
disconnect it from the power source.
0 Always leave space around your power adapter. Do not use this equipment in a location
where airflow around the power adapter is confined, such as a bookcase.
0 When connecting or disconnecting your power adapter, always hold the power adapter
by its sides. Keep fingers away from the metal part of the plug.
0 The power adapter for ShoqBox is a high-voltage component and should not be opened
for any reason, even when ShoqBox is off.
Using your headphones
0 Hearing safety
Listen at a moderate volume. Using headphones at high volume can impair your hearing.
Important (for models with bypacked headphones):
Philips guarantees compliance with the maximum sound power of its audio players as
determined by relevant regulatory bodies only with the original model of provided
headphones. In case this one needs replacement, we recommend that you contact your
retailer to order a model identical to that of the original provided by Philips.
0 Traffic safety
Do not use while driving or cycling as you may cause an accident.
0 Optimizing playback performance
We recommend to only use PHILIPS headphones for ShoqBox. Music volume and / or
quality is not guaranteed for other non-PHILIPS headphones.
21
Page 23

Technical Specifications
System
Output power:
Speaker 2 x 2W (4 Ω)
Earphone 2 x 4mW (16 Ω)
Frequency response 20 Hz - 20 kHz
THD 0.01%- 0.1%
Equalizer 6-band
Display Black / White 128 x 96 pixels
Connections Stereo headphone, Mini USB (B-type), 5V AC/DC adapter /
Battery Replaceable (by Philips service) 1600mAh Li-Ion
Storage PSS120: 512MB NAND Flash memory *
Supported playback format
MP3 8- 320 Kbps and VBR
WMA 32- 192 Kbps
Sample rates 8, 11.025, 16, 22.050, 32, 44.1, 48
ID3-tag support Yes
22
Backlight
White LED
charger input, FM antenna / stereo headphone, LINE IN
PSS110: 256MB NAND Flash memory *
* Actual formatted capacity of ShoqBox will be less
Page 24

PC Connectivity USB
File Transfer via Windows Explorer for data in general
Music Transfer via Musicmatch Jukebox for music playback
Power supply
5V AC adapter/charger AY3197/05
Built-in 1600mAh Lithium Ion (Li-Ion) rechargeable battery,
replaceable by a Philips Service Center
Battery playtime
10 hours using built-in rechargeable battery (4 hours fully charged, fast charge: 1 hour)
Battery life may vary according to use.
General
Dimensions 182 (W) x 58 (L) x 53 (H) mm
27.3 (W) x 2.3 (L) x 2 1(H) inch
Weight 350g (12.3oz)
PHILIPS reserves the right to make design and specification changes for
product improvement without prior notice.
Modifications not authorized by the manufacturer may void users authority
to operate this device.
All trademarks and registered trademarks are the property of their respective owners.
All rights reserved.
23
Page 25

Notice for the USA
Philips
PSS110
Note:
This equipment has been tested and found to comply with the limits for a Class B digital device, pursuant to
part 15 of the FCC Rules.These limits are designed to provide reasonable protection against harmful
interference in a residential installation.This equipment generates, uses, and can radiate radio frequency
energy and, if not installed and used in accordance with the instruction manual, may cause harmful
interference to radio communications.
However, there is no guarantee that interference will not occur in a particular installation. If this equipment
does cause harmful interference to radio or television reception, which can be determined by turning the
equipment off and on, the user is encouraged to try to correct the interference by one or more of the
following measures:
0 Relocate the receiving antenna.
0 Increase the separation between the equipment and receiver.
0 Connect the equipment into an outlet on a circuit different from that to which the
receiver is connected.
0 Consult the dealer or an experienced radio/ TV technician for help.
Philips
PSS120
Notice for Canada:
This Class B digital apparaatus complies with Canadian ICES-003.
The set complies with the FCC-Rules, Par t 15 and with 21 CFR 1040.10.
Operation is subject to the following two conditions:
1.This device may not cause harmful interference, and
2.This device must accept any interference received, including interference that may cause undesired
operation.
This product complies with the radio interference requirements of the European Union.
24
Page 26

About Musicmatch® Jukebox
With this award-winning software you can easily convert your CDs to MP3s, manage your digital music
collection and transfer music to your device.
Note:
Music that has not been transferred to your device using Musicmatch® Jukebox cannot
be played on your device.
About Device Manager
With Device Manager, you can update and restore your device with a few simple clicks.
Install Musicmatch® Jukebox and Device Manager
Insert the supplied CD into your computer’s CD-ROM drive.
1
2
Follow screen instructions to begin and complete installation.
Fill in necessary information when prompted to do so.
3
Launch Musicmatch® Jukebox
1
Connect your device to your computer using the supplied USB cable.
The USB connection screen will automatically appear.
✔
TIP
Please refer to your computer’s manual for the exact position of your USB port.
Look for the USB symbol on the processing unit of your computer.
Launch Musicmatch® Jukebox.
2
1
Page 27

1
6
7
The mainscreen
2
3
*Actual display varies with use
54
1
Pull down menus: to access various functions
2
Player window: shows track information and provides basic controls
3
Playlist window: shows playlist information
4
Text area: type your search criteria here
5
Resizing buttons: minimizes, maximizes / exit
6
Library screen: shows library information
7
Portable device: calls up Portable Device Manager
2
Page 28

*Actual display varies with use
Search and add tracks from all drives
(to the Library)
Musicmatch® Jukebox will find music files on your PC hard drive, or all hard drives available.
1
Go to the menu Options > Music Library > Search and Add Tracks From All Drives.
2
In the Look In field, choose All Drives (or any other preferred drives) to search for
music files. Check or uncheck other options and click OK to start searching.
3
Files will be added to the Library.
3
Page 29

*Actual display varies with use
Add Tracks to a Playlist by Drag and Drop
1
Click to highlight an item.
Drag the selection to the playlist window.
2
Your selection is now in the playlist. It will begin to play.
3
TIP
✔
Press and hold <Ctrl> on your keyboard and click to select more than one item.
To select consecutive items, click the first item, press and hold <Shift> on your
keyboard, and then click the last item.
4
Page 30

Delete Tracks and Playlists
1
Click to highlight an item.
2
Right click and select Remove tracks to delete.
3
Alternatively, press <Delete> on your keyboard to delete your selection.
TIP
✔
Press and hold <Ctrl> on your keyboard and click to select more than one item.
To select consecutive items, click the first item, press and hold <Shift> on your
keyboard, and then click the last item.
*Actual display varies with use
5
Page 31

Edit Track Information
1
Click on a track.
2
Right click and select Edit Track Info... for the Edit Track Info window.
3
Click on the text boxes to edit relevant information.
4
Click on OK to save the information. Click Cancel to discard changes made.
TIP
✔
You can also click the button in step 2.
*Actual display varies with use
6
Page 32

Search for Tracks
Type a search string in the Find field.
1
2
Click on Go to start searching.
3
You will see tracks that contain the search string.
4
You can transfer, delete or drag and drop these tracks.
*Actual display varies with use
7
Page 33

*Actual display varies with use
Send tracks and playlists to your device
Click on File > Send to portable device for the Portable Device Manager.
1
2
Drag and drop tracks and playlists into the Portable Device Manager. (Philips PSSxxx.
xxx=model number)
3
Your selection is now transferred to your device.
✔
TIP
You can transfer playlists directly to your device by clicking on the button
under the playlist window
For further details of Musicmatch® Jukebox, click Help > Musicmatch Jukebox Help.
8
Page 34

Upgrades
We know you will enjoy your product for a long time. For best performance, we recommend that
you regularly check in to www.philips.com for free upgrades of the latest software and firmware for
your product.
Firmware Upgrade
Your device is controlled by an internal program called firmware. You can download and install the latest
firmware to keep your device updated.
TIP
✔
Connect the included multi-voltage adaptor / charger into the jack marked 5V DC, and then
plug the multi-voltage adaptor / charger into a standard AC outlet. This will ensure steady
power supply for completing the whole process.
1
Download the latest Device Manager from www.philips.com/support. You may need
to key in the model number to obtain the upgrade files. Unzip the download
and install the application.
2
Connect your device to your computer (powered by the supplied AC/DC adapter if
applicable). Launch Device Manager from Start ➔ Program ➔ Philips ➔ xxx ➔
xxx. (xxx = model number)
3
In the main window, click Upgrade.
4
You will be prompted to disconnect your device from your computer as soon as
Device Manager finishes interacting with your device. Please safely remove your
device by clicking from your task tray.
5
Once the USB cable is disconnected, firmware restore will start automatically. The process
is complete when the device restarts and display the power up splash screen.
WindowsXP / Windows 2000 users:
Your device will be automatically disconnected as soon as Device Manager finishes
interacting with your device.
9
Page 35

Device Restore
Your device is controlled by an internal program called firmware. In case the firmware
files is corrupted, you may need to restore the device.
TIP
✔
Please charge your device fully before device restore. This will ensure steady power
supply for completing the whole process.
1
Connect your device to your computer (powered by the supplied AC/DC adapter if
applicable). Launch Device Manager from Start ➔ Program ➔ Philips ➔ xxx ➔
xxx. (xxx = model number)
WARNING !
All content and music will be erased!
Please back up all your files before device restore.
2
In the main window, click Restore. You will be prompted to disconnect your device from
your computer as soon as Device Manager finishes interacting with your device.
3
Please safely remove your device by clicking from your task tray.
4
Once the USB cable is disconnected, firmware restore will start automatically. The process
is complete when the device restarts and display the power up splash screen.
WindowsXP / Windows 2000 users:
Your device will be automatically disconnected as soon as Device Manager finishes
interacting with your device.
10
Page 36

Trademarks are the property of Koninklijke Philips Electronics N.V. or their respective owners.
Specifications are subject to change without notice.
2005 © Koninklijke Philips Electronics N.V. All rights reserved.
www.philips.com
3104 205 33172
Printed in China
 Loading...