

Philips PRV645 User Manual

Make your own DVD
Model
User Manual
645
DVD RECORDER
001-070_xRV645_Eng02 11/07/2005, 01:01 PM1
1
Important notes for users in the
U.K.
Mains plug
This apparatus is fitted with an approved 13
Amp plug. To change a fuse in this type of plug
proceed as follows:
1 Remove fuse cover and fuse.
2 Fix new fuse which should be a BS1362 5 Amp,
A.S.T.A. or BSI approved type.
3 Refit the fuse cover.
If the fitted plug is not suitable for your socket
outlets, it should be cut off and an appropriate
plug fitted in its place.
If the mains plug contains a fuse, this should
have a value of 5 Amp. If a plug without a fuse
is used, the fuse at the distribution board
should not be greater than 5 Amp.
Note: The severed plug must be disposed of to
avoid a possible shock hazard should it be
inserted into a 13 Amp socket elsewhere.
How to connect a plug
The wires in the mains lead are coloured with
the following code: blue = neutral (N),
brown = live (L).
¶ As these colour s may not correspond with the
colour markings identifying the terminals in
your plug, proceed as follows:
– Connect the blue wire to the terminal
marked N or coloured black.
– Connect the brown wire to the terminal
marked L or coloured red.
– Do not connect either wire to the earth
terminal in the plug, marked E (or e) or
coloured green (or green and yellow).
Before replacing the plug cover, make cer tain
that the cord grip is clamped over the sheath
of the lead - not simply over the two wires.
CAUTION
Use of controls or adjustments or
performance of procedures other
than herein may result in hazardous
radiation exposure or other unsafe
operation.
CAUTION
VISIBLE AND INVISIBLE LASER
RADIATION WHEN OPEN AVOID
EXPOSURE TO BEAM
ADVARSEL
SYNLIG OG USYNLIG
LASERSTRÅLING VED ÅBNING
UNDGÅ UDSÆTTELSE FOR STRÅLING
VARNING
SYNLIG OCH OSYNLIG
LASERSTRÅLNING NÄR DENNA DEL
ÄR ÖPPNAD BETRAKTA EJ STRÅLEN
VARO!
AVATTAESSA OLET ALTTIINA
NÄKYVÄLLE JA NÄKYMÄTTÖMÄLLE
LASER SÄTEILYLLE. ÄLÄ KATSO
SÄTEESEEN
VORSICHT
SICHTBARE UND UNSICHTBARE
LASERSTRAHLUNG WENN
ABDECKUNG GEÖFFNET NICHT DEM
STRAHL AUSSETSEN
ATTENTION
RAYONNEMENT LASER VISIBLE ET
INVISIBLE EN CAS D’OUVERTURE
EXPOSITION DANGEREUSE AU
FAISCEAU
Copyright in the U.K.
Recording and playback of material may
require consent. See Copyright Act 1956 and
The Performer’s Protection Acts 1958 to 1972.
2
001-070_xRV645_Eng02 11/07/2005, 01:01 PM2
For Customer Use:
Read carefully the information located at
the bottom or rear of your DVD Recorder
and enter below the Serial No. Retain this
information for future reference.
Model No. DVD RECORDER 645
Serial No. _______________

LASER
Type Semiconductor laser
InGaAlP (DVD)
AIGaAs (CD)
Wave length 658 nm (DVD)
790 nm (CD)
Output Power 30 mW (DVD+RW write)
1.0 mW (DVD read)
1.0 mW (CD read)
Beam divergence 84 degrees (DVD)
61 degrees (CD)
This product complies
with the radio
interference
requirements of the European
Community.
Manufactured under license from
Dolby Laboratories. “Dolby” and the
double-D symbol are trademarks of
Dolby Laboratories.
English
This product complies with
the requirements of the
following directives and
guidelines: 73/23/EEC +
89/336/EEC + 93/68/EEC
001-072_xRV645_Eng_15522 12/07/2005, 09:30 AM3
3
3139 246 13454

Notes
4
001-070_xRV645_Eng02 11/07/2005, 01:01 PM4
Special Functions
Your DVD recorder has a number of special functions that will make day-to-day use of
your new DVD recorder easier for you.
Using the ‘Digital Photo
Manager’, you can view and
modify JPEG pictures from a
Picture CD, DVD, or a CD ROM.
You can create slide shows and
play them on a DVD player
This function automatically
transfers all the television
channel settings onto your DVD
recorder via the scart cable
(EXT1 TO TV-I/O socket).
At the touch of a button, your
DVD recorder will check which
channel is currently playing on
your television set and record it
even if it is in Standby mode.
This product incorporates
copyright protection technology
that is protected by method
claims of certain US patents and
other intellectual property
rights owned by Macrovision
Corporation and other rights
owners. Use of this copyright
protection technology must be
authorized by Macrovision
Corporation, and is intended
for home and other limited
viewing uses only unless
otherwise authorized by
Macrovision Corporation.
Reverse engineering or
disassembly is prohibited.
(U.S. Patent Number 4,631,603,
4,577,216, 4,819,098 and
4,907,093, 5,315,448 and
6,516,132.)
English
001-070_xRV645_Eng02 11/07/2005, 01:01 PM5
5

Table of Contents
English
Special Functions ................................... 5
Care and Safety Information
Setup .............................................................. 8
Cleaning discs............................................... 8
About recycling ........................................... 8
General Information
Introduction ................................................. 9
Accessories supplied .................................. 9
Region codes ................................................ 9
Connecting to TV
General ........................................................ 10
Selecting a suitable connection
to your TV ................................................... 10
Setting the TV to the correct video in
channel ......................................................... 10
Option 1 : Using SCART socket ............ 11
Option 2 : Using S-Video (Y/C) socket 12
Option 3 : Using Video (CVBS) socket . 13
Connecting to Additional
Devices
Using second SCART socket
(EXT2-AUX-I/O) ...................................... 14
Connecting a Cable Box/Decoder ........... 14
Connecting a VCR/DVD player ................. 14
Connecting a camcorder to the
front sockets ..............................................15
Using S-VIDEO In or VIDEO In socket ... 15
Using analogue audio output sockets ... 16
Using digital audio output socket .......... 16
Front Panel................................................. 17
Sockets behind the flap ............................... 17
Remote Control ............................. 18-19
Inserting batteries ..................................... 20
Using the remote control to
operate the system .................................... 20
Using the alphanumeric keypad to
enter the characters .................................. 20
Installing the DVD Recorder
First Installation ................................... 21-22
TV channel programming ........................ 23
Automatic TV channel search .................... 23
Sorting TV channels according to
TV sequence .......................................... 23-24
Sorting the TV channels .............................. 24
Setting favourite TV channels ..................... 25
Manual TV channel search .................... 25-26
Allocating a decoder .................................... 26
Fine tuning the TV channels ....................... 27
Setting the time and date ........................ 27
Setting the language .................................. 28
Playback
Playable discs .............................................. 29
Inserting a disc ...........................................29
Starting disc playback ............................... 30
Playing a DVD video disc ............................ 30
Playing a (Super) Video CDs ....................... 30
Playing an audio CDs ................................... 30
Playing a DVD+R(W)................................... 31
Playing an MP3 CD ....................................... 31
Playing a picture disc (slide show) ............ 31
Supported JPEG picture formats .............. 31
Additional Playback Features
Using Toobal options ................................ 32
Changing subtitle language ......................... 32
Changing audio soundtrack language ....... 33
Switching camera angles.............................. 33
Zooming in ..................................................... 33
Time search ................................................... 33
Changing to another title/chapter/track34
Searching forwards/backwards............... 34
Pausing playback / slow motion play ..... 34
Selecting various play mode.................... 35
Repeat play ..................................................... 35
Repeating a specific segment (A-B) .......... 35
Shuffle play...................................................... 35
Scan disc ......................................................... 35
6
001-070_xRV645_Eng02 11/07/2005, 01:01 PM6

Table of Contents
Recording
Discs for recording ................................... 36
Recording settings..................................... 36
Recording mode ........................................... 37
Recording language ...................................... 37
Inserting chapter markers .......................... 37
Direct record function ................................ 38
Filter mode..................................................... 38
Manual recording................................. 38-39
Manual recording with automatic
turn-off (One Touch Recording) ............ 39
Direct recording........................................ 40
Deleting a recording................................. 40
Timer Recording
Introduction ............................................... 41
Programming recordings ...................41-42
Programming recording from a
Cable Box ....................................................... 42
Changing a programmed recording ...... 43
Deleting a programmed recording........ 43
Editing/Finalising Recording
About editing ............................................. 44
Colour coded buttons functions .............. 44
Index Picture screen .................................... 44
Changing the disc/title name .................. 45
Making the editing compatible
(DVD+RW) ................................................ 45
Playing your recording on other DVD
players (DVD+R) ....................................... 45
Video editing .............................................. 46
Hiding unwanted chapter ........................... 46
Editing chapter (merge/split/hide)............. 47
Editing title (divide/append/
index picture) .......................................... 47-48
Deleting chapter markers ........................... 48
Photo editing .............................................. 49
Using the Browser
Browsing the disc ...................................... 49
Colour coded buttons functions .............. 49
Browsing the picture disc.................... 50
Adding pictures to an album ...................... 50
Changing the picture order within
an album ....................................................... 51
Deleting an album ......................................... 51
Deleting picture in an album ...................... 51
Changing the slide show settings .............. 52
Protecting the recorded title
(DVD+RW) ................................................ 52
System Menu - Preferences
Accessing to the Preferences options .. 53
Recording ....................................................... 53
Sound .............................................................. 53
Disc .................................................................. 54
Access ............................................................. 54
Features .......................................................... 54
System Menu - Setup
Accessing to the Setup options ............. 55
System ....................................................... 55-56
Time-date ....................................................... 56
Analogue channels ........................................ 56
Video output............................................ 56-57
Audio output ................................................. 57
Language ......................................................... 57
Setting Access Control
About Access Control ............................. 58
Setting or changing the pin code ...........58
Activating/Deactivating the child lock .. 58
Authorising discs .......................................... 59
Troubleshooting ............................. 60-63
Display panel symbols/
messages................................................ 64-65
English
001-070_xRV645_Eng02 11/07/2005, 01:01 PM7
Glossary ......................................................... 66
Specifications ...........................................67
TV System Guide.......................... 70-71
7

Care and Safety Information
English
CAUTION!
High voltage! Do not open.
You run the risk of getting an
electric shock.
The machine does not contain any
user-serviceable parts. Please leave
all maintenance work to qualified
personnel.
Setup
Finding a suitable location
– Place the set on a flat, hard and stable
surface. Do not place the set on a carpet.
– Do not position the set on top of
other equipment that might heat it up
(e.g., receiver or amplifier).
– Do not put anything under the set
(e.g., CDs, magazines).
– Install this unit near the AC outlet and
where the AC power plug can be reached
easily.
Space for ventilation
– Place the apparatus in a location with
adequate ventilation to prevent internal
heat build up. Allow at least 10 cm (4.5”)
clearance from the rear and the top of
the set and 5cm (2.3”) from the left and
right to prevent overheating.
5cm (2.3")
10cm (4.5")
10cm (4.5")
Cleaning discs
Some problems occur because the disc
inside the recorder is dirty (frozen
picture, sound disruptions, picture
distortions). To avoid these problems,
discs should be cleaned on a regular
basis.
To clean a disc, use a micro fibre cleaning
cloth and wipe the disc from the center
to the edge in a straight line.
CAUTION!
Do not use solvents such as benzene,
thinner, commercially available cleaners,
or anti-static sprays intended for discs.
Since the optical unit (laser) of the DVD
recorder operates at a higher power than
regular DVD or CD players, cleaning CDs
intended for DVD or CD players may
damage the optical unit (laser). Therefore,
refrain from using a cleaning CD.
About recycling
These operating instructions have been
printed on non-polluting paper. This
electronic equipment contains a large
number of materials that can be recycled.
If you are disposing of an old machine,
please take it to a recycling centre.
Please observe the local regulations
regarding disposal of packaging materials,
exhausted batteries, and old equipment.
5cm (2.3")
Avoid high temperatures, moisture,
water and dust
– Apparatus shall not be exposed to
dripping or splashing.
– Do not place any sources of danger on
the apparatus (e.g., liquid filled objects,
lighted candles).
8
001-070_xRV645_Eng02 11/07/2005, 01:28 PM8

General Information
Introduction
Your DVD recorder allows you to record
the TV programmes or duplicate
camcorder recordings to a DVD+RW or
DVD+R and play pre-recorded DVDs.
The recordings you make on the
Recorder will play on some DVD players
and DVD-ROM drives. The DVD+R discs
have to be finalised before they can be
played on other DVD players.
Please take the time to read this user
manual before using your DVD recorder.
It contains important information and
notes regarding operation.
Helpful Hints:
– If you have questions or if problems come
up during operation, please see the chapter
'Troubleshooting'.
– If you need further assistance, please call
the customer support service for your
country. The corresponding telephone
numbers and e-mail addresses are given in
the guarantee booklet.
– Refer the type plate on the rear or buttom
of the product for indentification and supply
rating.
Accessories supplied
– Remote control and batteries
– Scart cable
– Antenna cable
– Quick Use Guide
Region codes
DVD films are usually not released at the
same time in all regions of the world, thus
all DVD players/recorders are keyed to a
specific region code.
This device will only play
Region 2 DVDs or DVDs
manufactured to be played in all
regions ('ALL'). DVDs from other
regions cannot be played on this
DVD recorder.
ALL
2
English
001-070_xRV645_Eng02 11/07/2005, 01:28 PM9
9

Connecting to TV
English
General
The necessary cable connections must be
made before you can record or playback
TV programmes using your DVD
recorder.
Selecting a suitable connection to
your TV
When you install your DVD recorder for
the first time, select
options to connect the DVD recorder
and your TV.
● Option 1: Using Scart socket
Select this if your TV is equipped with a
scart socket. It provides the best picture
quality (see pages 11).
● Option 2: Using S-Video (Y/C)
socket
Select this if your TV is equipped with a
S-Video (SVHS) socket. It provides
excellent picture quality (see page 12).
● Option 3: Using Video (CVBS)
socket
Select this if your TV is equipped with a
Video (CVBS) socket. It provides good
picture quality (see page 13).
one of the following
Setting the TV to the correct video
in channel
1 Press STANDBY-ON 2 on the DVD
recorder to turn it on.
2 Turn on the TV and set it to the correct
video-in channel. You should see the blue
DVD background screen or the first
installation screen on the TV.
➜ Usually this channel is between the
lowest and highest channels and may be
called FRONT, A/V IN, VIDEO. See your
TV’s manual for more details.
➜ Or, you may go to channel 1 on your
TV, then press the Channel down button
repeatedly until you see the Video In
channel.
➜ Or, the TV remote control may have a
button or switch that chooses different
video modes.
IMPORTANT!
When you complete the connections
and turn on the DVD recorder for
the first time, you must complete
the First Installation. This set up TV
channels, menu languages and other
features (see pages 21-22).
10
001-070_xRV645_Eng02 11/07/2005, 01:01 PM10

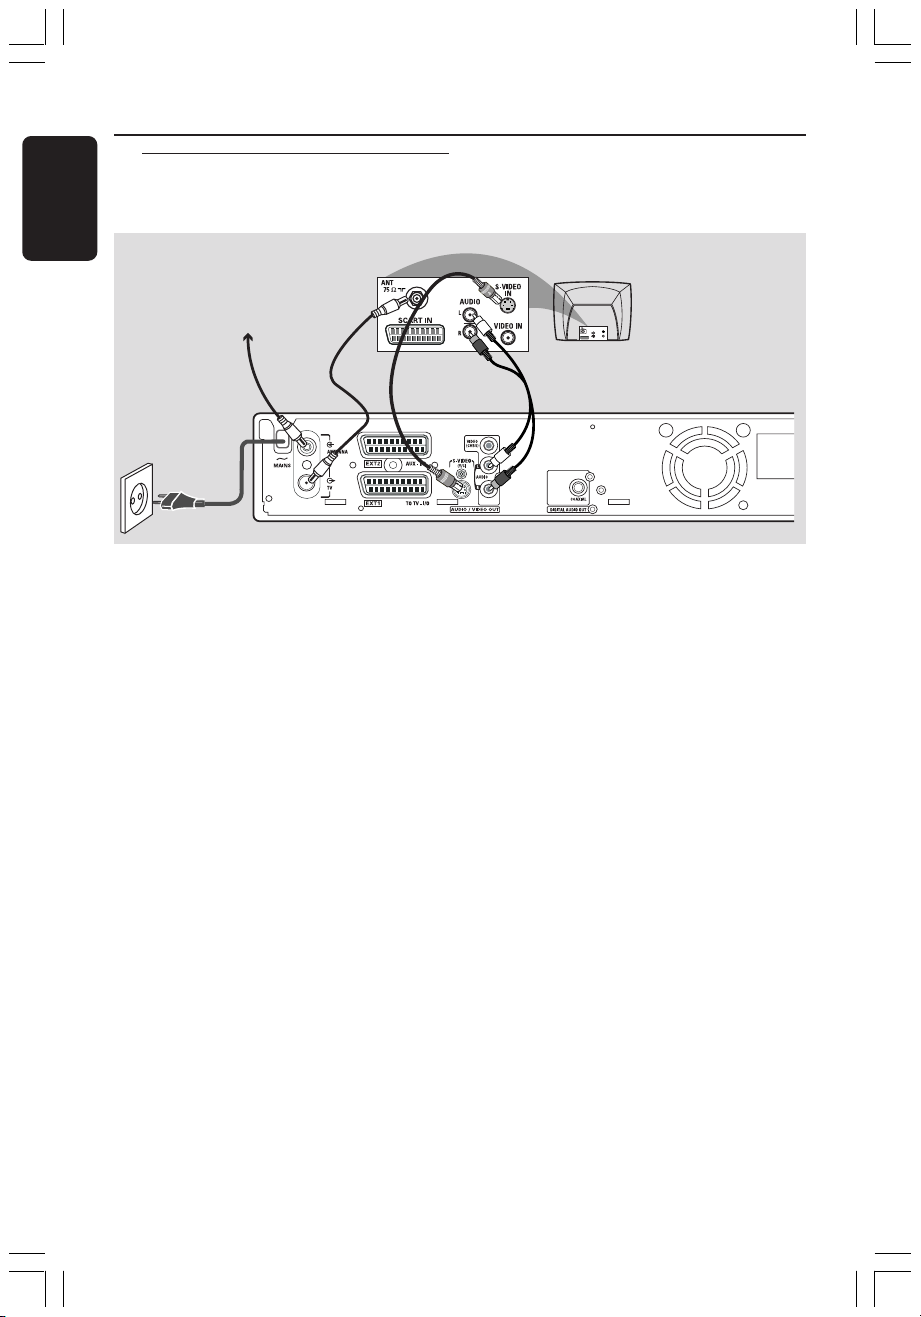
Option 1: Using SCART
socket
Antenna or
Satellite/Cable TV signal
Connecting to TV (cont’d)
TV
S-VIDEO
IN
AUDIO
OUT
VIDEO IN
SCART IN
English
1
2
4
The scart or Euro AV cable serves as the
universal connector for picture, sound
and control signals. With this type of
connection, there is practically no loss of
quality in picture or sound transmission.
Have the following cables ready:
1) Antenna cable
2) SCART cable
1 Turn off your TV and remove the antenna
cable from your TV (or Satellite Receiver/
Cable Box). Insert it into the
ANTENNA IN socket at the back of
the DVD recorder.
2 Use the supplied antenna cable to
connect the DVD recorder’s TV OUT
socket to the antenna input socket at the
back of your TV set.
3 Use a SCART cable to connect the DVD
recorder’s EXT 1 (TO TV-I/O) socket
to the SCART socket at the back of your
TV set.
4 Connect the power cable from the DVD
recorder’s ~ MAINS to the power
supply.
3
5 Press STANDBY-ON 2 on the DVD
recorder to turn it on.
➜ The message 'IS THE TV ON?'
appears on the display panel.
6 Turn on the TV power.
➜ If the connection has properly made,
your TV will automatically turn on to the
Video Input channel for the SCART
socket and you should see the
{ Language and Country } menu
appears on the TV.
➜ If not, select the correct Video In
channel at the TV manually until you see
the { Language and Country } menu.
7 Proceed to page 21 to continue the first
installation.
Helpful Hints:
– If your TV set has several SCART sockets,
select the SCART socket that is suitable for
both video output and video input.
– If your TV set displays a selection menu for
the SCART socket, select 'VCR' as the source
for the SCART socket.
– The EXT 2 AUX-I/O socket is intended
only for additional devices.
001-070_xRV645_Eng02 11/07/2005, 01:01 PM11
11
Connecting to TV (cont’d)
English
Option 2: Using S-Video
(Y/C) socket
Antenna or
Satellite/Cable TV signal
1
2
5
This connecting cable, also known as the
SVHS cable, is used to transmit the
brightness signal (Y signal) and colour
signal (C signal) separately. This mini DIN
socket is also called a Hosiden jack.
Have the following cables ready:
1) Antenna cable
2) S-Video (SVHS) cable (not supplied)
3) Audio cables (red/white, not supplied)
1 Turn off your TV and remove the antenna
cable from your TV (or Satellite Receiver/
Cable Box). Insert it into the
ANTENNA IN socket at the back of
the DVD recorder.
2 Use the supplied antenna cable to
connect the DVD recorder’s TV OUT
socket to the antenna input socket at the
back of your TV set
3 Use an S-Video (SVHS) cable to connect
the DVD recorder’s S-VIDEO (Y/C)
OUT socket to the S-Video In socket at
the back of your TV set (or labelled as
S-Video In or SVHS).
TV
S-VIDEO
IN
AUDIO
OUT
VIDEO IN
SCART IN
34
4
Use an audio cable (red/white) to
connect the DVD recorder’s
AUDIO L/R OUT socket to the audio
input socket at the back of your TV set
(or labelled as AV In or Audio In).
5 Connect the power cable from the DVD
recorder’s ~ MAINS to the power
supply.
6 Press STANDBY-ON 2 on the DVD
recorder to turn it on.
➜ The message 'IS THE TV ON?'
appears on the display panel.
7 Turn on the TV power. Select the correct
Video In channel at the TV (see page 10).
➜ The first installation menu
{ Language and Country } will appear
on the TV.
8 Proceed to page 21 to continue the first
installation.
12
001-070_xRV645_Eng02 11/07/2005, 01:01 PM12

Option 3 : Using Video
(CVBS) socket
Connecting to TV (cont’d)
English
Antenna or
Satellite/Cable TV signal
1
2
5
This cable, usually featuring yellow cinch
plugs, is used for transmitting the
Composite Video signal (FBAS, CVBS). In
this method of transmission, the colour
signal and the brightness signal are
transmitted on the same cable.
Have the following cables ready:
1) Antenna cable
2) Video (CVBS) cable (yellow, not supplied)
3) Audio cables (red/white, not supplied)
1 Turn off your TV and remove the antenna
cable from your TV (or Satellite Receiver/
Cable Box). Insert it into the
ANTENNA IN socket at the back of
the DVD recorder.
2 Use the supplied antenna cable to
connect the DVD recorder’s TV OUT
socket to the antenna input socket at the
back of your TV set.
3 Use a video (CVBS) cable to connect the
DVD recorder’s VIDEO (CVBS) OUT
socket to the Video In socket at the back
of your TV set (or labelled as Video In, AV
In or Composite).
TV
S-VIDEO
IN
AUDIO
OUT
VIDEO IN
SCART IN
4
4
3
Use an audio cable (red/white) to
connect the DVD recorder’s
AUDIO L/R OUT socket to the audio
input socket at the back of your TV set
(or labelled as AV In or Audio In).
5 Connect the power cable from the DVD
recorder’s ~ MAINS to the power
supply.
6 Press STANDBY-ON 2 on the DVD
recorder to turn it on.
➜ The message 'IS THE TV ON?'
appears on the display panel.
7 Turn on the TV power. Select the correct
Video In channel at the TV (see page 10).
➜ The first installation menu
{ Language and Country } will appear
on the TV.
8 Proceed to page 21 to continue the first
installation.
001-070_xRV645_Eng02 11/07/2005, 01:01 PM13
13

Connecting to Additional Devices
English
Using second SCART socket
(EXT2-AUX-I/O)
Cable Box/Decoder/
VCD/DVD player
You can connect a video cassette
recorder (VCR), DVD player, decoder,
satellite receiver or cable box to
EXT 2 AUX-I/O socket at the back of
the DVD recorder.
When playback is started on this
additional device, the DVD recorder will
automatically send the video/audio signals
from EXT 2 AUX-I/O socket to
EXT 1 TO TV-I/O socket. You will then
see the picture from the additional device
on your TV, even if the DVD recorder is
turned off (only if you have connected
your TV via EXT 1 TO TV-I/O socket,
see page 11).
Connecting a Cable Box/Decorder
If your Cable Box/Decorder has a scart
socket, you can choose to connect it to
the second scart socket.
1 Use a scart cable to connected the
Cable Box/Decoder scart socket (usually
labelled as ‘TV’ or ‘TO TV ’) to
EXT 2 AUX-I/O socket at the back of
the DVD recorder.
2 Select the TV channels to be received by
the Cable Box directly on the receiver
itself.
Connecting a VCR/DVD player
You will need this connection if you want
to record the video tapes or discs to a
DVD+R(W)s.
● Use a scart cable to connect the scart
socket (usually labelled as ‘SCART OUT’
or ‘TO TV’) of the VCD/DVD player to
EXT 2 AUX-I/O socket.
● Alternatively, you can choose to connect
via the front sockets of the DVD
recorder if your VCR/DVD player have
the same output sockets.
➜ Before you start operating, select
‘CAM1’ as the input channel. For
recording, see pages 38~39.
To switch between playback from
the additional devices and playback
from the DVD recorder
● Press TV/DVD on the remote control.
14
001-070_xRV645_Eng02 11/07/2005, 01:01 PM14
1) Connect to S-VIDEO input socket
and AUDIO L/R input sockets.
OR
2) Connect to VIDEO input socket and
AUDIO L/R input sockets.
Helpful Hint:
– Most prerecorded video cassettes and
DVDs are copy-protected. If you try to copy
them, the message 'COPY PRO' appears on
the display panel.

Connecting Additional Devices (cont’d)
Connecting a camcorder to
the front sockets
S-VIDEO OUT
OR
1
VIDEO OUT
AUDIO OUT
L
2
R
English
You can use the front sockets to copy
camcorder recordings. These sockets are
located behind the flap on the right hand
side.
Using S-VIDEO In or VIDEO In
socket
Use S-VIDEO connection if you have a
Hi8 or S-VHS(C) camcorder. It provides
very good picture quality.
Alternatively, you can use VIDEO
connection if your camcorder has only a
single video output (Composite Video,
CVBS). It provides good picture quality.
1 Use a S-video cable to connect the DVD
recorder’s S-VIDEO input socket to the
appropriate S-VHS output socket on the
camcorder.
OR
Use a video cable (yellow) to connect the
DVD recorder’s VIDEO input socket to
the appropriate video output socket on
the camcorder.
2 Use an audio cable (red/white) to
connect the DVD recorder’s
AUDIO L/R input socket to the audio
output socket on the camcorder.
Before you start operating, select ‘CAM1’
as the input channel.
For recording, see pages 38~39.
001-070_xRV645_Eng02 11/07/2005, 01:01 PM15
15
Connecting to Additional Devices (cont’d)
English
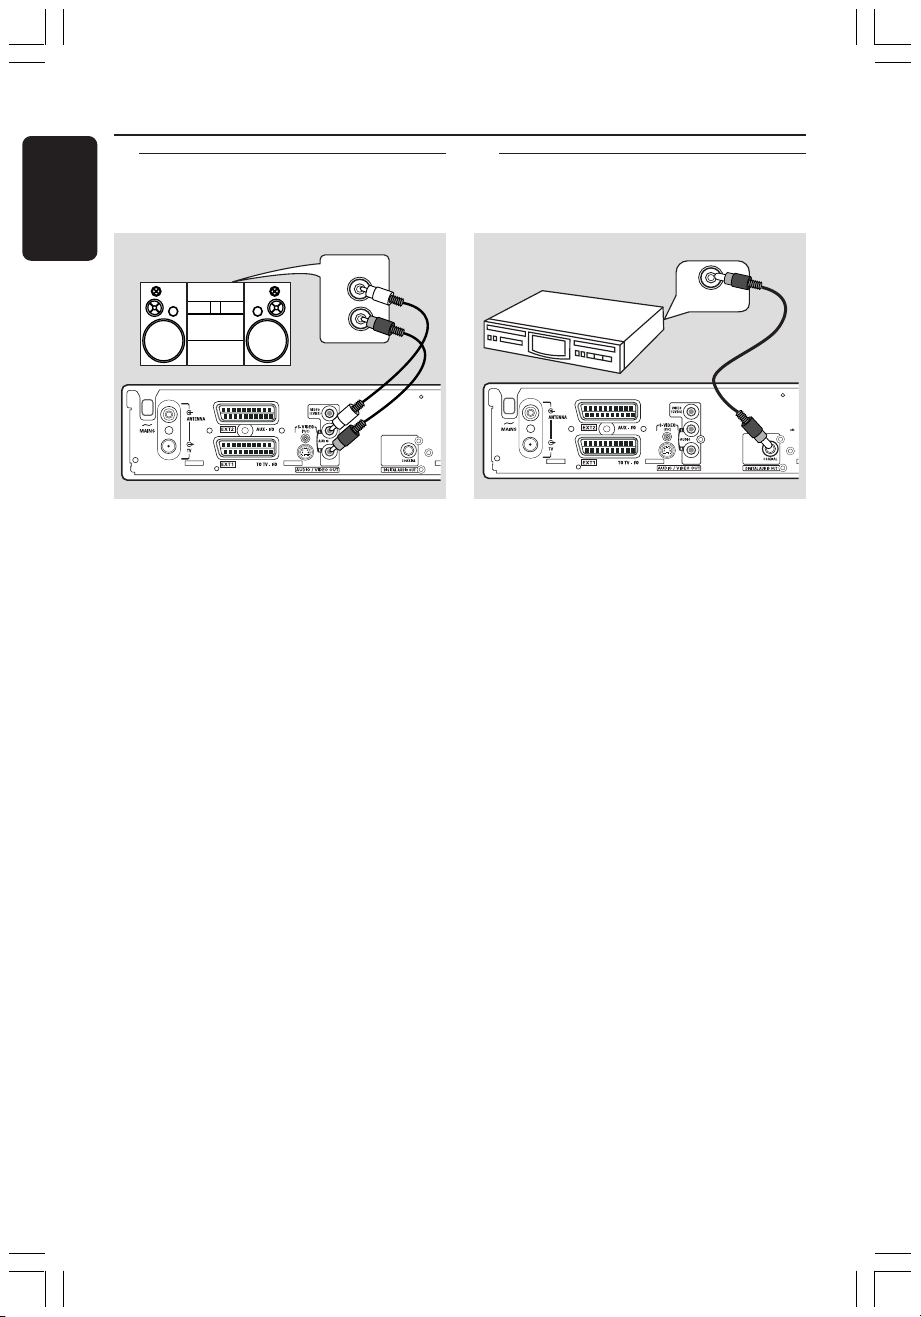
Using analogue audio output
sockets
STEREO
You can connect the DVD recorder to a
two channel stereo system or receiver in
order to enjoy the stereo sound system.
● Use an audio cable (red/white) to
connect AUDIO L/R (red/white) to one
of the following devices :
– a stereo system (for example, mini
system or TV)
– a receiver with Dolby Surround Pro Logic
– a receiver with two channel analogue
stereo
Before you start operating, set the
Analogue Output accordingly (see page
53). Choose a sound mode setting that is
most compatible with the connected
devices.
AUDIO IN
L
R
Using digital audio output
socket
DIGITAL IN
You can connect the DVD recorder to a
A/V receiver or amplifier in order to
enjoy the home theatre system’s
surround sound capabilities.
● Use a coaxial cable to connect COAXIAL
to one of the following devices :
– an A/V receiver or an A/V amplifier with a
digital multi-channel sound decoder
– a receiver with two channel digital stereo
(PCM)
Before you start operating, set the Digital
Output accordingly (see page 57). If the
Digital Output setting does not match
your stereo’s capabilities, the stereo may
produce a strong, distorted sound or no
sound at all.
CAUTION!
Do not use the ‘Phono’ input on an
amplifier to connect to the DVD
recorder. This input socket is designed
only for record players without
preamplifiers. The DVD recorder or the
amplifier may be damaged as a result.
16
001-070_xRV645_Eng02 11/07/2005, 01:01 PM16
Helpful Hints:
– Digital multi-channel sound offers the best
possible sound quality. You will need a multichannel A/V receiver or amplifier that
supports at least one of the audio formats of
the DVD recorder (MPEG2, Dolby Digital).
See your receiver’s manual to find out which
audio formats it supports.
– Playback in six-channel digital surround
sound is only possible if the receiver has a
digital multi-channel sound decoder.
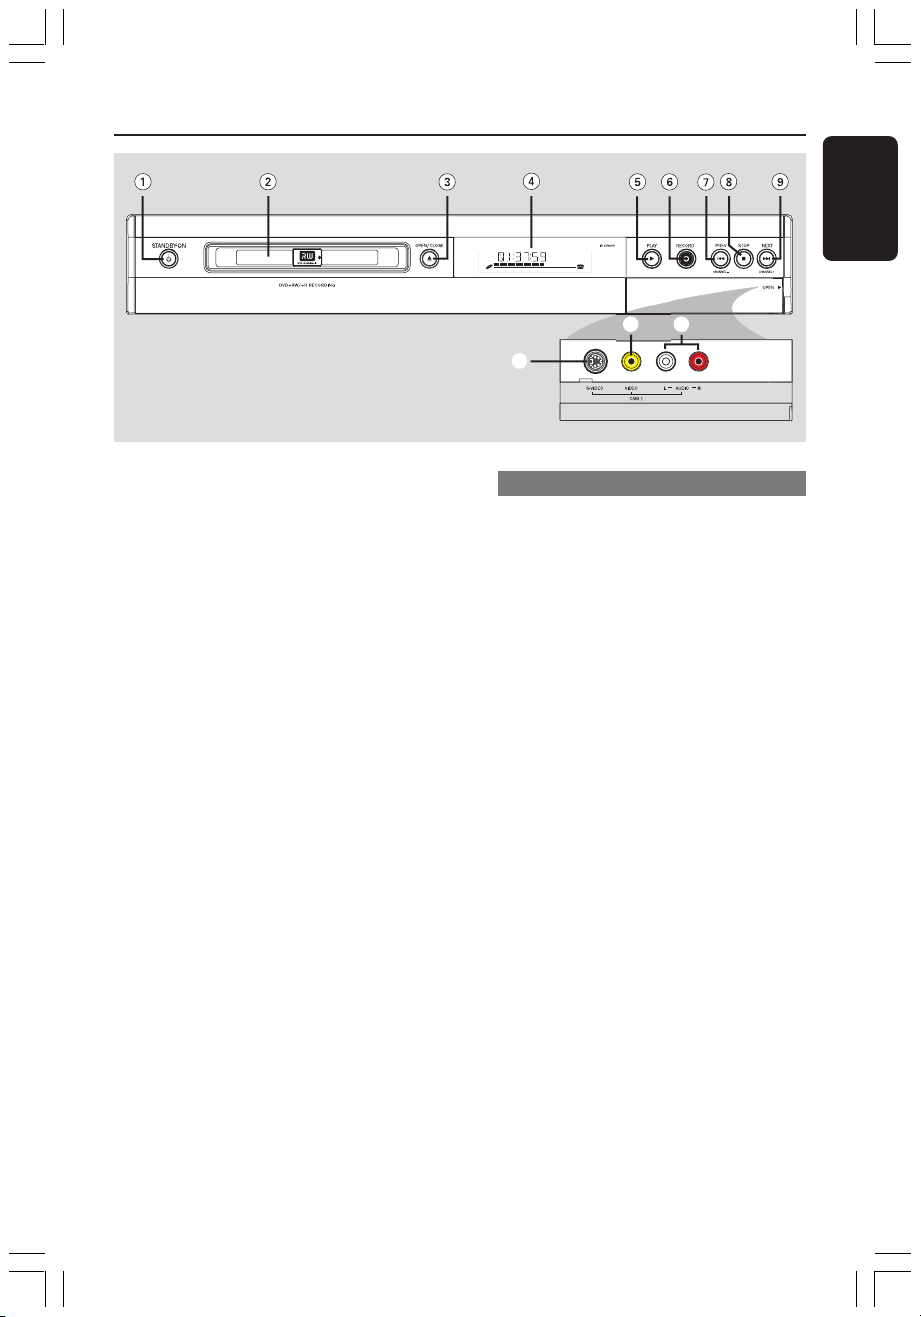
0
Front Panel
!
@
English
1 STANDBY-ON 2
– Turn on or off the DVD recorder.
2 Disc tray
3 OPEN/CLOSE ç
– Open or close the disc tray.
4 Display panel
– Show information about the current
status of the DVD recorder.
5 PLAY 2
– Play a disc.
6 RECORD 0
– Start recording the current TV channel or
the current video input source.
7 PREV ∞ (CHANNEL
– Go to the previous chapter/track, do a
reverse search, or go to the previous
channel.
--
-)
--
8 STOP 9
– Stop playback/recording.
9 NEXT § (CHANNEL
– Go to the next chapter/track, do a
forward search, or go to the next
channel.
++
+)
++
Sockets behind the flap
Flip down the door as indicated by the
OPEN 2 label at the right hand corner.
0 S-VIDEO
– S-video input for SVHS/Hi8 camcorders
or SVHS/Hi8 video recorders (input
channel number 'CAM 1').
! VIDEO
– Video input for camcorders or video
recorders (input channel number
'CAM 1').
@ L/R AUDIO
– Audio input for camcorders or video
recorders (input channel number
'CAM 1').
001-070_xRV645_Eng02 11/07/2005, 01:01 PM17
17
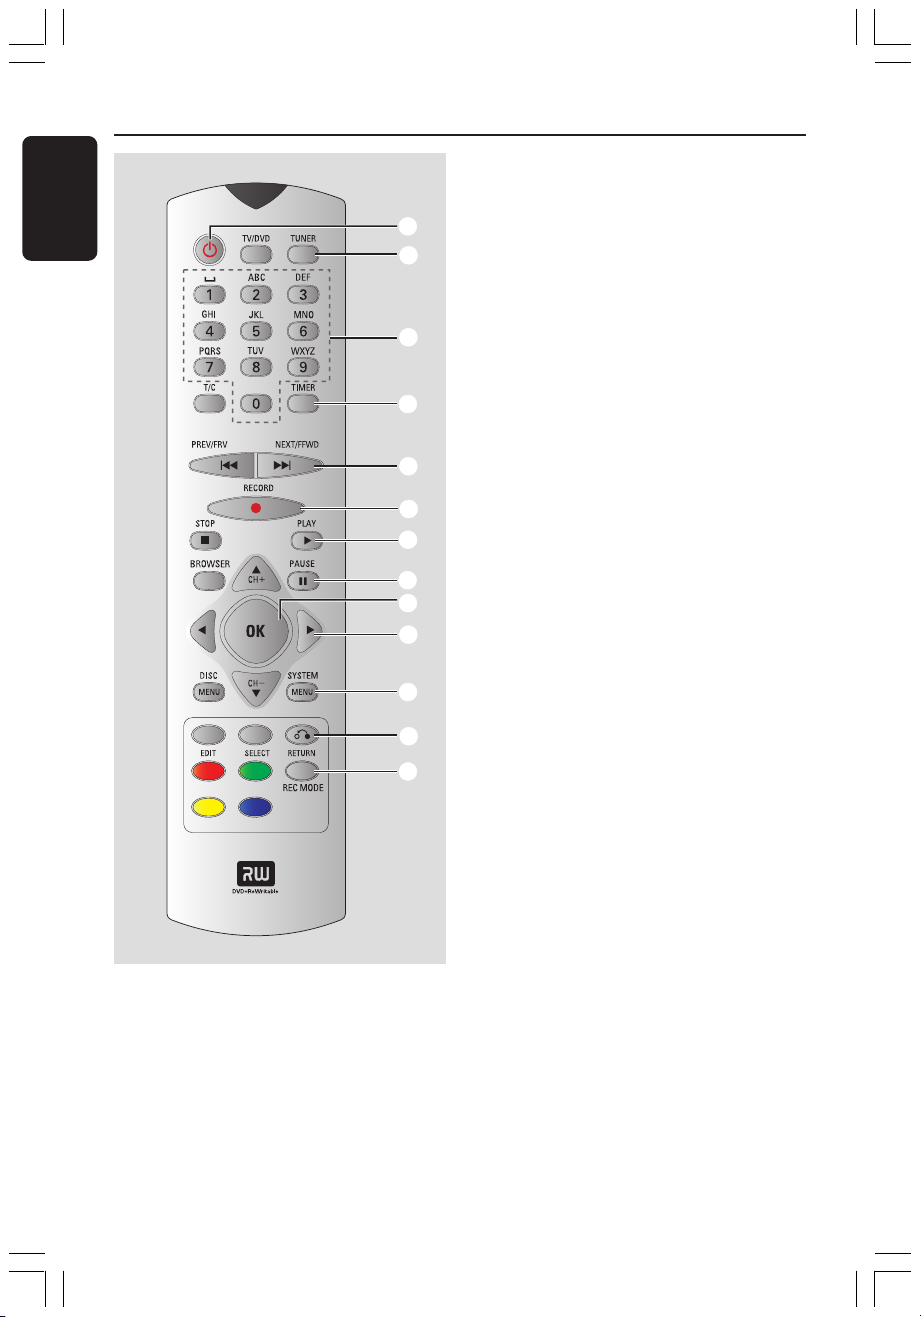
Remote Control
English
1 STANDBY-ON 2
– Turn on or off the DVD recorder.
2 TUNER
– Switch to TUNER mode.
1
2
3
4
5
6
7
8
9
0
!
@
#
3 Alphanumeric keypad
– Enter numbers or letters in appropriate
entry fields.
– Select a chapter/track number to play.
– Select a TV channel while in internal
tuner mode.
4 TIMER
– Access or exit the timer recording menu.
5 ∞ §
– Skip to previous or next Chapter/Track.
– Holding down the button for fast reverse
or fast forward function.
6 RECORD 0
– Start recording the current TV channel or
the current video input source.
7 PLAY 2
– Play a disc.
8 PAUSE ;
– Pause the playback or recording.
– Press repeatedly to advance a paused
picture one frame at a time.
9 OK
– Store or confirm an entry.
0 1 2: Cursor buttons for moving to the
left or right.
34: Cursor buttons for moving up/down
or change TV channel at the recorder in
TUNER mode.
! SYSTEM-MENU
– Access or exit the system menu.
@ RETURN
– Return to the previous menu on a video
CD (VCD) or some DVDs.
# REC MODE
– Select a recording speed : M2, M2x, M3,
M4, M6 or M8. This determines the
quality of the recording and the amount/
length of time you can record on a
DVD+R(W.)
18
001-070_xRV645_Eng02 11/07/2005, 01:01 PM18

$ TV/DVD
– Switch between the DVD recorder and
the antenna signal. This function operates
when the DVD recorder is connected to
the TV with only an antenna cable.
% T/C (Title/Chapter)
– Select a 'T'(title)/'C'(chapter) directly on
the menu bar.
^ STOP 9
– Stop playback/recording.
– Holding down the button will open and
close the disc tray.
& BROWSER
– Display the on-screen Media Browser
that allows you to browse through and
manage the contents stored in the
current disc.
* DISC-MENU
– Access to DVD’s disc menu or Index
Picture screen of a DVD+R(W.)
( SELECT
– Select a function.
– Toggle between upper and lower case
characters while using the alphanumeric
keypad.
) EDIT
– Access or exit the edit menu.
Remote Control (cont’d)
English
$
%
^
&
*
(
)
¡
¡ Color coded buttons
– A number of functions are available via
the color coded button. These functions
are displayed in the bottom of the onscreen menu wherever applicable.
001-070_xRV645_Eng02 11/07/2005, 01:01 PM19
19
ABC
JKL
TUV
Remote Control (cont’d)
English
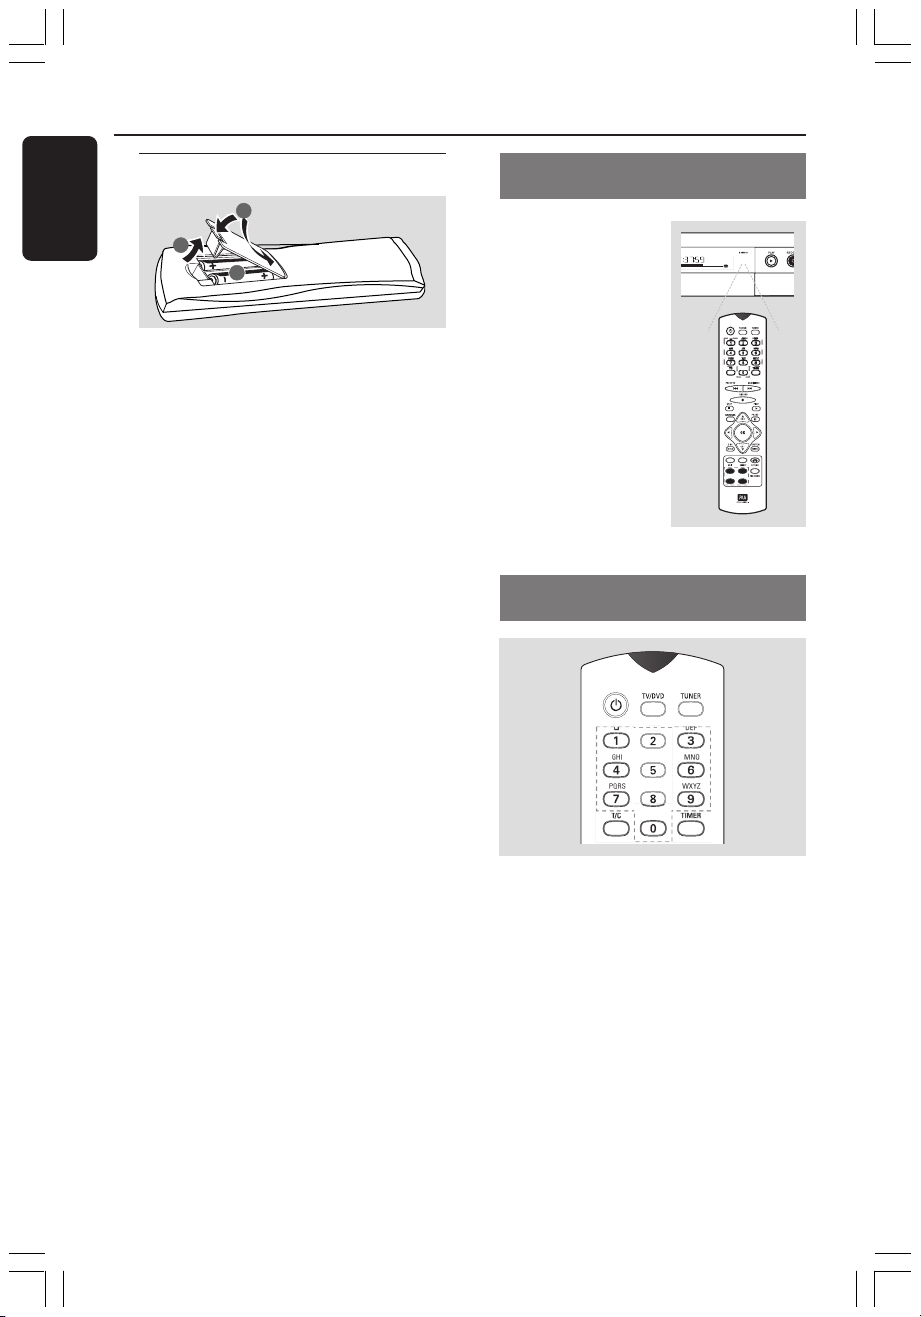
Inserting Batteries
3
1
2
1 Open the battery compartment.
2 Insert two batteries type R03 or AAA,
following the indications (+-) inside the
compartment.
3 Close the cover.
Caution!
– Remove batteries if they are
exhausted or if the remote control
is not to be used for a long time.
– Do not mix batteries (old and new
or carbon and alkaline, etc.).
– Batteries contain chemical
substances, so they should be
disposed of properly.
Using the remote control to
operate the system
1 Aim the remote
control directly at the
remote sensor (iR) on
the front panel.
2 Select the source you
wish to control by
pressing one of the
source select buttons
on the remote control
(for example TUNER,
TV).
3 Then select the
desired function (for
example S, T).
Using the alphanumeric keypad to
enter the characters
– Press a number button as often as the
required character or the number
appears.
– To enter language-dependent characters,
press ∞ or § on the corresponding
character.
– To enter a space, press button {1}.
20
001-070_xRV645_Eng02 11/07/2005, 01:02 PM20
TV FORMAT
Select your TV format
TV Format
Done
4:3 Panscan
4:3 Letterbox
16:9
CHANNEL SEARCH
Automatic channel search will find and
store all channels. Make sure to connect
the antenna.
Search channels
Skip Search
Start
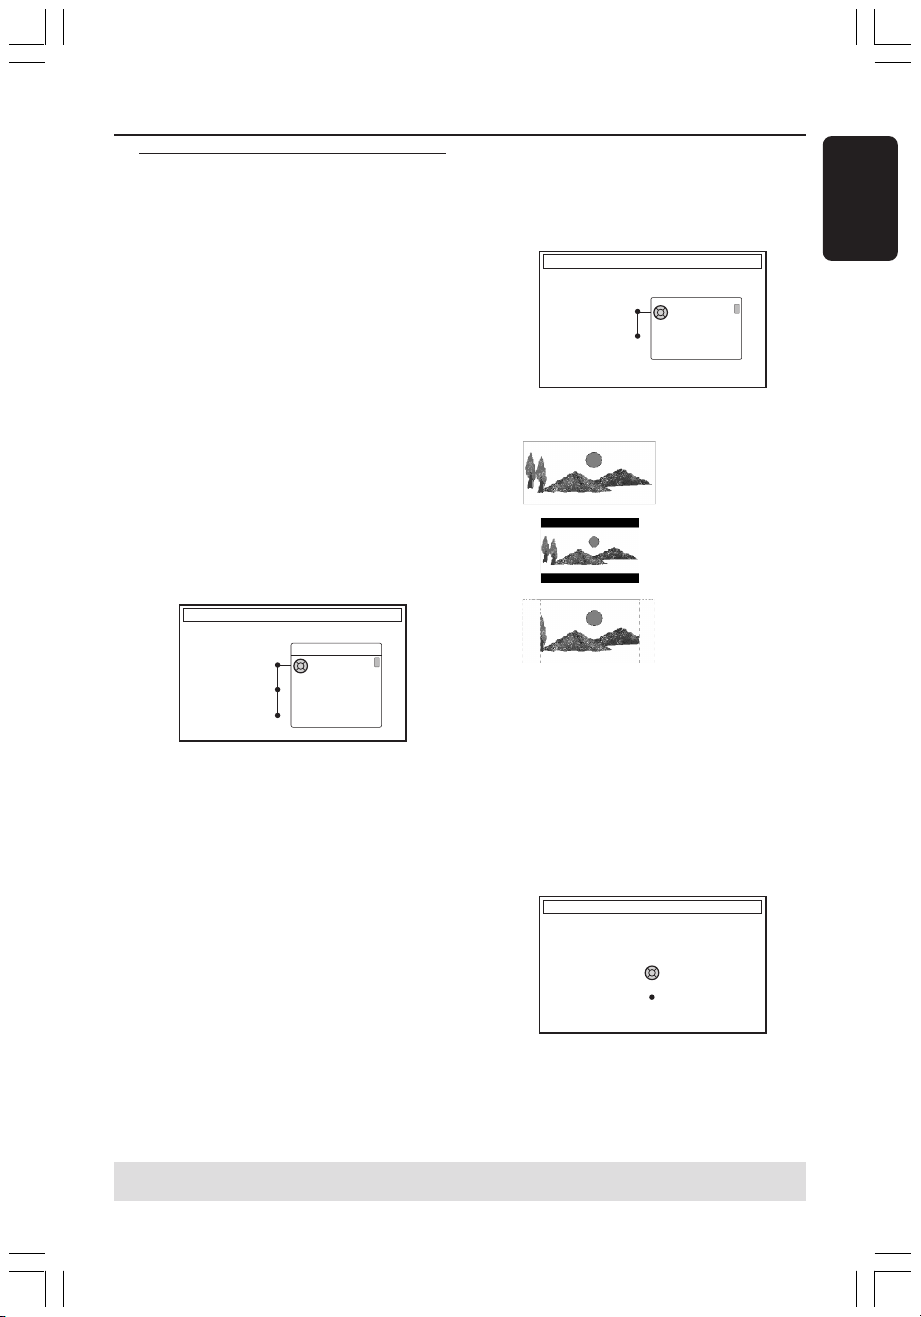
Installing the DVD Recorder
First Installation
The First Installation menu will appear
the very first time you turn on the DVD
recorder. These settings will help you set
up the basic DVD recorder features
easily, including TV channels and language
options.
IMPORTANT!
– You have to turn on your TV and
select the correct Video In channel
to see the First Installation menu.
– You have to complete the First
Installation before start operating
the DVD recorder.
1 Press STANDBY-ON 2 to turn on the
DVD recorder.
➜ The { Language and Country }
menu appears on the TV.
LANGUAGE AND COUNTRY
Select Language and Country
Language
Country
Done
Menu
English
Spanish
French
2 Select { Language } and press 2.
3 Press 3 4 to select the desired language
for the on-screen display (OSD) menu,
then press 1 to confirm.
4 Press 4 to select { Country } and press
2 to enter the selection field.
5 Press 3 4 to select the country of your
residence, then press 1 to confirm.
6 Press 4 to select { Done } and press OK
to confirm.
➜ The { TV Format } menu appears on
the TV.
7 Select { TV Format } and press 2.
16:9
4:3 Letterbox
4:3 Panscan
8 Press 3 4 to select the desired TV
screen format, then press 1 to confirm.
➜ The format you selected will only be
used if you insert a DVD that contains
the same format.
9 Press 4 to select { Done } and press OK
to confirm.
➜ The { Channel Search } menu
appears on the TV.
English
TIPS: Press OK to exit the first installation menu.
Press RETURN to go back to previous menu item.
001-070_xRV645_Eng02 11/07/2005, 01:02 PM21
21
Installing the DVD Recorder (cont’d)
English
Note: Make sure you have successfully
made all the required connections to the
DVD recorder, the TV and Satellite
Receiver/Cable Box (if any) and switched
them on. The automatic channel search
will detect the signals and save all the
available programme channels.
0 Press OK again to start automatic TV
channel search.
➜ The automatic search may take 15
minutes.
! When TV channel search complete, press
OK to continue.
➜ The { Time and Date } menu appears
on the TV.
TIME AND DATE
Check time and date and correct if
necessary
Time
Date
Done
09:00
26.06.2004
OK
" Check if the information on the menu is
correct.
➜ If required changes, follow steps 4~8
of “Setting the time and date” on page 27.
§ Press 4 to select { Done } and press OK
to save the changes.
➜ The first installation is now complete.
➜ The first tuned TV channel appears.
Helpful Hints:
– If the DVD recorder cannot find any TV
stations, select programme number {1} on
the TV set or check the cable connection
from the antenna socket to the DVD
recorder and TV set.
– If the sound or picture is distorted on any
of the stored TV channels, see pages 23~27
“TV channel programming” for manual TV
search or fine-tuning.
The DVD recorder is ready for use!
TIPS: Press OK to exit the initial installation menu.
Press RETURN to go back to previous menu item.
22
001-070_xRV645_Eng02 11/07/2005, 01:02 PM22
 Loading...