

Philips Pronto NG Owners manual

Table of Contents
Taking a First Look 3
Pronto: The Home Theater Control Panel 3
The Device 4
The Touch Screen 6
What’s New for Pronto Next Generation? 7
Before You Start 8
Placing the Batteries 8
Getting Started 9
Turning on Pronto 9
Setting the Contrast 9
Setting Time and Date 10
Changing the Time Format 10
Changing the Time 10
Changing the Date 11
Operating Pronto 12
Device Overview 12
Page Overview 13
Customizing Pronto 14
Using the Tools 14
Defining the Brand for a Device 14
Learning Commands 19
Labeling Elements 21
Adding Devices 23
Deleting Elements 25
Moving Devices 26
Adjusting the Settings 27
Setting the Timeout of the LCD Screen 27
Setting the Timeout of the LCD Backlight 28
Setting the Switch Level of the Light Sensor 28
Setting the Volume Level 28
Setting the Animation Mode 29
Operating Pronto with the Cursor 29
Calibrating the Touch Screen 29
User Guide
Using the Power Features 30
Creating and Editing Macros 30
Creating a Macro 30
Editing a Macro 32
Operating Pronto with the Cursor 33
Operating Pronto with RF 34
Selecting RF to Operate your Devices 35
Selecting IR to Operate your Devices 36
1
Table of Contents
ProntoEdit 37
FAQ 38
Troubleshooting 40
General Problems 40
Customizing Problems 40
Storage Problems 41
Pronto error messages 41
Maintaining Pronto 42
Important Notices 42
Cleaning Pronto 42
List of Symbols 43
Specifications 46
Glossary 47
Index 50
Copyright 52
User Guide
2

Taking a First Look
Pronto: The Home Theater Control Panel
Pronto is a Home Theater Control Panel that allows maximum flexibility and
customization for even the most sophisticated home entertainment system.
It can control almost any device that understands infrared (IR) remote control
signals. Its intuitive interface makes it a perfect remote control for every user.
Pronto is easy to configure. It contains a huge universal database where IR codes
are stored to control different brands for all kinds of video, audio devices and even
home automation equipment. By default Pronto is set up to control Philips or
Marantz devices. For other brands you simply choose the brands of your devices
when you use Pronto for the first time.
Pronto offers you some extra powerful features:
■ You can create and edit macros, allowing you to send a series of commands
with one single touch.
■ You can choose to have Pronto working with radio frequency (RF) signals to
operate devices from a distance or from an adjacent room. To do this, you
need an optional RF Extender that converts Pronto RF signals into IR signals.
With ProntoEdit software you can create your own screens and define a personal
look. ProntoEdit’s Online Help system (accessible via the ‘Help’ icon in ProntoEdit)
will guide you through the process. You can find ProntoEdit on the included
CD-ROM and on the Philips website www
See “ProntoEdit” on page 37 for more information.
.pronto.philips.com.
User Guide
3

Taking a First Look
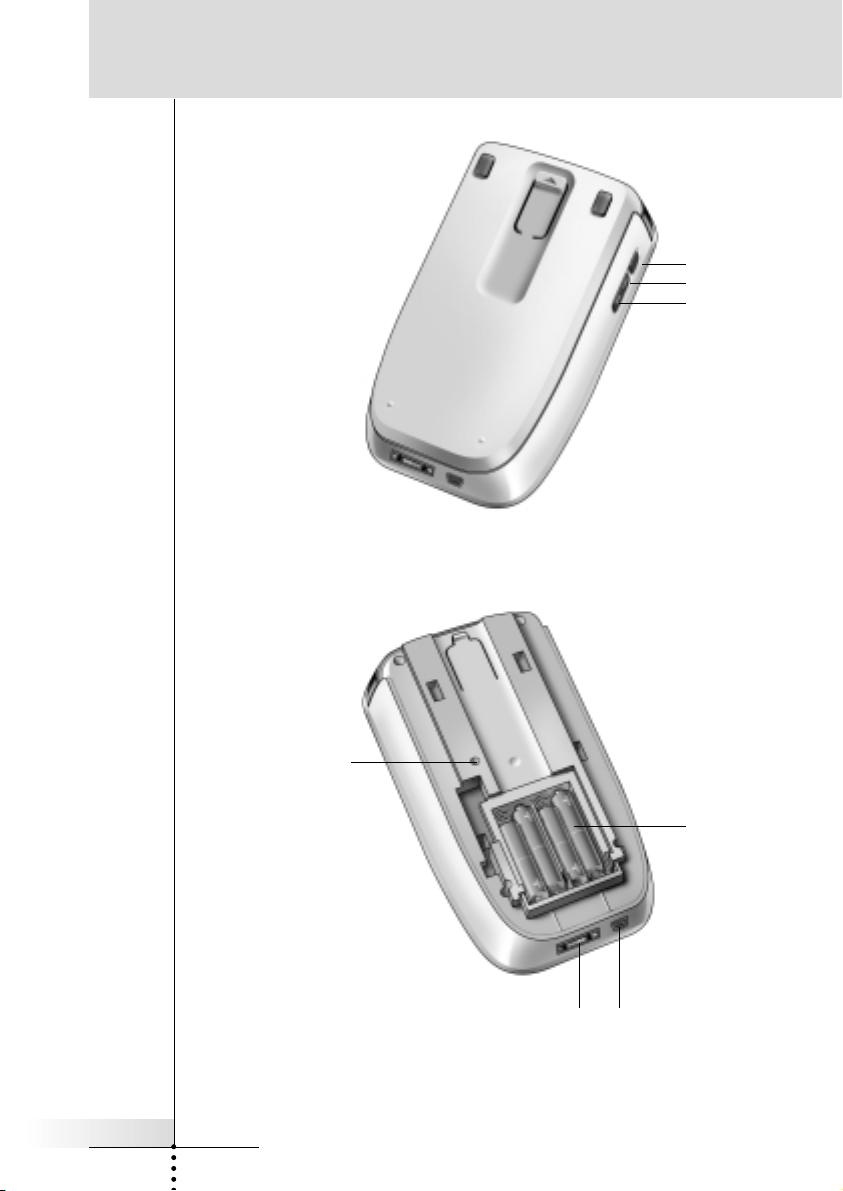
The Device
Pronto has several hard buttons.
Some are freely programmable, some have a predefined function:
■ The buttons on the left side of Pronto and the buttons at the right side of the
screen have predefined functions.
■ The utter left button below the touch screen has a predefined function.
The two middle buttons below the touch screen and the utter right button are
freely programmable.
You can reprogram the function of these buttons and change the label on the
touch screen.
■ The cursor and the OK and Home buttons on the right side of the cursor are
programmed to operate devices, for instance for navigating through the on
screen menu of your TV.
All these buttons are freely programmable. However, these buttons each have
a predefined function. If you learn one of these buttons or assign a macro to it,
its predefined function for that database will be permanently lost.
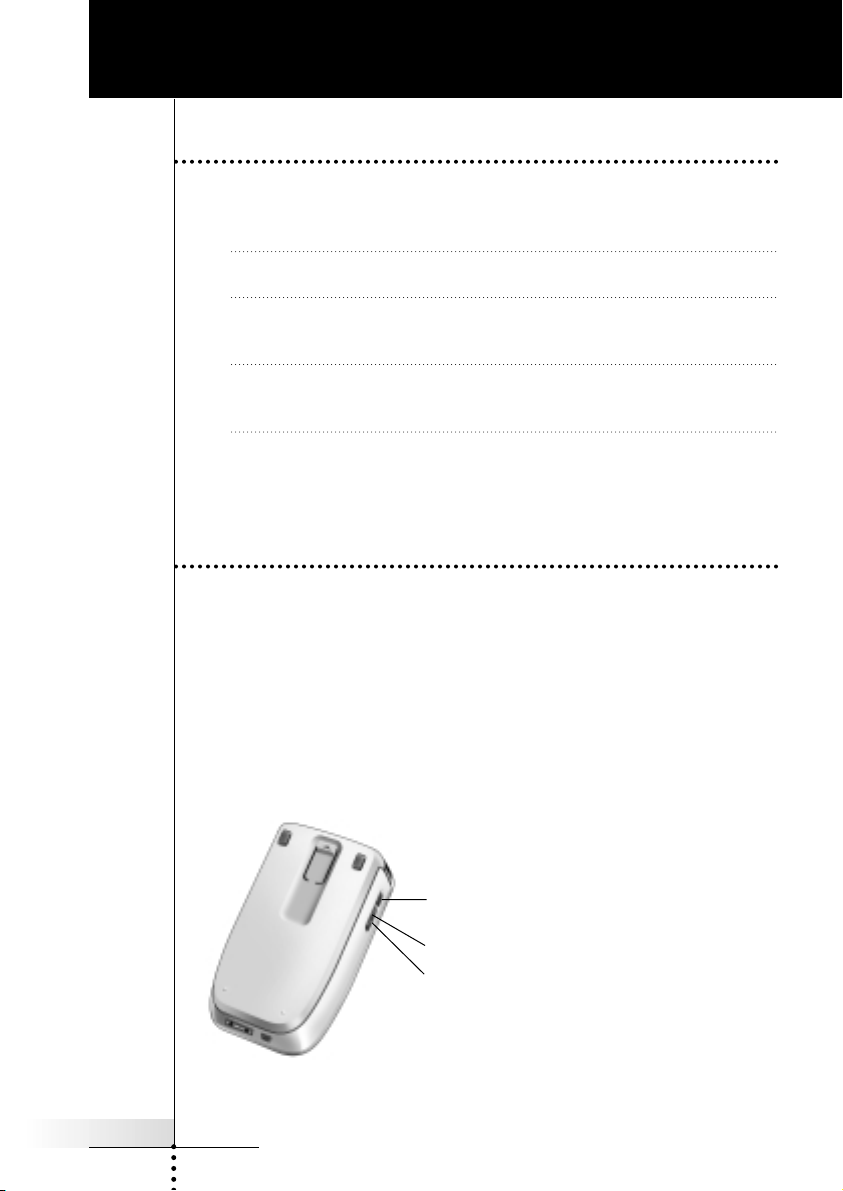
LCD touch screen
Buttons
Learning eye
Light sensor
Vol um e u p
Volume down
Mute
Channel up
Channel down
User Guide
Toggle button
Free programmable
4
OK
Home
Cursor
Taking a First Look
Backlight
Page up
Page down
User Guide
Reset button
5
Connection to docking station
Battery
compartment
USB port
Taking a First Look
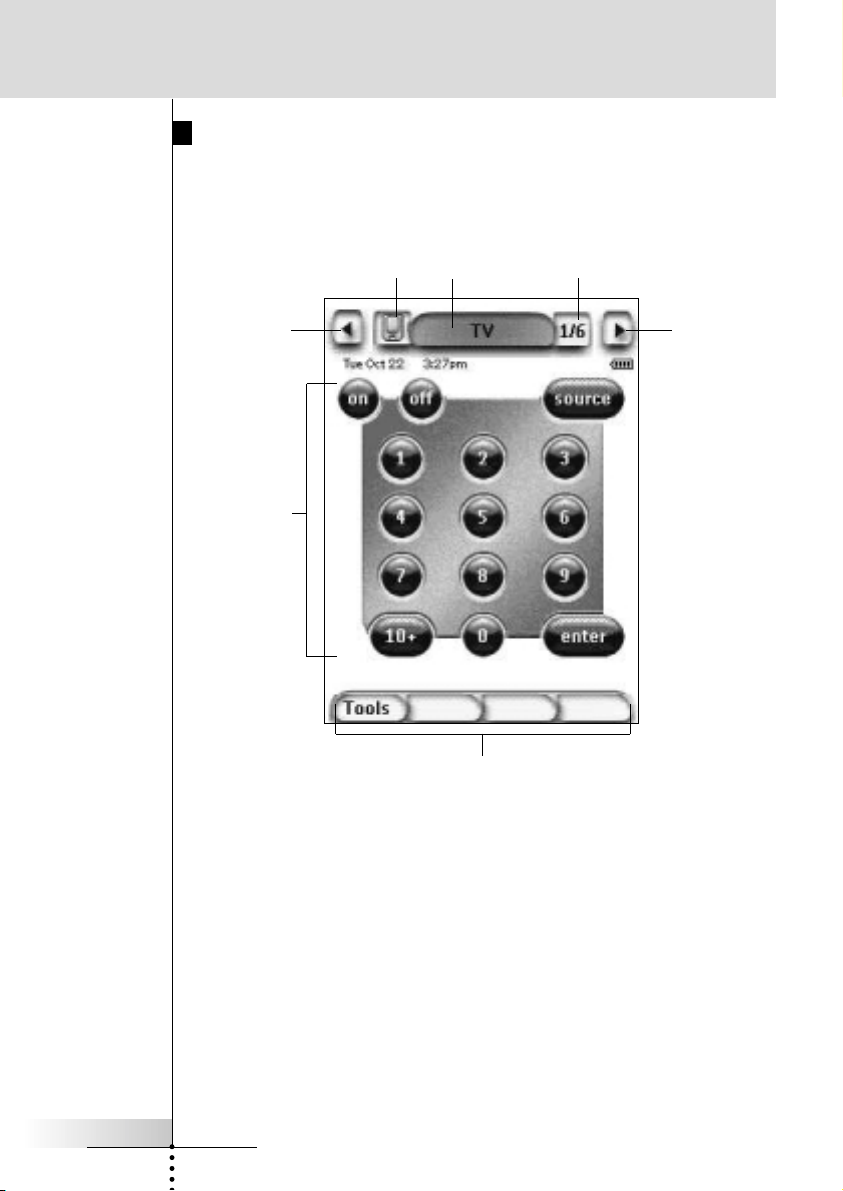
The Touch Screen
Previous
Device
Soft
buttons
Pronto
Icon
Device
Overview
button
Labels for
the hard
buttons
Page
Overview
button
Next
Device
User Guide
6

Taking a First Look
What’s New for Pronto Next Generation?
This new Pronto offers several new features compared to the previous model.
The most important ones are:
■ Light Sensor
The Light Sensor on your Pronto causes the backlight to switch on
automatically according to the ambient light of your own home theater
environment.
■ Page Overview
The Page Overview offers you a list of all the pages for one device.
Every device comes with a Page Overview, making it easier and faster to
browse through the device pages.
■ 16 Gray Scales
The number of gray scales has increased from 4 to 16.
Therefore the buttons look much more natural.
■ Transparency
Pronto supports transparency in buttons and other objects.
This allows the user to create complex user interfaces in an easy way.
■ Cursor Navigation
By default the cursor is programmed to operate devices. The functions
assigned to the cursor button depend on the device active on the Pronto.
Pronto also offers you the possibility to use the cursor for navigating through
devices and pages on the screen. The Left and Right cursor buttons allow you
to scroll through the devices, with the Up and Down cursor buttons you scroll
through the different pages.
■ Animation Mode
Pronto provides navigation feedback through graphical animations of mode
transitions and page transitions. You can enable and disable the animations of
your Pronto in the Setup Page.
■ RF
By default, Pronto operates your devices with IR signals. However, you can
choose to have Pronto working with radio frequency (RF) signals to operate
devices from a distance or from an adjacent room.
An RF Extender (not included) is therefore required.
■ USB
Pronto is provided with a USB port.
The USB port makes downloading much easier.
■ 4 MB of memory
Pronto has 4 MegaByte of memory.
This enables you to download larger configuration files to Pronto.
User Guide
7
Before You Start
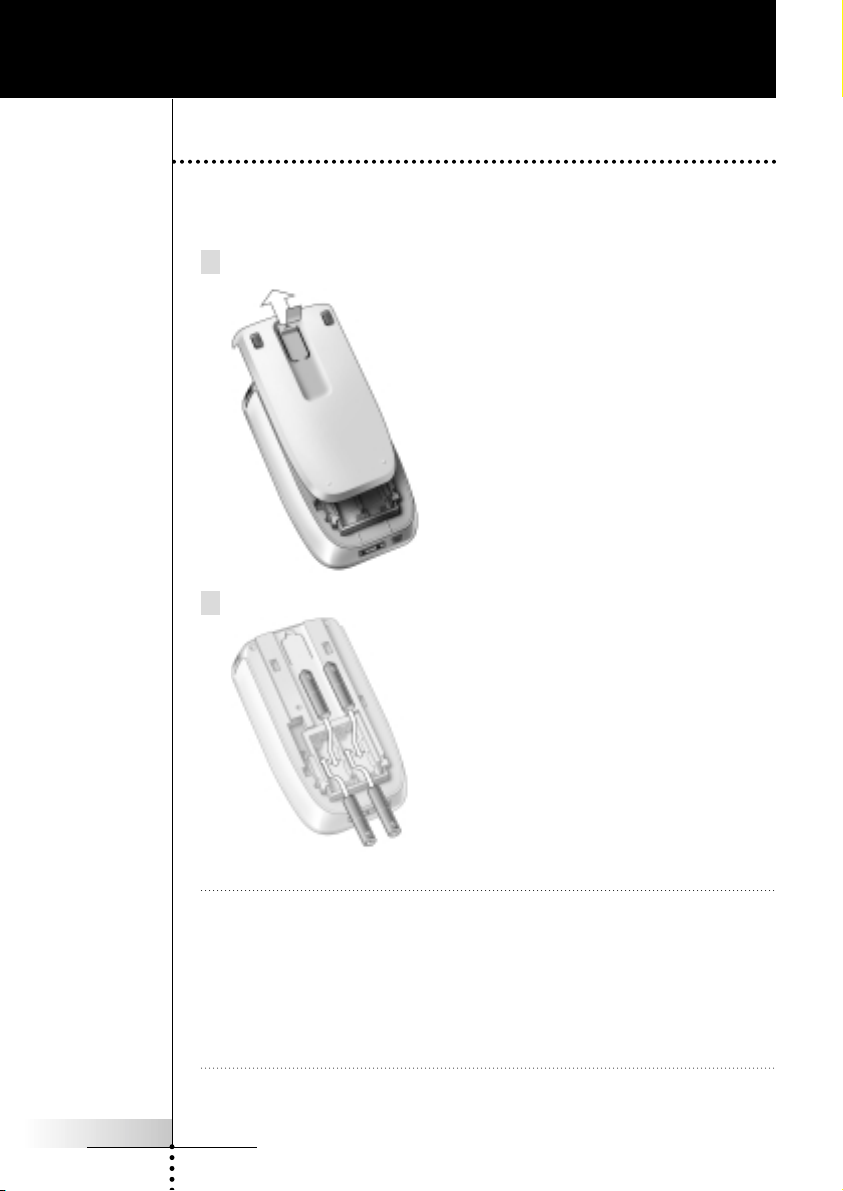
Placing the Batteries
When you use Pronto for the first time, you will have to place 4 AAA batteries.
You can use rechargeable or non-rechargeable AAA batteries.
1 Slide off the battery cover from the back of Pronto.
2 Place the batteries in the battery compartment.
User Guide
Notes When the batteries are running low, the Low Battery icon appears over the
battery icon in the right upper corner of the screen. Pronto retains all its settings
when the batteries have run out. You will only have to set the contrast and the
time. See “Setting the Contrast” on page 9 and “Changing the Time” on page 10
for more information.
You can also use a docking station and a battery pack to recharge your Pronto.
The docking station and the battery pack are optional.
8
Getting Started
Turning on Pronto
Pronto can be turned on in three different ways:
■ Tap the touch screen.
Note Only use your finger or a blunt soft object like a pencil eraser to operate the
touch screen.
■ Press one of the hard buttons.
Note When you press a hard button on Pronto, the according function will be
executed immediately, while the buttons below the touch screen will activate
the display.
■ Press the Backlight button.
Setting the Contrast
You can set the contrast level and switch on the backlight of Pronto using the hard
buttons on the left side of the device.
■ To decrease the contrast, press and hold the Backlight button and at the
same time press the “-” hard button.
To increase the contrast, press and hold the Backlight button and at the
same time press the “+” hard button.
■ To switch on the backlight, press the Backlight button.
User Guide
Backlight
& contrast
+
-
9
Getting Started
Setting Time and Date
When you have installed the batteries and turned on the Pronto, you might want to
set the current time and date. To go to the Setup Pages, tap the Pronto icon in
the top center of the touch screen.
Changing the Time Format
There are three different options:
■ 12 hour (AM/PM): This is the default format.
■ 24 hour
■ No time
You can select the Time Format by tapping the Time Format button
in the first Setup Page. The Time Format button toggles between the three
formats.
Changing the Time
Note When the batteries are replaced, the time is reset to 12.00 a.m.
1 Tap the Time button in the first Setup Page.
The Time button is selected.
The labels ‘+’ and ‘-‘ appear for the two middle hard buttons.
User Guide
2 To increase the time, press (and hold) the hard button labeled ‘+’.
-orTo decrease the time, press (and hold) the hard button labeled ‘-’.
3 Tap the Time button again.
The new time is set.
10

Getting Started
Changing the Date
To change the year
1 Tap the Year button in the first Setup Page.
The Year button is selected.
The labels ‘+’ and ‘-‘ appear for the two middle hard buttons.
2 To increase the years, press (and hold) the hard button labeled ‘+’.
-orTo decrease the years, press (and hold) the hard button labeled ‘-’.
3 Tap the Year button again.
The new year is set.
To change the month
1 Tap the Month button in the first Setup Page.
The Month button is selected. The labels ‘+’ and ‘-‘ appear for the two middle
hard buttons.
2 To increase the months, press (and hold) the hard button labeled ‘+’.
-orTo decrease the months, press (and hold) the hard button labeled ‘-’.
3 Tap the Month button again.
The new month is set.
User Guide
To change the day
1 Tap the Day button in the first Setup Page.
The Day button is selected.
The labels ‘+’ and ‘-‘ appear for the two middle hard buttons.
2 To increase the days, press (and hold) the hard button labeled ‘+’.
-orTo decrease the days, press (and hold) the hard button labeled ‘-’.
3 Tap the Day button again.
The new day is set.
11

Getting Started
Operating Pronto
Pronto contains a series of customizable devices, each consisting of several device
pages. All active devices on your Pronto are listed in the Device Overview. All the
available device pages are listed per device in the Page Overview.
Device Overview
The Device Overview offers you a list of all the
devices you can control with Pronto. To view the
Device Overview, press the middle button at the
top of the touch screen.
You can navigate between the devices in two
different ways:
■ Tap the device you want to operate from the
Device Overview.
■ Tap the Device Left button at the top
of the touch screen to navigate to the
previous device.
Tap the Device Right button at the top
of the touch screen to navigate to the next
device.
By default you navigate through Pronto using
this touch screen navigation. When cursor
navigation is enabled, the Device Left and
Device Right button disappear. You then navigate
through the devices and pages using the cursor.
For more information on changing the touch
screen navigation to cursor navigation, see
“Operating Pronto with the Cursor” on page 33.
Device Left
button
Device
Overview
button
Device Right
button
User Guide
12

Getting Started
Page Overview
The Page Overview offers you a list of all the pages for one
device. To view the Page Overview, tap the Page Number
in the upper area of touch screen.
You can navigate between the different pages in two
different ways:
■ Tap the page you want to operate from the
Page Overview.
■ Press the Up or Down hard button on the left
side of Pronto.
Page
Overview
button
User Guide
13
Customizing Pronto
What makes Pronto so powerful, is the ability to extend its functionality in multiple
ways, like programming additional functions, adding supplementary devices and
changing the interface as it suits you best.
For full editing you can use ProntoEdit software. See “ProntoEdit” on page 37 for
more information.
Using the Tools
Pronto provides different tools. For customizing Pronto you have to switch to the
appropriate tool. Pronto offers 8 different tools, each providing different
functionalities:
■ Brand Tool:
Defining the brands of your audio/video equipment (page 14);
■ Learn Tool:
Learning IR codes from other remote controls (page 19);
■ Label Tool:
Labeling buttons, devices and pages (page 21);
■ Add Tool:
Adding new devices or copying existing devices (page 23);
■ Delete Tool:
Deleting button actions or devices (page 25);
■ Move Tool:
Moving devices in the Device Overview (page 26);
■ Macro Tool:
Programming a sequence of commands for one single button (page 30);
■ RF IR Tool:
Defining to operate Pronto with IR signals or RF signals (page 34).
User Guide
Defining the Brand for a Device
Pronto contains a huge list of brands and their according IR codes in its database.
Pronto uses these IR codes to control devices. Because there are several brands
using specific IR codes, you have to define the brands and the corresponding code
sets for each device. You can either have Pronto autosearch the brand or select it
yourself. If a device’s brand contains more than one IR code set, you also have to
select it.
On the Device Overview you find buttons for the most common video and audio
devices. Pronto is set by default to operate Philips and Marantz devices. For all
devices other than Philips or Marantz, you first have to define the brand before you
can operate them with Pronto.
14

Customizing Pronto
Selecting the Brand and Code Set for your Device
1 Press the left hard button below the touch screen for
3 seconds.
The Tools menu appears.
2 Tap Brand in the Tools Menu.
The ‘Brand Tool’ screen appears.
3 Tap in the ‘Brand Tool’ screen.
The Device Overview appears.
4 In the Device Overview, tap the Device for which you want to define
the brand.
The ‘Brand Tool’ screen appears.
5 Tap in the ‘Brand Tool’ screen.
The ‘Brands’ screen appears.
User Guide
Selecting the brand
1 Tap the Scroll Down button or the Scroll Up button next to the
Brands list.
The Brands list scrolls down/up.
Note You can also select the brand via the virtual keyboard by tapping one or more
of the brand’s name characters.
2 Tap the brand for the selected Device in the Brands list.
3 Tap in the ‘Brands’ screen.
The ‘Brand Tool’ screen appears.
15

Customizing Pronto
4 Tap in the ‘Brand Tool’ screen.
If there is only one code set, the ‘Installing the Brand’ screen appears.
-or-
If there is more than one possible code set, the ‘Code Sets’ screen
appears.
Selecting the code set
1 Tap the Scroll Down button or the Scroll Up button next to the
Code Sets list.
The Code Sets list scrolls down/up.
User Guide
2 Tap the Code Set for the selected Device in the Code Sets list.
3 Tap in the ‘Code Sets’ screen.
The ‘Installing the Brand’ screen appears.
16
 Loading...