

Philips Pronto Owners manual

User Guide
1
Introduction 2
1. Intelligent Remote Control 2
2. Charging the Remote Control 3
Getting Started 6
1. Activating the Remote Control 6
2. Selecting a Device 7
3. Operating a Device 8
4. Adjusting the Settings 10
Getting the Maximum out of it 13
1. Introduction 13
2. Programming Buttons 15
3. Labeling Buttons and Menu Items 18
4. Adding and Moving Devices 20
5. Deleting and Restoring 22
6. Recording Macros and Setting Timers 24
7. ProntoEdit 29
Troubleshooting 32
1. General Problems 32
2. Programming Problems 32
3. Recharging Problems 34
FAQ 35
Overview of Symbols 37
Specifications 39
Index 40
Table of Contents

User Guide
2
The intelligent Remote Control can be used for all devices that
understand infrared remote control signals. Its easy-to-use
touchscreen and its intuitive interface makes it a perfect remote
control for every user.
The Remote Control is completely customizable and
programmable. You can add devices and functions, relabel
buttons, record macros and set timers. To make the Remote
Control your universal remote control, it is designed to learn
from existing remote controls.
Introduction
1. Intelligent Remote Control
direct-access buttons
Left/Right buttons
sending eye
touchscreen
learning eye
recharging contacts
battery door
contrast dial
backlight
button
serial port
reset button
User Guide
3
Introduction
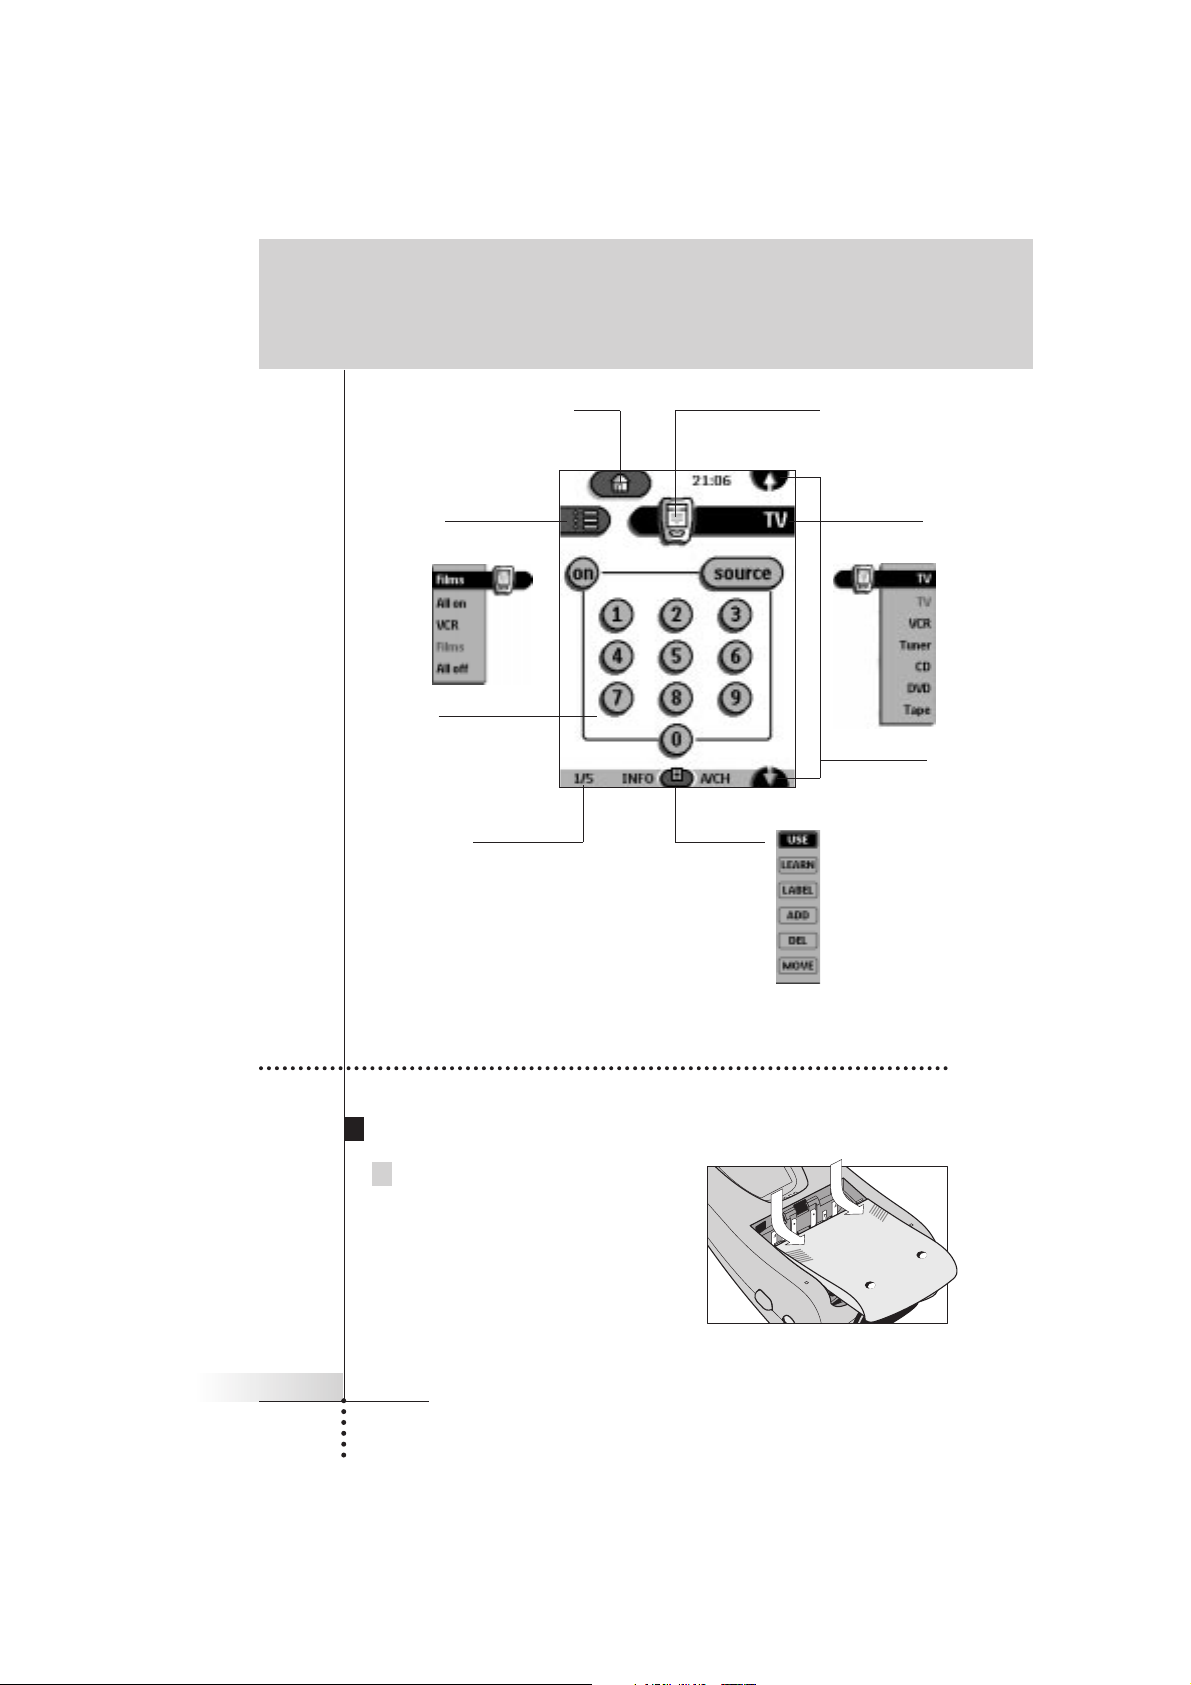
Remote control icon:
Touch and hold to enter Setup
Mode menu:
to customize
the Remote
Control
Home:
to go to the Home menu
Macro menu:
to open stored list
of commands
Device menu:
to open device
control panels
Panel number:
shows active
control panel
Scroll buttons:
to display previous
and next control
panel
2. Charging the Remote Control
AA batteries
1 Slide the battery door off the back
of the Remote Control.
Control panel:
to send commands
to components

User Guide
4
2 Insert 4 AA batteries (included
with the Remote Control) as
indicated on the bottom of
the battery compartment.
3 Slide the battery door back on.
After a few seconds, the Remote Control starts up automatically and beeps
twice to indicate that it is ready to use.
When batteries are running low, the Low Battery icon flashes at the center
top of the display. Replace the batteries as soon as possible to ensure perfect
performance.
Note The Remote Control retains all settings when batteries have run out or when
you replace them. You will only have to reset the clock.
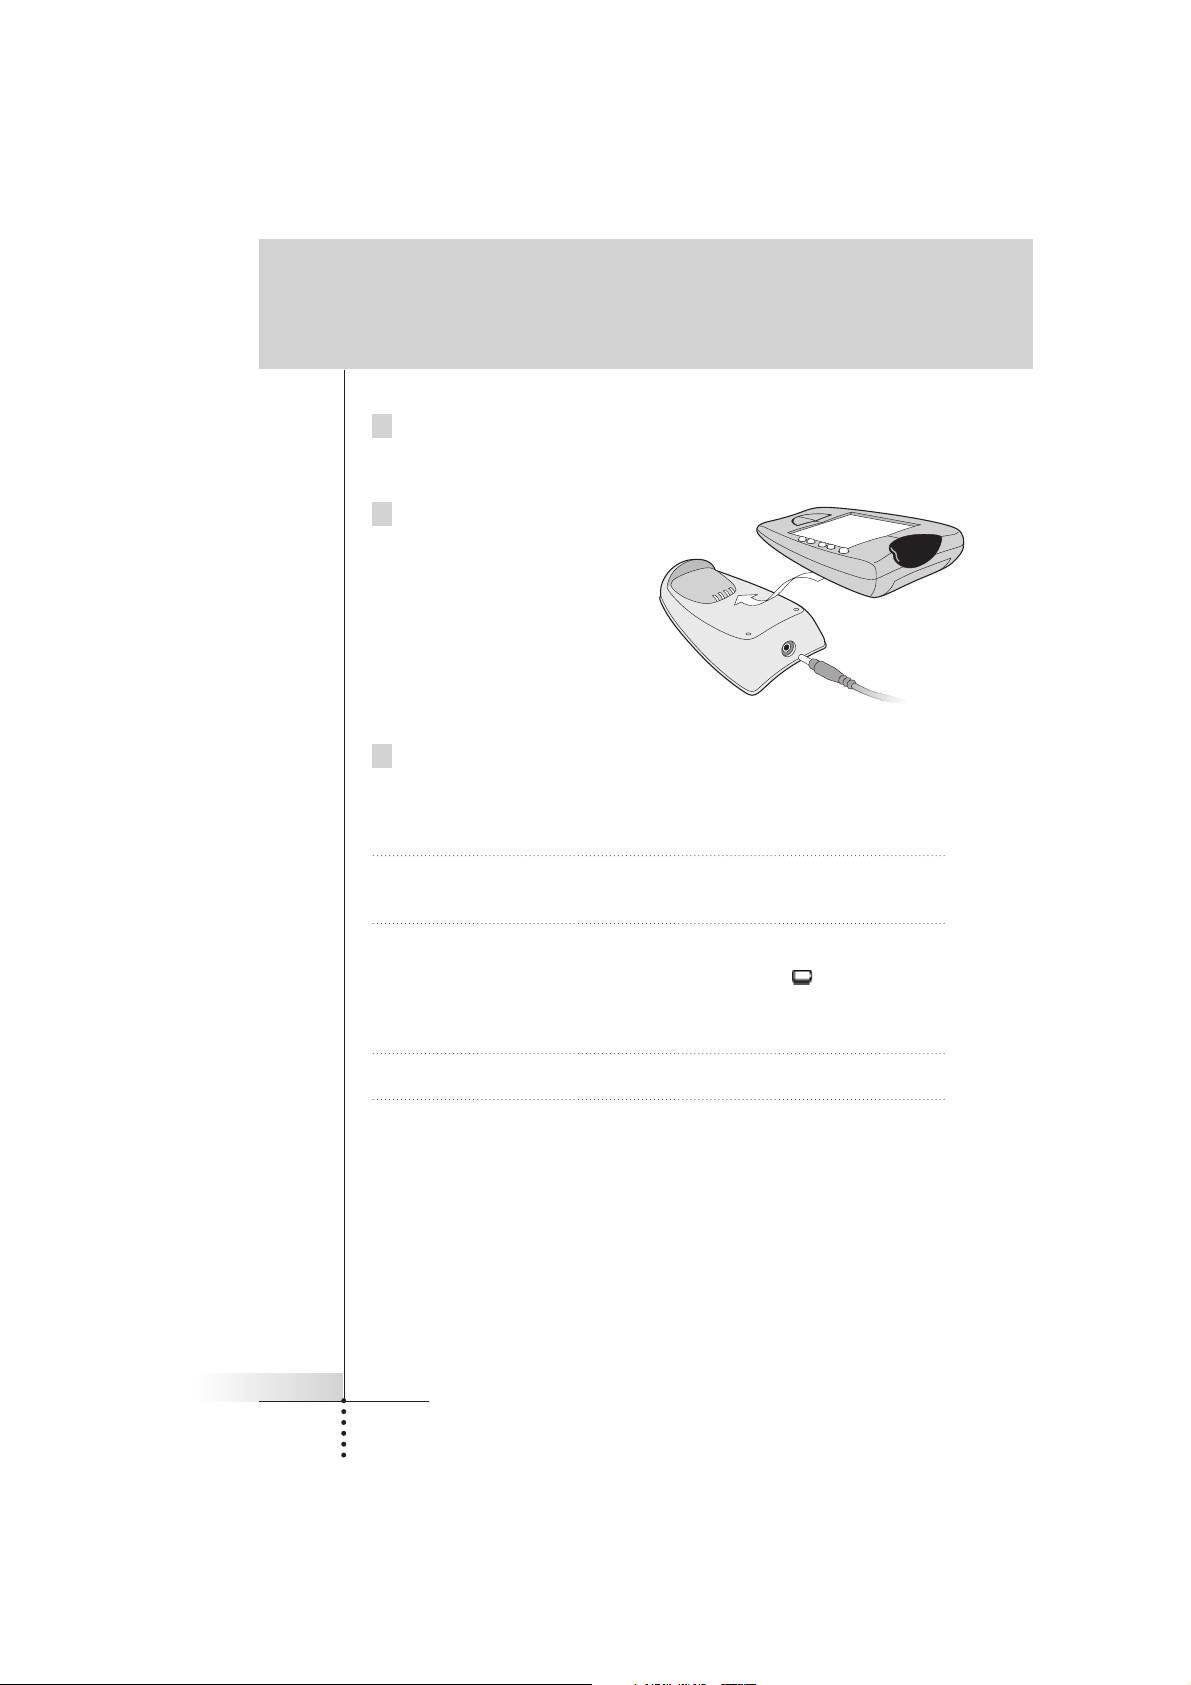
Optional recharging dock
Warning Use the recharging dock only with the Philips NiMH rechargeable battery pack.
1 Slide the battery door off the back of the Remote Control.
2 Remove the plastic AA battery tray
from the battery compartment.
3 Insert the battery pack (included
with the recharging dock) as
indicated on the side of the
battery pack.
Introduction
User Guide
5
4 Slide the battery door back on.
After a few seconds, the Remote Control starts up automatically and beeps
twice to indicate that it has finished starting up.
5 Plug the power adapter into
a wallet outlet and connect it
to the recharging dock.
6 Place the Remote Control on the recharging dock.
Recharging starts automatically. The light on the front of the recharging dock
indicates charging takes place. When the battery pack is fully charged, the
light goes off.
Notes · You can operate the Remote Control while it is being charged.
· Normal charging time is 2 to 3 hours, depending on the condition of the
battery pack.
When the battery pack is running low, the Low Battery icon flashes at the
center top of the display. Recharge the batteries as soon as possible to ensure
perfect performance.
Note The Remote Control retains all settings when the battery pack has run out.
You will only have to reset the clock.
Introduction
User Guide
6
Turning on the display
Tap the screen gently with your finger or a blunt, soft object like a
pencil eraser.
The display is activated and you see the Home panel.
Notes · If the display stays blank or becomes black, adjust the contrast dial on the left
side.
· If another panel is displayed, tap the Home button .
· The Remote Control shuts down automatically.
Using the backlight
Press the backlight button on the left side.
The backlight shuts off after a few seconds to save power.
Note In the settings (p. 10) you can choose to activate the backlight automatically
when you turn the Remote Control on.
Use mode
The Remote Control has different “modes”. When you activate the Remote Control
for the first time, it starts up in Use mode allowing you to immediately operate
your devices.
In Use mode the Remote Control icon is entirely visible. If a label
(like or ) covers the icon, see page 14 to switch your Remote Control to
Use mode.
Getting Started
1. Activating the Remote Control
User Guide
7
Via the Home menu
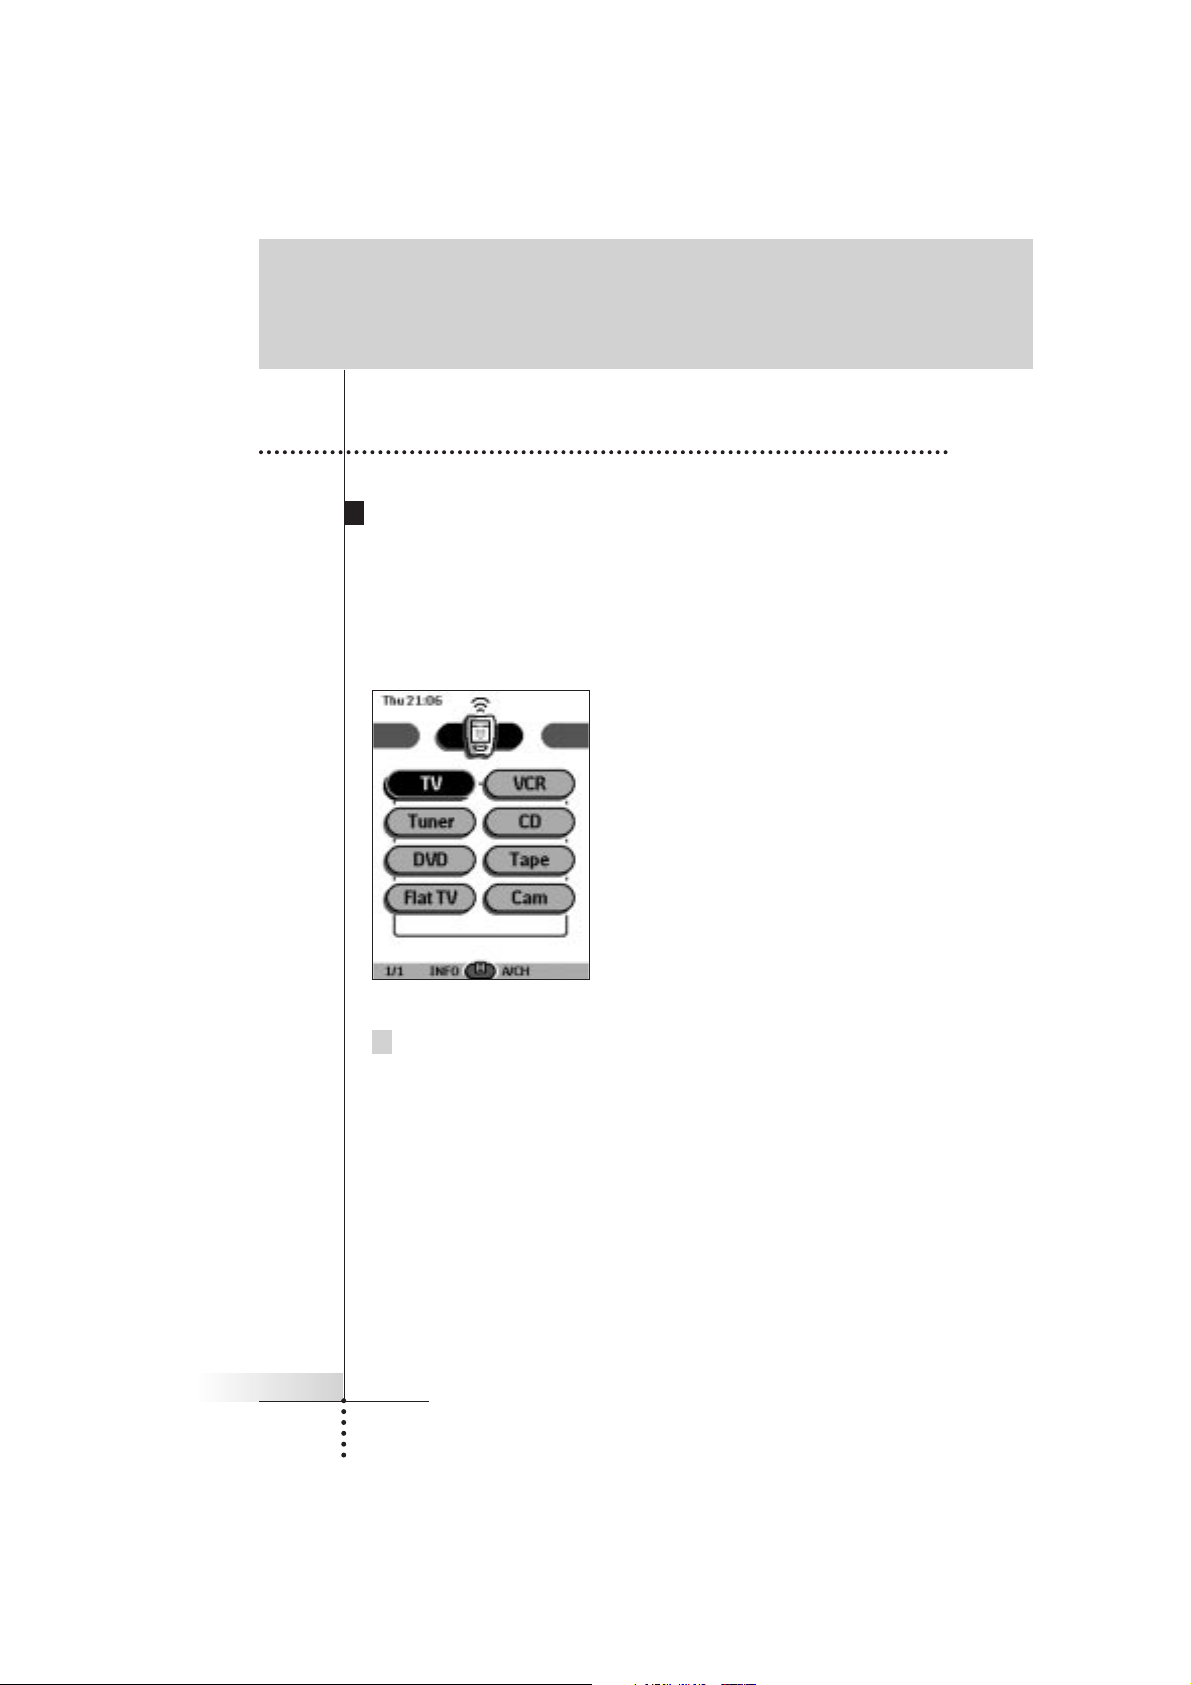
In the Home menu you find buttons for the most common video and audio devices.
These buttons are preprogrammed to work with popular devices made by Philips,
Marantz and other companies. If you have devices of other manufacturers that do
not respond to your Remote Control, you can program your Remote Control using
your original remote controls (see p. 15).
Tap the device you want to operate.
The first control panel of the selected device appears.
Getting Started
2. Selecting a Device
User Guide
8
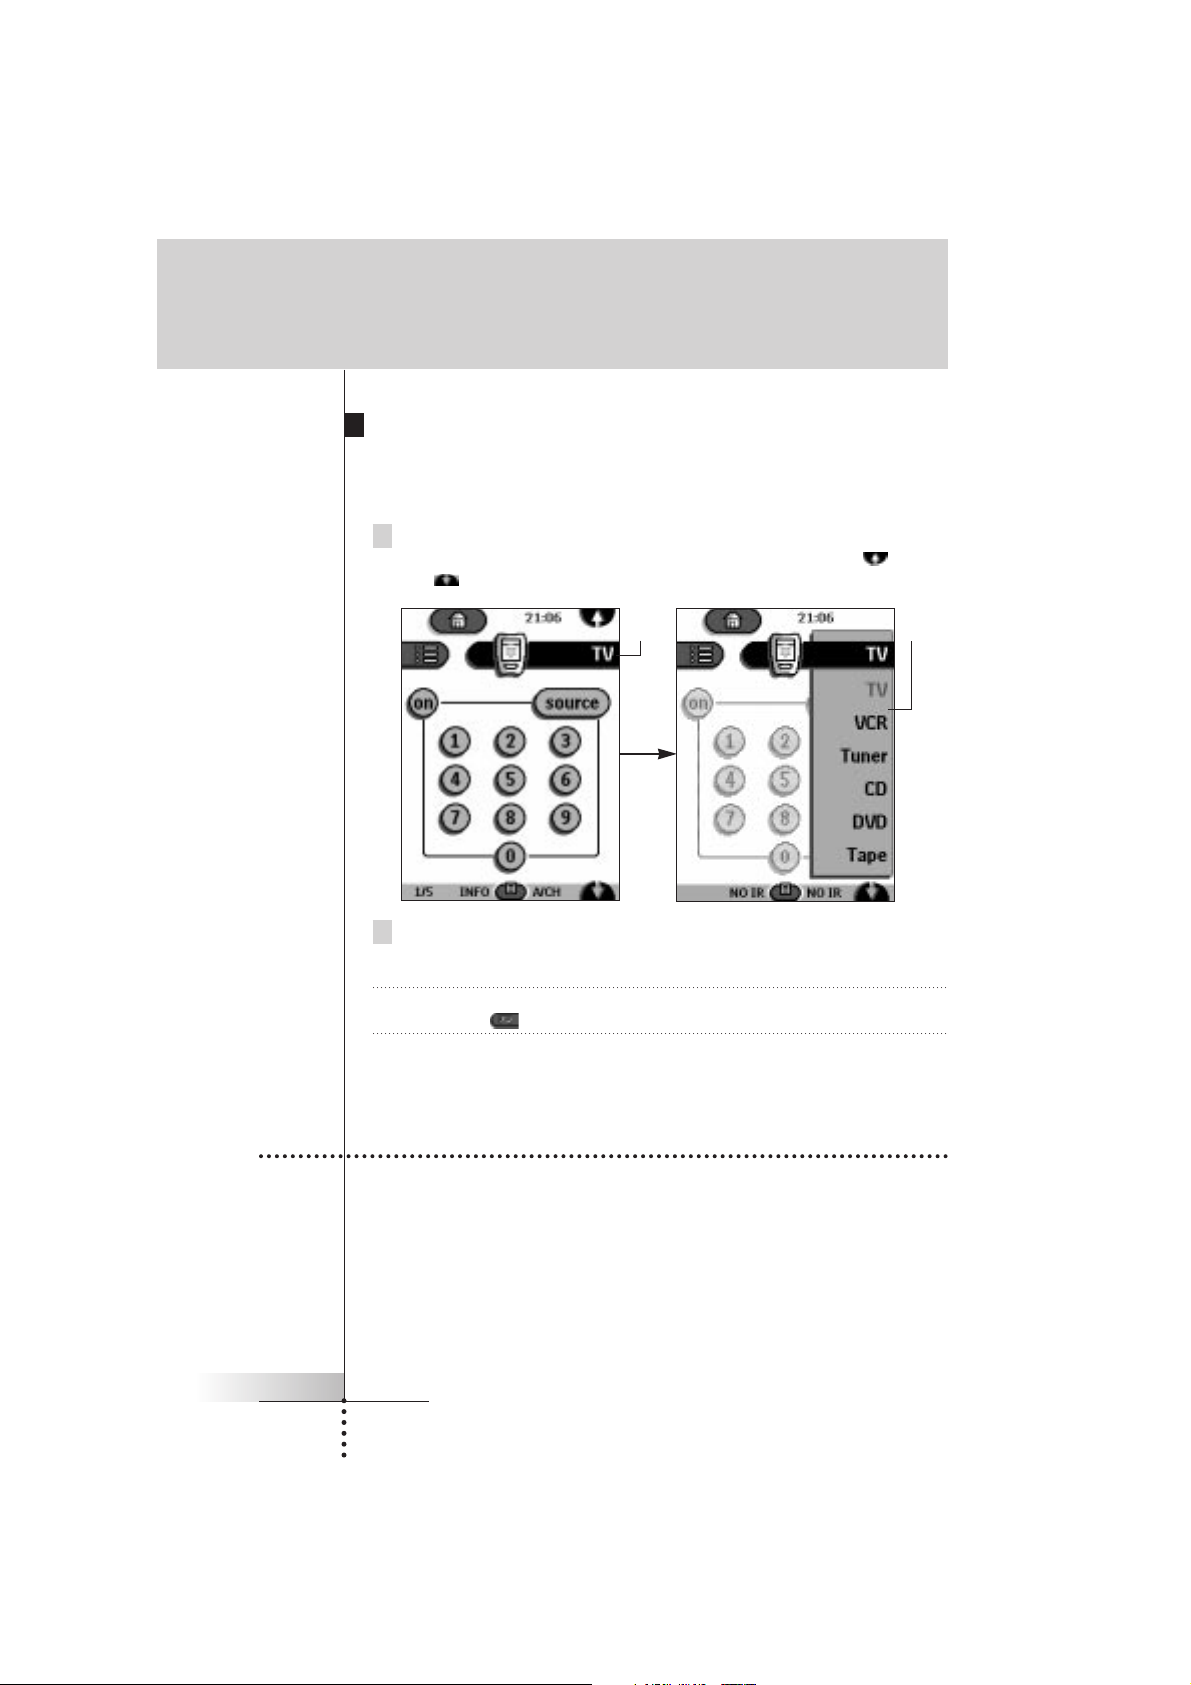
Via the Device menu
The Device menu allows you to easily switch to another device without having to
return to the Home menu.
1 From within any device control panel, tap the device tab.
The Device menu pops up. You can scroll through this menu using
and .
2 In the Device menu, tap the device you want to operate.
The control panel that was last accessed for the device appears.
Note You can also activate the Device menu from Home by tapping the device tab
icon .
Getting Started
3. Operating a Device
You operate devices using three kinds of buttons:
■ Touchscreen buttons
■ Left and Right button (below the touchscreen)
■ Direct-access buttons (to the right of the touchscreen)
device
tab
device
menu

User Guide
9
Using touchscreen buttons
Sending commands
By tapping the touchscreen buttons you send commands to the device you have
selected. When you send a command, the Remote Control icon shows
transmitting signals . The name of the active device is indicated on the device
tab.
Scrolling
Most devices have more than one control panel. You can scroll through these
control panels using and . The panel number on the left bottom of the
screen indicates the panel number and the total number of panels, for example
.
By holding down a scroll button, you go repeatedly through all the control panels
of a device in a loop.
Operating a device without affecting the active device
You can operate a device while another device is active (for example, rewinding
your VCR while watching TV) via the Device menu:
1 Open the device menu.
2 Press and hold the Left or Right button (labeled NO IR).
The Remote Control icon turns around.
Getting Started

User Guide
10
3 Tap the device you want to operate.
The device control panel appears and the Remote Control icon turns to its
original position. You can now operate the new selected device without
affecting the active device.
Using the Left and Right button
The Left and Right buttons change function depending on the device the Remote
Control is operating. The current function is displayed on the touchscreen right
above the button. The function can either be an IR (infrared) command which is
transmitted, or a jump to a specific device page.
IR commands Device pages
Using the direct-access buttons
Mute, Channel and Volume can be operated at any time, even without turning on
the touchscreen.
Getting Started
4. Adjusting the Settings
Most of the Remote Control’s features can be set to your own wishes.
1 Touch and hold the Remote Control icon for a few seconds.
The first setup panel appears. You can display the second and third setup
panel by using the scroll buttons.
2 Tap the button of the setting you want to adjust.
The button becomes black.
3 Use the Left and Right button to adjust the setting.

User Guide
11
First setup panel
Setting Function Adjusting
Battery Shows the battery level.
Clock Turns the clock display on Tap the clock repeatedly.
or off and lets you set 12 or
24h time display.
Time Sets the clock. Tap the time button and use
the Left and Right button.
Day Sets the day. Tap the day button and use
the Left and Right button.
LCD Sets how long the touchscreen Tap the LCD button and use
stays on. the Left and Right button.
LCD Light Sets how long the backlight of Tap the LCD Light button and
the touchscreen stays on. use the Left and Right button.
Button Light Sets how long the backlight of Tap the Button Light button and
the direct-access and Left/Right use the Left and Right button.
buttons stays on.
Second setup panel
Setting Function Adjusting
Level Turns the backlight always on
or off when activating
the touchscreen.
Note: When you choose always
off, you can only activate the
backlight using the backlight
button
Mode Menu Hides or shows the Mode button. Tap the Mode Menu button.
Touch Adjusts or turns off the Tap the Touch button
touchscreen beep. repeatedly.
Button Adjusts or turns off the beep of Tap the Button button
Left/Right and direct-access repeatedly.
buttons.
Calibrate Calibrates the touchscreen. Tap the Calibrate button and
follow the on-screen
instructions.
Revert Reverts the Remote Control to Tap the Revert button and
the factory default configuration. follow the on-screen
instructions.
Getting Started
Always on: Tap the Level button
and position the indicator in the
left half of the indication bar
using the Left button.
Always off: Tap the Level button and position the indicator in
the right half of the indication
bar using the Right button.

Third setup panel
This panel provides technical information about your Remote Control.
To exit Setup Mode
Tap the Setup label on the Remote Control icon.
User Guide
12
Getting Started

User Guide
13
Getting the Maximum out of it
1. Introduction
The Remote Control is preprogrammed to work with all
equipment that recognizes RC-5 and RC-6 infrared codes.
This includes all Philips and Marantz devices and several
devices made by other manufacturers.
What makes the Remote Control so powerful is the ability
to extend its functionality in multiple ways like programming
additional functions, adding supplementary devices, recording
macros and customizing the interface as it suits you best.
Working with Modes
When you operate your devices, the Remote Control is in Use mode. For actions
other than operating (like programming buttons, recording macro’s, adding devices,
and so on) you have to switch to the appropriate mode:
For operating devices.
For learning commands from other devices.
For recording macros and setting timers.
For labeling buttons and commands.
For adding new devices.
For deleting buttons, devices and macros.
For changing the order in a menu.
 Loading...