

Page 1
www.philips.com/support
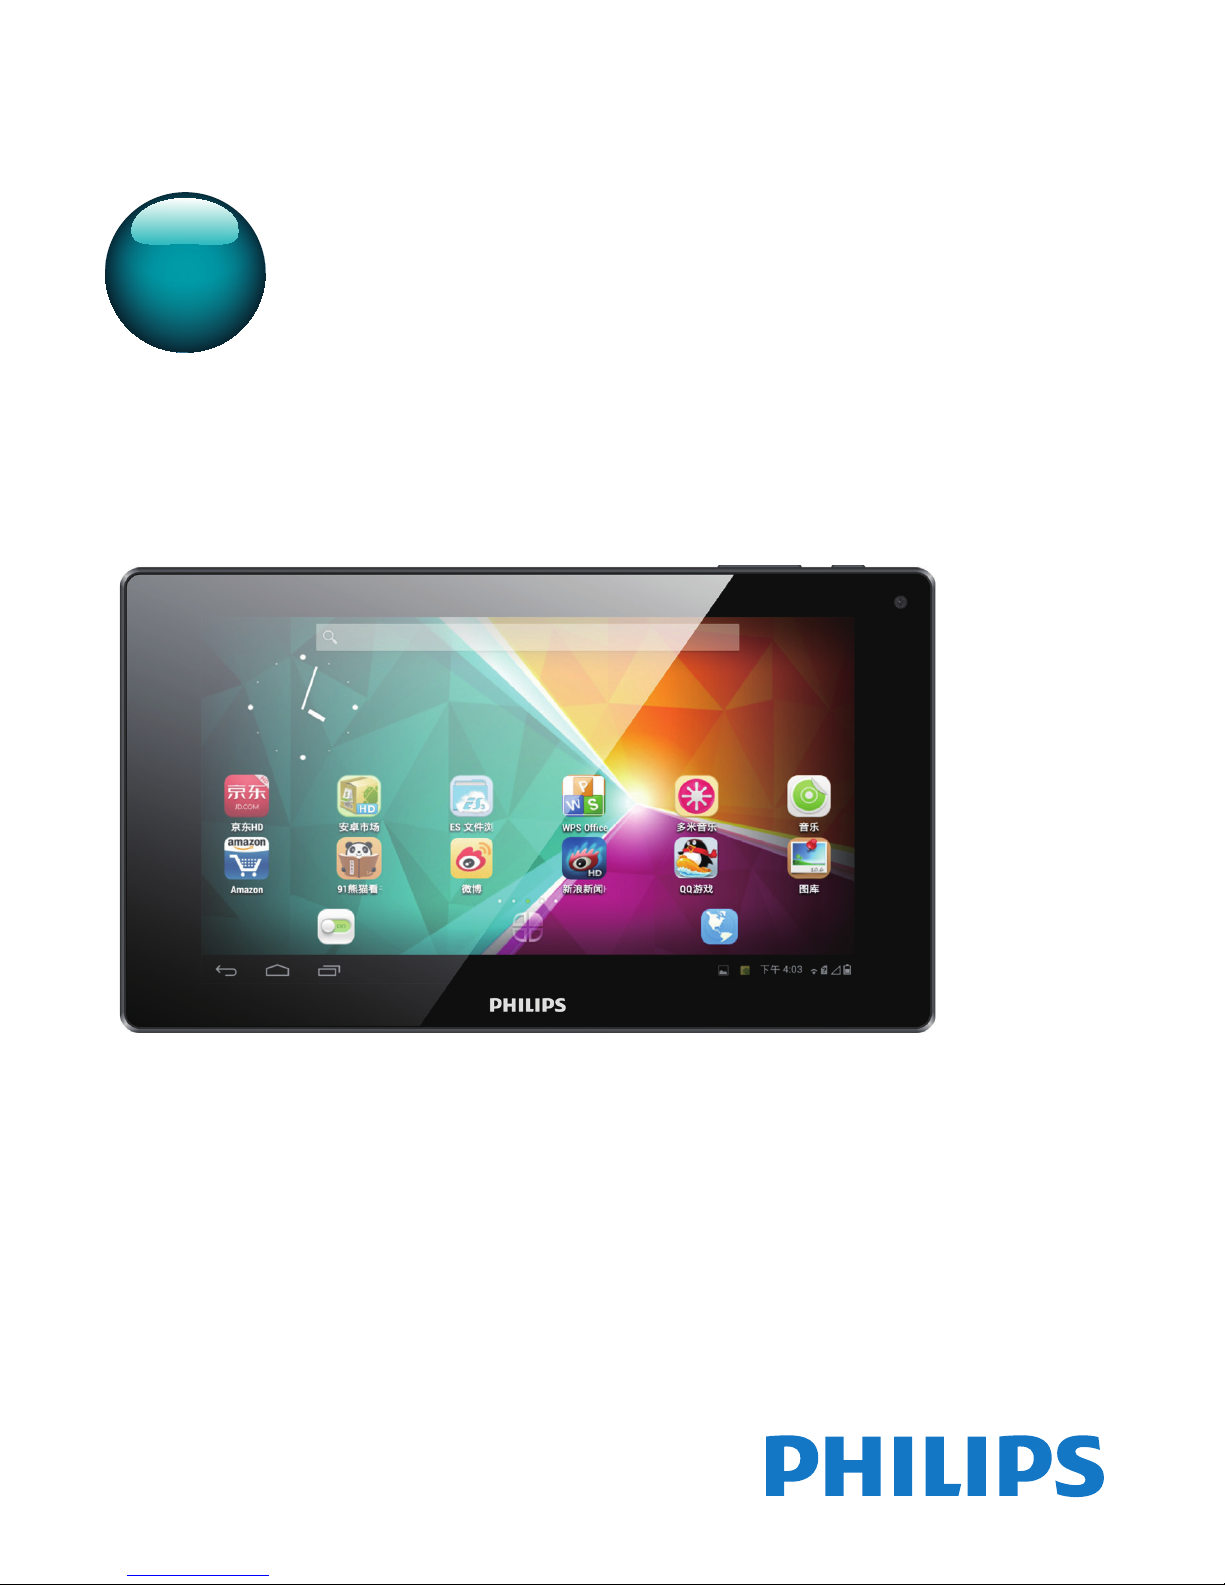
User manual
Always there to help you
Register your product and get support at
PI3205G
Question?
Contact
Philips
Question?
Contact
Philips
Page 2

Page 3

1EN
Contents
1 Important safety instructions 3
Safety 3
Compliance 3
Care of the en
vironment 3
Notice 4
Written Offer 4
2 Overview 5
Controls 5
Home screen
5
Use the pull-up menu 5
3 Get started 7
Charge power 7
Conser
ve battery power 7
Switch the device on or off 7
4 Basics 8
Find apps 8
Use the screen
9
Switch screen rotation on or off 9
Lock/ unlock the screen 9
Customize the Home screen 9
Add app icons and widgets 9
Delete items 10
Relocate items 10
Add wallpapers 10
Text entry 10
Select input methods 10
Enter text 10
Edit text 11
5 Connections 12
Connect to the Internet 12
Connect through
Wi-Fi 12
Connect through the mobile
network 12
Connect to your computer 13
Use a Micro SD card 13
Portable hotspot 13
6 Apps 14
Install apps 14
HiMar
ket 14
Other sources 14
Manage apps 14
Exit apps completely 14
7 Browser 16
Add a bookmark 16
8 Email 17
Set up your email account 17
Select account settings
17
Check your email messages 17
Compose email messages 18
Organize email messages 18
9 Tools 19
Camera 19
T
ake photos or record videos 19
Calendar 20
10 Use the device in corporate
networks
21
Install secure credentials 21
Set up y
our Microsoft Exchange account 21
Add VPN 21
11 Settings 23
WIRELESS & NETWORKS 23
WLAN 23
Data usage
23
Airplane mode 23
VPN settings 23
Mobile networks 23
DEVICE 23
Sound 23
Display 24
Storage 24
Battery 24
Apps 24
PERSONAL 24
Location access 24
Page 4

2 EN
Security 24
Language & input 25
Reset 25
ACCOUNTS 26
SYSTEM 26
Date & time 26
Accessibility 26
About tablet 26
12 Check for Àrmware update 28
Update the Àr
mware online 28
13 Technical data 29
Need help?
Please visit
www
.philips.com/support
where you can access a full set of supporting
materials such as the user manual, the latest
software updates, and answers to frequently
asked questions.
Page 5
3EN
1 Important safety
instructions
Safety
Only use attachments/accessories speciÀed by
the manufacturer.
Use only power supplies listed in the user
manual.
The product shall not be exposed to dripping
or splashing.
Do not place any sources of danger on the
product e.g. liquid Àlled obMects, lighted
candles).
Batteries (battery pack or batteries installed)
shall not be exposed to excessive heat such as
sunshine, Àre or the like.
Where the plug of the Direct Plug-in Adapter
is used as the disconnect device, the disconnect
device shall remain readily operable.
Warning
Never remove the casing of this apparatus.
Never lubricate any part of this apparatus.
Never place this apparatus on other electrical
equipment.
Keep this apparatus away from direct sunlight, naked
Áames or heat.
Ensure that you always have easy access to the power
cord, plug or adaptor to disconnect the apparatus from
the power.
Compliance
Note
The type plate is located on the back of the product.
Care of the environment
Environmental information
All unnecessary packaging has been omitted.
We have tried to make the packaging easy to
separate into three materials: cardboard (box),
polystyrene foam (buffer) and polyethylene
(bags, protective foam sheet.)
Your system consists of materials which can
be recycled and reused if disassembled by a
specialized company. Please observe the local
regulations regarding the disposal of packaging
materials, and old equipment.
Your product is designed and manufactured
with high quality materials and components,
which can be recycled and reused.
Please inform yourself about the local separate
collection system for electrical and electronic
products.
Please act according to your local rules and
do not dispose of your old products with your
normal household waste. Correct disposal of
your old product helps to prevent potential
negative consequences for the environment and
human health.Please inform yourself about the
local rules on separate collection of batteries
because correct disposal helps to prevent
negative consequences for the environmental
and human health.
Always bring your product to a professional to
remove the built-in battery.
Page 6

4 EN
Notice
Written Offer
WOOX Innovations hereby offers to deliver,
upon request, a copy of the complete
corresponding source code for the copyrighted
open source software packages used in this
product for which such offer is requested by
the respective licenses.
This offer is valid up to three years after
product purchase. To obtain source code,
please contact [email protected]. If you
prefer not to use email or if you do not receive
conÀrmation receipt within a week after mailing
to this email address, please write to Open
Source Team, 6/F, Philips Electronics Building, 5
Science Park East Avenue, Hong Kong Science
Park, Shatin, New Territories, Hong Kong. If you
do not receive timely conÀrmation of your
letter, please email to the email address above.
This product is partly based on Open
Source software. The license text and
acknowledgment can be retrieved from
the device under
> About tablet > Legal
information.
SpeciÀcations are subMect to change without
notice. Philips and the Philips’ Shield Emblem
are registered trademarks of KoninkliMke Philips
N.V. and are used by WOOX Innovations
Limited under license from KoninkliMke Philips
N.V.. WOOX Innovations reserves the right
to change products at any time without being
obliged to adMust earlier supplies accordingly.
Page 7
5EN
2 Overview
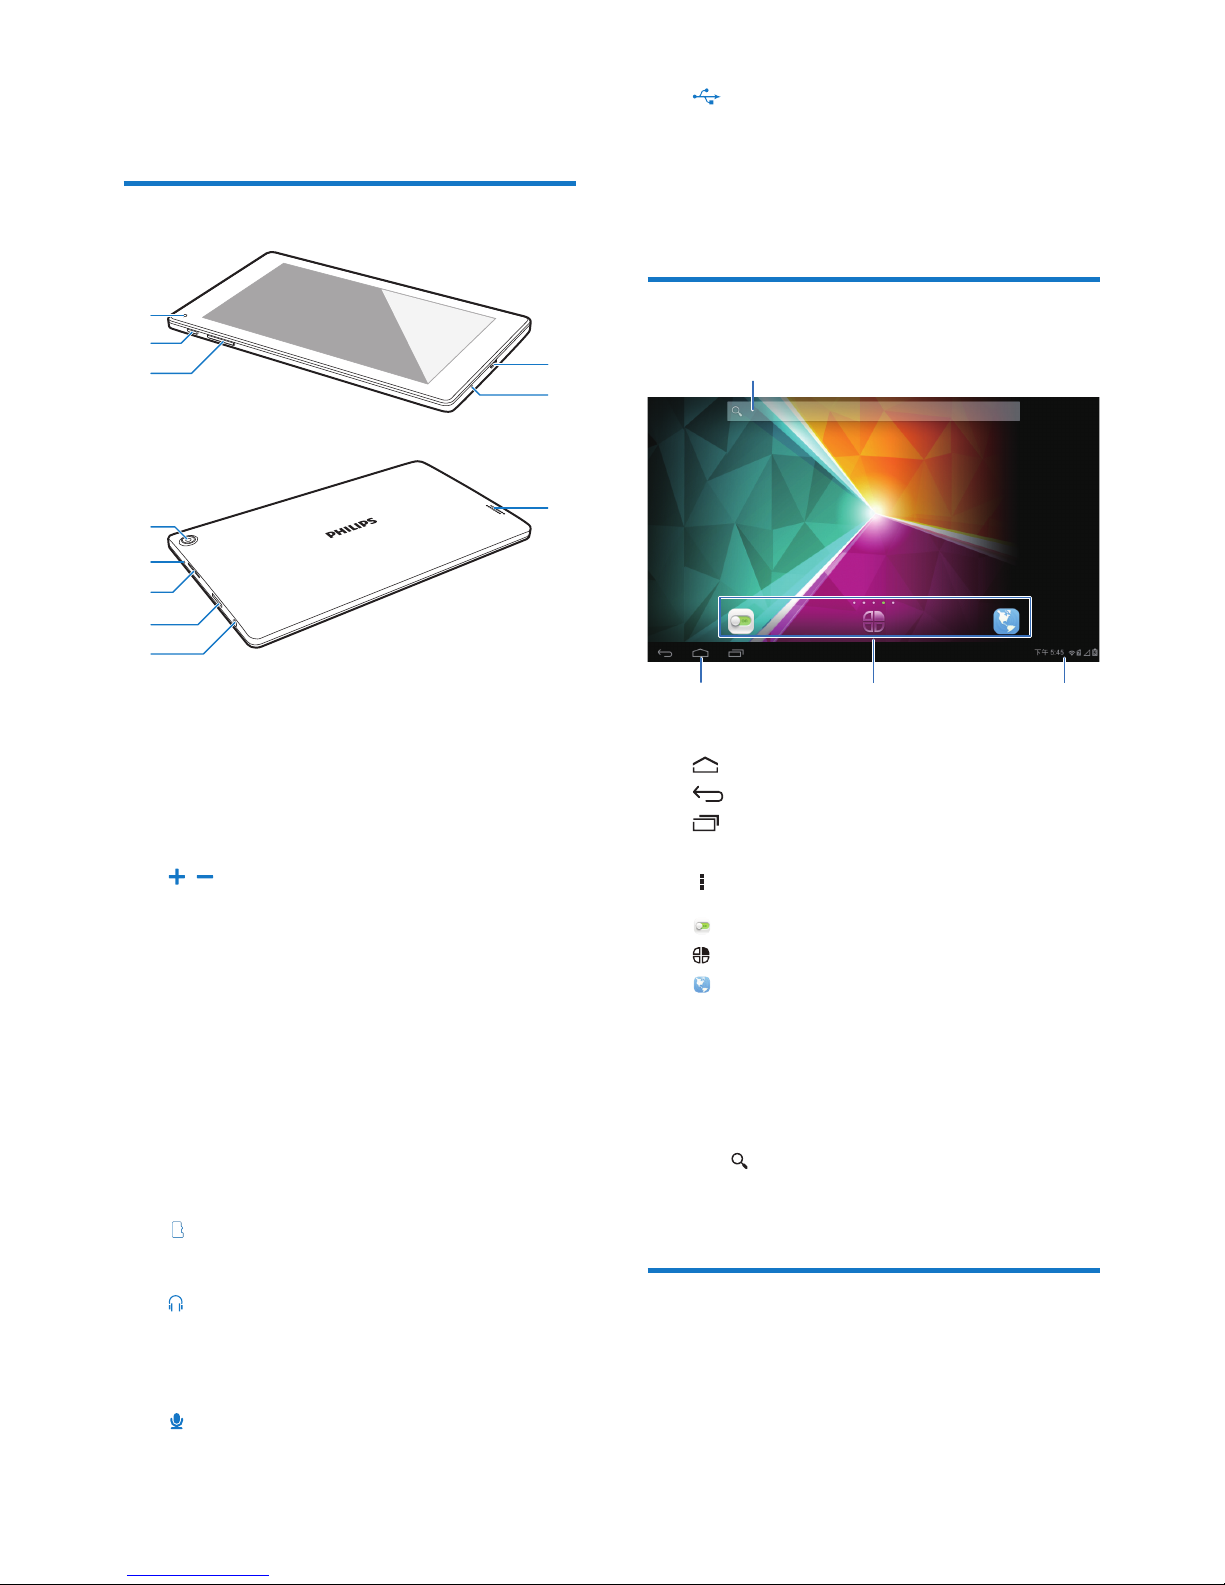
Controls
a Power/ lock button
Press and hold: switch on or off the
device.
Press: lock/unlock the screen; To unlock
the screen, drag the lock to unlock.
b
,
Press: increase/decrease the volume.
Press and hold: increase/decrease fast.
c Rear camera lens
d RESET
Press the hole by using the tip of a
paper clip when the screen does not
respond to the pressing of keys
e SIMCARD
Slot for SIM card (TD-SCDMA)
f
Slot for Micro SD card
g
3.5-mm headphone connector
h Speaker
i
Microphone
k
c
d
e
f
g
a
b
j
h
i
j
USB connector for data transfer and
power charging
k Front camera lens
Home screen
a : Tap to return to the Home screen.
: Go back one level.
: Display recent applications that you
have accessed.
(for some apps): View the options menu.
b
: Customize the setting of PI3205G.
: List all apps or widgets.
: Browse Web pages.
c NotiÀcations, time, setup options
Pull up the bar to check events, status,
or select setup options.
d Search
: Use the quick search box to search
on PI3205G or the Web.
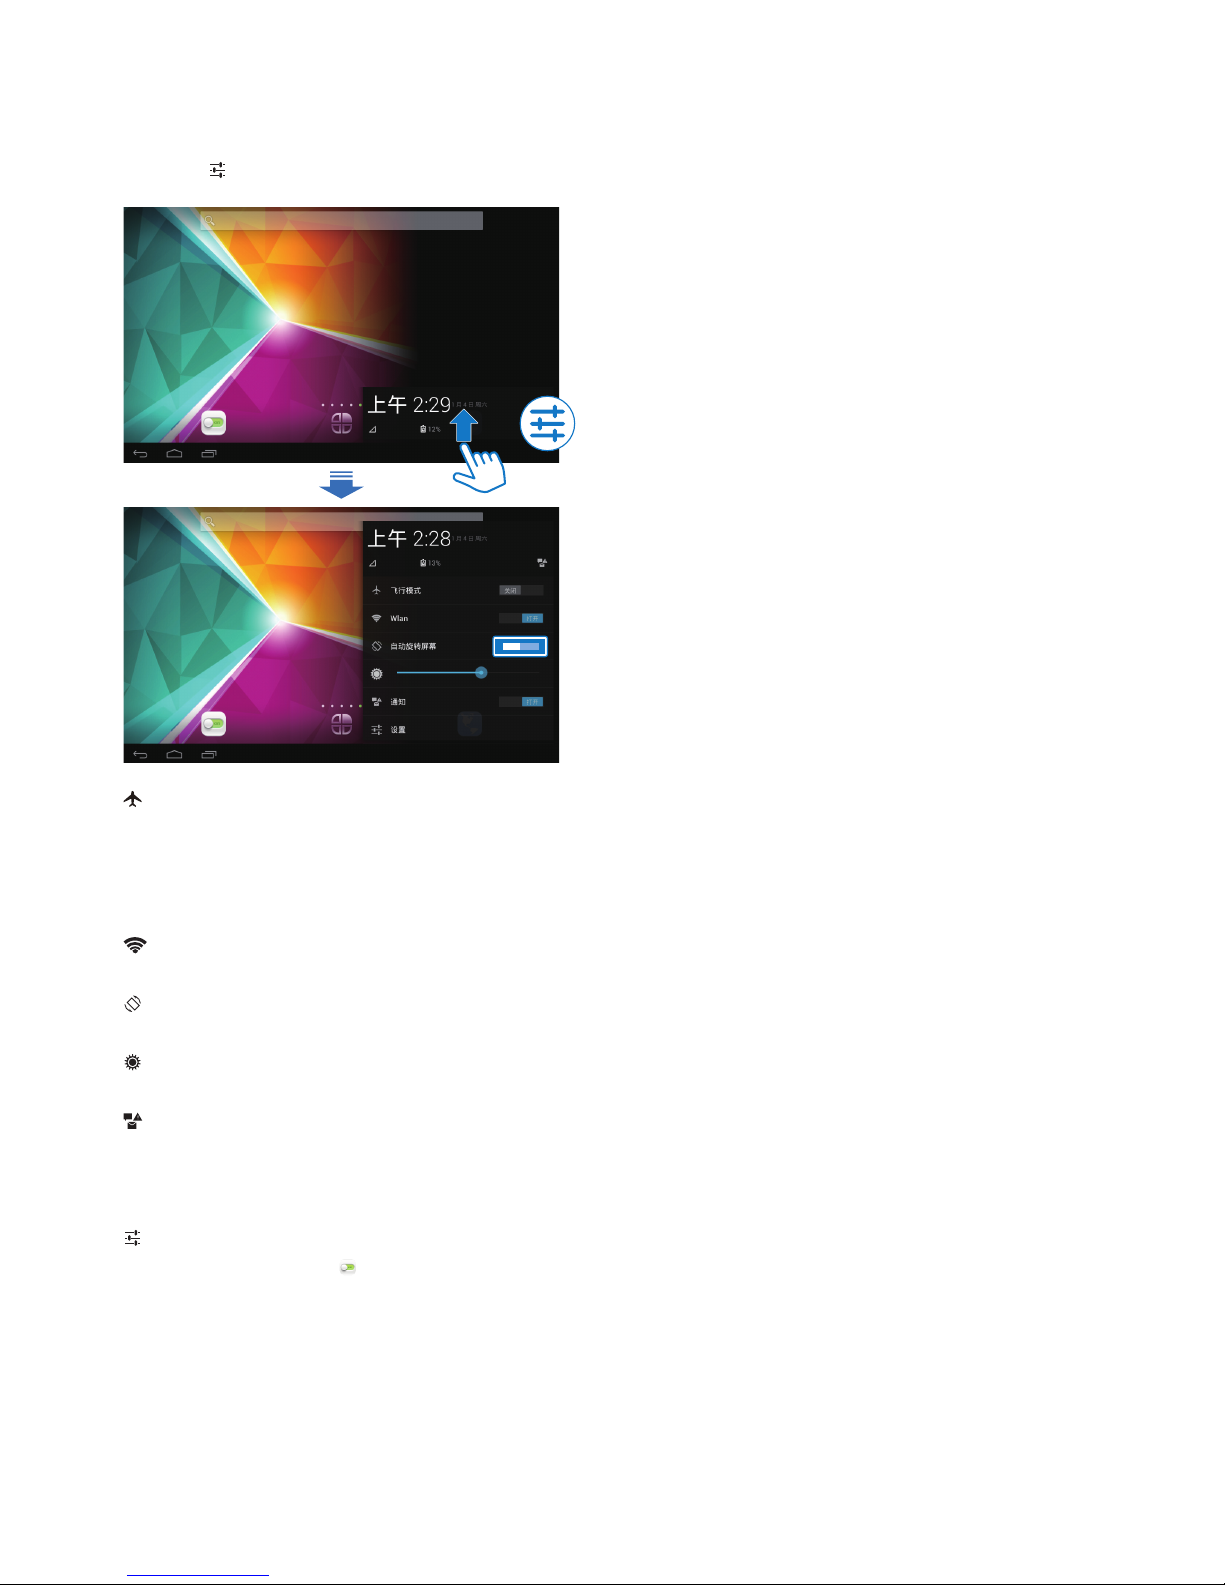
Use the pull-up menu
1
At the base of the screen, drag up to show
the pull-up menu.
a
c
b
d
Page 8
6 EN
» You can check events, status and select
setup options.
2 Tap to select setup options.
Switch on or off the airplane mode.
When the airplane mode is on, the
access to wireless connection is
disabled.
Switch on or off Wi-Fi.
Switch screen rotation on or off.
Change the screen brightness.
Switch on or off the notiÀcations
for incoming messages, Email, or
reminders.
Switch to the Settings menu.
Page 9
7EN
3 Get started
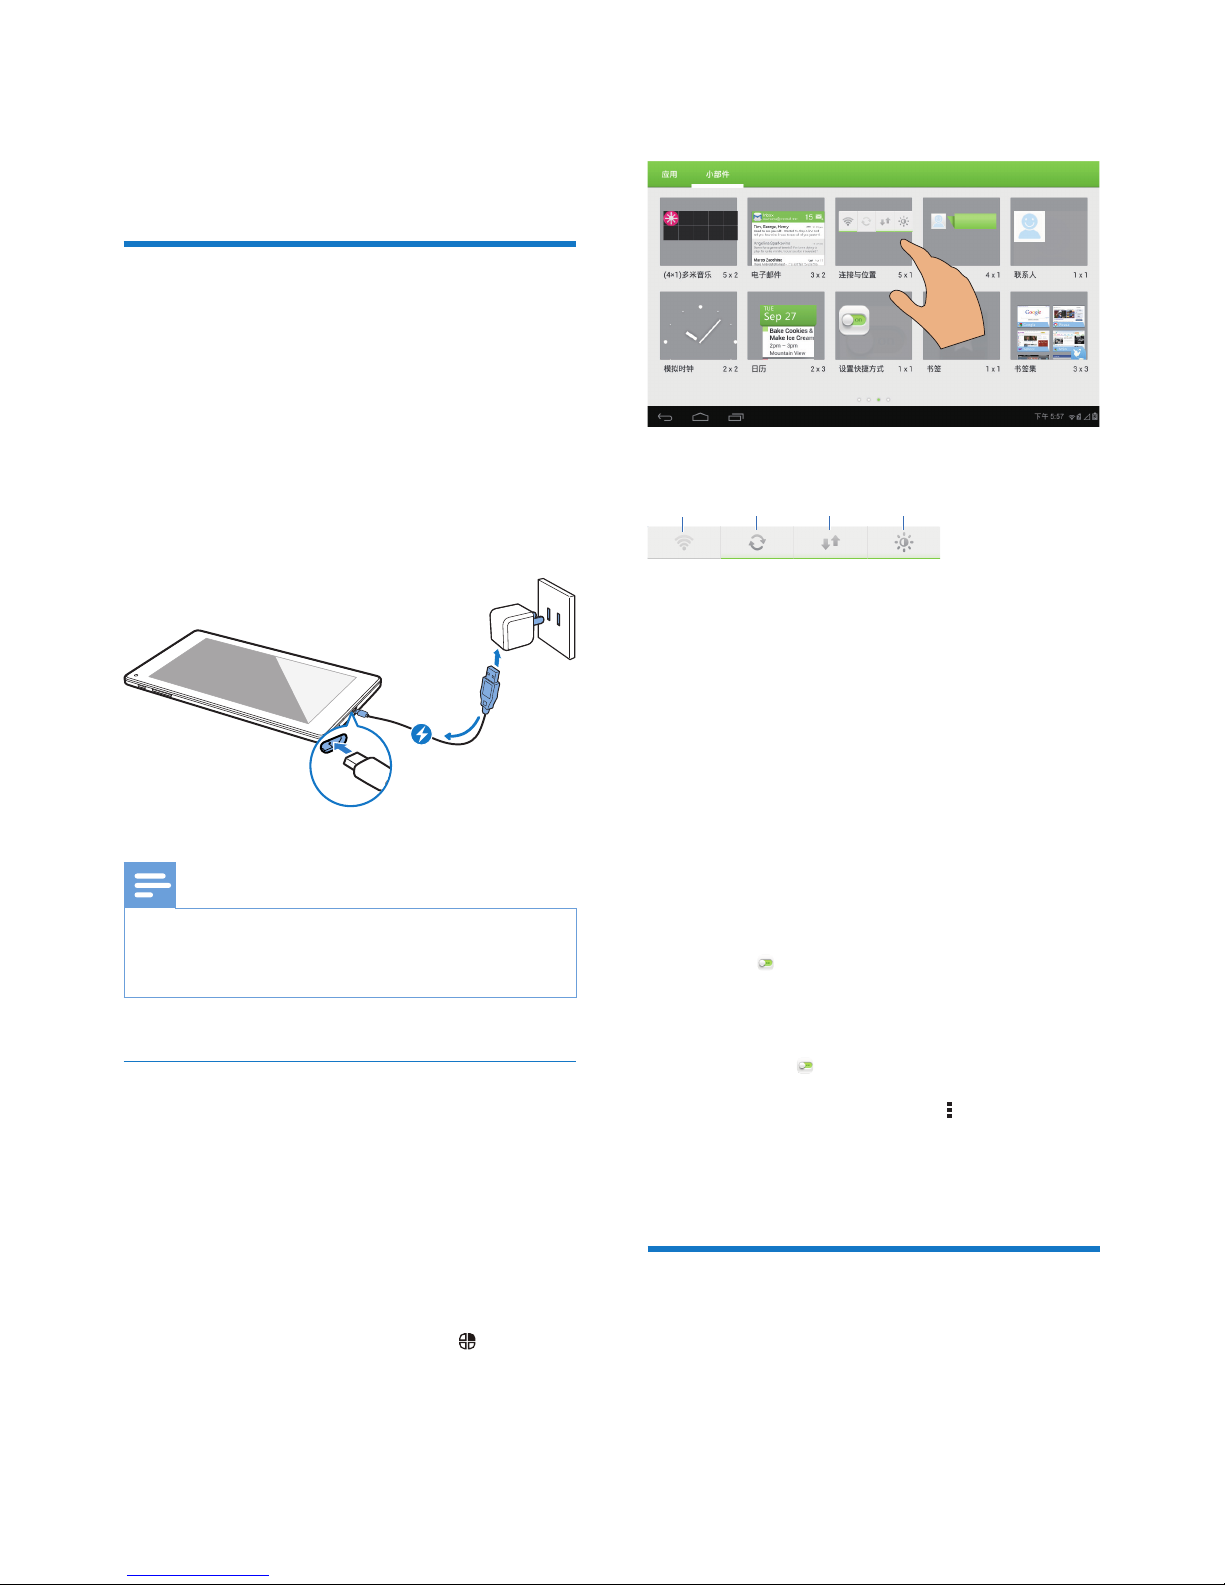
Charge power
PI3205G has a built-in battery that can be
charged through the USB connector of the
supplied USB power adapter.
The Àrst time you use PI3205G, charge
PI3205G for more than six hours.
By using the USB cable, connect
PI3205G to the supplied USB power
adapter.
Note
Rechargeable batteries have a limited number of charge
cycles. Battery life and number of charge cycles var y by
use and settings.
Conserve battery power
To conserve battery power and increase
the play time, do the following:
Use the power control widget
With the power control widget, you can switch
off the functions conveniently when they are
unnecessary.
To add the widget to the Home screen,
1 From the Home screen, select >
WIDGETS.
2 Swipe left/ right to Ànd the Power control
widget.
3 Tap and hold the widget to add to the
Home screen.
To use the widget,
a Switch on or off Wi-Fi
b Switch on or off background sync (for
some apps, like mail)
c Switch on or off the mobile network
d Change the screen brightness
Use the sleep mode
After the selected time duration, PI3205G goes
to the sleep mode, and the screen switches
off automatically. To save battery power, do the
following:
Go to
> Display > Sleep to set the
screen-off timer to a low value.
To switch off Wi-Fi during the sleep mode,
a Go to
> WLAN.
b At the top bar, select
> Advanced
> Keep WLAN on during sleep. Select
Never.
Switch the device on or off
Press and hold the power/ lock button until the
device is switched on or off.
d
a
c
b
Page 10
8 EN
4 Basics
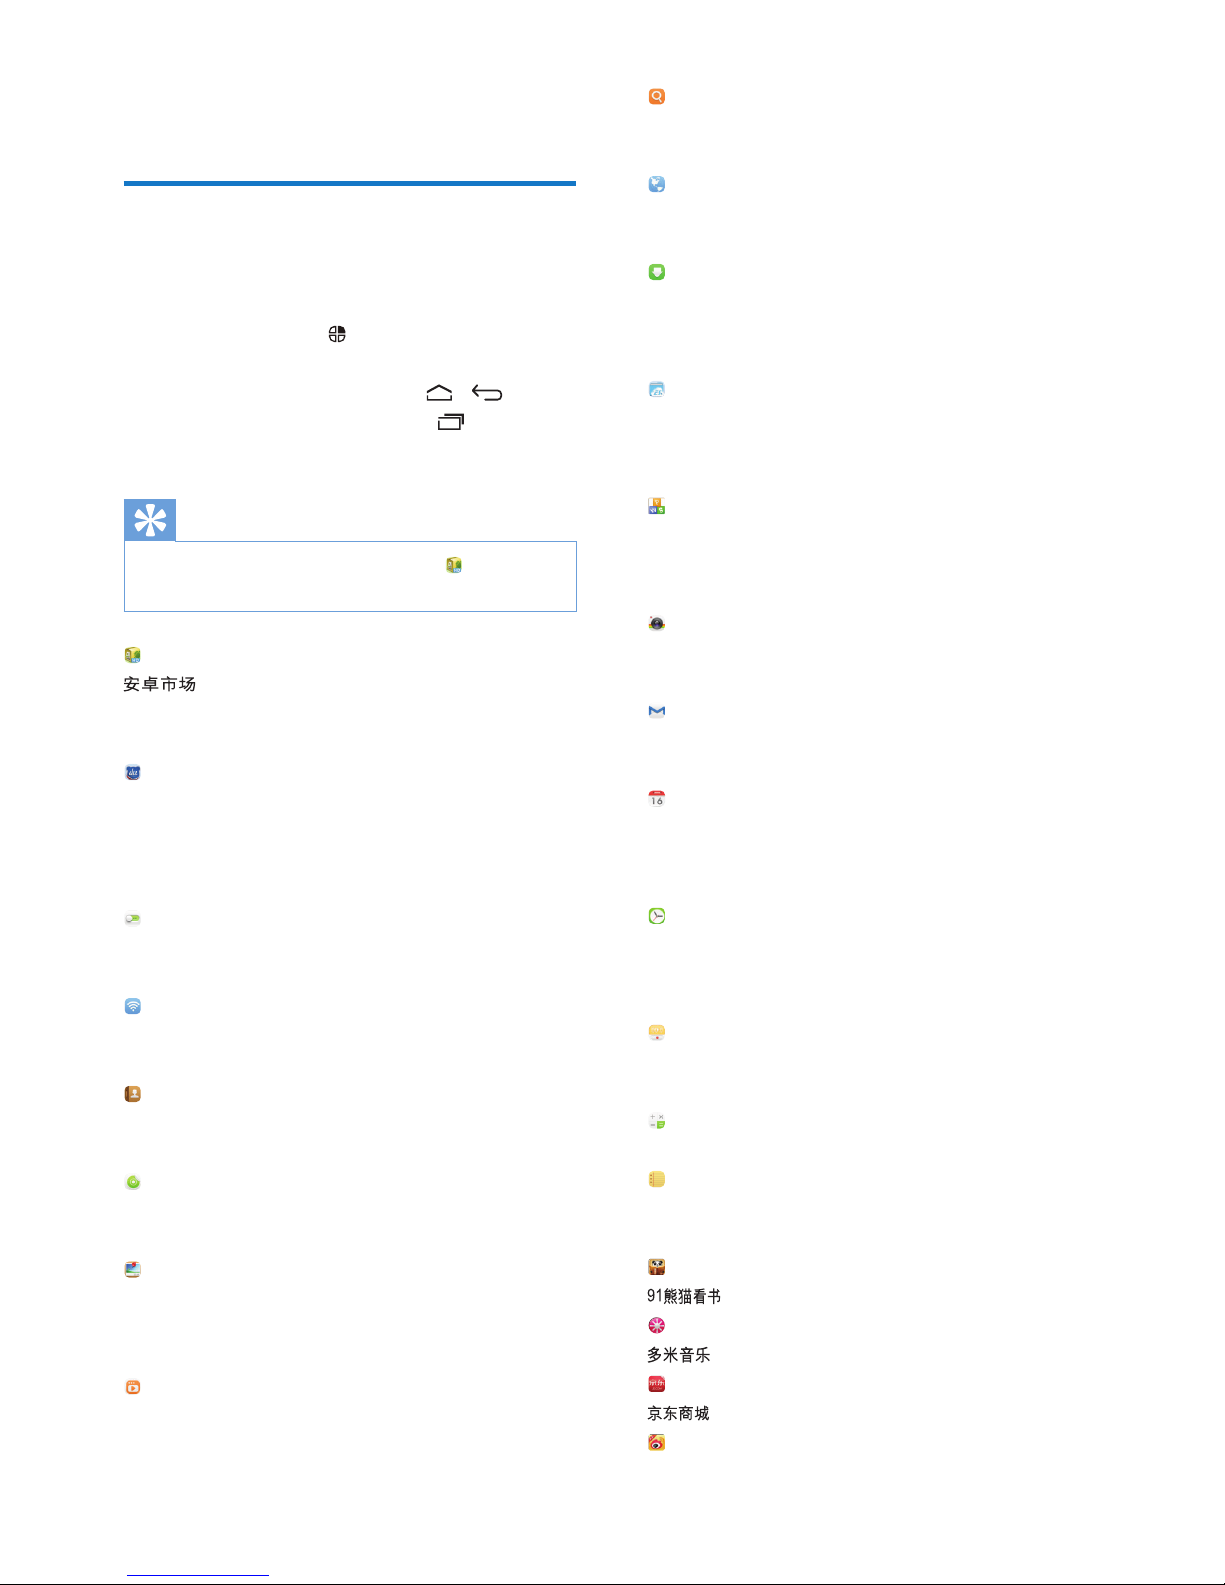
Find apps
Navigate on the Home screen to Ànd an app:
Swipe left/ right to select a page;
Alternatively, tap
to open the list of apps.
Swipe left/ right to scroll through the list;
Use the navigation buttons
/ to
switch between screens. Tap
to go to
the apps that you have accessed recently.
Tip
On PI3205G, you can install apps from or other
sources.
:
Download different apps, games, and
others.
Baidu Input:
Set Baidu Input as the default input
method, or select your options of
Baidu Input.
Settings:
Customize the settings of PI3205G.
WLAN:
Set up a Wi-Fi connection.
People:
Create, edit and check contacts.
Music:
Play music that you store on PI3205G.
Gallery:
View pictures and videos that you
store or make on PI3205G.
Video Player:
Play videos that you store on PI3205G.
Search:
Search on PI3205G or the Web.
Browser:
Browse Web pages.
Downloads:
View the list of your downloads from
the Web.
ES File Explorer:
Browse and manage the Àles/ folders
on PI3205G.
Kingsoft OfÀce:
Create and manage your document,
text, Powerpoint and Excel Àles.
Camera:
Take photos or record videos.
Email:
Set up your email account on PI3205G.
Calendar:
Add events, and set reminders for your
events.
Clock:
Use the timer, alarm clock, world clock
and stopwatch.
Sound Recorder:
Record and listen to voice messages.
Calculator
Notepad:
Keep quick notes.
: Online book store
: Online music service
: Online shopping service
Page 11
9EN
: Social networking service
: News por tal
Amazon: Online shopping service
: Online games
Use the screen
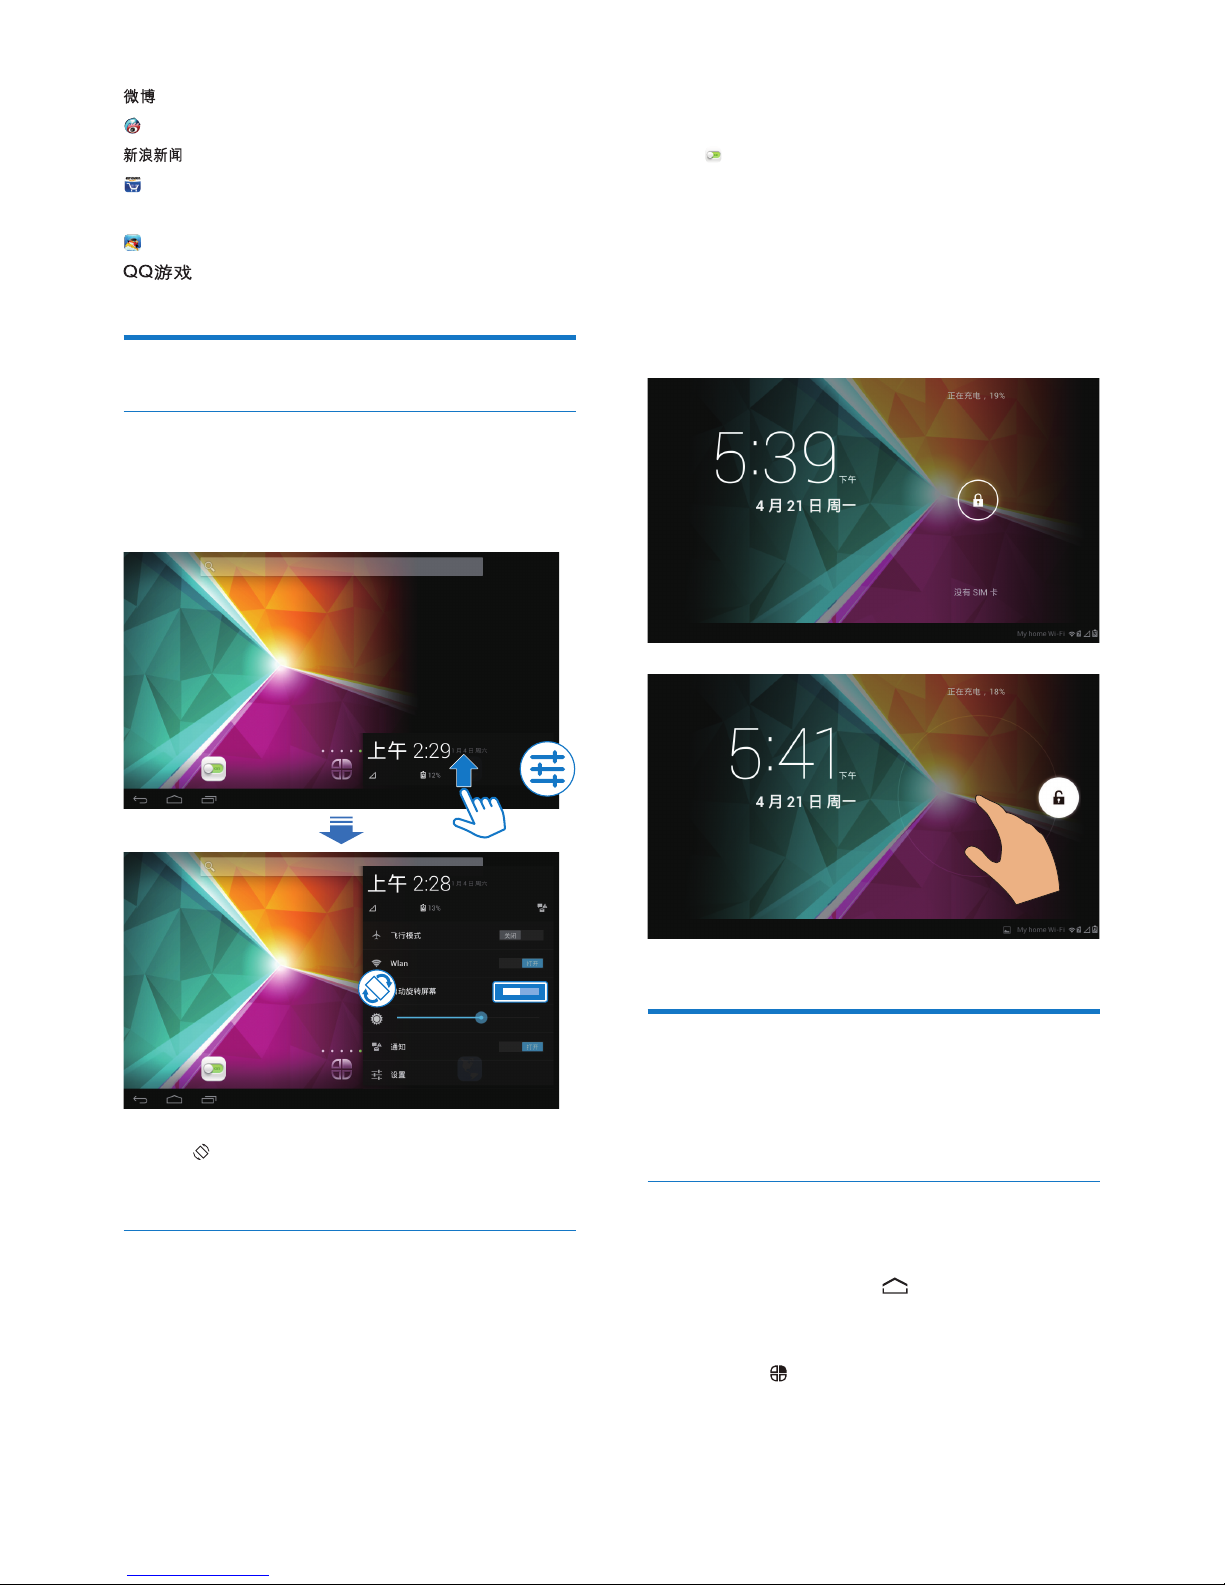
Switch screen rotation on or off
1 At the base of the screen, drag up to show
the pull-up menu.
2 In , tap to switch screen rotation on or
off.
Lock/ unlock the screen
By locking the screen, you can lock all the
touch controls on the screen. Thus, undesired
operations are prevented.
Auto lock
After a time duration, the screen dims and is
locked automatically. To set the time duration,
go to
> Display > Sleep.
To lock the screen manually
Press the power/ lock button.
To unlock the screen
1 If necessary, press the power/ lock button
to display the lock.
2 Drag the lock to unlock.
Customize the Home screen
To access functions quickly from the Home
screen, you can add and rearrange items.
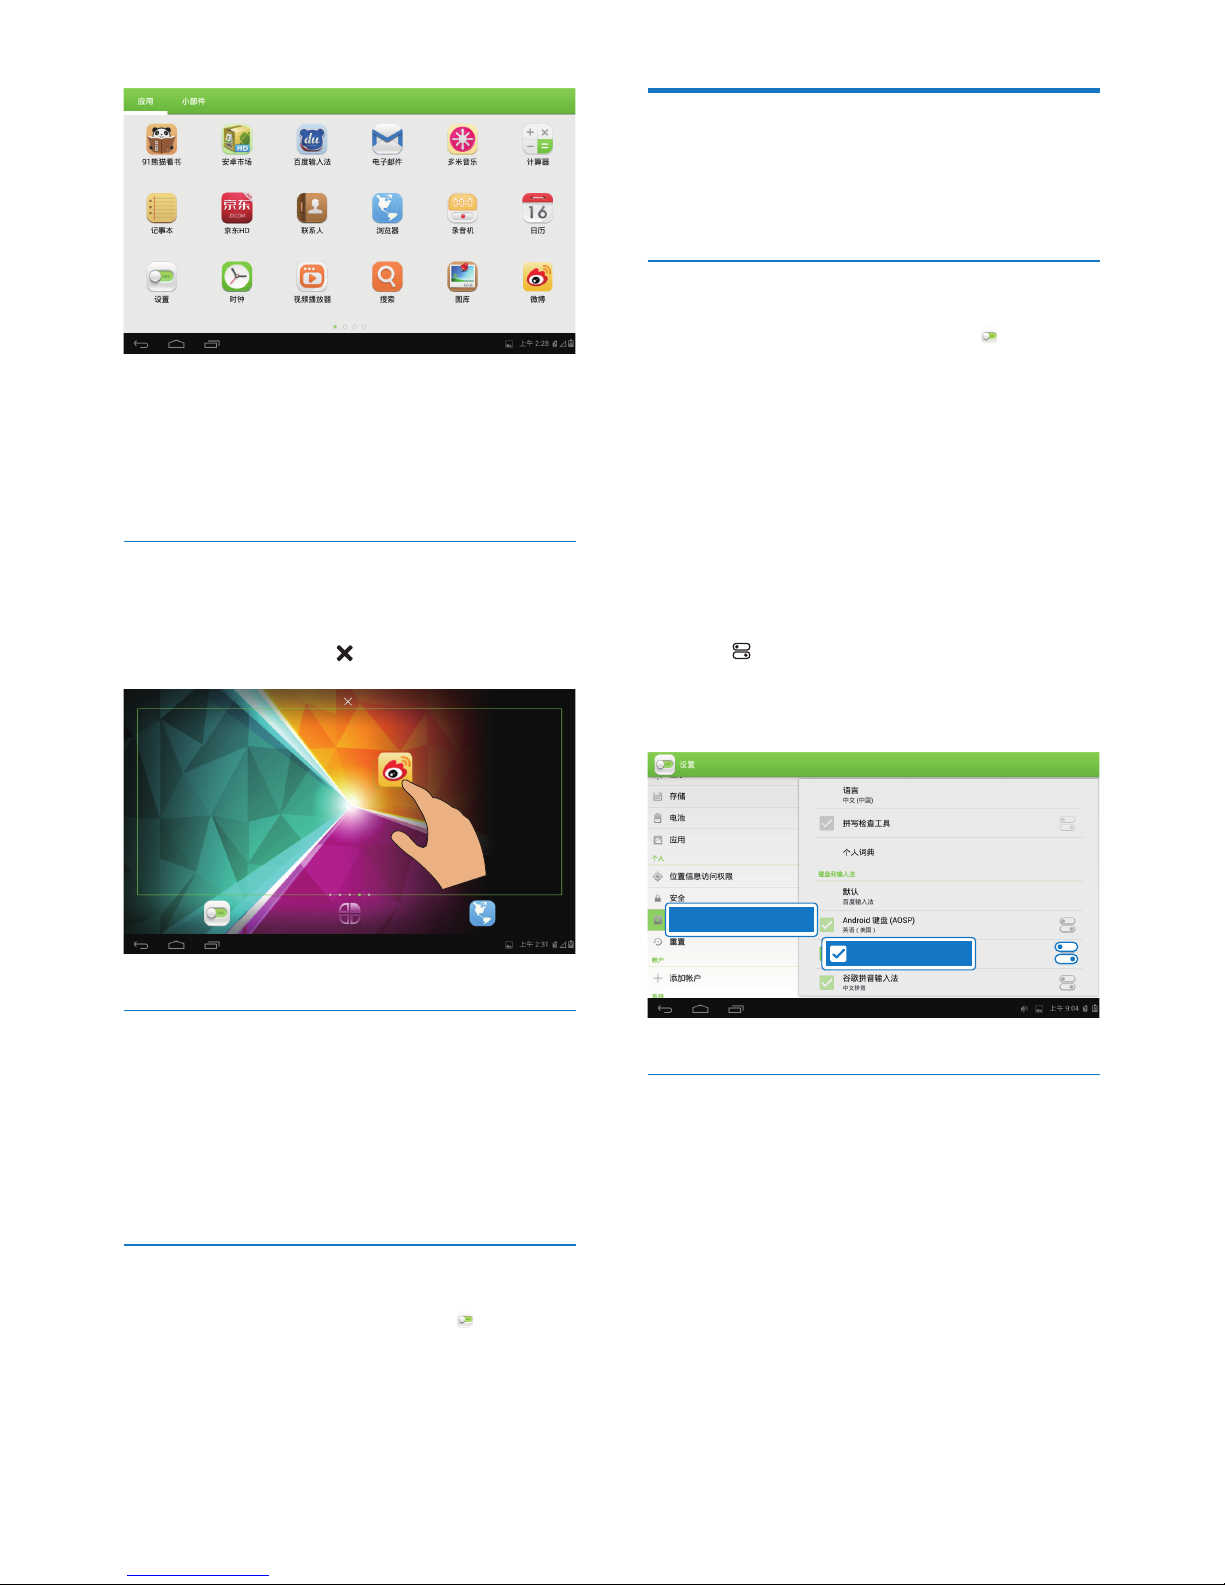
Add app icons and widgets
1 Swipe left/ right to select a page.
If necessary, tap
to return to the
Home screen.
Make sure that the page isnt Àlled.
Tap
. Tap APPS or WIDGET to open
the list of apps or widgets.
Page 12
10 EN
2 Tap and hold an icon or widget until the
page is displayed.
» The icon or widget is added to the
selected page.
Delete items
1 Tap and hold an item to unlock.
2 Drag the item to .
Relocate items
1 Tap and hold an item to unlock.
2 Drag the item to a space on the page.
3 Release the item.
» The item moves to the space.
Add wallpapers
1 From the Home screen, go to > Display
> Wallpaper.
2 Select your options.
Text entry
With the onscreen keyboard, you can enter
text in multiple languages.
Select input methods
1 From the Home screen, go to Settings
> Language & input.
2 Select your input methods:
Android keyboard: for multiple languages
other than Chinese
Baidu input: for Chinese input through
handwriting recognition, stroke, and Pinyin,
and English input
To useBaidu input,
1 Select Baidu input in Step 2 above.
2 Tap next to the input method.
3 Follow the onscreen instructions to set
Baidu input as the default input method.
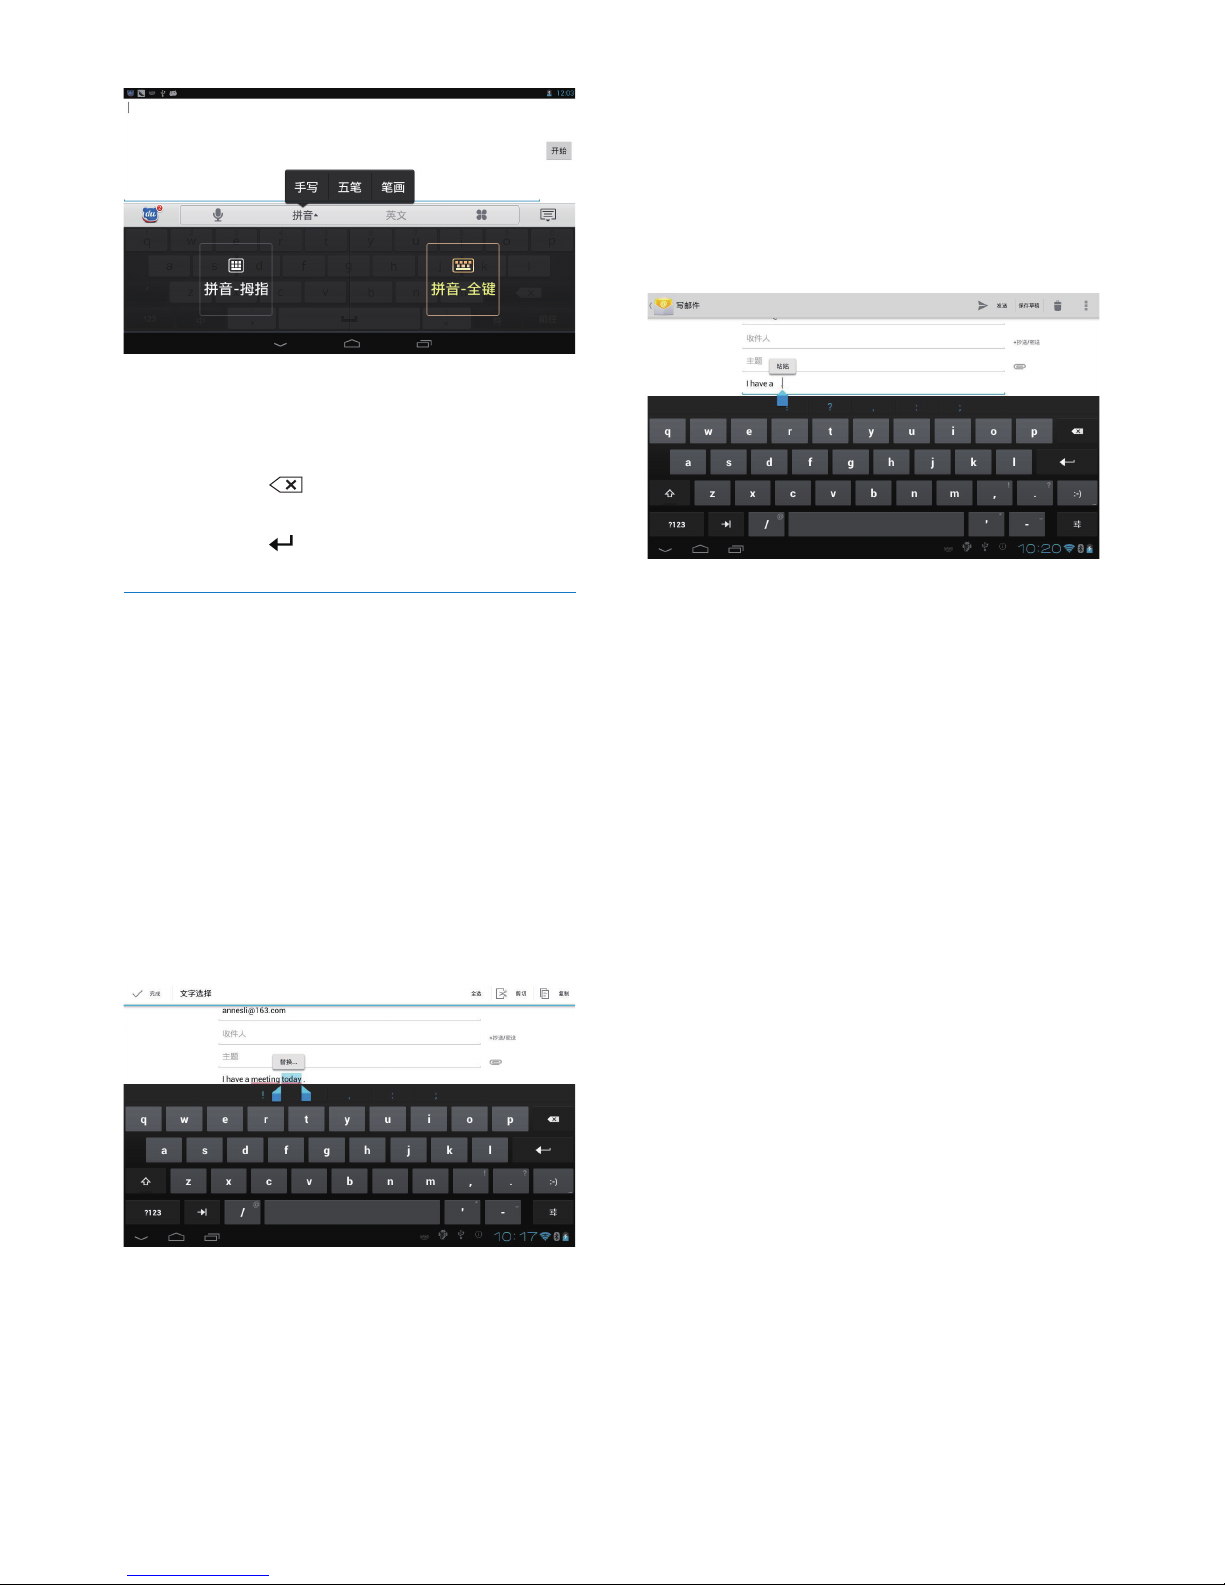
Enter text
1 Tap the text box to show the onscreen
keyboard.
2 Select text input modes as needed.
䇁㿔䕧ܹ⊩
჻ᣘЍ
Page 13
11EN
3 Tap keys or drag on the screen to enter
text.
To delete the entry before the cursor,
Select
.
To move to the next line,
Select
.
Edit text
You can cut, copy, and paste the text that you
have entered.
Select the text
1 Tap and hold the text until the pop-screen
is displayed.
» Current word is selected, with marks
for start and end positions.
Tap Select all to select all the text.
2 Drag the marks to select or change the
start/ end positions.
Copy or cut the selected text
Tap Copy or Cut.
» The selected text is copied or cut.
Paste the selected text
1 Put the cursor in a position.
2 Tap and hold the position until the pop-
screen is displayed.
» In the pop-up screen, the option Paste
is displayed.
» Tap Paste.The text is pasted in the
selected position.
Page 14
12 EN
5 Connections
Connect to the Internet
You can connect PI3205G to the Internet
through Wi-Fi or mobile network.
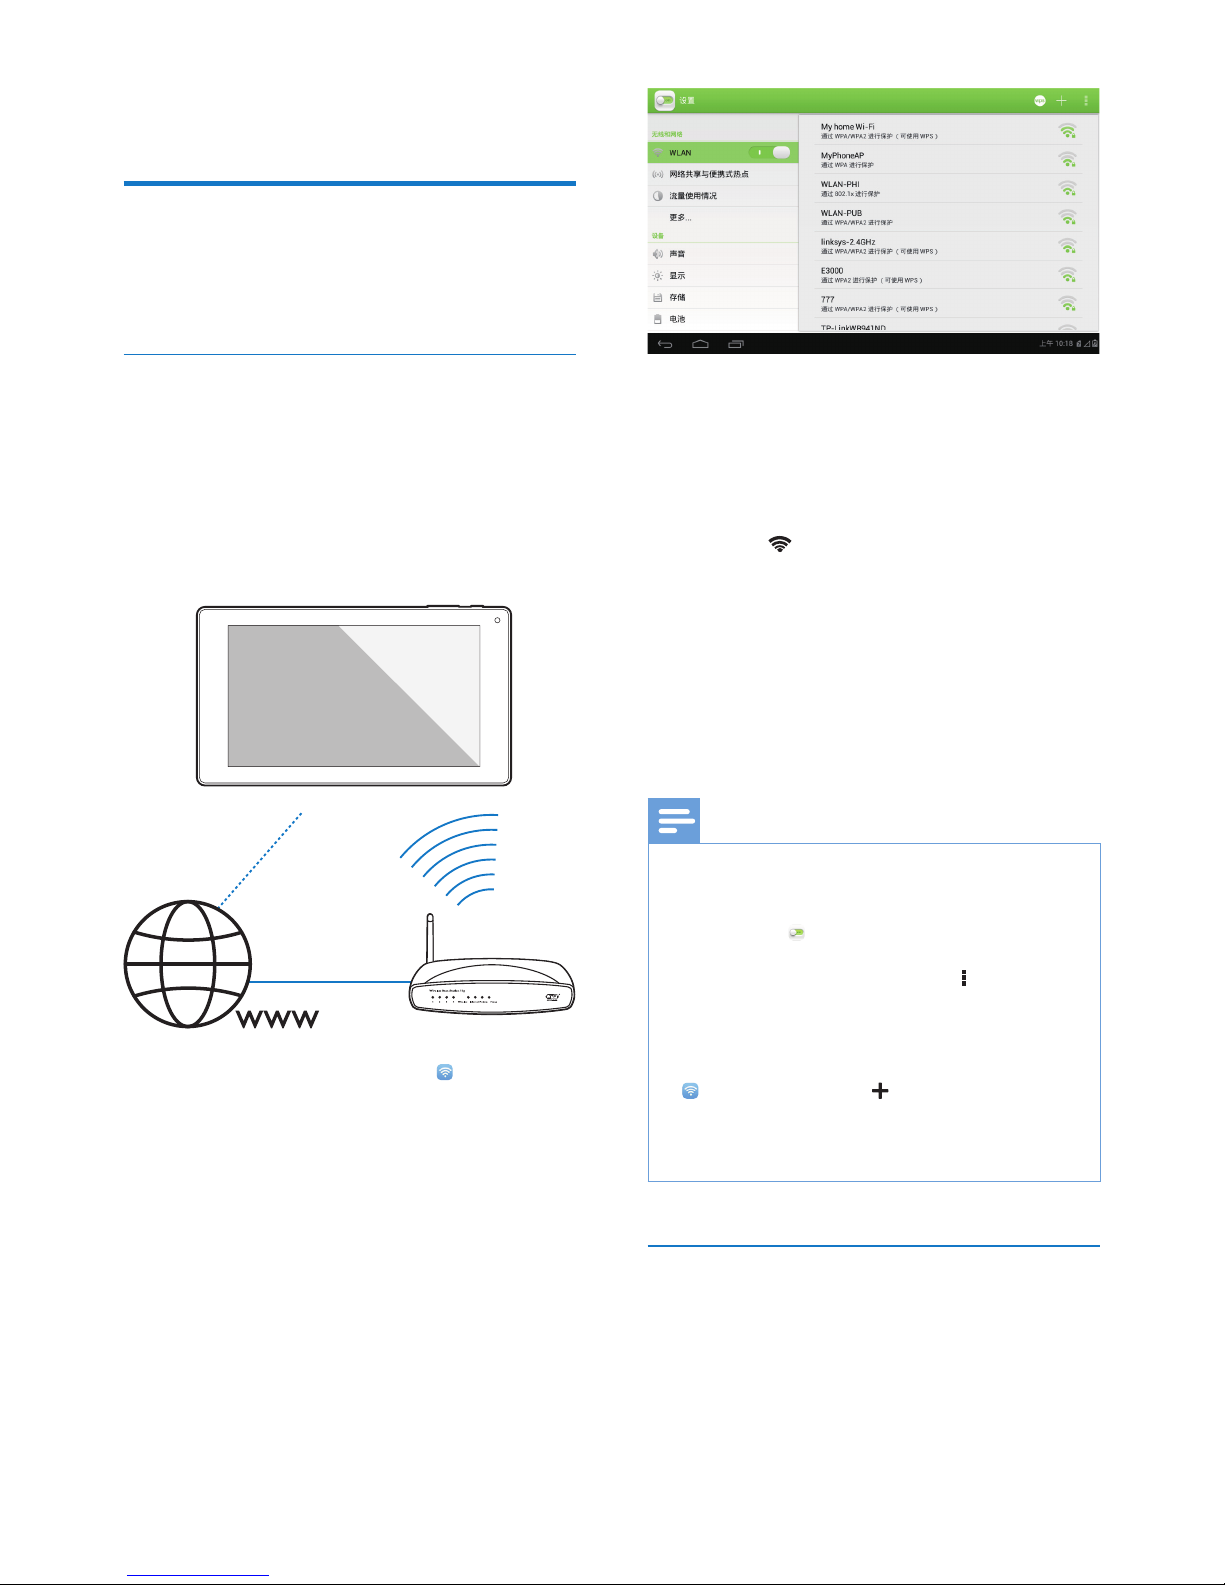
Connect through Wi-Fi
Connect PI3205G to a wireless router (Access
Point). You can connect PI3205G to the
network that is built around the router.
To connect to the Internet, make sure that the
router connects to the Internet directly and no
dial-up is required on the computer.
1 From the Home screen, tap .
2 Switch on the Wi-Fi function.
» You see a list of Wi-Fi networks in
range.
3 Connect PI3205G to a network:
a Tap to select a network.
b On the pop-up screen, enter the
password to the network.
»
is displayed in the status bar
when the Wi-Fi connection is
completed successfully.
» Next time you switch on
PI3205G, PI3205G connects to
the previously connected network
automatically.
Note
If MAC address Àltering is enabled on your router, add
the MAC address of PI3205G to the list of devices that
are allowed to Moin the network. To Ànd the Wi-Fi MAC
address, go to
Settings > About tablet > Status on
the Home screen.
To refresh the list of networks, select > Scan at the
upper-right corner of the screen.
If you have disabled SSID broadcasting or hidden the
Service Set IdentiÀer (SSID) of the router, manually
enter the SSID or public name for the network. Go to
. On the top bar, select .
If the DHCP (Dynamic Host ConÀguration Protocol)
is unavailable or disabled on the router, manually enter
the IP address of PI3205G.
Connect through the mobile network
With the SIM card (TD-SCDMA), you can
connect PI3205G to the Internet through the
mobile network. Consult your service provider
for more information.
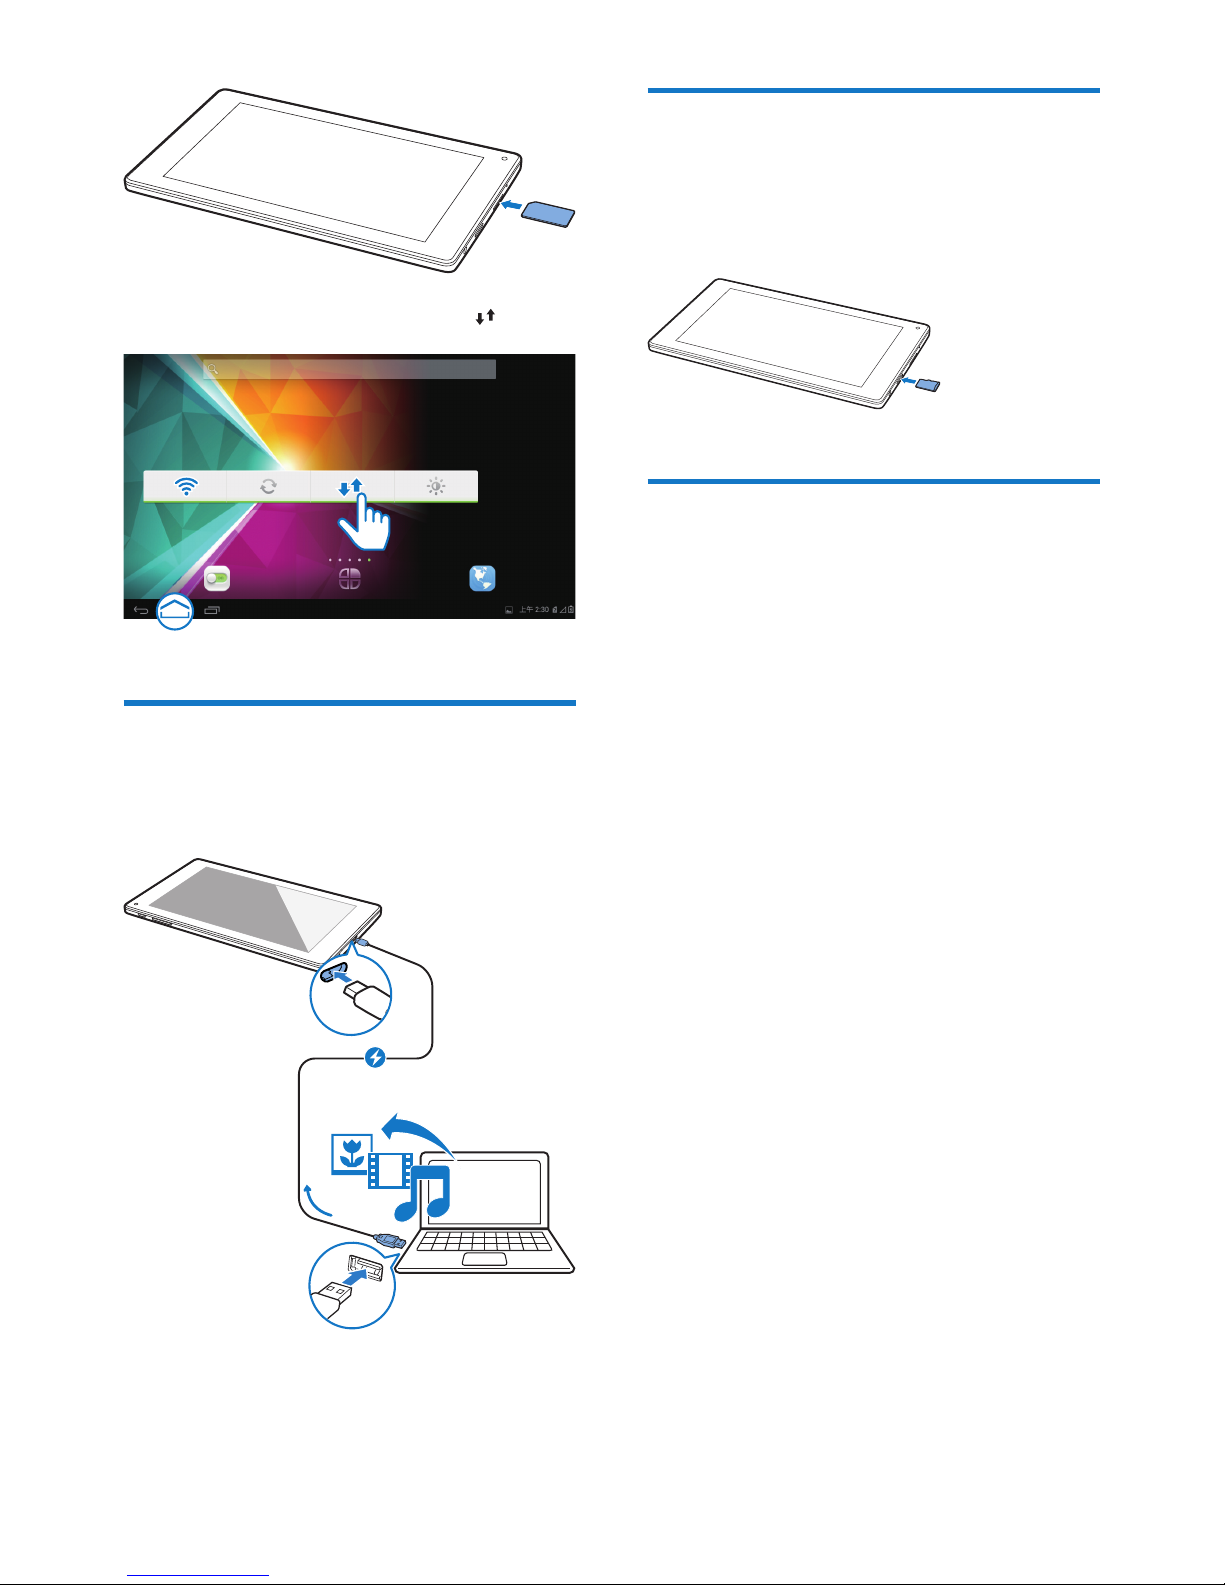
1 Mount your SIM card onto PI3205G.
Page 15
13EN
2 On the widget, tap to switch on .
Connect to your computer
Connect PI3205G to a computer through the
USB cable.
You can transfer apps or media Àles from your
computer to PI3205G,the internal storage or
SD card.
Use a Micro SD card
Insert a Micro SD card (up to 32 GB) into
PI3205G. You can expand the memory size of
PI3205G.
Portable hotspot
PI3205G can work as a Wi-Fi hotspot. Through
PI3205G, you can have your wireless devices
connected to the Internet.
To connect to the Internet through PI3205G,
1 Connect PI3205G to the Internet through
the mobile network (see 'Connect through
the mobile network' on page 12).
2 In Tethering & portable hotspot, tap to
switch on Portable WLAN hotspot.
3 Select Set up WLAN hotspot. You can
check and edit the network name (SSID)
and password.
4 On your wireless devices, search for and
connect to PI3205G.
Page 16
14 EN
6 Apps
With apps, you can access functions, services,
and different audio/ video content on PI3205G.
Install apps
On PI3205G, you can install apps from
( ) over the Internet; or
other sources, such as
other online sources,
the internal storage of PI3205G, a nd
the Micro SD card that you have
inserted into PI3205G.
Note
HiMarket is an open platform for apps developers to
promote their applications. Compatibility and quality
of execution of apps in HiMarket may vary from
developers to developers.
HiMarket
1 In , search for apps needed:
Tap
for search by category;
Tap
for keyword search.
2 Download the app:
Tap the app. ConÀrm as needed.
» When the downloading is
complete, installation starts
automatically.
» Check the status bar to Ànd the
status. If necessary, tap the icon to
start installation as prompted.
Other sources
Allow the installation from unknown sources
From the Home screen, go to
>
Security. Tap to switch on Unknown
sources.
» If the function is enabled, the tick box
is selected.
Download/ transfer apps
To download apps from online sources,
follow the onscreen instructions;
To transfer apps to the internal memory or
SD card of the device, use the USB cable
to connect PI3205G to your PC.
Start installation
The downloaded apps start installation
automatically;
To Ànd the apps that you have transferred
to the internal memory or SD card, go to
. Find the apps and tap the option to
start installation.
Manage apps
You can manage the apps on PI3205G, for
example, install/ uninstall apps, stop running
apps, or select other options.
1 From the Home screen, select Settings
> Apps:
In DOWNLOADED, Ànd the apps
that you have downloaded from the
HiMarket or other sources.
In On SD CARD, Ànd the apps that
you have installed on the SD card.
In RUNNING, Ànd the apps that are
running on PI3205G.
In ALL, Ànd all the apps that you have
installed on PI3205G.
2 Tap an app.
» Options and information are displayed.
3 Tap to select an option.
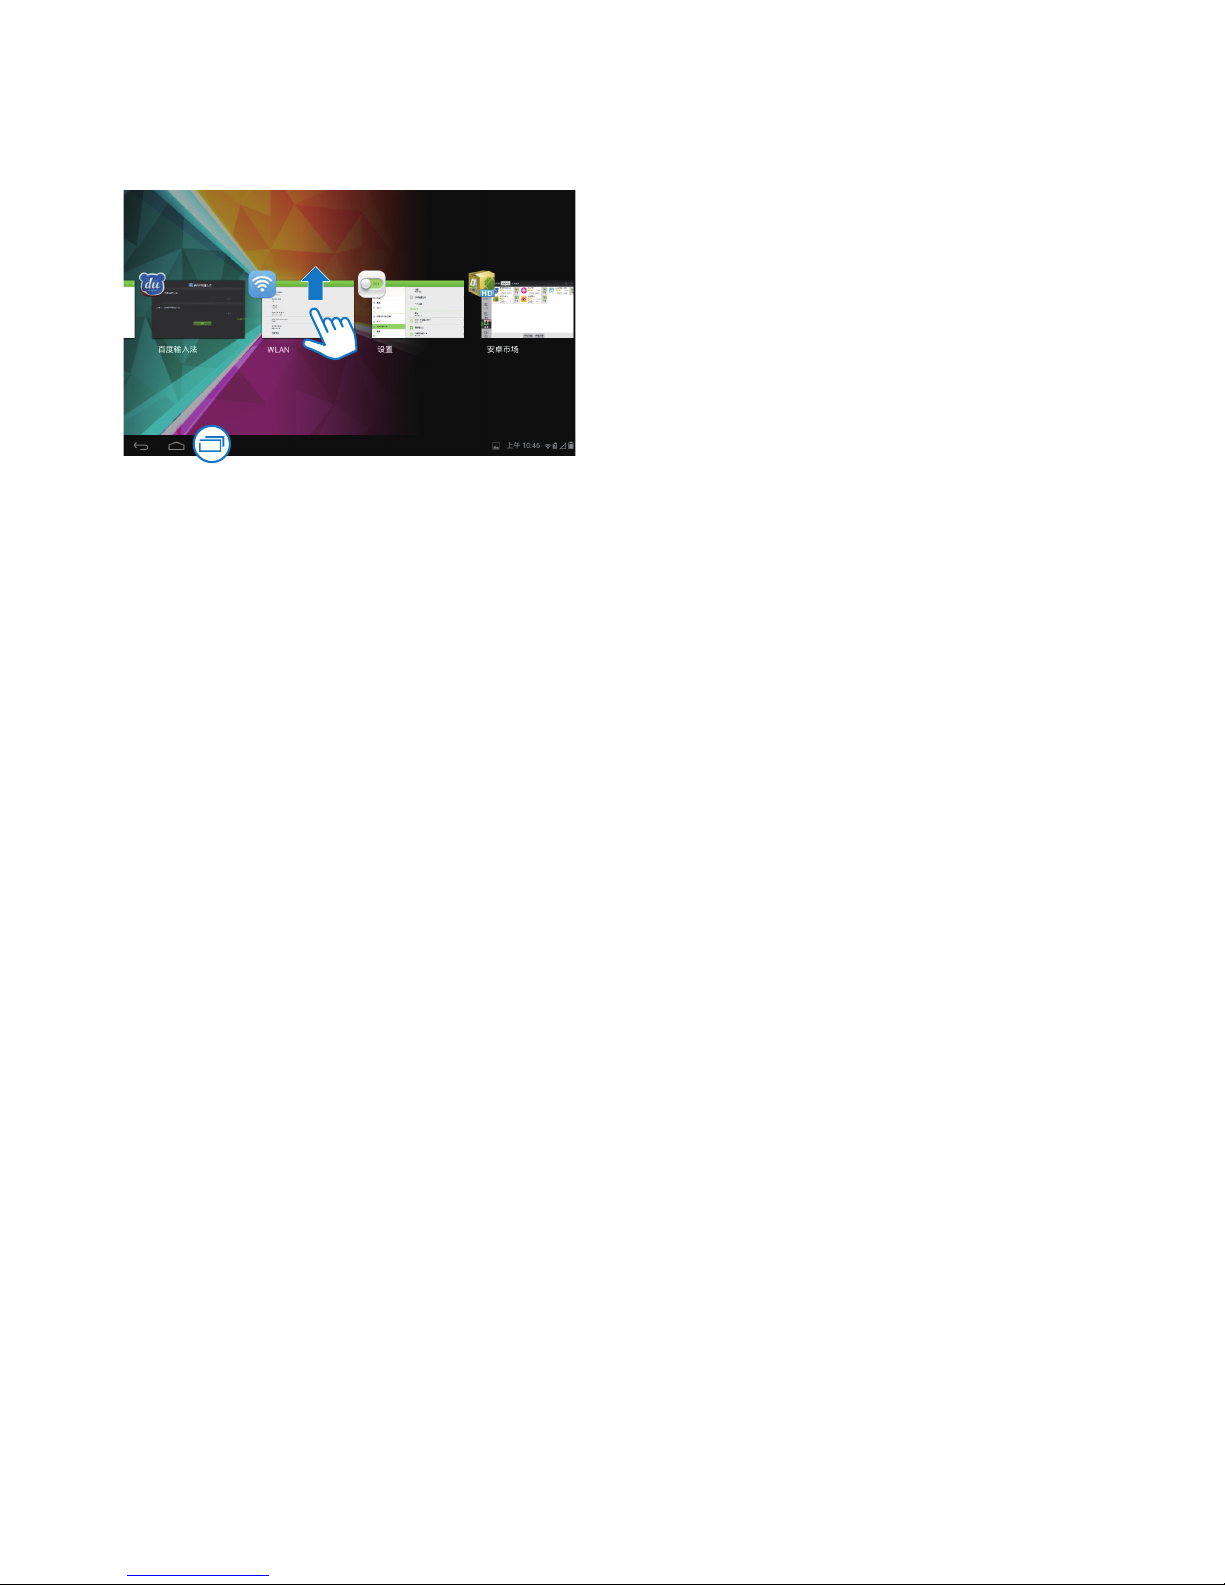
Exit apps completely
By exiting other apps completely, you can access
current app more smoothly.
1 At the base of the screen, tap .
» You go to the list of apps that you have
accessed recently.
Page 17
15EN
2 Pull up an app to exit completely.
» The app is removed from the list of
recent apps.
Page 18
16 EN
7 Browser
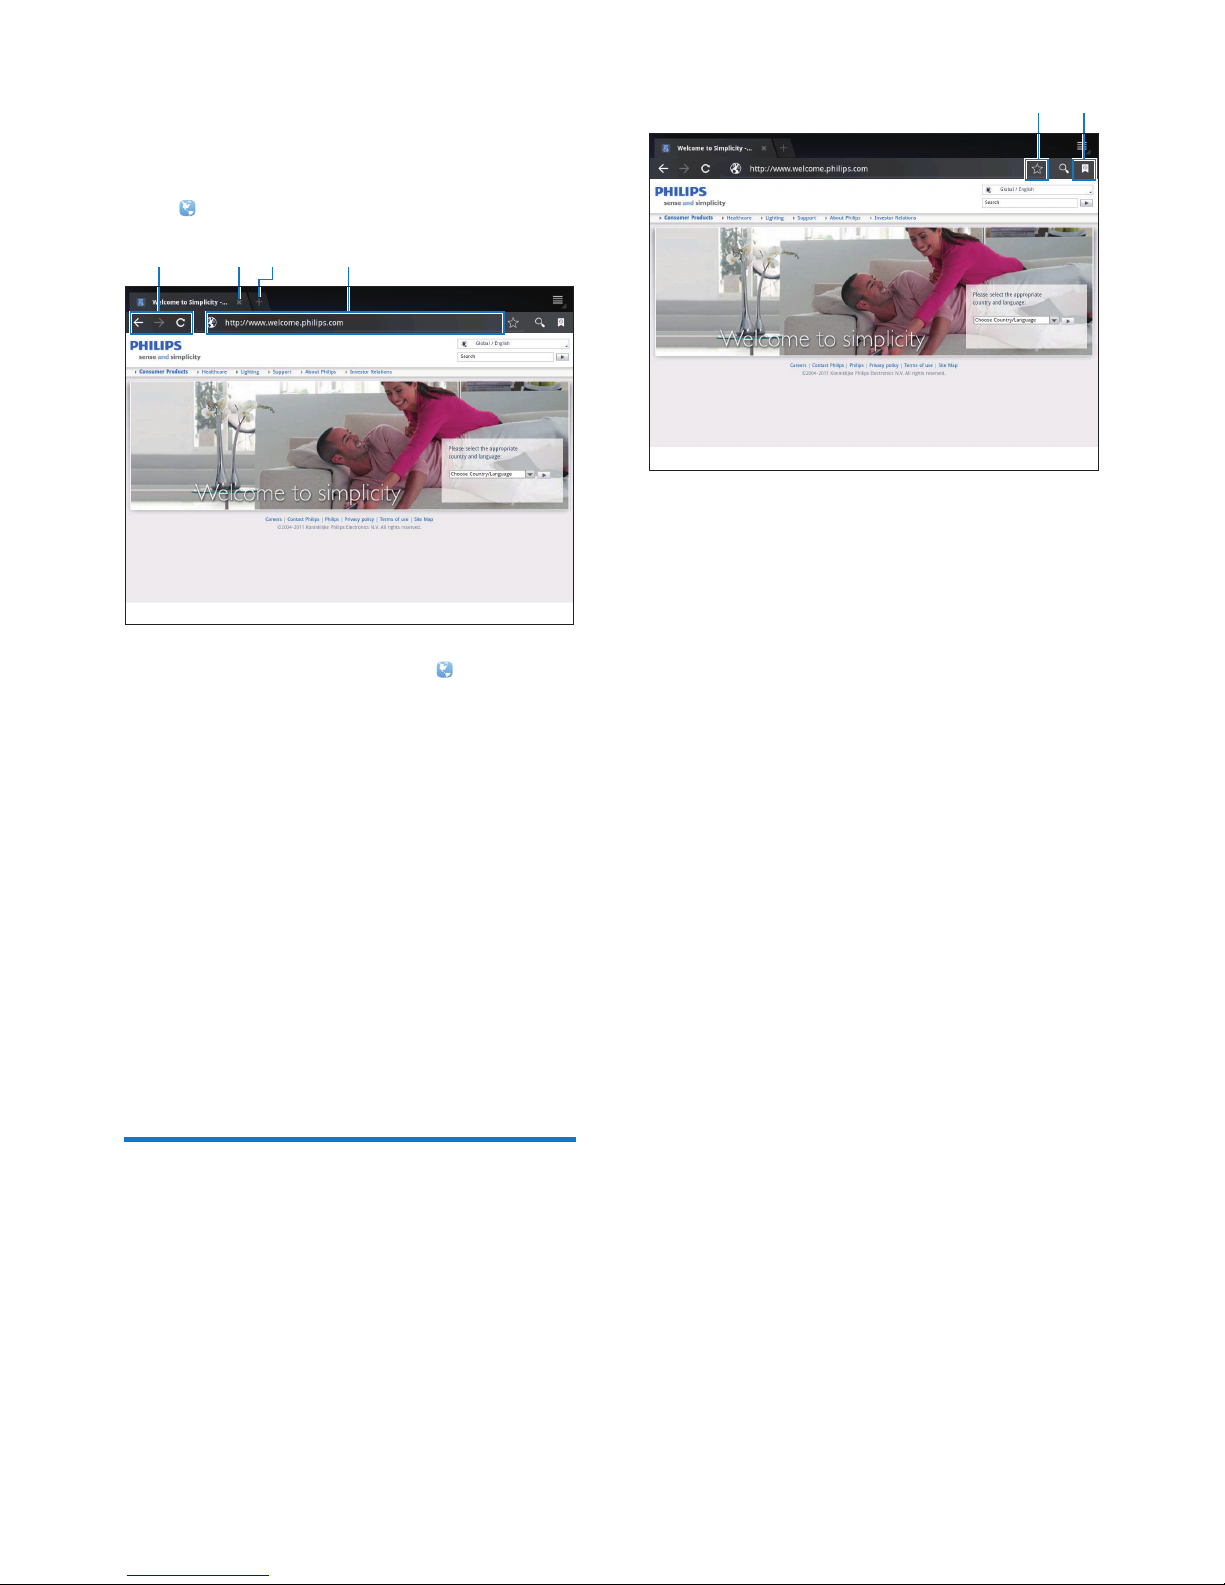
With , you can browse Web pages.
1 From the Home screen, tap .
2 Tap the icons or text box to do the
following:
a Enter the address of web pages. Tap
Go to start search.
b Tap the icons to search backwards,
forward, or refresh the Web page.
c Close the Web page.
d Open a new Web page.
To switch between Web pages,
At the top bar, tap the tab of the selected
Web page.
Add a bookmark
Add a bookmark. You can quickly access a
visited Web page.
abcd
a Add a bookmark to current Web page.
b Go to the bookmarked Web pages.
a
b
Page 19
17EN
8 Email
On PI3205G, you can receive and send email as
you do on a computer. Do the following:
Set up your email accounts on the
device.
Set up your email account
On PI3205G, set up your email accounts in the
following ways:
Set up your POP3 or IMAP mail accounts,
or
Set up your Microsoft Exchange account
to access your Exchange mailbox at work
(see 'Set up your Microsoft Exchange
account' on page 21).
Set up your POP3/ IMAP account
1 From the Home screen, go to .
2 Set up your email account:
Enter the information about your
account;
Select pop3 or IMAP account.
3 Follow the onscreen instructions to
complete the setup.
Consult your email service provider
for the setup information, such as the
outgoing server, incoming server.
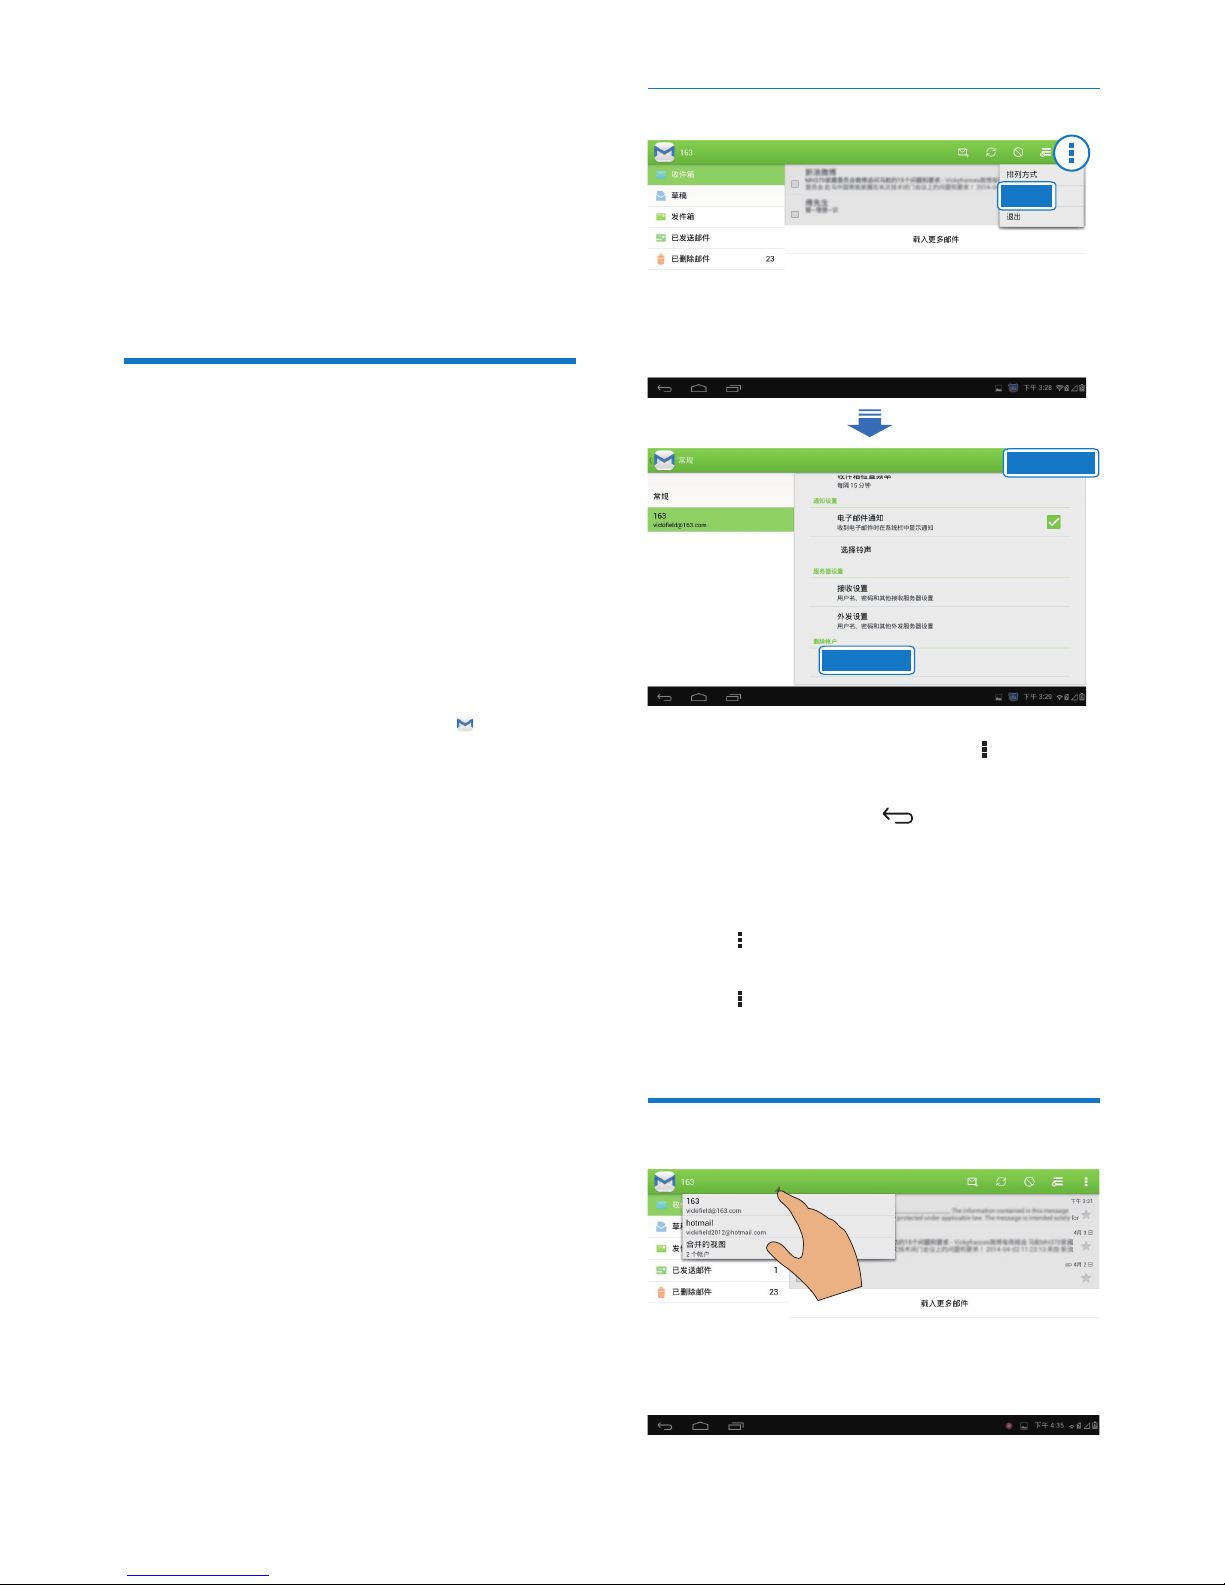
Select account settings
1 On the screen of mail list, tap > Settings.
» A pop-up screen is displayed.
If necessary, tap
repeatedly to
return to the screen of mail list.
2 Select your options for the account.
To add an account,
On
> Settings, tap Add account.
To remove an account,
On
> Settings, select Remove account.
» Current account is removed.
Check your email messages
䇴㖤
ࣖ䍜ᡭ
ࡖ䲚䍜ᡭ
Page 20
18 EN
You can check your email messages in the
following ways:
Check one combined mailbox;
Check messages by account;
Check starred messages;
Check unread messages.
To check one combined mailbox,
1 On the screen of mail list, tap the account
name.
» A drop-down list of account names is
displayed.
If necessary, tap
repeatedly to
return to the screen of mail list.
2 Tap Combined view.
» Different colors are used to mark the
messages from different accounts.
To check messages from a single account,
1 Repeat Step 1 in "To check one combined
mailbox".
2 Tap the selected account.
» Messages from the account are
displayed.
To check starred messages,
Tap the star next to the message.
» The message is added to the Starred
folder.
To check unread messages,
On the screen of mail list, the unread
messages are in white.
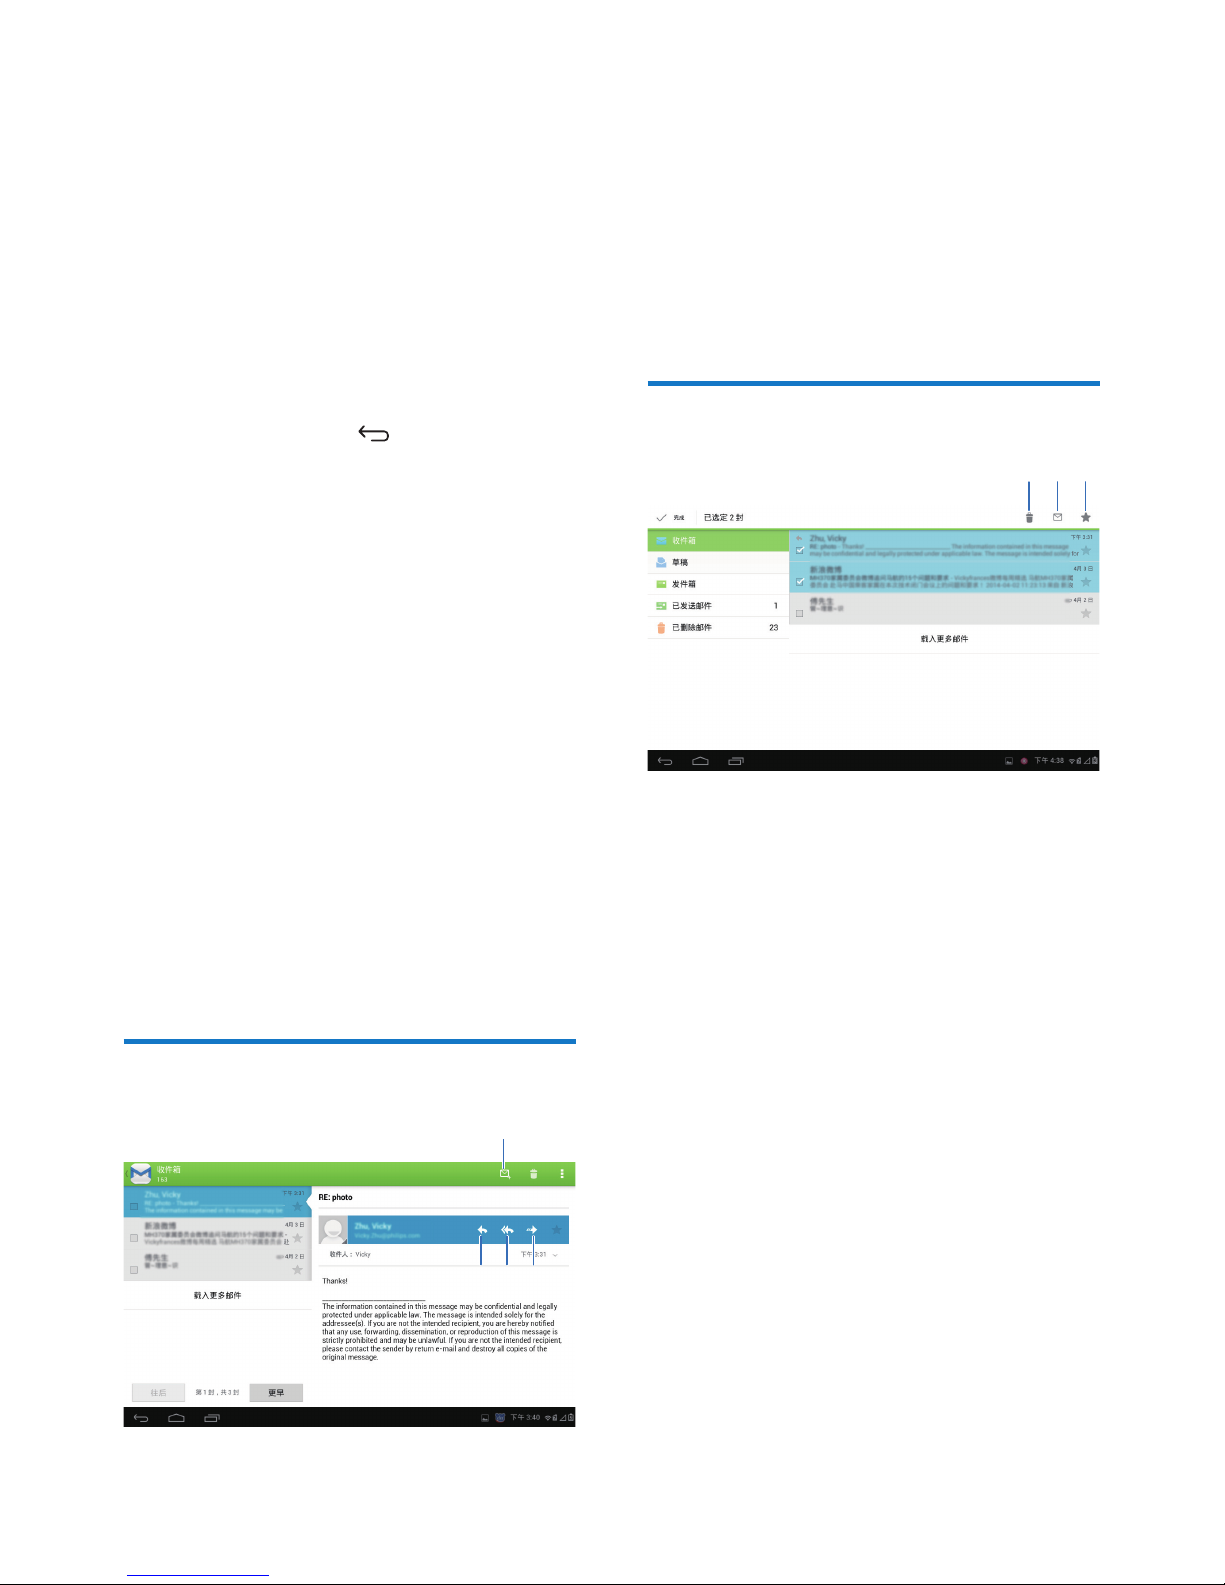
Compose email messages
a
b
cd
When you read a message, tap the icons to do
the following:
a Compose a new message
b Reply
c Reply all
d Forward
Organize email messages
1 On the screen of mail list, select messages
you want to manage:
Tap the check boxes next to the
messages.
» Selected messages are highlighted.
2 Tap the icons to do the following:
a Delete the messages.
b Mark the messages as read or unread.
c Add the messages to the Starred
folder.
abc
Page 21
19EN
9 Tools
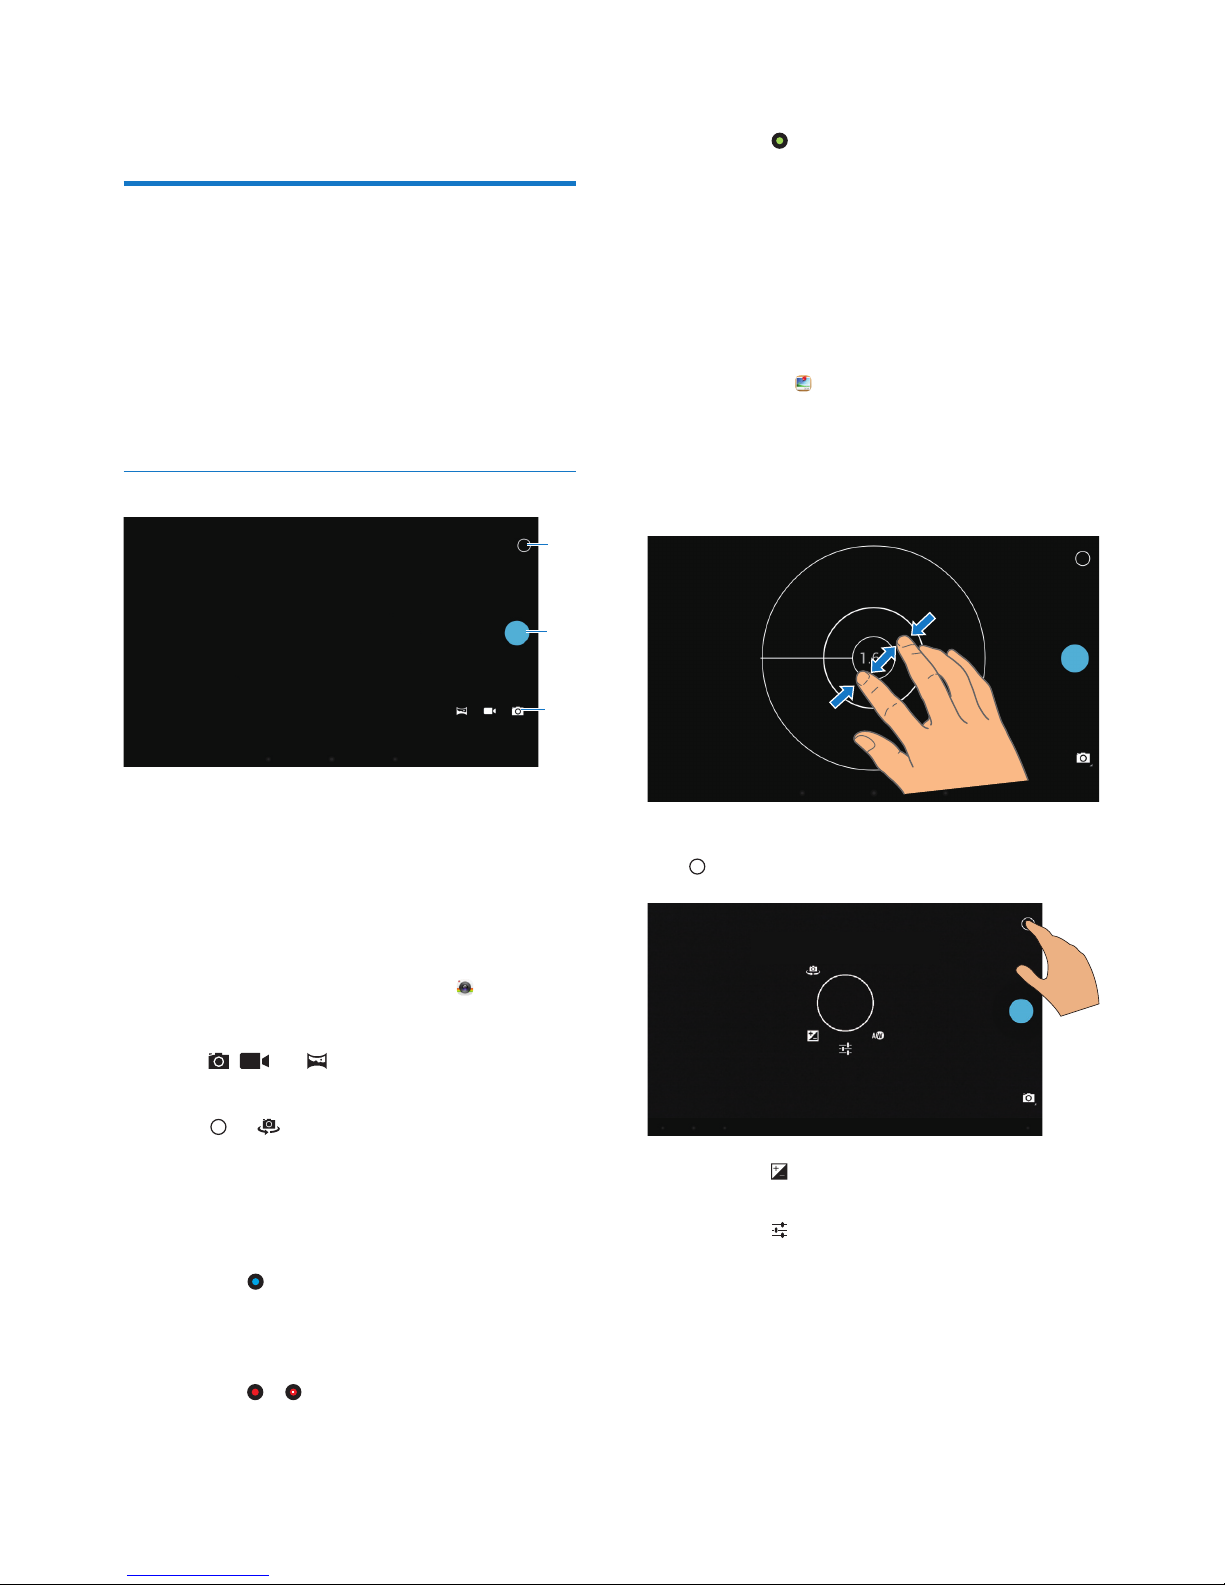
Camera
With the 0.3 and 2 Mega-pixel lens at the front
and back, you can do the following on PI3205G:
Shoot photos or videos by using the
camera or video recorder;
Have video chats with friends over the
Internet.
Take photos or record videos
a Selector for camera, video recorder, or
panorama mode
b Shutter
c Options menu
1 From the Home screen, go to .
» The onscreen buttons are displayed.
2 Tap , , or to switch to the camera,
video recorder, or panorama mode.
3 Tap > to switch to the camera lens
at the front or back.
4 To take photos:
a Point the lens at objects.
b Ta p
.
» The photo is taken.
To record videos:
Tap
/ to star t or stop video
recording.
To take a panoramic picture:
c
b
a
a Point the lens at the view.
b Ta p
to start shooting.
c Sweep through the view by moving
the device slowly and steadily.
» When the progress bar comes
to the end, the shooting stops. A
panoramic picture is generated.
To view photos/ videos
Go to
Gallery.
Zoom in or out
When you take photos or record videos, you
can zoom in or out the image.
Use two Àngers to stretch or squeeze.
Select settings
Tap
to display the options menu:
Tap to select an exposure value
according to the lighting conditions.
Tap
to select your options for the
camera or video recorder.
Tap the icon of scene, and then, drag
around the circle to switch to a scene
suitable to your shooting environment.
Page 22

20 EN
Calendar
On the device, you can sync the calendar with:
the calendar of your Microsoft
Exchange account.
Page 23
21EN
10 Use the device
in corporate
networks
You can use PI3205G in corporate networks.
Install the secure credentials or security
certiÀcates before you access corporate
networks.
The access to corporate network may allow
you to set up your Microsoft Exchange account
and add VPN on the device. With the Microsoft
Exchange account, you can access your
exchange mailbox at work.
Install secure credentials
Ask your network administrator for secure
credentials or security certiÀcates.
To install the secure credentials,
1 Make sure that you transfer the Àles of
secure credentials from a PC to the SD
card that you have mounted onto the
device.
Note
On PI3205G, make sure that the secure credentials are
saved to the root directory of the SD card, instead of
under a folder.
2 Install the secure credentials:
a From the Home screen, go to
>
Security > Install from SD card.
b Tap the Àle to start installation.
c Set the password and name for the
credentials as prompted.
To apply the secure credentials,
1 In , select Security > Trusted credentials.
2 Make sure that the credential is selected.
» If the function is enabled, the tick box
is selected.
» On the device, you allow the
applications to use the secure
credentials.
Set up your Microsoft
Exchange account
1
From the Home screen, go to .
2 Set up your email account:
Enter the information about your
account, and select Exchange as the
account type.
If you have set up other email
accounts, select
> Settings on the
screen of mail list. Tap Add account.
3 Follow the onscreen instructions to
complete the setup.
For the server address, enter the web
address for your Outlook web access,
for example, owa.company name.com
or mail. company name.com/owa.
For other setup information, such as
domain name, user name, check with
your system administrator.
Note
The device can work with Microsft Exchange 2003
and 2007.
Add VPN
Virtual private network (VPN) allows you to
connect to private networks through secure
access.
Sometimes, you need VPN access to connect to
corporate networks.
To add VPN on the device
Page 24

22 EN
1 Ask your network administrator for the
conÀguration information.
2 From the Home screen, go to >
Wireless & networks > More > VPN.
3 ConÀgure the VPN as prompted.
4 Install the secure credentials as needed
(see 'Install secure credentials' on page 21).
To connect to the VPN,
1 Make sure that you have connected
PI3205G to the Internet.
2 From the Home screen, go to >
Wireless & networks > More.
» A list of VPNs is displayed.
3 Tap the VPN to start connection.
Page 25

23EN
11 Settings
To select your settings,
1 On the Home screen, tap .
Alternatively, go to
in the pull-up
menu.
2 Swipe up or down to scroll through lists of
options.
3 Tap an option to select it.
WIRELESS & NETWORKS
WLAN
In WIRELESS & NETWORKS > WLAN, select
your Wi-Fi settings on the device (see 'Connect
through Wi-Fi' on page 12).
Add Wi-Fi network
Enter SSID manually
SSID (Service Set IdentiÀer) is the name of a
router. By the name, the router is recognized by
other Wi-Fi devices. If you have hidden the SSID
of the router (for example, disable the SSID
broadcasting), the router is invisible in the list of
available networks. To connect PI3205G to the
router, enter the SSID of the router manually
before you search for available networks on the
PI3205G.
1 In WLAN, drag the slider to switch on
Wi-Fi.
2 On the top bar, tap .
3 Enter the SSID of the router.
» The PI3205G starts searching for the
network.
» You can Ànd the network in the list of
networks.
4 Connect PI3205G to the network.
1etwork notiÀcation
Switch on Network notiÀcation. At the base of
the screen,
is displayed when an open Wi-Fi
network is available.
1 In WLAN, drag the slider to switch on
Wi-Fi.
2 At the top bar, tap and select Advanced
> Network notiÀcation.
Data usage
In Data usage, track the data usage of your
PI3205G by time period and app.
Airplane mode
Switch on the airplane mode when:
you need to disable the access to wireless
connection for safety purposes, such as on
an airplane.
In WIRELESS & NETWORKS, select More >
Airplane mode. You can disable or enable the
access to wireless connection.
VPN settings
Use VPN settings to access private networks,
such as corporate networks (see 'Use the
device in corporate networks' on page 21).
Mobile networks
In WIRELESS & NETWORKS, select More >
Mobile networks. You can select your settings
for the mobile network. Consult your service
provider for more information.
DEVICE
Sound
In Sound, select sound settings for your device.
Volumes
Drag the slider to select the volume level
for media, ringtone, notiÀcations, and
alarms.
Touch sounds
Page 26

24 EN
Sound is heard when you tap on the
screen.
Screen lock sound
Sound is heard when you lock/ unlock the
screen.
Display
In Display, select your display settings:
Brightness:
Drag the slider to change the display
brightness.
Wallpaper
Set the wallpaper of the device.
Auto-rotate screen
Tap to switch on or off screen rotation.
Sleep
After the selected time duration, the
screen switches off automatically. To save
battery power, select a low value.
Daydream
Select your screen saver options: what
screen saver to display. When the screen
saver is on, tap on the screen to exit.
Font size
Select font size for the on-screen display.
Storage
In Storage, learn the space information about
the internal storage and SD card on your
PI3205G.
Battery
In Battery, check the battery usage by the
screen and system.
Apps
In Apps, manage the apps on the internal
storage of PI3205G (see 'Manage apps' on page
14).
PERSONAL
Location access
In Location access, switch on or off the
options.
» If the function is enabled, the tick box
is selected.
» You can allow or disallow your location
information to be used in online
location services of Google, such as
Maps, or other relevant services and
applications.
Security
Screen lock
By default, to unlock the screen of PI3205G,
press the power/ lock button and then, drag the
lock to an icon.
In Screen lock, you can set a pattern, pin, or
password as the unlock security. To unlock the
screen, such unlock security is required.
None Switch off the lock.
Slide Slide to unlock the screen
(default).
Pattern Set a pattern as the unlock
security.
PIN Set a PIN that consists of
numbers.
Password Set a password that consists of a
combination of numbers, letters,
and symbols.
Visible passwords
Your password consists of several characters. To
make sure that you have entered the characters
correctly, show the characters as you type the
password. Switch Make passwords visible on or
off as needed.
Tap the tick box.
» If the function is enabled, the tick
box is selected.
Page 27

25EN
Device administrators
Applications in corporate networks require the
rights of device administrator, such as the email
and calendar under your Microsoft Exchange
account.
Before you uninstall such an application, disable
the rights of device administrator.
In Device administrators, tap an
application.
» The rights of device administrator are
disabled.
» You cannot sync data for the
application.
Unknown sources
On PI3205G, you can install applications that
you download from
, or from sources other
than
.
For the applications from sources
other than
, tap Unknown sources
to allow installation on the PI3205G.
» If the function is enabled, the tick
box is selected.
Verify apps
For the security of your system on PI3205G,
make sure that you have switched on Verify
apps.
» If the function is enabled, the tick box
is selected.
» You can disallow it or get warnings
when a possibly harmful app is to be
installed.
Trusted credentials
You need to install trusted credentials to access
some apps on PI3205G, for example, the access
to your corporate network. (see 'Use the
device in corporate networks' on page 21)
Install from SD card
To access some apps on PI3205G, you need to
install apps from the SD card that you mounted
ontoPI3205G (see 'Use the device in corporate
networks' on page 21).
Language & input
Language
In Language, select the language for the
onscreen instructions of PI3205G.
Personal dictionary
In Personal dictionary, add or remove words
or phrases to/ from the user dictionary. You
can customize the word suggestions that are
displayed on the pop-up screen during your
text entry on the Android keyboard.
To add a word or phrase,
Tap
to add a word or phrase.
To edit a word or phrase,
1 Tap on the word or phrase.
» A pop-up screen is displayed.
2 Edit the word or phrase.
To remove a word or phrase,
Tap
next to the word or phrase.
Text-to-speech output
In Text-to-speech output, select your options
for:
voice output for the accessibility
function on the device (see
'Accessibility' on page 26).
Install voice data
Download from the Marketthe voice data for
speech synthesis.
1 Connect the device to the Internet.
2 In Text-to-speech settings, tap Install voice
data.
» Search for and download the voice
data.
Select your options for the voice output
1 In Pico TTS, tap > Language. Select a
language as needed.
2 In Speech rate, select a speed at which the
text is read, normal, fast, or slow.
3 Tap Listen to an example.
» Your options are used to play the
demo of speech synthesis.
Reset
In Reset > Factory data reset, you can erase all
the data that you have stored on the internal
storage of PI3205G.
Page 28

26 EN
ACCOUNTS
In ACCOUNTS, add, remove, or manage an
account.
Tap Add account to add an account.
Tap an account to manage the account,
for example, remove the account or
select sync options.
SYSTEM
Date & time
Automatic setting
Over the Internet, you can sync the date and
time on PI3205G from online services.
To switch on the automatic clock setting,
1 In Date & time, tap to switch on
Automatic date & time.
» If the function is enabled, the tick
box is selected.
2 In Select time zone, select your current
time zone.
3 In Use 24-hour format and Choose date
format, select your options for time and
date display.
Manual setting
1 In Date & time, tap to switch off
Automatic date & time.
» If the function is disabled, the tick box
is deselected.
2 Tap to set date, time, and time zone in Set
date, Set time, and Set time zone.
To select a date, tap the date in the
calendar.
Accessibility
With the accessibility function, actions on the
screen of the device are read out through
the text-to-speech technology, such as the
taps, selection of menu items. For people who
cannot read the screen clearly, the function
allows them to use the device in an easier way.
Install the accessibility applications
From
, download an application, such
as Talkback. Install the application on
your device.
Use the accessibility function
1 Select Accessibility.
» If the function is enabled, the tick box
is selected.
2 Select an accessibility application that you
have installed.
3 Select your options for voice output.
Auto-rotate screen
In Auto-rotate screen, tap to switch on or off
screen rotation.
About tablet
In About tablet, learn the status and
information about your PI3205G.
System updates
In System updates, check for the system
updates of PI3205G. Make sure that you have
connected the device to the Internet.
Status and information about the device
In Status,
Battery status: Display the status of
power charging.
Battery level: Display remaining power
by percentage.
IP address: Display the IP address
that is assigned to PI3205G when the
device is connected a Wi-Fi network.
WLAN MAC address: Display the
unique identiÀer that is assigned to
the network adapter of PI3205G. If
MAC address Àltering is enabled on
your router, add the MAC address of
Page 29

27EN
PI3205G to the list of devices that are
allowed to Moin the network.
Battery use: Display the power consumption by
each running application.
Legal information: Legal information for
PI3205G
Model number: Model no. of the device
Android version:Firmware version of the
Android platform that the deviceis running on
Build number: Software version of PI3205G
Page 30

28 EN
12 Check for
firmware update
Connect PI3205G to Wi-Fi. You can receive
notiÀcations about Àrmware updates. Pull up
the bar at the base to check the notiÀcations.
Update the Àrmware online
On PI3205G, you can update the Àrmware
through our online services over the Internet
(see 'System updates' on page 26).
Page 31

29EN
13 Technical data
Power
Power adapter
PA03-050200U-C
Input: 100-240 V~ 50/60 Hz, 0.3 A
Output: DC 5.0 V, 2 A
Power supply: 3.7 V, 3,000 mAh Li-ion
polymer internal rechargeable battery
Play time¹
video streaming through Wi-Fi: 4 hours
Operating temperature
0°C to 45°C
Storage temperature
-25°C to 70°C
Display
Type: LCD Touch-sensitive screen
Diagonal screen size (inch): 7
Resolution: 1024 x 600 pixels
Platform
Android™ 4.2
Connectivity
Headphone: 3.5 mm
USB: 2.0 High speed, Micro type
Wireless LAN: Wi-Fi 802.11 b/g/n
Mobile network
TD-SCDMA
Headphone sound
Channel separation: > 45 dB
Frequency response: 60-18,000 Hz
Output power: 2 x 5 mW (maximum)
Signal to noise ratio: > 80 dB
Speaker sound
Frequency response: 250-10,000 Hz
Output power: 600 mW
Signal to noise ratio: > 60 dB
Audio playback
Supported formats:
WAV, MP3, AAC /. m4a, OGG Vorbis, 3GPP,
AMR-NB (mono), AMR-WB (stereo),
FLAC,
MIDI (Type 0 and 1 (.mid, .xmf,.mxmf)),
RTTTL/RTX (.rtttl, .rtx), OTA (.ota), and
iMelody(.imy)
Audio capturing
AMR-NB
Bitrate: 4.75 to 12.2 kbps
Sampling rate: 8 kHz
File supported: 3GPP (.3gp)
SpeciÀed
Bitrate: 128 kbps
Sampling rate: 44.1 kHz
File format: MP3
Built-in microphone: mono
Video playback
Supported formats:
MPEG-4 (.3gp), H.264 AVC (3gp, .mp4),
H.263 (3gp, .mp4), VP8 (.webm, .mkv)
Video capturing
H.264 Aspect ratio (4:3 or 16:9 selectable)
Video resolution: VGA (640 x 480)
Frame rate: 30 frames per second
Container: .mp4
Audio format: MP3
Lens: Fixed focus length
Recording time: Depending on the storage
Still picture playback
Supported formats:
JPEG, BMP, PNG, GIF
Still picture capturing
Picture resolution: VGA (640 x 480)
Picture format: JPEG, PNG
Lens: Fixed focus length
Storage media
Built-in memory capacity²:
8 GB NAND Flash
External storage:
Micro SD memory card slot (Maximum
memory card capacity: 32 GB)
Preloaded applications
, , ,
, , , , Amazon, ES File
Explorer,Kingsoft OfÀce, Baidu Input
Search, Browser, Galler y, Video Player,
Music, Camera, Email, Calendar, Clock,
Calculator
Page 32

30 EN
Note
¹ Rechargeable batteries have a limited number of
charge cycles. Battery life and number of charge cycles
vary by use and settings.
² 1GB = 1 billion bytes; available storage capacity is less.
Full memory capacity may not be available as some
memory is reser ved for the device. Storage capacity
is based on 4 minutes per song and 128 kbps MP3
encoding.
Page 33

Page 34

2014 ©WOOX Innovations Limited. All rights reserved.
This product has been manufactured by, and is sold under the
responsibility of WOOX Innovations Ltd., and WOOX Innovations
Ltd. is the warrantor in relation to this product. Philips and the
Philips Shield Emblem are registered trademarks of Koninklijke
Philips N.V. and are used under license from Koninklijke Philips N.V.
PI3205G_93_UM_V2.0_WK1426.3
 Loading...