

Page 1
EN User Manual
Register your product and get support at
www.philips.com/welcome
PFL40x7H/12
PFL40x7K/12
PFL40x7T/12
PFL40x7H/60
PFL40x7T/60
Page 2

Contents
1 Get started 3
TV tour 3
TV controls 4
Important information 5
Sustainability 8
Help and support 9
2 Use your TV 11
Watch TV 11
View programme guide 14
View media 15
Browse Smart TV 17
Interactive TV 19
3 Use more of your TV 21
Pause TV 21
Record TV shows 22
Play games 25
View Text 25
Set locks and timers 26
Use EasyLink 27
View Scenea 30
4 Set up your TV 31
Picture and sound 31
Channel settings 32
Satellite settings 35
Language settings 36
Universal access settings 36
Other settings 37
Update software 38
Restore default settings 39
5 Connect your TV 40
Network issues 56
Contact Philips 57
7 Product specifications 58
Power and reception 58
Display and sound 58
Display resolutions 58
Multimedia 58
Connectivity 60
Supported TV mounts 60
Help version 61
8 Index 62
About cables 40
Connect devices 41
Connect more devices 47
Watch a connected device 49
Network and the Internet 50
Common interface 52
6 Troubleshooting 54
General issues 54
Channel issues 54
Picture issues 54
Sound issues 55
Connection issues 56
EN 2
Page 3

English
1 Get started
TV tour
High Definition TV
Your TV is equipped with a High-Definition
(HD) display so you can watch HD video in
these ways and more:
a Blu-ray disc player, connected with an
HDMI cable, playing a Blu-ray disc
an upscaling DVD player, connected
with an HDMI cable, playing a DVD
disc
an over-the-air HD broadcaster (DVB-
T or DVB-T2 MPEG4)
a digital HD receiver, connected with
an HDMI cable, playing HD content
from a cable or satellite operator
an HD game console, connected with
an HDMI cable, playing HD games
Watch an HD demo clip
To experience the stunning sharpness and
picture quality of your HD TV, watch the
HD video clip available from the Home
menu.
Press > [Setup] > [Watch demos].
For information about the availability of HD
channels in your country, contact your Philips
dealer or see www.philips.com/support.
Smart TV
You can make your TV the centre of your
digital life with the Smart TV suite of
applications:
If you connect your TV to the home
network, you can share movies, pictures
and music from a computer or media
server on your home network.
If you connect your TV to the Internet,
you can enjoy a wealth of streaming
movies, pictures, music and much more
with Youtube and other Smart TV
applications.
While you're watching a digital channel,
you can pause TV at any time and catch
up with the broadcast later. The
broadcast is stored on a USB hard disk
or streamed through catch-up TV
applications in Smart TV.
If you connect your TV to the Internet,
you can record your favourite TV show
on a USB hard disk.
You can use Philips smartphone control
from your iPhone or Android phone to
control your TV.
Add a new dimension to your calls and
contact your friends and relatives on
the big screen. You can make video
calls on your TV with a Philips HD
Media box and a Philips TV video
camera (both sold separately). Enjoy
HD video and excellent sound quality
from the comfort of your settee and
start calling now!
Media playback
If you connect your TV to a USB storage
device, you can enjoy your movies, music
and pictures on a wide screen TV with
excellent sound.
You can also connect your PC to the TV
with an HDMI or VGA cable.
Programme guides
You can find out what's on and what's
coming up with the now and next EPG
(Electronic Programme guide) or eight day
EPG.
Programme guides are provided by
broadcasters or over the Internet. If you
connect your TV to the Internet, you can
access more extensive programme details.
EasyLink
If you connect your TV to HDMI-CEC
(Consumer Electronic Control) enabled
devices, such as a Blu-ray player or home
theatre, you can control them at the same
time with one remote control. Simply switch
on EasyLink after connection.
EN 3
Page 4
Intuitive menus
With the TV's intuitive menus, you can easily
access the channel or media file that you
want or tweak the TV settings to suit your
needs.
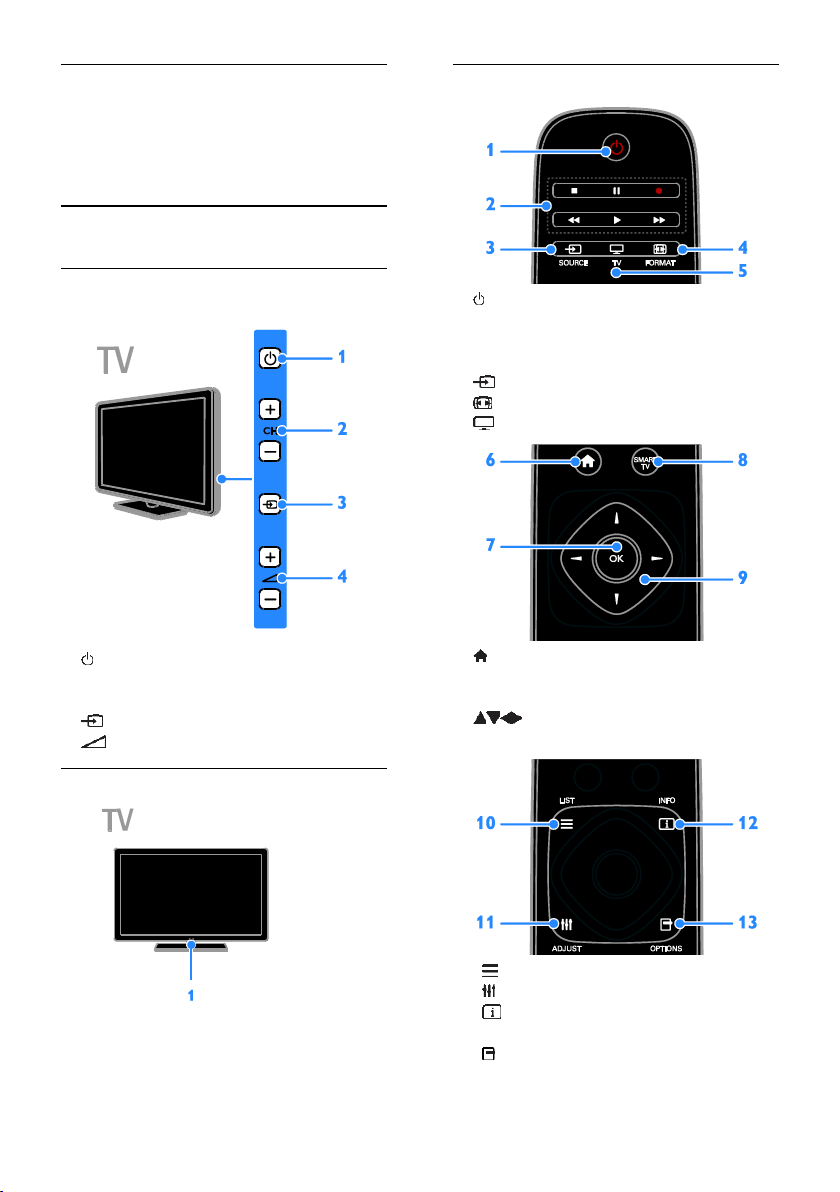
TV controls
Rear controls
1. : Switch the TV on or off.
2. CH +/-: Switch to the next or previous
channel.
3. : Select a connected device.
4. +/-: Increase or decrease volume.
Remote control
1. (Standby): Switch the TV on or to
standby.
2. Play buttons: Control playback of media
files.
3. SOURCE: Access a connected device.
4. FORMAT: Change picture format.
5. TV: Switch source to watch TV.
6. (Home): Access the Home menu.
7. OK: Confirm an entry or selection.
8. SMART TV: Access Smart TV features.
9. (Navigation buttons): Navigate
through menus and select items.
Sensors
1. Remote control sensor
Point the remote control at the sensor.
Make sure that the line of sight between the
remote control and the TV is not blocked by
furniture or other objects.
EN 4
10. LIST: Access the TV channel list.
11. ADJUST: Access TV settings.
12. INFO: Display information about
current activity.
13. OPTIONS: Access currently available
options.
Page 5
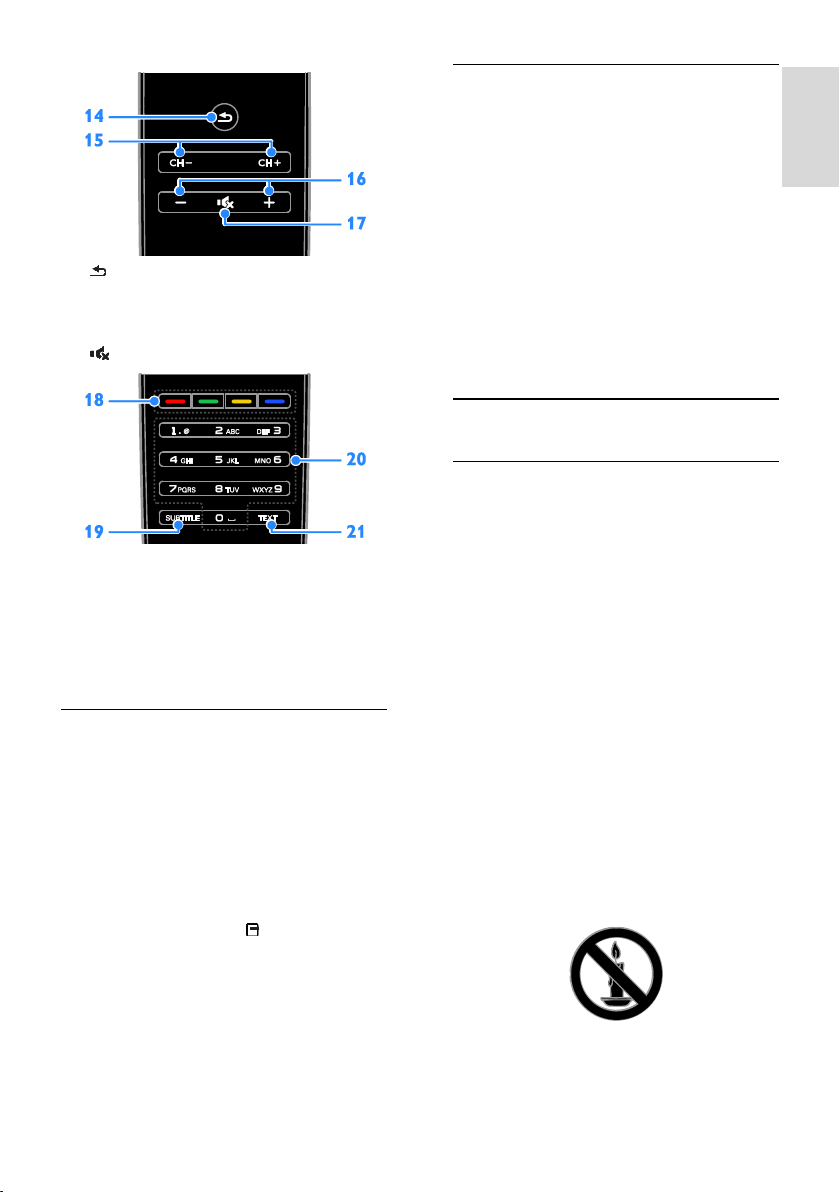
English
14. (Back): Return to the previous menu
page or exit from a TV function.
15. CH - / CH +: Change channels.
16. +/-(Volume): Adjust volume.
17. (Mute): Mute or restore audio.
18. Colour buttons: Select tasks or options.
The buttons function according to the
services offered by the broadcaster.
19. SUBTITLE: Switch subtitles on or off.
20. 0-9(Numeric buttons): Select TV
channels or enter text.
21. TEXT: Switch subtitles on or off.
EasyLink controls
Note: EasyLink controls are available when
the connected device is HDMI-CEC
compliant.
With EasyLink controls, you can control your
TV and other HDMI-CEC devices with one
remote control.
Access EasyLink controls
1. While you view content from a connected
HDMI-CEC device, press OPTIONS.
2. Select [Show device keys], then press
OK.
3. Select the EasyLink control button, then
press OK.
Read more on EasyLink in Use more of
your TV > Use EasyLink (Page 27).
Smartphone control
You can use your smartphone as a
secondary remote, and even as a keyboard.
You can also view a slideshow of the images
in your smartphone on the TV. To
download the application 'Philips My
Remote', visit the Apple App store or the
Android Market. Follow the instructions
provided at the application store.
Ensure that your TV and smartphone are
connected to the same local network. Read
more on network connections at Connect
your TV > Network and the Internet (Page
50).
Important information
Safety
Read and understand all instructions before
you use your TV. If damage is caused by
failure to follow the instructions, the
warranty does not apply.
Risk of electric shock or fire!
Never expose the TV to rain or water.
Never place liquid containers, such as
vases, near the TV. If liquids are spilt on
or into the TV, disconnect the TV from
the power outlet immediately.
Contact Philips Consumer Care to have
the TV checked before use.
Never place the TV, remote control or
batteries near naked flames or other
heat sources, including direct sunlight.
To prevent the spread of fire, keep
candles or other flames away from the
TV, remote control and batteries at all
times.
Never insert objects into the ventilation
slots or other openings on the TV.
EN 5
Page 6

Never expose the remote control or
batteries to rain, water or excessive
heat.
Avoid force coming onto power plugs.
Ensure that the power plug is fully
inserted into the power socket. Loose
power plugs can cause arcing or fire.
When the TV is swivelled, ensure that
no strain is exerted on the power cord.
Strain on the power cord can loosen
connections and cause arcing.
To disconnect the TV from the mains
power, the power plug of the TV must
be disconnected. When disconnecting
the power, always pull the power plug,
never the cord. Ensure that you have
full access to the power plug, power
cord and outlet socket at all times.
Risk of damage to the TV!
Two people are required to lift and
carry a TV that weighs more than 25kg
or 55lbs.
When stand mounting the TV, use only
the supplied stand. Secure the stand to
the TV tightly. Place the TV on a flat,
level surface that can support the
combined weight of the TV and the
stand.
When wall mounting the TV, use only a
wall mount that can support the weight
of the TV. Secure the wall mount to a
wall that can support the combined
weight of the TV and wall mount.
Koninklijke Philips Electronics N.V. bears
no responsibility for improper wall
mounting that result in accident, injury
or damage.
If you need to store the TV,
disassemble the stand from the TV.
Never lay the TV on its back with the
stand installed.
Before you connect the TV to the
power outlet, ensure that the power
voltage matches the value printed on
the back of the TV. Never connect the
TV to the power outlet if the voltage is
different.
Parts of this product may be made of
glass. Handle with care to avoid injury
and damage.
Risk of injury to children!
Follow these precautions to prevent the TV
from toppling over and causing injury to
children:
Never place the TV on a surface
covered by a cloth or other material
that can be pulled away.
Ensure that no part of the TV hangs
over the edge of the surface.
Never place the TV on tall furniture,
such as a bookcase, without anchoring
both the furniture and TV to the wall
or a suitable support.
Educate children about the dangers of
climbing on furniture to reach the TV.
Risk of swallowing batteries!
The product/remote control may
contain a coin-type battery, which can
be swallowed. Keep the battery out of
reach of children at all times!
Risk of overheating!
Never install the TV in a confined
space. Always leave a space of at least 4
inches or 10 cm around the TV for
ventilation. Ensure that curtains or
other objects never cover the
ventilation slots on the TV.
Risk of injury, fire or power cord damage!
Never place the TV or any objects on
the power cord.
Disconnect the TV from the socket and
aerial before lightning storms. During
lightning storms, never touch any part
of the TV, power cord or aerial cable.
Risk of hearing damage!
Avoid using earphones or headphones
at high volumes or for prolonged
periods of time.
Low temperatures
If the TV is transported in temperatures
below 5°C or 41°F, unpack the TV and
wait until the TV temperature matches
room temperature before connecting
the TV to the power outlet.
Screen care
Risk of damage to the TV screen!
Never touch, push, rub or strike the
screen with any object.
EN 6
Page 7
English
Unplug the TV before cleaning.
Clean the TV and frame with a soft
damp cloth. Never use substances such
as alcohol, chemicals or household
cleaners on the TV.
To avoid deformations and colour
fading, wipe off water drops as soon as
possible.
Avoid stationary images as much as
possible. Stationary images are images
that remain onscreen for extended
periods of time. Stationary images
include onscreen menus, black bars,
time displays, etc. If you must use
stationary images, reduce screen
contrast and brightness to avoid screen
damage.
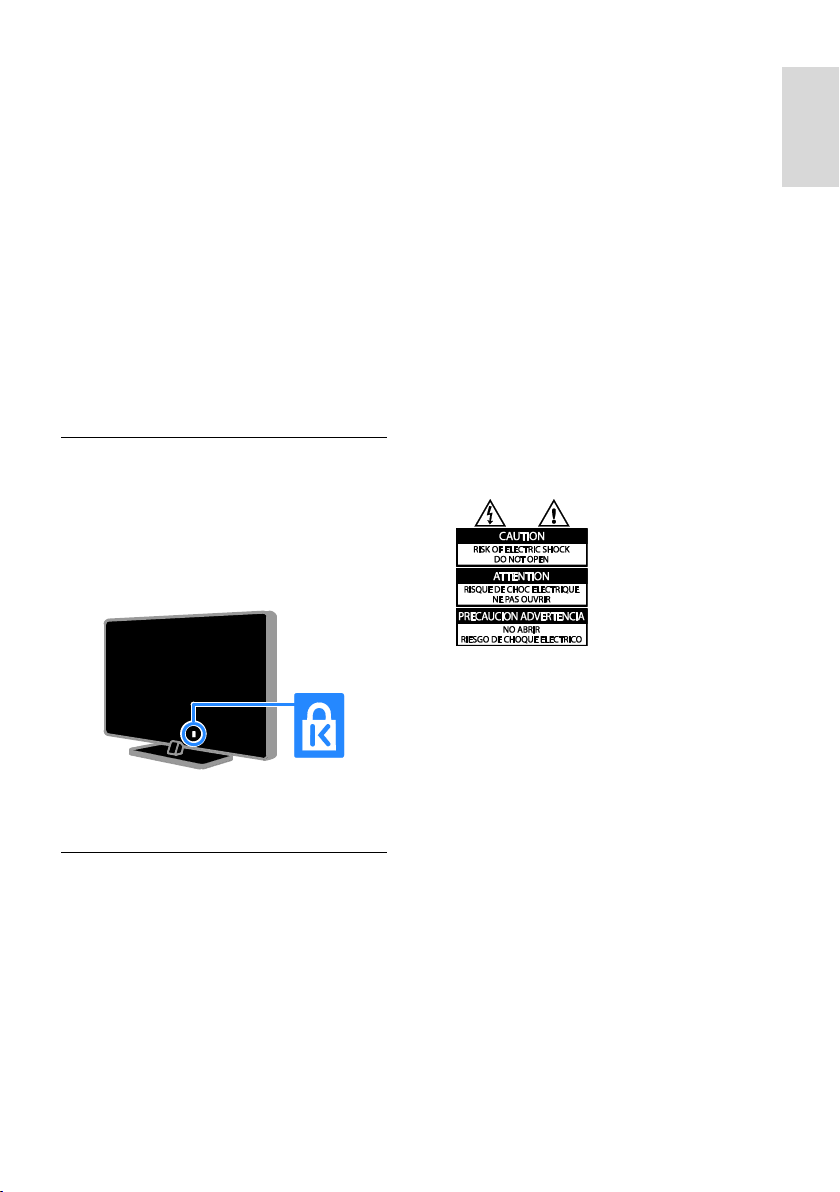
Lock the TV
Your TV is equipped with a Kensington
security slot at the base of the TV. To secure
the TV, purchase a Kensington anti-theft lock
(sold separately).
Notice
2012 © Koninklijke Philips Electronics N.V.
All rights reserved.
Specifications are subject to change without
notice. Trademarks are the property of
Koninklijke Philips Electronics N.V or their
respective owners. Philips reserves the right
to change products at any time without
being obliged to adjust earlier supplies
accordingly.
The material in this manual is believed
adequate for the intended use of the system.
If the product, or its individual modules or
procedures, are used for purposes other
than those specified herein, confirmation of
their validity and suitability must be obtained.
Philips warrants that the material itself does
not infringe any United States patents. No
further warranty is expressed or implied.
Terms of warranty
Risk of injury, damage to TV or void of
warranty! Never attempt to repair the
TV yourself.
Use the TV and accessories only as
intended by the manufacturer.
The caution sign printed on the back of
the TV indicates risk of electric shock.
Never remove the TV cover. Always
contact Philips Customer Care for
service or repairs.
Any operation expressly prohibited in
this manual, or any adjustments and
assembly procedures not
recommended or authorised in this
manual shall void the warranty.
Pixel characteristics
This LCD product has a high number of
colour pixels. Although it has effective pixels
of 99.999% or more, black dots or bright
points of light (red, green or blue) may
appear constantly on the screen. This is a
structural property of the display (within
common industry standards) and is not a
malfunction.
Compliance with EMF
Koninklijke Philips Electronics N.V.
manufactures and sells many products
targeted at consumers which, like any
electronic apparatus, in general have the
ability to emit and receive electromagnetic
signals.
EN 7
Page 8
One of Philips’ leading Business Principles is
to take all necessary health and safety
measures for our products, to comply with
all applicable legal requirements and to stay
well within the Electro Magnetic Field (EMF)
standards applicable at the time of producing
the products.
Philips is committed to develop, produce
and market products that cause no adverse
health effects. Philips confirms that if its
products are handled properly for their
intended use, they are safe to use according
to scientific evidence available today.
Philips plays an active role in the
development of international EMF and safety
standards, enabling Philips to anticipate
further developments in standardisation for
early integration in its products.
Trademarks and copyrights
Windows Media is either a registered
trademark or trademark of Microsoft
Corporation in the United States and/or
other countries.
Manufactured under licence from Dolby
Laboratories. Dolby and the double D
symbol are trademarks of Dolby
Laboratories.
HDMI, the HDMI logo and High-Definition
Multimedia Interface are trademarks or
registered trademarks of HDMI licensing LLC
in the United States and other countries.
Kensington and Micro Saver are registered
US trademarks of ACCO World
corporation with issued registrations and
pending applications in other countries
throughout the world.
DLNA , the DLNA Logo and DLNA
CERTIFIED are trademarks, service marks
or certification marks of the Digital Living
Network Alliance.
DivX , DivX Certified and associated logos
are trademarks of Rovi Corporation or its
subsidiaries and are used under licence.
ABOUT DIVX VIDEO: DivX is a digital
video format created by DivX, LLC, a
subsidiary of Rovi Corporation. This is an
official DivX Certified device that plays
DivX video. Visit divx.com for more
information and software tools to convert
your files into DivX videos.
ABOUT DIVX VIDEO-ON-DEMAND: This
DivX Certified device must be registered in
order to play purchased DivX Video-onDemand (VOD) movies. To obtain your
registration code, locate the DivX VOD
section in your device setup menu. Go to
vod.divx.com for more information on how
to complete your registration.
All other registered and unregistered
trademarks are the property of their
respective owners.
Sustainability
Energy efficiency
This TV is designed with energy-efficient
features. To access these features, press the
Green button on the remote control.
Energy saving picture settings: You can
apply a combination of energy saving
picture settings. While you watch TV,
press the Green button and select
[Energy saving].
Screen off: If you only want to listen to
audio from the TV, you can switch off
the TV display. Other functions
continue to operate normally.
Light sensor: When the surrounding
light darkens, the built-in ambient light
sensor lowers the brightness of the TV
screen.
EN 8
Page 9
English
Low standby power: The advanced
power circuitry reduces the power
consumption of the TV to an extremely
low level, without losing out on the
constant standby functionality.
Power management: An advanced
power management system helps save
the energy consumed by this TV.
To view how your personalised TV
settings affect the TV's relative power
consumption, press , then select
[Setup] > [Watch demos] > [Active
Control].
End of use
Your product is designed and manufactured
with high quality materials and components,
which can be recycled and reused.
When this crossed-out wheeled bin symbol
is attached to a product it means that the
product is covered by the European
Directive 2002/96/EC. Please inform yourself
about the local separate collection system
for electrical and electronic products.
Your product contains batteries covered by
the European Directive 2006/66/EC, which
cannot be disposed of with normal
household waste. Please inform yourself
about the local rules on separate collection
of batteries because correct disposal helps to
prevent negative consequences for the
environment and human health.
EU energy label
The European Energy Label informs you on
the energy efficiency class of the product.
The greener the energy efficiency class of
this product is, the lower the energy it
consumes.
On the label, you can find the energy
efficiency class, the average power
consumption of the product in use and the
average energy consumption for 1 year. You
can also find the power consumption values
for the product on the Philips website for
your country at www.philips.com/TV.
Please act according to your local rules and
do not dispose of your old products with
your normal household waste. Correct
disposal of your old product helps to
prevent potential negative consequences for
the environment and human health.
Help and support
Use Help
To access the onscreen Help menu, press
the Yellow button.
To switch between the Help menu and the
TV menu, press the Yellow button.
Visit the Philips website
If you can't find what you need in the
onscreen [Help], visit the Philips support
website at www.philips.com/support.
On the Philips support website, you can also:
Find answers to Frequently Asked
Questions (FAQ)
EN 9
Page 10

Download a printable PDF version of
this user manual
Email us a specific question
Chat online with our support personnel
(available in certain countries only)
Search the TV forum
Your question may have already been
answered by the Philips TV community of
users. Visit www.supportforum.philips.com.
Contact Philips
You can contact Philips Consumer Care in
your country for support. The number is
available in the leaflet accompanying this
product or online at
www.philips.com/support.
Before you contact Philips, write down the
model and serial number of your TV. You
can find this information on the back of your
TV or on the TV packaging.
EN 10
Page 11

English
2 Use your TV
Watch TV
Switch TV on or off
Switch the TV on
Press the power switch on the TV.
If the TV is in standby, press on the
remote control.
Note: There is a short delay before the TV
responds.
Tip: If you cannot find your remote control
and want to switch on the TV from standby,
press CH +/- on the TV.
Switch TV to standby
Press on the remote control.
The remote control sensor on the TV
switches to red.
Switch off the TV
Press on the TV.
The TV switches off.
Note: Though your TV consumes very little
energy when it is in standby or switched off,
it does use some energy. If you are not going
to use the TV for an extended period of
time, disconnect the TV from the mains plug.
Automatic switch off
You can save energy with this TV's energy
efficiency settings. The settings are enabled
by default, so that if there is no user
interaction (such as pressing a remote
control button or a control on the front
panel) for four hours, the TV will
automatically switch to standby.
To disable automatic switch off
1. While you watch TV, press the Green
button on the remote control.
2. Select [Auto switch off], then press OK.
A confirmation message is displayed.
Adjust TV volume
Increase or decrease the TV volume
Press +/- on the remote control.
Press +/- on the side of the TV.
Mute or unmute the TV volume
Press to mute the TV.
Press again to restore the volume.
Adjust headphone volume
1. Press > [Setup] > [TV settings] >
[Sound].
2. Select [Headphones volume], then press
OK.
3. Press the Navigation buttons to adjust the
volume.
EN 11
Page 12
Switch TV channels
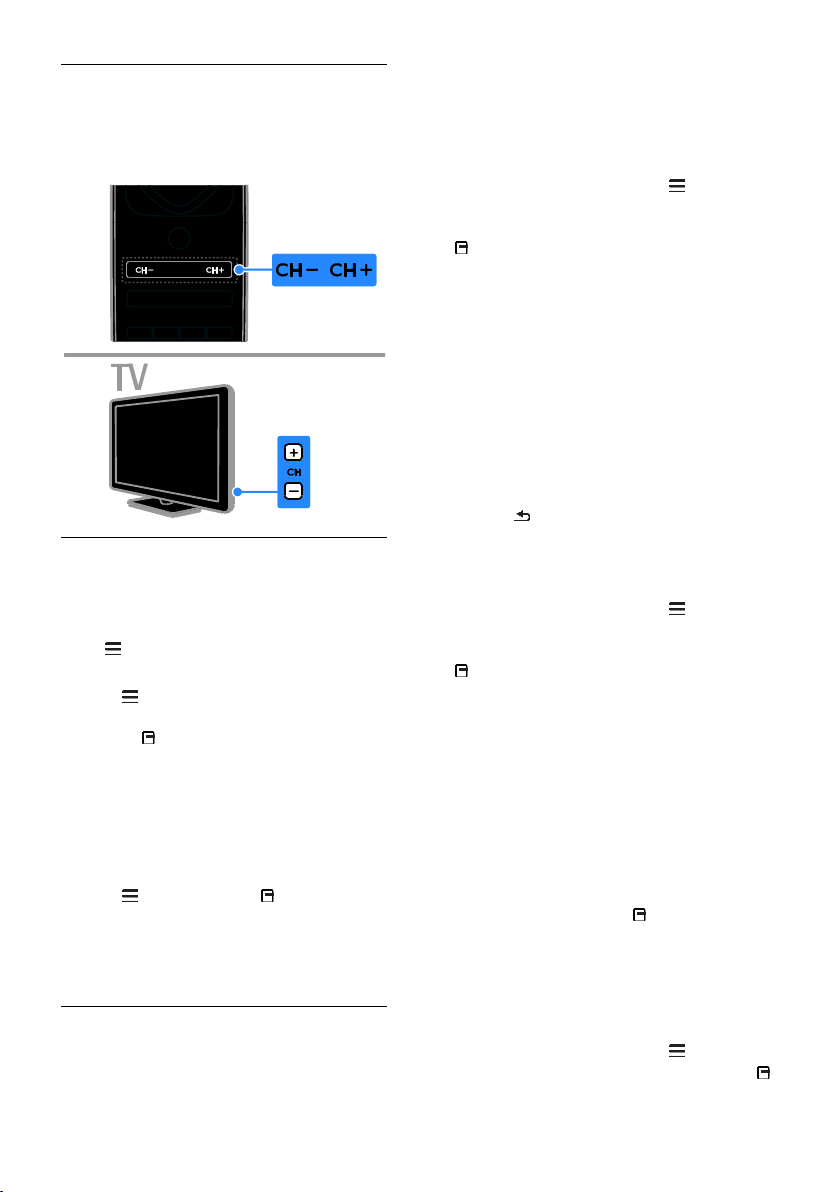
Press CH +/- on the remote control or
TV.
Press the Numeric buttons to enter a
channel number.
Manage favourites
You can view all channels or only a list of
your favourite channels so that you can find
them easily.
Press LIST to access the channel list.
Create a list of your favourite channels
1. Press LIST.
2. Select the channel to mark as a favourite,
then press OPTIONS.
3. Select [Mark as favourite], then press OK.
The selected channel is marked with a star.
To remove a channel from the favourites list,
select [Unmark as favourite], then press
OK.
Select a channel list
1. Press LIST, then press OPTIONS.
2. Select [Select list] > [Favourites] to
display channels in the favourite list or [All]
to display all channels.
3. Press OK to confirm.
Manage channel lists
After the channels have been installed, you
can manage them:
Rename channels
Reorder channels
Hide or unhide channels
Listen to digital radio
Rename channels
You can rename the channels. The name
appears when the channels are selected.
1. While you watch TV, press LIST.
The channel list is displayed.
2. Select the channel to rename, then press
OPTIONS.
3. Select [Rename], then press OK.
4. Press the Navigation buttons to select
each character, then press OK.
Tips:
You can press OK in the entry screen
to enable the Onscreen Keyboard.
Press [ABC] or [abc] to switch
between uppercase and lowercase
letters.
5. Once complete, select [Done], then press
OK to confirm.
6. Press to exit.
Reorder channels
After the channels have been installed, you
can reorder the channel list.
1. While you watch TV, press LIST.
The channel list is displayed.
2. Select the channel to reorder, then press
OPTIONS.
3. Select [Reorder], then press OK.
4. Press the Navigation buttons to move the
highlighted channel to another location, then
press OK.
5. Select one of the following options, then
press OK.
[Insert]: Insert the channel into the
desired location.
[Swap]: Swap location with another
channel.
6. Once complete, press OPTIONS, then
select [Exit].
Hide channels
You can prevent unauthorised access to
channels by hiding them from the channel
list.
1. While you watch TV, press LIST.
2. Select the channel to rename and press
OPTIONS.
EN 12
Page 13

English
3. Select [Hide channel], then press OK.
The channel is hidden.
Unhide channels
1. While you watch TV, press LIST.
2. Press OPTIONS.
3. Select [Show hidden channels], then press
OK.
Hidden channels appear in the channel list,
but the channel information is not displayed.
4. Select a hidden channel, then press
OPTIONS.
5. Select [Unhide all], then press OK.
All hidden channels are displayed and can be
watched.
Listen to digital radio
If digital radio channels are available, you can
listen to them. They are installed
automatically when you install TV channels.
1. While you watch TV, press LIST. The
channel list is displayed.
2. Press OPTIONS.
3. Select [Select list] > [Radio] , then press
OK.
4. Select a radio channel, then press OK.
Select a source
You can watch a connected device in one of
the following ways:
Add its icon to the Home menu.
Select from the Source menu.
Note: If you connect an HDMI-CEC
compliant device to the TV, it is
automatically added to the Home menu.
Add new device
1. Connect and switch on the device.
2. Press .
3. Select [Add your devices], then press
OK.
4. Follow the onscreen instructions.
If you are prompted to select the TV
connection, select the connector that this
device uses.
View from Home menu
After you have added the new device to the
Home menu, you can select its icon to start
using it.
1. Press .
2. Select the device icon from the Home
menu.
3. Press OK to confirm.
View from Source menu
You can also press SOURCE to display a
list of connector names. Select the
connector that connects the device to the
TV.
1. Press SOURCE.
2. Press the Navigation buttons to select a
connector in the list.
3. Press OK to confirm.
Use smart settings
Your TV comes with smart picture and
sound settings. You can apply these settings
or customise them.
Select your preferred picture setting
1. While you watch TV, press ADJUST.
2. Select [Smart picture].
3. Select one of the following settings, then
press OK:
[Personal]: Apply your personalised
picture settings.
[Vivid]: Rich and dynamic settings, ideal
for daytime viewing.
[Natural]: Natural picture settings.
[Cinema]: Ideal settings for movies.
[Game]: Ideal settings for games.
[Energy saving]: Settings that conserve
the most energy.
[Standard]: Default settings that suit
most environments and types of video.
[Photo]: Ideal settings for photos.
[Custom]: Customise and store your
own picture settings.
Select your preferred sound setting
1. While you watch TV, press ADJUST.
2. Select [Smart sound].
3. Select one of the following settings, then
press OK:
[Personal]: Apply your personalised
sound setting.
[Standard]: Settings that suit most
environments and types of audio.
[News]: Ideal settings for spoken audio,
such as the news.
[Movie]: Ideal settings for movies.
EN 13
Page 14

[Game]: Ideal settings for games.
[Drama]: Ideal settings for drama
programmes.
[Sports]: Ideal settings for sports.
Change picture format
You can change the picture format to suit
the video source.
1. Press ADJUST.
2. Select [Picture format], then press OK.
3. Select a picture format, then press OK to
confirm.
The available picture formats depend on the
video source:
[Auto fill]: Adjust the picture to fill the
screen (subtitles remain visible).
Recommended for minimal screen
distortion but not for HD or PC.
[Auto zoom]: Enlarge the picture to fill
the screen. Recommended for minimal
screen distortion but not for HD or PC.
[Super zoom]: Remove the black bars
on the sides of 4:3 broadcasts. Not
recommended for HD or PC.
[Movie expand 16:9]: Scale 4:3 format
to 16:9. Not recommended for HD or
PC.
[Wide screen]: Stretch 4:3 format to
16:9.
[Unscaled]: Provide maximum detail for
PC. Only available when PC mode is
selected in the picture menu.
View programme guide
From broadcaster
You can view information about digital TV
channels using programme guides provided
by broadcasters. This information can
include:
Channel schedules for the day ('Now
and next') or up to 8 days, if supported
by your broadcaster
Synopsis of programmes
Note: Programme guides are available in
certain countries only.
Set programme guide
Before you use the programme guide, check
the following settings:
1. Press .
2. Select [Setup] > [TV settings] >
[Preferences] > [Programme guide].
3. Select [From the broadcaster], then press
OK.
Access the TV programme guide
1. Press .
2. Select [Programme guide], then press
OK.
Use TV programme guide options
You can customise the displayed information
to:
Remind you when programmes start
Display only preferred channels
1. In the programme guide, press
OPTIONS.
2. Select an option, then press OK:
[Set reminder]: Set programme
reminders.
[Clear reminder]: Clear programme
reminders.
[Change day]: Select the day to display.
[More info]: Display programme
information.
[Search by genre]: Search TV
programmes by genre.
[Scheduled reminders]: List
programme reminders.
From the Internet
If your TV is connected to the Internet, you
can receive programme guides over the
Internet. Internet programme guides include:
Channel schedules
Synopsis of programmes
Note: Availability of Internet programme
guides is dependent on your broadcaster.
Set programme guide
Before you use the programme guide, check
the following settings:
1. Press .
2. Select [Setup] > [TV settings] >
[Preferences] > [Programme guide].
3. Select [From network] then press OK.
EN 14
Page 15

English
Access the TV programme guide
1. Press .
2. Select [Programme guide], then press
OK.
Note: If you are viewing the programme
guide for the first time, follow the onscreen
instructions to update the guide.
Use TV programme guide options
You can use the programme guide to:
Schedule recordings of programmes
Identify channels
Enable subtitles when available
Show onscreen remote control
1. In the programme guide, press
OPTIONS.
2. Select an option, then press OK:
[Record]: Set a scheduled recording.
[Identify channel]: Manually update
channel information.
[Select day]: Select the day to display.
[Manual record]: Set a scheduled
recording.
[Show remote control]: Display
onscreen remote control.
[Reload page]: Refresh the page display.
[Zoom page]: Change zoom level of
page display.
[Security info]: Display programme
security information.
[Subtitles]: Enable or disable subtitles
when available.
View media
What you can do
You can play videos, photos and music on
your TV from:
Your computer, connected through the
home network
A USB device connected to the TV
Note:
If the apparatus does not return to DLNA
mode due to external electrical disturbances
(e.g. electrostatic discharge), user
intervention is required.
Play files from computer
What you need
A wired or wireless home network,
connected with a Universal Plug and
Play (uPnP) router
Philips wireless USB adapter (PTA01)
for WiFi-ready models, or a LAN cable
that connects your TV to your home
network
A media server program running on
your computer
Appropriate settings on your computer
firewall to allow you to run the media
server program
Set up the network
1. Connect your TV and the computer to
the same home network. See Connect your
TV > Network and the Internet (Page 50).
2. Switch on your computer and the router.
Set up media sharing
1. Install a media server program on your
computer to share media files. Some of the
media server programs available are as
follows:
For PC: Windows Media Player 11 (or
higher) or TVersity
For Mac: Twonky
2. Switch on media sharing on your
computer using the media server. For more
information on how to set up the media
server, refer to the media server's website.
Play files
1. Press on the remote control.
2. Select [Your network], then press OK. If
the network installation starts, follow the
onscreen instructions.
3. Select a file from the content browser,
then press OK to start play.
4. Press the Play buttons on the remote
control to control play.
Play files from USB
If you have photos, videos or music files on a
USB storage device, you can play the files on
TV.
EN 15
Page 16

Caution:
Philips is not responsible if the USB
storage device is not supported, nor is
it responsible for damage or loss of
data in the device.
Do not overload the USB port. If you
connect a USB storage device that
consumes more than 500mA power,
make sure that it is connected to its
own external power supply.
View USB contents
1. Connect the USB device to the USB
connector on the TV.
2. Press , select [Browse USB], then press
OK.
3. Select a file from the content browser,
then press OK to start play.
4. Press the Play buttons on the remote
control to control play.
Play options
Watch video
Press the Navigation buttons to select a
video file, then press OK.
Press to pause video.
Press to stop video.
Press or to search forward or
backward within a video.
Press CH - / CH + to skip to the
previous or next video.
Press and hold to exit the content
browser.
Video playback options
While you play video, press OPTIONS to
access the following video options:
[Stop]: Stop playback.
[Repeat]: Repeat a video.
[Shuffle on] / [Shuffle off]: Enable or
disable random play of videos.
[Show info]: Display the file
information.
Listen to music
Press the Navigation buttons to select a
music track, then press OK.
Press to pause.
Press to stop.
Press or to search forward or
backwards within a music track.
Press CH - / CH + to skip to the
previous or next video.
Press and hold to exit content
browser.
Music playback options
Press OPTIONS to access or exit the
following music options:
[Stop]: Stop audio play.
[Repeat]: Repeat a track or an album.
[Play once]: Play the track once.
[Shuffle on] / [Shuffle off]: Enable or
disable random play of tracks.
[Show info]: Display the file
information.
View pictures
Press the Navigation buttons to select a
picture, then press OK to start the
slideshow.
Press to pause.
Press to stop.
To pause or stop the slideshow, press
OK.
To skip to the previous or next file,
press CH - or CH +.
Press and hold to exit the content
browser.
Picture slideshow options
Press OPTIONS to access or exit the
following picture options:
[Show info]: Display the file
information.
[Stop]: Stop slideshow.
[Rotate]: Rotate the file.
[Repeat]: Repeat the slideshow.
[Play once]: Play the file once.
[Shuffle off] / [Shuffle on]: Enable or
disable random display of pictures in
the slideshow.
[Slideshow speed]: Set the display time
for each picture in the slideshow.
[Slideshow transition]: Set the
transition from one picture to the next.
[Set as Scenea]: Set the selected
picture as wallpaper on TV. See Use
more of your TV > View Scenea >
Load TV wallpaper (Page 30).
EN 16
Page 17
English
Browse Smart TV
What you can do
With Internet Applications (apps), which are
specially adapted Internet websites for your
TV, you can enjoy these features and more:
Read newspaper headlines
Watch and rent videos
Check weather forecasts
Catch up with TV programmes that
you missed
Find out more on Smart TV services from
the Smart TV forum website,
www.supportforum.philips.com.
Note:
Smart TV services and apps vary from
country to country.
Availability of catch-up TV apps and
their TV programmes is subject to your
TV's country setting. To find out which
TV programmes are available, access
the TV programme guide within the
app.
Smart TV displays one page at a time, in
full screen.
Certain websites may not display
completely. Functions that require plugins may be unavailable.
Koninklijke Philips Electronics N.V. bears
no responsibility regarding the content
and the quality of the content provided
by the content service providers.
What you need
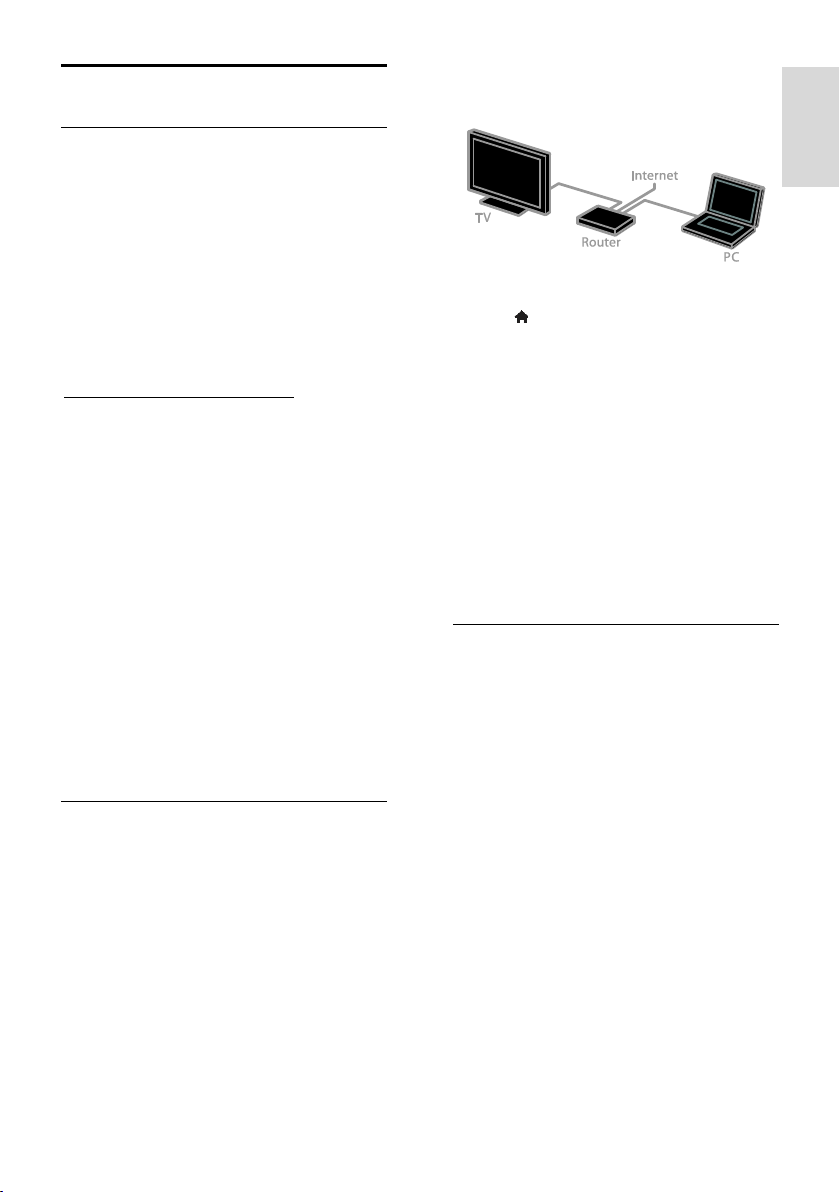
1. On your home network, connect the TV
to the Internet.
2. On your TV, configure Smart TV.
3. (Optional) On your PC, register with
Philips to enjoy exclusive benefits and
receive updates on product information. You
can register at any time.
Connect the TV to the Internet
1. On your home network, connect a router
with a high-speed connection to the
Internet.
2. Switch on the router.
3. Install the network. See Connect your TV
> Network and the Internet (Page 50).
Start Smart TV
1. Press , select [Smart TV], then press
OK.
The terms and conditions of use are
displayed.
2. Follow the onscreen instructions to
complete registration.
You can also press SMART TV on the
remote control to access Smart TV.
Note: The first time you start Smart TV, a
prompt asks if you want to enable parental
control to lock adult apps. If you lock an
adult app, advertisements and web pages
that are not adapted for Smart TV will
remain accessible.
Access Smart TV Applications (Apps)
You can access apps through the Smart TV
home page. The icons on this page represent
the apps installed on your TV.
Press the Navigation buttons to select
an app for access, then press OK to
confirm.
Select [App Gallery] to add more apps
to your home screen.
Browse Internet websites with Internet
apps.
Read the Smart TV quick guide on the
Smart TV home page for more
information.
Add apps
1. Select [App Gallery] > , then press OK.
2. Use the Navigation buttons to search for
apps.
3. Select an app, then press OK to add it to
your home screen.
EN 17
Page 18

Tips:
You can search for apps available in
other countries.
To return to the Smart TV home page,
press LIST.
Note: Smart TV services are updated
automatically. To view the latest updates,
change [All] to [New] in [App Gallery].
Access websites
1. Select an Internet app, then press OK.
2. Select the web address field, then press
OK.
A keyboard appears on the screen.
3. Press the Navigation buttons and OK to
enter each character of the web address.
Tip: You can also use the Numeric buttons
on the TV remote control to enter a web
address.
Zoom page
To zoom in and out on an Internet page, do
the following:
1. Press OPTIONS, then press [Zoom
page].
2. Use the slider bar to set the enlargement.
3. Use the Navigation buttons to jump
between highlighted items and scroll through
an Internet page.
Scroll pages
Press P+ and P- to scroll up and down on a
web page.
Reload page
If a page does not load correctly, press
OPTIONS, then select [Reload page].
View security info
To view security information about a page,
press OPTIONS, then select [Security
info].
Smart TV options
Press OPTIONS and access any of the
following items to modify the apps from the
Smart TV home screen:
[Remove App]
[Lock App]
[Unlock App]
[Move App]
Clear Smart TV memory
You can clear the Smart TV memory
completely, including your favourites,
parental control code, passwords, cookies
and history.
Warning: This option resets the Smart TV
memory completely. It also deletes the
settings of other interactive applications such
as MHEG, HbbTV, and MHP.
1. Press .
2. Select [Setup] > [Network settings].
3. Select [Clear Apps memory], then press
OK.
Rent online videos
What you can do
With this TV, you can rent a video from
online video store apps in Smart TV. You
can rent a video using the following steps:
1. Open a video store app. You may need to
register or enter your log-in information.
2. Select a video.
3. Make the online payment.
4. Download the video for viewing.
5. Start watching the video.
What you need
Make sure that your TV is connected to
the Internet through a high-speed
broadband connection. See Connect
your TV > Network and the Internet
(Page 50).
Connect a USB flash drive with a
minimum capacity of 4 GB to the TV.
For high-definition videos, use a flash
drive with at least 8 GB of storage
capacity.
Note: You can also use a single storage
device to record, pause and rent videos.
Connect a USB 2.0 compatible hard disk
drive (HDD) with a minimum capacity of
250 GB and a minimum transfer speed of 30
megabytes per second. See Use more of
your TV > Record TV shows > Install USB
hard drive (Page 23).
Format the USB flash drive
Before you download rented videos, your
USB drive must be formatted. All existing
content on the USB drive is erased.
EN 18
Page 19

English
1. Switch on the TV.
2. Connect the USB flash drive to a USB slot
on the TV.
3. Press to start formatting the drive.
4. After formatting, leave the USB drive
connected to the TV.
Access a video store
1. Press > [Smart TV], then press OK.
You can also press SMART TV on the
remote control.
2. Access the [App Gallery] to search for
available video store apps in your country.
3. Press the Navigation buttons to select a
store, then press OK to confirm.
The icon of the video store is added to the
home page.
4. To view a store, select its icon and press
OK.
Rent a video
To rent a video, open the video store app
and locate the video. Follow the onscreen
instructions to rent, pay for and download
the video.
Note: The way you select and rent a video
varies from store to store. Consult the video
store website for more information.
Payment
The store prompts you to log in or to open
a new account if you do not have one. The
login might consist of your email address and
a personal PIN code. When you are logged
in, you can select the payment method, a
credit card, or a value code in most cases.
Download the video
When you have paid, you can download the
video on to the video memory. While the
video downloads, you can continue watching
a TV programme until the TV notifies you
that the video is ready to play.
If you cancel a download, you can still return
to download the video before the rental
period expires.
Watch video
1. Press SMART TV on the remote control
to access Smart TV.
The installed video stores are displayed on
the home screen.
2. Select the video store where you rented
the video, then press OK.
3. With your log-in information, enter the
online video store.
4. Select the video from the list of
downloaded videos, then press OK to play.
Interactive TV
What you can do
With interactive TV, you can view additional
information or entertainment pages provided
by digital TV broadcasters. You can
experience true interactivity by responding
directly to the digital content.
Note: You cannot download files to your TV
with this feature.
Broadcasters use various interactive TV
systems such as:
HbbTV (Hybrid Broadcast Broadband
TV)
iTV (Interactive TV - MHEG)
MHP (Multimedia Home Platform)
DTVi (Digital TV interactive)
Visit the broadcaster's website for more
information to see which interactive system
is available in your country.
Here are some examples of interactive
activities you can enjoy:
View information about TV
programmes
Take part in a quiz or competition
Play games
Shop online
Pay for a video-on-demand (VOD)
programme
Vote
Chat
What you need
To enjoy this service, you need the following:
digital channels with interactive services
A wired or wireless home network,
connected with a Universal Plug and
Play (uPnP) router
For network connection, see Connect your
TV > Network and the Internet (Page 50).
EN 19
Page 20

Access interactive TV
Most channels that offer interactive services
invite you to press the Red button or OK to
open their interactive programme.
1. Switch to a digital channel with interactive
services.
While the application is loading, a blinking
symbol is displayed. When the application
has loaded, an icon is displayed.
2. Press the Red button or OK to launch
the interactive application.
3. Follow the onscreen instructions.
4. Press or the onscreen button to close
the interactive page.
To navigate the interactive pages, use:
The Navigation buttons
The Colour buttons
The Numeric buttons
To control video play within interactive
pages, press:
to play
to pause
to stop
To block HbbTV on a channel:
1.Press OPTIONS.
2. Select [HbbTV on this channel] > [Off].
To block HbbTV on all channels:
1. Press .
2. Select [Setup] > [TV settings] >
[Preferences] > [HbbTV] > [Off].
EN 20
Page 21
English
3 Use more of
your TV
Pause TV
What you can do
While you watch a digital channel, you can
pause a programme to answer a phone call
or to have a break. The broadcast is stored
on a USB hard drive that is connected to the
TV. You can resume playback of the
programme at any time.
Note:
You can pause a programme for a
maximum of 90 minutes.
What you need
Tune your TV to receive digital
channels. See Set up your TV >
Channel settings > Automatic install
(Page 32).
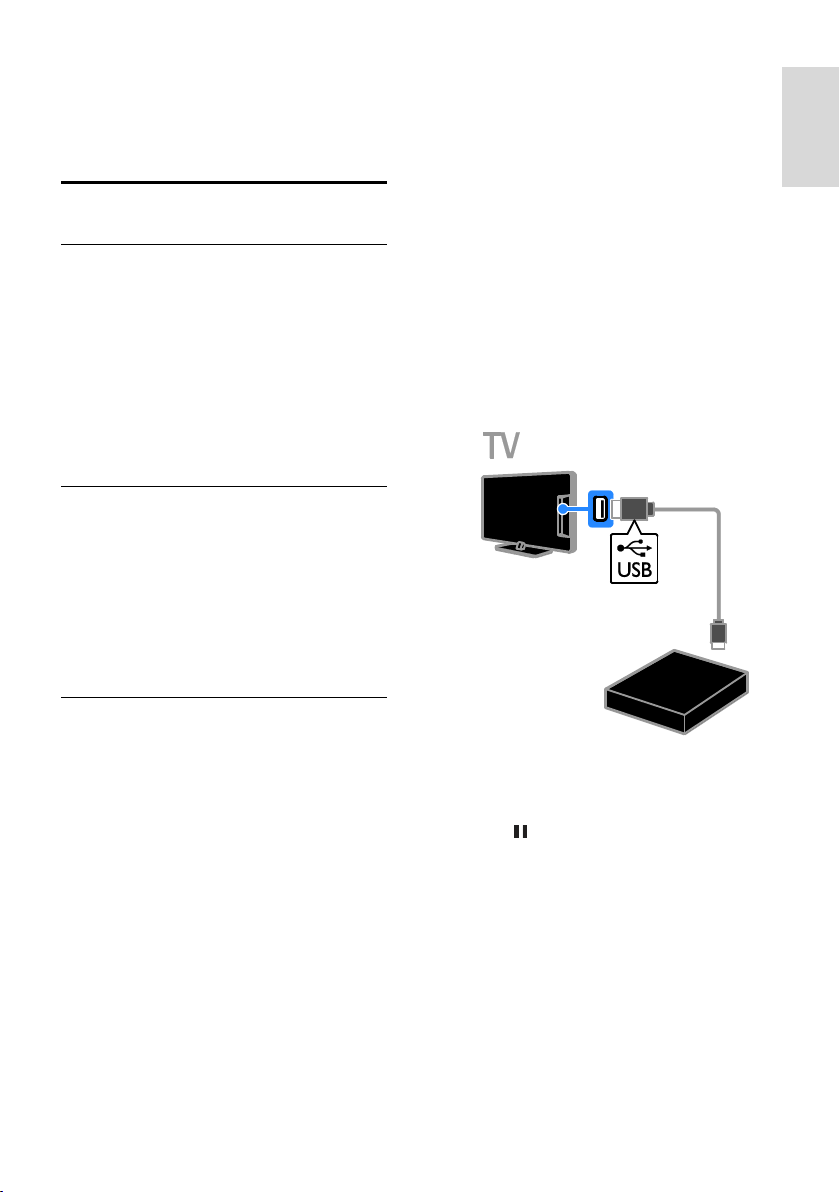
Connect a USB 2.0 compatible hard
drive with a minimum capacity of 32
GB and a minimum transfer speed of
30 MB per second.
Do not overload the USB port. If you
connect a USB hard drive device that
consumes more than 500mA power,
make sure that it is connected to its
own external power supply.
1. Make sure that the TV and the USB hard
drive are switched off.
2. Make sure that there are no other USB
devices connected to the TV.
3. Connect the USB hard drive directly to
the TV, or if you intend to connect other
USB devices in future, connect the USB hard
drive through a USB hub.
Note: While you are formatting the USB
hard drive, do not connect other USB
devices to the TV.
Install USB hard drive
To pause TV, you must connect a USB hard
drive to the TV and format it.
Caution:
Philips is not responsible if the USB
hard drive is not supported, nor is it
responsible for damage or loss of data
in the device.
Formatting removes all data from the
connected USB hard drive.
The USB hard drive is formatted
exclusively for this TV. Keep it
permanently connected to the TV. You
cannot access the USB hard drive
contents from another TV or PC.
4. Switch on the TV and the USB hard drive,
if it has an external power source.
5. Switch to a digital TV channel.
6. Press to start formatting.
7. Follow the onscreen instructions to
complete the formatting process.
Warning: The formatting process may take
some time. Do not switch off the TV or
disconnect the USB hard drive until this
process is complete.
EN 21
Page 22
Pause a live TV broadcast
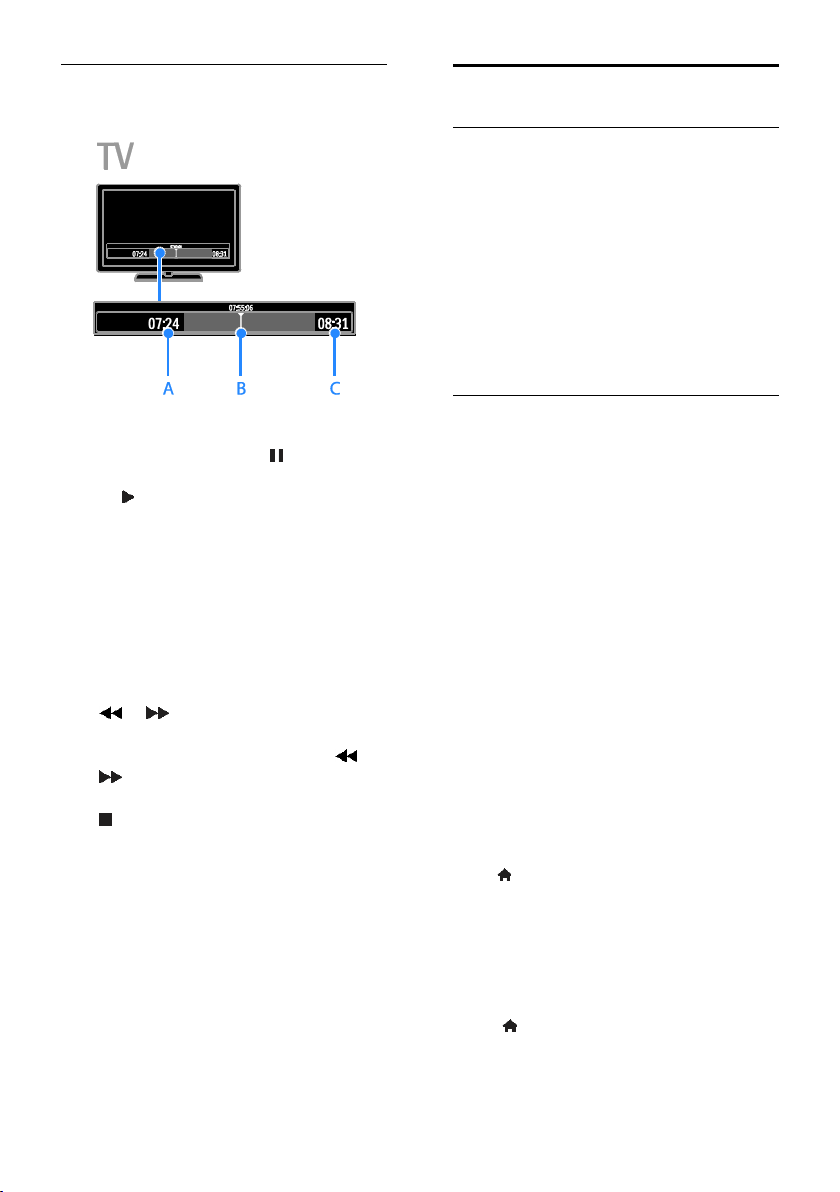
1. On a digital channel, press to pause a
TV programme.
2. Press to continue watching.
The status bar shows the following time
indicators:
A. When the programme was paused for
the first time.
B. Where the paused programme is
currently playing.
C. Where the live programme is currently
broadcast.
To watch the stored broadcast, press
or to search backward or
forward.
To change playback speed, press or
repeatedly.
To watch the live TV broadcast, press
.
Note: You cannot pause the TV broadcast
when a recording is in progress.
The stored broadcast on the USB hard
drive is deleted if you do any of the
following:
Disconnect the USB hard drive.
Start recording a TV programme.
Access Smart TV
Switch the TV to standby.
Switch to another channel.
Switch source to watch from a
connected device - a Blu-ray disc player,
digital receiver or USB storage device.
Record TV shows
What you can do
If your TV is connected to the Internet, you
can record TV programmes onto a USB
hard drive. You can either record current TV
programmes or a future TV programme.
Start and manage the recordings from the
electronic programme guide on the TV. See
Use your TV > View programme guide >
From the Internet (Page 14).
Note: Recording is only supported in
countries with Internet programme guides.
What you need
To record TV programmes, do the following:
Tune your TV to receive digital TV
channels (DVB broadcast or similar).
See Set up your TV > Channel
Settings > Automatic installation (Page
32).
Make sure that your TV is connected to
the Internet through a high-speed
broadband connection. See Connect
your TV > Network and the Internet
(Page 50).
Connect a USB 2.0 compatible hard
disk drive (HDD) with a minimum
capacity of 250 GB and a minimum
transfer speed of 30 megabytes per
second.
Note: You can use the same HDD to
record and Pause TV shows.
To check if the programme guide supports
recording:
Press and select [Programme guide].
If you find the [TV Recording] button on
the programme guide page, you can set up
and manage recordings.
If you can't see the [TV Recording] button,
make sure that the programme guide data is
set to be updated through the network.
Select > [Setup] > [TV settings] >
[Preferences] > [Programme guide] >
[From network].
EN 22
Page 23
English
Install USB hard drive
To record TV shows, you must connect a
USB hard disk to the TV and format it.
Caution:
Philips is not responsible if the hard disk
is not supported, nor is it responsible
for damage or loss of data in the
device.
Formatting removes all data from the
connected hard disk.
The USB hard drive is formatted
exclusively for this TV. Keep it
permanently connected to the TV. You
cannot access the USB hard drive
contents from another TV or PC.
Do not overload the USB port. If you
connect a USB hard drive device that
consumes more than 500mA power,
make sure that it is connected to its
own external power supply.
1. Make sure that the TV and the USB hard
drive are switched off.
2. Make sure that there are no other USB
devices connected to the TV.
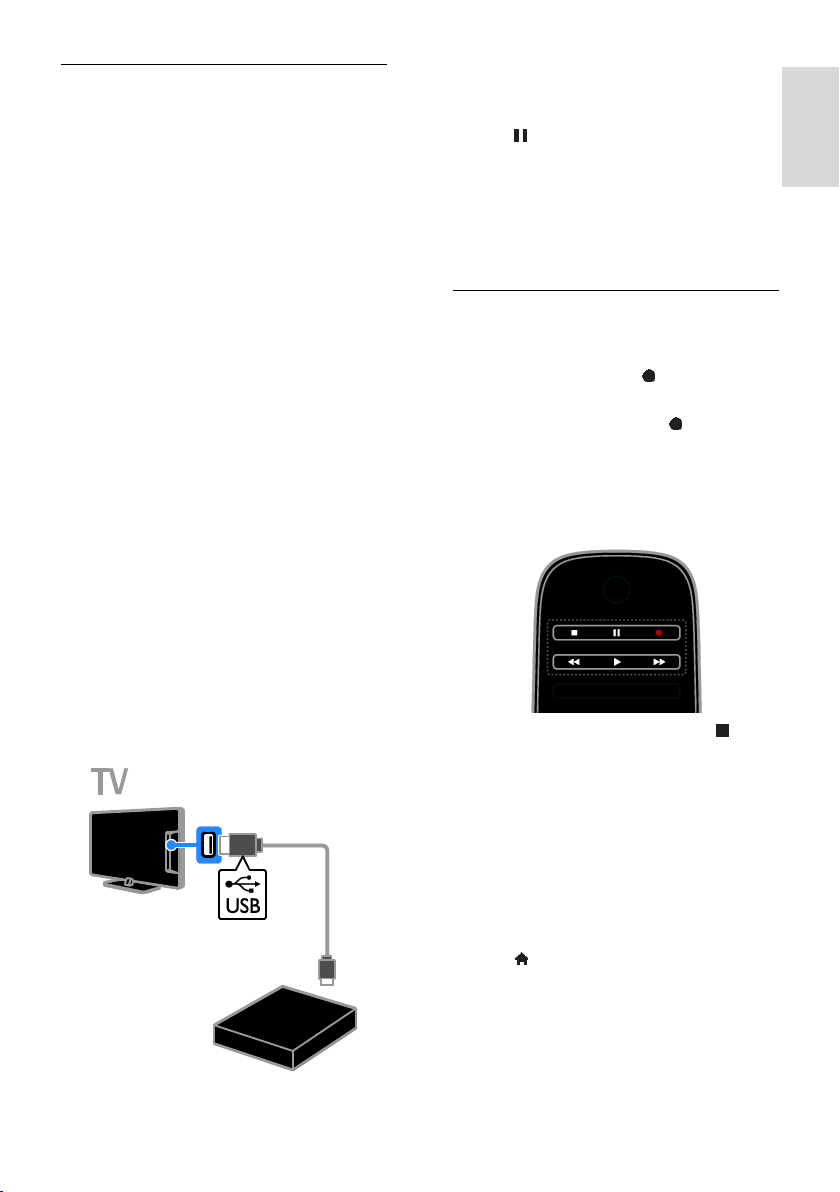
3. Connect the USB hard drive directly to
the TV, or if you intend to connect other
USB devices in future, connect the USB hard
drive through a USB hub.
Note: While you are formatting the USB
hard drive, do not connect other USB
devices to the TV.
4. Switch on the TV and the USB hard drive,
if it has an external power source.
5. Switch to a digital TV channel.
6. Press to start formatting.
7. Follow the onscreen instructions to
complete the formatting process.
Warning: The formatting process may take
some time. Do not switch off the TV or
disconnect the USB hard drive until this
process is complete.
Start recording
One-touch recording
To record the programme you are currently
watching, you can use the button on the
remote control:
1. While you watch TV, press .
Recording starts immediately. A pop-up
window is displayed, where you can select
the time when the recording ends.
2. Select [Schedule], then press OK to
confirm the end time.
To stop recording at any time, press .
Note:
While recording, you cannot switch TV
channels.
While recording, you cannot pause the
TV broadcast.
Schedule a TV programme recording
You can schedule a recording of an
upcoming programme that will be broadcast
today or in up to eight days' time.
1. Press and select [Programme guide].
2. Select the channel and programme to
record.
To scroll through programmes, use the
Navigation buttons.
To select a channel, enter the channel
number.
EN 23
Page 24

To change the date, select the date at
the top of the page, then press OK.
Select a date from the pop-up window,
then press OK.
3. Select the programme, press
OPTIONS, then select [Record].
4. To record beyond the time when the
programme is scheduled to end, change the
recording time.
5. Select [Schedule] then press OK. The
programme is scheduled for recording.
If you schedule overlapping recordings, a
warning is displayed.
If you schedule recordings while you are
away, make sure that you leave the TV in
standby and keep the USB hard drive
switched on.
Schedule a timed recording
To schedule a timed recording that is not
linked to any programme:
1. Press , then select [Programme guide].
2. Press OPTIONS, select [Manual
record], then press OK.
3. Select the channel, date and time span in
the dialogue box.
4. Select [Schedule], then press OK.
Programme information
To view more information about a
programme, select the programme from the
programme guide and press OK. Depending
on the status of this programme, you can
start watching it, schedule its recording, play
back the recording, or delete the recording
from this page.
Watch recordings
After you've recorded a TV programme, you
can watch it.
1. Press , select [Programme guide] > [{0}
Recordings], then press OK.
A list of recordings is displayed.
2. Select a recording from the list, then press
OK.
The recording starts to play.
Note: In [{0} Recordings], the number in
brackets shows the number of complete
recordings. If you see [TV Recording]
instead, no recordings are complete.
You can control play with the Play buttons
on the remote control:
To play or pause, press or .
To search forward or backwards, press
or .
To stop, press .
Note:
If a broadcaster limits the number of
days that a recording can be viewed
after the programme has been
broadcast, the list of recordings shows
the number of days before the
recording expires.
If a recording has expired or if a
broadcaster restricts playback, the
recording cannot be played.
Manage recordings
To manage your recordings, view the list of
complete and scheduled recordings.
1. Press , then select [Programme guide] >
[{0} Recordings], then press OK.
A list of recordings is displayed.
Note: In [{0} Recordings], the number in
brackets shows the number of complete
recordings. If you see [TV Recording]
instead, no recordings are complete.
From this list, you can:
Select a recording to watch
Delete a recording
Schedule a timed recording
Cancel a scheduled recording
Check the remaining hard disk space
Cancel a scheduled recording
1. Select the recording, then press
OPTIONS.
2. Select [Cancel recording] and press OK.
Delete a recording
1. Select the recording, then press
OPTIONS.
2. Select [Delete recording], then press OK.
Failed recordings
If a scheduled recording is prevented by the
broadcaster or if the recording does not
occur as per schedule, it is marked as
[Failed] in the recordings list.
EN 24
Page 25

English
Play games
Add a game console
You can play games projected on your TV.
Before you start, connect your game console
to this TV. Read Connect your TV >
Connect devices > Game console (Page
44).
For easy access, add the game console to
the Home menu.
1. Press .
2. Select [Add your devices] > [Game
console], then press OK.
3. Follow the onscreen instructions to add
the game console.
Game setting
You can optimise the TV display for gaming
without picture lag with the [Game] option
in the [Smart picture] settings.
If you add the game console to the
Home menu as [Game console], the
TV switches to the game setting
automatically.
If your game console is automatically
added to the Home menu as a Blu-ray
disc player or DVD player, set the
[Smart picture] setting to [Game]
before you start playing.
Switch to Game setting
1. Press ADJUST.
2. Select [Smart picture] > [Game], then
press OK. The TV is ready for gaming.
Note: When your gaming session ends,
switch back to your usual [Smart picture]
setting.
View Text
Select a page
While you watch channels that broadcast
text, you can view the text.
1. Select a channel that broadcasts text, then
press TEXT.
2. Select a page in one of the following ways:
Enter the page number with the
Numeric buttons.
Press CH + / CH - to view the next or
previous page.
Press the Colour buttons to select a
colour coded item.
3. Press to exit.
Text options
1. While you view text, press OPTIONS.
2. Select an option:
[Freeze page] / [Unfreeze page]:
Freeze or unfreeze the current page.
[Dual screen] / [Full screen]: Enable or
disable dual screen text. Dual screen
displays both the current channel and
the text broadcast on two halves of the
TV screen.
[T.O.P. overview]: Table Of Pages
(T.O.P.) text broadcasts allow you to
jump from one subject to another
without entering page numbers.
[Enlarge] / [Normal view]: Zoom in on
the page. Press the Navigation buttons
to move around the enlarged view.
[Reveal]: Hide or reveal hidden
information on a page, such as solutions
to riddles or puzzles.
[Cycle subpages]: If subpages are
available, each is shown automatically.
[Language]: Switch to a different
language group to correctly display
different character sets.
3. Press OPTIONS to exit.
Text language
For digital TV channels where the
broadcasters provide different text
languages, you can select your preferred
primary and secondary languages.
1. Press .
2. Select [Setup] > [Channel settings] or
[Satellite settings].
3. Select [Languages] > [Primary Text] or
[Secondary Text].
4. Select a language, then press OK.
EN 25
Page 26

Subpages
If the text page contains several subpages,
you can view each subpage in succession.
These subpages are shown on a bar next to
the main page number.
If subpages are available, press or to
select them.
Search
You can search for a word or number that
exists on the current text page.
1. While you are viewing text, press OK to
highlight the first word or number.
2. Press the Navigation buttons to skip to
the word or number to search.
3. Press OK to begin the search.
4. To exit the search, press until no word
or number is highlighted.
Digital text
If a digital TV channel's broadcaster offers
dedicated digital text or interactive services,
you can view digital text. Such channels, such
as BBC1, may have digital text with more
interactive features.
Note: Digital text services are blocked when
subtitles are broadcast and switched on.
Read Set up your TV > Language settings >
Subtitles on digital channels (Page 36).
When in digital text:
Press the Navigation buttons to select
or highlight items.
Press the Colour buttons to select an
option, then press OK to confirm or
activate.
Text 2.5
With Text 2.5, you can view text with more
colours and better graphics than normal text.
If Text 2.5 is broadcast by a channel, it is
switched on by default.
To switch Text 2.5 on or off
1. Press .
2. Select [Setup] > [TV settings] >
[Preferences].
3. Select [Text 2.5] > [On] or [Off], then
press OK.
Set locks and timers
Clock
You can display a clock on the TV screen.
The clock displays the time that is broadcast
by your TV service operator.
Display the TV clock
1. While you watch TV, press OPTIONS.
2. Select [Status], then press OK.
The clock is displayed on the lower right
hand corner of the TV screen.
Change the clock mode
You can change the clock mode to
automatic or manual. By default, it is set to
automatic mode, which synchronises it to
Coordinated Universal Time (UTC). If your
TV cannot receive UTC transmissions,
change the clock mode to [Manual].
1. While you watch TV, press .
2. Select [Setup] > [TV settings] >
[Preferences].
3. Select [Clock] > [Auto clock mode].
4. Select [Automatic], [Manual] or [Country
dependent], then press OK.
Enable or disable daylight saving time
You can enable or disable daylight saving
time depending on your region. Before you
enable/disable daylight saving time, set the
clock mode to [Country dependent].
1. In the [Clock] menu, select [Daylight
saving] > [Daylight saving time] or
[Standard time], then press OK. Daylight
saving time is enabled or disabled.
Set the clock manually
You can set the date and time manually.
Before you start, set the clock mode to
[Manual].
1. In the [Clock] menu, select [Date] or
[Time], then press OK.
2. Use the Navigation buttons to make
your selection.
3. Select [Done], then press OK.
EN 26
Page 27

English
Sleeptimer
You can switch the TV to standby after a
specified time. During the countdown to the
specified time, you can switch off your TV
earlier or reset the sleeptimer.
1. Press .
2. Select [Setup] > [TV settings] >
[Preferences] > [Sleeptimer].
3. Press the Navigation buttons to set the
sleeptimer.
The sleeptimer can be set up to 180
minutes, in steps of ten minutes. To switch
off the sleeptimer, set it to zero minutes.
4. Press OK to activate the sleep timer.
After the specified time, the TV switches to
standby.
Child lock
To protect children from unsuitable TV
programmes, you can lock the TV or block
age-rated programmes.
Set or change the child lock code
1. Press .
2. Select [Setup] > [Channel settings] or
[Satellite settings] > [Child lock].
3. Select [Set code] or [Change code].
4. Enter the code with the Numeric
buttons.
Tip: If you forget your code, enter '8888' to
override any existing codes.
Lock or unlock channels
1. In the child lock menu, select [Channel
lock].
2. Enter the child lock code with the
Numeric buttons. The [Channel lock] menu
appears.
3. Select channels to lock or unlock.
Parental rating
You can set your TV to display only
programmes with age ratings lower than
your child's age. This restriction only applies
to digital channels from broadcasters that
rate their programmes according to age.
1. Press .
2. Select [Setup] > [Channel settings] or
[Satellite settings].
3. Select [Child lock] > [Parental rating].
A message prompts you to enter the child
lock code.
4. Enter the child lock code with the
Numeric buttons.
5. Select an age rating, then press OK.
All programmes above the selected age
rating are blocked.
For information on child lock codes, see Use
more of your TV > Set locks and timers >
Child lock (Page 27).
Use EasyLink
What you can do
You can get the most out of your HDMICEC-compliant devices with Philips EasyLink
enhanced control features. Connect your
HDMI-CEC compliant devices through
HDMI to your TV and control them at the
same time with your TV remote control.
Note: Other brands describe HDMI-CEC
functionality differently. Some examples are
Anynet (Samsung), Aquos Link (Sharp) or
BRAVIA Sync (Sony). Not all brands are fully
compatible with Philips EasyLink.
After you have switched on Philips EasyLink,
the following features are available:
One-touch play
When you play an HDMI-CEC compliant
device, the TV switches on from standby and
switches to the correct source.
One-touch standby
When you press on the TV remote
control, the TV and all HDMI-CEC
compliant devices switch to standby mode.
EasyLink remote control
You can control multiple HDMI-CEC
compliant devices with your TV remote
control.
System audio control
If you connect an HDMI-CEC compliant
device that includes speakers through the
HDMI ARC connector, you can choose to
hear the TV audio from those speakers
instead of the TV speakers.
EN 27
Page 28

Synchronise audio
If you connect your TV to a home theatre,
you can synchronise the audio and video to
avoid lag between the picture and sound.
Retain picture quality
If your TV picture quality is affected by the
picture-processing features of other devices,
you can switch on Pixel Plus Link to retain
picture quality.
Maximise display for subtitled video
Some video subtitles can create a separate
subtitle bar under the video, which limits the
video display area. To maximise the video
display area, you can switch on auto subtitle
shift and display the subtitles on top of the
video image.
Listen to another device when TV is in
standby
You can listen to a connected HDMI-CEC
compliant device through the TV speakers,
even when the TV is in standby.
What you need
Connect at least two HDMI-CEC
compliant devices through HDMI. See
Connect your TV > About cables >
HDMI (Page 40).
Configure each HDMI-CEC compliant
device properly
Switch on EasyLink
Switch on EasyLink
1. Press .
2. Select [Setup] > [TV settings] >
[EasyLink].
3. Select [On] or [Off], then press OK.
Control devices simultaneously
If you connect multiple HDMI-CEC devices
that support this setting, you can control all
such devices through the TV remote control.
Note: This is an advanced setting. Devices
that do not support this setting will not
respond to the TV remote control.
1. Press .
2. Select [Setup] > [TV settings] >
[EasyLink].
3. Select [EasyLink Remote Control] >
[On] or [Off].
4. Press OK to activate.
Tips:
To switch back to TV control, press ,
then select [Watch TV].
To control another device, press ,
then select the device from the Home
menu.
To exit, press .
EasyLink buttons
You can control HDMI-CEC compliant
devices with the following buttons on the TV
remote control:
: Switch the TV and the connected
device on or to standby.
Play buttons: Control video or music
play.
Numeric buttons: Select a title, chapter
or track.
OK: Start, pause or resume play on the
connected device, activate a selection,
or access the device menu.
/ : Search backwards and
forwards on the connected device.
: Display the TV Home menu.
You can also control devices through other
EasyLink buttons that are available through
the On-Screen Remote Control (OSRC).
To access the OSRC
1. While you view content from a connected
device, press OPTIONS.
2. Select [Show device keys], then press
OK.
3. Select an onscreen button, then press OK.
4. Press to exit.
EN 28
Page 29

English
Select speaker output
If a connected device is HDMI Audio Return
Channel (HDMI ARC) compliant, you can
output TV audio through an HDMI cable.
Additional audio cables are not required.
Make sure you connect the device to the
HDMI ARC connector on the TV. See
Connect your TV > About cables > HDMI
(Page 40).
Configure TV speakers
1. Press .
2. Select [Setup] > [TV settings] >
[EasyLink] > [TV speakers].
3. Select an option, then press OK:
[Off]: Switch off TV speakers.
[On]: Switch on TV speakers.
[EasyLink]: Stream TV audio through
the connected HDMI-CEC device.
Switch the TV audio to the connected
HDMI-CEC audio device through the
Adjust menu.
[EasyLink autostart]: Turn off TV
speakers automatically and stream TV
audio to the connected HDMI-CEC
audio device.
Select speaker output with the adjust menu
If [EasyLink] or [EasyLink autostart] are
selected, you can access the Adjust menu to
switch the TV audio.
1. While you watch TV, press ADJUST.
2. Select [Speakers], then press OK.
3. Select one of the following, then press
OK:
[TV]: On by default.
Stream TV audio through TV and the
connected HDMI-CEC audio device
until the connected device switches to
system audio control. TV audio is then
streamed through the connected
device.
[Amplifier]: Stream audio through the
connected HDMI-CEC device. If system
audio mode is not enabled on the
device, audio continues to stream from
the TV speakers. If [EasyLink autostart]
was selected, the TV prompts the
connected device to switch to system
audio mode.
Synchronise audio
If your TV is connected to a home theatre
system (HTS) and there is a lag between the
picture and the sound, you can synchronise
them.
If you are using a Philips HTS, the audio
and video are automatically
synchronised.
For other HTS brands, you need to
switch on the audio sync delay on the
TV to synchronise the audio and video.
Switch on Audio Out Delay
1. Press .
2. Select [Setup] > [TV settings] >
[Preferences].
3. Select [Audio Out delay] > [On], then
press OK.
Retain picture quality
If your TV picture quality is affected by the
picture-processing features of other devices,
you can switch on Pixel Plus Link.
Switch on Pixel Plus Link
1. Press .
2. Select [Setup] > [TV settings] >
[EasyLink].
3. Select [Pixel Plus link] > [On], then press
OK.
Maximise video display
Some subtitles create a separate subtitle bar
under the video, which limits the video
display area. To maximise the video display
area, you can switch on auto subtitle shift.
The subtitles are then displayed over the
video image.
Switch on auto subtitle shift
1. Press .
2. Select [Setup] > [TV settings] >
[EasyLink] > [Auto subtitle shift].
3. Select [On], then press OK to activate.
Note: Make sure that the picture format of
the TV is set to [Auto format] or [Movie
expand 16:9].
EN 29
Page 30

Listen to another device while TV is in standby
You can listen to a connected HDMI-CEC
compliant device through the TV speakers,
even while the TV is in standby.
1. Press ADJUST to receive audio from
the connected Philips EasyLink device.
If available, audio only mode is switched on.
2. Accept the prompt on the TV to turn off
the TV screen.
3. Control the audio playback with the TV
remote control.
View Scenea
What you can do
With Scenea, you can display a picture as the
wallpaper on your TV. Display the default
picture or load your own picture as the
wallpaper.
The wallpaper is displayed for 240 minutes
or for the duration of the sleeptimer.
Switch on
1. Press .
2. Select [Scenea], then press OK.
The default picture is displayed.
Note: The wallpaper is displayed for 240
minutes or for the duration of the
sleeptimer. For information about the
sleeptimer, see Use more of your TV > Set
locks and timers > Sleeptimer (Page 27).
5. Select [Set as Scenea], then press OK.
6. Select [Yes], then press OK.
7. Press any button to exit Scenea.
Load TV wallpaper
You can also load your own picture from a
connected USB storage device or a
connected PC as the wallpaper.
Note: When you load a new picture, it
overrides the existing picture.
1. Connect the USB storage device to the
TV or connect to the network.
2. Press .
3. Select [Browse USB] or [Your network],
then press OK.
4. Select a picture, then press OPTIONS.
EN 30
Page 31

English
4 Set up your TV
Picture and sound
Settings assistant
You can select picture and sound settings
with the help of the settings assistant, which
demonstrates the effect of your chosen
setting immediately.
1. While you watch TV, press .
2. Select [Setup] > [Quick picture and
sound settings], then press OK.
3. Select [Start], then press OK.
4. Follow the onscreen instructions to
choose your preferred settings.
More picture settings
You can change the settings in the Picture
menu.
1. Press .
2. Select [Setup] > [TV settings] >
[Picture], then press OK.
3. Select a setting to adjust, then press OK.
Note: Options marked with a * are available
for certain models only.
[Smart picture]: Access predefined
smart picture settings.
[Reset]: Reset to default factory
settings.
[Backlight contrast]: Adjust the
contrast of the TV backlight.
[Brightness]: Adjust the intensity and
details of the dark areas.
[Colour]: Adjust the level of colour
saturation.
[Hue]: Compensate colour variations in
NTSC transmissions.
[Sharpness]: Adjust sharpness in the
image.
[Noise reduction]: Filter and reduce
noise in the image.
[Tint]: Adjust the colour balance in the
image.
[Custom tint]: Customise tint setting.
[Pixel Plus HD] / [Pixel Precise HD]*:
Control advanced settings to fine-tune
each pixel to match surrounding pixels.
This setting produces a brilliant, highdefinition image.
- [HD Natural Motion]: Available
on certain models. Reduce motion
judder and reproduce smooth motion.
- [Clear LCD]*: Enable superior
motion sharpness, better black level,
high contrast with a flicker-free, quiet
image and a larger viewing angle.
- [Super resolution]: Enable
superior sharpness, especially on lines
and contours in the picture.
- [Dynamic contrast]: Set the level
at which the TV automatically enhances
details in the dark, middle and light
areas of the picture.
- [Dynamic backlight]: Reduce
power consumption by dimming the
TV backlight to match room lighting
conditions.
- [MPEG artefact reduction]:
Smooth the digital transitions in the
picture.
- [Colour enhancement]: Set the
colours to be more vivid and improve
the resolution of details in bright
colours.
- [Gamma]: Non-linear setting for
picture luminance and contrast.
- [Video contrast]: Change the
intensity of the bright areas, keeping
dark areas unchanged.
[PC mode]: Allow picture settings to
be changed when a PC is connected to
the TV through HDMI.
If enabled, you can select [Picture
format] > [Unscaled] which provides
maximum detail for display of PC
content.
[Light sensor]: Adjust settings
dynamically to match lighting conditions.
[Picture format]: Change the picture
format.
[Screen edges]: Change the picture
size.
EN 31
Page 32

[Picture shift]: Move the position of the
picture. You cannot select this setting if
the selected picture format is [Auto
fill], [Auto zoom] or [Wide screen].
More sound settings
You can change the settings in the Sound
menu.
1. Press .
2. Select [Setup] > [TV settings] > [Sound],
then press OK.
3. Select a setting to adjust:
[Smart sound]: Access predefined
smart sound settings.
[Reset]: Reset to factory default
settings.
[Bass]: Adjust the bass level.
[Treble]: Adjust the treble level.
[Surround]: Enable spatial sound.
[Headphones volume]: Adjust
headphone volume.
[Auto volume leveling]: Automatically
reduce sudden volume changes, for
example when switching channels.
[Balance]: Adjust the balance of the left
and right speakers.
[Digital output format]: Select the type
of audio output through the digital
audio output connector. Select
[Stereo] for stereo sound or
[Multichannel] to output audio to
home theatre
Select audio format
If a digital TV channel broadcaster streams
audio in several formats, you can select an
audio format.
1. Press .
2. Select [Setup] > [Channel settings] or
[Satellite settings] > [Languages].
3. Select a setting, then press OK.
[Preferred audio format]: Receive
standard audio format (MPEG) or
advanced audio formats (AAC, EAC-3
or AC-3 if available).
[Mono/Stereo]: If stereo broadcasting is
available, select mono or stereo audio.
Reset picture and sound
You can restore the default picture and
sound settings, while the channel installation
settings remain the same.
1. While you watch TV, press .
2. Select [Setup] > [TV settings] > [Factory
settings], then press OK.
All TV settings (except for channel settings)
are reset to the default factory settings.
Channel settings
Automatic install
When the TV was switched on for the first
time, a full installation of channels was
performed. To change your language,
country and reinstall all available TV
channels, you can run this full installation
again.
Start installation
1. Press .
2. Select [Setup] > [Search for channels] >
[Reinstall channels], then press OK.
The country menu is displayed.
3. Select your country, then press OK.
4. Select your network, then press OK:
[Antenna (DVB-T)]: Access free-to-air
antenna or digital DVB-T channels.
[Cable (DVB-C)]: Access cable or
digital DVB-C channels.
5. Follow the onscreen instructions to select
other options, if any.
The start menu for channel search is
displayed.
6. Start channel search:
If your channel broadcaster has
instructed you to change settings, select
[Settings], then press OK. Follow the
broadcaster's instructions to update the
settings.
Otherwise, select [Start], then press
OK.
7. Once the channel search is complete,
select [Finish], then press OK.
8. Once the channel search is complete,
select [Finish], then press OK.
EN 32
Page 33

English
Tip: Press LIST to see the channel list.
Note: When digital TV channels are found,
the list of installed channels may display
empty channel numbers. You can rename,
reorder or uninstall these channels.
Install analogue channels
You can search and store analogue TV
channels one-by-one.
Step 1: Select your system
Note: Skip this step if your system settings
are correct.
1. While you watch TV, press .
2. Select [Setup] > [Channel settings] >
[Channel installation].
3. Select [Analogue: Manual installation] >
[System], then press OK.
4. Select the system for your country or
region, then press OK.
Step 2: Search and store new TV channels
1. In the [Analogue: Manual installation]
menu, select [Search channel], then press
OK.
2. Find the channel:
If you know the channel frequency,
enter it with the Navigation buttons or
Numeric buttons.
If you do not know the channel
frequency, search for the next
frequency that has a strong signal:
Select [Search], then press OK.
3. After you have found the correct channel,
select [Done], then press OK.
4. Select [Store as new channel], then press
OK to store the new TV channel.
Note: If the reception is poor, reposition
your antenna and repeat the procedure.
Install digital channels
If you know the channel frequency of the
channels you want to install, you can search
and store digital channels one-by-one. For
best results, contact the broadcaster or a
professional installer.
1. Press .
2. Select [Setup] > [Channel settings] >
[Channel installation].
3. Select [Digital: Reception test] >
[Search], then press OK.
4. Press the Numeric buttons to enter the
channel frequency.
5. Select [Search], then press OK.
6. When the channel is found, select [Store],
then press OK.
7. Press to exit.
Note: If your cable provider does not
provide you with a specific symbol rate value
for DVB-C channels, select [Automatic] in
[Symbol rate mode].
Fine-tune analogue channels
If the reception of an analogue TV channel is
poor, you can fine-tune the TV channel.
1. Press .
2. Select [Setup] > [Channel settings] >
[Channel installation].
3. Select [Analogue: Manual installation] >
[Fine tune], and then press OK.
4. Press or to fine-tune the channel.
5. When you have selected the correct
channel frequency, select [Done], and then
press OK.
6. Select an option, then press OK.
[Store current channel]: Store the
channel as the current channel number.
[Store as new channel]: Store the
channel as a new channel number.
Update channel list
When the TV was switched on for the first
time, a full installation of channels was
performed.
By default, when there are changes to these
channel lists, the TV updates them
automatically. You can also switch off the
automatic update or manually update the
channels.
Note: If you are prompted to enter a code,
enter '8888'.
Automatic update
To add or remove digital channels
automatically, leave the TV in standby mode.
The TV updates channels and stores new
channels every day. Empty channels are
removed from the channel list.
EN 33
Page 34

Switch off the channel update message
If a channel update is performed, a message
is displayed at startup. You can switch off this
message.
1. Press .
2. Select [Setup] > [Channel settings] or
[Satellite settings].
3. Select [Channel installation] > [Channel
update message].
4. Select [Off], then press OK.
Switch off automatic updates
In the [Channel installation] menu, select
[Automatic channel update] > [Off].
Update channels manually
1. Press .
2. Select [Setup] > [Search for channels] >
[Update channels], then press OK.
3. Follow the onscreen instructions to
update the channels.
Copy channels
ATTENTION: This feature is intended for
dealers and service personnel.
You can copy channel lists from one Philips
TV to another through a USB storage
device. You do not need to search for
channels or install them again on the second
TV. The channel list file is small enough to fit
on any USB storage device.
What you need
Two Philips TVs that have these properties:
The same country setting
The same year range
The same DVB type, as indicated by
the suffix (H, K, T, or D/00) in the
model name
The same settings for satellite channels,
including the number of LNB satellites
The same hardware type, as indicated
by the sticker on the back of the TV
(for example Qxxx.xx.Lx)
Compatible software versions
If the channel list cannot be copied to the
second TV, a message is displayed.
Note: If you are prompted to enter a code,
enter '8888'.
Step 1: Check the country setting
1. Switch on the first TV (with the channels
that you want to copy to the second TV).
2. Press .
3. Select [Setup] > [Search for channels] >
[Reinstall channels], then press OK.
The country menu is displayed.
4. Make a note of the current setting.
5. Press .
6. Press [Cancel] to exit.
Step 2: Copy channel list to USB
1. Connect a USB storage device to the first
TV (with the channels installed on it).
2. Press .
3. Select [Setup] > [TV settings] >
[Preferences] > [Channel list copy] >
[Copy to USB], then press OK.
The channel list is copied to the USB storage
device.
4. Disconnect the USB storage device.
Step 3: If the second TV has no channels
installed
1. Switch on the second TV (on which you
want to copy the channel list).
Initial installation starts.
2. Follow the onscreen instructions and
select the same country as the TV whose
channel list you want to copy.
3. Skip the search for channels.
4. Connect the USB storage device.
5. Press .
6. Select [Setup] > [TV settings] >
[Preferences] > [Channel list copy] >
[Copy to TV], then press OK.
The channel list is copied to the TV storage
device.
7. Disconnect the USB storage device.
Step 3: If the second TV has no channels
installed
1. Switch on the second TV (on which you
want to copy the channel list).
2. Press .
3. Select [Setup] > [Search for channels] >
[Reinstall channels], then press OK.
The country menu is displayed.
4. Make sure that the country setting is the
same as for the first TV.
5. Press .
6. Press [Cancel] to exit.
EN 34
Page 35

English
7. If the country setting is different, reinstall
the second TV to match the country setting
of the first TV. See Set up your TV >
Restore default settings (Page 39).
8. Connect the USB storage device to the
second TV.
9. Press .
10. Select [Setup] > [TV settings] >
[Preferences] > [Channel list copy] >
[Copy to TV], then press OK.
The channel list is copied to the second TV.
11. Disconnect the USB storage device.
Satellite settings
What you can do
View satellite channels
Note: Available on certain models only.
[Search for satellite] is only available if the
TV supports DVB-S.
To receive satellite channels, connect the
SAT connector on your TV to a satellite dish
antenna.
LNBs
This TV can receive signals from 4 different
low noise block-down converters (LNBs).
An LNB is mounted at the end pole of the
dish antenna and captures signals from a
satellite.
3. Select a setting, then press OK.
[One LNB]: Select if you have only one
LNB.
[DiSeqC Mini (2 LNBs)]: Select if you
have 2 LNBs.
[DiSeqC 1.0 (3-4 LNBs)]: Select for 3
or 4 LNBs.
Test signal strength
If a channel or transponder is skipped during
installation, you can test the signal strength of
a satellite or add a new channel.
1. While you watch TV, press .
2. Select [Setup] > [Search for satellite] >
[Satellite reception test], then press OK.
3. Select the LNB.
4. If you know the frequency of the
transponder (which can include several
channels), select [Frequency] and enter it.
5. Select [Search], then press OK.
6. If a new frequency is found, press
[Store]to add the new transponder with its
channels.
Update satellite channels
1. While you watch TV, press .
2. Select [Setup] > [Search for satellite] >
[Update channels].
3. Follow the onscreen instructions to
complete the installation.
4. Once complete, select [Finish], then press
OK.
Install satellite channels
1. While you watch TV, press .
2. Select [Setup] > [Search for satellite] >
[Reinstall channels].
3. Follow the onscreen instructions to
complete the installation.
4. Once complete, select [Finish], then press
OK.
Select connection type
While you install satellite channels, you need
to set the connection type. The connection
type determines the number of LNBs on
your dish antenna and the number of
satellite channels you can install.
1. After you select [Reinstall channels],
select [Settings] and then press OK.
2. Select [Connection type].
Add and remove satellites
You can add or remove satellites at any
time, and install channels from new satellites.
Note: Before you add satellites, make sure
that the connection type is correct. See Set
up your TV > Satellite Settings > Install
satellite channels (Page 35).
1. Press > [Setup] > [Search for
satellite], and press OK.
2. Select [Add satellite], then press OK.
The TV searches for a satellite on the first
free LNB. This can take several minutes. If no
satellite is found, check the antenna
connections and the position of the dish
antenna.
EN 35
Page 36

3. If no satellite is found, select [Search] to
scan again or [Next LNB] to skip to the
next LNB.
If there are no free LNBs available,
remove a satellite first.
If you are satisfied with the added
satellite, install the channels.
4. To install all channels, select [Install]. The
installation can take several minutes.
Remove a satellite
1. Press > [Setup] > [Search for
satellite].
2. Select [Remove satellite], then press OK.
3. Select the satellite you want to remove
and press OK.
The satellite and its channels are removed
from the installation.
Language settings
Menu language
1. While you watch TV, press .
2. Select [Setup] > [TV settings] >
[Preferences] > [Menu language].
3. Select a menu language from the list, then
press OK.
Audio language
If the TV channel broadcasts multiple audio
languages, you can select the preferred audio
language.
1. While you watch TV, press OPTIONS.
2. Select an option, then press OK.
[Audio language]: Select the audio
language for digital channels.
[Dual I-II]: Select the audio language for
analogue channels.
Audio languages for digital channels
For digital channels with multiple audio
languages, you can select the default audio
language that is broadcast.
1. Press .
2. Select [Setup] > [Channel settings] or
[Satellite settings] > [Language].
3. Select a setting, then press OK.
[Primary audio]: If this language is
broadcast, it is selected by default.
[Secondary audio]: If the primary audio
language is not broadcast, select this
language.
Subtitles on analogue channels
1. While you watch an analogue TV channel,
press TEXT.
2. Enter the three-digit page number of the
subtitles page (usually '888').
If available, subtitles are switched on.
3. Press to exit text.
Subtitles on digital channels
1. While you watch a digital TV channel,
press OPTIONS.
2. Select [Subtitles], then press OK.
3. Select [Subtitles off], [Subtitles on] or
[On during mute], then press OK.
If you select [On during mute], subtitles are
displayed only when you press to mute the
sound.
Note: If an MHEG application is activated,
subtitles are not displayed.
Subtitle language
For certain digital channels, you can change
the subtitle language.
1. While you watch TV, press .
2. Select [Setup] > [Channel settings] or
[Satellite settings] > [Subtitle language].
3. Select [Primary subtitles] or [Secondary
subtitles] for the preferred language.
4. Press OK to confirm.
Tip: Press OPTIONS > [Subtitle
language] to change the subtitle language for
a specific channel.
Universal access settings
Switch on
Some digital TV broadcasters provide special
audio and subtitle features for people who
are hearing or visually impaired. You can
switch these features on or off.
EN 36
Page 37

English
1. Press .
2. Select [Setup] > [TV settings] >
[Preferences].
3. Select [Universal access] > [On] or [Off],
then press OK.
Hearing impaired access
Tip: To make sure that a hearing impaired
audio language is available, press
OPTIONS, then select [Audio language].
Languages with an ear icon support hearing
impaired audio.
To switch on hearing impaired audio and
subtitles
1. While you watch TV, press OPTIONS.
2. Select [Universal access] >[Hearing
impaired].
3. Press a button to select an option:
Red button: Switch off hearing impaired
features.
Green button: Switch on hearing
impaired audio and subtitles.
4. Press to exit.
Visually impaired access
Tip: To make sure that a visually impaired
audio language is available, press
OPTIONS, then select [Audio language].
Languages with an eye icon support visually
impaired audio.
To switch on visually impaired audio
1. While you watch TV, press OPTIONS.
2. Select [Universal access].
3. Press the Green button to select [Visually
impaired].
4. Press a button to select an option:
Red button - [Off]: Switch off visually
impaired audio.
Yellow button - [Headphones]: Hear
visually impaired audio from
headphones only. (if applicable)
Green button - [Speakers]: Hear
visually impaired audio from speakers
only.
Blue button - [Speakers +
headphones]: Hear visually impaired
audio from speakers and headphones.
5. Press to exit.
Note: If the EasyLink remote control is
switched on, you cannot select the Green
buttonor the Yellow button. To switch off
EasyLink, see Use more of your TV > Use
EasyLink > What you need (Page 28).
Change volume for visually impaired audio
1. In the [Universal access] menu, press the
Yellow button to select [Mixed volume].
2. Press the Navigation buttons to change
the volume, then press OK.
3. Press to exit.
Audio feedback for the visually impaired
When you press a button on the remote
control or TV, you can set the TV to play a
beep.
1. In the [Universal access] menu, press the
Blue button to select [Key beep].
2. Press the Green button to turn on audio
feedback or press the Red button to turn it
off.
3. Press to exit.
Other settings
TV demo
You can start a demo to find out more
about the features on this TV.
Note: Demos are not supported on MHEG
channels.
1. While you watch TV, press .
2. Select [Setup] > [Watch demos], then
press OK.
3. Select a demo, then press OK.
4. Press to exit.
Location
To make sure that the correct TV settings
are applied, you can select where the TV is
used.
Shop or home mode
Select [Home] mode to access all TV
settings. In [Shop] mode, you can access only
limited settings.
1. While you watch TV, press .
2. Select [Setup] > [TV settings] >
[Preferences].
EN 37
Page 38

3. Select [Location] > [Home] or [Shop],
then press OK.
4. Restart the TV.
Placement
Before you position the TV, read all
safety precautions. See Get Started >
Important > Safety (Page 5).
Position the TV where light does not
shine directly on the screen.
The ideal viewing distance of this TV is
three times its diagonal screen size. For
example, if the diagonal screen size of
the TV is 81cm / 32", the ideal viewing
distance is ~3.5m / ~138" from the
front of the screen.
While seated, your eyes should be level
with the centre of the screen.
Stand mount or wall mount
You can apply the best settings for your TV
by selecting wall mount or stand mount.
1. In the [Preferences] menu, select [TV
placement].
2. Select [On a TV stand] or [Wall
mounted], then press OK.
Update software
Check version
1. Press .
2. Select [Setup] > [Software settings] >
[Current software info], then press OK.
The version of the current software is
displayed.
Caution: Do not install a lower version of
software than the current version installed
on your product. Philips cannot be held
liable or be made responsible for problems
caused by a software downgrade.
Update the software through one of these
methods:
update with USB storage device
update from digital broadcast
update from the Internet
Update with USB
Before you update the software, make sure
that you have:
A USB storage device that has at least
256 megabytes of storage space, is FAT
or DOS formatted and has its write
protection disabled.
Access to a computer with a USB
connector and Internet access.
Note: Do not use a USB hard drive.
1. Press .
2. Select [Setup] > [Update software], then
press OK.
3. Select [USB], then press OK.
4. Follow the onscreen instructions to start
the update.
Note: The update assistant directs you to
the Philips support website. See the
installation instructions on the website to
complete the update.
Update from digital broadcast
When available, the TV can receive software
updates through digital broadcasts. When a
software update is received, you are
prompted to update the software. We
strongly recommend that you update the
software when prompted.
Follow the onscreen instructions.
Note: To update the software later, select
> [Setup] > [Software settings] > [Local
updates].
From the Internet
You can update the TV software directly
from the Internet by connecting the TV to
the Internet. See Connect your TV >
Network and the Internet (Page 50).
1. Press > [Setup] > [Update software],
then press OK.
2. Select [Internet], then press OK.
3. Follow the onscreen instructions to start
the update.
When the update is complete, the TV
switches to standby and on again
automatically. Wait for the TV to switch
back on. Do not switch the TV on yourself.
EN 38
Page 39

English
Note: If the TV is connected to the Internet,
the TV displays the availability of new
software at startup.
Restore default settings
You can reset all picture and sound settings
and reinstall all TV channels on your TV.
1. Press .
2. Select [Setup] > [TV settings] >
[Reinstall TV], then press OK.
3. Follow the onscreen instructions.
EN 39
Page 40
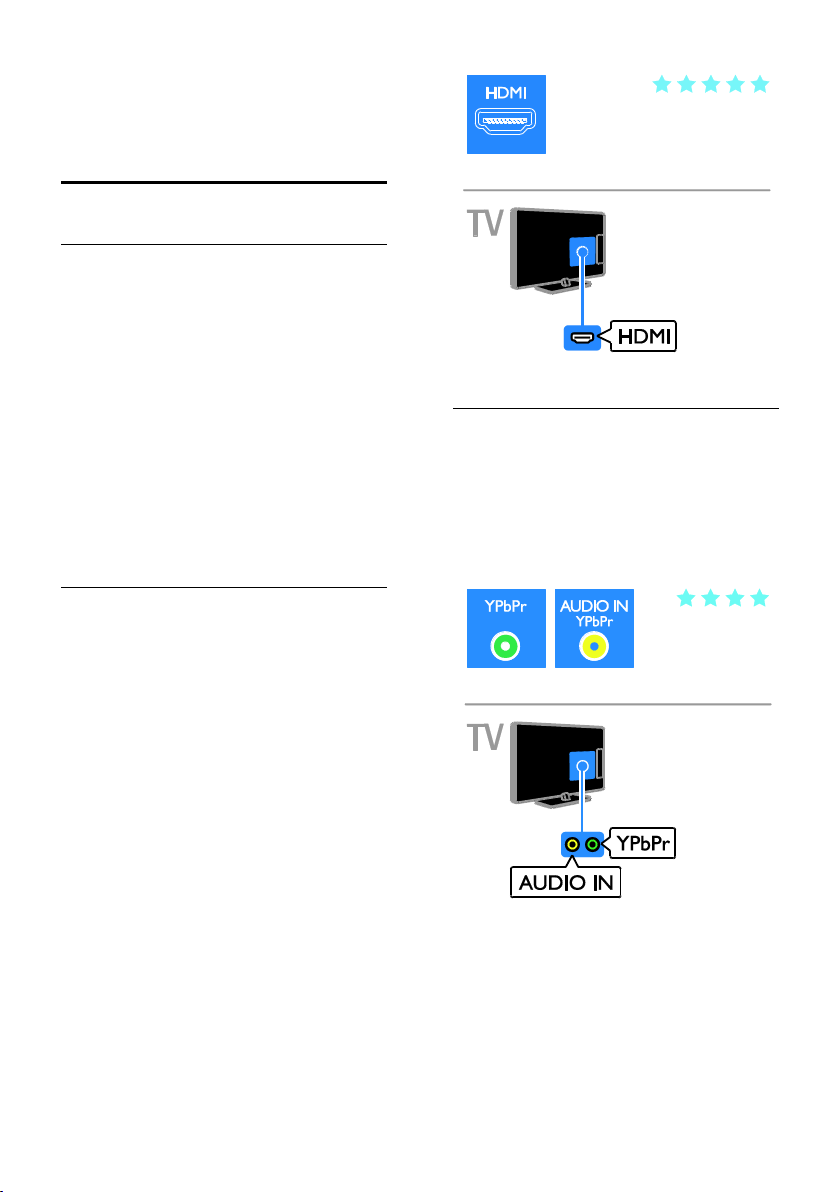
5 Connect your
TV
About cables
Cable quality
Overview
Before you connect devices to the TV, check
the available connectors on the device.
Connect the device to the TV with the
highest quality connection available. Good
quality connectors transfer picture and
sound better.
The connections shown in this user manual
are recommendations only. Other solutions
are possible.
Tip: If your device has only composite or
RCA connectors, use a composite (CVBS)
cable to connect the device to the Y Pb Pr
connector on the TV.
Y Pb Pr
Component video (Y Pb Pr) only transmits
video. For sound, also connect to AUDIO
IN. Use the supplied Y Pb Pr adapter cable
to connect devices.
The Y Pb Pr connection can handle highdefinition (HD) TV signals.
HDMI
An HDMI connection has the best picture
and sound quality.
An HDMI cable combines video and
audio signals. Connect HDMI for highdefinition (HD) TV signals and to switch
on EasyLink.
An HDMI Audio Return Channel
(ARC) connector allows output of TV
audio to an HDMI ARC compliant
device.
Connect HDMI cables shorter than 5
meters/16.4 feet.
EN 40
Page 41
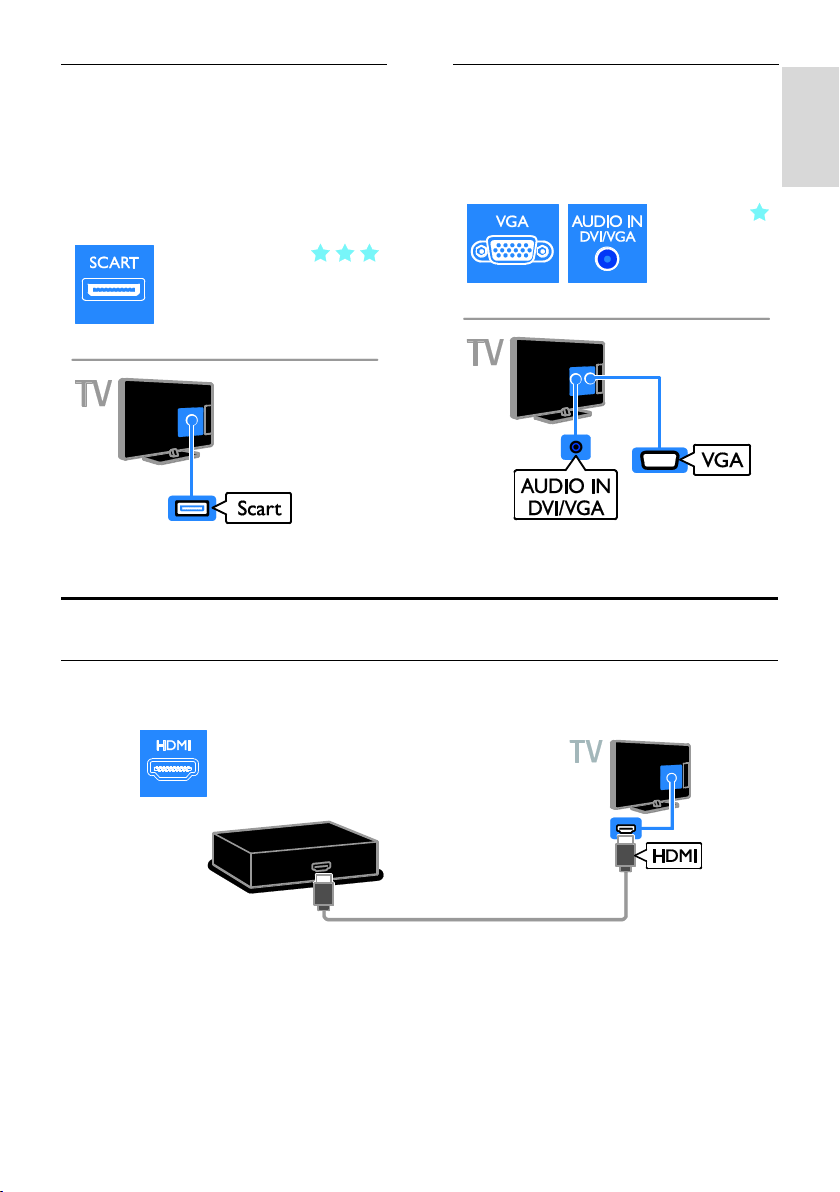
English
SCART
A SCART connection combines video and
audio signals. Use the supplied SCART
adapter cable to connect devices.
SCART connectors can handle RGB video
signals but cannot handle high-definition
(HD) TV signals.
Connect devices
VGA
You can connect VGA to display PC content
on the TV.
VGA only transmits video. For sound, also
connect to AUDIO IN.
Blu-ray or DVD disc player
Connect the disc player to the TV with an HDMI cable.
EN 41
Page 42
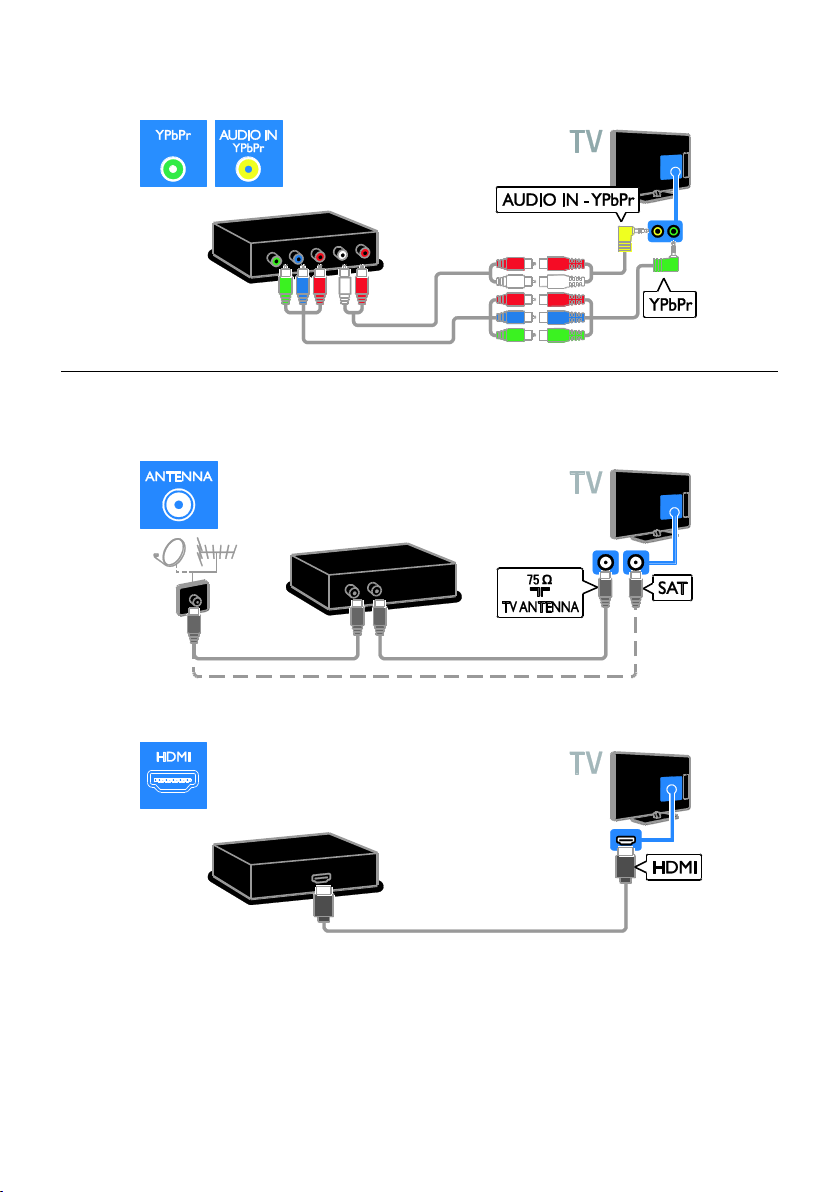
Use the supplied adapter cables with a component video (Y Pb Pr) cable and an audio (L/R) cable
to connect the disc player to the TV.
TV receiver
Connect the satellite or digital TV receiver to the TV with an antenna cable. (SAT is available on
certain models only.)
Connect the satellite or digital TV receiver to the TV with an HDMI cable.
EN 42
Page 43
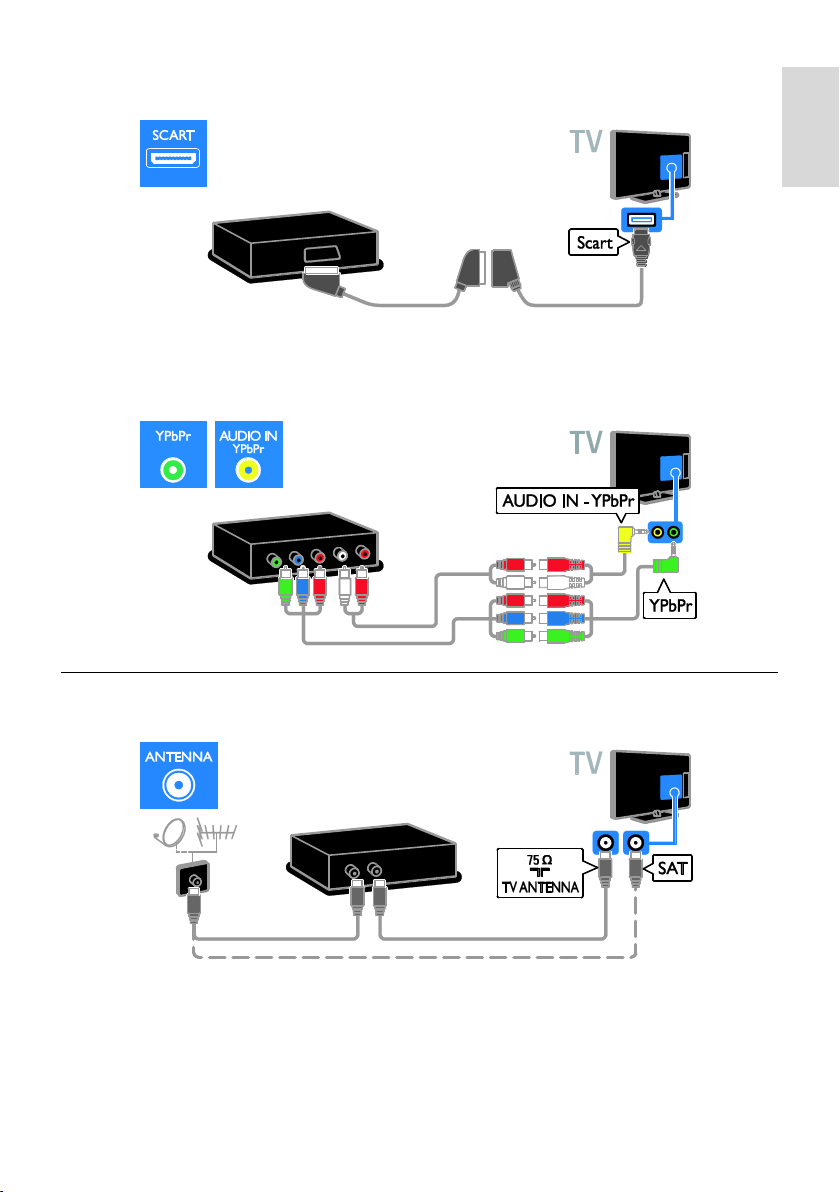
English
Use the supplied adapter cable with a SCART cable to connect the satellite or digital TV receiver to
the TV.
Use the supplied adapter cables with a component video (Y Pb Pr) cable and an audio (L/R) cable
to connect the receiver to the TV.
Video recorder
Connect the recorder to the TV with an antenna cable. (SAT is available on certain models only.)
EN 43
Page 44
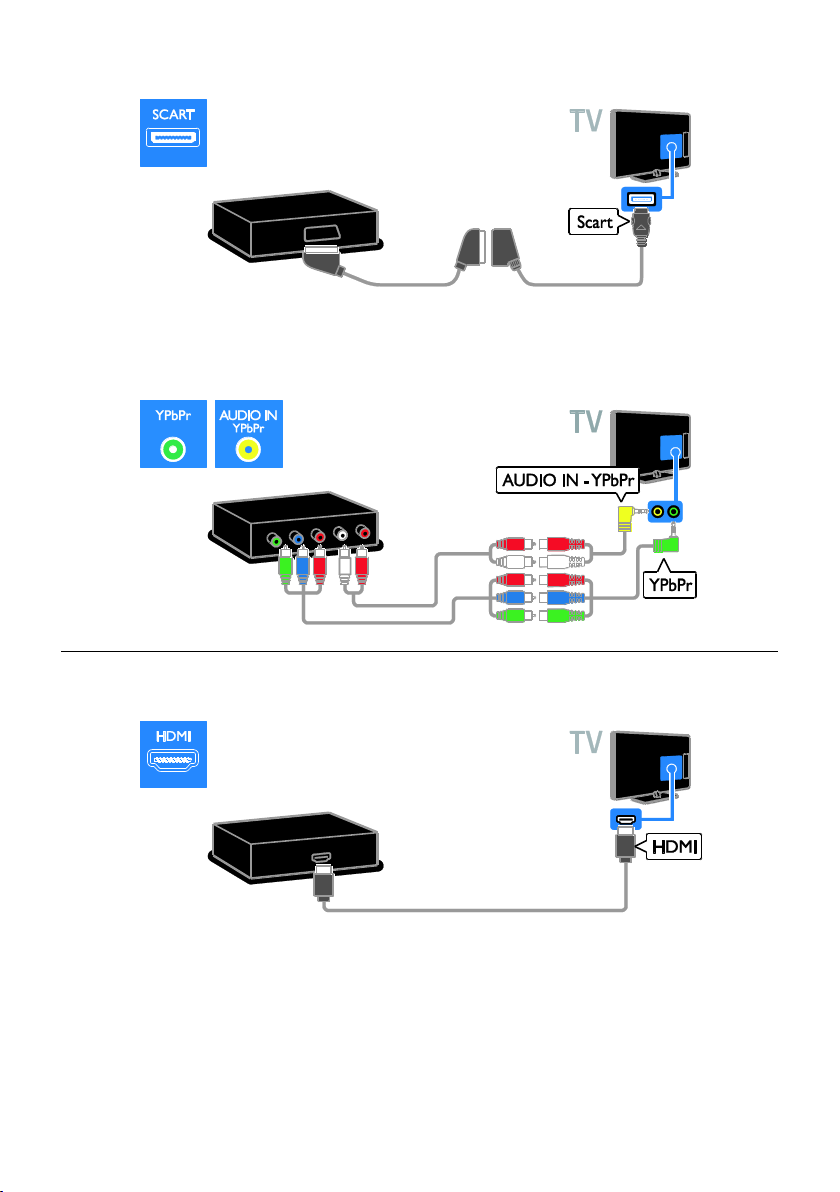
Use the supplied adapter cable with a SCART cable to connect the recorder to the TV.
Use the supplied adapter cables with a component video (Y Pb Pr) cable and an audio (L/R) cable
to connect the receiver to the TV.
Game console
Connect the game console to the TV with an HDMI cable.
EN 44
Page 45
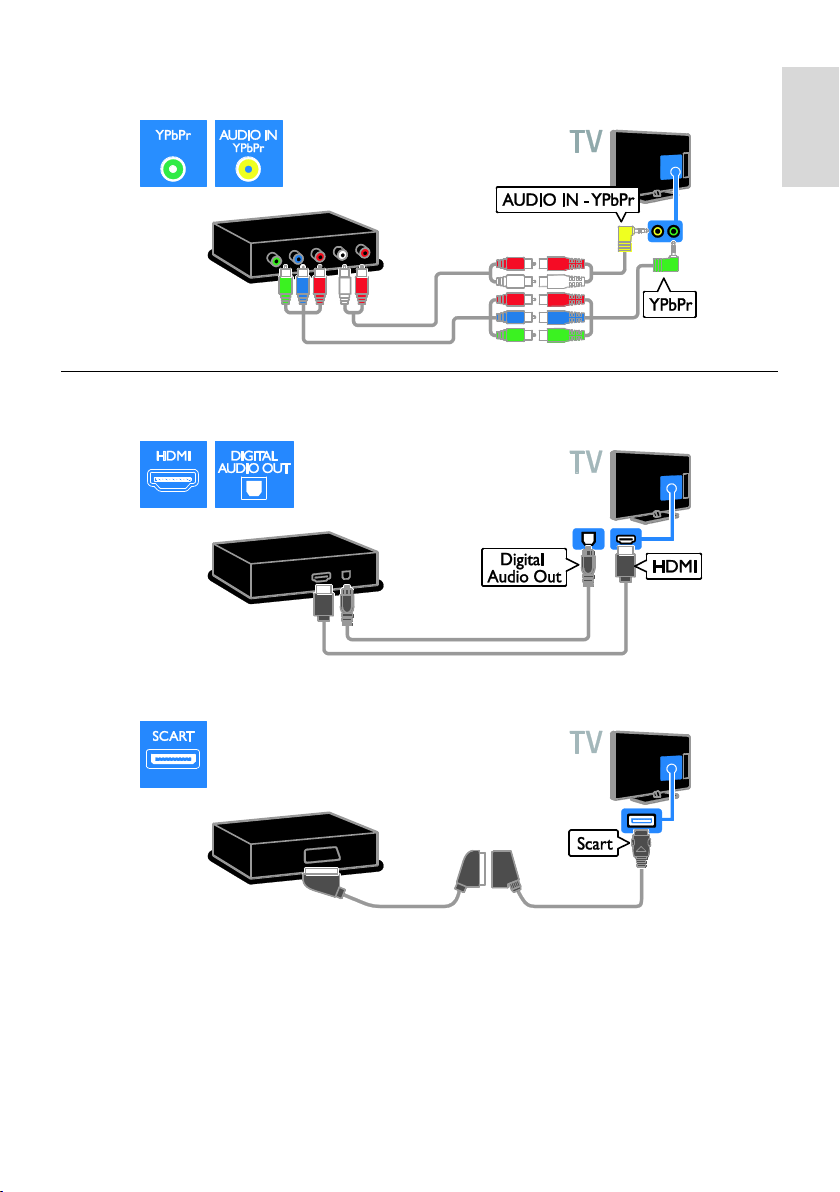
English
Use the supplied adapter cables with a component video (Y Pb Pr) cable and an audio (L/R) cable
to connect the game console to the TV.
Home theatre
Connect the home theatre to the TV with an HDMI cable and an optical cable.
Use the supplied adapter cable with a SCART cable to connect the home theatre to the TV.
EN 45
Page 46
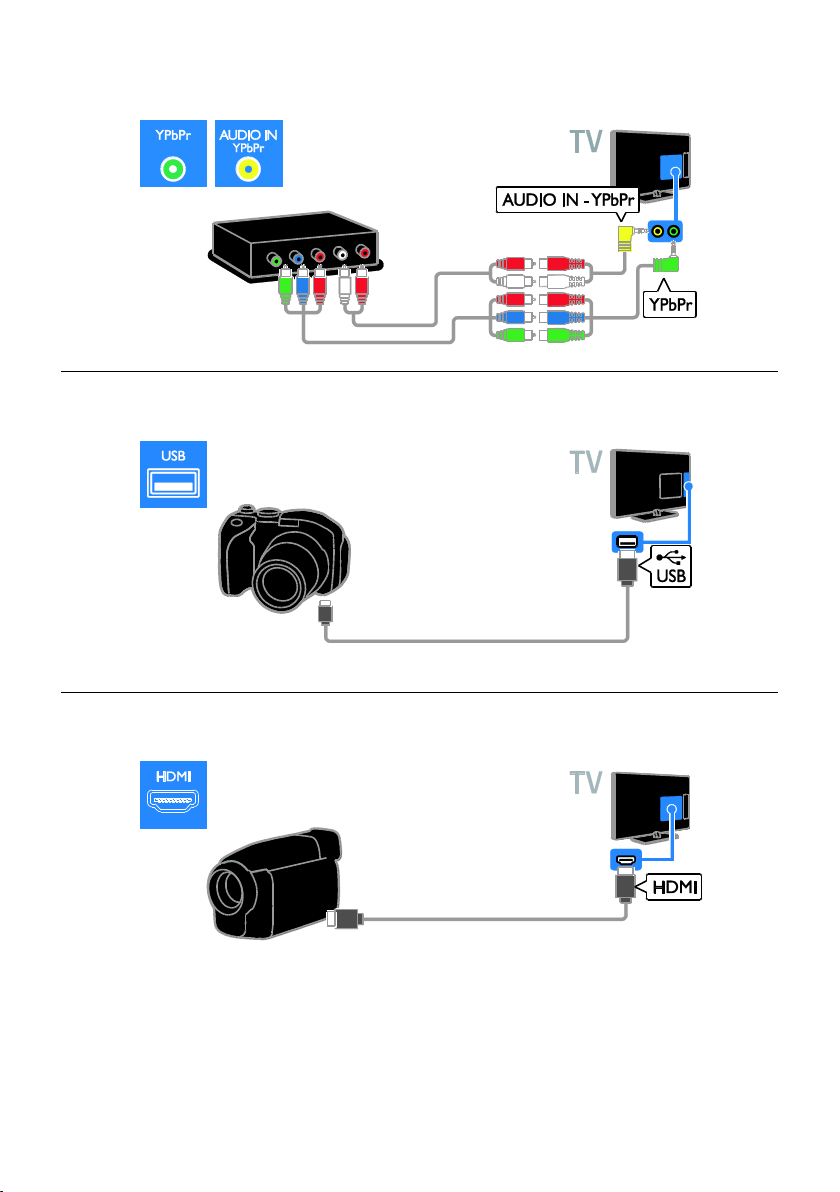
Use the supplied adapter cables with a component video (Y Pb Pr) cable and an audio (L/R) cable
to connect the home theatre to the TV.
Digital camera
Connect the digital camera to the TV with a USB cable.
Digital camcorder
Connect the digital camcorder to the TV with an HDMI cable.
EN 46
Page 47
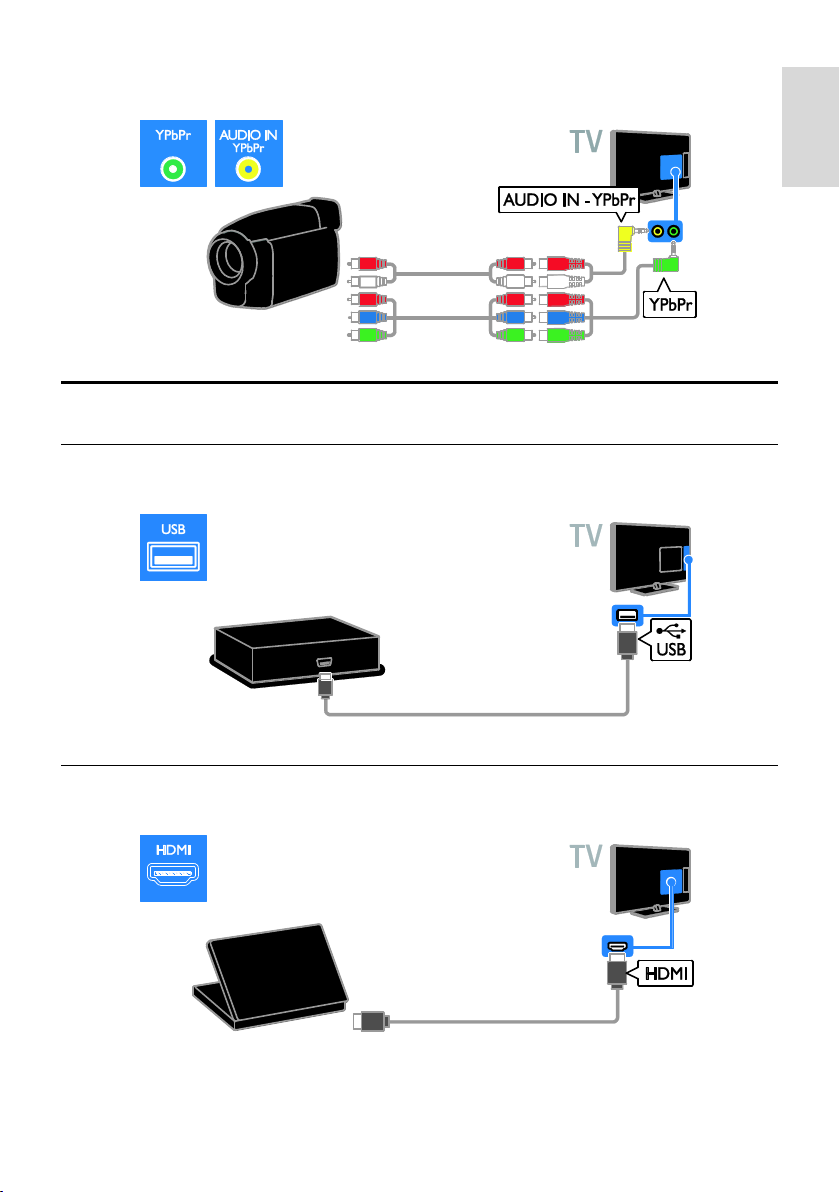
English
Use the supplied adapter cables with a component video (Y Pb Pr) cable and an audio (L/R) cable
to connect the camcorder to the TV.
Connect more devices
USB hard drive
Connect the USB hard drive to the TV with a USB cable.
Computer
Connect the computer to the TV with an HDMI cable.
EN 47
Page 48
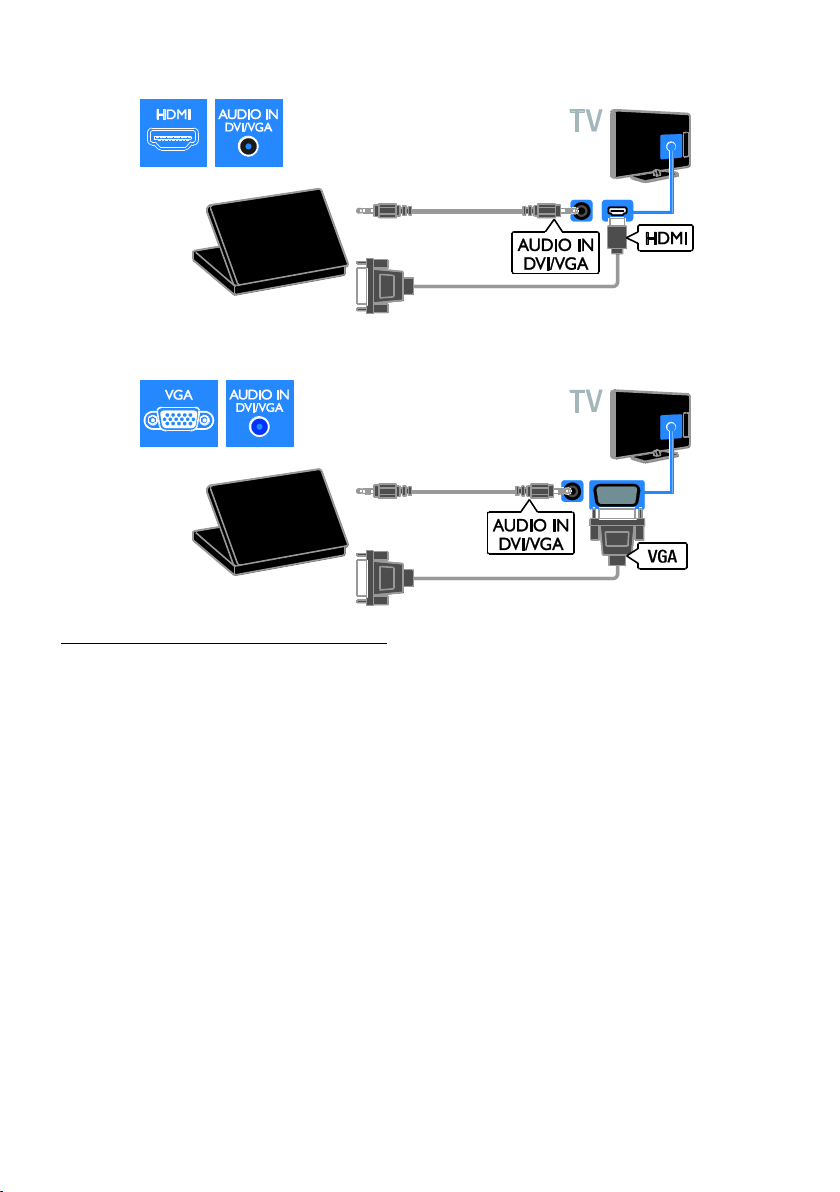
Connect the computer to the TV with a DVI-HDMI cable and an audio cable.
Connect the computer to the TV with a VGA cable and an audio cable.
Keyboard and mouse
USB keyboard
You can connect a USB keyboard to enter
text such as device names on the TV. You
can also type in channel names or subject
names in Smart TV apps such as YouTube.
Note:
If you need extra USB connectors, use
a USB hub. You can also connect the
USB mouse to a connected USB
keyboard.
You can also connect the USB mouse
to a connected USB keyboard.
USB mouse
You can connect a USB mouse to navigate
pages on the Internet and click on links
easily.
EN 48
Page 49
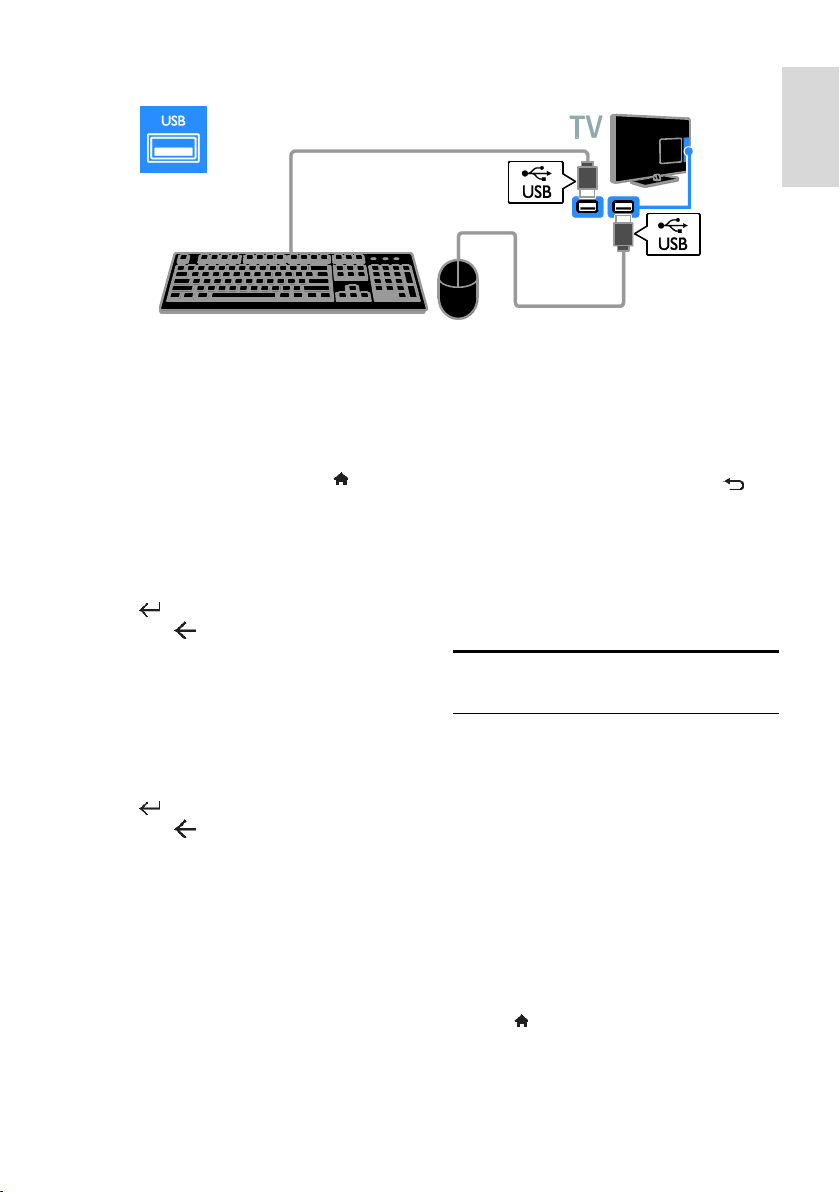
English
Connect the keyboard and mouse to the TV with a USB cable.
When the TV detects the keyboard, you can
select the keyboard layout and test your
selection. If you have selected a Cyrillic or
Greek keyboard layout first, you can also
select a secondary Latin keyboard layout.
To change the keyboard layout, press >
[Setup] > [TV settings] > [Preferences] >
[USB mouse/keyboard] > [Keyboard
settings] and press OK.
TV keys on your keyboard
To make a text entry, use the following keys:
Enter : confirm an entry
Backspace : delete a character
before the cursor
Navigation keys: navigate within a text
field
Alt + Shift: switch between keyboard
layouts if multiple keyboard layouts are
set
Smart TV keys on your keyboard
Enter : confirm an entry
Backspace : return to the previous
page
Navigation keys: navigate to the next
field
Tab: Next
Tab and Shift: Previous
Home: scroll to the top of the page
End: scroll to the bottom of the page
Page Up: jump up one page
Page Down: jump down one page
+/- : zoom in or out one step
* : fit to width
When the TV detects the mouse, set the
tracking speed. Navigate into the test area to
check the speed.
Use the USB mouse with your TV
Left mouse button (left-click):OK
Right mouse button (right-click):
(Back)
Scroll wheel: to scroll up and down an
Internet page.
Note:
The USB mouse cannot navigate in Smart
TV apps or the TV menus.
Watch a connected device
Add new device
You can watch a connected device in one of
the following ways:
Add its icon to the Home menu for
easy access.
Select from the Source menu.
Note: If you connect an HDMI-CEC
compliant device to the TV through the
HDMI connector and switch it on, the
device is automatically added to the Home
menu.
Add new device
1. Connect and switch on the device.
2. Press .
3. Select [Add your devices], then press
OK.
EN 49
Page 50

4. Follow the onscreen instructions.
If you are prompted to select the TV
connection, select the connector that this
device uses.
Rename device
After you have added a new device to the
Home menu, you can rename it.
1. Press .
2. Select the device icon from the Home
menu.
3. Press OPTIONS.
4. Select [Rename], then press OK.
A text input box appears.
5. Press the Numeric buttons and the
Navigation buttons to select and enter the
name.
6. When complete, select [Done], then
press OK.
Select a source
From Home menu
After you have added the new device to the
Home menu, you can select the new device
icon to view its contents.
1. Press .
2. Select the device icon from the Home
menu.
3. Press OK to confirm.
From Source menu
You can also press SOURCE to display a
list of connector names. Select the
connector that connects the device to the
TV.
1. Press SOURCE.
2. Press the Navigation buttons to select a
connector in the list.
3. Press OK to confirm.
Remove device
If the device is no longer connected to the
TV, you can remove it from the Home
menu.
1. Press .
2. Select the device icon from the Home
menu.
3. Press OPTIONS.
4. Select [Remove this device], then press
OK.
The selected device is removed from the
Home menu.
Network and the Internet
What you can do
View Media
If you connect the TV to a home network,
you can play photos, music and videos from
your computer. See Use your TV > View
Media (Page 15).
Smart TV
If you connect the TV to a home network
with an Internet connection, you can browse
Smart TV. Smart TV offers Internet services
and websites tailored to your TV. Play music
and videos, consult infotainment, rent movies
and much more. See Use your TV >
Browse Smart TV (Page 17).
Interactive TV
If you connect the TV to the Internet, you
can enjoy the full benefits of Interactive TV.
Systems such as HbbTV, MHP and DTVi, use
the Internet to communicate with the TV.
The availability of these systems depends on
your local broadcaster.
What you need
Warning: This TV complies with the EMC
directive only when you use a shielded
Cat5 Ethernet cable.
An Ethernet cable that is shorter than 3
metres.
A computer network that includes:
a) A universal plug-and-play (UPnP)
router and
b) A computer with one of the
following operating systems: Microsoft
Windows XP, Microsoft Windows
Vista, Mac OS X or Linux.
To connect your TV to computers, you
also need media server software that is
set to share files with your TV. See Use
your TV > View media (Page 15).
EN 50
Page 51
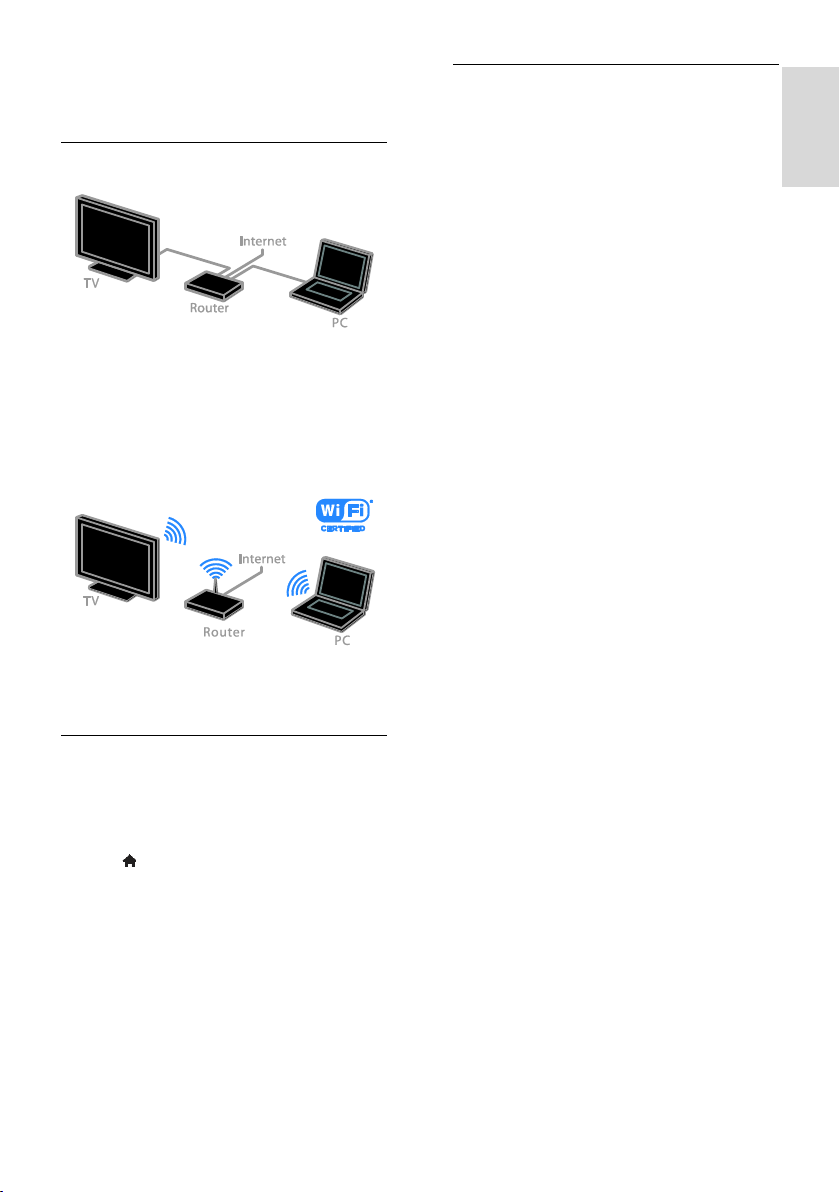
English
To connect your TV to the Internet,
you also need a high-speed connection
to the Internet.
Connect
You can connect this TV to your home
network through a wired or wireless
connection.
For a wired connection, see Connect
your TV > Network and the Internet
> Wired connection (Page 51).
For a Wi-Fi ready connection, see
Connect your TV > Network and the
Internet > Wi-Fi ready (Page 51).
Wired connection
1. Switch on the router and switch on its
DHCP setting.
2. Connect the router with an Ethernet
cable to the TV.
3. Press , then select [Setup].
4. Select [Connect to network], then press
OK.
5. Follow the onscreen instructions to install
the network.
6. Wait for the TV to find the network
connection.
7. If prompted, agree to the End User
Licence Agreement.
Wi-Fi ready
This section is only for Wi-Fi ready TVs.
With the Philips wireless USB adapter
PTA01 (sold separately), you can connect
the TV to your home network wirelessly.
You can enjoy the best of the Internet from
Smart TV services and share content
between your connected devices using
DLNA.
Note:
The wireless network operates in the same
2.4GHz frequency spectrum as common
household devices, such as Dect phones,
microwave ovens or Bluetooth devices,
which can cause Wi-Fi interference. Move
these devices away from the TV.
To reduce network traffic, switch off
unused network equipment in the
home network.
Reception quality depends on the
location of the wireless router and the
local Internet service provider.
When playing video over your wireless
home network, we recommend that
you use an IEEE 802.11 N router. The
connection speed may differ according
to the operating environment of your
wireless home network.
Start wireless setup
1. Switch on your wireless network router.
2. Connect the Philips USB adapter PTA01
to a USB connector on the TV.
The wireless installation starts automatically.
3. Follow the onscreen instructions.
Tip: Keep the wireless USB adapter
connected to the TV.
WPS - Wi-Fi Protected Setup
1. If your router supports WPS (WiFi
Protected Setup), press the WPS button on
the router.
2. After 2 minutes, select [WPS] on the TV,
then press OK.
The TV connects to your network. This
takes about 2 minutes.
EN 51
Page 52

Most new wireless routers have the WPS
system and carry the WPS logo. The WPS
system uses WPS security encryption and
cannot be combined with devices on your
network that use the WEP (Wired
Equivalent Privacy) security encryption.
If you still need the WEP devices in your
network, install with [Scan] > [Custom].
Scan for routers
If you have several routers in your network,
you can select the network you need.
1. To select a specific network router, press
[Scan] on the first page of the installation.
The routers with WPS and the strongest
signal are shown first in the list on screen.
2. Select the router you need, then press
OK.
If you are connecting to a WPS router,
select [WPS] on the TV.
If you want to set the PIN code in your
router software to connect, select
[WPS pin] and note down the code.
To enter the encryption key manually,
select [Standard] and enter the key
when prompted.
Set secured connection with WPS
encryption
1. To set the secured connection with a PIN
code, select the [WPS pin] and press OK.
2. Write down the 8-digit PIN code shown
on TV and enter it in the router software on
your PC.
See the router manual for where to enter
the PIN code.
Set secured connection with WPA
encryption
If your router has WPA (WiFi Protected
Access) security, enter the pass phrase with
the remote control.
1. To enter the encryption key (the security
key) manually, select [Standard] and press
OK.
2. To access the onscreen keyboard, select
the text entry field, then press OK.
Set secured connection with WEP
encryption
If your router has WEP security, the TV asks
for the WEP encryption key in hexadecimal
numbers.
1. Locate the hexadecimal key in the router
software on your PC and make a note of of
the first key in the WEP keys list.
2. Enter the security key on the TV with the
remote control to connect to the router.
3. If prompted, agree to the End User
Licence Agreement.
TV network name
If you have more than one TV in your home
network, you can rename this TV to give it a
unique name.
1. Press > [Setup] > [Network settings],
and select [TV network name].
2. To enter the name, press OK to open the
onscreen keyboard or use the remote
control keypad.
Common interface
What you can do
You can watch scrambled digital TV channels
with a Conditional Access Module (CAM).
After the CAM is inserted and subscription
fees are paid, you can watch the programme.
This TV supports CI as well as CI+. CI+
supports premium HD digital programmes
with a high level of copy protection.
Note: The applications, functions, content
and onscreen messages depend on the CAM
service provider.
What you need
Caution: To protect the CAM from damage,
insert the CAM as instructed.
Note: Refer to the documentation from
your service operator on how to insert a
smart card into the Conditional Access
Module.
EN 52
Page 53
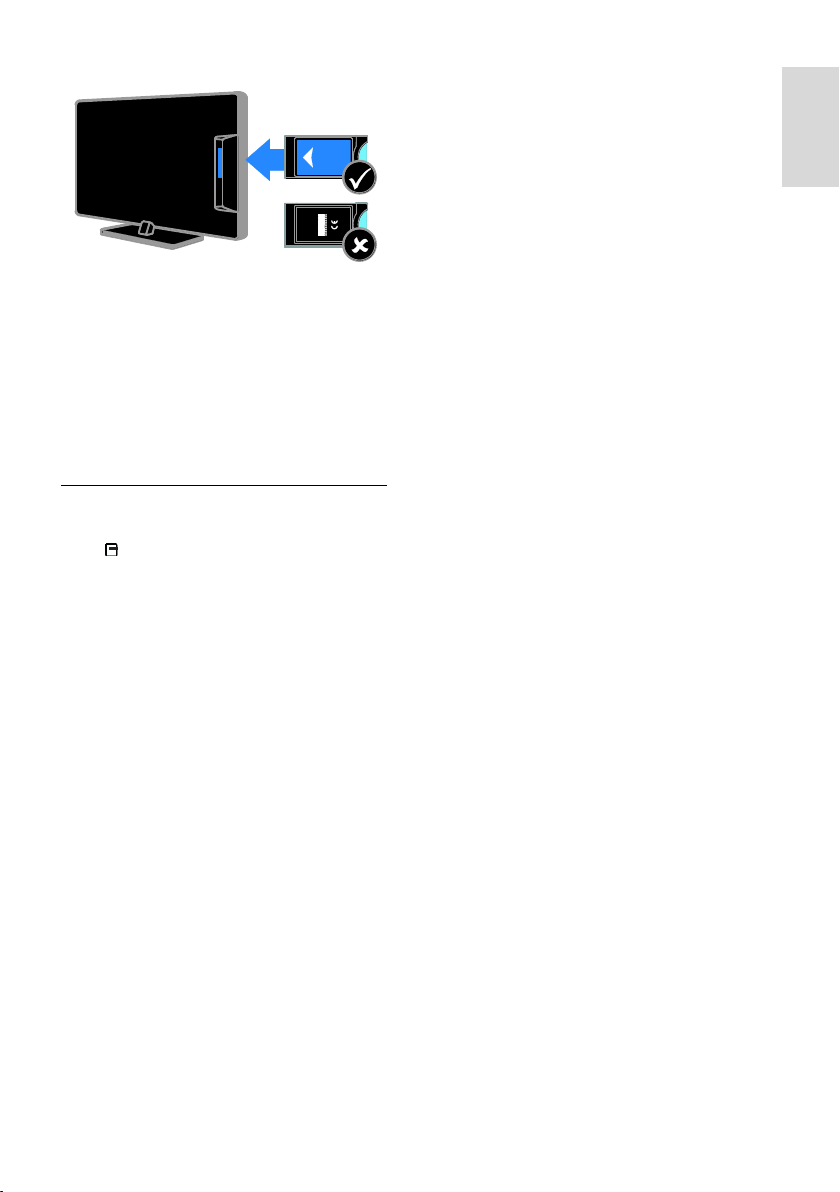
English
1. Switch off the TV.
2. Follow the directions printed on the CAM
to insert the CAM into the Common
Interface slot at the side of the TV.
Push the CAM in as far as it will go.
3. Switch on the TV, then wait for the CAM
to be activated. This takes a few minutes.
To maintain access to encrypted digital TV
channels, leave the CAM in the slot.
Watch CAM services
1. After inserting and activating the CAM,
press OPTIONS.
2. Select [Common interface], then press
OK.
3. Select the CAM provider, then press OK.
EN 53
Page 54

6 Troubleshooting
General issues
The TV does not switch on:
Disconnect the power cable from the
power outlet. Wait for one minute
then reconnect it.
Make sure that the power cable is
securely connected.
The TV does not respond to remote
control or front controls when switched
on:
The TV requires some time to start up.
During this time, the TV does not respond
to the remote control or front controls. This
is normal behaviour.
When you are turning the TV on, off or to
standby, you hear a creaking sound from
the TV chassis:
No action is required. The creaking sound is
due to the normal expansion and
contraction of the TV as it cools and warms
up. This does not affect performance.
When the TV is in standby, a startup splash
screen is displayed, then returns to standby
mode:
This is normal behaviour. When the TV is
disconnected and reconnected to the power
supply, the startup screen is displayed at the
next startup.
To switch on the TV from standby, press
on the remote control or press any key on
the TV.
The standby light on the TV blinks red:
Disconnect the power cable from the power
outlet. Wait until the TV cools down before
you reconnect the power cable. If the
blinking reoccurs, contact Philips Consumer
Care.
You forgot the 4-digit code to unlock the
channel blocking feature (child lock):
Enter ‘8888’.
The TV or Smart TV menu is in the wrong
language:
Change the menu to your preferred
language. See Set up your TV > Language
settings > Menu language (Page 36).
You want to upgrade your TV software:
Visit www.philips.com/support and
download the latest software package for
your TV. Software installation instructions
and release notes indicating what's been
updated are also available at the site. Full
instructions on how to upgrade your TV
software are also available at Set up your TV
> Update software (Page 38).
Channel issues
You want to install TV channels:
See Set up your TV > Channel settings
(Page 32) for instructions on installing
analogue or digital channels. If you want to
install satellite TV channels, see Set up your
TV > Satellite settings (Page 35).
No digital channels were found during the
installation:
Make sure that the TV supports DVB-T,
DVB-C or DVB-S in your country.
Make sure that all cables are properly
connected and that the correct
network is selected.
Previously installed channels do not appear
in the channel list:
Make sure that the correct channel list is
selected.
You want to rearrange or reorder the
channel list:
After channels have been installed, they
appear in the channel list. For information
about managing channel lists, including
rearranging channels, see Watch TV >
Manage channel lists (Page 12).
Picture issues
The TV is on, but there is no picture or the
picture is distorted:
Make sure that the antenna is properly
connected to the TV.
EN 54
Page 55

English
Make sure that the correct device is
selected as the display source.
Make sure that the external device or
source is properly connected.
There is sound but no picture:
Make sure that the picture settings are set
correctly.
There is poor TV reception from an
antenna connection:
Make sure that the antenna is properly
connected to the TV.
Loud speakers, unearthed audio
devices, neon lights, high buildings and
other large objects can influence
reception quality. If possible, try to
improve the reception quality by
changing the antenna direction or
moving devices away from the TV.
If reception on only one channel is
poor, fine-tune this channel.
There is poor picture quality from
connected devices:
Make sure that the devices are
connected properly.
Make sure that the picture settings are
set correctly.
The TV did not save your picture settings:
Make sure that the TV location is set to
[Home]. You can change and save settings in
this mode.
The picture does not fit the screen; it is
too big or too small:
Try a different picture format.
The picture format keeps changing with
different channels:
Try applying specific picture format instead
of [Auto zoom].
The picture position is incorrect:
Picture signals from some devices may not fit
the screen correctly. Check the signal output
of the device.
The picture from broadcasts is scrambled:
You may need a Conditional Access Module
to access content. Check with your service
operator.
An "e-sticker" banner displaying
information appears on the TV display:
The TV is in [Shop] mode. To remove the
e-sticker, set the TV to [Home] mode, then
restart the TV. See Set up your TV > Other
settings > Location (Page 37).
The computer display on the TV is not
stable:
Make sure that your PC uses the
supported resolution and refresh rate.
See Product specifications > Display
resolutions (Page 58).
Change the TV picture format to
[Unscaled].
Sound issues
There is a picture but sound quality is
poor:
If no audio signal is detected, the TV
automatically switches the audio output off
— this does not indicate malfunction.
Make sure that all cables are properly
connected.
Make sure that the volume is not
muted or set to zero.
Make sure that the TV speaker setting
is selected. Press ADJUST, select
[Speakers], then select [TV].
Make sure that the TV audio output is
connected to the audio input on the
HDMI-CEC enabled or EasyLink
compliant home theatre device. Sound
should be heard from the home theatre
speakers.
Some devices may require you to
manually enable HDMI audio output. If
HDMI audio is already enabled but you
still cannot hear audio, try changing the
digital audio format of the device to
PCM ('Pulse Code Modulation'). Refer
to the documentation accompanying
your device for instructions.
There is a picture but the sound quality is
poor:
Make sure that the sound settings are
correctly set.
EN 55
Page 56

There is a picture but sound comes from
one speaker only:
Make sure that sound balance is set to the
centre.
Connection issues
There are problems with HDMI devices:
Note that HDCP (High-bandwidth
Digital Content Protection) support can
delay the time taken for a TV to display
content from an HDMI device.
If the TV does not recognise the HDMI
device and no picture is displayed,
switch the source from one device to
another and back again.
If there are intermittent sound
disruptions, make sure that output
settings from the HDMI device are
correct.
If you use an HDMI-to-DVI adapter or
HDMI-to-DVI cable, make sure that an
additional audio cable is connected to
AUDIO IN - Y/Pb/Pr or AUDIO IN DVI/VGA (mini-jack only).
You cannot use EasyLink features:
Make sure that your HDMI devices are
HDMI-CEC compatible. EasyLink features
only work with devices that are HDMI-CEC
compatible.
If an HDMI-CEC compliant audio device is
connected to the TV and the TV does not
display any mute or volume icon when the
volume is muted, increased or decreased:
When a HDMI-CEC audio device is
connected this behaviour is normal.
USB device content is not displayed:
Make sure that the USB storage device
is set to Mass Storage Class compliant,
as described in the storage device's
documentation.
Make sure that the USB storage device
is compatible with the TV.
Make sure that the audio and picture
file formats are supported by the TV.
Audio and picture files on your USB
storage device do not play or display
smoothly:
The transfer performance of the USB
storage device may limit the data transfer
rate to the TV which causes poor playback.
Network issues
You want to establish a wireless
connection between your TV and home
network:
Refer to Connect your TV > Network and
the Internet > Wi-Fi ready (Page 51) for
instructions on how to connect your TV
wirelessly to your home network.
Smart TV does not work:
Check that the router is properly connected
to the TV and that your router has open
access to the Internet. If your router has a
firewall or security settings, make sure that it
allows Smart TV data to pass through check your router documentation for details.
Open Internet access via Smart TV is slow:
Try to improve the signal quality
between the router and TV if you are
accessing the Internet with a wireless
connection. See the router's
documentation for details.
Always use a fast broadband
connection wherever possible.
Update your TV with the latest
software to ensure that browsing speed
is optimal.
Your Network is slow:
If you are accessing your PC with a wireless
connection, see the router's documentation
to improve the signal quality between the
router and TV.
Wireless network is distorted or not
found:
Make sure that the wireless network is
not disturbed by microwave ovens,
DECT phones or other neighbouring
Wi-Fi devices.
If the wireless network is not working,
try a wired network connection.
EN 56
Page 57

English
Make sure that the firewalls in your
network allow access to the TV
wireless connection.
Contact Philips
Warning: Do not attempt to repair the TV
yourself. This may cause severe injury,
irreparable damage to your TV or void
your warranty.
If are not able to resolve your problem, refer
to the frequently asked questions (FAQs) for
this TV at www.philips.com/support. You
can also consult and contribute to the Philips
TV community at
www.supportforum.philips.com.
If you wish to speak to or email a Philips
representative, contact the Philips Consumer
Care in your country. You can find the
contact details in the leaflet accompanying
this TV or at www.philips.com/support.
Note your TV model and serial number
before you contact Philips. These numbers
are printed on the back of the TV and on
the packaging.
EN 57
Page 58

7 Product
specifications
Power and reception
Product specifications are subject to change
without notice.
Power
Mains power: AC 220-240 V~, 50-60
Hz
Standby power consumption: < 0.15 W
Ambient temperature: 5 to 40 degree
Celsius
For power consumption, see the
product specifications at
www.philips.com/support.
The power rating stated on the product
typeplate is the power consumption for this
product during normal household use (IEC
62087 Ed.2). The maximum power rating,
stated between brackets, is used for
electrical safety (IEC 60065 Ed. 7.2).
Reception
Antenna input: 75 ohm coaxial (IEC75)
TV system: DVB COFDM 2K/8 K,
Video playback: NTSC, PAL, SECAM
Digital TV: MPEG-4, DVB-T
(Terrestrial), DVB-T2*, DVB-C (Cable),
DVB-S/S2* (Satellite).
Tuner bands: VHF, UHF, S-Channel,
Hyperband
* Available on certain models only.
Display and sound
Picture/Display
Display type: LED backlight, Full HD
Diagonal size:
- 81 cm / 32 inch
- 94 cm / 37 inch
- 107 cm / 42 inch
- 119 cm / 47 inch
Aspect ratio: 16:9 (widescreen)
Panel resolution: 1920 X 1080 p
Picture enhancement: Pixel Plus HD
Perfect Motion Rate (PMR): 200 Hz
Sound
Output power (RMS) @ 10% THD:
- For PFL4007: 20 W
- For PFL40x7: 28 W
Incredible Surround
Clear Sound
Dynamic Bass Enhancement
Mono / Stereo / NICAM
Display resolutions
Computer formats - HDMI
(Resolution - refresh rate)
640 x 480 - 60 Hz
800 x 600 - 60 Hz
1024 x 768 - 60 Hz
1280 x 1024 - 60 Hz
1360 x 768 - 60 Hz
1600 x 1200 - 60 Hz
1920 x 1080 - 60 Hz
Computer formats - VGA
(Resolution - refresh rate)
640 x 480 - 60 Hz
800 x 600 - 60 Hz
1024 x 768 - 60 Hz
1280 x 1024 - 60 Hz
1360 x 768 - 60 Hz
1600 x 1200 - 60 Hz
1920 x 1080 - 60 Hz
Video formats
(Resolution - refresh rate)
480i - 60 Hz
480p - 60 Hz
576i - 50 Hz
576p - 50 Hz
720p - 50Hz, 60 Hz
1080i - 50Hz, 60 Hz
1080p - 24Hz, 25Hz, 30Hz, 50Hz, 60 Hz
Multimedia
Supported multimedia connections
USB: NTFS, FAT 16, FAT 32.
Connect only USB devices which
consume 500 mA of power or less.
EN 58
Page 59
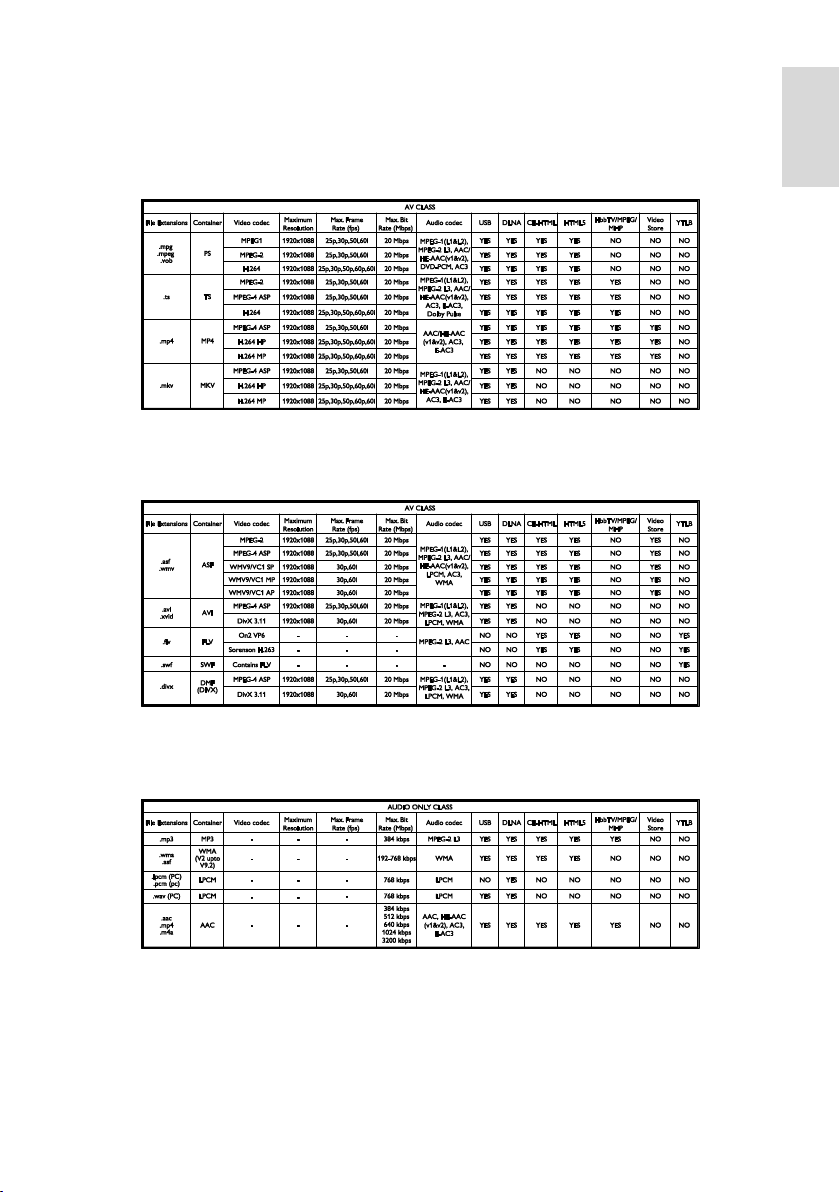
English
Ethernet LAN RJ-45
Supported image files
Supported audio/video files
Multimedia file names must not exceed 128 characters.
Supported audio/video files
Multimedia file names must not exceed 128 characters.
JPEG (*.jpg)
Supported audio/video files
Multimedia file names must not exceed 128 characters.
EN 59
Page 60
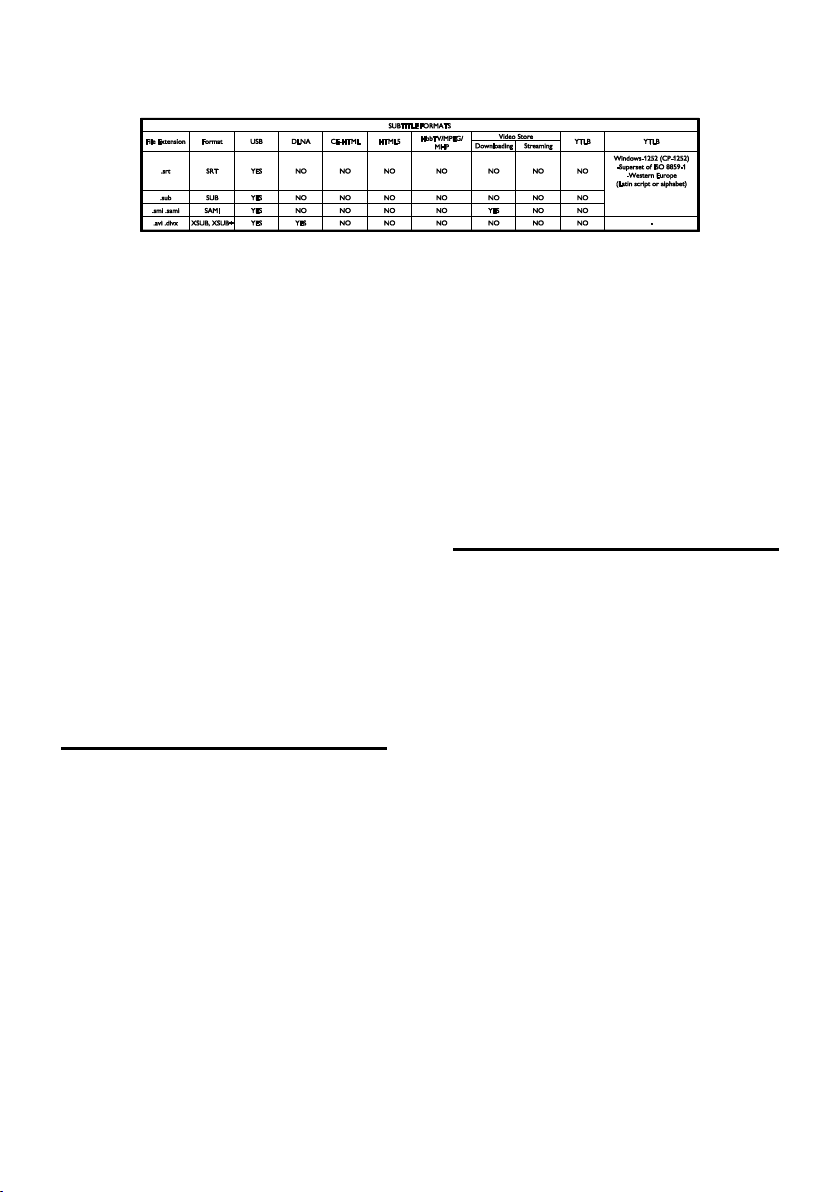
Supported subtitle formats
Multimedia file names must not exceed 128 characters.
Supported DLNA-compliant media server
software
Twonky Media (for Microsoft Windows
and Mac OS X)
Windows Media Player (for Microsoft
Windows)
Sony Vaio Media Server (for Microsoft
Windows)
TVersity (for Microsoft Windows)
Nero MediaHome
DiXiM (for Microsoft Windows XP)
Macrovision Network Media Server (for
Microsoft Windows)
Fuppes (for Linux)
uShare (for Linux)
AwoX
CyberLink
JVC media server
MediaTomb
Buffalo LinkStation Live
Connectivity
Rear
Ethernet LAN RJ-45
AUDIO IN (DVI/VGA): stereo 3.5 mm
mini-jack
Y/Pb/Pr and AUDIO IN (Y/Pb/Pr):
Component video and audio L/R mini
adaptors
SERV.U: Service port
VGA: PC input
SCART (RGB/CVBS): SCART mini
adaptor
HDMI 1 ARC: HDMI Audio Return
Channel
HDMI 2/3: HDMI
TV ANTENNA: 75 ohm coaxial
SAT: F-pin satellite (available on certain
models only)
USB
Side
CI: Common Interface
Headphones: stereo 3.5mm mini-jack
DIGITAL AUDIO OUT (OPTICAL):
Optical
USB
HDMI SIDE
Supported TV mounts
You can mount your TV on the wall with a
compatible TV mount (sold separately).
Select the type of TV mount for your TV
screen size:
81 cm / 32 inches: 200 mm x 200 mm, M6
94 cm / 37 inches: 200 mm x 200 mm, M6
107 cm / 42 inches: 400mm x 400mm, M6
119 cm / 47 inches: 400 mm x 400 mm, M6
Warning: Follow all instructions provided
with the TV mount. Koninklijke Philips
Electronics N.V. bears no responsibility for
improper TV mounting that results in
accident, injury or damage.
To prevent damage to cables and
connectors, leave a gap of at least 5.5 cm /
2.2 inches from the back of the TV.
Before you mount the TV on the wall, find
the correct length of the screw.
To find the length of the screw, add the
thickness of your wall mount to the screw
length (y), as shown in the graphic.
EN 60
Page 61
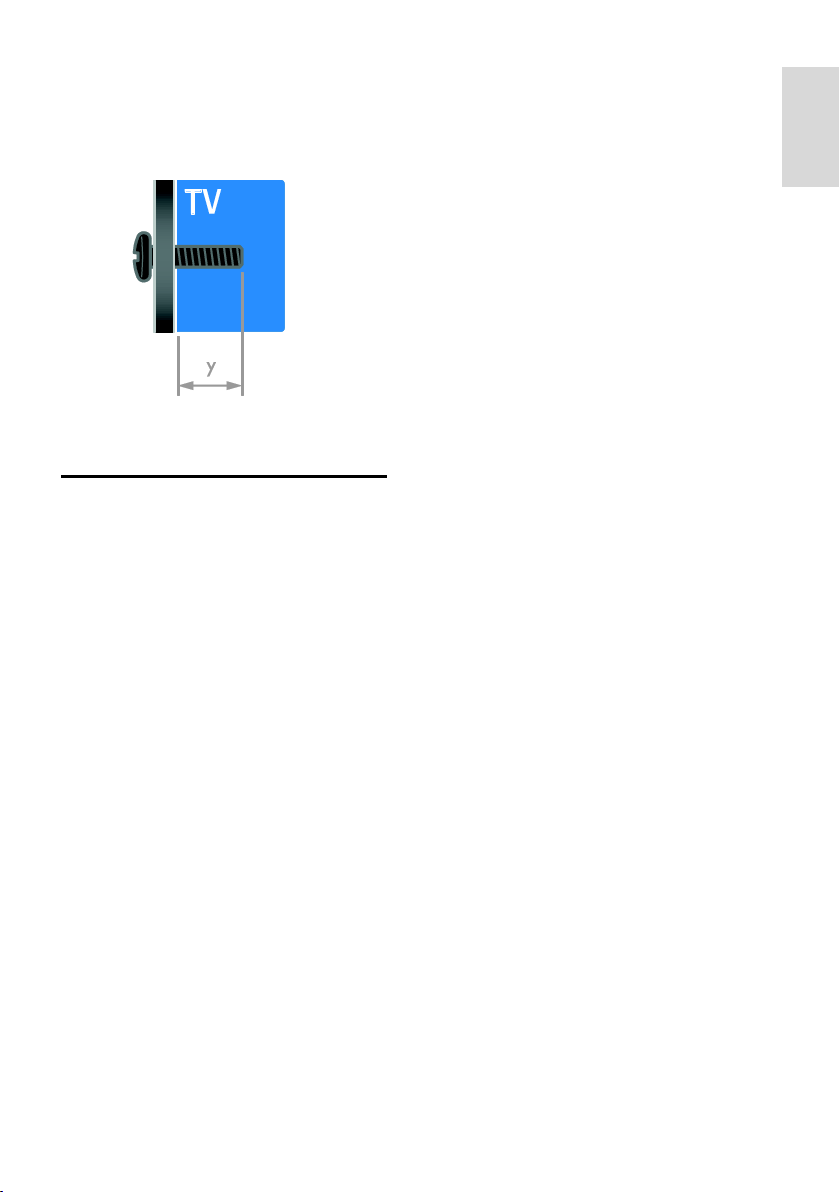
English
For 32 inch models: 18 mm
For 37 - 47 inch models: 17 mm
Help version
UMv 313913705181 - 20111231
EN 61
Page 62

8 Index
A
age rating - 27
amplifier, select output - 29
analogue channels, fine-tune - 33
analogue channels, subtitles - 36
audio language - 36
audio sync - 29
C
CAM, enable - 53
CAM, insert - 52
CAM, see Conditional Access Module - 52
channel list - 12
channel list, copy - 34
channels - 12
channels, favourites - 12
channels, fine-tune (analogue) - 33
channels, hide or unhide - 12
channels, install (automatic) - 32
channels, install (digital) - 33
channels, install (manual) - 33
channels, install (satellite) - 35
channels, reinstall - 39
channels, rename - 12
channels, reorder - 12
channels, switch - 12
channels, update - 33
child lock - 27
clock - 26
common interface - 52
computer, play files - 15
Conditional Access Module - 52
connect devices - 40
connect, digital camcorder - 46
connect, digital camera - 46
connect, disc player - 41
connect, external hard disk - 47
connect, game console - 44
connect, home network - 51
connect, home theatre system - 45
connect, keyboard - 48
connect, mouse - 48
connect, PC - 47
connect, recorder - 43
connect, TV receiver - 42
connect, USB - 15
connected device, add - 49
connected device, remove - 50
connected device, rename - 50
connectors - 40
contact information, on Internet - 9
contact Philips - 10
D
demo - 37
devices - 41
devices, add - 49
devices, watch - 50
digital camcorder - 46
digital camera - 46
digital channels - 33
digital channels, subtitles - 36
digital radio - 12
disc player, connect - 41
display - 58
display resolution - 58
DLNA - 15
DTVi - 19
E
EasyLink - 27
EasyLink, controls - 28
EN 62
Page 63

English
EasyLink, enable - 28
EasyLink, features - 27
EasyLink, onscreen control - 5
EasyLink, remote control buttons - 28
EasyLink, TV speakers - 29
end of use - 9
energy efficient, settings - 8
Energy label - 9
EPG, broadcaster - 14
EPG, Electronic Programme Guide - 3
EPG, Internet - 14
external hard disk - 47
F
favourite channels, list - 12
G
game console - 44
games - 25
H
HbbTV - 19
HDMI - 40
HDMI ARC - 40
hearing impaired - 37
help, onscreen - 9
Help, version - 61
high-definition (HD), content - 3
home mode - 37
home network - 50
home theatre system, connect - 45
L
language, menu - 36
language, subtitles - 36
location, home or shop - 37
M
media server program - 15
mode, home or shop - 37
Multimedia Home Platform (MHP) - 19
multimedia, play files - 15
multimedia, supported formats - 58
N
network, connect - 50
network, TV name - 52
P
parental rating - 27
pause TV - 21
PC, connect - 47
PC, display resolutions - 58
picture format - 14
picture settings - 31
picture settings, reset - 32
Pixel Plus link - 29
placement, stand or wall mount - 38
position - 38
power - 58
product support - 9
R
I
install channels, automatic - 32
Interactive TV - 19
K
kensington lock - 7
rear controls - 4
record, TV programmes - 22
record, USB device - 22
recorder, connect - 43
recordings, manage - 24
recordings, schedule - 23
EN 63
Page 64

recordings, watch - 24
recycle - 9
reinstall - 39
remote control - 4
remove, connected device - 50
rename channels - 12
rename, connected device - 50
S
safety - 5
satellite, add or remove - 35
satellite, install channels - 35
satellite, settings - 35
SCART - 41
Scenea, enable - 30
Scenea, load wallpaper - 30
screen care - 6
screen saver - 30
sensors - 4
settings, assistant - 31
settings, audio format - 32
settings, game - 25
settings, picture - 31
settings, sound - 32
shop mode - 37
sleeptimer - 27
smart settings - 13
Smart TV - 3
Smart TV, applications - 17
Smart TV, browse - 17
Smart TV, network - 50
smartphone control - 5
software, check version - 38
software, digital update - 38
software, Internet - 38
software, USB - 38
sound settings, reset - 32
standby - 11
subtitles, analog - 36
subtitles, digital - 36
subtitles, language - 36
sustainability - 8
switch TV on, off - 11
T
teletext, search - 26
text 2.5 - 26
text, digital text - 26
text, dual screen - 25
text, enlarge - 25
text, language - 25
text, subpages - 26
text, Table Of Pages - 25
trademarks and copyrights - 8
TV receiver, connect - 42
TV speakers, mute - 11
U
universal access, enable - 36
universal access, hearing impaired - 37
universal access, visually impaired - 37
USB keyboard - 48
USB mouse - 48
V
VGA - 41
visually impaired - 37
volume - 11
W
wall mount - 60
wallpaper - 30
wireless, dongle - 51
EN 64
Page 65

English
Y
YouTube - 17
YPbPr, component video - 40
EN 65
Page 66

© 2011 Koninklijke Philips Electronics N.V.
All rights reserved.
Document order number 313913705181
 Loading...