

Philips PageWriter TC70, PageWriter TC50, PageWriter TC30 Quick user guide

To wake up the cardiograph:
Lift the cover or press any key.
If the unit does not start, press the
On/Standby button.
PageWriter TC70/TC50/TC30 Cardiograph
QUICK HELP GUIDE

Contents
Skin Prep . . . . . . . . . . . . . . . . . . . . . . . . . . . . . . . . . . . . . . . . . . . . . . . . . . . . . . . . . . . . . . . . . . . . . . . . . . . . . . . . 2
Attaching Electrodes and Lead Wires . . . . . . . . . . . . . . . . . . . . . . . . . . . . . . . . . . . . . . . . . . . . . . . . . . . . . . . . . 3
Using the Patient Interface Module (PIM) . . . . . . . . . . . . . . . . . . . . . . . . . . . . . . . . . . . . . . . . . . . . . . . . . . . . . . 6
Checking Signal Quality . . . . . . . . . . . . . . . . . . . . . . . . . . . . . . . . . . . . . . . . . . . . . . . . . . . . . . . . . . . . . . . . . . . . 7
Taking a STAT or Urgent ECG . . . . . . . . . . . . . . . . . . . . . . . . . . . . . . . . . . . . . . . . . . . . . . . . . . . . . . . . . . . . . . 9
Taking a Routine ECG . . . . . . . . . . . . . . . . . . . . . . . . . . . . . . . . . . . . . . . . . . . . . . . . . . . . . . . . . . . . . . . . . . . . 10
Using the Main Screen . . . . . . . . . . . . . . . . . . . . . . . . . . . . . . . . . . . . . . . . . . . . . . . . . . . . . . . . . . . . . . . . . . . . 11
Status Bar . . . . . . . . . . . . . . . . . . . . . . . . . . . . . . . . . . . . . . . . . . . . . . . . . . . . . . . . . . . . . . . . . . . . . . . . . . . 13
Working with Exams . . . . . . . . . . . . . . . . . . . . . . . . . . . . . . . . . . . . . . . . . . . . . . . . . . . . . . . . . . . . . . . . . . 15
Changing the Waveform Display . . . . . . . . . . . . . . . . . . . . . . . . . . . . . . . . . . . . . . . . . . . . . . . . . . . . . . . . . 16
Split Screen View . . . . . . . . . . . . . . . . . . . . . . . . . . . . . . . . . . . . . . . . . . . . . . . . . . . . . . . . . . . . . . . . . . . . . 16
Using the Preview Screen. . . . . . . . . . . . . . . . . . . . . . . . . . . . . . . . . . . . . . . . . . . . . . . . . . . . . . . . . . . . . . . . . . 17
Using Rhythm . . . . . . . . . . . . . . . . . . . . . . . . . . . . . . . . . . . . . . . . . . . . . . . . . . . . . . . . . . . . . . . . . . . . . . . . . . . 21
Using Event Markers and Disclose. . . . . . . . . . . . . . . . . . . . . . . . . . . . . . . . . . . . . . . . . . . . . . . . . . . . . . . . . . . 22
Using the Worklist . . . . . . . . . . . . . . . . . . . . . . . . . . . . . . . . . . . . . . . . . . . . . . . . . . . . . . . . . . . . . . . . . . . . . . . 27
Transferring ECGs . . . . . . . . . . . . . . . . . . . . . . . . . . . . . . . . . . . . . . . . . . . . . . . . . . . . . . . . . . . . . . . . . . . . . . . 35
Using the Cardiograph and Cart . . . . . . . . . . . . . . . . . . . . . . . . . . . . . . . . . . . . . . . . . . . . . . . . . . . . . . . . . . . . 39
Protecting Patient Data . . . . . . . . . . . . . . . . . . . . . . . . . . . . . . . . . . . . . . . . . . . . . . . . . . . . . . . . . . . . . . . . 39
Loading Paper . . . . . . . . . . . . . . . . . . . . . . . . . . . . . . . . . . . . . . . . . . . . . . . . . . . . . . . . . . . . . . . . . . . . . . . . 39
Using the Cart Wheel Positioners . . . . . . . . . . . . . . . . . . . . . . . . . . . . . . . . . . . . . . . . . . . . . . . . . . . . . . . . 40
Using the Cart Brake . . . . . . . . . . . . . . . . . . . . . . . . . . . . . . . . . . . . . . . . . . . . . . . . . . . . . . . . . . . . . . . . . . 40
1

Skin Prep
Always follow good skin prep techniques for every patient. Proper skin prep helps to ensure a good quality ECG. Skin is a poor
conductor of electricity and frequently creates artifact that distorts the ECG signal.
To prepare the skin for an ECG:
123
Clip hair from electrode sites if necessary.
Excessive hair prevents a good connection.
Wash the skin thoroughly with soap and
water.
Dry the skin vigorously to increase capillary
blood flow to the tissues and to remove the
dead, dry skin cells and oil.
Do not use alcohol to clean the skin
because it dries the skin. If there is no time,
rub the electrode sites with gauze to remove
the dead, dry skin and to increase capillary
flow (adult patients only).
2
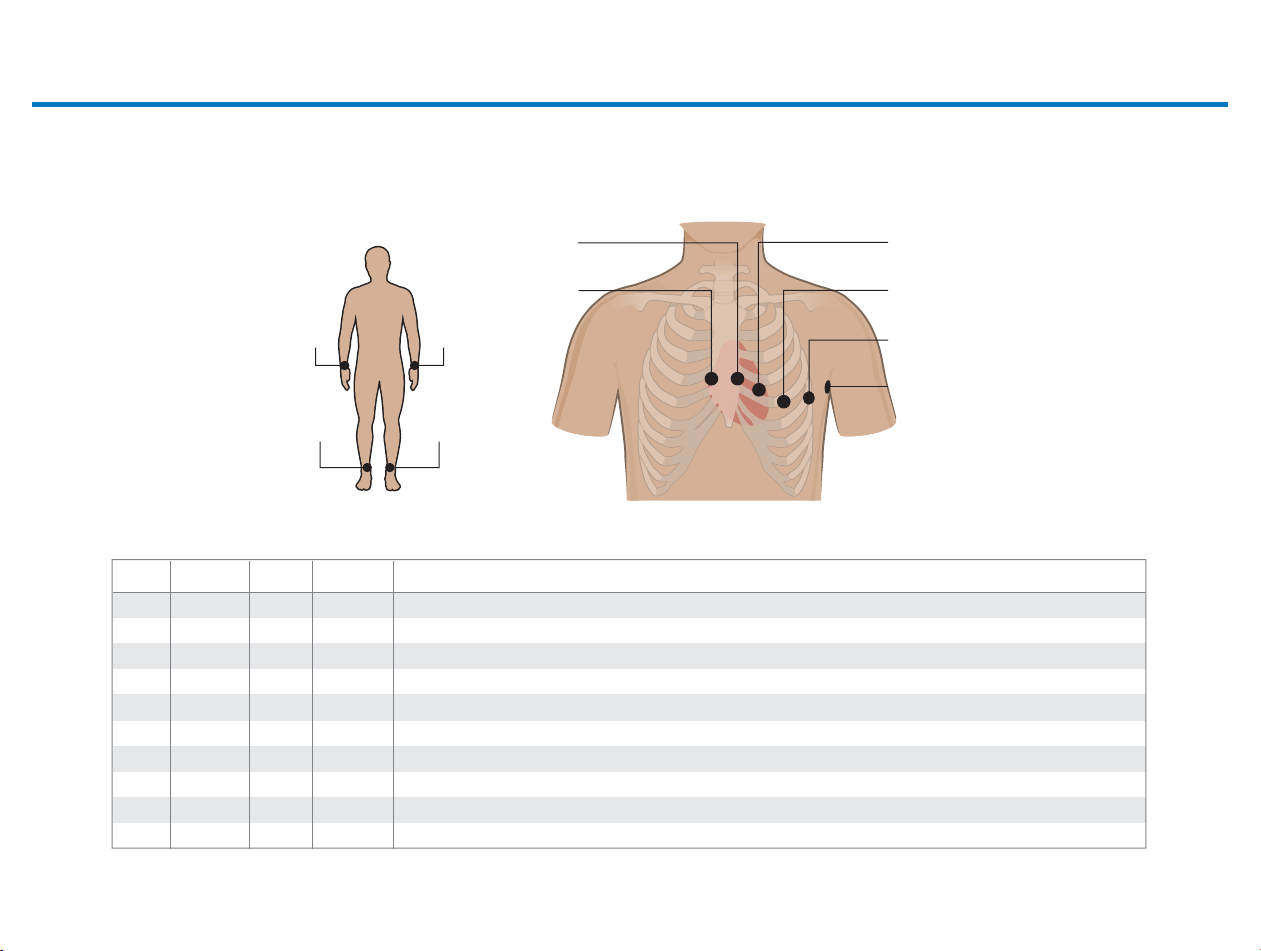
Attaching Electrodes and Lead Wires
Standard 12-Lead AAMI/IEC
3
AAMI
V1
V2
V3
V4
V5
V6
RA
LA
RL
LL
RA/R
RL/N
Color Location
Red
Yellow
Green
Blue
Orange
Purple
White
Black
Green
Red
IEC Color
C1
C2
C3
C4
C5
C6
R
L
N
F
Red
Yellow
Green
Brown
Black
Purple
Red
Yellow
Black
Green
LA/L
LL/F
Right side of sternum in the 4th intercostal space
Left side of sternum in the 4th intercostal space
Midway between V2/C2 and V4/C4
On the 5th intercostal space at the left midclavicular line
Anterior axillary line at same level as V4/C4 and V6/C6, midway between V4/C4 and V6/C6
Left mid-axillary line (middle of the arm pit) at the same level as V4/C4
Inside right arm between wrist and elbow
Inside left arm between wrist and elbow
Inside right calf between knee and ankle
Inside left calf between knee and ankle
V2/C2
V1/C1
V3/C3
V4/C4
1
2
3
4
5
V5/C5
V6/C6
Pediatric 15-Lead AAMI/IEC (TC70/TC50 only)
RA/R
RL/N
AAMI
V1
V2
V3
V4
V3R
V4R
V5
V6
V7
RA
LA
RL
LL
V1/C1
V3R/C3R
V4R/C4R
LA/L
LL/F
Color Location
Red
Yellow
Green
Blue
Yellow
Red
Orange
Purple
Black
White
Black
Green
Red
IEC Color
C1
C2
C3
C4
C3R
C4R
C5
C6
C7
R
L
N
F
Red
Yellow
Green
Brown
Pink
Gray
Black
Purple
Orange
Red
Yellow
Black
Green
Right side of sternum in the 4th intercostal space
Left side of sternum in the 4th intercostal space
Midway between V2/C2 and V4/C4
On the fifth intercostal space at the left midclavicular line
Midway between V1/C1 and V4R/C4R, right side of chest
Midclavicular line in the 5th intercostal space, right side of chest
Anterior axillary line at same level as V4/C4 and V6/C6, midway between V4/C4 and V6/C6
Left mid-axillary line (middle of the arm pit) at the same level as V4/C4
Left posterior axillary line at the same level as V6/C6
Inside right arm between wrist and elbow
Inside left arm between wrist and elbow
Inside right calf between knee and ankle
Inside left calf between knee and ankle
V2/C2
V3/C3
V4/C4
1
2
3
4
5
V5/C5
V6/C6
V7/C7
4

Adult Extended Lead AAMI/IEC (TC70/TC50 only)
5
RA/R
RL/N
AAMI
V1
V2
V3
V4
V3R
V4R
V5
V5R
V6
V7
V8
V9
RA
LA
RL
LL
V1/C1
V3R/C3R
LA/L
V4R/C4R
LL/F
Color Location
Red
Yellow
Green
Blue
Yellow
Red
Orange
Green
Purple
Black
Blue
Yellow
White
Black
Green
Red
IEC Color
C1
C2
C3
C4
C3R
C4R
C5
C5R
C6
C7
C8
C9
R
L
N
F
Red
Yellow
Green
Brown
Pink
Gray
Black
Green
Purple
Orange
Blue
Yellow
Red
Yellow
Black
Green
Right side of sternum in the 4th intercostal space
Left side of sternum in the 4th intercostal space
Midway between V2/C2 and V4/C4
On the 5th intercostal space at the left midclavicular line
Midway between V1/C1 and V4R/C4R, right side of chest
On the 5th intercostal space at the left midclavicular line, right side of chest
Anterior axillary line at same level as V4/C4 and V6/C6, midway between V4/C4 and V6/C6
Right anterior axillary line at same level as V4R/C5R
Left mid-axillary line (middle of the arm pit) at the same level as V4/C4
Left posterior axillary line at the same level as V6/C6
Under the left mid-scapular line at the same level as V6/C6
Left paraspinal border at the same level as V6/C6
Inside right arm between wrist and elbow
Inside left arm between wrist and elbow
Inside right calf between knee and ankle
Inside left calf between knee and ankle
V2/C2
V3/C3
1
2
3
4
5
V4/C4
V5/C5V5R/C5R
V6/C6
V7/C7
V8/C8
V9/C9
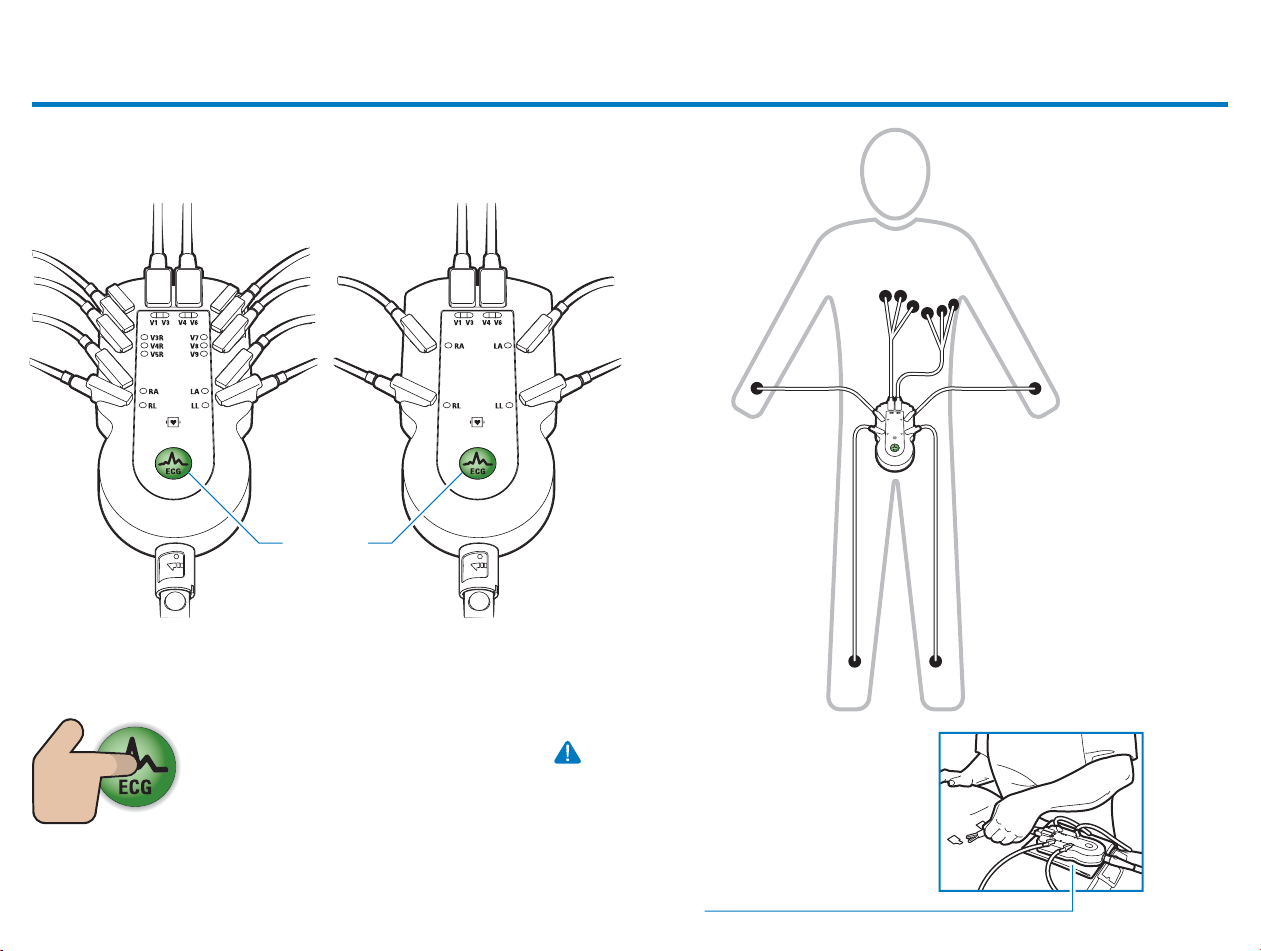
Using the Patient Interface Module (PIM)
16-Lead PIM
ECG
button
Using the ECG Button on PIM
Button turns green when all
required patient info is entered,
and ECG signal quality is good.
12-Lead PIM
The PIM is an electronic device and
can feel warm if placed on bare skin.
1x to take routine ECG
2x to take STAT
(button does not have to be lit)
If the PIM is placed on the patient’s
bare skin, always place a sheet or cloth
between the PIM and the patient.
6
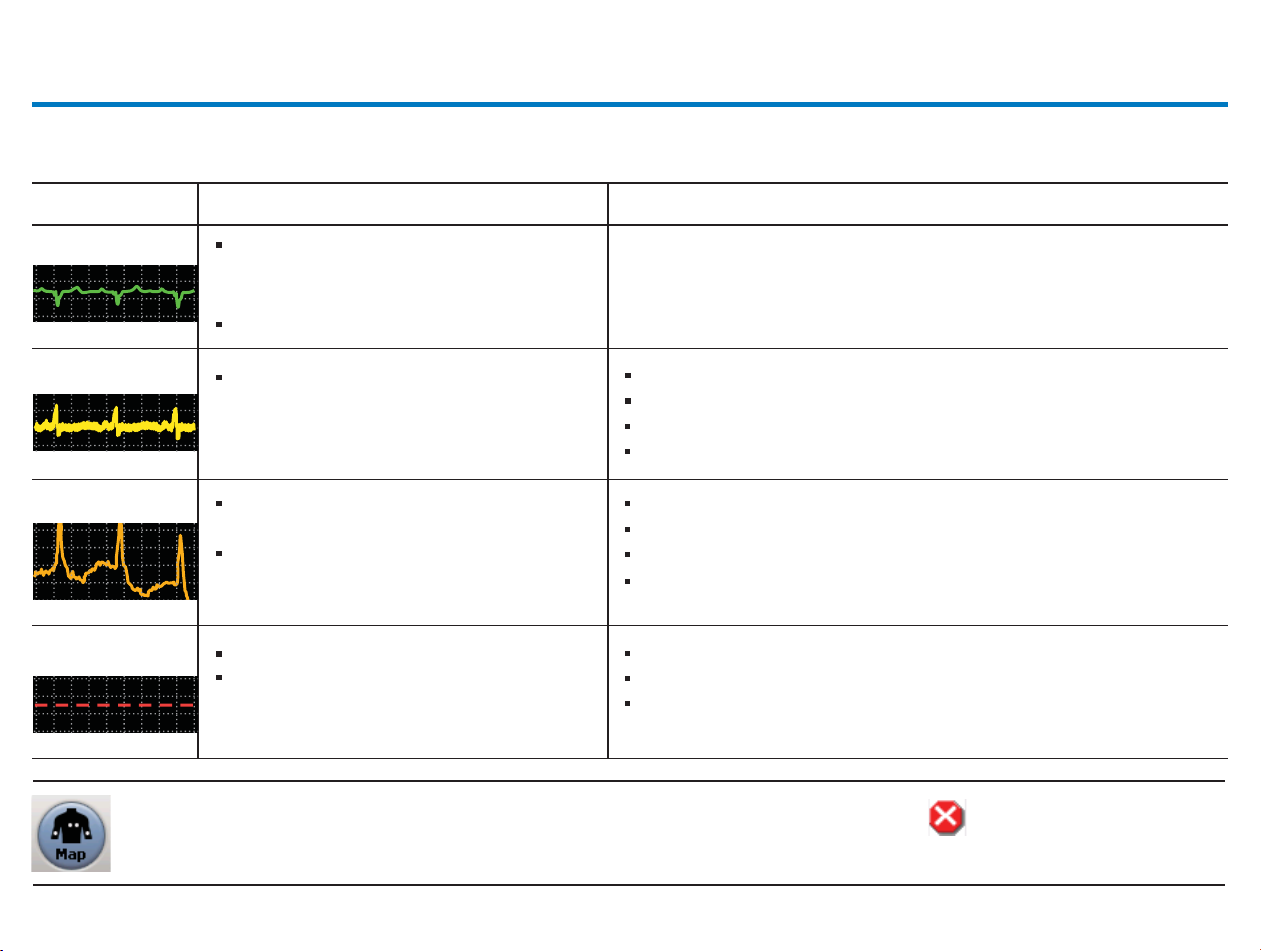
Checking Signal Quality
Check the color-coded waveforms on the Main screen. The color of the waveform indicates the lead signal quality.
Waveform Color Indicates Possible Causes
7
Green
Yellow
Orange
Red dotted line
Touch the Map button to check for any loose or inoperative electrodes or lead wires. A red mark identifies the
location of a bad electrode or lead connection.
Good connection; when all leads are of good
quality and all required patient information is
entered, the ECG button is lit.
Take the ECG.
Moderate noise level, artifact, electrode
interference, or a poor electrode connection
Severe artifact, electrical interference, or a poor
electrode connection
One or more limb leads are disconnected
(chest leads display orange)
Loose electrode connection
ECG waveform data that cannot be analyzed
Dry gel on electrode
Inadequate patient preparation
Electrical interference from another device
Moderate patient movement, tense patient
Electrical interference from another device
Patient tremors, shivering patient, inadequate patient preparation
Very poor electrode contact, dry electrodes
Limb lead(s) are disconnected
Inoperative electrode, electrode that has fallen off of the patient
Defibrillation has been performed too recently to take ECG measurements
Other cause that renders waveform data useless
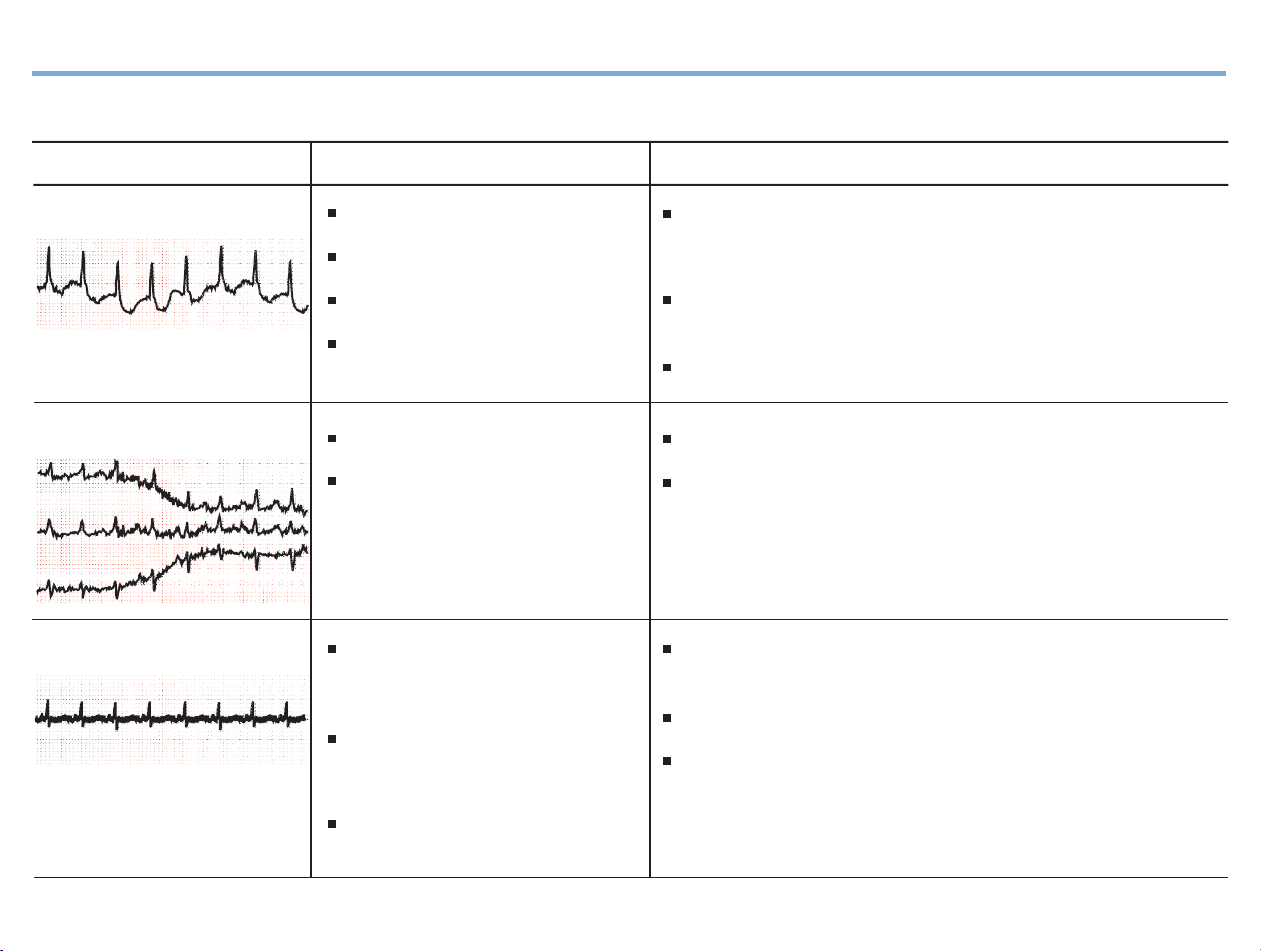
Signal Quality Troubleshooting
Possible CauseWaveform Solution
Wandering Baseline
Somatic Tremors
AC Interference
Inadequate patient preparation
Moderate patient movement
Very poor electrode contact
Patient respiratory interference
Patient is cold and shivering
Patient has tremors
Electrical interference from another
device (IV pump, microwave oven,
cellular phone, wireless device)
An electrical device near the
cardiograph that is improperly
grounded
Reassure the patient and make sure that the patient is comfortable. If the
patient has tremors, attach the limb electrodes higher on the patient
(closer to torso).
Ensure that the lead wires are not pulling on the electrodes and that the
electrodes are firmly attached.
Turn on the Baseline Wander filter.
Place a blanket on the patient to warm the patient.
Assist with limiting patient movement.
Check for devices that could be causing electrical interference. Unplug the
devices or switch to battery power.
Lay the lead wires alongside the limbs and away from any electrical devices.
Turn on the AC filter.
An improperly gelled electrode
(dried gel)
8
Taking a STAT or Urgent ECG
Connect the patient.
1
2
x2
Check signal quality.
Touch the Map button to display the location of any loose electrodes or leads. A loose electrode or lead
is indicated by a red mark.
Press the ECG button (on the PIM or above the keyboard) twice rapidly.
The ECG is acquired and appears on the Preview screen. See page 17 for information.
9
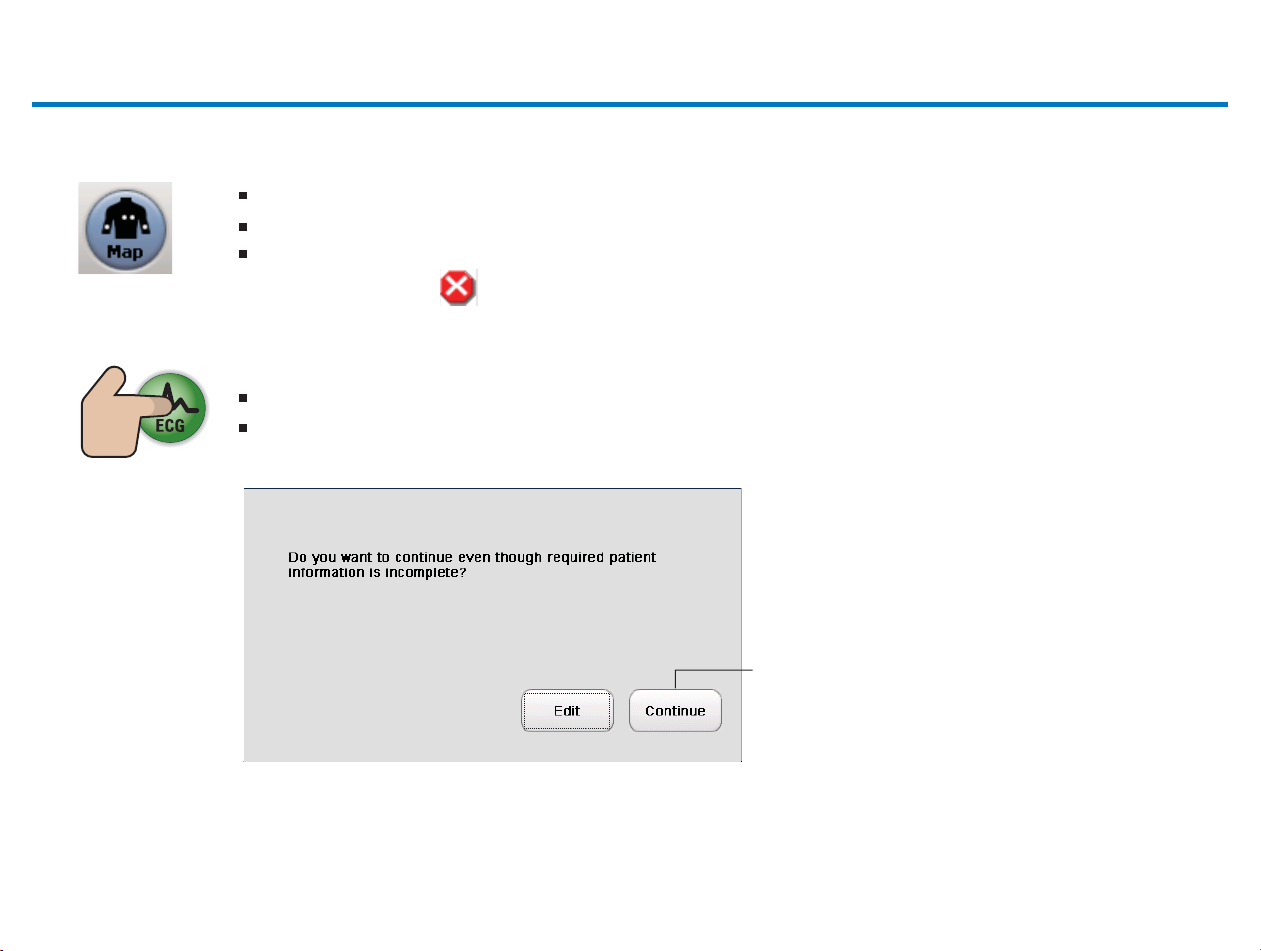
If a message appears that patient information
is missing, touch Continue.
Taking a Routine ECG
Connect the patient.
1
2
Check signal quality.
Touch the Map button to display the location of any loose electrodes or leads. A loose electrode or lead
is indicated by a red mark.
Once the patient is connected, the ID button is lit. Touch the ID button.
Enter patient information. Required information is indicated in blue type and must be completed in full in order
to transfer the ECG to TraceMaster or other remote system (if supported).
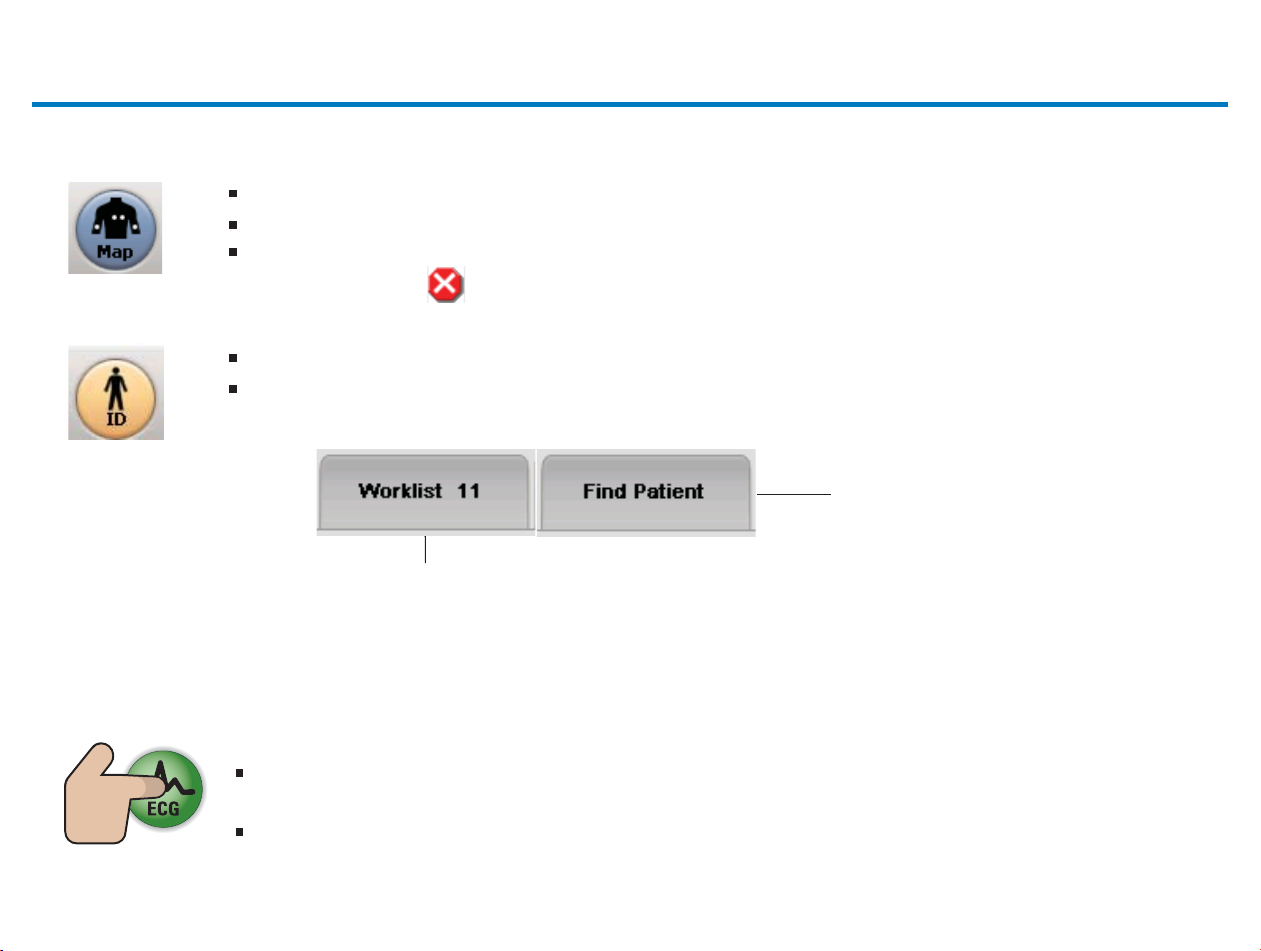
Touch the Worklist tab to select a pending order
or demographics. The number on the tab indicates
how many patients are available in the Worklist. See
page 27 for information.
Touch the Find Patient tab to
search for patient information.
3
x1
When all required patient information has been entered, and all leads are connected and are of good
quality, the ECG button is lit. Touch the ECG button on the cardiograph or on the PIM.
The ECG is acquired and appears on the Preview screen.
See page 17
for information.
10
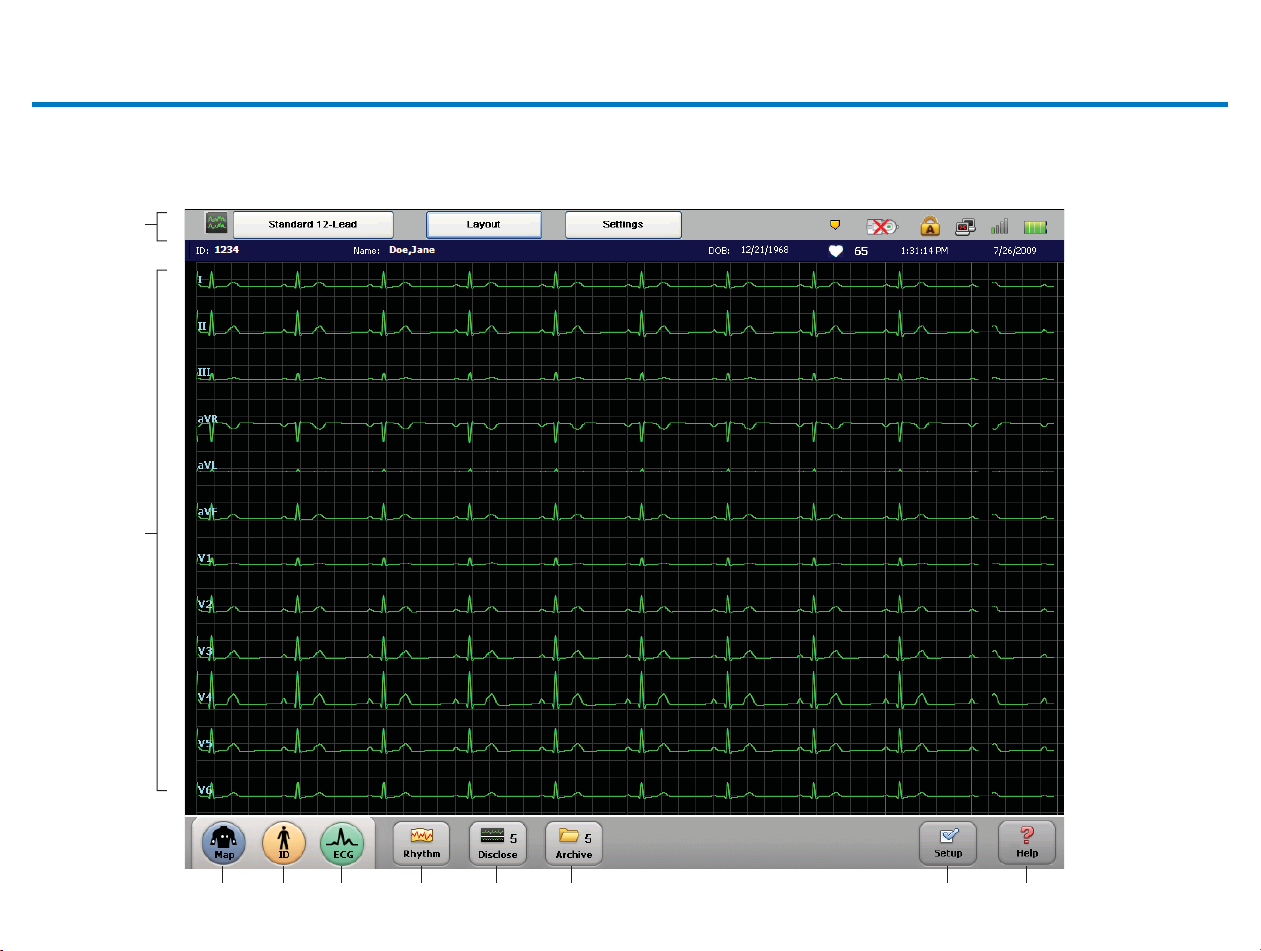
Using the Main Screen
Main Screen
A
B
11
C D E F G H I J
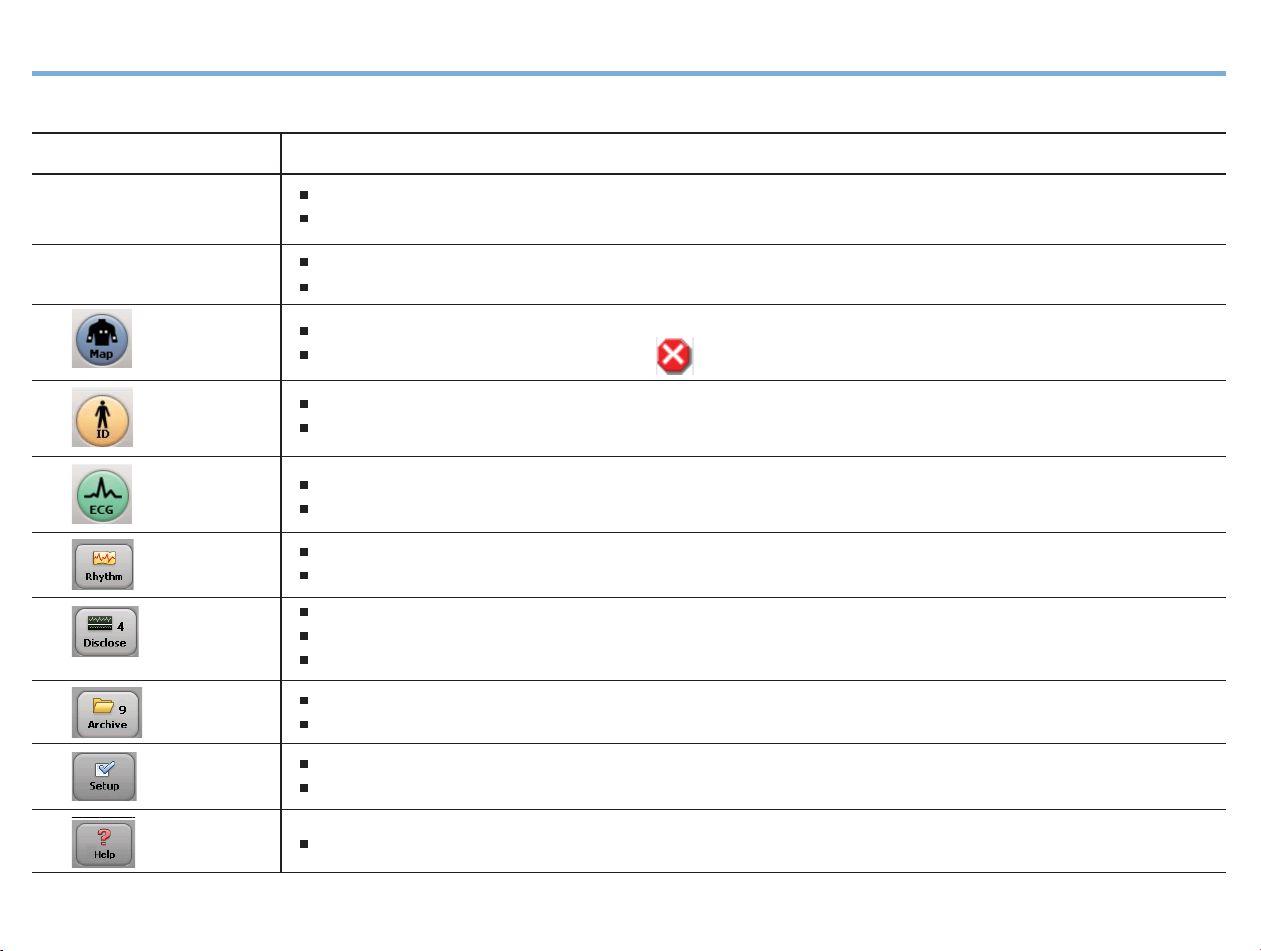
Main Screen
Name Description
A
Status Bar
Waveform Display area
B
C
D
E
F
G
H
I
Displays operating information for the cardiograph
See page 13 for information
The display area for waveform data. The waveforms are color-coded to indicate signal quality.
See page 7 for information
Displays a map of electrode placement
A loose lead or electrode is indicated by a red mark
Enter patient information for the current patient
Select patient information from the Worklist, see page 27 for information
Touch to take an ECG (after entering patient information)
Touch 2x to take a STAT or urgent ECG (no patient information is entered)
Record rhythm strips of up to 12 or 16 leads
See page 21 for information
View continuous data for a selected lead
View saved Events
See page 22
View, print, and transfer ECGs saved to the Archive
See page 35
Change cardiograph settings (may require a password)
Use Service Utilities (may require a password)
for information
for information
J
Get help with using the cardiograph
12
 Loading...