


NX0960
User manual

Table of contents
Important 3
Electromagnetic elds (EMF) 5
Automatic Shut-O 5
Introduction 6
General Overview 7
Description of functions 8
Before rst use 10
Connecting the Air Cooker to the NutriU App 10
Preparing for Use 13
Using the Air Cooker 13
Cooking modes 16
Recipe guided cooking via NutriU app 16
Mode “Ingredients” 18
Mode “cooking method” 22
Mode “manual” 30
Accessories 30
Voice control 31
Cleaning 32
General 32
Cleaning Table 34
Use the automated cleaning programs 35
Storage 36
Recycling 36
Declaration of Conformity 37
Guarantee and Support 37
Software and rmware updates 37
Device compatibility 37
Factory reset 37
Troubleshooting 38
2 English

Important
Read this important information document carefully before you use the
appliance and save it for future reference.
Danger
• Never immerse the appliance in water nor rinse it under the tap.
• Do not ll the cooking chamber with water as this may cause an electric shock.
• Do not ll the cooking chamber or pan with oil as this may cause a re hazard.
• Do not use the appliance, if the plug, the mains cord or the appliance itself is
damaged.
• Do not use sharp or spiky tools to clean the water nozzle inside the cooking
chamber, this could destroy the nozzle.
• Do not cover the air inlet and the air outlet openings while the appliance is
operating.
• Never touch the inside of the appliance while it is operating.
• Never put any amount of food that exceeds the MAX level indicated in the
accessories or touches the lid.
Warning
• If the supply cord is damaged, it must be replaced by Philips, its service agent
or similarly qualied persons in order to avoid a hazard.
• Only connect the appliance to an earthed wall socket. Always make sure that
the plug is inserted into the wall socket properly.
• This appliance is not intended to be operated by means of an external timer or
a separate remote-control system.
• The accessible surfaces may become hot during use.
• This appliance can be used by children aged from 8 years and above and
persons with reduced physical, sensory or mental capabilities or lack of
experience and knowledge if they have been given supervision or instruction
concerning use of the appliance in a safe way and understand the hazards
involved. Children shall not play with the appliance. Cleaning and user
maintenance shall not be made by children unless they are older than 8 years
and supervised.
• Keep the appliance and its cord out of reach of children less than 8 years.
• Never use light or inammable ingredients or baking paper in the appliance
• Do not expose the base of the appliance to high temperatures, hot gas, steam
or damp heat from other sources than the steamer itself. Do not place the
appliance on or near a hot gas stove or all kinds of electric stove and electric
cooking plates, or in a heated oven.
3English

• Do not place the operating appliance against a wall or against other
appliances or underneath objects that would be damaged by steam, such as
walls and cupboards. Leave at least 10 cm free space at the back, on both sides
and above the appliance. Do not place anything on top of the appliance.
• During use, hot steam is released through the air outlet openings. Keep your
hands and face at a safe distance from the steam and from the air outlet
openings
• The appliance is equipped with tempered glass, if the glass is damaged do not
use the appliance further and contact a service centre near you.
• Keep the mains cord away from hot surfaces.
• Accessories can become hot during and after use of the appliance, always
handle carefully.
• Beware of the hot steam that comes out of the appliance during cooking, in
the keep-warm mode or when you open the lid. When you check food, always
use kitchen utensils with long handles.
• Do not use the appliance for any other purpose than described in this manual
and use only original Philips accessories.
• Do not use any accessories or parts from other manufacturers or that Philips
does not specically recommend. If you use such accessories or parts, your
guarantee becomes invalid.
• Always use the dedicated accessory to process your food. Never put the food
into direct contact with the steam generator at the bottom.
• Do not let the appliance operate unattended, always make sure you are in
control over your appliance.
• Always use the appliance with properly closed lid.
• If using the sous vide function, make sure to use only high quality sous vide
bags.
• Only use the sous vide function of the appliance if you use sous vide bags,
otherwise sous vide bags could melt.
• Sous vide function with temperatures below 50°C is not recommended as it
could provoke bacteria growth.
• Check if the voltage indicated on the appliance corresponds to the local mains
voltage before you connect the appliance.
• Do not place the appliance on or near combustible materials such as a
tablecloth or curtain.
• Thoroughly clean, the parts that come into contact with food before you use
the appliance for the rst time and after every use. Refer to the instructions in
the manual.
• Never steam frozen meat, poultry or seafood. Always thaw these ingredients
completely before you steam them.
• Accessible surfaces may become hot during use.
• This appliance is designed to be used at ambient temperatures between 10°C
and 40°C.
4 English

Caution
• This appliance is intended for normal household use only. It is not intended for
use in environments such as sta kitchens of shops, oces, farms or other work
environments. Nor is it intended to be used by clients in hotels, motels, bed
and breakfasts and other residential environments.
• Always disconnect the appliance from the supply if it is left unattended and
before you assemble, disassemble, store or clean it.
• Do not move the food steamer while it is operating.
• Always return the appliance to a service center authorized by Philips for
examination or repair. Do not attempt to repair the appliance yourself,
otherwise the guarantee becomes invalid.
• Only use water in the water tank.
• Let the appliance cool down for approximately 30 minutes before you handle
or clean it.
• Place the appliance on a stable, horizontal and level surface and make sure
there is at least 10 cm free space around it to prevent overheating.
• Do not use the compartment of the appliance as storage except for
appropriate accessories.
• Temperature, humidity and time are varying based on the type and amount of
food you have placed into the appliance.
• If the appliance is used improperly or for professional or semi-professional
purposes or if it is not used according to the instructions in the user manual,
the guarantee becomes invalid and Philips refuses any liability for damage
caused.
• To ll, rell or empty the water tank please remove it from the appliance. Do
not tilt the complete appliance to empty the water tank.
• If liquids need to be removed from the cooking chamber use a sponge or
similar. Do not tilt the appliance to empty.
• As food diers in origin, size and brand, make sure it is suciently cooked
before serving.
• Do not refreeze food once it has thawed.
• Do not use any acetic acids for descaling.
Electromagnetic elds (EMF)
This Philips appliance complies with all applicable standards and regulations
regarding exposure to electromagnetic elds.
Automatic Shut-O
The Air Cooker is equipped with an automatic shut-o function. When the
appliance is switched on but not in the cooking or keep warm mode, it will go to
standby mode after 20 minutes of no user interaction. To switch o the appliance
manually, long press the rotary button.
5English

Introduction
Congratulations on your purchase and welcome to Philips!
To fully benet from the support that Philips oers, register your product at
www.philips.com/welcome.
The Philips Air Cooker uses NutriFlavor technology to create the optimal climate
of hot air circulation and humidity to cook every unique food to perfection.
Crispy vegetables, juicy sh, tender meat, soft bakes, with up to 90% nutrient
preservation*. Discover the joy of creating delicious healthy dishes at the touch of
a button.
For more inspiration, recipes and information about the Air Cooker, visit
www.philips.com/welcome or download the free NutriU App** for IOS® or
Android™.
* Tested on broccoli, bell pepper, snowpeas for 90% vitamin C, on salmon for
93% omega3/6, and beef for 90% iron. Laboratory measurement on Air Steam
setting.
** The NutriU App may not be available in your country. In this case, please
access your local Philips website for inspiration.
6 English

General Overview
1
2
3
4
5
6
7
9
10
11
8
1. Glass lid
2. Hot air circulation grid
3. Cooking chamber
4. Rotary button
5. Display
6. Steam outlet
12
7. Lid release button
8. Water tank + lid
9. Second layer (sold separately)
10. Basket
11. Cooking pot (for some models)
12. Bottom tray + grid
7English
Description of functions
160
°C
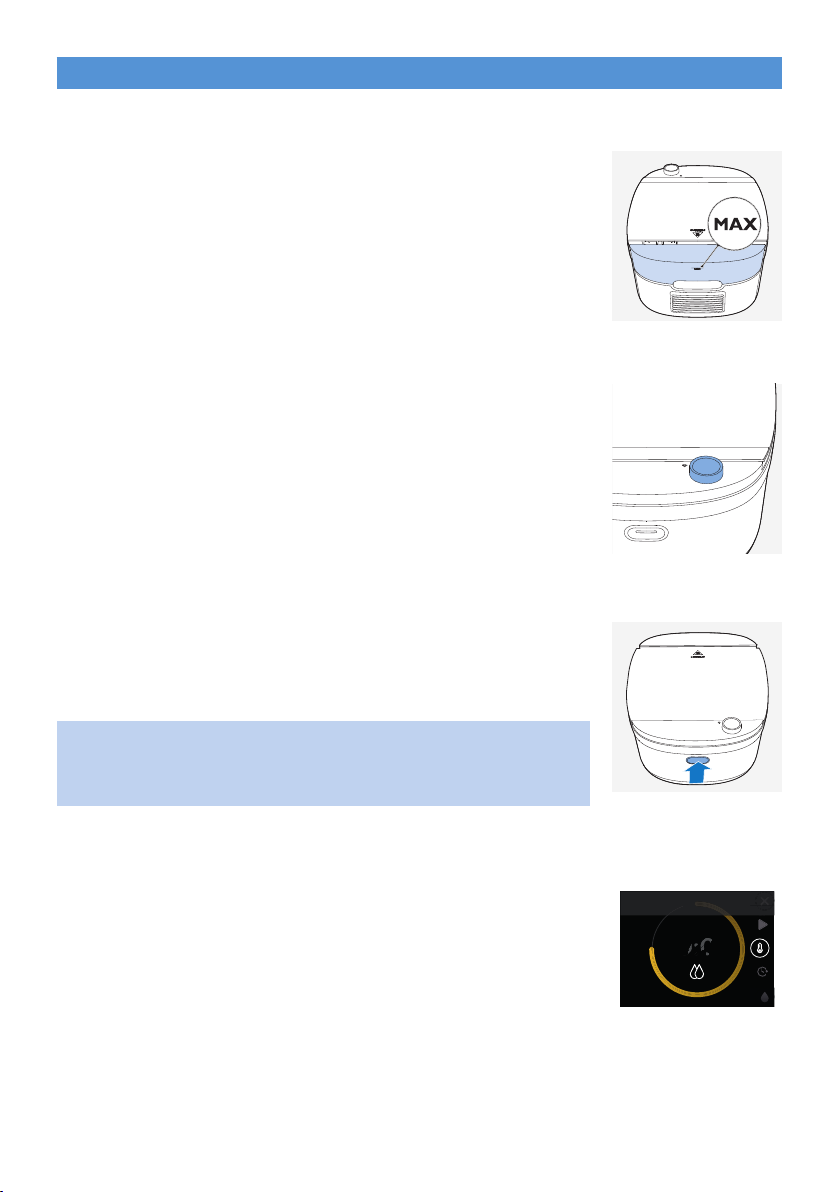
Water tank
The Air Cooker is equipped with a water tank, which is
located at the back of the appliance. The MAX water
level is about 600 ml. The MAX water level indication is
on the handle side of the water tank and should not be
exceeded.
To avoid accumulation of limestone, empty the water
tank after each cooking cycle.
Rotary button
Press the rotary button to turn on the appliance, press
and hold the rotary button to turn o the appliance.
After the appliance is switched on, press the rotary
button to conrm an action. Turn the rotary button to go
through dierent menu options or change the cooking
setting.
Glass lid
Push the lid release button to open the glass lid.
The lid opens automatically.
Warning
• The surface of the glass lid may become hot during
use.
Temperature setting
Some provided cooking methods have a default
recommended temperature setting, which cannot be
adjusted as a dierent temperature may impact the
cooking result. To change the cooking temperature, use
the manual mode (see chapter “Cooking modes”).
8 English
Adjust temperature
160°C
20:00

Humidity setting
160°C
160°C
Some provided cooking methods have a default
recommended humidity setting, which cannot be
adjusted as a dierent humidity may impact the cooking
result. To change the humidity setting, use the manual
mode (see chapter “Cooking modes”).
Three humidity levels
Description Used in cooking method
Humidity o Bake, roast
Medium humidity
High humidity
Refer to recipes in the NutriU app.
Also available in the manual mode
Steam, air steam, slow cook, defrost, reheat,
sous-vide
Cooking time
In the “manual” mode you can set the cooking time from
1 minute to 60 minutes.
In the “cooking methods” mode, you can set the cooking
time in a xed range. Refer to the table in chapter
“Cooking modes → cooking methods”.
All cooking methods have a default cooking time, which
can be adjusted based on the amount of food you put
into the appliance or the doneness level you prefer.
You can nd some suggested cooking time for various
food types in chapter “Cooking modes → ingredients”.
Adjust humidity
160°C
20:00
Adjust time
160°C
10:00
Sound
Appliance noise
You may hear some small noise while the appliance is working. This is normal.
The noise come from the pump, which sends the water through the internal
system, and also from the fan, which generates the airow in the appliance.
Sound notications
Sometimes you hear a sound, for example when the appliance has nished
cooking, or when there is a required action during cooking, e.g., putting
another ingredient into the Air Cooker.
9English

Preheating
Some cooking methods such as roast and bake require
preheating.
The preheating notication pops up automatically in cook
modes which require preheating.
If your Air Cooker is already heated up after you have
just cooked something, you can skip preheating and start
cooking right away.
The preheating timer is set to ve minutes and cannot be
adjusted.
Important
• To achieve optimal cooking result, put your food into the Air Cooker
after the preheating is completed.
Text wizard
All menu screens come with a text wizard, which helps you to navigate through
the menu. The text description disappears after 10 seconds and appears again
when you enter another page in the menu.
Start pre-heat
5:00
Before rst use
Important
• During the rst time use, the Air Cooker could produce some smoke and
smell. This should dissipate in a few minutes. Before starting to cook
with it, operate the appliance empty for about 30 minutes at 160°C with
humidity o and keep the room ventilated.
1. Remove all packing material.
2. Remove any stickers or labels (if applicable) from the appliance.
3. Thoroughly clean the appliance before rst use by wiping the cooking
chamber with a wet non-abrasive cloth. Rinse the accessories and
detachable parts under warm water.
Connecting the Air Cooker to the NutriU App
Important
• Make sure that your smart device is connected to your home WiFi
network before you start the WiFi set-up process.
10 English

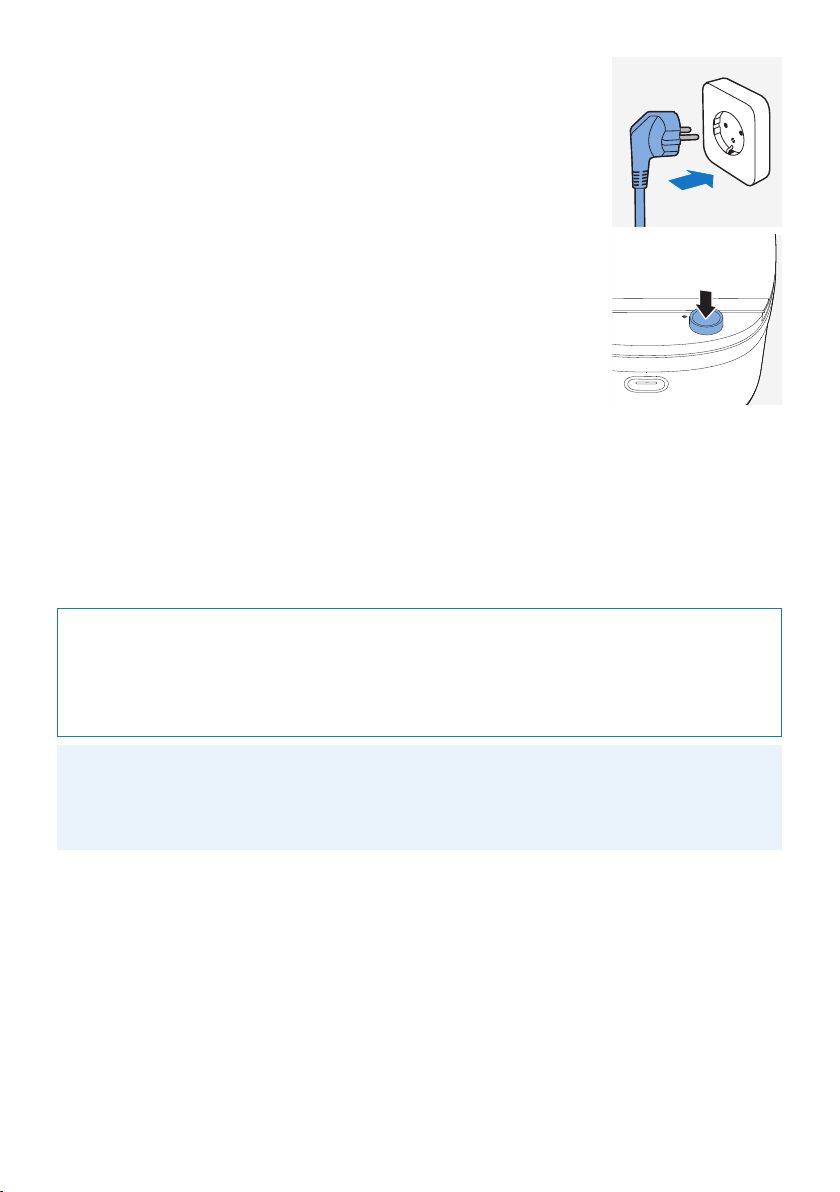
1. Plug in the appliance.
2. Press the rotary button to turn on the appliance.
Note
• When you switch on the appliance for the rst time,
you will be asked to select the language, which you
would like to use to navigate through the menu.
3. Scroll through the list until the language you prefer is
highlighted.
4. Press the rotary button to conrm your language
selection.
• A welcome screen is displayed.
Back
English
Deutsch
Francais
Español
Welcome to a world of avor.
Your appliance works best
connected to WiFi and paired to
the NutriU app.
Continue
5. Press the rotary button to conrm and continue.
Note
• In the next screen you can decide whether to connect
the appliance to your smart device right away or do it
later.
11English

6. If you decide to connect right away, navigate to
Do you wish to download the app?
Download app, follow
instructions
www.philips.com/NutriU
option “Yes, please”.
Note
• We recommend downloading the NutriU app and
add your “Air Cooker” to the app as soon as you set
up your appliance for the rst time. This enables you
I already have the app
Yes, please
No thanks
to use the Air Cooker to its full extent, for example, to
enjoy remote cooking and get notications on cooking
progress.
7. A QR code displays. Scan it to download the NutriU
app.
Tip
• You can also download the NutriU app from the App
Store or from the website www.philips.com/NutriU.
OK
Alternatively, you can scan the QR code in the booklet
which comes in the pack of your Air Cooker.
8. Open the NutriU app and follow the registration process.
9. Follow the steps in the App to connect your Air Cooker to your WiFi and
pair your Air Cooker with your smart device.
Note
• If you decide to connect your Air Cooker later, you can start the WiFi setup
process under “Tools → Settings → setup WiFi” in the Air Cooker menu.
• You can only use the Air Cooker with the app when the WiFi indicator beside
the display is solid white.
The WiFi indicator has two states.
The WiFi indicator is o. WiFi is disabled.
The WiFi indicator is on. WiFi is enabled and connected to the router.
12 English

Important
• Remote control: you can remotely control your Air Cooker through the
app (e.g. send a recipe, pause cooking, etc.) only if you have checked
o the “remote consent” in the NutriU app, to be found in your NutriU
prole.
• Make sure to connect your Air Cooker to a 2.4 GHz 802.11 b/g/n home
WiFi network.
• Single user pairing: the Air Cooker can be remotely controlled by only
one user at the same time. If a second user wants to control the Air
Cooker and use the NutriU app, this user has to follow the pairing
process. Once paired, the rst user will be unpaired automatically.
• The WiFi setup process can be cancelled via the app or by unplugging
the Air Cooker.
Note
• You can turn WiFi on or o in Tools → Settings → WiFi Setup.
• You can reset WiFi in Tools → Settings → WiFi Setup.
Preparing for Use
1. Place the appliance on a stable, horizontal, level and heat-resistant surface.
Warning
• Do not put anything on top or on the sides of the appliance. This could
disrupt the airow and aect the cooking result.
• Do not place the operating appliance near or underneath objects that
could be damaged by steam, such as walls and cupboard.
Note
• Always put the basket with the tray into the appliance. Do not use the basket
alone.
Using the Air Cooker
1. Plug in the Air Cooker.
13English

2. Press the rotary button to turn on the Air Cooker.
3. Fill in the water tank.
3a. Detach the water tank from the back of your Air
Cooker and open the lid of the water tank.
3b. Fill it with water up to the MAX indication.
Note
• The MAX water level indication is on the handle side of
the water tank and should not be exceeded.
3c. Place the lid of the water tank back onto the
water tank and attach it to the Air Cooker.
Note
• The amount of water needed for cooking depends
on the type of food and the duration of cooking, you
may need to rell the water tank during cooking. A
low water level indication will be shown in the cooking
status banner on the NutriU app as well as the display
of the appliance.
4. Place the food in the Air Cooker.
Note
• The “Bake” and “Roast” cooking methods require
preheating. Place the food in the device after
preheating is completed.
14 English
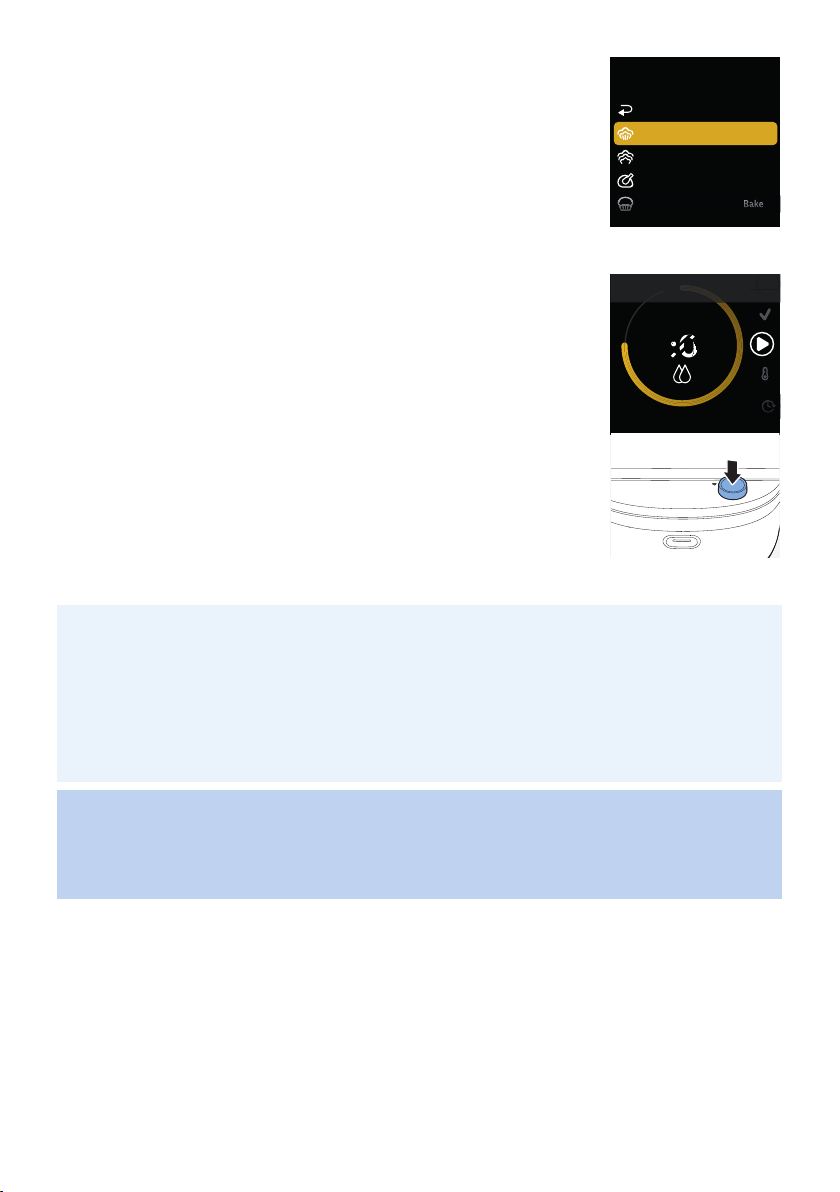
5. Select the cooking method you want to use (see also
Bake
140
°C
chapter “Cooking modes”).
Cooking methods
Air Steam
Steaming
Roast
6. Set the cooking parameters if needed.
7. Press the rotary button to start cooking.
Start
140°C
10:00
8. The cooking progress begins. The steam generator and fan switch on.
Note
• When you pause the cooking process, for example to adjust the cooking
parameters in between cooking, press the rotary button to do so. Press the
rotary button again to resume cooking.
• Do not place the Air Cooker beside another cooking appliance, close to the
kitchen wall, or beneath a kitchen cupboard as hot steam may condense and
run down the surfaces.
Back
Bake
Warning
• During use, hot steam is released through the air outlet openings. Keep
your hands and face at a safe distance from the steam and from the air
outlet openings.
15English

9. When the cooking time elapse, you will see the enjoy screen.
• A melody will sound.
10. You can either go back to main menu (toggle to icon x and conrm), keep
your food warm, or cook more.
Note
• Empty the water tank when you have nished cooking.
• Always make sure that your food is fully cooked before serving.
Cooking modes
Mode How to
Recipe guided
1
cooking
2 Ingredients
Cooking
3
methods
4 Manual mode
Choose a recipe in the app and
send it to the Air Cooker.
Select the ingredients, then
the cooking method. The Air
Cooker automatically adjusts
temperature and humidity.
Adjust time base on your
preferred end result and start
cooking.
Select the cooking method. The
Air Cooker automatically adjusts
temperature and humidity.
Adjust time base on your
preferred end result and start
cooking.
Adjust time, temperature, and
humidity manually and start
cooking.
Skill level of Air Cooker
user
All levels automated
cooking: full guidance
Beginner: full guidance
Advanced: basic guidance
Expert: no guidance
Recipe guided cooking via NutriU app
If you are a beginning Air Cooker user, we recommend using the recipe guided
cooking mode. It is the easiest way to get familiar with your Air Cooker. If you
are a more experienced user, the NutriU app helps you reach the full potential
of your Air Cooker.
Note
• Recipe guided cooking is only possible when your Air Cooker and your smart
device are connected, paired, and the remote consent is given in your NutriU
prole.
16 English
1. Plug in the Air Cooker.
2. Press the rotary button to turn on the Air Cooker.
3. Open the NutriU app on your smart device and choose a recipe in the
NutriU app.
4. Tap “Get started”.
• The respective setting is shown in the NutriU app and also mirrored on
your appliance.
5. Adjust time if needed, and then start cooking from either the app or on the
appliance.
Tip
• If you stick strictly to the recipe in terms of ingredients and amount of food,
you do not need to adjust the cooking time.
• If you cook less or more than the recipe recommended food amount, you
may need to adjust the cooking time accordingly.
Note
• You could also change cooking parameters such as “humidity” and
“temperature” for a recipe. Changing these parameters may impact the
cooking result.
17English

Mode “Ingredients”
Cook with this mode if you are a beginning Air Cooker user and would like to
have full guidance over the cooking process.
Important
• When you enter the ingredient list for the rst time, namely before
you have connected your Air Cooker to your home WiFi, there is only a
default ingredient list. The list will be updated automatically as soon as
you connect and pair your Air Cooker with your smart device according
to the country/region you choose during the connection process in the
app.
Note
• From time to time the ingredient list is updated automatically. This requires
that your Air Cooker is connected to your home WiFi.
1. Plug in the Air Cooker.
2. Press the rotary button to turn on the Air Cooker.
3. Turn the rotary button until Ingredients is selected.
18 English
Ingredients

4. Push the rotary button to conrm.
Meat
Ingredients
5. Turn the rotary button to choose the ingredient you
want to cook. Press the rotary button to conrm.
Back
Vegetables
Root & starchy veggies
Grains
Meat
2
1
6. Choose one of the recommended cooking methods
and conrm.
Cooking methods
Back
Air Steam
Steaming
Roast
7. Push the rotary button to start cooking.
Note
• The default cooking time is based on the amount of
ingredients you put into your Air Cooker.
Refer to the table below for the suggested food amount according to the default
cooking time.
Ingredient
Cluster
Ingredient Amount Methods
Cooking
temperature
Vegetables Spinach 250g Steam 100°C
Broccoli 600g Air Steam 120°C
600g Roast 160°C
Zucchini 500g Air Steam 120°C
Cauliower 600g Air Steam 120°C
Cooking
humidity
Cooking
time
Preheating
10 min no
12 min no
13 min yes
15 min no
15 min no
19English

Ingredient
Cluster
Root &
starchy
veggies
Grains Basmati rice
Ingredient Amount Methods
Green
beans
Eggplant 750g Air Steam 120°C
Brussel
sprouts
Asparagus
green
Bell Pepper 500g Air Steam 120°C
Tomatoes 750g Air Steam 120°C
Potato
whole
Potato
quartered
Sweet
potato
orange
quartered
Sweet
potatoe
whole
Pumpkin
cubes
Carrots 750g Air Steam 120°C
Jasmine rice
Long whole
grain rice
Millet
Quinoa
Barley
Buckwheat
Cooking
temperature
600g Roast 160°C
500g Air Steam 120°C
680g Roast 160°C 20 min yes
500g Air Steam 120°C
750g Air Steam 120°C
600g Air Steam 120°C
600g Air Steam 120°C
600g Roast 160°C
600g Air Steam 120°C
600g Roast 160°C
750g Air Steam 120°C
750g Roast 160°C
750g Roast 160°C
200g rice
/550 ml
water
200g/
550ml
200g/
550ml
200g/
400ml
200g/
550ml
water
200g/
600 ml
200g/
450ml
Air Steam 120°C
Air Steam 120°C
Air Steam 120°C
Air Steam 120°C
Air Steam 120°C
Air Steam 120°C
Air Steam 120°C
Cooking
humidity
Cooking
time
20 min yes
17 min no
25 min no
12 min no
12 min no
12 min no
12 min no
40 min no
35 min no
45 min yes
20 min no
30 min yes
30 min no
30 min yes
25 min no
25 min yes
25 min no
25 min no
40 min no
20 min no
25 min no
40 min no
20 min no
Preheating
20 English

Ingredient
Cluster
Meat
Poultry
Fish &
Seafood
Eggs
Ingredient Amount Methods
Couscous/
Bulgur
lean cuts of
beef
lean cuts of
pork
Streaky pork 1000g Roast 160°C
Pork rib 1000g Roast 160°C
Chicken
breast
Turkey
breast
Chicken
whole
Chicken
drumsticks
Duck breast
Salmon 450g Air Steam 120°C
Seabass 600g Air Steam 120°C
Shrimps 800g Air Steam 120°C
Trout 600g Air Steam 120°C
Squid 600g Air Steam 120°C
White sh
llet
Hardboiled
egg
Soft boiled
egg
200g/
300ml
water
1000g Air Steam 120°C
1000g Air Steam 120°C
550g (3
pieces)
550g Roast 160°C
550g Air Steam 120°C
550g Roast 160°C
1450g Roast 160°C
400g Roast 160°C
600g (2
pieces)
450g Roast 160°C 20 min yes
600g Air Steam 120°C
560g/
10 eggs
560g/
10 eggs
Air Steam 120°C
Air Steam 120°C
Roast 160°C
Air Steam 120°C
Air Steam 120°C
Cooking
temperature
Cooking
humidity
Cooking
time
10 min no
50 min no
60 min no
60 min yes
60 min yes
25 min no
25 min yes
25 min no
25 min yes
60 min yes
50 min yes
12 min yes
15 min no
12 min no
15 min no
12 min no
15 min no
12 min no
12 min no
8 min no
Preheating
Note
• For every ingredient there is also a NutriU recipe available. Refer to the app
for further information.
• If the default cooking time does not lead to the expected cooking result
as you have cooked more or less than the recommended amount of food,
adjust the cooking time accordingly.
21English

Mode “cooking method”
This mode is recommended when you are already a bit familiar with cooking with
your Air Cooker. You can choose various cooking methods.
Cooking
method
Air steam 120°C
Steam 100°C 10 min 1 – 90 min
Roast 160°C
Bake 160°C
Slow cook 80°C
Sous-vide 50°C - 90°C
Defrost 60°C
Reheat 120°C 15 min 1 – 90 min
Note
• Some cooking methods such as roast and bake require preheating.
• If your Air Cooker is already heated up after you have just cooked something,
you can skip preheating and start cooking right away.
• The preheating timer is set to ve minutes and cannot be adjusted.
Temperature
setting
Humidity
setting
Default time Range Examples
10 min 1 – 90 min
50 min (plus 5
min preheat)
35 min (plus 5
min preheat)
120 min 1 – 180 min
90 min 1 – 180 min
20 min 1 – 180 min
1 – 90 min
1 – 90 min
Vegetables, meat,
sh, seafood, egg
dishes
Leafy greens,
dumplings, freshly
made ravioli
Meat, poultry, sh,
vegetables, potatoes
Gratins, lasagna,
cakes, muns, bread
rolls
Meat, stews, soups,
sauces
Meat, poultry, sh,
seafood
Dierent kind of
frozen food
Dierent kind of
leftovers
Warning
• During use, hot steam is released through the air outlet openings. Keep
your hands and face at a safe distance from the steam and from the air
outlet openings.
• Beware of the hot steam that comes out of the appliance during
cooking, in the keep-warm mode or when you open the lid.
• When you check food, always use kitchen utensils with long handles.
• Never steam frozen meat, poultry or seafood. Always thaw these
ingredients completely before you steam them.
22 English

Air Steam
We recommend using “Air Steam” for all kinds of vegetables, lean meat, sh,
seafood and all types of grains. This setting keeps the natural taste, texture, and
the bright color of your food.
The cooking time given in the table is guideline for fresh ingredients. If the
cooking time does not lead to the expected cooking result, adjust the cooking
time accordingly.
Ingredient Cluster Ingredient Amount Cooking time
Vegetables Broccoli 600g 12 min
Zucchini 500g 15 min
Cauliower 600g 15 min
Green beans 500g 17 min
Brussel sprouts 500g 12 min
Asparagus green 750g 12 min
Bell Pepper 500g 12 min
Tomatoes 750g 12 min
Egg plant 750g 25 min
Root & starchy veggies Potato whole 600g 40 min
Potato quatered 600g 35 min
Sweet potato orange
quatered
Pumpkin cubes 750g 30 min
Carrots 750g 25 min
Grains Basmati rice 200g rice/550 ml water 25 min
Jasmin rice 200g/550ml 25 min
Long whole grain rice 200g/550ml 40 min
Millet 200g/400ml 20 min
Quinoa 200g/550ml water 25 min
Barley 200g/600 ml 40 min
buckwheat 200g/450ml 20 min
Couscous/Bulgur 200g/300ml water 10 min
Meat
Poultry Chicken breast 550g (3 pieces) 25 min
Fish & Seafood Salmon 450g 15 min
lean cuts of beef (beef
tenderloin)
lean cuts of pork 1000g 60 min
Turkey breast 550g 25 min
Seabass 600g 12 min
Shrimps 800g 15 min
600g 20 min
1000g 50 min
23English

Ingredient Cluster Ingredient Amount Cooking time
Trout 600g 12 min
Squid 600g 15 min
White sh llet 600g 12 min
Eggs Hard-boiled egg 560g/10 eggs 12 min
Soft boiled egg 560g/10 eggs 8 min
Steam
Steaming is a very gentle cooking method due to the low temperature and high
humidity. We recommend using “Steam” for leafy greens and food which should
stay moist and soft such as dumplings.
The cooking time given in the table is guideline for fresh ingredients. If the
cooking time does not lead to the expected cooking result, adjust the cooking
time accordingly.
Ingredient Cluster Ingredient Amounts Cooking time
Vegetables Spinach 250g 10 min
Broccoli 600g 14 min
Zucchini 500g 17 min
Cauliower 600g 17 min
Green beans 500g 19 min
Brussel sprouts 500g 14 min
Asparagus green 750g 14 min
Bell Pepper 500g 14 min
Tomatoes 750g 14 min
Egg plant 750g 27 min
Poultry Chicken breast 550g (3 pieces) 27 min
Turkey breast 550g 27 min
Fish White sh llet 600g 14 min
Salmon 450g 17 min
Shrimps 800g 17 min
Dumplings Chinese dumplings 400g 20 min
Knödel 600g 25 min
Fresh ravioli 500g 12 min
Eggs Egg bites 600g 15 min
Egg pudding 600g 15 min
Desserts Ricotta rolls 800g 25 min
Banana bread 600g 25 min
24 English

Roast
We recommend using “Roast” to cook ingredients at a higher temperature,
mainly meat dishes and sh, but also vegetables.
Tip
• For an optimal result, preheat the device before cooking.
The cooking time given in the table is guideline for fresh ingredients. If the
cooking time does not lead to the expected cooking result, adjust the cooking
time accordingly.
Ingredient Cluster Ingredient Amount Cooking time
Vegetables Broccoli 600g 13 min
Cauliower 500g 20 min
Eggplant 680g 20 min
Tomato 750g 15 min
Brussels sprouts 500g 15 min
Bell pepper 500g 20 min
Root & starchy veggies Potato quartered 600g 45 min
Pumpkin 750g 30 min
Carrots 600g 30 min
Sweet potato, whole 600g 30 min
Meat Streaky pork (pork belly) 1000g 60 min
Pork rib 1000g 60 min
Poultry Chicken breast 550g 25 min
Turkey breast 550g 25 min
Chicken whole 1450g 60 min
Chicken drumsticks 400g 50 min
Fish & Seafood Salmon 450g 20 min
25English

Bake
We recommend using “Bake” to bake bread, cakes and muns, but also gratins.
With this setting you will get delicious baking results that are soft on the inside
and crispy on the outside.
Tip
• For an optimal result, preheat the device before cooking.
• To bake cakes, bread and gratins, we recommend using the cooking pot. To
bake muns, use standard silicon cups that can be used in an oven.
The cooking time given in the table is guideline for baking various food. If the
baking time does not lead to the expected cooking result, adjust the cooking
time accordingly.
Ingredient Cluster Ingredient Cooking time
Cake Cheesecake 40 min
Cake batter 30 min
Sacher cake batter 30 min
Muns 20 min
Cinnamon rolls 30 min
Gratins Potato gratin 60 min
Lasagna 50 min
Quiche 45 min
Bread Bread 40 min
Garlic knots 25 min
Slow cook
In “Slow cook“ mode, you can cook food using low temperature for up to 3 hours.
We recommend using “Slow cook” for meat and chicken as well as stews or
soups. With this setting you will get tender and juicy results with a intense taste.
Tip
• Slow cook can also be used in combination with other cooking methods. For
example, you can rst slow cook your meat and then shortly fry it in the pan
for an optimal result.
The cooking time given in the table is guideline for fresh ingredients. If the
cooking time does not lead to the expected cooking result, adjust the cooking
time accordingly.
Ingredient Cluster
Meat Pork ribs 1000g 80°C 120 min
Streaky pork 1000g 80°C 180 min
Lean pork 1000g 80°C 180 min
Ingredient Amount
Cooking temperature
Cooking time
26 English

Ingredient Cluster
Lean beef 1000g 80°C 180 min
Chicken Whole chicken 1350g 80°C 180 min
Vegetables Ratatouille 800g 80°C 180 min
Stew Beef stew 1500g 80°C 180 min
Fruits Plum jam 1000g 80°C 180 min
Ingredient Amount
Cooking temperature
Cooking time
Sous vide
Sous vide is a special cooking method which uses vacuum at a low temperature
in order to cook food to its precision. In order to reach the vacuum, use dedicated
sealing plastic bags for sous vide cooking and a vacuum device. With your Air
Cooker, you can do sous vide cooking for up to 3 hours. With this setting, you will
get juicy and tender results for meat while there is no risk of overcooking.
Tip
• Sous vide can also be used in combination with other cooking methods. For
example, you can rst cook your meat with “Sous vide” and then shortly fry it
in the pan for an optimal result.
Warning
• If using the sous vide function, make sure to use only high quality sous
vide bags.
• If you put food in sous-vide bag, make sure to select sous-vide cooking
method otherwise sous-vide bag could melt.
• Sous vide function at temperatures below 50°C is not recommended as it
could provoke bacteria growth.
The cooking time given in the table is guideline for sous vide cooking. If the
cooking result does not meet your expectation, we recommend setting the
temperature a few degrees lower or higher to better meet personal taste. You
can also adjust the cooking time.
Ingredient
Cluster
(Red) Meat
Pork
Ingredient
Beef tenderloin
steak, 350 g, 4
cm thick
Rib eye steak,
450 g, 4 cm thick
Beef let
mignon, 250 g, 4
cm thick
2 x pork chops a
250 g
Cooking temperature
54°C
54°C 100 - 180 min Medium-raw
54°C
63°C 60 - 120 min
Cooking
humidity
Cooking time
70 - 180 min Medium-raw
80 - 120 min Medium-raw
Doneness
level
Medium,
tender, juicy
27English

Ingredient
Cluster
Poultry
Seafood
Fish
Eggs
Vegetables
Desserts
Ingredient
2 x chicken
breasts a 250 g
Shrimp, with
shell, mediumsized, 400 g
4 x salmon let a
150 g
10 medium-sized
eggs
10 medium-sized
eggs
Green asparagus,
250 g
Broccoli orets,
400 g
Caramel an, 5 x
9x5 cm ramekins
Cheesecake, 6
x 39cl glass jars
with lid
Cooking temperature
66°C
56°C 40 - 65 min
52°C
66°C 55 - 70 min
74°C
85°C 12 - 18 min Snappy
85°C 15 - 20 min Snappy
82°C
80°C 80 - 90 min Creamy
Cooking
humidity
Cooking time
70 - 180 min
45 - 70 min Firm and aky
60 - 75 min
70 - 80 min Silky
Doneness
level
Juicy and
tender
Opaque,
buttery, juicy
Poached like,
set white,
malleable yolk
Hard boiled
like
Defrost
We recommend using “Defrost” to defrost frozen food such as vegetables, meat,
sh, and fruits.
The cooking time given in the table is guideline for defrosting. The defrosting
time depends on the amount and size of the frozen food. If the frozen food is not
completely defrosted, add some more minutes to the defrosting time.
Ingredient Cluster Ingredient Amount Defrosting time
Fruits All kinds of berries 500g 8 min
Apple sauce/pieces 500g 10 min
Plums 500g 10 min
Peaches 500g 10 min
Vegetables Frozen vegetables in a block 500g 10 min
Fish Fish llets 200g 5 min
Whole sh 250g 8 min
Shrimps 300g 5 min
Beef and Pork Meat Minced meat 250g 15 min
Goulash meat 400g 20 min
Cutlets 250g 15 min
Sausages 250g 10 min
28 English

Ingredient Cluster Ingredient Amount Defrosting time
Poultry Whole chicken 1200g 30 min
Chicken breast 400g 15 min
Chicken drumsticks 400g 13 min
Baked goods Pu pastry 300g 10 min
Batters 500g 15 min
Cinnamon Rolls 500g 13 min
Bread/rolls Bread rolls 500g 13 min
Rye bread 500g 15 min
Whole grain bread 500g 15 min
White bread 500g 15 min
Ready meals Soups 1000g 25 min
Stews 1000g 30 min
Rice 250g 8 min
Important
• Do not use liquid from defrosted food for cooking.
• Do not refreeze food once it has thawed.
Reheat
We recommend using “Reheat” for a hassle-free, fast and healthy re-heating of
your leftovers for a juicy and homogeneous reheating results.
The cooking time given in the table is guideline for reheating. If your food is not
reheated to the expected result, add some more minutes to the reheating time.
Ingredient Cluster Amount Reheating time
Side dishes - Pasta 500g 10 min
Side dishes - Rice 500g 10 min
Casserole 1500g 25 min
Fish llet(s) 250g 8 min
Lasagna 1000g 25 min
Beef/pork meat 250g 10 min
Poultry 250g 10 min
Vegetables 500g 10 min
Soup 1000g 20 min
Dim sum 400g 12 min
Pancake(s) 250g 8 min
Omlette 250g 8 min
Pizza 2 slices 10 min
29English

Mode “manual”
This mode is recommended for Air Cooker users, who are already familiar with
the device and have gained some experience in “recipe-guided cooking” or in
“ingredients cooking”.
In this mode you can set all cooking parameters, such as time, temperature and
humidity manually.
You can choose the time from 1 to 60 minutes and the temperature from 60°C to
160°C. There are three humidity settings, which are (humidity o), (medium
humidity) and (high humidity).
Accessories
Your Air Cooker comes with basic accessories and with some additional ones,
depending on the model you purchased.
See below some possibilities how you could combine them for cooking in your
Air Cooker.
Note
• Always use the Air Cooker with the bottom tray and the grid. All other
accessories are placed on the top.
Bottom tray and grid only
30 English
Bottom tray and grid plus basket
Bottom tray and grid plus cooking pot
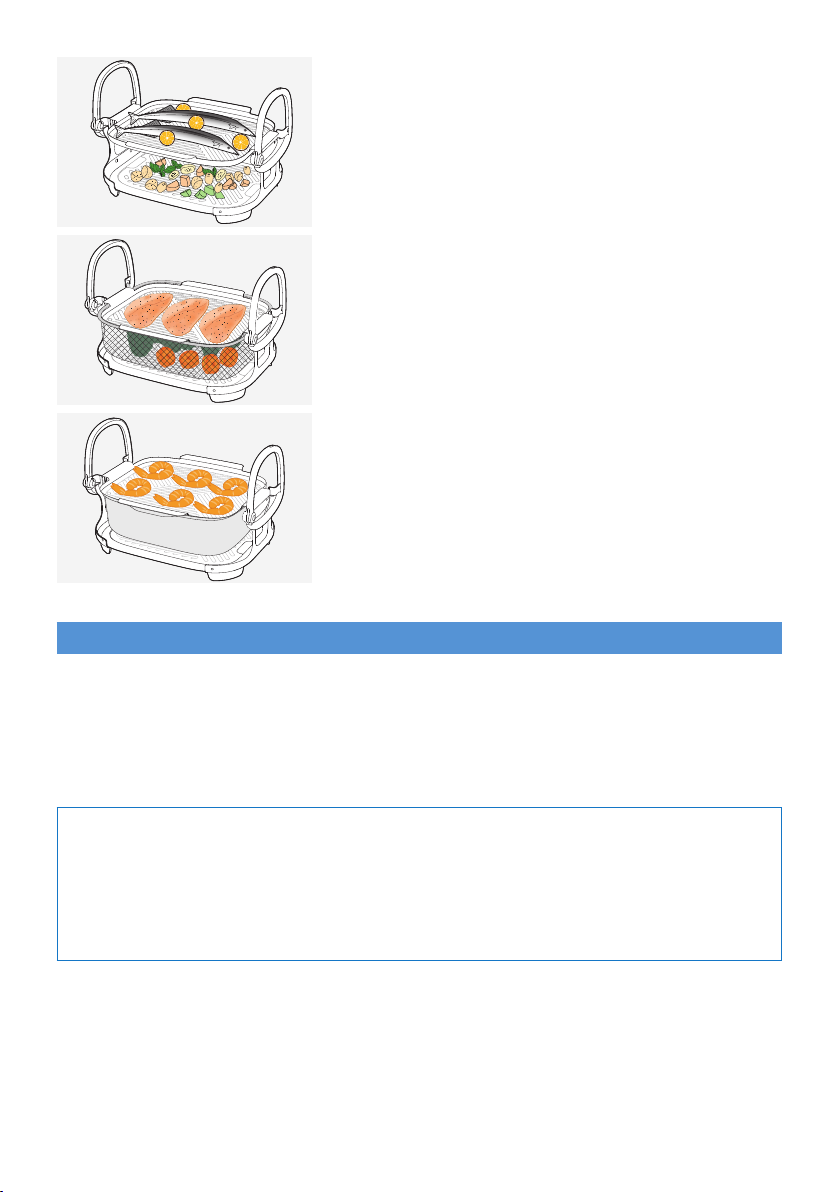
Bottom tray and grid plus second layer
Bottom tray and grid plus basket and second
layer
Bottom tray and grid plus cooking pot and
second layer
Voice control
1. Make sure your Air Cooker is connected and paired with your smart device,
and the remote consent is given in the NutriU app, to be found in your
prole.
2. Make sure you have downloaded the voice assistant app.
3. Connect the NutriU app with your voice assistant app.
Note
• In case you do not see the option to activate voice control in NutriU itself,
activate the Amazon Alexa skill through your voice assistant app.
• You can nd detailed voice commands in the voice assistant app.
• Connecting the NutriU app with your voice assistant app can also be done
when you connect and pair your Air Cooker for the rst time.
31English

Cleaning
General
Important
• Do not use metal kitchen utensils or abrasive cleaning materials as this
may damage the non-stick coating.
• Do not use sharp or spiky tools to clean the water nozzle inside the
cooking chamber, this could destroy the nozzle.
Note
• The inside of the appliance, the bottom tray, the basket, the cooking pot, and
the second layer have a non-stick coating.
• When using the appliance for the rst time, thoroughly clean the cooking
chamber by wiping it out with hot water. Also clean the bottom tray, the
basket, the cooking pot, and the second layer with hot water and a nonabrasive sponge. (see “Cleaning table”).
• Clean the appliance after every use. Remove oil and fat from the cooking
chamber and the lid after every use.
• Do not ll the cooking chamber with water for cleaning.
1. Press and hold the rotary button to switch o the appliance, remove
the plug from the wall outlet and let the appliance cool down for
approximately 30 minutes with the lid open.
2. Remove the bottom tray and the basket, cooking pot, and/or second layer
accessory to let the Air Cooker cool down more quickly.
3. Clean the cooking chamber with hot water, if needed use dishwashing
liquid and a non-abrasive sponge (see “Cleaning table).
4. Detach the grid from the bottom tray for an easy and thorough cleaning.
Tip
• If food residues stick to the cooking chamber, you can use the automated
cleaning program “EasyClean” to soften the residues and clean the appliance
easily (see ´Use the automated cleaning programs`).
32 English

5. Clean the bottom tray, the basket, the cooking pot, and the second
layer accessory in a dishwasher. You can also clean them with hot water,
dishwashing liquid and a non-abrasive sponge (see ‘Cleaning table’).
6. Wipe the outside of the appliance with a moist cloth.
7. Make sure the inside of the appliance is fully dry before storing with the lid
closed.
Tip
• If you will not use the appliance for a longer time, thoroughly clean the
inside before storing to avoid the build-up of odours, etc. Afterwards leave
the lid open until the inside of the appliance is completely dry. Never store
the appliance with the lid closed if the inside is not completely clean and dry.
Note
• Make sure no moisture remains on the display. Dry the control panel with a
cloth after you have cleaned it.
• In case of water or moist accumulation in the cooking chamber due to
any reason (excessive moist released by the food, water condense, during
automated cleaning programs etc.), remove the water by using a cleaning
sponge before it is getting to the level of the drainage hole on the rear part.
This could cause smoke emissions due to contact with the air heater.
33English

Cleaning Table
Note
• Use the “Rinsing” or “Easy Clean” function to thoroughly clean the inside of
the cooking chamber.
34 English

Use the automated cleaning programs
Rinsing
It is recommended to use the rinsing program when you have not used your Air
Cooker for a longer time. It ushes the internal system with water.
Easy Clean
The EasyClean function helps to dissolve greasy residuals and deep clean the
cooking chamber. The program takes 20 minutes. If the program has nished, you
only need to wipe the cooking chamber with a wet cloth.
Descaling
Your Air Cooker will remind you with a notication on the display when it is time
to descale the appliance.
Note
• We recommend descaling the appliance when you see the reminder,
otherwise the water system may get clogged. If you want to descale the
device later, you can skip the notication. When you switch on your Air
Cooker for the next time, you will be reminded again.
1. Go to “Tools → Descaling” on the appliance display.
Note
• Make sure the appliance is switched on and the cooking chamber has no
residual liquid. If the appliance is still hot, let it cool down with the lid open
for at least 30 minutes.
2. Pour about 80 ml of the Philips CA6700 descaling liquid or citric acid in the
empty water tank and put the water tank back to the appliance without
adding additional water.
Note
• Only use Philips descaling water or citric acid. Under no circumstances
should you use a descaling liquid based on sulfuric acid, hydrochloric acid,
sulfamic or acetic acid (vinegar) as this may damage the water system in your
appliance and not dissolve the limescale properly.
3. Press “continue” to start descaling.
Note
• The appliance will now dispense the descaling solution. The dispensed liquid
will be collected on the bottom of the cooking chamber.
4. Wait until you get the next instruction on the display screen. This will take
about 10 minutes.
5. Empty the water tank, rinse it and then rell it with fresh water up to the
MAX indication.
35English

6. Once you have done this, conrm it on the display screen by pressing “OK”
with the rotary button. The device then will ush the water system with
fresh water.
7. When the ushing is done, press “OK” to nish the descaling process.
8. Wipe the bottom of the cooking chamber with a dry cloth.
Tip
• You can use citric acid (mix it with water according to instructions) to remove
small calcication spots inside the cooking chamber. Just put it in the pan, let
it work for a couple of time and then swipe it o.
Storage
1. Unplug the appliance and let it cool down.
2. Empty the water tank.
3. Make sure all parts are clean and dry before storing.
4. Stack the accessories in each other and store them in the appliance.
Tip
• If you will not use the appliance for a longer time, thoroughly clean the
inside before storing to avoid the build-up of odours, etc. Afterwards leave
the lid open until the inside of the appliance is completely dry. Never store
the appliance with the lid closed if the inside is not completely clean and dry.
Note
• Always hold the Air Cooker horizontally when you carry it.
• Always make sure that the accessories of the Air Cooker are stacked in each
other correctly, so they can be stored in the appliance and the lid can be
closed.
Recycling
• Do not throw away the product with the normal household waste at the end
of its life, but hand it in at an ocial collection point for recycling. By doing
this, you help to preserve the environment.
• Follow your country’s rules for the separate collection of electrical and
electronic products. Correct disposal helps prevent negative consequences for
the environment and human health.
36 English

Declaration of Conformity
Hereby, DAP B.V. declares that the Air Cooker NX096x is in compliance with
Directive 2014/53/EU.
The full text of the EU declaration of conformity is available at the following
internet address: https://www.philips.com.
The Air Cooker NX096x is equipped with a WiFi module, 2.4GHz 802.11 b/g/n
with a maximum output power of 92,9mW EIRP.
Guarantee and Support
If you need information or support, please visit www.philips.com/support, scan
the QR code provided on the pack or in the introduction booklet or read the
separate worldwide guarantee leaet.
Software and rmware updates
Updating is essential to safeguard your privacy and the proper functioning of
your Air Cooker and the app.
Please always update the app to the latest version.
The Air Cooker is updating the appliance rmware automatically.
Note
• To enable the Air Cooker to update to the latest rmware version, make sure
your Air Cooker is connected to your home WiFi.
• Always use the latest app and rmware.
• Updates are made available when there are software improvements.
• A rmware update is started automatically when the Air Cooker is in stand-
by mode. This update takes a few minutes. During this time the Air Cooker
cannot be used.
Device compatibility
For detailed information about the compatibility of the app, please refer to the
information in the app Store.
Factory reset
For a factory reset of the Air Cooker, select the factory reset function in the Tools
→ Settings menu.
Your Air Cooker is then no more connected to your home WiFi and not paired
with your smart device anymore.
37English

Troubleshooting
This chapter summarizes the most common problems you could encounter with
the appliance. If you are unable to solve the problem with the information below,
visit www.philips.com/support for a list of frequently asked questions or contact
the Consumer Care Centre in your country.
Problem Possible cause Solution
The outside of the
appliance gets hot during
use.
The appliance does not
switch on.
I see some peeling o
spots inside my Air
Cooker and on some
accessories.
I hear some strange noise
coming from the inside of
the appliance.
The heat inside the cooking
chamber radiates to the outside
walls.
The appliance is not plugged in.
Several appliances are
connected to one outlet.
Some small spots can appear
in the cooking chamber or on
accessories due to incidental
touching or scratching of the
coating (e.g., during cleaning
with harsh cleaning tools
and/or while inserting the
accessories into the cooking
chamber.
The appliance is equipped
with a fan, which is needed to
transport the heat to the food,
and also a water pump, which
is needed for the steaming
function of the appliance.
This is normal. All handles and knobs
that you need to touch during use
stay cool enough to touch.
The cooking chamber, the bottom
tray and the grid, the basket, the
cooking pots (for some models),
the second layer (for some models)
and the retractable handles always
become hot when the appliance is
in use to ensure the food is properly
cooked. These parts are always too
hot to touch.
If you leave the appliance switched
on for a longer time, some areas get
too hot to touch. These areas are
marked on the appliance with the
following icon:
As long as you are aware of the hot
areas and avoid touching them, the
appliance is completely safe to use.
Check if the plug is inserted in the
wall outlet properly.
The appliance has a high wattage.
Try a dierent outlet and check the
fuses.
You can prevent damage by putting
the tray/grid/basket or another
accessories combination into the
cooking chamber carefully trying
not to knock against its walls. If you
notice that small pieces of coating
has chipped o, please be informed
that this is not harmful as all
materials used are food-safe.
This noise is normal and intended.
If the noise gets louder or changes
clearly, please contact the Philips
support center for further advice.
38 English

Problem Possible cause Solution
In case you cooked with a
The food, which I cooked,
did not turn out as
expected.
I only have some
ingredients under
"ingredients" on my
appliance.
Smoke and smell comes
out of the Air Cooker.
The WiFi LED on my Air
Cooker is not shining
anymore.
NutriU recipe, developed for
your Air Cooker, you might
not have followed the recipe
in terms of the amount of
ingredients you put in.
You changed cooking
parameters, such as time,
temperature or humidity,
although otherwise
recommended. This might
impact the cooking result.
You used a "cooking method",
which was not appropriate for
the type of food you cooked,
e.g., air steam setting used for
leafy greens might lead to an
overcooked, soggy result. Use
the "steam" setting instead and
refer to the cooking chapters
in the user manual for further
information.
Your Air Cooker comes with a
default ingredient list, which
gets updated when you rst
connect to your WiFi and pair
your Air Cooker with your smart
device.
Your are cooking fatty
ingredients
The cooking chamber still
contains greasy residuals from
previous use.
Marinade, liquid or meat juices
are splattering in the rendered
fat or grease
The Air Cooker is not connected
to your home WiFi anymore.
You might have changed your
home WiFi network.
When you cook with a NutriU recipe,
follow the quantities recommended
in the recipe. Changes might impact
the cooking result.
Check out the recipe and change the
cooking parameters only on demand,
e.g., when you want your food to be
longer cooked than recommended;
when you want your beef to be more
rare etc.
Refer to the cooking chapters in
the user manual to nd more info
and guidance on how to cook with
dierent cooking methods.
Follow the WiFi set up process by
entering Tools -> Settings -> WiFi
Setup on your appliance and follow
the instructions on the appliance
and in the app. Once this is done,
your ingredients list will be updated
automatically with the ingredients
intended for your country of origin.
Carefully pour o any excess oil or fat
from the cooking chamber or from
the accessories. You can also use the
"EasyClean" program of the appliance
- available under "Tools", which helps
dissolve fatty ingredients and clean
your appliance more thoroughly.
Smoke and smell is caused by greasy
residues heating up in the cooking
chamber. Always clean the cooking
chamber and the accessories, which
you use for cooking,
Pat food dry before placing into the
Air Cooker.
Start the WiFi set up process by
entering Tools → Settings → WiFi
Setup on your appliance and follow
the instructions on the appliance and
in the app.
39English

Problem Possible cause Solution
The app shows that the
pairing process is not
successful.
I cannot use the app to
remotely control my Air
Cooker (e.g. sending a
recipe and start cooking
from the NutriU app).
There is water in the
cooking chamber after
cooking.
Another user has paired the Air
Cooker with a dierent smart
device and is currently cooking.
The Air Cooker is not connected
to your home WiFi and/or not
paired to your smart device.
You might not have checked the
"remote consent", to be found
in your NutriU personal prole.
The Air Cooker produces steam
during cooking. The steam
condenses on the food and on
the inside walls of the cooking
chamber. The condense water
remains in the cooking chamber
after cooking.
Wait until the other user has nished
the current cooking process. Then
pair your smart device with the Air
Cooker again.
First, check if your Air Cooker is
connected to a WiFi network. If you
completed the WiFi Setup through
the Philips NutriU app and connected
your appliance to a specic WiFi
network, you should see a steady
white WiFi symbol on the display of
the appliance.
Got to the personal prole tab in
the NutriU app and tap the "remote
consent" check box.
A certain amount of water remaining
in the cooking chamber after cooking
is normal. Just wipe it out with a wet,
non-abrasive cloth.
40 English

© 2022 Philips Domestic Appliances Holding B.V.
All rights reserved
 Loading...