

Page 1
MAGNAVOX
Set-Up and Quick Use Guide
Table of Contents
Projection Television
and Remote Control
Antenna or
jil Cable TV
Am(i;nna).\ & В IM44.S
our TV has two sepa
rate ANT(enna)/Cable
F
inputs on the rear of the
set. These two signal
inputs offer convenient
hook-up options for both
normal TV program view
ing and Picture-In-Picture
(PIP) features.
The ANT(enna) A input is
intended for use and view
ing on the TV’s main
screen. Your home’s pri
mary Antenna, or Cable
TV signal, should be con
nected to this input for
normal TV setup, use and
feature operation.
The ANT(enna) B input is
a second, or auxiliary sig
nal source, designed to
supply your TV’s PictureIn-Picture (PIP) feature.
For many homes the use of
a single existing Antenna
(or Cable TV) source, for
both ANT A and B, will be
the preferred method of
connection. This type of
connection (optional
Signal Splitter required)
will work properly for the
TV’s Main on-screen fea
tures, as well as retain all
the features designed for
PIP. For more details refer
to the Picture-In-Picture
section in your other
owner’s manual.
—C begin)
r<3>
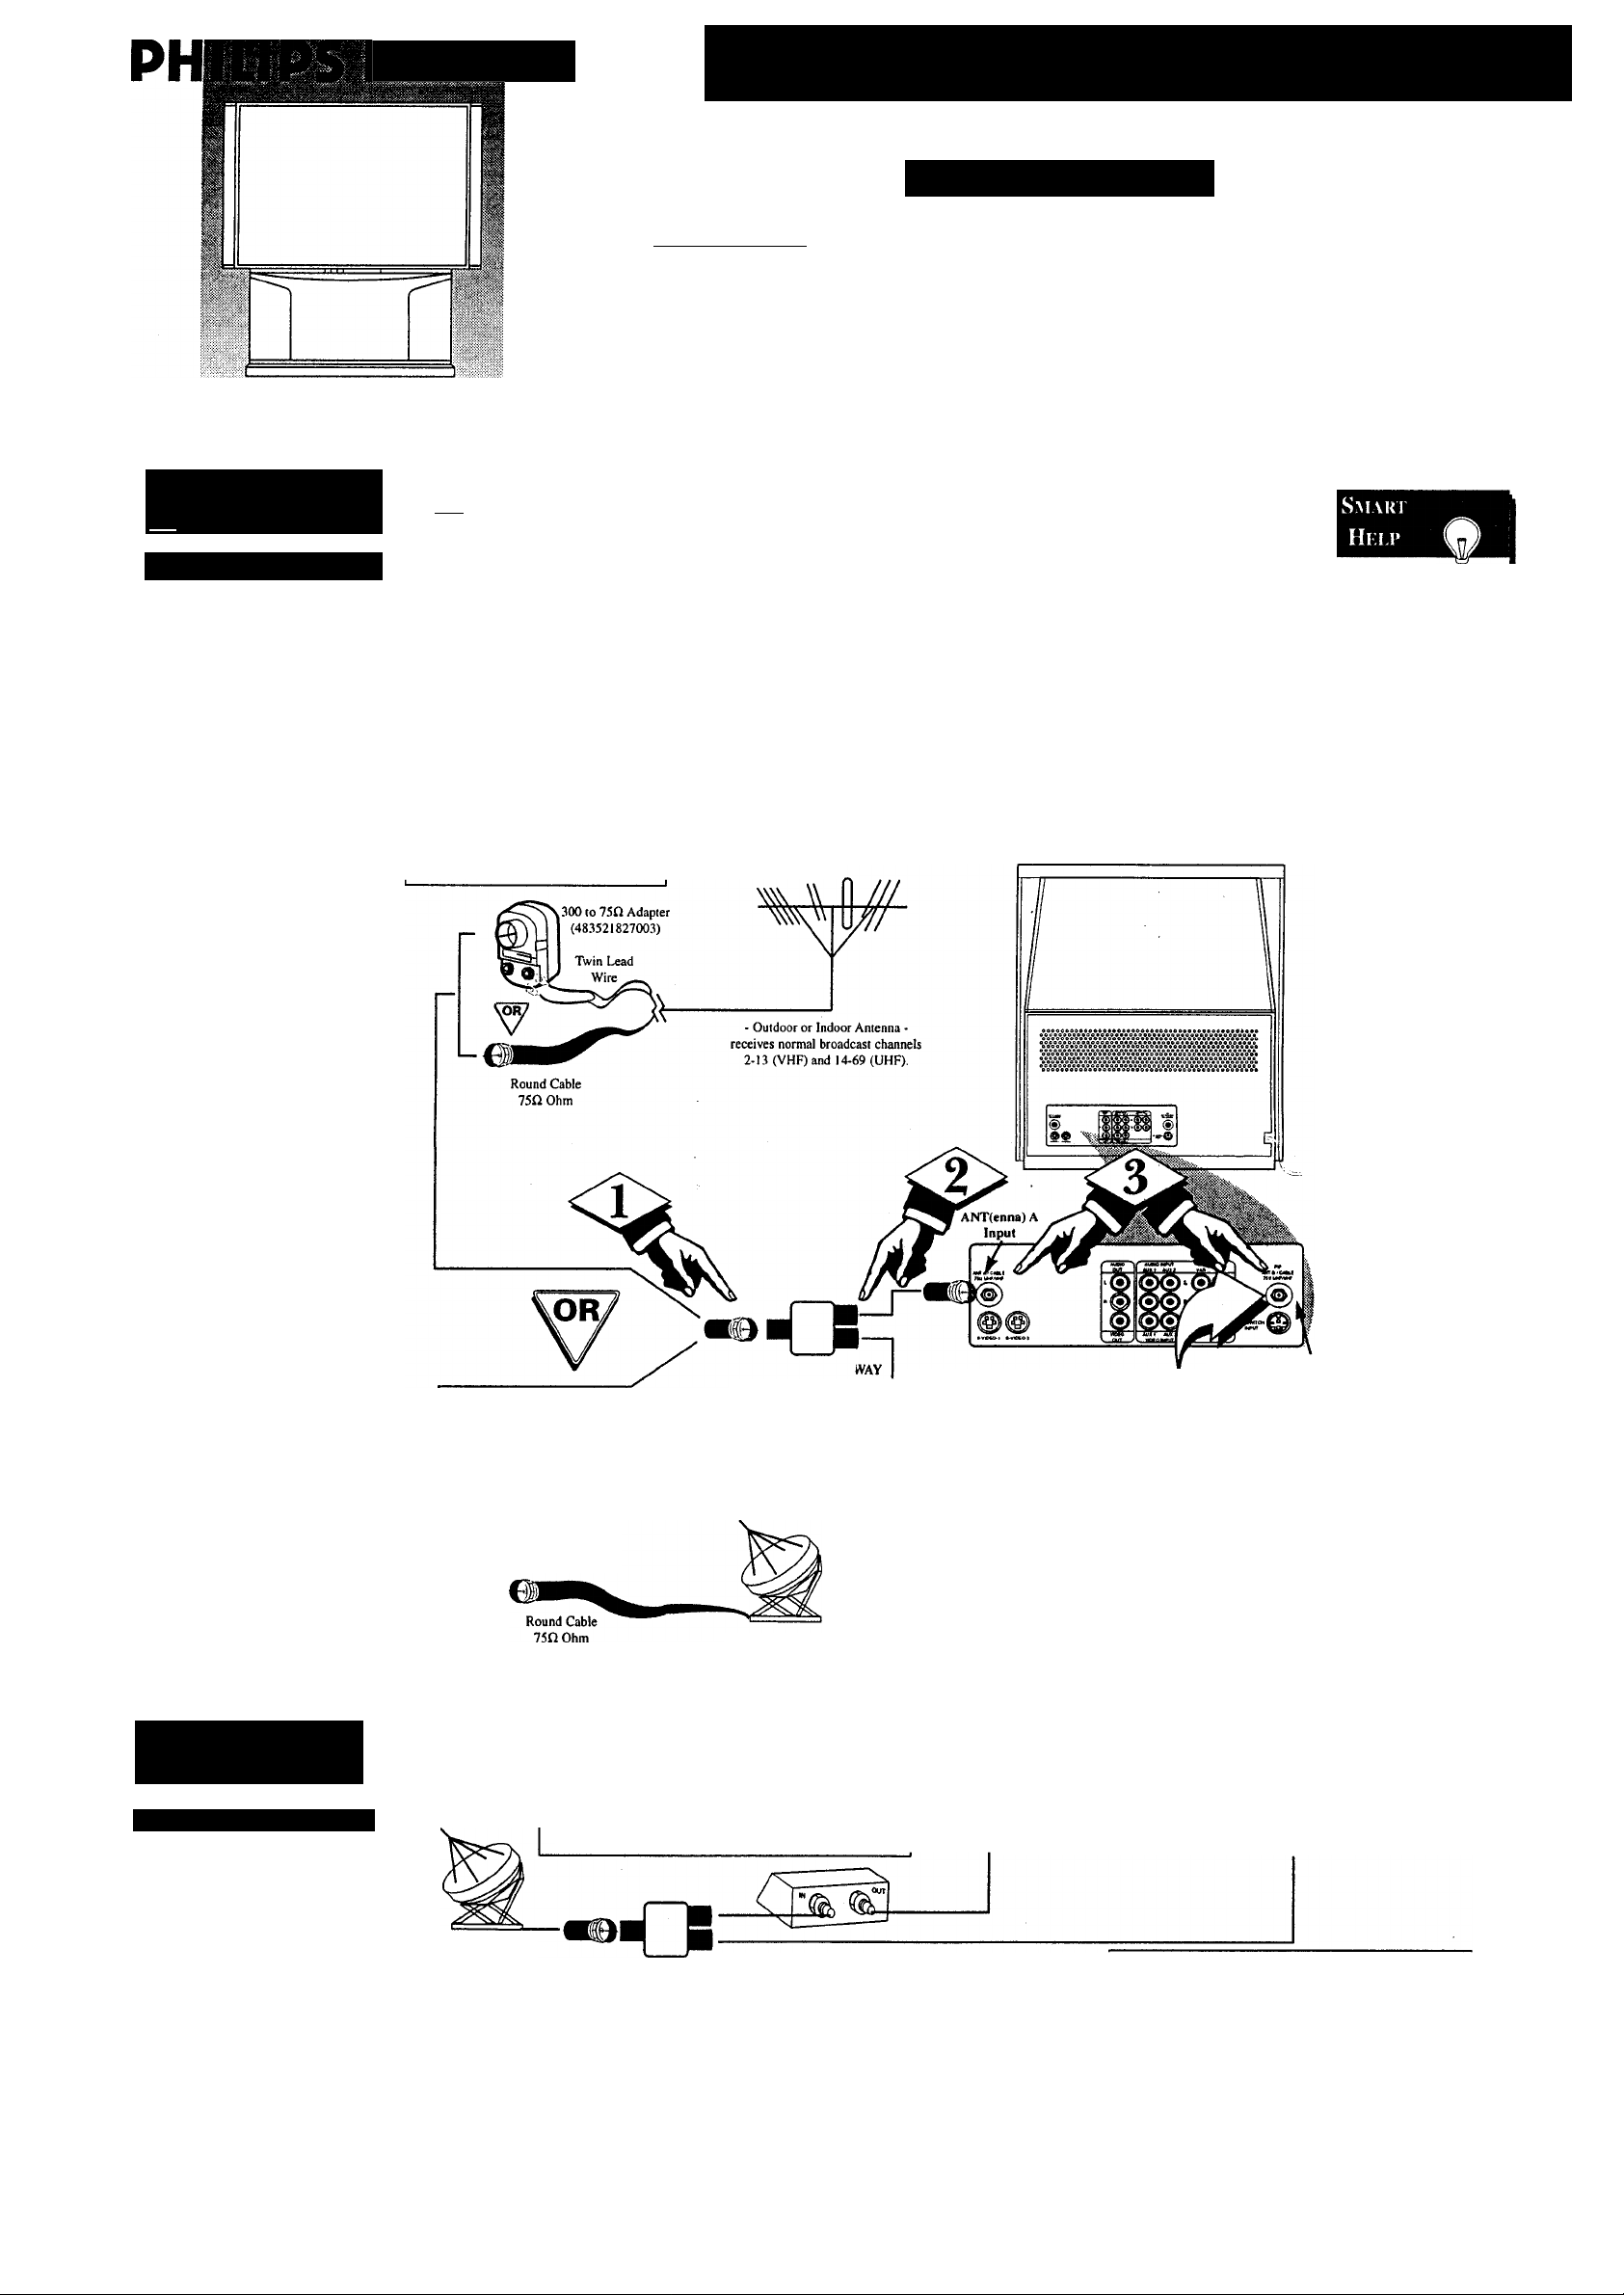
A typical ANT(enna)
A and B connection (using a
common signal source and an
optional Signal Splitter):
If your Antenna or Cable TV
signal has a round cable con
nector (75 ohm) on the end,
then you're ready to connect it
to the 75ohm Signal Splitter.
If your antenna has flat twinlead wire (300 ohm), you first
need to attach the antenna wires
to the screws on a 300 to 75
ohm adapter before connecting
to the 75ohm Signal Splitter.
Cable TV Signal
^ J Getting Started
Warning/Precautions...........................................1
Hooking Up Your TV.......................................................1
Attaching the Side Speaker Baffles...................................2
How to Use the First Time Set-Up Control
Basic TV and Remote Control Operation...........................3
How to Use the On-Screen Menu Controls.......................4
<l>
Connect your Antenna or
Cable TV signal to the single
75 ohm input plug on the twoway Signal Splitter (optional).
Then connect two lengths of RF
Coaxial Cable to the two Output
plugs on the two-way Signal
Splitter (F-type connector on
both ends).
Combination VHF/UHF Antenna
OPTIONAL TWO.'
SIGNAL SPLITTER
(single 75ohm Input to twin
75 ohm Outputs • optional
RF Coaxial connecting
cables also required)
Cable TV Company
........................
<s>
plugs on the Signal Splitter to
the ANT A and ANT B inputs
on the rear of the TV. Push the
round connector end of the RF
Coaxial Cable onto the
ANT(enna) plug and screw it
down tight (if using threaded
cables).
Note: Proper operation of your TV is not dependent upon
connection of the ANT B input. Its main purpose is to provide
an easily connected, dedicated picture source for PIP feature
use. Other signal source options (such as a satellite dish sys
tem, additional external antenna, VCR, or Video Game) could
also be connected and displayed on the TV screen through the
use of the ANT B input.
Note; Although the ANT B input can be used and swapped
as the source for the TV’s Main picture, certain setup fea
tures (such as TV Guide Plus+) are only based on a signal
being detected at the ANT A input. To ensure that all features
are operating properly, you may not want to rely solely on the
ANT B input as your TV’s Main screen signal source.
For details on product registration, warranty,
and service refer to the other literature included
with your TV information packet.
Please retain all these materials and keep them
handy for future reference.
2
WARNING: TO PREVENT FIRE OR SHOCK
HAZARD DO NOT EXPOSE THIS UNIT TO
RAIN OR EXCESSIVE MOISTURE.
Connect the twin Output
Back of TV
ее'
ANT(enna) В
Input
Remember, _
be sure to set the
TV for the type sig
nal you've connect
ed (see "SETUP"
on page 2 of this
Guide.)
Yoiir TV can set
itself to select only
the channel numbers
on your Cable sys
tem (see “Setup"
page 2). If you use a
Cable Converter box,
set the TV to the
same channel as the
converter's CH 3/4
switch (on the rear of
the converter.)
To order any
optional accessory
contact your dealer
or call the toll-free
accessory ordering
number (1-800-292-
6066):
• Two Way Splitter
(МбКЮО)
• 300-75 ohm
Adapter
(M61020)
• UHF/VHF
Antenna
Combiner
n Cable Box
Cahi.i: C’ow i;im r Boxk.s
or homes with Cable
TV Converter
F
Descrambler Boxes (with
Premium/Movie Channels
scrambled), follow the
steps to the right for an
alternative ANT A and
ANTB PIP feature
hookup. Note the Cable TV
signal will be split before
connection to the
Converter box (an optional
two-way 75 ohm Signal
Splitter will be required).
The signal routed to the TV’s ANT A input will allow for
Premium/Movie channels to be viewable on the TV.
Channel selection will be at the Converter.
The ANT A input channel on the TV should be set to the same
output channel as the Converter box (usually CH3 or 4).
Cable TV Company
OPTIONAL TWO-WAY
t BEGIN)
r<i> Connect your Cable
TV signal to the single 75 ohm
INPUT plug on a two-way
Signal Splitter (optional).
SIGNAL SPLITTER
Coaxial Cable to each of the
OUTPUT plugs on the 75 ohm
Signal Splitter. The two lengths
of RF Coaxial Cable need Ftype connectors (screw-on or
push type) for both ends.
Cable TV Converter
Box Connection
Connect one end of RF
1 • EL6246 E001
Connect to ANT A Input
<s>
Connect one of the Signal
Splitter OUTPUTS to the
INput terminal on the Cable
TV Converter Box. Then route
another connection from the
Cable Converter OUTput ter
minal to the ANT A Input on
the rear of the TV.
Connect to ANT В Input
• The signal routed to the TV’s ANT B input will allow for
the selection and viewing of Cable channels at the TV
(except for the scrambled Premium/Movie channels).
<Ф
Connect the remaining
Signal Splitter OUTPUT
from the Splitter to the ANT
B Input on the rear of the
■ ^1
Page 2
Attaching the Side Speaker Baffles
Speaker Baeei.ics
bur new Projection
Television comes with it’s
Side Speaker Baffles detached.
y
Locate the Speaker Baffles and
unwrap them. To attach the
Speaker Baffles to the TV cabi
net, follow the steps to the right.
This Projection Television
comes with two Side Speaker
Baffles (right and left) that the
consumer must attach.
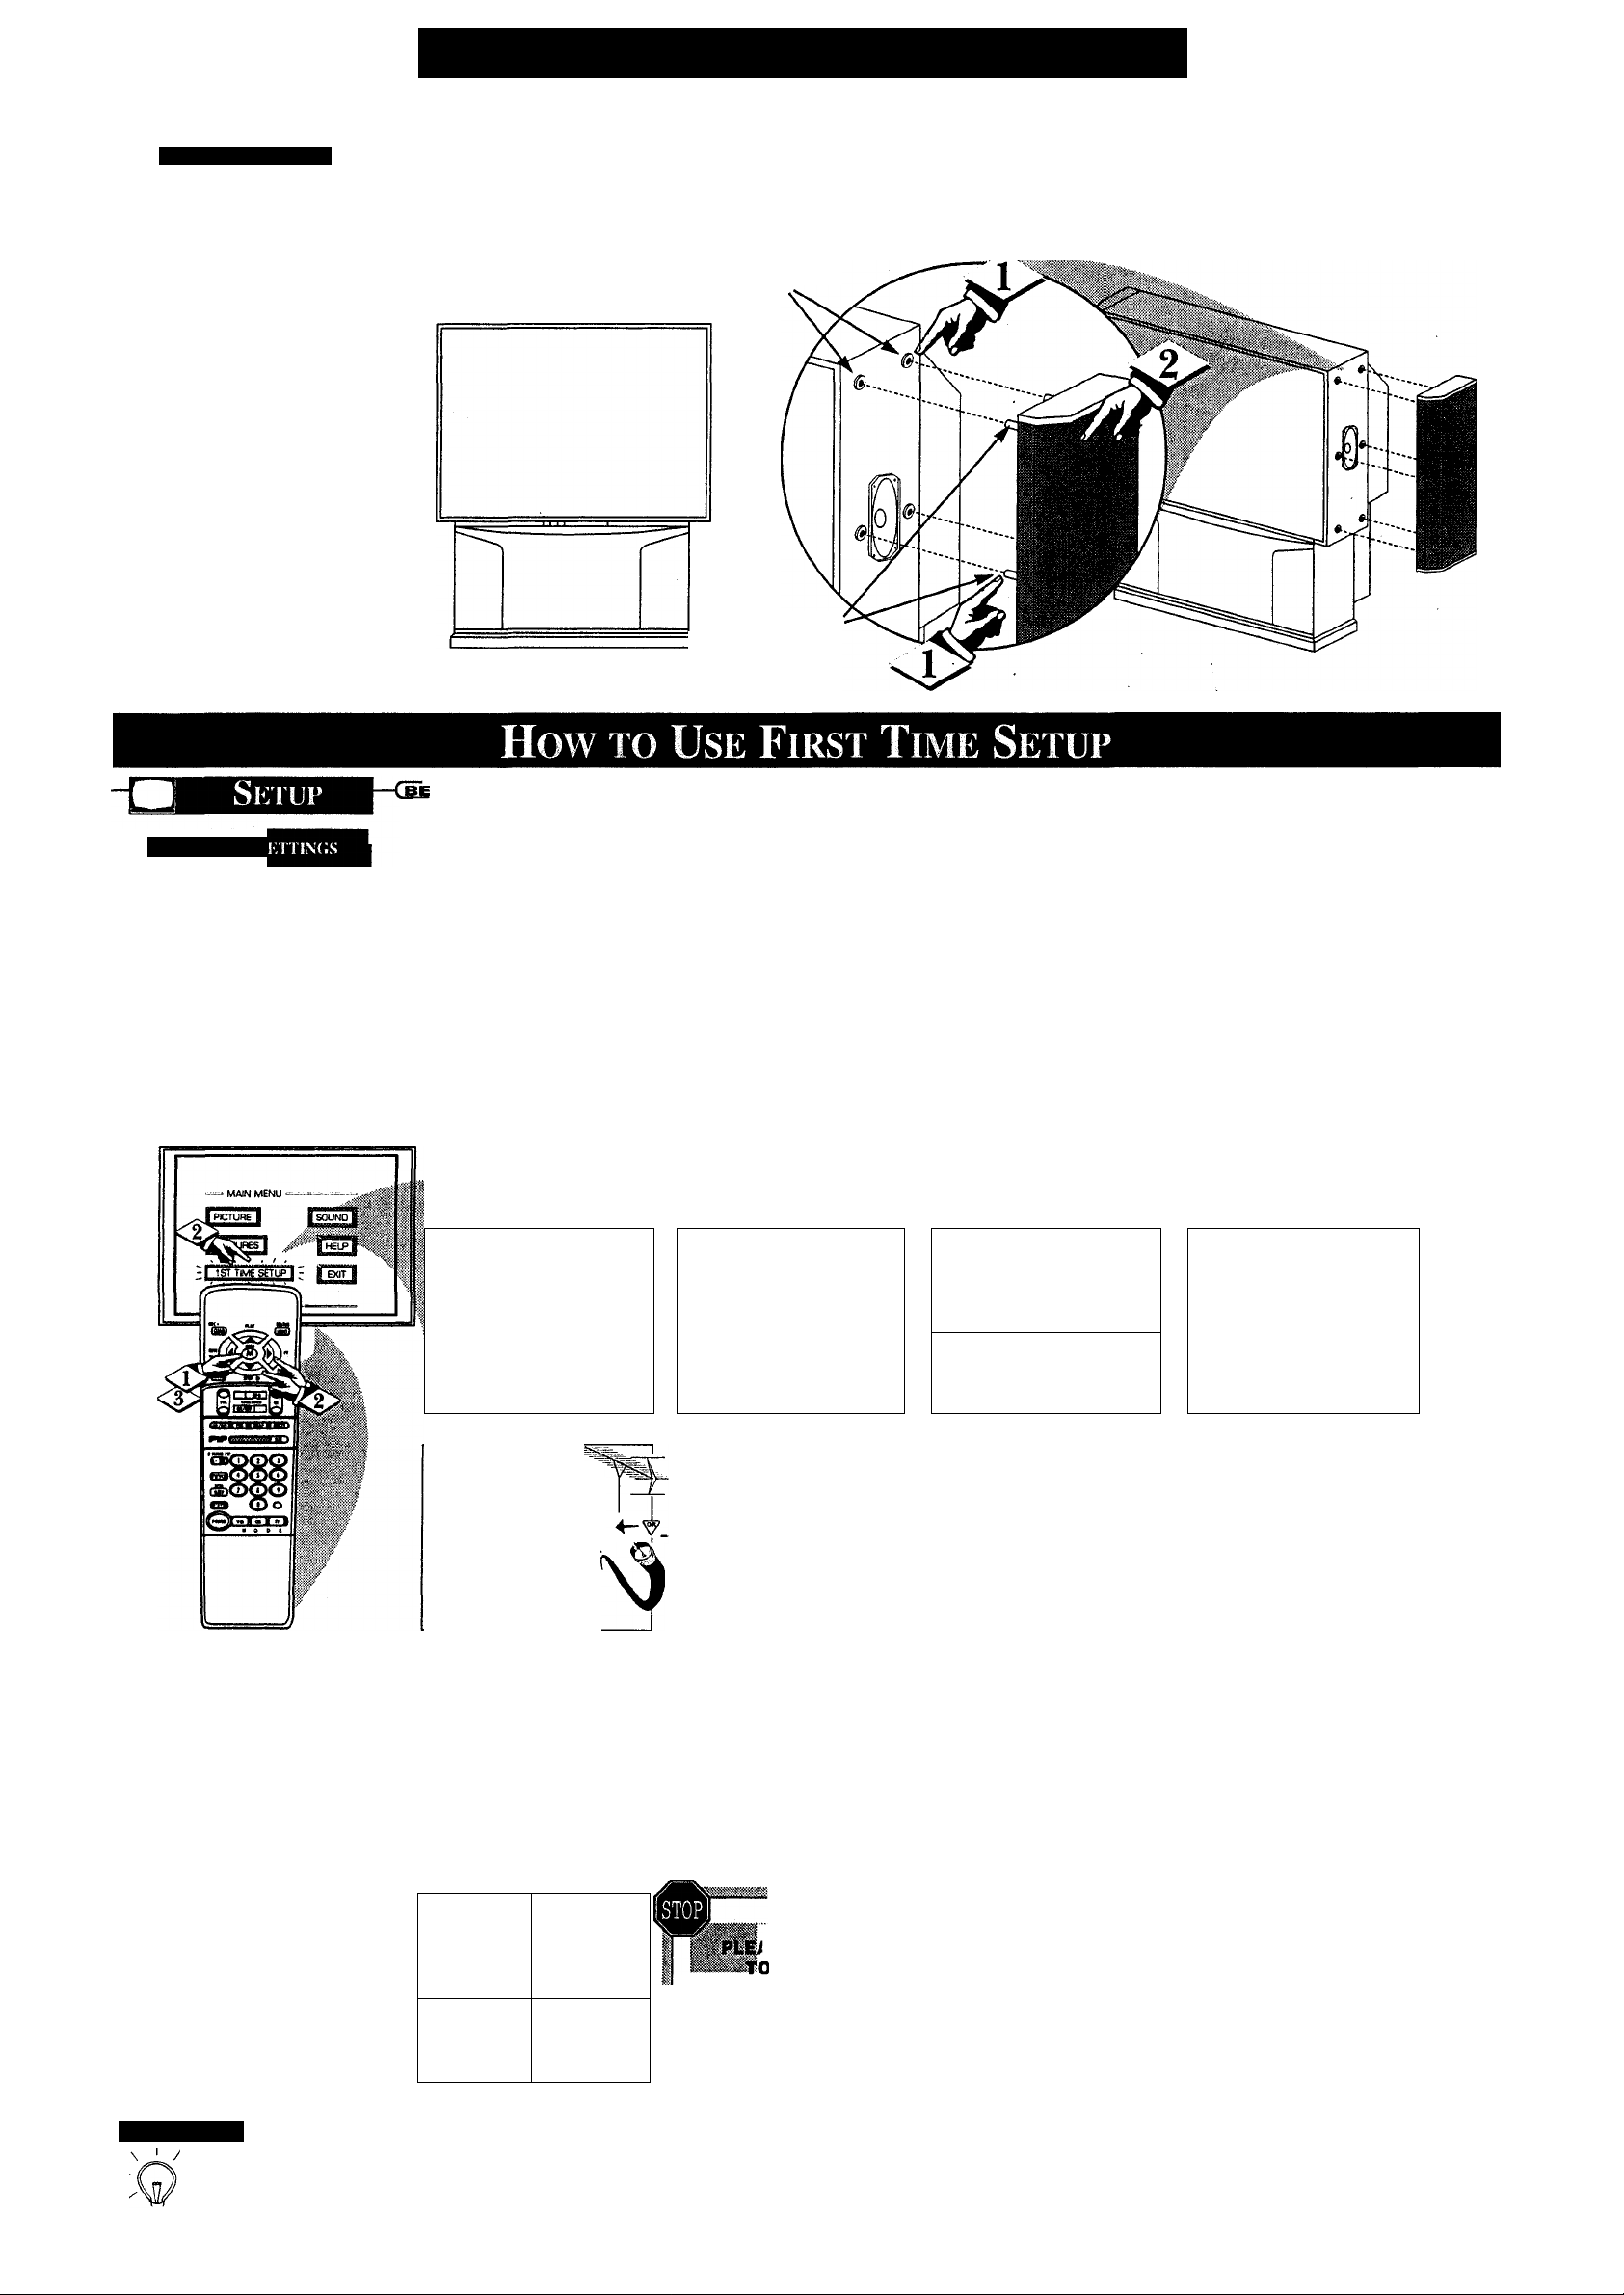
r Locate and align the
mounting holes in each side
of the PTV cabinet and the
mounting pins on the inside
of the Speaker Baffles (six
each side).
<l>f
Press the baffle to the cabinet. Then with your fist give a gentle
but firm hit to the Speaker Baffle (directly over the areas of the mount
ing pins). You will hear the baffle snap into place. If you notice any
space between the baffle and the PTV cabinet, the mounting pins did
not set properly into the mounting holes. Please repeat the process.
Mounting Holes in side
of PTV cabinet
Mounting Pins inside of
j Speaker Baftle
Ai roM vnc S
jrprst Time Setup automatical-
Jl ly takes care of some basic
TV control settings for you.
Follow the steps in this section
to quickly add area channel
numbers into the TV's memory,
and set the TV for your connect
ed signal (Antenna or Cable.)
You can also set-up your TV
Guide Plus+ feature for the first
time as well.
AiS)
-------------------
r<l> Press the MENU (M)
button on the remote or TV.
An on-screen list of TV fea
tures shows on the screen "MAIN MENU".
The Fiгs^Time Setup Many of the current TV
provides a simple method control settings will be
of adjusting the most
important controls for ^ with First-Time Setup.
this television receiver.
Press ‘M’ To Continue
<l>¿
Select "1ST TIME
SETUP" on the TV's Main
Menu. (Selected MENU item
is highlighted in RED.)
Press the remote's Menu
buttons to move UP/DOWN
and from SIDE-TO-SIDE
within the list of on-screen
ton on the remote or TV to
begin SETUP.
Follow the instructions
shown on the TV screen to
guide you through the First
Time Setup and use of your
new TV.
features.
Press ADV(ance) A T and
( + ) (-) on the TV to move
UP/DOWN and from SIDETO-SIDE within the list of
on-screen features.
Press "AT" to select the
language you would like
^ modified by continuing
Press STATUS to Quit
Press “M" to Continue Press "M" to Continue
or
the TV displays to use.
► I ENGLISH I
Press MENU (M) but
ESPAÑOL
FRANÇAIS
This TV is equipped with
the TV Guide Plus+ feature.
This feature is designed
to operate only on the
main antenna, ANT A,
Press "M" to Continue
Please check that your
other antenna or cable is
connected to the plug
marked ANT B on
the TV rear input panel.
Press STATUS to Quit
Press "M" to Continue
Surround-Sound System.
or
Please thoroughly read
the section in your
owners manual which
details the proper setup
and operation of the
Press 'M' to Continue
Please check that your
main antenna or cable is
connected to the plug
marked ANT A on
the TV rear input panel
Press STATUS to Quit
Press "M" to Continue
fringe on the
or
• Please Wait *
System is testing for
correct tuning mode
for ANT B.
1
If there is
use this ad
improve t
ÎED or BLUE
WHITE cross,
ustment to
le picture.
I
n
Press
to Continue
-1
)r -
to Return
Press ’M"
* Please Wait *
System is testing for
correct tuning mode
for ANT A.
1
* Please Wait *
System is searching for
all active channels
on ANT B.
Testing channel 2
in cable mode.
ISE REFER
I YOUR
TV GUIDE PLUS + "I
INSTRUCTION MANUAL
for DEfiliiLS ON
1st TIME SETUP.
* Please Wait *
System is searching for
all active channels
on ANT A.
Testing channel 2
in cable mode.
The search for active
channels is complete
fpr ANT B.
17 channels were found
and saved in memory
Press "M" to Continue
After ALL connections
and First'Time Setup
for TV GUIDE PLUS
" are completed, the TV '
will have to be turned
OFF overnight to receive
program information.
The search for active
channels is complete
for ANT A.
17 channels were found
and saved in memory
Press "M" to Continue
This TV is equipped with
a Surround-Sound system.
Surround Sound requires
the use of additional
speakers being placed
around your room.
Press "M" to Continue
This completes the
First-Time Setup.
Press "M" to Exit Setup
Smart Help
_• Press the STATUS button on
-V the remote or TV to stop the
j SETUP at any time.
• Remember, SETUP is a first -use, one
time operation and will not have to be
repeated (only the clock settings can be
lost).
• Even if there is no Antenna or Cable
signal connected to the ANT(enna) B
input (located on the rear of the TV), 1st
Time Setup will still attempt to add
channels into memory for that source.
2 - EL6246 E001
In such cases, a channel search in the
Antenna Mode will be completed, and
“0 channels saved in memory” will be
displayed on-screen.
Page 3

TV AND Remote Control Operation
Television
III Remote
Rvh i:kv Issiait. vi ion
o load the supplied bat
teries into the remote:
T
1. Remove the battery
compartment lid on the
back of the remote.
2. Place the batteries (3AA) in the remote. Be
sure the (+) and (-) ends
of the batteries line up
correctly (inside of case is
marked.)
TbeginT
r<3>,
button to turn the TV ON.
iBEQiN)
Press the POWER
“"^i^PresstheTV
"System" button on the
remote to be sure the remote
sends its commands to the TV.
Point the remote control
toward the remote sensor win
dow on the TV when operating
the TV with the remote.
---------------------------
<l>
Press the VOLUME UP
(A) or DOWN (T) button to
adjust the sound level.
POWER VOL
Press the CHANNEL UP
(A) or DOWN (▼) button to
select TV channels.
----------------------------------------Qg
+ A
VOL CH CH • STATUS
A A T
T -
MENU ADV
ADV
VCR
^
Reattach the battery lid.
T\ -CBL-VCR "S\.sri;M"
lit ITONS
The remote's TV-CBL-VCR
System buttons control how
buttons on the remote are
used.
For example:
With the "TV" system but
ton pressed:
the Menu, (M)AT, and
(+,-) buttons are used to
select and adjust on
screen TV features.
With the "CBL" system but
ton pressed:
the Power, Channel
Number, and Channel
UpA /DownT buttons on
the remote work with
Cable TV Converters.
With the "VCR" system but
ton pressed:
the Menu, (M)AT, and
(+,-) buttons on the remote
work Stop, Play, Pause,
and other VCR features.
Note: For more details on
how the TV remote works
with VCRs and Cable
Converters, see the other
owner's manual supplied with
your TV.
_______________________________________
IIGHTI^OTE: Press the glow in the dark STATUSAIGHT
11111>\ button to backlight other selected feature buttons
(Menu, Volume AT, Channel AT, etc.) on the remote control.
The five second backlight on these select buttons will make
them easier to read In the dark. Repress the STATUS/LIGHT
button to relight the buttons as needed.
VCR Buttons
For use of VCR buttons see the "Using the
Remote With a VCR" in your other owner's
manual.
Menu Buttons
Press the M button to show on-screen con
trols. Press M A or v buttons to move up (or
down), the M or ► to move left (or right)
through the list of controls.
(-) and f-i-) Buttons
Press to adjust the selected on-screen (Menu)
feature control.
Volume Buttons
Press to adjust the TV sound level.
2 lYiner A/B Button
Press to select either the ANT(enna) A or
ANT B input (on the rear of the TV) to be
displayed as the TV’s main screen signal.
TVA^CR Button
For use with accessory VCRs. Also can be
used to quickly select channels 3/4, ANT
A/B inputs, AUX1/2/3 modes as well as the
last viewed channel on the TV.
Sleep/Enter Button
Press to set the TV to automatically turn
itself OFF. Also can be used as an Enter but
ton when sending channel commands to
remote controlled cable converters or VCRs.
Smart Button
Press to select from a list of Smart controls.
Smart Picture for factory preset picture con
trol levels (set for different types of viewing
sources and programs.) Smart Sound to con
trol TV sound levels during program changes
or commercial breaks. Smart Surf to quickly
select up to 10 channels (separate from the
TV’s normal channel scan memory). See the
"Smart Features" section in your other
owner's manual for details.
Power Button
Press to turn the TV (or select VCR/ Cable
Converter) ON and OFF.
Smart Help
’'^__can press any button on
turn the TV ON.
Remember, You
the front of the TV to
«you can place up to 10 channels in memo
grammed channel numbers. •
TV Guide Plus + Bi^ttons
Press to operate the on-screen TV Guide
program system. Refer to your separate TV
Guide Plus-h Setup and Users manual for
operating details.
PIP Buttons
Press to operate Picture-In-Picture features.
See "PIP" section in your other owner's
manual for details.
Mute Button
Press to turn the sound OFF on the TV.
Press again to return the sound to its previ
ous level.
Number Buttons
Press the number buttons to select TV
channels. Press Jwq number buttons to
select single digit channels. For example:
press "0" then "6" for channel 6.
TV-VCR-CBI. Sv.stem
Buttons
Press to send remote signals to either the
The tuned channel number will
always briefly appear when the
TV is first turned ON (and with
channel changes.)
Press to see the current channel number on
the TV screen. Also press to clear the TV
screen after control adjustments. (See the
“LIGHT’ button note for glow in the dark
remote button functions.)
Surf Button
Press to select previously viewed channels.
With the TV’s “Smart Surf’ control ON
ry. Then by pressing the SURF button you
can quickly view the select channels.
See the "Smart Surf section (in your other
owner's manual) to see how to select a
series of channels using the Surf button.
Channel Scan Button
Press to scan up or down through any pro
You can also press the STATUS
button (on the remote) to see
what channel the TV is ON.
3 - EL6246 E001
Page 4

On-Screen MENU Controls
rQ
Menus
I'k.vu'ue Com k()f,s
eatures for your TV can
be adjusted from a
F
MENU screen shown on the
TV. A MENU is nothing more
than an on-screen list of fea
tures. Each MENU item can
be adjusted by viewing the
screen and pressing a button.
C BEGIN)
r<l>i
<l>i
selected MENU item will be
highlighted in RED.
Press the remote's Menu ^
buttons to move UP/DOWN
and from SIDE-TO-SIDE
within the list of on-screen
features.
See the "How to Select
Features" drawing on this
page.
Press MENU on the
TV (or M button on the
remote). An on-screen list of
TV features shows on the
screen - "MAIN MENU".
Press ADV(ance) A T
and (+) (-) on the TV to
move UP/DOWN and from
SIDE-TO-SIDE within the
list of on-screen features. The
.A
POWER VOL
4- A T - A
VOL CH CH STATUS
▼
MENU
ADV
A
T
VCR
On the tv
<S>i
Press MENU on the
TV (or M button on the
remote) to select the RED
highlighted feature control.
NOTE; Many Main Menu
features have 2 or 3 screens
of controls listed under its
heading. Select the "MORE"
on-screen item and press the
MENU (M) button to view all
of the individual controls list
ed under a Main Menu fea
ture heading.
Press (+) or (-) to
adjust a selected on-screen
feature control.
Press STATUS/EXIT
button on the remote to clear
the screen after an adjust
ment.
The screen can also be
cleared by selecting the Main
Menu's "EXIT" item and
pressing the MENU (M) but
ton. Waiting about a minute,
without a button press, will
also remove the MENU
from the screen.
On the Remote
HOW TO SELECT FEATURES
fwrm mmi'iNS ( >n i m , tv >
Press (+) and (-)
to move from
Side-tO’Side
within the Menu.
Press MENU to
select RED high
lighted feature.
TV ON-SCREEN FEATURE MENU
!
•TATU»I MBNU
Press ADV(ance)
A V to move Up
and Down within
the Menu.
Smari Hki.p
_and you are not finished working with it,
press the MENU button and the "Main
§ Menu" will return to the screen. Continue to
4 - EL6246 E001
Press MENU (M) to select RED highlighted item.
If the on-screen Menu disappears
HOW TO SELECT FEATURES
(WITH BUTTONS ON THE REMOTE)
Press MENU (M)^^
to move from Side-to-
Side within the Menu.
Press MENU (M)
Press MENU (M)
A T to move Up
and Down within
the Menu.
press the MENU button and the on-screen Menu
will advance until you are returned to the last fea
ture control screen you had selected.
to select RED
highlighted feature
 Loading...