

Index
CAUTION
VISIBLE AND INVISIBLE LASER RADIATION WHEN
OPEN AVOID EXPOSURE TO BEAM
ADVARSEL
SYNLIG OG USYNLIG LASERSTRÅLING VED ÅBNING
UNDGÅ UDSÆTTELSE FOR STRÅLING
VARNING
SYNLIG OCH OSYNLIG LASERSTRÅLNING NÄR
DENNA DEL ÄR ÖPPNAD BETRAKTA EJ STRÅLEN
VARO!
AVATTAESSA OLET ALTTIINA NÄKYVÄLLE JA
NÄKYMÄTTÖMÄLLE LASER SÄTEILYLLE. ÄLÄ KATSO
SÄTEESEEN
VORSICHT
SICHTBARE UND UNSICHTBARE LASERSTRAHLUNG
WENN ABDECKUNG GEÖFFNET NICHT DEM
STRAHL AUSSETSEN
ATTENTION
RAYONNEMENT LASER VISIBLE ET INVISIBLE EN CAS
D’OUVERTURE EXPOSITION DANGEREUSE AU
FAISCEAU
Manufactured under license from Dolby Laboratories.
“Dolby” and the double-D symbol are trademarks of Dolby
Laboratories. Confidential Unpublished Works.
©1992-1997 Dolby Laboratories, Inc. All rights reserved.
English -------------------------------------------------- 4
English
Français------------------------------------------------26
Français
Español ------------------------------------------------48
Deutsch -----------------------------------------------70
Deutsch Español
Nederlands -------------------------------------------92
Nederlands
Italiano ----------------------------------------------- 114
Manufactured under license from Digital Theater Systems, Inc.
US Pat. No. 5,451,942, 5,956,674, 5,974,380, 5,978,762 and
other world-wide patents issued and pending. “DTS” and
“DTS Digital Surround” are registered trademarks of Digital
Theater Systems, Inc. Copyright 1996, 2000 Digital Theater
Systems, Inc. All Rights Reversed.
This product incorporates copyright protection technology
that is protected by method claims of certain U.S. patents
and other intellectual property rights owned by Macrovision
Corporation and other rights owners. Use of this copyright
protection technology must be authorized by Macrovision
Corporation, and is intended for home and other limited
viewing uses only unless otherwise authorized by
Macrovision Corporation. Reverse engineer ing or
disassembly is prohibited.
The DVD VIDEO player is in conformity
with the EMC directive and low-voltage
directive.
Laser
Type Semiconductor laser GaAIAs
Wave length 650nm
Output Power 7mW
Beam divergence 60 degree
Italiano
Svenska ---------------------------------------------- 136
Dansk ------------------------------------------------ 158
Suomi ------------------------------------------------ 180
Português ------------------------------------------- 202
--------------------------------------------- 224
∂ППЛУИО¿ Português Suomi Dansk Svenska
Polski------------------------------------------------- 247
INDEX
Polski
3

Contents
English
Introduction and General
Information
Features ..............................................................................5
Discs for playback............................................................. 5
Player zone
Supplied accessories......................................................... 5
Environmental information.............................................5
Installation .......................................................................... 5
Maintenance....................................................................... 5
Functional Overview
Front panel......................................................................... 6
Remote Control ............................................................... 7
Connections
Step 1: Connecting antennas.......................................... 8
MW Indoor Loop Antenna
MW Outdoor Antenna
FM Indoor Antenna
FM Outdoor Antenna
Step 2: Connecting the speakers...................................9
Step 3: Connecting a TV .................................................. 9
Step 4: Connecting additional components.......10–11
Connecting a CD Recorder
Connecting a VCR
Connecting a Satellite Receiver or Cable Box
Connecting an auxiliary audio device
Connecting a second Subwoofer
Connecting a Digital (Optical) audio device
Preparations
Inserting batteries into the remote control.............12
Switching on the system ...............................................12
NTSC/PAL automatic conversion
Setting up the surround sound system...............12–13
Placing the speakers
Changing the speaker size
Changing the speaker distance
Changing the channel level
T est T one
Changing system settings-special circumstances
Selecting TV aspect.........................................................14
Selecting digital audio out.............................................14
Basic Functions
Selecting the source.......................................................15
Volume control................................................................15
Adjusting the tone..........................................................15
Selecting the surround sound mode ..........................15
Selecting the virtual sound effect................................16
Night mode ......................................................................16
Sleep timer setting..........................................................16
Operations
Discs information ...........................................................17
Basic playback..................................................................17
Playing an MP3 disc.........................................................17
General features .............................................................18
Skipping to another track/chapter
Fast Search
Continue playback from the last stop point
Repeat play
Programme favourite tracks (Audio CDs only).......19
Modifying the programme
Exit the programme mode temporarily
Reviewing the programme
Clearing the entire programme
Special VCD features......................................................19
Playback Control (PBC)
Special DVD/VCD features ...................................20–21
Advancing by frames
Searching for a particular passage
Playing in slow motion mode
Zooming in
Viewing from another angle
Changing subtitle language
Changing sound track language
Title menu
DVD menu
Advanced features (DVD) ............................................21
Using Graphic User Interface (GUI) menu icons
Parental control (DVD).................................................22
Setting a rating level and password
Selecting a rating level
Setting a password
Clearing the password
Radio Reception
Tuning to radio stations ................................................23
Presetting radio stations ...............................................23
Manual Preset
Automatic Preset
Listening to preset radio stations ...............................23
RDS....................................................................................23
4
CONTENTS
Specifications.............................................24
Troubleshooting......................................25
Introduction and General Information
2
Features
Your complete 7-piece 700-Watt DVD Digital Home
Cinema System creates the same dynamic sound qualities
that you find in full-fledged cinemas and incorporates some
of the best features in home cinema technology.
Other features include:
Built-in DTS and Dolby Digital
supporting Dolby Pro LogicR and virtual surround
Lets you use the Home Cinema Audio System for a movietheatre surround sound experience.
Adjustable Speaker Size, Channel Level, and
Distance
Lets you customise your setup for a true surround sound
experience.
Additional Component Connections
Lets you connect other audio and audio/visual components
to the DVD system so you can use the system’s surround
sound speakers.
Night Mode (Dolby Digital mode only)
Lets you compress the dynamic range, reducing the
difference in loudness between different sounds in Dolby
Digital mode.
Parental Control (Rating Level)
Lets you set a ratings level so that your children cannot
watch a DVD that has a rating higher than you set.
Sleep Timer
Enables the system to switch to standby mode
automatically at a preset time.
R
decoder,
Supplied accessories
– Remote control with two AA batteries
– MW loop antenna and FM wire antenna
– Audio cable (white/red) and Scart cable for connection
with the TV
– Five satellite speakers, including five speaker cables
– Subwoofer, including connection cable
– This instruction booklet and Quick Use Guide
If any item is damaged or missing, contact your retailer or
Philips.
Environmental information
All unnecessary packaging has been omitted. We have tried
to make the packaging easy to separate into three materials:
cardboard (box), polystyrene foam (buffer) and
polyethylene (bags, protective foam sheet).
Your system consists of materials which can be recycled
and reused if disassembled by a specialised company. Please
observe the local regulations regarding the disposal of
packaging materials, exhausted batteries and old equipment.
Installation
● Place the player on a flat, hard, and stable surface.
● There must be sufficient room in front of the player for the
drawer to open.
● In a cabinet, allows about 10cm (4 inches) of free space all
around the player for adequate ventilation.
● Do not expose your player to extreme temperatures or
humidity.
English
Discs for playback
Your DVD player is able to play :
– All pre-recorded audio CDs
– All finalised audio CDR and audio CDRW discs
– All VCDs and DVDs
– MP3-CDs (CD-ROMs with MP3 tracks)
Player zone
DVD discs and players are designed with regional
restrictions. Before playing a disc, make sure the
disc is the same zone as your player.
The region code for this DVD player is 2.
Maintenance
● When a disc becomes dirty, clean it with
a cleaning cloth. Wipe the disc from the
center out, in a straight line.
● Do not expose the player, batteries or
discs to humidity, rain, sand or excessive
heat (caused by heating equipment or
direct sunlight). Always keep the disc tray closed to avoid
dust on the lens.
● Do not use solvents such as benzene, thinner, commercially
available cleaners, or anti-static spray intended for colour
discs.
● The lens may cloud over when the player is suddenly
moved from cold to warm surroundings, making it
impossible to play a disc. Leave the player in the warm
environment until the moisture evaporates.
INTRODUCTION AND G ENERAL INFORMATION
5
Functional Overview
English
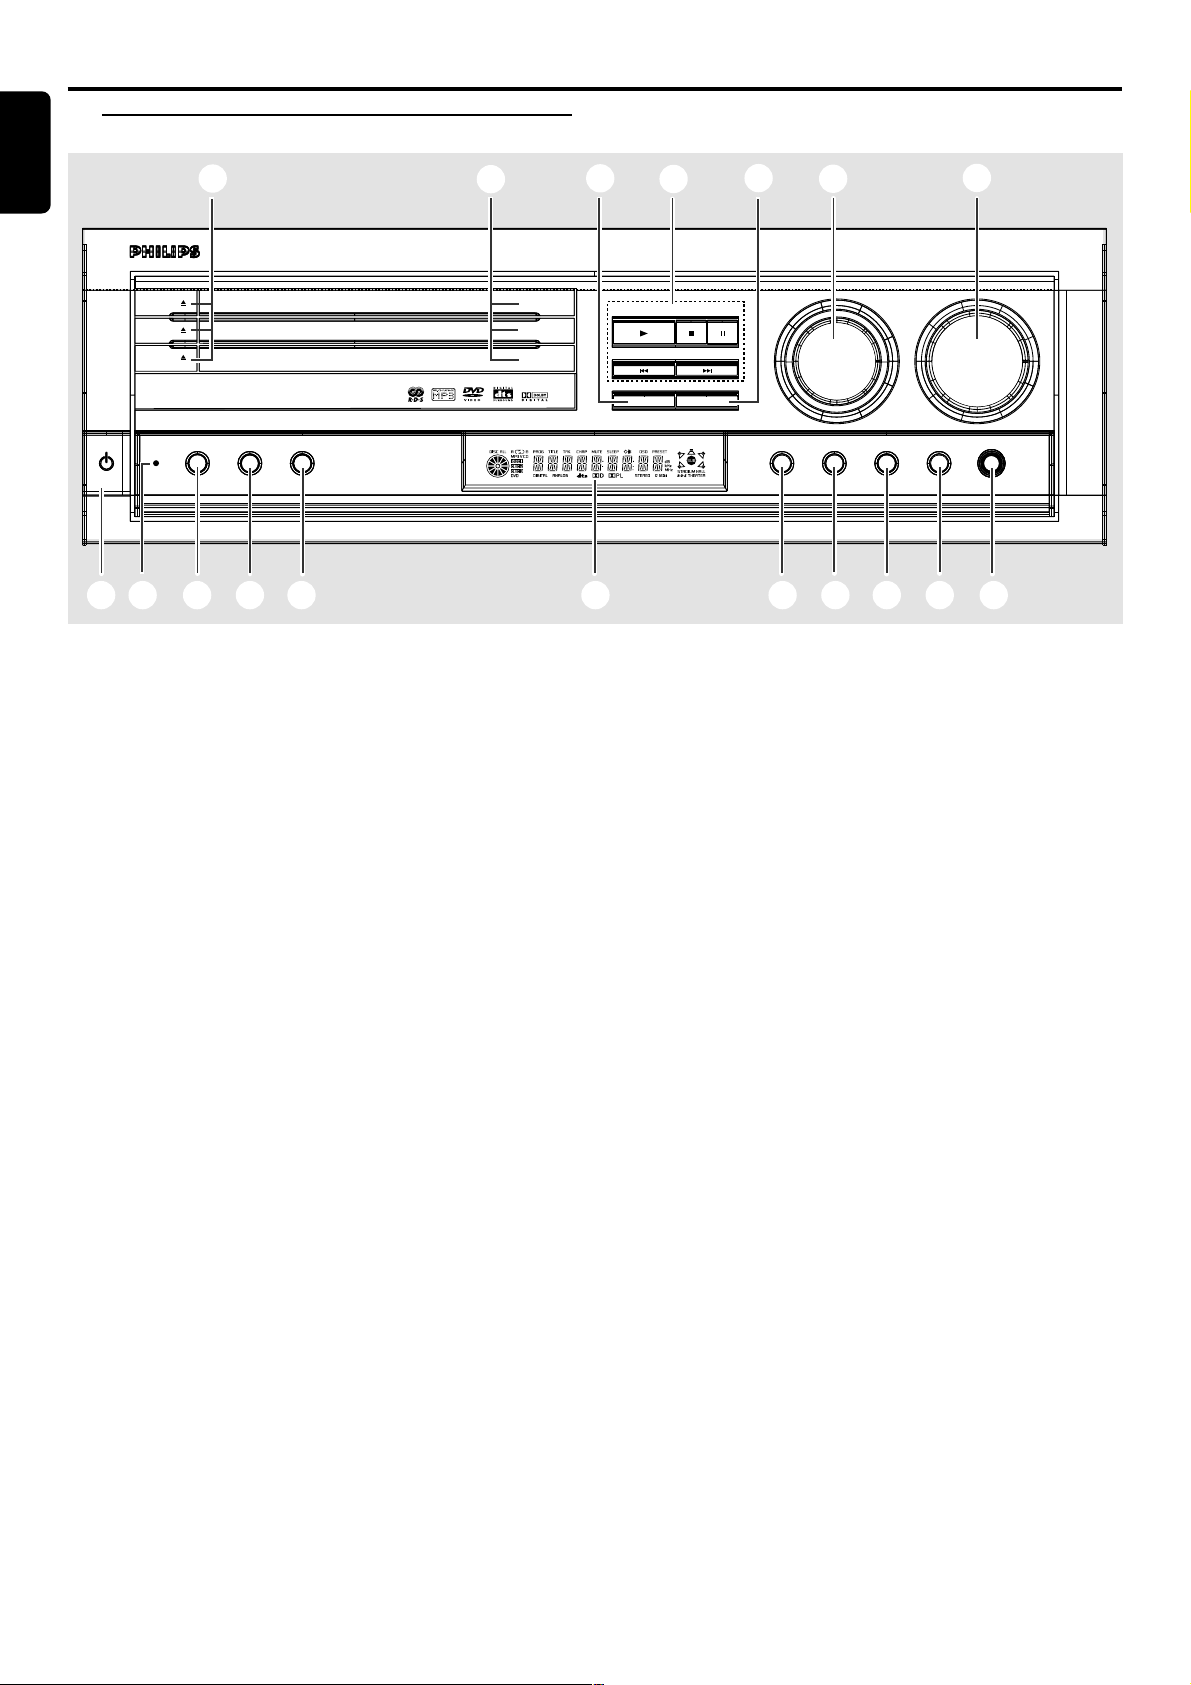
Front panel
2
MX 5000D 3 DVD VIDEO DIGITAL SURROUND SYSTEM
OPEN•CLOSE
OPEN•CLOSE
OPEN•CLOSE
POWER RDS REPEAT PROGRAM
STANDBY
ON
3
DISC 1
DISC 2
DISC 3
1 POWER / STANDBY ON B
– to switch between power on and standby modes.
2 OPEN•CLOSE 0 (in Disc mode only)
– to open or close the disc tray.
3 Disc T rays
4 DISC SKIP
– in Disc mode, to select another discs.
5 Mode selection
PLAY £
– to play the disc.
STOP•CLEAR Ç
– to stop playing the disc.
PAUSE Å
– to freeze the sound and picture.
SEARCH•PREV S / SEARCH•NEXT T
– in Disc mode, press to skip to the previous/next
chapter/track.
– in Disc mode, hold down to fast reverse/forward the
disc.
– in Tuner mode, to tune to a lower or higher radio
frequency.
– in Philips TV mode , to tune channel up/down.
6 TUNING•PRESET
– to switch between preset and tuning mode.
7 SOURCE
– to select the desired source or external input source
(DVD/CD, TV/AV, TUNER (FM/MW), CDR, AUX, SAT
or VCR).
(on the remote control only)
– to switch on the system.
– in Disc mode, press DISC to select another disc tray.
– in Tuner mode, press TUNER to select FM or MW
band.
4
PLAY
SEARCH• PREV SEARCH• NEXT
DISC SKIP TUNING•PRESET
5
STOP•CLEAR PAUSE
6
ON/
OFF
7
SOURCE VOLUME
SURROUND
VIRTUAL TONE NIGHT PHONES
8
$ # @ 0 9%1 & ^* !
8 VOLUME (+/-)
– to adjust the master volume.
– to adjust Philips television’s volume level.
– in Tone mode, to adjust the treble/bass tone level.
9 PHONES
– to connect headphones.
0 NIGHT (in Dolby Digital mode only)
– to optimise the dynamic of the sound output.
! TONE
– to select Bass/Treble adjustment mode.
@ VIRTUAL
– to select the vir tual sound effect : STADIUM, HALL or
THEATER
# SURROUND
– to select multichannel surround (Dolby Digital, DTS
or Dolby ProLogic) or stereo sound effect.
$ Display screen
– to display details for user’s information.
% PROGRAM
– in Disc mode, to programme disc tracks.
– in Tuner mode, to programme preset radio stations.
^ REPEAT
– to repeat chapter, track, title, disc(s).
– to repeat a specific section on a disc.
& RDS
– in Tuner (FM) mode, to select RDS information.
* Standby LED indicator
– to indicate standby mode.
6
FUNCTIONAL OVERVIEW
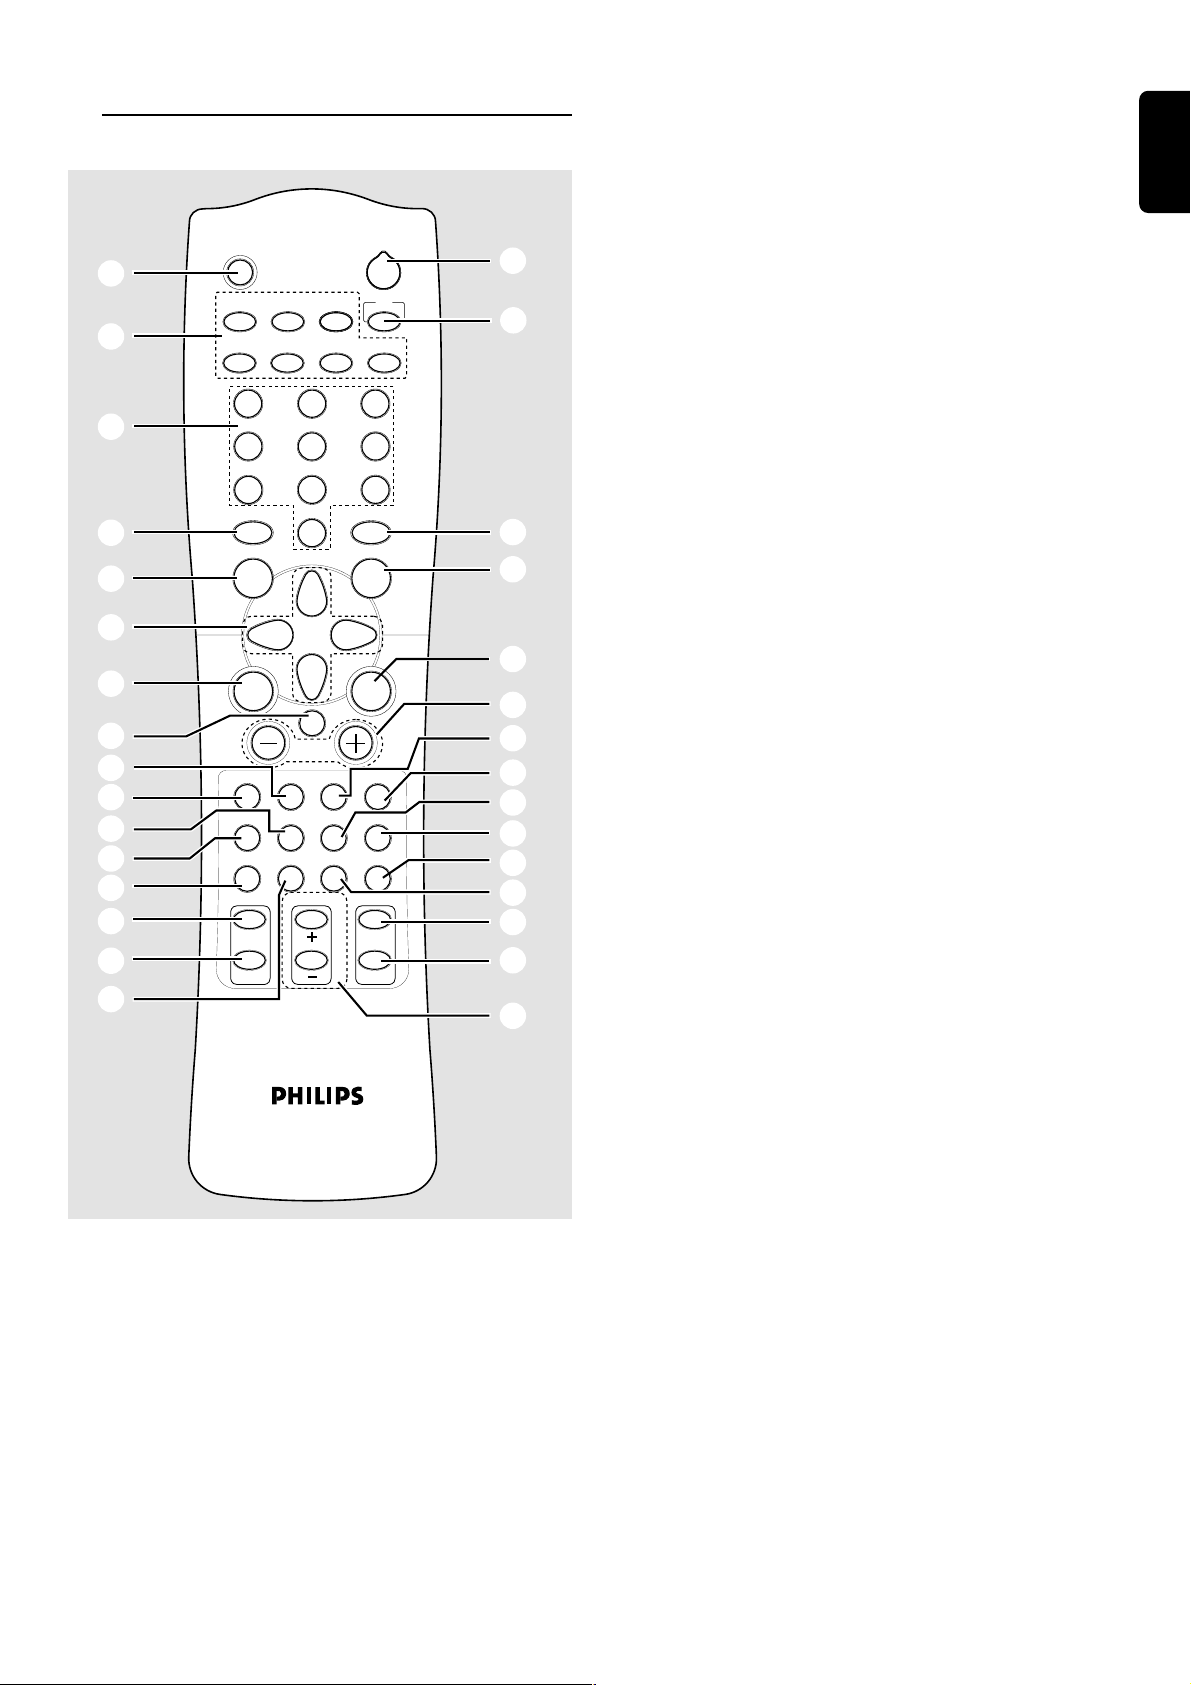
Remote control
(
MUTE
DVD/CD
TV/AV
TUNER
2
TV
°
‡
7
1
2
CDR
AUXVCR SAT
3
)
É
É
SLEEPREPEAT
SYSTEM
MENU
Éë
É
É
6
9
Å
PICTURE
ANGLE
ZOOM
fl
5
fi
8
!
›
‹
¤
0
⁄
º
ª
¡
5
™
5
£
@
#
≤
∞
%
§
≥
4
7
DISC
MENU
Ç
SURROUND VIRTUAL TONE TEST TONE
TITLE SPEAKER G U I RETURN
PROGRAM NIGHT
LANGUAGE
AUDIO
SUBTITLE
5
8
0
Éë
É
OK
SLOW MOTION
^
•
Notes for remote control:
– First, select the source you wish to control by
pressing one of the source select keys on the remote
control (D VD/CD or TUNER, for example).
– Then select the desired function (É, S ,
for example).
T
( MUTE
– to interrupt or resume sound reproduction.
) Numeric keypad (0-9)
– to enter a track/title number of the disc.
– to enter a number of preset radio stations.
¡ DISC MENU (disc mode only)
– to enter or exit the disc contents menu.
™ 3 4 1 2
– in Tuner mode, to select a preset radio station
number (1 or 2 ).
– to select movement direction in disc contents menu /
/ system setup menu / GUI menu.
£ OK (disc mode only)
– to exit or confirm the selection.
≤ SPEAKER
– to select speaker settings, volume balance and to test
the speaker settings.
∞ TITLE
– to display the Title menu if present on the disc.
– to switch on/off the playback control (PBC) function
while playing a VCD (ver sion 2.0).
§ LANGUAGE - AUDIO
– to select different audio languages available in the
DVD disc.
≥ LANGUAGE - SUBTITLE
– to select different subtitle languages available in the
DVD disc.
• SLOW MOTION+/-
– to watch a disc at a slower speed.
ª PICTURE - ZOOM
– to enlarge a still picture on the TV screen.
º PICTURE - ANGLE
– to select a camera angle available in the DVD disc.
⁄ SLEEP
– to set the sleep (auto-off) timer function.
¤ RETURN
– to return to the previous menu level during playback.
‹ GUI (disc mode only)
– to show the information contained on the disc.
› TEST TONE
– to check the sound level of the respective speakers.
fi ÉÅ
– to star t or interr upt disc playback.
fl SYSTEM MENU (disc mode only)
– to enter or exit the system setup menu.
‡ TV
– to select Philips TV mode .
° B
– to switch the system to standby mode.
English
FUNCTIONAL OVERVIEW
7
Connections
English
SPEAKERS 6
SURROUND
SUB
WOOFERCENTER
LR
FRONT
OUT
CDR
IN
LR
TV IN
OUT
VCR
IN
SAT
AUX
IMPORTANT!
– Before connecting the AC power cord to the
wall outlet, ensure that all other connections have
been made.
– Never make or change any connections with
the power switched on.
– The type plate is located at the rear of the
system.
Step 1: Connecting antennas
MW Indoor Loop Antenna
The supplied high-performance MW loop antenna is
sufficient for good reception in most areas.
AUDIO
FM (75 )
GND MW
ANTENNA
VIDEO
S-VIDEO
OUT
MONITOR
OUT
OUT
WOOFER
RL
DVD
VCR
IN
SAT
IN
SUB
PRE-OUT
DIGITAL
OUT
SAT
OPTICAL
IN
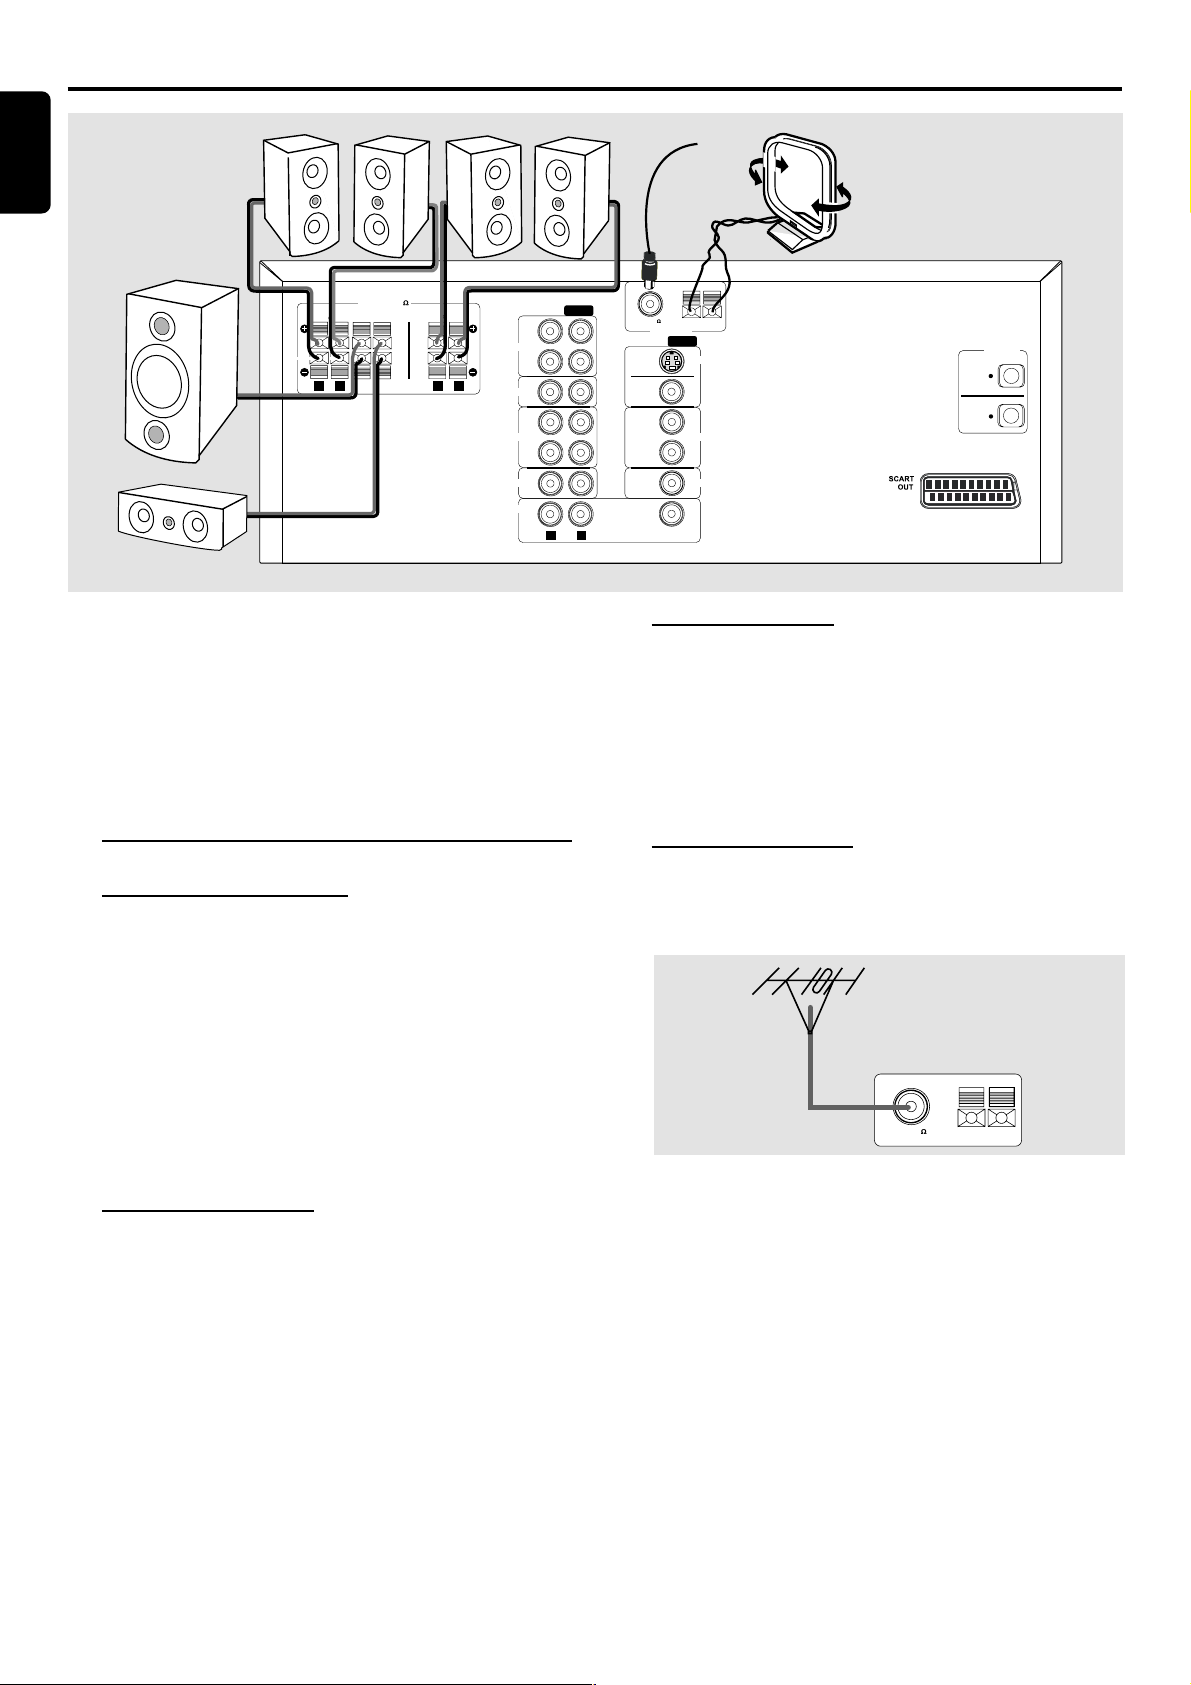
FM Indoor Antenna
Connect the supplied FM antenna to the FM (75 Ω)
jack. Move the antenna in various directions until the
clearest signal is received.
Note:
– Keep the antenna as far away as possible from the TV, VCR
or any radiation source to prevent unwanted noise.
FM Outdoor Antenna
For better FM reception, use a 75 ohm coaxial cable
(not supplied) to connect the system to an outdoor FM
antenna as shown.
1 Connect the loop antenna’s wires to MW and GND.
2 Place the antenna in a location (for example, on a shelf or
window frame) that gives the best reception.
Note:
– Keep the antenna as far away as possible from the entire
system, speaker cables, and the power cable to prevent
unwanted noise.
MW Outdoor Antenna
If the supplied MW loop antenna does not deliver sufficient
reception, use an outdoor MW antenna (not supplied).
Use an insulated wire more than 5m long. Strip one end,
and connect that end to MW.
String the antenna wire outdoors or indoors near a
window. For better reception, connect the GND terminal
to a reliable ground.
FM (75 )
GND MW
8
CONNECTIONS
Step 2: Connecting the
IN
OUT
IN
AUDIO
CDR
OUT
TV IN
VCR
SAT
S-VIDEO
OUT
MONITOR
OUT
SUB
WOOFER
PRE-OUT
OUT
IN
IN
VIDEO
RL
DVD
VCR
SAT
AUX
GND MW
FM (75 )
ANTENNA
DIGITAL
OUT
SAT
IN
OPTICAL
L
R
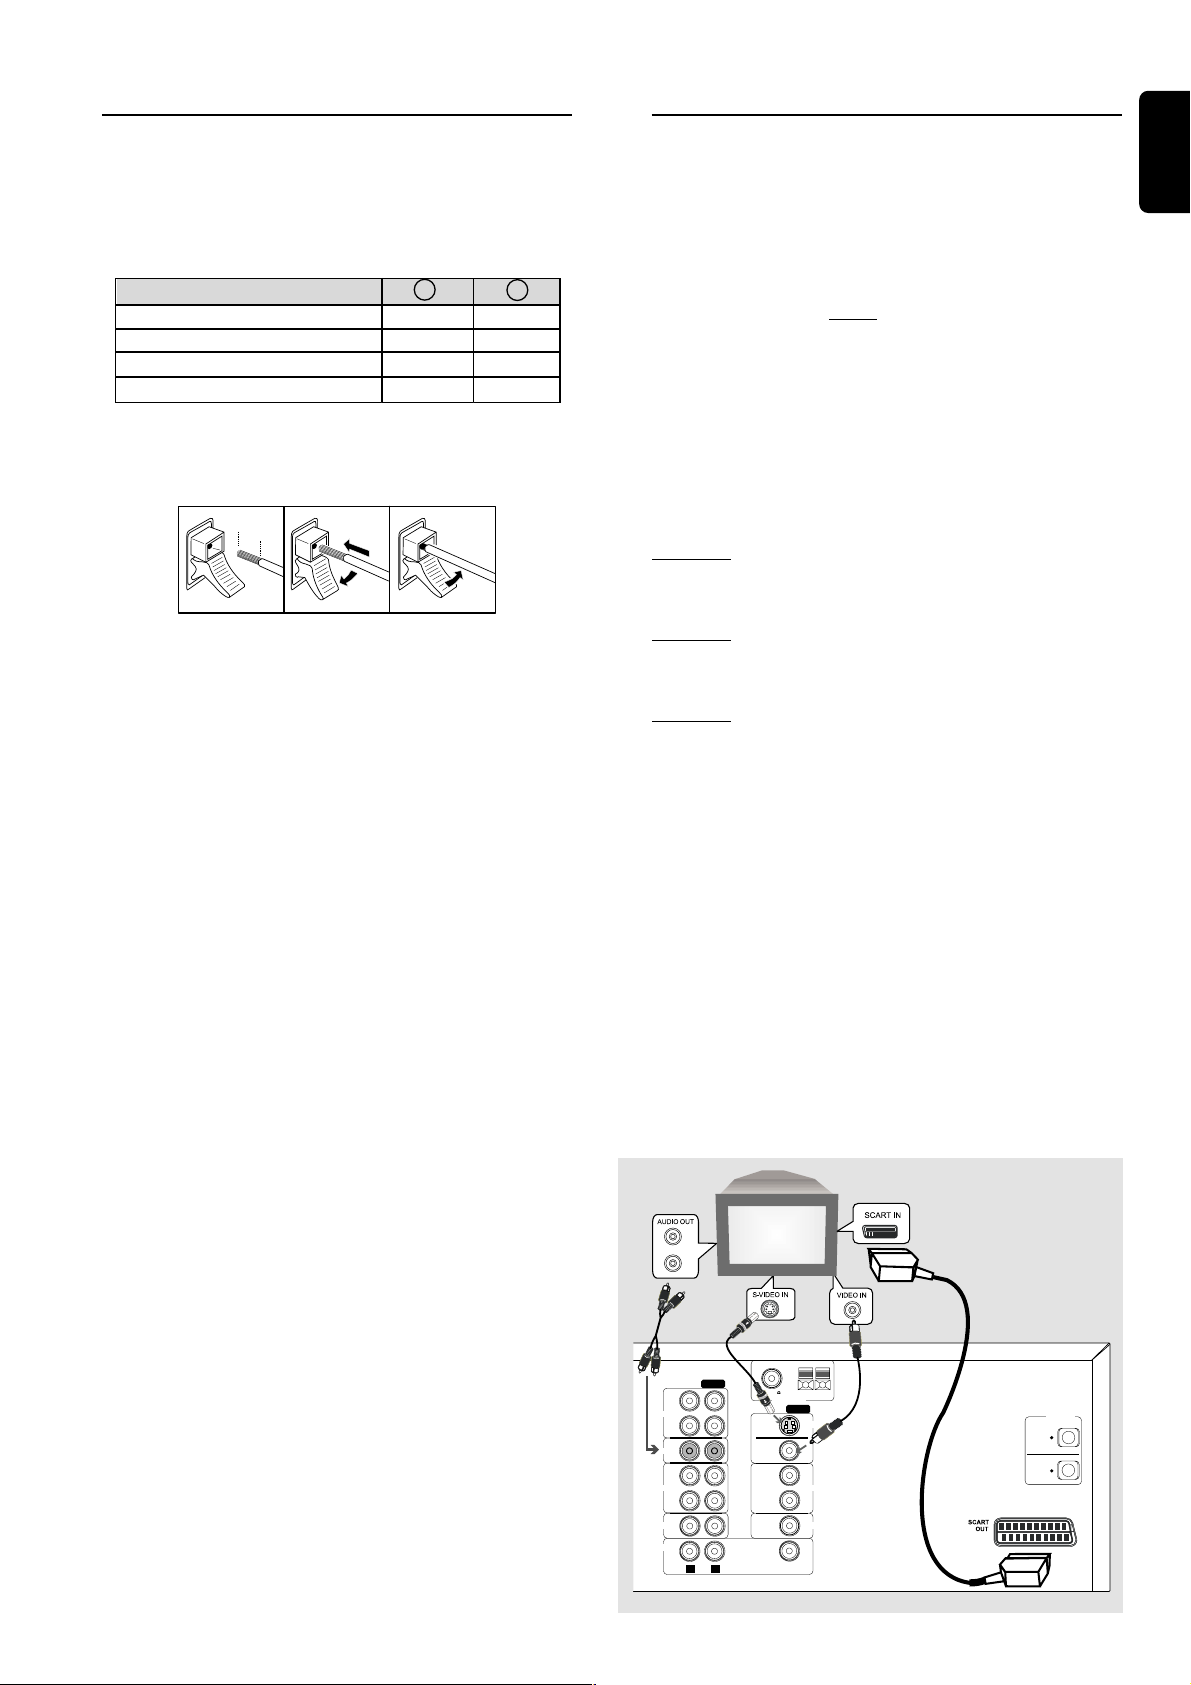
Step 3: Connecting a TV
speakers
Connect the supplied speaker systems using the supplied
speaker cables by matching the colours of the jacks and
speaker cables.
Speakers
FRONT (L/R) black red
CENTER black blue
REAR (SURROUND) (L/R) black grey
SUBWOOFER black brown
1 Press up (or down) the speaker’s jack and fully insert the
stripped portion of the speaker cable into the jack, then
release.
12 mm
abc
2 Connect the Front Left speaker to the FRONT L jacks
and Right speaker to the FRONT R jacks.
Connect the Left Surround speaker to SURROUND L
jacks and Right Surround speaker to SURROUND R
jacks.
Connect the Centre speaker to the CENTER jacks.
Connect the subwoofer’s audio input to the
SUBWOOFER jack.
Notes:
– Ensure that the speaker cables are corr ectly connected.
Improper connections may damage the system due to shortcircuit.
– For optimal sound performance, use the supplied speakers.
– Do not connect more than one speaker to any one pair of
+/- speaker jacks.
– Do not connect speakers with impedance lower than the
speakers supplied. Please refer to the SPECIFICATIONS
section of this manual.
- +
You must connect a TV to the DVD system in order to use
the DVD play er.
IMPORTANT!
– There are various ways to connect the system
to a TV (as shown in the illustration below). You
only need to make ONE of the best connections
(SCART, S-VIDEO or MONIT OR OUT),
depending on the capabilities of your TV system.
– If you are planning to connect the VCR, satellite
or other visual equipment to your DVD system,
you have to use the MONITOR OUT to connect
your TV. It will allow all the vie wing possibilities,
see “Step 4: Connecting additional components”
for complete connection.
Option 1
● Use the supplied Scart cable to connect SCART OUT
jack to the corresponding SCART VIDEO IN jack on a TV.
Option 2
● Connect the S-VIDEO OUT jack to the S-Video input
jack on the TV using a S-Video cable (not supplied).
Option 3
● Connect the MONITOR OUT jack to the video input
jack on the TV using the supplied video cable (yellow - not
supplied).
You can listen to the TV broadcast channels
through your DVD home cinema system
● Use the supplied audio cables to connect
AUDIO-TV IN (L/R) jacks to the corresponding AUDIO
OUT jacks on the TV.
Before start operation, press TV/AV on the remote
control to activate the input source.
Note: On the TV,
– The Video In jack is usually yellow and might be labeled
CVBS, Composite or Baseband.
– The S-Video In jack may be labeled, Y/C, S-Video or S-VHS.
English
or
or
CONNECTIONS
9
 Loading...