

Page 1

R
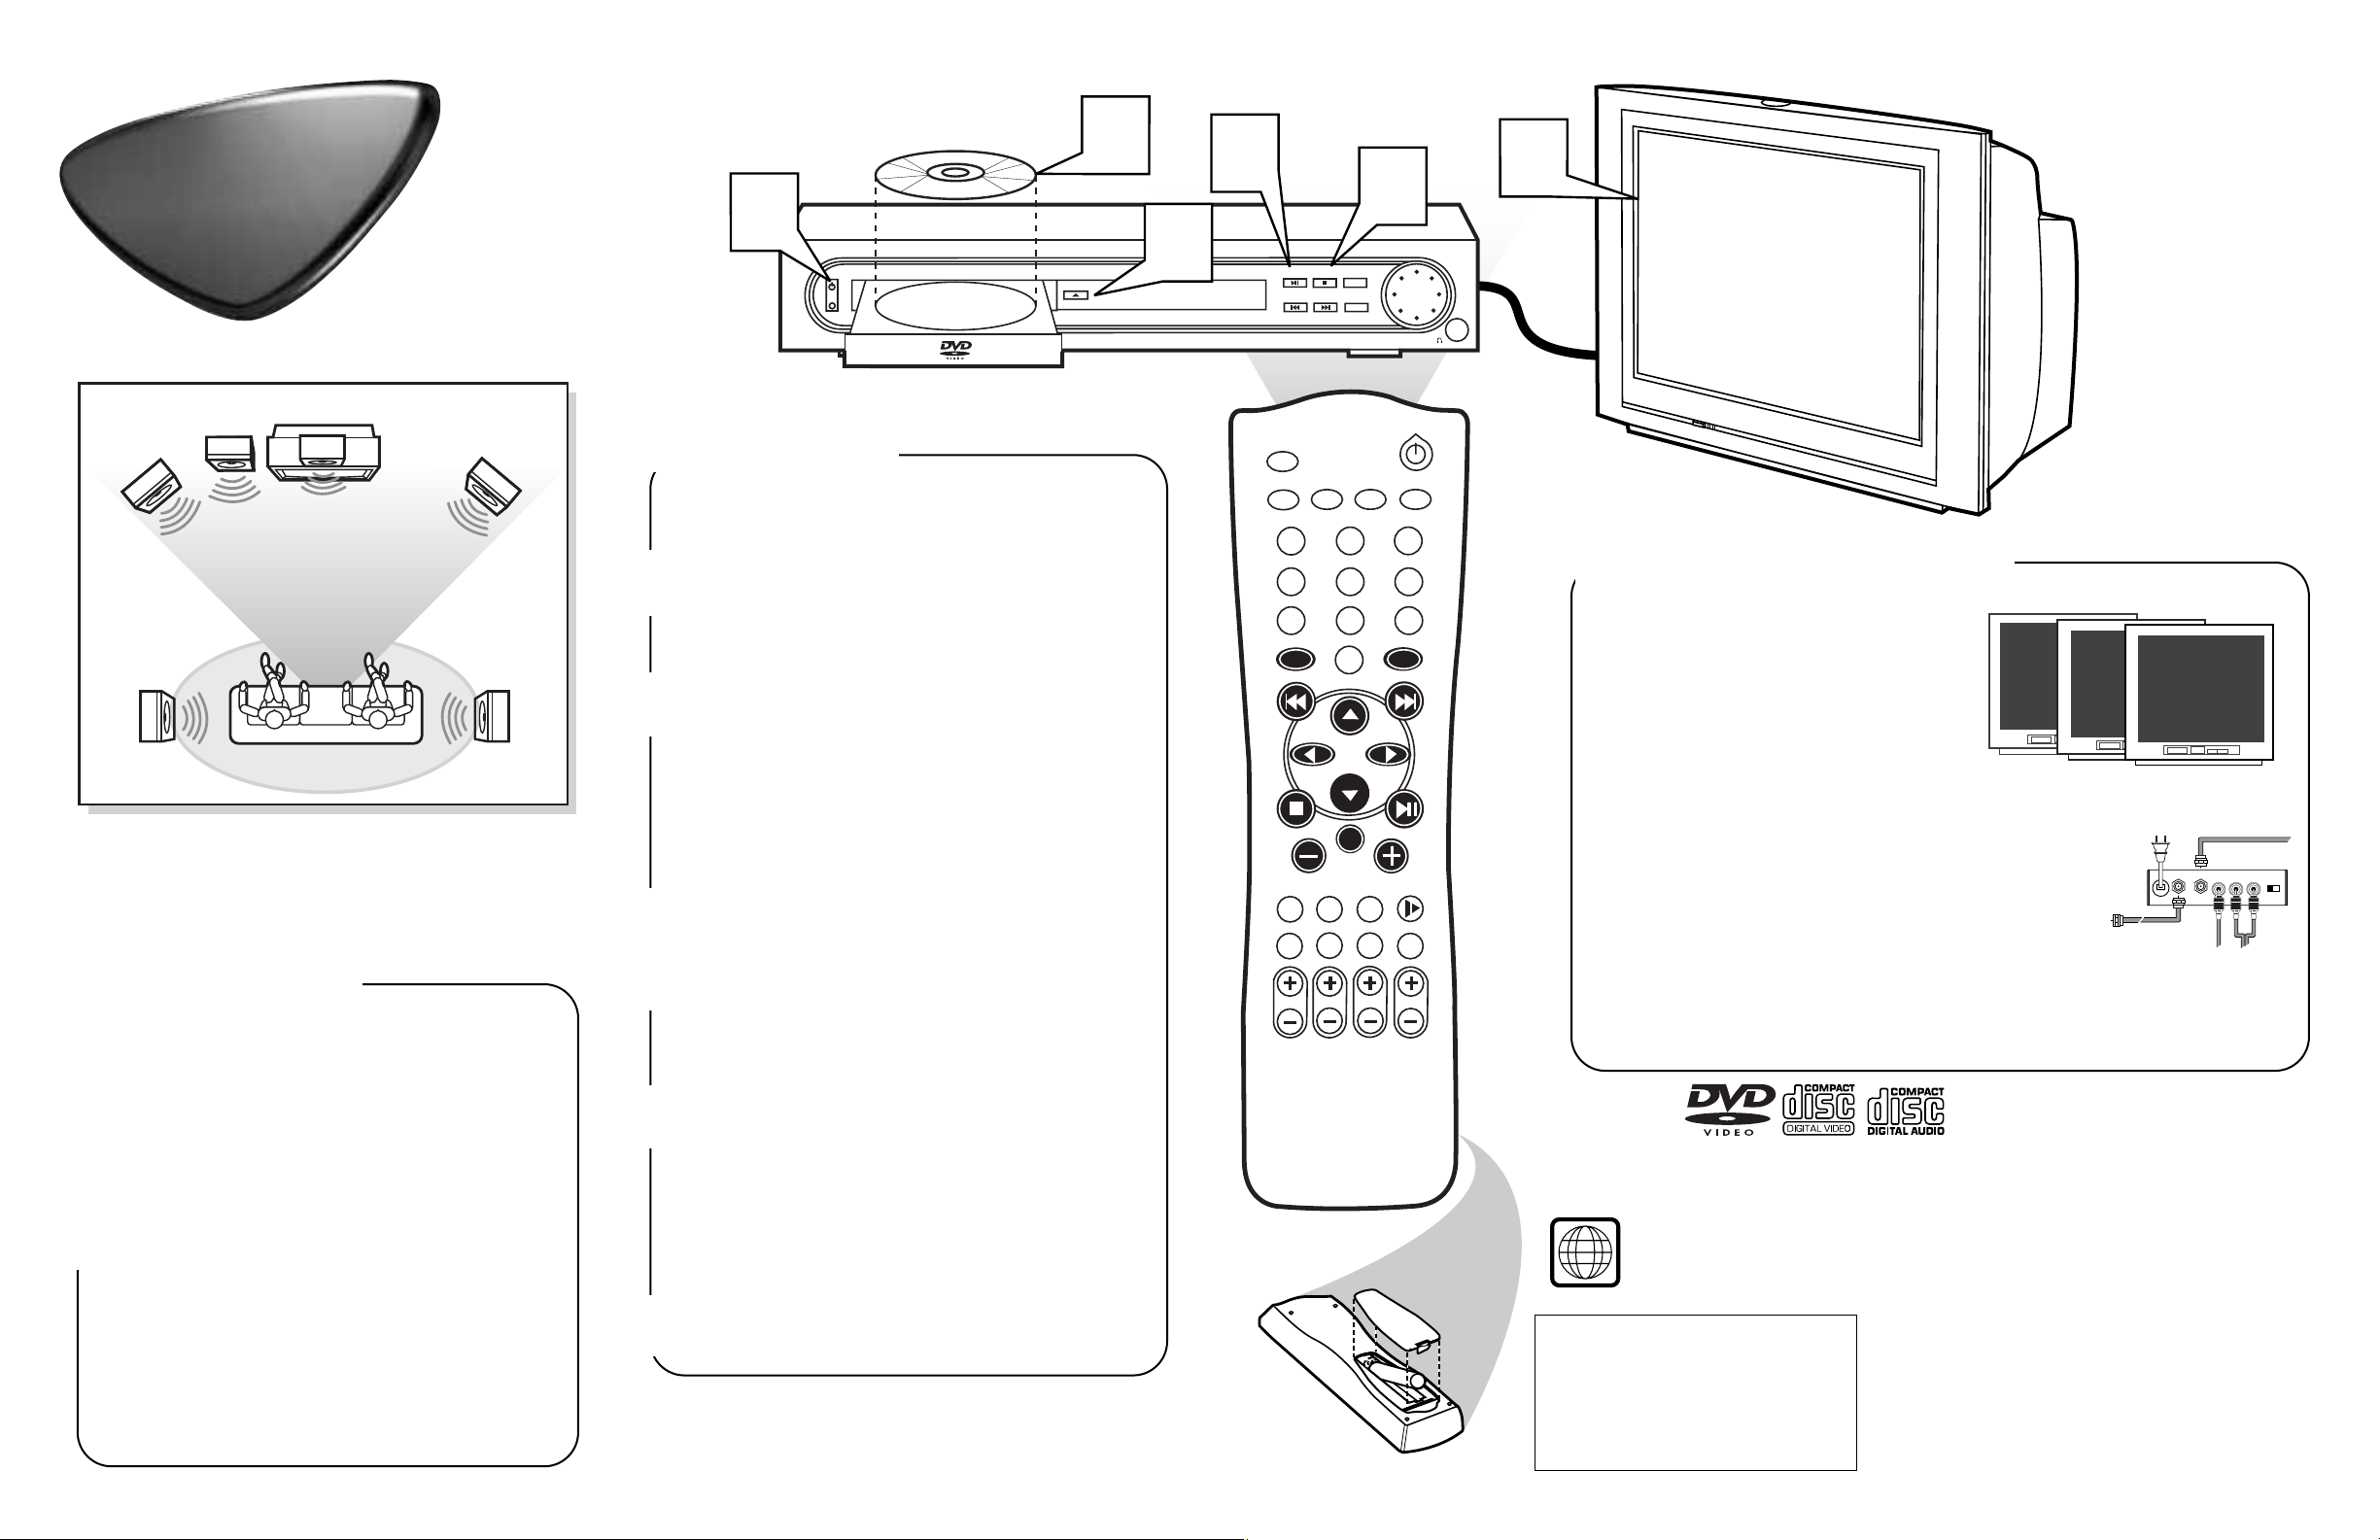
SPEAKER CONNECTIONS
a. • Connect the Front Right (+,-) speaker wires to
the FR (Red +,-) speaker terminals on the Receiver.
• Connect the Front Left (+,-) speaker wires to the
FL (White +,-) speaker terminals.
• Connect the Center speaker wires to the C (Green
+,-) speaker terminals.
b. • Connect the Surround Right (rear speaker) wires to
the SR (Gray +,- ) speaker terminals.
• Connect the Surround Left (rear speaker) wires to
the SL (Blue +,- ) speaker terminals.
c. • Connect the Subwoofer speaker AUDIO INPUT
jack to the WOOFER LINE OUT jack on the receiver. Use the supplied black cable with RCA connectors on each end.
Use this simple and quick way to watch your favorite
DVD movie and enjoy your Home Cinema experience!
Note: You must turn on the
power switch on the front
of Subwoofer when in
operation.
Flip the page to start DVD playback and arrange the surround speakers.
T
o connect your MRD 200 Home
Cinema Surround Receiver:
H
ELPFUL HINTS
Your TV capability determines which
type of video connection you can make
with the DVD Receiver.
to view DVD playback on your
TV. The RF Modulator converts the video from
the Receiver so it can play through the TV’s
Antenna connector.
See your electronics retailer or contact Philips for
details on RF Modulator availability.
If you use an RF modulator, set the TV to channel
3 or 4. Set the RF modulator’s 3/4 switch to the
same channel.
you can connect the receiver using
one of these for a higher quality connection.
Quick Use
Guide
Quick Use
Guide
r
OPTIONAL TV Audio Connection
In order to listen to normal TV broadcast channels
through the Home Cinema Surround Receiver (if your
TV has AUDIO OUT jacks) you must make an audio
connection.
IMPORTANT! The Receiver will use all surround
sound speakers only if the TV broadcast is in a surround
sound format (Dolby Digital, DTS, Dolby Pro Logic). If
the broadcast is in stereo only, some of the surround
speakers will not be active.
• Connect the red and white pair of audio cables from
the TV AUDIO IN (Left & Right) jacks on the
Receiver to the AUDIO OUT (Left & Right) jacks on
the TV.
NOTE: When listening to TV programs, the Receiver
must be set to the AUX mode for the sound to be heard.
If your TV has S-Video or
Component (PB PR Y) jacks
If your TV only has a single Antenna In
jack, you will need an accessory RF
Modulator
VIDEO CONNECTION
• Connect the yellow VIDEO OUT jack on the
Receiver to the matching VIDEO IN jack on the TV.
2
x5
x1
1
Rear of TV
AVIN
75 ⍀
AUDIO
OUT
L
S-VIDEO
IN
R
75 Ω
ANTENNA IN
Antenna or Cable TV Signal
S-VIDEO
Y
Pb/Cb
Pr/Cr
RF coaxial cable to TV
Back of RF Modulator
(example only)
TO TV
ANT IN
Audio/Video cables from DVD Receive
IN
VIDEO
IN
AUDIO IN
RL
CH3 CH4
AM/FM
ANTENNA
(SUBWOOFER)
75 ⍀
AV IN
AUDIO
OUT
L
R
S-VIDEO
IN
2
Front Speaker (Right) Center Speaker Front Speaker (Left)
+ -
+ -
+ -
1a
COMPONENT
Pr/Cr
VIDEO OUT
AM
CENTER
AUDIO OUT
LINE OUT
FM
(7Ω
)
WOOFER
LINE OUT
1c
Y
Pb/Cb
VIDEO
AUDIO IN
L
R
AUX
TV
abc
S-VIDEO
OUT
OUT
DIGITAL OUT
OPTICAL COAXIAL
Connecting Speaker Cable
.0
4
7
"
(12
m
m
)
P
PUSH
DOWN
U
S
H
IN
FR
FLCSR SL
+
(4Ω
SPEAKER
Surround Speaker (Right)
RELEASE
+
)
AC POWE
Surround Speaker (Left)
+ -
+ -
1b
Page 2
Quick Use
Surround Sound Speaker Setup
A
fter the speaker connections are complete, place all the speakers
in their proper locations.The speaker arrangement is what allows
you to enjoy a Surround Sound experience in your own home.You will
now be able to hear theater sound realism with audio signal separation and pinpoint sound placement.
Playable Discs
This DVD Receiver will play the following types of Discs: prerecorded Audio CDs, finalized Audio CD-R and
Audio CD-RW discs, Video CDs, Super VCDs, DVDs, and MP3-CDs (CD with MP3 tracks)
Region Codes
DVDs must be labeled for ALL regions or for Region 1 in order to play on this Home Cinema system.
You cannot play Discs that are labeled for other regions. If one of these logos appears on your DVD or
its case, it should play on this DVD Receiver.
To Load Remote Batteries:
• Open and remove compartment door.
• Place batteries in case as marked.
(Aligned +,- properly).
• Replace and close compartment door.
● If your TV has a video in jack, it should
have a special setting or channel for video
input. Usually these channels are between
the lowest and highest channels and may be
called FRONT, A/V IN, or VIDEO. See
your TV instruction book for more specific
instructions.
● If you only have a single antenna jack on the TV, you
will need an RF modulator to connect the Receiver to your
TV. The RF Modulator converts the Video from the
Receiver so it can play through the TV’s Antenna connector. When using an RF Modulator, you view DVD playback on TV channel 3 or 4 (like a VCR).
See your electronics retailer or contact Philips for details on RF Modulator
availability.
*Selecting Video Input on the TV
Place the Front Left and Right speakers at equal distances from the TV. Turn the speakers to an approximate
45 degree angle from the listening position.
Place the Center speaker above (or below) the TV to
localize the center channel sound.
Place the Surround speakers at normal listening ear level,
facing each other or mounted on the wall.
Place the Subwoofer on the floor near the TV.
NOTES:
• To avoid magnetic interference, do not position the Front
speakers too close to your TV.
• If the Rear Surround speakers are installed farther away
from the listening position than the front and center
speakers, it will weaken the Surround effect.
• All speakers should be securely installed to prevent accidents and improve sound quality.
PLACING SPEAKERS
1
2
3
4
Playing a DVD
T
o play a DVD movie using the DVD Receiver, follow these
steps:
Press STANDBY ON on the front of the Receiver to
turn on the power.
You also can turn on the Receiver using the DISC button on the
remote control (only if the STANDBY•ON button on the front
of the Receiver is depressed).
Turn on your TV. Select the correct Video In mode (AV1,
VIDEO, etc.) on the TV.
You should see the DVD screen saver on the TV (if no Disc
is in the Receiver).
Note: Your TV might have only a single connection for an
antenna or VCR. If so, you will need an RF Modulator. See
the reverse page of this guide for details. Set the TV to
channel 3 or 4 if you use an RF Modulator.
Press OPEN•CLOSE on the front of the Receiver to open
the disc tray.
Load your Disc in the tray, with the label facing up.
If the Disc (DVD) is two-sided, make sure the label for the
side you want to play is facing up. Press OPEN•CLOSE
again to close the tray.
Playback may start automatically. If not, press
PLAY•PAUSE on the Receiver or remote.
If a Disc menu appears, use the remote’s direction arrows
98; : and OK button (or Number buttons) to select features or start playback from a menu. Follow the instructions
in the Disc menu.
See the owner’s manual for additional playback features and
their use.
To stop playing the Disc, press the STOP C button.
1
2
3
4
5
6
Quick Use
Guide
Guide
Center Speaker
Front
Speaker
(Left)
Rear Speaker
(Left Surround)
Subwoofer
Above TV
VIEWING AREA
Rear Speaker
(Right Surround)
Front
Speaker
(Right)
1
MRD 200 DVD VIDEO DIGITAL SURROUND SYSTEM
STANDBY
ON
OPEN-CLOSE
4
MAGNOVOX
3
5
6
PLAY-PAUSE
STOP
PROGRAM
PREV NEXT SOURCE
VOLUME
MUTE
TUNER
TV/AV
2
5
87
0
DISC
1
4
DISC SYSTEM
MENU MENU
2
AV IN
(Do not use
*
CH.3 or 4 on the TV
with your DVD Receiver.)
AUX
3
6
9
FRONT
A/V IN
VIDEO
OK
SOUND
SURROUND
REPEAT
SUBW
MAGNOVOX
NIGHT RESUME
REPEAT
A-B
CENTER
SLEEP DIM
REAR TV VOL
+
-
1
Antenna or Cable TV Signal
TO TV
ANT IN
Audio/Video cables from DVD Receiver
RF coaxial cable to TV
Back of RF Modulator
(example only)
AUDIO IN
VIDEO
IN
RL
CH3 CH4
 Loading...