

Page 1

Instructions for use 2
MANTS10
MNT510F
o
o
Instrucciones de manejo 6
Mode d’emploi 10
PHILIPS
Page 2
Contents
2 What’s in the box
3 Connect
3 Connect coaxial cable to antenna
3 Connect coaxial cable to TV
3 Connect power
4 Install
4 Locating the signal
4 VHF reception
4 FM reception
5 UHF reception
S Using the selector switch
S Fine-tune the picture
5 Limited lifetime warranty
Philips produces products of the highest quality. If you are having
technical problems, please call our accessory support help line at
919-573-7854 before returning the product to the store, (please see
page 5 of this instruction manual for details ‘‘Before You Start”).
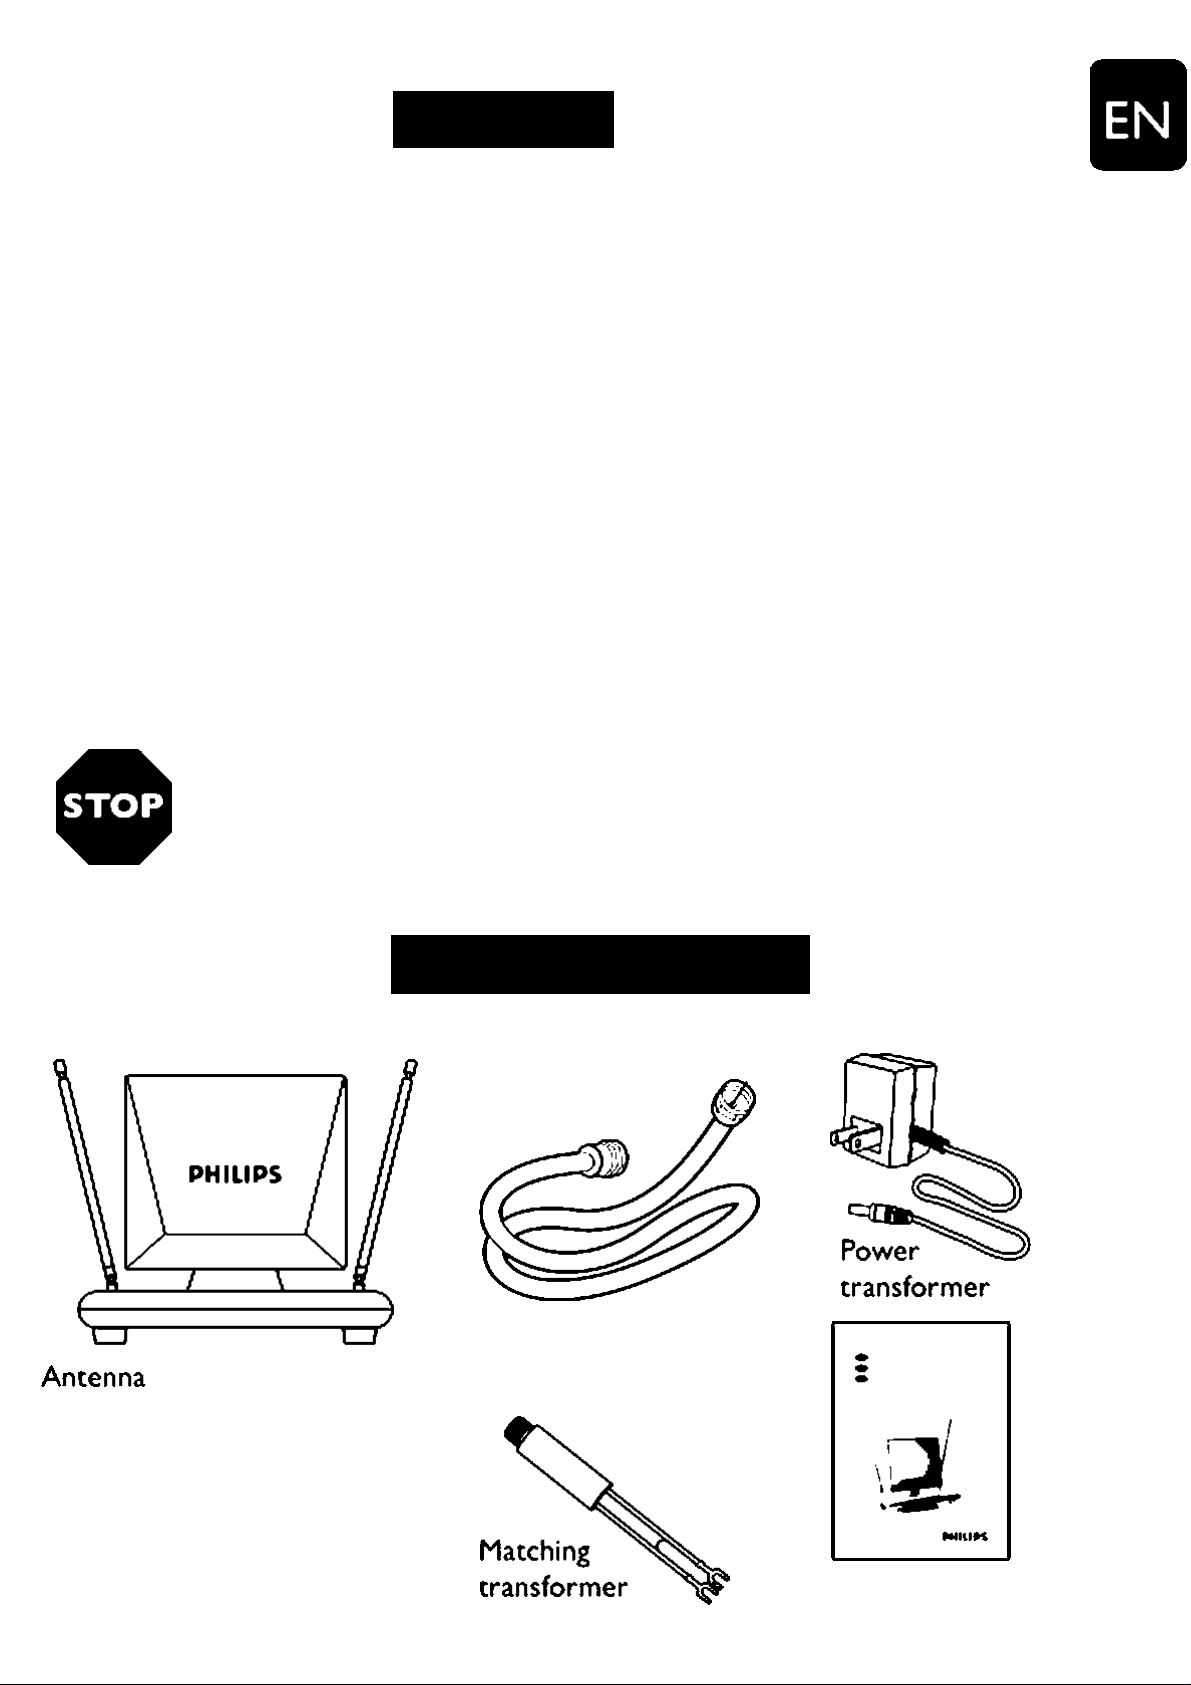
What’s in the box
RGS9 Coaxial cable
Instructions
for use
Page 3
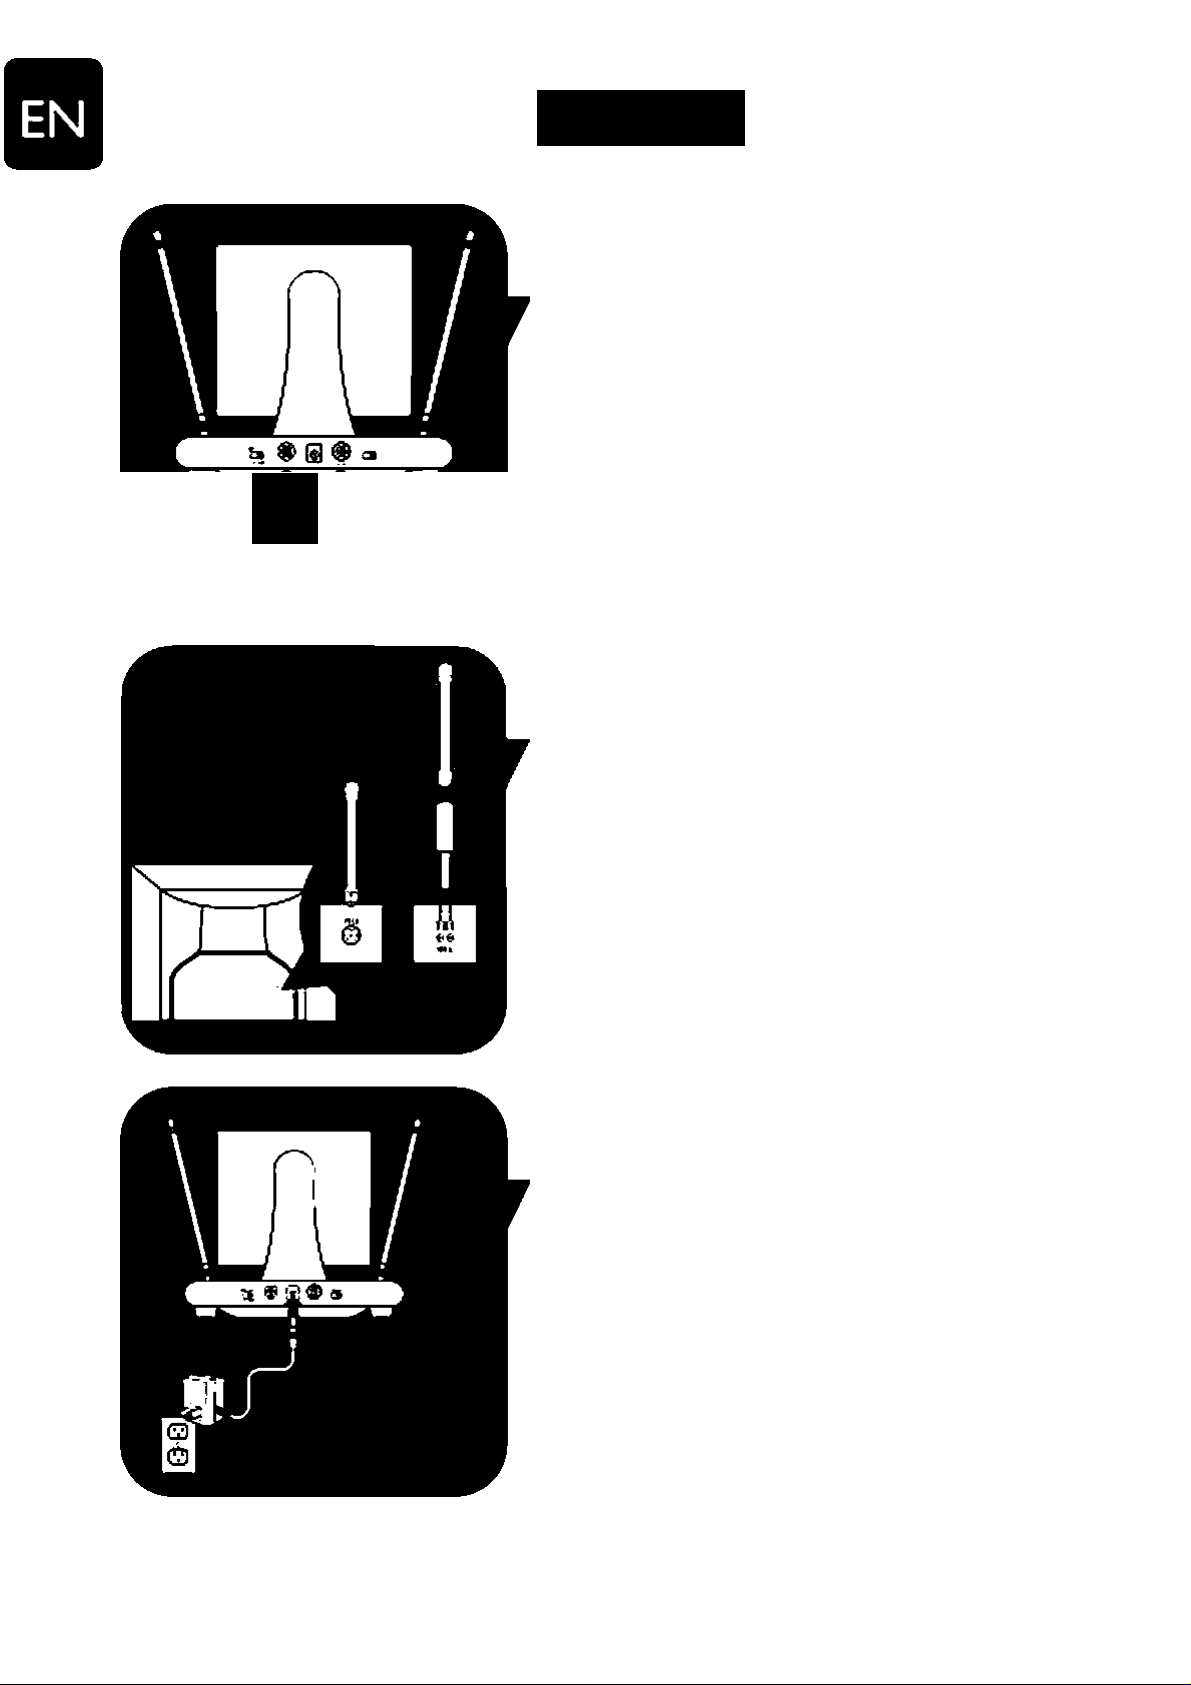
Connect
Connect coaxial cable to antenna
1 Connect supplied coaxial cable to the back
of the antenna.
2 Connect the coaxial cable from your cable
or satellite source to the back of the
T
antenna to the connector labeled IN
FROM CABLE
Connect coaxial cable to TV
Connect the supplied coaxial cable from the
antenna to the back of your TV using one of
the two methods illustrated*.
Connect power
Connect the power transformer to the antenna
then to AC power outlet.
*lf you have screw connections on your TV. attach the cable to the matching transformer and then to
yourTVYou will need a band separator (not included) to access UHF reception. If you have a 75 ohm
¡ack and a set of UHF screw connectors on yourTV, attach a coax cable to the 75 ohm jack.You will
need a band separator (not included) to access UHF reception.
Page 4
Install
Suggested starting point
Locate signal source
Face the antenna towards the source
of the signal (transmitter). For help locating the
signal source go to www.antennaweb.org
For VHP reception, position the dipoles
as shown**
For channels 2 through 6. extend the dipoles
fully and adjust to a horizontal position**. For
channels 7 through 13. shorten the dipoles by
1/3 length and position them in a'V'**.
For FM reception, position the dipoles
as shown**
For FM reception, extend the dipoles to 30”
and position them either straight up or
horizontally**.
**For best results, some additional adjustments may be necessary.
Page 5
Install
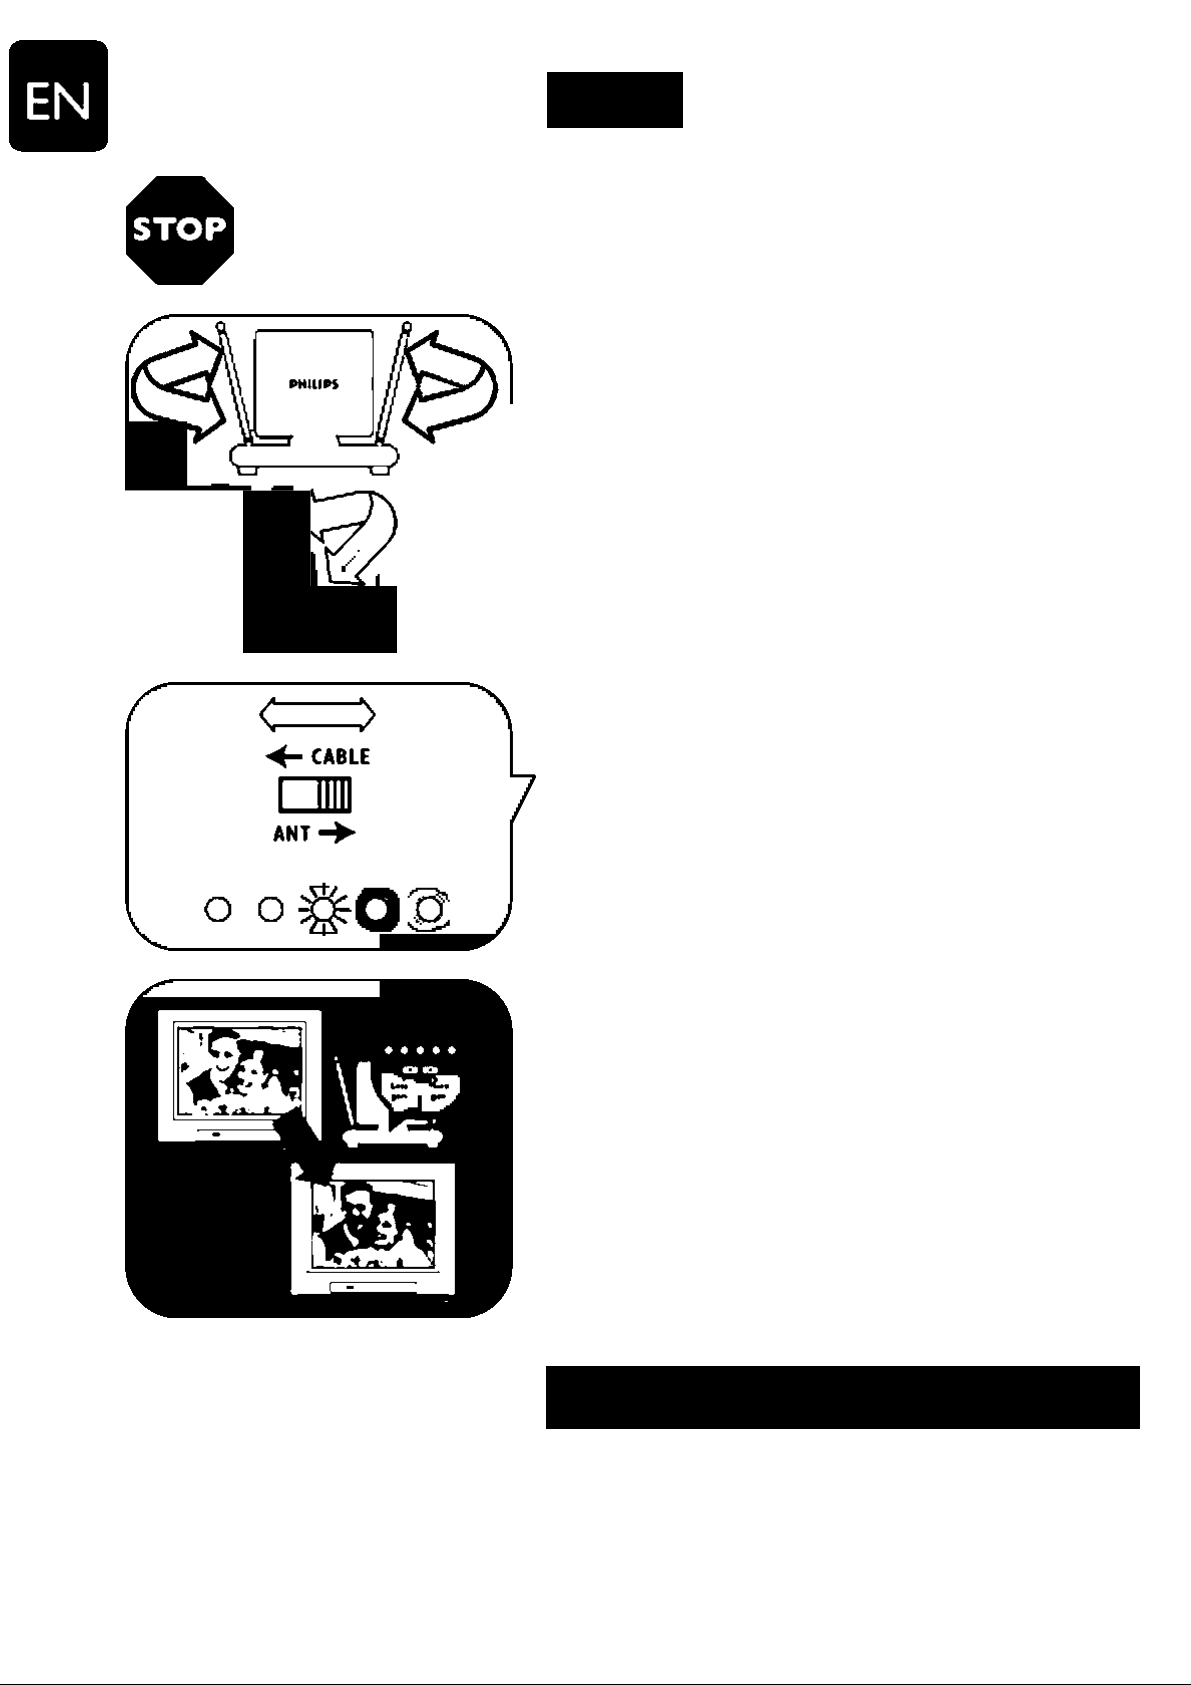
D _/_rp antenna to work properly, you must access the menu
Y on the television you are connecting this antenna to (consult
You television owner's manual) then set it to receive the
Start signal from an ANTENNA instead of CABLE or SATELLITE.
For UHF reception, position the dipoles
^ as shown**
For channels 14 through 69. rotate and/or tilt
the center loop towards the transmitter.
I
Using the selector switch
Choose your signal source by switching
from ANTENNA to CABLE
Note that in the CABLE position.
1 LED lamp will illuminate.
Fine-tune the picture
F Slowly increase the gain until you achieve the
clearest picture possible. Rarely.it is necessary
to use the maximum gain. Too much gain may
result in poor picture quality.
Limited lifetime warranty
Philips warrants that this product shall be free from defects in material, wortunanship and assembly, under normal
use. in accordance with the specifications and warnings, for as long as you own this produccThis warranty extends
only to the orijinal purchaser of the product and is not transferable To exercise your rights under this warranty, you
must provide proof of purchase in the form of an original sales receipt that shovrs the product name and the date of
purchase. For customer support or to obtain warranty service, please call 919*573-7854.THEREARE NO OTHER
EXPRESS OR IHPLIED WARRANTIES. Philips' liability is limited to repair or. at its sole option, replacement of the
product. Inddenul. special and consequential damages are disclaimed where permitted by law. This vrarranty gives you
specific legal rights.You may also have other rights that vary from state to state.
Page 6

Indice de contenido
6 Qué contiene la caja
7 Conectar
7 Conectar el cable coaxial a la antena
7 Conectar el cable coaxial a la TV
7 Conectar la corriente
8 Instalar
8 Localizar una fuente de señal
8 Para la recepción VHF
8 Para la recepción FM
9 Para la recepción UHF
9 Uso del conmutador selector
9 Sintonice la imagen
9 Garantía limitada de por vida
Philips fabrica productos de la mejor calidad. Si tiene algún proble*
ma técnico, llame a nuestra línea de ayuda de asistencia para acce
sorios al 919-573-7854 antes de devolver el producto al establec
imiento. (Consulte la página 9 de este manual de instrucciones para
obtener información ^Antes de comenzar").
Qué contiene la caja
Cable coaxial RG59
Transformador
de corriente
Transformador
de adaptación
Instrucciones
de manejo
Page 7

Connectar
Conectar el cable coaxial a la antena
1 Conectar el cable coaxial suministrado en la
parte trasera de la antena
2 Conectar el cable coaxial de su fuente de
cable o satélite en la parte trasera de la
T
antena, en el conector que indica IN FROM
CABLE.
Conectar el cable coaxial a la TV
Conectar el cable coaxial suministrado desde la
antena hasta la parte trasera del aparato de TV
mediante uno de los dos métodos ilustrados*.
Conectar la corriente
Conectar el transformador de corriente desde
la antena a una salida de corriente AC.
* Si tiene conexiones para atornillar en su TV. conecte el cable en el transformador de adaptación y
posteriormente en su TV. Para acceder a la recepción UHF necesitará un separador de bandas (que no
se incluye). Si cuenta con un conjuntor de 7S ohm y una serie de conectores de tomillo UHF en su
TV conecte el cable coaxial al conjuntor de 75 ohm. Para acceder a la recepción UHF necesitará un
separador de bandas (que no se incluye).
Page 8

Instalar
Punto de inicio sugerido
Localizar una fuente de señal
Colocar la antena en dirección a la fuente de
la señal (transmisor). Si necesita ayuda para
ubicar la fuente de la señal, diríjase a
www.antennaweb.org
Para la recepción VHF, coloque los dipolos
del modo indicado.**
Para los canales 2 a 6. extienda totalmente los
dipolos y ajústelos en posición horizontal**.
Para los canales 7 a 13. acorte 1/3 los dipolos y
colóquelos en forma de "V”**.
Para la recepción FM, coloque los dipolos
del modo indicado.**
Para la recepción FM. extienda los dipolos
hasta 30" y colóquelos en forma vertical u
horizontal*'*.
"Para lograr mc¡orcs resultados, pueden ser necesarios algunos a¡ustes adicionales.
8
Page 9

Antes
de
comenzar
Instalar
Para que la antena funcione correctamente, debe acced
er al menú del televisor al que esté conectada (consulte
el manual de instrucciones del televisor) y. luego, con
figúrelo para que reciba la señal desde una ANTENA en
lugar de un CABLE o SATÉLITE.
Para la recepción UHF, coloque los dípolos del modo indicado.**
Para los canales 14 a 69. rote y/o incline el
bucle central hacia el transmisor.
Uso del conmutador selector
Elegir la fuente de señal cambiando de
ANTENA a CABLE
Tener en cuenta que en la posición CABLE
se iluminarán 1 lámpara LED.
Sintonice la imagen
Aumente lentamente la ganancia hasta lograr la
imagen más clara posible. En raras ocasiones es
necesario utilizar la ganancia máxima. Demasiada
ganancia puede provocar una mala calidad
de imagen.
Garantía limitada de por vida
Philips garanoia que este producto carece de defectos de material, manufactura o armado, bajo uso normal y de
acuerdo con las especificaciones y advertencias, durante el tiempo que éste sea de su propiedad Esta garanoa cubre
únicamente al comprador original del producto y no es cransferible. Para ejercer sus derechos bajo esu garanua.
debe proporcionar una prueba de compra mediante una factura original que muestre el nombre del producto y la
fecha de compra. Por atención al cliente o para obtener servicio de garanua. sírvase llamar al 919«S73*78S4, NO
EXISTEN OTRAS GARANTÍAS IMPLÍCITAS O EXPÜCITAS.Us obligaciones de Philips se limican a la reparación o. a
SU sola opción, al reemplazo del producto. No se aceptan reclamos por daños incidenules. especiales e indirectos, de
acuerdo a lo permitido por la ley. Esta garanoa le otorga a usted derechos legales específicos. Usted también tener
otros derechos que pueden variar de estado a estado.
Page 10

Table des matières
10 Contenu de la boîte
11 Branchez
11 Connectez le câble coaxial à l'antenne
11 Connectez le câble coaxial à votre TV
12 Branchez l'alimentation
12 Installez
12 Repérez la source du signal
12 Pour la réception VHF
13 Pour la réception FM
13 Pour la réception UHF
13 Utilisation du sélecteur
13 Réglage de l'image
13 Garantie à vie limitée
Philips fabrique des produits de la meilleure qualité possible.
Si vous rencontrez des problèmes techniques, appelez notre ligne
téléphonique de soutien pour les accessoires au 919 573*7854 avant
de rapporter le produit au magasin (voir page 13 de ce manuel dinstruc*
tions pour plus de détails sur ce quil faut faire « avant de commencer »).
Contenu de la boîte
Transformateur
Câble coaxial RG59
de puissance
correspondant
Table des
matières
10
Page 11

Branchez
Connectez le câble coaxial à l’antenne
1 Connectez le câble coaxial (inclus) à l'arrière
de votre antenne.
2 Branchez le câble coaxial (inclus) depuis
votre source télévisuelle (câble ou satellite)
T
jusqu’à l’arrière de votre antenne, dans le
connecteur libellé IN FROM CABLE
(Entrée depuis Câble).
Connectez le câble coaxial à votre TV
Connectez le câble coaxial (inclus) depuis
l’antenne jusqu’à l’arrière de votre TV en
suivant l’une des deux méthodes illustrées*.
11
Branchez l’alimentation
Raccordez le transformateur de puissance depuis
l'antenne jusqu’à la prise d’alimentation c.a.
*Si votre TV est dotée de connexions à vis. connectez le câble au transformateur correspondant puis à
votre TV. Un séparateur de bande (vendu séparément) sera nécessaire pour accéder à la réception
UHF. Si la TV est dotée d'une prise 75 ohms et d'un jeu de connexions à vis UHF. connectez un câble
coaxial à la prise 75 ohms. Un séparateur de bande (vendu séparément) sera nécessaire pour accéder
à la réception UHF.
Page 12

Installez
Point de départ suggéré
Repérez la source du signal
Orientez l’antenne vers la source du signal
(transmetteur). De l'aide pour localiser la
source du signal est disponible sur le site
www.antennaweb.org
Pour la réception VHP, positionnez
l'antenne dipôle comme illustré.’"*
Dans le cas des canaux 2 à 6. déployez à
l’horizontale l'antenne dipôle sur toute sa
longueur.** Pour les canaux 7 à 13. ra
ccourcissez l’antenne dipôle d’environ 1/3 et
donnez-lui la forme d’un «V».
Pour la réception FM, positionnez
l'antenne dipôle comme illustré.**
Para la recepción FM. extienda los dipolos
hasta 30" y colóquelos en forma vertical u
horizontal**.
"Pour de meilleurs résultats, des réglages supplémentaires peuvent s'avérer nécessaires.
12
Page 13

Avant
de
commencer
Installez
Pour que cette antenne fonctionne correctement vous
devez accéder au menu du téléviseur auquel vous connectez
cette antenne (et consulter le guide d'utilisateur du
téléviseur), puis le régler pouf qu'il reçoive le signe d'une
ANTENNE plutôt que du CABLE ou d'un ^TELLITE.
Pour la réception UHF, positionnez l’anneau comme illustré.**
Pour les canaux 14 à 69. tournez et/ou penchez
l'anneau central vers le transmetteur.
Utilisation du sélecteur
Sélectionnez votre source de signal en
basculant de ANTENNA à CABLE
Notez qu'à la position CABLE, les
1 voyant DEL s’allumeront.
Réglage de l’image
Augmentez le gain lentement jusqu’à ce que
vous obteniez l'image la plus nette possible.
Parfois mais rarement, il peut s’avérer
nécessaire d'utiliser le gain maximum. Un niveau
de gain trop élevé peut engendrer une image
de piètre qualité.
13
Garantie limitée à vie
Philips garantit que ce produit est dépourvu de défauts au niveau des matériaux, de la main d'ceuvre et du montage,
moyennant des conditions normales duulisation. conformément aux spécificaDons et aux avertissemenu. aussi
longtemps que vous êtes propriéuire de ce produit. Cette garantie est seulement accordée au propriéuire d*origine
du produit et n'est pas transférable. Pour vous prévaloir du service en vertu de cette garantie, vous devez fournir
une preuve d'achat sous b forme du ticket de caisse original indiquant le nom du produit et la date d'achat. Pour un
support clientèle ou pour obtenir un service de garantie, veuillez appeler 919*S73*78H. AUCUNE AUTRE
GARANTIE. QU'EUE SOIT EXPRESSE OU TACITE. N'EST OFFERTE. U garantie de Philips est limitée à la répara
tion ou. à sa seule discrétion, au remplacement du produit. Les dommages accessoires, spéciaux et indirects ne sont
pas acceptés dans les limites permises par la loi. Cette garantie vous donne des droits reconnus par la loi.Vous pou
vez également disposer d'autres droits suivant les états.
Page 14

Specifications are subject to change without notice.
Trademarks are property of Koninklijke Philips Electronics N.V. or their respective owners.
2007 © Koninklijke Philips Electronics N.V. All rights reserved
Made in China - M
www.philips.com
 Loading...