

Page 1
VGA Retro Camera
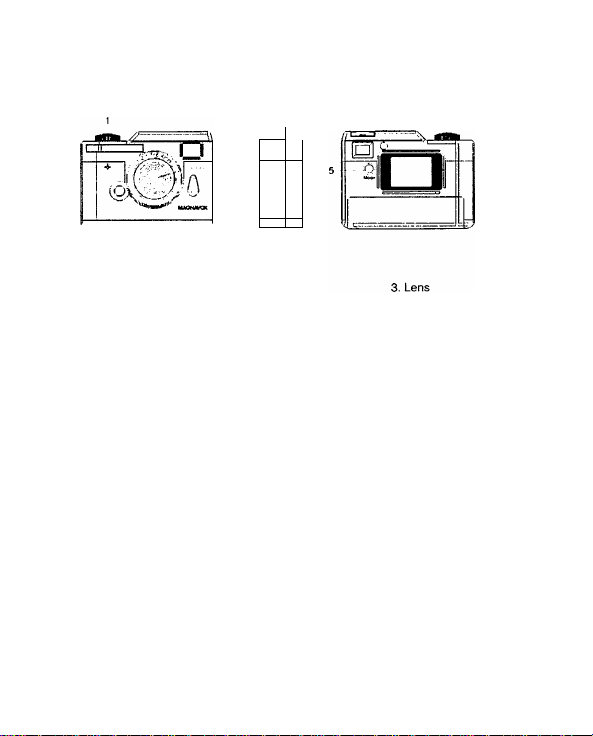
LOCATION OF CONTROLS
/ 1
_ ^
1. Shutter
4. USB connector
7. LCD display
1.0 GETTING STARTED
1. The device is operated by the built-in rechargeable battery. If the battery is low on the device,
please recharge the battery before operating the device.
2. The battery can be recharged through the USB cable connected to the computer. The LED
will turn on during the battery charge up take place. The recharging time takes approximately
5 hours. The LED will go off when the battery is fully charged.
3. Press the Mode button once, the camera will turn on. The camera will beep once and the
LCD will display the picture counter. The counter shows the number of images that are
stored in the camera. It will display "00” when the camera is first turned on.
2.0 TAKING A PICTURE
1. Verify the LCD is displaying the number of images taken. If the display is other than a
number, press the mode button until a number is displayed. If this is the first time the
camera has been activated, the LCD should display “00”.
2. Next, look through the camera Viewfinder. Hold the camera steady and press the Shutter
button until you hear 2 beeps. A photo was taken successfully.
3. The counter displayed in the LCD will be increased by one each time an image is captured.
4. If the counter did not increase by one it may be because the Shutter button was not pressed
properly.
5. Ultimately, “FL” will be shown on the LCD display indicating that the camera memory is full.
Viewfinder
Mode button
Page 2

3.0 The BATTERY and AUTO STAND-BY MODE
1. The camera will switch to stand-by mode after 60 seconds of inactivity. The LCD will go
blank to help conserve battery power.
2. If the camera is in stand-by mode, pressing the Mode button once will bring the camera out
of stand-by mode. Any pictures taken will remain in the memory.
3. Any of the following indicates battery need to be recharged :
a. The LCD display keep flashing
b. When you press the “Mode" button, the LCD turns on once then goes off immediately.
c. When you press the “Mode" button, the LCD display does not turn on at all, it means
the battery power is running out and it is time to recharge the battery.
Note: Always upload all images to PC when the battery is low.
Low battery power will affect image quality & performance of the camera.
4.0 ADDITIONAL FEATURES
Press the mode button repeatedly until the desired features are shown on the LCD. Then press
the shutter button. If the desired feature is not selected in 5 seconds, the display will be
switched back to the Picture Counter.
00 : Picture Counter
: Self Timer
St
: Video Clip Recording
d B
: Continuous Shooting for 3 Images py . ^ 31^ Rggolution by Interpolation
L FI : Delete All Photos
L t_ • Clear Last Photo
Ud : Mass Storage Device Mode
PC ; PC Cam Mode
4,10 Self-Timer
1. Press the Mode button until “ ” appears on the LCD.
2. Press the shutter button to activate a 10 second self-timer.
3. The camera wiil issue a series beeping sounds and an image is taken successfuliy when
the beeping sound stops.
4. The picture counter will increase by one to indicate that the image has been taken.
5. The Self Timer mode cannot be selected when the camera memory is full.
(i.e. “FL" displayed on the LCD)
H I : High Resolution (VGA)
! ^ : Low Resolution (QVGA)
g : High Image Quality
L 9 : Standard Image Quality
SO :60Hz
SO
:50 Hz
4.20 AVI Video Clip
1. Press the Mode button until “ " is displayed on the LCD, then press the Shutter button
to start recording video.
2. The LCD will display a Timer in seconds, starting from “01”.
3. The camera allows to take video up to 10 seconds for each clip and maximum for 5 clips.
The video recording will stop when the LCD shows “10”. Then it will switch back to the
picture counter. The picture counter will be increased by one.
4. Video will be recorded in QVGA format (320 x 240).
5. If you want to stop the video recording, press the Shutter button once.
6. The video recording stops when the memory is full, or if the Shutter button is being
pressed during recording.
Note: During the AVI mode, the camera automatically adjusts the exposure.
4.30 Continuous Shooting for 3 Images
1. Press the “Mode” button until “is displayed on the LCD, then press the Shutter
button to begin Continuous mode.
2. The camera will take 3 images continuously and then stop. The Picture Counter will be
increased by one.
3. Continuous shooting stops when the memory is full.
4.40 Clearing the stored images
4.41 Delete All Photos
Press the Mode button until “ ^ appears on the LCD. Pressing the shutter button
once, you will hear one (1) beep and the picture counter will start flashing.
Press the Shutter button once and it will clear all the photos or AVI movies stored in the
camera and reset the picture counter to “00”.
4.42 Delete Single Photos
Press the Mode button until “ “ appears on the LCD. Press the shutter button once
and it will clear the last picture or the last AVI movie.
4.50 Image Resolutions
1. The camera is defaulted with the setting in “HI” - VGA resolution.
There are two resolutions available to select in the camera:
HI : High Resolution. This option will set the resolution to 640 x 480 VGA
Lo : Low Resolution. This option will set the resolution to 320 x 240 QVGA
PU ; 1.3M Resolution by Interpolation. This option will set the resolution to
1280x960 1.3M Pixels.
Page 3

2. Press the Mode button until “HI” appears in the LCD display. Then keep pressing the
Shutter button will display the following sequence:
Lo ^ HI ^ PU
3. Select the desired resolution format then press Mode button to confirm the change.
5.0 INSTALLING THE SOFTWARE AND UPLOADING IMAGES TO PC
Windows 98 Users
To upload the images to PC, install the camera driver first. After this has been done, the
stored images in the camera can be moved to the PC.
Note: Do NOT connect camera to USB port prior to installing software and drivers. -
4.60 Image Quality
High Quality and Standard Quaiity
1. The camera is defaulted with the setting in ^ High Quality.
2. To set to Standard Quality 1- 9, press the “Mode” button until “ 3»appears in the
LCD. Press the “Shutter” Button once and the LCD will display ^ 9 .
3. Press the Mode button once to confirm the mode change. The ^ 9 standard
Quality is being selected.
Below is a table to show the maximum number of images can be taken at different
resolutions with different Image Quality:
Resolutions
HI (VGA 640 X 480)
Lo (QVGA 320 x 240)
PU (1.3M bv interpolation)
4.70 Frequency Selection- when using as a Web camera (Video mode) or
Indoor Image Capturing
Hiqh Quality
70 imaqes
170 images
22 imaqes
Standard Quality
110 images
270 images
35 images
50Hz/60Hz Frequency mode
1. Select 50Hz or 60Hz according to the power frequency set in your living country to
avoid flickering under video mode or indoor image capturing.
2. The 60Hz frequency is set as a default. To select 50Hz frequency, press the Mode
button until “60” is displayed on the LCD, then press the Shutter button to confirm
selecting 50Hz.
1. Insert the CD into the CD-Rom drive. The installation window automatically appears.
Ensure the camera is not connected to your computer.
2. Close out of all programs and disable any background applications such as Anti-Virus
software.
3. If the installation window does not appear, click the Start button on the desktop and
choose Run.
4. When the Run dialog box appears, click the Browse button and navigate to your CDROM drive directory. Double-click the Setup.exe icon to begin the installation process.
5. An Install shield Wizard will be appeared. Click the “Next" button.
6. After the installation is completed, click the “Finish” button and restart the computer.
Page 4

7. Connect the camera to the PC with the USB cable. “Building Driver Information” &
“New Hardware found” dialogue box will open and the computer will recognize the
camera.
8. If you can see “Removable Disk” under “My Computer'’, the camera driver installation is
successful.
_J|0| lotHOnl
Lec4fDiA
|F|
^161 CD-AOhDk
SytHctfddet
JgC««elP«^<f $y«wir«idcr
idO>M»N«Nooitr>i} 'SytiWiFclder
jfw«tF«lden VtUttfcÉte
For Windows ME/2000/XP user
It is not necessary to install the camera driver to upload pictures if your computer runs on
Windows ME/2000/XP. Connect the camera to the computer and it will recognize the device
automatically. If you check the “Removable Disk” under “My Computer” exist, the
camera driver installation is successful.
6.0 UPLOADING STORED PICTURES
1. Connect the camera to your PC with USB cable.
2. On your computer desktop display, select “My Computer” or “Windows Explorer” and
double click [Removable Disk] -> [DCIM]-> [100IMAGE]. The image files will then be
displayed
3. Use the COPY or MOVE function to download the images to your PC.
7.0 PLAYING AVI VIDEO
Follow the steps in 6.0 to upload all pictures/AVI Video files. Then select and double click
the AVI files in the dialogue box. It will automatically launch your default media player and
play the file.
8.0 DRIVER INSTALLATION TO VIEW LIVE VIDEO
8.10 Driver Installation
To view live video on PC, Windows ME/2000/XP users need to install the driver. Please
follow the steps in section 5.0. Windows 98 user is not required to repeat the installation
process.
1. After installation is completed, the PC cam mode needs to be activated in the camera
in order to view Live Video.
2. To set to PC Cam mode, hoid down the Shutter button first, then plug in the USB
cable.
3. Do not release the Shutter button until the “ ” is displayed in the LCD.
4. Double click the icon “EZCam” on the Desktop. Select and double click the “PCCAM”
to start the Live Video Application.
5. Live video will appear in the PCCAM window.
Pf
8.20 Video Capture
1. Please set up the directory to which the file will be saved. Go to File -> select “Set
Capture File”. Then select a directory and named a new file to save the video. The
click “Open” to save the link.
2. You can set the maximum recording file size by selecting the “Aliocate File Size”
under the “File” menu.
To set the recording time of the video, go to “Capture” “Set Time Limif.
3. Go to “Capture” menu and select “Start Capture” click OK. It will then start the
video capturing.
4. Press “Esc” on the computer keyboard whenever you want to stop, or go to “Capture’
menu and select “Stop Capture”.
5. Go back to the directory you set and select the saved file to view the video.
6. You can email the captured video to your friends / family by selecting the file you want
to send, then right click your mouse, select “send to” -> go to “Mail Recipient”. It will
launch your email application and attaché your selected file to your email accordingly.
Page 5

8.30 Recording Audio
If your laptop has a built in microphone, or if you had installed a microphone on your
home PC, you are able to capture the audio while recording the video. The audio will be
attached in the same Captured video file.
Remark: External USB microphones are available at most computer stores.
It the microphone has not been built on the PC, It can be added subject to availability of
USB port. The USB ports could be expanded with a simple multi port hub.
8.40 Video Conferencing
You can use the digital camera to work as a Webcam to perform Video conferencing:
1. If the net meeting programs are not included in your Explorer®, download
“NetMeeting” from
2. Connect your digital camera and start the net meeting programs. You can see your
friends and families if they are on the same net meeting program and have the web
camera set up.
www.microsoft.com or “Yahoo® Messenger” from www.vahoo.com .
9.0 REMOVING THE REMOVABLE DISK
9.10 Windows 98SE
1. Check that the camera is not transferring any files to the PC. Under transmission of files,
the LED will light up and flash, wait until the LED on the camera turns off.
2. Unplug the USB cable.
9.20 Windows 2000/ME/XP
1. Check whether the camera and PC are transferring a file and check if the LED is flashing,
wait until the LED on the camera turns off.
2. Double click the [Unplug or Eject Hardware] icon on the task bar as show in below:
»43 n4
3. The [Unplug or Eject Hardware] window will open. Select the [USB Disk] and click the
[Stop] button.
4. The [Stop a Hardware device] window will open. Select [USB Mass Storage] and click
the [OK] button.
5. [Safe to Remove Hardware] window will open. Click [OK] button and the removable disk
will be removed safely.
n» UM 6 ‘ C» ne
S.Unplug the USB cable.
10.0 HINTS ON SOFTWARE INSTALLATION
The camera driver might share same resource files with other imaging device. In case
user encounter difficulties in software installation, uninstall driver of other imaging device and
reinstall the camera driver from beginning.
Helpful Hints and Camera Maintenance
Troubleshooting:
1. The camera does not work:
■ Make sure the battery has inserted with the correct polarity.
Check if the battery power is low / run out of battery, replace a new one.
Page 6

2. “No New Hardware Found” message appears:
Make sure the camera and PC are connected properly. Go to “My Computer” icon-> Right
click your mouse-> Choose “Property” ^ Select “Device Manager” ^ If you have encounter
below two situations :
(I) “Imaging Device” does not exist under the list
(ii) The “Imaging Device” is on the list, check out if the driver named “EZ Cam”
exist, if not
unplug the camera and re-connect the camera into your computer's USB port.
Note: If the camera is listed, but other cameras are also installed, disable all other
cameras; make sure your camera is enabled.
3. “Camera not connected” or “Device cannot be detected” message appears:
• Try removing the previous driver and reinstalling the software.
Go to “My Computer” icon^ Right click your moused Choose “Property” Select “Device
Managed ^ “Imaging Device” -> select the driver “EZCam” and choose “Remove” to
uninstall the driver:
■Srj:-- jiii
Then uninstall the driver program named “EZCam” under the “Add/ Remove program”
from the Windows Control Panel and restart the computer. Reinstall the driver again.
4. After installing the camera software, the camera is not detected by the software:
• Some PC's have been shipped without the USB port mode enabled. To enable the USB
Port. You must run the system CMOS setup program. This setup program is only available
when you power up the computer. The procedure is different for each system so you will
need refer to your PC manual for more details.
5. To Uninstall the Camera Driver:
■ To uninstall the Camera Driver, go to Windows Start menu -> Programs-> EZCam-> click
“Uninstall”.
Camera Maintenance:
Maintaining your camera will ensure longer life and will minimize the chances of causing
damage to your camera and computer.
Keep the camera away from moisture and extreme temperature.
■ Clean the outside of the camera with a clean, dry cloth.
• Never use harsh or abrasive cleaners or organic solvents on camera or on any of its parts.
Never disassemble or touch the inside of the camera.
11.0 ACCESSORIES
Your kit contains the following:
* Installation CD
* USB Cable
* Keychain
* Instruction manual
Note: Your computer needs a USB port to use your digital camera.
10
11
Page 7

12.0 SYSTEM REQUIREMENTS
PC with Intel Pentium III 800MHz or Higher
Microsoft Windows 98SE/ME/2000/XP
128MB RAM or Higher
350MB available hard drive space
Available USB port
24-bit display adaptor
True Color (24-bit) display settings at 1024 X 768 pixels (recommended)
8X or faster CD-ROM drive
Mouse
Note: When using a USB connection, a PC running window 98 Is required to upload pictures from
the camera. Window 95 does not support USB connection.
13.0 GENERAL SPECIFICATIONS
• Resolution: 640 x 480 Pixels VGA resolution
• Fixed Focus
• Internal Memory: 8MB SDRAM
• Store a maximum 70 VGA images, or
• Record up to 5 AVI video clips, each at maximum 10 seconds
• Self Timer
• Auto Exposure and Auto White Balance
• LCD display to show camera status
• Video conferencing mode
• TwainA/FW driver for Windows 98SE/ME/2000/XP
• Built in rechargeable battery
• Fixed Focus
• Weight about 40 grams
• Dimension: 2.5“(L) x 1.8“(‘H) x 1.1 "(D)
320 X 240 Pixels QVGA resolution
1-3M by Interpolation
170 QVGA images with High Image Quality, or
22 1,3M images by Interpolation
Specifications are subject to change without notice.
12
 Loading...