

Page 1

tv
Page 2

Information for users in the UK
(Not applicable outside the UK)
Positioning the TV
For the best results, choose a position where light does not fall directly on the screen,and at some
distance away from radiators or other sources of heat. Leave a space of at least 5 cm all around
the TV for ventilation, making sure that curtains, cupboards etc. cannot obstruct the air flow
through the ventilation apertures.
The TV is intended for use in a domestic environment only and should never be operated or
stored in excessively hot or humid atmospheres.
General Points
Please take note of the section 'Tips' at the end of this booklet.
Interference
The Department of Trade and Industry operates a Radio Interference Investigation Service to help
TV license holders improve reception of BBC and IBA programmes where they are being spoilt by
interference.
If your dealer cannot help, ask at a main Post Office for the booklet "How to improve Television
and Radio Reception".
Mains connection
Before connecting the TV to the mains, check that the mains supply voltage corresponds to the
voltage printed on the type plate on the rear panel of the TV. If the mains voltage is different, consult your dealer.
Important
This apparatus is fitted with an approved moulded 13 Amp plug.
To change a fuse in this type of plug proceed as follows :
1. Remove fuse cover and fuse.
2. Fit new fuse which should be a BS1362 5A,A.S.T.A. or BSI approved type.
3. Refit the fuse cover.
In order to maintain conformity to the EMC directive, the mains plug on this product must not be
removed.
Connecting the aerial
The aerial should be connected to the socket marked x at the back of the set. An inferior aerial is
likely to result in a poor, perhaps unstable picture with ghost images and lack of contrast. Makeshift or set-top aerials are unlikely to give adequate results.
Your dealer will know from experience the most suitable type for your locality.
Should you wish to use the set in conjunction with other equipment, which connects to the aerial
socket such as TV games, or a video camera, it is recommended that you consult your dealer on
the best method of connection.
Stand (if provided)
Use only the stand provided with the set, making sure that the fixings are properly tightened.A diagram showing how to assemble the stand is packed with the stand. Never use a make-shift stand, or
legs fixed with woodscrews.
Page 3
Contents
Installation
Help?
If this instruction manual does
not give an answer or if ‘Tips’ do
not solve your TV problem, you
can call your Local Philips
Customer or Service Centre. See
the supplied World-wide
guarantee booklet.
Please, have the Model and
Product number which you can
find at the back of your
television set or on the
packaging, ready, before calling
the Philips helpline.
Model: 32PW9588
Product No: AG ....................................
R End of life directives
Philips is paying a lot of attention to
producing environmentally-friendly in
green focal areas.Your new TV contains
materials which can be recycled and
reused. At the end of its life specialised
companies can dismantle the
discarded TV to concentrate the
reusable materials and to minimise
the amount of materials to be
disposed of.
Please ensure you dispose of your old
TV according to local regulations.
Preparation ...................................................................................... 2
Keys/LCD display on top of the TV ........................................... 3
Your remote control .................................................................. 4-5
To use the menus ............................................................................6
Select the menu language and country ..................................... 6
Store TV channels .......................................................................... 7
Automatic installation ............................................................7
Manual installation................................................................... 7
Give name ................................................................................. 7
Reshuffle the programme list................................................. 8
Select favourite TV channels ................................................. 8
Install TV setup ............................................................................... 8
Speakers .................................................................................... 8
General ...................................................................................... 9
Source ...................................................................................... 10
Decoder .................................................................................. 10
Demo .............................................................................................. 10
Operation
TV menu
Picture menu .......................................................................... 11
Sound menu ........................................................................... 12
Features menu....................................................................... 13
NEXTVIEW/Teletext guide ...................................................... 14-15
Teletext ..................................................................................... 16-17
RDS Radio ................................................................................ 18-19
Connect peripheral equipment
Connecting and selecting equipment .................................20-21
Audio and Video equipment keys ............................................. 22
Tips ................................................................................................ 23
English
EasyLink features are based on the “one touch operation” approach.
This means that a sequence of actions are executed at the same
time in both the television and the video cassette recorder, provided
both are fitted with the EasyLink function and connected with the
eurocable supplied with your video recorder.
1
Page 4

Preparation
1m
min.
75
ANTENNA
FM RADIO
& Place the TV on a solid surface.
! 32PW9588: 60 kg !
For ventilation, leave at least 5 cm free all
around the TV. Do not place the TV on a
carpet.To prevent any unsafe situations, do not
place any objects on top of the TV. Avoid heat,
direct sunlight and exposure to rain or water.
é Insert the aerial plug firmly into the aerial
socket x at the back of the TV. For best
picture quality use the suppressor-aerial cable
supplied.
“ Remote control: Insert the 2 batteries
supplied (Type R6-1,5V).
The batteries supplied do not contain the heavy
metals mercury and cadmium. Please check on how
to dispose of exhausted batteries according to local
regulations.
‘ Insert the mains plug of the TV in the wall
socket having a mains voltage of 220V-240V.
( Switch the TV on :Press the power switch A
on the front of your TV.
A blue indicator on the front of the TV lights
up, the screen comes on and the LCD display
smoothly and automatically pops up. If the
indicator is red, press the
-P+ keys on the
remote control.
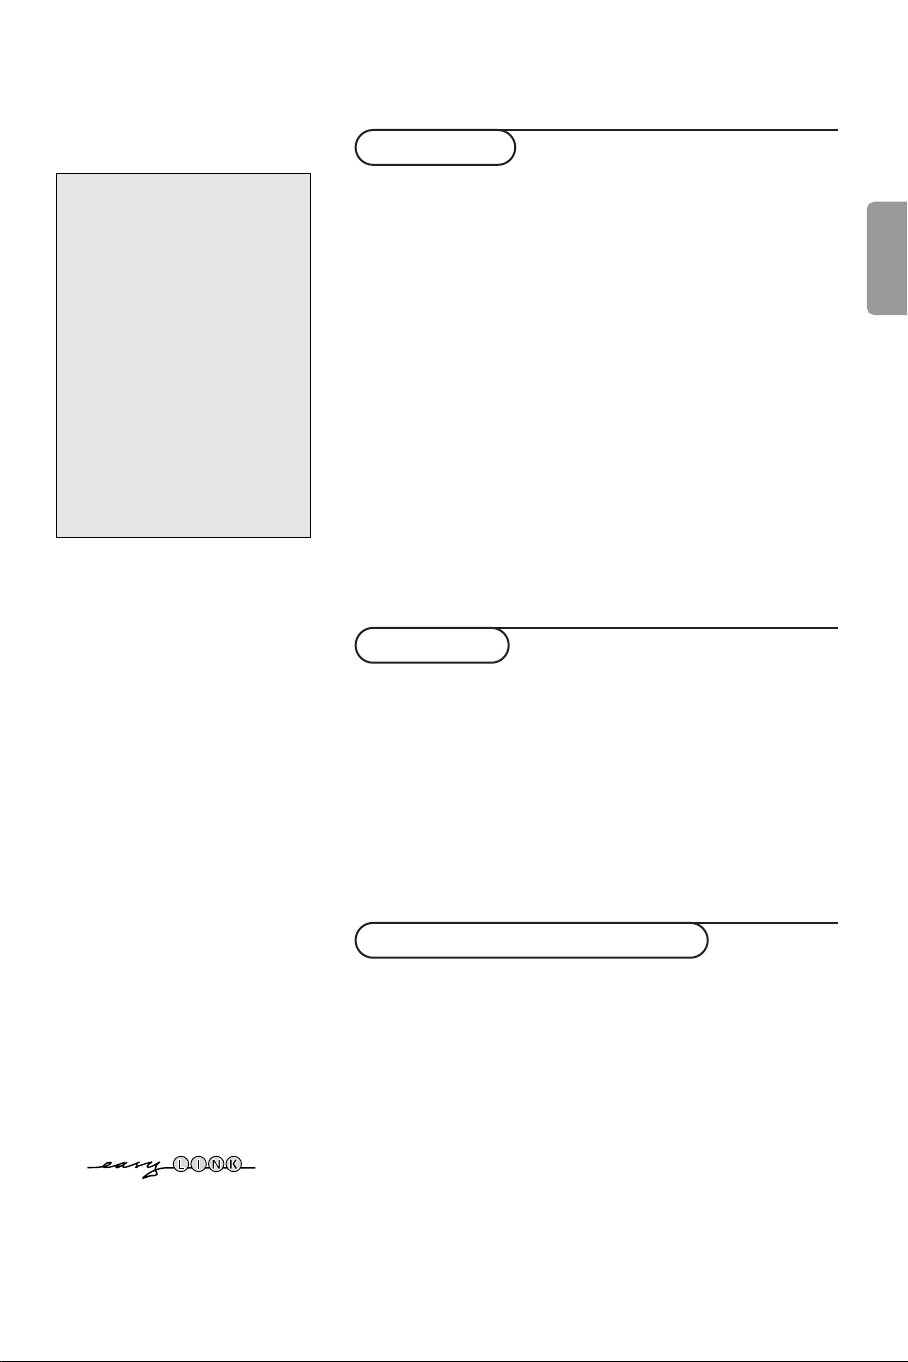
§ LCD display:When popped up, the LCD
display will show the mode the TV is in (TV or
Radio) together with information about the
selected mode.
When the TV is switched off to standby the
display will go down again.When the TV is
switched off with the power switch the display
will remain in the position it was. If needed, you
can manually push the display down.
Note:
- to switch off the automatic display movement, see
Setup, General menu, Auto LCD movement, p. 9.
- you can change the position of the display, up or
down, with the LCD key on the remote control.
See use of the remote control, p. 4.
More details about the content of the display,
see p. 3.
FM Wire Antenna connection
Connect the supplied FM wire antenna to the
FM RADIO ANTENNA 75 ø connector at the
back of the TV. Adjust the position of the FM
antenna for the best reception.
75
75
ANTENNA
ANTENNA
FM RADIO
FM RADIO
Note: for better FM stereo reception, connect an
outdoor FM antenna or cable antenna to the
RADIO ANTENNA 75 ø connector using a
FM
75 ø coaxial wire.
2
2
Page 5
Keys on top of the TV
V
V
MENU
P
P
+
-
+
-
MENU/OK
Picture Sound Features
TV
Setup
Demo
Install
Exit
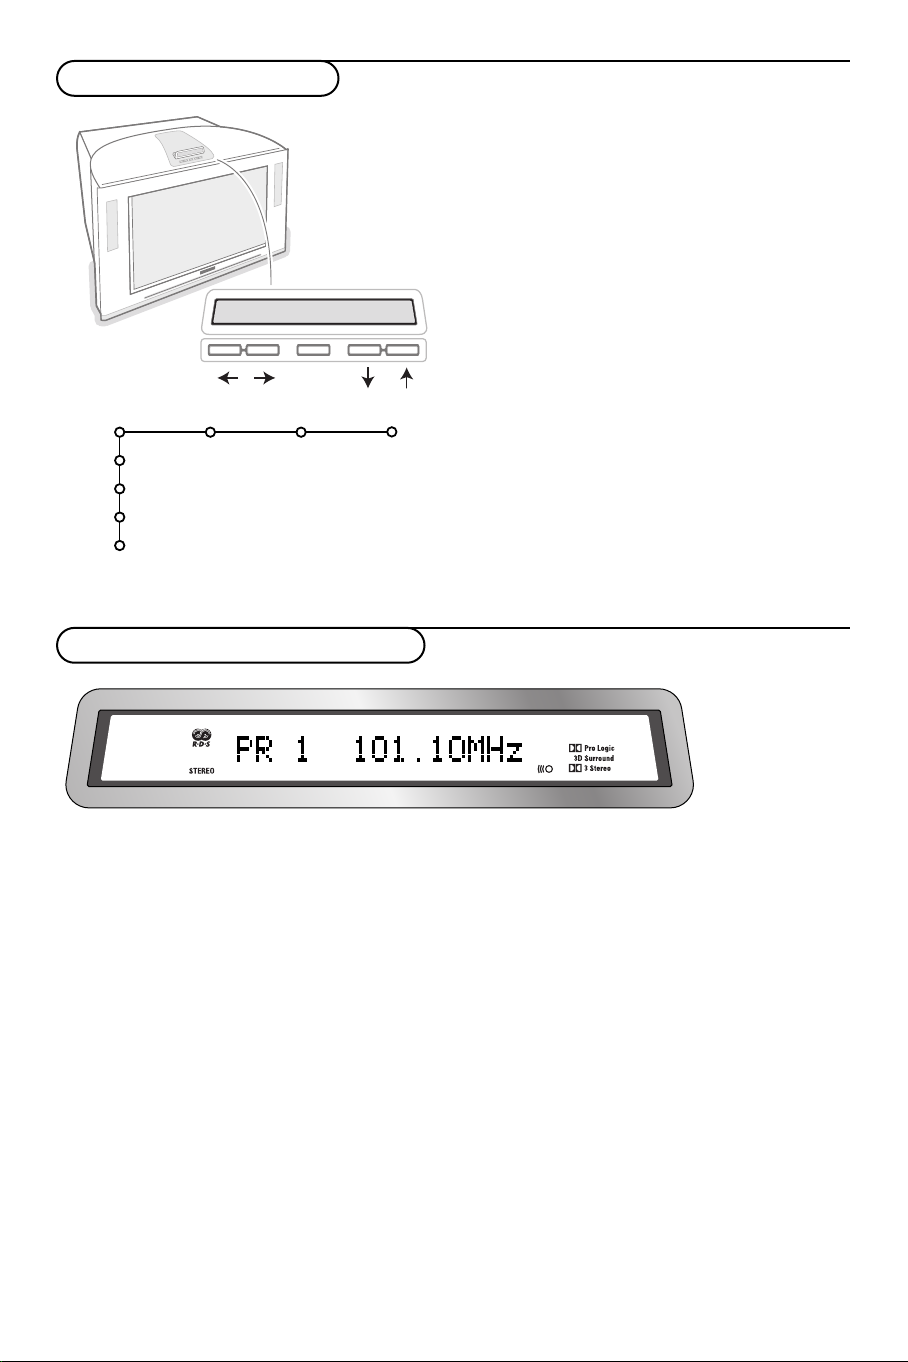
Contents of the LCD display
Should your remote be lost or broken you can still
change some of the basic settings with the keys on
top of your TV.
Press:
• the V - or + key to adjust the volume;
• the -P+ keys to select the TV channels or
sources.
The
MENU key can be used to summon the main
menu without the remote control.
Use:
• the V - and + keys and the
P- and P+keys to
select menu items in the directions as shown;
• the
MENU key to confirm your selection.
Note:
When activated via the
only
Exit lets you dismiss the menu.
Navigate to
Exit and press the MENU key.
MENU key on top of the TV,
rO starts blinking when the TV is receiving a command from the remote control.
Dependent on the selected mode, the following information may be displayed:
In TV mode:
- channel number, channel name or the selected
external
-a volume bar
-feed back messages
- the surround signal the TV is processing
In Radio mode:
- the name of the selected station, the type of
programme, the frequency
-a volume bar
- the RDS icon when playing a radio station with
RDS signal
- the sound signal (stereo)
3
Page 6

B
†
®
®
®
®
hb q
0
i
0
879
546
2
Ì
Q
®
v
S
bæ
MENU
+
-
V
¬
+
-
P
13
LCD
RADIO
Select
VCR DVD SAT AMP CD
OK
Active Control
Ò‡ π
U
Use of the remote control RC4360
Note: For most keys pressing a key once will activate the function. Pressing a second time will de-activate it.
When a key enables multiple options, a small list will be shown. Press repeatedly to select the next item in the list.
The list will be removed automatically after 4 seconds or press
OK to remove immediately.
VCR DVD SAT AMP CD
Audio- and Video equipment keys
(p. 22)
v Select peripherals (p. 21)
®Ò‡π†
Audio- and Video equipment keys
(p. 22)
RDS Radio see p. 18
® Record
See Record with your recorder
with EasyLink, p. 22
U Time display
The time is displayed on the
screen.
Q Surround mode
Press this key repeatedly to
Ì Cinema Go
select another available surround
mode.
See separate Cinema Link
booklet supplied.
æ NEXTVIEW on/off p. 14
S Freeze
To freeze the picture.
i On Screen information
Press to display information
about the selected TV channel
and programme or the tuned
radio station.
RDS radio function, see p. 18
Menu/Remote control info
When a menu is on screen, press
i to display info on the
selected menu item. For
information on the remote
control functions, while the
menu info is displayed, press any
key on the remote control.
The normal function of the key is
not executed.
B Standby
Press to switch the TV on or off.
When switched off, a red indicator
on the TV lights up.
xPixel Plus demo on/off
In the right part Pixel Plus and
Digital Natural Motion are
switched on.
b Teletext on/off p. 16
RDS radio function, see p. 18
OK Press this key
• to activate your choice, when in the
menus.
• to display the programme list.
MENU Main menu, see p. 6
RDS radio function, see p. 18
V To adjust the volume.
¬ Interrupt or restore the sound.
PProgramme selection
To browse through the TV
channels and sources stored in
the favourite list.
RDS radio function, see p. 18
0/9 Digit keys
To select a TV channel.
For a two digit programme
number, enter the second digit
before the dash disappears.To
switch immediately to a selected
one digit TV channel, keep the
digit key pressed a bit longer.
RADIO
Radio/TV mode selection, p. 18
LCD: LCD tilt up/down
4
Page 7

B
†
®
®
®
®
hb q
0
i
0
879
546
2
Ì
Q
®
v
S
bæ
MENU
+
-
V
¬
+
-
P
13
LCD
RADIO
Select
VCR DVD SAT AMP CD
OK
Active Control
Ò‡ π
U
0 Smart surf / NEXTVIEW themes
With this key you can easily switch between 2 up to 9 different TV
channels or sources or quickly select TV programmes if
NEXTVIEW
with defined themes is broadcast. See General, Smart surf, p. 9.
Press the
OK key or wait for the time out to dismiss the Smart surf
display.
b Dual screen
& Press the b or æ key.
Press the b key to show Teletext or
NEXTVIEW/Teletext Guide on
the right half of the screen.
é Move the puck to the blue ball in the left screen. Press +P- to select
another TV channel.
“ Press the q key to select a vertical squeezed or a non vertical
squeezed picture size.
‘ Press the b key to switch off Dual screen.
Note: Dual screen is not possible in Radio mode.
h
Active control see p. 11
q Picture format
Press this key repeatedly or press the cursor up/down to select
another picture format:Auto format, Super zoom, 4:3, Movie Expand
14:9, Movie Expand 16:9, Subtitle zoom or Wide screen.
Super zoomAuto format 4:3 Movie Expand 14:9
Movie Expand 16:9 Subtitle zoom Wide screen
Auto format makes the picture fill the screen as much as possible.
In case of subtitles in the bottom black bar,Auto format makes the
subtitles visible. If subtitles are only partly visible, press cursor up.
In case of a broadcaster logo in the corner of the top black bar, the
logo disappears from the screen.
Super zoom removes the black bars on the sides of 4:3 programmes
with minimal distortion.
When in Movie Expand 14:9, 16:9, Super zoom or Subtitle zoom
picture format, you can make subtitles visible with the cursor
up/down.
RDS Radio function, see p. 18
0
5
Page 8

To use the menus
B
†
®
®
®
®
Ì
Q
®
v
S
bæ
MENU
+ +
Select
VCR DVD SAT AMP CD
OK
Ò‡ π
U
& Press the MENU key on the remote control to summon the
main menu.At any moment you can exit the menu by
pressing the
Note: If you have connected equipment with Cinema Link, more
menu items are present.
Demo
OK key to
activate
cursor to select
adjustments
return or switch
main menu on/off
é Use the cursor in the up/down direction to select the TV,
Setup, Demo or Install menu.
Use the cursor left/right to select
Features.
Note: Sometimes not all the menu items are visible on the screen
(indicated by a cluster of blue balls). Use the cursor down or right
to reveal all items.
“ Use the cursor in the left/right direction to select the menu
item.
Press the i key to get
information about the selected
menu item.
‘ Use the cursor up/down again to select the control you
want to select or to adjust.
Note: Items temporary not available or not relevant are displayed
in a light grey colour and cannot be selected.
Installation
The installation menu contains the following items:
MENU key again.
Picture Sound Features
TV
Setup
Install
Picture, Sound or
Language Country Automatic Manual Give name Reshuffle Favourite
install install programmes
Install
EasyLink
If your video recorder has an EasyLink function, during installation, the language, country and available channels are
automatically transmitted to the video recorder.
Select the menu language and country
Install
Install
6
Language
English
Deutsch
Français
Country
Austria
Belgium
Croatia
& Press the MENU key on the remote control.
é Use the cursor down to select Install.
“ Use the cursor right to select Language.
Follow the instructions on screen.
‘ Use the cursor up/down to select your preferred language
and press the
( Use the cursor right to select Country.
§ Select the country where you are now located and press
the
OK key.
Select
è Proceed with the Install menu.
OK key to confirm your selection.
Other when none of the countries applies.
Page 9
Store TV channels
After language and country are set correctly, you can now search for and store the TV channels in two
different ways:using Automatic Installation or Manual Installation (tuning-in channel by channel).
Select your choice with the cursor right.
Automatic installation
Install
& Select Automatic install in the Install menu.
Automatic install
Install Start
Note: All channels must be unlocked in order to
autoprogram. If requested, enter your code to unlock
all channels. (See TV, Features menu, Childlock,
p. 13.)
é Press the cursor down.
The autoprogramming option label
Start
appears.
“ Press the cursor right.
‘ The message Searching appears and the
progress of autoprogramming is displayed.
If a cable system or a TV channel which broadcasts
ACI (Automatic Channel Installation) is detected, a
programme list appears.Without ACI broadcast,
the channels are numbered according your
language and country selection.You can use
Reshuffle to renumber them. See p. 8.
It is possible that the cable company or the TV channel
displays a broadcast selection menu. Layout and items
are defined by the cable company or the TV channel.
Make your choice with the cursor and press the
OK
key.
Manual installation
Searching for and storing TV channels is done channel by channel.
You must go through every step of the Manual Installation menu.
Install
Manual install
Selection mode
System
Programme
Search
Fine tune
Store
& Select Manual install in the Install menu.
é Press the cursor down.
Follow the instructions on screen.
Note: Search or direct selection of a TV channel.
If you know the frequency, the C- or S-channel number, enter the 3 or
2 digits of the frequency or the channel number directly with the digit
keys 0 to 9 (e.g. 048). Press the cursor down to proceed.
Repeat to search for another TV channel.
Give name
Install
It is possible to change the name stored in the
memory or to assign a name to a TV channel for
which a name has not yet been entered.A name
with up to 5 letters or numbers can be given to
the programme numbers 0 to 99.
& Select Give Name in the Install menu and
press the cursor down.
Give name
VCR1
BBC1
BBC2
CNN
TVE
.....
® Space ® Delete
pπ
ABCDEFG 123
HIJKLMN 456
OPQRSTU 789
VWXYZ 0
® Shift ® Special
é Select the programme number.
Note: keep the cursor up/down pressed to scroll
through the programme list quickly.
“ Press the cursor right.
A keyboard appears on the screen.
Press the cursor right to enter the keyboard.
Press the cursor up/down, left/right to select
the first character and press
OK. Repeat for
every character you want to enter.
Select
Space to enter a space; Delete to erase
the highlighted character in the name entered;
Shift to display upper- or lowercase characters
on the keyboard;
characters on the keyboard. Press
Special to display special
OK to
confirm.
‘ Press the cursor left repeatedly when you have
finished the name giving.
( Select another programme number and repeat
steps
“ to ‘.
7
Page 10

Reshuffle the programme list
You can change the order of the stored TV
channels.
& Select Reshuffle in the Installation menu.
é Follow the instructions on screen.
TV Setup
Speakers General Source Decoder
Setup
Test tone
Balance
Centre volume
(Surround volume)
Surround speakers
Auto surround
Select Favourite TV channels
& Select Favourite programmes in the Install
menu.
é Select your programme number with the
cursor up/down.
“ Select Ye s or No with the cursor right.
‘ Repeat é and “ for every TV channel or
external you want to make a favourite or a
non-favourite TV channel or external.
The Setup menu contains items that control the
settings of the TV’s functions, features, services and
peripherals you may have connected.
The
Speakers menu reflects the speaker-related
controls.
The
General menu allows you to change settings
that will typically be accessed only occasionally.
The
Source menu allows you to select a source.
The
Decoder menu allows you to define one or
more programme numbers as decoder programme
numbers.
Speakers
Your TV is equipped with integrated front left, right
and centre loudspeakers, capable of reproducing
Stereo, Dolby 3 stereo and 3D Surround modes.
For full Dolby Pro Logic Surround sound you
should use two amplified rear surround speakers
connected to the back of the TV.
See Extra loudspeakers/Amplifier, p. 21.
Depending on the output and Surround mode (see
Main menu,TV, Sound, Surround mode, p. 12)
selected, some menu items may be greyed out and
are not selectable.
Test tone controls
The menu item
balance the volume levels of the speakers.
& Select Test tone and press the cursor right.
é Once turned on, the Test Tone will circulate
through the left, centre, right speakers and
both rear surround speakers (if present).
“ Press the cursor up/down to select the desired
speaker for individual volume level adjustment.
‘ Press the cursor left/right to adjust the volume
level.
Test tone enables you to
Surround Speakers
See Connect Peripheral Equipment, Extra
loudspeakers/amplifier, p. 21.
If no Surround Speakers are connected do
not change the predefined factory settings
which is
Off. If Surround Speakers are
connected select On.
(Dolby Pro Logic and Hall are not available
if Off is selected.)
Auto Surround
Sometimes the broadcaster transmits
special signals for Surround Sound
encoded programmes.
The TV automatically switches to the best
surround sound mode when
Surround
is switched On.
Auto
However it is possible to overwrite this
setting.
8
Page 11

General
Setup
Menu background
Smart surf
Factory settings
NEXTVIEW
Tilt adjust
Programme title
Teletext level 2.5
Auto LCD movement
Set/Change code
This menu allows you to change various settings
that are presumably adjusted less frequently than
most other settings.
Press the i key on the remote control to get
information about the selected menu item.
Smart surf
& Select Smart surf.
é With the cursor left/right, select
•
2 programmes if you want the 0 key to
toggle between the current and the previously
selected channel,
•
9 programmes if you want the 0 key to
summon a list of up to 9 channels which can
be selected,
•
Themes if you want the 0 key to quickly
select TV programmes if
defined themes is broadcast.
To add/remove a channel or source:
Tune to the channel or source you wish to add
or remove. Press the 0 key and press the
cursor right to add or remove.
Note: If there are already 9 channels/sources in the
list, the one at the bottom of the list will be
removed.
Factory settings
This resets the picture and sound settings to
their predefined factory values, but maintains
the channel installation settings.
NEXTVIEW provider
Select a TV broadcaster that provides
NEX
TVIEW data. How to make use of NEXTVIEW,
see p. 14.
General
provider
OSD
NEXTVIEW with
OSD (On Screen Display)
See Use of the remote control, p. 4, i On
screen information.
& Select OSD.
é Select Normal to activate the continuous
display of the programme number.Also TV
channel and programme information are
extended.
Minimum will display reduced
channel information.
Note:When subtitles is switched on, see Features,
p.13, continuous display of the programme number
is not possible.
Teletext level 2.5
Some broadcasters offer the opportunity to
see more colours, other background colours
and nicer pictures in the teletext pages.
& Select Teletext level 2.5.
é Press the cursor right to select Teletext level
to take advantage of this feature.
2.5 On
“ Press the cursor right again to select Teletext
level 2.5 Off
if you like the more neutral
teletext layout.
The selection made is valid for all channels
which broadcast teletext level 2.5.
Note: It may take a few seconds before teletext
broadcast switches over to Teletext level 2.5.
Set/Change code
The Child lock feature (see TV, Features, p. 13)
allows you to lock channels to prevent others
from watching certain programmes.To watch
locked channels, a 4-digit code must be
entered.The Set/Change code menu item
allows you to create or change a Personal
Identification Number (PIN).
& Select Change code.
é If no code exists yet, the menu item is set to
Set code. If a code has previously been
entered, the menu item is set to
Change code.
Follow the instructions on screen.
Important:You have forgotten your code !
& Select Change code in the General menu and
press
OK.
é Press the cursor right and enter the overriding
code 8-8-8-8.
“ Press the cursor again and enter a new
personal 4-digit code.The previous code is
erased and the new code is stored.
9
Page 12

Source
Source
Setup
EXT1
EXT2
EXT3
EXT4
SIDE
Centre input
Centre in volume
This menu allows you to indicate the peripheral
you connected to one of the external inputs.
& Press the cursor right to enter the list of types
of peripherals attached to the selected input.
é Select the peripheral device with the cursor
up/down.
Once you have selected the source type, e.g. DVD,
this source will automatically be selected when
your remote control is in DVD mode, see p. 4, and
when you press the v key on the remote
control.
Centre input - Centre in volume
When you have connected a surround receiver
to the TV, see p. 21, the loudspeakers of the TV
will act as centre speaker, making a separate
centre speaker unnecessary.
Select Centre input On or Cinema Link.
Select
On in case you have connected an
external audio receiver without Cinema Link.
Select
Cinema Link in case you have
connected a Cinema Link surround receiver.
When having selected
Centre in volume with the cursor left/right to
On you can adjust the
correct volume level differences of the external
audio receiver and speakers.
Decoder
Setup
If a decoder or a descrambler is connected, see
p. 20, you can define one or more programme
numbers as decoder programme numbers.
Decoder
Programme
Status
Demo
TV
Setup
Demo
Install
Auto demo
......
Dealer demo - Digital options
- Light sensor
- Comb filter
& Select Decoder with the cursor right.
é Select Programme.
“ Select the programme number under which
you have stored the programme coming from
your decoder.
‘ Select Status.
• Select the input used to connect your decoder:
None, EXT1 or EXT2.
• Select
None if you do not want the selected
programme number being activated as a
decoder programme number.
Note: Select
EXT2 when the decoder is connected
to your EasyLink video recorder.
The Demo menu allows to demonstrate the TV
features separately or in a continuous loop.
If
Auto demo has been selected the demo will
automatically present the features sequentially in a
loop. Press one of the cursor keys to stop the
Auto demo.
If one of the features has been selected, this
particular feature demo will run only once, and the
Demo menu will reappear.
Note:The Dealer demo is not part of the automatic
sequence and can only be activated separately.
10
Page 13

TV menu
Press the MENU key on the remote control to summon the main menu.
Press the i key on the remote control to get information about the selected menu item.
Picture menu
Picture Sound Features
TV
Smart picture
Contrast
Brightness
Colour
Sharpness
Tint
Digital options
Dynamic contrast
DNR
Colour enhancement
(Hue)
Picture format
& Press the cursor right to select Picture.
é Select the menu items in the Picture menu with the cursor
up/down.
“ Adjust the settings with the cursor left/right or enter the list of
submenu items with the cursor right. Select a submenu item
with the cursor up/down.
Note:To remove the menu background before adjusting the picture
settings, see Select TV setup, General, p. 9.
Smart picture
Select
Smart picture to display a list of predefined picture
settings, each corresponding with specific factory settings.
Personal refers to the personal preference settings of picture in
the picture menu.
Digital options
Pixel Plus is the most ideal setting, doubles the horizontal
resolution and increases the number of lines with 33%.You may
consider to select Movie Plus in case a halo effect should
disturb you. Dependent on your own preference, select Double
lines, or 100 Hz Digital Scan.
Note:When 60 Hz NTSC material is used, the options are changed
to Pixel Plus or Progressive, progressive scan without motion
compensation.
Active Control
The TV continuously measures and corrects all incoming signals
in order to provide the best picture possible.
& Press the h key on the remote control.
é The Active Control menu appears.
“ Press the cursor up/down to select the Active Control values
Off, Minimum, Medium (recommended) or Maximum.
The picture settings are being optimised continuously and
automatically which is displayed by bars.The menu items can
not be selected.
‘ Press the cursor right to select Smart picture.
( Press the cursor up/down to select one of the predefined
picture settings.
§ Press the cursor right to select Active Display.
è Press the cursor up/down to select Bars, one of the Dual
screen demos or Off.
When you select Dynamic contrast, Pixel Plus, Digital Noise
Reduction or Digital Natural Motion, the TV screen is divided
into two parts: in the left part the selected picture quality
setting is switched off; in the right part it is switched on.
! Press the h key again to switch off the Active Control menu.
11
Page 14

Sound menu
Sound
TV
Smart sound
Equalizer
Volume
(Loudness)
Headphone volume
Surround mode
(Dual I-II)
(Mono/Stereo)
(Nicam/Analogue)
(3D effect)
AVL
Delta volume
& Press the cursor right to select Sound.
é Select the menu items in the Sound menu with the cursor
up/down and adjust the settings with the cursor
left/right.Remember, control settings are at normal mid-range
levels when the bar scale is centred.
Smart sound
Select
settings, each corresponding with specific factory settings of
treble and bass.
Personal refers to the personal preference settings of sound in
the sound menu.
Notes:
- Some menu items are only available in case of a Cinema Link
configuration and when the Cinema Link is activated. Others are
steered by the audio receiver instead of by the TV. See the separate
Cinema Link booklet supplied.
- Dual X is only available with dual sound transmission.
- Mono/Stereo is only selectable in case of analogue stereo
transmission.
- Nicam/Analogue is only selectable in case of Nicam transmission.
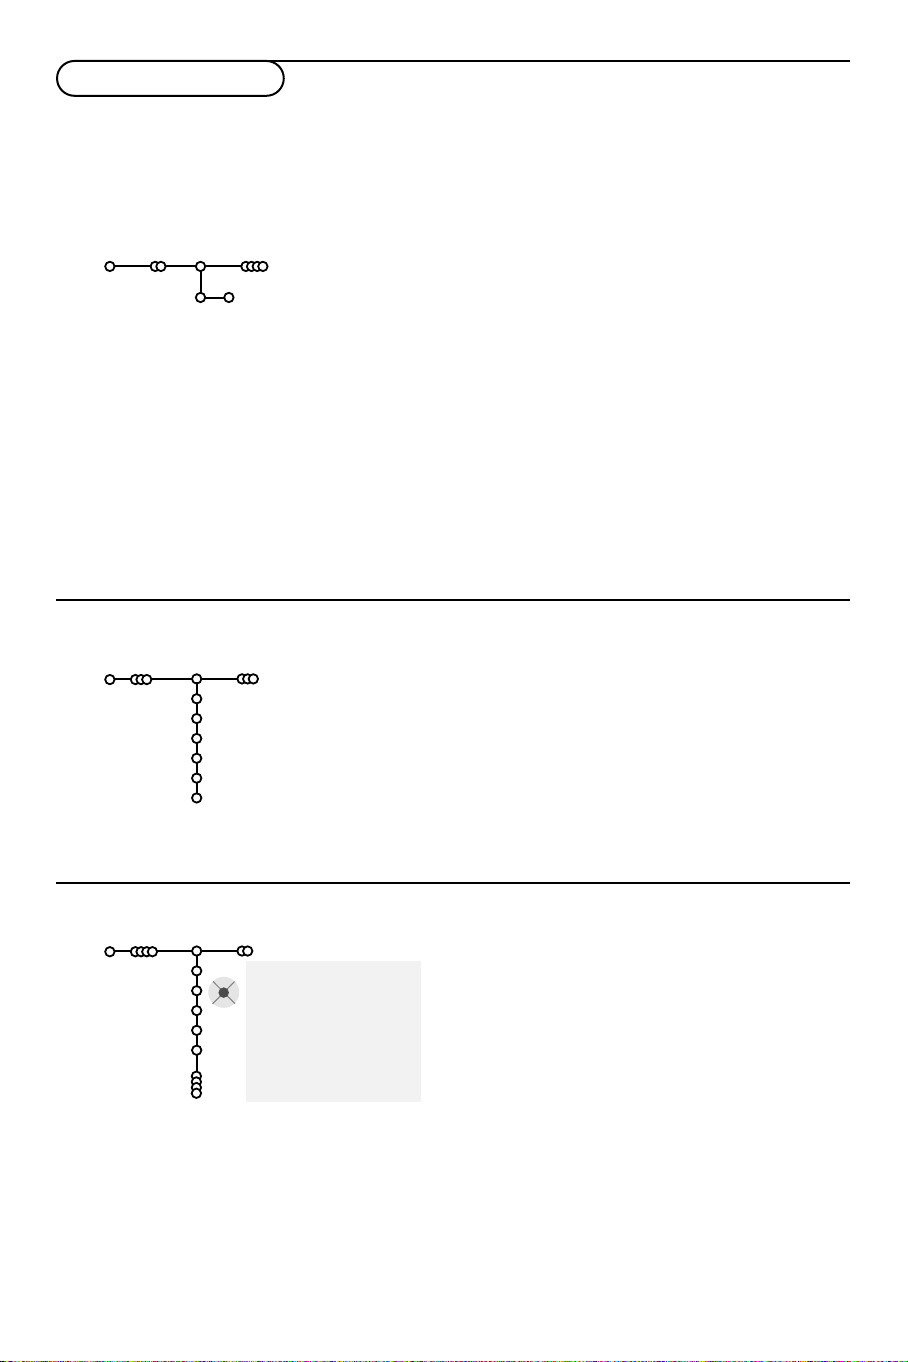
Surround Modes
Dependent on your personal preference and the
sound signal broadcasted, select one of the
Surround modes. Only the speakers indicated in
the drawings can reproduce sound.
Stereo
This mode reproduces only the left
and right front sound signals.
Dolby 3 Stereo
(optimal with Dolby Surround broadcasting)
The Dolby Pro Logic* sounds are
distributed over the front left, the
front right and the centre TV
loudspeakers.
3D Surround
(optimal with Dolby Surround broadcasting)
3D Surround enables you to
experience the 3D effect of
Dolby Surround Pro Logic*
without the need of having rear
speakers connected or activated.
The graphical representation of the rear
loudspeakers is replaced by the symbol ®r.
Select the level of
3D effect with the cursor
left/right.
Smart sound to display a list of predefined sound
Hall
The sound signal is distributed
over the rear loudspeakers
which creates a hall effect
from the rear.
The centre loudspeaker does
not reproduce any signal.
Dolby Pro Logic
(optimal with Dolby Surround broadcasting)
All front and rear
loudspeakers reproduce the
Dolby Surround Pro Logic
sounds.This sound is always
present in the movie or
programme marked with
G Dolby Surround.
Note:
•Normal stereo broadcast is not always encoded to
produce a rear surround sound effect.
•In case of a Cinema Link receiver configuration
connected, only the surround modes of the external
receiver can be selected.
•Pro Logic and Hall can only be reproduced if Surround
speakers is set to Yes in the Setup, Speakers menu,
p. 8, and rear speakers are connected.
•When a headphone is connected, only the Surround
mode
Stereo-headphone is available.
* Dolby’ ‘Pro Logic’ and the double-D symbol are trademarks of Dolby Laboratories Licensing Corporation. Manufactured under
license from Dolby Laboratories Licensing Corporation.
12
Page 15

Features menu
TV
Programme list
Sleeptimer
Child lock
On timer
Programme list
Press the
selected TV channel or external.
Select subtitles
The subtitle page must be stored for each TV
channel:
Switch on teletext and select the proper
subtitle page from the index. Switch off
teletext.
Subtitle On will automatically display them on
the selected TV channels if subtitles are in the
transmission.A symbol will indicate that the
mode is on.
Select
On during mute when you want to
have the subtitles automatically displayed only
when the sound has been muted with the ¬
key on the remote control.
On timer
& Select On timer with the cursor down.
On timer
é Select On with the cursor right.
“ Press the cursor right again to enter the
programme list.
‘ Select the TV channel or external you want
your TV to switch to on a selected time and
day.
( Press the cursor right again to select a day of
the week or to select
§ Press the cursor right once again to enter the
time with the digit keys or with the cursor
up/down and press the
è Press the MENU key to turn off the menu.
Note:To check your timer settings, press the i
key.
Features
Off
Subtitle
Zoom
OK key to switch over to the
Off
On
On
On during mute
VCR1
BBC2
CNN
TVE
π.....
Sunday
Monday
.......
Daily
Daily.
OK key to activate.
15:45
Press the cursor right to select Features.
Select the menu items with the cursor up/down
and adjust the settings with the cursor left/right.
Use the on-screen Menu-Info i for more
information about the menu items.
Child lock
& Select Child lock.
Lock
Child lock
é Press the cursor right to enter the Child lock
Custom lock
Unlock
Age lock
Lock after
Programme lock
Category lock
menu.You’re summoned to enter your code.
Note:You have to re-enter your code each time you
enter the child lock menu.
Important:You have forgotten your code !
See p. 9.
“ Select one of the menu items of the child lock
menu:
•
Lock if you want to lock all channels and
externals.
•
Custom lock and press the cursor right.
The items Age lock and Category lock are only
available when
NEXTVIEW broadcast is available.
Select:
-
Age lock if you want to lock programmes
related to a certain age: off, 2, 4 ... 18;
-
Lock after if you want to lock all programmes
from a certain time onwards.
Press the cursor right and enter the time
with the cursor up/down and right. Press the
OK key to validate.
-
Programme lock if you want to lock a
certain TV channel or external;
-
Category lock if you want to lock
programmes related to a certain theme:
Movies, Sports, Shows.... See
• Select
Unlock to disable all locks you have set.
NEXTVIEW,p.14.
Note:The Radio mode cannot be locked separately.
Zoom
& Select Zoom with the cursor down and press
the
OK key.
é Press the OK key to select one of the zoom
magnifications (x1, x4, x9, x16).
“ Additionally you can shift the selected zoom
window over the screen with the cursor keys
up/down, left/right.
‘ Press the MENU key to turn off the zoom
function.
13
Page 16

NEXTVIEW / Teletext guide
NEXTVIEW is an electronic guide that allows you to look up programmes as you would in a
newspaper or a TV magazine.You can sort the programmes by subject (films, sport...), obtain
detailed information and programme your video recorder if it comes with the
NEXTVIEWLink
function.
Important note: The
countries.When no
based on teletext programme information (if available) and offers most functions of
NEXTVIEW service is only available on certain programmes and in certain
NEXTVIEW information is broadcast, the teletext programme guide appears in its place.This is
NEXTVIEW.
Note:The broadcaster is responsible for the content of the information.
Call NEXTVIEW / Teletext guide
Press the æ key on the remote control to call the NEXTVIEW/Teletext guide.
A menu appears with the message One moment please.After a while you obtain:
•a NEXTVIEW page, if the selected channel broadcasts this service (the NEXTVIEW logo is displayed),
•a teletext page, if the selected channel does not broadcast
•
No information available is displayed if neither NEXTVIEW nor teletext are transmitted. In this case,
select another channel.
Select TV channels by theme
If
NEX
TVIEW with defined theme is broadcast, it is possible to quickly select TV programmes with the
0 key. See Setup, General menu, Smart surf, p. 9.
NEXTVIEW,
Display of a
The information is set by the channel that transmits the
General,
This logo is only displayed
transmission or when one
of the externals is selected.
NEXTVIEW page
NEXTVIEW provider, p. 9.
puck
during a NEXTVIEW
Mon 05 Feb 18.00
Menu 18.00 Channel Theme
Mon 03
Mon 03
BBC1 18.00 BBC News
Tue 04
BBC2 18.00 The Simpsons
Wed 05
CNN 18.00 World News
Thu 06
FR2 18.00 On a tout essayé!
Fri 07
CH5 18.15 Tomorrow Never Dies
Sat 08
NEXTVIEW service. See also Setup menu,
NEXTVIEW
guides
Programme name and
broadcast time
No logo indicates a teletext
programme guide
function keys
NEX
TVIEW guides
Review Record Remind Watch Lock
& Use the cursor key left/right to select Time, Channel, Theme, the Date guide.
The
Time guide provides an overview of all programme titles active in the selected time block.The
Channel guide provides an overview of all programmes that are broadcast by a single channel during
one day. With the
Date guide you can choose a specific date.The Theme guide displays a list of all
programmes at the selected date, that matches with the selected category.
Going through the menu guide, the TV is collecting the sorting criteria to finally display a list of
programme events.
é Press the OK key to select the guide type.
“ Move the puck down and to the right to select the programmes.
If available a summary or commentary on the programme is displayed at the bottom of the screen.
‘ Use the cursor up/down to scroll through the programmes.
14
Page 17

Teletext Guide
& Enter with the digit keys, the teletext page number that contains the programme information for the
current channel.
é Press the cursor right to move the puck over the selection ball.
“ Use the cursor up/down to scroll through the different programmes.
page ball
selection ball
channel list
Mon 05 Feb 16.35
BBC1
BBC2
ITV
CH4
CH5
Review Record Remind Watch Lock
100 1
BBC CEEFAX
LIONS RECORD ANOTHER WIN 430
Index 100 News 300
BBC Info 110 Headlines 305
Children 120 Weather 400
Cookery 150 Sports 415
Education 200 Radio 500
subpages
scroll ball
• If the selected programme contains a page number with an optional subcode referring to a page with
more info about the programme, press the
OK key to display the information. Press the OK key again
to return to the programme guide page.
• If the selected programme guide page satisfies the VPT requirements,
- it will be possible to record, remind, watch or lock programmes:
- the TV will remember the last selected teletext page number of that channel that contains programme
guide information and indicates which programme starts at what time. Every time you press the æ
key, the teletext programme guide page of the selected TV channel will be available.
• When necessary you can select the subpage number by moving the cursor to the pageball and
pressing right.
Note:You must enter the teletext pagenumber for each channel.You can change the channels also by moving
the cursor up/down in the list in the left of the page.
Basic functions
Press one of the grey x,red ®,green U,yellow Q or blue Ì keys to activate a
Teletext Guide function.The keys appear in grey if the function is not available.
Review: this menu provides a list of programmes that are marked as reminders, those that have to be
recorded and those that are locked.This menu can be used to change or remove marked
programmes.
Record: to programme the recording of the video recorder (if it has a NEXTVIEWLink function and is
connected to
EXT.2).
Remind: automatically switch on the TV if it is in standby or by displaying a message if the TV is on.
Lock: to lock certain programmes to prevent recording or watching.
For the functions Record, Remind or Lock, a small menu pops up in which you can choose the
interval: once, daily or weekly, or clear an earlier made record, remind or lock setting.The default
interval is set to
Once.To confirm the frequency, press the OK key.
Watch: to watch the selected and currently broadcast programme.
NEXTVIEW
or
Acquisition and updating of NEXTVIEW information
Acquisition and updating of NEXTVIEW is done when you are watching the TV channel of the selected
NEXTVIEW provider, see Setup menu, p. 9, or when the TV is switched to standby.
Acquisition of fresh data will happen once during the night.
Note: it may be necessary to put the TV in standby mode when all
returning from holiday.
NEXTVIEW information is outdated, e.g. when
15
Page 18

Teletext
Most TV channels broadcast information via teletext.This TV has a 1200 pages memory that will store
most broadcasted pages and subpages to reduce waiting time. After each programme change, the
memory is refreshed.
Switch Teletext on and off
•Press b to switch the teletext on.
102 «03 04 05 06 07 08 09 10 11 12»
BBC CEEFAX 102 Mon 05 Feb 16.35.22
BBC CEEFAX
LIONS RECORD ANOTHER WIN 430
Index 100 News 300
BBC Info 110 Headlines 305
Children 120 Weather 400
Cookery 150 Sports 415
Education 200 Radio 500
Lottery 230 Travel 550
Finance 240 Subtitling 888
Music 280 TV Listings 600
Red Green Yellow Blue
Select a Teletext page
- Enter the desired page number with the digit
keys, the cursor keys up/down, left/right or
with the
-P+ key.
- Select the options at the bottom of the screen
with the colour keys.
Previously selected page
(Only possible in case there is no list of favourite
teletext pages available. See p. 17.)
Press the 0 key.
Select the index teletext page
Press the grey colour key † to display the
main index (usually p.100).
Only for T.O.P teletext broadcasts :
Press i.A T. O.P. overview of the teletext
subjects available is displayed.
Select with the cursor up/down, left/right the
desired subject and press the OK key.
Not all TV channels broadcast T.O.P. teletext.
Select subpages
When a selected teletext page consists of
different subpages, a list of available subpages
appears on the screen.
Press the cursor left or right to select the next
or previous subpage.
Enlarge a Teletext page
Press q repeatedly to display the upper
teletext part, the lower teletext part and then
to return to the normal teletext page size.
When the teletext page is enlarged, you can
scroll the text, line by line using the cursor
up/down.
Active screen selection
When in dual screen picture/teletext, enter the
desired page number with the
press the
MENU key, then select the left screen
-P+ key, then
(with the blue ball at the top).
You can now select a compressed or full screen
view of picture/teletext with the q key.
Hypertext
With hypertext you can quickly jump to a
pagenumber or search for a specific word
shown on the current teletext page.
& Press the OK key to highlight the first word or
a number on the page.
é Use the cursor up/down, left/right to select any
other word or number you want to search for.
“ Press the OK key to confirm. The search starts.
A message appears at the bottom of the screen
to indicate the searching, or that the word or
page is not found.
‘ Use the cursor up to exit hypertext.
16
Page 19

Teletext menu
(only available in full screen teletext mode)
& Press the MENU key to activate the menu.
é Press the cursor up/down to select the menu
items.
“ Press the cursor right to activate.
Reveal
Reveals/conceals hidden information on a page,
such as solutions to riddles and puzzles.
Press the cursor right to activate.
Favourite
This list contains up to eight favourite teletext
pages. Only the pages of the current channel
can be selected.
& Press the cursor right to enter the list.
é Press the cursor right again to add the current
page or to select one of the favourite pages to
the list.
“ Press the MENU key to watch the page.
‘ Use the 0 key to browse through the list of
favourite pages.
Search
Selecting a word
On the keyboard on screen you can type in a
random word you want to search for in the
teletext pages.Whether upper- or lowercase is
used has no influence.
puck
102 «03 04 05 06 07 08 09 10 11 12»
WORD
BBC1
NAME
FOOTBALL
Cancel Accept
Space Delete
ABCDEFG 1 2 3
HIJKLMN 4 5 6
OP QRSTU 7 8 9
V W X Y Z 0
Shift Special
Red Green Yellow Blue
& Press the cursor right to enter the keyboard.
é Press the cursor left/right, up/down to select
TELETEXT
the characters, words or functions.
“ Press the OK key to confirm each character
selected.
‘ Select Cancel to cancel the word; Space to
enter a space;
character selected;
lowercase or capital characters;
Delete to delete the last
Shift to switch between
Special to
display special characters on the keyboard and
press the
( Press the cursor left repeatedly to return to
OK key.
the Teletext menu again.
Searching a word
& Type in the word on screen or select a word
from the history list on the right and press
é Select Accept and press OK again. The message
OK.
Searching appears.
“ To cancel the searching or to search for a new
word, select
‘ When a word is not found, a message appears.
Keyboard and press OK.
When the word is found, it is highlighted in the
teletext page.To continue the search, press the
ok key.
Cycle subpages (if available)
Makes the subpages cycle automatically.
Press the cursor right to activate and to deactivate again.
Timed page
To display a specific page from a selected TV
channel at a certain time.
& Press the cursor right and select Ye s or No.
é Enter the time and pagenumber with the cursor
keys or the digit keys.
Note:Teletext does not have to remain switched on,
but you should watch the TV channel you have
selected the specific page from.
“ Press the cursor left to return to the TV menu
again.
Language
If the displayed characters on screen do not
correspond with the characters used by the
teletext broadcaster, you can change the
language group here.
Select
Group 1 or Group 2 with the cursor
right.
Press the
MENU key to leave the Teletext menu.
17
Page 20

B
†
®
®
®
®
hb q
0
i
0
879
546
2
Ì
Q
®
v
S
bæ
MENU
+
-
V
¬
+
-
P
13
LCD
RADIO
Select
VCR DVD SAT AMP CD
OK
Active Control
Ò‡ π
U
RDS radio function keys
When in RDS radio mode (Remote control info is not available)
® Programming radio stations
(p. 19)
U no function
Q no function
i Press repeatedly to select the
display information mode:
programme
FREQUENCY, the programme
TYPE or TEXT for messages
broadcast by the radio station.
RADIO
Press repeatedly to select Radio
or TV mode.
Switch to the RDS Radio mode
Press the RADIO key on the remote control
repeatedly until the RDS Radio mode is selected.
The screen is blanked and, if the received radio
station transmits RDS data*, the RDS indicator on
the display lights up together with the available
information about the radio station tuned.
Tuning to radio stations
To find a new frequency hold down the Ò or †
key on the remote control until the frequency
starts to change.The radio automatically tunes to a
station with sufficient reception.
NAME, the timed
Ò †
Press to tune the radio to a
station with sufficient reception.
‡ Press to stop programming radio
stations. Press twice to erase the
name of a selected radio station.
b Press if you want to label radio
stations without RDS reception
or if you want to alter a
detected RDS name. Use the
cursor up/down, left/right keys
and press
OK to confirm.
MENU
Press to select the sound menu.
P Radio station selection
Press P+/- to select the
programmed radio stations.
0 Press to select the previous
selected radio station.
LCD
Automatic LCD tilt on/off
* RDS, Radio Data Systems, is a service that allows
FM stations to show additional information. If you
are receiving a RDS station, the RDS icon and the
station name are displayed.
If a FM station is received in stereo,
STEREO is
displayed.To tune to a weak station,briefly and
repeatedly press the Ò or † key until you have
found optimal reception.
18
Page 21

Programming radio stations
You can store up to a total of 50 radio stations.
Automatic programming
Press the ® key on the remote control for
about 3 seconds.
SEARCH is displayed and all
the available stations are programmed
(overriding all former programmed radio
stations).The system will store first the RDS
stations with a strong enough signal, then the
RDS stations with a weaker signal and finally
the non RDS stations.
Note:
- to stop the automatic installation, press the ‡
key. All stations before the stop, are stored into the
memory.
Manual programming
& Briefly press the ® key on the remote control.
The current station number starts flashing and
the station name, in case of a RDS station, or
the tuned frequency is displayed.
é Hold down the Ò or † key to start the
search for a new radio station.The search will
stop on the next radio station and display the
tuned frequency which will eventually be
replaced by the detected RDS name.
Note: briefly and repeatedly press the Ò or †
key to fine tune the frequency if necessary.
é Use the P- or + key or the digit keys to select
the station number where you want to store
the new radio station.
‘ Press the ® key to store the new radio
station on the selected station number.
( Repeat & to ‘ to store another radio
station.
Note:To stop the manually installation, press the ‡
key. Nothing is stored and everything is restored to
the radio status just before entering the manual
installation mode.
Give name
& Select the station number of the radio station
you want to assign a name (for stations without
RDS reception) or to change the name.
é Press and hold the b key on the remote
control for about 3 seconds.The cursor flashes
on the first of 8 characters.
“ Press the cursor up/down to change the
character.
‘ Press the OK key to confirm the new name.
Note:To erase a station name:
- Select the station number you want to erase the
name of.
- Press and hold the ‡ key for about 3 seconds.
- the message
DELETED appears and the RDS
name or the frequency is displayed.
19
Page 22

AUDIO
VIDEO
S•VIDEO
1 2 3
2
EXT.EXT.2EXT.
CABLE
1
4
2
3
1/21/2
EXT.EXT.
1/2
EXT.
CABLE
1
2
3
5
4
Connect Peripheral Equipment
There is a wide range of audio and video equipment that can be connected to your TV.
The following connection diagrams show you how to connect them.
EXT. 1 can handle CVBS and RGB, EXT. 2 CVBS, RGB and Y/C, EXT. 3 and EXT. 4 only CVBS.
Note:
It is preferred to connect peripherals with RGB output to
If your recorder is provided with the EasyLink function, it should be connected to
EXT. 1 or 2 as RGB provides a better picture quality.
EXT. 2 to benefit from the
EasyLink functionality.
Recorder (VCR-DVD+RW)
Connect the aerial cables 1, 2 and, to obtain the optimum
picture quality, eurocable 3 as shown.
If your recorder does not have a euroconnector, the only possible
connection is via the aerial cable.You will therefore need to tune in
your recorder’s test signal and assign it programme number 0 or
store the test signal under a programme number between 90 and
99, see Manual installation, p. 7.
See the handbook of your recorder.
Decoder and Recorder
Connect a eurocable 4 to your decoder and to the special
euroconnector of your recorder. See also the recorder handbook.
See Decoder, p. 10. You can also connect your decoder directly to
EXT.1 or 2 with a eurocable.
Other equipment (satellite receiver, decoder, DVD, games, etc.)
& Connect the aerial cables 1, 2 and 3 as shown (only if your
peripheral has TV aerial in-/output).
Connect your equipment with a eurocable 4 or 5 to one of the
euroconnectors
é Look for the test signal of your peripheral in the same way as you
do for a recorder.
“ Make a selection in the Setup, Source menu, p. 10.
EXT.1, 2, 3 or 4 to obtain a better picture quality.
Side connections Camera or Camcorder
& Connect your camera or camcorder as shown.
é Connect to VIDEO 2 and AUDIO L 3 for mono equipment.
For stereo equipment also connect
S-VHS quality with an S-VHS camcorder is obtained by connecting
the S-VHS cables with the S-video input 1 and audio inputs 3.
Do not connect cable 1 and 2 at the same time.This may cause
picture distortion !
Headphone
20
& Insert the plug into the headphone socket L as shown.
é Press ¬ on the remote control to switch off the internal
loudspeakers of the TV.
The headphone impedance must be between 8 and 4000 Ohm.The
headphone socket has a 3.5 mm jack.
In the Sound menu select
headphone volume.
AUDIO R 3.
Headphone volume to adjust the
Page 23

Connect extra loudspeakers/amplifier
REAR
multimedia loudspeakers
& Select Surround speakers On in the Setup
menu, see p. 8.
é Connect the audio cables to the rear
loudspeakers and to the Dolby Surround
output
SURROUND OUT at the back of your
TV. There is only one output for both
speakers.
“ Adjust the volume of the rear loudspeakers.
Use the Test tone function in the Speakers
menu, see p. 8.
Note: Once you have adjusted the volume of the
rear loudspeakers, do not change it while watching
TV as the whole configuration operates with the
volume adjustment of your TV.
(Analogue) Multichannel surround receiver
& Connect a MultiChannel surround receiver to
the
AUDIO OUT R and L connectors at the
back of your TV.
é If you want the loudspeakers of your TV to act
as centre speaker, also connect an audiocable
to the MultiChannel surround receiver
CENTRE OUT connector and to the CENTRE
IN connector at the back of your TV.
“ Select Centre input On in the Source menu.
See p. 10.The loudspeakers of the TV will now
only produce centre sound.
‘ If necessary, adjust the volume level of the
centre sound in the
Centre in volume menu
item of the Source menu.The overall volume
has to be controlled via the MultiChannel
surround receiver.
To select connected equipment
Press the v key on the remote control repeatedly to select EXT1, EXT2, EXT3, EXT4 or SIDE
according to where you connected your equipment at the back or the right side of your TV.
Remark : Most equipment (decoder, recorder) carries out the switching itself, when it is switched on.
Cinema Link surround receiver
See the separate supplied Cinema Link instruction manual.
Attention: the sound info on screen will not correspond with the actual sound reproduction.
Recorder or DVD with EasyLink
The recorder (VCR or DVD+R(W)) or DVD can
be operated with the remote control via the
Recorder or DV D menu on screen.
Recorder
Òp‡π † ® Ï
Rwd Play Stop Play Ffw Rec Eject
DVD
Òp ‡ π † Ï
Prev. Play Stop Play Next Eject
& Press the MENU key on the remote control.
é Select the Recorder or DVD menu with the
cursor up/down.
“ Press the cursor left/right, up/down to select
one of the recorder or DVD functions.
The key ® for recording can be operated in the TV
mode.
If your EasyLink recorder has the system standby
function, when you press the B key for 3 seconds,
both TV and the recorder are switched to standby.
21
Page 24

B
†
®
®
®
®
hb q
0
i
0
879
546
2
Ì
Q
U
®
v
S
bæ
MENU
+
-
V
¬
+
-
P
13
LCD
RADIO
Select
VCR DVD SAT AMP CD
OK
Active Control
Ò‡ π
Audio- and Video equipment keys
Most of the audio and video equipment from the Philips range of products
can be operated with the remote control of your TV.
Press the
Select key to operate any of the equipment indicated in the
display.Another device can be selected by pressing
2 seconds.The led will blink slowly to indicate the device.
Press one of the keys on the remote control to operate the peripheral
equipment.
To r eturn to TV mode press
When no action is taken within 60 seconds, the remote goes back to TV
mode.
Note:When the
Select key is pressed and hold for more than 2 seconds, the
RC5/RC6 system select command is transmitted.
B to switch to standby
S for pause (
® for record,
Ò for rewind (
search down (
‡ for stop
π for play
† for fast forward (
search up (
æ to select your choice of
subtitle language (
RDS news/TA (
Selecting submodes for DVD+RW, SAT, CDR
& The remote control should be in TV mode.
é Press the OK key together with
Record with your recorder with EasyLink
to shuffle play (
b to select a
RDS display (
info on screen (
i display information
In TV mode, it is possible to start a direct recording of the programme
which is being displayed on the TV screen.
Continue to press the ® record key on the remote control for more than
2 seconds.
Note:
Switching programme numbers on your TV does not disturb recording !
When recording a programme from a peripheral connected to
SIDE you can not select another TV programme on the screen.
22
Select while the led is blinking.
VCR, DVD, CD)
VCR, CD);
DVD , AMP)
VCR, CD);
DVD/AMP)
DVD );
AMP);
CD)
DVD title;
AMP);
CD)
• digit 1:
• digit 2:
• digit 3:
• digit 4:
• digit 5:
• digit 6:
Select repeatedly within
MENU to switch the menu on or
off
- P + for chapter, channel, track
selection
0 to 9 digit entry
0 tape index (
VCR),
select a DVD chapter,
select a frequency (
U VCR timer
Q surround on/off (
cursor up/down
to select the next or the
previous disc (
cursor left/right
to select the previous or
following track (
search up/down (
DVD mode is selected
DVD+RW mode is selected
SAT (RC5) mode is selected
SAT (RC6) mode is selected
CD mode is selected
CD-R mode is selected.
EXT. 1, 3, 4 or
AMP)
AMP, CD)
CD)
CD)
AMP)
Page 25

Tips
Tips
Care of the screen Clean the TV with a slightly damp soft cloth.Do not use abrasive solvent as it can
damage the TV screen.
Poor Picture •Have you selected the correct TV system in the manual installation menu?
• Is your TV or house aerial located too close to loudspeakers,non-earthed audio
equipment or neon lights, etc.?
• Mountains or high buildings can cause double pictures or ghost images.
Sometimes you can improve the picture quality by changing the direction of the
aerial.
• Is the picture or teletext unrecognisable? Check if you have entered the correct
frequency. See Installation, p. 7.
•Are brightness, sharpness and contrast out of adjustment? Select Factory
settings in the Setup, General menu, p. 9.
• Sometimes poor picture quality is possible when having activated an S-VHS
camera or camcorder connected to the right side of your TV and another
peripheral is connected to one of the externals at the same time. In this case
switch off one of the other peripherals.
Digital distortion The low quality of some digital picture material may be the cause of digital image
distortion. In this case select the Soft setting using the Picture menu, Smart
Picture, without changing the picture settings manually.
No picture • Is the aerial connected properly?
•Are the plugs tightly connected in the aerial socket?
• Is the aerial cable in good condition and does it have suitable plugs?
•Press the
No sound • No sound on any channel? Check the volume isn’t at minimum.
RADIO key on the remote control to switch to TV mode.
• Is the sound interrupted with the mute key ¬? Check if your speaker
configuration corresponds with the selections made in the Setup menu,
Speakers, p. 8.
• No sound from the connected audio receiver? Select
Centre input Off in the
Source men, see p. 10.
No Surround •Perhaps the channel is not broadcasting good quality surround sound.
sound • No sound from the rear speakers or the centre speakers? Select an appropriate
surround mode, according to the broadcasted sound signal or adjust the
volume. See Surround Modes, p. 12.
No solution found Switch your TV off and then on again once. Never attempt to repair a defective
for your picture or TV yourself. Check with your dealer or call a TV technician.
sound problem ?
Menu
Have you selected the wrong menu? Press the MENU key again to exit from the
menu.
NEXTVIEW No NEXTVIEW info:
See Acquisition and updating of
Displayed time is wrong:
NEXTVIEW information, p. 15.
The broadcaster on programme number one does not transmit the correct local
date and time. Use Reshuffle in the installation menu to place another broadcaster
on programme number one.
Remote control • If your TV no longer responds to the remote control, the batteries may be dead.
• Check if the remote control is in the correct mode.
•You can still use the
Standby Your TV consumes energy in the standby mode. Energy consumption contributes
MENU key and the -/+ keys at the top of your TV.
to air and water pollution. Power consumption: 1 W.
23
Page 26

English
3104 315 2229.1
Page 27

Table of TV frequencies.
Frequenztabelle der Fernsehsender.
Liste des fréquences des émetteurs.
Frequentietabel TV-Zenders.
Tabella delle frequenze delle trasmittenti.
Lista de las frecuencias de las emisoras.
Lista das frequências dos emissores.
Liste over TV senderne.
Tabell over TV-frekvenser.
EUROPE
CH ..FREQ (MHz)
E2.............48.25
E3.............55.25
E4.............62.25
E5...........175.25
E6...........182.25
E7...........189.25
E8...........196.25
E9...........203.25
E10.........210.25
E11.........217.25
E12.........224.25
S1...........105.25
S2...........112.25
S3...........119.25
S4...........126.25
S5...........133.25
S6...........140.25
S7...........147.25
S8...........154.25
S9...........161.25
S10.........168.25
S11.........231.25
S12.........238.25
S13.........245.25
S14.........252.25
S15.........259.25
S16.........266.25
S17.........273.25
S18.........280.25
S19.........287.25
S20.........294.25
H1 ..........303.25
H2 ..........311.25
H3 ..........319.25
H4 ..........327.25
H5 ..........335.25
H6 ..........343.25
H7 ..........351.25
H8 ..........359.25
H9 ..........367.25
H10 ........375.25
H11 ........383.25
H12 ........391.25
H13 ........399.25
H14 ........407.25
H15 ........415.25
H16 ........423.25
H17 ........431.25
H18 ........439.25
H19 ........447.25
21...........471.25
22...........479.25
23...........487.25
24...........495.25
25...........503.25
26...........511.25
27...........519.25
28...........527.25
29...........535.25
30...........543.25
31...........551.25
32...........559.25
33...........567.25
34...........575.25
35...........583.25
36...........591.25
37...........599.25
38...........607.25
39...........615.25
40...........623.25
41...........631.25
42...........639.25
43...........647.25
44...........655.25
45...........663.25
46...........671.25
47...........679.25
48...........687.25
49...........695.25
50...........703.25
51...........711.25
52...........719.25
53...........727.25
54...........735.25
55...........743.25
56...........751.25
57...........759.25
58...........767.25
59...........775.25
60...........783.25
61...........791.25
62...........799.25
63...........807.25
64...........815.25
65...........823.25
66...........831.25
67...........839.25
68...........847.25
69...........855.25
E-EUROPE
CAN..FREQ (MHz)
R1 ..........49.75
R2 ..........59.25
R3 ..........77.25
R4 ..........85.25
R5 ..........93.25
R 6 .......175.25
R 7 .......183.25
R 8 .......191.25
R 9 .......199.25
R10 ......207.25
R11 ......215.25
R12 ......223.25
S1 ........105.25
S2 ........112.25
S3 ........119.25
S4 ........126.25
S5 ........133.25
S6 ........140.25
S7 ........147.25
S8 ........154.25
S9 ........161.25
S10 ......168.25
S11 ......231.25
S12 ......238.25
S13 ......245.25
S14 ......252.25
S15 ......259.25
S16 ......266.25
S17 ......273.25
S18 ......280.25
S19 ......287.25
S20 ......294.25
H1 ........303.25
H2 ........311.25
H3 ........319.25
H4 ........327.25
H5 ........335.25
H6 ........343.25
H7 ........351.25
H8 ........359.25
H9 ........367.25
H10 ......375.25
H11 ......383.25
H12 ......391.25
H13 ......399.25
H14 ......407.25
H15 ......415.25
H16 ......423.25
H17 ......431.25
H18 ......439.25
H19 ......447.25
21.........471.25
22.........479.25
23.........487.25
24.........495.25
25.........503.25
26.........511.25
27.........519.25
28.........527.25
29.........535.25
30.........543.25
31.........551.25
32.........559.25
33.........567.25
34.........575.25
35.........583.25
36.........591.25
37.........599.25
38.........607.25
39.........615.25
40.........623.25
41.........631.25
42.........639.25
43.........647.25
44.........655.25
45.........663.25
46.........671.25
47.........679.25
48.........687.25
49.........695.25
50.........703.25
51.........711.25
52.........719.25
53.........727.25
54.........735.25
55.........743.25
56.........751.25
57.........759.25
58.........767.25
59.........775.25
60.........783.25
61.........791.25
62.........799.25
63.........807.25
64.........815.25
65.........823.25
66.........831.25
67.........839.25
68.........847.25
69.........855.25
Tabell över TV-frekvenser.
TV-taajuustaulukko.
Kατάλογος συχνοτήτων ποµπών.
Spisok hastot peredathikov.
A televizió−adóállomások frekvenciáinak a listája.
Lista częstotliwości stacji nadawczych.
Seznam frekvenčních pásem vysílačů.
Zoznam frekvenčných pásiem vysielačov.
FRANCE
CAN..FREQ (MHz)
2 ..............55.75
3 ..............60.50
4 ..............63.75
5 ..............176.0
6 ..............184.0
7 ..............192.0
8 ..............200.0
9 ..............208.0
10 ............216.0
B............116.75
C............128.75
D............140.75
E............159.75
F ............164.75
G ...........176.75
H............188.75
I .............200.75
J ............212.75
K............224.75
L ............236.75
M...........248.75
N ...........260.75
O ...........272.75
P............284.75
Q ...........296.75
H1..........303.25
H2..........311.25
H3..........319.25
H4..........327.25
H5..........335.25
H6..........343.25
H7..........351.25
H8..........359.25
H9..........367.25
H10........375.25
H11........383.25
H12........391.25
H13........399.25
H14........407.25
H15........415.25
H16........423.25
H17........431.25
H18........439.25
H19........447.25
21 ..........471.25
22 ..........479.25
23 ..........487.25
24 ..........495.25
25 ..........503.25
26 ..........511.25
27 ..........519.25
28 ..........527.25
29 ..........535.25
30 ..........543.25
31 ..........551.25
32 ..........559.25
33 ..........567.25
34 ..........575.25
35 ..........583.25
36 ..........591.25
37 ..........599.25
38 ..........607.25
39 ..........615.25
40 ..........623.25
41 ..........631.25
42 ..........639.25
43 ..........647.25
44 ..........655.25
45 ..........663.25
46 ..........671.25
47 ..........679.25
48 ..........687.25
49 ..........695.25
50 ..........703.25
51 ..........711.25
52 ..........719.25
53 ..........727.25
54 ..........735.25
55 ..........743.25
56 ..........751.25
57 ..........759.25
58 ..........767.25
59 ..........775.25
60 ..........783.25
61 ..........791.25
62 ..........799.25
63 ..........807.25
64 ..........815.25
65 ..........823.25
66 ..........831.25
67 ..........839.25
68 ..........847.25
69 ..........855.25
ITALY
CAN..FREQ (MHz)
A ..............53.75
B ..............62.25
C ..............82.25
D ............175.25
E ............183.75
F.............192.25
G............201.25
H ............210.25
H1 ..........217.25
S1 ..........105.25
S2 ..........112.25
S3 ..........119.25
S4 ..........126.25
S5 ..........133.25
S6 ..........140.25
S7 ..........147.25
S8 ..........154.25
S9 ..........161.25
S10 ........168.25
S11 ........231.25
S12 ........238.25
S13 ........245.25
S14 ........252.25
S15 ........259.25
S16 ........266.25
S17 ........273.25
S18 ........280.25
S19 ........287.25
S20 ........294.25
H1 ..........303.25
H2 ..........311.25
H3 ..........319.25
H4 ..........327.25
H5 ..........335.25
H6 ..........343.25
H7 ..........351.25
H8 ..........359.25
H9 ..........367.25
H10 ........375.25
H11 ........383.25
H12 ........391.25
H13 ........399.25
H14 ........407.25
H15 ........415.25
H16 ........423.25
H17 ........431.25
H18 ........439.25
H19 ........447.25
21...........471.25
22...........479.25
23...........487.25
24...........495.25
25...........503.25
26...........511.25
27...........519.25
28...........527.25
29...........535.25
30...........543.25
31...........551.25
32...........559.25
33...........567.25
34...........575.25
35...........583.25
36...........591.25
37...........599.25
38...........607.25
39...........615.25
40...........623.25
41...........631.25
42...........639.25
43...........647.25
44...........655.25
45...........663.25
46...........671.25
47...........679.25
48...........687.25
49...........695.25
50...........703.25
51...........711.25
52...........719.25
53...........727.25
54...........735.25
55...........743.25
56...........751.25
57...........759.25
58...........767.25
59...........775.25
60...........783.25
61...........791.25
62...........799.25
63...........807.25
64...........815.25
65...........823.25
66...........831.25
67...........839.25
68...........847.25
69...........855.25
GB
The frequencies used by a cable company may differ from the
frequencies on the table. Consult your cable company or your
dealer for detailed information.
D
In Kabelfernsehanlagen können Abweichungen von den in den
Frequenztabellen aufgeführten Frequenzen vorkommen. Bitte
wenden Sie sich an Ihren Fachhändler oder Ihre
Kabelfernsehgesellschaft, die Ihnen die zutreffenden Frequenzen
mitteilt.
F
Les fréquences utilisées par une société de télédistribution
peuvent être différentes de celles sur la liste des fréquences.
Consultez votre société de télédistribution ou votre revendeur
pour des informations plus détailées.
NL
De frequenties die gebruikt worden door een kabelmaatschappij
kunnen verschillen van deze op de tabel. Raadpleeg uw
kabelexploitant of uw handelaar voor meer informatie.
I
Le frequenze usate per una società di teledistribuzione possano
essere differenti di quelle nella tabella. Consultate la società di
teledistribuzione o il vostro rivenditore per informazione specifica.
E
Las frecuencias utilizadas por las empresas de distribución de
señal por cable, pueden ser diferentes de las que se encuentran
en esta tabla. Consulte con su compañia de distribución de
televisión por cable o con su distribuidor para que le proporcionen
una información más detallada.
P
As frequências utilizadas por uma sociedade de teledistribuição
podem ser diferentes das indicadas na lista de frequências.
Consultar a sociedade de teledistribuição ou o vendedor para
informações mais detalhadas.
DK
Frekvenser benyttet af kabel operatører kan være afvigende fra
disse, kantakt deres kabel operatør eller forhandler for næmere
informa-tion.
N
Frekvensene som benyttes pa et kabelnett kan avvike fra de
som er oppfört i tabellen. Kontakt ditt kabel-TV selskap eller din
forhandler for næmere opplysninger.
S
Frekvenserna som används i kabel-TV-näten kan avvika från
frekvenserna i tabellen. Kontakta ditt kabel-TV-bolag eller din
radiohandlare för vidare information.
SF
Kaapeliyhtiöden käyttämät taajuudet voivat poiketa taulukossa
olevista taajuuksista. Tarkat tiedot saat kaapeliyhtiösta tai myyjältä.
GR
Οι συχντητες που χρησιµοποιούνται απ µια εταιρεία τηλεµετάδοσης
είναι δυνατν να είναι διαφορετικές απ αυτές που περιέχει ο κατάλογος.
(Συµβουλευθείτε την εταιρεία τηλεµετάδοσης ή τον πωλητή για
λεπτοµερέστερες πληροφορίες).
CEI
Hastoty na kotoryx peredaòt telakampaniä mogut
otlihatæsä ot hastot na dannoj tablice. (Obratitæsä k
Vaπej telekampanii ili Vaπemu prodavcu za
dopolnitelænoj informaciej.
H
Egy televizió−adóállomás sugárzáshoz használt frekvenciatar−
tományai lehetnek a táblázatban közöltektől eltérőek is. (Abban
az esetben, ha bővebb információkra van szüksége, forduljon az
eladóhoz.)
PL
Operator sieci telewizyjnej może stosować inne częstotliwości,
niż te, które figurują na tablicy (bardziej szczegółowych infor−
macji na ten temat zasięgnąć u operatora lub sprzedawcy).
CZ
Frekvence používané některými televizními společnostmi se
mohou lišit od údajů uvedených v tomto seznamu. Informujte se
blíže u příslušné společnosti nebo v prodejně, kde jste televizor
koupili.
SK
Frekvencie používané niektorými spoločnosami televízneho
prenosu sa môžu liši od údajov uvedených v tomto zozname.
Informujte sa bližšie u príslušnej spoločnosti alebo v predajni,
kde ste televízor kúpili.
Page 28

Printed in Belgium
 Loading...