

Page 1
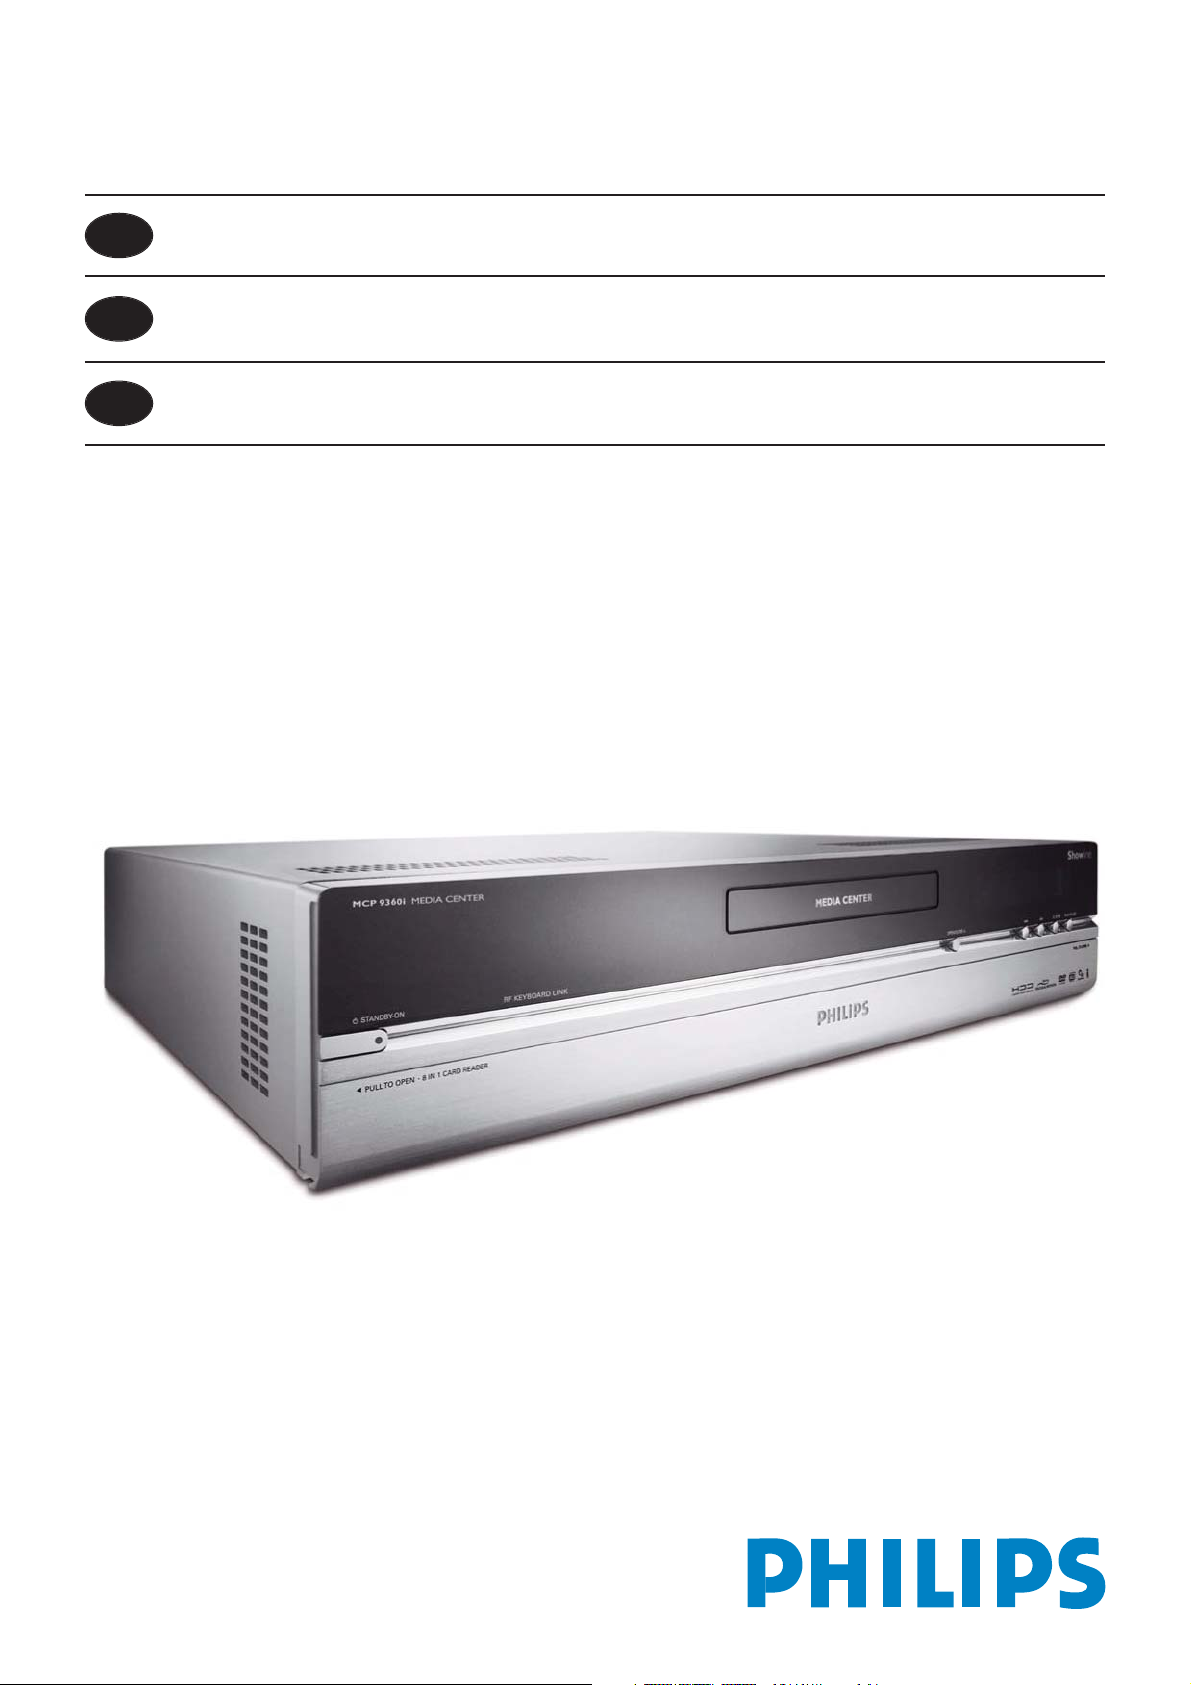
Media Center MCP9360i/31
Guide d’installation rapide
2
Beknopte installatiehandleiding 36
Quick install guide 70
FR
NL
EN
Page 2

2
Assistance
Si vous avez besoin d’aide pour votre MCP9360i, visitez le site web d’assistance technique de Philips :
www.philips.com/support
Si vous n’y trouvez pas la réponse à votre problème, contactez le service d’assistance utilisateurs de Philips :
France 08 9165 0006 € 0,23/min
Page 3
3
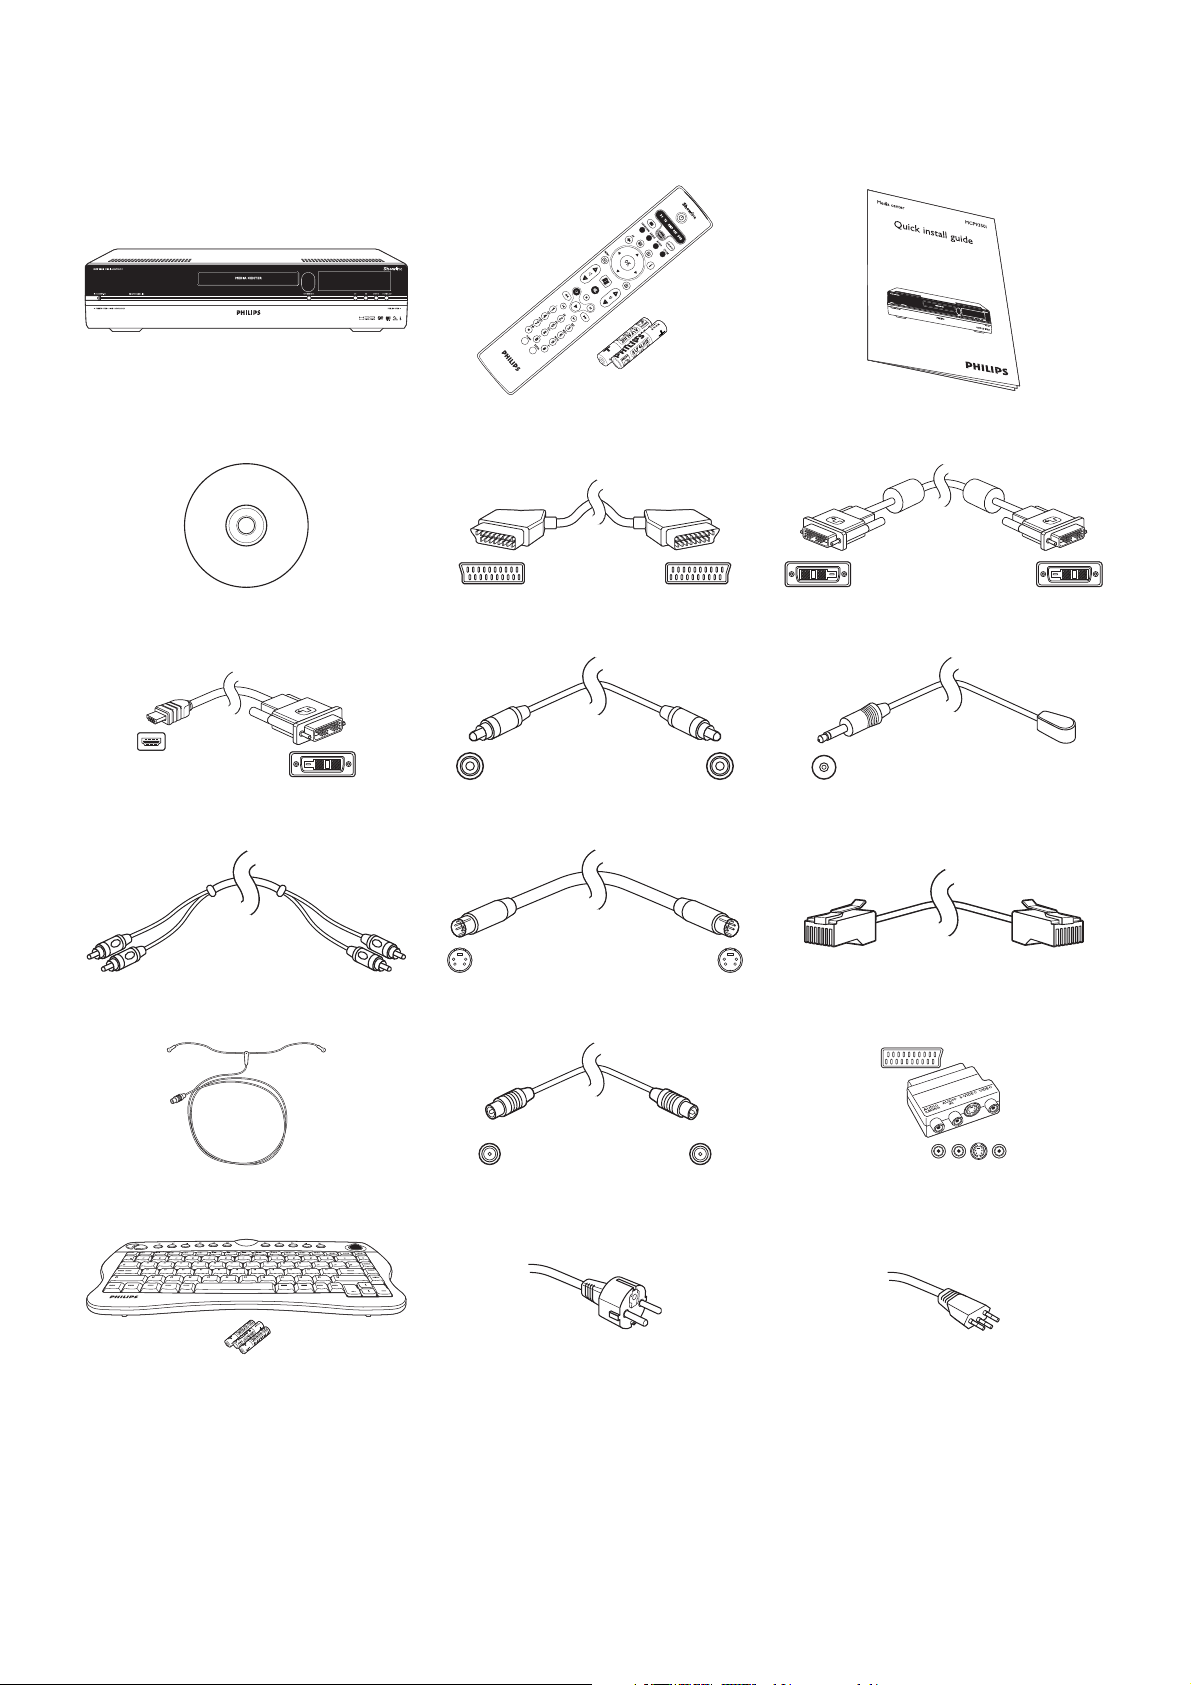
Contenu de l’emballage
Media Center MCP9360i Télécommande,
2 piles AA
Guide d’installation rapide
CD Câble Péritel Câble DVID
Raccord DVI-D - HDMI Câble coaxial audio numérique 2 répartiteurs IR pour décodeurs
Câble coaxial audio stéréo Câble S-Video Câble Ethernet
Câble d’antenne FM Câble d’antenne TV (1 m)
Câble d’antenne TV (10 cm)
Adaptateur Péritel — SVHS/CVBS
3 piles AA
pour clavier sans fil
Cordon d’alimentation Cordon d’alimentation
(MCP 9360i/23)
Page 4

4
Contenu de l’emballage ....................................................... 3
1 Présentation des fonctionnalités .................................... 5
Vue avant ................................................................................................................................ 5
Vue arrière ............................................................................................................................. 6
Télécommande ..................................................................................................................... 7
Clavier sans fil ....................................................................................................................... 9
2 Installation de votre Philips Media Center .................. 10
Branchement d’un téléviseur/écran ............................................................................... 10
Branchement vidéo (par ex., décodeur) ....................................................................... 12
Branchement audio ........................................................................................................... 13
Raccordement à Internet ................................................................................................. 14
Branchement d’antennes .................................................................................................. 16
Insertion des piles dans la télécommande ................................................................... 16
Branchement au secteur / Mise sous tension (ON) et en veille ........................... 17
Installation du clavier sans fil ........................................................................................... 18
3 Configuration de votre Philips Media Center ............. 19
Configuration de Microsoft Windows® ....................................................................... 19
Assistant de configuration de Media Center .............................................................. 20
Recherche manuelle des canaux .................................................................................... 22
Installation d’autres logiciels ............................................................................................ 23
Modification des paramétres ........................................................................................... 23
Changement de résolution d’écran ............................................................................... 24
Réglage du rapport largeur-hauteur ............................................................................... 25
4 Autres branchements .................................................... 27
Branchement d’un microphone ...................................................................................... 27
Branchement d’un casque ................................................................................................ 27
Branchement d’une caméra vidéo (ou autre source portable externe) .............. 27
Branchement d’un lecteur multimédia portable
(ou d’un disque dur ou d’un appareil photo) .............................................................. 28
Branchement d’un lecteur externe (disque dur, lecteur optique) ......................... 28
Insertion de cartes mémoire .......................................................................................... 29
5 Important ........................................................................ 30
Déni de responsabilité en cas de perte de données ................................................. 30
Sécurité et réglementation .............................................................................................. 30
Sommaire
Page
Page 5
5
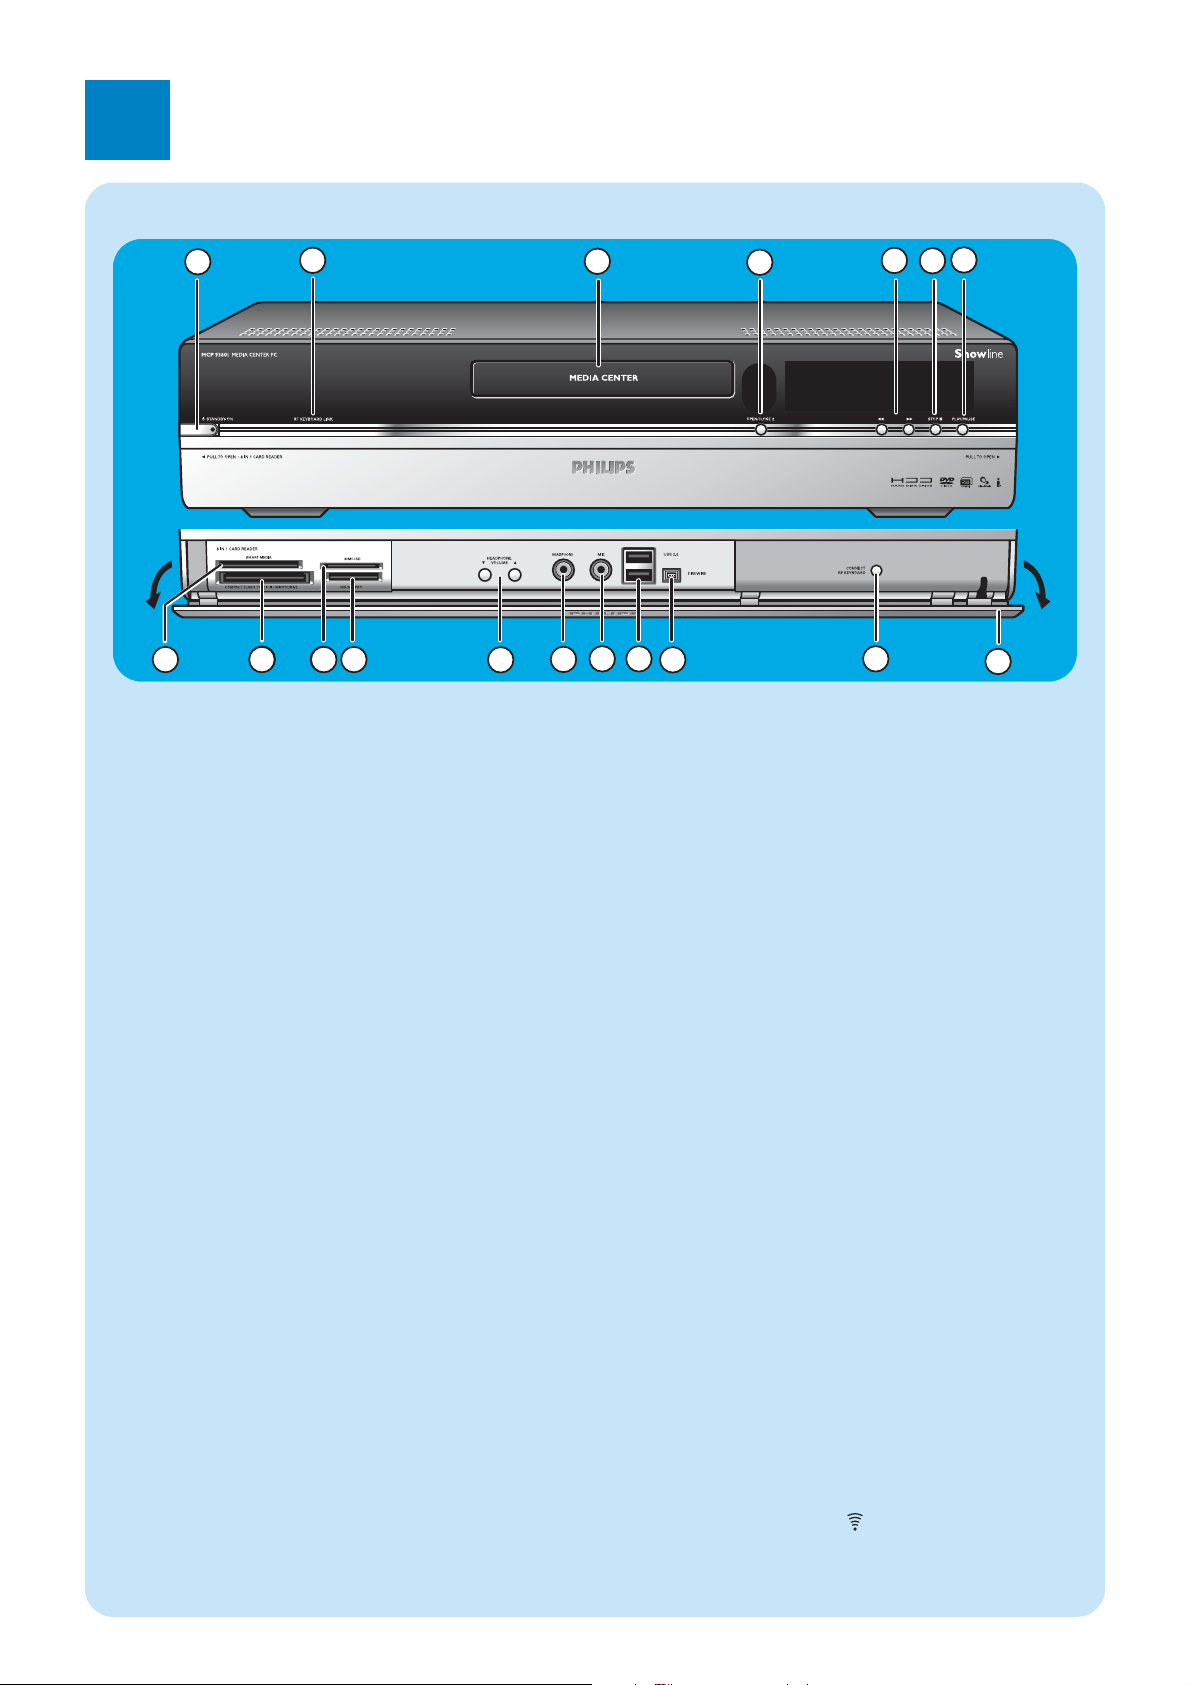
Vue avant
1
5
8
7
6
8
9
3
13
12
9 10
11
4
14
15
16
17
18
2
1
yy
STANDBY-ON
Fait basculer le Media Center entre le mode actif (ON)
et le mode veille (faible consommation).
Indicateur STANDBY/ON (sur la touche)
– S’allume en orange lorsque le Media Center est bran-
ché au secteur. Le Media Center passe alors en mode
basse consommation.
– S’allume en rouge lorsque le Media Center est mis en
veille avec la touche yyStandby (1) de la télécommande.
– L’indicateur s’éteint lorsque le Media Center est mis
sous tension avec la touche yyStandby (1) de la télécommande ou la touche yySTANDBY-ON (1).
2 RF KEYBOARD LINK
Clignote lorsque l’appareil reçoit des signaux du clavier
sans fil.
3 Lecteur optique
Lecture et gravure de CD/DVD.
4 OPEN/CLOSE //
Ouverture et fermeture du lecteur optique.
5 5
– Rembobinage rapide sur la piste active (maintenir la
touche enfoncée).
6
– Défilement rapide vers l’avant sur la piste active (main-
tenir la touche enfoncée).
– Lecture de la piste au ralenti lorsque le DVD est en
mode pause (appuyer une fois).
6 STOP 9
Arrêt de la lecture.
7 PLAY/PAUSE
– Lancement de la lecture.
– Suspension de la lecture.
8 SMART MEDIA
Insertion d’une carte mémoire Smart Media.
9 COMPACT FLASH TYPE 1 / 11 MICRODRIVE
Insertion d’une carte mémoire Compact Flash.
10 MMC/SD
Insertion de la carte mémoire MMC/SD (MultiMedia
Card / Secure Digital), par exemple, d’un appareil photo
numérique.
11 MS/MS PRO
Insertion d’une carte Memory Stick (Pro).
12 4 HEADPHONE VOLUME 3
Réglage du volume du casque. Le volume du casque est
indépendant de celui de l’appareil.
13 HEADPHONE
Branchement d’un casque.
14 MIC
Branchement d’un microphone.
15 USB 2.0
Branchement de périphériques USB 1.1 et 2.0.
16 FIREWIRE (IEEE1394 / i.LINK) - 4 broches
Branchement d’équipements numériques compatibles
FireWire/IEEE1394/i.LINK (caméscopes numériques, disques durs, etc., nécessitant un connecteur à 4 broches)
pour le transfert de données vers le Media Center.
17 CONNECT RF KEYBOARD
Raccordement du Media Center et du clavier. S’utilise
conjointement à la touche (3) du clavier.
18 Volet
1
Présentation des fonctionnalités
Page 6
6
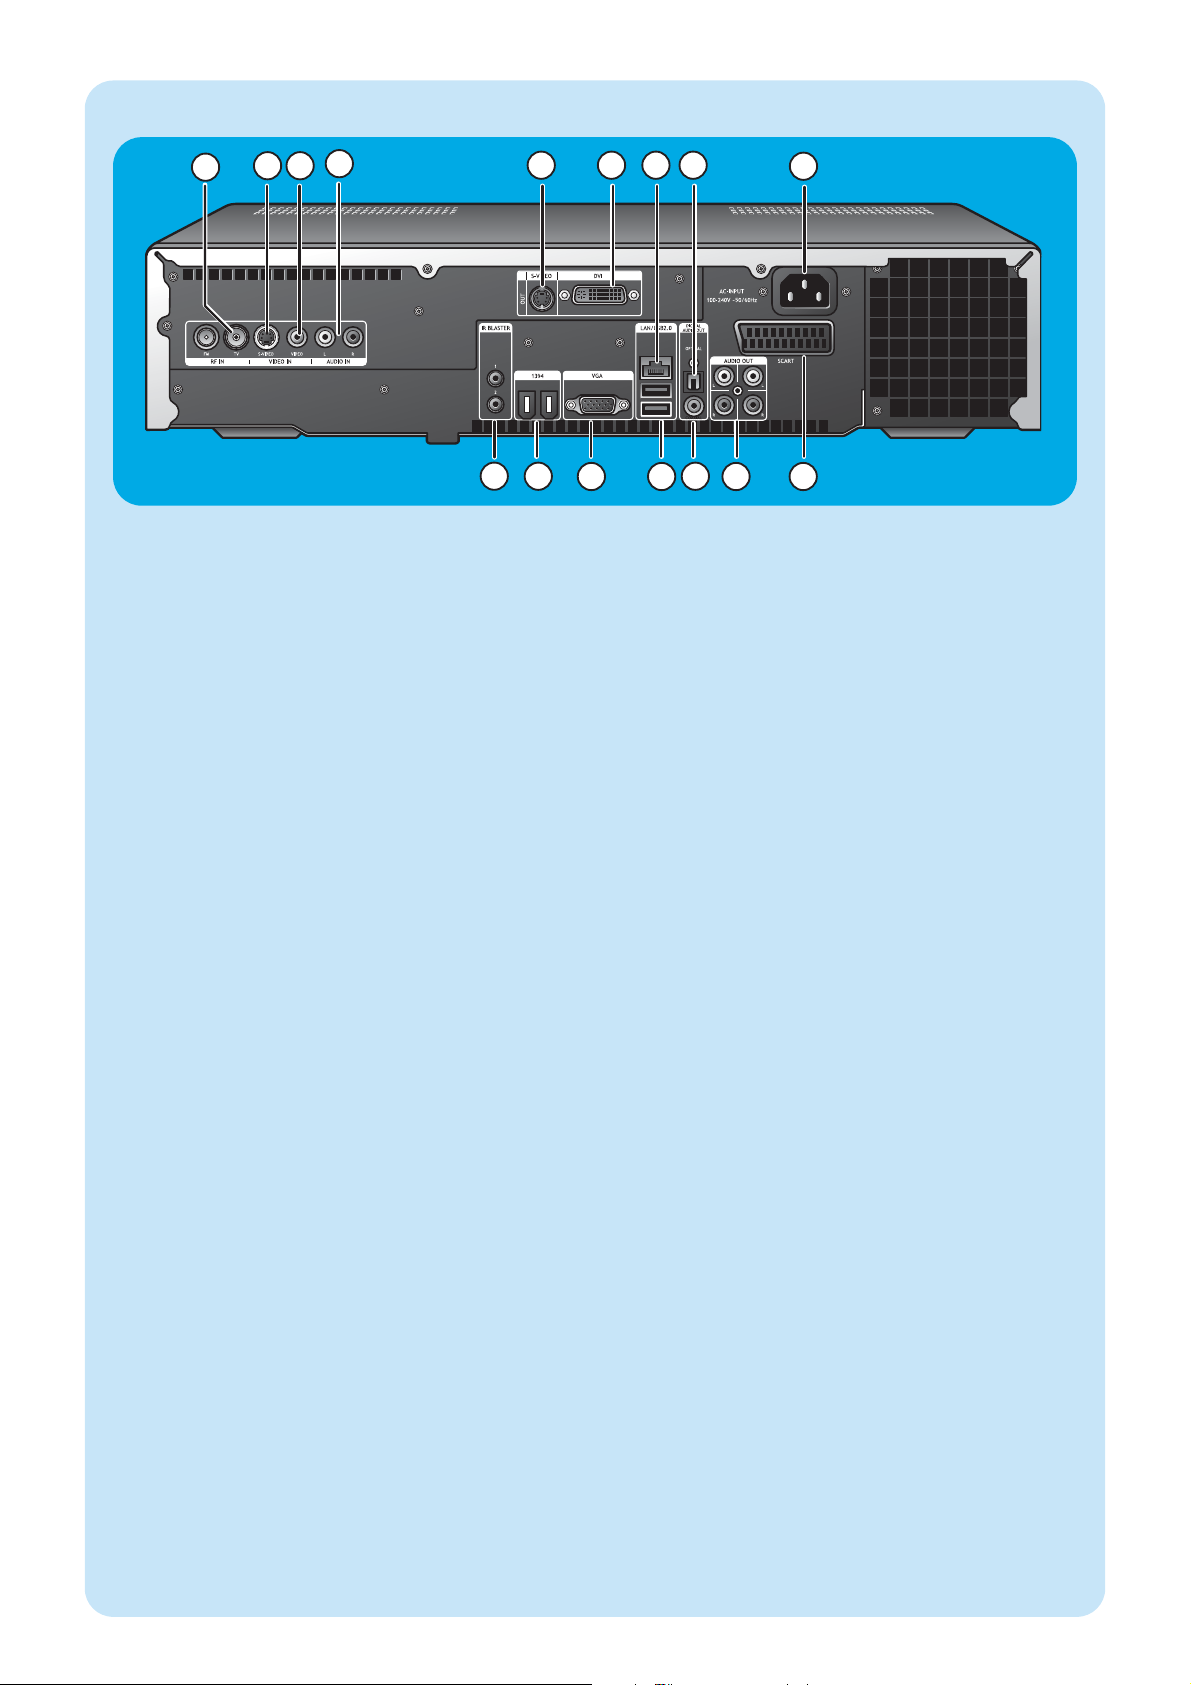
Vue arrière
5
9
11
10
12
13
14
15 16
6 7 8
2 3
4
1
1 RF IN - TV
Branchement au système de réception par câble.
2 VIDEO IN - S-Video
Connecteur d’entrée vidéo pour raccordement au
connecteur de sortie S-Video d’un téléviseur, décodeur
câble/satellite, lecteur/enregistreur de DVD, etc.
3 VIDEO IN -Video (CVBS)
Connecteur d’entrée vidéo pour raccordement au
connecteur de sortie CVBS (vidéo composite) d’un
téléviseur, décodeur câble/satellite, lecteur/enregistreur
de DVD, etc.
4 AUDIO IN
Connecteur d’entrée audio pour raccordement aux connecteurs de sortie audio d’un décodeur câble/satellite,
lecteur/enregistreur de DVD, équipement audio, etc.
5 S-VIDEO OUT
Connecteur de sortie pour le raccordement au connecteur d’entrée d’équipements d’enregistrement S-Video
(DVD, magnétoscope) ou d’un téléviseur compatible
S-Video.
6 DVI OUT
Connecteur de sortie DVI-D (Digital Video Interface –
Digital only) pour le raccordement au connecteur
d’entrée DVI-D d’un écran compatible ou d’un téléviseur à écran plat.
7 LAN
Raccordement à votre réseau local.
8 DIGITAL AUDIO - Optical - Out
Connecteur de sortie optique pour raccordement au
connecteur d’entrée optique d’un récepteur, d’un téléviseur ou d’un matériel d’enregistrement (graveur de CD,
magnétoscope, etc.).
9 AC-INPUT (100-240V - 50/60Hz)
Raccordement du Media Center au secteur.
10 IR (Infrarouge) BLASTER (2 x)
Branchement d’un répartiteur IR (infrarouge) pour
sélectionner les canaux sur votre décodeur câble/satellite avec la télécommande du Media Center.
11 1394 (Firewire / i.LINK) - 6 broches (2 x)
Raccordement de périphériques et de matériels compatibles IEEE 1394 / Firewire / i.LINK tels qu’un disque dur
externe nécessitant deux broches supplémentaires pour
l’alimentation.
12 VGA
Raccordement à un moniteur VGA (Video Graphics
Array) ou à un téléviseur à écran plat.
13 USB 2.0 (2 x)
Branchement de périphériques USB 1.1 et 2.0.
14 DIGITAL AUDIO - COAXIAL - Out
Connecteur de sortie coaxial pour le raccordement au
connecteur coaxial d’entrée d’un récepteur ou d’un
matériel d’enregistrement (par ex., un graveur de DVD).
15 AUDIO OUT (2 x)
Connecteur de sortie audio stéréo pour le raccordement au connecteur d’entrée audio d’un récepteur ou
d’un matériel d’enregistrement (par ex., un graveur de
DVD).
16 SCART (RGB / CVBS)
Raccordement au connecteur d’entrée Péritel d’un téléviseur.
Remarque : les antennes pour réseau local sans fil (802.11b/g)
sont intégrées à l’appareil. Il n’est donc pas nécessaire d’y brancher un adaptateur sans fil pour intégrer
le Media Center à votre réseau sans fil.
Page 7
7
C
Télécommande
3
1
2
5
4
6
10
9
7
8
12
13
14
17
18
21
20
22
23
16
15
19
11
24
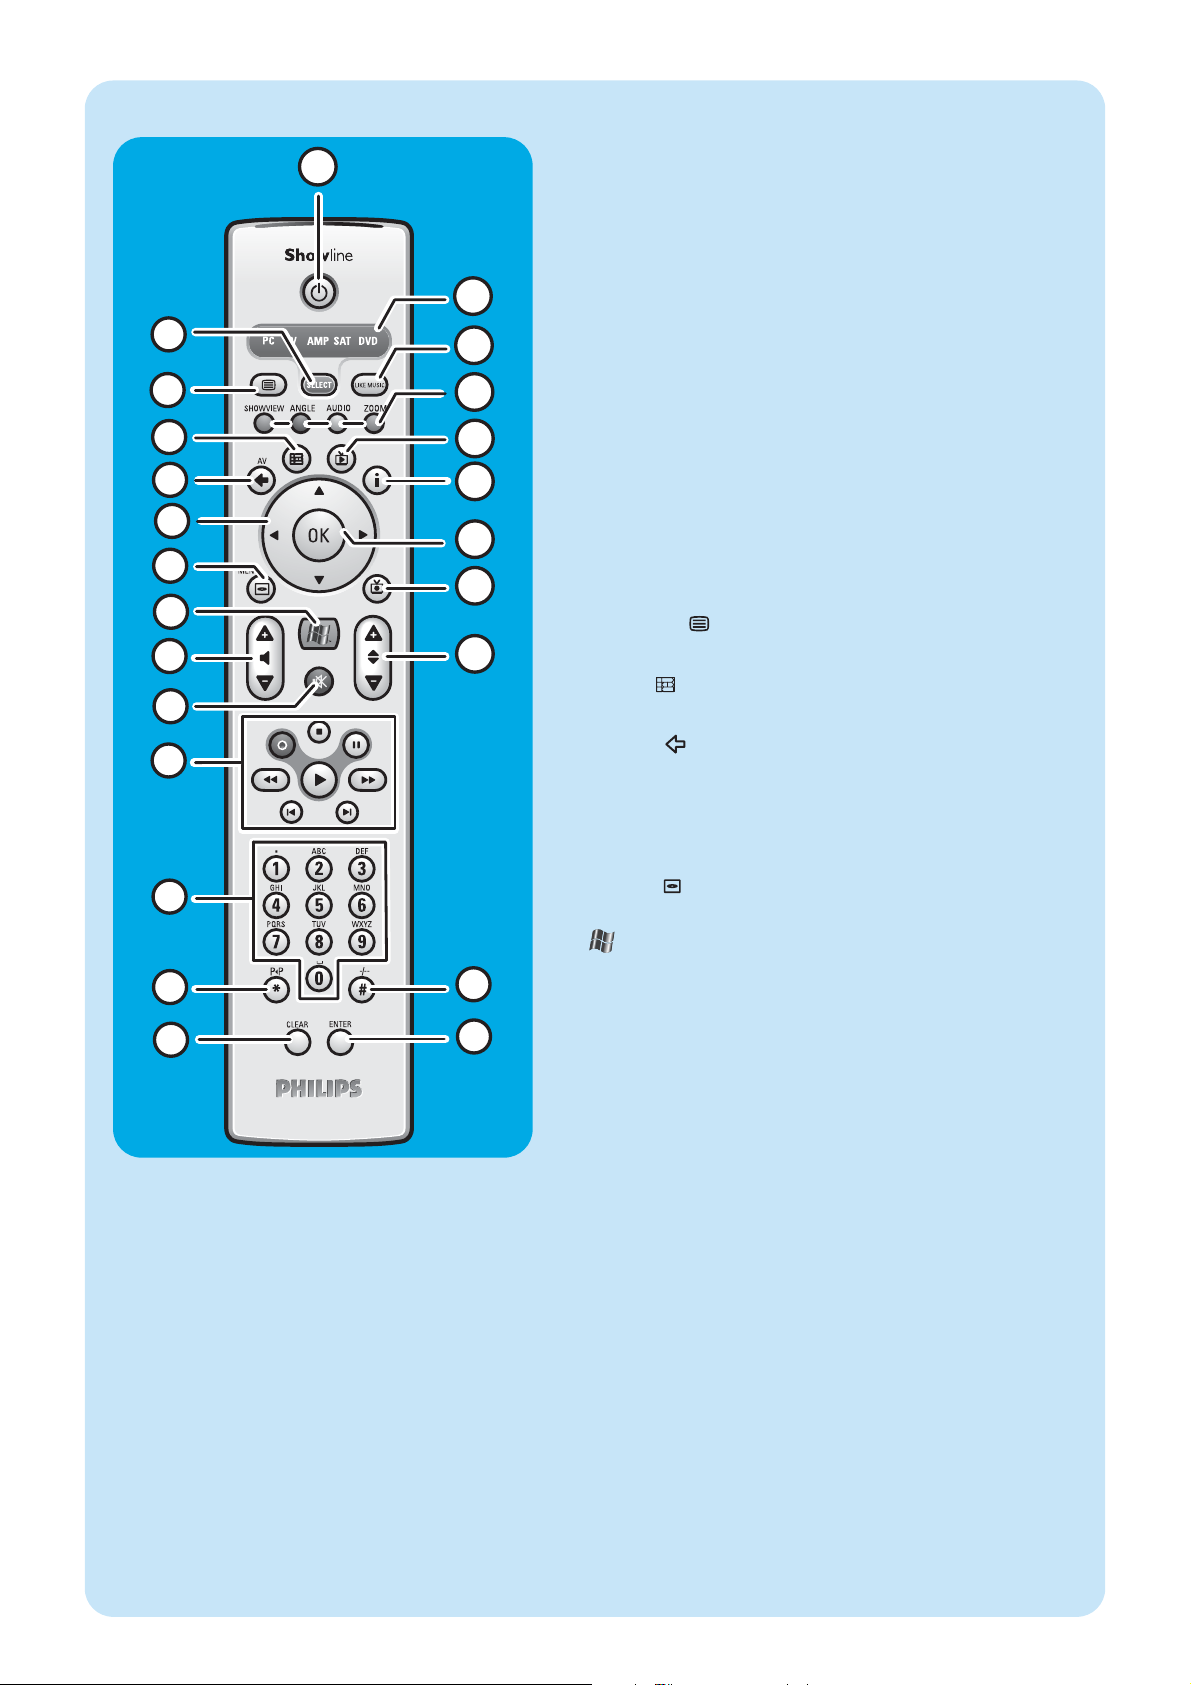
Ce chapitre décrit uniquement les fonctions des touches RC du
mode Media Center (PC). En ce qui concerne les fonctions des
touches dans les autres modes (TV, AMP, SAT et DVD), consultez
le manuel de l’utilisateur de la RC4370.
Remarques :
– Après avoir allumé le Media Center, la télécommande passe auto-
matiquement en mode Media Center.
– Lorsqu’une touche ou une combinaison de touches reste enfoncée
plus de 30 secondes, la télécommande cesse de transmettre des
signaux infrarouges.
1yyVeille
Allume le Media Center ou le fait passer en mode veille.
2 SELECT
Sélectionne l’appareil que vous souhaitez télécommander :
dans le cas du Media Center, choisissez PC.
Lorsque vous l’allumez, la télécommande passe automatiquement en mode Media Center (PC).
3 Télétexte ( )
TV/SAT (en mode PC) : texte actif/inactif.
4 Guide ( )
Affiche le guide électronique des programmes TV.
5 Retour ( )
Retour à l’écran précédent.
6 1 2 3 4
Touches de navigation gauche, droite, haut et bas.Touches de
navigation dans les menus.
7 MENU ( )
Affiche le menu du DVD qui se trouve dans le lecteur optique.
8
Ouvre le menu principal de Microsoft Windows®XP Media
Center edition.
9 – Volume +
Réduit (–) ou augmente (+) le volume de votre téléviseur
Philips.
Pour régler le volume d’autres marques de téléviseur, reportez-vous au manuel de l’utilisateur de la RC4370.
10 Muet (s)
Coupe la sortie casque.
11 0 (Enregistrement)
Enregistre une émission télévisée sur le disque dur du Media
Center. Par défaut, les émissions enregistrées sont placées dans
le dossier Documents Partagés (dossier des émissions télévisées enregistrées).
9 (Arrêt) Arrête la lecture ou l’enregistrement en cours.
; (Pause) Suspend la lecture ou l’enregistrement en cours.
5 6 (Recherche)
Lance une recherche rapide en arrière (5) et en avant (6)
dans le chapitre actuel du DVD (maintenir la touche enfoncée).
2 (Lecture) Lit un film, de la musique ou des images.
¡ ™ (Ignorer)
Permet de se déplacer sur le support (vidéo et/ou audio), vers
l’arrière (¡) ou vers l’avant (™), à raison d’une piste (CD) ou
d’un chapitre (DVD) à la fois.
Page 8
8
3
1
2
5
4
6
10
9
7
8
12
13
14
17
18
21
20
22
23
16
15
19
11
24
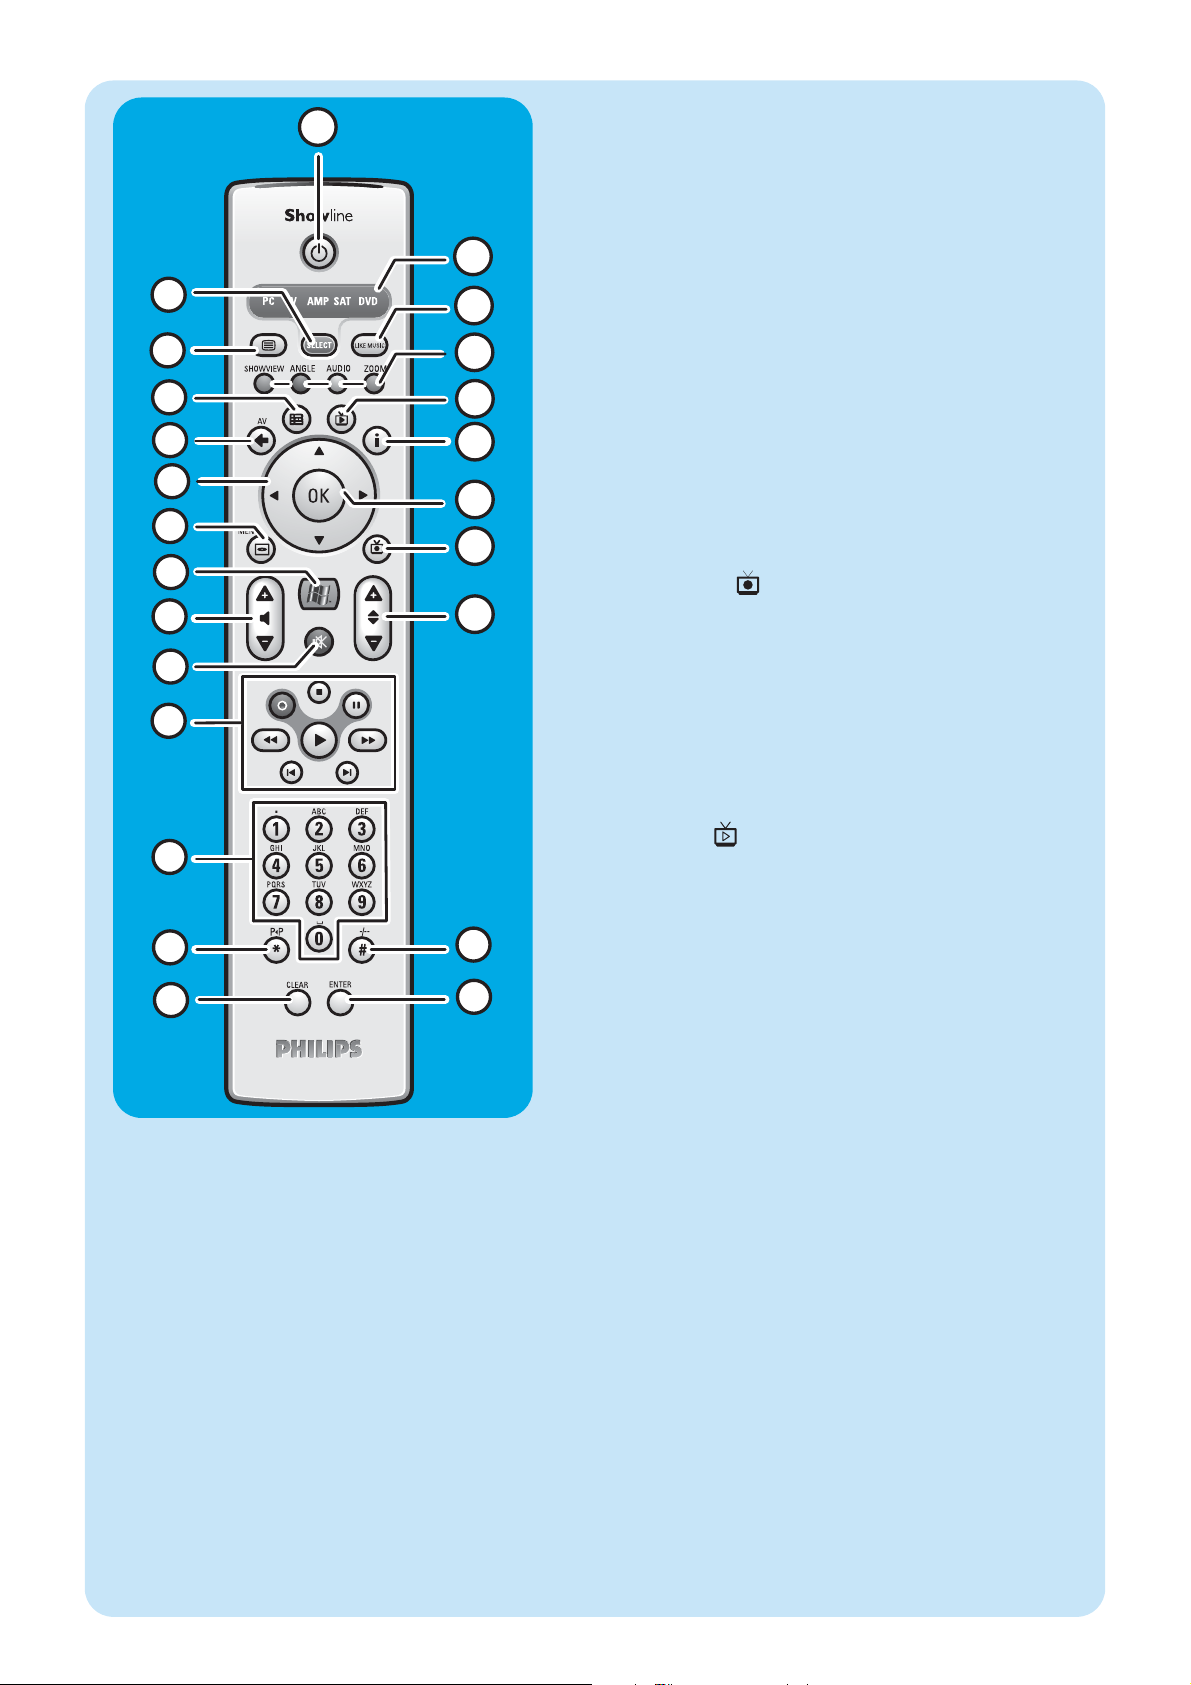
12 Touches 0-9
Permettent de saisir des numéros ou des lettres (selon la fonction sélectionnées) afin de changer de canal, de saisir du texte
dans une boîte de dialogue de recherche ou une zone de texte
du Media Center, etc.
13 P 1 P (*)
Programme/canal précédent.
14 CLEAR
Efface votre dernière sélection (fonctionne comme la touche
Eff AR d’un clavier).
15 ENTER
Sélectionne l’action ou l’option souhaitée.
16 – / – – (#)
Bascule entre les numéros de programme/canal à un et à deux
chiffres.
17 – Programme +
Programme/canal précédent (-) et suivant (+)
18 TV enregistrée ( )
Raccourci vers les émissions RV enregistrées sur le disque dur
du Media Center.
19 OK
Sélectionne l’option ou la fenêtre souhaitée (fonctionne
comme la touche Enter).
20 i
– Affiche des informations sur l’émission TV sélectionnée. -
Offre d’autres possibilités dans les différents menus.
21 TV en direct ( )
Raccourci permettant de regarder les émissions en direct.
22 Rouge (SHOWVIEW)
Télétexte actif : rouge.
Ver t (ANGLE)
Télétexte actif : vert.
Jaune (Audio)
Télétexte actif : jaune.
Bleu (Zoom)
Télétexte actif : bleu.
23 LIKE MUSIC
Génère automatiquement une liste de lecture musicale.
24Fenêtre du sélecteur
Indique l’appareil sélectionné.
Page 9
9
Clavier sans fil
3
6
4
5
9
7
8
14
15
1 2 10 11
12
13
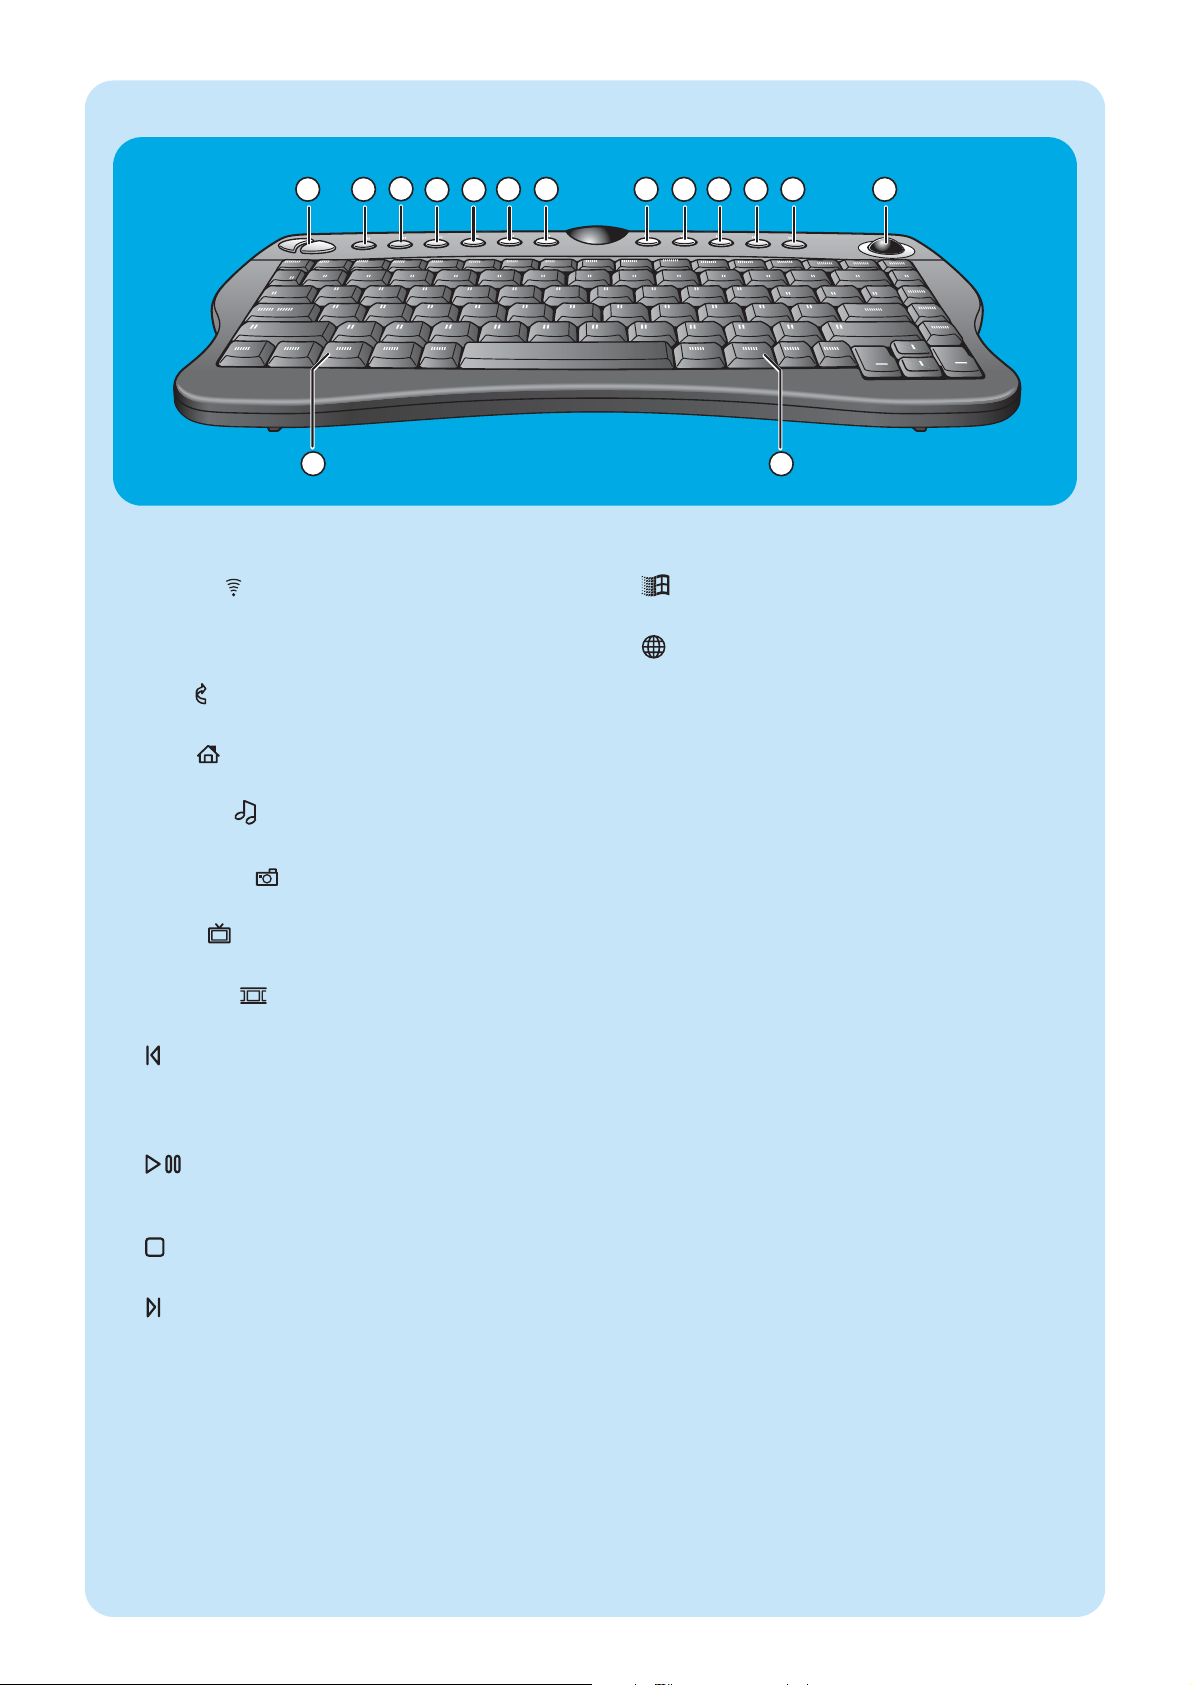
1 Touches équivalant aux boutons gauche et droit
de la souris
2 Connect
Raccordement du clavier au Media Center. S’utilise conjointement à la touche CONNECT RF KEYBOARD
(17) située en façade du Media Center.
3 Back
Retour à l’écran précédent.
4 Start
Ouvre le menu Media Center.
5 My Music
Ouvre le menu My Music du Media Center.
6 My Pictures
Ouvre le menu Mes images du Media Center.
7 My TV
Ouvre le menu Ma TV du Media Center.
8 My Videos
Ouvre le menu Mes vidéos du Media Center.
9
Permet de passer directement à la piste musicale précédente (support vidéo et/ou audio) ou au chapitre de
DVD précédent.
10
Lance la lecture des images ou de la musique sur le lecteur de CD ou de DVD.
11
Arrête la lecture ou l’enregistrement en cours.
12
Permet de passer directement à la piste musicale suivante (support vidéo et/ou audio) ou au chapitre de DVD
suivant.
13 Trackball (souris)
Commande le curseur à l’écran.
14
Ouvre le menu Démarrer de Windows®.
15
Lance Internet Explorer.
Page 10
10
2
Installation de votre Philips Media Center
Branchement d’un téléviseur/écran
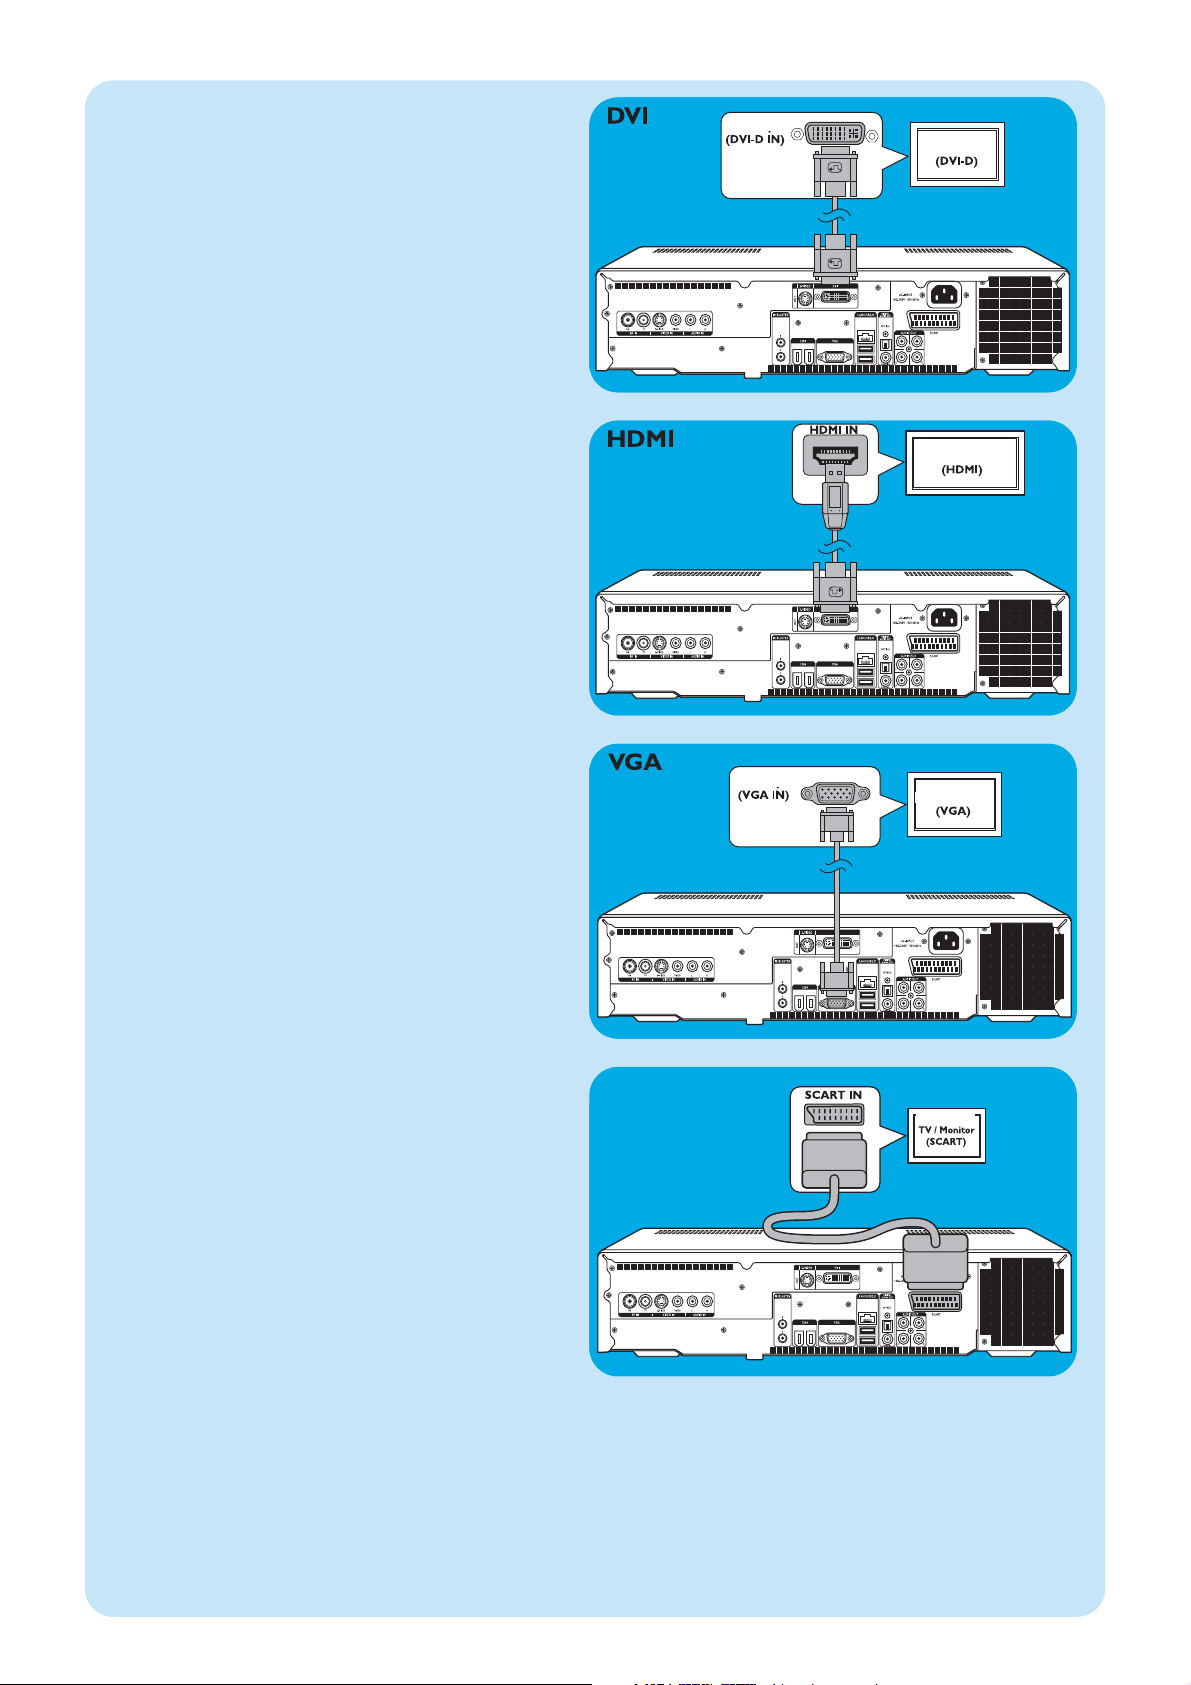
Votre Media Center est équipé de quatre connecteurs TV OUT/MONITOR OUT : S-VIDEO OUT (6), DVI OUT (7),
VGA (16) et SCART (21). La connexion DVI (vers HDMI) est recommandée, car c’elle qui offre la qualité d’affichage la
plus élevée. Si votre téléviseur est équipé d’un connecteur CVBS, vous pouvez utiliser l’adaptateur Péritel (SCART) –
SVHS/CVBS pour établir une connexion CVBS.
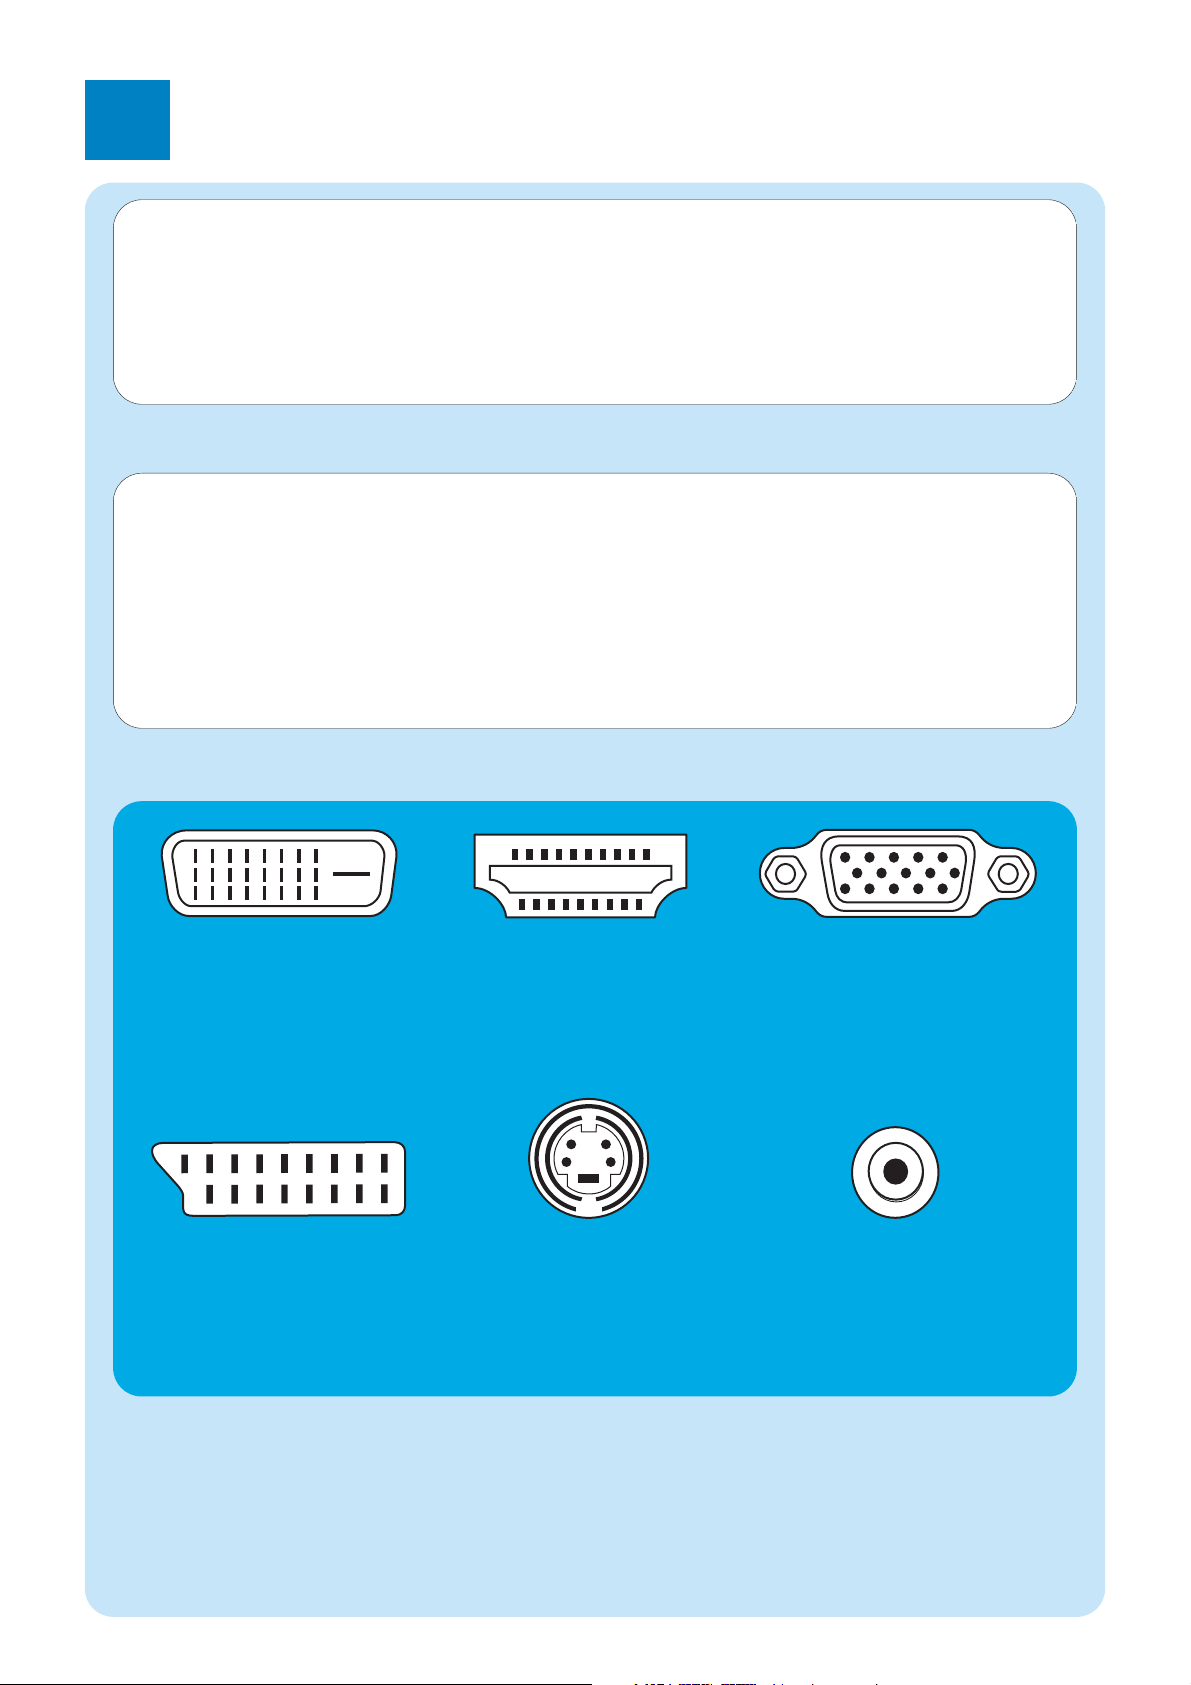
Repérez le connecteur :
Commencez par vérifier le type de connecteur de votre téléviseur/écran avant d’effectuer tout branchement.Vous trouverez votre
connecteur en consultant l’illustration ci-dessous. La séquence (1-6) indique également le niveau de qualité d’affichage des différents
connecteurs.
ATTENTION ! Assurez-vous que le Media Center est éteint et débranché du secteur avant d’effectuer les autres
branchements.
Remarques :
– Sauf indication contraire, toutes les entrées et sorties du Media Center mentionnées se situent au dos de celui-ci.
– Commencez par tous les branchements vidéo (TV/écran) requis, ensuite reportez-vous au chapitre « Branchement audio ».
Vous y trouverez les instructions concernant les branchements audio du Media Center.
1. Connecteur DVI-D
Recommandé. Résolution
élevée et connexion
numérique.
2. Connecteur HDMI
Recommandé. Résolution
élevée et connexion
numérique.
3. Connecteur VGA
Résolution élevée, mais le
signal est converti en
signal analogique.
4. Connecteur Péritel
Résolution limitée et
connexion analogique (RVB :
séparation en 3 couleurs).
5. Connecteur S-Video
Résolution limitée et
connexion analogique (RVB : 1
canal modulé).
6. Connecteur CVBS
Ne sert que pour
l’enregistrement à partir
d’un décodeur.
Connecteur TV/écran
Page 11
11
4. Connexion Péritel
• Branchez le câble Péritel sur la sortie SCART du téléviseur/écran et le connecteur SCART (16) du Media
Center.
Remarques :
– Assurez-vous que le connecteur Péritel de votre téléviseur est
compatible avec l’affichage RVB (rouge, vert, bleu) pour
bénéficier d’une qualité d’image optimale.
– Avec les applications pour PC ordinaires, il n’est pas indis-
pensable que la qualité de l’image soit parfaite.
– Certains téléviseurs basculent automatiquement entre les
rapports hauteur-largeur 4:3 et 16:9 à réception des signaux Wide Screen Signaling. Cependant, le Media Center ne
reconnaît pas le format WSS (Wide Screen Signaling). Pour
sélectionner le rapport hauteur-largeur, consultez le manuel
de l’utilisateur de votre téléviseur.
– Dans le cas d’une connexion Péritel (SC ART), de petites bar-
res peuvent apparaître sur les bords de l’écran. Ce n’est pas
un défaut.
2. Connexion HDMI (recommandée)
• Branchez le câble DVI-D - HDMI sur la prise HDMI IN
du téléviseur/écran et la prise DVI OUT (6) du Media
Center.
• Serrez les vis du connecteur DVI.
• Sélectionnez SPDIF ou Analogue dans le menu Audio
du téléviseur. Pour de plus amples informations, voir le
manuel de votre téléviseur.
3. Connexion VGA
• Branchez le câble VGA (non fourni) sur la prise
VGA IN du téléviseur/écran et la prise de sortie VGA
(12) du Media Center. Serrez les vis des deux connecteurs.
Remarque : Si votre téléviseur/écran est équipé d’un câble VGA
à connexion fixe, branchez-le simplement sur le
connecteur de sortie VGA (12) du Media Center et
serrez les vis.
1. Connexion DVI-D (recommandée).
• Branchez le câble DVI-D sur la prise DVI-D IN du
téléviseur/écran et la prise DVI OUT (6) du Media
Center. Serrez les vis des deux connecteurs.
Remarque : Si votre téléviseur/écran DVI-D est équipé d’un
câble DVI-D à connexion fixe, branchez-le simplement dans la prise DVI OUT (6) du Media Center
et serrez les vis.
SCART
Entrée vidéo
Entrée vidéo
TV/écran
TV (HD)/écran
TV/écran
TV/écran
Page 12
12
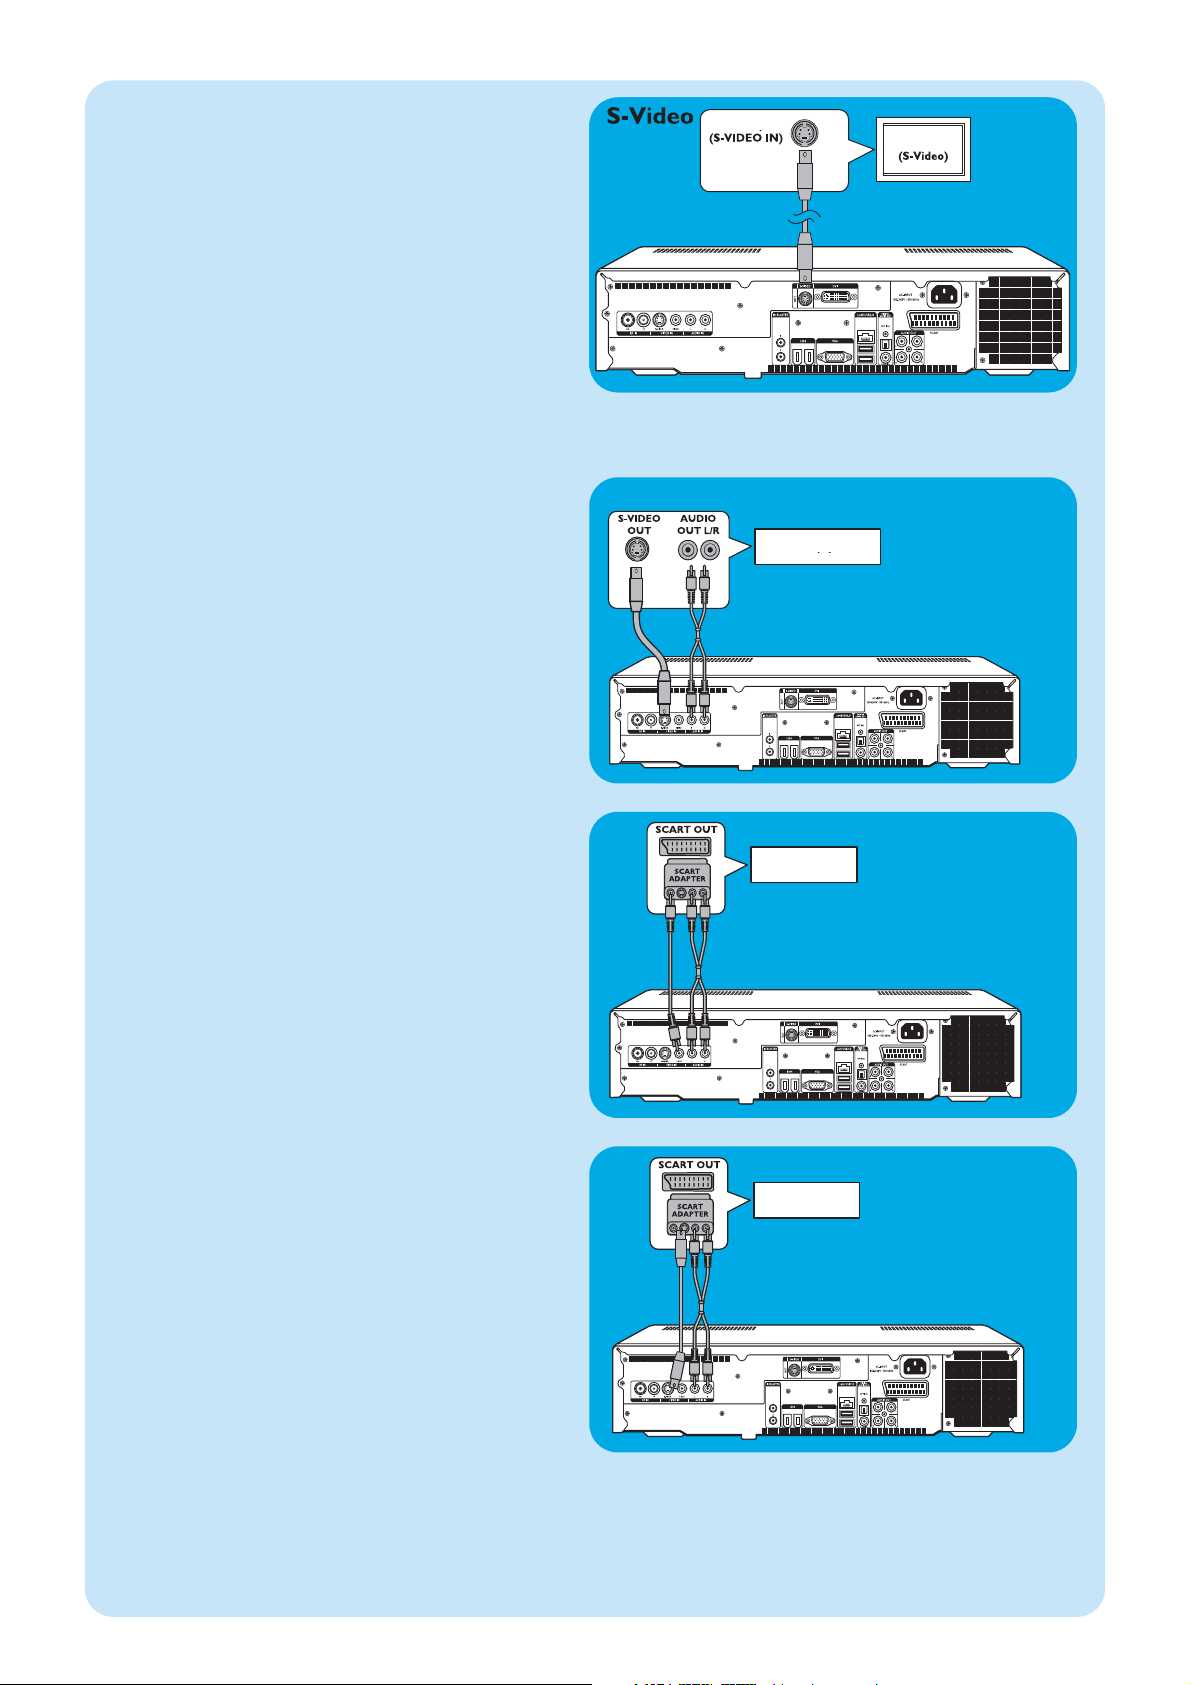
Connexion Péritel
Si votre matériel vidéo est équipé uniquement d’une sortie
Péritel, vous pouvez utiliser l’adaptateur Péritel – SVHS/
CVBS pour le brancher au Media Center.
1 Branchez l’adaptateur péritel-SVHS/CVBS au connec-
teur SCART (Péritel) du matériel vidéo.
2 Branchez un câble CVBS (non fourni) au connecteur
vidéo jaune de l’adaptateur et au connecteur d’entrée
CVBS (3) du Media Center.
OU :
2 Branchez le câble S-Video au connecteur S-Video de
l’adaptateur et à l’un des connecteurs d’entrée S-Video
(VIDEO IN - 2) du Media Center.
3 Branchez le câble coaxial audio stéréo aux connecteurs
audio rouge et blanc de l’adaptateur et aux connecteurs
de sortie AUDIO correspondants (4) du Media Center.
Remarque : Lorsque vous utilisez la connexion S-Video, l’image
peut apparaître en noir et blanc. Pour résoudre ce
problème, vérifiez que le matériel vidéo utilise la
sortie S-Video. Pour ce faire, consultez le manuel de
l’utilisateur fourni avec votre matériel vidéo.
SCART / CVBS
Branchement vidéo (par ex., décodeur)
Connexion S-Video
La connexion S-Video offre la meilleure qualité d’image.
1 Branchez le câble S-Video sur la prise S-VIDEO
OUT du matériel vidéo et à l’une des prises
S-VIDEO IN (2) du Media Center.
2 Branchez le câble audio coaxial stéréo aux connecteurs
AUDIO OUT L/R du matériel vidéo et aux prises
AUDIO IN L/R (4) du Media Center.
S-Video
SCART / S-Video
5. Connexion S-Video
• Branchez le câble S-Video sur la prise S-VIDEO IN du
téléviseur/écran et la prise S-VIDEO OUT (5) du
Media Center.
Remarque : Avec les applications pour PC ordinaires, il n’est pas
indispensable que la qualité de l’image soit parfaite.
Entrée vidéo
TV/écran
Matériel vidéo
Matériel vidéo
Matériel vidéo
Page 13
13
Branchement audio
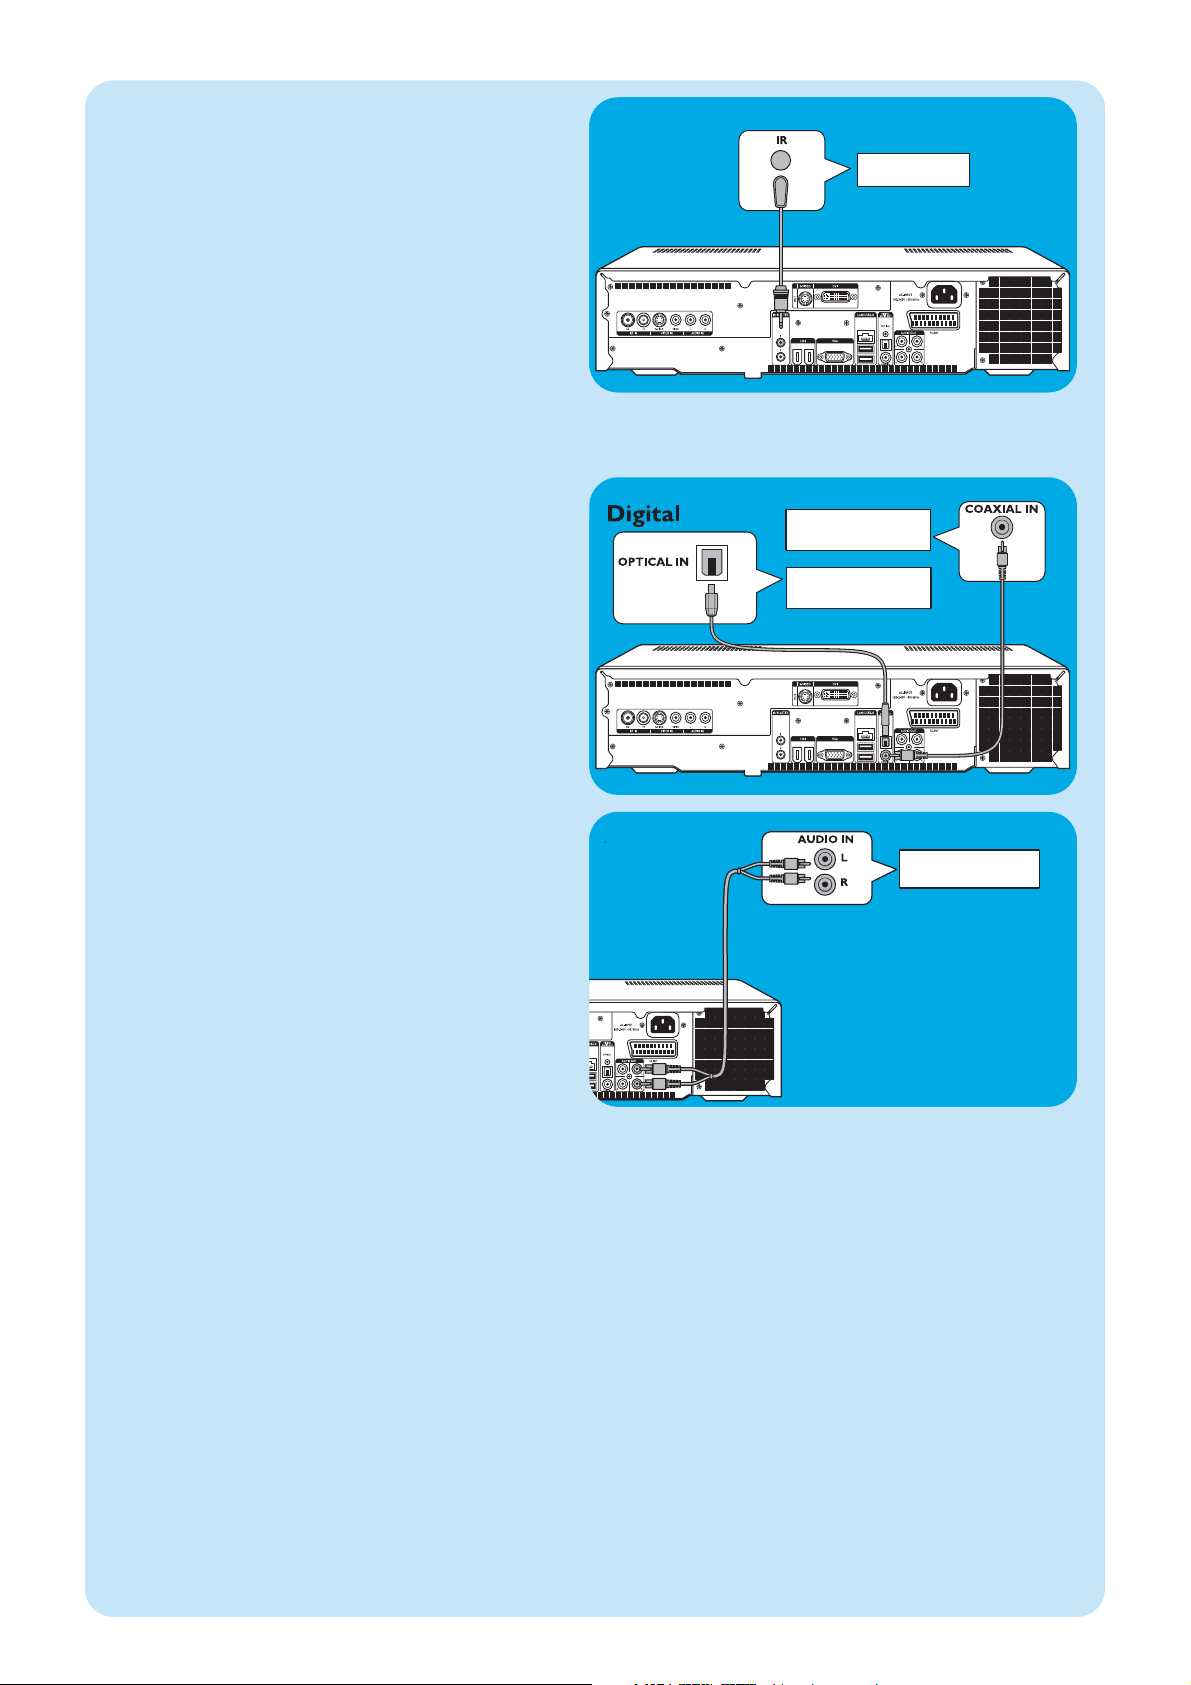
Connexion audio optique numérique
• Branchez un câble optique numérique (non fourni) au
connecteur OPTICAL IN de l’écran, du téléviseur, du
récepteur ou de l’appareil d’enregistrement et l’autre
extrémité au connecteur de sortie DIGITAL
OPTICAL (8) du Media Center.
Connexion audio coaxiale numérique
• Branchez un câble coaxial numérique (non fourni) au
connecteur COAXIAL IN de l’écran, du téléviseur, du
récepteur ou de l’appareil d’enregistrement et l’autre
extrémité au connecteur de sortie DIGITAL
COAXIAL (14) du Media Center.
Connexion audio analogique
• Branchez le câble audio coaxial stéréo aux connecteurs
AUDIO IN L/R de l’écran, du téléviseur, du récepteur
ou du matériel d’enregistrement et aux prises AUDIO
OUT L/R (15) du Media Center.
Analog
Raccordement à un répartiteur IR
1 Retirez le ruban adhésif du capteur infrarouge du
répartiteur IR.
2 Placez le répartiteur IR en face du récepteur IR du
décodeur câble/satellite.
3 Branchez le câble du répartiteur IR à l’une des sorties
Cordon IR (IR BLASTER) (10) du Media Center.
> Vous pouvez alors sélectionner les canaux sur votre déco-
deur câble/satellite avec la télécommande du Media
Center.
Cordon IR
Décodeur
Récepteur/matériel
d’enregistrement
Récepteur/matériel
d’enregistrement
Récepteur/matériel
d’enregistrement
Page 14
14
LAN
Ethernet (LAN)
Router / DSL modem
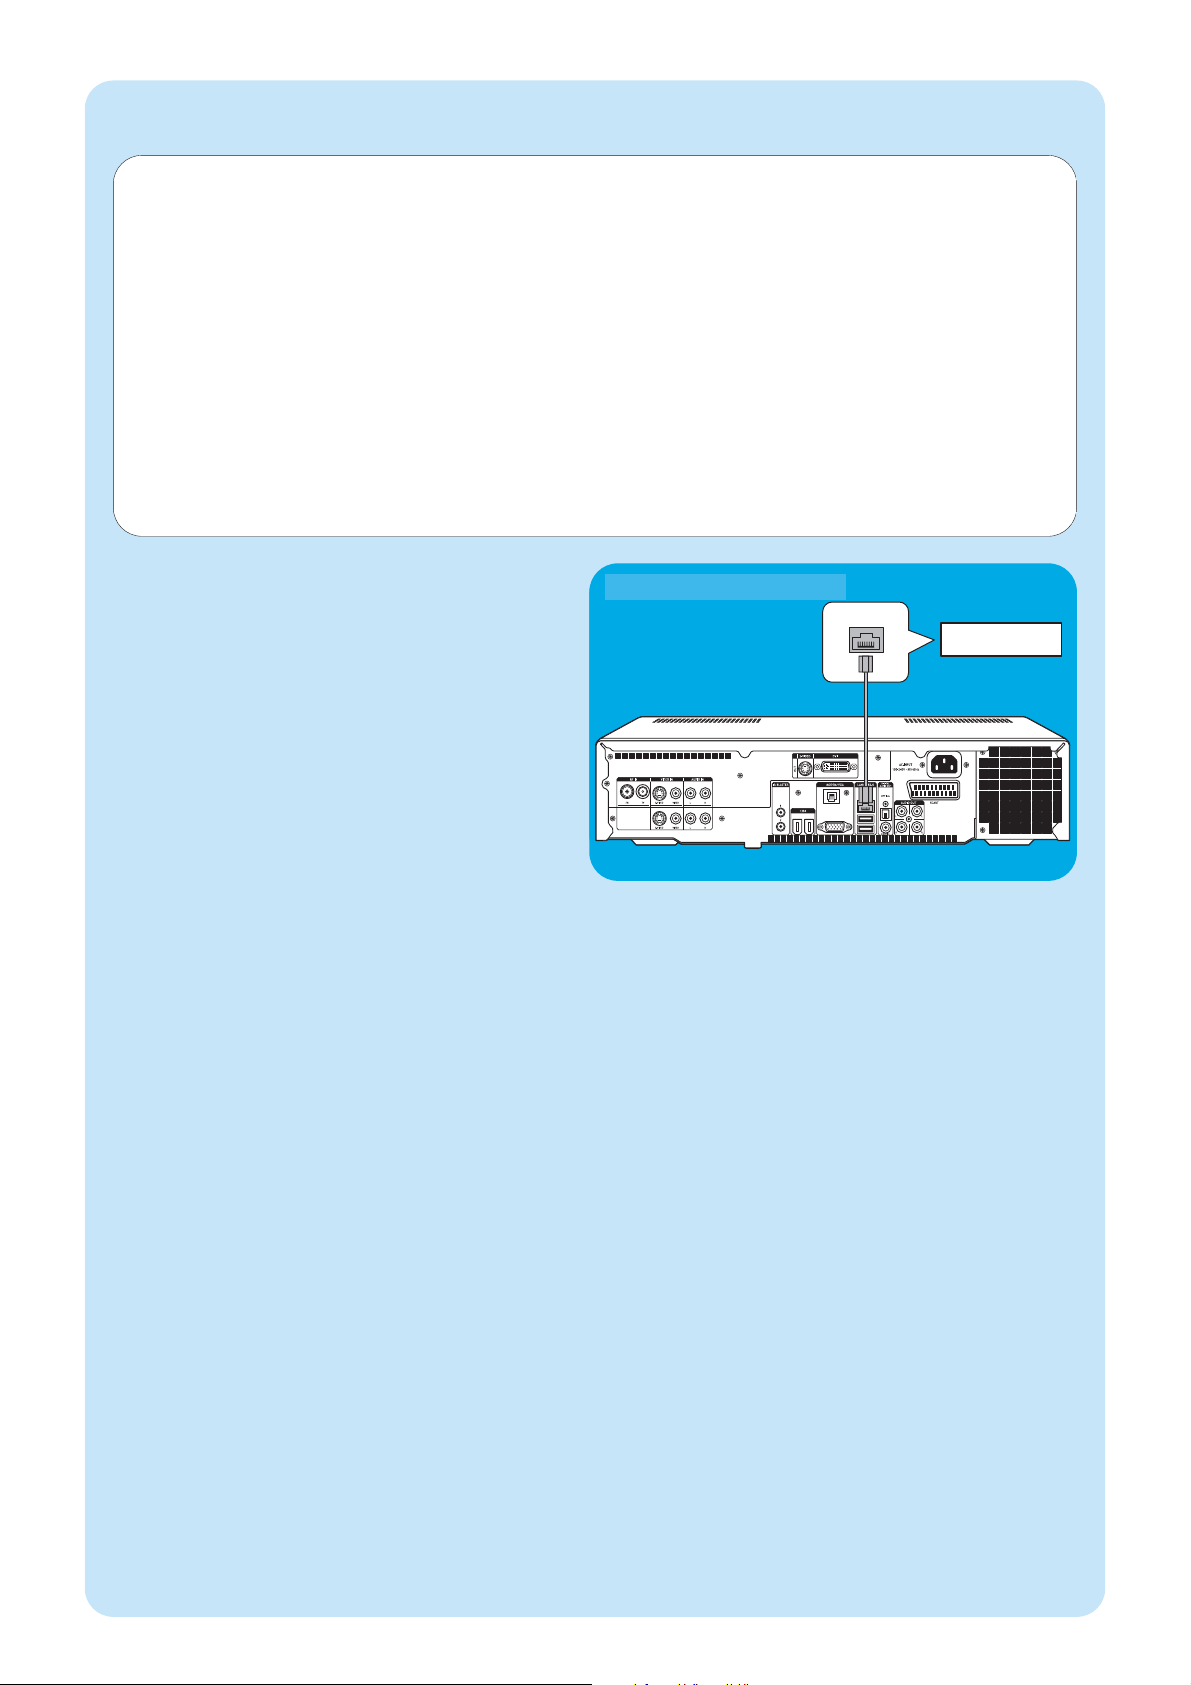
Connexion Ethernet
• Branchez le câble Ethernet sur le routeur/modem DSL
et le connecteur LAN (7) du Media Center.
• Pour connaître les paramètres requis, consultez votre
fournisseur d’accès Internet.
Raccordement à Internet
Votre Media Center doit être connecté à Internet pour le téléchargement de l’EPG (Electronic Program Guide, guide
électronique des émissions) et pour connaître les fréquences des canaux.Avant de configurer le logiciel de votre Media
Center, assurez-vous de disposer d’une connexion modem ou haut débit. Pour savoir comment configurer votre connexion Internet, contactez votre fournisseur d’accès.Voir aussi « Connexion à Internet ».
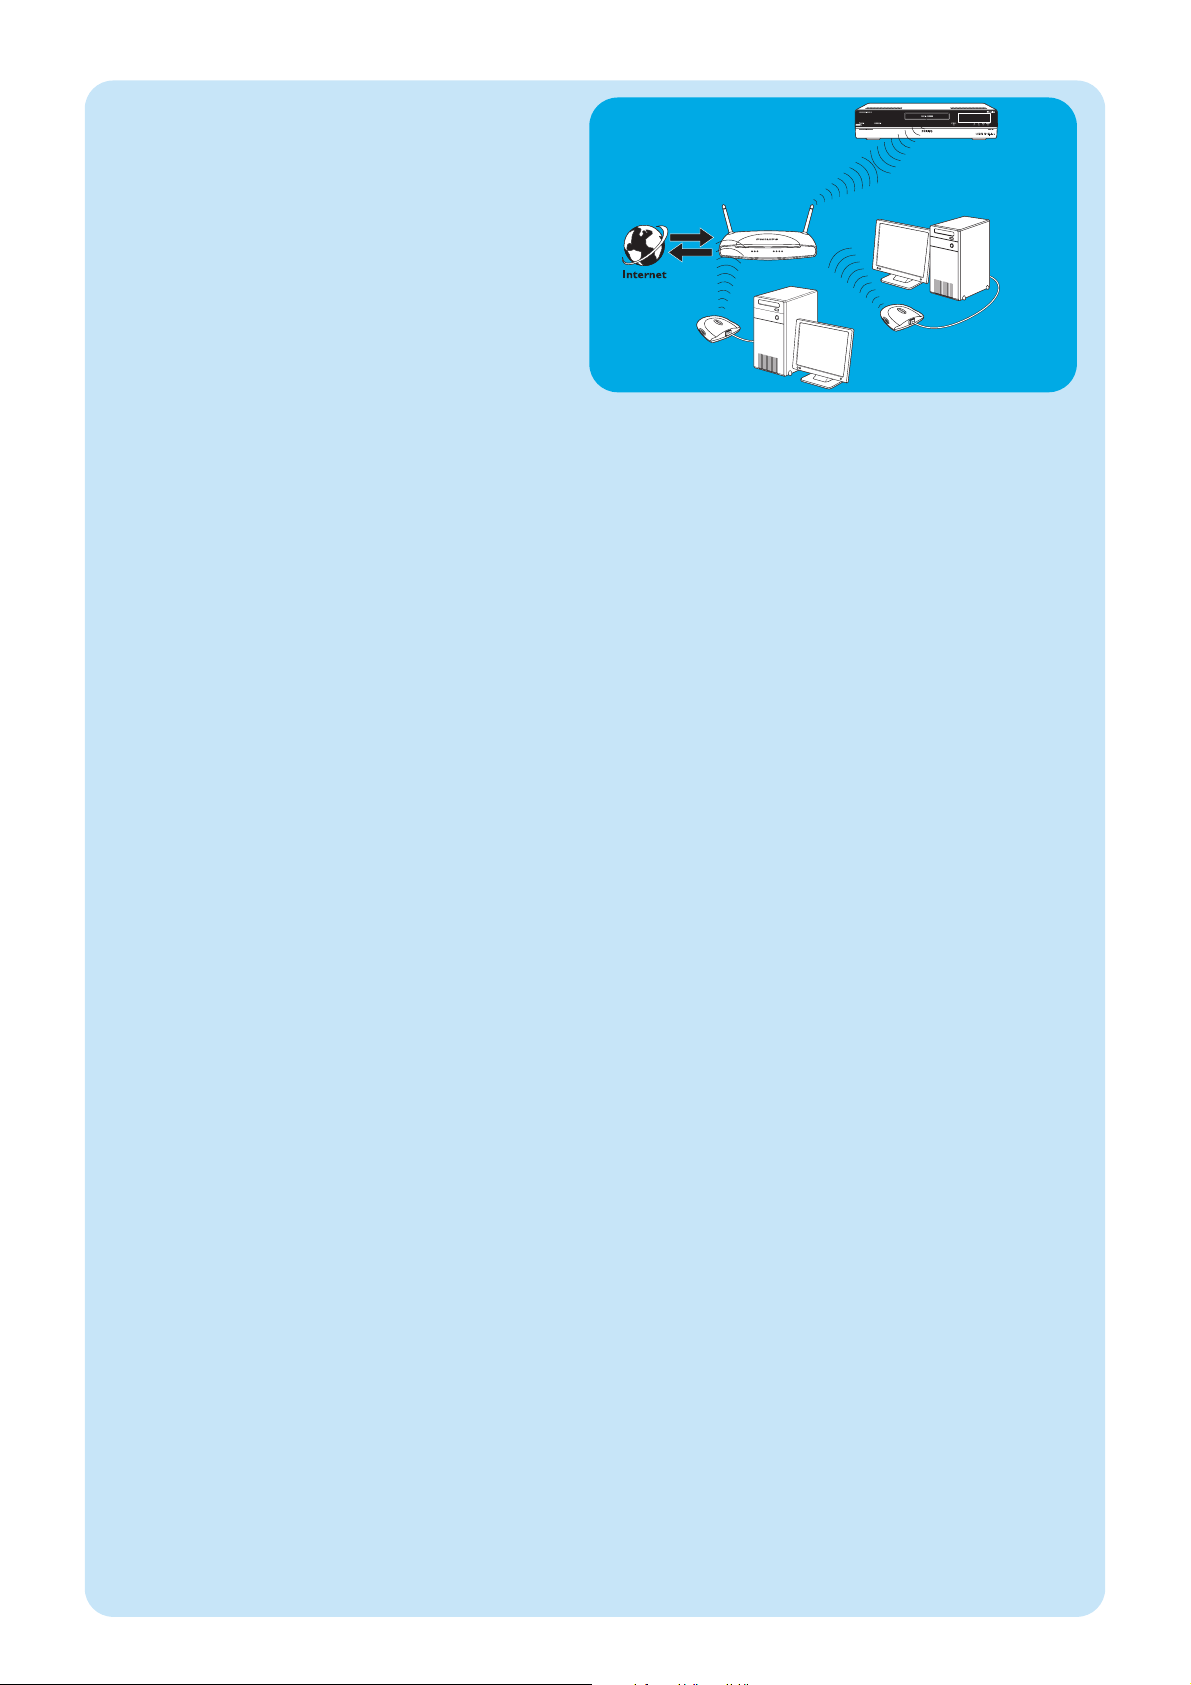
Le Media Center offre deux méthodes de connexion à Internet:
1 via le câble Ethernet à un modem DSL (Digital Subscriber Line) si vous disposez d’un réseau câblé ;
2 par une connexion sans fil à un modem DSL (si vous avez un réseau sans fil).
Si vous raccordez (en mode filaire ou sans fil) le Media Center à un réseau domestique existant disposant d’un accès
Internet partagé par tous les ordinateurs, vous pouvez raccorder le Media Center directement à votre périphérique central d’accès réseau, c’est-à-dire au routeur/passerelle.Ainsi, le Media Center accès à Internet de la même manière que vos
ordinateurs. Il n’est pas nécessaire d’installer la fonction ICS (Internet Connection Sharing, partage de connexion Internet)
pour permettre au Media Center d’accéder à Internet.
Routeur/modem DSL
Ethernet (réseau local)
Page 15
15
Connexion sans fil
Les stations de base sans fil (et les routeurs de passerelle
Internet filaires) partagent leur accès Internet haut débit
automatiquement sur le réseau.
Remarques :
– Nous recommandons vivement l’utilisation d’une clé de
chiffrement pour protéger votre réseau contre tout risque
d’intrusion.
– Les antennes pour réseau local sans fil (802.11b/g) sont
intégrées à l’appareil. Il n’est donc pas nécessaire d’y
brancher un adaptateur sans fil pour intégrer le Media
Center à votre réseau sans fil.
1 Vérifiez les paramètres de votre réseau sans fil existant
pour les saisir lorsque vous y serez invité pendant la
configuration du Media Center.
Déterminez le nom du réseau sans fil (SSID) et la ou les
clés de chiffrement que vous avez utilisées pour le
sécuriser.
Nom du réseau sans fil (SSID — Service Set
Identifier) :
en principe, vous trouvez le nom du réseau sans fil dans
le menu des options de votre carte réseau ou de votre
station de base sans fil. Pour vous en assurer, lancez le
programme fourni avec votre carte réseau.
Clé de chiffrement :
la clé de chiffrement peut être un code WEP ou un
code WPA.
WEP (Wired Equivalent Privacy) assure une protection
élémentaire des réseaux domestiques au moyen de clés
de chiffrement de 64 ou 128 bits.
- 64 bits : 5 caractères ASCII, ou 10 caractères
hexadécimaux, ou
- 128 bits : 13 caractères ASCII ou 26 caractères hexa-
décimaux.
WPA (Wi-Fi Protected Access) fournit des clés de chiffrement de 256 bits, beaucoup plus difficiles à décoder
que les clés WEP.
WPA renforce la protection des données et les contrôles
d’accès pour les réseaux sans fil.
Remarque : le nom du réseau (SSID) et la clé de chiffrement
sont tous deux sensibles à la casse ; autrement dit,
« ABC » est différent de, par exemple, « aBc ».
Veillez à respecter la casse (différence entre majuscules et minuscules) pour éviter tout problème.
2 Prenez note de votre ou vos clés de chiffrement et du
SSID.Vous pourrez en avoir besoin lors de l’installation
du Media Center.
3 S’ils vous sont demandés, spécifiez le SSID et la clé de
chiffrement pour ajouter le Media Center au réseau
sans fil. Pour plus de détails, consultez le manuel de l’utilisateur de la station de base (point d’accès sans fil).
Sans fil
Page 16
16
ANTENNA
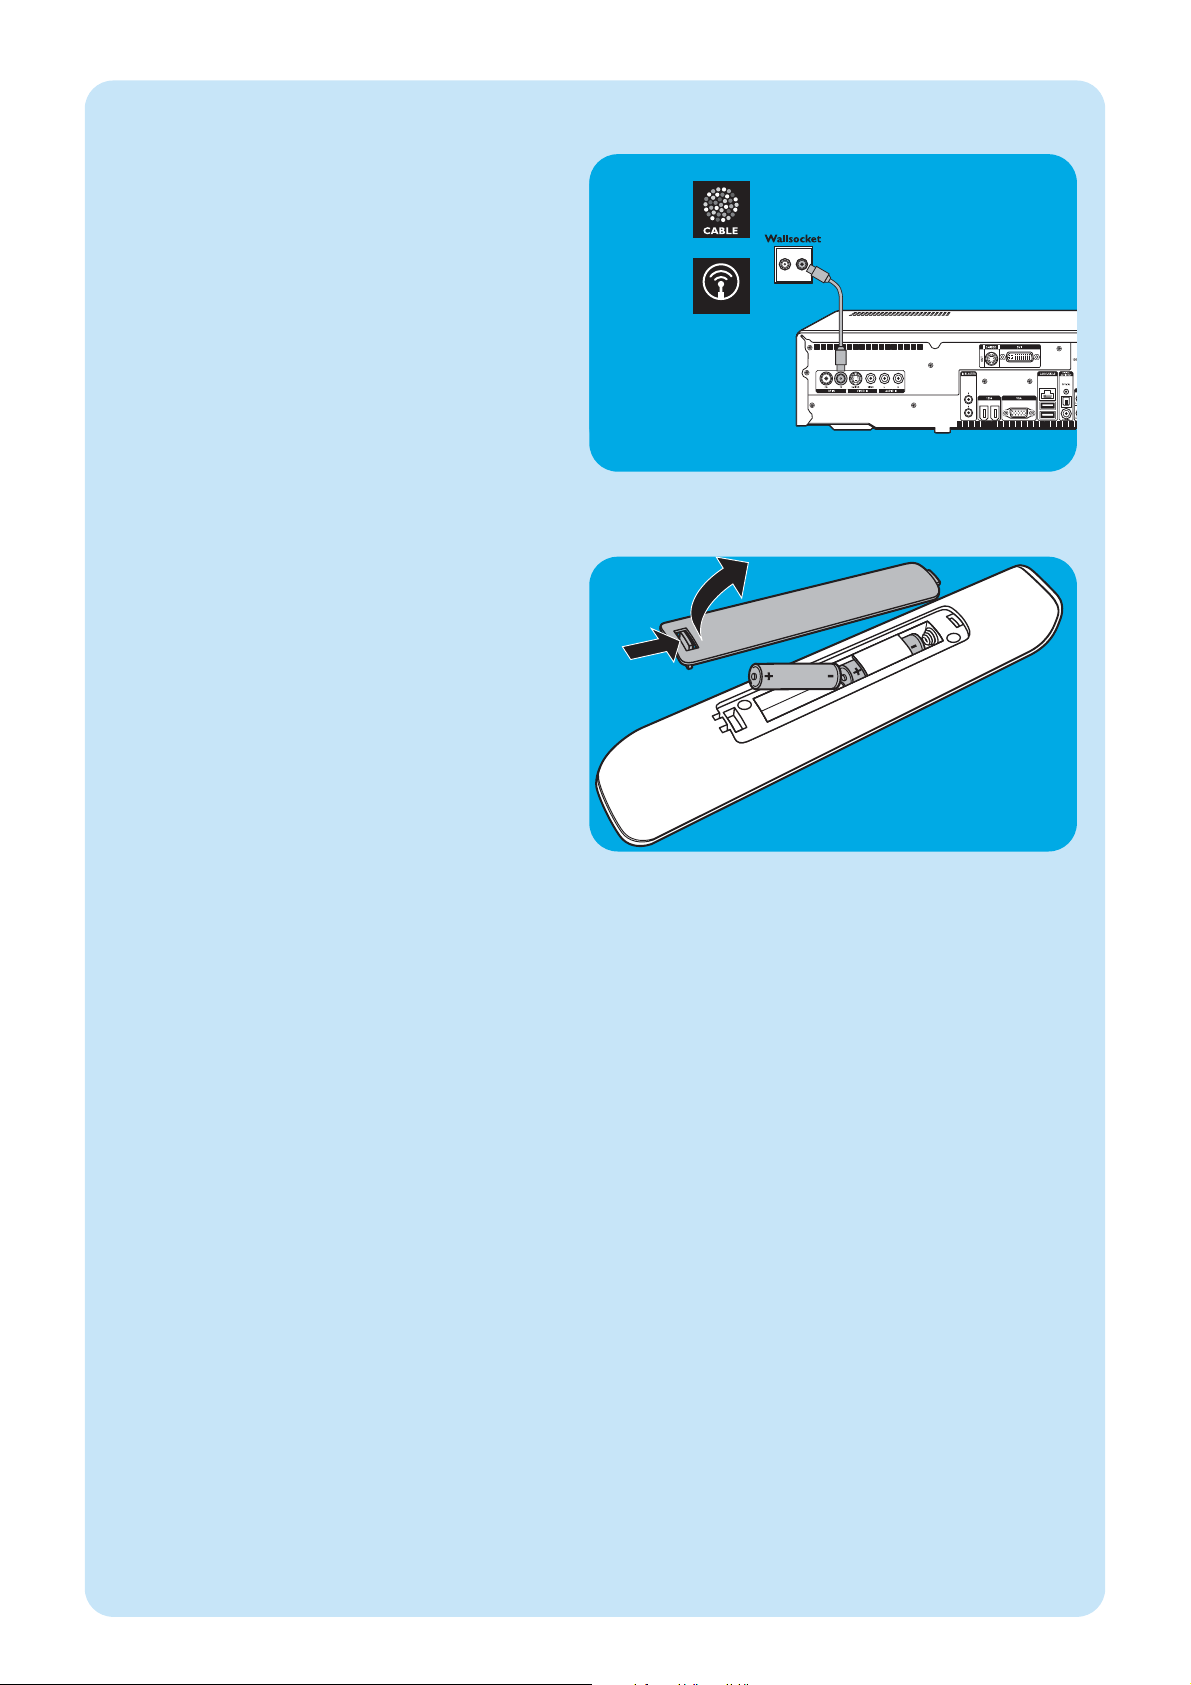
Branchement d’antennes de télévision
1 Débranchez le câble d’antenne TV du système de
réception par câble.
2 Branchez le câble d’antenne TV au connecteur RF IN TV
(1) du Media Center et au système de réception par
câble
.
Branchement d’antennes
1 Ouvrez le couvercle du compartiment des piles et insé-
rez deux piles AA de 1,5 V, en respectant les polarités
indiquées.
2 Remettez le couvercle en place.
Insertion des piles dans la télécommande
2 x
Page 17
17
Branchement au secteur
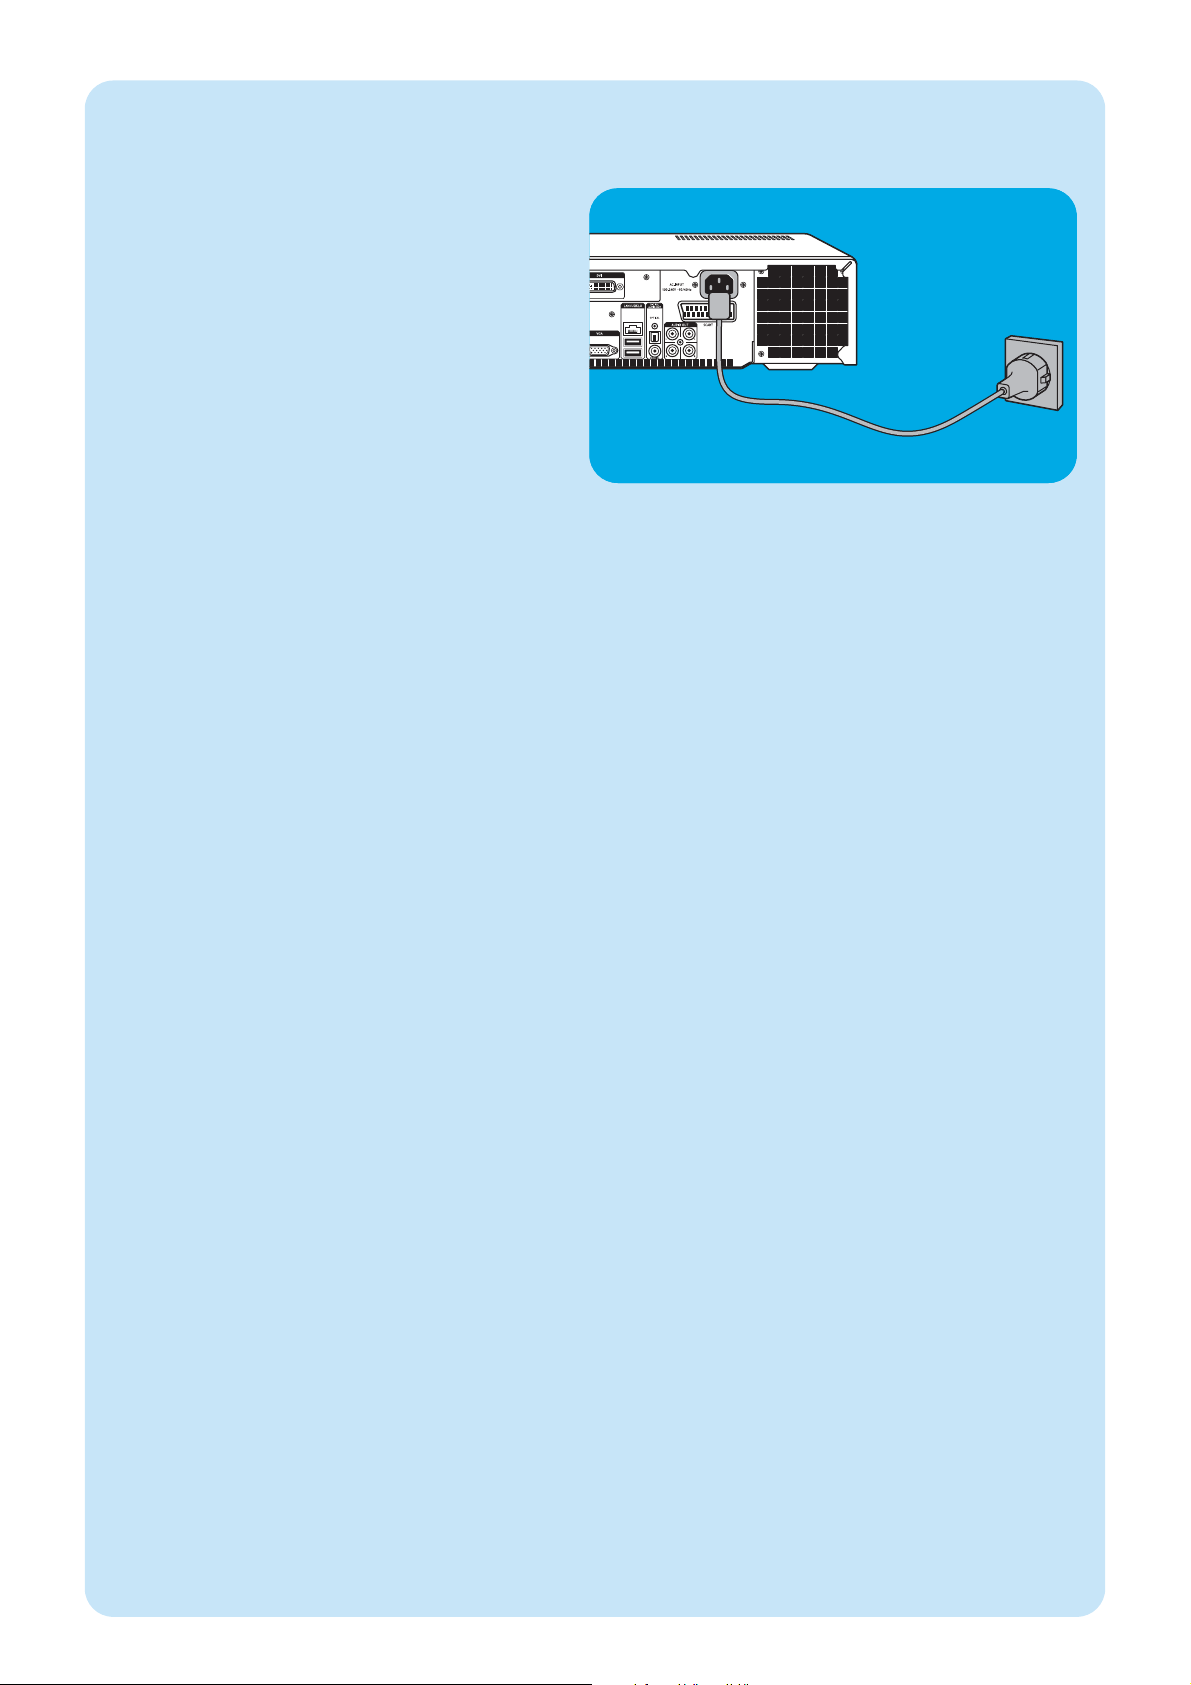
Après avoir effectué tous les branchements décrits plus
haut, vous pouvez raccorder le Media Center à une prise
secteur.
1 Vérifiez que tous les branchements sont effectués avant
de brancher le Media Center au secteur.
2 D’abord, branche le cordon d’alimentation à la prise
AC-INPUT (9) ; ensuite seulement à une prise secteur.
>
L’indicateur de veille/marche (sur la touche STANDBY-ON 1)
s’allume en orange.
> Le Media Center passe alors en mode basse consomma-
tion.
Mise sous tension
• Pour mettre le Media Center lorsqu’il est en veille,
appuyez sur la touche
y STANDBY-ON (1) située sur
le devant du Media Center.
> L’indicateur de veille/marche (1) s’éteint.
• Appuyez sur la touche
y STANDBY-ON (1) une
nouvelle fois pour remettre le Media Center en veille.
Mise en veille
• Lorsque le Media Center est allumé (indicateur de veille/marche éteint), appuyez sur la touche
y Standby (1)
de la télécommande pour le mettre en veille.
> L’indicateur de veille/marche (1) s’allume alors en rouge.
• Pour réactiver le Media Center lorsqu’il est en veille,
appuyez une nouvelle fois sur la touche
y Standby (1)
de la télécommande ou sur la touche
y STANDBY-
ON (1) située sur le devant du Media Center.
> L’indicateur de veille/marche (1) s’éteint.
Remarque : En mode basse consommation et en mode veille, le
Media Center consomme néanmoins de l’électricité.
Pour couper complètement l’alimentation, débranchez le cordon de la prise secteur.
Branchement au secteur / Mise sous tension (ON)
et en veille
Page 18
18
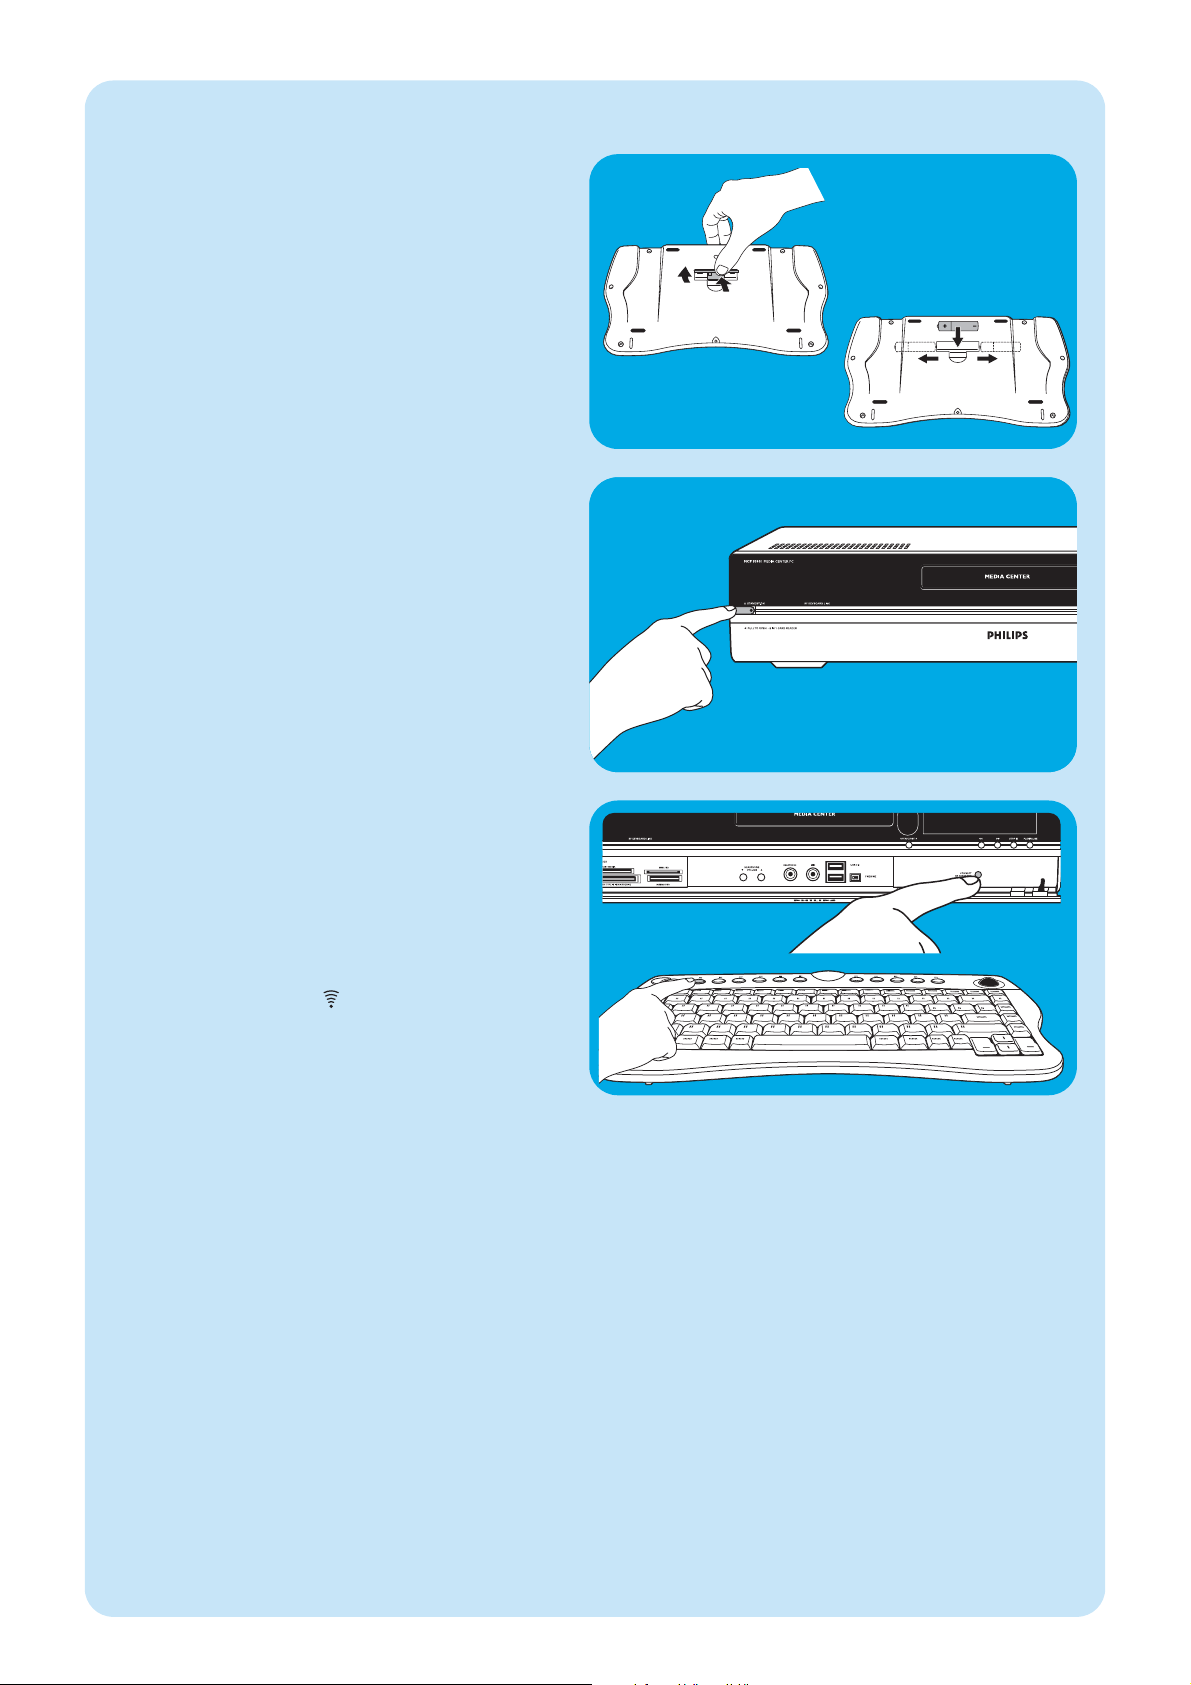
1 Ouvrez le couvercle du compartiment des piles et insé-
rez trois piles AA de 1,5 V, en respectant les polarités
indiquées.
2 Remettez le couvercle en place.
3 Assurez-vous que le Media Center est branché au sec-
teur.
4 Appuyez sur la touche
y STANDYON (1) pour allumer
le Media Center.
>
L’indicateur de veille/marche (sur la touche STANDBY-ON 1)
s’éteint.
5 Appuyez sur la touche CONNECT RF KEYBOARD
(17) du Media Center.
6 Appuyez sur la touche (2) du clavier.
> Le Media Center est désormais en mesure de recevoir les
commandes du clavier sans fil.
Remarque : Lorsqu’il est inactif 5 minutes, le clavier passe en
mode veille.Vous pouvez le réactiver en appuyant
sur une touche quelconque, à l’exception des boutons gauche et droit de la souris (1) et du trackball
(13).
Installation du clavier sans fil
3 x
Page 19
19
3
Configuration de votre Philips Media Center
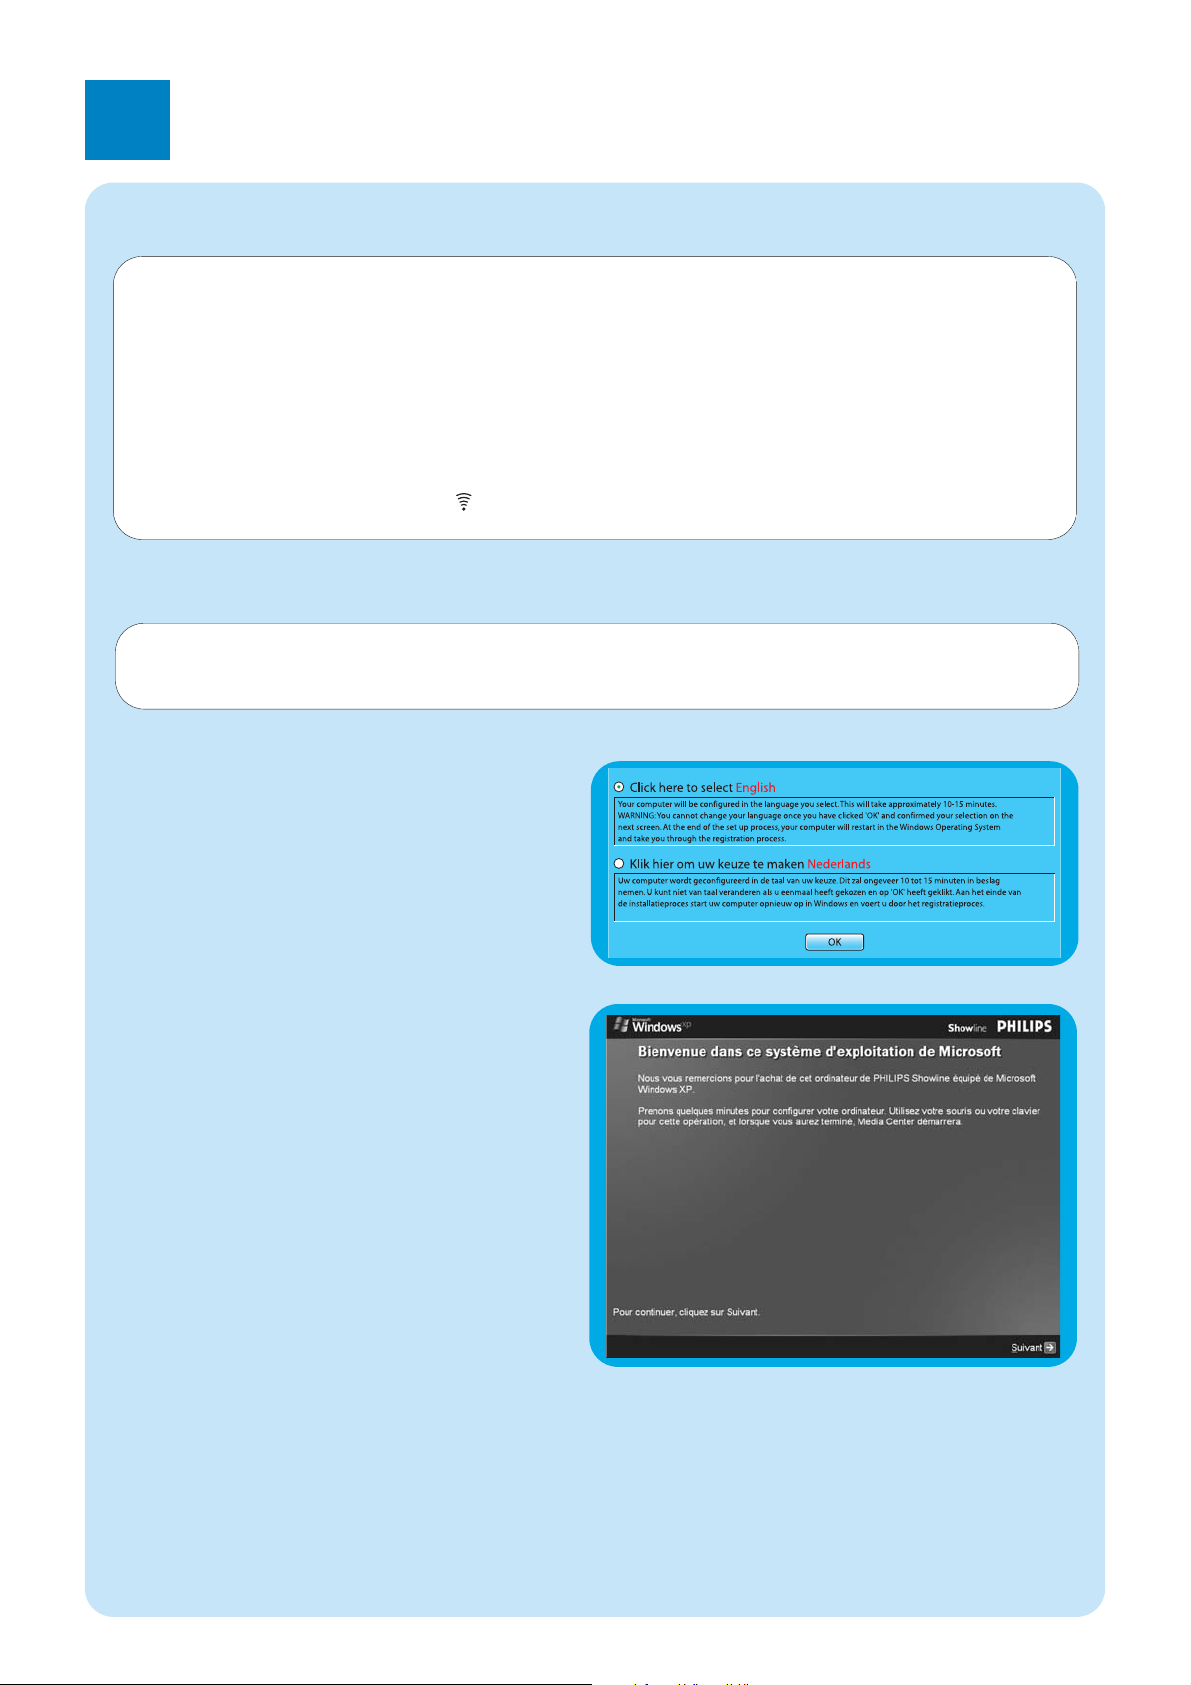
1 Lancez le Centre de Sources d'Information.
> La fenêtre de sélection Langue s'affiche.
2 Sélectionnez la langue de l'interface utilisateur pour
Microsoft Windows®.
3 Observez les instructions affichées sur l'écran.
Configuration initiale de Windows :
Suivez les instructions à l’écran pour la configuration initiale
de Microsoft Windows.
1 Cliquez sur Suivant pour configurer votre système.
2 Sélectionnez votre pays/région et votre langue.
3 Sélectionnez votre fuseau horaire.
4 Lisez le Contrat de licence d’utilisateur final.
Sélectionnez « J’accepte ».
5 Choisissez un nom d’ordinateur. Un nom par défaut est
déjà indiqué.Vous pouvez l’accepter ou en choisir un
autre, par exemple « Media Center de la famille ».
6 Cliquez sur Suivant si votre ordinateur ne fait pas
partie d’un domaine.
S’il fait partie d’un domaine, cliquez sur Oui puis
saisissez le nom du domaine.
7 Sélectionnez Terminé.
Configuration de Microsoft Windows
®
Lorsque vous allumez le Media Center pour la première fois, l’écran de configuration de Microsoft Windows apparaît.
Suivez les instructions à l’écran pour terminer l’installation.
Remarques :
- Avant d’utiliser le Media Center, n’oubliez pas d’allumer votre écran ou un téléviseur puis de sélectionner un canal sur votre
téléviseur pour le Media Center.
– Pour parcourir les options affichées, utilisez votre clavier sans fil avec trackball intégré. Faites vos choix avec le curseur puis
cliquez sur Suivant.
– En l’absence de connexion sans fil entre le clavier et le Media Center, appuyez sur la touche CONNECT RF KEYBOARD
(17) du Media Center puis sur la touche ( ) (2) du clavier.
IMPORTANT
Après avoir appuyé sur la touche OK, vous ne pourrez plus changer la langue, car les autres langues ne seront plus
disponibles.Veillez à sélectionner correctement la langue souhaitée.
Programmation de la langue :
Page 20
20
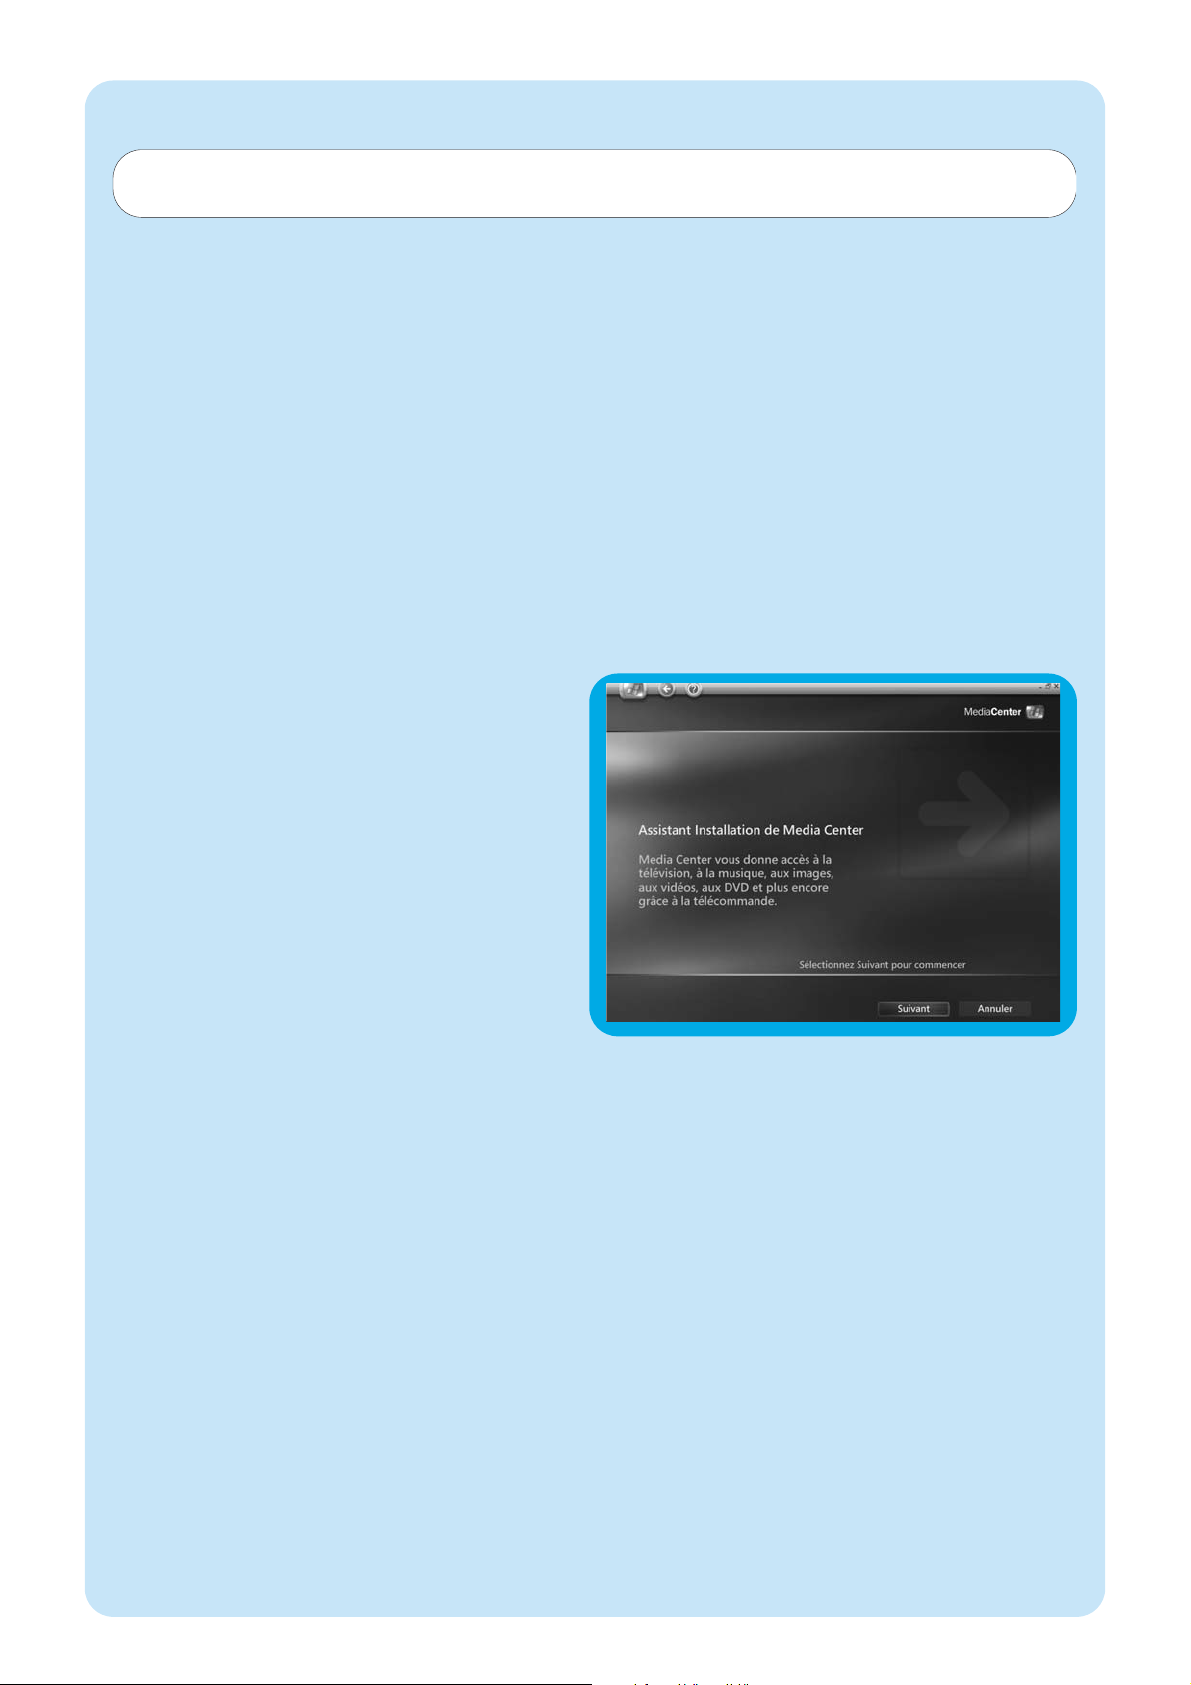
L’écran d’accueil de l’assistant de configuration de Media
Center apparaît.
1 Cliquez sur Suivant.
> La configuration requise et les informations facultatives de
configuration de Media Center s’affichent.
2 Cliquez sur Suivant.
> La Déclaration de confidentialité de Media
Center s’affiche.
3 Cliquez sur Suivant.
> L’écran Lecture améliorée apparaît.
4 Suivez les informations affichées, faites votre choix puis
cliquez sur Suivant.
> L’écran Rejoindre un réseau sans fil apparaît.
5 Pour raccorder votre Media Center à un réseau sans fil,
sélectionnez Oui puis cliquez sur Suivant.
• Sélectionnez « Entrer manuellement mon nom
de réseau » puis cliquez sur Suivant.
• Sélectionnez votre nom de réseau dans la liste puis
cliquez sur Suivant.
• Sélectionnez Terminé.
OU :
Si votre nom de réseau n’apparaît pas :
• Sélectionnez « Ne figure pas dans la liste » puis
cliquez sur Suivant.
• Saisissez votre nom de réseau puis cliquez sur
Suivant.
• Si votre réseau est protégé, sélectionnez Oui puis
cliquez sur Suivant.
• Saisissez votre clé de réseau (WEP ou WPA) puis
cliquez sur Suivant.
Remarque : la clé de chiffrement est sensible à la casse ; autre-
ment dit, « ABC » est différent de « aBC ».
6 Si vous disposez d’une connexion Internet permanente
(DSL ou câble), sélectionnez Oui puis cliquez sur
Suivant.
Assistant de configuration de Media Center
Configuration requise
L’assistant de configuration de Media Center vous guide
dans la configuration initiale, notamment pour la connexion
réseau et haut débit. Suivez les instructions à l’écran pour
terminer l’installation.
Remarques :
– Pour parcourir les options affichées, utilisez votre clavier
sans fil avec trackball (13) intégré.
– Assurez-vous que les branchements physiques suivants ont
été effectués sur votre Media Center :
- Internet,
- signal TV et radio,
- connexion réseau (si votre Media Center doit faire partie
d’un réseau),
- raccordement à un décodeur (si vous en avez un).
Une fois la configuration initiale de Microsoft Windows terminée,Windows redémarre automatiquement et
l’assistant de configuration de Media Center apparaît.
Page 21

21
Configuration optionelle
La procédure de configuration optionnelle vous permet de personnaliser votre Media Center.
L’assistant d’installation vous permet de :
- configurer les syntoniseurs, le signal TV et les informations relatives au guide des programmes TV ;
- sélectionner et régler les paramètres d’affichage du Media Center ;
- configuration des haut-parleurs ;
- commande de votre décodeur.
Configuration des syntonisateurs, du signal TV et du guide
Cette option vous permet de configurer les connexions des signaux TV et radio.
1 Confirmez la région dans laquelle vous êtes situé.
2 Sélectionnez le signal TV :
3 Make your selection for a set-top box :
• Câblé. Continuez avec « Configuration analogique ».
• Antenne :
- Analogique. Continuez avec « Configuration analogique ».
- Numérique. Continuez avec « Configuration numérique ».
Configuration analogique
1 Sélectionnez le type de signal TV (Europe – PAL/SECAM).
2 Effectuez la sélection désirée relative au décodeur :
a Si vous disposez d’un décodeur :
• Vérifiez que votre décodeur et le câble du récepteur IR sont correctement branchés (voir la section intitulée «
Installation du Media Center de Philips : Branchement du matériel vidéo (par ex. d’un décodeur) »).
• Sélectionnez un signal TV.
b Si vous ne disposez pas d’un décodeur :
• Suivez les instructions à l’écran.
3 Configurez le guide des programmes TV électronique.
• Lisez les Conditions générales d’utilisation du guide et acceptez-les.
• Saisissez votre code postal.
• Sélectionnez le nom de votre fournisseur d’accès au signal TV.
> Votre Media Center utilise une connexion Internet pour télécharger toutes les informations relatives aux chaînes TV auprès de
votre fournisseur d’accès au signal TV.Toutes les chaînes disponibles sont mémorisées sous un numéro prédéfini individuel.
Configuration numérique
1 Sélectionnez le type de signal TV : « Numérique terrestre (DVB-T) ».
2 Effectuez la sélection désirée relative au décodeur :
Sélectionnez « Non ».
3 Lisez la Politique en matière de confidentialité du guide et acceptez-la.
4 Configurez le guide des programmes TV électronique.
• Lisez les Conditions générales d’utilisation du guide et acceptez-les.
• Saisissez votre code postal.
• Téléchargez les informations relatives au fournisseur d’accès
• Sélectionnez le nom de votre fournisseur d’accès au signal TV. Sélectionnez « Numérique terrestre : toutes les chaînes ».
• Téléchargez les informations relatives au guide du programme TV.
Optimisez l’affichage de Media Center à l’écran
Cette option vous permet d’ajuster l’affichage.
1 Sélectionnez votre type d’écran.
2 Sélectionnez le type de connexion de votre écran.
Remarque : si vous utilisez la sortie Péritel (SCART, 21) du Media Center, sélectionnez Component (YpbPr).
3 Ajustez les paramètres d’affichage selon vos préférences personnelles dans Display Calibration (étalonnage de l’é-
cran).
Remarque : Si vous sélectionnez un paramètre incorrect, l’écran peut devenir tout noir.Attendez environ 15 secondes ; les informa-
tions se réaffichent alors.
7 Cliquez sur Tester pour tester votre connexion Internet.
• Si votre connexion est inopérante, vérifiez :
- les connecteurs et les câbles,
- les paramètres de votre routeur,
- contactez votre fournisseur d’accès Internet.
Page 22
22
Pour la recherche automatique des canaux, voir ´Guide TV fonction – Rechercher d’un programme TV´ dans les cas
d’utilisation.
1 Appuyez sur la touche (8) de la télécommande.
2 Sélectionnez Plus de programmes puis appuyez sur la touche OK (19).
3 Sélectionnez TVScanner puis appuyez sur la touche OK (19).
4 Sélectionnez ReadMe puis appuyez sur la touche OK (19).
5 Suivez les instructions fournies dans le fichier ReadMe.
Recherche des chaînes numériques
1 Confirmez la région dans laquelle vous êtes situé.
2 Sélectionnez le signal TV : « Antenne ».
3 Sélectionnez le type de signal TV : « Numérique terrestre (DVB-T) ».
4 Effectuez la sélection désirée relative au décodeur :
Sélectionnez « Non ».
5 Lisez la Politique en matière de confidentialité du guide.
Sélectionnez « Non ».
> La fenêtre Recherche de services s’affiche.
6 Sélectionnez ´Démarrer la recherche´. Suivez les instructions à l’écran.
Installer vos haut-parleurs
Cette option vous permet de configurer les haut-parleurs et de les tester.
• Sélectionnez toujours l’option 2 haut-parleurs, sachant que le Media Center n’offre qu’une sortie stéréo analogique.
Si vous utilisez la connexion audio numérique :
lorsque l’assistant de configuration de Media Center a fini de s’exécuter, suivez les instructions ci-dessous :
1 Appuyez sur la touche (8) de la télécommande.
> Le menu de démarrage du Media Center apparaît.
2 Sélectionnez Suppléments puis appuyez sur la touche OK (9).
3 Sélectionnez DVD Settings (configuration DVD) puis appuyez sur la touche OK (9).
4 Sélectionnez Audio Settings (paramètres audio) puis appuyez sur la touche OK (9).
5 Sélectionnez SPDIF puis appuyez sur la touche OK (9).
6 Sélectionnez Enregistrer puis appuyez sur la touche OK (9).
> Une fois la procédure de configuration facultative terminée, l’écran de démarrage de Media Center apparaît.Votre Philips Media
Center est prêt à être utilisé.
Remarque : S/PDIF (Sony/Philips Digital Interface) est un format standard de transfert de fichiers audio généralement utilisé sur les
matériels audio numériques ou de traitement numérique. Il permet le transfert de signaux audio sans passer par la conversion au format analogique ou depuis celui-ci, préservant ainsi la qualité du signal.
Recherche manuelle des chaînes
Recherche des chaînes analogiques
Page 23
23
Installation d’autres logiciels
Norton
Le module Norton Internet Security assure une protection essentielle contre les virus, les pirates informatiques et les
menaces pour la confidentialité. Norton Internet Security intègre un pare-feu et divers autres puissants outils assurant la
protection de votre système. Le pare-feu se réactive automatiquement au bout d’un certain temps lorsqu’il a été désactivé
temporairement.Avec cette version, la plus récente, vous empêchez certains vers Internet de pénétrer dans votre système.
Vous pouvez empêcher la diffusion d’adresses de messagerie à des sites web sans votre autorisation, et déterminer les sites
autorisé à suivre vos activité au moyen de cookies Internet.Vous pouvez également bloquer les bannières publicitaires et les
fenêtres intempestives. Le programme d’installation Norton est lancé automatiquement lorsque vous allumez Media Center
la première fois. Il vous suffit alors de suivre les instructions à l’écran.
Modification des paramètres
Lorsque vous avez terminé la procédure de configuration initiale avec l’assistant de Media Center, vous pouvez toujours modifier les paramètres.Vous pouvez également terminer les étapes que vous avez sautées pendant la configuration initiale.
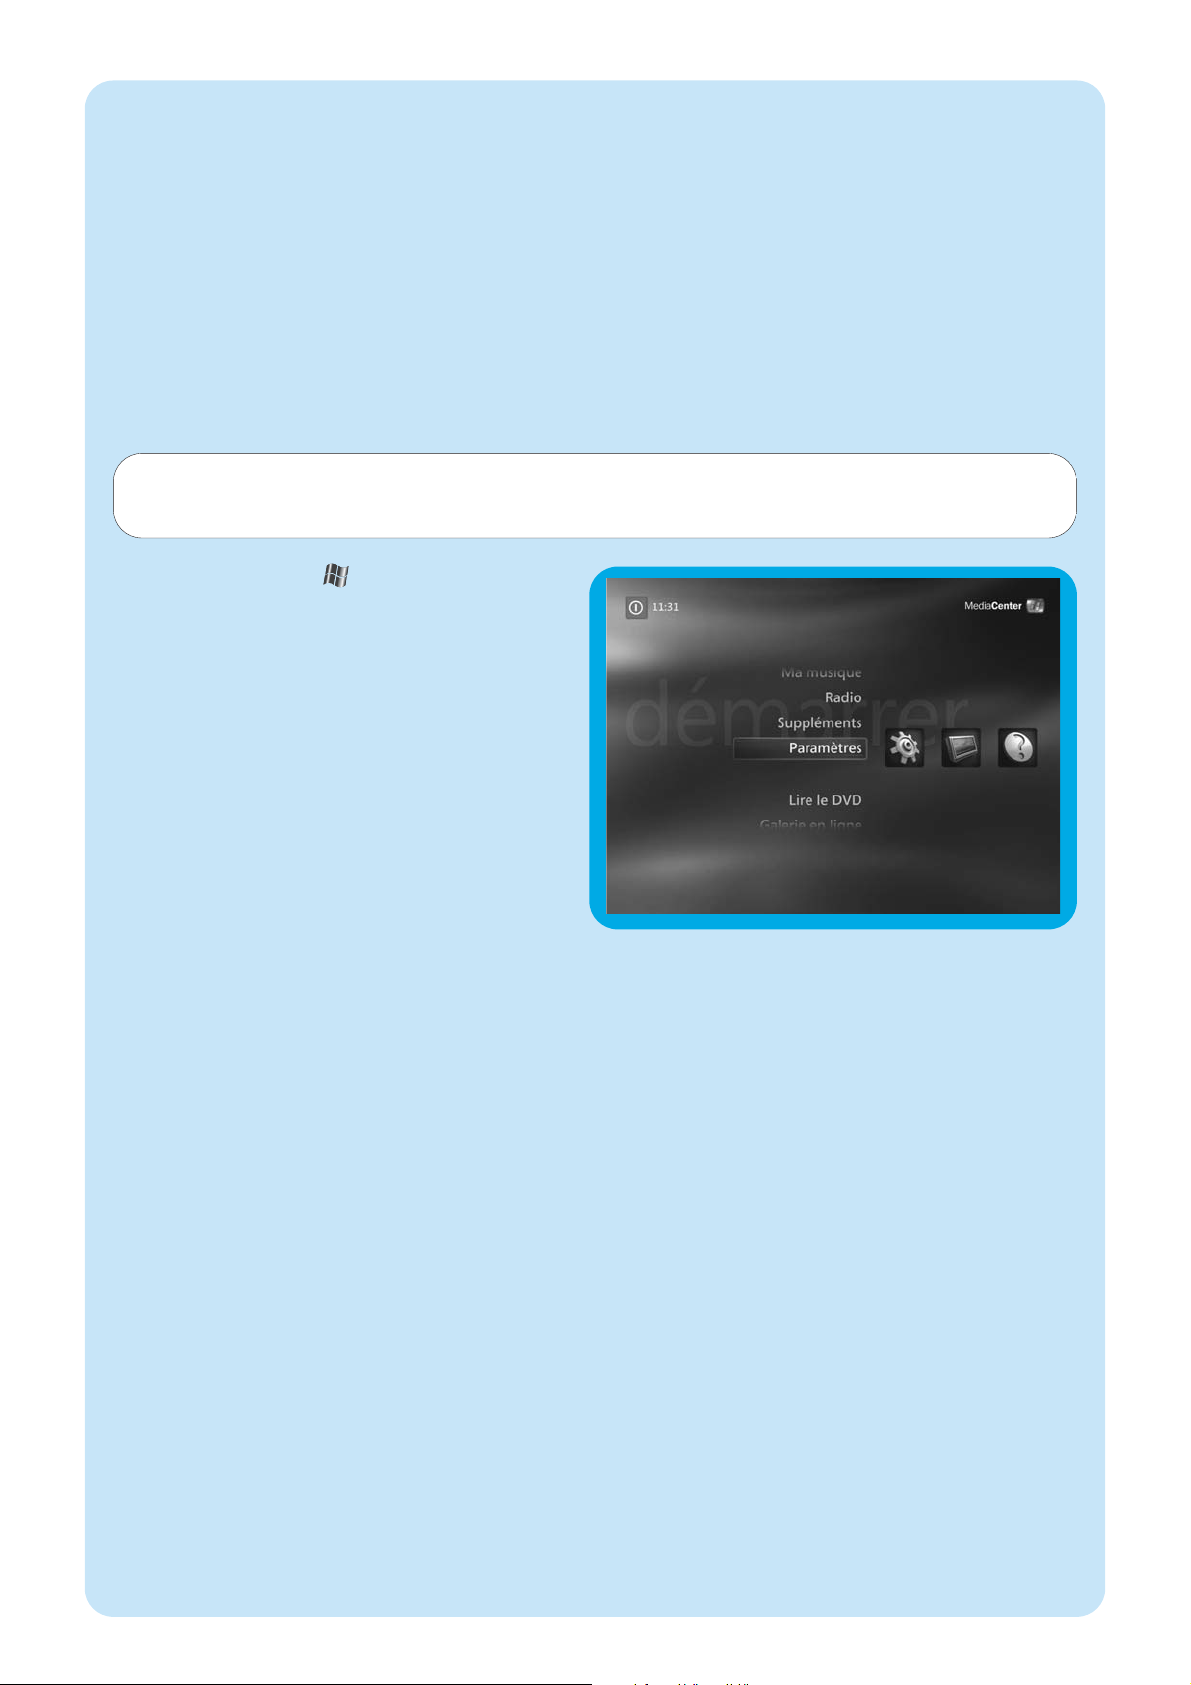
1 Appuyez sur la touche (8) de la télécommande.
>Le menu de démarrage du Media Center apparaît.
2 Sélectionnez Paramètres.
3 Appuyez sur la touche OK (19).Vous accédez aux sous-
menus Paramètres pour :
- Paramètres généraux de Media Center
- TV
- Images
- Musique
- DVD
- Messenger et présentation du n° d’appel
- Aide
Page 24
24
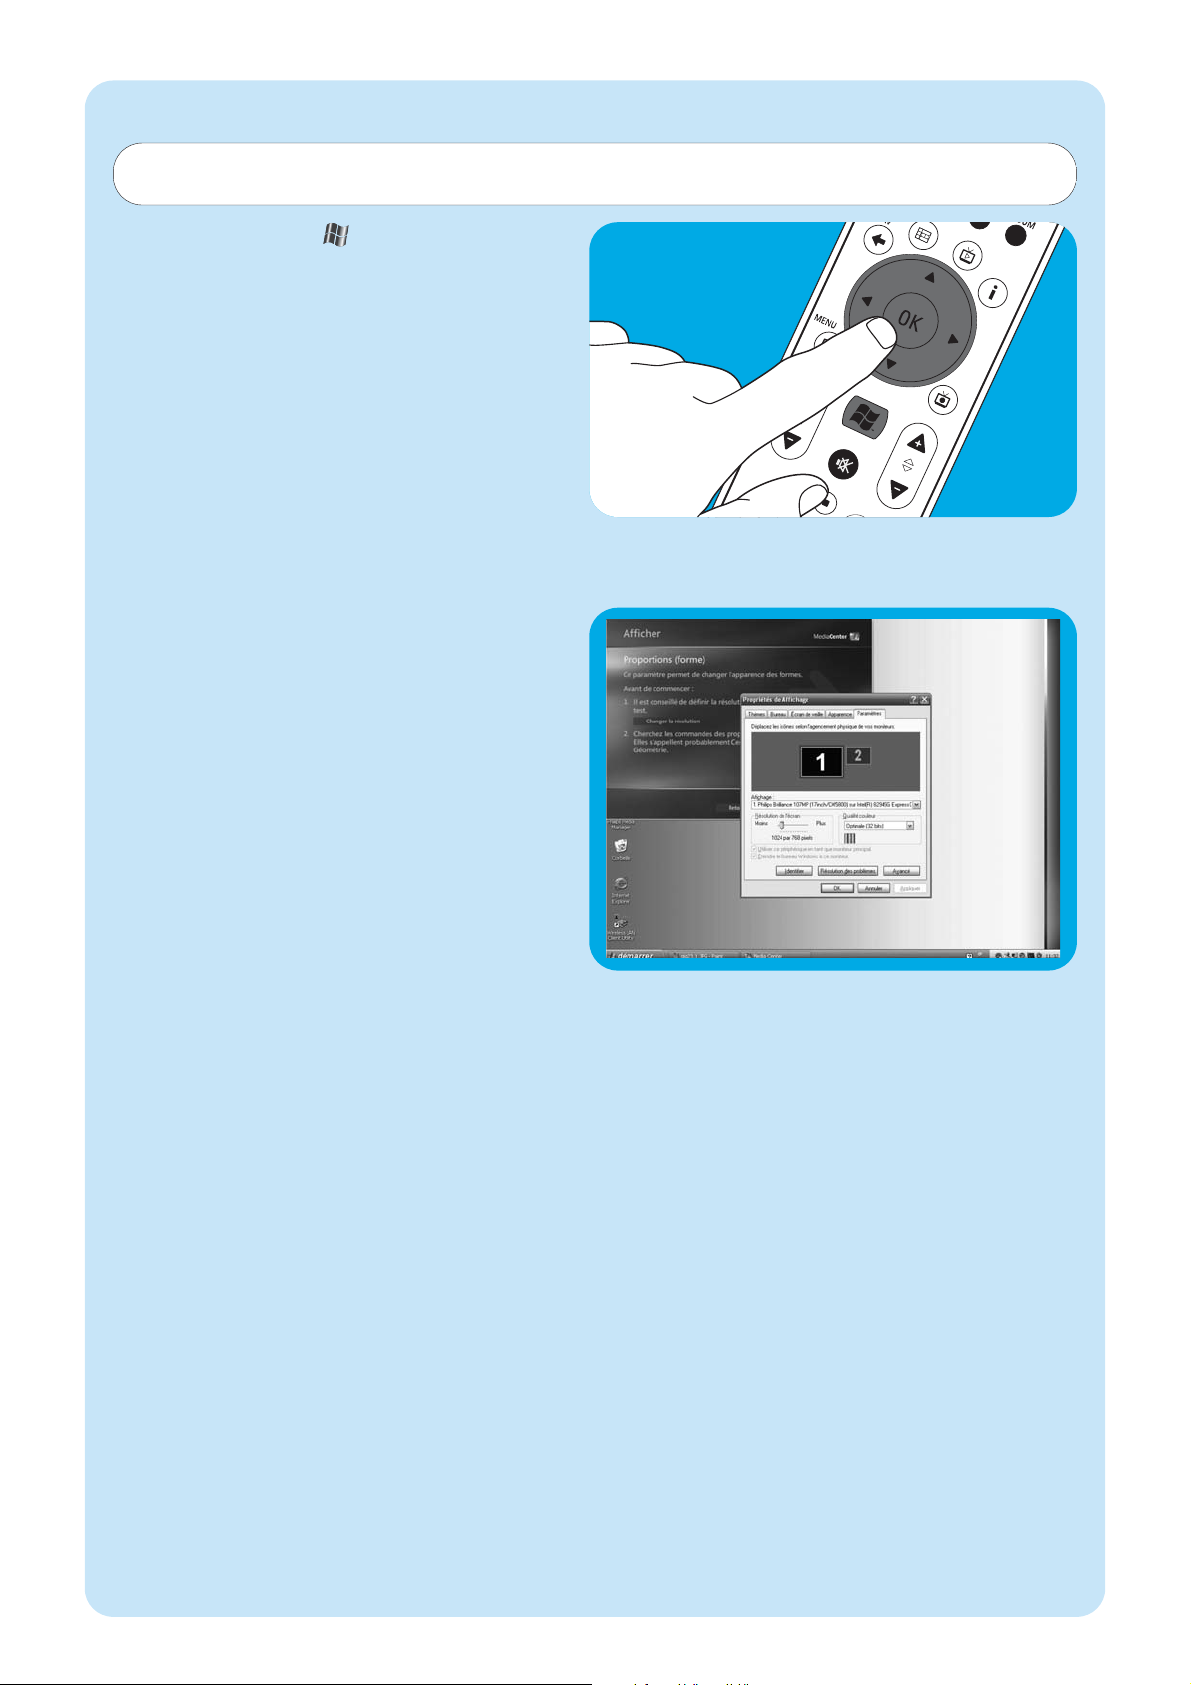
1 Appuyez sur la touche (8) de la télécommande.
2 Sélectionnez Paramètres puis appuyez sur la touche
OK (19).
3 Sélectionnez Configuration de Media Center dans
la fenêtre Paramètres (Général) puis appuyez sur la
touche OK (19).
4 Sélectionnez Configurer votre TV ou votre
moniteur dans la fenêtre des paramètres de
Configuration de Media Center puis appuyez sur la
touche OK (19).
5 Suivez les instructions à l’écran puis sélectionnez
Display type et Type de connexion.
Remarque : si vous utilisez la sortie Péritel (SCART, 21) du
Media Center, sélectionnez Component (YpbPr).
6 Sélectionnez Ajuster les contrôles d’affichage dans
la fenêtre Régler vos paramètres d’affichage puis
appuyez sur la touche OK (19).
7 Sélectionnez Suivant puis appuyez sur OK (19) pour
afficher la liste des contrôles dans la fenêtre Display
Calibration (étalonnage de l’écran).
8 Sélectionnez Aspect Ratio (Shape) (rapport hauteur-
largeur) puis appuyez sur la touche OK (19).
9 Sélectionnez Changer la résolution, appuyez sur la
touche OK (19) puis sélectionnez Oui dans la fenêtre
incrustée.
10 Utilisez le clavier et la souris pour définir la nouvelle
résolution dans la fenêtre des propriétés d’affichage de
Windows XP qui s’ouvre alors.
11 Lorsque vous avez terminé, cliquez sur la case d’afficha-
ge plein écran dans l’angle supérieur droit de la fenêtre
de Media Center pour restaurer l’affichage en plein
écran de celle-ci.
Changement de résolution d’écran
Le changement de résolution d’écran constitue un bon exemple de modification des paramètres de votre Media
Center.
Page 25
25
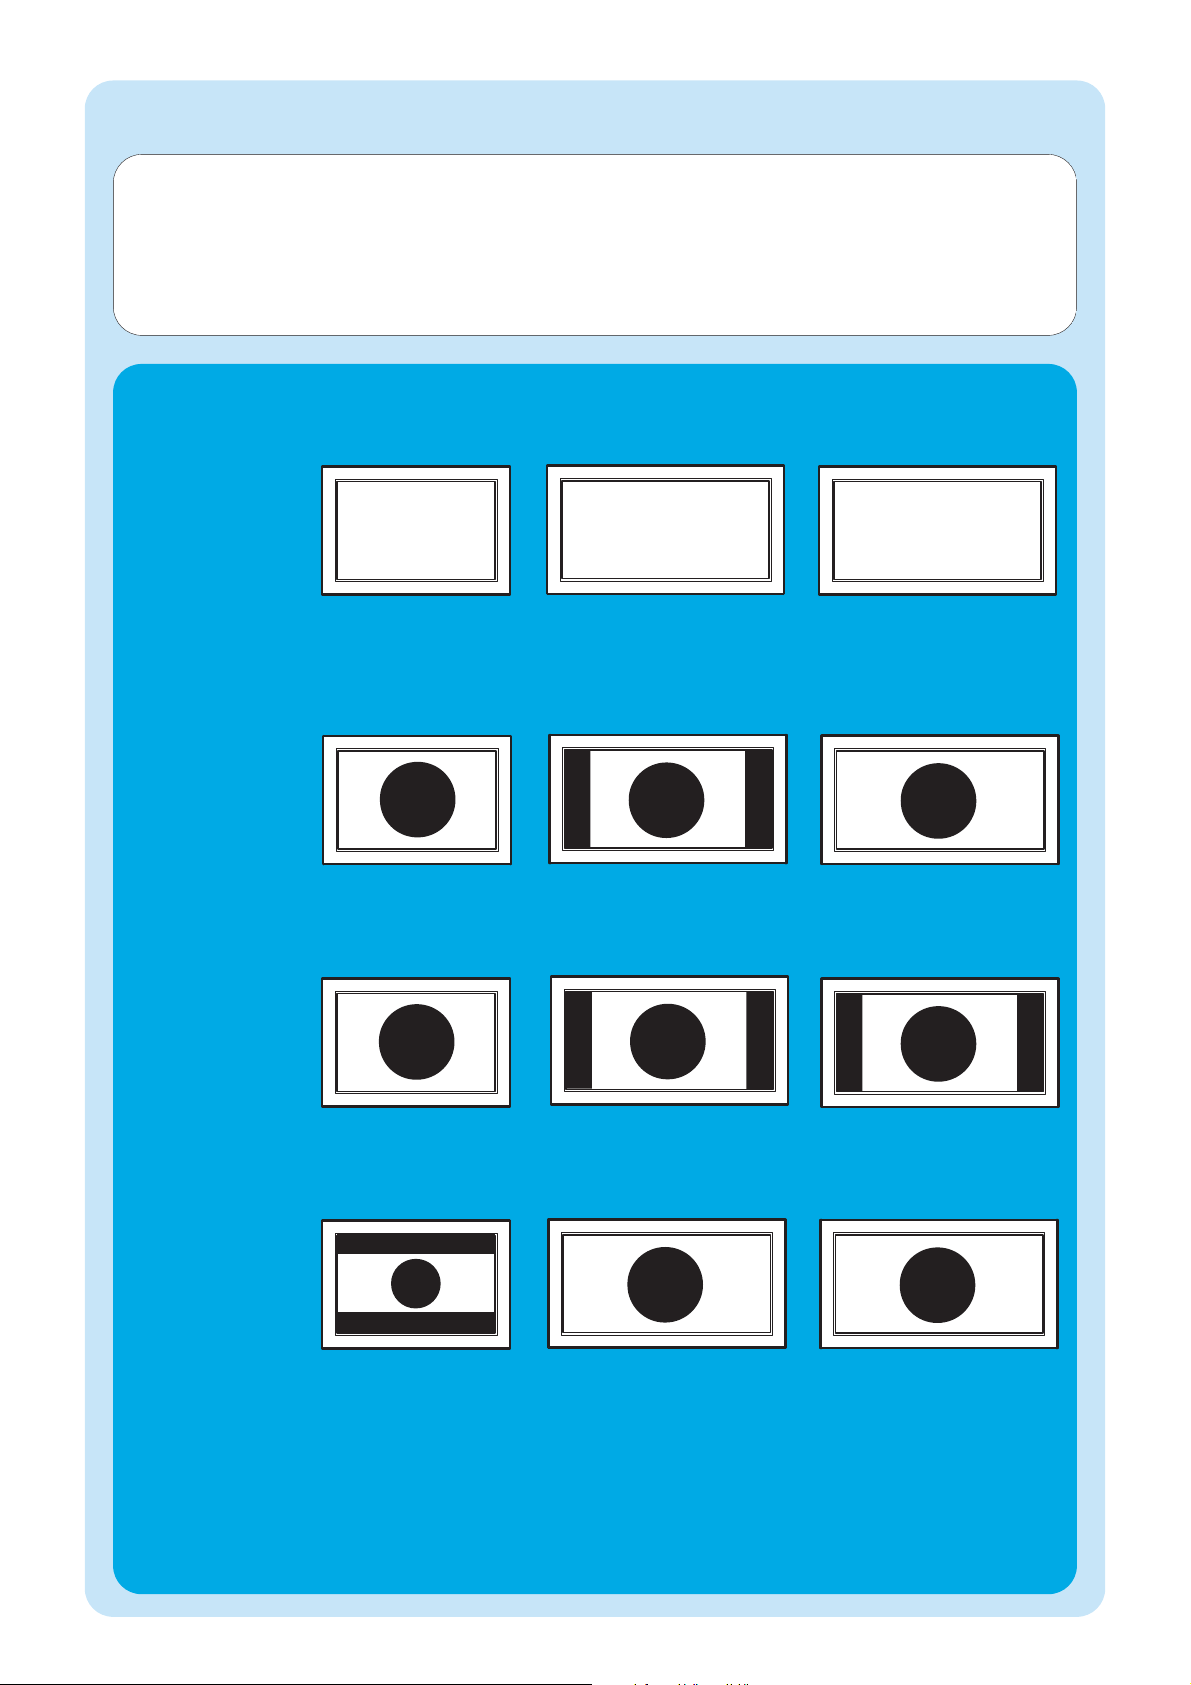
Réglage du rapport largeur-hauteur
Ce réglage désigne le rapport entre la largeur et la hauteur d’une image. Sur l’écran d’un ordinateur standard et un tube
cathodique de téléviseur, il est en standard de 4:3.Autrement dit, il a 4 unités de largeur pour 3 de hauteur.
Le format de la télévision haute définition (TV HD) est le 16:9.Votre téléviseur, le contenu diffusé (vidéo ou DVD que
vous regardez sur votre TV) et Media Center peuvent avoir des rapports largeur-hauteur différents, d’où la présence de
barres horizontales ou verticales sur votre écran. Dans ce cas, suivez les instructions ci-après pour le régler dans les
différentes situations.
Résolution : 720 x 576.
Prise Péritel con-
nectée.
TV
(tube cathodique)/
écran standard
Résolution : 720 x 576.
Prise Péritel connectée.
TV
(tube cathodique)/
écran standard
Résolution présentant un
rapport largeur-hauteur 16:9
(par ex. : 1280 x 720 ou
1920 x 1080). Connexion
DVI,VGA ou HDMI.
TV/moniteur
à écran plat
(plasma ou LCD)
Écran standard
(ni vidéo ni DVD
en cours de
lecture)
Lecture d’une
vidéo ou d’un
DVD avec un
rapport largeurhauteur de 4:3.
Lecture d’une
vidéo ou d’un
DVD avec un
rapport largeurhauteur de 16:9.
Pas de barre. Rapport
largeur-hauteur correct.
Aucune intervention
requise.
Barres verticales.
Voir A.
Pas de barre. Rapport lar-
geur-hauteur correct.
Voir D.
Pas de barre. Rapport
largeur-hauteur correct.
Aucune intervention
requise.
Barres verticales.
Voir B.
Barres verticales.
Voir B.
Barres horizontales.
Voir C.
Pas de barre. Rapport lar-
geur-hauteur correct.
1
Pas de barre. Rapport
largeur-hauteur correct.
Aucune intervention requise.
2
Page 26
26
A
Barres verticales sur écran standard (ni vidéo ni
DVD affiché) :
• réduisez ou supprimez les barres en réglant le rapport
largeur-hauteur de votre TV. Pour ce faire, consultez le
manuel de l’utilisateur fourni avec votre téléviseur.
Remarque : le rapport largeur-hauteur de l’image affichée sera
faussé.
B
Barres verticales lors de l’affichage d’une vidéo ou
d’un DVD 4:3 sur un téléviseur (ou moniteur) 16:9.
Dans ce cas, les barres verticales de part et d’autre sont
normales et ne peuvent pas être réduite/supprimées sans
fausser le rapport largeur-hauteur de l’image. Réglez le
rapport largeur-hauteur du contenu affiché (vidéo ou
DVD).
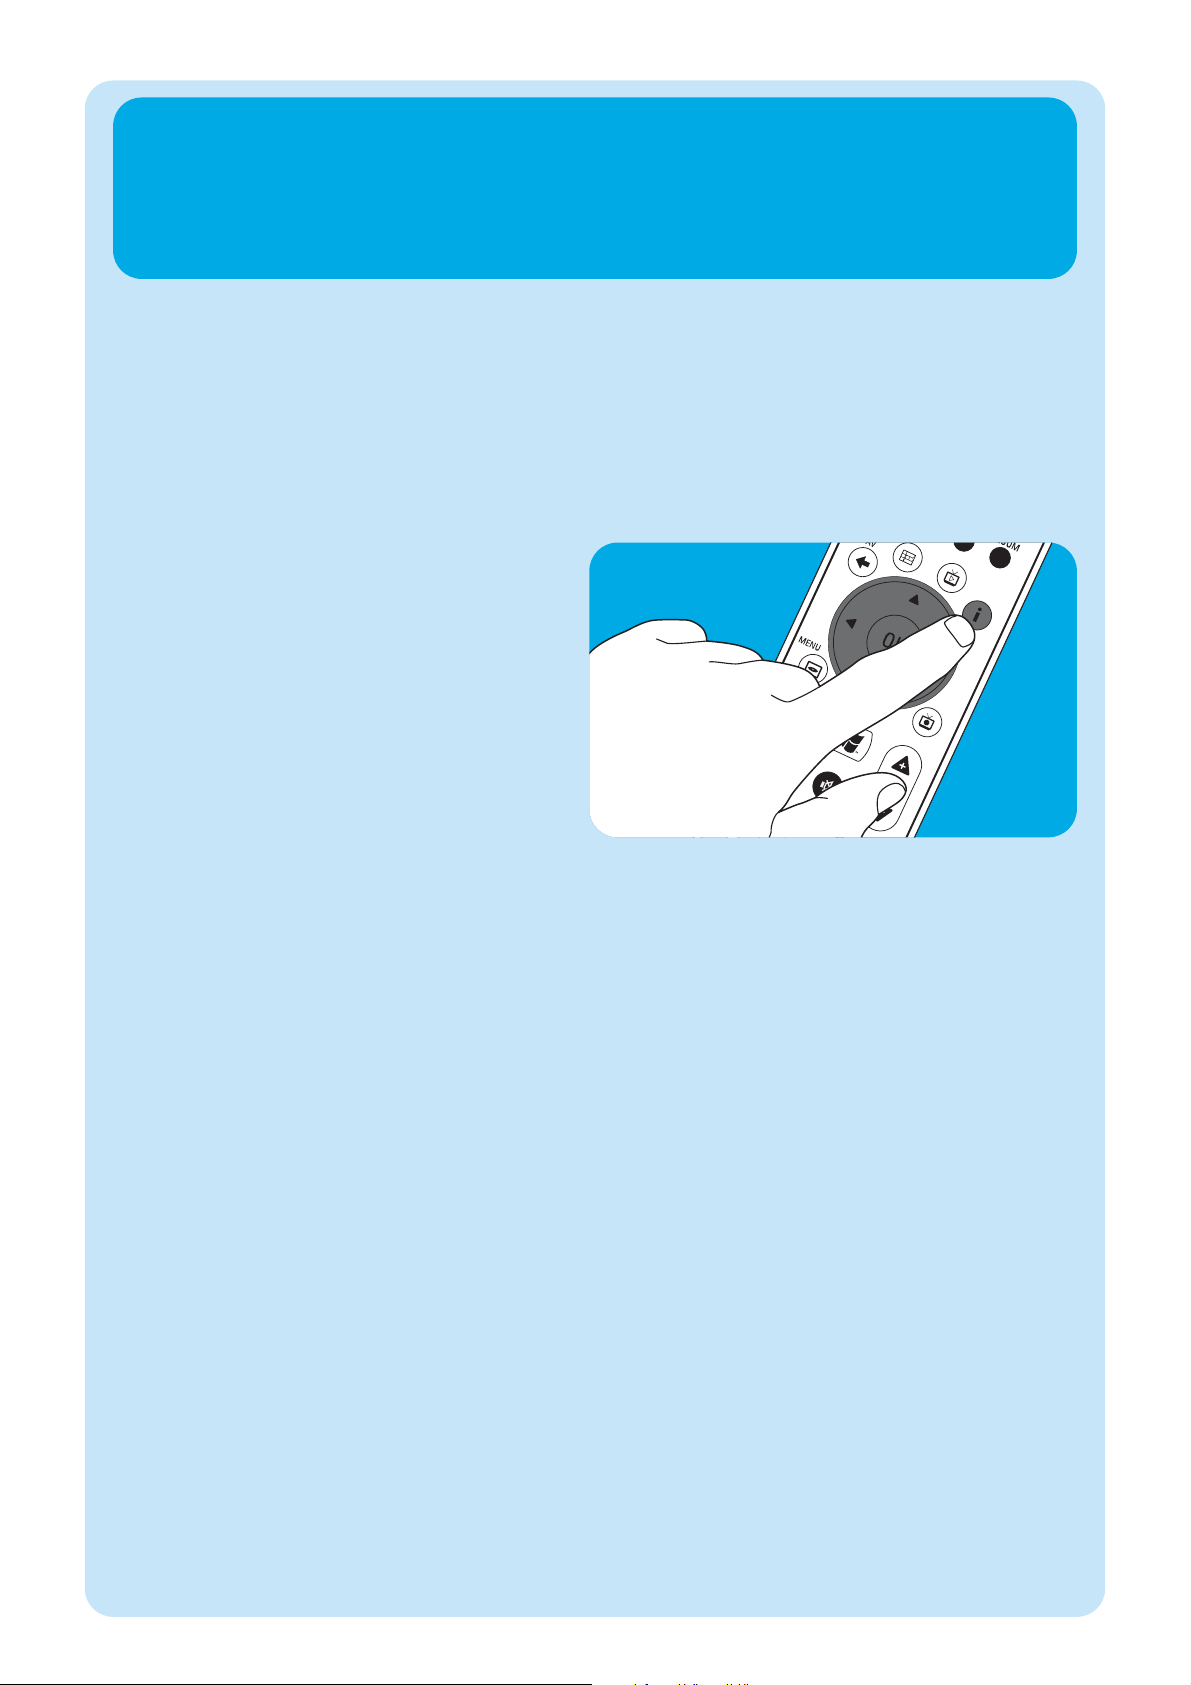
1 Appuyez sur la touche i (20) de la télécommande.
2 Sélectionnez Zoom puis appuyez sur la touche OK
(19) .
3 Sélectionnez le meilleur rapport largeur-hauteur pour
cette situation situation (1, 2 ou 3).
C
Barres horizontales lors de l’affichage d’une vidéo
ou d’un DVD 16:9 sur un téléviseur (ou moniteur)
4:3.
Dans ce cas, les barres horizontales sont normales et ne
peuvent pas être réduite/supprimées sans fausser le rapport
largeur-hauteur de l’image ou sans afficher seulement une
partie de celle-ci. Réglez le rapport largeur-hauteur du contenu affiché (vidéo ou DVD).
1 Appuyez sur la touche i (20) de la télécommande.
2 Sélectionnez Zoom puis appuyez sur la touche OK
(19).
3 Sélectionnez le meilleur rapport largeur-hauteur pour
cette situation situation (1, 2 ou 3).
D
• Réglez l’affichage du Media Center pour une résolution
16:9 offrant la meilleure qualité d’image pour votre
TV/écran. Les résolutions de 280 x 720 ou de 1920 x
1080 sont les plus courantes sur les téléviseurs/écrans
plats.
1 – Si des barres verticales apparaissent : réglez le rapport largeur-hauteur de votre TV.
– Si des barres horizontales apparaissent : réglez le rapport largeur-hauteur du contenu affiché (vidéo ou DVD) en suivant
les instructions des paragraphes B et C.
– Le contenu « grand écran » (par ex., DVD) n’est pas toujours enregistré en 16:9, mais dans un format légèrement diffé-
rent. Dans ce cas, de petites barres horizontales peuvent apparaître.
2 Le contenu « grand écran » (par ex., DVD) n’est pas toujours enregistré en 16:9, mais dans un format légèrement différent.
Dans ce cas, de petites barres horizontales peuvent apparaître.
Page 27
27
4
Autres branchements
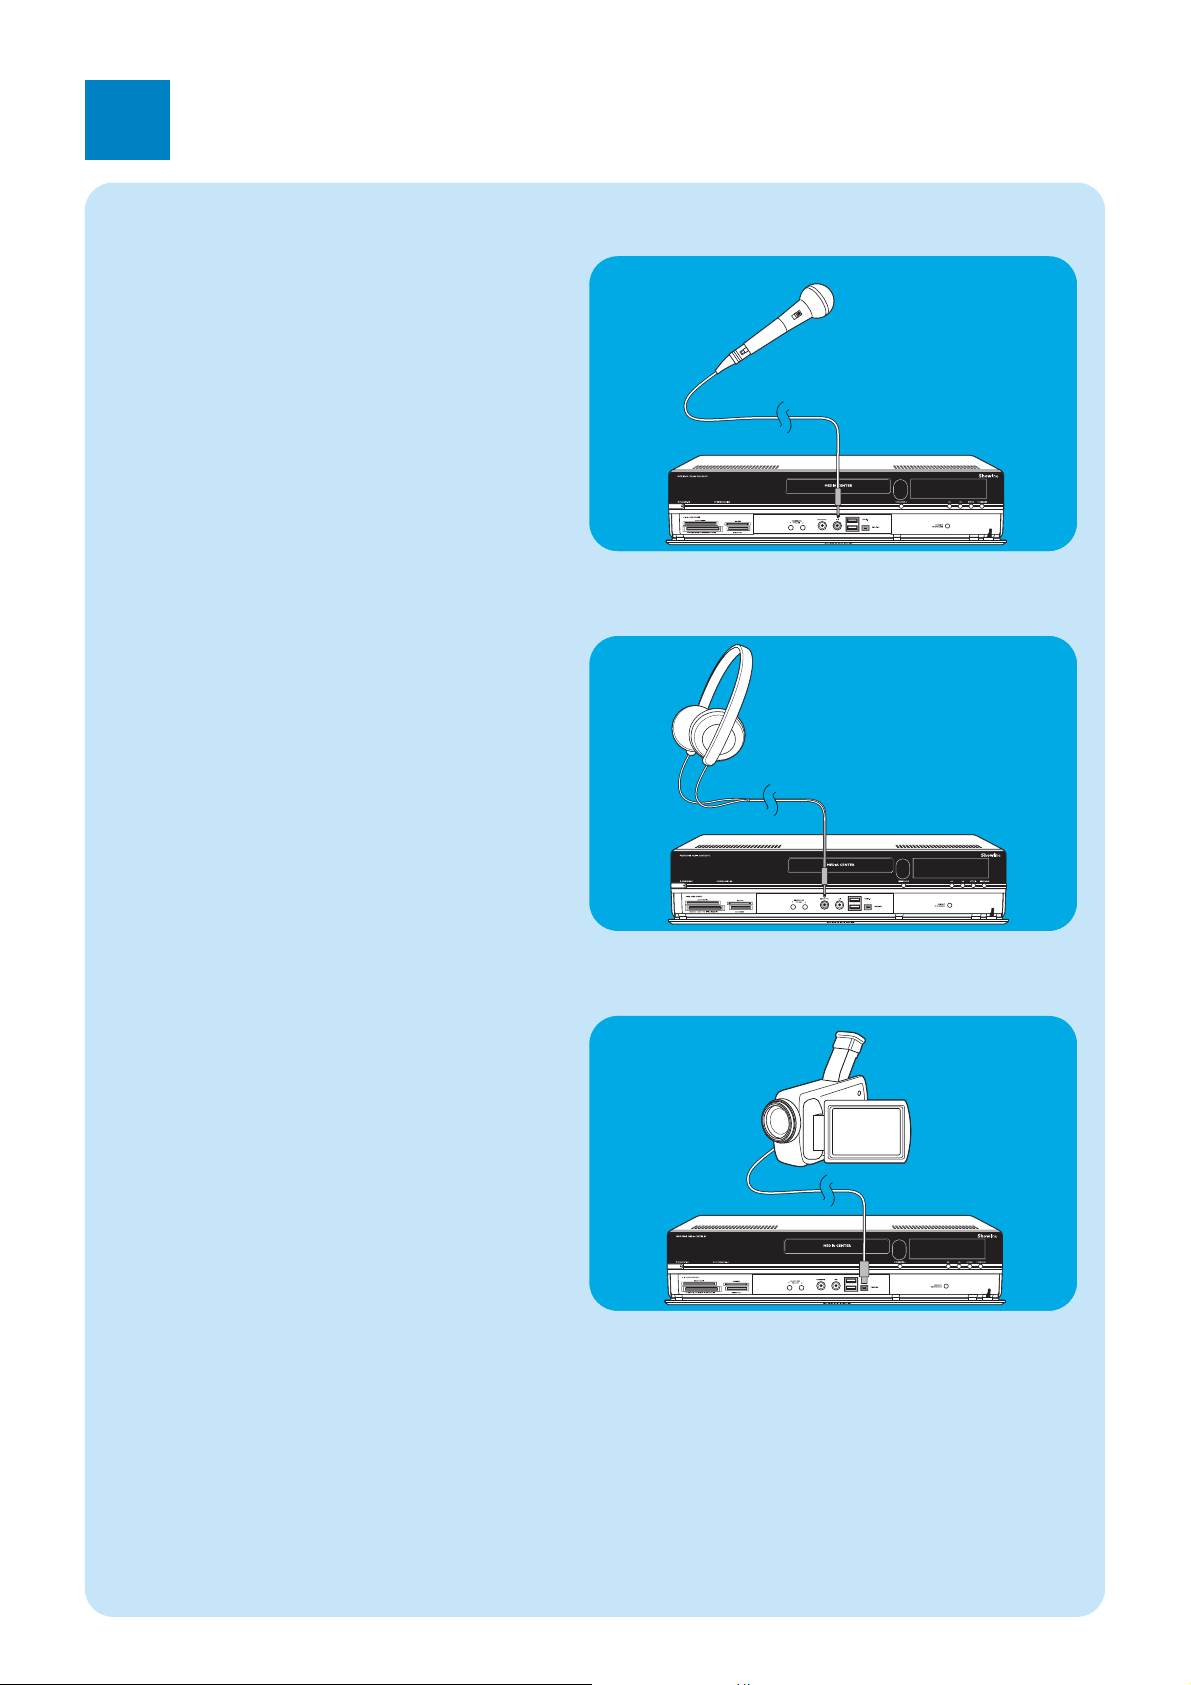
1 Branchez un casque avec une prise jack de 3,5 mm au
connecteur d’entrée HEADPHONE
(13) situé sur le
devant du Media Center.
2 Réglez le volume du casque avec les touches
4 HEADPHONE VOLUME 3 (12).
• Vous pouvez couper le son du casque avec la touche
Muet (s) (10) de la télécommande.
Branchement d’un casque
Video
camera
• Branchez le connecteur Firewire(IEEE1394/i.LINK) de
votre caméscope au connecteur FIREWIRE
(IEEE394/Firewire/i.LINK) (16) situé sur le devant du
Media Center. Pour ce faire, utilisez un câble Firewire
(IEEE1394 / i.LINK) à 4 broches (non fourni).
OU :
• Branchez le connecteur USB de votre caméscope au
port d’entrée USB 2.0 (15) situé sur le devant du
Media Center. Pour ce faire, utilisez un câble USB 2.0
(non fourni) .
Remarques :
– Veillez à brancher le caméscope au Media Center avant de
lancer le programme DV Capture.
– N’oubliez pas de refermer le programme DV Capture
avant de débrancher le caméscope.
– Vérifiez si un logiciel supplémentaire est nécessaire pour
votre matériel. Installez les pilotes fournis avec le matériel
avant de brancher celui-ci au Media Center. Pour ce faire,
consultez le manuel de l’utilisateur du matériel.
Branchement d’une caméra vidéo (ou autre source portable externe)
• Branchez un microphone au connecteur d’entrée MIC
(rophone) (14)
situé sur le devant du Media Center.
Branchement d’un microphone
Page 28
28
External HD
Input
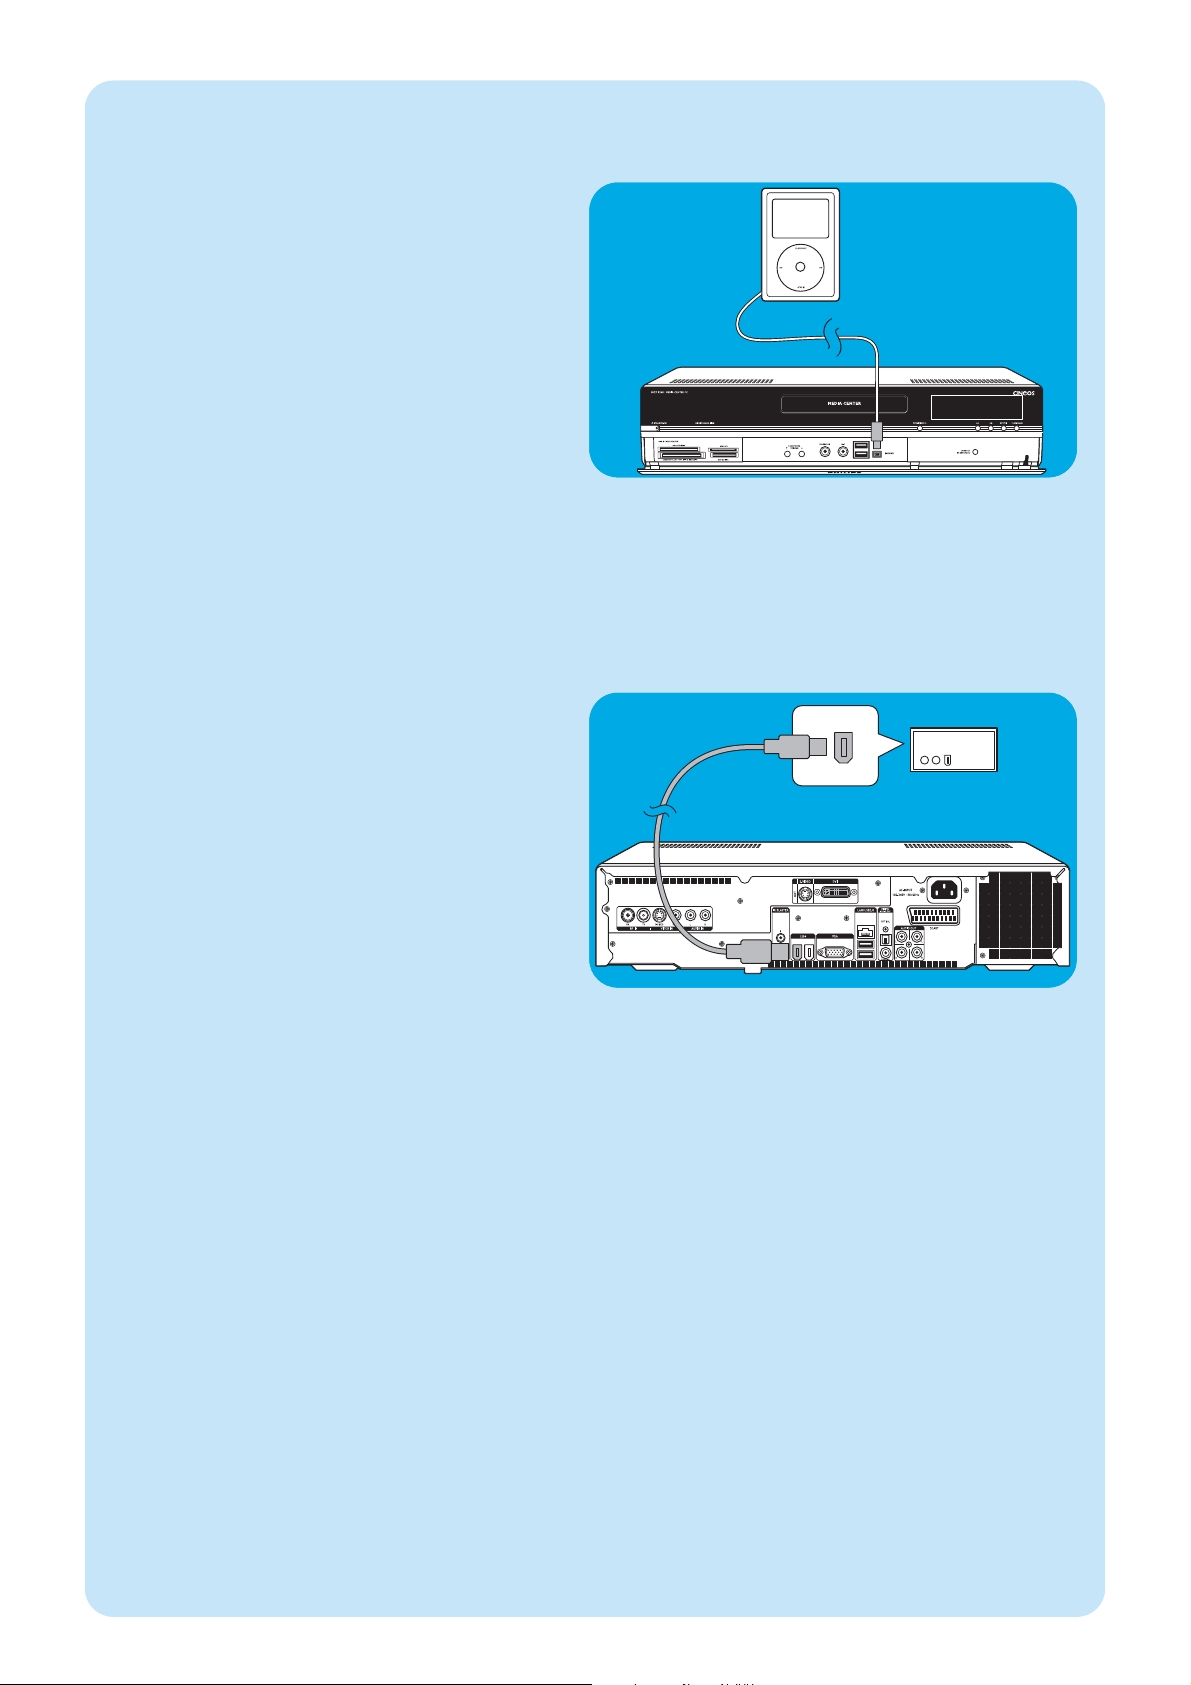
External HD
• Branchez le connecteur Firewire(IEEE1394/i.LINK) de
votre lecteur externe au connecteur FIREWIRE
(IEEE394/Firewire/i.LINK) (11) situé à l’arrière du Media
Center. Pour ce faire, utilisez un câble Firewire
(IEEE1394 / i.LINK) à 6 broches (non fourni).
OU :
• Branchez le connecteur USB de votre lecteur externe
au port d’entrée USB 2.0 (13) situé à l’arrière du
Media Center. Pour ce faire, utilisez un câble USB 2.0
(non fourni) .
Remarque :Vérifiez si un logiciel supplémentaire est nécessaire
pour votre matériel. Installez les pilotes fournis avec
le matériel avant de brancher celui-ci au Media
Center. Pour ce faire, consultez le manuel de l’utilisateur du matériel.
Branchement d’un lecteur externe (disque dur, lecteur optique)
Portable
Media
Player
• Branchez le connecteur Firewire (IEEE1394/i.LINK) de
votre lecteur multimédia portable (lecteur MP3, disque
dur ou appareil photo) au connecteur FIREWIRE
(IEEE394/Firewire/i.LINK) (11) situé sur le devant du
Media Center. Pour ce faire, utilisez un câble Firewire
(IEEE1394 / i.LINK) à 4 broches (non fourni).
OU :
• Branchez le connecteur USB de votre lecteur multi-
média portable (lecteur MP3, disque dur ou appareil
photo) au connecteur d’entrée USB 2.0 (13) situé sur
le devant du Media Center. Pour ce faire, utilisez un
câble USB 2.0 (non fourni) .
Remarque :Vérifiez si un logiciel supplémentaire est nécessaire
pour votre matériel. Installez les pilotes fournis avec
le matériel avant de brancher celui-ci au Media
Center. Pour ce faire, consultez le manuel de l’utilisateur du matériel.
Branchement d’un lecteur multimédia portable
(ou d’un disque dur ou d’un appareil photo)
Page 29
29
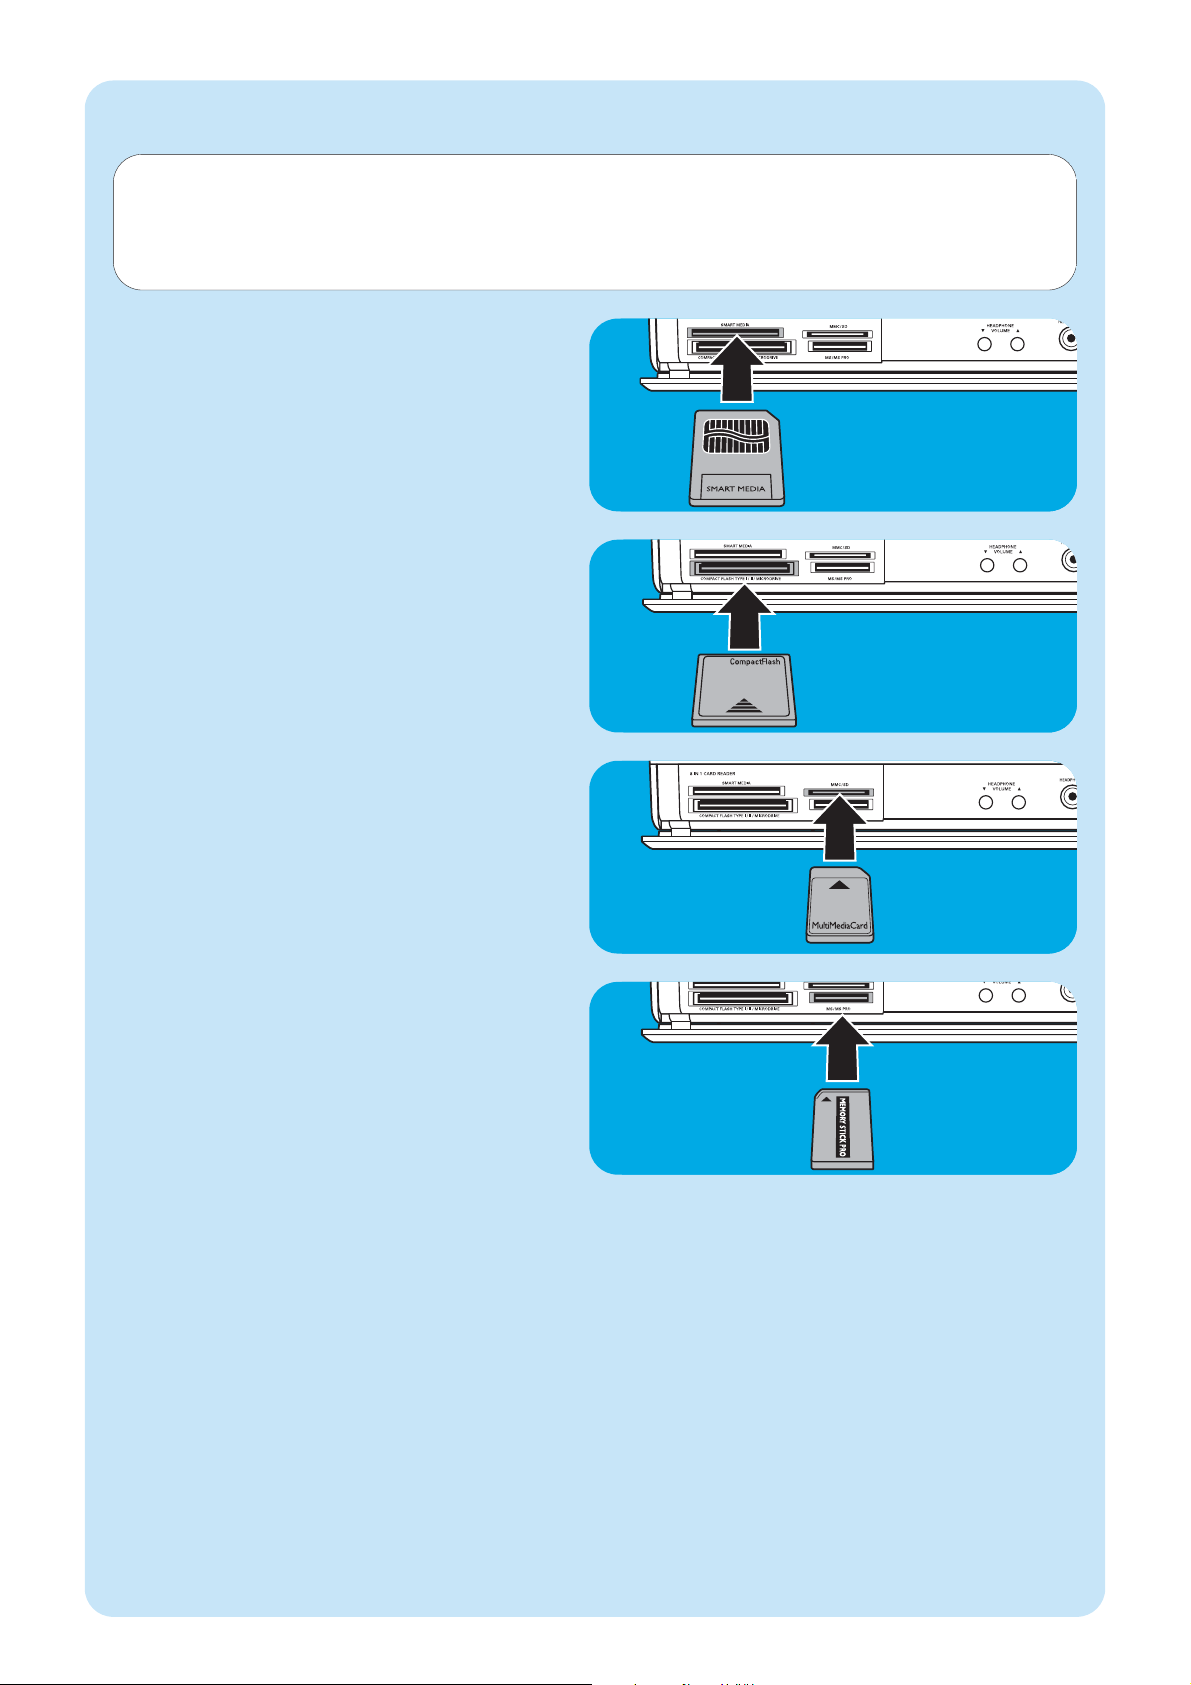
• Vous pouvez insérer les cartes Smart Media dans le
lecteur SMART MEDIA (8) du Media Center.
Insertion de cartes mémoire
• Vous pouvez insérer les cartes Compact Flash dans le
lecteur COMPACT FLASH TYPE 1 / 11 MICRODRIVE (9) du Media Center.
• Les cartes MMC (MultiMedia Card) et SD (Secure
Digital) peuvent être insérées dans le lecteur MMC/SD
(10) du Media Center.
• Les cartes mémoire/memory sticks MS et MS PRO
peuvent être insérées dans le lecteur MS/MS PRO
drive (11) du Media Center.
La première fois que vous insérez une carte mémoire dans l’un des lecteurs de carte (SMART MEDIA -8, COMPACT
FLASH TYPE 1 / 11 MICRODRIVE -9, MMC/SD-10 ou MS/MS PRO-11) du Media Center, l’explorateur crée quatre
nouvelles lettres de lecteur, une par lecteur.Ainsi, si la dernière lettre était, par exemple, D, celles des cartes mémoire seront
E, F, G et H, et ainsi de suite.
Page 30

30
Déni de responsabilité en cas de perte de données
Avant de renvoyer le MCP9360i Media Center en réparation, n’oubliez pas de sauvegarder toutes les données et de désinstaller tout logiciel tiers.
En cas d’intervention, il vous incombe de sauvegarde le contenu de votre Media Center, tel que les données que vous avez
éventuellement stockées ou les logiciels que vous avez installé sur celui-ci. Il est en effet probable que le contenu de votre
Media Center sera perdu lors de la réparation. Nous déclinons toute responsabilité pour les éventuelles altérations ou pertes de programmes, de données ou de toute autre information enregistrés sur des supports, ou de tout autre élément du
produit faisant l’objet d’une intervention.
SI, LORS DE LA RÉPARATION DU PRODUIT, LE CONTENU DE LA 2005 Entertainment PC Platform
EST ALTÉRÉ, SUPPRIMÉ OU MODIFIÉ DE QUELQUE MANIÈRE QUE CE SOIT, NOUS NE SAURIONS
EN ÊTRE TENUS POUR RESPONSABLES.VOTRE PRODUIT VOUS SERA RENVOYÉ AVEC LA CONFIGURATION USINE TELLE QUE VOUS L’AVEZ ACHETÉ (SOUS RÉSERVE DE DISPONIBILITÉ DES LOGICIELS).
N’oubliez pas de retirer les matériels, logiciels, fonctionnalités, pièces, options, modifications et autres accessoires de tiers
qui ne sont pas garantis par Philips avant de renvoyer le produit en réparation. Nous déclinons toute responsabilité en cas
de perte ou de dommages les concernant.
Sécurité et réglementation
Cette section fournit des informations détaillées concernant la sécurité et la réglementation pour la 2005 Entertainment PC
Platform : Déclaration de conformité concernant la sécurité. Ce produit est également conforme aux exigences de sécurité
internationales relatives aux équipements informatiques, à la norme IEC/EN 60950-1, et il est estampillé CE et peut à ce
titre être utilisé en Union Européenne.
Avertissement concernant les piles au lithium
SS
ATTENTION
Risque d’explosion si les piles sont remplacées par des piles incompatibles. Dans la mesure du possible, elles doivent être recyclées.
L’élimination des piles usées doit être effectuée conformément à la réglementation locale en vigueur sur l’environnement.
Avis de sécurité, télécommunications
SS
ATTENTION
Pour réduire les risques d’incendie, utilisez exclusivement les cordons de télécommunication AWG n°26 fournis avec ce
produit, ou des cordons de diamètre supérieur.
Avis de sécurité, radiofréquence
La 2005 Entertainment PC Platform, à l’instar des autres appareils de radio, émet des ondes électromagnétiques à radiofréquence.Toutefois, les émissions électromagnétiques de ce matériel sont inférieures à celles d’autres appareils sans fil tels
que les téléphones portables.
Avis :
Installez ou placez le MCP9351i Media Center de sorte que l’antenne (qui se trouve derrière le panneau avant) se trouve à
au moins 20 cm de l’utilisateur ou d’autres personnes.
Dans certains cas ou environnements, l’utilisation d’un matériel sans fil peut faire l’objet de restrictions de la part du propriétaire du bâtiment ou des représentants des organismes ou autorités compétents. Si vous n’êtes pas certain de la réglementation concernant l’utilisation d’appareils sans fil dans des entreprises ou des environnements particuliers, nous vous
invitons à demander l’autorisation d’utiliser le MCP9360i Media Center avant de transmettre des données sans fil.
Avis de sécurité, câble
SS
ATTENTION
Le blindage du câble coaxial doit être connecté à la terre à l’entrée de la maison.
5
Important
Page 31

31
Autres avis de sécurité concernant les autres équipements du réseau sans fil : Consultez la documentation de
l’utilisateur fournie avec le clavier sans fil, la souris sans fil, l’émetteur Bluetooth ou tout autre matériel du réseau sans fil
pour connaître les avis de sécurité applicables.
Restrictions locales concernant l’utilisation de matériel radio
La bande de fréquence de 2,4 GHz utilisée par le MCP9360i Media Center n’est pas complètement harmonisée dans tous
les pays. Ce matériel a été homologué pour certains pays, mais il ne doit pas être utilisé en dehors des pays ou secteurs
géographiques désignés ci-après. En tant qu’utilisateur de ce produit, il vous incombe de vous assurer que ce matériel est
utilisé exclusivement dans les pays pour lesquels il est conçu.Vous devez également veiller à ce qu’il soit configuré
correctement quant à la sélection des fréquences et des canaux dans le pays d’utilisation.Tout écart par rapport aux
paramètres autorisés dans le pays d’utilisation constitue une infraction au droit, aux règles ou aux réglementations nationales,
et peut entraîner des poursuites. Informations concernant les différents pays :
Bandes de fréquence de l’Union Européenne :
• Allemagne, Luxembourg, Pays-Bas, Espagne, Suède et Royaume Uni : 2,400 – 2,4835 GHz (Europe ETSI)
• France :
départements métropolitains : 2,400 – 2,4835 GHz en intérieur : 2400 – 2454 GHz (canaux 1 à 7) en
extérieur.
Guadeloupe, Martinique, St-Pierre et Miquelon, Mayotte : 2,400 – 2,4835 GHz en intérieur et en extérieur.
Réunion, Guyane : 2,400 – 2,4835 GHz en intérieur : 2,420 – 2,4835 GHz en extérieur (canaux 5 à 13)
• Italie : utilisation dans des locaux privés, en intérieur ou à l’extérieur : 2,400 – 2,4835 GHz
Utilisation dans les lieux publics, intérieur ou extérieur ; autorisation générale d’utilisation à demander au
ministère italien des postes et télécommunications : 2,400 – 2,4835 GHz. • Belgique : utilisation dans des
locaux privés, en intérieur ou à l’extérieur ; rayon d’utilisation inférieur à 300 m :2,400 – 2,4835 GHz
utilisation dans des locaux privés ; l’utilisation en extérieur et dans les lieux publics au-delà d’un rayon de
300 m nécessite une licence IBPT/BIPT : 2,400 – 2,4835 GHz
Interopérabilité sans fil
Le MCP9360i Media Center est conçu pour être interopérable avec tout produit de réseau local utilisant la technologie
radio à étalement de spectre en séquence (DSSS) et conforme aux normes suivantes :
• IEEE 802.11a - Norme des réseaux locaux sans fil.
• IEEE 802.11b - 1999, Norme des réseaux locaux sans fil.
• IEEE 802.11 - Norme des réseaux locaux sans fil.
• Homologation Wireless Fidelity (WiFi), définie par la WECA (Wireless Ethernet Compatibility Alliance).
Déclaration de conformité concernant les émissions
Toute modification du matériel sans autorisation expresse de Philips peut annuler votre droit à l’utiliser.
Ce matériel doit être installé et utilisé en stricte conformité avec les instructions figurant dans la documentation de
l’utilisateur fournie avec le produit.Toute modification (y compris des antennes) apportée à ce matériel sans l’autorisation
explicite du constructeur peut annuler les droits de l’utilisateur. Le constructeur ne saurait être tenu pour responsable des
interférences entravant la réception des émissions de radio ou de télévision en cas de modification sans autorisation de ce
matériel, ou de remplacement par des câbles ou autres équipements différents de ceux qu’il préconise. Il incombe à
l’utilisateur de remédier à tout problème d’interférence dû à des modifications, substitutions ou ajouts effectués sans
autorisation. Le constructeur et ses revendeurs ou distributeurs agréés déclinent toute responsabilité en cas de préjudice
ou d’infraction à la réglementation gouvernementale par suite du non-respect de ces directives.
Page 32

32
Déclarations de conformité de l’Union Européenne
Nous, Philips, déclarons que le produit, Entertainment PC, est conforme aux conditions essentielles requises et autres
dispositions de la Directive 1999/5/CE (équipements de radio et terminaux de télécommunications). Ce produit porte la
marque CE attestant sa conformité et autorisant sa distribution dans tous les états membres de l’UE, avec les réserves
mentionnées plus haut.
Déclarations relative aux aspects écologiques du produit
Les informations suivantes concernent les préoccupations et réglementations mondiales concernant les produits et
l’écologie.
Élimination en fin de vie
Ce produit contient les matériaux suivants, dont l’élimination peut être réglementée : soudure au plomb sur circuits
imprimés.
Recyclage
Nous incitons nos clients à recycler leurs produits et les composants (piles, circuits imprimés, boîtiers en plastique, etc.)
dans la plus large mesure possible.
En l’absence de possibilité de recyclage viable, les produits et leurs composants doivent être éliminés conformément à la
réglementation environnementale locale en vigueur.
Sécurité : champs électriques, magnétiques et électromagnétiques
1 Philips Royal Electronics fabrique et commercialise de nombreux produits s’adressant au grand public qui, à l’instar de
tout équipement électronique, ont tendance à émettre et à recevoir des ondes électromagnétiques.
2 L’un des principes fondamentaux de Philips est de mettre tout en œuvre sur le plan de la santé et de la sécurité, afin
que ses produits soient conformes à toutes les exigences légales et que leurs émissions électromagnétiques restent
largement inférieures aux normes en vigueur à la date de production.
3 Philips s’engage à développer, à produire et à commercialiser des produits sans effets néfastes pour la santé.
4 Philips confirme que si ses produits sont utilisés conformément à l’usage prévu, ils sont parfaitement sûrs en l’état actuel
des connaissances scientifiques.
5 Philips joue un rôle actif dans la définition des normes internationales concernant les émissions électromagnétiques et la
sécurité, ce qui lui permet d’anticiper l’évolution de la standardisation et d’intégrer les normes futures à l’avance dans
ses produits.
Page 33
33
Informations pour le consommateur
Mise au rebut des produits en fin de vie
Ce produit a été conçu et fabriqué avec des matériaux et composants recyclables de haute qualité.
Le symbole d'une poubelle barrée apposé sur un produit signifie que ce dernier répond aux
exigences de la directive européenne 2002/96/EC.
Informez-vous auprès des instances locales sur le système de collecte des produits électriques et
électroniques en fin de vie.
Conformez-vous à la législation en vigueur et ne jetez pas vos produits avec les déchets ménagers.
Seule une mise au rebut adéquate des produits peut empêcher la contamination de l'environnement
et ses effets nocifs sur la santé.
Toute reproduction sans autorisation des documents couverts par copyright, tels que les logiciels, fichiers, contenus de diffusion et enregistrements audio, constitue une violation des droits d’auteur et une infraction passible de poursuites pénales.
Ce matériel ne doit en aucun cas être utilisé à de telles fins.
Page 34

34
Notes
Page 35

35
Notes
Page 36

36
Helpinformatie
Voor helpinformatie over uw MCP9360i kunt u de Philips support site bezoeken:
www.philips.com/support
Biedt de website geen oplossing voor uw probleem, bel dan de Philips-helpdesk:
Nederland 0900 0400 063 € 0,30/min.
Page 37
37
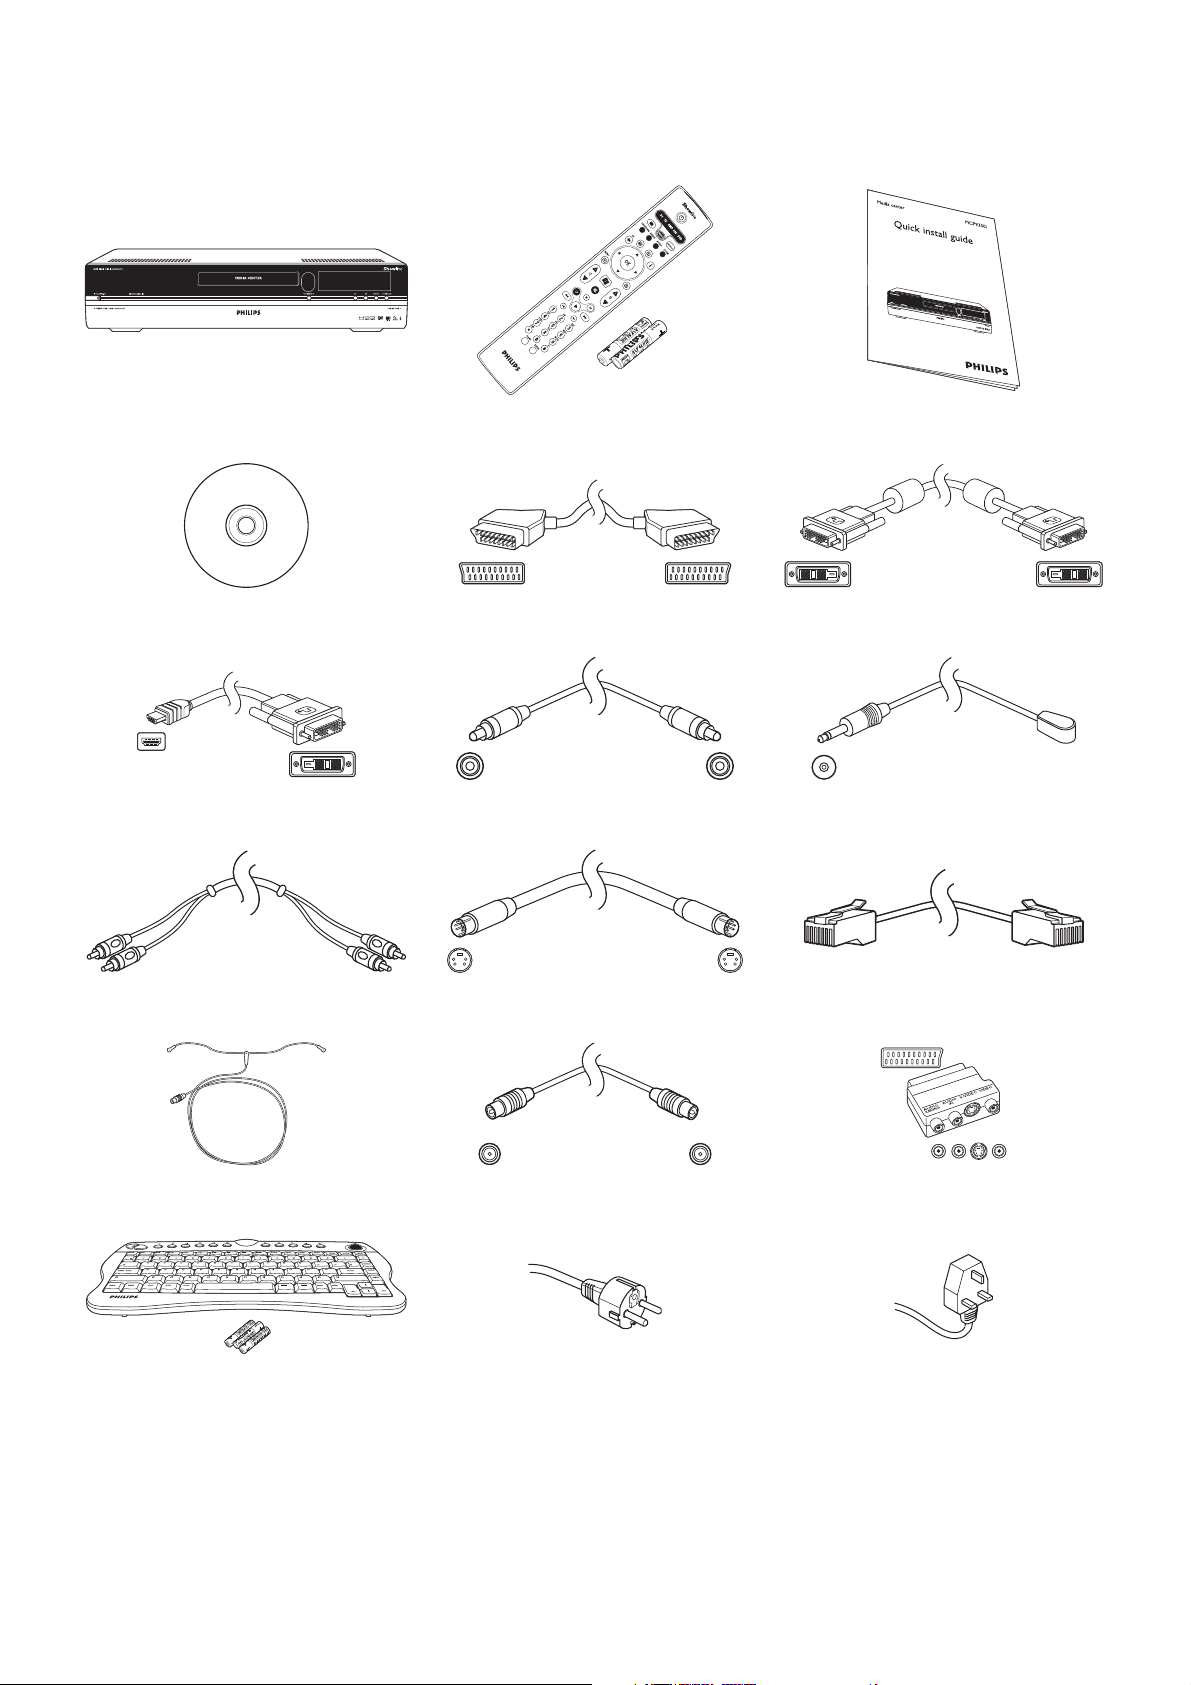
Inhoud van de verpakking
Media Center MCP9360i Afstandsbediening,
2 x AA-batterijen
Beknopte installatiehandleiding
CD SCART-kabel DVI-D-kabel
DVI-D naar HDMI verloopkabel Digitale audiokabel (coax, cinch) 2 x IR blaster voor set-top box
Stereo-audiokabel (cinch) S-Video-kabel Ethernet-kabel
FM-antennekabel TV-antennekabel (1 m)
TV-antennekabel (10 cm)
Adapter voor SCART naar SVHS / CVBS
CDraadloos toetsenbord,
3 x AA-batterijen
Netspanningskabel Netspanningskabel
(MCP 9360i/22)
Page 38

38
Inhoud van de verpakking .................................................. 37
1 Functiebeschrijving ......................................................... 39
Voorzijde .............................................................................................................................. 39
Achterzijde .......................................................................................................................... 40
Afstandsbediening ..............................................................................................................41
Draadloos toetsenbord .................................................................................................... 43
2 Philips Media Center installeren ................................... 44
Tv/monitor aansluiten ....................................................................................................... 44
Video aansluiten (b.v. set-top box) ................................................................................ 46
Audio aansluiten ................................................................................................................. 47
Internet-verbinding aansluiten ........................................................................................ 48
Antennes aansluiten .......................................................................................................... 50
Batterijen in afstandsbediening plaatsen ....................................................................... 50
Netspanning aansluiten / INschakelen en standby zetten ........................................ 51
Draadloos toetsenbord activeren .................................................................................. 52
3 Philips Media Center instellen ...................................... 53
Microsoft Windows®instellen ....................................................................................... 53
Media Center Setup-wizard ............................................................................................ 54
Handmatig kanalen zoeken .............................................................................................. 56
Extra software instellen ................................................................................................... 57
Instellingen wijzigen ........................................................................................................... 57
Beeldschermresolutie wijzigen ....................................................................................... 58
Aspect ratio wijzigen ........................................................................................................ 59
4 Overige aansluitmogelijkheden ..................................... 61
Microfoon aansluiten ......................................................................................................... 61
Hoofdtelefoon aansluiten ................................................................................................. 61
Videocamera (of andere draagbare signaalbron) aansluiten .................................... 61
Draagbare mediaspeler (of HDD of fotocamera) aansluiten .................................. 62
Externe harde schijf (HDD, optische schijf) aansluiten ............................................. 62
Geheugenkaarten plaatsen .............................................................................................. 63
5 Belangrijke informatie ................................................... 64
Geen aansprakelijkheid voor verloren gegevens ........................................................ 64
Veiligheidsvoorschriften en juridische informatie ...................................................... 64
Inhoud
Pagina
Page 39
39
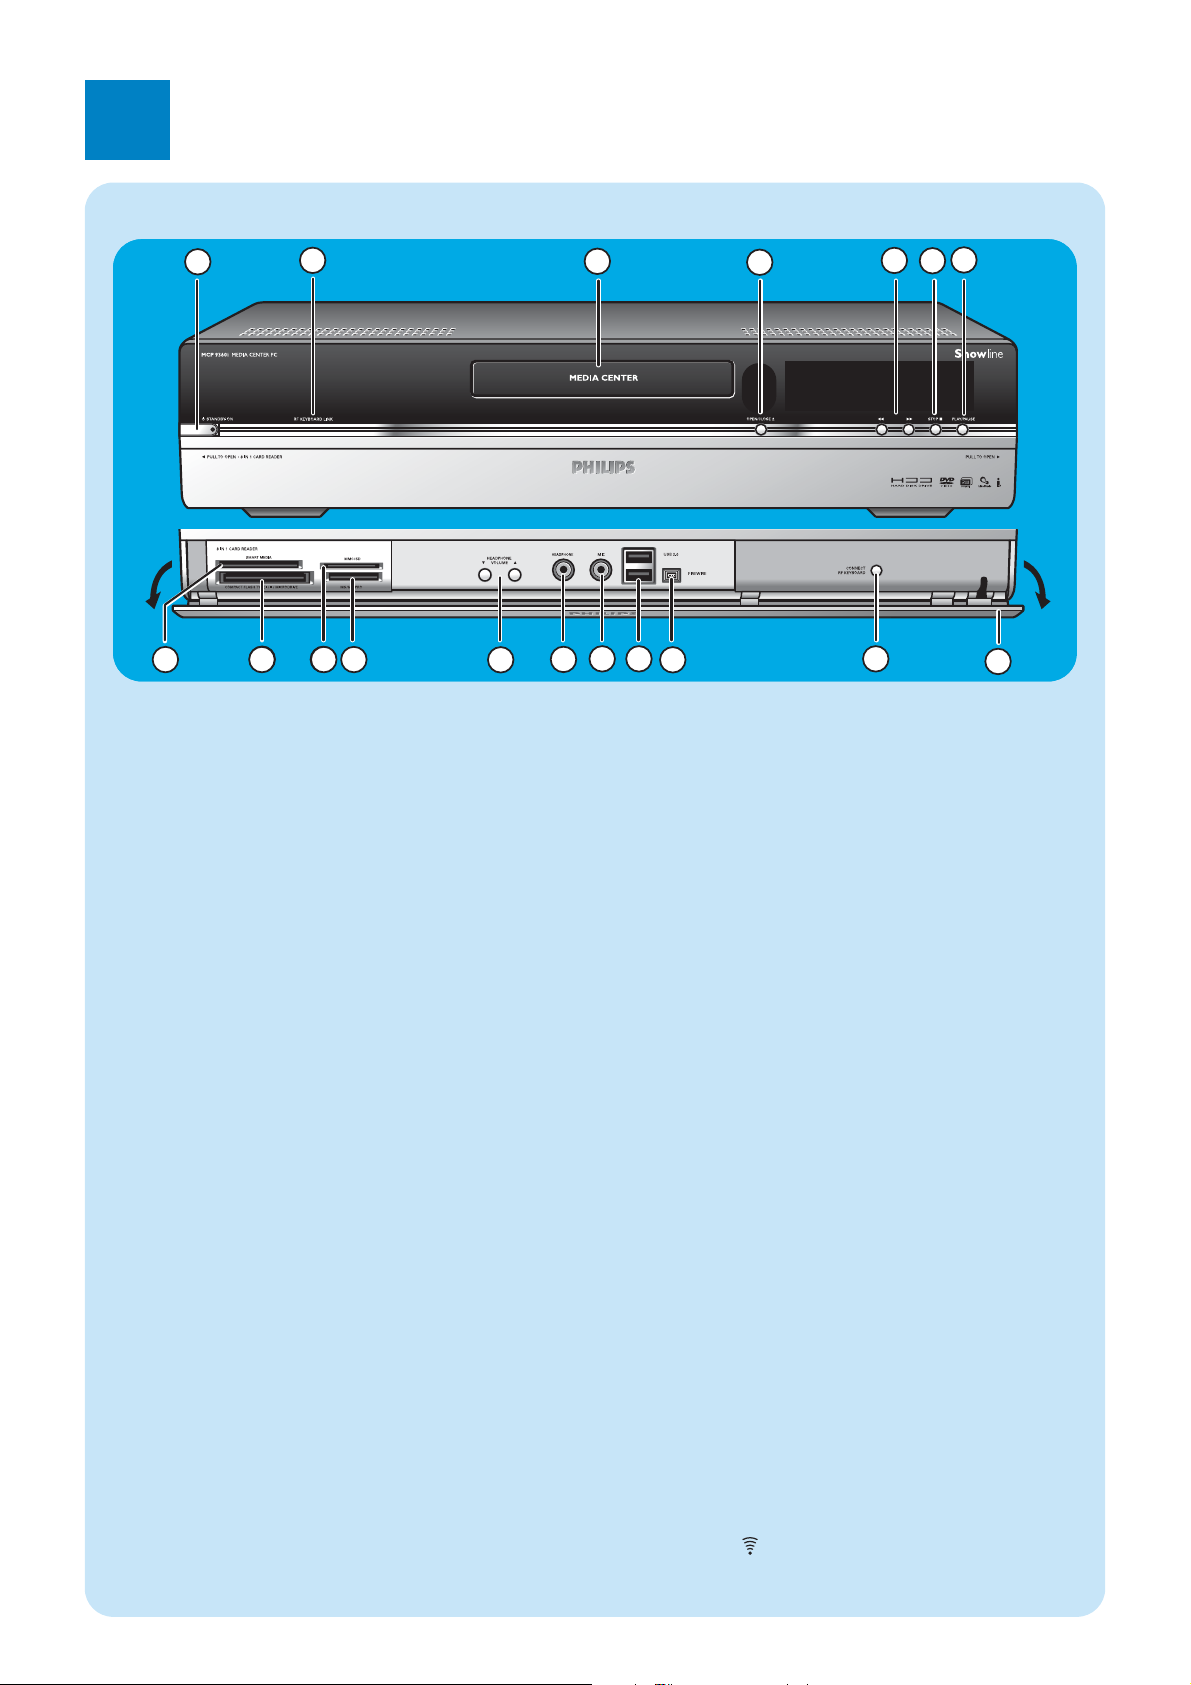
Voorzijde
1
5
8
7
6
8
9
3
13
12
9 10
11
4
14
15
16
17
18
2
1yySTANDBY-ON
Zet Media Center AAN of in de stand standby (energiebesparende stand).
STANDBY/ON-lampje (in de toets)
– Oranje als Media Center op de netspanning is aange-
sloten. Uw Media Center staat dan in de energiebesparende stand, waarbij nauwelijks energie wordt
verbruikt.
– Rood als uw Media Center standby wordt gezet met
de yyStandby-toets (1) van de afstandsbediening.
– Het lampje dooft als het Media Center wordt
ingeschakeld met de yyStandby-toets (1) van de
afstandsbediening of de yySTANDBY-ON-toets (1).
2 RF KEYBOARD LINK
Knippert als uw Media Center informatie van het
draadloze toetsenbord ontvangt.
3 Optisch station
Voor het afspelen en branden van cd’s/dvd’s
4 OPEN/CLOSE //
Opent en sluit de lade van het optisch station.
5 5
– Snel terugzoeken binnen het huidige nummer
(ingedrukt houden).
6
– Snel vooruitzoeken binnen het huidige nummer
(ingedrukt houden).
– Nummer in slow motion afspelen als dvd in
pauzestand staat (één keer indrukken).
6 STOP 9
Afspelen stoppen.
7 PLAY/PAUSE
– Afspelen starten.
– Afspelen onderbreken.
8 SMART MEDIA
Sleuf voor Smart Media-geheugenkaart.
9 COMPACT FLASH TYPE 1 / 11 MICRODRIVE
Sleuf voor Compact Flash-geheugenkaart.
10 MMC/SD
Sleuf voor MMC/SD (MultiMedia Card / Secure Digital
Card) geheugenkaart, b.v. van een digitale camera.
11 MS/MS PRO
Sleuf voor memory stick (Pro).
12 4 HEADPHONE VOLUME 3
Volumeregelaars voor hoofdtelefoon. Het volume van de
hoofdtelefoon is onafhankelijk van het volume van de
set.
13 HEADPHONE
Aansluiting voor hoofdtelefoon.
14 MIC
Aansluiting voor microfoon.
15 USB 2.0
Aansluitingen voor USB 1.1- en USB 2.0-apparatuur.
16 FIREWIRE (IEEE1394/i.LINK) - 4-polig
Aansluiting voor digitale apparatuur die geschikt is voor
FireWire / IEEE1394 / i.LINK (b.v. digitale camcorders,
harde schijven enz. met een 4 -polige connector) om
data naar het Media Center te kopiëren.
17 CONNECT RF KEYBOARD
Toets voor verbinding tussen Media Center en draadloos toetsenbord. Deze toets wordt gebruikt in combinatie met de toets (3) op het toetsenbord.
18 Klep
1
Functiebeschrijving
Page 40
40
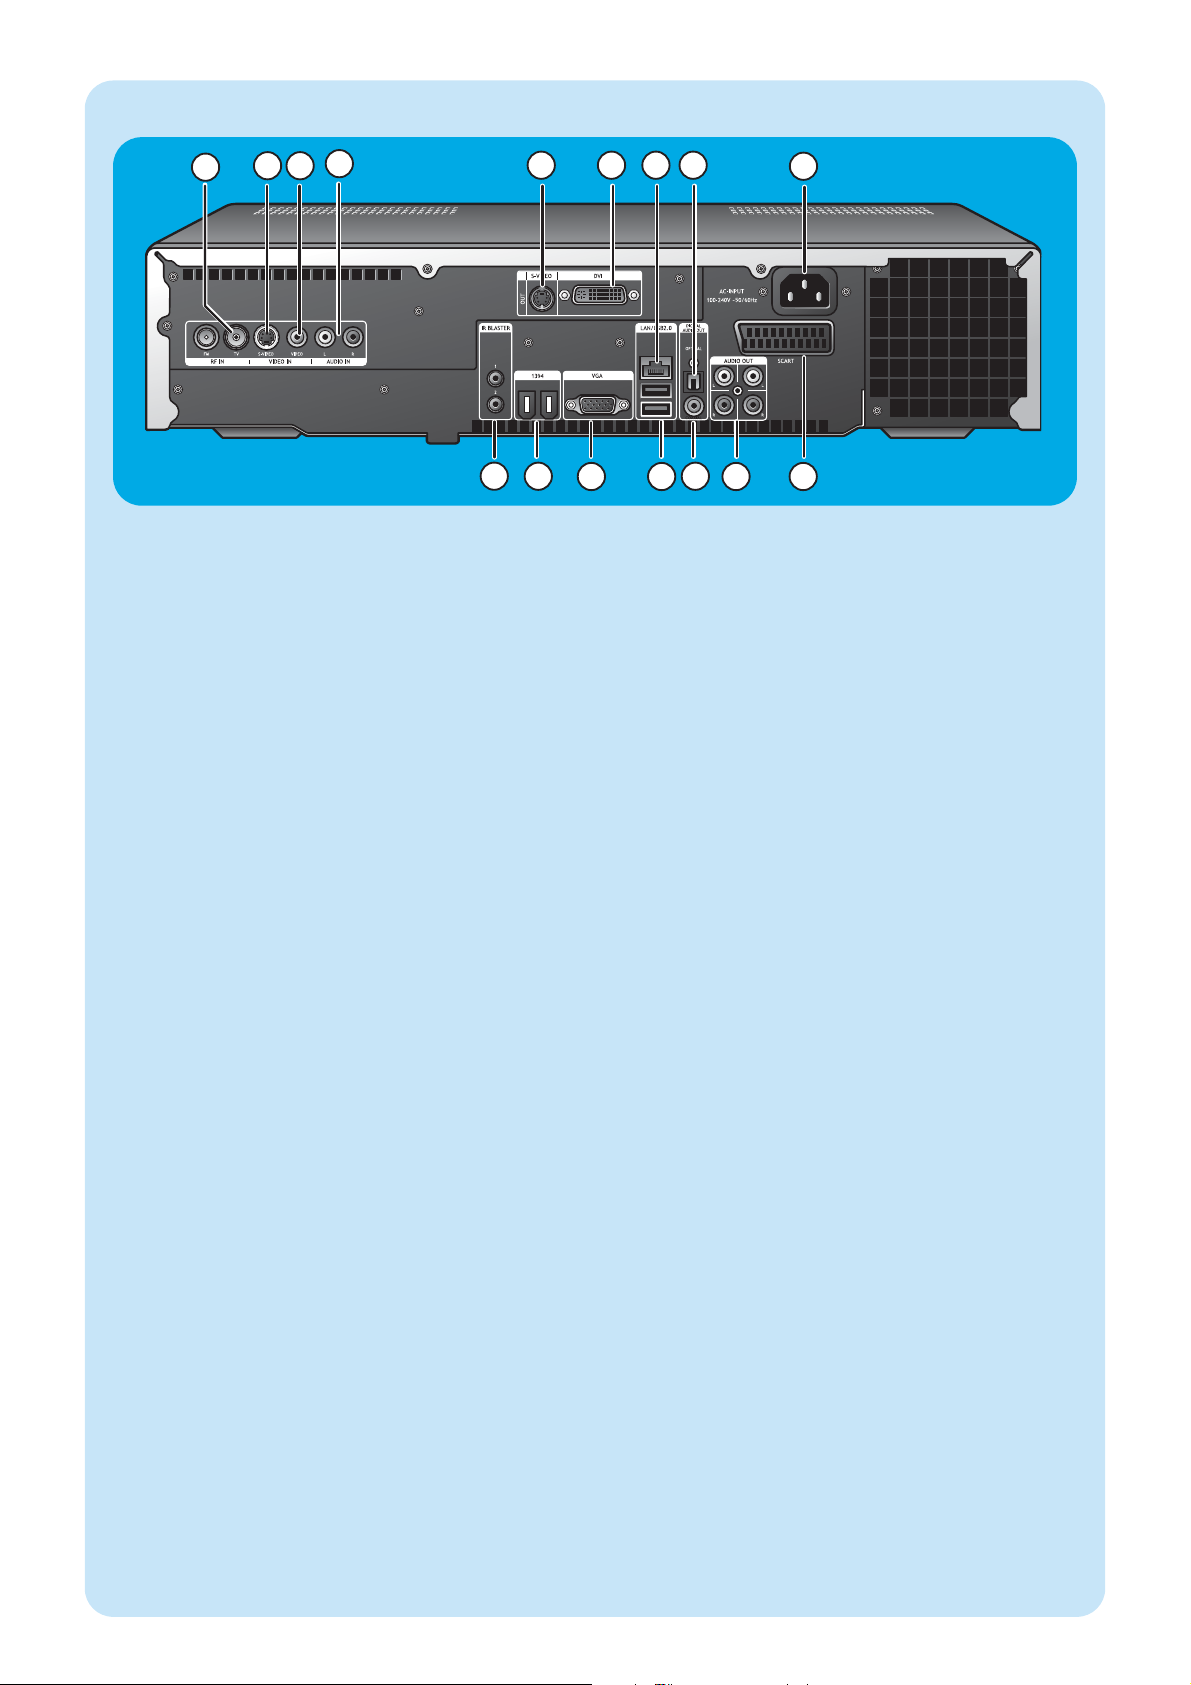
Achterzijde
5
9
11
10
12
13
14
15 16
6 7 8
2 3
4
1
1 RF IN - tv
Aansluiting voor een kabelantenne voor tv-ontvangst.
2 VIDEO IN - S-Video
Video-ingang voor aansluiting op de S-Video-uitgang van
een tv, kabel/satelliet set-top box, dvd-speler/recorder
enz.
3 VIDEO IN -Video (CVBS)
Video-ingang voor aansluiting op de CVBS-uitgang
(samengestelde video) van een tv, kabel/satelliet set-top
box, dvd-speler/recorder enz.
4 AUDIO IN
Stereo-ingangen voor aansluiting op de geluidsuitgangen
van een kabel/satelliet set-top box, dvd-speler/recorder,
geluidsapparatuur enz.
5 S-VIDEO OUT
Uitgang voor aansluiting op de ingang vanopnameapparatuur met S-Video (dvd,VCR) of een tv met
S-Video.
6 DVI OUT
DVI-D (alleen Digital Video Interface-Digital) uitgang
voor aansluiting op een monitor of flatscreen-tv die een
DVI-D-ingang heeft.
7 LAN
Voor aansluiting op uw lokale netwerk (LAN).
8 DIGITAL AUDIO - Optical - Out
Optische audio-uitgang voor aansluiting op de optische
audio-ingang van een receiver, tv of opnameapparatuur
(cd-recorder,VCR enz.).
9 AC-INPUT (100-240V - 50/60Hz)
Voor aansluiting van het Media Center op de netspanning.
10 IR (Infrarood) BLASTER (2x)
Voor aansluiting van een IR-blaster (infrarood) voor het
kiezen van kanalen op uw kabel/satelliet set-top box via
de afstandsbediening van uw Media Center.
11 1394 (Firewire/i.LINK) - 6-polig (2x)
Voor aansluiting van randapparaten die compatibel zijn
met IEEE 1394/Firewire/i.LINK en apparatuur zoals
externe harde schijven die twee extra pennen voor hun
voedingsspanning nodig hebben.
12 VGA
Voor aansluiting op een monitor of flatscreen-tv met
een VGA-ingang (Video Graphics Array).
13 USB 2.0 (2x)
Aansluitingen voor USB 1.1- en USB 2.0-apparatuur.
14 DIGITAL AUDIO - COAXIAL - Out
Coax audio-uitgang voor aansluiting op de coax audioingang van een receiver of opnameapparatuur (b.v. een
dvd-recorder enz.).
15 AUDIO OUT (2x)
Stereo-uitgangen voor aansluiting op de geluidsingangen
van een receiver of opnameapparatuur (b.v. een dvdrecorder).
16 SCART (RGB / CVBS)
Voor aansluiting op de SCART-ingangsconnector van een
tv.
Opmerking:
Het Media Center heeft al ingebouwde antennes voor
uw wireless LAN (802.11b/g). Daarom hoeft u geen
wireless USB-adapter aan te sluiten om het Media
Center in uw draadloze netwerk op te nemen
.
Page 41
41
C
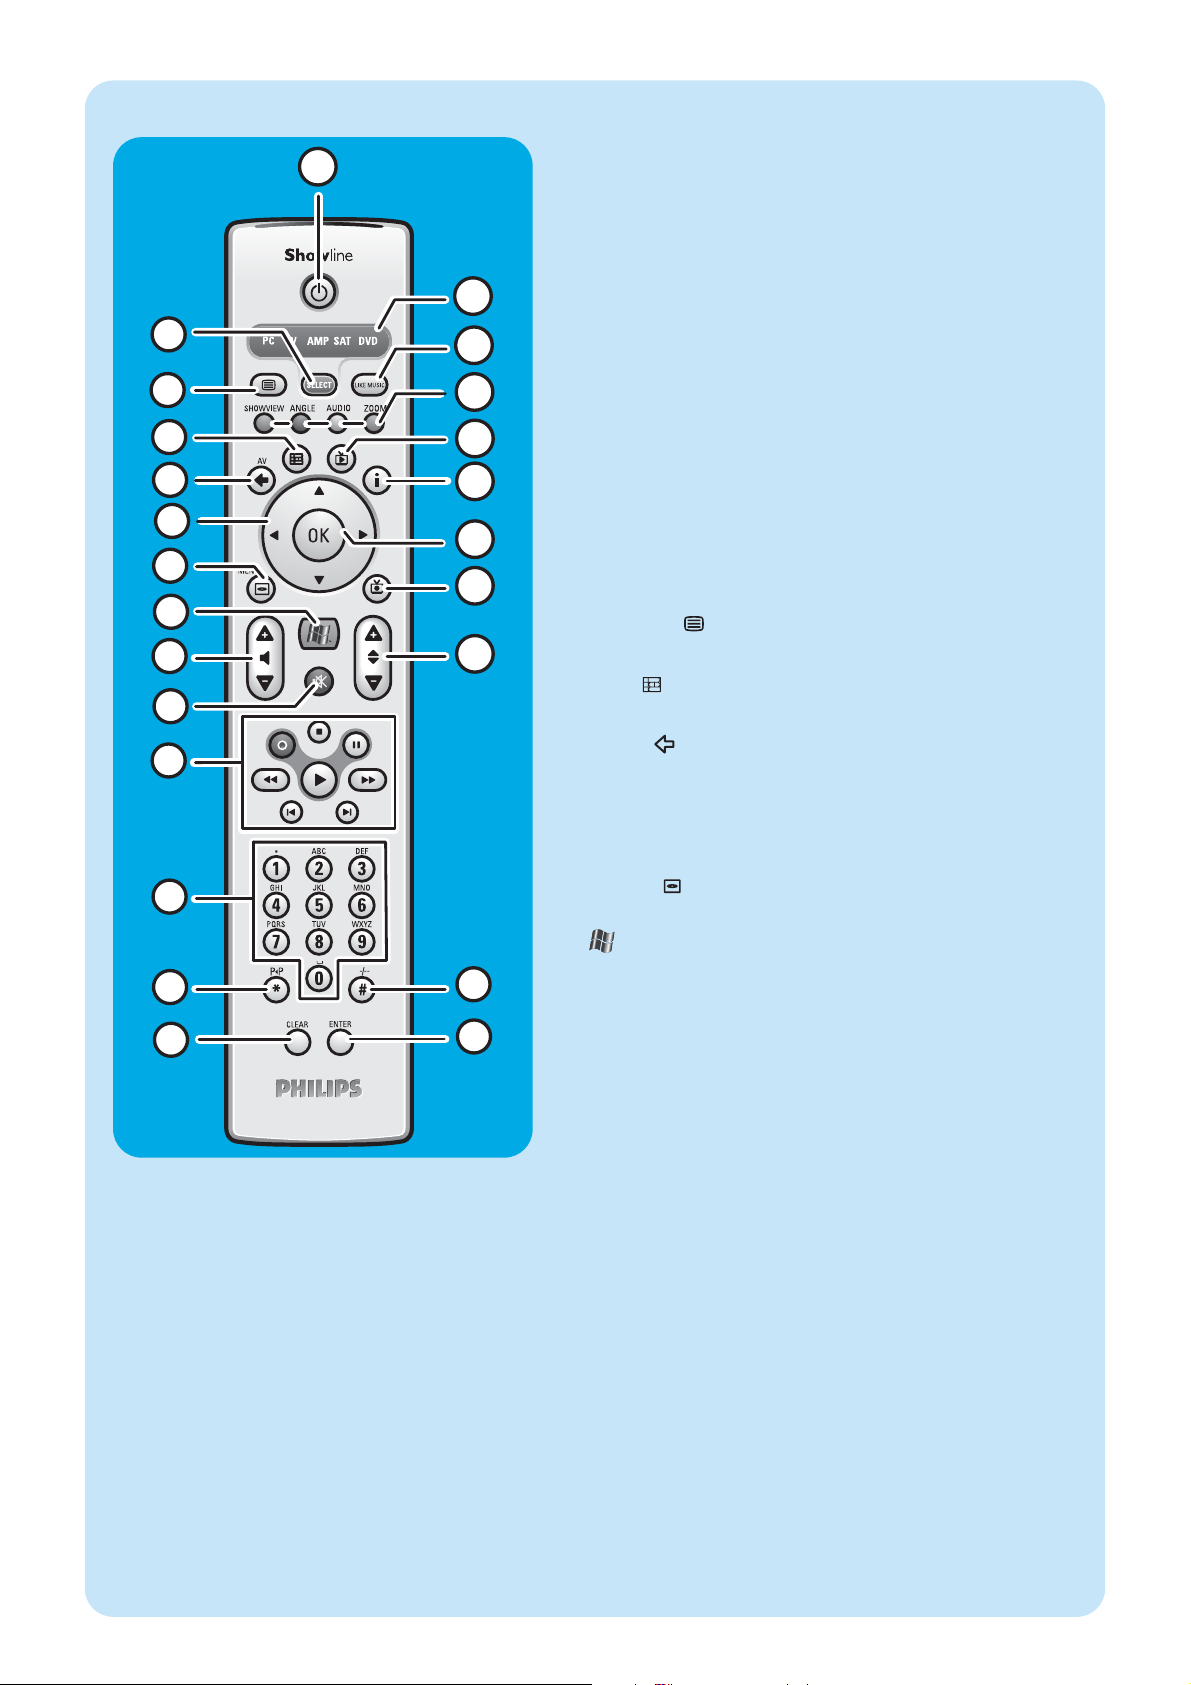
Afstandsbediening
3
1
2
5
4
6
10
9
7
8
12
13
14
17
18
21
20
22
23
16
15
19
11
24
In dit hoofdstuk worden de functies van de toetsen op de
afstandsbediening alleen behandeld voor de stand PC. Informatie
over de toetsfuncties in andere standen (tv, AMP, SAT en dvd)
vindt u in de gebruikershandleiding van de RC4370.
Opmerkingen:
– Na het inschakelen van het Media Center kiest de afstandsbedie-
ning automatisch de stand Media Center.
– Als u een toets of toetsencombinatie langer dan 30 seconden inge-
drukt houdt, verstuurt de afstandsbediening geen infraroodsignalen
meer.
1yyStandby
Zet het Media Center AAN of in de stand standby.
2 SELECT
Met deze toets kiest u het apparaat dat u met de afstandsbediening wilt bedienen.Voor het Media Center is dat de stand PC.
Na het inschakelen van de afstandsbediening kiest deze automatisch de stand Media Center.
3 Teletekst (
)
Tv/SAT (in PC-stand): teletekst aan/uit.
4 Gids ( )
Opent de elektronische tv-programmagids.
5 Terug ( )
Terug naar vorig scherm.
6 1 2 3 4
Cursor naar links of rechts en omhoog of omlaag.
Voor navigatie in menu’s.
7 MENU ( )
Toont het menu van de dvd in het optisch station.
8
Opent het hoofdmenu van de Media Center-versie van
Microsoft Windows®XP.
9 – Volume +
Verlaagt (–) of verhoogt (+) het volume van uw Philips-tv.
Zie de gebruikershandleiding van de RC4370 voor de volumeregeling met tv’s van andere merken.
10 Mute (s)
Zet het geluid van de hoofdtelefoon uit.
11 0 (Opname)
Tv-programma opnemen en opslaan op de harde schijf van het
Media Center. Opgenomen programma’s worden standaard
opgeslagen in de map Gedeelde documenten (map tv-opnamen).
9 (Stop) Stopt momenteel afspelend of opnemend medium.
; (Pauze) Onderbreekt afspelend of opnemend medium.
5 6 (Zoeken)
Snel terugzoeken (5) of vooruitzoeken (6) in huidige dvdhoofdstuk (ingedrukt houden).
2 (Afspelen) Film, muziek of afbeeldingen afspelen.
¡ ™ (Overslaan)
Op het medium (video en/of audio) een muziektitel (cd) of een
filmhoofdstuk (dvd) per keer terugspringen (¡) of
vooruitspringen (™).
Page 42
42
3
1
2
5
4
6
10
9
7
8
12
13
14
17
18
21
20
22
23
16
15
19
11
24
12 Cijfertoetsen 0 - 9
Voor het invoeren van cijfers of letters (afhankelijk van de
gekozen functie) voor het kiezen van tv-kanalen, het invoeren
van tekst in een zoek- of tekstvenster van het Media Center
enz.
13 P1 P (*)
Naar vorige programma/kanaal gaan.
14 CLEAR
Annuleert de vorige keuze die u maakte (zoals de Backspacetoets op een toetsenbord).
15 ENTER
Bevestigt uw opdracht of gekozen optie.
16 – / – – (#)
Afwisselen tussen 1- of 2-cijferige programma/kanaalnummers.
17 – Program +
Naar een lager (–) of hoger (+) programma/kanaalnummer.
18 Tv-opnamen ( )
Sneltoets naar opgenomen tv-programma’s op de harde schijf
van het Media Center.
19 OK
Bevestigt uw opdracht of gekozen optie (zoals de ENTERtoets).
20 i
–
Geeft informatie over het momenteel gekozen tv-programma.
– Biedt in verschillende menu’s extra mogelijkheden.
21 Live TV ( )
Sneltoets voor live-TV bekijken.
22 Rood (SHOWVIEW)
Teletekst actief: (
)
rood.
Groen (ANGLE)
Teletekst actief: groen.
Geel (AUDIO)
Teletekst actief: geel.
Blauw (ZOOM)
Teletekst actief: blauw.
23 LIKE MUSIC
Maakt automatisch een afspeellijst van muziek.
24Selectievenster
Geeft aan welke stand momenteel gekozen is.
Page 43
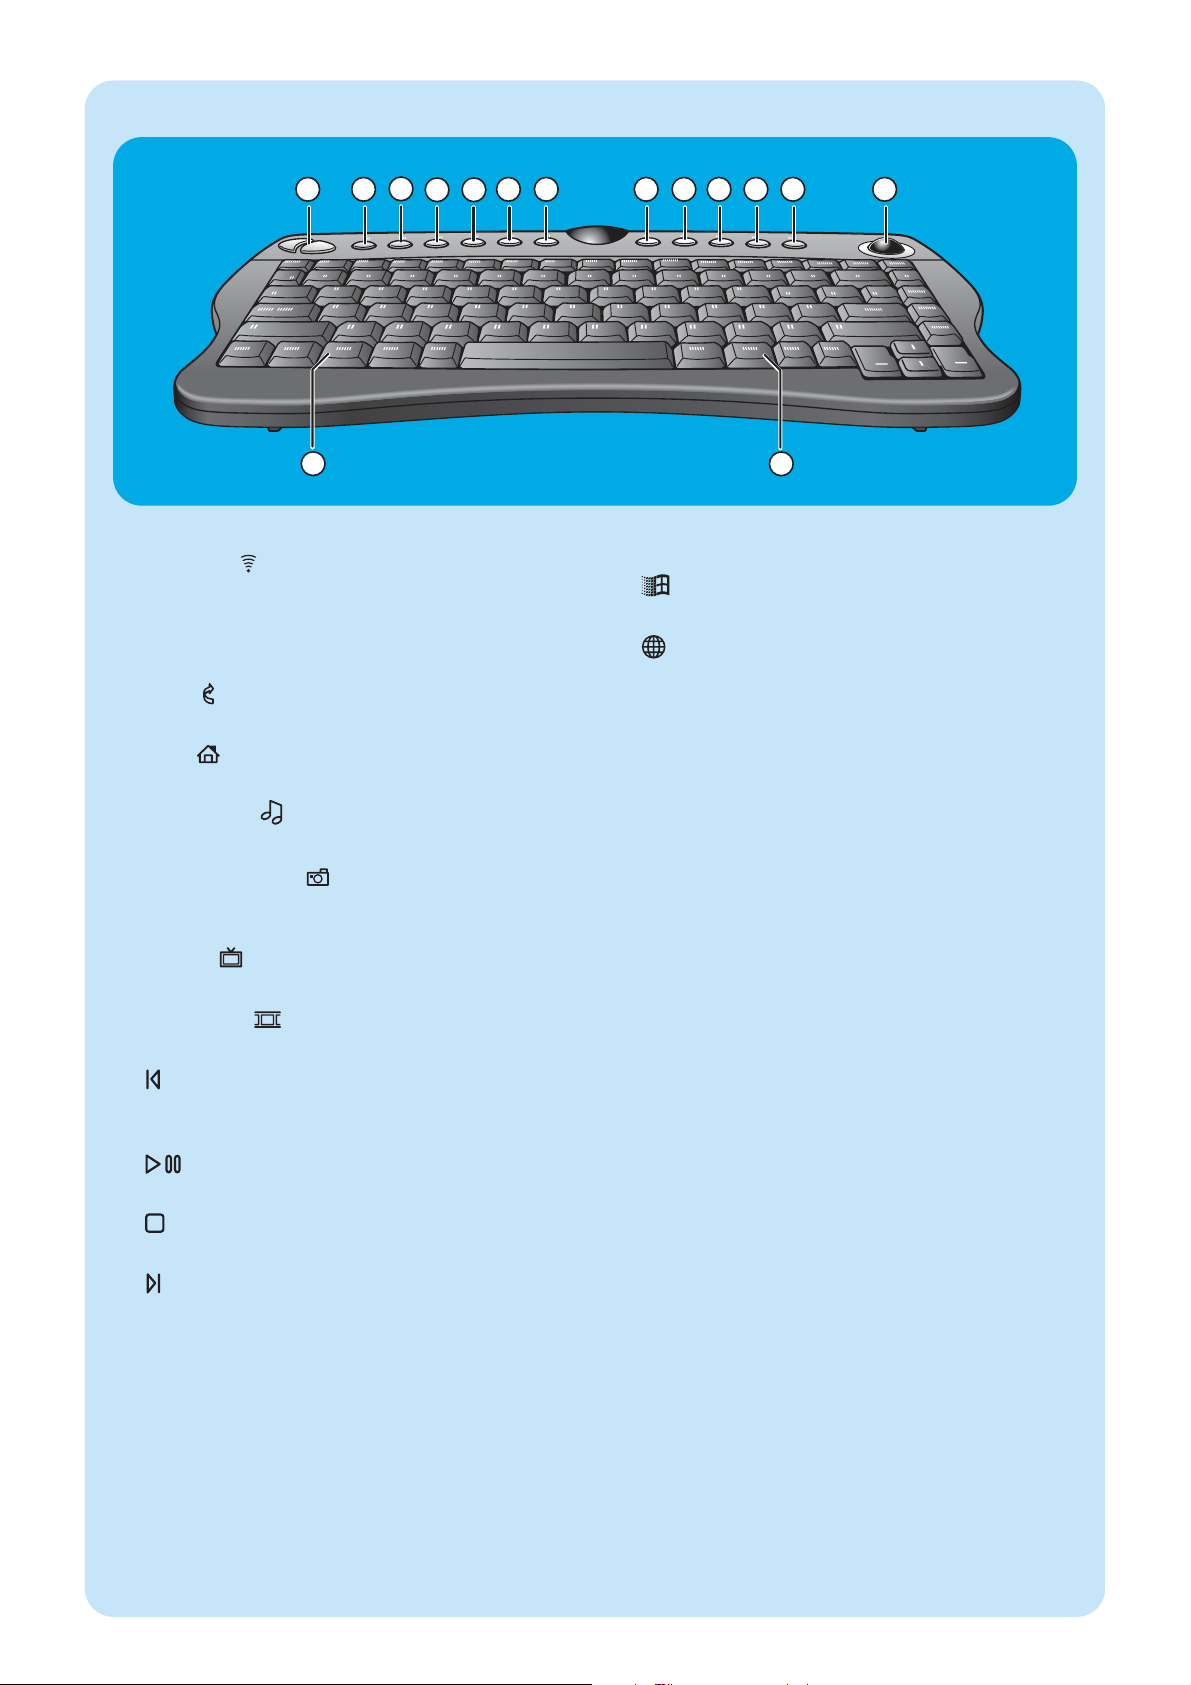
43
Draadloos toetsenbord
3
6
4
5
9
7
8
14
15
1 2 10 11
12
13
1 Linker- en rechtermuisknop
2 Verbinden
Toets voor verbinding tussen draadloos toetsenbord en
Media Center. Deze toets wordt gebruikt in combinatie
met de toets CONNECT RF KEYBOARD (17) op
de voorzijde van het Media Center.
3 Terug
Terug naar vorig scherm.
4 Start
Opent het menu van het Media Center.
5 Mijn muziek
Opent het menu Mijn muziek van het Media Center.
6 Mijn afbeeldingen
Opent het menu Mijn afbeeldingen van het Media
Center.
7 Mijn TV
Opent het menu Mijn TV van het Media Center.
8 Mijn video’s
Opent het menu Mijn video’s van het Media Center.
9
Op het medium (video en/of audio) een muziektitel of
een dvd-hoofdstuk per keer terugspringen.
10
Afspelen van cd- en dvd-speler, afbeeldingen, muziek.
11
Stopt momenteel afspelend of opnemend medium.
12
Op het medium (video en/of audio) een muziektitel of
een dvd-hoofdstuk per keer vooruitspringen.
13 Trackball (muis)
Verplaatst de cursor over het scherm.
14
Opent het Start-menu van Windows®.
15
Start Internet Explorer.
Page 44
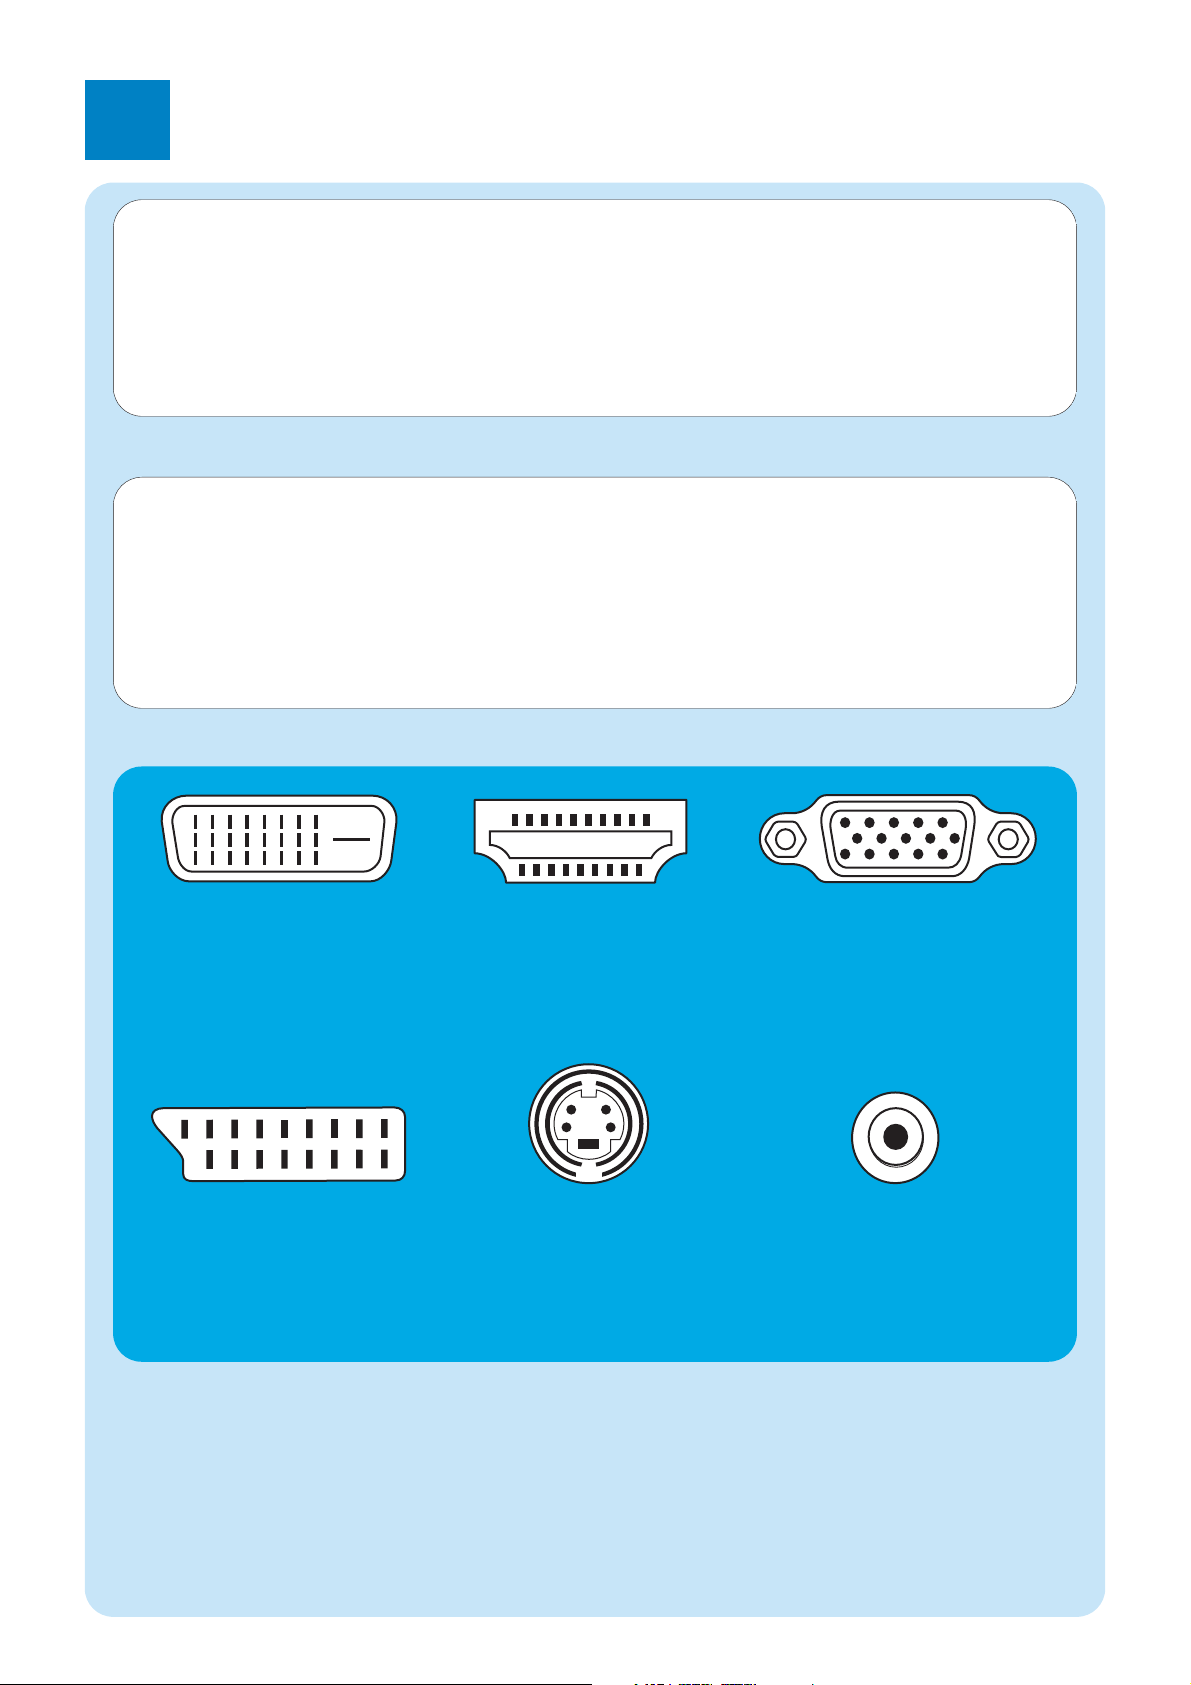
2
Philips Media Center installeren
44
Tv/monitor aansluiten
Uw Media Center heeft vier tv OUT/MONITOR OUT-connectors: S-VIDEO OUT (6), DVI OUT (7),
VGA (16) en SCART (21). We raden u aan DVI (op HDMI) aan te sluiten, want dat geeft de beste beeldkwaliteit. Heeft
uw tv een CVBS-connector, dan kunt u de adapter voor SCART naar SVHS/CVBS gebruiken voor een CVBS-verbinding.
Controleer het type connector:
Controleer eerst welk type connector uw tv of monitor heeft voordat u iets gaat aansluiten. Gebruik daarbij de onderstaande
afbeeldingen van de verschillende connectortypen. De volgorde van de afbeeldingen geeft tevens de beeldkwaliteit aan, van de hoogste (1) naar de laagste (6) kwaliteit.
LET OP! Schakel altijd uw Media Center uit en trek de stekker uit het stopcontact voordat u kabels aansluit of
losmaakt.
Opmerkingen:
– Tenzij anders is vermeld, bevinden alle in- en uitgangen van uw Media Center zich aan de achterzijde.
– Sluiteerst alle videobekabeling (tv/monitor) aan en kijk daarna in het hoofdstuk ‘Audio aansluiten’ voor informatie over het
aansluiten van audioverbindingen op uw Media Center.
1. DVI-D-connector
Aanbevolen.Volledige
resolutie en digitale
verbinding
2. HDMI-connector
Aanbevolen.Volledige
resolutie en digitale
verbinding
3.VGA-connector
Volledige resolutie, maar
signaal wordt omgezet
naar analoog.
4. SCART-connector
Beperkte resolutie en
analoge verbinding (RGB:
scheiding in 3 kleuren).
5. S-Video-connector
Beperkte resolutie en analoge verbinding (RGB:
1 kanaal gemoduleerd).
6. CVBS-connector
Alleen gebruikt voor
opnemen vanaf een
set-top box.
Tv/monitorconnectors
Page 45
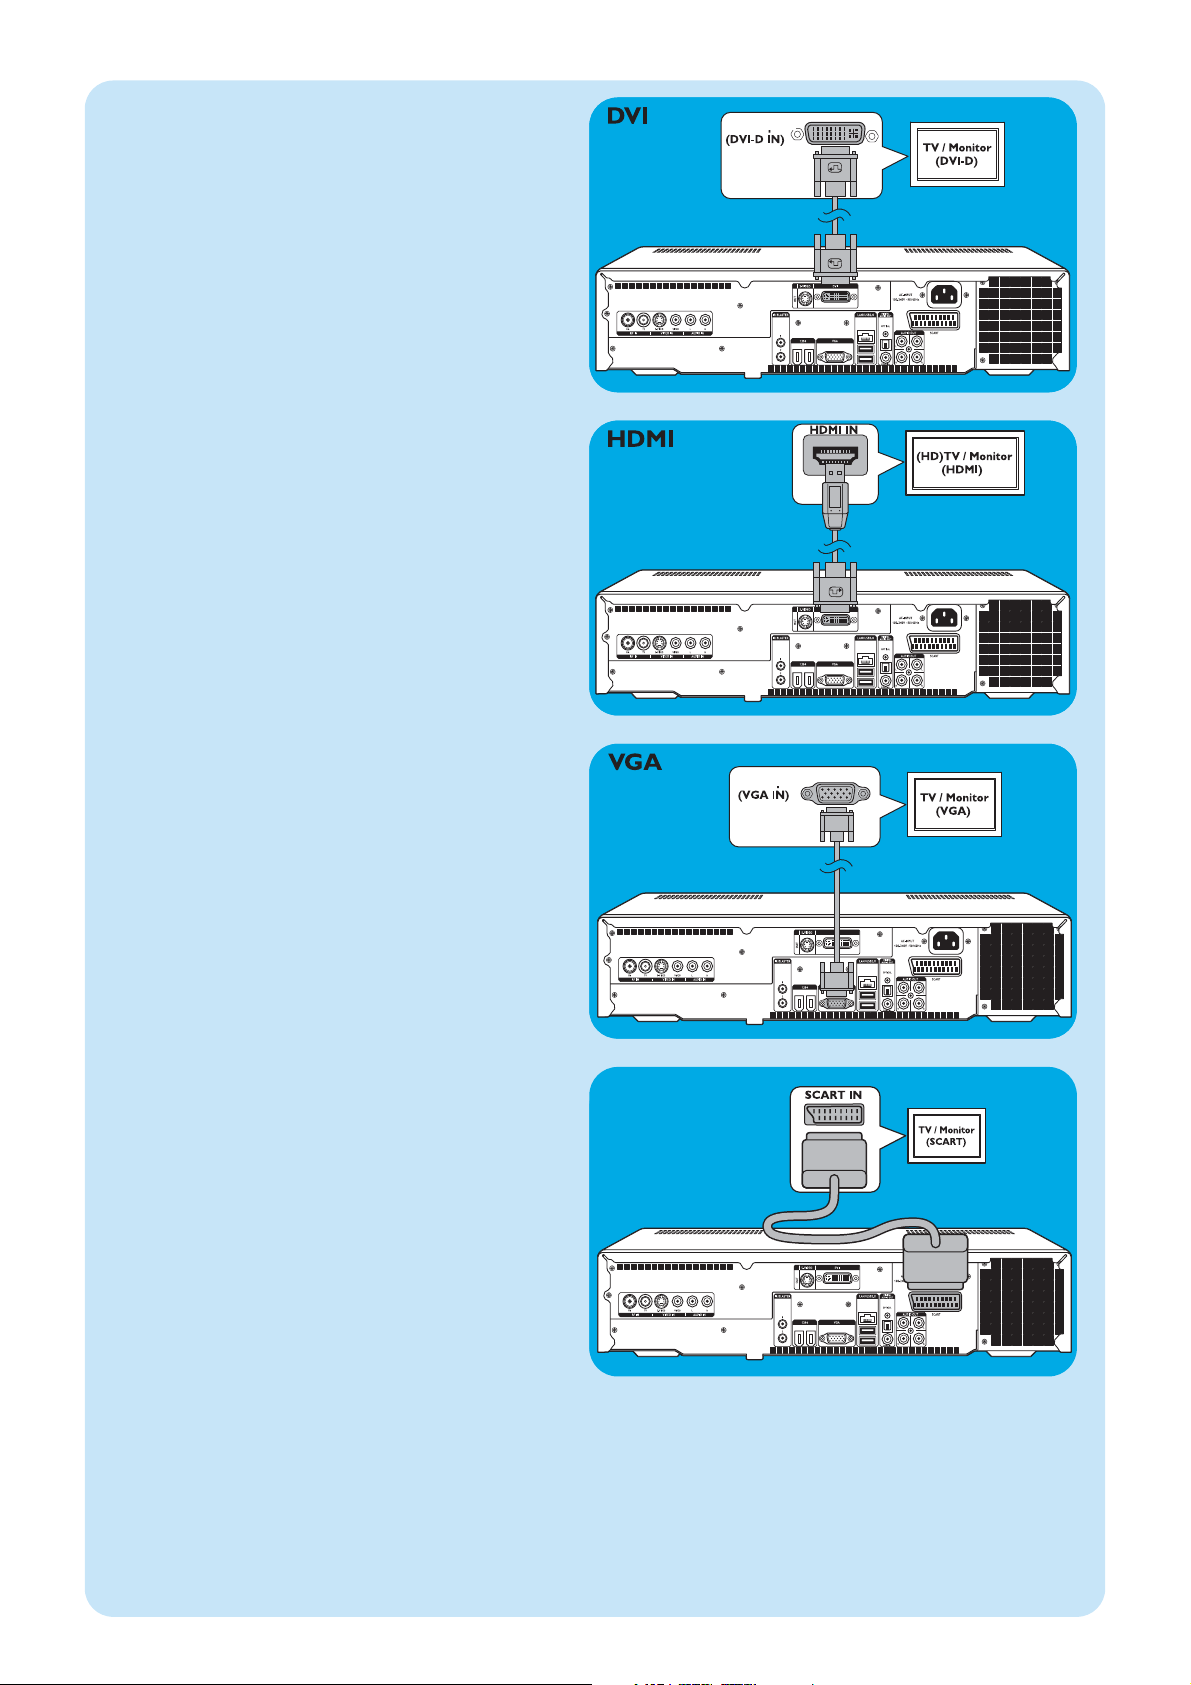
45
4. SCART-verbinding
• Sluit de SCART-kabel aan tussen de SCART-connector
van uw tv/monitor en de SCART-connector (16) van
het Media Center.
Opmerkingen:
– Controleer of de SCART-connector op uw tv RGB (Rood,
Groen, Blauw) ondersteunt, zodat u de optimale beeldkwaliteit krijgt.
– Bij normale PC-toepassingen kan de beeldkwaliteit iets lager
worden.
–
Sommige tv’s schakelen automatisch om tussen de beeldverhoudingen 4:3 en 16:9 op grond van de functie Wide
Screen Signaling (WSS). Het Media Center heeft echter
geen WSS-functie. Kijk daarom in de handleiding van uw tv
hoe u de beeldverhouding zelf kunt aanpassen.
– Bij een SCART-verbinding kunnen kleine balken rondom
het beeld verschijnen. Dit wijst niet op een defect.
2. HDMI-verbinding (aanbevolen)
• Sluit de verloopkabel van DVI-D naar HDMI-kabel
tussen de HDMI IN-stekkerbus van de tvof het beeldscherm en de DVI OUT-stekkerbus (6) van het Media
Center.
• Draai de schroefjes van de DVI-kabelconnector vast.
• Selecteer SPDIF of Analoog in het geluidsmenu van de
TV. Zie voor meer informatie de handleiding van uw TV.
3.VGA-verbinding
• Sluit een VGA-kabel (niet meegeleverd) aan tussen de
VGA IN -connector van uw tv/monitor en de VGA-
uitgang (12) van het Media Center. Draai de schroefjes
van de twee kabelconnectors vast.
Opmerking: Als uw VGA tv/monitor een vast bevestigde VGA-
kabel heeft, steek die kabel dan in de VGA -
connector (12) van het Media Center en draai de
schroefjes vast.
1. DVI-D-verbinding (aanbevolen)
• Sluit de DVI-D-kabel aan tussen de DVI-D IN-connec-
tor van uw tv/monitor en de DVI OUT-connector (6)
van het Media Center. Draai de schroefjes van de twee
kabelconnectors vast.
Opmerking: Als uw DVI-D tv/monitor een vast bevestigde DVI-D-
kabel heeft, steek die kabel dan in de DVI OUTconnector (6) van het Media Center en draai de
schroefjes vast.
SCART
Video-ingang
Video-ingang
Page 46
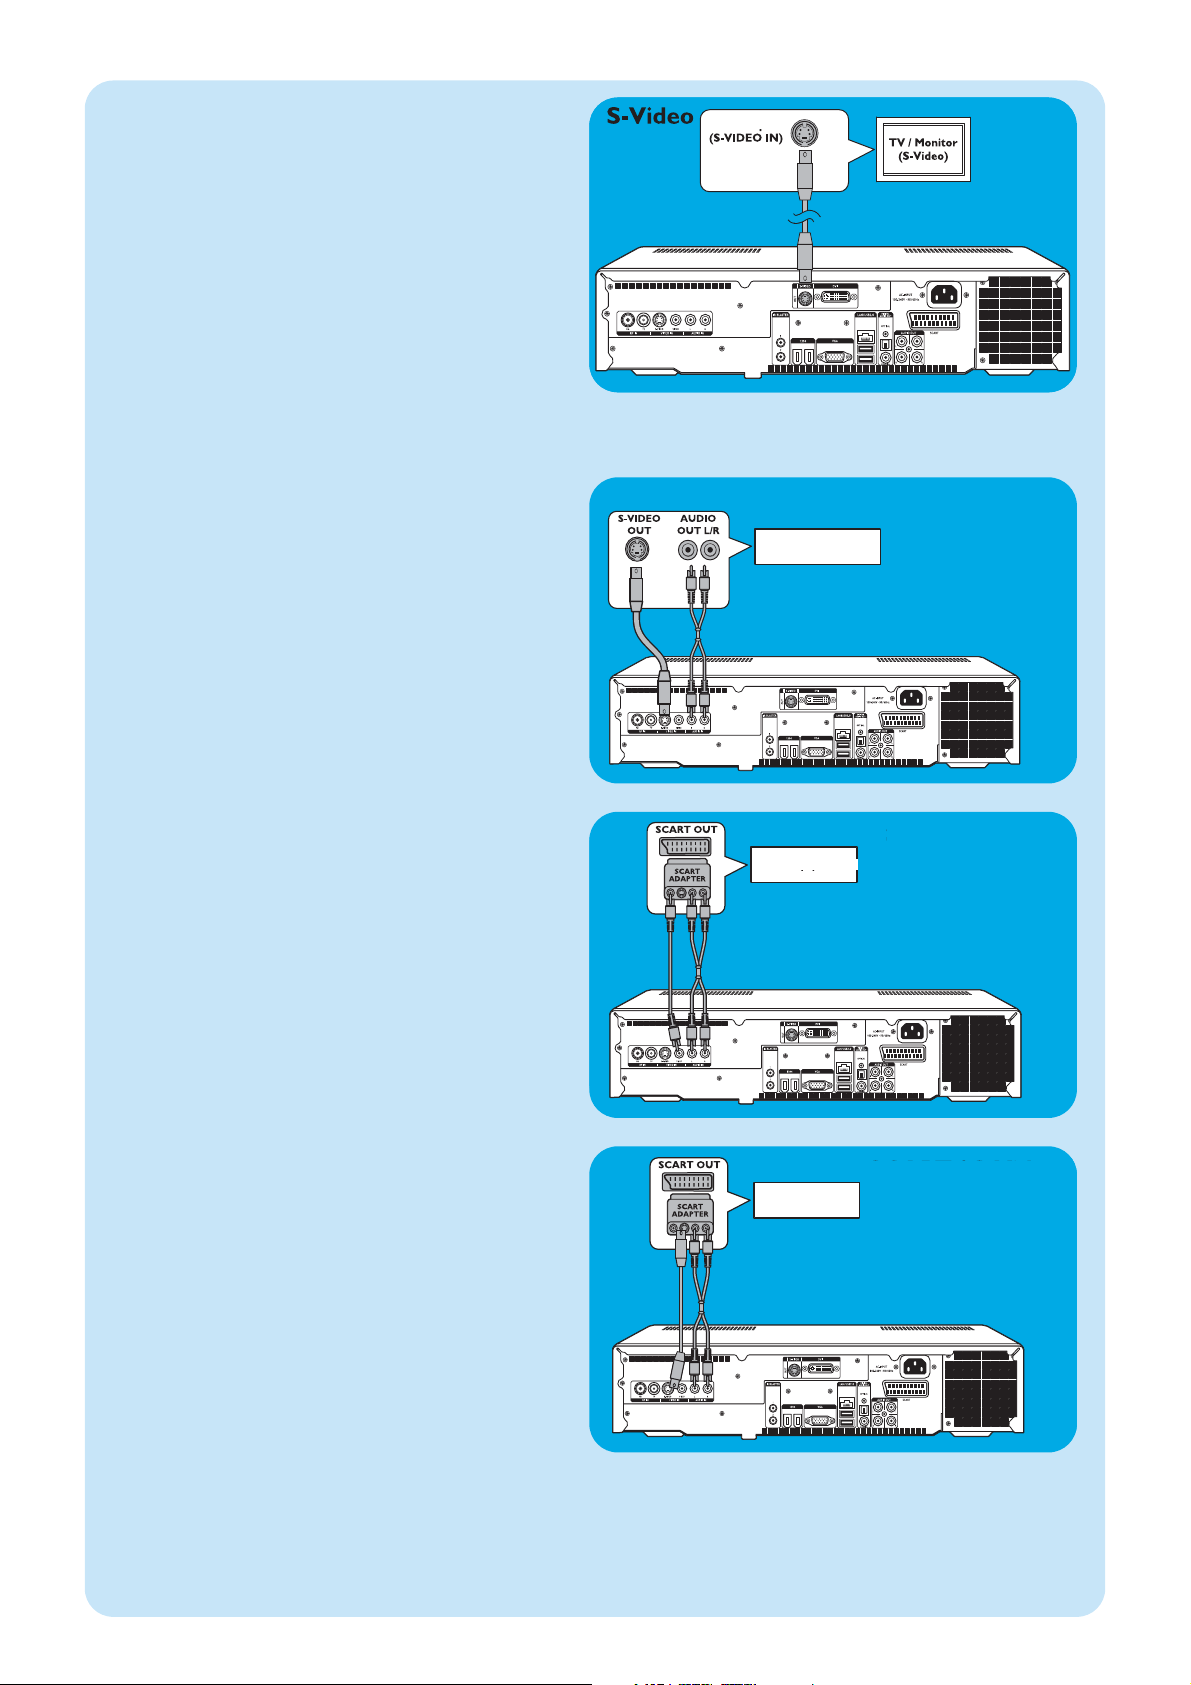
SCART / CVBS
S-Video
SCART / S-Video
46
SCART-verbinding
Als uw video-apparaat alleen een SCART-uitgang heeft, dan
kunt u die met de adapter voor SCART naar SVHS/CVBS
op het Media Center aansluiten.
1 Sluit de adapter voor SCART naar SVHS/CVBS aan op
de SCART-connector van het video-apparaat.
2 Sluit een CVBS-kabel (niet meegeleverd) aan tussen de
gele videoconnector van de adapter en de CVBS-
ingang (3) op het Media Center.
OF:
2 Sluit de S-Video-kabel aan tussen de S-Video-connector
op de adapter en een van de S-Video-ingangen (VIDEO
IN - 2) op het Media Center.
3 Sluit de cinch stereo-audiokabel aan tussen de rode en
witte audioconnectors op de adapter en de identieke
AUDIO-uitgangen (4) op het Media Center.
Opmerking: Als u de S-Video-verbinding gebruikt, kan dat een
zwart/wit-beeld opleveren. Controleer in dat geval of
de video-apparatuur een S-Video-uitgangssignaal
levert. Kijk daarvoor in de handleiding die bij het
video-apparaat is geleverd.
Video aansluiten (b.v. set-top box)
S-Video-verbinding
Een S-Video-verbinding geeft de beste beeldkwaliteit.
1 Sluit de S-Video-kabel aan tussen de S-VIDEO OUT-
connector van uw video-apparatuur en een van de S-
VIDEO IN-connectors (2) van het Media Center.
2 Sluit de cinch stereo-audiokabel aan tussen de AUDIO
OUT L/R-connectors van uw video-apparatuur en de
AUDIO IN L/R-connectors (4) van het Media Center.
5. S-Video-verbinding
• Sluit de S-Video-kabel aan tussen de S-VIDEO IN-con-
nector van uw tv/monitor en de S-VIDEO OUT-connector (5) van het Media Center.
Opmerking: Bij normale PC-toepassingen kan de beeldkwaliteit
iets lager worden.
Video-ingang
Video-apparatuur
Video-apparatuur
Video-apparatuur
Page 47
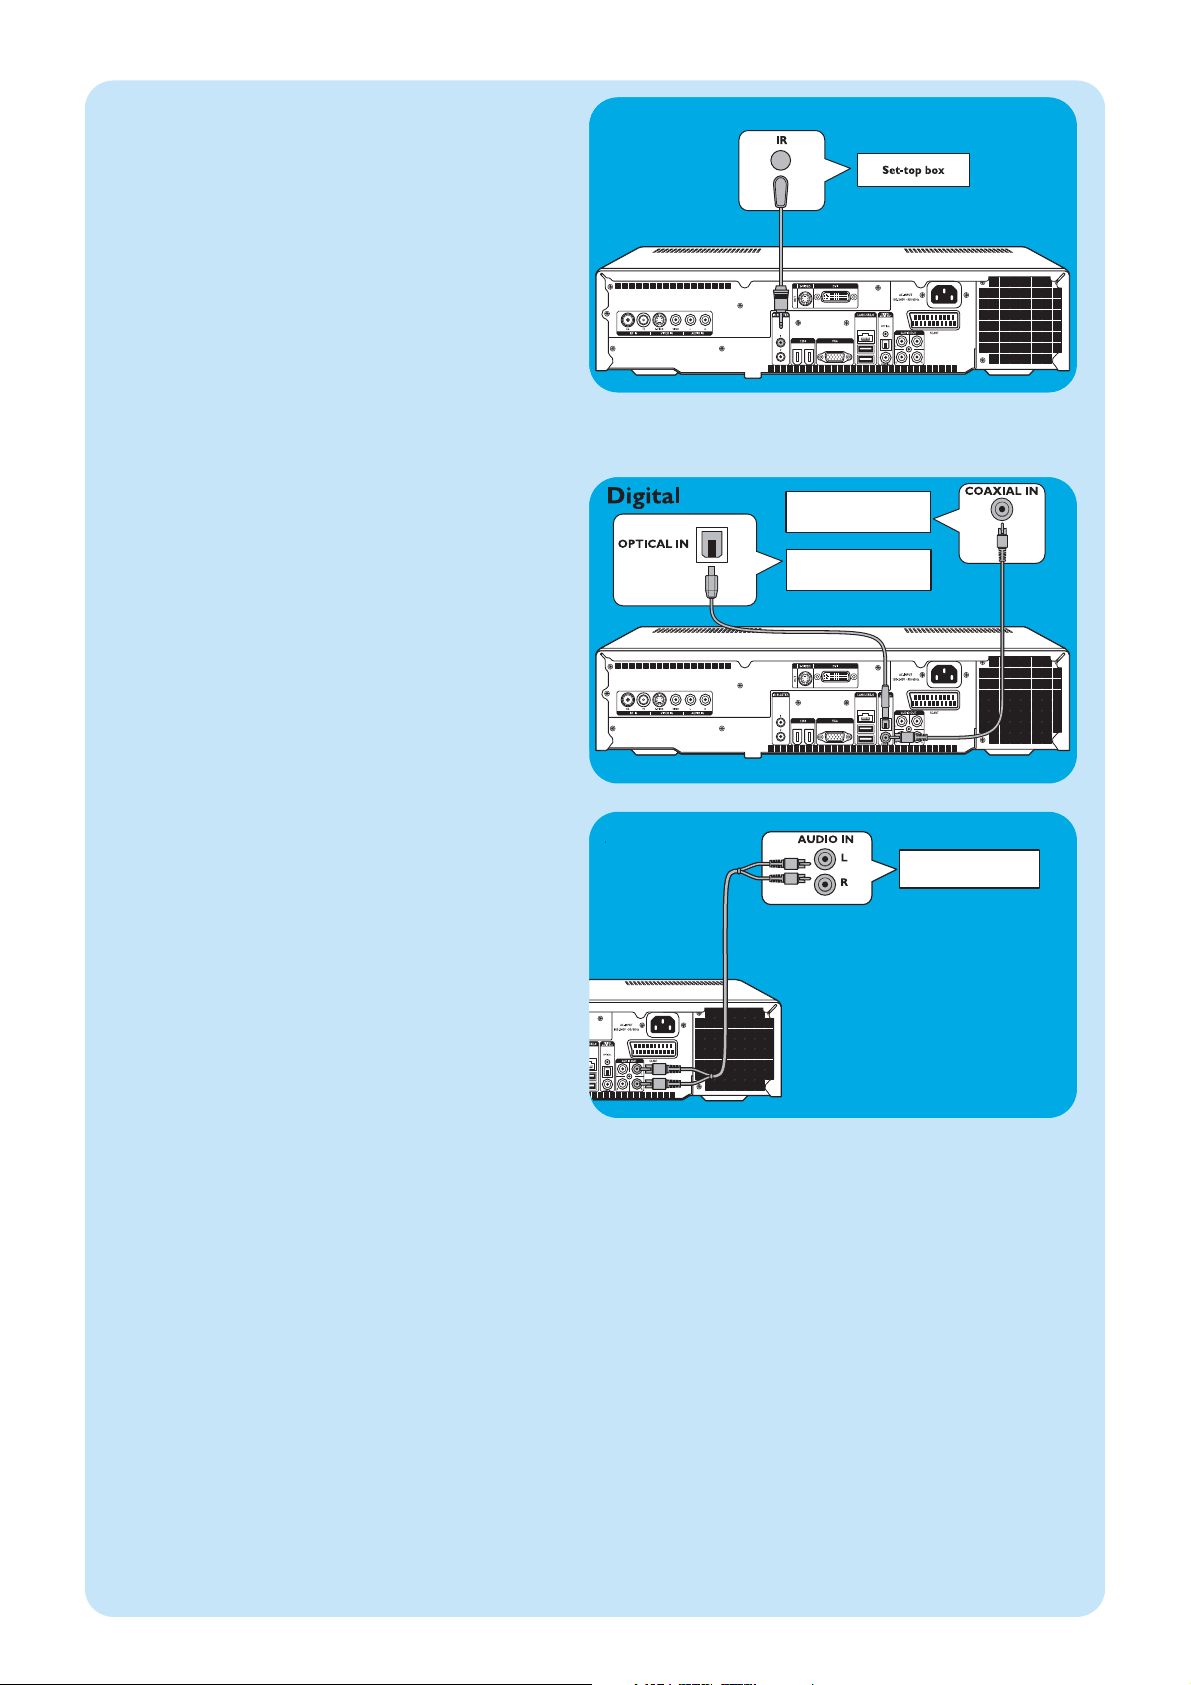
Analog
IR-blaster
47
Audio aansluiten
Digitale optische audioverbinding
• Sluit een digitale optische kabel (niet meegeleverd) aan
tussen de OPTICAL IN-connector van de monitor, tv,
receiver of recorder en de DIGITAL OPTICAL -uit-
gang (8) van het Media Center.
Digitale optische audioverbinding
• Sluit de digitale coaxkabel aan tussen de COAXIAL
IN-connector van uw monitor, tv, receiver of recorder
en de DIGITAL COAXIAL-uitgang (14) van het
Media Center.
Analoge audioverbinding
• Sluit de cinch stereo-audiokabel aan tussen de AUDIO
IN L/R-connectors van uw monitor, tv, receiver of
recorder en de AUDIO OUT L/R-connectors (15)
van het Media Center.
IR-blaster aansluiten
1 Verwijder het beschermende folie van de infraroodsen-
sor op de IR-blaster.
2 Plaats de IR-blaster voor de IR-ontvanger van de
kabel/satelliet set-top box.
3 Sluit het kabeltje van de IR-blaster aan op een van de
IR BLASTER-uitgangen (10) van het Media Center.
> U kunt nu met de afstandsbediening van uw Media
Center kanalen kiezen op uw kabel/satelliet set-top box.
Receiver/recorder
Receiver/recorder
Receiver/recorder
Page 48
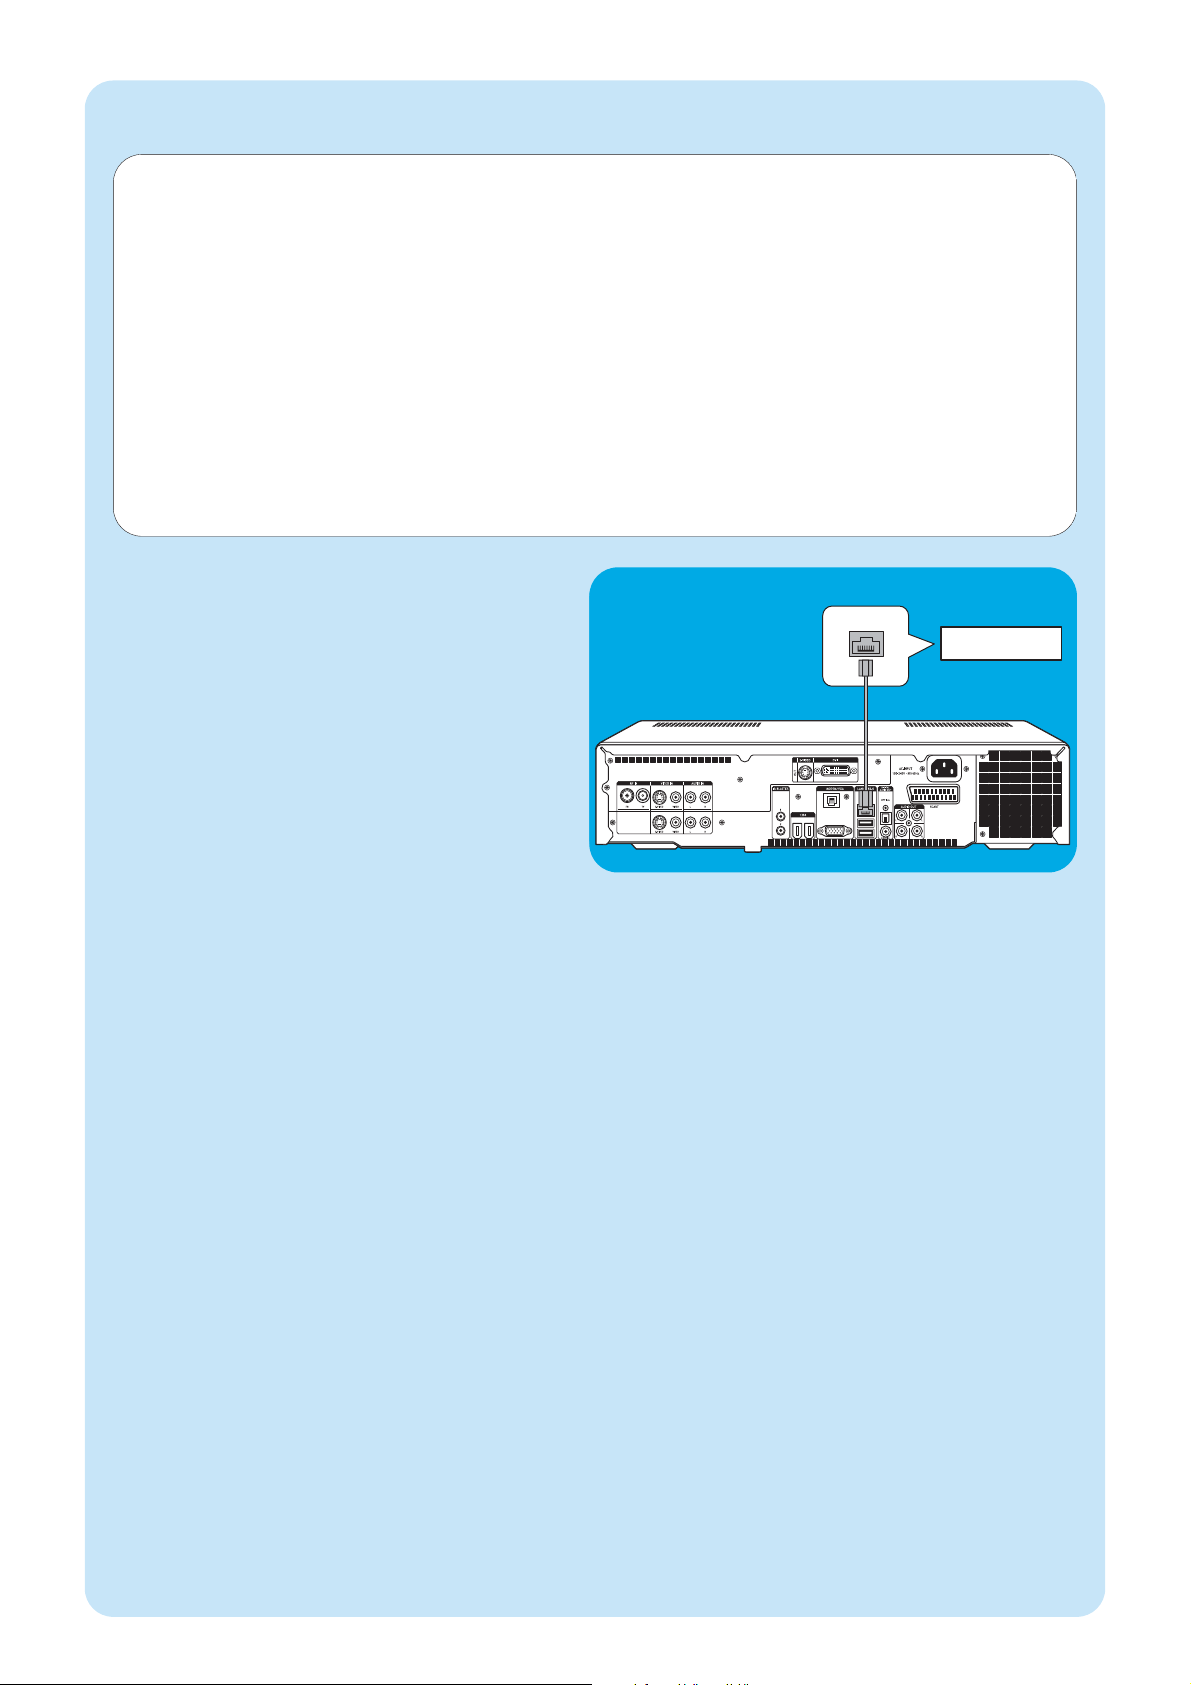
48
LAN
Ethernet (LAN)
Router / DSL modem
Ethernet-verbinding
• Sluit de Ethernet-kabel aan tussen de router/DSLmodem en de LAN-connector (7) van het Media
Center.
• Vraag uw Internet Service Provider (ISP) meer
informatie over de juiste instellingen.
Internet-verbinding aansluiten
Voor het downloaden van de EPG (Elektronische Programmagids) en informatie over zenderfrequenties moet uw Media
Center toegang tot Internet hebben. Controleer daarom of u met een werkende inbelverbinding of breedbandverbinding
Internet-toegang hebt voordat u de software van uw Media Center gaat instellen. Neem contact op met uw Internet
Service Provider (ISP) voor meer informatie over uw Internet-verbinding. Raadpleeg ook ‘Internet-verbinding aansluiten’.
Het Media Center kan op twee manieren met het Internet worden verbonden:
1 via de Ethernet-kabel en een DSL-modem (Digital Subscriber Line), als u een bedraad netwerk hebt;
2 met een draadloze verbinding naar een DSL-modem (Digital Subscriber Line), als u een draadloos netwerk hebt.
Als u het Media Center bedraad of draadloos aansluit op een bestaand thuisnetwerk met één gezamenlijk gebruikte
breedband Internet-verbinding voor alle computers in dat netwerk, dan kunt u het Media Center rechtstreeks op de ‘centrale netwerkeenheid’ aansluiten: dus op de router/gateway. Op die manier heeft het Media Center net als alle andere
computers in het netwerk toegang tot het Internet en is het installeren van ICS (Internet Connection Sharing) overbodig
om uw Media Center op het Internet aan te sluiten.
Page 49
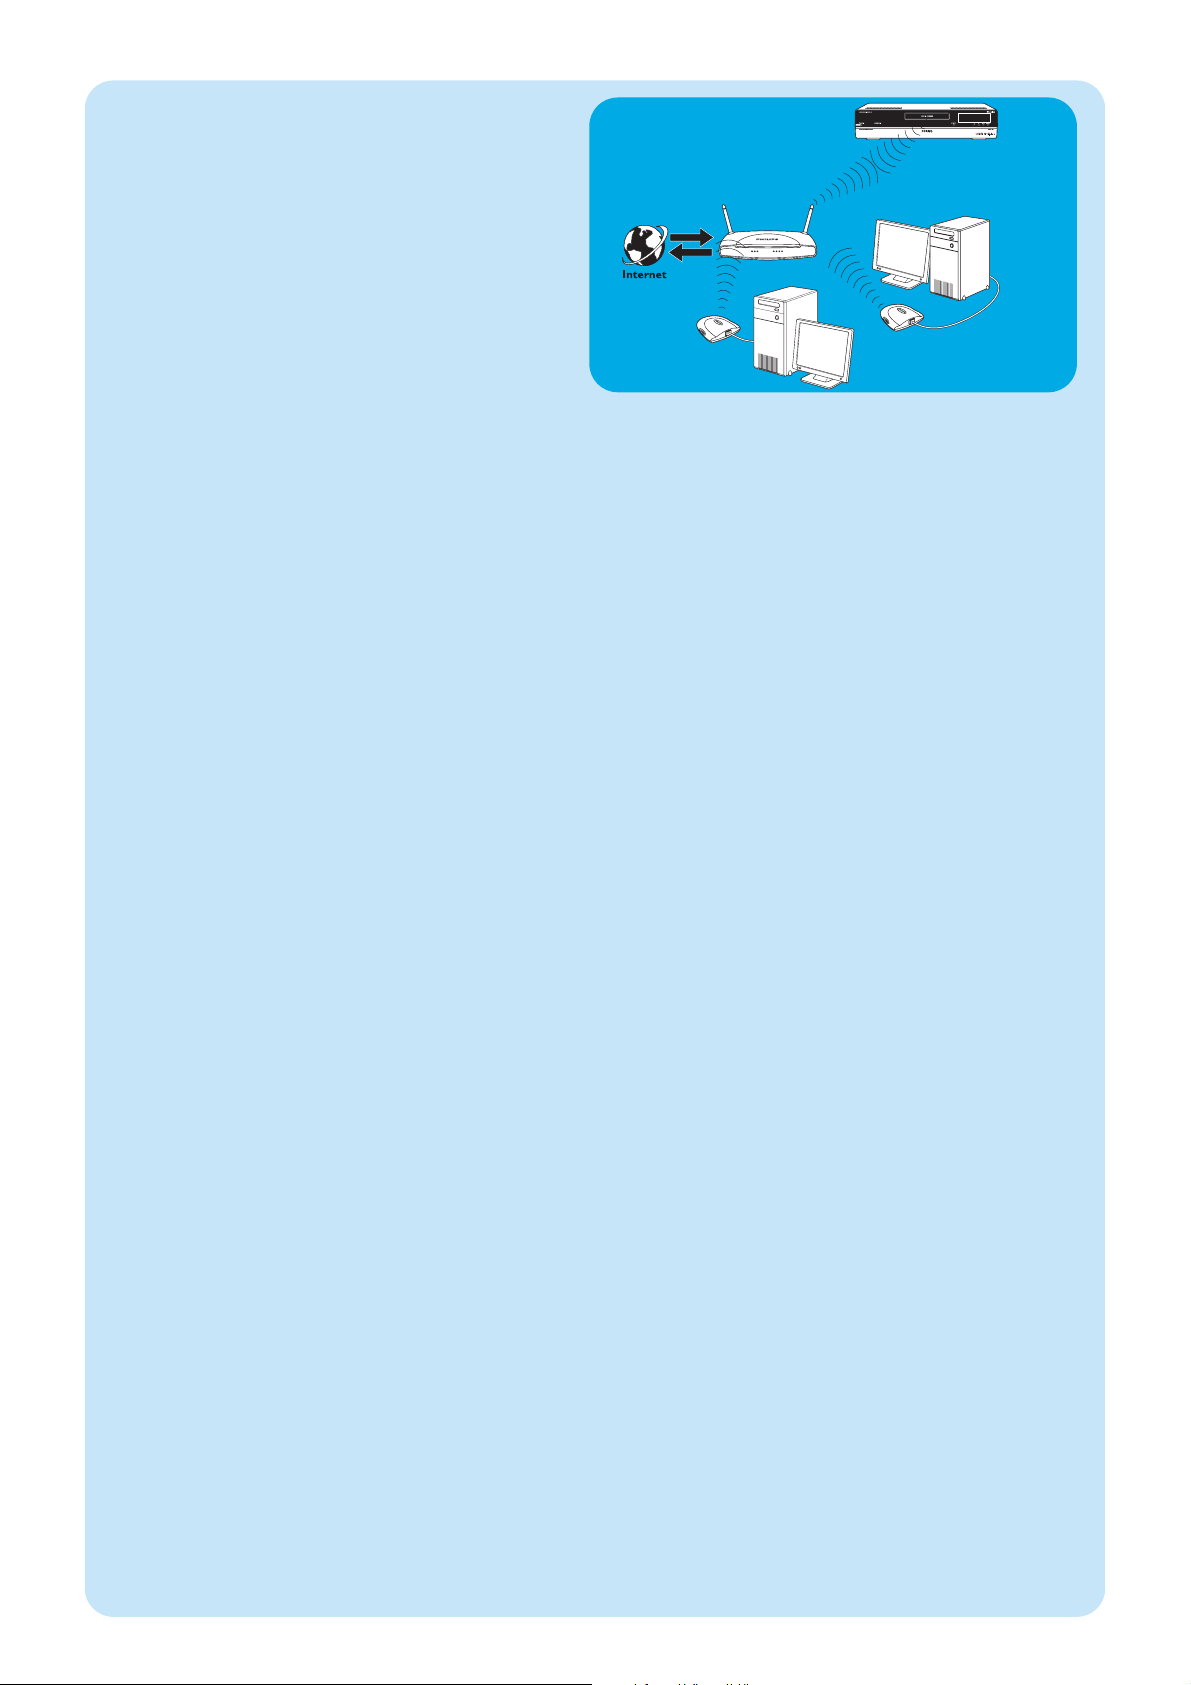
49
Draadloze verbinding
Wireless base stations (en bedrade Internet gateway
routers) delen hun breedband Internet-verbinding automatisch binnen het netwerk.
Opmerkingen:
–We raden u sterk aan een codeersleutel te gebruiken om
uw netwerk tegen indringers te beveiligen.
– Het Media Center heeft al ingebouwde antennes voor uw
wireless LAN (802.11b/g). Daarom hoeft u geen wireless
USB-adapter aan te sluiten om het Media Center in uw
draadloze netwerk op te nemen.
1 Zoek de bestaande instellingen van uw bestaande
draadloze netwerk op, zodat u die kunt opgeven als er
tijdens het instellen van het Media Center om wordt
gevraagd.
Zoek ook de naam van het draadloze netwerk (SSID)
en de codeersleutel(s) waarmee uw draadloze netwerk
is beveiligd.
Naam van het draadloze netwerk (SSID Service Set Identifier):
meestal vindt u deze naam in het Opties-menu van uw
wireless network adapter of wireless base station.
Start het programma dat bij uw netwerkadapter is geleverd om dat menu te openen.
Codeersleutel:
de codeersleutel kan een WEP-code of een WPA-code
zijn.
WEP (Wired Equivalent Privacy) biedt basisbeveiliging
voor thuisnetwerken en hanteert codeersleutels van 64
of 128 bits.
- 64 bits: 5 ASCII-tekens of 10 HEX-tekens of
- 128 bits: 13 ASCII-tekens of 26 HEX-tekens.
WPA (Wi-Fi Protected Access) biedt codeersleutels
tot 256 bits, die veel moeilijker te kraken zijn dan WEPcodeersleutels.
WPA zorgt voor een hoger beveiligingsniveau van data
en de toegang tot draadloze netwerken.
Opmerking: Zowel in de netwerknaam (SSID) als in codeersleu-
tels wordt onderscheid gemaakt tussen hoofdletters
en kleine letters. Dus ‘ABC’ is niet hetzelfde als ‘aBc’.
Let daar altijd op als u deze gegevens invoert, zodat
u fouten vermijdt.
2 Noteer uw codeersleutel(s) en SSID. Misschien hebt u
die informatie nodig bij het installeren van het Media
Center.
3 Wordt om de SSID en codeersleutel gevraagd om het
Media Center in het draadloze netwerk op te nemen,
voer die dan in. Kijk in de handleiding van het base
station (draadloos toegangspunt) voor meer informatie.
Draadloos
Page 50
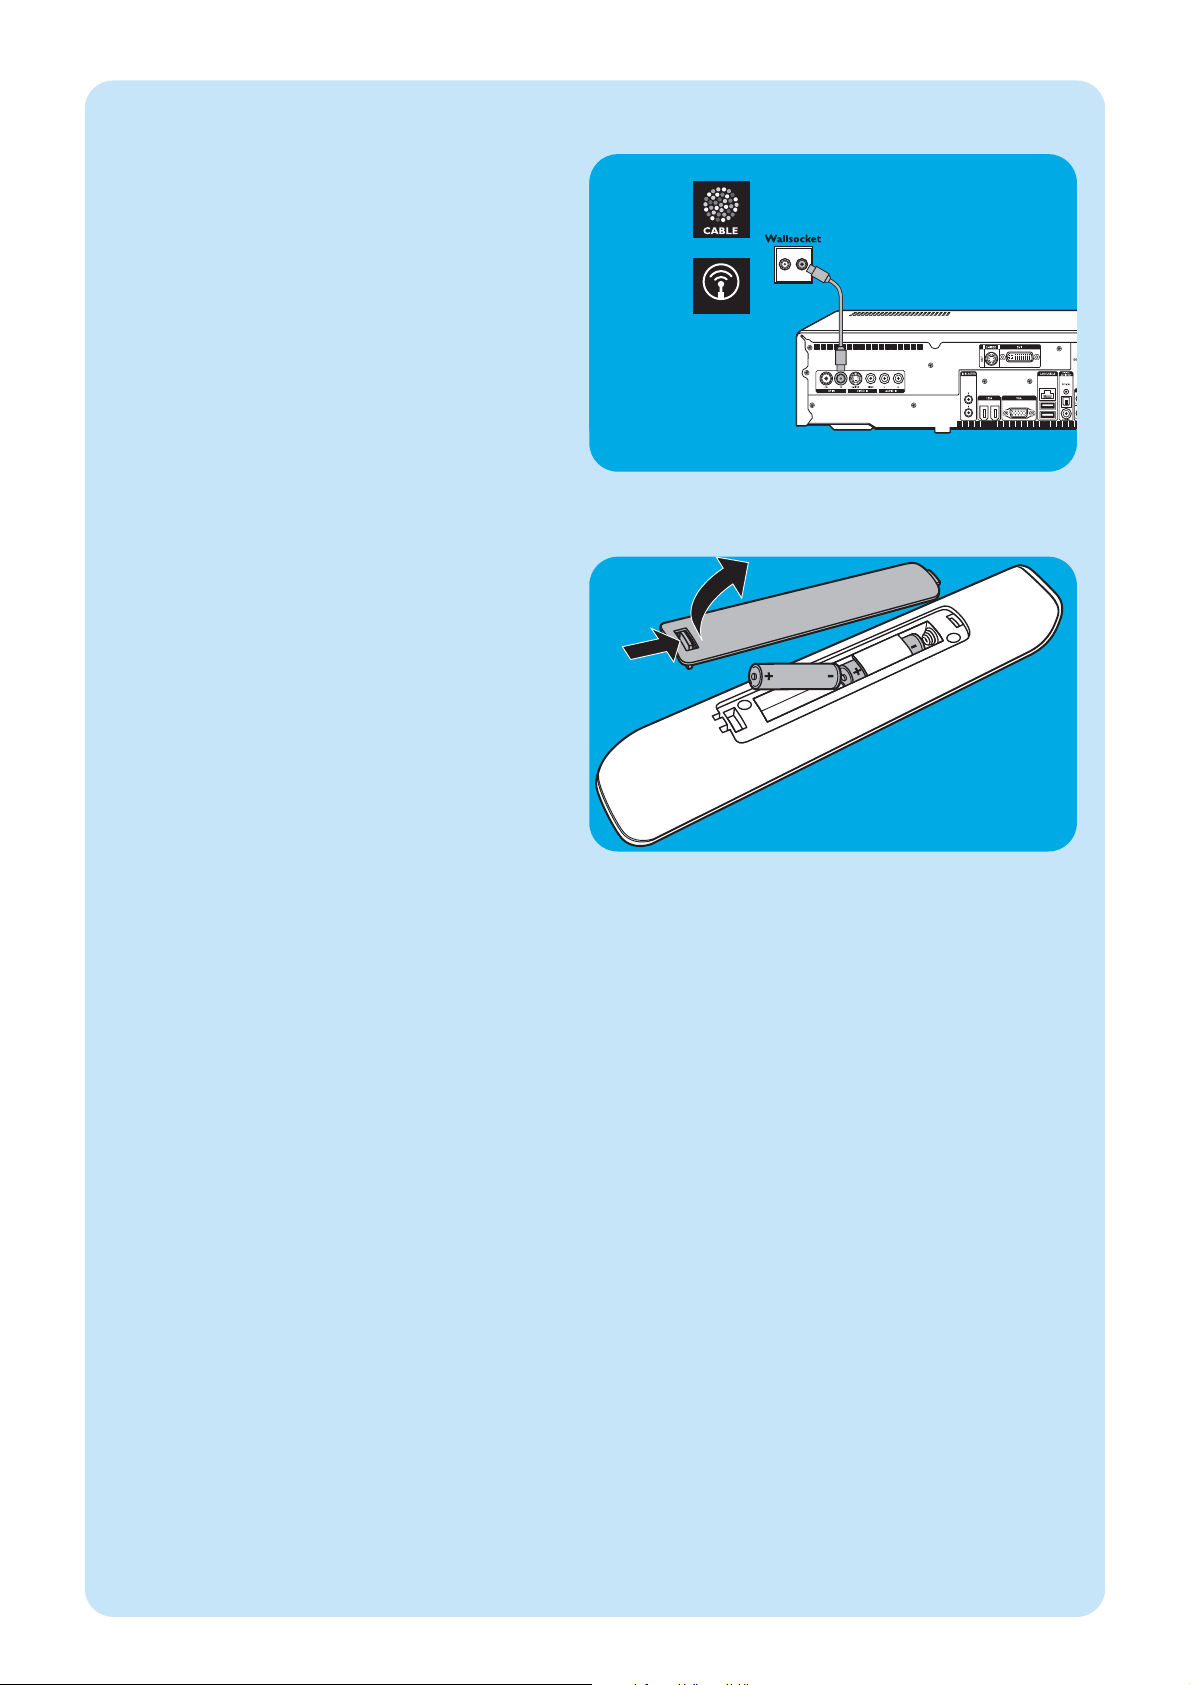
50
ANTENNA
Tv-antenne aansluiten
1 Trek de tv-antennekabel uit de kabelaansluiting.
2 Sluit de tv-antennekabel aan tussen de RF IN tv-
connector (1) van het Media Center en de
kabelaansluiting.
Antennes aansluiten
1 Verwijder het dekseltje over het batterijvak en plaats
twee AA-batterijen (1,5 V). Let daarbij op de juiste positie van + en –.
2 Breng het dekseltje weer aan.
Batterijen in afstandsbediening plaatsen
2 x
Page 51
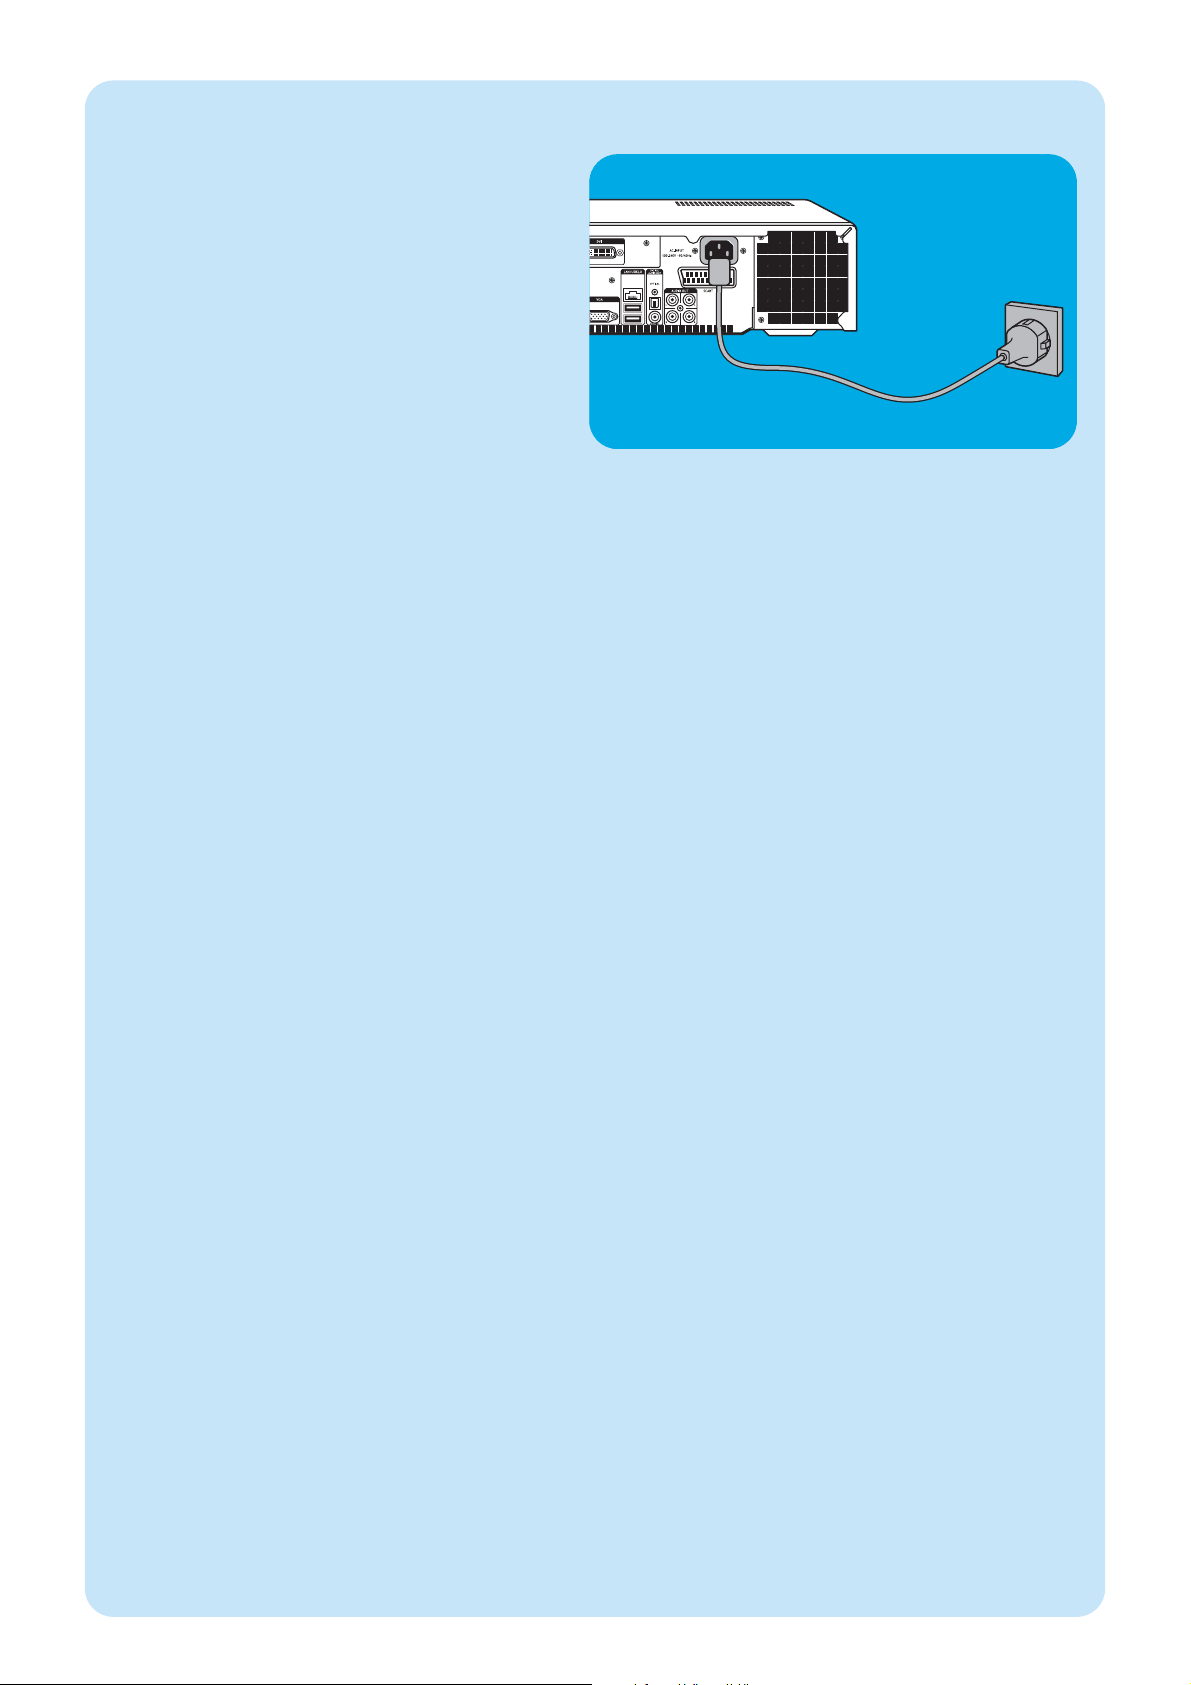
51
Op netspanning aansluiten
Nadat u alle gewenste apparatuur zoals beschreven hebt
aangesloten, kunt u het Media Center op een stopcontact
aansluiten.
1 Controleer of u alle gewenste verbindingskabels hebt
aangesloten voordat u het Media Center op een stopcontact aansluit.
2
Sluit de netspanningskabel eerst aan op AC-INPUT (9) van
het Media Center en daarna pas op een stopcontact.
> Het Standby/On-lampje (in de STANDBY-ON toets 1)
brandt dan oranje.
> Uw Media Center staat nu in de energiebesparende
stand, waarbij nauwelijks energie wordt verbruikt.
Inschakelen
• Om het Media Center vanuit de energiebesparende
stand in te schakelen, drukt u op de
y STANDBY-
ON-toets (1) op het frontpaneel van het Media Center.
> Het Standby/On-lampje (1) gaat uit.
• Druk nogmaals op de
y STANDBY-ON-toets (1) als
u het Media Center weer in de energiebesparende
stand wilt zetten.
Standby zetten
• Als het Media Center is ingeschakeld (Standby/Onlampje is uit), kunt u op de
y Standby-toets (1) van de
afstandsbediening drukken om het Media Center standby te zetten.
> Het Standby/On-lampje (1) brandt dan rood.
• Om het Media Center vanuit standby weer in te schakelen, drukt u nogmaals op de
y Standby-toets (1) van
de afstandsbediening of op de
y STANDBY-ON-toets
(1) op het frontpaneel van het Media Center.
> Het Standby/On-lampje (1) gaat uit.
Opmerking: In de energiebesparende stand en tijdens standby
verbruikt het Media Center nog een beetje energie.
Wilt u het Media Center helemaal van de netspanning ontkoppelen, trek dan de stekker uit het stopcontact.
Netspanning aansluiten / Inschakelen en standby zetten
Page 52
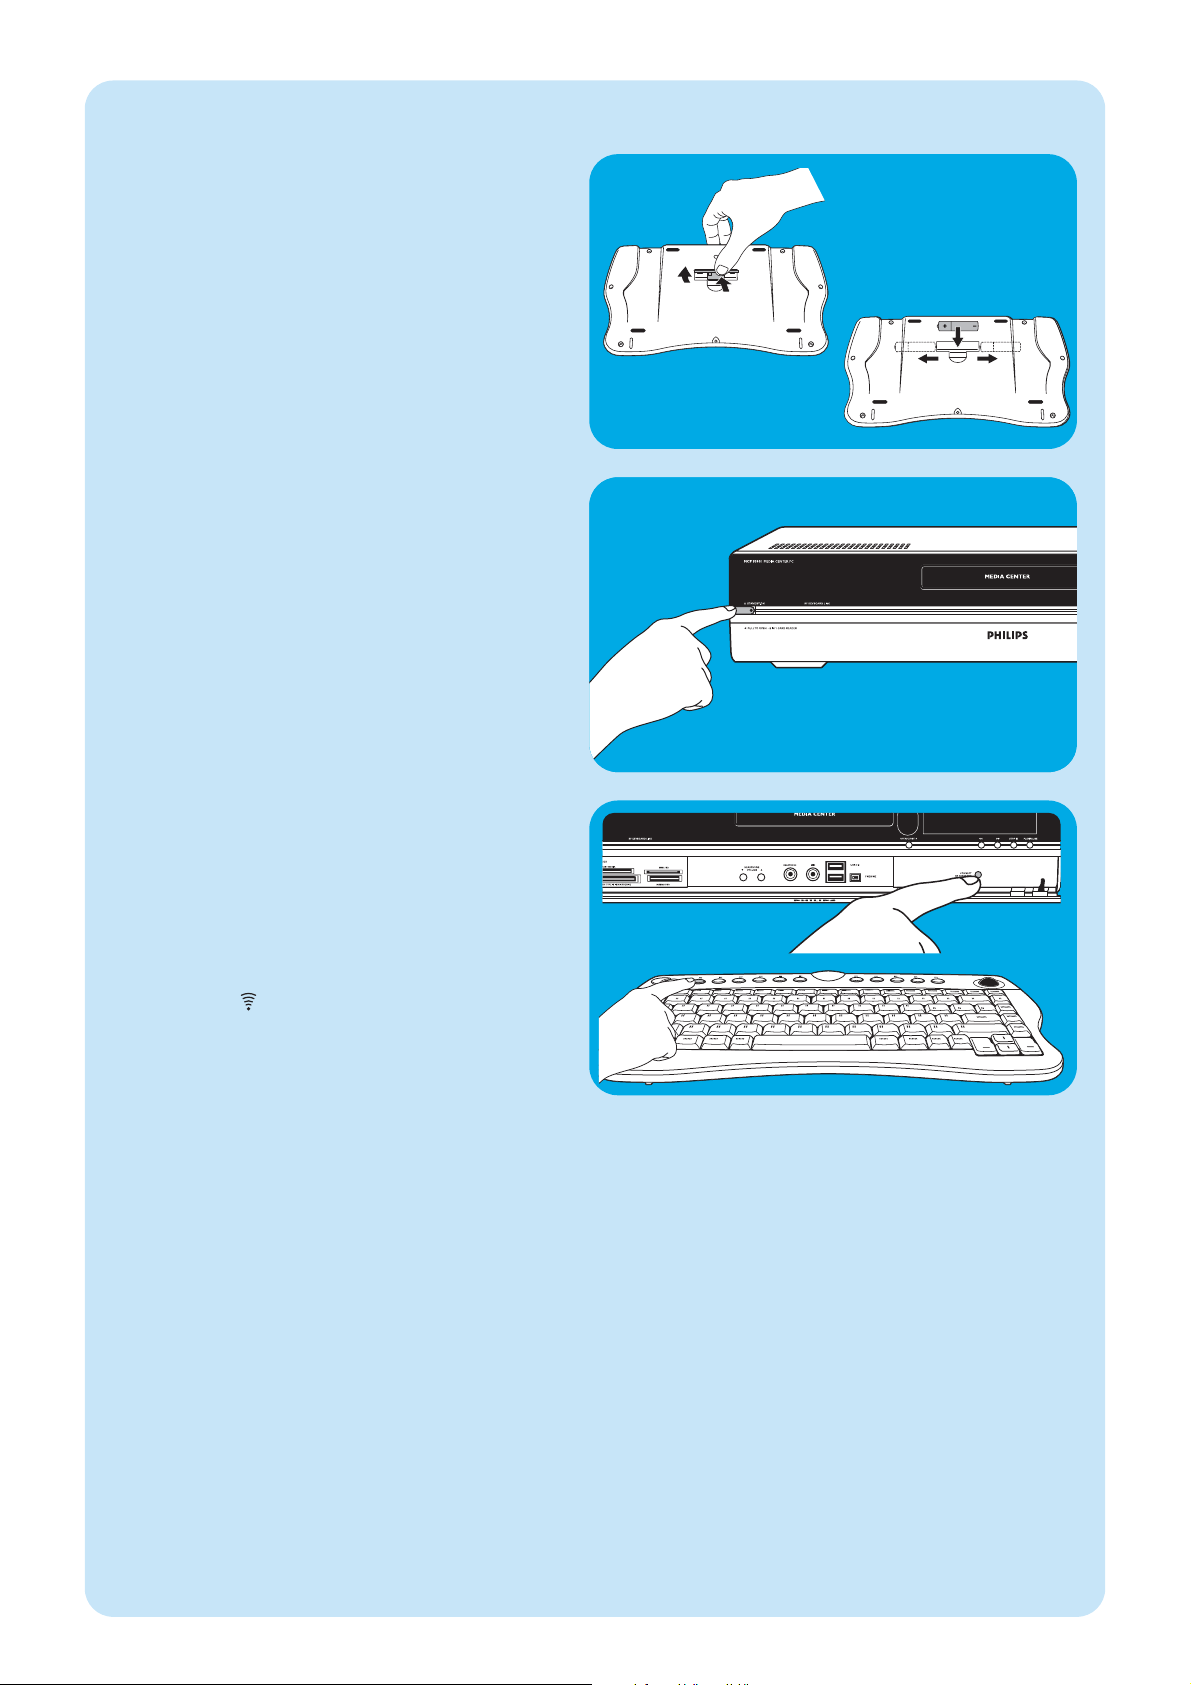
52
1 Verwijder het dekseltje van het batterijvak en plaats
drie AA-batterijen (1,5 V). Let daarbij op de juiste positie van + en –.
2 Breng het dekseltje weer aan.
3 Zorg dat het Media Center op de netspanning is aange-
sloten.
4 Druk op de
y STANDBY-ON-toets (1) om het Media
Center aan te zetten.
> Het Standby/On-lampje (in de STANDBY-ON toets 1) gaat
uit.
5 Druk op de toets CONNECT RF KEYBOARD (17)
van het Media Center.
6 Druk op de -toets (2) op het toetsenbord.
> Het Media Center kan nu opdrachten van het draadloze
toetsenbord ontvangen.
Opmerking: Als het toetsenbord langer dan 5 minuten niet wordt
gebruikt, gaat het naar standby. U kunt het toetsenbord weer activeren door het indrukken van een willekeurige toets, behalve de linker- en rechtermuisknoppen (1) en de trackball (13).
Daadloos toetsenbord activeren
3 x
Page 53
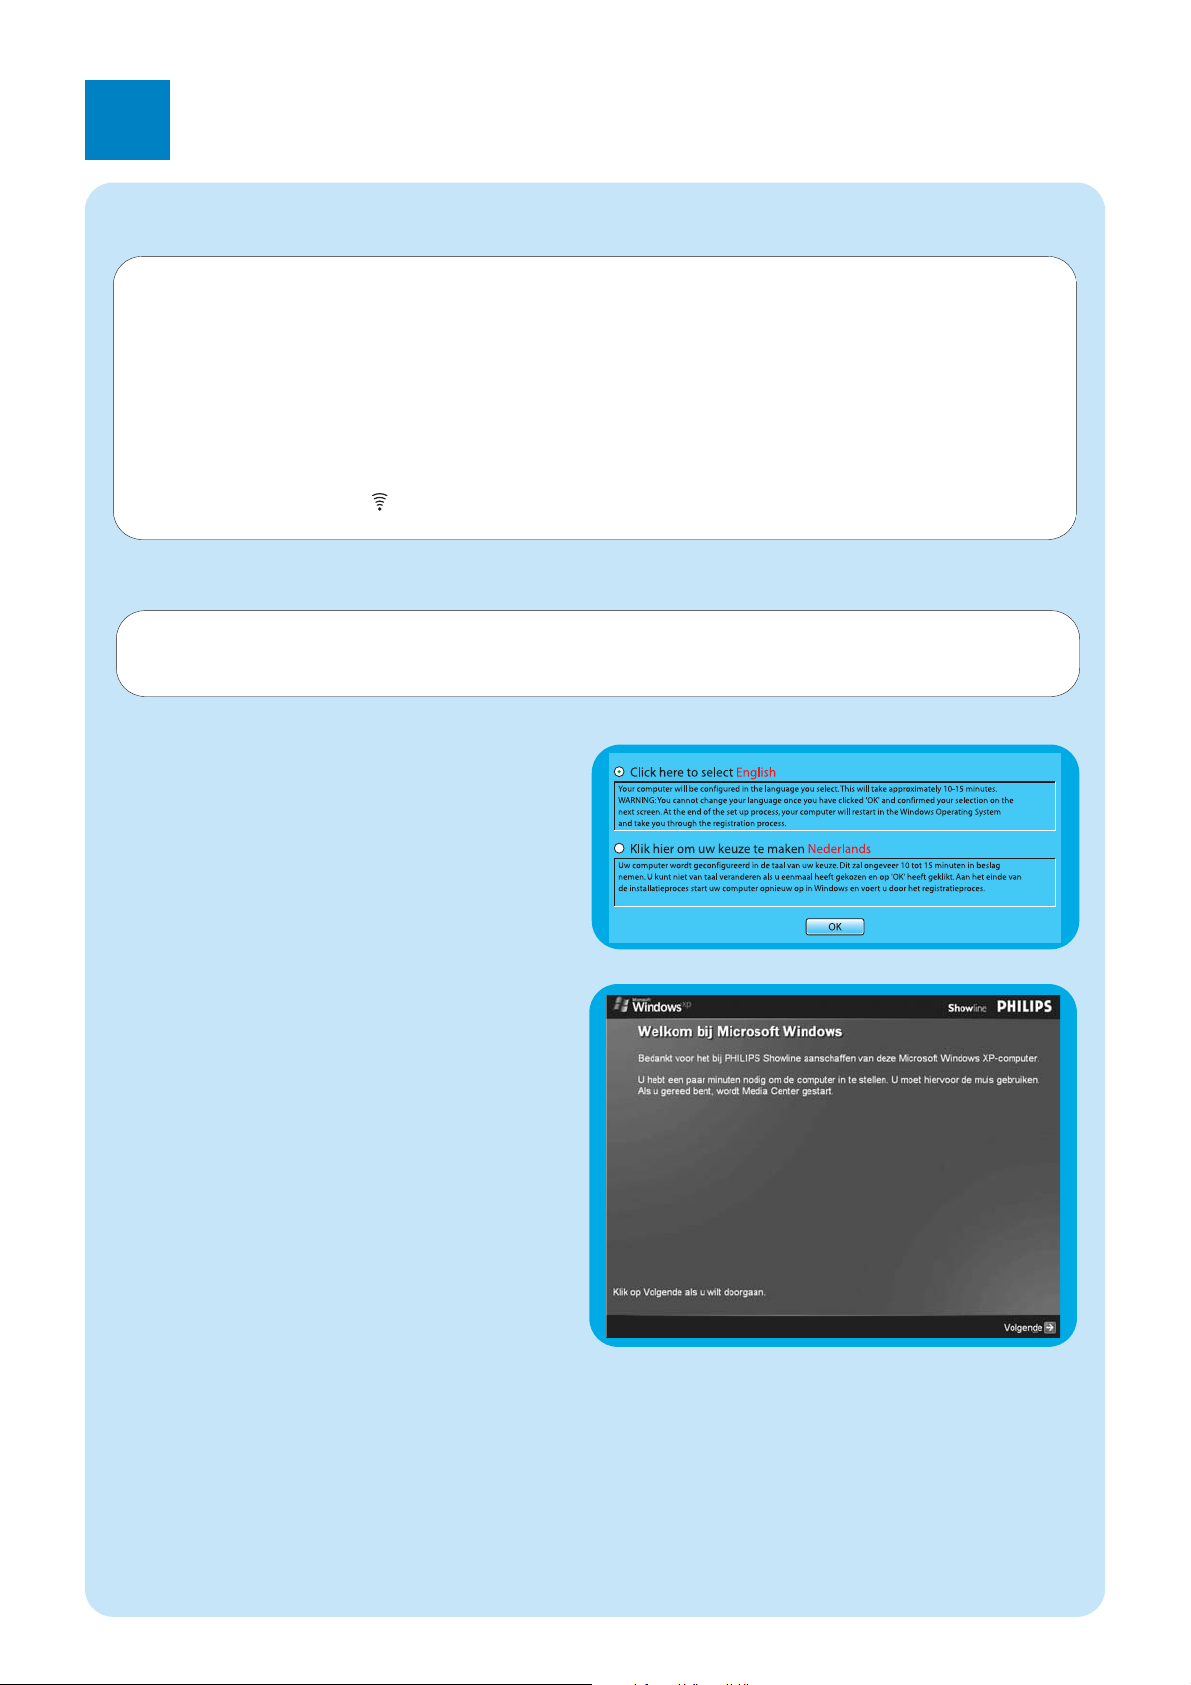
53
3
Philips Media Center instellen
1 Start het Media Center.
> Het taalkeuzevenster verschijnt.
2 Kies de taal van het gebruikersinterface voor Microsoft
Windows®.
3 Volg de scherminstructies op.
Windows de eerste keer instellen:
Volg de scherminstructies om Windows de eerste keer in
te stellen.
1 Klik op Volgende om te beginnen met het instellen.
2 Selecteer uw land/regio en taal.
3 Selecteer uw tijdzone.
4 Lees de licentieovereenkomst voor eindgebruikers.
Klik op ‘Ja, ik accepteer deze’ om te bevestigen dat u
akkoord gaat.
5 Geef een computernaam op. Er is al een naam ingevuld.
U kunt die naam accepteren, maar u mag die ook vervangen door een andere, b.v.‘Ons Media Center’.
6 Klik op Volgende als uw computer niet in een domein
is opgenomen.
Wilt u uw Media Center wel in een domein opnemen,
klik dan op Ja en geef de naam van het domein op.
7 Klik op Voltooien.
Microsoft Windows®instellen
Nadat u het Media Center de eerste keer inschakelt, verschijnt het instelscherm voor Microsoft Windows.Volg de scherminstructies om de instellingen uit te voeren.
Opmerkingen:
– Schakel het Media Center pas in nadat u uw monitor of tv hebt ingeschakeld en op uw tv een kanaal voor het Media Center
hebt gekozen.
– Gebruik het draadloze toetsenbord met de ingebouwde trackball om door te setupschermen te navigeren. Zet de cursor op een
gewenste optie en klik daarna op Volgende.
– Als het Media Center niet reageert op het draadloze toetsenbord: druk op de toets CONNECT RF KEYBOARD (17) op het
Media Center en op de toets ( ) (2) op het toetsenbord.
BELANGRIJK
U kunt niet veranderen van taal na het drukken op OK, omdat de andere talen dan niet meer beschikbaar zijn. Let dus
op de juiste taalkeuze.
Het instellen van de taal:
Page 54
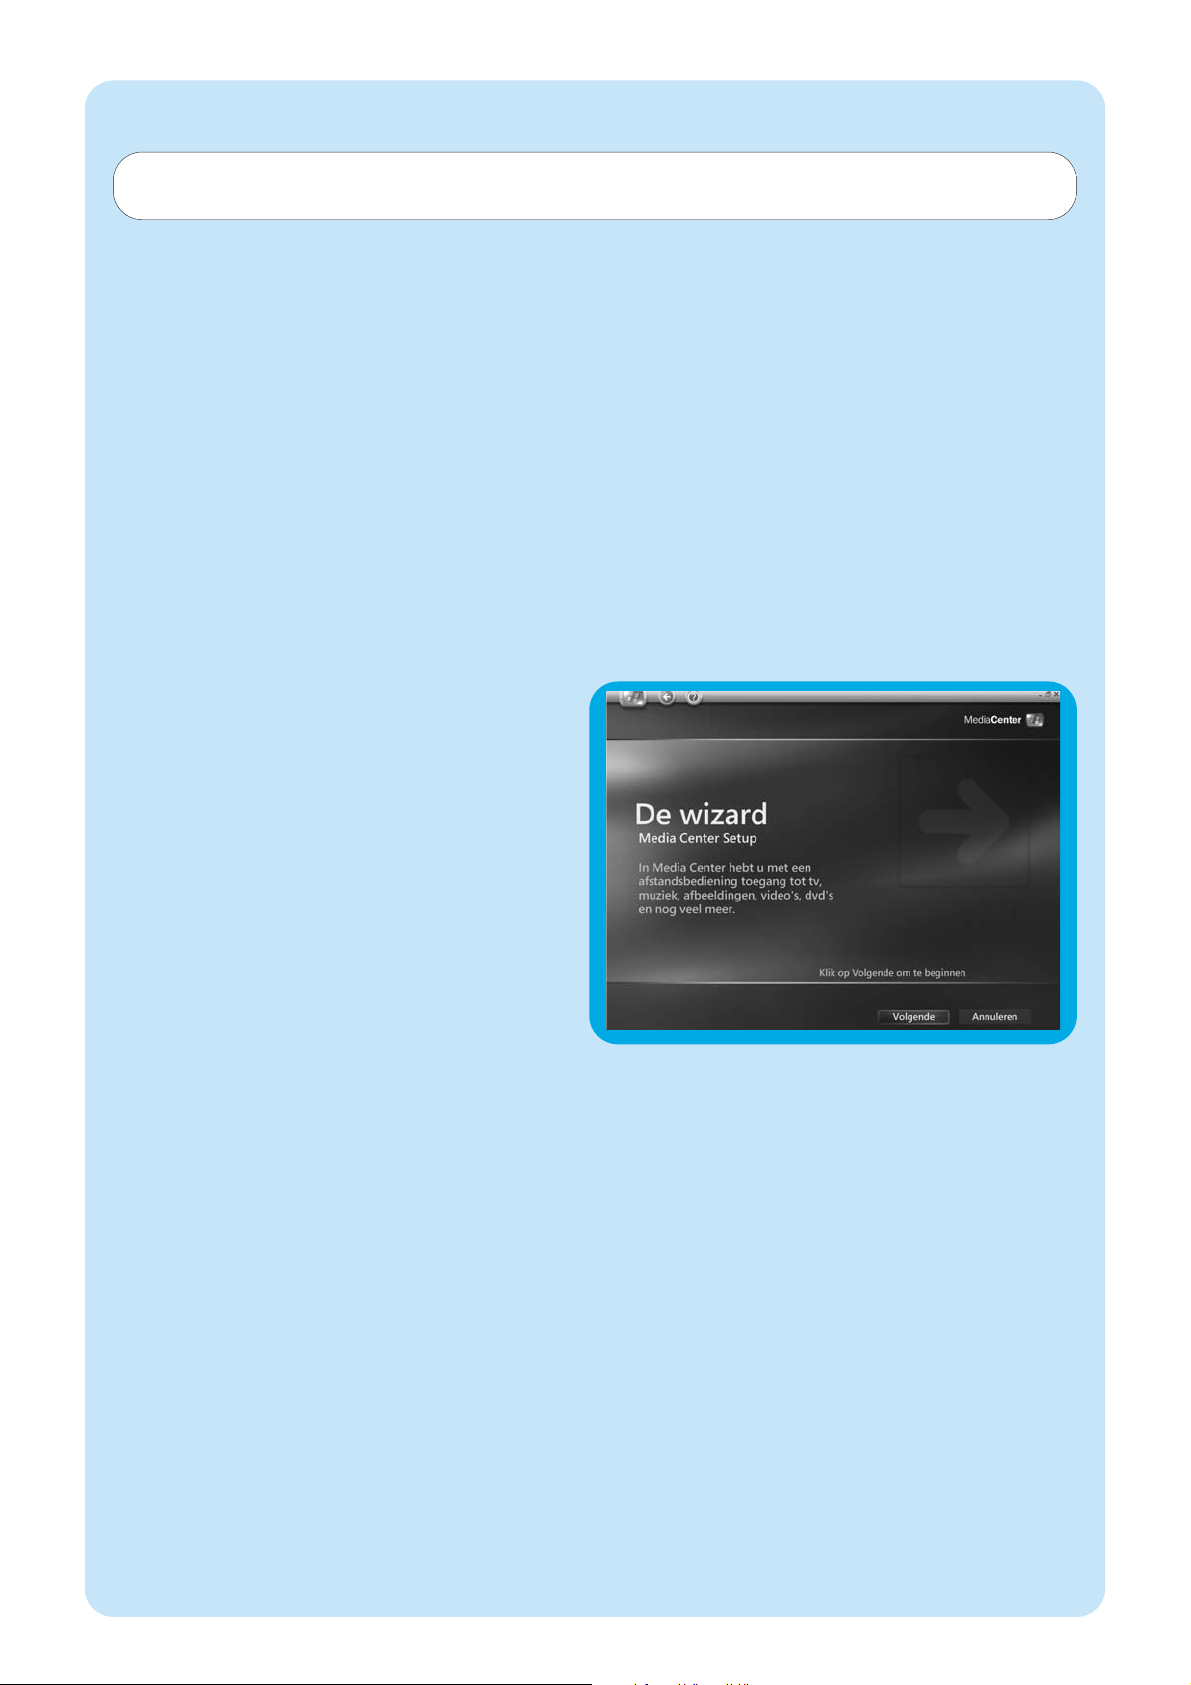
54
Het welkomscherm van de wizard Media Center Setup verschijnt.
1 Klik op Volgende.
> De verplichte en optionele informatie voor Media Center
Setup verschijnt.
2 Klik op Volgende.
> Dan volgt informatie over het Media Center-privacy-
beleid.
3 Klik op Volgende.
> Het scherm Verbeterd afspelen verschijnt.
4 Volg de getoonde aanwijzingen, maak uw keuze en klik
op Volgende.
> Het scherm Verbinding maken met een draadloos
netwerk verschijnt.
5 Om uw Media Center met een draadloos netwerk te
verbinden, klikt u op Ja en klikt u op Volgende.
• Selecteer ‘Mijn netwerknaam handmatig invoe-
ren’ en klik dan op Volgende.
• Selecteer in het overzicht de naam van uw netwerk en
klik op Volgende.
• Klik op Voltooien om het programma af te sluiten.
OF:
Als de naam van uw netwerk ontbreekt:
• Selecteer ‘Niet weergegeven’ en klik dan op Volgende.
• Geef de naam van uw netwerk op en klik op Volgende.
• Is uw netwerk beveiligd, klik dan op Ja en daarna op
Volgende.
• Voer de beveiligingscode (WEP- of WPA-sleutel) voor uw
netwerk in en klik op Volgende.
Opmerking: In de codeersleutel wordt onderscheid gemaakt tus-
sen hoofdletters en kleine letters. Dus ‘ABC’ is niet
hetzelfde als ‘aBc’.
6 Als u een permanente Internet-verbinding (‘altijd actief’
DSL of kabelaansluiting) hebt, klik dan op Ja en dan op
Volgende.
Media Center Setup-wizard
Verplichte instellingen
De Media Center Setup-wizard begeleidt u bij de eerste setup
van uw Media Center, inclusief de instellingen die noodzakelijk
zijn voor de netwerkverbinding en uw breedbandverbinding.
Volg de scherminstructies om de instellingen uit te voeren.
Opmerkingen:
– Gebruik het draadloze toetsenbord met de ingebouwde
trackball (13) om door te schermen te navigeren.
– Zorg dat de volgende verbindingen en ingangssignalen op
uw Media Center beschikbaar zijn:
- Internet;
- Tv- en radiosignaal;
- netwerkverbinding (als uw Media Center deel van een net-
werk is);
- set-top box (als u een set-top box gebruikt).
Na afronding van de eerste setup van Microsoft Windows start Windows automatisch opnieuw op. Daarna verschijnt
de Media Center Setup-wizard.
Page 55

55
Optionele setup
Met de optionele instellingen kunt u het Media Center aan uw eigen wensen aanpassen. De setup-wizard biedt de
volgende mogelijkheden:
– tuners,TV-signaal en programmagids configureren;
– schermweergave van Media Center aanpassen;
– luidsprekers instellen;
– set-top box instellen.
Tuners, tv-signaal en programmagids configureren
Met deze optie kunt u de aansluitingen voor tv- en radio-ontvangst instellen.
1 Geef uw regio op.
2 Kies het TV-signaal.
3 Make your selection for a set-top box.
• Kabel. Ga verder met ´Analoge setup´.
• Antenne:
- Analoog. Ga verder met ´Analoge setup´.
- Digitaal. Ga verder met ´Digitale setup´.
Analoge setup
1 Kies het type TV-signaal (Europa - PAL/SECAM).
2 Kies een set-top box:
a Als u een set-top box hebt:
• Controleer of uw set-top box en de kabel van de IR-ontvanger goed zijn aangesloten
(zie ´Philips Media Center installeren – Video aansluiten (b.v. set-top box)´).
• Kies een TV-signaal.
b Als u geen set-top box hebt:
• Volg de instructies op het scherm.
3 Stel de elektronische programmagids in.
• Lees de Servicevoorwaarden van de gids en accepteer deze.
• Geef uw postcode in.
• Kies uw TV-provider.
> Uw Media Center gebruikt de internet-verbinding om de informatie over de TV-kanalen bij uw TV-provider te downloaden.
Elke beschikbare TV-zender wordt onder een afzonderlijk kanaalnummer opgeslagen.
Digitale setup
1 Kies het type TV-signaal: ´Digitaal terrestrial (DVB-T)´.
2 Kies een set-top box:
Kies ´Nee´.
3 Lees de Privacyvoorwaarden van de gids en accepteer deze.
4 Stel de elektronische programmagids in.
• Lees de Servicevoorwaarden van de gids en accepteer deze.
• Geef uw postcode in.
• Download de informatie van de provider.
• Kies uw TV-provider. Kies ´Digitaal terrestrisch – alle kanalen´.
• Download de programmagids.
Het uiterlijk van Media Center op het beeldscherm optimaliseren
Met deze optie kunt u de schermen van Media Center aanpassen.
1 Selecteer uw type beeldscherm.
2 Selecteer het type verbinding met uw beeldscherm.
Opmerking: Gebruikt u de SCART-uitgang (21) van het Media Center, selecteer dan Component (YpbPr).
3 Gebruik Beeldschermkalibratie om de beeldscherminstellingen aan uw eigen wensen aan te passen.
Opmerking:Als u een verkeerde scherminstelling kiest, kan een zwart scherm verschijnen.Wacht ongeveer 15 seconden. Dan moet
de scherminhoud weer zichtbaar worden.
7 Klik op Testen om uw Internet-verbinding te controleren.
• Werkt uw Internet-verbinding niet, controleer dan:
- de connectors en kabels
- en instellingen van uw router
- of neem contact op met uw Internet service provider (ISP).
Page 56

56
Handmatig kanalen zoeken
Analoge kanalen zoeken
Zie voor automatisch kanalen zoeken de gebruikershandleiding onder ´Functionele gids voor de TV - Een TV-kanaal zoeken´.
1 Druk op de -toets (8) op de afstandsbediening.
2 Kies Meer programma’s en druk op OK (19).
3 Kies TVScanner en druk op OK (19).
4 Kies LeesMij en druk op OK.
5 Volg de aanwijzingen in het LeesMij-bestand (19).
Digitale kanalen zoeken
1 Geef uw regio in.
2 Kies het TV-signaal: ´Antenne´.
3 Kies het type TV-signaal: ´Digitaal terrestrisch (DVB-T)´
4 Kies een set-top box:
Kies ´Nee´.
5 Lees de Privacyvoorwaarden van de gids.
Kies ´Nee´.
> Het venster Scan op services verschijnt.
6 Kies ´Start scan´.Volg de instructies op het scherm.
De luidsprekers instellen
Met deze optie kunt u uw luidsprekers opgeven en testen.
• Selecteer altijd de optie voor 2 luidsprekers, want het Media Center heeft alleen een analoge stereo-uitgang.
Als u de digitale audioverbinding gebruikt:
Na het afronden van de Media Center Setup-wizard voert u de volgende stappen uit:
1 Druk op de -toets (8) van de afstandsbediening.
> Het Start-menu van het Media Center verschijnt.
2 Selecteer Programma’s en druk op de OK-toets (9).
3 Selecteer Dvd Settings en druk op de OK-toets (9).
4 Selecteer Audio-instellingen en druk op de OK-toets (9).
5 Selecteer SPDIF en druk op de OK-toets (9).
6 Selecteer Opslaan en druk op de OK-toets (9).
> Na het afronden van de optionele Setup-instellingen verschijnt het opstartscherm van het Media Center en is uw Media Center
gebruiksklaar.
Opmerking: S/PDIF (Sony/Philips Digital Interface) is een standaard interfaceprotocol voor geluidsbestanden, meestal beschikbaar op
digitale geluidsapparatuur en systemen voor geluidsbewerking. Het biedt de mogelijkheid geluidsinformatie uit te wisselen
zonder omzettingen van digitaal naar analoog en omgekeerd, zodat de geluidskwaliteit onaangetast blijft.
Page 57
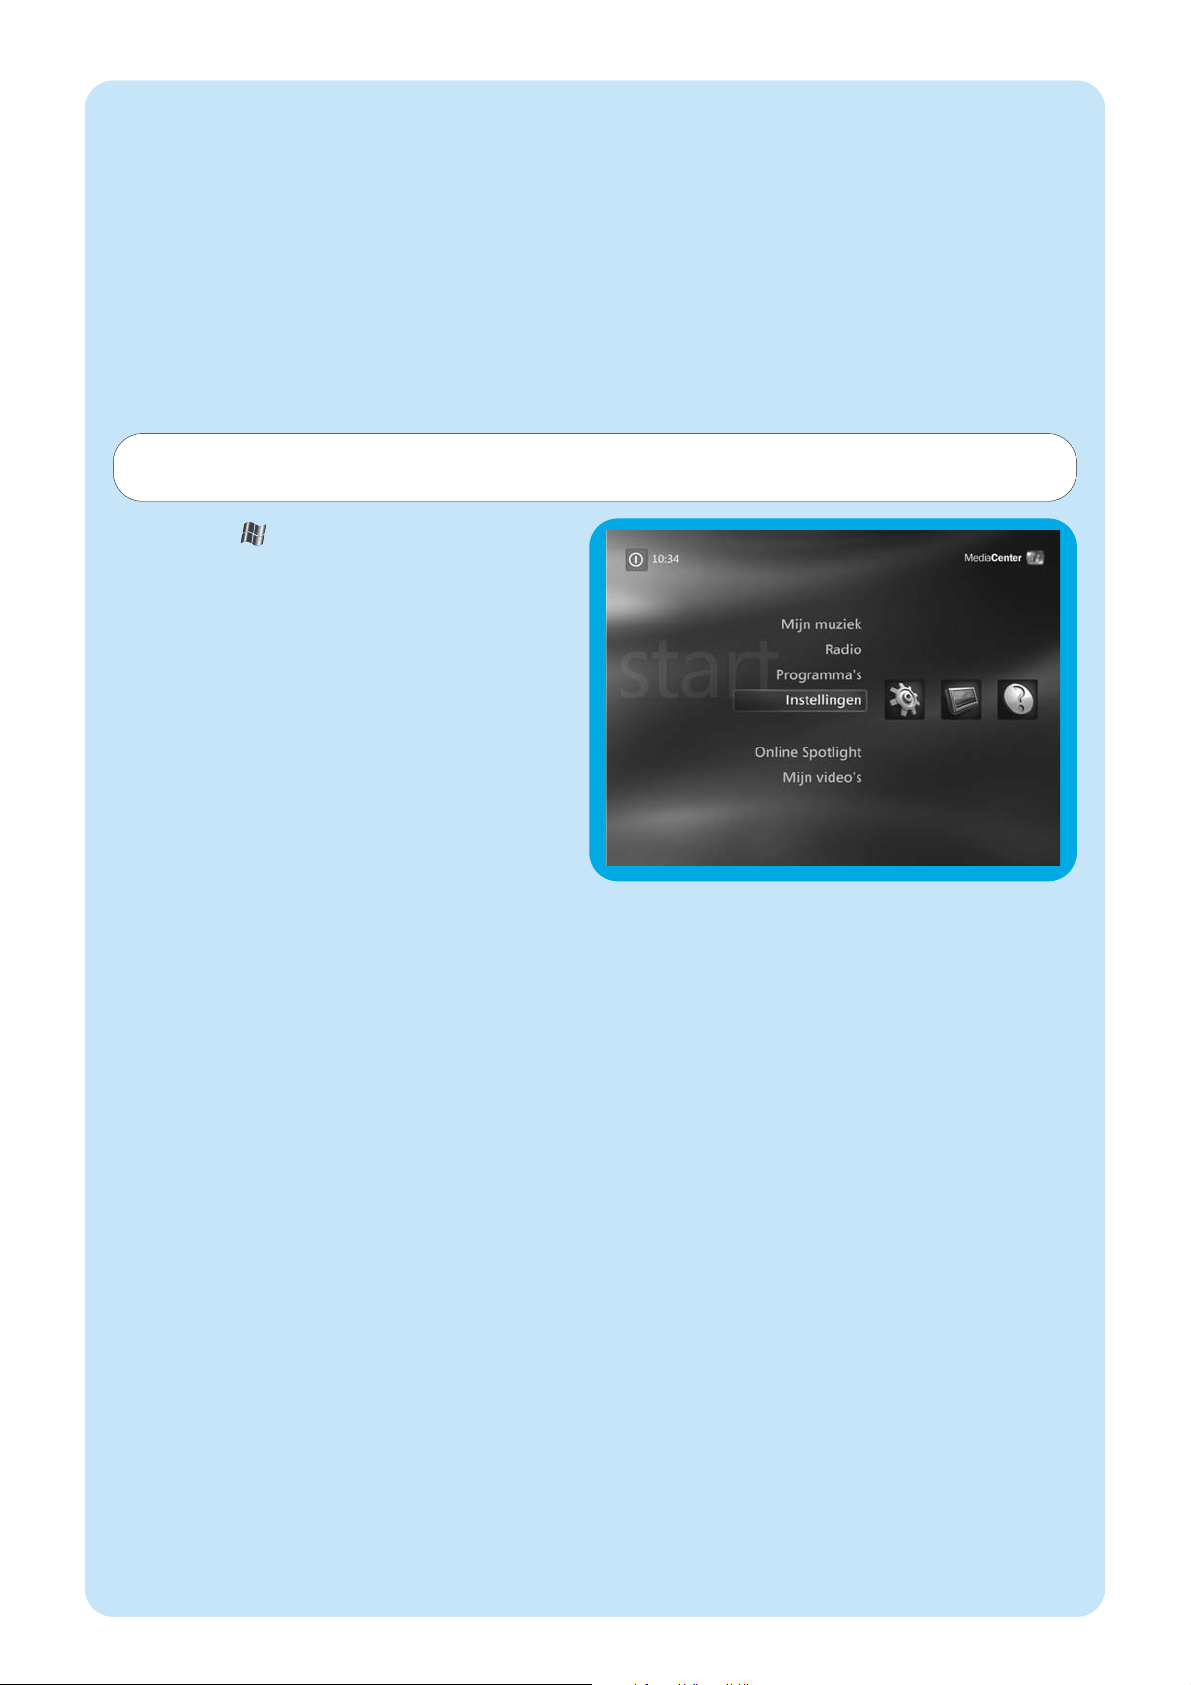
57
Extra software instellen
Norton
De module Norton Internet Security verzorgt de essentiële beveiliging tegen virussen, hackers en inbreuk op uw privacy.
Norton Internet Security bevat een firewall en andere krachtige hulpprogramma’s voor de beveiliging van uw systeem.
Hebt u de firewall tijdelijk uitgeschakeld, dan wordt die na een bepaalde tijdsduur weer automatisch geactiveerd. Met deze
nieuwste versie kunt u verhinderen dat bepaalde Internet-wormvirussen uw systeem besmetten. U kunt verhinderen dat
e-mailadressen naar web-sites worden gestuurd en opgeven welke sites via Internet-cookies uw activiteiten kunnen
registreren. Bovendien kunt u reclamebanners en pop-up-vensters blokkeren. Bij de eerste keer inschakelen van uw Media
Center wordt automatisch het Norton-installatieprogramma gestart. U hoeft alleen maar de instructies te volgen.
Instellingen wijzigen
Nadat u de Media Center Setup-wizard de eerste keer hebt uitgevoerd, kunt u de gekozen instellingen later aanpassen. Hebt u bij die eerste setup bepaalde stappen overgeslagen, dan kunt u die later alsnog uitvoeren.
1 Druk op de -toets (8) van de afstandsbediening.
> Het Start-menu van het Media Center verschijnt.
2 Selecteer Instellingen.
3 Druk op de OK-toets (19). Bij Instellingen zijn de vol-
gende submenu’s beschikbaar:
- Algemeen voor algemene instellingen van het Media
Center
- TV
- Afbeeldingen
- Muziek
- DVD
- Messenger en nummerherkenning
- Help
Page 58
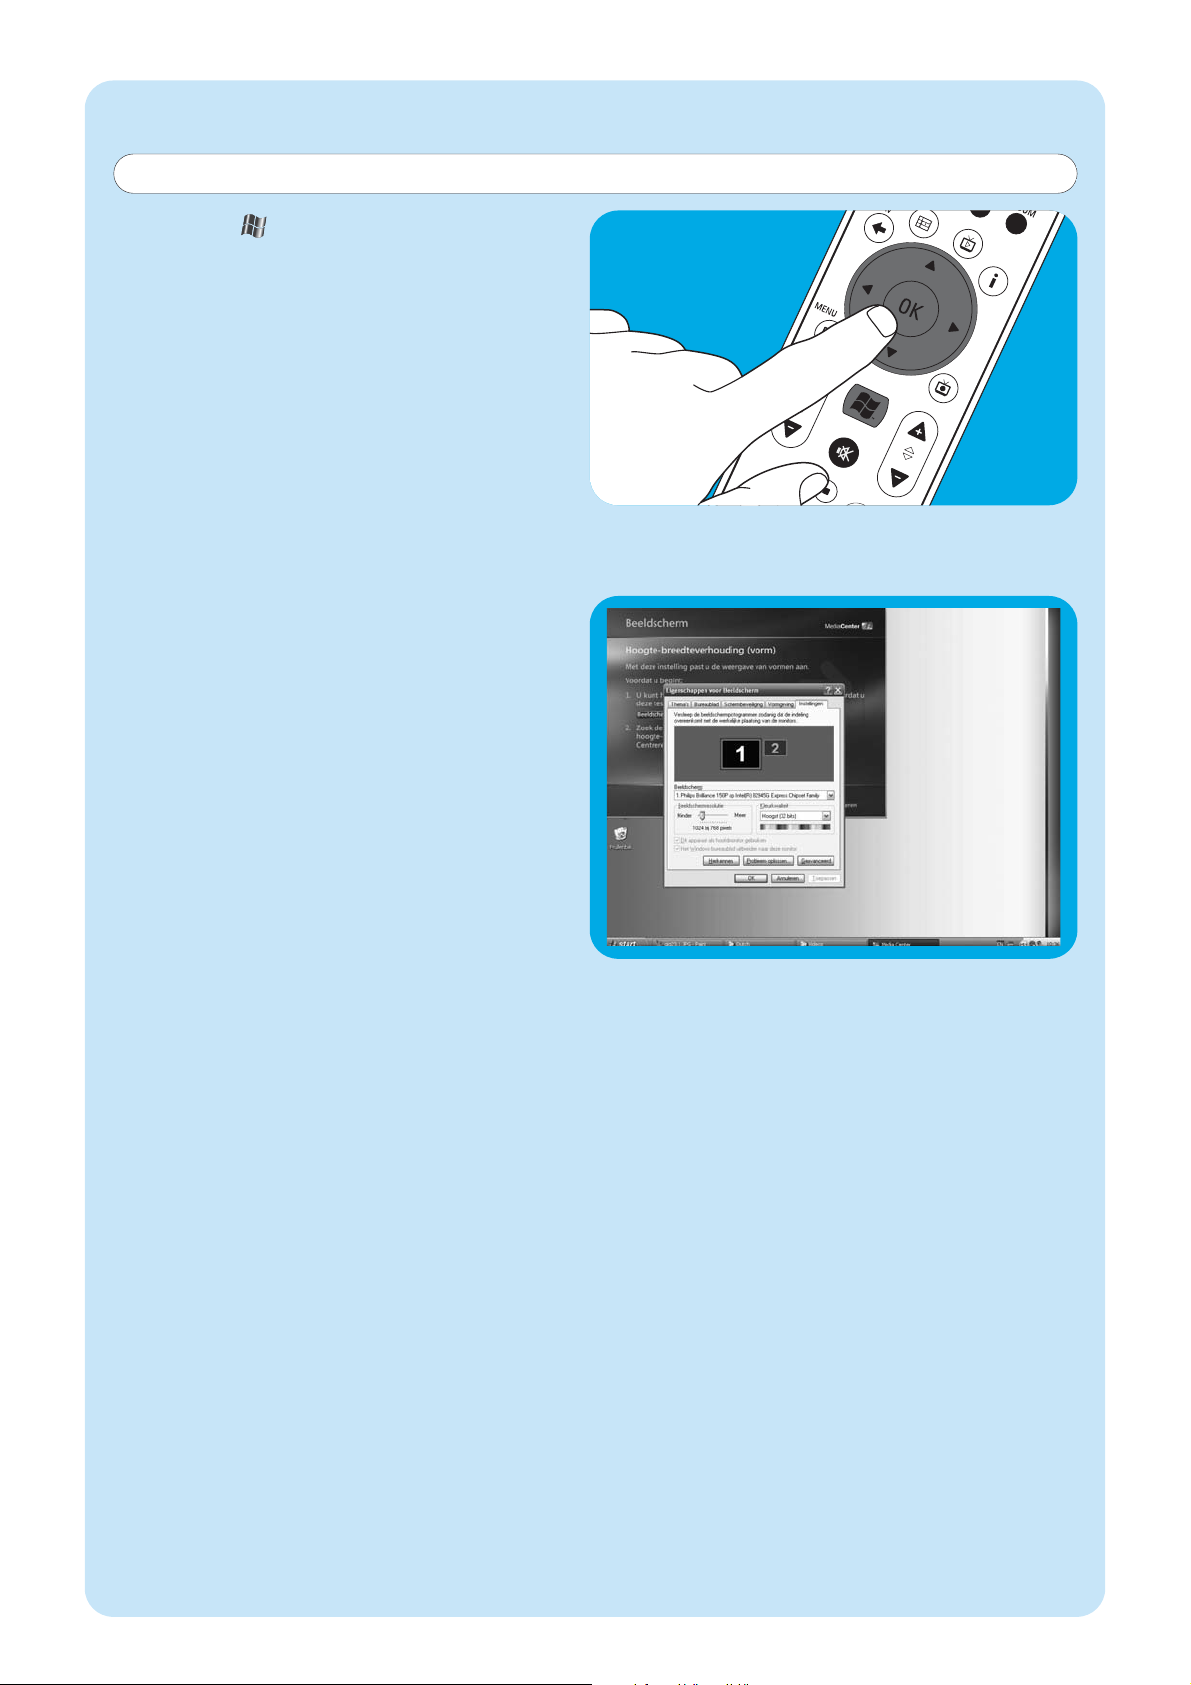
58
1 Druk op de -toets (8) van de afstandsbediening.
2 Selecteer Instellingen en druk op de OK-toets (19).
3
Selecteer Media Center Setup in het venster
Instellingen (Algemeen) en druk op de OK-toets (19).
4 Selecteer De TV of het beeldscherm configureren
in het venster Media Center Setup en druk op de
OK-toets (19).
5 Volg de aanwijzingen. Selecteer Type beeldscherm en
Type verbinding.
Opmerking: Gebruikt u de SCART-uitgang (21) van het
Media Center, selecteer dan Component (YpbPr).
6 Selecteer Beeldschermregelaars aanpassen in het
venster Beeldscherminstellingen wijzigen en druk
op de OK-toets (19).
7 Klik op Volgende en druk op de OK-toets (19).
Dan volgt het venster Beeldschermkalibratie met
regelaars.
8 Selecteer Hoogte-breedteverhouding (vorm) en
druk op de OK-toets (19).
9 Selecteer Beeldschermresolutie wijzigen, druk op
de OK-toets (19) en klik op Ja in het kleine venster.
10 Dan volgt het Windows XP-venster Eigenschappen voor
beeldscherm. Gebruik uw toetsenbord en muis om
daarin de nieuwe resolutie in te stellen.
11 Na het instellen klikt u in de rechterbovenhoek van het
Media Center-venster om dat venster weer schermvullend te maken.
Beeldschermresolutie wijzigen
Een belangrijk voorbeeld van het wijzigen van Media Center-instellingen is de schermresolutie.
Page 59
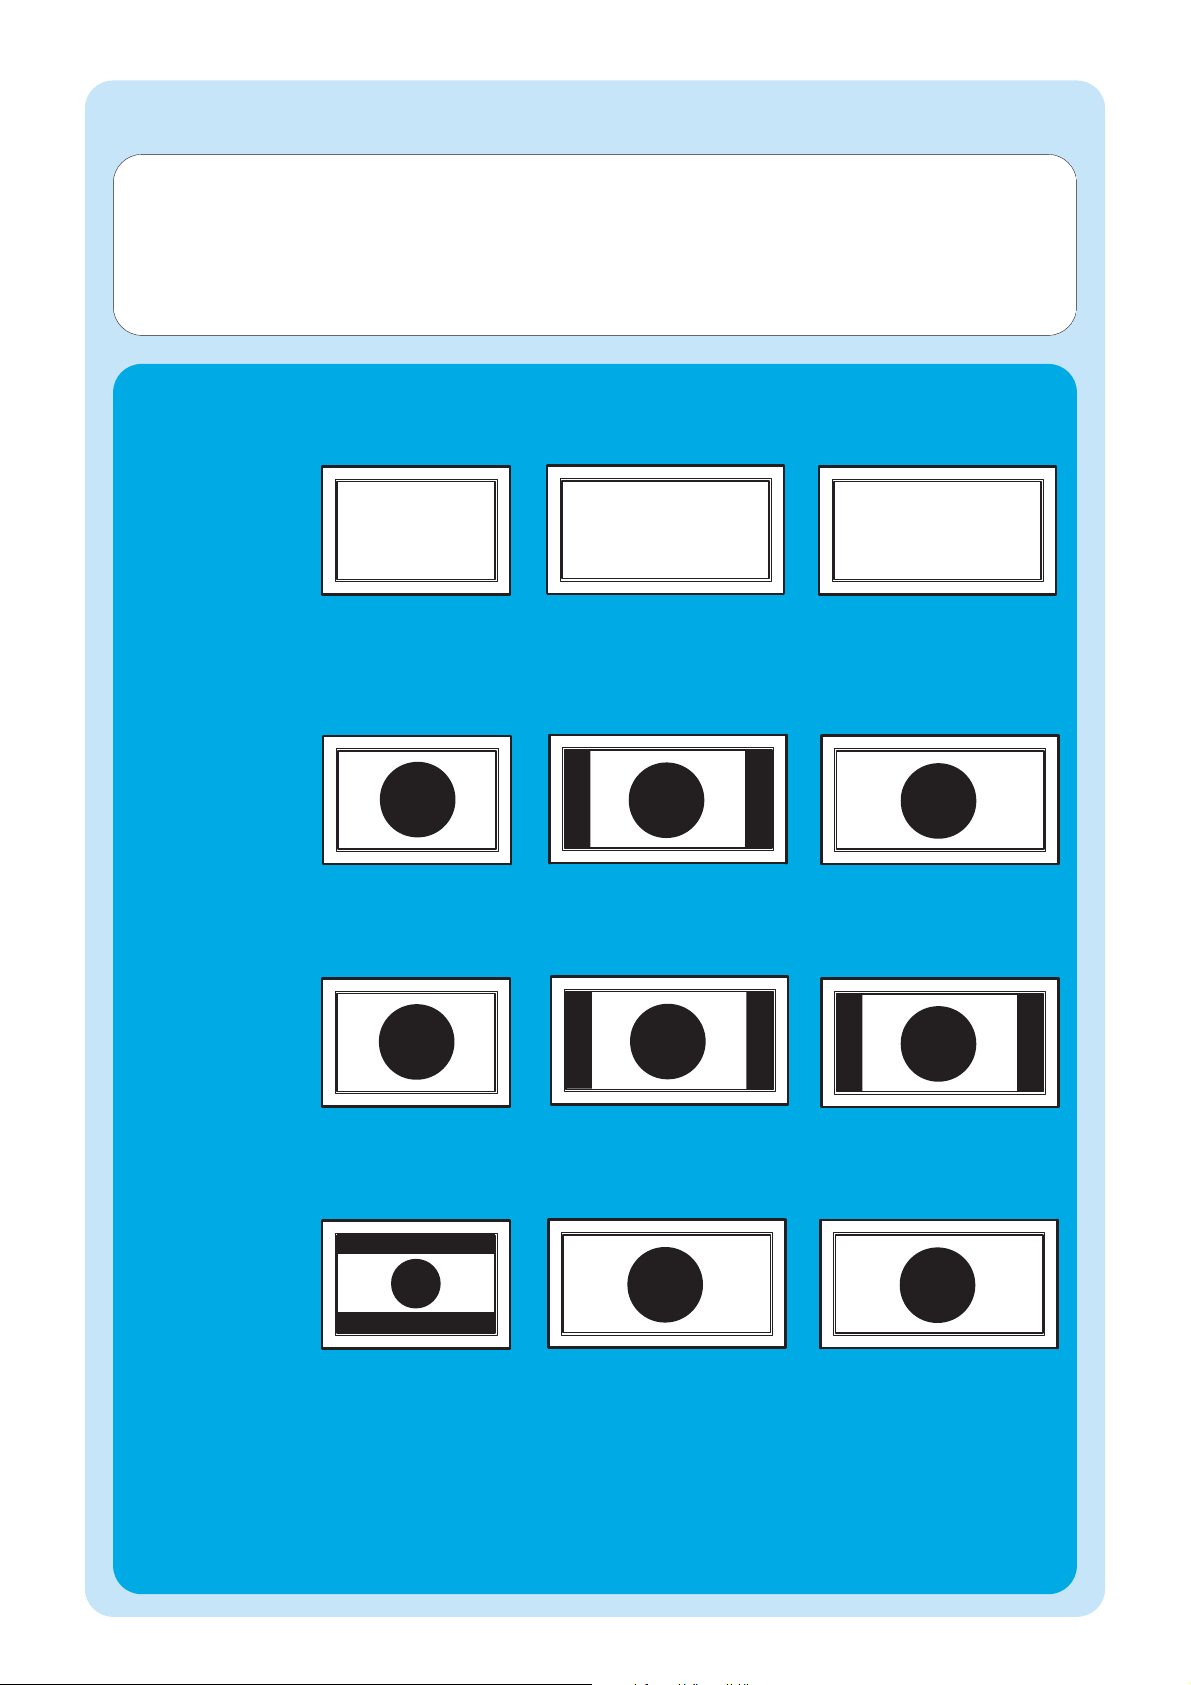
59
Aspect ratio wijzigen
De ‘aspect ratio’ is de verhouding tussen de breedte en de hoogte van het beeld. Bij een computermonitor of conventioneel tv-toestel is die verhouding 4:3, d.w.z. de verhouding breed:hoog is 4:3. Bij een breedbeeld-tv en hoge-definitie-tv
(HDTV) is die verhouding 16:9 (breed:hoog). Misschien hebben uw tv, content (afgespeelde video of dvd) en het Media
Center onderling afwijkende beeldverhoudingen, zodat er horizontale of verticale balken in beeld verschijnen. In dat geval
ziet u hieronder hoe u die verhouding kunt aanpassen.
Resolutie: 720 x 576.
SCART -aansluiting.
Standaard
(CRT) tv/
monitor
Resolutie: 720 x 576.
SCART -aansluiting.
Standaard (CRT)
tv/monitor
Resolutie voor verhouding 16:9
(b.v. 1280 x 720 of 1920 x 1080).
DVI-,VGA- of HDMI-aansluiting.
Flatscreen-tv/
monitor (plasma of
Lcd)
Standaardscherm
(Geen video of
dvd afgespeeld)
Video of dvd met
verhouding 4:3
afgespeeld
Video of dvd met
verhouding 16:9
afgespeeld
Geen balken.
Verhouding correct.
Geen aanpassing nodig.
Verticale balken.
Zie A.
Geen balken.
Verhouding correct. Zie D.
Geen balken.
Verhouding correct.
Geen aanpassing nodig.
Verticale balken.
Zie B.
Verticale balken.
Zie B.
Horizontale balken.
Zie C.
Geen balken.
Verhouding correct.
1
Geen balken.
Verhouding correct.
Geen aanpassing nodig.
2
Page 60
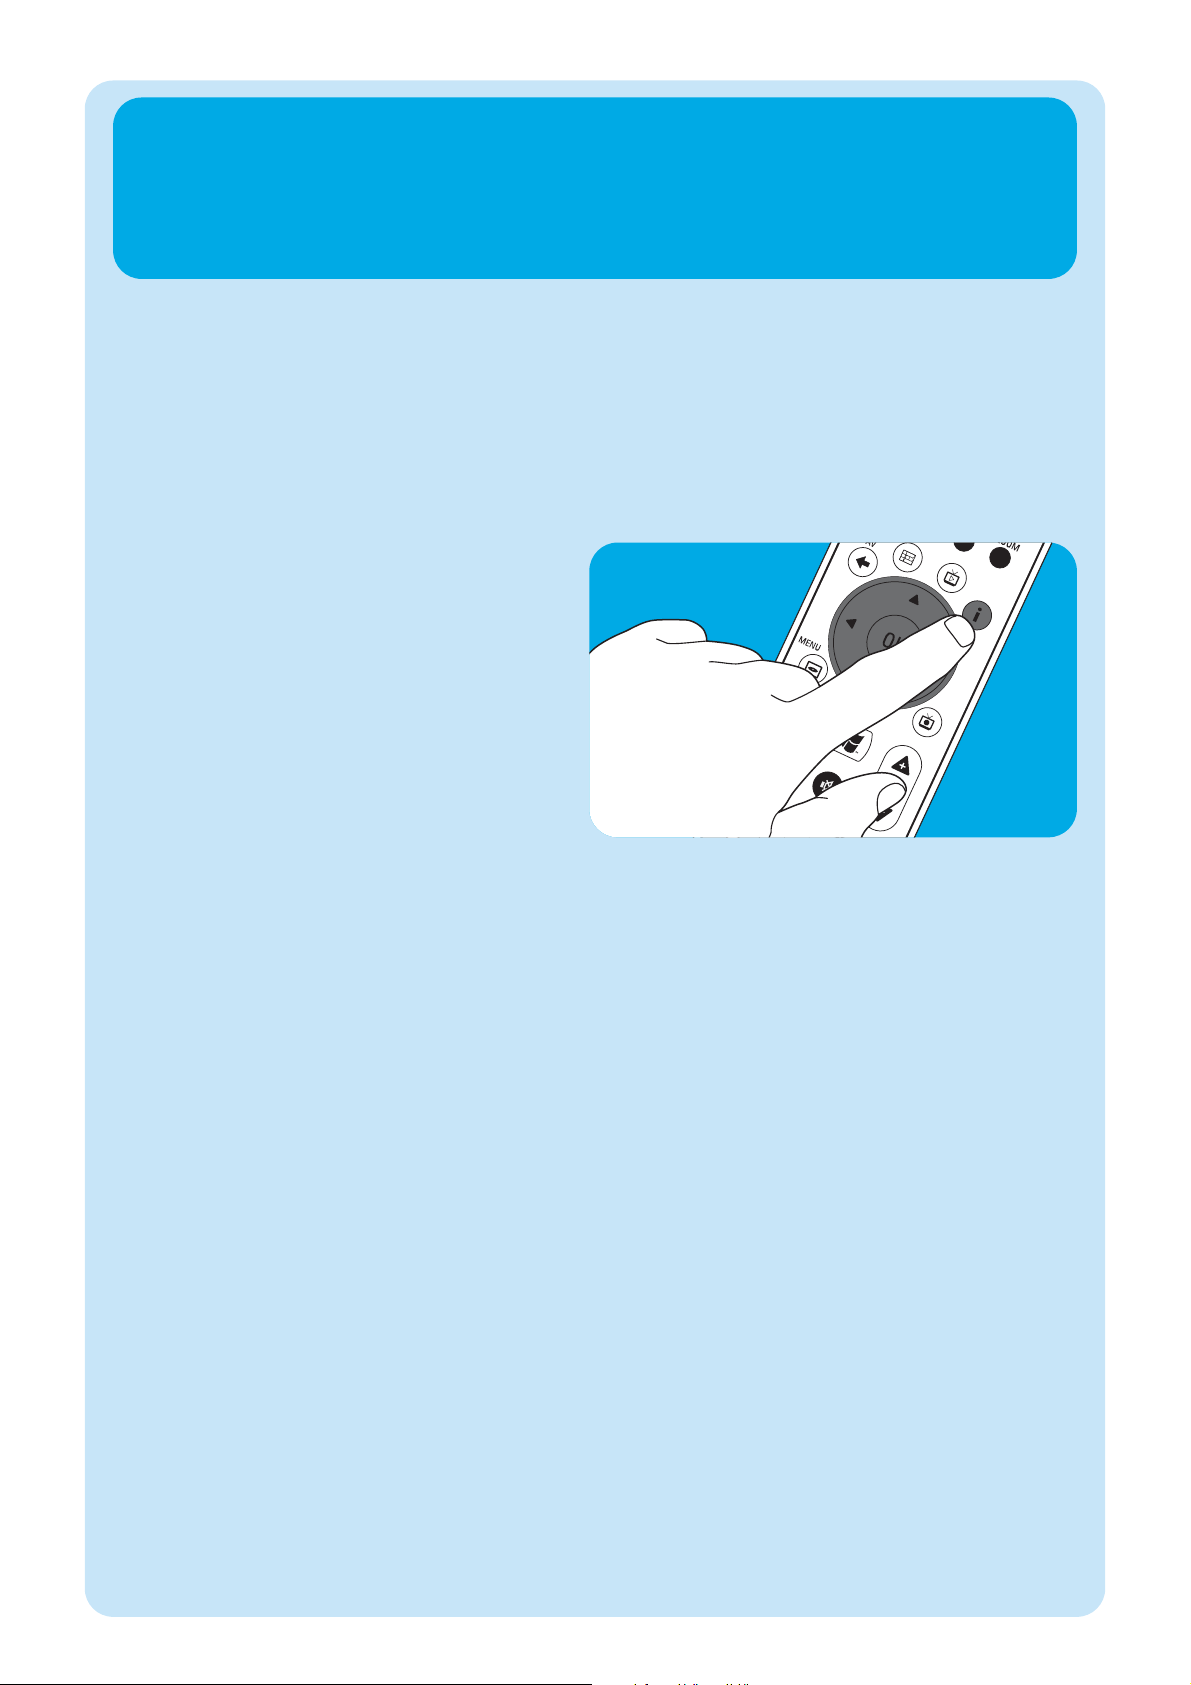
60
A
Verticale balken op standaardscherm (geen video of
dvd afgespeeld):
• Wijzig de aspect ratio op uw tv/monitor, zodat de bal-
ken verdwijnen of tot een minimum beperkt blijven. Kijk
daarvoor in de handleiding die bij het tv is geleverd.
Opmerking: De hoogte-breedteverhouding zal vervormd zijn.
B
Verticale balken bij het afspelen van 4:3 video of
dvd op 16:9 tv/monitor:
In dit geval zijn verticale balken links en rechts normaal.
Die kunnen niet worden versmald of verwijderd zonder
een vervormde hoogte-breedteverhouding van het beeld.
Wijzig de hoogte-breedteverhouding van de afgespeelde
content (video of dvd).
1 Druk op de i-toets (20) van de afstandsbediening.
2 Selecteer In- en uitzoomen en druk op de OK-toets
(19).
3 Selecteer de in deze situatie beste hoogte-breedtever-
houding (1, 2 of 3).
C
Horizontale balken bij het afspelen van 16:9 video
of dvd op 4:3 tv/monitor:
In dit geval zijn horizontale balken boven en onder normaal.
Die kunnen alleen worden versmald of verwijderd door
een vervormde hoogte-breedteverhouding van het beeld of
door verlies van een deel van het beeld.Wijzig de hoogtebreedteverhouding van de afgespeelde content (video of
dvd).
1 Druk op de i-toets (20) van de afstandsbediening.
2 Selecteer In- en uitzoomen en druk op de OK-toets
(19).
3 Selecteer de in deze situatie beste hoogte-breedtever-
houding (1, 2 of 3).
D
• Kies bij de grafische instellingen van het Media Center
een resolutie voor 16:9 die de beste beeldkwaliteit op
uw eigen tv/monitor oplevert.
De meeste flatscreen-tv’s/monitors zijn geschikt voor
1280 x 720 of 1920 x 1080.
1 – Als er verticale balken verschijnen: wijzig de hoogte-breedteverhouding van uw tv. – Als er horizontale balken verschijnen:
wijzig de hoogte-breedteverhouding van de afgespeelde content (video of dvd) zoals aangegeven bij B en C.
– ‘Wide screen’ content (b.v. van dvd’s) is niet altijd voor de verhouding 16:9 opgenomen, maar wijkt daarvan iets af. In dat
geval kunnen toch smalle horizontale balken zichtbaar blijven.
2 ‘Wide screen’ content (b.v. van dvd’s) is niet altijd voor de verhouding 16:9 opgenomen, maar wijkt daarvan iets af. In dat
geval kunnen toch smalle horizontale balken zichtbaar blijven.
Page 61
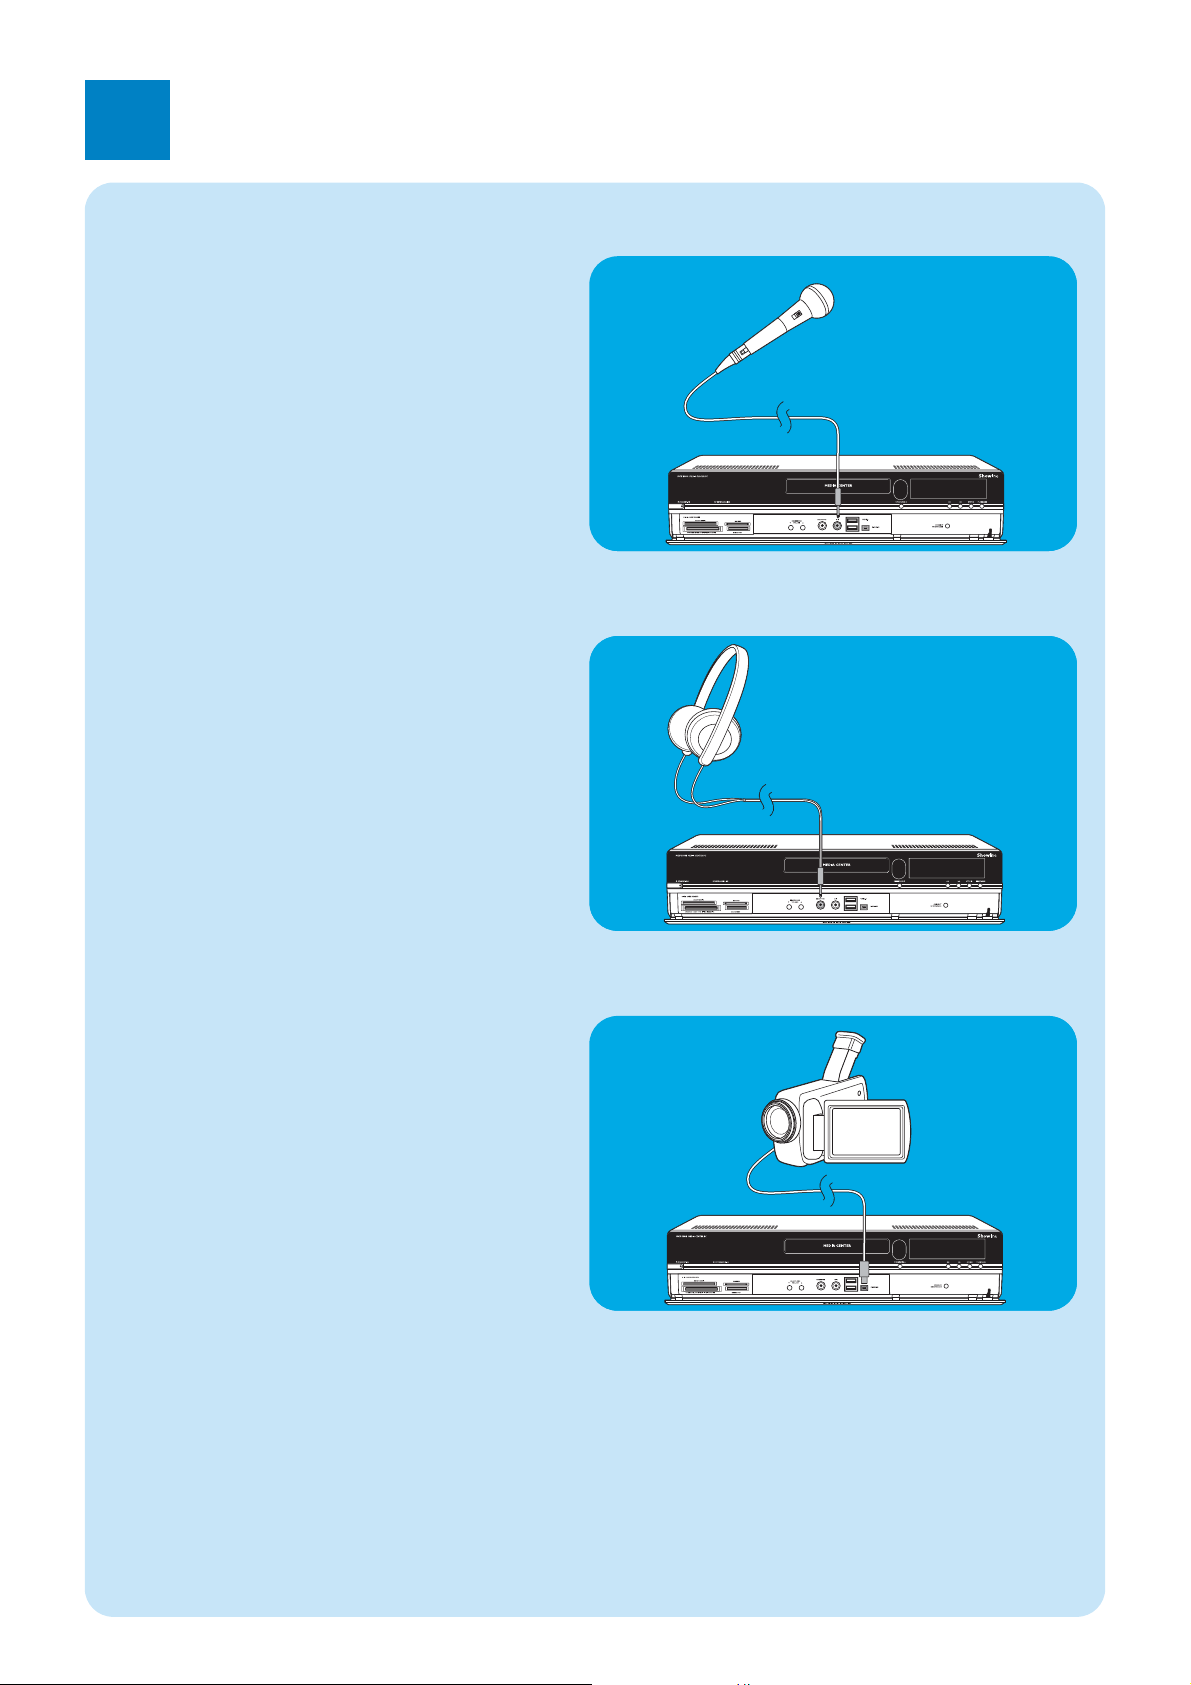
61
4
Overige aansluitmogelijkheden
1 Op de HEADPHONE-uitgang (13) aan de voorzijde
van het Media Center kunt u een hoofdtelefoon met
een plug van 3,5 mm aansluiten.
2 Het volume voor de hoofdtelefoon kunt u regelen met
de toetsen
4 HEADPHONE VOLUME 3 (12).
• U kunt het geluid van de hoofdtelefoon tijdelijk uitzet-
ten met de toets Mute (s) (10) van de afstandsbediening.
Hoofdtelefoon aansluiten
Video
camera
• Sluit de Firewire (IEEE1394 / i.LINK) connector van
uw camera aan op de FIREWIRE (IEEE1394 / Firewire
/ i.LINK) connector (16) aan de voorzijde van het Media
Center. Gebruik daarvoor een 4-polige Firewire
(IEEE1394 / i.LINK) kabel (niet meegeleverd).
OF:
• Sluit de USB-connector van uw camera aan op de
USB 2.0-connector (15) aan de voorzijde van het
Media Center. Gebruik daarvoor een USB 2.0-kabel
(niet meegeleverd).
Opmerkingen:
– Sluit de camera op het Media Center aan voordat u het pro-
gramma DV Capture start.
– Sluit het programma DV Capture af voordat u de camera
weer van het Media Center ontkoppelt.
– Controleer of voor de aangesloten onderdelen extra software
nodig is. Installeer de stuurprogramma’s die bij deze extra
apparatuur zijn geleverd voordat u die apparatuur op het
Media Center aansluit. Kijk daarvoor in de handleiding die
bij het apparaat is geleverd.
Videocamera (of andere draagbare signaalbron) aansluiten
• Op de MIC(rofoon)-ingang (14) aan de voorzijde van
het Media Center kunt u een microfoon aansluiten.
Microfoon aansluiten
Page 62
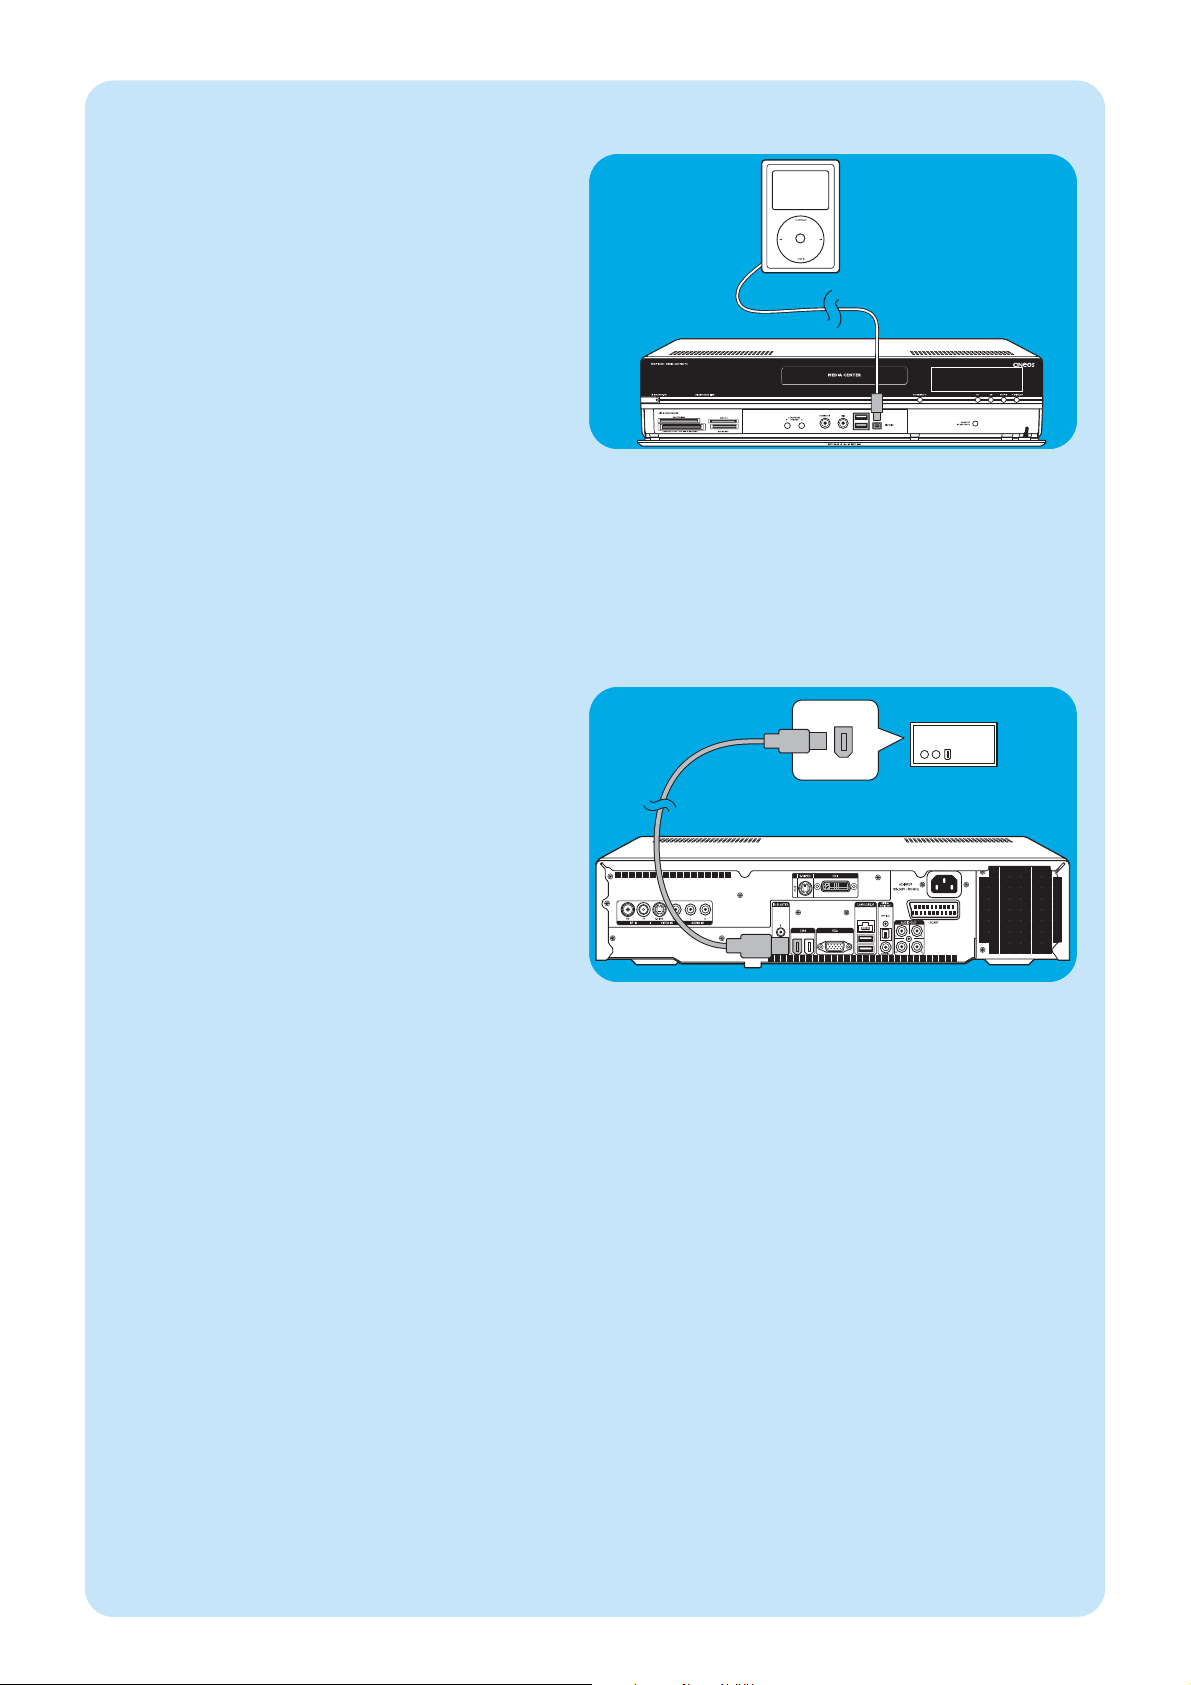
62
External HD
Input
External HD
• Sluit de Firewire (IEEE1394 / i.LINK) connector van de
externe schijfeenheid aan op de FIREWIRE (IEEE1394
/ i.LINK) connector (11) aan de achterzijde van het
Media Center. Gebruik daarvoor een 6-polige Firewire
(IEEE1394 / i.LINK) kabel (niet meegeleverd).
OF:
• Sluit de USB-connector van de externe schijfeenheid
aan op de USB 2.0-connector (13) aan de achterzijde
van het Media Center. Gebruik daarvoor een USB
2.0-kabel (niet meegeleverd).
Opmerking: Controleer of voor de aangesloten onderdelen extra
software nodig is. Installeer de stuurprogramma’s die
bij deze extra apparatuur zijn geleverd voordat u die
apparatuur op het Media Center aansluit.
Kijk daarvoor in de handleiding die bij het apparaat
is geleverd.
Externe harde schijf (HDD, optische schijf) aansluiten
Portable
Media
Player
• Sluit de Firewire (IEEE1394 / i.LINK) connector van
uw draagbare mediaspeler (b.v. een MP3-speler, harde
schijf of fotocamera) aan op de FIREWIRE (IEEE1394
/ i.LINK) connector (11) aan de voorzijde van het Media
Center. Gebruik daarvoor een 4-polige Firewire
(IEEE1394 / i.LINK) kabel (niet meegeleverd).
OF:
• Sluit de USB-connector van uw draagbare mediaspeler
(b.v. een MP3-speler, harde schijf of fotocamera) aan op
de USB 2.0-connector (13) aan de voorzijde van het
Media Center. Gebruik daarvoor een USB 2.0-kabel
(niet meegeleverd).
Opmerking: Controleer of voor de aangesloten onderdelen extra
software nodig is. Installeer de stuurprogramma’s die
bij deze extra apparatuur zijn geleverd voordat u die
apparatuur op het Media Center aansluit.
Kijk daarvoor in de handleiding die bij het apparaat
is geleverd.
Draagbare mediaspeler (of HDD of fotocamera) aansluiten
Page 63
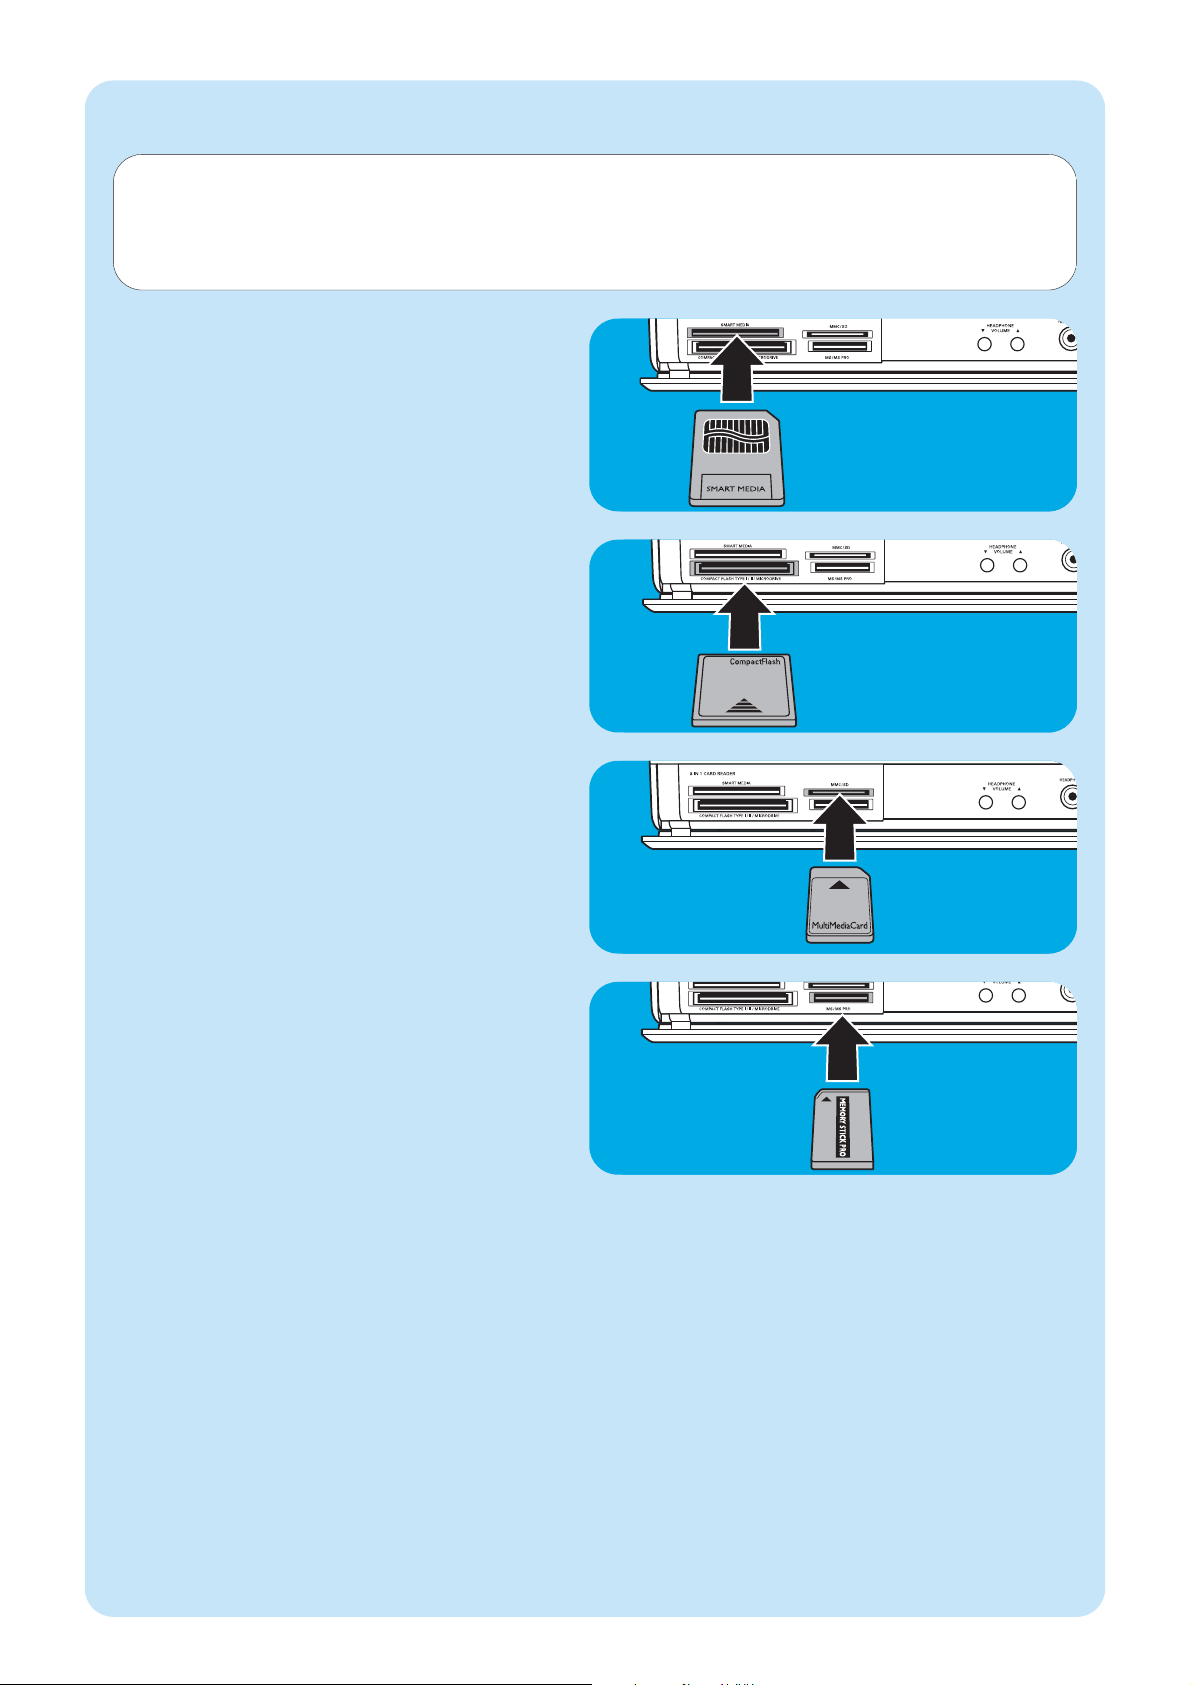
63
• Voor Smart Media-geheugenkaarten kunt u de sleuf
SMART MEDIA (8) van het Media Center gebruiken.
Geheugenkaarten plaatsen
• Voor Compact Flash-geheugenkaarten kunt u de sleuf
COMPACT FLASH TYPE 1 / 11 MICRODRIVE
(9) van het Media Center gebruiken.
• Voor geheugenkaarten van de typen MC (MultiMedia
Card) en SD (Secure Digital Card) kunt u de
MMC/SD -sleuf (10) van het Media Center gebruiken.
• Voor MS- en MS PRO-geheugenkaarten/sticks kunt u de
MS/MS PRO-sleuf (11) van het Media Center gebrui-
ken.
Als u voor de eerste keer een geheugenkaart in een van de sleuven (SMART MEDIA - 8, COMPACT FLASH TYPE
1 / 11 MICRODRIVE - 9, MMC/SD -10 of MS/MS PRO - 11) van het Media Center steekt, worden vier nieuwe stationsletters aangemaakt.Voor elke gebruikte sleuf wordt een letter gemaakt. Stel dat tot dan toe D: de laatste stationsletter was.
In dat geval worden voor de geheugenkaarten de letters E, F, G en H aangemaakt.
Page 64

64
Geen aansprakelijkheid voor verloren gegevens
Als u het MCP9360i Media Center voor service terugstuurt, maak dan vooraf een backup van al uw gegevens en verwijder
alle door u geïnstalleerde software van derden.
Bij elke vorm van serviceverlening bent u zelf verantwoordelijk voor het maken van een backup van de gegevens op uw
Media Center, inclusief alle gegevens en software van derden die u op het Media Center hebt geïnstalleerd. Het is waarschijnlijk dat alle opgeslagen gegevens tijdens servicewerkzaamheden verloren gaan en wij zijn op geen enkele wijze aansprakelijk voor het verlies van programma’s, gegevens of andere informatie, opgeslagen op een medium of een onderdeel van
een Product waaraan servicewerkzaamheden worden uitgevoerd.
ALS TIJDENS REPARATIE VAN HET PRODUCT DE GEGEVENS VAN het 2005 Entertainment PC
Platform WORDEN GEWIJZIGD, GEWIST OF OP ENIGERLEI WIJZE WORDEN AANGEPAST, ZIJN WIJ
DAARVOOR OP GEEN ENKELE WIJZE AANSPRAKELIJK. UW PRODUCT WORDT NAAR U TERUGGESTUURD MET DE CONFIGURATIE ZOALS DIE WAS TOEN U HET PRODUCT HEBT GEKOCHT
(AFHANKELIJK VAN DE BESCHIKBAARHEID VAN SOFTWARE).
Zorg dat alle software van derden en software, functies, onderdelen, aanpassingen en uitbreidingen waarop wij geen garantie
verlenen, door u worden verwijderd voordat u het product voor onderhoud aan ons toestuurt.Wij zijn niet aansprakelijk
voor verlies of schade aan die items.
Veiligheidsvoorschriften en juridische informatie
Hieronder vindt u gedetailleerde informatie over veiligheidsvoorschriften en normen waaraan het 2005 Entertainment PC
Platform voldoet, waaronder:Veiligheidsverklaring Dit product voldoet aan de internationale veiligheidsnorm IEC/EN 60950-1
voor IT-apparatuur en heeft het CE-keurmerk voor gebruik binnen de Europese Unie.
Lithiumbatterij - Waarschuwing
SS
LET OP:
Vervanging van de batterijen door een ongeschikt type kan een explosie veroorzaken. Indien mogelijk moeten batterijen worden hergebruikt.
Lege batterijen moeten worden ingeleverd als klein chemisch afval (KCA).
Veiligheidsmaatregelen, telecom
SS
LET OP:
Om het risico op brand te beperken, dient u alleen een telefoonkabel van de dikte AWG 26 of hoger, zoals bij dit product
geleverd, te gebruiken.
Veiligheidsmaatregelen, radiofrequenties
Evenals andere radiografische apparatuur straalt het 2005 Entertainment PC Platform elektromagnetische energie met
radiofrequenties uit. Het niveau van de door dit apparaat uitgestraalde energie is echter lager dan de elektromagnetische
energie die door andere draadloze apparaten, zoals mobiele telefoons, wordt uitgestraald.
Opmerking:
Stel het MCP9360i Media Center zodanig op dat de antenne (achter het frontpaneel van het apparaat) op een afstand van
minimaal 20 cm van de gebruiker of andere personen blijft.
In bepaalde gevallen kunnen de eigenaar van een gebouw of verantwoordelijke personen van een regulerende instantie
beperkingen aan het gebruik van draadloze apparatuur opleggen.Als u niet zeker weet welke regels in een bepaalde organisatie of omgeving van toepassing zijn voor het gebruik van draadloze apparatuur, dan raden we u aan toestemming voor het
gebruik van het MCP9360i Media Center te vragen voordat u draadloos gegevens verzendt.
Veiligheidsmaatregelen, kabel
SS
LET OP:
De mantel van de coaxkabel moet bij binnenkomst van het huis verbonden worden met de aarding.
5
Belangrijke informatie
Page 65

65
Andere draadloze apparatuur Veiligheidsvoorschriften voor andere apparatuur in het draadloze netwerk:
Controleer of er extra veiligheidsvoorschriften staan in de documentatie die werd geleverd bij het draadloze toetsenbord,
de draadloze muis, de Bluetooth-zender of andere apparatuur in het draadloze netwerk.
Lokale beperkingen aan gebruik radiofrequenties
De door het MCP9360i Media Center gebruikte frequentieband 2,4 GHz is niet in alle landen geharmoniseerd. De apparatuur is gecertificeerd voor gebruik in bepaalde landen en mag niet in andere dan de hieronder vermelde landen of locaties
worden gebruikt.Als gebruiker van dit product bent u er zelf verantwoordelijk voor dat deze apparatuur alleen wordt
gebruikt in de landen waarvoor die werd ontwikkeld. U bent er ook verantwoordelijk voor dat de apparatuur correct is
geconfigureerd met de juiste frequenties en kanalen voor het land waar het product wordt gebruikt. Elke afwijking van de
voor het land waar u het product gebruikt toelaatbare instellingen geldt als een schending van wetten, reglementen of regelgeving en kan daarom tot strafvervolging leiden. Zie de volgende informatie voor specifieke landen:
Frequentiebanden Europese Unie:
• Duitsland, Luxemburg, Nederland, Spanje, Zweden en het Verenigd Koninkrijk: 2,400 - 2,4835 GHz (Europa ETSI)
• Frankrijk:
Departementen in Frankrijk: 2,400 - 2,4835 GHz binnen: 2,400 - 2,454 GHz (kanalen 1 t/m 7) buiten.
Guadeloupe, Martinique, St Pierre et Miquelon, Mayotte: 2,400 - 2,4835 GHz binnen en buiten.
Reunion, Guyane: 2,400 - 2,4835 GHz binnen: 2,420 - 2,4835 GHz buiten (kanalen 5 t/m 13)
• Italië:
in privéruimten; binnen en buiten: 2,400 - 2,4835 GHz
In openbare ruimten; binnen en buiten; voor gebruik is in het algemeen toestemming vereist van Italiaanse
ministerie voor post en telecommunicatie: 2,400 - 2,4835 GHz.
• België:
in privéruimten; binnen en buiten; bereik minder dan 300 m: 2,400 - 2,4835 GHz
In privéruimten; buiten en in openbare ruimten en met een werkbereik boven 300 m is een licentie
vereist van IBPT/ BIPT: 2,400 - 2,4835 GHz.
• Verbindingen met andere draadloze apparatuur
Het MCP9360i Media Center is geschikt voor verbindingen met elk draadloos LAN-product dat gebruik maakt van de
radiografische technologie DSSS (Direct Sequence Spread Spectrum) en voldoet aan de volgende normen:
• IEEE 802.11a - norm voor Wireless LAN.
• IEEE 802.11b - 1999, norm voor Wireless LAN.
• IEEE 802.11 - norm voor Wireless LAN.
• Wireless Fidelity-certificaat (WiFi), vastgelegd door WECA (Wireless Ethernet Compatibility Alliance).
Straling
Elke niet uitdrukkelijk door Philips goedgekeurde aanpassing aan deze apparatuur kan tot gevolg hebben dat de toestemming
tot het gebruik van de apparatuur vervalt.
De opstelling en het gebruik van deze apparatuur moet nauwgezet voldoen aan de instructies in de bij het product geleverde
documentatie. Elke niet uitdrukkelijk door de fabrikant van dit product goedgekeurde aanpassing aan deze apparatuur (inclusief de antennes) kan tot gevolg hebben dat de toestemming tot het gebruik van de apparatuur vervalt. De fabrikant is niet
aansprakelijk als storing in de ontvangst van radio- of tv-signalen wordt veroorzaakt door een ontoelaatbare aanpassing aan
dit product of vervanging of aansluiting van andere dan de door de fabrikant gespecificeerde kabels of apparatuur.
De gebruiker dient zelf de door ontoelaatbare aanpassingen, vervangingen of aansluitingen veroorzaakte storingen op te lossen.
De fabrikant en door de fabrikant geautoriseerde resellers of distributeurs aanvaarden geen enkele aansprakelijkheid voor
schade of overtreding van overheidsreglementen, die het gevolg is van het niet voldoen aan deze richtlijnen.
Page 66

66
Normen van Europese Unie
Wij, Philips, verklaren dat dit product, Entertainment PC, voldoet aan de essentiële vereisten en andere relevante voorwaarden van richtlijn 1999/5/EC (Radio Equipment and Telecommunications Terminal Equipment). Het CE-keurmerk bewijst deze
conformiteit en bevestigt dat het product in alle EU-landen met inachtneming van de hierboven aangegeven beperkingen
mag worden gebruikt.
Milieuvoorschriften
De volgende informatie gaat in op ecologie en milieuvoorschriften.
Afvalverwerking
Dit product bevat de volgende producten die misschien als speciaal afval moeten worden behandeld: loodhoudend soldeermiddel in diverse onderdelen.
Recycling
We raden onze klanten aan producten en onderdelen (b.v. batterijen, prints, kunststoffen) indien enigszins mogelijk voor
recycling beschikbaar te maken.
Indien recycling onmogelijk is, moeten producten en onderdelen in overeenstemming met alle lokaal geldende voorschriften
voor afvalverwerking worden behandeld.
Veiligheidsmaatregelen: elektrische, magnetische en elektromagnetische
velden (‘EMF’)
1 Philips Royal Electronics vervaardigt en levert consumentenproducten die, evenals alle elektronische apparatuur, in het
algemeen elektromagnetische signalen kunnen ontvangen en versturen.
2 Een van de belangrijkste principes van Philips is het nemen van alle noodzakelijke maatregelen die tot producten leiden
die voldoen aan alle voorschriften over de gezondheid en veiligheid en aan alle wettelijke voorschriften en die ruim binnen
de gestelde EMF-normen blijven zoals die op het moment van de productvervaardiging gelden.
3 Philips verplicht zich tot het ontwikkelen, produceren en op de markt brengen van producten die geen bedreiging voor
de gezondheid vormen.
4 Philips bevestigt dat Philips-producten bij toepassing voor de taak waarvoor ze zijn bedoeld op grond van momenteel
beschikbaar wetenschappelijk bewijs veilig zijn.
5 Philips speelt een actieve rol in het ontwikkelen van internationale normen voor EMF en veiligheid, zodat Philips toe-
komstige ontwikkelingen in die normen tijdig in de eigen producten kan integreren.
Page 67
67
Informatie voor de consument
Verwijdering van uw oude product
Uw product is vervaardigd van kwalitatief hoogwaardige materialen en onderdelen, welke gerecycled
en opnieuw gebruikt kunnen worden.
Als u op uw product een doorstreepte afvalcontainer op wieltjes ziet, betekent dit dat het product
valt onder de EU-richtlijn 2002/96/EC.
Win inlichtingen in over de manier waarop elektrische en elektronische producten in uw regio
gescheiden worden ingezameld.
Neem bij de verwijdering van oude producten de lokale wetgeving in acht en plaats deze producten
niet bij het gewone huishoudelijke afval.Als u oude producten correct verwijdert voorkomt u negatieve gevolgen voor het
milieu en de volksgezondheid.
Het onbevoegd kopiëren van materiaal waarop copyright rust, waaronder computerprogramma’s, bestanden, radio- en tvprogramma’s en geluidsopnamen, kan een inbreuk op het copyright zijn en tot strafvervolging leiden. Deze apparatuur mag
niet voor dergelijke doeleinden worden gebruikt.
Page 68

Aantekeningen
68
Page 69

69
Aantekeningen
Page 70

70
Support
If you need help with your MCP9360i, please visit the Philips support website:
www.philips.com/support
If the website does not provide the solution you are looking for, please contact the Philips helpdesk:
UK 0906 1010 017 £ 0.15 / min
Page 71
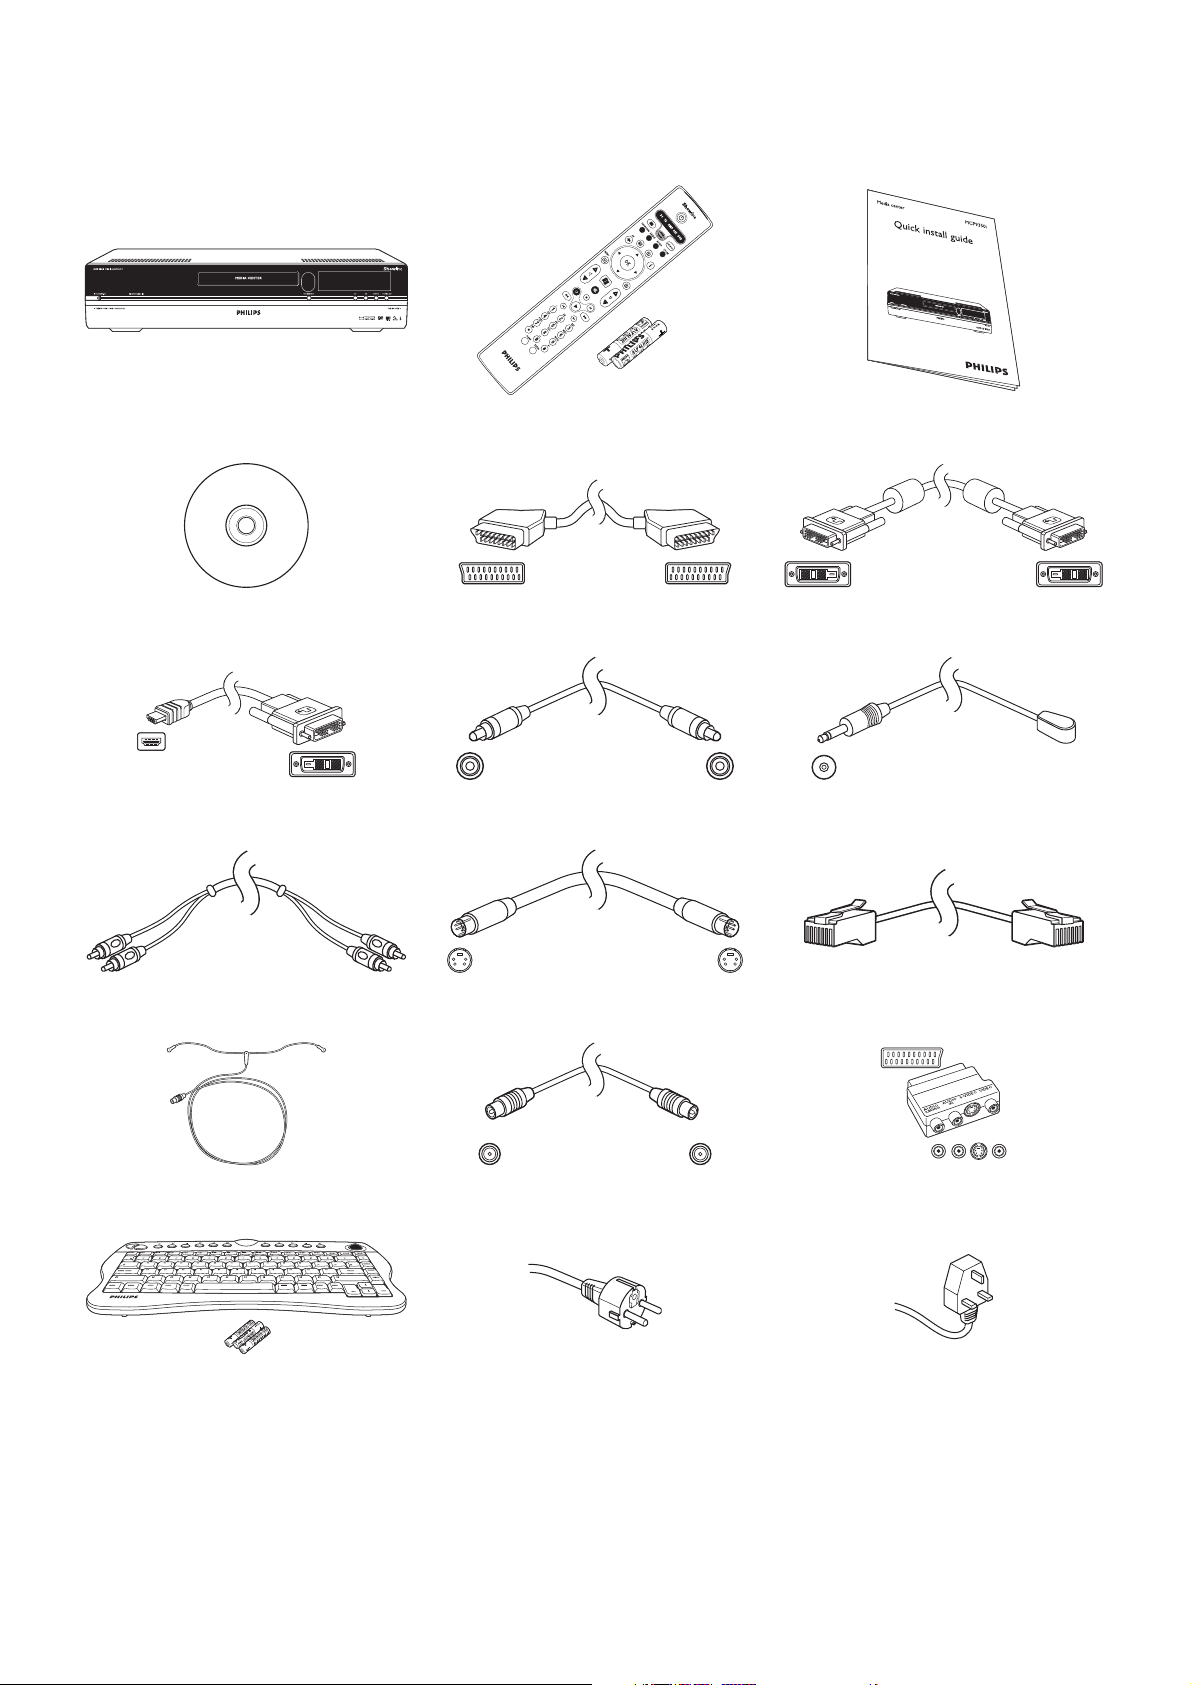
71
What’s in the box
Media Center MCP9360i Remote control,
2 x AA batteries
Quick install guide
CD SCART cable DVI-D cable
DVI-D to HDMI cable Digital audio cinch (coaxial) cable 2 x IR blaster for set-top box
Stereo audio cinch cable S-Video cable Ethernet cable
FM antenna cable TV antenna cable (1 m)
TV antenna cable (10 cm)
SCART to SVHS / CVBS adapter
Wireless keyboard,
3 x AA batteries
Power cable Power cable
(MCP 9360i/22)
Page 72

72
What’s in the box ................................................................ 71
1 Functional overview ....................................................... 73
Front view ........................................................................................................................... 73
Rear view ............................................................................................................................. 74
Remote control ................................................................................................................75
Wireless keyboard ............................................................................................................. 77
2 Installing your Philips Media Center ............................ 78
Connecting a TV / monitor ............................................................................................. 78
Connecting video (e.g. set-top box) .............................................................................. 80
Connecting audio ...............................................................................................................81
Connecting to the Internet ............................................................................................. 82
Connecting antennas ......................................................................................................... 84
Inserting batteries in the remote control .................................................................... 84
Connecting to the mains / Switching ON and to standby ...................................... 85
Installing the wireless keyboard ..................................................................................... 86
3 Setup of your Philips Media Center ............................. 87
Microsoft Windows®setup ............................................................................................ 87
Media Center setup wizard ............................................................................................. 88
Manual channel search ...................................................................................................... 90
Additional software setup ................................................................................................ 91
Changing settings ............................................................................................................... 91
Changing screen resolution ............................................................................................. 92
Adjusting aspect ratio ....................................................................................................... 93
4 Additional connections .................................................. 95
Connecting a microphone ............................................................................................... 95
Connecting headphones ................................................................................................... 95
Connecting a video camera (or other portable external source) ......................... 95
Connecting a portable media player (or HDD or photo camera) ........................ 96
Connecting an external drive (HDD, optical drive) .................................................. 96
Inserting memory cards ................................................................................................... 97
5 Important information .................................................. 98
Data loss disclaimer .......................................................................................................... 98
Safety and regulatory information ................................................................................. 98
Contents
Page
Page 73
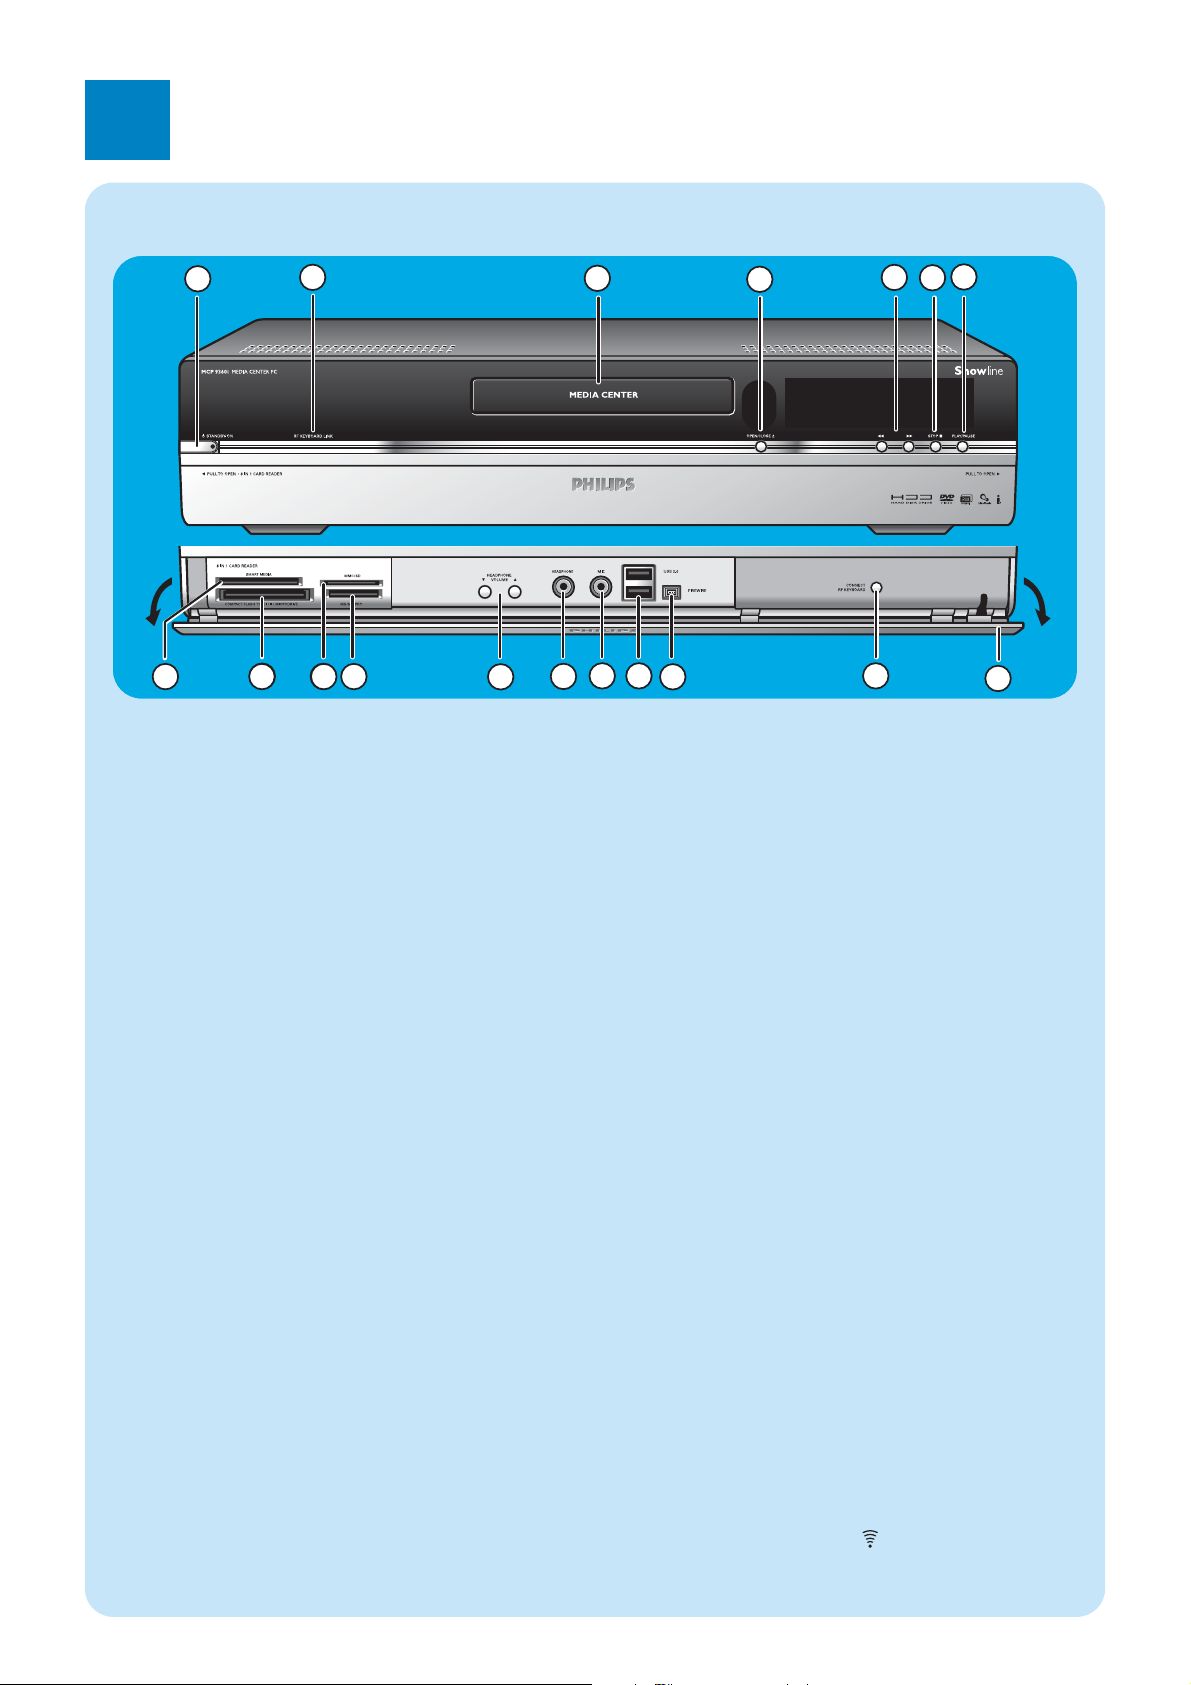
73
Front view
1
5
8
7
6
8
9
3
13
12
9 10
11
4
14
15
16
17
18
2
1yySTANDBY-ON
Switches the Media Center ON and to standby (lowpower mode).
STANDBY/ON indicator (on the key)
– Lights up orange when the Media Center is connected
to the mains supply.The Media Center is then in lowpower mode, consuming only minimum power.
– Lights up red when the Media Center is switched to
standby with the yyStandby key (1) on the remote
control.
– The indicator is off when the Media Center is
switched on with the y Standby key (1) on the remote control or the yySTANDBY-ON key (1).
2 RF KEYBOARD LINK
Flashes when the set receives signals from the wireless
keyboard.
3 Optical drive
For playing and burning CDs / DVDs.
4 OPEN/CLOSE //
Opens and closes the optical drive.
5 5
– Searches fast backwards in the current track (keep
pressed).
6
– Searches fast forward in the current track (keep pres-
sed).
– Plays the track in slow motion when the DVD is in
pause mode (press once).
6 STOP 9
Stops playback.
7 PLAY/PAUSE
– Starts playback.
– Pauses playback.
8 SMART MEDIA
For inserting a Smart Media memory card.
9 COMPACT FLASH TYPE 1 / 11, MICRODRIVE
For inserting a Compact Flash memory card.
10 MMC/SD
For inserting an MMC/SD (MultiMedia Card / Secure
Digital card) memory card from a digital camera for example.
11 MS/MS PRO
For inserting a Memory Stick (Pro).
12 4 HEADPHONE VOLUME 3
Sets the headphones volume. Headphones volume is
independent from set volume.
13 HEADPHONE
For connecting headphones.
14 MIC
For connecting a microphone.
15 USB 2.0
For connecting USB 1.1 and 2.0 enabled devices.
16 FIREWIRE (IEEE1394 / i.LINK) - 4 pins
For connecting digital, FireWire / IEEE1394 / i.LINK
enabled, products (e.g. digital camcorders, hard disks, etc.
that require 4-pin connection) to transfer data to the
Media Center.
17 CONNECT RF KEYBOARD
Connects the Media Center with the keyboard.To be
used in combinationwith the key (3) on the keyboard.
18 Flap
1
Functional overview
Page 74
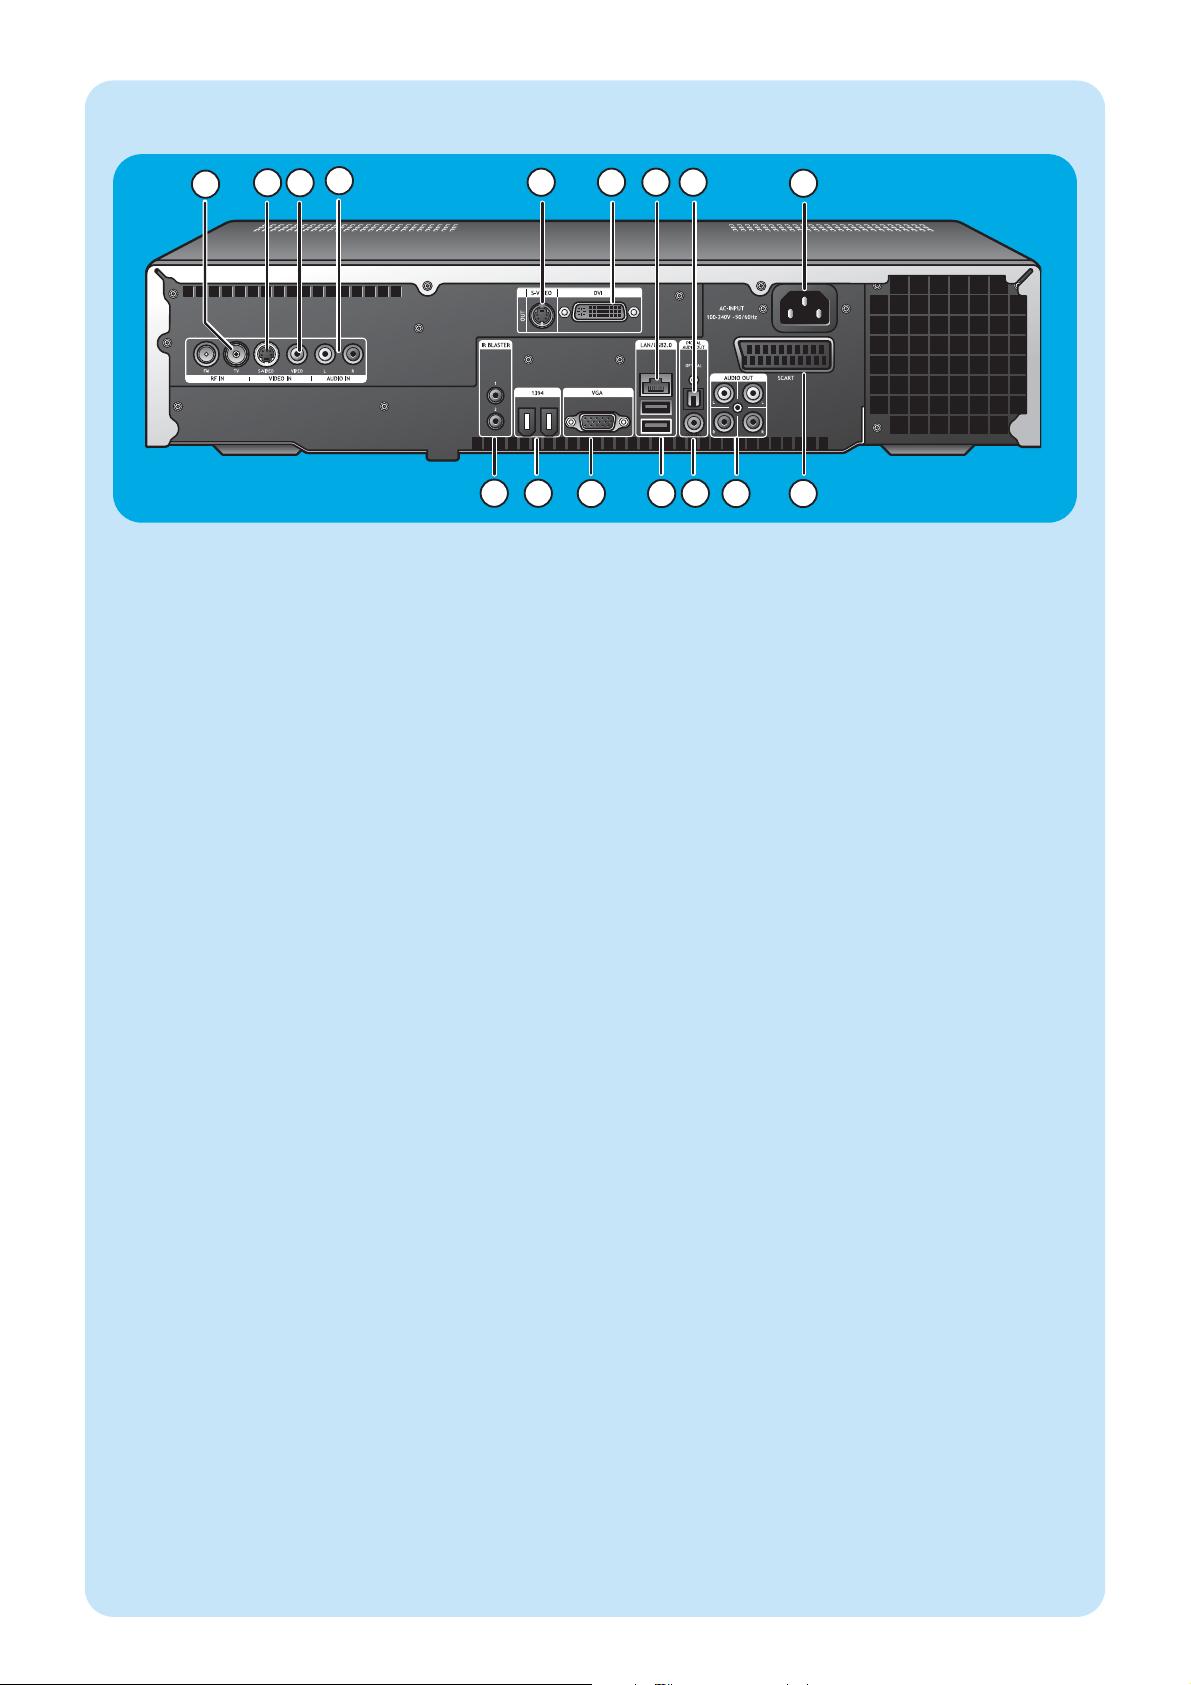
74
Rear view
5
9
11
10
12
13
14
15 16
6 7 8
2 3
4
1
1 RF IN - TV
For connecting to the cable antenna system.
2 VIDEO IN - S-Video
Video input socket for connecting to the S-Video output
socket of a TV, cable/satellite set-top box, DVD
player/recorder, etc.
3 VIDEO IN -Video (CVBS)
Video input socket for connecting to the CVBS (composite video) output socket of a TV, cable/satellite set-top
box, DVD player/recorder, etc.
4 AUDIO IN
Stereo audio input sockets for connecting to the audio
output sockets of a cable/satellite set-top box, DVD
player/recorder, audio equipment, etc.
5 S-VIDEO OUT
Output socket for connecting to the input socket of
S-Video enabled recording devices (DVD,VCR) or an
S-Video enabled TV.
6 DVI OUT
DVI-D (Digital Video Interface-Digital only) output socket for connecting to the DVI-D input socket of a DVID enabled monitor or flat screen TV.
7 LAN
For connecting to your local area network (LAN).
8 DIGITAL AUDIO - Optical - Out
Optical output socket for connecting to the optical
input socket of a receiver, TV or recording device (CD
recorder,VCR, etc.).
9 AC-INPUT (100-240V - 50/60Hz)
For connecting the Media Center to the mains.
10 IR (infrared) BLASTER (2 x)
For connecting an IR (infrared) blaster in order to select
channels on your cable/satellite set-top box via the
Media Center remote control.
11 1394 (Firewire / i.LINK) - 6-pin(2 x)
For connecting to IEEE 1394 / Firewire / i.LINK compatible peripherals and devices such as an external hard
disk that requires two additional pins for power supply..
12 VGA
For connecting to a VGA (Video Graphics Array) enabled monitor or flat screen TV.
13 USB 2.0 (2 x)
For connecting USB 1.1 and 2.0 enabled devices.
14 DIGITAL AUDIO - COAXIAL - Out
Coaxial output socket for connecting to the coaxial
input socket of a receiver or recording device (e.g a
DVD recorder).
15 AUDIO OUT (2 x)
Stereo audio output sockets for connecting to the audio
input sockets of a receiver or recording device (e.g a
DVD recorder).
16 SCART (RGB / CVBS)
For connecting to the SCART input connector of a TV.
Note:Wireless LAN antennas (802.11b/g) are already built in in
the set so there is no need for connecting a wireless USB
adapter in order to integrate the Media Center in your
wireless netwerk.
Page 75
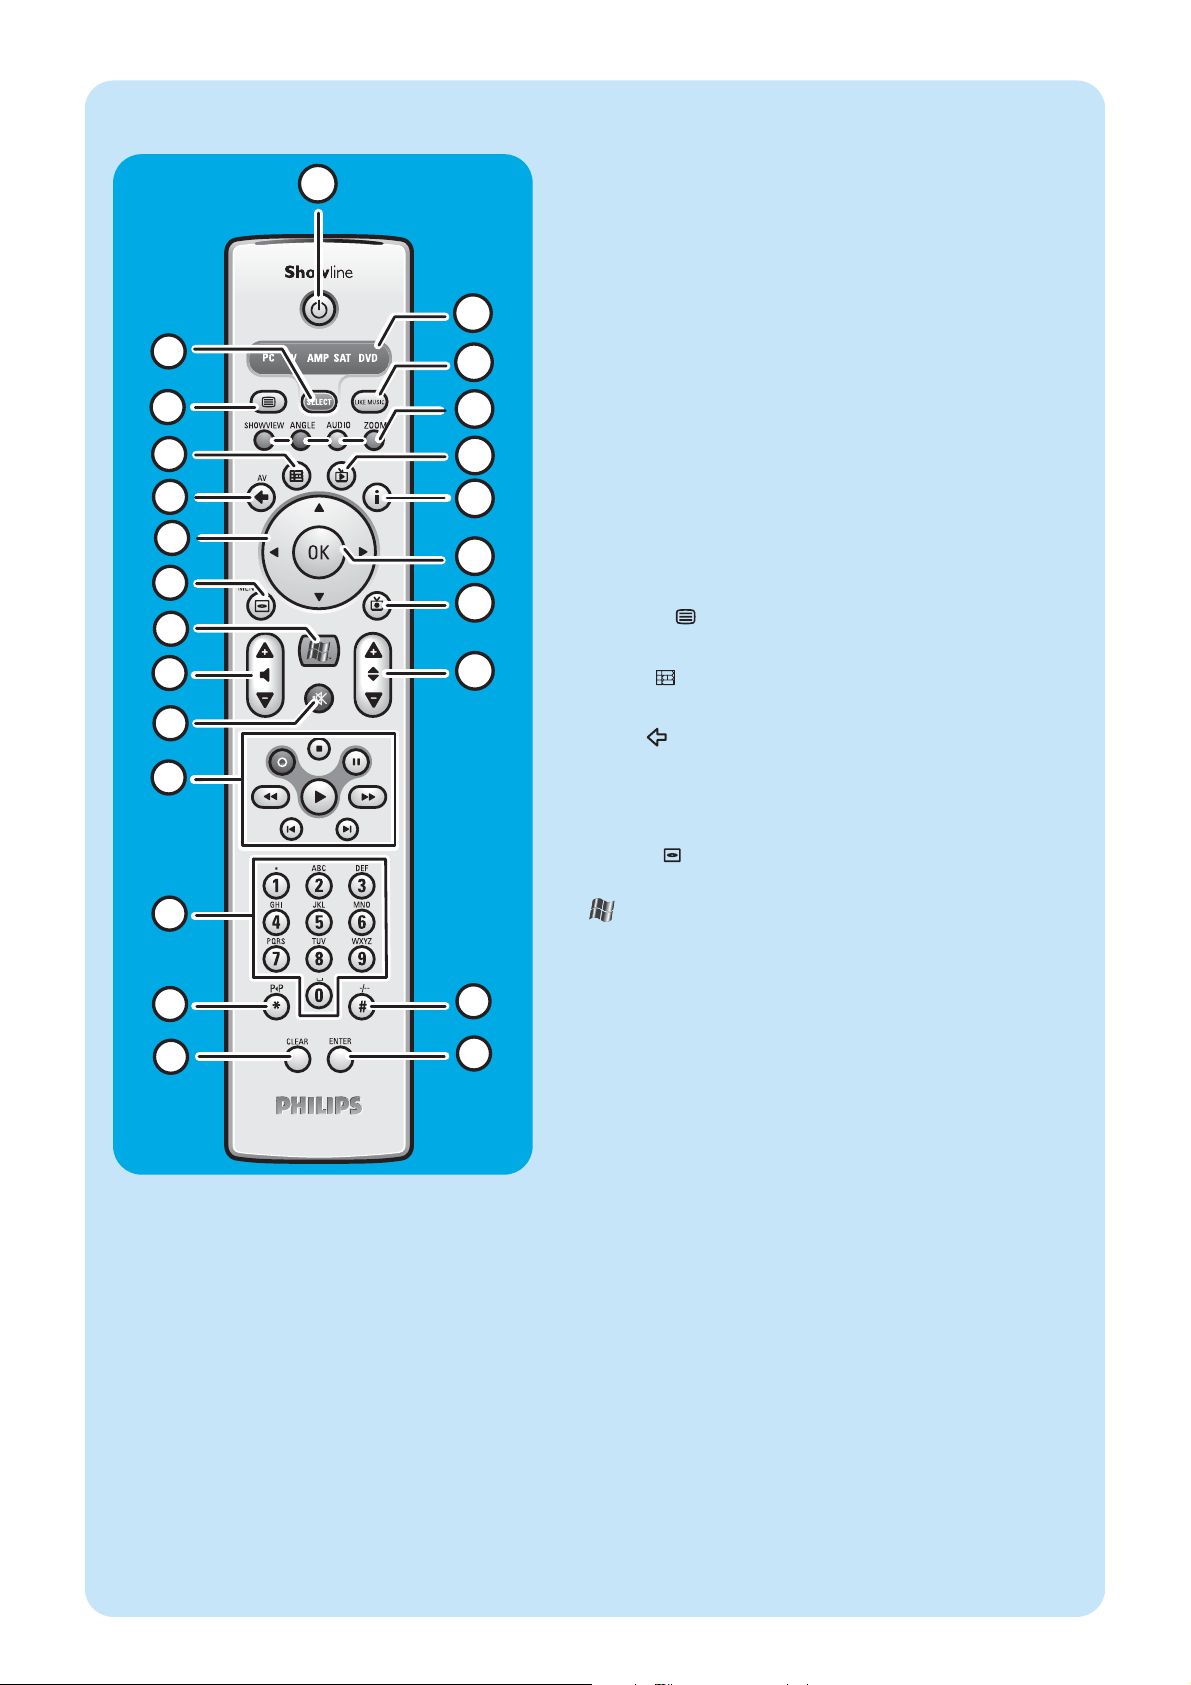
75
C
Remote control
3
1
2
5
4
6
10
9
7
8
12
13
14
17
18
21
20
22
23
16
15
19
11
24
In this chapter we will only describe RC key functions in Media
Center (PC) mode. For a desciption of key functions in other
modes (TV, AMP, SAT and DVD), please refer to the RC4370 user
manual.
Notes:
– After switching on the Media Center, the remote control will auto-
matically switch to Media Center mode as well.
– If a key or key combination is pressed for longer than 30 seconds,
the remote control will stop transmitting IR signals.
1yyStandby
Switches the Media Center ON and to standby.
2 SELECT
Selects the device you wish to operate via the remote control.
PC stands for the Media Center.
After switching on the remote control, it will automatically
enter the Media Center mode.
3 Teletext (
)
TV/SAT (in PC mode): text on/off.
4 Guide ( )
Opens the electronic TV program guide.
5 Back ( )
Returns to the previous screen.
6 1 2 3 4
Cursor left, right, up and down keys. Menu navigation keys.
7 MENU ( )
Displays the menu of the DVD currently in the optical drive.
8
Opens Microsoft Windows®XP Media Center edition home
menu.
9 – Volume +
Adjusts the volume of your Philips TV down (–) and up (+).
For adjusting the volume of other TV brands, see the RC4370
User manual.
10 Mute (s)
Mutes headphones output.
11 0 (Record)
Records a TV program and stores it on the Media Center hard
disc drive. By default, recorded programs are stored in the
Shared Documents folder (RecordedTV folder).
9 (Stop)
Stops media currently playing or recording.
; (Pause)
Pauses media currently playing or recording.
5 6 (Search)
Search fast backwards (5) and forward (6) in the current
DVD chapter (keep pressed).
2 (Play)
Plays movie, music or pictures.
¡ ™ (Skip)
Skips the media (video and / or audio) backwards (¡) or forward (™) one music track (CD) or one movie chapter (DVD)
at a time.
Page 76
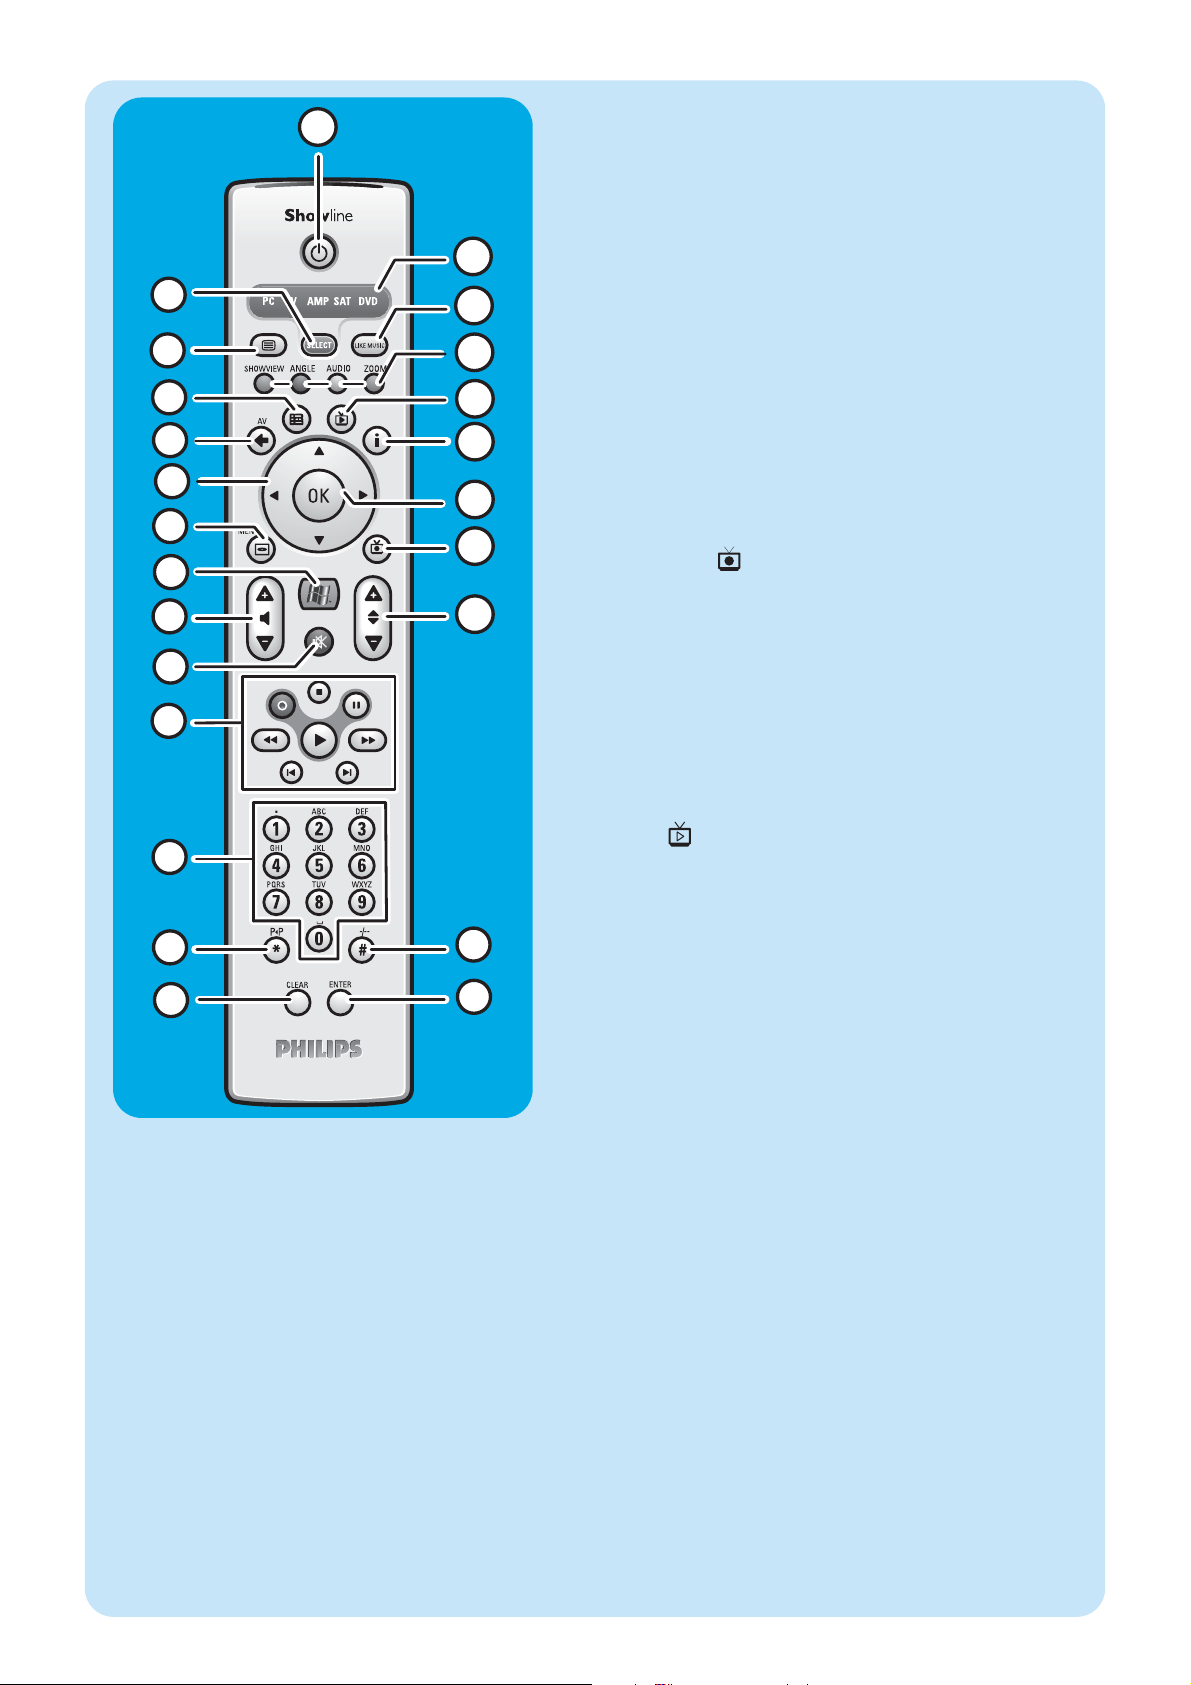
76
3
1
2
5
4
6
10
9
7
8
12
13
14
17
18
21
20
22
23
16
15
19
11
24
12 0 - 9 digit keys
Used to enter numbers or letters (depending on selected
function) that are used to change TV channels, enter text into
a Media Center search or text box, etc.
13 P 1 P (*)
Previous program / channel.
14 CLEAR
Deletes the previous selection you made (functions as the
backspace key on a keyboard).
15 ENTER
Selects desired action or window option.
16 – / – – (#)
Selects between single and double digit program / channel
numbers.
17 – Program +
Program / channel down (–) and up (+).
18 Recorded TV ( )
Shortcut to TV programs, recorded on the Media Center hard
disk.
19 OK
Selects your desired action or window (functions like the
Enter key).
20 i
– Provides information about the currently selected TV pro-
gram.
– Provides extra possibilities within different menus.
21 Live TV ( )
Shortcut for viewing live TV.
22 Red (SHOWVIEW)
Teletext active: red.
Green (ANGLE)
Teletext active: green.
Yellow (AUDIO)
Teletext active: yellow.
Blue (ZOOM)
Teletext active: blue.
23 LIKE MUSIC
Automatically generates a music playlist.
24 Selector window
Indicates which device is selected.
Page 77
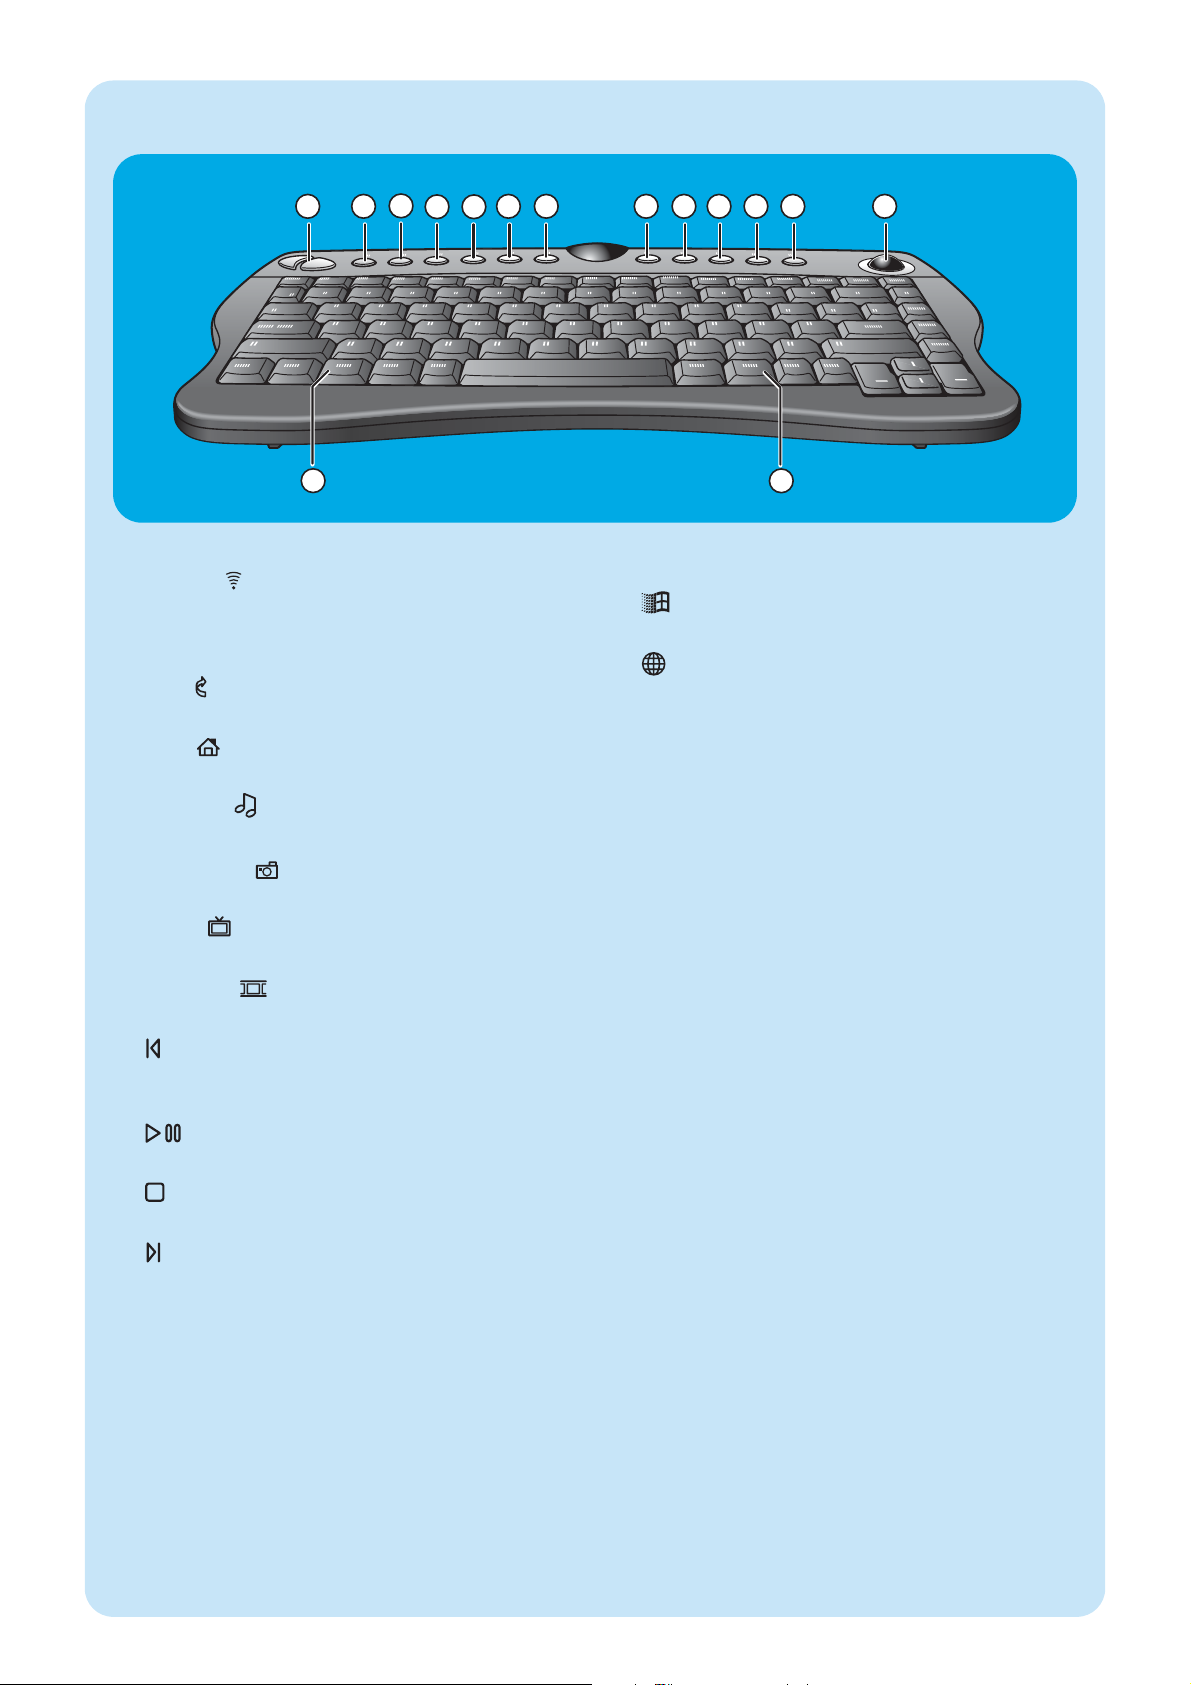
77
Wireless keyboard
3
6
4
5
9
7
8
14
15
1 2 10 11
12
13
1 Left and right mouse keys
2 Connect
Connects the keyboard with the Media Center.To be
used together with the CONNECT RF KEYBOARD
key (17) on the front of the Media Center.
3 Back
Returns to the previous screen.
4 Start
Opens the Media Center menu.
5 My Music
Opens the My Music menu of the Media Center.
6 My Pictures
Opens the My Pictures menu of the Media Center.
7 My TV
Opens the My TV menu of the Media Center.
8 My Videos
Opens the My Videos menu of the Media Center.
9
Moves the media (video and/ or audio) backwards one
music track or one DVD chapter at a time.
10
Plays the CD and DVD player, images, music.
11
Stops media currently playing or recording.
12
Moves the media (video and/or audio) forward one
music track or one DVD chapter at a time.
13 Trackball (mouse)
Controls the cursor on the screen.
14
Opens Windows®Start menu.
15
Starts Internet Explorer.
Page 78
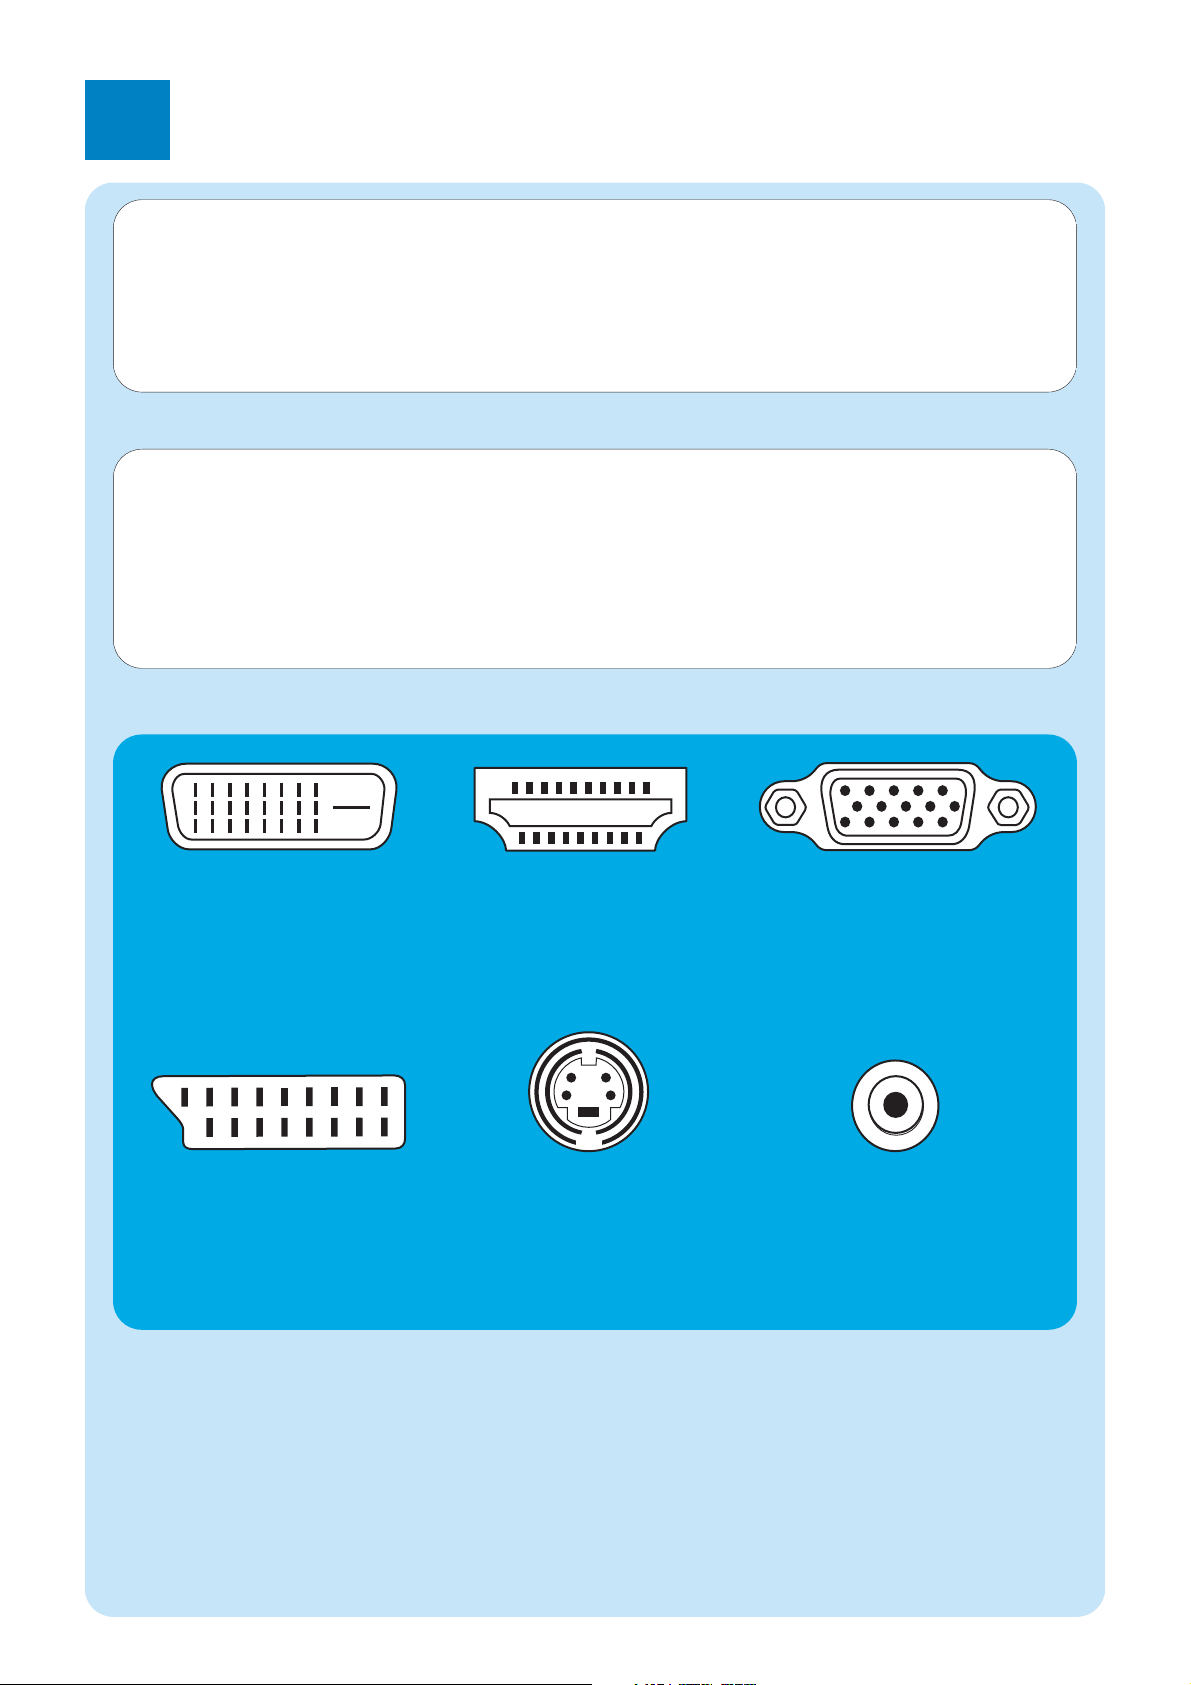
2
Installing your Philips Media Center
78
Connecting a TV / monitor
Your Media Center is equipped with four TV OUT / MONITOR OUT connectors: S-VIDEO OUT (6), DVI OUT (7),
VGA (16) and SCART (21). The DVI (to HDMI) connection is recommended as it offers the highest picture quality. If your
TV is equipped with a CVBS connector, you can use the SCART to SVHS / CVBS adapter to make a CVBS connection.
Locate your connector:
Please, first check the type of connector your TV / monitor is equipped with before making any connections.You can locate your
connector in the overview below.The sequence (1-6) also indicates the order of picture quality of the various connectors.
CAUTION! Be sure the Media Center is switched off and disconnected from the mains before making any con-
nections.
Notes:
– Unless indicated otherwise, all Media Center inputs and outputs mentioned are located on the rear of the Media Center.
– First make all required video (TV / monitor) connections, then refer to the ‘Connecting audio’ chapter for instructions on how
to make audio connections on the Media Center.
1. DVI-D connector
Recommended. Full resolution and digital connection.
2. HDMI connector
Recommended. Full resolution and digital connection.
3. VGA connector
Full resolution but signal
converts to analog.
4. SCART connector
Limited resolution and
analog connection (RGB: 3
color separation).
5. S-Video connector
Limited resolution and analog connection (RGB: 1
channel modulated).
6. CVBS connector
Only used for recording
from a set-top box.
TV / monitor connectors
Page 79
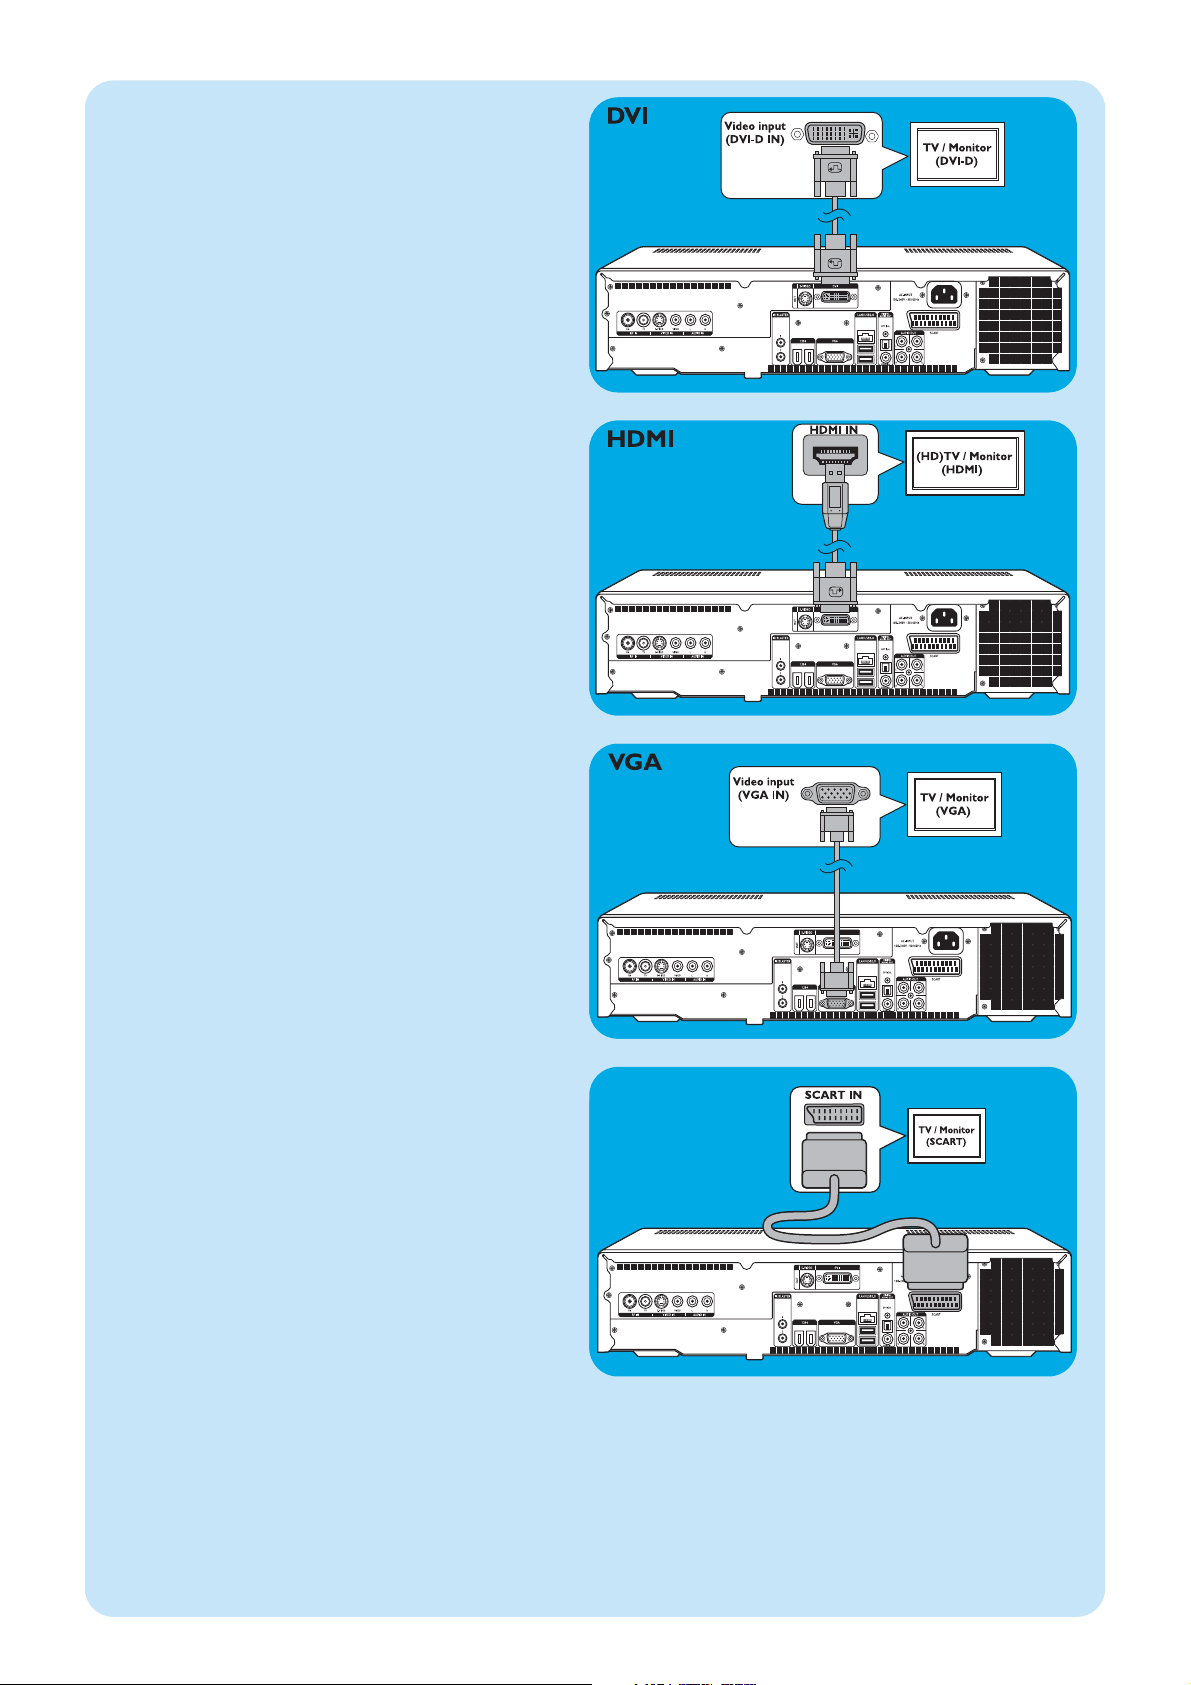
79
4. SCART connection
• Connect the SCART cable between the SCART input
of the TV / monitor and the SCART connector (16) of
the Media Center.
Notes:
– Be sure the SCART connector on your TV supports RGB
(Red, Green, Blue) for optimum picture quality.
– When using normal PC applications, picture quality may not
be optimal.
– Some TVs automatically switch between 4:3 and 16:9 image
ratio according to the Wide Screen Signaling information.The
Media Center however does not support Wide Screen
Signaling (WSS). Please consult the User manual that came
with your TV on how to select image ratio manually.
– In case of SCART connection, some small bars might appear
on all sides of the screen.This is not a defect
2. HDMI connection (recommended)
• Connect the DVI-D to HDMI cable between the
HDMI IN socket of the TV / monitor and the DVI
OUT socket (6) of the Media Center.
• Tighten the screws of the DVI connector.
• Select SPDIF or Analogue in the Audio menu of the
TV. For more information, see the manual of your TV.
3.VGA connection
• Connect an VGA cable (not supplied) to the
VGA IN socket the TV / monitor and the VGA output
(12) of the Media Center. Tighten the screws on both
connectors.
Note: If your VGA TV / monitor is equipped with a fixed VGA con-
nection cable, simply plug this cable into the VGA output
(12) of the Media Center and tighten the screws.
1. DVI-D connection (recommended)
• Connect the DVI-D cable between the DVI-D IN socket
of the TV /monitor and the DVI OUT socket (6) of
the Media Center. Tighten the screws on both connectors.
Note: If your DVI-D TV / monitor is equipped with a fixed DVI-D
connection cable, simply plug this cable into the DVI
OUT socket (6) of the Media Center and tighten the
screws.
SCART
Page 80
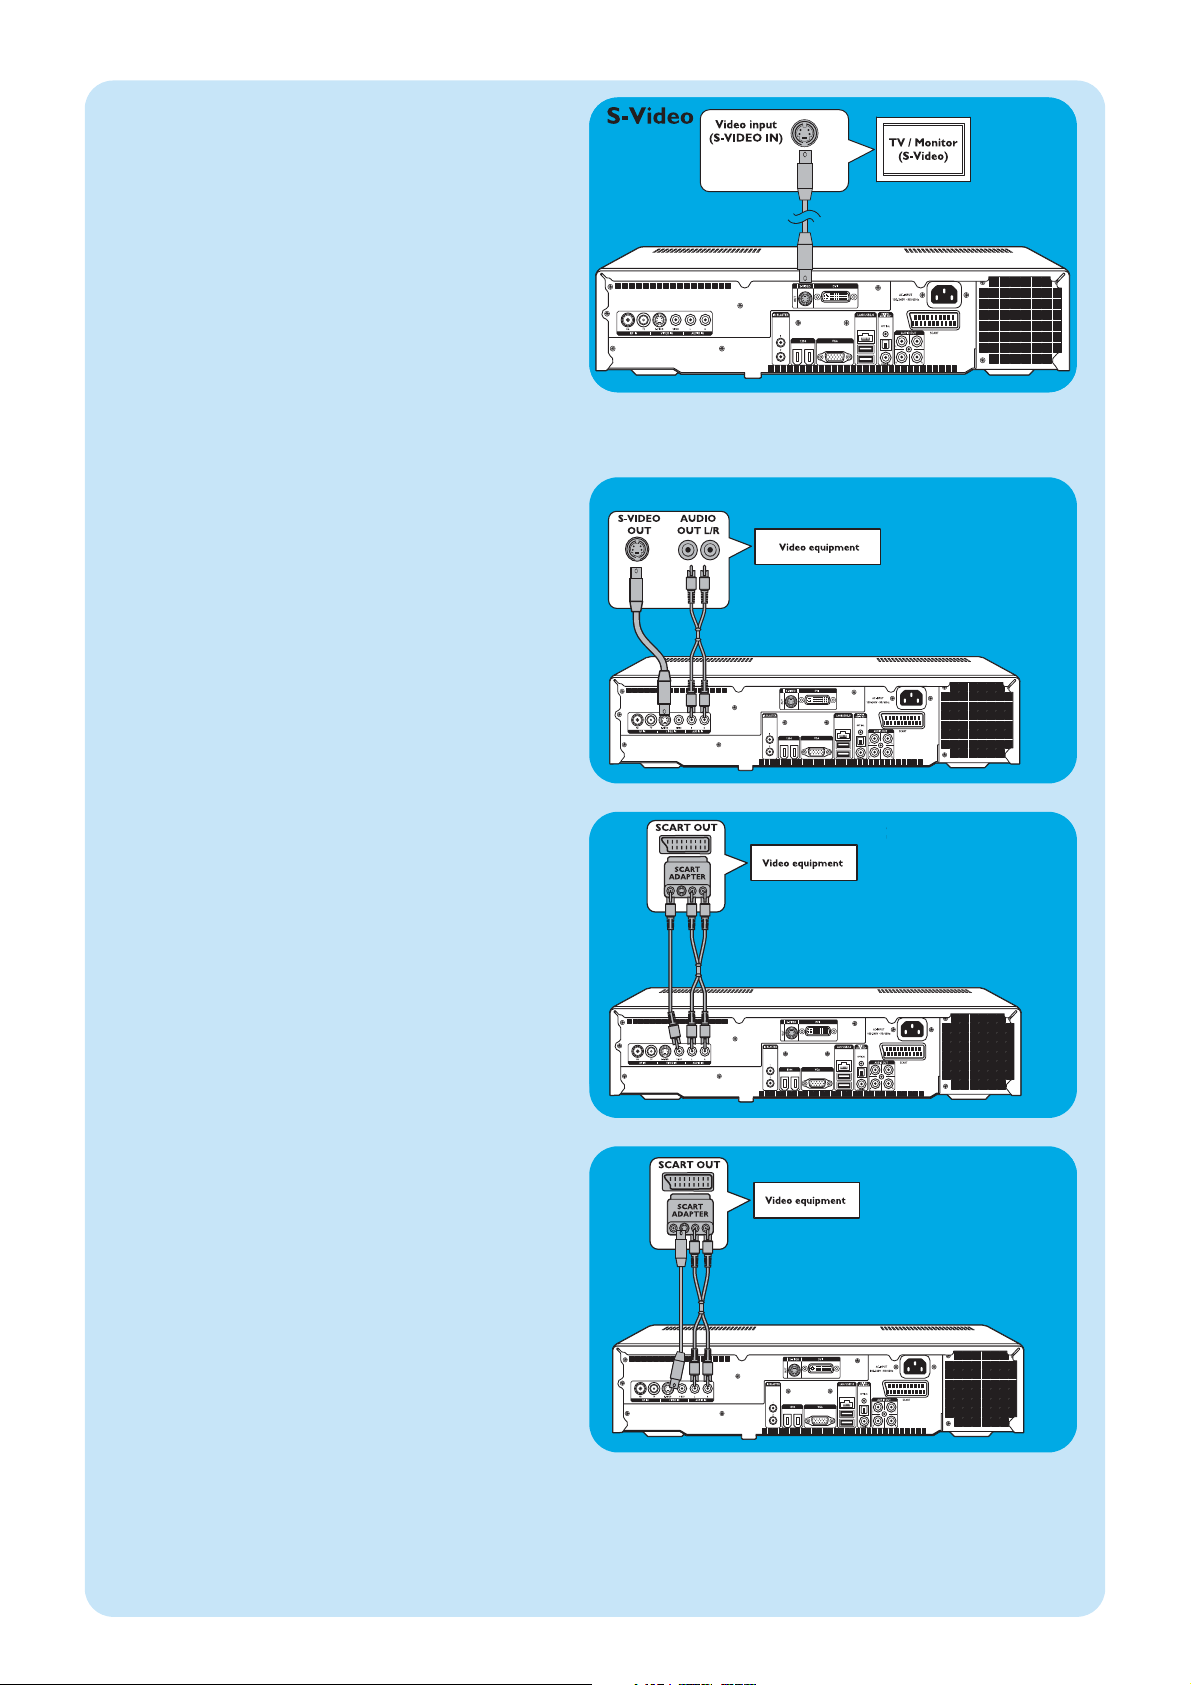
80
SCART connection
If your video equipment is only equipped with a SCART
output, you can use the SCART to SVHS / CVBS adapter to
connect the equipment to the Media Center.
1 Connect the SCART to SVHS / CVBS adapter to the
SCART connector of the video equipment.
2 Connect an CVBS cable (not supplied) between the yel-
low video connector of the adapter and the CVBS
input (3) of the Media Center.
OR:
2 Connect the S-Video cable between the S-Video con-
nector of the adapter and one of the S-Video inputs
(VIDEO IN - 2) of the Media Center.
3 Connect the stereo audio cinch cable between the red
and white audio connectors of the adapter and the corresponding AUDIO outputs (4) of the Media Center.
Note: Upon using the S-Video connection, the picture may be
black & white.To solve this problem make sure that the
video equipment uses S-Video as output. For this see the
User manual that came with your video equipment.
SCART / CVBS
Connecting video (e. g. set-top box)
S-Video connection
S-Video connection offers the best picture quality.
1 Connect the S-Video cable between the
S-VIDEO OUT socket of the video equipment and
one of the S-VIDEO IN sockets (2) of the Media
Center.
2 Connect the stereo audio cinch cable between the
AUDIO OUT L/R sockets of the video equipment
and the AUDIO IN L/R sockets (4) of the Media
Center.
S-Video
SCART / S-Video
5. S-Video connection
• Connect the S-Video cable between the
S-VIDEO IN socket of the TV / monitor and the
S-VIDEO OUT socket (5) of the Media Center.
Note:When using normal PC applications, picture quality may
not be optimal.
Page 81
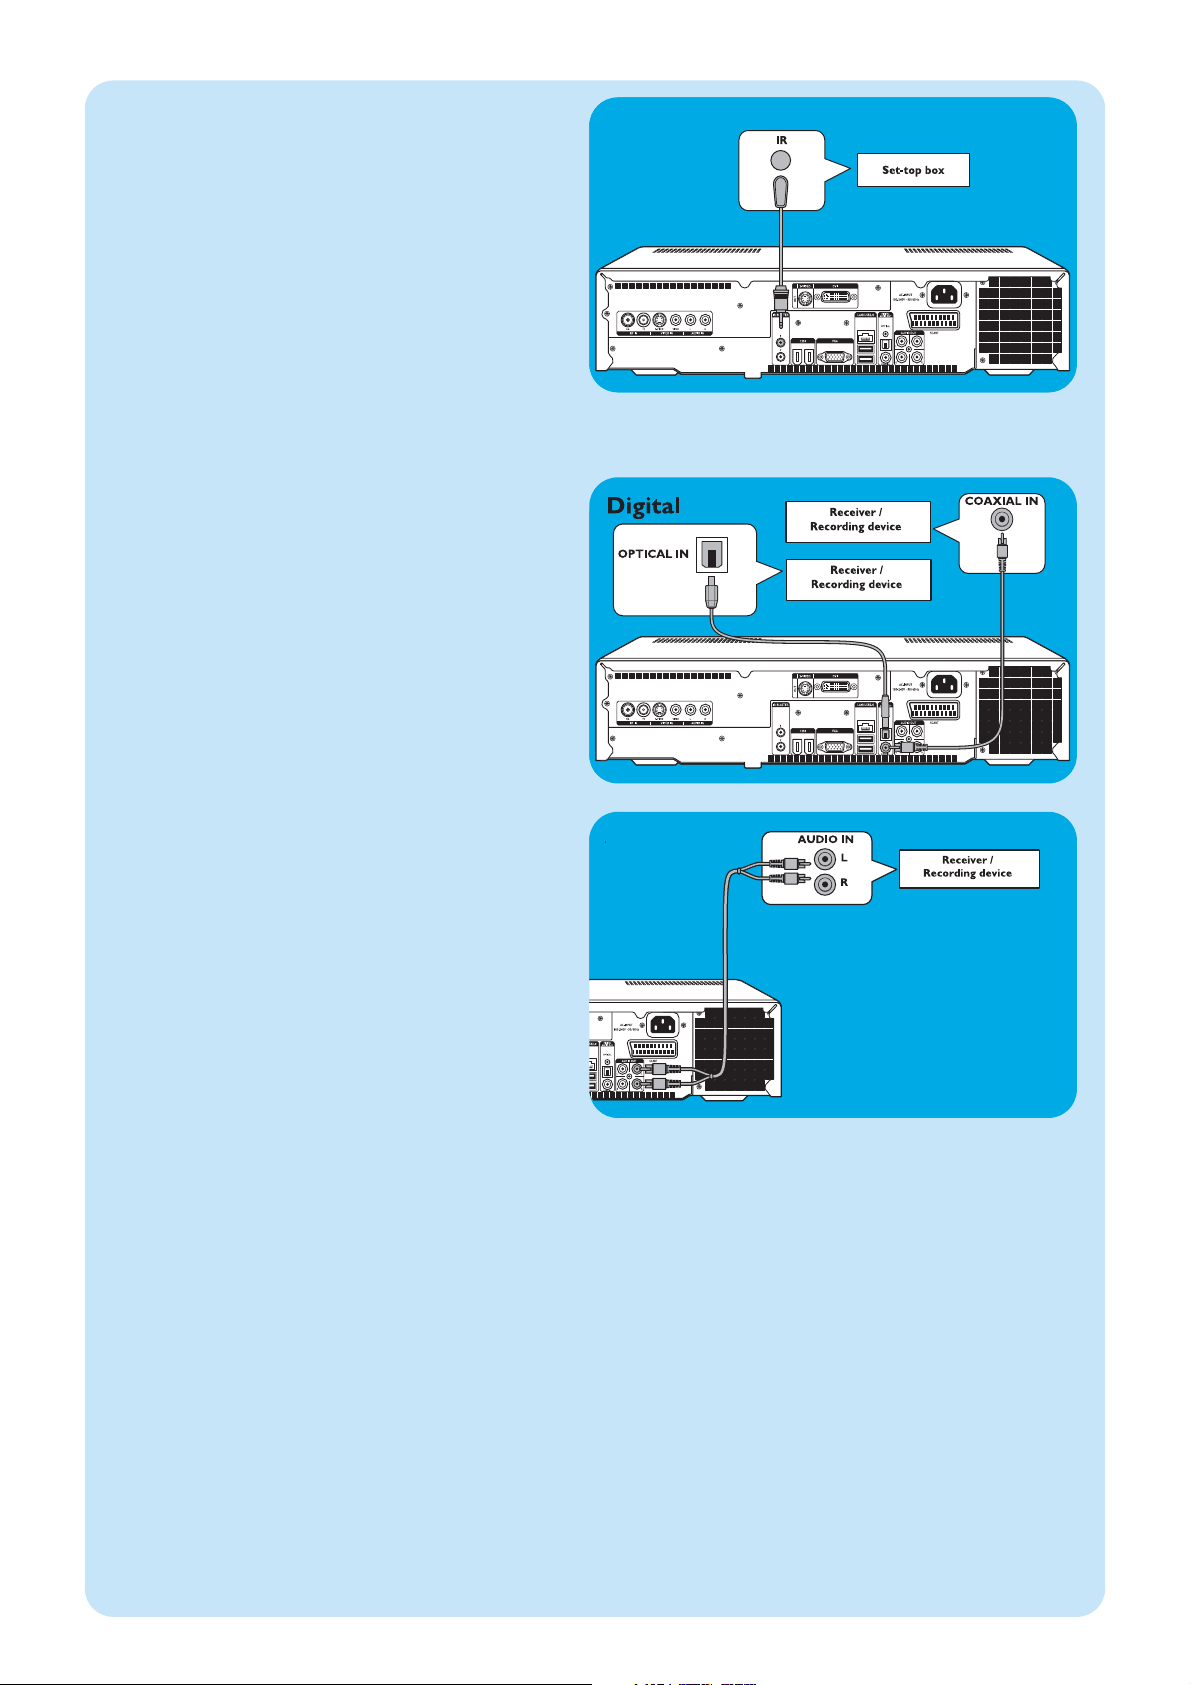
81
Connecting audio
Digital optical audio connection
• Connect a digital optical cable (not supplied) between
the OPTICAL IN socket of the monitor,TV, receiver
or recording device and the DIGITAL OPTICAL
output (8) of the Media Center.
Digital coaxial audio connection
• Connect the digital coaxial cable between the
COAXIAL IN socket of the monitor,TV, receiver or
recording device and the DIGITAL COAXIAL output
(14) of the Media Center.
Analog audio connection
• Connect the stereo audio cinch cable between the
AUDIO IN L/R sockets of the monitor,TV, receiver or
recording device and the AUDIO OUT L/R sockets
(15) of the Media Center.
Analog
Connecting an IR-blaster
1 Remove the adhesive tape from the infrared sensor of
the IR blaster.
3 Place the IR blaster in front of the IR receiver eye of
the cable / satellite set-top box.
4 Connect the IR blaster cable to one of the IR
BLASTER outputs (10) of the Media Center.
> You can now select channels on your cable/satellite set-top
box, using the Media Center remote control.
IR-blaster
Page 82
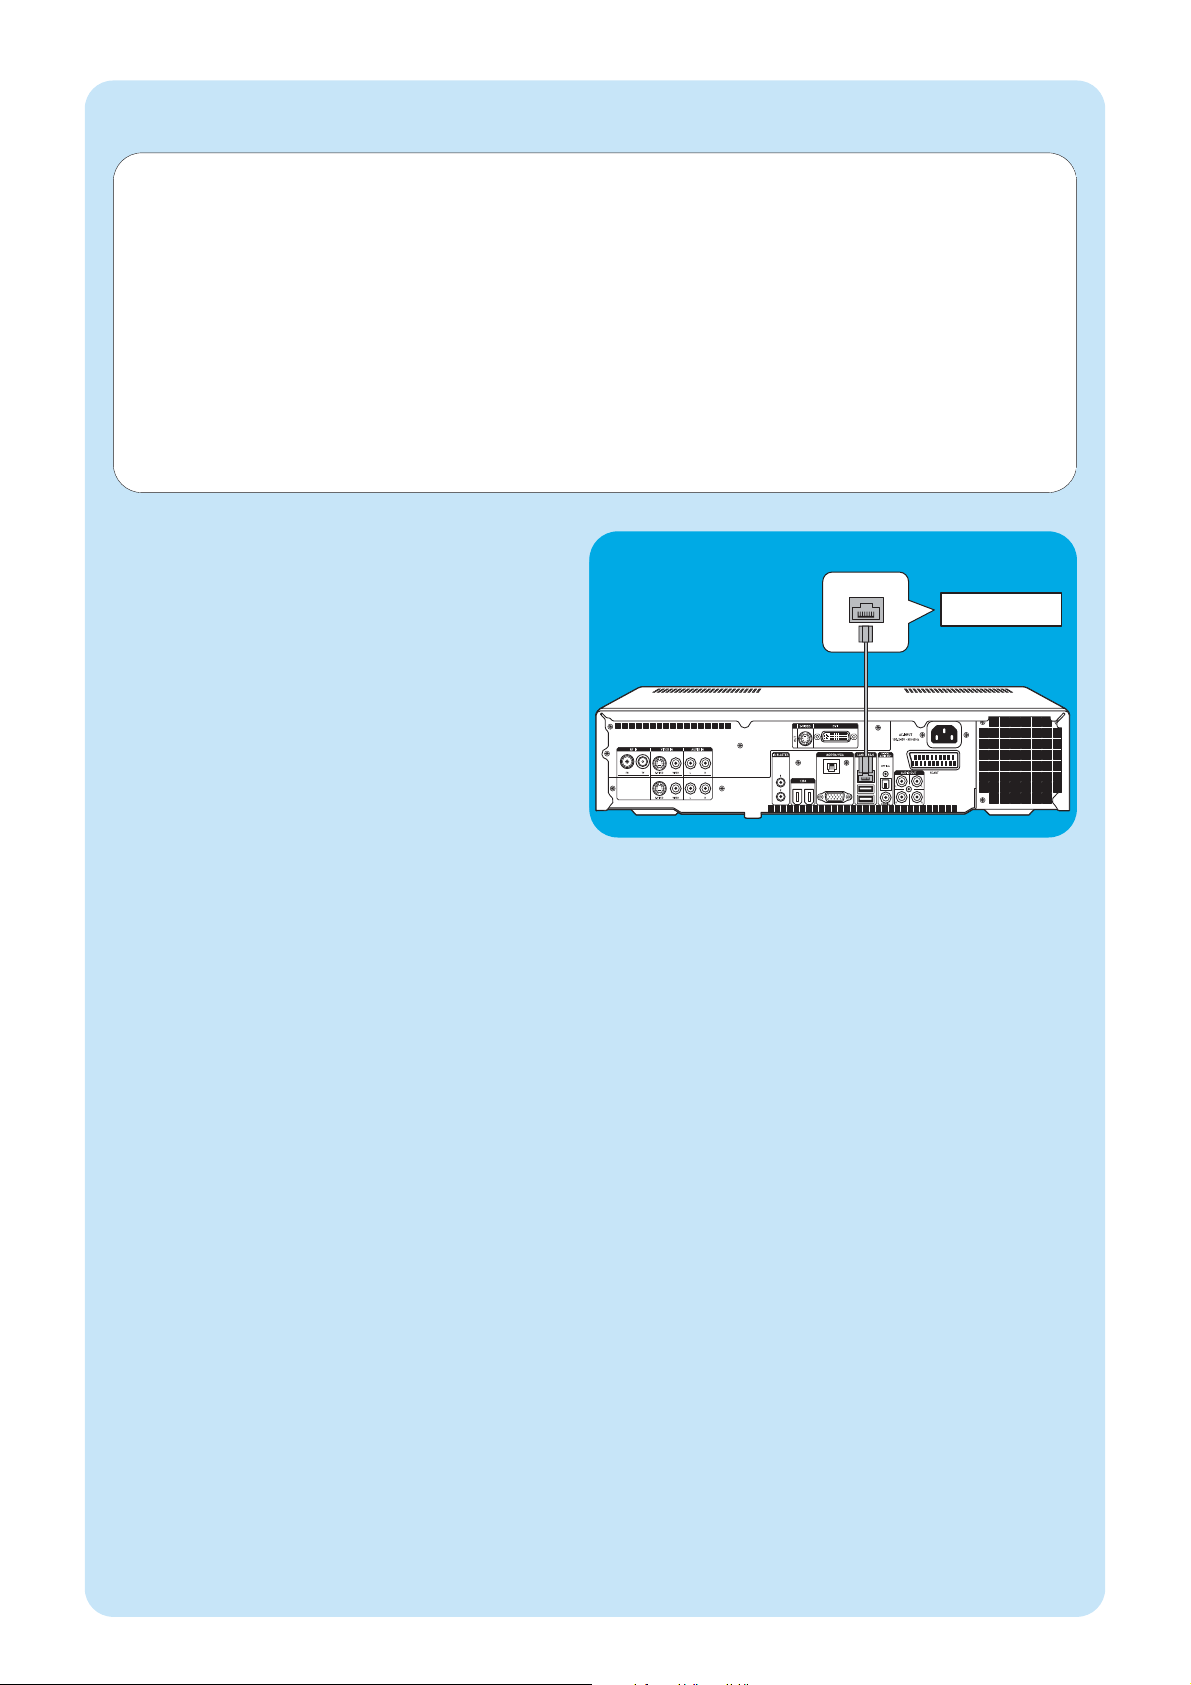
82
LAN
Ethernet (LAN)
Router / DSL modem
Ethernet connection
• Connect the ethernet cable between the router/DSL
modem and the LAN connector (7) of the Media
Center.
• For settings, contact your Internet service provider.
Connecting to the Internet
Your Media Center needs an Internet connection to download the EPG (Electronic Program Guide) and channel frequency
information. Make sure that you have access to a dial-up or broadband Internet connection before starting your Media
Center software setup. Contact your Internet service provider for more information about setting up your Internet connection.Also see ‘Connecting to the Internet’.
The Media Center offers two possible ways for connecting to the Internet:
1 via the ethernet cable to a DSL (Digital Subscriber Line) modem (if you have a wired network);
2 wireless connection to a DSL (Digital Subscriber Line) modem (if you have a wireless network).
If you connect (either wired or wireless) the Media Center to an existing home network with centrally shared broadband
Internet access for all connected computers, you can connect the Media Center directly to your central network device
(the router/gateway). In this way, the Media Center can access the Internet just like your other computers and you do not
need to install ICS (Internet Connection Sharing) to make Internet access available to your Media Center.
Page 83
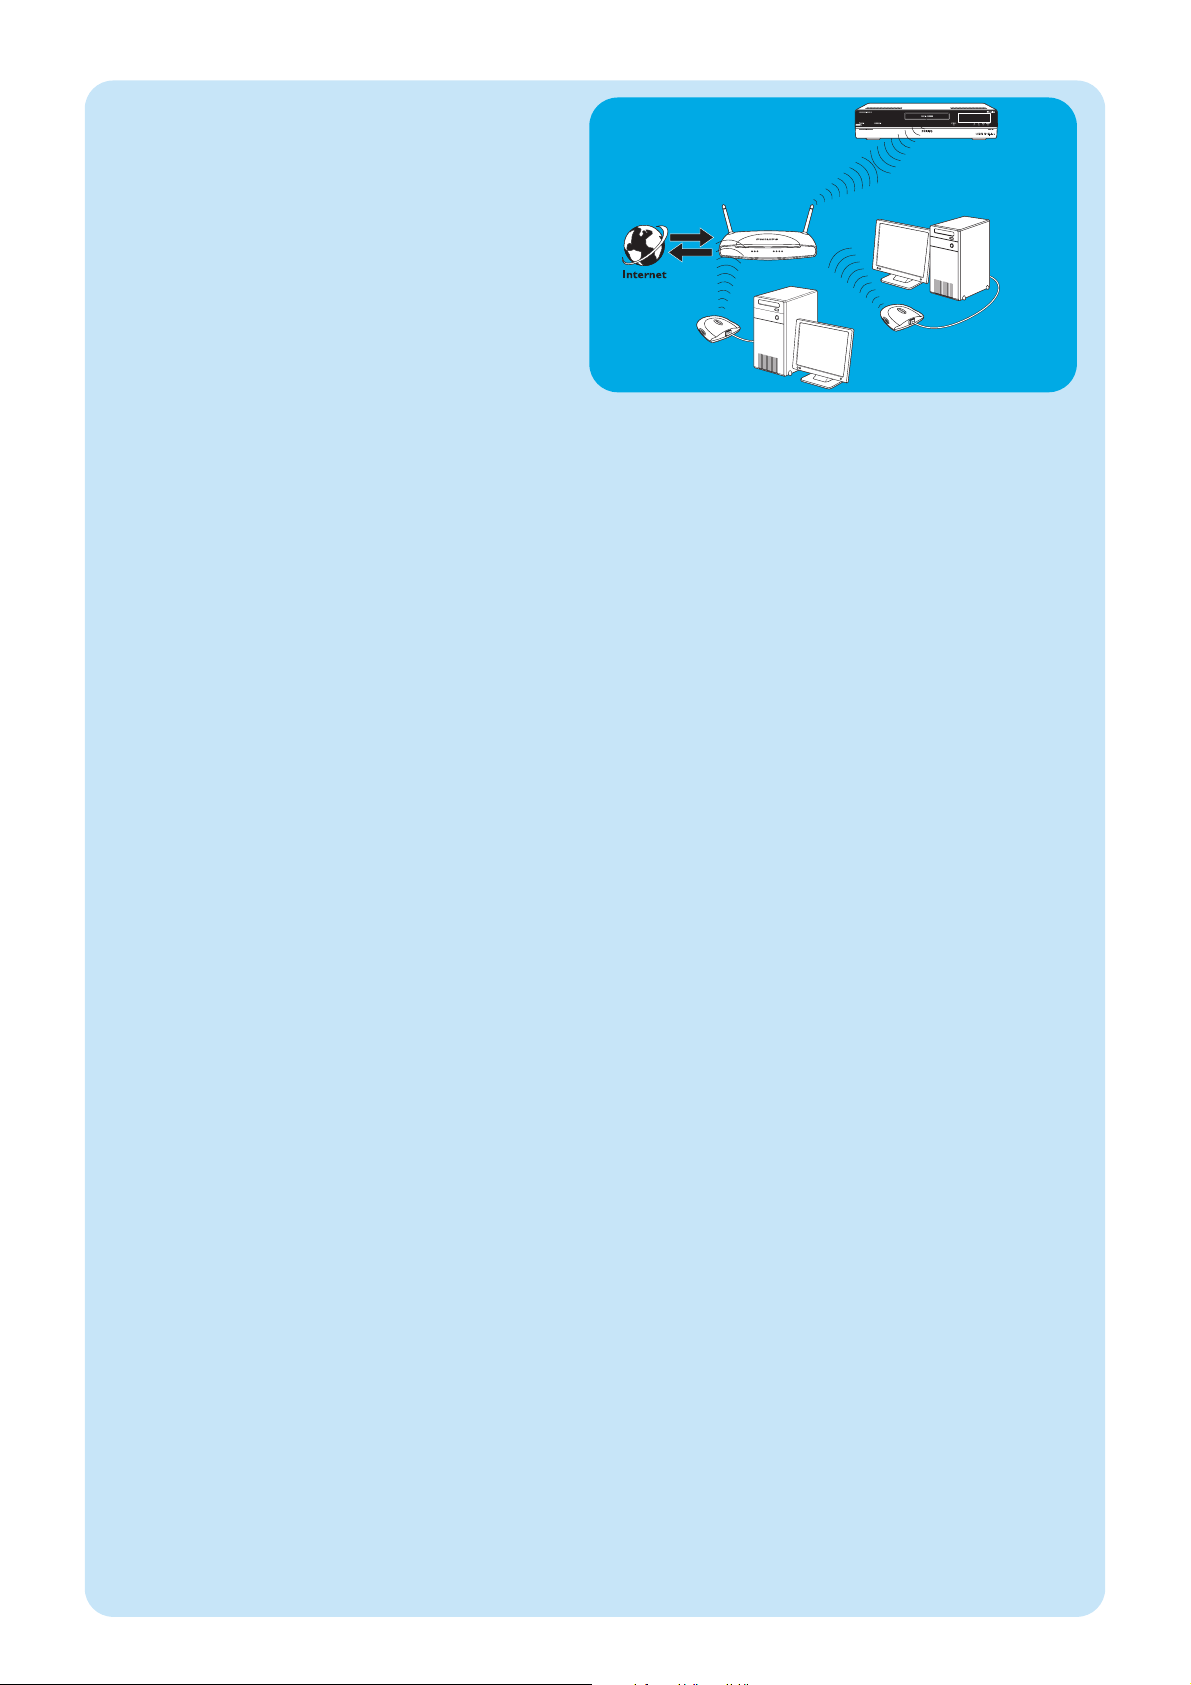
83
Wireless connection
Wireless base stations (and wired Internet gateway routers) share their broadband Internet access automatically
within the network.
Notes:
–We strongly recommend the use of an encryption key to
protect your network against intruders.
– Wireless LAN antennas (802.11b/g) are already integrated
in the set so there is no need for connecting a wireless USB
adapter in order to integrate the Media Center in your wireless netwerk.
1 Check your existing wireless network settings to enter
them upon request during Media Center setup.
Determine the wireless network name (SSID) and the
encryption key(s) you used for securing your wireless
network.
Wireless Network Name (SSID - Service Set
Identifier):
Usually, you can find the wireless network name in the
options menu of your wireless network adapter or
wireless base station.To check this, open the program
that came with your network adapter.
Encryption key:
The wireless encryption key can be either a WEP code
or a WPA code.
WEP (Wired Equivalent Privacy) provides basic protection for home networks and uses 64- or 128-bit
encryption keys.
- 64-bit: 5 characters ASCII, or 10 characters HEX, or
- 128 bit: 13 characters ASCII, or 26 characters HEX.
WPA (Wi-Fi Protected Access) offers up to 256-bit
encryption keys, which are much harder to decode than
WEP encryption keys.
WPA increases the level of data protection and access
control for wireless networks.
Note: Both network name (SSID) and encryption key are case
sensitive, meaning that ‘ABC’ is not the same as ‘aBc’.
Always input characters in the correct case to avoid problems.
2 Write down your encryption key(s) and SSID.You may
need them when installing the Media Center.
3 Upon request enter your SSID and encryption key to
add the Media Center to the wireless network. Refer to
the base station (wireless access point) user manual for
details.
Wireless
Page 84
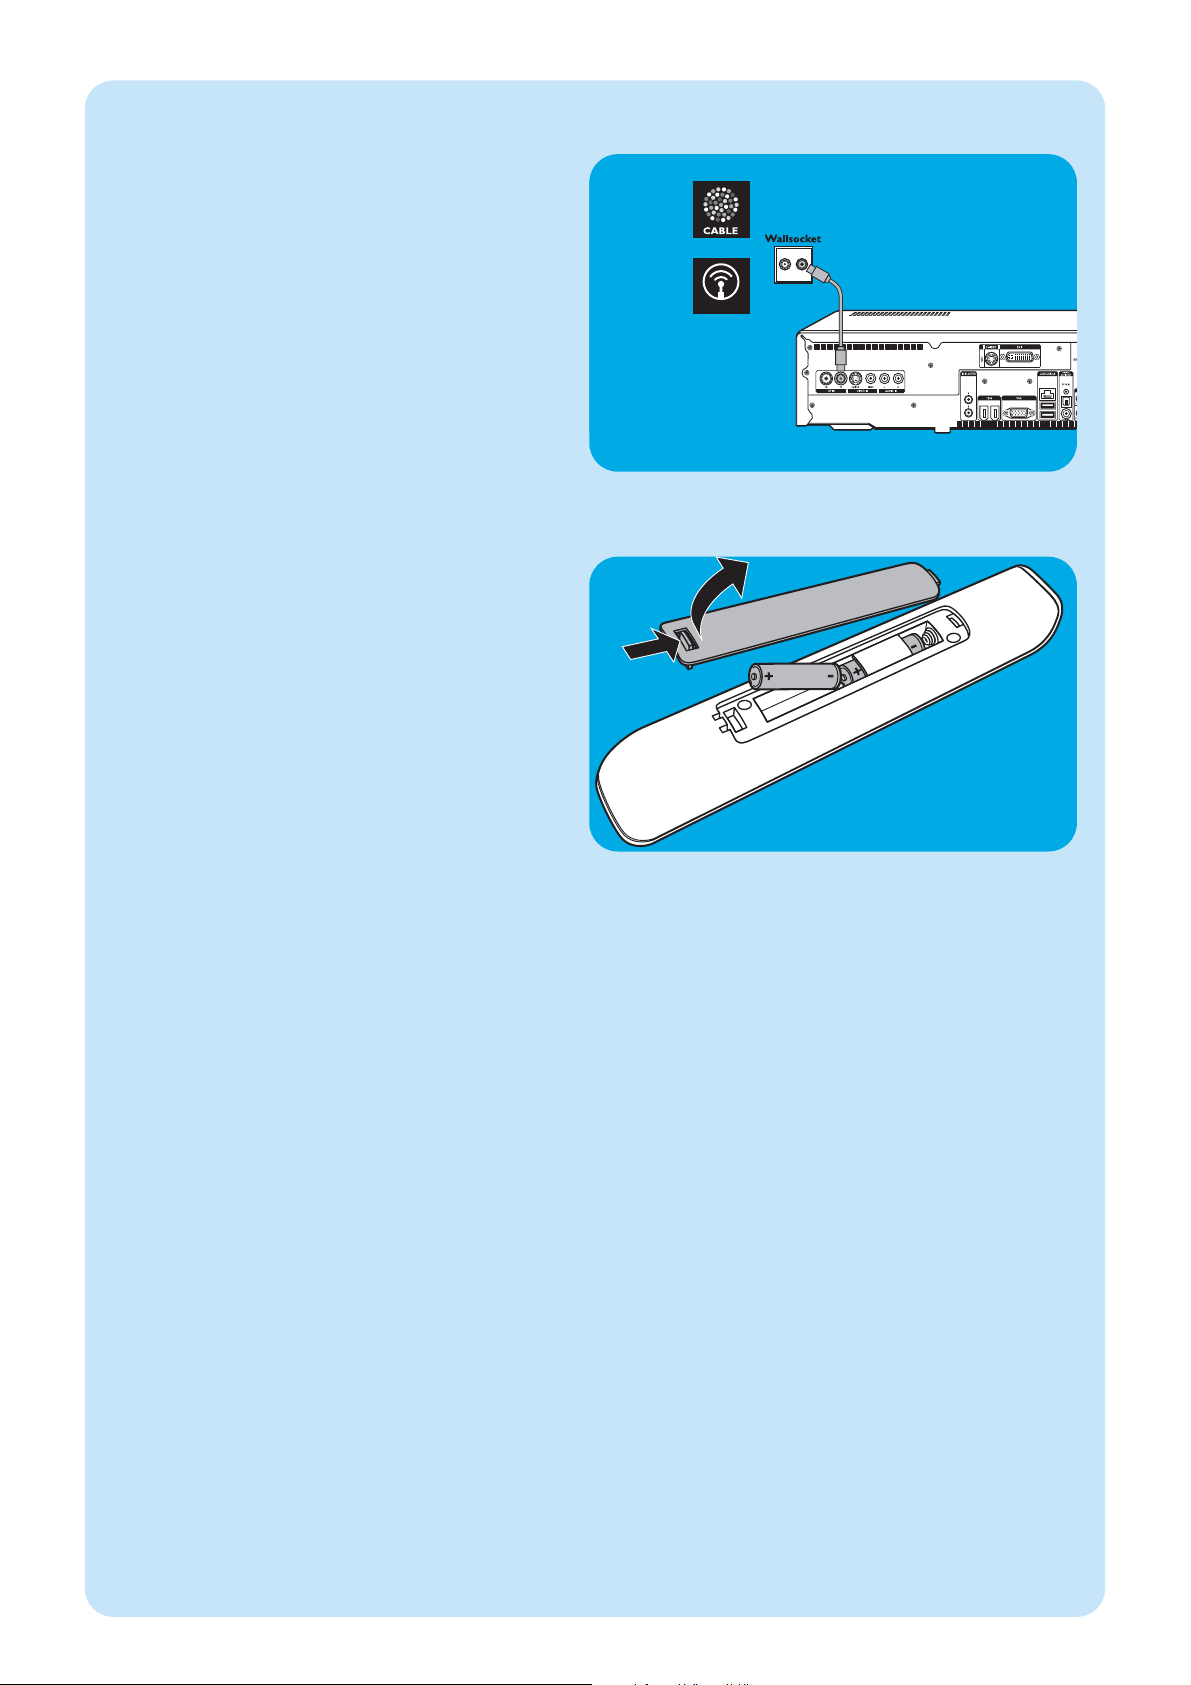
84
ANTENNA
TV antenna connection
1 Disconnect the TV antenna cable from the cable antenna
system.
2 Connect the TV antenna cable to the RF IN TV socket
(1) of the Media Center and to the cable
antenna system.
Connecting antennas
1 Remove the battery compartment cover and insert two
AA (1.5 V) batteries, noting the + and – configuration in
the battery compartment.
2 Replace the cover.
Inserting the batteries in the remote control
2 x
Page 85
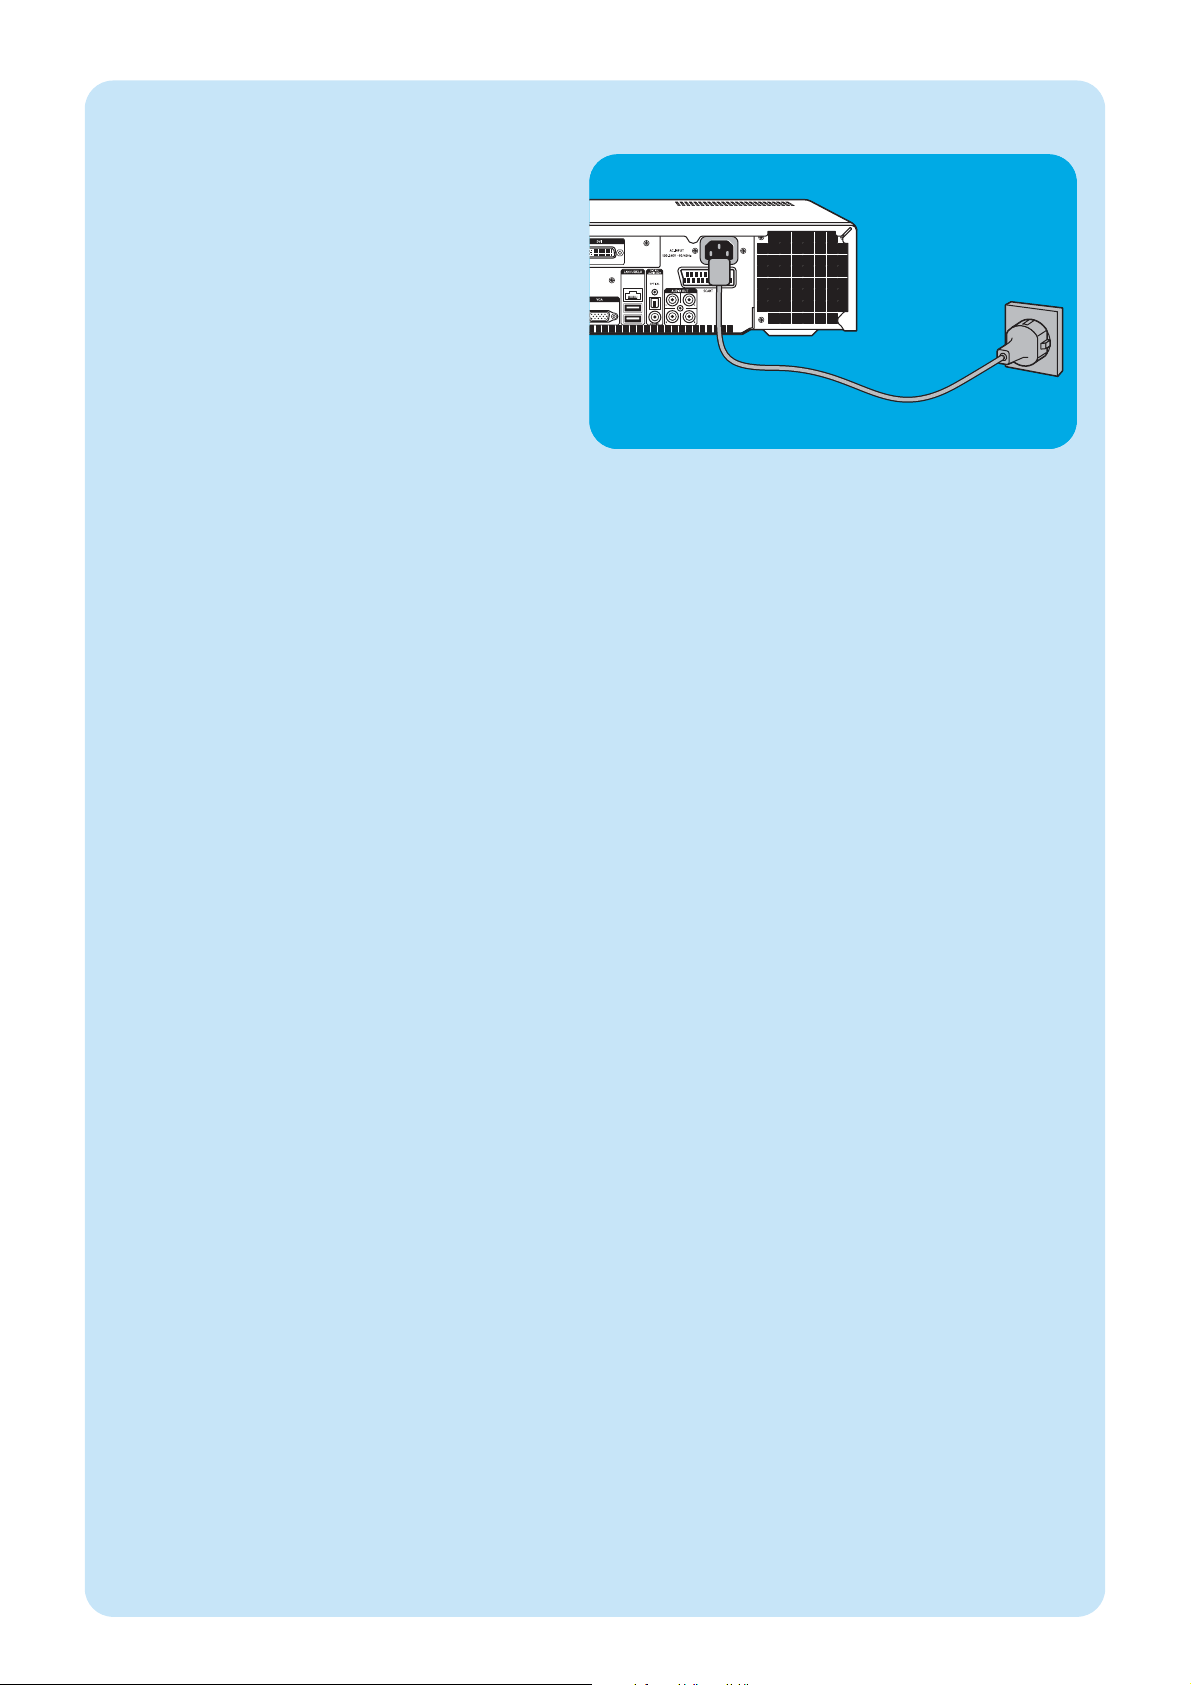
85
Connecting to the mains
After connecting all desired equipment as described, you
can connect the Media Center to a wall socket.
1 Make sure all connections have been made before con-
necting the Media Center to the mains supply.
2 First connect the mains lead to the AC-INPUT (9) and
then to a wall socket.
> The Standby/On indicator (on the STANDBY-ON key 1)
lights up orange.
> The Media Center is now in low power mode, consuming
only a minimum amount of power.
Switching ON
• To switch on the Media Center from low-power mode,
press the y STANDBY-ON key (1) on the front of
the Media Center.
> The Standby/On indicator (1) goes out.
• Press the y STANDBY-ON key (1) again to put the
Media Center back to low-power mode.
Switching to standby
• When the Media Center is switched on (Standby/On
indicator out), press the y Standby key (1) on the
remote control to place the Media Center in standby
mode.
> The Standby/On indicator (1) lights up red.
• To switch the Media Center on again from standby
mode, press the y Standby key (1) on the remote
control again or the y STANDBY-ON key (1) on the
front of the Media Center.
> The Standby/On indicator (1) goes out.
Note: In both low-power and standby mode the Media Center is
still consuming some power.To disconnect the Media
Center from the mains supply completely, disconnect the
mains lead from the wall socket.
Connecting to the mains / Switching ON and to standby
Page 86
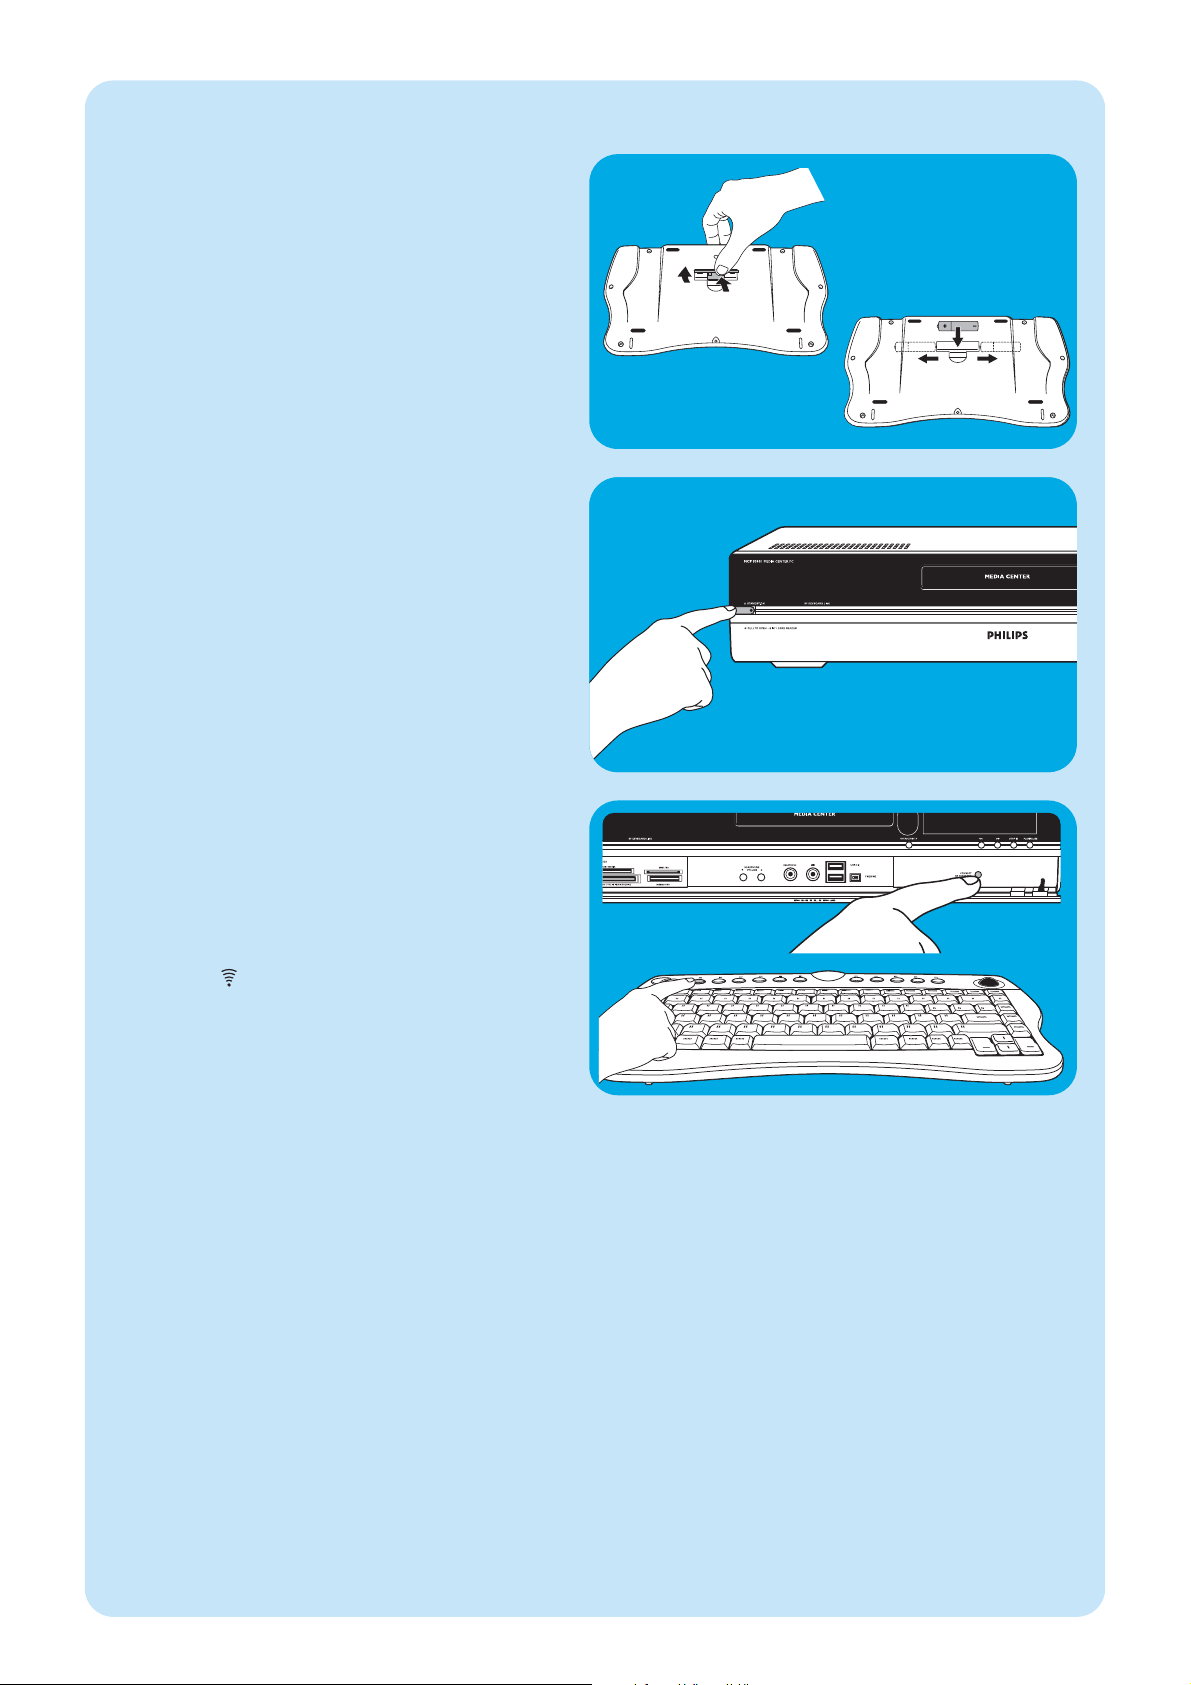
86
1 Remove the battery compartment cover and insert
three AA (1.5 V) batteries, noting the + and – configuration in the battery compartment.
2 Replace the cover.
3 Make sure the Media Center is connected to the mains.
4 Press the y STANDBY-ON key (1) to switch on the
Media Center.
> The Standby/On indicator (on the STANDBY-ON key 1)
goes out.
5 Press the CONNECT RF KEYBOARD key (17) on
the Media Center.
6 Press the key (2) on the keyboard.
> The Media Center is now able to receive commands from
the wireless keyboard.
Note:When not used for 5 minutes, the keyboard switches to
standby.You can activate the keyboard again by pressing
any key except the left and right mouse keys (1) and the
trackball (13).
Installing the wireless keyboard
3 x
Page 87
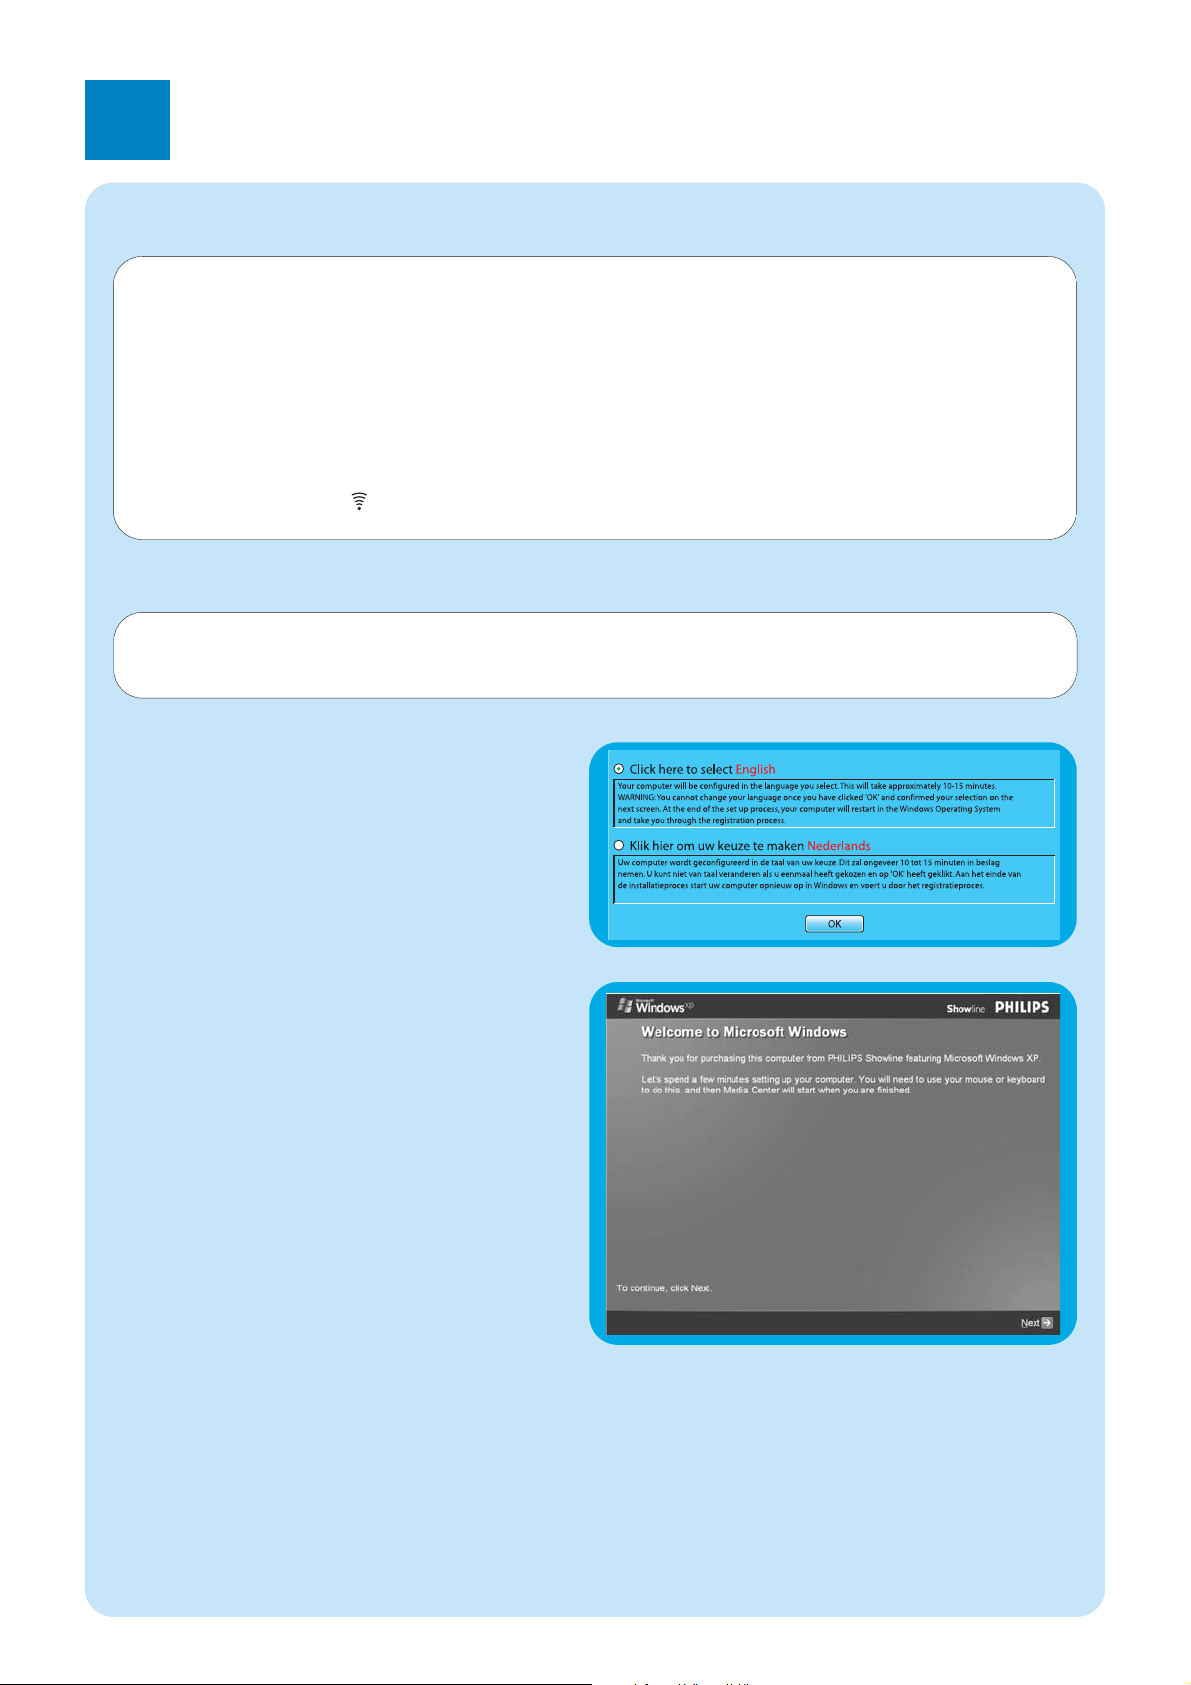
87
3
Setup of your Philips Media Center
1 Start the Media Center.
> The language selection window shows.
2 Select the language of the user interface for Microsoft
Windows®.
3 Follow the on-screen instructions.
To setup Windows for the first time:
Follow the on-screen instructions for the initial Microsoft
Windows setup.
1 Click Next to set up your system.
2 Select your country/region and language.
3 Select your time zone.
4 Read the End Users License Agreement.
Select ‘Yes, I accept’ to accept.
5 Select a computer name.A default name is already filled
in.You are free to accept this name or to enter any
other name. E.g. ‘Our family Media Center’.
6 Click Next if your computer is not part of a domain.
If your Media Center will be part of a domain, select
Ye s and enter the name of this domain.
7 Select Finish.
Microsoft Windows®setup
After switching on your Media Center for the first time, the initial Microsoft Windows setup screen is displayed. Follow
the on-screen instructions to complete this setup.
Notes:
– Before switching on the Media Center, be sure to switch on your monitor or TV first and select a channel for the Media Center
on your TV.
– Please use your wireless keyboard with integrated trackball to navigate the screens. Make your selection with the cursor and
click Next.
– If there is no wireless connection between keyboard and Media Center: press the CONNECT RF KEYBOARD key (17) on
the Media Center and the ( ) key (2) on the keyboard.
IMPORTANT
You cannot change the language after you push the OK button, since the other languages are no longer available.
Make sure that you choose the correct language.
To set the language:
Page 88
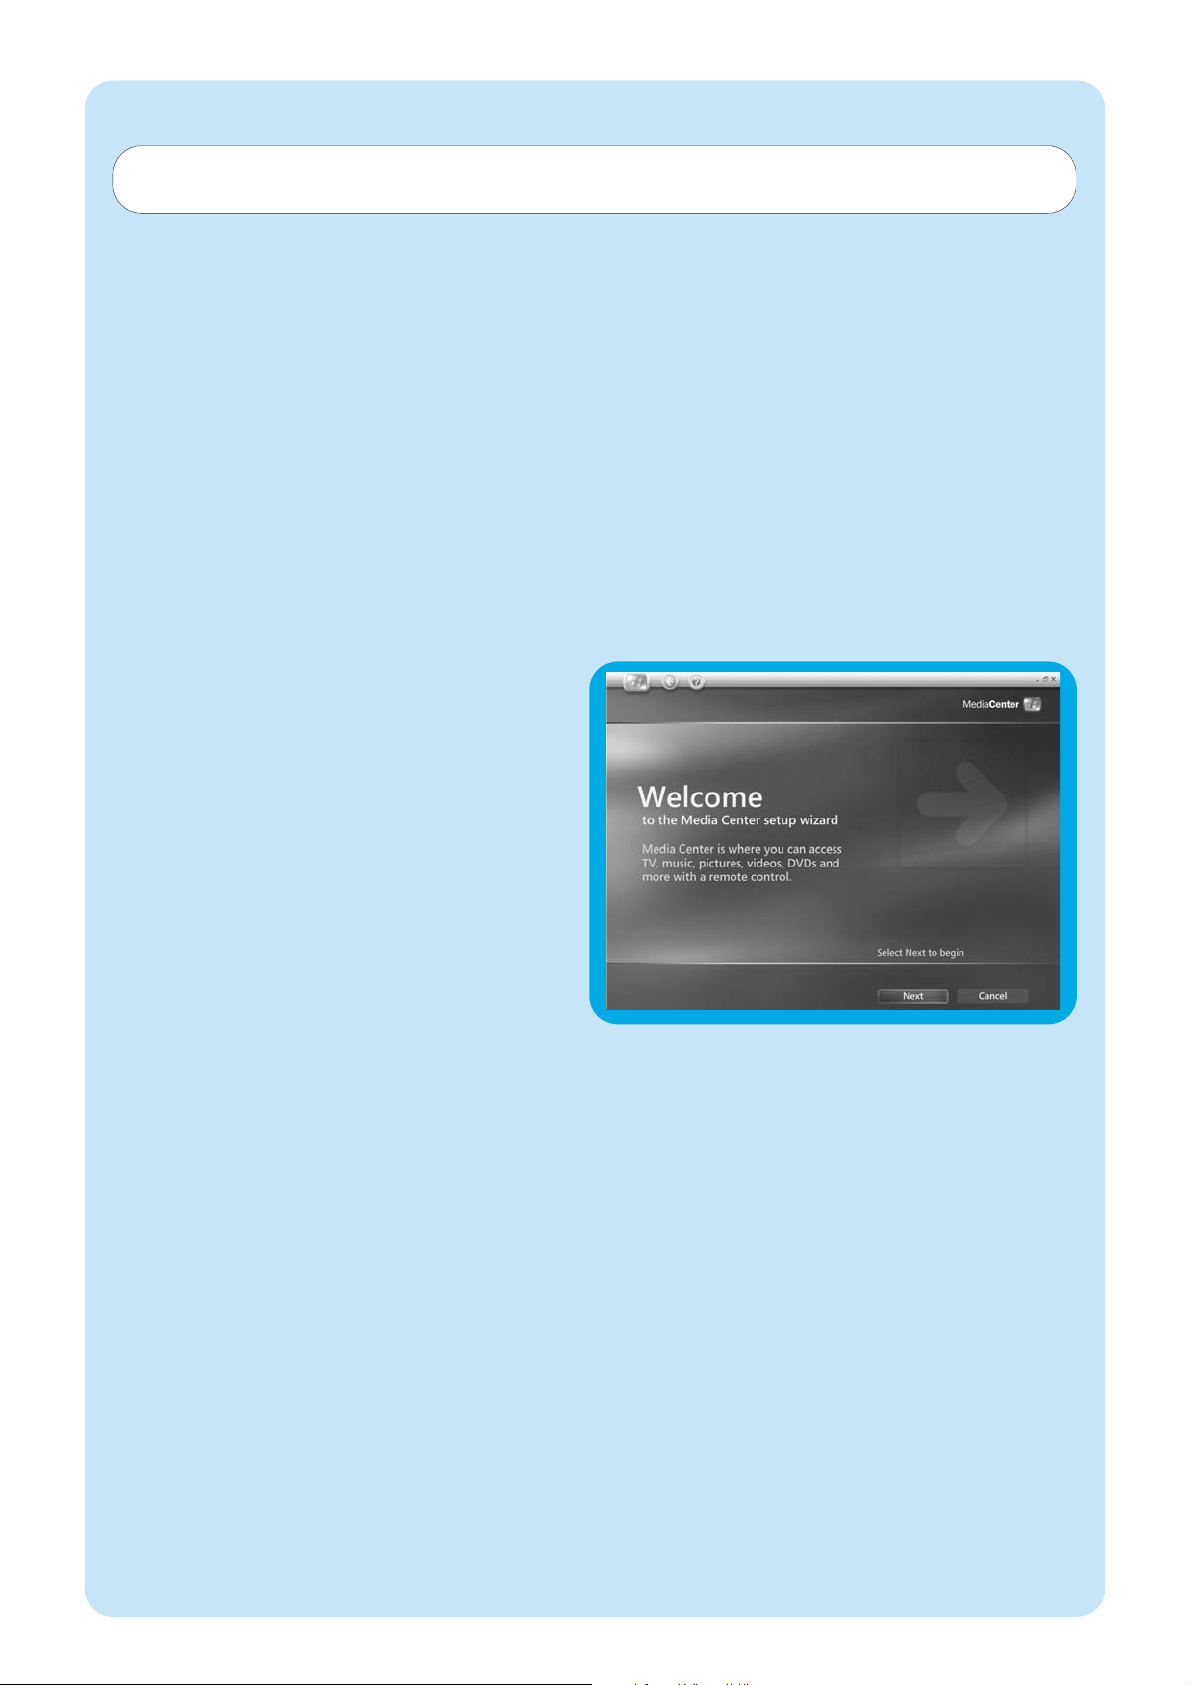
88
The Welcome screen of Media Center setup wizard is displayed.
1 Click Next.
> Media Center Setup required and optional setup informa-
tion is displayed.
2 Click Next.
> Media Center Privacy Policy information is displayed.
3 Click Next.
> Enhanced Playback screen is displayed.
4 Follow the on-screen instructions, make your selection
and click Next.
> Join Wireless Network screen is displayed.
5 For connection of your Media Center to a wireless
network select Ye s and click Next.
• Select ‘Enter my network name manually’ and
click Next.
• Select your network name in the list and click Next.
• Select Finish to exit.
OR:
If your network name is not listed:
• Select ‘Not listed’ and click Next.
• Enter your network name and click Next.
• If your network is protected, select Yes and click
Next.
• Enter your network key (WEP or WPA) and click
Next.
Note:The encryption key is case sensitive, meaning that ‘ABC’ is
not the same as ‘aBC’.
6 If you have a permanent connection to the Internet
(‘always on’ DSL or cable connection) selectYe s and
click Next.
7 Click Test to test your Internet connection.
• If your connection is not working, check:
- connectors and cables;
- check your router settings;
- contact your Internet service provider.
Media Center setup wizard
Required Setup
Media Center setup wizard guides you through the initial
setup of the Media Center, including the steps required for
your network connection and your broadband connection.
Follow the on-screen instructions to complete this setup.
Notes:
– Please use your wireless keyboard with integrated trackball
(13) to navigate the screens.
– Make sure the following physical connections are established
for your Media Center:
- Internet;
- TV- and radio signal;
- network connection (if your Media Center will be part of a
network);
- set-top box connection (if you are using a set-top box).
After finishing the initial Microsoft Windows setup,Windows restarts automatically and the Media Center setup
wizard is displayed.
Page 89

89
Optional setup
In the optional setup procedure you can customize your Media Center. The setup wizard enables you to:
– configure tuners,TV signal, and TV program guide information;
– select and adjust Media Center display settings;
– setup of speakers;
– control of your set-top box.
Configure tuners,TV signal and Guide
This option enables you to configure your connections for TV and radio signals.
1 Confirm your region.
2 Select the TV signal.
3 Make your selection for a set-top box:
• Cable. Continue with ´Analogue setup´.
• Antenna:
- Analogue. Continue with ´Analogue setup´.
- Digital. Continue with ´Digital setup´.
Analogue setup
1 Select the type of TV signal (Europe - PAL/SECAM).
2 Make your selection for a set-top box:
a If you have a set-top box:
• Make sure that your set-top box and IR-receiver cable are connected properly (see ´Installation of your Philips Media
Center – Connecting video equipment (e.g. a set-top box)´).
• Select a TV signal
b If you do not have a set-top box:
• Follow the on-screen instructions.
3 Setup Electronic Television Program Guide.
• Read the Guide Terms of Service and accept.
• Enter your postal code.
• Select your TV signal provider.
> Your Media Center uses the internet connection to download all TV station information from your TV signal provider.
Every available station is stored as a separate preset number.
Digital setup
1 Select the type of TV signal: ´Digital terrestrial (DVB-T)´.
2 Make your selection for a set-top box:
Select ´No´.
3 Read the Guide Privacy and accept.
4 Setup Electronic Television Program Guide.
• Read the Guide Terms of Service and accept.
• Enter your postal code.
• Downlaod the provider information
• Select your TV signal provider. Select ´Digital terrestrial – all channels´.
• Download the TV Program Guide Information.
Optimize how the Media Center looks on your display
This option enables you to adjust display settings.
1 Select your display type.
2 Select the connection type of your display.
Note: If you are using the SCART output (21) of the Media Center, select Component (YpbPr).
3 Adjust display settings to your personal preferences in Display Calibration.
Note: If you select a wrong display setting the screen may turn black. Please wait for about 15 seconds, then the on-screen infor-
mation will be be visible again.
Page 90

90
Manual channel search
Search for analogue channels
For automatic channel search, see ‘TV Guide function - Seeking a TV program’ in the use cases.
1 Press the key (8) on the remote control.
2 Select More Programs and press the OK key (19).
3 Select TVScanner and press the OK key (19).
4 Select Readme and press the OK key (19).
5 Follow the instructions in the Readme file.
Search for digital channels
1 Confirm your region.
2 Select the TV signal: ´Antenna´.
3 Select the type of TV signal: ´Digital terrestrial (DVB-T)´.
4 Make your selection for a set-top box:
Select ´No´.
5 Read Guide privacy.
Select ´No´.
> The Scan for services window appears.
6 Select ´Start scan´. Follow the on-screen instructions.
Setup your speakers
This option enables you to specify and test your speaker configuration.
• Always select the 2 speakers option since the Media Center offers analog stereo output only.
If you are using the digital audio connection:
After finishing the Media Center setup wizard, follow the instructions below:
1 Press the key (8) on the remote control.
> The Media Center Start menu appears.
2 Select More Programs and press the OK key (9)
3 Select DVD Settings and press the OK key (9)
4 Select Audio Settings and press the OK key (9)
5 Select SPDIF and press the OK key (9)
6 Select Save and press the OK key (9)
> After finishing the Optional Setup procedure, the Media Center’s Start screen is displayed and your Philips Media Center is
ready for use.
Note: S/PDIF (Sony/Philips Digital Interface) is a standard audio transfer file format, usually found on digital audio equipment or audio
processing devices. It allows the transfer of audio without the conversion to and from an analog format, which could degrade the
signal quality.
Page 91
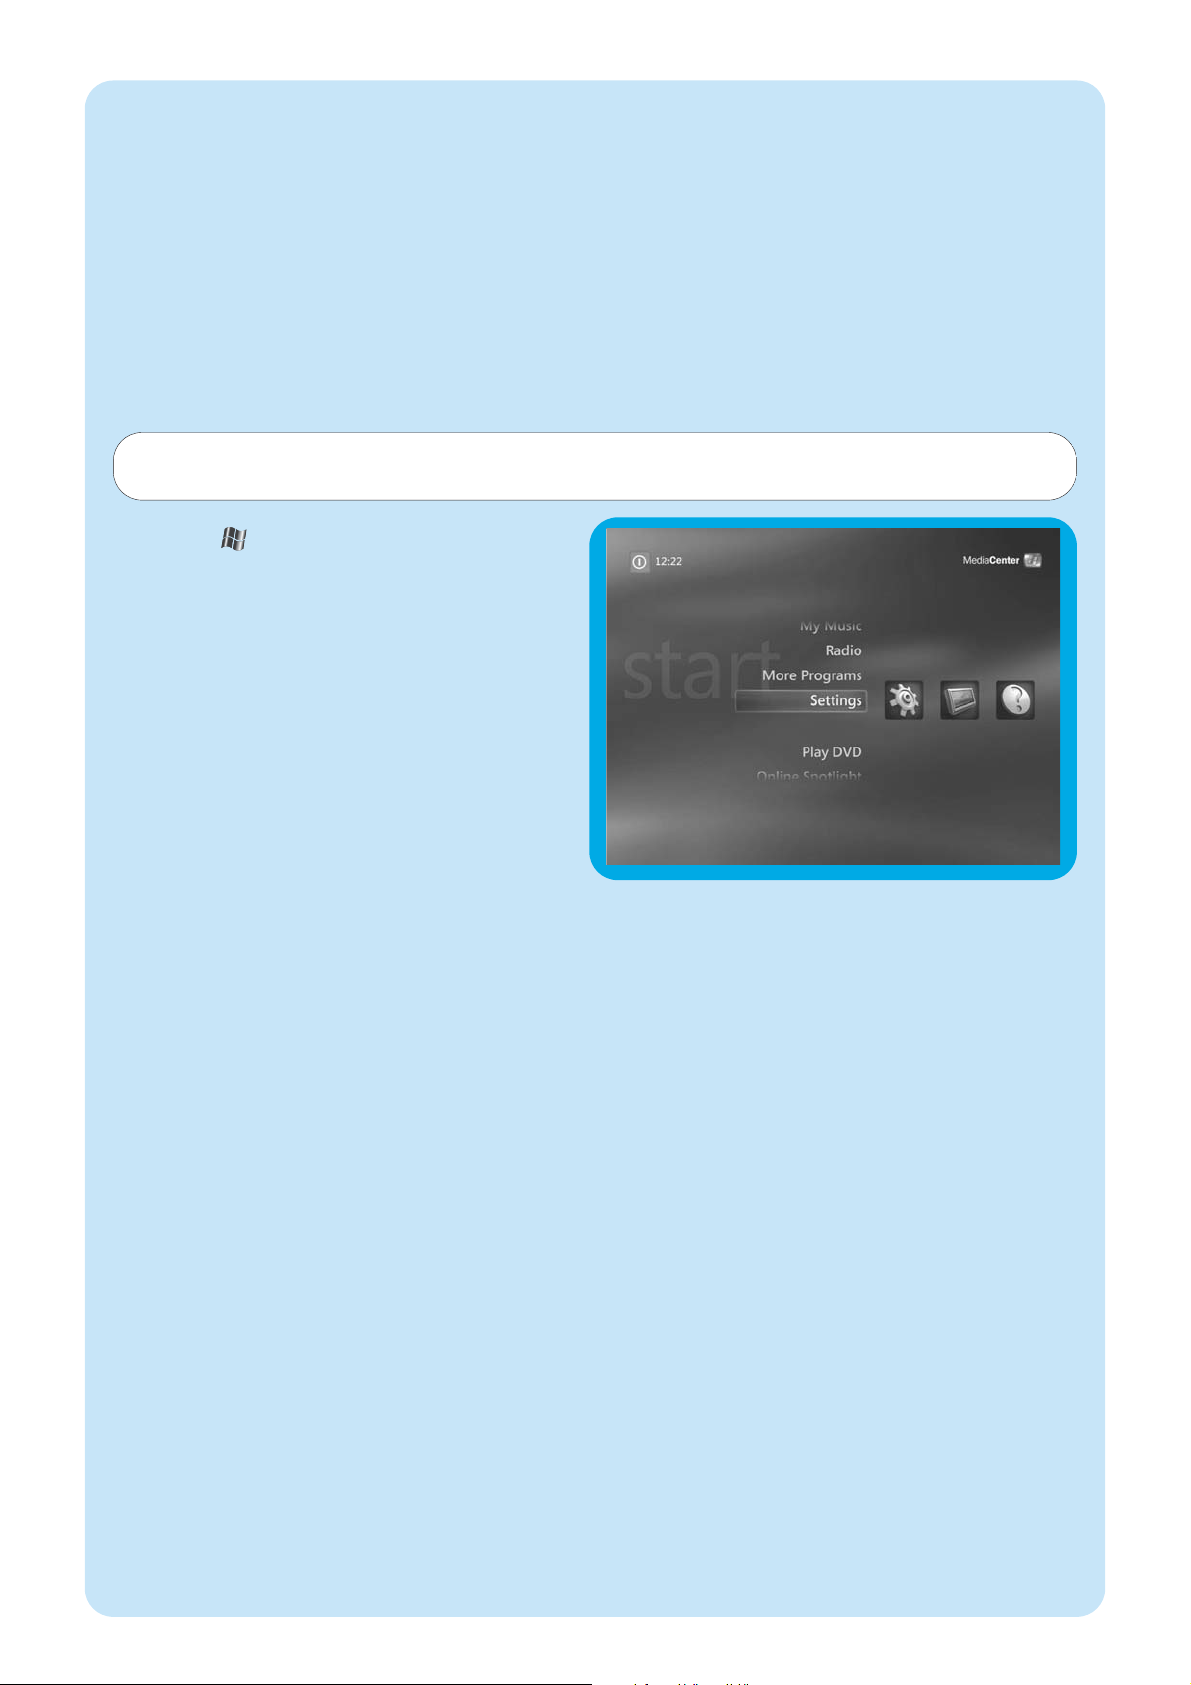
91
Additional software setup
Norton
The Norton Internet Security module provides essential protection from viruses, hackers, and privacy threats. Norton
Internet Security includes a firewall and other powerful tools to safeguard your system.The firewall automatically turns back
on after a period of being temporarily switched off.With the most recent version you can prevent certain Internet worms
from entering your system.You can stop e-mail addresses from being sent to Web sites without your permission, and you
can control which sites track your activities with Internet cookies.You can also block banner ads and pop-up windows.The
Norton installer is started up automatically when the Media Center is switched on for the first time. All you have to do is
follow the on-screen instructions.
Changing settings
After you have completed the initial setup procedure with the Media Center setup wizard, changing of settings is
always possible. Steps you have skipped during initial setup can also be completed.
1 Press the key (8) on the remote control.
> The Media Center Start menu appears.
2 Select Settings.
3 Press the OK key (19).
You have access to Settings-submenus for:
- General Media Center settings
- TV
- Pictures
- Music
- DVD
- Messenger and Caller ID
- Help
Page 92
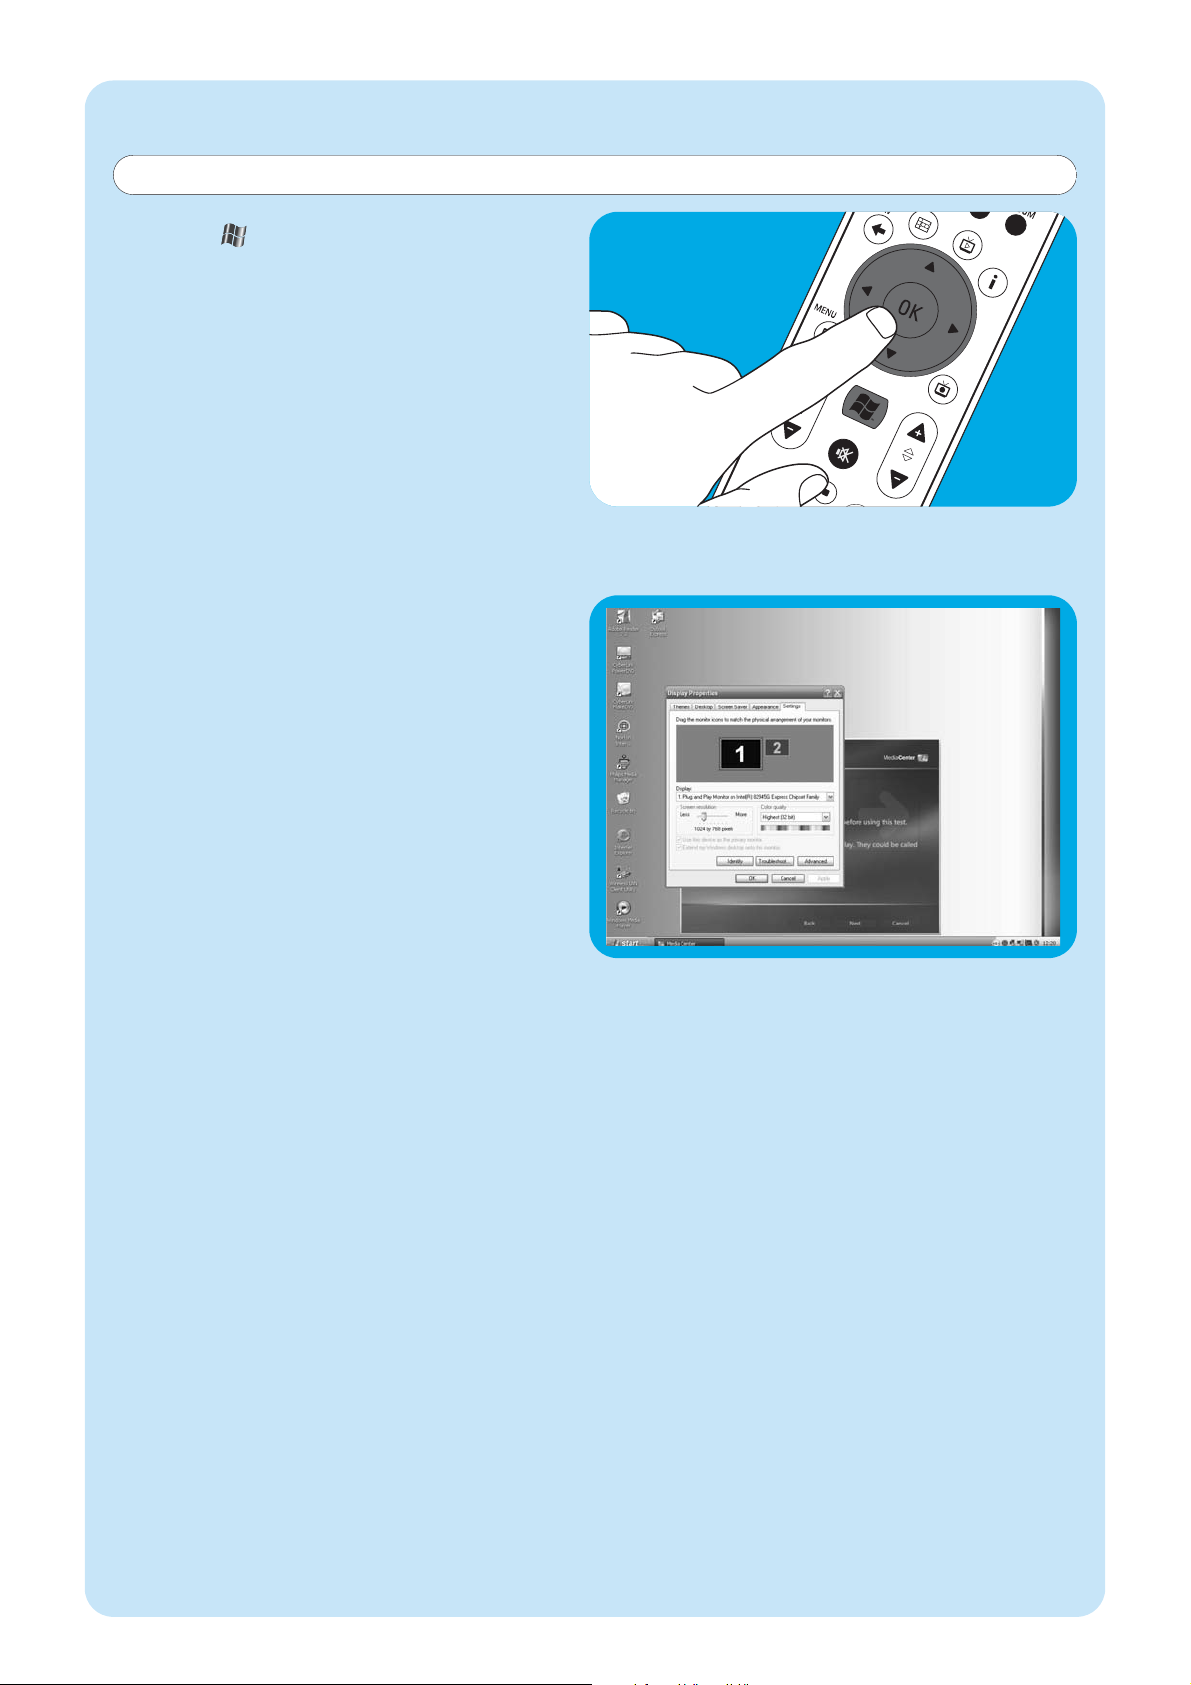
92
1 Press the key (8) on the remote control.
2 Select Settings and press the OK key (19).
3 Select Media Center Setup in the Settings
(General) window and press the OK key (19).
4 Select Configure Your TV or Monitor in the Media
Center Setup settings window and the OK key (19).
5 Follow the on-screen instructions and select Display
type and Connection type.
Note: If you are using the SCART output (21) of the Media
Center, select Component (YpbPr).
6 Select Adjust Display Controls in the Adjust Your
Display Settings window and the OK key (19).
7 Select Next and press the OK key (19) to display the
list of controls in the Display Calibration window.
8 Select Aspect Ratio (Shape) and press the OK key
(19).
9 Select Change Screen Resolution, press the OK key
(19) and select Ye s in the inset window.
10 Use your keyboard and mouse to set the new resolu-
tion in the Windows XP Display Properties window
that appears.
11 When finished click the maximize key in the upper right
corner of the Media Center window to return to the
fullscreen display of the Media Center window.
Changing screen resolution
An important example of changing your Media Center’s settings is the change in screen resolution.
Page 93
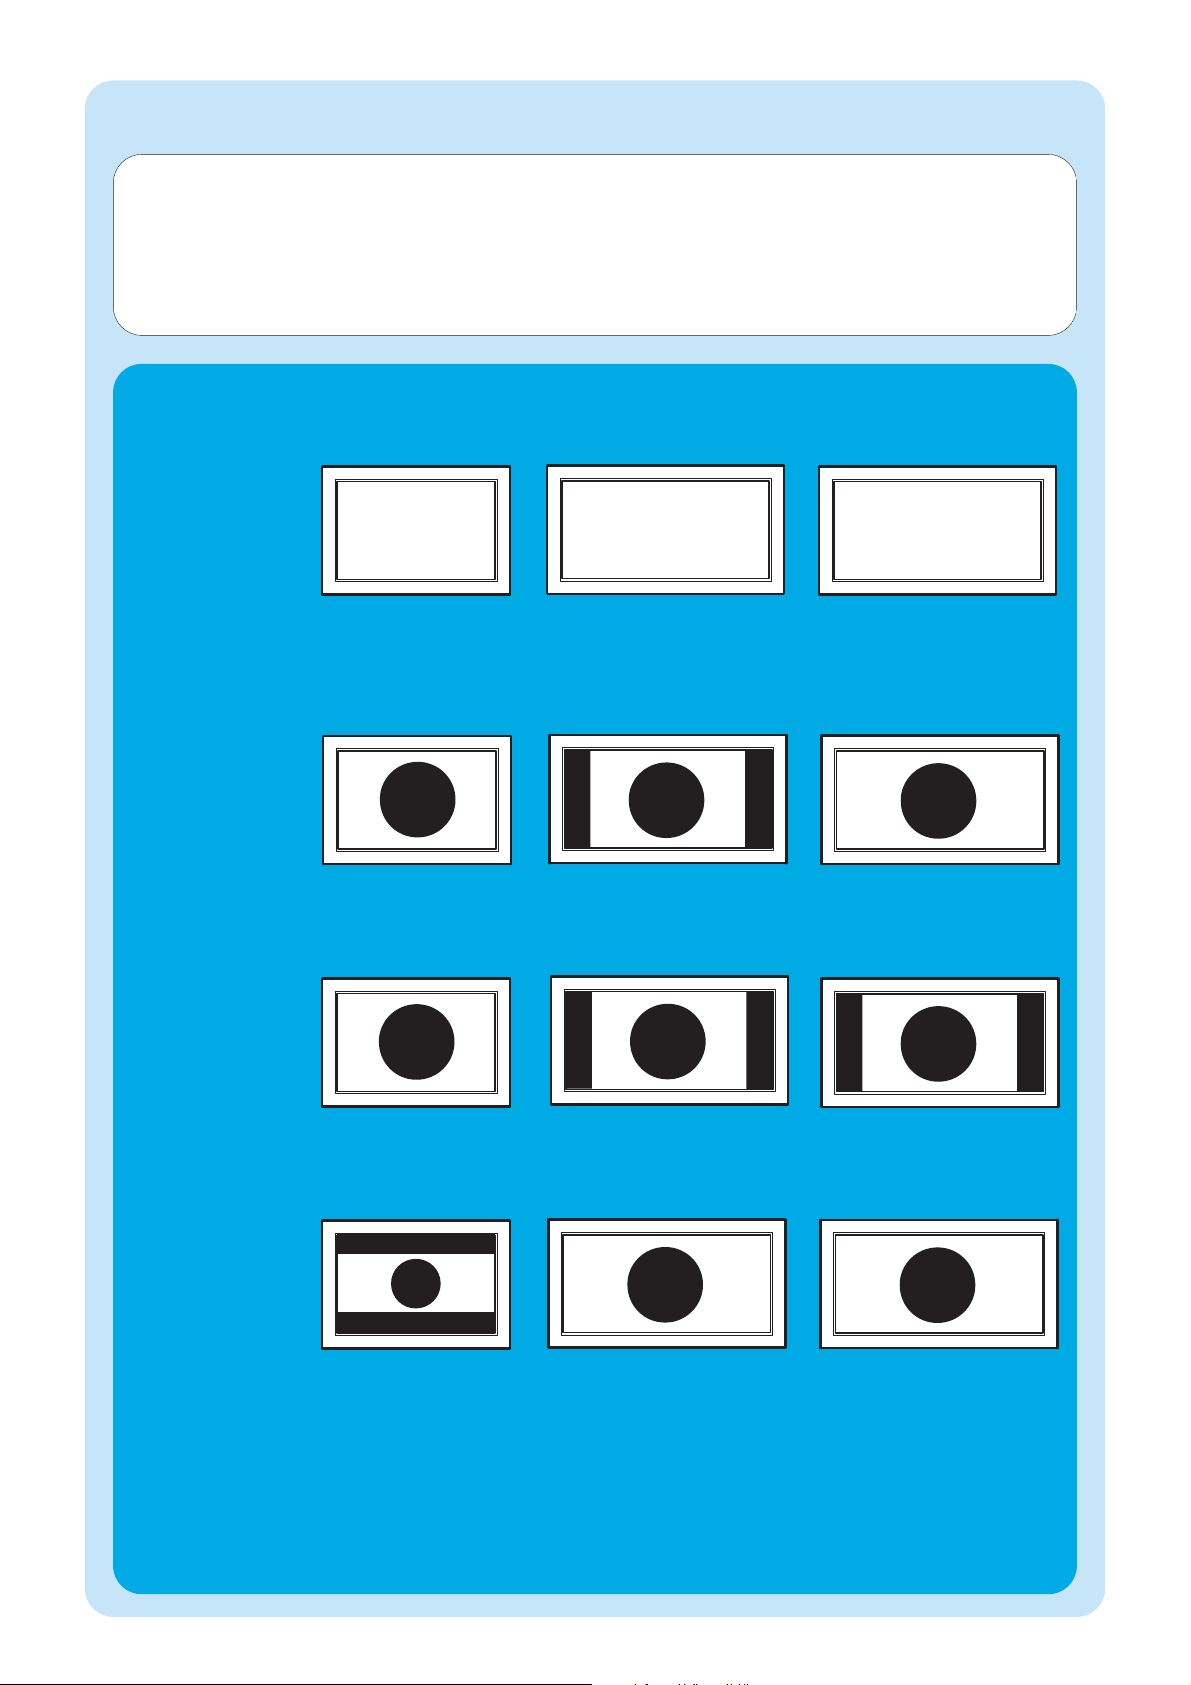
93
Adjusting aspect ratio
Aspect ratio is the relation between width and height of an image.The aspect ratio of the screen of a standard computer
monitor and CRT (Cathode Ray Tube) TV set is 4:3.The 4 means 4 units wide, and the 3 means 3 units high.
High-definition TV (HDTV) format is 16:9.
Your TV,TV content (video or DVD played on your TV) and Media Center may have different aspect ratios, resulting in
horizontal or vertical bars on your screen. If this is the case, refer to the information below on how to adjust the aspect
ratio in various situations.
Resolution: 720 x 576.
SCART connected.
Standard (CRT)
TV / monitor
Resolution: 720 x 576.
SCART connected.
Standard (CRT)
TV / monitor
Resolution that gives a 16:9
aspect ratio (e.g.: 1280 x 720
or 1920 x 1080). DVI,VGA or
HDMI connected.
Flat screen TV /
monitor (plasma or
LCD)
Standard screen
(No video or
DVD is played)
Video or DVD
with a 4:3 aspect
ratio is played
Video or DVD
with a 16:9
aspect ratio is
played
No bars.Aspect ratio
correct. No action
required.
Vertical bars. See A. No bars.Aspect ratio correct.
See D.
No bars.Aspect ratio
correct. No action
required.
Vertical bars. See B. Vertical bars. See B.
Horizontal bars. See C.
No bars.
Aspect ratio correct.
1
No bars.Aspect ratio correct.
No action required.
2
Page 94
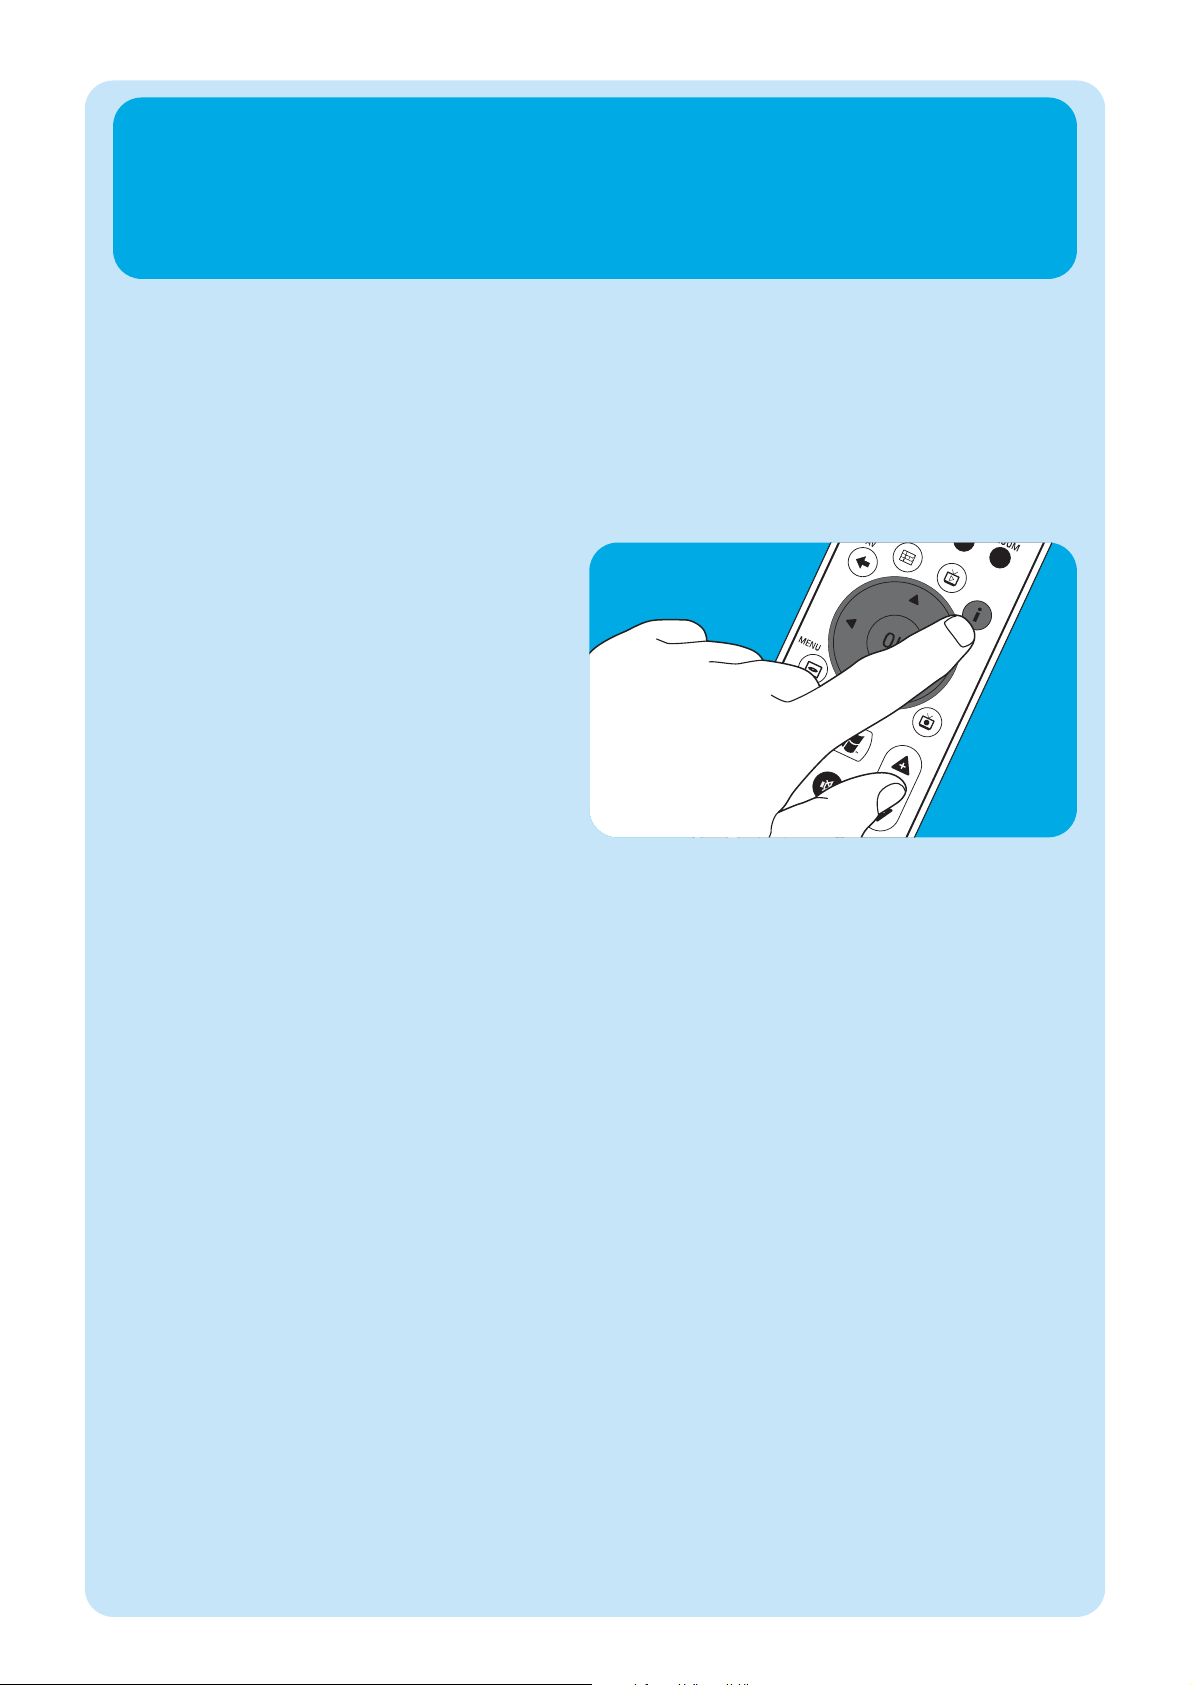
94
A
Vertical bars on standard screen (no video or DVD
is played):
• Minimize / remove bars by adjusting the aspect radio of
your TV. For this see the User manual that came with
your TV.
Note:Aspect ratio of the displayed image will be distorted.
B
Vertical bars when playing 4:3 video or DVD on 16:9
TV (monitor):
In this situation vertical bars on both sides are normal and
cannot be minimized / removed without distorting the
aspect ratio of the displayed image.Adjust the aspect ratio
of the played content (video or DVD).
1 Press the i key (20) on the remote control.
2 Select Zoom and press the OK key (19).
3 Select the best aspect ratio option for your situation
(1, 2 or 3).
C
Horizontal bars when playing 16:9 video or DVD on
4:3 TV (monitor):
In this situation horizontal bars on both sides are normal
and cannot be minimized / removed without distorting the
aspect ratio of the displayed image or without displaying
only part of the image. Adjust the aspect ratio of the played
content (video or DVD).
1 Press the i key (20) on the remote control.
2 Select Zoom and press the OK key (19).
3 Select the best aspect ratio option for your situation (1,
2 or 3).
D
• Adjust the Media Center graphic settings to a 16:9
resolution that gives the best picture quality on your
specific TV / monitor. 1280 x 720 or 1920 x 1080 are
most commonly supported by flat screen TVs / monitors.
1 – If vertical bars appear: adjust aspect ratio of your TV.
– If horizontal bars appear: adjust aspect ratio of the played content (video or DVD) as decribed under B and C.
– ‘Wide screen’ content (e.g. DVDs) is not always recorded with a 16:9 aspect ratio but slightly different. If this is the case,
small horizontal bars might still appear.
2 ‘Wide screen’ content (e.g. DVDs) is not always recorded with a 16:9 aspect ratio but slightly different. If this is the case,
small horizontal bars might still appear.
Page 95
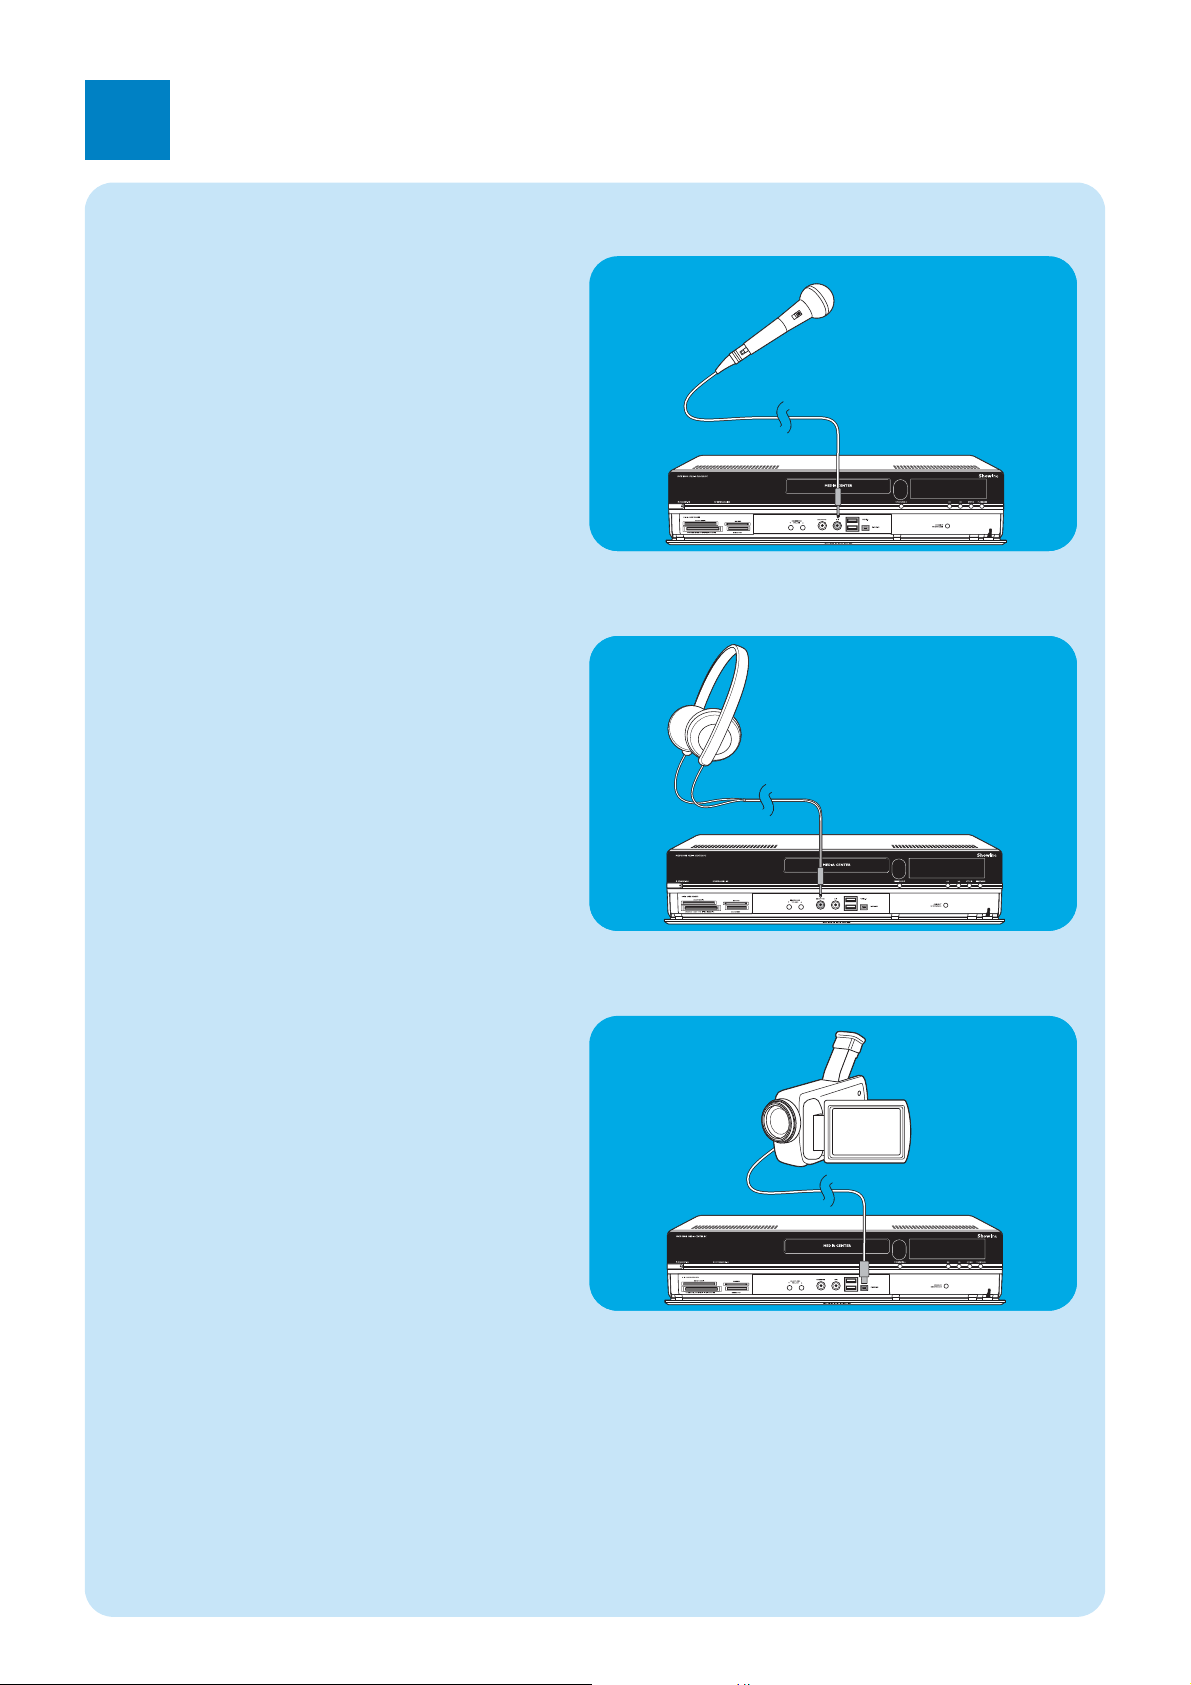
95
4
Additional connections
1 Connect headphones with a 3.5 mm jack to the
HEADPHONE socket (13) on the front of the Media
Center.
2 Set the headphone volume with the
4 HEADPHONE VOLUME 3 keys (12).
• You can mute the headphones sound with the Mute
(s) key (10) on the remote control.
Connecting headphones
Video
camera
• Connect the Firewire (IEEE1394 / i.LINK) connector
of your camera to the FIREWIRE (IEEE1394 / Firewire
/ i.LINK) connector (16) on the front of the Media
Center. For this use a 4-pin firewire (IEEE1394 / i.LINK)
cable (not supplied).
OR:
• Connect the USB connector of your camera to the
USB 2.0 input (15) on the front of the Media Center.
For this use a USB 2.0 cable (not supplied).
Notes:
– Be sure to connect the camera to the Media Center before
starting the DV Capture program.
– Be sure to exit the DV Capture program before disconnec-
ting the camera.
– Please check to see if additional software is required to sup-
port your device. Install the drivers that came with your device before connecting the device to the Media Center. For
this, see the user manual of the device.
Connecting a video camera (or other portable external source)
• Connect a microphone to the MIC input (14) on the
front of the Media Center.
Connecting a microphone
Page 96
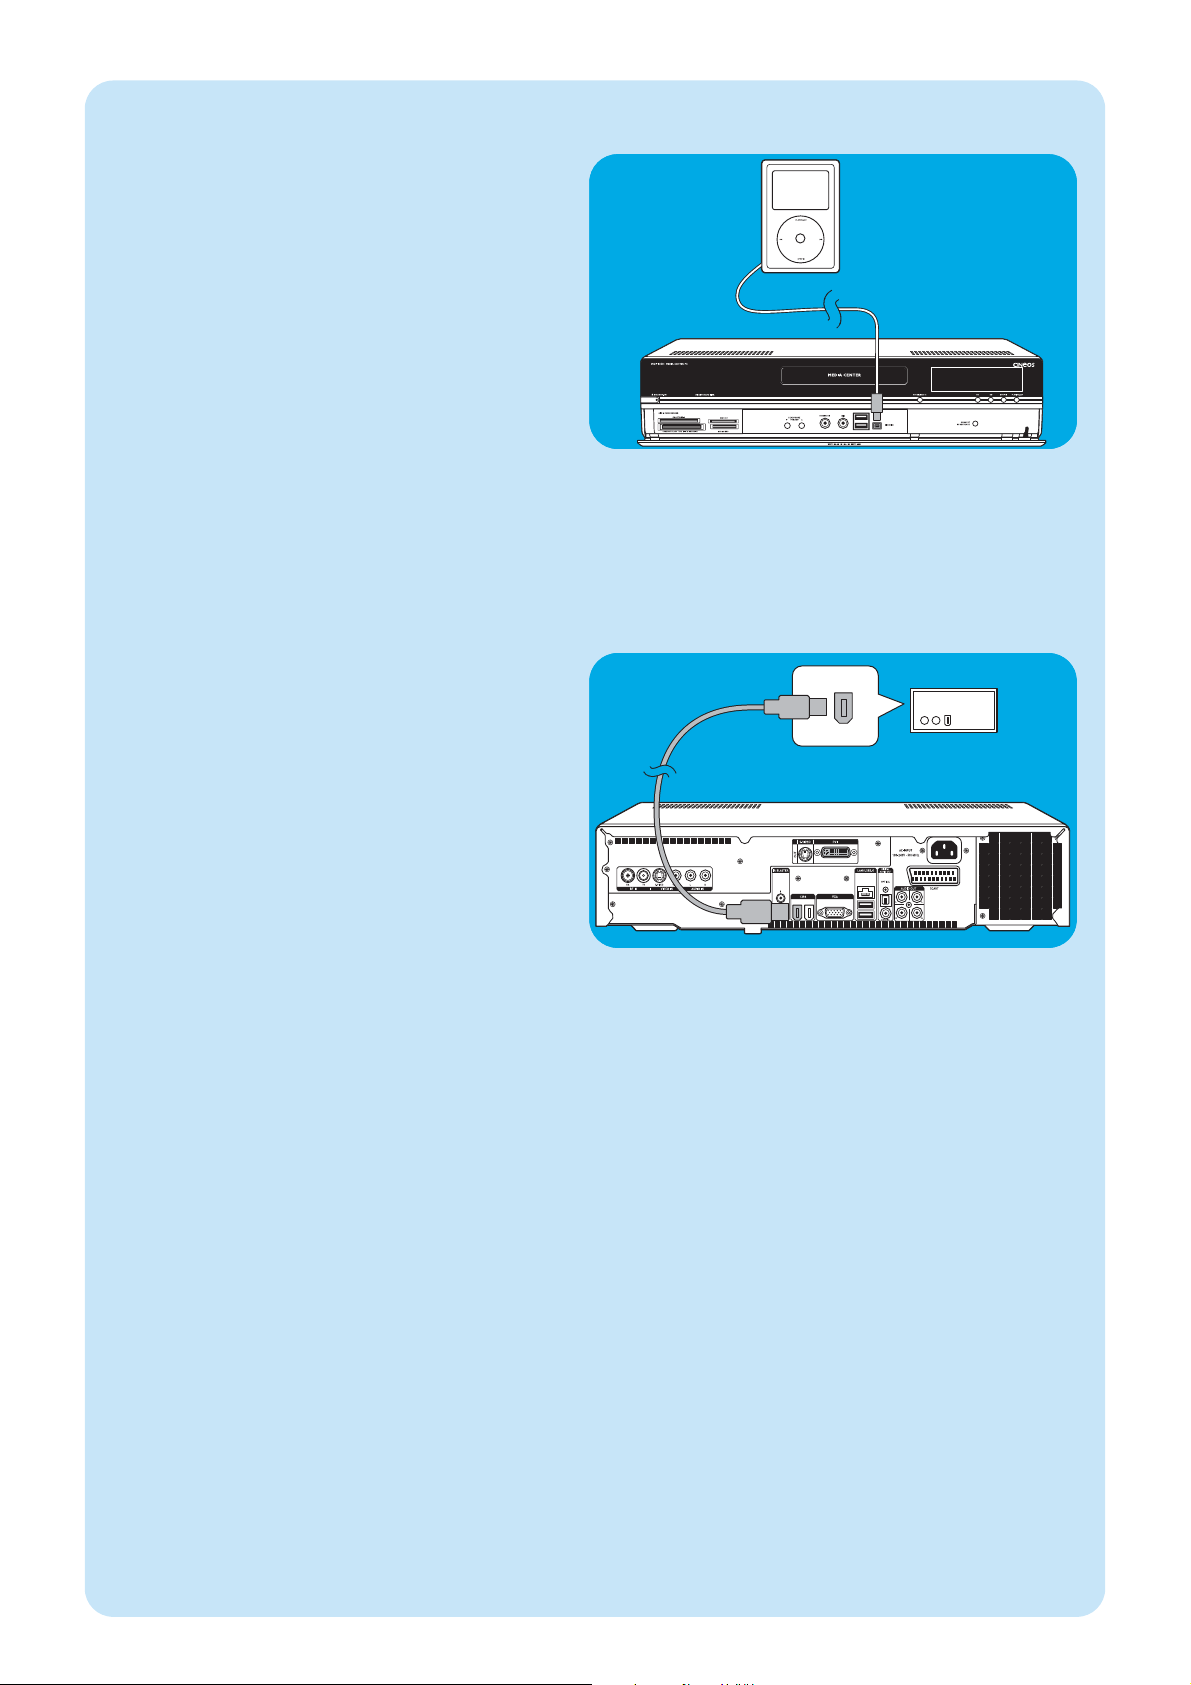
96
External HD
Input
External HD
• Connect the Firewire (IEEE1394 / i.LINK) connector
of your external drive to the FIREWIRE (IEEE1394 /
i.LINK) connector (11) on the rear of the Media
Center. For this use a 6-pin firewire (IEEE1394 / i.LINK)
cable (not supplied).
OR:
• Connect the USB connector of your external drive to
the USB 2.0 connector (13) on the rear of the Media
Center. For this use a USB 2.0 cable (not supplied).
Note: Please check to see if additional software is required to
support your device. Install the drivers that came with your
device before connecting the device to the Media Center.
For this, see the user manual of the device.
Connecting an external drive (HDD, optical drive)
Portable
Media
Player
• Connect the Firewire (IEEE1394 / i.LINK) connector
of your portable media player (e.g. an MP3 player, Hard
Disk Drive or photo camera) to the FIREWIRE
(IEEE1394 / i.LINK) connector (11) on the front of the
Media Center. For this use a 4-pin firewire (IEEE1394 /
i.LINK) cable (not supplied).
OR:
• Connect the USB connector of your portable media
player (e.g. an MP3 player, Hard Disk Drive or photo
camera) to the USB 2.0 input (13) on the front of the
Media Center. For this use a USB 2.0 cable (not
supplied).
Note: Please check to see if additional software is required to
support your device. Install the drivers that came with your
device before connecting the device to the Media Center.
For this, see the user manual of the device.
Connecting a portable media player (or HDD or photo camera)
Page 97
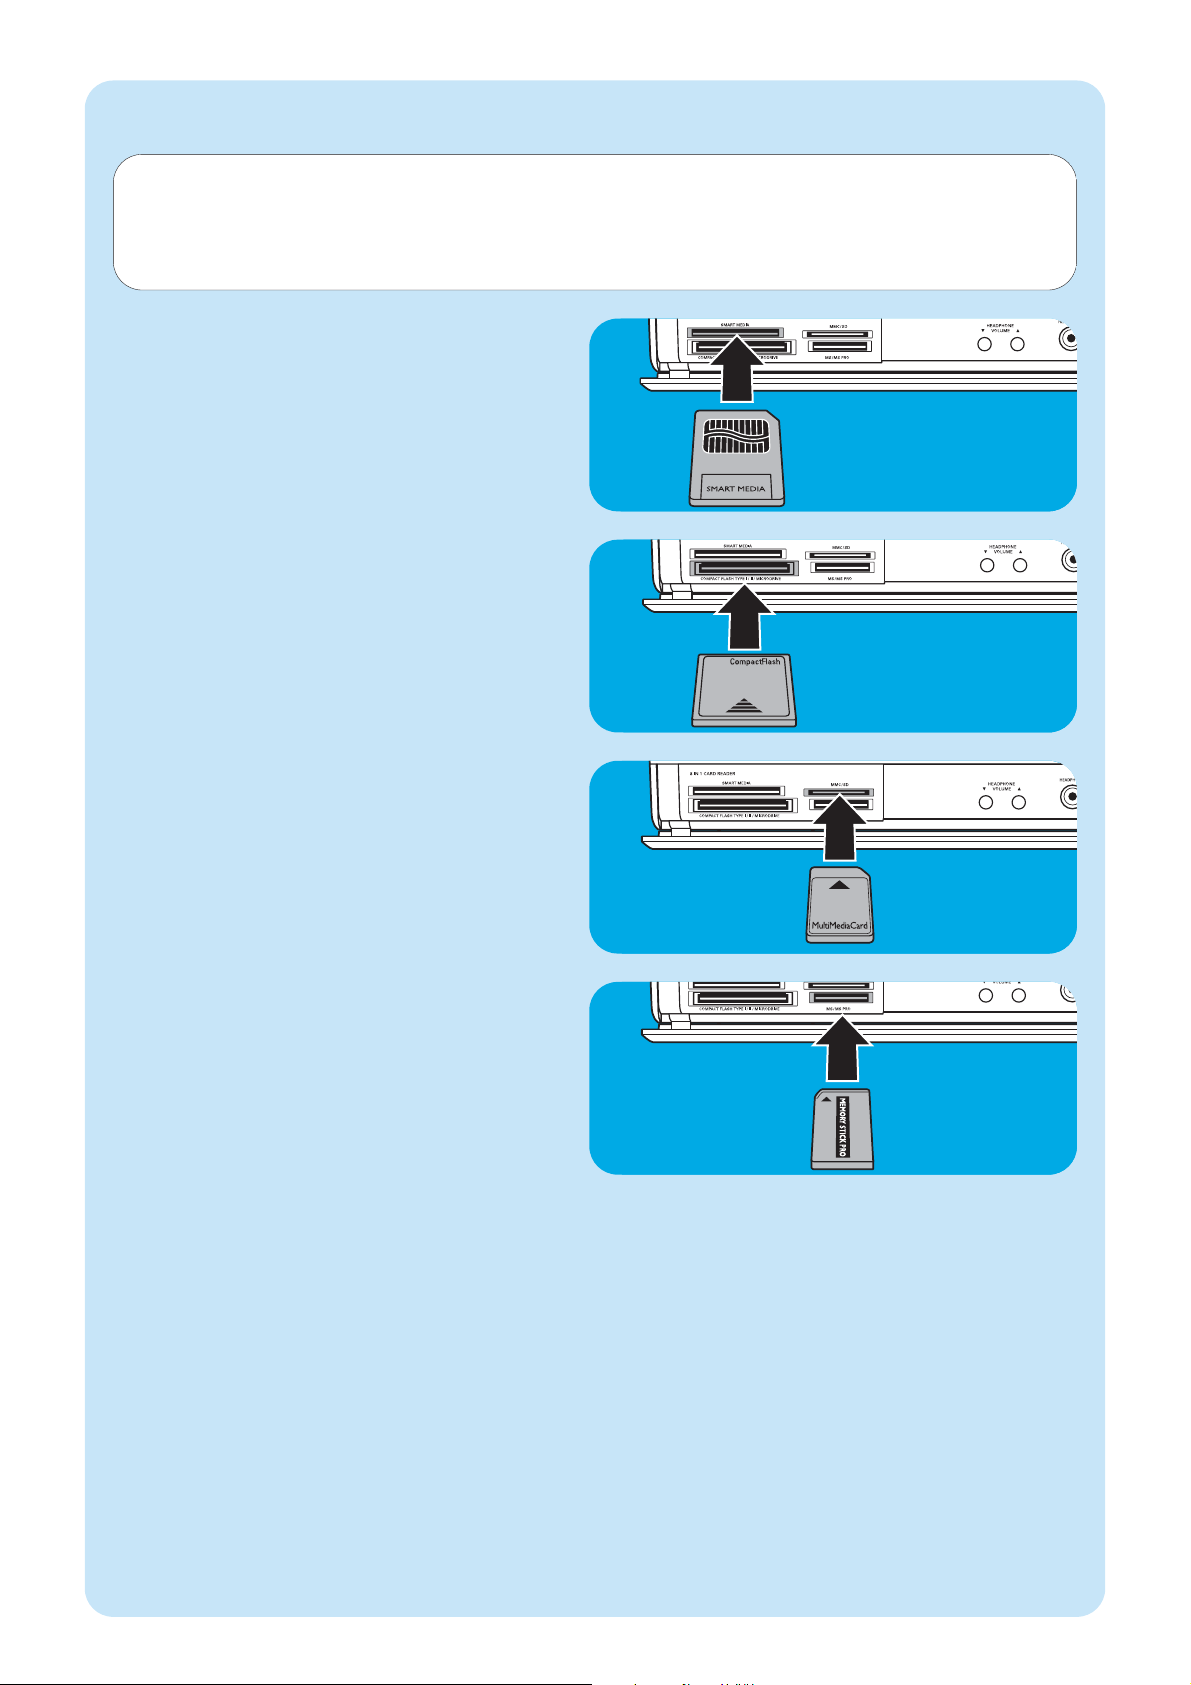
97
• Smart Media memory cards can be inserted into the
SMART MEDIA drive (8) of the Media Center.
Inserting memory cards
• Compact Flash memory cards can be inserted into the
COMPACT FLASH TYPE 1 / 11, MICRODRIVE
(9) of the Media Center.
• MMC (MultiMedia Card) and SD (Secure Digital card)
memory cards can be inserted into the MMC/SD drive
(10) of the Media Center.
• MS and MS PRO memory cards/sticks can be inserted
into the MS/MS PRO drive (11) of the Media Center.
The first time a memory card is inserted in one of the memory card drives (SMART MEDIA - 8, COMPACT FLASH
TYPE 1 / 11, MICRODRIVE - 9, MMC/SD - 10 or MS/MS PRO - 11) of the Media Center, the explorer creates four
new drive letters. One for each drive. So if the last drive letter was for example, then the drive letters for the memory
cards will be E, F, G and H and so on.
Page 98

98
Data Loss Disclaimer
Before sending the MCP9360i Media Center out for service, be sure to make a backup all data and remove all third party
software.
With respect to all service provided, it is your responsibility to back up the contents of your Media Center, including any
data you have stored or software you have installed on the Media Center. It is likely that the contents of your Media Center
will be lost in the course of service and we will not be responsible for any damage to or loss of any programs, data or
other information stored on any media or any part of any product serviced hereunder.
IF DURING THE REPAIR OF THE PRODUCT THE CONTENTS OF the 2005 Entertainment PC Platform
ARE ALTERED, DELETED, OR IN ANY WAY MODIFIED,WE ARE NOT RESPONSIBLE WHATSOEVER.
YOUR PRODUCT WILL BE RETURNED TO YOU CONFIGURED AS ORIGINALLY PURCHASED (SUBJECT TO AVAILABILITY OF SOFTWARE).
Be sure to remove all third party hardware, software, features, parts, options, alterations, and attachments not warranted by
us prior to sending the product to us for service.We are not liable for any loss or damage to these items.
Safety and Regulatory Information
This section provides detailed safety and regulatory information for the 2005 Entertainment PC Platform, including:
Safety Compliance Statement This product also complies with international safety requirements for Information Technology
Equipment, IEC/EN 60950-1, and is properly CE labeled for use within the European Union.
Lithium Battery Caution Statement
SS
CAUTION
Risk of explosion if the batteries are replaced with an incorrect type. Batteries should be recycled where possible.
Disposal of used batteries must be in accordance with local environmental regulations.
Safety Notices,Telecom
SS
CAUTION
To reduce the risk of fire, use only No. 26 AWG or larger telecommunication line cord provided with this product.
Safety Notices, Radiofrequency
The 2005 Entertainment PC Platform, like other radio devices, emits radiofrequency electromagnetic energy.The level of
energy emitted by this device, however, is less than the electromagnetic energy emitted by other wireless devices such as
mobile phones.
Notice:
Install or position the MCP9360i Media Center so that the antenna (located behind the equipment front panel) is at least
8 inches (20 cm.) from the user or other persons.
In some situations or environments, the use of the wireless device may be restricted by the proprietor of the building or
responsible representatives of any applicable organization or authority. If you are uncertain of the policy that applies to the
use of wireless devices in specific organizations or environments, you are encouraged to request authorization to use the
MCP9360i Media Center prior to any wireless transmission of data.
Safety Notices, Cable
SS
CAUTION
The screen of the coaxial cable must be connected to earth ground as it enters the house.
5
Important information
Page 99

99
Other Wireless Devices
Safety Notices for Other Devices in the Wireless Network: Please refer to the user documentation supplied with
wireless keyboard, wireless mouse, Bluetooth transmitter, or other devices in the wireless network for any additional safety
notices.
Local Restrictions on Radio Usage
The 2.4GHz frequency bands used by the MCP9360i Media Center are not fully harmonized in all countries.This equipment
has been certified for use in specific countries and should not be operated outside the countries or markets designated
below.As a user of this product, you are responsible for ensuring that this equipment is used only in the countries for
which it was intended and for verifying that it is properly configured with the correct selection of frequency and channels
for the country of use. Any deviation from the permissible settings for the country of use is an infringement of national law,
rules, or regulations and may be punishable as such. See below for country- specific information:
Europe Union frequency bands:
• Germany, Luxemburg, Netherlands, Spain, Sweden and the United Kingdom: 2.400 - 2.4835 GHz (Europe ETSI)
• France:
Metropolitan departments: 2.400 - 2.4835 GHz indoor use: 2.400 -2.454 GHz (channels 1 to 7) outdoor
use.
Guadeloupe, Martinique, St Pierre et Miquelon, Mayotte: 2.400 - 2.4835 GHz indoor and outdoor use.
Reunion, Guyane: 2.400 - 2.4835 GHz indoor use: 2.420 - 2. 4835 GHz outdoor use (channels 5 to 13)
• Italy:
For use in private premises; indoor or outdoor use: 2.400 - 2. 4835 GHz
For use in public premises; indoor or outdoor use; general use authorization is required from the Italian
Ministry of Post and Telecommunication: 2.400 - 2.4835 GHz.
• Belgium:
For use in private premises; indoor or outdoor use; less than 300 m operating range: 2.400 - 2.4835 GHz
For use in private premises; outdoor use and above public areas exceeding 300 m operating range, a
license from IBPT/ BIPT is required: 2. 400 - 2.4835 GHz.
Wireless interoperability
The MCP9360i Media Center is designed to be interoperable with any wireless LAN product that is based on direct
sequence spread spectrum (DSSS) radio technology and compliant with the following standards:
• IEEE 802.11a - Standard for Wireless LAN.
• IEEE 802.11b - 1999, Standard for Wireless LAN.
• IEEE 802.11 - Standard for Wireless LAN.
• Wireless Fidelity (WiFi) certification, as defined by WECA (Wireless Ethernet Compatibility Alliance).
Emissions Compliance Statements
Any changes or modifications to the equipment not expressly approved by Philips could void the user’s authority to
operate the equipment.
Installation and use of this device must be in strict accordance with the instructions included in the user documentation
provided with the product.Any changes or modifications (including the antennas) made to this device that are not expressly
approved by the manufacturer may void the user’s authority to operate the equipment.The manufacturer is not responsible
for any radio or television interference caused by unauthorized modification of this device, or the substitution of the connecting cables and equipment other than manufacturer specified. It is the responsibility of the user to correct any interference caused by such unauthorized modification, substitution or attachment. Manufacturer and its authorized resellers or
distributors will assume no liability for any damage or violation of government regulations arising from failing to comply
with these guidelines.
Page 100

100
European Union Compliance Statements
We, Philips, declare that the product, Entertainment PC, is in compliance with the essential requirements and other relevant
provisions of Directive 1999/ 5/ EC (Radio Equipment and Telecommunications Terminal Equipment).The product is properly CE labeled demonstrating this conformity and is for distribution within all member states of the EU with restrictions as
noted above.
Product Ecology Statements
The following information is provided to address worldwide product ecology concerns and regulations.
Disposal Considerations
This product contains the following materials that may be regulated upon disposal: lead solder on printed wiring board
assemblies.
Recycling Considerations
We encourage our customers to recycle their products and components (e. g., batteries, circuit boards, plastic enclosures,
etc.) whenever possible.
In the absence of a viable recycling option, products and their components must be disposed of in accordance with all applicable local environmental regulations.
Safety Information: Electric, Magnetic and Electromagnetic Fields (‘EMF’)
1 Philips Royal Electronics manufactures and sells many products targeted at consumers, which, like any electronic appara-
tus, in general have the ability to emit and receive electro magnetic signals.
2 One of Philips’ leading Business Principles is to take all necessary health and safety measures for our products, to com-
ply with all applicable legal requirements and to stay well within the EMF standards applicable at the time of producing
the products.
3 Philips is committed to develop, produce and market products that cause no adverse health effects.
4 Philips confirms that, if its products are handled properly for their intended use, they are safe to use according to scien-
tific evidence available today.
5 Philips plays an active role in the development of international EMF and safety standards, enabling Philips to anticipate
further developments in standardization for early integration in its products.
 Loading...